

Page 1
Scheduling
DRAFT - Revised 10/14/02
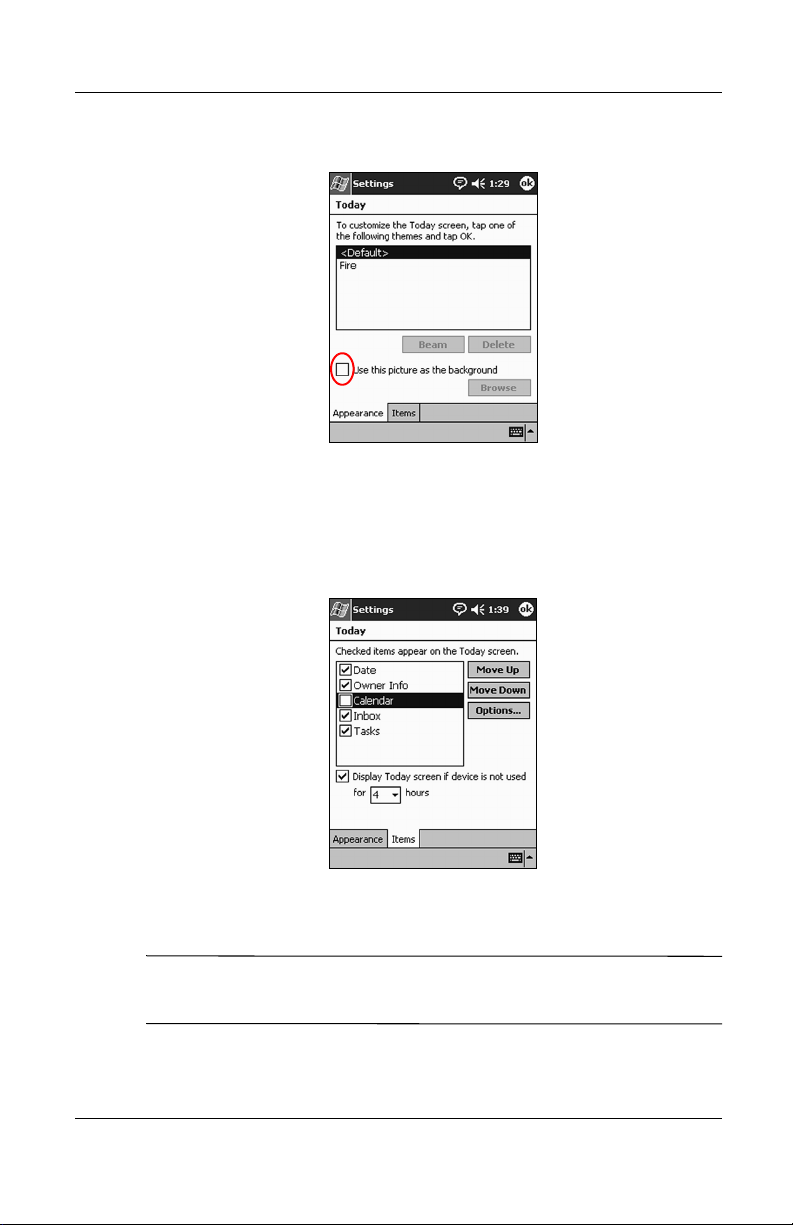
2. Select “Use this picture as the background” check box.
3. Tap Browse to select a picture from File Explorer.
4. Tap the Items tab to select or reorder the information on the
Today screen.
5. Tap an item to highlight it.
6. Tap Move Up or Move Down to change the order of items on
the Today screen.
You cannot change the placement of the Date on the Today
✎
screen.
5–4 Reference Guide
hp CONFIDENTIAL 12/5/02
File: ch5-Scheduling.fm PN: 293146-001
Page 2

DRAFT - Revised 10/14/02
7. Tap the down arrow associated with “Display Today screen if
device is not used for...hours” check box to determine how
many hours must pass before the Today screen displays.
8. Tap OK.
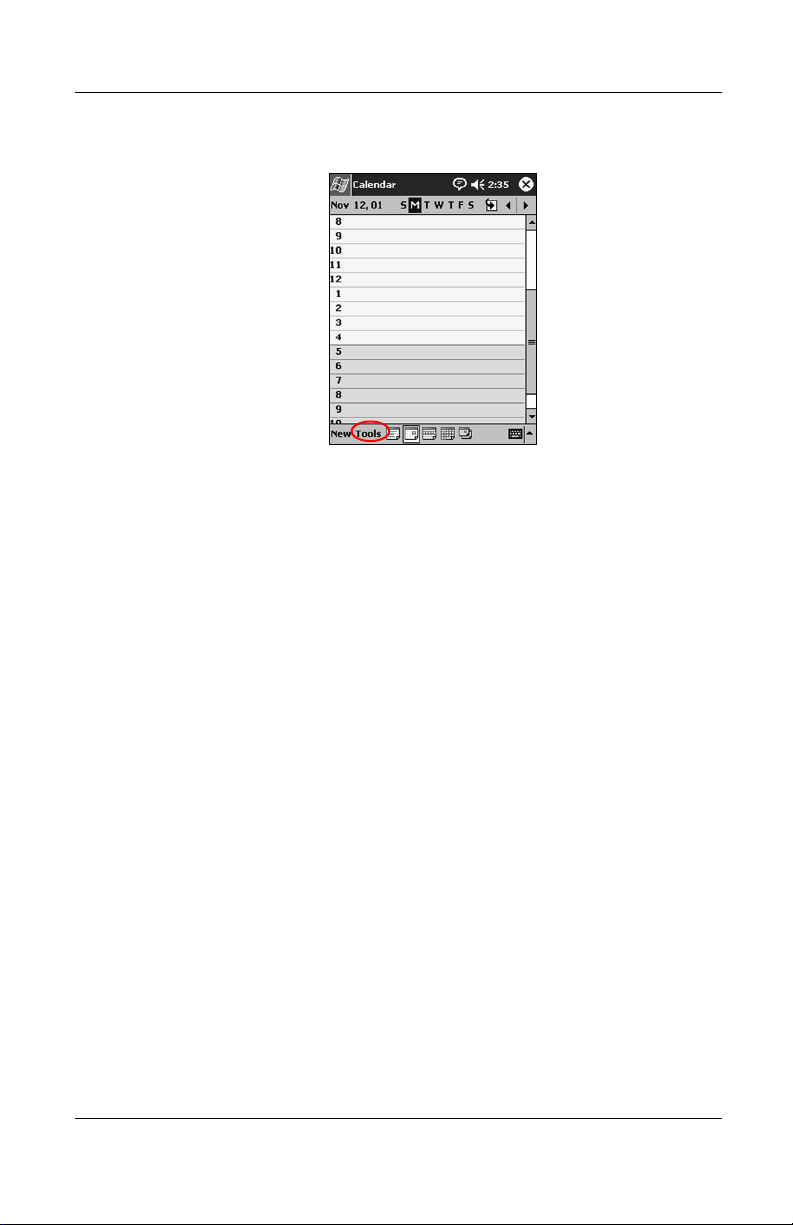
Using the Calendar
Use the Calendar to schedule appointments and set reminders.
View your calendar by:
■ Agenda
■ Day
■ Week
■ Month
■ Ye ar
Keep the amount of information in your appointments small in
order to conserve memory.
Scheduling
Shortcut: Press the Calendar application button on the
Today screen to navigate quickly to Calendar.
Looking at the Calendar
By default, the Calendar first appears in the Agenda view. The
Agenda view provides the most detail about your appointments.
From the Start menu, tap Calendar to view your appointments.
Reference Guide 5–5
hp CONFIDENTIAL 12/5/02
File: ch5-Scheduling.fm PN: 293146-001
Page 3

DRAFT - Revised 10/14/02
Scheduling
Changing the Calendar View
By default, the Calendar first appears in the Agenda view, which
provides the most detail about your appointment. You can also
view your calendar by:
■ Day
■ Week
■ Month
■ Ye ar
1. From the Start menu, tap Calendar.
2. Tap the Agenda, Day, Week, Month, or Yea r icon to see
your calendar in that view.
Customizing the Calendar Appearance
Change the appearance of your calendar by setting the 1st day of
the week, deciding how many days in a week you want to view,
showing the number of weeks and the half-hour time slots,
deciding to use a large font, and deciding to set reminders for new
items. You can also display several icons that give visual
information about your appointments, including:
■ Reminder
■ Recurrence
■ Note
■ Location
■ Attendees
■ Private
You can determine whether to send meeting requests through
ActiveSync 3.5 or an e-mail service.
1. From the Start menu, tap Calendar.
5–6 Reference Guide
hp CONFIDENTIAL 12/5/02
File: ch5-Scheduling.fm PN: 293146-001
Page 4
DRAFT - Revised 10/14/02
2. Tap Tools.
3. Tap Options.
4. Select the calendar options.
5. Tap OK.
Scheduling Appointments
Scheduling
Keep the amount of information in your appointments small to
conserve memory.
Shortcut: You can schedule an appointment and set a
reminder from the Today screen.
1. From the Start menu, tap Calendar.
2. Tap New to schedule an appointment.
Reference Guide 5–7
hp CONFIDENTIAL 12/5/02
File: ch5-Scheduling.fm PN: 293146-001
Page 5
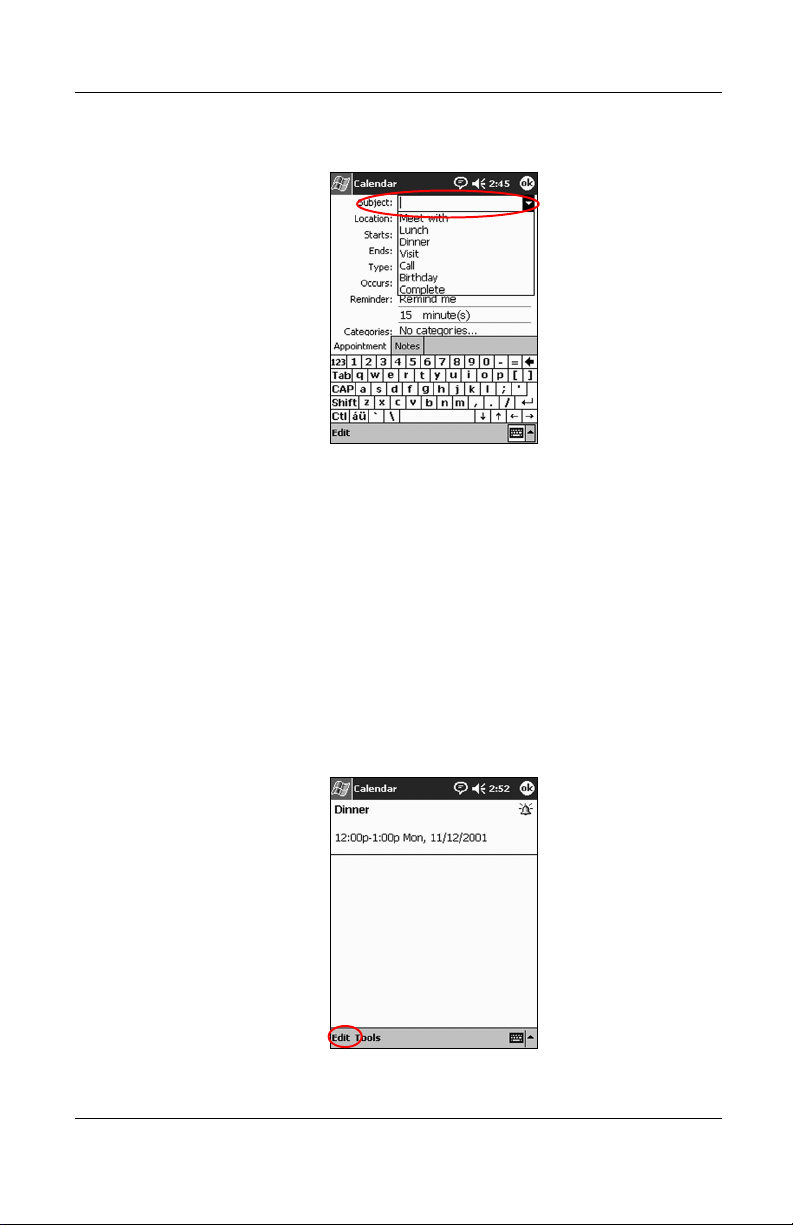
DRAFT - Revised 10/14/02
Scheduling
3. Enter a subject or select from the Subject drop-down list.
4. Tap any item to enter additional information.
5. Tap OK to schedule the appointment.
Creating Reminders
You can create a reminder when you are scheduling an
appointment or you can do it at a later date.
1. From the Start menu, tap Calendar.
2. Tap an appointment.
3. Tap Edit.
5–8 Reference Guide
hp CONFIDENTIAL 12/5/02
File: ch5-Scheduling.fm PN: 293146-001
Page 6
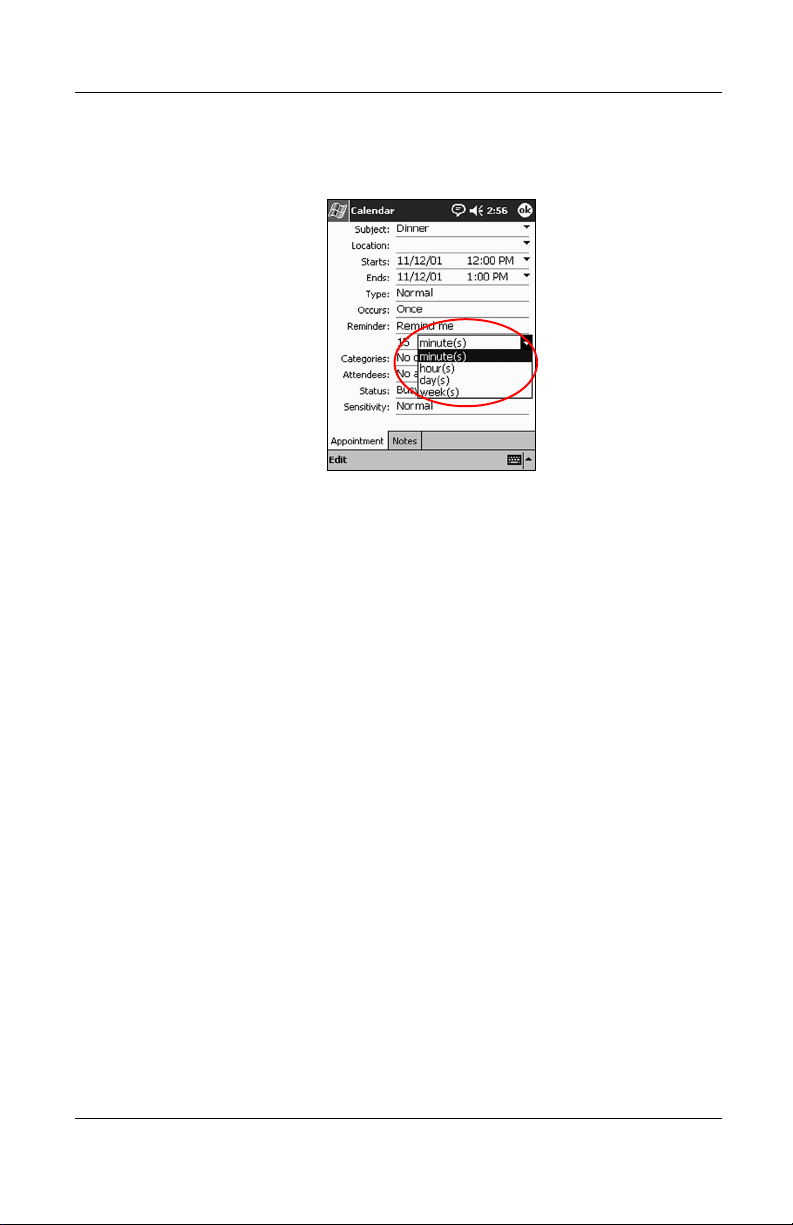
DRAFT - Revised 10/14/02
4. Tap the second Reminder field to select the time interval
between reminders. The default is 15 minutes.
Deleting Appointments
1. From the Start menu, tap Calendar.
2. Tap an appointment.
Scheduling
3. Tap Tools.
4. Tap Delete Appointment.
5. Tap Ye s to confirm deletion.
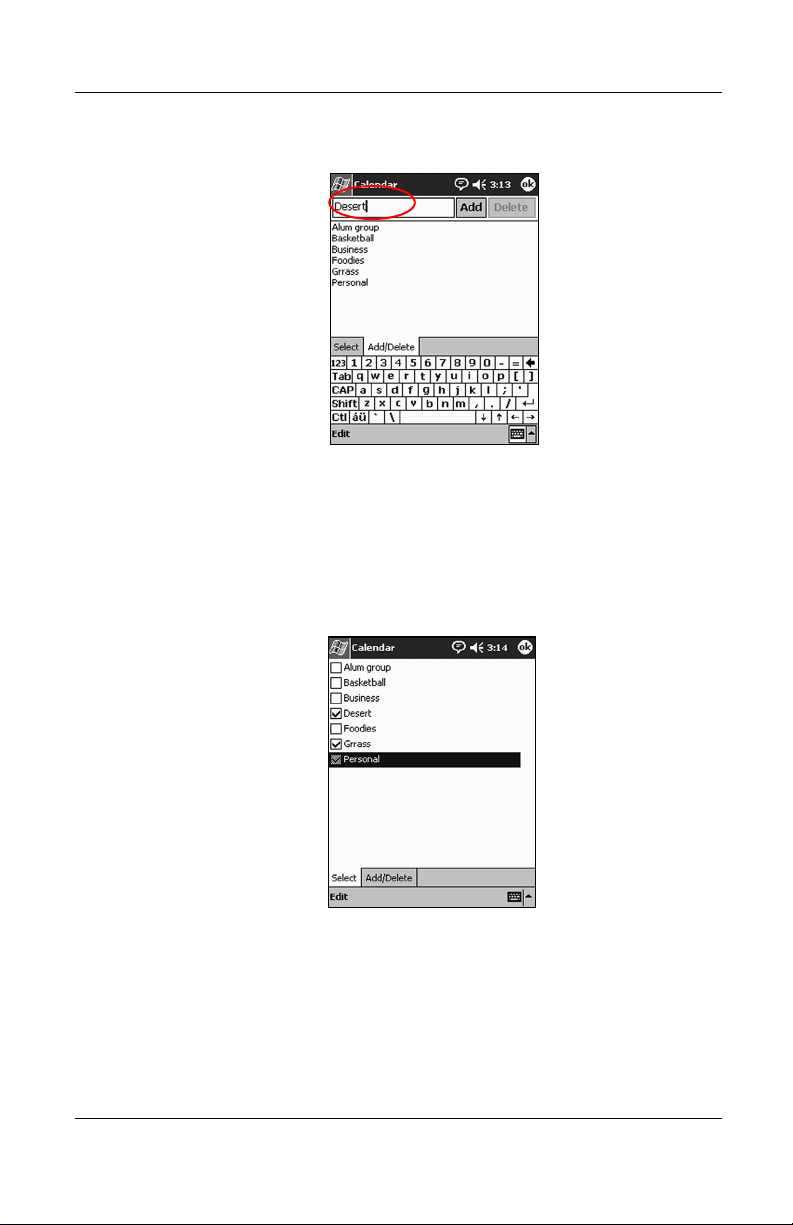
Categorizing Appointments
Use categories to filter the appointments in your calendar.
1. From the Start menu, tap Calendar.
2. Tap an appointment.
3. Tap Edit.
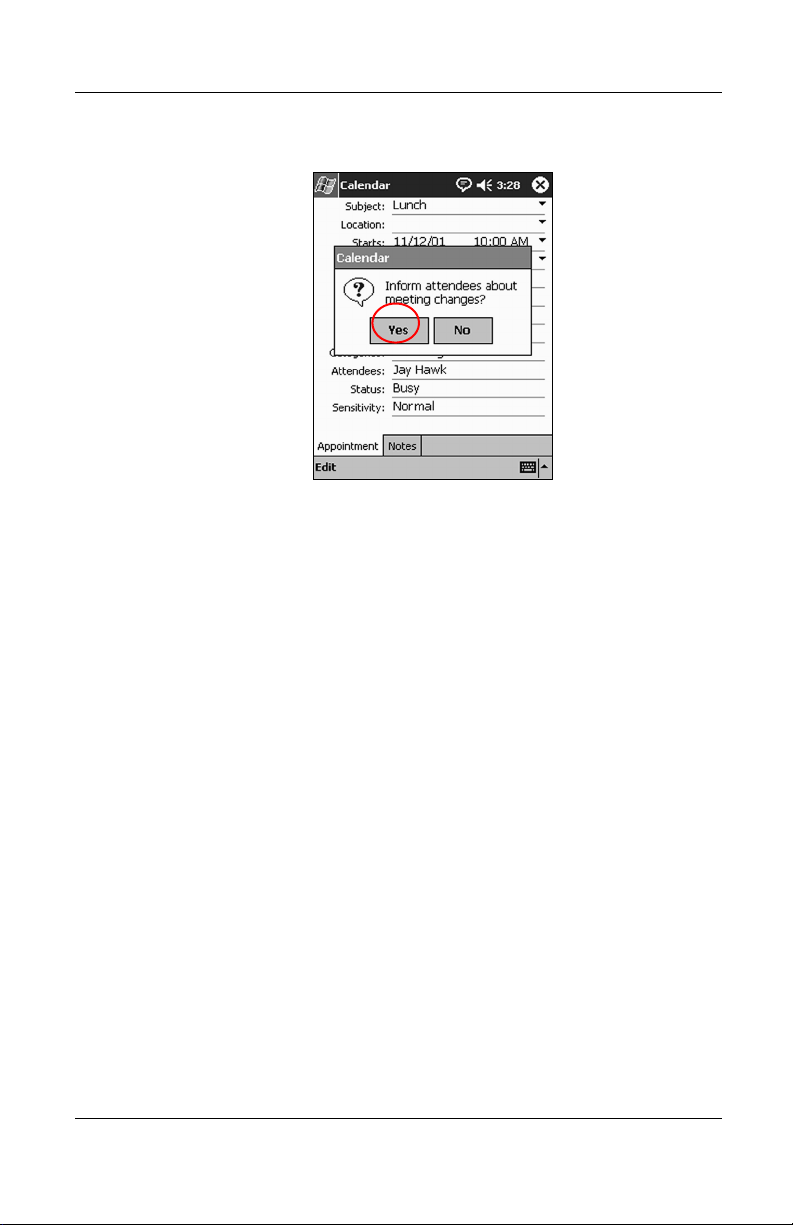
4. Tap the Categories field to see a list of available categories.
5. Tap Add/Delete to create a category.
Reference Guide 5–9
hp CONFIDENTIAL 12/5/02
File: ch5-Scheduling.fm PN: 293146-001
Page 7
Scheduling
DRAFT - Revised 10/14/02
6. Enter the name of the new category.
7. Tap Add.
8. Tap OK to place your appointment in the category.
9. Tap the Categories field to place your appointment in more
categories.
10. Tap additional category names to select them.
11. Tap OK to list the categories you selected in the Categories
field.
12. Tap OK to save the category information and return to the
Calendar screen.
5–10 Reference Guide
hp CONFIDENTIAL 12/5/02
File: ch5-Scheduling.fm PN: 293146-001
Page 8

DRAFT - Revised 10/14/02
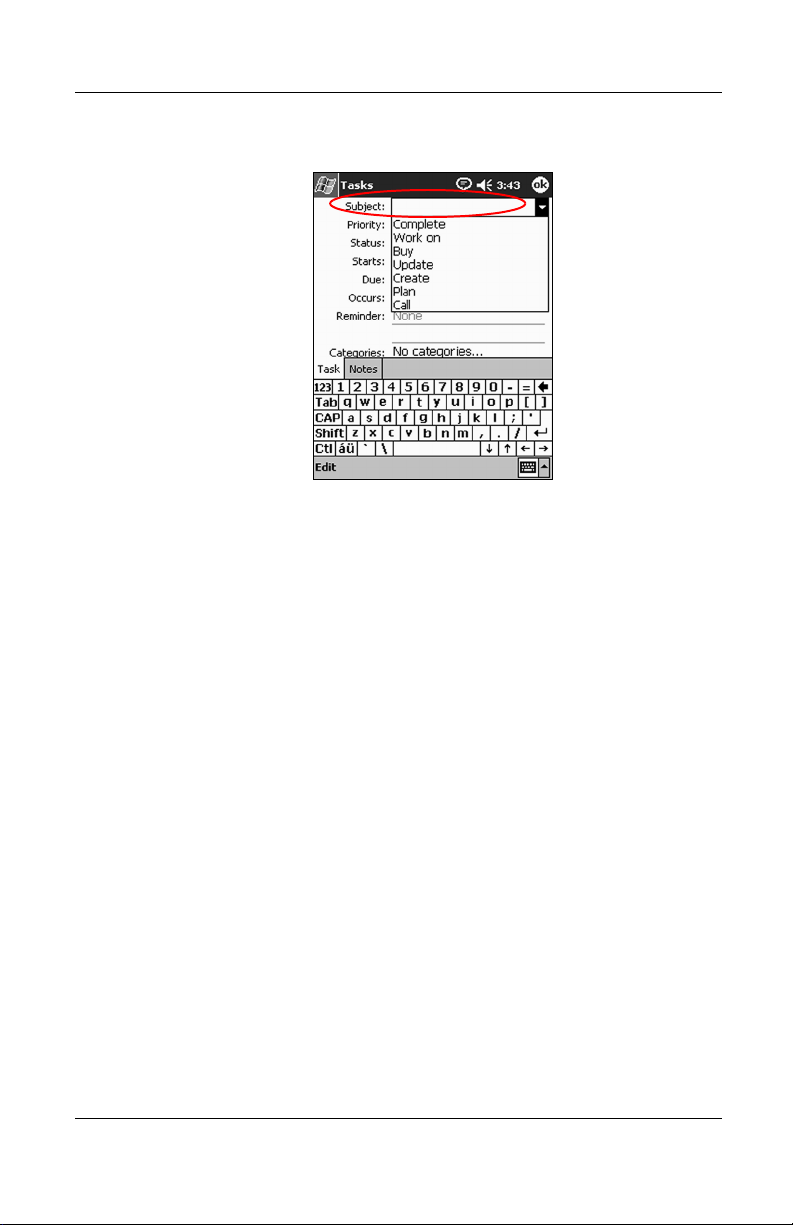
Requesting Meetings
You can schedule a meeting and send a meeting request through
ActiveSync or an e-mail service.
You must enter contacts with e-mail addresses in the Contacts
✎
application and set up the Inbox application to send and receive
e-mail before you can send a meeting request.
To request a meeting:
1. From the Start menu, tap Calendar > Tools > Options.
2. Tap the “Send meeting requests via” down arrow.
3. Tap the e-mail service you want to use to send a meeting
request, then tap OK.
4. Tap New to create a new appointment.
5. Enter the information.
Scheduling
6. Tap the Attendees field.
7. Tap the contacts you want to invite to the meeting.
8. Tap OK to add the attendees.
9. Tap OK to schedule the meeting.
Reference Guide 5–11
hp CONFIDENTIAL 12/5/02
File: ch5-Scheduling.fm PN: 293146-001
Page 9
DRAFT - Revised 10/14/02
Scheduling
10. Tap Ye s to inform attendees about the meeting.
Using Tasks
You can use Tasks to:
■ Create new tasks
■ Set a reminder for a task
■ Delete a task
■ Sort your task list by category, status, priority, subject, start
date, and due date
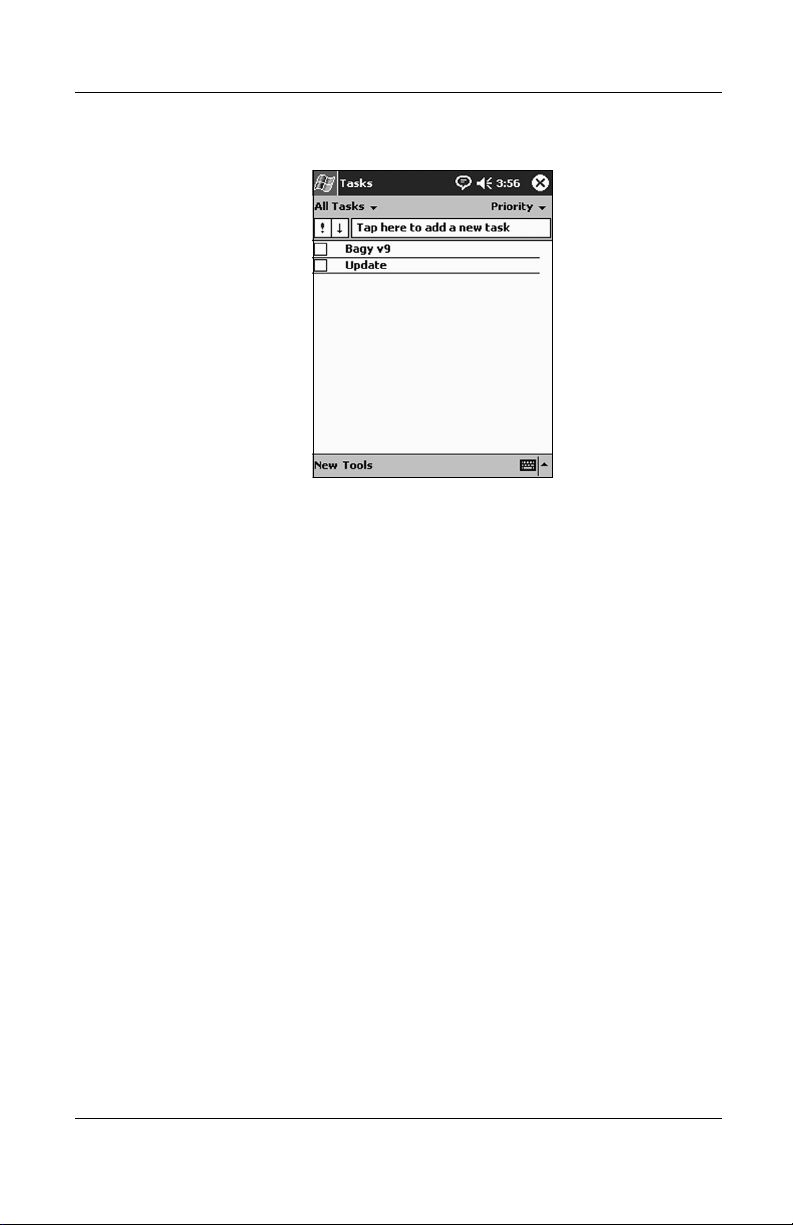
Creating a Task
To create a task from the Today screen.
1. From the Start menu, tap Tasks.
2. Tap New to create a new task.
5–12 Reference Guide
hp CONFIDENTIAL 12/5/02
File: ch5-Scheduling.fm PN: 293146-001
Page 10
DRAFT - Revised 10/14/02
Scheduling
3. Enter a subject or select from the Subject drop-down list.
4. Tap any item to enter additional information.
5. Tap Due to add a due date for the task.
6. Tap Reminder, then select “Remind me.”
7. Tap the date to select when you want to be reminded.
8. Tap OK to set the reminder and create the task.
Creating a Task Quickly
Create a task quickly by customizing Tasks, so you see an Entry
Bar at the top of the Ta sk s screen.
1. From the Start menu, tap Tasks > Tools > Entry Bar.
2. Enter the subject.
3. Set a priority:
a. For high priority, tap the exclamation point.
b. For low priority tap the down arrow icon.
c. For normal priority, do not tap an icon.
Reference Guide 5–13
hp CONFIDENTIAL 12/5/02
File: ch5-Scheduling.fm PN: 293146-001
Page 11
DRAFT - Revised 10/14/02
Scheduling
4. Tap outside the Entry Bar to add the task to your task list.
Deleting a Task
1. From the Start menu, tap Tasks.
2. Tap the task you want to delete.
3. Tap Tools.
4. Tap Delete Task.
5. Tap Ye s to permanently delete the task.
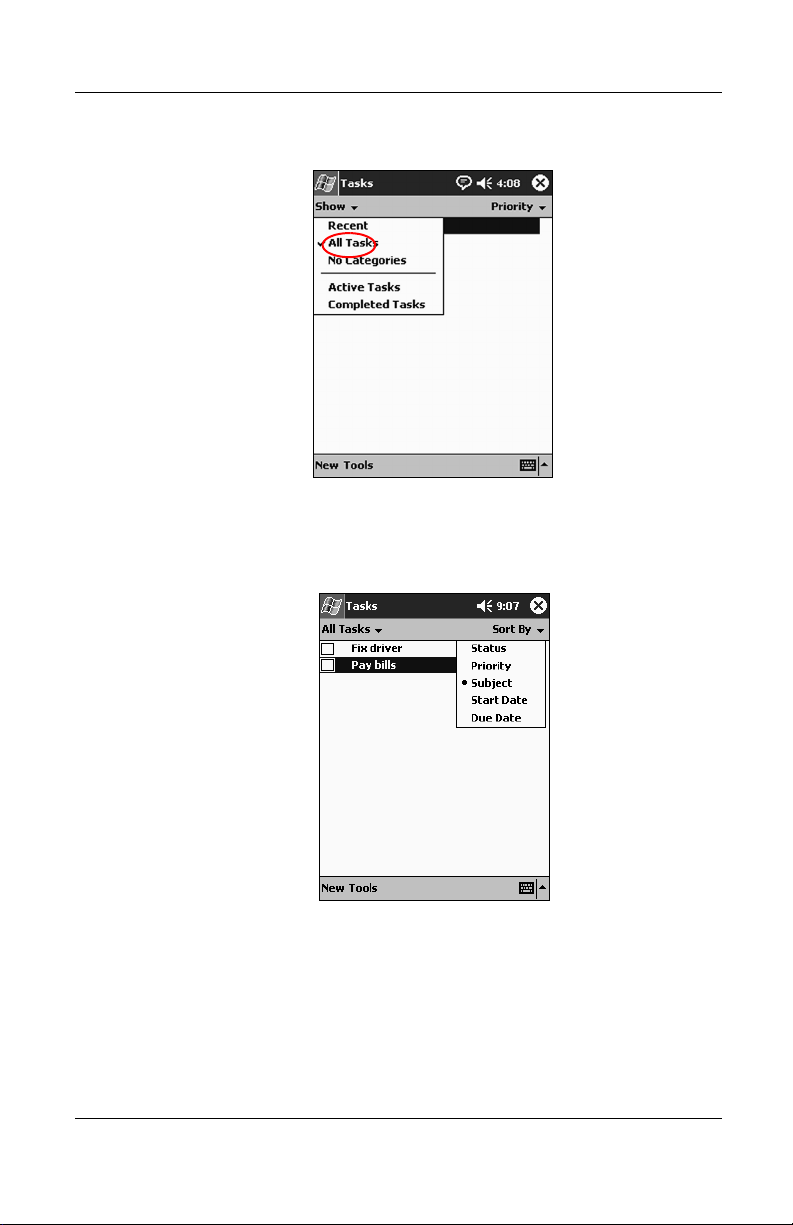
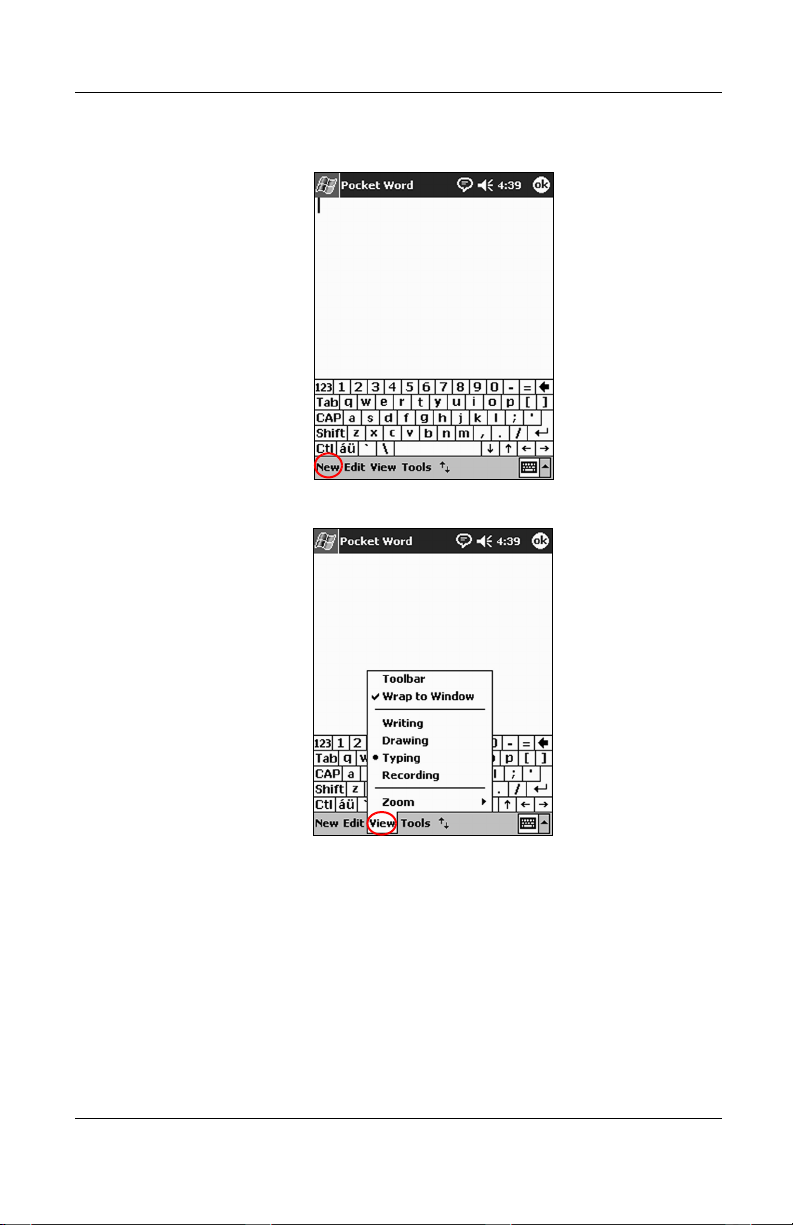
Sorting Tasks
1. From the Start menu, tap Tasks.
2. Tap the down arrow at the top left of the screen to sort the
task list by category.
5–14 Reference Guide
hp CONFIDENTIAL 12/5/02
File: ch5-Scheduling.fm PN: 293146-001
Page 12
DRAFT - Revised 10/14/02
Scheduling
3. Select a category.
4. Tap the down arrow at the top right of the screen to sort the
task list by status, priority, subject, start date, or due date.
5. Select a sort option.
Reference Guide 5–15
hp CONFIDENTIAL 12/5/02
File: ch5-Scheduling.fm PN: 293146-001
Page 13

DRAFT - Revised 10/14/02
Scheduling
Changing the Appearance of Tasks
You can change the appearance of Tasks to use a large font, show
the start and end dates, and set reminders for new items.
1. From the Start menu, tap Tasks > Tools > Options.
2. Select the Ta sk s options.
3. Tap OK.
5–16 Reference Guide
hp CONFIDENTIAL 12/5/02
File: ch5-Scheduling.fm PN: 293146-001
Page 14

DRAFT - Revised 10/23/02
6
Using the Software
Use the software applications on your HP iPAQ h2200 Series to:
■ Open or create Word documents
■ Open or create Excel workbooks
■ Use Audio Player
■ Use Pocket Internet Explorer
■ Use Windows Media Player
■ Read eBooks with Microsoft Reader
Using Pocket Word
Use Pocket Word to create new Word documents from your iPAQ
h2200 Series or to synchronize existing Word documents from
your computer to your iPAQ h2200 Series.
Microsoft ActiveSync converts Word documents into the Pocket
Word format and changes the .doc extension to a .psw extension.
CAUTION: Because Microsoft ActiveSync converts Word documents
Ä
into the Pocket Word format, you may lose some formatting from the
original Word document.
Reference Guide 6–1
hp CONFIDENTIAL 10/23/02
File: ch6-Software.fm PN: 293146-001
Page 15

DRAFT - Revised 10/23/02
Using the Software
Pocket Word does not support the following items:
■ Columns
■ Numbered lists
■ Headers and footers
■ Footnotes
■ Style sheets
For more help with Pocket Word, tap Help from the Start menu,
✎
then tap Pocket Word.
Use ActiveSync to move existing Word documents to your iPAQ
h2200 Series, convert them automatically to the Pocket Word
format, and open them. Pocket Word recognizes and displays
documents in one folder below My Documents.
For example, if you created another folder in the Personal folder
in My Documents, the documents in that folder will not be
shown.
Creating a Word Document
To create a new document from the Toda y screen:
1. From the Start menu, tap Programs > Pocket Word.
6–2 Reference Guide
hp CONFIDENTIAL 10/23/02
File: ch6-Software.fm PN: 293146-001
Page 16
DRAFT - Revised 10/23/02
Using the Software
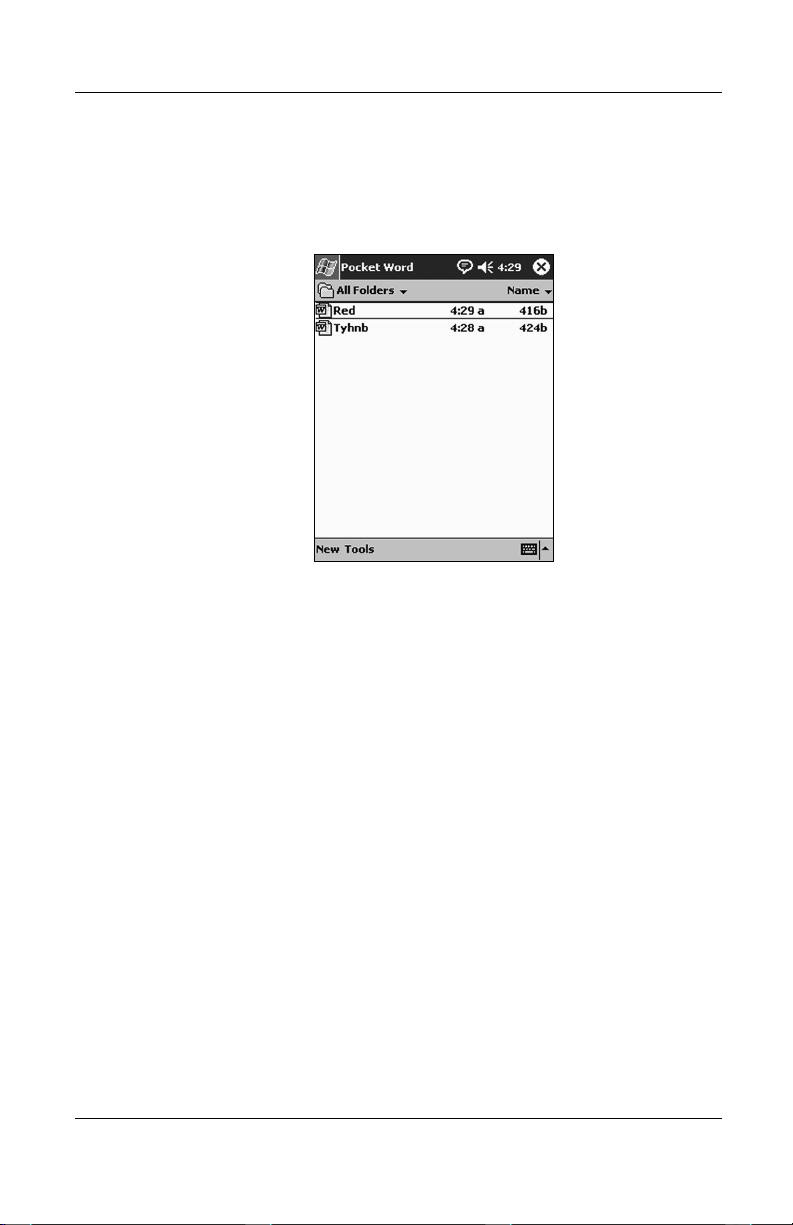
2. Tap New to create a new document.
3. Tap View, then tap Toolbar to display the format toolbar.
4. Tap OK to close and save the document.
The document is automatically saved as a Pocket Word
Document with the first few words of your text as its name.
You may want to rename it.
Reference Guide 6–3
hp CONFIDENTIAL 10/23/02
File: ch6-Software.fm PN: 293146-001
Page 17
DRAFT - Revised 10/23/02
Using the Software
Opening a Word Document
1. From the Start menu, tap Programs > Pocket Word.
2. Tap a document to open it.
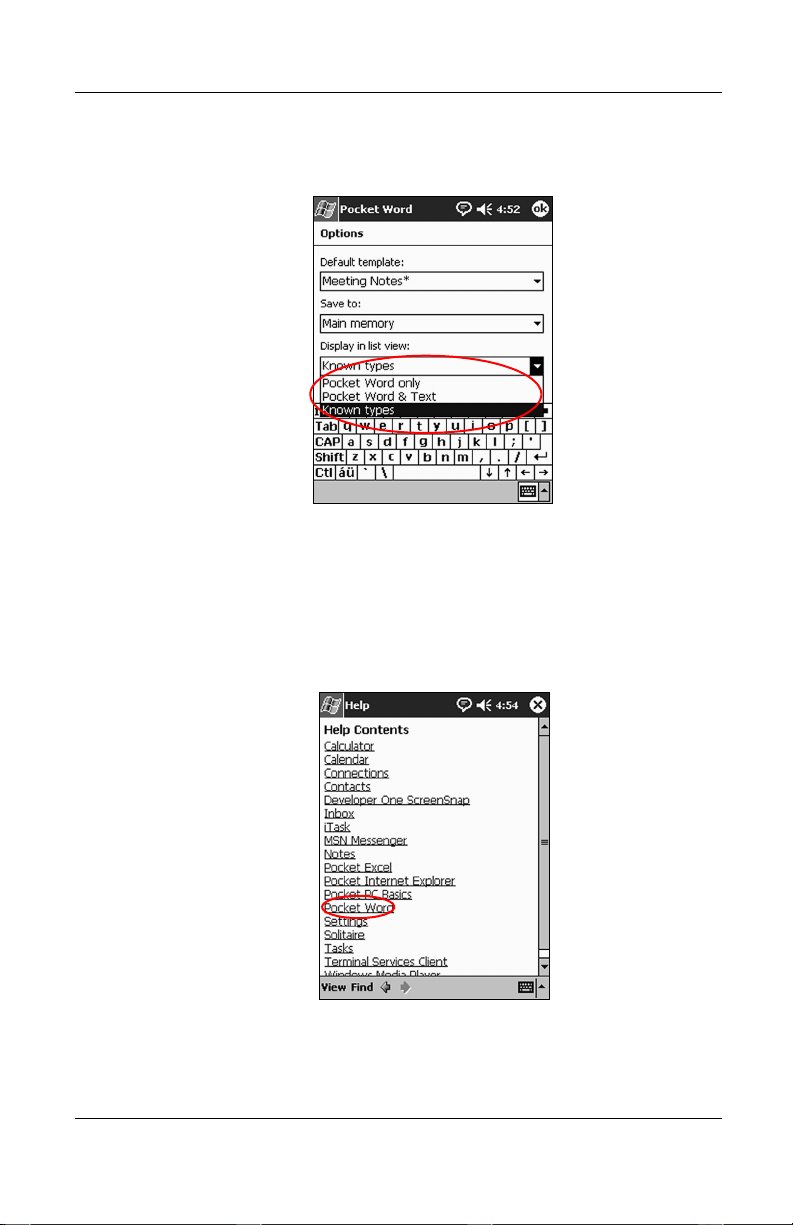
Changing Pocket Word options
You can select:
■ A default template
■ Whether documents are stored in main memory or on a
memory card
■ Which types of documents are displayed in the list view
To change Pocket Word options:
1. From the Start menu, tap Programs > Pocket Word.
6–4 Reference Guide
hp CONFIDENTIAL 10/23/02
File: ch6-Software.fm PN: 293146-001
Page 18
DRAFT - Revised 10/23/02
Using the Software
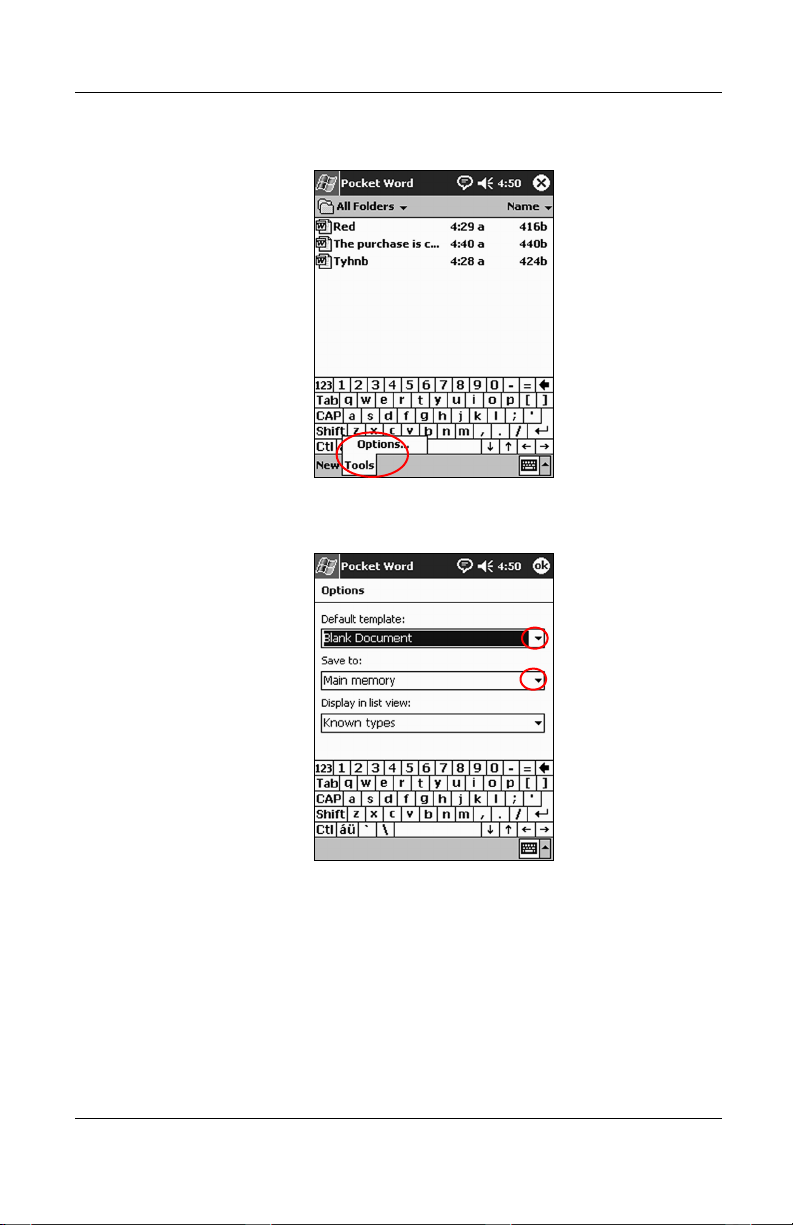
2. Tap Tools, then Options.
3. Tap the Default template down arrow to select a default
template.
4. Tap the Save to down arrow to store documents in main
memory or on a memory card.
Reference Guide 6–5
hp CONFIDENTIAL 10/23/02
File: ch6-Software.fm PN: 293146-001
Page 19
DRAFT - Revised 10/23/02
Using the Software
5. Tap the Display in list view down arrow to select which types
of documents to display in the list view.
6. Tap OK to save the options.
Finding more Help for Pocket Word
1. From the Start menu, tap Help.
2. Tap Pocket Word.
6–6 Reference Guide
hp CONFIDENTIAL 10/23/02
File: ch6-Software.fm PN: 293146-001
Page 20

DRAFT - Revised 10/23/02
Using Pocket Excel
Create Excel workbooks from your iPAQ h2200 Series or
synchronize existing Excel workbooks from your computer to
your iPAQ h2200 Series. ActiveSync converts Excel workbooks
into the Pocket Excel format and changes the .xls extension to a
.pxl extension.
CAUTION: Because ActiveSync converts Excel workbooks into the
Ä
Pocket Excel format, you may lose some formatting from the original
Excel workbook.
Pocket Excel does not support the following items:
■ Data validation
■ Cell notes
■ Add-ins
■ Protection
Using the Software
■ Scenarios
■ Object charts
■ Vertical alignment
■ Text boxes
■ Embedded OLE objects
■ Hyperlinks
For more help with Pocket Excel, tap Help from the Start menu,
✎
and tap Pocket Excel.
Reference Guide 6–7
hp CONFIDENTIAL 10/23/02
File: ch6-Software.fm PN: 293146-001
Page 21

DRAFT - Revised 10/23/02
Using the Software
Creating a Workbook
You can create a new workbook from the To da y screen by
✎
tapping New.
To create a new workbook:
1. From the Start menu, tap Programs > Pocket Excel.
2. Tap New to create a new workbook.
3. Tap OK to close and save the workbook.
6–8 Reference Guide
hp CONFIDENTIAL 10/23/02
File: ch6-Software.fm PN: 293146-001
Page 22

DRAFT - Revised 10/23/02
The workbook is automatically saved as a Pocket Excel
workbook named Book1. Depending on how many
workbooks you have created since opening Pocket Excel, you
may want to rename it.
Opening a Document
CAUTION: Pocket Excel only recognizes and displays documents
Ä
saved in the My Documents folder or one folder below it. Files saved
elsewhere cannot be displayed.
To open an Excel file:
1. From the Start menu, tap Programs > Pocket Excel.
2. Tap a workbook to open it.
Changing Excel Options
Using the Software
You can change options to select:
■ A template for new workbooks
■ Whether workbooks are stored in main memory or on a
memory card
■ Which types of workbooks are displayed in the list view
To change Excel options:
1. From the Start menu, tap Programs > Pocket Excel.
Reference Guide 6–9
hp CONFIDENTIAL 10/23/02
File: ch6-Software.fm PN: 293146-001
Page 23

DRAFT - Revised 10/23/02
Using the Software
2. Tap Tools, then Options.
3. Tap the Template for new workbook down arrow to select a
template.
6–10 Reference Guide
hp CONFIDENTIAL 10/23/02
File: ch6-Software.fm PN: 293146-001
Page 24

DRAFT - Revised 10/23/02
Using the Software
4. Tap the Save new workbooks to down arrow to store
workbooks in main memory or on a memory card.
5. Tap the Files to display in list view down arrow to select
which workbooks are displayed in the list view.
6. Tap OK to save the options.
Reference Guide 6–11
hp CONFIDENTIAL 10/23/02
File: ch6-Software.fm PN: 293146-001
Page 25

DRAFT - Revised 10/23/02
Using the Software
Using Audio Player
Use Audio Player to listen to music by downloading files to your
iPAQ h2200 Series. You can download files to your personal
computer and transfer them to your iPAQ h2200 Series, or
download them directly to your iPAQ h2200 Series using your
Bluetooth wireless LAN connection.
Some Internet music files are protected by licensing technology.
✎
Audio Player uses Digital Rights Management (DRM) for the
electronic licensing procedure. Audio Player and Windows Media
Rights Manager must be installed on the personal computer and
are available on XXXX’s Web site.
Copying Music to Your iPAQ h2200 Series
NEED MORE INFO WHENEVER THE SOFTWARE
BECOMES AVAILABLE
Using Windows Media Player
Use Windows Media Player to listen to music or play video by
downloading files to your iPAQ h2200 Series.
You can download files:
■ To your personal computer and transfer them to your iPAQ
h2200 Series, or
■ Directly to your iPAQ h2200 Series using your Bluetooth
wireless LAN connection
Windows Media Play is included on the HP iPAQ h2200 Series
✎
Companion CD and must be installed on your h2200 Series
before it can be used.
6–12 Reference Guide
hp CONFIDENTIAL 10/23/02
File: ch6-Software.fm PN: 293146-001
Page 26

DRAFT - Revised 10/23/02
Using the Software
For more information on Windows Media Player, tap Help from
✎
the Start menu, then tap Windows Media Player.
Reference Guide 6–13
hp CONFIDENTIAL 10/23/02
File: ch6-Software.fm PN: 293146-001
Page 27

DRAFT - Revised 10/23/02
Using the Software
Media Player supports the organization and playback of:
■ Windows Media content
■ MP3 audio files
■ Windows Media audio and video
■ FhG MP3
■ Streamed content in Windows Media format using
WM protocols (HTTP and MMS)
(MEDIA PLAYER SCREEN ON HAMMER HAS MUTE
BUTTON)
6–14 Reference Guide
hp CONFIDENTIAL 10/23/02
File: ch6-Software.fm PN: 293146-001
Page 28

DRAFT - Revised 10/23/02
Using the Software
Some Internet music files are protected by licensing technology.
✎
Windows Media Player uses Digital Rights Management (DRM)
for the electronic licensing procedure. Windows Media Player
and Windows Media Rights Manager must be installed on the
personal computer and are available on Microsoft’s Web site.
Copying Music to Your iPAQ h2200 Series
You can copy music that is in one of the accepted formats from
your personal computer to the iPAQ h2200 Series. Drag and drop
the music file into the My Documents folder located in RAM or
on a storage card.
To copy music from an audio CD to your iPAQ h2200 Series, you
must have Windows Media Player or similar software installed on
your personal computer.
To copy music to your iPAQ h2200 Series:
The actual steps for copying music using the Windows Media
✎
Player may vary depending on the version of Media Player on the
personal computer.
1. Connect your iPAQ h2200 Series to your personal computer.
2. Open Windows Media Player on your personal computer.
3. Insert the audio CD into your CD drive.
4. From Media Player on your personal computer, select CD
Audio to display the tracks on the audio CD.
5. Select the tracks to copy and select Copy Music to transfer
the tracks to the hard drive.
6. From Media Player on your personal computer, select
Portable Device to display the tracks on the hard drive and
the files on the iPAQ h2200 Series.
Reference Guide 6–15
hp CONFIDENTIAL 10/23/02
File: ch6-Software.fm PN: 293146-001
Page 29

DRAFT - Revised 10/23/02
Using the Software
7. Select the tracks to copy and the storage location on the iPAQ
h2200 Series and select Copy Music to transfer the tracks.
Music files can be relatively large. It is recommended that you
✎
store your music files on a storage card.
Playing Music on Your iPAQ h2200 Series
1. Tap Start, then Windows Media.
2. Tap Select.
3. Tap the down arrow and Local Content to display media files
stored on the iPAQ h2200 Series.
4. Tap and highlight the desired file.
5. Tap the Play icon.
6–16 Reference Guide
hp CONFIDENTIAL 10/23/02
File: ch6-Software.fm PN: 293146-001
Page 30

DRAFT - Revised 10/23/02
Using the Software
By default, Media Player will play all files stored as local content
✎
on the iPAQ h2200 Series. You can repeat a file and shuffle the
contents by selecting Tools, then Repeat or Shuffle.
Creating Playlists
You can organize music and video files into playlists.
To create a playlist:
1. Tap Start, then Windows Media.
2. Tap Select.
3. Tap the down arrow, then Organize Playlists.
Reference Guide 6–17
hp CONFIDENTIAL 10/23/02
File: ch6-Software.fm PN: 293146-001
Page 31

DRAFT - Revised 10/23/02
Using the Software
4. Tap New to name your playlist, then tap OK.
6–18 Reference Guide
hp CONFIDENTIAL 10/23/02
File: ch6-Software.fm PN: 293146-001
Page 32

DRAFT - Revised 10/23/02
5. Select the files to include in this playlist.
6. Tap OK to display your new playlist.
7. Tap OK.
Using the Software
Playing a Playlist
1. Tap Start > Windows Media > Select.
2. Tap the down arrow and tap the playlist name to display its
contents.
Reference Guide 6–19
hp CONFIDENTIAL 10/23/02
File: ch6-Software.fm PN: 293146-001
Page 33

DRAFT - Revised 10/23/02
Using the Software
3. Tap OK, then the Play icon to start the playlist.
You can delete and rename playlists by using the Organize
✎
Playlists menu option. You can also edit playlists by using the
Edit icon while viewing a playlist.
Playing Video
You can play and manage video files just like music. You must
have an internet connection to play streaming video.
Using Pocket Internet Explorer
Use Pocket Internet Explorer (Pocket IE) to view Web or WAP
pages on your iPAQ h2200 Series by downloading pages while
connected to the Internet through ActiveSync.
For more information, tap Start > Help, then Pocket Internet
✎
Explorer.
6–20 Reference Guide
hp CONFIDENTIAL 10/23/02
File: ch6-Software.fm PN: 293146-001
Page 34

DRAFT - Revised 10/23/02
Using Pocket IE When Connected
Use Pocket IE to browse when connected to the Internet.
1. Tap Start > Internet Explorer.
You can use the pre-installed links that HP has provided to access
✎
content and services that are optimized for the iPAQ h2200
Series.
2. Enter the URL address in the address bar at the top of the
screen. If you do not see the address bar, tap View, then tap
Address Bar.
3. Tap Go.
Using Pocket IE When Disconnected
With Pocket IE, you can browse previously viewed and stored
information when disconnected from the Internet. This
information can be viewed using the cached content or through
synchronization.
Using the Software
To view the cached content:
1. Tap Start > Internet Explorer.
2. Tap Tools, then Options.
3. In the General tab, select the number of days to save the
history of pages visited.
4. Tap OK.
Using Microsoft Reader
Use Microsoft Reader to read and listen to eBooks from your
iPAQ h2200 by downloading files to your personal computer and
transferring them to your h2200 Series.
Reference Guide 6–21
hp CONFIDENTIAL 10/23/02
File: ch6-Software.fm PN: 293146-001
Page 35

DRAFT - Revised 10/23/02
Using the Software
Microsoft Reader must be downloaded from the Web using a link
✎
included on the HP iPAQ h2200 Series Companion CD. After
downloading it, Microsoft Reader must be activated before you
can copy protected eBooks from the Internet. To activate Reader,
you must have a Hotmail, Microsoft Net, or Passport account.
Microsoft Reader may not be available in your country.
A detailed eBook guide is available in some countries on the CD,
✎
and you can also copy it to your iPAQ h2200 Series.
Activating Microsoft Reader
To activate Microsoft Reader to copy protected eBooks:
1. Connect your iPAQ h2200 Series to your computer.
2. Open Internet Explorer on your computer.
3. Go to
4. Enter your e-mail address and sign in to Microsoft Passport.
http://das.microsoft.com/activate.
Copying eBooks
You can copy eBooks from any eBook retailer to your iPAQ
h2200 Series.
1. Connect your iPAQ h2200 Series to your computer.
2. Go to any eBook retailer’s Web site and follow the directions
for downloading or installing files to your iPAQ h2200
Series.
6–22 Reference Guide
hp CONFIDENTIAL 10/23/02
File: ch6-Software.fm PN: 293146-001
Page 36

DRAFT - Revised 10/23/02
Reading an eBook
Read your eBook from start to finish or select specific topics. If
you close your eBook and later want to open it, your ebook will
open on the last page you read.
1. From the Start menu, tap Programs > Microsoft Reader.
Using the Software
2. Tap the title of your eBook (NEED NEW SCREENSHOT).
Reference Guide 6–23
hp CONFIDENTIAL 10/23/02
File: ch6-Software.fm PN: 293146-001
Page 37

DRAFT - Revised 10/23/02
Using the Software
3. Tap the page number or left and right arrows to move
backward and forward in the book. (NEW SCREENSHOT)
To jump to a topic, tap a link. Links can occur throughout the text
✎
or table of contents. To return from a link, tap the title of the
eBook, then tap Return.
Listening to an eBook
You can listen to an Audible eBook on your iPAQ h2200 Series.
For more information on buying and listening to Audible eBooks,
<http://www.audible.com>.
go to
1. From the Start menu, tap Programs > Microsoft Reader.
2. Tap the title.
3. Tap Play to listen to the book.
4. Tap Stop to quit listening to the book.
6–24 Reference Guide
hp CONFIDENTIAL 10/23/02
File: ch6-Software.fm PN: 293146-001
Page 38

DRAFT - Revised 10/23/02
Annotating your eBook
Annotate your eBook text by:
■ Creating Bookmarks
■ Highlighting Words Or Phrases
■ Attaching Notes
■ Creating drawings
1. From the Start menu, tap Programs > Microsoft Reader.
2. Tap the title.
Using the Software
Reference Guide 6–25
hp CONFIDENTIAL 10/23/02
File: ch6-Software.fm PN: 293146-001
Page 39

DRAFT - Revised 10/23/02
Using the Software
3. Highlight and hold the text where you want to create a
bookmark, highlight, attach a note, or create a drawing.
4. Tap Add Bookmark, Add Highlight, Add Text Note, or
Add Drawing from the pop-up menu.
Deleting eBooks
You can delete an eBook from your iPAQ h2200 Series library. If
your eBook is stored on your computer, you can copy it again to
your iPAQ h2200 unit.
1. From the Start menu, tap Programs > Microsoft Reader.
6–26 Reference Guide
hp CONFIDENTIAL 10/23/02
File: ch6-Software.fm PN: 293146-001
Page 40

DRAFT - Revised 10/23/02
2. Tap and hold the title of your eBook.
3. Tap Delete.
Using the Software
Reference Guide 6–27
hp CONFIDENTIAL 10/23/02
File: ch6-Software.fm PN: 293146-001
Page 41

DRAFT - Revised 10/23/02
Using the Software
4. Tap Ye s .
Changing Microsoft Reader options
Customize Microsoft Reader to meet your individual needs.
Choose to see visual guides, allow annotations (bookmarks, text
notes, drawings, or highlights), or adjust the size of the font.
1. From the Start menu, tap Programs > Microsoft Reader.
2. Tap Settings.
6–28 Reference Guide
hp CONFIDENTIAL 10/23/02
File: ch6-Software.fm PN: 293146-001
Page 42

DRAFT - Revised 10/23/02
3. Tap the Visual Guides option.
4. Tap Page 1.
5. Select the Annotations options.
6. Tap Page 2.
Using the Software
7. Tap and drag the cursor along the ruler to adjust the font size.
Reference Guide 6–29
hp CONFIDENTIAL 10/23/02
File: ch6-Software.fm PN: 293146-001
Page 43

DRAFT - Revised 10/23/02
Using the Software
8. Tap Library to return to the list of eBooks.
6–30 Reference Guide
hp CONFIDENTIAL 10/23/02
File: ch6-Software.fm PN: 293146-001
Page 44

DRAFT - Revised 10/07/02
7
Expansion Cards
Expansion cards expand the memory and connectivity of your
iPAQ h2200 Series Pocket PC with the following options:
■ View the content of memory cards
■ Connect wirelessly using the optional 802.11 card
■ Connect to the Internet or to your network using an optional
modem card
■ Add functionality such as a wireless modem connection,
digital camera, or expand the memory of your iPAQ h2200
Series by using an optional CompactFlash (CF) card
■ Expand the memory of your iPAQ h2200 Series by using an
optional Secure Digital (SD) Card
To prevent power loss to the battery, remove any expansion cards
✎
from either the CD or SD expansion slots before turning off
power to the h2200 Series.
If you would like... Then install the...
Wireless connectivity 802.11 card
To increase memory SD or CF memory card
Modem connectivity Modem or CF modem card
Reference Guide 7–1
hp CONFIDENTIAL 10/10/02
File: ch7-ExpCards.fm PN: 293146-001
Page 45

DRAFT - Revised 10/07/02
Expansion Cards
Several vendors manufacture memory and connectivity cards that
✎
are compatible with the Secure Digital and CompactFlash
Expansion slots on the h2200 Series.
To see a list of compatible PC cards, go to:
www.hp.com/products/pocketpc/options
Viewing the Content of Memory Cards
Use File Explorer to view the files that are located on your
optional CompactFlash or Secure Digital cards.
1. From the Start menu, tap Programs > File Explorer.
2. Tap the Storage Card icon to see a list of files and folders.
7–2 Reference Guide
hp CONFIDENTIAL 10/10/02
File: ch7-ExpCards.fm PN: 293146-001
Page 46

DRAFT - Revised 10/07/02
Wireless Connection with an
Optional 802.11 CF or SD Card
Use an optional 802.11 CompactFlash (CF) or Secure Digital
(SD) card to connect wirelessly to the Internet or to a network
with your iPAQ h2200 Series.
Installing an 802.11 CF or SD Card
Before inserting a CompactFlash (CF) card into the CF expansion
✎
slot, remove the plastic cover from the CF slot by pulling it out.
Remember to replace the plastic cover after removing the CF card
from the slot.
Insert an 802.11 CF or SD card into the appropriate expansion
slot on the top of the h2200 Series. Push the connection edge of
the card firmly into the expansion slot.
Expansion Cards
If your 802.11 card is not recognized, follow the manufacturer’s
✎
instructions to install the driver.
Removing an 802.11 CF or SD card
1. Close all applications using the 802.11 CF or SD card.
2. To remove the 802.11 CF card, push the eject finger slot on
the CF expansion slot.
To remove the 802.11 SD card, push in the SD slot.
3. Pull the 802.11 card from the expansion slot.
4. If you removed a CF card from the slot, remember to replace
the CF expansion slot plastic cover.
Reference Guide 7–3
hp CONFIDENTIAL 10/10/02
File: ch7-ExpCards.fm PN: 293146-001
Page 47

DRAFT - Revised 10/07/02
Expansion Cards
Finding Information
To locate information about 802.11 cards, visit the following HP
Web site:
www.hp.com/products/pocketpc/options
Using an Optional Modem Card
If you use an optional modem card to connect your iPAQ h2200
Series to the Internet or a network, you must connect with a cable
rather than through a wireless connection.
Installing a Modem Card
Remove the plastic cover from the CF expansion slot before
✎
inserting any cards into the CF slot.
Insert the modem card into the CF expansion slot in the top of the
h2200 Series unit. Push the connection edge of the card firmly
into the expansion slot.
If your modem card is not recognized, follow the manufacturer’s
✎
instructions to install the driver.
Removing a Modem Card
1. Close all applications using the modem card.
2. Push the CF finger slot.
3. Pull the modem card from the expansion slot.
4. Replace the plastic cover by inserting it into the CF
expansion slot.
7–4 Reference Guide
hp CONFIDENTIAL 10/10/02
File: ch7-ExpCards.fm PN: 293146-001
Page 48

DRAFT - Revised 10/07/02
Expansion Cards
Finding information about modem cards
To locate information about modem cards, visit the following HP
Web site:
www.hp.com/products/pocketpc/options
Using an Optional CF Card
Use an optional CF card to:
■ Create a modem connection with a CF modem card, which
requires a phone line and a dial-up Internet Service Provider
■ Increase the memory capacity of your iPAQ h2200 Series
with a CF memory card
With a CF card, you must connect to the Internet with a cable
(Ethernet or phone line).
Inserting a CF Card
1. Locate the CF expansion slot on top of the h2200 Series and
remove the plastic cover from the CF expansion slot.
2. Insert the CF card into the CF expansion slot on top of the
h2200 Series.
3. Push the connection edge of the card firmly into the
expansion slot.
Removing a CF card
1. Close all applications using the CF card.
2. Pull the CF card from the expansion slot.
3. Replace the plastic cover by inserting it into the CF slot.
Reference Guide 7–5
hp CONFIDENTIAL 10/10/02
File: ch7-ExpCards.fm PN: 293146-001
Page 49

DRAFT - Revised 10/07/02
Expansion Cards
Finding information
To locate information about CF cards, visit the following HP Web
site:
www.hp.com/products/pocketpc/options
Using an Optional SD Memory Card
Use an optional SD memory card to increase the memory
capacity of your iPAQ h2200 Series.
CAUTION: Install the SD card only into the SD expansion slot on the
Ä
iPAQ h2200 Series. You cannot install this card into the
CompactFlash expansion slot.
Installing an SD Card
1. Locate the SD expansion slot on your iPAQ h2200 Series.
2. Insert an SD memory card into the SD expansion slot.
3. Push the connection edge of the card firmly into the
expansion slot until it clicks into place or is flush with the top
of the slot.
Removing an SD Card
1. Close all applications and files using the SD memory card.
2. Push down on the SD memory card.
3. Pull the SD memory card from the slot.
Finding information
To locate information about SD memory cards, visit the following
HP Web site:
www.hp.com/products/pocketpc/options
7–6 Reference Guide
hp CONFIDENTIAL 10/10/02
File: ch7-ExpCards.fm PN: 293146-001
Page 50

DRAFT - Revised 09/30/02
Troubleshooting
Use the following suggestions to troubleshoot problems with the
HP iPAQ h2200 Series.
The
symptom or
situation
is... Suggestion
I cannot see
anything on the
screen.
I cannot keep
my battery
charged.
The backlight
keeps turning
off.
• Make sure the iPAQ h2200 Series is powered on.
• Make sure the iPAQ h2200 Series is connected to the
AC adapter and the cradle.
• Always keep the iPAQ h2200 Series connected to the
AC adapter when you are not using it.
• In the backlight settings, slide the bar to the lowest level
to conserve the most power.
Change the time the backlight stays on and select the option
to turn on the backlight when you touch the screen or push a
button.
8
Reference Guide 8–1
hp CONFIDENTIAL 10/16/02
File: ch8-Troubleshooting.fm PN: 293146-001
Page 51

DRAFT - Revised 09/30/02
Troubleshooting
The
symptom or
situation
is... Suggestion (Continued)
I cannot connect
to my computer
using the cable
or the cradle.
I connected my
iPAQ h2200
Series before
installing
Microsoft
ActiveSync.
Microsoft
ActiveSync
cannot locate
my iPAQ h2200
Series when I
synchronize.
• Make sure you have installed Microsoft ActiveSync on
your host computer before connecting your iPAQ h2200
Series to it.
• Make sure your iPAQ h2200 Series is connected to the
sync cable or inserted in the sync cradle, and that the
sync cable or cradle is connected to your computer.
• Make sure your iPAQ h2200 Series is securely seated in
the cradle and is making contact with the cradle
connector.
• If you are using a serial cable, make sure it is plugged
into the COM port on your host computer.
• If you are using a USB cable, make sure you are running
Microsoft Windows 98SE, Me, or 2000 and that you
have installed Microsoft ActiveSync 3.5 or a later version
on your computer.
1. Disconnect the USB or serial cable from your computer.
2. If you have Windows 98SE, 2000, or NT 4.0, uninstall
the USB or the serial device record.
3. Install Microsoft ActiveSync.
4. Reconnect the h2200 Series cable or cradle.
• Make sure the h2200 Series unit is on.
• Make sure all cables are securely connected.
• Make sure the battery is charged by viewing the h2200
system battery icon.
• Remove your iPAQ h2200 Series from the cradle or
cable, power on the unit by pressing the Power button,
then put it back in the cradle or connect it to the cable.
• Insert the stylus into the Unit Reset Switch, and press
for one second.
8–2 Reference Guide
hp CONFIDENTIAL 10/16/02
File: ch8-Troubleshooting.fm PN: 293146-001
Page 52

DRAFT - Revised 09/30/02
The
symptom or
situation
is... Suggestion (Continued)
I want to travel
with my iPAQ
h2200 Series.
I want to travel
internationally
with my iPAQ
h2200 Series.
I want to ship
my iPAQ h2200
Series to a
repair facility.
I cannot connect
to a network.
I cannot find the
keyboard.
I cannot open
e-mail in the
Inbox after I
restore using
Microsoft
ActiveSync.
• Back up your information.
• Take a copy of your backup with you on a CompactFlash
memory card.
• Disconnect all external devices.
• Take the AC adapter and charger adapter with you.
• Keep your iPAQ h2200 Series in a protective case and
take it with your carry-on luggage.
Make sure you have the modem, cable, and plug adapter
appropriate for the country you are visiting.
• Back up your information.
• Disconnect all external devices.
• Pack your iPAQ h2200 Series and all external devices in
protective packaging.
• Make sure you have added the necessary server
information.
• Make sure the network is not busy.
• Make sure the proper drivers for your card are installed.
• Make sure your user name and password are correct.
Tap the Keyboard icon.
It may be necessary to synchronize your iPAQ h2200 Series
with your computer again with Microsoft ActiveSync to link
your e-mail from your h2200 Series to your computer. For
more information, see the “Synchronizing with Your
Computer” section in Chapter 2, “Connecting.”
Troubleshooting
Reference Guide 8–3
hp CONFIDENTIAL 10/16/02
File: ch8-Troubleshooting.fm PN: 293146-001
Page 53

DRAFT - Revised 09/30/02
Troubleshooting
The
symptom or
situation
is... Suggestion (Continued)
When I try to
open the Inbox,
I receive an
error or the
application
hangs.
I get an error
when I try to
record a note in
Calendar or in
Tasks.
I want to see the
current date.
I cannot see all
of my
appointments.
I cannot find the
document or
workbook I
saved.
I tried to
synchronize a
workbook and
the file is
unresolved in
Microsoft
ActiveSync.
I cannot view
the map that I
created using a
mapping
application on
my computer.
Limit the number of e-mail services you create.
Try using a more compressed recording format in Calendar
or Tasks (e.g., 8,000 Hz, Mono (.7 KB/s) is the most
compressed format available).
•From the Start menu, tap Calendar.
•Tap the Go-to-Today icon to see today’s date.
Make sure the appointment you created is in the selected
category.
Pocket Word and Excel only recognize and display
documents in one folder below My Documents. For example,
if you created another folder in the Personal folder in My
Documents, the documents in that folder will not be shown.
Pocket Excel does not support all Excel formatting; therefore,
Microsoft ActiveSync cannot synchronize the file.
Recreate your map in a version 2001 mapping application.
8–4 Reference Guide
hp CONFIDENTIAL 10/16/02
File: ch8-Troubleshooting.fm PN: 293146-001
Page 54

DRAFT - Revised 09/30/02
The
symptom or
situation
is... Suggestion (Continued)
I created
annotations in
my eBook and
cannot figure
out how to
delete them.
I cannot
discover
another device.
I can see other
devices, but I
cannot connect
or exchange
data with them.
My range seems
to be degraded
in certain
groups.
Other devices
cannot find my
device.
Other devices
can discover my
device, but they
cannot connect.
Other devices
do not receive
my correct
business card
information.
1. Navigate to the page that contains the annotation.
2. Tap and hold the bookmark, note, or drawing icon or
the highlighted text.
3. Tap Delete from the pop-up menu.
• Try to move closer to the device.
•Make sure the Bluetooth radio is turned on.
• Make sure you have not limited your ability to see
devices.
• Try to move closer to the device.
•Make sure the Bluetooth radio is turned on.
• Make sure the other device has not restricted your
access.
• Check your transmission power.
Check your transmission power.
• Try to move closer to the device.
• Make sure the radio is turned on.
• Make sure you have not restricted other devices from
finding yours.
Make sure you have not restricted other devices from
connecting to yours.
Make sure you have correctly set up your business card
information.
Troubleshooting
Reference Guide 8–5
hp CONFIDENTIAL 10/16/02
File: ch8-Troubleshooting.fm PN: 293146-001
Page 55

DRAFT - Revised 09/30/02
Troubleshooting
The
symptom or
situation
is... Suggestion (Continued)
When I
exchange
business cards, I
do not receive
the device’s
data.
I cannot find my
device I saved
to a group.
My device is
always asking
me for a
password.
I cannot find
files sent to me
by another
device.
I cannot delete
the “All Devices”
group.
I cannot get my
iPAQ h2200
Series to
recognize the
expansion card.
I cannot insert
my card.
I cannot
establish a
connection.
Make sure you have the right to retrieve that information from
the other computer.
See if they have expired due to inactivity.
Check your passkey settings.
Check your shared directory.
This action cannot be performed. The “All Devices” group
cannot be renamed or deleted.
• Make sure you have firmly pushed the expansion card
down into the iPAQ h2200 Series.
• Make sure you have inserted the appropriate card into
the appropriate slot.
• Make sure you are not inserting the card at an angle.
• Make sure you insert the connection area first.
• Make sure your card is inserted into the appropriate
expansion slot (SF or CD).
• Make sure your card is properly inserted into the
appropriate expansion slot on your h2200 unit.
• Follow the manufacturer’s instructions to install the driver.
8–6 Reference Guide
hp CONFIDENTIAL 10/16/02
File: ch8-Troubleshooting.fm PN: 293146-001
Page 56

DRAFT - Revised 09/30/02
The
symptom or
situation
is... Suggestion (Continued)
My iPAQ h2200
Series cannot
recognize my
card.
Perform a normal reset of your iPAQ h2200 Series by
inserting the stylus into the unit reset switch on the back of the
iPAQ h2200 Series for two seconds.
Troubleshooting
Reference Guide 8–7
hp CONFIDENTIAL 10/16/02
File: ch8-Troubleshooting.fm PN: 293146-001
Page 57

Troubleshooting
DRAFT - Revised 09/30/02
8–8 Reference Guide
hp CONFIDENTIAL 10/16/02
File: ch8-Troubleshooting.fm PN: 293146-001
Page 58

DRAFT - Revised 11/07/02
A
Regulatory Notices
Federal Communications Commission
Notice
This equipment has been tested and found to comply with the
limits for a Class B digital device, pursuant to Part 15 of the FCC
Rules. These limits are designed to provide reasonable protection
against harmful interference in a residential installation. This
equipment generates, uses, and can radiate radio frequency
energy and, if not installed and used in accordance with the
instructions, may cause harmful interference to radio
communications. However, there is no guarantee that interference
will not occur in a particular installation. If this equipment does
cause harmful interference to radio or television reception, which
can be determined by turning the equipment off and on, the user
is encouraged to try to correct the interference by one or more of
the following measures:
■ Reorient or relocate the receiving antenna
■ Increase the separation between the equipment and receiver
■ Connect the equipment into an outlet on a circuit different
from that to which the receiver is connected
■ Consult the dealer or an experienced radio or television
technician for help
Reference Guide A–1
hp CONFIDENTIAL 11/7/02
File: appA.fm PN: 293146-001
Page 59

DRAFT - Revised 11/07/02
Regulatory Notices
Modifications
The FCC requires the user to be notified that any changes or
modifications made to this device that are not expressly approved
by Hewlett-Packard Company may void the Reference authority
to operate the equipment.
Cables
Connections to this device must be made with shielded cables
with metallic RFI/EMI connector hoods in order to maintain
compliance with FCC Rules and Regulations.
Declaration of Conformity for products
marked with the FCC logo—United States
only
This device complies with Part 15 of the FCC Rules. Operation is
subject to the following two conditions: (1) this device may not
cause harmful interference, and (2) this device must accept any
interference received, including interference that may cause
undesired operation.
For questions regarding your product, contact:
Hewlett-Packard Company
P. O. Box 692000, Mail Stop 530113
Houston, Texas 77269-2000
Or, call 1-800-652-6672
For questions regarding this FCC declaration, contact:
Hewlett-Packard Company
P. O. Box 692000, Mail Stop 510101
Houston, Texas 77269-2000
Or, call (281) 514-3333
To identify this product, refer to the Part, Series, or Model
number found on the product.
A–2 Reference Guide
hp CONFIDENTIAL 11/7/02
File: appA.fm PN: 293146-001
Page 60

DRAFT - Revised 11/07/02
Canadian Notice
This Class B digital apparatus meets all requirements of the
Canadian Interference-Causing Equipment Regulations.
Avis Canadien
Cet appareil numérique de la classe B respecte toutes les
exigences du Règlement sur le matériel brouilleur du Canada.
Japanese Notice
Regulatory Notices
Battery Warning
WARNING: This computer contains a lithium ion rechargeable
Å
battery pack. To reduce the risk of fire or burns, do not disassemble,
crush, puncture, short external contacts, or dispose of in fire or water.
CAUTION: Danger of explosion if battery is incorrectly replaced.
Ä
Replace only with the same or equivalent type recommended by the
manufacturer. Dispose of used batteries according to the
manufacturer’s instructions.
Because of the type of battery used in your h2200 Series, follow
local regulations regarding the safe disposal of the battery. Your
vendor can advise you on local regulations, and/or the existence of
any battery disposal programs in operation.
Reference Guide A–3
hp CONFIDENTIAL 11/7/02
File: appA.fm PN: 293146-001
Page 61

DRAFT - Revised 11/07/02
Regulatory Notices
Equipment Warning
WARNING: To reduce the risk of personal injury, electrical shock, fire or
Å
damage to the equipment:
■ Plug the AC adapter into a grounded (earthed) electrical outlet
that is easily accessible at all times.
■ Disconnect power from the equipment by unplugging the AC
adapter from the electrical outlet or unplugging the
Synchronization cable from the host computer.
■ Do not place anything on the AC adapter cord or any of the
other cables. Arrange them so that no one may accidentally step
on or trip over them.
■ Do not pull on a cord or cable. When unplugging from the
electrical outlet, grasp the cord by the plug or, in the case of the
AC adapter, grasp the AC adapter and pull out from the electrical
outlet.
■ Do not use converter kits sold for appliances to power the iPAQ
h2200 Series.
Airline Travel Notice
Use of electronic equipment aboard commercial aircraft is at the
discretion of the airline.
Wireless Notices
In some situations or environments, the use of wireless devices
may be restricted. Such restrictions may apply aboard airplanes,
in hospitals, near explosives, in hazardous locations, etc.
If you are uncertain of the policy that applies to the use of this
device, please ask for authorization to use it prior to turning it on.
A–4 Reference Guide
hp CONFIDENTIAL 11/7/02
File: appA.fm PN: 293146-001
Page 62

DRAFT - Revised 11/07/02
Regulatory Notices
U.S. Regulatory Wireless Notice
This products emits radio frequency energy, but the radiated
output power of this device is far below the FCC radio frequency
exposure limits. Nevertheless, the device should be used in such a
manner that the potential for human contact with the antenna
during normal operation is minimized.
Canadian Regulatory Wireless Notice
Operation is subject to the following two conditions: (1) this
device may not cause interference, and (2) this device must
accept any interference, including interference that may cause
undesired operation of the device.
To prevent radio interference to the licensed service, this device is
intended to be operated indoors and away from windows to
provide maximum shielding. Equipment (or its transmit antenna)
that is installed outdoors is subject to licensing.
The term “IC:” before the certification/registration number only
signifies that the Industry Canada technical specifications were
met.
Reference Guide A–5
hp CONFIDENTIAL 11/7/02
File: appA.fm PN: 293146-001
Page 63

DRAFT - Revised 11/07/02
Regulatory Notices
European Union Notice
0682
Products bearing the CE marking comply with the R&TTE
Directive (1999/5/EC), EMC Directive (89/336/EEC), and the
Low Voltage Directive (73/23/EEC) issued by the Commission of
the European Community.
Compliance with these directives implies conformity to the
following European Norms (in parentheses are the equivalent
international standards and regulations):
■ EN 55022 (CISPR 22)—Electromagnetic Interference
■ EN 55024 (IEC61000-4-2, 3, 4, 5, 6, 8, 11)—
Electromagnetic Immunity
■ EN61000-3-2 (IEC61000-3-2)—Power Line Harmonics
■ EN61000-3-3 (IEC61000-3-3)—Power Line Flicker
■ EN 60950 (IEC 60950)—Product Safety
■ ETS 300 328—Technical requirements for radio equipment
■ ETS 300 826 or EN 301 489-17—General EMC
requirements for radio equipment
This product may be used in all EU and EFTA countries.
A–6 Reference Guide
hp CONFIDENTIAL 11/7/02
File: appA.fm PN: 293146-001
Page 64

DRAFT - Revised 11/07/02
Regulatory Notices
Japanese Regulatory Wireless Notice
Brazilian Regulatory Wireless Notice
Este equipamento opera em caráter secundário, isto é, não tem
direito a proteção contra interferência prejudicial, mesmo de
estações do mesmo tipo, e não pode causar interferência a sistemas operando em caráter primário.
Reference Guide A–7
hp CONFIDENTIAL 11/7/02
File: appA.fm PN: 293146-001
Page 65

DRAFT - Revised 11/07/02
Regulatory Notices
A–8 Reference Guide
hp CONFIDENTIAL 11/7/02
File: appA.fm PN: 293146-001
Page 66

DRAFT - Revised 10/17/02
Hardware Specifications
System Specifications
Specifications
System
Feature hp iPAQ h2200 Series
Processor Intel Cotulla 200 Mhz or Cotulla 400 Mhz(Need Street
Name)
Memory 64 MB SDRAM or greater
B
Read only
Memory
SD Storage Memory card and SDIO ready
CD Storage Memory card, modem card, and SDIO ready
Display Transflective color TFT, 240 x 320 pixels, 64K-color support,
LED Backlight Multi-level brightness adjustment
Audio Speaker, 3.5 mm stereo headphone and microphone jack
Infrared IrDA, data transfer up to 115.2 Kb per second and
Bluetooth Select models only
Reference Guide B–1
32 MB ROM or greater
.24-dot pitch
Universal Remote Control for control of home entertainment
units (on select models)
hp CONFIDENTIAL 10/17/02
File: appB.fm PN: 293146-001
Page 67

DRAFT - Revised 10/17/02
Hardware Specifications
Specifications (Continued)
System
Feature hp iPAQ h2200 Series
Communications Communication port
Indicators 3-mode alarm notification:
Flashing green LED, tone, pop-up message
Charging: flashing LED/Fully
Charged: solid amber LED
Bluetooth active: flashing/solid blue LED
Battery Removable/rechargeable 900mAh Lithium ion with internal
memory backup battery
Physical Specifications
hp iPAQ h2200 Series
US Metric
Length 4.50 in 114.3 mm
Width
Depth 0.63 in 16.0 mm
Weight 5.49 oz 155.6 g
2.75 - 2.50 in tapering 69.8 - 64.5 mm tapering
Operating Environment
Environment
US Metric
Temperature Operating 32° to 104°F 0° to 40°C
Nonoperating -22° to 140°F -30° to 60°C
Relative Humidity Operating 10 to 90% 10 to 90%
Nonoperating 10 to 90% 10 to 90%
Maximum Altitude Operating 0-15,000 ft 14.7 to 10.1 psia
Nonoperating 0-15,000 ft 14.7 to 10.1 psia
B–2 Reference Guide
hp CONFIDENTIAL 10/17/02
File: appB.fm PN: 293146-001
Page 68

Routine Care and Battery
Routine Care
To keep your HP iPAQ h2200 Series Pocket PC in good condition
and working properly, follow these guidelines:
■ Keep your Pocket PC away from excessive moisture and
temperature extremes. Do not expose your Pocket PC to
liquids or precipitation.
■ To prevent damage to the screen, do not place anything on
top of your Pocket PC.
■ Store your Pocket PC in a protective case when not in use.
■ Clean your Pocket PC by wiping the screen and the exterior
with a soft, damp cloth moistened only with water.
C
Guidelines
■ Avoid exposing your Pocket PC to direct sunlight or strong
ultraviolet light for extended periods of time. Also avoid
scratching the surface of the screen and banging it against
hard objects.
■ Use only the h2200 stylus on the screen to prevent scratching
the screen.
CAUTION: To reduce the risk of electrical shock or damage to the
Ä
internal components, do not spray liquid directly on the screen or
allow excess liquid to drip inside your h2200 Series. Using soap or
other cleaning products on the screen may discolor the finish and
damage the screen.
Reference Guide C–1
Page 69

Routine Care and Battery Guidelines
Battery Guidelines
WARNING: This computer contains a lithium ion rechargeable
Å
battery pack. To reduce the risk of fire or burns, do not disassemble,
crush, puncture, short external contacts, or dispose of in fire or water.
The h2200 battery is a rechargeable, user-removeable Lithium
ion type. This battery can be recharged using the iPAQ h2200
Series in the synchronization cradle or by using the included AC
adapter.
When the Lithium ion battery is no longer rechargeable, it should
not be disposed of along with general household waste. In order
to forward them to recycling or dispose of them properly, please
use the public collection system or return them to HewlettPackard, or your authorized Hewlett-Packard agents.
Because of the type of battery used in your h2200 Series, follow
N
local regulations regarding the safe disposal of the battery. Your
vendor can advise you on local regulations, and/or the existence of
any battery disposal programs in operation.
In North America, dispose of the h2200 Series battery by taking
advantage of the battery recycling program. You will be provided
with a postage-paid battery pack mailer pre-addressed to a
reclamation facility where the metals are recycled.
C–2 Reference Guide
Page 70

DRAFT - Revised mm/dd/yy
Index
802.11 memory card 7–3
A
AC adapter
traveling
working at desk
ActiveSync
connect to computer
application buttons
customize
applications
close
install
opening
appointments
categorize
delete
schedule
1–17
1–17
synchronize with computer
2–1
1–6
1–37
1–38
1–36
5–9
5–9
5–7
B
backlight 1–23
battery
C–1
charging with the cradle
charging with the
synchronization cable
preserving battery time
1–20
1–19
1–22
recharging
standby settings
Block Recognizer
1–17
C
Calendar 5–5
cards
installing
cards, installing
CompactFlash (CF) Cards
connect
to the Internet
to your network
contacts
categorize
create
delete
edit
view
convert writing to text
customize
application buttons
Calendar appearance
7–4, 7–5, 7–6
3–18
3–15
3–21
3–17
3–17
D
date
1–5
set
delete
6–24
eBook
1–22
1–31
7–3
7–5
2–8
2–8
1–34
1–6
5–6
Manual Title Variable Index–1
hp CONFIDENTIAL 10/17/02
File: H2200SeriesIX.fm PN: 293146-001
Page 71

Index
DRAFT - Revised: mm/dd/yy
draw on screen 1–33
E
eBook
annotate
copy
delete
listen to
read
e-mail
create
delete
manage folders
move
open
open a folder
receive
send
e-mail service, set up
enter information
expansion cards
802.11 memory card
CompactFlash (CF) Cards
modem card
Secure Digital (SD) card
6–23
6–20
6–24
6–22
6–21
3–3
3–9
3–13
3–11
3–8
3–12
3–7
3–3
3–1
1–25
7–3
7–5
7–4
7–6
F
files, move to, from computer 2–7
folders
3–12, 3–13
H
help
6–6
Word
I
infrared connection
connect computer
install
2–1
802.11 memory card
applications
CompactFlash Card
modem card
Secure Digital card
Internet Service Provider
1–38
7–5
7–4
7–6
L
Letter Recognizer 1–29
link to Web sites
2–12
M
memory cards
802.11
Secure Digital (SD) card
view content
Microsoft Reader
copy ebooks
delete eBook
Microsoft Transcriber
modem card
using a
7–3
7–2
6–19
6–20
6–24
1–30
7–4
2–8
N
network, connect 2–8
notes
1–41
write
O
options, change
Microsoft Reader
6–4
Word
word suggestions
6–26
1–25
P
Pocket Excel 6–7
Pocket Word
6–1
7–3
2–8
7–6
Index–2 Manual Title Variable
hp CONFIDENTIAL 10/17/02
File: H2200SeriesIX.fm PN: 293146-001
Page 72

DRAFT - Revised: mm/dd/yy
Index
R
realign screen 1–13
record
1–39
voice
reminders, set
5–7, 5–12
S
screen
realign
Secure Digital (SD) card
set
date
time, home
time, visiting location
specifications
synchronization, change settings
2–5
synchronize
Excel workbooks
links to Web sites
with your computer
Word documents
1–13
7–6
1–5
1–2
1–4
B–1
6–7
2–12
2–2
6–1
T
tasks 5–12
time
set for home
set for visiting location
Today screen
1–2
5–1
V
view
contacts
memory card content
voice
recording
3–17
1–39
W
Web sites
synchronize links
Windows Explorer
wireless connection, 802.11 card
7–3
6–1
Word
word suggestions, change options
1–25
write on screen
writing, convert to text
2–7
1–33
1–4
7–2
2–12
1–34
Manual Title Variable Index–3
hp CONFIDENTIAL 10/17/02
File: H2200SeriesIX.fm PN: 293146-001
Page 73

Index
DRAFT - Revised: mm/dd/yy
Index–4 Manual Title Variable
hp CONFIDENTIAL 10/17/02
File: H2200SeriesIX.fm PN: 293146-001
 Loading...