

Page 1
User’s Guide
March 15, 2010
NOUG-2.1-update1-105
Nexus One™ phone and Android™ mobile technology platform 2.1-update1
Page 2

Legal
2
Copyright © 2010 Google Inc. All rights reserved.
Google, the stylized Google logo, Android, the stylized Android logo, Nexus One, the
stylized Nexus One logo, Android Market, the stylized Android Market logo, Gmail,
Google Apps, Google Calendar, Google Checkout, Google Earth, Google Goggles,
Google Latitude, Google Maps, Google Talk, Picasa, and YouTube are trademarks of
Google Inc. All other company and product names may be trademarks of the
companies with which they are associated.
Availability of Google applications, services, and features may vary by country, carrier,
and manufacturer.
For more information about your Nexus One phone, visit google.com/phone/support
NOUG-2.1-update1-105 Nexus One User’s Guide
Page 3

Contents 3
About this guide 11
Your phone and accessories 15
What’s in the box 16
Getting to know your phone 17
Installing the battery, SIM, and microSD card 18
Charging your phone 22
Using the headset 23
Monitoring the status and trackball lights 24
Status light 24
Trackball 24
Turning the phone on and off 25
3
Contents
Android basics 27
Starting Android for the first time 28
If you don’t have a SIM card 28
Your Google Account 29
Additional accounts 30
Google services 31
Getting to know the Home screen 32
Using the touchscreen 36
Using the phone’s buttons 37
Using the trackball 38
Using the onscreen keyboard 39
Entering text by speaking 42
Editing text 44
Opening and switching applications 46
Working with menus 48
Options menus 48
Context menus 49
Monitoring your phone’s status 50
Status icons 50
Notification icons 51
NOUG-2.1-update1-105 Nexus One User’s Guide
Page 4

Contents 4
Managing notifications 52
Searching your phone and the web 54
Locking your screen 57
Customizing the Home screen 58
Connecting quickly with your contacts 61
Optimizing battery life 62
Connecting to networks and devices 65
Connecting to mobile networks 66
Connecting to Wi-Fi networks 68
Connecting to Bluetooth devices 71
Connecting to a computer via USB 74
Connecting to virtual private networks 76
Working with secure certificates 78
Placing and receiving calls 79
Placing and ending calls 80
Answering or rejecting calls 82
Working with the Call log 84
Calling your contacts 86
Listening to your voicemail 87
Dialing by voice 88
Options during a call 89
Managing multiple calls 91
Contacts 93
Opening your contacts 94
Adding contacts 96
Importing, exporting, and sharing contacts 97
Adding a contact to your favorites 99
Searching for a contact 100
Editing contact details 101
Communicating with your contacts 104
Changing which contacts are displayed 106
Joining contacts 108
Separating contact information 109
Accounts 111
Adding and removing accounts 112
Configuring account sync and display options 115
NOUG-2.1-update1-105 Nexus One User’s Guide
Page 5

Contents 5
Gmail 119
Gmail is different 120
Opening Gmail and your Inbox 121
Reading your messages 123
Composing and sending a message 125
Replying to or forwarding a message 126
Working with conversations in batches 127
Labeling a conversation 128
Starring a message 129
Viewing conversations by label 130
Reporting spam 131
Searching for messages 132
Archiving conversations 133
Synchronizing your messages 134
Appending a signature to your messages 136
Changing Gmail settings 137
General Settings 137
Notification settings 137
Calendar 139
Viewing your calendar and events 140
Working in Agenda view 142
Working in Day view 143
Working in Week view 144
Working in Month view 145
Viewing event details 146
Creating an event 147
Editing or deleting an event 148
Setting an event reminder 149
Responding to an event reminder 150
Displaying and synchronizing calendars 151
Changing Calendar settings 152
Google Voice 153
Opening Google Voice and your Inbox 154
Reading or listening to your voicemail 156
Exchanging text (SMS) messages 158
Starring messages 159
Viewing messages by label 160
Configuring Google Voice 161
Placing calls with Google Voice 163
NOUG-2.1-update1-105 Nexus One User’s Guide
Page 6

Contents 6
Changing Google Voice settings 164
General Settings 164
Refresh and notification settings 165
Google Talk 167
Signing in and opening your Friends list 168
Chatting with friends 170
Changing and monitoring online status 173
Managing your Friends list 175
Changing Google Talk settings 177
Email 179
Opening Email and the Accounts screen 180
Reading your messages 183
Responding to a message 184
Starring messages 185
Working with message in batches 186
Composing and sending email 187
Working with account folders 188
Adding and editing email accounts 189
Changing email account settings 191
Email account settings 191
Incoming server settings 192
Outgoing server settings 194
Messaging 197
Opening Messaging 198
Exchanging messages 199
Changing Messaging settings 203
Storage settings 203
Text message (SMS) settings 203
Multimedia message (MMS) settings 203
Notification settings 204
Browser 205
Opening Browser 206
Navigating within a webpage 209
Navigating among webpages 211
Working with multiple Browser windows 213
Downloading files 214
Working with bookmarks 215
NOUG-2.1-update1-105 Nexus One User’s Guide
Page 7

Contents 7
Changing Browser settings 217
Page content settings 217
Privacy settings 218
Security settings 219
Advanced settings 219
Maps 221
Opening Maps and viewing your location 222
Obtaining details about a location 224
Starring a location 226
Changing map layers 228
Searching for locations and places 230
Getting directions 231
Navigating with spoken, turn-by-turn directions 233
Finding your friends with Google Latitude 238
Camera 241
Opening Camera and taking pictures 242
Reviewing your pictures 245
Reviewing your videos 246
Changing Camera settings 247
Camera settings 247
Camcorder settings 248
Gallery 249
Opening Gallery and viewing your albums 250
Working with albums 252
Working with pictures 256
Working with videos 260
Goggles 263
Opening Goggles and searching with pictures 264
Working with your search history 266
YouTube 267
Opening YouTube and watching videos 268
Music 271
Transferring music files to your phone 272
Opening Music and working with your library 273
Playing music 275
Working with playlists 278
NOUG-2.1-update1-105 Nexus One User’s Guide
Page 8

Contents 8
News & Weather 281
Checking the news and weather 282
Changing News & Weather settings 285
News & Weather settings 285
Weather settings 285
News settings 285
Refresh settings 286
Clock 287
Viewing the date, time, and other information 288
Setting alarms 290
Changing Clock alarm settings 292
Car Home 293
Using Car Home 294
Calculator 295
Using the Calculator 296
Market 297
Opening Android Market and finding applications 298
Downloading and installing applications 301
Managing your downloads 303
Settings 307
Opening Settings 308
Wireless & networks 309
Wireless controls screen 309
Wi-Fi settings screen 309
Advanced Wi-Fi settings screen 310
Bluetooth settings screen 310
VPN settings screen 310
Mobile networks settings screen 311
Call settings 312
Call settings screen 312
Additional settings 312
Fixed Dialing Numbers screen 313
Sound & display settings 314
Sound & display settings screen 314
Location & security settings 316
NOUG-2.1-update1-105 Nexus One User’s Guide
Page 9

Contents 9
Applications settings 318
Applications settings screen 318
Application Info screen 318
Development screen 319
Accounts & sync settings 320
Accounts & sync settings screen 320
Account screen 320
Privacy settings 321
SD card & phone storage settings 322
SD Card & Phone Storage screen 322
Search settings 323
Search settings screen 323
Language & keyboard settings 324
Language & Keyboard screen 324
Android Keyboard settings screen 324
Device Keyboard settings screen 325
Accessibility settings 326
Text-to-speech settings 327
Text-to-Speech settings screen 327
Date & time settings 328
About phone 329
About Phone screen 329
Specifications 331
NOUG-2.1-update1-105 Nexus One User’s Guide
Page 10

Contents 10
NOUG-2.1-update1-105 Nexus One User’s Guide
Page 11
This guide describes the Google™ Nexus One™ phone, its components and
accessories, and how to use release 2.1-update1 of the Android™ mobile technology
platform.
Chapter Describes
11
About this guide
“Your phone and accessories” on page 15
“Android basics” on
page 27
“Connecting to networks and devices” on
page 65
“Placing and receiving
calls” on page 79
“Contacts” on page 93 Organizing and finding contact information for the people you know.
“Accounts” on page 111 Adding and synchronizing email and other accounts, including Google
“Gmail” on page 119 Sending and receiving messages using Gmail™ webmail service.
“Google Voice” on
page 153
“Calendar” on page 139 Viewing and creating events on your calendar and synchronizing them
Your handset, its parts, preparing it for use, and the accessories that
come with it.
Starting Android the first time, signing into your Google Accounts so
you can take full advantage of Google Apps™, and performing basic
Android tasks.
Configuring how your phone connects to mobile and Wi-Fi™ networks, to Bluetooth™ devices, and to a computer. This chapter also
describes how to secure your connections to virtual private networks
(VPNs) and other networks.
Using your phone to place, receive, and manage multiple calls.
Accounts and Microsoft™ Exchange ActiveSync™ accounts.
Checking your voicemail and placing calls with Google Voice.
with the Google Calendar™ calendaring service on the web.
“Google Talk” on
page 167
“Email” on page 179 Configuring your phone so you can send and receive email via a con-
NOUG-2.1-update1-105 Nexus One User’s Guide
Communicating with friends by using the Google Talk™ instant messaging service.
ventional email service.
Page 12
About this guide 12
Chapter Describes
“Messaging” on
Exchanging text and multimedia messages with other phones.
page 197
“Browser” on page 205 Browsing the web on your phone.
“Maps” on page 221 Discovering the world with street and satellite data from the Google
Earth™ mapping service, getting directions, finding your location,
sharing your location through the Google Latitude™ user location service, navigating with spoken turn-by-turn directions from Google
Maps Navigation, and the many other features available on your
phone in the Google Maps™ mapping service
“Camera” on page 241 Taking and previewing photos and videos.
“Gallery” on page 249 Viewing, sharing, and uploading your photos and videos to the
Picasa™ photo organizing software service and the YouTube™ usergenerated content website.
“Goggles” on page 263 Using the Google Goggles™ visual search service to search the web
for information about the subjects of photos you take or to get information about nearby businesses.
“YouTube” on page 267 Viewing YouTube videos.
“Music” on page 271 Listening to music by the song, album, or playlist.
“News & Weather” on
Checking the news and weather on your Home screen or in detail.
page 281
“Clock” on page 287 Checking the time and setting alarms.
“Car Home” on
Using your phone effectively in the car.
page 293
“Calculator” on
Calculating the solutions to math problems.
page 295
NOUG-2.1-update1-105 Nexus One User’s Guide
Page 13
About this guide 13
Chapter Describes
“Market” on page 297 Finding new applications on Android Market™ downloadable applica-
tions service, purchasing paid applications with Google Checkout™
payment and billing service, and installing them.
“Settings” on page 307 Opening the Settings application and its many tools for configuring
and customizing your phone.
“Specifications” on
page 331
Details about your phone and its features.
NOUG-2.1-update1-105 Nexus One User’s Guide
Page 14

About this guide 14
NOUG-2.1-update1-105 Nexus One User’s Guide
Page 15

15
Your phone and accessories
Your phone comes with a number of accessories, including a headset
and a protective pouch. For safety reasons, the battery is not shipped
inside the phone, so you need to insert it and charge it fully before using
your phone. This chapter describes the parts of your phone, how to
install and charge the battery, how to turn the phone on and off, and
other useful information.
In this section
“What’s in the box” on page 16
“Getting to know your phone” on page 17
“Installing the battery, SIM, and microSD card” on page 18
“Charging your phone” on page 22
“Using the headset” on page 23
“Monitoring the status and trackball lights” on page 24
“Turning the phone on and off” on page 25
NOUG-2.1-update1-105 Nexus One User’s Guide
Page 16
Your phone and accessories 16
Nexus One Phone
Quick-start card, safety
and regulatory booklet,
warranty booklet
Headset
Battery
Pouch
Charger
(plug varies
by country)
USB cable
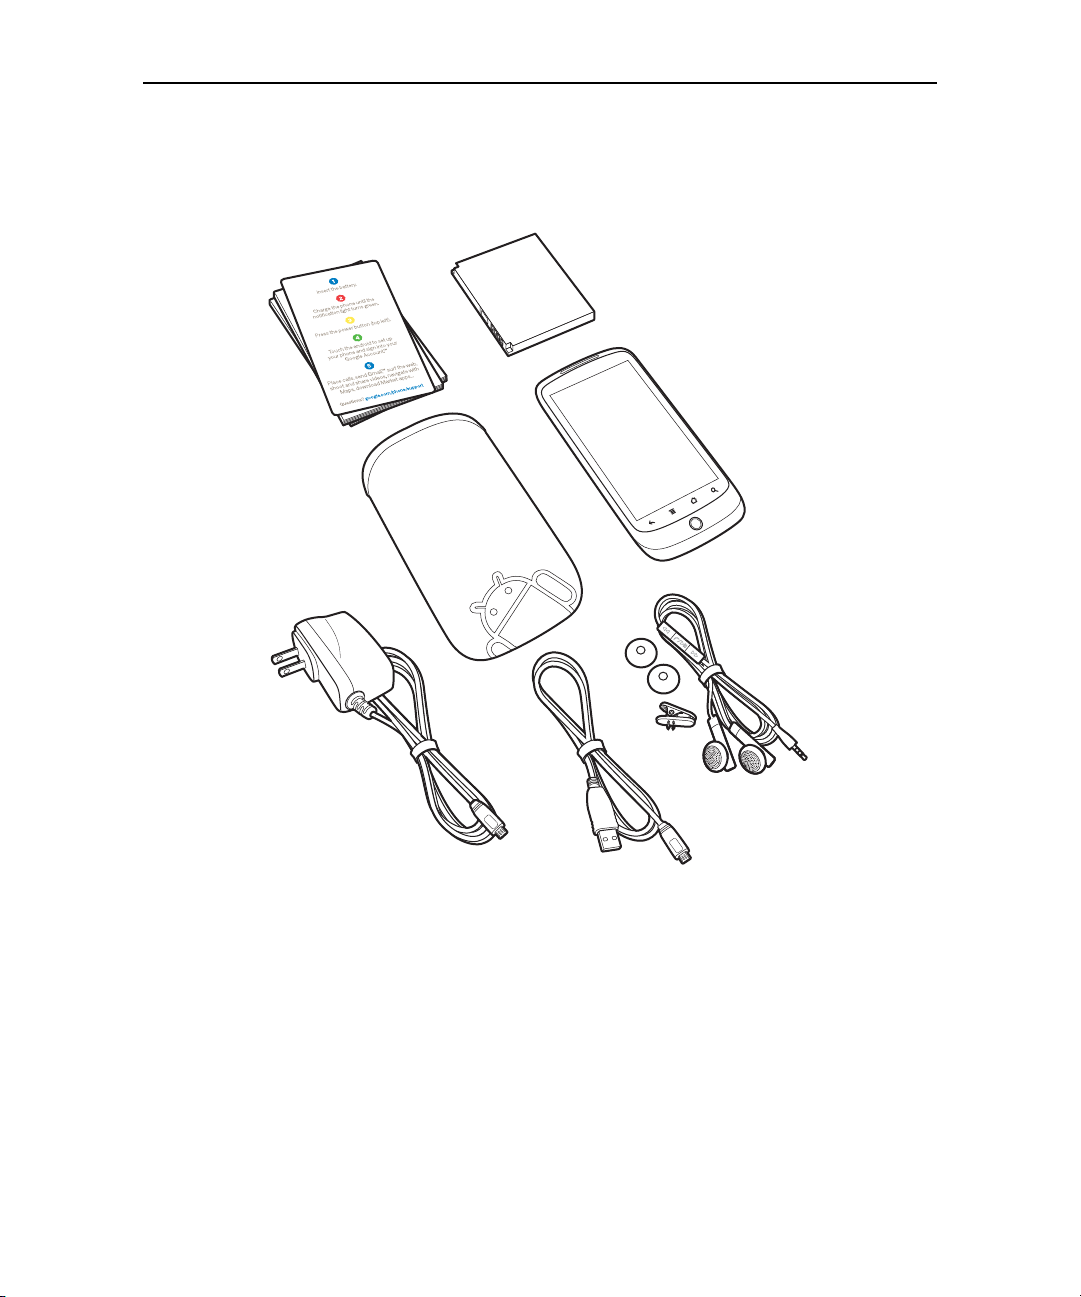
What’s in the box
Your Nexus One phone comes with the following accessories.
NOUG-2.1-update1-105 Nexus One User’s Guide
A 4GB microSD card (not shown) is installed in the phone. If you purchased the phone
with a contract with a GSM mobile carrier, a SIM card for your carrier is also installed.
See “Installing the battery, SIM, and microSD card” on page 18 to learn how to insert or
remove the battery, microSD card, and SIM.
Page 17

Your phone and accessories 17
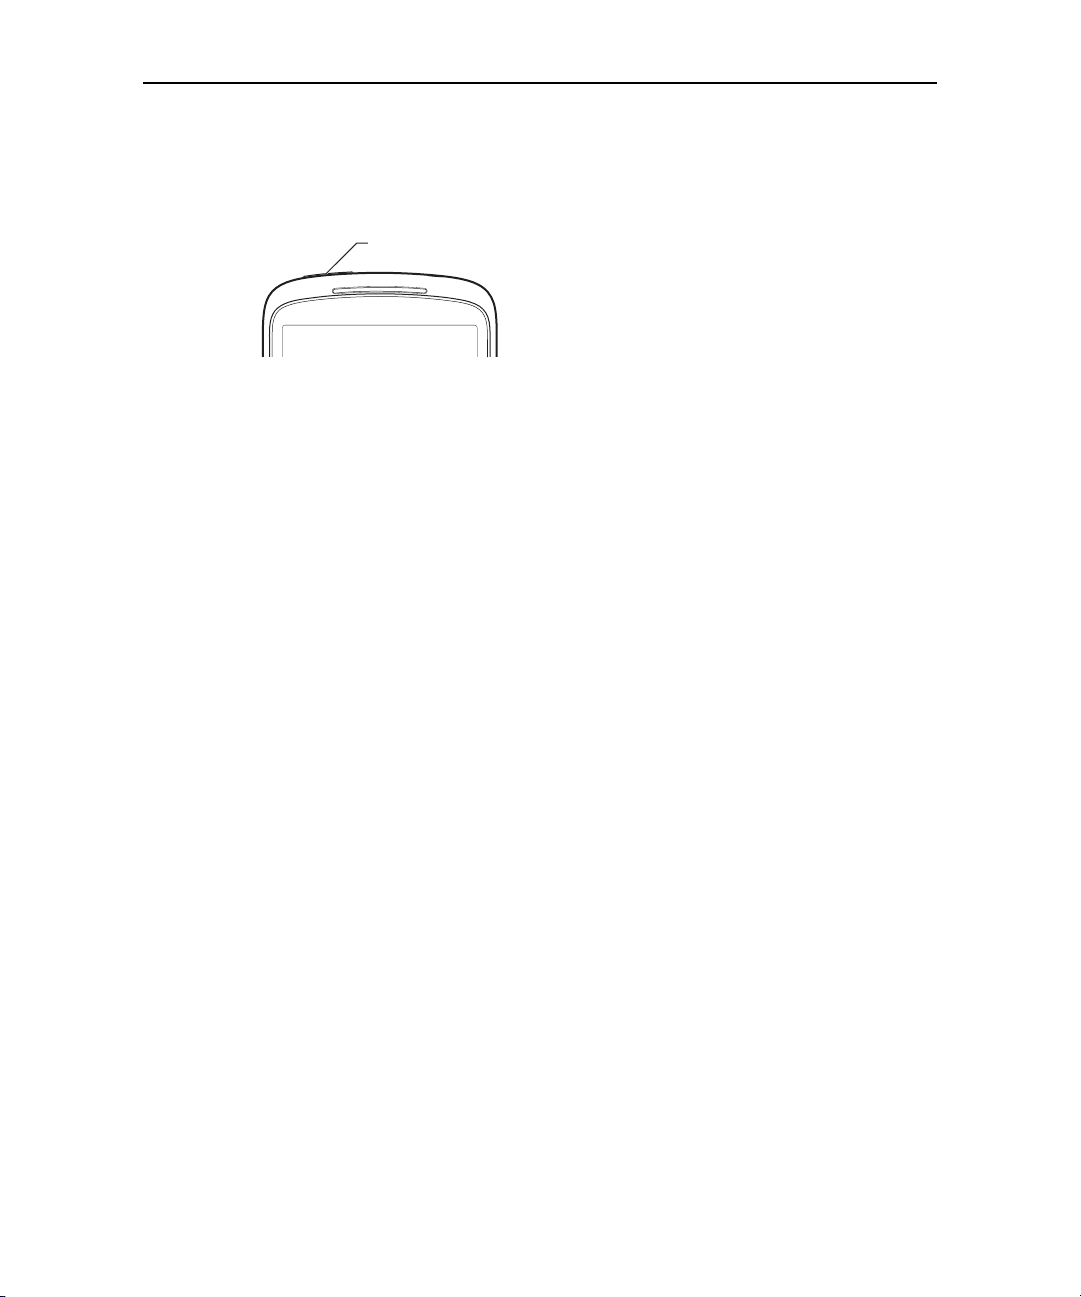
Getting to know your phone
Trackball
Proximity &
light sensors
Earpiece
Touchscreen
Soft buttons
Power button
Status light
3.5mm
headphone jack
5-megapixel camera
with autofocus
Noisecancellation
microphone
Vol um e
up/down
button
USB port
Back cover
LED
camera
flash
Speaker
Dock connectors
(for optional dock accessories)
Microphone
Before you use the phone, insert the battery and charge it fully. (See “Installing the
battery, SIM, and microSD card” on page 18 and “Charging your phone” on page 22.)
Other sections in this chapter describe the use and function of the headset and its
remote, status light, turning the phone on and off, and so on.
“Android basics” on page 27 describes how to place calls, use the trackball, and take
advantage of other basic features of the phone, including turning it on for the first time
and signing into your Google Account.
The 5-megapixel camera’s lens is underneath a protective lens that is built into the
camera’s back cover. The camera features an autofocus mechanism and up to 2x
digital zoom. Be sure to keep the lens clean with lint-free cloth; smudges and
fingerprints will distort your pictures. The camera’s LED flash is next to the lens. Taking
pictures and shooting videos is described in “Camera” on page 241.
NOUG-2.1-update1-105 Nexus One User’s Guide
Page 18
Your phone and accessories 18
Installing the battery, SIM, and microSD card
To install or replace the battery, SIM, or microSD card, you must remove the phone’s
back cover.
You must install the battery before you can use the phone. The phone comes with a
4GB microSD card for storage already installed. If you purchased the phone with a
contract, it also comes with a SIM card for your carrier installed.
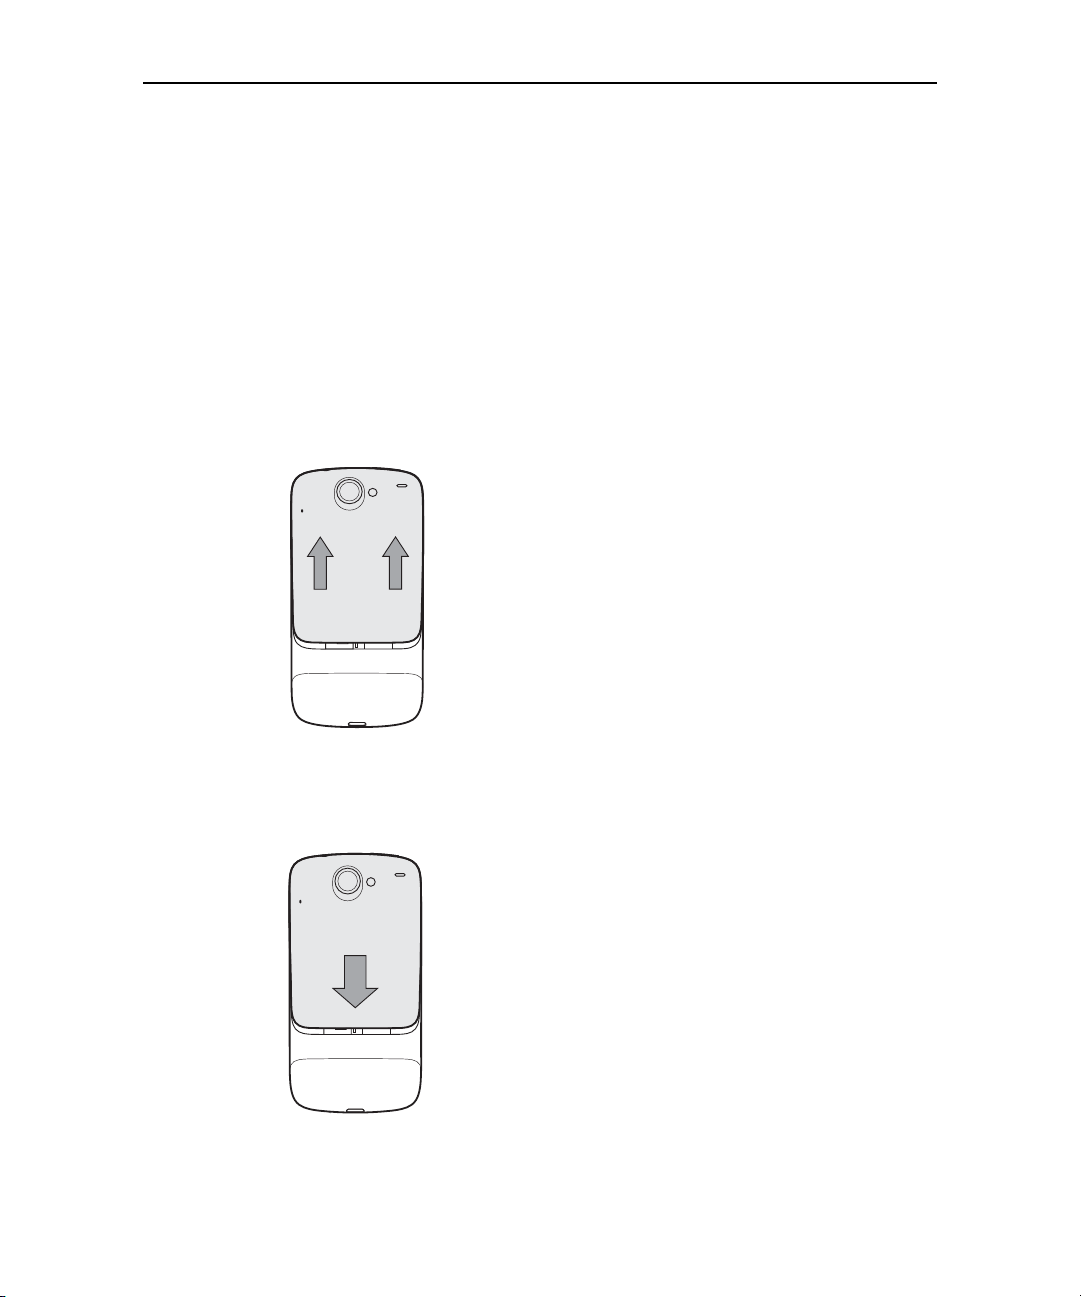
To open the phone’s back cover
S Firmly press your thumbs on either side of the back cover, just below the camera
lens, and push the cover up to remove it.
To replace the phone’s back cover
S Place the cover on the back of the phone and push it down into place.
NOUG-2.1-update1-105 Nexus One User’s Guide
Page 19
Your phone and accessories 19
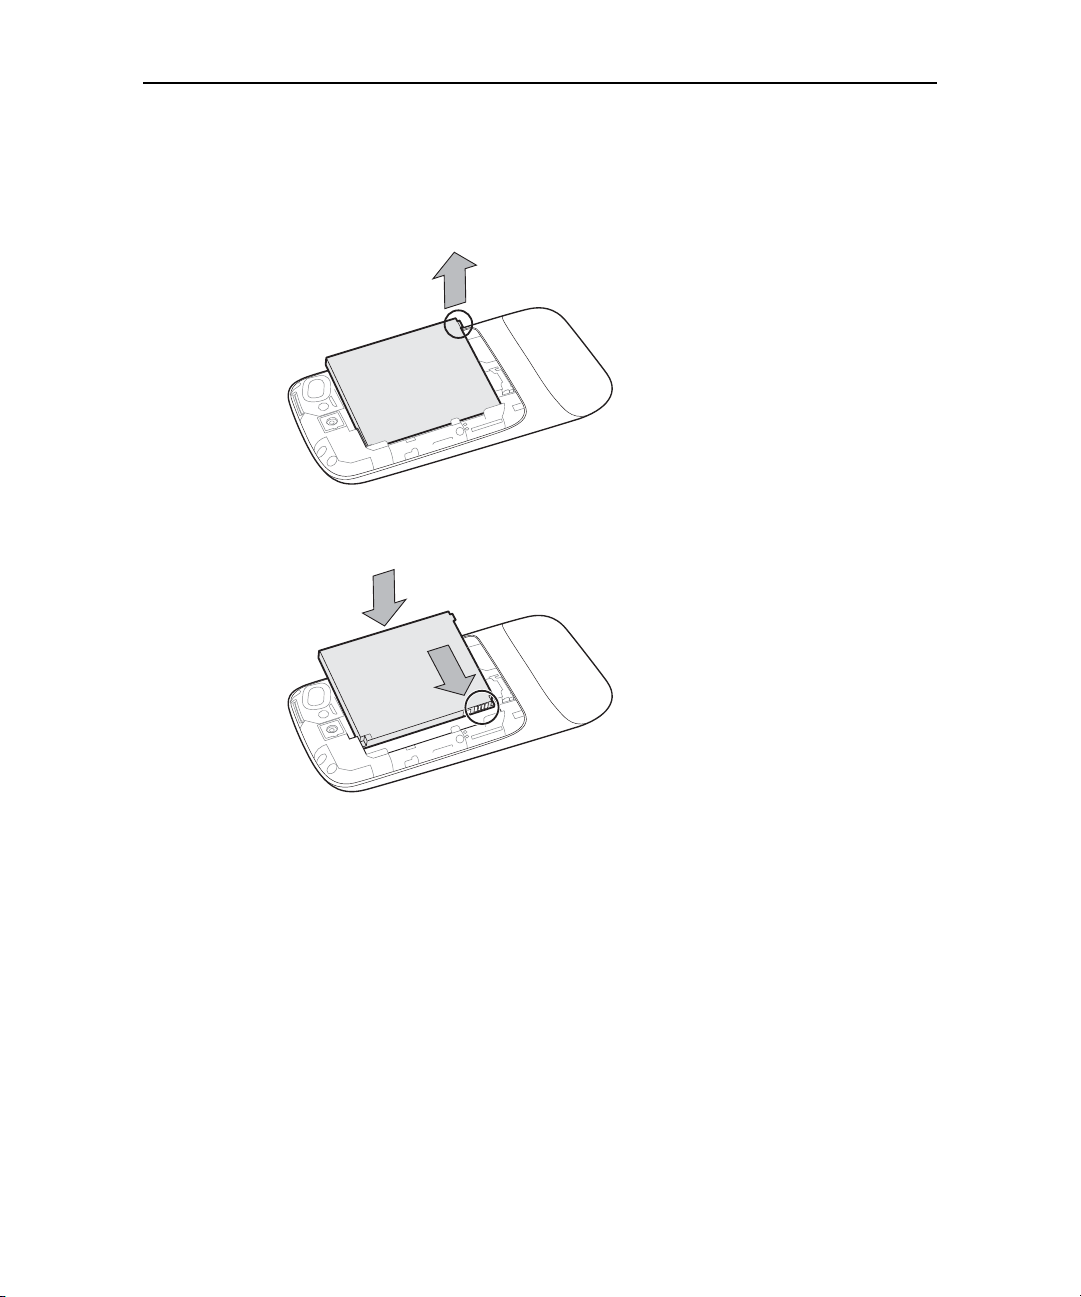
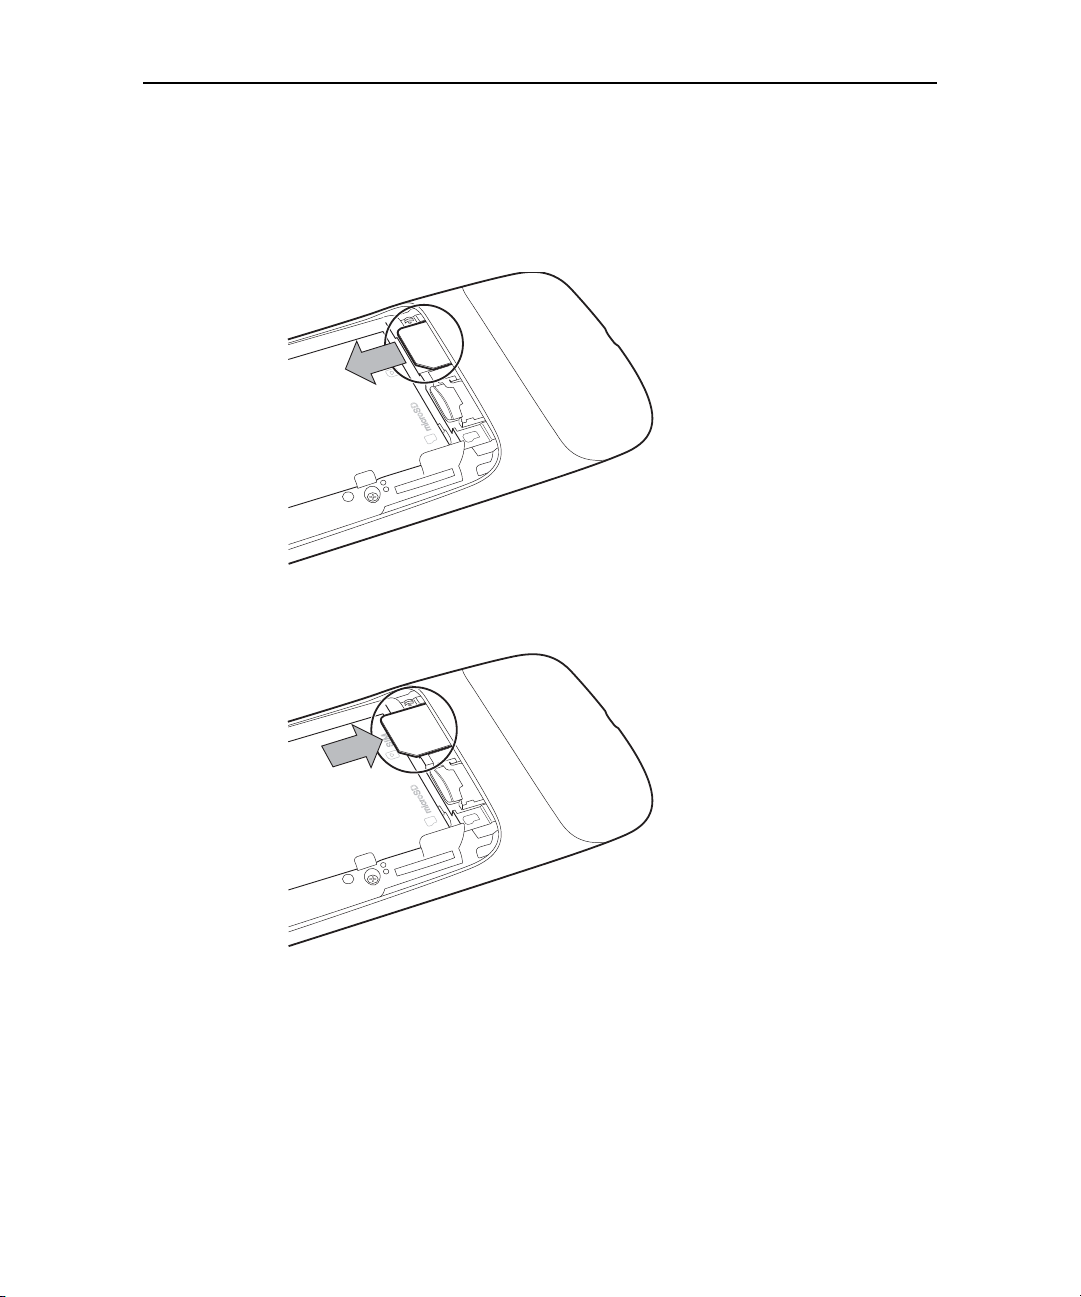
1
2
To remove or insert the battery
You must open the phone’s back cover to remove or insert the battery.
S Lift out the battery by slipping your finger under the small corner tab.
S Slide the battery into place by aligning the gold contacts on the phone and the
battery and then gently pressing the battery into place.
NOUG-2.1-update1-105 Nexus One User’s Guide
Page 20
Your phone and accessories 20
2
1
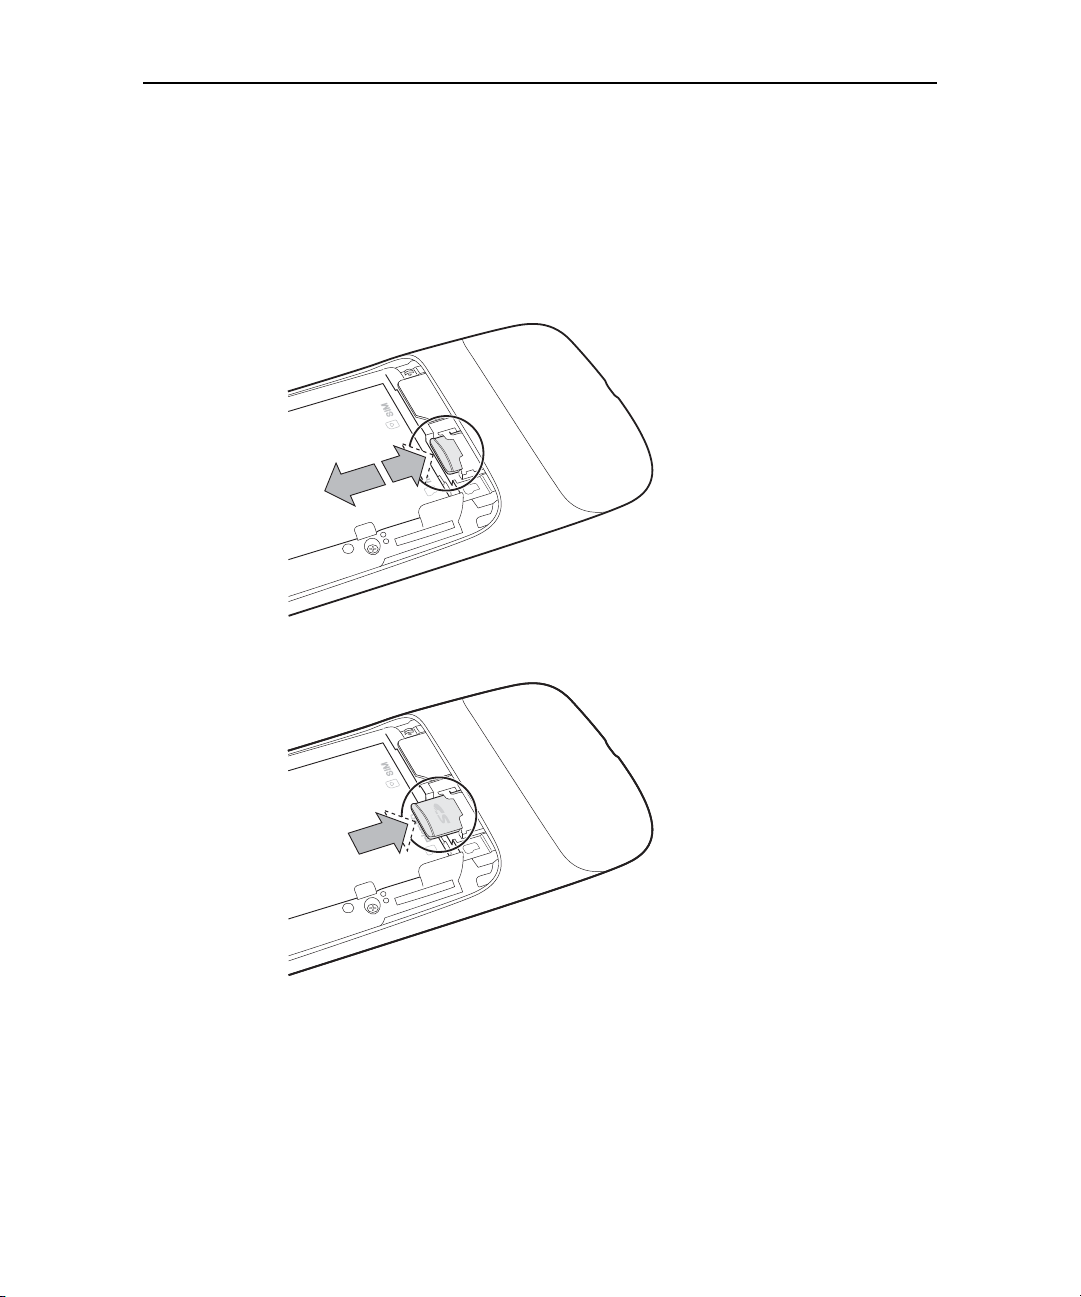
To remove or insert a microSD card
You must open the phone’s back cover and remove the battery to remove or insert the
microSD card.
S Remove the microSD card by pressing it toward the bottom of the phone. When
you release the card it starts to pop out of its slot, so you can pull it the rest of the
way out.
S Insert the microSD card by aligning it and then sliding it into its slot.
NOUG-2.1-update1-105 Nexus One User’s Guide
Page 21
Your phone and accessories 21
To remove or insert a SIM card
You must open the phone’s back cover and remove the battery to remove or insert the
SIM card.
S Remove the SIM card by sliding it out of its slot with the tip of your finger.
S Insert the SIM card by aligning it (notch to the top left and gold contacts down) and
then sliding it into its slot.
NOUG-2.1-update1-105 Nexus One User’s Guide
Page 22
Your phone and accessories 22
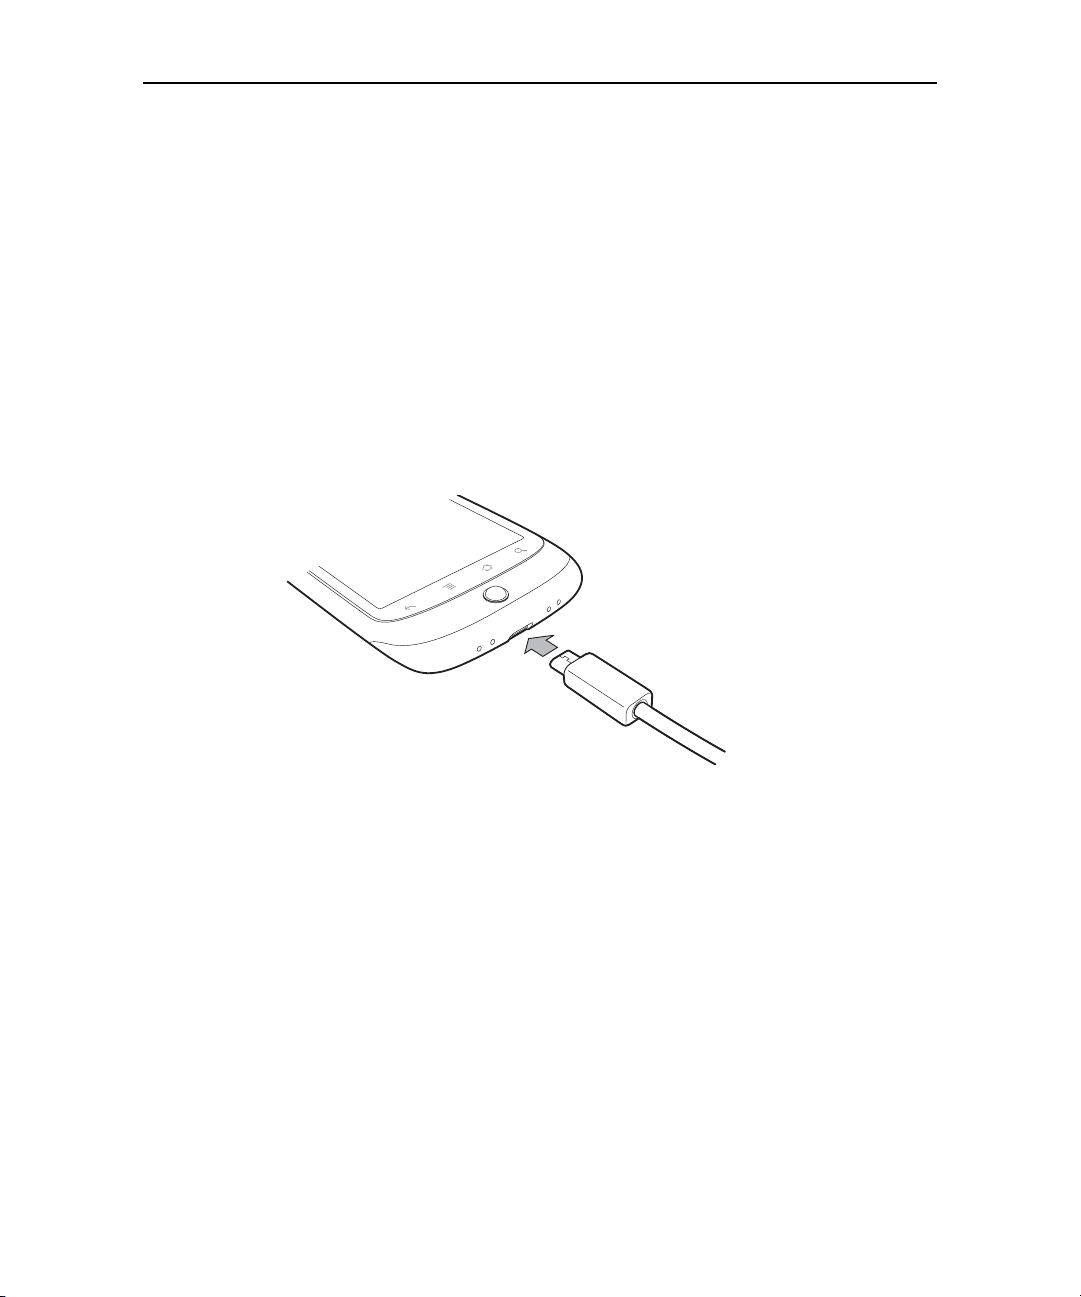
Charging your phone
Before you can use your phone, you must charge it fully, until the status light turns
green. See “Monitoring the status and trackball lights” on page 24.
The phone also charges when it is connected to a computer’s USB port with the
included USB cable, and when inserted in an optional desktop or car dock accessory
(available from google.com/phone ). For information about connecting the phone to a
computer, see “Connecting to a computer via USB” on page 74.
To charge the phone
1 Plug one end of the charger into an AC outlet.
2 Plug the other end into the USB port on your phone
The phone’s status light turns orange, indicating that it’s charging.
When charging is complete, the status light turns green.
3 When the phone is fully charged, disconnect it from the charger.
NOUG-2.1-update1-105 Nexus One User’s Guide
Page 23
Your phone and accessories 23
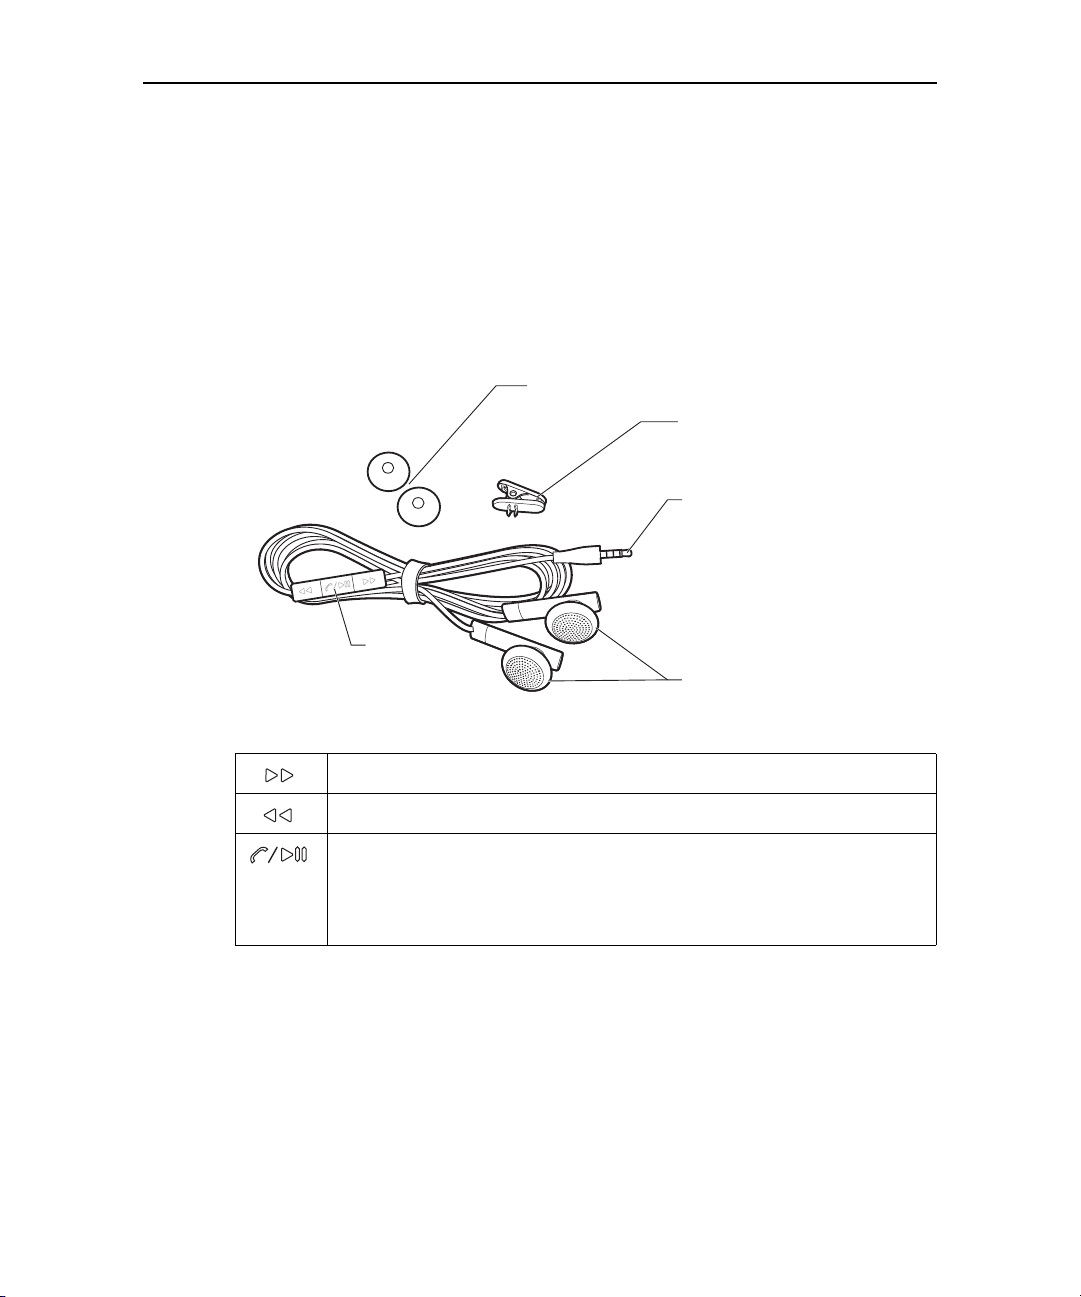
3.5mm
headphone jack
Headphones
Remote
(microphone
on back)
Lapel clip
Foam headphone
covers
Using the headset
The headset plugs into the phone’s 3.5mm headset jack.It includes a pair of
headphones and a remote with a microphone on the back. The remote also includes
buttons that you use to manage phone calls and music.
Use the lapel clip to attach the remote high on your shirt, so the microphone is near
your mouth.
The remote features a microphone on the back and three buttons on the front.
Skip to the next music track.
Skip to the previous music track.
When listening to music, press pause and play.
For an incoming call, press to answer.
During a phone call, press to mute or unmute the microphone.
During a phone call, press & hold to hang up the call.
You control the headphones’ volume with the phone’s Volume Up/Down button.
NOUG-2.1-update1-105 Nexus One User’s Guide
Page 24
Your phone and accessories 24
Trackball
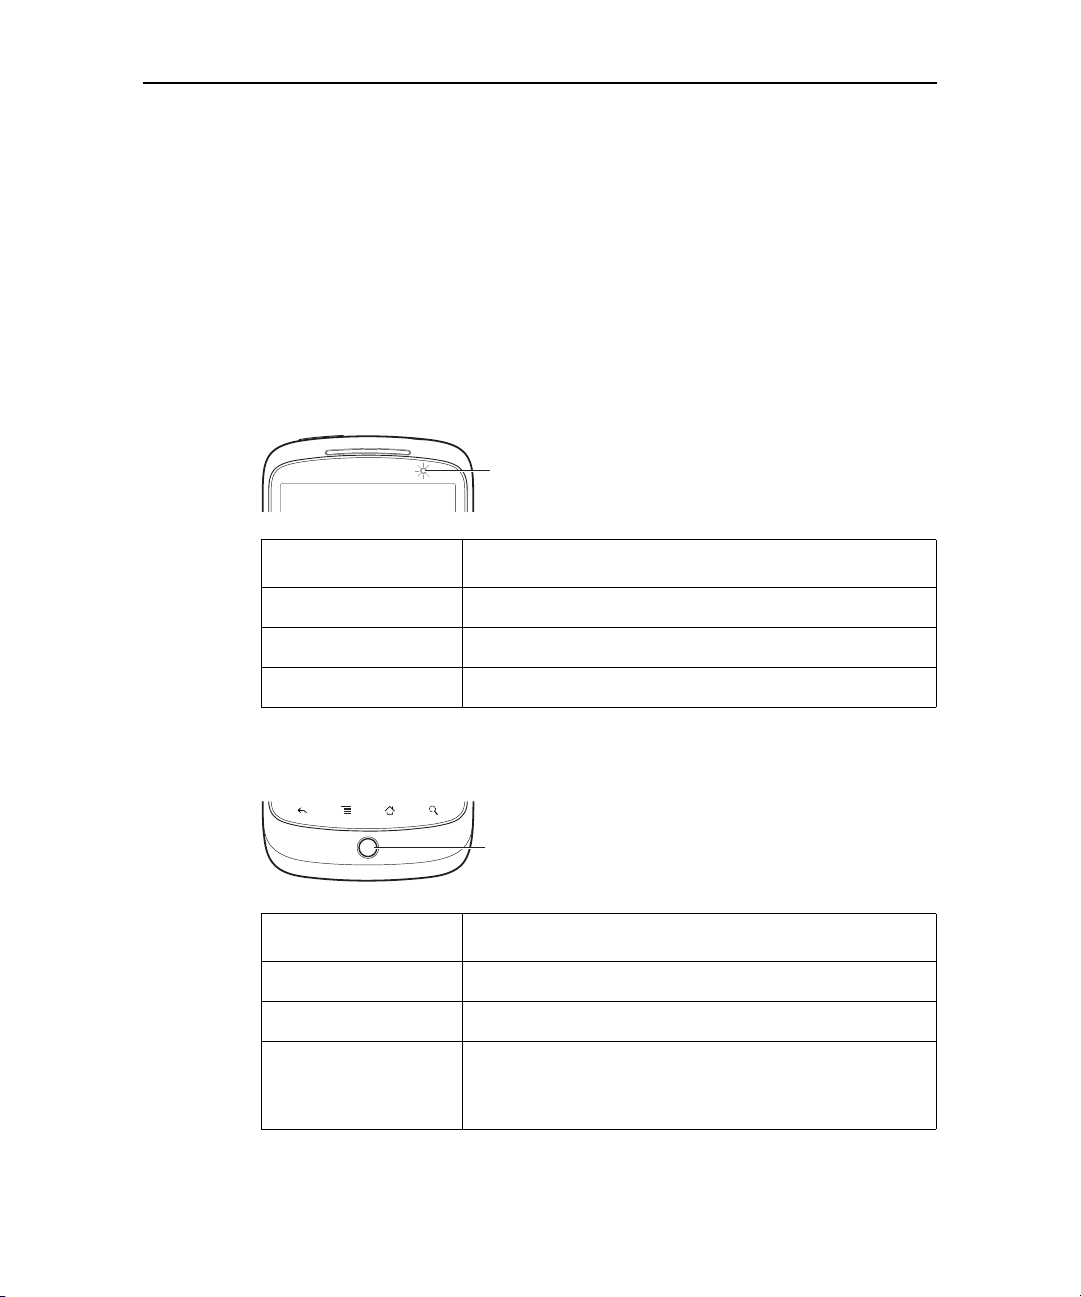
Monitoring the status and trackball lights
The status light (to the right of the earpiece) and the Trackball change colors, flash,
or glow briefly to inform you of the charging status of the phone and other important
information.
The status bar at the top of the touchscreen also provides information about the
phone, as described in “Monitoring your phone’s status” on page 50 and “Managing
notifications” on page 52.
Status light
Status
light
Status light state Meaning
Green Fully charged (when connected to charger)
Orange Charging (when connected to charger)
Flashing red Battery low
Trackball
Trackball state Meaning
Flashing white Incoming call.
Flashing blue Incoming call when connected to a Bluetooth headset.
White pulse Notification received. You can configure the trackball to
pulse once or repeatedly when you receive a new notification. See “Sound & display settings” on page 314.
NOUG-2.1-update1-105 Nexus One User’s Guide
Page 25
Your phone and accessories 25
Turning the phone on and off
You use the power button to turn the phone on and off.
Power button
To turn on the phone
S Press the Power button for a few seconds, until the screen illuminates.
The first time you turn on the phone, you’re welcomed to Android and prompted to
sign into your Google Account. See “Starting Android for the first time” on
page 28.
When you turn on the phone, you may be prompted to enter a personal
identification number (PIN) for your SIM card.
To unblock a SIM
If you enter the wrong PIN three times, the SIM card is blocked and you can’t use
your phone except to dial an emergency number. You must obtain a PIN
Unblocking Key (PUK) from your mobile carrier to unblock the SIM and set a new
PIN.
S Dial the following, replacing “PUK” with the PUK from your carrier and replacing
both instances of “PIN” with a 4- to 8-digit PIN of your choosing:
**05*PUK*PIN*PIN#
To turn off the phone
1 Press & hold the Power button until a menu opens.
2 Touch Power off in the menu.
3 Touch OK when asked to confirm that you want to turn off the phone.
For more about working with the touchscreen and menus, see “Android basics” on
page 27.
NOUG-2.1-update1-105 Nexus One User’s Guide
Page 26

Your phone and accessories 26
NOUG-2.1-update1-105 Nexus One User’s Guide
Page 27

27
Android basics
When you first turn on your phone, you have the opportunity to learn
more about it and to sign into your Google Account. Then it’s a good
idea to become familiar with the basics of your phone and how to use
it—the Home screen, the touchscreen and buttons, applications, search,
and so on.
In this section
“Starting Android for the first time” on page 28
“Getting to know the Home screen” on page 32
“Using the touchscreen” on page 36
“Using the phone’s buttons” on page 37
“Using the trackball” on page 38
“Using the onscreen keyboard” on page 39
“Entering text by speaking” on page 42
“Editing text” on page 44
“Opening and switching applications” on page 46
“Working with menus” on page 48
“Monitoring your phone’s status” on page 50
“Managing notifications” on page 52
“Searching your phone and the web” on page 54
“Locking your screen” on page 57
“Customizing the Home screen” on page 58
“Connecting quickly with your contacts” on page 61
“Optimizing battery life” on page 62
NOUG-2.1-update1-105 Nexus One User’s Guide
Page 28
Android basics 28
Touch the android to begin.
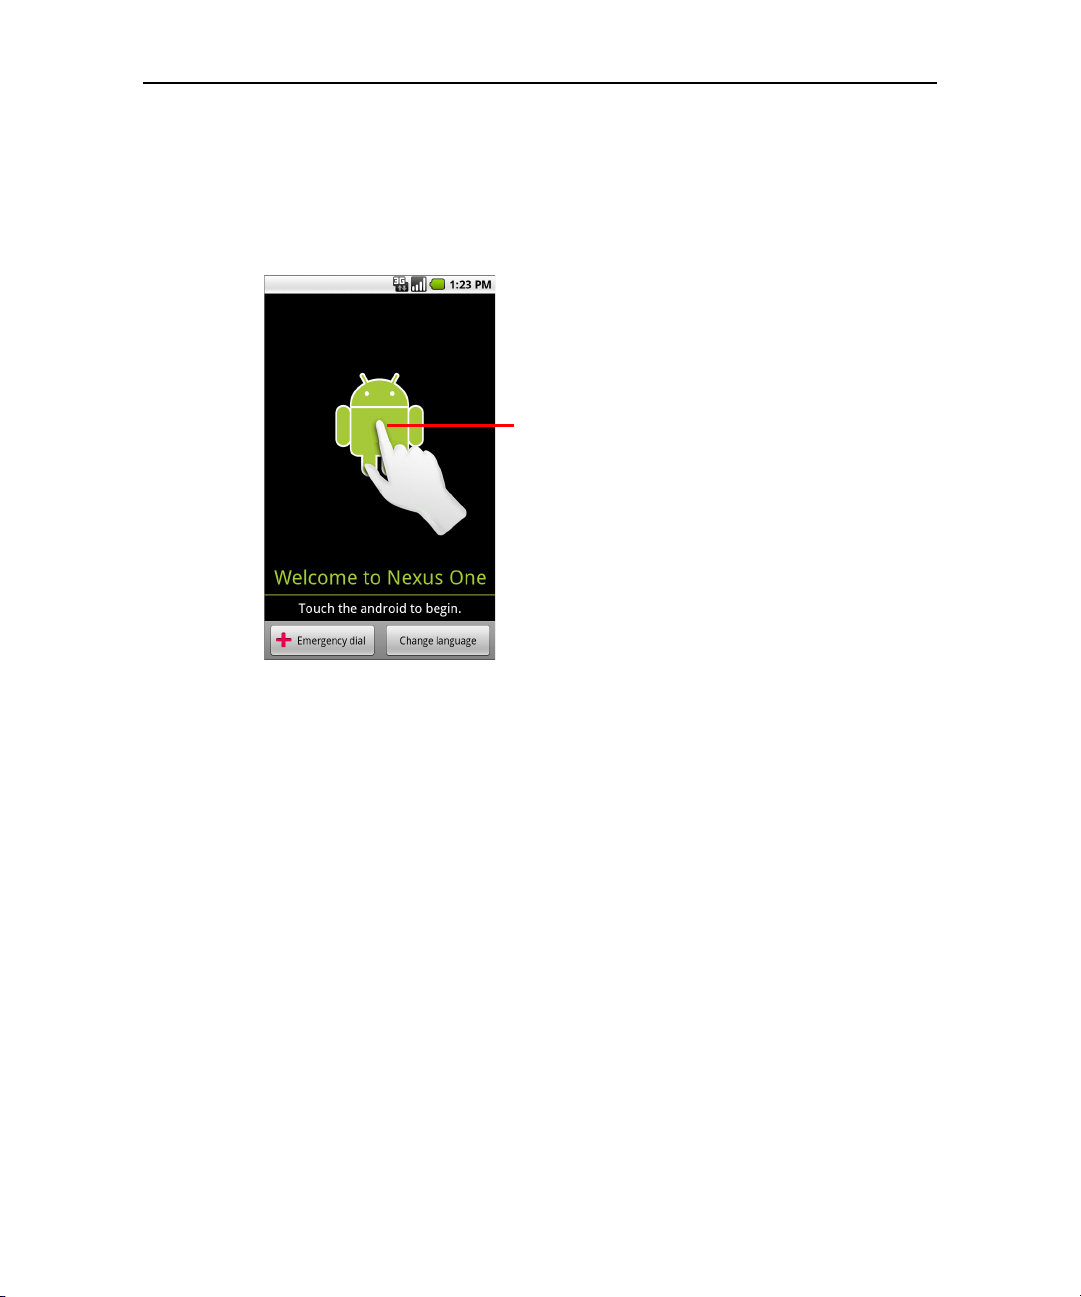
Starting Android for the first time
The first time you power on your phone (after setting it up, as described in “Your phone
and accessories” on page 15), you’re prompted to touch the Android logo to begin
using your phone.
Then you’re offered a chance to learn about your phone, you’re prompted to create or
to sign into your Google Account, and you’re asked to make some initial decisions
about how you want to use Android and Google features.
If you don’t have a SIM card
If your phone doesn’t have a SIM card installed, you can’t connect to mobile networks
for voice and data services, but you can connect to a Wi-Fi network to sign into your
Google Account and to use all the features of your phone, except voice calling.
If you start Android the first time without a SIM card, you’re asked if you want to touch
Connect to Wi-Fi to connect to a Wi-Fi network (instead of to a mobile network) to
set up your phone. To learn more, see “Connecting to Wi-Fi networks” on page 68.
NOUG-2.1-update1-105 Nexus One User’s Guide
Page 29

Android basics 29
Your Google Account
You must sign into a Google Account to use Gmail, Google Talk, Google Calendar, and
other Google Apps; to download applications from Android Market; to back up your
settings to Google servers; and to take advantage of other Google services on your
phone.
If you don’t have a Google Account, you’re prompted to create one.
If you have an enterprise Gmail account through your company or other organization,
your IT department may have special instructions on how to sign into that account.
Important Some applications, such as Calendar, work only with the first Google Account you add.
If you plan to use more than one Google Account with your phone, be sure to sign into
the one you want to use with such applications first.
When you sign in, your contacts, Gmail messages, Calendar events, and other
information from these applications and services on the web are synchronized with
your phone.
If you don’t sign into a Google Account during setup, you are prompted to sign in or to
create a Google Account the first time you start an application that requires one, such
as Gmail or Android Market.
Important If you want to restore your settings to this phone from another phone that was running
Android release 2.0 or later (see “Google services” on page 31), you must sign into your
Google Account now, during setup. If you wait until after setup is complete, your settings are not restored.
NOUG-2.1-update1-105 Nexus One User’s Guide
Page 30
Android basics 30
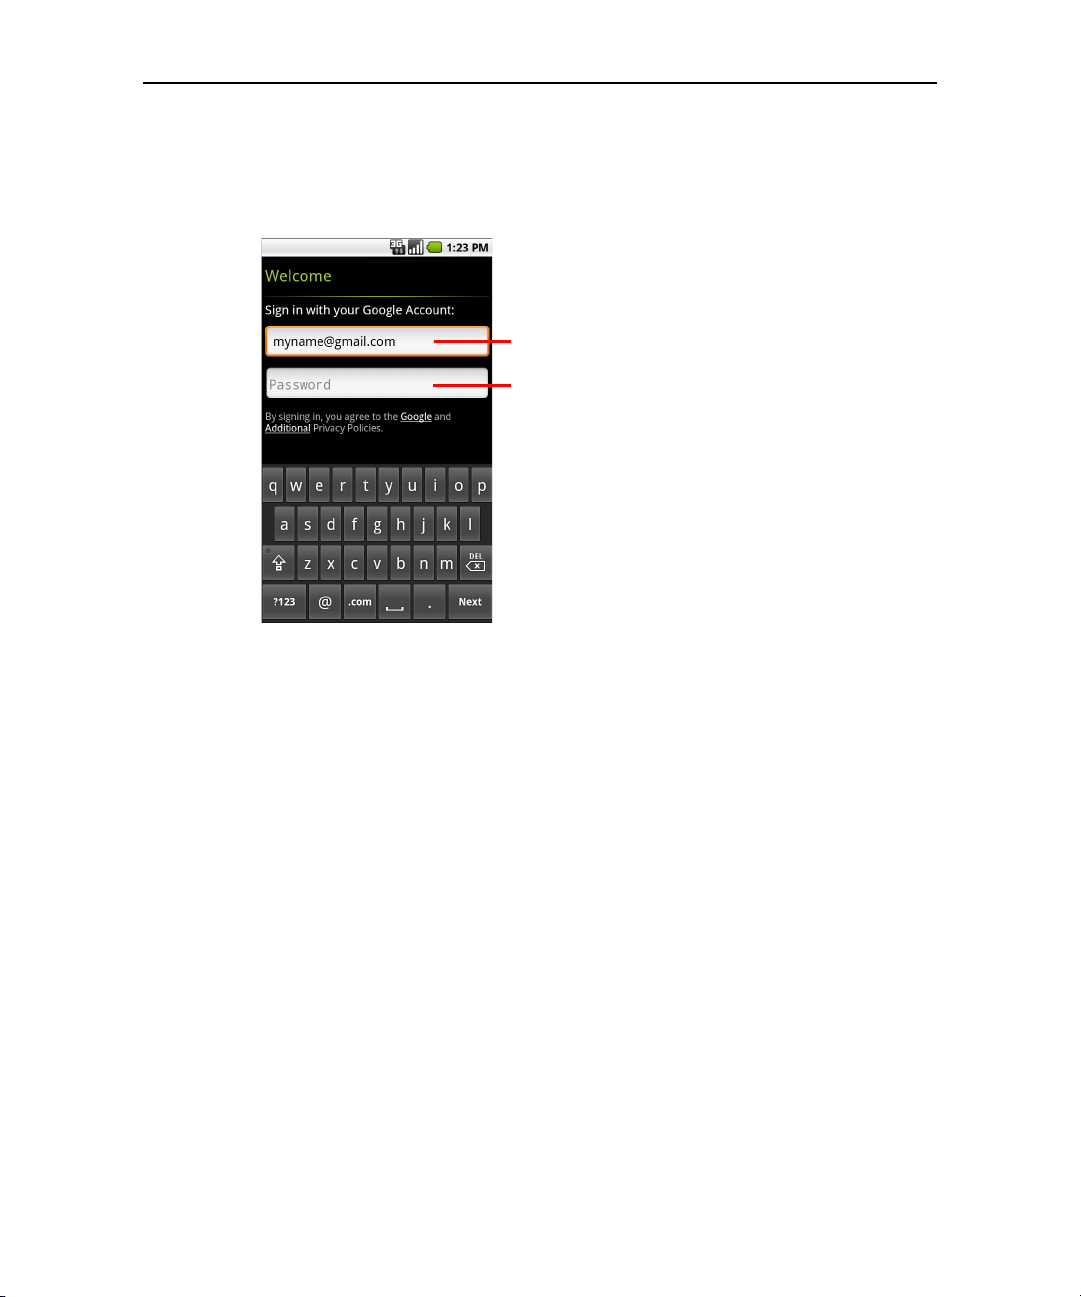
When you’re finished, touch Done on
the keyboard (or press the phone’s
Back button) to close the onscreen
keyboard, so you can touch the Sign In
button at the bottom of the screen.
Touch to open the onscreen keyboard, to
enter your Google Account username.
Touch (or touch Next on the keyboard)
to enter your password.
When you sign in, you’re prompted to enter your username and password, using the
onscreen keyboard. For information about navigating the touchscreen and entering
text, see “Using the touchscreen” on page 36 and “Using the onscreen keyboard” on
page 39.
If you have a Google Account but have forgotten your password, you must reset it
before you can sign in. Go to http://www.google.com, click Sign In, click “Can’t access
your account?” in the sign-in box, and then follow the instructions for resetting your
password.
Additional accounts
After setup, you can add Google, Microsoft Exchange ActiveSync, Facebook,
conventional email, and other kinds of accounts to your phone, and sync some or all of
their data, as described in “Accounts” on page 111. However, only the first Google
Account you sign into is backed up to Google servers, and some applications that only
work with a single account, such as Calendar, sync and display data only from the first
account that you sign into.
NOUG-2.1-update1-105 Nexus One User’s Guide
Page 31

Android basics 31
Google services
When you sign in, you’re asked whether you want to take advantage of the following
Google services.
Location You can choose whether to take advantage of Google’s location service,
which provides applications with your approximate location without using GPS, and
whether to use your location for Google search results and other Google services. For
information about changing these settings later, see “Location & security settings” on
page 316 and “Privacy settings” on page 321.
Settings backup You can choose to back up your settings, such as your
bookmarks and Wi-Fi passwords, to your Google Account, on Google servers. That
way, when you need to replace your phone (when you upgrade or replace a lost phone),
your settings are restored to your new phone when you first sign in. For information
about changing this setting later, see “Privacy settings” on page 321.
Date and time If you aren’t connected to a mobile network, you’re prompted to set
the date and time on your phone. See “Date & time settings” on page 328.
NOUG-2.1-update1-105 Nexus One User’s Guide
Page 32

Android basics 32
The Status bar shows the time, signal
strength, battery status, and other
information. It also displays notification
icons.
Widgets are applications that you can
use directly on the Home screen.
Touch an icon to open an application,
open a folder, and so on.
Touch the Launcher icon to open the
Launcher and view icons for all installed
applications.
Getting to know the Home screen
When you sign in, the Home screen opens.
The Home screen is your starting point to access all the features on your phone. It
displays application icons, widgets, shortcuts, and other features. You can customize
the Home screen with different wallpaper and display the items you want. See
“Customizing the Home screen” on page 58.
At the top of the screen, the Status bar displays the time, information about the status
of your phone, and icons for notifications that you’ve received. To learn more, see
“Monitoring your phone’s status” on page 50 and “Managing notifications” on
page 52.
Touch the Launcher icon at the bottom of the screen to view all installed applications.
See “Opening and switching applications” on page 46.
NOUG-2.1-update1-105 Nexus One User’s Guide
Page 33

Android basics 33
To wake up the phone
If you don’t use the phone for a while, the Home screen or other screen you are
viewing, is replaced with the lock screen and then the screen darkens, to conserve the
battery.
1 Press the Power button.
If you’ve locked your screen with a pattern, you must draw the unlock pattern to
unlock it. See “Locking your screen” on page 57.
If you haven’t locked your screen with a pattern, the lock screen appears.
2 Drag the lock icon to the right.
The last screen you were working on opens.
To return to the Home screen
S Press the Home button at any time, in any application.
NOUG-2.1-update1-105 Nexus One User’s Guide
Page 34

Android basics 34
To view other parts of the Home screen
S Slide your finger left or right across the Home screen.
The two left and two right extensions to the Home screen provide more space for
icons, widgets, shortcuts, and other items. For more on sliding, see “Using the
touchscreen” on page 36.
Small dots at the lower left and right of the screen indicate which screen you’re
viewing.
NOUG-2.1-update1-105 Nexus One User’s Guide
Page 35

Android basics 35
S Touch & hold the small dots on the lower left or right of the screen to view
thumbnails of the Home screen and its extensions, which you can touch to open.
NOUG-2.1-update1-105 Nexus One User’s Guide
Page 36

Android basics 36
Using the touchscreen
The main way to control Android features is by using your finger to manipulate icons,
buttons, menu items, the onscreen keyboard, and other items on the touchscreen. You
can also change the screen’s orientation.
Touch To act on items on the screen, such as application and settings icons, to type
letters and symbols using the onscreen keyboard, or to press onscreen buttons, you
simply touch them with your finger.
Touch & hold Touch & hold an item on the screen by touching it and not lifting
your finger until an action occurs. For example, to open a menu for customizing the
Home screen, you touch an empty area on the Home screen until the menu opens.
Drag Touch & hold an item for a moment and then, without lifting your finger, move
your finger on the screen until you reach the target position. You drag items on the
Home screen to reposition them, as described in “Customizing the Home screen” on
page 58, and you drag to open the Notifications panel, as described in “Managing
notifications” on page 52.
Swipe or slide To swipe or slide, you quickly move your finger across the surface
of the screen, without pausing when you first touch it (so you don’t drag an item
instead). For example, you slide the screen up or down to scroll a list, and in some
Calendar views you swipe quickly across the screen to change the range of time
visible.
Double-tap Tap quickly twice on a webpage, map, or other screen to zoom. For
example, you double-tap a section of a webpage in Browser to zoom that section to fit
the width of the screen. You can also double-tap to control the Camera zoom, in Maps,
and in other applications. Double-tapping after pinching to zoom in some applications,
such as Browser, reflows a column of text to fit the width of the screen.
Pinch In some applications (such as Maps, Browser, and Gallery), you can zoom in
and out by placing two fingers on the screen at once and pinching them together (to
zoom out) or spreading them apart (to zoom in).
Rotate the screen On most screens, the orientation of the screen rotates with the
phone as you turn it from upright to its left side and back again. You can turn this
feature on and off, as described in “Sound & display settings” on page 314.
NOUG-2.1-update1-105 Nexus One User’s Guide
Page 37

Android basics 37
Using the phone’s buttons
The phone’s physical buttons and soft buttons offer a variety of functions and
shortcuts. See “Getting to know your phone” on page 17 for a diagram showing the
location of the buttons on the phone.
Button Press Press & hold
Back Opens the previous screen you were
working in. If the onscreen keyboard is
open, closes the keyboard.
Menu Opens a menu with items that affect
the current screen or application.
Home Opens the Home screen. If you’re view-
ing the left or right extended Home
screen, opens the central Home screen.
Search In some applications, opens Quick
Search Box for searching the phone
and the web. In other applications,
opens a search box for just that application. Press twice to open Quick Search
Box from any application.
Power
(top left)
Volume Up /
Down
(left side)
Turns off the screen. Opens a menu with options for
When a call is in progress, increases or
decreases the call volume. When the
phone is ringing, silences the ringer. On
the Home screen when no call is in
progress, increases or decreases the
ringtone volume, or sets the phone to
be silent or to vibrate instead of ringing.
In other applications, controls the volume of music, spoken directions, and
other audio.
Opens the most recently used
applications screen.
Opens Google search by voice.
Airplane mode, for Silent mode,
and for powering off the phone.
Quickly increases the ringtone
volume to maximum or minimum.
NOUG-2.1-update1-105 Nexus One User’s Guide
Page 38

Android basics 38
Items that you select with the
Trackball are highlighted in orange.
Using the trackball
Some actions are easier using the Trackball than your finger, such as:
G Opening an event in a crowded calendar
G Selecting a link or form field on a web page
G Selecting text to edit
To use the trackball
S Roll the trackball to select items on the screen.
The selected item is highlighted in orange.
S Pressing the trackball is equivalent to touching the selected item with your finger.
S Pressing & holding the trackball is equivalent to touching & holding the selected
item with your finger.
NOUG-2.1-update1-105 Nexus One User’s Guide
Page 39

Android basics 39
Touch once to capitalize the next letter
you type. Touch & hold for all caps.
Touch a suggestion to enter it.
Press space or a punctuation mark to
enter the red suggestion.
Using the onscreen keyboard
You enter text using the onscreen keyboard. Some applications open the keyboard
automatically. In others, you touch a text field where you want to enter text to open the
keyboard.
You can also enter text by speaking instead of by typing. See “Entering text by
speaking” on page 42.
NOUG-2.1-update1-105 Nexus One User’s Guide
Page 40

Android basics 40
To enter text
1 Touch a text field where you want to type
The onscreen keyboard opens.
For most text fields, the keyboard starts with letter keys. Text fields for phone
numbers and other special purposes may display number and symbol keys or
custom keyboards, to make it easier to enter the required information.
You can also use the Trackball to select a text field and then press the Trackball
to open the onscreen keyboard.
2 Touch the keys on the keyboard to type.
The characters you’ve entered appear in a strip above the keyboard, with
suggestions for the word you are typing to the right. Press the left or right arrow in
the strip to view more suggestions.
3 Press space or a punctuation mark to enter the red suggested word.
OR
Touch another suggested word to enter it.
OR
Touch & hold the leftmost word to add it to the dictionary.
You can view, edit, or delete the words that you add to the dictionary. See
“Language & keyboard settings” on page 324.
4 Use the Delete key to erase characters to the left of the cursor.
5 When you’re finished typing, press Back to close the keyboard.
To enter numbers, symbols, and other characters
S Press the Symbols key to switch to the numbers and symbols keyboard. Press the
Alt key to view additional symbols; press it again to switch back.
S Touch & hold a vowel or the C, N, or S key to open a small window where you can
touch an accented vowel or other alternate letter.
S Touch & hold the Period key ( . ) to open a small window with a set of common
symbol keys.
S Touch & hold a number or symbol key to open a window of additional symbols.
When you touch a key, a larger version displays briefly over the keyboard. Keys with
alternate characters display an ellipsis ( ... ) below the character.
NOUG-2.1-update1-105 Nexus One User’s Guide
Page 41

Android basics 41
To change the keyboard orientation
S Turn the phone sideways or upright.
The keyboard is redrawn to take best advantage of the new phone orientation.
Many people find the larger horizontal onscreen keyboard easier to use.
You can control whether the screen changes orientation automatically when you
turn the phone. See “Language & keyboard settings” on page 324.
NOUG-2.1-update1-105 Nexus One User’s Guide
Page 42

Android basics 42
Entering text by speaking
You can use voice input to enter text by speaking. Voice input is an experimental
feature that uses Google’s speech-recognition service, so you must have a data
connection to use it.
To turn on voice input
If the onscreen keyboard does not display a Microphone key , voice input is not
turned on.
1 Press Home , press Menu , then touch Settings > Language &
keyboard > Android keyboard.
You can also touch & hold the Symbol key on the onscreen keyboard; in the
dialog that opens, touch Android keyboard settings.
2 Check Voice input.
3 Touch OK in the dialog that opens.
NOUG-2.1-update1-105 Nexus One User’s Guide
Page 43

Android basics 43
Text that you enter by speaking is
underlined. You can delete it, or you can
continue entering text to keep it.
Touch to enter text by speaking.
To enter text by speaking
You can enter text by speaking, anywhere that you can enter text with the onscreen
keyboard.
1 Touch a text field.
2 Touch the Microphone key on the keyboard.
Or just swipe your finger across the keyboard from left to right.
3 When prompted to “Speak now,” speak what you want to enter.
Say “comma,” “period,” “question mark,” “exclamation mark,” or “exclamation
point” to enter punctuation.
When you pause, what you spoke is transcribed by the speech-recognition service
and entered in the text field, underlined. You can press the Delete key to erase
the underlined text. If you start typing or entering more text by speaking, the
underline disappears.
You can edit the text that you enter by typing or speaking. See “Editing text” on
page 44.
NOUG-2.1-update1-105 Nexus One User’s Guide
Page 44

Android basics 44
Editing text
You can edit the text you enter in text fields and use menu commands to cut, copy, and
paste text, within or across applications. Some applications don’t support editing
some or all of the text they display.
To edit text
1 Touch the text field that contains the text to edit.
2 Use the Trackball to move the cursor to the location where you want to add or
delete text.
The cursor is a vertical bar that indicates where text you type or paste will be
inserted.
3 Type, cut, paste, or delete text.
4 Press the Back button when you’re finished typing, to close the keyboard.
You may also have a Next or Done button on the keyboard, depending on the
application and text field you’re typing in.
To select text
You select text that you want to cut or copy. Selected text is highlighted in orange.
1 Touch the text field or other portion of the screen that contains the text to select.
2 Use the trackball to move the cursor to the beginning or end of the text to select.
You can also touch in the text field to move the cursor in text.
3 Press & hold the trackball, or touch & hold the text field.
A menu opens with options for cutting, copying, and performing other tasks with
the text field.
4 Touch Select text.
Or touch Select all to select all the text in the text field.
5 Roll the trackball to select the text you want.
6 Press & hold the trackball again (or touch & hold the text field) to open a menu
you can use to cut or copy your selection, select all the text, or stop selecting text.
NOUG-2.1-update1-105 Nexus One User’s Guide
Page 45

Android basics 45
To cut or copy text
1 Select the text to cut or copy.
2 Press & hold the Trackball, or touch & hold the selected text.
3 Touch Cut or Copy in the menu that opens.
If you touch Cut, the selected text is removed from the text field. In either case, the
text is stored in a temporary area on the phone, so that you can paste it into
another text field.
To paste text
1 Copy the text to paste.
2 Touch the text field where you want to paste the text.
You can paste text that you copied from one application into a text field in any
application.
3 Use the trackball to move the cursor to the location where you want to paste the
text.
4 Press & hold the Trackball, or touch & hold the text field.
5 Touch Paste in the menu that opens.
The text is inserted at the cursor. The text that you pasted also remains in a
temporary area on the phone, so you can paste that same text in another location.
NOUG-2.1-update1-105 Nexus One User’s Guide
Page 46

Android basics 46
Slide the Launcher up or down to bring
more icons into view.
Touch to close the
Launcher.
Touch an application to open it
Opening and switching applications
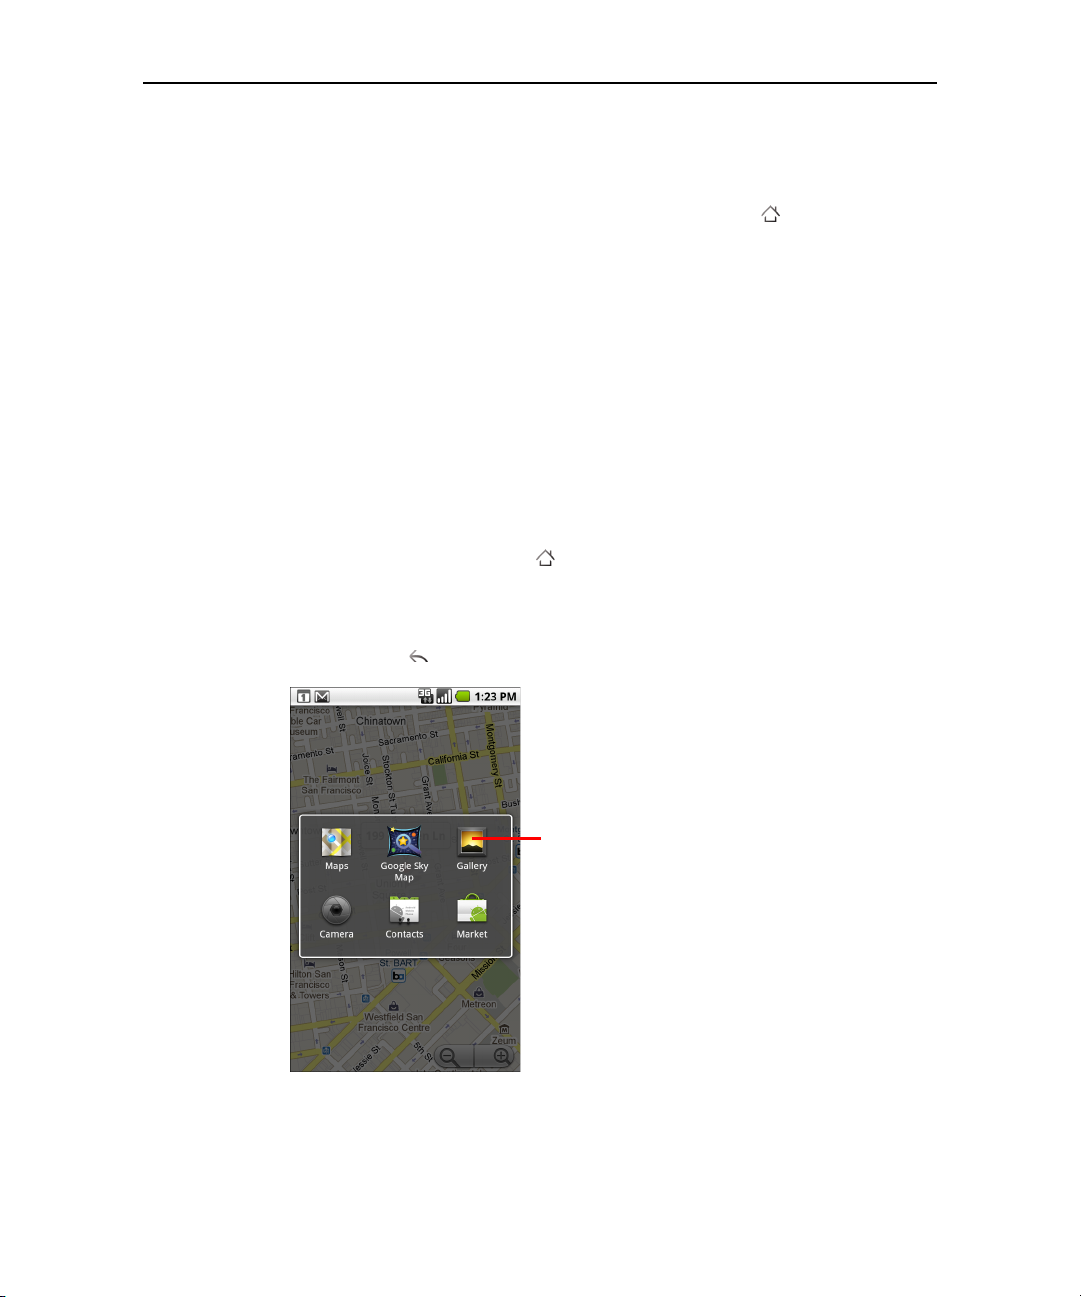
The Launcher, which you open from the Home screen, holds icons for all of the
applications on your phone, including any applications that you downloaded and
installed from Android Market or other sources.
When you open an application, the other applications you’ve been using don’t stop;
they keep on running: playing music, rendering webpages, and so on. You can quickly
switch among your applications, to work with several at once. The Android operating
system and applications work together to ensure that applications you aren’t using
don’t consume resources unnecessarily, stopping and starting them as needed. For
this reason, there’s no need or facility for quitting applications.
See “Market” on page 297 to learn how to discover and install additional applications
and games on your phone.
To open and close the Launcher
S On the Home screen, touch the Launcher icon to open it.
If you have more applications than can fit on the Launcher in one view, you can
slide the Launcher up or down to view more.
NOUG-2.1-update1-105 Nexus One User’s Guide
Page 47
Android basics 47
Touch an icon to open an application
you’ve used recently.
You can add an application icon to the Home screen by touching & holding it on
the Launcher until it vibrates and then dragging it to a location on the Home
screen.
S Touch the Home icon on the Launcher or the Home button to close the
Launcher.
The Launcher closes automatically if you touch an icon to open its application or if
you move an icon from the Launcher to the Home screen.
To open an application
S Touch an application’s icon on the Home screen.
OR
S Touch an application's icon on the Launcher.
To switch to a recently used application
1 Press & hold the Home button .
A small window opens, with icons of applications that you’ve used recently.
2 Touch an icon to open its application.
Or press Back to return to the current application.
NOUG-2.1-update1-105 Nexus One User’s Guide
Page 48

Android basics 48
Touch to open more menu items.
Options menus contain items that apply
to the current screen or to the
application as a whole.
Working with menus
There are two kinds of Android menus: options menus and context menus.
Options menus
Options menus contain tools that apply to the activities of the current screen or
application, not to any specific item on the screen. You open options menus by
pressing the Menu button . Not all screens have options menus; if you press
Menu on a screen that has no options menu, nothing happens.
Some screens have more options menu items than can fit in the main menu; you
touch More to open a menu of additional items.
NOUG-2.1-update1-105 Nexus One User’s Guide
Page 49

Android basics 49
When you touch & hold some items
on a screen, a context menu opens.
Context menus
Context menus contain tools that apply to a specific item on the screen. You open a
context menu by touching & holding an item on the screen. Not all items have context
menus. If you touch & hold an item that has no context menu, nothing happens. You
can also open a context menu for an item by selecting it with the trackball and then
pressing the trackball.
NOUG-2.1-update1-105 Nexus One User’s Guide
Page 50

Android basics 50
Notification icons
Status icons
Monitoring your phone’s status
The Status bar appears at the top of every screen. It displays icons indicating that
you’ve received notifications (on the left) and icons indicating the phone’s status (on
the right), along with the current time.
If you have more notifications than can fit in the status bar, a plus icon prompts
you to open the Notifications panel to view them all. See “Managing notifications” on
page 52.
Status icons
The following icons indicate the status of your phone.
GPRS connected Roaming
GPRS in use No signal
EDGE connected No SIM card installed
EDGE in use Vibrate mode
3G connected Ringer is silenced
3G in use Phone microphone is mute
Connected to a Wi-Fi network Battery is very low
Bluetooth is on Battery is low
Connected to a Bluetooth device Battery is partially drained
Airplane mode Battery is full
Alarm is set Battery is charging
Signal strength GPS is on
Speakerphone is on Receiving location data from GPS
NOUG-2.1-update1-105 Nexus One User’s Guide
Page 51

Android basics 51
Notification icons
The following icons indicate that you’ve received a notification. See “Managing
notifications” on page 52 for information about responding to these notifications. In
addition these icons, applications you install on your phone may use their own
notification icons.
New Gmail message 3 more notifications not displayed
New text or multimedia message Call in progress
Problem with text or multimedia
message delivery
New Google Talk message Missed call
New voicemail Call on hold
Upcoming event Call forwarding is on
Data is syncing Uploading data
Problem with sign-in or sync Downloading data
microSD card is full Download finished
An open Wi-Fi network is available Connected to VPN
Phone is connected via USB cable Disconnected from VPN
Song is playing System update available
Call in progress using Bluetooth headset
NOUG-2.1-update1-105 Nexus One User’s Guide
Page 52

Android basics 52
Managing notifications
Notification icons report the arrival of new messages, calendar events, and alarms, as
well as ongoing events, such as when call forwarding is on or the current call status.
When you receive a notification, its icon appears in the Status bar, along with a
summary that appears only briefly. For a table of notification icons, see “Notification
icons” on page 51. The trackball light also pulses once or repeatedly when you receive
a new notification. See “Sound & display settings” on page 314.
You can open the Notifications panel to view a list of all your notifications. Depending
on your settings and the model of your phone, you may also hear a notification sound,
the phone may vibrate, and LEDs may blink.
Adjusting sound volume and other general notifications settings is described in
“Sound & display settings” on page 314.
Applications whose activities produce notifications, such as Gmail and Google Talk,
have their own settings, which you can use to configure whether and how they send
notifications. See the sections on those applications for details.
To open the Notifications panel
S Drag the Status bar down.
On the Home screen, you can also press Menu and touch Notifications.
The Notifications panel displays your wireless provider and a scrolling list of your
current notifications. Notifications about ongoing activities are listed first, followed
by Notifications about events, such as new mail notifications or Calendar
reminders.
NOUG-2.1-update1-105 Nexus One User’s Guide
Page 53

Android basics 53
Touch a notification to open it in its
application.
To respond to a notification
1 Open the Notifications panel.
Your current notifications are listed in the panel, each with a brief description.
2 Touch a notification to respond to it.
The Notification panel closes. What happens next depends on the notification. For
example, new voicemail notifications dial your voicemail box, and network
disconnect notifications open the list of configured networks so you can
reconnect.
To clear all notifications
1 Open the Notifications panel.
2 Touch Clear at the top right of the panel.
All event-based notifications are cleared; ongoing notifications remain in the list.
To close the Notifications panel
S Drag the tab at the bottom of the Notifications panel to the top of the screen. Or
just press the Back button.
The panel also closes when you touch a notification to respond to it.
NOUG-2.1-update1-105 Nexus One User’s Guide
Page 54

Android basics 54
Touch to search by voice.
Shortcuts to previously chosen search
results.
Searching your phone and the web
You can search for information on your phone and on the web by typing in Quick
Search Box for Android, or by speaking, with Google search by voice.
Some applications, such as Contacts, Gmail, and Maps, have their own search
services, which you can use to search within those applications.
You can also dial a phone number with the Voice Search application, as described in
“Dialing by voice” on page 88.
To search your phone and the web by entering text
1 Press the Search button .
When you press Search on the Home screen or in many other applications,
Quick Search Box opens.
In some applications, such as Gmail and Contacts, the application’s own search
box opens when you press the Search button . See the sections about those
applications for information about searching in them. To search your phone and
the web instead of that application, press Search again to switch to Quick
Search Box. That is, no matter what application you’re working in, pressing
Search twice opens Quick Search Box.
You can also search the web with the Search widget on the Home screen, if you
have added it there. See “Customizing the Home screen” on page 58.
2 Enter the text you’re searching for in Quick Search Box.
NOUG-2.1-update1-105 Nexus One User’s Guide
Page 55

Android basics 55
Tou ch to s ear ch the we b.
As you type, search results from your
phone, previously chosen search results,
and web search suggestions appear.
Touch a result to open it.
As you type, matching items on your phone and suggestions from Google web
search are added to the list of previously chosen search results.
You can use the Search preferences to configure some aspects of Google web
search (for example, whether it makes suggestions below Quick Search Box as
you type), and what phone features you want to include in searches. You can also
clear the list of recently chosen searches. See “Search settings” on page 323.
3 If what you’re searching for is in the list of suggestions, phone search results, or
previously chosen search results, touch it in the list.
The item opens in the appropriate application, such as Contacts or the Browser.
4 If what you’re searching for is not in the list, touch the magnifying glass icon in
Quick Search Box or on the keyboard to search the web.
The Browser opens, displaying results of a Google search on the web. For more
information, see “Browser” on page 205.
NOUG-2.1-update1-105 Nexus One User’s Guide
Page 56

Android basics 56
To search the web by speaking
S Press & hold the Search button
OR
S Touch the Microphone icon in Quick Search Box.
If you touch the Microphone icon in an application’s search box, you search the
application by voice, not the web.
A dialog opens, prompting you to speak the words that you want to search for.
When you’re finished speaking, Google search by voice analyzes your speech and
displays the results of your search.
If Google search by voice misunderstood you, Quick Search Box presents a list of
similar-sounding search terms.
You can also preface your search by speaking special words to take the following
actions:
G Say “Call,” followed by a name from your contacts, followed by the kind of
phone number (“mobile,” “work,” and so on)—for example, “Call Mike home.” If
there is a single match, the number is dialed automatically. See “Dialing by
voice” on page 88.
G Say “Directions to,” followed by an address, name, business name, type of busi-
ness, or other destination, to get directions to that location from Google Maps.
G Say “Navigate to,” followed by an address, name, business name, type of busi-
ness, or other destination to get spoken, turn-by-turn directions to that destination.
G Say “Map of,” followed by an address, name, business name, type of business,
or other location, to view that location on Google Maps.
NOUG-2.1-update1-105 Nexus One User’s Guide
Page 57

Android basics 57
Draw your unlock pattern.
Touch Continue to draw your pattern
again to confirm it.
Locking your screen
You can lock your screen so that only you can unlock it to make calls, access your
data, buy applications, and so on. See “Location & security settings” on page 316 for
other ways to protect your phone and privacy.
To lock your screen
1 On the Home screen, press Menu and touch Location & security.
2 Scroll to the Screen unlock pattern section and touch Set unlock pattern.
The first time you do this, a short tutorial about creating an unlock pattern
appears. You can press Menu and touch Help at any time for a refresher.
Then you’re prompted to draw and redraw your own pattern.
The next time you turn on your phone or wake up the screen, you’re prompted to
draw your unlock pattern to unlock the screen.
NOUG-2.1-update1-105 Nexus One User’s Guide
Page 58

Android basics 58
Customizing the Home screen
You can add application icons, shortcuts, widgets, and other items to any part of the
Home screen. You can also change the wallpaper.
For an introduction to the Home screen, see “Getting to know the Home screen” on
page 32.
To add an item to the Home screen
1 Open the Home screen pane where you want to add the item.
For an introduction to working with the Home screen, see “Getting to know the
Home screen” on page 32.
2 Press Menu and touch Add.
Or just touch & hold an empty location on the Home screen.
If there are no empty spots on the Home screen, Add is dimmed; you must delete
or move an item before you can add another item, or switch to another pane of the
Home screen.
3 In the menu that opens, touch the type of item to add.
You can add the following types of items to the Home screen.
Shortcuts Add shortcuts to applications, a bookmarked webpage, a favorite
contact, a destination in Maps, a Gmail label, a music playlist, and many other items.
The shortcuts available depend on the applications you have installed.
Widgets Add any of a variety of miniature applications (widgets) to your Home
screen, including a clock, a music player, a picture frame, the Google search bar, a
power manager, a calendar that shows upcoming appointments, and a News &
Weather widget. You can also download widgets from Android Market.
Folders Add a folder where you can organize Home screen items, or folders that
contain all your contacts, contacts with phone numbers, or starred contacts. Your
folders’ contents are kept up to date automatically.
NOUG-2.1-update1-105 Nexus One User’s Guide
Page 59

Android basics 59
To move an item on the Home screen
1 Touch & hold the item you want to move, until it vibrates. Don’t lift your finger.
2 Drag the item to a new location on the screen.
Pause at the left or right edge of the screen to drag the item onto another Home
screen pane.
3 When the item is where you want it, lift your finger.
To remove an item from the Home screen
1 Touch & hold the item you want to remove, until it vibrates. Don’t lift your finger.
The Launcher icon changes to a trash can.
2 Drag the item to the Trash Can icon.
3 When the icon turns red, lift your finger.
To change the Home screen wallpaper
1 Press Menu and touch Wallpaper.
You can also touch & hold an empty area of the home screen and in the menu that
opens, touch Wallpapers.
2 Touch Live wallpaper, Photographs, or Wallpaper gallery.
Touch Live wallpaper to open a scrolling list of animated wallpapers installed on
your phone. Some live wallpapers change according to the time of day, in response
to touching the screen, tell the time, or offer other information. Some live
wallpapers have a Settings button.
Touch Photographs to use a picture that you have captured using the camera or
copied to your phone as a wallpaper. You can crop the picture before setting it as a
wallpaper. Working with pictures is described in “Gallery” on page 249.
Touch Wallpaper gallery to open a screen where you can sample the wallpaper
images that come with the phone. Slide the miniature images left and right to view
the samples. Touch a sample to view a larger version.
3 Touch Save or Set wallpaper.
NOUG-2.1-update1-105 Nexus One User’s Guide
Page 60

Android basics 60
To rename a folder
1 Touch the folder to open it.
2 Touch & hold the folder window’s title bar.
3 Enter a new name in the dialog that appears.
4 Touch OK.
NOUG-2.1-update1-105 Nexus One User’s Guide
Page 61

Android basics 61
Touch an icon to start communicating
with the contact in that application.
Connecting quickly with your contacts
As you build up your list of contacts on your phone, you can use Quick Contact for
Android in many applications to quickly start a chat, email, or text message, to place a
call, or to locate your contacts. Quick Contact for Android is a special icon that you
can touch to open a bubble with options for quickly initiating a connection to that
contact.
S Identify a Quick Contact icon by its frame.
Contacts that you can access with Quick Contact are displayed differently in
different applications, but usually with a picture frame that looks like this:
S Touch a Quick Contact icon to open a bubble with icons for all the ways you can
communicate with the contact.
If there are more icons than can fit in the bubble, drag them left and right to view
them all.
S Touch an icon to open its application, where you can start communicating with
your contact right away.
You can also touch an icon to edit the contact’s information in Contacts, to view
the contact’s address in Google Maps, and so on, depending on which applications
and accounts are configured on your phone.
You can add a shortcut for a contact to your Home screen, which you can then touch
to open Quick Contact for Android for that contact. For more information about
adding shortcuts to the Home screen, see “Customizing the Home screen” on
page 58.
NOUG-2.1-update1-105 Nexus One User’s Guide
Page 62

Android basics 62
Optimizing battery life
You can extend your battery’s life between charges by turning off features that you
don’t need. You can also monitor how applications and system resources consume
battery power.
To extend the life of your battery
S Turn off radios that you aren’t using.
If you aren’t using Wi-Fi, Bluetooth, or GPS, use the Settings application to turn
them off. See “Wireless & networks” on page 309 and “Location & security
settings” on page 316. (The GPS receiver is only turned on when you’re using an
application that makes use of it.)
S Turn down screen brightness and set a shorter screen timeout.
See “Sound & display settings screen” on page 314.
S If you don’t need them, turn off automatic syncing for Gmail, Calendar, Contacts,
and other applications.
See “Configuring account sync and display options” on page 115.
S Use the Power Control widget to check and control the status of radios, the display
brightness, and syncing.
Adding widgets is described in “Customizing the Home screen” on page 58.
To check the battery charge level
S On the Home screen, press Menu and touch Settings > About phone >
Status.
The battery status (charging, discharging) and level (as a percentage of fully
charged) are displayed at the top of the screen.
NOUG-2.1-update1-105 Nexus One User’s Guide
Page 63

Android basics 63
To monitor and control what uses the battery
The Battery Use screen shows which applications consume the most battery power.
You can also use it to turn off applications that you’ve downloaded, if they are
consuming too much power.
S On the Home screen, press Menu and touch Settings > About phone >
Battery use.
The Battery Use screen lists the applications that have been using the battery,
from greatest to least battery use.
The top of the screen displays the time since you were last connected to a charger
or, if you’re currently connected to one, how long you were running on battery
power before you connected to a charger.
Then each application or service that used battery power during that time is
displayed, in order of the amount of power they used.
S Touch an application in the Battery Use screen to learn details about its power
consumption.
Different applications offer different kinds of information. Some applications
include buttons that open screens with settings to adjust power use.
NOUG-2.1-update1-105 Nexus One User’s Guide
Page 64

Android basics 64
NOUG-2.1-update1-105 Nexus One User’s Guide
Page 65

65
Connecting to networks and
devices
Your phone can connect to a variety of networks and devices, including
mobile networks for voice and data transmission, Wi-Fi data networks,
and Bluetooth devices, such as headsets. You can also connect your
phone to a computer, to transfer files from your phone’s microSD card.
In this section
“Connecting to mobile networks” on page 66
“Connecting to Wi-Fi networks” on page 68
“Connecting to Bluetooth devices” on page 71
“Connecting to a computer via USB” on page 74
“Connecting to virtual private networks” on page 76
“Working with secure certificates” on page 78
NOUG-2.1-update1-105 Nexus One User’s Guide
Page 66

Connecting to networks and devices 66
Connecting to mobile networks
When you assemble your phone with a SIM card from your wireless service provider
(see “Installing the battery, SIM, and microSD card” on page 18), your phone is
configured to use your provider’s mobile networks for voice calls and for transmitting
data.
Your phone is configured to work with many mobile carriers’ networks. If your phone
does not connect to a network when you insert a SIM card and turn it on, contact your
carrier to obtain the details of its access point name. See “To edit or create a new
access point” on page 71.
Different locations may have different mobile networks available. Initially, your phone
is configured to use the fastest mobile network available for data. But you can
configure your phone to use only a slower 2G network for data, to extend the life of
your battery between charges. You can also configure your phone to access a
different set of networks entirely, or to behave in special ways when roaming.
The icons in the Status bar indicate which kind of data network you’re connected to
and the voice and data network signal strength.
Connected to the fastest 3G networks (UMTS or HSDPA)
Connected to the second-fastest network (EDGE)
Connected to a 2G network (GPRS)
The more bars are lit, the stronger the wireless signal
Connected to another wireless service provider’s network (roaming)
When you’re connected to slower networks, you may want to postpone using your
phone for data-intensive tasks until you are connected to a faster network again, or
find a Wi-Fi network to connect to. See “Connecting to Wi-Fi networks” on page 68.
To determine what network you’re using
1 Press Home , press Menu , and touch Settings to open the Settings
application.
2 Touch Wireless & networks > Mobile networks > Access Point Names.
The name of the wireless service provider you’re currently registered with is
selected in the list.
NOUG-2.1-update1-105 Nexus One User’s Guide
Page 67

Connecting to networks and devices 67
To disable data when roaming
You can prevent your phone from transmitting data over other carriers’ mobile
networks when you leave an area that is covered by your carrier’s networks. This is
useful for controlling expenses if your cell plan doesn’t include data roaming.
1 Press Home , press Menu , and touch Settings, to open the Settings
application.
2 Touch Wireless & networks > Mobile networks and uncheck Data
roaming.
With Data roaming unchecked, you can still transmit data with a Wi-Fi
connection.See “Connecting to Wi-Fi networks” on page 68.
To limit your data connection to 2G networks
You can extend your battery life by limiting your data connections to 2G networks
(GPRS or EDGE). When you are connected to a 2G network, you may want to
postpone activities that transmit a lot of data, such as sending, uploading, or
downloading pictures or video, until you are connected to a faster mobile or other
wireless network.
1 Press Home , press Menu , and touch Settings to open the Settings
application.
2 Touch Wireless & networks > Mobile networks and check Use only 2G
networks.
To edit or create a new access point
If you and your wireless service provider determine that you need to change the
settings of your current access point name (APN) or to create a new one, you must
obtain the APN and detailed settings from your provider.
1 Press Home , press Menu , and touch Settings to open the Settings
application.
2 Touch Wireless & networks > Mobile networks > Access Point Names.
3 Touch an existing APN to edit it. Or press Menu and touch New APN.
Enter the APN settings that you obtained from your wireless service provider by
touching each setting that you need to edit.
4 When you’re finished, press Menu and touch Save.
5 If you created a new APN, touch it in the APNs screen to start using it.
NOUG-2.1-update1-105 Nexus One User’s Guide
Page 68

Connecting to networks and devices 68
Connecting to Wi-Fi networks
Wi-Fi is a wireless networking technology that can provide Internet access at
distances of up to 100 meters, depending on the Wi-Fi router and your surroundings.
To use Wi-Fi on your phone, you access a wireless access point, or “hotspot.” Some
access points are open and you can simply connect to them. Others are hidden or
implement other security features, so you must configure your phone so it can
connect to them.
There are numerous systems for securing Wi-Fi connections, including some that rely
on secure certificates or other schemes to ensure that only authorized users can
connect. For information about installing secure certificates, see “Working with secure
certificates” on page 78.
Turn off Wi-Fi when you’re not using it, to extend the life of your battery.
The Status bar displays icons that indicate Wi-Fi status.
Connected to a Wi-Fi network (waves indicate connection strength)
Notification that an open Wi-Fi network is in range
When you connect to a Wi-Fi network, the phone obtains a network address and other
information it needs from the network, using the DHCP protocol. To configure the
phone with a fixed IP address and other advanced settings, press Menu and touch
Advanced. See “Advanced Wi-Fi settings screen” on page 310.
To turn Wi-Fi on and connect to a Wi-Fi network
If you’re adding a Wi-Fi network when first setting up your phone, Wi-Fi is turned on
automatically, so you can skip to step 4.
1 Press Home , press Menu , and touch Settings.
2 Touch Wireless & networks > Wi-Fi settings.
NOUG-2.1-update1-105 Nexus One User’s Guide
Page 69

Connecting to networks and devices 69
3 Check Wi-Fi to turn it on.
The phone scans for available Wi-Fi networks and displays the names of those it
finds. Secured networks are indicated with a Lock icon.
If the phone finds a network that you connected to previously, it connects to it.
4 Touch a network to connect to it.
If the network is open, you are prompted to confirm that you want to connect to
that network by touching Connect.
If the network is secured, you’re prompted to enter a password or other
credentials. (Ask your network administrator for details.)
When you’re connected to a network, you can touch its name in the Wi-Fi settings
screen for details about the speed, security, address, and related settings.
To receive notifications when open networks are in range
By default, when Wi-Fi is on, you receive notifications in the Status bar when your
phone detects an open Wi-Fi network.
1 Turn on Wi-Fi, if it’s not already on.
2 In the Wi-Fi settings screen, check Network notification.
You can uncheck this option to stop receiving notifications.
To add a Wi-Fi network
You can add a Wi-Fi network so the phone will remember it, along with any security
credentials, and connect to it automatically when it is in range. You must also add a
Wi-Fi network to connect to it, if it does not broadcast its name (SSID), or to add a WiFi network when you are out of range of it.
To join a secured network, you need to contact the network’s administrator to learn
what security scheme is deployed on it and to obtain the password or other required
security credentials. For more information about installing secure certificates, see
“Working with secure certificates” on page 78.
1 Turn on Wi-Fi, if it’s not already on.
If you’re adding a Wi-Fi network when first setting up your phone, Wi-Fi is turned
on automatically.
2 In the Wi-Fi settings screen, touch Add Wi-Fi network (at the bottom of the list
of discovered networks).
NOUG-2.1-update1-105 Nexus One User’s Guide
Page 70

Connecting to networks and devices 70
3 Enter the SSID (name) of the network. If the network is secured, touch the
Security menu and then touch the type of security deployed on the network.
4 Enter any required security credentials.
5 Touch Save.
The phone connects to the wireless network. Any credentials that you entered are
saved, so you are connected automatically the next time you come within range of
this network.
To forget a Wi-Fi network
You can make the phone forget about the details of a Wi-Fi network that you added—
for example, if you don’t want the phone to connect to it automatically or if it is a
network that you no longer use.
1 Turn on Wi-Fi, if it’s not already on.
2 In the Wi-Fi settings screen, touch & hold the name of the network.
3 Touch Forget network in the dialog that opens.
NOUG-2.1-update1-105 Nexus One User’s Guide
Page 71

Connecting to networks and devices 71
Connecting to Bluetooth devices
Bluetooth is a short-range wireless communications technology that devices can use
to exchange information over a distance of about 8 meters. The most common
Bluetooth devices are headphones for making calls or listening to music, hands-free
kits for cars, and other portable devices, including laptops and cell phones.
There are several Bluetooth profiles that define the features and communications
standards for Bluetooth devices. For a list of the profiles supported by your phone, see
“Specifications” on page 331.
To connect to a Bluetooth device, you must turn on your phone’s Bluetooth radio. The
first time you use a new device with your phone, you must “pair” them, so that they
know how to connect securely to each other. After that, you can simply connect to a
paired device.
Turn off Bluetooth when you’re not using it, to extend the life of your battery between
charges. You may also be required to turn Bluetooth off in some locations. Bluetooth is
turned off in Airplane mode.
The Status bar displays icons that indicate Bluetooth status.
Bluetooth is on
Connected to a Bluetooth device
To turn Bluetooth on or off
1 Press Home , press Menu , and touch Settings to open the Settings
application.
2 Touch Wireless & networks.
3 Check or uncheck Bluetooth to turn it on or off.
NOUG-2.1-update1-105 Nexus One User’s Guide
Page 72

Connecting to networks and devices 72
To change your phone’s Bluetooth name
Your phone has a generic Bluetooth name by default, which is visible to other devices
when you connect them. You can change the name so that it is more recognizable.
1 Press Home , press Menu , and touch Settings to open the Settings
application.
2 Touch Wireless & networks > Bluetooth settings.
The Bluetooth settings screen opens.
3 If Bluetooth isn’t turned on, check Bluetooth to turn it on.
4 Touch Bluetooth name, enter a name, and touch OK.
To pair your phone with a Bluetooth device
You must pair your phone with a device before you can connect to it. Once you pair
your phone with a device, they stay paired unless you unpair them.
1 Press Home , press Menu , and touch Settings to open the Settings
application.
2 Touch Wireless & networks > Bluetooth settings.
3 If Bluetooth isn’t turned on, check Bluetooth to turn it on.
Your phone scans for and displays the IDs of all available Bluetooth devices in
range.
4 If the device you want to pair with isn’t in the list, make it discoverable.
See the documentation that came with your device to learn how to make it
discoverable by your phone, and for other instructions for pairing.
5 If your phone stops scanning before you make the other device discoverable,
touch Scan for devices.
6 Touch the ID of the other device in the list in Settings to pair them.
The devices pair with each other. If you’re prompted to enter a passcode, try
entering 0000 or 1234 (the most common passcodes), or consult the
documentation that came with the device to learn its passcode.
If the pairing is successful, your phone connects to the device.
NOUG-2.1-update1-105 Nexus One User’s Guide
Page 73

Connecting to networks and devices 73
To connect to a Bluetooth device
Once paired, you can connect to a Bluetooth device—for example, to switch devices or
to reconnect after the phone and the device come back into range.
1 Press Home , press Menu , and touch Settings to open the Settings
application.
2 Touch Wireless & networks > Bluetooth settings.
3 If Bluetooth isn’t turned on, check Bluetooth to turn it on.
4 In the list of devices, touch a paired but unconnected device in the list.
If the device you expected isn’t displayed, touch Scan for devices.
When the phone and the device are connected, the device is displayed as
connected in the list.
To configure the Bluetooth features you want to use
Some Bluetooth devices have multiple profiles. Profiles can includes the ability to
transmit your phone conversations, to play music in stereo, or to transfer files or other
data. You can select which profiles you want to use with your phone.
1 Touch & hold the device in the Bluetooth settings screen.
2 Touch Options in the menu that opens.
A screen opens with a list of the device’s profiles.
3 Check or uncheck a profile to use it or not.
4 When you’re finished, press Back .
To disconnect from a Bluetooth device
1 Touch the device in the Bluetooth settings screen.
2 Touch OK to confirm that you want to disconnect.
To unpair a Bluetooth device
You can unpair a Bluetooth device to erase all pairing information about it.
1 Touch & hold the device in the Bluetooth settings screen.
2 Touch Unpair or Disconnect & unpair in the menu that opens.
NOUG-2.1-update1-105 Nexus One User’s Guide
Page 74

Connecting to networks and devices 74
Connecting to a computer via USB
You can connect your phone to a computer with a USB cable, to transfer music,
pictures, and other files between your phone’s microSD card and the computer.
Warning! When connecting your phone to a computer and mounting its microSD card, you must
follow your computer’s instructions for connecting and disconnecting USB devices, to
avoid damaging or corrupting the files on your microSD card.
To connect your phone to a computer via USB
1 Use the USB cable that came with your phone to connect the phone to a USB port
on your computer.
You receive a notification that the USB is connected.
2 Open the Notifications panel and touch USB connected.
For details on working with the Notifications panel, see “Managing notifications”
on page 52.
3 Touch Mount in the dialog that opens to confirm that you want to transfer files.
When the phone is connected as USB storage, you receive a notification.
Your phone’s microSD card is mounted as a drive on your computer. You can now
copy files to and from the microSD card. For more information, see the
documentation for your computer.
During this time, you can’t access the microSD card from your phone, so you can’t
use applications that rely on the microSD card, such as Camera, Gallery, and
Music.
To disconnect your phone from the computer
Warning! Carefully follow your computer’s instructions to unmount the microSD card and dis-
connect USB devices correctly, to avoid losing information on the card.
1 Unmount the microSD card on your computer.
2 Open the Notifications panel and touch Turn off USB storage.
3 Touch Turn off in the dialog that opens.
NOUG-2.1-update1-105 Nexus One User’s Guide
Page 75

Connecting to networks and devices 75
To safely remove the microSD card from your phone
You can safely remove the microSD card from your phone any time the phone is
turned off, as described in “Your phone and accessories” on page 15. If you need to
remove the microSD card while the phone is on, you must unmount the storage card
form the phone first, to prevent corrupting or damaging the storage card.
1 Press Home , press Menu , and touch Settings, to open the Settings
application.
2 Touch SD card & phone storage.
3 Touch Unmount SD card.
You can now safely remove the microSD card from the phone.
To format a microSD card
If you purchase a new microSD card, you may need to format it before you can use it
with your phone. You can also format a microSD card to erase its contents.
1 Press Home , press Menu , and touch Settings, to open the Settings
application.
2 Touch SD card & phone storage.
3 If necessary, touch Unmount SD card.
You can format a microSD card only when it is unmounted.
4 Touch Format SD card. On the screen that warns you that formatting the
microSD card will erase its contents, touch Format SD card.
NOUG-2.1-update1-105 Nexus One User’s Guide
Page 76

Connecting to networks and devices 76
Connecting to virtual private networks
Virtual private networks (VPNs) allow you to connect to the resources inside a secured
local network, from outside that network. VPNs are commonly deployed by
corporations, schools, and other institutions so that their users can access local
network resources when not on campus, or when connected to a wireless network.
There are numerous systems for securing VPN connections, including some that rely
on secure certificates or other schemes to ensure that only authorized users can
connect. For information about installing secure certificates, see “Working with secure
certificates” on page 78.
To configure VPN access from your phone, you must obtain the details from your
network administrator.
To add a VPN
1 Press Home , press Menu , and touch Settings, to open the Settings
application.
2 Touch Wireless & networks > VPN settings.
3 Touch Add VPN.
4 Touch the type of VPN to add.
5 In the screen that opens, follow the instructions from your network administrator
to configure each component of the VPN settings.
6 Press Menu and touch Save.
The VPN is added to the list on the VPN settings screen.
To connect to a VPN
1 Open the Settings application.
2 Touch Wireless & networks > VPN settings.
The VPNs you’ve added are listed on the VPN settings screen.
3 Touch the VPN to which you want to connect.
4 In the dialog that opens, enter any requested credentials and touch Connect.
When you’re connected to a VPN, you receive an ongoing notification in the Status
bar. If you are disconnected, you receive a notification that you can use to return to
the VPN settings screen so that you can reconnect to it. See “Managing
notifications” on page 52.
NOUG-2.1-update1-105 Nexus One User’s Guide
Page 77

Connecting to networks and devices 77
To disconnect from a VPN
S Open the Notifications panel and touch the ongoing notification for the VPN
connection.
To edit a VPN
1 Open the Settings application.
2 Touch Wireless & networks > VPN settings.
The VPNs you’ve added are listed on the VPN settings screen.
3 Touch & hold the VPN whose settings you want to edit.
4 In the dialog that opens, touch Edit network.
5 Edit the VPN settings you want.
6 Press Menu and touch Save.
To delete a VPN
1 Open the Settings application.
2 Touch Wireless & networks > VPN settings.
The VPNs you’ve added are listed on the VPN settings screen.
3 Touch & hold the VPN you want to delete.
4 In the dialog that opens, touch Delete network.
5 Touch OK in the dialog that asks you to confirm you want to delete the VPN.
NOUG-2.1-update1-105 Nexus One User’s Guide
Page 78

Connecting to networks and devices 78
Working with secure certificates
If your organization’s VPN or Wi-Fi networks rely on secure certificates, you must
obtain the certificates (in files that conform to the PKCS #12 standard) and store them
in your phone’s secure credential storage, before you can configure access to those
VPN or Wi-Fi networks on your phone.
If your network administrator instructs you to download the certificates from a
website, you’re prompted to set a password for the credential storage when you
download the certificates.
For more information about working with credential storage, see “Location & security
settings” on page 316.
To install a secure certificate from the microSD card
1 Copy the certificate from your computer to the root of the microSD card (that is,
not in a folder).
See “Connecting to a computer via USB” on page 74 for information about
connecting your phone to a computer and copying files to the microSD card.
2 Press Home , press Menu , and touch Settings, to open the Settings
application.
3 Touch Location & security.
4 Touch Install from SD card.
5 Touch the file name of the certificate to install.
Only the names of certificates that you have not already installed on your phone
are displayed.
6 If prompted, enter the certificate’s password and touch OK.
7 Enter a name for the certificate and touch OK.
If you have not already set a password for your phone’s credential storage, you’re
prompted to enter a password for it twice and then touch OK. For more
information about credential storage, see “Location & security settings” on
page 316.
You can now use the certificate that you installed when connecting to a secure
network. For security, the certificate is deleted from the microSD card.
NOUG-2.1-update1-105 Nexus One User’s Guide
Page 79

79
Placing and receiving calls
You can place a phone call by dialing a phone number. You can also
touch a number in your contacts, on web pages, and other places. When
you're on a call, you can answer incoming calls or send them to your
voicemail box. You can even set up conference calls with several
participants.
You can also use Google Voice to manage your voicemail and to place
calls from your phone, as described in “Google Voice” on page 153.
In this section
“Placing and ending calls” on page 80
“Answering or rejecting calls” on page 82
“Working with the Call log” on page 84
“Calling your contacts” on page 86
“Listening to your voicemail” on page 87
“Dialing by voice” on page 88
“Options during a call” on page 89
“Managing multiple calls” on page 91
NOUG-2.1-update1-105 Nexus One User’s Guide
Page 80

Placing and receiving calls 80
Touch & hold to enter +.
Touch to erase a digit. Touch & hold to
erase the entire number.
Placing and ending calls
You can place calls with the Phone application. You can also place calls when working
in the Call log (see “Working with the Call log” on page 84) or in Contacts (see
“Communicating with your contacts” on page 104).
To open Phone
S Touch the Phone icon on the Home screen or in the Launcher.
OR
S If you’re already working with Contacts or the Call log, touch the Phone tab.
To place a call by dialing
1 Open Phone.
2 Touch the keys on the Phone tab to enter the phone number.
If you enter a wrong number, touch to erase digits one by one.
To erase the entire number, touch & hold .
To dial an international number, touch & hold the 0 key to enter the plus ( + )
symbol. Then enter the international prefix for the country, followed by the full
phone number.
3 Touch the green phone icon to dial the number that you entered.
NOUG-2.1-update1-105 Nexus One User’s Guide
Page 81

Placing and receiving calls 81
The duration of the call.
Information from Contacts about the
person you’re calling.
Touch to enter additional numbers
during your call.
You can switch applications during a call—for example, to look up information by
using the Browser. The green phone icon appears in the Status bar while the call is
underway.
Press the Volume Up / Down button to adjust the call volume.
Use the onscreen buttons to place the current call on hold, to add a caller, and for
other options, as described in “Options during a call” on page 89.
To end a call
S Touch End .
To disable phone calls (Airplane mode)
Some locations may require you to turn off your phone’s mobile, Wi-Fi, and Bluetooth
wireless connections. You can turn off all wireless connections at once by placing your
phone in Airplane mode.
1 Press & hold the Power button
2 Touch Airplane mode.
You can also use the Settings application to turn Airplane mode on and off and to
configure other mobile and network settings. See “Wireless & networks” on
page 309.
NOUG-2.1-update1-105 Nexus One User’s Guide
Page 82

Placing and receiving calls 82
Drag the green phone to the right to
answer the call.
Answering or rejecting calls
When you receive a phone call, the Incoming Call screen opens with the caller ID and
any additional information about the caller that you have entered in Contacts. See
“Contacts” on page 93.
All incoming calls are recorded in the Call log. See “Working with the Call log” on
page 84. If you miss a call, you receive a notification. See “Managing notifications” on
page 52.
To answer a call
S Drag the green phone icon to the right.
If you were already on a call, the first call is placed on hold while you answer the
new call.
To silence the ringer before answering the call, press the Volume Down button.
NOUG-2.1-update1-105 Nexus One User’s Guide
Page 83

Placing and receiving calls 83
Drag the red phone to the left to send
the caller directly to your voicemail box.
To decline a call and divert it to voicemail
S Drag the red phone button to the left.
The caller is sent directly to your voicemail box to leave a message.
NOUG-2.1-update1-105 Nexus One User’s Guide
Page 84

Placing and receiving calls 84
Missed call
Incoming call
Touch to call back
Outgoing call
Touch & hold an entry for more options
Working with the Call log
The Call log is a list of all the calls you’ve placed, received, or missed. It offers a
convenient way to redial a number, return a call, or add a number to your Contacts.
To open the Call log
S Press the Call button.
Or, if you have the Phone or Contacts tab open, touch the Call log tab.
Calls are listed with the most recent at the top. Scroll to view earlier entries in the
log.
To dial a number in the Call log
S Touch the green phone icon at the right of the entry.
You can also touch & hold the entry to open a menu with options for
communicating with that contact in other ways.
NOUG-2.1-update1-105 Nexus One User’s Guide
Page 85

Placing and receiving calls 85
To add an entry’s number to your Contacts
1 Touch & hold the entry.
2 Touch Add to contacts in the menu that opens.
3 In the list of contacts that opens, touch Create new contact at the top, or scroll
to find and then touch an existing contact to which you want to add the number.
For more information about creating and editing contacts, see “Contacts” on
page 93.
To take other actions on a Call log entry
S Touch a Call log entry to open a screen where you can call the contact again, send
the contact a message, add the number to your Contacts, and learn more about
the original call.
S Touch & hold a Call log entry to open a menu where you can call the contact, view
contact information, edit the number before you redial, and more.
To clear the Call log
S While viewing the Call log, press Menu and touch Clear call log.
You can also touch & hold an entry in the log. In the menu that opens, touch
Remove from call log to remove just that entry from the log.
NOUG-2.1-update1-105 Nexus One User’s Guide
Page 86

Placing and receiving calls 86
Calling your contacts
Instead of entering the number in the Phone tab, you can touch a phone number to
dial it.
You can also quickly call a contact by using Quick Contact. See “Connecting quickly
with your contacts” on page 61.
Adding, editing, and performing other tasks with your contacts is described in
“Contacts” on page 93. If you have contacts on the web, they’re synchronized with
your phone when you first connect to your Google Account.
To call a contact
1 Open your contacts.
For example, on the Home screen, touch the Contacts icon . Or in Phone,
touch the Contacts tab.
2 Touch the contact to call.
You can search for or scroll to find a contact.
3 Touch the phone number to use to call the contact.
See “Communicating with your contacts” on page 104 for more options.
To call a favorite contact
1 Open your list of favorites.
For example, on the Home screen, touch the Contacts icon and then touch
the Favorites tab.
The list of your favorite contacts is followed by a list of the numbers that you call
most often.
You can add and remove favorites by touching the star next to their names, while
you’re viewing information about the Contact. See “Adding a contact to your
favorites” on page 99.
2 Touch the favorite to call.
3 Touch the phone number to use to call the contact.
NOUG-2.1-update1-105 Nexus One User’s Guide
Page 87

Placing and receiving calls 87
Listening to your voicemail
When you have a new voicemail message, the voicemail icon appears in the
Status bar.
If you have not set up your voicemail number, or if you need to change it, you can do
that with the Call settings. See “Call settings” on page 312.
To listen to your voicemail
S Open the Notifications panel and touch New voicemail.
Responding to notifications is described in “Managing notifications” on page 52.
OR
S Open Phone and touch the voicemail icon on the Phone tab.
Opening Phone is described in “Placing and ending calls” on page 80.
Typically, your carrier’s voicemail system guides you through the process of
listening to and managing your voicemail. The first time you call your voicemail, it
also guides you through the process of recording greetings, setting a password,
and so on.
NOUG-2.1-update1-105 Nexus One User’s Guide
Page 88

Placing and receiving calls 88
Dialing by voice
You can search for and dial a contact by speaking, rather than by using the Phone tab
or touching a contact’s number.
To place a call by speaking
You can call a contact by using Google search by voice.
1 Press & hold the Search button .
You’re prompted to speak.
2 Say “Call” followed by the name of the contact to call.
If Google search by voice finds a match, it dials the contact’s default number.
For details about setting a contact’s default number, see “Editing contact details”
on page 101.
NOUG-2.1-update1-105 Nexus One User’s Guide
Page 89

Placing and receiving calls 89
Options during a call
When a call is in progress, you can put a call on hold, create a phone conference, mute
your microphone, and more. See “Managing multiple calls” on page 91.
To place a call on hold
S Touch the Hold icon .
The current call screen indicates that you have a call on hold.
A Hold icon appears in the Status bar to remind you that you have a call on
hold. From any other application, you can open the Notifications panel and touch
the entry for the call on hold to return to the current call screen.
Take the call off hold by touching the Unhold button.
To mute the microphone during a call
S Touch Mute.
The Mute button lights up green to indicate that the microphone is muted.
The Mute icon appears in the Status bar to remind you that the microphone is
turned off.
When viewing the current call screen, you can unmute the microphone by
touching the Mute icon again.
The microphone is unmuted automatically when the current call ends.
NOUG-2.1-update1-105 Nexus One User’s Guide
Page 90

Placing and receiving calls 90
To turn the speakerphone on or off
S Touch Speaker.
The Speaker button lights up green to indicate that the speakerphone is on.
The Speaker icon appears in the Status bar and the sound from your call is played
through the phone’s speaker.
When viewing the current call screen, you can turn the speakerphone off by
touching the Speaker icon again.
The speaker is turned off automatically when your current call ends.
Warning! To avoid damage to your hearing, do not hold the phone against your ear when the
speakerphone is turned on.
To switch between a Bluetooth headset and the phone
When a Bluetooth headset is paired and connected to your phone, you can conduct all
calls on the headset for hands-free conversation.
For details about configuring the phone to use a Bluetooth headset, see “Connecting
to Bluetooth devices” on page 71.
When using the Bluetooth headset during a call, the current call screen has a blue
border and the Ongoing Call icon turns blue in the Status bar.
S Touch the Bluetooth icon to switch from the headset to the phone or vice versa.
NOUG-2.1-update1-105 Nexus One User’s Guide
Page 91

Placing and receiving calls 91
Tou ch to s wa p c al ls.
The call on hold.
Touch to merge the calls into a
conference call.
Managing multiple calls
If you accept a new call when you’re already on a call, you can switch between the two
callers or merge the two calls into a single conference call. You can also set up a
conference call with multiple callers.
To switch between current calls
S Touch the Swap icon .
The current call is put on hold and you join the other call.
To set up a conference call
Contact your wireless service provider to learn whether they support conference calls
and how many participants you can include.
1 Place a call to the first participant.
2 When you’re connected, touch Add call.
The first participant is put on hold and you’re prompted to dial the second caller.
3 Place the next call, using the Phone tab, the Call log, or your contacts.
4 When you’re connected, touch Merge calls.
The participant is added to the conference call.
NOUG-2.1-update1-105 Nexus One User’s Guide
Page 92

Placing and receiving calls 92
You can add as many callers as your carrier supports.
During a conference call, touch Manage to drop a conference call participant or
to talk privately with one of the participants.
To end a conference call and disconnect all callers
S Touch End.
NOUG-2.1-update1-105 Nexus One User’s Guide
Page 93

93
Contacts
Contacts gives you quick and easy access to the people you want to
reach. When you first turn on your phone and sign into your Google
Account, any existing Google contacts are downloaded to your phone.
After that, changes to your contacts are synchronized. Information
about your contacts is shared with other applications, such a Gmail,
Google Talk, Messaging, Gallery (for sharing photos and videos), and so
on.
If you have more than one account with contact information, Contacts
merges duplicate contacts into a single entry. You can also manage that
process manually.
In this section
“Opening your contacts” on page 94
“Adding contacts” on page 96
“Importing, exporting, and sharing contacts” on page 97
“Adding a contact to your favorites” on page 99
“Searching for a contact” on page 100
“Editing contact details” on page 101
“Communicating with your contacts” on page 104
“Changing which contacts are displayed” on page 106
“Joining contacts” on page 108
“Separating contact information” on page 109
NOUG-2.1-update1-105 Nexus One User’s Guide
Page 94

Contacts 94
Touch to view only your favorite
contacts.
Touch a contact to view its details.
Touch an icon to open Quick Contact.
Opening your contacts
Open Contacts to add, view, and communicate with your friends and acquaintances.
To open your contacts
S Touch the Contacts icon on the Home screen or in the Launcher.
You can also open Contacts by using Quick Contact. See “Connecting quickly with
your contacts” on page 61.
All of your contacts are displayed alphabetically in a scrolling list. Each contact is
followed by the default phone number.
If you have a new phone and haven’t added any contacts yet, Contacts displays a
message with hints on how to start adding contacts to your phone.
You can drag the list up or down to scroll it, or slide your finger up or down to scroll
quickly. Either way, a tab briefly appears to the right of the list, which you can drag
up and down to scroll very quickly, while displaying the letter of the alphabet for the
contacts you’re scrolling past.
NOUG-2.1-update1-105 Nexus One User’s Guide
Page 95

Contacts 95
Touch to open Quick Contact.
Touch an address to view it on Google
Maps.
Touch a contact method to start
communicating with the contact.
Touch an icon to call, email, text, chat,
map, and so on.
The contact’s status and where it’s from.
To open a list of your favorite contacts
S Open your contacts and touch the Favorites tab.
The Favorites tab lists the contacts you’ve added to the list (see “Adding a contact
to your favorites” on page 99), followed by a list of your most frequently called
contacts.
To view details about a contact
1 Open your contacts.
2 Touch the contact whose details you want to view.
Entries for communicating with the contact are followed by details.
Touch a communication method to start dialing, texting, or emailing the contact by
using the listed number, address, and so on.
Touch an address to view it on Google Maps. See “Maps” on page 221.
You can also press Menu and touch Edit contact to edit the contact’s
information (see “Editing contact details” on page 101), or touch Delete contact
to delete all information about the contact.
NOUG-2.1-update1-105 Nexus One User’s Guide
Page 96

Contacts 96
Adding contacts
You can add contacts on your phone and synchronize them with the contacts in your
Google Account, Microsoft Exchange ActiveSync account, or other accounts that
support syncing contacts.
When you reply to or forward an email message to an email address that is not in
Contacts, the email address is added as a contact. Contacts tries to join new
addresses with existing contacts, to create a single entry. You can also manage that
process manually. See “Joining contacts” on page 108 and “Separating contact
information” on page 109.
To add a new contact
1 Open your contacts.
2 Press Menu and touch New contact.
3 If you have more than one account with contacts, touch the account to which you
want to add the contact.
4 Enter the contact’s name.
5 Touch a category of contact information, such as phone numbers and email
addresses, to enter that kind of information about your contact.
Scroll the page to view all categories.
6 Touch a category’s plus button to add more than one entry for that category—
for example, to add both work and home numbers.
Touch the button to the left of the item of contact information to open a menu with
preset labels, such as Mobile and Work for a phone number, or touch Custom
in the menu to create your own label.
7 Touch the Picture Frame icon to select a picture to display next to the name in your
lists of contacts and in other applications.
8 When you’re finished, touch Done.
NOUG-2.1-update1-105 Nexus One User’s Guide
Page 97

Contacts 97
Importing, exporting, and sharing contacts
If you have contacts stored in vCard format on a microSD card or SIM, you can import
them into Contacts on your phone. You can export contacts in vCard format onto a
microSD card, to back them up to a computer or other device. And you can send a
contact via email.
To import contacts from your SIM card
Your service provider may store some contacts on your SIM card, such as customer
care and voicemail numbers. You may also have stored contacts on the SIM card if
you’re moving it from another phone. You can add some or all of these contacts to the
Contacts application.
1 Open your contacts.
2 Press Menu and touch Import/Export.
3 Touch Import from SIM.
4 If you have more than one account on your phone, touch the account into which
you want to import the contacts.
A list of the contacts on the SIM appears.
5 Touch & hold a contact and touch Import in the menu that opens. Or press
Menu and touch Import all.
To import contacts from your microSD card
You can copy individual or group contacts in vCard format onto your microSD card
and then import them into one of your accounts on the phone. See “Connecting to a
computer via USB” on page 74 for details about copying files to a microSD card from
your computer.
You may also have contacts stored on a microSD card from another device. See “Your
phone and accessories” on page 15 for details about working with microSD cards.
1 Open your contacts.
2 Press Menu and touch Import/Export.
NOUG-2.1-update1-105 Nexus One User’s Guide
Page 98

Contacts 98
3 Touch Import from SD card.
4 If you have more than one account on your phone, touch the account into which
you want to import the contacts.
5 If you have more than one vCard file on the microSD card, touch the option to
import a single contact file, multiple contact files, or all of the contact files on the
microSD card.
The contacts are imported.
To export contacts to your microSD card
You can export all of the contacts on your phone to your microSD card, as a group
vCard file. You can then copy this file to a computer or another device that can work
with files in this format, such as an address book application. See “Connecting to a
computer via USB” on page 74)
1 Open your contacts.
2 Press Menu and touch Import/Export.
3 Touch Export to SD card.
4 Touch OK to confirm.
Contacts creates a file with the .vcf extension on your microSD card. This file
contains all of your contacts.
To share a contact
You can share a contact with someone by emailing it to them in vCard format.
1 Open Contacts.
2 Open the contact you want to share.
3 Press Menu and touch Share.
A Gmail compose message screen opens, with the contact attached as a vCard
(.vcf) file.
Address, write, and send the email, as described in “Composing and sending a
message” on page 125.
NOUG-2.1-update1-105 Nexus One User’s Guide
Page 99

Contacts 99
Adding a contact to your favorites
The Favorites tab contains the contacts you’ve starred as favorites followed by the
short list of the contacts you communicate with most frequently.
To add a contact to your favorites
1 Open your contacts.
2 Touch a contact to view its details.
3 Touch the star to the right of the contact’s name.
The star turns gold .
To remove a contact from your favorites list
1 Open your contacts and touch the Favorites tab.
2 Touch a contact to view its details.
3 Touch the gold star to the right of the contact’s name.
The star turns gray and the contact is removed from your favorites.
NOUG-2.1-update1-105 Nexus One User’s Guide
Page 100

Contacts 100
Searching for a contact
You can search for a contact by name.
To search for a contact
1 Open your contacts.
2 Press the Search button .
3 Start entering the name of the contact you’re searching for.
As you type, contacts with matching names appear below the search box.
4 Touch a matching contact in the list to open its Details screen. Or touch the
Magnifying Glass icon to open a screen with a list of matching contacts.
NOUG-2.1-update1-105 Nexus One User’s Guide
 Loading...