

Page 1

User Manual
Page 2

2 |
Please Read Before Proceeding
Microsoft, MS-DOS, Windows, Windows NT, Windows Server, Windows Mobile,
ActiveSync, Excel, Internet Explorer, MSN, Outlook, PowerPoint, and Word are
either registered trademarks or trademarks of Microsoft Corporation in the United
States and/or other countries.
THIS DEVICE IS NOT CHARGED WHEN YOU TAKE IT OUT OF THE BOX.
DO NOT REMOVE THE BATTERY PACK WHEN THE DEVICE IS CHARGING.
YOUR WARRANTY IS INVALIDATED IF YOU OPEN OR TAMPER WITH THE
DEVICE’S OUTER CASING.
EXPLOSIVE ATMOSPHERES
When in any area with a potentially explosive atmosphere or where
flammable materials exist, the product should be turned off and the
user should obey all signs and instructions. Sparks in such areas
could cause an explosion or fire resulting in bodily injury or even death.
Users are advised not to use the equipment at refueling points such
as service or gas stations, and are reminded of the need to observe
restrictions on the use of radio equipment in fuel depots, chemical
plants, or where blasting operations are in progress. Areas with a
potentially explosive atmosphere are often, but not always, clearly
marked. These include fueling areas, below deck on boats, fuel or
chemical transfer or storage facilities, and areas where the air contains
chemicals or particles, such as grain, dust, or metal powders.
Page 3

| 3
Important Safety Precautions
When using this product, the safety precautions below must be taken to offset
possible legal liabilities and damages.
ELECTRICAL SAFETY
This product is intended for use when supplied with power from
the battery.
Other usage may be dangerous and will invalidate any
approval given to this product.
SAFETY IN AIRCRAFTS
Due to the possible interference caused by this product to an aircraft's
navigation system and its communications network, using this product
on board an airplane is against the law in most countries.
ENVIRONMENT RESTRICTIONS
Do not use this product at gas or refueling stations. The use of this
product is also prohibited in fuel storehouses, chemical plants, and
locations containing explosives.
SAFETY FOR ENVIRONMENTS
Do not use this product in gas stations, fuel depots, chemical plants or
where blasting operations are in progress, or in potentially explosive
atmospheres such as fuelling areas, below deck on boats, fuel or
chemical transfer or storage facilities, and areas where the air contains
chemicals or particles, such as grain, dust, or metal powders. Please
be aware that Sparks in such areas could cause an explosion or fire
resulting in bodily injury or even death.
ROAD SAFETY
Vehicle drivers in motion are not permitted to use telephony services
with handheld devices, except in the case of emergency. In some
countries, using hand-free devices as an alternative is allowed.
Page 4

4 |
INTERFERENCE WITH MEDICAL EQUIPMENT FUNCTIONS
This product may cause medical equipment to malfunction. The use of
this device is forbidden in most hospitals and medical clinics.
NONIONIZING RADIATION
This product should be operated in the suggested normal condition
only to ensure the radiative performance and safety of the interference.
As with other mobile radio transmitting equipment, users are advised
that for satisfactory operation of the equipment and for the safety
of personnel, it is recommended that no part of the human body be
allowed to come too close to the antenna during operation of the
equipment.
Page 5

| 5
Contents
Chapter 1 Getting Started
1.1 Getting to Know your Device andits Accessories .... 10
1.2 Battery Information .....................................................
15
1.3 Starting Up ...................................................................
17
1.4 The Today Screen ........................................................
19
1.5 Indicators .....................................................................
20
1.6 Using the Start Menu ...................................................
23
Chapter 2 Entering and Searching Information
2.1 Introduction .................................................................. 26
2.2 Using the Standard On-Screen Keyboard .................
26
2.3 Recording a Note .........................................................
27
2.4 Sea
rching Information ................................................ 28
Chapter 3 Synchronizing Your Pocket PC
3.1 Using ActiveSync ........................................................ 30
3.2 Synchronizing Information ......................................... 31
3.3 Synchronizing via Infrared and Bluetooth ................ 34
3.4 Synchronizing Music, Video, and Pictures ............... 35
Page 6

6 |
Chapter 4 Managing Your Pocket PC
4.1 Personalizing Your Pocket PC ................................... 38
4.2 Adding and Removing Programs ............................... 45
4.3 Managing Memory ....................................................... 47
4.4 Backing Up Files ......................................................... 48
4.5 Protecting Your Device ............................................... 50
4.6 Resetting Your Pocket PC .......................................... 52
Chapter 5 Getting Connected
5.1 Using Wireless Connection ........................................ 54
5.2 Connecting to the Internet .......................................... 56
5.3 Internet Explorer Mobile ............................................. 58
5.4 Using Bluetooth ........................................................... 61
5.5 Using Terminal Services Client .................................. 66
Chapter 6 Exchanging Messages
and Using Outlook
6.1 E-mail and Text Messages .......................................... 70
6.2 Pocket MSN .................................................................. 76
6.3 Calendar ....................................................................... 78
6.4 Contacts ....................................................................... 80
6.5 Tasks ............................................................................. 82
6.6 Notes ............................................................................ 84
Page 7

| 7
Chapter 7 Experiencing Multimedia
7.1 Using Pictures & Videos ............................................. 88
7.2 Using Windows Media Player ..................................... 93
Chapter 8 Using Other Applications
8.1 Word Mobile ............................................................... 102
8.2 Excel Mobile ............................................................... 104
8.3 Viewing Slide Shows withPowerPoint Mobile ........ 106
Appendix
A.1 Regulatory Notices .....................................................110
A.2 PC Requirement to Run ActiveSync 4.x ...................11
6
A.3 Specifications
............................................................116
A.4 Index ............................................................................11
8
Page 8

8 |
Page 9

1.1 Getting to Know your Device
and its Accessories
1.2 Battery Information
1.3 Starting Up
1.4 The Today Screen
1.5 Indicators
1.6 Using the Start Menu
Chapter 1
Getting Started
Page 10
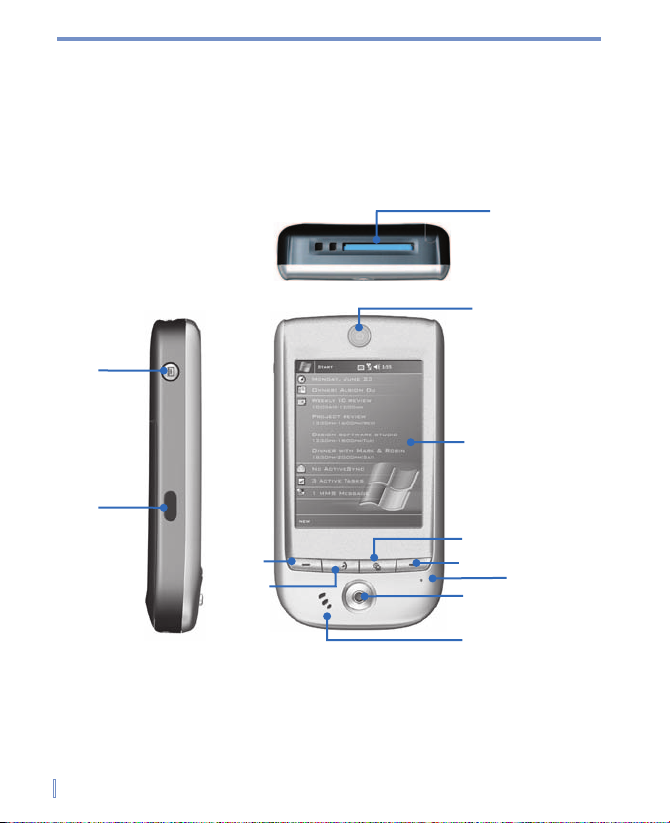
10 | Getting Started
1.1
Getting to Know your Device and its Accessories
Front, top, and left-side view
4
9
12
8
11
6
7
5
1
2
3
10
Page 11
Getting Started | 11
1 Record Press to record a voice note.
2 Infrared Port Enables you to exchange file(s) or data with other
devices without calbles/wires.
3 MMC card or SDIO
accessories Slot
Insert either MMC card or SDIO accessories in this
slot.
4 Power/Backlight Press to turn on and off your device or backlight.
5 Touch Screen For making a selection with the stylus.
6 Calendar/Left Soft Key Press for quick Calendar access and perform the
command shown in the label above the button.
7 GPS Launch Key Press to start GPS system in your pocket PC.
8 Today Screen Press anytime to go back to Today screen.
9 Contact/Right Soft Key Press for quick acess to your contacts.
10 Microphone Speak here when recording voice.
11
Navigation Pad Press this multi-directional control up, down, left, or
right to move through menus, program instructions;
carry out the selection by pressing the center button
as ENTER key.
12 Speaker Listen to audio media here.
Page 12
12 | Getting Started
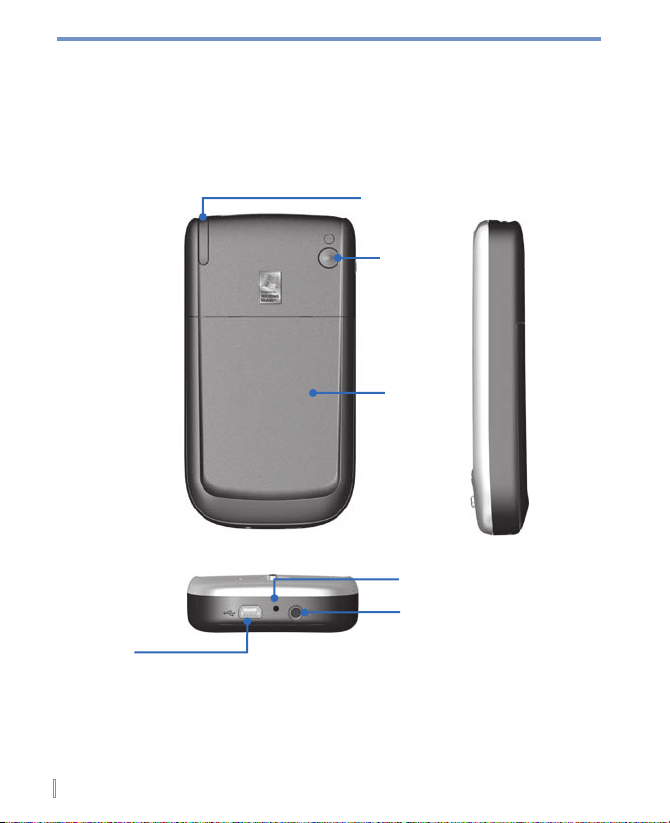
Back, and bottom view
14
15
13
18
17
16
Page 13

Getting Started | 13
13 Stylus and Stylus Slot
14 GPS Antenna If available, you can attach your device to its antenna
and utilize its superior reception quality for GPS
signal.
15 Back Cover
16
Sync Connector Use this connector for synchronizing data or
recharging the battery.
17
Soft Reset Press into the hole with the stylus to reset your
device.
18
Earphone Jack Allows you to listen to audio media.
Page 14
14 | Getting Started
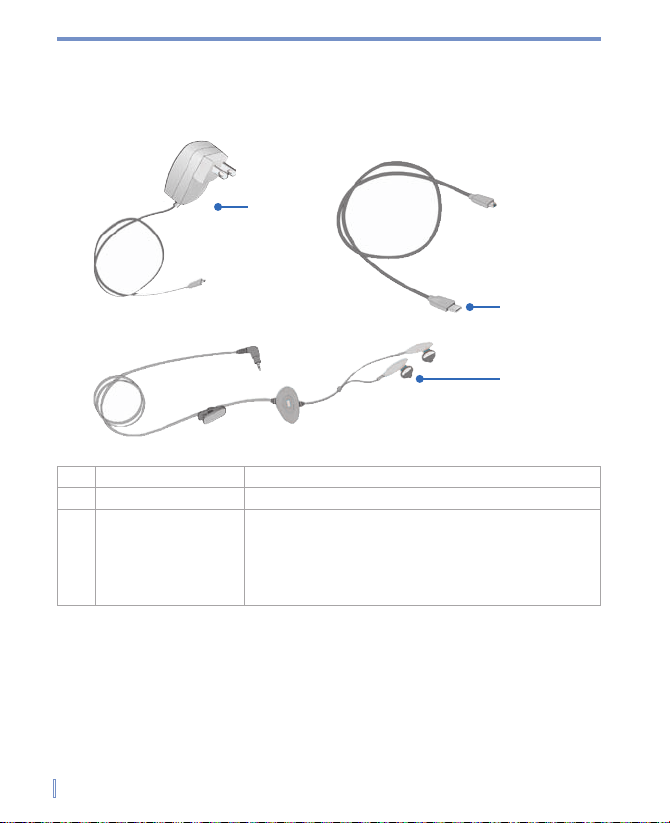
Accessories
The following accessories are provided with the device:
19 AC adapter Recharge the device battery.
20 USB cable Connect your device to a PC and synchronize data.
21 Stereo-wired
headset with volume
control jog dial
Use when listening to music or playback of media files.
19
21
20
Page 15

Getting Started | 15
1.2 Battery Information
Your device contains a rechargeable Li-ion polymer battery. Your
device is designed to use only manufacturer-specified original batteries
and accessories. Battery
performance depends on many factors,
including your wireless service provider’s network configuration, signal
strength, the temperature of the environment in which you operate your
device, the features and/or settings you select and use, items attached
to your device’s connecting ports, and your voice, data, and other
program usage patterns.
Battery life estimates (approximations):
GPS mode: > Up to 5 hours:
Standby time: Up to 200 hours
WMV playback: 8 hours
WMA playback: 12 hours
Battery recharge time: Less than 4 hours
Warning! To reduce risk of fire or burns.
•
Do not attempt to open, disassemble, or service the battery pack.
•
Do not crush, puncture, short external contacts, or dispose of in fire
or water.
• Do not expose to temperatures above 60˚C (140˚F).
•
Replace only with the battery pack designated for this product.
•
Recycle or dispose of used battery as stipulated by local regulation.
Page 16
16 | Getting Started
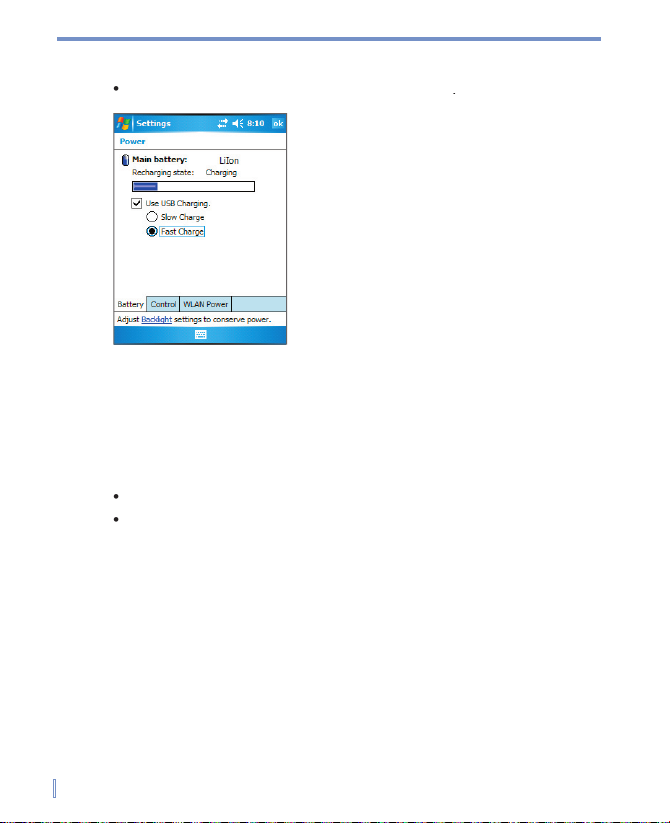
To check the battery power
Tap
Start
>
Settings
>
System
tab >
Power
Power Information
Charge the battery
Connecting your device directly to an external power source.
Plugging the device sync cable into the USB port on your PC.
Low battery
1.
2.
3.
Page 17

Getting Started | 17
1.3 Starting Up
Turn the device on and off
Calibrate the Device
1.
>
>
tab >
2.
tab, tap
Align Screen
Page 18
18 | Getting Started
Manage screen settings
To change the orientation, tap
>
>
tab >
To smooth the edges of screen fonts for many programs, on the
tab, select the
check box.
To increase the readability or to see more content on the screen,
tab, adjust the text size by moving the slider.
Today Screen in Portrait Mode Today Screen in Landscape Mode
Note The screen orientation changes automatically when you open, unfold
and rotate your device.
Page 19
Getting Started | 19
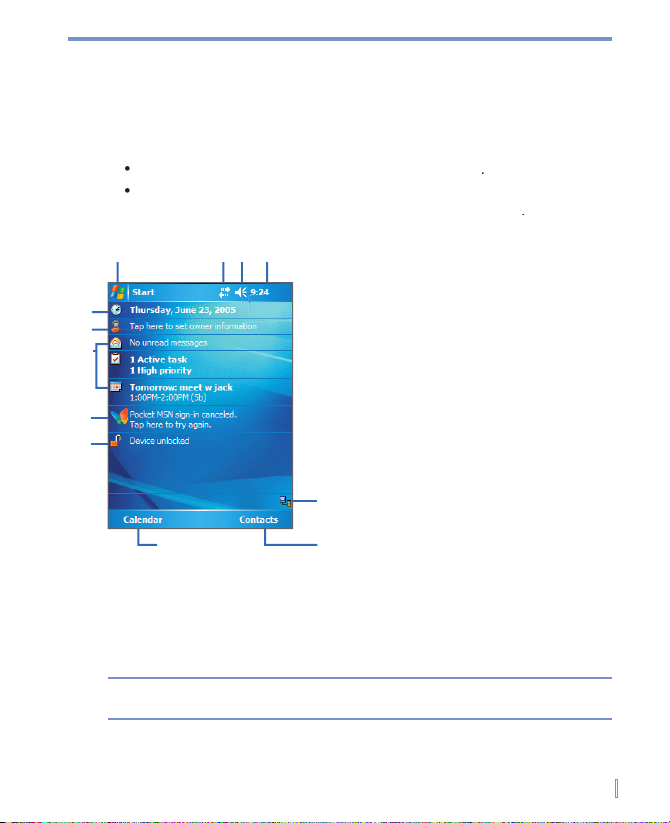
1.4 The Today Screen
To access the Today screen, tap
To customize the Today screen display, including the background
>
>
tab >
1 Tap to display the items listed in
the Start menu.
2 Tap to view connectivity status.
3 Tap to control device volume level.
4 Tap to see time and next
appointment. Tap and hold to
change time format.
5 Displays the synchronization
status between your device and
PC.
6 Tap to open the Contacts screen.
7 Tap to open your calendar.
8 Tap to lock your device.
9 Tap to sign-in Pocket MSN
10 Your day at a glance with
reminders. Tap to open the related
program.
11 Tap to set owner information.
12 Tap to change date and time.
1
2 3
7
10
11
12
4
5
6
Today Screen
8
9
Note You can access the Today screen from anywhere by tapping Start >
Today
.
Page 20
20 | Getting Started
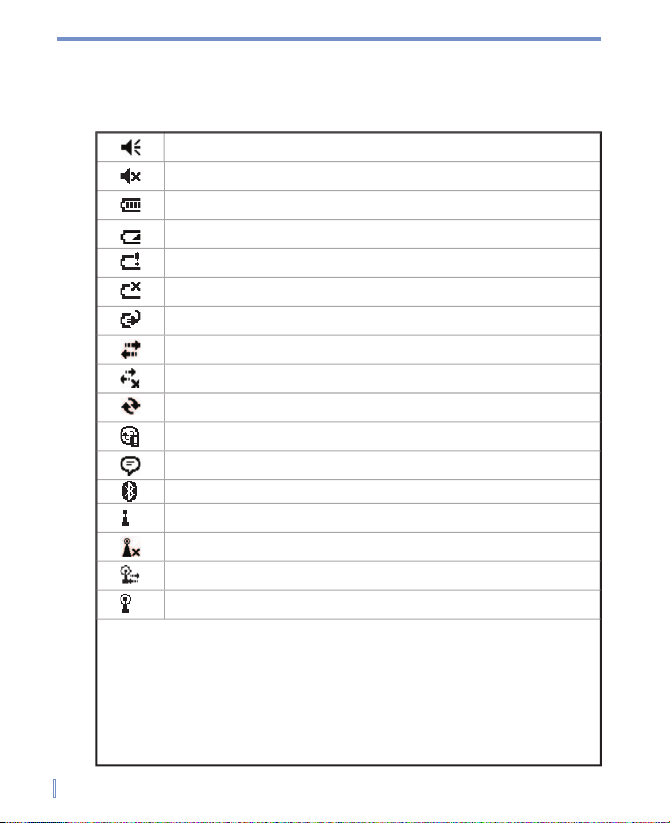
1.5 Indicators
Sound on & adjusting sound volume
Sound off
Battery level
Main battery low
Main battery very low
Battery empty
Battery charging
Connection is active
Connection is not active
Synchronization in progress
Synchronization error
There are more indicators. Tap the icon to view all.
Bluetooth
Wi-Fi on
Wi-Fi off
Wi-Fi connecting
Wi-Fi connected
Page 21
Getting Started | 21
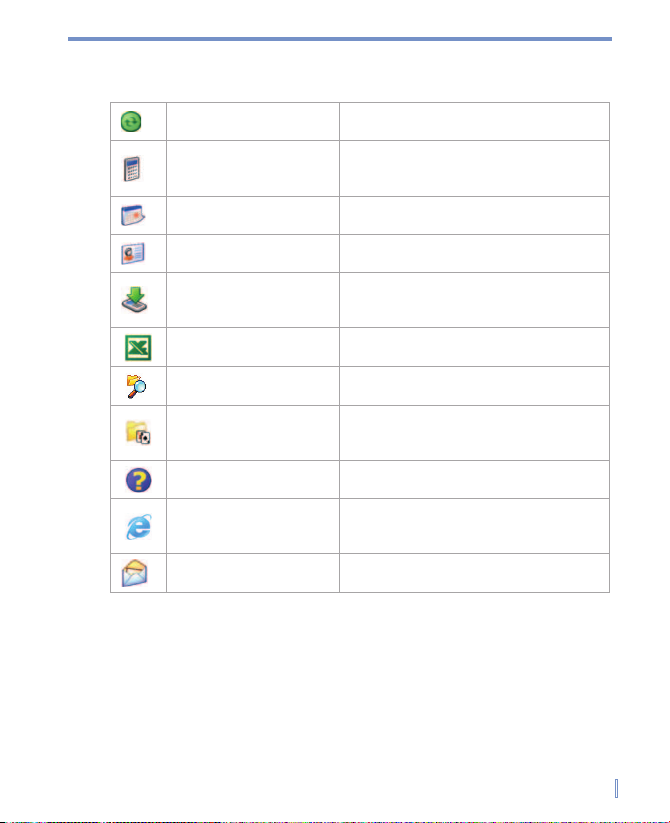
ActiveSync
Synchronizes information between your
device and a PC.
Performs basic arithmetic and
calculations, such as addition,
subtraction, multiplication, and division.
Keeps track of your appointments and
creates meeting requests.
Keeps track of your friends and
colleagues.
Provides information about the
download status and the downloaded
content from the Internet.
Creates new workbooks or lets you
view and edit Excel workbooks.
Enables you to organize and manage
files on your device.
Lets you play two games; Bubble
Breaker and Solitaire are included in
this folder, by default.
Enables you to see Help topics for a
program on your device.
Internet Explorer browses Web and
WAP sites, and downloads new
programs and files from the Internet.
Sends and receives e-mail and text
messages.
Page 22
22 | Getting Started
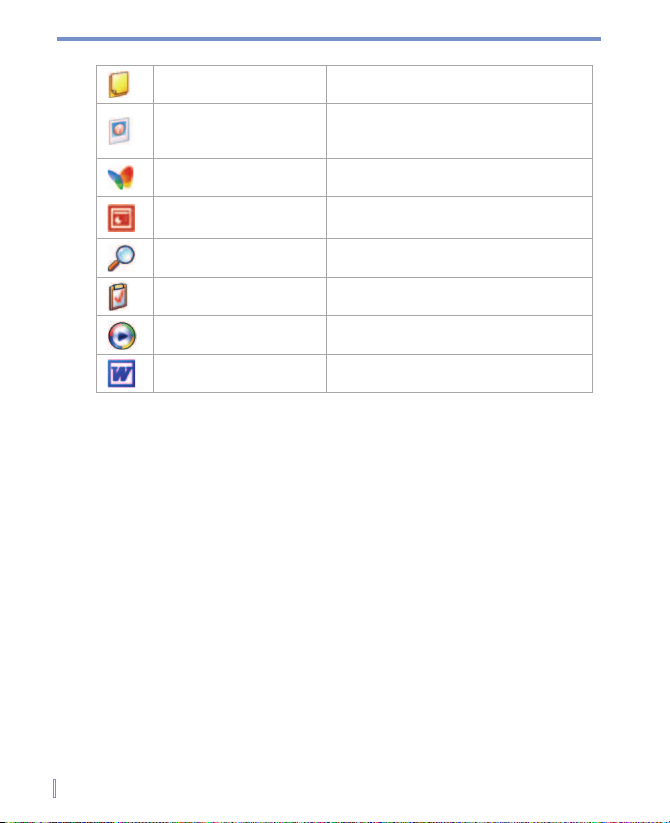
Creates handwritten or typed notes,
drawings, and recordings.
Collects, organizes, and sorts picture
and video files in the My Pictures folder
of your device or on a storage card.
Sends and receives instant messages
with your MSN Messenger contacts.
Lets you view and edit PowerPoint
slides and presentations.
Enables you to search contacts, data,
and other information on your device.
Keeps track of your tasks.
Windows Media Player
Enables the multimedia function on
your device.
Word Mobile
Creates new documents or lets you
view and edit Word documents.
Page 23
Getting Started | 23
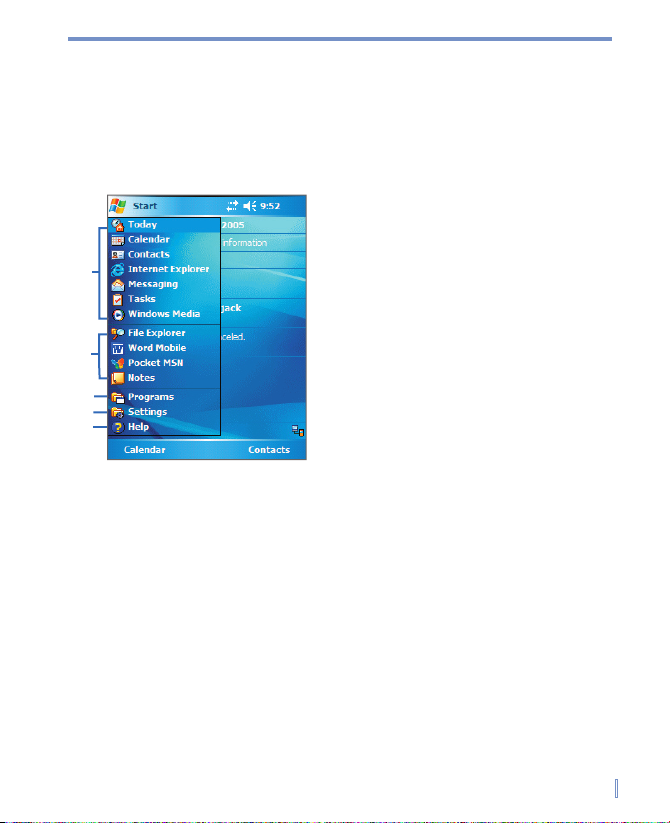
1.6 Using the Start Menu
1 Tap to switch to a program.
2
Tap to switch to a recently-used program.
3 Tap to see more programs.
4 Tap to change device settings.
5 Tap to see a Help topic for the current
screen.
2
1
3
4
5
Start Menu
Page 24

24 | Getting Started
Page 25

2.1 Introduction
2.2 Using the Standard On-Screen Keyboard
2.3 Recording a Note
2.4 Searching Information
Chapter 2
Entering and Searching Information
Page 26

26 | Entering and Searching Information
2.1 Introduction
To show or hide Input Panel
Tap the Input Panel icon on the menu bar.
2.2 Using the Standard On-Screen Keyboard
To enter text using the on-screen keyboard
1.
2.
To enlarge the on-screen keyboard
1.
>
2.
list, select
3.
Page 27

Entering and Searching Information | 27
2.3 Recording a Note
You can create a stand-alone recording (voice note) or you can add a
To create a voice note
1.
>
2.
•
To create a stand-alone recording, record from the note list.
•
To add a recording to a note, create or open a note.
3.
toolbar, tap
View
4.
to begin recording.
5.
6.
when fi nished recording.
7.
to return to the note
8.
9.
Tip To quickly create a recording, press the RECORD button. When you
hear the beep, begin your recording. Release the button when you are
finished.
Page 28

28 | Entering and Searching Information
To change recording formats
1.
>
>
tab >
2.
tab, and in the
Voice recording format
3.
Note You can also change recording formats from within Notes. In the note
list, tap Menu > Options > Global Input Options link (at the bottom of
the page).
2.4 Searching Information
You can search for files and other items stored on your device in the
To search for a fi le or an item
1.
2.
want to search for.
3.
4.
5.
6.
folder and subfolders are searched.
7.
list, tap the item you want to open.
Note The storage card symbol is displayed next to the names of files
saved on a storage card.
Page 29

3.1 Using ActiveSync
3.2 Synchronizing Information
3.3 Synchronizing via Infrared
and Bluetooth
3.4 Synchronizing Music,
Video, and Pictures
Chapter 3
Synchronizing Your Pocket PC
Page 30

30 | Synchronizing Your Pocket PC
3.1 Using ActiveSync
ActiveSync synchronizes information on your device with information
Synchronize information, such as Outlook E-mail, Contacts,
well as pictures, video, and music.
Synchronize Outlook E-mail, Contacts, Calendar appointments,
Exchange fi les between your device and your PC without
Select which types of information are synchronized and specify
ActiveSync on your PC and create a synchronization relationship
You may be able to synchronize your device with Exchange Server
Page 31

Synchronizing Your Pocket PC | 31
To install and set up ActiveSync
1.
2.
•
Create a synchronization relationship between your PC and
•
Configure an Exchange Server connection to synchronize
3.
Note When you finish the wizard, ActiveSync synchronizes your device
automatically. Once synchronization completes, you can disconnect
your device from your PC.
3.2 Synchronizing Information
Synchronizing Outlook information
Page 32

32 | Synchronizing Your Pocket PC
You can set up your device to synchronize with more than one PC or
with a combination of one or more PCs and Exchange Server. When
will appear on all of the computers with which they are synchronized.
PC1 All Outlook contacts and calendar appointments that were on PC2
are now also on PC1.
PC2 All Outlook contacts and calendar appointments that were on PC1
are now also on PC2.
Device All Outlook contacts and calendar appointments from both PC1
and PC2 are on the device.
Note Outlook e-mail can be synchronized with only one computer.
To start and stop synchronization
To synchronize Outlook information and other local information
If you are synchronizing directly with Exchange Server, you can
In ActiveSync, tap
•
To end synchronization before it completes, tap
To change which information is synchronized
1.
>
Page 33

Synchronizing Your Pocket PC | 33
2.
•
Select the check box for any items you want to synchronize.
•
Clear the check box for any items you want to stop
3.
Notes Outlook e-mail can be synchronized with only one computer.
To change available synchronization settings, select the type of
information and tap Settings.
To synchronize directly with Exchange Server
You can set up synchronization with Exchange Server on your device,
1.
Add Server Source
2.
3.
•
To change the rules for resolving synchronization conflicts, tap
Advanced
4.
want to synchronize with Exchange Server.
5.
6.
Page 34

34 | Synchronizing Your Pocket PC
3.3 Synchronizing via Infrared and Bluetooth
You can connect your device to the PC to synchronize using the local
wireless technologies, such as infrared (IR) and Bluetooth. These
To synchronize with a PC via infrared
1.
2.
3.
ActiveSync
4.
>
5.
To synchronize with a PC via Bluetooth
1.
2.
ActiveSync
3.
4.
Note You can also use the Sync Setup Wizard to set up the device to
synchronize remotely with Exchange Server. This wizard is started
when you connect your mobile device to your PC after installing
ActiveSync on the PC.
Page 35

Synchronizing Your Pocket PC | 35
3.4 Synchronizing Music, Video, and Pictures
while you travel, ActiveSync works with Windows Media Player to
Install Windows Media Player Version 10 on the PC.
Connect your device to the PC with a USB cable. If the device
Insert a 32-MB or larger storage card into your device.
Set up a sync partnership between the storage card and
Change Media synchronization settings
To set up a sync relationship with a storage card
1.
2.
tab.
3.
4.
Page 36

36 | Synchronizing Your Pocket PC
Page 37

4.1 Personalizing Your Pocket PC
4.2 Adding and Removing Programs
4.3 Managing Memory
4.4 Backing Up Files
4.5 Protecting Your Device
4.6 Resetting Your Pocket PC
Chapter 4
Managing Your Pocket PC
Page 38

38 | Managing Your Pocket PC
4.1 Personalizing Your Pocket PC
Today screen settings
To customize the Today screen
1.
2.
Appearance
3.
tab, select the items you want to appear on the
Tip To change the order of items displayed on the Today screen, tap the
item, and tap Move Up or Move Down.
To add a custom background image
You can use one of your own pictures as the background image on the
1.
2.
as the background
to view a list of your picture fi les.
3.
4.
To set options for displaying appointments on the Today screen
1.
>
>
2.
tab.
3.
and tap
4.
•
Select
to show only the next appointment
to show
Page 39

Managing Your Pocket PC | 39
•
To set options for displaying tasks on the Today screen
1.
>
2.
tab.
3.
and tap
4.
•
Under
•
In the
list, select whether to display only tasks
Customize the Start menu
You can choose which items appear in the
1.
tab >
2.
Tip You can also create folders and shortcuts to appear on the Start menu.
In ActiveSync on your PC, click Explore. Double-click My Windows
Mobile-Based Device, click Windows, click Start Menu, and then
create the folders and shortcuts that you want. You will see the added
items after you synchronize.
Set Date / Time / Language / Regional Options
To set the time and date
1.
>
tab >
2.
Note During synchronization, the time on your device is updated with the time
on your PC.
Page 40

40 | Managing Your Pocket PC
To set an alarm
1.
>
tab >
>
Alarms
2.
3.
4.
5.
to specify the type of alarm you want. You can choose a
6.
To set the time and date for a different location
1.
>
tab >
2.
Visiting
3.
To change language and regional settings
1.
>
tab >
2.
tab, select your region and language.
3.
4.
Page 41

Managing Your Pocket PC | 41
Personal and system settings
To reassign programs or shortcuts to program buttons
Your device may come with programs already assigned to hardware
1.
>
>
tab >
2.
A list of buttons and their current assignments is displayed on the
tab.
3.
4.
Assign a program
box, tap the program or shortcut you
want to assign.
5.
To increase or decrease the size of text on the screen
1.
tab >
2.
To enter owner information
1.
tab >
2.
tab, enter your personal information.
Tip If owner information is displayed on the Today screen, you can open
and edit the information directly from the Today screen. Just tap that
section of the screen.
Page 42

42 | Managing Your Pocket PC
To choose how to be notifi ed about events or actions
1.
>
tab >
2.
tab, choose how you want to be notifi ed by
3.
tab, in
Tip Turning off sounds and the flash light helps conserve battery power.
To adjust the volume for sounds
You can change the volume for sounds, such as the sound you hear
when you tap program names and menu options.
1.
2.
, move the system volume slider to the desired volume
3.
Vibrate
to quickly change both the system and
Tip You can also press the volume control on your device to quickly change
both the ringer and system volume settings.
Page 43

Managing Your Pocket PC | 43
To adjust the speed for scrolling
1.
tab >
/
2.
•
Under
•
To change the time it takes to scroll from one item to the next,
To fi nd the operating system version number
Tap
>
About
To get detailed device information
Tap
tab>
About
Version
To change the device name
1.
>
>
About
2.
tab.
3.
Page 44

44 | Managing Your Pocket PC
Why is the device name important?
Synchronizing with a PC
Connecting to a network
Restoring information from a backup
Note If you synchronize multiple devices with the same PC, each device must
have a unique name.
To make the battery last longer
Tap
>
tab >
Advanced
Use the AC adapter to plug your device into external power
whenever possible, especially when using a CompactFlash card
Adjust the backlight settings.
To adjust the brightness of the backlight
1.
>
>
tab >
2.
To set the backlight to dim after a time delay
1.
>
>
tab >
2.
tab.
3.
Page 45

Managing Your Pocket PC | 45
4.2 Adding and Removing Programs
You can then use ActiveSync to add programs to your device, or add a
To add programs
1.
2.
with the program. Many programs provide special installation
3.
4.
Page 46

46 | Managing Your Pocket PC
•
If the executable file is an installation wizard, follow the
•
If an installation wizard does not start, you will see an
To remove programs
You can only remove programs that you installed. Programs that come
with your device cannot be removed.
1.
2.
list, select the program you
want to remove, and tap
3.
Yes
Yes
Page 47

Managing Your Pocket PC | 47
4.3 Managing Memory
To see how much memory is available
Tap
tab >
To see available storage card memory
You can see how much memory is available on a storage card that is
1.
tab >
2.
tab.
Tip If you have more than one card inserted, tap the list box and then the
storage card whose information you want to see.
To free up program memory
Close programs you are not currently using.
Move e-mail attachments to a storage card.
Move fi les to a storage card. Tap
>
>
Delete unnecessary fi les. Tap
Delete large fi les. To fi nd your largest fi les, tap
list, tap
In Internet Explorer Mobile, delete temporary Internet fi les and
Remove programs you no longer use.
Reset your device.
Page 48

48 | Managing Your Pocket PC
To close a program
1.
tab >
tab.
2.
Tip In most programs, you can also use the keyboard shortcut CTRL+Q to
close the program.
4.4 Backing Up Files
You can back up files to your PC using ActiveSync, or copy files to a
To copy fi les to a storage card
1.
2.
>
>
and navigate to the
3.
4.
by default) and tap
5.
>
Page 49

Managing Your Pocket PC | 49
To copy a fi le using ActiveSync
will not affect the other.
1.
2.
3.
4.
•
To copy the file to your device, right-click the file, and click
•
To copy the file to your PC, right-click the file and click
To automatically save fi les on a storage card
1.
>
2.
box,
3.
Note In the file or note list, a storage card symbol is displayed next to the
names of files saved on a storage card.
Page 50

50 | Managing Your Pocket PC
4.5 Protecting Your Device
You can prevent unauthorized access to any part of the device by
To protect your device with a password
You can help keep your data more secure by requiring a password
1.
>
tab >
2.
box, select
3.
tab, enter a phrase that will help you remember your
4.
Notes Each time a wrong password is entered, the time the device takes to
respond will get longer and longer until the device appears to be not
responding.
If you forget your password, you must follow the instructions in your
owner’s manual to clear memory before you can access your device.
Page 51

Managing Your Pocket PC | 51
To change your password
1.
>
>
tab >
2.
box, enter your new password.
3.
tab, enter a phrase that will help you remember your
4.
To display owner information on the Today screen
1.
>
tab >
2.
tab, select the
check
3.
tab, select the
4.
tab, enter the additional text.
Tip To display owner information on the Today screen, tap Start > Settings
> Personal tab > Today. On the Items tab, select the Owner Info
check box.
Page 52

52 | Managing Your Pocket PC
4.6 Resetting Your Pocket PC
You can also perform a hard reset (also known as a full reset). A hard
To perform a soft reset
Use the stylus to lightly press and hold the RESET button on the
To perform a hard reset
Press and hold both SOFT KEYS shown enclosed by circles in
Soft Reset
Page 53

5.1 Using Wireless Connection
5.2 Connecting to the Internet
5.3 Internet Explorer Mobile
5.4 Using Bluetooth
5.5 Using Terminal Services Client
Chapter 5
Getting Connected
Page 54

54 | Getting Connected
5.1 Using Wireless Connection
Check for a Wireless LAN signal
Today screen. If your device detects a WLAN network
WLAN Power Status screen. The current connection status and
Note WLAN (Wi-Fi) is the default wireless channel setting for your device.
Page 55

Getting Connected | 55
To connect to a Wi-Fi network
Wireless LAN
1.
tab >
Wireless
2.
to open Wireless Manager.
3.
WLAN icon (
is highlighted to indicate that Wi-Fi is turned
Page 56

56 | Getting Connected
Page 57

Getting Connected | 57
5.2 Connecting to the Internet
Your device is equipped with powerful networking functions that
To connect to a private network
Connection Setting
1.
•
Server phone number
•
User name
•
Password
•
Domain (If provided by an ISP or a network administrator)
2.
>
>
tab >
3.
4.
Note To start browsing the private network, tap Start > Programs > Internet
Explorer.
Page 58

58 | Getting Connected
To reset or modify the network card settings on your device
1.
>
tab >
>
tab.
•
If you want to connect to the Internet using your ISP, select
•
If you want to connect to a private network, select
Work
3.
4.
5.
Page 59

Getting Connected | 59
5.3 Internet Explorer Mobile
To start Internet Explorer Mobile
Tap
To choose a Home page
1.
>
2.
•
To use the displayed page as your Home page, tap
•
To use the default Home page, tap
Tip To go to your Home page, tap Menu > Home.
To transfer favorites from your PC
You can transfer the favorites you have stored on your PC to your
1.
2.
3.
To add a favorite
1.
2.
Add to Favorites
3.
Page 60

60 | Getting Connected
To delete a favorite or folder
1.
Add
/
tab.
2.
To change how Web pages fi ll the screen
1.
View
2.
To change the size of text on Web pages
In Internet Explorer Mobile, tap
To show or hide pictures on Web pages
In Internet Explorer Mobile, tap
View
A check mark next to
To clear the History list
1.
>
>
>
tab.
2.
To save a picture from a Web page
1.
2.
•
To save the picture in
on your device, tap
Yes
Page 61

Getting Connected | 61
•
To save the picture in another location, such as a storage
To change cookies and security settings
1.
2.
Tip To prevent Internet Explorer Mobile from accepting any cookies, clear
the Allow cookies check box.
To delete temporary Internet fi les
1.
>
>
>
tab.
2.
All pages stored on your device, including offline favorites
Page 62

62 | Getting Connected
5.4 Using Comm Manager
Enable or disable Wi-Fi
Enable or disable Bluetooth
Switch on or off your device sound
Turn ActiveSync on or off
then choose which phone feature you
want to configure.
Page 63

Getting Connected | 63
5.5 Using Bluetooth
You can even beam information to a device in a different room, as long
Beam information, such as fi les, appointments, tasks, and contact
Create a dial-up modem connection between your device and a
To turn on or off Bluetooth on your device
1.
tab >
2.
and
check boxes.
3.
Note To add an extra layer of security while beaming information with other
devices, or to set up Bluetooth synchronization, tap Start > Settings >
System tab > Bluetooth Setting.
Bluetooth modes
On. Bluetooth is turned on and you can use Bluetooth features.
Off. Bluetooth is turned off. In this mode, you can neither send
Discoverable. Bluetooth is turned on, and all other Bluetooth-
Page 64

64 | Getting Connected
Note By default, Bluetooth is turned off. If you turn it on, and then turn off your
device, Bluetooth also turns off. When you turn on your device again,
Bluetooth automatically turns on.
To make your device discoverable
1.
>
>
tab >
2.
and
3.
Note Selecting the Make this device discoverable to other devices check
box also turns on Bluetooth.
Bluetooth partnerships
A Bluetooth partnership is a relationship that you create between your
To create a Bluetooth partnership
1.
>
tab >
2.
Your device searches for other Bluetooth devices and displays
3.
4.
Page 65

Getting Connected | 65
5.
6.
7.
You can, however, edit and enter a new name for the other
8.
To accept a Bluetooth partnership
1.
2.
when prompted to establish a partnership with the other
3.
4.
5.
You can now exchange information with the other device.
To rename a Bluetooth partnership
1.
>
2.
tab.
3.
4.
5.
Page 66

66 | Getting Connected
To delete a Bluetooth partnership
1.
>
tab >
2.
tab.
3.
Delete
from the shortcut menu.
Beam information using Bluetooth
To beam information from your device
1.
2.
[
3.
Note If the device you want to beam to does not appear in the box, make sure
that it is turned on, discoverable, and within close range (10 meters) of
your device.
Use a Bluetooth device as a modem
You can use a phone that has Bluetooth capabilities as a modem for
Page 67

Getting Connected | 67
To confi gure and use a Bluetooth device as a modem
1.
>
2.
Add a new modem connection
3.
4.
list, tap
5.
6.
list, skip to step 11.
7.
8.
9.
10.
11.
12.
13.
You can start using this service for the program that uses the Bluetooth
Page 68

68 | Getting Connected
5.6 Using Terminal Services Client
Connect to a Terminal Server
1.
>
2.
3.
You can also select a server name in
if you have
4.
Navigate within Terminal Services Client
check box. For best results, the programs on your PC should
Page 69

Getting Connected | 69
Disconnect without ending a session
1.
2.
Notes Do not use the Start menu on your device.
If a network administrator has configured Terminal Services Client on
your device to reconnect to disconnected sessions, and you previously
disconnected from a Terminal Server without ending the session, the
Terminal Services Client reconnects to that session.
Disconnect after ending a session
1.
>
2.
Page 70

6.1 E-mail and Text Messages
6.2 Pocket MSN Messenger
6.3 Calendar
6.4 Contacts
6.5 Tasks
6.6 Notes
Chapter 6
Exchanging Messages
and Using Outlook
Page 71

70 | Exchanging Messages and Using Outlook
6.1 E-mail and Text Messages
You can also access e-mail from work using a VPN connection. For
To set up an e-mail account
You need to set up an e-mail account that you have with an Internet
1.
2.
>
>
3.
Auto configuration
attempts to download necessary e-mail
4.
Auto confi guration
has fi nished, tap
5.
check box if you want to save your
Auto configuration
was successful, the
Your name
and
fields automatically get populated. Tap
to
to access additional
Change the time intervals for downloading new messages.
Limit the amount of messages that are downloaded and
Download attachments or parts of messages.
Auto configuration
is unsuccessful or you have an account you
Page 72

Exchanging Messages and Using Outlook | 71
User name Enter the user name assigned to you by your ISP or network
administrator. This is often the first part of your e-mail
address, which appears before the at sign (@).
Password Choose a strong password. You have the option to save
your password so you do not need to enter it each time you
connect to your e-mail server.
Domain Not required for an account with an ISP. May be required for
a work account.
Account type Select POP3 or IMAP4.
Account name Enter a unique name for the account, such as Work or
Home. This name cannot be changed later.
Incoming mail
server
Enter the name of your e-mail server (POP3 or IMAP4).
Outgoing mail
server
Enter the name of your outgoing e-mail server (SMTP).
Require SSL
connection
Select this to ensure that you always send e-mail from this
account using an SSL connection. This enables you to send
personal information more securely. Note that if you select
this and your ISP does not support an SSL connection, you
will not be able to send e-mail.
Outgoing
mail requires
authentication
Select this if your outgoing e-mail server (SMTP) requires
authentication. Your user name and password from above
will be used.
Use separate
settings
Select this if your outgoing e-mail server requires a different
user name and password than the ones you entered before.
Outgoing
server settings:
User name Enter your user name for the outgoing e-mail server.
Password Enter your password for the outgoing e-mail server.
Domain Enter the domain of the outgoing e-mail server.
Require SSL for
outgoing mail
Select this to ensure you always send e-mail from this
account using an SSL connection. This enables you to send
personal information more securely. Note that if you select
this and your ISP does not support an SSL connection, you
will not be able to send e-mail.
Tip
You can set up several e-mail accounts in addition to your Outlook E-
mail account.
Page 73

72 | Exchanging Messages and Using Outlook
To compose and send a message
1.
>
and select an
2.
3.
4.
and tap a desired message.
5.
6.
Tips To enter symbols, tap Shift using the on-screen keyboard.
To set the priority, tap
Menu > Message Options.
If you are working offline, e-mail messages are moved to the Outbox
folder and will be sent the next time you connect.
If you are sending a text message and want to know if it was received,
before sending the message, tap Menu > Tools > Options. Tap Text
Messages and select the Request delivery notification check box.
To reply to or forward a message
1.
>
2.
>
and tap a desired message.
3.
>
4.
Tips To see more header information, scroll up.
To always include the original message, from the list view, tap
Menu
> Tools > Options > Message tab, and select the When replying to
e-mail, include body check box.
Page 74

Exchanging Messages and Using Outlook | 73
In the Outlook E-mail account, you will send less data if you do not edit
the original message. This may reduce data transfer costs based on
your rate plan.
To add an attachment to a message
1.
and tap the item you
want to attach:
Voice Note
2.
To receive attachments
An attachment sent with an e-mail message or downloaded from
1.
ActiveSync
2.
3.
Attachments
1.
2.
3.
4.
until you reach
5.
twice, and select
and
When getting full copy, get attachments
Tip To store attachments on a storage card rather than on the device,
tap Menu > Tools > Options > Storage tab, and select the Store
attachments on a storage card check box.
Page 75

74 | Exchanging Messages and Using Outlook
Downloading messages
To send and receive e-mail for an Outlook E-mail account, begin
To send and receive e-mail messages for an e-mail account
To download messages from the server
1.
and tap the account you want to
2.
>
Tips If you want to read the entire message, tap Menu > Download
Message while in the message window. If you are in the message list,
tap and hold the message, and tap Menu > Download Message. The
message will download the next time you send and receive e-mail. This
will also download message attachments if you selected those options
when you set up the e-mail account.
Page 76

Exchanging Messages and Using Outlook | 75
Managing folders
You can select to synchronize additional folders by designating them
Page 77

76 | Exchanging Messages and Using Outlook
6.2 Pocket MSN
Send and receive instant messages.
See which contacts are online or offl ine.
Subscribe to status updates for selected contacts so you know
when they come online.
Block contacts from seeing your status or sending you messages.
Note You must have either a Microsoft .NET Passport or Hotmail account to
use MSN Messenger. If you have a Hotmail.com or MSN.com e-mail
address, you already have a Passport. To get a Passport account, go
to http://www.passport.com. To get a Hotmail account, go to http://www.
hotmail.com.
To start MSN Messenger
1.
>
2.
To sign in or out
To sign in, tap anywhere on the MSN Messenger screen. Enter
To sign out, tap
Your status changes to Offl ine.
Page 78

Exchanging Messages and Using Outlook | 77
To add or delete contacts
To add a contact, tap
Add a Contact
To delete a contact, tap and hold the contact's name, and tap
To send an instant message
1.
2.
Tip To quickly add common phrases, tap Menu > My Text and select a
phrase in the list.
To block or unblock contacts
To block a contact from seeing your status and sending you
To unblock a contact, tap and hold the name of the blocked
To check your own Messenger status
Tap and hold your own name at the top of the page.
Your current status is indicated in the displayed list by a bullet point.
To change your display name
1.
tab.
2.
To get more help about MSN Messenger
From within MSN Messenger, tap
>
Page 79

78 | Exchanging Messages and Using Outlook
6.3 Calendar
You can look at your appointments in several different views (Day,
To schedule an appointment
1.
2.
>
3.
4.
All Day
box, tap
Yes
5.
to return to the calendar.
Notes All-day events do not occupy blocks of time in Calendar; instead, they
appear in banners at the top of the calendar.
To cancel an appointment, tap the appointment and tap
Menu > Delete.
Tip
To have the time entered automatically in Day view, tap the time slot for
the new appointment, and tap Menu > New Appointment.
To send a meeting request
1.
2.
3.
Attendees
4.
5.
Add
Page 80

Exchanging Messages and Using Outlook | 79
6.
7.
Note When attendees accept your meeting request, the meeting is
automatically added to their schedules. When their response is sent
back to you, your calendar is updated as well.
To set a default reminder for all new appointments
You can have a reminder automatically turned on for all new
1.
2.
Appointments
tab.
3.
check box.
4.
5.
to return to the calendar.
Page 81

80 | Exchanging Messages and Using Outlook
6.4 Contacts
To create a contact
1.
2.
and enter the contact information.
3.
Tips If someone who is not in your list of contacts calls you or sends you
a message, you can create a contact from Call History, or from the
message by tapping Menu > Save to Contacts.
In the list of contact information, you’ll see where you can add a picture
or assign a ring tone to a contact.
To change contact information
1.
2.
3.
and enter the changes.
4.
To work with the contact list
1.
2.
Page 82

Exchanging Messages and Using Outlook | 81
•
In Name view, you can search for a contact by entering a
View By
•
To see a summary of information about a contact, tap the
•
To see a list of available actions for a contact, tap and hold the
•
To see a list of contacts employed by a specific company, tap
View By
To fi nd a contact
1.
>
2.
>
View By
3.
•
Begin entering a name or phone number in the provided
•
Use the alphabetical index displayed at the top of the contact
•
Filter the list by categories. In the contact list, tap
All Contacts
Page 83

82 | Exchanging Messages and Using Outlook
6.5 Tasks
Your tasks are displayed in a task list. Overdue tasks are displayed in
To create a task
1.
> Tasks.
2.
3.
Tip You can easily create a short, to-do-type task. Simply tap the Tap here
to add a new task box, enter a subject, and press ENTER. If the task
entry box is not available, tap Menu > Options and select the Show
Tasks entry bar check box.
To change the priority of a task
1.
>
2.
3.
and in the
box, tap a priority level.
4.
to return to the task list.
Note All new tasks are assigned a Normal priority by default.
Page 84

Exchanging Messages and Using Outlook | 83
To set a default reminder for all new tasks
You can have a reminder automatically turned on for all new tasks you
1.
2.
3.
check box.
4.
to return to the task list.
Note The new tasks must have due dates set in order for the reminder to take
effect.
To show start and due dates in the task list
1.
>
2.
>
3.
check box.
4.
To locate a task
1.
>
>
2.
•
Sort the list. Tap
•
Filter the list by category. Tap
Tip To filter your tasks further, tap Menu > Filter > Active Tasks or
Completed Tasks.
Page 85

84 | Exchanging Messages and Using Outlook
6.6 Notes
Entering information in Notes
To set the default input mode for Notes
1.
2.
3.
box, tap one of the following:
•
Writing
if you want to draw or enter handwritten text in a note.
•
if you want to create a typed note.
4.
To create a note
1.
2.
3.
arrow next to the Input Method icon on
4.
arrow is not displayed, tap the Input Method
5.
to return to the note list.
Page 86

Exchanging Messages and Using Outlook | 85
To record a note
You can create a stand-alone recording (voice note) or you can add a
1.
2.
•
To create a stand-alone recording, record from the note list.
•
To add a recording to a note, create or open a note.
3.
toolbar, tap
>
View
4.
to begin recording.
5.
6.
when fi nished recording.
7.
to return to the note list.
Note To play a recording, tap the Recording icon in the open note or tap the
recording in the note list.
Tip
To quickly create a recording, press the RECORD hardware button.
When you hear the beep, begin your recording. Release the button
when you are finished.
Page 87

86 | Exchanging Messages and Using Outlook
Page 88

7.1 Using Pictures & Videos
7.2 Using Windows Media Player
Chapter 7
Experiencing Multimedia
Page 89

88 | Experiencing Multimedia
7.1 Using Pictures & Videos
Image
.bmp
.jpg
Video
.wmv
You can view the pictures as a slide show, bean them, send them via
To copy a picture or video clip to your device
You can copy pictures from your PC
and view them on your device.
Copy the pictures from your PC or a storage card to the My
Note You can also copy pictures from your PC to your device using a memory
card. Insert the memory card into the memory card slot on your device,
and then copy the pictures from your PC to the folder you created on
the memory card.
Page 90

Experiencing Multimedia | 89
To view pictures
1.
>
2.
View
Pictures and Videos
To play videos with audio
1.
icon.
2.
To view slideshows
You can view your pictures as a slide show on your device. Pictures
1.
2.
Note You can specify how pictures are scaled to optimize their display in
a slide show. Tap Menu > Options and on the Slide Show tab, tap
Portrait Pictures or Landscape Pictures.
Page 91

90 | Experiencing Multimedia
To sort pictures and video clips
1.
2.
want to sort by.
To delete a picture or video clip
Select a picture or video clip on the Pictures & Videos screen,
to confi rm the deletion.
Tap and hold the thumbnail of the picture you want to delete, and
To edit a picture or video clip
You can rotate, crop, and adjust the brightness and color contrast of
1.
>
>
2.
3.
•
To rotate a picture 90 degrees, tap
•
To crop a picture, tap
•
To adjust the brightness and contrast levels of a picture, tap
Auto Correct
Note To undo an edit, tap Menu > Undo. To cancel all unsaved edits you
made to the picture, tap Revert to Saved.
To set a picture as the Today screen background
Page 92

Experiencing Multimedia | 91
You can use a picture as the background on the Today screen.
1.
2.
3.
as Today Background
4.
5.
To send pictures and video clips via e-mail
You can send pictures and video clips to other devices via e-mail.
1.
2.
3.
A new message is created with the item attached.
4.
Note Pictures and video clips are saved automatically before they are sent.
To beam a picture
You can beam a picture to your friends or a family member using
1.
Pictures & Videos
2.
3.
Menu
4.
5.
Page 93

92 | Experiencing Multimedia
To assign pictures to contacts
You can assign a picture to a contact so that you can easily identify the
1.
2.
3.
>
4.
to choose the contact
To use advance options
1.
2.
3.
>
•
Resize a picture so that you can send it faster to someone
•
Configure the view settings during slide shows and activate
•
Set the direction you want to rotate a picture 90 degrees.
Page 94

Experiencing Multimedia | 93
7.2 Using Windows Media Player
You can use Microsoft Windows Media Player 10 Mobile for Pocket PC
Video
• Windows Media Video .wmv
Audio
• Windows Media Audio
• MP3
• MIDI
.wma
.mp3
.wav
Page 95

94 | Experiencing Multimedia
About the controls
Plays a file. Increases the
volume level.
Pauses a file. Decreases the
volume level.
Skips to the
beginning of the
current file or to the
previous file.
Turns the sound on
or off.
Skips to the next file. Displays a video
by using the entire
screen (full screen).
Adjusts the playback
progress of a
selected file.
Displays a Web site
where you can find
music and videos
to play.
Note If your device hardware supports it, you can rewind and fast-forward
files by pressing and holding the Left/Right controls.
Page 96

Experiencing Multimedia | 95
About the screens and menus
The default screen that displays the playback
The screen that displays the Now Playing
The screen that lets you quickly find your audio files,
Video, My TV, and My Playlists.
At the bottom of each screen is a menu called
Playback screen menu
Play/Pause Starts or pauses playback.
Shuffle/Repeat Plays the items in the Now Playing playlist repeatedly or
randomly.
Stop Stops playback.
Full Screen
When a video is playing, displays it by using the entire screen.
Library
Displays the Library screen so you can choose a file to play.
Options Lets you adjust various Windows Media Player options,
including network, skin, and hardware button options.
Properties Displays information about the currently playing file.
About Displays information about Windows Media Player, such as
the version number.
Page 97

96 | Experiencing Multimedia
Now Playing screen menu
Library Displays the Library screen so you can choose a file
to play.
Move Up Moves the selected item up in the playlist order.
Move Down Moves the selected item down in the playlist order.
Remove from Playlist
Deletes the selected item from the playlist.
Clear Now Playing Deletes all items from the Now Playing playlist.
Error Details Displays error information about the selected item (an
exclamation mark appears before the item name if
error details are available).
Properties Displays information about the selected file.
Library screen menu
Queue Up Adds the selected item to the end of the current (Now
Playing) playlist.
Delete from Library MDeletes the selected item from the library.
Update Library Adds new items to the library by searching your device
or storage card.
Open File Lets you find and play files that are stored on your
device or storage card but that are not in the library..
Properties Displays information about the selected file.
Page 98

Experiencing Multimedia | 97
About licenses and protected files
protected files
Note You can view the protection status for a file by checking its file
properties (tapping Menu > Properties).
To play items on your device
1.
2.
3.
Note To play a file that is stored on your device but is not in a library, on the
Library screen, tap Menu > Open File. Tap and hold the item that you
want to play (such as a file or a folder), and then tap Play.
Page 99

98 | Experiencing Multimedia
Copy files to your device
with protected files.
Note Audio files copy faster if the desktop Player is configured to
automatically set the quality level for audio files copied to your device.
For more information, see desktop Player Help on the PC.
Page 100

Experiencing Multimedia | 99
Accessibility for people with disabilities
www.microsoft.com/enable/default.aspx
www.microsoft.com/enable/default.aspx
Accessibility in Microsoft Windows
Adjusting Microsoft products for people with accessibility needs
Free step-by-step tutorials
Microsoft documentation in alternative formats
Assistive technology for Windows
Customer service for people who are deaf or hard-of-hearing
Note The information in this section applies to users who license Microsoft
products in the United States. If you obtained this product outside the
United States, your package contains a subsidiary information card that
you can use to contact your subsidiary about the products and services
available in your area.
Troubleshooting
/w
ww.microsoft.com/
windows/windowsmedia/player/windowsmobile
windows/windowsmedia/player/windowsmobile
/
 Loading...