

Page 1

T-Mobile G1
User Guide
™
Android™ mobile technology platform R1.0
Document Rev 08 - September 8, 2008
Copyright 2008 © Google, Inc. All rights reserved.
Page 2

Contents
Check that you’ve received everything. . . . . . . . . . . . . . . . . . . . . . . . . . .8
Phone controls . . . . . . . . . . . . . . . . . . . . . . . . . . . . . . . . . . . . . . . . . . . . .9
Control buttons . . . . . . . . . . . . . . . . . . . . . . . . . . . . . . . . . . . . . . . . . . . . . . . . . . . . . . . . . . . . . . .9
Status light indicators . . . . . . . . . . . . . . . . . . . . . . . . . . . . . . . . . . . . . . . . . . . . . . . . . . . . . . . . 11
SD card slot. . . . . . . . . . . . . . . . . . . . . . . . . . . . . . . . . . . . . . . . . . . . . . . . . . . . . . . . . . . . . . . . 11
SIM card slot . . . . . . . . . . . . . . . . . . . . . . . . . . . . . . . . . . . . . . . . . . . . . . . . . . . . . . . . . . . . . . . 12
Battery charging . . . . . . . . . . . . . . . . . . . . . . . . . . . . . . . . . . . . . . . . . . . . . . . . . . . . . . . . . . . . 13
Keyboard . . . . . . . . . . . . . . . . . . . . . . . . . . . . . . . . . . . . . . . . . . . . . . . . . . . . . . . . . . . . . . . . . 13
SEARCH key. . . . . . . . . . . . . . . . . . . . . . . . . . . . . . . . . . . . . . . . . . . . . . . . . . . . . . . . . . . . 13
MENU key . . . . . . . . . . . . . . . . . . . . . . . . . . . . . . . . . . . . . . . . . . . . . . . . . . . . . . . . . . . . . 13
ALT key . . . . . . . . . . . . . . . . . . . . . . . . . . . . . . . . . . . . . . . . . . . . . . . . . . . . . . . . . . . . . . . 13
SHIFT key . . . . . . . . . . . . . . . . . . . . . . . . . . . . . . . . . . . . . . . . . . . . . . . . . . . . . . . . . . . . . . 14
@ key . . . . . . . . . . . . . . . . . . . . . . . . . . . . . . . . . . . . . . . . . . . . . . . . . . . . . . . . . . . . . . . . 14
Typing and text navigation tips . . . . . . . . . . . . . . . . . . . . . . . . . . . . . . . . . . . . . . . . . . . . 14
Touch screen & trackball . . . . . . . . . . . . . . . . . . . . . . . . . . . . . . . . . . . . . . . . . . . . . . . . . . . . . . 15
Selection. . . . . . . . . . . . . . . . . . . . . . . . . . . . . . . . . . . . . . . . . . . . . . . . . . . . . . . . . . . . . . . 15
Context menus . . . . . . . . . . . . . . . . . . . . . . . . . . . . . . . . . . . . . . . . . . . . . . . . . . . . . . . . . . 15
Scroll . . . . . . . . . . . . . . . . . . . . . . . . . . . . . . . . . . . . . . . . . . . . . . . . . . . . . . . . . . . . . . . . . 15
Crop pictures . . . . . . . . . . . . . . . . . . . . . . . . . . . . . . . . . . . . . . . . . . . . . . . . . . . . . . . . . . . 15
Drag items . . . . . . . . . . . . . . . . . . . . . . . . . . . . . . . . . . . . . . . . . . . . . . . . . . . . . . . . . . . . . 15
Zoom in or out . . . . . . . . . . . . . . . . . . . . . . . . . . . . . . . . . . . . . . . . . . . . . . . . . . . . . . . . . . 16
Scale & scroll . . . . . . . . . . . . . . . . . . . . . . . . . . . . . . . . . . . . . . . . . . . . . . . . . . . . . . . . . . 16
Navigate in lists. . . . . . . . . . . . . . . . . . . . . . . . . . . . . . . . . . . . . . . . . . . . . . . . . . . . . . . . . . . . . 17
Silent mode . . . . . . . . . . . . . . . . . . . . . . . . . . . . . . . . . . . . . . . . . . . . . . . . . . . . . . . . . . . . . . . 17
Screen sleep . . . . . . . . . . . . . . . . . . . . . . . . . . . . . . . . . . . . . . . . . . . . . . . . . . . . . . . . . . . . . . . 17
Screen lock . . . . . . . . . . . . . . . . . . . . . . . . . . . . . . . . . . . . . . . . . . . . . . . . . . . . . . . . . . . . . . . . 18
Global shortcuts . . . . . . . . . . . . . . . . . . . . . . . . . . . . . . . . . . . . . . . . . . . . . . . . . . . . . . . . . . . . 18
Application “quick launch” . . . . . . . . . . . . . . . . . . . . . . . . . . . . . . . . . . . . . . . . . . . . . . . . . 19
Recent applications . . . . . . . . . . . . . . . . . . . . . . . . . . . . . . . . . . . . . . . . . . . . . . . . . . . . . . 19
Wireless off . . . . . . . . . . . . . . . . . . . . . . . . . . . . . . . . . . . . . . . . . . . . . . . . . . . . . . . . . . . . . . . 19
Making phone calls . . . . . . . . . . . . . . . . . . . . . . . . . . . . . . . . . . . . . . . . . . . . . . . . . . . . . . . . . . 20
Power on/off . . . . . . . . . . . . . . . . . . . . . . . . . . . . . . . . . . . . . . . . . . . . . . . . . . . . . . . . . . . . . . 20
Home screen . . . . . . . . . . . . . . . . . . . . . . . . . . . . . . . . . . . . . . . . . . . . . .21
Home screen overview . . . . . . . . . . . . . . . . . . . . . . . . . . . . . . . . . . . . . . . . . . . . . . . . . . . . . . . 21
Extended Home screen . . . . . . . . . . . . . . . . . . . . . . . . . . . . . . . . . . . . . . . . . . . . . . . . . . . . . . . 22
T-Mobile G1 User Guide R1.0 2 September 8, 2008
Page 3

Create Home screen shortcuts and widgets . . . . . . . . . . . . . . . . . . . . . . . . . . . . . . . . . . . . . . . 22
Remove items from the Home screen . . . . . . . . . . . . . . . . . . . . . . . . . . . . . . . . . . . . . . . . . . . . 22
Move objects on the Home screen . . . . . . . . . . . . . . . . . . . . . . . . . . . . . . . . . . . . . . . . . . . . . . 23
Create and delete folders on the Home screen . . . . . . . . . . . . . . . . . . . . . . . . . . . . . . . . . . . . 23
Customize Home screen wallpaper. . . . . . . . . . . . . . . . . . . . . . . . . . . . . . . . . . . . . . . . . . . . . . 23
Notification and connection status icons . . . . . . . . . . . . . . . . . . . . . . . . . . . . . . . . . . . . . . . . . . 24
Read your notifications . . . . . . . . . . . . . . . . . . . . . . . . . . . . . . . . . . . . . . . . . . . . . . . . . . . 25
Wireless operator . . . . . . . . . . . . . . . . . . . . . . . . . . . . . . . . . . . . . . . . . . . . . . . . . . . . . . . 25
Call voicemail . . . . . . . . . . . . . . . . . . . . . . . . . . . . . . . . . . . . . . . . . . . . . . . . . . . . . . . . . . 25
System settings . . . . . . . . . . . . . . . . . . . . . . . . . . . . . . . . . . . . . . . . . . . .26
Wireless controls . . . . . . . . . . . . . . . . . . . . . . . . . . . . . . . . . . . . . . . . . . . . . . . . . . . . . . . . . . . . 26
Call settings. . . . . . . . . . . . . . . . . . . . . . . . . . . . . . . . . . . . . . . . . . . . . . . . . . . . . . . . . . . . . . . . 27
Basic phone settings . . . . . . . . . . . . . . . . . . . . . . . . . . . . . . . . . . . . . . . . . . . . . . . . . . . . . . . . . 28
Data synchronization. . . . . . . . . . . . . . . . . . . . . . . . . . . . . . . . . . . . . . . . . . . . . . . . . . . . . . . . . 31
Sync by application. . . . . . . . . . . . . . . . . . . . . . . . . . . . . . . . . . . . . . . . . . . . . . . . . . . . . . 32
Sync by Gmail label . . . . . . . . . . . . . . . . . . . . . . . . . . . . . . . . . . . . . . . . . . . . . . . . . . . . . 33
Bluetooth. . . . . . . . . . . . . . . . . . . . . . . . . . . . . . . . . . . . . . . . . . . . . . . . .34
Turn on Bluetooth services . . . . . . . . . . . . . . . . . . . . . . . . . . . . . . . . . . . . . . . . . . . . . . . . . . . . . 34
Discoverability. . . . . . . . . . . . . . . . . . . . . . . . . . . . . . . . . . . . . . . . . . . . . . . . . . . . . . . . . . . . . . 34
Name your Bluetooth device . . . . . . . . . . . . . . . . . . . . . . . . . . . . . . . . . . . . . . . . . . . . . . . . . . 34
Pair & connect with Bluetooth devices. . . . . . . . . . . . . . . . . . . . . . . . . . . . . . . . . . . . . . . . . . . . 35
Rescan for Bluetooth devices. . . . . . . . . . . . . . . . . . . . . . . . . . . . . . . . . . . . . . . . . . . . . . . . . . . 35
Clear device list . . . . . . . . . . . . . . . . . . . . . . . . . . . . . . . . . . . . . . . . . . . . . . . . . . . . . . . . . . . . 35
Contacts . . . . . . . . . . . . . . . . . . . . . . . . . . . . . . . . . . . . . . . . . . . . . . . . .36
Your contact list. . . . . . . . . . . . . . . . . . . . . . . . . . . . . . . . . . . . . . . . . . . . . . . . . . . . . . . . . . . . . 36
Add a contact . . . . . . . . . . . . . . . . . . . . . . . . . . . . . . . . . . . . . . . . . . . . . . . . . . . . . . . . . . . . . . 37
Assign favorites. . . . . . . . . . . . . . . . . . . . . . . . . . . . . . . . . . . . . . . . . . . . . . . . . . . . . . . . . . . . . 38
Edit contact details . . . . . . . . . . . . . . . . . . . . . . . . . . . . . . . . . . . . . . . . . . . . . . . . . . . . . . . . . . 38
Communicate with a contact . . . . . . . . . . . . . . . . . . . . . . . . . . . . . . . . . . . . . . . . . . . . . . . . . . . 38
Display a contact group . . . . . . . . . . . . . . . . . . . . . . . . . . . . . . . . . . . . . . . . . . . . . . . . . . . . . . 40
Contacts settings . . . . . . . . . . . . . . . . . . . . . . . . . . . . . . . . . . . . . . . . . . . . . . . . . . . . . . . . . . . . 40
About the My Contacts group. . . . . . . . . . . . . . . . . . . . . . . . . . . . . . . . . . . . . . . . . . . . . . . . . . 41
Contacts shortcuts . . . . . . . . . . . . . . . . . . . . . . . . . . . . . . . . . . . . . . . . . . . . . . . . . . . . . . . . . . . 41
Email, IM, and Messaging . . . . . . . . . . . . . . . . . . . . . . . . . . . . . . . . . . .42
Gmail . . . . . . . . . . . . . . . . . . . . . . . . . . . . . . . . . . . . . . . . . . . . . . . . . . . . . . . . . . . . . . . . . . . . 42
About messages . . . . . . . . . . . . . . . . . . . . . . . . . . . . . . . . . . . . . . . . . . . . . . . . . . . . . . . . . 42
Inbox conversation list . . . . . . . . . . . . . . . . . . . . . . . . . . . . . . . . . . . . . . . . . . . . . . . . . . . . 42
T-Mobile G1 User Guide R1.0 3 September 8, 2008
Page 4

Conversation labels . . . . . . . . . . . . . . . . . . . . . . . . . . . . . . . . . . . . . . . . . . . . . . . . . . . . . 43
Read email. . . . . . . . . . . . . . . . . . . . . . . . . . . . . . . . . . . . . . . . . . . . . . . . . . . . . . . . . . . . . 44
Compose email . . . . . . . . . . . . . . . . . . . . . . . . . . . . . . . . . . . . . . . . . . . . . . . . . . . . . . . . . 46
Search for messages . . . . . . . . . . . . . . . . . . . . . . . . . . . . . . . . . . . . . . . . . . . . . . . . . . . . . 46
Add signature to messages . . . . . . . . . . . . . . . . . . . . . . . . . . . . . . . . . . . . . . . . . . . . . . . . 46
Select labels to synchronize. . . . . . . . . . . . . . . . . . . . . . . . . . . . . . . . . . . . . . . . . . . . . . . . 46
Set new email notifications . . . . . . . . . . . . . . . . . . . . . . . . . . . . . . . . . . . . . . . . . . . . . . . . 47
Gmail shortcuts . . . . . . . . . . . . . . . . . . . . . . . . . . . . . . . . . . . . . . . . . . . . . . . . . . . . . . . . . 47
POP3 and IMAP email accounts . . . . . . . . . . . . . . . . . . . . . . . . . . . . . . . . . . . . . . . . . . . . . . . . 48
Add an email account . . . . . . . . . . . . . . . . . . . . . . . . . . . . . . . . . . . . . . . . . . . . . . . . . . . . 48
Use your POP3 and IMAP email account . . . . . . . . . . . . . . . . . . . . . . . . . . . . . . . . . . . . . 48
Remove an email account . . . . . . . . . . . . . . . . . . . . . . . . . . . . . . . . . . . . . . . . . . . . . . . . . 49
Edit account settings. . . . . . . . . . . . . . . . . . . . . . . . . . . . . . . . . . . . . . . . . . . . . . . . . . . . . . 50
Email shortcuts . . . . . . . . . . . . . . . . . . . . . . . . . . . . . . . . . . . . . . . . . . . . . . . . . . . . . . . . . . 51
Google Talk . . . . . . . . . . . . . . . . . . . . . . . . . . . . . . . . . . . . . . . . . . . . . . . . . . . . . . . . . . . . . . . 52
Your Google Talk Friends list . . . . . . . . . . . . . . . . . . . . . . . . . . . . . . . . . . . . . . . . . . . . . . 52
Chat . . . . . . . . . . . . . . . . . . . . . . . . . . . . . . . . . . . . . . . . . . . . . . . . . . . . . . . . . . . . . . . . . . 54
Sign in automatically . . . . . . . . . . . . . . . . . . . . . . . . . . . . . . . . . . . . . . . . . . . . . . . . . . . . . 55
Display mobile indicator . . . . . . . . . . . . . . . . . . . . . . . . . . . . . . . . . . . . . . . . . . . . . . . . . . 55
Set new message notifications . . . . . . . . . . . . . . . . . . . . . . . . . . . . . . . . . . . . . . . . . . . . . . 56
Sign out . . . . . . . . . . . . . . . . . . . . . . . . . . . . . . . . . . . . . . . . . . . . . . . . . . . . . . . . . . . . . . . 56
Add other IM accounts . . . . . . . . . . . . . . . . . . . . . . . . . . . . . . . . . . . . . . . . . . . . . . . . . . . . 56
SMS and MMS messaging . . . . . . . . . . . . . . . . . . . . . . . . . . . . . . . . . . . . . . . . . . . . . . . . . . . . 57
About text and multimedia messages . . . . . . . . . . . . . . . . . . . . . . . . . . . . . . . . . . . . . . . . 57
The message list . . . . . . . . . . . . . . . . . . . . . . . . . . . . . . . . . . . . . . . . . . . . . . . . . . . . . . . . . 57
The Read view . . . . . . . . . . . . . . . . . . . . . . . . . . . . . . . . . . . . . . . . . . . . . . . . . . . . . . . . . . 57
Compose text and multimedia messages . . . . . . . . . . . . . . . . . . . . . . . . . . . . . . . . . . . . . 59
Save message as draft . . . . . . . . . . . . . . . . . . . . . . . . . . . . . . . . . . . . . . . . . . . . . . . . . . . 59
Text and multimedia message settings . . . . . . . . . . . . . . . . . . . . . . . . . . . . . . . . . . . . . . . 60
Browser. . . . . . . . . . . . . . . . . . . . . . . . . . . . . . . . . . . . . . . . . . . . . . . . . .62
About the Browser. . . . . . . . . . . . . . . . . . . . . . . . . . . . . . . . . . . . . . . . . . . . . . . . . . . . . . . . . . . 62
Zoom and navigation in Web pages . . . . . . . . . . . . . . . . . . . . . . . . . . . . . . . . . . . . . . . . 62
The Browse screen. . . . . . . . . . . . . . . . . . . . . . . . . . . . . . . . . . . . . . . . . . . . . . . . . . . . . . . . . . . 63
Screen orientation . . . . . . . . . . . . . . . . . . . . . . . . . . . . . . . . . . . . . . . . . . . . . . . . . . . . . . . . . . . 64
Open pages in separate windows . . . . . . . . . . . . . . . . . . . . . . . . . . . . . . . . . . . . . . . . . . . . . . 64
Manage bookmarks . . . . . . . . . . . . . . . . . . . . . . . . . . . . . . . . . . . . . . . . . . . . . . . . . . . . . . . . . 65
Set your home page . . . . . . . . . . . . . . . . . . . . . . . . . . . . . . . . . . . . . . . . . . . . . . . . . . . . . . . . . 66
Links in Web pages . . . . . . . . . . . . . . . . . . . . . . . . . . . . . . . . . . . . . . . . . . . . . . . . . . . . . . . . . 67
Browser history . . . . . . . . . . . . . . . . . . . . . . . . . . . . . . . . . . . . . . . . . . . . . . . . . . . . . . . . . . . . . 68
Download Web files and applications. . . . . . . . . . . . . . . . . . . . . . . . . . . . . . . . . . . . . . . . . . . 68
View your downloads . . . . . . . . . . . . . . . . . . . . . . . . . . . . . . . . . . . . . . . . . . . . . . . . . . . . 68
T-Mobile G1 User Guide R1.0 4 September 8, 2008
Page 5

Browser settings . . . . . . . . . . . . . . . . . . . . . . . . . . . . . . . . . . . . . . . . . . . . . . . . . . . . . . . . . . . . 69
Browser shortcuts . . . . . . . . . . . . . . . . . . . . . . . . . . . . . . . . . . . . . . . . . . . . . . . . . . . . . . . . . . . 70
Google Maps . . . . . . . . . . . . . . . . . . . . . . . . . . . . . . . . . . . . . . . . . . . . .71
About Google Maps . . . . . . . . . . . . . . . . . . . . . . . . . . . . . . . . . . . . . . . . . . . . . . . . . . . . . . . . . 71
Zoom and navigation in maps . . . . . . . . . . . . . . . . . . . . . . . . . . . . . . . . . . . . . . . . . . . . . . 71
Find your location . . . . . . . . . . . . . . . . . . . . . . . . . . . . . . . . . . . . . . . . . . . . . . . . . . . . . . . . . . . 72
Find any location. . . . . . . . . . . . . . . . . . . . . . . . . . . . . . . . . . . . . . . . . . . . . . . . . . . . . . . . . . . . 72
Get directions . . . . . . . . . . . . . . . . . . . . . . . . . . . . . . . . . . . . . . . . . . . . . . . . . . . . . . . . . . . . . . 74
Select map mode . . . . . . . . . . . . . . . . . . . . . . . . . . . . . . . . . . . . . . . . . . . . . . . . . . . . . . . . . . . 76
Map view. . . . . . . . . . . . . . . . . . . . . . . . . . . . . . . . . . . . . . . . . . . . . . . . . . . . . . . . . . . . . . 76
Satellite view . . . . . . . . . . . . . . . . . . . . . . . . . . . . . . . . . . . . . . . . . . . . . . . . . . . . . . . . . . . 76
Traffic view . . . . . . . . . . . . . . . . . . . . . . . . . . . . . . . . . . . . . . . . . . . . . . . . . . . . . . . . . . . . 76
Street View . . . . . . . . . . . . . . . . . . . . . . . . . . . . . . . . . . . . . . . . . . . . . . . . . . . . . . . . . . . . 77
Map history. . . . . . . . . . . . . . . . . . . . . . . . . . . . . . . . . . . . . . . . . . . . . . . . . . . . . . . . . . . . . . . . 78
Map shortcuts . . . . . . . . . . . . . . . . . . . . . . . . . . . . . . . . . . . . . . . . . . . . . . . . . . . . . . . . . . . . . . 78
Dialer & Voice Dialer . . . . . . . . . . . . . . . . . . . . . . . . . . . . . . . . . . . . . . .79
About the dialers. . . . . . . . . . . . . . . . . . . . . . . . . . . . . . . . . . . . . . . . . . . . . . . . . . . . . . . . . . . . 79
Bluetooth devices . . . . . . . . . . . . . . . . . . . . . . . . . . . . . . . . . . . . . . . . . . . . . . . . . . . . . . . . 79
Make a call by dialing . . . . . . . . . . . . . . . . . . . . . . . . . . . . . . . . . . . . . . . . . . . . . . . . . . . . . . . 80
Make a call by speaking. . . . . . . . . . . . . . . . . . . . . . . . . . . . . . . . . . . . . . . . . . . . . . . . . . 81
Answer an incoming call . . . . . . . . . . . . . . . . . . . . . . . . . . . . . . . . . . . . . . . . . . . . . . . . . . . . . . 82
In-call options . . . . . . . . . . . . . . . . . . . . . . . . . . . . . . . . . . . . . . . . . . . . . . . . . . . . . . . . . . . . . . 83
Multiple calls . . . . . . . . . . . . . . . . . . . . . . . . . . . . . . . . . . . . . . . . . . . . . . . . . . . . . . . . . . . . . . . 84
Incoming call during call in progress . . . . . . . . . . . . . . . . . . . . . . . . . . . . . . . . . . . . . . . . . 84
End all calls . . . . . . . . . . . . . . . . . . . . . . . . . . . . . . . . . . . . . . . . . . . . . . . . . . . . . . . . . . . . 84
Conference calling . . . . . . . . . . . . . . . . . . . . . . . . . . . . . . . . . . . . . . . . . . . . . . . . . . . . . . . 85
Call log . . . . . . . . . . . . . . . . . . . . . . . . . . . . . . . . . . . . . . . . . . . . . . . . . . . . . . . . . . . . . . . . . . . 86
Call settings. . . . . . . . . . . . . . . . . . . . . . . . . . . . . . . . . . . . . . . . . . . . . . . . . . . . . . . . . . . . . . . . 87
Google Calendar. . . . . . . . . . . . . . . . . . . . . . . . . . . . . . . . . . . . . . . . . . .89
Calendar views . . . . . . . . . . . . . . . . . . . . . . . . . . . . . . . . . . . . . . . . . . . . . . . . . . . . . . . . . . . . . 89
Month view. . . . . . . . . . . . . . . . . . . . . . . . . . . . . . . . . . . . . . . . . . . . . . . . . . . . . . . . . . . . . 89
Agenda view . . . . . . . . . . . . . . . . . . . . . . . . . . . . . . . . . . . . . . . . . . . . . . . . . . . . . . . . . . . 90
Week view. . . . . . . . . . . . . . . . . . . . . . . . . . . . . . . . . . . . . . . . . . . . . . . . . . . . . . . . . . . . . 90
Day view . . . . . . . . . . . . . . . . . . . . . . . . . . . . . . . . . . . . . . . . . . . . . . . . . . . . . . . . . . . . . . 91
Create an event . . . . . . . . . . . . . . . . . . . . . . . . . . . . . . . . . . . . . . . . . . . . . . . . . . . . . . . . . . . . 92
The View event screen . . . . . . . . . . . . . . . . . . . . . . . . . . . . . . . . . . . . . . . . . . . . . . . . . . . . . . . 93
Event reminders. . . . . . . . . . . . . . . . . . . . . . . . . . . . . . . . . . . . . . . . . . . . . . . . . . . . . . . . . . . . . 94
Edit an event . . . . . . . . . . . . . . . . . . . . . . . . . . . . . . . . . . . . . . . . . . . . . . . . . . . . . . . . . . . . . . . 95
T-Mobile G1 User Guide R1.0 5 September 8, 2008
Page 6

Go to today . . . . . . . . . . . . . . . . . . . . . . . . . . . . . . . . . . . . . . . . . . . . . . . . . . . . . . . . . . . . . . . 95
View multiple calendars . . . . . . . . . . . . . . . . . . . . . . . . . . . . . . . . . . . . . . . . . . . . . . . . . . . . . . 95
Calendar settings . . . . . . . . . . . . . . . . . . . . . . . . . . . . . . . . . . . . . . . . . . . . . . . . . . . . . . . . . . . 96
Calendar shortcuts . . . . . . . . . . . . . . . . . . . . . . . . . . . . . . . . . . . . . . . . . . . . . . . . . . . . . . . . . . 96
Camera & Pictures. . . . . . . . . . . . . . . . . . . . . . . . . . . . . . . . . . . . . . . . . .98
Before you begin . . . . . . . . . . . . . . . . . . . . . . . . . . . . . . . . . . . . . . . . . . . . . . . . . . . . . . . . . . . 98
Load pictures onto your SD card . . . . . . . . . . . . . . . . . . . . . . . . . . . . . . . . . . . . . . . . . . . . 98
Take a picture . . . . . . . . . . . . . . . . . . . . . . . . . . . . . . . . . . . . . . . . . . . . . . . . . . . . . . . . . . . . . . 99
Capture settings. . . . . . . . . . . . . . . . . . . . . . . . . . . . . . . . . . . . . . . . . . . . . . . . . . . . . . . . 100
View your pictures . . . . . . . . . . . . . . . . . . . . . . . . . . . . . . . . . . . . . . . . . . . . . . . . . . . . . . . . . 100
Screen orientation . . . . . . . . . . . . . . . . . . . . . . . . . . . . . . . . . . . . . . . . . . . . . . . . . . . . . . 101
Zoom and navigate . . . . . . . . . . . . . . . . . . . . . . . . . . . . . . . . . . . . . . . . . . . . . . . . . . . . . 101
Picture options . . . . . . . . . . . . . . . . . . . . . . . . . . . . . . . . . . . . . . . . . . . . . . . . . . . . . . . . . 102
Play slideshow . . . . . . . . . . . . . . . . . . . . . . . . . . . . . . . . . . . . . . . . . . . . . . . . . . . . . . . . . 103
Picture settings . . . . . . . . . . . . . . . . . . . . . . . . . . . . . . . . . . . . . . . . . . . . . . . . . . . . . . . . . 104
Music . . . . . . . . . . . . . . . . . . . . . . . . . . . . . . . . . . . . . . . . . . . . . . . . . 105
Your Library of music . . . . . . . . . . . . . . . . . . . . . . . . . . . . . . . . . . . . . . . . . . . . . . . . . . . . . . . 105
Supported music formats . . . . . . . . . . . . . . . . . . . . . . . . . . . . . . . . . . . . . . . . . . . . . . . . . 105
Load music onto your SD card . . . . . . . . . . . . . . . . . . . . . . . . . . . . . . . . . . . . . . . . . . . . . 105
Play back music. . . . . . . . . . . . . . . . . . . . . . . . . . . . . . . . . . . . . . . . . . . . . . . . . . . . . . . . . . . . 107
Playlists . . . . . . . . . . . . . . . . . . . . . . . . . . . . . . . . . . . . . . . . . . . . . . . . . . . . . . . . . . . . . . . . . . 108
Create a playlist on your phone . . . . . . . . . . . . . . . . . . . . . . . . . . . . . . . . . . . . . . . . . . . 108
Manage your playlists . . . . . . . . . . . . . . . . . . . . . . . . . . . . . . . . . . . . . . . . . . . . . . . . . . . 109
Load your own playlists. . . . . . . . . . . . . . . . . . . . . . . . . . . . . . . . . . . . . . . . . . . . . . . . . . 109
Create ringtones from songs . . . . . . . . . . . . . . . . . . . . . . . . . . . . . . . . . . . . . . . . . . . . . . . . . . 110
Delete music from SD card . . . . . . . . . . . . . . . . . . . . . . . . . . . . . . . . . . . . . . . . . . . . . . . . . . . 110
Music shortcuts . . . . . . . . . . . . . . . . . . . . . . . . . . . . . . . . . . . . . . . . . . . . . . . . . . . . . . . . . . . . . 110
Android Market. . . . . . . . . . . . . . . . . . . . . . . . . . . . . . . . . . . . . . . . . . 111
About Android Market . . . . . . . . . . . . . . . . . . . . . . . . . . . . . . . . . . . . . . . . . . . . . . . . . . . . . . 111
Browse items to install . . . . . . . . . . . . . . . . . . . . . . . . . . . . . . . . . . . . . . . . . . . . . . . . . . . . . . . 111
Install an item . . . . . . . . . . . . . . . . . . . . . . . . . . . . . . . . . . . . . . . . . . . . . . . . . . . . . . . . . . . . . 112
Manage your downloads . . . . . . . . . . . . . . . . . . . . . . . . . . . . . . . . . . . . . . . . . . . . . . . . . . . . 113
Review your downloaded items . . . . . . . . . . . . . . . . . . . . . . . . . . . . . . . . . . . . . . . . . . . . . . . 114
Rate a downloaded item. . . . . . . . . . . . . . . . . . . . . . . . . . . . . . . . . . . . . . . . . . . . . . . . . 114
Write a comment . . . . . . . . . . . . . . . . . . . . . . . . . . . . . . . . . . . . . . . . . . . . . . . . . . . . . . . 115
Remove rating and/or comment . . . . . . . . . . . . . . . . . . . . . . . . . . . . . . . . . . . . . . . . . . . 115
Flag content . . . . . . . . . . . . . . . . . . . . . . . . . . . . . . . . . . . . . . . . . . . . . . . . . . . . . . . . . . . 115
Market shortcuts . . . . . . . . . . . . . . . . . . . . . . . . . . . . . . . . . . . . . . . . . . . . . . . . . . . . . . . . . . . 115
T-Mobile G1 User Guide R1.0 6 September 8, 2008
Page 7

YouTube . . . . . . . . . . . . . . . . . . . . . . . . . . . . . . . . . . . . . . . . . . . . . . . 116
Getting started with YouTube. . . . . . . . . . . . . . . . . . . . . . . . . . . . . . . . . . . . . . . . . . . . . . . . . 116
Watch videos . . . . . . . . . . . . . . . . . . . . . . . . . . . . . . . . . . . . . . . . . . . . . . . . . . . . . . . . . . . . . 116
Search for videos . . . . . . . . . . . . . . . . . . . . . . . . . . . . . . . . . . . . . . . . . . . . . . . . . . . . . . . . . . 117
Filter videos by time . . . . . . . . . . . . . . . . . . . . . . . . . . . . . . . . . . . . . . . . . . . . . . . . . . . . . . . . 117
View video details . . . . . . . . . . . . . . . . . . . . . . . . . . . . . . . . . . . . . . . . . . . . . . . . . . . . . . . . . 118
Video comments . . . . . . . . . . . . . . . . . . . . . . . . . . . . . . . . . . . . . . . . . . . . . . . . . . . . . . . . . . . 118
Video favorites . . . . . . . . . . . . . . . . . . . . . . . . . . . . . . . . . . . . . . . . . . . . . . . . . . . . . . . . . . . . 118
Add video to favorites . . . . . . . . . . . . . . . . . . . . . . . . . . . . . . . . . . . . . . . . . . . . . . . . . . 119
Remove video from favorites. . . . . . . . . . . . . . . . . . . . . . . . . . . . . . . . . . . . . . . . . . . . . . 119
Share videos . . . . . . . . . . . . . . . . . . . . . . . . . . . . . . . . . . . . . . . . . . . . . . . . . . . . . . . . . . . . . . 119
Tools. . . . . . . . . . . . . . . . . . . . . . . . . . . . . . . . . . . . . . . . . . . . . . . . . . 120
Alarm Clock. . . . . . . . . . . . . . . . . . . . . . . . . . . . . . . . . . . . . . . . . . . . . . . . . . . . . . . . . . . . . . . 120
Set an alarm . . . . . . . . . . . . . . . . . . . . . . . . . . . . . . . . . . . . . . . . . . . . . . . . . . . . . . . . . . 120
Add more alarms. . . . . . . . . . . . . . . . . . . . . . . . . . . . . . . . . . . . . . . . . . . . . . . . . . . . . . . 121
Change clock display. . . . . . . . . . . . . . . . . . . . . . . . . . . . . . . . . . . . . . . . . . . . . . . . . . . . 121
Change date & time display . . . . . . . . . . . . . . . . . . . . . . . . . . . . . . . . . . . . . . . . . . . . . . 121
Calculator . . . . . . . . . . . . . . . . . . . . . . . . . . . . . . . . . . . . . . . . . . . . . . . . . . . . . . . . . . . . . . . . 122
Calculator panels. . . . . . . . . . . . . . . . . . . . . . . . . . . . . . . . . . . . . . . . . . . . . . . . . . . . . . . 122
Operation history. . . . . . . . . . . . . . . . . . . . . . . . . . . . . . . . . . . . . . . . . . . . . . . . . . . . . . . 122
Index. . . . . . . . . . . . . . . . . . . . . . . . . . . . . . . . . . . . . . . . . . . . . . . . . . 124
T-Mobile G1 User Guide R1.0 7 September 8, 2008
Page 8
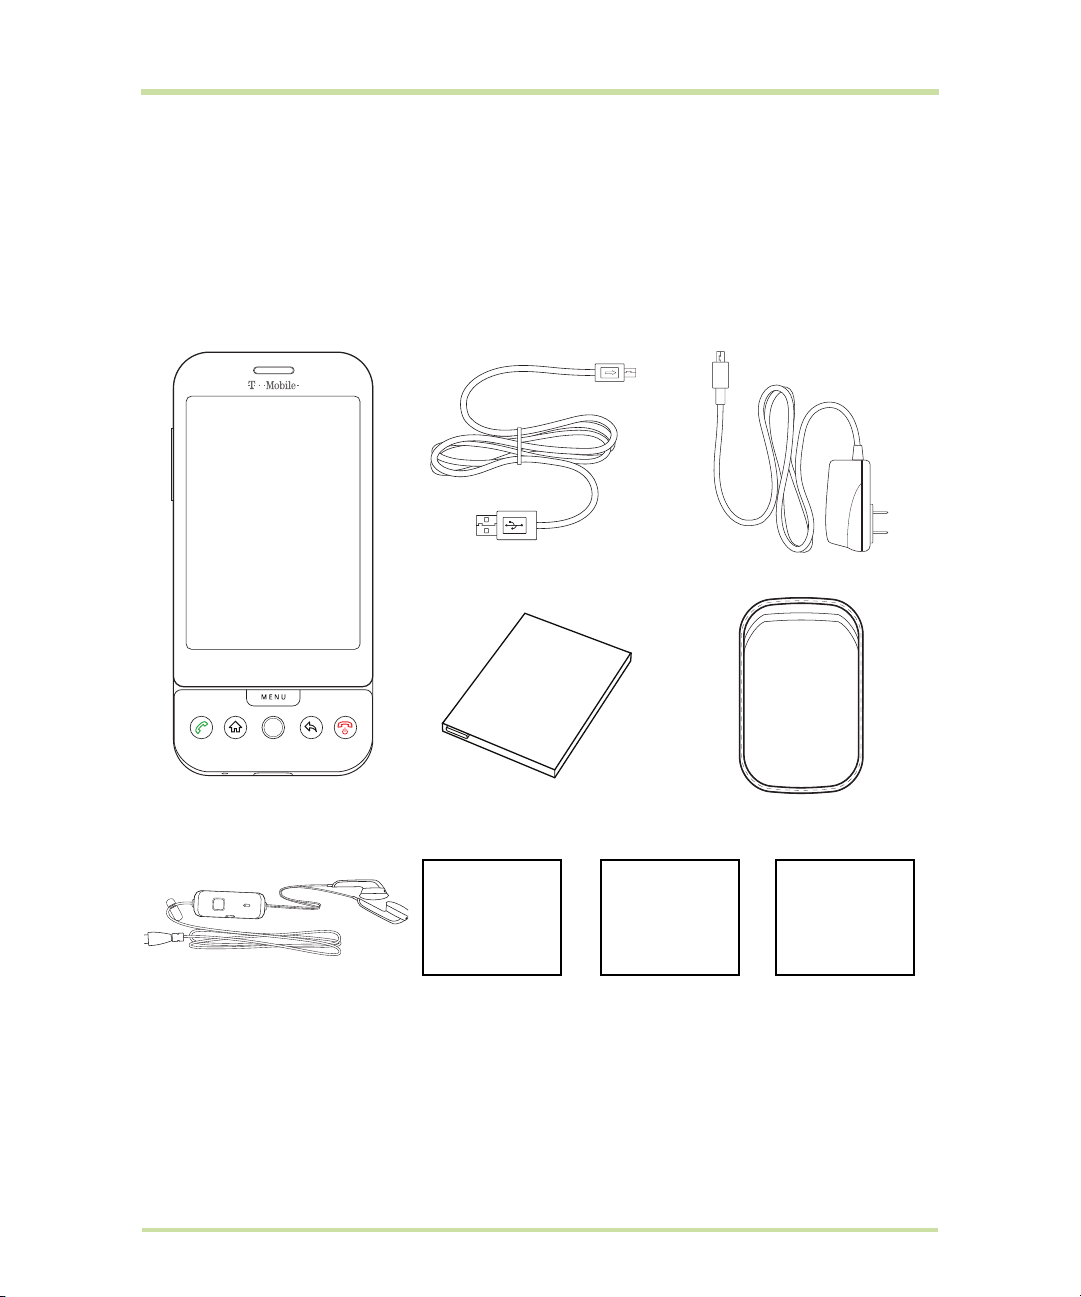
Check that you’ve received everything
These are the items that you should find inside your box:
.
USB Sync Cable AC Adapter
T-Mobile G1 Battery Pouch
Tips & Tricks Start Guide
Wired Stereo Headset
T-Mobile G1 User Guide R1.0 8 September 8, 2008
Tips & Tricks Start Guide Terms & Conditions
Term s &
Conditions
Page 9

Phone controls
Control buttons
Volume buttons
Menu
Call
Home
Use the control buttons on your phone to do the following:
Home button
Menu button
Back button
• Press
• Press & hold
• Press
• Press
again to see the menu shortcuts for that screen. The shortcuts will blink in
place as long as you hold down the
• Press & hold
• Press
screen (you may need to draw you unlock pattern first if you have set one.
(Read more in “Screen lock” on page 18.)
• Press
or menu.
Back
Trackball
HOME to return to the Home screen from anywhere on your phone.
HOME to bring up the recent applications window.
MENU to open a list of actions you can take on the current screen.
MENU once to open the list of actions, then press & hold MENU
MENU when using in combination with a keyboard shortcut.
MENU to wake up the screen; press MENU again to unlock the
BACK to go back to the previous screen, or to dismiss a dialog box
Camera capture
End call / Power
MENU button.
T-Mobile G1 User Guide R1.0 9 September 8, 2008
Page 10

Call button
• Press
• Press & hold
CALL to do one of the following, depending on the context:
- Open the log of recent calls.
- Call contact (when a contact/contact number is highlighted).
- Add another call (while in a call).
- Display call in progress on the screen (if you had navigated to another
application during the call).
- Call number (when a phone number is highlighted, e.g., in Browser).
CALL to open the voice dialer.
End call button
Trackball
Camera capture
button
Volume controls
• When on a call, press
• When not on a call, press
to sleep.
• When not on a call, press & hold
menu, from which you can power off or put your phone in silent mode.
•Roll the
on the screen. Click the
• Press & hold the
(if applicable).
• On a Web page, click the
mode. (Read more in “Scale & scroll” on page 16.)
• When on the Home screen, press & hold the
capture screen.
• When in the Camera application, press the
down to focus, then complete the press to take a picture.
• Press either
separately for the incoming call ringer and audio/video files:
- If you are on a phone call when you press the volume controls, the
- If you are listening to an audio or video file when you press the volume
• While an incoming call is ringing, press either the
immediately silence the phone. The caller will continue to hear the ringing
until you answer the call.
• To put your phone in “silent mode” quickly, press & hold the
control.
TRACKBALL up/down and left/right to navigate selectable items
+ or – to open the sound volume controls. Volume is controlled
Ringer volume slider will open.
controls, the Media volume slider will open.
END CALL to hang up.
END CALL to lock the screen and put the phone
END CALL to open the Phone options
TRACKBALL to select a highlighted item or action.
TRACKBALL to bring up the selected item’s context menu
TRACKBALL twice to enter “scale & scroll”
CAPTURE button to go to the
CAPTURE button half-way
+ or – volume control to
– volume
T-Mobile G1 User Guide R1.0 10 September 8, 2008
Page 11

Status light indicators
There is an LED light in the speaker that provides a status or activity indication.
Status light
• Solid green - Battery is fully charged (while connected to power adapter).
• Solid red - Battery is charging.
• Flashing red - Battery is low. Connect to charger!
• Flashing green - You have a pending notification.
The indicators are listed in order of priority. This means, for example, that if your phone is connected
to a power adapter, the LED will be solid red and not switch to a flashing green light even if there is
a pending notification.
SD card slot
Your phone has a slot for a microSD flash memory card. (Read more about the contents of the SD
card in “Load pictures onto your SD card” on page 98 and “Load music onto your SD card” on
page 105.)
The slot is located along the bottom edge of the phone, just below the
by a cover. Follow the instructions below to remove or insert an SD card:
1 If you are going to remove your SD card, first you must unmount it from your phone by doing the
following:
•Press
• Scroll down and select
• Select
Now you are ready to remove your SD card.
2 Open the display to reveal the keyboard.
T-Mobile G1 User Guide R1.0 11 September 8, 2008
HOME, then press MENU and select Settings.
SD card & phone storage.
Unmount/eject SD card.
Call button, and is protected
Page 12

3 Pull the SD card cover open by pulling the small bump on the inside, left edge so that it rotates
open to reveal the SD card slot
.
Small bump
4 Once the slot is revealed, you can insert or remove the SD card:
• To insert an SD card, push the card into the slot, copper contacts facing down and with the
notched edge facing right. Push the card in gently until you feel it “snap” into place.
SD card slot
Notched edge faces right
Copper contacts face down
• To remove an already-installed SD card, push the card in gently, then release. The card
should pop out far enough so you can remove it.
5 Close the SD card cover until both ends are seated.
Important! The phone does not think the SD card is inserted if both ends of the cover are not
properly closed.
SD card slot cover (represented in green)
SIM card slot
To insert your wireless operator-provided SIM card, do the following:
1 Hold the phone with the control buttons on the right. Slide the display up to reveal the
keyboard.
2 The battery cover release tab is located to the left of the keyboard along the edge. Pull the tab
up with your thumb while pulling the cover back, then free.
3 Turn the phone over. Slide the SIM card into the slot with the copper contacts face-down and
with the cut corner facing away from the slot.
4 Insert the battery so the copper contacts match the contacts on the phone, then gently press the
battery into place.
5 Reattach the battery cover.
T-Mobile G1 User Guide R1.0 12 September 8, 2008
Page 13

To remove your SIM card, remove the battery cover and battery as instructed above, then push the
SIM card to the right, free of the brackets, and lift out.
Battery charging
1 Connect the AC adapter plug to an electrical outlet and connect the other end to the USB port
at the bottom of the phone. To fully charge when the phone is discharged, keep connected for
at least three hours.
2 To power on your phone, press & hold the
off, press & hold three seconds. From the menu that opens, select
END CALL button. (Later, should you want to power
Power off.)
Keyboard
To use the keyboard, hold your phone horizontally, with the control buttons on the right. Push the
display up and slightly to the left to reveal the keyboard. Your display will always use the landscape
screen orientation when your keyboard is open.
SEARCH key
There is a SEARCH key (just to the left of @), which you can use when the keyboard is open.
Pressing the
then select
SEARCH key launches the search window. Type your search criteria in the text field,
Search.
MENU key
There is a MENU key (just to the left of Z), which you can use when the keyboard is open instead of
pressing the
your left hand (press the
MENU control button. This means, with the keyboard open, you can open the menu using
MENU key) and select a menu option with your right (roll and click the
TRACKBALL).
ALT key
To type the characters shown in color on some of the keys, first press the ALT key, then the key
showing the special character. For example, if you need to type a double quote (“), you would first
press the
• Lock the
• Unlock the
T-Mobile G1 User Guide R1.0 13 September 8, 2008
ALT key, then the k key [ALT, k].
ALT key to type a series of characters by pressing ALT twice. The cursor shape changes
while the key is locked: .
ALT key by pressing it once again.
Page 14

SHIFT key
There are two SHIFT keys on your phone; one on the far left and the other on the far right of the
lower row of keys. Press the
or symbol keys, pressing the
SHIFT key while typing a letter to type the letter's capital. On number
SHIFT key causes the special character to appear.
• Lock the
changes while the key is locked: .
• Unlock the
SHIFT key to type a series of characters by pressing SHIFT twice. The cursor shape
SHIFT key by pressing it once again.
@ key
When you type an email address, the “at” symbol (@) separates the username from the domain; for
example, username@domain.com. Use the @ key (located in the bottom row of keys, just to the left
of the
SPACEBAR) to insert the @ symbol in an email address.
Typing and text navigation tips
Insert special character
Delete character to left
Delete entire line
Per si stent CAPS
Jump cursor to beginning/end of line
Create tab character
Highlight text
Deselect highlighted text
Cut text
Copy text in text field to clipboard
Paste text copied to clipboard
Select all text in field
ALT + SPACEBAR opens special character selector
DEL
ALT + DEL
Press SHIFT twice; press SHIFT again to escape
ALT + roll TRACKBALL left/right
ALT + q
Press & hold
Roll TRACKBALL
Highlight text, press
Highlight text, press & hold
Highlight text, press MENU + c, or
Highlight text, press & hold
SHIFT while rolling the TRACKBALL
MENU + x, or
TRACKBALL, select Cut
TRACKBALL, select Copy
MENU + v, or
Press & hold
TRACKBALL, select Paste
MENU + a, or
Highlight text, press & hold
TRACKBALL, select Select all
T-Mobile G1 User Guide R1.0 14 September 8, 2008
Page 15

Touch screen & trackball
Selection
To select an item or button on the screen, you can either:
•Roll the
• Touch the item directly with your fingertip. You will know when an item on the screen is selected
when its color changes, usually to yellow or orange.
Tip: To hear a sound when an item is selected, select the
TRACKBALL to highlight the item, then click the TRACKBALL to select the item; or
Audible selection check box in Home >
Settings > Sound & display.
Context menus
To open the context menu for an item on the screen, you can either:
•Roll the
• Touch & hold the item on the screen with your fingertip. You must hold for one full second before
the context menu will appear.
TRACKBALL to highlight the item, then press & hold the TRACKBALL; or
Scroll
To scroll up or down in a list or page on the screen, you can either:
•Roll the
• Slide your finger up/down on the screen. With repeated short, quick brushing gestures, you can
accelerate the scroll. Touch the screen to stop the scrolling.
TRACKBALL up/down; or
Crop pictures
When creating wallpaper or an icon from a picture, you can control how the picture is cropped.
Touch & hold an edge of the cropper to reveal the sizing arrows, then drag the edge in or out to
size. Touch & drag the center of the cropper to move it with the picture.
Drag items
In some contexts you can drag items on the screen with your fingertip. Moving the cropper frame
within a picture is one example.
T-Mobile G1 User Guide R1.0 15 September 8, 2008
Page 16
Zoom in or out
Zoom in on a picture when viewed full-screen, Web page, or map:
1 Touch the screen to open the zoom-in and zoom-out controls .
2 Touch the
Zoom out on a picture (when viewed full-screen), Web page, or map:
1 Touch the screen to open the zoom-in and zoom-out controls .
2 Touch the
+ control to zoom in. With each touch you zoom in closer.
– control to zoom out. With each touch you zoom out further.
Scale & scroll
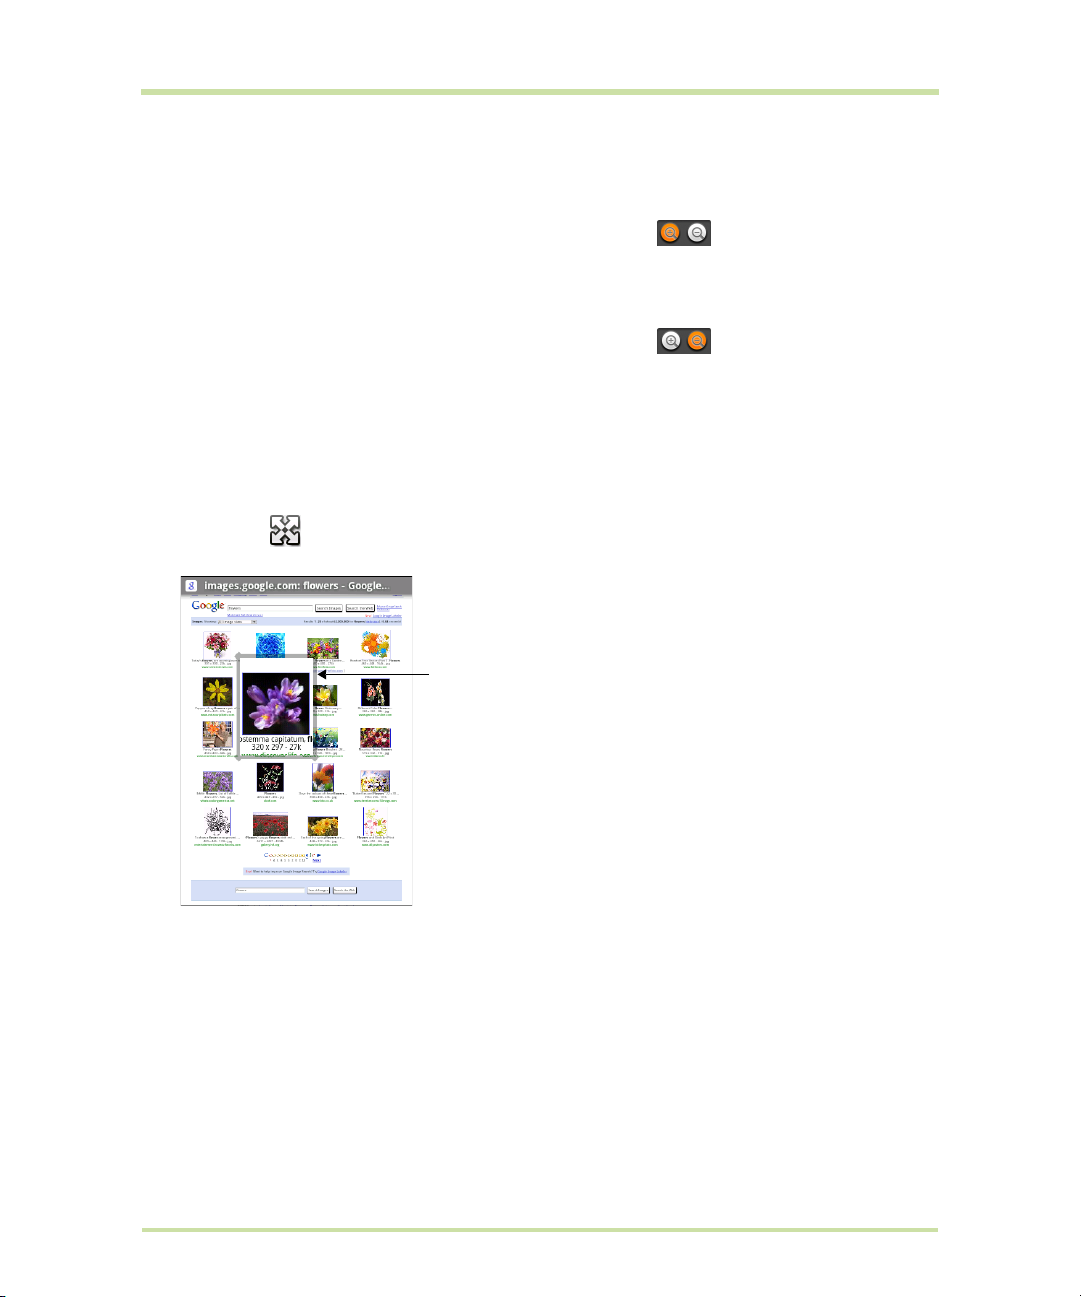
To navigate quickly to a section of a large Web page, use the “scale & scroll” interface:
1 Touch the screen to reveal the zoom controls and the “scale & scroll” icon at the bottom right of
the screen: . Touch the icon. The magnifying window opens and the Web page reduces to fit
the width of the screen.
Magnifying window
2 Move the magnifying window around the screen with your fingertip or by rolling the
TRACKBALL.
3 When you find the area of the page you want to view more closely, release your finger and the
view expands to fit the screen.
T-Mobile G1 User Guide R1.0 16 September 8, 2008
Page 17

Navigate in lists
When viewing a list that scrolls off the screen or menu, you can navigate using keyboard shortcuts:
Page down
Page up
Jump to end of list
Jump to top of list
SPACEBAR
Press
SHIFT + SPACEBAR
Press
ALT + TRACKBALL roll DOWN
Press
ALT + TRACKBALL roll UP
Press
Silent mode
To silence your phone quickly, press & hold END CALL (two seconds). The Phone options menu opens.
Select
Silent mode.
Other ways to silence your phone:
•Press & hold the
•Press
HOME, then press MENU and select Settings > Sound & display. Select the Silent
check box.
mode
– volume button to zero volume.
Screen sleep
After a period of inactivity, your screen will go to sleep (display will turn black). In sleep, your phone
uses less battery power. You can control this behavior:
Set screen timeout period
1 Press
2 Select
3 Scroll down to the
HOME, then press MENU and select Settings.
Sound & display.
Display settings section and select
Screen timeout. Select a time or “never timeout” from the
menu.
Prevent sleep while charging
Lock screen & put phone to sleep
(immediately)
T-Mobile G1 User Guide R1.0 17 September 8, 2008
1 Press
2 Select
3 Select the
Except when on a phone call, from any screen, press
CALL
HOME, then press MENU and select Settings.
Applications, then Development.
Stay awake check box.
END
.
Page 18

Screen lock
While not on a call, to lock your control buttons and screen from accidental touch activation, press
END CALL button. To unlock your screen, press MENU.
the
You can increase the security of your phone by setting a screen unlock pattern. Once set, in order to
unlock your screen, you’ll have to draw the correct unlock pattern. You can set your screen unlock
pattern as follows:
1 Press
2 Select
3 Select the
4 Set or change your unlock pattern by selecting either
5 Follow the prompts to define your pattern. Note: You must slide your finger along the screen to
6 When you unlock your screen, if you want your pattern to be hidden as you draw it, clear the
HOME, then press MENU and select Settings.
Security & location, then scroll down to the Screen unlock pattern section.
Require pattern check box.
Set unlock pattern or Change unlock
pattern
create the pattern, not select individual dots. Connect at least four dots.
, as applicable.
Use visible pattern check box.
Global shortcuts
Use these control button and keyboard shortcuts from anywhere on your phone:
Lock screen and put phone to sleep
Open dialer
Open voice dialer
T-Mobile G1 User Guide R1.0 18 September 8, 2008
END CALL
Press
CALL, select Dialer tab
Press
Press & hold
CALL
Page 19

Application “quick launch”
You can set keyboard shortcuts that open individual applications when used together with the
SEARCH key (located between the ALT and @ keys on your keyboard). For example, if the shortcut
to the Browser application is “b”, then from anywhere on the phone, you could press
jump to the Browser application.
You can customize the shortcut keys from the Quick launch settings screen:
SEARCH + b to
1 Press
2 Select
3 The Quick launch screen is organized first by letter, a-z, then followed by numbers, 1-9. Some
4 To change or add a new shortcut, select the letter or number slot to open the list of applications.
HOME, then press MENU and select Settings.
Applications, then select Quick launch.
shortcuts have been defined by default (such as “b” for Browser). You can change these default
shortcuts as well as add shortcuts to letters or numbers that are unassigned.
Select the application you want to shortcut, and it’s assigned.
Recent applications
From any screen, press & hold Home to open the recent applications window. The window displays
(up to) the last six applications you used since last restarting your phone. Select an application to
open it.
Wireless off
When you need to turn off all your phone radios, switch to “airplane” mode:
1 Press
2 Select
3 To enable wireless connections again, return to this settings screen and clear the
T-Mobile G1 User Guide R1.0 19 September 8, 2008
HOME, then press MENU and select Settings.
Wireless controls, then select the Airplane mode check box. When selected, the
airplane mode icon displays in the status bar and all wireless connections are disabled.
Airplane
check box.
mode
Page 20

Making phone calls
To dial a number, press the CALL button. To call using the voice dialer, press & hold CALL. To answer
an incoming call, press
CALL. To end a call, press END CALL.
While in a call, press
Dial pad Displays the on-screen dial pad so you can respond to in-call menu prompts.
Add call Puts current call on hold and displays the on-screen dial pad so you can dial
another number.
Speaker Turns on the speakerphone.
Mute Mutes your side of the conversation.
Hold Puts call-in-progress on hold.
MENU to reveal the in-call options:
Power on/off
To power off your phone, press & hold the END CALL button. On release, the Phone options menu
opens. Select
To power on again, press the
Power off.
END CALL button.
T-Mobile G1 User Guide R1.0 20 September 8, 2008
Page 21

Home screen
Home screen overview
The Home screen is your starting point for using all the applications on your phone. You can customize
your Home screen to display applications, shortcuts, and widgets as you like.
Status bar
Notifications
Slide your fingertip
down the screen to
read details
Today’s date
displays when you
touch notifications
Connection status
Touch or drag the
application tab
fingertip to reveal/hide the
application icons
Recent applications window
opens when you press
& hold the HOME button (from
any screen)
Touch any icon
to start using the
application
For landscape orientation,
open the display to reveal the
keyboard
Wherever you are, whatever you’re doing on your phone, simply press the
to the Home screen.
Home screen tips:
with your
HOME button to return
• To find a contact quickly, close the application tab, then open the keyboard and start typing
the contact’s name. The contact list appears and resolves to the letters you’ve typed.
• To find an application quickly, open the application tab, then open the keyboard and start
typing the application name. The list of applications reduces to those that match the letters
you’ve typed.
T-Mobile G1 User Guide R1.0 21 September 8, 2008
Page 22
Extended Home screen
The Home screen actually extends beyond the screen width. After pressing HOME, slide your
fingertip left and right along the screen to reveal the full width of the Home screen. This additional
space gives you more room to customize Home with applications, shortcuts, and widgets.
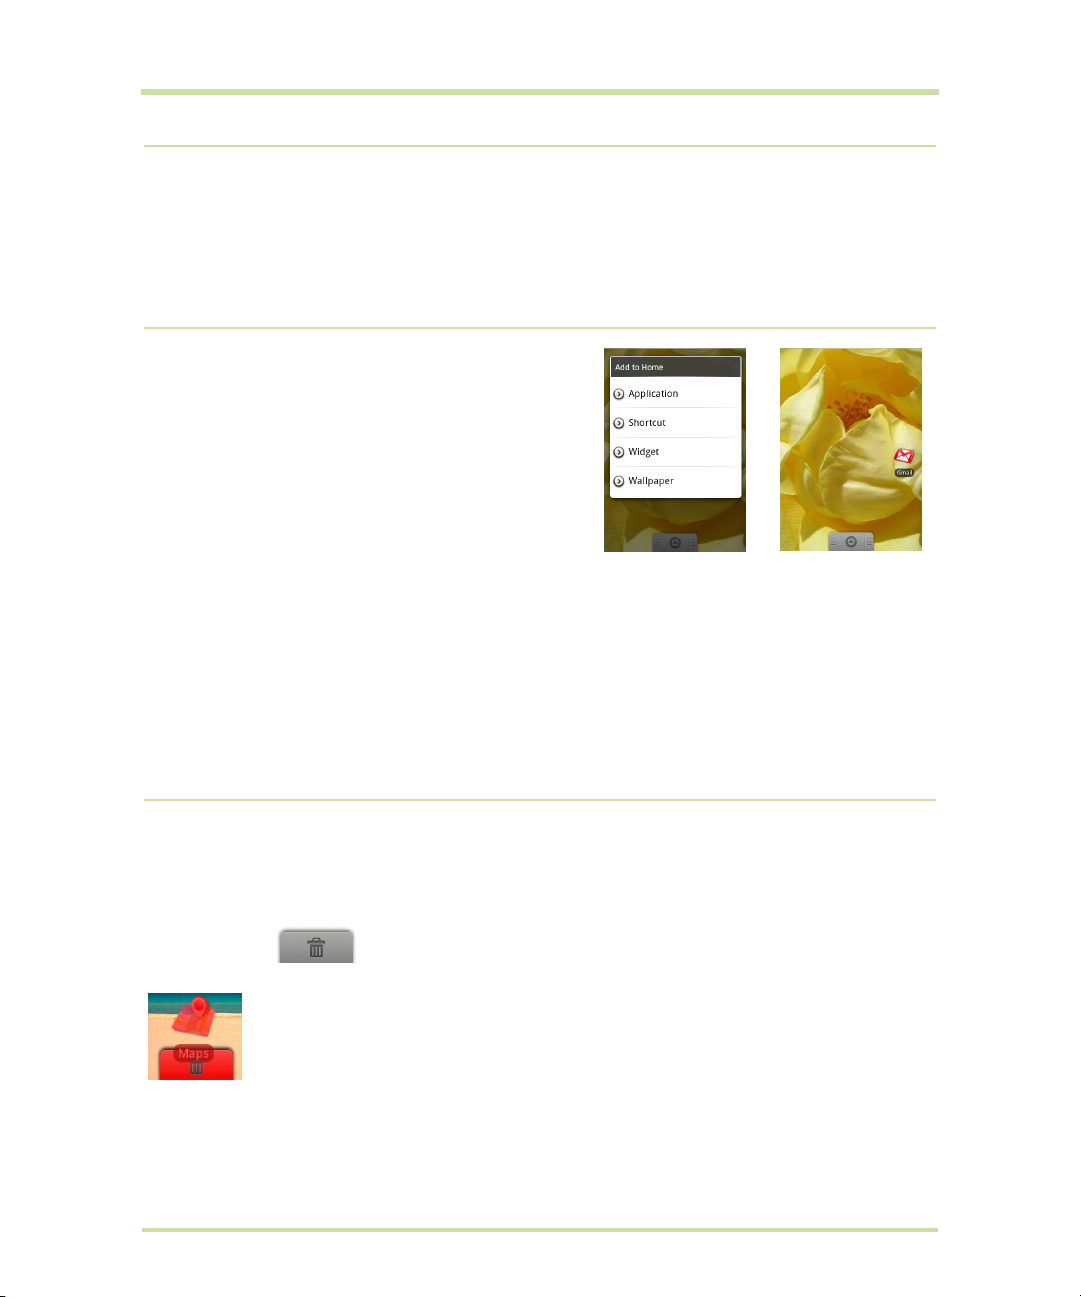
Create Home screen shortcuts and
widgets
1 Start from the Home screen (press the HOME button
to get oriented). Then touch & hold the screen with
your fingertip. The
2 Select an
of your saved information (such as a playlist, a Web
bookmark, or folder), a
frame, or Google search bar), or
3 The application, shortcut, folder, or widget appears on the screen. (Read more about folders in
“Create and delete folders on the Home screen” on page 23.) If you selected Wallpaper, you’ll
be asked to select a picture.
Tip: To create an application shortcut quickly, touch the application tab to reveal all the application
icons, then touch & hold an application icon. Its shortcut is added to the Home screen; close the
application tab to see it.
Application shortcut, a Shortcut to some
Add to Home menu opens.
Widget (a clock, picture
Wallpaper for your Home screen.
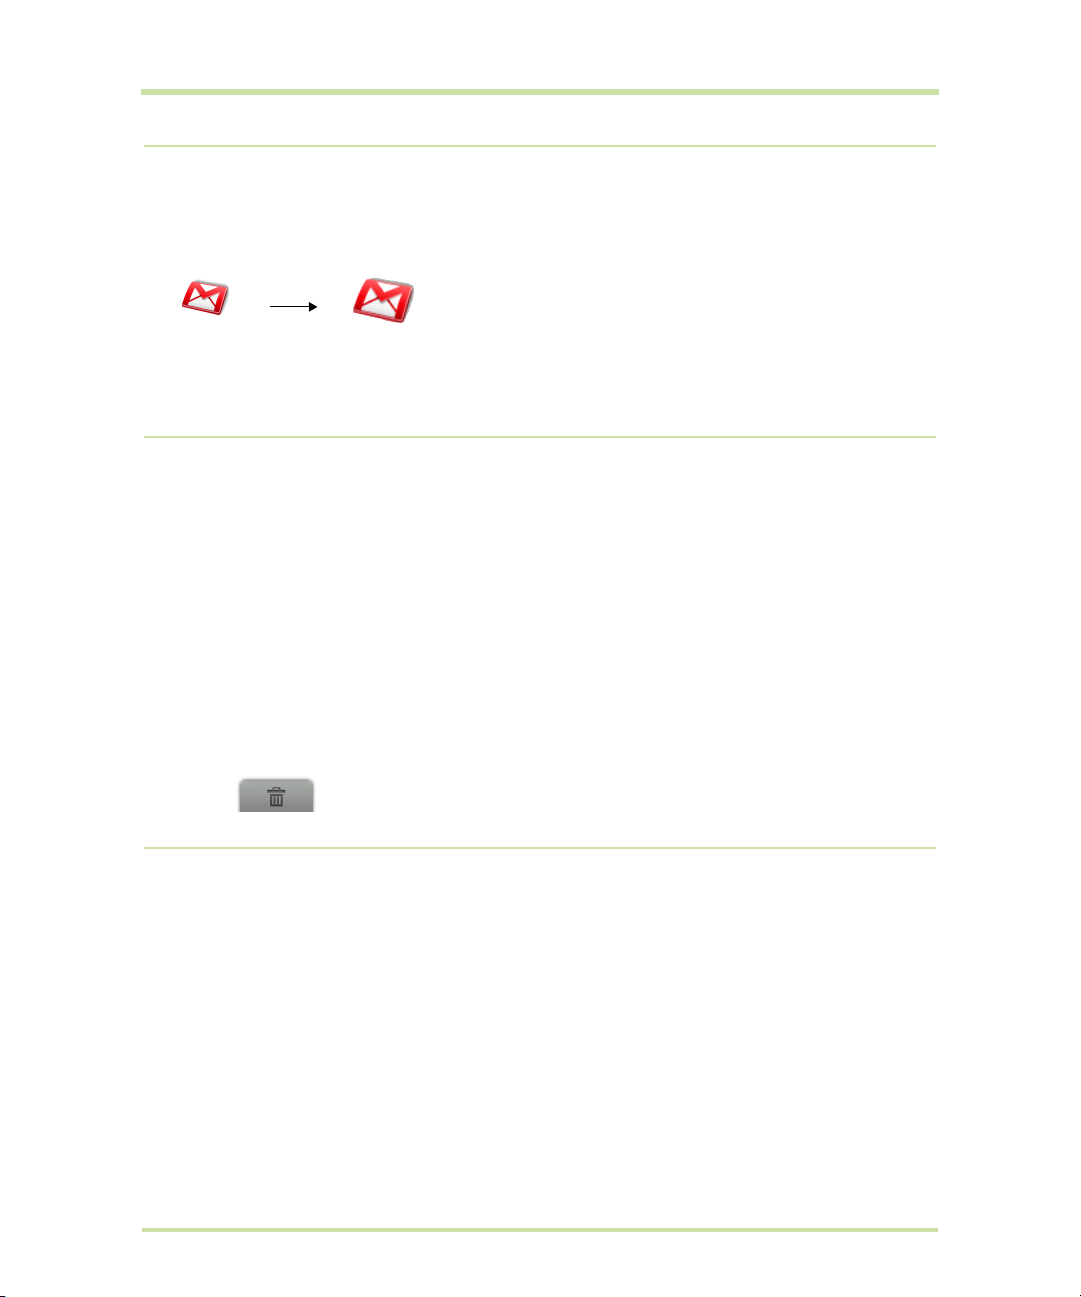
Remove items from the Home screen
To remove a shortcut or widget from your Home screen, touch & hold the item to enter “move mode”
(read more in the next section below). The application tab turns into a Trash button. Drag the item to
the Trash button and release. You’ll know when your item is in the Trash because the item
and the tab will turn red:
T-Mobile G1 User Guide R1.0 22 September 8, 2008
Page 23
Move objects on the Home screen
1 To move an icon or other item on the Home screen, you must first touch & hold it to enter move
mode. The object will magnify when it’s ready to be moved.
Touch & hold
2 Without lifting your finger (or you’ll drop out of move mode), drag the object to the new
position. To move an item to a section of the Home screen not in view, move it to the edge of the
screen and hold it there for a moment. The screen view will shift; position the object and release.
Icon magnifies.
Drag it to reposition.
Create and delete folders on the Home screen
You can add folders to hold application icons or shortcuts:
1 From the Home screen, press
MENU and select Add, or touch & hold the screen to open the
Add to Home menu.
2 Select
3 Touch & hold any of the application icons or shortcuts to enter move mode (the icon will
4 Touch the folder once to open it; touch the folder’s title bar to close it.
5 To rename a folder, first open the keyboard. Then touch & hold the folder title bar to open the
6 To delete a folder, touch & hold the folder to enter move mode. Drag the folder to the Trash
Shortcuts > Folder. A new folder appears on the screen.
magnify), then drag the item on top of the new folder.
Rename folder dialog box. Type your new folder name, then select
button and release.
OK.
Customize Home screen wallpaper
Wallpaper your Home screen with pictures you have stored on your SD card, or select a picture from
the Wallpaper gallery that comes preinstalled on your phone:
1 From the Home screen, press
the Home screen to open the
2 Select
3 If you select Wallpaper gallery, then scroll through the gallery.
Wallpaper, then select either Pictures or Wallpaper gallery.
• Touch a thumbnail to highlight it and view a larger version.
• When you’ve decided on a wallpaper, make sure it’s highlighted, then select
MENU and select Wallpaper. Alternatively, you can touch & hold
Add to Home menu.
Set wallpaper.
T-Mobile G1 User Guide R1.0 23 September 8, 2008
Page 24

4 If you select Pictures, your picture album opens. Note that if this is the first time you have
viewed the pictures stored on your SD card from your phone, it may take a while for the pictures
to load.
• Navigate to find the picture you want to use, then select it.
• The cropper appears. Touch & hold an edge of the cropper to reveal the sizing arrows, then
drag the edge in or out to size. Touch & drag the center of the cropper to move it within the
picture.
• When you’re happy with the cropped area, select
5 The wallpaper is applied.
Save or press the BACK button.
Notification and connection status icons
Along the top of your phone screen is the status bar. On the left side, icons will appear, notifying you
of a new message, upcoming calendar event, alarm, or something else you should notice. On the
right side of the status bar, you’ll see connection status icons.
New email message Call in progress GSM signal, roaming,
no signal
New SMS or MMS Missed call GPRS service connected,
data flowing
Problem with SMS or
MMS delivery
New instant message Call forwarding is on 3G service connected,
New voicemail Speakerphone is on Wi-Fi service connected,
Upcoming event Ringer is off
Alarm is set Ringer on vibrate only Battery is charging
Call on hold Edge service connected,
data flowing
data flowing
network available
Battery charge indicators:
(Silent mode)
full, half-full, low, very low!
Song is playing Phone on mute Wireless services are off
(Airplane mode)
Data is syncing GPS is enabled and
working
SD card full! Uploading/downloading
Content downloaded
More (undisplayed)
notifications
T-Mobile G1 User Guide R1.0 24 September 8, 2008
Sign-in/sync error
Bluetooth® is on,
Bluetooth device connected
No SIM card in phone
Page 25

Read your notifications
When you see a notification in the status bar, touch the bar and slide your finger down the screen to
open the list of notifications displayed in the sliding window.
• Ongoing notifications report activities such as call forwarding ON, current call status, song
playing.
• Notifications report the arrival of new messages, calendar events, and alarms. You can clear
notifications list by selecting
To open the message, reminder, or other notification, touch the item. To close the notifications window,
slide your finger up the screen. You can also open the notifications window by pressing
selecting
Notifications.
Clear notifications at the top of the notifications window.
MENU and
Wireless operator
To view the network your phone is currently using, slide open the notifications window. The name of
the wireless operator’s network appears at the top of the list in bold.
Call voicemail
If you have a new voicemail message, you will see this icon in the status bar. To call your voicemail
number:
1 Open the notifications window to reveal the
2 Select the notification.
3 Your voicemail number is dialed.
• To remove an already-installed SD card, push the card in gently, then release. The card
should pop out far enough so you can remove it.
4 Close the SD card cover until both ends are seated.
Important! The phone does not think the SD card is inserted if both ends of the cover are not
properly closed.
T-Mobile G1 User Guide R1.0 25 September 8, 2008
New voicemail notification:
Page 26

System settings
Control phone-wide settings from the Home settings screen: Press HOME, then press MENU and
select
Settings. You can also select the Settings icon from the Home screen.
Wireless controls
Wi-Fi on/off
Wi-Fi settings screen Open the Wi-Fi settings screen to:
Bluetooth on/off Use this check box to turn Bluetooth services on or off.
Bluetooth settings With Bluetooth services on, you can open the Bluetooth settings screen to:
Airplane mode on/off When airplane mode is selected, all wireless connectivity is off. This icon
Mobile network
settings
Select this check box if you prefer to use Wi-Fi for your data connection.
• View and scan for available networks - Press
• Connect to a network - Select it from the network list. Provide your
username or password if required.
• Rename your device.
• Select to be discoverable for up to 120 seconds, or not discoverable.
• Pair or unpair with one of the Bluetooth devices in range - You will be
asked to type a PIN before pairing. Refer to the manufacturer’s
documentation for the PIN code.
• Rescan for devices - Press
• Clear devices from list - Press
will display in the status bar when airplane mode is selected.
• Select data roaming capability.
• Select to connect only to 2G (slower) networks to save battery power.
• Select a wireless operator network - Scan for all available networks, or
select a network automatically.
• Add or edit network Access Point Names (APNs) - Do not change this
setting unless advised to do so by your wireless operator!
MENU and select Scan.
MENU and select Clear device list.
MENU and select Scan.
T-Mobile G1 User Guide R1.0 26 September 8, 2008
Page 27

Call settings
Note that when you open Call settings, your current settings are fetched, which can take a few
moments.
Fixed Dialing
Numbers
Voic em ai l Select to set a voicemail number that isn’t being read from the SIM card.
Call forwarding Select how you want busy, unanswered, and unreachable calls to be
Additional settings From this setting you can set your Caller ID preference and turn on/off call
Operator selection Select a wireless operator network - Scan for all available networks, or
This feature allows you to restrict outgoing calls to a fixed set of numbers.
To enable this feature you must know the SIM PIN2 code for your phone.
You can get this number from your wireless operator, assuming this feature
is supported. Read more in “Call settings” on page 87.
handled. There is also an option to
settings” on page 87.
waiting.
Read more in “Call settings” on page 87.
select a network automatically.
Always forward. Read more in “Call
T-Mobile G1 User Guide R1.0 27 September 8, 2008
Page 28

Basic phone settings
Sound & display Sound settings
• Silent mode - Select to silence your phone.
• Ringer volume - Select to open the volume control, then slide your finger
along the volume bar to set an incoming call ring volume.
• Media volume - Select to open the volume control, then slide your finger
along the volume bar to set the volume for playing back music, videos,
or voice recordings.
• Phone ringtone - Select to decide on a ringtone to use for incoming
calls. Note that you can override this setting for individual contacts in
the Edit contact details screens. Read more in “Edit contact details” on
page 38.
• Phone vibrate - Select to have your phone vibrate for incoming calls.
• Notification ringtone - Select to decide on a ringtone to use when you
receive a notification (e.g., new message, upcoming event). Note that
you can override this setting for new Calendar event notifications and
new Gmail, IM, text, and multimedia message notifications. Go to the
applications’ settings screens to select specific ringtones.
• Audible touch tones - Select to have a tone sound when you use the onscreen Dialer.
• Audible selection - Select to have a sound play when you select an item
on the screen either using touch or the TRACKBALL.
Display settings
• Brightness - Select to open the brightness control, then slide your finger
along the brightness bar to set the level. In sunlight, increase the level.
• Screen timeout - Select to decide how long your phone must be inactive
before the screen turns off. Select
battery life will decrease.
Never timeout if you wish, but
Data synchronization Read more in “Data synchronization” on page 31.
• Turn on/off synchronization for all services.
• Select individual services to synchronize with your data on the Web.
The last time the service synchronized is reported under the service
name.
• To start an unscheduled sync, press
sync is in progress, cancel it by pressing
.
sync
T-Mobile G1 User Guide R1.0 28 September 8, 2008
MENU and select Sync now. If a
MENU and selecting Cancel
Page 29

Security & location My Location
Select a source for determining your location:
• Wireless networks, or
• GPS satellites
Typically GPS will be more accurate (to street level) but it consumes more
battery power. Note that GPS is active only when in Maps or another
application requiring your location. The first time you select
pattern
Screen unlock pattern - Create a pattern you will be asked to draw
before your screen will unlock. You can select to make the pattern visible
or invisible as you draw it.
SIM card lock settings - Lock your SIM card for extra security. You can
also change your SIM card PIN from this screen. If you don’t know your
SIM PIN, you can obtain it from your wireless operator.
Visible passwords - Select to have your password display as you type it.
Applications Unknown sources - Select this check box if you want the ability to
download applications from the Web. With this check box not selected,
you will only be able to download applications from Android Market.
To ensure your personal data and phone remain secure, it is recommended
you not select this check box.
Quick launch - Select to assign shortcuts (a-b, 1-9) to applications. Some
applications have been assigned shortcuts by default. You can change
these, plus add shortcuts. From this screen:
1 Select the letter or number you want to use as a shortcut.
2 Select the application from the list that appears.
3 The shortcut is assigned.
, you will step through a quick tutorial.
Set unlock
T-Mobile G1 User Guide R1.0 29 September 8, 2008
Page 30

Manage applications - View all the applications stored on your phone
and how much space they occupy. If you’ve downloaded an application
from Android Market, you can uninstall it from this screen.
Select a specific application to:
• Clear your user data (if you have any associated with a particular
application).
• Disassociate the application with any actions. For example, you may
have selected to use YouTube to open any Browser links to videos. If
you’d like to use another application to open video links, simply select
the
Clear defaults button. The next time you try to perform that action,
you’ll be shown a dialog box so you can select an application. To make
it the default, make sure you select the
check box on this dialog box before you select the application.
• Uninstall - If you’ve downloaded an application from Android Market,
you will be able to uninstall it from this screen by selecting
Development - If you are an application developer, you may be
interested in these settings:
• USB debugging - If you want be able to communicate with your phone
directly via USB, select the
• Stay awake - To prevent your phone from sleeping while charging (via
power adapter or USB), select the
USB debugging check box.
Use by default for this action
Uninstall.
Stay awake check box.
SD card & phone
storage
T-Mobile G1 User Guide R1.0 30 September 8, 2008
View and manage the data storage on your phone:
• SD card - Monitor and manage the use of your SD card from this
screen:
- View how much space you are using on your memory card.
- Select to use your memory card as USB mass storage when your
phone is connected to your computer (selected by default)
- Unmount/eject your memory card from your phone. Note that when
your phone is connected to your computer via USB, you cannot view
pictures or play any media stored on the card from your phone.
• Internal phone storage - Reports how much internal storage is free.
The phone has a total of 256 MB internal flash memory. You can also
select to reset your phone to factory settings. This will erase all your
data from the phone and require you to sign in and go through the setup screens to use any of the applications.
Page 31

Date & time
Text • Turn Auto-replace feature on/off - This feature is not a spell-checker,
• Set time, time zone, and date - Use
override the network values.
• Time format - Select from 12- or 24-hour formats.
• Date format - Select from a variety of formats.
but automatically corrects commonly-mistyped words when selected.
• Turn Auto-cap on/off - When selected, automatically capitalizes the
first letter in a text field, or the first letter after a period (.), question
mark (?), or exclamation point (!).
• Turn Auto-punctuate on/off - When selected, automatically inserts a
period (.) when you type two spaces in succession.
Automatic unless you need to
About phone
•View your phone
including your phone number, the network you are currently using, the
type of network, signal strength, whether you are roaming or not, any
Wi-Fi addresses you’re connected to, and more.
•Select
• Read about the
• View the model number and version information for your phone.
Legal information for copyright and licensing information, as
well as the Google Terms of Service for the Google applications on
your phone.
Status. This screen lists a variety of information,
Contributors to the Android phone.
Data synchronization
Some Google applications on your phone (Gmail, Calendar, and Contacts) give you access to the
same personal information that you can add, view, and edit on your computer using Google Web
applications. This means that when you add, change, or delete your information in any of these
applications on the Web, the updated information also appears on your phone, and vice versa. Also,
if you lose your phone or if your phone is destroyed, your personal information is not lost and will
appear, as before, on a replacement phone.
This mirroring of information happens through over-the-air data synchronization, or data “syncing”.
Data syncing occurs in the background and shouldn’t ever get in your way. You’ll know your data is
being synchronized when you see this icon in the status bar: .
Because sending large amounts of data back and forth over the air can take time and require
considerable bandwidth, there are some settings on the phone that allow you to control data sync.
T-Mobile G1 User Guide R1.0 31 September 8, 2008
Page 32

Sync by application
To control synchronization for Gmail, Calendar, and Contacts, do the following:
1 Press
2 Select
3 By default, the personal information in Gmail, Calendar, and Contacts will sync whenever you
HOME, then press MENU and select Settings.
Data synchronization.
When any of the applications are synchronizing, you will see the “sync” icon: . You will also
see the last time your data was synchronized.
Date & time
of last sync
make a change or receive a new message. You can change this behavior:
Auto-sync When selected, Auto-sync will sync Gmail, Calendar, and Contacts
Gmail Clear this check box to exclude Gmail from auto-sync. To force a sync,
Calendar Clear this check box to exclude Calendar from auto-sync. To force a sync,
Data is syncing
automatically, as you make changes or receive new messages. When OFF,
information will not be synced automatically, although you can force a sync
by using the individual application check boxes described below.
either clear the check box then select it, or press
. To control sync by Gmail label, you must do so from the Gmail
now
settings screen. Read more in “Select labels to synchronize” on page 46.
either clear the check box then select it, or press
.
now
MENU and select Sync
MENU and select Sync
Contacts Clear this check box to exclude Contacts from auto-sync. To force a sync,
either clear the check box then select it, or press
.
now
Cancel sync
Sync problems
T-Mobile G1 User Guide R1.0 32 September 8, 2008
During a sync you can stop it by pressing
sync
.
If you see this icon to the left of the sync check box, then there was a
temporary problem with the data synchronization. Check your data
connection and try again later.
MENU and select Sync
MENU and selecting Cancel
Page 33

Sync by Gmail label
You can select to sync only Gmail messages with certain labels from the Gmail application settings
screen. Read more in “Select labels to synchronize” on page 46.
T-Mobile G1 User Guide R1.0 33 September 8, 2008
Page 34

Bluetooth
Your phone is equipped with Bluetooth® wireless technology Specification 2.0. You can use Bluetooth
to send and receive calls using a headset or hands-free car kit.
Turn on Bluetooth services
1 Press HOME, then press MENU and select Settings.
2 Select
3 When on, the Bluetooth icon appears in the status bar.
Discoverability
By default, your phone is not “discoverable”. This means other Bluetooth devices will not see your
phone in their scans for Bluetooth devices. If you make your phone discoverable, it will be visible to
other Bluetooth devices for up to 120 seconds.
To make your phone discoverable:
1 Make sure you have turned Bluetooth on, as described in “Turn on Bluetooth services” on
2 Press
3 Select the
4 Select
Wireless controls, then select the Bluetooth check box to turn on Bluetooth services.
page 34.
HOME, then press MENU and select Settings > Wireless controls > Bluetooth settings.
Discoverable check box to make your phone visible to other Bluetooth devices for
120 seconds. You must stay on the Bluetooth settings screen to remain discoverable.
Discoverable again during the 120 seconds, or leave the Bluetooth settings screen, to
make your phone undiscoverable.
Name your Bluetooth device
1 Make sure you have turned Bluetooth on, as described in “Turn on Bluetooth services” on
page 34.
2 Press
3 Type the name for your device in the dialog box, then select
4 Your new device name appears on the Bluetooth settings screen.
T-Mobile G1 User Guide R1.0 34 September 8, 2008
HOME, then press MENU and select Settings > Wireless controls > Bluetooth settings
>
Device name.
OK.
Page 35

Pair & connect with Bluetooth devices
Before your phone can communicate with a Bluetooth headset or hands-free car kit, the devices must
“pair”, then “connect”:
1 Make sure you have turned Bluetooth on, as described in “Turn on Bluetooth services” on
page 34.
2 Press
3 Your phone starts scanning for Bluetooth devices within range. As they are found, the devices
4 To pair with a device in the list, select it.
5 Type the device’s PIN, then select
6 Once paired, select the device name to connect. You can also touch & hold the name to open the
7 Pairing and connection status appear under the device name.
8 Once the other Bluetooth device shows “connected” status, you can start using it to make and
9 To disconnect or unpair with a device, touch & hold the device to open the context menu. Select
Notes:
• The phone supports only the headset and hands-free Bluetooth profiles, so if you try to connect
• If you pair with a second headset while connected to the first, the first headset will remain
HOME, then press MENU and select Settings > Wireless controls > Bluetooth settings.
appear in the list of Bluetooth devices.
OK. (Read the manufacturer’s documentation if you don’t
know the PIN.)
context menu, then select
receive phone calls.
Connect.
Disconnect or Unpair, as appropriate. If you select Unpair when connected, you will be
disconnected as well.
to a device that is not a headset or hands-free car kit, then you will receive an “unable to
connect” message.
connected. To switch connection to the second headset you must manually select that headset
again after pairing.
Rescan for Bluetooth devices
If you want to update the list of Bluetooth devices, press MENU and select Scan for devices.
Clear device list
If you want to disconnect, unpair, and remove the devices in the list, press MENU and select Clear
device list
until you
T-Mobile G1 User Guide R1.0 35 September 8, 2008
. Note that devices that were connected to your phone will remain paired and in the list
Clear device list again.
Page 36

Contacts
Your contact list
The contacts on your phone are synced with your Google account contacts stored on the Web. To
view the contacts on your phone, press
HOME and select Contacts . You can also press the
CALL button and select the Contacts tab.
Contacts belonging to a specific group (you can choose which group) are listed in the
Only those contacts you star as “favorites” are listed in the
on page 40 to learn how to change which contact group displays in
online and if you are signed in to Google Talk, their online status as well as their first-labeled
number will appear under their name.
Online status
Browse through your contacts by rolling the
the screen. Rapid brush movements in either direction accelerates the scrolling. Touch the screen to
stop the scrolling.
TRACKBALL, or by sliding your fingertip up and down on
Favorites tab. (Read “Contacts settings”
Contacts.) If your contact is
Contacts tab
Favorites tab
The quick scroll tab appears when you
begin scrolling with your fingertip.
Drag the tab, then release to jump to
names beginning with the letter
displayed.
Contacts tab.
Tip: To find a contact quickly from the Home screen, open the keyboard and start typing their name.
Your contact list appears and resolves to the letters you’ve typed.
T-Mobile G1 User Guide R1.0 36 September 8, 2008
Page 37

Another way to find a contact quickly is to use the “quick scroll” tab. As soon as you start scrolling
with your fingertip, the quick scroll tab appears on the right, connected to the scroll bar. Select, then
drag the tab up or down to scroll through the alphabet rapidly. Release your fingertip when the first
letter of the name you’re looking for appears. You’ll jump to that point in the list.
From the
Take action on a contact Touch & hold the contact’s name to open the context menu. From the
View contact’s online
status
Go to Contact details
screen
Contacts tab, you can:
menu you can select to view the Contact details screen, call the contact’s
number, send a text message, add or remove a star, edit the contact
details, or delete the contact.
Directly below a contact’s name their online status displays:
- Available
- Away
- Busy
- Offline
Select the contact’s name to open the Contact details screen, where all
the information you’ve saved for this contact is displayed. Note that the
number with this icon is the default number for that contact.
To edit a contact’s details, press
MENU and select Edit contact.
Add a contact
1 Press HOME and select Contacts . Your contact list appears.
2 Press
3 Add all the information you want to store for this contact in the appropriate fields. You must add
4 Assuming you have an SD card inserted with pictures on it, you can assign a Caller ID icon to
MENU and select New contact, or press MENU + n.
some information to save a contact.
To change a default label, select the label name to open the label menu. Select a different
label or create a custom label. To add more fields, select
your contact by selecting the
picture and select it, size the cropper with your fingertips. (Read more in “Crop pictures” on
page 15.) When finished, select
assign an icon, a default android icon will be assigned: .
Add icon button. The Pictures application opens. Navigate to a
Save. The picture is associated with your contact. If you do not
+ More info.
T-Mobile G1 User Guide R1.0 37 September 8, 2008
Page 38

5 To associate this contact with a ringtone for incoming calls, select the Ringtone pop-up menu.
Select a ringtone, then select
6 If you want all calls from this contact to go directly to voicemail, select the S
to voicemail
7 To save your contact, press
Note: Email addresses are automatically added to Contacts each time you use the Reply, Reply to
all, or Forward functions in Gmail to send messages to addresses not previously stored in Contacts.
check box.
OK. When you select a ringtone, it plays briefly.
end calls directly
BACK, or press MENU and select Save.
Assign favorites
Use Favorites as a way to display only those contacts you contact most frequently. To add a contact
to
Favorites:
1 From Contacts, touch & hold the contact you want to add to Favorites. The context menu opens.
2 Select
3 Now your contact will be listed in
Add to favorites.
Favorites and display with a colored star: . Their details
screen will also display the colored star.
Edit contact details
You can always make changes to the information you’ve stored for a contact:
1 From Contacts, touch & hold the contact whose information you want to edit. The context menu
opens.
2 Select
3 Make your edits, then select
Note: Once you’ve edited a contact’s details, the contact will automatically become part of the My
Contacts group. Read more in “About the My Contacts group” on page 41.
Edit contact. The Edit contact screen appears.
Save. To cancel, select Discard changes.
Communicate with a contact
From Contacts you can quickly call or text a contact’s default number, as displayed below their name
on the screen. However, to view all the information you’ve stored for a contact, and to initiate other
types of communication with that contact, open the Contact details screen. To open a contact’s details
screen, simply select their name from Contacts.
T-Mobile G1 User Guide R1.0 38 September 8, 2008
Page 39

Call a contact From the contact list:
1 Highlight the contact you want to call.
2 Press
3 To dial a different number for the contact, select the contact’s name,
From the contact details:
1 In the Dial number section, select the number you want to dial.
2 The number is dialed.
CALL to dial that contact’s primary number (first in the list on
their details screen).
then select the number on their details screen.
Send a text or multimedia
message to a contact
Send email to a contact To send an email message to a contact, you must have an email
To send a text or multimedia message to a contact, you must have a
mobile number stored for them in contact details.
From the contact list:
1 Touch & hold the contact’s name to open the context menu.
2 Select
3 Complete your message and select
From the Contact details screen:
1 In the
2 A Compose screen opens for your new message.
3 Complete your message and select
address stored for them in their contact details.
1 Select the contact you want to email. Their Contact details screen
2 In the
3 Complete your message, press
Send SMS/MMS. A Compose screen opens for your new
message.
Send or press ENTER.
Send SMS/MMS section, select a phone number.
Send or press ENTER.
opens.
Send email section, select the email address. If you are
fetching POP3 or IMAP email accounts to your phone, then select the
account you wish to use to send. A Compose screen opens for your
new message.
MENU, and select Send or press
ENTER.
T-Mobile G1 User Guide R1.0 39 September 8, 2008
Page 40

Send an instant message
to a contact
Map a contact’s address To map a contact’s address, you must have a postal or physical
To send an instant message to a contact, you must have an instant
message screen name stored for them in their contact details.
1 Select the contact you want to instant message. Their Contact details
screen opens.
2 In the
3 Your chat session begins. If your contact is offline, there will be a
address stored for them in their contact details.
1 From your contact list, select the contact whose address you want to
2 On the contact’s details page, in the
3 The Maps application opens and locates the address. Press
Send instant message section, select the screen name. If you
haven’t signed in to the client you want to use, you’ll be asked to sign
in.
message letting you know in the Chat screen.
map.
Other information section,
select the address.
MENU
to see your options. Read more in “Google Maps” on page 71.
Display a contact group
To select which contact group to display in Contacts, press MENU and select Display group. You
can select from the following:
All contacts Displays every contact you’ve created or that has been added
automatically.
Contacts with phone numbers Displays only contacts with phone numbers, regardless of whether
you've created them on the phone or Web.
My Contacts Displays a group created automatically based on those contacts
you communicate with most frequently. Read more in “About the
My Contacts group” on page 41.
Contacts settings
To set Contacts preferences, from Contacts or Favorites, press MENU and select Settings.
Sync groups You can limit the contacts that are synced to your phone. Select to sync all
contacts, or just certain groups.
T-Mobile G1 User Guide R1.0 40 September 8, 2008
Page 41

SIM contacts importer If you have stored names and phone numbers on your SIM card, you can
add these to the Contacts stored on your phone by selecting this settings
option. Once the list of names and numbers appears you can:
• Import all names/numbers in the list - Press
all
.
• Import only certain names/numbers in the list - Select the name/
number you want to import, then repeat for others as you wish. (As soon
as you select the name/number, it is imported.)
MENU and select Import
About the My Contacts group
“My Contacts” is a special group of contacts that displays by default in Contacts. It includes the
contacts that you communicate with frequently. To display all your contacts and not just those in My
Contacts, press
To move a regular contact into the My Contacts group on your phone, simply edit that contact’s
details. (Read more in “Edit contact details” on page 38.)
All the email addresses you’ve sent messages to are added automatically to the “Suggested
Contacts” group. You can move contacts from Suggested Contacts into My Contacts at any time from
the Web Contacts client. Note that you can create additional contact groups from the Web client as
well.
MENU, select Settings, then select the Show all contacts check box.
Contacts shortcuts
Contact list screen
New contact
View contact
Call contact
Jump to top/bottom of list
Contact details screen
Edit contact
T-Mobile G1 User Guide R1.0 41 September 8, 2008
MENU + n
ENTER
CALL
ALT + roll TRACKBALL up/down
MENU + e
Page 42

Email, IM, and Messaging
Gmail
To open Gmail™ webmail service, press HOME and select the Gmail icon .
About messages
With Gmail, each message you send is grouped with all the responses you receive. This “conversation
view” continues to grow as new replies arrive, so you can always see your messages in context.
Conversations are also referred to as “message threads” or simply “threads”. A new message or a
change to the subject of a current message will begin a new conversation.
Inbox conversation list
All the Gmail that you fetch to your phone is delivered to your Inbox, and the Inbox is your default
Gmail view. The total number of unread messages displays in the title bar and individual unread
messages display in bold. If you have labeled a message, its label appears in a colored rectangle
to the left of the date.
Number of
unread messages
Unread messages
display in bold
Number of messages
in conversation
Label
Draft message saved
Starred message
T-Mobile G1 User Guide R1.0 42 September 8, 2008
Page 43

Conversation labels
Organize your email by labeling your conversations. You can filter the conversation list to show only
those with a specific label. You can apply as many labels to a conversation as you wish.
A “star” is a special system-provided label: =starred message; =unstarred message. Use
stars to mark important conversations, or any way that you wish. Other system labels include: Inbox,
Sent, Outbox, Drafts, and All Mail.
Here are some specific instructions on using labels:
Label a conversation 1 From a conversation list, touch & hold a conversation to open the
context menu.
2 Select
3 The Labels menu appears. Labels already applied are marked with a
4 Select the label to either apply it or remove it from the conversation,
Star a conversation 1 From a conversation list, touch & hold a conversation to open the
2 Select
Change labels.
- sign; unapplied labels are marked with a + sign.
then select
context menu.
OK to return to the conversation list.
Add star. If the conversation already is starred and you want
to remove it, select
Remove star.
Star a message in a
conversation
Filter conversations by
label
T-Mobile G1 User Guide R1.0 43 September 8, 2008
1 From a conversation list, select a conversation to open it for reading.
2 Expand the message you want to star.
3 Touch the star to select it. To “unstar” the message, touch the star
again.
1 From a conversation list, press
2 Select the label of the conversations you want to view, including
system labels.
3 A list appears, showing just the conversations marked with the label
you selected.
4 To return to the Inbox, press
press the
BACK key.
MENU and select View labels.
MENU and select Back to Inbox, or
Page 44

Select labels to sync You can select to synchronize specific labels:
1 From a conversation list, press MENU and select Settings.
2 Select
Labels.
3 All your labels appear in a list. Select the labels you want
synchronized on a regular basis. Read more in “Select labels to
synchronize” on page 46.
Refresh
1 From a conversation list, press
2 Select
Refresh.
MENU and select Settings.
3 Your email is synchronized per settings. Read more in “Select labels to
synchronize” on page 46.
Read email
When you open a conversation for reading, the subject will appear in a box at the top of the screen
and the latest message will appear at the bottom of the conversation.
You can star individual
messages in a conversation
Latest message in conversation
Actions you can take on the
message
Actions you can take on the
entire conversation
T-Mobile G1 User Guide R1.0 44 September 8, 2008
Page 45

Here are some actions you can take on individual messages and conversation:
Open/collapse messages All read messages are collapsed. To expand these messages, select
the “read messages” header:
Once the read messages are expanded, their individual headers
display. Touch the header to open/collapse the message body.
All messages are collapsed
to show just the headers.
Select a header to expand
that message.
Scroll through messages Slide your finger up or down on the screen; quickly brush your
finger up or down to scroll faster.
You can also roll the
Mark conversation as spam • From a conversation list, touch & hold the conversation to open
the context menu. Select
• From the read view, press
.
spam
TRACKBALL down to scroll through messages.
Report spam.
MENU and select More > Report
Mark conversation as read/
unread
Unread messages are shown
in bold.
Archive conversation • From a conversation list, touch & hold the conversation to open
T-Mobile G1 User Guide R1.0 45 September 8, 2008
• From a conversation list, touch & hold the conversation to open
the context menu. Select
appropriate.
• From the read view, press
unread
the context menu. Select
messages, from the list of labels, select
• From the read view, press
also use the keyboard shortcut
as appropriate.
Mark read/Mark unread as
MENU and select Mark read/Mark
Archive. To view your archived
All mail.
MENU and select Archive. You can
MENU + y.
Page 46

Compose email
Compose new
Reply, Reply all, Forward 1 With a conversation highlighted or open for reading, scroll to the
1 Press
2 Add recipients by typing a name or address in the To field.
3 Type a subject and message.
4 To add a picture attachment, press
5 Select
2 Select
3 Compose your message and
MENU and select Compose.
Matching contacts will appear. Select the recipient or continue
typing the address. Add as many as you wish.
MENU and select Attach.
Select a picture. To remove an attachment, select the
attachment’s
Remove button.
Send or Save as draft when ready. Pressing BACK will
also save as draft.
end of the conversation.
Reply, Reply all, or Forward.
Tip: Always double-check that you’ve made the right selection!
Send or Save as draft when
ready. Pressing
BACK will also save as draft.
Search for messages
In Gmail, you can search for a specific message by sender, word in subject, or label:
1 From a conversation list, press
press the
2 Type your search string into the box, then select
SEARCH button.
MENU and select Search. You can also open the keyboard and
Search.
Add signature to messages
You can append a signature to every message you send:
1 From a conversation list, press
2 Select
3 Type your signature in the box. Your signature can be multiple lines, as long as you like. When
Signature.
finished,
OK.
MENU and select Settings.
Select labels to synchronize
You can choose to synchronize messages based on the labels you’ve assigned to them. Limiting the
amount of email that is regularly synchronized will cut down on network data exchange.
1 From a conversation list, press
2 Select
T-Mobile G1 User Guide R1.0 46 September 8, 2008
Labels to open the Labels screen. In addition to the labels you’ve created, all the “system
labels” (Inbox, Starred, Chats, Sent, Spam, and Trash) are listed.
MENU and select Settings.
Page 47

3 Select a label name to cycle through the sync options: Sync recent, Sync all, or never (no sync
option displays).
Note: You cannot turn off sync for Inbox except through the
synchronization
options. Read more in “Sync by application” on page 32.
Home > Settings > Data
Set new email notifications
You can receive a notification each time you receive a new email message:
1 From a conversation list, press
2 Select the
message arrives.
3 If you want a sound to play when a new message arrives, select
ringtone menu, select a ringtone that will play for new email notifications. Note that when you
select a ringtone, it plays briefly. If you don’t want a ringtone to play when you receive a new
message, select
Email notifications check box to see an icon in the status bar when a new
Silent. The ringtone marked Default ringtone is defined in the Home >
MENU and select Settings.
Select ringtone. From the
Settings > Sound & display > Notification ringtone menu.
4 If you want your phone to vibrate when you receive a new message, select the
box.
Vibrate check
Gmail shortcuts
Conversation list screen
Refresh list
Compose new
Open conversation to read
Archive conversation
Jump to top of list
Jump to end of list
Page up
Page down
MENU + u
MENU + c
ENTER
MENU + y
Press ALT + TRACKBALL roll UP
ALT + TRACKBALL roll DOWN
Press
SHIFT + SPACEBAR
SPACEBAR
Read message/conversation screen
Reply to last message in conversation
Reply all to last message in conversation
Forward last message in conversation
Archive conversation
T-Mobile G1 User Guide R1.0 47 September 8, 2008
MENU + r
MENU + a
MENU + f
MENU + y
Page 48

POP3 and IMAP email accounts
Add an email account
You can fetch messages from up to five POP3 or IMAP accounts. Follow these steps:
1 Press
2 The Set up new account screen appears.
3 Type your account email address and password.
4 If you want, select the
5 Select
6 To add more accounts (up to five), from an Inbox or your Accounts screen, press
Home, then select the Email application .
Send email from this account by default check box. This setting only
applies if you have more than one POP3 or IMAP account set up.
Next.
• If you have a popular email account, the application will set everything up for you! Before
you go to your Inbox, you can name the account (if you don’t, your email address will be
used). You are also asked to type your name as you want it to display on outgoing messages.
You must complete this field before you can select
• For less popular accounts, follow the prompts to type the email server, protocol, and other
account information yourself. After your account settings have been verified, select
go to your Inbox.
Next and go to your Inbox.
Next to
MENU and
select
Add account.
Use your POP3 and IMAP email account
Once you’ve set up an account, you can do the following:
Refresh Inbox
Read email You can display or collapse the messages in your Inbox by selecting
From the Inbox, press
Inbox with any previously-unfetched email.
Inbox. Unread messages display with a colored band. (Each account
you add will use a different color.)
MENU and then select Refresh to update your
Select
to display
messages
Unread messages
display with a
colored band
To open an email for reading, select it.
T-Mobile G1 User Guide R1.0 48 September 8, 2008
Page 49

Forward, Reply, Reply all You can forward, reply, or reply all to an email message from either
the Inbox or the read view:
From the read view, press
take.
From the Inbox, touch & hold the message to open its context menu.
Select the action you want to take.
Compose new From the Inbox:
1 Press
2 Add recipients by typing a name or address in the To field.
3 Type a subject and message.
4 Select
Delete message From the Inbox:
1 Expand the Inbox to display the messages.
2 Touch & hold the message you want to delete.
3 Select
4 Your message is moved to the Trash.
Empty Trash Once you’ve moved a message to the Trash, a Trash folder will display
below your Inbox. To empty messages in the Trash you must delete
each message individually:
1 Expand the Trash folder to display the messages.
2 Touch & hold the message you want to delete to open the context
3 Select
MENU and select Compose.
Matching contacts will appear. Select the recipient or continue
typing the address. Add as many as you wish.
Send, Save as draft, or Discard. Pressing BACK will also
save as draft unless you have not typed anything.
Delete.
menu.
Delete. Note that the message is only deleted from your
phone, not from the account server.
MENU and select the action you want to
Remove an email account
You can always remove a POP3 or IMAP email account from your phone by doing the following:
1 Go to your Inbox.
2 Press
3 Touch & hold the account you want to remove to open the context menu.
4 Select
5 You will be asked to confirm before the account is removed.
T-Mobile G1 User Guide R1.0 49 September 8, 2008
MENU and select Accounts. Your Accounts screen opens.
Remove account.
Page 50

Edit account settings
To open your Account settings screen, do the following:
1 From your account Inbox, press
2 The Account settings screen appears. You can do the following from this screen:
Account name Select to change the name of your account as it appears on
Your name Select to change your name as it appears in outgoing email.
Email check frequency Select this pop-up menu to set how frequently your email
Default account If you have more than one POP3 or IMAP email account set
Email notifications
Incoming server settings
MENU and select Account settings.
your Accounts screen.
account is checked for new messages. Note that whenever you
open a folder, email is refreshed, regardless of this setting.
up on your phone and want to use this account by default
when selecting
check box.
If you want an icon
new message arrives, select this check box.
Select
Incoming settings if you need to edit the username/
password, server, port, or option to delete email from server.
Compose from the Accounts screen, select this
to appear in the status bar when a
Outgoing server settings
Add another POP3 or IMAP
account
3 To save your settings, press the
T-Mobile G1 User Guide R1.0 50 September 8, 2008
BACK button.
Outgoing settings if you need to edit the SMTP
Select
server, port, security type, option to require sign-in, or
username/password.
To add another account (you can add up to five), select
another account
.
Add
Page 51

Email shortcuts
Inbox screen
Refresh list
Compose new
Open highlighted message to read
Jump to top folder (Inbox)
Jump to last folder
Page up
Page down
Read message screen
Reply to message
Reply all to message
Forward message
Move message to Trash
Mark as unread
MENU + r
MENU + a
MENU + f
MENU + q
MENU + u
MENU + r
MENU + c
ENTER
ALT + TRACKBALL roll UP
Press
Press ALT + TRACKBALL roll DOWN
SHIFT + SPACEBAR
SPACEBAR
T-Mobile G1 User Guide R1.0 51 September 8, 2008
Page 52

Google Talk
You can use Google Talk™ instant messaging service to send instant messages to your friends. All
you need is a Gmail account and you’re set up. To open Google Talk, press
icon . The IM accounts screen opens. The number of open chats displays opposite the account
name. You can have as many open chats as you wish.
Your Google Talk Friends list
On the IM accounts screen, select Google Talk account. Your Friends list appears. You can see and
do the following from this screen:
HOME and select the IM
Change your status
Select your status (at the top of the list) to select
Available, Busy, or
Invisible. To set a custom status, type it in the text field.
Select to open status menu
View open chats If you have any open chats, they will display just below your status. If you
have an unread message, it will display in the chat display.
Select the chat display to open the Chat screen.
View your friends In the list, friends are sorted first by their status:
• Available
•Away
•Busy
•Offline
Within the status groupings, friends are listed in alphabetical order, A-Z.
Show all or just
“most popular”
By default, only the friends that you communicate with most often – the
“most popular” – are on the Friends list. If you want to display all your
friends, press
popular view, press
MENU and select All friends. To switch back to the most
MENU and select Most popular.
T-Mobile G1 User Guide R1.0 52 September 8, 2008
Page 53

View friend status To the left of a friend’s name, you can see their online status in the upper-
right corner of their icon:
- Available
- Away
- Busy
- Offline
Mobile indicator To the far right of your friend’s name, you might see an icon that reveals
the last client from which they signed in. If you don’t see an icon, then they
signed in last from a computer.
- Signed in from Android phone
- Signed in from mobile phone
To set whether or not a mobile indicator displays next to your name, read
“Display mobile indicator” on page 55.
Find a friend From the Friends list, start typing to filter your list to show only friends with
names that match what you type.
Block a friend 1 From the Friends list, touch & hold the friend’s name to open the context
menu.
2 Select
3 Now the friend cannot send you messages and they are removed from
4 To unblock, from the Friends list, press
Block friend.
your Friends list. They appear on the Blocked friends screen.
MENU and select Blocked
friends
confirm.
. Select the name of the friend you want to unblock and then
Pin/unpin a friend To pin a friend is to make sure that friend always appears in your “most
popular” list.
1 From the Friends list, touch & hold the friend’s name to open the context
menu.
2 Select
Show/hide a friend To hide a friend is to never show the friend on the “most popular” list.
1 From the Friends list, touch & hold the friend’s name to open the context
2 Select
T-Mobile G1 User Guide R1.0 53 September 8, 2008
Pin friend or Unpin friend, as appropriate.
menu.
Show friend or Hide friend, as appropriate.
Page 54

Switch between
active chats
If you have more than one chat going, you can switch between them by
pressing
MENU and selecting Switch chats, or use the keyboard shortcut
MENU + SPACEBAR. On the panel that opens, select the chat you want to
join.
Close a chat From your Friends list, touch & hold the active chat to open the context
menu. Select
Close chat.
Add a friend to your
Friends list
View invites
1 From the Friends list, press
2 You can add a friend stored in your Contacts application, or invite a
new friend.
• If you add from your Contacts, select a contact from the list.
• If you add a new friend, complete the information required on the Invite
screen and select
1 From the Friends list, press
2 All chat invitations you’ve sent or have received are listed on the
Pending invitations screen.
3 To accept a pending invitation, select it. Choose to
4 When someone you invite to chat accepts, the pending invitation
disappears from the list.
Invite.
MENU and select Add friend.
MENU and select Invites.
Accept or Decline.
Chat
To start a chat, select a friend from the Friends list or highlight the friend and press ENTER. The Chat
screen opens. From here you can:
Start a chat 1 Type your message using the keyboard.
2 To inse rt a smi ley:
• Press
• Select a smiley from the list.
• When ready, select
3 When ready, select
Note: In the Chat screen, after every one minute of inactivity, a timestamp
appears.
MENU and select Insert smiley. The character smiley appears.
Send or press ENTER. You can also just type the
characters rather than selecting from the menu.
Send or press ENTER.
T-Mobile G1 User Guide R1.0 54 September 8, 2008
Page 55

Start a group chat You can invite more friends to chat from an existing Chat screen:
1 Press
2 Select the additional friend to invite.
3 When the additional friend joins, a notification that the chat is now a
MENU and select Add friend to chat.
“group chat” appears in the Chat screen for all participants to see.
Close chat
Block a friend While in a chat with a friend, if you want to block them from contacting in the
To close the current chat, press
future, press
MENU and select Block friend.
MENU and select Close chat.
Sign in automatically
If you want to sign in to your Google Talk account automatically every time you power on your
phone, make this setting:
1 From the Friends list, press
opens.
2 Select the
3 Press
Automatically sign in check box.
BACK to save your setting.
MENU and select More, then select Settings from the menu that
Display mobile indicator
You can select to display an icon in others’ Friends lists that indicate what type of mobile client you’re
using:
1 From the Friends list, press
opens.
2 Select the
3 Press
The appropriate mobile icon will now display to the far right of your name in others’ Friends lists:
Mobile indicator check box.
BACK to save your setting.
MENU and select More, then select Settings from the menu that
- Signed in from Android phone
- Signed in from mobile phone
If you are signed in from a computer, no indicator will display. If you are signed in from multiple
clients, then the client you’ve most recently signed in from will display.
T-Mobile G1 User Guide R1.0 55 September 8, 2008
Page 56

Set new message notifications
You can receive a notification each time you receive a new instant message:
1 From a Friends list, press
2 Select the
message arrives.
3 If you want your phone to ring when a new message arrives, select
ringtone menu, select a ringtone specific to new IM message notifications. Note that when you
check a ringtone, it plays briefly. If you don’t want a ringtone to play when you receive a new
message, select
4 If you want your phone to vibrate when you receive a new message, select the
box.
IM notifications check box to receive a notification in the status bar when a new
Silent.
MENU and select Settings.
Select ringtone. From the
Vibrate check
Sign out
To sign out, from the Friends list, press MENU and select More > Sign out.
Add other IM accounts
If you have another instant messaging account and if it is available on your phone, you can add it to
your list of accounts and use your phone to chat with those friends as well:
1 Go to the IM accounts screen. If you are viewing your
>
Account list. From a Chat screen, press BACK until you’re on the IM accounts screen.
2 Select the account type you want to add. The Sign-in screen appears.
3 Type your username and password. Select the
automatically
4 Select
5 Your Friends list appears.
Sign in.
check boxes if you want.
Friends list, press MENU and select More
Remember my password and the Sign me in
Note: If your IM account displays
“header”. Select the header to open the list; select again to close.
T-Mobile G1 User Guide R1.0 56 September 8, 2008
friends in groups, each group will appear in a collapsible group
Page 57

SMS and MMS messaging
To open the SMS & MMS Messaging application, press HOME and select the Messaging icon .
About text and multimedia messages
SMS messages are also know as “text” messages and can each be around 160 characters. If you
continue to type after the limit is reached, your message will be delivered as one, but count as more
than one message. These are called “concatenated” messages.
MMS messages are also known as “multimedia” or “picture” messages and can contain text, picture,
audio, and video files.
When you compose a message, the phone will automatically convert a text message into a
multimedia message as soon as you add a subject or an attachment, or if you address the message
using an email address rather than a phone number.
The message list
Like Gmail, text and multimedia messages are grouped with the replies you receive into
conversations or “message threads” or just “threads”. Message threads are listed in order of when
you received them (newest at the top). To open a thread for reading, select it. Read more below.
Unread messages appear with a green band on the left.
The Read view
Select a message thread in the list to open it for reading. When open, the individual messages
appear stacked on the screen, much like with instant messaging conversations (or chats). Note that
messages you send are also listed in the Read view.
Reading multimedia messages If you have selected to auto-retrieve your multimedia messages,
then both the message header and body will download. (Read more in “Text and multimedia
message settings” on page 60.) To view your message, select the “play” button.
If you are downloading only the headers, then you must first select the
the message body. If you are concerned about the size of your data downloads, you can check the
message size before you download.
Once the message has downloaded, select the “play” button to view the message.
T-Mobile G1 User Guide R1.0 57 September 8, 2008
Download button to retrieve
Page 58

From a message read view, you can do the following:
Open a message for reading Open a message for reading by either selecting it, or highlighting it
and pressing
Reply to a message 1 Simply start typing your message in the text box at the bottom of
the screen to reply to a message.
2 You can always press
attachment to convert it to a multimedia message.
3 Select
Links in messages If a message contains a link to a Web page, it will be selectable. To
view the Web page in the Browser, simply select it.
Delete messages Your messages will be saved until you explicitly delete them.
• Delete one message in a thread - With the message thread
open in Read view, touch & hold the individual message you want
to delete to open the context menu. Select
• Delete all messages in a thread - With the message thread
open in Read view, press
entire thread. You can also delete an entire thread from the
message list by pressing & holding the thread to open the context
menu, then selecting
• Delete all message threads - From the message list, press
and select
ENTER.
MENU and select to add a subject or an
Send or press ENTER when ready.
Delete message.
MENU and select More > Delete
Delete.
MENU
Delete all threads.
Delivery problems
View message details To view details about a particular message, in the Read view, touch
T-Mobile G1 User Guide R1.0 58 September 8, 2008
If a message you sent appears with this icon on the right, there
was a delivery problem. Touch & hold the message to open the
context menu. You can edit, retry sending, or delete the message.
To see all your undelivered messages (assuming there is at least
one), from the message list, press
messages
& hold the message to open the context menu. Select
message details
.
.
MENU and select Undelivered
View
Page 59

View message delivery or
read reports
If a message contains a delivery or read report (you would have
requested it in Settings), you’ll see this icon to the right of the
message .
Touch & hold the message to open the context menu. Select
. Status icons are shown and mean the following:
report
- Delivery problem
- Message delivered
- Message is being delivered
Read more about delivery and read reports in “Text and multimedia
message settings” on page 60.
View
Compose text and multimedia messages
1 Press MENU and select Compose. The Compose screen opens.
2 Add recipients by typing a name, phone number, or email address in the To field. Matching
contacts will appear. Select the recipient or continue typing. Add as many recipients as you wish.
If you send the message to an email address, the message will automatically convert from a text
to a multimedia message.
3 To add a subject, press
convert to a multimedia message.
4 To add an attachment, press
convert the message to a multimedia message. Select from audio or picture files. You can select
to take a new picture if you want, or record an audio file. Any recordings you make will be
stored automatically in the Music application in a playlist named “My recordings”.
To remove an attachment, select the attachment’s
5 Type your message. As you type, you’ll be able to track how many characters/messages you’re
creating. Remember that text messages have a limit around 160 characters. Once you go over
that limit, a new message is actually created but automatically joined into one when received.
6 Select
Send or press ENTER when ready. You can also save a draft. Read more below.
MENU and select Add subject. If you add a subject, the message will
MENU and select Attach. Adding an attachment will always
Remove button.
7 As your message sends, progress displays in the title bar. If you see this icon to the right of
the message, it means your message is still being delivered.
Save message as draft
1 While composing, press BACK.
2 Your message automatically saves as a draft.
3 To resume composing, in the message list, touch & hold the message and select
T-Mobile G1 User Guide R1.0 59 September 8, 2008
Edit.
Page 60

Text and multimedia message settings
To set text and multimedia message preferences, from the message list, press MENU and select
Settings. You can set the following from this screen:
Notification settings
New message notifications
Text message settings
Delivery reports To receive a report on the delivery status of your message, select
Manage messages on
SIM card
You can receive a notification each time you receive a new
message:
1 From a message list, press
2 Select the
3 If you want your phone to ring when a new message arrives,
select that check box as well. Select
ringtone menu and select a ringtone specific to new text and
multimedia message notifications. Note that when you check a
ringtone, it plays briefly.
4 If you want your phone to vibrate when you receive a new
message, select the
this check box. Status can be:
• Successful delivery
• Temporary delivery failure; an attempt to deliver will be made
again
• Unsuccessful delivery; no attempt to re-deliver will be made
Text messages can also be stored on your SIM card. The exact
number depends on your card, but it is usually around 25-50. To
view messages on your SIM card, delete them, and copy them to
your phone memory, select this setting.
Notifications check box to receive a notification
in the status bar when a new message arrives.
MENU and select Settings.
Ringtone to open the
Vibrate check box.
Multimedia message settings
Delivery reports To receive a report on the delivery status of your message, select
this check box. Status can be:
• Successful delivery
• Temporary delivery failure; an attempt to deliver will be made
again
• Unsuccessful delivery, where no attempt to re-deliver will be
made
T-Mobile G1 User Guide R1.0 60 September 8, 2008
Page 61

Read reports To receive a report on whether each recipient has read or deleted
the message without reading it, select this check box.
Auto-retrieve To retrieve all your MMS messages automatically (the header plus
the message will download to your phone), select this check box.
If you clear this check box, then only the message headers will be
retrieved and display in your message list. You can retrieve the full
message by selecting the
header. Once the message has downloaded, select the “play”
button to expand the message.
Roaming auto-retrieve If you are concerned about data traffic and just want the message
headers to download while roaming, clear the
retrieve
have your messages download even while roaming.
check box. Otherwise, you can select this check box to
Download button that displays in the
Roaming auto-
T-Mobile G1 User Guide R1.0 61 September 8, 2008
Page 62

Browser
About the Browser
To open the Browser, press HOME and select the Browser icon .
The Browser always opens to the last Web page you were viewing. The first time you enter the
Browser after powering on, your home page will display. You can change your home page by
pressing
any Web site, press
Zoom and navigation in Web pages
While viewing a Web page, take advantage of the following zoom and navigation techniques:
MENU and selecting More > Settings > Set home page. To go to your home page from
MENU + SPACEBAR key.
Zoom in
Zoom out
Navigate
1 Touch the screen to open the zoom-in and zoom-out controls . You can also
press
MENU and select More > Zoom to open the zoom controls.
2 Touch the + control to zoom in. With each touch you zoom in closer.
1 Touch the screen to open the zoom-in and zoom-out controls . You can also
press
MENU and select More > Zoom to open the zoom controls.
2 Touch the
• Roll the
• Slide your fingertip in any direction to shift your page view.
• Touch the screen to reveal the zoom controls and the “scale & scroll” icon at the
bottom right of the screen: . Touch the icon. The entire Web page will display
in the screen and the magnifying window will open. Drag the window to the
portion of the Web page you want view, then release. (Read more in “Scale &
scroll” on page 16.)
– control to zoom out. With each touch you zoom out further.
TRACKBALL in any direction to shift your page view.
T-Mobile G1 User Guide R1.0 62 September 8, 2008
Page 63

The Browse screen
From the Browse screen you can do the following:
Go to a Web page 1 Make sure the focus is not on a text box and then start typing the URL.
2 The Go to window opens. Possible matches appear in the drop-down
menu. Select a match or continue typing the URL.
3 Press
Navigate within pages You can navigate on a Web page in a variety of ways:
• To navigate on a Web page, slide your fingertip on the screen,
• To traverse a Web page by jumping from link to link, roll the
• Touch the screen to reveal the zoom controls and the “scale & scroll”
Zoom in/out You can zoom in/out on a Web page in a couple of ways:
• Press
ENTER to go to the page.
generally in the opposite direction that you want to view.
TRACKBALL to navigate.
icon at the bottom right of the screen: . Touch the icon. The
magnifying window opens and the Web page reduces to fit the width
of the screen. Move the magnifying box to the part of the page you
want to view, then touch the box or click the
in “Scale & scroll” on page 16.)
TRACKBALL. (Read more
MENU and select More > Settings > Zoom to open the zoom
controls: . Press the + magnifier to zoom in; press the magnifier to zoom out.
• If you’re on a page with contents that don’t fit completely within the
screen, the zoom controls will appear when you touch the screen.
• Touch the screen to reveal the zoom controls and the “scale & scroll”
icon at the bottom right of the screen: . Touch the icon. The
magnifying window opens and the Web page reduces to fit the width
of the screen. Move the magnifying box to the part of the page you
want to view, then touch the box or click the
in “Scale & scroll” on page 16.)
T-Mobile G1 User Guide R1.0 63 September 8, 2008
TRACKBALL. (Read more
Page 64

Add a bookmark Bookmark the Web page you are currently viewing:
1 Press
2 From the Bookmarks screen, select
3 Confirm the URL and name, then select
Bookmark a highlighted link on a Web page:
1 Press & hold the
2 Select
To view all your bookmarks, press
MENU and select Bookmarks.
New bookmark.
OK.
TRACKBALL to open the context menu.
Bookmark link.
MENU and select Bookmarks.
Refresh a Web page
To refresh the contents of the current page, press
MENU and select
Refresh.
Screen orientation
When your keyboard is open, Web pages will always display using landscape orientation. However,
when your keyboard is closed, you can change orientation by pressing
orientation
. The orientation will “stick” until you explicitly change it.
MENU and selecting Flip
Open pages in separate windows
You can keep more than one Web page open by using multiple windows to display the pages. You
can open up to eight windows.
Open a new window
1 From a Web page, press
windows screen opens, showing the Web page you started from, plus
a “new window”.
2 Select
3 Your home page opens in a new window.
4 To return to one of the other windows, press
New window.
Window. Select the page you want to view.
MENU and select Window. The Current
MENU and select
View the page in a
window
T-Mobile G1 User Guide R1.0 64 September 8, 2008
Select a window to view it full-screen. Alternatively, you can use the
context menu:
1 From a Web page, press
windows screen appears.
2 Touch & hold the window you want to view. The context menu opens.
3 Select
View.
MENU and select Window. The Current
Page 65

Close a window Touch the “X” in the lower-right corner of the window you want to close.
Alternatively, you can use the context menu:
1 From a Web page, press
2 Touch & hold the window you want to close. The context menu opens.
3 Select
Close.
MENU and select Window.
Bookmark the page
displayed in a window
View page info
Go to Bookmarks screen
View Browser history
1 From a Web page, press
2 Touch & hold the window whose page you want to bookmark. The
3 Select
4 Confirm the URL and name, then select
1 From a Web page, press
2 Touch & hold the window whose page you want to bookmark. The
3 Select
4 When you’re finished reading the information, select
From the Current windows screen, press
to go to your list of bookmarks.
From the Current windows screen, press
to your Recently-visited pages screen. Read more in “Browser history”
on page 68.
Manage bookmarks
MENU and select Window. The Current
windows screen appears.
context menu opens.
Bookmark.
OK.
MENU and select Window. The Current
windows screen appears.
context menu opens.
Page info.
OK.
MENU and select Bookmarks
MENU and select History to go
You can store as many bookmarks as you want on your phone.
Bookmark any page
T-Mobile G1 User Guide R1.0 65 September 8, 2008
1 Press
2 Select
3 Type a name and location (URL) in the dialog box.
4 Select
MENU and select Bookmarks. The Bookmarks screen opens.
New bookmark.
OK.
Page 66

Send bookmarked page’s
URL
1 Press
2 Touch & hold the bookmark you want to send. The context menu
3 Select
4 An email Compose screen opens with the URL as the message.
5 Address your message and finish composing.
6 Select
MENU and select Bookmarks. The Bookmarks screen opens.
opens.
Share link.
Send or press ENTER.
View bookmarked page
Edit bookmark
Delete a bookmark
Bookmark current page 1 Go to a Web page you want to bookmark.
1 Press
2 Touch & hold the bookmark you want to open. The context menu
3 Select
1 Press
2 Touch & hold the bookmark you want to edit. The context menu
3 Select
4 Type your change and select
1 Press
2 Touch & hold the bookmark you want to send. The context menu
3 Select
2 Press
3 Press
MENU and select Bookmarks. The Bookmarks screen opens.
opens.
View page or Open in new window.
MENU and select Bookmarks. The Bookmarks screen opens.
opens.
Edit bookmark. The edit bookmark dialog box opens.
OK.
MENU and select Bookmarks. The Bookmarks screen opens.
opens.
Delete bookmark. You will be asked to confirm.
MENU and select Bookmarks. The Bookmarks screen opens.
MENU and select Bookmark last-viewed page. The
Bookmark link dialog box opens. Confirm or edit the information,
then select
OK.
Set your home page
You set your home page from the Settings screen:
1 Press
2 In the
3 Type the URL of the page you want to set as home, then select
T-Mobile G1 User Guide R1.0 66 September 8, 2008
MENU and select More > Settings. The Settings screen opens.
Page content section, select Set home page to open the dialog box.
OK.
Page 67

The shortcut to go to your home page is MENU + SPACEBAR. You can also press MENU and select
More > Home page.
Links in Web pages
Navigate the links on a page using the TRACKBALL. Links are outlined in yellow when highlighted.
Highlighted link
To go to a link, highlight the link using the
by clicking the
Tip: When links are too small to touch directly on the screen, highlight the link with the
then either click the
context menu.
URLs • Select a link to jump to the URL.
Phone numbers Select a linked phone number to:
Email addresses Select a linked email address to:
TRACKBALL or by touching it again with your fingertip.
TRACKBALL to open the link, or press & hold the TRACKBALL to open the link’s
• Touch & hold a link to open the context menu and:
- Open link in new window
- Bookmark the link
- Copy the link to the clipboard
- Share link via email
• Call the number - The Dialer opens, ready for you to send the call.
• Add the number to your Contact list - Opens the New contact screen for you
to complete and save.
• Send email - Opens an email Compose screen with the email address added
for you to complete and send.
• Copy email address to clipboard.
TRACKBALL or by touching the screen, then select the link
TRACKBALL,
T-Mobile G1 User Guide R1.0 67 September 8, 2008
Page 68

Streaming audio Select a link to a streaming audio file to play the file using the Music
application.
Browser history
The Recently-visited pages (history) screen lists the last 250 sites you’ve visited on the Web. To view
your Web site history:
• From the Browser screen, press
•Press
Select a Web site from the Recently-visited pages list to go to the site.
MENU + h.
MENU and select More > History, or
Download Web files and applications
Before you download any files or applications using the Browser, note the following:
• Before you can download Web applications, you must explicitly “allow” downloading from the
Home > Settings screen:
1 Press
2 Select
• All items downloaded form the Web are stored on your SD card, so be sure you have a card
installed in your phone before you download from the Browser. (Read more in “SD card slot” on
page 11.)
• The Browser will only allow you to download items that are supported by an application
installed on the phone.
Warning! Applications downloaded from the Web can be from unknown sources. To protect your
phone and personal data, only download applications from sources you trust, such as Android
Market.
HOME, then press MENU and select Settings.
Applications, then on the Application settings screen, select the Unknown sources
check box.
View your downloads
To see which files or applications you’ve downloaded:
1 From the Browse screen, press
2 The Download history screen appears with the list of downloads. If you have no downloads,
nothing will be shown on this screen.
T-Mobile G1 User Guide R1.0 68 September 8, 2008
MENU and select More > View downloads.
Page 69

Browser settings
To set Browser preferences, from the Browser screen, press MENU and select More > Settings.
Page content settings
Tex t size
Block pop-up windows Select this check box if you want pop-up windows to be blocked.
Load images Select this check box if you want images on Web pages to load. For
Auto-fit pages Select to size pages to the screen automatically.
Enable JavaScript™ Select to enable JavaScript on pages. Disabling JavaScript may
Open in background Select if you want links to new pages to open in a new window in the
Select to open the
can increase the size to
or
Smallest. Note that this text size setting only affects pages you
view through the Browser.
faster page loading, clear this check box.
cause some Web pages to not work properly.
background.
Tex t siz e menu. Default setting is Normal, but you
Larger or Largest, or decrease to Smaller
Set home page Your currently-set home page is shown on the Settings screen. To
change your home, select
home page, then select
Privacy settings Select one of the privacy settings to clear the following:
• Browser cache
• Browser page-visited history
• stored cookie data
• saved form data
Accept cookies Select this check box if you want the Browser to save cookies. Some
Web sites might not work properly with cookies disabled.
Remember form data Select this check box if you want the Browser to remember text you
have typed in forms, so that you can select the same text later rather
than retyping it.
T-Mobile G1 User Guide R1.0 69 September 8, 2008
Set home page, type the URL for your
OK.
Page 70

Security settings
Remember passwords Select this check box to save usernames and passwords to various
Web sit es.
Clear passwords
Show security warnings Select this check box if you want a warning to be displayed when you
Advanced settings
Enable Google Gears™
open source browser
plugin
Gears settings View permissions granted to Web sites to use Gears.
Reset to default Select if you want to reset all Browser settings to factory default
Select
Clear passwords to clear all your saved passwords.
are going to an insecure Web site.
Select to enable the Gears Browser plugin. Google Gears extends
the Browser with APIs to create a richer platform for Web
applications.
values, except for your home page.
Browser shortcuts
Browse screen
Open Go to window
Open Bookmarks
Open Windows
View history (recently-visited)
Refresh or stop page
Go back a page
Go forward a page
Jump to top/bottom of page
Go to home page
Zoom in
Zoom out
Page down
Page up
MENU + l
MENU + b
MENU + t
MENU + h
MENU + r
MENU + j
MENU + k
ALT + roll TRACKBALL up/down
MENU + SPACEBAR
MENU + i
MENU + o
SPACEBAR
SHIFT + SPACEBAR
T-Mobile G1 User Guide R1.0 70 September 8, 2008
Page 71

Google Maps
About Google Maps
To open Google Maps™ mapping service, press HOME and select the Maps icon .
Maps opens by default in “Map mode”. To read more about the different map modes, read “Select
map mode” on page 76.
Zoom and navigation in maps
While viewing a map, take advantage of the following zoom and navigation techniques:
Zoom in
Zoom out
Navigate • Slide your fingertip in any direction to shift your map view.
1 Use the keyboard shortcut
and zoom-out controls by doing one of the following:
• Touch the screen.
• Use the keyboard shortcut
• Press
2 If using the zoom controls, touch the + control to zoom in. With each touch you
zoom in closer.
1 Use the keyboard shortcut
in and zoom-out controls by doing one of the following:
• Touch the screen.
• Use the keyboard shortcut
• Press
2 If using the zoom controls, touch the
zoom out further.
•Roll the
MENU and select More > Zoom.
MENU and select More > Zoom.
TRACKBALL in any direction to shift your map view.
MENU + i to zoom in. You can also open the zoom-in
MENU + z.
MENU + o to zoom out. You can also open the zoom-
MENU + z.
– control to zoom out. With each touch you
T-Mobile G1 User Guide R1.0 71 September 8, 2008
Page 72

Find your location
1 Make sure you have enabled a “location source” in global Settings by doing the following:
•Press
• Select
• Select either
2 From the main Map screen, press
3 Your location is shown on the map as a blue blinking dot surrounded by a circle . The
“accuracy circle” will typically have a larger radius when using wireless networks rather than
GPS to determine your location. (Read more in “My Location” on page 29.)
HOME, then press MENU and select Settings.
Security & location.
Wireless networks or GPS satellites, or both.
MENU and select My Location.
Accuracy circle. (Your actual location is somewhere in this circle.)
You are here.
Touch the screen to open zoom controls.
Find any location
1 From the main Map screen, press MENU and select Search.
2 You can use a variety of search criteria in the search box:
• Type an address.
• Type a type of business and city (e.g., sushi seattle).
• Select an address you’ve visited before in Maps from the drop-down menu (stored in
History).
T-Mobile G1 User Guide R1.0 72 September 8, 2008
Page 73

3 Select Search when ready. Your search results display.
4 Select
Show map to see the highlighted result on a map.
Select the left/right arrows to display the location of the previous/next result.
T-Mobile G1 User Guide R1.0 73 September 8, 2008
Page 74

5 Touch the result balloon to open the location’s details.
In addition to seeing details about the location, from this screen you can:
• Zoom in to address
• Dial the number
• Get directions to address to another location
• Get directions from this address to another location
• Add to Contacts
• Go to associated Web site, if available
Get directions
To get detailed directions to a location, do the following:
1 From the main Map screen, press
2 Enter the starting point in the first box. You can type an address, or select to open the
location source menu. Select from:
•
My current location - Remember to have a location selected. (Read how in “Find your
location” on page 72.)
Contacts - Opens a list of the contacts you’ve stored with a physical address.
•
•
History - Opens a menu of places you’ve visited.
3 Enter your destination in the second box. You can type an address or select to select from
the location source menu.
T-Mobile G1 User Guide R1.0 74 September 8, 2008
MENU and select Directions.
Page 75

4 Select Route. You can choose to view your directions in a list, or you can select Show map, to
view the same directions overlaid on a map.
After
selecting
Route, the
directions
appear in a
list
Select Show map
to display directions
in map view
Select the arrows to step
through or repeat directions
Start point
End point
Turn point
Select list icon to
return to the list view
5 When finished reading or following the directions, press
MENU and select Clear map. Your
destination is saved in History.
T-Mobile G1 User Guide R1.0 75 September 8, 2008
Page 76

Select map mode
Whenever you are viewing a map, you can switch your view. Press MENU and select Map mode to
select from
Map view Satellite view Traffic view Google Street View™
Map view
This is the default view and displays a map, complete with names of streets, rivers, lakes, mountains,
parks, and boundaries.
Satellite view
Satellite images are not real-time. Google Maps acquires the best imagery available, most of which
is approximately one to three years old.
Map, Satellite, Traffic, or Street View.
Traffic view
If available in your area, real-time traffic conditions are displayed over the highway as color-coded
lines. Each color represents how fast the traffic is moving:
Green > 50 mph
Yellow 25 - 50 mph
Red < 25 mph
Gray Speed not available
T-Mobile G1 User Guide R1.0 76 September 8, 2008
Page 77

Street View
In some areas, a street-level photo view is available. Street View imagery is not real-time but is
gathered by vehicles driving on public streets. The imagery consists of a combination of Googleowned data and data obtained from partners.
To use street view, do the following:
1 Press
2 If the display switches to a view that shows blue outlined streets, then you are viewing an area
3 If you want to move your street position, touch & hold the person icon . The icon will then
4 Street View will then find a view that you can enter. Select the address balloon to view the
MENU and select Map mode. From the menu, select Street View.
that supports street view.
Blue outlined street
“Person” icon that marks
your street position
If you do not see any blue lined streets, then use
view.
change so you can use the bulls-eye to pinpoint your desired position . Release when
you’ve positioned the icon where you want it.
street.
Search to find an area that supports street
Once on the street, touch the arrows to move your position or press
backward, zoom, or return to the map. You can also navigate by moving your fingertip around
on the screen.
T-Mobile G1 User Guide R1.0 77 September 8, 2008
MENU to Step forward,
Page 78

5 To have your view orient to your actual position as you turn, press MENU and select Compass
. (To turn off Compass mode, select the menu item again.)
mode
6 If you encounter a street view image that is inappropriate in any way, you can report the image
by pressing
can make your report.
MENU and selecting Report image. The Browser will take you to a site where you
Map history
To open the History screen, press MENU and select More > Search history, or press MENU + h.
The History screen lists all recent searches and viewed positions , and directions . Selecting an
item opens it on the map.
Map shortcuts
Map screen
Directions
Select map mode
History
My Location
Open zoom controls
Zoom in
Zoom out
Jump to top/bottom of list
MENU + d
MENU + m
MENU + h
MENU + 0 (zero)
MENU + z
MENU + i
MENU + o
ALT + roll TRACKBALL
Search results screen
Clear search
Previous result on map
Next result on map
Directions screen
Prev direction point
Next direction point
Cancel directions
T-Mobile G1 User Guide R1.0 78 September 8, 2008
MENU + q
MENU + j
MENU + k
MENU + j
MENU + k
MENU + q
Page 79

Dialer & Voice Dialer
About the dialers
You can use your phone to make phone calls by using either the Dialer or the Voice Dialer:
• To dial a number using the on-screen dial pad or the keyboard, press
and select the Dialer icon
• To dial by speaking either a number or contact name, press & hold CALL, or press HOME and
select the Voice Dialer icon
.
.
CALL, or press HOME
Bluetooth devices
You can place and receive calls using a hands-free Bluetooth headset or hands-free car kit. Before
you can use your Bluetooth device, follow these steps:
1 Turn Bluetooth “on”. (Read more in “Turn on Bluetooth services” on page 34.)
2 Get your headset or hands-free car device ready for pairing by following the manufacturer's
instructions.
3 Pair and connect your phone to the Bluetooth headset or car kit. (Read more in “Pair & connect
with Bluetooth devices” on page 35.)
4 You are ready to use your headset or car kit to place and receive calls.
T-Mobile G1 User Guide R1.0 79 September 8, 2008
Page 80

Make a call by dialing
1 From anywhere on your phone, press CALL to open the Call log. Select the Dialer tab to open
the Dialer.
2 You have several choices for placing a call:
Dialer tab Touch the on-screen dial pad to enter a number, or open the display to type
using the keyboard number keys. If using the dial pad, select to delete
numbers you’ve entered. Touch & hold to delete all the numbers in the
field.
Call log tab Select an entry listed in the log to call the number. Read more in “Call log” on
page 86.
Contacts tab Contacts with phone numbers are listed. Select a contact, then select the
phone number to dial the call. Read more in “Contacts” on page 36.
Favorites tab Favorite contacts with phone numbers are listed. Select a favorite, then select
the phone number to dial the call. Read more in “Assign favorites” on
page 38.
T-Mobile G1 User Guide R1.0 80 September 8, 2008
Page 81

Make a call by speaking
You can make a phone call by opening the Voice Dialer and speaking:
1 Press & hold
2 Wait until you hear a tone and the Voice Dialer reports on the screen that it is “listening”.
3 You can tell the Voice Dialer any of the following:
•“Dial number”, where number can be 3 digits (e.g., 911), 7 digits (e.g., 555-0123), or 10
digits (e.g., 205-555-0123). If you’re speaking a phone number, then always say “Dial”
before the number.
• “Call name”, where name is a contact stored on your phone in Contacts. If you’re speaking a
name, then always say “Call” before the name.
• “Call voicemail” to dial your voicemail number.
• “Redial” to dial the last outgoing call.
4 Regardless of what you tell the Voice Dialer, you will be asked to confirm your choice from a
menu. If you spoke a name with more than one match in Contacts, or if you’ve stored more than
one number for the contact, you’ll be asked to select the number.
CALL, or press HOME and select the Voice Dialer icon .
You can always cancel the call at this point by selecting
5 Once you select or confirm your choice, your call is placed.
T-Mobile G1 User Guide R1.0 81 September 8, 2008
Cancel on the dialog box.
Page 82

Answer an incoming call
To answer a call, simply press the CALL button The Call-in-progress screen appears. If you want to
send the call directly to voicemail instead of answering, press the
Caller ID icon
END CALL button.
Name & number if
stored in Contacts
Call duration
Slide dialer tab up to
reveal on-screen dial pad
T-Mobile G1 User Guide R1.0 82 September 8, 2008
Page 83

In-call options
While on a call, press MENU to reveal the in-call options: Speaker, Mute, and Hold. Note that if
Bluetooth services are on and you are connected to a hands-free device, the menu indicator will
show Bluetooth on.
Speaker
Mute
Hold
Show dial pad If you need to enter numbers while on a call (such as to select in-call menu
T-Mobile G1 User Guide R1.0 83 September 8, 2008
To use the speaker, press
turn it off, select it again so the bar is unfilled . The status bar will display
this icon when the speaker is on.
To mute your side of the conversation, press
green bar. To turn it off, select it again so the bar is unfilled . The status
bar will display this icon when Mute is on.
To put an active call on hold, press
bar. To resume the call, or take the call off hold, select it again so the bar is
unfilled . If you take a call while already on a call, the first call will be
placed on hold automatically. The status bar will display this icon when a call
is on hold.
options) slide the dialer tab up.
MENU and select Speaker so it shows a green bar. To
MENU and select Mute so it shows a
MENU and select Hold so it shows a green
Page 84

Multiple calls
Incoming call during call in progress
If you are on a call (“call in progress”) when another call comes in (“incoming call”), you have a few
choices:
Answer incoming,
hold call in progress
Send incoming to
voicemail
Answer incoming,
end call in progress
The incoming call will display in the foreground.
Press
CALL to answer the incoming call and place the call in progress on
hold. You can also press
answer
To switch calls at any time, press
If you don’t want to interrupt your call in progress, then press
The incoming call is sent to voicemail.
To end the call in progress and answer the incoming, press
select
.
End call in progress & answer.
MENU and select Hold call in progress &
MENU and select Switch calls.
MENU and
END CALL.
If you are on a call with a second call on hold when another call comes in, you can:
•Press
•Press
CALL to end the call in progress and answer the incoming call (the call on hold remains on
hold).
END CALL to send the incoming call to voicemail and continue the call in progress (call on
hold remains on hold).
End all calls
If you have one call in progress and one caller on hold, to end both calls, press & hold END CALL.
T-Mobile G1 User Guide R1.0 84 September 8, 2008
Page 85

Conference calling
While on a call, you can conference up to six callers, counting yourself. Note that you can also have
an additional caller on hold during a conference call, regardless of how many participants are on
the conference.
1 Dial the first conference participant as instructed in “Make a call by dialing” on page 80.
2 Press
3 When your new caller is on the line, press
CALL to return to the Dialer to call your next participant, or you can press MENU and
select
Add call. Once you press CALL or select Add all, the call in progress is put on hold. Dial
the number.
MENU and select Merge calls.
4 The conference begins. To add more participants, repeat steps 2 and 3, up to a total of six.
5 If you want to drop any of the callers from the conference, press
conference
drop a caller from the
Select Back to call
remaining caller(s).
T-Mobile G1 User Guide R1.0 85 September 8, 2008
. The list of conference participants appears.
Select to
conference.
to rejoin the
MENU and select Manage
Select to talk directly
to one of the participants
and put the others on hold.
Resume the conference by
pressing
selecting Merge Calls.
MENU and
Page 86

6 To end the conference call and disconnect all callers, press the END CALL button.
Call log
The call log is one of the tabs on the Dialer. To open the call log, press the CALL button. The Call log
displays by default.
The call log lists all incoming and outgoing calls, including missed calls.
• To call any of the numbers in the list, simply select the name or number.
• To clear the entire call log, press
• To clear one call log entry, touch & hold the entry, then select
If available, the online status of the contact associated with the number in the log will display. Read
more about online status in “View contact’s online status” on page 37.
Select an entry to start dialing the number. Touch & hold an entry to open the context menu and take
these actions:
Call number Select to dial this number.
View contact
(if stored in Contacts)
Add to contacts
(if not stored in Contacts)
T-Mobile G1 User Guide R1.0 86 September 8, 2008
Select to open their Contact details screen.
Select to add the phone number to your Contacts list. You can select
to add a new contact, or add the number to an existing contact.
MENU and select Clear call log.
Remove from call log.
Page 87

Edit number before call Select to open the dialer with this number pre-populated and
ready for edit.
Send SMS message Select to open an SMS/MMS message Compose screen, with the
message already addressed to this caller.
Remove from call log Select to remove only this entry from the call log.
Call settings
To edit your call settings, open the Home > Settings screen:
1 Press
2 In the Mobile network section, select
3 Wait a few moments while your current call settings are fetched from the service.
4 The following settings are available:
HOME, then press MENU and select Settings.
Call settings.
Fixed Dial Number
(FDN) list
Voic em ai l Select this setting to set or change your voicemail number. Note that this
Select this setting to manage your FDN list of numbers. When you enable
FDN, you can only call numbers are stored on your SIM card. To add
numbers to your SIM card:
1 Enable FDN. You must type your PIN2 to enable FDN. (The PIN2 is
provided by your wireless operator.)
2 Select
3 Type the name and phone number in the fields, then select
4 The FDN list now contains this name and number.
5 To add another contact or edit/delete an existing contact in the list,
You can always change your PIN2 by selecting
must know your existing PIN2 before you can change it.
number is usually set by your wireless operator and is stored on your SIM
card.
Manage FDN list. If you have no numbers on your SIM card,
then press
will be asked to type your PIN2 again.
press
MENU and select Add contact.
MENU and select the appropriate menu item.
Change PIN2, but you
Save. You
T-Mobile G1 User Guide R1.0 87 September 8, 2008
Page 88

Call forwarding Set the following:
• Always forward calls - Select to specify a forwarding number and to
enable this feature. When this feature is enabled, the following three
features are disabled.
• Forward when busy - Select to enable this feature. When enabled,
incoming calls are forwarded to voicemail when you are on a call.
• Forward when unanswered - Select to enable this feature. When
enabled, incoming calls are forwarded to voicemail when unanswered.
• Forward when unreachable - Select to enable this feature. When
enabled, calls are forwarded to voicemail if an incoming call cannot
connect.
Additional call
settings
Operator selection Select a wireless operator network - Scan for all available networks, or
• Caller ID - Select to open a menu of options: use the
setting,
your phone number and Caller ID picture will display to people you
call, assuming the call recipient’s device supports this feature.
• Call waiting - Select this check box to display incoming calls when you
are on a call. Clear the check box to ignore incoming calls when you
are already on a call. Note that the routing of the ignored call is
determined by your Call forwarding setting.
select a network automatically.
Hide number, or Show number. When your number shows,
Network default
T-Mobile G1 User Guide R1.0 88 September 8, 2008
Page 89

Google Calendar
To open Google Calendar™ calendaring service, press HOME and select the Calendar icon .
The Calendar on your phone stays in sync with your Google Calendar events on the Web.
Calendar views
You can view multiple calendars on your phone, so each calendar event is
coded with a color. Read more about controlling which calendars are
displayed in “View multiple calendars” on page 95.
Note: To create new calendars, you must go to Google Calendar on the Web.
You can view your calendar in a variety of ways. Press
, or Day.
Week
Month view
Days are shown in a month grid. Busy time slots are shown
as vertical bars in the corresponding part of the day.
An all-day event is shown as a small vertical bar at the top
of the slot (it does not fill the entire slot).
• View event details - Select a day to view all the events in
that day. This will take you to either the Agenda or Day view,
depending on which you last visited. Select the event to view
its details.
• Edit an event - First select a day to go to either the Day or
Agenda view. From there, select the event to view its details.
Assuming you have write privileges on an event, press
and select
more in “Edit an event” on page 95.
• Navigate months - Slide your fingertip up/down, or roll the
TRACKBALL up/down through the days and past the
beginning/end of the month to move to the previous/next
month.
• Create new event- Touch & hold a day to open the context
menu. Select
select
• Jump to current day - Press
Edit event to open the event for editing. Read
New event. You can also press MENU and
New event.
MENU to select from Month, Agenda,
MENU
MENU and select Today.
T-Mobile G1 User Guide R1.0 89 September 8, 2008
Page 90

Agenda view
Week view
Events in the current month are shown vertically in a list, one
event after the other. Days with no events are not displayed.
• Repeating events - Marked with icon following the time or
date.
• View event details - Select the event to view its details.
• Edit an event - First, select the event to view its details.
Assuming you have write privileges on an event, press
and select
more in “Edit an event” on page 95.
• Navigate within the current month - Roll the
slide your fingertip up/down.
• Jump to current agenda - Press
Days are shown vertically within the Week view. Time slots are
defined horizontally in rows. Events are shown as blocks.
• View event details - Highlight an event to open a small popup window in the lower part of the screen that provides more
event information. This window will stay open for three
seconds. (Note that highlighted events are outlined in orange.)
To view the full event details, touch the pop-up window while
it’s open, or select the event itself. You can also touch & hold
the event to open the context menu, then select
• Edit an event - Assuming you have write privileges on an
event, touch and hold the event to open the context menu, then
select
• Navigate within the current week - Roll the
slide your fingertip up/down.
• Navigate to a past or future week - Roll the
slide your fingertip left/right.
• Jump to current day - Press
current time is highlighted.
Edit event to open the event for editing. Read
TRACKBALL or
MENU and select Today.
Edit event. Read more in “Edit an event” on page 95
TRACKBALL or
TRACKBALL or
MENU and select Today. The
MENU
View event.
T-Mobile G1 User Guide R1.0 90 September 8, 2008
Page 91

Day view
Days are divided into hour time slots. Events are shown tiled and
span the time they last. All-day events are displayed at the top
of the day list.
• View event details - Highlight an event to open a small popup window in the lower part of the screen that provides more
event information. This window will stay open for three
seconds. (Note that highlighted events are outlined in orange.)
To view the full event details, touch the pop-up window while
the pop-up window is open, or select the event itself. You can
also touch & hold the event to open the context menu, then
select
View event.
• Edit an event - Assuming you have write privileges on an
event, touch and hold the event to open the context menu, then
Edit event. Read more in “Edit an event” on page 95.
select
• Navigate within the current day - Roll the
slide your fingertip up/down.
• Navigate to a past or future day - Roll the
slide your fingertip left/right.
• Jump to current day - Press
current time is highlighted.
• Create new event - Touch an empty time slot to open the new
Event details screen.
MENU and select Today. The
TRACKBALL or
TRACKBALL or
T-Mobile G1 User Guide R1.0 91 September 8, 2008
Page 92

Create an event
From any of the views, press MENU and select New event to open the new Event details screen.
1 Type the information in the fields.
Name that appears in
Day view.
Select date & time from the
pop-up menus.
Hint: You can type directly
Description can be as long
as you like.
Select a calendar if you display more than one.
Set a default reminder time in Calendar Settings.
Reminders are not required. Select x to remove.
in the date fields if you
don’t want to step through
using the
+ and – buttons.
Press MENU and select
Show extra options to set
Presence and Privacy:
Set online presence: available or busy.
Select calendar privacy from Default (as defined when
calendar was created), Private, or Public.
2 When finished, select
Save or Discard changes. Pressing BACK also saves the event.
Tip: Create an event quickly in the Day or Week view by selecting an empty time slot. A new Event
details screen appears. The From field contains the selected time slot.
T-Mobile G1 User Guide R1.0 92 September 8, 2008
Page 93

The View event screen
In the Day and Week views, when you highlight an event, a pop-up window with more details opens
(the window stays open for three seconds). To see even more details, open the View event screen by
touching the pop-up window.
Highlighted events are
shown outlined in orange.
When highlighted,
a pop-up window
appears with more details.
Touch the pop-up to view
even more details on the
View event screen.
From the Agenda view, simply select an event to open the View event screen. From the Month view,
first select the day of the event to go to either the Agenda or and Day view, then select the event
(Agenda view) or pop-up window (Day view).
From the View event screen, you can do the following:
View details All the information you’ve entered about the event is displayed on the View
event screen.
Reset reminder
Add reminder
Delete reminder
Select the
Press
event. This will not replace existing reminders. You can have up to five
reminders per event.
Either select the x to the right of a reminder, or press
Reminders pop-up menu to select a new reminder time.
MENU and select Add reminder to create another reminder for the
MENU and select
Delete event to remove the event from your calendar. If this is a repeating
event, you will be asked if you want to delete just this one instance, this &
future events, or all events.
Edit event
T-Mobile G1 User Guide R1.0 93 September 8, 2008
MENU and select Edit event to open the event for editing. If this is a
Press
repeating event, you will be asked if you want to change just this one
instance, this & future events, or all events.
Page 94

Event reminders
If you have set at least one reminder for an event (you can set up to five), the upcoming event icon
will appear in the left side of the status bar to remind you. To view, dismiss, or snooze the
reminder, do the following:
1 Touch the status bar and slide your finger down the screen to open the notifications list. The
upcoming event name is displayed. If you have only one reminder, the place is also displayed.
Select Clear notifications to dismiss
the reminder.
To read more details about the event or
see additional reminders (if applicable),
select the reminder.
2 To read more details about the event, select the reminder. If you have other reminders pending,
they will be listed on this screen as well. You can
BACK to keep the reminder(s) pending in the notifications bar. The snooze time is five minutes.
Snooze or Dismiss the reminder(s), or press
Select either Snooze all or Dismiss all. Press BACK to
do neither and keep the reminder icon in the bar.
T-Mobile G1 User Guide R1.0 94 September 8, 2008
Page 95

Edit an event
To edit an event, you must have the View event screen open and you must have created, or have
write privileges, for the event.
1 Navigate to the View event screen as described in “Calendar views” on page 89.
2 Press
3 Once you have finished your edits, select
4 To delete the event, from the View event screen, press
MENU and select Edit event. If Edit event isn’t an option, then you cannot make any
changes to that particular event.
Note: If your event repeats, you will be asked to choose which events you want changed (only
the current one you’re editing, all events in the series, or the current event plus future events).
Save.
MENU and select Delete event.
Go to today
From any view, to jump to the screen that shows “today”, press MENU and select Today. If you are
in the Day or Week view, the current time will be highlighted.
View multiple calendars
If you’ve created more than one Google Calendar on the Web client, you can change which
calendars are displayed and synced to your phone:
1 From any of the calendar views, press
2 All your synced calendars are shown in a list. The checked calendars are displayed on your
phone.
3 To hide a calendar from display on your phone, clear that calendar’s check box.
4 To remove a calendar and all its events from your phone, press
calendars
Note: Hiding or removing calendars on your phone does not affect the display of calendars on
the Web.
T-Mobile G1 User Guide R1.0 95 September 8, 2008
. On the menu that appears, select the calendar that you want to remove.
MENU and select More > My calendars.
MENU and select Remove
Page 96

Calendar settings
Calendar view setting
Hide declined events Select this check box if you want all the events you decline to be hidden
from all calendar views.
Reminder settings
Alerts & notifications Select to set the type of event reminder you want:
• Alert - A dialog box will appear to remind you of the event.
• Status bar notification - An icon appears on the left side of the
status bar.
• Off - You will receive no reminder.
Ringtone
Vibrate Select this check box to have your phone vibrate when you are reminded
Default reminder Select to open the default reminder menu. The time you select will
Select
Ringtone to open the ringtone menu and select a ringtone specific
to new event notifications. Note that when you check a ringtone, it plays
briefly.
of an event.
appear by default in the Reminder section when you create a new event.
Calendar shortcuts
Calendar views
New event
Go to today
Agenda view
Day view
Week view
Month view
Go to settings
View event details for highlighted
Edit opened event
Delete highlighted event
T-Mobile G1 User Guide R1.0 96 September 8, 2008
MENU + n
MENU + t
MENU + a
MENU + d
MENU + w
MENU + m
MENU + p
ENTER
MENU + e
DEL
Page 97

View event screen
Add reminder
Edit event
Delete event
Edit event details screen
Add reminder
MENU + r
MENU + e
DEL
MENU + r
T-Mobile G1 User Guide R1.0 97 September 8, 2008
Page 98

Camera & Pictures
Before you begin
All the pictures you can capture or view on your phone are stored on an SD card, which must be
installed in your phone. Before you can use the Camera or view pictures in Pictures, make sure you
have a card installed. (Read more in “SD card slot” on page 11.)
When you first receive your phone, the camera sensor window (on the back cover) will be protected
by a plastic film. Be sure to peel off this film before using the camera.
Load pictures onto your SD card
Read the instructions below to add pictures to your SD card. Read more about inserting or removing
an SD card in “SD card slot” on page 11.
1 Mount your microSD card to your computer by doing one of the following:
• Remove the SD card and insert it into a card reader attached to your computer; or,
• Attach your phone to your computer using a USB cable that came in the box. If you use this
method, make sure the
storage
2 On your computer, find the mounted USB drive and open it.
3 Create a folder at the top-level called “Pictures” or some other descriptive name and open it.
4 Copy .jpg or other image files into this folder. To organize pictures into albums that will display
in the Pictures application, create a folder and copy pictures there for each album you want to
display.
5 When finished, close the USB drive window and unmount or eject the drive as required by your
computer's operating system. You can also go to
storage
phone and computer.
check box is selected. It is selected by default.
, and clear the Use for USB storage check box. Remove the USB cable from your
Home > Settings > SD card & phone storage > Use for USB
Home > Settings > SD card & phone
T-Mobile G1 User Guide R1.0 98 September 8, 2008
Page 99

Take a picture
The camera is 3.0 megapixels and able to capture resolutions up to 2048x1536. Captured pictures
are saved to the “DCIM” folder on your SD card.
Tip: Before you take a picture, wipe the sensor window (on the back cover) to remove any small
amounts of oil.
1 To open the Camera, press
button as a shortcut.
2 The Camera opens in capture mode. Frame your picture within the screen and hold the phone
steady. Press half-way down on the
the upper-right of the screen once focused), then press the button fully to capture. Continue to
hold the camera steady for a second after you hear the shutter sound.
Capture button
3 Immediately after capture, you can select to
(via a compatible application), or
4 If you select to save, set as, or share, your picture is saved to the Pictures application. Pictures
taken with your phone are named by date and time; e.g., 2009-3-15 14:21:50 (picture was
taken March 15, 2009 at 2:21pm).
HOME and select the Camera icon or press the CAPTURE
CAPTURE button to focus (a green circle will appear in
Save, Set as (contact icon or wallpaper), Share
Delete your picture.
T-Mobile G1 User Guide R1.0 99 September 8, 2008
Page 100

Capture settings
Store location in pictures Select this check box if you want to save the longitude and latitude in
the picture’s metadata so you know where the photo was taken. Some
applications, such as Picasa Web albums, can then display the picture
on a map.
Prompt after capture Select this check box if you always want the post-capture menu to
display after capturing a picture:
View your pictures
To view the pictures you’ve captured, as well as any you’ve stored on your SD card, go to the
Pictures application:
1 To open Pictures, press
2 Depending on how many pictures you’ve stored, they may take a few minutes to load.
3 If you’ve stored your pictures in folders on your SD card, then the folders will display as
separate “albums”. The top left album always contains all the pictures in all the albums.
Select an album to view the pictures.
T-Mobile G1 User Guide R1.0 100 September 8, 2008
HOME and select the Pictures icon .
 Loading...