

Page 1
Getting Started Guide
Page 2

Welcome to AT&T
Please use our interactive Web tutorial available at
att.com/WirelessTutorials
for most complete and up-to-date information available to set up your device
and services. The on-line tutorials include detailed step-by-step instructions
and screen shots to assist your learning.
Or use this simple Getting Started Guide to quickly get an overview of the
major features and services available with your smartphone.
Thanks again for choosing AT&T.
Your device controls are
shown on this foldout.
2
Page 3

Table of Contents
Welcome to AT&T 2
Table of Contents 3
What’s in the box 5
Device setup 6
Insert the SIM card 6
Insert the battery 6
Install a microSD card 7
Charge the battery 7
Turn on your HTC FUZE™ 8
Sleep Mode 8
Get to know your HTC FUZE™ 9
Check device status, make calls, and set up voice
Before making a call 12
Make a phone call 13
Set up your voicemail 13
Make a Video Share call 14
Receive a Video Share call 14
The TouchFLO™ 3D 15
Home 18
Change the date and time 18
Enter Information 18
Add a contact to your device 19
Copy all SIM card contacts to your device 19
Schedule an appointment 20
People 21
Add a favorite in the People tab 21
Use the People tab 22
Email 23
mail 12
3
Page 4

Table of Contents
About email 24
Set up a personal email with Xpress Mail 24
Send and receive personal email 25
Corporate email setup with Xpress Mail 25
Set up IT managed corporate email 26
Synchronize information 26
Text Messages 27
Compose and send a text message 27
AT&T Services 28
Use MEdia Net to access the Web and shop online 29
AT&T Music 30
Use Instant Messaging 30
AT&T Navigator 31
CV 33
Push to Talk 33
Internet 35
While in the Web browser (Opera® Mobile) 35
Add your favorite Web site as a bookmark 36
Music Player 37
Transfer music 37
Weather 38
Add a new location 38
Programs 39
Photos and Videos 40
Take a picture of your contact 40
Use the camera and send a Multimedia Message (MMS) 41
Settings 42
Frequently Asked Questions 44
Tips and Tricks 45
4
Page 5
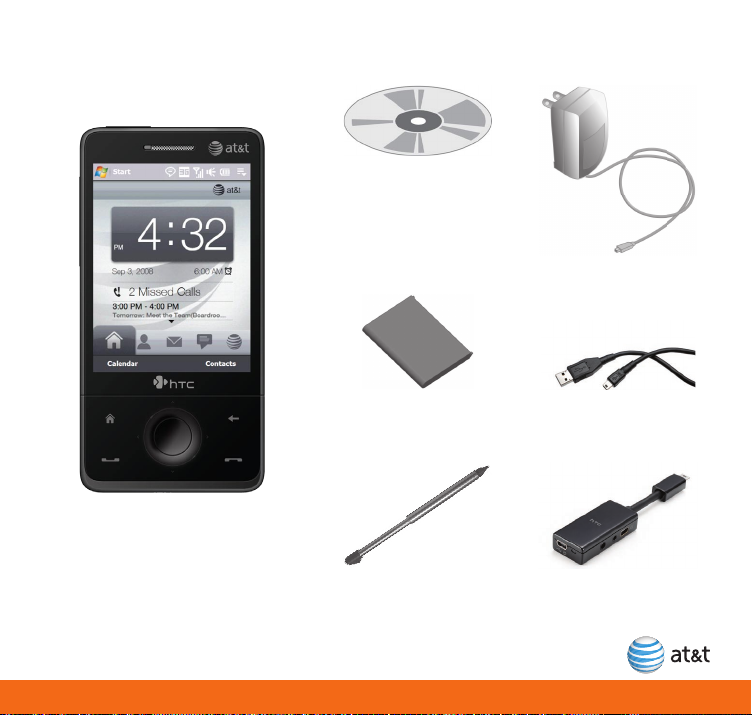
What’s in the box
Getting Started CD
Includes User Manual,
Microsoft ActiveSync,
and Warranty
information for your
AT&T device.
AC Charger
HTC FUZE™
Rechargeable Battery
Extra Stylus
USB Sync Cable
3.5 mm Audio Adapter
5
Page 6
Device setup
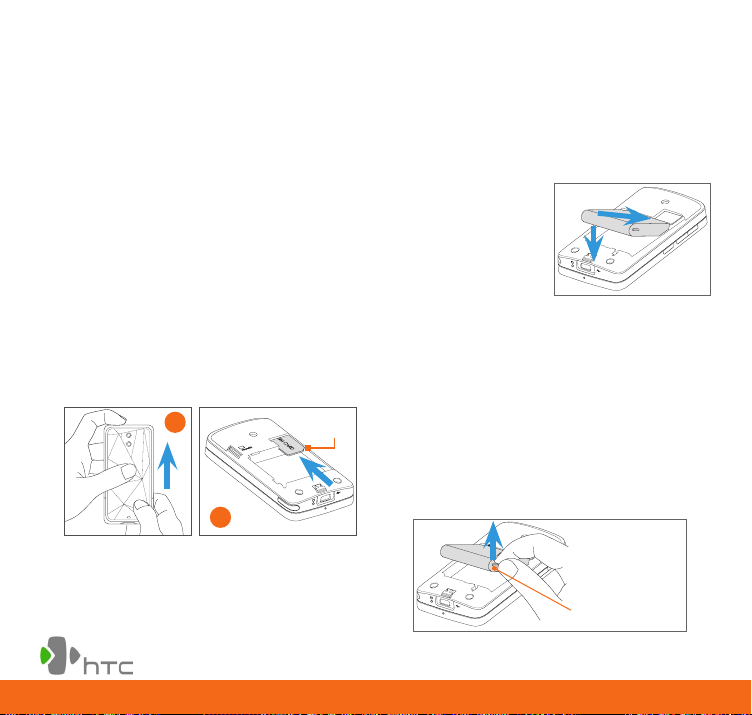
Insert the SIM card
The SIM card contains your phone number,
service details, and phonebook/message
memory. Make sure that your device is turned
off before you remove the back cover and
insert the SIM card, microSD card, and battery.
1. Hold the device with both hands and the
front panel facing down.
2. Push the back cover up with your thumbs
until it disengages from the device and
then slide it up to remove.
3. Locate the SIM card slot, then insert the
SIM card with its gold contacts facing down
and its cut-off corner facing out the card
slot.
4. Slide the SIM card completely into the slot.
2
3
Note: To remove the SIM card, remove theTo remove the SIM card, remove the
battery if it is installed, then slide the
SIM card out from the SIM card slot with
your thumb.
Cut-off
corner
Insert the battery
Your device comes with a rechargeable
Lithium-ion or Lithium-ion polymer battery and
is designed to use only manufacturer-specified
original batteries and accessories.
1. Align the battery’s
exposed copper
contacts with the
battery connectors
inside the battery
compartment.
2. Insert the contact’s side of the battery
first and then gently push the battery into
place.
3. Replace the back cover.
To remove the battery
1. Make sure your device is turned off.
2. Remove the back cover.
3. Lift the protruding grip at the bottom right
side of the battery to remove the battery.
Battery grip
6
Page 7
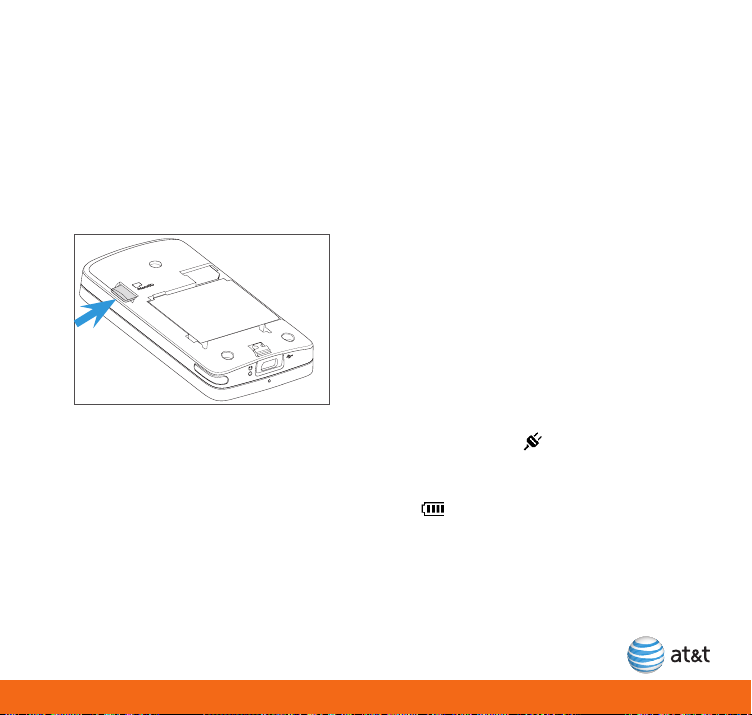
Install a microSD card
To have additional storage for your images,
videos, music, and files, you can purchase a
microSD™ card and install it into your device.
Insert the microSD card into the slot with its
gold contacts facing down, then replace the
back cover.
Note: To remove the microSD card, press it to
eject it from the slot.
Charge the battery
New batteries are shipped partially charged.
Before you start using your device, it is
recommended that you install and charge
the battery. Some batteries perform best after
several full charge/discharge cycles.
To charge the battery
• Connect the USB connector of the AC
adapter to the PC and to the sync connector
on your device, or
• Plug in the AC adapter to an electrical outlet
to start charging the battery.
Note: Only the AC adapter and USB sync
cable provided with your device must be
used to charge the device.
Charging is indicated by a “breathing” white
light around the Navigation Control. As the
battery is being charged while the power is
on, a charging icon also appears in the
title bar of the Home screen. After the battery
has been fully charged, the Navigation Control
LED shows a solid white light and a full battery
icon appears in the title bar of the Home
screen.
Warning! Do not remove the battery from
the device while you are charging it
using the AC or car adapter.
As a safety precaution, the battery
stops charging when it overheats.
7
Page 8
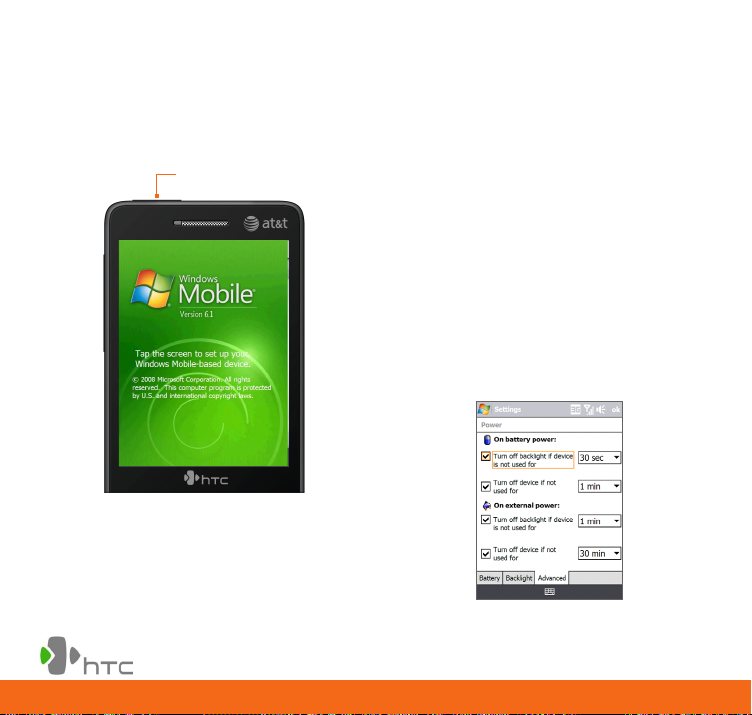
Turn on your HTC FUZE™
Press the POWER button to turn on the device.
Power button
It may take several minutes for the TouchFLO
3D interface to load during initial setup. Do not
press any buttons or turn off the device while
TouchFLO 3D is loading.
Sleep Mode
Your device will go to Sleep Mode after 30
seconds or more of inactivity. Sleep Mode
suspends your device to a low power state
while the display is off in order to save battery
power.
You will still be able to receive messages and
calls while your device is in Sleep Mode. To
wake up your device, press the POWER button
again. Incoming calls or messages will also
wake up your device from Sleep Mode.
Tip: You can change how long before your
device goes into Sleep Mode by touching
Start > Settings > System tab > Power >
Advanced tab.
8
Page 9

Get to know your HTC FUZE™
Start menu
Access more
programs and
settings.
Time
Adjust the time or
set alarms.
Open Call History.
Open Calendar.
Open Contacts.
HOME
Press to return to
the Home screen.
TALK/SEND
Press to answer an
incoming call or dial a
number.
Status Indicators
Page 12
Open the Quick
menu.
TouchFLO 3D tabs
Page 17
BACK
Press to return to the
previous screen.
END
Press to end a call or
return to the Home screen.
9
Page 10
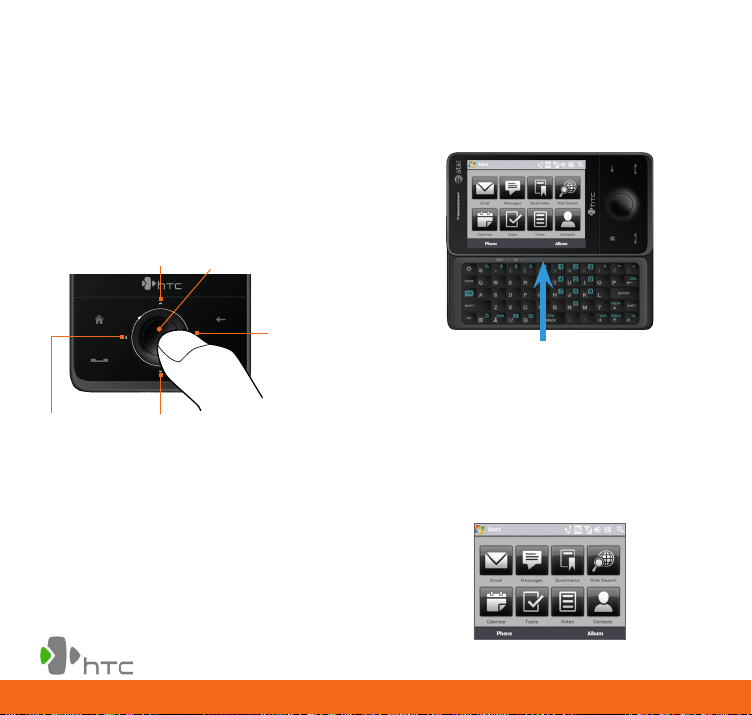
Check out the Navigation Control
On the Home screen and in many programs on
your device, you can use the Navigation Control
for directional control.
Press the directional arrows to navigate up,
down, left, and right on the screen. When an
item has been selected on the screen, press the
ENTER button (the center button) to confirm
your selection.
Open the keyboard
Hold the device sideways with the control
buttons on your right, then slide the screen
panel up to reveal the keyboard.
Left arrow
10
Up arrow
Down arrow
ENTER button
Right
arrow
Tasks screen
The Tasks screen displays when you open the
hardware keyboard while on any of the TouchFLO
3D tabs. The Tasks screen lets you quickly start a
task such as compose an email or text message,
create a new appointment, open the Web
browser, and more.
Page 11
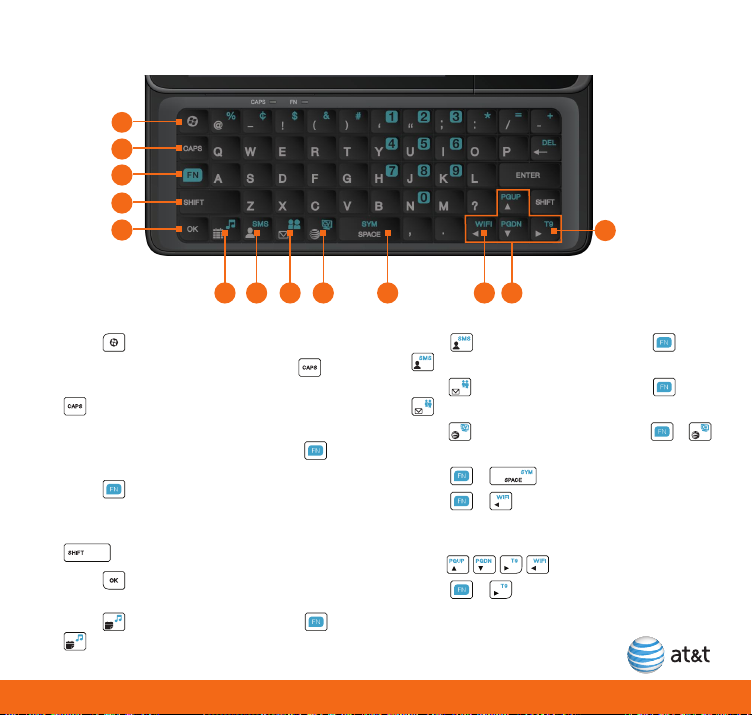
Enter text using the keyboard
1
2
3
4
5
13
6 7108 9
1. Press to open the Start menu.
2. To enter all uppercase letters, press .
To change back to all lowercase letters, press
again.
3. To enter a number or symbol (labeled at the
upper left of each key in blue), press and
then press the corresponding key.
Press twice to enter all numbers or
symbols.
4. To enter a single uppercase letter, press
and then press the corresponding key.
5. Press to verify your data entries or exit
the program in use.
6. Press to open Calendar, or press +
to open AT&T Music in File Explorer.
11
12
7. Press to open Contacts, or press +
to open text message.
8. Press to open Messaging, or press +
to open Instant Messaging.
9. Press to open MEdia Net, or press +
to open CV.
10. Press + to open the Symbol Pad.
11. Press + to open the Wireless
Manager.
12. For directional movement, press the arrow
keys: .
13. Press + to enable the T9 predictive
text input.
11
Page 12
Check device status, make calls, and set up voice
mail
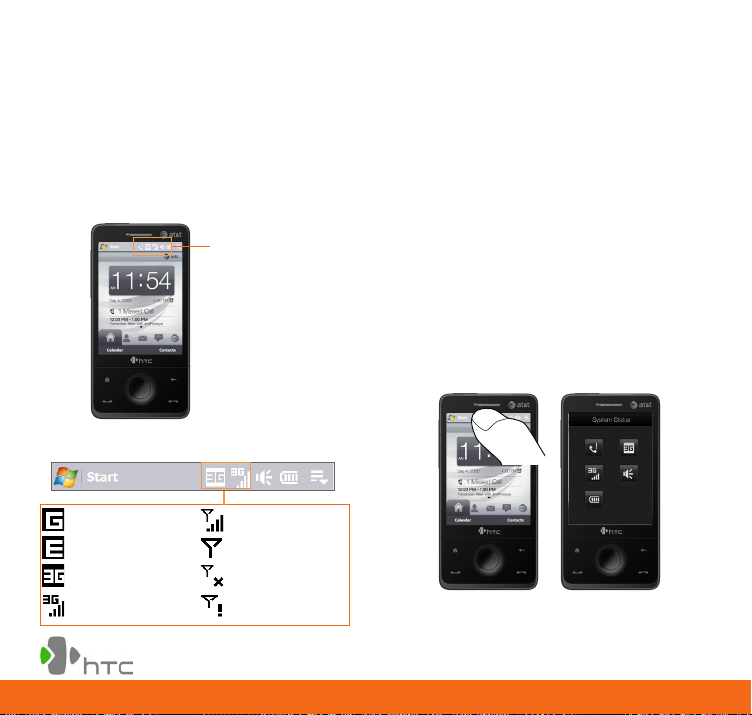
Before making a call
Before you make a call, check that your device is receiving a wireless signal and the status of the
other icons in the title bar. The title bar contains important status icons that display the current
status of your wireless signal, connection type and signal strength, battery power remaining, and
any alerts received. Always check to make sure that your device’s phone function is turned on
and that your device is receiving a signal before placing a call or using any data service.
Refer to Chapter 1 of the User Manual (on the
Status Indicators
Title Bar Status Icons
CD) for a complete list of status icons.
System Status screen
Touch the Title Bar to open the System Status
screen. The System Status screen displays
larger icons making it easier for you to touch
them.
GPRS available.
EDGE available. No signal.
3G available.
Connected to the
3G network.
12
Maximum signal
strength.
Phone function
is off.
No wireless
service.
Page 13
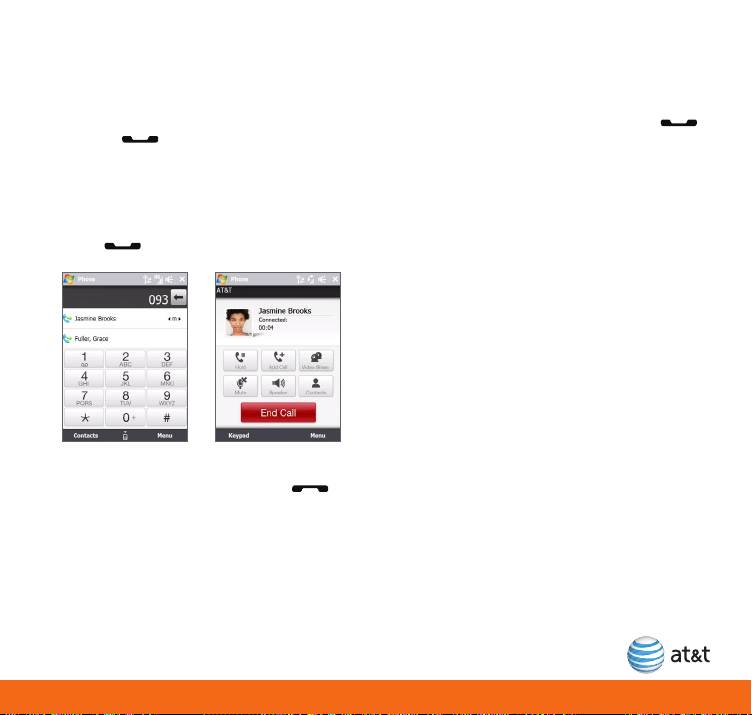
Make a phone call
1. From any screen, press the TALK/SEND
button ( ) to open the Phone screen.
2. On the Phone screen, touch the desired
phone number using the Phone keypad.
Tip: You can also use the slide out keyboard to
enter the phone number you wish to dial.
3. Press to make the call.
4. To end the call, touch End Call on the
screen or press the END button ( ).
Did you know? Normally, AT&T 3G allows
you to maintain your data
connection when connected
to a voice call.
Tip: When the device is face up and you
receive an incoming call, silence the ringer
by turning the device over.
Set up your voicemail
From any screen, press the TALK/SEND ( )
button, then touch and hold the 1 key for
several seconds. You will be connected to the
voicemail system, which will then ask you to:
1. Create your password.
2. Record your name.
3. Record a greeting.
Check your voicemail messages from
your device
1. Touch and hold the 1 key.
2. Follow the voice prompts.
Check your voicemail messages from
other phones
1. Dial your 10-digit wireless number.
2. Touch the * key when you hear your
personal greeting.
3. Enter your personal password.
4. Follow the voice prompts.
13
Page 14
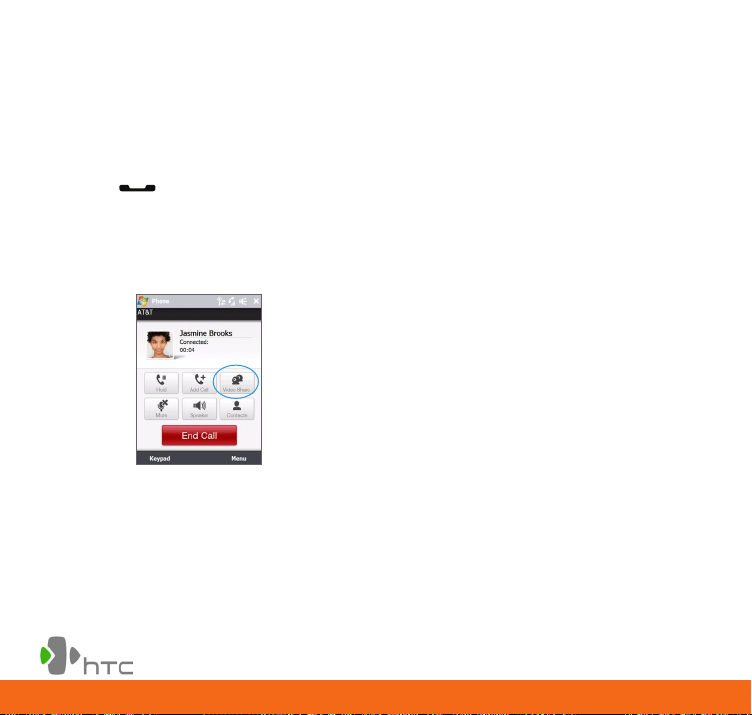
Make a Video Share call
Video Share enables you to share live or
recorded video during a call.
1. Dial the number and press the TALK/SEND
button ( ).
2. When the call is answered, the Video
Share button becomes available if both the
caller and the called party’s devices are
capable of Video Share and are within a 3G
coverage area.
3. Touch the Video Share button to invite the
called party to view video from your device.
4. “Establishing a video connection” is
displayed on your screen, and the called
party sees a notification on their device.
5. The called party accepts the connection
and will begin receiving live or recorded
video.
Receive a Video Share call
1. When you see a notification of video
connection on your device, touch Yes.
2. When connected, the calling party will start
to stream live or recorded video on your
device screen.
3. Touch End Call to end the Video Share call.
Tip: Only the person who initiated the Video
Share is charged.
Note: Video Share is a one way video and two
way audio connection between two
Video Share devices. Both devices must
be provisioned for Video Share and be in
3G service areas (a 3G icon must appear
by the signal bars prior to a call being
placed).
*You need an AT&T rate plan to use Video
Share.
14
Page 15
The TouchFLO™ 3D
TouchFLO™ 3D gives you touch control over your HTC FUZE™. TouchFLO allows you to use
finger gestures to navigate screens and provides a Home screen that lets you access your most
important information and most-used applications quickly and easily.
Note: For detailed information about gestures and screen navigation, refer to the User Manual on For detailed information about gestures and screen navigation, refer to the User Manual onFor detailed information about gestures and screen navigation, refer to the User Manual on
the Getting Started CD.
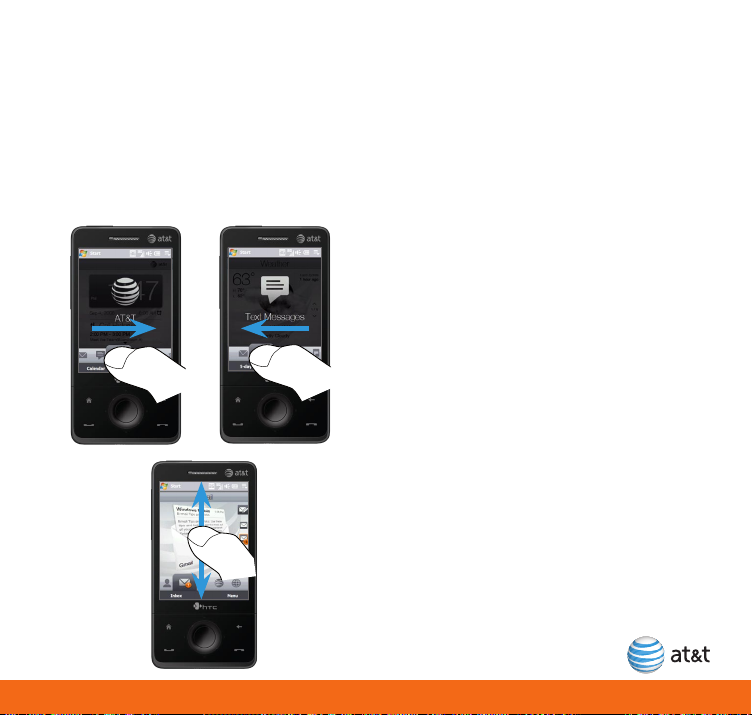
TouchFLO 3D: Learn the gestures for TouchFLO 3D
Touch, Hold and Slide
To navigate the Home screen, touch and hold
your finger on the active tab, then slide your
finger right or left over the tabs. Release when
you have selected the desired tab.
Note: Apply some pressure when touching and
holding on the active tab to be able to
slide over the tabs.
Up/Down Navigation
Inside each tab, to browse through pictures,
emails, and more, hold and slide your finger up
or down on the item on the screen or press the
Navigation Control Up/Down.
Refer to the Navigation Control on page 10 for
more information.
15
Page 16

TouchFLO 3D: Zooming
TouchFLO 3D: G-Sensor
To zoom in: Slide your finger clockwise around
the Navigation Control or touch the screen
twice.
To zoom out: Slide your finger
counterclockwise around the Navigation
Control or touch the screen twice again.
The following applications allow you to use the
Navigation Control for zooming:
• Album
• Camera
• Web browser (Opera® Mobile)
• Word Mobile and Excel Mobile
Zooming in
Zooming out
16
The HTC FUZE™ also comes with a built in
G-Sensor (aka motion sensor) that can change
the screen orientation based on the position of
the device.
Applications or features that use the G-Sensor
include:
• Album
• Web browser (Opera® Mobile)Opera® Mobile)
• Teeter game
For example, in the Web browser (Opera®
Mobile), go to a Web site to get a full portrait
view and then move the device sideways to
change the orientation.
Page 17

TouchFLO 3D Tabs
The TouchFLO 3D tabs gives you instant access to various information and applications such as
your favorite contacts, email, text messages, AT&T services, Music Player, and more right on the
Home screen.
2 3 4 5106 7 8 9
1
11
1. Home. Check the date and time,
appointments, and call history.
See page 18.
2. People. Call or send a text message or
email to your favorite contacts. See page
21.
3. Email. Read, send, and receive emails from
up to 4 email accounts. See page 23.
4. Text Messages. Read, send, and receive text
messages. See page 27.
5. AT&T Services. Access AT&T services such
as MEdia Net, AT&T Mall, AT&T Music, AT&T
GPS, and more. See page 28.
6. Internet. Open Web bookmarks and
browse the Internet using the Web browser
(Opera® Mobile). See page 35.
7. Music Player. Flip through music albums
and play back songs. See page 37.
8. Weather. Check the current weather
conditions and the 5-day weather forecast
for up to 10 cities. See page 38.
9. Programs. Add up to 18 program shortcuts
to quickly access them. See page 39.
10 Photos and Videos. Visually browse photos
and videos that are in your favorite album.
See page 40.
11. Settings. Adjust device settings such
as ringtone, device profile, Home tab
wallpaper, and more. See page 42.
17
Page 18

Home
The Home tab summarizes the most important and frequently used items on one screen to help
you keep your information organized at a glance.
Enter Information
Displays the
date and time
and alarm.
Displays the
number of
missed calls.
Note: For appointments, one all-day
appointment and up to two timed
appointments can be displayed.
Displays your
appointments.
Change the date and time
1. Touch the digital time display.
2. On the Time tab, select the correct time
zone and change the date or time.
3. Touch OK.
Note: If you visit or communicate with
someone in a particular time zone often,
you can select it as your visiting time
zone.
On-screen character input
When you start a program or select a field that
requires text or numbers, you can either use
the slide out key board or on-screen keyboard
for entering characters. Touch the Input Panel
icon to toggle between showing and hiding
the input panel.
Input Panel icon
18
Page 19

With the slide out keyboard open and in
landscape mode you enter information directly
from the keyboard; when in portrait mode with
the keyboard closed you can enter characters
by touching the keys on the on-screen
keyboard.
Key will
expand when
you touch it.
Input Panel
(Full QWERTY)
Tip: A shortcut to enter the number, symbol, or A shortcut to enter the number, symbol, orto enter the number, symbol, or
punctuation mark on top of the key is to
touch and hold the key until the character
appears. For example, to enter “2”, touch
and hold the “w” key (Full QWERTY) or the
“ty” key (Compact QWERTY).
Add a contact to your device
1. On the Home screen, touch Contacts.
2. Touch New > Outlook Contact.
3. Enter the contact details for the person.
You can associate a photo with the contact
by touching Select a picture.
4. When you are finished entering the contact
details, touch OK.
Copy all SIM card contacts to
your device
1. On the Home screen, touch Contacts >
Menu > SIM Manager.
2. Touch Menu > Select All.
3. Touch Menu > Save to Contacts.
19
Page 20

Schedule an appointment
1. On the Home screen, touch Calendar.
2. Touch Menu > New Appointment.
3. Enter a subject for the appointment.
4. Enter the other appointment details and
then touch OK when you are finished.
View your appointments on the Home
screen
The Home tab displays your upcoming
calendar appointments.
20
Swipe upward
on the screen to
display the smaller
digital clock
and view more
appointments.
One all-day
appointment and
up to two timed
appointments can
be displayed. Touch
this area to create,
edit or view an
appointment.
Page 21

People
Use the People tab to add favorite contacts (up to 15) you most frequently communicate with.
3. Select a phone number or an email address
to associate to the favorite contact. When
Add a
favorite.
Open
Contacts.
Open a menu
where you
can view,
add, remove,
and edit the
favorite.
Add a favorite in the People tab
1. On the Home screen, slide to the People
tab, then touch the Plus icon.
2. On the Select a Contact screen, touch the
name of the desired contact.
finished, the People tab displays your
favorite contact.
Note: If there is no photo associated with
the contact, you will be asked to pick a
photo in your device or you can choose
to take a photo using the device’s
camera.
4. To add another favorite contact, touch
the small Plus icon ( ) on the right and
repeat steps 2 and 3.
1
2
21
Page 22

Use the People tab
Flip through the contact pictures and quickly make a call, send a text message, or send an email
to a favorite contact.
Touch and
Touch this
icon or the
information
below the
photo to call,
send a text
message
or send an
email to your
contact.
22
hold on the
photo strip,
then slide
up or down
to scroll
through
your favorite
contacts.
Touch the
contact
picture
to access
detailed
contact
information.
Touch to open the contact
details, add or remove a
contact, or change the
contact picture.
You can
also hold
and slide
your finger
up or down
the center
screen to flip
through your
contacts.
Page 23

Email
The Email tab is where you set up email accounts (up to 4) and send and receive email messages.
Displays the
email message.
Open the
inbox of the
selected email
account.
Create a new email, add
a new email account, or
send and receive email
on the selected account.
Hold and
slide up or
down on the
envelope
image to
browse
through
received
emails.
Create and
send a new
email.
Displays
the email
accounts
that have
been set
up in your
device.
Touch the
envelope
to switch to
that email
account.
There are two methods for opening and
reading an email. Option 1, from the envelope
view you can do the following:
Touch the email on the screen to open and
read and reply to the message.
Option 2, you can open your inbox, and then
from the inbox, touch the email to open and
read it.
23
Page 24

About email
Choose the best email option for you. Your
Windows Mobile powered PDA device can
connect to:
• Personal Email Accounts Personal email
syncs email directly with your internet
service provider (ISP) like Yahoo!, AOL or
Hotmail to your Windows Mobile powered
PDA device. To set up a personal email
account on your HTC FUZE™, you can use
Xpress Mail. Xpress Mail offers automated
setup and synchronization so that changes
and deletions on your HTC FUZE™ also
appear in your ISP email account.
• Corporate Email Accounts Corporate
email accounts from Microsoft® Exchange
Server, IBM Lotus Domino, or Novell
GroupWise are typically managed by an IT
organization. To set up wireless corporate
email synchronization on your HTC FUZE™,
you can use self service set up with Xpress
Mail or IT Managed set up with Microsoft®
Direct Push, BlackBerry Connect or Good
Mobile Messaging.
Set up a personal email with
Xpress Mail
1. On the Home screen, slide to the AT&T tab,
touch the Messaging icon , then touch
Xpress Mail.
2. Touch Install Now to launch the Xpress Mail
download site.
3. Touch Install Now on the download page.
4. Select the Open after download option,
then touch Yes to continue. Xpress Mail is
downloaded and installed on your device.
5. When prompted to restart the device,
touch OK.
6. After the device restarts, touch Xpress
Mail Settings, then touch OK to accept the
license agreement.
7. Confirm your 10 digit mobile (cell) number
(numbers only) and touch Next.
8. Select Portal or ISP and touch Next.
9. Choose your provider and touch Next. (If
your email provider is not listed, touch
More to view an additional list of personal
email providers.) Touch Accept when
prompted to agree to the ISP terms of use,
if applicable.
10. Enter your User Name and Password and
touch Next to continue.
24
Page 25

11. Touch Register and wait for the registration
process to complete.
12. When the process is complete, touch OK
when the message appears telling you the
device has been successfully registered.
Your device will automatically display the
Xpress Mail Settings screen where you can
change your email settings and preferences.
Touch Inbox to view your messages.
Send and receive personal email
1. On the Home screen, slide to the Email tab,
touch an email account icon, then touch
Inbox.
2. Touch Menu > Send/Receive to download
your emails.
3. To compose a new email, touch Menu >
New.
3
2
4. When you are finished composing your
message, touch Send.
Corporate email setup with
Xpress Mail
To set up self service corporate wireless
email and calendar on your device, use
Xpress Mail. Auto-push email from corporate
accounts including Microsoft® Exchange
and IBM Lotus Domino. Simply go to http://
xpressmailpe.wireless.att.com to register and
install “redirector” software on your PC. This
computer must remain on and connected to
the corporate network in order for corporate
email to be redirected to the device. To set up
Xpress Mail for corporate email, you will need
a work email address, the type of mail server
your company runs (Microsoft® Exchange,
Lotus Notes or IMAP) and the computer you
use to access your corporate email (must be
connected to the Internet).
To set up Xpress Mail for corporate
email and calendar:
1.
Open Internet Explorer on your computer and
go to http://xpressmailpe.wireless.att.com.
2. Follow the instructions to install and
connect Xpress Mail to your corporate
email account.
3. You will receive a notification message
confirming that your software is installed
and you are now connected to Xpress Mail.
4. Set up access to your corporate email from
your device.
25
Page 26

Set up IT managed corporate
email
To set up IT managed corporate wireless
email on your HTC FUZE™, you will need a
PIN or server address from your corporate IT
organization. Contact your IT administrator
for more information about Microsoft® Direct
Push, BlackBerry Connect or Good Mobile
Messaging support for the HTC FUZE™.
Microsoft® Direct Push provides wireless
access to your corporate email, contacts,
calendar and tasks for Microsoft® Exchange
Server. Contact your IT administrator for set
up instructions. Activate a “PDA Enterprise for
Microsoft” data plan on your AT&T account
before using Microsoft® Direct Push.
BlackBerry® Connect for Windows Mobile®
provides access to BlackBerry wireless
push email and more, including BlackBerry
Enterprise Server™ for corporate email and
BlackBerry Internet Service™ for personal/ISP
email. You will need to have a PDA Enterprise
for BlackBerry Connect data plan provisioned
on your wireless service. To learn more, please
visit att.com/blackberry.
Good Mobile Messaging provides your
corporate email, calendar, contacts, tasks and
notes for Microsoft® Exchange Server and Lotus
Domino. Visit get.good.com to check availability
of Good Mobile Messaging for your HTC FUZE™.
You will need a PIN in order to download and
install. If you do not have a PIN, check with your
IT administrator. Activate a “PDA Enterprise for
Good” data plan on your AT&T account before
using Good Mobile Messaging.
Synchronize information
If you are using Windows® XP or other
compatible Windows systems, install Microsoft
ActiveSync 4.5 or later to sync information with
your computer. If you have Windows Vista®,
you can use Microsoft Windows Mobile® Device
Center to easily sync with your computer.
Tip: The Getting Started CD contains Windows
Mobile Device Center and Microsoft
ActiveSync 4.5 or later, that you can install
on your PC.
After you have installed Microsoft ActiveSync
or Windows Mobile Device Center to your PC
and set up all items or information you want
to synchronize, connect the device to your PC
using the USB sync cable.
On the Home screen, slide to the Programs
tab, then touch the ActiveSync icon to begin
synchronization.
For detailed information on how to use these
applications to synchronize information
between your device and your PC, consult the
User Manual in the Getting Started CD.
26
Page 27

Text Messages
On the Messages tab, you can read text messages as they arrive and create a new text message.
You can also view the text of received multimedia messages on this tab.
Create
Displays
the
received
message.
Open the
Messaging
Inbox.
When there is a message, you can do the
following:
To flip
through
received
text and
multimedia
messages,
hold and
slide upward
or downward
on the
screen.
Touch the message on
the screen to read and
reply to the message.
and send
a new text
message.
Create a
new text
message, or
to reply to,
forward, or
delete the
displayed
message.
You can also
touch the
Up/Down
arrow to
flip through
the received
messages.
Compose and send a text message
1. Touch the New Message icon .
2. Enter the mobile phone number of one
or more recipients, separating them with
a semicolon. To access mobile phone
numbers from Contacts, touch To.
3. Enter your message.
• To quickly add common messages, touch
Menu > My Text and touch a desired
message.
• To check the spelling, touch Menu > Spell
Check.
4. Touch Send.
2
4
3
27
Page 28

AT&T Services
AT&T Music Opens the AT&T Music screen
where you can log on to XM radio, or shop for
music, songs, music videos, streaming media,
or open the music player. See page 30
Messaging Opens the Messaging screen
where you can send and receive email,
multimedia, and text messages, or use Instant
Messaging to chat online. See page 30.
AT&T GPS Opens a link to the AT&T
Navigator download site. When you have
downloaded and installed the AT&T Navigator,
touch this icon to launch the program.
See page 31.
Tools Opens the Tools folder where you can
find value-added applications for your device.
CV Opens the browser to the CV Web site
where you can select and watch streaming
video clips on-demand. See page 33.
Games and Apps Opens the Games & Apps
folder where you can find games and other
applications for your device
.
Push to Talk Launches the Push to Talk
function that allows you to instantly talk to
your PTT contacts. See page 33.
The AT&T tab is your portal to AT&T features and services that are available for your device.
Displays the
available
applications.
Refer to the
table below.
Go to the
Go to the
Home tab.
MEdia Net Home Opens the browser
to the MEdia Net home page where you
can access various information.
See page 29.
AT&T Mall Opens the AT&T Mall screen
where you can access the Web to shop
online for games, ringtones, graphics,
multimedia, goodies and other applications.
See page 29.
Programs
tab.
Touch a box
to open the
associated
application.
28
For detailed information on how to use AT&T
features and services, refer to User Manual in the
Getting Started CD.
Page 29

Use MEdia Net to access the Web and shop online
Access the Web on your device using MEdia Netccess the Web on your device using MEdia Net ( ) from AT&T as your default home page.
You can customize your MEdia Net page with your favorite content.
To browse the Web with MEdia Net
1. On the Home screen, slide to the AT&T tab,
then touch the MEdia Net icon ( )..
2. Scroll and touch the content you want to
browse.
3. Touch Edit to customize
your MEdia Net Home
page for quicker
access.
Tip: Refer to the TouchFLO
3D topic on page 15
to learn how to use
finger gestures to
zoom in and out and
navigate the Web page.
Note: If you do not have a data plan
associated with your device go to
wireless.att.com/support or call 611
from your wireless device (1-800-8887600 from a landline) to add, upgrade,
or change your data plan.
To browse other Web sites
1.
On the Home screen, slide to the AT&T tab,
then touch the MEdia Net icon ( )..
2. In the address bar that appears at the top
of the screen, enter the address (URL) of the
Web site, then touch the arrow or press the
ENTER button.
3. To bookmark a Web page, touch Menu > Add to
Favorites.
Shop via AT&T Mall
AT&T Mall is your launch pad for shopping for
several types of content for your device, like
applications, games, graphics, ringtones and
other multimedia content.
Access AT&T Mall
1. On the Home screen, slide to the AT&T tab,On the Home screen, slide to the AT&T tab,
then touch the AT&T Mall icon ( )..
2. Touch the icon on the screen for the type
of content you are interested in.
Note: On your device, you can look up
information on the Web while you’re on
a call.
29
Page 30

AT&T Music
AT&T Music ( ) provides the ultimate music
experience with just a touch of a button. Listen
to your favorite music, watch the latest video,
and stay in the know with music, news and
more.
• Transfer and listen to your music with the
integrated Music Player.
• Purchase and load tracks from digital music
stores like Napster® to your device.
• Personalize with ringtones and Answer
Tones™ under Shop Music.
• Instantly ID the title and artist of a song with
Music ID.
• Stream dozens of commercial free XM
music stations with XM Radio.
Open AT&T Music
On the Home screen, slide
to the AT&T tab, and then
touch the AT&T Music
icon ( ). Highlight the
application you wish to
choose and press ENTER.
Use Instant Messaging
If you use an instant messaging (IM) ( )
service, such as Yahoo!® Messenger, AOL® Instant
Messenger™, or
can experience the convenience and fun of IM
on the go with your device.
Open Instant Messaging and sign-in
1. On the Home screen, slide to the AT&T tab,
then touch the Messaging icon ( ), and, and
then touch Instant Messaging..
2. Touch the IM service icon ( ).
3. Enter your screen name (AOL® Instant
Messenger™), email address (Windows
Live™ Messenger), or Yahoo! ID (Yahoo!®
Messenger) and password, then touch
Sign In.
Windows Live™ Messenger, you
30
Page 31

Add an IM contact
1. Touch the group that you want to add the
contact to.
2. From the IM main screen, touch Menu >
Add Contact.
3. Type in the ID and nickname of the contact
you want to add, and then touch Add.
Send a message
1. Touch the desired IM contact to send a
message to.
2. Slide the hardware keyboard, then
compose your message.
3. Touch Send.
AT&T Navigator
Turn your HTC FUZE™ into a GPS navigation
system.
Download and install AT&T Navigator
1. On the Home screen, slide to the AT&T tab,
then touch the AT&T Navigator icon ( ),,
and then touch Get AT&T Navigator.
Note: If downloading AT&T Navigator via the
Web browser, enter http://att.telenav.
com/nav on the address bar, then touch
Enter.
2. When a dialog box opens, select the Open
file after download option, then touch Yes
to download the file.
3. If an “Unknown Publisher” prompt appears,
touch Yes to continue.
4. Once AT&T Navigator has installed
successfully, touch OK to restart the HTC
FUZE™.
Note: If you don’t already have an AT&T
Navigator account, AT&T Maps is
installed with the option to upgrade to
AT&T Navigator. AT&T Maps does not use
the GPS capabilities of the HTC FUZE™.
31
Page 32

Start AT&T Navigator
1. On the Home screen, slide to the AT&T tab,
then touch the AT&T Navigator icon ( ),,
and then touch AT&T Navigator.
2. Enter your mobile phone number, first and
last name, then touch Login.
3. On the warning screen, touch Go.
4. When offered to take a brief tour of
the AT&T Navigator features, touch Yes.
Otherwise, touch No.
5. AT&T Navigator is now ready to use. Select
the AT&T Navigator feature you would like
to use.
Note: You must be outdoors to establish a
GPS connection. Eligible wireless service
plan required.
32
Generate a Route
1. Select the Drive To option.
2. Select the Address option and choose the
Type In Address Option.
3. Enter the address for your desired
destination.
4. AT&T GPS will attempt to validate the
address and prompt you to confirm the
address.
5. Once the address for your destination
is confirmed, touch OK to generate your
route.
Page 33

Stars shine on
the red carpet
Access Hollywood
PLAY
Rookie mak es
final draft pick.
PLAY
ESPN
Volcano erupt s in
Indones ia
PLAY
My Favorites
EDIT
Vid eo Categori es
1.
2.
3.
4.
5.
6.
7.
8.
Customi ze CV
Parenta l Controls
MEdia N et
Help
Top Clips
Enterta inment
Music
Sports
News & Weather
Kids & Cartoons
HBO Mob ile
Playlis ts
CNN New s
ESPN
Video
CV
CV ( ) brings you streaming video clips
on-demand from the most popular networks,
trusted news sources, entertainment, sports,
music and cable providers. With CV, there
are thousands of videos to watch - anytime,
anyplace for any reason.
Open CV
1. On the Home screen,
slide to the AT&T tab,
then touch the CV
icon ( )..
2. When connected, select
a category, find your
favorite show, then
touch PLAY.
Push to Talk
Push to Talk (PTT) ( ) is a communication
service that allows you to use your device
for instant communication with one or many
contacts simply by pressing the PTT button.
Set up Push to Talk
The first step in using the Push to Talk (PTT)
service is initializing the device.
1. Press the PTT button on the left panel of
the device.
2. Touch Yes when prompted to initialize PTT.
3. Type a name that is up to 20 characters
(this will be your PTT user name) and touch
OK. You will receive a notification when the
PTT service is initialized successfully.
Once the initialization process is completed (it
may take several minutes), a message box will
appear and then the “Available” icon ( ) will
appear in the title bar.
Note:
For Push to Talk calling, AT&T recommends
adding the Push to Talk feature to your
account, so that you are not charged on a
pay per use basis.
33
Page 34

Add a Push to Talk contact
After initializing PTT, you must add individuals
or groups to your PTT contact list before you
can place a PTT call. Individuals and group
members must subscribe to the AT&T PTT
service.
1. On the Home screen, slide to the AT&T tab,
then touch the PTT icon ( )..
2. On the PTT Menu screen, touch Add
Contacts.
3. You may now enter the new contact’s
name and mobile phone number. Enter the
number, then touch OK.
4. The device will now send the invitation
to your new contact. You will see an icon
while the invitation is in progress.
Make a Push to Talk call
The Push to Talk feature allows you to talk to
friends who have the same feature on their
devices.
1. Press the PTT button located on the left
side of the device.
2. The PTT Contacts Screen will appear. Use
the Navigation Control buttons to highlight
the contact you would like to call.
3. Press and hold the PTT button to establish
a connection.
4. A moment later, your device will sound a
beep. You may begin talking. When the
connection is established, your screen will
change to include a timer for the duration
of your connection.
5. Press and hold the PTT button while
speaking and release it when you are not.
6. To end a PTT call session, touch END
on the screen. You will be automatically
disconnected if the call has no activity for
30 seconds.
Receive a Push to Talk call
You will be notified by a ring when you receive
a Push to Talk call.
1. Press the PTT button located on the left
side of the device, then begin talking to the
other party.
2. Release the PTT button when you are
finished speaking.
34
Page 35

Internet
The internet tab is the quickest method to access the internet. On the Internet tab, you can open
the Web browser (Opera® Mobile) and browse the Web. You can also access the internet using
the MEdia Net shortcut on the AT&T Service tab (see page 29).
While in the Web browser (Opera®
Mobile)
Use finger gestures to pan and zoom on the
Web page.
You can also use Navigation Control to zoom
in or out of the Web page.
Open all
bookmarks.
Open the
Web browser
(Opera®
Mobile).
Hold and slide
your finger
upward to scroll
down the screen
and access more
Web favorites.
Touch a bookmarked
item to open it in the
Web browser (Opera®
Mobile).
Refer to the TouchFLO 3D topic on page 15 to
learn how to use finger gestures to navigate
the Web page.
35
Page 36

Add your favorite Web site as a
bookmark
Create a bookmark for Web sites that you
frequently visit. This lets you access that Web
site faster in the future.
1. On the Home screen, slide to the Internet
tab, then touch the globe on the screen.
2. Touch the URL field and then enter the URL
of the Web site you want to add as a
bookmark. Touch .
Tip: You can also use the hardware keyboard
to enter name of the Web site.
3. At the bottom of the screen, touch .
4. In the Bookmarks screen, touch .
5. Enter the name for the bookmark and
select the folder where you want to save
the bookmark.
6. Touch .
36
Page 37

Music Player
The Music Player tab allows you to visually browse through music albums and play music.
Shuffle and
Repeat
Displays the
album art.
Music
progress bar
Open the
music library.
Touch to play, to pause.
To move
forward/
backward in
the song, touch
and hold to
display the
progress bar
and then slide
right or left.
Touch to set music playback
to repeat and turn shuffle
mode on or off.
For more information on how to create playlists and
play music in the music library, refer to the User
Manual in the Getting Started CD.
indicators
Playback
controls
Hold and slide
your finger
upward or
downward
on the album
covers or touch
the arrow icons
to flip through
music tracks.
Transfer music
To play a song, first copy some music files to
your device. To copy the songs to your device,
you will need the following:
• Music on your PC in one of these formats:
MP3, WMA, AAC.
• A microSD™ card is preferable to copy songs
to your device for extra storage (1GB or larger
is recommended).
• Windows Mobile® Device Center or Microsoft®
ActiveSync® software loaded onto your PC.
During the setup process, choose Connect
without setting up your device for Windows
Mobile Device Center or click Cancel when
the Sync Setup Wizard opens for ActiveSync.
• Windows Media® Player 11.
You are now ready to transfer music to your
device.
1. Connect the device to the PC using the
USB sync cable.
2. On the PC, open Windows Media Player 11
and click on the Sync tab.
3. Drag the audio files you want to load on your
device to the Sync list. (You can load MP3,
WMA, and AAC music files from your PC.)
4. Click Start Sync to start loading the music
files on to your device.
37
Page 38

Weather
You can check your local weather as well as the weather for cities around the globe on the
Weather tab. You can monitor up to 10 cities on the Weather tab.
Displays the
current
temperature.
Displays
the current
weather
conditions.
See five day
weather
forecast of
the week.
To switch
between
cities, hold
and slide
your finger
upward/
downward.
38
Display the
time the
Weather
page was
updated.
Change the
temperature
scale or
add a new
location
.
Touch here
to download
the latest
weather
information.
You can also
touch the Up/
Down arrow
to switch
between
cities.
Add a new location
1. Touch Menu > Add Location.
2. On the Select Country screen, slide your
finger up or down the screen or use the
Quick Scroll bar to scroll through the list
of countries and then touch a country to
select it.
3. On the Select City screen, slide your finger
up or down the screen or use the Quick
Scroll bar to scroll through the list of cities
and then touch a city to select it.
Quick
Scroll
bar
Page 39

Programs
You can add up to 18 program shortcuts on the Programs tab. You can add, delete or replace any
of the shortcuts you have added to customize your tab.
Displays the
program
shortcuts.
Access the
complete list
of programs
on your
device.
Open the
corresponding
program.
Return
to the
Programs
tab.
Empty slot
Touch a
program icon
to open the
corresponding
To view more
program
shortcuts, hold
and slide your
finger upward/
downward on
the screen.
Remove programs
from the Programs
tab.
Tip: To replace a slot with another program,
you must delete the occupying program
shortcut first and then add your desired
program.
program.
Touch an
empty slot to
add a favorite
program.
39
Page 40

Photos and Videos
Quickly browse your photos and video clips that are in your device or storage card. View your
photos in full screen or as a slideshow.
While viewing your photos in full screen mode,
you can use finger gestures or the Navigation
Control to browse, pan, and zoom your photos.
Refer to the TouchFLO 3D section on page 15.
Take a picture of your contact
1. Slide to the Photos and Videos tab, then
touch .
2. Frame your contact on the screen, touch
the ENTER button to activate auto-focus,
then press it to take the shot.
3. You can now associate the picture to the
contact and add the contact in the People
tab. Refer to the People tab in page 21 for
more information.
Displays the
photo or
video clip.
Open
Album to
view all
your photos
and videos.
To flip
through
photos and
videos, hold
and slide
upward or
downward
on the
center of
the screen.
Touch the photo or
video on the screen to view
or play it in full screen.
Open Camera.
Open
Camera in
Video mode.
View your
photos as a
slideshow.
You can also
touch the
Up/Down
arrow to flip
through the
photos.
40
Page 41

Use the camera and send a Multimedia Message (MMS)
You can use your device’s camera to capture photos and videos, then send these as multimedia
messages.
Take and send a picture
1. Slide to the Photos and Videos tab, then
touch .
2. Touch the ENTER button to activate autofocus, then press it to take the shot.
3. In the Review screen, touch , select
Send via MMS, then touch Send.
4. In To: , enter the phone number of your
message recipient. To add mobile phone
numbers from Contacts, touch To.
5. Enter the message subject, then compose
the multimedia message.
6. Touch Send.
Capture and send a video
1. Slide to the Photos and Videos tab, then
touch .
2. Touch the ENTER button to activate autofocus, then press it to start recording. To
stop recording, press the ENTER button
again.
3. In the Review screen, touch , select
Send via MMS, then touch Send.
4. In To: , enter the phone number of your
message recipient. To add mobile phone
numbers from Contacts, touch To.
5. Enter the message subject, then compose
the multimedia message.
6. Touch Send.
41
Page 42

Settings
The Settings tab lets you access the most frequently used device settings so that you can
customize your device quickly.
Personalize your device ringtone
Displays the
available
settings
that you
can adjust.
Configure
Access
all device
settings.
To view more
settings, hold
and slide
your finger
upward/
downward on
the screen.
Note: For complete information on how to
configure or adjust the device settings,
refer to the User Manual in the Getting
Started CD.
the Wi-Fi and
Bluetooth
settings.
Touch a
setting to
adjust.
1. On the Home screen, slide to the Settings
tab and then touch Sound.
2. Scroll down and then touch Ringtone.
3. Select the ringtone you want to use.
4. Touch Done.
Tip: You can use *.wav, *.mid, *.mp3, *.wma,
or other types of sound files that you
downloaded from the Internet or copied
from your computer as ringtones.
You can also purchase ringtones from the AT&T
Mall. On the Home screen, slide to the AT&T
tab, then touch the AT&T Mall icon. Select
Shop Tones.
Change the Home tab wallpaper
1. On the Home screen, slide to the Settings
tab and then touch Wallpaper.
2. Locate the image file that you want to use
as the wallpaper.
3. Touch the image file.
42
Page 43

Connect a Bluetooth headset
1. On the Home screen, slide to the Settings
tab and then touch Menu > Bluetooth
Devices > Mode tab.
2. Select the Turn on Bluetooth and Make this
device visible to other devices check boxes.
3. Touch OK. The title bar will show to
indicate that the device is in visible mode.
Note: is displayed on the title bar when
Bluetooth is only turned on.
4. Turn on and make visible the Bluetooth
headset and place it within close range.
Refer to the headset’s documentation to
learn how to set it to visible mode.
5. On the Bluetooth screen of your device,
touch the Devices tab, then touch Add new
device. The device will search for Bluetooth
devices which are within range.
6. When detected, touch the name of the
Bluetooth headset, then touch Next. The
device will automatically pair the device
with the Bluetooth headset. The icon
will show on the title bar.
Note: Windows Mobile will automatically try
one of the preconfigured passcodes
(0000, 8888) to pair the Bluetooth
headset with the device. If this fails, you
have to enter the passcode delivered
with your headset manually.
Tip: You can use a Bluetooth headset to listen
to music on your device.
Connect to Wi-Fi
1. On the Home screen, slide to the Settings
tab, then touch Communications.
2. Touch the Wi-Fi button to turn the wireless
function on or off.
3. The network names of the detected Wi-Fi
networks will be displayed on a pop-up
message window. Select the desired Wi-Fi
network, then touch OK.
4. On the next pop-up message window,
select The Internet to connect your device
to the Internet. Otherwise, touch Work to
connect your device to a private network.
5. Enter the security key, then touch Connect.
Note: The proxy server must be turned off in
order to connect to a Wi-Fi network.
To change the proxy server setting,
touch Start > Settings > Connections
tab > Connections, then clear the This
network uses a proxy server to connect
to the Internet check box.
Wi-Fi networks are self-discoverable,
which means no additional steps are
required for your device to connect to
a Wi-Fi network. It may be necessary to
provide a username and password for
secured wireless networks.
43
Page 44

Frequently Asked Questions
How long should it take to charge my battery?
Your battery can take up to 3 hours to fully
charge using the AC charger. It will take much
longer using the USB cable.
Why won’t my device power on?
Your battery may be drained or is not seated
correctly. Try removing and reinserting the
battery. If no success, try charging the device
using the AC charger. The LED ring around the
Navigation Control shows a “breathing” white
light when the battery is being charged.
When I try to download a lot of songs, I always
get timed out and the download stops.
If you are downloading 50 or more songs to your
device, it may timeout. To bypass this, touch Start
> Settings > Connections tab > USB to PC. Select
the Enable advanced network functionality check
box and touch OK. You may want to deselect this
box if you are getting corporate email, as it may
cause issues with VPNs and servers.
What is needed to use the built in GPS on my
device?
AT&T supports AT&T Navigator with a monthly
subscription but the device is capable of
supporting any GPS application.
Which GPS applications are supported by AT&T?
AT&T Navigator is currently the only GPS solution
that has been tested and certified for use with
this device.
How do I turn on/off Wi-Fi?
Slide to the Settings tab, then touch
Communications. Touch Wi-Fi to turn it on or off.
Why can’t I connect to the Internet when using
Wi-Fi?
The proxy server must be turned off in order to
connect to a wireless network. You can change
the proxy server setting by performing the
following:
1. Touch Start > Settings > Connections tab >
Connections > Set up my proxy server.
2. Make sure that the box “This network uses
a proxy server to connect to the Internet” is
unchecked.
What is a soft reset and how is it performed?
A soft reset of your device clears all active
program memory and shuts down all active
programs.
to press the Reset button.
What is a hard reset and how is it performed?
A hard reset restores the device to its default
settings — the way it was when you first
purchased it. A hard reset should only be
performed after all other troubleshooting options
have been exhausted.
To perform a hard reset:
1. Touch Start > Settings > System tab > Clear
Storage.
2. Enter “1234” in the box, then touch Yes.
OR
1. With the device turned off, press and hold the
2. Continue pressing the Volume Down and Enter
3. Press the Volume Up button.
To perform a soft reset,
Volume Down and Enter buttons and then
briefly press the Power button.
buttons until you see the Reset message.
use the stylus
44
Page 45

Tips and Tricks
Change the Home tab background:
1. On the Home screen, slide to the Settings
tab, then touch Wallpaper.
2. On the Select a Picture screen, touch the
desired picture.
Set an MP3 file as your ringtone:
1. Copy the MP3 file to the My Ringtones
folder on your device.
2. On the Home screen, slide to the Settings
tab and then touch Sound.
3. Scroll down and then touch Ringtone.
4. In the Ringtones list, select the MP3 file as
your ringtone.
Assign a picture to a contact:
1. On the Home screen, slide to the People
tab and then touch All People.
2. Touch a contact to open his/her contact
card.
3. Touch Menu > Edit.
4. Touch Select a picture in the Picture field.
5. Select the desired picture and touch OK.
OR
1. Go to Start > Programs > Tools > Pictures &
Videos.
2. Select the picture you want to assign.
3. Touch Menu > Save to Contact.
4. Choose the desired contact.
Assign a ringtone to a contact:
1. On the Home screen, slide to the People
tab and then touch All People.
2. Touch a contact to open his/her contact
card.
3. Touch Menu > Edit.
4. Scroll down and touch the Ring tone field.
5. Select the desired ringtone.
Modify the date or time settings:
1. Touch the digital clock on the Home tab,
then touch the Time tab.
2. Touch Home or Visiting.
3. Select the appropriate time zone and
adjust the time or date.
Assign a shortcut button to a program:
1. On the Home screen, slide to the Settings
tab, then touch All Settings > Personal tab
> Buttons.
2. On the Program Buttons tab, touch a
button you want to reassign.
3. In the Assign a program box, touch the
program or shortcut command you want to
assign to the button.
4. Touch OK.
45
Page 46

The Bluetooth wordmark and logos are owned by the Bluetooth SIG, Inc. and any use of such
marks by Wireless is under license. Microsoft, Windows, Windows Mobile, ActiveSync, Excel, Internet
Explorer, MSN, Outlook, PowerPoint, Windows Media, Word and OneNote are registered trademarks
or trademarks of Microsoft Corporation in the United States and/or other countries. The GSM letter
mark is a trademark of the GSM Association. microSD is a trademark of SD Card Association. The
BlackBerry and RIM families of related marks, images, and symbols are the exclusive properties
of Research in Motion Limited. © 2008 AT&T Intellectual Property. All rights reserved. AT&T and
the AT&T logo are trademarks of AT&T Intellectual Property and/or AT&T affiliated companies.
Subsidiaries and affiliates of AT&T Inc. provide products and services under the AT&T brand. All
other brands, product names, company names, trademarks and service marks are the properties of
their respective owners.
HTC FUZE™ October 2008 Getting Started Guide
46
Page 47

91H00795-40M Rev.A
Find More Information
On the Web
• Interactive Web tutorials, tips & tricks and FAQs are available at
att.com/WirelessTutorials. Select Manufacturer: HTC and Model: FUZE from the drop
down menus.
• Detailed support information including device specifications, user manual,
troubleshooting, user forums and knowledgebase articles are available at
att.com/DeviceSupport.
• For information about your wireless account, service plan or network, visit
att.com/Wireless.
On the device
Call AT&T Customer Care at 1-800-331-0500 or dial 611 from any AT&T mobile phone
for assistance with your service or device.
On your computer
To view the user manual for your device, insert the Getting Started CD into your
computer and open the guide file.
Find Accessories
Accessories for your smartphone are available at att.com/WirelessAccessories or visit
your local AT&T store.
Page 48

Frequently used application icons
Icon
AT&T Mall
AT&T Music Shop for music, songs, music videos, streaming media, and access AT&T's music
player.
ActiveSync Synchronize information between your device and a PC or the Exchange Server.
Calendar Keep track of your appointments and create meeting requests.
Contacts Keep track of your friends and colleagues.
Instant Messaging This is the mobile version of instant messenger that supports
multiple IM services, such as from AOL, Yahoo!, and Windows Live™.
Internet Explorer Mobile Browse Web and WAP sites as well as download new
programs and files from the Internet.
MEdia Net Home Open the MEdia Net Home page where you can access various
information including international, sports, financial, and entertainment news, weather,
chat, and more.
Messaging Send and receive email, multimedia, and text messages.
Office Mobile Use the complete suite of Microsoft® Office applications for your mobile
device.
Phone Make and receive calls, switch between calls, and set up conference calling.
Push to Talk
talk to your contacts with Push To Talk-capable handsets — all by simply pressing a button.
Windows Media Player Mobile Play back audio and video files.
Wireless Manager Manage your device’s connections (including Wi-Fi, GPRS, Bluetooth,
Modem, and ActiveSync), turn the device on or off, switch to ringer/vibration mode, and
enable or disable the Direct Push function.
Shop for games, ringtones, graphics, multimedia, goodies and other applications.
Provide you with a “walkie-talkie” like feature that instantly allows you to
Description
Page 49

HTC FUZE™ Features
VOLUME UP
During a call or
when playing music,
press this button to
increase the volume.
VOLUME DOWN
During a call or
when playing music,
press this button to
lower the volume.
PUSH TO TALK
(PTT)
Press to launch
the Push to Talk
function.
HOME
Press to return to
the Home screen.
TALK/SEND
• Press to answer
an incoming call
or dial a number.
• During a call,
press and hold
to toggle the
speakerphone on
and off.
• Press to open
the Phone
screen.
NAVIGATION CONTROL
This Navigation Control is
both press-sensitive and
touch-sensitive.
EARPIECE
Listen to a phone
call from here.
TOUCH SCREEN
BACK
Press to return
to the previous
screen.
END
• Press to end a
call or return
to the Home
screen.
• Press and hold
to lock the
device.
STYLUS
 Loading...