

HTC Desire 820 Dual SIM User Manual

User guide
HTC Desire 820 dual sim

2 Contents
Contents
What's new
Android 6.0 Marshmallow 9
HTC app updates 10
Unboxing
HTC Desire 820 11
Dual nano SIM cards 12
Storage card 14
Battery 15
Switching the power on or off 16
Choosing which nano SIM card to connect to the 4G/3G network 16
Managing your nano SIM cards with Dual network manager 16
Phone setup and transfer
Setting up HTC Desire 820 for the first time 17
Restoring content from HTC Backup 18
Transferring content from an Android phone 18
Ways of transferring content from an iPhone 19
Transferring iPhone content through iCloud 19
Transferring contacts from your old phone through Bluetooth 19
Other ways of getting contacts and other content 20
Transferring photos, videos, and music between your phone and computer 21
Using Quick Settings 21
Getting to know your settings 23
Updating your phone's software 23
Getting apps from Google Play 25
Downloading apps from the web 26
Uninstalling an app 27
Your first week with your new phone
Basics 28
HTC Sense Home widget 36
Lock screen 38
Notifications 41
Working with text 42
HTC Help 46

3 Contents
Phone calls
Making a call with Smart dial 47
Making a call with your voice 47
Dialing an extension number 48
Returning a missed call 48
Speed dial 48
Calling a number in a message, email, or calendar event 48
Making an emergency call 49
Receiving calls 49
What can I do during a call? 49
Setting up a conference call 50
Call History 51
Switching between silent, vibrate, and normal modes 51
Home dialing 52
Messages
Sending a text message (SMS) 53
Sending a multimedia message (MMS) 53
Sending a group message 54
Resuming a draft message 54
Replying to a message 54
Forwarding a message 55
Moving messages to the secure box 55
Blocking unwanted messages 56
Copying a text message to the nano SIM card 56
Deleting messages and conversations 56
Personalizing
Themes 58
More ways to personalize 61
HTC BlinkFeed
What is HTC BlinkFeed? 68
Turning HTC BlinkFeed on or off 69
Restaurant recommendations 69
Ways of adding content on HTC BlinkFeed 70
Customizing the Highlights feed 72
Posting to your social networks 72
Removing content from HTC BlinkFeed 72
Camera
Camera basics 73
Selfies and people shots 77
Split Capture 80
Panoramic shots 80
Other camera features 81
Camera settings 82

4 Contents
Gallery
Viewing photos and videos in Gallery 84
Adding photos or videos to an album 87
Copying or moving photos or videos between albums 87
Tagging photos and videos 87
Searching for photos and videos 88
Changing the video playback speed 89
Trimming a video 89
Viewing, editing, and saving a Zoe highlight 90
Photo Editor
Basics 91
Creative effects 93
Entertainment
HTC BoomSound 100
HTC Music 100
FM Radio 104
HTC Connect 104
Power and storage management
Battery 109
Phone storage 112
File Manager 117
Sync, backup, and reset
Online sync 119
Backup 120
HTC Sync Manager 124
Reset 126
People
Your contacts list 128
Setting up your profile 129
Adding a new contact 129
Editing a contact’s information 130
Getting in touch with a contact 131
Importing or copying contacts 131
Merging contact information 132
Sending contact information 133
Contact groups 133
Private contacts 134
Calendar and Email
Calendar 136
Mail 140

5 Contents
Web browser
Browsing the Web 145
Bookmarking a webpage 147
Using your browsing history 147
Clearing your browsing history 147
Google Search and apps
Google Now 148
Google Search 150
Google apps 151
Other apps
HTC Dot View 153
HTC Car 155
Scribble 157
Clock 159
Weather 160
Voice Recorder 160
Tasks 161
Internet connections
Turning the data connection on or off 162
Managing your data usage 162
Wi-Fi connection 164
Connecting to VPN 165
Using HTC Desire 820 as a Wi-Fi hotspot 166
Sharing your phone's Internet connection by USB tethering 167
Wireless sharing
Bluetooth 168
Settings and security
Turning location services on or off 171
Do not disturb mode 171
Airplane mode 173
Automatic screen rotation 173
Setting when to turn off the screen 173
Screen brightness 173
Touch sounds and vibration 174
Changing the display language 174
Installing a digital certificate 175
Pinning the current screen 175
Disabling an app 176
Controlling app permissions 176
Setting default apps 176
Setting up app links 176
Assigning a PIN to a nano SIM card 177
Accessibility features 177
Accessibility settings 178

6 Contents
Turning Magnification gestures on or off 178
Navigating HTC Desire 820 with TalkBack 179
Trademarks and copyrights
Index
7 About this guide
About this guide
In this user guide, we use the following symbols to indicate useful and important information:
This is a note. A note often gives additional information, such as what happens when you choose
to do or not to do a certain action. A note also provides information that may only be applicable
to some situations.
This is a tip. A tip gives you an alternative way to do a particular step or procedure, or lets you
know of an option that you may find helpful.
This indicates important information that you need in order to accomplish a certain task or to
get a feature to work properly.
This provides safety precaution information, that is, information that you need to be careful
about to prevent potential problems.
Some apps may not be available in all regions or with your mobile operator.

8 Important note on recoverable data
Important note on recoverable data
Files and other data that have been deleted, cleared, removed, or erased from your device
may still be recoverable by third-party data recovery software. Even a factory reset may not
permanently erase all data from your mobile device, including personal information.

9 What's new
What's new
Android 6.0 Marshmallow
Android™ 6.0 Marshmallow brings new features that make your mobile life more convenient.
Now on Tap
Now on Tap intuitively searches and delivers related information right in the app. This means that
you'll never have to leave the conversation or the website you're browsing to search for information.
Just press and hold
Tap on page 150.
and Now on Tap displays related information, apps, and actions. See Now on
Manage phone memory
Use Memory in Settings to monitor the average memory use and performance of HTC Desire 820.
You can also use this setting to check which apps use the most memory.
Major change to how you use storage cards
If you have an existing storage card with media and other files, use it as removable storage so you
can insert the card and access your files on any Android phone.
If you have a brand new storage card, you can use the card to expand the internal storage. See
Should I use the storage card as removable or internal storage? on page 113 and Setting up your
storage card as internal storage on page 113.
Network settings reset
Quickly reset all network settings when HTC Desire 820 has a hard time connecting to the mobile
data or Wi-Fi® network or Bluetooth® device. See Resetting network settings on page 126.
Google settings
Easily manage settings for Google® apps and features on HTC Desire 820. Tap Google in Settings
and change your preferences.
Smarter app linking
Android 6.0 Marshmallow automatically opens the correct app for links that you tap in a text or
email message or website. With smarter app linking, there's no more guessing which app can handle
the links you tap.
In Settings, you can change the default apps to link to. For details, see Setting default apps on page
176 and Setting up app links on page 176.

10 What's new
App permissions
To help protect your phone and privacy, Android 6.0 Marshmallow has improved the way apps are
given access to certain data or features, such as contacts or the microphone. For details, see
Controlling app permissions on page 176.
HTC app updates
From time to time, HTC adds or enhances features in apps such as HTC Sense™ Home, Camera,
Gallery, and more. Download and install the latest updates of HTC and other apps from
Google Play™ to enjoy the new and improved features. Some HTC apps that are not preloaded in
certain phones can also be downloaded from Google Play.
The information in this guide may not be most up-to-date if there are more recent app updates
available.

11 Unboxing
Unboxing
HTC Desire 820
1. Dual speakers
2. POWER
3. VOLUME buttons
4. 3.5mm headset jack
5. Proximity sensor
6. Front camera
7. Notification LED
8. Slot cover
9. USB connector
™
You need a 4G/LTE
services. Check with your operator for details.
§ If you want to use a case or screen protector, don’t cover and block the proximity sensor.
Purchase a case or screen protector designed for HTC Desire 820.
§ Avoid liquid or dust from entering the microphone hole to prevent damage to the microphone.
§ Avoid connecting third-party headsets or accessories with metallic charms that dangle near the
headset jack. Using these may affect signal reception.
plan to use your operator's 4G/LTE network for voice calls and data
§ Don’t disassemble any part of the phone. Don’t try to open the phone or remove the battery by
force. This may damage the phone or its electronics and will invalidate the warranty.

12 Unboxing
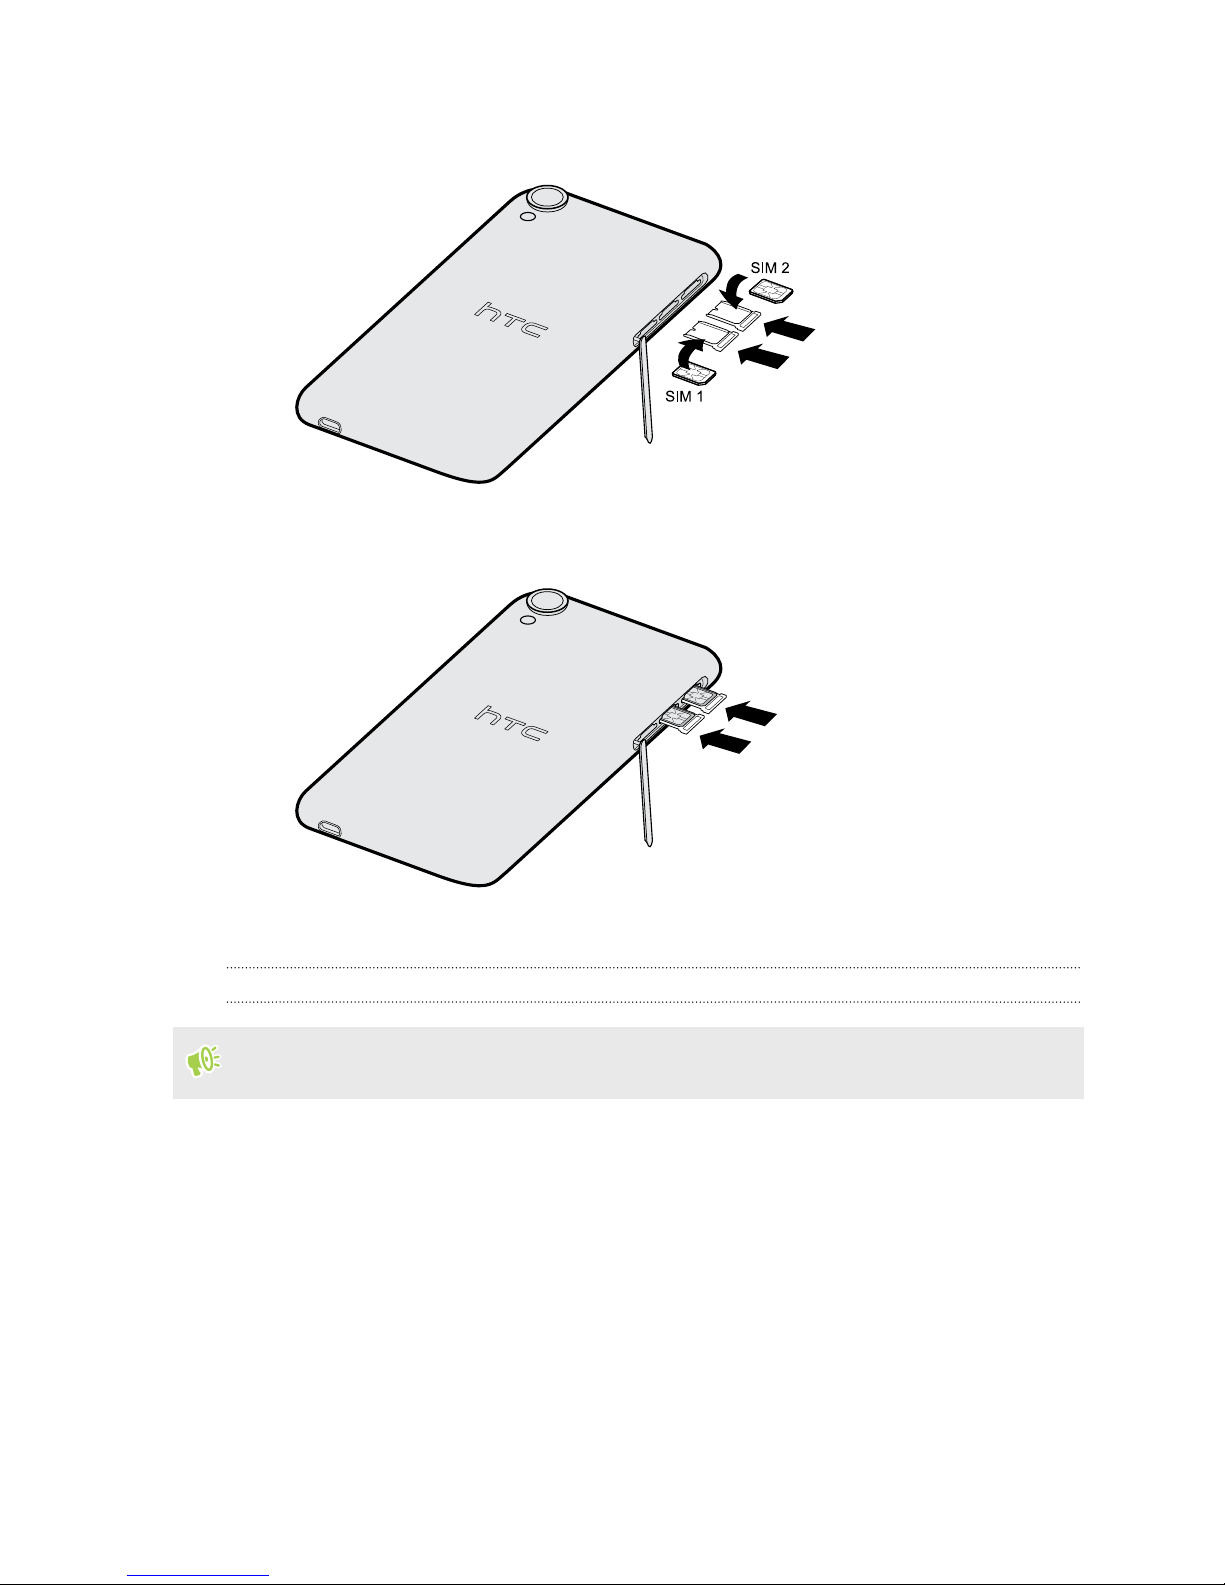
Dual nano SIM cards
HTC Desire 820 has two nano SIM card slots. You can insert a 4G LTE/3G/GSM nano SIM card in
either slot.
When you have two cards inserted, only one card can connect to a mobile data network. The other
card will connect to the 2G network only. Go to Settings > Dual network manager to set which card
connects to mobile data network.
Use a standard nano SIM card only. Inserting a modified card that is thicker than the standard
nano SIM card may cause the card to not fit properly or damage the card slot.
Inserting nano SIM cards
1. Make sure HTC Desire 820 is off and hold it securely with the front facing down.
2. Open the slot cover with your thumb or finger.
3. Pull the trays out from the nano SIM slots.
13 Unboxing
4. Place the nano SIM cards into the trays with the gold contacts facing up and the cut-off
corner facing out.
5. When reinserting the trays, make sure they are facing up so that the nano SIM cards don’t fall
out. Slide the trays all the way into the slots.
6. Close the slot cover. Press from the top to the bottom of the slot cover to lock it in place.
Removing a nano SIM card
Make sure to switch off HTC Desire 820 before removing the card.
1. Open the slot cover with your thumb or finger.
2. Pull the tray out from the nano SIM slot, and remove the nano SIM card.
3. Close the slot cover. Press from the bottom to the top of the slot cover to lock it in place.
14 Unboxing
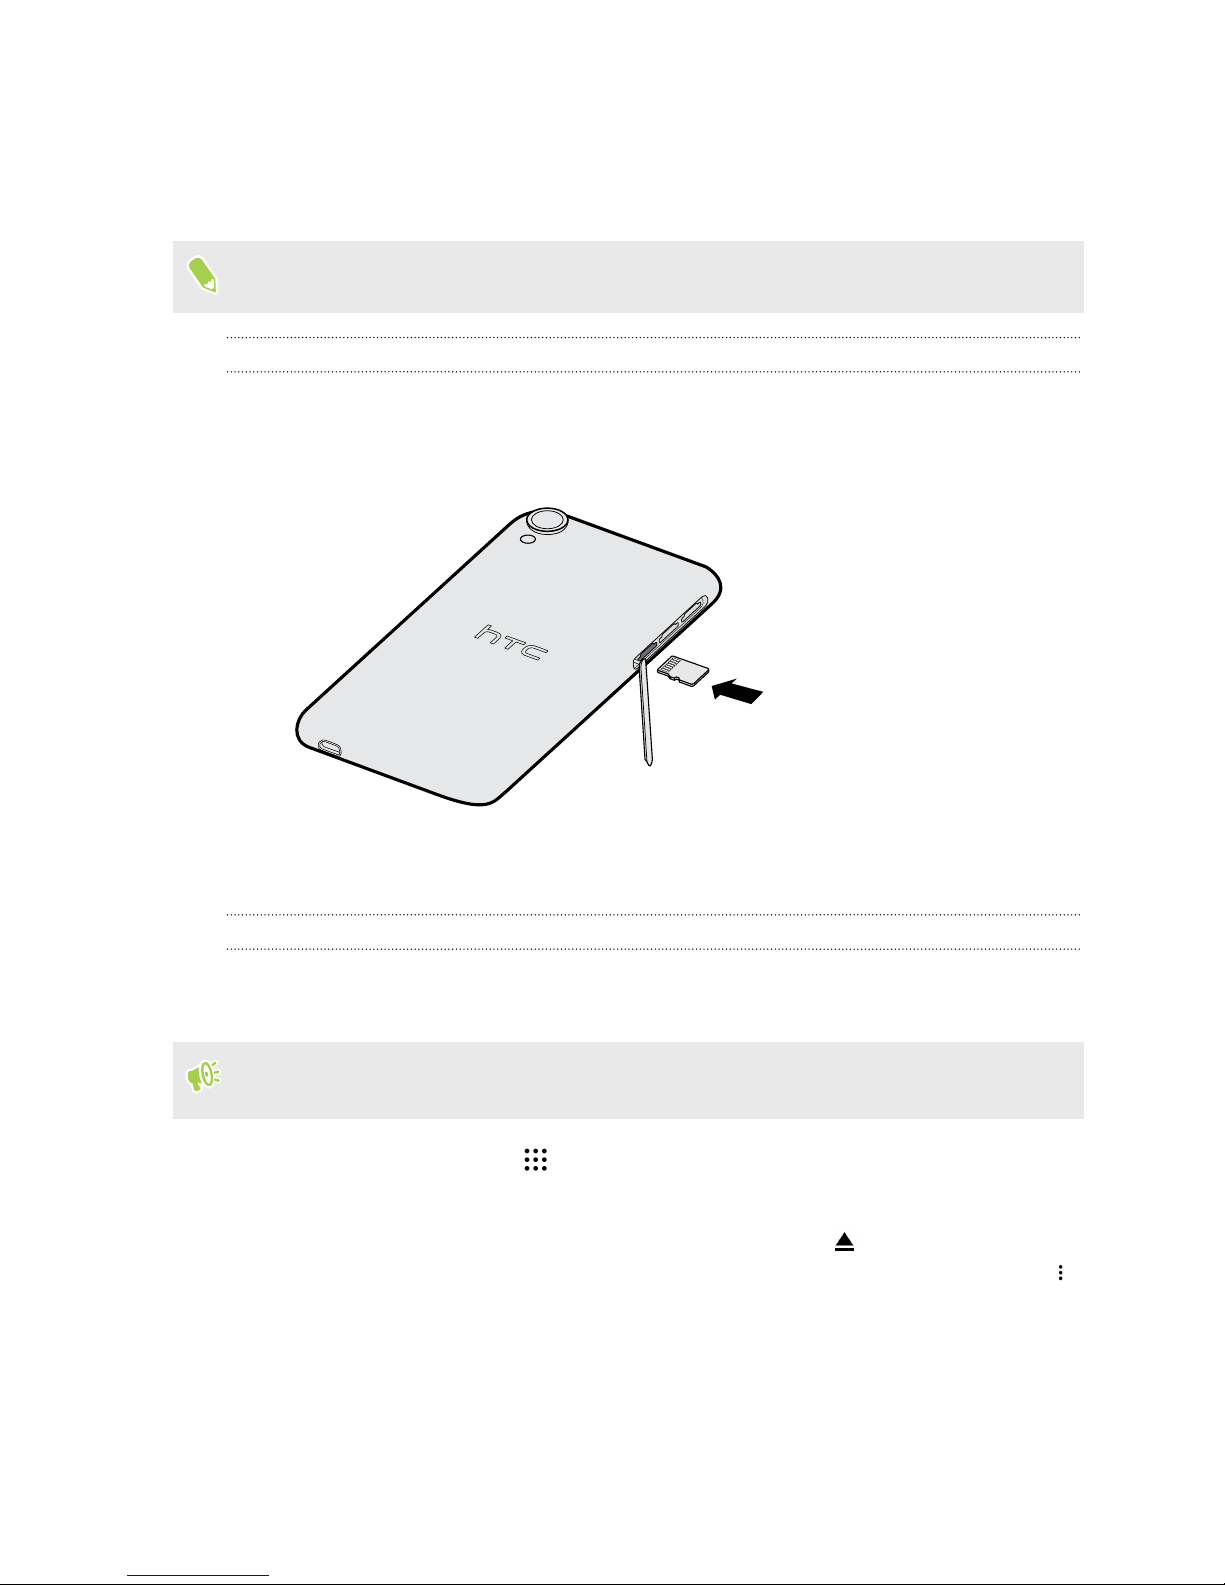
Storage card
Use a storage card to store your photos, videos, and music. When you need to free up phone storage
space, you can also move certain apps to the storage card, if the apps support this feature.
The storage card is optional and sold separately.
Inserting the storage card
1. Open the slot cover with your thumb or finger.
2. With HTC Desire 820 facing down, insert a microSD™ into the storage card slot, with its gold
contacts facing up and towards the slot.
3. To close the slot cover, slide the plastic hinge into the side and press the cover until it clicks
into place.
Unmounting the storage card
When you need to remove the storage card while HTC Desire 820 is on, unmount the storage card
first to prevent corrupting or damaging the files in the storage card.
If your storage card is used as internal storage and there are apps that were moved to the card,
you will not be able to open these apps after unmounting the card.
1. From the Home screen, tap > Settings > Storage.
2. Do one of the following:
§ If your storage card appears under Removable storage, tap next to the card name.
§ If your storage card appears under Internal storage, tap the card name, and then tap
> Eject.
15 Unboxing
Removing the storage card
1. Open the slot cover with your thumb or finger.
2. Push the storage card in to eject it from its slot.
3. To close the slot cover, slide the plastic hinge into the side and press the cover until it clicks
into place.
Battery
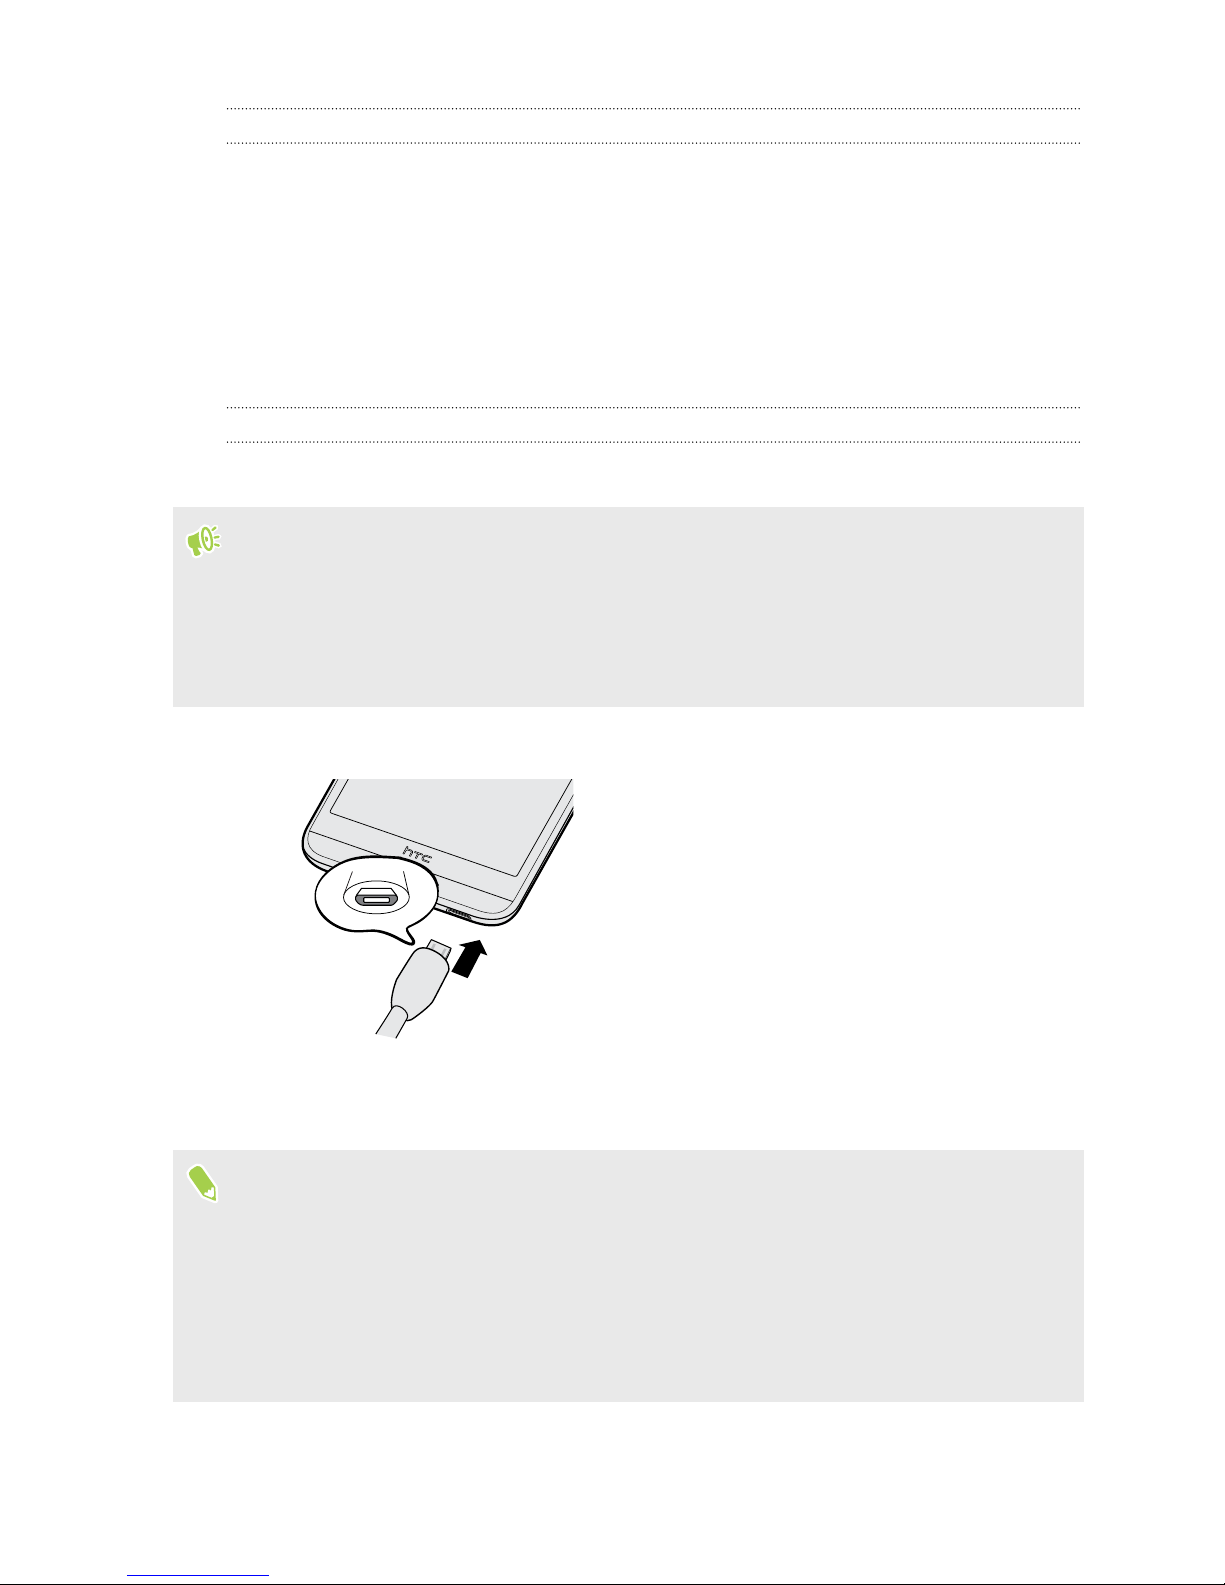
Charging the battery
Before you turn on and start using HTC Desire 820, it is recommended that you charge the battery.
§ If the battery has been discharged for several days, you may need to charge HTC Desire 820 for
several minutes before powering it on.
§ Use only the adapter and the USB cable that came with HTC Desire 820 to charge the battery.
When the battery power is too low, make sure to use the power adapter to charge, not the USB
cable connection with your computer.
1. Insert the small end of the USB cable into the USB connector.
2. Insert the other end of the USB cable into the power adapter.
3. Plug in the power adapter to an electrical outlet to start charging the battery.
§ As a safety precaution, the battery may stop charging to avoid overheating.
§ Avoid charging the battery in hot environments.
§ When you're using the web browser and charging the battery, HTC Desire 820 may become
warmer. This is normal.
§ To conserve energy, unplug the power adapter from the electrical outlet after you finish
charging.

16 Unboxing
Switching the power on or off
Switching the power on
Press the POWER button until HTC Desire 820 vibrates.
When you turn on HTC Desire 820 for the first time, you’ll need to set it up.
Switching the power off
1. If the display is off, press the POWER button to turn it back on.
2. Press and hold the POWER button for a few seconds.
3. Tap Power off on the options menu.
Choosing which nano SIM card to connect to the
4G/3G network
When you have two nano SIM cards inserted on your phone, only one card can connect to the
4G/3G network. The other card will connect to the 2G network only.
You can set which card you want to connect to the 4G/3G network.
1. From the Home screen, tap
2. Tap Preferred data network.
3. Choose the card you want to connect to the 4G/3G network.
> Settings > Dual network manager.
Managing your nano SIM cards with Dual network
manager
From the Home screen, tap
off, change the slot names, and more.
> Settings > Dual network manager. You can turn either slot on or

17 Phone setup and transfer
Phone setup and transfer
Setting up HTC Desire 820 for the first time
When you switch on HTC Desire 820 for the first time—or after you've done a factory reset—you’ll
be asked to set it up.
You can enable TalkBack to navigate by voice feedback before selecting the language. Press and
hold two fingers on the screen until you hear a message saying that accessibility mode is enabled.
Walk through the on-device setup to choose your Internet connection, sign in to your Google
Account, set up device protection for HTC Desire 820, and more.
Use Android Backup Service if you've used it to back up your old phone before. On the Get your app
& data screen, tap Restore from this backup. From the menu, choose your old phone if you want to
restore your apps from a previous phone that was backed up using Android Backup Service.
Otherwise, tap Set up as new device.
Some features that need to connect to the Internet such as location-based services and auto-sync
of your online accounts may incur extra data fees. To avoid incurring data fees, disable these
features under Settings. For more information on location services, see Turning location
services on or off on page 171.

18 Phone setup and transfer
Restoring content from HTC Backup
If you used HTC Backup before, you can restore your saved backups from your cloud storage to
HTC Desire 820. See About HTC Backup on page 121 and Restoring your backup to HTC Desire 820
with HTC Backup on page 121 for details.
Transferring content from an Android phone
On your old Android phone, download the HTC Transfer Tool and use it to transfer your content to
HTC Desire 820.
The types of locally stored content on your old phone that the HTC Transfer Tool can transfer
include contacts, messages, calendar events, music, photos, videos, and some settings. More types of
data such as call histories, email accounts, and some HTC app settings can be transferred from HTC
phones that have HTC Sense 5.5 or higher.
§ You need Android version 2.2 or later to use the HTC Transfer Tool on your old phone.
§ If your old phone has Android version 2.1 or an earlier version, you need to use Bluetooth
transfer. For details, see Transferring contacts from your old phone through Bluetooth on page
19.
1. From the Home screen, tap > Settings > Get content from another phone.
2. Choose whether to transfer from an HTC Android phone or other Android phone.
3. Tap Full transfer, and then tap Next.
4. Follow the steps shown on HTC Desire 820 to download the HTC Transfer Tool from
Google Play to your old phone, install it, and open the tool.
5. When you see a PIN on your old phone, make sure the same PIN also appears on HTC Desire
820 before you continue.
If the PIN code doesn't appear, tap Retry on your old phone. If it still won't appear, this may
mean that your old phone is unable to connect to HTC Desire 820. When this happens, try
another transfer method.
6. Tap Confirm on your old phone.
7. On your old phone, choose the types of content you want to transfer, tap Transfer, and then
tap Yes.
8. On your old phone, read the onscreen message, and then tap Yes.
9. Wait for the transfer to finish.
10. Tap Done on both phones.

19 Phone setup and transfer
Ways of transferring content from an iPhone
If you have an iPhone, there are 3 easy ways to transfer your contacts, messages, and other content
to HTC Desire 820.
§ Back up and restore iPhone content through iCloud. To find out how, see Transferring
iPhone content through iCloud on page 19.
§ Back up iPhone content using iTunes on your computer, and then use HTC Sync Manager to
transfer the content to HTC Desire 820. For details, see Transferring iPhone content and
apps to your HTC phone on page 125.
§ If you only need to copy your contacts, you can use Bluetooth transfer. For details, see
Transferring contacts from your old phone through Bluetooth on page 19.
Transferring iPhone content through iCloud
If you have an iCloud account, sync iPhone content to your iCloud storage, and then transfer the
content to HTC Desire 820. You can transfer the following types of content from iCloud: contacts,
bookmarks, text messages, messages from iMessage, calendar events, and photos.
1. From the Home screen, tap
2. Tap iPhone > Import from iCloud backup.
3. Follow the steps shown onscreen to back up your iPhone content to your iCloud storage.
4. Enter your iCloud email address and password, and then tap Sign in.
5. Choose the iPhone backup that you want to transfer to HTC Desire 820, and then tap Next.
6. Choose the types of content you want to transfer, and then tap Import.
7. Wait for the transfer to finish, and then tap Done.
Only some contact details can be transferred, such as the contact name, photo, postal address,
email address, birthdate, anniversary date, and notes.
> Settings > Get content from another phone.
Transferring contacts from your old phone through
Bluetooth
Use Bluetooth if you only need to transfer contacts from an iPhone, a phone that has Android
version 2.1 (or earlier version), or other types of phones.
1. From the Home screen, tap > Settings > Get content from another phone.
2. Choose whether to transfer from an Android phone, iPhone, or other phone types.
3. If you chose to transfer from an Android phone, tap Quick transfer.
Or to transfer from iPhone, tap Transfer contacts over Bluetooth.
20 Phone setup and transfer
4. On your old phone, turn Bluetooth on.
5. Follow the onscreen instructions on your old and new phones to pair them and start the data
transfer.
§ Depending on the capabilities of your old phone, you may be able to transfer not only contacts
but also other data such as calendar events and text messages through Bluetooth.
§ Use your iCloud storage or HTC Sync Manager to transfer more types of content from an
iPhone.
Other ways of getting contacts and other content
There are different ways you can individually add contacts and other content to HTC Desire 820.
Sync with your
computer
Google Account Google contacts are imported to HTC Desire 820 after you sign in to your
Social network
accounts
Microsoft® Exchange
ActiveSync
Outlook.com account Sync personal contacts from your Microsoft Outlook.com account.
Phone contacts You can create contacts locally on HTC Desire 820, if you don't prefer to
nano SIM cards Copy all your nano SIM contacts to HTC Desire 820.
®
Use HTC Sync Manager to sync contacts, documents, playlists, and more
between HTC Desire 820 and your computer running a Windows® or OS X
operating system.
You can also use it to transfer your iTunes backup that contains contacts,
messages, and other content from an iPhone from your computer to
HTC Desire 820.
Google Account. You can also create more Google contacts right from
HTC Desire 820.
Log in to your favorite social networks to sync contact information from
them.
HTC Desire 820 syncs your work contacts from the Microsoft Exchange
ActiveSync Server in your workplace.
store them on your online accounts.
21 Phone setup and transfer
Transferring photos, videos, and music between your
phone and computer
Here are ways you can transfer your media from or to your computer.
§ Connect HTC Desire 820 to your computer. Your computer will recognize it just like any
removable USB drive, and you can copy your media between them. See Copying files between
HTC Desire 820 and your computer on page 115.
§ Download and use the HTC Sync Manager software on your computer. You can set it up to
automatically get music, photos, and videos off HTC Desire 820 to your computer. You can
also sync playlists from your computer to the phone.
If you have an iPhone, you can also connect it and transfer camera roll photos to your
computer using HTC Sync Manager. Then reconnect HTC Desire 820 and copy them over.
See About HTC Sync Manager on page 124.
§ Use cloud storage services to put your media in one place so you can manage them anywhere
—on your computer, HTC Desire 820, and other mobile devices.
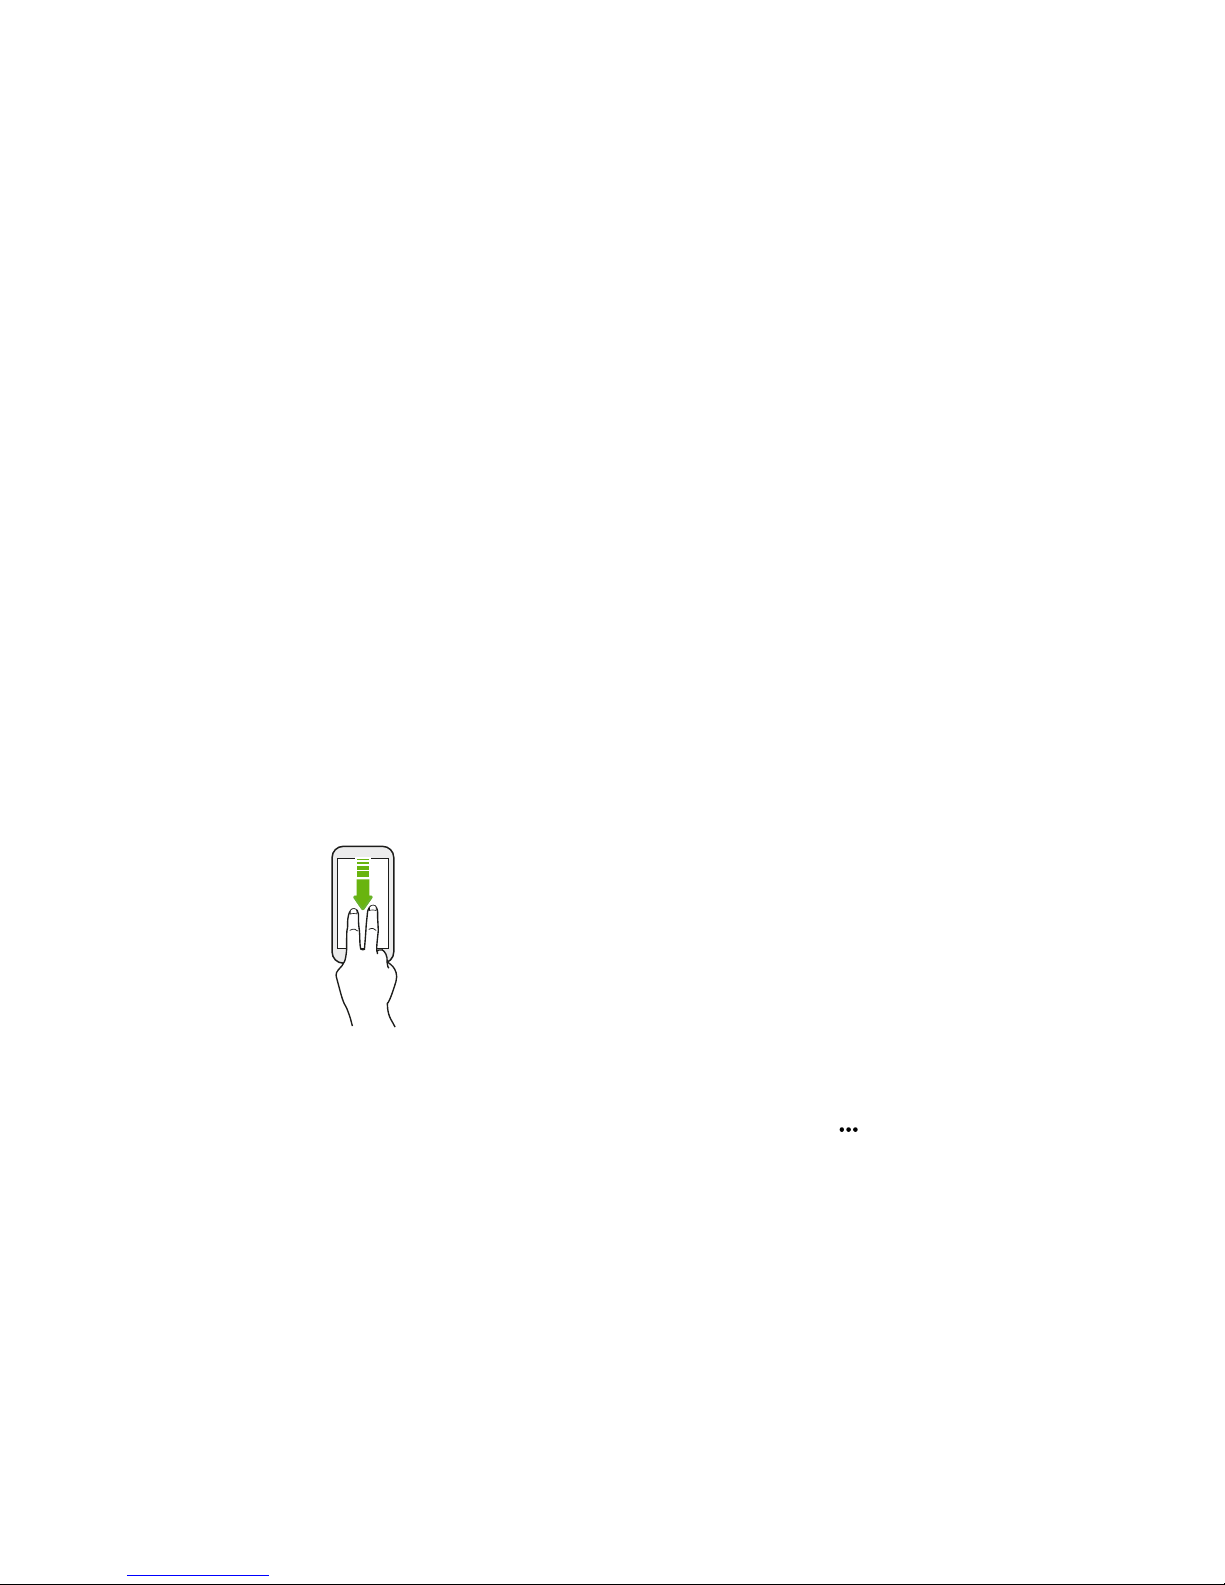
Using Quick Settings
In the Quick Settings panel, easily turn settings such as Wi-Fi and Bluetooth on or off.
1. Do any of the following:
§ With two fingers, swipe down from the status bar.
§ Swipe down twice from the status bar.
2. To turn a setting on or off, just tap its tile.
3. To change the options for a setting, press and hold its tile. Or tap .

22 Phone setup and transfer
Customizing Quick Settings
You can remove, replace, or rearrange the tiles in Quick Settings.
1. With two fingers, swipe down from the top of the screen to open Quick Settings.
2. Tap and do one of the following:
§ In the Quick Settings list, press and hold next to the item you want to move and drag
it to rearrange the list.
§ Under Hidden items, press and hold and drag it up to make it available in Quick
Settings.
There is a limit to the number of tiles that can be shown in Quick Settings. You may need to
remove an existing item to make space for another one. To remove an item, drag it below Hidden
items.
23 Phone setup and transfer
Getting to know your settings
Want to change the ringtone, set up a Wi-Fi connection, or add your accounts? Do this and more in
Settings.
1. Open Settings from the Apps screen, Notifications panel, or Quick Settings panel.
§ From the Home screen, tap to switch to the Apps screen, and then tap Settings.
§ Swipe down from the top of the screen to open the Notifications panel, and then tap .
§ With two fingers, swipe down from the top of the screen to open Quick Settings, and
then tap .
2. Here are some of the basic settings you can change:
§ Tap the On/Off switch next to an item such as Wi-Fi to turn it on or off. Tap the item
itself to configure its settings.
§ Tap Sound & notification to set a ringtone, choose a sound profile, and configure
notification settings.
§ Tap Personalize to change the wallpaper, add apps and widgets to the Home screen,
and more.
§ Tap Accounts & sync to add and sign in to your different accounts, such as email, social
networks, and more.
§ Tap Security to help secure HTC Desire 820, for example with a screen lock.
Tap
in Settings to quickly find options and settings.
Updating your phone's software
HTC Desire 820 can check and notify you if there’s a new update available.
Updates for some HTC apps and features, such as HTC Sense Home, may be downloaded and
installed from Google Play. See Installing app updates from Google Play on page 24 for details.
Checking your system software version
Before installing a system software update, you can check first what Android and HTC Sense
versions you have on your phone.
1. From the Home screen, tap > Settings > About.
2. Tap Software information.
24 Phone setup and transfer
Enabling automatic updates
You can choose to automatically download and install software updates for HTC or mobile operator
apps.
1. From the Home screen, tap , and then find and tap Settings.
2. Tap About > Software updates.
3. To save on data usage, you can choose to update through Wi-Fi only.
4. Choose whether to auto-download system updates, app updates, or both.
App updates are installed automatically. You'll still need to confirm when to install system
software updates.
Installing a software update
When HTC Desire 820 is connected to the Internet and there's a new software update available, the
update notification icon appears in the status bar.
1. Slide the Notifications panel open, and then tap the system update notification.
2. If you don't want to download the update using your data connection, select Update over
Wi-Fi only.
3. Tap Download.
4. When download is complete, select Install now, and then tap OK.
After updating, HTC Desire 820 will restart.
Installing an application update
When Internet connection is on and there's an available update for your HTC or mobile operator
apps, the update notification icon appears in the status bar.
1. Slide the Notifications panel open, and then tap the update notification.
The Updates screen opens with the list of application updates to be installed.
2. Tap an item to view its details, and then tap .
3. When you're done reviewing the updates, tap Install. You'll be asked to restart HTC Desire
820 if needed.
Installing app updates from Google Play
Some HTC apps and third-party apps get updated with improvements and bug fixes through
Google Play. You can manually update apps or set your phone to automatically download and install
app updates when available.
1. From the Home screen, tap , and then find and tap Play Store.
2. Tap to open the slideout menu.
25 Phone setup and transfer
3. Tap My apps & games.
You'll see a list of apps installed on your phone.
4. Under Updates, tap an app.
5. Tap Update.
6. If prompted, tap Accept.
In Play Store, tap > Settings > Auto-update apps to choose how you want Google Play to
update your apps.
Checking for updates manually
1. From the Home screen, tap , and then find and tap Settings.
2. Tap About > Software updates. HTC Desire 820 checks if updates are available.
If you don't have Internet connection, you'll be prompted to turn on mobile data or connect to a
Wi-Fi network. Once connected, tap Check now to check for updates.
Getting apps from Google Play
Google Play is the place to go to find new apps for HTC Desire 820. Choose from a wide variety of
free and paid apps ranging from productivity apps, entertainment, to games.
§ You need a Google Wallet™ account to buy paid apps or to make in-app purchases. If you already
have a Google Account, just add Google Wallet by signing in with your existing username and
password at wallet.google.com.
§ The name of the Play Store app may differ depending on your region.
§ The ability to purchase apps varies by region.
Finding and installing an app
When you install apps and use them on HTC Desire 820, they may require access to your personal
information or access to certain functions or settings. Download and install only apps that you trust.
Be cautious when downloading apps that have access to functions or a significant amount of your
data on HTC Desire 820. You’re responsible for the results of using downloaded apps.
1. From the Home screen, tap , and then find and tap Play Store.
2. Browse or search for an app.
3. When you find the app that you like, tap it and read its description and user reviews.
26 Phone setup and transfer
4. To download or purchase the app, tap Install (for free apps) or the price button (for paid
apps).
5. Tap Accept.
Apps sometimes get updated with improvements or bug fixes. To automatically download
updates, after installing the app, tap > Auto-update.
To open the app, go to the Apps screen and tap the app.
Restoring apps from Google Play
Upgraded to a new phone, replaced a lost one, or performed a factory reset? Restore apps that you
previously downloaded.
1. From the Home screen, tap , and then find and tap Play Store.
2. Tap to open the slideout menu.
3. Tap My apps & games, swipe to the All tab, and then tap the app you want to restore.
4. Install the app.
For more details, refer to the Google Play help.
Downloading apps from the web
You can download apps directly from websites.
§ Apps downloaded from websites can be from unknown sources. To help protect HTC Desire 820
and your personal data, we strongly recommend that you only download from websites you
trust.
§ Before you can install the downloaded app, make sure that you've set HTC Desire 820 to allow
installation of third-party apps in Settings > Security > Unknown sources.
1. Open the browser, and then go to the website where you can download the app you want.
2. Follow the website's download instructions for the app.
After installing the app, make sure to go back to Settings > Security and clear the Unknown
sources option.

27 Phone setup and transfer
Uninstalling an app
If you no longer need an app that you've downloaded and installed, you can uninstall it.
Most of the preloaded apps cannot be uninstalled.
From the Apps screen, press and hold the app you want to remove, and then drag it to Uninstall.
If you purchased an app in Play Store, you can uninstall it for a refund within a limited time. To
know more about the refund policy for paid apps, refer to the Google Play help.
28 Your first week with your new phone
Your first week with your
new phone
Basics
HTC Sense Home
After you've turned on and set up HTC Desire 820 for the first time, you'll see the Home screen.
§ Set up the HTC Sense Home widget to experience the convenience of a Home screen that
automatically adjusts when you're at home, work, or outdoors. See What is the HTC Sense
Home widget? on page 36.
§ Swipe right and you'll find HTC BlinkFeed™. You can customize HTC BlinkFeed to show
posts from your social networks, headlines from your favorite news media, and more. For
details, see What is HTC BlinkFeed? on page 68.
§ Swipe left and you’ll discover space for adding your favorite widgets, apps, and more so
they’re just a tap away. You can also add panels. For details, see Adding or removing a widget
panel on page 64.
§ You can change the apps on the launch bar at the bottom of the Home screen. See Launch bar
on page 62.
While you're in another screen or app, press
to return to the last Home screen you visited.
Sleep mode
Sleep mode saves battery power by putting HTC Desire 820 into a low power state while the display
is off. It also stops accidental button presses when HTC Desire 820 is in your bag.
Switching to Sleep mode
To turn off the display and switch to Sleep mode, briefly press the POWER button.
HTC Desire 820 also automatically goes into Sleep mode when it’s left idle for a while. You can
change the time before HTC Desire 820 sleeps by setting the screen timeout. For details, see Setting
when to turn off the screen on page 173.
Waking up from Sleep mode
Press the POWER button.
29 Your first week with your new phone
Unlocking the screen
Swipe up to unlock the screen.
If you've set up a screen lock, you'll be asked to provide your credentials before HTC Desire 820
unlocks.
If you've set an event reminder or an alarm, you can snooze or dismiss the event or alarm right
from the lock screen. Just drag or up.
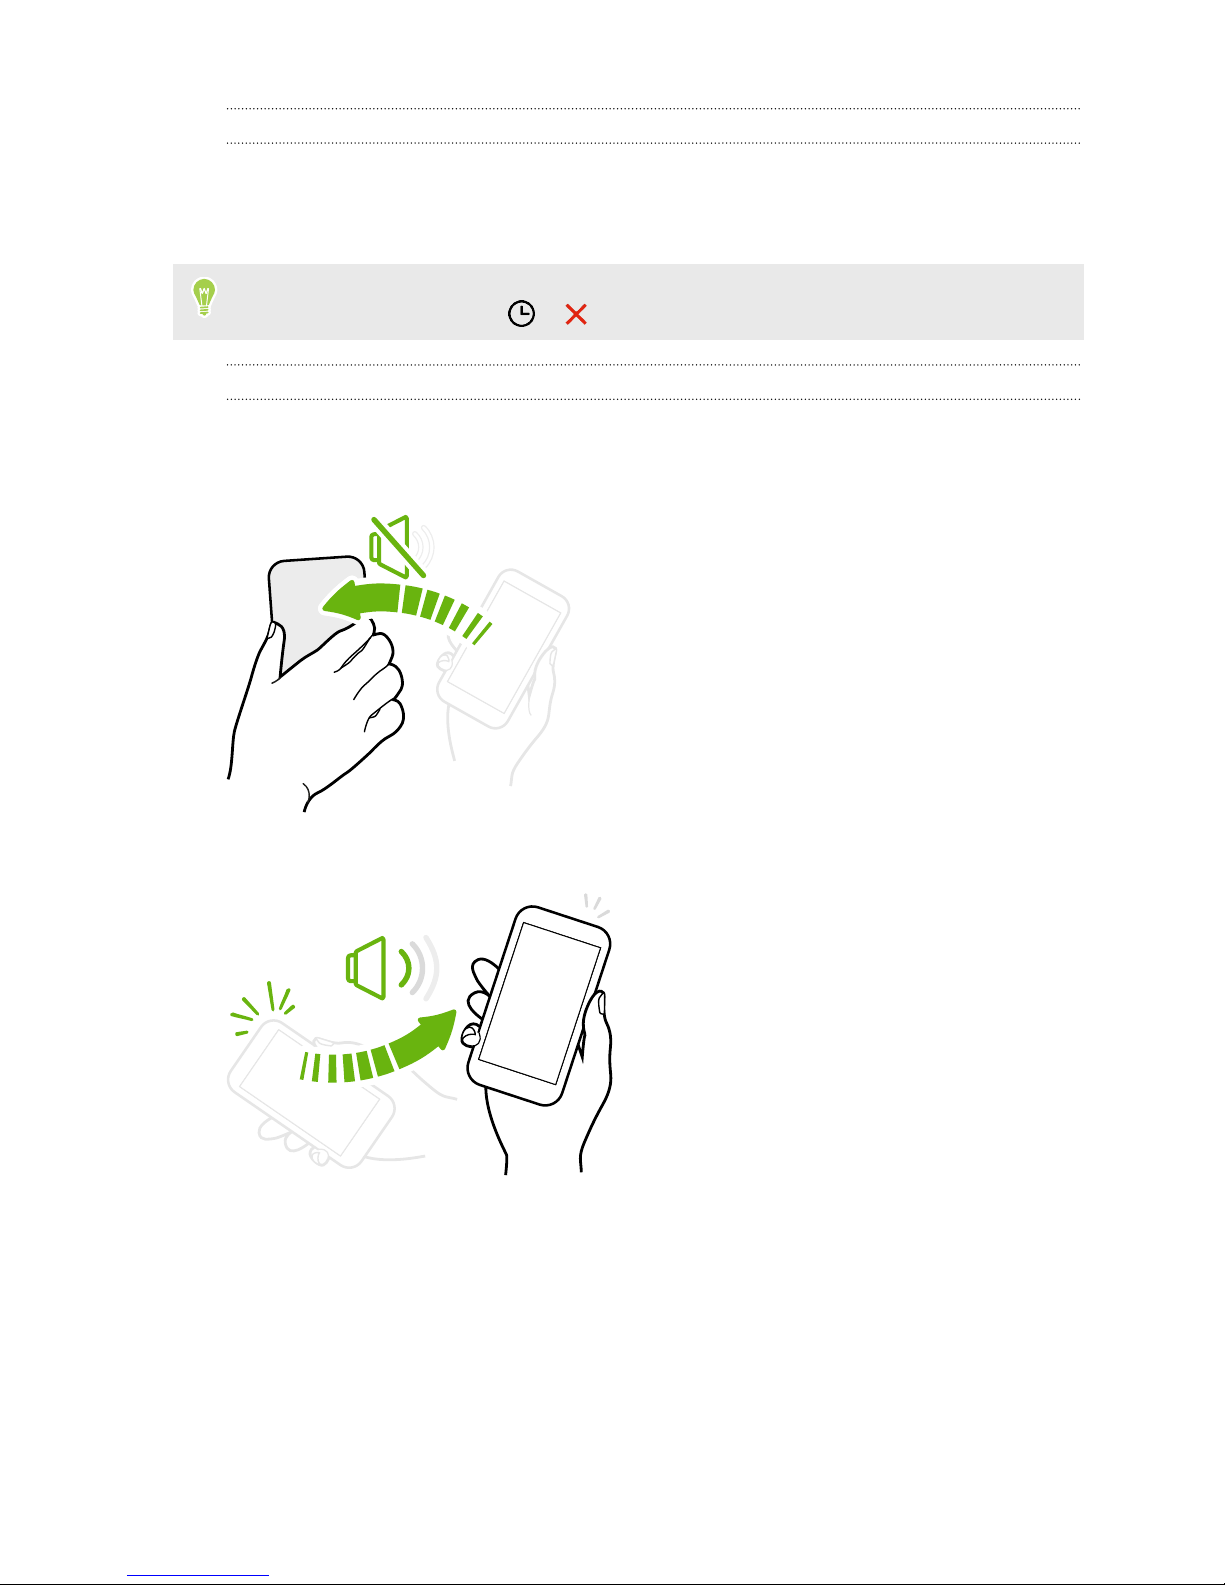
Motion gestures
Use motion gestures to mute HTC Desire 820, lower the ring volume, and more.
Flip to mute
If your phone is facing up when a call comes in, turn
the phone over to mute it.
Pick up to lower volume
In a business meeting or restaurant, pick
HTC Desire 820 up when a call comes in to
lower the ring volume automatically.
You can turn this feature on or off. Go to
Settings, tap Sound & notification, and then
select or clear Quiet ring on pickup.
30 Your first week with your new phone
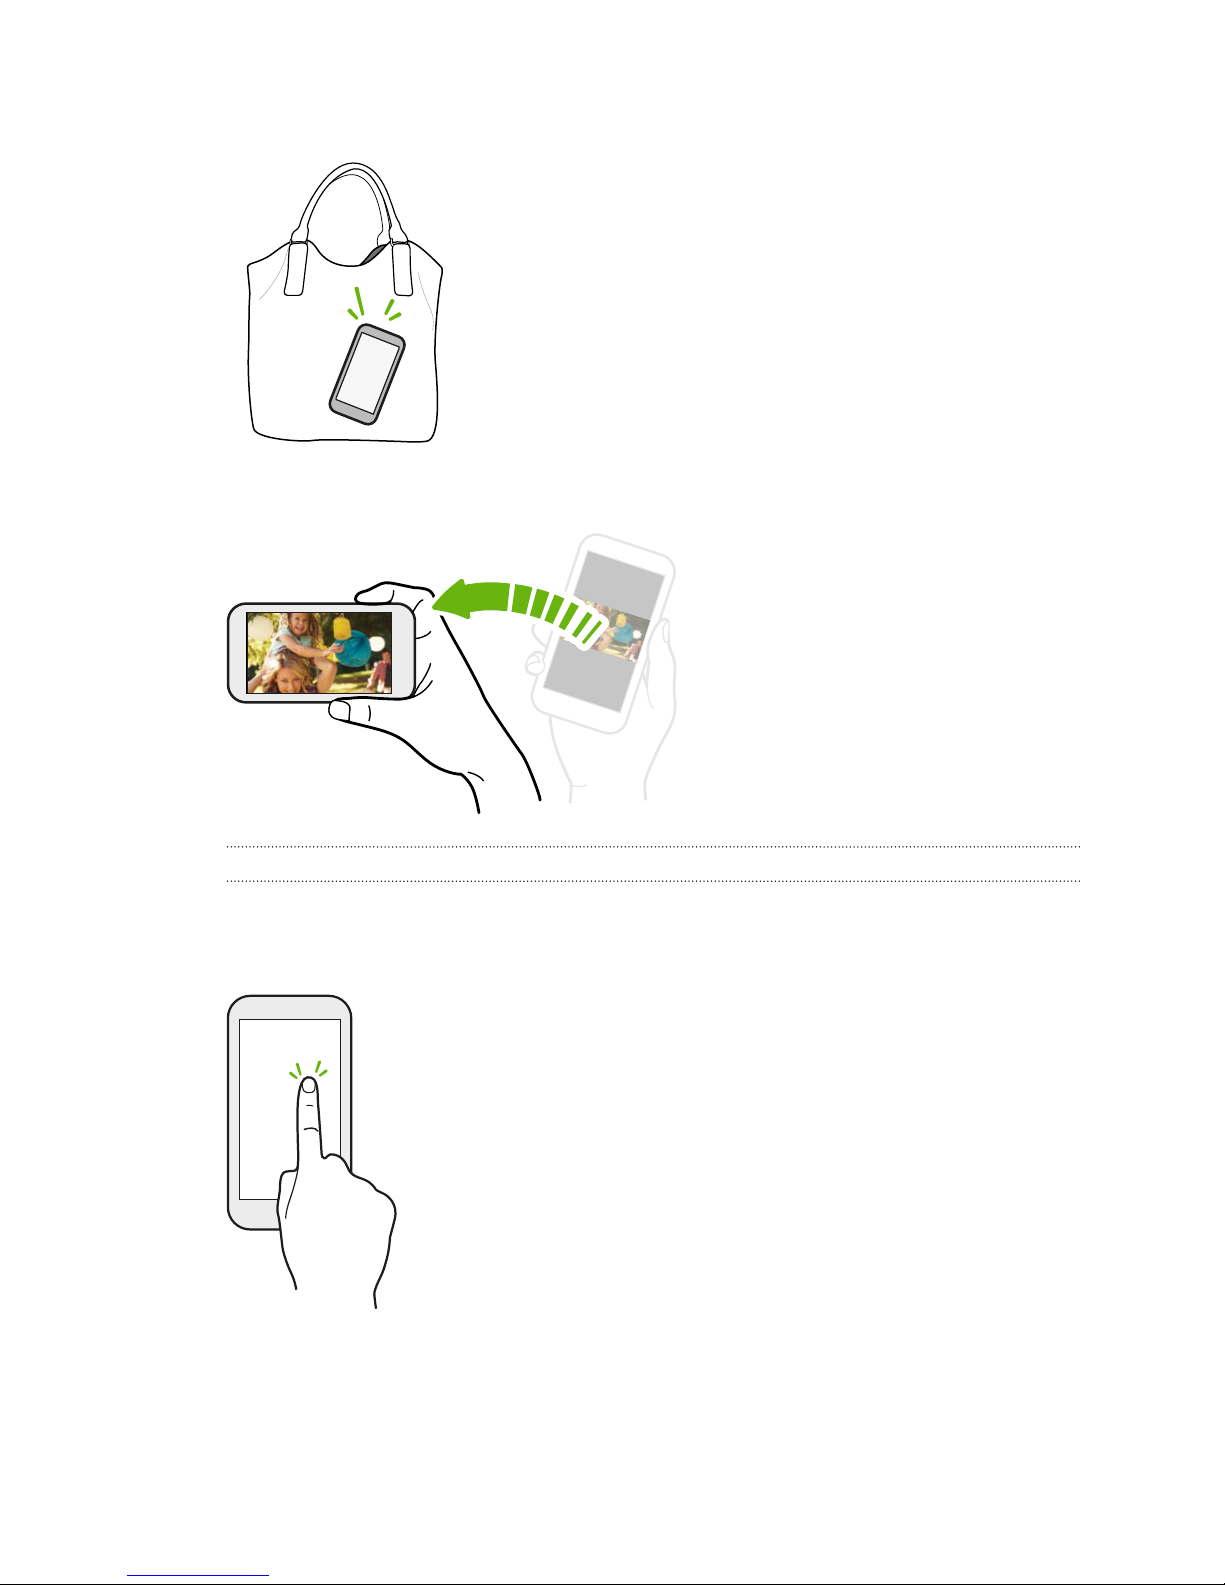
Increase ring volume automatically while phone is in your pocket or bag
Pocket mode makes HTC Desire 820 recognize when your phone
is in your bag or pocket and raise the ring volume so that you can
hear it in noisy environments.
You can turn this feature on or off. Go to Settings, tap Sound &
notification, and then select or clear Pocket mode.
Rotate HTC Desire 820 for a better view
For many screens, you can automatically
change the screen orientation from
portrait to landscape by turning
HTC Desire 820 sideways.
When entering text, you can turn
HTC Desire 820 sideways to bring up a
bigger keyboard.
Touch gestures
Use touch gestures to get around the Home screen, open apps, scroll through lists, and more.
Tap
Tap the screen with your finger when you want to select onscreen items
such as application and settings icons, or press onscreen buttons.
 Loading...