

Page 1

Smart
Quick Start Guide
Page 2

2
Contents
1. What’s in the Box? ...................................................................................................3
2. Your Phone at a Glance ...........................................................................................4
3. Setting up your Phone ............................................................................................9
4. Setting up an E-mail Account ...............................................................................12
5. Personalizing your Phone .....................................................................................13
6. Browsing the Web ..................................................................................................15
7. Using the Camera ..................................................................................................16
8. Using Pictures & Videos ........................................................................................17
9. Protecting your Phone ..........................................................................................
18
10. Knowing Status Indicators ....................................................................................
20
11. Learn More .............................................................................................................
21
12. Warranty .................................................................................................................22
Page 3
3
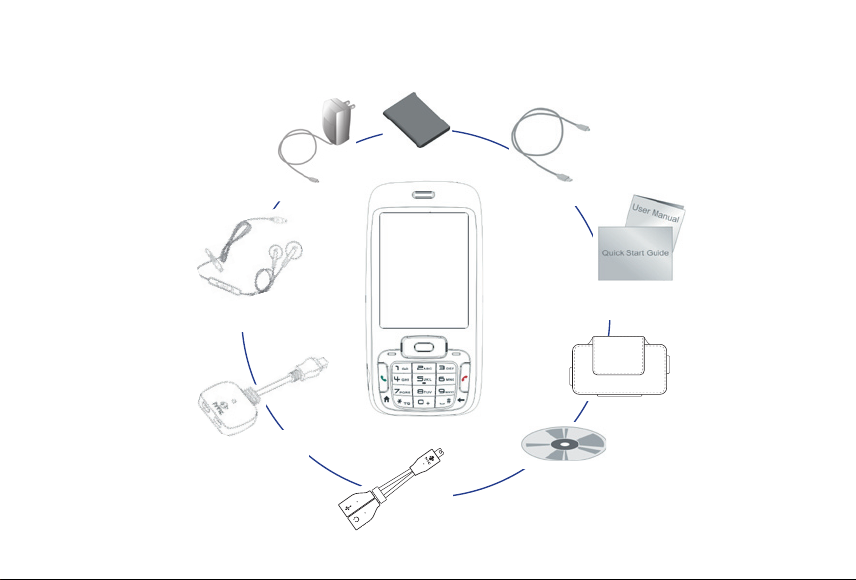
1. What’s in the Box?
Getting
Started Disc
Smartphone
User Manual and
Quick Start Guide
Pouch
Battery
Mini-USB
Stereo Headset
USB Sync Cable
Splitter
Adapter
Y-Splitter
Cable
AC Adapter
Page 4
4
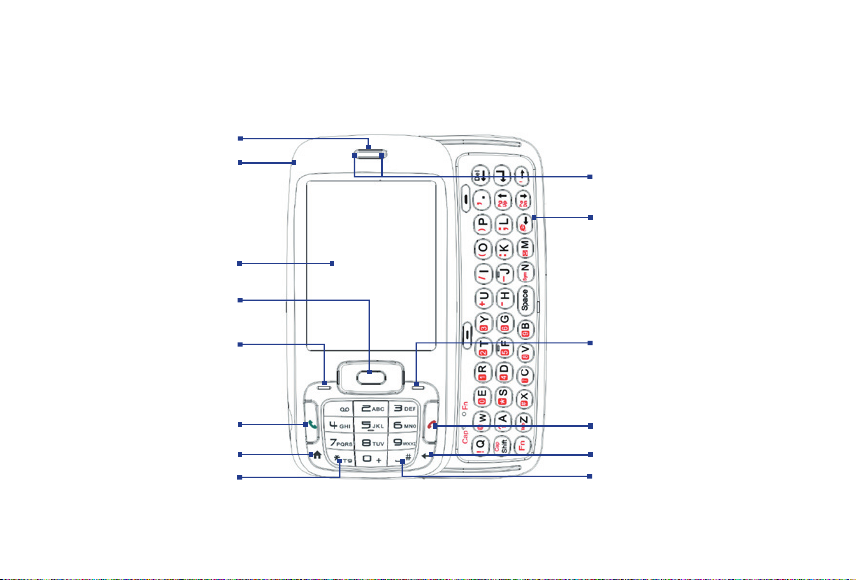
2. Your Phone at a Glance
1
2
3
4
5
6
7
8
14
13
12
11
10
9
Page 5

5
Item Function
1. Speaker Listen to phone call.
2.
Light Sensor
Sense dark conditions and activate a backlight under the keypad and the QWERTY keyboard
automatically, glowing in dark.
3.
Display Screen
4.
NAVIGATION
CONTROL/ENTER
Use to scroll left, right, up, or down. Press the center to use as the ENTER button..
5. Left SOFT KEY Press to perform the command shown in the label above the button.
6. TALK
Press to dial a phone number or answer a call. Press and hold to activate/deactivate speakerphone
mode
.
7. HOME Press to go to the Home screen or press and hold to lock the phone keypad and the keyboard.
8. Key
Press to change input modes or press and hold to choose an input mode or symbols from the list.
9. Key
Press to add a space or press and hold to display a list of symbols.
10. BACK Press to go back to the previous screen, or backspace over characters.
11. END Press to end a call or exit a program. Press and hold to terminate an active data connection.
12.
Right
SOFT KEY Press to perform the command shown in the label above the button.
13. Keyboard Slide out to reveal, while slide in to hide the QWERTY keyboard with 36 keys and two soft keys.
14. LED Indicators
The LED indicators notify you of the battery, network, and connectivity status of your phone. For
more information, see the table at the end of this section.
Page 6
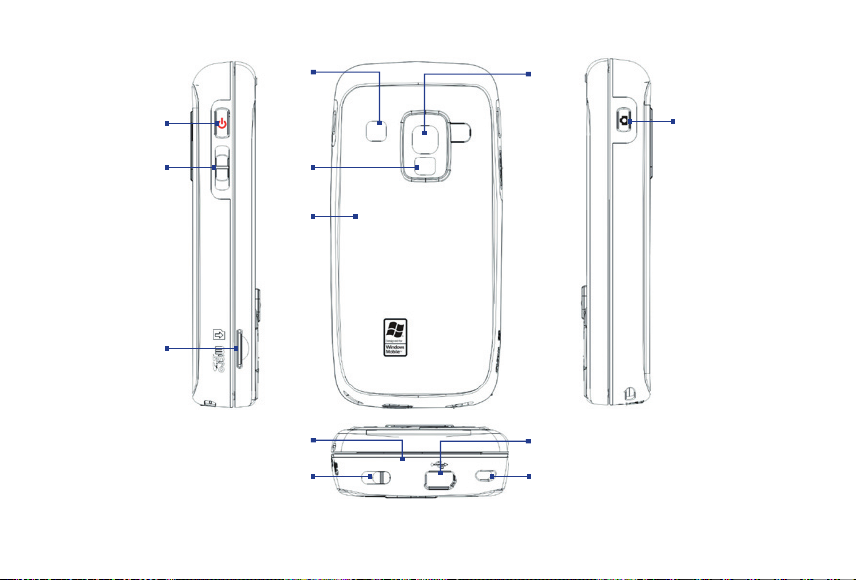
6
15
16
17
18
19
20
23
24
25
26
22
21
Page 7

7
Item Function
15. POWER
Press to turn on (more than 1 second) and off the phone. Or press and quickly release the
POWER button to display the Quick List, which allows you to change profiles, open Comm
Manager, and enable/disable phone lock.
16. Volume Adjustment
Slider
Slide this up or down to increase or decrease the earpiece volume during a call. Drag and
hold the slider down to launch Voice Speed Dial.
17. microSD Slot Insert a microSD memory card for storing data.
18. Speaker Listen to audio media or phone call when using speakerphone mode.
19. Self-Portrait Mirror
Turn the back side of your phone to face yourself so that your image reflects on the mirror
when taking self-portrait shots.
20. Back Cover Remove to insert or replace battery.
21. Camera lens
22. CAMERA
Press and hold to open the Camera program. If already running, press to capture an image or
start recording a video clip.
23. Microphone Speak into the microphone when receiving or making a phone call or during voice recording.
24. Battery Cover Latch Slide this latch to release the battery cover.
25. Strap Holder Attach a strap for carrying your device.
26.
Sync Connector/
Earphone Jack
Use for synchronizing data, recharging the battery, connecting the earphone to listen to
audio media, or connecting the phone’s hands-free kit.
Page 8
8
LED indicator lights
Various colors that might display in the two LED Indicators are summarized here.
Left LED Status
Solid green Battery is fully charged.
Blank Battery case is empty or the phone is off.
Solid amber Battery is charging or the phone is using ActiveSync to synchronize with a PC.
Solid red Battery is not installed or battery is over-discharged.
Flashing green Connected to the network.
Flashing red Battery very low (less than 10%).
Flashing amber
Battery temperature is hotter or colder than the functional limits of 0 to 48 degrees Celsius
(32 to 118 degrees Fahrenheit), and has stopped charging.
Amber/Green LED off
Battery fault. The “Battery Fault” indicator (
) is displayed. In this case, the flashing green
LED can be recovered by unplugging the AC adapter.
Right LED Status
Flashing blue Bluetooth mode set to on or visible mode.
Page 9

9
3. Setting up your Phone
With the following simple steps, you can easily set up and start using your phone.
1
Install and charge the battery
New batteries are shipped partially charged. Before you start using your phone, it is recommended that
you install and charge the battery.
To install the battery
1. Slide the battery cover latch to release the back cover.
2. Insert the battery by aligning the exposed copper
part of the battery pack with the protruding copper
conductor.
3. Gently push the battery into place.
4. Replace the back cover.
To charge the battery
Some batteries perform best after several full charge/discharge cycles. You can charge the battery in
one of the following ways:
• Connect your phone directly to an electrical outlet using the AC adapter.
• Connect your phone to the USB port on your PC using the USB sync cable.
Charging is indicated by a solid amber light on the LED indicator. A charging icon (
) also appears on
the display screen. After the battery has been fully charged, the LED indicator becomes green.
Slide the battery cover latch
to open the back cover.
Page 10

10
2
Install the microSD card
You can install a microSD (Secure Digital) card on your phone to have an alternative storage place for
your images, video, music, and other phone data.
• Slide in the microSD card into the slot with its gold
contacts facing up and gently push until it clicks
securely in place.
To remove, press the microSD card briefly inward and
release it to pop out of the slot.
3
Turn on your phone
Press and hold the POWER button to turn on the phone.
4
Install and set up ActiveSync or Windows Mobile Device Center
To synchronize your phone with a PC running Windows XP or earlier version of Windows, ActiveSync
is the choice. ActiveSync synchronizes information between your phone and your PC, keeping
information up-to-date on your phone as well as on the PC. Before you connect your phone to your
PC, you must install ActiveSync on the PC. ActiveSync is already installed on your phone.
1. Insert the Getting Started Disc into the CD drive of your PC.
2. Follow the instructions on the installation wizard screen to install ActiveSync.
3. Connect the USB cable to the phone and plug it into the USB port of your PC.
4.
Turn on your phone. When the PC detects a USB connection, it starts the Synchronization Setup
Wizard. Follow the instructions on the screen and select the items you want to synchronize.
Page 11

11
Microsoft Windows Mobile® Device Center is the replacement for Microsoft® ActiveSync® on Windows Vista™
.
1. Insert the Getting Started Disc into the CD drive of your PC.
2. Follow the instructions on the installation wizard screen to install Windows Mobile Device Center.
3. Connect the phone to your PC and turn on your phone.
4. When the PC detects a USB connection, the Windows Mobile Device Center screen opens. Click
Set up your device and then select the information you want to synchronize.
5.
Type in a name for your Smartphone and click Set Up.
Note To synchronize your phone directly with a server running Microsoft Exchange, please refer to Chapter 7 of the
User Manual or contact your company network administrator.
5
Make your first phone call
Before you place a phone call, make sure you
have an active phone connection from the
nearest operator and your phone battery is
sufficiently charged.
• To make a call, enter the phone number
and press TALK
( )
.
• To end a call, press END
( )
.
Page 12

12
4. Setting up an E-mail Account
You can easily set up an e-mail account that you have with an Internet service provider (ISP), a webbased email or an account that you access using a VPN server connection (typically a work account) on
your phone.
To set up an e-mail account
1. On the Home screen, click Start > Messaging > New E-mail Account.
2. In E-mail address, enter the e-mail address for this account.
3. Select Try to get e-mail settings automatically from the Internet and click Next.
4. If Auto Setup is successful, click Next to move on to the next screen.
5. In Your name, enter your display name for e-mail messages while in Account display name, enter
a name for the account that should appear on the Messaging screen. Then, click Next.
6. The User name field automatically gets populated. Select Save password and click Next.
If Auto Setup is unsuccessful, contact your ISP or network administrator for the settings.
Note The domain name is not required for an account with an ISP but may be required for a work account.
7. Once setup is complete, click Finish to download e-mails.
Note You can view e-mail download settings by clicking Review downand settings. To configure e-mail
download settings, click the Automatic Send/Receive box.
Page 13

13
To send an e-mail or SMS message
1. On the Home screen, click Start > Messaging.
2. Select an e-mail account, or select Text Messages. Then, click Select.
3. Click New or Menu > New.
4. Enter the e-mail address or phone number of one or more recipients, separating them with a
semicolon (;). To access addresses and phone numbers from Contacts, in To, press ENTER and
select a recipient from the list.
5. Enter a message and click Send.
5. Personalizing your Phone
Set up the Home screen
The Home screen is your starting place for most tasks. You can gain access to all features and programs
from the Home screen.
The top of the Home screen displays icons for the programs that you have most recently used. The
center of the Home screen can display your next appointment, the number of new messages (voice
mail, text, e-mail, or MMS) that you have received, and other important information. When you click an
icon or item on the Home Screen, the associated program opens.
To customize the Home screen
1. On the Home screen, click Start > Settings > Home Screen.
2. In Home screen layout, Color scheme, Background image, and Time out, select the options
you want, and click
Done.
Page 14

14
To set a picture as the background
1. On the Home screen, click Start > Pictures & Videos.
2. Select the picture you want to set as the background. Click View or press ENTER for a larger view
of the image.
3. Click Menu > Use as Home Screen.
4. Use NAVIGATION to select the portion of the picture you want to use, and click Next. If the picture
fits the screen, this step is skipped.
5. In Adjust the transparency, select a higher percentage for a more transparent picture or a lower
percentage for a more opaque picture.
6. Click Finish.
Set date, time, language, and other regional options
Your phone should already be set up with the regional settings that are appropriate for your locale.
To change regional settings
You can specify the language, locale, date and time style, as well as number and currency formatting options
.
1. On the Home screen, click Start > Settings > Regional Settings.
2. In Language, select your preferred language.
3. In Locale, select the locale for the language you selected, and click Done. The Locale option
automatically changes the format of the remaining options (such as date, time, and currency)
according to the locale you specify.
Note
You must turn your phone off and on again for the changes to take effect.
Page 15

15
To set the date and time
1. On the Home screen, click Start > Settings > Clock & Alarm > Date and Time.
2. In Time zone, select your time zone.
3. In Date, edit the month, day, or year.
4. In Time, edit the hour, minute, and second.
5. Click Done.
6. Browsing the Web
Your phone comes with Internet Explorer Mobile
installed. Internet Explorer Mobile is a fullfeatured Internet browser, optimized for use on
your phone.
You can use ActiveSync to synchronize the
Internet Explorer favorites on your PC with
your phone so you can use them with Internet
Explorer Mobile as well. For more information,
see ActiveSync Help on your PC.
To open Internet Explorer
• On the Home screen, click Start > Internet Explorer.
Page 16

16
7. Using the Camera
Taking photos and shooting video clips with audio
is easy with your phone’s built-in camera. To open
Camera or Video Recorder, do any of the following:
• On the Home screen, click Start > Camera or
Video Recorder
.
• Press and hold the CAMERA button.
To exit Camera or Video Recorder, press END
( )
.
Note Pressing
( )
simply "minimizes" the Camera
program, it is still runing in the background. To
close the Camera program, go to Task Manager.
To capture a still image
• Press the CAMERA button.
• Press ENTER.
To record a video clip
• Press the CAMERA button. To stop recording, press the CAMERA button again.
• Press ENTER to start recording a video clip. To stop recording, press ENTER again.
Page 17

17
8. Using Pictures & Videos
The Pictures & Videos program allows you to view pictures and play GIF animation files and video clips
on your phone. You can also view the pictures as a slide show, beam them, send them via a messaging
program, edit them, or set them as the background on the Home screen.
To use the Pictures & Videos program
• Click Start > Pictures & Videos.
• After capturing an image, click the View icon
( ) on the Review screen to switch to
Pictures & Videos.
To view pictures
1. On the Home screen, click Start > Pictures &
Videos
.
2. Select a picture and click View.
Note If you cannot find a picture in the default My Pictures folder, click Menu > Folders > My Device to go to
other folders.
To play GIF animation files
1. On the Home screen, click Start > Pictures & Videos.
2. Select the GIF animation file and click View.
Page 18

18
To play videos
1. On the Home screen, click Start > Pictures & Videos. Video files appear as thumbnails with a
icon.
2. Select a video and click Play to play it with the built-in Windows Media Player.
9. Protecting your Phone
You can protect your phone from unauthorized use by requiring a type of password called a simple PIN
(personal identification number) or a strong alphanumeric password.
To lock the keypad and keyboard
Locking the keypad and keyboard turns off their functionality. This is a helpful feature if, for example, the
phone is turned on and in your pocket, and you want to prevent accidental keypresses.
• On the Home screen, press and hold
( )
.
Once the keypad and keyboard are locked, the left soft key label changes to Unlock.
Tip To quickly lock the keypad and keyboard, press POWER briefly, and select Key lock from the Quick List.
Note You can still receive calls and make emergency calls when the keypad and keyboard are locked.
To unlock the keypad and keyboard
• On the Home screen, click Unlock and press the *T9 key.
Page 19

19
To enable the phone lock
1. On the Home screen, click Start > Settings > Security > Device lock.
2. Select Prompt if device unused for then select the amount of time for the phone to be inactive
before automatically locking.
3. Select the Password type then enter and confirm your password.
4. Click Done.
Note Once you configure the phone lock settings, you can enable the phone lock from the Quick List directly
without configuring the settings again.
To disable the phone lock
• Click Unlock then enter the password you have set to unlock your phone.
To encrypt files on the microSD card
• Click Start > Settings > Security > Encryption and select Encrypt files placed on storage cards.
Page 20

20
10. Knowing Status Indicators
The Home screen displays important information, such as upcoming appointments, status indicators.
The following table lists some of the common status indicators with their description.
Icon Description Icon Description
New SMS message No battery or battery fault
New e-mail message Signal strength
Roaming Radio connected or no signal
New MSN Messenger message Radio off
Incoming voice call
1xRTT available (1xRTT, 1 times Radio Transmission
Technology, is the third-generation data service)
Voice call in progress
EVDO available (EVDO, Evolution Data Optimized, is a
high speed data service for wireless broadband and
quick Internet access)
Data call in progress Lowercase text input
Missed call Uppercase text input, caps lock
Battery level Uppercase text input
Low battery
Numeric or symbol (labeled in blue color on keyboard)
input, locked
Very low battery
Numeric or symbol input (labeled in blue color on
keyboard)
Battery charging XT9 text input mode, lowercase
Page 21

21
Icon Description Icon Description
XT9 text input mode, uppercase
Voice privacy currently unavailable
XT9 text input mode, caps lock Voice privacy available and turned on
Ringer off Location settings off
Speakerphone on Location settings on
Vibrate call alert Bluetooth On or Visible mode
Microphone muted
Bluetooth headset connected
Sync error
11. Learn More
For more instructions, refer to the User Manual or contact your nearest wireless service provider for
assistance.
Page 22

22
12. Warranty
12 MONTH LIMITED WARRANTY
UTStarcom Personal Communications (the Company) warrants to the original retail purchaser of this
UTStarcom handheld portable cellular telephone, that should this product or any part thereof during
normal consumer usage and conditions, be proven defective in material or workmanship that results in
product failure within the first twelve (12) month period from the date of purchase, such defect(s) will
be repaired or replaced (with new or rebuilt parts) at the Company’s option, without charge for parts or
labor directly related to the defect(s).
The antenna, keypad, display, rechargeable battery and battery charger, if included, are similarly
warranted for twelve (12) months from date of purchase.
This Warranty extends only to consumers who purchase the product in the United States or Canada and
it is not transferable or assignable.
This Warranty does not apply to:
(a) Product subjected to abnormal use or conditions, accident, mishandling, neglect, unauthorized
alteration, misuse, improper installation or repair or improper storage;
(b) Product whose mechanical serial number or electronic serial number has been removed, altered
or defaced.
(c) Damage from exposure to moisture, humidity, excessive temperatures or extreme environmental
conditions;
(d) Damage resulting from connection to, or use of any accessory or other product not approved or
authorized by the Company;
Page 23

23
(e) Defects in appearance, cosmetic, decorative or structural items such as framing and non-operative
parts;
(f) Product damaged from external causes such as fi re, fl ooding, dirt, sand, weather conditions,
battery leakage, blown fuse, theft or improper usage of any electrical source.
The Company disclaims liability for removal or reinstallation of the product, for geographic coverage,
for inadequate signal reception by the antenna or for communications range or operation of the cellular
system as a whole.
When sending your wireless device to UTStarcom Personal Communications for repair or service, please
note that any personal data or software stored on the device may be inadvertently erased or altered.
Therefore, we strongly recommend you make a back up copy of all data and software contained on
your device before submitting it for repair or service. This includes all contact lists, downloads (i.e.
third-party software applications, ringtones, games and graphics) and any other data added to your
device. In addition, if your wireless device utilizes a SIM or Multimedia card, please remove the card
before submitting the device and store for later use when your device is returned, UTStarcom Personal
Communications is not responsible for and does not guarantee restoration of any third-party software,
personal information or memory data contained in, stored on, or integrated with any wireless device,
whether under warranty or not, returned to UTStarcom Personal Communications for repair or service.
To obtain repairs or replacement within the terms of this Warranty, the product should be delivered
with proof of Warranty coverage (e.g. dated bill of sale), the consumer’s return address, daytime phone
number and/or fax number and complete description of the problem, transportation prepaid, to the
Company at the address shown below or to the place of purchase for repair or replacement processing.
In addition, for reference to an authorized Warranty station in your area, you may telephone in the
United States (800) 229-1235, and in Canada (800) 465-9672 (in Ontario call 416-695-3060).
Page 24

24
THE EXTENT OF THE COMPANY’S LIABILITY UNDER THIS WARRANTY IS LIMITED TO THE REPAIR OR
REPLACEMENT PROVIDED ABOVE AND, IN NO EVENT, SHALL THE COMPANY’S LAIBILITY EXCEED THE
PURCHASE PRICE PAID BY PURCHASER FOR THE PRODUCT.
ANY IMPLIED WARRANTIES, INCLUDING ANY IMPLIED WARRANTY OF MERCHANTABILITY OR FITNESS
FOR A PARTICULAR PURPOSE, SHALL BE LIMITED TO THE DURATION OF THIS WRITTEN WARRANTY.
ANY ACTION FOR BREACH OF ANY WARRANTY MUST BE BROUGHT WITHIN A PERIOD OF 18 MONTHS
FROM DATE OF ORIGINAL PURCHASE. IN NO CASE SHALL THE COMPANY BE LIABLE FOR AN SPECIAL
CONSEQUENTIAL OR INCIDENTAL DAMAGES FOR BREACH OF THIS OR ANY OTHER WARRANTY, EXPRESS
OR IMPLIED, WHATSOEVER. THE COMPANY SHALL NOT BE LIABLE FOR THE DELAY IN RENDERING
SERVICE UNDER THIS WARRANTY OR LOSS OF USE DURING THE TIME THE PRODUCT IS BEING REPAIRED
OR REPLACED.
No person or representative is authorized to assume for the Company any liability other than expressed
herein in connection with the sale of this product.
Some states or provinces do not allow limitations on how long an implied warranty lasts or the
exclusion or limitation of incidental or consequential damage so the above limitation or exclusions
may not apply to you. This Warranty gives you specifi c legal rights, and you may also have other rights,
which vary from state to state or province to province.
IN USA:
UTStarcom Personal Communications
555 Wireless Blvd.
Hauppauge, NY 11788
(800) 229-1235.
IN CANADA
:
UTStarcom Canada Company
5535 Eglinton Avenue West, Suite# 234
Toronto, ON M9C 5K5
(800) 465-9672
 Loading...