

Page 1

HP xp7010/xp7030 Series
Digital Projector
User’s Guide
Page 2

© Copyright 2005 Hewlett-Packard Development Company, L.P.
The information contained herein is subject to change without notice.
The only warranties for HP products and services are set forth in the express warranty statements accompanying such products and services.
Nothing herein should be construed as constituting an additional warranty. HP shall not be liable for technical or editorial errors or omissions
contained herein.
Hewlett-Packard Company
Display Technologies and Products
1000 NE Circle Blvd.
Corvallis, OR 97330
First Edition, November 2005
Page 3

Contents
1 Setting Up
Safety precautions . . . . . . . . . . . . . . . . . . . . . . . . . . . . . . . . . . . . . . . . . . . . . . . . . . . . . . 6
What’s in the box? . . . . . . . . . . . . . . . . . . . . . . . . . . . . . . . . . . . . . . . . . . . . . . . . . . . . . . 7
Identifying common features. . . . . . . . . . . . . . . . . . . . . . . . . . . . . . . . . . . . . . . . . . . . . . . . 8
Projector at a glance . . . . . . . . . . . . . . . . . . . . . . . . . . . . . . . . . . . . . . . . . . . . . . . . . . 8
Projector buttons and lights . . . . . . . . . . . . . . . . . . . . . . . . . . . . . . . . . . . . . . . . . . . . . . 9
Back panel . . . . . . . . . . . . . . . . . . . . . . . . . . . . . . . . . . . . . . . . . . . . . . . . . . . . . . . . 10
Remote control . . . . . . . . . . . . . . . . . . . . . . . . . . . . . . . . . . . . . . . . . . . . . . . . . . . . . 11
Accessories. . . . . . . . . . . . . . . . . . . . . . . . . . . . . . . . . . . . . . . . . . . . . . . . . . . . . . . . 12
Setting up the projector . . . . . . . . . . . . . . . . . . . . . . . . . . . . . . . . . . . . . . . . . . . . . . . . . . 13
Positioning the projector . . . . . . . . . . . . . . . . . . . . . . . . . . . . . . . . . . . . . . . . . . . . . . . 13
Connecting power . . . . . . . . . . . . . . . . . . . . . . . . . . . . . . . . . . . . . . . . . . . . . . . . . . . 15
Connecting a computer . . . . . . . . . . . . . . . . . . . . . . . . . . . . . . . . . . . . . . . . . . . . . . . 16
Connecting a handheld organizer . . . . . . . . . . . . . . . . . . . . . . . . . . . . . . . . . . . . . . . . 17
Connecting a video source . . . . . . . . . . . . . . . . . . . . . . . . . . . . . . . . . . . . . . . . . . . . . 18
Turning the projector on and off . . . . . . . . . . . . . . . . . . . . . . . . . . . . . . . . . . . . . . . . . . . . 23
Turning the projector on . . . . . . . . . . . . . . . . . . . . . . . . . . . . . . . . . . . . . . . . . . . . . . . 23
Turning the projector off . . . . . . . . . . . . . . . . . . . . . . . . . . . . . . . . . . . . . . . . . . . . . . . 24
Moving the projector . . . . . . . . . . . . . . . . . . . . . . . . . . . . . . . . . . . . . . . . . . . . . . . . . 24
Making basic adjustments . . . . . . . . . . . . . . . . . . . . . . . . . . . . . . . . . . . . . . . . . . . . . . . . 25
Aiming the projector . . . . . . . . . . . . . . . . . . . . . . . . . . . . . . . . . . . . . . . . . . . . . . . . . 25
Adjusting the focus and zoom . . . . . . . . . . . . . . . . . . . . . . . . . . . . . . . . . . . . . . . . . . . 25
Using the remote control . . . . . . . . . . . . . . . . . . . . . . . . . . . . . . . . . . . . . . . . . . . . . . . . . 26
2 Showing Presentations
Showing a computer screen . . . . . . . . . . . . . . . . . . . . . . . . . . . . . . . . . . . . . . . . . . . . . . . 28
Selecting a different source . . . . . . . . . . . . . . . . . . . . . . . . . . . . . . . . . . . . . . . . . . . . . . . 28
Hiding or showing the picture . . . . . . . . . . . . . . . . . . . . . . . . . . . . . . . . . . . . . . . . . . . . . 28
3
Page 4

3 Adjusting the Projector
Adjusting the picture and sound . . . . . . . . . . . . . . . . . . . . . . . . . . . . . . . . . . . . . . . . . . . . . 29
Choosing the best picture mode . . . . . . . . . . . . . . . . . . . . . . . . . . . . . . . . . . . . . . . . . . 29
Adjusting the shape of the picture . . . . . . . . . . . . . . . . . . . . . . . . . . . . . . . . . . . . . . . . . 30
Adjusting a slanted picture . . . . . . . . . . . . . . . . . . . . . . . . . . . . . . . . . . . . . . . . . . . . . . 31
Adjusting the picture for best color. . . . . . . . . . . . . . . . . . . . . . . . . . . . . . . . . . . . . . . . . 32
Adjusting other picture settings . . . . . . . . . . . . . . . . . . . . . . . . . . . . . . . . . . . . . . . . . . . 32
Adjusting the sound settings (certain models only) . . . . . . . . . . . . . . . . . . . . . . . . . . . . . . 33
Adjusting the projector setup. . . . . . . . . . . . . . . . . . . . . . . . . . . . . . . . . . . . . . . . . . . . . 33
Preventing unauthorized use . . . . . . . . . . . . . . . . . . . . . . . . . . . . . . . . . . . . . . . . . . . . . 33
Using the on-screen menu . . . . . . . . . . . . . . . . . . . . . . . . . . . . . . . . . . . . . . . . . . . . . . . . . 34
Changing settings using the on-screen menu . . . . . . . . . . . . . . . . . . . . . . . . . . . . . . . . . . 34
Changing the default settings . . . . . . . . . . . . . . . . . . . . . . . . . . . . . . . . . . . . . . . . . . . . 34
Setup menu. . . . . . . . . . . . . . . . . . . . . . . . . . . . . . . . . . . . . . . . . . . . . . . . . . . . . . . . . 35
Picture menu . . . . . . . . . . . . . . . . . . . . . . . . . . . . . . . . . . . . . . . . . . . . . . . . . . . . . . . . 36
Source menu. . . . . . . . . . . . . . . . . . . . . . . . . . . . . . . . . . . . . . . . . . . . . . . . . . . . . . . . 38
Help menu . . . . . . . . . . . . . . . . . . . . . . . . . . . . . . . . . . . . . . . . . . . . . . . . . . . . . . . . . 38
4 Maintaining the Projector
Performing routine maintenance . . . . . . . . . . . . . . . . . . . . . . . . . . . . . . . . . . . . . . . . . . . . . 39
Getting the projector status . . . . . . . . . . . . . . . . . . . . . . . . . . . . . . . . . . . . . . . . . . . . . . 39
Cleaning the projector lens . . . . . . . . . . . . . . . . . . . . . . . . . . . . . . . . . . . . . . . . . . . . . . 39
Replacing the lamp module. . . . . . . . . . . . . . . . . . . . . . . . . . . . . . . . . . . . . . . . . . . . . . 40
Replacing the battery in the remote control . . . . . . . . . . . . . . . . . . . . . . . . . . . . . . . . . . . 42
Upgrading the projector . . . . . . . . . . . . . . . . . . . . . . . . . . . . . . . . . . . . . . . . . . . . . . . . . . 43
Updating the firmware . . . . . . . . . . . . . . . . . . . . . . . . . . . . . . . . . . . . . . . . . . . . . . . . . 43
5 Installing Permanently
Installing the projector. . . . . . . . . . . . . . . . . . . . . . . . . . . . . . . . . . . . . . . . . . . . . . . . . . . . 44
Choosing cables . . . . . . . . . . . . . . . . . . . . . . . . . . . . . . . . . . . . . . . . . . . . . . . . . . . . . 44
Installing on a table . . . . . . . . . . . . . . . . . . . . . . . . . . . . . . . . . . . . . . . . . . . . . . . . . . . 44
Installing on the ceiling. . . . . . . . . . . . . . . . . . . . . . . . . . . . . . . . . . . . . . . . . . . . . . . . . 45
Installing for rear projection . . . . . . . . . . . . . . . . . . . . . . . . . . . . . . . . . . . . . . . . . . . . . 45
Locking the projector . . . . . . . . . . . . . . . . . . . . . . . . . . . . . . . . . . . . . . . . . . . . . . . . . . 45
Controlling an external accessory . . . . . . . . . . . . . . . . . . . . . . . . . . . . . . . . . . . . . . . . . 46
Connecting to a room controller . . . . . . . . . . . . . . . . . . . . . . . . . . . . . . . . . . . . . . . . . . . . . 47
Serial connections . . . . . . . . . . . . . . . . . . . . . . . . . . . . . . . . . . . . . . . . . . . . . . . . . . . . 47
Examples of room controller commands . . . . . . . . . . . . . . . . . . . . . . . . . . . . . . . . . . . . . 48
Room controller commands . . . . . . . . . . . . . . . . . . . . . . . . . . . . . . . . . . . . . . . . . . . . . . 50
4
Page 5

6 Fixing Problems
Troubleshooting suggestions. . . . . . . . . . . . . . . . . . . . . . . . . . . . . . . . . . . . . . . . . . . . . . . 55
Warning light problems . . . . . . . . . . . . . . . . . . . . . . . . . . . . . . . . . . . . . . . . . . . . . . . 55
Start-up problems. . . . . . . . . . . . . . . . . . . . . . . . . . . . . . . . . . . . . . . . . . . . . . . . . . . . 56
Picture problems . . . . . . . . . . . . . . . . . . . . . . . . . . . . . . . . . . . . . . . . . . . . . . . . . . . . 56
Sound problems . . . . . . . . . . . . . . . . . . . . . . . . . . . . . . . . . . . . . . . . . . . . . . . . . . . . 59
Interruption problems . . . . . . . . . . . . . . . . . . . . . . . . . . . . . . . . . . . . . . . . . . . . . . . . . 59
Remote control problems. . . . . . . . . . . . . . . . . . . . . . . . . . . . . . . . . . . . . . . . . . . . . . . 60
Testing the projector . . . . . . . . . . . . . . . . . . . . . . . . . . . . . . . . . . . . . . . . . . . . . . . . . . . . 60
Running the projector diagnostics . . . . . . . . . . . . . . . . . . . . . . . . . . . . . . . . . . . . . . . . 60
7 Reference
Specifications. . . . . . . . . . . . . . . . . . . . . . . . . . . . . . . . . . . . . . . . . . . . . . . . . . . . . . . . . 61
Safety information. . . . . . . . . . . . . . . . . . . . . . . . . . . . . . . . . . . . . . . . . . . . . . . . . . . . . . 64
Mercury safety . . . . . . . . . . . . . . . . . . . . . . . . . . . . . . . . . . . . . . . . . . . . . . . . . . . . . 64
Regulatory information . . . . . . . . . . . . . . . . . . . . . . . . . . . . . . . . . . . . . . . . . . . . . . . . . . 64
U.S.A. . . . . . . . . . . . . . . . . . . . . . . . . . . . . . . . . . . . . . . . . . . . . . . . . . . . . . . . . . . . 64
Canada . . . . . . . . . . . . . . . . . . . . . . . . . . . . . . . . . . . . . . . . . . . . . . . . . . . . . . . . . . 65
Japan. . . . . . . . . . . . . . . . . . . . . . . . . . . . . . . . . . . . . . . . . . . . . . . . . . . . . . . . . . . . 65
Korea. . . . . . . . . . . . . . . . . . . . . . . . . . . . . . . . . . . . . . . . . . . . . . . . . . . . . . . . . . . . 65
International . . . . . . . . . . . . . . . . . . . . . . . . . . . . . . . . . . . . . . . . . . . . . . . . . . . . . . . 65
Recycling information . . . . . . . . . . . . . . . . . . . . . . . . . . . . . . . . . . . . . . . . . . . . . . . . . . . 67
5
Page 6

1Setting Up
Safety precautions
WARNING! Read and observe these precautions and all others in this manual to reduce the
risk of injury and equipment damage.
• Do not look directly into the lens when the lamp is on.
• Do not expose the projector to rain or moisture, and do not use it near water.
• Do not subject the projector to physical abuse or misuse such as exposure to smoke,
unusual stresses, or excessive or continuous (24/7) operation.
• Keep paper, plastic, and combustible material at least 0.5 m (2 ft) away from the
projector’s lens and exhaust vents.
• Do not allow liquid, food, or small objects to get inside the projector. If material gets inside
the projector, contact HP for assistance.
• Do not put anything on top of the projector. Do not place any liquids where they might spill
on the projector.
• Do not block any vents on the projector. Do not place the projector near any source of heat,
such as a radiator or amplifier.
• Use only an approved power cord rated for the voltage and current marked on the product
label. Do not overload any outlet or extension cord. Do not circumvent the grounding prong
on the power cord.
• Route all cables so they are not located where people can step on them or trip on them.
• Place the projector flat on its base on a sturdy surface or on an HP ceiling mount. Do not
stand the projector on its front surface.
• Do not touch the lens with your fingers. See “Cleaning the projector lens” on page 39. Use
a soft, dry cloth to clean the projector case.
• Do not open the projector except as instructed by this manual, and only after allowing the
projector to cool down.
• If the projector is damaged in any way, contact HP for assistance.
Setting Up6
Page 7
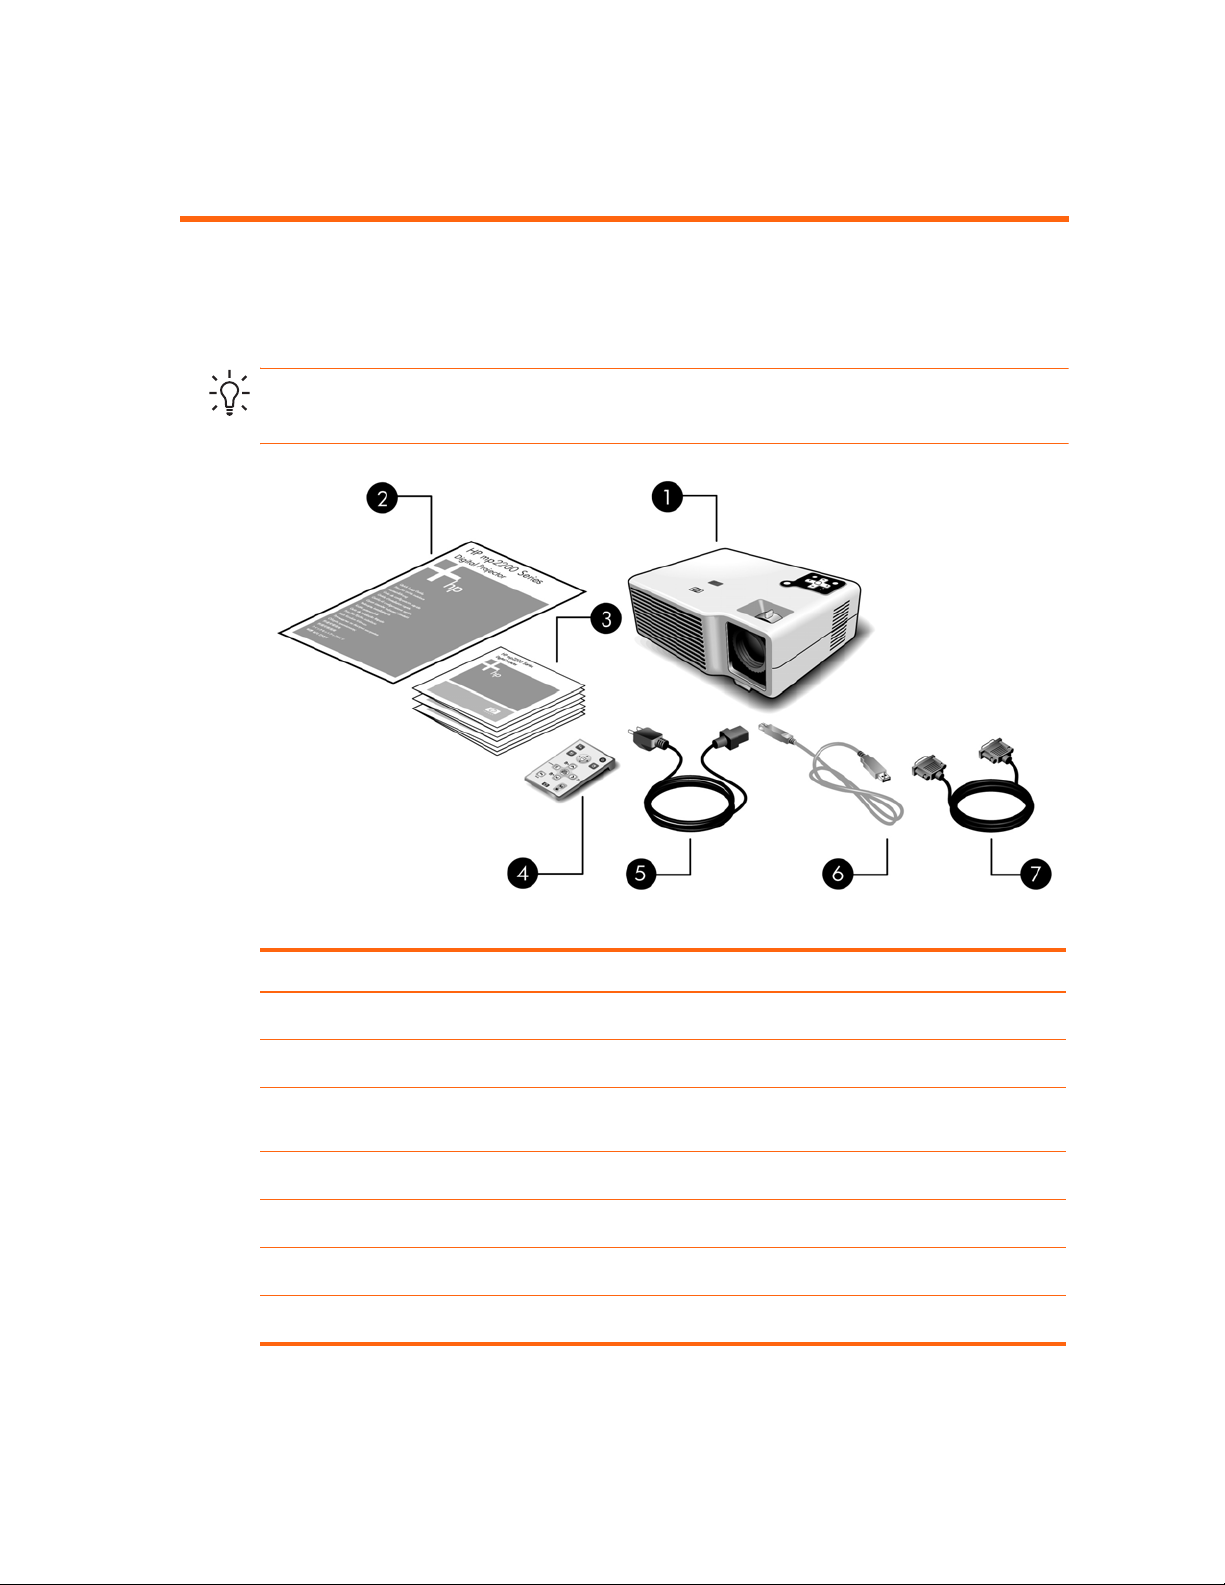
What’s in the box?
Before setting up your projector, be sure its shipping box includes the following items. If the
shipping box does not contain all of the following items, contact HP.
TIP: After you open the box and remove the contents, save the box in case you must ship the
projector.
Identifying the contents of the box
Item Function
Projector Displays images.
1
Quick Setup Guide Provides instructions to help get started.
2
Literature package Contains documentation for the setup and use of the projector,
3
Remote control Controls the projector.
4
Power cord Connects the projector to a power source.
5
USB cable Connects the projector’s USB output to a computer.
6
VGA cable Connects a computer video output to the projector.
7
plus support and warranty information.
What’s in the box? 7
Page 8
Identifying common features
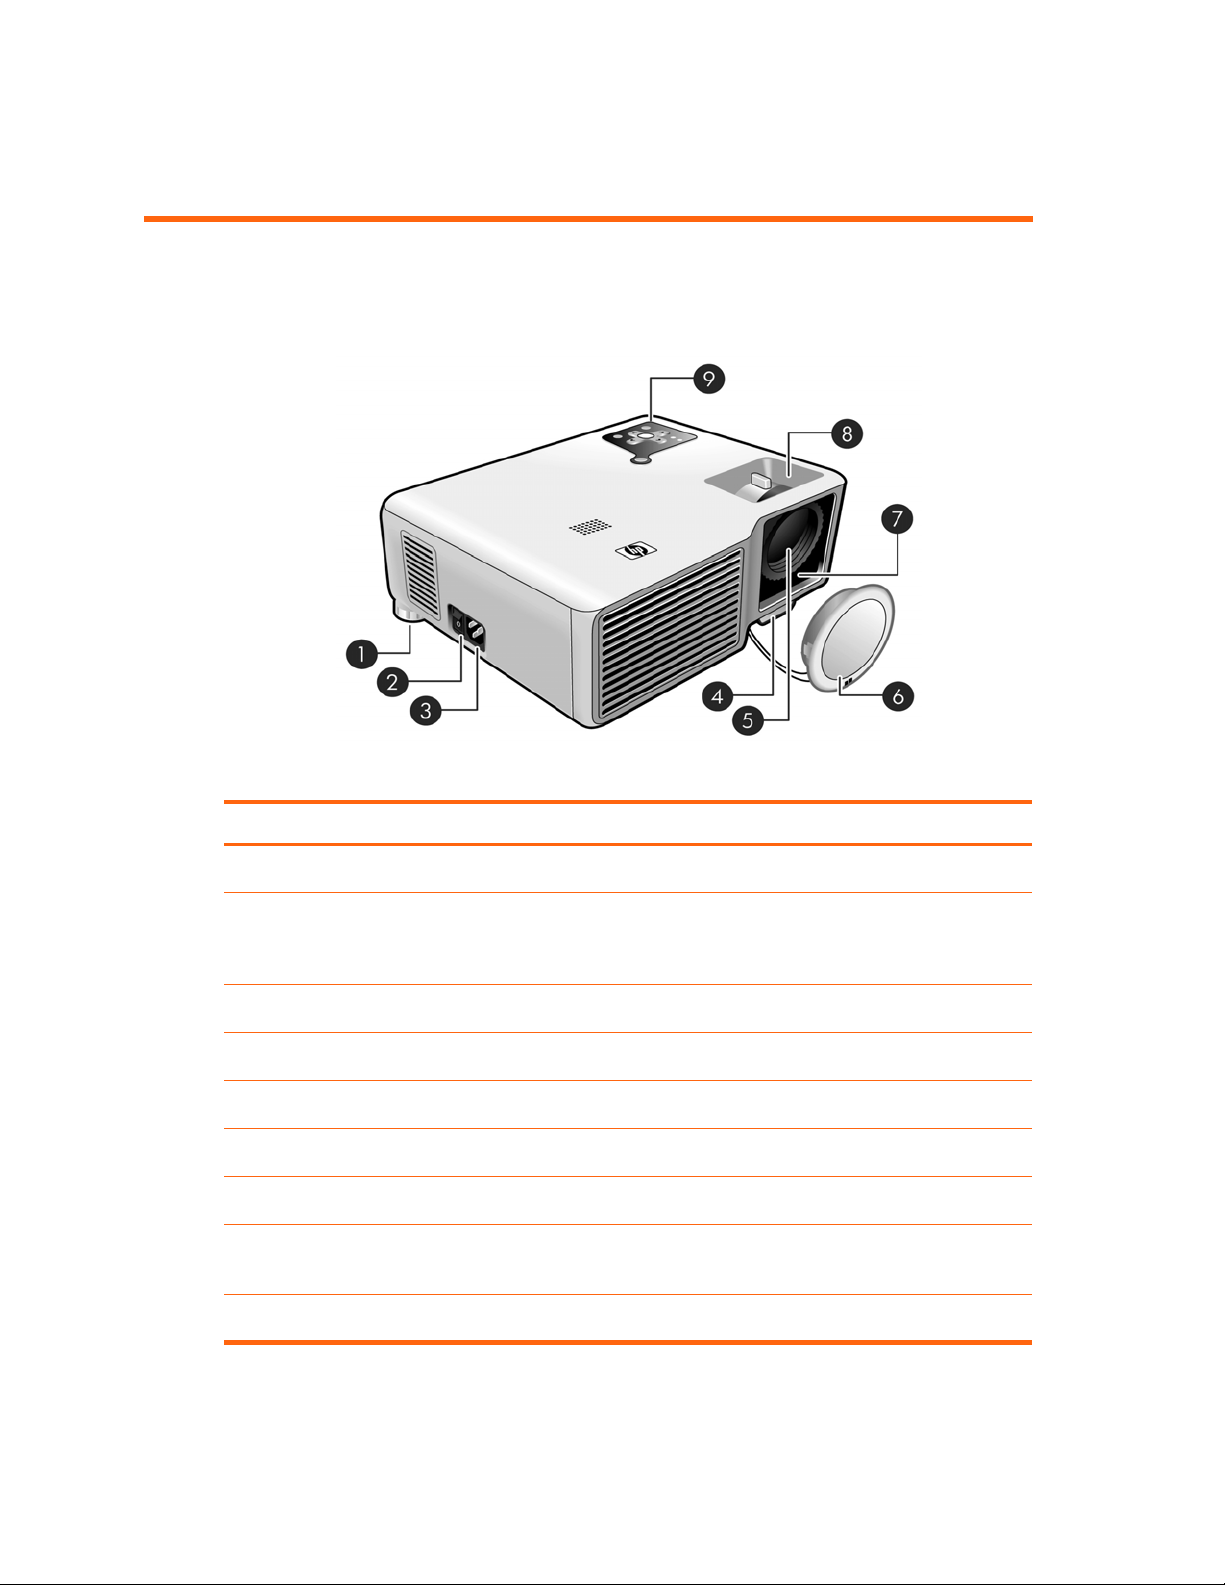
Projector at a glance
Identifying major components
Item Function
Adjustable foot Levels the projector (one foot on each rear corner).
1
Disconnect switch Disconnects power. Turn off when unplugging the power cord.
2
CAUTION: Do not use this switch to turn off the projector. Use the
power button on top of the projector.
Power cord socket Connects the power cord to the projector.
3
Height adjustment button Adjusts the height of the picture.
4
Lens Projects the image.
5
Lens cap Protects the lens.
6
Infrared port Receives signals from the remote control.
7
Focus and zoom rings Focus ring: focuses at a distance of 1.2 to 10 m (4 to 33 ft).
8
Zoom ring (with tab): enlarges the picture from 100% to 120%.
Button panel Contains control buttons and indicator lights.
9
Setting Up8
Page 9
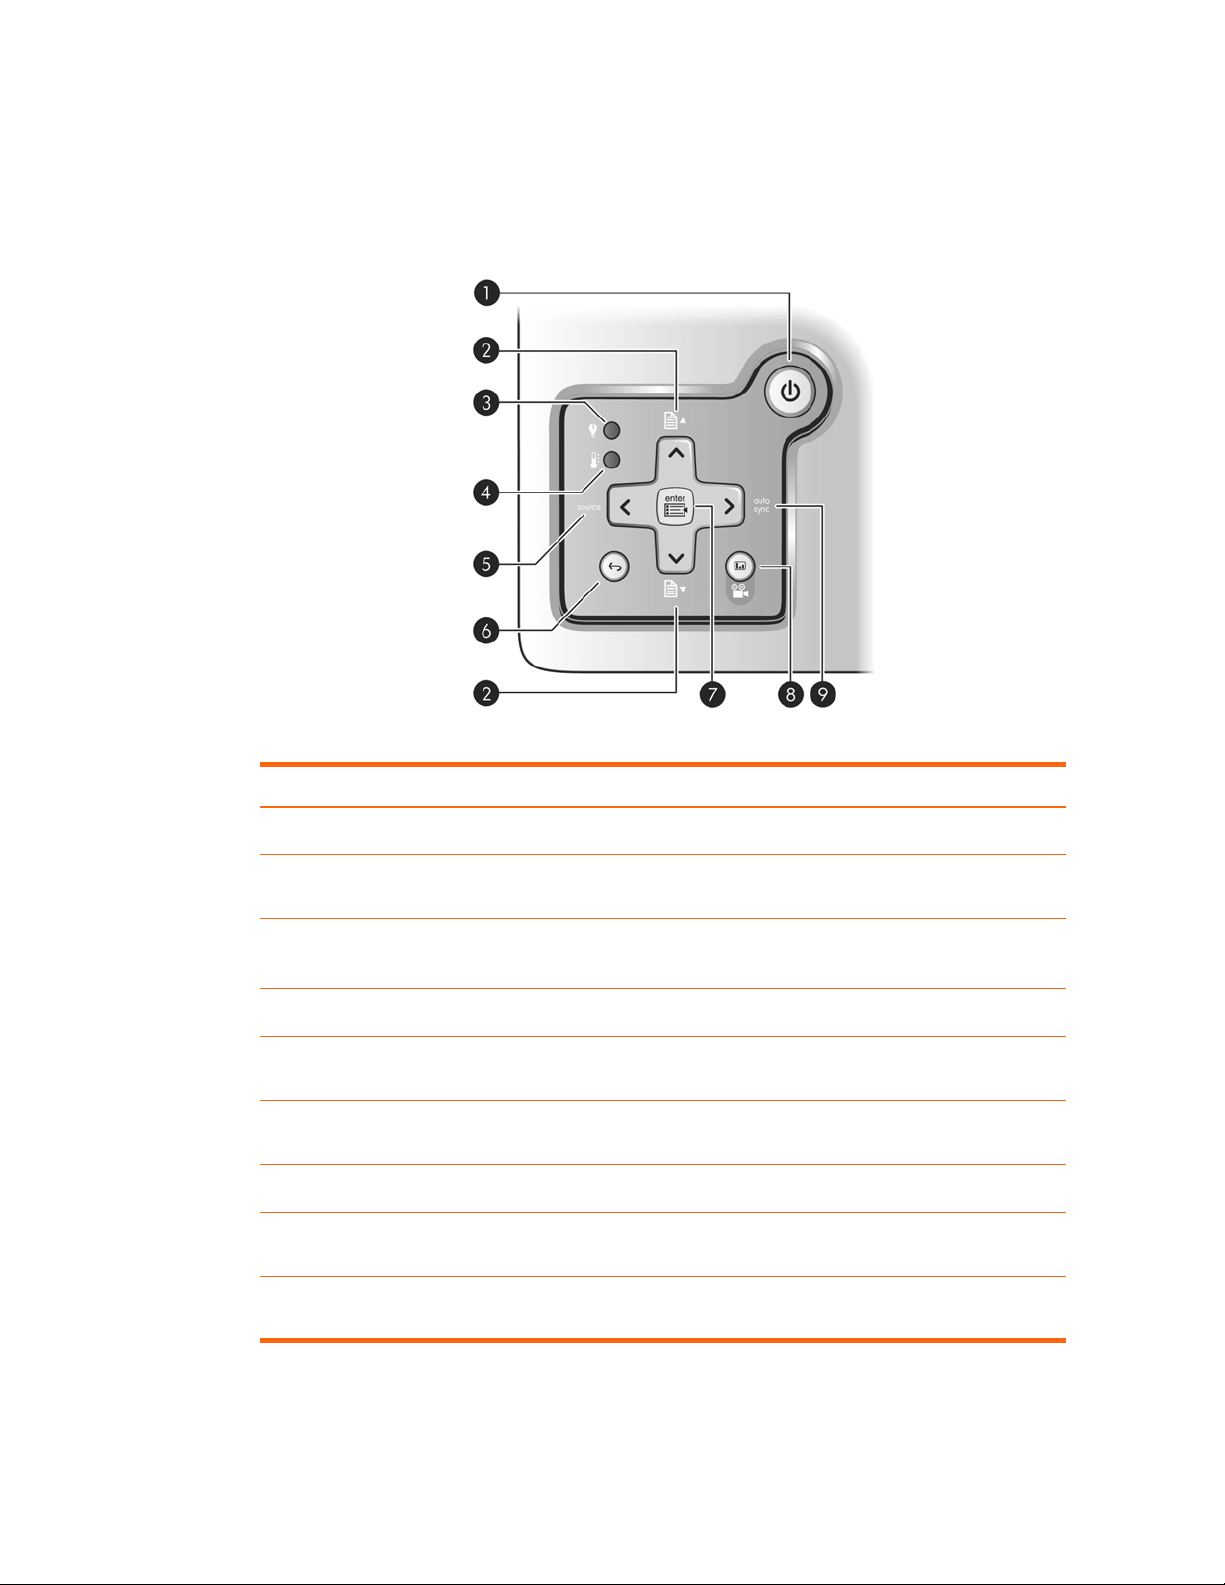
Projector buttons and lights
Identifying the projector buttons and lights
Item Function
Power button Turns the projector on or off.
1
Page-up and Page-down buttons Scrolls up and down through pages on a connected
2
Lamp warning light Lit steady: the lamp is faulty.
3
Temperature warning light Warns if the projector is too hot.
4
Source button Displays the picture from the next input port, or navigates the
5
Back button Exits the on-screen menu, or re-enters the on-screen menu at
6
Enter button Opens the on-screen menu or acts on the selected menu item.
7
Picture mode button Selects the next picture and color combination—can be
8
Auto sync button Resynchronizes the projector to the input signal from a
9
computer, or navigates the on-screen menu.
Flashing: the lamp ballast is faulty.
on-screen menu.
the most recently used item.
customized.
computer, or navigates the on-screen menu.
Identifying common features 9
Page 10
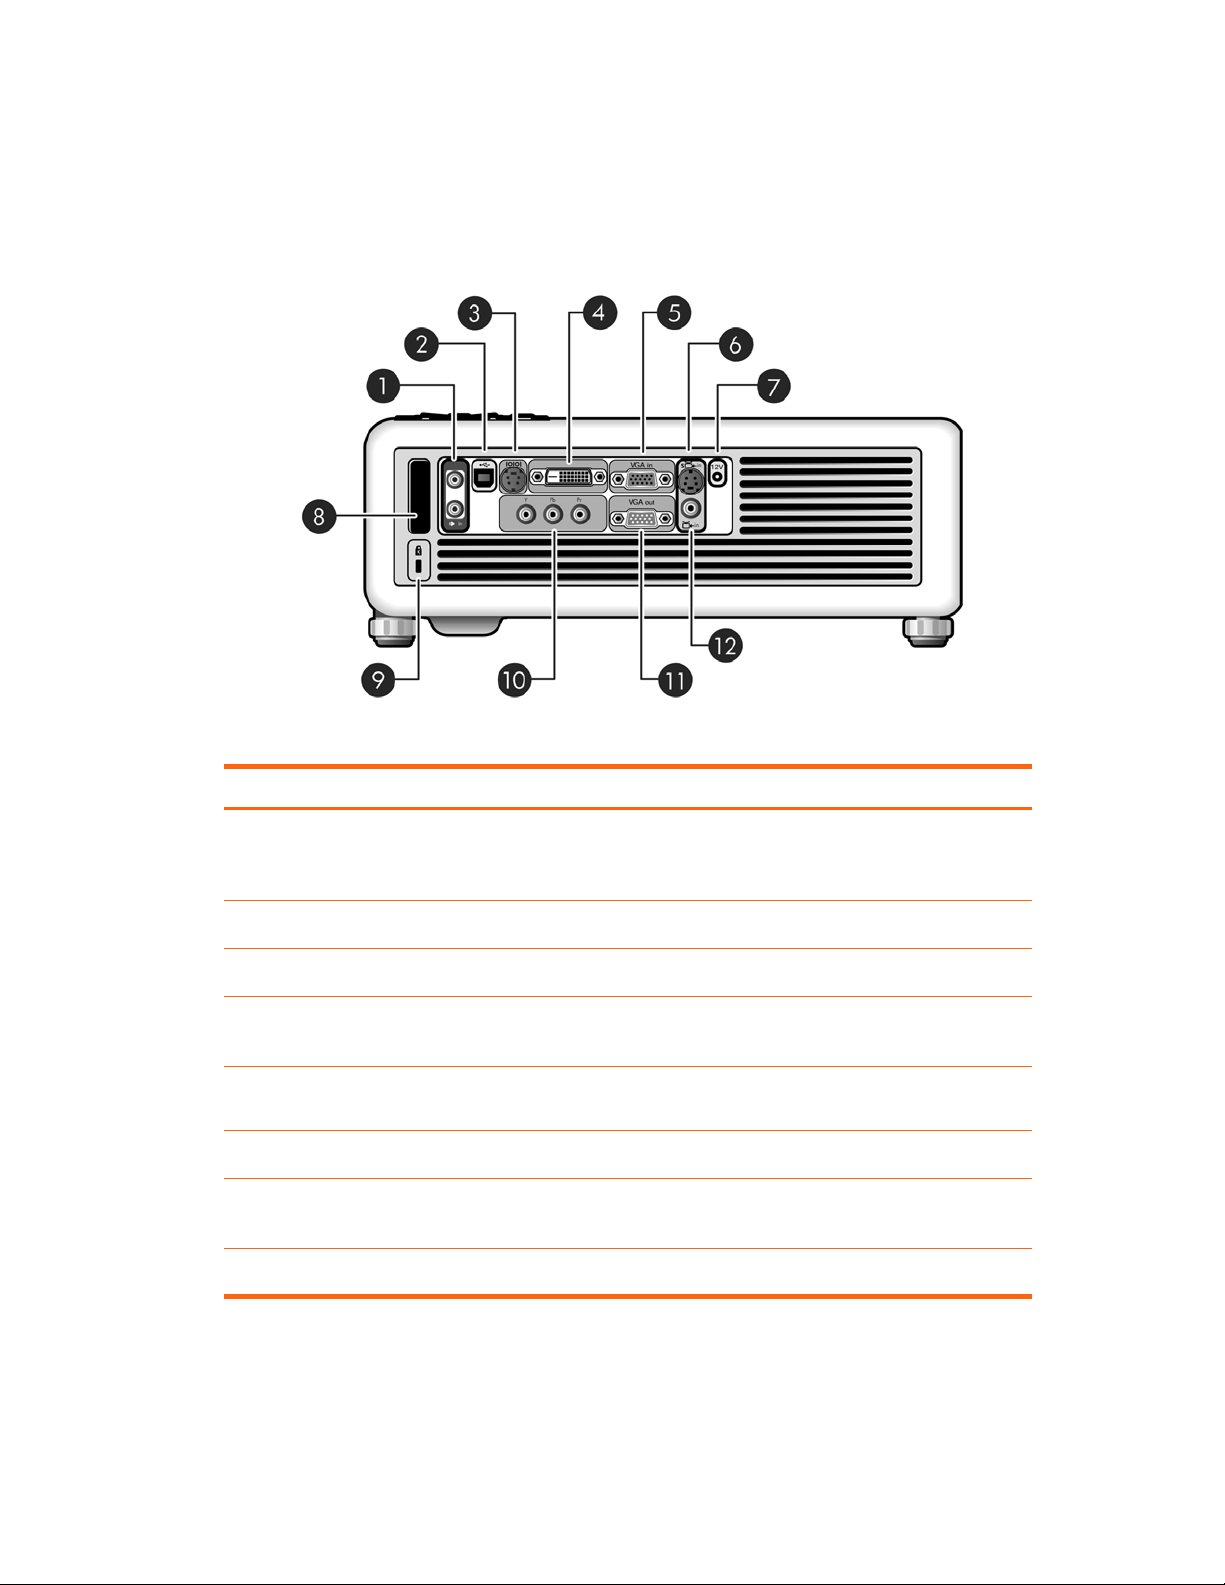
Back panel
Identifying back panel components
Item Function
Audio in and out ports Connect a stereo audio source using a stereo mini-phone
1
USB port Connects to a computer and controls the mouse.
2
Serial port Connects a room controller.
3
DVI input port Connects a DVI-D digital video source.
4
VGA-in port Connects video input from a computer or component-video
5
S-video input port Connects an S-video source.
6
12-Vdc trigger output Controls a motorized screen or similar accessory device.
7
Infrared port Receives signals from the remote control.
8
Setting Up10
plug, or an optional RCA-to-mini-phone plug.
NOTE: Available only on certain models.
NOTE: Available only on certain models.
source.
NOTE: Available only on certain models.
Page 11
Identifying back panel components (continued)
Item Function
Lock slot Locks the projector to a stationary object with the use of a
9
Component video input port Connects a component video source.
:
VGA-out port Sends the VGA-in signal to a monitor.
;
Composite-video input port Connects a composite-video source.
<
Remote control
TIP: Before using the remote control, remove the battery protector by pulling the plastic tab
until it comes out of the remote control.
cable and lock.
Identifying common features 11
Page 12

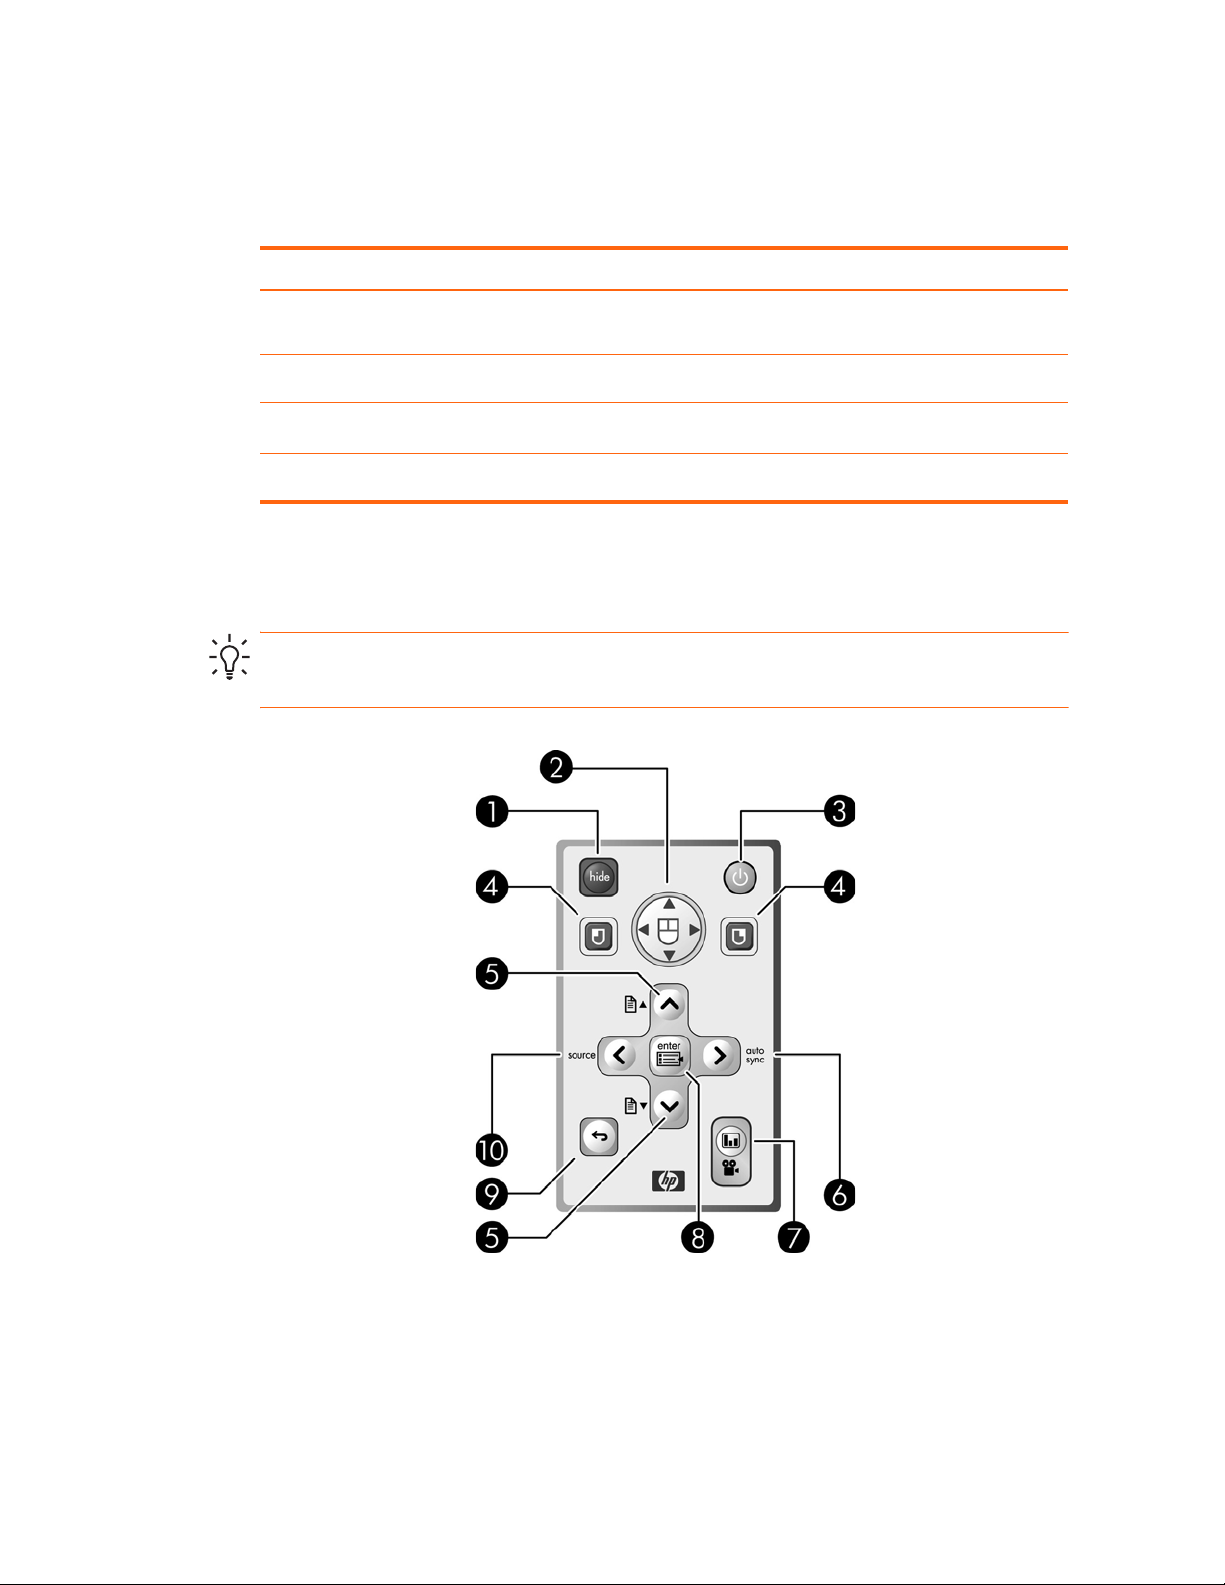
Identifying components of the remote control
Item Function
Hide button Blanks the picture, and mutes the audio (certain models only).
1
Mouse pad Moves the mouse pointer on a connected computer.
2
Power button Turns the projector on or off.
3
Left-click and right-click mouse
4
buttons
Page-up and Page-down buttons Scrolls up and down through pages on a connected computer, or
5
Auto sync button Resynchronizes the projector to the input signal from a computer, or
6
Picture mode button Selects the next picture and color combination—can be customized.
7
Enter button Opens the on-screen menu or acts on the selected menu item.
8
Back button Exits the on-screen menu, or re-enters the on-screen menu at the most
9
Source button Displays the picture from the next input port, or navigates the on-screen
:
Performs left-click and right-click mouse functions on a connected computer.
navigates the on-screen menu.
navigates the on-screen menu.
recently used item.
menu.
Accessories
Get more from your presentations with HP projector accessories. You can purchase accessories
at http://www.hp.com or through your projector dealer.
• HP ceiling mount kit—enables you to simply and discreetly install your projector on the
ceiling.
• HP projection screens—mobile screens that are easy to carry and set up anywhere, and
fixed screens for even greater convenience.
• HP premium remote control—allows you to control every aspect of your presentations.
• HP power cables—allow you to connect in any region.
• HP cables—allow you to connect all audio-video equipment.
• HP replacement lamp—brings your projector up to factory-fresh brightness.
• HP pn1050 Jetdirect projector server—enables you to connect your projector directly to a
network, and manage it from anywhere on the network.
• HP projector carrying case—enables you to transport your projector safely.
• HP SCART to composite S-video adapter—allows you to connect SCART devices.
Setting Up12
Page 13
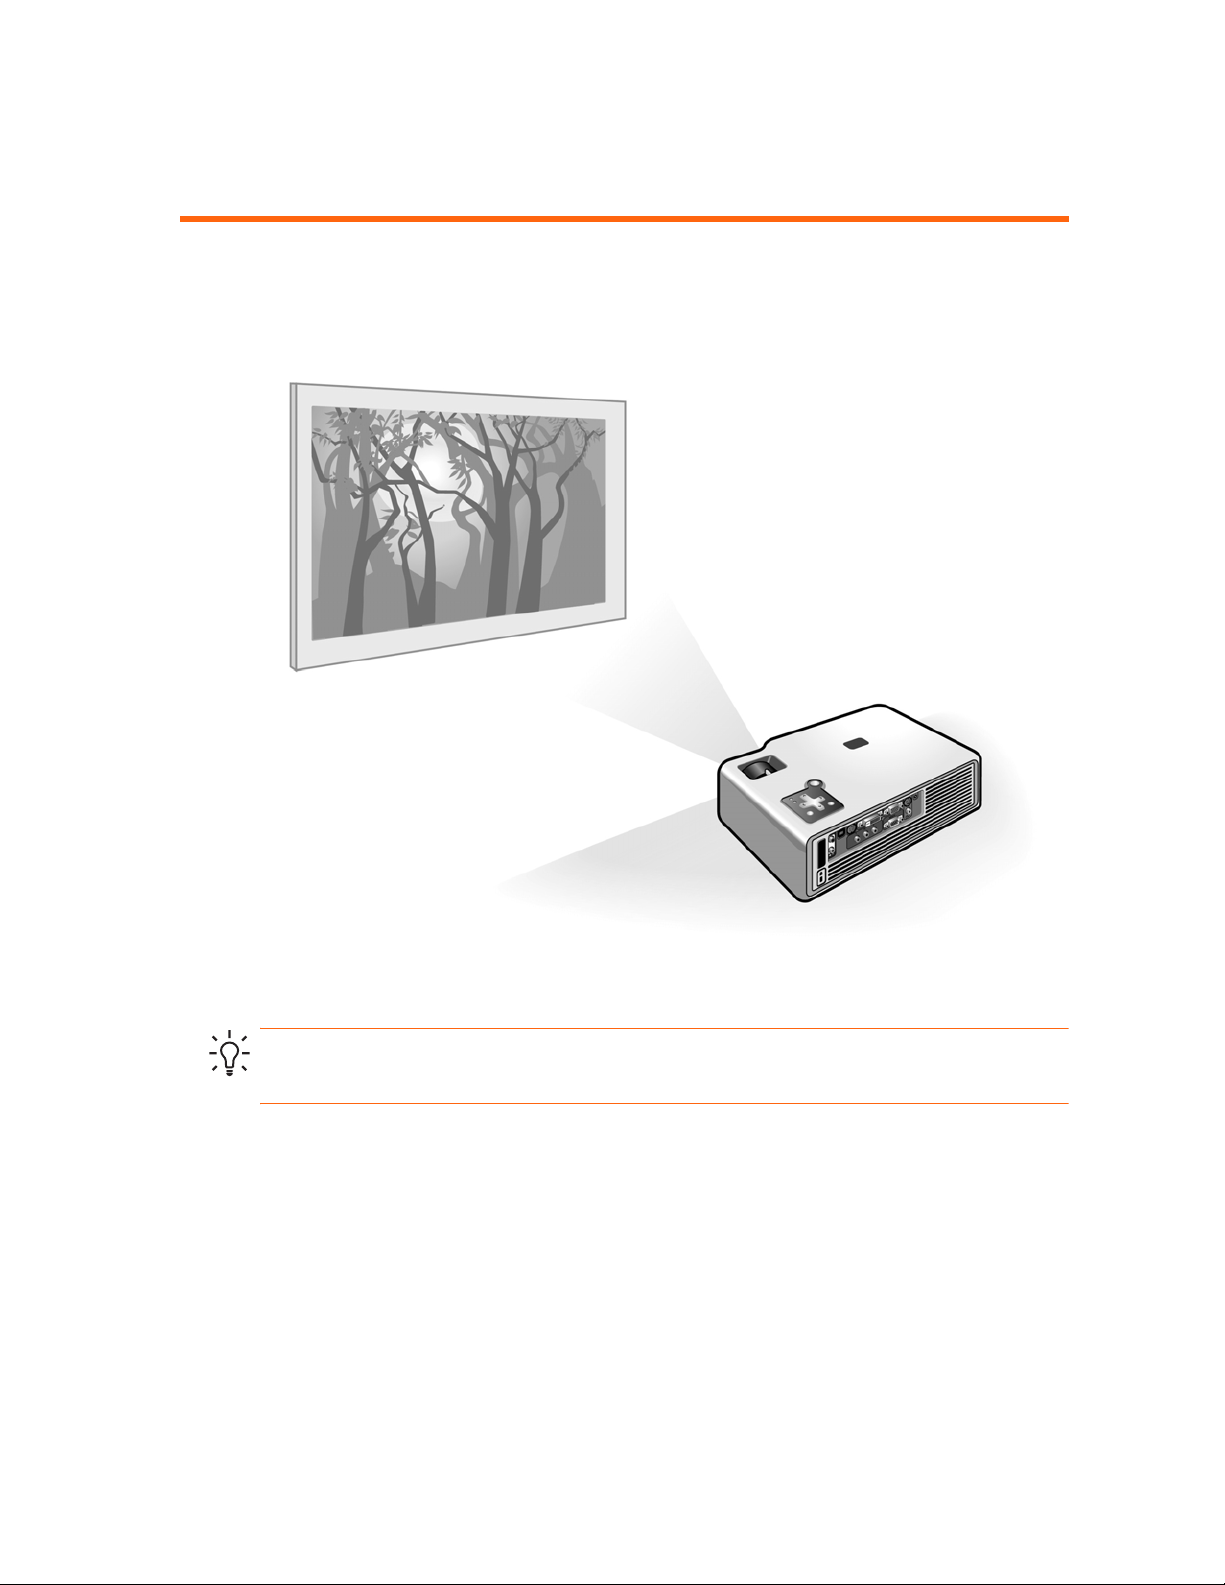
Setting up the projector
Positioning the projector
The following tables show you where to position the projector in relation to the screen.
TIP: For more information on adjusting the picture, see “Making basic adjustments” on
page 25 and “Adjusting the Projector” on page 29.
Setting up the projector 13
Page 14

Image size relative to distance from the screen — xp7010/xp7030 series
Image size (diagonal) Image size (width) Distance — Tele (lens to screen)
(inches) (meters) (inches) (meters) (inches) (meters)
40 1.0 32 0.8 52 to 63 1.3 to 1.6
50 1.3 40 1.0 65 to 79 1.7 to 2.0
60 1.5 48 1.2 79 to 94 2.0 to 2.4
80 2.0 64 1.6 105 to 126 2.7 to 3.2
100 2.5 80 2.0 131 to 157 3.3 to 4.0
150 3.8 120 3.0 197 to 236 5.0 to 6.0
200 5.1 160 4.1 262 to 315 6.7 to 8.0
250 6.4 200 5.1 328 to 394 8.3 to 10.0
If you do not want to use the distance table, you can use the following equations to help
determine where to install the projector relative to the screen.
Calculating projection distances
distance from lens to screen = A × width of screen
minimum and maximum distance from screen = B
width of screen = 0.8 × diagonal of screen (for 4:3 screen)
projector lens below bottom of screen = C × width of screen (for 4:3 screen, with projector sitting level)
xp7010/xp7030 series
A = 1.6 to 2.0
B = 1.2 to 10 m (4 to 33 ft)
C = 0.12
Setting Up14
Page 15
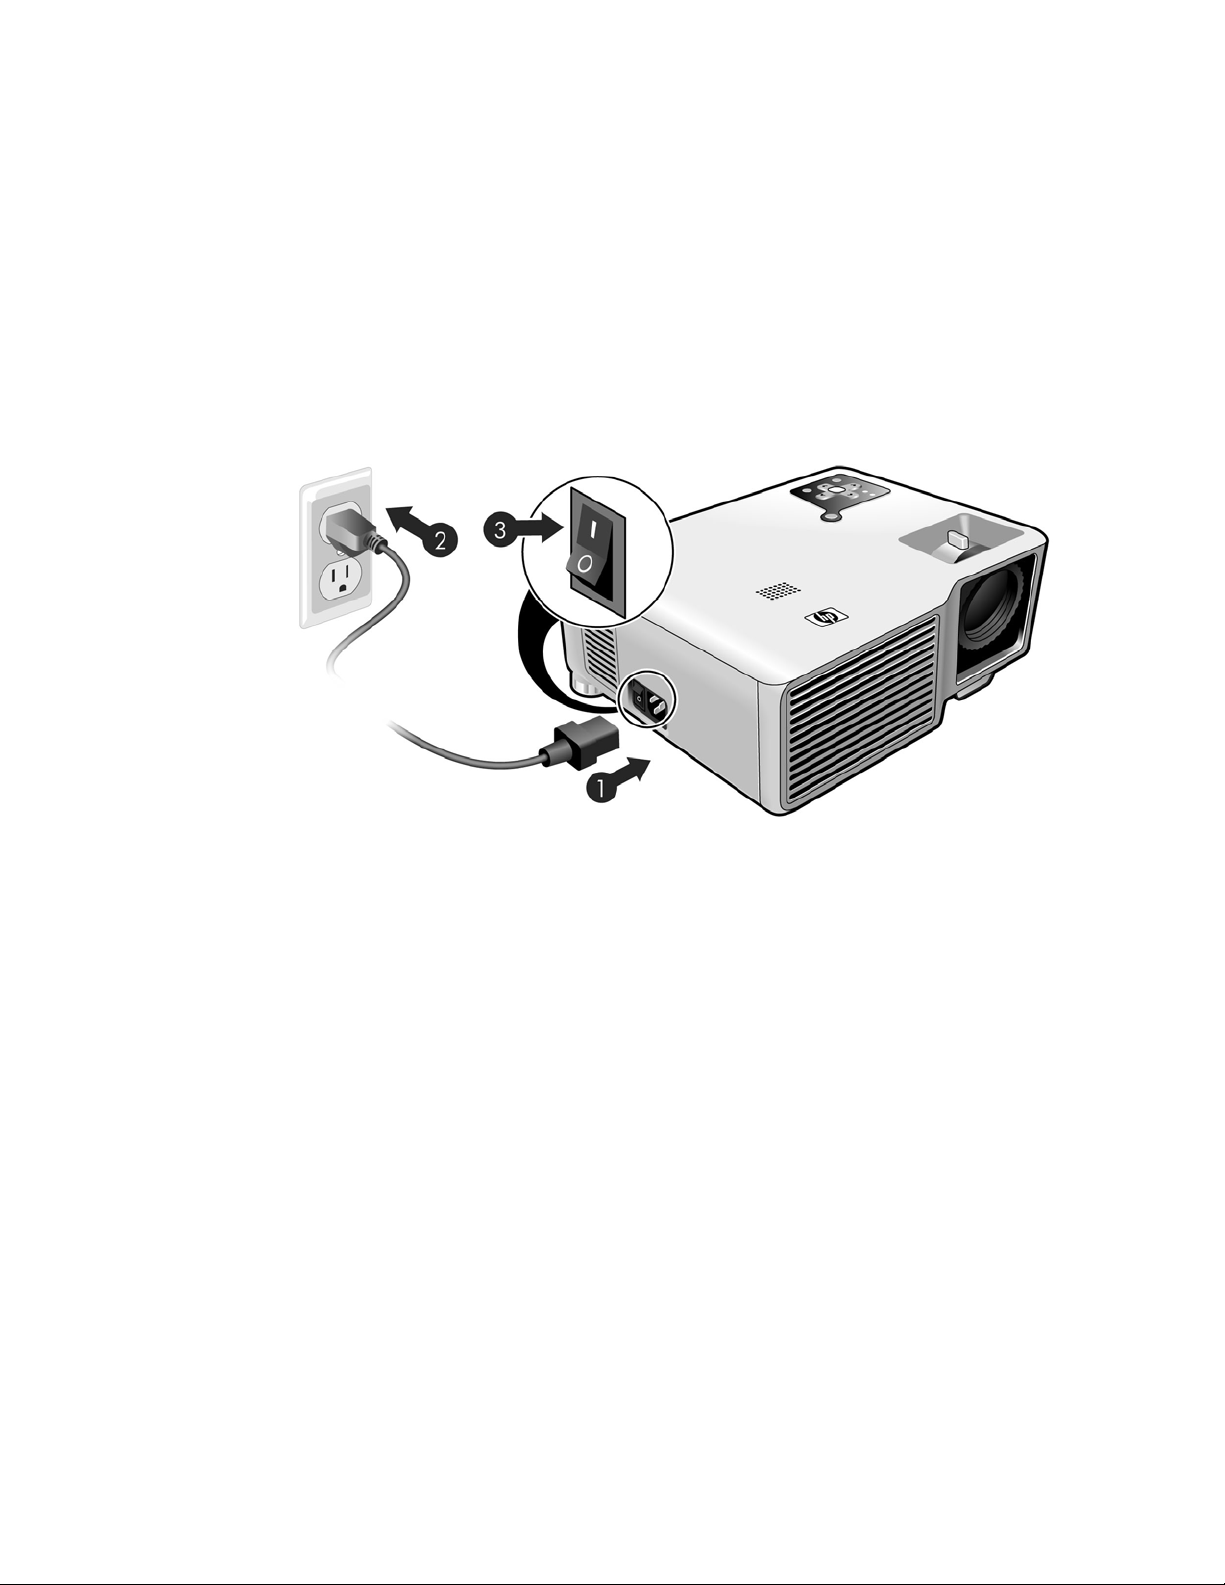
Connecting power
1. Place the projector on a stable platform located 1.2 to 10 m (4 to 33 ft) in front of the
screen. Ideally, the platform should be lower than the bottom of the screen.
2. Connect one end of the power cord to the back of the projector
grounded electrical outlet
3. Turn on the disconnect switch
If you want to permanently install the projector on the ceiling or behind the screen, see
“Installing the projector” on page 44.
2.
3 on the side of the projector.
1 and the other end to a
Setting up the projector 15
Page 16

Connecting a computer
Requires:
• VGA cable or other video source cable
• USB cable 2 (optional)
• Audio cable, mini-phone (optional)
1
The optional USB connection allows you to use the mouse and page up/down features on the
remote control.
See “Showing a computer screen” on page 28.
TIP: If the computer display does not appear on the projector, you might have to press a
combination of keys on the computer to turn on the computer’s VGA output. For example, on
some computers you must press F
documentation provided with your computer.
TIP: You can connect an external computer monitor to the VGA-out port on the projector. The
monitor displays the signal connected to the VGA-in port—even if the projector is turned off or
showing a different input.
Setting Up16
N+F4 or FN+F5. For instructions, refer to the user
Page 17
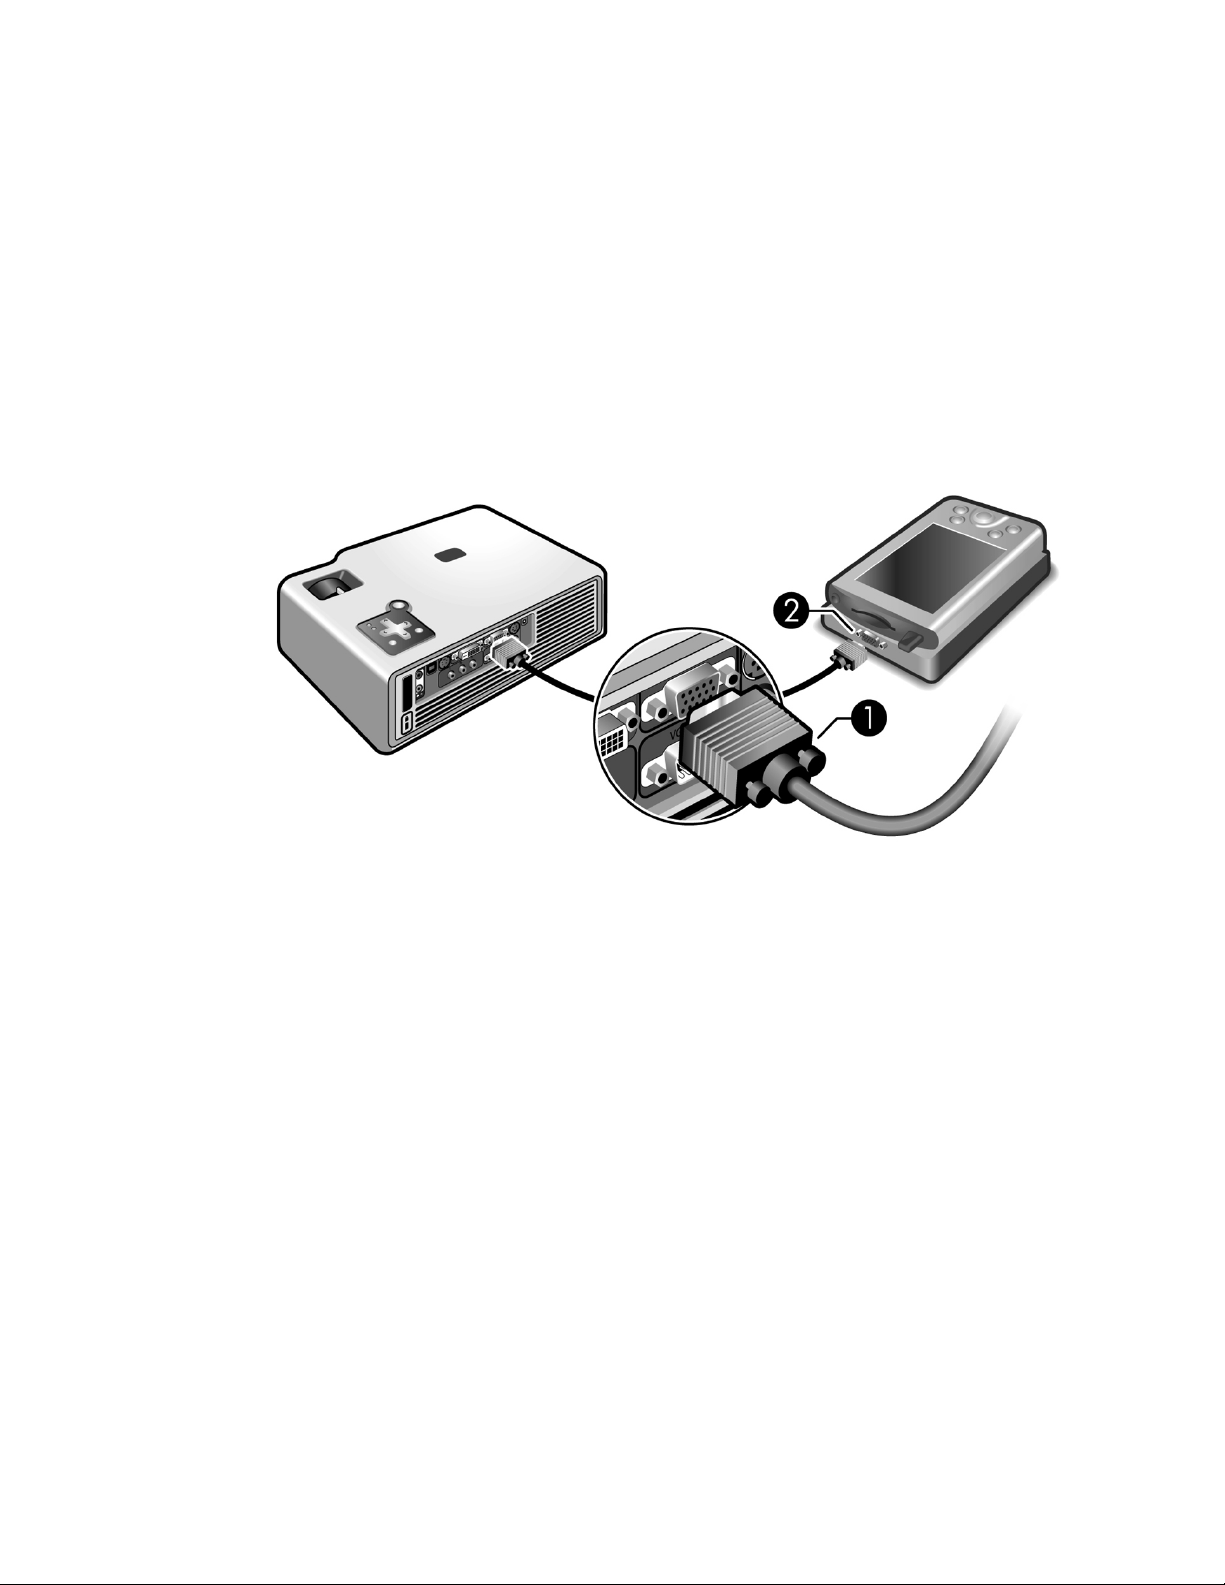
Connecting a handheld organizer
Not all handhelds come with VGA-out ports. For example, an iPAQ Pocket PC may require a
VGA-out PC Card with 15-pin connector. If necessary, install a VGA-out accessory card into
the organizer.
Requires:
• VGA cable
• VGA-out accessory card 2 (in some cases)
1
Setting up the projector 17
Page 18

Connecting a video source
Many video devices have more than one type of output port. When you connect the device to
the projector, choose the connection that provides the best picture quality. This list shows video
connections in order with highest picture quality at the top:
• DVI connection (highest quality)
• Component-video connection
• S-video connection
• Composite-video connection
The video and audio cables shown in the following sections are available from HP.
If you want to connect a SCART video device to the projector, you will need a SCART adapter
(available from HP).
Connecting a DVI source
The DVI port is available only on certain models. It supports only DVI digital sources.
Examples: Cable boxes, satellite receivers, and some computers
Requires:
• DVI-D cable
• Audio cable, mini-phone 2 (optional)
Setting Up18
1
Page 19
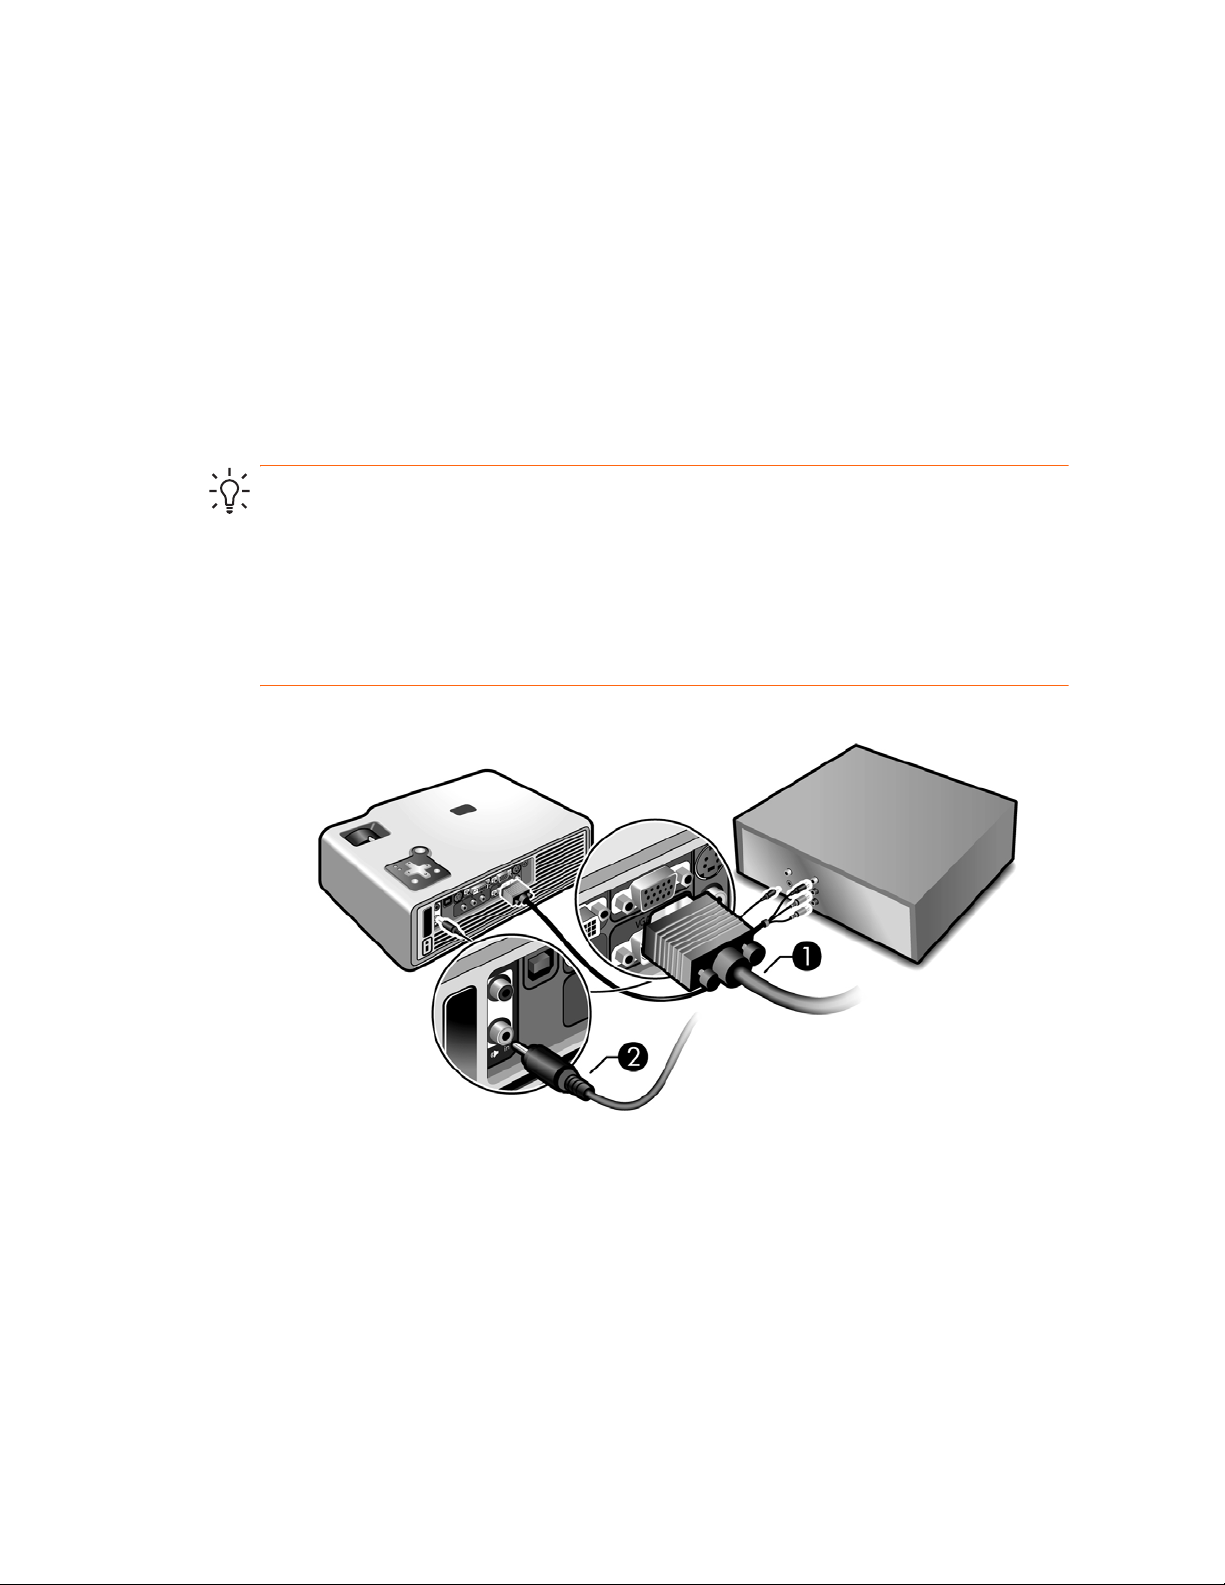
Connecting a component-video source with a component-to-VGA cable
Examples: Cable boxes, DVD players, satellite receivers, and audio-video receivers
Requires:
• Component-to-VGA cable
• Audio cable, mini-phone 2 (optional)
TIP: Many DVD players and other high-quality video devices provide component video output
through three RCA connectors (which might be labeled YPbPr or YCbCr). Connect the
component-to-VGA cable to the video device’s RCA connectors and the projector’s VGA-in
port.
If possible, configure the video source to use progressive scan output, such as 480p, 575p,
or 720p. For additional information, refer to the user documentation provided with the video
source.
1
Setting up the projector 19
Page 20
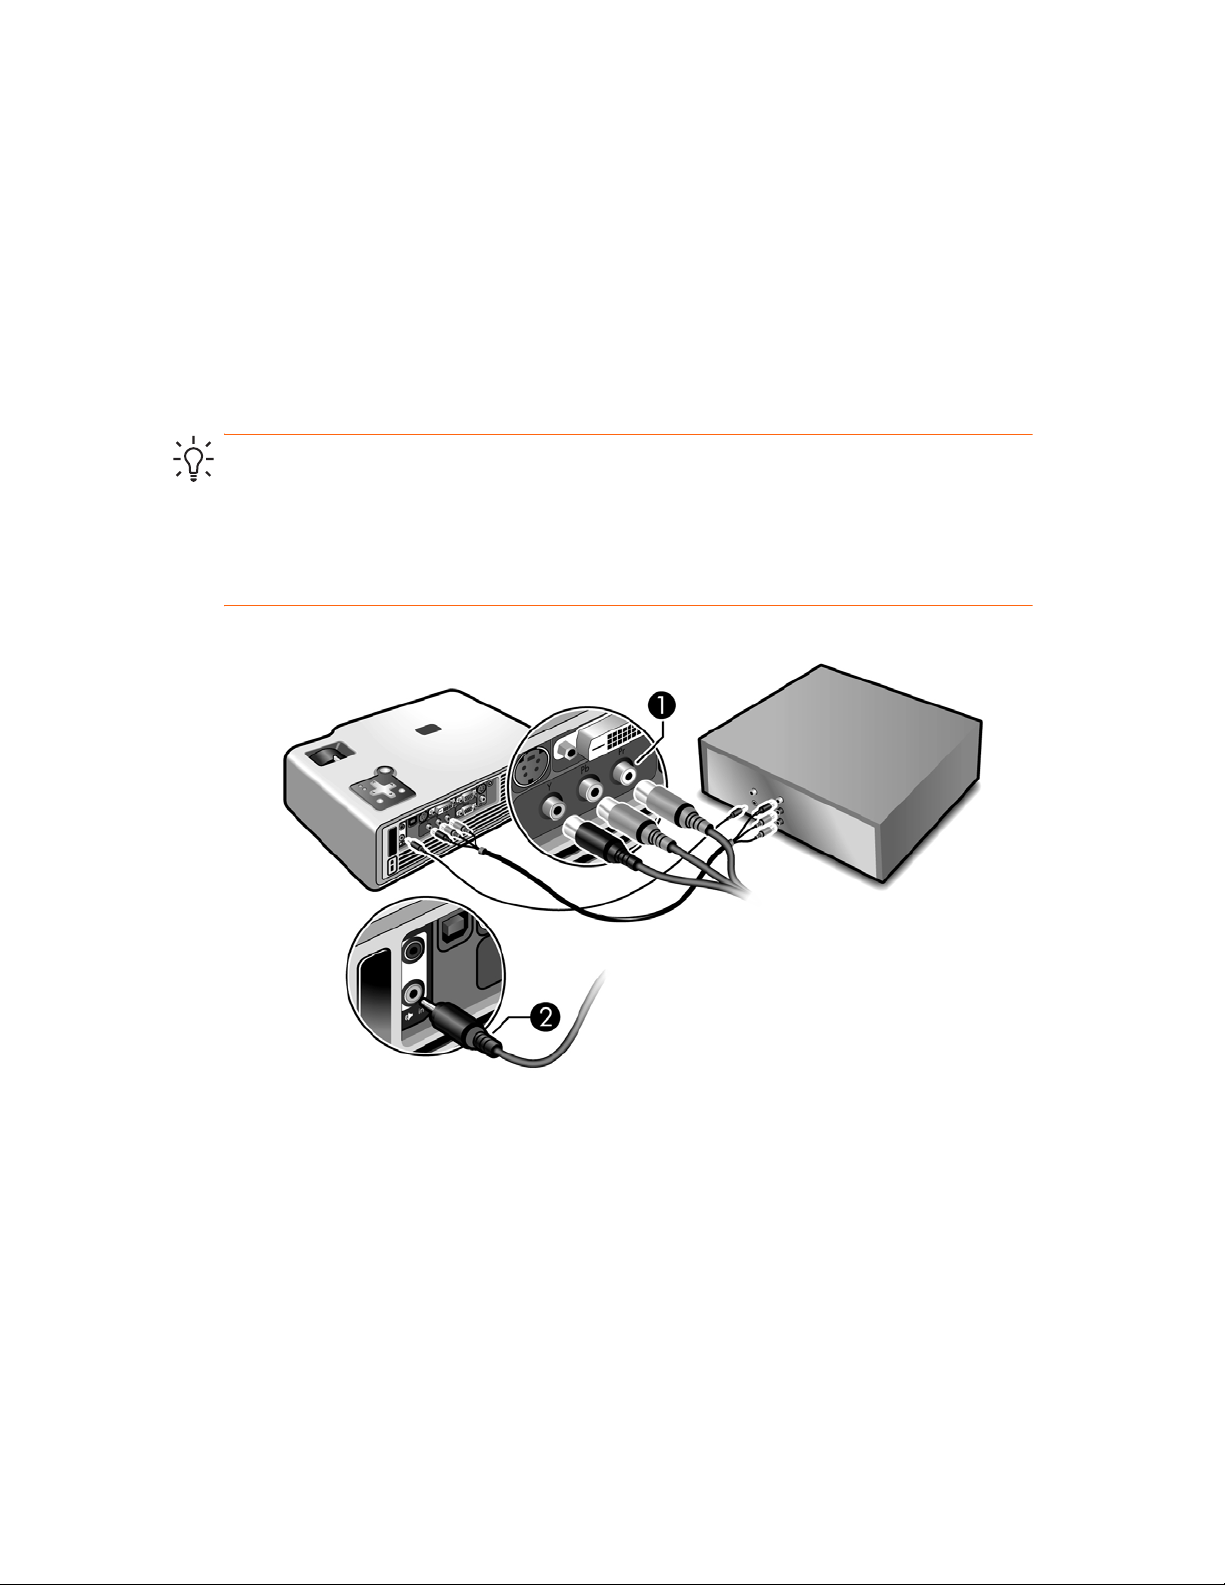
Connecting an RCA component-video source (certain models only)
Examples: Cable boxes, DVD players, satellite receivers, and audio-video receivers
Requires:
• Standard component-video cable
• Audio cable, mini-phone 2 (optional)
TIP: Many DVD players and other high-quality video devices provide component video
output. The three RCA connectors might be labeled YPbPr or YCbCr.
If possible, configure the video source to use progressive scan output, such as 480p, 575p,
or 720p. For additional information, refer to the user documentation provided with the video
source.
1
Setting Up20
Page 21
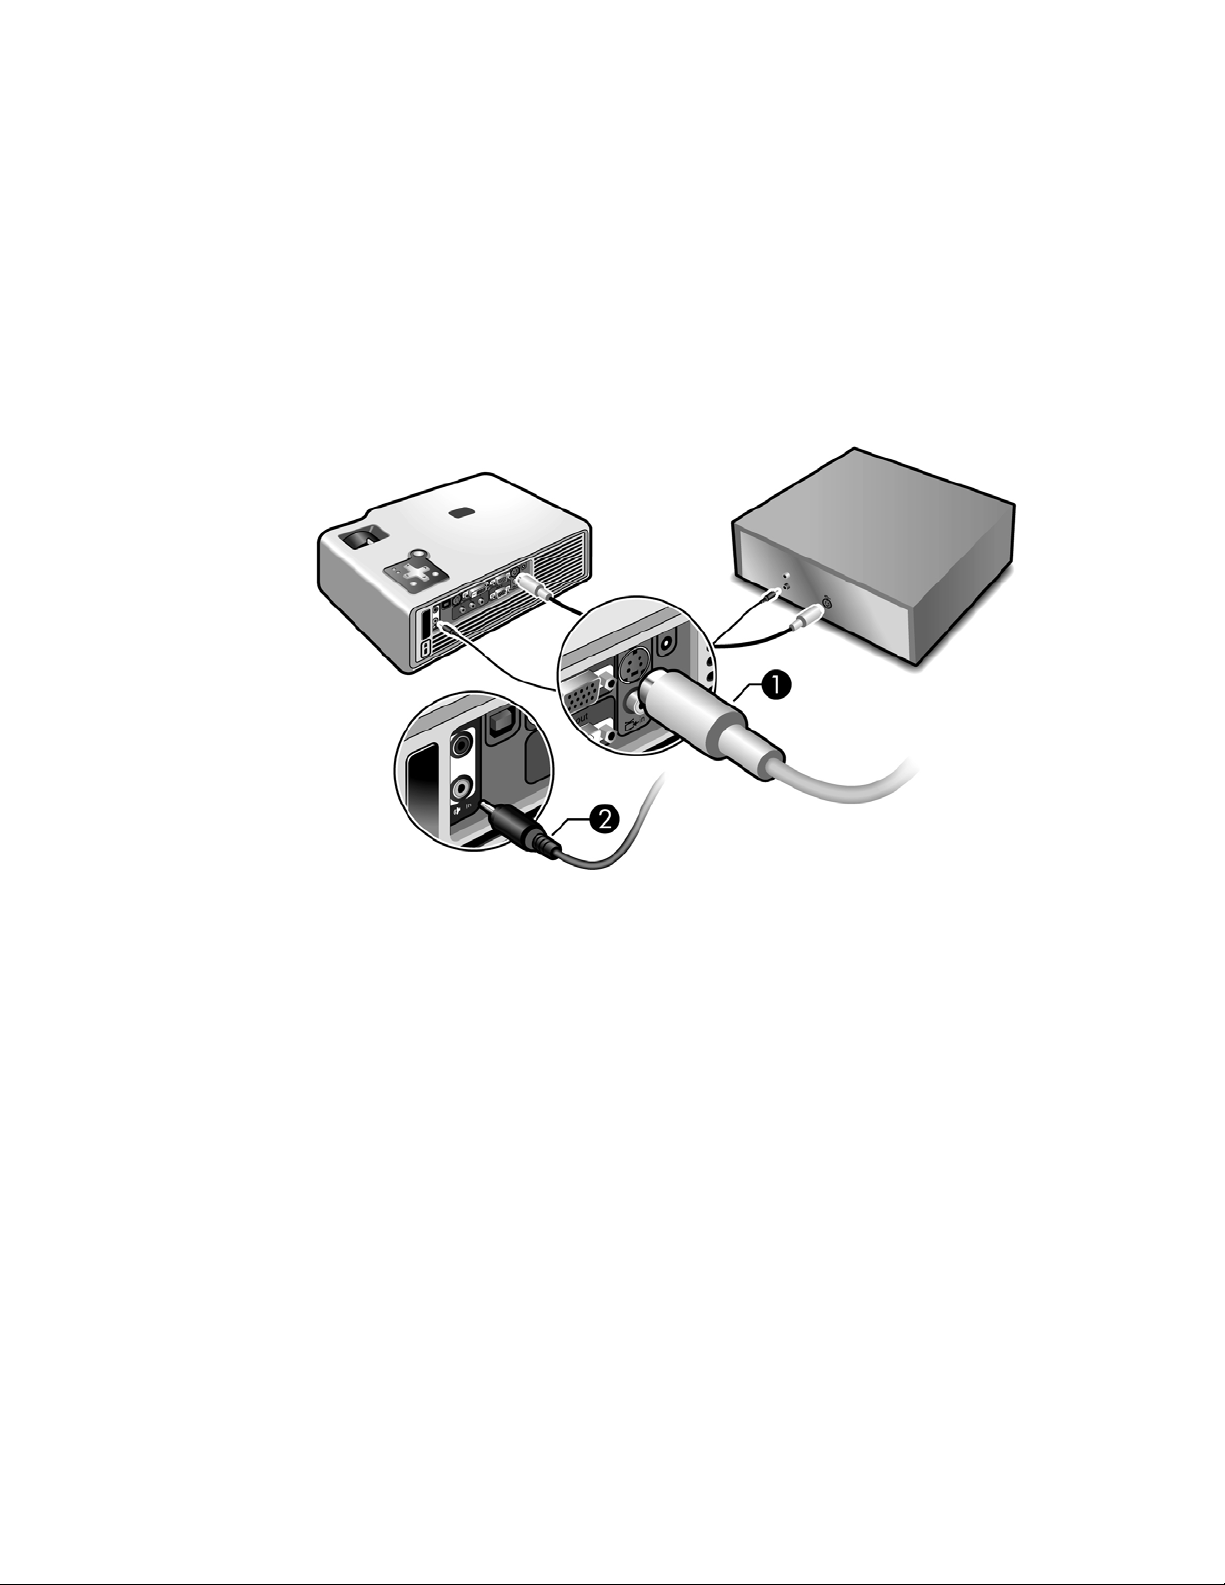
Connecting an S-video source
Examples: DVD players, VCRs, cable boxes, camcorders, and video gaming devices
Requires:
• S-video cable
• Audio cable, mini-phone 2 (optional)
1
Setting up the projector 21
Page 22
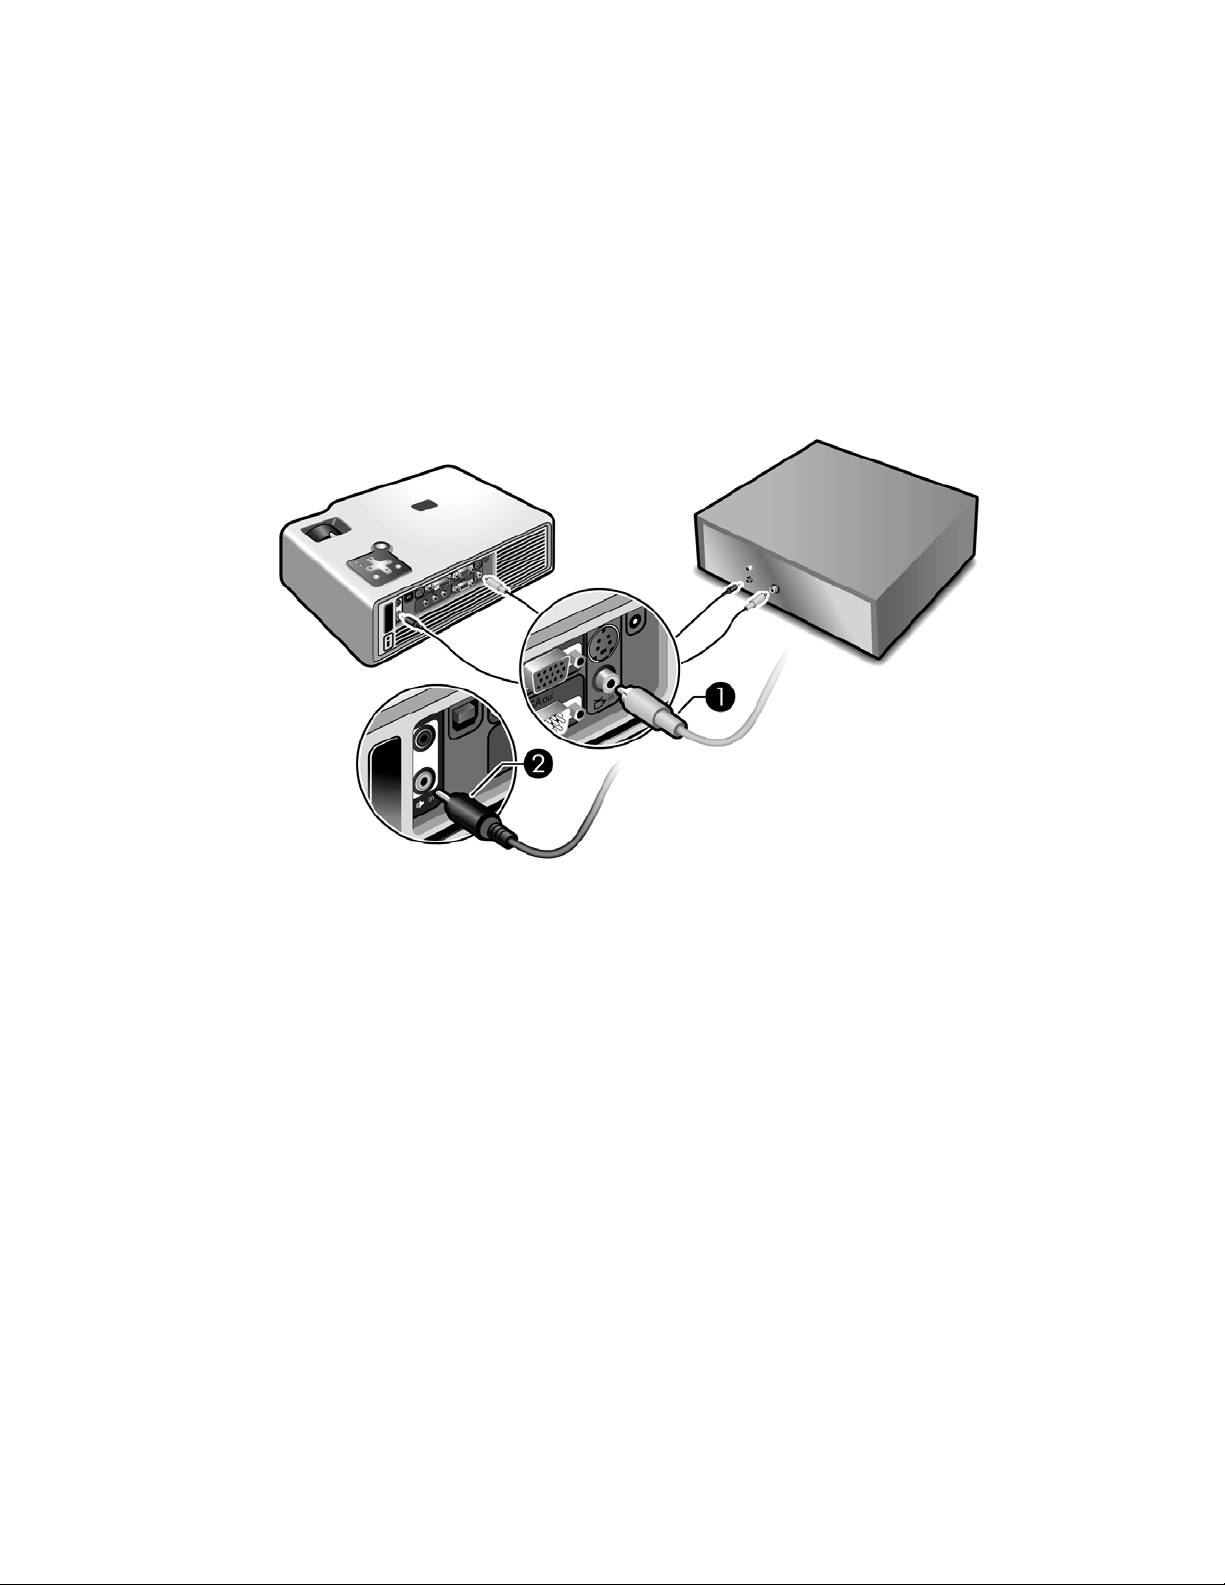
Connecting a composite-video source
Examples: VCRs, DVD players, audio-video receivers, and video gaming devices
Requires:
• Composite-video cable
• Audio cable, mini-phone 2, or combined video-audio cable (optional)
1
Setting Up22
Page 23

Turning the projector on and off
Turning the projector on
1. Be sure the power cord is connected and the disconnect switch is on.
2. Remove the lens cover
3. Press the power button
The projector takes a minute or so to warm up. The power button blinks during warm-up.
1.
2 on the projector or on the remote control.
TIP: If the picture does not appear on the screen, try the following:
• If you are using a computer, press the key combination that turns on its video output. For
example, press F
• On the projector, press the source button one or more times to select the correct input port.
NOTE: It is normal for parts of the projector and the air coming out of the projector to be very
warm. If the projector starts to overheat, the temperature warning light will turn on and the
projector will shut down.
N+F4 or FN+F5 on some computers.
Turning the projector on and off 23
Page 24

Turning the projector off
1. Press the power button on the projector or remote control to turn off the projector. Do not
hold the button down.
The power button blinks during the cool-down period, then the projector turns off. Even
though the projector is off, it uses a small amount of power internally.
2. If you want, disconnect video and audio equipment from the projector during the cool-
down period or after the power button stops blinking.
CAUTION: Do not disconnect power or turn off the disconnect switch until the projector has
cooled down (the fan stops) and the power button stops blinking. Otherwise, you might shorten
the life of the lamp.
3. If you must unplug or remove the projector, wait until the power light stops blinking, then
unplug the power cord.
If you try to turn on the projector again during the cool-down period, it will not turn on. Wait
until the cool-down period ends and the power button stops blinking.
Moving the projector
When moving the projector:
• Allow the projector to cool down before moving it. Then disconnect all cables.
• Avoid bumps and jolts. Use a carrying case or padded container when possible.
• Observe temperature and humidity limits (see “Specifications” on page 61). If the projector
is cold, allow it to warm gradually to avoid condensation.
Setting Up24
Page 25

Making basic adjustments
This section provides instructions for making basic adjustments to the projector.
Aiming the projector
• To raise or lower the projected picture on the screen, press the height adjustment button 1
and raise or lower the front of the projector
• To level the picture on the screen, turn the adjustable feet
2. Release the button to lock the adjustment.
3 to lengthen or shorten.
Adjusting the focus and zoom
• Rotate the focus ring until the image becomes clear. The projector can be focused at
distances of 1.2 to 10 m (4 to 33 ft).
• Rotate the zoom ring (with tab) to adjust the picture size (100% to 120%).
If the picture does not fit the screen, you might have to move the projector closer to or farther
away from the screen.
TIP: For more information on adjusting the picture, see “Adjusting the Projector” on page 29.
Making basic adjustments 25
Page 26

Using the remote control
To do this... Press this...
Hide or unhide the picture, and mute or unmute
the audio (certain models only)
Move mouse pointer on computer Edge of the mouse pad
Turn the projector on or off Power button
Click mouse button on computer Left-click or right-click button
Page up or page down on computer Page-up or page-down button 5. This feature
Readjust picture of computer screen auto sync button 6.
Setting Up26
hide button
1.
2 in the direction you
want the pointer to move. This feature requires a
USB connection between the projector and
computer.
3.
4. This feature
requires a USB connection between the projector
and computer.
requires a USB connection between the projector
and computer.
Page 27

To do this... Press this...
Change picture settings for different type of input
signal
Change settings using on-screen menu enter and navigation buttons 8. See “Using the
Exit from any on-screen menu or adjustment Exit button 8.
Switch to next input source source button
Picture mode button 7 one or more times.
on-screen menu” on page 34.
9 one or more times.
TIP: From within the distance of 8 m (26 ft), aim the remote control at the screen or at the front
or back of the projector.
Using the remote control 27
Page 28

2 Showing Presentations
Showing a computer screen
1. Be sure the computer is connected to the projector and turned on. See “Connecting a
computer” on page 16.
2. Be sure the projector is set up, turned on, and adjusted. See “Making basic adjustments”
on page 25.
3. If a different input source is shown on the projector, press the source button on the projector
or remote control one or more times to select the VGA-in port.
4. If the computer display is not shown on the projector, you might have to turn on the
computer’s video output port. For example, some computers require you to press a key
combination, such as F
computer.
If you want to adjust the picture, see “Adjusting the picture and sound” on page 29.
Selecting a different source
N+F4 or FN+F5. Refer to the user documentation provided with your
If the picture from your video source does not appear on the screen, you can quickly select the
correct source.
S Press the source button one or more times—until you see the picture or you see the name of
the video port where the source is connected.
You should also be sure the video source is turned on and playing video.
Hiding or showing the picture
1. Press the hide button on the remote control to blank the picture, and to mute the audio
(certain models only). This does not affect the video source, which continues playing.
2. Press any button to restore the picture, as well as the audio (certain models only).
Showing Presentations28
Page 29

3 Adjusting the Projector
You can change the projector’s settings through its built-in on-screen menu system, using the
buttons on the projector or the remote control.
To access the on-screen menu, press enter on the projector or remote control.
For details, see “Using the on-screen menu” on page 38.
Adjusting the picture and sound
Choosing the best picture mode
You can quickly choose a different picture mode to make adjustments to the picture. Picture
modes can control properties such as color and size. They let you easily choose the best
settings for ambient lighting and the type of video content.
S Press the picture mode button one or more times to select the picture mode that gives the
best picture.
Adjusting the picture and sound 29
Page 30

You can also customize the picture modes so they are best for your video sources:
1. Press the picture mode button to select the picture mode you want to adjust.
2. Press enter and go to Picture > Customize picture mode.
3. Adjust the settings until you are satisfied with the picture.
TIP: To exit from any on-screen menu or adjustment, press the exit button.
To return to the most recently used menu item when no on-screen menu or adjustment is
displayed, press the exit button.
Adjusting the shape of the picture
Depending on the type of video source you are viewing, the picture might or might not always
look correct or fit on the screen:
• If the active video device sends widescreen output to the projector, press enter, go to
Source, and set Widescreen input to On. See
• If the video device sends standard output, set Widescreen input to Off.
TIP: If you show widescreen pictures on a wide projection screen, a standard picture might
not fit on the screen. One solution is to change the current picture mode so it makes a smaller
picture. Press enter, go to Picture > Customize picture mode, and set Aspect Ratio to Reduced.
See 2 in the following diagram.
1 in the following diagram.
Adjusting the Projector30
Page 31

Adjusting a slanted picture
If the projector is tilted up or down, the sides of the picture on the screen might slant in or out,
even though the top and bottom are level. The keystone adjustment corrects this problem.
Adjust the picture using the keystone setting in the on-screen menu. Press enter, go to Setup >
Keystone, and adjust until the picture looks correct.
TIP: If the projector is not perpendicular to the screen, the projected image may slant left or
right. If this happens, turn the projector until the image is rectangular, with straight corners.
Adjusting the picture and sound 31
Page 32

Adjusting the picture for best color
You can fine tune the picture settings on your projector to get the best color and image quality.
You should perform these steps for each input source device and each input port that you use.
Do them in the order shown. For some input ports, some of these settings may not be available.
1. Press the picture mode button and select the picture mode you want to use for the current
source.
2. Press enter and go to the Picture menu.
3. Go to Color settings > Brightness. Adjust to the highest setting that still gives the darkest
black for black areas.
4. Go to Color settings > Contrast. Adjust to the highest setting that does not wash out fine
detail in bright areas. You can view bright clouds or textured white areas.
5. Go to Customize picture mode > Picture enhancement. Adjust to the setting that gives the
best overall mid-range brightness. This should have minimal effect on blacks and whites.
6. Go to Customize picture mode > Color temperature. Adjust to the setting where whites and
colors look best.
7. Go to Color settings > Color saturation. Adjust to the setting where colors look most
natural.
8. Go to Color settings > Tint. Adjust to the setting where colors look most natural.
9. Go to Advanced Color. Adjust Red, Green, and Blue to the settings where the colors
appear most natural.
10. Go to Customize picture mode > White intensity. Adjust this setting above 0 as needed to
brighten the picture. Note that color accuracy drops as white intensity increases.
11. Repeat all steps if necessary.
Adjusting other picture settings
The on-screen menu provides many settings that allow you to fine-tune the picture.
1. Press enter, and go to Picture.
2. Change the picture adjustments as needed.
From the Picture menu, you can change many picture options, such as brightness, contrast,
and picture shape, as well as customize the picture modes.
To get descriptions for all available picture adjustments, see “Picture menu” on page 36.
Adjusting the Projector32
Page 33

Adjusting the sound settings (certain models only)
You can control the volume of the projector’s speaker or any connected speakers:
• To change the volume, press enter, go to Setup > Volume, and change the setting.
• To turn the sound on or off temporarily, press enter, go to Setup > Mute, and mute the
sound.
Adjusting the projector setup
1. Press enter, and go to Setup.
2. Set the setup adjustments as needed.
From the Setup menu, you can select settings, such as menu language, projector position,
and menu timeout.
To get descriptions for all available setup adjustments, see “Setup menu” on page 35.
Preventing unauthorized use
You can prevent unauthorized people from using the projector by creating a secret button
sequence that is required for the projector to turn on. The unlock sequence is a series of 4 to 8
arrow buttons. If the buttons are not pressed in the order you specify, the projector does not
turn on. Use the following steps to set or clear an unlock sequence.
1. Press enter, go to Setup > Advanced setup > Projector lock, and press enter.
2. If an old unlock sequence is set, press the buttons according to the old sequence when
prompted, and then press enter.
3. To set a new unlock sequence, press the arrow buttons for the new sequence, and then
press enter.
To clear the unlock sequence and remove this protection, press only enter.
4. When prompted, confirm the new sequence and press enter.
NOTE: If you set an unlock sequence, you must press the sequence every time you turn on the
projector. The sequence protects the projector only when the projector is turning on, not at any
other time.
If you forget the unlock sequence, you must call HP support to unlock the projector. You must
have the projector and your proof of purchase.
Adjusting the picture and sound 33
Page 34
Using the on-screen menu
Changing settings using the on-screen menu
You can change the on-screen menu settings with the buttons on either the projector or the
remote control.
1. Press enter on the projector or remote control. This displays the on-screen menu.
2. Press up or down to highlight the desired menu icon, then press right to move into
that menu.
3. Press up or down to highlight a setting, then press enter to begin adjusting the
setting.
4. Press left or right , or press up or down , to adjust the setting, as prompted.
5. Press enter to return to the menu.
6. To go to a different menu, press left and select a menu.
7. To close the on-screen menu, press the exit button.
If you do nothing for a period of time, the on-screen menu closes. To change the amount of
time until the on-screen menu closes, press enter and select Setup > Timeout for menu.
TIP: To exit from any on-screen menu or adjustment, press the exit button.
Changing the default settings
The on-screen menus enable you to return selected or all projector settings to saved default
values. These values are originally the factory defaults, but you may prefer to replace the
factory defaults with a custom set of your own, using the following procedure. (You can also
restore the original factory defaults if needed.)
NOTE: This procedure will normally be performed by a system administrator.
1. Press enter on the projector or remote control. This displays the on-screen menu.
2. Use the on-screen menus to select the desired settings for all inputs and picture modes.
3. Select Help > Diagnostics....
4. On the remote or the projector, press the up and down buttons in this sequence to open the
default settings menu:
up – up – down – down – up – down ( )
5. Press enter to save the projector’s current settings as the new defaults. (You can also press
the exit button to restore the original factory default settings.)
Adjusting the Projector34
Page 35

Setup menu
Setup menu
Keystone Corrects the slanted sides of the picture. This compensates for a projector
Reset keystone Resets the keystone correction to zero (no correction).
Volume Adjusts the loudness of the projector’s audio (certain models only).
Mute Temporarily turns off the projector’s audio (certain models only).
Projector position Adjusts the picture to match the orientation of the projector: upright or
Lamp saver Sets a lower power level for the lamp.
Language... Selects the language used by the on-screen menu.
Hide Hides the picture and mutes the sound.
Advanced setup... Adjusts additional setup settings.
Power timeout Sets the length of time the projector waits for an input signal before
that is too high or low relative to the screen.
upside-down, in front of or behind the screen. Inverts or reverses the image
accordingly.
automatically shutting down.
Clean edges Enlarges and clips video images to remove noise from picture edges.
Timeout for menu Sets how many seconds the on-screen menu waits for input before it closes.
Horizontal size Fine-tunes the width of the image for multi-projector setups.
Reset lamp hours For a new lamp, resets the hours of use.
Projector lock... Sets or cancels a secret button sequence that must be entered for the
projector to operate.
Reset all settings Restores all menu settings to factory default settings.
Using the on-screen menu 35
Page 36

Picture menu
Changing these settings affects only the active source. Some picture adjustments are available
only when certain input ports are in use. Unavailable adjustments are shown in gray in the onscreen menu.
Picture menu
Color settings... Adjusts the picture and colors.
Brightness Brightens or darkens the picture.
Contrast Sets the difference between light and dark areas.
Sharpness Sharpens or softens the picture.
Color saturation Adjusts the intensity of colors.
Tint Shifts colors toward red or green.
Reset color settings Restores these color settings to the default settings.
Advanced color... Adjusts the individual colors in the picture.
Red Adjusts the amount of red in the picture.
Green Adjusts the amount of green in the picture.
Blue Adjusts the amount of blue in the picture.
Reset advanced
settings
Adjusting the Projector36
Restores the advanced color settings to their default values.
Page 37

Picture menu (continued)
VGA settings... Adjusts settings for a computer input.
Auto-sync Resynchronizes the projector with the input. If a VGA input image looks
incorrect, press auto-sync to try correcting the image.
Frequency Adjusts the timing of the projector relative to the computer.
Tracking Adjusts the phase of the projector relative to the computer.
Vertical offset Adjusts the picture up or down within the projection area.
Horizontal offset Adjusts the picture left or right within the projection area.
Picture mode Adjusts color and picture settings to one of several combinations designed
for different types of viewing situations. You can use a different picture
mode for each source or each viewing environment. You can also customize
each picture mode.
Customize picture mode... Changes settings associated with the current picture mode.
Picture enhancement Refines the color, lightness, and other characteristics of the picture.
White intensity Increases the brightness of white areas.
Color temperature Shifts color toward red or blue.
Aspect ratio Selects how the picture fits on the screen:
• Best fit automatically fits the picture without stretching it.
• 1-to-1 shows each picture dot as one projected dot.
• Reduced fits a standard-shape picture onto a widescreen projection
screen.
• Full uses the entire projector resolution screen size, with stretching
permitted.
Reset this picture mode Restores the current picture mode to its default settings.
Using the on-screen menu 37
Page 38

Source menu
For a visual aid, see “Back panel” on page 10.
Source menu
VGA Shows the source connected to the VGA-in port.
Composite video Shows the source connected to the composite-video port.
S-video Shows the source connected to the S-video port.
Component Shows the source connected to the component video port (available only on
DVI Shows the source connected to the DVI port (available only on certain models).
Source scan Sets whether the projector automatically searches for input signals and displays
Widescreen input Sets whether a widescreen (16:9) input device is in use. Adjusts the height of the
Help menu
certain models).
the next one found.
picture accordingly.
Help
Displays information and status of the projector.
Diagnostics... Show tests for checking the operation of the projector and the remote
control.
HP digital projector Displays information about the projector and any network connection.
Adjusting the Projector38
Page 39

4 Maintaining the Projector
Performing routine maintenance
Getting the projector status
To get the projector status:
S Press the enter button on the projector or remote control and go to Help.
This screen shows information and status for the projector.
Cleaning the projector lens
You can clean the front lens of the projector using the following recommendations. You cannot
clean any of the internal surfaces.
• To minimize the risk of damaging or scratching the lens surface, blow dust particles off the
lens with clean, dry, deionized air.
• If this method does not work, use the following method:
a. Wipe the lens in a single direction with a clean, dry cloth. Do not wipe back and forth
across the lens.
b. If the cloth is dirty or smears the lens, wash the cloth. If the cloth is still dirty after
washing it or the fabric is damaged, replace it.
CAUTION: Cleaning requires special consideration:
• Do not spray any type of fluid or cleaner directly on the lens surface. Cleaners might
damage the lens.
• Do not use fabric softener when washing a cleaning cloth or softener sheets when drying
the cloth. Chemicals on the cloth might damage the surface of the lens.
• Do not store a cleaning cloth in contact with the lens for a long time because doing so
contaminates the lens with dye from the cloth. The cloth can be contaminated if left in the
open air.
Performing routine maintenance 39
Page 40

Replacing the lamp module
As the projector operates over time, the brightness of the projector lamp gradually decreases
and the lamp becomes more susceptible to breakage. You can install a new lamp at any time
to bring the projector up to factory-fresh brightness. We recommend replacing the lamp if a
warning message is displayed.
WARNING! Replacing the lamp module requires special consideration:
• To reduce the risk of injury, be careful when removing the lamp module as broken glass
might be present. HP also recommends wearing goggles and gloves when removing the
lamp module. If the lamp is broken, contact HP about repairs that might be required due to
glass fragments.
• The lamp in this digital projector contains mercury. If the lamp breaks, adequately ventilate
the immediate area, discard any nearby food and drink, and thoroughly clean the table
surface around the projector. Wash your hands after cleaning the area or handling a
broken lamp. Note that disposal of this lamp may be regulated under applicable
environmental laws due to presence of mercury. For disposal or recycling information,
please contact your local authorities or the Electronic Industries Alliance (www.eiae.org).
For additional safety information about the lamp in this digital projector, please see:
www.hp.com/hpinfo/globalcitizenship/environment/productdata
• Because the lamp assembly operates at a very high temperature, wait 30 minutes before
removing the lamp module.
1. Turn off the projector and allow it to cool for 30 minutes.
2. If the projector is installed in a ceiling mount, remove it from the mount.
3. Unplug the power cord.
Maintaining the Projector40
Page 41
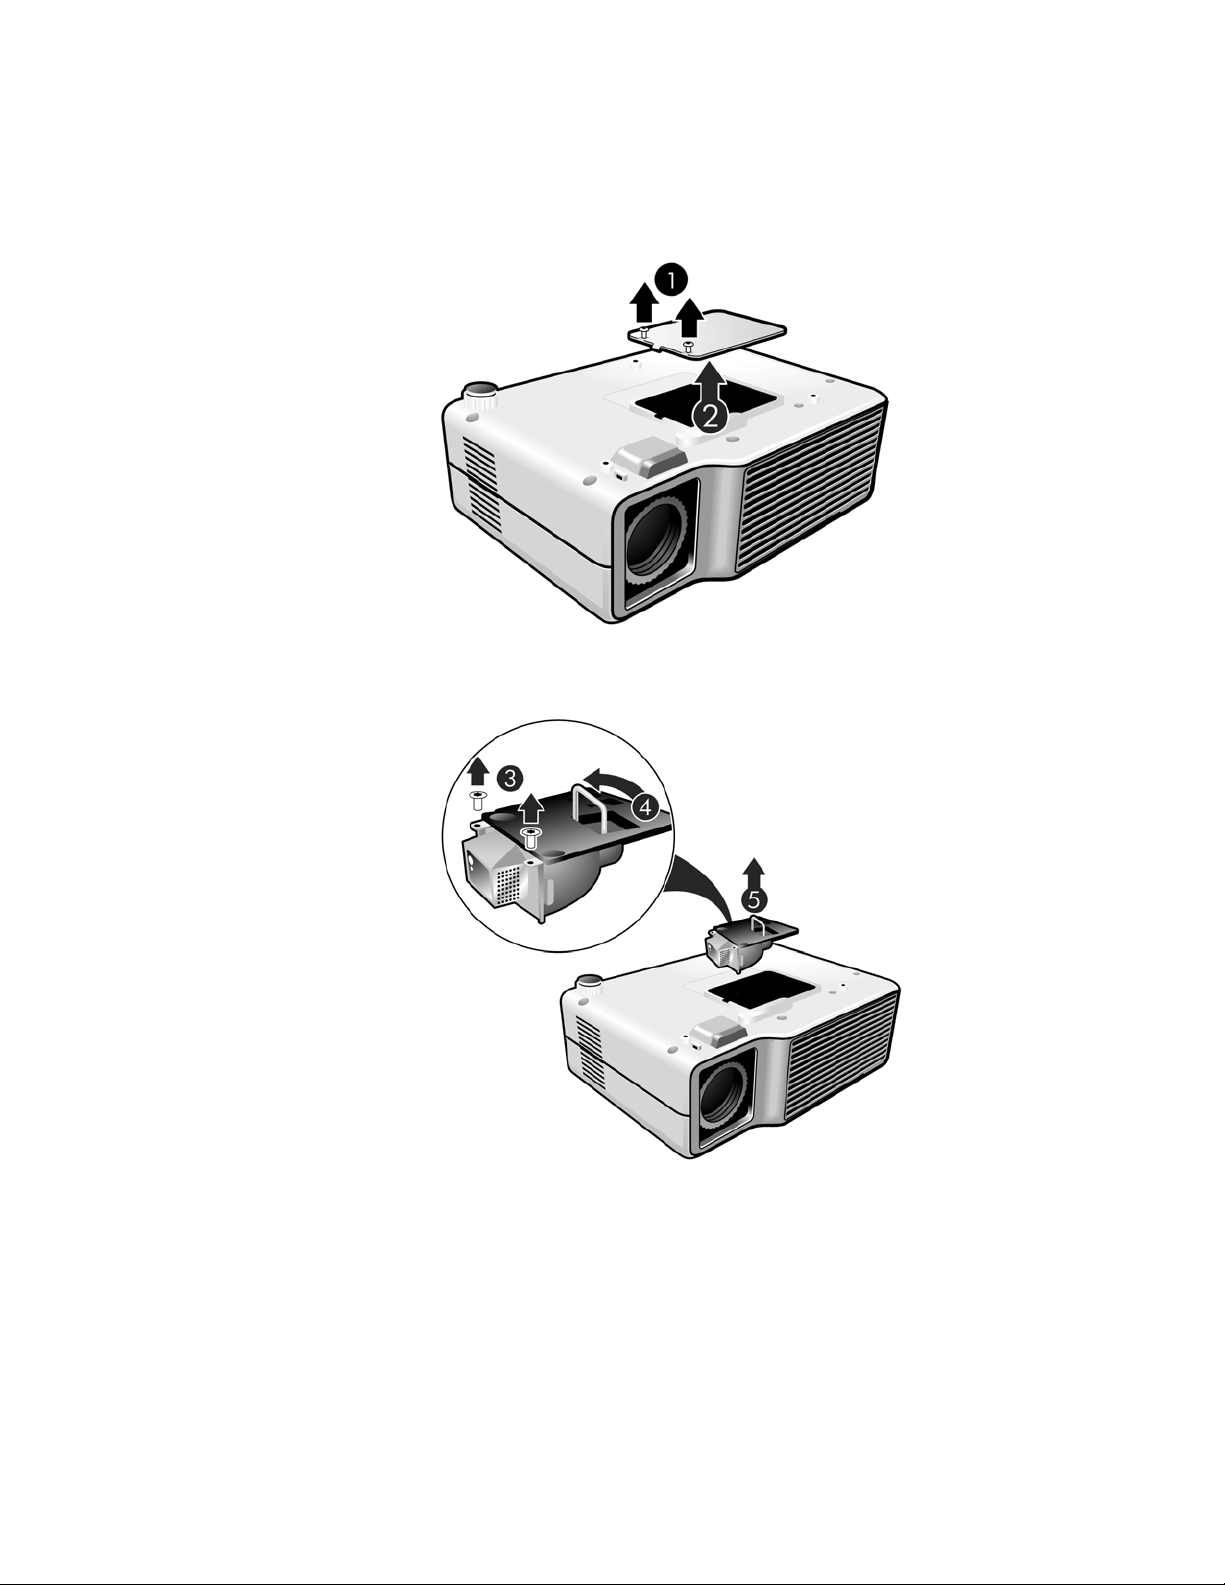
4. Loosen the two screws in the lamp cover 1 and remove the cover 2.
5. Remove the two screws
module
6. Insert the new lamp module into the projector and tighten the two screws.
7. Replace the lamp cover and tighten the two screws.
5.
3 from the lamp module, raise the handle 4, and lift out the
8. Turn on the projector. If the lamp does not turn on after the warm-up period, try reinstalling
the lamp.
9. Press enter, go to Setup > Advanced setup > Reset lamp hours, and press enter.
Performing routine maintenance 41
Page 42

Replacing the battery in the remote control
1. Use a ballpoint pen to hold the battery latch toward the center, then pull out the battery
holder
1.
2. Insert the new battery
3. Push the holder
When discarding old batteries, contact your local waste-disposal provider regarding local
restrictions on the disposal or recycling of batteries.
2 in the holder.
3 into the remote control.
Maintaining the Projector42
Page 43

Upgrading the projector
Updating the firmware
HP might periodically release updated versions of the projector firmware to enhance the
projector performance. The projector firmware version is shown in the on-screen menu at Help.
Check for updated versions at http://www.hp.com/support.
USB method
1. On a computer with a USB port, go to the HP projector upgrade website (see introduction
for this section) and download the latest file intended for the xp7010/xp7030 series
projector.
2. Connect a USB cable (available from HP) to the USB port on the computer. Do not connect
the cable to the projector at this point.
3. On the computer, run the file you downloaded by double-clicking the file.
4. Follow the on-screen instructions. When prompted, connect the USB cable to the projector.
NOTE: Be sure to follow the “new hardware found” instructions exactly as shown on-screen,
or the firmware will not be updated.
Upgrading the projector 43
Page 44

5 Installing Permanently
Installing the projector
Choosing cables
If you are permanently installing the projector or using it with long cables, consider the
following suggestions when planning the installation:
• Use high-quality cables. Use only video cables that are made with 75-ohm cable and
connectors. For high-resolution video, use low-loss video cables. For standard audio, use
audio cables that are shielded.
• Minimize cable length as much as possible. For video cables longer than 6 m (20 ft), use
low-loss cables. For standard audio cables longer than 6 m (20 ft), use 12-gauge wire.
• Do not run audio or video cables next to power or network cables. If they must cross, cross
them at 90 degrees.
• If you are installing cables in walls, use cables with necessary approvals, such as
Underwriters Laboratories (UL) approval.
• If you are running cables above a dropped ceiling, you must use plenum-rated cables if the
space above the ceiling is open to the space above other rooms. You must use plenumrated cables if you are running cables in a duct.
• Before installing cables permanently, check the setup with the final cables in the open.
Installing on a table
This installation is covered in detail in Chapter 1. See “Setting up the projector,” for more
information.
Installing Permanently44
Page 45

Installing on the ceiling
WARNING! To minimize the risk of injury from improperly installed equipment, it is
recommended that a professional installer performs the ceiling installation.
1. Attach the projector to the ceiling using an HP ceiling mount kit. Refer to the installation
instructions provided with the ceiling mount kit.
2. After the projector is mounted on the ceiling, adjust the projector settings to match this
setup. Press enter, go to Setup > Projector position, and select Front Ceiling.
Installing for rear projection
1. Place the projector 1.2 to 10 m (4 to 33 ft) behind a translucent screen that is designed for
rear projection.
See “Setting up the projector,” or “Installing on the ceiling,” above, for more instructions.
2. Press enter, go to Setup > Projector position. Then select Rear Table or Rear Ceiling.
Locking the projector
The projector includes a built in slot to secure the projector with a cable and lock (such as the
Kensington MicroSaver lock system, available at many computer stores).
1. Wrap the cable around a secure object, such as a table leg. Loop the cable to create a slip
knot around the stationary object, and be sure it cannot slip off.
2. Insert the lock
1 into the hole and twist the key 2.
Installing the projector 45
Page 46

Controlling an external accessory
If your projector has a 12-volt trigger output port, the projector can automatically control one
or more accessories. Certain types of accessories can use a 12-volt signal to trigger their
actions, such as a motorized screen lowering and raising the screen. The output provides a
12-volt dc signal whenever the projector is on (200 mA maximum current output).
Requires:
• Two-wire cable with 3.5-mm × 1.3-mm barrel connector (+12 V on inner contact) with the
following specifications.
+12V output electrical specification
Parameter Value
Output voltage 12 +/- 10% V
Output ripple 0.1 Vpp
Maximum output current 200 mA
Maximum rush current 2.0 A
Maximum rush current duration 10 ms
Installing Permanently46
Page 47

Connecting to a room controller
If your projector has a serial port, you can connect the projector to a room controller using a
serial (RS-232) cable. After you program the room controller using the following commands,
you can use the room controller to operate the projector and other components of your
installation.
Serial connections
The serial port on the projector uses a female, mini-DIN 6, RS-232 connector:
3: data sent to the projector (RX)
• Pin
• Pin
5: data sent from the projector (TX)
• Pins
• Pin
•
The room controller must use the following serial (RS-232) settings:
• 9600 baud
• 1 start bit + 8 data bits (D0=LSB, D7=MSB) + 1 stop bit
• No parity
• Full duplex communication channels (no flow control)
• No handshaking
TIP: Go to http://www.hp.com/support for additional information.
1, 4, and 6: not connected
2: ground (GND)
7: metal frame (shroud)
Connecting to a room controller 47
Page 48

Examples of room controller commands
In the following examples, “<CR>” and “<LF>” represent a carriage return and line feed,
respectively.
Commands are sent to the projector as “requests” which consist of an asterisk (*) prefix, the
command name, any needed parameter, and a carriage return <CR> as a terminator:
* command = parameter <CR>
Requests can contain only ASCII alphanumeric characters. Blanks (spaces) are allowed, except
within keywords and numbers. Line feeds <LF> are ignored.
The following table shows the specific syntax to use for various requested tasks.
To perform this task... Use this request syntax...
Change a setting to a specified value *command=value<CR>
Ask the current setting *command=?<CR>
Increment a setting *command=+<CR>
Decrement a setting *command=–<CR>
Invoke an action (no parameter needed) *command<CR>
In general, every request sent to the projector generates one or more notification messages,
which are sent to the room controller. Actions initiated by the projector can also generate
notifications.
The projector always sends notifications whenever a setting changes, whether as the result of a
request from a controller, or as the result of an action, such as a button press or menu change.
Some requested setting changes take time to perform, or are carried out in stages. Because of
this, requests might produce delayed notifications.
Installing Permanently48
Page 49

The following table lists the types of notifications generated in various situations.
This type of request... Generates this type of notification...
Modify a setting Echoes the request command and shows the resulting value:
Request: *BRT=65<CR>
Notification: *BRT=65<CR><LF>
Query a setting Echoes the request command and shows the resulting value:
Request: *CON=?<CR>
Notification: *CON=40<CR><LF>
Execute an action Echoes the request command:
Request: *NXT<CR>
Notification: *NXT<CR><LF>
Incorrect commands cause the following types of notifications:
• No asterisk at start of command—no response
• Unrecognized command name—command with “?” added
• Command that is currently unavailable—command with “?” added
• Invalid parameter—command with current value
• Action command with unnecessary parameter—action command
• Action command that is unavailable—action command
The following simplified example shows how the projector typically responds to a request to
change the active input source. Note that the three latter notifications are delayed.
Request: *RSRC=4<CR>
Notification: *RSRC=4<CR><LF> (acknowledges request)
*SRC=0<CR><LF> (projector is attempting to acquire source 4, and in the interim
has no valid source)
*SRC=4<CR><LF> (source 4 is now active)
*BRT=60<CR><LF> (brightness has been modified for source 4)
*CSPC=?<CR><LF> (color space is not supported for this input)
Connecting to a room controller 49
Page 50

Room controller commands
In the following tables, if the parameter listing for a particular command is “None,” that
command requires no parameter. Some commands are valid only when the projector is turned
on, STAT=1. Some commands are available only when specific input sources are active.
Source function
Command Parameters Description
SRC ? Queries the current active input source: 0=no active
RSRC 1, 3, 4, 8, ? Attempts to use the specified source as the active input
NXT None Switches to the next input source.
AUTO 0, 1, ? Sets or queries automatic searching inputs for signal: 0=no
Video functions
source,1=VGA-in, 3=composite video, 4=S-video, 8=DVI.
source, or queries the last source requested: 1=VGA-in,
3=composite video, 4=S-video, 8=DVI.
searching, 1=searching.
Command Parameters Description
CSPC 0 to 2, ? Sets or queries the active color space: 0=RGB, 1=YPbPr,
2=YCbCr.
PMOD 0,1,5,? Sets or queries the picture mode: 0=graphics, 1=video,
5=custom.
VSHF value, +, –, ? Sets or queries the vertical shift of the projected image:
usable range is determined by the active input source.
HSHF value, +, –, ? Sets or queries the horizontal shift of the projected image:
usable range is determined by the active input source.
WHIT 0 to 10, +, –, ? Sets or queries the white intensity.
BRT 0 to 100, +, –, ? Sets or queries the brightness.
CON 0 to 100, +, –-, ? Sets or queries the contrast.
SAT 0 to 100, +, –, ? Sets or queries the color saturation.
Installing Permanently50
Page 51

Video functions (continued)
Command Parameters Description
TNT –45 to 45, +, –, ? Sets or queries the tint.
RADJ –50 to 50, +, –, ? Sets or queries the amount of red.
GADJ –50 to 50, +, –, ? Sets or queries the amount of green.
BADJ –50 to 50, +, –, ? Sets or queries the amount of blue.
CTMP 0 to 2, ? Sets or queries the color temperature: 0=warm, 1=neutral,
2=cool.
SHRP 0 to 12, +, –, ? Sets or queries the sharpness.
PENH 0 to 6, +, –, ? Sets or queries the picture enhancement setting.
KEYV –50 to 50, +, –, ? Sets or queries the vertical keystone: 0=no keystone
adjustment, 1 to 50=shrinks the top of the display,
–1 to -50=shrinks the bottom of the display.
ASPT 0, 1, 4, ? Sets or queries the aspect ratio: 0=1-to-1, 1=Best Fit,
4=Reduced.
SYNC None Automatically resynchronizes the projector to the active
computer input source.
FREQ –50 to 50, +, –, ? Sets or queries the projector’s timing relative to the active
computer input source.
TRK value, +, –, ? Sets or queries the synchronization of the projector to the
active computer input source.
VPOS value, +, –, ? Sets or queries the vertical positioning of the projected
image: usable range is the maximum and minimum allowed
by the active computer input source.
HPOS value, +, –, ? Sets or queries the horizontal positioning of the projected
image: usable range is the maximum and minimum allowed
by the active computer input source.
HIDE 0, 1, ? Sets or queries picture blanking: 0=not hidden, 1=hidden.
WIDE 0, 1, ? Sets or queries wide screen mode: 0=normal, 1=wide.
KEYR None Resets keystone to zero.
Connecting to a room controller 51
Page 52

Audio functions
Command Parameters Description
MUTE 0, 1, ? Sets or queries audio muting: 0=not muted, 1=muted.
VOL 0 to 31, +, –, ? Sets or queries audio volume: 0=off, 31=maximum.
INTSP 0, 1, ? Sets or queries usage of the internal speaker (certain models
only): 0=disabled, 1=enabled.
Setup functions
Command Parameters Description
LANG 0 to 10, ? Sets or queries the language used by the projector:
0=English, 1=French, 2=Italian, 3=German, 4=Portuguese,
5=Spanish, 6=Traditional Chinese, 7=Simplified Chinese,
8=Korean, 9=Japanese, 10=Czech.
LSAV 0, 1, ? Sets or queries low-power operating mode: 0=normal
power, 1=low power.
LHRS ? Queries the time (in tenths of hours) that the lamp has been
in use.
THRS ? Queries the total time (in tenths of hours) that the projector
has been in use.
POS 0 to 3, ? Sets or queries the projector’s position: 0=front table,
1=front ceiling, 2=rear table, 3=rear ceiling.
TMO 5 to 120, ? Sets or queries the menu timeout setting (seconds)
PTMO 0, 3 to 6, ? Sets or queries the power timeout: 0=never, 3=15 min,
4=30 min, 5=60 min, 6=120 min.
EDGE 0, 1, ? Sets or queries the cleaning of noise from edges of image:
0=no cleaning, 1=cleaning.
VERS ? Queries the projector model number and firmware version.
The notification takes this form:
*VERS=”proj_model:proj_fw”
Installing Permanently52
Page 53

Setup functions (continued)
Command Parameters Description
FWVERS ? Queries the projector firmware model number and firmware
version. Similar to VERS, but used to verify that a firmware
update image is appropriate for the projector. The
notification takes this form:
*VERS="proj_model:M.mmm"
IPADDR Hex IP address, ? Used by network module to tell projector the IP address to
display in the help menu.
SNET Hex subnet mask, ? Used by network module to tell projector the subnet mask to
display in the help menu.
MAC Hex MAC address, ? Used by network module to tell projector the MAC address
to display in the help menu.
SNUM ? Queries the projector's serial number.
RSET None Restores all settings to defaults.
Power and status functions
Command Parameters Description
SHDN None Puts the projector into cool-down state, and later into standby
state. The projector sends a notification when it enters cooldown state (STAT=3), and another when it enters standby state
(STAT=0). This keyword requires the projector to be in its on
state (STAT=1).
Do not send any requests other than STAT in the time between
the cool-down and standby state notifications. Otherwise,
unexpected results can occur.
W or WAKE None Puts the projector into warm-up state, and later into on state.
The projector sends a notification when it enters warm-up state
(STAT=2), and another when it enters the on state (STAT=1).
This keyword requires the projector to be in standby state
(STAT=0).
Do not send any requests other than STAT in the time between
the warm-up and on state notifications. Otherwise, unexpected
results can occur.
Connecting to a room controller 53
Page 54

Power and status functions (continued)
Command Parameters Description
STAT ? Queries the projector's current state: 0=standby state (off),
1=on, 2=warm-up state, 3=cool-down state.
ALERT Not a request Notifies when a system alert condition occurs: 0=lamp life
warning, 1=lamp life reached, 2=lamp faulty, 3=lamp
problem, 4=internal temperature too high, 5=fan problem,
6=ambient temperature too high, 7=color wheel problem,
8=lamp cover open, 9=ballast faulty.
ALERT is sent only by the projector, and cannot be used in
requests.
Simulated key presses
Command Parameters Description
BACK None Simulates pressing the Exit Arrow key on keypad
ENTER None Simulates pressing the ENTER key on keypad
LEFT None Simulates pressing the Left Arrow key on keypad
RIGHT None Simulates pressing the Right Arrow key on keypad
UP None Simulates pressing the Up Arrow key on keypad
DOWN None Simulates pressing the Down Arrow key on keypad
Installing Permanently54
Page 55

6Fixing Problems
Troubleshooting suggestions
If you have a problem with your projector, check the following statement that most closely
matches the nature of the problem, then look in that section of this chapter:
• “Warning light problems” on page 55
• “Start-up problems” on page 56
• “Picture problems” on page 56
• “Sound problems” on page 59
• “Interruption problems” on page 59
• “Remote control problems” on page 60
TIP: If these suggestions do not solve your problem, go to http://www.hp.com/support for
additional information. To contact HP, refer to the support guide included with the projector.
Warning light problems
If both red warning lights are blinking:
• Allow the projector to cool down after it turns off. If this condition occurs after you
restart the projector, an internal component has failed. Contact HP for assistance.
If the red temperature light is on:
• Allow the projector to cool down after it turns off. Be sure that nothing is near or
blocking the vents on the projector, and that the vents are free of lint and other objects.
Remove any sources of excess heat in the room. Observe temperature and altitude limits
(see “Specifications” on page 61). If the warning light turns on or blinks after you
restart the projector, contact HP for assistance.
If the red temperature light is blinking:
• Contact HP for assistance.
Troubleshooting suggestions 55
Page 56

If the red lamp light is on:
• Install a new lamp. If the lamp light is on after you install a new lamp module, remove
and reinstall the lamp module. If a new lamp does not fix the problem, contact HP for
assistance.
If the red lamp light is blinking:
• Contact HP for assistance.
If the red lamp light is flickering quickly:
• Check that the cover over the lamp at the side of the projector is correctly installed and
fully attached. Check the tab at the top of the cover and latch at the bottom.
Start-up problems
If no lights or sounds turn on:
• Be sure that the power cable is securely connected to the projector and the other end is
plugged into an outlet with power.
• Be sure the disconnect switch is turned on.
• Press the power button again.
• Unplug the power cord for 15 seconds, then plug it in and press the power button
again.
Picture problems
If a “scanning” or “waiting” message is displayed on a blank screen:
•Press the source button on the projector or remote control one or more times until the
correct source name is selected.
• Be sure the external source is turned on and connected.
• For a computer connection, ensure your notebook computer’s external video port is
turned on. Refer to the computer manual. On some notebooks, for example, press the
F
N+F4 or FN+F5 function keys to turn on the external video port.
If the wrong input source is displayed:
•Press the source button on the projector or the remote control one or more times to select
another active input source.
Fixing Problems56
Page 57

If the image is out of focus:
• Be sure the lens cover is open.
• While displaying the on-screen menu, adjust the focus ring. (The image size should not
change; if it does, you are adjusting the zoom, not the focus.)
• Ensure the projection screen is 1.2 to 10 m (4 to 33 ft) from the projector.
• Check the projection lens to see if it needs cleaning.
• For a computer connection, set the display resolution as the computer to the same
resolution as the projector, 800 × 600 or 1024 × 768 (see “Specifications” on
page 61). If the computer has multiple monitors, adjust the resolution of the monitor
assigned to the projector.
• For a computer connected to the S-video port, the picture cannot be as high resolution
as what you see on the computer display.
If an upside-down or reversed image is displayed:
• The projector has been set to the wrong position setting. Press enter, go to Setup >
Projector position, and select the correct setting.
If the image is too small or too large:
• Adjust the zoom ring on top of the projector.
• Move the projector closer to or farther from the screen.
• On the projector or remote control, press the picture mode button one or more times
to see if one of the picture modes makes the image the correct size.
•Press enter, go to Picture > Customize picture mode > Aspect ratio. Try the different
settings.
• If the source device sends wide-screen output, press enter, go to Source, and try setting
Widescreen input to On. Otherwise, set it to Off.
If the image has slanted sides:
• As much as possible, reposition the projector so that it is centered on the screen and
below the bottom or above the top of the screen.
• On the projector, press enter, go to Setup > Keystone, and adjust until the sides are
vertical.
Troubleshooting suggestions 57
Page 58

If the image is stretched:
• On the projector or remote control, press the picture mode button one or more times
to see if one of the picture modes makes the image the correct size.
•Press enter, go to Picture > Customize picture mode > Aspect ratio. Try the different
settings.
• If the source device sends wide-screen output, press enter, go to Source, and try setting
Widescreen input to On. Otherwise, set it to Off.
If the projected colors seem slightly wrong:
• See “Adjusting the picture for best color” on page 32.
•Press enter, go to Help > Diagnostics, and run the color test.
If the projected colors seem completely wrong:
• Be sure the pins on the cable connectors are not bent or broken.
•Press enter, go to Help > Diagnostics, and run the color test.
•Press enter, go to Picture > Color settings > Reset color settings, and press enter.
•Press enter, go to Setup > Advanced settings > Reset all settings, and press enter.
If the picture is not clear (ghost images, smearing, poor quality):
• Be sure the video cable you are using is coaxial cable rated at 75 ohms. Any other
cable or impedance rating can reduce picture quality.
• The video cable connecting the video source to the projector probably must be higher
quality. See “Choosing cables” on page 44.
If several picture settings seem completely wrong and you cannot fix them:
•Press enter, go to Picture > Color settings > Reset color settings, and press enter.
•Press enter, go to Setup > Advanced settings > Reset all settings, and press enter.
If a scrolling or cut-off image is displayed for a computer connection:
•Press the auto sync button on the projector or remote control.
• Turn everything off. Then power on the projector first and power on the notebook or
desktop computer second.
• If the previous steps do not correct the display image, adjust the resolution of the
notebook or desktop computer to the same resolution as the projector, 800 × 600 or
1024 × 768 (see “Specifications” on page 61). If the computer has multiple monitors,
adjust the resolution of the monitor assigned to the projector.
Fixing Problems58
Page 59

If the image is flickering or unstable for a computer connection:
•Press the auto sync button on the projector or remote control.
•Press enter, go to Picture > VGA settings, and adjust Frequency or Tracking.
If the image disappears from the computer screen:
• For a notebook computer, you might be able to turn on both the external VGA port and
the built-in screen. Refer to the computer manual.
• Connect a monitor to the VGA-out port.
If text or lines from a computer display seem rough or uneven:
• Check the focus adjustment.
•Press enter, go to Setup > Reset keystone, and press enter.
Sound problems
If no sound is coming out of the projector:
• Be sure you have an audio cable securely connected between the projector and the
source device.
•Press enter, go to Setup, and check that Mute is set to Not muted and Volume is correct.
•Press enter, go to Help > Diagnostics, and run the sound test.
• Be sure that the mute and volume settings are correct on the source device, such as a
VCR, camcorder, or computer.
Interruption problems
If the projector stops responding to all controls:
• If possible, turn off the projector, then unplug the power cord and wait at least
15 seconds before reconnecting power.
If the lamp shuts off during a show:
• A minor power surge might cause the lamp to shut off. This is normal. Wait a few
minutes, then power on the projector.
• If a red warning light is on or blinking, see “Warning light problems” on page 55.
If the lamp burns out or makes a popping sound:
• If the lamp burns out and makes a popping sound, the projector will not turn back on
until the lamp module has been replaced.
• If the lamp breaks, contact HP about repairs that might be required due to glass
fragments.
Troubleshooting suggestions 59
Page 60

Remote control problems
If the remote control does not operate:
• Be sure nothing is blocking the remote control receiver on the front or back of the
projector. Move to within 8 m (26 ft) of the projector.
• Aim the remote control at the screen or at the front or back of the projector.
• Move the remote control so it is more directly in front of or behind the projector and not
as far to the side.
•Press enter, go to Help > Diagnostics, and run the remote control test.
• Replace the battery in the remote control.
Testing the projector
Running the projector diagnostics
The on-screen menu contains diagnostic tests you can use to verify the proper operation of the
projector and the remote control.
1. Press enter and go to Help > Diagnostics.
2. Select a test and press enter.
3. Follow the displayed instructions.
Fixing Problems60
Page 61

7 Reference
This chapter lists the specifications, safety information, and regulatory information for the
projector.
Specifications
Because HP continually improves its products, the following specifications are subject to
change. For the latest specifications, visit the HP website at http://www.hp.com.
Projector specifications
Size 309 × 229 × 102 mm (12.2 × 9.0 × 4.0 in.)
Weight 3.3 kg (7.3 lb)
Resolution XGA (1024 × 768)
Technology DLP
Video connectors VGA-in (D-sub) with optional cable for component-video input
VGA-out (D-sub)
S-video (mini-DIN)
Composite video (RCA)
DVI-D (available only on certain models)
RCA component video (available only on certain models)
Audio connectors Stereo-in and out (2 mini-phone, available only on certain models)
Other connectors USB 1.1 type B
RS-232 control
12-Vdc trigger output (available only on certain models)
Specifications 61
Page 62

Projector specifications (continued)
Video compatibility NTSC-M
NTSC 4.43 MHz
PAL-60
PAL B, D, G, H, I, M, N
SECAM: B, D, G, K, K1, L
HDTV (480i/p, 576i/p, 720p, 1080i)
DVI with HDCP (available only on certain models)
IR receivers Front and back of projector
Lamp 300-watt lamp
2000-hour average lamp life (to half of original brightness)
Lamp saver mode reduces lamp power to 250 watts, extends life to
3000 hours
Replacement lamp: L2139A
Optics 1.2 to 10 m (4 to 33 ft) focus range
7.2 to 8.6 m (23.6 to 28.3 ft) focal length
1.2:1 optical zoom
Throw ratio (distance/width)
Wide: 1.641
Tele: 1.969
115% ±5% offset (relative to half-height)
Light engine 0.7-in. 12° DDR DMD
Audio Monaural speaker, 2-watt peak output (certain models only)
Noise level Less than 35 dBA in Normal mode, or 32 dBA in lamp saver mode
Vertical tilt 0° to 8°
Vertical keystone
correction
Remote control USB mouse
Mounting options Ceiling and tabletop, front and rear projection
Lens cap Detachable with connecting leash
Security Kensington lock compatible
Reference62
±15%
Unlock sequence protects against unauthorized use
Page 63

Projector specifications (continued)
Power 100 to 240 V at 50 to 60 Hz
Environment Operating:
Temperature: 10 to 35 °C (50 to 95 °F)
Humidity: 80% RH max, non-condensing
Altitude: up to 3,000 m (10,000 ft), up to 25 °C (77 °F)
Storage:
Temperature: –20 to 55 °C (–4 to 131 °F)
Humidity: 80% RH max, non-condensing
Altitude: up to 12,000 m (40,000 ft)
Video mode compatibility
Compatibility Resolution Refresh rates (Hz)
Analog
VGA 640 × 350 70, 85
640 × 400 85
640 × 480 60, 72, 75, 85
720 × 400 70, 85
SVGA 800 × 600 56, 60, 72, 75, 85
XGA 1024 × 768 60, 70, 75, 85
SXGA 1280 × 1024 60, 75
SXGA+ 1400 × 1050 60
Specifications 63
Page 64

Safety information
Mercury safety
WARNING! The lamp in this digital projector contains mercury. If the lamp breaks,
adequately ventilate the immediate area, discard any nearby food and drink, and thoroughly
clean the table surface around the projector. Wash your hands after cleaning the area or
handling a broken lamp. Note that disposal of this lamp may be regulated under applicable
environmental laws due to presence of mercury. For disposal or recycling information, please
contact your local authorities or the Electronic Industries Alliance (www.eiae.org). For
additional safety information about the lamp in this digital projector, please see:
www.hp.com/hpinfo/globalcitizenship/environment/productdata
Regulatory information
This section presents information that shows how your digital projector complies with
regulations in certain regions. Any modifications to your digital projector not expressly
approved by HP could void the authority to operate the digital projector in these regions.
U.S.A.
This digital projector has been tested and found to comply with the limits for a Class B digital
device, pursuant to Part 15 of the FCC Rules. These limits are designed to provide reasonable
protection against harmful interference in a residential installation.
This digital projector generates, uses, and can radiate radio frequency energy. If not installed
and used in accordance with the instructions, it can cause harmful interference to radio
communications. However, there is no guarantee that interference will not occur in a particular
installation. If this digital projector does cause harmful interference to radio or television
reception (which can be determined by unplugging the unit), try the following:
• Reorienting or relocating the receiving antenna.
• Relocating the digital projector with respect to the receiver.
• Connecting the digital projector’s power cord to another power outlet.
Reference64
Page 65

Connections to peripheral devices
To maintain compliance with FCC Rules and Regulations, use properly shielded cables with
this device.
For more information, consult your dealer, an experienced radio/television technician, or,
prepared by the Federal Communications Commission, How to Identify and Resolve Radio-TV
Interference Problems. This booklet is available from the U.S. Government Printing Office,
Washington, DC 20402, Stock Number 004-000-00345-4. At the first printing of this manual,
the telephone number was 202-512-1800.
Canada
This Class B digital apparatus complies with Canadian ICES-003.
Japan
Korea
International
For regulatory identification purposes, your product is assigned a regulatory model number.
The regulatory model number for your product is listed in the declaration of conformity. This
regulatory number is different from the marketing name and product number.
Regulatory model number: CRVSB-05LE
Regulatory information 65
Page 66

Declaration of conformity
Manufacturer's name: Hewlett Packard Company
Manufacturer's address: Hewlett Packard Company
Declares, that the product(s):
Product name: Digital Projector
Model numbers: xp7010, xp7030 series
Regulatory model: CRVSB-05LE
Conforms to the following Product Specifications:
Safety:
IEC 60950-1: 2001 / EN 60950-1: 2001
GB4943-1995
EMC:
EN 55022 +A1:2000 +A2:2003 [1]
CISPR 24:1997 / EN 55024:1998 + A1:2001 +A2:2003
IEC 61000-3-2:1995 / EN 61000-3-2:2000
IEC 61000-3-3:1994 / EN 61000-3-3:1995+A1:2001
GB9254-1998
FCC Title 47 CFR, Part 15 Class B/ANSI C63.4: 2003
AS/NZS 3548: 1995 Rules and Regulations of Class B
VCCI
Supplementary information:
The product herewith complies with the requirements of following Directives and carries the CE marking accordingly:
– Low Voltage Directive: 73/23/EEC
– EMC Directive: 89/336/EEC
[1] The product was tested in a typical configuration with Hewlett Packard Personal Computer peripherals.
According to ISO/IEC Guide 22 and EN 45014
Display Technologies and Products
1000 NE Circle Blvd.
Corvallis, OR 97330-4239
This device complies with Part 15 of the FCC Rules. Operation is subject to the following two conditions: (1) This
device may not cause harmful interference, and (2) this device must accept any interference received, including
interference that may cause undesired operation.
Corvallis, Oregon, October 5, 2005
Steve Brown, General Manager
European Contact for regulatory topics only: Hewlett Packard GmbH, HQ-TRE, Herrenberger StraBe 140,
71034 Boeblingen, Germany. (FAX:+49-7031-143143).
USA Contact: Hewlett Packard Co., Corporate Product Regulations Manager, 3000 Hanover Street, Palo Alto, CA 94304.
Phone: (650) 857-1501.
Reference66
Page 67
Recycling information
Disposal of Waste Equipment by Users in Private Households in the European Union
This symbol on the product or on its packaging indicates that this product must not be disposed of with your other
household waste. Instead, it is your responsibility to dispose of your waste equipment by handing it over to a designated
collection point for the recycling of waste electrical and electronic equipment. The separate collection and recycling of your
waste equipment at the time of disposal will help to conserve natural resources and ensure that it is recycled in a manner
English
that protects human health and the environment. For more information about where you can drop off your waste equipment
for recycling, please contact your local city office, your household waste disposal service or the shop where you purchased
the product.
Evacuation des équipements usagés par les utilisateurs dans les foyers privés au sein de l'Union européenne
La présence de ce symbole sur le produit ou sur son emballage indique que vous ne pouvez pas vous débarasser de ce
produit de la même façon que vos déchets courants. Au contraire, vous êtes responsable de l'évacuation de vos
équipements usagés et à cet effet, vous êtes tenu de les remettre à un point de collecte agréé pour le recyclage des
équipements électriques et électroniques usagés. Le tri, l'évacuation et le recyclage séparés de vos équipements usagés
Français
permettent de préserver les ressources naturelles et de s'assurer que ces équipements sont recyclés dans le respect de la
santé humaine et de l'environnement. Pour plus d'informations sur les lieux de collecte des équipements usagés, veuillez
contacter votre mairie, votre service de traitement des déchets ménagers ou le magasin où vous avez acheté le produit.
Entsorgung von Elektrogeräten durch Benutzer in privaten Haushalten in der EU
Dieses Symbol auf dem Produkt oder dessen Verpackung gibt an, dass das Produkt nicht zusammen mit dem Restmüll
entsorgt werden darf. Es obliegt daher Ihrer Verantwortung, das Gerät an einer entsprechenden Stelle für die Entsorgung
oder Wiederverwertung von Elektrogeräten aller Art abzugeben (z.B. ein Wertstoffhof). Die separate Sammlung und das
Recyceln Ihrer alten Elektrogeräte zum Zeitpunkt ihrer Entsorgung trägt zum Schutz der Umwelt bei und gewährleistet, dass
Deutsch
sie auf eine Art und Weise recycelt werden, die keine Gefährdung für die Gesundheit des Menschen und der Umwelt
darstellt. Weitere Informationen darüber, wo Sie alte Elektrogeräte zum Recyceln abgeben können, erhalten Sie bei den
örtlichen Behörden, Wertstoffhöfen oder dort, wo Sie das Gerät erworben haben.
Smaltimento di apparecchiature da rottamare da parte di privati nell'Unione Europea
Questo simbolo che appare sul prodotto o sulla confezione indica che il prodotto non deve essere smaltito assieme agli
altri rifiuti domestici. Gli utenti devono provvedere allo smaltimento delle apparecchiature da rottamare portandole al
luogo di raccolta indicato per il riciclaggio delle apparecchiature elettriche ed elettroniche. La raccolta e il riciclaggio
separati delle apparecchiature da rottamare in fase di smaltimento favoriscono la conservazione delle risorse naturali e
Italiano
garantiscono che tali apparecchiature vengano rottamate nel rispetto dell'ambiente e della tutela della salute. Per ulteriori
informazioni sui punti di raccolta delle apparecchiature da rottamare, contattare il proprio comune di residenza, il servizio
di smaltimento dei rifiuti locale o il negozio presso il quale è stato acquistato il prodotto.
Recycling information 67
Page 68

Eliminación de residuos de aparatos eléctricos y electrónicos por parte de usuarios domésticos en la Unión Europea
Este símbolo en el producto o en el embalaje indica que no se puede desechar el producto junto con los residuos
domésticos. Por el contrario, si debe eliminar este tipo de residuo, es responsabilidad del usuario entregarlo en un punto
de recolección designado de reciclado de aparatos electrónicos y eléctricos. El reciclaje y la recolección por separado de
estos residuos en el momento de la eliminación ayudará a preservar recursos naturales y a garantizar que el reciclaje
Español
proteja la salud y el medio ambiente. Si desea información adicional sobre los lugares donde puede dejar estos residuos
para su reciclado, póngase en contacto con las autoridades locales de su ciudad, con el servicio de gestión de residuos
domésticos o con la tienda donde adquirió el producto.
Likvidace vysloužilého zarízení uživateli v domácnosti v zemích EU
Tato znacka na produktu nebo na jeho obalu oznacuje, že tento produkt nesmí být likvidován prostým vyhozením do
bežného domovního odpadu. Odpovídáte za to, že vysloužilé zarízení bude predáno k likvidaci do stanovených sberných
míst urcených k recyklaci vysloužilých elektrických a elektronických zarízení. Likvidace vysloužilého zarízení samostatným
sberem a recyklací napomáhá zachování prírodních zdroju a zajištuje, že recyklace probehne zpusobem chránícím lidské
Cesky
zdraví a životní prostredí. Další informace o tom, kam mužete vysloužilé zarízení predat k recyklaci, mužete získat od
úradu místní samosprávy, od spolecnosti provádející svoz a likvidaci domovního odpadu nebo v obchode, kde jste
produkt zakoupili.
Bortskaffelse af affaldsudstyr for brugere i private husholdninger i EU
Dette symbol på produktet eller på dets emballage indikerer, at produktet ikke må bortskaffes sammen med andet
husholdningsaffald. I stedet er det dit ansvar at bortskaffe affaldsudstyr ved at aflevere det på dertil beregnede
indsamlingssteder med henblik på genbrug af elektrisk og elektronisk affaldsudstyr. Den separate indsamling og genbrug
af dit affaldsudstyr på tidspunktet for bortskaffelse er med til at bevare naturlige ressourcer og sikre, at genbrug finder sted
Dansk
på en måde, der beskytter menneskers helbred samt miljøet. Hvis du vil vide mere om, hvor du kan aflevere dit
affaldsudstyr til genbrug, kan du kontakte kommunen, det lokale renovationsvæsen eller den forretning, hvor du købte
produktet.
Afvoer van afgedankte apparatuur door gebruikers in particuliere huishoudens in de Europese Unie
Dit symbool op het product of de verpakking geeft aan dat dit product niet mag worden afgevoerd met het huishoudelijk
afval. Het is uw verantwoordelijkheid uw afgedankte apparatuur af te leveren op een aangewezen inzamelpunt voor de
verwerking van afgedankte elektrische en elektronische apparatuur. De gescheiden inzameling en verwerking van uw
afgedankte apparatuur draagt bij tot het sparen van natuurlijke bronnen en tot het hergebruik van materiaal op een wijze
die de volksgezondheid en het milieu beschermt. Voor meer informatie over waar u uw afgedankte apparatuur kunt
Nederlands
inleveren voor recycling kunt u contact opnemen met het gemeentehuis in uw woonplaats, de reinigingsdienst of de winkel
waar u het product hebt aangeschaft.
Eramajapidamistes kasutuselt kõrvaldatavate seadmete käitlemine Euroopa Liidus
Kui tootel või toote pakendil on see sümbol, ei tohi seda toodet visata olmejäätmete hulka. Teie kohus on viia tarbetuks
muutunud seade selleks ettenähtud elektri- ja elektroonikaseadmete utiliseerimiskohta. Utiliseeritavate seadmete eraldi
kogumine ja käitlemine aitab säästa loodusvarasid ning tagada, et käitlemine toimub inimeste tervisele ja keskkonnale
Eesti
ohutult. Lisateavet selle kohta, kuhu saate utiliseeritava seadme käitlemiseks viia, saate küsida kohalikust omavalitsusest,
olmejäätmete utiliseerimispunktist või kauplusest, kust te seadme ostsite.
Hävitettävien laitteiden käsittely kotitalouksissa Euroopan unionin alueella
Tämä tuotteessa tai sen pakkauksessa oleva merkintä osoittaa, että tuotetta ei saa hävittää talousjätteiden mukana.
Käyttäjän velvollisuus on huolehtia siitä, että hävitettävä laite toimitetaan sähkö- ja elektroniikkalaiteromun
keräyspisteeseen. Hävitettävien laitteiden erillinen keräys ja kierrätys säästää luonnonvaroja. Näin toimimalla varmistetaan
Suomi
myös, että kierrätys tapahtuu tavalla, joka suojelee ihmisten terveyttä ja ympäristöä. Saat tarvittaessa lisätietoja jätteiden
kierrätyspaikoista paikallisilta viranomaisilta, jäteyhtiöiltä tai tuotteen jälleenmyyjältä.
µ µ µ µ
µµ. , µ µ µ
µµ! ! µ. " !
! ! ! # µ ! $# ! $
!o µ # ! #! . % $
µ µ !, ! µ
µ µ .
Reference68
Page 69

A hulladékanyagok kezelése a magánháztartásokban az Európai Unióban
Ez a szimbólum, amely a terméken vagy annak csomagolásán van feltüntetve, azt jelzi, hogy a termék nem kezelheto
együtt az egyéb háztartási hulladékkal. Az Ön feladata, hogy a készülék hulladékanyagait eljuttassa olyan kijelölt
gyujtohelyre, amely az elektromos hulladékanyagok és az elektronikus berendezések újrahasznosításával foglalkozik. A
hulladékanyagok elkülönített gyujtése és újrahasznosítása hozzájárul a természeti eroforrások megorzéséhez, egyúttal azt
Magyar
is biztosítja, hogy a hulladék újrahasznosítása az egészségre és a környezetre nem ártalmas módon történik. Ha
tájékoztatást szeretne kapni azokról a helyekrol, ahol leadhatja újrahasznosításra a hulladékanyagokat, forduljon a helyi
önkormányzathoz, a háztartási hulladék begyujtésével foglalkozó vállalathoz vagy a termék forgalmazójához.
Lietotju atbrvošans no nedergm iercm Eiropas Savienbas privtajs mjsaimniecbs
Šis simbols uz ierces vai ts iepakojuma norda, ka šo ierci nedrkst izmest kop ar prjiem mjsaimniecbas atkritumiem.
Js esat atbildgs par atbrvošanos no nedergs ierces, to nododot nordtaj savkšanas viet, lai tiktu veikta nederg
elektrisk un elektronisk aprkojuma otrreizj prstrde. Specila nedergs ierces savkšana un otrreizj prstrde paldz
taupt dabas resursus un nodrošina tdu otrreizjo prstrdi, kas sarg cilvku veselbu un apkrtjo vidi. Lai iegtu papildu
Latviski
informciju par to, kur otrreizjai prstrdei var nogdt nedergo ierci, ldzu, sazinieties ar vietjo pašvaldbu,
mjsaimniecbas atkritumu savkšanas dienestu vai veikalu, kur iegdjties šo ierci.
Europos Sjungos vartotoj ir privači nam ki atliekamos rangos išmetimas
Šis simbolis ant produkto arba jo pakuots nurodo, kad produktas negali bti išmestas kartu su kitomis nam kio atliekomis.
Js privalote išmesti savo atliekam rang atiduodami j atliekamos elektronikos ir elektros rangos perdirbimo punktus. Jei
atliekama ranga bus atskirai surenkama ir perdirbama, bus išsaugomi natrals ištekliai ir užtikrinama, kad ranga yra
perdirbta žmogaus sveikat ir gamt tausojančiu bdu. Dl informacijos apie tai, kur galite išmesti atliekam perdirbti skirt
Lietuviškai
rang kreipkits atitinkam vietos tarnyb, nam kio atliek išvežimo tarnyb arba parduotuv, kurioje pirkote produkt.
Utylizacja zuzytego sprzetu przez uzytkowników domowych w Unii Europejskiej
Symbol ten umieszczony na produkcie lub opakowaniu oznacza, ze tego produktu nie nalezy wyrzucac razem z innymi
odpadami domowymi. Uzytkownik jest odpowiedzialny za dostarczenie zuzytego sprzetu do wyznaczonego punktu
gromadzenia zuzytych urzadzen elektrycznych i elektronicznych. Gromadzenie osobno i recykling tego typu odpadów
Polski
przyczynia sie do ochrony zasobów naturalnych i jest bezpieczny dla zdrowia i srodowiska naturalnego. Dalsze
informacje na temat sposobu utylizacji zuzytych urzadzen mozna uzyskac u odpowiednich wladz lokalnych, w
przedsiebiorstwie zajmujacym sie usuwaniem odpadów lub w miejscu zakupu produktu.
Descarte de equipamentos por usuários em residências da União Européia
Este símbolo no produto ou na embalagem indica que o produto não pode ser descartado junto com o lixo doméstico. No
entanto, é sua responsabilidade levar os equipamentos a serem descartados a um ponto de coleta designado para a
reciclagem de equipamentos eletro-eletrônicos. A coleta separada e a reciclagem dos equipamentos no momento do
descarte ajudam na conservação dos recursos naturais e garantem que os equipamentos serão reciclados de forma a
proteger a saúde das pessoas e o meio ambiente. Para obter mais informações sobre onde descartar equipamentos para
Português
reciclagem, entre em contato com o escritório local de sua cidade, o serviço de limpeza pública de seu bairro ou a loja
em que adquiriu o produto.
Postup používateov v krajinách Európskej únie pri vyhadzovaní zariadenia v domácom používaní do odpadu
Tento symbol na produkte alebo na jeho obale znamená, že nesmie by″ vyhodený s iným komunálnym odpadom.
Namiesto toho máte povinnos″ odovzda″ toto zariadenie na zbernom mieste, kde sa zabezpečuje recyklácia elektrických
a elektronických zariadení. Separovaný zber a recyklácia zariadenia určeného na odpad pomôže chráni″ prírodné
zdroje a zabezpečí taký spôsob recyklácie, ktorý bude chráni″ udské zdravie a životné prostredie. alšie informácie o
Slovencina
separovanom zbere a recyklácii získate na miestnom obecnom úrade, vo firme zabezpečujúcej zber vášho komunálneho
odpadu alebo v predajni, kde ste produkt kúpili.
Ravnanje z odpadno opremo v gospodinjstvih znotraj Evropske unije
Ta znak na izdelku ali embalaži izdelka pomeni, da izdelka ne smete odlagati skupaj z drugimi gospodinjskimi odpadki.
Odpadno opremo ste dolžni oddati na določenem zbirnem mestu za recikliranje odpadne električne in elektronske opreme.
Z ločenim zbiranjem in recikliranjem odpadne opreme ob odlaganju boste pomagali ohraniti naravne vire in zagotovili, da bo
odpadna oprema reciklirana tako, da se varuje zdravje ljudi in okolje. Več informacij o mestih, kjer lahko oddate odpadno
Slovenšcina
opremo za recikliranje, lahko dobite na občini, v komunalnem podjetju ali trgovini, kjer ste izdelek kupili.
Recycling information 69
Page 70

Kassering av förbrukningsmaterial, för hem- och privatanvändare i EU
Produkter eller produktförpackningar med den här symbolen får inte kasseras med vanligt hushållsavfall. I stället har du
ansvar för att produkten lämnas till en behörig återvinningsstation för hantering av el- och elektronikprodukter. Genom att
lämna kasserade produkter för återvinning hjälper du till med att bevara våra gemensamma naturresurser. Dessutom
Svenska
skyddas både människor och miljön när produkter återvinns på rätt sätt. Kommunala myndigheter, sophanteringsföretag
eller butiken där varan köptes kan ge mer information om var du lämnar kasserade produkter för återvinning.
Reference70
Page 71

Index
A
accessories 12
adjusting
color 32
picture 29
setup 33
shape of picture 30
slanted picture 31
sound 29
aiming projector 25
analog video mode
compatibility 63
audio
adjusting 29
ports 10
troubleshooting 59
audio, connecting
B
buttons
location 9
opening menu 34
C
cables
choosing 44
connections 18
ceiling installation 45
choosing cables 44
cleaning 6, 39
component-video
connecting RCA source
20
connecting source with
component-to-VGA
cable 19
port 10
composite-video
connecting source 22
port 10
computer screen, showing
28
computer, connecting 16
connecting
component-video source
19, 20
composite-video source
22
computer 16
DVI source 18
external accessory 46
handheld organizer 17
power 15
room controller 47
SCART source 18
S-video source 21
controlling external
accessory 46
D
default settings, changing
34
diagnostics 60
DVI video
connecting source 18
port 10
E
external accessory 46
F
firmware, updating 43
focus 25
H
handheld organizer,
connecting 17
hiding picture 28
I
image. See picture
installing projector 13, 44
L
lamp, replacing 40
lens, cleaning 39
lights. See lamp; warning
lights
locking projector 33, 45
M
menu
language 35
listing 34
using 34
mercury safety 64
moving projector 24
O
on-screen menu. See menu
P
PC. See computer
picture
focus 25
hiding and showing 28
quality of 13, 18, 58
troubleshooting 56
zoom 25
picture mode, choosing 29
Index 71
Page 72

power
connecting 15
turning off 24
turning on 23
presentations, showing 28
projector, locking 33
slanted picture, adjusting
31
specifications 61
S-video
connecting source 21
port 10
Y
YPbPr. See component-
video
Z
zoom 25
Q
quality of picture 18, 58
R
rear projection installation
45
recycling information 67
regulatory information 64
remote control
buttons 11
installing batteries 42
opening menu 34
troubleshooting 60
using 26
replacing lamp 40
room controller 47
room layout 13
RS-232 47
S
safety information 6, 64
SCART 18
screen
controlling 46
positioning 14
security
locking cable 45
security code 33
selecting video source 28
serial port 47
connector 47
setting up 13
shape, adjusting 30
showing picture 28
showing presentations 28
T
table installation 13, 44
triggering external
accessory 46
troubleshooting
audio 59
interruptions 59
picture 56
remote control 60
start-up 56
warning lights 55
turning on and off 23
U
unlocking projector 33
updating firmware 43
upgrading projector 43
USB, connecting 16
using remote control 26
V
VGA
connecting source 16,
17
port 11
video mode compatibility
63
video source, selecting 28
W
warning lights
location 9
meanings 55
troubleshooting 55
Index72
 Loading...