

Page 1

HP Vectra XU PC Getting Started Guide
Welcome to Your HP Vectra PC
Overview
In This Manual
Preparing Your PC for Use
Overview
Installing the PC
Connecting the Keyboard, Mouse, and Display
Connecting a Printer or Plotter, or Network
Connecting the Power Cords
Starting the PC for the First Time
Configuring the Matrox Video Adapter Board
Setting User Preferences (including User Password)
Setting Your User Password
Keyboard Lock Button
Setting the Keyboard Lock Timer
Setting Screen Blanking
Using Your PC
Overview
Using Your PC's Control Panel
Using the User Password Prompt
Using the Keyboard Lock Button and Timer
Using the Keyboard Lock Button
Using the Keyboard Lock Timer
Using Windows
Setting Windows Power Management
A Quick Guide to Dashboard
Using Diskettes
Using a Network
Using a Printer
Tips for Using Your PC
If You Have a Problem with Your PC
How to Clean Your PC
How to Solve a Problem
Solving Problems When Starting the PC
If Your PC Does Not Start
If an Error Occurs When the PC Starts
If You Forget Your User Password
Solving Problems After the PC Has Started
If Your PC has the Wrong Date and Time
If You Can't Change Your User Password in SETUP
Solving Problems When Using Your Applications
HP Vectra XU – Getting Started Welcome to Your HP Vectra PC •• 1
Page 2

If Your Application Does Not Work
If Your Application Screen is Blurred
If you Select the Wrong Display in the HP User Tools Menu
Solving Problems When Using Your Hardware
If Your Keyboard Does Not Work
If Your Mouse Does Not Work
If Your Flexible Disk Drive Does Not Work
If Your Hard Disk Drive Does Not Work
If Power Management Does Not Work
If Your Printer Does Not Work
If Your Network Does Not Work
HP Vectra XU – Getting Started Welcome to Your HP Vectra PC •• 2
Page 3

Welcome to Your HP Vectra PC
HP Vectra XU – Getting Started Welcome to Your HP Vectra PC •• 3
Page 4

Overview
Congratulations on the purchase of your new Hewlett-Packard Personal Computer. Your
high-performance HP PC provides:
• a main processor in a Zero Insertion Force (ZIF) socket
• a ZIF socket for easily adding a Dual Companion Processor, or a Pentium OverDrive
Processor.
• an integrated level-two cache of 256 KB or 512 KB (models with a Matrox Board have a
high-speed, synchronous burst cache).
• a main memory of 8 or 16 MB, upgradable to 256 MB
• an integrated Ultra VGA PCI (Peripheral Component Interconnect) video controller with
2 MB of video memory, or a Matrox video adapter board with 2 MB of video memory
(which can be upgraded to 4 MB)
• an integrated PCI Enhanced IDE (Integrated Drive Electronics) controller
• an integrated PCI Fast SCSI-2 (Small Computer Systems Interface) controller
• an integrated or optional CD-ROM drive
• four shelves for disk drives:
◊◊ two for front-access devices
◊◊ two for hard disk drives.
• five slots for accessory boards:
◊◊ three 16-bit ISA (industry Standard Architecture) slots
◊◊ one 32-bit PCI (Peripheral Component Interconnect) slot
◊◊ one combination ISA or PCI slot.
• a keyboard and mouse
• one parallel port and one serial port
• an integrated PCI Ethernet network adapter
• preinstalled software on hard disk models
• easy-to-use security features to protect your software and data:
◊◊ a User Password prompt at power on
◊◊ a Keyboard Lock Button
◊◊ a Keyboard Lock Timer
• Screen Blanking
HP Vectra XU – Getting Started Welcome to Your HP Vectra PC •• 4
Page 5

• Power Management system to reduce power when the PC is not in use
• a SETUP program to set your User Password and Screen Blanking.
HP Vectra XU – Getting Started Welcome to Your HP Vectra PC •• 5
Page 6

In This Manual
This manual contains the following information:
Chapter 1 explains how to:
• prepare your PC so it is ready for use
• set your User Password and Screen Blanking.
Chapter 2 describes how to:
• use your PC's control panel, including the power button, RESET button, and Keyboard
Lock Button
• use a User Password and prompt when the PC is locked at power on, and how to lock
the PC with the Keyboard Lock Button and Keyboard Lock Timer
• use Power Management to save power
• start your applications
• use your diskettes, network, and printer.
Chapter 3 provides information on fixing problems when using your PC.
NOTE If you need more information on:
Installing and configuring hardware accessories, refer to the Setting Up Your PC
manual supplied with your PC
Installing new application software and using your software, refer to your
applications' manuals
Using a network, refer to your network documentation.
HP Vectra XU – Getting Started Welcome to Your HP Vectra PC •• 6
Page 7

Preparing Your PC for Use
HP Vectra XU – Getting Started Preparing Your PC for Use •• 7
Page 8

Overview
Welcome to your new PC. This chapter provides information on:
• preparing your PC to be ready to use:
◊◊ connecting the keyboard and mouse
◊◊ connecting the display
◊◊ connecting a printer
◊◊ connecting to a network
◊◊ connecting the power cords
◊◊ starting the PC and setting up the software
• setting a User Password and Screen Blanking to prevent unauthorized access to your
PC.
• setting Power Management to save power when your PC is not in use.
Install any additional main and video memory inside the PC before you switch it on for the
first time. This is because models supplied with a hard disk drive have software preloaded.
When you first switch on the PC a special startup routine automatically runs. This configures
the preloaded software and video drivers. For information on installing accessories, refer to
the Setting Up Your PC manual supplied with your PC.
WARNING For your safety, always connect the equipment to a grounded wall outlet.
Always use a power cord supplied with your PC or one with a properly
grounded plug. Ensure that the cable meets your country's standards for
safety.
HP Vectra XU – Getting Started Preparing Your PC for Use •• 8
Page 9
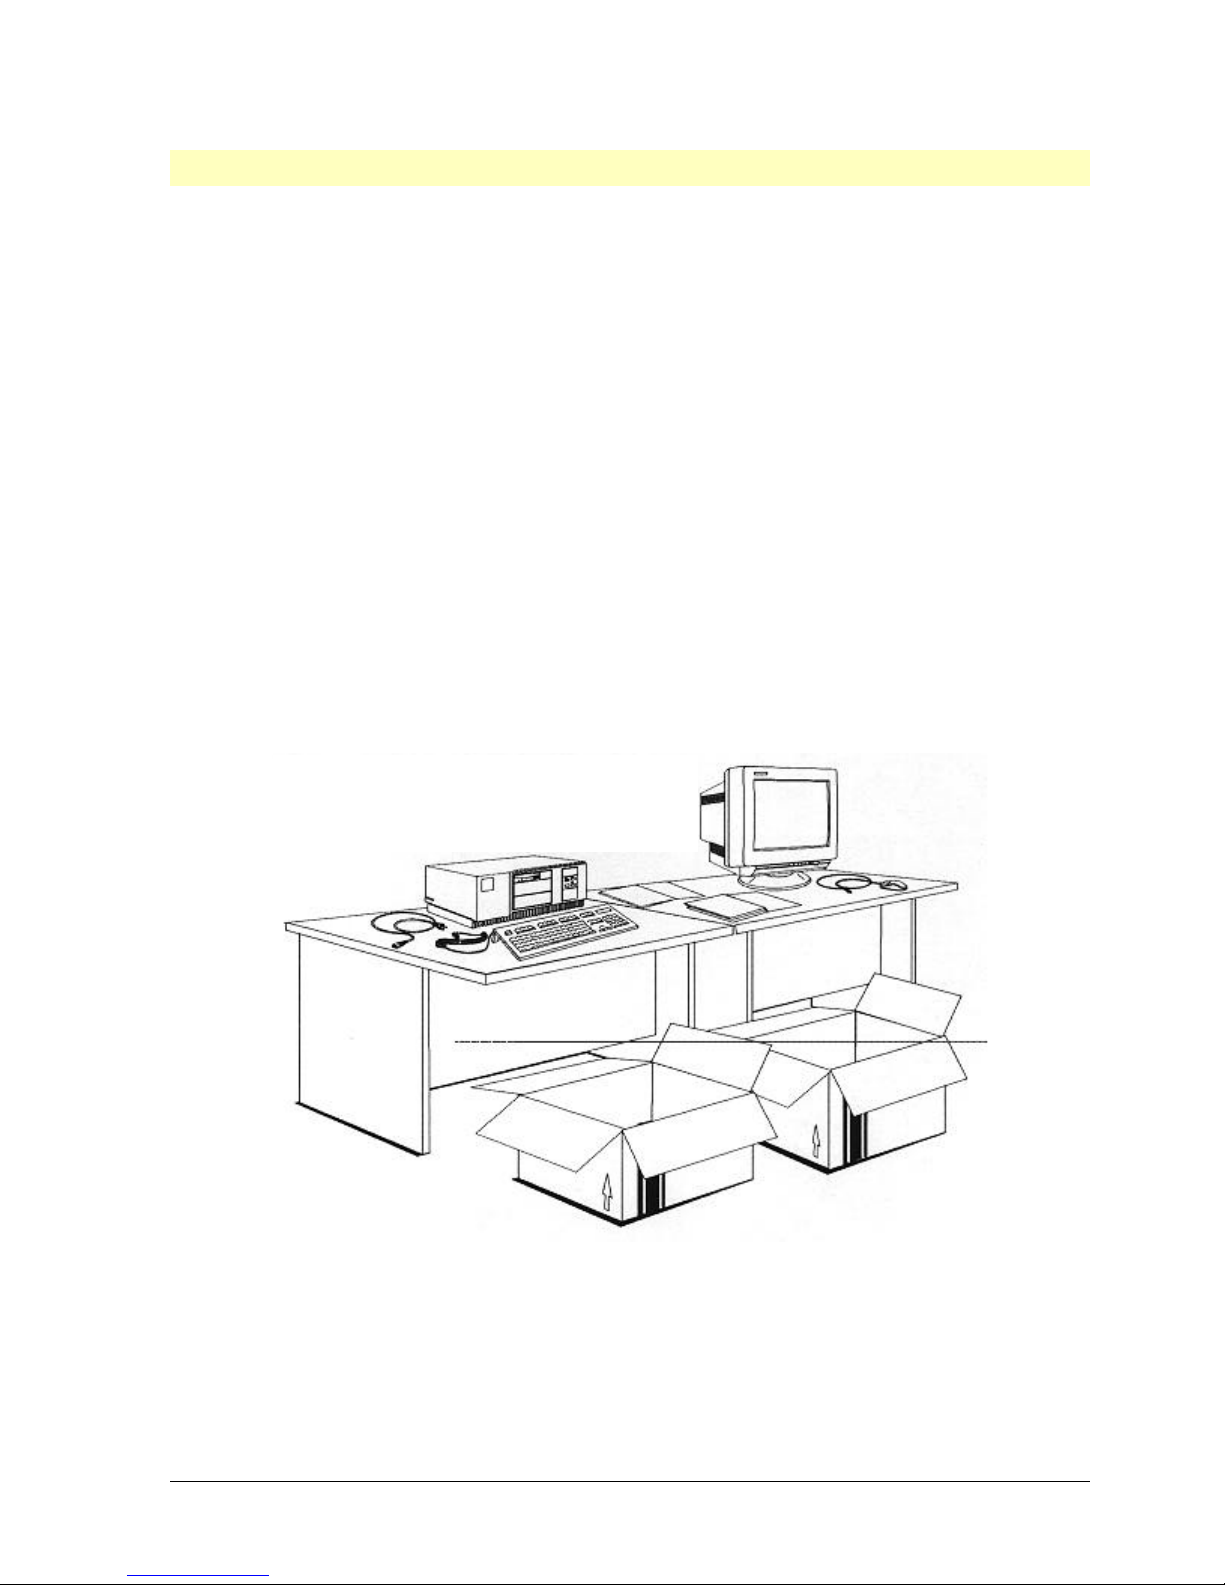
Installing the PC
1. When you receive the PC, unpack and gather all the components:
◊◊ the manuals
◊◊ the PC, power cord and keys
◊◊ the keyboard
◊◊ the mouse
◊◊ the display and its cables
◊◊ PC accessories (if you have any), for example, additional memory.
2. Place the PC on a sturdy desk, within reach of a power outlet, and with enough space
for the keyboard, mouse, and any other accessories.
3. Position the PC so that its rear connectors are easily accessible.
4. Install any additional Main and video memory inside the PC before you switch it on for
the first time. (Refer to the Setting Up Your PC manual supplied with your PC.)
5. You can position the PC horizontally or vertically. (Refer to the Setting Up Your PC
manual.)
6. If you have a large display, place it next to the PC.
HP Vectra XU – Getting Started Preparing Your PC for Use •• 9
Page 10
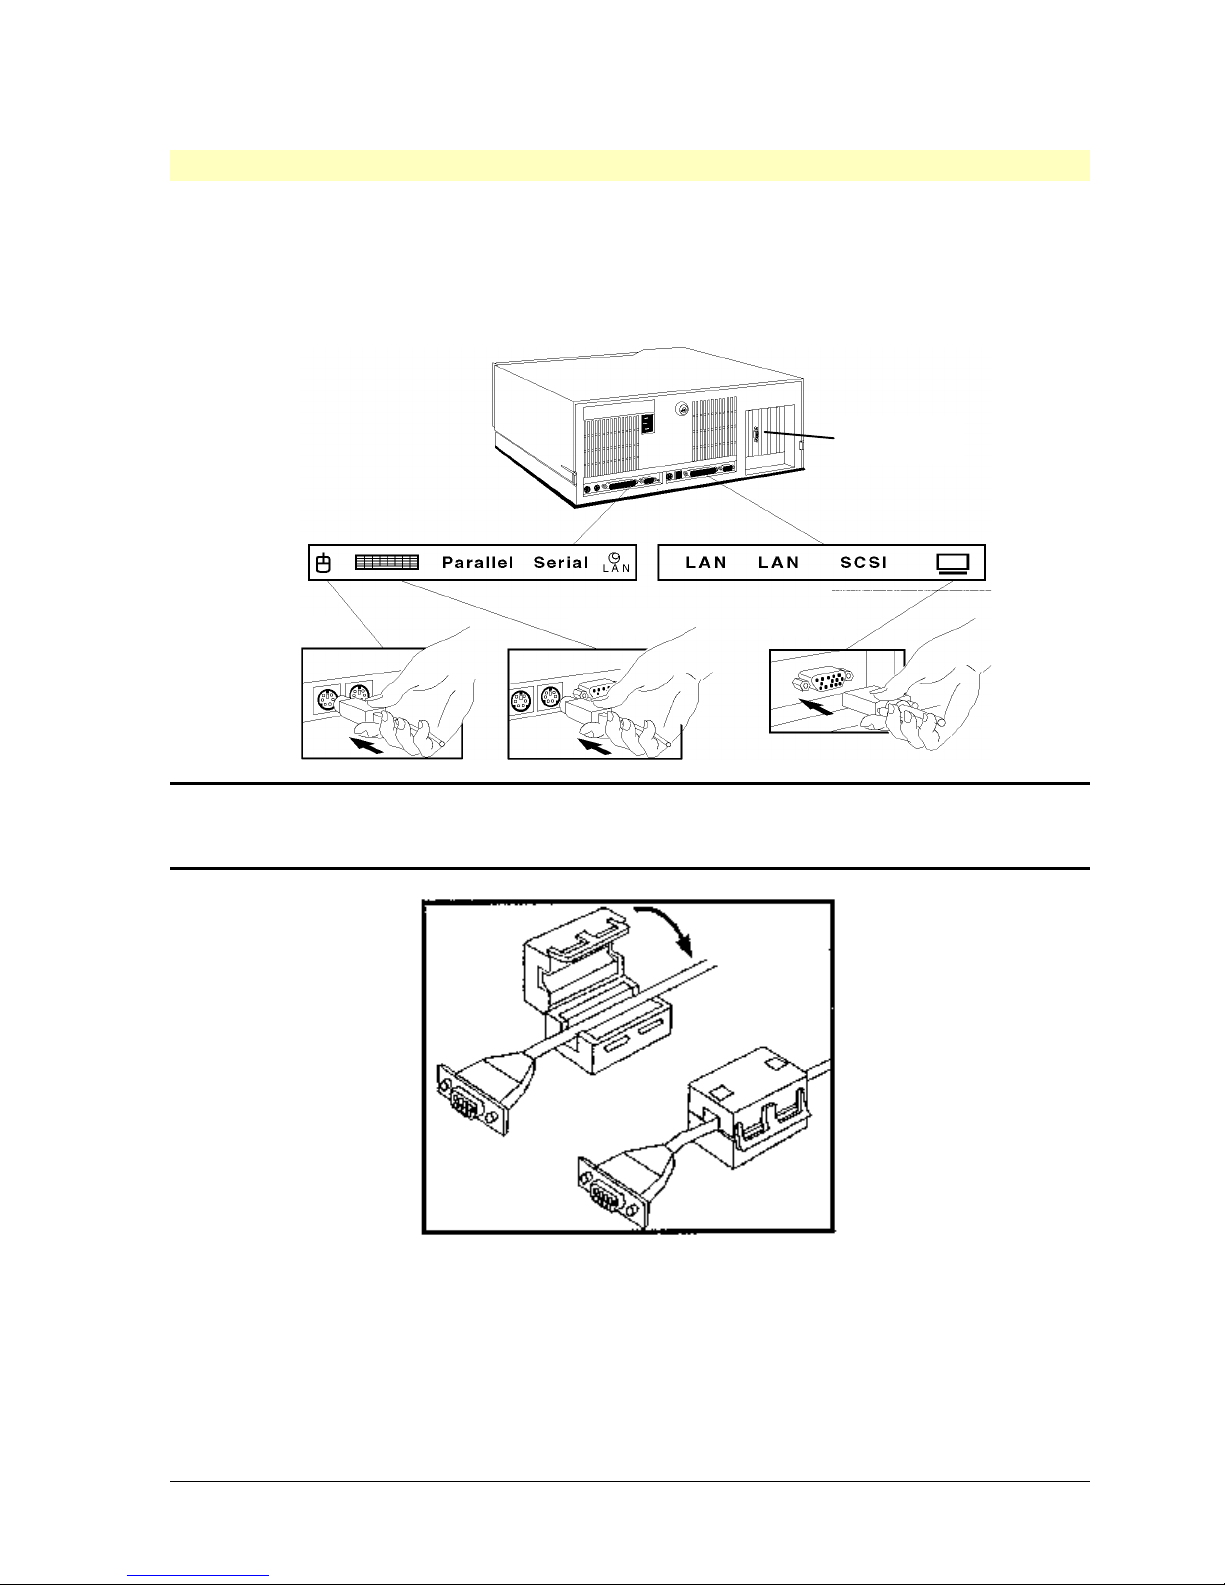
Connecting the Keyboard, Mouse, and Display
1. Connect the keyboard, mouse, and display to the back of the PC. If your PC has a
Matrox video adapter board, connect the video cable to the Matrox video connector.
The connectors are shaped to fit one way only.
2. Tighten the video cable attachment screws.
Matrox video
connector
Mouse
Keyboard
Display
NOTE USA Only: for non-HP displays that do not have a ferrite bead on the video cable,
clamp the supplied ferrite bead onto the cable as close as possible to the end that
connects to the PC.
HP Vectra XU – Getting Started Preparing Your PC for Use •• 10
Page 11
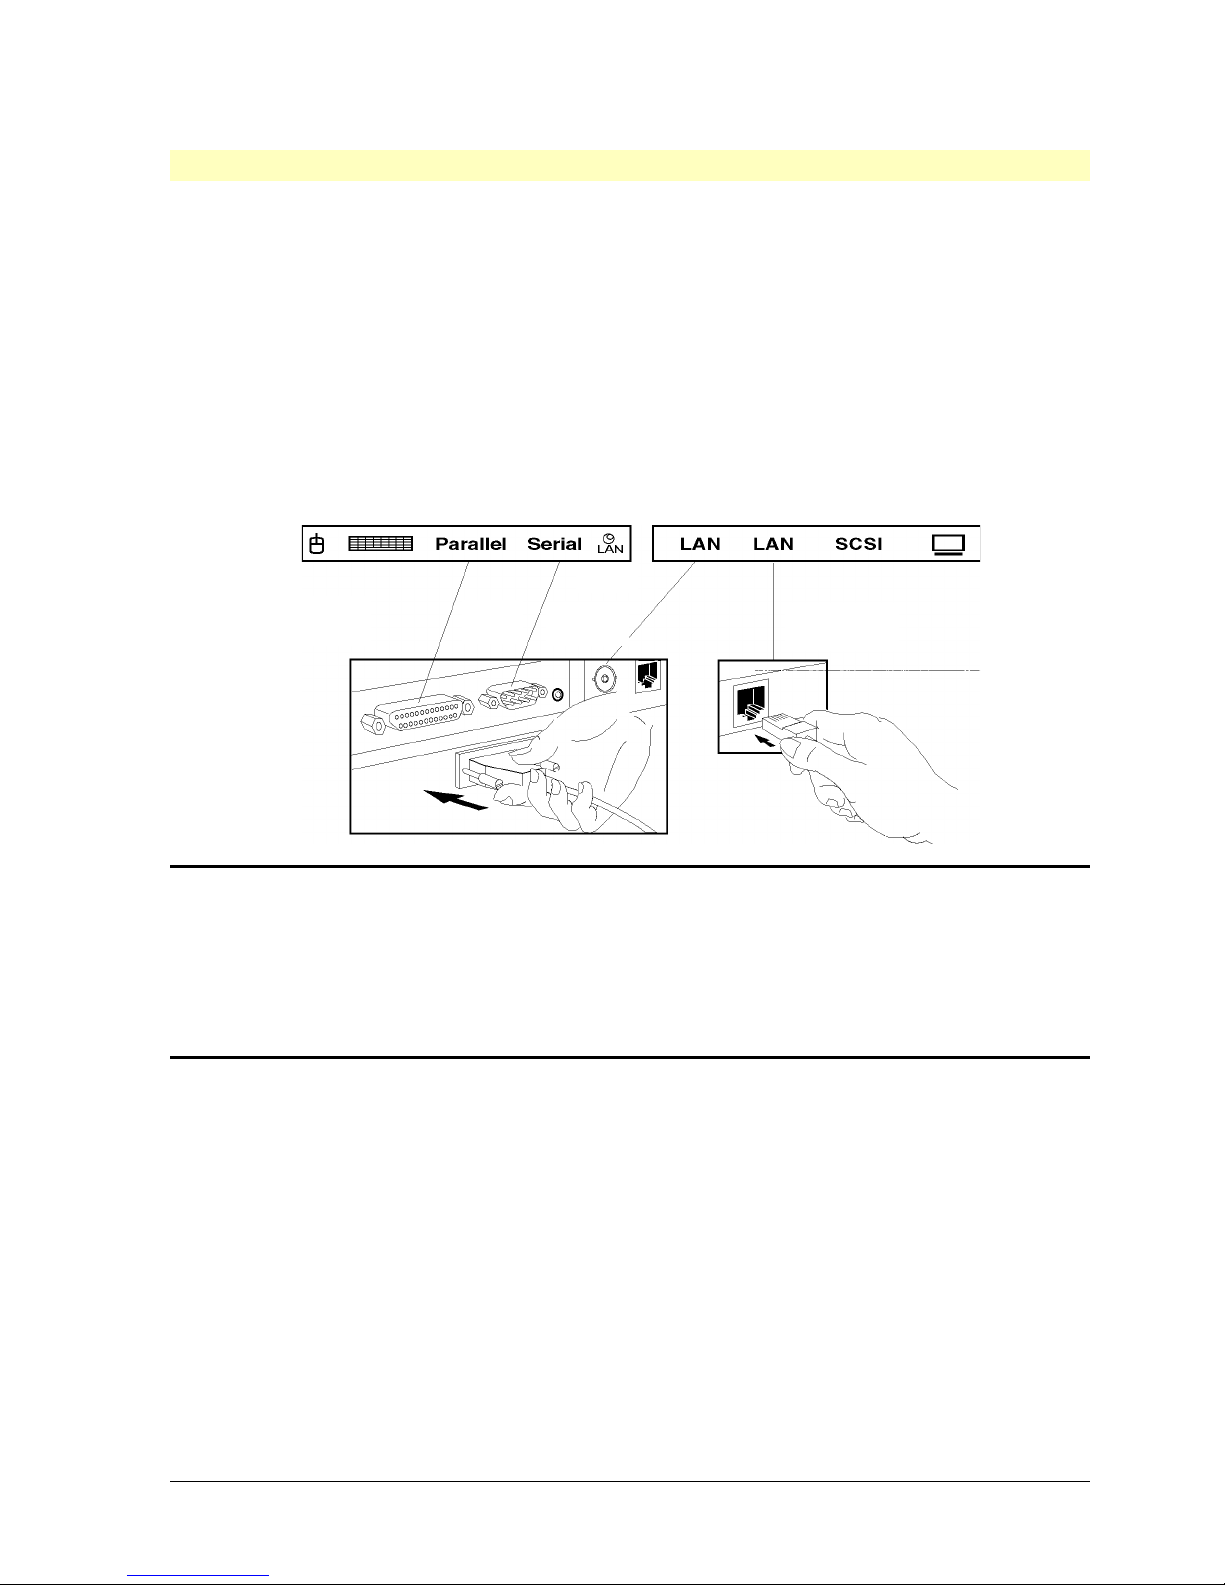
Connecting a Printer or Plotter, or Network
1. Connect the printer or plotter cable to the back of the PC, and tighten the attachment
screws. If the printer or plotter has an ECP/EPP interface, make sure you use a
compatible cable, IEEE 1284-B standard connector or IEEE 1284-C small connector.
Use the:
◊◊ 25-pin ECP/EPP bidirectional parallel connector for a parallel device
◊◊ 9-pin serial connector for a serial device.
2. Connect the network cable either to the RJ-45 UTP LAN connector, and check that the
LAN LED is on, or to the BNC coaxial LAN connector. When the RJ-45 UTP connection
is made, the BNC coaxial connector is disabled. Let your Network Administrator know
you are connecting your PC to the network.
LED
25-pin
parallel
9-pin
serial
BNC LAN
Connector
UTP LAN
Connector
NOTE Parallel port (LPT1) default: parallel 1, I/O address 378h, and IRQ 7 using ECP
bidirectional mode.
Serial port (COM1) default: serial 1, I/O address 3F8h, and IRQ 4.
If necessary, you can disable the ports or change their configuration using the PC's
SETUP program.
HP Vectra XU – Getting Started Preparing Your PC for Use •• 11
Page 12
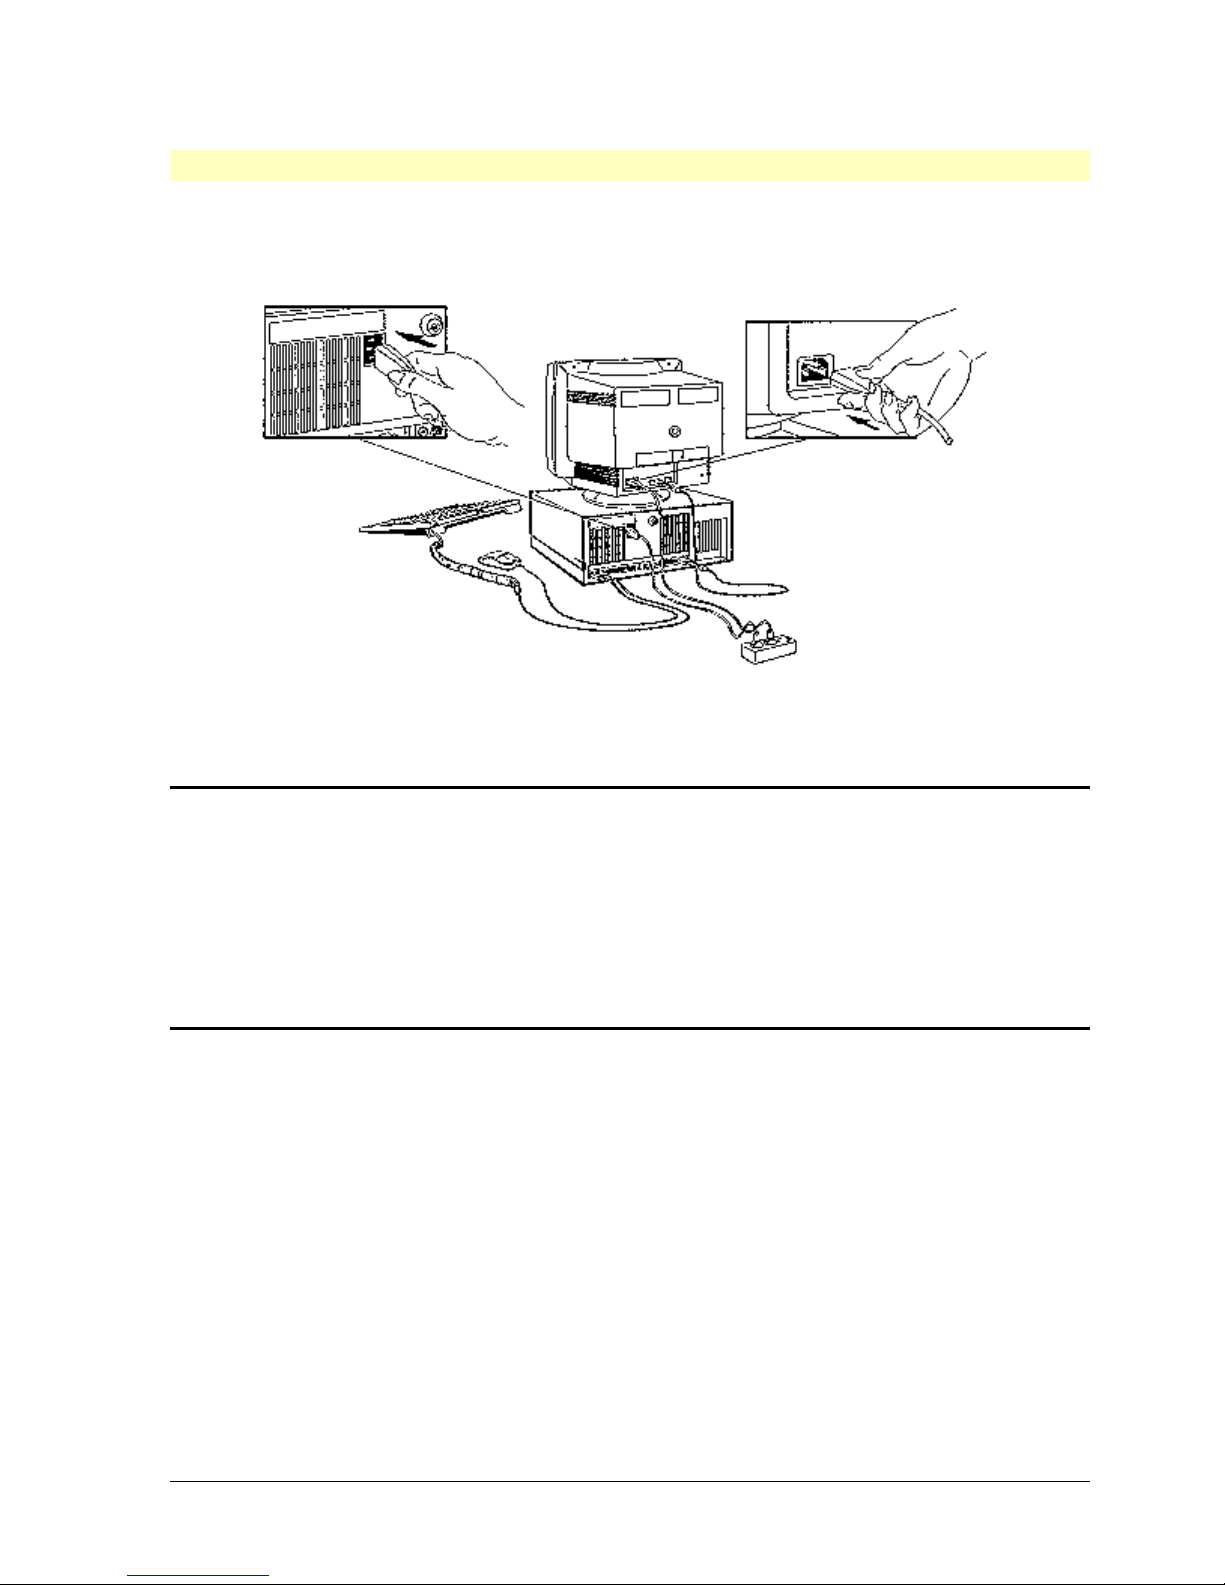
Connecting the Power Cords
1. If fitted, remove the label covering the PC's power connector.
2. Connect the display and PC power cords to a grounded power outlet. The connectors
are shaped to fit one way only.
3. Before you switch ON the PC for the first time, install any additional Main memory and
video memory inside the PC. (Refer to the Setting Up Your PC manual supplied with
your PC.)
NOTE This PC has been designed to operate on all power systems, including "IT" power
systems. It is disconnected from the power by removing the power cord from the
power outlet. This means that the PC must be located near to an easily accessible
power outlet.
In order to improve energy consumption, it is recommended that the power cord be
removed from the power outlet when the PC is not used for some time. If several
pieces of equipment are being used, it is recommended that a multiple-outlet strip is
used with a double-pole switch or circuit breaker.
HP Vectra XU – Getting Started Preparing Your PC for Use •• 12
Page 13
Starting the PC for the First Time
Your PC's hard disk has preinstalled software. This is initialized the first time you start the
PC, taking about 10 minutes. It sets up the preinstalled software to use the hardware
installed in your PC. You can change the settings after the software has been initialized,
using Windows Setup in the Windows Main group.
CAUTION Do NOT switch OFF the PC while the software is being initialized as this could
cause unexpected results.
To initialize your software:
1. Switch ON the display and then the PC.
The PC performs a Power-On Self-Test and displays a test screen.
NOTE If an error is detected at power on, the power light turns RED and a message
appears:
Press [F2] to start SETUP. Follow the screen messages to correct the error. Do not
set a password as this could cause unexpected results during the software
initialization routine.
Press [F3] to save the settings and exit SETUP.
2. The software initialization routine starts. It asks you for information about the PC, such
as:
◊◊ Your User Name, Company Name, the Date and the Time.
◊◊ The type of display. The model number is shown on the label on the rear of the
display.
◊◊ The type of printer, shown on the front of the printer.
HP Vectra XU – Getting Started Preparing Your PC for Use •• 13
Page 14

◊◊ The connection used by the printer:
∗ LPT1 is a "parallel printer" connected to the parallel port
∗ COM1 is a "serial printer" connected to the serial port.
3. When the initialization routine finishes, a Windows screen appears. (For operating
systems other than Windows, refer to the manuals supplied with the operating system
and follow the instructions on the display screen.)
4. Click the mouse on the Master Diskette Creation Utility, in the Hputils group. Follow
the screen messages to create master diskettes of your preloaded software.
5. * Click the mouse on the HP PCID utility. Follow the screen messages to create a
personalized identification label. An identification label similar to the one shown below
will appear on the PC's Power-On Self-Test screen the next time you start the PC.
HP Vectra XU – Getting Started Preparing Your PC for Use •• 14
Page 15
Configuring the Matrox Video Adapter Board
To select the video resolution, we recommend that you use only the HP User Tools or the
MGA Control Panel. To use the MGA Control Panel, double-click on the MGA Control Panel
icon in the bottom left-hand corner of your display. (On models without a hard disk, the video
board can be configured using the Matrox configuration utility supplied on diskette.)
Configure the Matrox video board, using the HP User Tools in Windows as follows:
1. Double-click on the HP User Tools icon, in the HP Utils Group in Windows.
2. Click on the Video Mode button and a dialog box appears.
3. Click on the Graphics button, and follow the instructions on the screen.
Adjust the display screen's brightness and contrast to your needs. If the picture does not fill
the screen or is not centered, adjust the position of the screen image. Set the keyboard to a
comfortable position.
To optimize conventional memory:
Exit from Windows. Run MemMaker from the MS-DOS prompt and follow the instructions on
the screen. This MS-DOS utility optimizes your PC's memory, increasing the amount of
conventional memory available to your applications.
Your PC installation is complete.
Before using your PC, set a User Password and enable Screen Blanking, as described in
the next section.
HP Vectra XU – Getting Started Preparing Your PC for Use •• 15
Page 16

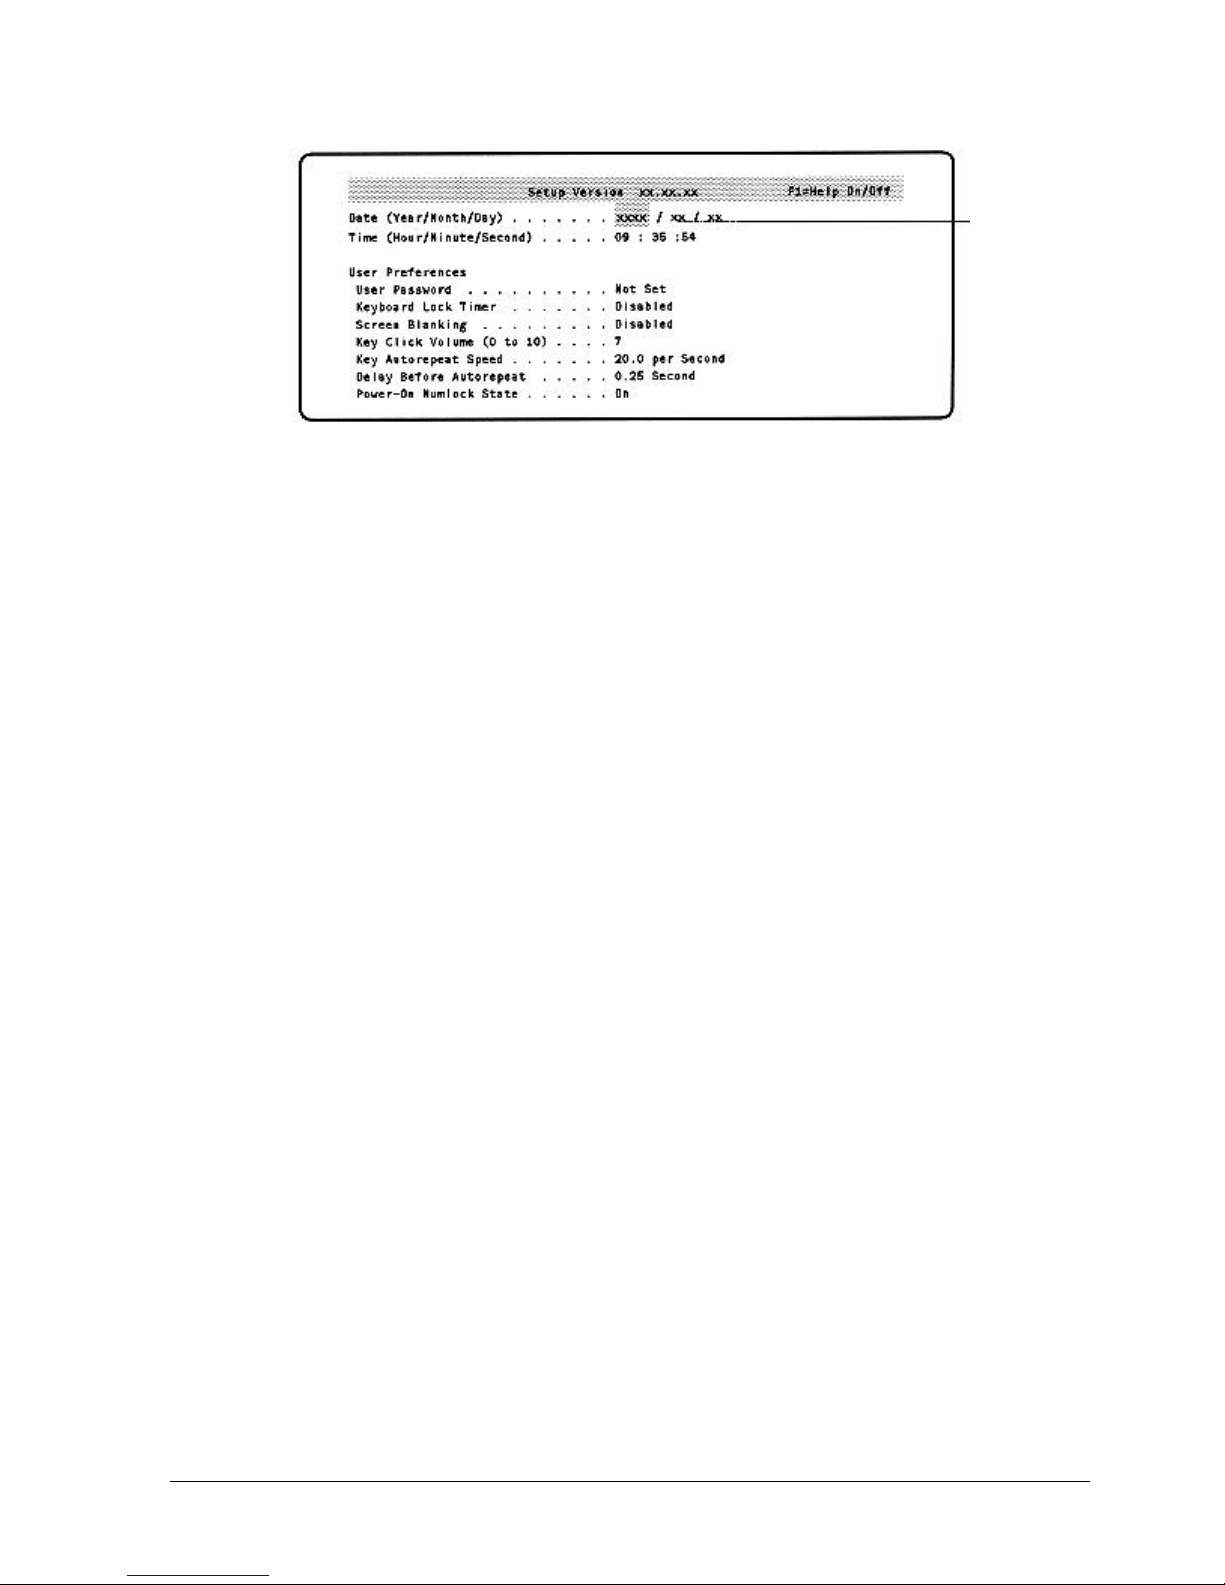
Setting User Preferences (including User Password)
The SETUP program allows you to view and set your PC's configuration. Use the PC's
SETUP program to set a User Password, set the Keyboard Lock Timer, and enable Screen
Blanking.
The User Password provides:
• a User Password prompt to prevent your PC from being started in your absence
• a Keyboard Lock Button to lock your PC when you are away from your desk, leaving
your applications running. It also prevents your PC from being reset or turned OFF.
• a Keyboard Lock Timer to lock your PC automatically when you haven't used the
keyboard or mouse for a specified time.
• Screen Blanking to hide your data when the PC is locked.
NOTE You cannot use Screen Blanking if your PC has a Matrox video adapter board.
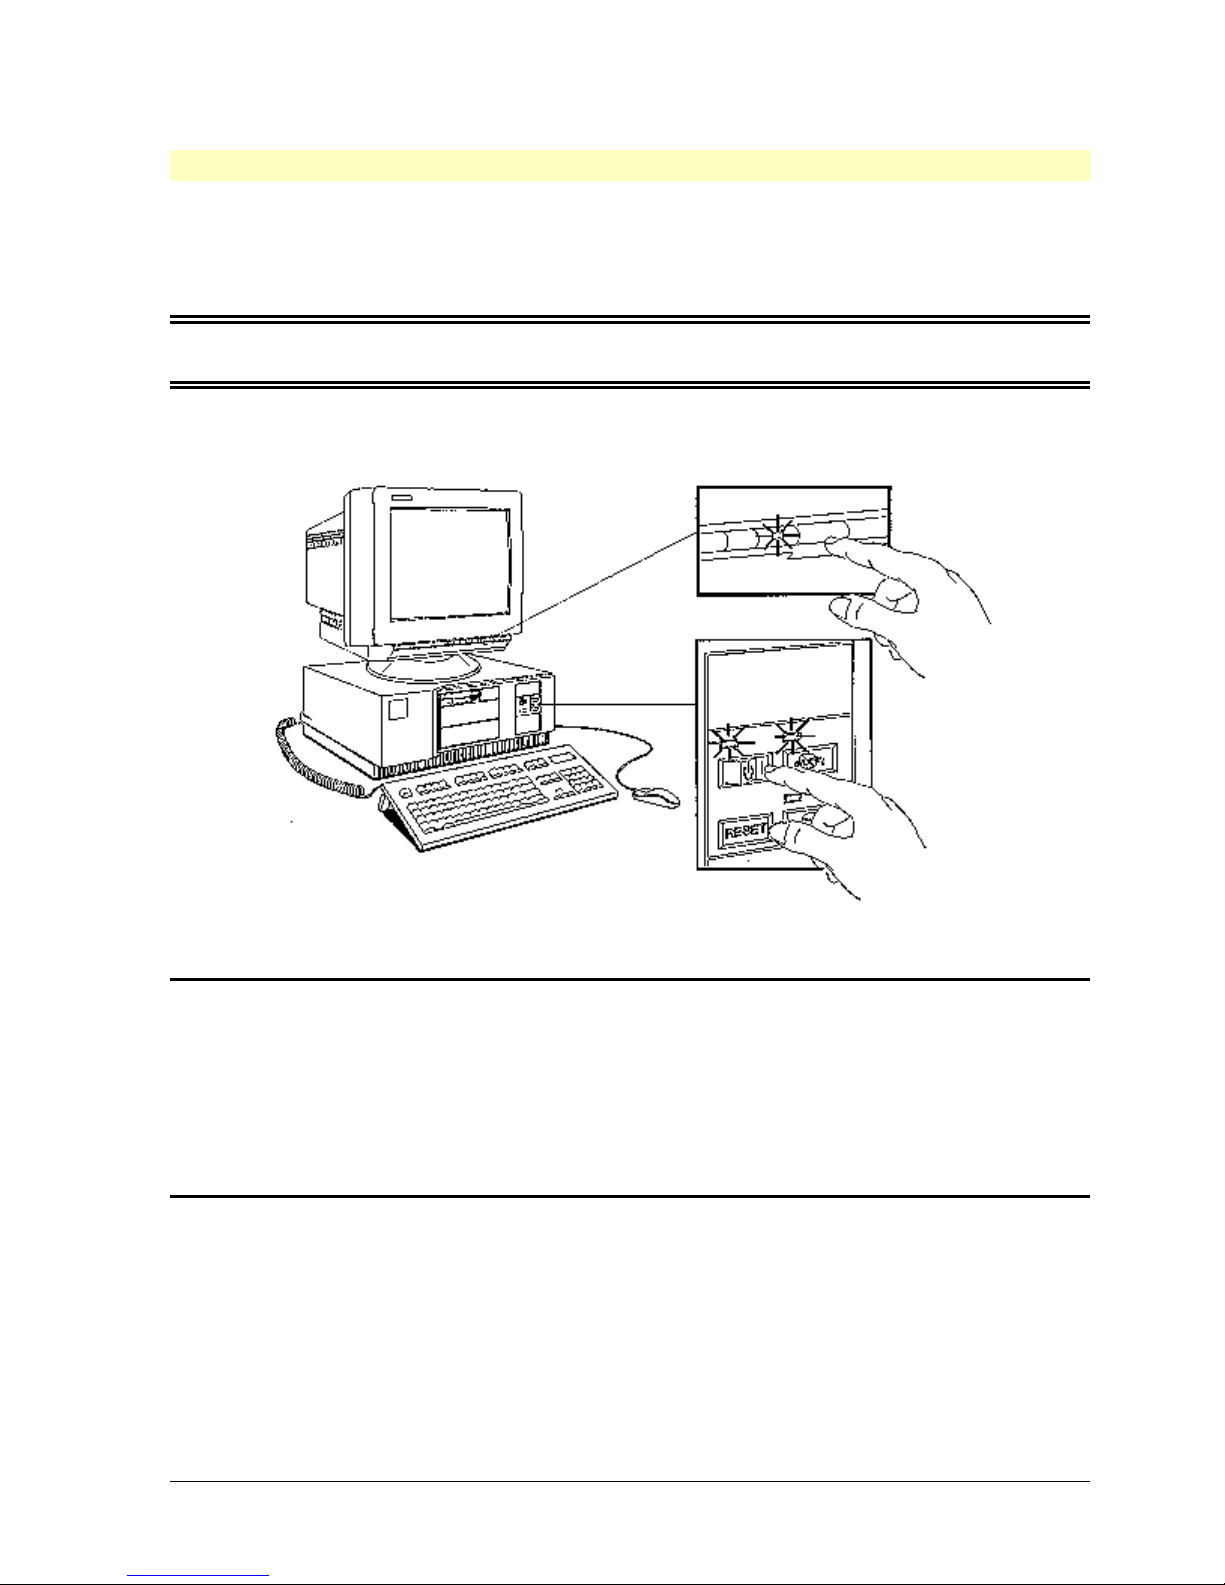
Starting the PC's SETUP program:
1. Save your data and exit any program, then press-and-hold the RESET button on the
control panel until the PC restarts.
2. Press [F2] while <Setup=F2 > is displayed at the bottom of the screen.
<Setup=F2 > appears for only a couple of seconds, just after the beeps signaling the
end of the Power-On Self-Test.
If you miss <Setup=F2 >, press-and-hold the RESET button to restart the PC, and try
again.
3. The PC's SETUP program will appear.
HP Vectra XU – Getting Started Preparing Your PC for Use •• 16
Page 17
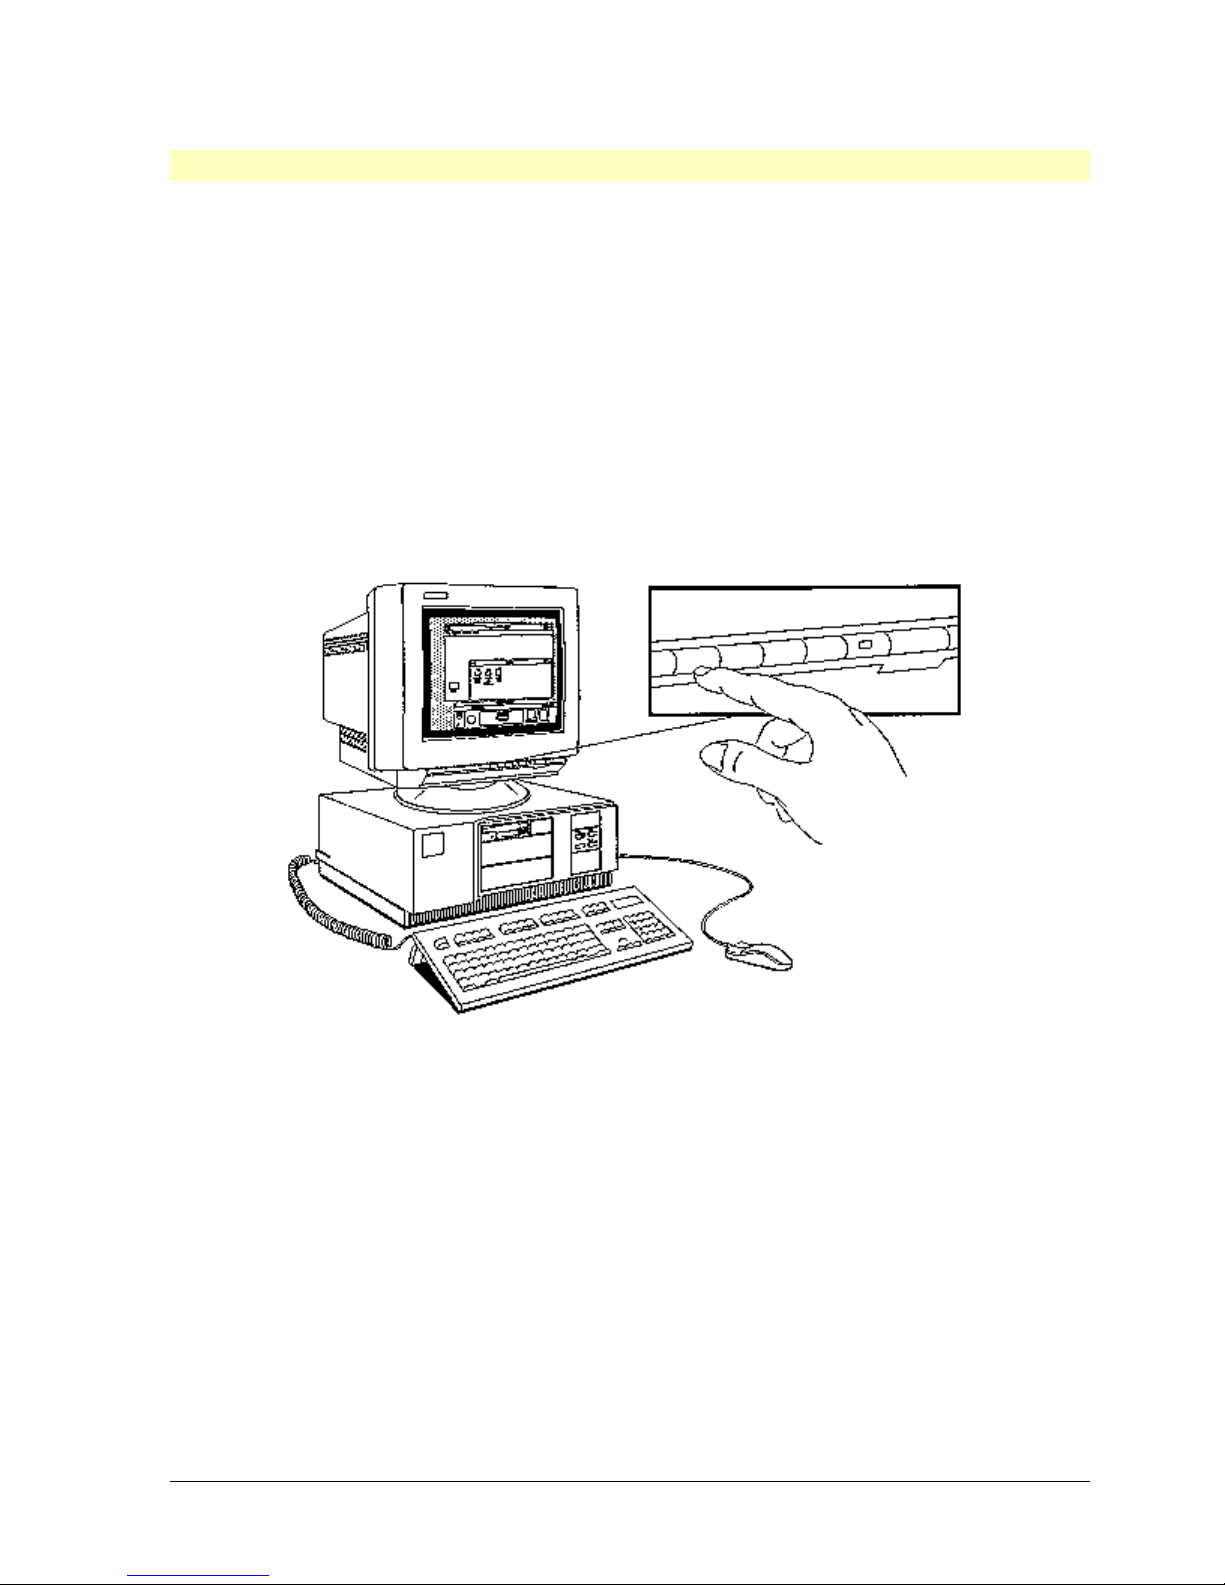
To change a setting, select a line with the highlight and use the following keys.
• Use the ↑ or ↓ key to move the highlight from one line to another.
• Use the ← or → key to move the highlight left or right.
• Use the [PAGE DOWN] or [PAGE UP] key to move from one screen to another.
• Use the [F7] and [F8] keys to select settings.
• Use the [F1] key to display Help, press it again to turn Help Off.
• Use the [HOME] key to display the first SETUP screen.
• Use the [NUM LOCK] key to set the numeric keypad to cursor control.
• Use the [F3] key to save your settings and exit SETUP.
• Use the [F12] key to exit SETUP without saving changes.
HP Vectra XU – Getting Started Preparing Your PC for Use •• 17
Page 18

Setting Your User Password
1. Press the [HOME] key to display the User Preferences.
2. Press the ↓ key to go to the User Password line.
3. To set your User Password, press [ENTER] once.
a. Type your User Password and press [ENTER].
b. Type your User Password again, and press [ENTER] again to confirm it. The screen
shows User Password Set.
4. To erase your User Password, press [ENTER] twice. The screen shows Not Set.
HP Vectra XU – Getting Started Preparing Your PC for Use •• 18
Page 19

Keyboard Lock Button
If you have set a User Password, the Keyboard Lock Button locks your PC.(Refer to Using
the Keyboard Lock Button in “Using Your PC” for details.)
HP Vectra XU – Getting Started Preparing Your PC for Use •• 19
Page 20

Setting the Keyboard Lock Timer
If you have set a User Password, the Keyboard Lock Timer locks your PC when you haven't
used the keyboard or mouse for a specified time.
1. Press ↓ to go to the Keyboard Lock Timer line.
2. Press [F7] or [F8] to select a value between 1 and 75 minutes.
3. To stop using the Keyboard Lock Timer, select Disabled.
HP Vectra XU – Getting Started Preparing Your PC for Use •• 20
Page 21

Setting Screen Blanking
Screen Blanking blanks the display, if you have set a User Password and you lock the PC
using the keyboard Lock Button or Keyboard Lock Timer. You cannot use Screen Blanking
if your PC has a Matrox video adapter board.
1. Press ↓ to go to the Screen Blanking line.
2. Press [F7] or [F8] to change the line to Screen Blanking Enabled .
3. Press [F3] to save the changes.
4. Follow the instructions on the screen to exit SETUP.
Your PC automatically restarts. If you have set a User Password, the User Password prompt
is displayed. Type your User Password and press [ENTER].
HP Vectra XU – Getting Started Preparing Your PC for Use •• 21
Page 22

Using Your PC
HP Vectra XU – Getting Started Using Your PC •• 22
Page 23

Overview
Before using your PC, make sure you have a comfortable working environment.
1. Use a desk with enough space for your work and enough leg room—at least 6 cm (2
inches) of space between the desktop and your lap.
2. Adjust your chair so the work surface is at elbow height, with your knees at the same
level as your hips or slightly higher. Use a foot rest if your chair is too high for your feet
to rest firmly on the floor. Your back should be erect with your lower back supported.
3. Adjust your display so the top of the screen is at eye level when you are seated. The
screen should be perpendicular to your line of sight, at a viewing distance of about 60
cm (24 inches), and positioned to avoid glare or reflections.
4. Place the keyboard directly in front of the screen, with at least 15 cm (6 inches) of free
space in front for your wrists. When typing, keep your elbows close to your body.
Minimize bending your wrists and do not use too much force.
5. Place your mouse as close to the keyboard as possible and, when using the mouse,
rest your wrist on the work surface.
6. Set the mouse's double-click speed, tracking speed, and buttons to your needs—using
the Mouse icon in the Windows Control Panel.
7. Place your work material within easy reach. If you need to read documents, use a
document holder placed next to the screen.
8. Take periodic breaks and change tasks frequently to avoid muscle strain.
HP Vectra XU – Getting Started Using Your PC •• 23
Page 24

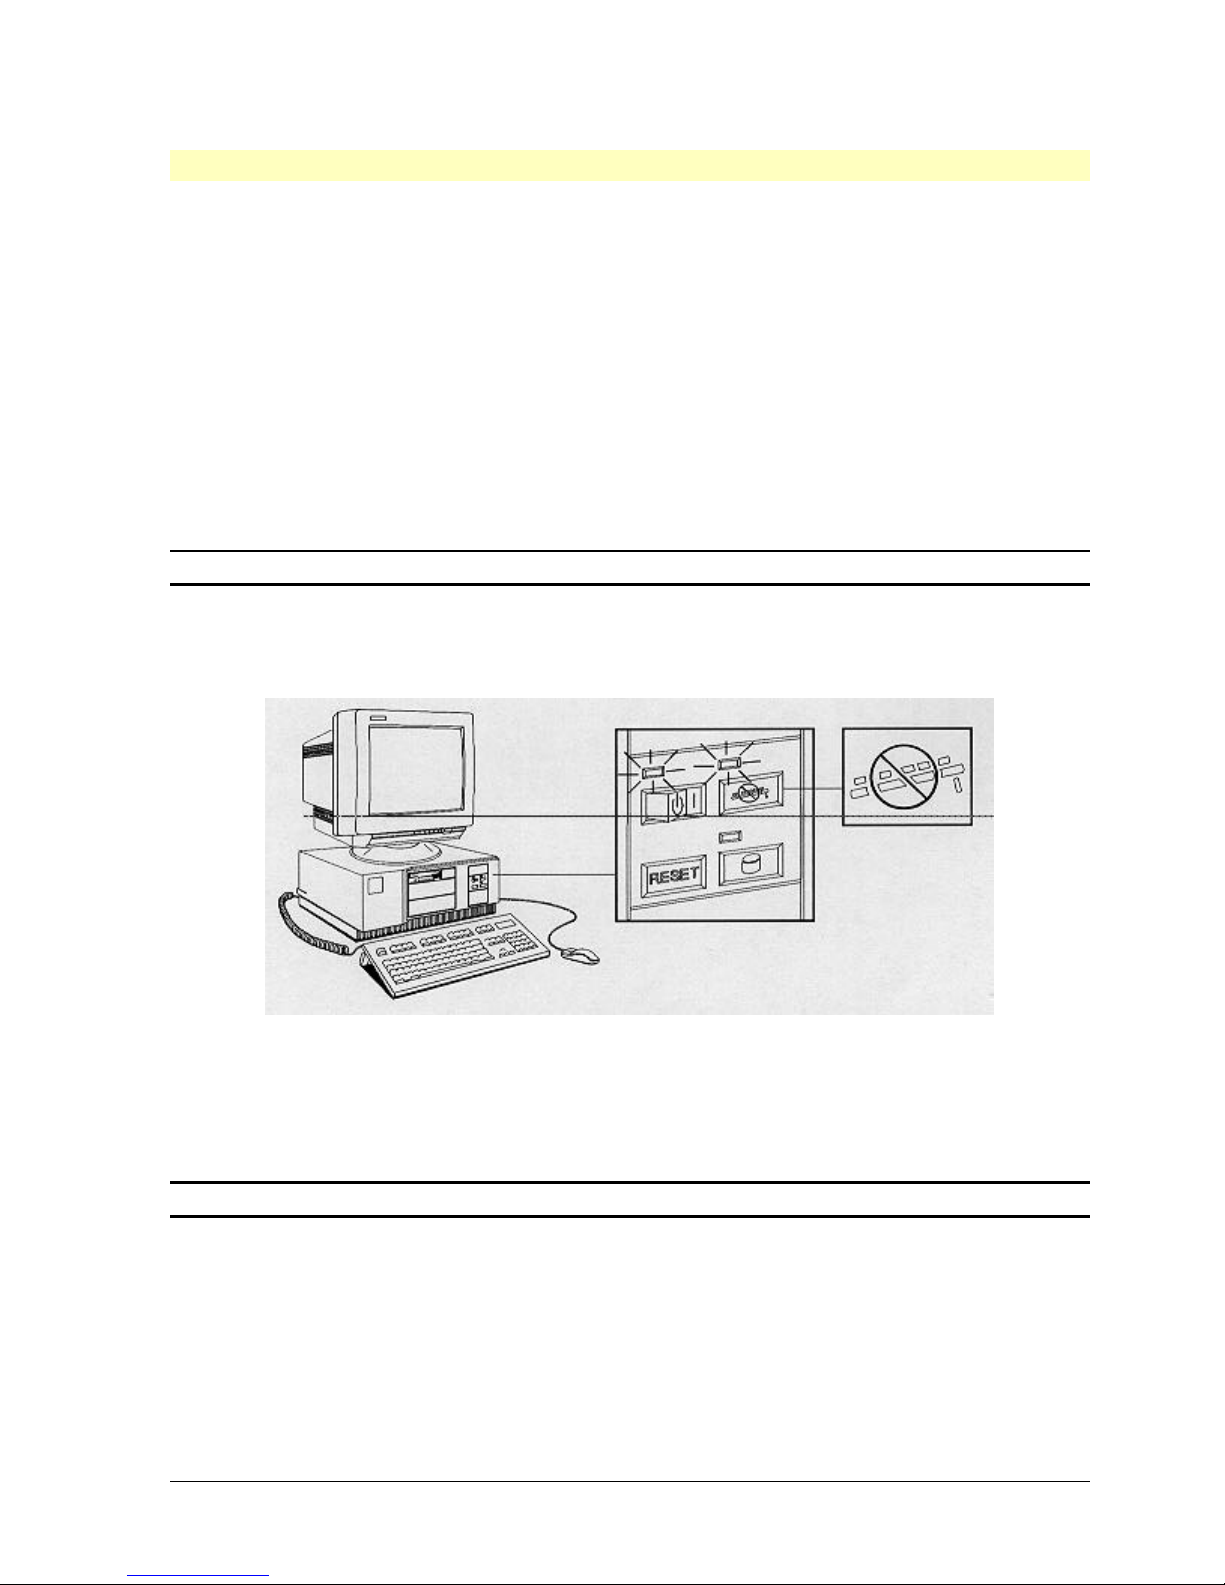
Using Your PC's Control Panel
1. To switch ON the PC, press the power button.
◊◊ The light next to the power button is GREEN when the PC is ON. (The light is RED if
the PC has a problem, refer to “If You Have A Problem With Your PC” for details.)
◊◊ The PC beeps and displays a Power-On Self-Test screen before displaying your
operating system screen.
2. To reset your PC, press-and-hold the RESET button.
3. To lock your PC, set a User Password in the PC's SETUP program (as described in
“Preparing Your PC for Use”), then press the Keyboard Lock Button.
To unlock the PC, type your User Password and press [ENTER].
HP Vectra XU – Getting Started Using Your PC •• 24
Page 25

Using the User Password Prompt
If you have set a User Password in the PC's SETUP program (as described in “Preparing
Your PC for Use”), the User Password prompt at power on appears when you:
• switch ON the PC
• reset the PC by pressing and holding the RESET button
• exit the SETUP program.
When the User Password prompt appears, type your User Password and press [ENTER].
If you type the wrong User Password, the prompt appears and you can't use the PC. Type
your User Password again.
You have three chances to enter the User Password. After three unsuccessful attempts, the
prompt "*" appears. You must restart your PC by pressing the RESET button, before you
can try again.
HP Vectra XU – Getting Started Using Your PC •• 25
Page 26
Using the Keyboard Lock Button and Timer
When you set a User Password in the PC's SETUP program, you can use the Keyboard
Lock Button or Keyboard Lock Timer to prevent your PC being used.
Using the Keyboard Lock Button
1. To lock your PC, press the Keyboard Lock Button.
◊◊ If you have not set a User Password, the PC "beeps" and the light next to the
Keyboard Lock Button lights up. With a User Password set, the light next to the
Keyboard Lock Button lights up.
◊◊ Your keyboard and mouse lock, and the RESET and power buttons are disabled so
the PC can't be reset or turned OFF.
◊◊ The screen goes blank if you enabled Screen Blanking in the SETUP program.
NOTE You cannot use Screen Blanking if your PC has a Matrox video adapter board.
◊◊ The application that was running when you locked the PC keeps running.
2. To return to your program, type your User Password and press [ENTER].
Using the Keyboard Lock Timer
When the Keyboard Lock Timer is set, the keyboard locks after a specified time since your
last keystroke or mouse click. The screen goes blank if you enabled Screen Blanking in the
SETUP program.
NOTE You cannot use Screen Blanking if your PC has a Matrox video adapter board.
To use your PC, type your User Password and press [ENTER].
HP Vectra XU – Getting Started Using Your PC •• 26
Page 27

Using Windows
If your PC has a hard disk drive, it has software preinstalled, depending on the operating
system used.
If Windows and Dashboard are preinstalled, your PC will display Windows when you start
your PC. Windows manages your applications and files:
• The Program Manager group contains all your application programs. Each icon
represents a group of application programs.
• In Program Manager there is Help that provides a Windows Tutorial which explains
how to use your mouse and Windows.
• The Hputils window contains the group of programs and utilities supplied by Hewlett-
Packard.
• The Main icon contains Windows system applications such as File Manager and the
Control Panel.
Refer to your applications manuals for information on installing new programs.
Expanding an icon into a window:
1. Use the mouse to move the cursor to the icon.
2. Double-click on the icon by pressing the left-hand mouse button twice in quick
succession. For example, to display the Windows setup README file in the Hputils
window, double-click on Windows setup README file.
3. When you have finished with the window:
a. To minimize the window (but leave it running as an icon), click once on the minimize
button at the top right of the window.
b. To close the window, double-click on the control-menu box at the top left of the
window.
Starting your Windows applications
1. Double-click on the application's icon in the Program Manager window. (If its icon is
covered by another window, minimize the window.)
If your application is minimized, its icon appears at the bottom of the background
screen. (The background screen is the pattern underlying all the other windows.)
2. If you have multiple applications running simultaneously:
a. To switch from the current application to another application you have running,
press-and-hold [ALT] then press [TAB] to cycle through the programs that are
running. To select the displayed program, release [ALT].
b. To switch to the next application that is running, press [ALT] and [ESC]
simultaneously.
c. To switch to the previous application that is running, press [SHIFT] and [ALT] and
[ESC] simultaneously.
d. To call up a list of applications that are running, press [CTRL] and [ESC]
simultaneously. Then double-click on the application you want to use.
HP Vectra XU – Getting Started Using Your PC •• 27
Page 28

e. To exit any Windows application, press [ALT] and [F4] simultaneously.
HP Vectra XU – Getting Started Using Your PC •• 28
Page 29

Setting Windows Power Management
The Power Management system in Windows reduces the power used by your PC and
display when they are not in use.
You can set Power Management to start after a specified period (Standby Mode), at a
specified time (Sleep Mode), or both. The PC's power light flashes when Power
Management is operating.
Standby Mode significantly reduces power consumption. However, the PC is still active and
the LAN connection stays active. Sleep Mode reduces power consumption to a minimum. In
this case, the LAN connection is no longer active.
To activate Sleep Mode, click on the Sleep Mode icon which is displayed at the bottom of
the screen.
To return to full power, press any key or type your User Password (if you have set one).
Configuring Power Management in Windows:
1. In the Program Manager group, double-click on the Main icon to display the Control
Panel icon.
2. Double-click on the Control Panel icon to display the Power icon.
3. Double-click on the Power icon to display the Power dialog box.
4. Select Advanced Mode .
5. Click on Options, and the Setup Power Management dialog box appears.
6. Select the Standby timeout, the Sleep At time, or both.
7. Select Hard Disk OFF if you want your hard disk drive to power down in Sleep Mode.
8. Click on OK to close the Setup Power Management dialog box.
9. Click on OK to enable Power Management in Windows.
HP Vectra XU – Getting Started Using Your PC •• 29
Page 30

A Quick Guide to Dashboard
Dashboard gives you convenient push-button control of Windows.
1. To set up Dashboard for your needs, click on the Customize button and follow the
screen instructions. For example, the Dashboard "Preferences" menu allows you to set
up Dashboard as a Windows shell for starting your programs instead of using the
Windows Program Manager.
2. To start your applications use either Dashboard's Quick Launch buttons or Dashboard's
Program Menu:
a. To start an application using Dashboard's Quick Launch buttons, click on the
application's icon.
b. To start an application using Dashboard's Program Menu:
i. Click once on the Program Menu button to list the programs in the group (or
double-click on the button to expand the group).
ii. Click once on the program name to start it.
c. To exit an application, double-click on the control-menu box at the top left of the
program's window.
3. To click back and forth between programs, use Dashboard's Extended screens that
contain miniature views of the open program windows.
4. To change the setup of installed printers, double-click on Dashboard's Printer Manager
button.
5. For help on using Dashboard, click on the ? button. Move the ? to the Dashboard
feature on which you need help, and click the mouse button.
HP Vectra XU – Getting Started Using Your PC •• 30
Page 31

Using Diskettes
3.5-inch diskette used in drive A:
720 KB 1.44 MB
Your PC has a 3.5-inch, high-density, 1.44 MB, flexible disk drive (A) for:
• high-density (1.44 MB) diskettes have HD written in one corner
• low-density (720 KB) diskettes.
If you installed a 5.25-inch, high-density, 1.2 MB flexible disk drive (B), it can use highdensity 5.25-inch diskettes. It is recommended that you do not use low-density diskettes in
the high-density drive.
To use diskettes:
1. Insert the diskette into the flexible disk drive—ensure it is the right way up (label side
up).
2. Use your application software to access the diskette. The flexible disk drive light flashes
when your PC is using the diskette.
3. When you have finished using the diskette, wait until the drive light stops flashing, then
use the button on the flexible disk drive (the lever on a 5.25-inch flexible disk drive) to
release your diskette.
Store your diskettes in a safe place. Never touch the exposed surface.
Direction
arrow
Write protect
hole
1.44 MB
diskette
identification
hole
5.25-inch diskette
used in drive B
A:
B:
1.2 MB
HP Vectra XU – Getting Started Using Your PC •• 31
Page 32

Using a Network
Your PC's integrated network interface allows you to use a network. This could be a
connection to another PC to share files and resources, such as a printer. Alternatively it
could be a connection to a local area network (LAN), allowing your PC to use extra disk
drives and network printers.
To use the network features:
1. Double-click on the Main icon in Windows Program Manager to display the File
Manager and Control Panel icons.
2. To access the network mass storage devices, double-click on the File Manager icon.
3. To access the network features, double-click on the Control Panel icon, then doubleclick on the Network icon and follow the instructions on the screen.
4. To connect the network printers, double-click on the Control Panel icon, then doubleclick on the Printers icon and follow the instructions on the screen.
Typical network mass
storage devices (other
names may be available
on your server)
Network
cable
Typical network printer Typical network server Your PC
HP Vectra XU – Getting Started Using Your PC •• 32
Page 33

Using a Printer
Setting up your printer for use by all your Windows applications:
1. Double-click on the Main icon in Windows Program Manager to display the Control
Panel icon.
2. Double-click on the Control Panel icon to display the Printers icon.
3. Double-click on the Printers icon to display the Printers window. Use the Printers
window to install, connect and set up the printer. The Printers window tells Windows
the type of printer you have, where it is connected, the paper size and orientation, and
how to install any special fonts. For more information, click on Windows Help.
4. When you have finished, click on Close.
Printing your data:
1. Make sure you are using the correct printer cable. (Refer to Connecting a Printer or
Plotter, or Network.)
2. Make sure the printer is on-line and correctly set up to work with your PC. You may
have to do this using a control panel or switches on the printer. (Refer to your printer
manual for details.)
3. Use the "print" menu in your application to print your data. (Refer to your application's
manual for details.)
4. If you want to view the print queue or change the print priority:
a. Double-click on the Main icon in Windows Program Manager to display the Print
Manager icon.
b. Double-click on the Print Manager icon to display the Print Manager window. Use
the Printer Manager window to view the progress of your print jobs.
HP Vectra XU – Getting Started Using Your PC •• 33
Page 34

Tips for Using Your PC
If you want to: You need to:
Install hardware accessories. Refer to “Preparing Your PC for Use” in the
manual Setting Up Your PC.
Configure hardware accessories. Refer to “Preparing Your PC for Use” in the
manual Setting Up Your PC.
Install new applications, and set up
and use the application software.
Start a Windows application. Double-click on its icon.
Switch to another application that is
running under Windows.
Change the mouse double-click and
tracking speed, and left-hand and
right-hand buttons.
Set up a printer. Use the Printers icon in the Windows Control
Safeguard your files. Use the Microsoft Backup program.
Restore a file you've accidentally
deleted.
Make more hard disk space
available.
Improve the performance of your
hard disk.
Make more memory available. Increase (conventional) memory space using the
Display more colors. If your PC has a Matrox video adapter board,
Protect your PC from viruses. Run the Microsoft Anti-Virus program.
Read your application software's manuals.
Press [ALT] and [ESC] simultaneously.
Use the Mouse icon in the Windows Control
Panel.
Panel.
Recover your file using the Microsoft Undelete
program.
Delete unnecessary files, and increase hard disk
space by using a disk compression program.
Install a larger hard disk drive as described in
“Preparing Your PC for Use” of the manual Setting
Up Your PC.
Use the Microsoft Defragmenter program.
Microsoft MemMaker program. Install more main
memory as described in “Preparing Your PC for
Use” of the manual Setting Up Your PC.
install more video memory as described in
“Preparing Your PC for Use” of the manual Setting
Up Your PC. If you need to update the display
drivers, use the Windows Setup icon in the
Windows Main group.
If you want to: You need to: What happens:
Stop anyone from starting
your PC in your absence.
HP Vectra XU – Getting Started Using Your PC •• 34
Run SETUP and set a
User Password.
When you power on the PC, it will
display a User Password prompt.
The PC won't start until you type
in your User Password.
Page 35

Stop anyone from using
your PC when you leave
your desk.
Run SETUP and set a
User Password.
Press the Keyboard
Lock Button when you
leave your desk.
Lock your PC without
pressing the Keyboard
Lock Button.
Run SETUP, set a
User Password and
enable the Keyboard
Lock Timer.
Make the screen go blank
when you lock the PC.
(Integrated video adapter
only.)
Run SETUP, set a
User Password and
enable the Screen
Blanking field
(except if your PC has
a Matrox video
adapter board). Press
the Keyboard Lock
Button when you
leave your desk.
Set the keyboard's
numeric keypad to cursor
control when you start the
PC.
Change the volume of the
key click.
Run SETUP and set
the Power-on Num
Lock State field to
Off.
Run SETUP and
change the Key
Click Volume field.
Change the speed at
which characters repeat
when you hold a key
down.
Change your PC's clock
from winter to summer
time.
Run SETUP and
change the Key
Autorepeat Speed
field.
Run SETUP and
change the Time
field.
Reset your PC. Save your data and
exit your program.
Press and hold the
RESET button for one
second.
Run SETUP to set a User
Password.
Reset your PC. When
the message
<Setup=F2 >
appears, press the
[F2] key.
Reduce power
consumption.
Enable Power
Management in
Windows.
The PC locks, but any
applications you were using
continue to run. You can't use the
PC until you type in your User
Password.
When you haven't used your
keyboard or mouse for a specified
time, the PC locks. Any
applications you were using
continue to run. You can't use the
PC until you type in your User
Password.
The PC locks and the screen
goes blank, but any applications
you were using continue to run.
You can't use the PC until you
type in your User Password.
The Num Lock key is set to Off
when you save and exit SETUP.
The key click volume changes
when you save and exit SETUP.
The key repeat speed changes
when you save and exit SETUP.
The PC's clock shows the correct
time.
The PC will restart.
The SETUP menu will appear.
The PC will go into Standby or
Sleep Mode.
HP Vectra XU – Getting Started Using Your PC •• 35
Page 36

Save your SETUP
selections.
When the SETUP
menu is displayed,
press the [F3] key.
You will be asked to confirm that
you want to save the settings.
Press the Enter key. The PC will
restart.
HP Vectra XU – Getting Started Using Your PC •• 36
Page 37

If You Have a Problem with Your PC
HP Vectra XU – Getting Started If You Have a Problem with Your PC •• 37
Page 38

How to Clean Your PC
Periodically wipe any dust and fingerprints off your PC's cover and display screen.
• Before cleaning your PC, turn it OFF and disconnect the power cords.
• Wipe the PC with a cloth, dampened with water or a non-detergent cleaning solution (do
not use spray liquids or a soaking-wet cloth).
• After cleaning your PC, make sure everything is dry before turning it back ON.
• Do not try to clean diskettes.
Any other cleaning, including cleaning inside the PC, should be left to your dealer or
authorized HP service personnel.
HP Vectra XU – Getting Started If You Have a Problem with Your PC •• 38
Page 39

How to Solve a Problem
The following pages explain how you can correct problems with your PC. If you need further
help:
• Refer to the Setting Up Your PC manual supplied with your PC.
• Ask your system administrator or dealer for assistance.
HP Vectra XU – Getting Started If You Have a Problem with Your PC •• 39
Page 40

Solving Problems When Starting the PC
HP Vectra XU – Getting Started If You Have a Problem with Your PC •• 40
Page 41

If Your PC Does Not Start
1. If the lights on the power switches of the PC and display are not ON:
a. Make sure your PC and display are connected to a working power outlet.
b. Make sure the PC and display are turned ON.
2. If the display's screen is blank:
a. If the light next to the Keyboard Lock Button is lit, type your User Password and
press [ENTER] to unlock your PC.
b. Make sure the display's brightness and contrast controls are properly set.
c. Check the display is properly connected to the PC.
3. If the light next to the PC's power switch is RED, your PC has a Power-On Self-Test
(POST) error.
HP Vectra XU – Getting Started If You Have a Problem with Your PC •• 41
Page 42

If an Error Occurs When the PC Starts
If an error occurs when you switch ON the PC, the light next to the power switch turns RED
and the Power-On Self-Test screen shows the error:
1. Press [ENTER]. A message appears describing the error and how to fix it.
2. Or press [F2] to run the PC's SETUP program and correct the error. (The Setting Up
Your PC manual supplied with your PC provides details on using SETUP.)
3. Alternatively, press [F1] to continue. Then contact your dealer or system administrator
for assistance in fixing the problem.
HP Vectra XU – Getting Started If You Have a Problem with Your PC •• 42
Page 43

If You Forget Your User Password
If the User Password prompt appears when you start your PC, but you have forgotten your
User Password:
1. Start the PC's SETUP program using the System Administrator Password, and erase
the old User Password. (“Preparing Your PC for Use” describes how to set and erase
the User Password.)
2. If there is no System Administrator Password, erase the User Password using a switch
on the PC's system board. (Refer to the Setting Up Your PC manual supplied with your
PC for details.)
HP Vectra XU – Getting Started If You Have a Problem with Your PC •• 43
Page 44

Solving Problems After the PC Has Started
HP Vectra XU – Getting Started If You Have a Problem with Your PC •• 44
Page 45

If Your PC has the Wrong Date and Time
1. Restart the PC. Run the PC's SETUP program and set the correct date and time.
2. * If you are using a network, your PC's clock may be synchronized with the server's
clock. Ask your network administrator to check the server's date and time.
HP Vectra XU – Getting Started If You Have a Problem with Your PC •• 45
Page 46

If You Can't Change Your User Password in SETUP
If you started the PC's SETUP program but you cannot change your User Password or
keyboard preferences, this is because these settings are protected.
1. Restart the PC's SETUP program and enter your User Password when requested.
2. Check that security mode has not been enabled using a switch on the PC's system
board. (Refer to the Setting Up Your PC manual supplied with your PC for details.)
HP Vectra XU – Getting Started If You Have a Problem with Your PC •• 46
Page 47

Solving Problems When Using Your Applications
HP Vectra XU – Getting Started If You Have a Problem with Your PC •• 47
Page 48

If Your Application Does Not Work
1. If an error message is displayed when using the PC, refer to your application manuals
for details.
2. If the application won't run properly, ensure it has been correctly installed and set up.
(Refer to your application manuals for details.)
HP Vectra XU – Getting Started If You Have a Problem with Your PC •• 48
Page 49

If Your Application Screen is Blurred
• Check that the display is properly connected to the PC.
If you changed the display resolution in Windows, you may have selected a resolution
which is not supported by your display.Restart the PC from a diskette containing the
operating system, then run Windows Setup from the C:\WINDOWS directory and change
the video resolution. (Refer to the Setting Up Your PC manual, supplied with your PC.)
HP Vectra XU – Getting Started If You Have a Problem with Your PC •• 49
Page 50

If you Select the Wrong Display in the HP User Tools Menu
If you select the wrong display in the HP User Tools menu, the display screen may become
blurred or unreadable. To correct this problem:
1. Restart the PC, either by switching the PC off then on, or by pressing [ENTER] + [ALT]
+ [DEL]. The PC will perform its power-on-self-test (POST).
2. When POST completes, press [F5] to bypass the startup files and display the MS-DOS
prompt (C:\).
3. Type CD:\WINDOWS and press [ENTER].
4. Type SETUP and press [ENTER].
5. Press the up-arrow key to select the [Display] line, and press [ENTER].
6. Select the line 640x480x16, and press [ENTER].
7. Press [ENTER] again to accept the configuration.
8. Press [CTRL] + [ALT] + [DEL] to restart the PC.
9. If neccessary, type WIN and press [ENTER] to restart Windows.
10. When Windows starts, select the correct display with HP User Tools. For further
information on HP User Tools, refer to the chapter on HPUtilities in Setting Up Your PC.
HP Vectra XU – Getting Started If You Have a Problem with Your PC •• 50
Page 51

Solving Problems When Using Your Hardware
HP Vectra XU – Getting Started If You Have a Problem with Your PC •• 51
Page 52

If Your Keyboard Does Not Work
If the light next to the Keyboard Lock Button is lit, your PC is locked. Type your User
Password and press [ENTER] to unlock your PC.
Turn OFF the PC and check the keyboard is properly connected to the PC.
HP Vectra XU – Getting Started If You Have a Problem with Your PC •• 52
Page 53

If Your Mouse Does Not Work
1. If the light next to the Keyboard Lock Button is lit, your PC is locked. Type your User
Password and press [ENTER] to unlock your PC.
2. Turn OFF the PC and check the mouse is properly connected to the PC.
3. Check that your software has been set up to use the mouse.
4. Clean the mouse by removing the ball and ensuring the guide rollers are clean.
HP Vectra XU – Getting Started If You Have a Problem with Your PC •• 53
Page 54

If Your Flexible Disk Drive Does Not Work
1. Check that you have inserted the diskette correctly. The arrow should be on the top left
hand corner of the diskette if you are inserting it horizontally or at the bottom if you are
inserting the diskette vertically.
2. Check the diskette you are using works by trying it in another PC.
3. Check that your PC's flexible disk drive is correctly configured in the PC's SETUP
program. (This procedure is described in the Setting Up Your PC manual.)
4. Clean the flexible disk drive using a "wet-cleaning diskette kit" available from your
dealer.
HP Vectra XU – Getting Started If You Have a Problem with Your PC •• 54
Page 55

If Your Hard Disk Drive Does Not Work
Check that your PC's hard disk drive is correctly configured in the PC's SETUP program.
(This procedure is described in the Setting Up Your PC manual.)
HP Vectra XU – Getting Started If You Have a Problem with Your PC •• 55
Page 56

If Power Management Does Not Work
Check that Power Management is enabled using the Power icon in Windows Control Panel,
as described in “Preparing Your PC for Use.”
If the Power icon does not appear in the Windows Control Panel :
1. At the MS-DOS prompt, change to the C:\WINDOWS directory.
2. Run Windows Setup and set the Computer field to MS-DOS System with APM .
HP Vectra XU – Getting Started If You Have a Problem with Your PC •• 56
Page 57

If Your Printer Does Not Work
1. If the lights on the front of the printer are not lit:
◊◊ Make sure the printer is connected to a working power outlet.
◊◊ Make sure the printer is turned ON.
2. Make sure the printer has sufficient paper, and it is not jammed.
3. Make sure the printer is "on-line", and set up to work with your PC. (Refer to your printer
manual for more details.)
4. Check the printer has been correctly set up in the Windows Print Manager icon.
5. Check that your software is correctly set up to use the printer, and your PC's
communications ports are correctly configured. (The Setting Up Your PC manual
describes how to configure the ports.)
6. If you are using a printer with an ECP/EPP parallel interface, make sure you have
installed the ECP software driver provided with the printer.
7. Make sure you are using an ECP/EPP compatible cable, IEEE 1284-B standard
connector or IEEE 1284-C small connector.
HP Vectra XU – Getting Started If You Have a Problem with Your PC •• 57
Page 58

If Your Network Does Not Work
1. If an error message is displayed when starting the PC from the network, refer to the
Setting Up Your PC manual.
2. Check that your network administrator has set up your PC to use the network. (This
procedure is described in the Setting Up Your PC manual.)
3. Ask your network administrator to check the network is operating correctly, and the
correct network drivers have been installed and configured.
HP Reference Documentation
If you need service information about your PC, refer to the HP Vectra PC Service Handbook
which can be ordered from your local HP Sales and Support Office.
HP Vectra XU – Getting Started If You Have a Problem with Your PC •• 58
 Loading...