

HP Vectra VE5 4, Vectra VE 4/xxx User Manual

saxo.bk : title.fb4 Page iii Tuesday, August 5, 1997 9:44 AM
User’s Guide

saxo.bk : title.fb4 Page iv Tuesday, August 5, 1997 9:44 AM
Who this Manual is For
This manual is for anyone who wants to:
Set up the PC for the first time
•
Configure the PC
•
Add accessories to the PC
•
Troubleshoot problems on the PC
•
Find out where to get more information and support.
•
WARNING
Important Safety Information
If you have any doubt that you can lift the PC or display safely, do not
try to move it without help.
For your safety, always connect the equipment to a grounded wall
outlet. Always use a power cord with a properly grounded plug, such
as the one provided with this equipment, or one in compliance with
your national regulations. This PC is disconnected from the power by
removing the power cord from the power outlet. This means the PC
must be located close to a power outlet that is easily accessible.
For your safety, never remove the PC’s cover without first removing
the power cord from the power outlet, and any connection to a
telecommunications network. Always replace the cover on the PC
before switching it on again.
To avoid electric shock, do not open the power supply. There are no
user serviceable parts inside.
This HP PC is a class 1 laser product. Do not attempt to make any
adjustment of the laser units.
iv English

saxo.bk : title.fb4 Page v Tuesday, August 5, 1997 9:44 AM
WARNING
There is a danger of explosion if the battery is incorrectly installed. For
your safety, never attempt to recharge, disassemble, or burn the old
battery. Replace the battery only with the same or equivalent type
recommended by the manufacturer. The battery in this PC is a lithium
battery which does not contain heavy metals, nevertheless, in order to
protect the environment, do not dispose of batteries in household
waste. Please return used batteries to the shop from which you bought
them, or to the dealer from whom you purchased your PC, or to HP, so
that they can either be recycled or disposed of in an environmentally
sound way. Returned used batteries will be accepted free of charge.
Important Ergonomic Information
It is strongly recommended that you read the ergonomic information
before using your PC.
For Windows NT 4.0 and Windows 95 users, open the Start menu in the
task bar and select Help. Then double-click on the help topic “Working
in Comfort”.
English v

saxo.bk : title.fb4 Page vi Tuesday, August 5, 1997 9:44 AM
vi English

saxo.bk : saxo.toc Page vii Tuesday, August 5, 1997 9:44 AM
Contents
1 Setting Up and Using Your PC
Unpacking Your PC . . . . . . . . . . . . . . . . . . . . . . . . . . . . . . . . . . . . . . . . . 2
Connecting the Mouse, Keyboard and Display . . . . . . . . . . . . . . . . . . 3
Connecting to a Network . . . . . . . . . . . . . . . . . . . . . . . . . . . . . . . . . . . . 4
Connecting Audio Accessories . . . . . . . . . . . . . . . . . . . . . . . . . . . . . . . 5
Connecting the Power Cables . . . . . . . . . . . . . . . . . . . . . . . . . . . . . . . . 8
Your PC’s Control Panel . . . . . . . . . . . . . . . . . . . . . . . . . . . . . . . . . . . . . 9
Starting and Stopping Your PC. . . . . . . . . . . . . . . . . . . . . . . . . . . . . . . 10
Starting Your PC. . . . . . . . . . . . . . . . . . . . . . . . . . . . . . . . . . . . . . . . . . . . . 10
Starting the PC for the First Time . . . . . . . . . . . . . . . . . . . . . . . . . . . . . . 11
Stopping Your PC. . . . . . . . . . . . . . . . . . . . . . . . . . . . . . . . . . . . . . . . . . . . 12
Using the Flexible Disk Drive . . . . . . . . . . . . . . . . . . . . . . . . . . . . . . . 13
Setting Passwords . . . . . . . . . . . . . . . . . . . . . . . . . . . . . . . . . . . . . . . . . 14
Setting an Administrator Password . . . . . . . . . . . . . . . . . . . . . . . . . . . . . 14
Setting a User Password . . . . . . . . . . . . . . . . . . . . . . . . . . . . . . . . . . . . . . 15
Using Power Management . . . . . . . . . . . . . . . . . . . . . . . . . . . . . . . . . . 16
Additional Information and Help. . . . . . . . . . . . . . . . . . . . . . . . . . . . . 16
English vii

saxo.bk : saxo.toc Page viii Tuesday, August 5, 1997 9:44 AM
2 How to Install Accessories In Your PC
Accessories You Can Install . . . . . . . . . . . . . . . . . . . . . . . . . . . . . . . . 18
Removing and Replacing the Cover. . . . . . . . . . . . . . . . . . . . . . . . . . 19
Removing the Cover . . . . . . . . . . . . . . . . . . . . . . . . . . . . . . . . . . . . . . . . . 19
Replacing the Cover after Installing Accessories . . . . . . . . . . . . . . . . . . 20
Moving and Replacing the Power Supply . . . . . . . . . . . . . . . . . . . . . 21
Moving the Power Supply . . . . . . . . . . . . . . . . . . . . . . . . . . . . . . . . . . . . . 21
Replacing the Power Supply. . . . . . . . . . . . . . . . . . . . . . . . . . . . . . . . . . . 22
Installing Memory. . . . . . . . . . . . . . . . . . . . . . . . . . . . . . . . . . . . . . . . . 23
Installing Main Memory. . . . . . . . . . . . . . . . . . . . . . . . . . . . . . . . . . . . . . . 23
Installing an OverDrive Processor . . . . . . . . . . . . . . . . . . . . . . . . . . . 25
Removing the Processor . . . . . . . . . . . . . . . . . . . . . . . . . . . . . . . . . . . . . . 25
Installing the New Processor . . . . . . . . . . . . . . . . . . . . . . . . . . . . . . . . . . 26
Installing Mass Storage Devices. . . . . . . . . . . . . . . . . . . . . . . . . . . . . 27
Connecting IDE Devices . . . . . . . . . . . . . . . . . . . . . . . . . . . . . . . . . . . . . . 27
Configuring an IDE Device After Installation . . . . . . . . . . . . . . . . . . . . . 28
Installing an IDE Hard Disk Drive in the Top Rear Shelf . . . . . . . . . . . . 29
Installing an IDE Hard Disk Drive in the Bottom Rear Shelf . . . . . . . . . 32
Installing a CD-ROM, Tape or Zip Drive in a Front Shelf . . . . . . . . . . . . 35
Installing Accessory Boards . . . . . . . . . . . . . . . . . . . . . . . . . . . . . . . . 39
Configuring Accessory Boards with Plug and Play . . . . . . . . . . . . . . . . . 39
Configuring non-Plug and Play ISA Accessory Boards . . . . . . . . . . . . . . 40
Installing the Board. . . . . . . . . . . . . . . . . . . . . . . . . . . . . . . . . . . . . . . . . . 40
Installing a Security Cable. . . . . . . . . . . . . . . . . . . . . . . . . . . . . . . . . . 42
viii English

saxo.bk : saxo.toc Page ix Tuesday, August 5, 1997 9:44 AM
3 Troubleshooting Your PC
Using the HP Setup Program . . . . . . . . . . . . . . . . . . . . . . . . . . . . . . . . 44
HP Vectra Hardware Diagnostics Utility . . . . . . . . . . . . . . . . . . . . . . 45
If Your PC Does Not Start Properly. . . . . . . . . . . . . . . . . . . . . . . . . . . 47
Display is Blank and There Are No Error Messages . . . . . . . . . . . . . . . . 47
If a POST Error Message is Displayed . . . . . . . . . . . . . . . . . . . . . . . . . . . 49
If You Cannot Turn Off Your PC. . . . . . . . . . . . . . . . . . . . . . . . . . . . . . 51
If Your PC Has a Hardware Problem. . . . . . . . . . . . . . . . . . . . . . . . . . 51
Display Does Not Work Properly. . . . . . . . . . . . . . . . . . . . . . . . . . . . . . . . 51
If Your Keyboard Does Not Work . . . . . . . . . . . . . . . . . . . . . . . . . . . . . . . 53
If Your Mouse Does Not Work . . . . . . . . . . . . . . . . . . . . . . . . . . . . . . . . . . 53
If Your Printer Does Not Work. . . . . . . . . . . . . . . . . . . . . . . . . . . . . . . . . . 54
If the Flexible Disk Drive Does Not Work. . . . . . . . . . . . . . . . . . . . . . . . . 54
If the Hard Disk Does Not Work . . . . . . . . . . . . . . . . . . . . . . . . . . . . . . . . 55
If the CD-ROM Drive Has a Problem. . . . . . . . . . . . . . . . . . . . . . . . . . . . . 56
If an Accessory Board Does Not Work . . . . . . . . . . . . . . . . . . . . . . . . . . . 57
If You Have Forgotten Your Password . . . . . . . . . . . . . . . . . . . . . . . . 58
If Your PC Has a Software Problem . . . . . . . . . . . . . . . . . . . . . . . . . . 59
If Your Application Software Does Not Work . . . . . . . . . . . . . . . . . . . . . . 59
If the Date and Time are Incorrect . . . . . . . . . . . . . . . . . . . . . . . . . . . . . . 59
If Your PC Has an Audio Problem . . . . . . . . . . . . . . . . . . . . . . . . . . . . 60
Changing the Battery. . . . . . . . . . . . . . . . . . . . . . . . . . . . . . . . . . . . . . . 62
English ix

saxo.bk : saxo.toc Page x Tuesday, August 5, 1997 9:44 AM
4 Technical Information
Technical Information . . . . . . . . . . . . . . . . . . . . . . . . . . . . . . . . . . . . . 66
System Board Switches. . . . . . . . . . . . . . . . . . . . . . . . . . . . . . . . . . . . . . . 66
Power Consumption . . . . . . . . . . . . . . . . . . . . . . . . . . . . . . . . . . . . . . . . . 67
Acoustic Noise Emission. . . . . . . . . . . . . . . . . . . . . . . . . . . . . . . . . . . . . . 67
IRQs, DMAs, and I/O Addresses Used by Your PC . . . . . . . . . . . . . . . . . 68
5 Hewlett Packard Support and Information Services
Introduction . . . . . . . . . . . . . . . . . . . . . . . . . . . . . . . . . . . . . . . . . . . . . 70
Your HP Authorized Reseller . . . . . . . . . . . . . . . . . . . . . . . . . . . . . . . 71
HP SupportPack . . . . . . . . . . . . . . . . . . . . . . . . . . . . . . . . . . . . . . . . . . 71
HP Support Assistant CD-ROM . . . . . . . . . . . . . . . . . . . . . . . . . . . . . 72
Hewlett-Packard Information Services . . . . . . . . . . . . . . . . . . . . . . . 73
HP Forum on CompuServe. . . . . . . . . . . . . . . . . . . . . . . . . . . . . . . . . . . . 73
HP Forum on America Online. . . . . . . . . . . . . . . . . . . . . . . . . . . . . . . . . . 74
HP BBS Library . . . . . . . . . . . . . . . . . . . . . . . . . . . . . . . . . . . . . . . . . . . . . 75
HP World Wide Web Site . . . . . . . . . . . . . . . . . . . . . . . . . . . . . . . . . . . . . . 75
HP FAXback on Demand—HP FIRST . . . . . . . . . . . . . . . . . . . . . . . . . . . 76
HP Audio Tips (USA only) HP Automated Support Directory. . . . . . . . 76
Ordering Drivers and BIOS on Diskette. . . . . . . . . . . . . . . . . . . . . . . . . . 77
HP Support Services . . . . . . . . . . . . . . . . . . . . . . . . . . . . . . . . . . . . . . 78
Hewlett-Packard Telephone Support. . . . . . . . . . . . . . . . . . . . . . . . . 79
Lifeline Telephone Support . . . . . . . . . . . . . . . . . . . . . . . . . . . . . . . . . 80
x English

saxo.bk : saxo.toc Page xi Tuesday, August 5, 1997 9:44 AM
HP Network Phone-in Support Service (NPS). . . . . . . . . . . . . . . . . . 81
Summary. . . . . . . . . . . . . . . . . . . . . . . . . . . . . . . . . . . . . . . . . . . . . . . . . 82
Hewlett-Packard Marketing Headquarters. . . . . . . . . . . . . . . . . . . . . 83
Glossary . . . . . . . . . . . . . . . . . . . . . . . . . . . . . . . . . . . . . . . . . . 85
Index . . . . . . . . . . . . . . . . . . . . . . . . . . . . . . . . . . . . . . . . . . . . . 89
English xi

saxo.bk : saxo.toc Page xii Tuesday, August 5, 1997 9:44 AM
xii English

saxo.bk : saxo-us1.fb4 Page 1 Tuesday, August 5, 1997 9:44 AM
1
Setting Up and Using Your PC
saxo.bk : saxo-us1.fb4 Page 2 Tuesday, August 5, 1997 9:44 AM
1 Setting Up and Using Your PC
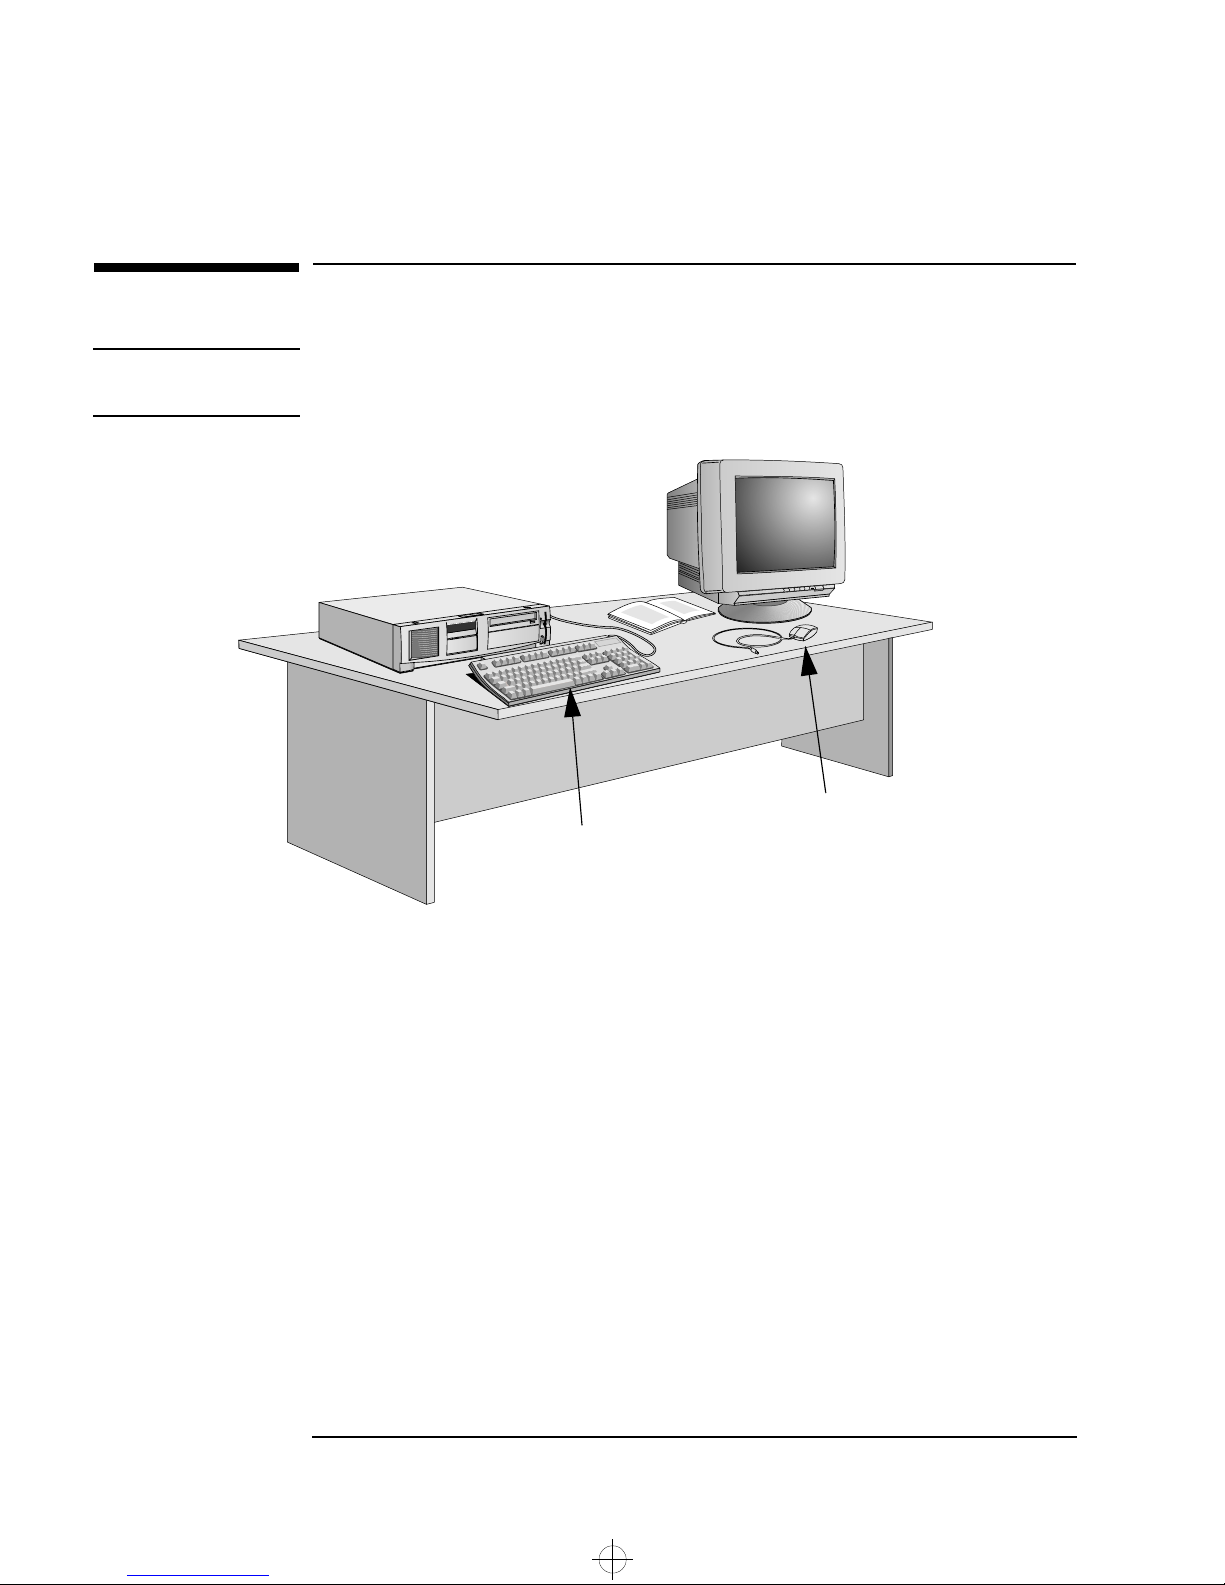
Unpacking Your PC
Unpacking Your PC
WARNING
If you have any doubt that you can lift the PC or display safely, do not
try to move it without help.
Typical Display
Computer
Mouse
Keyboard
Operating System
Installation Tools
When you receive your PC, unpack all the components.
1
Place the PC on a sturdy desk near to easily accessible power outlets,
2
with enough space for the keyboard, mouse, and any other
accessories. You can either place the PC horizontally (flat on the
desk) or vertically (on its side), with the flexible disk drive at the top.
Position the PC so that its rear connectors are easily accessible.
3
Refer to the display’s manual for information about the display.
4
Your PC’s operating system is preloaded on your PC’s hard disk drive.
No tools are required to set up your PC. However, if you plan to install a
disk drive, you may need a screwdriver. For further information about
installing accessories, refer to chapter 2, “How to Install Accessories In
Your PC”.
2 English
saxo.bk : saxo-us1.fb4 Page 3 Tuesday, August 5, 1997 9:44 AM
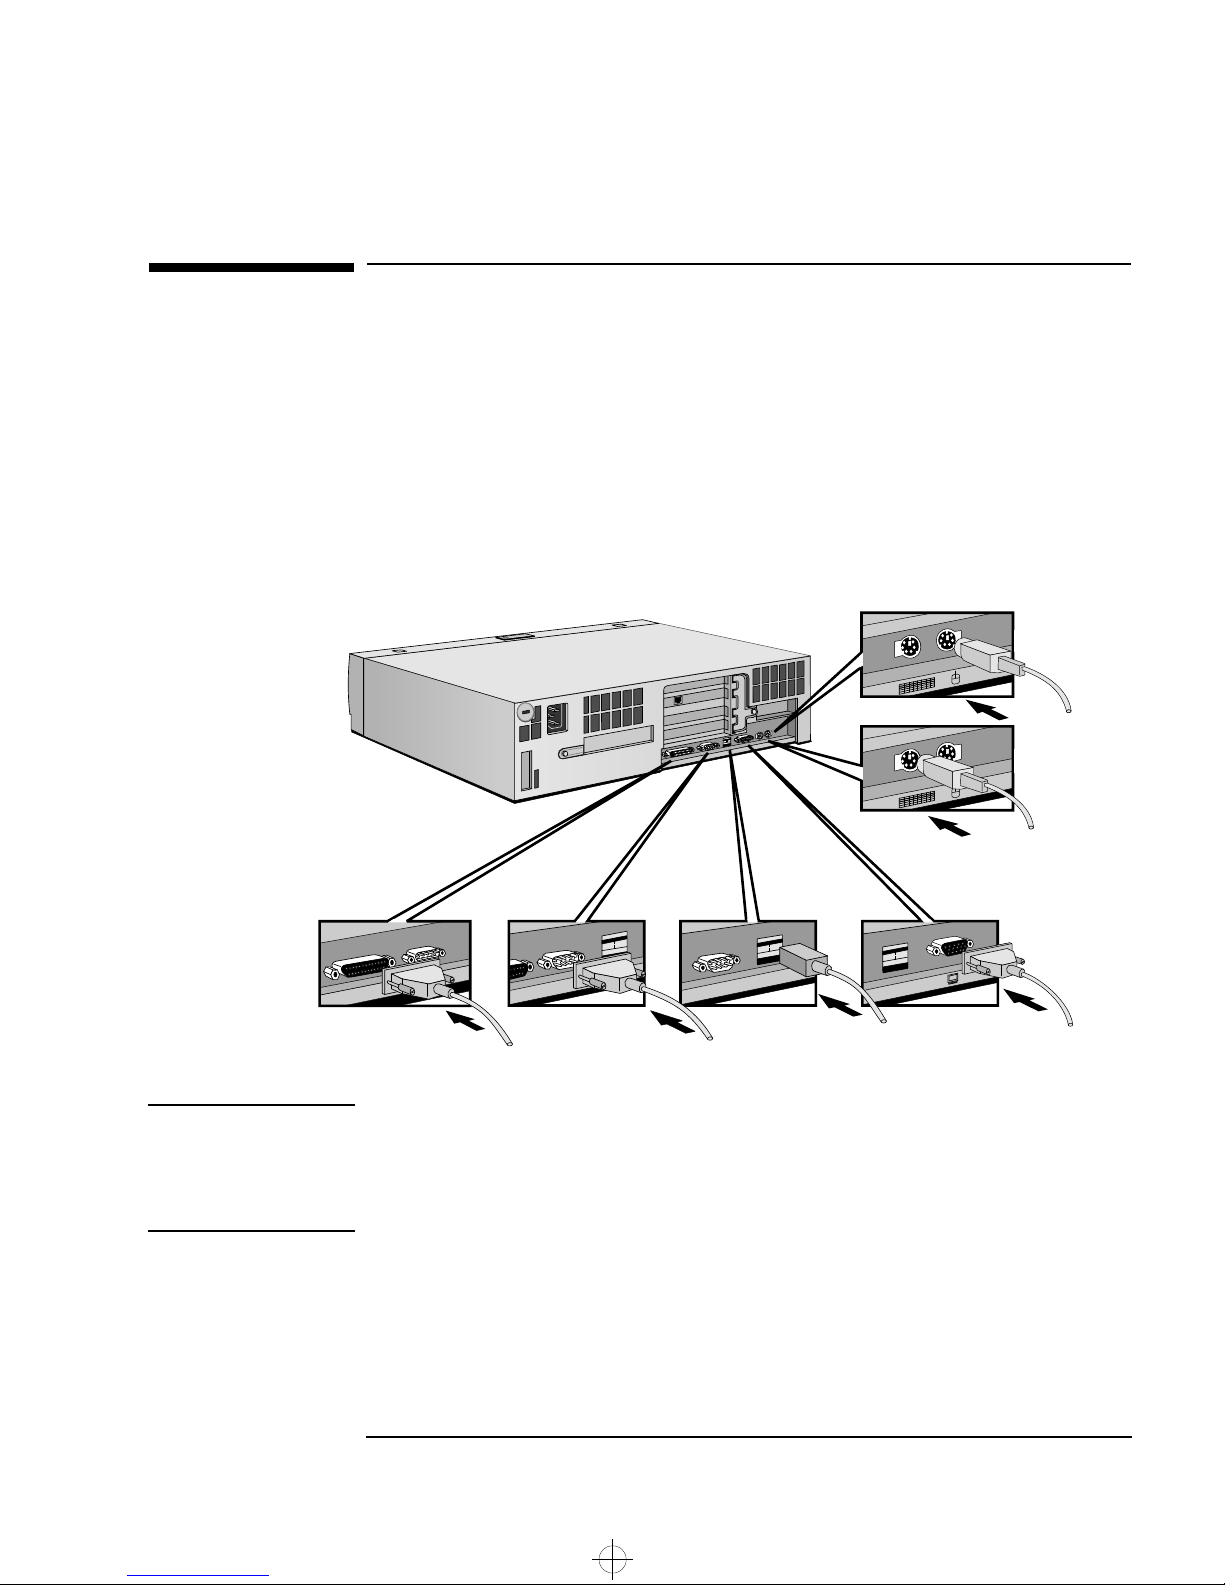
Connecting the Mouse, Keyboard and Display
Connect the mouse, keyboard, and display to the back of the computer.
Tighten the display cable attachment screws. The connectors are
shaped to go in one way only.
Connect the printer cable to the back of the computer and tighten the
attachment screws. Use the connector labeled:
Parallel (25-pin parallel connector) for a parallel device
•
Serial (9-pin serial connector) for a serial device.
•
1 Setting Up and Using Your PC
Connecting the Mouse, Keyboard and Display
Mouse
Keyboard
Parallel
Connector
Serial
Connector
USB
(see note below)
Display
NOTE The Universal Serial Bus (USB) connectors can be used for USB
accessories. Most USB accessories are automatically configured by
Windows 95 as soon as they are physically attached to the PC. USB is
not supported by all operating systems.
English 3
saxo.bk : saxo-us1.fb4 Page 4 Tuesday, August 5, 1997 9:44 AM
1 Setting Up and Using Your PC
Connecting to a Network
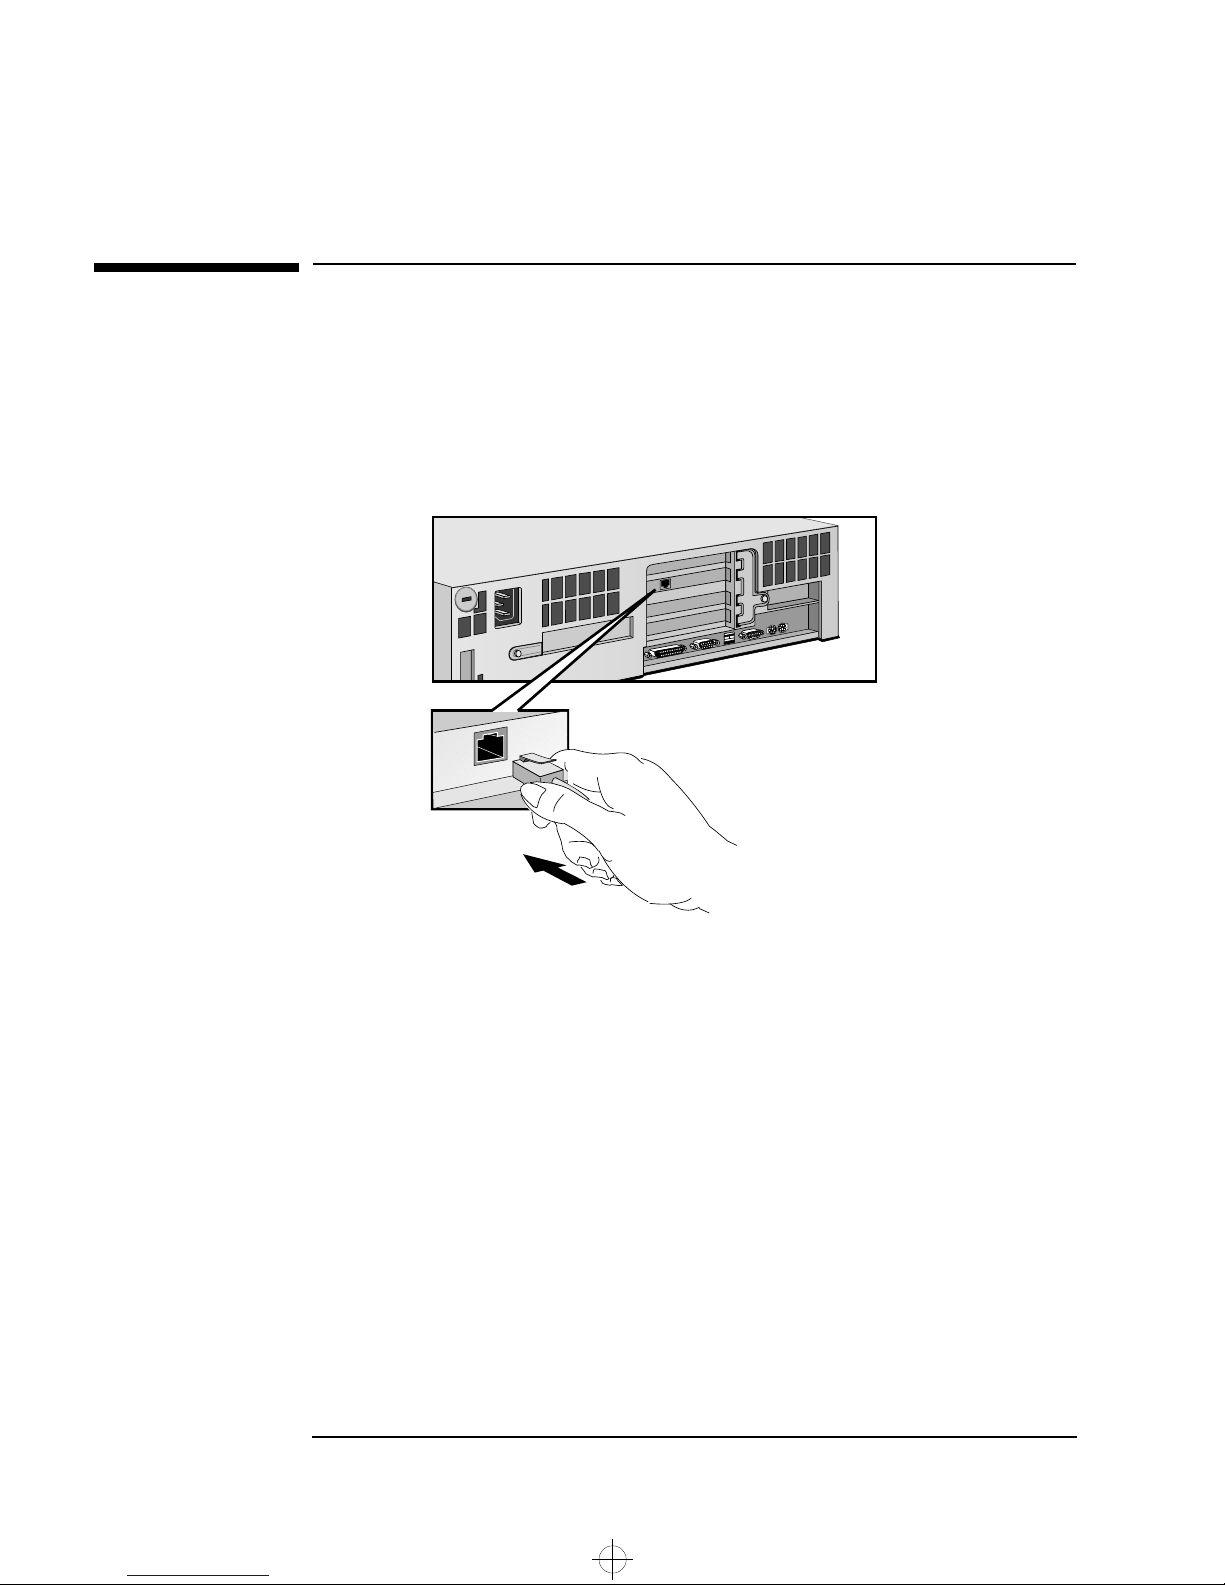
Connecting to a Network
Let your Network Administrator know you are connecting your PC to
the network.
Connect the network cable to the RJ-45 UTP (Unshielded Twisted
Pair) LAN connector.
10/100BT
Connector
To enable your network connection, refer to the Integrated Network
Interface Submenu in the Configuration Menu of the HP Setup
program.
4 English
saxo.bk : saxo-us1.fb4 Page 5 Tuesday, August 5, 1997 9:44 AM
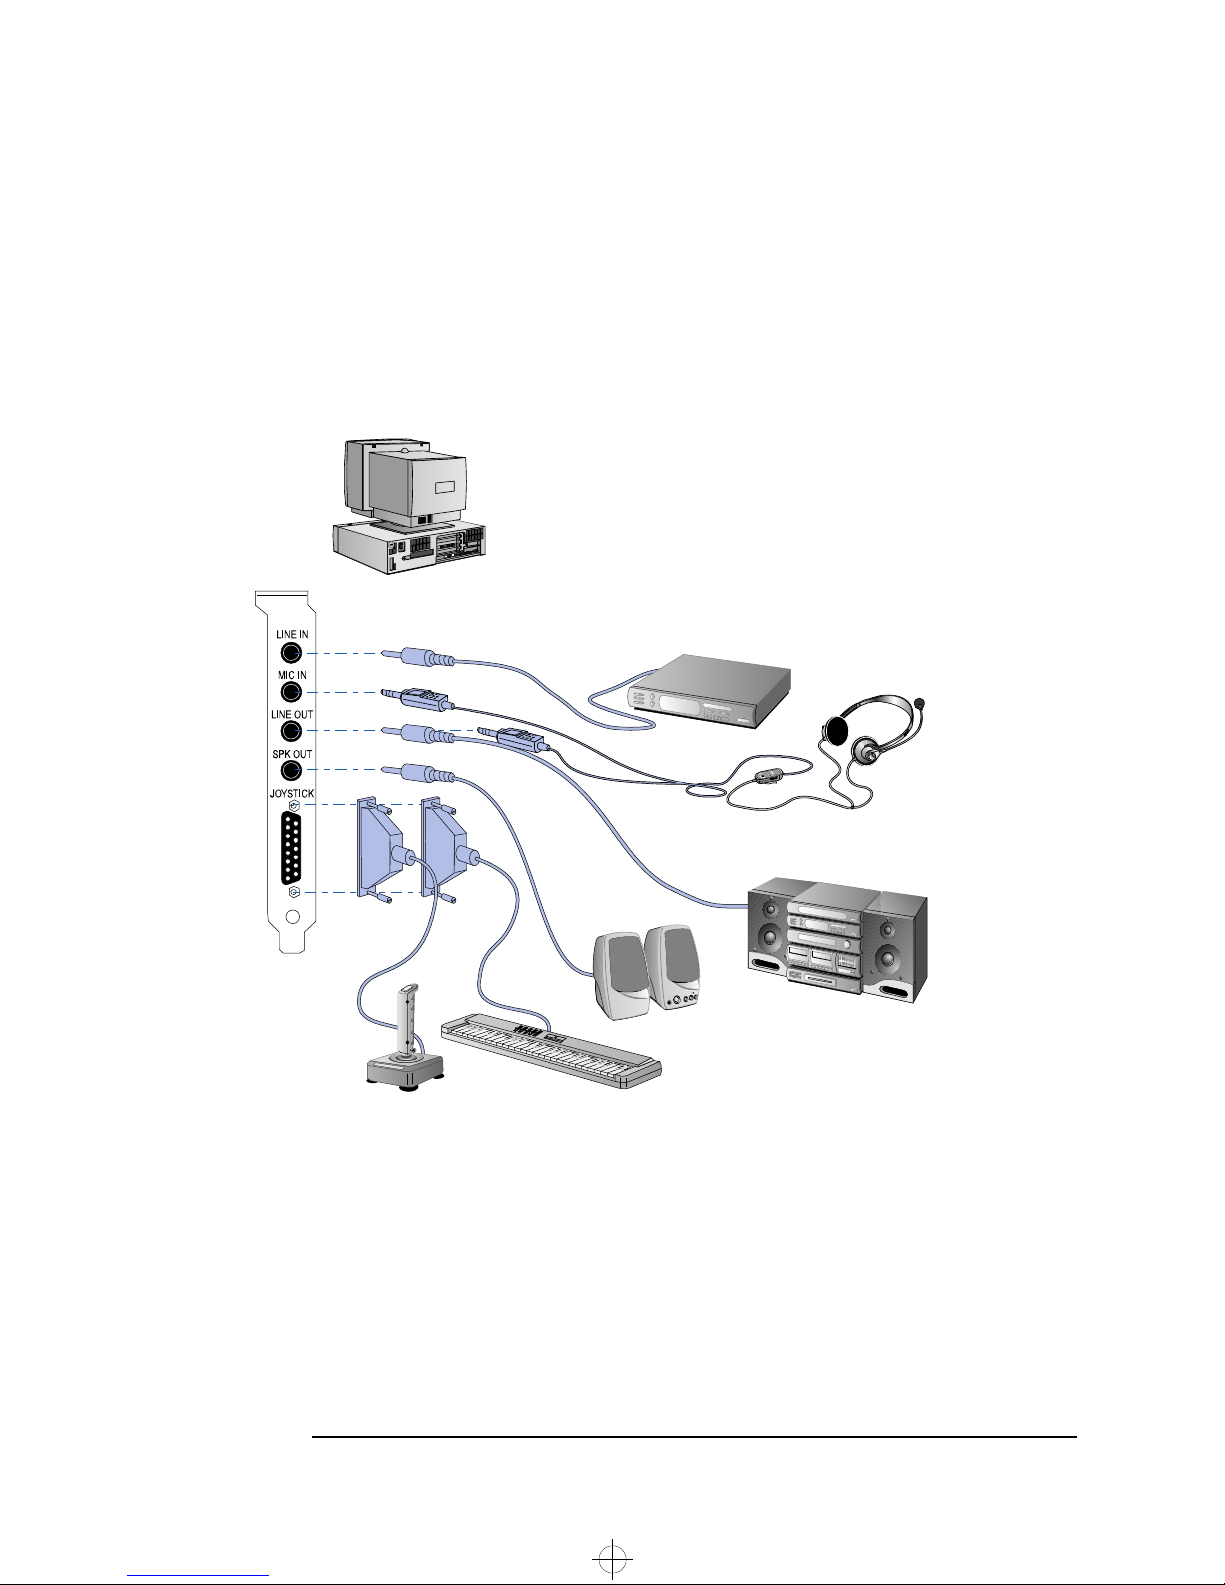
Connecting Audio Accessories
1 Setting Up and Using Your PC
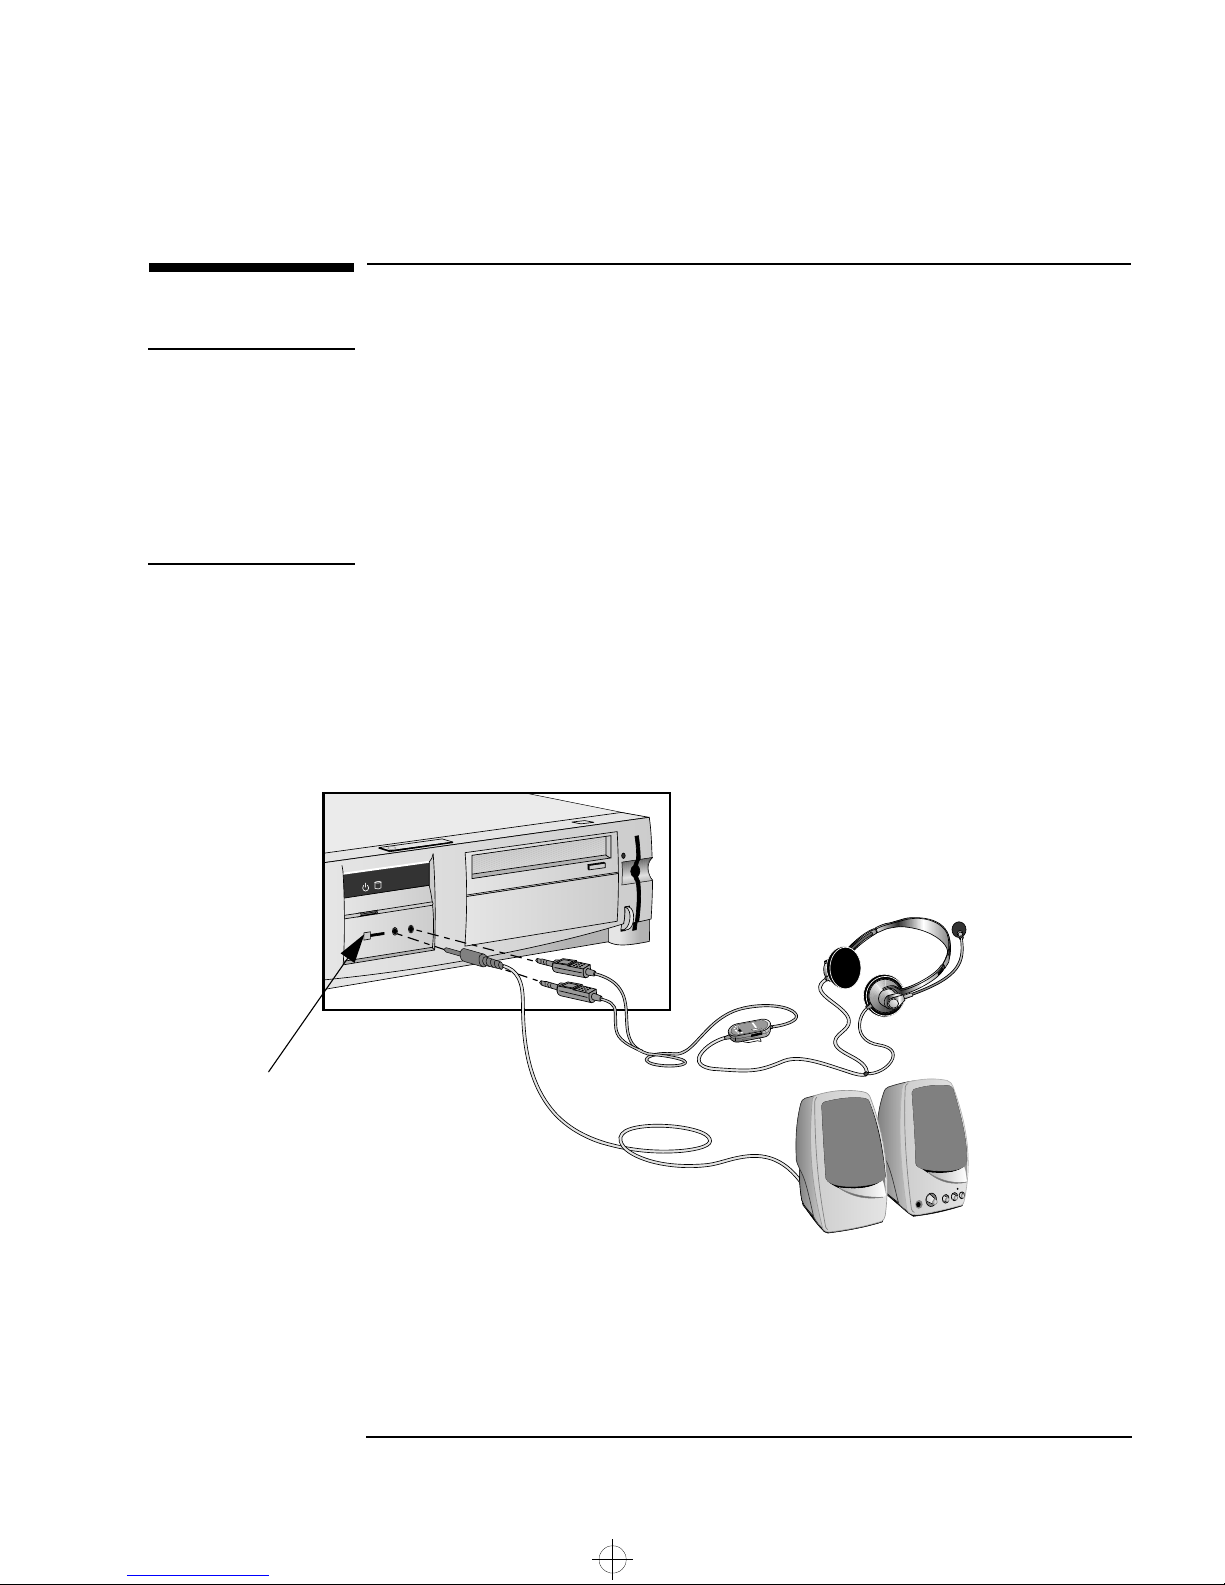
Connecting Audio Accessories
WARNING
To avoid discomfort from unexpected noise, always turn the volume
down before connecting headphones or speakers.
Listening to loud sounds for prolonged periods may permanently
damage your hearing. Before putting on headphones, place them
around your neck and turn the volume down. When you put on the
headphones, slowly increase the volume until you find a comfortable
listening level, and leave the volume control in that position.
If your PC has multimedia capabilities, it will have a multimedia front
panel and multimedia rear panel. The front panel has a
headphones/speaker jack, a microphone jack, and a volume control
NOTE
The internal speaker and the Line Out jack on the
rear of your PC are deactivated when you use
the Headphones jack.
Volume Control
Speakers must
have built-in
amplifiers.
The audio accessories shown here (audio
headphones and speakers) are not supplied with
your PC.
English 5
saxo.bk : saxo-us1.fb4 Page 6 Tuesday, August 5, 1997 9:44 AM
1 Setting Up and Using Your PC
Connecting Audio Accessories
The multimedia rear panel has an audio Line In jack, an audio Line Out
jack, and a MIDI interface connector (“JOYSTICK”). An additional
headphones jack and an additional microphone jack are also on the
rear panel.
NOTE
The internal speaker and the Line Out jack on the rear of your
PC are deactivated when you use the Headphones jack.
The internal speaker is deactivated when you use the Line
Out jack.
6 English
The audio accessories shown here (microphone,
speakers, joystick, musical instrument, and hifi
equipment) are not supplied with your PC.
saxo.bk : saxo-us1.fb4 Page 7 Tuesday, August 5, 1997 9:44 AM
If your PC does not have multimedia capabilities and you want to listen
to audio CDs on your CD-ROM drive, you can use the headphones jack
and the volume control on the front of the CD-ROM drive. To access
these controls:
1 Carefully remove the CD-ROM drive’s front bezel.
2 Replace it with the universal front bezel.
1 Setting Up and Using Your PC
Connecting Audio Accessories
You will find a spare universal front bezel inside your PC, or you can
order one from an authorized HP reseller.
English 7

saxo.bk : saxo-us1.fb4 Page 8 Tuesday, August 5, 1997 9:44 AM
1 Setting Up and Using Your PC
Connecting the Power Cables
Connecting the Power Cables
WARNING
For your safety, always connect the equipment to a grounded wall
outlet. Always use a power cable with a properly grounded plug such
as the one provided with this equipment or in compliance with your
national regulations. This PC is disconnected from the power by
removing the power cable from the power outlet. This means the PC
must be located close to a power outlet that is easily accessible.
Connect the power cords to the display and the computer. (The
1
connectors are shaped to go in one way only.)
Connect the display’s power cord and the computer’s power cord to
2
a grounded outlet.
Display
Power Cord
Computer
Power Cord
8 English
Grounded Outlet
saxo.bk : saxo-us1.fb4 Page 9 Tuesday, August 5, 1997 9:44 AM
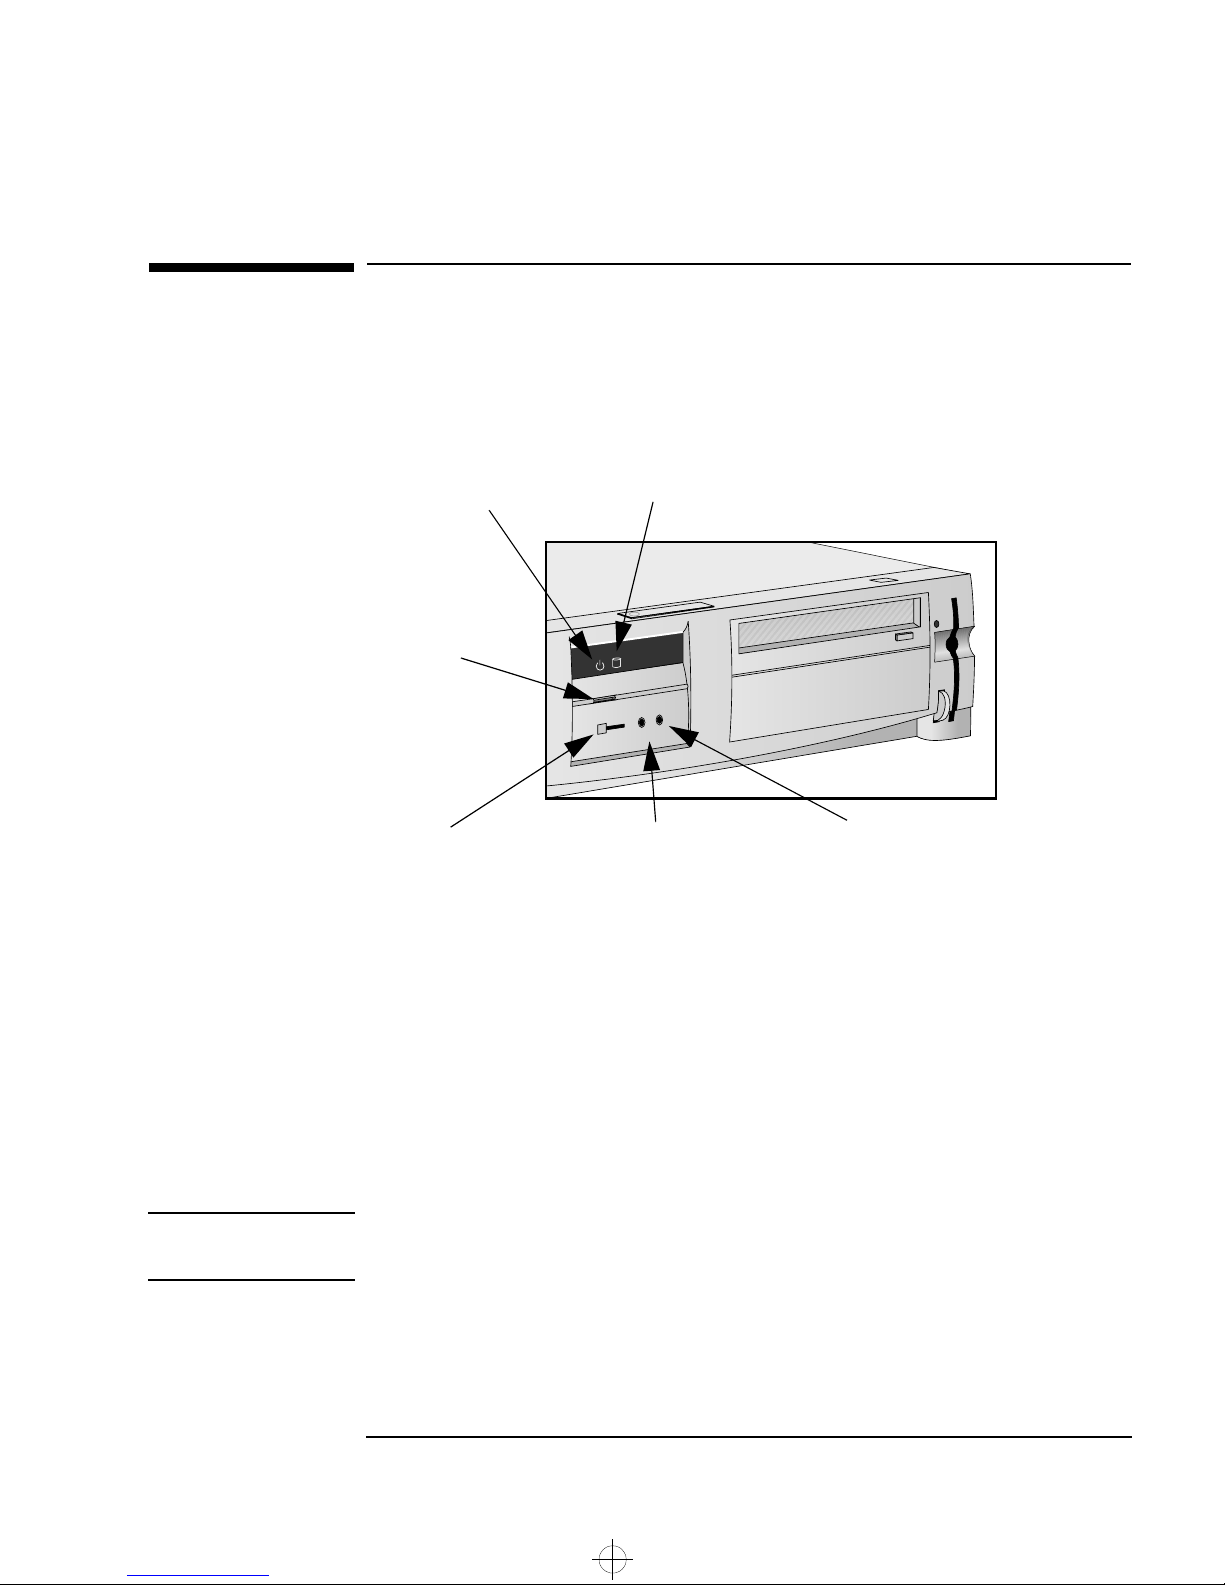
Your PC’s Control Panel
Your PC’s hardware control panel is on the front of your PC.
1 Setting Up and Using Your PC
Your PC’s Control Panel
Power On/Off Button
Power On/Off Button
Power on Status Light
Volume Control
(Optional—see note below)
Hard Disk Activity Light
Speaker Out for Headphones
(Optional—see note below)
Microphone connector
(Optional—see note below)
Press this button to turn the power on or off to your PC.
Hard Disk Activity Light
This light glows/flickers when your hard disk drive is being accessed.
The hard disk activity light will also work if you install a second IDE hard
disk drive (supplied by HP). However, if you replace this drive with a
SCSI hard disk drive, this light will not illuminate.
NOTE If your PC comes with an audio board, the front panel will have controls
for the audio board.
English 9
saxo.bk : saxo-us1.fb4 Page 10 Tuesday, August 5, 1997 9:44 AM
1 Setting Up and Using Your PC
Starting and Stopping Your PC
Starting and Stopping Your PC
NOTE If you are starting your PC for the first time, refer to "Starting the PC
for the First Time", on page 11.
Starting Your PC
Before you start your PC, first switch on the display.
1
Start your PC in one of these ways:
2
Press the power button on the front panel.
•
Press the keyboard space bar.
•
The keyboard power-on feature will work only if it is enabled in
the Setup program (refer to chapter 3) and the system board
switch 9 is CLOSED (refer to chapter 4).
When you switch on the computer, it carries out the Power-On-SelfTest (POST) while the Vectra logo is displayed. If you wish to view
the POST details, press to view the HP Summary Screen. If
there is an error in the POST, the error will automatically be
displayed. For details, refer to chapter 3.
If you have set a password in the PC’s Setup program and the option
3
At Start-up
is selected, the password prompt displays after the
POST has completed. If the Password prompt is displayed, type your
password and press to be able to use the PC.
10 English

saxo.bk : saxo-us1.fb4 Page 11 Tuesday, August 5, 1997 9:44 AM
Starting the PC for the First Time
If your PC has preinstalled software, it is initialized the first time you
start the PC. The software initialization process takes a few minutes.
This process sets up the software in your language and sets up your
software to use the hardware installed in your computer (you can
change the settings after the software has been initialized).
Choice of Operating System
For the best performance and reliability, you must specify which
operating system is used by your PC.
If you are using Windows 95, or any other Plug and Play operating
system, set the
program to
Plug & Play OS
. For all other operating systems, set this field to No. To
Yes
learn how to access the PC’s Setup program, refer to chapter 3.
field in the
1 Setting Up and Using Your PC
Starting and Stopping Your PC
menu of the Setup
Main
Changing the operating
system
If you change the operating system used by your PC, ensure that the
Plug & Play OS
field in the Setup program is correctly set.
Initializing Your Software
NOTE Do NOT switch OFF the PC while the software is being initialized—this
could cause unexpected results.
To initialize your software:
Turn on the display first, and then the PC.
1
When the PC is switched on, the Vectra Logo is displayed. The PC
performs a Power-On-Self-Test (POST). Press if you want to
view the POST details in the HP Summary Screen (refer to chapter
3).
If an error is detected during the Power-On-Self-Test, the PC will
automatically display the error. You may be prompted to press
to start the Setup program to correct the error.
English 11

saxo.bk : saxo-us1.fb4 Page 12 Tuesday, August 5, 1997 9:44 AM
1 Setting Up and Using Your PC
Starting and Stopping Your PC
2 The software initialization routine starts. It displays the software
license agreement, gives you an opportunity to read Working in
Comfort (ergonomic advice for computer users), and then asks
questions about the PC. For example:
The name of the person who will use the PC and your company
•
name. (If necessary, the name of the user can be modified later.)
3 While the initialization program is running, you can complete the
reply card that came with this manual.
4 When the initialization routine has finished, click on OK and the PC
will restart.
After Your PC Has Restarted
Set the keyboard to a comfortable position.
❒
Adjust the display screen’s brightness and contrast to suit your
❒
needs. If the picture does not fill the screen or is not centered, adjust
it using the controls on the display. Refer to the display’s manual for
details.
Stopping Your PC
To stop the PC, press the power button on the control panel. If you
have any unsaved documents, you will be prompted to save the data
before the PC performs a system shutdown.
Refer to the preloaded online documents for more information about
the preloaded HP software which provides this data protection feature.
12 English
saxo.bk : saxo-us1.fb4 Page 13 Tuesday, August 5, 1997 9:44 AM
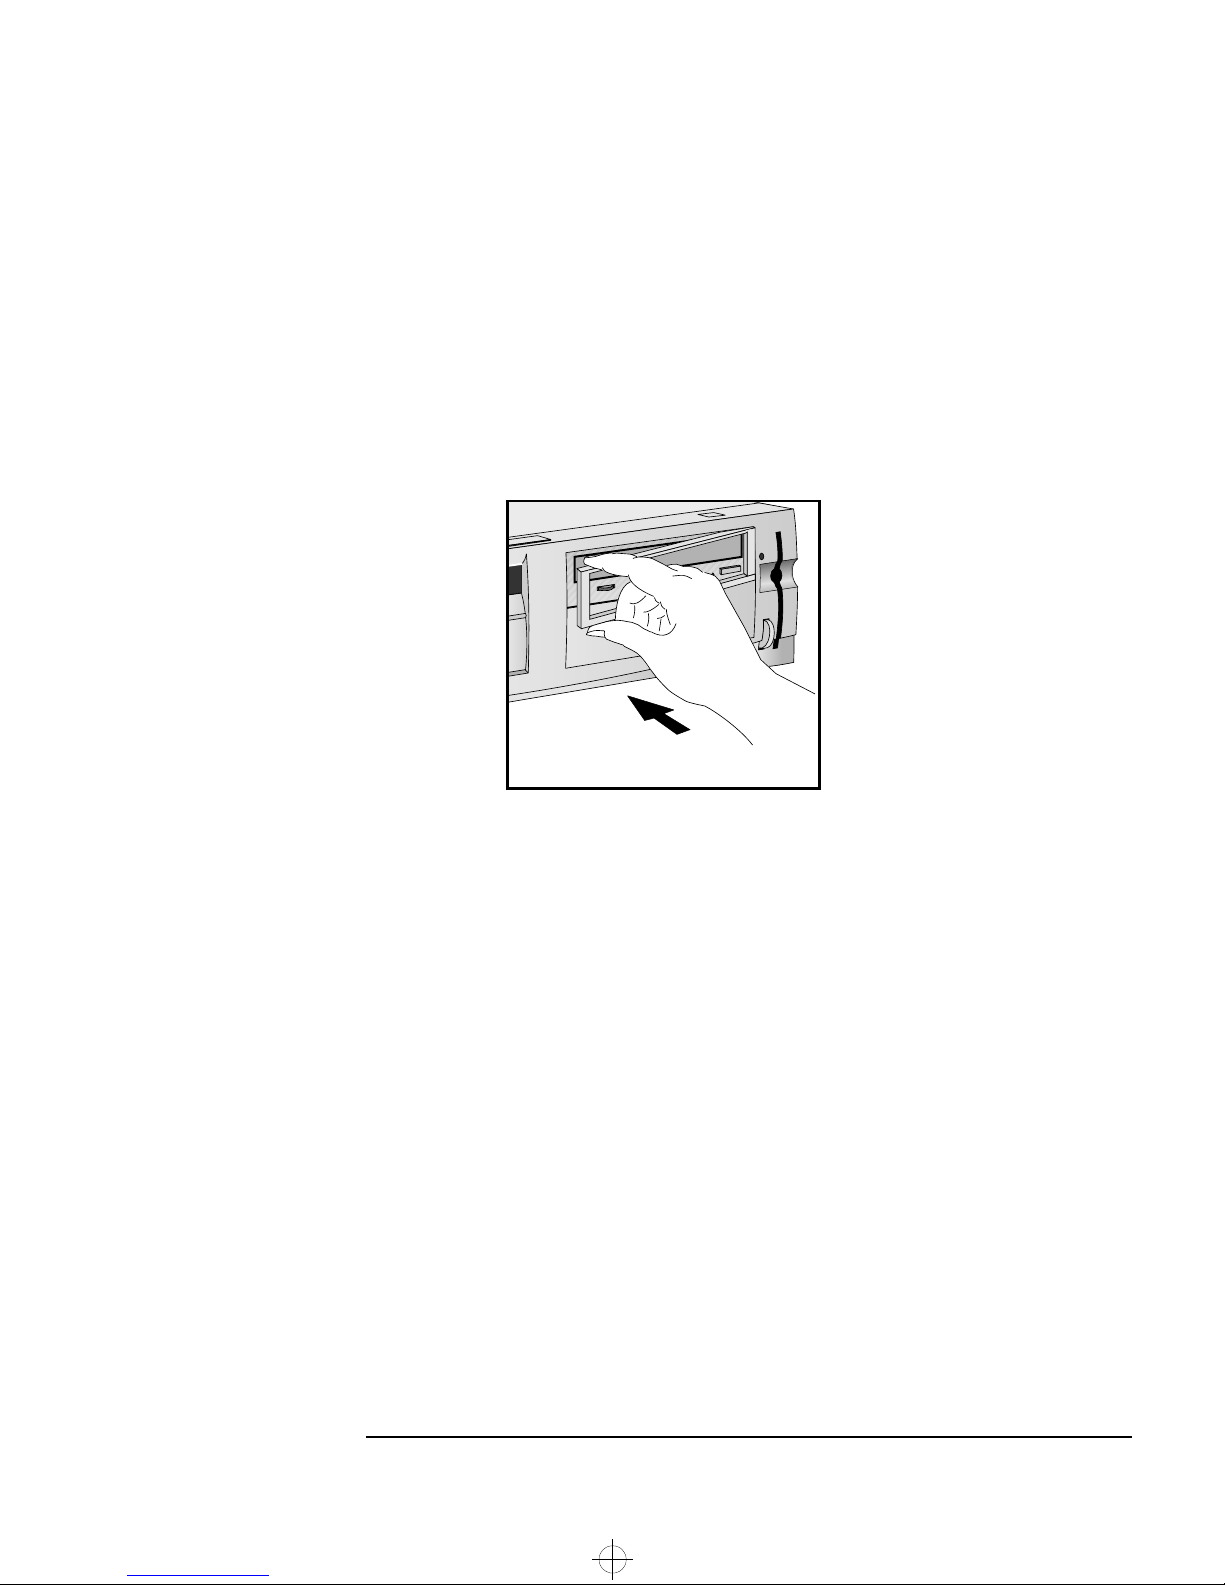
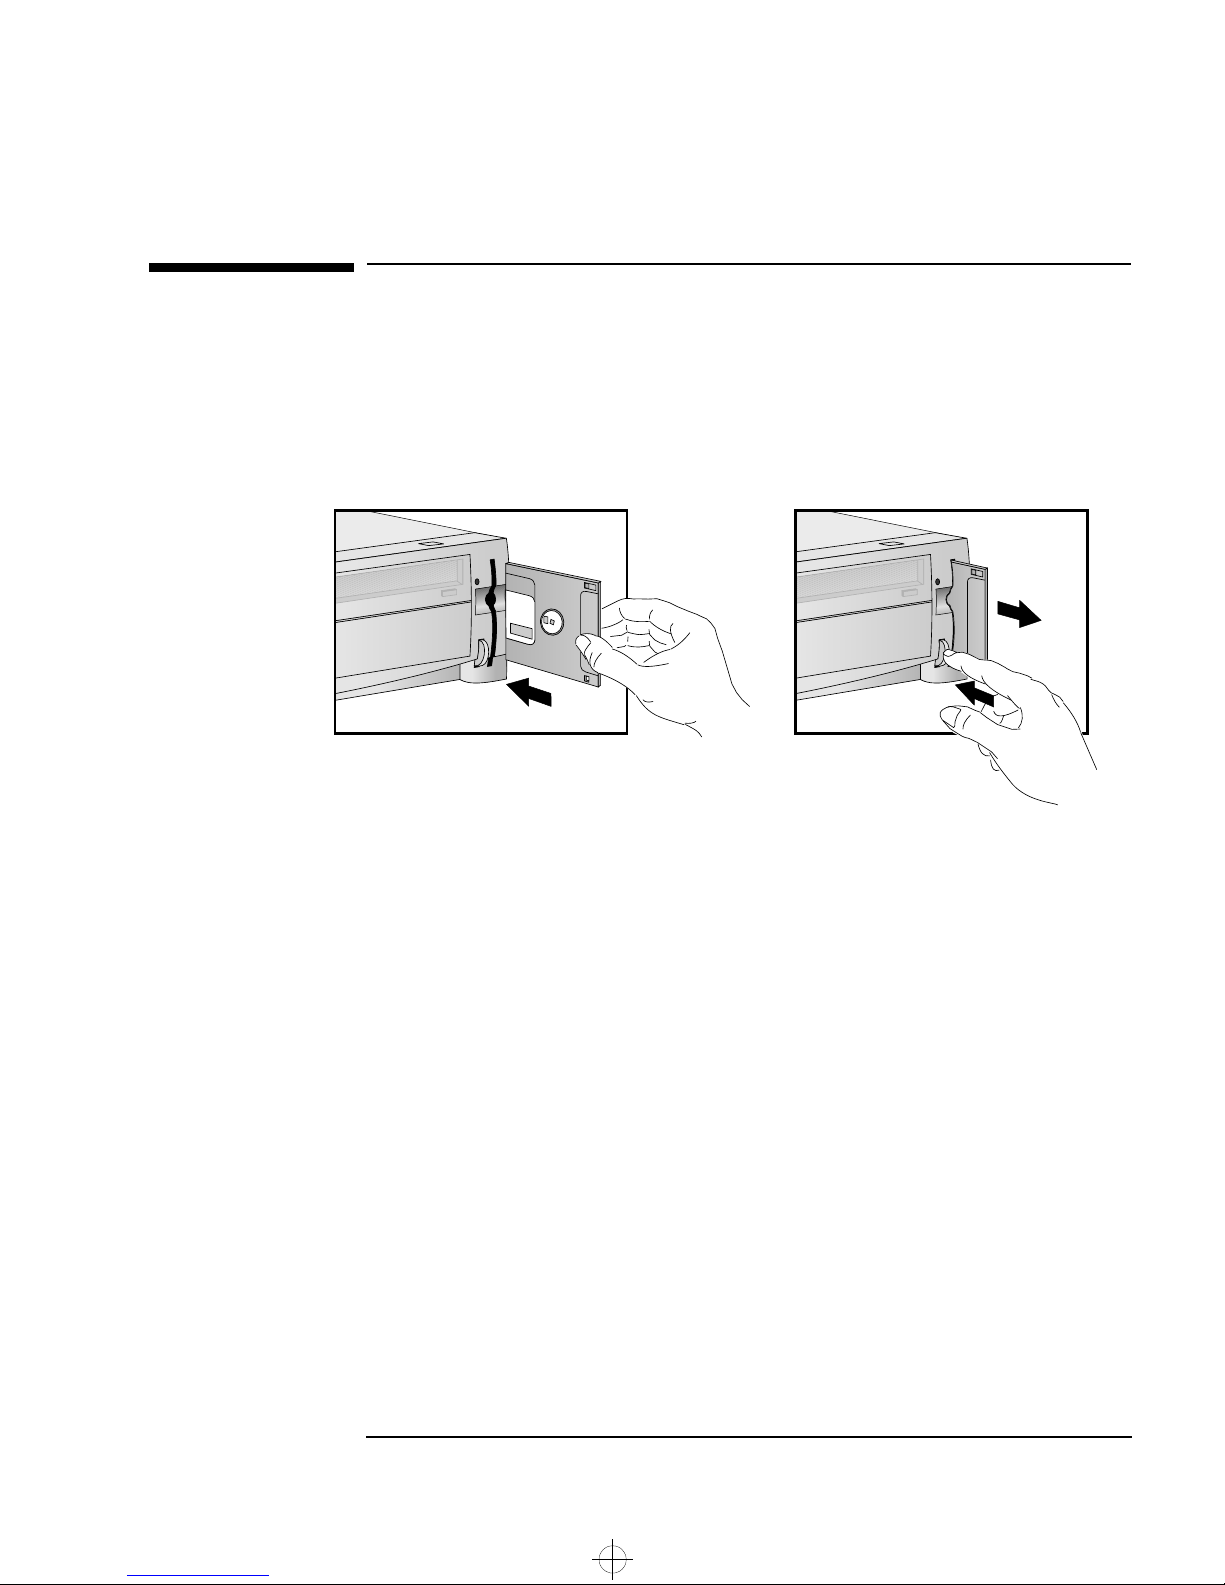
Using the Flexible Disk Drive
Your PC has a flexible disk drive for 3½-inch flexible disks. Ensure that
you insert the flexible disk correctly when using the drive.
1 Setting Up and Using Your PC
Using the Flexible Disk Drive
Inserting a disk Ejecting a disk
English 13
saxo.bk : saxo-us1.fb4 Page 14 Tuesday, August 5, 1997 9:44 AM
1 Setting Up and Using Your PC
Setting Passwords
Setting Passwords
You can set two passwords, the Administrator password and the User
password, to provide two levels of protection for your PC. You set both
passwords in the Security menu group of the Setup program.
Setting an Administrator Password
Set the Administrator password to protect the PC’s configuration in
Setup. An Administrator password can provide a power-on password
prompt to prevent your PC being started or used in your absence. You
can also use this password to start the PC when the keyboard is
locked—you must type the password and press to unlock the
keyboard (refer to "Power-On Password", in the HP Setup program).
If you have set both an Administrator password and a User password,
and you enter the Setup program by using the User password, you will
be restricted in your ability to change setup items. If you enter the
Setup program with an Administrator password, you will have no
restrictions.
To set an Administrator Password:
Start the Setup Program. Refer to chapter 3 for instructions.
1
Select the Security menu group.
2
Select the “Administrator Password” submenu.
3
Choose the “Set Administrator Password” setup item. You will be
4
asked to enter your password twice. Save your changes when you
exit the Setup program by selecting “Exit”, then “Save and Exit”.
To remove the password, follow the same procedure as to set a
password. You will be asked to enter the existing password first. Then,
for the new password, leave the password field blank and press
. To confirm your choice, press a second time.
NOTE If you forget your password, refer to chapter 3 for information on
deleting the password.
14 English
saxo.bk : saxo-us1.fb4 Page 15 Tuesday, August 5, 1997 9:44 AM
Setting a User Password
A User password can only be set if an Administrator password has
already been set.
Set a User Password to:
provide a power-on password prompt to prevent your PC being
•
started or used in your absence
start the PC when the keyboard is locked—you must type the
•
password and press to unlock the keyboard (refer to
"Power-On Password", in the HP Setup program).
If you have set both an Administrator password and a User password,
and you enter the Setup program by using the User password, you will
be restricted in your ability to change setup items. If you enter the
Setup program with an Administrator password, you will have no
restrictions.
1 Setting Up and Using Your PC
Setting Passwords
To set a User Password:
Start the Setup Program. Refer to chapter 3 for instructions.
1
Select the Security menu group.
2
Select the “User Password” submenu.
3
Choose the “Set User Password” setup item. You will be asked to
4
enter your password twice. Save your changes when you exit the
Setup program by selecting “Exit”, then “Save and Exit”.
To remove the password, follow the same procedure as to set a
password. You will be asked to enter the existing password first. Then,
for the new password, leave the password field blank and press
. To confirm your choice, press a second time.
NOTE If you forget your password, refer to chapter 3 for information on
deleting the password.
English 15

saxo.bk : saxo-us1.fb4 Page 16 Tuesday, August 5, 1997 9:44 AM
1 Setting Up and Using Your PC
Using Power Management
Using Power Management
Power management enables you to reduce the PC’s power
consumption when you are not using the PC. Refer to the preloaded
online documents for more information about the power management
features provided by the preloaded HP software.
This PC’s power management complies with the Energy Star
Computers Program initiated by the United States Environmental
Protection Agency.
Additional Information and Help
Additional information about your PC is preloaded on your PC’s hard
disk drive. This information includes:
New features—what is new and special about your PC
•
Using your PC—simple, “how-to-use” guidelines about using your PC
•
Working in comfort—guidance on ergonomic issues
•
Inside your PC—describes the basic parts of your PC and how to
•
optimize performance
HP support—similar to chapter 4 in this User’s Guide
•
Glossary.
•
Users of Windows 95 and Windows NT 4.0 can access this information
by opening the Start menu in the task bar and selecting Help.
16 English

saxo.bk : saxo-us2.fb4 Page 17 Tuesday, August 5, 1997 9:44 AM
2
How to Install Accessories In Your PC
This chapter explains how to install accessories, such as extra memory,
accessory boards, and additional disk drives, in your PC.
saxo.bk : saxo-us2.fb4 Page 18 Tuesday, August 5, 1997 9:44 AM
2 How to Install Accessories In Your PC
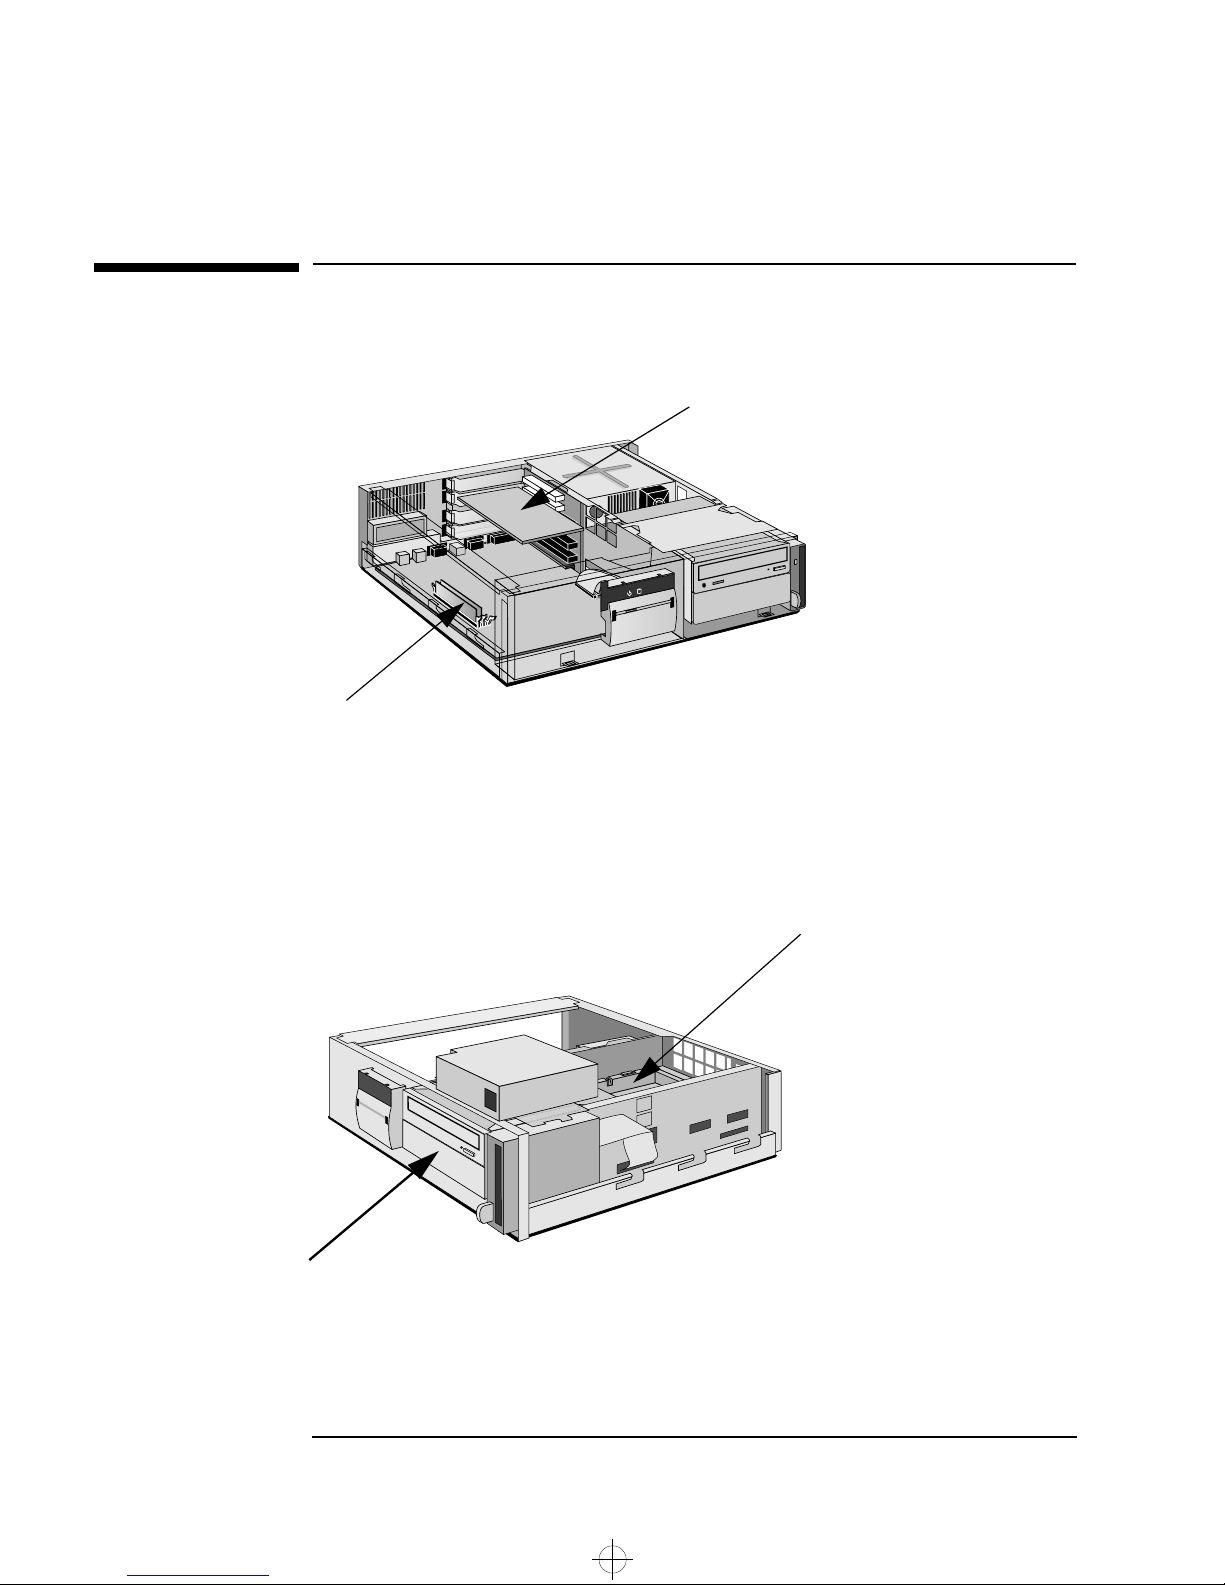
Accessories You Can Install
Accessories You Can Install
Up to Four Accessory Boards
(Some slots may come with pre-installed boards)
Main Memory Modules (SDRAM):
16 MB kit SDRAM modules
32 MB kit SDRAM modules
64 MB kit SDRAM modules
One or Two Free Front-Access Device Shelves
Zip Drive
Tape Drive
CD-ROM Drive (already installed on some models)
One Free Internal Mass
Storage Shelf
or
Supplementary PCI
Accessory Board Slot
18 English
saxo.bk : saxo-us2.fb4 Page 19 Tuesday, August 5, 1997 9:44 AM
Removing and Replacing the Cover
2 How to Install Accessories In Your PC
Removing and Replacing the Cover
WARNING
For your safety, never remove the PC’s cover without first removing
the power cord from the power outlet, and any connection to a
telecommunications network. Always replace the cover before
switching the PC on again.
Removing the Cover
Switch off the display and the PC.
1
Disconnect the power cords from the power outlets, the PC, and the
2
display. Disconnect any connection to a telecommunications
network.
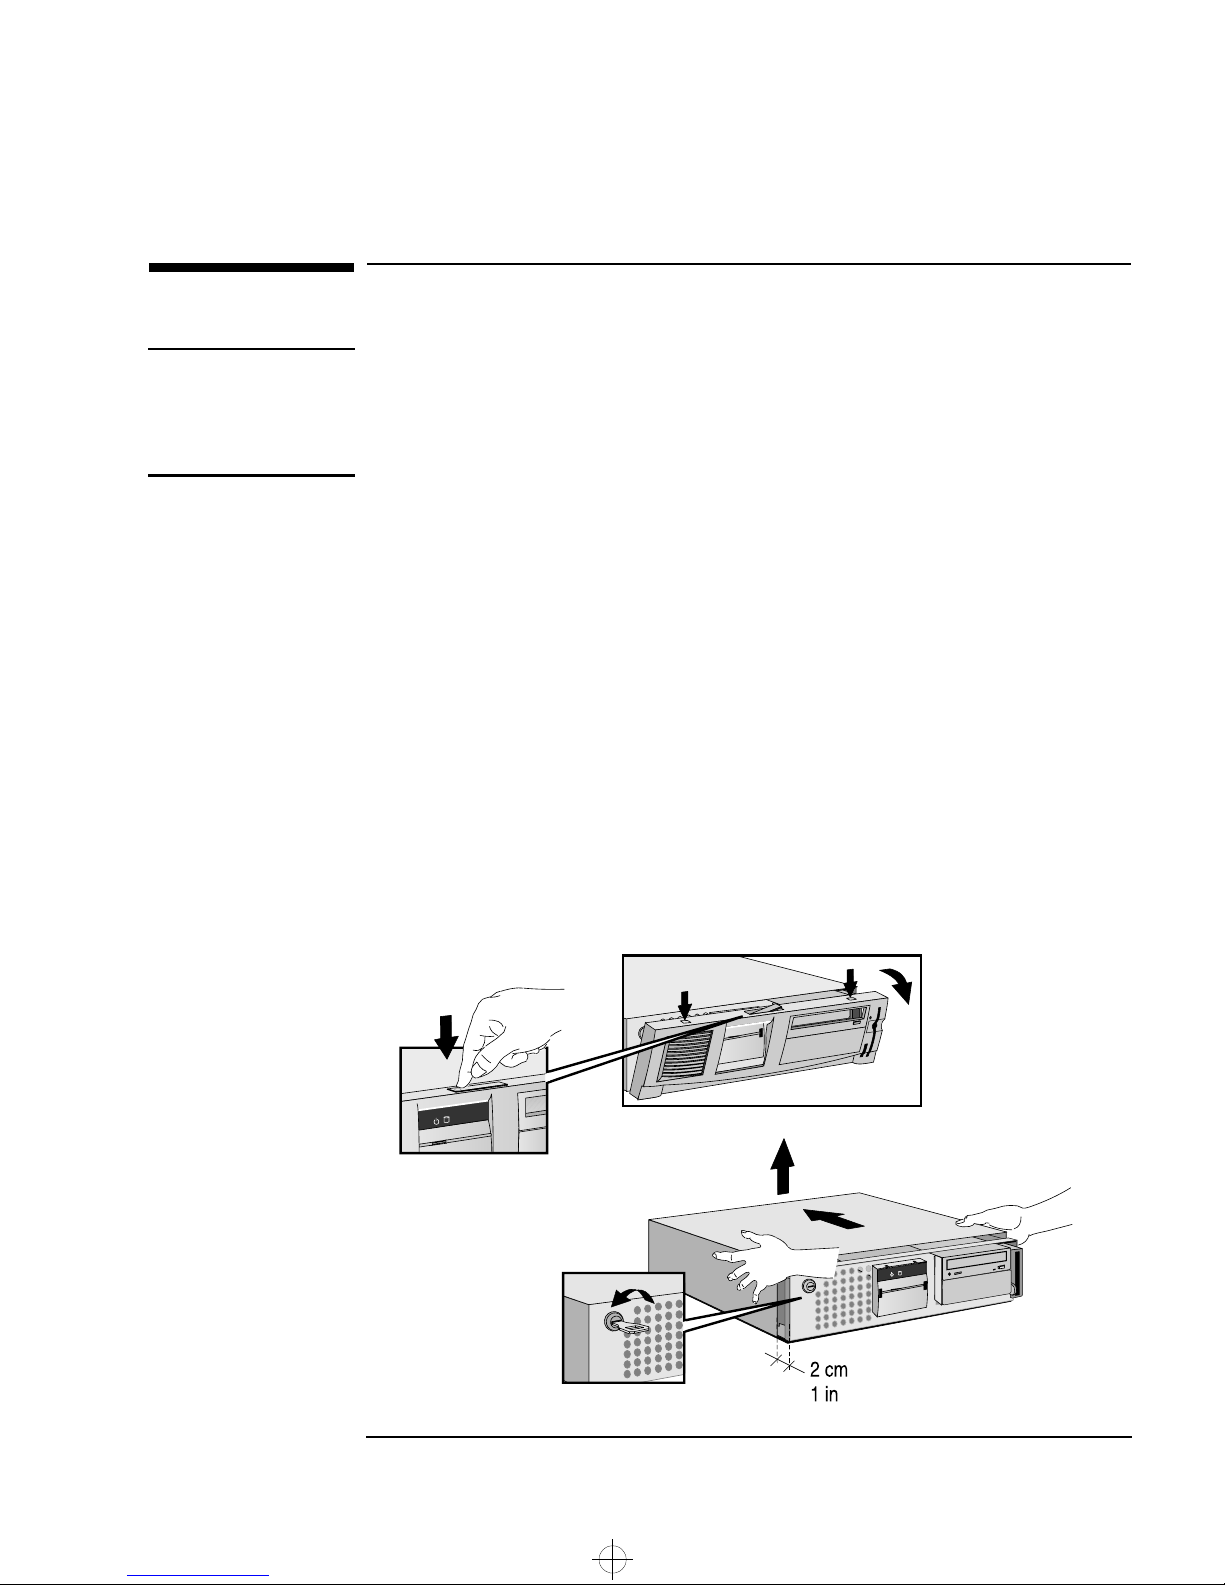
Press the central latch down to unlock the front panel.
3
Remove the front panel by pressing the two tabs down, pivoting the
4
front panel downward, and lifting it off.
If necessary, unlock the cover using the key provided with the PC.
5
Placing your hands on the sides of the cover, push the cover forward
6
by about 2 cm (about 1 inch) and lift the cover off.
English 19
saxo.bk : saxo-us2.fb4 Page 20 Tuesday, August 5, 1997 9:44 AM
2 How to Install Accessories In Your PC
Removing and Replacing the Cover
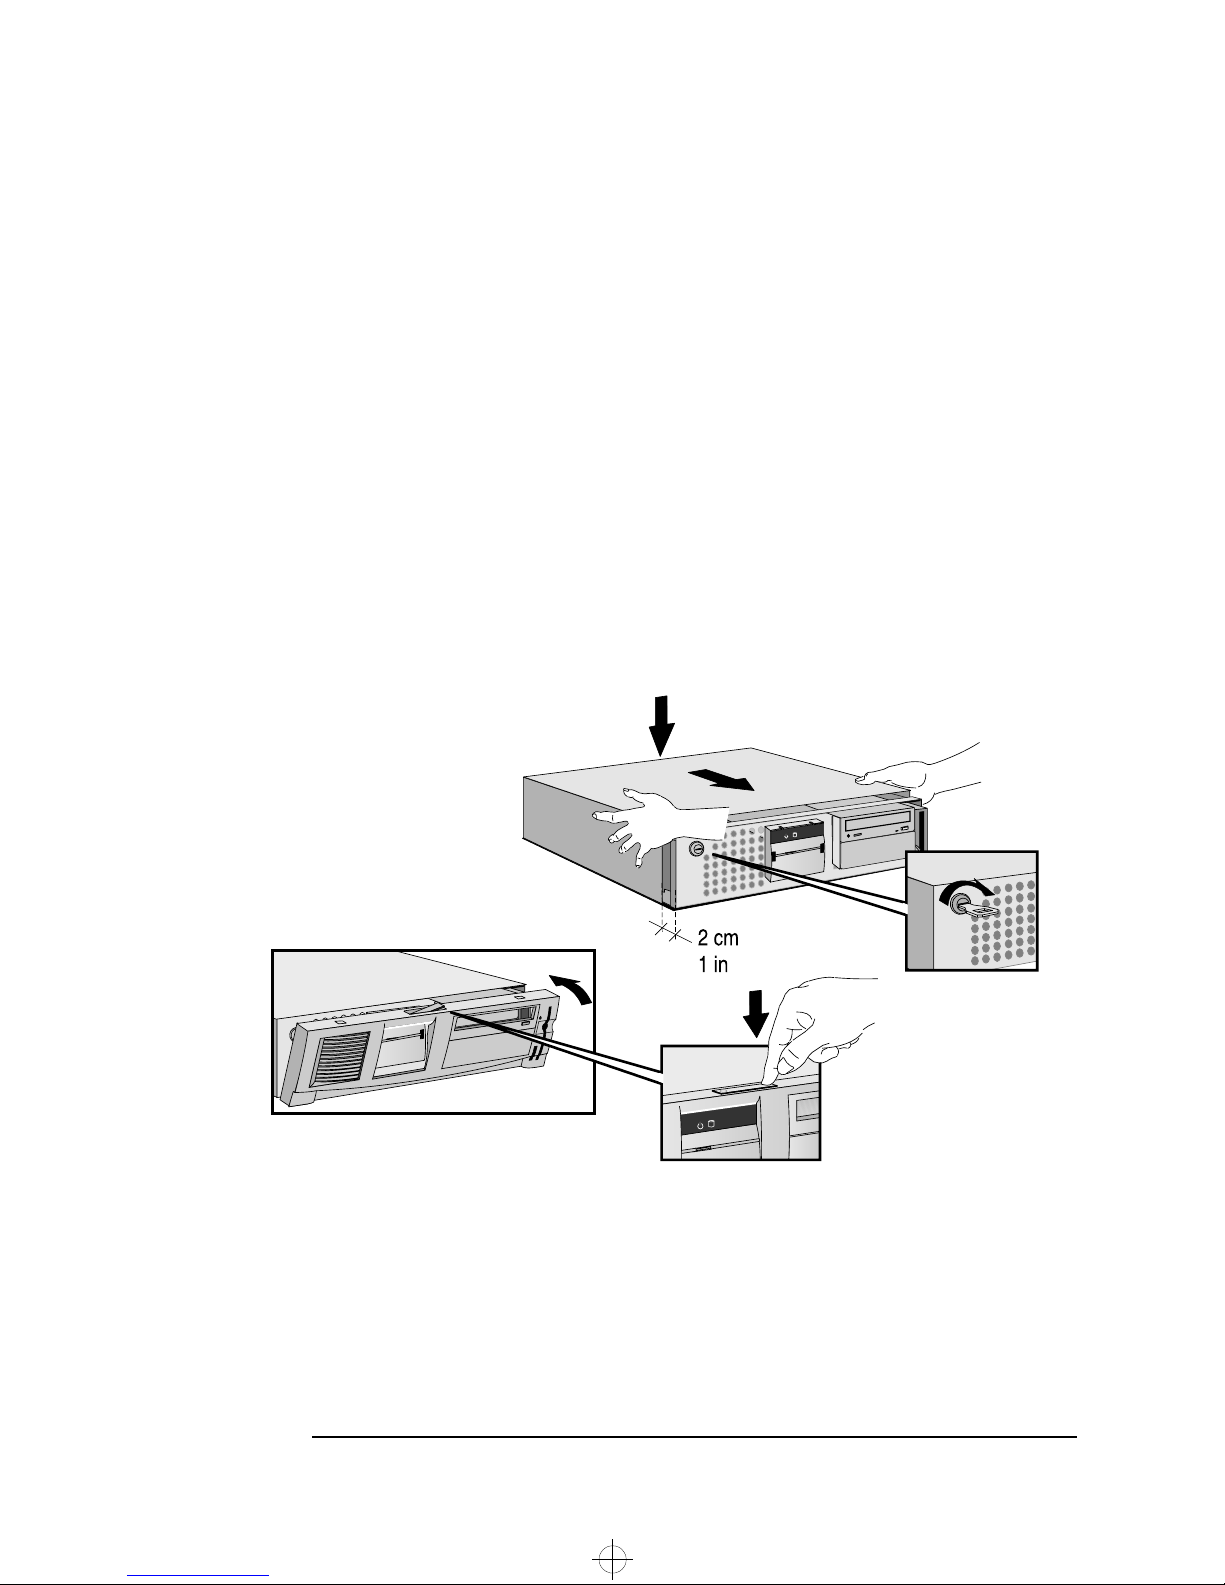
Replacing the Cover after Installing Accessories
Check that you have installed all your accessories.
1
Make sure that all internal cables are properly connected and safely
2
routed so they will not be entangled when you replace the cover.
Ensure that the cover lock is unlocked.
3
Lower the cover onto the computer (aligning the front of the cover
4
with the inner front edge of the computer frame), and firmly slide it
forwards into position.
If required, lock the cover using the key.
5
Replace the front panel by first inserting the two lower hinges then
6
pivoting it upwards into place. The two tabs will click into place.
Close the central latch on top of the front panel.
7
Reconnect all cables and power cords.
8
20 English
 Loading...