

HP Vectra VE 4/xx, Vectra VE 4 User Manual

HP Vectra PC User’s Guide
Printed Manual Information
Trademarks
1 Setting Up Your PC
Unpacking the PC
Connecting the Mouse, Display, and Keyboard
Connecting a Printer or Plotter
Connecting the Power Cables
Starting the PC for the First Time
Creating Master Diskettes
2 Using Your PC
Using the HP Setup Program
Starting the Setup Program
Setup Fields
Using the Security Features
Setting Passwords
How To Set a Password
Setting Other Security Features
Disabling Startup from Disk Drives
Preventing Writing to Flexible Disks
Using the HP User Tools
What’s Behind the Icons
Finding More Information About Your PC
Using Power Management
Configuring Power Management in Windows
Activating Sleep Mode in Windows
Understanding the Desktop Management Interface
Personalizing Your Mouse
Tips for Using Your PC
3 Installing Accessories In Your PC
Supported HP Accessories
Removing and Replacing the Cover
Removing the Cover
Replacing the Cover After Installing Accessories
Removing and Replacing the Power Supply Unit
Removing the Power Supply Unit
Replacing the Power Supply Unit After Installing Accessories
Installing Memory
Installing a Main Memory Module
Cache Memory
Installing the Cache Memory Module
Video Memory
Installing Video Memory Chips
Installing Accessory Boards
HP Vectra PC User's Guide 1 Setting Up Your PC •• 1

Plug and Play
Installing the Board
Installing Mass Storage Devices
Installing an IDE Hard Disk Drive in the Bottom Shelf
Installing a Flexible Disk Drive or a CD-ROM Drive in the Middle Shelf
Installing or Replacing an IDE Hard Disk Drive in the Rear Shelf
Installing an Upgrade Processor
Installing the Security Bracket
Checking the Installation
Configuring Your PC
Using the Setup Program to Configure the PC
Using HP User Tools to Configure Video Settings
4 Troubleshooting
The PC Does Not Work
No Error Messages Displayed
After Installing an Accessory
Error Messages
If a System ROM Message Appears
If a Power-On Error Message Appears
Power-On Errors That May Prevent the PC from Starting
BIOS and Operating System Messages
Hardware Problems
The Display Does Not Work
If Your Display is Blurred or Unreadable
If You Cannot Activate any Video Resolution Higher than 640 x 480
The Keyboard or Mouse Does Not Work
The Printer Does Not Work
The Flexible Disk Drive Does Not Work
The Hard Disk Does Not Work
The Hard Disk Activity Light Does Not Work
An Accessory Board Does Not Work
You Lose the Key
You Need to Replace the Battery
To Install the External Battery
To Install a Replacement Battery
Software Problems
You Have Forgotten a Password
You Can’t Start the Setup Program
Your Application Software Does Not Work
Power Management Does Not Work
Power Management in Windows
Power Management in DOS
The Date and Time are Incorrect
5 Technical Information
Specifications
Features and Characteristics
HP Vectra PC User's Guide 1 Setting Up Your PC •• 2

Power Consumption Information
IRQs, DMAs, and I/O Addresses Used
Available Video Resolutions
With standard 1 MB Video Memory
With additional 1 MB Video Memory
Memory Map
Rear Connectors
System Board Connectors and Jumpers
Recycling Your PC
6 Getting Support
Getting Support from your HP Reseller
HP Support Pack
Hewlett Packard Information Services
HP Internet – FTP Library Service/World-Wide Web
HP Forum on CompuServe
Hewlett Packard Telephone Support
If You Need to Contact Hewlett-Packard
Glossary
Definitions
7 Regulatory Information and Warranty
Regulatory Information
FCC (for USA only)
Notice for Canada
Safety Warning for the USA and Canada
Notice for the United Kingdom
Noise Declaration for Germany
Notice for Japan
Notice for Korea
HP Hardware Warranty
HP Vectra PC User's Guide 1 Setting Up Your PC •• 3

Printed Manual Information
© 1995 Hewlett-Packard Company
HP Vectra PC User's Guide 1 Setting Up Your PC •• 4

Trademarks
Centronics® is a registered trademark of Centronics Data
Computer Corporation.
CompuServe® is a registered trademark of CompuServe
Incorporated. Logitech™ is a trademark of Logitech Inc.
Microsoft® and MS-DOS® are U.S. registered trademarks of
Microsoft Corporation.
OS/2™ is a trademark of International Business Machines
Corporation.
Windows™ and Windows NT™ are trademarks of Microsoft
Corporation.
HP Vectra PC User's Guide 1 Setting Up Your PC •• 5

1 Setting Up Your PC
HP Vectra PC User's Guide 1 Setting Up Your PC •• 6

Unpacking the PC
1. When you receive the PC, unpack and gather all the components.
NOTE The operating system software, drivers, and HP utilities are preloaded on models
supplied with a hard disk. No diskettes are supplied.
2. Place the computer on a sturdy desk, close to easily accessible power outlets, and with
enough space for the keyboard, mouse, and any other accessories.
3. Position the computer so that its rear connectors are easily accessible.
4. Place the display on top of the computer. (If you have a large display, place it next to
the computer.)
WARNING If you are in any doubt that you cannot lift the display safely, do not attempt to
move it without help.
Display
Power Cord
Computer
Mouse
Keyboard
HP Vectra PC User's Guide 1 Setting Up Your PC •• 7
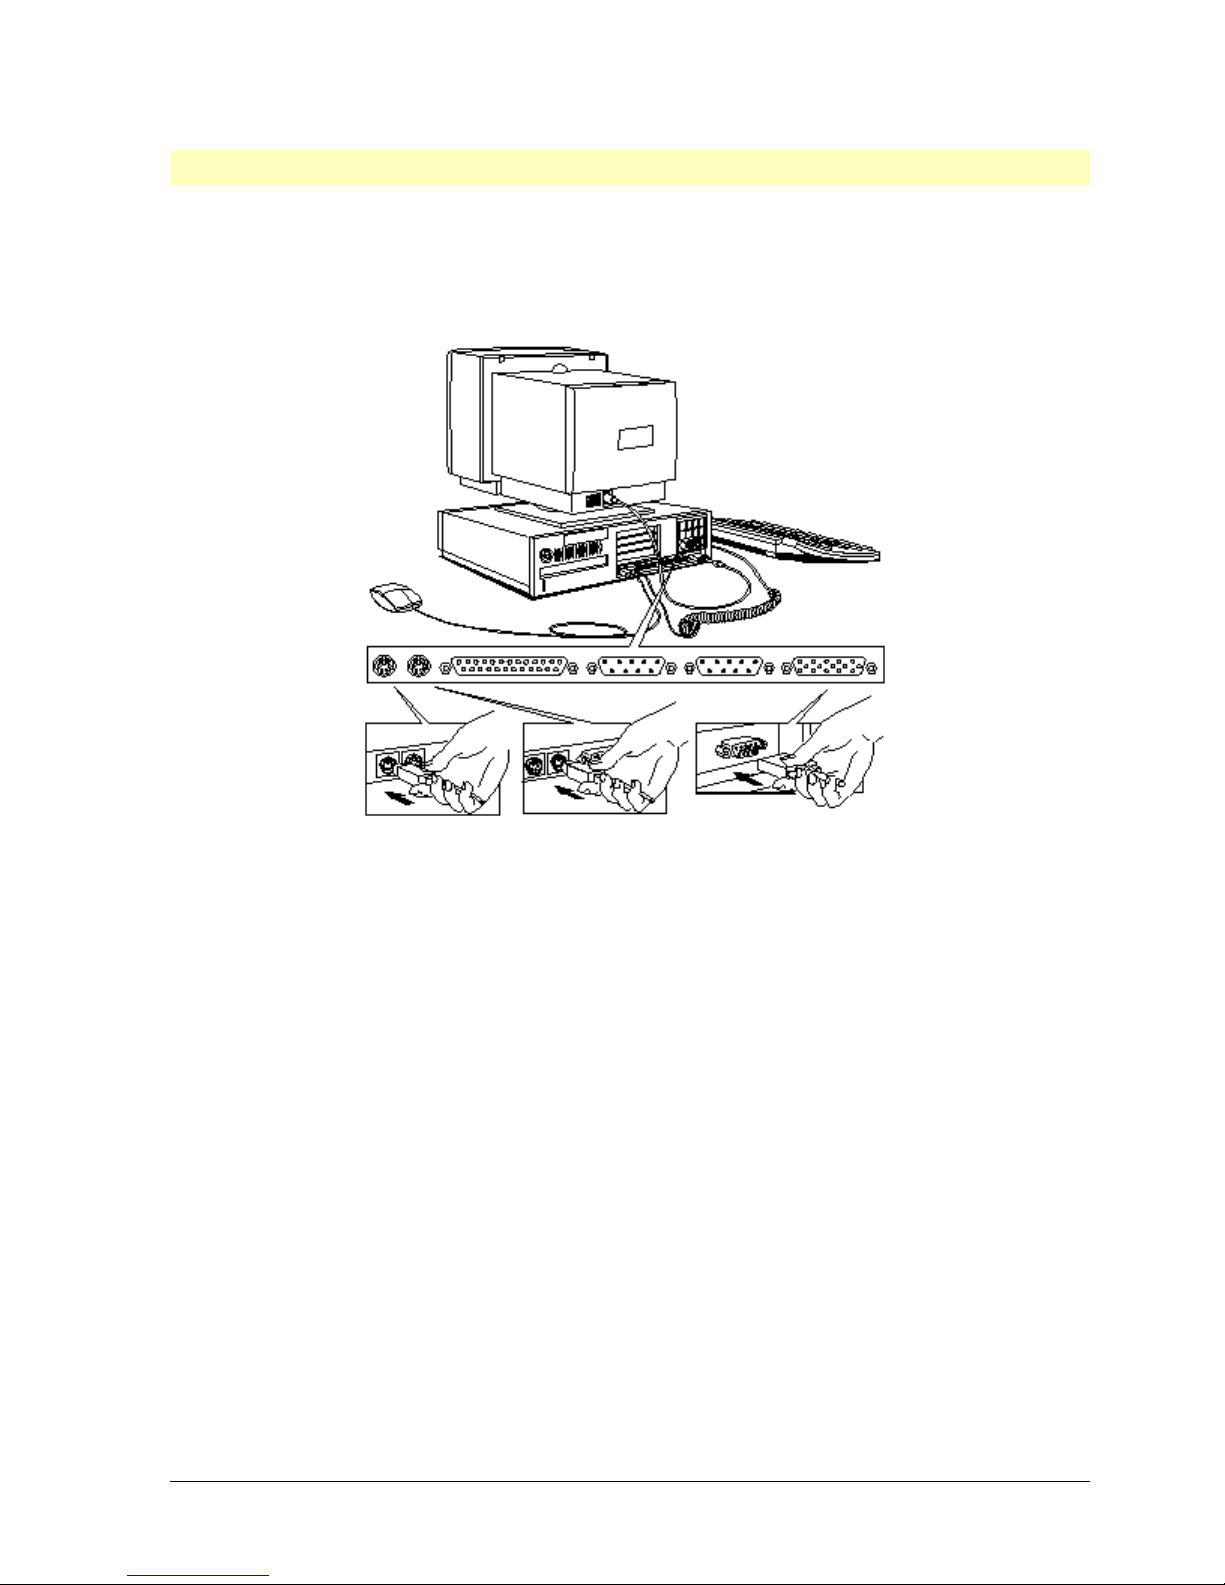
Connecting the Mouse, Display, and Keyboard
1. Connect the mouse, keyboard, and display cables to the back of the computer. The
connectors are shaped to go in one way only.
2. Tighten the display cable attachment screws.
Mouse Cable
Display Cable
Keyboard
Cable
HP Vectra PC User's Guide 1 Setting Up Your PC •• 8
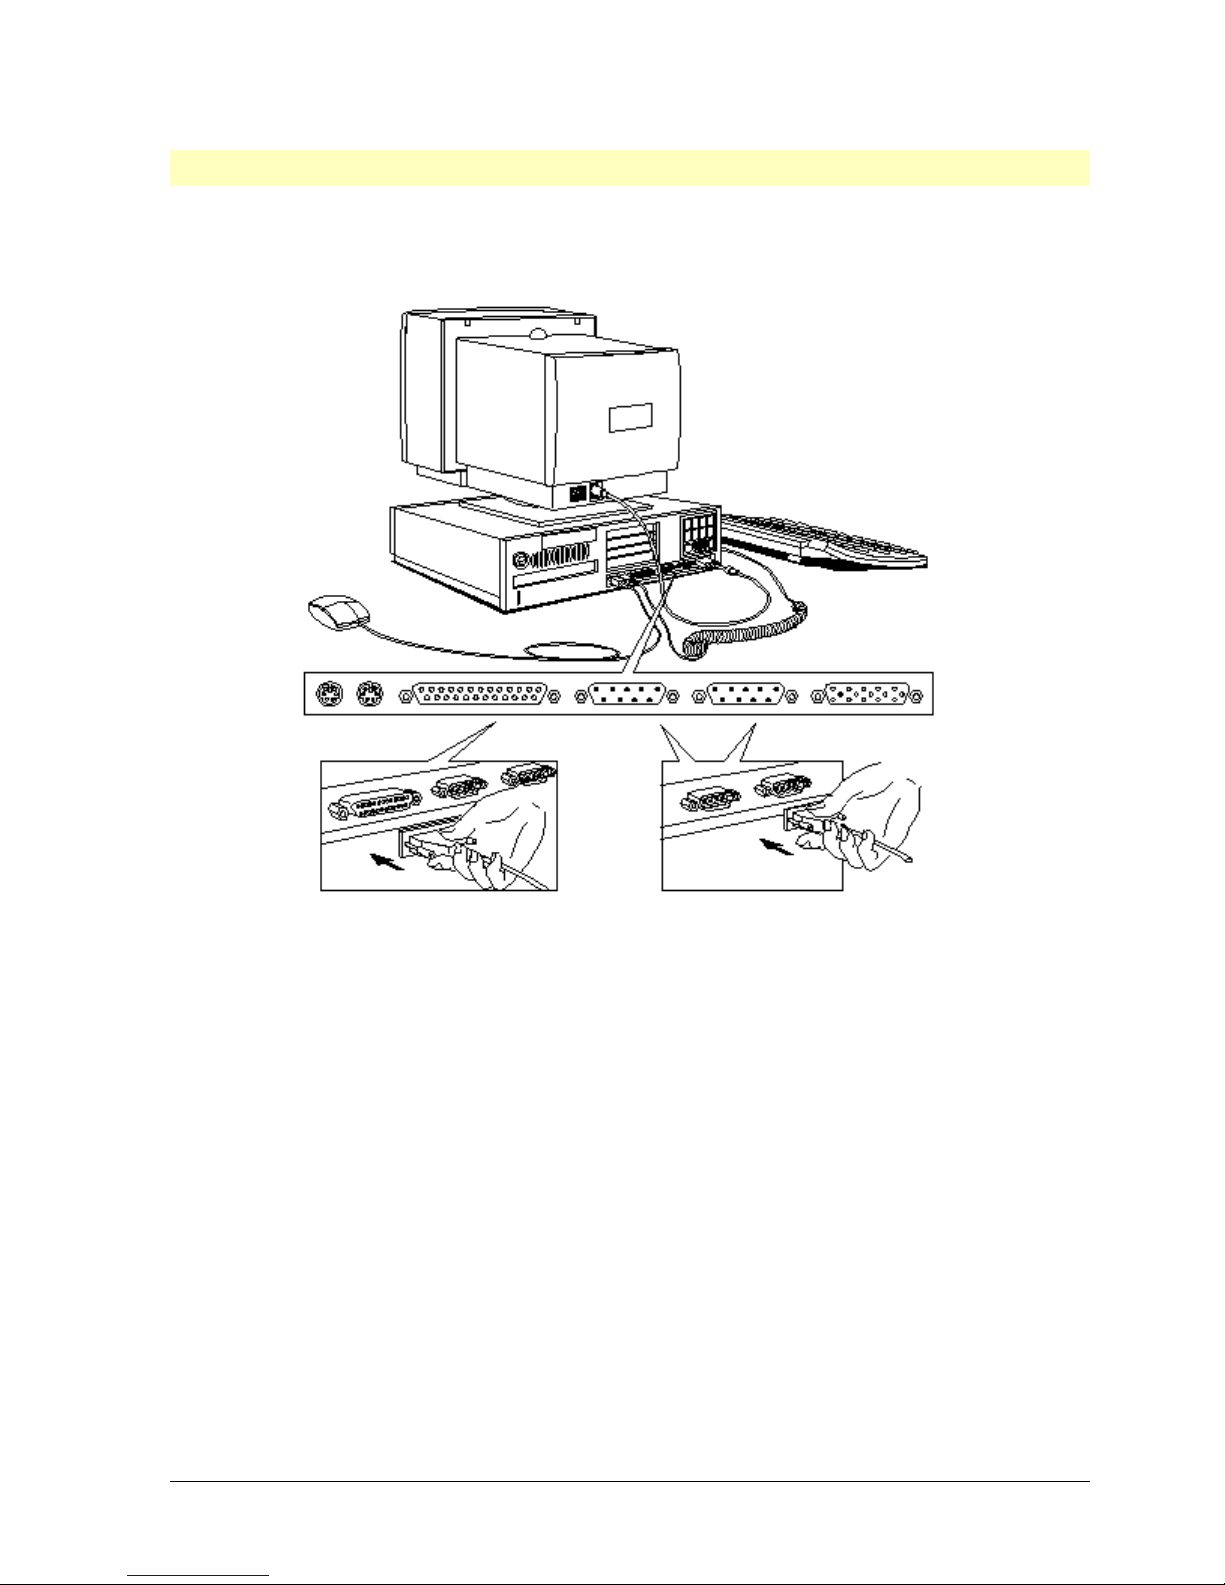
Connecting a Printer or Plotter
If you have a printer or plotter, connect its cable to the back of the computer and tighten the
attachment screws.
Connector for Parallel Printer
Connectors for Serial Printers
HP Vectra PC User's Guide 1 Setting Up Your PC •• 9

Connecting the Power Cables
1. If fitted, remove the label covering the computer’s power connector.
2. Connect the power cables to the display and computer. (The connectors are shaped to
go in one way only.)
3. Connect the display’s power cable and the computer’s power cable to a grounded
outlet.
WARNING For your safety, always connect the equipment to a grounded wall outlet.
Always use a power cable with properly grounded plugs, such as the one
provided with this equipment, or one in compliance with your national
regulation. This PC has been designed to operate on all power systems,
including ‘IT’ power systems. It is disconnected from the power by removing the
power cable from the power outlet. This means the PC must be located close
to an easily accessible power outlet.
HP Vectra PC User's Guide 1 Setting Up Your PC •• 10
Starting the PC for the First Time
Your PC’s hard disk has preinstalled software that is initialized the first time you start the PC.
The initialization takes approximately three minutes, and sets up your software to use the
hardware installed in your computer.
To initialize your software:
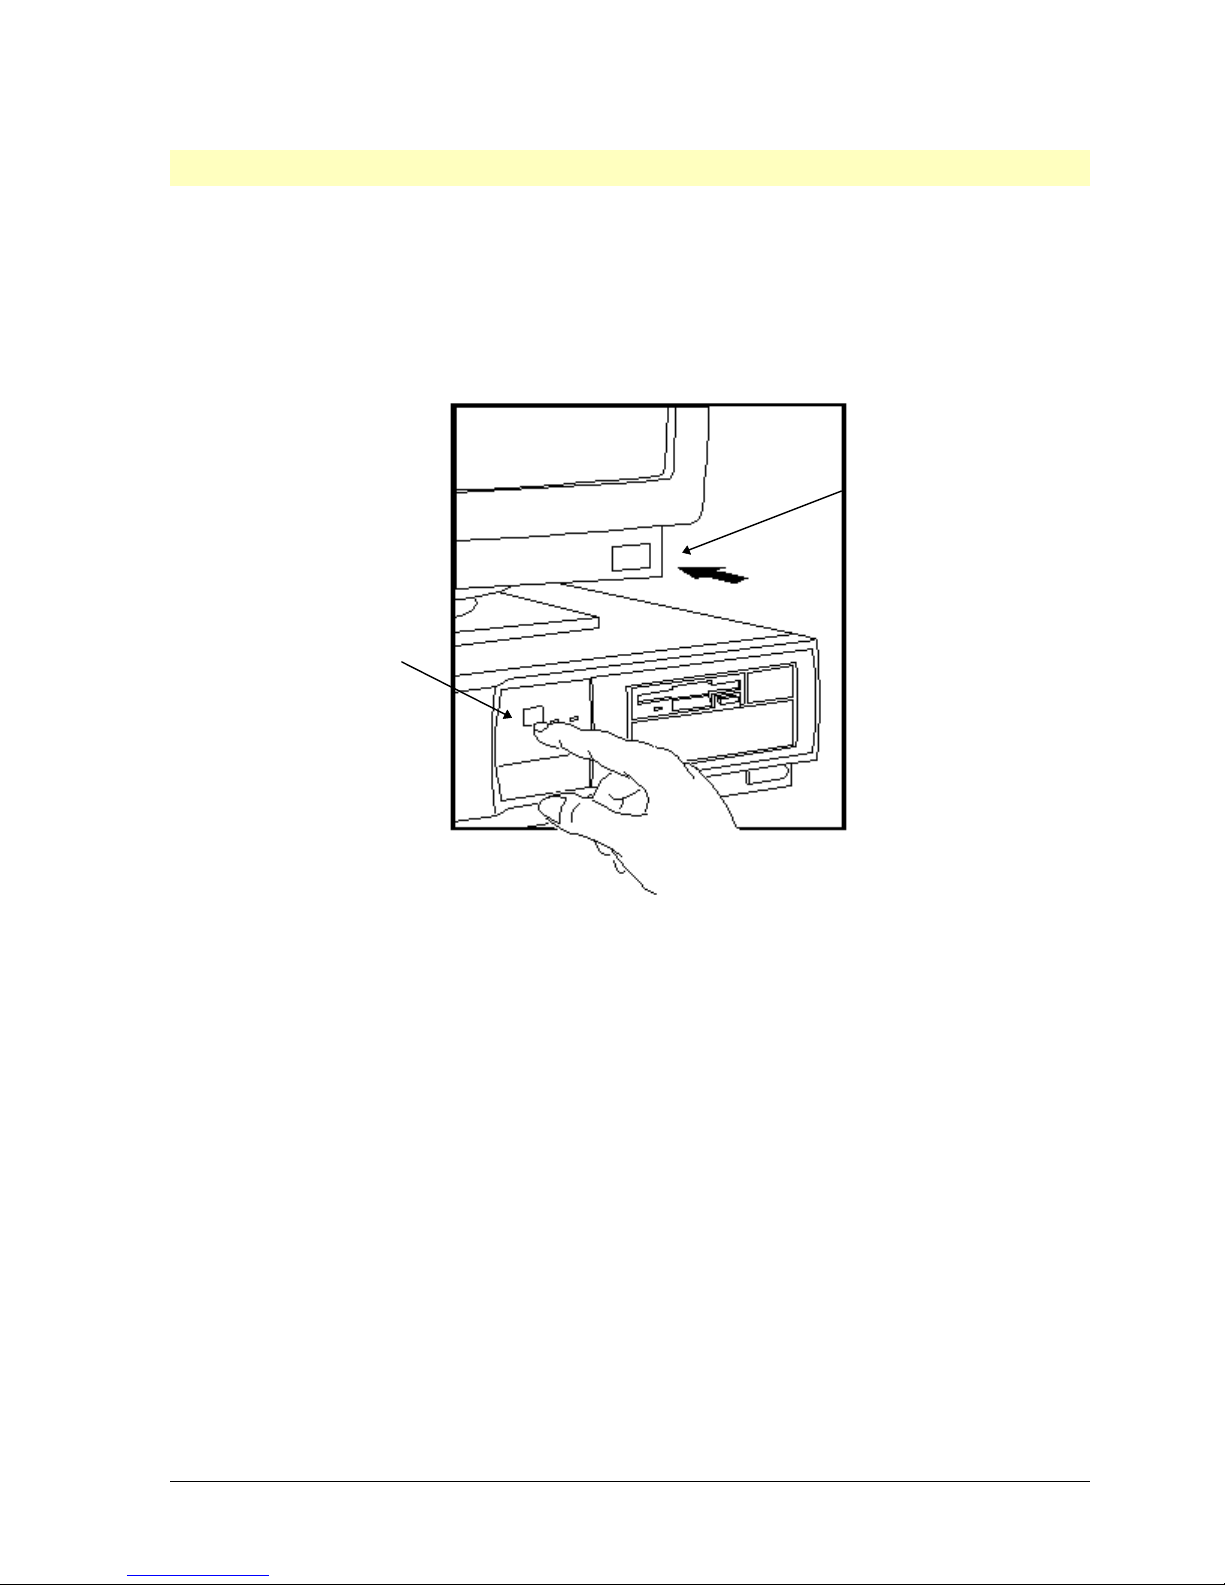
1. Switch on the display and then the computer.
First power-on
the display
Then power-on the
computer
2. The PC performs a power-on system hardware test which checks the configuration. This
test is performed each time the PC is switched on. A screen is displayed that shows the
progress of the test and indicates any errors found. If an error is detected, see “If a
Power-On Error Message Appears.”
3. The software initialization routine starts. It displays the software license agreement and
gives you an opportunity to read Working in Comfort (ergonomic advice for computer
users). You may be asked to enter information during the intiialization routine, for
example:
◊◊ The name of the person who will use the computer and your company name. (If
necessary, the name of the user can be changed later.)
◊◊ The current date and time.
◊◊ The type of printer (for example, HP LaserJet 4M). You may also be requested to
enter the connection used by the printer (for example, LPT1 for a parallel printer or
COM1 for a serial printer).
◊◊ The model number of your display. (HP display model numbers are shown on the
rear of the display.)
4. Follow any other instructions that are displayed on the screen.
HP Vectra PC User's Guide 1 Setting Up Your PC •• 11
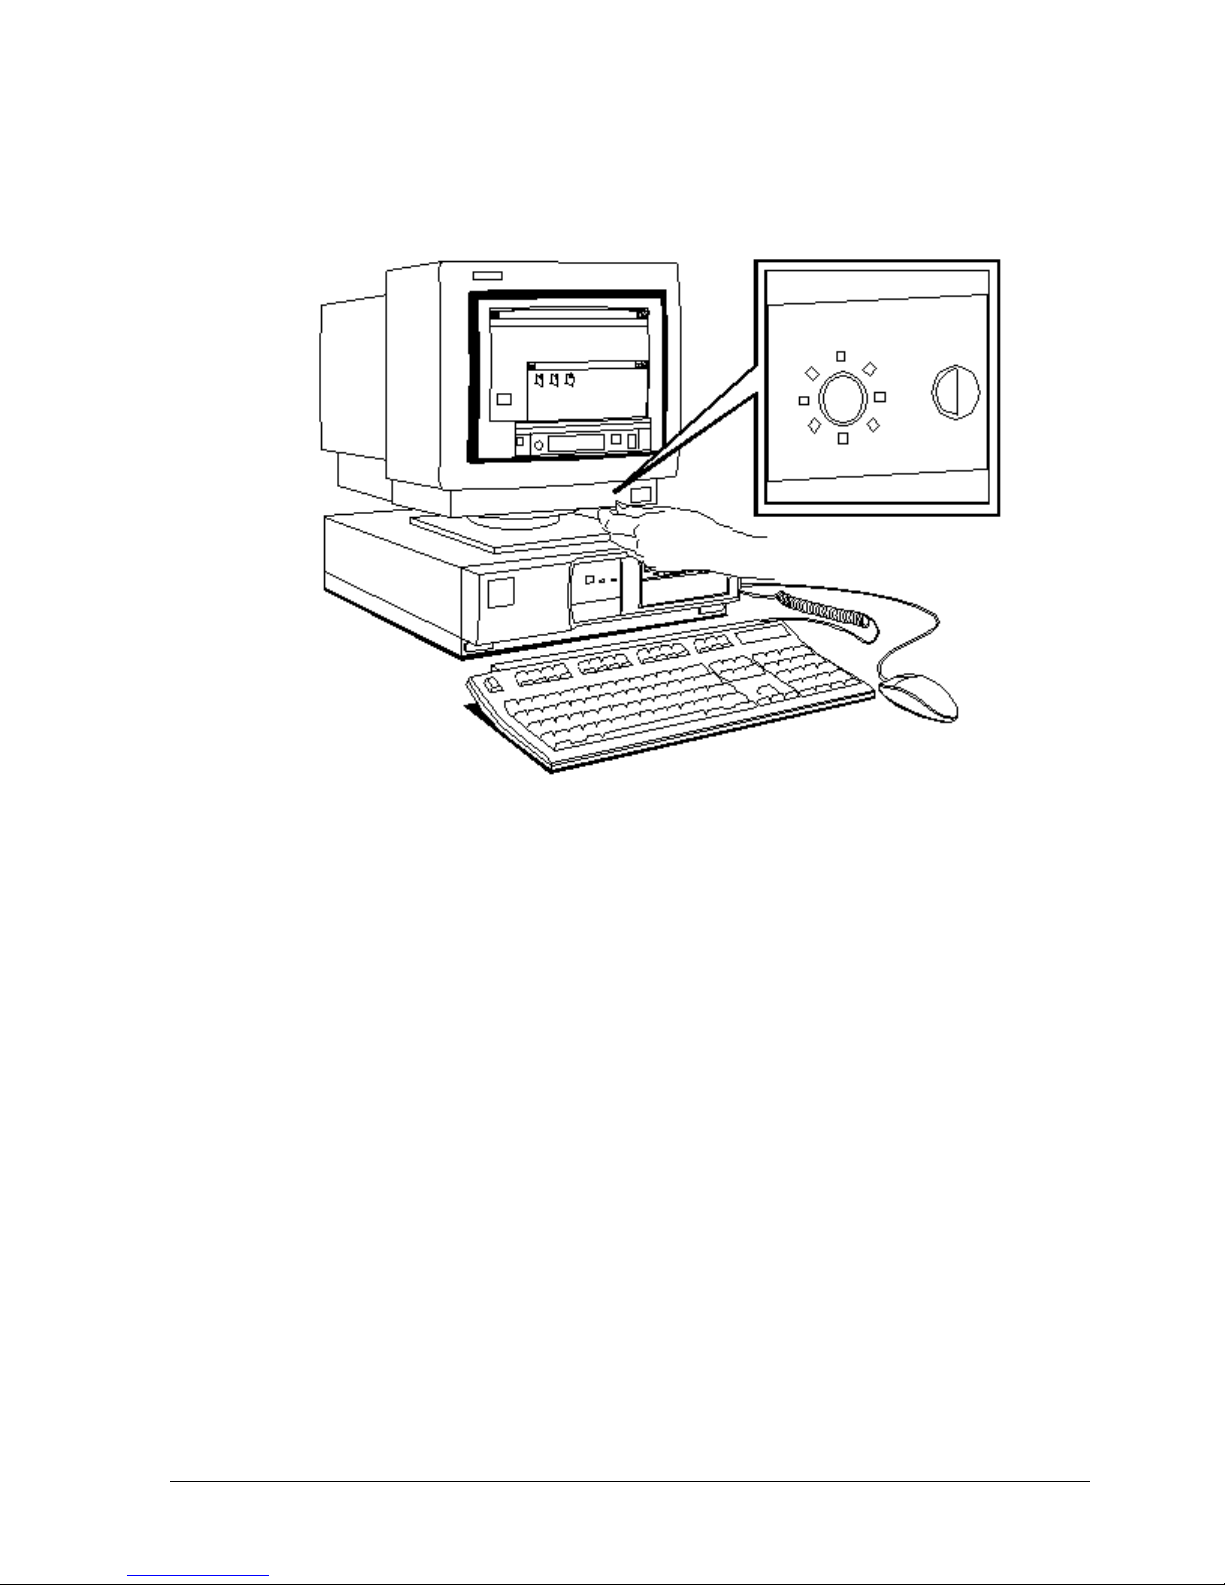
5. Adjust the display screen’s brightness and contrast to your needs. If the picture does not
fill the screen or is not centered, adjust it using the controls on the display. Refer to the
display’s manual for details.
Adjust the display’s
brightness to your
needs
6. Set the keyboard angle and mouse to comfortable positions.
7. After the initialization has finished, fill in your Warranty Registration card.
HP Vectra PC User's Guide 1 Setting Up Your PC •• 12

Creating Master Diskettes
It is very important that you create master diskettes for your preloaded software. HP
recommends that you do this within thirty (30) days of receiving your PC, using new
diskettes. These diskettes can then be used to restore the preloaded software to your PC in
case of corrupted files.
1. Double-click the mouse on the Master Diskette Creation Utility icon in the HPutils group
in the Windows Program Manager.
2. Follow the screen messages to create master diskettes of your preloaded software. The
messages will tell you how many diskettes are required.
HP Vectra PC User's Guide 1 Setting Up Your PC •• 13

2 Using Your PC
HP Vectra PC User's Guide 2 Using Your PC •• 14

Error! Bookmark not defined.Using the HP Setup Program
The integrated (ROM-based) Setup program displays your PC’s configuration and allows
you to set certain parameters.
HP Vectra PC User's Guide 2 Using Your PC •• 15

Error! Bookmark not defined.Starting the Setup Program
1. Turn on the display and the computer.
If the computer is already turned on, save your data and exit all programs, then press CTRL
ALT and DELETE to restart the PC.
2. Press F2 while <Setup=F2> is displayed at the bottom of the screen during the poweron system hardware test.
<Setup=F2>
NOTE To avoid missing [F2] (which is displayed only briefly), you can press [F2] as soon
as the power-on-system-hardware-test has passed the Flexible Disk Drives test.
3. The Setup program will appear.
Administrator Password...Not Set User Password..........Not Set
Date (YYYY,mm,dd)......1995/01/07
Flexible Drive 1.........1.44 MB Time (hh:mm:ss)........12:04:30
Flexible Drive 2.........none Power-on Numlock State.On
Start from FDD...........Enabled Key Autorepeat.........Medium
Setup Version xx.
If a password has been set, you will be prompted to enter it.
◊◊ Use the arrow keys to move the highlight from one field to another.
◊◊ Use the [F7] or [F8] key to display available values.
◊◊ Use the [F3] key to save your settings and exit the Setup program.
◊◊ Use the [F12] key to exit the Setup program without saving any changes.
HP Vectra PC User's Guide 2 Using Your PC •• 16

Setup Fields
The following section explains the fields that you may wish to change, for example, the date
and time if your PC does not show the correct local time.
Date and Time Enter the correct values.
Power-on Numlock
State
Key Autorepeat This field determines the speed that a key repeats itself when
The other fields are explained later in the manual at the place where you may need to
modify the settings. For easy reference, all Setup fields can be located in the index, under
“HP Setup program fields”.
This field determines if the numeric keys on the right of the
keyboard are set to numeric values (On) or cursor control (Off)
when the PC is started.
the key is held down. Options available are Slow, Medium,
and Fast.
HP Vectra PC User's Guide 2 Using Your PC •• 17

Error! Bookmark not defined.Using the Security Features
To protect your PC and its data against unauthorized access, the following actions can be
taken:
• Setting passwords to prevent the PC being started in your absence, and prevent
modifications being made to your system configuration.
• Disabling startup from the flexible disk drive, hard disk drives, or both.
• Disabling the flexible disk drive or drives so that data cannot be copied in your absence.
• Locking the computer’s cover to prevent unauthorized access to the internal
components.
The following sections describe how to perform these tasks.
HP Vectra PC User's Guide 2 Using Your PC •• 18

Error! Bookmark not defined.Setting Passwords
When you set a password, two levels of protection may be selected:
• User Password—requests that a password be entered when the PC is powered on.
The Setup program can be run, but the password must be entered to change the
configuration.
• Administrator Password—provides additional security by preventing changes to the
configuration settings in the Setup program, even if the User password is known. If this
password is set, a forgotten User password can be reset from the Setup program.
When either or both passwords are set, the Setup program can be started and the
settings displayed, but no changes are allowed unless the correct password is entered.
CAUTION A jumper is provided on the system board that allows forgotten passwords to
be cleared. To prevent unauthorized personnel from using this method to
bypass your passwords, you are strongly recommended to lock the cover of the
computer using the key provided.
HP Vectra PC User's Guide 2 Using Your PC •• 19
Error! Bookmark not defined.How To Set a Password
1. Start the Setup program (see “Using the HP Setup Program”).
2. Use the right arrow key to move the highlight to the User Password or Administrator
Password field, as required.
3. To set your password, press ENTER once.
a. Type your password and press ENTER.
b. Type your password and press ENTER again.
The screen displays Set.
If you wish to erase your password, press ENTER twice.
NOTE It is recommended that you set a password that you can easily remember. If you
forget a password, see “Software Problems.”
4. Press [F3] to save your password and exit the Setup program.
5. When you have set a User password, the next time the PC is started the power-on
prompt is displayed. Type your User password and press ENTER to use the PC.
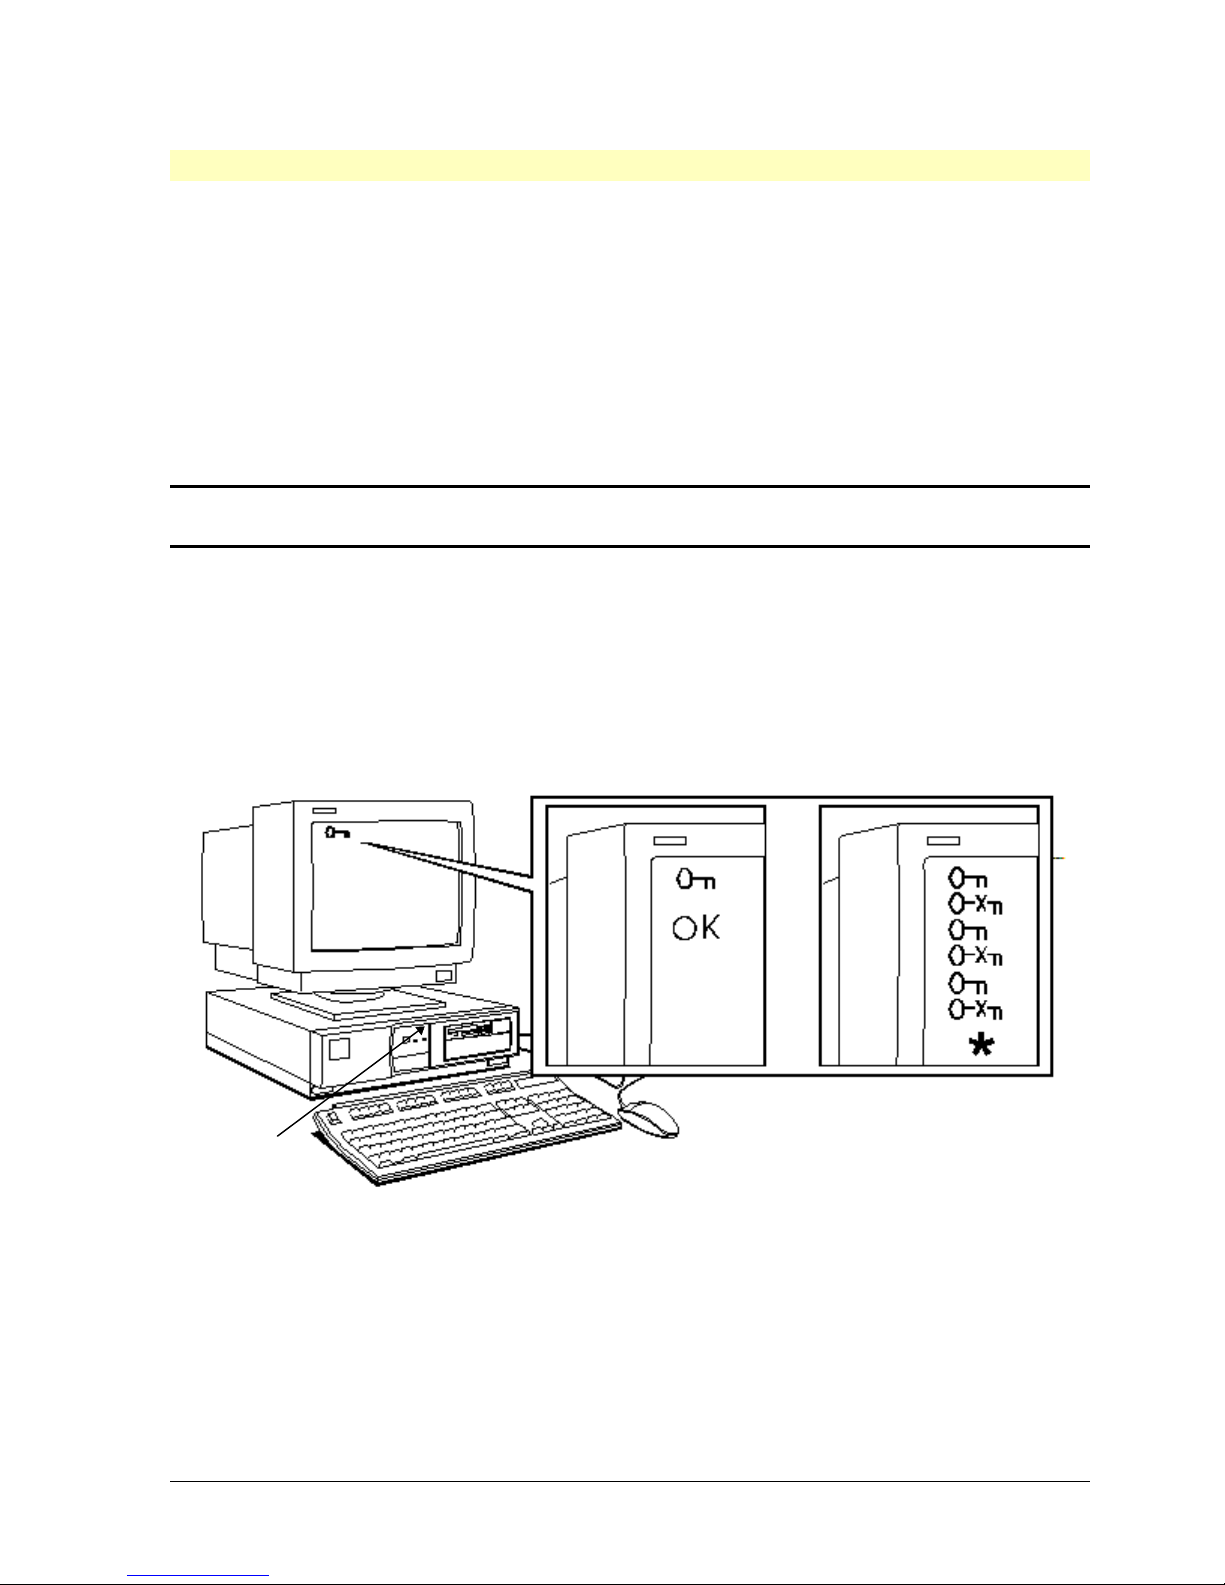
You have three chances to enter the password. After three unsuccessful attempts, the
‘*’ prompt appears and you must restart your PC (by pressing the power button twice)
before you can try again.
Power
Button
HP Vectra PC User's Guide 2 Using Your PC •• 20
Wrong password. Restart the PC,
then enter the correct password.

Error! Bookmark not defined.Setting Other Security Features
HP Vectra PC User's Guide 2 Using Your PC •• 21

Disabling Startup from Disk Drives
Your PC can be configured to prevent it being started from the hard disk drive, flexible disk
drive, or both. If both types of drive are disabled, the PC can only be started from a network.
To prevent the configuration being changed to allow startup from disk drives, set a
password. If both User and Administrator passwords are set, the Administrator password
must be entered to change the setting.
1. Start the Setup program (see “Using the HP Setup Program”).
2. If a password has not been set, set one now (see “How to Set a Password”).
3. Use the arrow keys to move the highlight to the Start from FDD field if you wish to
disable starting from the flexible disk drive.
4. Use the [F8] key to disable the function.
5. Repeat steps 2 and 3 using the Start from HDD field if you wish to disable starting from
the hard disk drive(s).
6. If you do not wish to change any other settings, use the [F3] key to save your settings
and exit the Setup program.
HP Vectra PC User's Guide 2 Using Your PC •• 22

Preventing Writing to Flexible Disks
Your PC can be configured to prevent data from being copied onto a flexible disk. To
prevent the configuration from being changed to allow data to be copied onto diskettes, set
a password. If both User and Administrator passwords are set, the Administrator password
must be entered to change the setting. The following sections describe how to perform these
actions.
1. Start the Setup program (see “Using the HP Setup Program”).
2. If a password has not been set, set one now (see “How to Set a Password”).
3. Use the arrow keys to move the highlight to the Flexible Disk Drives field.
4. Use the [F8] key to disable the drive(s).
5. If you do not wish to change any other settings, use the F3 key to save your settings
and exit the Setup program.
HP Vectra PC User's Guide 2 Using Your PC •• 23

Error! Bookmark not defined.Using the HP User Tools
The HP User Tools provide online information about your PC and allow you to configure
your printer and display settings.
To access the HP User Tools:
1. Double-click on the HPutils group icon in Windows Program Manager to display the
Hewlett-Packard utilities.
2. Double-click on the HP User Tools icon to display the HP User Tools utility.
3. Click on the icon of the tool that you wish to use.
HP Vectra PC User's Guide 2 Using Your PC •• 24
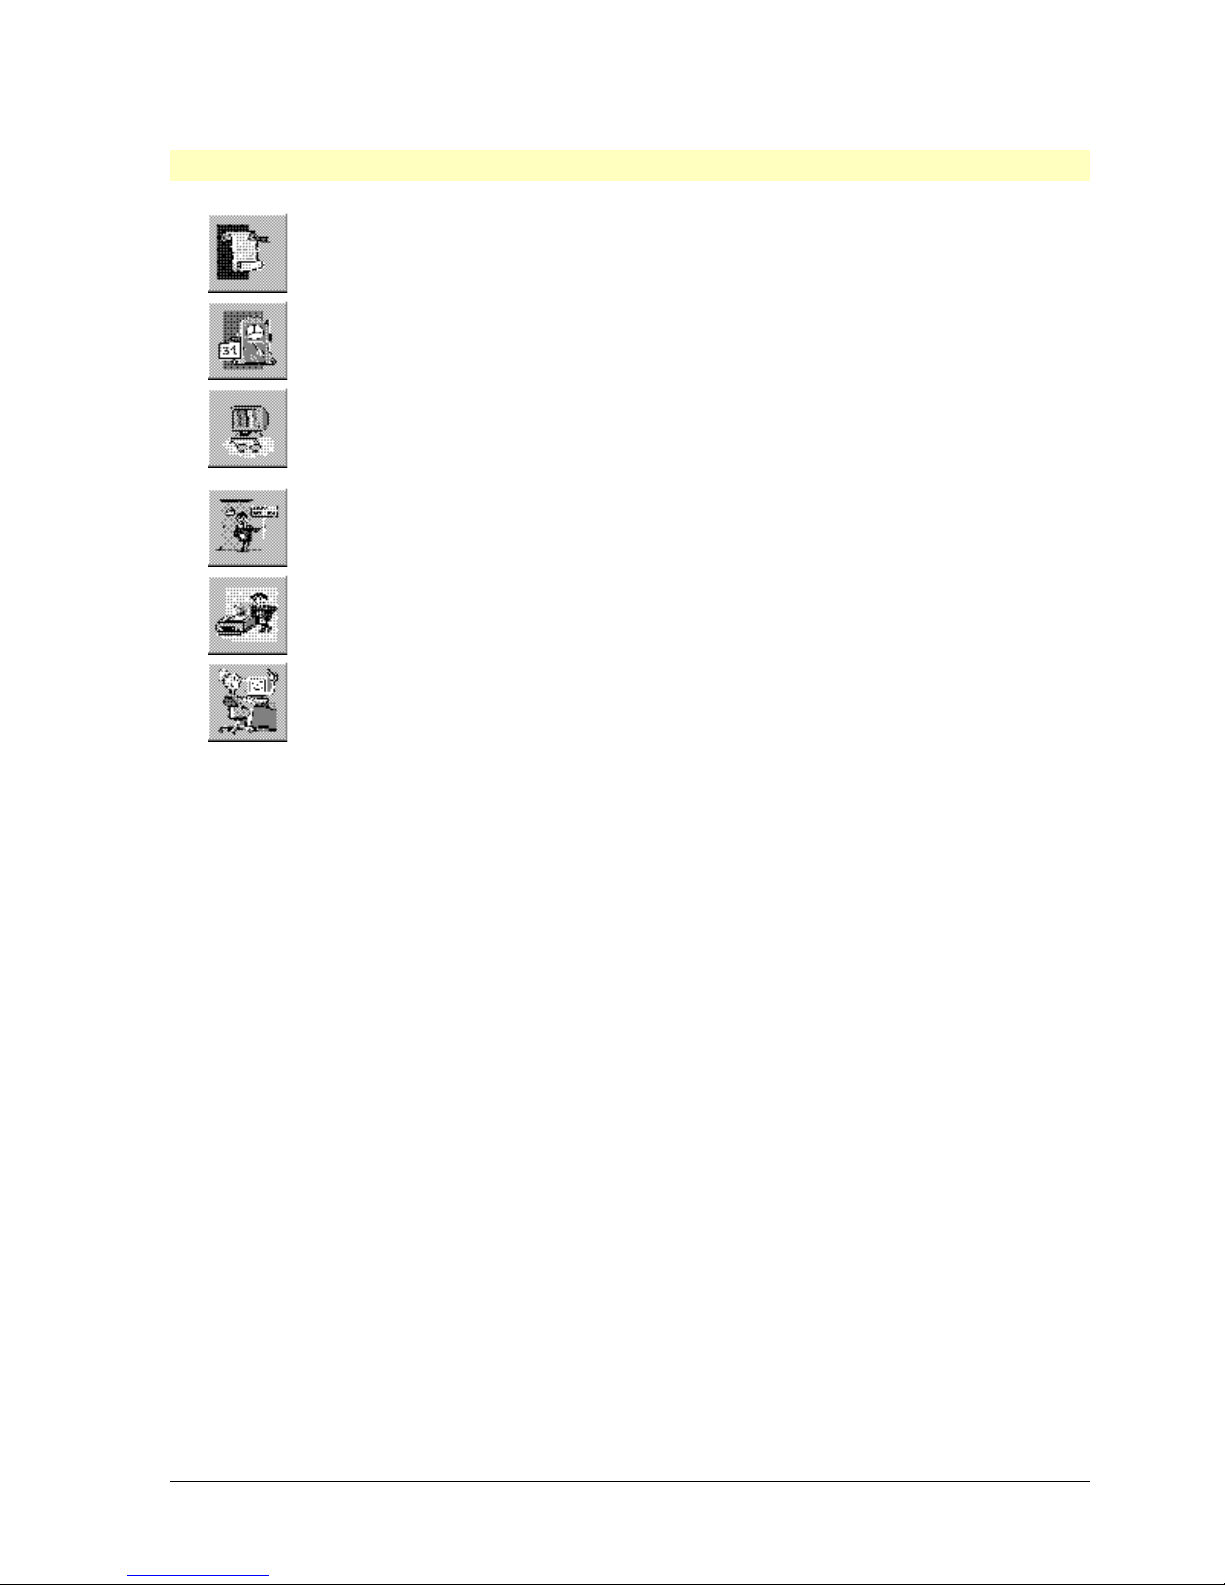
What’s Behind the Icons
Click on this icon to view the license agreement for the preinstalled
software.
Click on this icon to set the correct date and time for the PC. Use
this when the daylight saving hour changes or when you change the
PC’s battery.
Click on this icon to change the video resolution, the number of
colors displayed, and the display’s refresh rate. Click on this icon if
you change your display. Disable the Plug and Play field in the Setup
program to retain your settings next time you start the PC.
Click on this icon if you want to change the name of the user of your
PC. If a user name has already been entered during the software
initialization routine, you can change it.
Click on this icon to set up and configure your printer. Use this tool
when you attach a printer to your PC. (Refer to the printer manual for
details.)
Click on thiss icon to read the Working in Comfort document that
provides ergonomic advice for using the computer.
HP Vectra PC User's Guide 2 Using Your PC •• 25

Finding More Information About Your PC
Your PC has a preinstalled online document called Discover Your Vectra PC that explains
the key features of your PC, provides information about supplied software, and describes
the procedures for installing accessories.
To view the document:
1. Double-click on the HPutils group icon in Windows Program Manager to display the
Hewlett-Packard utilities.
2. Double-click on the Discover Your HP Vectra VE 4/xx PC icon to display the document.
HP Vectra PC User's Guide 2 Using Your PC •• 26

Error! Bookmark not defined.Using Power Management
Your PC supports a power management system that complies with the Environmental
Protection Agency (EPA) Energy Star program. This means that your PC uses less than 30
Watts of power when not in use and power management is enabled. Two power
management modes are supported:
• Standby mode, which can be set to occur after a specified time of inactivity, reduces
power consumption to 27 Watts by blanking the display. The PC returns to normal
operation as soon as any key on the keyboard is pressed.
• Sleep mode, which can be set to occur at a specific time, reduces power consumption
to 22 Watts by blanking the display, and switching off the hard disk drive and processor.
The PC returns to normal operation up to 15 seconds after any key on the keyboard is
pressed.
The PC will also be awoken from Standby Mode by peripheral devices, such as a fax or
modem, being activated.
NOTE If your PC is on a Novell network, the Sleep Mode option will disconnect you from
the network.
HP Vectra PC User's Guide 2 Using Your PC •• 27

Configuring Power Management in Windows
1. Double-click on the Main icon to display the Main program group.
2. Double-click on the Control Panel icon
3. Double-click on the Power icon to display the Power dialog box.
4. Select the Advanced mode.
5. Click on Options and the Setup Power Management dialog box appears.
6. Set the “Standby” timeout (30 minutes, by default), the “Sleep At” time (set to Off, by
default), or both.
NOTE For more information about the Windows Power Management utility, click on the
Help button in the Setup Power Management dialog box.
7. Click on OK to close the Setup Power Management dialog box.
8. Click on OK to enable Power Management in Windows.
HP Vectra PC User's Guide 2 Using Your PC •• 28

Activating Sleep Mode in Windows
To activate Sleep mode manually, click on the Sleep Mode icon (at the bottom-left of the
screen). Otherwise, Sleep Mode will be entered automatically after the time specified has
elapsed.
To return to full power, press any key.
Power Management in DOS
1. Start the Setup program (see “Using the HP Setup Program”).
2. Use the arrow keys to move the highlight to the DOS APM Standby item.
3. Set the “Standby” timeout required.
4. Use the [F3] key to save your settings and exit the Setup program.
For more information about the DOS power management utility, at the DOS prompt type
HELP POWER and press ENTER.
HP Vectra PC User's Guide 2 Using Your PC •• 29

Understanding the Desktop Management Interface
Your PC supports the Desktop Management Interface (DMI). The DMI lets an application
request information about your personal computer. For example, an application can use the
DMI to view:
• the hardware and software components installed in your PC
• the operating system used by your PC
• the number of available accessory board slots
All of this information is stored in a Management Information Format (MIF) file, installed on
your PC as part of the DMI package.
To install the DMI demonstration program and learn more about the Desktop Management
Interface:
1. Double-click on the HP DMI group icon in the Windows Program Manager.
2. Double-click on the DMI Readme icon for up-to-date information about the DMI support
for your PC.
3. Double-click on the DMI Setup icon to install the DMI demonstration application on your
PC.
HP Vectra PC User's Guide 2 Using Your PC •• 30
 Loading...