

HP VECTRA VE User Manual

HP Vectra VE
User’s Guide

Notice
The information contained in this document is subject to change
without notice.
Hewlett-Packard makes no warranty of any kind with regard to this
material, including, but not limited to, the implied warranties of
merchantability and fitness for a particular purpose. Hewlett-Packard
shall not be liable for errors contained herein or for incidental or
consequential damages in connection with the furnishing, performance,
or use of this material.
Hewlett-Packard assumes no responsibility for the use or reliability of
its software on equipment that is not furnished by Hewlett-Packard.
This document contains proprietary information that is protected by
copyright. All rights are reserved. No part of this document may be
photocopied, reproduced, or translated to another language without the
prior written consent of Hewlett-Packard Company.
Centronics
® is a registered trademark of Centronics Data Computer
Corporation.
Microsoft
® and MS-DOS® are registered trademarks of Microsoft
Corporation. Microsoft Windows
®, and Windows® 95 are products of
Microsoft Corporation.
OS/2 is a registered trademark of International Business Machines
corporation.
Novell
® and NetWare® are U.S. registered trademarks of Novell, Inc.
PENTIUM
TM
is a trademark of Intel Corporation.
UNIX
® is a registered trademark of UNIX System Laboratories Inc. in
the U.S.A. and other countries.
Hewlett-Packard France
Commercial Desktop Computing Division
38053 Grenoble Cedex 9
France
© 1997 Hewlett-Packard Company

User’s Guide

Important Safety Information
iv Francais
Who this Manual is For
This manual is for anyone who wants to do any of the following:
• Set up the PC for the first time
• Configure the PC
• Add accessories to the PC
• Troubleshoot problems on the PC
• Find out where to get more information and support
Important Safety Information
If you have any doubt that you can lift the PC or display safely, do not
try to move it without help.
For your safety, always connect the equipment to a grounded wall
outlet. Always use a power cord with a properly grounded plug, such as
the one provided with this equipment, or one in compliance with your
national regulations. This PC is disconnected from the power by
removing the power cord from the power outlet. This means the PC
must be located close to a power outlet that is easily accessible.
For your safety, never remove the PC’s cover without first removing the
power cord from the power outlet, and any connection to a
telecommunications network. Always replace the cover on the PC
before switching it on again.
WARNING To avoid electric shock, do not open the power supply.
This HP PC is a class 1 laser product. Do not attempt to make any
adjustment of the laser units.

Francais v
Important Safety Information
Important Ergonomic Information
We recommend strongly that you read the ergonomic information
before using your PC.
For Windows 95 users, open the Start menu in the task bar and choose
Help. Then double-click on the help topic “Working in Comfort”.
For Windows for Workgroups users, open the Program Manager, open
the program group ‘HPUtils’, and double-click on “HP User Tools” icon.
Then click on “Working in Comfort” in the page tagged “Information”.
For DOS users, refer to the Working in Comfort booklet.

Important Safety Information
vi Francais

Contents
English vii
Important Safety Information . . . . . . . . . . . . . . . . . . . . . . . . . . . . . . . iv
1 Setting Up and Using Your PC
Unpacking Your PC . . . . . . . . . . . . . . . . . . . . . . . . . . . . . . . . . . . . . . . . . 2
Connecting the Mouse, Keyboard, Display and Printer . . . . . . . . . . . 3
Connecting the Power Cords . . . . . . . . . . . . . . . . . . . . . . . . . . . . . . . . . 4
Connecting to a Network . . . . . . . . . . . . . . . . . . . . . . . . . . . . . . . . . . . . 5
Your PC’s Hardware Control Panel . . . . . . . . . . . . . . . . . . . . . . . . . . . . 6
Starting and Stopping Your PC. . . . . . . . . . . . . . . . . . . . . . . . . . . . . . . . 7
Starting Your PC for the First Time . . . . . . . . . . . . . . . . . . . . . . . . . . . . . . 7
Starting Your PC. . . . . . . . . . . . . . . . . . . . . . . . . . . . . . . . . . . . . . . . . . . . . . 7
Stopping Your PC and HP Off . . . . . . . . . . . . . . . . . . . . . . . . . . . . . . . . . . . 7
Asset Tracking . . . . . . . . . . . . . . . . . . . . . . . . . . . . . . . . . . . . . . . . . . . . . 9
PC Identification/Tattoo String . . . . . . . . . . . . . . . . . . . . . . . . . . . . . . . . . . 9
PC Serial Number. . . . . . . . . . . . . . . . . . . . . . . . . . . . . . . . . . . . . . . . . . . . . 9
Protecting Your PC . . . . . . . . . . . . . . . . . . . . . . . . . . . . . . . . . . . . . . . . 10
Setting an Administrator and a User Password . . . . . . . . . . . . . . . . . . . . 10
Using Power Management . . . . . . . . . . . . . . . . . . . . . . . . . . . . . . . . . . 11
Desktop Management Interface (DMI) . . . . . . . . . . . . . . . . . . . . . . . . 11
HP Dynamic Video. . . . . . . . . . . . . . . . . . . . . . . . . . . . . . . . . . . . . . . . . 11
Additional Information and Help. . . . . . . . . . . . . . . . . . . . . . . . . . . . . 12

viii English
2 How to Install Accessories In Your PC
Accessories You Can Install . . . . . . . . . . . . . . . . . . . . . . . . . . . . . . . . 14
Removing and Replacing the Cover. . . . . . . . . . . . . . . . . . . . . . . . . . 15
Removing the Cover . . . . . . . . . . . . . . . . . . . . . . . . . . . . . . . . . . . . . . . . . 15
Replacing the Cover after Installing Accessories . . . . . . . . . . . . . . . . . . 15
Moving and Replacing the Power Supply . . . . . . . . . . . . . . . . . . . . . 16
Installing Memory. . . . . . . . . . . . . . . . . . . . . . . . . . . . . . . . . . . . . . . . . 17
Main Memory Modules . . . . . . . . . . . . . . . . . . . . . . . . . . . . . . . . . . . . . . . 17
Installing an Optional Cache Memory Module . . . . . . . . . . . . . . . . . . . . . 19
Upgrading Video Memory To Improve Resolution and Increase the Number
of Displayed Colors . . . . . . . . . . . . . . . . . . . . . . . . . . . . . . . . . . . . . . . . . . 20
Installing Mass Storage Devices . . . . . . . . . . . . . . . . . . . . . . . . . . . . . 21
Connecting IDE Devices . . . . . . . . . . . . . . . . . . . . . . . . . . . . . . . . . . . . . . 21
Configuring an IDE Device After Installation . . . . . . . . . . . . . . . . . . . . . 22
Installing a Flexible Disk Drive or a CD-ROM Drive
in the Middle Shelf . . . . . . . . . . . . . . . . . . . . . . . . . . . . . . . . . . . . . . . . . . 23
Installing an IDE Hard Disk Drive in the Rear Shelf . . . . . . . . . . . . . . . . 24
Installing an IDE Hard Disk Drive in the Bottom Shelf. . . . . . . . . . . . . . 26
Installing a Tape Drive in the Bottom Shelf. . . . . . . . . . . . . . . . . . . . . . . 28
Installing a BNC Coax Adapter. . . . . . . . . . . . . . . . . . . . . . . . . . . . . . 30
Installing an Upgrade/Overdrive Processor . . . . . . . . . . . . . . . . . . . 32
Installing Accessory Boards . . . . . . . . . . . . . . . . . . . . . . . . . . . . . . . . 36
Configuring Accessory Boards with Plug and Play . . . . . . . . . . . . . . . . . 36
Installing the Board. . . . . . . . . . . . . . . . . . . . . . . . . . . . . . . . . . . . . . . . . . 37
Installing the Security Bracket . . . . . . . . . . . . . . . . . . . . . . . . . . . . . . 39

English ix
3 The HP Setup Program
The HP Summary Screen . . . . . . . . . . . . . . . . . . . . . . . . . . . . . . . . . . . 42
HP Summary Screen . . . . . . . . . . . . . . . . . . . . . . . . . . . . . . . . . . . . . . . . . 42
Using the Setup Program . . . . . . . . . . . . . . . . . . . . . . . . . . . . . . . . . . . 44
4 Troubleshooting Your PC
HP Summary Screen . . . . . . . . . . . . . . . . . . . . . . . . . . . . . . . . . . . . . . . 48
If Your PC Does Not Start At All . . . . . . . . . . . . . . . . . . . . . . . . . . . . . 48
If Your PC Does Not Start Properly. . . . . . . . . . . . . . . . . . . . . . . . . . . 48
Display is Blank and There Are No Error Messages . . . . . . . . . . . . . . . . 48
If you are Unable to Change any Values in Setup. . . . . . . . . . . . . . . . . . . 50
If a POST Error Message is Displayed . . . . . . . . . . . . . . . . . . . . . . . . . . . 50
If Your PC Has a Hardware Problem. . . . . . . . . . . . . . . . . . . . . . . . . . 52
Display Does Not Work Properly. . . . . . . . . . . . . . . . . . . . . . . . . . . . . . . . 52
If Your Keyboard Does Not Work . . . . . . . . . . . . . . . . . . . . . . . . . . . . . . . 53
If Your Mouse Does Not Work . . . . . . . . . . . . . . . . . . . . . . . . . . . . . . . . . . 53
If Your Printer Does Not Work. . . . . . . . . . . . . . . . . . . . . . . . . . . . . . . . . . 54
If the Flexible Disk Drive Does Not Work. . . . . . . . . . . . . . . . . . . . . . . . . 55
If the Hard Disk Does Not Work . . . . . . . . . . . . . . . . . . . . . . . . . . . . . . . . 55
If the CD-ROM Drive Has a Problem. . . . . . . . . . . . . . . . . . . . . . . . . . . . . 56
If an Accessory Board Does Not Work . . . . . . . . . . . . . . . . . . . . . . . . . . . 57
If Your PC Has a Software Problem . . . . . . . . . . . . . . . . . . . . . . . . . . 58
If You Have Forgotten Your Password . . . . . . . . . . . . . . . . . . . . . . . . . . . 58
If Your Application Software Does Not Work . . . . . . . . . . . . . . . . . . . . . . 59
If the Date and Time are Incorrect . . . . . . . . . . . . . . . . . . . . . . . . . . . . . . 59

x English
If You Need to Change the Battery. . . . . . . . . . . . . . . . . . . . . . . . . . . 59
5 Features and Specifications
Features and Specifications . . . . . . . . . . . . . . . . . . . . . . . . . . . . . . . . 62
IRQs, DMAs, and I/O Addresses . . . . . . . . . . . . . . . . . . . . . . . . . . . . . 64
System Board Switches . . . . . . . . . . . . . . . . . . . . . . . . . . . . . . . . . . . . 65
Processor Speed Switch SW2 and Bus Speed Jumper J-7 . . . . . . . . . . . 65
Cache Jumper J6 . . . . . . . . . . . . . . . . . . . . . . . . . . . . . . . . . . . . . . . . . . . . 65
Multipurpose Switch SW1. . . . . . . . . . . . . . . . . . . . . . . . . . . . . . . . . . . . . 66
Power-on Spacebar Feature Jumper JP4. . . . . . . . . . . . . . . . . . . . . . . . . 66
6 Hewlett Packard Support and Information Services
Introduction . . . . . . . . . . . . . . . . . . . . . . . . . . . . . . . . . . . . . . . . . . . . . 68
Your HP Authorized Reseller . . . . . . . . . . . . . . . . . . . . . . . . . . . . . . . 69
HP SupportPack . . . . . . . . . . . . . . . . . . . . . . . . . . . . . . . . . . . . . . . . . . 69
HP Support Assistant CD-ROM . . . . . . . . . . . . . . . . . . . . . . . . . . . . . 70
Hewlett-Packard Information Services . . . . . . . . . . . . . . . . . . . . . . . 71
HP Forum on CompuServe. . . . . . . . . . . . . . . . . . . . . . . . . . . . . . . . . . . . 71
HP Forum on America Online. . . . . . . . . . . . . . . . . . . . . . . . . . . . . . . . . . 72
HP BBS Library . . . . . . . . . . . . . . . . . . . . . . . . . . . . . . . . . . . . . . . . . . . . . 73
HP World Wide Web Site . . . . . . . . . . . . . . . . . . . . . . . . . . . . . . . . . . . . . . 73
HP FAXback on Demand—HP FIRST . . . . . . . . . . . . . . . . . . . . . . . . . . . 74

English xi
HP Audio Tips (USA only) HP Automated Support Directory . . . . . . . . 74
Ordering Drivers and BIOS on Diskette . . . . . . . . . . . . . . . . . . . . . . . . . . 75
Hewlett-Packard Telephone Support . . . . . . . . . . . . . . . . . . . . . . . . . 76
Lifeline Telephone Support . . . . . . . . . . . . . . . . . . . . . . . . . . . . . . . . . 77
HP Network Phone-in Support Service (NPS). . . . . . . . . . . . . . . . . . 78
Summary. . . . . . . . . . . . . . . . . . . . . . . . . . . . . . . . . . . . . . . . . . . . . . . . . 79
Hewlett-Packard Marketing Headquarters. . . . . . . . . . . . . . . . . . . . . 80
Glossary . . . . . . . . . . . . . . . . . . . . . . . . . . . . . . . . . . . . . . . . . . 81

xii English

1
Setting Up and Using
1
Setting Up and Using Your PC
1 Setting Up and Using Your PC
Unpacking Your PC
2 English
1
Setting Up and Using
Unpacking Your PC
WARNING If you have any doubt that you can lift the PC or display safely, do not
try to move it without help.
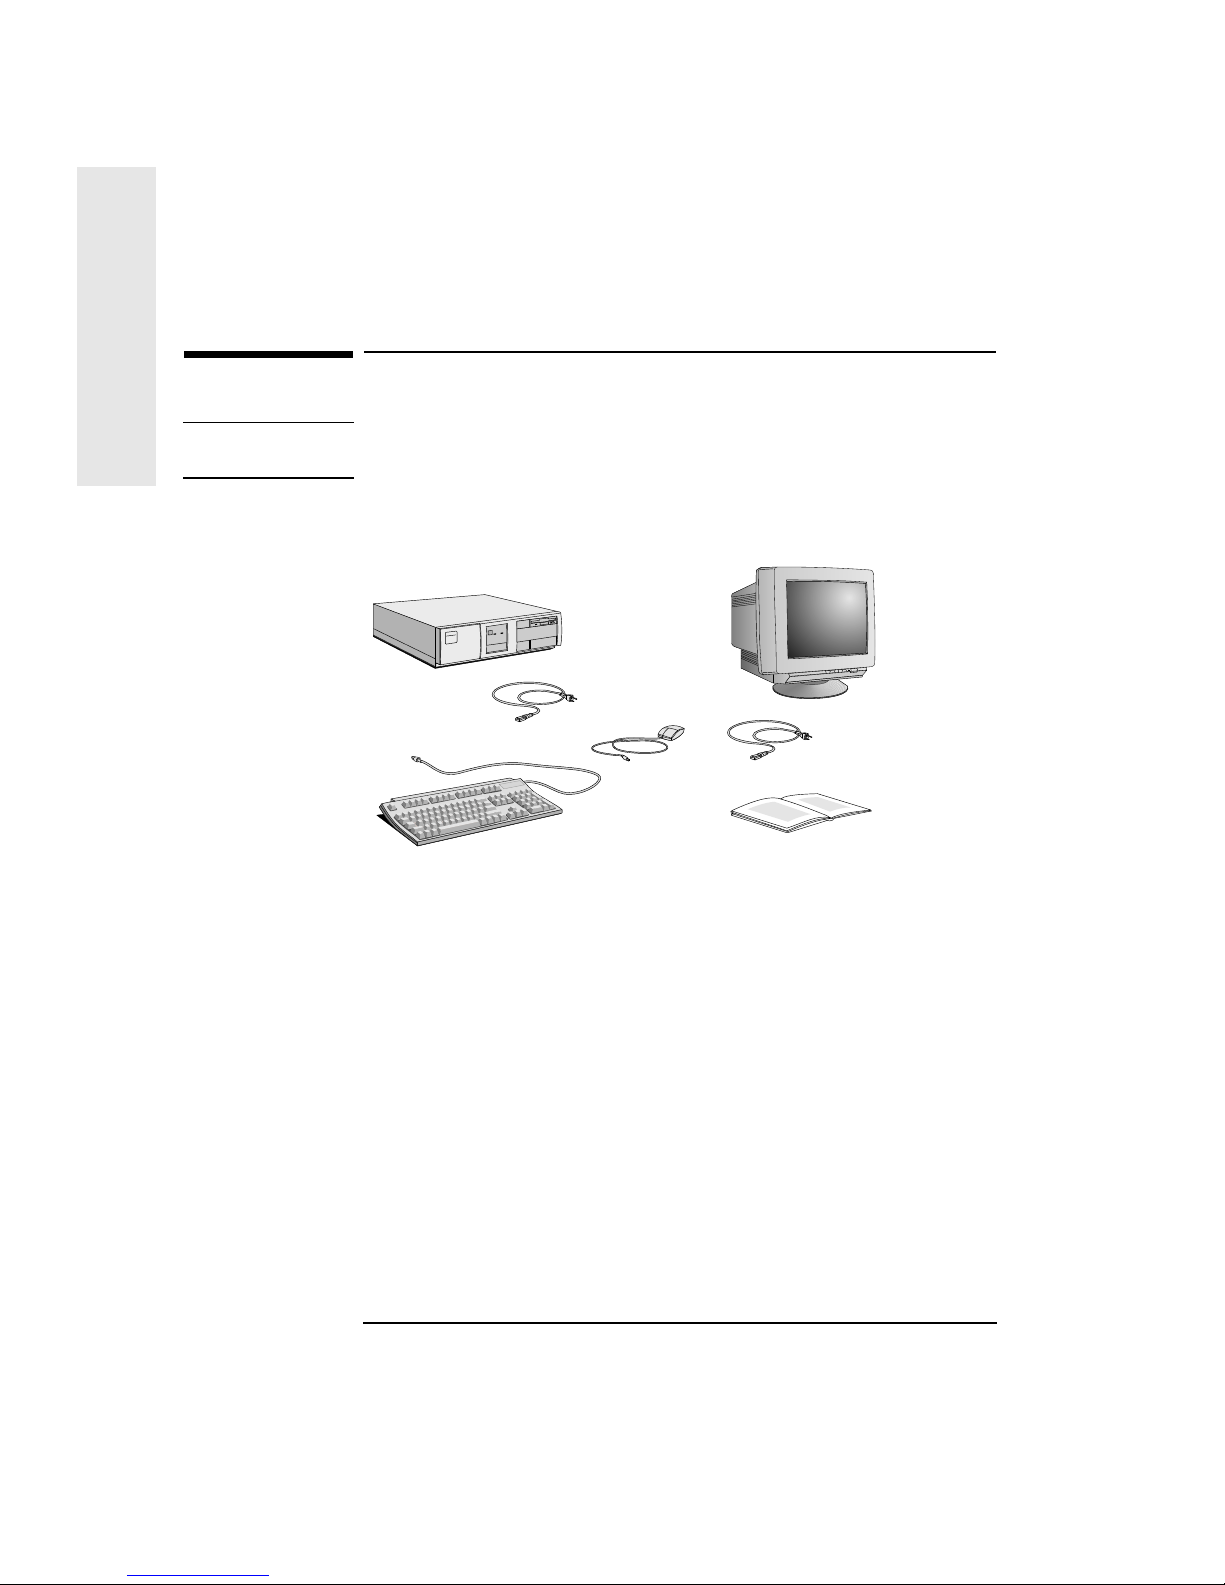
1 When you receive your PC, unpack all the components.
2 Place the PC on a sturdy desk near to easily accessible power outlets,
with enough space for the keyboard, mouse, and any other
accessories.
3 Position the PC so that its rear connectors are easily accessible.
4 Place the display on top of the computer. If you have a large display,
place it next to the computer. Refer to the display’s manual for
information about the display.
Operating System Your PC’s operating system is preloaded on your PC’s hard disk.
Installation Tools No tools are required to set up your PC. However, if you plan to install a
disk drive or an accessory board in your PC, you will need a flat-blade
screwdriver. For further information about installing accessories, see
chapter 2, How to Install Accessories In Your PC.
Manuals
Mouse
Computer Power Cord
Display Power Cord
Typical
Display
Computer
Keyboard
English 3
1 Setting Up and Using Your PC
Connecting the Mouse, Keyboard, Display and Printer
1
Setting Up and Using
Connecting the Mouse, Keyboard, Display and Printer
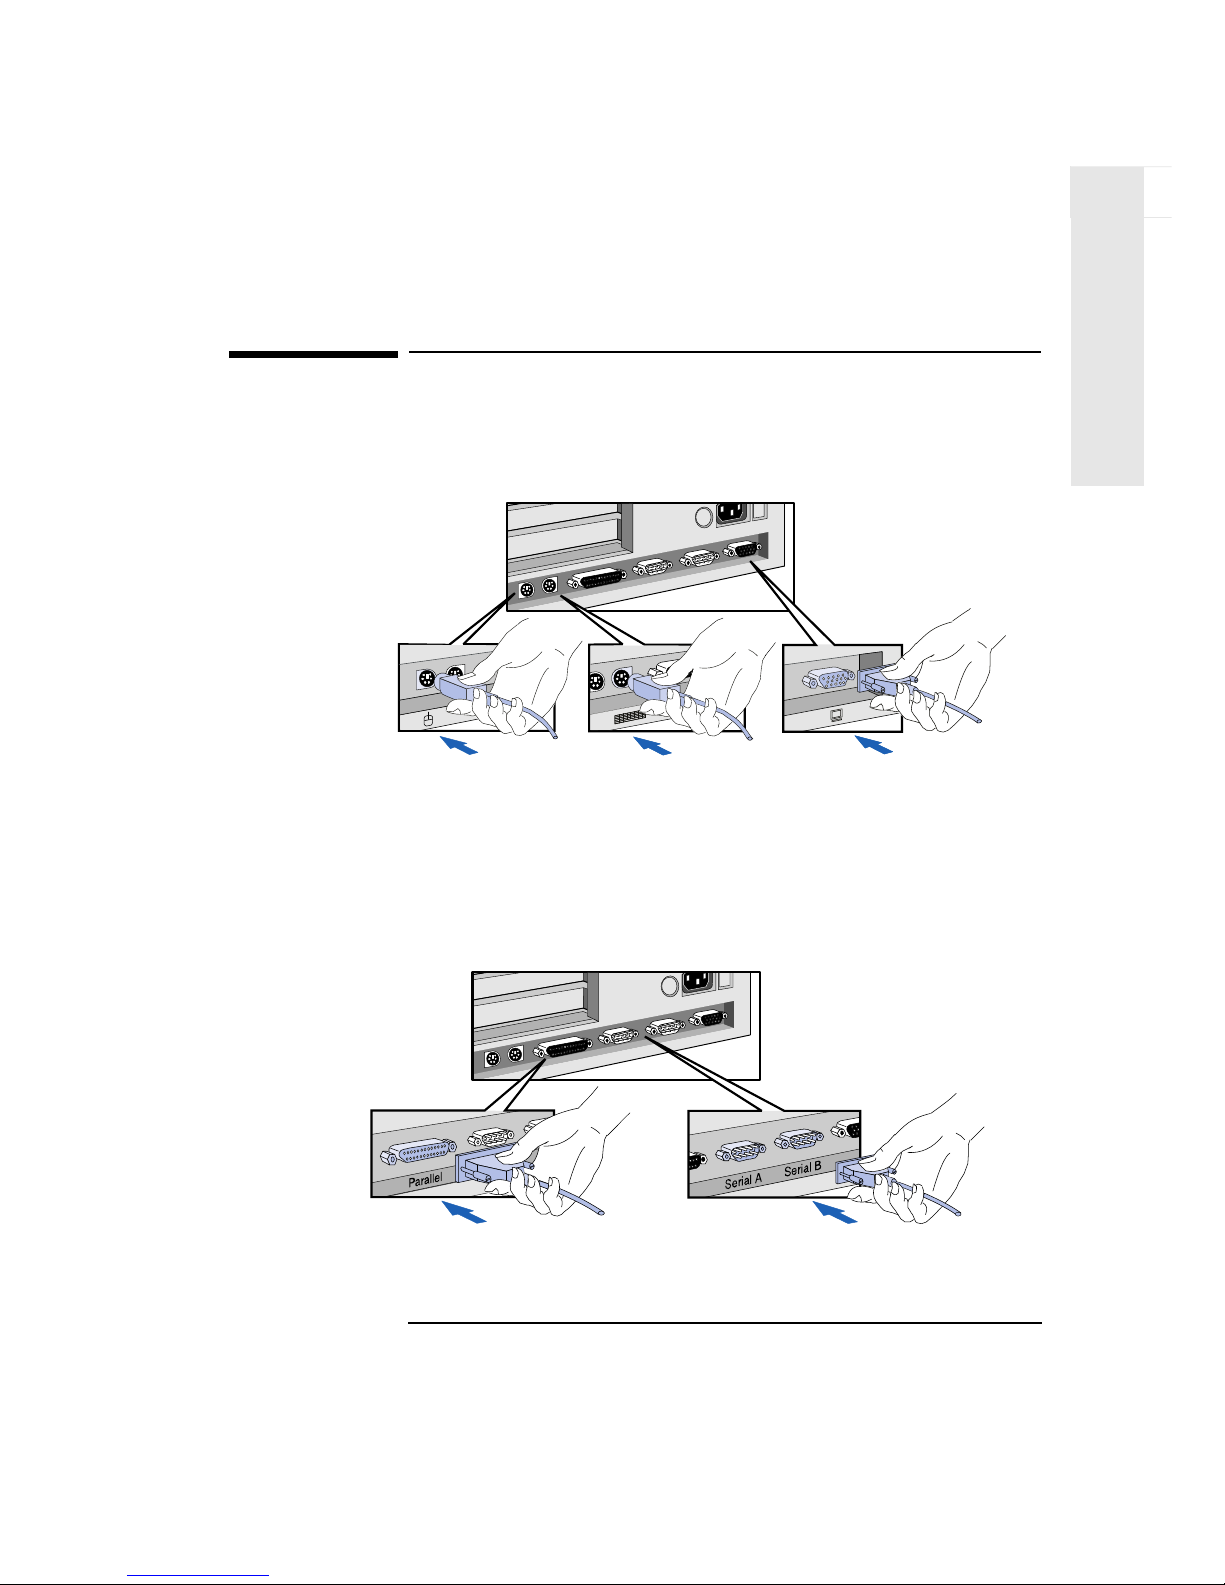
Connect the mouse, keyboard, and display to the back of the computer.
The connectors are shaped to go in one way only. Tighten the display
cable attachment screws.
If you have a printer, connect the printer cable to the back of the
computer and tighten the attachment screws. Use the connector
labeled:
• Parallel (25-pin parallel connector) for a parallel device
• Serial A (9-pin serial connector) for a serial device
• Serial B (9-pin serial connector) for a second serial device.
Mouse
Keyboard
Display
Parallel Connector
Serial Connector
1 Setting Up and Using Your PC
Connecting the Power Cords
4 English
1
Setting Up and Using
Connecting the Power Cords
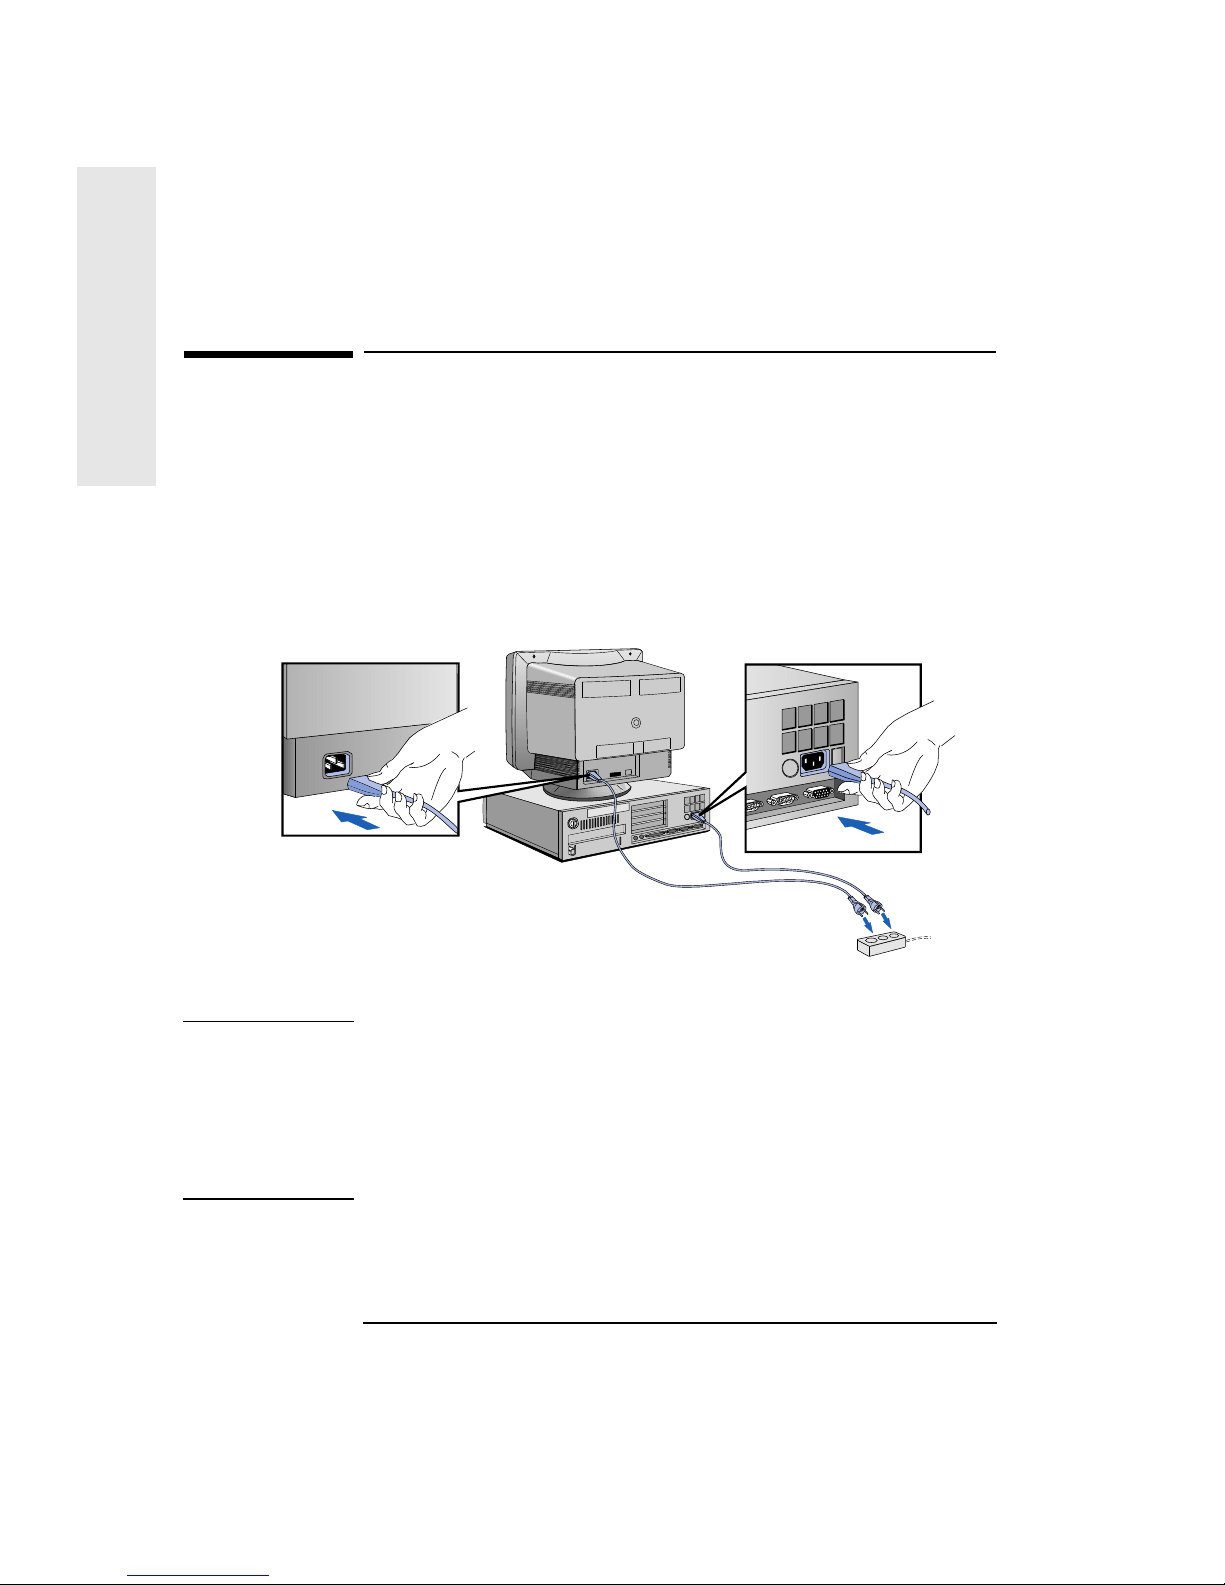
1 If fitted, remove the label covering the computer’s power connector.
2 Connect the power cords to the display and the computer. (The
connectors are shaped to go in one way only.)
3 Connect the display’s power cord and the computer’s power cord to
a grounded outlet.
WARNING For your safety, always connect the equipment to a grounded wall
outlet. Always use a power cord with a properly grounded plug, such
as the one provided with this equipment, or one in compliance with
your national regulations.
This PC is disconnected from the power by removing the power cord
from the power outlet. This means the PC must be located close to a
power outlet that is easily accessible.
Display
Power Cord
Computer
Power Cord
Grounded Outlet
English 5
1 Setting Up and Using Your PC
Connecting to a Network
1
Setting Up and Using
Connecting to a Network
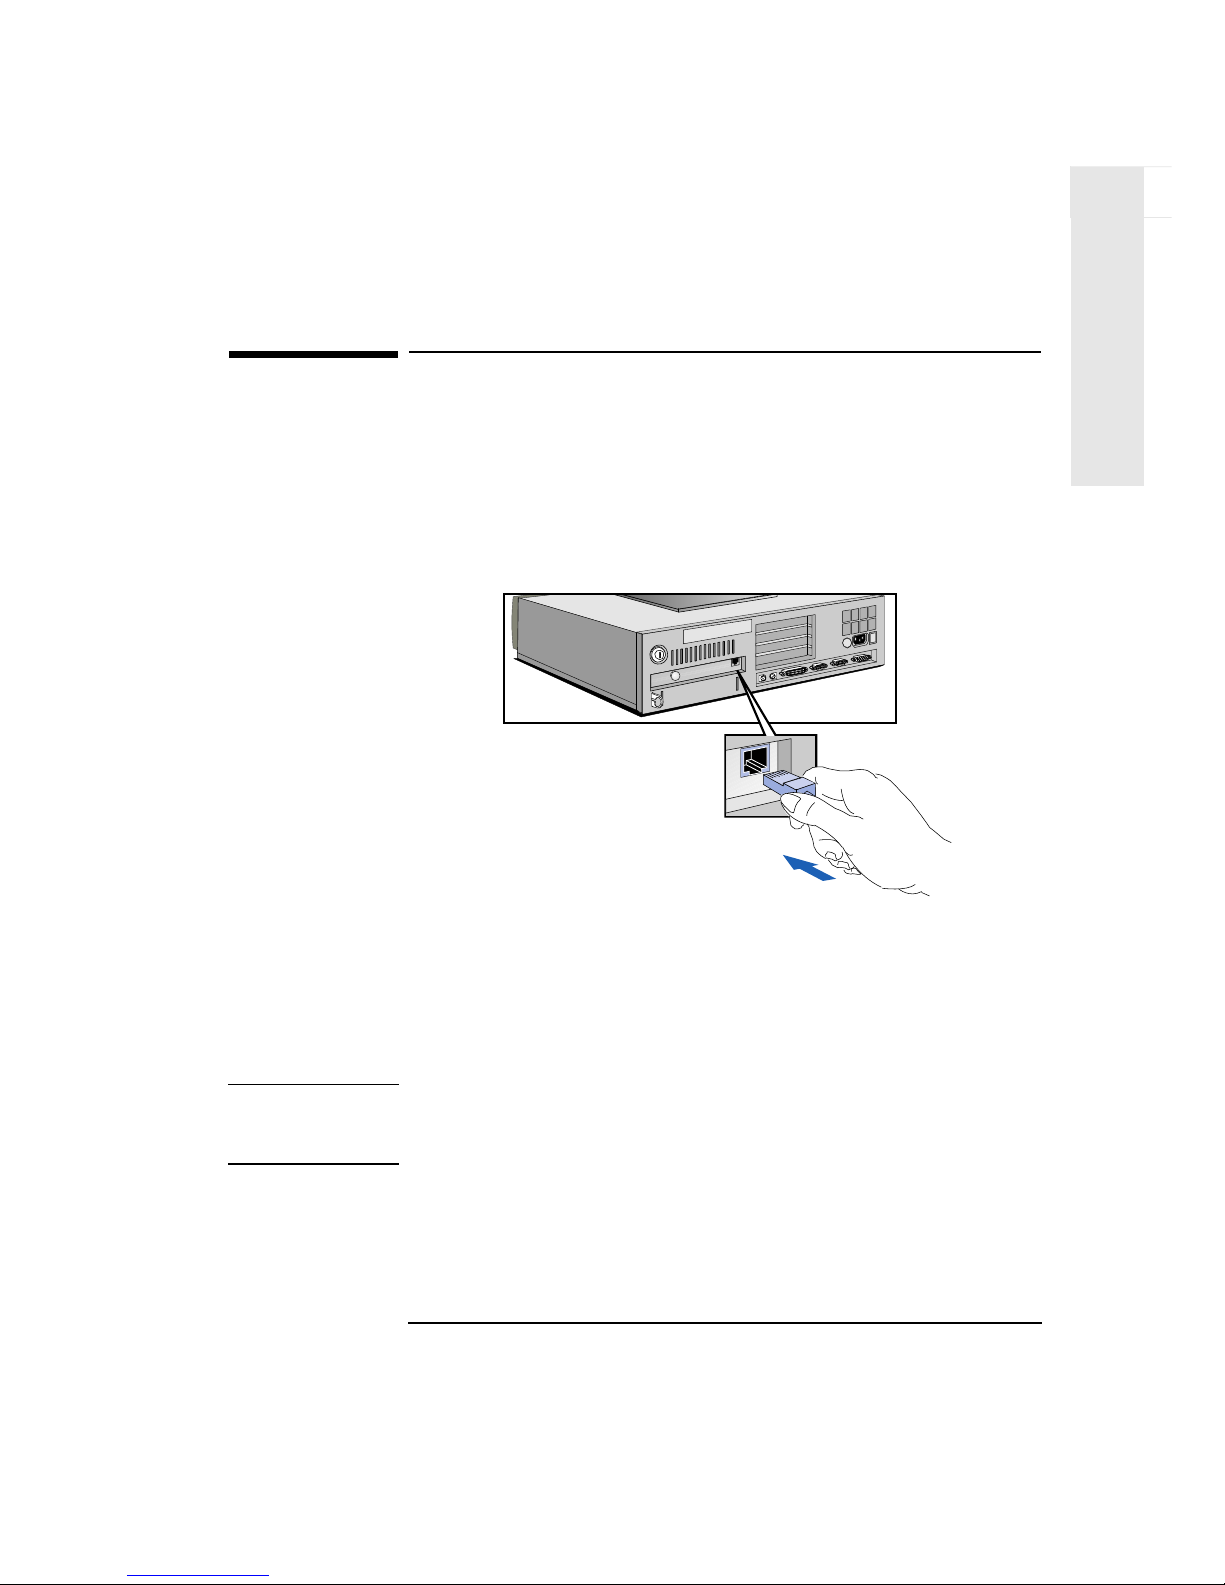
If your PC comes with a network connector, let your Network
Administrator know you are connecting your PC to the network.
Connect the network cable to the RJ-45 UTP (Unshielded Twisted
Pair) LAN connector.
To enable your network connection, refer to the Integrated Network
Interface Submenu in the Configuration Menu of the HP Setup
program. (You can find additional information in the online Network
Administrator’s Guide.)
NOTE If you need a BNC Coax connector to connect to the network, you can
install an optional BNC coax adapter (order HP D3979A). Refer to
“Installing a BNC Coax Adapter” on page 30.
1 Setting Up and Using Your PC
Your PC’s Hardware Control Panel
6 English
1
Setting Up and Using
Your PC’s Hardware Control Panel
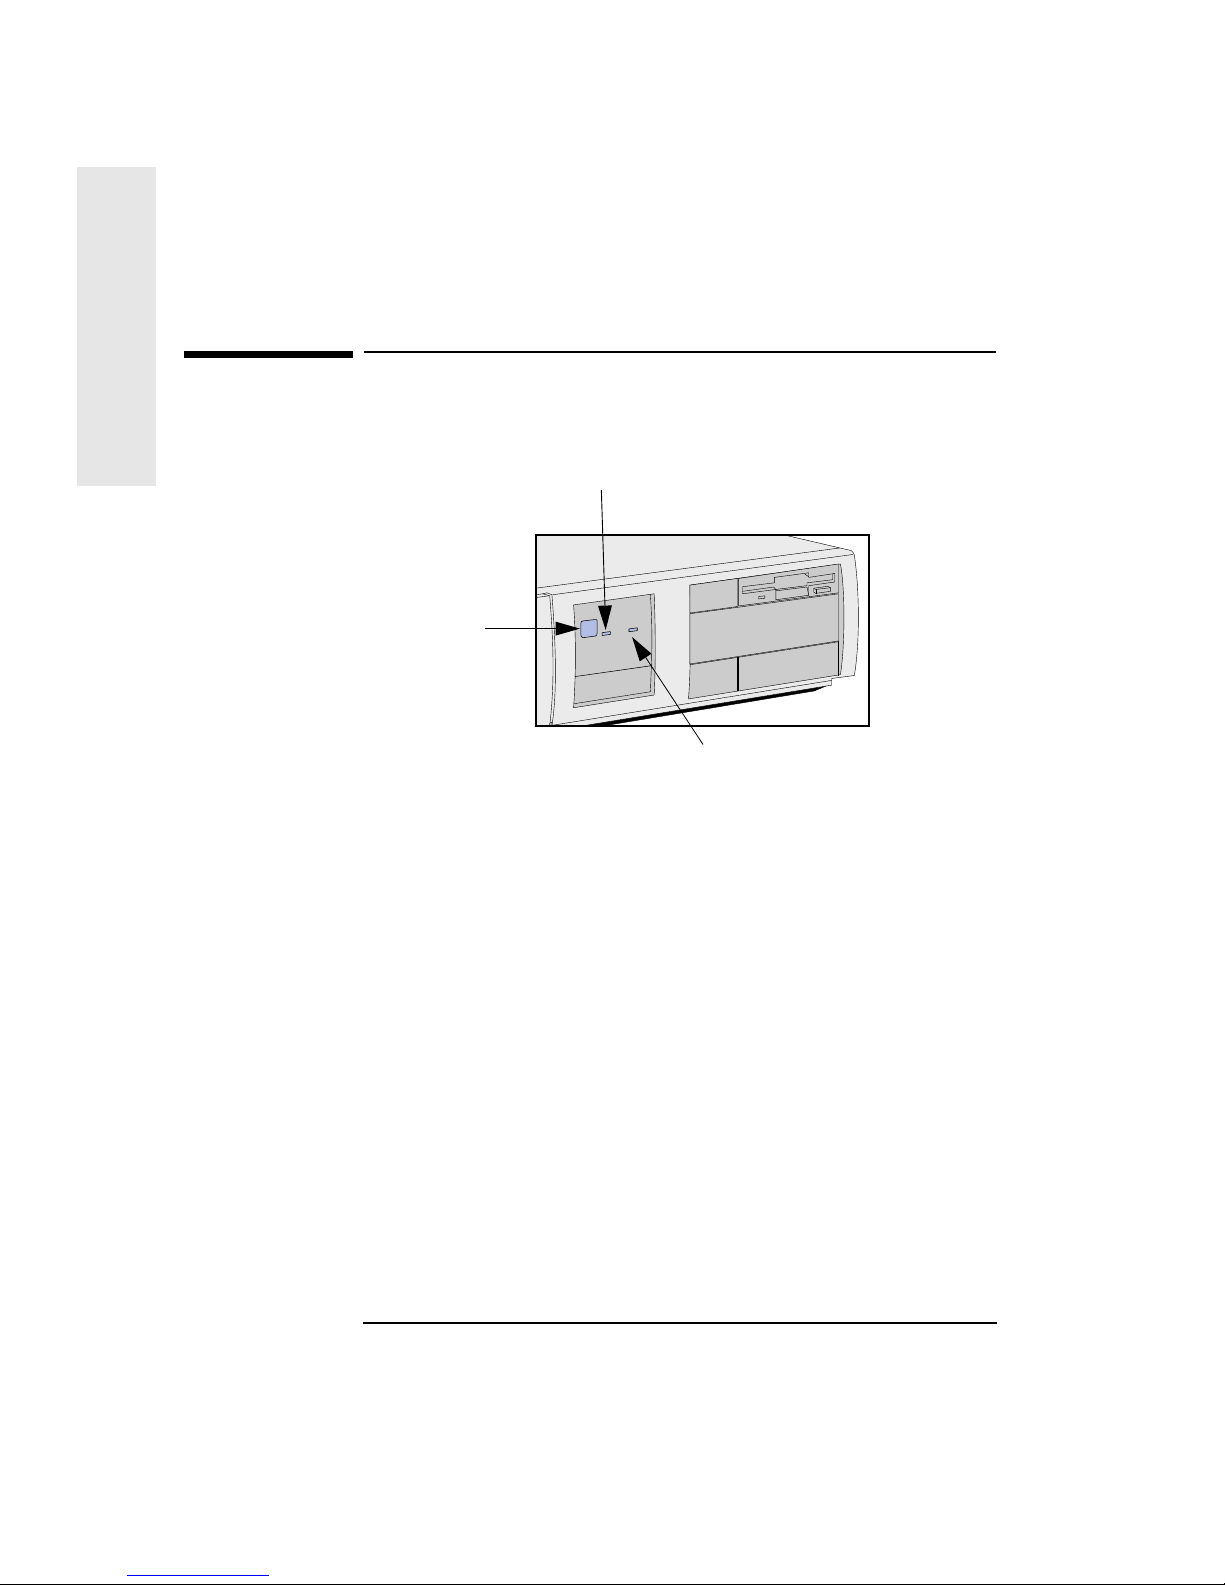
Your PC’s hardware control panel is on the front of your PC.
Power On/Off Button Press this button to turn the power on or off to your PC.
Hard Disk Activity Light This light glows/flickers when your hard disk drive is being accessed.
The hard disk activity light only works if you have an IDE hard disk
drive, which comes with your Vectra PC. If you replace this drive with a
SCSI hard disk drive, this light will not work.
Power On/Off
Power on Status Light
Hard Disk Activity Light

English 7
1 Setting Up and Using Your PC
Starting and Stopping Your PC
1
Setting Up and Using
Starting and Stopping Your PC
Starting Your PC for the First Time
CAUTION On certain models of this PC, you may be given the choice of installing
either Windows 95 or Windows for Workgroups. You are given this
choice the first time you start the PC. This is a once only choice. Once
installed you cannot go back and change the operating system unless
you buy new operating system software.
Starting Your PC
1 Before you start your PC, always switch on the display first.
2 Start your PC in one of these ways:
• press the power button on the front panel
• press the space bar.
When you switch on the computer, the computer carries out the
Power-On-Self-Test (POST) while the Vectra logo is displayed. If
you wish to view the POST details, press to get the HP
Summary Screen. If there is an error in the POST, the error will
automatically be displayed.
3 If you have set a password in the PC’s Setup program, the password
prompt displays after the POST has completed. If the Password
prompt is displayed, press , type your password and press
again to use the PC.
Stopping Your PC and HP Off
Before switching off the PC, save any open documents and close all
open applications. If you are using Windows 95, go to the Start menu in
the task bar and choose Shut Down. If you are using Windows for
Workgroups, close Program Manager.

1 Setting Up and Using Your PC
Starting and Stopping Your PC
8 English
1
Setting Up and Using
Windows 95 and HP Off If you are using the HP-preloaded Windows 95, the HP Off utility can
protect your files and your system. If you have unsaved data or new files
open and you switch off your PC using the power switch on the front
control panel before shutting down windows 95, HP Off presents you
with the shut-down dialog box and allows you to save any open
documents before closing open applications. Windows 95 is then shut
down cleanly.
To Enable HP Off To enable HP Off:
1 Open the “Power” control panel.
2 Click the “HP Off” tab and click the “HP Off” option.
3 Set a time for the HP Off time-out. This is the amount of time you are
given (in seconds) to cancel the shut-down sequence.
Try Out HP Off If you want to try out HP Off, do the following:
1 Enable HP Off.
2 Create a new file and do not save it.
3 Press the on/off button the PC front panel. A dialog box with the
message “About to shut down Windows” appears on the screen. You
have between 1 and 5 seconds (according to the value you set for HP
Off time-out) to cancel the shutdown.
4 If you cancel the PC returns to normal operation. Otherwise a
message warns you that you have an unsaved file open and asks if
you want to save changes to the file.
5 To shutdown cleanly, click “Yes”. To return to normal operation of
the PC, click “Cancel”. To not save changes to the file and shutdown
cleanly, click “No”.

English 9
1 Setting Up and Using Your PC
Asset Tracking
1
Setting Up and Using
Asset Tracking
PC Identification/Tattoo String
If you are using Windows 95 or Windows for Workgroups, you can
permanently ‘tattoo’ the PC with a message of your choice the very first
time you start your PC. The message appears in the following places:
• The HP Summary Screen (“HP Summary Screen” on page 42)
• In the PC Identification Control Panel
To Modify the Tattoo To modify the tattoo string, double-click the PC Identification icon
in the Control Panel.
PC Serial Number
The PC serial number appears in the HP Summary Screen (“HP
Summary Screen” on page 42) and is accessible by DMI. It cannot be
modified.

1 Setting Up and Using Your PC
Protecting Your PC
10 English
1
Setting Up and Using
Protecting Your PC
Your HP Vectra PC provides complete security against its unauthorized
use. You can choose to:
• Start the PC and prompt the user for a password. This prevents the
PC from being started and used in your absence
• Start the PC with keyboard locked. To unlock the PC, press
, type your password, then press again.
You can set two passwords, the administrator password and the user
password, to provide two levels of protection for your PC. You set both
passwords in the Security menu group of the Setup program.
If you have set both an Administrator Password and a User Password,
and you enter the Setup program by using the User Password, you will
be restricted in your ability to change setup items. If you enter the
Setup program with an Administrator Password, you will have no
restrictions.
Setting an Administrator and a User Password
To set an administrator or a user password:
1 Start the Setup Program. Refer to “Using the Setup Program” on
page 44.
2 Select the Security menu group.
3 Select the “Administrator Password” or “User Password” submenu.
4 Choose the “Set Administrator Password” or “User Password” setup
item. You will be asked to enter your password twice. Be sure to save
your changes before you exit the Setup program.
To remove the password, follow the same procedure as to set a
password, but do not enter anything in the password field. Press return
and then press return a second time to confirm your action.
NOTE If you forget your password, refer to “If You Have Forgotten Your
Password” on page 58.

English 11
1 Setting Up and Using Your PC
Using Power Management
1
Setting Up and Using
Using Power Management
Power management enables you to reduce the PC’s power
consumption when you are not using the PC. To configure power
management, use the HP Setup Program (refer to “Using the Setup
Program” on page 44).
Refer to your operating system documentation for detailed information
about the capabilities of your operating system to implement power
management.
CAUTION Some network operating systems may inadvertently disconnect your PC
while it is in Suspend mode. Some other software applications may also
not be compatible with Suspend mode. In case of network disconnects
in Suspend mode, try using Stand-By mode. If you still get disconnects,
disable power management.
Desktop Management Interface (DMI)
If your PC has Windows 95 or Windows for Workgroups, it is delivered
with DMI software. This allows management information systems
(MIS) personnel to manage up to 300 features on the PC remotely.
Double-click on the DMI on-line reference document (preloaded)
which appears in the HP DMI Window.
HP Dynamic Video
If your PC has Windows 95 or Windows for Workgroups, you can
upgrade video memory without adding costly dedicated video memory
modules using HP Dynamic Video.
A part of main memory is allocated as video memory (frame buffer).
For more information refer to “Upgrading Video Memory To Improve
Resolution and Increase the Number of Displayed Colors” on page 20.

1 Setting Up and Using Your PC
Additional Information and Help
12 English
1
Setting Up and Using
Additional Information and Help
If your PC has Windows 95 or Windows for Workgroups, there is more
information about your PC in the help files that come with your PC.
In Windows 95 For Windows 95 users, open the Start menu in the task bar and choose
Help. Then double-click on the help topic “HP Vectra VE 5/xxx”. The
information includes the following topics:
• New features—what is new and special about your PC
• Using your PC—simple, “how-to-use” guidelines about using your PC
• Working in comfort—guidance on ergonomic issues
• Inside your PC—describes the basic parts of your PC, how to
upgrade, and how to optimize performance
• HP support—similar to chapter 5 in this User’s Guide.
In Windows for
Workgroups
For Windows for Workgroups users, open the Program Manager and
then open the ‘HPUtils’ group. Then double-click on “HP User Tools”.
The information includes the following topics:
• Working in comfort—guidance on ergonomic issues
• Getting HP support—similar to chapter 5 in this User’s Guide.

2
Installing Accessories
2
How to Install Accessories In Your PC
This chapter explains how to install accessories, such as extra memory,
accessory boards, and additional disk drives, in your PC.
2 How to Install Accessories In Your PC
Accessories You Can Install
14 English
2
Installing Accessories
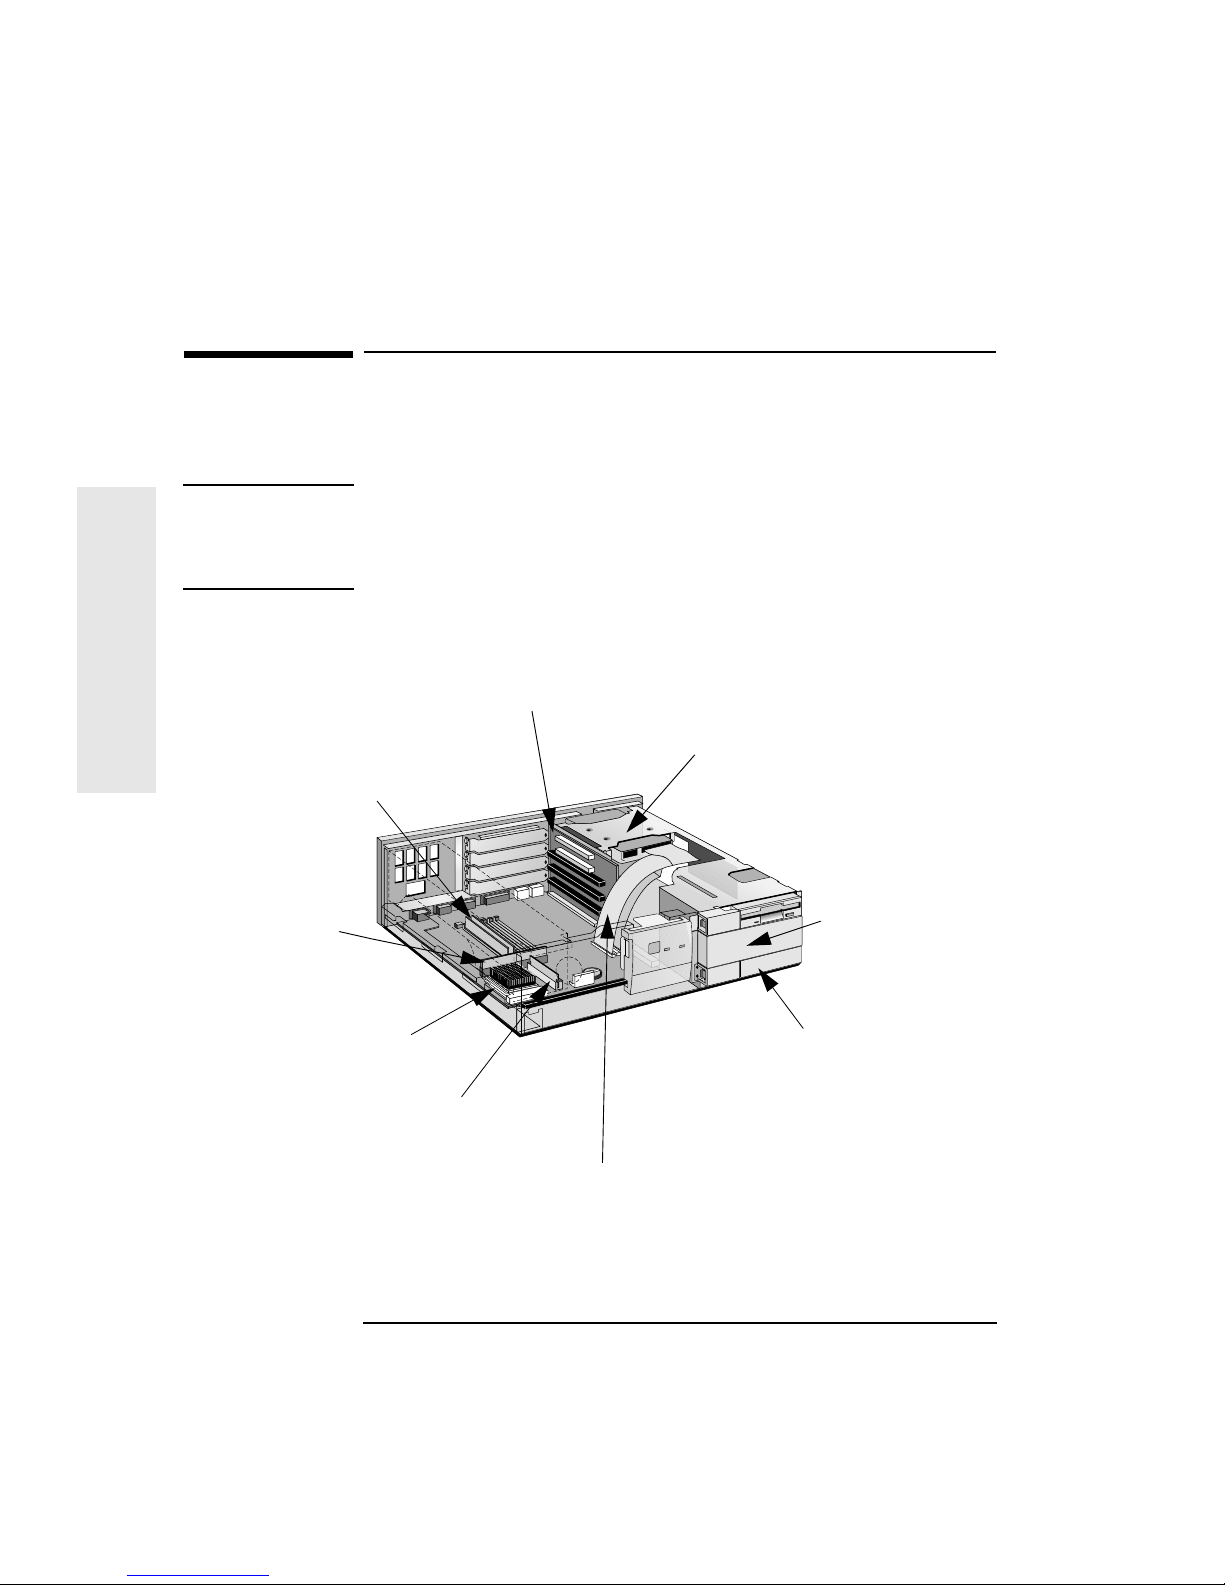
Accessories You Can Install
Please contact your authorized reseller for information about HP
accessory product numbers.
WARNING For your safety, never remove the PC’s cover without first removing
the power cord from the power outlet, and any connection to a
telecommunications network. Always replace the cover on the PC
before switching it on again.
Bottom Front Access Shelf,
for accessories such as:
Tape drive
Second hard disk drive
Mounting Rails can be ordered
for front access devices:
5.25-inch disk drive rails
3.5-inch disk drive rails
One internal mass storage device
Main Memory Modules (32-bit EDO):
8 MB kit (includes 2 x 4 MB modules)
16 MB kit (includes 2 x 8 MB modules)
32 MB kit (includes 2 x 16 MB modules)
64 MB kit (includes 2 x 32 MB modules)
Up to four accessory boards
Processor
256 KB synchronous
pipeline
burst cache
Middle Front Access
Shelf, for accessories
such as:
CD-ROM drive
2nd IDE data cable
(orderable as an HP accessory)
Voltage Regulator Module
(Some models only)

English 15
2 How to Install Accessories In Your PC
Removing and Replacing the Cover
2
Installing Accessories
Removing and Replacing the Cover
Removing the Cover
1 Switch off the display and the PC.
2 Disconnect the power cords from the power outlets, the PC, and the
display. Disconnect any connection to a telecommunications
network. Then remove the display.
3 If necessary, unlock the cover using the key provided with the PC.
4 Slide the two tabs on the front of the computer inwards. Firmly slide
the cover forward 5 cm (2 inches), and lift it up and off the
computer.
Replacing the Cover after Installing Accessories
1 Check that you have installed all your accessories.
2 Make sure that all internal cables are properly connected and safely
routed so they will not be entangled when you replace the cover.
3 Ensure the cover lock is unlocked and the tabs are inwards.
4 Lower the cover onto the computer, and firmly slide it into position.
5 Slide the two tabs on the front of the cover outwards.
6 If a keylock is fitted, lock the cover using the key.
7 Place the display on top of the computer. Reconnect all cables and
power cords.
2 How to Install Accessories In Your PC
Moving and Replacing the Power Supply
16 English
2
Installing Accessories
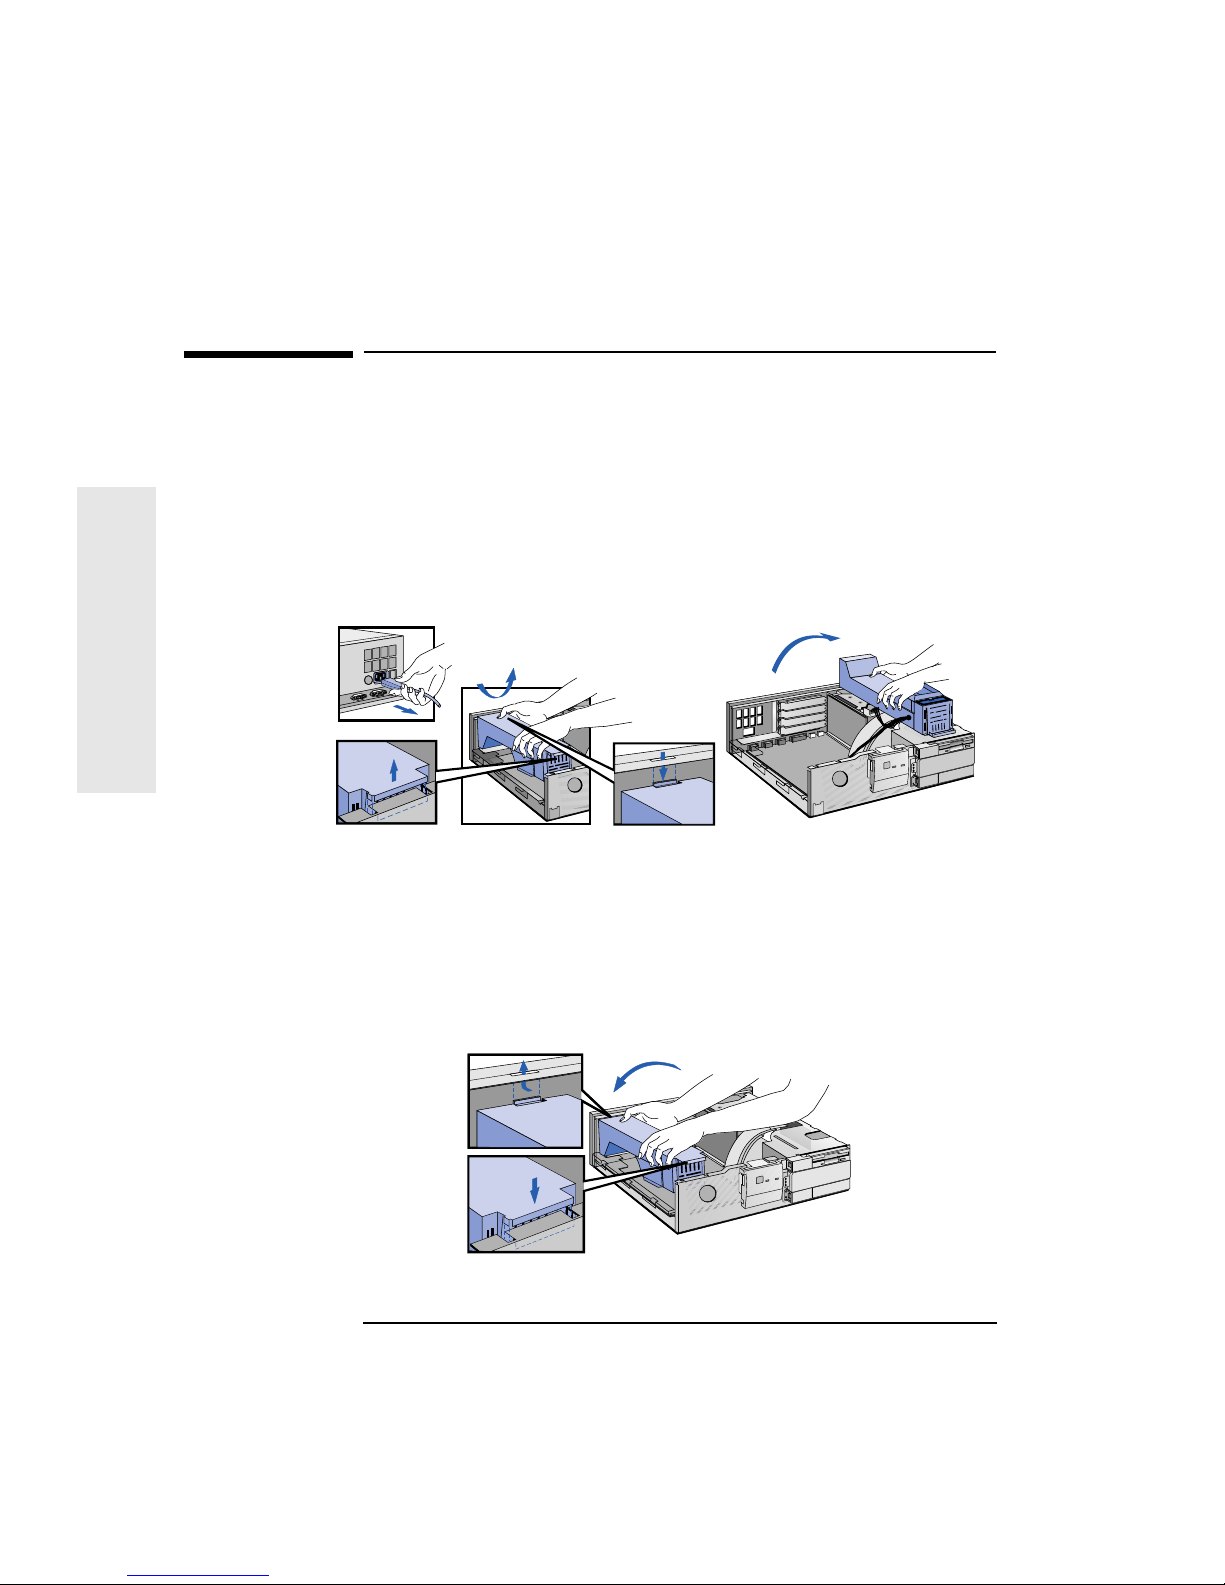
Moving and Replacing the Power Supply
You must move the power supply to access the sockets for the main
memory, video memory, processor, battery, or accessory board slots.
1 Disconnect the computer’s power supply cord and any connection to
a telecommunications network. Remove the computer’s cover.
2 Lift the front of the power supply to disengage the hinge on the rear.
Lift the power supply clear and lay it upside down on the frame
above the disk drives.
3 Before replacing the power supply, ensure that you have installed all
your accessories in the PC. Replace the power supply on the lefthand side of the PC, and ensure that the cables are neatly routed
around any accessory boards.
4 Raise the front of the power supply and engage the hinge on the rear.
Lower the front of the power supply into position so that it rests on
the front panel.

English 17
2 How to Install Accessories In Your PC
Installing Memory
2
Installing Accessories
Installing Memory
CAUTION Static electricity can damage electronic components.
Turn all equipment OFF. Don’t let your clothes touch the accessory.
To equalize the static electricity, rest the accessory bag on top of the
power supply while you are removing the accessory from the bag.
Handle the accessory as little as possible and with care.
Main Memory Modules
Your PC is supplied with main memory. If you need more main memory
to run your application software, you can install up to a total of
192 MB (6 x 32 MB).
NOTE Fill up memory banks in the following order: Bank A, Bank B, Bank C.
If you install memory modules in the last memory bank (C1 and C2), you
cannot use the lowermost HP option slot.
Main memory (EDO) is available in modules of 4 MB, 8 MB, 16 MB, or
32 MB. There are three memory “banks”.
To install a main memory module:
1 Disconnect the computer’s power supply cord and any connection to
a telecommunications network.
2 Remove the computer’s cover and power supply.
Bank Memory Modules You Can Install
Bank A (A1 and A2) Use ONLY a pair of identical memory modules in this memory bank.
The PC is delivered with either 8 MB (2 x 4 MB) or 16 MB (2 x 8 MB).
Bank B (B1 and B2) Use a pair of identical memory modules in this memory bank
or a single module in B1.
Bank C (C1 and C2) Use a pair of identical memory modules in this memory bank
or a single module in C1.
2 How to Install Accessories In Your PC
Installing Memory
18 English
2
Installing Accessories
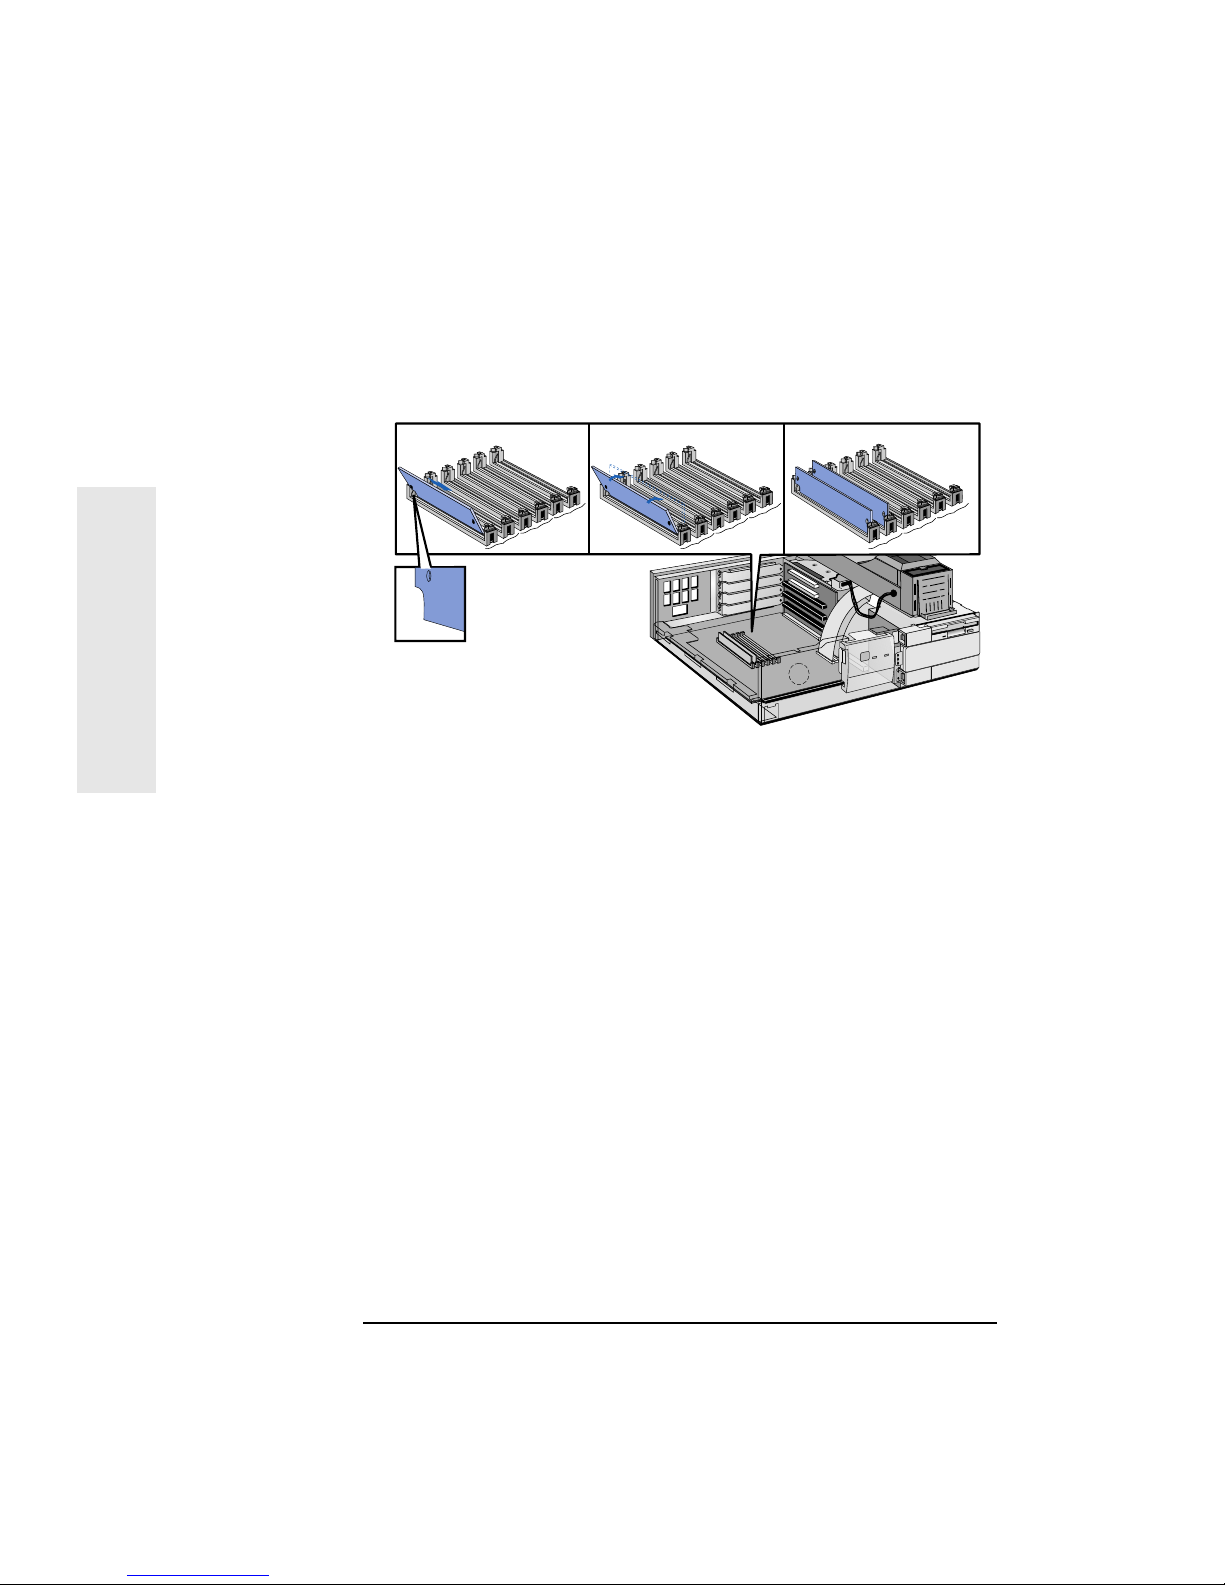
3 For each memory module, slide it into the slot at 45°. Pivot the
memory module to the vertical position and click into place.
4 To add memory modules to memory bank B, first loosen the clips and
tilt forward the memory modules in memory bank A. To add memory
modules to memory bank C, do the same for the memory modules in
both memory banks A and B. Reinstall the memory modules
afterwards.
5 If you need to remove a main memory module, release the retaining
clip and pull the module forward and out of the socket.
6 Install any other accessories before replacing the cover and power
supply. Reconnect all cables and power cords.
7 Check the HP Summary Screen to verify the new configuration.
Refer to “The HP Summary Screen”, on page 42.
C
B
A
C
B
A
C
B
A
 Loading...