

HP Vectra, Brio, KayakSERIES Quick User Manual
HP Desktop PCs
Quick User’s Guide
See inside for information on:
Setting Up your PC
and more...
www.hp.com/go/support

Notice
The information contained in this document is subject to change without notice.
Hewlett-Packard makes no warranty of any kind with regard to this material, including, but not
limited to, the implied warranties of merchantability and fitness for a particular purpose.
Hewlett-Packard shall not be liable for errors contained herein or for incidental or
consequential damages in connection with the furnishing, performance, or use of this material.
This document contains proprietary information that is protected by copyright. All rights are
reserved. No part of this document may be photocopied, reproduced, or translated to another
language without the prior written consent of Hewlett-Packard Company.
Adobe and Acrobat are trademarks of Adobe Systems Incorporated.
Microsoft, MS-DOS, Windows and Windows NT are U.S registered trademarks
Hewlett-Packard France, Business Desktop Division, 38053 Grenoble Cedex 9, France
2000 Hewlett-Packard Company
Important Safety Information
If you are in any doubt that you can lift the equipment safely, do not try to move it without help.
For your safety, never remove the PC's cover without first removing the power cord from the
power outlet and any connection to a telecommunications network. If a Power Protection Device
is fitted to your PC, you must shut down your computer using the on/off switch, then remove the
power cord before removing the PC’s cover. Remove the Power Protection Device cables before
any servicing operation. Always replace the cover before switching the PC on again.
To avoid electric shock, do not open the Power Supply Unit. There are no serviceable parts inside.
For your safety only replace with a Power Supply Unit provided by HP Support Services.
Ensure that the that the electrical power requirements of your PC (refer to the label on the Power
Supply Unit) can be suitably provided by your electrical installation.
There is a danger of explosion if the battery is incorrectly installed. For your safety, never attempt
to recharge, disassemble, or burn an old battery. Only replace the battery with the same or
equivalent type, as recommended by the manufacturer. The battery in this PC is a lithium battery
which does not contain any heavy metals. Nevertheless, in order to protect the environment, do
not dispose of batteries in household waste. Please return used batteries either to the shop from
which you bought them, to the dealer from whom you purchased your PC, or to HP so that they
can either be recycled or disposed of in the correct way. Returned batteries will be accepted free
of charge.
If you have a modem:
Do not attempt to connect this product to the phone line during a lightning storm. Never install
telephone jacks in wet locations unless the telephone line has been disconnected at the network
interface. Never touch uninsulated telephone wires or terminals unless the telephone line has
been disconnected at the network interface. Use caution when installing or modifying telephone
lines. Avoid using a telephone (other than a cordless type) during an lightning storm. There may be
a risk from lightning.
Do not use the telephone to report a gas leak in the vicinity of the leak.
Never touch or remove the communications board without first removing the connection to the
telephone network.
Important Safety Information
Use minimum Nº 26 AWG wire for telephone cable.
Warning: Some parts inside the computer may be hot, please wait for them to cool down before
touching them.
2
Information about Your PC
Thank you for purchasing an HP computer product. This Quick User’s
Guide provides you with essential information on setup, troubleshooting,
and ergonomics. Out of concern for the environment, we have kept this
guide small.
This HP product has been designed to be easy to use. If you require
further information, you can refer to the HP web site or the HP
Information CD-ROM (if you have a Vectra PC), described below.
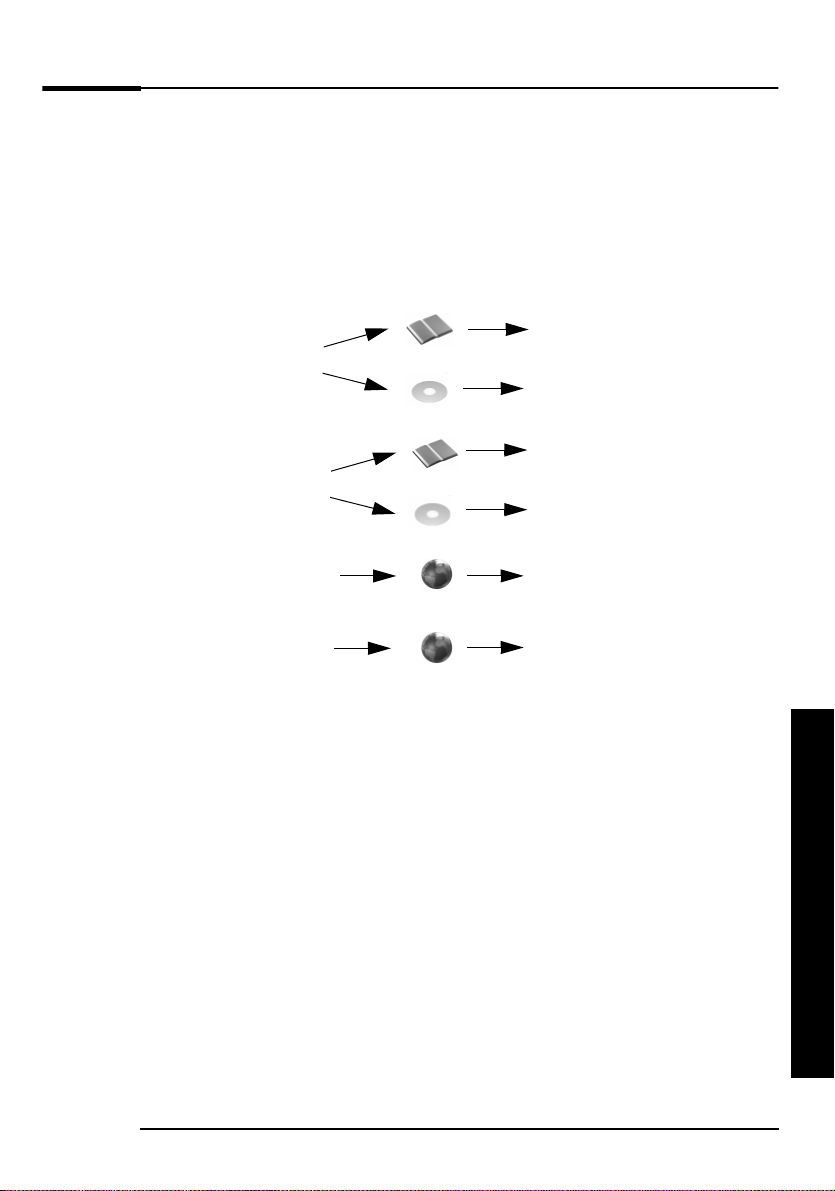
Set up your PC
Find out how to
– troubleshoot your PC
– install accessories
Information about Your PC
TTTThhhhiiiis
s mmmmaaaannnnuuuuaaaallll- Quick User’s Guide
s s
Information CD-ROM (Vectra only)
(For detailed information)
TTTThhhhiiiis
s mmmmaaaannnnuuuuaaaal
l - Quick User’s Guide
s s
(For basic information only)
Information CD-ROM (Vectra only)
(For detailed information)
l l
For support information
For a web-based user club
for after sales services and
information
HP Information CD-ROM (Vectra Only)
The HP Information CD-ROM contains complete information about your
PC:
Product Overview
•
Setting Up the PC
•
Using the PC
•
Installing Accessories
•
Troubleshooting the PC
•
Servicing the PC
•
Warranty and Support Service
•
Before installing accessories in your PC, it is recommended that you print
out the instructions in the Information CD-ROM before starting.
If you have a Vectra PC, you can order your HP Information CD-ROM
from HP’s web site at
select your HP Vectra, then click
order form on the next page and fax it to the number on the form.
www.hp.com/go/vectrasupport
www.hp.com/go/support
(For downloadable documentation, drivers & utilities,
service & support options)
www.hp.com/desktops/pccafe
HP Information CD-ROM
Manuals
(click
) or fill out the
,
Information about Your PC
3
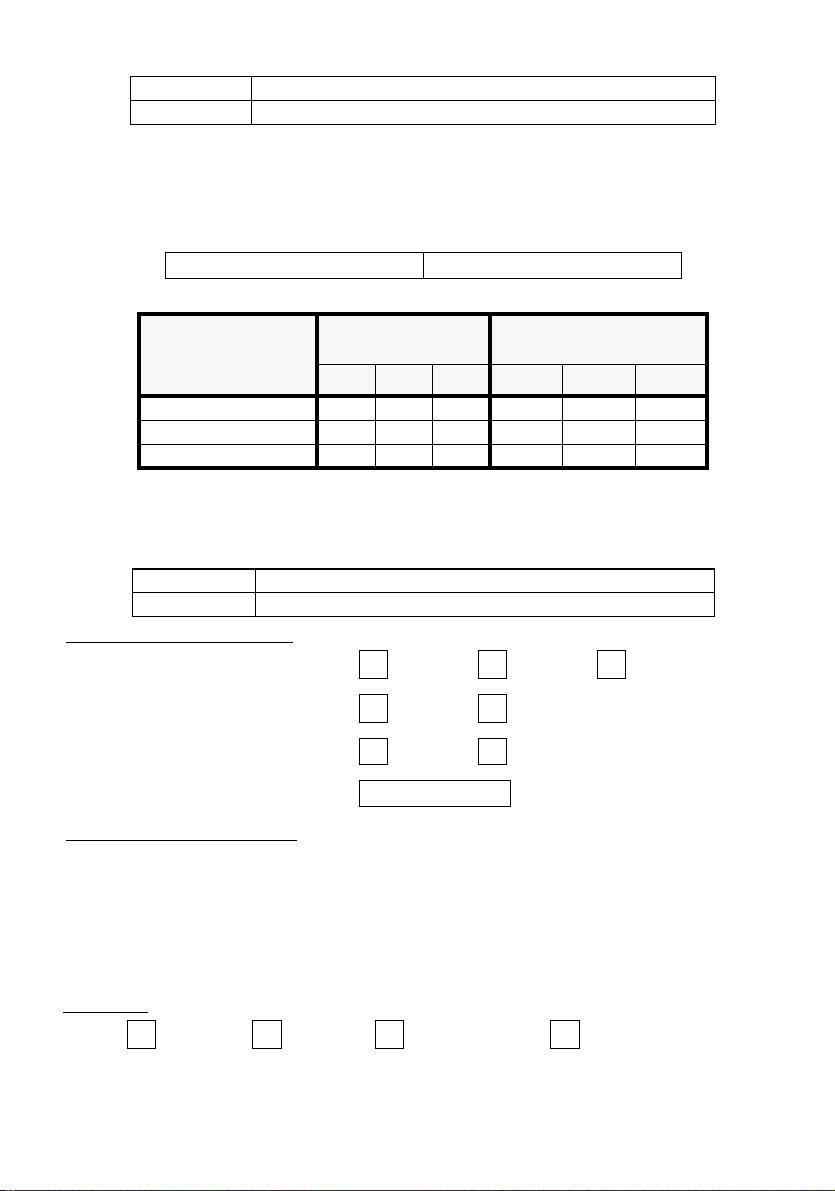
RODUCT ORDER FORM
P
Title: Information CD-ROM for Vectra VL600, VL400 & e-Vectra
Part Number: 5011-8109
Do you want an
To order your HP Information CD-ROM from the web:
To order your HP Information CD-ROM by fax, fill out the order form below and fax it to the following number.
1 Go to www.hp.com/go/vectrasupport, then select Manuals
2 Select yyyyoooouuuur
r pppprrrroooodu
ducccctttt, then select HP Information CD-ROM
r r
dudu
Worldwide Fax Number: +33 320 699 877
HP Information CD-ROM
?
PRODUCT INFORMATION
Number of Kits:
Worldwide Price
Standard Post 12.00 29.00 76.00 12.00 30.00 80.00
Express Mail 38.00 67.00 167.00 40.00 70.00 175.00
Above prices do not include sales taxes (if applicable): transport is included
:
Europe
Euro
1 5 20 1 5 20
USA / Latin America/Asia
U.S$
--------------------------------------------------------------------------------------------------------------------------------------------------------------
PRODUCT ORDER FORM
Title: Information CD-ROM for Vectra VL600, VL400 & e-Vectra
Part Number: 5011-8109
A) ORDERING INFORMATION
Number of Information CD-ROMs:
1)
2) Mail:
3) Currency: U.S$ EURO
TTTTOOOOTTTTAAAAL
B) CUSTOMER INFORMATION:
4)Name:................................................................................................................................................................
5) Company:........................................................................................................................................................
6) Address:...........................................................................................................................................................
7) Postal Code:...................................................................................................................................................
8) City:...............................................9)State:........................................... Country:.....................................
10) Fax:......................................................................... 11) Tel:........................................................................
PAYMENT
C)
Other Visa Mastercard AMEX
:
L AAAAMMMMOOOOUUUUNNNNTTTT====
L L
1520
Express Standard
Credit Card Number: ..............................................................................................
Expiry Date of Card:...............................................................................................
Signature:...................................................................................................................
Setting Up and Using Your PC
Important Ergonomic Information
Improper and prolonged use of keyboards and input devices can be associated with
repetitive strain injury (RSI) to soft tissues in the hands and arms. If you do experience
discomfort or pain while using any computing equipment, discontinue use immediately
and consult your physician as soon as possible.
Your comfort and safety are our primary concern. Consequently, we strongly
recommend that you read HP’s ergonomic information before using your PC. For
detailed information, refer to HP’s online version of “Working in Comfort” which is
preloaded on your PC’s hard disk or visit HP’s Working in Comfort Web Site at:
www.hp.com/ergo
A summary is provided in the “Comfort and Safety Checklist” on page 8.
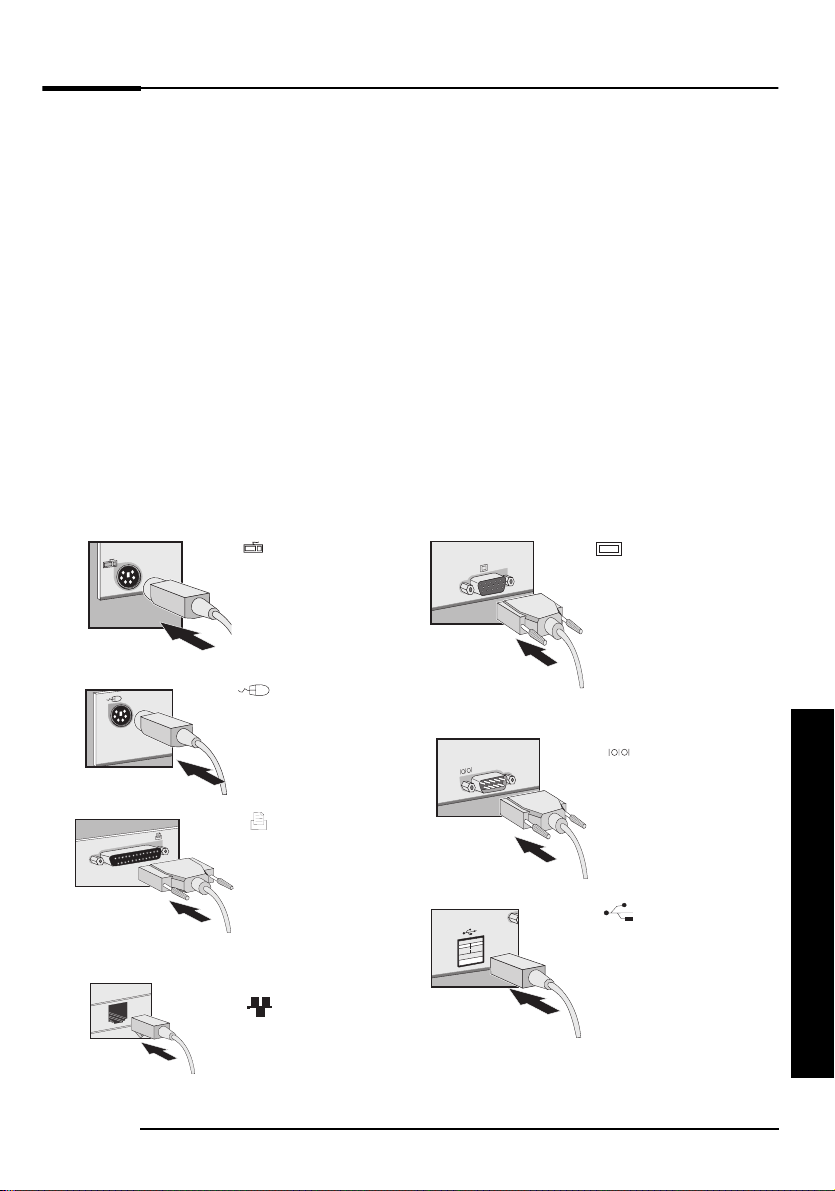
Connecting Devices to the Rear of the PC
The connectors are color-coded for easy matching. Match the colors. The
connectors are shaped to go in one way only.
Setting Up and Using Your PC
Keyboard
(purple)
Mouse
(green)
25-pin Parallel
Connector
To connect the printer to
your PC, refer to the
manual that came with
the printer
(burgundy)
LAN
Monitor
To connect the monitor to
your PC, refer to the manual
that came with the monitor.
If you have a model with
a graphics card, use the
graphics card connector.
Two 9-pin Serial
Connectors
2 USB Connectors
(black)
(turquoise)
Setting Up and Using Your PC
5
Setting Up and Using Your PC
Connecting Multimedia Accessories
WARNING
To avoid electrical shock and harm to your eyes by laser light, do not open the laser
module. The laser module should only be serviced by service personnel. Do not attempt
to make any adjustment to the laser unit. Refer to the label on the CD-ROM for power
requirements and wavelength. This product is a class 1 laser product.
Always turn the volume down before connecting the headphones or speakers. This
avoids discomfort from unexpected noise or static. Listening to loud sounds for
prolonged periods of time may permanently damage your hearing. Before putting on
headphones, place them around your neck and turn the volume down. When you put the
headphones on, slowly increase the volume until you find a comfortable listening level.
When you are able to hear comfortably and clearly, without distortion, leave the volume
in that position.
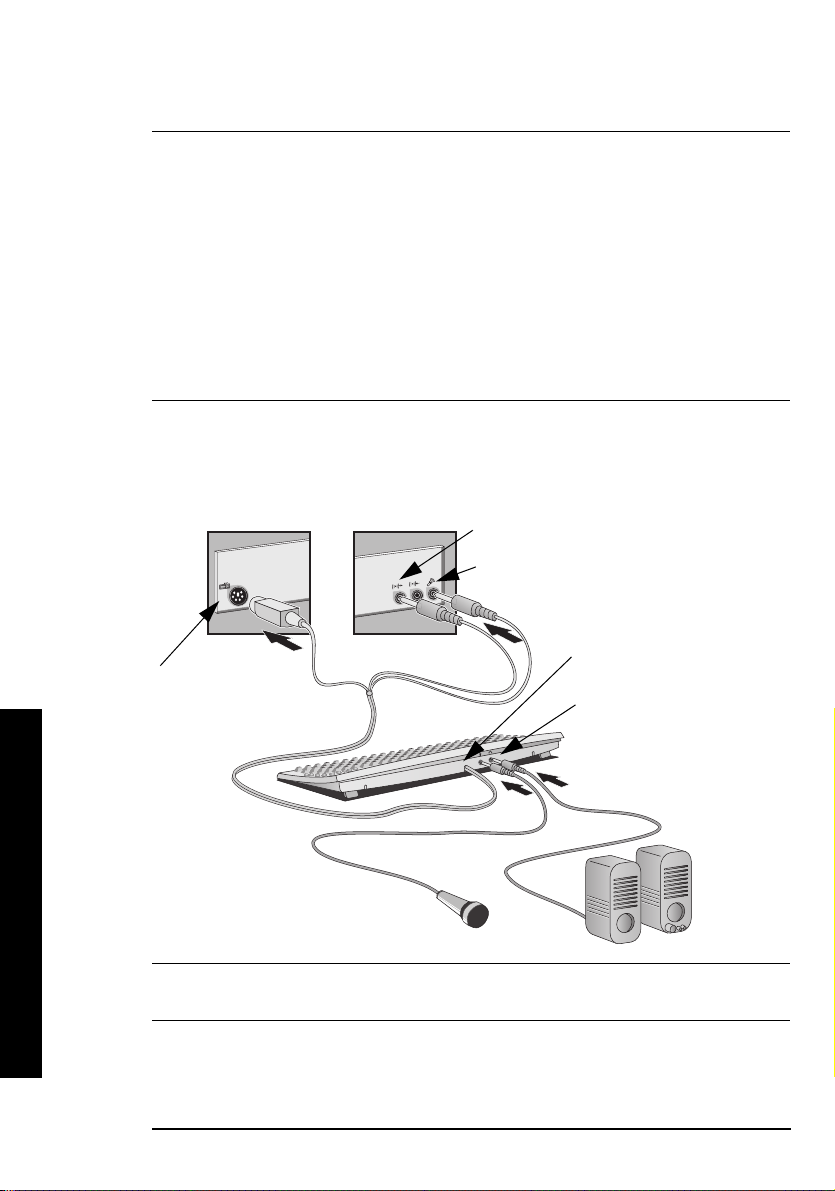
1 Connect the HP multimedia keyboard to the PC. The connectors are
color-coded for easy matching.
2 Connect the microphone and headphones (or amplified speakers) to
the keyboard.
Speaker/headphones socket (lime)
Microphone socket (pink)
Keyboard
microphone socket
Standard
keyboard
connector (purple)
Keyboard
headphones/speaker
socket
Note
Connect devices such as a smart card reader to both a serial connector and a mouse port (not
a keyboard port, which does not provide enough power).
Setting Up and Using Your PC
6
Connecting the Power Cord
Setting Up and Using Your PC
WARNING
Note
For your safety always connect equipment to a grounded wall outlet. Always use a
power cord with a properly grounded plug, such as the one provided with the
equipment, or one in compliance with your national safety standards. This equipment
can be disconnected from the power by removing the power cord from the power outlet.
This means the equipment must be located close to an easily accessible power outlet.
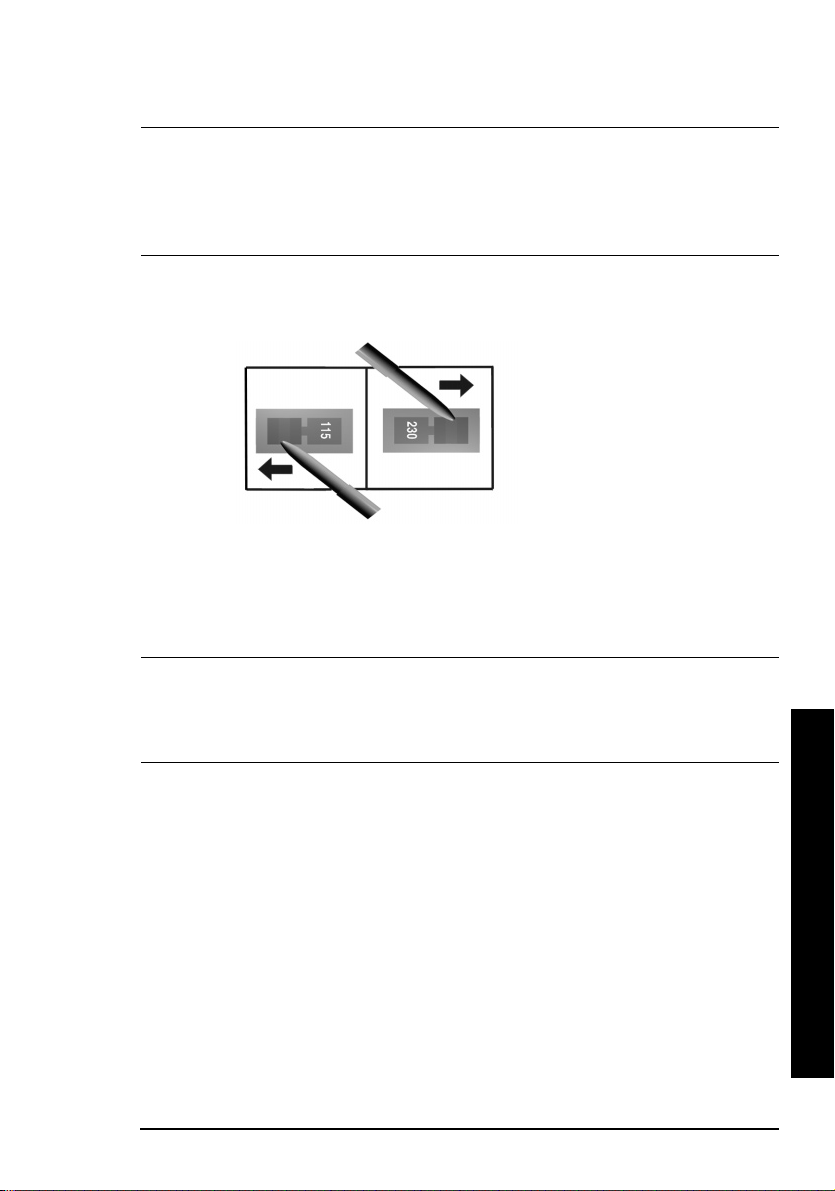
1 Remove the warning label covering the PC’s power connector, and
ensure that the voltage setting is correct for your country. (The
voltage is set during manufacture and should already be correct.)
Voltage
Selection
Switch
2 Connect the power cords to the rear of the monitor and the computer.
(The connectors are shaped to go in one way only.)
3 Connect the monitor’s power cord and the computer’s power cord to a
grounded outlet.
Hewlett-Packard does not support power supply upgrades. Power supply installation
information is only intended to assist with the replacement of a defective power supply unit.
For you safety, only replace your power supply unit with the one provided by HP Support
Services.
Setting Up and Using Your PC
7
Comfort and Safety Checklist
Comfort and Safety Checklist
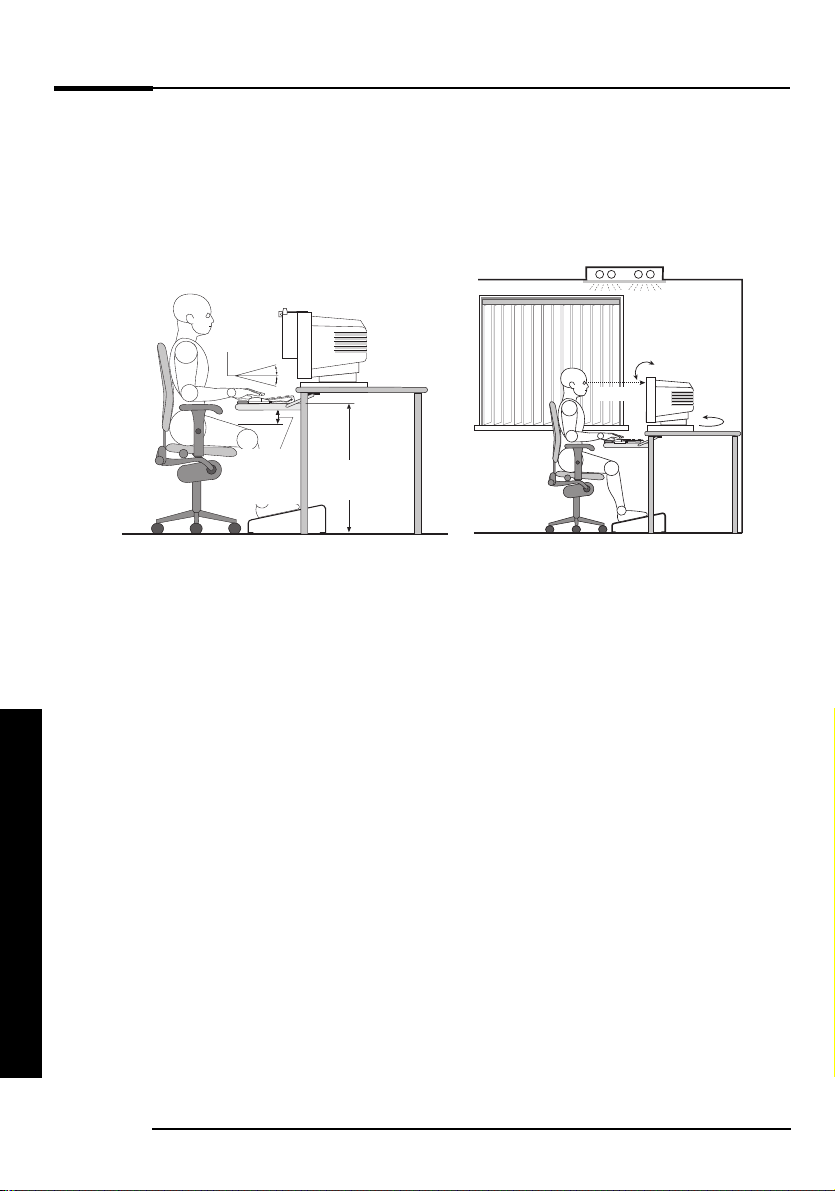
Preparing Your Work Environment
When using HP computing equipment, it is important that your work
environment contributes to your comfort and productivity:
Document Holder
Keyboard
<15°
Thigh
Clearance
≥
6cm
Work Surface Height - Your work surface should be height adjustable.
•
Keyboard Height
64-76 cm
To ensure that your worksurface is at the correct height, first adjust the
height of your chair so that your feet are firmly on the floor, then adjust
the work surface height until your forearms are parallel to the floor
when you have your fingers on the keyboard or other input devices.
Chair - Your chair should provide a comfortable sitting position
•
including features such as a height and tilt adjustment feature, curved
seat edge, a stable base (for example, five legs and castors, adjustable
back support, a freely rotating swivel, fully adjustable padded arm
rests).
Monitor - Place your monitor so that the top of the screen is at, or
•
slightly below, eye level (up to 15 degrees).
Work Surface Arrangement - Make sure that all elements of your HP
•
PC system for example, monitor, document holder, keyboard, mice and
other input devices, and headphones and speakers- are optimally
arranged and adjusted to meet your personal requirements. For
example, if you are primarily using the keyboard, place it directly in
front of you, not to the side. If your work involves extensive use of a
mouse or other pointing device, place that device directly in front of
your left or right arm. If you are using both a mouse and keyboard, place
them both at the same work surface height and close together. If a palm
Comfort and Safety Checklist
rest is used, the height should be flush with the front edge of the
keyboard. Other items, such as your telephone or notepad, should also
be considered.
8

Comfort and Safety Checklist
Caution
Various aspects of using mice, keyboards and other input devices may increase your risk of
discomfort or injury. Optimize your comfort and safety by positioning these devices properly.
Your Work Posture
Sitting in one position for long periods can be uncomfortable. To minimize
the potential risk for physical discomfort or injury, it’s important that you
maintain a proper posture.
Head - When viewing your monitor, your head should not be tilted more
•
than 15 degrees forward, and do not turn your head toward either side.
Back - While sitting at your work surface, make sure your back is
•
supported by the chair's backrest in an erect position or angled slightly
backwards.
Arms - Make sure your arms and elbows are relaxed and loose, with
•
your upper arms perpendicular to the floor or tilted downward not more
than 15 degrees. Keep your forearms and hands approximately parallel
with the floor with elbows bent between 70 and 115 degrees. Keep your
elbows close to your sides (less than 20 degrees away from your body).
Hands, Wrists, Forearms - Try to keep your hands wrists and forearms
•
in a relaxed neutral position when using your mouse keyboard or other
input devices. For example, while using your keyboard and mouse, rest
your forearms (flat) on your desktop.
Legs - Your thighs should be horizontal or angled slightly downward.
•
Your lower legs should be near a right angle to your thighs. Make sure
there is sufficient room under the work surface for your legs.
Feet - If after adjusting your chair you cannot rest your feet comfortably
•
on the floor, use a footrest, preferably one that can be adjusted in height
and angle.
Overall
Look away from the screen from time-to-time to help reduce eyestrain.
•
Focus on distant objects briefly, and blink periodically to lubricate your
eyes. You also should have your eyes checked on a regular basis and
ensure your eyeglass prescription is suitable for working on a computer
monitor.
Remember to occasionally shift position and move your body. Keeping
•
your body in one position for long periods is unnatural and stressful.
When prolonged work is required, take frequent short breaks. As a rule
of thumb, a five or ten minute break every hour is a good idea. Short
frequent breaks are more beneficial than longer less frequent breaks.
Data show that people who work for long periods of time without a
break may be more prone to ergonomic injury.
Comfort and Safety Checklist
9
 Loading...