

Page 1

t450
Digital Camcorder
數位攝像機
デジタルビデ オカメラ
디지털 비디오 카메라
クイックスタートガイド
For the full version of the t450 product user manual go to: www.hp.com/support
t450 完整版產品使用者手冊請至: www.hp.com/support
t450 完整版产品用户手册请至: www.hp.com/support
t450 ユーザー向け取扱説明書のフルバージョンは以下のサイトでご覧頂けます: www.hp.com/support
t450 제품에관련된상세설명서는다음사이트에서확인해주십시오: www.hp.com/support
数码摄像机
Quick Start Guide
快速啟動指南
快速启动指南
빠른시작가이드
Page 2

English
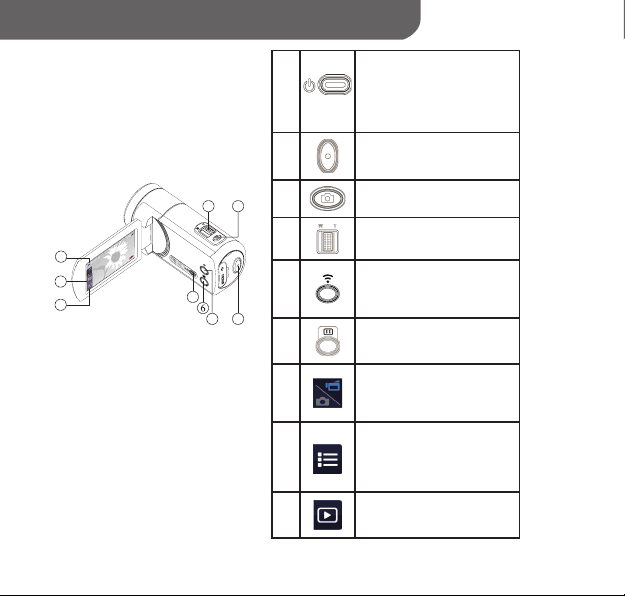
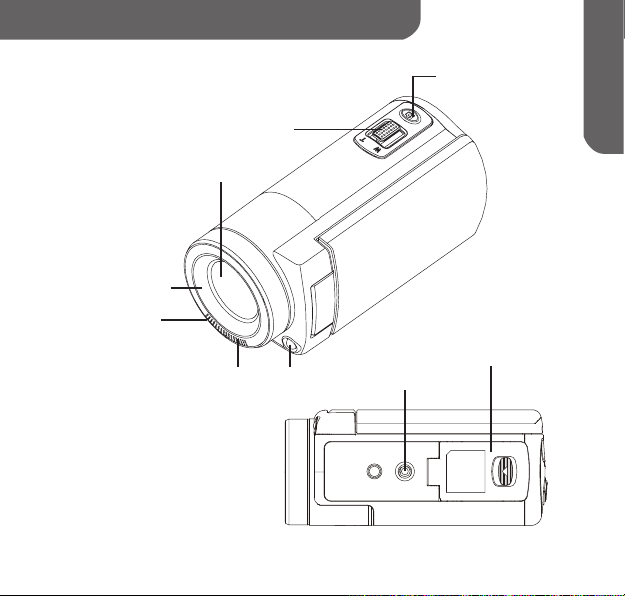
Tour of Your Camcorder
[Photo] Button
Battery/SD Card Cove
r
[Tele/Wide] Toggle
Optical Lens
External Lens
Mount
Microphone
Indicator
Light
Tripod Socket
1
Page 3

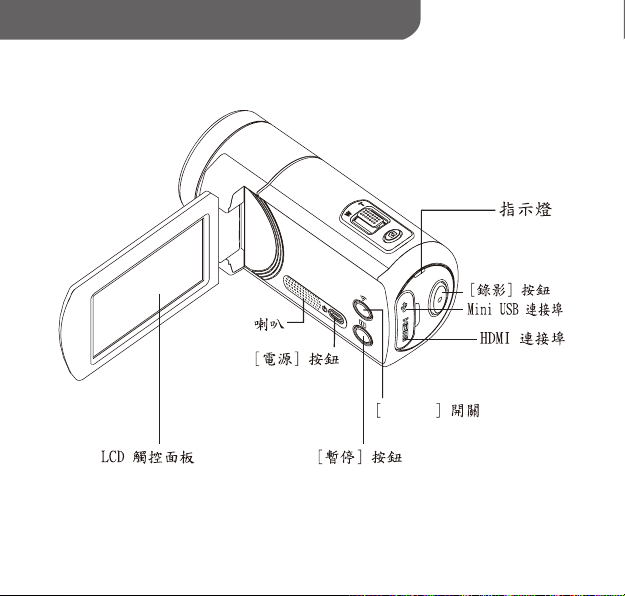
English
Tour of Your Camcorder
Speaker
[Power] Button
LED Indicator
[Record] Button
Mini USB Port
HDMI Port
[Wireless] On/Off Button
LCD Touch Panel
[Pause] Button
2
Page 4

English
Getting Started
Adapter charging mode
PC USB charging mode
Step 1 :
Load the Battery
• Slide the latch and open the battery cover.
• Insert the battery correspondingly with the
correct polarity marks (+ or -).
• Close the battery cover firmly so that it
locks into place.
Step 2 :
Charge the Li-ion Battery
• Charge the battery fully before rst use.
• Under charging, the indicator will ash.
• It could ta ke up to 5 hours to charge fully
with an a dapter. Once complete, the
indicator will t urn of f automat ically.
Note:
• A longer time is required via a PC USB.
Step 3 :
Insert the Memory Card
• Slide the latch and open the battery cover.
• Insert the SD card into the slot
until it locks properly.
• To remove the SD card, press inward to
release it and gently pull it out.
3
Page 5
English
Record & Play WiVideo Installation
Power
• Flip out the LCD panel or press the
[ Power ]button.
• After idling for 3 minutes, the
device
will turn off automatically.
Record
• Press to take video.
Press again to stop.
Photo
• Press to take photo.
Tele/Wide
• T: Zoom in . • W: Zoom out.
Wireless
• Touch to enable/disable wireless
Use wireless to link with PC/
Mobile/Cloud.
Pause
• Press to pause recording.
Press again to continue.
Video/Photo
• Touch to switch between Video and
Photo.
• The default is in Video mode.
Menu
• Touch to turn the option menu on.
• Scroll left/right or touch to
change among three menu pages
(Video/Photo/Setting).
Playback
• Touch to go to the Playback Mode
View or delete the recorded les.
4
7
8
9
1
5
Tap on the screen to display the icons.
①
②
③
3
④
⑤
2
⑥
⑦
⑧
⑨
Page 6

English
WiVideo Installation
To support wireless connection between camcorder and PC/Laptop
(wireless enabled), WiVideo is a software that allows to view, manage video/
photo and live streaming taken from the camcorder wirelessly. Two versions
are provided:
Note: Streaming will remain on even LCD panel is closed.
Version 1 :
Version 2 :
App Store
Google Play
PC WiVideo Suite
• Power on the camcorder before connecting to
a PC/notebook.
• Use the camcorder (internal memory) to
install [ WiVideo Suite ] automatically onto the PC/
Laptop via USB cable when AutoRuns/AutoPlay is
activated.
• If AutoRuns/AutoPlay is not activated:
Go to [ My computer ]→ search [ WiVideo Suite ] for
installation.
Note:
• WiVideo is for Windows® only.
• When language on screen is not legible,
refer to troubleshooting page.
Mobile WiVideo App
• For iPhone/iPad:
Download and install WiVideo App from App Store onto
iPhone/iPad.
• For Android phone/tablet:
Download and install WiVideo App from Google Play onto
Android phone/tablet.
5
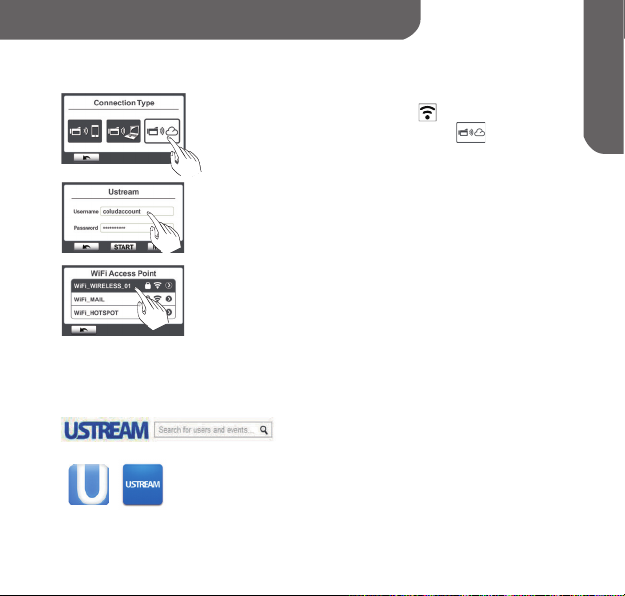
Page 7
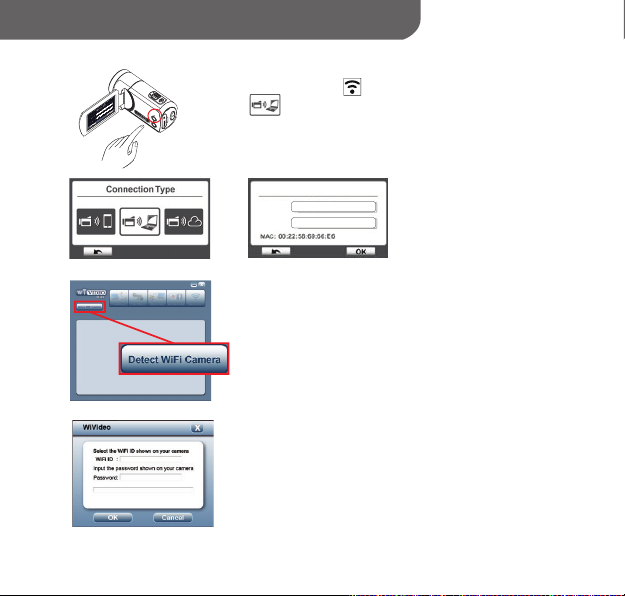
English
Wireless Mode To PC PC WiVideo Suite Function
Step 1: (Camcorder side)
• Press [ Wireless ] button → Seletct [ Wireless to PC
].
The screen will show the Wireless ID and Password.(The
default password is 0000. Wireless ID and password can
be edited on Setting menu.)
WiFi to PC
Wireless to PC
CD-675C-60675C
WiFi ID
CD-675C-60675C
Wireless ID
Password
0000
Password
0000
Step 2:(PC/Laptop side)
• Open the WiVideo software
• Click [ Detect Wireless Camera] button to search for
camcorder.
• Check [ Wireless ID ] and enter [ Password ] shown on
camera to the WiVideo window.
• Then, wireless to PC WiVideo Suite Mode is completed.
CD-675C-60675C
0000
Note: Turn PC/Laptop wireless function on before use.
6
Page 8

English
PC WiVideo Suite Function
Active Mode Function
Manage Video and Photo Files
• Transfer les from camera to PC.
• Delete les in camera.
Wireless/USB
Watch Live Video (wireless only)
• Watch live streaming on PC.
• Remote control the camera.
Wireless
Wireless Webcam for Skype/MSN (wireless only)
• Change video/audio setting of Skype/MSN.
• Select WiVideo Camera
Wireless
USB
USB
(e.g. Skype)
A ccount Setting (USB only)
• Set up social network account and save info to
camera via USB.
Wireless Setup (USB only)
• Congure and synchronize wireless proles on camera
via USB.
• Name camera and create security password.
7
Page 9
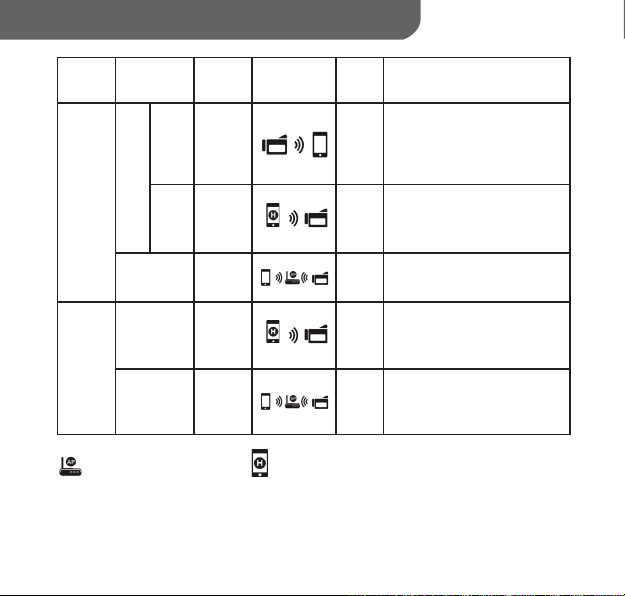
English
Wireless Modes to Mobile
System AP/3G Mode Schema Page Note
1. Once Direct mode is on
w/o
Direct
3G
w/o
AP
iPhone/
iPad
Android
w/3G Hotspot
w/AP AP
w/o AP Hotspot
w/AP AP
(
(
Hotspot
Hotspot
)
)
AP : Wireless Access Point Hotspot : Mobile as Access Point
8
original wireless will be turned off.
2. Remember to turn wireless
9
connection
back on once quit Direct mode.
1. Hotspot is limited or charged
by wireless mobile service
10
(3G/4G) provider.
2. Mobile system will be slower.
1. Distance will affect the signal
10
strength.
1. Hotspot is limited or charged
by wireless mobile service
11
(3G/4G) provider.
2. Mobile system will be slower.
1. Distance will affect the signal
strength.
11
Page 10
English
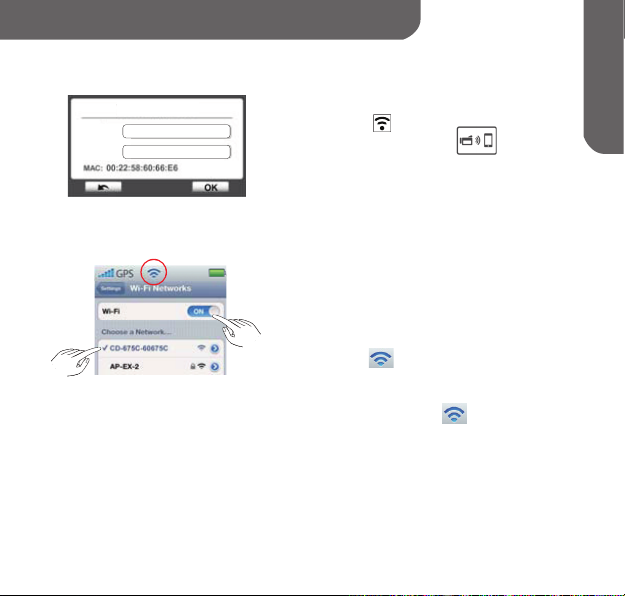
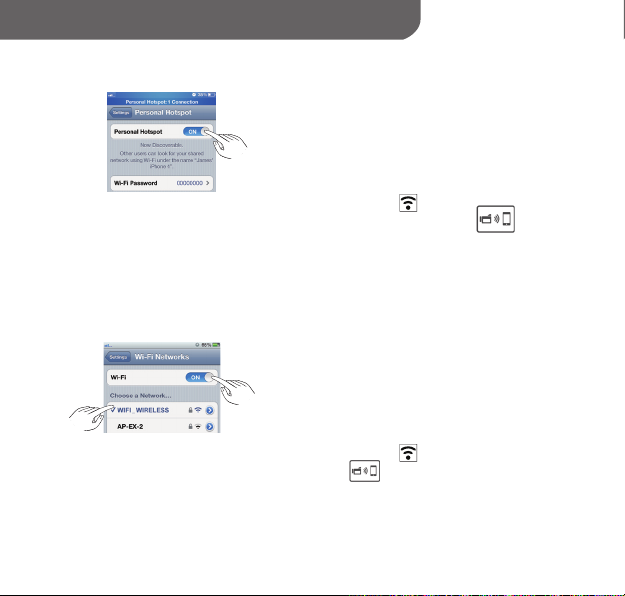
Wireless to Mobile (iPhone/iPad)
Direct Mode
Wireless to Mobile
wireless ID
CD-675C-60675C
Password
0000
Step 1 : (Camcorder side)
• Press [ Wireless ] button
→ Select [ Wireless to Mobile ]
→ Select [ Direct Mode ]
→ The screen will show [ Wireless ID ] and
[ Password ].
Step 2 : (Mobile side)
• Go to [ Settings ] → [ Wireless ]
→ Select the same [ Wireless ID ] in Step 1 to
connect.
• Once the icon [
connection is activated.
• Activate Mobile WiVideo App.
Note: It will take a while for [
9
] shows, the Dierct Mode
] to show up.
Page 11
English
Wireless to Mobile (iPhone/iPad)
Mobile Hotspot Mode
[ Mobile Hotspot ]
AP Mode
[ AP ]
Step 1 : (Mobile side)
• Go to [ Settings ] → [ Wireless ]
→ Enable [ Personal Hotspot ]
Step 2 : (Camcorder side)
• Press [ Wireless ] button
→ Select [ Wireless to Mobile
available AP
→ Connect camcorder to mobile Hotspot.
] to scan
Step 1 : (Mobile side)
• Go to [ Settings ] → [ Wireless ]
→ Enable wireless and Select one available
AP.
Step 2 : (Camcorder side)
• Press [ Wireless ] → Select [ Wireless to
Mobile
→ Connect camcorder to the same selected
AP.
10
] to scan available AP
Page 12

English
Wireless to Mobile (Android)
Mobile Hotspot Mode
AP Mode
Step 1 : (Mobile side)
• Go to [ Settings ] → [ Wireless & network ]
→ Enable mobile Hotspot/AP
Note: Operation may vary, please refer to each
individual model.
Step 2 : (Camcorder side)
• Press [ Wireless ] button
→ Select [ Wireless to Mobile
available AP
→ Connect camera to mobile Hotspot/AP.
] to scan
Step 1 : (Mobile side)
• Go to [ Settings ] → [ Wireless & network ]
→ [ Wireless settings ] → Enable wireless and
Select one available AP.
Step 2 : (Camcorder side)
• Press [ Wireless ] button → [ Wireless to
Mobile
→ Connect camera to the same selected AP.
11
] to scan available AP
Page 13
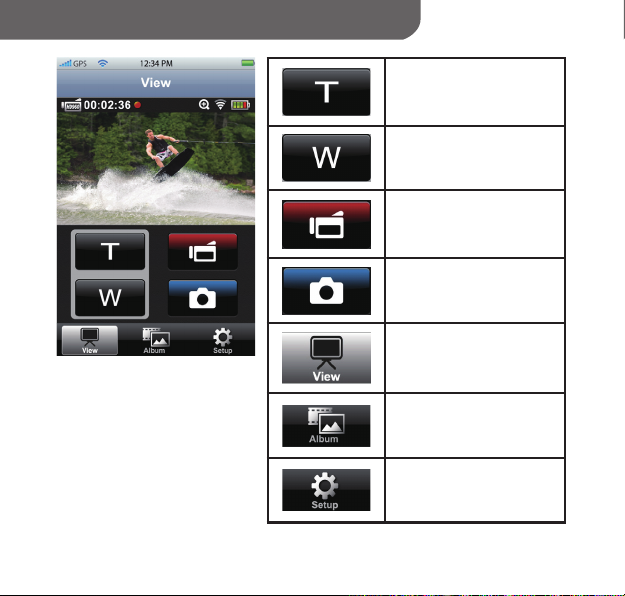
English
Mobile WiVideo Suite Function
Tele(T)
• Zoom in
Wide(W)
• Zoom out
Video
• Press to take/stop video
Photo
• Press to take photo
View
• Watch live view on
camcorder
Album
• Playback/Delete les on
camcorder
Setup
• Manage settings on
camcorder
12
Page 14
English
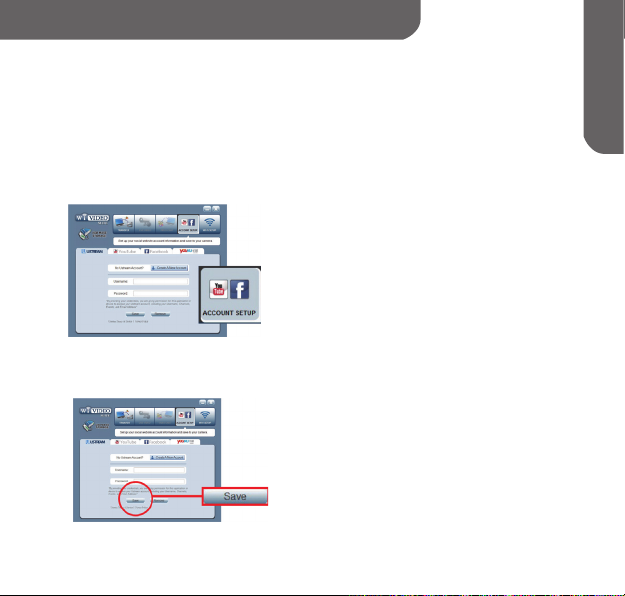
Wireless Mode to Cloud
Ustream enables to broadcast live events freely. People can watch live video
broadcasting on PC and Mobile devices.
WiVideo Suite can guide you to setup Ustream automatically.
1. Set up Ustream account on PC
( PC internet connection is required)
Step 1 : Create an account
• Plug the USB cable between PC/Laptop
and camcorder
• Go to WiVideo Suite [ Account Setup ]
• Click [ Create A New Account ] and then ll up
the information requested step by step.
• Then click [ Sign Up ].
Step 2 : Save account information to
camera
• Enter Username/Password created in Step 1
• Then click [ Save ].
13
Page 15
English
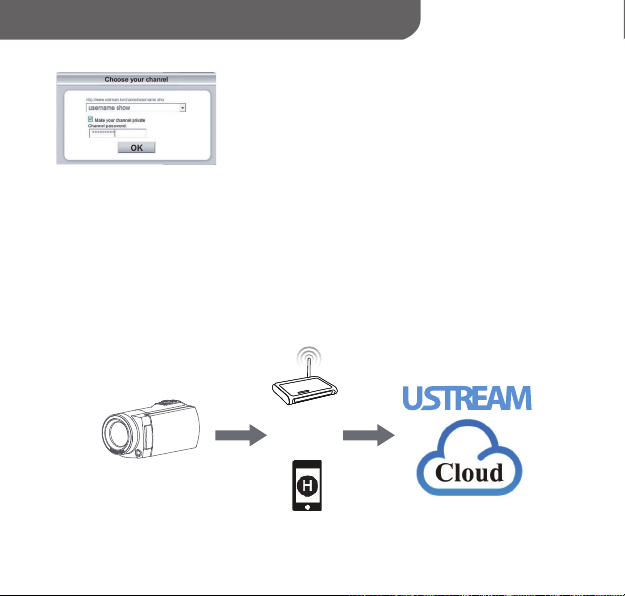
Wireless Mode to Cloud
Step 3 : Select one channel
WiVideo Suite creates one default channel.
You can create more channels on Ustream website.
• Select one channel for Ustream video broadcasting.
• For privacy, it is optional to enter password for the
selected channel.
Warning:
• Mobile device Ustream App cannot access private
channel.
• For private channel usage, refer to Ustream website for
detail information.
2. Prepare AP/Mobile Hotspot for Ustream broadcasting
AP(Access Point)
or
Mobile
14
Page 16
English
Wireless Mode to Cloud
3. Broadcast live video on Ustream (Camcorder side)
Step 1 :
Press [ Wireless
• Select [ Wireless to Cloud ]
Step 2 :
Log in your Ustream account
• Enter your username and password.
Step 3 :
Scan & Select Access Point
• The camcorder lists available Access Points.
• Select one for wireless connection.
The camcorder connects to Ustream server and
starts video streaming.
4. Watch your Ustream broadcasting on PC/Mobile Device
PC user:
• Go to Ustream website and enter
www.ustream.tv
the username/channel
Mobile user:
• Download Ustream App from App Store/
Ustream
Google Play
Launch App and enter the username/channel
15
] button
Page 17
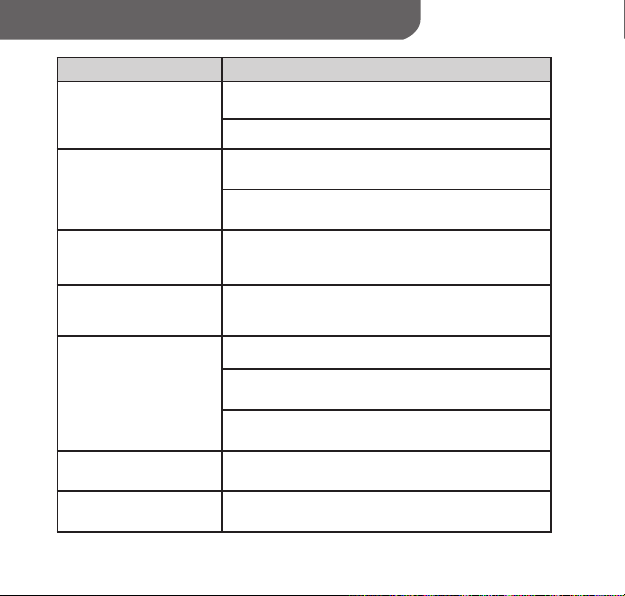
Troubleshooting
Problem/Situation Remediation/Solution
Cannot power on the device/
The power turns off suddenly.
The les on the memory card
do not display smoothly when
the LCD shows the “!” mark.
Why do some of my indoor
photos look blurry and dark?
When the device is connected
to the PC via USB cable.
Cannot connect to wireless
WiVideo Suite does not
install properly.
WiVideo Suite language on
screen is not legible.
Check battery direction and press the [ Power Button ] to turn on.
Battery is weak or run out. Recharge the battery.
“!” means the SD card is low-speed or contains corrupted les
Try to form at the card on the de vice not on PC.
The card has some problems and cannot be recognized.
Use another card.
The device extends photo exposure time under low light/ indoor
condition. Keep the device (and the target subject) steady for several
seconds while taking photo.
The disk [ DV ] indicates the internal memory of the camera.
The disk [ Removable Disk ] indicates the SD card.
The disk [ WiVideo Suite ] indicates the built-in application.
The password conguration does not match the AP.
The AP router or the computer wireless is not turned on.
Turn the AP router or your computer wireless on.
The device is not in the wireless network service area or the
wireless network service is affected by distance.
If the disk [ WiVideo Suite ] cannot be found, reboot
your computer.
Refer to FAQ of the instructions from each original computer
manufacturer.
16
Page 18
ᕷᡏύЎ
攝影機導覽
Ѧௗ᜔ᓐௗα
ഝլ
\࣬Т^!ࡪ່
\ᕭܫ^!ࡪ່
ӀᏢ᜔ᓐ
ࡰҢᐩ
ᐩဦ
ႝԣ0TE!ьៈᇂ
Οفࢎකኲ
1
Page 19
ᕷᡏύЎ
攝影機導覽
Wireless
2
Page 20
ᕷᡏύЎ
開始使用
ᡂᓸᏔкႝኳԄ
ႝတ!VTCкႝኳԄ
步驟 1:
裝入電池
•滑動卡榫以開啟電池護蓋。
•依照正確的電極標示 (+ 或 -) 置入
電池。
•將電池護蓋關妥。
步驟 2:
鋰電池充電
•第一次使用前請先將電池充飽。
•充電時,指示燈會閃爍。
•使用變壓器充電時約需 4 - 5 小時才
能充飽。充電完成後,指示燈會自動熄
滅。
注意:
•透過電腦 USB 充電時需要較長時間。
步驟 3:
插入記憶卡
•滑動卡榫以開啟電池護蓋。
•將 SD 卡 ( 選購 ) 推入插槽中直到它
確實鎖住。
•若要取出 SD 卡,按下以釋放卡片,然
後輕輕取出。
3
Page 21

ᕷᡏύЎ
錄影和播放 安裝
電源
•掀動 LCD 面板或按下 [ 電源 ]
按鈕。
•閒置 3 分鐘後,裝置會自動關閉。
錄影
•按下以拍攝影片。
再按一下以停止。
相片
•按下以拍攝相片。
縮放
•T: 放大。 •W: 縮小。
Wireless
•輕觸以啟用 / 停用 Wireless。
使用 Wireless 以連結電腦 / 行動
裝置 / 雲端。
暫停
•按下以暫停錄影。
再按一下以繼續。
影片 / 相片
•輕觸以切換影片和相片。
•預設為影片模式。
功能表
•輕觸以開啟選項功能表。
•左右捲動或輕觸以切換三個功能
表頁面 ( 影片 / 相片 / 設定)。
播放
•輕觸以前往播放模式。
檢視或刪除錄製的檔案。
7
8
9
ᗺΠᑻჿаᡉҢკҢǶ
①
②
3
4
③
④
1
2
5
⑤
⑥
⑦
⑧
⑨
4
Page 22
ᕷᡏύЎ
安裝
WiVideo
為了支援攝影機和電腦 / 行動裝置之間的無線連線,WiVideo 軟體可以
無線的方式來檢視、管理影片/ 相片和攝影機所拍攝的即時串流。它提
供兩種版本:
注意:即使 LCD 面板關閉了,串流仍然會繼續。
版本 1 :
電腦 WiVideo Suite
•在啟動自動執行 / 自動播放的情況下,
使用攝影機透過 USB 纜線自動將
[ WiVideo Suite ] 安裝到電腦中。
•如果未啟動自動執行 / 自動播放:
前往 [ My computer ]( 我的電腦 ) → 搜
尋 [ WiVideo Suite ] 以進行安裝。
注意:
•WiVideo 僅適用於 Windows®。
•如果無法閱讀螢幕上的文字,請參閱疑
難排解頁面。
ހҁ!3!;
App Store
Google Play
行動 WiVideo App
•針對 iPhone/iPad:
在 App Store 下載 WiVideo App 並安裝
到 iPhone/iPad。
•針對 Android 手機 / 平板電腦:
在 Google Play 下載 WiVideo App 並安
裝到 Android 手機 / 平板電腦。
5
Page 23

ᕷᡏύЎ
Wireless
CD-675C-60675C
0000
模式到電腦
步驟 1:( 攝影機端 )
•按下 [ Wireless ] 按鈕→選擇
[ Wireless to PC
螢幕會顯示 Wireless ID 和密碼。( 預設密碼為
0000。Wireless ID 和密碼可以在設定功能表中
編輯。)
Wireless ID
Password
Password
步驟 2:( 電腦端 )
•執行 [ WiVideo Suite ]。
•按一下 [ Detect Wireless Camer ]( 偵測
Wireless 攝影機 ) 按鈕搜尋攝影機。
•檢查 [ Wireless ID ] 並在 WiVideo 視窗中輸入
攝影機上所顯示的 [ Password ]( 密碼 )。
•然後 WiVideo Suite 的 Wireless 到電腦模式就
完成了。
注意:使用前請開啟電腦的無線功能。
Wireless to PC
CD-675C-60675C
WiFi ID
CD-675C-60675C
0000
0000
6
](Wireless 到電腦 ).
WiFi to PC
Page 24
ᕷᡏύЎ
電腦
WiVideo Suite
作用模式 功能
管理影片和相片檔
• 從攝影機傳輸檔案到電腦。
• 刪除攝影機中的檔案。
Wireless/USB
觀賞即時視訊 ( 僅適用 Wireless)
• 在電腦上觀賞即時串流。
• 遠端遙控攝影機。
Wireless
無線網路攝影機供 Skype/MSN 使用 ( 僅適用 Wireless)
• 變更 Skype/MSN 的視訊 / 音訊設定。
• 選擇 WiVideo 攝影機
功能
Wireless
USB
USB
(e.g. Skype)
帳戶設定 ( 僅適用 USB)
• 設定社交網站帳戶並透過 USB 將資訊儲存到攝影機。
Wireless 設定 ( 僅適用 USB)
• 透過 USB 設定並同步攝影機上的 Wireless 設定檔。
• 為攝影機命名並建立安全性密碼。
7
Page 25
ᕷᡏύЎ
Wireless
模式到行動裝置
系統 存取點 /3G 模式 架構 頁次 備註
1. 開啟直接模式後,原來的
Wireless 將會被關閉。
9
2. 離開直接模式後,請記得重新
開啟 Wireless 連線。
1. 上網熱點受到無線行動服務
(3G/4G) 提供者的限制和收費。
10
2. 行動系統會較慢。
1. 距離會影響訊號強度。
10
iPhone/
iPad
無
存
取
點
有存取點
無 3G 直接
上網
有 3G
熱點
存取
點
(
Hotspot
)
無存取點
Android
有存取點
存取點:Wireless 存取點
上網
熱點
存取
點
(
Hotspot
)
11
11
上網熱點:行動裝置作為存取點
8
1. 上網熱點受到無線行動服務
(3G/4G) 提供者的限制和收費。
2. 行動系統會較慢。
1. 距離會影響訊號強度。
Page 26

ᕷᡏύЎ
Wireless
直接模式
到行動裝置
(iPhone/iPad)
Wireless to Mobile
wireless ID
CD-675C-60675C
Password
0000
步驟 1:( 攝影機端 )
•按下 [ Wireless ] 按鈕
→選擇 [ Wireless to Mobile
(Wireless 到行動裝置 )
→選擇 [ Direct Mode ]( 直接模式 )
→螢幕會顯示[ Wireless ID ] 和 [ Password
]( 密碼 ).
]
步驟 2:( 行動裝置端 )
•前往 [ Settings ]( 設定 ) → [ Wireless
] →選擇與步驟 1 相同的 [ Wireless ID ]
以進行連線。
•出現[
•啟動行動 WiVideo App。
注意:需要一點時間才會出現 [
] 圖示時,表示已啟動直接模式。
] 圖示。
9
Page 27

ᕷᡏύЎ
Wireless
到行動裝置
(iPhone/iPad)
行動上網熱點模式
!!!!!\!Չᆛᗺ!^
存取點模式
!!!!!\!Ӹڗᗺ!^
步驟 1:( 行動裝置端 )
•前往 [ Settings ]( 設定 ) →
[ Wireless ] →啟用 [ Personal
Hotspot ]( 個人熱點 )
步驟 2:( 攝影機端 )
•按下 [ Wireless ] 按鈕→選擇
[ Wireless to Mobile
到行動裝置 ) 以掃描可用的存取點→將攝
影機連線到行動上網熱點。
](Wireless
步驟 1:( 行動裝置端 )
•前往 [ Settings ]( 設定 ) →
[ Wireless ] →啟用 Wireless 並選擇一
個可用的存取點。
步驟 2:( 攝影機端 )
•按下 [ Wireless ] 按鈕→選擇
[ Wireless to Mobile
到行動裝置 ) 以掃描可用的存取點→將攝
影機連線到同一個已選取的存取點。
10
](Wireless
Page 28

ᕷᡏύЎ
Wireless
到行動裝置
(Android)
行動上網熱點模式
存取點模式
步驟 1:( 行動裝置端 )
•前往 [ Settings ]( 設定 ) →
[ Wireless & network ]( 無線和網路 )
→ 啟用行動上網熱點 / 存取點。
注意:操作方式可能不同,請參閱個別機型。
步驟 2:( 攝影機端 )
•按下 [ Wireless ] 按鈕
→選擇 [ Wireless to Mobile
(Wireless 到行動裝置 ) 以掃描可用的存
取點→將攝影機連線到行動上網熱點 / 存
取點。
]
步驟 1:( 行動裝置端 )
•前往 [ Settings ]( 設定 ) → [ Wireless
& network ]( 無線和網路 ) →
[ Wireless settings ] (Wireless 設
定 ) →啟用 Wireless 並選擇一個可用的
存取點。
步驟 2:( 攝影機端 )
•按下 [ Wireless ] 按鈕→選擇
[ Wireless to Mobile ](Wireless
到行動裝置 ) 以掃描可用的存取點→將攝
影機連線到同一個已選取的存取點。
11
Page 29

ᕷᡏύЎ
行動
WiVideo Suite
功能
12
望遠
•放大
廣角
•縮小
影片
•按下以拍攝 / 停止影片。
相片
•按下以拍攝相片。
檢視
•在攝影機上進行即時檢視。
相簿
•播放/ 刪除攝影機上的檔案。
設定
•在攝影機上管理設定。
Page 30

ᕷᡏύЎ
模式到雲端
WiFi
Ustream 可以自由傳播即時活動。您可以在電腦或行動裝置上觀賞即時
視訊傳播。
WiVideo Suite 會自動引導您進行設定。
1. 在電腦上設定 Sensr.net 帳戶
( 電腦需要網際網路連線 )
步驟 1:建立帳戶
•插上 USB 纜線連接電腦和攝影機。
•前往 WiVideo Suite[ Account Setup ]( 帳
戶設定 )。
•按一下 [ Create A New Account ]( 建立新
帳戶 ) 然後逐步填入所需的資訊。.
•然後按一下 [ Sign Up ]( 註冊 ).
步驟 2:將帳戶資訊儲存到攝影機中
•輸入步驟 1 中所建立的使用者名稱 / 密碼。
•然後按一下 [ Save ]( 儲存 ).
13
Page 31

ᕷᡏύЎ
Wireless
模式到雲端
步驟 3:選擇一個頻道
WiVideo Suite 會建立一個預設頻道。
您可以在 Ustream 網站上建立更多頻道。
•為加強隱私,您可以選擇將選取的頻道輸入密碼。
警告 :
•行動裝置的 Ustream App 無法存取私人頻道。
•有關私人頻道的使用方式,請參閱 Ustream 網站以
取得詳細資訊。
•選擇一個頻道以進行 Ustream 視訊傳播。
2. 準備存取點 / 行動上網熱點以進行 Ustream 傳播
BQ!)Ӹڗᗺ*
܈
Չး
14
Page 32

ᕷᡏύЎ
Wireless
模式到雲端
在 Ustream ( 攝影機端 ) 上傳播即時視訊
步驟 1:
按下 [
•選擇 [ WWireless to Cloud ]
(Wireless 到雲端 )
Wireless
步驟 2:
登入您的 Ustream 帳戶
•輸入使用者名稱和密碼。
步驟 3:
掃描並選擇存取點
•攝影機會列出可用的存取點。
•選擇一個以進行 Wireless 連線。
攝影機會連線到 Ustream 伺服器並開始視
訊串流。
4. 在電腦 / 行動裝置上觀賞 Ustream 傳播
電腦使用者:
•前往 Ustream 網站並輸入使用者名稱 /
www.ustream.tv
頻道
行動使用者 :
•在 App Store/Google Play
Ustream
Launch App 下載 Ustream App,然後輸
入使用者名稱 / 頻道
15
] 按鈕
Page 33

疑難排解
問題 / 情況 解決方法
無法開啟裝置 / 電源忽然關閉。
當 LCD 顯示 “!” 符號時,記
憶卡中的檔案無法順利顯示。
為什麼有些室內的相片看起來模
糊或較暗?
當裝置透過 USB 纜線連接到電
腦時。
無法連線到 WiFi
WiVideo Suite 未正確安裝。 如果找不到 [ WiVideo Suite ] 磁碟,請重新啟動
無法閱讀 WiVideo Suite 螢幕
上的文字。
檢查電池方向然後按下 [ 電源 ] 按鈕以開啟電源。
電力不足或電力耗盡。將電池充電。
“!” 表示 SD 卡速度較慢或包含損壞的檔案。嘗試
在裝置上格式化記憶卡,不要在電腦上進行。
記憶卡有問題,無法辨識。
請使用另一張記憶卡。
裝置在燈光較暗 / 室內的情況時會延長相片的曝光時
間。拍照時,請維持裝置 (和目標物件 ) 靜止數秒。
磁碟 [DV] 表示攝影機的內建記憶體。
磁碟 [ 抽取式磁碟 ] 表示 SD 卡。
磁碟 [WiVideo Suite] 表示內建應用程式。
密碼設定與存取點不符。
存取點路由器或電腦的 Wireless 未開啟。
將存取點路由器或電腦的 Wireless 開啟。
裝置不在無線網路服務的範圍內,或無線網路服務受
到距離的影響。
電腦。
請參閱原始電腦生產廠商的常見問題集以取得操作指
示。
16
Page 34

亞խ֮
认识你的摄像机
˩敦䄍妹˪攕
ℰ⭍敃⤛
⣽㎌敃⤛⍈⏊
溍Ⅎ梵
˩䅎䈮˪攕
㋮䤡䁖
塌ℰ䁖
䔜㱇⁄ 6'⍈䚽
儁㞝㎌⏊
1
Page 35

亞խ֮
认识你的摄像机
Wireless
2
Page 36

亞խ֮
开始使用
忩愴♏ℬ䔜㨈
第 1 步 :
安装电池
• 滑动闩锁,打开电池盖。
• 对应极性标记(+/-)插入电池。
• 盖好电池盖。
第 2 步 :
给锂电池充电
• 首次使用前请将电池充满。
• 在充电过程中,指示灯将闪烁。
• 如使用适配器充电,充满电池需要
个小时。充满后,指示灯将自动关闭。
4~5
注:
• 如通过电脑 USB 接口充电,则需较长
时间。
䔜僸86%㎌⏊ℬ䔜㨈
第 3 步 :
插入存储卡
• 滑动闩锁,打开电池盖。
• 将 SD 卡(选配)插入插槽,直至锁定
到位。
• 取卡时,向内按一下,卡即弹出,轻轻
取出即可。
3
Page 37

亞խ֮
录制和播放 安装 WiVideo
电源
• 翻开 LCD 触控面板,或按下【电源】键。
• 闲置 3 分钟后,装置将自动关机。
录制
• 按键即可录像。
要停止录像,再次按键。
照片
• 按键即可照相。
长焦 / 广角
• T:放大。 • W:缩小。
Wireless
• 按键启用∕禁用 Wireless。
使用 Wireless 可连接电脑∕移动设备∕
云端。
暂停
• 按键可暂停录制。
再次按键可继续。
录像∕照片
• 触碰选项可在摄像和照相模式
间切换。
• 默认为摄像模式。
菜单
• 触碰按钮打开菜单项。
• 向左∕右滑动或触摸屏幕,可
在三页菜单之间切换(录像∕
照片∕设置)。
回放
• 触碰按钮进入回放模式
查看或删除录制文件。
7
8
9
形㕙ⰶ⸼Ə㘥䤡䛟⛥㟮˛
①
②
③
3
4
④
⑤
1
5
⑥
2
⑦
⑧
⑨
4
Page 38

亞խ֮
安装 WiVideo
通过 WiVideo 软件可无线连接摄像机与电脑∕移动设备,进而查看、管
理视频∕照片及通过摄像机无线获取的实时视频(流媒体)。具体有以
下两种应用 :
注:即便 LCD 触控面板已合上,流媒体也将继续获取。
应用 1:
䔏 2 :
App Store
Google Play
电脑 WiVideo 套件
• 使用 USB 数据线连接摄像机与电脑,
当 AutoRuns/AutoPlay 激活时,
[ WiVideo Suite ](WiVideo 套件 ) 即自动
在电脑上安装。
• 如 AutoRuns/AutoPlay 未激活:
前往 [ My computer ]( 我的电脑 ) →搜
索 [ WiVideo Suite ](WiVideo 套件 ) 进
行安装。
注:
• WiVideo 仅适用于 Windows® 。
• 如屏幕上的语言模糊,参见常见问题与解
答页面。
移动设备 WiVideo 应用程序
• For iPhone/iPad:
从应用商店中下载 WiVideo App 应用程
序,并在 iPhone/iPad 上安装。
• 安卓手机∕平板 :
从 Google Play 下载 WiVideo App 应用
程序,并在安卓手机∕平板上安装。
5
Page 39

亞խ֮
与电脑无线连接 电脑 WiVideo 套件功能
第 1 步:(摄像机端)
• 按 [ Wireless ] 键→选择 [ Wireless to
PC
]( 无线连接电脑 )。
屏幕上将显示 Wireless ID 和密码。(默认密码
为 0000。Wireless ID 和密码可在设置菜单中加以
编辑。)
WiFi to PC
WiFi ID
CD-675C-60675C
Wireless ID CD-675C-60675C
Password
0000
0000
第 2 步:(电脑端)
• 运行 [ WiVideo Suite ](WiVideo 套件 )
• 点击 [ Detect WiFi Camera ]( 侦测 Wireless 摄
像机 ) 键,搜索摄像机。
• 检查 [ Wireless ID ],在 WiVideo 窗口中输入摄
像机上显示的 [ Password ]( 密码 )。
• 然后,即完成与电脑无线连接的 WiVideo 套件模
式。
CD-675C-60675C
0000
注:在使用前请打开电脑无线功能。
6
Page 40

亞խ֮
电脑 WiVideo 套件功能
活动模式 功能
管理视频和照片文件
• 将文件从摄像机传至电脑。
• 删除摄像机中的文件。
Wireless/USB
观看现场直播(仅支持 Wireless)
• 在电脑上观看实时流媒体。
• 遥控摄像机。
Wireless
Skype/MSN 用无线网络摄像头(仅支持 Wireless 模式)
• 更改 Skype/MSN 的音∕视频设置。
• 选择 WiVideo 摄像机。
Wireless
USB
USB
(e.g. Skype)
帐号设置(仅支持 USB)
• 通过 USB 连接,可设置社交网络帐号并将
信息存入摄像机。
Wireless 设置(仅支持 USB)
• 通过 USB 连接可配置并同步摄像机上的
Wireless 配置文件。
• 为摄像机命名,创建安全密码。
7
Page 41

亞խ֮
Wireless Modes to Mobile
系统
iPhone/
iPad
安卓
AP/3G
w/o
3G
w/o
AP
w/3G
w/AP
w/o AP
w/AP
接入点:Wireless 接入点
模式 图示 页面 备注
1. 一旦开启直接模式,原有
Wireless 将关闭。
直接
热点
接入
点
热点
接入
点
(
)
Hotspot
(
)
Hotspot
热点:移动设备用作接入点
2. 当退出直接模式时,记得重新
9
打开 Wireless 连接。
1. 热点模式受一定限制,且需向
无线移动服务营运商(3G/4G)
付费。
10
2. 移动设备系统速度较慢。
1. 信号强弱受距离远近影响。
10
1. 热点模式受一定限制,且需向
无线移动服务营运商(3G/4G)
11
付费。
2. 移动设备系统速度较慢。
1. 信号强弱受距离远近影响。
11
8
Page 42

亞խ֮
与移动设备无线连接(iPhone/iPad)
直接模式
第 1 步:(摄像机端)
Wireless ID CD-675C-60675C
0000
• 按 [Wireless ]键
→ 选择 [ Wireless to Mobile
连接移动设备 ) → 选择 [Direct Mode]( 直
接模式 ) → 屏幕将显示 [Wireless ID] 和
[Password]( 密码 )。
第 2 步:(移动设备端)
• 前往 [ Settings ]( 设置 ) → [Wireless] →
选择与第 1 步相同的 [ Wireless ID ] 开始连
接。
• 当 [
• 激活 移动设备 WiVideo App 应用程序。
] 图标出现时,直接模式连接即完
成。
]( 无线
注:[
] 需要等待一段时间才会显示。
9
Page 43

亞խ֮
与移动设备无线连接(iPhone/iPad)
第 1 步:(移动设备端)
• 前往 [ Settings ]( 设置 )
→ [ Wireless ] →启用 [Personal
Hotspot]( 个人热点 )。
第 2 步:(摄像机端)
[ 䧢⊏宥⣮䃔䂠 ]
[ ㎌⅌䂠 ]
• 按 [ Wireless ] 键
→ 选择 [ Wireless to Mobile
( 无线连接移动设备 ) 浏览现有接入点
→ 将摄像机接至移动设备热点。
第 1 步:(移动设备端)
• 前往 [ Settings ]( 设置 ) →
[ Wireless ] → 启用 Wireless 并选择
一个现有接入点。
第 2 步:(摄像机端)
• 按 [ Wireless ] 键 → 选择
[ Wireless to
移动设备 ) 浏览现有接入点 → 将摄像机接
至相同的接入点。
10
Mobile
]
]( 无线连接
Page 44

亞խ֮
与移动设备无线连接(安卓)
移动设备热点模式
接入点模式
第 1 步:(移动设备端)
• 前往 [ Settings ]( 设置 ) → [ Wireless
& network ]( 无线和网络 ) →启用移动设
备热点∕接入点。
注:实际操作可能不同。请以具体产品为准。
第 2 步:(摄像机端)
• 按 [ Wireless ] 键
→ 选择 [ Wireless to Mobile
( 无线连接移动设备 ) 浏览现有接入点
→ 将摄像机接至移动设备热点∕接入点。
]
第 1 步:(移动设备端)
• 前往 [ Settings ]( 设置 ) → [ Wireless
& network ]( 无线和网络 ) →
[ Wireless settings ](Wireless 设
置 ) →启用 Wireless 并选择一个现有接
入点。
第 2 步:(摄像机端)
• 按 [ Wireless ] 键 → 选择
[ Wireless to Mobile
移动设备 ) 浏览现有接入点→将摄像机接
至相同的接入点。
11
]( 无线连接
Page 45

亞խ֮
移动设备 WiVideo 套件功能
12
长焦(T)
• 放大
广角(W)
• 缩小
录像
• 按键即可摄像∕停止摄
像
照片
• 按键即可照相
查看
• 在摄像机上实时取景
相册
• 回放∕删除摄像机上的文件
设置
• 管理摄像机上的设置
Page 46

亞խ֮
无线连接至云端
Ustream 允许自由观看实时赛事。人们可在电脑和移动设备上观看视频
直播。
WiVideo 套件可引导你自动完成设置。
1. 在电脑上设置 Ustream 账号
( 需要电脑联网 )
第 1 步:新建帐号
• 用 USB 数据线连接电脑和摄像机
• 前往 WiVideo 套件 [ Account Setup ]( 帐
户设置 )
• 点击[ Create A New Account ](新建账户 ),
按步骤填写所需信息。
• 然后点击 [ Sign Up ]( 注册 )。
第 2 步:保存帐户信息至摄像机
• 输入第 1 步创建的用户名∕密码
• 然后点击 [ Save ]( 保存 )。
13
Page 47

亞խ֮
无线连接至云端
第 3 步:选择一个信道
WiVideo 套件新建一个默认信道。
你可以在 Ustream 网站上创建更多信道。
• 有关隐私保护,可选择为选中信道输入密码。
警告 :
• 移动设备 Ustream App 无法访问专用信道。
• 有关专用信道使用的详细信息,参见 Ustream 网站。
• 选择一个信道,开始 Ustream 视频广播。
2. 为 Ustream 广播准备接入点∕移动设备热点
AP(㎌⅌䂠)
ㇽ
䧢⊏宥⣮
14
Page 48

亞խ֮
无线连接至云端
3. 在 Ustream(摄像机端)观看现场直播
第 1 步 :
按 [ Wireless
• 选择 [
Wireless
线连接云端 )
第 2 步 :
登录你的 Ustream 帐号
• 输入你的用户名和密码。
第 3 步 :
浏览并选择接入点
• 摄像机将列出现有接入点。
• 选择一个接入点进行 WiFi 连接。
摄像机即接入 Ustream 服务器并开始播放
流媒体
。
4. 在电脑∕移动设备上观看你的 Ustream 广播
电脑用户 :
www.ustream.tv
Ustream
• 前往 Ustream 网站,输入用户名∕信道
移动设备用户 :
• 从应用商店 App Store ∕ Google Play
Launch App 下载 Ustream App 应用程序
运行应用程序,输入用户名∕信道
15
] 键
to Cloud ]( 无
Page 49

常见问题与解答
问题∕情形 纠正∕解决方法
无法开机∕电源突然关
闭。
存储卡上的文件无法顺
利显示,LCD 屏幕上显
示叹号“!”。
为什么有些室内照片显
得模糊、暗?
当使用 USB 数据线连
接装置至电脑时。
无法连接 Wireless
WiVideo 套 件 安 装 不当。如无法发现 [ WiVideo Suite ](WiVideo 套件 ),请重启电脑。
检查电池方向,按下 [ 电源 ] 键开机。
电池电力弱或耗尽。给电池充电。
“!”表示 SD 卡速度慢或卡内有受损文件。尝试在摄像机而非
电脑上格式化 SD 卡。
SD 卡有问题,无法辨识。
换一张存储卡。
本装置在光线较暗∕室内条件下会延长照片曝光时间。当照相时,
让摄像机(和目标主体)保持数秒的稳定。
[ DV ] 盘表示摄像机内存。
[ Removable Disk ]( 可移动磁盘 ) 盘表示 SD 卡。
[ WiVideo Suite ](WiVideo 套件 ) 盘表示内置应用程序。
密码设置与接入点不匹配。
无线路由器或电脑 Wireless 没打开。
打开无线路由器或电脑 Wireless。
本装置不在无线网络服务区,或无线网络服务受距离影响。
屏幕 上的 WiVideo 套
件语言模糊。
参见每家原始电脑制造商的常见问题说明。
16
Page 50

ᣣᧄ⺆
カメラの使い方
䎾ᄢ䎒❗ዊ䏀䎃䮣䮆䮺䎃
శቇ䮳䮺䮁䎃
ᄖㇱ䮳䮺䮁
ข䭙ઃ䬠
䮥䭫䭶
䎾౮⌀䏀䎃䮣䮆䮺
䭫䮺䭿䭸䯃䮆䎃
䮰䭫䮏
䮗䮊䮍䮱䯃䎒䎶䎧䎃䭲䯃䮐䭲䮗䯃
⣉↪ⓣ
1
Page 51

ᣣᧄ⺆
カメラの使い方
Wireless
2
Page 52

ᣣᧄ⺆
はじめに
䭩䮇䮞䮆ల㔚䮩䯃䮐
ステップ 1:
バッテリーの装着
• ラッチをスライドさせてバッテリーカバー
を開きます。
• 正しい極性(+ または -)に従ってバッテ
リーを挿入します。
• バッテリーカバーをしっかりと閉めます。
ステップ 2:
リチウムイオンバッテリーの交換
• 初めて使用する前にバッテリーをフル充
電します。
• 充電中はインジケータが点滅します。
• アダプタ使用時、フル充電にかかる時間は
4 ~ 5 時間です。充電が完了したら、イ
ンジケータは自動的に消えます。
注:
• PC USB 使用時、充電時間は長くなります。
䎳䎦䎃䎸䎶䎥䎃ల㔚䮩䯃䮐
ステップ 3:
メモリカードの挿入
• ラッチをスライドさせてバッテリーカ
バーを開きます。
• SD カード(オプション)をスロットに挿入
し、しっかりロックされるま差し込みます。
• SD カードを取り外すには、内側に押
してリリースし、丁寧に引き抜きます。
3
Page 53

ᣣᧄ⺆
録画と再生 WiVideo のインストール
電源
• LCD パネルをフリップアウトする
か、[ 電源 ] ボタンを押します。
• アイドル状態が 3 分間続くとデ
バイスは自動でオフになります。
撮影
• 押すとビデオを撮影します。
もう一度押すと停止します。
写真
• 押すと写真を撮影します。
拡大 / 縮小
• T: ズームイン(拡大)• W: ズー
ムアウト(縮小)
Wireless
• タッチして WiFi を有効 / 無効に
します Wireless を使用して PC/
携帯機器 / クラウドにリンクさせ
ます。
一時停止
• 押すと撮影を一時停止します。
もう一度押すと続行します。
ビデオ / 写真
• タッチしてビデオと写真を切り替
えます。
• デフォルトではビデオモードにな
っています。
メニュー
• タッチしてオプションメニューを
オンにします。
• 左右にスクロールするか、タッチ
して 3 つのメニューページ(ビデ
オ / 写真 / 設定)を切り替えます。
再生
• このボタンを押して再生モードを
開きます。撮影したファイルを表
示または削除します。
7
8
9
↹㕙䭡䮆䮊䮞䬦䬵䭩䭫䭺䮺䭡
␜䬤䬪䭍䬨䫻
①
②
③
3
4
④
⑤
1
2
5
⑥
⑦
⑧
⑨
4
Page 54

ᣣᧄ⺆
WiVideo のインストール
カメラと PC/ 携帯機器の間のワイヤレス接続をサポートするため、WiVideo はカ
メラで撮影したビデオ / 写真およびライブ / ストリーミングを表示、管理できる
ソフトウェアです。2 つのバージョンがあります :
注 :LCD パネルが閉じられている場合でもストリーミングを行うことができます。
バージョン 1:
䮗䯃䭿䮮䮺䎃䎕䎝
App Store
Google Play
PC WiVideo Suite
• [AutoRuns/AutoPlay(自動実行 / 自動再生)]
が有効になっている場合は、カメラを使用
して USB ケーブル経由で [ WiVideo Suite ]
を自動的に PC にインストールします。
• [AutoRuns/AutoPlay(自動実行 / 自動再生)]
が無効になっている場合 :
[ マイコンピュータ ] → [ WiVideo Suite ]
を開いてインストールします。
注:
• WiVideo は Windows® 専用です。.
• 画面の言語が読み取れない場合は、トラブ
ルシューティングページを参照してくださ
い。
Mobile WiVideo アプリ
• iPhone/iPad 用 :
App Store から iPhone/ iPad へ WiVideo
アプリをダウンロードし、インストールし
ます。
• Android 携帯電話 / タブレット用 :
Google Play から Android 携帯電話 / タブ
レットへ WiVideo アプリをダウンロード
し、インストールします。
5
Page 55

ᣣᧄ⺆
Wireless モードから PC へ PC WiVideo Suite 機能
ステップ 1:(カメラサイト)
• [ Wireless ] ボタンを押し、→ Seletct
[ Wireless to PC(WiFi から PC へ )
選択します。
画面に Wireless ID およびパスワードが表示され
ます(デフォルトのパスワードは「0000」です。
Wireless ID およびパスワードは [Setting(設
定)] メニューで編集できます)。
WiFi to PC
Wireless to PC
CD-675C-60675C
WiFi ID
CD-675C-60675C
Wireless ID
Password
0000
Password
0000
] を
ステップ 2:(PC サイト)
• [ WiVideo Suite ] を実行します
• [ Detect Wireless Camera(Wireless カメラを
検出)] ボタンをクリックしてカメラを検索しま
す。
• カメラに表示されている [Wireless ID] と [
Password(パスワード)] を WiVideo ウィンドウ
CD-675C-60675C
0000
に入力します。
• すると、[ Wireless to PC WiVideo Suite(WiFi
から PC WiVideo Suite へ)] モードが完了しま
す。
注 : 使用前に PC の無線機能をオンにしてください。
6
Page 56

ᣣᧄ⺆
PC WiVideo Suite 機能
アクティブモ
ード
Wireless/USB
Wireless
Wireless
USB
USB
機能
ビデオと写真ファイルの管理
• カメラから PC へファイルを転送します。
• カメラ内のファイルを削除します。
ライブビデオの視聴(
• PC ライブストリーミングを視聴します。
• カメラのリモートコントロール。
Skype/MSN 向けワイヤレス Web カム(Wireless 専用)
• Skype/MSN のビデオ / オーディオ設定を変更します。
• WiVideo カメラを選択します。
(e.g. Skype)
アカウント設定(USB のみ)
• ソーシャルネットワークアカウントを設定し、USB
経由で情報をカメラに保存します。
設定(USB のみ)
Wireless
• USB を使用してカメラで Wireless プロファイル設定を行い、同期し
ます。
• カメラに名前を付け、セキュリティパスワードを作成します。
Wireless
のみ)
7
Page 57

ᣣᧄ⺆
Wir e les s モードからモバイルに接続
システム AP/3G モード スキーマ ページ 注
1. ダイレクトモードがオンになると、
元の WiFi はオフに切り替わります。
2. ダイレクトモードを終了したら、
9
忘れずに WiFi 接続をもう一度オンにし
てください。
1. ホットスポットは無線モバイル
サービス(3G/4G)プロバイダーに
よって制限または課金されます。
10
2. 携帯機器システムの速度は遅く
なります。
iPhone/
iPad
ア
3G なしダイレ
ク
セ
ス
ポ
イ
ン
3G あ
ト
な
し
クト
ホット
スポッ
り
(
)
Hotspot
ト
アクセ
スポイ
ント
ホット
スポッ
ト
アクセ
スポイ
ント
(
Hotspot
)
Android
アクセスポ
イントあり
アクセスポ
イントなし
アクセスポ
イントあり
アクセスポイント :Wireless アクセスポイント
ホットスポット : アクセスポイントとしての携帯機器
8
1. 信号の強度は距離の影響を受け
ます。
10
1. ホットスポットは無線モバイル
サービス(3G/4G)プロバイダーに
よって制限または課金されます。
11
2. 携帯機器システムの速度は遅くな
ります。
1. 信号の強度は距離の影響を受けま
す。
11
Page 58

ᣣᧄ⺆
Wireless から携帯機器へ
ダイレクトモード
(iPhone/iPad)
Wireless to Mobile
wireless ID
CD-675C-60675C
Password
0000
ステップ 1:(カメラサイト)
• [ Wireless ] ボタン → [ Wireless to
Mobile(Wireless から携帯機器へ)
] → [Direct Mode(ダイレクトモード)]
の順に選択すると、画面に [ Wireless ID ]
と [ Password(パスワード)] が表示され
ます。
ステップ 2:(モバイルサイト)
• [ Settings(設定)] → [ Wireless ] を開
き、ステップ 1 と同じ [ Wireless ID ] を
選択して接続します。
• アイコン [
クトモードはアクティブになります。
• Mobile WiVideo アプリをアクティブにします。
注 :[
かかります。
9
] が表示されたら、ダイレ
] が表示されるまでしばらく時間が
Page 59

ᣣᧄ⺆
Wireless から携帯機器へ(iPhone/iPad)
モバイルホットスポットモード
䎾䮩䮗䭫䮲䮢䮊䮏䮀䮤䮊䮏䏀
AP モード
䎃䎃䎃䎃䎃䎾䎃䎤䎳䎃䏀
ステップ 1:(モバイルサイト)
• [ Settings(設定)] → [ Wireless ]
→ [ Personal Hotspot(個人用ホットスポ
ット)] を有効にする
ステップ 2:(カメラサイト)
• [ Wireless ] を選択→ [ Wireless
to Mobile(Wireless から携帯機器へ )
] を選択して利用可能なアクセスポ
イントをスキャン → カメラを同じモバイ
ルホットスポット / アクセスポイントに接
続します。
ステップ 1:(モバイルサイト)
• [ Settings(設定)] → [ Wireless ]
→ Wireless を有効にして利用可能なアク
セスポイントを選択します。
ステップ 2:(カメラサイト)
• [ Wireless ] を選択→ [Wireless
to Mobile(Wireless から携帯機器へ)
] を選択して利用可能なアクセスポイ
ントをスキャン → カメラを同じアクセス
ポイントに接続します。
10
Page 60

ᣣᧄ⺆
Wireless から携帯機器へ
(Android)
モバイルホットスポットモード
AP モード
ステップ 1:(モバイルサイト)
• [ Settings(設定)] → [ Wireless & network(ワ
イヤレスとネットワーク)] → モバイルホット
スポット / アプリを有効にします。
注 : 操作は異なる場合があります。各個別モ
デルを参照してください。
ステップ 2:(カメラサイト)
• P[ Wireless ] を選択→ [ Wireless to
Mobile(Wireless から携帯機器へ)
を選択して利用可能なアクセスポイントを
スキャン → カメラを同じモバイルホット
スポット / アクセスポイントに接続します。
]
ステップ 1:(モバイルサイト)
• [ Settings(設定)] → [ Wireless &
network(ワイヤレスとネットワーク)]
→ Wireless を有効にして利用可能なアク
セスポイントを選択します。
ステップ 2:(カメラサイト)
• [ Wireless ] ボタンを選択→ [
Wireless to Mobile(Wireless から携帯機器
] を選択して利用可能なアクセスポ
へ)
イントをスキャン → カメラを同じアクセス
ポイントに接続します。
11
Page 61

ᣣᧄ⺆
モバイル WiVideo Suite 機能
12
Tele(T)
• ズームイン(拡大)
Wide(W)
• ズームアウト(縮小)
ビデオ :
• 押すとビデオを撮影 /
停止します。
写真 :
• 押すと写真を撮影しま
す。
ビュー
• カメラでライブビュー
を視聴します
アルバム
• カメラでファイルを再
生 / 削除します
設定
• カメラで設定を管理し
ます
Page 62

ᣣᧄ⺆
Wireless モードからクラウドへ
Ustream を使用するとライブイベントを自由に放送することができます。ユー
ザーは PC または携帯機器でライブビデオの放送を視聴することができます。
WiVideo Suite を使用すると自動で設定を行うことができます。
1. PC で Sensr.net アカウントを設定する
( PC のインターネット接続が必要です )
ステップ 1: アカウントの作成
• PC とカメラを USB ケーブルで接続します
• WiVideo Suite の [ Account Setup(アカ
ウント設定)] を開きます。
• [ Create A New Account(新しいアカウン
トを作成する)] をクリックし、要求され
る情報を順に入力します。
• 次に [ OK ] をクリックします。
• 次に [ Sign Up(登録)] をクリックしま
す。
ステップ 2: アカウント情報をカメ
ラに保存する
• ステップ 1 で作成したユーザー名 / パスワ
ードを入力します
• 次に [ Save(保存)] をクリックします。
13
Page 63

ᣣᧄ⺆
Wireless モードからクラウドへ
ステップ 3: チャネルを 1 付選択
WiVideo Suite はデフォルトのチャンネルを 1 つ作
成します。
Ustream Web サイトでは複数のカメラを作成できます。
• プライバシー保護の理由から、オプションで選択し
たチャンネルにパスワードを入力することができま
す。
警告 :
• モバイルデバイス App からプライベートチャンネ
ルにアクセスすることはできません。
• カメラのプライベートチャンネルの詳細について
は、Ustream の Web サイトを参照してください。
• Ustream ビデオ放送用のチャンネルを 1 つ選択します。
2. Ustream 放送用のアクセスポイント / モバイルホットスポ
ットの準備
䎤䎳䯴䭩䭶䮂䮀䮤䭫䮺䮏䯵
䭍䬮䬾
៤Ꮺᯏེ
14
Page 64

ᣣᧄ⺆
Wireless モードからクラウドへ
3. Ustream でのライブビデオの放送(カメラサイト)
ステップ 1:
Wireless
[
• [ Wireless to Cloud(Wirelessi からクラウ
ドへ) ] を選択します
ステップ 2:
自分の Ustream アカウントへログイ
ンします
• 自分のユーザー名とパスワードを入力します。
ステップ 3:
アクセスポイントのスキャンと選択
• カメラに利用可能なアクセスポイントが表
示されます。
• Wireless 接続用のアクセスポイントを 1 つ
選択します。
カメラは Ustream サーバーに接続し、ビデオ
のストリーミングを開始します。
4. PC/ 携帯機器でクラウド Ustream 放送を視聴する
PC ユーザー :
• Ustream Web サイトに移動してユーザー名
www.ustream.tv
モバイルユーザー :
• App Store/Google Play から Ustream アプリ
Ustream
] ボタンを押します
/ チャンネルを入力します
をダウンロードし、アプリを立ち上げてから
ユーザー名 / チャンネルを入力します。
15
Page 65

トラブルシューティング
問題 / 状況 修正 / ソリューション
デバイスの電源が入らない /
突然電源が切れる。
LCD に「!」と表示されている
間はメモリカードのファイル
がスムーズに表示されない。
屋内で写真を撮影するとぼや
けたり暗くなったりするのは
なぜですか?
USB 経由でデバイスを PC に
接続したとき。
に接続できません
W
ireless
WiVideo Suite が正しくイン
ストールされていません。
画面の WiVideo Suite 言語を
読み取ることができません。
バッテリーの表示を確認し、[ 電源 ] ボタンを押して電源を
入れてください。
バッテリーが弱い、または消耗している。バッテリーを再充
電してください。
「!」は、SD カードが低速、または壊れたファイルを含むか
のス映画あります。PC 以外のデバイスでカードを初期化して
ください。
カードに問題があり、認識できません。
別のカードを使用してください。
光の量が少ない場所 / 屋内ではデバイスの写真露光時間が長
くなります。写真撮影時にはデバイス(および撮影対象)を
数秒間停止させてください。
ディスク [DV] はカメラの内蔵メモリを表します。
ディスク [ Removable Disk(リムーバブルディスク)] は
SD カードを表します。
ディスク [ WiVideo Suite ] は内蔵アプリケーションを表し
ます。
パスワード設定がアクセスポイントと一致していません。
アクセスポイントまたは Wireless の電源が入っていませ
ん。アクセスポイントルータまたはコンピュータ Wireless
の電源を入れてください。
デバイスがワイヤレスネットワークのサービスエリア外にあ
るか、ワイヤレスネットワークサービスが距離の影響を受け
ています。
ディスク [ WiVideo Suite ] が見つからない場合は、コンピ
ュータを再起動してください。
各コンピューターメーカーの説明書の FAQ を参照してくださ
い。
16
Page 66

䚐ạ㛨
카메라 각부 명칭
{V~Gⶸ䏰G
㝩䐤䀠G⥀㪼G
㞬⺴G⥀㪼G
㣙㵝⺴
⫼㢨䆠
wGⶸ䏰
㫴㐐☥
㦤⮹☥
ⵤ䉤⫠VzkG㾨☐G䀘ⶸ
ㇰᴵG㋀䁇
1
Page 67

䚐ạ㛨
카메라 각부 명칭
Wireless
2
Page 68

䚐ạ㛨
사용 준비하기
㛨⑅䉤G㻝㤸G⯜☐G
wjG|ziG㻝㤸G⯜☐
단계 1:
배터리 끼우기
• 래치를 밀어서 배터리 커버를 엽니다.
• 극성 (+ 또는 -) 방향이 맞도록 배터
리를 삽입합니다 .
• 배터리 커버를 단단히 닫습니다 .
단계 2:
리튬이온 (Li-ion) 배터리 충전
하기
• 처음 사용하기 전에 배터리를 100%
충전하도록 하십시오 .
• 완전히 충전되지 않을 경우 지시등이
점멸합니다 .
• 어댑터를 사용해 완전히 충전하는 데는
4-5 시간 정도 걸립니다 . 충전이 완료
되고 나면 지시등이 자동으로 꺼집니
다.
참고 :
• PC USB 를 통해 충전할 경우 더 오래
걸립니다 .
단계 3:
메모리 카드 삽입하기
• 래치를 밀어서 배터리 커버를 엽니다.
• 슬롯에 SD 카드 ( 선택 항목 ) 를 넣고
완전히 걸릴 때까지 밀어 넣습니다 .
• SD 카드를 뺄 때는 안쪽으로 밀어 걸
림 장치가 빠지도록 하 다음 부드럽
게 잡아 당기면 됩니다 .
3
Page 69

䚐ạ㛨
동영상촬영 & 재생 WiVideo 설치
전원 (Power)
• LCD 패널을 열거나 [Power] 버튼을
누릅니다 .
• 3 초간 사용하지 않고 두면 전원이
자동으로 꺼집니다 .
리코드 (Record)
• 누르면 동영상 촬영이 시작됩니다
한 번 더 누르면 촬영이 중지됩니다
사진 (Photo)
• 사진 촬영할 때 누릅니다 .
줌 (Tele/Wide)
• T: 줌인 ( 부분 확대 ).
• W: 줌아웃 ( 넓게 보기 ).
와이파이 (WiFi)
• Wireless 켜기 / 끄기 버튼입니다 .
Wireless 를 사용해 PC/ 모바일 / 클
라우드에 연결합니다 .
일시정지 (Pause)
• 누르면 동영상 촬영이 일시 정지됩니
다한 번 더 누르면 촬영이 다시 시작됩
니다
동영상 / 사진
• 동영상과 사진 촬영 기능을 번갈아
선택합니다 .
• 기본설정은 동영상 모드입니다 .
메뉴 (Menu)
• 터치하면 옵션 메뉴가 켜집니다.
• 왼쪽 / 오른쪽으로 스크롤하거나 터
치해서 3 개의 메뉴 페이지 사이를 오
갈 수 있습니다 (동영상 / 사진 / 설정 ).
재생 (Playback)
• 터치하면 재생 모드 (Playback Mode)
로 이동합니다 .
촬영된 동영상 파일을 보거나 삭제
할 수 있습니다 .
7
8
9
䞈⮨㡸G䈡䚌⮨G㙸㢨䂌☘㢨G
䖐㐐╝⏼␘U
①
②
③
3
4
④
⑤
1
2
5
⑥
⑦
⑧
⑨
4
Page 70

䚐ạ㛨
WiVideo 설치
WiVideo 는 카메라와 PC/ 모바일 기기 사이의 무선 연결을 지원하며 ,
카메라로 촬영한 동영상 / 사진 및 라이브 스트림 동영상을 재생 및 관
리할 수 있는 프로그램입니다 . WiVideo 는 두 가지 버전이 있습니다 :
참고 : LCD 패널이 닫혀 있는 상태에서도 스트리밍이 계속됩니다 .
버전 1:
PC WiVideo Suite
• AutoRuns/AutoPlay 기능이 켜져 있는
상태에서 카메라를 사용해 USB 케이블을
통해 PC 에 자동으로 [ WiVideo Suite ]
설치할 수 있습니다 .
• AutoRuns/AutoPlay 기능이 켜져 있지
않은 경우 :
[ My computer ]( 내 컴퓨터 ) 로 가서
[ WiVideo Suite ] 를 검색해 설치하시면
됩니다 .
ⶸ㤸GYa
App Store
Google Play
참고 :
• WiVideo는 Windows
• 화면에 알아볼 수 없는 글씨가 표시되는
경우 문제해결 페이지를 참조하십시오 .
모바일 WiVIdeo 앱
•iPhone/iPad:
D 앱스토어에서 WiVideo 앱을 다운로드
받아 iPhone/iPad 에 설치합니다 .
• 안드로이드 폰 / 태블릿 :
구글 플레이에서 WiVideo 앱을 다운로드
받아 안드로이드 폰 / 태블릿에 설치합니
다.
5
®
전용 프로그램입니다 .
Page 71

䚐ạ㛨
Wireless 모드에서 PC 로 PC WiVideo Suite 기능
단계 1: ( 카메라에서 )
• [ Wireless ] 버튼을 누릅니다 → Seletct [
Wireless to PC
니다 . 화면에 WiFi ID 와 패스워드가 표시됩니다
( 기본설정 패스워드는 “0000”입니다 . Wireless
ID 와 패스워드는 설정 [ Setting ] 메뉴에서 수정
하실 수 있습니다 .)
WiFi to PC
Wireless to PC
CD-675C-60675C
WiFi ID
CD-675C-60675C
Wireless ID
Password
0000
Password
0000
](WiFi 에서 PC 로 ) 를 선택합
단계 2: (PC 에서 )
• [ WiVideo Suite ] 를 실행합니다
• [ Detect Wireless Camera ](Wireless 카메라 감
지 ) 버튼을 클릭해 카메라를 검색합니다
• 카메라에 표시되는 [Wireless ID] 를 확인하고
WiVideo 창에 [ Password ]( 암호 ) 를 입력합니
다.
• 이제 Wireless to PC WiVideo Suite 모드가 완
료되었습니다 .
CD-675C-60675C
0000
참고 : 사용하기 전에 PC 무선 기능을 켜십시오 .
6
Page 72

䚐ạ㛨
PC WiVideo Suite 기능
활성 모드 기능
동영상과 사진 파일을 관리합니다 .
• 카메라에서 PC 로 파일을 전송합니다 .
• 카메라에서 파일을 삭제합니다 .
/USB
Wireless
라이브 동영상을 봅니다 (Wireless 만 해당 )
• PC 에서 라이브 스트림 동영상을 봅니 다 .
• 카메라를 원격 조정합니다 .
Wireless
Skype/MSN 용 무선 웹캠 (Wireless 만 해당 )
• Skype/MSN 의 동영상 / 오디오 설정을 변
경합니다 .
• WiVideo 카메라를 선택합니다 .
Wireless
USB
USB
(e.g. Skype)
계정 설정 (USB 만 해당 )
• 소셜 네트워크 계정을 설정하고 USB 를 통해 정보
를 카메라에 저장합니다 .
Wireless 설정 (USB 만 해당 )
• USB 를 통해 카메라의 Wireless 프로파일을
구성 및 동기화합니다 .
• 카메라 이름을 정하고 보안 패스워드를
만듭니다 .
7
Page 73

䚐ạ㛨
Wireless 모드에서 모바일로
시스템 AP/3G 모드 스키마
3G 없
직접
음
AP
없
음
iPhone/
iPad
Android
3G 있음핫스
AP 있음 AP
AP 없음
AP 있음 AP
핫스
팟
(
)
Hotspot
팟
(
)
Hotspot
페이
지
1. 직접 (Direct) 모드가 켜지면
원래
2. 직접 (Direct) 모드를 종료하
9
고 나면 잊지 말고 다시
Wireless
1. 핫스팟은 무선 모바일 서비스
(3G/4G) 업체에 따라 제한되거
나 유료로 제공됩니다 .
10
2. 모바일 시스템은 더 느립니
다.
1. 신호 강도는 거리의 영향을 받
습니다 .
10
1. 핫스팟은 무선 모바일 서비스
(3G/4G) 업체에 따라 제한되거
나 유료로 제공됩니다 .
11
2. 모바일 시스템은 더 느립니
다.
1. 신호 강도는 거리의 영향을
받습니다 .
11
참고
Wireless
를 연결해야 합니다 .
AP: Wireless 액세스 포인트 (Access Point) 를 말합니다 .
핫스팟 (Hotspot): 액세스 포인트로 모바일 기기를 사용하는 경우를 말합니다 .
8
는 꺼집니다 .
Page 74

䚐ạ㛨
Wireless 에서 모바일 (iPhone/iPad)
직접 (Direct) 모드
Wireless to Mobile
wireless ID
CD-675C-60675C
Password
0000
단계 1: ( 카메라에서 )
• [ Wireless ] 버튼을 누릅니다 .
→ [ Wireless to Mobile
에서 모바일로 ) 을 선택합니다 → [ Direct
Mode ]( 직접 모드 ) 를 선택합니다 → 화면
에 [ Wireless ID ] 와 [ Password ]( 암호 )
가 표시됩니다 .
](Wireless
단계 2: ( 모바일 기기에서 )
• [ Settings ]( 설정 ) 으로 갑니다 . →
[ Wireless ] 로 갑니다 . → 단계 1 에서와
동일한 [ Wireless ID ] 를 선택해 연결합
니다 .
] 아이콘이 표시되면 직접 (Direct)
• [
모드 연결이 활성 상태임을 알 수 있습니
다.
• A 모바일 WiVideo 앱을 실행합니다 .
참고 :[
시 시간이 걸립니다 .
] 아이콘이 표시될 때까지는 잠
9
Page 75

䚐ạ㛨
Wireless 에서 모바일 (iPhone/iPad)
모바일 핫스팟 모드
GGGGGG⯜ⵈ㢰G䚟㏘䑓G
AP 모드
[ AP ]
단계 1: ( 모바일 기기에서 )
• [ Settings ]( 설정 ) 으로 갑니다 .
→ [ Wireless ] 로 갑니다 . →
[ Personal Hotspot ]( 개인 핫스팟 )
을 켭니다
단계 2: ( 카메라에서 )
• [ Wireless ] 버튼을 누릅니다
→ Select [ Wireless to Mobile
](Wireless 에서 모바일로 ) 을 선택해
이용 가능한 AP 를 스캔합니다 → 카메
라를 모바일 핫스팟에 연결합니다 .
단계 1: ( 모바일 기기에서 )
• [ Settings ]( 설정 ) 으로 갑니다 . →
[ Wireless ] 를 선택합니다 . →
Wireless 기능을 켜고 이용 가능한 AP
중 하나를 선택합니다 .
단계 2: ( 카메라에서 )
• [ Wireless ] 를 누릅니다 → [
Wireless to Mobile
서 모바일로 ) 을 선택해 이용 가능한
AP 를 스캔합니다 . → 카메라를 선택한
AP 에 연결합니다 .
10
](Wireless 에
Page 76

䚐ạ㛨
Wireless 에서 Mobile( 안드로이드 )
모바일 핫스팟 모드
AP 모드
단계 1: ( 모바일 기기에서 )
• [ Settings ]( 설정 ) 으로 갑니다 . → [
Wireless & Network ]( 무 선 & 네트워
크 ) 로 갑니다 . → 모바일 핫스팟 /AP
기능을 켭니다
참고 : 작동 방법은 기기별로 다를 수 있
습니다 . 개별 모델을 참조하십시오 .
단계 2: ( 카메라에서 )
• [ Wireless ] 버튼을 누릅니다
→ [ Wireless to Mobile
(Wireless 에서 모바일로 ) 을 선택해 이
용 가능한 AP 를 스캔합니다 → 카메라
를 모바일 핫스팟에 연결합니다 .
]
단계 1: ( 모바일 기기에서 )
• [ Settings ]( 설정 ) 으로 갑니다 . →
[ Wireless & network ]( 무선 & 네트
워크 ) 를 선택합 니다 . → [ Wireless
settings ](Wireless 설정 ) 를 선택합
니다 . → Wireless 기능을 켜고 이용
가능한 AP 중 하나를 선택합니다 .
단계 2: ( 카메라에서 )
• [ Wireless ] 를 누 릅 니 다 →
[Wireless to Mobile
에서 모바일로 ) 을 선택해 이용 가능
한 AP 를 스캔합니다 → 카메라를 선택
한 AP 에 연결합니다 .
11
](Wireless
Page 77

䚐ạ㛨
Mobile WiVideo Suite 기능
12
Tele(T)
• 줌인 ( 부분 확대 ).
Wide(W)
• 줌아웃 ( 넓게 보기 ).
동영상 (Video)
• 누르면 동영상 촬영이
시작 / 중지됩니다 .
사진 (Photo)
• 사진 촬영할 때 누릅니
다.
보기 (View)
• 카메라에서 라이브 동
영상을 봅니다 .
앨범 (Album)
• 카메라에 있는 파일을
재생 / 삭제합니다 .
설정 (Setup)
• 카메라 설정을 관리합
니다 .
Page 78

䚐ạ㛨
Wireless 모드에서 클라우드
Ustream 을 이용하면 각종 이벤트를 간편하게 라이브로 중계할 수 있
습니다 . 사람들은 PC 나 모바일 기기를 통해 라이브로 중계되는 동
영상을 시청할 수 있습니다 .
WiVIdeo Suite 가 자동으로 설정을 안내해 드립니다 .
1. PC 에서 Sensr.net 계정을 설정합니다
( PC 가 인터넷에 연결되어 있어야 합니다 )
단계 1: 계정을 만듭니다 .
• PC 와 카메라 사이에 USB 케이블을 연결합
니다 .
• WiVideo Suite 의 [ Account Setup ]( 계정
설정 ) 으로 갑니다
• [ Create A New Account ](새 계정 만들기 )
를 클릭한 다음 각 단계별로 필요한 정보
를 입력합니다 .
• 그런 다음 [ Sign Up ]( 등록 ) 을 클릭합니
다.
계 2: 계정 정보를 카메라에 저장
합니다
• 단계 1 에서 만든 사용자이름 / 패스워드를
입력합니다
• 그런 다음 [ Save ]( 저장 ) 를 클릭합니다 .
13
Page 79

䚐ạ㛨
Wireless 모드에서 클라우드
단계 3: 채널을 1 개 선택합니다
WiVideo Suite는 1 개의 기본설정 채널을 생성합니다.
Ustream 웹사이트에서 채널을 추가로 생성하실 수
있습니다 .
• 개인정보 보호를 위해 선택한 채널에 패스워드를
입력하실 수 있습니다 .
경고 :
• 모바일 기기의 Ustream 앱은 비공개 채널에 액세
스할 수 없습니다 .
• 비공개 / 공개 채널 사용에 관한 자세한 설명은
Ustream 웹사이트를 참조하십시오 .
• Ustream 동영상 브로드캐스트용 채널을 1 개 선택
하십시오 .
2. Ustream 브로드캐스트용 AP/ 모바일 핫스팟을 준비합니다
AP(Access Point)
❄⏈
⯜ⵈ㢰
14
Page 80

䚐ạ㛨
Wireless 모드에서 클라우드
3.Ustream 에서 라이브 동영상을 브로드캐스트합니다(카메라에서 )
단계 1:
[ Wireless ] 버튼을 누릅니다
• [ Wireless to Cloud ](Wireless
클라우드 ) 를 선택합니다
단계 2:
Ustream 계정에 로그인합니다
• 사용자이름과 패스워드를 입력합니다 .
단계 3:
액세스 포인트를 스캔해 선택합니
다
• 카메라에 이용 가능한 AP 목록이 표시
됩니다 .
• WiFi 연결에 사용할 AP 를 선택합니다 .
카메라가 Ustream 서버에 연결되면서 동영
상 스트리밍이 시작됩니다 .
4. PC/ 모바일 기기에서 Ustream 브로드캐스트를 봅니다
PC 사용자 :
• Ustream 웹사이트로 가서 사용자이름 /
www.ustream.tv
Ustream
채널을 입력합니다 .
모바일 사용자 :
• 앱스토어 / 구글 플레이에서 Ustream 앱
을 다운로드 받은 다음 사용자이름 / 채
널을 입력합니다 .
15
Page 81

문제 해결
문제 / 상황 조치 / 해결
기기 전원을 켤 수 없습
니다 / 전원이 갑자기 꺼
졌습니다 .
메모리 카드에 있는 파일
이 제대로 표시되지 않고
LCD 에 “!”가 표시됩니
다.
실내 사진 중에 흐릿하거
나 어둡게 찍히는 사진이
있습니다 .
기기가 USB 케이블로 PC
에 연결되어 있는 경우
Wireless 가 연결되지 않
습니다 .
WiVideo Suite 가 제대로
설치되지 않았습니다 .
화면에 표시되는 WiVideo
Suite 언어를 알아볼 수
없습니다 .
배터리 방향을 확인한 후 [ Power ] 버튼을 눌러 전원을 켭니다 .
배터리 전력이 얼마 남지 않았거나 소진되었습니다 . 배터리를 충전합니다 .
“!”는 SD 카드가 저속이거나 손상된 파일이 포함되어 있다는 의미입니다 . PC
대신 기기에서 카드를 포맷해 보십시오 .
카드에 문제가 있어서 인식되지 않습니다 .
다른 카드를 사용하십시오 .
낮은 조명 / 실내 조건에서는 사진 노출 시간이 늘어납니다 . 사진을 찍을 때 기
기 ( 와 피사체 )가 몇초간 흔들리지 않도록 하십시오 .
디스크 중 [ DV ] 는 카메라의 내장 메모리를 의미합니다 .
디스크 중 [ Removable Disk ] 는 SD 카드를 의미합니다 .
디스크 중 [ WiVideo Suite ]는 원래 설치되어 있는 애플리케이션을 의미합니다 .
패스워드 설정이 AP 와 일치하지 않습니다 .
AP 라우터나 컴퓨터의 Wireless 기능이 켜져 있지 않습니다 .
AP 라우터 또는 컴퓨터 Wireless 기능을 켜십시오 .
기기가 무선 네트워크 서비스 영역 내에 있지 않거나 , 무선 네트워크 서비스가
거리의 영향을 받고 있습니다 .
디스크 [ WiVideo Suite ] 를 찾을 수 없는 경우 컴퓨터를 재부팅하십시오 .
해당 컴퓨터 제조사의 설명서 FAQ 부분을 참조하십시오 .
16
Page 82

DC-B229 2520AB229L-A01
 Loading...