

Page 1

HP Systems Insight Manager 6.0 User Guide
HP Part Number: 601823-001
Published: January 2010, First Edition
Page 2

© Copyright 2010 Hewlett-Packard Development Company, L.P.
Legal Notices
Confidential computer software. Valid license from HP required for possession, use or copying. Consistent with FAR 12.211 and 12.212, Commercial
Computer Software, Computer Software Documentation, and Technical Data for Commercial Items are licensed to the U.S. Government under
vendor's standard commercial license.
The information contained herein is subject to change without notice. The only warranties for HP products and services are set forth in the express
warranty statements accompanying such products and services. Nothing herein should be construed as constituting an additional warranty. HP shall
not be liable for technical or editorial errors or omissions contained herein.
Acknowledgments
Microsoft, Windows, Windows Server, Windows Vista, Windows NT, and Windows XP are U.S. registered trademarks of Microsoft Corporation.
Linux is a U.S. registered trademark of Linus Torvalds.
Publication history
The manual publication date and part number indicate its current edition. The publication date will change when a new edition is released. The
manual part number will change when extensive changes are made.
To ensure that you receive the latest edition, you should subscribe to the appropriate product support service. See your HP sales representative for
details.
Please direct comments regarding this guide to:
Hewlett-Packard Company
HP Systems Insight Manager Learning Products
20555 Tomball Parkway
Houston, Texas 77070
Or, use this web form to send us feedback:
http://docs.hp.com/assistance/feedback.html
Typographic conventions
find
(1) HP-UX manpage. In this example, “find” is the manpage name and “1” is the manpage section.
Book Title
Linked Title
http://www.hp.com A Web site address that is a hyperlink to the site.
Command Command name or qualified command phrase.
user input Commands and other text that you type.
computer output Text displayed by the computer.
Enter The name of a keyboard key. Note that Return and Enter both refer to the same key. A sequence such as Ctrl+A
term Defined use of an important word or phrase.
variable The name of an environment variable, for example PATH or errno.
value A value that you may replace in a command or function, or information in a display that represents several possible
<element> An element used in a markup language.
attrib= An attribute used in a markup language.
Title of a book or other document.
Title that is a hyperlink to a book or other document.
indicates that you must hold down the key labeled Ctrl while pressing the A key.
values.
Page 3

Table of Contents
I Introduction...............................................................................................11
1 About this document.............................................................................12
User Guide.....................................................................................................................................12
Systems Insight Manager User Guide layout........................................................................................12
2 Product overview..................................................................................13
What's new in Systems Insight Manager 6.0.......................................................................................13
Systems Insight Manager features.......................................................................................................13
Basic concepts................................................................................................................................14
Discovery and identification.........................................................................................................14
Inventory...................................................................................................................................14
Status info.................................................................................................................................14
Reports......................................................................................................................................14
Automatic event handling............................................................................................................14
Tools and tasks...........................................................................................................................15
Collections.................................................................................................................................15
Users and Authorizations.............................................................................................................15
Signing in and using the graphical user interface.................................................................................15
Security Alerts in Internet Explorer and Firefox................................................................................15
Automatically signing in..............................................................................................................16
Configuring the CMS.............................................................................................................16
Configuring the browser.........................................................................................................16
Behavior..............................................................................................................................17
Guided tour of the Systems Insight Manager user interface...............................................................18
Customizing views......................................................................................................................19
II Setting up Systems Insight Manager............................................................20
3 Setting up managed systems..................................................................21
Setting up Windows servers to be managed by Systems Insight Manager................................................21
Installing the ProLiant Support Pack on a Systems Insight Manager Windows systems for the first time....21
Requirements........................................................................................................................21
Installing the ProLiant Support Pack..........................................................................................21
Setting up HP-UX servers to be managed by Systems Insight Manager....................................................23
Manually setting up an HP-UX managed system..............................................................................24
Configuring SNMP to send traps to the CMS.............................................................................24
Configuring SSH access.........................................................................................................25
Subscribing to WBEM indications/events:................................................................................25
Setting up Linux servers to be managed by Systems Insight Manager......................................................26
Installing the ProLiant Support Pack on a Linux system for the first time................................................26
Configuring agents remotely using Configure or Repair Agents:........................................................26
Manually setting up Linux managed systems...................................................................................26
Installing and configuring SSH................................................................................................26
Configuring a Linux system to send SNMP traps.........................................................................26
4 Credentials..........................................................................................28
Example XML file to add more than 10 WBEM username and password pairs.........................................28
5 WMI Mapper Proxy .............................................................................30
6 Discovery............................................................................................31
Recommended discovery tasks...........................................................................................................31
Options on the Discovery page.........................................................................................................32
Discovery credentials........................................................................................................................32
Configuring Configure or Repair Agents through a discovery task..........................................................32
Viewing discovery task results............................................................................................................32
Discovery filters...............................................................................................................................33
Table of Contents 3
Page 4

7 Manage Communications......................................................................34
Configuring the managed system software using the Configure or Repair Agents feature from the CMS.......34
Sending test traps and indications......................................................................................................34
8 Automatic event handling......................................................................36
Example automatic event handling tasks.............................................................................................36
9 Users and Authorizations.......................................................................37
Users..............................................................................................................................................37
User groups...............................................................................................................................37
Toolboxes.......................................................................................................................................37
10 Managed environment.........................................................................38
III Systems Insight Manager basic features......................................................39
11 Basic and advanced searches...............................................................40
Basic search....................................................................................................................................40
Advanced search.............................................................................................................................40
Hierarchical displays...................................................................................................................40
Save as.....................................................................................................................................40
View.........................................................................................................................................40
Searching for tools...........................................................................................................................41
12 Monitoring systems..............................................................................42
Viewing system collections................................................................................................................42
Pages displaying system status......................................................................................................42
Viewing health status from the table or icon view............................................................................43
Viewing health status in the tree view............................................................................................43
System status types......................................................................................................................43
Software status types...................................................................................................................44
WBEM operational status types....................................................................................................44
Monitoring clusters...........................................................................................................................45
System properties.............................................................................................................................45
Example of setting system properties...................................................................................................46
Setting customer company and contact information individually........................................................46
Example of setting system properties for multiple systems.......................................................................46
13 Event management..............................................................................48
Event management configuration.......................................................................................................48
Example - Creating a paging task based on e-mail notification..............................................................48
Examples of e-mail pages.................................................................................................................49
Example of a standard e-mail page..............................................................................................50
Example of a Pager/SMS page....................................................................................................50
Example of an HTML page..........................................................................................................51
Example - Creating a task to send an e-mail when a system reaches a critical state...................................51
Example - Creating a task to delete all cleared events...........................................................................53
14 Reporting in Systems Insight Manager....................................................54
Standard reports..............................................................................................................................54
New Reports..............................................................................................................................54
Managing reports.......................................................................................................................54
Snapshot Comparison.................................................................................................................55
Enhanced Reports.......................................................................................................................55
Predefined reports.................................................................................................................55
Run Enhanced reports............................................................................................................56
New Enhanced reports..........................................................................................................56
Editing Enhanced reports........................................................................................................56
E-mailing reports...................................................................................................................56
Deleting reports.....................................................................................................................57
15 Systems Insight Manager tools..............................................................58
Target selection...............................................................................................................................58
4 Table of Contents
Page 5

Scheduling tools..............................................................................................................................58
Managing with tasks........................................................................................................................58
Viewing results................................................................................................................................59
Example - Device ping......................................................................................................................59
IV Systems Insight Manager advanced features................................................60
16 Collections in Systems Insight Manager 6.0............................................61
Collections in Systems Insight Manager...............................................................................................61
Types of collections.....................................................................................................................62
Other customization features........................................................................................................63
17 Systems Insight Manager custom tools....................................................68
General concepts............................................................................................................................68
Tool types..................................................................................................................................68
Environment variables for custom tools...........................................................................................69
Custom tool menu placement........................................................................................................70
Custom tool URL format...............................................................................................................71
Creating custom tools through the GUI................................................................................................71
New.........................................................................................................................................72
Edit...........................................................................................................................................72
View tool definition.....................................................................................................................72
Run Now/Schedule....................................................................................................................72
Delete.......................................................................................................................................72
Creating custom tools through the Systems Insight Manager CLI.............................................................72
Creating a custom SSA tool..........................................................................................................72
Example Web launch tool............................................................................................................75
Example MSA tool......................................................................................................................75
Example Enabling Remote Desktop tool.........................................................................................76
Adding a TDEF to Systems Insight Manager...................................................................................77
Removing a TDEF from Systems Insight Manager.............................................................................77
Modifying a TDEF.......................................................................................................................78
18 Understanding Systems Insight Manager security.....................................79
Securing communication...................................................................................................................79
Secure Sockets Layer (SSL)...........................................................................................................79
Secure Shell (SSH)......................................................................................................................79
Hyper Text Transfer Protocol Secure (HTTPS)...................................................................................79
Secure Task Execution (STE) and Single Sign-On (SSO)....................................................................79
Distributed Task Facility (DTF).......................................................................................................79
WBEM......................................................................................................................................80
LDAP.........................................................................................................................................80
RMI..........................................................................................................................................80
Credentials management..................................................................................................................80
SSL certificates...........................................................................................................................80
Certificate sharing......................................................................................................................80
SSH keys...................................................................................................................................80
Passwords..................................................................................................................................80
Browser..........................................................................................................................................81
SSL...........................................................................................................................................81
Cookies.....................................................................................................................................81
Passwords..................................................................................................................................81
Password warnings.....................................................................................................................81
Browser session..........................................................................................................................81
Internet Explorer zones................................................................................................................82
System link format.......................................................................................................................82
Operating-system dependencies.........................................................................................................82
User accounts and authentication.................................................................................................82
File system.................................................................................................................................82
Background processes.................................................................................................................83
Windows Cygwin.......................................................................................................................83
Table of Contents 5
Page 6

HP-UX and Linux.........................................................................................................................83
Systems Insight Manager database....................................................................................................83
SQL Server and MSDE................................................................................................................83
Remote SQL Server.....................................................................................................................83
PostgreSQL................................................................................................................................83
Oracle......................................................................................................................................83
Command-line interface....................................................................................................................84
How to: configuration checklist..........................................................................................................84
General....................................................................................................................................84
Configuring the CMS..................................................................................................................84
Strong security...........................................................................................................................84
Configuring managed systems......................................................................................................84
How to: lockdown versus ease of use on Windows systems....................................................................85
Moderate..................................................................................................................................85
Strong.......................................................................................................................................85
19 Privilege elevation...............................................................................87
20 Contract and warranty........................................................................88
Viewing contract and warranty information.........................................................................................88
Collecting contract and warranty data................................................................................................88
Viewing contract and warranty status.................................................................................................89
Overview..................................................................................................................................89
System Information......................................................................................................................89
Contract....................................................................................................................................89
Warranty...................................................................................................................................90
Monitoring contract and warranty status........................................................................................90
21 License Manager................................................................................92
CLI mxlmkeyconfig...........................................................................................................................93
License types...................................................................................................................................93
Licensed System(s)............................................................................................................................94
Add Licenses...................................................................................................................................94
Collect Remote License Info...............................................................................................................94
License Collection Results table.....................................................................................................95
Assigning and Unassigning licenses...................................................................................................96
Apply Licenses.................................................................................................................................96
Add License page............................................................................................................................97
Key details page..............................................................................................................................97
Assigning or Applying Licenses page.................................................................................................98
License unlicensed systems (optional) page..........................................................................................99
22 Storage integration using SMI-S..........................................................100
About storage systems....................................................................................................................100
Storage integration using SNMP......................................................................................................100
Storage events...............................................................................................................................100
Storage inventory details.................................................................................................................101
Introduction to SMI-S for Systems Insight Manager..............................................................................101
About SMI-S.............................................................................................................................102
Key components.......................................................................................................................102
CIM...................................................................................................................................102
WBEM...............................................................................................................................102
SLP....................................................................................................................................102
Profiles....................................................................................................................................102
SMI-S implementation................................................................................................................102
About storage security using SNMP..................................................................................................103
Discovery and identification.......................................................................................................103
Using storage solutions...................................................................................................................103
Creating a storage by type group...............................................................................................103
Event collection and launch........................................................................................................103
For Command View SDM.....................................................................................................104
6 Table of Contents
Page 7

Configuring the SNMP trap destination on Windows 2000.......................................................104
Configuring the SNMP trap destination on HP-UX....................................................................104
Loading the HSV MIB on the CMS for EVA..............................................................................104
Discovery......................................................................................................................................105
Configuring HP SIM with storage systems..........................................................................................105
Subscribe to WBEM indication events.........................................................................................105
Viewing storage system collections..............................................................................................105
Viewing individual storage systems..............................................................................................106
Viewing storage system reports........................................................................................................106
Existing storage system reports...................................................................................................106
Viewing storage array capacity.......................................................................................................106
Viewing storage capacity for all arrays........................................................................................106
Viewing storage capacity for a single array.................................................................................107
23 Managing MSCS clusters...................................................................108
MSCS status..................................................................................................................................108
Cluster fields............................................................................................................................108
Node fields.............................................................................................................................109
Network fields..........................................................................................................................109
Resource fields.........................................................................................................................109
Cluster Monitor resource thresholds..................................................................................................110
Disk capacity thresholds............................................................................................................110
CPU utilization thresholds...........................................................................................................110
Cluster resources supported by Systems Insight Manager...............................................................110
Cluster Monitor states.....................................................................................................................110
Cluster Monitor polling rate.............................................................................................................111
CPU polling rate.......................................................................................................................111
Disk polling rate.......................................................................................................................111
MSCS status polling rate............................................................................................................111
System status polling rate...........................................................................................................111
24 Systems Insight Manager Audit log......................................................112
Configuring the Systems Insight Manager audit log............................................................................112
Configuring the tool definition files...................................................................................................112
Configuring the log.properties file ...................................................................................................112
Viewing the audit log.....................................................................................................................112
Example audit log..........................................................................................................................112
Log content...................................................................................................................................113
25 HP Version Control and Systems Insight Manager..................................114
About the Version Control Agent......................................................................................................114
Additional resources.................................................................................................................114
About the Version Control Repository Manager.............................................................................114
About integration......................................................................................................................115
About software repositories........................................................................................................115
About multiple system management.............................................................................................116
26 Compiling and customizing MIBs........................................................117
MIB management tools...................................................................................................................117
mcompile................................................................................................................................117
mxmib....................................................................................................................................119
mxmib MIB keyword customization........................................................................................120
SNMP Trap Settings page..........................................................................................................123
A Troubleshooting.....................................................................................125
Authentication....................................................................................................................................125
Browser.............................................................................................................................................125
Central Management Server.................................................................................................................126
Complex............................................................................................................................................126
Configure or Repair Agents..................................................................................................................126
Container View...................................................................................................................................127
Table of Contents 7
Page 8

Data Collection...................................................................................................................................127
Database...........................................................................................................................................129
Discovery...........................................................................................................................................129
Event.................................................................................................................................................130
Host name.........................................................................................................................................130
HP Insight Control power management..................................................................................................131
Identification......................................................................................................................................131
Installation.........................................................................................................................................132
Locale...............................................................................................................................................132
Managed Environment.........................................................................................................................132
HP MIBs............................................................................................................................................133
OpenSSH..........................................................................................................................................133
Performance.......................................................................................................................................133
Property pages...................................................................................................................................133
System Page.......................................................................................................................................133
Tasks.................................................................................................................................................134
Tools.................................................................................................................................................134
B Protocols used by Systems Insight Manager................................................135
SNMP...............................................................................................................................................135
HTTP.................................................................................................................................................136
WBEM..............................................................................................................................................136
Remote Method Invocation (RMI)...........................................................................................................136
Remote Wake-Up................................................................................................................................136
Internet Control Message Protocol (ICMP)...............................................................................................136
Lightweight Directory Access Protocol (LDAP)..........................................................................................136
Simple Object Access Protocol (SOAP)...................................................................................................137
Protocol functionality...........................................................................................................................137
Configuring protocol settings in Systems Insight Manager.........................................................................138
C Data Collection......................................................................................139
Append new data set (for historical trend analysis)..................................................................................139
Overwrite existing data set (for detailed analysis)....................................................................................139
Initial data collection...........................................................................................................................139
Bi-weekly data collection......................................................................................................................139
D Default system tasks................................................................................140
Biweekly Data Collection.....................................................................................................................140
Daily System Identification....................................................................................................................140
Delete Old Noisy Events......................................................................................................................141
Delete Events Older Than 90 Days........................................................................................................141
Hardware Status Polling for Non Servers................................................................................................141
Hardware Status Polling for Servers.......................................................................................................141
Hardware Status Polling for Systems No Longer Disabled.........................................................................141
Initial Data Collection..........................................................................................................................141
Initial Hardware Status Polling..............................................................................................................141
Software Version Status Polling..............................................................................................................141
Software Version Status Polling for Systems no Longer Disabled.................................................................141
Daily Check Event Configuration...........................................................................................................141
Status polling.....................................................................................................................................142
E Host file extensions.................................................................................143
Default values.....................................................................................................................................144
F System Type Manager rules......................................................................146
Adding new SNMP rules......................................................................................................................146
G Custom tool definition files......................................................................147
Tool type-specific requirements..............................................................................................................147
SSA-specific attributes.....................................................................................................................147
MSA-specific attributes....................................................................................................................147
WLA-specific attributes...................................................................................................................148
8 Table of Contents
Page 9

mxtool command parameters................................................................................................................148
Parameterized strings...........................................................................................................................149
Common tool attributes........................................................................................................................150
Tool Filtering attributes.........................................................................................................................151
Environment Variables.........................................................................................................................152
Tool parameter guidelines....................................................................................................................153
H Out-of-the-box MIB support in Systems Insight Manager...............................155
I Support and other resources.....................................................................159
Information to collect before contacting HP.............................................................................................159
How to contact HP..............................................................................................................................159
Registering for software technical support and update service...................................................................159
How to use your software technical support and update service...........................................................159
Warranty information.....................................................................................................................159
HP authorized resellers.........................................................................................................................159
Documentation feedback......................................................................................................................160
Related documents..............................................................................................................................160
Documentation and support............................................................................................................160
Systems Insight Manager documentation...........................................................................................160
Typographic conventions.................................................................................................................160
Glossary..................................................................................................162
Index.......................................................................................................172
Table of Contents 9
Page 10

List of Tables
2-1 Status types....................................................................................................................................14
12-1 Health status types........................................................................................................................43
12-2 Software status types.....................................................................................................................44
12-3 WBEM operational status..............................................................................................................44
14-1 Reports by Product columns............................................................................................................55
14-2 Reports by Product buttons.............................................................................................................55
17-1 Tool types....................................................................................................................................68
20-1 Contract and Warranty status.........................................................................................................90
21-1 Supported hardware for Integrity management processor license collections.........................................92
21-2 License types................................................................................................................................93
21-3 License types reported by management processor products.................................................................94
23-1 Cluster fields..............................................................................................................................108
23-2 Node fields................................................................................................................................109
23-3 Network fields............................................................................................................................109
23-4 Resource fields............................................................................................................................109
26-1 Varbind keywords and descriptions...............................................................................................122
E-1 Hosts file system information...........................................................................................................143
E-2 Changing default hosts file parameters............................................................................................143
E-3 Globally changing hosts file parameters...........................................................................................143
E-4 Hosts file default parameters...........................................................................................................145
G-1 SSA-specific attributes....................................................................................................................147
G-2 MSA-specific attributes...................................................................................................................147
G-3 WLA-specific attributes...................................................................................................................148
G-4 Command mxtool parameters.........................................................................................................148
G-5 Global attribute parameters............................................................................................................149
G-6 Current selected target parameters..................................................................................................149
G-7 Multiple selected target parameters (not supported for Custom Command Tools)....................................150
G-8 Task Wizard names values.............................................................................................................150
G-9 Defined name values.....................................................................................................................151
G-10 All tools values...........................................................................................................................151
G-11 Web-launch tools........................................................................................................................151
G-12 Tool filtering attributes..................................................................................................................152
G-13 Environment Variables.................................................................................................................152
G-14 New Command Line Tool parameter entry guidelines......................................................................153
H-1 MIBs supported in Systems Insight Manager.....................................................................................155
10
Page 11

Part I Introduction
11
Page 12

1 About this document
User Guide
HP Systems Insight Manager provides this user guide to help you understand management features.
Systems Insight Manager User Guide layout
• Introduction Describes the features, basic concepts, and using the
Systems Insight Manager.
• Setting up Systems Insight Manager Describes how to set up Systems Insight Manager by explaining
requirements for systems to be managed by Systems Insight Manager, credentials, discovery, automatic
event handling, and users and
• Systems Insight Manager basic features Describes Systems Insight Manager basic features, including
monitoring systems, clusters, and events, performing basic and advanced searches, editing system
properties, and basic reporting.
• Systems Insight Manager advanced features Describes Systems Insight Manager advanced features,
including managing with
For information on Systems Insight Manager support and how to access related documentation, see Support
and other resources.
authorizations
collections
.
, advanced reporting, and creating custom tools.
graphical user interface
(GUI) in
User Guide 12
Page 13

2 Product overview
What's new in Systems Insight Manager 6.0
• Scalability HP Systems Insight Manager can mange up to 10,000 systems (up to 5,000 servers, with
additional 5,000 management processors, VMS, and so on) when using Windows 64-bit.
• Reporting Systems Insight Manager 6.0 introduces enhanced reporting including tables and graphs
for easier access to Systems Insight Manager data.
• Migration New migration tool to transfer settings from a Systems Insight Manager 5.3.x Central
Management Server (CMS) to an Systems Insight Manager 6.0 CMS, and from a Systems Insight
Manager 6.0 CMS to another Systems Insight Manager 6.0 CMS.
• Firmware update Firmware update from Systems Insight Manager integrates with HP SUM and
provides agentless firmware upgrade for management processor and Onboard Administrator.
• Heterogeneous support Discovery and identification of non-HP systems through Systems Insight
Manager. The power cycle, power on, and power off commands are supported. Data collection support
is available for non-HP systems through Windows Management Instrumentation (WMI).
• Health status Mouseover of health status icons in system list shows which components are contributing
to the status, making it easier to identify the root cause of failures.
Systems Insight Manager features
• Automatic discovery Automatically discovers and identifies systems attached to the network. Use
discovery filters
• Health monitoring Colored status icons enable you to see at a glance the operational health of your
systems, and quickly drill down to find the failing component if any are not ok.
• Fault management and event handling Systems Insight Manager provides proactive notification of
actual or impending component failure alerts. Automatic Event Handling enables you to configure
actions to notify appropriate users of failures through e-mail or pager, , and enables automatic execution
of scripts or
Node Manager.
NOTE: Pager support is only for Windows-based
• Inventory Performs comprehensive system data collection and enables users to quickly produce
detailed inventory reports for
into popular reporting packages.
• Consistent multisystem management Systems Insight Manager initiates a task on multiple systems or
nodes from a single command on the CMS. This functionality eliminates the need for tedious, one-at-a-time
operations performed on each system.
• Role-based security Allows effective delegation of management responsibilities by giving systems
administrators granular control over which management operations users can perform on selected
systems.
to prevent discovery of unwanted system types.
event
forwarding to enterprise platforms such as HP Operations Manager or HP Network
managed systems
Central Management Server (CMS)
. Save reports in multiple formats for easy incorporation
.
• Two user interfaces Systems Insight Manager provides the option of a browser-based GUI or a
command line interface
management processes.
• Customized tools Simple Extensible Markup Language (XML) documents that allow you to integrate
off-the-shelf or custom command line and web-based applications or scripts into the Systems Insight
Manager user interface.
(CLI) that enables you to incorporate Systems Insight Manager into your existing
What's new in Systems Insight Manager 6.0 13
Page 14
Basic concepts
Discovery and identification
Systems Insight Manager can automatically discover and identify systems attached to the network using
information from management protocols such as
Management Instrumentation (WMI), WBEM,
discovery tasks to limit discovery to specific network segments or IP address ranges, or to control the frequency
that each task runs. Use discovery filters to prevent discovery of unwanted system types.
Inventory
Simple Network Management Protocol
Secure Shell
(SSH), and
Secure Sockets Layer
(SNMP), Windows
(SSL). Create
Data collection
Systems Insight Manager collects various information such as system type and sub-type, supported protocols,
and available memory. You can choose to maintain only the most recent data, enabling you to run reports
or compare different systems using Snapshot Comparison. Or, you can store all data collected over time,
which enables use of Snapshot Comparison to view trends on a single system.
Status info
The following status icons are used in the status list columns to show status on different aspects of the managed
systems. For example, the MP column displays the status icon of the management processor if the system
has a management processor board installed.
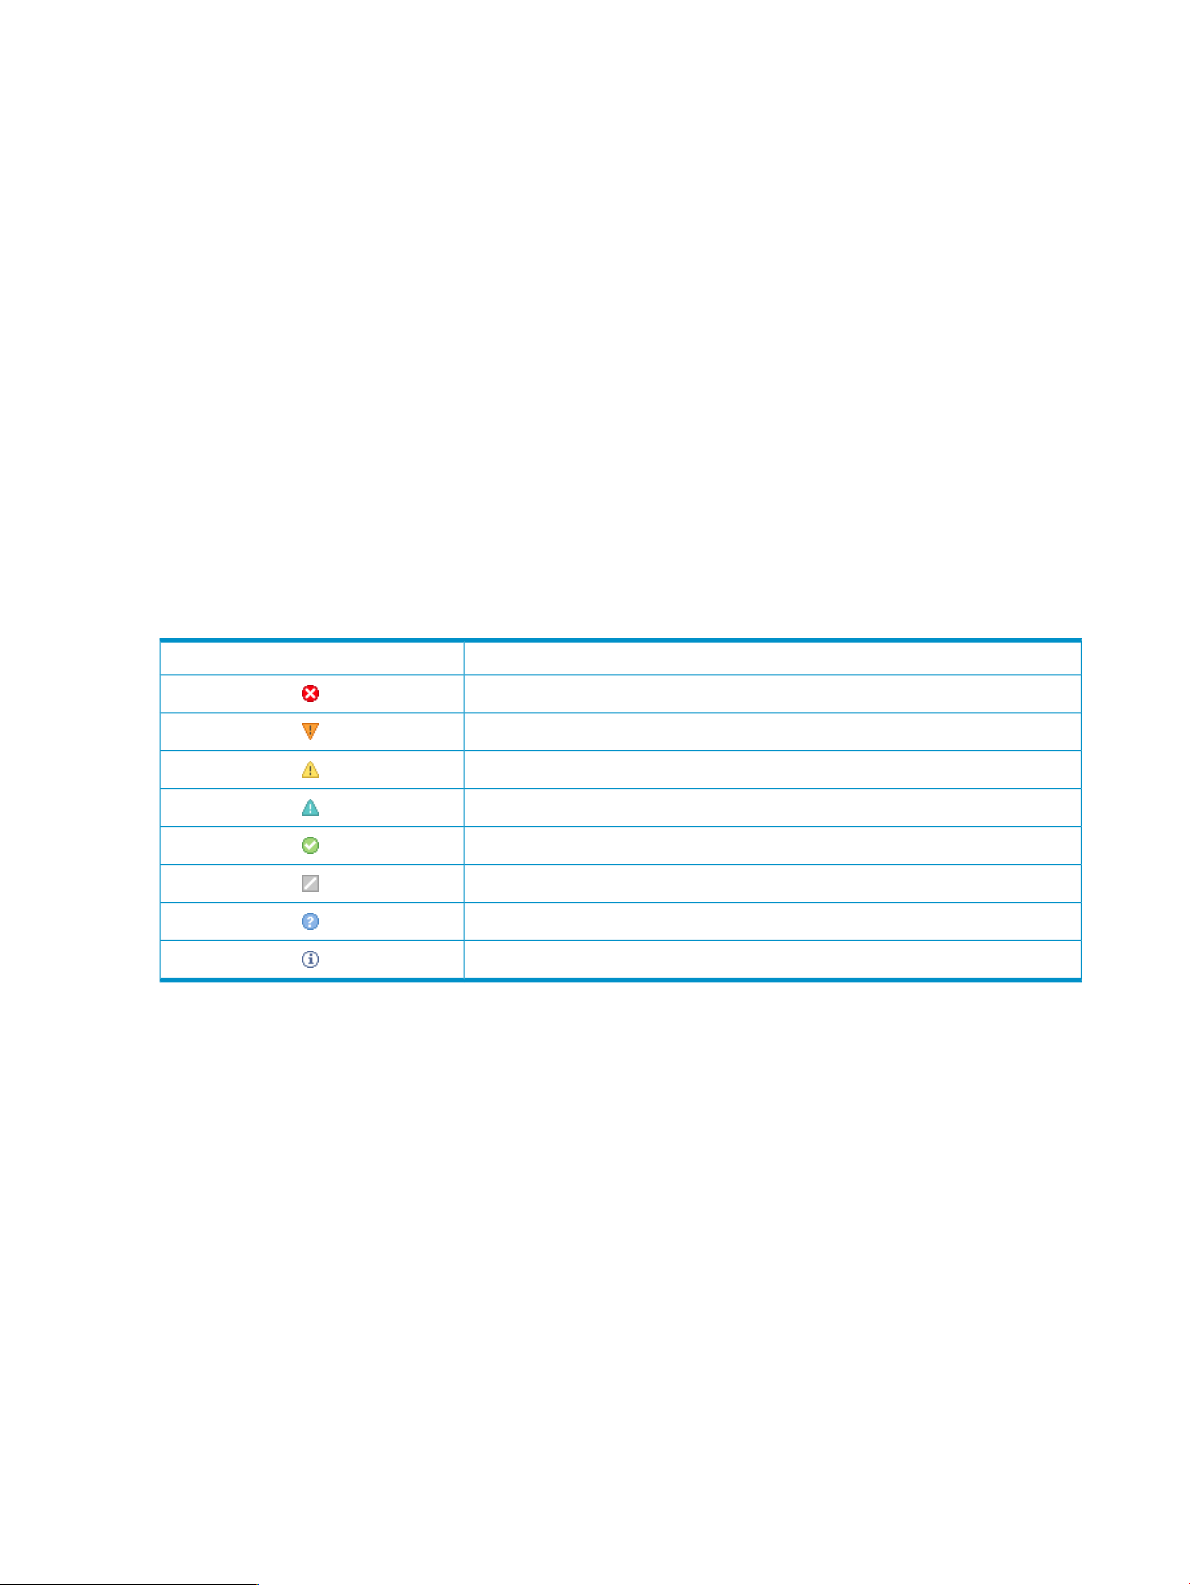
Table 2-1 Status types
gathers data that can be used for reporting and to populate various fields in the user interface.
Status typeStatus icon
Critical
Major
Minor
Warning
Normal
Disabled
Unknown
For specifics, see:
• Hardware status Health status types
• Software status Software status types
• Contract and warranty status Contract and Warranty status
• WBEM status WBEM operational status
Reports
Systems Insight Manager performs comprehensive system data collection and enables you to quickly produce
detailed inventory reports for managed systems. Reports can be generated in Hyper Text Markup Language
(HTML), XML, or Comma Separated Value (CSV) format. Enhanced reports can be automatically generated
and e-mailed on a scheduled basis. The type of data collected depends on the management software (SNMP
agents or WBEM/WMI providers) that is installed.
Automatic event handling
Automatic event handling enables you to define an action that Systems Insight Manager performs when an
event is received. These actions can include running a program or script, forwarding the event to another
management system, clearing the event, or notifying a user through e-mail or pager.
14 Product overview
Informational
Page 15

Tools and tasks
Tools are actions you perform on the managed systems from within Systems Insight Manager's GUI or CLI.
Many tools ship with Systems Insight Manager, but you can also add your own custom tools. Tasks are
instances of running tools. To create a task, select
on) and then select the tool from the Systems Insight Manager menu. Tasks can be run immediately or
scheduled, and you can view task results by selecting Tools→View Task Results.
Tools can be run from the Systems Insight Manager menus and can be added to a Quick Launch list that is
available from many pages within Systems Insight Manager.
Collections
Collections are groups of systems and events that can be used for viewing information, or as a way to specify
the targets for a tool. They can be created through the Customize link in the System and Event Collections
panel either by selecting specific systems to be included, or by specifying attributes to be matched. Once
created, they are displayed in the System and Event Collections panel for quick access. Shared collections
can be seen by everyone logging into Systems Insight Manager. Private collections can only be seen by the
user who created them.
You can bind event collections and system collections together and use them either separately or together.
For example, after you define a collection of Security Events, you can easy look at those events on any
system collection, such as Security Events on All Servers or Security Events on My FinancialServers.
Conversely, you can choose a system collection, and view any set of events on those systems. For example,
you can easily select My FinancialServers and look at All Events, Sign-in Events, Security Events, or any other
event collection as it applies to that collection of systems.
target systems
(systems or events that the task will work
Users and Authorizations
Systems Insight Manager enables effective delegation of management responsibilities by giving system
administrators granular control over which users can perform specific management operations on specific
systems.
Signing in and using the graphical user interface
Systems Insight Manager provides a browser-based
• For Windows:
Microsoft Internet Explorer 7 or later•
• Firefox 3.0.10 or later
• For HP-UX:
Firefox 3.0.10 or later
To download, go to http://www.hp.com/go/firefox.
• For Linux:
Firefox 3.0.10 or later
NOTE: Browser settings:
For all Windows Internet Explorer browsers, you must have the SSL 3.0 or Transport Layer Security
•
(TLS) 1.0 browser security options enabled for Systems Insight Manager to work properly.
• To use automatic sign-in with Firefox, you must configure Firefox with a list of sites with automatic sign-in.
For more information, see
Initial setup
section of the Systems Insight Manager online help.
GUI
. Supported browsers include:
Security Alerts in Internet Explorer and Firefox
Because the Systems Insight Manager web server uses a self-signed SSL certificate (unless otherwise
configured), you will encounter a browser warning when browsing to the CMS. Firefox warns of an
Connection
measures to avoid repeatedly encountering those warnings. This applies to Systems Insight Manager, SMH,
Integrated Lights-Out (iLO), Onboard Administrator, and all web servers you browse to.
. Internet Explorer warns of a
Certificate Error
Untrusted
. Both browsers let you continue, but you can take
Signing in and using the graphical user interface 15
Page 16
Each time you receive an
exception to avoid seeing the warning again for that host. Note that if you browse to a single system using
its short host name, fully qualified Domain Name Service (FQDN), and IP address (for example, three different
ways), you must add three security exceptions.
With Internet Explorer, you must install the SSL certificate into the Trusted Root Certification Authorities
certificate store, but the browser will continue to warn you (by default) when details in the certificate do not
match (for example, browsing by short host name when the full host name is in the certificate). To avoid
certificate errors when names do not match, the following setting must be turned off: Internet
Explorer→Advanced→Security→Warn about cer tificate address mismatch.
If you do not install the SSL certificate in Internet Explorer 8, these warnings appear for each pop-up window
that appears in Systems Insight Manager.
Automatically signing in
You can sign in to Systems Insight Manager using the same account with which you are logged in on your
desktop, bypassing the Systems Insight Manager sign-in page. If user groups are configured for Systems
Insight Manager, membership in these groups is accepted and treated the same as if you manually signed
in.
Configuring the CMS
• Systems Insight Manager must be running on a Windows CMS that is a member of a Windows domain.
The browsing system must be a member of the same domain.
• The Systems Insight Manager service account must be a domain account; local accounts can not be
used.
• The CMS must be registered with an SPN in the domain, which requires a domain administrator to
configure. From any system that is a member of the domain, the domain administrator can run the
setspn.exe utility from the Windows Support Tools. For example:
setspn -a HTTP/<cms_fqdn> <sim_service_account>
Where HTTP is in all capital letters,
is the domain account under which Systems Insight Manager service runs.
Untrusted Connection
<cms_fqdn>
warning in Firefox, you must add a
is the FQDN of the CMS, and
permanent
security
<sim_service_account>
IMPORTANT: Automatic sign-in fails if the SPN registered more than once. If you change the name
of the Systems Insight Manager service account, you must first delete the SPN associated with the old
service account name, and then register the new service account name:
setspn –d HTTP/<cms_fqdn> <old_sim_service_account>
setspn –a HTTP/<cms_fqdn> <new_sim_service_account>
NOTE: Local accounts cannot be used for Systems Insight Manager service account if automatic sign-in
is desired.
• The automatic sign-in feature must be enabled in Systems Insight Manager in the
globalsettings.props file. You can use the mxglobalsettings command, or directly modify
the file. Set the value for the
necessary.
Configuring the browser
• Supported in Internet Explorer 7 and Firefox. Internet Explorer 6 is not supported.
• The browsing system must be remote; browsing locally from the CMS does not perform automatic
sign-in.
• The browsing system and the CMS must be members of the same Windows domain.
• You must be logged in to the browsing system with a domain account that is configured as a user
account in Systems Insight Manager, or is a member of a user group configured in Systems Insight
Manager.
AutomaticSignIn
property to 1. Restarting Systems Insight Manager is not
16 Product overview
Page 17

Behavior
• There must be no proxy servers between the browser and the CMS. Use the proxy bypass list in the
browser, or use no proxy at all.
• The browser must be configured to support automatic sign-in.
Procedure 2-1 Configuring the browser in Internet Explorer
1. In Internet Explorer, enable Integrated Windows Authentication under Tools→Internet
Options→Advanced tab.
2. The CMS must be in the Local Intranet or Trusted Sites zone, which can be configured under the
Tools→Internet Options→Security tab.
3. (Optional) If the CMS is in the Internet Explorer Local Intranet zone, select Automatic Logon only in
Intranet zone.
4. (Optional) If the CMS is in the Internet Explorer Trusted Sites zone, select Automatic logon with current
user name and password.
Configuring the browser in Firefox:
Firefox must be configured with a list of sites (for example, the CMS) where automatic sign-in can be
performed, and should be restricted to local intranet sites. This list can be configured by entering
about:config in the Firefox address bar. From the list of Preference Names, select
network.negotiate-auth.trusted-uris and either double-click or right-click, and select Modify. Here, you
can specify a comma-separated list of URLs or domains, enter the list of URLs used to access Systems Insight
Manager. For example:https://cms_fqdn, where
When automatic sign-in occurs, an intermediate sign-in page appears. If you click Cancel from this page,
the manual sign-in page appears. You might want to cancel automatic sign-in if any unexpected network or
domain errors occur. If any browser configuration errors are detected, automatic sign-in is cancelled and
the manual sign-in page appears along with the configuration error.
Failures encountered during automatic sign-in are logged as normal sign-in failures in both the audit log and
the event log. If automatic sign-in is not attempted, no failure is detected or logged by Systems Insight
Manager.
If automatic sign-in is configured, you can manually sign in to Systems Insight Manager.
cms_fqdn
is the FQDN of the CMS.
• If automatic sign-in fails, the manual sign-in page appears This might occur if you are logged in to
the operating system using an account that is not an Systems Insight Manager account.
• If automatic sign-in is not attempted This might occur if the browser is not properly configured for
automatic sign-in, or the feature is disabled in Systems Insight Manager.
• If you click Sign Out from Systems Insight Manager This enables you to specify another user account
to use if you are signed in to the operating system with a different account.
Signing in and using the graphical user interface 17
Page 18
Guided tour of the Systems Insight Manager user interface
The GUI includes the following six regions:
1. Banner area The
Manager, and displays the user that is currently signed in. Click the minimize icon in the top right
corner to minimize the banner. To maximize the banner, click the maximize icon.
2. System Status panel This panel provides uncleared event status,
an alarm to notify you about certain events or statuses. You can customize the System Status panel
for your environment. If you do not need to view this panel at all times, you can collapse it by clicking
the minus sign ( ) in the top right corner of the panel. To expand the panel, click the plus sign ( ). If
the System Status panel is collapsed and an alarm is received, the panel expands to show the alarm.
You can enlarge the panel by clicking the Open in new window icon ( ) to display a separate large
window that you can resize and view from across a room without sitting at the Systems Insight Manager
terminal.
3. Search panel The search feature enables you to search for matches by system name and common
system attributes. You can also perform an advanced search for matches based on selected criteria.
To speed the search process, as you enter system information in the search box, a dropdown list appears
listing systems that begin with the text you are entering. You can select from the dropdown list or continue
to enter the information. If you do not need to view this panel at all times, you can collapse it by clicking
the minus sign ( ) in the top right corner of the panel. To expand the panel, click the plus sign ( ).
4. System and Event Collections panel System and event collections enable you to view all known
systems and events in a specific management environment. A collection can be private, visible only to
its creator, or shared, visible to all users. All default collections are shared. You can add additional
collections by clicking the Customize link. Collections can optionally be configured to show
status
icons in this area.
5. Systems Insight Manager menus The Systems Insight Manager menus provide access to tools, logs,
software options, and online help. The Options menu is primarily for users who administer the Systems
Insight Manager software. If you lack authorization to use these tools, you might not be able to view
certain menus.
6. Systems Insight Manager workspace The workspace displays the results of your latest request. It can
contain a collection,
terminal instead of displaying in the
to Systems Insight Manager. By default, the introductory page is the Home page. The introductory
page provides information and tips about Systems Insight Manager and links to frequently used features.
You can customize Systems Insight Manager to display a different page as the Home page.
banner
provides a link to the Home page, a link to Sign Out of Systems Insight
tool
, or report. Some tools launch a separate browser window or X Window
workspace
. This area contains the Home page when you sign in
system health status
information, and
health
18 Product overview
Page 19

NOTE: To maximize the workspace, click the Maximize link next to the Help icon ( ). To restore
the workspace to its original size, click Restore Size.
Customizing views
A Customize link is available in the upper right of many pages in Systems Insight Manager. Use this link
to customize the way the page is presented.
Signing in and using the graphical user interface 19
Page 20

Part II Setting up Systems Insight Manager
20
Page 21
3 Setting up managed systems
Setting up managed systems involves installing the required Management Agents software and configuring
the supported protocols to communicate with the Systems Insight Manager software.
Setting up Windows servers to be managed by Systems Insight Manager
To be fully managed by Systems Insight Manager, HP ProLiant servers running Windows should have the
Insight Management Agents installed. These agents are part of the ProLiant Support Pack. See below for
instructions on how to do this through Systems Insight Manager. You can also configure these agents to be
installed as part of your normal operating system deployment procedures. For third party servers, enable
WMI and/or SNMP in the operating system. Systems Insight Manager attempts to retrieve information that
is instrumented in an industry-standard way. After setting up the management agents on the managed systems,
the remaining configuration can be done from the Systems Insight Manager user interface. Continue to
Chapter 4 Credentials for further information.
For more information regarding ProLiant Support Pack, see the http://www.hp.com/servers/psp.
Installing the ProLiant Support Pack on a Systems Insight Manager Windows systems for the first time
The Initial ProLiant Support Pack Install task enables you to install a ProLiant Support Pack from a Windows
CMS to a Windows managed system when you do not have any Insight Management Agents, especially
the HP Version Control Agent, installed. This task also configures the
Systems Insight Manager and the setting to use the desired HP Version Control Repository Manager.
systems
to use the trust
certificate
from
Requirements
• The Initial ProLiant Support Pack Install feature is only supported on a Windows CMS.
• The target system must be a Windows system.
• VCRM must be installed and populated on servers containing a repository.
• You must have Windows administrator privileges on target systems to install a ProLiant Support Pack.
• Only one Initial ProLiant Support Pack Install task can be run at a time. If you execute a second task
before the first one is complete, the second task starts after the first task completes.
Installing the ProLiant Support Pack
Procedure 3-1 Installing the ProLiant Support Pack
1. Select Deploy→Deploy Drivers, Firmware and Agents→Initial ProLiant Support Pack Install.
The Initial ProLiant Support Pack Install page appears.
2. Select the target systems. For more information about selecting target systems, see the Systems Insight
Manager online help.
3. Click Next.The Enter Windows credentials page appears.
4. On the Enter Windows credentials page, complete the following:
Setting up Windows servers to be managed by Systems Insight Manager 21
Page 22
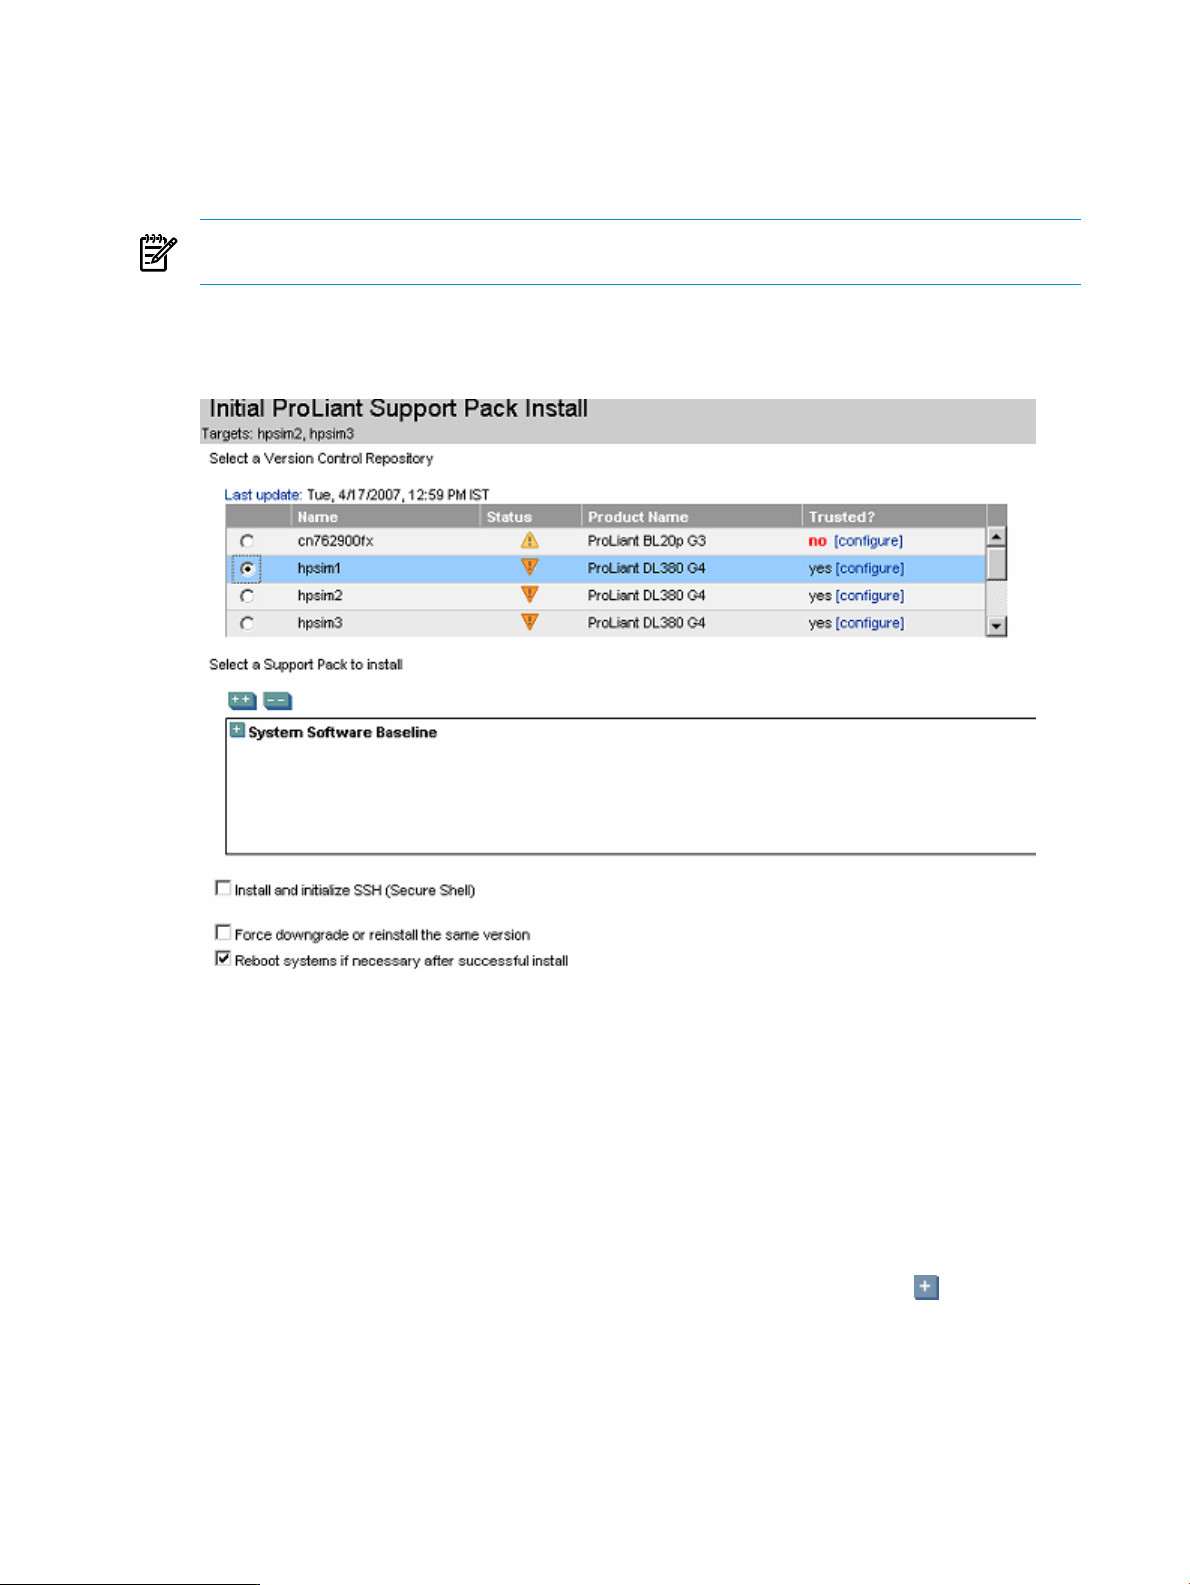
a. In the User name field, enter the Windows administrator user name for the target system.
b. In the Password field, enter the administrator password.
c. In the Password (Verify) field, re-enter the Windows administrator password.
d. In the Domain field, enter the Windows domain. This field can be left blank if the system is not
part of a domain.
NOTE: If ProLiant Support Pack has not been previously installed on the system, you must enter the
credentials here and do not select Use sign-in credentials.
5. Click Next. The Select a Windows Support Pack page appears.
6. Under Step 3: Select a Version Control Repository, select a source repository system to retrieve the
catalog.
The following fields appear:
• Name. Displays the name of the system.
• Status. Displays the status of the system.
• Product Name. Displays the name of the product.
• Trusted?. Displays whether the system trust relationship has been configured. To configure a trust
relationship, click configure.
This section displays systems authorized by the current user name. If the current user is not authorized
to view the systems, a message appears, indicating that the user does not have authorization rights on
the system.
7. Under Select a Support Pack to Install, select a support pack to install. Click the icon to navigate
down and view the contents of the Version Control Repository that you selected.
22 Setting up managed systems
Page 23
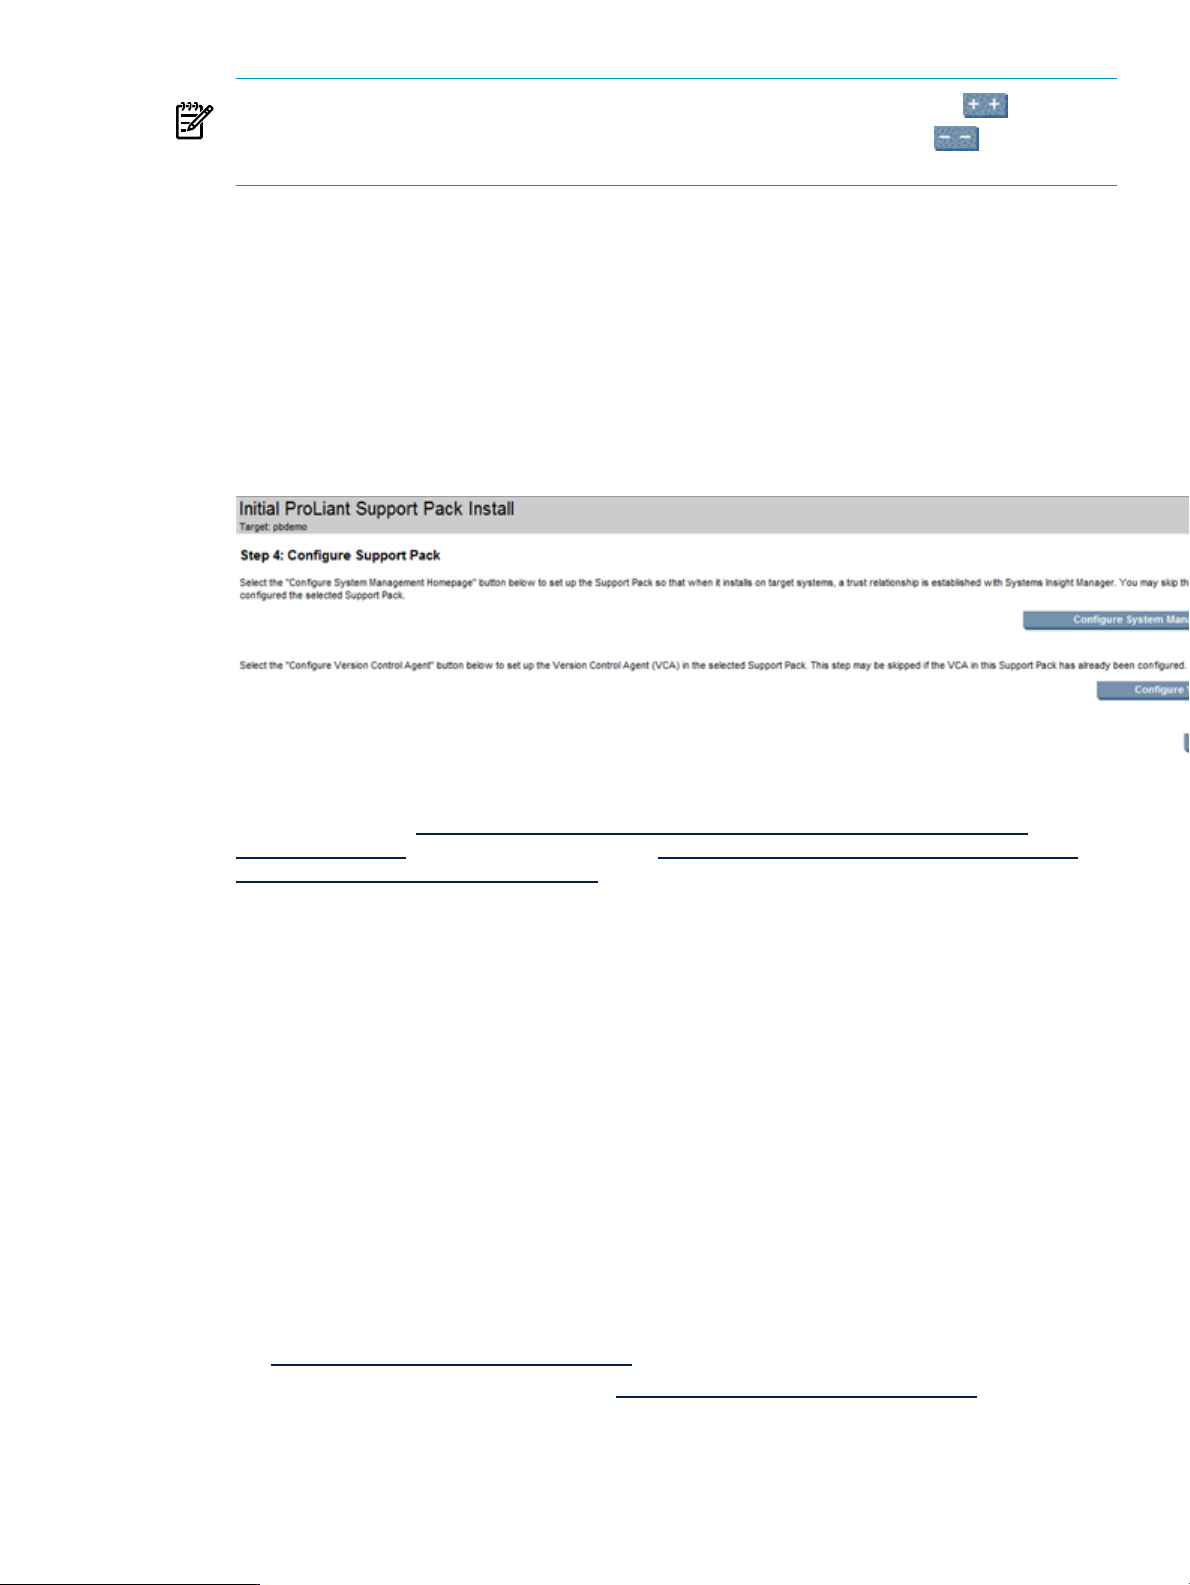
NOTE: To expand the System Software Baseline to display all contents, click the icon located
in the upper-left corner of the Select a Support Pack to Install section. Click the icon to collapse
the listings.
8. (Optional) To install and configure
(Secure Shell). This option is disabled by default.
9. (Optional) If you are installing a ProLiant Support Pack that is earlier than or the same as the
version
10. (Optional) If you do not want to reboot after the installation, clear the Reboot systems if necessary
after successful install option, which is selected by default. However, the system must be rebooted
for the new ProLiant Support Pack to be available.
11. Click Next. The Step 4: Configure Support Pack page appears, showing the following options:
• Configure HP System Management Homepage
• Configure Version Control Agent
, select Force downgrade or re-install the same version. This option is disabled by default.
OpenSSH
on the target systems, select Install and initialize SSH
installed
For more information about preconfiguring the SMH component, see
Installation Guide
documentation.html and for Version Control, see http://h18013.www1.hp.com/products/servers/
management/agents/documentation.html.
12. Click Next to start the ProLiant Support Pack download. The Download Support Pack page appears.
13. After the support pack is downloaded, click Schedule to create a scheduled task for the Initial ProLiant
Support Pack Install to run or click Run Now to run the task immediately.
at http://h18013.www1.hp.com/products/servers/management/agents/
HP System Management Homepage
Setting up HP-UX servers to be managed by Systems Insight Manager
Procedure 3-2 Setting up HP-UX managed systems
1. Understand the basic managed system software for HP-UX.
For HP-UX, the following software, shown with minimum recommended versions, is required for essential
Systems Insight Manager functionality to operate. This software is installed by default as part of the
latest HP-UX 11i v2 and 11i V3 operating environments, but it might need to be installed or updated
on HP-UX 11i v1 or older HP-UX 11i v2 environments.
• T1471AA HP-UX Secure Shell
• B8465BA HP
This WBEM Services bundle contains basic system instrumentation displayed in the Systems Insight
Manager Property pages, supporting collection and reporting by Systems Insight Manager inventory
functionality. To maximize the value of Systems Insight Manager for properties, inventory, and events,
see http://www.hp.com/go/hpsim/providers for the latest WBEM Services bundle.
For the latest WBEM Services bundle, go to http://www.hp.com/go/hpsim/providers.
WBEM Services
for HP-UX
Setting up HP-UX servers to be managed by Systems Insight Manager 23
Page 24

If iCap information is desired, also install:
▲ B9073BA version 08.01.01 iCAP for HP-UX
2. Ensure the managed system software is installed.
To verify that the minimum required software is installed, log in to the remote system, and run the
following command:
$ swlist –l bundle T1471AA B8465BA OpenSSL
To verify that the optional providers and HP System Management Homepage are installed, run commands
such as:
$ swlist –l bundle LVMProvider WBEMP-LAN-00 SysMgmtWeb SysFaultMgmt
OnlineDiag
3. Acquire and install the managed system software if not previously installed.
The SSH and WBEM bundles are included on the HP-UX Operating Environment and Application Release
media, as well as part of the Systems Insight Manager HP-UX depot downloaded from
http://h18013.www1.hp.com/products/servers/management/hpsim/dl_hpux.html.
For the WBEM providers, see
http://h18013.www1.hp.com/products/servers/management/hpsim/dl_hpux.html .
After you have obtained the depots containing the software, you can install then from the managed
system:
$ swinstall –s <depot_location> OpenSSL
NOTE: B8465BA and B9073BA version 08.01.01 depends on OpenSSL, so you must install OpenSSL
first.
$ swinstall –s <depot_location> T1471AA
$ swinstall –s <depot_location> B8465BA
$ swinstall –s <depot_location> <names of WBEM providers being installed>
After you have verified that the correct management software is installed on your managed systems, continue
to Chapter 4 Credentials> to finish the configuration from the Systems Insight Manager user interface.
Manually setting up an HP-UX managed system
Although chapters 4-7 explain how to finish configuring managed systems from the Systems Insight Manager
GUI, this section describes how to perform some of these same steps from the command line for HP-UX
systems. You do need to first supply credentials and discover the systems, as described in Chapter 4
Credentials and Chapter 6 Discovery. Then you can do the following actions from the command line, if
desired.
You can use the Systems Insight Manager Configure or Repair Agents tool to configure HP-UX managed
systems simultaneously, or you can configure each managed system manually.
Configuring SNMP to send traps to the CMS
• On the managed system, add the full host name or IP address of the CMS as a trapdest in the following
file:
/etc/SnmpAgent.d/snmpd.conf
trap-dest: hostname_or_ip_address
• Stop the SNMP Master agent and all subagents with the command:
/sbin/init.d/SnmpMaster stop
• Restart the SNMP Master agent and all subagents with the command:
/usr/sbin/snmpd
24 Setting up managed systems
Page 25
Configuring SSH access
On the CMS, copy the SSH-generated public key from the CMS to the managed system using the
mxagentconfig:
Use one of the following commands:
• mxagentconfig -a -n <hostname> -u root -f <file_with_root_password>
• mxagentconfig -a -n <hostname> -u root -p <root_password>
NOTE: Using the -p option exposes the password through ps output, so using the -f option (with a
file only readable by root, and containing only the managed system root password) is highly
recommended when using mxagentconfig -a. If you use the -p option, enclose the password in
single quotes if the password has any special characters, such as & or $. For more information and
options, see the mxagentconfig manpage with man mxagentconfig.
Subscribing to WBEM indications/events:
NOTE: For more information about HP-UX WBEM events, see the Systems Insight Manager online help.
Procedure 3-3 Subsribing to WBEM indications/events
1. From the managed system, be sure WBEM is installed.
swlist -l bundle B8465BA
2. Verify that SysFaultMgmt provider is installed.
Depending on the System Fault Manager configuration, run the following:
cimprovider –lm SFMProviderModule
The EMSWrapperProvider appears.
or
cimprovider –ls
The EMSWrapperProvider appears.
NOTE: For more information regarding System Fault Manager, see HP System Fault Management
Diagnostics.
3. From the CMS:
To subscribe to WBEM Events, you must have root access. You can verify what credentials are used for
WBEM access by running the following command line:
mxnodesecurity –l –p wbem –n <systemname>
If the managed system does not have a root level user credential configured, you can add it for the
individual system.
NOTE: You can use the Configure or Repair Agents tool in the Systems Insight Manager UI to perform
this step without permanently recording a root password.
• To change the individual system:
mxnodesecurity -a -p WBEM -c \
<username:password> -n <systemname>
4. From the CMS, run the WBEM Indications/Events command line:
mxwbemsub -l -n <systemname>
Setting up HP-UX servers to be managed by Systems Insight Manager 25
Page 26

Setting up Linux servers to be managed by Systems Insight Manager
To be fully managed by Systems Insight Manager, HP ProLiant servers running Linux should have the Insight
Management Agents installed. These agents are part of the ProLiant Support Pack. You can install the PSP
manually, or configure it to be installed as part of your normal operating system deployment procedures.
After setting up the management agents on the managed systems, the rest of the configuration can be done
from the Systems Insight Manager UI. Continue to Chapter 4 Credentials for further information.
Installing the ProLiant Support Pack on a Linux system for the first time
For Linux systems, use the Linux Deployment Utility to install the latest support pack with the preconfigured
components to the local system. For more information regarding installing a support pack using the Linux
Deployment Utility, see http://www.hp.com/servers/psp.
Configuring agents remotely using Configure or Repair Agents:
1. For Linux systems, select Install Linux PSP or ESX Agents.
2. Click Next. The Step 3: Configure or Repair Agents page appears.
Manually setting up Linux managed systems
Although chapters 4-7 explain how to finish configuring managed systems from the HP SIM GUI, this section
describes how to perform some of these same steps from the command line for Linux systems. You do need
to first supply credentials and discover the systems, as described in chapters 4 and 6. Then you can do the
following actions from the command line, if desired.
Installing and configuring SSH
Procedure 3-5 Installing and configuring SSH on a Linux system
1. Verify that SSH is installed on the managed system:
rpm -qa | grep ssh
If SSH is not installed, see your Linux provider for information about installing SSH.
2. On the CMS, copy the SSH-generated public key from the CMS to the managed system, and place it
in the authorized keys file of the execute-as user (root or administrator).
IMPORTANT: On a non-English CMS, ensure that an administrator account exists on the CMS, and
that mxagentconfig has run on the CMS for the created administrator account.
a. Launch the Manage SSH Keys dialog box from the CMS command prompt:
mxagentconfig -a -n hostname -u username -p Password
b. Click Connect.
Configuring a Linux system to send SNMP traps
NOTE: These steps might vary slightly, depending on your version of Linux. See your Linux provider for
details if these file paths and file names do not exist on your system.
Procedure 3-6 Configuring a Linux system to send SNMP traps
1. Verify that SNMP is installed:
rpm -qa | grep snmp
If it is not installed, see your Linux provider for information about installing SNMP.
2. If the HP Server and Management Drivers and Agents daemons are installed on your system, stop them:
/etc/init.d/hpasm stop
3. Stop the SNMP daemon:
/etc/init.d/snmpd stop
26 Setting up managed systems
Page 27

4. Edit the snmpd.conf file.
For Red Hat Linux, open the following file in the vi editor:
vi /etc/snmp/snmpd.conf
For SuSE SLES 8, open the following file in the vi editor:
vi /usr/share/snmp/snmpd.conf
a. Remove the comment symbol (#) from the trapsink line, and add the IP address of the CMS:
trapsink IPaddress
where IPaddress is the IP address of the CMS.
b. Add the CMS to the read only community by adding the line:
rocommunity CommunityName IPaddress
where CommunityName is the SNMP community string used by the CMS and IPaddress is the
IP address of the CMS.
c. Save the changes to the file. To save and close this file using the vi editor, press the Esc key, enter
:wq!, and then press the Enter key.
5. Start the SNMP daemon:
/etc/init.d/snmpd start
6. If the HP Server Management Drivers and Agents daemons are installed on your system, start them:
/etc/init.d/hpasm start
Setting up Linux servers to be managed by Systems Insight Manager 27
Page 28

4 Credentials
In Systems Insight Manager, credentials are used to enable the CMS to communicate with managed systems,
through WBEM, WS-MAN, SSH, and SNMP. However, the Sign-in credential is used unless you configure
the other protocols. The Sign-in credential is protocol independent and can be tied to systems through the
discovery credential. In Systems Insight Manager, there are three different types of credentials:
• System credentials Credentials used by
include WBEM, WS-MAN, and SSH credentials, Sign-in, SNMP community string, and
(SSO) credentials.
• Discovery task credentials Credentials used by a discovery task that apply to all systems discovered
by that task.
• Global Credentials Global credentials are system credentials that apply to all systems.
During the identification process (done automatically during discovery), credentials are tried, starting with
System Credentials. If they do not work, and the Try Others setting is chosen for them, then Discovery
credentials are used. Similarly, if those do not work and the Try Others setting is chosen, then Global
Credentials are tried. As soon as a credential is found that works, Systems Insight Manager notes that
credential as
as it continues to work. If it should fail, then the process is repeated the next time identification is run. To see
the
working
(Options→Security→Credentials→System Credentials). These
Credentials that are in use table.
When a discovery credential is used to successfully communicate with a system, a credential reference is
created for that system. If the credential is later changed on that same discovery task, the credential that is
used on all systems referencing it changes. This enables credentials to be changed in one place (usually
passwords for an account) and immediately be available for use in Systems Insight Manager. The same is
true for global credentials.
Because of this, if a global or discovery credential is deleted, you are asked if all references to that credential
should be removed or if copies should be made as system credentials for each system that is referencing the
current credential.
However, when a credential is overwritten, instead of deleted and then re-added, the credential is changed
and each system referencing it uses the new username/password values.
If the intent is not to change what is currently in use, you must add a new credential. For discovery tasks, a
new discovery task must be created with its own credentials, instead of editing an existing discovery task,
if the systems require different credentials than contained in the existing discovery task.
working
credentials for any managed system, go to the System Credentials page
and continues to use it for regular communications with the managed system as long
identification
to access managed systems. These credentials
Single Sign-On
working
credentials appear in the
Example XML file to add more than 10 WBEM username and password pairs
To save time and effort, create an XML file that defines your system authorizations before running discovery.
For example:
<?xml version="1.0" encoding="UTF-8"?>
<!--
15.43.215.47
15.43.212.150
15.3.110.117
15.3.105.51
15.3.110.113
-->
<nodelist>
<node name="system1">
<credential protocol="wbem" username="root"
Example XML file to add more than 10 WBEM username and password pairs 28
Page 29

password="pswd" />
</node>
<node name="system2">
<credential protocol="wbem" username="root"
password="pswd" />
</node>
<node name="system3">
<credential protocol="wbem" username="root"
password="pswd" />
</node>
<node name="system4">
<credential protocol="wbem" username="root"
password="pswd" />
</node>
<node name="system5">
<credential protocol="wbem" username="euploid\administrator"
password="pswd" />
</node>
</nodelist>
You can include the IP addresses of the systems to be discovered in an XML comment so that you can maintain
the IP addresses with the XML file and can copy and paste into the Ping inclusion ranges, system (hosts)
names, templates, and/or hosts files field when creating or editing a discovery task.
After you create the XML file import it into Systems Insight Manager before running discovery using the
following CLI command:
mxnodesecurity -a -f <path-to-xml-file>
HP recommends limiting the WBEM user name and password pairs to 10 to reduce the overall discovery
run time.
Example XML file to add more than 10 WBEM username and password pairs 29
Page 30

5 WMI Mapper Proxy
Windows systems use a variation on the WBEM
Manager to communicate with Windows systems, the WBEM protocol it uses must be converted to the WMI
protocol and vice versa. This is the function of the WMI Mapper Proxy. This proxy is typically installed on
the same system as Systems Insight Manager when Systems Insight Manager is installed on a Windows
system. For Linux or HP-UX installations where Windows systems will be managed, it can be installed on a
separate Windows system, with its location configured in the Options→Protocol Settings→WMI Mapper
Proxy menu.
You can configure the WMI Mapper Proxy from the First Time Wizard. You can also add, edit, and delete
WMI Mapper Proxies by selecting Options→Protocol Settings→WMI Mapper Proxy.
management protocol
called WMI. For Systems Insight
30
Page 31

6 Discovery
Discovery is the process of finding systems in the
the CMS by Systems Insight Manager;. Systems Insight Manager can automatically discover and identify
systems attached to the network using information from management protocols such as SNMP, WMI, WBEM,
SSH, and SSL. Create discovery tasks to limit discovery to specific network segments or IP address ranges,
or to control the frequency that each task runs. Use discovery filters to prevent discovery of unwanted system
types.
When you access the Discovery page, a table displays a list of all available discovery tasks. You can
configure multiple instances of discovery with each instance having its own schedule and set of inclusion
ranges. When a discovery task is executed, the Last Run column is updated to display its progress, including
the percentage of completion.
Automatic discovery
(performed on each host) is 10% of the process; the system identification is 90% of the process. If no host
is found on an IP address, the system identification is considered complete. For example, you have 100
hosts in your discovery range. If 50 hosts have been pinged, but only 10 identified, you have: 50/100 *
.10 = 0.05 (ping sweep) 10/100 * .90 = 0.09 (identification) 0.05 + 0.09 = 0.14 * 100 = 14% (total
completed percentage).
NOTE: You can run only one discovery task at a time. If you select to run more than one discovery task,
the percentage in the Last Run column remains at 0% until the currently running task is complete.
and completion percentages are calculated by weighting two factors: the ping sweep
Recommended discovery tasks
For best results, HP recommends creating the following discovery tasks, and running them sequentially in
the suggested order. You might want to create multiple tasks for certain types, such as servers, grouping
them so that systems with the same credentials are in the same discovery tasks, with up to three sets of
credentials supplied in each discovery task. This reduces the chance of account lockout when an invalid
credential is tried too many times.
1. Central Management Server (CMS) This discovery task is for discovery of the Systems Insight Manager
CMS and its management processor, if it has one.
2. Onboard Administrator This discovery task is for discovery of the Onboard Administrators for every
enclosure to be managed. When specifying credentials for this task, include the iLO credentials for
every blade in the enclosures associated with the Onboard Administrators.
3. Management Processors This discovery task is for discovery of all management processors not
discovered in the previous tasks. This includes iLOs and management processors for all non-blade
systems.
4. Physical Servers This discovery task is for discovery of physical servers (blade servers and standalone
servers). The management processors for these servers must be discovered prior to this discovery task
being run.
5. Virtual Machines This discovery task is for discovery of virtual machines associated with servers
discovered in the previous category.
management domain
so that they can be managed from
NOTE: If discovery tasks are run out of order, errors are likely. Typical errors due to running discovery
tasks in an improper order include:
• Association errors For example, a server not associated with a management processor or virtual
machine not associated with a virtual machine host.
• Credentials errors Because discovery of systems can trigger additional discovery of associated systems
or management processors, if the correct credentials are not supplied for the associated systems, their
discoveries are likely to show errors. If you discover these associated systems with a subsequent discovery
task containing the proper credentials, they should then complete successfully.
Recommended discovery tasks 31
Page 32

NOTE: Citrix Xen VMs discovered in category 5 will always return a discovery error unless the Citrix Xen
Host has been registered through Configure→Virtual Machine→Register Virtual Machine Host.
If you have a small network, an alternate way of setting up your discovery tasks is to create a single task
with one IP address range and all of the required credentials for the systems in that range. However, doing
this can make it difficult to troubleshoot and diagnose errors if one or more systems are not configured
correctly.
Options on the Discovery page
Under the For all automatic discoveries section, the following options are available:
• Configure general settings Select this option to configure general settings that apply to all discovery
tasks.
• Manage hosts files Select this option to manage
• Configure global protocol settings Select this option to configure global protocol settings.
NOTE: To discover clusters correctly, you must enable SNMP with the correct security settings on
Systems Insight Manager on the target systems.
From the Discovery page, you can:
• Create a new discovery task Click New and the New Discovery section appears.
• Edit an existing discovery task Select a task from the table,and click Edit. The Edit Discovery section
appears.
• Enable or disable a discovery task Select a task and click Disable to disable the schedule of an
enabled task. If a task is disabled, the button changes to Enable. To resume automatic execution of
the task, click Enable.
• Delete an existing discovery task Select a task from the table and click Delete.
• View Task Results This button displays the task results for the current discovery task.
• Run a discovery task Select the task you want to run and click Run Now. When a task is running,
the Run Now button changes to a Stop button.
• Stop a discovery task from running Select the running task and click Stop.
See the HP Systems Insight Manager online help for more information on each of these options.
hosts files
Discovery credentials
One of the best ways to configure credentials for your managed systems is to do so as part of a discovery
task. You can enter one or more sets of credentials. As each system is discovered, the credentials listed in
the discovery task will be tried on it, in order, until one set is found to work. This set will be saved as the
working credentials for that system. You can configure more than one set of credentials for each discovery
task, but it is suggested that you keep it to a small number (less than 5) for best performance. If possible,
group systems with similar credentials into the same discovery task.
Configuring Configure or Repair Agents through a discovery task
You can choose to have additional configuration done on the managed systems, as they are discovered,
by configuring the settings using the Configure or Repair Agents button. For additional information, see the
Systems Insight Manager online help.
Viewing discovery task results
To display the task results for discovery task, select the task on the Discovery page, and then click View
Task Results. You can also view discovery task results, by selecting Tasks & Logs→View Task Results.
32 Discovery
Page 33

Discovery filters
Discovery filters prevent or enable certain system types from being added to the database through automatic
discovery. When you want to discover systems of a certain type, using filters is much easier than specifying
the IP addresses of each individual system. Discovery filters do not apply to individually added systems.
You can access discovery filters from the Discovery page by selecting Enable discovery filters in the
Configure general settings, section.
To disable filters, clear the Enable discovery filters checkbox. To enable filters, select the Enable discovery
filters checkbox, and then select the system types that you want to discover.
To access and modify discovery filters, you must have
only systems of the selected types are added to the database through automatic discovery. Because all
operate on systems that exist in the database, tasks do not run on any system until the filter criteria has been
met and that system has been added to the database. Filters do not affect any systems already discovered,
even if the systems change to a type that no longer matches the current filter. If discovery filters are disabled,
automatic discovery discovers systems according to the General Settings for All Discoveries section on
the Discovery page.
If you do not discover the HP systems that you expect to find, ensure that the Insight Management Agents
are installed and running correctly on the target systems. In addition, verify that the SNMP Community Strings
settings and WBEM user name and passwords in Systems Insight Manager and on the agents for systems
that are not discovered are configured correctly.
administrative rights
. If discovery filters are enabled,
tasks
Discovery filters 33
Page 34

7 Manage Communications
Use the Manage Communications feature to troubleshoot communication problems between the CMS and
targeted systems. For each failed communication function, troubleshooting information is available. You can
reconfigure communication settings, launch agents, and push certificates to target systems. This feature is
available by selecting Configure→Manage Communications menu and includes the following tabs:
• Identification tab Includes status information on the state of an identification process . Identification
attempts to determine what the system type is, what management protocol a system supports, and
attempts to determine the operating system and version loaded, along with other basic attributes about
the system. Finally, it determines if the system is associated with another system.
• Events tab Indicates if the CMS can receive events from the target systems. This status considers the
setting of SNMP traps and WBEM indications.
• Run Tools tab Indicates if the CMS can run tools locally on target systems. Communication issues in
this column usually relate to security and trust relationships.
• Version Control tab Indicates the availability of software and firmware inventory data for target
systems. The status is collected and stored during data collection.
The following information is available:
• Advising and repairing managed system settings Includes a tabbed interface with a tab for each
functional column (Identification, Events, Run Tools, and Version Control). Each tab displays the
diagnostic results and includes troubleshooting tips and advice for fixing communication problems.
• Repairing managed system settings Launches the Configure or Repair Agents tool. Configure or
Repair Agents enables you to quickly and optimally configure systems for manageability.
• Updating communication statuses Runs to get an updated communication status.
• Printing Manage Communications table Creates a printer-friendly version of the list in a new window.
NOTE: Experienced users who do not need the troubleshooting advice might be able to repair their systems
faster with the Configure or Repair Agents feature. To access Configure or Repair Agents, select
Configure→Configure or Repair Agents.
Configuring the managed system software using the Configure or Repair Agents feature from the CMS
The Systems Insight Manager Configure or Repair Agents tool is a quick and easy way to configure Linux,
HP-UX and Windows managed systems to communicate with Systems Insight Manager.
To run Configure or Repair Agents remotely against multiple systems simultaneously, you must have
authorizations to run the Configure or Repair Agents tool.
In addition, you must enter administrator level user credentials for the target system.
Sending test traps and indications
To verify that SNMP traps and WBEM indications can be sent, send test traps and indications.
You can send test traps and indications from Configure or Repair Agents on Windows and HP-UX systems,
with the WBEM provider installed, from the Step 4: Configure or Repair Agents page, under Configure
WBEM / WMI.. Select Send a sample WBEM / WMI indication to this instance of Systems Insight
Manager to test that events appear in Systems Insight Manager in the Event list or All Event User
Interface for the selected system..
You can also send test SNMP traps from some HP-UX version by running the following procedure:
Configuring the managed system software using the Configure or Repair Agents feature from the CMS 34
Page 35

Procedure 7-1 Sending test traps on a Windows or HP-UX system
1. From the HP-UX managed system, run /ect/opt/resmon/lbin/send_test_event monitor
name . For example, /etc/opt/resmon/lbin/send_test_event disk_em.
Possible monitor names:
• dm_memory
• lpmc_em
• disk_em
• dm_chassis
• dm_core_hw
• ia64_corehw
• fpl_em
2. Confirm that the test indication is shown in the Systems Insight Manager event table view after you
trigger it.
Sending test traps and indications 35
Page 36

8 Automatic event handling
Automatic event handling enables you to define an action that Systems Insight Manager performs when an
event is received. Users who want to access this feature must have
• Managing Tasks Enables you to view definitions, copy tasks, edit tasks, view task results, disable or
enable tasks, or delete existing Automatic Event Handling tasks.
• Creating a New Task Enables you to create a new Automatic Event Handling task. Select
Options→Events→Automatic Event Handling→New Task.
• E-mail Settings Enables you to set up the various e-mail settings needed because of an event action.
You can access the E-mail Settings page using one of the following methods:
• Select Options→Events→Automatic Event Handling→E-mail Settings.
• From the Systems Insight Manager introductory page, click e-mail in the Do this now to finish
the installation section.
E-mails are sent to alert users about problems. Ask your e-mail administrator to verify whether you need
the following information:
• SMTP host name of the outgoing mail server, such as mail.company.com. This server receives
the mail messages from Systems Insight Manager and begins routing them to the recipient.
• The name of the management server e-mail address. This address appears in the From field of
any e-mail sent from Systems Insight Manager. The user can be a system name. Enter the full
domain address in the form server@domain.com, as the sender.
administrative rights
.
NOTE: Some e-mail systems require a valid From user before they accept the message. HP suggests
that a valid e-mail account be used for this purpose.
• Modem Settings Enables you to set up a modem to use for alphanumeric paging. Before you send
a page from the Systems Insight Manager server, set up the modem on the server. Be sure you know
the COM port used by the modem to send the page.
This feature is available to users with
Insight Manager CMS is installed on Windows.
You can access the Modem Settings for Paging page using one of the following methods:
• Select Options→Events→Automatic Event Handling→Modem Settings.
• From the Systems Insight Manager introductory page, click paging in the Do this now to finish
the installation section.
Access the Automatic Event Handling page to edit or delete an existing rule by clicking Automatic Event
Handling in the Do this now to finish the installation section of the Systems Insight Manager introductory
page.
administrative rights
Example automatic event handling tasks
Systems Insight Manager ships with three example automatic event handling tasks that are disabled by
default. When the Automatic Event Handling - Manage Tasks page appears, you can select one of the
example tasks and click View Definition.
• example - all desktop information events This task is triggered when an informational event is received
from the discovered desktop systems, and this task clears the event. The same task can be edited to
change the action of the system criteria .
only and is available only when the Systems
• example - all linux MIB updates This task is triggered when a MIB update events request is received
from all managed Linux target systems that are discovered and identified in Systems Insight Manager.
The same task can be edited and saved as new task.
• example - all server failed sign-in events This task is triggered when a failed sign-in attempt is made.
Sign-in failure might be caused by an invalid user account, sign-in attempt from an excluded IP address,
or failed sign-in authentication.
Example automatic event handling tasks 36
Page 37

9 Users and Authorizations
Systems Insight Manager enables you to configure authorizations for specific
Authorizations give the user access to view and manage systems. Each authorization specifies a user or user
group, a
specified in the assigned toolbox.
You must plan which systems each user will manage and which specific set of
to execute on managed systems. A user with no toolbox authorizations on a particular system cannot view
or manage that system.
Authorizations are cumulative. If a user is authorized for Toolbox1 and Toolbox2 on the same system, the
user is authorized for all tools in both Toolbox1 and Toolbox2 on that system. Similarly, a user authorized
for the All Tools toolbox on a system requires no other toolbox authorizations on that system because the
All Tools toolbox always includes all tools. See the HP Systems Insight Manager online help for more
information on setting up users and authorizations.
Users
Create user accounts to sign-in to Systems Insight Manager. The account must be valid on the operating
system (including Active Directory on Windows) on the CMS and is authenticated by the CMS. You must
know the operating system
the password.
User groups
User groups must exist in the operating system. For Windows, they must also exist in Active Directory.
Members of user groups in the operating system can sign-in to Systems Insight Manager and inherit the
group's attributes for configuration rights, sign-in IP address restrictions, and authorizations. When a group's
configuration rights, sign-in IP address restrictions, or authorizations are changed, this change is immediately
reflected for all current members of the group.
With configuration rights, the user inherits the highest setting. With sign-in IP address restrictions, the user
inherits all entries. With authorizations, the user inherits all authorizations.
toolbox
usersoruser groups
, and a system or system group. The specific set of tools that can be run on a system is
tools
each user is authorized
user account
name of the user you are adding, but it is not necessary to know
.
NOTE: A user's group membership is determined at sign-in. If a user's group membership changes in the
operating system, it is not reflected in Systems Insight Manager until the next time the user signs in to Systems
Insight Manager.
Toolboxes
Toolboxes are used to configure a group of
some users can use the group of tools to which each user has access but not others. For example, an
administrator has access to more tools than a user.
NOTE: For users with
to events, you must select Configuration Tool from the Show tools in category dropdown list. Then, select
Clear Events, Delete Events, Assign Events, and Comment Events as necessary, and then click
to add them to the Toolbox contents.
operator rights
tools
for each
and user rights to clear, delete, assign events, and add comments
user
that has access. Toolboxes are set up so that
Users 37
Page 38

10 Managed environment
The Managed Environment feature enables you to select the operating systems that you will manage. There
are four options: Windows, Linux, HP-UX, and Other. The selections made here configure Systems Insight
Manager to hide collections, tools, and reports for operating systems you do not manage.
NOTE: These settings can be changed at any time, and the hidden collections, tools, and reports can be
made visible again.
If you select Linux or HP-UX, you can select to have GlancePlus or Ignite-UX and Software Distributor menu
items appear in Systems Insight Manager. The HP-UX menu items are for handling Integrity Extensions on
a Windows or Linux CMS and are not available on an HP-UX CMS.
If both Linux and HP-UX are selected, the same user name must be specified for GlancePlus in both the
places. Root user is used if no user name is specified.
38
Page 39

Part III Systems Insight Manager basic features
39
Page 40

11 Basic and advanced searches
Basic search
The Search feature enables you to quickly retrieve details about a
attributes. For example, you could search for a system name, IP address, or a word such as server, HP-UX,
or storage.
The search field only allows the following characters: letters, numbers, tilde (~), dash (-), period (.), underscore
(_), apostrophe ('), and space.
As you type, a dropdown list appears and lists systems with names that begin with the text entered. The list
includes up to 12 systems, and shows the icon for the system health status. If more than 12 systems are
found, an ellipsis (...) appears at the bottom of the list. Continue typing to narrow the list further. You can
use the mouse or arrow keys to select a system to view, or do not select a system and press Enter or click
Search to search for the indicated criteria.
If you selected a system in the dropdown list, the System Page for that system appears.
If you did not select a system, and you pressed Enter or clicked Search, the Search Results page displays
a list of systems that match your criteria. Clicking a name in the list displays the System Page for that system.
If no system in the database resembles the target system, the Search Results page indicates that no entries
meet the criteria, and gives you the option to search again or perform an advanced search.
Advanced search
To access the Advanced Search page, click the Advanced Search link in the Search panel.
You can create a system,
for box at the top of the Advanced Search page. Then you can specify the criteria to be used in the search.
The result of running a search is a collection. The criteria selected can also be saved as a collection definition,
so that search can be run again at a later date. The saved collections are stored in the System and Event
Collections panel as Systems or Events. These collections can be saved as private or shared.
event
, or
cluster
search by selecting systems, events, or clusters in the Search
system
using its name or common system
Hierarchical displays
Some search criteria require hierarchical displays. Examples of hierarchical criteria are: Operating System,
Event Type, and Software/Firmware.
In these cases, the comparison selection box is replaced by a selection box containing the appropriate
syntax for that particular tree level. The most complex of these cases is the Software/Firmware criteria. When
Software/Firmware is selected, a series of search criteria are added below in a tree format:
• component type is
• and operating system is
• and category type is
• and name is
• and version is
In this case, as selections are made in the higher-level selection boxes, the available selections in lower-level
boxes are updated.
Save as
When you click Save As Collection, the Save As Collection section displays. Enter a name for the search
in the Name field, and then select where to save it.
View
When you click View, the results of the search appear below the search frame. This functionality enables
you to preview the results of the search before saving it, or to run a search without saving it.
Basic search 40
Page 41

Searching for tools
The Tool Search feature provides a quick way to search and filter textually, based on tool names, tool
locations in the Systems Insight Manager cascading menu structure, and tool descriptions.
For additional information, see the Systems Insight Manager online help.
Searching for tools 41
Page 42

12 Monitoring systems
Viewing system collections
In Systems Insight Manager monitoring systems involves Systems Insight Manager polling
Management Agents
this information as status icons. There are several types of status that can be displayed, such as Health Status
(HW), Software Versioning Status (SW), or Management Processor status (MP). Other status icons might be
added by plug-ins to Systems Insight Manager. These icons enable you to see, at a glance, the state of your
systems.
Pages displaying system status
• System lists There are four system lists page views; table view, icon view, tree view, and picture view
(for racks and enclosures). Common in each view is the system name and system status. To access the
system list pages, select a collection or system from the System and Event Collections panel. The
type of collection or system that you select determines the view that appears.
or firmware on the managed systems to retrieve status information, and then displays
HP Insight
• Table view The HS column on the system list page displays the overall
which is determined by the default Hardware Status Polling task and is a roll up of all the status
sources, which can be SNMP, WBEM, HTTP, and cluster status. The legend shows how many
systems in the view are Critical, Major, Minor, Normal, Disabled, and Unknown.
• Icon view The icon view lists the system name of all discovered systems, as well as the
health status
Minor, Normal, Disabled, and Unknown.
• Tree view The tree view displays the health status icon and the system name for each system in
a tree format.
• Picture view The picture view page for racks and enclosures contains a picture view of the
discovered systems in the rack or
Manager, placing your cursor over a server shown in the view displays information on that
particular server, including
is located. You can also click a component name to display detailed information about the
component.
In all views, you can select the checkbox next to the system name to select a system. You can select
more than one system, or to select an entire collection, select the checkbox, Select "collection
name" itself.
• System pages On the System Page, System tab, a status icon indicates the overall health status
stored in the
hardware status icon and software status icon. The System Status section contains more information
on the
system
You can access the System Page one of the following ways:
for each system. The legend shows how many systems in the view are Critical, Major,
database
status.
enclosure
server blade
. If system monitoring is suspended, a disabled icon appears in place of the
if available. While signed in to Systems Insight
name, slot number, and the enclosure in which the server
system health status
system
,
• Select Tools→System Information→System Page, and then select a target system.
• Click the system name in the System Name column on the system table view page.
• Property pages The Property page Status tab displays WBEM properties that help determine the
status of the target system, such as determining memory status and process status. Computer system
Viewing system collections 42
Page 43

status is determined by information collected live through the WBEM protocol and the information
provided by the WMI provider.
You can access Property pages in the following ways:
• From the System Page on the System tab, click Properties. The Property pages appear for
the target system.
• Select Tools→System Information→Properties, select the target system, and click Run now.
The Property pages display for the target system.
• System Status Panel This panel provides uncleared event status, system health status information, and
an alarm to notify you about certain events or statuses. The System Status panel is in the upper left
corner of the Systems Insight Manager GUI and can be customized by clicking the Customize link
within the panel.
Viewing health status from the table or icon view
To display the next level of status detail from any page in Systems Insight Manager that shows a health status
icon, place your cursor over the icon and additional status detail information appears. The status values that
appear depend on the agents installed on the target system.
In some cases, the system is a container, such as a rack, enclosure,
icon views, the status value is the status of the container and does not include status of subsystems. If the
status is Unknown, only the system name and Unknown status icon appears.
Viewing health status in the tree view
complex
, or cluster. In the table and
The tree view displays status data for each system, as well as rollup status for container systems. The status
icon is located on the left side of the tree view next to the selection checkbox. For systems that are containers,
the status to the left of the container name indicates the most critical status of the systems in the container,
including the container status itself. The status of the container itself, if there is one, appears to the right of
the system name, inside parentheses, alongside the system type label. Placing your cursor over the status
icons will reveal additional status details.
System status types
The following table describes the Systems Insight Manager, system health status types, which appear in the
HS column on the system list page.
Table 12-1 Health status types
Critical
Major
Minor
DescriptionStatus typeStatus icon
Systems Insight Manager can no longer communicate with the system. The
system was previously
be down, powered off, or no longer accessible on the network because of
network problems.
A major problem exists with this system that should be addressed immediately.
For systems running Insight Management Agents, a component has failed.
The system might no longer be properly functioning and data loss can occur.
In Insight Manager (WIN32), this status was identified as
A minor problem exists with this system. For systems running Insight
Management Agents, a component has failed, but the system is still
functioning. In Insight Manager (WIN32), this status was identified as
Degraded
.
discovered
but cannot be pinged. The system might
Failed
.
Warning
Disabled
The system has a potential problem or is in a state that might become a
problem.
The system is operating normally. The system is accessible.Normal
The system is suspended, which enables a system to be excluded from status
polling, identification, data collection, and automatic event handling. On
the Automatic Discovery page, if you select the Automatically discover
a ser ver blade when its iLO is identified option, new servers discovered
through iLO (for example, no operating system or IP address known) are
shown as disabled until the system is discovered with an IP address or
operating system.
Viewing system collections 43
Page 44

DescriptionStatus typeStatus icon
Unknown
No Status
Software status types
The following table describes Systems Insight Manager system software status types, which are displayed
in the SW column on the system list page.
Table 12-2 Software status types
Minor
Informational
Systems Insight Manager cannot obtain management information about the
system using SNMP>. Although no
is available, the system can be pinged. It might have an invalid community
string or security setting, or it might be an IP address that is no longer
associated with a system.
The system might be in a transitional state or a nonerror state.Informational
The system has not been polled by one or more of the polling tasks since the
system was discovered.
DescriptionStatus typeStatus icon
An update that contains a critical bug fix is available for this system.Major
An update that contains new hardware support or bug fixes is available for
this system.
All components on the system match the repository.Normal
The system is suspended. No software status is available.Disabled
The CMS could not reach the
the status of the system is unknown.
management instrumentation
HP Version Control Agent
information
on the system, so
Unknown
WBEM operational status types
Systems Insight Manager reports WBEM operational status for storage and server elements, such as storage
switch ports and filled memory slots. These status icons appear on the Property pages, System Page, and
in the status details that appear when you mouseover the health status column on the System Page. The
following statuses are available:
Table 12-3 WBEM operational status
The VCA cannot communicate with HP Version Control Repository Manager
(VCRM).
The Unknown status appears for server systems only under the following
circumstances:
• The VCA is not installed on the managed server.
• The VCA is installed on a server, but that server does not have a trust
relationship established with Systems Insight Manager.
• The operating system on the target server is not supported. Windows and
Linux operating systems are supported.
• The correct version of the agent is not on the target system.
• The target server type brand is not supported (only HP or Compaq brand
servers are supported).
• The target system is not licensed for monitoring by the HP Insight
Performance Management Pack (PMP). The target system must have the
Insight Management Agents 6.20 or later installed.
• PMP reports an indeterminate status for the system.
DescriptionStatus typeStatus icon
44 Monitoring systems
communication
Systems Insight Manager can no longer communicate with the element.Non-recoverable error, lost
• Nonrecoverable indicates that the element has failed, and recovery is
not possible.
• Lost communication indicates that the element was previously discovered
but is currently unreachable.
Page 45

DescriptionStatus typeStatus icon
Supporting Entity in Error
Mode, Other
A major problem exists with this system and must be addressed immediately.Predictive Failure, Error, Aborted,
• Predictive Failure indicates that the element is functioning nominally, but
a failure is likely to occur in the near future.
• Error indicates that the element is in an error state.
• Aborted indicates that the element's functionality has stopped abruptly.
The element's configuration might need to be updated.
• Supporting Entity in Error indicates that the element might be functioning
normally, but an element that it depends on is in an error state.
A minor problem exists with this element.Degraded, Stressed
• Degraded indicates that the element is not operating at optimal
performance or might be reporting recoverable errors.
• Stressed indicates that the element is functioning but needs attention.
The element is operating normally.OK
The element is suspended.In service, Stopped
• In Service indicates that the element is being configured.
• Stopped indicates that element is stopped.
No management information about the element could be obtained.Unknown, No contact
• Unknown indicates that the element status is not available.
• No Contact indicates that the element exists, but Systems Insight Manager
has never been able to communicate with it.
This status provides useful information about the port. No attention is required.Starting, Stopping, Dormant, Power
• Starting indicates that the element is starting.
• Stopping indicates that element is stopping.
• Dormant indicates that the element is inactive.
• Other indicates that additional information is available, but it does not
fit into the previously listed categories.
Monitoring clusters
To access MSCS
select one of the available cluster collections.
collections from the cluster collection view. Users can manage their own private collections, as well as:
• Save collections Click Save As Collection from the cluster table view page.
• Delete clusters Click Delete from the cluster table view page. A confirmation box appears. To delete
the cluster, click OK, or to cancel the deletion, click Cancel.
NOTE: Clusters that contain cluster members cannot be deleted. To delete a cluster with its cluster
members, select the All Systems collection in the System and Event Collections panel. Then, select
the cluster and all of its members, and then click Delete.
• Print cluster collection view Click Print to print the collection results.
• Customize the view Click Customize to customize which columns display and in what order.
Cluster
System properties
The Set System Properties tool enables you to set
You have two options for setting system properties:
• Edit system properties for a single system Select the Tools & Links tab on the System Page, and
then click the Edit System Properties link.
collections in the System and Event Collections panel, click Systems and then
Users
with
administrative rights
system properties
for a single system or for multiple systems.
can manage all shared cluster
• Set system properties for one or more systems Select Options→System Properties→Set System
Properties.
Monitoring clusters 45
Page 46

The Suspend or Resume Monitoring tool enables you to suspend monitoring of a single system or multiple
systems, which enables systems to be excluded from status polling, identification, data collection, and the
automatic event handling features of Systems Insight Manager. The available suspend lengths include the
predetermined increments of 5 minutes, 15 minutes, 1 hour, 2 hours, 8 hours, 1 day, 2 days, 3 days, 4
days, 5 days, 6 days, and 7 days. You can turn on the suspend tool indefinitely. Configuration changes
take effect immediately. To view the new settings for a system, click the System tab on the System Page.
Changes made with this tool override previous settings. A system that is suspended appears with a disabled
icon throughout Systems Insight Manager.
You can suspend or resume monitoring using one of the following methods:
• Suspend or resume monitoring for a single system Click the Tools & Links tab on the System Page,
and then click the Suspend/Resume Monitoring link.
• Suspend or resume monitoring for one or more systems Select Options→System
Properties→Suspend or Resume Monitoring.
NOTE: You must have
administrative rights
to access these tools.
Example of setting system properties
Setting customer company and contact information individually
If the customer company or contact information is different between multiple systems, the preferred
configuration method is through the Set System Properties or Edit System Properties page using the
procedures outlined below.
Systems Insight Manager provides two sections on the Set System Properties page under Contract and
Warranty Information, called System Site Information and Customer Contact. Each section is treated
by Systems Insight Manager as a unique database record with the first field of each section representing
the record’s header.
The System Site Information section uses Site name as the header, and Customer Contact uses Contact’s
first name and Contact’s last name as the header. You must be aware, when entering information in
these sections, that certain properties are tied to the Site name and Contact’s first name / last name
fields. If information is meant to be unique for a particular system or system location, you must ensure that
the Site name and/or Contact’s first name/last name are also unique.
Under Customer Contact, changing any of the fields Contact job title through Contact other changes
the corresponding properties for
For example, if the Site name was set globally to
individual system located in Brussels. You can create a Site name of
the unique address information for this system does not overwrite the other system’s System Site Information,
nor will it be overwritten if changes are made to those systems.
all
of the systems that use the same Contact’s first name/last name.
Widgets Inc.
and you require a unique address for an
Widgets Inc. – Brussels
to ensure that
IMPORTANT: Although Systems Insight Manager currently does not require you to complete both System
Site Information and Customer Contact sections, the Remote Support Pack requires both sections are
filled out, especially the fields designated by *.
Example of setting system properties for multiple systems
This tool enables you to edit system properties for multiple systems at one time. The Set System Properties
page for multiple systems is similar to the Edit System Properties page for a single system, except that a
checkbox appears next to each property. The checkboxes enable you to select the properties you want to
configure when the tool executes. Only the selected properties are saved as a property for the target systems.
If the value of the selected property is blank, that property is not set for the systems All properties are
optional.
46 Monitoring systems
Page 47

NOTE: This tool can be used for a single system. However, some of the properties that are available from
the System Page are not available when selecting this option. For example, the serial number is not available
here, whereas it is available from the System Page.
NOTE: To complete this procedure, you must be authorized to use the EDIT_SYSTEM_PROPERTIES
tool on the systems you want to update.
See the Systems Insight Manager online help for information on editing system properties.
Example of setting system properties for multiple systems 47
Page 48

13 Event management
Events are typically sent to the CMS from agents running on the managed systems. However, some events
are generated directly from the CMS itself. Managed systems must be configured to send events to the CMS.
After the CMS receives the event, if it passes the filters, any actions configured to happen upon its receipt
are run, and the event is stored in the Systems Insight Manager database for later viewing.
The event list page is the view for an event collection and lists of events that meet common criteria. From this
page, you can clear, delete, and assign events, enter comments on the event, and view printable reports.
To access the event list page, select an event collection from the System and Event Collections panel.
Monitoring
• Automatic Event Handling Enables you to manage automatic event handling tasks, create new
• Clearing Events Enables you to clear events. Select Options→Events→Clear Events. Select the
• Deleting Events Enables you to delete events from the database.
events
in Systems Insight Manager includes the following tasks:
automatic event handling tasks, and configure e-mail and modem settings.
target events to clear and click Clear.
Cleared events remain in the Systems Insight Manager database, but no longer contribute to the status
icon reported in the System Status panel.
Select Options→Events→Delete Events. Select the events to delete and click Delete. The events are
deleted from the database This tool can be scheduled to run on a regular basis. For more information,
see Default system tasks.
NOTE: You can also delete events from the event view page.
Event management configuration
The following menu options are used to configure event management:
• Event Filter Settings Enables you to filter SNMP
setting is to accept all registered
of the traps you want to see and use the IP address ranges to create a subset of systems whose traps
you can receive or ignore. For example, you can use event filtering to ignore informational traps. This
feature is available to users with administrative rights.
To access Event Filter Settings, select Options→Events→Event Filter Settings.
• SNMP Trap Settings Enables you to tailor trap messages to your specific network needs. Trap messages
can be cryptic, poorly written, and incomprehensible. You can modify the
Base
(MIB) information in the database representation. You can also modify a .cfg file of the MIB.
HP recommends that you never modify an actual MIB. To access SNMP trap settings, select
Options→Events→SNMP Trap Settings.
SNMP trap settings are available to users with administrative rights and are used to view or edit trap
details for a registered MIB.
• Status Change Event Settings Enables you to control if a status change event is generated when health
status changes. To access, select Options→Events→Status Change Event Settings.
• Subscribing to WBEM Events Enables you to subscribe to WBEM events. Select
Options→Events→Subscribe to WBEM Events.
SNMP traps
traps
you receive from discovered
from all discovered systems. You can specify the severity
Management Information
systems
. The default
• Unsubscribing to WBEM Events Enables you to unsubscribe to WBEM events. Select
Options→Events→Unsubscribe to WBEM Events.
Example - Creating a paging task based on e-mail notification
You can set up a notification task to forward an e-mail to a cell phone (for example,
(SMS)) or other paging interface applications, whenever the CMS receives a Critical, Major, or Minor event.
Event management configuration 48
Short Message Service
Page 49

IMPORTANT: When using time filters, you can use on-call style e-mails or pages. If you want one person
to be notified during business hours and another at night, create two different tasks and set the time filter
appropriately.
NOTE: This same type of task configuration can be applied to a Paging Task to use a modem in the Systems
Insight Manager server to page through a cell phone or alphanumeric pager.
NOTE: Paging is only supported on a CMS running Windows.
Procedure 13-1 Setting notification task to forward e-mail to cell phone
1. Select Options→Events→Automatic Event Handling→New Task. The Automatic Event Handling
- New Task page appears.
2. In the Task name field, enter a name for the task, such as Important Events for e-mail-Pager
Task.
3. Click Next. The Select event collection page appears.
4. Select use event attributes that I will specify.
5. From the second selection box (comparison selection), click the down arrow, and then select is.
6. From the third selection box (value selection), the available values for a given criteria or comparison
combination are given. Select Informational.
7. From the third selection box (value selection), the available values for a given criteria or comparison
combination are given. Select Critical.
8. Click Add.
9. Repeat steps 5-8, and in the third selection box, select Major and then Minor.
10. Click Next. The Select system collection page appears.
11. Select Use system attributes that I will specify.
12. Click Next. The Select systems page appears.
a. In the first selection box (criteria selection), select system name.
b. In the second selection box (comparison selection), select is.
c. In the third selection box (value selection), select (any).
d. Click Next. The Select actions page appears.
13. Select Send e-mail.
a. In the To address field, enter the e-mail address to which you want the notification sent (multiple
addresses can be added so that a group is notified). A CC address can also be added so that a
manager or supervisor is also notified.
b. In the Subject field, enter your subject. For example, HP Systems Insight Manager Events.
c. In the Message Format section, change the option to Pager/SMS. This option sends a condensed
e-mail format that is similar to a paging task in Systems Insight Manager, which is the ideal way
to send alerts to a cell phone type of hardware (or when Telephony Application Programming
Interface (TAPI) is not available and an e-mail-to-paging provider is being used).
d. Click Next. The Review summary page appears.
14. Click Next. The Select time filter section appears.
15. Select Use time filter and select Nights and Weekends, unless you want to receive the e-mail 24
hours per day. If so, clear Use time filter.
16. Click Finish to create the new task.
Examples of e-mail pages
Automatic Event Handling enables you to send a system's home page URL in an e-mail address if that system
has a home page. If the system does not have a home page, then Automatic Event Handling sends a URL
that points to the Systems Insight Manager System Page of the system on the current CMS.
Examples of e-mail pages 49
Page 50

NOTE: The URL specified in an e-mail message appears only if the format is set to standard.
You can send the following e-mail pages from Systems Insight Manager:
• Standard
• Pager/SMS
• HTML
Example of a standard e-mail page
From: Doe, John
Sent: Wednesday, April 28, 2004 5:04 PM
To: Doe, Jane
Cc: Smith, Jim; Jones, Beth
Subject: System A: Storage System side panel is removed (Ver. 3):
Standard E-mail format
Event Name: Storage System side panel is removed (Ver. 3)
URL: https://systemname:2381
Event originator: System A
Event Severity: Major
Event received: 28-Apr-2004, 17:03:47
Event description: Storage System side panel is removed. The side
panel status has been set to removed. The storage system`s side
panel is not in a properly installed state. This situation may result
in improper cooling of the drives in the storage system due to
air flow changes caused by the missing side panel.
User Action: Replace the storage system side panel.
Status: sidePanelRemoved
Example of a Pager/SMS page
From: Doe, John
Sent: Wednesday, April 28, 2004 5:04 PM
To: Doe, Jane
Cc: Smith, Jim; Jones, Beth
Subject: System A: Storage System side panel is removed
(Ver. 3): Pager
SMS Format E-mail testing
System A, Storage System side panel is removed (Ver. 3),Status:
sidePanelRemoved
50 Event management
Page 51

Example of an HTML page
From: Doe, John
Sent: Wednesday, April 28, 2004 5:04 PM
To: Doe, Jane
Cc: Smith, Jim; Jones, Beth
Subject: qaunit1: Storage System side panel is removed (Ver. 3): HTML
Format E-mail testing
Where
quanit1
is the system name.
Example - Creating a task to send an e-mail when a system reaches a critical state
The following instructions set up an automatic event handling task to be run when a discovered system goes
to a
Critical status
Procedure 13-2 Creating a task to send an e-mail when a system reaches a critical state
1. In the Search panel, click Advanced Search. The Advanced Search page appears.
2. Select events from the Search for dropdown list.
3. From the first selection box (
4. From the second selection box (comparison selection), click the down arrow, and then select is.
5. In the third selection box (value selection), the available values for a given criteria or comparison
combination are given. Select Critical.
6. (Optional) Click View to view the search results.
7. Click Save As Collection to save the event collection.
8. In the Name field, enter a name for the collection, such as Critical Events.
9. Under Place in Folder, select to save the collection in Events by Severity to have it available to other
users.
10. Click OK to save the collection, or click Cancel to cancel the save operation.
11. To configure Systems Insight Manager to send an e-mail, select Options→Events→Automatic Event
Handling→E-mail Settings. The E-mail Settings page appears.
12. Specify the SMTP host in the SMTP Host box.
.
criteria
selection), click the down arrow, and then select severity.
Example - Creating a task to send an e-mail when a system reaches a critical state 51
Page 52

13. Specify the e-mail address that the management server uses when sending e-mail notifications in the
Sender's Email Address box.
14. To authenticate your SMTP server, select the Server Requires Authentication checkbox.
15. Specify the account name in Account name box.
16. Specify the password in the Password box.
17. Click OK to save changes.
18. To configure status change events, select Options→Events→Status Change Event Settings. The
Status Change Event Settings page appears.
19. Select Enable creation of system status change events. This option sends a system unreachable
event whenever a system cannot be reached by a ping through the Hardware Status Polling task.
Enabling this option creates a system reachable event whenever the system is reachable again.
20. Click OK to apply changes.
21. To create the task, select Options→Events→Automatic Event Handling→New Task. The Automatic
Event Handling - New Task page appears.
22. On the Step 1, Select name page, enter a name for the task in the Task name box, such as Send
E-mail for Critical Status.
23. Click Next. The Step 2, Select event collection page appears.
24. Select the Critical Events collection from the dropdown list.
25. Click Next. The Select system collection page appears. Do not select a system collection.
26. Click Next. The Select action page appears.
27. Select Send e-mail.
a. In the To field, enter the list of e-mail addresses that should receive the notification.
b. In the CC field, enter any e-mail address that should receive a copy of the e-mail, separating each
with a comma.
c. In the Subject field, enter a note describing the subject of the e-mail.
d. In the Message Format field, select from the following formats based on the encoding preference
of the recipient:
• Standard. This default message format sends a text e-mail message to the recipients.
• Pager/SMS. An e-mail message formatted with the same information and format as a pager
message is sent to the recipients.
• HTML. An e-mail message that looks like the HTML Event Details page is sent to the
recipients.
e. In the Encoding field, select from the following formats:
• Western European (ISO-8859-1)
• Unicode (UTF-8)
• Japanese (ISO-2022-JP)
• Japanese (Shift_JIS)
• Japanese (EUC-JP)
• Chinese (GB18030)
• Chinese (Big5)
• Korean (EUC-KR)
28. Click Next. The Step 4, Select time filter page appears.
29. Select the Use time filter box if you want to use time filters, and then select an option from the dropdown
list.
Click Manage Filters if you want to set user defined filters.
30. Click Next. The Step 5, Review summary page appears. The Task name, the selected event
collection, the events, system criteria, and Action(s) information appear.
31. If you want to edit the e-mail selections, click Edit e-mail Settings to edit the SMTP settings.
32. Click Finish to create the new task.
52 Event management
Page 53

Example - Creating a task to delete all cleared events
The following example describes how to create a task to delete all cleared server events from the Systems
Insight Manager database. This task is useful to include in your management portfolio because deleting
cleared events on a regular basis empties the database of unnecessary entries and improves system
performance.
The following task has the following segments:
• Creating an event collection that contains the events you want to delete
• Creating and scheduling the task to delete all cleared server events and run the task
Procedure 13-3 Creating a task to delete all cleared events
1. In the Search panel, click Advanced Search. The Advanced Search page appears.
2. Select events from the Search for dropdown list.
3. From the first selection box (
4. From the second selection box (comparison selection), click the down arrow, and then select is.
5. In the third selection box (value selection), select cleared.
6. Click Add to add the system type criteria.
7. From the first selection box (
8. From the second selection box (comparison selection), click the down arrow, and then select is.
9. In the third selection box (value selection), the available values for a given criteria or comparison
combination are given. Select server.
10. (Optional) Click View to view the search results.
11. Click Save As Collection to save the event collection.
12. In the Name field, enter a name for the collection, such as Delete Cleared Server Events.
13. Under Place in Folder, select to save the collection in Events by Severity to have it available to other
users.
14. Click OK to save the collection.
15. To create and schedule the task, select Options→Events→Delete Events. The Delete Events page
appears.
16. Select the Delete Cleared Server Events collection. Select Select "Delete Cleared Server Events"
itself.
17. Click Apply.
18. Click Schedule.
19. In the Task name box, give the task a name, such as Delete Cleared Server Events.
20. In the Refine schedule section, select the scheduling option that you prefer.
In this example, if you select When new systems or events are added to the collection, then Systems
Insight Manager automatically deletes server events whenever they become cleared.
21. Click Done. The task is now scheduled, and the All Scheduled Tasks page appears.
To run this task at any time, select Tasks & Logs→View Task Results. Then select Delete Cleared
Server Events from the table, and then click Run Now.
criteria
criteria
selection), click the down arrow, and then select cleared state.
selection), click the down arrow, and then select system type.
Example - Creating a task to delete all cleared events 53
Page 54

14 Reporting in Systems Insight Manager
Standard reports
Standard reports are shipped with Systems Insight Manager. The reports are based on common user scenarios
and do not need any additional configuration or enablement. These reports are installed, configured, and
available for use as soon as Systems Insight Manager is installed and configured. Standard reports are tied
to existing systems collections in Systems Insight Manager, for instance, All Systems or All Servers. Report
results appear based on logged in user authorization of systems.
Standard reports are available by navigating to the Manage Reports page .
New Reports
A report configuration is a customer-defined set of preferences that pulls specified criteria from the
tables and places it in a report in the specified format. The report configurations can be saved and used to
run a report at a later date with live data.
You must have administrative or
Users
with
user rights
If User 1 with administrative rights generates a report and a private collection, then User 2 with administrative
rights is allowed to generate a report using the report configuration and private collection that User 1 created.
User 2 is allowed to edit, save, and delete the report configuration but cannot delete the private collection
created by User 1.
The create new report wizard helps you to create a new report and add it to Systems Insight Manager
reports. This option is only available for Systems Insight Manager.
You can save the report configuration for future use or generate a one-time report.
Select Reports→New Report..., the Step 1: Select Target Systems page appears.
Managing reports
The Manage Reports feature provides you with the following options:
• Run Report A generated report provides you with the following information:
• Report name
• Associated system collection
NOTE: The Associated system collection information does not appear if there is no collection
selected to run the report.
operator rights
can run the authorized report configurations only.
to create, save, edit, copy, or delete report configurations.
database
• Report run date and time
Format for generated report:
• HTML (Recommended for viewing) Enables viewing an existing report in HTML format.
• XML Enables viewing an existing report in XML format.
• CSV Enables viewing an existing report in CSV format.
• Copy Systems Insight Manager enables you to copy report configurations from an existing report
configuration. You can edit the newly copied configurations to create a new report.
NOTE: You must be signed in to Systems Insight Manager with
to copy report configurations. If you are not signed in with administrative or operator rights, the copy
option is not available.
• New Enables you to create a new report and add it to Systems Insight Manager reports. This option
is only available for Systems Insight Manager.
You can save the report configuration for future use or generate a one-time report.
administrative rightsoroperator rights
Standard reports 54
Page 55

• Edit Systems Insight Manager enables you to edit existing report configurations. You can save these
updated report configurations over the existing report configuration, or you can save it as a new report
configuration.
NOTE: You must have
report configurations. Users with
• Delete You can permanently delete a report configuration from the Manage Reports page.
• Showing SQL Queries. Enables viewing SQL queries.
Select Reports→Manage Reports.... The Manage Reports page appears. Select the report for which
you want to view the SQL details, select Run Report, and then on the report itself, click Show SQL
queries.
Snapshot Comparison
Snapshot comparisons enable you to compare up to four systems (with the same operating system) to each
other or to compare a single system to itself and observe changes over time.
Enhanced Reports
Enhanced reports contain the Reports by Product table that displays the products registered with Systems
Insight Manager along with the available reports.
The reporting engine main page contains the Reports by Product table that displays the products registered
with Systems Insight Manager along with the available reports.
The Reports by Product table displays reports for Systems Insight Manager by default. Only products that
have been registered with Systems Insight Manager have
Table 14-1 Reports by Product columns
administrative rightsoroperator rights
user rights
cannot edit the report configurations.
Predefined
to create, save, edit, copy, or delete
reports displayed.
Product/Report Name
Report Type
Table 14-2 Reports by Product buttons
Edit
Delete
DescriptionName
Displays the name of the products along with the total number of
reports in parenthesis registered with Systems Insight Manager for
reports. When the product item is expanded by clicking the expand
icon, the available reports are displayed under the product section
along with report details Description, Target Systems and Report
Type.
Displays the type of report such as; Table, Bar, Pie, Bar-Pie, or
Line.
Displays the target selection in which the report is executed.Target Systems
Displays a short description of the report.Report Description
DescriptionName
Creates a new report.New
Edits a selected report. Only enabled for user created/defined
reports under Systems Insight Manager. Remains disabled for
Predefined reports.
Executes a report.Run Report
Enables users to email a report.Email Report
Deletes a selected report. Only user created/defined reports can
be deleted.
Predefined reports
Predefined Reports are shipped with Systems Insight Manager. The reports are based on common user
scenarios. Predefined Reports are tied to existing system collections in Systems Insight Manager, for instance,
"All Systems" or "All Servers". Report results appear based on logged in user authorization of systems.
Standard reports 55
Page 56

Select Reports→Enhanced Reports. The Enhanced Reports, Reports by Product page appears.
Run Enhanced reports
Running reports executes an available report in the reporting engine. The generated report is displayed in
a new page when Run Report is clicked.
A generated report provides you with the report name, associated system collection, and report run date
and time in the following formats. You select the format before you run the report.
• HTML (Recommended for viewing)
• XML
• CSV
New Enhanced reports
A report configuration is a customer-defined set of preferences that pulls specified criteria from the database
tables and places it in a report in the specified format. The report configurations can be saved and used to
run a report at a later date with live data.
An additional create new report option is to select the type of report to use. You can select the following
options in any combination.
• Include Chart
• Include Table
The report type graph supports three sub types.
• Bar
• Pie
• Line (Trend)
The Include Chart section dynamically changes to display the selection items that are required to create
the corresponding report. Depending on the type of chart selected, additional details are presented as
follows.
• Graph Title The graph title is available for all chart types.
• Footer The footer is available for all chart types.
• X-axis The X-axis is available for a bar or line chart.
• Y-axis The Y-axis is available for a bar or line chart.
The Include Table option allows the selection of the column fields and order to be displayed in the table
of the generated report.
You can save the report configuration for future use or generate a one-time report.
Editing Enhanced reports
Only custom reports can be edited.
The details from the opened report are pre-populated in the text fields. The Edit button is only enabled for
custom reports under Systems Insight Manager
E-mailing reports
E-mailing reports enables you to schedule a report to be run at a specified time and sent through e-mail. You
can schedule a report to be run periodically or once. Select from the following options to run the report.
• Select Run when the central management server is started if you want the report to run when the
central management server is started.
• Select Run now if you want to run the report immediately.
• Select Disable this task if you want to disable the report at any time.
56 Reporting in Systems Insight Manager
Page 57

Deleting reports
User-created reports located in the Reports by Product section can be deleted. Before the report is deleted,
a popup message displays asking if you are sure you want to delete the selected report. If you click OK,
the report is deleted and the product and report page is refreshed to show the correct status of the reports.
Standard reports 57
Page 58

15 Systems Insight Manager tools
Target selection
Targets are systems that a tool acts upon. Targets can be single systems, collections, or groups of systems
that are chosen just for the task at hand. You can select the targets either before or after selecting the tool.
You can verify and modify the selection using the task wizard.
After the targets are verified, they appear in the title area of the tool.
NOTE: Some tools cannot work on multiple systems. In this case, a warning is displayed that states you
can select only an individual system.
See the HP Systems Insight Manager online help for more information on the task wizard.
Scheduling tools
The following options are available when scheduling tools to run:
• Periodically Select from intervals of minutes, hours, days, weeks, or months. With periodic scheduling,
you can configure the task to run until a certain date and time or to execute only a set number of times.
Periodic scheduling allows time filters to be applied. These filters specify the hours of the day when a
scheduled task can operate.
NOTE: If you want to schedule a task to run once a month on the 31st of the month and the month
has only 30 days, the task will run on the 1st day of the following month.
• Once Specify the date and time the task is to run.
• When new systems or events are added to the collection This option is only available if you select a
Collection of Systems or Events as your target. The task runs only when new systems or events meet
the collection criteria. You can also apply a time filter to this type of scheduling.
• When systems or events are removed form the collection This option is almost identical to the previous
option, except that the task runs only when systems contained in the Collection of Systems or Events
no longer meet the collection criteria. A time filter can be applied to this type of scheduling.
• Not Scheduled This option specifies that the task runs only when manually executed by a user with
appropriate privileges. This task never runs automatically. Tasks can be manually run from the All
Scheduled Tasks page or the CLI.
Managing with tasks
Systems Insight Manager enables you to manage
Tasks are actions performed using an Systems Insight Manager
instance of a
Users can:
• Create a variation of a task
• Schedule a task
• Modify a task
• Delete a task
task
.
systems
and
events
by scheduling and executing tasks.
tool
. Task instances are an executed single
• Stop an executing task
• Track task status
Task information is available by selecting one of the following:
• Tasks & Logs→View All Scheduled Tasks
• Tasks & Logs→View Task Results
Target selection 58
Page 59

Systems Insight Manager provides system-delivered (default) tasks. These tasks can be disabled or have their
schedules modified but they cannot be removed or reassigned to another user. Systems Insight Manager
requires these tasks (for example, Data Collection) to provide a complete picture of the systems being
monitored.
Viewing results
After a task runs, you can view the task results by selecting Tasks & Logs→View Task Results. The Task
Results page appears and includes a table displaying all tasks that are complete or currently running. The
table includes information on the launching task, the tool used, status of the task, who ran the task, and the
start and end time of the task.
Example - Device ping
Use the Ping tool to ping an individual system or multiple systems. To ping systems, select Diagnose→Ping.
The Ping window appears. Select the target systems and click Run Now to run the task.
If a system does not resolve to anIPaddress, the request cannot be performed. For systems with multiple IP
addresses, the result of each IP address occupies one row in the result page. The status on the upper-right
corner is: Pinging selected systems. After all the systems on the list are pinged, the status is: Ping
completed with a time stamp of the completion time.
The ping results appear in a separate window. You might receive the following replies:
• Replied. The request has been executed successfully, and the pinged system has responded.
• Request timed out. The request has been executed, but the pinged system failed to respond.
• System has no IP address. There is no IP address associated with the system. Unable to perform
ping.
• No system is selected. No system is selected.
If the ping is successful, there is no retry. You can retry only when the ping fails. The ping results have no
effect on the system status on the Task Results or system view pages.
Viewing results 59
Page 60

Part IV Systems Insight Manager advanced features
60
Page 61

16 Collections in Systems Insight Manager 6.0
Collections in Systems Insight Manager
Systems and events are grouped into collections based on information from the Systems Insight Manager
database. After a collection is defined, you can display the results or associate the collection with a task.
You can also save an edited or unedited collection as a collection with another name.
You can use collections to organize large numbers of systems into smaller, more meaningful groupings. For
example, your organization might have five system administrators who are responsible for 100 different
systems in 6 different buildings. You can create a collection for each administrator that includes only his or
her systems, or you can create a collection for each building that includes only the systems located in that
building. You must have administrative rights to customize shared collections.
NOTE: Use English text for naming collections. If you do not use English text, you might see named collections
generated by Systems Insight Manager. For example,
You can create a collection several ways:
• Create a collection from the Customize Collections page.
Click the Customize link on the System and Event Collections panel. The Customize Collections page
appears. Select Events or Systems and click New. The New Collection section is displayed.
Customize Collections page
collection-<number>
NOTE: Both systems and event collections can be created.
• Create a collection from the system view page.
Click Save As Collection at the bottom of any system view page. This command enables you to save
the currently selected the systems (or collections) as a new collection.
Saving from the table view page
Collections in Systems Insight Manager 61
Page 62

• Run a
system search
Saving a collection from the Advanced Search page
For more information on saving collections, see the HP Systems Insight Manager online help.
Types of collections
• By member
When you create a collection, you can select exactly which specific systems or collections you want to
include. From the, Customize Collections page, click New. The New Collection section appears. Select
Choose members individually.
NOTE: When you create event collections, you cannot select individual events. However, you can
select event collections, which enables you to create a convenient hierarchy.
and save the search criteria as the attributes defining a collection.
• By attribute
When you create a collection, you can describe the contents of the collection by the attributes of its
members. Collections defined by attributes are dynamic because each time they are invoked, the
contents are determined again.
You can use many system attributes for creating collections, for example, system name (full or partial),
operating system, or system type. For event collections, some of the attributes you can select are
status
, type, severity, and time. You can combine multiple attributes to create the exact group of systems
or events that you need.
To create collections by attribute, click Save As Collection from the Advanced Search page or click
New from the Customize Collections page. Then, in the New Collection section, select Choose members
by attributes. Select the attributes and click Save As Collection
62 Collections in Systems Insight Manager 6.0
cleared
Page 63

Because collections by attribute use a database query, collections that are complex take more system
resources every time they are accessed. Keeping collections simple minimizes performance impact.
• Combination collections
Combination collections are new in Systems Insight Manager 6.0. This new form of collections enables
you to bind together a system collection and an event collection. Combination collections enable you
to reuse and recombine system and event collections that you have created.
NOTE: There are two kinds of combination collections. If you are creating a system collection, then
the combination collection returns a system list. If you are creating an event collection, then the
combination collection returns an event list. For example, the two collections All Servers and All Login
and Logout Events could be combined in two ways. One way yields all servers that have login and
logout events. The other way yields all login and logout events that occurred on servers.
Other customization features
The Customize Collections page enables you to create and organize your collections in a way that works
for you.
Customize Collections page
On the Customize Collections page, some collections show their contents and others do not. For example,
in the above image, All Systems, HP BladeSystems, and Storage Systems are not collections by member
because the expansion icon ( ) is located beside the collection name, and when you click the icon, the
contents of the collection are displayed.
Because collections by attribute are dynamic, determining their content and displaying it in this interface
would be very time consuming. Therefore, their content is not displayed and you cannot set properties on
Collections in Systems Insight Manager 63
Page 64

members of these collections. Setting properties on systems that might not be part of the collection in the
future would be of very limited value.
• Edit
Any collection can be edited. However, collections cannot change type. For example, you can change
the criteria for a collection that is defined by attribute, but you cannot change the collection type so the
collection is a collection by member or a combination collection.
• Copy
Copy enables you to copy a collection from one place in the collection hierarchy to another. It is
important to note that what is copied is independent of the original collection; any collections that are
within the copied collection are themselves copied by reference.
For example, consider the following hierarchy (contents of the collections not relevant to the example
are not shown):
If CollectionB is copied to CollectionF, the hierarchy would look like the following:
The new instance of CollectionB receives a new name, but its contents are copied directly. The contents,
CollectionC and CollectionD, are copied by reference. Both CollectionB and Copy of CollectionB refer
to the exact same instances of CollectionC and CollectionD.
Later, if SystemC is added to CollectionC, and SystemD is added to the original CollectionB, the result
would be that SystemC appears in both places, and SystemD appears only in one place, as follows:
64 Collections in Systems Insight Manager 6.0
Page 65

There are two instances of SystemC in the view of the hierarchy because CollectionC is the same
throughout the application. Any place that CollectionC is referenced, it will always contain the same
systems. However, SystemD appears only under CollectionB. CollectionB and Copy of CollectionB are
distinct and independent collections.
• Move
Move enables you to easily move a collection exactly where you want it in the hierarchy.
NOTE: Collections can be moved from Private to Shared, but not from Shared to Private.
• Delete
Most collections can be deleted. However, there are some restrictions.
• Collections cannot be deleted if they are not empty.
• Collections cannot be deleted if they are in use. That is, if the collection is the target for a scheduled
task, if it is used for the System Status panel, or if it is used in some other collection, then it cannot
be deleted.
• The All Systems and All Events collections cannot be deleted.
• After a collection is deleted, it cannot be recovered.
• Set Properties
Collections have properties, and these properties define the way collections behave in the System and
Event Collections panel and elsewhere in Systems Insight Manager.
• Visible property
It might be the case that there are system or event collections, that are either shipped with HP SIM
or are user-defined, that you do not use, but at the same time, do not want to delete. If you do not
use these collections, but you do not want to delete them, you can remove them from the user
interface by using the Visible setting in the collection properties. When you select No, do not show
collection and its members in the user interface for a collection, that collection no longer appears
in the System and Event Collections panel, in the Task Wizard, or any place in the user interface
(except the customization panel itself) where collections are shown.
Making collections invisible can make the System and Event Collections panel less cluttered, but
note that once you make collections invisible, they are excluded everywhere in HP SIM including
being removed from tasks. For example, if a task is scheduled to run with a certain collection, and
Collections in Systems Insight Manager 65
Page 66

that collection is made not visible, then the task will not run on that collection. You can change
the visibility setting at any time.
• Status Displayed property
You can set the Status Displayed property to enable you to easily view the aggregate status of a
particular collection in the System and Event Collections panel. You can set this property only
on individual systems or on collections by attribute, for example, the lowest
System and Event Collections panel displaying collection aggregate status.
level of the hierarchy (the leaves of the tree).
In the System and Event Collections panel, where the status is displayed, the status will “bubble
up” to the higher levels of the hierarchy (the root of the tree) so that the most urgent statuses are
always visible at any level.
Statuses are merged so that the most significant is always displayed.
NOTE: Statuses at the top of the following list take priority over those at the bottom.
• Critical
• Major
• Minor
• Warning
• Normal
• Disabled
• Unknown
• Informational
• Default View property
When you select a collection in the System and Event Collections panel, the contents of that collection
are displayed in the workspace. By default, different types of collections are displayed in different
ways. Collections by attribute and combination collections default to a table view, but they can also
66 Collections in Systems Insight Manager 6.0
Page 67

be displayed as icons or a tree. Collections by members default to a tree view, but they can also be
displayed as icons or a table. Special types of system collections default to picture views or special
consoles. You can change the default view using this property.
Collections in Systems Insight Manager 67
Page 68

17 Systems Insight Manager custom tools
General concepts
Custom tools are tools that can be created by the user to run on the CMS or on target systems. For example:
• Remote tool A tool that runs on selected target systems. It might copy files to the target systems or run
specific X-Window applications on the target systems. You can schedule this tool.
• CMS tool A tool that runs on the CMS. It is usually a script or batch file and can pass in environment
variables. Using Automatic Event Handling, you can configure this tool to run when events are received.
You can schedule this tool.
• Web page tool A tool that launches a web URL. The URL is launched in a separate browser window
on the CMS. You cannot schedule this tool.
To add custom tools, you can either use the New Custom Tools menu in the GUI, or edit the tool definition
files (tdefs) in a text editor and register them with the CLI mxtool. Both procedures are explained in this
chapter.
Tool types
As delivered, Systems Insight Manager provides an administrator with unified management control of any
number of servers and storage devices from a single console in the data center or in a remote location.
When customized with specialized tools or HP Insight Essentials plug-ins, Systems Insight Manager becomes
a comprehensive, easy-to-use platform for controlling Microsoft Windows, Linux, or HP-UX enterprise
environments.
A key method of administering multiple systems is through scripting. Systems Insight Manager features a
modular architecture that uses
the definitions of one or more tools used by Systems Insight Manager and define how a tool launches and
executes. A tool can be a script or an executable file. Creating custom tools enables you to extend the use
of Systems Insight Manager to your specific business environment.
Table 17-1 Tool types
Single-system-aware command tool OR Remote Tool in the GUI
Multiple-system-aware command tool
Web launch tool or Web page tool in the GUI
tool definition files
(TDEFs) written in the XML data file format. A TDEF contains
DescriptionName
An SSA tool executes on a selected target and is only aware of
the target system environment. In executing an SSA tool, the
Systems Insight Manager
uses SSH to send one or more files to the target system, which
then executes the tool. An example of an SSA tool would be a
tool that wraps a common Unix command such as ls. cat, or cp.
An MSA tool executes typically on the CMS and can work with
multiple target systems. When launched, the MSA process is
created once and then passed to all targets on the list. An
XWindows tool is an example of an MSA tool.
A WLA tool typically launches in a separate browser (by default)
or in the same frame as Systems Insight Manager and is specified
Distributed Task Facility
(DTF) of the CMS
General concepts 68
Page 69

DescriptionName
by a universal resource locator (URL). Web-launch applications
that do not share Systems Insight Manager certificates should be
executed in a separate frame.
Application launch tool OR CMS Tool in the GUI
Environment variables for custom tools
NOTE: If your user-defined variables have the same names as the Systems Insight Manager environment
variables, the Systems Insight Manager environment variables override the user-defined variables.
DOS environment variables are supported in custom tool parameters and work as parameters on the New
Custom Tool page or the Manage Custom Tools page. Unless you use DOS environment variables in a
batch or script file, you must surround them with double percent (%) signs. For example, to pass in the
NOTICELABEL
you use DOS environment variables in a batch file or script file, use only a single percent (%) sign before
and after the environment variable name.
NOTICELABEL
server-level notices, or the type of trap that caused the notice.
NOTICESTATE
NOTICEPLAINTEXT
or Not Cleared).
NOTICERAWDATA
set of variables and might be useful for some simple parsing rules.
NOTICESEVERITYSTR
Major, Minor, Unknown, Warning, or Normal.
NOTICESEVERITY
• 0, Unknown
environment variable as a parameter on the parameter line, enter
. Type of notice. A small string that contains discovered system, other Systems Insight Manager
. An internal value used by Systems Insight Manager, indicating whether the notice is cleared.
. A text description of the notice that contains details about the notice (In Progress, Cleared,
. The raw data from the notice is passed as a string. This is a small pipe (|) delimited
. A verbose description of the notice severity, which can be Critical, Informational,
. The integer value of the NOTICESEVERITYSTR which can be one of the following:
An application launch tool is a batch file, script, or executable
that runs on the CMS and can reference environment variables
specified by the tool to access device or event information. An
example of an application launch tool would be one that performs
a task that is tied to the contents of an “Exchange Servers” list
which returns three devices (A, B, and C). The tool will run three
times (in the context of A, B, and C).
%%NOTICELABEL%%
. If
• 1, Normal
• 2, Warning
• 3, Minor
• 4, Major
• 5, Critical
• 100, Informational
NOTICEQUERYNAME
. The collection name based on how the notice was generated. This value can say
one of the following:
• This system or event meets the following search criteria: +QueryName;
• This system or event now meets the following search criteria: +QueryName;
• This system or event no longer meets the following search criteria:
+QueryName;
DEVICENAME
DEVICEIPADDRESSCOUNT
DEVICEIPADDRESS%d
. The name of the
. The number of IP addresses that are mapped to this system.
. Based on the count, %d is an integer that shows the actual IP address. For example:
system
that caused the notice.
IF, DEVICEIPADDRESSCOUNT = 2
General concepts 69
Page 70

Then, DEVICEIPADDRESS0 = 111.111.111.111
DEVICEIPADDRESS1 = 222.222.222.222
DEVICEMACADDRESSCOUNT
is available, you must run a Data Collection task.
DEVICEMACADDRESS%d
MAC address environment variable. For example:
IF, DEVICEMACADDRESSCOUNT = 2
Then, DEVICEMACADDRESS0=00:80:5F:7F:B0:81
DEVICEMACADDRESS1=00:80:C7:29:EF:B6
GENERICTRAPID
from an
SNMP trap
SPECIFICTRAPID
from an SNMP trap.
Path
. The Path environment variable value from the context where the service is running
SystemRoot
Windir
. The Windir environment variable value, from the context where the service is running.
COMPUTERNAME
service is running.
MPIP
. The the IP address of the associated management processor.
MPNAME
. The SNMP Generic Trap ID of the trap received, if this is an event-based list and originated
.
. The SNMP Specific Trap ID of the trap received, if this is an event-based list and originated
. The SystemRoot environment variable value, from the context where the service is running.
. The COMPUTERNAME environment variable value, where the context in which the
. The name of the associated management processor.
RELATEDDEVICECOUNT
RELATEDDEVICENAME%d
example:
. The number of MAC addresses collected for the system. Before this information
. Based on the MAC address count, %d is an integer that references the actual
. The number of associated systems.
. The name of the associated system, where %d is the iteration number. For
IF, RELATEDDEVICECOUNT = 2
Then, RELATEDDEVICENAME0=DeviceName0
RELATEDDEVICENAME1=DeviceName1
RELATEDDEVICEIP%d
example:
IF, RELATEDDEVICECOUNT = 2
Then, RELATEDDEVICEIP0=111.111.111.111
RELATEDDEVICEIP1=222.222.222.222
RELATIONSHIP%d
example:
IF, RELATEDDEVICECOUNT = 2
Then, RELATIONSHIP0=ServerToEnclosure
RELATIONSHIP1=VMGuestToVMHost
. The IP address of the associated system, where %d is the iteration number. For
. The relationship string with the associated system, and %d is the iteration number. For
Custom tool menu placement
To place custom tools in the following menu locations, use a string in the form base|submenu|subsubmenu.
70 Systems Insight Manager custom tools
Page 71

For example, place a tool under Tools→Custom Tools, place an entry in the Menu placement field such
as Tools|CustomTools.
By default, if the Menu placement field is left blank, the tools are placed in Tools→Custom Tools.
Custom tool URL format
The URL strings for web-aware tools and command line tools must be provided as absolute URLs beginning
with http:// or https://. For example,
https://%n:1188/kcweb/ https://%l:2381/
Web-launch aware tools and command line tools that always run on the CMS must be relative URLs beginning
with /. For example,
/propertypages/Identify.jsp?device=%n
Multiple selections can be substituted into the URL. A selection index is used during the substitution process
to track the
target systems remains current until a%zparameter is encountered in the URL. (An exception to this exists
in the repeat block.) When the%zparameter is encountered, the next selection becomes current, the selection
index is incremented by 1, and so on. For example,
http://server/app/doit.jsp?name=%n%z&addr=%a
where the doit.jsp page is invoked with the network name of the first selected system assigned to the
name
You can substitute any number of selected targets can be substituted by using the repeat block construct,
... %)
with the current selection and selection index. For example,
https://%{deploy.server%}/deploy/deployimage.jsp? device1=%n%z%(&device%i=%n%z%)
current
parameter and with the IP address of the second selected target assigned to the
. Anything inside the repeat block delimiters is repeated until the selection list is exhausted, starting
selection. The selection index is initially set to 1, and the first selection of the list of selected
ExampleMenu level
Toolstop-level-menu
Tools|Custom Toolstop-level-menu|first-level-cascade
Tools|Custom Tools|My Toolstop-level-menu|first-level-cascade|second-level-cascade
addr
parameter.
%(
NOTE: When using the%iparameter, the current selection index (1, 2, 3, and so on) is substituted for
this parameter during the substitution process.
If the end of the repetition clause is reached and no%zparameter is encountered, the selection index and
current election are automatically incremented to avoid an infinite loop during the substitution phase.
In the above example, if there were two selected target systems, the expanded URL string would look like
this:
https://deploy.hp.com:280/deploy/deployimage.jsp?
device1=nodea.hp.com&device2=nodeb.hp.com
If there was only one selected target system, the expanded URL string would look like:
https://deploy.hp.com:280/deploy/deployimage.jsp? device1=nodea.hp.com
Because there is no current selection when the string gets to the repeat block, the repeat block is suppressed
during the substitution process.
Creating custom tools through the GUI
Use the Manage Custom Tools page to view and manage custom tools created through the New Custom
Tool feature. The Manage Custom Tools page displays a table listing the custom tools and information
on each tool. The table includes:
• Selection column
• Name
• Description
Creating custom tools through the GUI 71
Page 72

• Command
• Run as user
• Automatic Event Handling
The following options are available for managing custom tools:
• “New”
• “Edit”
• “View tool definition”
• “Run Now/Schedule”
• “Delete”
New
Use to create a custom tool and open the Select the tool to create page.
Edit
Use to edit an existing custom tool. Select the tool, and then click Edit. The Edit Custom Tool Details
section appears. You can edit all fields and add or delete environment variables.
View tool definition
Use to display the XML code for the tool. This tool is not enabled if you select more than one tool.
Run Now/Schedule
Use to run the tool immediately or to schedule the tool to run (if the tool can be scheduled). If the tool can
be run, the schedule a task page appears. You can schedule when and how often the tool runs.
Delete
Use to delete a tool. Deleting a tool removes it from the Manage Custom Tools page and from the system.
If a tool is dependent on a task, an alert appears with the list of tasks associated with the tool.
For information custom tool definition files details, see Custom tool definition files.
Creating custom tools through the Systems Insight Manager CLI
Systems Insight Manager includes a CLI that allows manual control of Systems Insight Manager functions.
This manual control enables you to create your own customized tools. The CLI is accessible directly on the
CMS or from any network client using
understanding of the XML file format and allows greater flexibility in exercising the options available when
creating TDEFs. For more informaiton on custom tool definition file syntax, see Custom tool definition files.
Creating a custom SSA tool
This procedure uses the CLI to create a custom SSA tool for copying any executable file to a managed system
(target system) and having it execute (install) there.
This example illustrates the creation of a custom tool that installs a security patch on every Windows server
managed by Systems Insight Manager. If done manually, the administrator would have to locate each
Windows server and perform the following commands in that server:
SSH client
software. Creating custom tools manually offers a better
• Log on as Administrator
• Access a network drive or portable media containing a copy of the file to be used for the tool (we will
use hpsecurity_patch.exe in this example) and copy that file to the local drive.
• Use Start/Run or a command line prompt to enter the command:
<install_path>\hpsecurity_patch.exe
• Log off of the system
72 Systems Insight Manager custom tools
Page 73

For this example, it is assumed that the administrator will want to execute this procedure again and be able
to quickly locate it in the Systems Insight Manager menus, so an entry in the Deploy menu is made and called
Software Distributor, which when invoked allows the administrator to execute this custom tool.
Procedure 17-1 Creating the Software Distributor tool
1. Log into the CMS using a valid user name and password. Systems Insight Manager grants authorization
based on the operating system login.
NOTE: Only administrators have command line access to Systems Insight Manager on a Windows
CMS. Administrators on a HP-UX/Linux CMS must have root capability.
2. Open a terminal window or a command prompt window to execute Systems Insight Manager commands.
3. Open a text editor and create a new file by typing the XML version text and tool list tags as follows:
NOTE: Your text editor must be able create a text-only file with no embedded formatting.
4. Following the leading XML version and tool-list tags, type the tool name tag of <ssa-command-tool
name=”Deploy HP Security Patch”> to define the type and name of the tool. The revision string
is used to keep track of different versions of the tool as will be seen later. Enter the subsequent category,
description, and comment elements to further define the tool for Systems Insight Manager and the user
(the description and comments will be displayed in the GUI window for that particular tool).
5. Enter the execute-as-user element with the value of Administrator to define the user whose permissions
are allowed on the target node. After entering the execute-as-user element, the TDEF should display as
follows:
6. The include-filter element specifies which hardware and/or operating system filters will be applied. For
this example, enter the include-filter data as shown below.
7. Following the include-filter element is a block element that is the heart of the tool and includes the
command(s) to be executed. Enter the ssa block element as shown below. It will copy the file to the
specified destination and execute it there. In the example, the HP Security Patch v.1 executable is given
the filename hpsecurity_patch.exe.
Creating custom tools through the Systems Insight Manager CLI 73
Page 74

NOTE: The <destination> must be a directory that exists on the Managed Node. The default file
permission value used by DTF for a file copy operation is 755. If another permission is to be used, an
explicit file permission command such as chmod should be included in the copy block element for
security reasons.
8. Type the following attribute element code, which states where the tool will be located in the Systems
Insight Manager menu.
9. To finish the TDEF, enter the final tool list tag as shown below.
The fully composed TDEF for a SSA copy tool to deploy the HP Security Patch to a managed node and
then execute, should display as follows:
10. Save the file. HP recommends using a file name that indicates its function, in this
case,DeployHPSecurityPatchv.1.xml Make sure that the file name ends with the .XML extension.
74 Systems Insight Manager custom tools
Page 75

Note that file names on Linux and HP-UX operating systems are case-sensitive. The directory used by
Systems Insight Manager to store tools is as follows:
• for HP-UX and Linux systems: /var/opt/mx/tools
• for Windows systems: C:\Program Files\HP\Systems Insight Manager\tools
11. To add the new tool to Systems Insight Manager, perform the procedure described in the section “Adding
a TDEF to Systems Insight Manager”.
For more information about specific SSA tool attributes, see SSA-specific attributes.
Example Web launch tool
A web launch tool launches an application requiring a URL. The example below launches the application
WebJetAdmin for a device selected within the Systems Insight Manager window as long as that device is a
printer. The <web-block> element (in bold below) provides the URL of the managed node where WebJetAdmin
is installed. The parameter %n is used to substitute the managed node hostname. The <toolbox-enabled>
element can have a value of true or false. If the <toolbox-enabled> element is true, it will be associated with
the Toolboxes under Systems Insight Manager User and Authorization. This allows a trusted user to disable
the tool in the Toolbox if the value is false. This tool launches in a separate browser window using the
“target-frame” of WJAFrame. For additional parameters, see mxtool command parameters.
NOTE: In the previous example, hostname.domain should be replaced with the FQDN of where the
WebJetAdmin tool is running.
For more information about specific web launch tool requirements and attributes, see WLA-specific attributes.
For more information about parameterized strings, see Parameterized strings.
Example MSA tool
The MSA tool executes on the CMS and is functional with multiple targets. The process executes once, and
then is passed to all targets selected. The example below shows an MSA tool that deploys the SSH
key
to the selected managed target nodes as long as those nodes are recognized as iLO devices on an HP
single partition server. To do this manually, the administrator would:
• Log on as Administrator on the CMS
• Use Start/Run or a command line prompt to enter the command.
• Mxagentconfig –a –n <nodename> -u <username> -p <password>
• Repeat the command for each managed system
• Log off the system
The <msa-block> element (in bold below) initiates mxagentconfig and requires the user name and
password parameters.
public
Creating custom tools through the Systems Insight Manager CLI 75
Page 76

NOTE: When the XWindows tool is launched, the system running the browser must be running an XWindows
server for the tool's GUI to be visible.
For more information about specific MSA tool requirements and attributes, see MSA-specific attributes.
Example Enabling Remote Desktop tool
Remote Desktop is a Microsoft feature that enables you to remotely access any Windows 2003 server.
Unfortunately, Remote Desktop is disabled by default during installation, which can lead to problems accessing
the system without physically being present in front of the server. Systems Insight Manager enables you to
create a custom TDEF to enable remote desktop on selected targets as long as the selection is running
Windows 2003 server operating system. The following example demonstrates the ability of the TDEF to
create a menu item called Enable Remote Desktop.
76 Systems Insight Manager custom tools
Page 77

Adding a TDEF to Systems Insight Manager
After you create a custom TDEF, to function, you must add it into Systems Insight Manager. Add a TDef to
Systems Insight Manager using the mxtool -a command, as described in the following procedures:
Procedure 17-2 Adding a TDEF to Systems Insight Manager
1. At a terminal or command line prompt, type mxtool -a -f <file pathname> .
NOTE: For more information about mxtool command parameters, see mxtool command parameters.
2. To use the web launch tool previously created, type:
mxtool -a -f /tools/webjetadmin.xml
A successful TDEF addition results in a dialog box displaying the following
Successfully parsed tool file
Successfully added tool named "WebJetAdmin"
Successfully added 1 tool
Removing a TDEF from Systems Insight Manager
Removing a TDEF from Systems Insight Manager requires using the option -r when running the mxtools
command.
Removing a tool is not OS specific and can be run from and terminal or command prompt.
To remove a TDEF from Systems Insight Manager, use the mxtool -r command as in the following example:
Procedure 17-3 Removing a TDEF from Systems Insight Manager
1. mxtool –r –f /tools/webjetadmin.xml
2. A successful TDEF removal will result in the dialog box displaying the following:
Successfully parsed tool file
Successfully removed tool named "WebJetAdmin"
Successfully removed 1 tool
Creating custom tools through the Systems Insight Manager CLI 77
Page 78

NOTE: If a task or task results are tied to a tool, by default the tool cannot be removed. The -x force
option is used in this case.
Modifying a TDEF
Modifying a TDEF allows users to customize the XML to align with their business. Each TDEF included can
be modified to fit with each customers business needs.
To modify a TDEF to execute as a different user, perform the following steps:
Procedure 17-4 Modifying a TDEF
1. Modify the Windows Systems Insight Manager tools to use the new user account as follows:
a. Navigate to the tools directory.
Example: C:\Program Files\HP\Systems Insight Manager\tools
b. Search the tools directory for the tool to modify. Alternatively, you may create a tool definition file
from an existing tool using the mxtool command.
Example: mxtool - lf -t netstat > netstat.xml
c. Edit netstat.xml using a text editor. Find each execute-as-user line in the XML file.
Example: <execute-as-user>Administrator</execute-as-user>
d. (Optional) Change the revision attribute value for the tool type and name element or use the -x
force option on the mxtool command line:
Example: In the SSA command tool sample code in the previous example, change
revision="1.0" to revision="1.1".
e. Run mxtool to update the tool definition:
Example: mxtool -m -f netstat.xml -x force.
2. Configure each managed system that is to run tools with the user account. If the current users account
was used to install OpenSSH, then the managed node should be correctly configured. If a different
account is used, then the administrator should either run the Configure or Repair Agents tool on the
systems (specifying the administrator or other account to be used by the SSH), or perform the following
steps:
a. Add the administrator user to the passwd file using the “sshuser” utility on the managed system.
Example: sshuser -u MyUser -d MyDomain -f "C:\Program
Files\OpenSSH\etc\passwd"
b. Run mxagentconfig on the CMS to configure public key authentication for the administrator
user. Example: mxagentconfig -a -n <managed system> -u MyDomain\MyUser
NOTE: For more information about mxtool command parameters, see mxtool command parameters.
To view changes to TDEFs, refresh the Systems Insight Manager GUI by selecting the system list. A software
restart is not necessary.
78 Systems Insight Manager custom tools
Page 79

18 Understanding Systems Insight Manager security
This chapter provides an overview of the security features available in the Systems Insight Manager framework.
Systems Insight Manager runs on a CMS and communicates with managed systems using various protocols.
You can browse to the CMS or directly to the managed system.
Securing communication
Secure Sockets Layer (SSL)
SSL is an industry-standard protocol for securing communications across the Internet. It provides for encryption
to prevent eavesdropping as well as data integrity to prevent modification, and it can also authenticate both
the client and the server, leveraging public-key technology. All communications between the browser and
the CMS are protected by SSL. Systems Insight Manager supports both SSL 3 and TLS 1.0.
Secure Shell (SSH)
SSH is an industry-standard protocol for securing communications. It provides for encryption to prevent
eavesdropping plus data integrity to prevent modification, and it can also authenticate both the client and
the server utilizing several mechanisms, including key-based authentication. Systems Insight Manager supports
SSH 2.
Hyper Text Transfer Protocol Secure (HTTPS)
HTTPS
refers to HTTP communications over SSL. All communications between the browser and Systems Insight
Manager are carried out over HTTPS. HTTPS is also used for much of the communication between the CMS
and the managed system.
Secure Task Execution (STE) and Single Sign-On (SSO)
STE
is a mechanism for securely executing a command against a managed system using the Web agents.
It provides authentication, authorization, privacy, and integrity in a single request. SSO provides the same
features but is performed when browsing a system. STE and SSO are implemented in very similar ways. SSL
is used for all communication during the STE and SSO exchange. A single-use value is requested from the
system prior to issuing the STE or SSO request to help prevent against replay or delay intercept attacks.
Afterwards, Systems Insight Manager issues the digitally signed STE or SSO request. The managed system
uses the digital signature to authenticate the Systems Insight Manager server. Note that the managed system
must have a copy of the CMS SSL certificate imported into the Web agent and be configured to trust by
certificate to validate the digital signature. SSL can optionally authenticate the system to Systems Insight
Manager, using the system’s certificate, to prevent Systems Insight Manager from inadvertently providing
sensitive data to an unknown system.
NOTE: For SSO to web agents, the Replicate Agent Settings and Install Software and Firmware tools each
provide administrator-level access to the web agents. System Management Homepage As Administrator,
System Management Homepage As Operator, and System Management Homepage As User each provide
SSO access at the described level.
Distributed Task Facility (DTF)
DTF is used for custom command tools and multiple- and single-system aware tools. Commands are issued
securely to the managed system using SSH. Each managed system must have the CMS SSH public key in
its trusted key store so that it can authenticate the CMS. Managed systems are also authenticated to the CMS
by their SSH public key.
In Systems Insight Manager, the Privilege Elevation feature enables tools to be run against HP-UX, Linux, and
ESX managed systems by first signing in as a non-root user, and then requesting privilege elevation to run
root-level tools. This can be configured under Options→Security→Privilege Elevation.
Securing communication 79
Page 80

WBEM
LDAP
RMI
All WBEM access is over HTTPS for security. Systems Insight Manager is configured with a user name and
password for WBEM agent access. Using SSL, Systems Insight Manager can optionally authenticate the
managed system using its SSL certificate.
For HP-UX, certificates can be used instead of username and password for WBEM authentication. You can
configure WBEM authentication from the System Credentials→WBEM tab by selecting
Options→Security→Credentials→System Credentials. For more information, see the Systems Insight
Manager online help.
When configured to use a directory service, HP SIM can be configured to use LDAP with SSL (default) or
without SSL, which would transmit credentials in clear-text. To enable LDAP over SSL in Microsoft Active
Directory, refer to http://support.microsoft.com/default.aspx?scid=kb;en-us;321051. Additionally, the
directory server can be authenticated using the Trusted Certificate list in Systems Insight Manager.
Java RMI is secured by requiring digitally signed requests using the CMS
available to the local system. All communications use localhost to prevent the communication from being
visible on the network.
Credentials management
SSL certificates
Certificates generated by Systems Insight Manager and the Web Agents are self-signed. Public Key
Infrastructure (PKI) support is provided so that certificates may be signed by an internal certificate server or
a third-party
help alleviate name-mismatch warnings in a browser.
There are several certificates used by Systems Insight Manager. The certificate described above is the main
certificate and is used by the Systems Insight Manager SSL web server, the partner application
Access Protocol
authenticate Systems Insight Manager, if necessary, in the browser, in partner applications that communicate
with Systems Insight Manager through SOAP, and in WBEM agents that deliver indications to Systems Insight
Manager. This certificate is also configured in managed systems (for example, SMH, Onboard Administrator,
Integrated Lights-Out, Storage Essentials, CV) to enable a trust relationship with the managed system for
SSO. A separate certificate in Systems Insight Manager is used for authenticating Systems Insight Manager
to HP-UX WBEM Services 2.5 and later, when configured to do so for the WBEM protocol. Certificates from
managed systems can be imported into the Systems Insight Manager Trusted Certificates list, allowing Systems
Insight Manager to authenticate those systems. See the section How to: lockdown versus ease of use on
Windows systems.
Certificate Authority
(SOAP) interface, and the WBEM indications receiver. This is the certificate used to
private key
(CA). The Systems Insight Manager certificate supports multiple names to
, which should only be
Simple Object
Certificate sharing
Systems Insight Manager supports a mechanism whereby other components installed on the system can use
the same certificate and private key, facilitating authentication of the system as a whole instead of each
individual component. This is currently used by the Web Agents and the WBEM components on the CMS.
SSH keys
An SSH key-pair is generated during initial configuration. The CMS public key is copied to the managed
system using the mxagentconfig tool. This key-pair is not the same as for SSL and requires a manual process
to regenerate a new pair. See the manpages or online documentation for mxagentconfig for more details.
See the
products/servers/management/hpsim/infolibrary.html.
Secure Shell (SSH) in HP SIM 5.3 or greater
Passwords
Passwords configured on the Systems Insight Manager System Credentials and Global Credentials pages
are stored in the database encrypted using 128-bit Blowfish. These passwords can be further managed using
80 Understanding Systems Insight Manager security
white paper located at http://h18013.www1.hp.com/
Page 81

the CLI command mxnodesecurity. A few passwords might be stored in a file on the CMS that are also
encrypted using the same 128-bit Blowfish key. These passwords can be managed using the mxpassword
command. The password file and the Blowfish key file are restricted with operating system file permissions
to administrators or root.
Prior to Systems Insight Manager 5.3, passwords configured on the Systems Insight Manager protocol settings
pages are stored in a local file on the CMS, restricted with operating system file permissions to administrators
or root. These passwords can be further managed using the mxnodesecurity command.
Browser
SSL
All communication between the browser and the CMS or any managed server occurs using HTTPS over SSL.
Any navigation using HTTP (not using SSL) is automatically redirected to HTTPS.
Cookies
Although cookies are required to maintain a logged in session, only a session identifier is maintained in the
cookie. No confidential information is in the cookie. The cookie is marked as secure, so it is only transmitted
over SSL.
Passwords
Password fields displayed by Systems Insight Manager do not display the password. Passwords between
the browser and the CMS are transmitted over SSL.
Password warnings
There are several types of warnings that can be displayed by the browser or by the Java plug-in on the
browser, most having to do with the SSL server certificate.
• Untrusted system
This warning indicates the certificate was issued by an untrusted system. Since certificates are by default
self-signed, this is likely if you have not already imported the certificate into your browser. In the case
of CA-signed certificates, the signing root certificate must be imported. The certificate can be imported
before browsing if you have obtained the certificate by some other secure method. The certificate can
also be imported when you get the warning, but is susceptible to
authenticated. Do this if you can independently confirm the authenticity of the certificate or you are
comfortable that the system has not been compromised.
• Invalid certificate>
If the certificate is invalid because it is not yet valid or it has expired, it could be a date or time problem,
which could be resolved by correcting the system’s date and time. If the certificate is invalid for some
other reason, it might need to be regenerated.
• Host name mismatch>
If the name in the certificate does not match the name in the browser, you might get this warning. This
can be resolved by browsing using the system’s name as it appears in the certificate, for example,
marketing1.ca.hp.com or marketing1. The Systems Insight Manager certificate supports multiple names
to help alleviate this problem. See the System link format section below for information on changing
the format of names created in links by Systems Insight Manager.
spoofing
since the host system is not
• Signed applet
Previous versions of Systems Insight Manager use a Java plug-in that can additionally display a warning
about trusting a signed applet. Those previous versions of Systems Insight Manager use an applet
signed by Hewlett-Packard Company, whose certificate is signed by Verisign.
Browser session
By default, Systems Insight Manager does not time-out a user session while the browser is displaying the
Systems Insight Manager banner. This is known as monitor mode, and allows a continuous monitoring of
Browser 81
Page 82

the managed systems without any user interaction. The session times-out after 20 minutes if the browser is
closed or navigates to another site.
An active mode is also supported where the session times out after 20 minutes if the user does not interact
with Systems Insight Manager, by clicking a menu item, link or button. You can enable active mode by
editing the globalsettings.props file and change the EnableSessionKeepAlive setting to false.
Best security practices include care when visiting other websites. You should use a new browser window
when accessing other sites; when you are finished using Systems Insight Manager you should both sign out
and close the browser window.
Internet Explorer zones
Internet Explorer supports several zones that can each be configured with different security settings. The
name used to browse to Systems Insight Manager or managed systems can affect which browser zone
Internet Explorer places the system. For example, browsing by IP address or full Domain Name System (DNS)
(for example, hpsim.mycorp.com) can place the system into the browser’s more restrictive Internet zone,
causing improper operation. Ensure systems are being placed into the correct Internet zone when browsing.
You might need to configure Internet Explorer, or use a different name format when browsing.
System link format
To facilitate navigation to managed systems, Systems Insight Manager provides the System Link Configuration
option to configure how links to managed systems are formed. Go to Options→Security→System Link
Configuration.
The following options are available:
• Use the system name
• Use the system IP address
• Use the system full DNS name
If you need full DNS names to resolve the system on your network, keep in mind that the browser might
display a warning if the name in the system’s certificate does not match the name in the browser.
Operating-system dependencies
User accounts and authentication
Systems Insight Manager accounts are authenticated against the CMS host operating system. Any operating
system features that affect user authentication affect signing into Systems Insight Manager. The operating
system of the CMS can implement a lock-out policy to disable an account after a specified number of invalid
sign in attempts. Additionally, an account can be manually disabled in the Microsoft Windows domain. Any
account that cannot authenticate against the operating system prevents signing into Systems Insight Manager
using that account. For automatic sign-in to Systems Insight Manager,
NOTE: A user who is already signed into Systems Insight Manager is not re-authenticated against the
operating system until the next sign in attempt and continues to remain signed into Systems Insight Manager,
retaining all rights and privileges therein, until signing out of Systems Insight Manager.
IMPORTANT: If creating operating system accounts exclusively for Systems Insight Manager accounts, give
users the most limited set of operating system privileges required. Any root or administrator accounts should
be properly guarded. Configure any password restrictions, lock-out policies, and so on, in the operating
system.
user accounts
must be domain accounts.
File system
Access to the file system should be restricted to protect the object code of Systems Insight Manager. Inadvertent
modifications to the object code can adversely affect the operation of Systems Insight Manager. Malicious
modification can allow for covert attacks, such as capturing sign in credentials or modifying commands to
managed systems. Read-level access to the file system should also be controlled to protect sensitive data
82 Understanding Systems Insight Manager security
Page 83

such as private keys and passwords, which are stored in a recoverable format on the file system. Systems
Insight Manager does not store user account passwords for users signing into Systems Insight Manager.
IMPORTANT: Systems Insight Manager sets appropriate restrictions on the application files. These restrictions
should not be changed because this could affect the operation of Systems Insight Manager or allow unintended
access to the files.
Background processes
On Windows, Systems Insight Manager is installed and runs as a Windows service. The service account
requires administrator privileges on the CMS and the database, and can be either a local or a domain
account. For automatic sign-in to Systems Insight Manager, a domain account must be used. On UNIX,
Systems Insight Manager is installed and runs as daemons running as root.
Windows Cygwin
The version of
been modified with security enhancements to restrict access to the shared memory segment. As a result, it
does not interoperate with the generally available version of Cygwin. Only administrative users can connect
to a system running the modified SSH server.
Cygwin
provided with the
SSH server
HP-UX and Linux
The device /dev/random command is used, if available on the CMS, as a source for random numbers
within Systems Insight Manager.
Systems Insight Manager database
Access to the database server should be restricted to protect Systems Insight Manager data. Specify
appropriate non-blank passwords for all database accounts, including the system administrator (sa) account
for SQL Server. Changes to the operating data, such as authorizations, tasks, and collection information,
can affect the operation of HP SIM. System data contains detailed information about the managed systems,
some of which might be considered restricted including asset information, configuration, and so on. Task
data might contain extremely sensitive data, such as user names and passwords.
SQL Server and MSDE
Systems Insight Manager uses only Windows authentication with SQL Server and MSDE. The installation of
MSDE with previous versions of Systems Insight Manager creates a random password for the sa account,
though it is not used for Systems Insight Manager.
Remote SQL Server
for Windows, for CMS and the managed systems, has
SQL Server supports advanced security features, including SSL encryption during sign in and data
communication. More information can be found in SQL Server documentation and the Microsoft website.
PostgreSQL
PostgreSQL uses a password that is randomly generated when Systems Insight Manager is installed. This
password can be changed through the command line. See the mxpassword manpage for more information.
Oracle
The Oracle database administrator must create a user (preferably with a non-blank password) for Systems
Insight Manager to use when connecting to Oracle. The Oracle user must have, at the minimum, the Connect
and DBA roles, which allow Systems Insight Manager to have the correct privileges to create and delete
Systems Insight Manager tables and views, along with read/write access to the Systems Insight Manager
tables. Changes to the operating data, such as authorizations, tasks, and collection information, can affect
the operation of Systems Insight Manager. System data contains detailed information about the managed
systems, some of which might be considered restricted, including asset information, configuration, and so
on. Task data can contain extremely sensitive data, such as user names and passwords.
Systems Insight Manager database 83
Page 84

Command-line interface
Much of Systems Insight Manager’s functionality can be accessed through the command line. To access the
command-line interface, you must be logged on to the CMS using an operating system account that is a
valid Systems Insight Manager user account. That account’s authorizations and privileges within Systems
Insight Manager apply to the command line interface as well.
NOTE: On a Windows system, the operating system account must have administrator-level access on the
CMS for all of the commands to work properly.
How to: configuration checklist
General
• Configure firewalls to allow desired ports and protocols
• Review lockdown versus ease of use
• After configuring the CMS and managed systems, run discovery on the CMS
Configuring the CMS
• Inspect SSL server certificate and update if desired
• Configure passwords and SNMP community strings (See the Configuring managed systems section
below)
• Configure user accounts, based on operating system accounts that will access Systems Insight Manager
• Review and configure toolboxes if defaults are not appropriate
• Review and configure authorizations for users
• Configure system link configuration format
• Review audit log
Strong security
NOTE: How-to: lockdown versus ease of use for more details.
• Enable Require Trusted Certificates, inspect and import desired system SSL certificates or root signing
certificates
• Require only known SSH keys, inspect and import desired system SSH public keys
Configuring managed systems
• Configure SNMP community strings, which are required at the CMS.
• For WBEM on HP-UX and Linux, configure the WBEM password. This password is required at the CMS.
For the highest level of security, a different user name and password can be used for each managed
system; each user name and password pair must be entered into the CMS to enable access.
For HP-UX, certificates can be used instead of username and password for WBEM authentication. For
more information, see the Systems Insight Manager online help.
• The CMS requires a user name and password to access WMI data on Windows systems. By default,
a domain administrator account can be used for this, but you should use an account with limited
privileges for WMI access. You can configure the accounts accepted by each Windows managed
system by using the Computer Management tool:
1. Select the WMI Control item.
2. Right-click WMI Control, and then select Security.
3. Select the Security tab, select Root namespace, and then click Security>
84 Understanding Systems Insight Manager security
Page 85

4. Add a user to access WMI data along with their access rights. The enable account and remote
enable permissions options must be enabled for correct operation of Systems Insight Manager.
5. The user name and password specified here must be configured in the CMS.
• Set up user accounts for Insight Web Agents
• Add the CMS SSH public key to the system’s trusted key store by running mxagentconfig on the
CMS.
• Configure trust relationship option for Insight Web Agents; import the CMS SSL certificate if set to trust
by certificate.
How to: lockdown versus ease of use on Windows systems
Moderate
The Insight Management Agents should be configured to trust by certificate. This requires distributing the
Systems Insight Manager certificate, which includes the public key, to all the managed systems. After the
systems have been configured to trust the Systems Insight Manager system, they will accept secure commands
from that particular system only.
This certificate can be distributed in a number of different ways, including:
• Use the Configure or Repair Agents Set Trust Relationship option in Systems Insight Manager to
deploy the Systems Insight Manager certificate to the managed systems. Depending on the managed
system, this might use SSL or Windows network connections to copy files and configure the managed
systems.
• Use the Web-based interface in an individual Insight Management Agents to specify the Systems Insight
Manager system to trust. This causes the agents to pull the digital certificate from the Systems Insight
Manager system immediately, enables you to verify it, and then sets up the trust relationship. While
this option does have some limited vulnerability, it would be possible to spoof the Systems Insight
Manager system at the time the certificate is pulled and thus set up an unexpected trust relationship.
However, it is reasonably secure for most networks.
• Import the HP SIM certificate during initial installation of the Insight Management Agents. This can be
done manually during an attended installation or through the configuration file in an unattended one.
This method is more secure because there is little opportunity for the spoofing attack described above.
• If you have already deployed the Insight Management Agents, you can distribute the security settings
file and the Systems Insight Manager certificate directly to the managed systems using operating system
security.
Strong
IMPORTANT: When using the Trust by certificate option, the Systems Insight Manager SSL certificate
must be redistributed if a new SSL certificate is generated for Systems Insight Manager. SSH on the managed
system normally operates in a mode similar to trust by certificate in that it requires the SSH public key from
the CMS. Note that the SSH public key is not the same as the SSL certificate. The command mxagentconfig
is used on the CMS to copy the key to the managed system. This must be done for each user account that
is to be used on the managed system since the root or Administrator account is used by default.
IMPORTANT: The Systems Insight Manager SSH public key must be redistributed if the SSH key-pair is
regenerated.
IMPORTANT: The Systems Insight Manager SSH public key must be redistributed if the SSH key-pair is
regenerated.
The strong security option lets you take advantage of every security feature. This option provides the highest
level of security available within the Systems Insight Manager security framework, but there are some
additional procedural steps you must make in your server operations. Also, this option is facilitated by using
your own PKI that includes a certificate authority and certificate server.
How to: lockdown versus ease of use on Windows systems 85
Page 86

Procedure 18-1 Setting security to strong
1. Generate certificates from your certificate server for each managed system and the Systems Insight
Manager system. To do this, first generate a certificate signing request (CSR) from the various systems.
This generates a PKCS#7 file. This file should then be taken to the certificate server and signed, and
then the resulting file (generally a PKCS#10 response) should be imported into the each managed
system and the Systems Insight Manager system.
To maximize security, it is important that none of these steps be done over a network unless all
communications are already protected by some other mechanism.
Thus, in the case of the Insight Management Agents, a removable media (for example, USB thumb drive,
floppy disk) should be taken directly to the managed system, have the PKCS#7 file placed on it, and
hand-carried to a secure system with access to the certificate server. The PKCS#10 response file should
similarly be placed on the removable media and returned to the managed system to be imported into
the Insight Management Agents.
2. Take the root certificate (just the certificate, not the private key) of your certificate server and import that
into the Systems Insight Manager trusted certificate list. This allows Systems Insight Manager to trust all
the managed systems because they were signed with this root certificate.
3. Take the certificate from the Systems Insight Manager system and import it into the Insight Management
Agents of each system. This allows the managed systems to trust the Systems Insight Manager system.
This certificate can be distributed using any of the methods available to distribute the Systems Insight
Manager certificate. However, the option to pull the certificate directly from the Systems Insight Manager
system over the network must be avoided due to the potential man-in-the-middle attack.
As in the Moderate option, you must redistribute the Systems Insight Manager SSL certificate to the
managed systems whenever a new Systems Insight Manager SSL certificate is generated.
4. Once these steps have been completed, you can turn on the option in Systems Insight Manager to enable
Require Trusted Certificates. Select Options→Security→Trusted Systems, and then click Trusted
Certificates. The warnings presented around this option make it clear that any managed system that
does not have a certificate signed by your certificate server will not be sent secure commands from the
Systems Insight Manager system, although it will be monitored for hardware status.
5. For SSH, turn on the option to accept SSH connections only from specified systems. Select
Options→Security→Trusted Systems, click SSH Host Keys, and then enable the The central
management server will accept an SSH connection only if the host key is in list below. Afterwards,
you must manually import each managed system’s public SSH key into the list of keys in Systems Insight
Manager.
To configure this in previous versions of Systems Insight Manager, add or modify the following line in
the Hmx.properties file:
MX_SSH_ADD_UNKNOWN_HOSTS=false
and then restart Systems Insight Manager.
Afterwards, you must manually import each managed system's public SSH key into the list of keys in
Systems Insight Manager.
86 Understanding Systems Insight Manager security
Page 87

19 Privilege elevation
Privilege elevation enables users without root privileges to run tools requiring root privileges on HP-UX, Linux,
and VMware ESX managed systems. To use this feature with Systems Insight Manager, a privilege elevation
utility such as su, sudo, or Powerbroker must be installed on the managed system. Typically, these utilities
are used to sign in as a normal user, then when you want to run a program requiring root, prefix the command
line for that program with the privilege elevation utility’s executable. For example sudo rm
/private/var/db/.setupFile. Some of these utilities can be configured to prompt the user for a
password before allowing root access.
For Systems Insight Manager to run tools on managed systems using privilege elevation, Systems Insight
Manager must be configured to know which user to use to sign in to the managed systems, how to prefix
the command line that it will run, and whether or not the privilege elevation utility will prompt for a password.
This is configured either from the First Time Wizard, or from the Options menu by selecting
Options→Security→Privilege Elevation. You can configure different values of these settings for Unix and
Linux systems versus VMware ESX systems.
Once you have configured Systems Insight Manager to use privilege elevation, it determines if a tool needs
privilege elevation by looking at the tool's
on the managed system. If this parameter is specified as root in the tool’s tool definition file (tdef), then
Systems Insight Manager will invoke privilege elevation. If this parameter is not specified in the tdef, then
Systems Insight Manager defaults the value of execute-as to be the identity of the user invoking the tool
within Systems Insight Manager. If this user is logged in as root, then privilege elevation will also be used.
When Systems Insight Manager determines that privilege elevation should be used, it uses SSH to sign in
to the remote system with the user that was configured in the privilege elevation settings page (a specific
user, the user who is currently signed into Systems Insight Manager, or a user specified at runtime). If the
user must be specified at runtime, or if a password is required for privilege elevation, these prompts appear
on the Task Wizard page that collects any parameters necessary to run a tool. After Systems Insight Manager
is signed into the remote system through SSH, it invokes the command for the tool, prefixed by the privilege
elevation utility executable, and supplies the password if required.
execute-as
parameter. This is the user the tool should be run as
87
Page 88

20 Contract and warranty
The Contract and Warranty Status is available when you have a Windows CMS, and the HP Insight Remote
Support Pack is installed. You can view Contract and Warranty status updates for HP systems that have
contract and warranty data collection enabled. Click the Contract and Warranty Status icon to view the
Contract and Warranty Details page for the system.
The following requirements must be met in order to view contract and warranty data in Systems Insight
Manager:
• The Systems Insight Manager CMS must have connectivity to http://www.hp.com.
• The Remote Support Pack software must be installed and properly configured. The Remote Support
Software Manager is installed on the CMS during the Systems Insight Manager installation. After the
Systems Insight Manager installation is complete, you must configure the Remote Support Software
Manager to fit your enterprise specifications. Once configured, the Remote Support Software Manager
will download and install the Remote Support tool. The Remote Support tool must be installed, configured,
and registered before you can retrieve contract and warranty data.
• To collect contract and warranty data for a system, the system's serial number, product ID, and country
code must be present in the system properties. In most cases, the serial number and product ID are
obtained during Systems Insight Manager's identification process. You can enter a serial number and
product ID if needed. It is important to specify the correct country code to ensure accurate information.
If Systems Insight Manager cannot obtain a country code, it defaults toUS. If you have a support
contract, enter an entitlement or obligation identifier and entitlement type if you want to view contract
data.
NOTE: Collecting Contract and Warranty information is limited to once a day.
Viewing contract and warranty information
You can view contract and warranty information by:
• Clicking the CW icon in the system table view page.
• Clicking the Contract and Warranty status link on the system page.
• Viewing a Warranty-Contract report.
• Searching for systems with contracts or warranties that expire in a specified number of days.
• Configuring alerts for systems with expiring contracts or warranties.
• Viewing the initial and monthly contract and warranty data collection tasks.
• Viewing the Remote Support Eligible collection, which lists systems the Remote Support Pack supports
if you choose to enable them for support and are entitled to support. If a system is enabled without
proper entitlement, events are submitted to the Remote Support tool, but they are not monitored and
will not trigger a response.
NOTE: If you receive an incorrect response for a particular HP brand system after clicking the CW icon
on the system table view page, there might be an entitlement issue with the system. This is not a Remote
Support or an Systems Insight Manager issue. Please contact HP support. You must have a valid serial
number, product ID, and any contract or Care Pack numbers that are applicable.
Collecting contract and warranty data
The following tasks are used to collect contract and warranty data:
• Initial contract and warranty collection. This task collects contract and warranty data from newly
discovered systems. If the required system properties are not entered for a new system or automatically
Viewing contract and warranty information 88
Page 89

collected by Systems Insight Manager during identification, contract and warranty data will not be
collected.
• Monthly contract and warranty collection This task collects contract and warranty data every month.
If the required system properties are not entered for a system or automatically collected by Systems
Insight Manager during identification, contract and warranty data will not be collected.
If you want to run the Contract and Warranty Collection task immediately for an updated system, select
Options→Contract and Warranty Data Collection.
IMPORTANT: Running the contract and warranty collection task more than once a month is not recommended
or needed since the data does not often change.
NOTE: Collecting Contract and Warranty information is limited to once a day.
Viewing contract and warranty status
Overview
The Contract and Warranty Status page is available when you click the CW icon on the system table
view page or the Contract and Warranty Status link on the system page. This page lists System
Information and contract and warranty details.
NOTE: If you receive an incorrect response for a particular HP brand system after clicking the CW icon
on the system table view page, there might be an entitlement issue with the system. This is not a Remote
Support or an Systems Insight Manager issue. Please contact HP support. You must have a valid serial
number, product ID, and any contract or Care Pack numbers that are applicable.
NOTE: A system can have multiple contracts and warranties.
System Information
• System Name. The system name or IP address.
• Serial Number. The system serial number. This can be the serial number discovered by Systems Insight
Manager or the number you entered in the Customer-Entered serial number field on the Edit System
Properties page.
• Product ID/Number The product number. Typically, the product number is the number used to order
a system.
• Product Line. Details about the product line.
Contract
• CCRN (Customer Contract Reference Number). The reference used for the contract as renewed over
time.
• Active Contract. This value is true if an active contract exists.
• Start Date. The start date of an active contract.
• End Date. The end date of an active contract. If no end date is available, this field is blank.
• Contract Status. The possible values are:
A: Active.•
• F: The start date is in the future.
• X: Expired.
• E: There is no end date.
• I: The agreement is informal. This status might mean that the agreement is not finalized.
Viewing contract and warranty status 89
Page 90

• B: Delivery blocked
• C: Cancelled.
• Active Obligation. This value is true if there is an active support contract for a system.
The contract start and end date is listed for each contract item along with the following information:
• Status The possible values are:
A: Active.•
• F: The start date is in the future.
• X: Expired.
• E: There is no end date.
• I: The agreement is informal. This status might mean that the agreement is not finalized.
• B: Delivery blocked
• C: Cancelled.
• Service Level. The level of service specified in the offer. This includes the amount of time HP has to
react to an issue, the time to resolution for a set of issues, and the type of response HP will use to react
to an issue.
• Deliverables. A description of services offered with this contract, for example, onsite support or parts
and materials.
Warranty
• Warranty Type. The type of warranty, for example, Base Warranty, Bundled Warranty, or HP Care
• Start Date. The start date of an active warranty.
• Extension. The number of days that this warranty has been extended.
The warranty start and end date is listed for each warranty item along with the following information:
• Status. The possible values are:
• Service Level. The level of service specified in the warranty. This includes the amount of time HP has
• Deliverables. A description of services offered with this warranty, for example, onsite support or parts
Pack.
A: Active.•
• F: The start date is in the future.
• X: Expired.
• E: There is no end date.
• I: The agreement is informal. This status might mean that the agreement is not finalized.
• B: Delivery blocked
• C: Cancelled.
to react to an issue, the time to resolution for a set of issues, and the type of response HP will use to
react to an issue.
and materials.
Monitoring contract and warranty status
Contract and warranty status is shown by the following status types:
Table 20-1 Contract and Warranty status
90 Contract and warranty
DescriptionIcon MeaningStatus Icon
The contract or warranty is expiredMajor
Page 91

DescriptionIcon MeaningStatus Icon
Minor
Unknown
Disabled
• Contract information is temporarily
unavailable.
• The contract expires in 30 days.
The contract expires in 90 days.Warning
The system has a valid contract or warranty.Normal
No contract information was found. The
system might not have a serial number or
product ID.
The Do not collect contract and warranty
data for this system option is set for the
system.
Viewing contract and warranty status 91
Page 92

21 License Manager
License Manager enables you to view and manage product licenses within the Systems Insight Manager
user interface. To access additional information about Updates, Upgrades, and Technical support, contact
your HP services or HP partner representative or access the IT Resource Center (ETC) at www.itrc.hp.com.
NOTE: To run License Manager, you must have
administrative rights
on the CMS (to set, select
Options→Security→Users and Authorizations→User) and choose the Configure CMS Security option,
and the All Tools toolbox (to set, select Options→Security→Users and Authorizations→Authorizations)
on the managed systems that you want to license.
You can view and associate licenses to specified target
systems
discovered by Systems Insight Manager. A
product may use artificial systems to contain licenses. Therefore, you may see names of non-existent systems.
System licenses can be reviewed by product. Licenses can be associated with specific systems. Licenses can
be collected and deployed to management processors. New licenses can be added individually or in bulk
from a file. License Manager database tables are updated and synchronized daily at midnight or at Systems
Insight Manager startup, and expired license information is sent to registered plug-ins.
For some products, License Manager only permits users to review system licenses, available licenses, and
add licenses. For other products, License Manager allows association of licenses with systems selected by
the user. The association of the license is dependent on the particular product. For some products, licenses
can be freely associated with selected systems and those associations can be changed. However, in most
cases the license is locked to the system once it is used with the product. Once locked, associations can no
longer be changed. For other products, the product association is permanent once made in License Manager.
Finally, some products allow License Manager to manage their licenses entirely such that selection and
licensing systems is final. The distinction between these latter modes is that associations may be changed if
the user options include Assign / Un assign and are final if there is one option, Apply.
License Manager includes functionality to collect and deploy licenses with most management processors.
The License Manager core establishes and maintains a secure communication channel for license deployment
with the management processor through two options provided by Systems Insight Manager, SSL and Secure
Shell (SSH). Both, SSL and SSH meet the requirements for a secure channel. If the target systems are
management processors, the management processor must support SSH and you must provide the required
credentials. An SSH based solution uses CLO. All management processor firmware releases include support
for SSH/CLP. ProLiant SSH/CLP support is included in v1.70 or later of the management processor firmware.
Integrity SSH/CLP support is included in management processor firmware. All management processors can
be updated to this version or later. The license collection uses an HTTP based mechanism and operates
without credentials. Management processor firmware in many instances allows the user to define if license
information is available on demand using this mechanism.
Table 21-1 Supported hardware for Integrity management processor license collections
Firmware supportServer typeProduct nameHardware
F.02.19 or greaterRackMerlinrx2660
F.02.19 or greaterRackRubyrx3600
F.02.19 or greaterRackSapphirerx6600
T.03.07 or greaterBladeTahitiBL860c
T.03.07 or greaterBladeBarbaraBL870c
NOTE: The new management processor license collection is supported on management processor and
management processor devices. Deployment is supported on management processor and management
processors with newer firmware versions.
In some instances, licenses are managed and controlled by the licensed system (remote licensing). In this
case, License Manager provides the facility to collect and deploy licenses to those systems. For
non-management processor systems, communication used is a Microsoft COM mechanism.
92
Page 93

For some products, the license is stored in a licensing structure in the Windows registry on the licensed
system. License Manager employs Microsoft's remote registry API over the COM protocol to assign licenses
to and collect license information from those remote systems. License information is duplicated in the Systems
Insight Manager database, but licenses are managed remotely and must be periodically collected to keep
this information current. Authentication credentials for the specified systems are needed when licenses are
sent to the specified system. If WBEM authentication credentials have been provided for a specific target,
these credentials are used. If specific credentials have not been provided, each set of WBEM credentials
provided as global credentials are used in turn. If no credentials are provided, the connection is attempted
using the default credentials of the Systems Insight Manager server. The remote registry service must be
started and run on candidate target systems for key collection or assignment. This mechanism of license
management is rare. Those instances where used, will be clearly stated in product documentation.
NOTE: Automatic collection of management processor licenses is not supported.
NOTE: You do not have support or upgrade options by default. After July 9, 2007, all license keys are
included in one year of 24 x 7 Software Technical Support and Update Service. The License Manager
informs you which license keys are "support and update enabled" and which license keys require the
purchase of future updates and upgrades.
CLI mxlmkeyconfig
The CLI mxlmkeyconfig enables you to combine all the License Manager key files into one file instead of
having to execute multiple files. Combining these files into a single file makes it easier when adding keys
from a file through the License Manager Graphical user interface (GUI).
The mxlmkeyconfig command takes all the keys and related information and places it in the resulting key
file. The CLI program will not allow duplicates. If there are duplicate <key string> values, a warning message
appears and only the first value is placed in the resulting key file. If badly formatted files are encountered,
warning messages appear.
The key file is created when the CLI mxlmkeyconfig is command is executed. If the resulting key file already
exists, then the previous keys remain and the information from the source key files are added to the resulting
key file.
License types
License Manager displays licenses by product. If a license authorizes multiple products, the number of seats
permitted by the license is applied in full to each authorized product. For example, a license authorizing
five seats and two products authorize five seats for each product.
Table 21-2 License types
Flexible Quantity
Activation Key Agreement
Demo (seats and time)
Demo (time)
Beta
DescriptionLicense Type
Offers full, unlimited functionality for an unlimited time and for a
specific number of seats purchased, up to 50,000.
Offers full, unlimited functionality for an unlimited time. This license
represents an expected upper limit on the number of seats, up to
50,000.
Offers full, unlimited functionality for a limited time and a specific
number of seats. The license determines the number of days the
key enables the product to function. The days begin counting from
the day of first use. The key can permit more than one instance of
the product to run. Demo keys can authorize up to 255 seats for
up to 255 days.
Offers full, unlimited functionality for a limited time. The license
determines the number of days the key allows the product to
function. The days begin counting from the day of first use. The
key can permit more than one instance of the product to run. Demo
keys can authorize use for up to 65,535 days.
Offers full, unlimited functionality for a limited time. The license
determines the number of days the key enables the product to
function. The days begin counting from the day the key is created.
The key can permit more than one instance of the product to run.
Demo keys can authorize use for up to 65,535 days.
CLI mxlmkeyconfig 93
Page 94

DescriptionLicense Type
Duration
Subscription
Offers time limited, full functionality license. A Duration license
(DLL) can be assigned to a system multiple times. When the
licensed product consumes a license and that license subsequently
expires, a new license will be consumed and removed from the
stack of assigned licenses (if there are any and using the same
license key). For example, if seven product licenses from the same
DLL key are assigned the license remains valid for seven times the
interval specified in the corresponding DLL license. Any number
of the assigned licenses still assigned can be unassigned at any
time.. The basic time unit encoded in the key is one month. A DLL
can authorize up to 255 seats for up to 255 months.
Offers time limited, full functionality license. The basic time unit
encoded in the key is one month. A Subscription license can
authorize up to 255 seats for up to 255 months. All subscriptions
licenses based on a specific subscription license key will all expire
when the first license used from this key expires. All time
representations in License Manager displays are in days
NOTE: Systems Insight Manager considers one month equal to 30 days.
Table 21-3 License types reported by management processor products
Intrinsic
Individual
Offers full, unlimited functionality and represents a single-use key
for the product. This license type is specific to management
processors.
Offers full, unlimited functionality and represents a single-use key
for the product. This license type is specific to management
processors.
DescriptionLicense Type
Demo (time)
Licensed System(s)
License Systems in License Manager enables you to list the systems licensed for the selected product. Products
can elect to not display all or some licensing details.
Some products provide licenses to enable other products. The license keys generated by these products can
be manually added. In many instances, these generated licenses are not visible to the user. Therefore, the
only way to determine if a system is licensed for a product is to check the license status of the enabling
product and noting this relationship.
Add Licenses
Systems Insight Manager enables you to add individual license keys to the License Manager database.
HP Insight Control remote management product license keys can be added into the database because they
can be deployed directly to management processors.
Collect Remote License Info
Collect Remote License Info (for management processors) collects licenses using an HTTP based
protocol which does not require credentials.
When collecting remote licenses, be aware of the following:
Offers full, unlimited functionality.Permanent
Offers full, unlimited functionality for a limited time. The license
determines the number of days the key allows the product to
function. The days begin counting from the day of first use. The
key can permit more than one instance of the product to run. Demo
keys can authorize use for up to 65,535 days.
• Automatic collection of management processor licenses is not supported.
• You do not have support or upgrade options by default. After July 9, 2007, all license keys are included
in one year of 24 x 7 Software Technical Support and Update Service. The License Manager informs
94 License Manager
Page 95

you which license keys are "support and update enabled" and which license keys require the purchase
of future updates and upgrades.
Collect Remote License Info (for servers) collects license details from selected targets. If licenses are stored
on the selected system (for details, see the specific product information), the selected machine must be running
a variant of Microsoft Windows.
This collection process will do the correct behavior when a product has been selected in Product License
Information table above. When no product has been selected, the behavior is determined by the type of
system selected. When no product has been selected, select the management processor and NOT the server
hosting the desired management processor.
License Collection Results table
1
System Name. The names of the systems where the task was executed.
2
Key. The license keys received from the target systems. Each key retrieved from a system is on a separate
line. Some products have more than one license key. License details are contained in the key, and each
key might enable more than one product.
3
Product. The name of the product associated with the use of this key.
4
Response Status. The status of the request for license data for the selected system.
• Successful task
Licensing information from the remote system.A.
B. Licensing information from the target system.
NOTE: This response status displays for systems running Windows variant OS and has license stored
in the registry.
• Unsuccessful task
Connection to device failed. Possible reasons could be device not
A.
reachable or device is an older firmware version of management
processor.
This happens due to the following reasons:
a. Network error - Connection Refused.
b. Network error - Connection timed out.
c. The system you are trying to connect has firmware version that is older or not supported.
B. Device not found.
Failure in pinging the system.
C. License Key overused. Please refer to the license agreement to avoid
any violations.
D. No valid licensing information found on the remote system.
E. No licensing information on the remote system.
F. Problem collecting licensing information.
G. Failed to contact this system. Network path not found or similar error.
H. Specified system is no longer in the database.
Collect Remote License Info 95
Page 96

I. Target system is not running Microsoft Windows as required.
J. Keys cannot be collected from a system of this type.
NOTE: This displays if the system is of a different type such as; a switch, a printer, a cluster, a
complex, or a system not running a Windows OS.
K. Cannot collect keys stored on this node. Systems Insight Manager host
and specified system must be running Microsoft Windows.
NOTE: This happens when, for example CMS or a remote system is not running a Windows
variant operating system.
L. License Manager does not know how to assign licenses for this product.
License Manager has no information about this product. Install the HP
Systems Insight Manager plug-in that uses this license or collect
license information from a system running this product first.
Assigning and Unassigning licenses
Systems Insight Manager enables you to assign and Un assign product licenses for plug-ins, if applicable
for that plug-in, and to assign licenses to remote target systems when licenses are managed remotely.
Remember that management processor licenses must be applied directly to the management processor and
NOT its host server. For plug-ins, when assigning licenses, note the following for non-management processor
targets:
• When a license is assigned to a system, it is not locked or consumed until the product operates on that
system.
• A system can be licensed with a demo key just once. If the license expires, the only option to continue
to use the system with that product is to purchase a license. A system licensed by a demo key can be
relicensed at any time with a paid license.
• An assigned license can be unassigned from one system and assigned to another system, as long as
the product enabled by the license has not consumed the license. When a product has been used on
a system, the license is locked to that system permanently. Licenses delivered directly to a target system
that manages its own licenses cannot be unassigned (product will provide details on when a license
must be sent to a remote server). There is no penalty for having these licenses remain on those systems
because they are consumed on an as-needed basis. The remaining licenses can be used elsewhere.
• A DLL can be assigned to a system a multiple number of times. When the licensed product consumes
a license and that license subsequently expires, a new license will be consumed and removed from the
stack of assigned licenses (if there are any and using the same license key). For example, if seven
product licenses based on the same DLL key are assigned, the license remains valid for seven times the
time interval specified in the corresponding DLL license. Any number of the assigned licenses still
assigned may be unassigned at any time.
Some products limit the use of the License Manager interface. Consequently, Manage Licenses may be
selected, however Apply or Assign/Un-assign might be disabled.
Apply Licenses
A license applied to a system is irreversible. Licenses applied to management processors are managed by
each management processor and so the policy is set by the management processor. The license is locked
to the specified system.
For management processor targets:
• When a license is assigned to a management processor, a license record is created and stored in the
License Manager database.
• If the selected management processor is already licensed, you cannot replace that license with a new
license from License Manager. You must first delete the existing license at the management processor
console and then insert the new license (directly or using License Manger). However, Integrity MP does
96 License Manager
Page 97

replace a demo key with a permanent license. If a permanent key is already present, Integrity MP
displays a message such as License already Installed.
• An assigned license cannot be unassigned from one management processor and assigned to another
management processor. Licenses delivered directly to the actual target system cannot be unassigned
because the behavior of the product operating with that license is outside the scope of License Manager.
When assigning licenses to management processor targets, the SSH credentials for each target must be
known. When deploying licenses to remote servers, the access credentials must be known.
Remember that management processor licenses must be applied directly to the management processor and
not its host server.
Add License page
1
Select the complete key string and press Carl + C to copy it.
Position the cursor in any of the five fields forming the input box and press Carl + V, or right-click your
mouse to paste the license key. If the Add License function was selected after you copied the key, press
Carl + V to paste the key.
The license key displays with five characters in each field.
2
Enter the full path and file name in the Specify a file name and path field.
3
Click Browse.
a. The Choose file dialog box appears.
b. Navigate to the file that contains the licenses to be added.
c. When a file has been located, click Process.
NOTE: When pasting in the complete key, the key can be in the normal format of five groups of five
characters, with each separated by a hyphen (-), (for example, 12345-67890-54321-09876-12345). There
are no spaces between the characters and the hyphens.
Key details page
Click Process to display the license details.
1
Product The name of the product.
2
License Version The license version of the product.
3
Licenses Type The type of license for example, Demo, Beta, Duration, Site, and
Maintenance.
4
Licenses Purchased The number of licenses purchased for a product.
5
Days Max The maximum number of days the licenses can be used.
6
Back Returns to the Add License page.
7
Add Licenses Now Adds the keys to the database.
Add License page 97
Page 98

Assigning or Applying Licenses page
1
System Name The name of the system where the task was executed.
2
Serial Number A number the licensing product chooses to identify remote systems. (Check product
information for specific details).
3
Unique Identifier A unique string that further identifies a system. Systems can be licensed by any
combination of system name, serial number, or unique identifier.
4
Status The status of the use of the license on the named system.
5
Operating System The name and edition of the operating system installed on the product.
6
System Type The type of system licensed, for example, server, storage, or unmanaged.
7
System IP Address The IP Address of the licensed system.
8
All Features Supported A 'Yes' or 'No' value. Systems can be licensed with a bundle license. The Yes
in this column implies that all products licensed by bundle license fully support the system indicated.
No, indicates that some licenses do not support this system. You must determine which products do not
support the selected system.
9
License advisories and warnings resulting from last licensing activity: Table that indicates other licenses
which are required to be in place on indicated system to fully comply with the selected product license.
98 License Manager
Page 99

License unlicensed systems (optional) page
1
System license status Displays the status of system licenses, such as Not licensed, or assigned duration
license.
2
System selected to be licensed System Name 15.146.233.1 is selected to have a license assigned
to it.
3
Licenses currently available Displays all of the currently available licenses to be assigned.
4
License selected A license is selected to be assigned to system 15.148.233.1.
5
Apply license Applies the selected license to the selected system.
Online license page displaying the change to both the System license status table and the Licenses currently
available table after a node is licensed with DLL license.
1
System license status System 15.146.233.1 displays the status as having a assigned duration license.
2
Licenses currently available Displays that the Duration license has been reduced by the number of
licenses assigned to system 15.146.233.1.
License unlicensed systems (optional) page 99
Page 100

22 Storage integration using SMI-S
About storage systems
Storage systems are SAN-attached Fibre Channel disk arrays, switches, tape libraries, or hosts (with Fibre
Channel host bus adapters). Systems Insight Manager uses
data from storage systems. To view the latest information about Systems Insight Manager device support
and for information about obtaining and installing SMI-S providers, see http://www.hp.com/go/hpsim/
providers .
The default
Event Collections panel. The following collections are available under Storage Systems:
• All Storage Systems This category includes all devices that were discovered through an
• All Storage Hosts A storage host is a server, desktop, or workstation that is connected by a HBA to a
• All Storage Switches A storage switch is a Fibre Channel switch that is connected to a SAN. Storage
• All Storage Arrays A storage array is a disk array that uses a Fibre Channel controller to connect to a
• All Tape Libraries A tape library is a tape drive that is connected to SAN. Tape libraries are also
Storage integration using SNMP
Storage devices can be broken down into real-time access and backup systems. Real-time access systems
can be subdivided into internal disks, RAIDs, tape libraries, SANs, and NAS.
Most data centers have combinations of these systems including:
collection
SAN Storage hosts are also included in the All Servers and All Systems collections.
switches are also included in the All Systems and All Network Devices collections.
SAN. Storage arrays are also included in the All Systems collection.
included in the All Systems collection.
Storage Systems is listed under Systems by Type in the tree in the System and
WBEM SMI-S providers
to discover and collect
SMI-S provider
.
• Small Business Almost entirely internal disk drives
• Medium Business Varying combination of internal disks and RAID systems
• Large Business Varying combination of internal disks, RAID, and some SAN or NAS
• Enterprise Business Mostly large SAN or NAS, but some RAID and internal disks might be present
Systems Insight Manager can retrieve the information for the internal disk drives for monitored systems. This
does not mean that Systems Insight Manager actively manages and configures each system previously
indicated.
Systems Insight Manager can:
• Discover and identify storage systems that are directly attached to a server.
• Discover and identify storage systems that are on the network, including tape libraries.
• Discover and identify HP StorageWorks Command View storage device manager systems.
• Receive storage system events and associate them with the system that generated the event (through
Command View) running on a system, or from a tape library management card.
• Context launch appropriate management application from the context of the event or the context of the
system running the Command View that generated the event.
Storage events
With Systems Insight Manager, administrators can monitor inventory and configure and manage hardware
resources and the system software that affects the systems.
Systems Insight Manager provides the administrator with a complete overview of the hardware status. Storage
events provide notification that a problem exists that might affect the availability of storage resources, which
can affect system and application availability. Systems Insight Manager receives detailed event messages
through WBEM events or SNMP traps. These events identify the system and the affected disk and provide
an error number for looking up details and a description of the problem. The event details also contain links
About storage systems 100
 Loading...