

Page 1

HP 3PAR System Reporter 2.9 Software
User’s Guide
Abstract
This guide provides the information you need to install and use HP 3PAR System Reporter to monitor performance, create
charge back reports, and plan storage resources for HP 3PAR Storage Systems, and is intended for system and storage
administrators who monitor and direct system configurations and resource allocation for HP 3PAR Storage Systems.
HP Part Number: QL226-96085
Published: June 2011
Page 2

© Copyright 2011 Hewlett-Packard Development Company, L.P.
The information contained herein is subject to change without notice. The only warranties for HP products and services are set forth in the express
warranty statements accompanying such products and services. Nothing herein should be construed as constituting an additional warranty. HP shall
not be liable for technical or editorial errors or omissions contained herein.
Acknowledgments
Intel®, Itanium®, Pentium®, Intel Inside®, and the Intel Inside logo are trademarks or registered trademarks of Intel Corporation or its subsidiaries
in the United States and other countries.
Microsoft®, Windows®, Windows® XP, and Windows NT® are U.S. registered trademarks of Microsoft Corporation.
Adobe® and Acrobat® are trademarks of Adobe Systems Incorporated.
Java and Oracle are registered trademarks of Oracle and/or its affiliates.
UNIX® is a registered trademark of The Open Group.
Perl DBD, MySQL Driver Copyright & License
This module is Copyright (c) 2003 Rudolf Lippan; Large Portions Copyright (c) 1997-2003 Jochen Wiedmann, with code portions Copyright
(c)1994-1997 their original authors. This module is released under the same license as Perl itself. See the Perl README for details.
MySQL TCL Copyright & License
Copyright (c) 1994, 1995 Hakan Soderstrom, Enskede, Sweden and Tom Poindexter, Denver, Colorado Permission to use, copy, modify, distribute,
and sell this software and its documentation for any purpose is hereby granted without fee, provided that the above copyright notice and this
permission notice appear in all copies of the software and related documentation.
Redistribution and use in source and binary forms, with or without modification, are permitted provided that the following conditions are met:
• Redistributions of source code must retain the above copyright notice, this list of conditions and the following disclaimer.
• Redistributions in binary form must reproduce the above copyright notice, this list of conditions and the following disclaimer in the documentation
and/or other materials provided with the distribution.
• Neither the names of the copyright owners nor the names of its contributors may be used to endorse or promote products derived from this
software without specific prior written permission.
THIS SOFTWARE IS PROVIDED BY THE COPYRIGHT HOLDERS AND CONTRIBUTORS "AS IS" AND ANY EXPRESS OR IMPLIED WARRANTIES,
INCLUDING, BUT NOT LIMITED TO, THE IMPLIED WARRANTIES OF MERCHANTABILITY AND FITNESS FOR A PARTICULAR PURPOSE ARE
DISCLAIMED. IN NO EVENT SHALL THE COPYRIGHT OWNER OR CONTRIBUTORS BE LIABLE FOR ANY DIRECT, INDIRECT, INCIDENTAL,
SPECIAL, EXEMPLARY, OR CONSEQUENTIAL DAMAGES (INCLUDING, BUT NOT LIMITED TO, PROCUREMENT OF SUBSTITUTE GOODS OR
SERVICES; LOSS OF USE, DATA, OR PROFITS; OR BUSINESS INTERRUPTION) HOWEVER CAUSED AND ON ANY THEORY OF LIABILITY,
WHETHER IN CONTRACT, STRICT LIABILITY, OR TORT (INCLUDING NEGLIGENCE OR OTHERWISE) ARISING IN ANY WAY OUT OF THE USE
OF THIS SOFTWARE, EVEN IF ADVISED OF THE POSSIBILITY OF SUCH DAMAGE.
OraTcl Copyright and License
Copyright (c) 2000-2005 Todd M. Helfter
Permission to use, copy, modify, distribute, and sell this software and its documentation for any purpose is hereby granted without fee, provided
that (i) the above copyright notices and this permission notice appear in all copies of the software and related documentation, and (ii) the name of
Todd Helfter may not be used in any advertising or publicity relating to the software without the specific, prior written permission of Todd Helfter.
THE SOFTWARE IS PROVIDED "AS-IS" AND WITHOUT WARRANTY OF ANY KIND, EXPRESS, IMPLIED OR OTHERWISE, INCLUDING WITHOUT
LIMITATION, ANY WARRANTY OF MERCHANTABILITY OR FITNESS FOR A PARTICULAR PURPOSE.
IN NO EVENT SHALL TODD HELFTER BE LIABLE FOR ANY SPECIAL, INCIDENTAL, INDIRECT OR CONSEQUENTIAL DAMAGES OF ANY KIND,
OR ANY DAMAGES WHATSOEVER RESULTING FROM LOSS OF USE, DATA OR PROFITS, WHETHER OR NOT ADVISED OF THE POSSIBILITY
OF DAMAGE, AND ON ANY THEORY OF LIABILITY, ARISING OUT OF OR IN CONNECTION WITH THE USE OR PERFORMANCE OF THIS
SOFTWARE.
MySQL Client Library Copyright & License
Copyright © 1989, 1991 Free Software Foundation, Inc. 59 Temple Place - Suite 330, Boston, MA 02111-1307, USA Everyone is permitted to
copy and distribute verbatim copies of this license document, but changing it is not allowed.
SQLite Copyright & License
The original author of SQLite has dedicated the code to the public domain. Anyone is free to copy, modify, publish, use, compile, sell, or distribute
the original SQLite code, either in source code form or as a compiled binary, for any purpose, commercial or noncommercial, and by any means.
Page 3

Apache HTTP Server Copyright & License
Licensed under the Apache License Version 2.0, January 2004, http://www.apache.org/licenses/
TERMS AND CONDITIONS FOR USE, REPRODUCTION, AND DISTRIBUTION
1. Definitions.
"License" shall mean the terms and conditions for use, reproduction, and distribution as defined by Sections 1 through 9 of this document.
"Licensor" shall mean the copyright owner or entity authorized by the copyright owner that is granting the License.
"Legal Entity" shall mean the union of the acting entity and all other entities that control, are controlled by, or are under common control with
that entity. For the purposes of this definition, "control" means (i) the power, direct or indirect, to cause the direction or management of such
entity, whether by contract or otherwise, or (ii) ownership of fifty percent (50%) or more of the outstanding shares, or (iii) beneficial ownership
of such entity.
"You" (or "Your") shall mean an individual or Legal Entity exercising permissions granted by this License.
"Source" form shall mean the preferred form for making modifications, including but not limited to software source code, documentation
source, and configuration files.
"Object" form shall mean any form resulting from mechanical transformation or translation of a Source form, including but not limited to
compiled object code, generated documentation, and conversions to other media types.
"Work" shall mean the work of authorship, whether in Source or Object form, made available under the License, as indicated by a copyright
notice that is included in or attached to the work (an example is provided in the Appendix below).
"Derivative Works" shall mean any work, whether in Source or Object form, that is based on (or derived from) the Work and for which the
editorial revisions, annotations, elaborations, or other modifications represent, as a whole, an original work of authorship. For the purposes
of this License, Derivative Works shall not include works that remain separable from, or merely link (or bind by name) to the interfaces of,
the Work and Derivative Works thereof.
"Contribution" shall mean any work of authorship, including the original version of the Work and any modifications or additions to that Work
or Derivative Works thereof, that is intentionally submitted to Licensor for inclusion in the Work by the copyright owner or by an individual
or Legal Entity authorized to submit on behalf of the copyright owner. For the purposes of this definition, "submitted" means any form of
electronic, verbal, or written communication sent to the Licensor or its representatives, including but not limited to communication on electronic
mailing lists, source code control systems, and issue tracking systems that are managed by, or on behalf of, the Licensor for the purpose of
discussing and improving the Work, but excluding communication that is conspicuously marked or otherwise designated in writing by the
copyright owner as "Not a Contribution."
"Contributor" shall mean Licensor and any individual or Legal Entity on behalf of whom a Contribution has been received by Licensor and
subsequently incorporated within the Work.
2. Grant of Copyright License. Subject to the terms and conditions of this License, each Contributor hereby grants to You a perpetual, worldwide,
non-exclusive, no-charge, royalty-free, irrevocable copyright license to reproduce, prepare Derivative Works of, publicly display, publicly
perform, sublicense, and distribute the Work and such Derivative Works in Source or Object form.
3. Grant of Patent License. Subject to the terms and conditions of this License, each Contributor hereby grants to You a perpetual, worldwide,
non-exclusive, no-charge, royalty-free, irrevocable (except as stated in this section) patent license to make, have made, use, offer to sell import,
and otherwise transfer the Work, where such license applies only to those patent claims licensable by such Contributor that are necessarily
infringed by their Contribution(s) alone or by combination of their Contribution(s) with the Work to which such Contribution(s) was submitted.
If You institute patent litigation against any entity (including a cross-claim or counterclaim in a lawsuit) alleging that the Work or a Contribution
incorporated within the Work constitutes direct or contributory patent infringement, then any patent licenses granted to You under this License
for that Work shall terminate as of the date such litigation is filed.
4. Redistribution. You may reproduce and distribute copies of the Work or Derivative Works thereof in any medium, with or without modifications,
and in Source or Object form, provided that You meet the following conditions:
a. You must give any other recipients of the Work or Derivative Works a copy of this License; and
b. You must cause any modified files to carry prominent notices stating that You changed the files; and
c. You must retain, in the Source form of any Derivative Works that You distribute, all copyright, patent, trademark, and attribution notices
from the Source form of the Work, excluding those notices that do not pertain to any part of the Derivative Works; and
d. If the Work includes a "NOTICE" text file as part of its distribution, then any Derivative Works that You distribute must include a readable
copy of the attribution notices contained within such NOTICE file, excluding those notices that do not pertain to any part of the Derivative
Works, in at least one of the following places: within a NOTICE text file distributed as part of the Derivative Works; within the Source
form or documentation, if provided along with the Derivative Works; or, within a display generated by the Derivative Works, if and
Page 4

wherever such third-party notices normally appear. The contents of the NOTICE file are for informational purposes only and do not
modify the License. You may add Your own attribution notices within Derivative Works that You distribute, alongside or as an addendum
to the NOTICE text from the Work, provided that such additional attribution notices cannot be construed as modifying the License.
You may add Your own copyright statement to Your modifications and may provide additional or different license terms and conditions for
use, reproduction, or distribution of Your modifications, or for any such Derivative Works as a whole, provided Your use, reproduction, and
distribution of the Work otherwise complies with the conditions stated in this License.
5. Submission of Contributions. Unless You explicitly state otherwise, any Contribution intentionally submitted for inclusion in the Work by You
to the Licensor shall be under the terms and conditions of this License, without any additional terms or conditions. Notwithstanding the above,
nothing herein shall supersede or modify the terms of any separate license agreement you may have executed with Licensor regarding such
Contributions.
6. Trademarks. This License does not grant permission to use the trade names, trademarks, service marks, or product names of the Licensor,
except as required for reasonable and customary use in describing the origin of the Work and reproducing the content of the NOTICE file.
7. Disclaimer of Warranty. Unless required by applicable law or agreed to in writing, Licensor provides the Work (and each Contributor provides
its Contributions) on an "AS IS" BASIS, WITHOUT WARRANTIES OR CONDITIONS OF ANY KIND, either express or implied, including,
without limitation, any warranties or conditions of TITLE, NON-INFRINGEMENT, MERCHANTABILITY, or FITNESS FOR A PARTICULAR
PURPOSE. You are solely responsible for determining the appropriateness of using or redistributing the Work and assume any risks associated
with Your exercise of permissions under this License.
8. Limitation of Liability. In no event and under no legal theory, whether in tort (including negligence), contract, or otherwise, unless required
by applicable law (such as deliberate and grossly negligent acts) or agreed to in writing, shall any Contributor be liable to You for damages,
including any direct, indirect, special, incidental, or consequential damages of any character arising as a result of this License or out of the
use or inability to use the Work (including but not limited to damages for loss of goodwill, work stoppage, computer failure or malfunction,
or any and all other commercial damages or losses), even if such Contributor has been advised of the possibility of such damages.
9. Accepting Warranty or Additional Liability. While redistributing the Work or Derivative Works thereof, You may choose to offer, and charge
a fee for, acceptance of support, warranty, indemnity, or other liability obligations and/or rights consistent with this License. However, in
accepting such obligations, You may act only on Your own behalf and on Your sole responsibility, not on behalf of any other Contributor,
and only if You agree to indemnify, defend, and hold each Contributor harmless for any liability incurred by, or claims asserted against, such
Contributor by reason of your accepting any such warranty or additional liability.
TWAPI Copyright & License
Copyright (c) 2003-2008, Ashok P. Nadkarni All rights reserved.
Redistribution and use in source and binary forms, with or without modification, are permitted provided that the following conditions are met:
• Redistributions of source code must retain the above copyright notice, this list of conditions and the following disclaimer.
• Redistributions in binary form must reproduce the above copyright notice, this list of conditions and the following disclaimer in the documentation
and/or other materials provided with the distribution.
• The name of the copyright holder and any other contributors may not be used to endorse or promote products derived from this software
without specific prior written permission.
THIS SOFTWARE IS PROVIDED BY THE COPYRIGHT HOLDERS AND CONTRIBUTORS "AS IS" AND ANY EXPRESS OR IMPLIED WARRANTIES,
INCLUDING, BUT NOT LIMITED TO, THE IMPLIED WARRANTIES OF MERCHANTABILITY AND FITNESS FOR A PARTICULAR PURPOSE ARE
DISCLAIMED. IN NO EVENT SHALL THE COPYRIGHT OWNER OR CONTRIBUTORS BE LIABLE FOR ANY DIRECT, INDIRECT, INCIDENTAL,
SPECIAL, EXEMPLARY, OR CONSEQUENTIAL DAMAGES (INCLUDING, BUT NOT LIMITED TO, PROCUREMENT OF SUBSTITUTE GOODS OR
SERVICES; LOSS OF USE, DATA, OR PROFITS; OR BUSINESS INTERRUPTION) HOWEVER CAUSED AND ON ANY THEORY OF LIABILITY,
WHETHER IN CONTRACT, STRICT LIABILITY, OR TORT (INCLUDING NEGLIGENCE OR OTHERWISE) ARISING IN ANY WAY OUT OF THE USE
OF THIS SOFTWARE, EVEN IF ADVISED OF THE POSSIBILITY OF SUCH DAMAGE.
GNU General Public License
PREAMBLE
The licenses for most software are designed to take away your freedom to share and change it. By contrast, the GNU General Public License is
intended to guarantee your freedom to share and change free software---to make sure the software is free for all its users. This General Public License
applies to most of the Free Software Foundation's software and to any other program whose authors commit to using it. (Some other Free Software
Foundation software is covered by the GNU Library General Public License instead.) You can apply it to your programs, too.
Page 5

When we speak of free software, we are referring to freedom, not price. Our General Public Licenses are designed to make sure that you have the
freedom to distribute copies of free software (and charge for this service if you wish), that you receive source code or can get it if you want it, that
you can change the software or use pieces of it in new free programs; and that you know you can do these things.
To protect your rights, we need to make restrictions that forbid anyone to deny you these rights or to ask you to surrender the rights. These restrictions
translate to certain responsibilities for you if you distribute copies of the software, or if you modify it.
For example, if you distribute copies of such a program, whether gratis or for a fee, you must give the recipients all the rights that you have. You
must make sure that they, too, receive or can get the source code. And you must show them these terms so they know their rights.
We protect your rights with two steps: (1) copyright the software, and (2) offer you this license which gives you legal permission to copy, distribute
and/or modify the software.
Also, for each author's protection and ours, we want to make certain that everyone understands that there is no warranty for this free software. If
the software is modified by someone else and passed on, we want its recipients to know that what they have is not the original, so that any problems
introduced by others will not reflect on the original authors' reputations.
Finally, any free program is threatened constantly by software patents. We wish to avoid the danger that redistributes of a free program will
individually obtain patent licenses, in effect making the program proprietary. To prevent this, we have made it clear that any patent must be licensed
for everyone's free use or not licensed at all.
The precise terms and conditions for copying, distribution and modification follow.
GNU GENERAL PUBLIC LICENSE TERMS AND CONDITIONS FOR COPYING, DISTRIBUTION AND MODIFICATION
This License applies to any program or other work which contains a notice placed by the copyright holder saying it may be distributed under the
terms of this General Public License. The ``Program'', below, refers to any such program or work, and a ``work based on the Program'' means
either the Program or any derivative work under copyright law: that is to say, a work containing the Program or a portion of it, either verbatim or
with modifications and/or translated into another language. (Hereinafter, translation is included without limitation in the term ``modification''.) Each
licensee is addressed as ``you''.
Activities other than copying, distribution and modification are not covered by this License; they are outside its scope. The act of running the Program
is not restricted, and the output from the Program is covered only if its contents constitute a work based on the Program (independent of having
been made by running the Program). Whether that is true depends on what the Program does.
You may copy and distribute verbatim copies of the Program's source code as you receive it, in any medium, provided that you conspicuously and
appropriately publish on each copy an appropriate copyright notice and disclaimer of warranty; keep intact all the notices that refer to this License
and to the absence of any warranty; and give any other recipients of the Program a copy of this License along with the Program.
You may charge a fee for the physical act of transferring a copy, and you may at your option offer warranty protection in exchange for a fee.
You may modify your copy or copies of the Program or any portion of it, thus forming a work based on the Program, and copy and distribute such
modifications or work under the terms of Section 1 above, provided that you also meet all of these conditions:
You must cause the modified files to carry prominent notices stating that you changed the files and the date of any change.
You must cause any work that you distribute or publish, that in whole or in part contains or is derived from the Program or any part thereof, to be
licensed as a whole at no charge to all third parties under the terms of this License.
If the modified program normally reads commands interactively when run, you must cause it, when started running for such interactive use in the
most ordinary way, to print or display an announcement including an appropriate copyright notice and a notice that there is no warranty (or else,
saying that you provide a warranty) and that users may redistribute the program under these conditions, and telling the user how to view a copy
of this License. (Exception: if the Program itself is interactive but does not normally print such an announcement, your work based on the Program
is not required to print an announcement.)
These requirements apply to the modified work as a whole. If identifiable sections of that work are not derived from the Program, and can be
reasonably considered independent and separate works in themselves, then this License, and its terms, do not apply to those sections when you
distribute them as separate works. But when you distribute the same sections as part of a whole which is a work based on the Program, the distribution
of the whole must be on the terms of this License, whose permissions for other licensees extend to the entire whole, and thus to each and every part
regardless of who wrote it.
You may copy and distribute the Program (or a work based on it, under Section 2) in object code or executable form under the terms of Sections
1 and 2 above provided that you also do one of the following:
Accompany it with the complete corresponding machine-readable source code, which must be distributed under the terms of Sections 1 and 2 above
on a medium customarily used for software interchange; or,
Page 6

Accompany it with a written offer, valid for at least three years, to give any third-party, for a charge no more than your cost of physically performing
source distribution, a complete machine-readable copy of the corresponding source code, to be distributed under the terms of Sections 1 and 2
above on a medium customarily used for software interchange; or,
Accompany it with the information you received as to the offer to distribute corresponding source code. (This alternative is allowed only for
noncommercial distribution and only if you received the program in object code or executable form with such an offer, in accord with Subsection
b above.)
The source code for a work means the preferred form of the work for making modifications to it. For an executable work, complete source code
means all the source code for all modules it contains, plus any associated interface definition files, plus the scripts used to control compilation and
installation of the executable. However, as a special exception, the source code distributed need not include anything that is normally distributed
(in either source or binary form) with the major components (compiler, kernel, and so on) of the operating system on which the executable runs,
unless that component itself accompanies the executable.
If distribution of executable or object code is made by offering access to copy from a designated place, then offering equivalent access to copy the
source code from the same place counts as distribution of the source code, even though third parties are not compelled to copy the source along
with the object code.
You may not copy, modify, sublicense, or distribute the Program except as expressly provided under this License. Any attempt otherwise to copy,
modify, sublicense or distribute the Program is void, and will automatically terminate your rights under this License. However, parties who have
received copies, or rights, from you under this License will not have their licenses terminated so long as such parties remain in full compliance.
You are not required to accept this License, since you have not signed it. However, nothing else grants you permission to modify or distribute the
Program or its derivative works. These actions are prohibited by law if you do not accept this License. Therefore, by modifying or distributing the
Program (or any work based on the Program), you indicate your acceptance of this License to do so, and all its terms and conditions for copying,
distributing or modifying the Program or works based on it.
Each time you redistribute the Program (or any work based on the Program), the recipient automatically receives a license from the original licensor
to copy, distribute or modify the Program subject to these terms and conditions. You may not impose any further restrictions on the recipients' exercise
of the rights granted herein. You are not responsible for enforcing compliance by third parties to this License.
If, as a consequence of a court judgment or allegation of patent infringement or for any other reason (not limited to patent issues), conditions are
imposed on you (whether by court order, agreement or otherwise) that contradict the conditions of this License, they do not excuse you from the
conditions of this License. If you cannot distribute so as to satisfy simultaneously your obligations under this License and any other pertinent obligations,
then as a consequence you may not distribute the Program at all. For example, if a patent license would not permit royalty-free redistribution of the
Program by all those who receive copies directly or indirectly through you, then the only way you could satisfy both it and this License would be to
refrain entirely from distribution of the Program.
If any portion of this section is held invalid or unenforceable under any particular circumstance, the balance of the section is intended to apply and
the section as a whole is intended to apply in other circumstances.
It is not the purpose of this section to induce you to infringe any patents or other property right claims or to contest validity of any such claims; this
section has the sole purpose of protecting the integrity of the free software distribution system, which is implemented by public license practices.
Many people have made generous contributions to the wide range of software distributed through that system in reliance on consistent application
of that system; it is up to the author/donor to decide if he or she is willing to distribute software through any other system and a licensee cannot
impose that choice.
This section is intended to make thoroughly clear what is believed to be a consequence of the rest of this License.
If the distribution and/or use of the Program is restricted in certain countries either by patents or by copyrighted interfaces, the original copyright
holder who places the Program under this License may add an explicit geographical distribution limitation excluding those countries, so that
distribution is permitted only in or among countries not thus excluded. In such case, this License incorporates the limitation as if written in the body
of this License.
The Free Software Foundation may publish revised and/or new versions of the General Public License from time to time. Such new versions will be
similar in spirit to the present version, but may differ in detail to address new problems or concerns.
Each version is given a distinguishing version number. If the Program specifies a version number of this License which applies to it and ``any later
version'', you have the option of following the terms and conditions either of that version or of any later version published by the Free Software
Foundation. If the Program does not specify a version number of this License, you may choose any version ever published by the Free Software
Foundation.
If you wish to incorporate parts of the Program into other free programs whose distribution conditions are different, write to the author to ask for
permission. For software which is copyrighted by the Free Software Foundation, write to the Free Software Foundation; we sometimes make exceptions
Page 7

for this. Our decision will be guided by the two goals of preserving the free status of all derivatives of our free software and of promoting the sharing
and reuse of software generally.
Documentation
For the latest version of this document, go to http://www.hp.com/go/3par/, navigate to your product page, click Support for your product, and
then click Manuals.
Page 8

Contents
1 Introduction.............................................................................................18
User Interfaces.......................................................................................................................18
Related Documentation............................................................................................................18
Typographical Conventions......................................................................................................19
Advisories..............................................................................................................................19
2 Overview and Features.............................................................................20
About System Reporter............................................................................................................20
Configuring System Reporter Policy Settings................................................................................20
Choosing a Method for Accessing Reports.................................................................................21
Creating Customized Reports...................................................................................................21
Formatting Reports for Presentation...........................................................................................23
Customizing the Reporting Format.............................................................................................23
Generating Email Alerts..........................................................................................................23
Accessing Report Data using Web Queries................................................................................23
Using the Database Schema to Build Custom Reports..................................................................24
Analyzing and Optimizing Storage Utilization............................................................................24
3 Installation, Configuration, Update, and Removal..........................................25
Before You Begin....................................................................................................................25
System Reporter CD Contents...................................................................................................25
System Requirements...............................................................................................................26
Using the System Reporter Sizing Spreadsheet............................................................................27
System Reporter Components...................................................................................................28
Installing the System Reporter Components.................................................................................30
Required Components........................................................................................................30
Optional Components........................................................................................................30
Installing the Web Server.........................................................................................................31
Installing the Database Server..................................................................................................32
Choosing the Appropriate Database....................................................................................32
SQLite.........................................................................................................................32
Microsoft SQL...............................................................................................................33
MySQL........................................................................................................................33
Oracle.........................................................................................................................33
Installing and Setting Up the Microsoft SQL Server Database (Optional)....................................34
System Reporter Host Configuration.................................................................................34
Installing and Setting Up the MySQL Database (Optional).......................................................38
Installing MySQL Server.................................................................................................38
Configuring the MySQL Database...................................................................................39
Setting the max_allowed_packet parameter......................................................................40
Creating MySQL Users and Schema................................................................................40
Setting Up the Oracle Database (Optional)...........................................................................41
Creating an Oracle database.........................................................................................41
Creating the Oracle Users for System Reporter..................................................................42
Creating the Oracle Net Service.....................................................................................42
Installing or Upgrading the System Reporter Tools.......................................................................43
Installing or Upgrading System Reporter Tools on Windows.....................................................43
Installing System Reporter Tools on Linux...............................................................................46
Adding Storage Systems.....................................................................................................47
Setting File Permissions (Optional)...................................................................................48
Verifying Installation......................................................................................................48
Installing the Excel Client (Optional)..........................................................................................48
8 Contents
Page 9

About Apache HTTP Server Authorization and Access Control......................................................49
Removing the System Reporter Components................................................................................50
Removing the System Reporter Tools on Windows..................................................................50
Removing the System Reporter Tools on Linux.........................................................................51
Removing the MySQL Database (Optional)............................................................................51
4 Getting Started........................................................................................52
Accessing the Main System Reporter Interface............................................................................52
System Reporter Main Menu Window.......................................................................................52
Getting Help..........................................................................................................................54
Using the Object Selection Controls..........................................................................................54
Simple Selection List...........................................................................................................54
Filtered Multi-Selection Control.............................................................................................54
Accessing the Optional Excel Client..........................................................................................55
Starting the System Reporter Excel Client...............................................................................55
Setting the Security Level for Excel........................................................................................56
Setting the Security for Excel 2003..................................................................................56
Setting the Security Level for Excel 2007..........................................................................57
Connecting to the Web Server from the Excel Client...............................................................59
Changing the Excel Client Server and Resetting the Workbook.....................................................61
Changing the Web Server..................................................................................................61
Resetting the Workbook......................................................................................................61
Accessing the Excel Client Query Log........................................................................................61
Deleting Excel Sheets..............................................................................................................61
Deleting Menu Sheets.........................................................................................................61
Deleting Data Sheets..........................................................................................................62
Deleting the Query Log.......................................................................................................62
Saving and Exiting the Excel Client......................................................................................62
5 Accessing and Creating Reports.................................................................64
Accessing Quick Reports.......................................................................................................103
Accessing Scheduled Reports...................................................................................................65
Creating Custom Reports.........................................................................................................66
Building the Report Menu....................................................................................................67
Sample Resolution.........................................................................................................67
Report.........................................................................................................................68
Select Systems..............................................................................................................68
Select Domains.............................................................................................................69
Generating the Report........................................................................................................69
Controls Available by Report...............................................................................................72
Report Selection.................................................................................................................76
Standard Report Types...................................................................................................76
Select Summary Columns...............................................................................................81
Compare.....................................................................................................................81
Max. Number..............................................................................................................82
Select Peak...................................................................................................................82
Group By.....................................................................................................................82
Order By......................................................................................................................83
Low Bucket...................................................................................................................84
High Bucket..................................................................................................................84
Sum End Buckets...........................................................................................................84
Time Selection...................................................................................................................84
Reload After (mins)........................................................................................................84
Begin/At Time..............................................................................................................84
End Time.....................................................................................................................85
Count..........................................................................................................................85
Contents 9
Page 10

Object Selection................................................................................................................85
Select PDIDs.................................................................................................................85
Include Chunklets..........................................................................................................85
Select Cage IDs............................................................................................................86
Select Disk Types...........................................................................................................86
Select Disk Speed.........................................................................................................86
Include PDs in States......................................................................................................86
Select Usr CPGs............................................................................................................87
Select Snp CPGs...........................................................................................................87
Select CPGs.................................................................................................................87
Select LDs....................................................................................................................88
Select RAID Types.........................................................................................................88
Select LD Usage............................................................................................................88
Select LUN...................................................................................................................88
Select VVs....................................................................................................................89
Select Prov Types...........................................................................................................89
Select VV Types............................................................................................................89
Select Port Types...........................................................................................................90
Select Port Rates............................................................................................................90
Select Ports (n:s:p).........................................................................................................90
Select Hosts..................................................................................................................91
Select Nodes................................................................................................................91
Select To Nodes............................................................................................................91
Select Queues..............................................................................................................91
Format Selection (Web interface only)...................................................................................91
Report Information.........................................................................................................92
Chart Lib......................................................................................................................92
Chart Types..................................................................................................................92
Chart X Pixels...............................................................................................................96
Chart Y Pixels...............................................................................................................96
Time Labels..................................................................................................................96
Legend Position.............................................................................................................96
Time Format.................................................................................................................96
Select Space Unit..........................................................................................................97
Working with Excel Charts.......................................................................................................97
Choosing a Chart Type.......................................................................................................97
Refreshing Charts...............................................................................................................98
Retaining Charts................................................................................................................99
Exporting Executable Reports............................................................................................100
Customizing Excel Reports................................................................................................100
Adding Custom Columns to a Data Sheet.......................................................................101
Creating a Custom Chart.............................................................................................101
Saving Customized Settings..........................................................................................102
6 Interpreting Report Metrics.......................................................................103
Summary Report...................................................................................................................103
Space Reports......................................................................................................................106
PD Space Reports............................................................................................................106
CPG Space Reports.........................................................................................................106
LD Space Reports.............................................................................................................107
VV Space Reports............................................................................................................107
Performance Reports.............................................................................................................108
Common Performance Metrics...........................................................................................108
VV Cache Performance Reports..........................................................................................109
Node Cache Performance Reports.....................................................................................109
10 Contents
Page 11

CPU Performance Reports..................................................................................................110
Link Performance Reports..................................................................................................110
Adaptive Optimization Reports...............................................................................................111
7 Configuring the System Reporter Policy Settings..........................................112
Accessing the System Reporter Policies.....................................................................................112
Configuring Sampling Policies................................................................................................112
Compacting Databases....................................................................................................113
Editing Sampling Policies..................................................................................................114
Adding, Removing and Re-Configuring HP 3PAR Storage Systems...............................................115
Adding a Storage Server..................................................................................................115
Verifying Addition of a Storage Server................................................................................115
Removing a Storage Server...............................................................................................115
Re-Configuring a Storage Server Sampling..........................................................................116
Configuring Rules for Email Alerts...........................................................................................116
Adding an Alert Rule........................................................................................................117
Changing an Alert Rule....................................................................................................117
Removing an Alert Rule.....................................................................................................118
Alert Rule Parameters........................................................................................................118
Data Table.................................................................................................................118
Resolution..................................................................................................................119
System.......................................................................................................................119
Metric........................................................................................................................119
Direction....................................................................................................................121
Limit Value.................................................................................................................121
Limit Count.................................................................................................................121
Condition...................................................................................................................121
Condition Value..........................................................................................................121
Recipient....................................................................................................................121
Example of an Alert Rule...................................................................................................121
Scheduling Reports...............................................................................................................122
Adding a Scheduled Report..............................................................................................123
Changing a Scheduled Report...........................................................................................123
Removing a Scheduled Report...........................................................................................124
Configuring Adaptive Optimization.........................................................................................124
About File Permissions...........................................................................................................124
Modifying the Apache HTTP Server Configuration Files..............................................................125
8 Web Queries.........................................................................................126
About Web Queries..............................................................................................................126
Data Format Version Report...................................................................................................190
About Reports and Options....................................................................................................127
Report Options.....................................................................................................................128
category.........................................................................................................................128
example:....................................................................................................................128
compare.........................................................................................................................128
values:.......................................................................................................................128
example:....................................................................................................................130
comparesel.....................................................................................................................130
values:.......................................................................................................................130
table..............................................................................................................................131
values:.......................................................................................................................131
example:....................................................................................................................131
refresh............................................................................................................................131
values:.......................................................................................................................131
example:....................................................................................................................132
Contents 11
Page 12

charttab..........................................................................................................................132
values:.......................................................................................................................132
example:....................................................................................................................132
charttype........................................................................................................................132
values:.......................................................................................................................132
example:....................................................................................................................133
graphx...........................................................................................................................133
value:........................................................................................................................133
example:....................................................................................................................133
graphy...........................................................................................................................133
value:........................................................................................................................133
example:....................................................................................................................133
graphlegpos...................................................................................................................134
value:........................................................................................................................134
example:....................................................................................................................134
tableformat.....................................................................................................................134
value:........................................................................................................................134
example:....................................................................................................................134
alllabels..........................................................................................................................134
values:.......................................................................................................................134
example:....................................................................................................................135
timeform.........................................................................................................................135
values:.......................................................................................................................135
example:....................................................................................................................135
begintsecs.......................................................................................................................135
value:........................................................................................................................135
example:....................................................................................................................136
endtsecs.........................................................................................................................136
value:........................................................................................................................136
example:....................................................................................................................136
groupby.........................................................................................................................136
values:.......................................................................................................................136
example:....................................................................................................................138
orderby..........................................................................................................................138
values:.......................................................................................................................138
example:....................................................................................................................140
histbegin........................................................................................................................140
values:.......................................................................................................................140
example:....................................................................................................................141
ldspaceunit.....................................................................................................................141
values:.......................................................................................................................141
examples:..................................................................................................................141
pdspaceunit....................................................................................................................141
values:.......................................................................................................................141
examples:..................................................................................................................142
vvspaceunit.....................................................................................................................142
values:.......................................................................................................................142
examples:..................................................................................................................142
selcageid........................................................................................................................142
value:........................................................................................................................143
examples:..................................................................................................................143
selchunks........................................................................................................................143
values:.......................................................................................................................143
example:....................................................................................................................144
selcpg............................................................................................................................144
12 Contents
Page 13

value:........................................................................................................................144
example:....................................................................................................................144
selusrcpg........................................................................................................................144
selsnpcpg.......................................................................................................................145
seldisktype......................................................................................................................145
value:........................................................................................................................145
example:....................................................................................................................145
seldiskspeed...................................................................................................................145
value:........................................................................................................................145
example:....................................................................................................................145
seldomain.......................................................................................................................146
value:........................................................................................................................146
example:....................................................................................................................146
selhost............................................................................................................................146
value:........................................................................................................................146
example:....................................................................................................................146
selld...............................................................................................................................147
value:........................................................................................................................147
example:....................................................................................................................147
sellduse..........................................................................................................................147
values:.......................................................................................................................147
example:....................................................................................................................148
selnode..........................................................................................................................148
value:........................................................................................................................148
example:....................................................................................................................148
selnsp.............................................................................................................................148
value:........................................................................................................................148
example:....................................................................................................................149
selpdid...........................................................................................................................149
value:........................................................................................................................149
example:....................................................................................................................149
selpdstate.......................................................................................................................149
values:.......................................................................................................................149
example:....................................................................................................................150
selporttype......................................................................................................................150
values:.......................................................................................................................150
example:....................................................................................................................150
selraidtype......................................................................................................................150
values:.......................................................................................................................150
example:....................................................................................................................151
selsys.............................................................................................................................151
values:.......................................................................................................................151
example:....................................................................................................................151
selvv..............................................................................................................................151
values:.......................................................................................................................151
example:....................................................................................................................152
selvvtype........................................................................................................................152
values:.......................................................................................................................152
selprovtype.....................................................................................................................152
values:.......................................................................................................................152
Report Types........................................................................................................................153
Summary Report...................................................................................................................153
summary........................................................................................................................153
example:....................................................................................................................153
Space Reports......................................................................................................................153
Contents 13
Page 14

pd_space_time................................................................................................................153
example:....................................................................................................................153
pd_space_group..............................................................................................................154
example:....................................................................................................................154
ld_space_time.................................................................................................................154
example:....................................................................................................................154
ld_space_group...............................................................................................................154
example:....................................................................................................................154
vv_space_time.................................................................................................................154
example:....................................................................................................................155
vv_space_group..............................................................................................................155
example:....................................................................................................................155
Performance Reports.............................................................................................................155
pd_perf_time...................................................................................................................155
example:....................................................................................................................155
pd_perf_group................................................................................................................155
example:....................................................................................................................156
pd_svt_hist......................................................................................................................156
example:....................................................................................................................156
pd_svt_histvstime.............................................................................................................156
example:....................................................................................................................156
port_perf_time.................................................................................................................156
example:....................................................................................................................156
port_perf_group..............................................................................................................156
example:....................................................................................................................157
port_svt_hist....................................................................................................................157
example:....................................................................................................................157
port_svt_histvstime............................................................................................................157
example:....................................................................................................................157
ld_perf_time....................................................................................................................157
example:....................................................................................................................157
ld_perf_group.................................................................................................................157
example:....................................................................................................................158
ld_svt_hist.......................................................................................................................158
example:....................................................................................................................158
ld_svt_histvstime..............................................................................................................158
example:....................................................................................................................158
vlun_perf_time.................................................................................................................158
example:....................................................................................................................158
vlun_perf_group..............................................................................................................158
example:....................................................................................................................159
vlun_svt_hist....................................................................................................................159
example:....................................................................................................................159
vlun_svt_histvstime...........................................................................................................159
example:....................................................................................................................159
vv_cmp_time...................................................................................................................159
example:....................................................................................................................159
vv_cmp_group.................................................................................................................159
example:....................................................................................................................159
cpu_perf_time.................................................................................................................160
example:....................................................................................................................160
cpu_perf_group...............................................................................................................160
example:....................................................................................................................160
Adaptive Optimization Reports...............................................................................................160
regiodensity....................................................................................................................160
14 Contents
Page 15

regiondensity example.................................................................................................160
regmoves........................................................................................................................160
regmoves example......................................................................................................161
vvtier..............................................................................................................................161
vvtier example............................................................................................................161
Options Available by Report..................................................................................................161
Objects Present Reports.........................................................................................................167
objectpres= cageid..........................................................................................................168
example:....................................................................................................................168
output:..................................................................................................................169
objectpres= cpg_name.....................................................................................................169
example:....................................................................................................................169
output:.......................................................................................................................169
objectpres= diskspeed......................................................................................................170
example:....................................................................................................................170
output:.......................................................................................................................170
objectpres= disktype........................................................................................................170
example:....................................................................................................................170
output:.......................................................................................................................170
objectpres= domain_name................................................................................................171
example:....................................................................................................................171
output:.......................................................................................................................171
objectpres= host_name.....................................................................................................171
example:....................................................................................................................171
output:.......................................................................................................................171
objectpres= ld_name........................................................................................................172
example:....................................................................................................................172
output:.......................................................................................................................172
objectpres=node..............................................................................................................172
example:....................................................................................................................172
output:.......................................................................................................................173
objectpres=pdid..............................................................................................................173
example:....................................................................................................................173
output:.......................................................................................................................173
objectpres=port...............................................................................................................174
example:....................................................................................................................174
output:.......................................................................................................................174
objectpres= system...........................................................................................................174
example:....................................................................................................................174
output:.......................................................................................................................174
objectpres= vv_name.......................................................................................................175
example:....................................................................................................................175
output:.......................................................................................................................175
objectpres= vv_name_nosnap............................................................................................175
example:....................................................................................................................175
output:.......................................................................................................................176
objecctpres= porttype.......................................................................................................176
example:....................................................................................................................176
output:.......................................................................................................................176
sample_times..................................................................................................................177
example:....................................................................................................................177
output:.......................................................................................................................177
9 Using Adaptive Optimization...................................................................178
Overview............................................................................................................................178
Contents 15
Page 16

Selecting an HP 3PAR Storage System for Adaptive Optimization................................................179
Configuring Adaptive Optimization.........................................................................................179
Tier Definition (CPG Name and GiB)..................................................................................180
Schedule........................................................................................................................182
Measurement Hours.........................................................................................................182
Adaptive Optimization Mode............................................................................................183
Adaptive Optimization Active............................................................................................183
Adding an Adaptive Optimization Configuration..................................................................183
Changing an Adaptive Optimization Configuration..............................................................184
Removing an Adaptive Optimization Configuration...............................................................184
Adaptive Optimization Reports...............................................................................................184
Region IO Density Report..................................................................................................184
VV Tiers Report................................................................................................................186
Adaptive Optimization Space Moved Report.......................................................................187
The showvvcpg CLI extension.................................................................................................188
10 Database Schema.................................................................................190
Using The Database Schema..................................................................................................190
Table Versions and Naming Conventions.................................................................................190
Administrative Tables............................................................................................................190
The policy Table..............................................................................................................190
The sampleinserv Table.....................................................................................................190
The system Table..............................................................................................................191
The alertconfig Table........................................................................................................192
The scheduled_report Table...............................................................................................193
The scheduled_report_log Table.........................................................................................193
The adprovconfig Table....................................................................................................193
The adprov_log Table.......................................................................................................194
The ldrgmoves Table.........................................................................................................194
The recentsample Table....................................................................................................195
The Sample Data and Inventory Tables....................................................................................196
The pdspace Table...........................................................................................................196
The pdspaceinv Table.......................................................................................................197
The ldspace Table............................................................................................................198
The ldspaceinv Table........................................................................................................198
The vvspace Table...........................................................................................................199
The vvspaceinv Table........................................................................................................201
The cpgspace Table.........................................................................................................201
The cpgspaceinv Table.....................................................................................................203
Common Performance Table Columns.................................................................................203
Calculating Common Performance Metrics......................................................................205
Service Time Histogram Buckets....................................................................................206
IO Size Histogram Buckets............................................................................................206
The statpd Table..............................................................................................................206
The statpdinv Table..........................................................................................................207
The statld Table...............................................................................................................207
The statldinv Table...........................................................................................................208
The statport Table............................................................................................................208
The statportinv Table........................................................................................................209
The statvlun Table............................................................................................................209
The statvluninv Table........................................................................................................210
The statvvcmp Table.........................................................................................................210
The statvvcmpinv Table.....................................................................................................211
The statcpu Table.............................................................................................................211
The statcpuinv Table.........................................................................................................212
16 Contents
Page 17

The statlink Table.............................................................................................................212
The statlinkinv Table.........................................................................................................213
The statldrg Table.............................................................................................................213
The statldrg_timeinv Table.................................................................................................214
The perf_timeinv Table......................................................................................................214
The space_timeinv Table...................................................................................................214
11 Troubleshooting....................................................................................215
Troubleshooting Overview......................................................................................................215
Troubleshooting the Sampling Components..............................................................................215
Sampling Component Log Files..........................................................................................215
Installation Configuration..................................................................................................216
Sampling Errors...............................................................................................................216
Errors incurred by the inservsample process....................................................................216
Errors incurred by the CLI sampler process......................................................................217
Sampler Service/Daemon Errors........................................................................................217
Troubleshooting Adaptive Optimization Components.................................................................217
Troubleshooting the Web Server Components...........................................................................217
Troubleshooting the Excel Client..............................................................................................217
Extracting Data from the Database with sysbck.........................................................................218
Examples of Using sysbck for Various Databases..................................................................219
Dumping the Entire Database.................................................................................................222
Dumping the Entire SQLite Database..................................................................................222
Dumping the Entire MySQL Database.................................................................................222
Index.......................................................................................................223
Contents 17
Page 18

1 Introduction
This guide provides the information you need to install and use HP 3PAR System Reporter to monitor
performance, create charge back reports, and plan storage resources for HP 3PAR Storage Systems.
An optionally licensed component called Adaptive Optimization is also included with System
Reporter that can be used to monitor and automatically optimize utilization of storage resources.
If you do not have a licence for Adaptive Optimization, the monitoring and system reporting
features are still accessible but the optimization capabilities are inactivated.
User Interfaces
NOTE: The InServ Storage Server has been rebranded as HP 3PAR Storage Systeem. There are
instances in this document where screenshots and/or menu items and command output refer to the
HP 3PAR Storage System as InServ or InServ Storage Server.
The HP 3PAR InForm® Operating System (InForm OS) has two user interfaces: the HP 3PAR InForm
Command Line Interface (CLI) and the HP 3PAR InForm Management Console (IMC). You can use
the IMC or the InForm CLI to monitor storage servers and access statistics. From the IMC or InForm
CLI, you also can export table data to a.CSV (Comma-Separated Variable) file and then use
Microsoft® Excel® or similar software to import that file. However, to generate reports directly in
Microsoft Excel and to access historical information, you must use the system reporting tools
described in this guide.
Two user interfaces are offered as part of the HP 3PAR Storage System: a Web-based interface
and an Excel client.
• The Web-based interface enables you to monitor HP 3PAR Storage Systems and access statistics
using a standard Web browser. Configuration of the System Reporter database sampling
policies must be done via a Web browser.
• The Excel client enables you to monitor HP 3PAR Storage Systems and access statistics using
Microsoft® Excel®. This option also offers additional customization options not offered by
the Web-based interface.
Related Documentation
The following documents provide information related to HP 3PAR Storage Systems, the InForm®
Operating System, the InForm® Management Console and InForm® CLI:
environmental considerations, power requirements, cabling,
network configurations and third-party rack implementations
(CLI)
using the InForm Management Console (IMC)
Read the…For information about…
HP 3PAR Storage System Physical Planning ManualStorage system hardware specifications, site-planning,
HP 3PAR InForm OS Message and Operator’s GuideIdentifying storage server components and fixing problems
HP 3PAR InForm OS Command Line Interface ReferenceUsing the HP 3PAR InForm OS Command Line Interface
HP 3PAR InForm OS Management Console Online HelpConfiguring and managing HP 3PAR Storage Systems and
18 Introduction
Page 19

Typographical Conventions
This guide employs the following typographical conventions:
ExampleMeaningTypeface
ABCDabcd
ABCDabcd
Advisories
To avoid unexpected configuration or operational problems, be sure to observe the notes and
cautions in this guide.
WARNING! Warnings alert you to actions that can cause injury to people or irreversible damage
to data or the operating system.
CAUTION: Cautions alert you to actions that can cause damage to equipment, software, or data.
NOTE: Notes are reminders, tips, or suggestions that supplement the procedures included in this
guide.
Used for dialog elements such as titles,
button labels, and other .
output.
When prompted, click Finish to
complete the installation.
Open the fileUsed for paths, filenames, and screen
\gui\windows\setup.exe
Typographical Conventions 19
Page 20

2 Overview and Features
This chapter provides a brief overview of the features and capabilities offered by System Reporter.
About System Reporter
System Reporter monitors performance and the usage of storage resources and allows you to
generate charts and graphs that report useful statistics for planning and configuring the operation
of HP 3PAR Storage Systems.
System Reporter provides the following main features:
• Convenient access to configuration options for selecting systems to include for reporting,
specifying sampling parameters, scheduling reports, and generating alerts.
• Extensive selection of reports for obtaining performance and storage utilization statistics on
selected objects (i.e., hosts, ports, nodes, physical disks, virtual volumes, etc.).
• Quick access to pre-defined reports that contain useful statistics for most common types of
installations.
• Scheduling of reports with predefined parameters that are initiated at predetermined times
and can then be accessed when needed.
• Customization of reports using the standard web interface, (or through the provided Excel
client), that provide specifically selected and formatted reports for specified systems.
• Options for choosing the time and duration for the collection of reporting statistics which can
be initiated at a specific time, collected over a period of time, and/or compared between a
range of times.
• Options for viewing and comparing report information in a variety of formats through a
selection of charts and tables.
• Alerts that can be configured to send email notifications to a specified address when certain
reporting criterion are met.
• Support for customized formatting of report data via the Comma Separated Values (CSV) file
formatting standard for inclusion in web or Excel applications.
• Support for creating custom web or Excel reports using well documented Web queries.
• Access to the database schema for direct queries to the reporting data stored in the database
used by System Reporter.
• Inclusion of an optionally licensed component called Adaptive Optimization that can analyze
access rates for sub-volume level regions and move regions between tiers of storage for more
optimal and efficient storage utilization.
Configuring System Reporter Policy Settings
Although you can begin using System Reporter immediately after it has been installed to quickly
access reports, you may want to make some adjustments or set up some of the capabilities for your
particular operating environment by selecting the appropriate configuration options through the
Policy Settings.
The following configuration options are available from the Policy Settings:
• Sampling Policies -- Specifies the report sampling policies that determine sampling intervals,
how long reports are stored, when to perform database compaction, etc.
• InServ Systems -- Selects the HP 3PAR Storage Systems to include for sampling, report generation
and optional optimization. The systems are generally added during the installation, but you
can access this option to add or remove systems as needed.
20 Overview and Features
Page 21

• Alert Rules -- Used to add, modify and remove alert rules and to specify the parameters for
generating email reports.
• Scheduled Reports -- Used to add, modify, and remove scheduled reports for generation at a
specified time.
• Adaptive Optimization -- Configures the optionally licensed Adaptive Optimization components
that are used to monitor and optimize storage utilization.
See for details on how to configure the policy settings for your site.
Choosing a Method for Accessing Reports
There are three basic methods for accessing reports through System Reporter:
Quick Reports -- Allows you to immediate access a variety of pre-defined reports (created through
CGI programs) that are deemed useful for most installations. The reports are made available
through a menu tree that you expand and collapse to select the systems and options of interest.
For instance, one of the reports provides a comparison of the peak hourly system CPU utilization
for the past seven days for all systems while another compares the utilization of the most active
physical disks for a given system.
Scheduled Reports -- Allows you to view reports that were created at scheduled times based on
pre-selected parameters and stored in a reserved directory structure. You can either view the reports
via the web interface provided through System Reporter or you can copy the report subdirectories
to another area and view them there. Maintaining a report directory for scheduled reports allows
an administrator to limit the users who have access to each report directory. One example where
this may be useful is when multiple departments share an array. In this case, the administrator can
schedule various reports specifically designed for each department, place them in different report
directories, and then grant each department access to the relevant scheduled reports in their own
report directory.
Custom Reports -- Custom reports are more complex to generate because they allow for a great
deal of customization, but they are also very useful. You can select the resolution, the type of report,
and then specify which systems and domains are to be monitored for the reporting information
that is collected. You also have the choice of specifying how the information is to be formatted for
presentation through a selection of tables and graphs.
Creating Customized Reports
System Reporter provides a number of options for building customized reports as follows:
• Report Selection. Allows you to select from one of the reports shown in Table 1 (page 21):
Table 1 Available Reports
Summary
PD Space
CPG Space
LD Space
VV Space
Port Performance
Report Metrics Cross ReferenceDescriptionReport Name
“Accessing Quick Reports” (page 103)Displays summary
information.
“PD Space Reports” (page 106)Displays physical disk
space usage.
“PD Space Reports” (page 106)Displays CPG disk space
usage.
“LD Space Reports” (page 107)Displays logical disk
space usage.
“VV Space Reports” (page 107)Displays virtual volume
space usage.
“Common Performance Metrics” (page 108)Displays port
performance.
Choosing a Method for Accessing Reports 21
Page 22

Table 1 Available Reports (continued)
Report Metrics Cross ReferenceDescriptionReport Name
VLUN Performance
LD Performance
PD Performance
VV Cache Performance
Node Cache Performance
CPU Performance
Link Performance
Adaptive Optimization
(volume-LUN)
performance.
performance.
performance.
volume) cache
performance.
Displays Node Cache
Performance.
performance.
links between nodes.
Optimization reports.
“Common Performance Metrics” (page 108).Displays VLUN
“Common Performance Metrics” (page 108)Displays logical disk
“Common Performance Metrics” (page 108)Displays physical disk
“VV Cache Performance Reports” (page 109)Displays VV (virtual
“Node Cache Performance Reports”
(page 109)
“CPU Performance Reports” (page 110)Displays CPU
“Link Performance Reports” (page 110)Displays performance of
“Adaptive Optimization Reports” (page 111)Displays Adaptive
• Sample Resolution – Specifies how often operational metrics are sampled for a given report:
• Daily – Sampling is performed once a day.
• Hourly – Sampling is performed on an hourly basis.
• Hi Resolution – Sampling is performed at much more frequent intervals as defined by the
"Requested High-Res sampling interval in minutes" option defined through the Sampling Policies
setting which offers the finest granularity of operational statistics.
The retention period for the sampled data in the database tables is set through the sampling policy
(see “Configuring Sampling Policies” (page 112)). The data is purged based on the limit set through
the policy settings. You also have the ability to set the data retention period for individual systems
(see for details).
• System and Domain Selection – Specifies the systems and domains that are to be included in
the report.
• Scope of Report Selection – The options for all reports (except for the Summary report), are
divided into four sections:
◦ Versus Time reports plot data over a period of time (time is along the X-axis). These reports
can either plot aggregate metrics or separate metrics for up to 16 objects. If you want to
compare more than 16 objects, or do more complex object selection you must use the
At Time reports described below.
◦ At Time reports allow you to compare a large number of objects, defined in more complex
ways, but only at a specific point in time. The objects are plotted along the X-axis.
◦ Histogram At Time reports show the distribution of service times and IO sizes at a specific
point in time.
◦ Histogram vs Time reports show the distribution of service times and IO sizes over a
period of time (time is along the X-axis).
• Time Selection – Selects the time or range of times when the report is to be generated.
22 Overview and Features
Page 23

• Object Selection – Selects the list of objects that are to be included in the reporting data. For
example, you can select the VVs, ports and hosts for a VLUN.
• Format Selection – Selects the format of the report including whether the report should show
charts and/or tables and the type and size of charts.
See for complete details on how to build customized reports.
Formatting Reports for Presentation
When building customized reports, you can specify how the reporting data is formatted for viewing
by selecting the appropriate table or type of chart. You can choose from the following chart types:
• Stacked Bars
• Staked Vertical Bars
• Stacked Area
• Bars
• Vertical Bars
In addition to choosing the type of chart that is best suited for the report being generated, you can
also fine tune the presentation by selecting the position of the legend, choosing a time format and
specifying how the units of storage measurement are represented (i.e., MBs, TBs, chunklets, etc.).
When using the Excel client to build reports, you have additional flexibility in the formatting of a
report by modifying the datasheet and including customized columns.
See for descriptions and options available for formatting reporting data.
NOTE: Access to a currently unsupported charting package is also available in this version and
offered as one of the formatting options (under Chart Lib) when generating a report.
To use the unsupported charting capabilities offered through this “Dynamic” charting option, you
must use a browser that supports html5 canvas tags (the latest versions of Windows E9, Firefox
and Google Chrome browsers currently offer this support).
Customizing the Reporting Format
Although System Reporter provides a number of built-in controls for specifying the format of a
report, in some cases you may want to present the data using a different format that is not available
from the standard selection. In this case, you can save the data for the report using the Comma
Separated Values (CSV) format as an option that is accessible with the click of an icon next to the
heading of the report. You can then open the CSV formatted file in an application (such as a
spreadsheet) where it can then be charted or formatted as desired. If the browser is set up to open
files with a .csv extension in a spreadsheet application, this can be done automatically.
Generating Email Alerts
You can configure System Reporter to send email alerts when certain metrics meet specified
conditions. For example, suppose you want to receive an email alert when any VLUN has an
average read service time of more than 100 ms in any high-resolution sampling interval. To do
this, all you need to do is fill in a form with the specified details and then submit the query.
See for complete details on how to configure email alerts.
Accessing Report Data using Web Queries
The querying mechanism employed by System Reporter is made available for specialized
customization of reports. For instance, instead of using the Excel client provided with System
Reporter, you can use web queries in an Excel spreadsheet to bring various report data into your
spreadsheets. As another alternative, you might like to view multiple standard reports presented
Formatting Reports for Presentation 23
Page 24

together in a single web page. You can do this by creating an html file that includes multiple iframe
elements, each of which includes a standard web report query.
See “Web Queries” (page 126)for details on how to instigate web queries.
Using the Database Schema to Build Custom Reports
The databases used by System Reporter are standard relational databases capable of supporting
SQL queries. The default (built-in) database is SQLite (see http://www.sqlite.org) but MySQL and
Oracle database servers can optionally be used instead. The database schema is documented so
you can write your own reports by directly querying the System Reporter database.
See for details on how to utilize the database schema.
Analyzing and Optimizing Storage Utilization
An optionally licensed component called Adaptive Optimization is included with System Reporter.
Adaptive Optimization analyzes sub-volume, region level disk access rates for a given array over
a scheduled period of time and then performs a data migration of regions between tiers according
to a cost versus performance preference. Disk utilization is optimized by having frequently accessed
data moved to the higher performance tier (e.g., RAID 1 using Solid State Disks or SSDs) while
infrequently accessed data is moved to the lower cost tier (e.g., RAID 6 on Nearline disks). By
using Adaptive Optimization, you can achieve a much higher degree of control over disk usage
by reserving your faster and more expensive storage resources for the data that is frequently
accessed and relegating your slower and less expensive drives to storing data that is only
occasionally accessed.
24 Overview and Features
Page 25

3 Installation, Configuration, Update, and Removal
This chapter describes how to install and configure as well as remove the HP 3PAR System Reporter
components.
Before You Begin
Before installing HP 3PAR System Reporter components, select a system on which to run the System
Reporter sampler and Web server. This system must use Windows® Server 2003, Windows®
Server 2008 or Red Hat® Enterprise Linux 5.
If necessary, perform the following setup activities on the designated Windows® or Red Hat®
Linux server:
• Install the InForm OS Command Line Interface (CLI), version 2.3.1 or above.
• Install the Apache Server.
• If you are using an Oracle database, you must install the Oracle client.
• (Optional). To avoid a DHCP-assigned address changing, assign a fixed IP address to the
system.
NOTE: The CLI installer executable for the InForm OS can be found on the System Reporter CD
at: Windows\CLI\setup.exe (for Windows) or Linux/CLI/setup.bin (for Linux)
See the InForm OS Management Console Online Help, located on the System Reporter CD at:
Document/CLI\231_CLI_Administrator_Manual.pdf, for instructions on installing the
InForm CLI.
System Reporter CD Contents
InServ Storage ServerCD includes the following contents (Table 2 (page 25)):
Table 2 InServ Storage Server CD Contents
/Documents/
231_CLI_Admininstrator_Manual.pdf
nl
SR_Sizing.xls
nl
nl
/Linux/
/Linux/
CLI/
/Scripts/
nl
nl
nl
showvvcpg.tcl
nl
DescriptionFilenameDirectory
HP 3PAR InForm OS CLI Administrators Guide.CLI\
System Reporter server sizing spreadsheet (see “Using the System Reporter
Sizing Spreadsheet” (page 27)).
HP 3PAR System Reporter Software User Guide (this document).System_Reporter.pdf
System Reporter sampleloop package for Red Hat Linux.sampleloop-2.9-1.i386.rpm
System Reporter sysrptwebsrv package for Red Hat Linux.sysrptwebsrv-2.9-1.i386.rpm
(Version 2.3.1 of the InForm CLI has only been validated for RedHat 5.2.
Version 2.2.4 of the InForm CLI has been validated for RedHat 5.0 and
5.1.).
HP 3PAR InForm OS CLI installer executable for Red Hat Linux.setup.bin
CLI script implementing the CLI showvvcpg extension command (see “The
showvvcpg CLI extension” (page 188)).
/Windows/
apache_2.2.14-win32-x86-openssl-0.9.8k.msi
nl
Apache HTTP Server installer executable for Microsoft Windows. This
installer is provided only as a convenience. You may choose to download
and install directly from: http://httpd.apache.org.
Before You Begin 25
Page 26

Table 2 InServ Storage Server CD Contents (continued)
CLI/
System Requirements
HP 3PAR System Reporter supports the use of the HP 3PAR InForm OS, versions 2.2.4 through
2.3.1 MU1 and beyond.
Observe the following minimum system hardware requirements:
Table 3 Minimum Hardware Requirements
For better performance, it is recommended that you use separate disks for application data and
database data.
DescriptionFilenameDirectory
System Reporter installer executable for Microsoft Windows.installer.exe
HP 3PAR InForm OS CLI installer executable for Microsoft Windows.setup.exe/Windows/
Minimum RequirementSystem Component
Pentium 4, 3GHz (or faster)CPU
1 GBMemory
20 GB free space (application and data)Disk
NOTE: When running System Reporter on a Virtual Machine, it is best to have the database
server running on a separate VM, especially for Microsoft SQL, MySQL or Oracle.
HP 3PAR System Reporter components have the following requirements (Table 4 (page 26):
Table 4 HP 3PAR Storage System Requirements
Additional RequirementsSupported Operating SystemsComponent
Database
Microsoft SQL Server Note
that Microsoft SQL is not
supported on Linux platforms.
Sampling service
Web server
Web Browser (one of the
following)
Windows® Server 2008 Red Hat
Enterprise Linux 5.4 32 or 64-bit OS
versions are supported except that only the
32-bit versions of Linux are supported for
the Sampling service when using the
Oracle 11g Database since we need to
use the 32-bit Oracle 11g client which is
only supported on the 32-bit Linux.
MySQL® Database Server version version
5.1(Optional) Oracle 11g® Database
(Optional) (Oracle RAC is not currently
supported.)
Microsoft SQL Server Note that Microsoft
SQL is not supported on Linux platforms.
Oracle 11g Client (32-bit only) when used
with Oracle 11g Database
Apache HTTP Server 2.0 or later (installer
provided for version 2.2.14 on Microsoft
Windows)
• Internet Explorer 7 or later
• Mozilla Firefox 3.0 or later
(To use the dynamic charting capabilities
offered as an unsupported formatting
option, you must have Firefox 3.6 or later
or IE 9.)
Excel client
26 Installation, Configuration, Update, and Removal
Microsoft® Excel 2003, 2007 (not
supported on Mac OS X)
Page 27

Table 4 HP 3PAR Storage System Requirements (continued)
Additional RequirementsSupported Operating SystemsComponent
Adaptive Optimization
NOTE: The optionally licensed Adaptive Optimization component is only supported by InForm
OS versions 2.3.1 MU 1 and beyond. Adaptive Optimization is not supported for SQLite databases;
only Oracle and MySQL are supported.
Using the System Reporter Sizing Spreadsheet
Before installing System Reporter, you need to determine the system resources that are required to
adequately run System Reporter and the selected data base server. The optimal computing power
(CPU cores), memory and storage space needed to accommodate the data that is sampled by
System Reporter and used to generate reports depends on the number of systems and the amount
of storage that is being monitored for your particular installation. An Excel spreadsheet named
SR_Sizing.xls (Figure 1 (page 28)) is included with System Reporter for the purpose of determining
the optimal system resources that are recommended for running System Reporter and the database
server at your site. This spreadsheet is included on the installation CD.
NOTE: The System Reporter Sizing Spreadsheet is protected except for the cells in red, but you
can turn off the protection to see the formulas that are used to derive a given value.
InForm OS version 2.3.1 MU1 and
beyond. Not supported when using SQLite
database.
Adobe Acrobat ReaderOn-Line Help (User’s Guide)
Entities in the spreadsheet are color coded. Only the values into controls or cells colored red need
to be set. Cells or ranges in yellow are output values that you can use to size or configure the
server that you will use to run System Reporter. Values in blue are empirically determined parameters
used to drive the sizing model.
Using the System Reporter Sizing Spreadsheet 27
Page 28
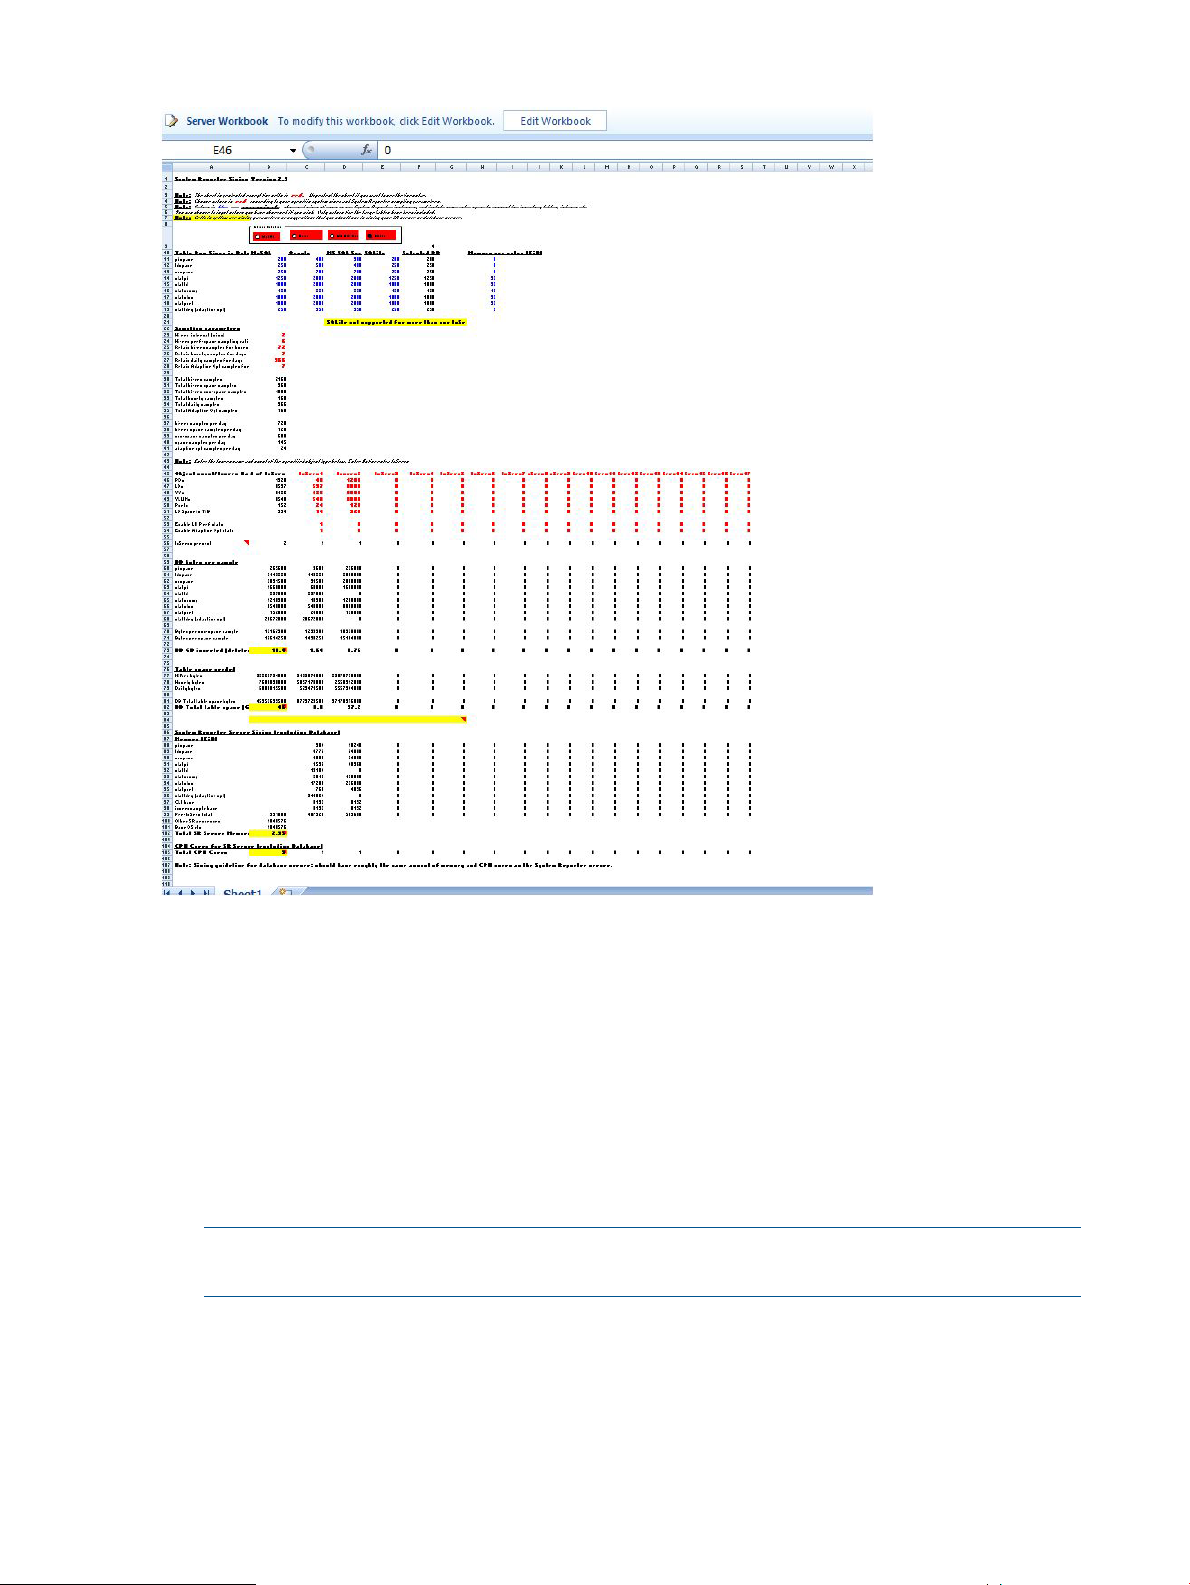
Figure 1 System Reporter Sizing Spreadsheet
1. Click on the appropriate type of database that you are using for System Reporter at your site.
You will notice that SQlite only supports one HP 3PAR Storage System for use with System
Reporter. Please consider another database if you plan on using System Reporter to monitor
more than a single HP 3PAR Storage System.
2. Modify the Sampling Parameters in red to reflect the approximate values for your installation.
The values for Table Row Sizes in blue are approximate table row sizes (bytes) based on
observations derived by HP during testing System Reporter instances and includes some extra
space to accommodate typical inventory tables, indexes, etc.
3. Observe the requirements that are shown in the yellow cells to determine the suggested
allocation of system resources for your System Reporter server or database server.
NOTE: The database server should have roughly the same amount of memory and CPU
cores as the System Reporter server.
System Reporter Components
System Reporter includes the following components (Figure 2 (page 29)):
28 Installation, Configuration, Update, and Removal
Page 29
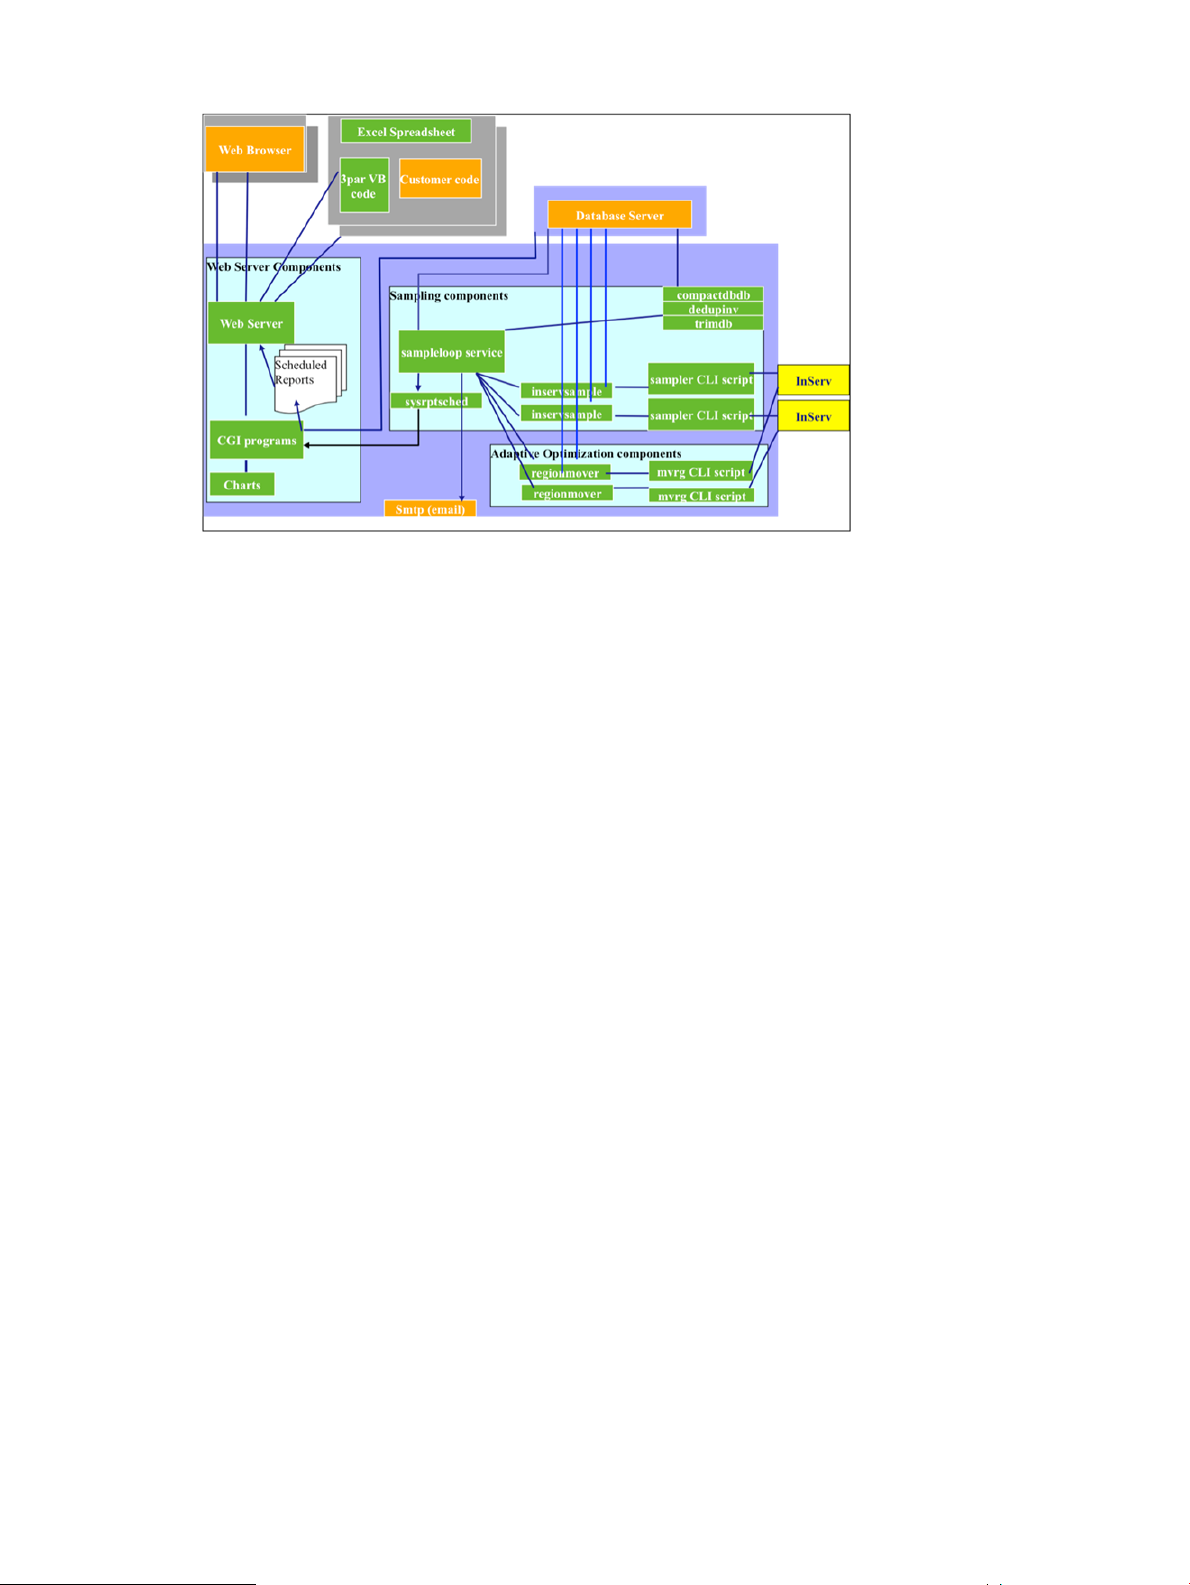
Figure 2 HP 3PAR Storage System and User Interface Components
• Database. The HP 3PAR System Reporter database is capable of supporting SQL queries.
Four types of databases are supported: Microsoft SQL Server, SQLite, MySQL and Oracle
(see “Installing the Database Server” (page 32)).
• Sampler components. The sampler components are responsible for sampling performance
and space information from the HP 3PAR Storage System arrays, saving the data in the
database, and removing old samples from the database. The sampler components include
the following:
◦ The sampling service (sampleloop) runs as a service on Windows or as a daemon on
Linux. It creates and coordinates other sampler components.
◦ A separate inservsample process is created for each HP 3PAR Storage System being
sampled. This process in turn creates a separate CLI process that runs the sampler script
which logs into the array and collects the required data. The inservsample process then
inserts the data into the database. Along with the tables that contain the space and
performance data, the database also includes inventory tables that allow quicker creation
of report menus. The inservsample process also update the inventory tables.
◦ For MySQL, Microsoft SQL Server (Windows only), and Oracle databases, the sampleloop
service/daemon creates a separate process to maintain the database (since SQLite
supports limited concurrency, these functions are performed by the sampleloop process).
These include:
– The trimdb process removes samples that are older than the sample retention period
specified in the sampling policies (see “Configuring Sampling Policies” (page 112)).
– The dedupinv process removes duplicate entries from the inventory tables.
– The compactdb process periodically compacts and optimizes the database when
necessary.
• Adaptive Optimization components. The sampleloop process also creates a regionmover
process for each HP 3PAR Storage System array for which Adaptive Optimization is configured
(see “Selecting an HP 3PAR Storage System for Adaptive Optimization” (page 179)). Each
regionmover process analyzes region level performance data for each Adaptive Optimization
configuration and generates region moves between tiers. The regionmover process creates a
separate CLI process that logs into the array and executes the mvrg program that executes
the data movement commands on the array.
System Reporter Components 29
Page 30

• Web server components. The HP 3PAR System Reporter Web server has customized scripts
that access the database to generate reports to standard browsers as clients, enabling users
to access the reports and configure System Reporter without installing any additional software.
• Excel client. The customized HP 3PAR System Reporter Excel client has built-in Web queries
to the Web server. Use of the Excel client is optional, but offers you additional options. You
must have Microsoft® Excel® in order to use the HP 3PAR System Reporter Excel client.
Installing the System Reporter Components
Required Components
To begin using HP 3PAR System Reporter, you must install the following components which are
supplied on the installation CD:
• CLI for InForm OS
• Web server (Apache HTTP Server)
• System Reporter tools (sampler, default SQLite database, and web server tools for generating
reports)
◦ Windows
◦ installer.exe
◦ Linux
◦ sysrptwebsrv-2.9-1.i386.rpm
◦ sampleloop-2.9-1.i386.rpm
NOTE: To install and use System Reporter, you must have a valid license. If you plan use Adaptive
Optimization, you must also have an additional license to take advantage of the storage optimization
capabilities offered by this optional component.
Optional Components
Installation of the following components are optional:
• Excel client (optional). While the necessary Excel sheet is automatically included, Microsoft
Excel is required by the machine accessing the Excel sheet from the System Reporter server.
• The Microsoft SQL, MySQL or Oracle database (optional). Except for the SQLite database
which is supplied with System Reporter, any other choice of database must be obtained from
the respective vendor.
• Adaptive Optimization (Offered by HP as an option and requires a separate license)
NOTE: If you are upgrading an existing System Reporter installation to the 2.9 release, you do
not need to re-install the CLI, optional MySQL database or Apache web server. You only need to
re-install the System Reporter Tools as described in “Installing or Upgrading the System Reporter
Tools” (page 43). If you wish to keep the previously collected data, you must specify the same
database during the installation process. The System Reporter installer for Microsoft Windows will
automatically detect previous settings and offer the option to upgrade the existing installation.
System Reporter 2.9 will automatically convert the earlier release database tables into the format
that it needs. If you wish to retain the tables in an earlier format, you must make a backup copy
of the database before upgrading.
All table updates are logged in the Sampleloop.log. Contact your customer service representative
if any tables fail to update properly.
The following flowchart (Figure 3 (page 31)) provides a visual representation of the installation
process for a new installation that is described in detail in the following sections.
30 Installation, Configuration, Update, and Removal
Page 31

Figure 3 Installation Process Flowchart
Installing the Web Server
HP 3PAR System Reporter requires Apache HTTP Server, version 2.2 or later.
A copy of the installer executable for Windows of Apache HTTP Server, version 2.2, is located on
the HP 3PAR System Reporter CD or you can download the most recent version from
www.apache.org. Red Hat Linux typically includes the Apache Web Server.
Installing the Web Server 31
Page 32

NOTE: System Reporter 2.9 and beyond supports secure connections on Apache servers using
the SSL protocol. For details on implementing the SSL protocol on Apache servers, please consult
the following links:
http://httpd.apache.org/docs/2.2/ssl/ssl_intro.html
http://httpd.apache.org/docs/2.2/ssl/ssl_howto.html
http://httpd.apache.org/docs/2.1/ssl/ssl_faq.html
Use the Apache HTTP Server Installation Wizard to complete a typical installation, accepting all
defaults (with possibly the exception of the Administrator’s Email address).
To verify successful installation of Apache HTTP Server, open a Web browser and point it at the
Web server (or localhost if the browser is on the same machine).
If the installation was successful, you will see a message in the Web browser that confirms that
your installation was successful.
NOTE: On Linux, Apache should be configured to run as the default apache user and the
sampleloop daemon will also be configured to run as the apache user. The default locations for
html files (/var/www/html) and CGI files (/var/www/cgi-bin) should be used because the
sysrptwebsrv package installs files in these directories.
Please note that System Reporter has not been tested with virtual domains in Apache.
NOTE: If SELinux (Security Enhanced Linux) is implemented at your site, you may need to either
disable SELinux entirely or temporarily grant permissive access to the system to install the System
Reporter tools. Please consult your Linux documentation for details on how to grant permissive
access.
NOTE: It is recommended that you increase the default Timeout parameter to at least 360
seconds (or more for installations with very large databases) in the appropriate apache configuration
file (typically httpd.conf) and then restart apache to let this change take effect. This is to ensure
that CGI calls that take a long time to generate a report do not timeout.
On Windows, by default the Timeout parameter is specified in the following file:
C:\Program Files\Apache Software Foundation\Apache2.2\conf\
httpd-default.conf
On Linux, by default the Timeout parameter is specified in the following file:
/etc/httpd/conf/httpd.conf
Installing the Database Server
HP 3PAR System Reporter supports several database servers: Microsoft SQL, SQLite, MySQL and
Oracle. Before beginning the installation, select the database based on the considerations described
below and summarized in Table 5 (page 33).
Choosing the Appropriate Database
Before beginning, you want to choose the right database for your particular installation.
SQLite
SQLite is an embedded database that is included with System Reporter. It does not run as a separate
application but rather as a module within the sampling tool and web server. Since it requires no
installation or configuration, it is very simple to use but it has several limitations that make it only
suitable for small database sizes and limited concurrency.
SQLite supports only limited database concurrency because it relies on a single file lock for the
entire database. The sampling process needs exclusive access to the database when inserting new
samples. If the database is very large or if there are a large number of concurrent web requests,
32 Installation, Configuration, Update, and Removal
Page 33

the sampler or the Web server can time out. Furthermore, database compaction (see “Compacting
Databases” (page 113)) cannot be done in parallel with sample insertion so there could be a large
gap in samples during database compaction.
Sampling of multiple HP 3PAR Storage Systems is not supported with an SQLite database, either
the Microsoft SQL Server, MySQL or the Oracle database servers should be used instead.
For large databases (over about 1 GB) or a large number of concurrent Web users, either the
MySQL®, Microsoft SQL, or the Oracle database servers should be used instead.
NOTE: The optionally licensed Adaptive Optimization feature is not supported with the SQLite
database. Please consider another database if you plan on utilizing the storage optimization
capabilities provided by Adaptive Optimization.
Microsoft SQL
System Reporter supports Microsoft SQL version 2008 R2 database server but it is not included
and must be purchased separately. The Microsoft SQL server is not supported on Linux and does
not support data generated by System Reporter when installed on a Linux platform.
MySQL
A MySQL database server can be used with System reporter but is not included with it. You must
purchase it separately. MySQL is a good choice for System reporter because it supports MyISAM
tables. These tables do not support transactions (which are not required for System Reporter) and
are consequently somewhat higher performance than Oracle for sample insertion and deletion.
Oracle
System Reporter supports an Oracle 11g database server but it is not included with it. You must
purchase it separately. Compared with MySQL, Oracle is slightly slower and more resource
intensive for sample insertion and deletion. However, Oracle is also a good choice for large and
active System Reporter installation.
NOTE: System Reporter does not currently support Oracle RAC implementations.
NOTE: System Reporter requires the 32-bit Oracle client and does not support the 64-bit version.
NOTE: If you choose Oracle as the database, you cannot install System Reporter on a 64-bit
Linux system since it requires a 32-bit Oracle client which is not supported on 64-bit Linux. This
limitation does not apply to the 64-bit Windows version since the 32-bit Windows version of Oracle
Client works on 64-bit Windows platforms.
Table 5 (page 33) provides a comparison of features for the various database choices.
Table 5 Database Comparison
OracleMySQLMicrosoft SQLSQLiteComment
NoNoNoYesIncluded with System
Reporter?
YesYesYesNoSample more than one
HP 3PAR Storage
System?
Optimization?
database server?
Scale to large database
size?
YesYesYesNoSupports Adaptive
YesYesYesNoCan have remote
YesYesYesNo, recommend
less than 1 GB
Installing the Database Server 33
Page 34

Table 5 Database Comparison (continued)
concurrent users?
OracleMySQLMicrosoft SQLSQLiteComment
YesYesYesNoScale to large number of
Performance for sample
insertion and deletion?
small databases
GoodHighGoodAdequate for
Installing and Setting Up the Microsoft SQL Server Database (Optional)
To install the Microsoft SQL Server Database, you must create the database and then set up a valid
login and user. Consult the appropriate Microsoft SQL Server documentation for details.
System Reporter Host Configuration
Once you have set up the Microsoft SQL database and created a login and user, you need to
configure the System Reporter host to create the data source (ODBC) using the appropriate
Administrative Tools Figure 4 (page 34).
NOTE: The screens shown in the following examples are specific for the 32 bit ODBC
Administrator utility but are similar to those for the 64 bit Administrator utility.
For a 64 bit Windows Server please run the 32 bit ODBC Administration utility to create the DSN.
Usually, this utility can be found in the following path:
C:\Windows\SysWOW64\odbcad32.exe
Figure 4 Selecting Data Sources (ODBC)
On the System Reporter host create a System ODBC DSN as follows:
34 Installation, Configuration, Update, and Removal
Page 35

1. Select Administrative Tools→Data Sources (ODBC).
The ODBC Data Source Administrator screen appears:
Figure 5 ODBC Data Source Administrator Screen
2. Select the System DSN tab.
3. Click Add.
The Create New Data Source screen appears:
Figure 6 Selecting the data source for the SQL driver
4. Choose SQL Server Native Client 10.0. Any SQL server ODBC driver will work. However, the
SQL Server Native Client ODBC is supplied with the Microsoft SQL Server client and is
considered to be the most efficient.
NOTE: Although you have the option of using the default SQL Server ODBC, if the SQL
Server client is already installed on the machine, choose the latest ODBC.
5. Click Finish.
The Create a New Data Source to SQL Server screen Figure 7 (page 36)appears:
Installing the Database Server 35
Page 36

Figure 7 Create a New Data Source to SQL Server Screen
Note that the screens appear somewhat differently depending on whether you have chosen
to use the default version of the SQL ODBC.
6. Click Next.
Figure 8 Entering the Login ID and Password
36 Installation, Configuration, Update, and Removal
Page 37

7. Enter the user's log in and password information, then click Next.
Figure 9 Specifying the MSSQL Database Name
8. Check the Change the default database check box, and enter the name of the MSSQL database
that has been created for System Reporter.
9. Click Next.
Figure 10 Checking the Details for the Database
10. Click Finish.
Installing the Database Server 37
Page 38

Figure 11 ODBC Microsoft SQL Server Setup Screen.
11. Check the details for the selected database, then click Test Data Source.
The screen must show the following (Figure 12 (page 38)):
Figure 12 SQL Server ODBC Data Source Test Screen
If the screen does not show the appropriate information, please run the configuration again.
Installing and Setting Up the MySQL Database (Optional)
To use MySQL, you must install MySQL Database Server, version 5.1, following the instructions
provided in this section. MySQL Database Server is optional third-party software and is not provided
by HP.
Installing MySQL Server
To use MySQL for the HP 3PAR System Reporter database, obtain a software license and a copy
of MySQL Database Server, version 5.1. See www.mysql.com for licensing and download
instructions.
38 Installation, Configuration, Update, and Removal
Page 39

NOTE: Beginning with the 2.2 release, System Reporter can use a MySQL database on a remote
server. The MySQL installation and configuration steps are the same for the remote server. See
section for configuring System Reporter to use a remote MySQL database. This type of configuration
is highly recommended.
After downloading the MySQL executable, use the MySQL Server Setup Wizard to set up and
configure MySQL as follows:
1. Open the MySQL executable.
2. When prompted, click Next.
3. Choose a Typical installation and click Next.
4. Click Install.
5. Click Skip Sign-Up then click Next.
6. Make sure that Configure MySQL Server now is checked and then click Finish.
The MySQL Server Instance ConfigurationWizard appears.
NOTE: When installing on a Redhat Linux server where the MySQL server is running locally
on the same server, you must complete one of the following procedures:
Create a symbolic link using the following command:
ln -s /var/lib/mysql/mysql.sock /var/run/mysqld/mysqld.sock
Or, make the following change in the /etc/my.cnf file:
socket=/var/run/mysqld/mysqld.sock
and then restart the MySQL server.
Without one of these modifications, the sampleloop logs the following error:
2010-03-09 12:54:01: Could not connect to database: mysqlconnect/db
server: Can't connect to local MySQL server through
socket'/var/run/mysqld/mysqld.sock' (2)
Configuring the MySQL Database
Use the MySQL Server Instance ConfigurationWizard to configure the MySQL database as follows:
1. In the MySQL Server Instance ConfigurationWizard, click Next to begin configuring the
database.
2. Select Detailed Configuration and then click Next.
3. Select Server Machine then click Next.
4. Select Multifunctional Database then click Next.
5. When prompted to select a drive for the warehousing data file, accept the default drive
and directory and click Next.
6. Choose Decision Support (DSS)/OLAP and click Next.
7. Confirm that Enable TCP/IP Networking is selected and that the Port Number is 3306 and
then click Next.
8. Confirm that Standard Character Set is selected and then click Next.
9. Confirm the following and then click Next:
• Install As Windows Service is selected
• the default Service Name is MySQL
• the Launch the MySQL Server automatically checkbox is checked
Installing the Database Server 39
Page 40

10. Confirm that Modify Security Settings is selected, enter a root password, and then retype the
password to confirm.
CAUTION: Be sure to record the password for later reference.
11. Make sure that Create An Anonymous Account is not selected and then click Next.
12. Click Execute.
13. When prompted, click Finish.
CAUTION: System Reporter only supports and creates MyISAM tables. Conversion of these
tables to use any other type of storage engine is not supported.
Setting the max_allowed_packet parameter
Change the max_allowed_packet MySQL parameter by editing its value in the MySQL initialization
file.
• On Linux, the default initialization file is /etc/my.cnf.
• On Windows, the default initialization file is C:\Program Files\MySQL\MySQL Server
5.1\my.ini.
The initialization file should include the following line:
max_allowed_packet=32M
After changing the max_allowed_packet parameter, you need to restart the MySQL server.
• On Windows you can do this by restarting the MySQL service.
• On Linux, you can run:
/etc/init.d/mysqld restart
CAUTION: It is necessary to use a large max_allowed_packet length because, when sampling
a large number of systems or very large systems, the SQL INSERT command length can be quite
large and the max_allowed_packet must be large enough to hold the entire statement. If the
max_allowed_packet is not large enough, the sampler will get an error and sampling will stop.
Creating MySQL Users and Schema
If you are using MySQL, after installing and configuring MySQL you must create the MySQL users
and schema as described in this section.
1. Log in to MySQL as root. You may need to do this on the machine on which MySQL is installed
since root login is typically restricted to local logins only.
mysql -u root -p
2. Run the following command at the mysql prompt to create the database (named inservstats
by default):
create database inservstats;
3. Run the following commands to create the two users cliuser and webuser.
create user cliuser identified by ’cliuserpassword’;
create user webuser identified by ’webuserpassword’;
40 Installation, Configuration, Update, and Removal
Page 41

These users have different privilege levels that correspond with optional Apache HTTP Server
privilege levels, as described in “Installing or Upgrading the System Reporter Tools” (page 43).
• cliuser is the default user name for the sampler and policy change user. This user can
create and edit database tables and change database sampling policies (see “Editing
Sampling Policies” (page 114)).
• webuser is the default user name for the Web reports user. This user has database read
privileges only.
As part of installing the System Reporter tools (see “Installing or Upgrading the System Reporter
Tools” (page 43)), the installer creates two Apache HTTP Server config.tcl files to store
the user names and passwords for the cliuser and the webuser. See for instructions on editing
these config.tcl files if you change the MySQL usernames and passwords at a later time.
NOTE: When creating the users, you must assign them passwords in order for System
Reporter to function properly.
4. Grant the two users the privilege levels described above by running the commands below:
use inservstats
grant all on * to cliuser;
grant select on * to webuser;
exit;
5. Exit the mysql command line by running the following command:
exit;
Setting Up the Oracle Database (Optional)
System Reporter supports the use of MySQL® Database Server or Oracle 11g Database Server.
To use Oracle, you must set up Oracle, following the instructions provided in this section. To use
and install MySQL go to “Installing and Setting Up the Microsoft SQL Server Database (Optional)”
(page 34).
Oracle is optional third-party software and is not provided by HP.
Installing the Oracle database server is beyond the scope of this guide. We assume that you
already have an Oracle database server. In this section we describe how to create a database
and users on that server for the System Reporter and how to set up a connection to the database
from the System Reporter.
NOTE: To ensure that all environment variables are properly updated, install Oracle prior to
installing the Apache Web Server. If Apache is already installed, be sure to restart it after the
Oracle client is installed.
Creating an Oracle database
On the Oracle database server:
1. Start the Oracle Database Configuration Assistant.
2. Click Next at the welcome screen.
3. Select the Create a Database radio button and click Next.
4. Select the radio button for the Data Warehouse template and click Next.
5. Enter a name for the database and Oracle System Identifier (SID) and click Next.
6. Keep defaults for Configure Enterprise Manager, and click Next.
7. Select passwords for various Oracle users and click Next.
8. Select the desired storage mechanism and click Next.
9. At this point you can click Finish or continue to set further options.
Installing the Database Server 41
Page 42

10. After clicking Finish, check the settings in the confirmation screen and click OK.
11. Click Exit after the database has been created.
Creating the Oracle Users for System Reporter
Use the instructions that follow to create two users: cliuser and webuser. These users have different
privilege levels that correspond with optional Apache HTTP Server privilege levels, as described
in “About Apache HTTP Server Authorization and Access Control” (page 49).
• cliuser is the default user name for the sampler and policy change user. The System Reporter
tables are created in the cliuser schema. This user can create and edit database tables and
change database sampling policies (see “Editing Sampling Policies” (page 114)).
• webuser is the default user name for the Web reports user. This user has select privileges only
for the tables in the cliuser schema.
As part of installing the System Reporter tools (see “Installing or Upgrading the System Reporter
Tools” (page 43)), the installer creates two Apache HTTP Server config.tcl files to store the
user names and passwords for the cliuser and the webuser. See for instructions on editing these
config.tcl files if you change the Oracle usernames and passwords at a later time.
To create the users, open the Oracle Enterprise Manager for the database in a web browser. When
you create the database in section “Creating an Oracle database” (page 41), a link to the Oracle
Enterprise Manager URL for the database would typically have been added to the Windows
programs submenu for Oracle.
1. At the login screen for the Oracle Enterprise Manager login as SYSTEM with the password for
the SYSTEM user.
2. Click the link (or tab) for Server.
3. Under Security, click on the link for Users.
4. Click the Create button.
5. In the create user screen, enter the user name cliuser along with the password. Select a default
and temporary tablespace, select Unlocked for the status.
6. Click on the link (or tab) for Roles.
7. The cliuser needs to have the CONNECTION and RESOURCE roles. The CONNECTION role
should be there by default, otherwise add it along with the RESOURCE role by clicking the
Edit List button and adding RESOURCE and/or CONNECTION and clicking OK. The cliuser
should also have the CREATE TABLE role.
8. Click OK to create the cliuser user.
Repeat the steps above to create the webuser user as well. The webuser needs SELECT
privileges for all the tables in the cliuser schema. System Reporter will automatically grant
SELECT privileges to the webuser when it creates the tables.
NOTE: To improve performance, System Reporter runs the dbms_stats utility in Oracle.
Please grant execute permission for this utility in Oracle.
NOTE: System Reporter 2.9 logs more information for debugging purposes. It uses two
Oracle views v$instance and v$version. Please grant permissions to these views for the
user that sets the policy settings.
Creating the Oracle Net Service
You need to create an Oracle Net Service on the host on which the System Reporter will be installed.
This is used by the System Reporter sampler and the web CGI programs to connect to the Oracle
database.
1. Install the Oracle Client (the Runtime version is sufficient) on the host. This should include the
Net Configuration Assistant under the Oracle client program menu.
42 Installation, Configuration, Update, and Removal
Page 43

2. Start the Net Configuration Assistant.
3. Select the Local Net Service Name Configuration radio button and click Next.
4. Select the Add radio button and click Next.
5. Enter the service name for the database according to the directions and click Next.
6. Select TCP protocol and click Next.
7. Enter the host name for the database server along with the appropriate port number and click
Next.
8. Select Yes, perform a test and click Next. The test may fail if the default user and password
are not set. Click the Change Login button and enter cliuser and password and click OK.
The test should succeed. Click Next.
9. Enter a net service name. This is the name you will need to enter when installing the System
Reporter tools. Click Next.
10. Follow instructions to complete the net service configuration and exit the program.
Installing or Upgrading the System Reporter Tools
You have several options for installing the HP 3PAR System Reporter tools, depending on whether
you choose to use the SQLite database (the default), or one of the other optional databases.
If you are using Microsoft SQL Server, MySQL or Oracle for your database, before installing the
HP 3PAR System Reporter tools you must install and configure the database as described in:
• “Installing and Setting Up the Microsoft SQL Server Database (Optional)” (page 34)
• “Installing and Setting Up the MySQL Database (Optional)” (page 38)
• “Setting Up the Oracle Database (Optional)” (page 41)
NOTE: Before installing the System Reporter tools, make sure that you have installed Apache
HTTP Server as described in 3.6.2 Optional Components. Figure 3 (page 31) provides a visual
representation of the installation process for a new installation that is described in detail in the
following sections.
There are different procedures for installing or upgrading System Reporter tools on Windows and
Linux. For Windows, refer to section“Installing or Upgrading System Reporter Tools on Windows”
(page 43) and for Linux refer to section “Installing System Reporter Tools on Linux” (page 46).
Installing or Upgrading System Reporter Tools on Windows
Install the HP 3PAR System Reporter tools on Windows as follows:
1. Insert the HP 3PAR System Reporter Software CD into your CD-ROM drive and open the file.
installer.exe
The System Reporter Installer window opens.
2. If the installer detects a previous System Reporter installation, it will initialize the settings for
the installation to the existing settings instead of the default settings and include an Upgrade
button.
Click the Upgrade button to keep the existing settings and skip to step 10.
Click the Next button to step through each of the settings as described in the following steps.
NOTE: If the installer detects a previous version of System Reporter, it will pop up a window
at this point. If the compactdb process is running, the popup will advise you to wait for the
compaction to complete and perform the upgrade later. It will not provide an option to stop
the previous installation since terminating a compactdb prematurely causes problems with
the database for MySQL. If compactdb is not running, the popup window asks for permission
to stop the previous installation before proceeding with the new installation.
Installing or Upgrading the System Reporter Tools 43
Page 44

3. When prompted, use the Browse... button to select and enter the full path to the InForm CLI
executable cli.exe (if it is different from the default) then click Next.
4. When prompted, use the Browse... button to select and enter the full path to the location where
you installed Apache HTTP Server (if it is different from the default) then click Next.
5. Use the Browse... button to select and enter the installation directory for the HP 3PAR System
Reporting Tools sampler or accept the default directory (C:/Program Files/3PAR/System
Reporter) and then click Next.
6. Make sure that the desired database is selected, then click Next.
7. This step differs based on the type of database you selected.
a. If you selected SQLite for the database, you are prompted for the installation directory
for the HP 3PAR Reporting Tools SQLite database. Use the Browse... button to select and
enter the directory or accept the default directory (C:/Program Files/3PAR/System
Reporter/inservstats) and then click Next. Since SQLite databases are merely on
local files no user name or password are required and you will skip step 8 and be taken
directly to step 9.
b. If you selected Microsoft SQL for the database, you are prompted for the DSN name and
user name password. Enter the DSN name for a remote Microsoft SQL server if different
from the default database that is displayed (inservstats). Enter the user name
password. Click Next.
c. If you selected MySQL for the database, you are prompted for the MySQL server host
name and database name. Enter the host name or IP address for a remote MySQL server
or leave it as localhost for local MySQL server. Enter the database name if different from
the default database that is displayed (inservstats). Click Next.
d. If you selected Oracle for the database you are prompted for the host string. Enter the
net service name you entered in step 9 and click Next.
NOTE: If you are upgrading from an earlier version of the System Reporter or reinstalling
an existing 2.9 version for SQLite, and if you wish to retain the data collected from the
previous installation, you must specify the same (existing) database, otherwise a new
database will be created.
System Reporter 2.9 will automatically convert the earlier release database tables into
the format that it needs. If you wish to retain the tables in an earlier format you must make
a backup copy of the database before upgrading.
NOTE: When upgrading from an earlier version of System reporter (for MySQL only),
the Sampling process may take a while to start sampling. This delay is necessary to
address an issue related to case insensitiveness with default installs of MySQL.
8. When prompted, type the webuser password in the Web reports password field and the
cliuser password in the Sampler and policy change password field and then click Next.
NOTE: See and for additional information about cliuser and webuser.
These users correspond with the Apache HTTP Server privilege levels (see “About Apache
HTTP Server Authorization and Access Control” (page 49)) and are also defined in the Apache
Server HTTP config.tcl files (see “Modifying the Apache HTTP Server Configuration Files”
(page 125)).
The installer places these user names and passwords in the Apache HTTP Server config.tcl
files and the cliuser user name and password in the database password file called dbpwfile
located in the installation directory for the HP 3PAR System Reporting Tools sampler (default
file path C:/Program Files/3PAR/System Reporter/dbpwfile). See for information
on setting the appropriate permissions for the files.
9. Enter optional SMTP (Simple Mail Transfer Protocol) parameters to allow System Reporter to
send email. If you do not wish to use the email alerts feature (see “Configuring Rules for Email
44 Installation, Configuration, Update, and Removal
Page 45

Alerts” (page 116)) you may leave all entries in this screen blank. If you want to be able to
configure System Reporter to generate email alerts, you must enter the IP address or name of
the SMTP server, the user name and password if the SMTP server requires authentication, and
the SMTP originator name (the mailbox name that the email appears to be from). This
information is stored in the sampleloop_config.tcl file in the System Reporter installation
directory. Click Next to continue.
NOTE: In addition to configuring the SMTP parameters for alerts, it is also used for sending
an email when the If there is a problem with sampling, send email to this address option is
set through the Sampling Policies settings.
NOTE: Some firewalls or antivirus software may prevent the HP 3PAR System Reporter
sampler service (an executable named sampleloop.exe) or the facility for sending email
links for reports (an executable named inserv_perf.exe) from connecting to the SMTP
server. Ensure that the security software allows these executables to connect to the SMTP server.
To check if the connection is working, create an alert as described in that will always generate
an alert on a high-resolution table. Then check that email was received. If email was not
received, check for error information in the sampleloop.log file (see “Troubleshooting the
Sampling Components” (page 215)).
10. Click Next and then, when prompted, click Finish.
The HP 3PAR System Reporter Installer window closes.
11. On the Windows Control Panel, open Administrative Tools and then Services.
12. In the Services window, locate the entry for HP 3PAR System Reporter sampler and verify that
the Status is Started.
NOTE: If the Status is not Started, the installation of the HP 3PAR Reporting Tools may be
unsuccessful. Check the sampleloop.log. If the installation was unsuccessful, remove all
System Reporter components using the instructions provided in and then repeat the installation
steps described in “Installing or Upgrading the System Reporter Tools” (page 43).
See Chapter 11, Troubleshooting for additional troubleshooting information.
13. Close the Services window.
At this point the System Reporter sampler service has been installed and started.
If this is an upgrade from a previous version of System Reporter, the sampler process will
automatically convert existing tables in the database into newer version tables and create new
tables necessary for version 2.8.
WARNING! Do not interrupt the sampler process during a System Reporter upgrade. Stopping
the sampling service while it is in the process of upgrading the database tables may leave it in a
state where it cannot continue. If you encounter a problem and need to stop the sampler process,
you should first consult the sampleloop.log to make sure that the database tables have been
upgraded before attempting to stop or restart the sampler process.
NOTE: The upgrade process may take some time during which web access to the reports will
not be available. Consult the sampleloop.log file in the installation directory to check on the
progress of the table conversion.
After all the new tables are available, sampling will start automatically.
Once all the tables have been created, the main web page for system reporter should be accessible
at http://<host_name>/3par where <host_name> is the name of the server where Apache and
System Reporter are installed.
Proceed to section “Adding Storage Systems” (page 47).
Installing or Upgrading the System Reporter Tools 45
Page 46

Installing System Reporter Tools on Linux
System Reporter tools on Linux consists of two RPM packages available on the CD:
• sampleloop (sampleloop-2.9-1.i386rpm) consists of the files needed to install the sampleloop
daemon.
• sysrptwebsrv (sysrptwebsrv-2.9-1.i386.rpm) consists of the files needed to install the System
Reporter web server code.
Both these packages must be installed after logging in to a terminal session on the server as the
root user. Make sure that httpd and mysqld are running before starting sampleloop (when using
the MySQL database). Note that mysqld may not be running on the same server.
NOTE: The sysrptwebsrv requires the 32-bit version of the gd (version 2.0 or greater) package
to be installed. If running the 64-bit version of Red Hat Enterprise Linux 5, the package requirement
incorrectly appears to be met by the 64-bit version of the gd package. You must ensure that the
32-bit (i386) version of the gd package is installed.
NOTE: Although the packages are installed as root, the sampleloop daemon and the CGI
programs executed from the Apache web server run as the apache user.
NOTE: If SELinux (Security Enhanced Linux) is implemented at your site, you may need to either
disable it or temporarily grant permissive access to the system to install the System Reporter tools.
Please consult your Linux documentation for details on how to grant permissive access.
1. If there is an existing System Reporter installation, stop the sampleloop daemon and remove
the older packages as follows:
/etc/init.d/sampleloop stop
rpm --erase sampleloop
rpm --erase sysrptwebsrv
The rpm --erase command will remove the previous installation of the packages but save
any edited configuration files with a .rpmsave suffix appended to their names.
2. Install the sampleloop package by mounting the System Reporter CD, changing to the directory
on the CD that includes the rpm packages and running:
rpm --install sampleloop-2.9-1.i386.rpm
3. Edit the /etc/sampleloop.conf file following the directions in the file. If a previous version
of that file was saved you may keep the previous settings and simply replace the /etc/
sampleloop.conf file with the /etc/sampleloop.conf.rpmsave file.
4. For MySQL and Oracle databases, create/edit the /etc/sampleloop_dbpwfile file to
include a single line that has the database user name and password separated by a space.
5. Start the sampleloop daemon by running:
/etc/init.d/sampleloop start
Look at the sampleloop.log file in the /var/log/sampleloop/ directory to see status
and progress of the sampleloop daemon. If this is a new installation, the sampleloop daemon
will create all the required tables and initialize the policy table. Since no systems have yet
been added to the sampling list, none will be sampled.
If this is an upgrade of an existing installation, sampleloop will automatically convert tables
to the newer versions required for System Reporter 2.9. Then it will resume sampling.
If errors are reported in the sampleloop.log file (for example due to incorrect database
setup, or incorrect sampleloop.conf parameters) correct those error and restart the sampleloop
daemon:
/etc/init.d/sampleloop restart
46 Installation, Configuration, Update, and Removal
Page 47

6. Install the sysrptwebsrv package by mounting the System Reporter CD, changing to the directory
on the CD that includes the rpm packages and running:
rpm --install sysrptwebsrv-2.9-1.i386.rpm
7. Edit the /var/www/cgi-bin/3par-rpts/config.tcl and /var/www/cgi-bin/
3par-policy/config.tcl files following the directions in those files. If previous versions
of the file were saved, you may keep the previous settings and simply replace the files with
the saved versions. If the configuration files are correct, you should be able to open the web
page http://hostname/3par.
Once all the tables have been created, the main web page for system reporter should be accessible
at http://<host_name>/3par where <host_name> is the name of the server where Apache and
System Reporter are installed.
Adding Storage Systems
Follow these instructions for adding HP 3PAR Storage Systems to be sampled.
1. Open a Web browser and point it at http://<host_name>/3par/ where <host_name>
is the Web server where Apache HTTP Server is installed.
The HP 3PAR System Reporter window appears.
2. Click on Policy Settings in the Extras Menu area.
The System Reporter Policies window appears.
NOTE: If you upgraded from a previous version of System Reporter (and you changed the
location of the CLI password directory with that previous release) you must first remove, and
then re-add your HP 3PAR Storage Systems.
3. Choose the InServ Systems tab.
4. Click Add InServ.
5. In the Add InServ System to be Sampled window, type the IP Name or address of a storage
server you wish to add, your CLI User name, and CLI Password.
NOTE: If you do not plan on using the capabilities offered by the optionally licensed Adaptive
Optimization feature, you can specify a Browse level access since no special privileges are
required to view reports. However, if you are using Adaptive Optimization to perform system
optimization, you should specify an Edit level user access. Specifying a Super level privilege
is not required or recommended. For 3.1.1 systems, users can have the 3PAR_AO role instead
of the edit role. This role has browse level privileges plus the ability to move regions between
Common Provisioning Groups (CPGs).
6. Check the Use SSL box if the CLI connection should be over SSL.
7. Leave the Skip LD Performance data box checked if you do not need to collect performance
data for Logical Disks (LDs). If you intend to configure Adaptive Optimization for the HP 3PAR
Storage System, you should uncheck the box since Adaptive Optimization uses LD performance
data.
8. Check the Sample Adaptive Optimization Data box if you want to collect performance statistics
for the optional Adaptive Optimization component. When choosing this option, you must
make sure that the Skip LD Performance data check box is unchecked, otherwise an error
message is generated.
9. You have the option of specifying the amount of time to retain certain types of data or you
can accept the default values:
• Hours to keep High Res Data -- Specifies the amount of time (in hours) to keep High Res
data.
• Days to keep Hourly Data -- Specifies the number of days to retain hourly data.
Installing or Upgrading the System Reporter Tools 47
Page 48

• Days to keep Daily Data -- Specifies the number of days to retain daily data.
• Days to keep Adaptive Optimization Data -- Specifies the number of days to retain
Adaptive Optimization data.
10. Click Submit Query.
NOTE: Since performance data for LDs can increase the database size substantially you
should check the Skip LD Performance data box unless you intend to configure Adaptive
Optimization for the system.
You can change the value of the Use SSL and Skip LD Performance data parameters or even
disable sampling for a storage server entirely as described in section “Re-Configuring a Storage
Server Sampling” (page 116).
11. Repeat step 5 to add additional storage servers and then click Return to Policies.
NOTE: The maximum CPG size supported when region data sampling is enabled for Adaptive
Optimization is 250 TB. The maximum Adaptive Optimization configuration size is limited to
125 TB.
Setting File Permissions (Optional)
Set file permissions as desired for the password and configuration files created during installation.
See About File Permissions for additional information.
Verifying Installation
Perform the following steps to verify that the System Reporter tools were installed correctly and that
systems are being sampled successfully:
1. Wait several minutes after adding the last storage server as described in step 5??? (for SQLite
configurations).
2. Look at the sampleloop.log file. On WIndows this is in the log subdirectory in the directory
where System Reporter is installed (C:\Program Files\3par\System Reporter\log\
sampleloop.log). On Linux, open /var/log/sampleloop.log.
3. At the bottom of the log file, for each system to be sampled, look for an entry similar to the
following:
2009-04-29 10:16:15: Adding system inserv1 into system table
nl
2009-04-29 10:16:21: Sample inserted (1 systems) (time=2009-04-29 10:14:53) (hires,
space=0) (9 secs)
nl
You can now return to the HP 3PAR System Reporter window and execute database queries
using a Web browser.
NOTE: For performance type reports, at first you may only be able to see high resolution
performance information. For space type reports, it may take more than 30 minutes before
you can sample high resolution data. Daily and hourly data samples may take even longer.
Installing the Excel Client (Optional)
If you plan to use the HP 3PAR System Reporter Excel client to access the HP 3PAR System Reporter
database, you must install the Excel client on a local machine as described in this section.
48 Installation, Configuration, Update, and Removal
Page 49

NOTE: Use of the HP 3PAR System Reporter Excel client requires that you have Microsoft® Excel®
2003 or 2007 software already installed on your local machine. See for additional details.
The HP 3PAR System Reporter Excel client is contained in a single Microsoft® Excel® workbook
with the file name 3PAR System Reporter.xls. After downloading this file, you can save it
in any convenient location.
To download the HP 3PAR System Reporter Excel client:
1. Open a browser window and point it at http://<host_name>/3par/ where <host_name> is
the server where Apache HTTP Server is installed (see Before You Begin and Optional
Components).
2. Near the top of the page is the Excel Client link (see Figure 14 (page 53)).
3. Use the Excel Client link to download and save the file 3PAR System Reporter.xls to
any convenient location on your local machine.
Methods for saving this file locally will vary according to the Web browser you are using.
CAUTION: Depending on your Web browser, simply clicking the Excel Client link may cause
the Excel client to open in your browser window, which will not give you access to the full
Excel client functionality. Be sure to save the file on your local machine and then refer
to“Accessing the Optional Excel Client” (page 55) for further instructions.
About Apache HTTP Server Authorization and Access Control
You can configure Apache HTTP Server to require a username and password before allowing a
user to:
• read the HP 3PAR System Reporter database or view the database sampling policies.
• make changes to database sampling policies.
NOTE: Viewing and editing the HP 3PAR System Reporter database sampling policies can only
be done via Web browser, as described in “Editing Sampling Policies” (page 114).
One username and password pair can be used for both, or a different username/password pair
can be used for each of these functions. Using two username/password pairs will allow you to
configure System Reporter such that a user is able to read the database and view sampling policies,
but is not allowed to modify System Reporter database policy settings.
Apache HTTP Server authorization and access control information is stored in the main configuration
file, httpd.conf. You can add one or two Directory directives to the httpd.conf file to
control user access to the System Reporter database as described above. Refer to the contents of
the httpd.conf file as well as your Apache documentation for more information regarding the
directives contained in this file and how to add Directory directives.
When adding Directory directives to the httpd.conf file, a username and password pair
applied to the cgi-bin/3par-rpts directory will control reading of the database and the
display of policy settings. A username and password pair applied to the cgi-bin/3par-policy
directory will control modifications to the policy settings.
Within the Directory directive, the AuthName property corresponds to a field that appears in
the connection dialog box that the user sees when trying to access restricted functionality (see and
for examples). Depending on how you configure the Apache httpd.conf file, the user will see
this dialog box when attempting to read the database (or database sampling policies) or when
attempting to edit the sampling policies via Web browser. Note that the appearance of this dialog
box may vary depending on which version of Windows you are using.
The following example provides two sample Directory directives that can be placed in the
Apache httpd.conf file for the purpose of user access control. This example allows for the
About Apache HTTP Server Authorization and Access Control 49
Page 50

distinction between users with database and sampling policy read access and those with database
sampling policy edit privileges. Note that, when adding Directory directives to the httpd.conf
file, you must also create a password file {password_file}, as described in your Apache
documentation.
<Directory "cgi-bin/3par-rpts">
AuthType Basic
AuthName "3PAR System Reporter Database Query"
AuthUserFile {password_file}
Require user {username_read}
</Directory>
<Directory "cgi-bin/3par-policy">
AuthType Basic
AuthName "3PAR System Reporter Policy Update"
AuthUserFile {password_file}
Require user {username_edit}
</Directory>
In the above example:
• {password_file} is a password file that you must create (see the Apache documentation
for instructions). Both directives can use the same password file.
• {username_read} is the username for a user that is allowed read access to the System
Reporter database and database sampling policies
• {username_edit} is the username for a user that is allowed to edit database sampling
policies.
Removing the System Reporter Components
This section describes how to remove the HP 3PAR System Reporter Components. This includes
removing the System Reporter sampler and default database, as well as deleting the optional
MySQL database (when applicable).
Removing the System Reporter Tools on Windows
To remove the System Reporter tools on WIndows:
1. Go to the Windows Control Panel, open Administrative Tools and then Services.
2. In the Services window, right-click 3PAR System Reporter sampler and then click Stop. Close
the Services window.
3. From a command prompt, change to the directory where you installed the HP 3PAR System
Reporter tools:
# cd \program files\3par\system reporter
4. Execute the following command:
# winserv uninstall "3PAR System Reporter sampler”
5. Exit and close the command prompt window.
# exit
50 Installation, Configuration, Update, and Removal
Page 51

6. Using Windows Explorer, go to the location where you installed the HP 3PAR System Reporter
tools (for example, C:\Program Files\3par\System Reporter) and delete the entire
directory.
7. Locate and remove the inservstats.db file if the file was in a location other than the
System Reporter folder. Also remove the file inservstats.db-journal if present in the
same folder.
8. (Optional) In the location where you installed Apache HTTP Server, locate the htdocs directory
(for example, C:\Program Files\Apache Group\Apache2\htdocs) and delete the
3par subdirectory (C:\Program Files\Apache Group\Apache2\htdocs\3par).
9. (Optional) Go to the location where you installed Apache HTTP Server and locate the cgi-bin
directory (for example, C:\Program Files\Apache Group\Apache2\cgi-bin), then
delete the subdirectories 3par-policy and 3par-rpts.
Removing the System Reporter Tools on Linux
1. Stop the sampleloop daemon by running:
/etc/init.d/sampleloop stop
2. Remove the sampleloop and sysrptwebsrv packages by running:
rpm --erase sampleloop
rpm --erase sysrptwebsrv
Although these commands remove the files associated with the packages, user-modified
configuration files are saved with a .rpmsave suffix appended to their names. If you do not
plan to re-install these packages later with similar configuration settings you may delete these
configuration files.
3. If you used SQLite as the database, locate and remove the inservstats.db file, typically
in the /var/inservstats directory. Also remove the file inservstats.db-journal if
present in the same directory.
Removing the MySQL Database (Optional)
If you are using a MySQL database and you want to completely remove all HP 3PAR System
Reporter components, you should also remove the inservstats database using the MySQL
Administrator, as described in this section.
1. Log in to MySQL as root. You may need to do this on the machine on which MySQL is installed
since root login is typically restricted to local logins only.
mysql -uroot -p
2. Run the following command at the mysql prompt to delete (drop) the database (named
inservstats by default):
drop database inservstats;
CAUTION: Deleting the database schema will remove the inservstats database and cannot
be undone.
3. Delete the users created by running the following commands:
drop user cliuser;
drop user webuser;
4. Exit the MySQL command line.
exit;
Removing the System Reporter Components 51
Page 52

4 Getting Started
This chapter describes how to start using HP 3PAR System Reporter from the primary web interface
or Excel client.
NOTE: For information on using a Web browser to edit database sampling policies, add or
remove storage servers from the database, schedule reports or optimize storage utilization with
the optional Adaptive Optimization feature, see “Configuring the System Reporter Policy Settings”
(page 112).
Accessing the Main System Reporter Interface
You can access the HP 3PAR System Reporter main features using any standard Web browser. A
Web browser is not provided on the 3PAR System Reporter CD.
To access HP 3PAR System Reporter using a Web browser, point your browser at http://
<host_name>/3par/ where <host_name> is the Web server where Apache HTTP Server and
the HP 3PAR System Reporter Web server scripts are installed (see “Before You Begin” (page 25)).
NOTE: If your Apache Server is configured for secure connections, be sure to precede the address
with https:// (instead of http://) when accessing System Reporter. For complete details on
configuring the Apache Server, please consult “About Apache HTTP Server Authorization and
Access Control” (page 49).
If the Apache HTTP Server has been configured to require a password to read the database, a
connection dialog box appears (Figure 13 (page 52)). Type the user name and password and
click OK.
Figure 13 Connection Dialog Box
NOTE: See for more instructions on setting Apache HTTP Server to require a username and
password.
System Reporter Main Menu Window
The various System Reporter menu options are accessed through the Main Menu Window.
52 Getting Started
Page 53

Figure 14 The System Reporter Main Window
The HP 3PAR System Reporter Main Menu (Figure 14 (page 53)) is divided into the following
areas:
• Title Pane which shows the version of System Reporter.
• Main Menu tabs which provide options for generating quick reports, accessing scheduled
reports and creating customized reports. (See for details).
• Extras Menu area has links to:
Excel Client used to create and access custom reports.◦
◦ Policy Settings (see“Configuring the System Reporter Policy Settings” (page 112) for
complete details on configuring policy settings). The following tabs are provided from
the policy settings window:
– Add Systems -- used to specify the HP 3PAR Storage Systems for reporting purposes.
– Alert Rules -- used to specify the alert rules.
– Schedule Report -- used to schedule reports at specified times.
– Adaptive Optimization -- used to configure optimization for storage utilization.
System Reporter Main Menu Window 53
Page 54

◦ User Guide (this document in PDF format).
◦ Sampling Status (the time since the most recent high-resolution sample for each system
Getting Help
While accessing HP 3PAR System Reporter using a Web browser, you can open the HP 3PAR
System Reporter Software User’s Guide and access online help from your browser as follows:
1. From the Extras Menu, click User Guide. The HP 3PAR System Reporter Software User’s Guide
opens in a separate browser window.
2. Click the underlined labels for various menu items to access the appropriate section of the
User Guide that provides help.
being sampled).
NOTE: Instead of opening a new window, browsers can be configured to open a new
tab instead.
For Firefox, open the options window (Tools→Options), click on the Tabs tab, and select
the option that opens new pages in a new tab.
For Internet Explorer, open the Internet Options window (Tools→Internet Options), click
on the General tab and the Settings button for Tabs. This opens the Tabbed Browsing
Settings window. Ensure that the Enable Tabbed Browsing checkbox is checked, and
select the Always open popups in a new tab option.
NOTE: Adobe Acrobat® is required to view the HP 3PAR System Reporter Software User’s
Guide. See www.adobe.com/support/downloads for download instructions.
Using the Object Selection Controls
Menus in System Reporter often provide a way to select a subset of objects to include in a report
from among a list of available objects. System Reporter provides two types of selection lists to
implement this, a simple selection list and a filtered multi-selection control as described in the
following sections.
Simple Selection List
When the number of available objects is fixed or expected to be small, System Reporter uses a
standard selection list in which multiple items can be selected (using CTRL+CLICK). An example is
the selection list to select from the available disk speeds (see “Select Disk Speed” (page 86)). Since
the number of distinct disk speeds available is small, a simple selection list is adequate.
Filtered Multi-Selection Control
When the number of available objects is large (for example there may be thousands of VVs in a
VV selection list), it is difficult to scroll through a simple selection list to find a desired object or to
select specific objects in this list using CTRL+CLICK. To make it easier to find specific objects and
select them, System Reporter provides a filtered multi-selection control. Two examples of this, for
selecting systems and for selecting domains, are shown in Figure 26 (page 70).
A filtered multi-selection control consists of two lists: one showing the available objects and one
showing the currently selected objects. Objects can be moved between lists by either double-clicking
on the object or by selecting objects and clicking on the appropriate arrow button in the control.
If no specific object is selected, then all objects are considered selected.
54 Getting Started
Page 55

The list of available objects can be filtered by typing an expression pattern in the text input area
above the list of available objects and clicking on the Filter button.
CAUTION: Filtering large numbers of objects may exceed the limit for your server, in which case
you should reduce the number of objects being filtered and try again.
NOTE: When using an expression pattern, you should be aware that the Web interface uses a
Regular Expression syntax for filtering whereas the Excel client uses a LIKE operator syntax. For
example, to search for an object with “DB” anywhere in the name, the filter text would use DB for
the web interface and *DB* for the Excel client. As another example, to search for an object starting
with “DB” and ending with “12”, the filter text would be ^DB.*12 for the Web interface and DB*12
for the Excel client. For more complex search patterns, please refer to the Regular Expression syntax
for the Web and the LIKE Operator help in Excel.
Accessing the Optional Excel Client
The HP 3PAR System Reporter Excel client is supported on Microsoft® Windows® systems for
creating and accessing custom reports. Microsoft® Excel® 2003 or 2007 is required but is not
provided as part of HP 3PAR System Reporter.
NOTE: In order to use the HP 3PAR System Reporter Excel client, you must first install and configure
the Excel client as described in “Installing the Excel Client (Optional)” (page 48).
Starting the System Reporter Excel Client
To start the HP 3PAR System Reporter Excel client, use your file manager to locate the Excel
worksheet that was saved locally during the installation and access your local version.
NOTE: If you have not yet saved a version of the Excel worksheet locally, see for instructions on
saving the 3PAR System Reporter.xls
nl
file on your local machine.
The HP 3PAR System Reporter Excel client opens in Microsoft® Excel® (“System Reporter Excel
Client” (page 56)).
Accessing the Optional Excel Client 55
Page 56

Figure 15 System Reporter Excel Client
Setting the Security Level for Excel
The HP 3PAR System Reporter Excel client uses macro code to implement its functionality. In order
for this code to be executed, you must set the proper security settings depending on the version of
Excel that you are using.
Setting the Security for Excel 2003
In most cases, when accessing the System Reporter client for Excel 2003, a Security Warning
screen appears indicating that macros have been disabled (Figure 16 (page 56)).
Figure 16 Security Warning for Enabling Macros in Excel 2003
1. Click Enable Macros to continue launching the Excel client.
If you do not see the Security Warning, try completing steps 2 thru 7 to set the macro security
level for Microsoft® Excel® 2003, before continuing.
2. On the Microsoft® Excel® Tools menu, point to Macro, then Security.
The Security dialog box appears with the Security Level tab enabled (Figure 17 (page 57)).
56 Getting Started
Page 57

Figure 17 Setting the Security Level
3. On the Security Level tab, set the security level to Medium or Low (Medium is the default and
suggested setting) and then click OK.
NOTE: The HP 3PAR System Reporter Excel client will not work if the Microsoft® Excel®
security level is set to High or Very High.
4. If you changed the security level setting, close the Excel workbook and then reopen it.
With a security setting of Medium, Excel will prompt you when the workbook is opened to
specify whether or not macros should be enabled.
5. You need to select Enable Macros for the workbook to function.
NOTE: Please consult your company’s security policy before changing any security settings.
Setting the Security Level for Excel 2007
In most cases, when accessing the System Reporter client for Excel 2007, a security warning,
indicating that macros have been disabled, is shown in the upper left part of the screen. If you do
not see the Security Warning, try completing steps 4 thru 9 before continuing.
To enable macros for the current session, follow these steps:
Accessing the Optional Excel Client 57
Page 58

1. Click the Options button next to the security alert.
The Security Alert - Macro screen appears (Figure 18 (page 58)).
Figure 18 Macro Security Alert for Excel 2007
2. Choose the Enable this content radio button.
3. Click OK.
If you do not see a Security Warning when accessing the Excel client, it is likely that the main
Excel Macro Settings are not set up properly and need to be changed. In this case, follow
these steps:
4. Click the Windows icon in the left corner of the screen.
5. Click Excel Options at the bottom of the menu.
6. Click Trust Center.
7. Click Trust Center Settings.
The Trust Center screen appears (“Trust Center Screen” (page 59))
58 Getting Started
Page 59

Figure 19 Trust Center Screen
8. If it is not already set, from the list of Macro Settings, choose Disable all macros with
notification.
NOTE: The HP 3PAR System Reporter Excel client will not work if the Macro Setting is set
to Disable all macros without notification or Disable all macros except digitally signed macros.
9. Click OK, then click OK again to return to the System Reporter Excel client main screen.
10. Close the Excel client, then launch it again from the System Reporter main menu.
11. Continue with step 1 thru 3.
NOTE: When launching the Excel 2007 client after making and saving changes, you may
see a connection warning message. See Saving and Exiting the Excel Client for more details.
NOTE: Please consult your company’s security policy before changing any security settings.
Connecting to the Web Server from the Excel Client
After opening the HP 3PAR System Reporter Excel client workbook with the correct security level
setting, you must initialize or refresh the systems and domains.
NOTE: You must connect to a Web server each time you open the Excel client workbook. The
workbook does not store the server information.
To connect to a Web server from the Excel client workbook:
Accessing the Optional Excel Client 59
Page 60

1. After opening the HP 3PAR System Reporter Excel client workbook with the correct security
level setting, click Initialize.
The Connection Parameters dialog box appears (Figure 20 (page 60)).
Figure 20 Connection Parameters Dialog Box
2. In the Server Hostname box, type a host name and click OK.
The host name is the name of the Web server where the Apache HTTP Server and HP 3PAR
System Reporter Web server scripts are installed (see “Before You Begin” (page 25)). If the
server is configured for secure connections, check the HTTPS box.
NOTE: You can point the Excel client to a different Web server at any time. See Changing
the Web Server for instructions on changing the Web server.
If the Web server has been configured to require a password to read the database, a
connection dialog box appears (Figure 21 (page 60)).
Figure 21 Connection Dialog Box
3. Type your user name and password and click OK.
NOTE: See for more instructions on setting Apache HTTP Server to require a username and
password.
The versions of the System Reporter’s Web server component and the Excel client are compared.
If the data format provided by the server is incompatible with the Excel client, you must choose
a compatible server before the Excel client can be used.
NOTE: If your server version is newer, but still compatible, a dialog appears stating that
some features of the data provided by the server cannot be displayed by the Excel client.
60 Getting Started
Page 61

Changing the Excel Client Server and Resetting the Workbook
The HP 3PAR System Reporter Excel client workbook includes a custom 3PAR menu that is accessible
from the Microsoft® Excel® menu tab called Add-Ins. This menu tab enables you to change the
Web server, reset the workbook, and delete menu sheets.
Changing the Web Server
To change the Web server used for querying the System Reporter database:
1. Click the Add-Insmenu tab, choose the 3PAR pull down menu, and then select Set server
name....
The Connection Parameters dialog box appears.
2. In the Server Hostname box, type the new server name.
3. Click OK.
Resetting the Workbook
To reset the HP 3PAR System Reporter Excel client workbook click the Add-Ins menu tab, choose
the 3PAR pull down menu and then select the Reset all option.
All reporting tool sheet controls are reset.
Accessing the Excel Client Query Log
The HP 3PAR System Reporter Excel client workbook uses various Web queries to initialize user
interface controls and draw charts. The most recent queries are recorded on a worksheet called
the Query Log. By default, the Query Log is hidden. However, you can make this sheet visible as
follows:
To make the Query Log visible:
1. Click on the tab associated with the report for which you want to examine the query log.
2. Right click on the tab.
3. Choose the unhide option. The unhide dialog box appears.
4. Choose the query log.
A new Query Log tab appears at the bottom of the Microsoft® Excel® window.
In the query log, there is a row for each query with the time and URL. Click on a URL to bring
up a Web browser and display the results of the query in table form.
When the number of entries in the query log reaches 150, the older 50 are automatically deleted,
leaving the most recent 100 entries.
You can hide, unhide, or delete the Query Log sheet as desired. If deleted, a new hidden sheet is
created for the next query. See to learn how to delete the query log and other sheets.
Deleting Excel Sheets
When using the HP 3PAR System Reporter Excel client, you can reset the entire workbook to its
original state by following the instructions in “Resetting the Workbook” (page 61), or you can
delete unwanted sheets individually as described in this section.
Deleting Menu Sheets
When creating reports with the Excel client, the menu sheets can begin to clutter up the work space
after a while and you may want to delete menus that are no longer needed.
To delete menu sheets, click the Add-Ins menu tab, choose the 3PAR pull down menu and then
select the Delete menu sheets option.
Changing the Excel Client Server and Resetting the Workbook 61
Page 62

Deleting Data Sheets
Data sheets remain until you manually delete them. Manually deleting a data sheet causes any
embedded charts associated with that data sheet to disappear as well.
To delete a data sheet:
1. At the bottom of the Microsoft® Excel® window, click a data sheet tab to enable the sheet to
be deleted.
2. Point to the name of the data sheet tab and then right-click.
3. On the shortcut menu that appears, click Delete.
4. In the confirmation dialog that appears, click OK.
The data sheet is deleted. Any embedded charts associated with that data sheet disappear
as well.
Deleting the Query Log
You can also delete the query log, which is by default a hidden sheet, by making it visible and
then using the method described above to delete it.
To delete the query log:
1. Make the Query Log tab visible by following the instructions in “Accessing the Excel Client
Query Log” (page 61).
2. At the bottom of the Microsoft® Excel® window, point to the Query Log tab and then right-click.
3. On the shortcut menu that appears, click Delete.
4. In the confirmation dialog that appears, click OK.
The query log is deleted. The next time that you initiate a new query using the Excel workbook,
a new hidden query log sheet is created.
Saving and Exiting the Excel Client
To exit the HP 3PAR System Reporter Excel client workbook, on the File menu, click Close.
Upon exiting, Microsoft Excel will prompt you to save changes. If you have added customized
charts and/or data sheets, as described in “Working with Excel Charts” (page 97), you may want
to save your changes when prompted. However, it is not necessary to save changes and in most
cases it is not desirable to do so. Saving the Excel workbook does not save the Web server
information and saved workbooks do not automatically update embedded charts or data sheets
when they are reopened.
When opening a previously saved Excel worksheet, you may receive a security alert indicating
that macros and data connection have been disabled (Figure 22 (page 63)).
62 Getting Started
Page 63

Figure 22 Security Alerts Multiple Issues
To enable macros and the data connection, choose the Enable this content buttons.
NOTE: If it is ever necessary, you can obtain an entirely new copy of the HP 3PAR System
Reporter Excel client workbook by following the instructions provided in “Installing the Excel Client
(Optional)” (page 48).
Deleting Excel Sheets 63
Page 64

5 Accessing and Creating Reports
This chapter describes how to access quick reports, scheduled reports, and build custom reports
that are specifically tailored for your operating environment. The menu selections and controls
available for creating custom reports from either the web interface or the Excel client are functionally
identical, so the information in this chapter applies to both with explanations provided for any
minor variations.
NOTE: For information on using a Web browser to edit database sampling policies, adding or
removing storage servers from the database, scheduling reports or optimizing storage utilization
with the optional Adaptive Optimization feature, see “Configuring the System Reporter Policy
Settings” (page 112).
Accessing Quick Reports
Quick reports provide predefined reports that you can generate quickly by choosing the Quick
Report tab from the System Reporter Main Menu Window and then selecting one of the customized
reports from the list of directories as shown in Figure 23 (page 65). Reports are provided for all
the systems that are currently configured for System Reporter (available by expanding the All
Systems branch) and from individual systems (available by expanding a particular system’s branch)
and encompass sampling over a given period of time.
64 Accessing and Creating Reports
Page 65

Figure 23 Quick Reports Window
Accessing Scheduled Reports
Scheduled reports are generated using pre-selected parameters at scheduled times and are stored
in sub-directories whose structure is reflected in the tree shown in Figure 24 (page 66). Scheduled
reports are stored with a name that is assigned when the report is scheduled. Each time the report
runs, a new subdirectory is created for that instance of the report using the timestamp as the name.
You can either view the reports via the Scheduled Reports tab or you can copy the report
subdirectories to another area where they can be accessed by authorized users according to
whatever permissions are deemed appropriate.
Accessing Scheduled Reports 65
Page 66

Figure 24 Scheduled Reports Window
NOTE: See“Scheduling Reports” (page 122) for complete details on scheduling a report.
Creating Custom Reports
You can create customized reports by selecting the Custom Reports tab from the Main Menu or by
choosing the Excel Client from the Extras Menu.
NOTE: The web interface and Excel client for creating custom reports are identical except that
the Excel client charting functions are accessed separately from the main interface and provide
some additional flexibility.
In general, there are two main steps involved in creating a report:
1. Choose a report, select the sample resolution, select the system(s) and/or domain(s) and click
on the Build Report Menu button. This will build the report menu for that report in a new
window (or tab).
2. Set the appropriate controls in the report menu and click on the Generate Report button. The
report will be generated in a new window (or tab).
A detailed description of the various menu choices are described in the following sections.
66 Accessing and Creating Reports
Page 67

Building the Report Menu
The first step in creating a report is to choose the appropriate options for the type of report that
you want to generate.
Figure 25 Custom Reports Window
NOTE: The layout and placement of controls may vary slightly for the Excel client but operate in
the same manner as described for the web interface.
Sample Resolution
The Sample resolution control enables you to select from one of three resolutions corresponding
to the tables that are maintained in the database (see Table 6 (page 68)). The samples can be
retained for a different lengths of time for each resolution (see for instructions on altering the default
sampling policies).
Since a different set of objects may be present in data tables for different resolutions, the generated
report menu is populated with the objects present in the tables for the selected resolution.
Creating Custom Reports 67
Page 68

Table 6 Sample Resolution
PurposeOption
Report
Daily
Hourly
High-Res
Choose the Daily data table, which covers the largest time range, but has the coarsest
resolution with only one sample per day.
Choose the Hourly data table, which covers a shorter time range than the daily data table,
but has one sample per hour.
Choose the High-Resolution data table, which spans an even smaller time range, but has
the finest granularity.
Use the Report menu to choose from the following reports (Table 7 (page 68)):
Table 7 Reports and Uses
PurposeReports
Summary
PD Space
CPG Space
LD Space
Display summary information. See “Working with Excel Charts” (page 97) for the types of statistics
provided by this report.
Display physical disk space usage. See “PD Space Reports” (page 106) for the types of statistics
provided by this report.
Display Common Provisioned Group (CPG) disk space usage. See “CPG Space Reports” (page 106)
for the types of statistics provided by this report.
Display logical disk space usage. See“LD Space Reports” (page 107) for the types of statistics
provided by this report.
VV Space
Port Performance
VLUN Performance
LD Performance
PD Performance
VV Cache
Performance
Node Cache
Performance
CPU Performance
Link Performance
Adaptive
Optimization
Display virtual volume space usage. See “VV Space Reports” (page 107) for the types of statistics
provided by this report.
Display port performance. See “Common Performance Metrics” (page 108) for the types of statistics
provided by this report.
Display VLUN (volume-LUN) performance. See “Common Performance Metrics” (page 108) for
the types of statistics provided by this report.
Display logical disk performance. See “Common Performance Metrics” (page 108) for the types
of statistics provided by this report.
Display physical disk performance. See “Common Performance Metrics” (page 108) for the types
of statistics provided by this report.
Display VV (virtual volume) cache performance. See “VV Cache Performance Reports” (page 109)
for the types of statistics provided by this report.
Display Node Cache Performance. See “Node Cache Performance Reports” (page 109) for the
types of statistics provided by this report.
Display CPU performance. See “CPU Performance Reports” (page 110) for the types of statistics
provided by this report.
Display performance of links between nodes. See “Link Performance Reports” (page 110) for the
types of statistics provided by this report.
Display Adaptive Optimization reports. See “Adaptive Optimization Reports” (page 111) for the
types of statistics provided by this report.
Select Systems
This is a filtered multi-selection control (see “Filtered Multi-Selection Control” (page 54)) used to
select one or more systems to include in the report.
68 Accessing and Creating Reports
Page 69

Table 8 Select System
PurposeOption
The report will include all the systems that are included in the database.-All Systems-
list of specific system names
NOTE: When selecting systems for System Reporter where there are multiple HP 3PAR Storage
Systems available for reporting, consider limiting the number of systems that you select to avoid
having to wait for longer report generations.
NOTE: When generating an Adaptive Optimization report, only one system can be selected at
a time. See “Using Adaptive Optimization” (page 178) for details.
Select Domains
This is a filtered multi-selection control (see “Filtered Multi-Selection Control” (page 54)) used to
select one or more domains to be included in the report. This control is available for LD Space,
VV Space, LD Performance, VLUN Performance and VV Cache Performance reports.
Table 9 Select Domains
list of specific domain names
Generating the Report
Select one or more systems to include in the report. Multiple systems can be
selected.
PurposeOption
The report will include all the domains that are included in the database.-All Domains-
Select one or more domains to include in the report. Multiple domains can
be selected.
When you click on the Build Report Menu button in the Custom Reports window, a new window
(or tab) is created containing a report menu for the selected report. An example of this report menu
is shown in Figure 26 (page 70). This is the report menu for Daily VLUN Performance.
Creating Custom Reports 69
Page 70

Figure 26 Report Menu for Daily VLUN Performance
The top of the report menu includes a section that lists the current selection of systems of domains.
In this example, the menu includes only system named unicorn and all domains.
For most reports, the controls in the report menu are divided into four sections:
• 1. Report Selection: controls the type of report that will be generated, see “Report Selection”
(page 76).
• 2. Time Selection: controls the time or range of time for which the report is generated, see
“Time Selection” (page 84).
• 3. Object Selection: controls the specific objects to be included in the report, see “Object
Selection” (page 85).
• 4. Format Selection (web client only): controls the format of the report, see “Format Selection
(Web interface only)” (page 91).
NOTE: The Summary report does not include the Object selection, but provides options for
selecting columns instead; see “Select Summary Columns” (page 81)
NOTE: The Excel client does not include a Format Selection but instead allows you to choose
and modify the charts and graphs after the report is generated. See Working with Excel Charts
for details.
NOTE: Adaptive Optimization reports have different options for the report selection and do
not include the object selection section. For details on Adaptive Optimization reports, see
“Using Adaptive Optimization” (page 178).
70 Accessing and Creating Reports
Page 71

Use the controls in the menu to select the desired report parameters and then click Generate Report.
See for a listing of the controls that are available for each report and then consult the relevant
sections later in this chapter for complete details.
CAUTION: Filtering large numbers of objects may exceed the limit for your server, in which case
you should reduce the number of objects being filtered and try again.
Once the report is generated, query results appear in one or more charts and/or tables in a new
window (or tab) of the browser (Figure 27 (page 72)). The top of the report includes a section that
describes the various selection parameters used to generate the report.
NOTE: Internet Explorer has a URL length limit of 2048 characters. The Firefox (Browser) has a
65,536 character limit. Apache produces a "413 Entity Too Large" error after 4000 characters.
To avoid this type of error, break the query into a smaller size (especially for PD/LD reports).
NOTE: All the data that is shown in the results pane can be downloaded as a CSV format
document (has a .csv extension) by clicking on a document icon that appears next to the main
heading. If your browser is configured to open .csv files in a spreadsheet program such as
Microsoft Excel this is a very convenient way of importing data into a spreadsheet.
Creating Custom Reports 71
Page 72

Figure 27 Query Results
If necessary, use the scrollbox on the right to view all charts and/or tables.
Controls Available by Report
Table 10 (page 73) lists the set of controls that are valid for generating each report. The entries
have the following meanings:
• A blank entry indicates that the control is not valid for report.
• A Y entry indicates that the control is valid for all report types.
• A T entry indicates that the control is valid for the report but only for Versus Time report types.
• An H entry indicates that the control is valid for the report but only for Histogram At Time
report types.
• An h entry indicates that the control is valid for the report but only for Histogram Versus Time
report types.
• An A entry indicates that the control is valid for the report but only for At Time report types.
72 Accessing and Creating Reports
Page 73

Table 10 Controls for Each Report
Section and
Control
Main Menu
Resolution”
(page 67)
Systems”
(page 68)
Domains”
(page 69)
Report
Selection
Report
Types”
(page 76)
(page 81)
Number”
(page 82)
VLUN
LD
CPG
PD
SummaryReport:
Space
Space
Space
VV
Space
Perf
Perf
Port
PD
LD
Perf
Perf
TTTT“Max.
VV
Cache
Perf
Cache
Perf
Perf
CPU
Node
Link
Perf
TTTTTT“Compare”
Adaptive
Optimization
YYYYYYYYYYYYYY“Sample
YYYYYYYYYYYYYY“Select
YYYYYYY“Select
YYYYYYYYYYYYY“Standard
Peak”
(page 82)
By”
(page 82)
(page 83)
Bucket”
(page 84)
Bucket”
(page 84)
Buckets”
(page 84)
Time
Selection
After
(mins)”
(page 84)
YYYYYYYYY“Select
AAAAAAAAAAAA“Group
AAAAAAAAAAAA“Order By”
hhhh“Low
hhhh“High
hhhh“Sum End
YYYYYYYYYYYYYY“Reload
Time”
(page 84)
YYYYYYYYYYYYYY“Begin/At
Creating Custom Reports 73
Page 74

Table 10 Controls for Each Report (continued)
Section and
Control
(page 85)
(page 85)
Object
Selection
PDIDs”
(page 85)
Chunklets”
(page 85)
Cage IDs”
(page 86)
Disk Types”
(page 86)
Disk
Speed”
(page 86)
VLUN
LD
CPG
PD
SummaryReport:
Space
Space
Space
YY“Include
YY“Select
VV
Space
Perf
YYY“Select
Perf
YYYY“Select
YYY“Select
Port
PD
LD
Perf
Perf
HHHH“Count”
VV
Cache
Perf
Cache
Perf
Perf
CPU
Node
Link
Perf
Adaptive
Optimization
TTTYTTTTTTTTT“End Time”
PDs in
States”
(page 86)
CPGs”
(page 87)
CPGs”
(page 87)
CPGs”
(page 87)
LDs”
(page 88)
RAID
Types”
(page 88)
Usage”
(page 88)
YY“Include
Y“Select Usr
Y“Select Snp
YYY“Select
YY“Select
YY“Select
Y“Select LD
LUN”
(page 88)
74 Accessing and Creating Reports
Y“Select
Page 75

Table 10 Controls for Each Report (continued)
Section and
Control
VVs”
(page 89)
Prov
Types”
(page 89)
Types”
(page 89)
Hosts”
(page 91)
Types”
(page 90)
Types”
(page 90)
Rates”
(page 90)
VLUN
LD
CPG
PD
SummaryReport:
Space
Space
Space
VV
Space
Y“Select
Y“Select VV
Perf
Perf
Y“Select
Y“Select Port
Y“Select Port
Port
PD
LD
Perf
Perf
YYY“Select Port
VV
Cache
Perf
YYY“Select
Cache
Perf
Perf
CPU
Node
Link
Perf
Adaptive
Optimization
“Select
Ports
(n:s:p)”
(page 90)
Hosts”
(page 91)
Nodes”
(page 91)
Nodes”
(page 91)
Queues”
(page 91)
Format
Selection
Information”
(page 92)
Types”
(page 92)
YY“Select
YYY“Select
Y“Select To
Y“Select
YYYYYYYYYYYYY“Report
YYYYYYYYYYYYY“Chart
Pixels”
(page 96)
YYYYYYYYYYYYY“Chart X
Creating Custom Reports 75
Page 76

Table 10 Controls for Each Report (continued)
Adaptive
Optimization
YYYYYYYYYYYYY“Chart Y
YYYYYYYYYYYYY“Legend
Section and
Control
Pixels”
(page 96)
Labels”
(page 96)
Position”
(page 96)
Format”
(page 96)
Space
Unit”
(page 97)
VLUN
LD
CPG
PD
SummaryReport:
Space
Space
Space
VV
Space
YYYY“Select
Perf
Perf
Port
PD
LD
Perf
Perf
VV
Cache
Perf
Cache
Perf
Perf
CPU
Node
Link
Perf
TTTTTTTTTTTT“Time
TTTTTTTTTTTT“Time
Detailed descriptions for each of the controls described in this table are provided in the following
sections.
Report Selection
For each report except for the Summary Report, you can use the Report Type pull-down list to
choose a report type. There are two selections of report types: standard report types and adaptive
optimization report types that only apply to the Adaptive Optimization feature that is available
through an optional license with System Reporter.
Standard Report Types
The following standard report types are available (Table 11 (page 76)):
Table 11 Standard Report Types
Versus Time
At Time
PurposeReport Type
Display metrics versus time. The beginning of the time range is specified by the Begin/At
Time control (see “Begin/At Time” (page 84)) and the end of the time range is specified
by the End Time control (see “End Time” (page 85)).
Unless the Compare control is available and set to something other than none, the
Versus Time report shows aggregate metrics for all the selected objects over a range
of time. See Figure 28 for an example.
If the Compare control (see section “Compare” (page 81)) is set to a specific object,
then the Versus Time report plots the metrics separately for each of up to 16 of the
objects so that they can be compared. Figure 29 shows an example where the
performance of systems is being compared.
Display metrics at the time specified by the Begin/At Time control (see “Begin/At Time”
(page 84)). For this type of report, the Group By (see section “Group By” (page 82))
and Order By (see section “Order By” (page 83)) controls are enabled and can be
used to compare different groupings of object type. “Group By System:Host At Time
Report Example” (page 79) shows an example of an example with System and Host
selected in the Group By control and IOPs/s selected in the Order By control.
Histogram Versus Time
76 Accessing and Creating Reports
Display service time histogram versus time, with a separate data series for each service
time bucket between the Low Bucket (see “Low Bucket” (page 84)) and the High Bucket
(see “High Bucket” (page 84)).
Page 77

Table 11 Standard Report Types (continued)
PurposeReport Type
The beginning of the time range is specified by the Begin/At Time control (see
“Begin/At Time” (page 84)) and the end of the time range is specified by theEnd Time
control (see “End Time” (page 85)). See “Histogram Versus Time Report Example”
(page 80).
Histogram At Time
Display histogram of metrics at the time specified by the Begin/At Time control (see
“Begin/At Time” (page 84)). This control is only available for PD, LD, Port and VLUN
performance reports. See “Histogram At Time Report Example” (page 81).
For each report type, controls in the report menu that do not apply to that report type are disabled.
NOTE: See for complete details on Adaptive Optimization reports.
Figure 28 Versus Time Report Example
In the aggregate performance of all the selected objects (possibly in multiple systems) is shown.
Typically, some components of the metric may be shown separately, for example Read and Write
metrics are shown separately.
Creating Custom Reports 77
Page 78

Figure 29 Versus Time with Compare=System Report Example
If you want to compare the performance of a particular class of objects (for example, systems),
then you can use the Compare control (see section “Compare” (page 81)) available in some reports
if the Report Type is Versus Time. Figure 29 shows an example where systems are being compared.
In this kind of report, for each metric there is a single line per object being compared so it is not
possible to break down components (for example Reads and Writes) of the metric.
78 Accessing and Creating Reports
Page 79

Figure 30 Group By System:Host At Time Report Example
The At Time report can be used in conjunction with the Group By and Order By controls to do more
detailed comparisons at a specific point in time. Figure 30 shows an At Time report with System
and Host selected in the Group By control and IOPs/s selected in the Order By control. This allows
us to easily compare the performance of hosts on different systems.
Creating Custom Reports 79
Page 80

Figure 31 Histogram Versus Time Report Example
The Histogram Versus Time report provides a histogram or service times for the aggregate of the
selected objects as shown in Figure 31 “Histogram Versus Time Report Example” (page 80). There
is a separate line per service time bucket.
80 Accessing and Creating Reports
Page 81

Figure 32 Histogram At Time Report Example
The Histogram At Time report provides a histogram or service times and IO sizes at a specific time
for the aggregate of the selected objects as shown in Figure 32 “Histogram At Time Report Example”
(page 81).
Select Summary Columns
This control is valid only for the Summary report and selects which columns are displayed in the
Summary report.
Compare
This control is only valid for some Versus Time performance reports and the options available
depend on the report. If the none option is selected, the aggregate performance metrics of the
selected systems and objects are presented versus time. However, instead of the aggregate -- if
you want to compare systems or objects -- select the appropriate Compare option. For example,
if the System option is selected, the performance metrics for each selected system are plotted
separately. An example of this is shown in Figure 29 “Versus Time with Compare=System Report
Example ” (page 78).
The number of objects that can be compared in a report is limited to 16 (the number of distinct
colors available for charts). With some reports, if there are more than 16 objects present then the
Creating Custom Reports 81
Page 82

Select Peak control (see section “Max. Number” (page 82)) can be used to select 16 objects to
compare.
Max. Number
Specifies the maximum number of graphs that will be generated for a given report. This option is
only valid when a compare is requested and when set to none, this option is ignored.
Select Peak
For some reports, when the number of objects to be compared (see section “Compare” (page 81))
exceeds 16, the Select Peak control can be used to select which 16 objects to compare. The Select
Peak control is used to select a metric (for example, total_iops) and the 16 objects that have the
highest peak in the selected metric in the selected time range are chosen.
Group By
This control is only valid for At Time reports and specifies the X (category) axis for the reports. The
menu options available depend on the report selected and are listed with each report. One or
more Group By options can be selected (use CTRL+CLICK to select multiple options) and the default
if none are selected is System. There is an X axis value for (and/or a table row for) each unique
combination of selected objects that exists in the data table. For example, if System and Host in
the Group By options are selected for the VLUN performance report, a table row and chart X axis
value exists in the report for each System:Host combination that exists in the VLUN data table as
shown in Figure 30 “Group By System:Host At Time Report Example” (page 79). See for a listing
of all available options.
Table 12 Group By
RAID Type
LDUsage
PurposeOption
Group by HP 3PAR Storage System.System
Group by domain name.Domain
Group by RAID Type. See “Select RAID Types” (page 88) for the list of RAID types and
descriptions.
Group by Controller Node.Node
Group by Cage ID.CageID
Group by magazine.Mag
Group by ID of the Physical Disk.PDID
Group by VV provisioning type.ProvType
Group by disk position in magazine.Disk
Group by Disk Type.DiskType
Group by Disk Speed.DiskSpeed
Group by LD name.LD
Group by LD Usage. See “Select LD Usage” (page 88) for the list of LD usages and
descriptions.
82 Accessing and Creating Reports
Group by VV name.VV
Group by VV type.VVType
Group by the CPG that the LD belongs to.CPG
Group by the Usr CPG to which the VV belongs.UsrCPG
Group by the Usr CPG to which the VV belongs.SnpCPG
Page 83

Order By
Table 12 Group By (continued)
PurposeOption
Group by port’s node number (The n in n:s:p).PortNode
Group by the port (n:s:p).n:s:p
This control is only valid for At Time reports and specifies the order of the X (category) axis for the
reports. The menu options available depend on the report selected and are listed with each report.
One or more Order By options can be selected (use CTRL+CLICK to select multiple options) and
the default if none are selected is System. See for a listing of all available options.
Table 13 Order By
PurposeOption
Order by HP 3PAR Storage System.System
Order by domain name.Domain
RAID Type
LDUsage
Order by RAID Type. See “Select RAID Types” (page 88) for the list of RAID types and
descriptions.
Order by Controller Node.Node
Order by Cage ID.CageID
Order by magazine.Mag
Order by ID of the Physical Disk.PDID
Order by VV provisioning type.ProvType
Order by disk position in magazine.Disk
Order by Disk Type.DiskType
Order by Disk Speed.DiskSpeed
Order by LD name.LD
Order by LD Usage. See “Select LD Usage” (page 88) for the list of LD usages and
descriptions.
Order by LD SIze.LDSize
Order by free space in LD.LDFreeSize
Order by LD Raw SIze.LDRawSize
Order by VV name.VV
Order by VV type.VVType
Order by VV virtual size.VirtSize
Order by total reserved space associated with the VV.TotalRsvdSize
Order by total raw space associated with the VV.TotalRawSize
Order by the CPG that the LD belongs to.CPG
Order by the Usr CPG to which the VV belongs.UsrCPG
Order by the Usr CPG to which the VV belongs.SnpCPG
Order by port’s node number (The n in n:s:p).PortNode
Order by the port (n:s:p).n:s:p
Creating Custom Reports 83
Page 84

Table 13 Order By (continued)
PurposeOption
Order by total of the selected chunklets for PD space reports.SelChunkSize
Order by total IOPs.IOPs/s
Order by total Bandwidth.Bandwidth
Order by total service time.Service Time
Order by total IO Size.IO Size
Order by queue length.Queue Length
Busy Percentage
Low Bucket
This control is only valid for Histogram Versus Time reports and specifies the lowest service time
bucket that will be included in the report.
High Bucket
This control is only valid for Histogram Versus Time reports and specifies the highest service time
bucket that will be included in the report.
Sum End Buckets
This control is only valid forHistogram Versus Time reports and controls whether the Low Bucket
and/or High Bucket should include the counts for lower or higher buckets respectively. For example,
if High Bucket is 256 ms and Sum End Buckets is High, then the counts in the 256 ms bucket will
include the sum of counts for all buckets higher than 256 ms.
Order by the percentage of time that the VLUN is busy (i.e., has at least one outstanding
IO operation).
Order by total number of accesses for VV and node cache performance.Total Accesses
Order by read hit% for VV and node cache performance.ReadHit%
Order by write hit% for VV and node cache performance.WriteHit%
Order by Idle time for CPU performance reports.Idle
Order by interrupts per sec for CPU performance reports.Intr
Order by context switches per sec for CPU performance reports.Ctxt
Time Selection
Reload After (mins)
If you enter a number into the Reload After (mins) field, the browser will recompute and reload the
report periodically after the specified number of minutes.
NOTE: Reloading the report is not equivalent to periodically clicking Submit Query. The report
will be reloaded with the parameter values that were set at the time Submit Query was clicked.
Begin/At Time
For Versus Time or Histogram Versus Time reports this control selects the beginning of the time
span of the report. For At Time or Histogram At Time reports this control selects the sample that is
used in the report.
84 Accessing and Creating Reports
Page 85

Table 14 Begin/At Time
PurposeOption
Begin with the earliest sample available.earliest
End Time
Count
a list of specific time values
Begin at the specified time value. The values in the menu are populated based on the
actual samples in the selected data table.
Begin at the specified time before the current time.a list of relative time values
NOTE: Since the Summary Report requires data from both Space and Performance samples, the
Begin/At Time control will only include times that have both space and performance samples.
The End Time control specifies the end of the time range. It is only valid for Versus Time or Histogram
Versus Time reports.
Table 15 End Time
PurposeOption
End with the most recent sample available.most recent
a list of specific time values
End at the specified time value. The values in the menu are populated based on the
actual samples in the selected data table.
This control is only valid for Histogram At Time or Histogram Versus Time reports.
Table 16 Count
Total
Object Selection
The type of object that can be selected and the available options depend on the type of report
that is being generated as described in the following section.
Select PDIDs
This is a filtered multi-selection control (see “Filtered Multi-Selection Control” (page 54)) used to
select one or more PDIDs to include in the report. This control is available for PD Space and PD
Performance reports.
Table 17 Select PDIDs
Include Chunklets
PurposeOption
Only count accesses within the current sample intervalCurrent sample
Count all accesses from the beginning (object creation or system reboot) until the
current sample.
PurposeOption
The report will include all the PDIDs that are included in the database.-All PDIDs-
Select one or more PDIDs to include in the report.list of specific PDIDs
This control is only valid for PD space reports and it allows you to control which chunklet types will
be included in the report.
Creating Custom Reports 85
Page 86

Table 18 Include Chunklets
PurposeOption
Show all the chunklet types in the report.-All Chunklets Types-
list of specific chunklet types
Select Cage IDs
This is a filtered multi-selection control (see “Filtered Multi-Selection Control” (page 54)) used to
select one or more Cage IDs to include in the report. This control is available for PD Space reports.
Table 19 Select Cage IDs
list of specific Cage IDs
Select Disk Types
This control is available for PD Space, CPG Space, LD Space and PD Performance reports.
Table 20 Select Disk Types
Select one or more chunklet types to include in the report. Multiple chunklet types
can be selected using (CTRL+CLICK). See Table 44 (page 106) for a list of chunklet
types and their description.
PurposeOption
The report will include all the Cages that are included in the database.-All Cage IDs-
Select one or more Cage IDs to include in the report. Multiple Cage IDs can be
selected.
PurposeOption
The report will include all the Disk Types that are included in the database.-All Disk Types-
list of specific Disk Types.
Select Disk Speed
This control is available for PD Performance and PD Space reports.
Table 21 Select Disk Speed
list of specific Disk Speeds.
Include PDs in States
Select one or more Disk Types to include in the report. Multiple Disk Types can be
selected using (CTRL+CLICK). Currently available disk types are:
• FC - Enterprise Fibre Channel disks
• NL - Nearline Fibre Channel disks
• SSD - Solid State Disks
PurposeOption
The report will include all the Disk Speeds that are included in the database.-All Disk Speeds-
Select one or more Disk Speeds to include in the report. Multiple Disk Speeds can
be selected using (CTRL+CLICK). Currently available disk speeds are:
• 10- 10 K RPM disks
• 7- 7200 RPM disks
• 15 - 15 K RPM disks
• 150 - SSDs
This control is only available for PD Space reports.
86 Accessing and Creating Reports
Page 87

Table 22 Include PDs in States
Select Usr CPGs
This is a filtered multi-selection control (see “Filtered Multi-Selection Control” (page 54)) used to
select one or more Usr CPGs to include in the report. This control is available for VV Space reports.
NOTE: For InForm OS releases prior to 2.3.1, a single CPG could be associated with a VV to
provision its snapshot copy space. For thin provisioned VVs, this snapshot copy space was also
used for provisioning the base VV’s space (the usr space).
Beginning with the InForm OS release 2.3.1, thin provisioned VVs can have separate spaces and
corresponding separate CPGs to provision the base VV (usr CPG) and the snapshot copy space
(snp CPG).
The VV space report therefore provides separate controls to select the Usr CPGs and the Snp CPGs.
Since LDs can only belong to one CPG, the LD space reports only have a single Select CPG control
(see “Select CPGs” (page 87)).
PurposeOption
Include all PD in the report.-All PD States-
Include PDs in a valid state in the report.valid
Include PDs not in a valid state in the report.Not valid
Table 23 Select Usr CPGs
Select Snp CPGs
This is a filtered multi-selection control (see “Filtered Multi-Selection Control” (page 54)) used to
select one or more Snp CPGs to include in the report. This control is available for VV Space reports.
See note in “Select Usr CPGs” (page 87).
Table 24 Select Snp CPGs
Select CPGs
This is a filtered multi-selection control (see “Filtered Multi-Selection Control” (page 54)) used to
select one or more CPGs to include in the report. This control is available for CPG Space, LD
Space, and Adaptive Optimization Region IO Density reports.
PurposeOption
The report will include all the Usr CPGs that are included in the database.-All CPGs-
Select one or more Snp CPGs to include in the report. Multiple CPGs can be selected.list of specific CPGs
PurposeOption
The report will include all the Snp CPGs that are included in the database.-All CPGs-
Select one or more Snp CPGs to include in the report. Multiple CPGs can be selected.list of specific CPGs
Table 25 Select CPGs
PurposeOption
The report will include all the CPGs that are included in the database.-All CPGs-
Select one or more CPGs to include in the report. Multiple CPGs can be selected.list of specific CPGs
Creating Custom Reports 87
Page 88

Select LDs
This is a filtered multi-selection control (see “Filtered Multi-Selection Control” (page 54)) used to
select one or more LDs to include in the report. This control is available for LD Space and LD
Performance reports.
Table 26 Select LDs
Select RAID Types
This control is only available for CPG and LD Space reports.
Table 27 Select RAID Types
PurposeOption
The report will include all the LDs that are included in the database.-All LDs-
Select one or more LDs to include in the report. Multiple LDs can be selected.list of specific LDs
PurposeOption
Include LDs of all RAID Types in the report.-All RAID Types-
Include RAID 0 LDs in the report.RAID 0
Include RAID 1 LDs in the report.RAID 1
Include RAID 5 LDs in the report.RAID 5
Select LD Usage
This option is only available for the LD Space reports.
Table 28 Select LD Usage
P: Preserved data
P,F: First Preserved data
log: Logging
Select LUN
Include RAID 6 LDs in the report.RAID 6
PurposeOption
Include all LD uses.-All LD Uses-
Include LDs mapped to VV user space.V: Volume User Space
Include LDs mapped to VV snapshot copy data space.C,SD: Copy Snapshot Data
Include LDs mapped to VV snapshot copy admin space.C,SA: Copy Snapshot Admin
Include LDs that are marked to hold data that cannot be flushed due to RAID set
failure.
Include Preserved data LDs that are also distinguished as being the first in the group
of Preserved data LDs.
Include LDs that are marked for use in temporarily storing data during physical disk
replacement operation. Typically, each Controller Node has 20GB of logging LD
space.
This is a filtered multi-selection control (see “Filtered Multi-Selection Control” (page 54)) used to
select one or more LUNs to include in the report. This control is available for VLUN Performance
report.
88 Accessing and Creating Reports
Page 89

Table 29 Select LUN Usage
Select VVs
This is a filtered multi-selection control (see “Filtered Multi-Selection Control” (page 54)) used to
select one or more VVs to include in the report. This control is available for VV Space, VLUN
Performance and VV Cache reports.
Table 30 Select VVs
PurposeOption
The report will include all the LUNs that are included in the database.-All LUNs-
Select one or more LUNs to include in the report.list of specific LUNs
PurposeOption
The report will include all the VVs that are included in the database.-All VVs-
list of specific VVs
Select Prov Types
This control is available for VV Space reports.
Table 31 Select Prov Types
list of specific provisioning types
Select one or more VVs to include in the report. Multiple VVs can be selected using
(CTRL+CLICK).
For VV Space reports, these only include base VVs, not snapshots.
For VLUN Performance reports these include only VVs that have been exported as
VLUNs.
PurposeOption
The report will include all the VV provisioning types that are included in the database.-All Prov Types-
Select one or more VV provisioning types to include in the report. Multiple VV
provisioning types can be selected using (CTRL+CLICK). Provisioning types include:
• full - Fully provisioned VV. The base Usr space is fully provisioned with either
with no Snp (snapshot) space or with statically allocates Snp space.
• cpvv - Commonly provisioned VV. The base Usr space for the VV is fully
provisioned and the snapshot space is associated with a Snp CPG.
• tpvv - Thin provisioned VV. The base Usr space for the VV is provisioned from
the Usr CPG. Snapshots allocate copy space from a Snp CPG if any.
• tpsd - Old-style thin provisioned VV (created with an older release than 2.3.1)
where both the base VV space and the snapshot copy space are allocated from
the same Snp space associated with the same Snp CPG.
• snp - The VV is a virtual copy (snapshot).
Select VV Types
This control is available for VV Space reports and is used to select the copy type of the VV.
Creating Custom Reports 89
Page 90

Table 32 Select VV Types
PurposeOption
The report will include all the VV Types that are included in the database.-All VV Types-
list of specific VV Types
Select Port Types
This control is only available for Port Performance reports.
Table 33 Select Port Types
list of specific Port Types
Select one or more VV Types to include in the report. Multiple VV Types can be
selected using (CTRL+CLICK). VV Types include:
• base - Base volume (not a copy)
• pcopy - Physical (full) copy
• vcopy - Virtual copy (snapshot)
PurposeOption
The report will include all the Port Types that are included in the database.-All Port Types-
Select one or more Port Types to include in the report. Multiple Port Types can be
selected using (CTRL+CLICK). Currently, the port types available include
• disk - Fibre Channel disk ports
• free - Free (unused) ports
• host - Fibre Channel host ports
• rcip - Remote Copy IP ports
• rcfc - Remote Copy Fibre Channel ports
• iscsi - iSCSI host ports
Select Port Rates
This is a filtered multi-selection control (see “Filtered Multi-Selection Control” (page 54)) used to
select port rates to include in the report. This control is available for Port Performance reports.
Table 34 Select Port Rates
Select Ports (n:s:p)
This control is available for PD Performance, Port Performance and VLUN Performance reports.
Table 35 Select Ports (n:s:p)
list of specific ports
PurposeOption
The report will include data for all port rates.-All Port Rates
Select one or more port rates to include in the report.list of specific Port Rates
PurposeOption
The report will include all the Ports that are included in the database.-All Ports-
Select one or more ports to include in the report. Multiple ports can be selected
using (CTRL+CLICK). The format for ports is n:s:p where
• n is the controller node
• s is the PCI slot in the controller node
• p is the port number in a PCI slot
90 Accessing and Creating Reports
Page 91

Select Hosts
This is a filtered multi-selection control (see “Filtered Multi-Selection Control” (page 54)) used to
select one or more Hosts to include in the report. This control is available for VV Space and VLUN
Performance reports.
Table 36 Select Hosts
Select Nodes
This control is available for CPU and Link Performance reports. For Link Performance reports it is
the source node for the link.
Table 37 Select Nodes
PurposeOption
The report will include all the Hosts that are included in the database.-All Hosts-
Select one or more Hosts to include in the report. Multiple Hosts can be selected.list of specific Hosts
PurposeOption
The report will include all the Controller Nodes that are included in the database.-All Nodes-
list of specific Nodes
Select To Nodes
This control is available for Link Performance reports and it selects the destination node for the link.
Table 38 Select To Nodes
list of specific Nodes
Select Queues
This control is available for Link Performance reports.
Table 39 Select Queues
list of specific Queues
Select one or more Nodes to include in the report. Multiple Nodes can be selected
using (CTRL+CLICK).
PurposeOption
The report will include all the Controller Nodes that are included in the database.-All Nodes-
Select one or more Nodes to include in the report. Multiple Nodes can be selected
using (CTRL+CLICK).
PurposeOption
The report will include all the queues that are included in the database.-All Queues-
Select one or more Queues to include in the report. Multiple Queues can be selected
using (CTRL+CLICK).
Format Selection (Web interface only)
The format selection controls are used to specify how the output of a given report is formatted for
presentation. The various controls for specifying the formatting options are described in the following
sections.
NOTE: The Formatting options available from the web interface are not provided through the
Excel client when generating a report but can be specified instead after the report is generated.
For information on formatting reports when using the Excel client, see “Working with Excel Charts”
(page 97).
Creating Custom Reports 91
Page 92

Report Information
For each report except for the Summary Report, you can use the Report Information pull-down list
to choose between displaying query results in the form of a chart, a table, or both.
Tables display query results in tabular format, as in the example shown in Figure 33 (page 92).
Figure 33 Example of a Table
Chart Lib
Allows you to optionally select the charting package used by System Reporter. By default, the
(Static) charting capabilities are used, but you can try out the unsupported (Dynamic) option
providing you are using a browser that supports html5 canvas tags (the latest versions of Windows
E9, Firefox and Google Chrome browsers currently offer this support).
Chart Types
Stacked charts stack data on top of each other so you can also see totals. However, since the total
height of the stacked charts (with Stacked Bars, Stacked Vert Bars andStacked Area charts) is the
sum of the individual segments, they are not suitable for some forms of data. For example, in
performance charts, the average service time for I/O is not the sum of the average service time
for reads plus the average service time for writes. Similarly, the average I/O size for I/O is not
the sum of the average I/O sizes of reads plus the average I/O size of writes. Therefore, when
you select stacked charts, only the total service time and total I/O sizes are shown. If you want to
see the service time and I/O sizes for reads and writes separately, select Bars, Vert Bars orLines
from the ChartType list.
92 Accessing and Creating Reports
Page 93

You can choose from the following chart types:
• Stacked Bars
Figure 34 Chart Using Stacked Bars
• Stacked Vert Bars
Creating Custom Reports 93
Page 94

Figure 35 Chart Using Stacked Vertical Bars
• Stacked Area
Figure 36 Chart Using Stacked Areas
• Lines
94 Accessing and Creating Reports
Page 95

Figure 37 Chart Using Lines
• Bars
Figure 38 Chart Using Bars
Creating Custom Reports 95
Page 96

• Vert Bars
Figure 39 Chart Using Vert Bars
Chart X Pixels
You can explicitly specify the length in pixels of the X (category) axis of charts. If this is left blank
the X axis length will be automatically chosen. If the length specified is too small, the chart may
not be drawn.
Chart Y Pixels
You can explicitly specify the length in pixels of the Y (value) axis of charts. If this is left blank the
Y-axis length will be automatically chosen. If the length specified is too small, the chart may not
be drawn.
Time Labels
This is a checkbox that selects whether or not each point on the time axis of charts is labelled. If
checked, each point on the time axis is labelled, otherwise only some points along the axis are
labelled so that the length of the X (time) axis can be reduced.
Legend Position
You can choose the position of the chart legend.
Table 40 Legend Position
PurposeOption
Legend position is chosen automatically based on the Chart Type.Auto
Time Format
This control selects how time values are labelled and is only valid when Report Type is Versus Time.
96 Accessing and Creating Reports
Legend is placed below the chart.Bottom
Legend is placed to the right of the chart.Right
Page 97

Table 41 Time Format
PurposeOption
Auto
Relative
Select Space Unit
This control selects the units in which storage space is represented. It is only valid for space reports.
Table 42 Select Space Unit
MiB (2^20 byes)
Time format is chosen automatically based on the sample resolution. If resolution is Daily, the
format includes the month, date, hours and minutes, for example: 11-29 08:32. If the resolution
is hourly, the format includes the date, hours and minutes, for example: 29 08:32. If the
resolution is High-Res, the format include date, hours, minutes and seconds, for example: 29
08:32:05.
Time values are labelled fully, for example: 2005-11-01 22:45:15Full
Time values are labelled relative to the current time, for example: 5d 07:50:03 (meaning 5
days, 7 hours, 50 mins, 3 secs ago).
PurposeOption
Space unit is chunklet (256 MB). This option is only available for PD Space reports.Chunklets
Space unit is 2^20 bytes (“binary” megabyte). This option is not available for PD space
reports.
Space unit is 10^9 bytes.GB (10^9 bytes)
Space unit is 2^30 bytes (“binary” gigabyte).GiB (2^30 bytes)
Space unit is 10^12 bytes.TB (10^12 bytes)
Space unit is 2430 bytes (“binary” terabyte).TiB (2^40 bytes)
Working with Excel Charts
When working with reports created with the Excel client, you have a variety of choices on how to
format the information for presentation once the report has been generated.
Choosing a Chart Type
If you want to change the default format for a report chart once it has been generated, you can a
have the data formatted using another type of chart:
1. Click the existing data that you want to reformat using another type of chart.
2. Click the Design tab.
3. Choose Change Chart Type.
The selection of available charts shown in appears.
Working with Excel Charts 97
Page 98

Figure 40 Change Chart Type Menu for the Excel Client
4. Choose the appropriate selection from the list of chart types, then select on the chart that you
want to use to display the report data.
5. Click OK.
CAUTION: The Excel Chart controls are configured for the default Chart Type. If you change
the default Chart Type, you may also need to modify other chart controls for optimal viewing.
Refreshing Charts
Using a feature provided by System Reporter, you can refresh a report at any time with the latest
reporting data by clicking on the Refresh button in the upper right side of the spread sheet. Excel
allows for custom charts to be created along with the existing charts. These charts also get refreshed
when the Refresh button is clicked.
Using another option provided through Excel, you can have the data refreshed according to a
specific schedule by modifying the properties of query table from which the charting information
is derived. When the table data is refreshed, any charts based on the table will also be refreshed.
Setting a table to be automatically refreshed is most applicable with a table that was created using
relative time selections. Here are the steps for modifying the query table to refresh the data according
to a given schedule.
98 Accessing and Creating Reports
Page 99

1. Right-click in any data cell and click Data Range Properties in the shortcut menu that appears.
Figure 41 Data Range Properties Shortcut Menu
The External Data Range Properties dialog box appears.
2. Select the Refresh every checkbox and enter the desired value.
Figure 42 External Data Range Properties Dialog Box
3. Click OK.
Retaining Charts
The HP HP 3PAR System Reporter Excel client workbook is designed to reuse data sheets, redrawing
charts on the reporting tool sheets with updated data or modified query parameters as required.
To redraw a chart on a reporting tools sheet with updated data or modified query parameters,
use the reporting tool sheet controls to make any changes and then click Refresh. The values on
the corresponding data sheet are updated and the charts on the reporting tool sheet are redrawn.
Working with Excel Charts 99
Page 100

It is also possible to retain a chart for further reference. This can be done by moving the chart and
the data sheet linked to that chart to new worksheets. See the instructions that follow for a detailed
description of how to complete this procedure.
To retain a chart for further reference
1. On the chart to be retained, right-click to bring up the shortcut menu.
2. On the shortcut menu, click Location (for Excel 2003) or Move Chart (for Excel 2007).
The Chart Location (for Excel 2003) or Move Chart (for Excel 2007) dialog appears.
3. In the Chart Location or Move Chart dialog box, click As new sheet or New sheet and then
click OK to move the chart to a new sheet.
A new tab (with the specified name) appears at the bottom of the window for the new worksheet
that holds the moved chart.
NOTE: Moving a chart may cause it to be resized. When a chart becomes smaller, you can
adjust the axis labels to make them more readable. To adjust the axis, right-click the axis,
click Format Axis... on the shortcut menu that appears, and then use the controls in the Format
Axis dialog box.
4. Identify the data sheet that contains the source data for the moved chart. For example, a chart
generated with the PDIO reporting tool sheet is linked to data on either the PDSpace Time Data
or PDSpace Items Data sheet.
NOTE: If you don’t know the name of the data sheet that holds the source data for a chart,
you can right-click the chart and click Source Data..., then click the Series tab in the Source
Data dialog box that appears. On the Series tab, look at the Name and Values boxes. The
worksheet name appears in both boxes, just before the exclamation point.
5. Right-click the source data sheet tab and click Rename, then edit the data sheet name. Be sure
to use a unique name that is not used for any other reporting tool or data sheets in the Excel
client workbook.
After editing the data sheet name, you can return to the reporting tool sheet to perform
additional queries without affecting the relocated chart or the data sheet holding its source
data.
Exporting Executable Reports
When working with reports generated through the Excel client, you have the ability to save the
contents to a file where the formatted data can be accessed. This is useful when you want to have
data in a given report accessible to anyone in a directory or to email the reports. Here are the
steps for saving an executable report:
1. Click on the appropriate tab at the bottom of the screen to access the report you want to save
as an executable file.
2. Click on the Windows Office Button in the upper right corner.
3. Choose Save As, then select Microsoft Office Excel Workbook (for Excel 2007, you also have
the option of saving as (Excel Macro Enabled Workbook).
4. Assign a name to the file and click Save.
Customizing Excel Reports
Read this section for information on customizing the charts used to plot the results of database
queries initiated with the HP 3PAR System Reporter Excel client.
To customize a chart, you must edit the data sheet associated with that chart. Customized charts
typically make use of custom columns added to a data sheet.
100 Accessing and Creating Reports
 Loading...