

Page 1

HP Structured Records Management Solution
Tutorial
Document release date: August 2011
Software release date: August 2011
Page 2

Legal notices
Warranty
The only warranties for HP products and services are set forth in the express
warranty statements accompanying such products and services. Nothing herein
should be construed as constituting an additional warranty. HP shall not be liable
for technical or editorial errors or omissions contained herein.
The information contained herein is subject to change without notice.
Restricted rights legend
Confidential computer software. Valid license from HP required for possession,
use or copying. Consistent with FAR 12.211 and 12.212, Commercial Computer
Software, Computer Software Documentation, and Technical Data for
Commercial Items are licensed to the U.S. Government under vendor's standard
commercial license.
Licensing
The use of HP products is governed by the terms and conditions of the applicable
End User License Agreement (EULA).
Copyright notices
© Copyright 2011 Hewlett-Packard Development Company, L.P.
Trademark notices
Intel and Itanium are trademarks or registered trademarks of Intel Corporation or
its subsidiaries in the United States and other countries.
Java™ and all Java based trademarks and logos are trademarks or registered
trademarks of Sun Microsystems, Inc. in the U.S. and other countries.
Microsoft, Windows, Windows NT, and Windows XP are U.S. registered
trademarks of Microsoft Corporation.
Oracle is a registered trademark of Oracle Corporation and/or its affiliates.
UNIX® is a registered trademark of The Open Group.
2 HP Structured Records Management Solution Tutorial
Page 3

Contents
About this document. . . . . . . . . . . . . . . . . . . . . . . . . . . . . . . . . . . . . . . . . . . . . .5
Intended audience . . . . . . . . . . . . . . . . . . . . . . . . . . . . . . . . . . . . . . . . . . . . . . . . . .5
Prerequisites . . . . . . . . . . . . . . . . . . . . . . . . . . . . . . . . . . . . . . . . . . . . . . . . . . . . . .5
New and revised information . . . . . . . . . . . . . . . . . . . . . . . . . . . . . . . . . . . . . . . . .6
Related documentation . . . . . . . . . . . . . . . . . . . . . . . . . . . . . . . . . . . . . . . . . . . . . .6
Document conventions and symbols . . . . . . . . . . . . . . . . . . . . . . . . . . . . . . . . . . .6
Subscription service . . . . . . . . . . . . . . . . . . . . . . . . . . . . . . . . . . . . . . . . . . . . . . . .7
Support . . . . . . . . . . . . . . . . . . . . . . . . . . . . . . . . . . . . . . . . . . . . . . . . . . . . . . . . . .8
1 Structured records management concepts. . . . . . . . . . . . . . . . . . . . . . . . . . .9
Tutorial overview . . . . . . . . . . . . . . . . . . . . . . . . . . . . . . . . . . . . . . . . . . . . . . . . . .9
Tutorial prerequisites . . . . . . . . . . . . . . . . . . . . . . . . . . . . . . . . . . . . . . . . . . . . . . .9
Structured records management . . . . . . . . . . . . . . . . . . . . . . . . . . . . . . . . . . . . . .11
Database archiving concepts. . . . . . . . . . . . . . . . . . . . . . . . . . . . . . . . . . . . . . . . .14
Records management concepts. . . . . . . . . . . . . . . . . . . . . . . . . . . . . . . . . . . . . . .14
Summary and next steps . . . . . . . . . . . . . . . . . . . . . . . . . . . . . . . . . . . . . . . . . . . .14
2 Configuring the Demarc data. . . . . . . . . . . . . . . . . . . . . . . . . . . . . . . . . . . . .15
Loading the Demarc data . . . . . . . . . . . . . . . . . . . . . . . . . . . . . . . . . . . . . . . . . . .15
Summary and next steps . . . . . . . . . . . . . . . . . . . . . . . . . . . . . . . . . . . . . . . . . . . .16
3 Creating an archive definition . . . . . . . . . . . . . . . . . . . . . . . . . . . . . . . . . . . .17
Importing an existing project . . . . . . . . . . . . . . . . . . . . . . . . . . . . . . . . . . . . . . . .17
Creating a connection to the HP TRIM database . . . . . . . . . . . . . . . . . . . . . . . . .18
Summary and next steps . . . . . . . . . . . . . . . . . . . . . . . . . . . . . . . . . . . . . . . . . . . .20
4 Creating a cartridge. . . . . . . . . . . . . . . . . . . . . . . . . . . . . . . . . . . . . . . . . . . . .21
Creating a cartridge. . . . . . . . . . . . . . . . . . . . . . . . . . . . . . . . . . . . . . . . . . . . . . . .21
Navigating in the cartridge editor . . . . . . . . . . . . . . . . . . . . . . . . . . . . . . . . . . . . .23
Previewing the cartridge . . . . . . . . . . . . . . . . . . . . . . . . . . . . . . . . . . . . . . . . . . . .23
Classifying extracted data. . . . . . . . . . . . . . . . . . . . . . . . . . . . . . . . . . . . . . . . . . .25
Summary and next steps . . . . . . . . . . . . . . . . . . . . . . . . . . . . . . . . . . . . . . . . . . . .27
5 Creating a business flow . . . . . . . . . . . . . . . . . . . . . . . . . . . . . . . . . . . . . . . . .29
Creating a business flow. . . . . . . . . . . . . . . . . . . . . . . . . . . . . . . . . . . . . . . . . . . .29
Adding a Groovy script. . . . . . . . . . . . . . . . . . . . . . . . . . . . . . . . . . . . . . . . . . . . .31
Summary and next steps . . . . . . . . . . . . . . . . . . . . . . . . . . . . . . . . . . . . . . . . . . . .36
HP Structured Records Management Solution Tutorial 3
Page 4

6 Deploying and running a business flow. . . . . . . . . . . . . . . . . . . . . . . . . . . .37
Deployment prerequisites . . . . . . . . . . . . . . . . . . . . . . . . . . . . . . . . . . . . . . . . . . .37
Deploying the business flow. . . . . . . . . . . . . . . . . . . . . . . . . . . . . . . . . . . . . . . . .37
Running the business flow . . . . . . . . . . . . . . . . . . . . . . . . . . . . . . . . . . . . . . . . . .41
Summary and next steps . . . . . . . . . . . . . . . . . . . . . . . . . . . . . . . . . . . . . . . . . . . .45
7 Querying the archive . . . . . . . . . . . . . . . . . . . . . . . . . . . . . . . . . . . . . . . . . . . .47
Viewing the extract in HP TRIM . . . . . . . . . . . . . . . . . . . . . . . . . . . . . . . . . . . . .47
Searching the extract in HP TRIM . . . . . . . . . . . . . . . . . . . . . . . . . . . . . . . . . . . .49
Querying archived data. . . . . . . . . . . . . . . . . . . . . . . . . . . . . . . . . . . . . . . . . . . . .49
Summary and next steps . . . . . . . . . . . . . . . . . . . . . . . . . . . . . . . . . . . . . . . . . . . .53
A Troubleshooting . . . . . . . . . . . . . . . . . . . . . . . . . . . . . . . . . . . . . . . . . . . . . . . . .55
Summary of issues . . . . . . . . . . . . . . . . . . . . . . . . . . . . . . . . . . . . . . . . . . . . . . . .55
Design time issues . . . . . . . . . . . . . . . . . . . . . . . . . . . . . . . . . . . . . . . . . . . . . . . .56
Runtime issues . . . . . . . . . . . . . . . . . . . . . . . . . . . . . . . . . . . . . . . . . . . . . . . . . . .57
Archive access issues . . . . . . . . . . . . . . . . . . . . . . . . . . . . . . . . . . . . . . . . . . . . . .60
Index . . . . . . . . . . . . . . . . . . . . . . . . . . . . . . . . . . . . . . . . . . . . . . . . . . . . . . . . . .71
4 Contents
Page 5

About this document
Using HP Database Archiving and HP TRIM in conjunction with one another
provides a powerful means of safely retiring old, legacy data and applications
within the bounds of your existing records management policies.
This tutorial is designed to help you get started using HP Database Archiving to
move eligible data from your production database into a structured records
management system, HP TRIM.
This guide provides information about:
• an example cartridge that employs HP TRIM classifications
• steps for designing the example cartridge using an existing data model
• creation of a sample business flow that invokes the cartridge
• deployment of the example business flow
• execution of the example business flow
Intended audience
Prerequisites
• querying the archive
This guide is intended for:
• Archive developers building cartridges for structured records management
Prerequisites for using this product include:
• Knowledge of the operating system
• Database knowledge
• Application knowledge
• Knowledge of HP TRIM and structured records management
HP Structured Records Management Solution Tutorial 5
Page 6

New and revised information
This document includes the following new and revised features in the HP SRMS
software:
• HP TRIM is now supported on 64-bit machines
• For SRMS, you must apply hot fix 16 with HP Database Archiving 6.30
For more information about the hot fix, refer to http://quixy.deu.hp.com/hotfix
• The default HP TRIM installation path is now changed to
Files\Hewlett-Packard\HP TRIM
• To check the memory leak errors for SRMS add-ins, a new check box is added
on the External Link dialog.
Related documentation
NOTE This documentation is written to the latest patch version. If you have not
installed the latest patch, there may be items in this documentation that do not
apply to your environment.
HP TRIM documentation For more information about HP TRIM, refer to:
http://www.hp.com/go/imhub/trimdoc
HP Database Archiving For more information about HP Database Archiving, refer to:
ttp://www.hp.com/go/imhub/dbadoc
h
C:\Program
Document conventions and symbols
Convention Element
[ ] Indicates that the enclosed element is optional
and may be left out.
{ } Indicates that you must specify one of the listed
options.
| Separates alternatives.
6About this document
Page 7

Convention Element
<parameter_name> You must supply a value for a variable
parameter.
... • Indicates a repetition of the preceding
parameter.
• Example continues after omitted lines.
Medium blue text: Figure 1 Cross-reference links and e-mail addresses
Medium blue, underlined text
(http://www.hp.com
Bold
)
Web site addresses
• Key names
• GUI elements that are clicked or selected,
such as menu and list items, buttons, and
check boxes
Italics Text emphasis
Monospace
• File and directory names
• Text displayed on the screen, such as system
output and application messages
• Code syntax
Monospace, italic You must supply a value.
• Code variables
• Command-line variables
CAUTION Indicates that failure to follow directions could result in damage to
equipment or loss of data.
NOTE Provides additional information.
TIP Provides helpful hints and shortcuts.
RECOMMENDATION Provides guidance from HP for a best practice or for
optimum performance.
Subscription service
HP strongly recommends that customers sign up online using the Subscriber's
choice web site:
http://www.hp.com/go/e-updates
HP Structured Records Management Solution Tutorial 7
Page 8

Support
• Subscribing to this service provides you with e-mail updates on the latest
product enhancements, versions of drivers, and firmware documentation
updates as well as instant access to numerous other product resources.
• After signing up, you can quickly locate your products under Product
Category.
You can visit the HP Software Support web site at:
http://www.hp.com/go/hpsoftwaresupport
HP Software Support Online provides an efficient way to access interactive
technical support tools. As a valued support customer, you can benefit by using
the support site to:
• Search for knowledge documents of interest
• Submit and track support cases and enhancement requests
• Download software patches
• Manage support contracts
• Look up HP support contacts
• Review information about available services
• Enter into discussions with other software customers
• Research and register for software training
Most of the support areas require that you register as an HP Passport user and sign
in. Many also require a support contract.
To find more information about access levels and register for HP Passport, go to:
http://support.openview.hp.com/new_access_levels.jsp
8About this document
Page 9

1 Structured records management
concepts
This chapter provides you with a conceptual overview of the archive building
process and the tutorial itself.
This chapter includes: • Tutorial overview (page 9)
• Tutorial prerequisites (page 9)
• Structured records management (page 11)
• Database archiving concepts (page 14)
• Records management concepts (page 14)
• Summary and next steps (page 14)
Tutorial overview
This tutorial is designed to introduce you to archiving data with HP Database
Archiving and managing the archived data files in HP TRIM. The tutorial walks
you through the following high level tasks using the sample Demarc database
objects:
• Designing a database to file cartridge, based on an existing data model.
• Specifying which HP TRIM classifications to apply to the data extracted by
the cartridge.
• Creating a business flow to call the cartridge.
• Creating an environment.
• Creating Web Console users.
• Deploying the business flow.
• Running the business flow from the Web Console.
• Confirming the results of the business flow.
• Changing the business flow and redeploying it.
• Querying the archive.
Tutorial prerequisites
Before starting this tutorial, ensure all of the following have been completed:
HP Structured Records Management Solution Tutorial 9
Page 10
• HP TRIM 7.10, HP Database Archiving software 6.30 with hot fix 7, and
RQS 6.30 with hot fix 11 have been installed and configured in your
environment by HP Enterprise Services for structured records management
(HP TRIM Enabler Pack).
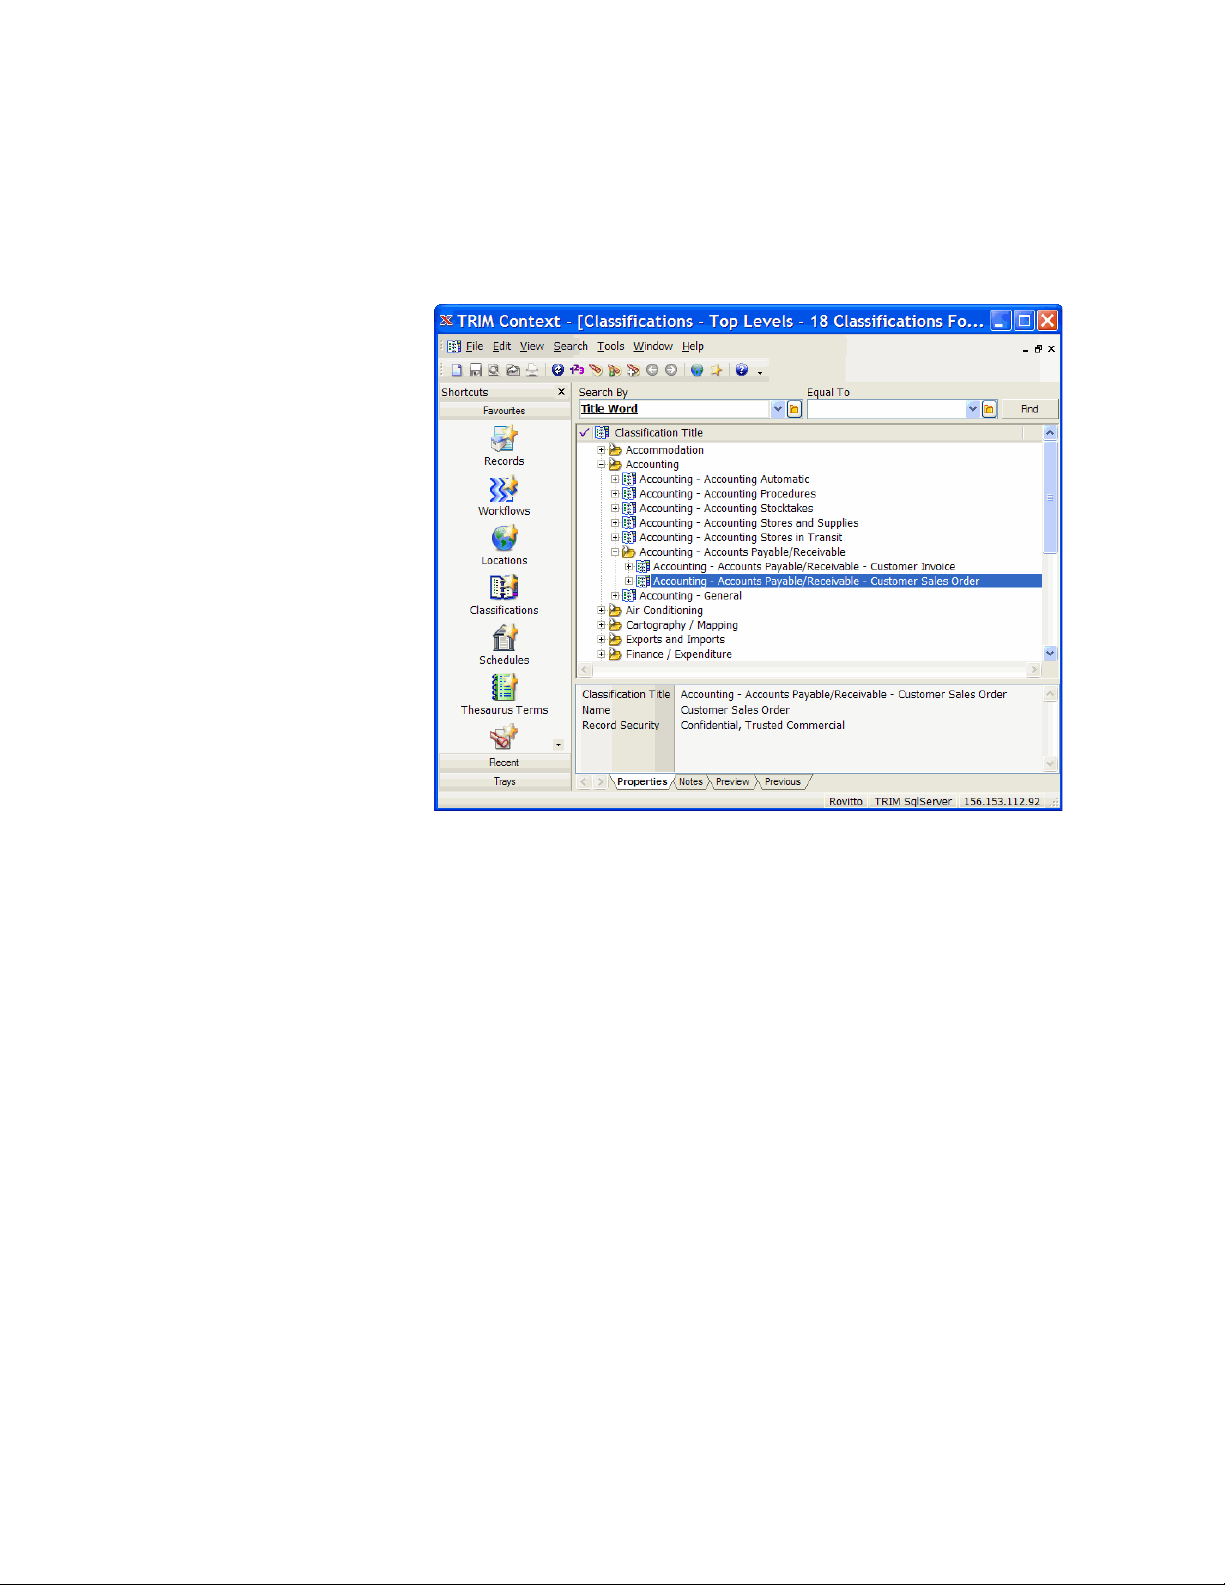
• You have created a classification for the sales orders from DEMARC similar
to the following:
• You have installed a database that is supported by HP Database Archiving
software 6.30. For details, see the HP Database Archiving software
Installation manual.
The steps and screen images in this tutorial assume a SQL Server database for
the HP TRIM repository and an Oracle database as the source database for HP
Database Archiving. If you use other databases, you can still follow the steps,
but you may encounter some small differences in the steps and/or the
appearance of the product.
• You have run the Web Console to set up a repository and at least one
environment for the source database.
For details See Chapter 5, Starting and configuring the Web Console, of the HP Database
Archiving software Runtime guide.
• You have noted all of the following:
— database administrator user name
— database administrator password
— HP Database repository user name (for example, obt_rep)
— HP Database repository password
— encryption key
10 Chapter 1: Structured records management concepts
Page 11

Structured records management
Records management traditionally concerned itself with information printed on
paper. These records included:
• narrative papers such as correspondence, memos, and policies.
• non-narrative papers, such as inventories, general ledgers, and customer
registers.
When records management moved into the digital age, it took control of the
electronic equivalents of narrative papers, namely unstructured information.
Records management tended to neglect the more structured, non-narrative
information because it was seemingly managed by the line of business
applications that generated, used, and stored it.
The costs and risks of infinite retention
Over time, corporations and organizations came to understand that simply
allowing structured records to accumulate in databases indefinitely lead to both
increased costs and risks:
• Maintaining very old, infrequently-accessed data and systems for the sole
purpose of potential legal discovery is extremely expensive. Such data and
systems invariably become a major drain on data center resources and
personnel.
• Keeping data indefinitely can, in some cases, put your corporation or
organization at greater legal risk. Very few of the applications or their
underlying databases provide features to manage the data from a records
management point of view. Hence, structured records are often kept far longer
than they would be if standard corporate retention policies were applied to
them in a systematic way.
HP Structured Records Management Solution (SRMS)
The best solution to structured records management is to extract older,
infrequently accessed data from the source applications into an open,
standards-based format (XML) for future ease of access. This standard format can
then be ingested into the corporate records management system for long term
management and eventual disposal according to corporate policy.
Extracting and purging inactive data from the source systems brings many
benefits:
• Systems become more performant with a smaller footprint and reduced
backup volumes.
• Legacy systems can be retired.
• Database management costs are reduced.
• Saved resources may be re-purposed for other, more current applications and
databases.
HP Structured Records Management Solution Tutorial 11
Page 12

Used together, HP Database Archiving and HP TRIM provide just such a solution
with its many associated benefits.
Figure 1 Structured records management workflow
1 Define
This step defines the data model and the rules for the data to be extracted.
Unlike unstructured information, which is stored in relatively well defined
containers in the shape of files, structured data is stored in a set of tables,
some of which are active data tables and some of which serve as lookup
tables. The modeling allows an administrator to define what data and links
make up the records so that the extracted data has integrity and usability.
Criteria and rules can be defined for the selection of the data, as well as for
exceptions that will exclude data from extraction. Once the model and rules
are defined they can be used and re-used many times over.
2 Classify
Not all data required to manage the records may be inherent in the source data
itself. Records management relies on descriptive data to manage the context
in which the data was created and used. The classify step allows the
administrator to select a target in the records management classification
scheme, as well as to assign additional metadata properties that will be used to
describe and manage the extracted data in the records management system.
Like the definition step, the classification step is part of the preparatory design
and serves many extracts of a certain type of data from that point onward.
3 Extract
The result of the define and classify steps is a combination of data model,
rules, and attributes that you use to extract data unattended from the source
system. It is common practice to run the extract as a scheduled process,
although you can also run it manually. Once the extract is initiated it selects
the eligible data based on the model and rules, and exports it along with the
associated attributes to an XML file. The resulting extract consists of a
descriptive summary file and the individual data files containing the records.
For each file type, an XSD schema description is exported. The descriptive
metadata for the records management system is created in a tab delimited text
file. Once all the files are exported, the extraction script calls the HP TRIM
loader to ingest the data into the records management system.
12 Chapter 1: Structured records management concepts
Page 13

NOTE The extraction process also can create an MD5 hash of each exported
file and includes this in the summary file. These hashes can be used to
validate that the files loaded into HP TRIM are identical to the files generated
by HP Database Archiving.
TIP You have the option to remove the data from the source system
immediately upon its extraction or at some later time (deferred deletion). In
deferred deletion, the administrator defines a point in time after extraction
when the record is removed from the source system. Deferred deletion allows
records to be extracted as soon as they become static but while they are still
used in day-to-day queries in the source system. If a record is ever deleted
prematurely from the source system, a reload option allows the data to be
extracted from HP TRIM and loaded back into the original source in an
automated process.
4 Ingest
The ingest step creates a folder inside the records management system to
group all the files created by the extract. The folder is placed in the
classification that was selected during the classify step and uses the metadata
attributes contained in the tab delimited file created by the extract step.
Once the folder is created the importer loads all the XML, XSD, and the log
files for the ingest step into the folder. As for the folder, it uses the predefined
metadata attributes from the classify step to create profiles for each of the
files. Once the import concludes, the import step can perform a validation of
the records’ contents against the MD5 values generated by the extract step
and store the details of this validation. The hash validation can also be
invoked manually at a later stage.
5 Manage
The manage step is the same for structured records as it is for unstructured
information. The same HP TRIM structures, rules, and features are used for
both, including metadata and content searching, addition and removal of
holds, and security and auditing features.
In the case of SRMS, since the records are structured, you typically will want
to run SQL queries against them rather than a standard search. To address this
requirement, you can extract batches of records from HP TRIM and
automatically register them with the Records Query Server (RQS). Using
RQS (also known as the Archive Query Server), you can query the archive
XML files using any ODBC, JDBC, or OLEDB compliant SQL query tool.
6 Dispose
The disposal of records in the records management system uses the same
features that are applied to unstructured records. A retention period can be
defined for the record and, when that period is up, the record is marked as
destroyed. Once a record is marked as destroyed, a check is run to confirm
whether the original record in the source system was destroyed as well. If not,
the user will be prompted to execute a deferred deletion from the source
system at that point.
HP Structured Records Management Solution Tutorial 13
Page 14

Scalability
In order to achieve optimum performance and scalability with SRMS, you may
spread the configuration across multiple machines where necessary. HP TRIM
runs only on MS Windows, but HP Database Archiving can run on UNIX or MS
Windows. The following SRMS configurations are possible:
• MS Windows only. In this case, all of the machines in the configuration are
MS Windows systems. Note that one of the machines in this configuration
must have HP TRIM and HP Database Archiving installed on them.
• MS Windows and UNIX. In this case, HP TRIM is installed on an MS
Windows system and HP Database Archiving is installed on a UNIX system.
Since the products are on disparate operating systems, you will need to call
the SRMS Loader differently from the Groovy script in your business flow.
NOTE RQS must be installed on the same machine as HP TRIM.
Database archiving concepts
For conceptual information about HP Database Archiving, refer to the HP
Database Archiving software Concepts guide.
Records management concepts
For conceptual information about HP TRIM, refer to the HP TRIM online help.
Summary and next steps
In this chapter you learned about:
• the overall structure of the tutorial
• the prerequisites for building the tutorial
• HP Structured Records Management Solution
• where to look for conceptual information about HP Database Archiving
You are now ready to begin the tutorial.
14 Chapter 1: Structured records management concepts
Page 15

2 Configuring the Demarc data
To follow the instructions in this tutorial, you must have the sample Demarc data
set loaded in your database.
This chapter explains how to obtain and load the Demarc data.
This chapter includes: • Loading the Demarc data (page 15)
• Summary and next steps (page 16)
Loading the Demarc data
The example in this tutorial is based upon the Demarc data set. You must install
this schema and populate it before you can start the tutorial.
TIP Typically, you will install the Demarc data set into a database that is separate
from the HP TRIM database.
To load the data into your database, perform the following steps:
1 Install and configure the database of your choice. See Tutorial prerequisites
(page 9) for information about which databases you can use.
NOTE The demo data loader does not support Oracle RAC or SQL Server
Windows authentication.
2 Install and configure HP Database Archiving software as per the HP
Database Archiving software Installation guide.
3 Change to the bin directory where you installed HP Database Archiving. For
example, on MS Windows:
cd c:\Program Files\HPDBArchiving\obt\bin
or on UNIX:
cd /home/HPDBArchiving/obt/bin
Type the command appropriate for your database:
4
On MS Windows:
load_demo oracle
load_demo sqlserver
load_demo sybase
load_demo db2
load_demo generic
HP Structured Records Management Solution Tutorial 15
Page 16

On UNIX:
./load_demo.sh oracle
./load_demo.sh sqlserver
./load_demo.sh sybase
./load_demo.sh db2
./load_demo.sh generic
NOTE The generic option is for JDBC/ODBC data sources.
5 Respond to the prompts. Default values are displayed next to the prompts
inside of square brackets [ ]. It may take a few minutes for the scripts to
complete running.
TIP If you want to use a schema name other than DEMARC, enter the desired
name when prompted for demo schema/username.
TIP Note that SQL Server database names are case sensitive. Hence, if you
accept the default name, you must use DEMARC when referencing it.
6 To confirm that the scripts executed properly, check the log files located in
<install_dir>\obt\demo for any errors:
—
—
—
—
7 If you have an ad hoc query tool, you can use it to confirm the presence of
DEMARC and its tables.
Summary and next steps
In this chapter, you learned:
• how to run the scripts to load the sample data into the database you plan to use
for the tutorial.
The next step is to import a project that you can modify for structured records
management.
ngfloadlog.log for DB2
ogfloadlog.log for Oracle
sgfloadlog.log for SQL Server
ygfloadlog.log for Sybase
16 Chapter 2: Configuring the Demarc data
Page 17

3 Creating an archive definition
This structured records management tutorial is based upon the same data model
used in the general HP Database Archiving tutorial in Tutorial: Designing and
deploying archive modules. This chapter walks you through the process of
importing the solution project for the general tutorial. In subsequent chapters, you
will modify this project for the structured records management case.
This chapter includes: • Importing an existing project (page 17)
• Creating a connection to the HP TRIM database (page 18)
• Summary and next steps (page 20)
Importing an existing project
The general tutorial solution project shipped with HP Database Archiving
contains the data model you need for this structured records management tutorial.
Rather than recreating the model from scratch, you can simply import that
existing project.
To import the tutorial solution project:
TIP If you successfully built the tutorial project yourself as described in Tutorial:
Designing and deploying archive modules, you can simply open that project and
skip to Chapter 4, Creating a cartridge.
1 Launch Designer.
— On MS Windows, from the Start menu, open Designer by selecting
Database Archiving > Designer
— On Linux, use the designer desktop link, if you opted to create the links at
install time. Otherwise, navigate to <install dir>
./designer.sh
When you start Designer for the very first time, you are automatically
prompted to create a new project.
The first field is the project Name. The second field is the Database
connection used to get the table definitions.
.
/obt/bin and type:
HP
TIP If you are not prompted to create a new project, select File > New Project.
Or, you can click the New Project icon.
HP Structured Records Management Solution Tutorial 17
Page 18

In the Name field, type DEMARC Orders App v1 SRMS as the name of your
new project.
2 For Database, if you already created a connection to the database with
DEMARC, choose that connection from the pull-down list. Otherwise, click
New to set up a database connection for DEMARC.
3 Once the New Project dialog box is filled out, click OK.
4 Select File > Import. The Import dialog box displays.
5 Choose Existing Designer project from the list.
6 Click Next. The Import Existing Project dialog box appears.
7 Browse to the location of the tutorial solution project. On MS Windows, it can
be found in <install dir>
<install dir>
8 Select tutorial_soln_<db_type>.hdp, where <db_type> is your database
oracle, sqlserver, sybase, neoview).
type (
9 Click Open. You should now have a complete, working version of the tutorial
/obt/demo/project.
\obt\demo\project. On UNIX, it can be found in
solution project, which you can modify for structured records management.
Creating a connection to the HP TRIM database
In order to retrieve and apply classifications from HP TRIM, HP Database
Archiving requires a connection to the HP TRIM database. When the HP TRIM
Enabler Pack was implemented by HP Enterprise Services for you, they defined a
name for this connection. You need to create a connection with this name in
Designer. If you do not have the connection name or details for HP TRIM, contact
your DBA or HP TRIM administrator.
1 In Designer, choose Connection > Edit Connections.
18 Chapter 3: Creating an archive definition
Page 19
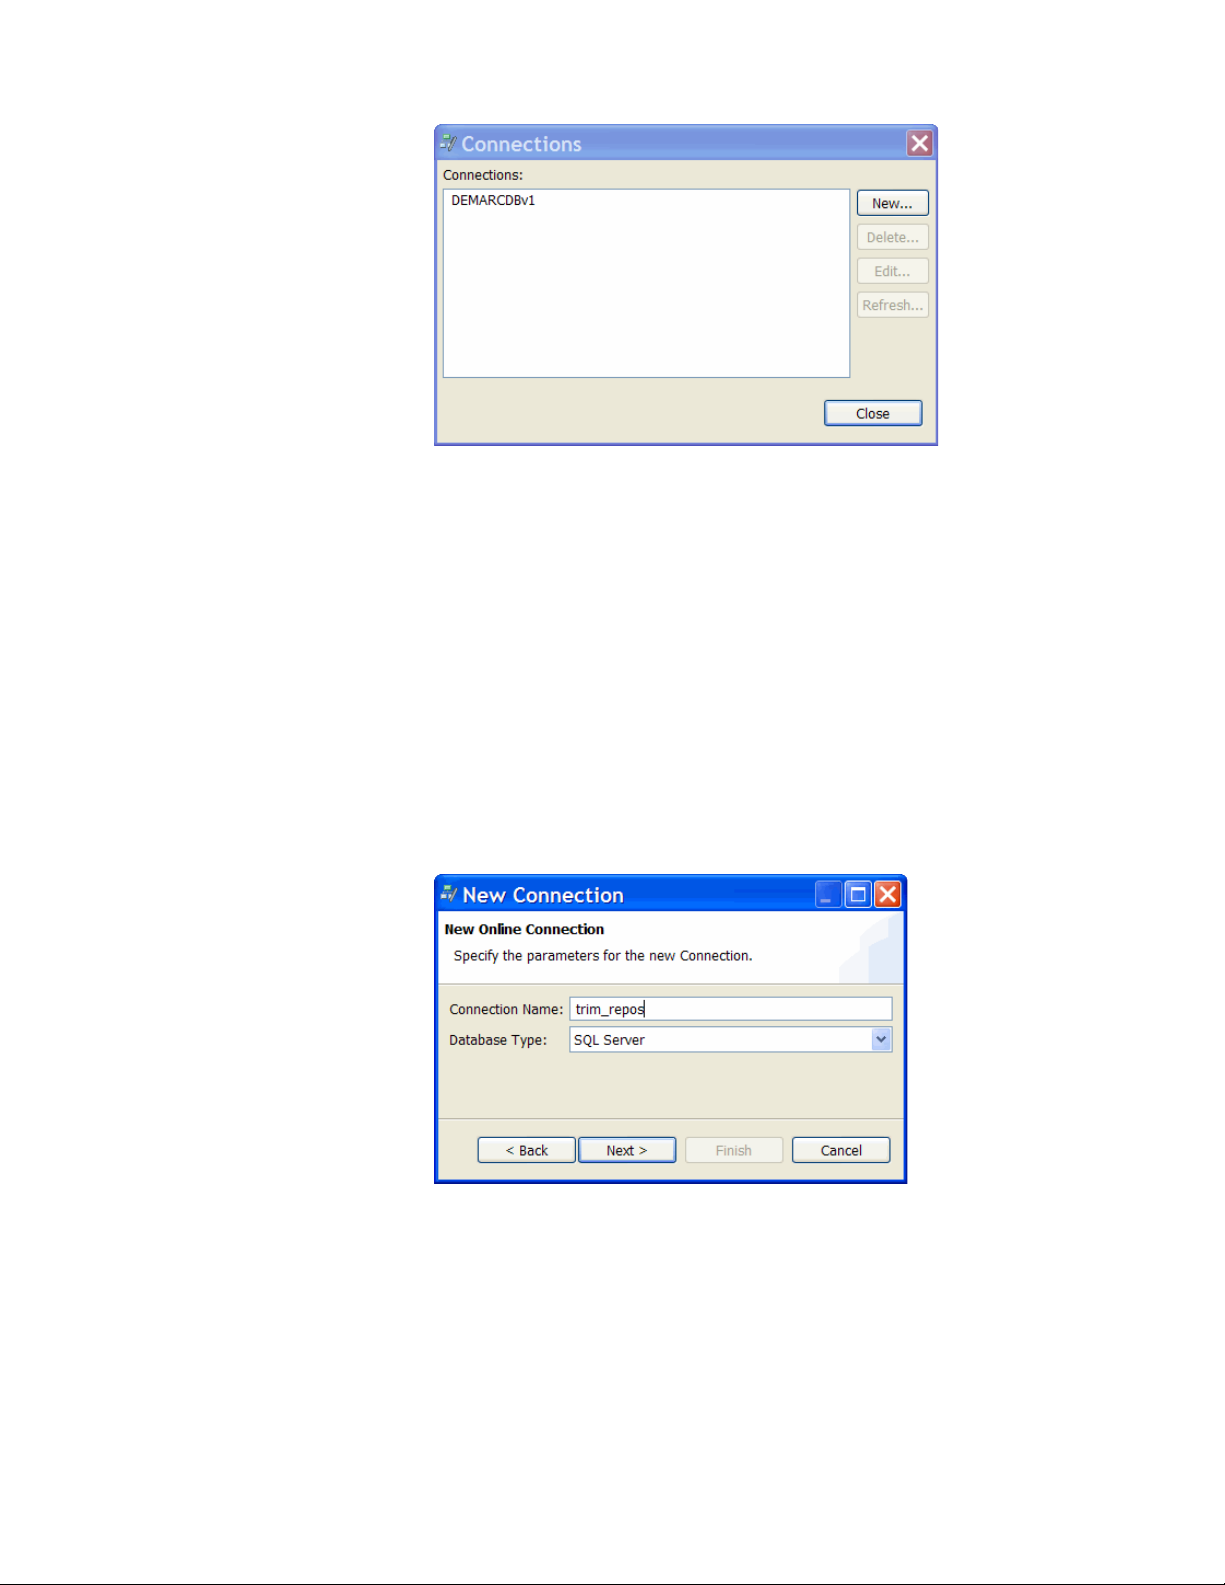
2 Click New.
3 Click Next.
4 Enter a name for the HP TRIM connection, for example, trim_repos.
The name you choose must match the value specified by
<connectionName> in the srmsLoader_config.xml, which resides in
the location where the HP TRIM Enabler Pack was installed and configured.
For example:
<dbarch>
<connectionName>trim_repos</connectionName>
...
</dbarch>
If you are uncertain of the connection name or details, consult your DBA or
HP TRIM administrator.
5 Choose the Database Type, for example, SQL Server.
6 Click Next.
7 Enter the database connection details for the HP TRIM database.
HP Structured Records Management Solution Tutorial 19
Page 20

TIP Typically, a special user will have been created for this purpose. This user
must have SELECT privileges on the TSFILEPLAN table. If you are not sure
what user name and password to use for the HP TRIM database, contact your
DBA or HP TRIM administrator.
8 Click Finish.
9 Click Close.
Summary and next steps
In this chapter you learned to:
• Import a project and create a connection to the HP TRIM database
The next step is to create a cartridge to actually archive and classify the data.
20 Chapter 3: Creating an archive definition
Page 21

4 Creating a cartridge
Once you have a working data model and a connection to HP TRIM, you can
begin to create, convert, and classify cartridges.
This chapter includes: • Creating a cartridge (page 21)
• Navigating in the cartridge editor (page 23)
• Previewing the cartridge (page 23)
• Classifying extracted data (page 25)
• Summary and next steps (page 27)
Creating a cartridge
A cartridge is the mechanism by which HP Database Archiving specifies a
versioned instance of an archive model for one type of archiving. In your cartridge
definition, you can select settings such as the following:
• The type of archive operation to perform (database to database or database to
file, and archive or copy)
• Which rules to apply
• How to treat transactional and chaining objects
• How to treat lookup objects
• HP TRIM classifications to apply
For this tutorial, create a cartridge that archives from a database to a file (an XML
file).
1 Go to File > New Cartridge.
2 In the New Cartridge dialog box, type Orders_D2F_SRMS as the Name.
3 Select Database to File as the Type.
4 If it is not already selected, select the Model radio button.
Advanced concept Model means that the cartridge is based upon a defined data model with
relationships. This type of cartridge is typically used for ongoing archive
operations.
Schema means that the cartridge is based upon the database schema rather
than a defined data model with relationships. This type of cartridge is
typically used for database retirement or the cleanup of orphan tables.
Related information HP Database Archiving software Developer’s guide.
HP Structured Records Management Solution Tutorial 21
Page 22
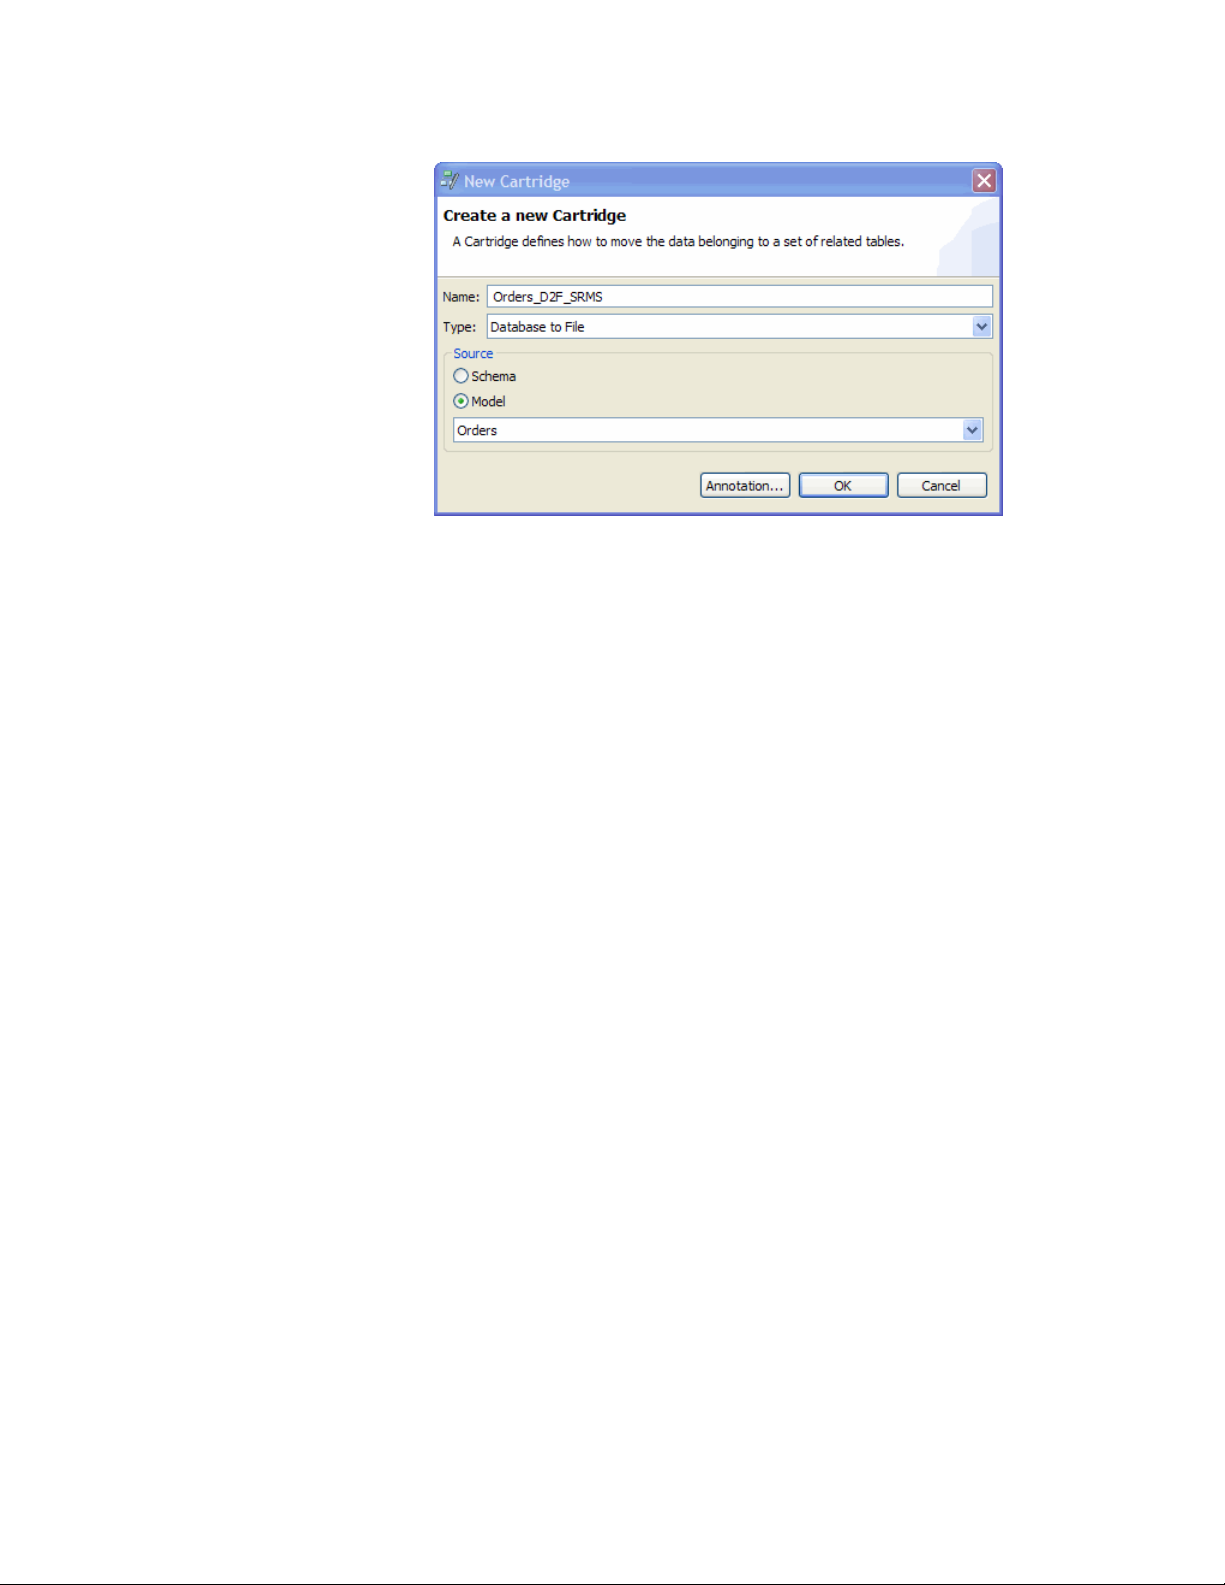
5 If it is not already selected, select Orders as the model.
6 Optionally, click Annotation to add a comment. Click OK to exit the
Annotation dialog box when you are done.
7 Click OK.
8 Click OK. The Database to File Cartridge editor appears.
22 Chapter 4: Creating a cartridge
Page 23
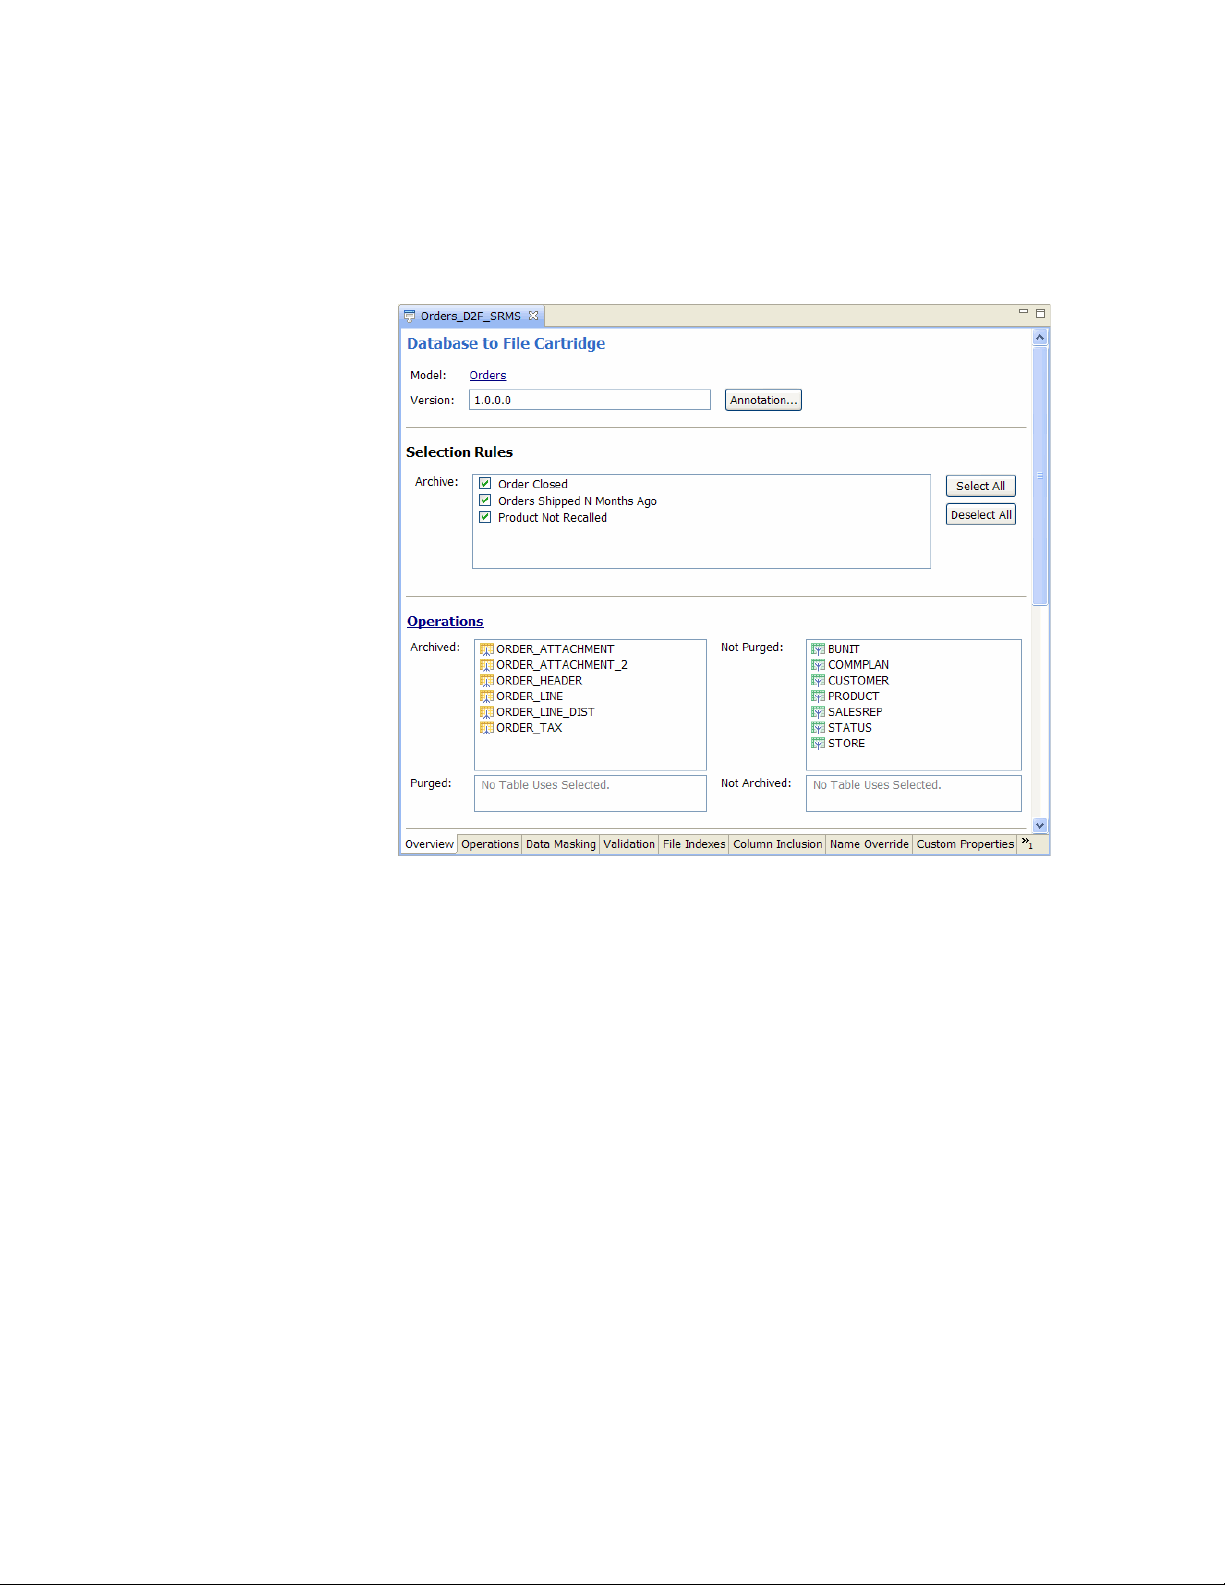
Navigating in the cartridge editor
If you look carefully at the bottom of the editor, you see a number of tabs, which
correspond to the different parts of the cartridge you can edit. The first tab,
Overview, is an overview of the cartridge. Each section on the page has a title that
acts as a hyperlink to the corresponding tab.
At the top of each page, you will find a link called
returns you to the Overview page.
Any change you make in any page is immediately reflected in the Overview page.
For the purposes of this tutorial, you need not make any modifications to the
default settings of the cartridge.
Previewing the cartridge
You can preview your cartridge to confirm it is behaving as you intended.
1 In the toolbar, click the Preview tool.
2 In the Parameter Values dialog box, leave the default values and click OK.
Back to Overview, which
HP Structured Records Management Solution Tutorial 23
Page 24

3 Review the data in the Preview tab.
— The top part of the window shows the rows of the driving table. Select a
row or range of rows in the top part of the window to filter the rows
displayed in the bottom part. Use Ctl-click to select more than one row or
clear the rows selected.
— The Excluded By column displays the rule that caused a row to be
excluded. All rows that are excluded are displayed in red.
— Click on column headers to sort the rows by that value. For example, if
you click the Excluded By column header, the rows are sorted according
to the values of that column.
— Click and drag the column borders to resize the columns in the display.
— The model structure, including rules, is displayed in the lower left pane.
Expand and collapse the node to view the tables and rule you want.
Positive numbers in parentheses next to the driving table indicate the
number of driving table rows included by that table. Negative numbers in
parentheses next to a rule indicate the number of driving table rows
excluded by the rule.
If you notice any problems in preview, you can return to the model or
cartridge definition, modify it, and preview the results again by clicking the
Preview tool.
4 When you are finished with the Preview tab, close it.
24 Chapter 4: Creating a cartridge
Page 25

Classifying extracted data
Once the cartridge is working satisfactorily, you can use the SRMS menu to select
HP TRIM classifications for the extracted data. For example, in this case, your HP
TRIM instance could have an Accounts Payables/Receivables classification called
Customer Sales Orders. Given that the cartridge is archiving sales order data, you
could classify all of the extracted data under Customer Sales Orders.
NOTE For the purposes of this tutorial, you will apply a classification to the
cartridge, but it is not required in order to push your extracted data files to HP
TRIM. As an alternative to applying a classification, you could set properties in a
property set as described below. This metadata could in turn be used by HP TRIM
to manage the extracted data files.
To classify the data extracted by the cartridge:
1 If it is not already open, double-click the Orders_D2F_SRMS cartridge in the
project navigator to open the cartridge editor.
2 Choose SRMS > Convert to SRMS Cartridge.
3 In the dialog box, choose an appropriate property set type from the list of
values. For the purposes of this tutorial, the Default property set type is
sufficient.
TIP Property set types are created as part of the HP TRIM Enabler Pack
installation and configuration. If you are uncertain about which property set
type to select, you may want to consult with your DBA or HP TRIM
administrator before proceeding.
4 Click OK. You should receive a message indicating that the cartridge was
successfully converted.
5 Click OK to clear the message dialog.
6 Click the Custom Properties tab to review the properties added to your
cartridge for the purposes of HP TRIM.
HP Structured Records Management Solution Tutorial 25
Page 26

7 Choose SRMS > Classify.
NOTE The names and hierarchy of your classifications may vary depending
upon your HP TRIM instance. If necessary, you can substitute your own
classification selection here. The key is to apply a valid HP TRIM
classification to the cartridge.
8 Choose an appropriate classification for the data you plan to extract. For
example, you could select
Customer Sales Orders.
Accounting > Accounts Payable /Receivable >
Advanced concept HP TRIM classifications can be used to fulfill the following purposes:
— Find information by browsing a hierarchical structure (as opposed to
searching)
— Set the retention rule of records
— Set the security of records
— Set the access control of records
— Determine the numbering pattern of records
26 Chapter 4: Creating a cartridge
Page 27

— Assign a default owner for records
Once you know for what purposes you need the classification, you can design
it to the detail required. Note that you can also import specific metadata
values during the load process, or default the values of the HP TRIM record
type. It is not mandatory to have a classification at all.
The following fields can be imported on load:
— CLASSIFICATION
— DATE CREATED
— DATE REGISTERED
— DATE CLOSED
— DOSFILE
— EXTERNAL REFERENCE
— RECORD TYPE
— RETENTION SCHEDULE
— TITLE
— NOTES
— any user defined field.
9 Click OK.
10 Optionally, return to the Custom Properties tab. You should now see a value
for the
Summary and next steps
trim.classification property.
In this chapter you learned to:
• Create a cartridge
HP Structured Records Management Solution Tutorial 27
Page 28

• Preview the data for your cartridge
• Convert it to an SRMS cartridge
• Apply a classification to the cartridge
Once you are satisfied with your cartridge, you could deploy and run it by itself,
but, for structured records management, you must perform some additional
processing. To do that, you must create a business flow that runs the cartridge
along with a Groovy script. When you deploy and run the business flow, the
cartridge will be deployed and run with it.
28 Chapter 4: Creating a cartridge
Page 29

5 Creating a business flow
You can run your cartridge separately or as part of a larger workflow. For
example, in the case of structured records management, you run your cartridge
and then run a script to load the archive files into HP TRIM.
This chapter includes: • Creating a business flow
• Adding a Groovy script (page 31)
• Summary and next steps (page 36)
Creating a business flow
1 Select File > New Business Flow.
2 Type Orders_D2F_BF_SRMS for the Name.
(page 29)
3 Optionally, click Annotation to add an annotation and click OK to close the
Annotation dialog box.
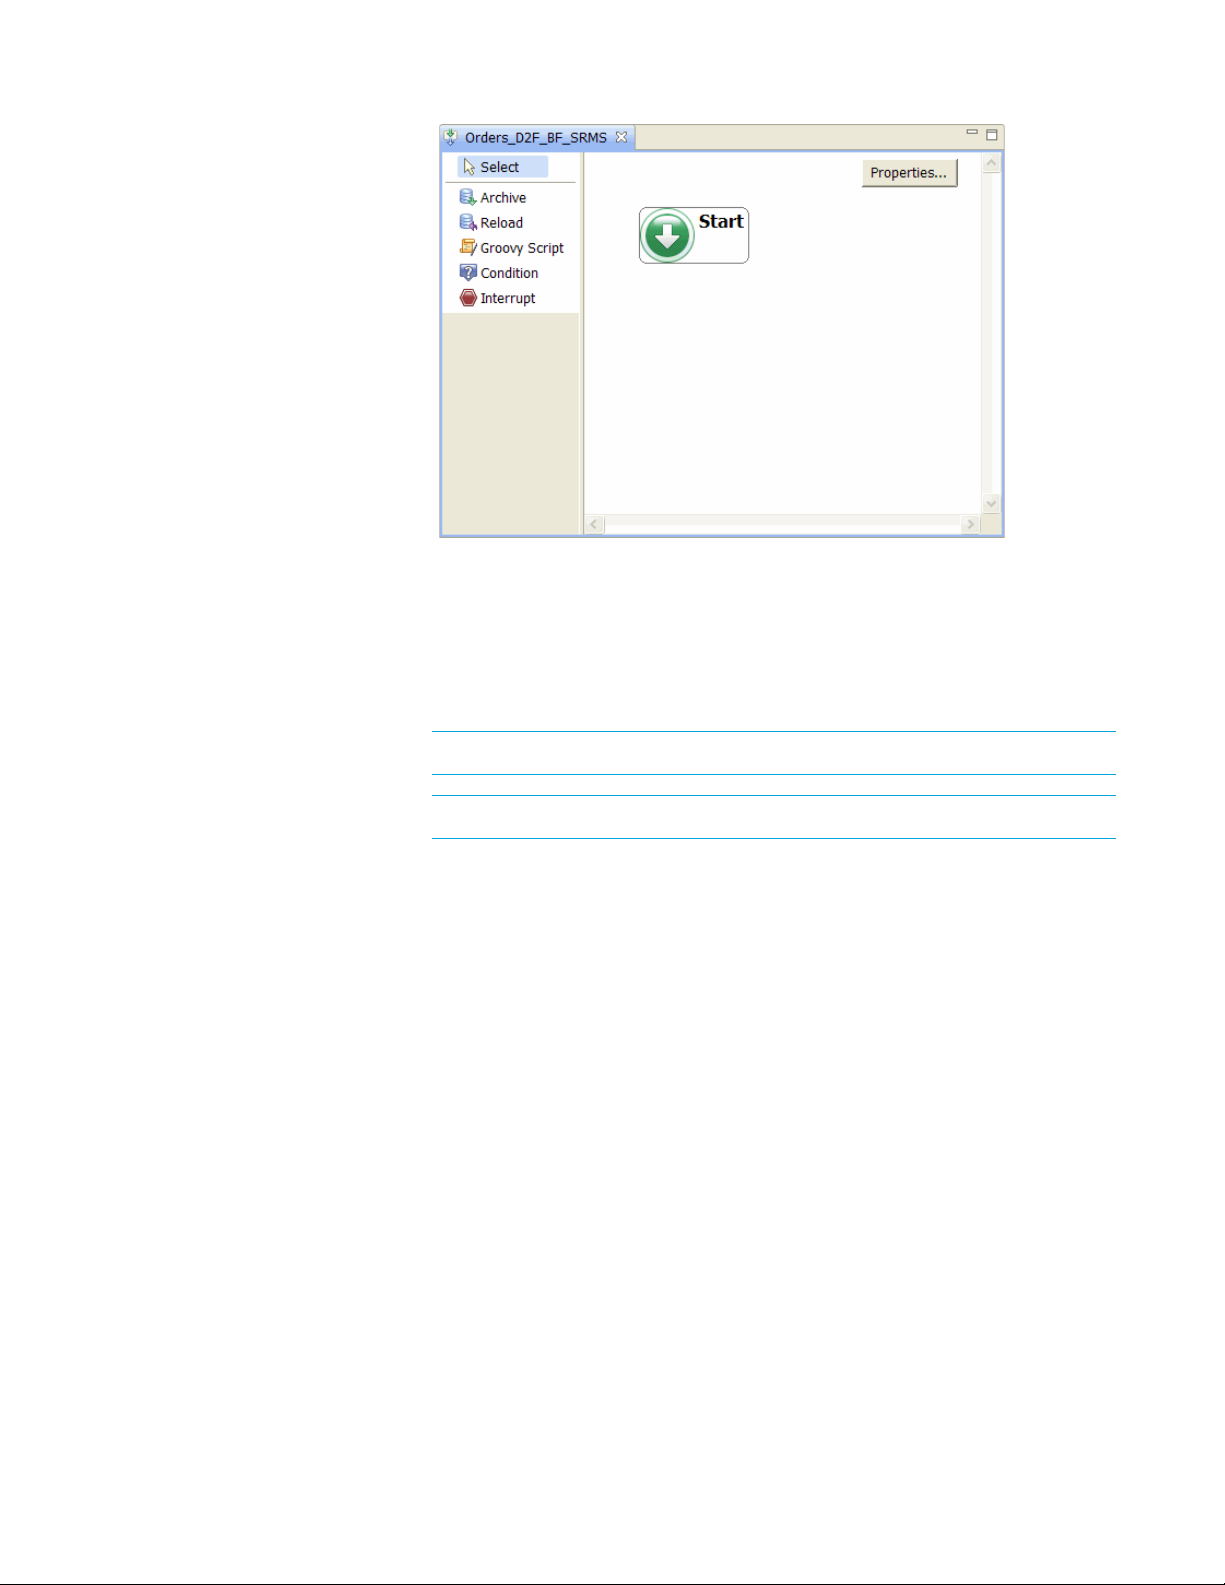
4 Click OK to create the business flow. The business flow always starts from the
Start activity. The left side of the editor contains a toolbar with the various
objects you can insert into the business flow.
HP Structured Records Management Solution Tutorial 29
Page 30
5 Click Archive and then click under the Start activity to place it.
6 In the Archive dialog, select Orders_D2F_SRMS in the Cartridge field, if not
already selected.
7 Standard should be selected by default in the Selection field and Copy in the
Data Movement field. If not, you should select those values.
NOTE You can select Archive instead of Copy, if required.
CAUTION For Deferred Deletes, you must select Copy only.
Advanced concept
Standard selection uses the transactional method to select the rows to be
copied to the file.
Advanced uses a more sophisticated algorithm that
attempts to find interrelated rows across multiple tables. Refer to the HP
Database Archiving software Archive developer’s guide for more information
about selection algorithms.
In the Data Movement field,
and then deletes the data from the source database.
Archive makes a copy of the data in an XML file
Copy makes a copy of the
data but does not delete the data from the source database.
30 Chapter 5: Creating a business flow
Page 31

8 Click OK. You now have a business flow with one cartridge.
Adding a Groovy script
As it stands now, your business flow extracts the data from the database and puts
it in a file, but you still need to ingest the file into HP TRIM. To get the extracted
data into HP TRIM, you need to add another activity that loads the data file into
HP TRIM.
To add a Groovy script that loads the archived data file into HP TRIM:
1 Open the Orders_D2F_SRMS business flow.
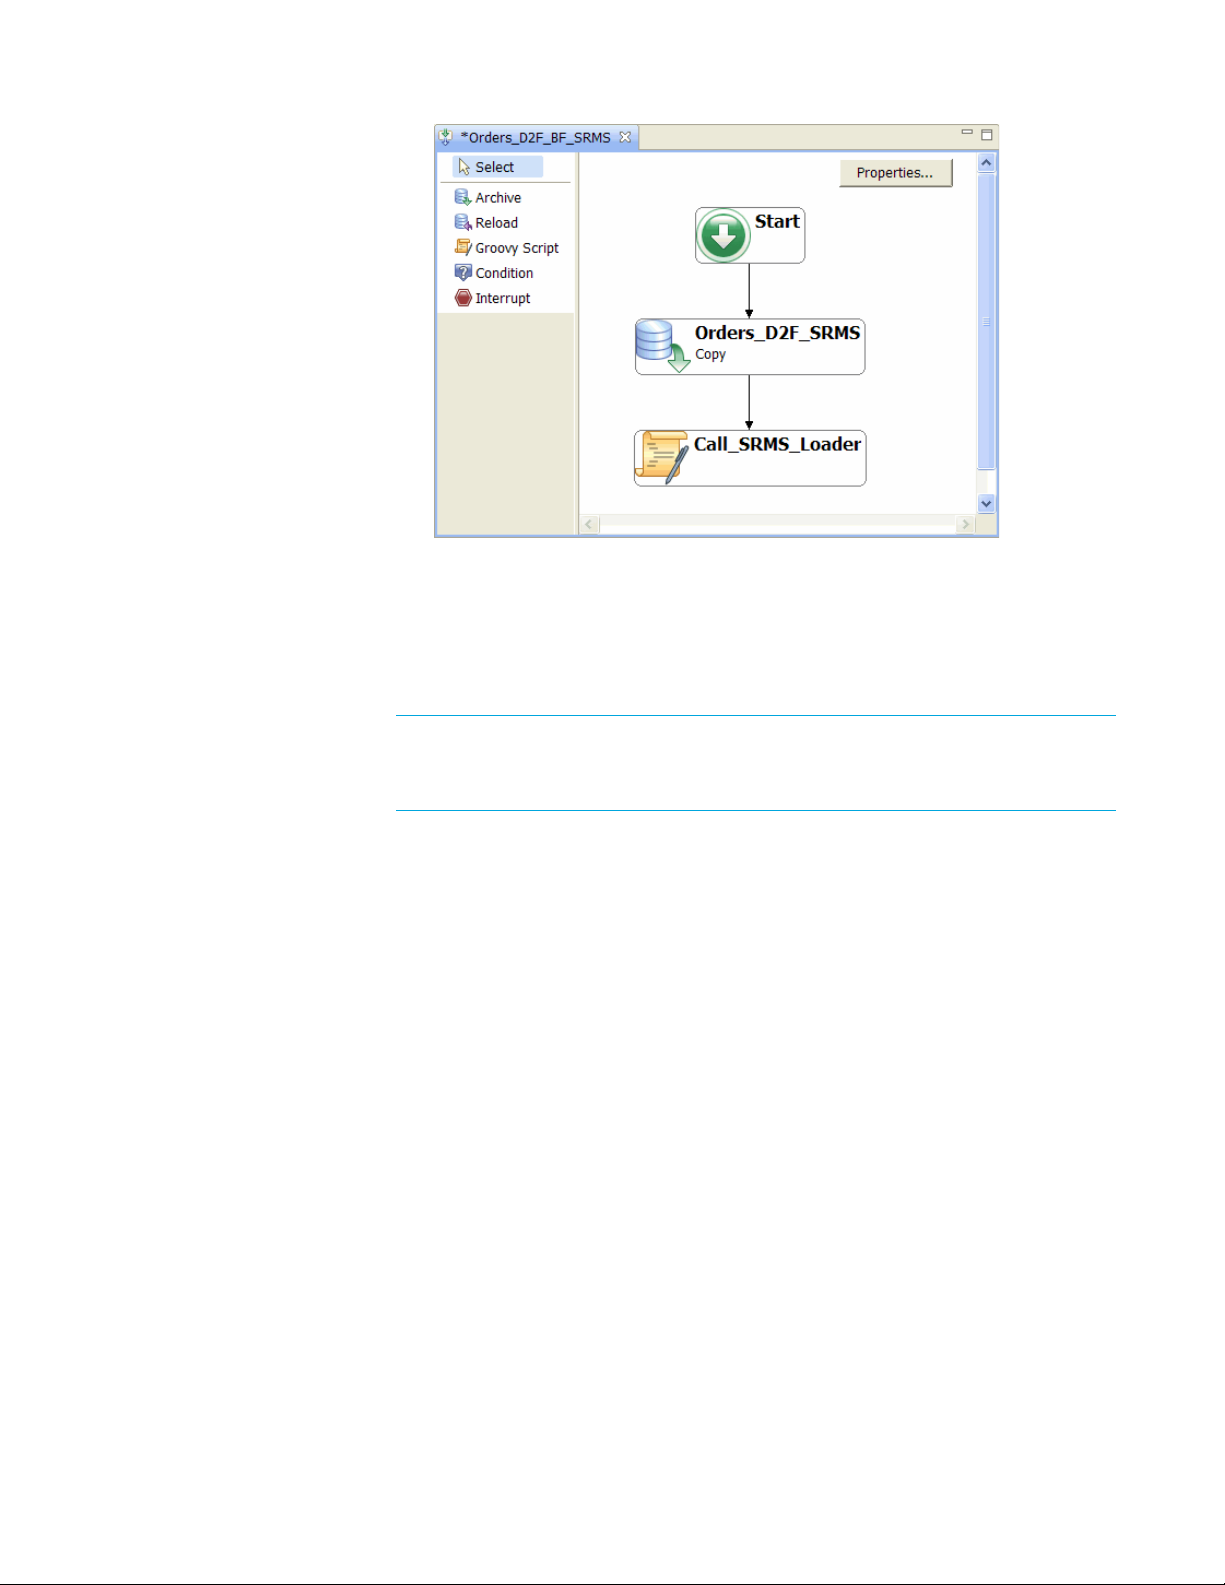
2 Choose SRMS > Add SRMS activity to Business Flow. A Groovy script
named Call_SRMS_Loader is added to your business flow. Ensure that this
Groovy script comes after Orders_D2F_SRMS in the business flow.
HP Structured Records Management Solution Tutorial 31
Page 32

TIP Alternatively, you could add the necessary Groovy script just as you
would any other Groovy script. Select the Groovy Script tool, click
underneath the Orders_D2F_SRMS box, and select the
Loader template.
3 Double-click Call_SRMS_Loader to review the Groovy script. For the
SRMS > Call TRIM
purposes of this tutorial, you can accept the default behavior of the basic
template. For more information about the basic and advanced templates, and
options for heterogeneous operating environments, refer to Calling the SRMS
Loader (page 33).
NOTE Notice that in this example call, "DEFAULT_PATH" was changed to
"Z:\\Oracle_OLTP". That change assumes that the SRMS loader resides on
a Windows machine and that the shared
archivedata folder has been
mapped to Z: on the SRMS loader machine.
4 Click OK.
TIP The SRMS Loader script must come after the archiving activity in the
business flow. If it is not placed there automatically, you must manually move
it to that position.
32 Chapter 5: Creating a business flow
Page 33
Calling the SRMS Loader
Your configuration determines how you need to invoke the SRMS Loader to
ingest your archive files into HP TRIM:
NOTE In most cases, HP Database Archiving resides on a different machine than
HP TRIM. HP Database Archiving can reside on MS Windows or UNIX, whereas
HP TRIM can reside only on MS Windows.
• When HP Database Archiving and HP TRIM are on homogeneous operating
systems with shared file systems and identical path specifications, you can
usually just choose
SRMS > Add SRMS activity to Business Flow and accept
the default settings. If the path specifications are different, you need to change
"DEFAULT_PATH" to a path specification. For example, suppose the path to the
archive files on Windows PC1 is
Files\HPDBArchiving\archivedata\Oracle_OLTP
C:\Program
and the archivedata
folder is shared, but, on Windows PC2, the path to that same location is
mapped to
"DEFAULT_PATH" to "Z:\\Oracle_OLTP\\" in the sendToSRMS call.
Z:\Oracle_OLTP. In this case, you would change
• When HP Database Archiving and HP TRIM reside on homogeneous
operating systems with unshared file systems, you need to include an ftp
command for moving the archive files to a file system accessible by the
SRMS Loader. To achieve this result, you need to insert a Groovy script in the
business flow editor and choose the
SRMS > Call TRIM Loader template.
• When HP Database Archiving and HP TRIM reside on heterogeneous
operating systems with shared file systems, you must provide a path
specification and manually call the SRMS Loader. To achieve this result, you
need to insert a Groovy script in the business flow editor and choose the
> Call TRIM Loader (Advanced)
HP Structured Records Management Solution Tutorial 33
template.
SRMS
Page 34

• When HP Database Archiving and HP TRIM reside on heterogeneous
operating systems with unshared file systems, you must provide a path
specification, insert an ftp command for moving the archive files, and
manually call the SRMS Loader. To achieve this result, you need to insert a
Groovy script in the business flow editor and choose the
Loader (Advanced) template.
TIP For more information about adding Groovy scripts to your business flows,
SRMS > Call TRIM
refer to the HP Database Archiving software Archive developer’s guide.
Tabl e 1 summarizes the options just described.
Table 1 Guidelines for SRMS Loader calls
HP DB OS Shared file system Non-shared file system
MS Windows •
ASYNCHRONOUS |
SYNCHRONOUS
• DEFAULT_PATH | path
a
spec
• ASYNCHRONOUS |
SYNCHRONOUS
• DEFAULT_PATH | path
spec
• insert ftp command to
a
UNIX • ASYNCHRONOUS |
SYNCHRONOUS
• path spec
• manually call loader with
host and port
b
copy/move files
• ASYNCHRONOUS |
SYNCHRONOUS
• path spec
• insert ftp command to
copy/move files
• manually call loader with
host and port
a. Use the Call TRIM Loader Groovy script template for this case.
b. Use the Call TRIM Loader (Advanced) Groovy script template for this case.
b
Synchronous and asynchronous calls to the SRMS Loader
In the SRMS Loader call in your Groovy script, SYNCHRONOUS / ASYNCHRONOUS
indicates whether the business flow should wait for the SRMS Loader to
complete.
•
SYNCHRONOUS indicates that the business flow will wait for the archive files
to finish loading into HP TRIM.
business flow completes, the files are in HP TRIM. This option is most
applicable when HP Database Archiving and HP TRIM are both on MS
Windows.
ASYNCHRONOUS indicates the business flow will not wait for the archive files
•
to finish loading into HP TRIM. With A
may continue for some time after the business flow completes. You can use
ASYNCHRONOUS in any situation, but it is particularly helpful when HP TRIM
is on a remote machine and may take some time to load the archive files. In
this case, you might want to send the request to load the file and then end the
business flow without waiting for the load request to complete.
34 Chapter 5: Creating a business flow
SYNCHRONOUS ensures that, when the
SYNCHRONOUS, the loading process
Page 35

Substitution path specifications for archive files
In the SRMS Loader call in your Groovy script, a path specification indicates a
substitution path to apply to the HP Database Archiving metadata files.
DEFAULT_PATH indicates that the existing paths in the metadata files can be
•
used as is. This setting is best when both HP Database Archiving and HP
TRIM are on MS Windows systems with shared file systems and identical
path specifications.
• A path specification, such as
c:\\temp\\mydir\\, indicates that the paths
in the metadata files should be replaced with this path. Notice that the
backslash must be escaped by entering it twice. This setting is best when HP
Database Archiving is on a UNIX system. If HP Database Archiving is
running on a UNIX system, the metadata files will contain UNIX paths that
are not usable by HP TRIM, which runs on MS Windows. This setting can
convert those paths to ones that are usable on MS Windows.
If you enter a path specification in your SRMS Loader call, you must ensure that it
matches the actual location of the archive data files. Otherwise, you will get an
error similar to the following when you run the business flow:
Exception while executing a Groovy script
You can ensure that the archive files reside in the specified location in one of two
ways:
• In the Web Console, create a new location,
Locations > New
, that matches the path specification in your SRMS Loader
Web Console > Environment >
call. Choose that location as the destination location when you run your
business flow. HP Database Archiving will generate the files in that location.
This method is the preferred way to ensure that the archive files end up in the
location where the SRMS Loader is expecting them.
• Manually move the archive files from wherever HP Database Archiving
generated them to the path you specified in your SRMS Loader call. This
method requires an additional step, but, in some cases, it may be your only
option.
Example SRMS Loader calls
This first example illustrates an asynchronous call to the loader with an MS
Windows path specification. It will spawn the SRMS Loader and finish, and
override the path to the data files in the metadata file to be
SrmsMetadata.sendToSRMS("TRIM", CURRENT_GROUP_RUN_ID,
ENVIRONMENT_NAME, REPOS_DB,
srmsMetadata.getdefaultConfigFile(),
"ASYNCHRONOUS","c:\\temp\\mydir\\",
"LOCAL")
This example illustrate an asynchronous call to the loader with an alternative MS
Windows path specification. It will spawn the SRMS Loader and finish, and
override the path to the data files in the metadata file to be
SrmsMetadata.sendToSRMS("TRIM", CURRENT_GROUP_RUN_ID,
ENVIRONMENT_NAME, REPOS_DB,
HP Structured Records Management Solution Tutorial 35
c:\temp\mydir.
c:\temp\mydir.
Page 36

srmsMetadata.getdefaultConfigFile(),
"ASYNCHRONOUS","c:/temp/mydir/",
"LOCAL")
This example call loads the output generated by all cartridges within the current
business flow into HP TRIM:
import groovy.sql.Sql
import com.hp.ilm.db.extensions.srms.infrastructure.*
SrmsMetadata.sendToSRMS("TRIM", CURRENT_GROUP_RUN_ID,
ENVIRONMENT_NAME, REPOS_DB,
SrmsMetadata.getdefaultConfigFile(),
"SYNCHRONOUS","DEFAULT_PATH",
"LOCAL")
This example call also loads the output generated by all cartridges within the
current business flow into HP TRIM, but it allows users access to perform
additional processing at intermediate points:
import groovy.sql.Sql
import com.hp.ilm.db.extensions.srms.infrastructure.*
//Generate the metadata file(s) required by the
//srmsLoader, but do not initiate the load
def srmsMetadataPayload=SrmsMetadata.generateSRMSMetadata
"TRIM", CURRENT_GROUP_RUN_ID,
ENVIRONMENT_NAME, REPOS_DB,
SrmsMetadata.getdefaultConfigFile(),
"DEFAULT_PATH")
//Do some intermediate processing here e.g. FTP files.
//initiate loading the files
SrmsMetadata.callSRMSLoader (srmsMetadataPayload,
"SYNCHRONOUS", "LOCAL")
Summary and next steps
In this chapter you learned to:
• Create a business flow
• Add a cartridge to the business flow
• Add a Groovy script to call the SRMS loader from the business flow.
The next step is to deploy and run this business flow, which also deploys and runs
your cartridge.
36 Chapter 5: Creating a business flow
Page 37

6 Deploying and running a business
flow
When the business flow definition is complete, you are ready to deploy it to the
local or remote system where you plan to execute it. Alternatively, you could also
generate it on the file system for future deployment on another system by you or
someone else.
This chapter describes how to set up the deployment environment, deploy and run
a business flow in the environment, and monitor the business flow while it is
running.
This chapter includes: • Deployment prerequisites (page 37)
• Deploying the business flow (page 37)
• Running the business flow (page 41)
• Summary and next steps (page 45)
Deployment prerequisites
Before you deploy your business flow, you must perform the following tasks in
the Web Console:
• Start the Web Console service.
• Invoke the Web Console URL from your browser.
• Install the repository.
• Create a deployment environment.
• (Optionally) Create users.
See also For detailed information on how to perform these tasks in the Web Console, refer
to HP Database Archiving software Runtime guide. In particular, look for the
tutorial on configuring the Web Console.
Deploying the business flow
In order to run your business flow, you must first deploy it.
NOTE Before performing the steps in this section, you must meet all of the
prerequisites in Deployment prerequisites (page 37).
HP Structured Records Management Solution Tutorial 37
Page 38

To deploy your business flow:
1 Return to Designer or restart if it is not currently open.
2 In the Project Navigator, right-click the Orders_D2F_BF_SRMS and select
Deploy from the pop-up menu.
TIP In the Deployment Assistant on the Deployment Type page, you can
select Deploy Locally, if you installed the repository on the same database
server where you are currently running Designer. If you do not have the
repository installed on the same database server where you are running
Designer, you must choose Deploy Remotely or Generate. Refer to the HP
Database Archiving software Archive developer’s guide for more information.
3 Select Deploy Locally for the purposes of this example.
4 Check Include Documentation to generate a PDF document that describes the
business flow/cartridge structure, including your annotations.
5 Click Next.
6 Type your encryption key in the Encryption Key field. The Encryption Key
was set when installing the repository. The Encryption Key is only required
once in each session.
38 Chapter 6: Deploying and running a business flow
Page 39

7 Click Next. The Deploy Environment page displays.
8 Choose the environment to which you want to deploy this business flow, for
example,
Oracle_OLTP.
9 Click Next.
NOTE If you deployed database to database archiving as part of your
environment setup, you are prompted for topology. If database to database
archiving is not present, the only option is to archive from the active database
and Deployment Assistant need not prompt you for topology.
See also Refer to the HP Database Archiving software Developer’s guide for more
information about topologies.
10 Click Next.
11 The Source Database Administrator page prompts you for the credentials of
the active database. The Deployment Assistant needs this to grant access to
the cartridge tables. For example, user system and password oracle or user sa
and password manager1.
HP Structured Records Management Solution Tutorial 39
Page 40

12 Click Next. The Summary page shows a summary of the options you have
selected.
13 Click Finish. You may have to wait a few minutes before the Deployment
Finished dialog appears.
14 When the Deployment Finished dialog appears, click Show Log to show the
log file. Review the log and ensure there are no errors or problems.
40 Chapter 6: Deploying and running a business flow
Page 41

15 If you discovered errors in the previous step, click OK and step back through
the Deployment Assistant to correct the problems. If there were no errors,
click
16 Click OK to close the Deployment Finished dialog.
17 In the Deployment Assistant, if you specified Include Documentation, you
should find a PDF file with your business flow’s documentation located in
install_dir\obt\businessflow\environment_name. For example:
C:\Program
Files\HPDBArchiving\obt\businessflow\Oracle_OLTP\
Orders_D2F_BF_SRMS.1_0_0_0.pdf
Examine the PDF file. You should find all of your annotations along with
other useful information about the structure and design of your business flow.
In this same directory, you should also find the generated business flow file,
Orders_D2F_BF_SRMS.1_0_0_0.busflow, and the properties file,
Orders_D2F_BF_SRMS.1_0_0_0.properties.
Running the business flow
OK to close the log file.
After your business flow is successfully deployed, you are ready to run it. You can
run jobs from the Web Console or the command line. For this tutorial, run the job
through the Web Console.
1 If the Web Console is not open in your browser, invoke it by accessing its
URL, for example,
TIP The Web Console must have been started before you invoke its URL in
http://localhost:8080/WebConsole.
your browser. To learn more about starting the Web Console and invoking it
from your browser, refer to HP Database Archiving software Runtime guide.
2 Login as a user with privileges to run jobs for the environment in which you
plan to run this job. For example, login as the admin user, whose password
you set when installing the repository.
TIP If you have more than one environment available in your Web Console,
make sure that the currently active environment is the one where you plan to
run your business flow. To check the active environment and change it if
necessary, click
Environment from the menu at the top of the page and then
set the active environment, if necessary.
3 Before you launch the business flow, you should confirm that the parameters
are set appropriately. Click
Parameters from the menu at the top of the page
to review the parameters and their values.
The database to file parameters display first. You can see the parameters for
database to database, business flows, and cartridges by clicking those items in
the navigation bar on the left.
HP Structured Records Management Solution Tutorial 41
Page 42

4 Under Core parameters, notice that Extract file format is set to XML
denormalized
by default, which means that the archive file will be XML
rather than comma separated values (CSV).
5 If the SRMS Loader was configured to perform hash checks, you need to
perform the following steps to generate MD5 files:
TIP If the ExecuteHashCheck parameter in srmsLoader_config.xml is
set to true, the loader performs a hash check before loading the XML files into
HP TRIM. This hash check requires an MD5 file.
a Scroll down to the Validation parameters.
b Locate the Checksum algorithm parameter.
c Choose MD5 checksum from the list of values.
HP TRIM uses the MD5 files generated by HP Database Archiving as a
point of comparison for the hash files it generates as it loads the XML
files. Thus, HP TRIM can validate that the loaded XML files exactly
match the ones generated by HP Database Archiving. If HP Database
Archiving does not generate MD5 files, then HP TRIM has no point of
comparison for its validation step and you will receive a log message
indicating that some hashes did not match the originals.
42 Chapter 6: Deploying and running a business flow
Page 43

For the purposes of this tutorial, the remainder of the parameters can use the
default values.
6 Click Apply to accept any parameter changes.
7 (Optional) Since the business flow will create files on the file system, you
might also want to confirm the exact location where HP Database Archiving
will create the files. To perform this procedure, you need to be the admin user
or another user with Manage Environment privileges.
a Click Environment from the menu at the top of the page.
b Click Locations in the left navigation pane.
c Click the LOCAL_ARCHIVE_FS system parameter. A pane opens at the
bottom of the page displaying the settings. Note down the
Directory
property value. This path is where files will be created. You could change
this path, but, for the purposes of this tutorial, the default location is fine.
HP Structured Records Management Solution Tutorial 43
Page 44
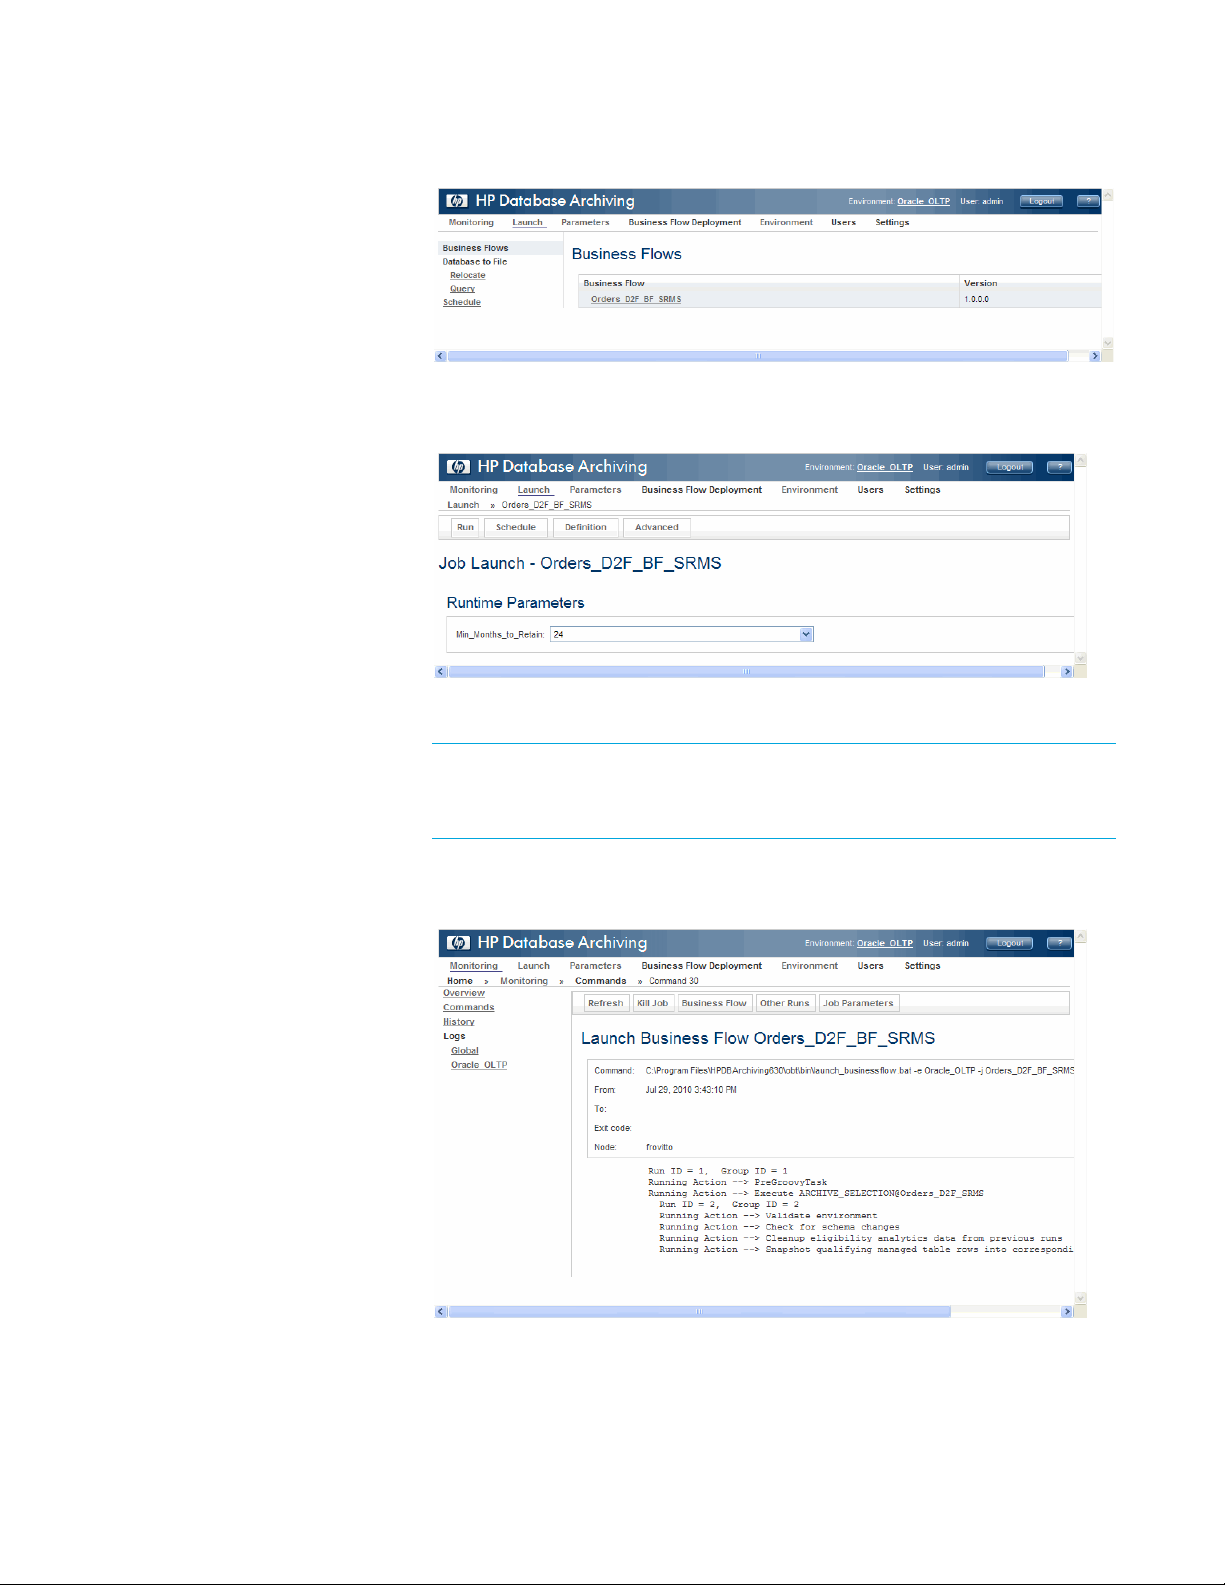
8 Click Launch from the menu at the top of the page.
9 Click Orders_D2F_BF_SRMS. The Launch page for that business flow
appears.
10 Click Run.
TIP For the purposes of this tutorial, you run the business flow manually. For
your production systems, you would typically click
Schedule to automate the
running of the business flow.
11 Click Confirm when prompted. The business flow is launched and you are
taken to a monitoring page that will periodically refresh with the latest status.
12 When the job completes, click Monitoring at the top of the page to return to
the main entry for the job. Notice that the business flow’s status is completed.
44 Chapter 6: Deploying and running a business flow
Page 45

NOTE You may recall that, in Designer, we chose to run the loader with the
ASYNCHRONOUS parameter. Hence, the business flow will not go into
completed status until the files are actually loaded into HP TRIM.
Summary and next steps
In this chapter you learned to:
• Deploy your business flow
• Find the generated business flow and its PDF documentation
• Run the business flow from the Web Console
• Monitor the execution of the business flow from the Web Console
Once your business flow runs successfully, you can access the XML through HP
TRIM.
HP Structured Records Management Solution Tutorial 45
Page 46

46 Chapter 6: Deploying and running a business flow
Page 47

7Querying the archive
After your data has been archived to file and ingested by HP TRIM, you can see
the files as a record in HP TRIM. You can also query the data in the files by using
the Record Query Server.
This chapter describes how you can use the query server on MS Windows to look
at the archived data in MS Excel.
This chapter includes: • Viewing the extract in HP TRIM (page 47)
• Searching the extract in HP TRIM (page 49)
• Querying archived data (page 49)
• Summary and next steps (page 53)
See also HP Database Archiving software Runtime guide for more information about the
Record Query Server.
Viewing the extract in HP TRIM
After you successfully run your SRMS cartridge, you can see the archive data file
from HP TRIM.
1 If it is not already open, start your HP TRIM client.
2 Display your classifications and expand the one to which you assigned your
cartridge. You should see a new record set under that classification that
contains a series of documents.
3 Select the first document under the new record set. This document is the
ingest log, which provides an unbroken audit trail for the data. It shows
exactly when each data file was created and enclosed in the container.
4 Select the Preview tab at the bottom of the page to see the document’s
contents.
HP Structured Records Management Solution Tutorial 47
Page 48

5 Select the next document, which is an MD5 summary. This is created by HP
Database Archiving as part of the extraction. It contains the md5 hash for the
summary.xml file and is used to check that the summary file has not been
tampered with.
After all the files have been imported into HP TRIM, it performs a validation
of their contents against the MD5 files created by HP Database Archiving
during extraction. The process creates a new hash for each imported data file
and compares it with the original hash in the summary document and reports
the outcome of the check.
TIP You can manually run this validation at any time in the future by right
clicking on the folder and choosing
Send To > Validate File Integrity from
the context menu.
6 The next five documents are the data, schema, and summary files. The
summary files describe the data and the schema files describe the XML
schema used. These descriptive schemas are tightly coupled with the data
because we may want to remodel the extract schema at some stage. To do that,
we would need to know which model was used for each run. This will help us
reconstitute and use the data for years to come.
TIP In some cases, it may be that this file is too large to preview, in which case
you will receive a message to that effect. In such cases, you can right-click the
document and choose View to see it.
48 Chapter 7: Querying the archive
Page 49

Searching the extract in HP TRIM
HP TRIM also allows you to search the structured records. As with any other
record in HP TRIM, you may need to query it for business reasons, a Freedom of
Information request or an e-discovery exercise for litigation. All of the HP TRIM
search methods are available, in the same way that they would be for other types
of records.
For example, you might search by Date Created.
TIP While searching in HP TRIM is useful, you may find that what you really
need is to query the archive data in much the same way that you do when the data
was stored in a database. HP Database Archiving provides a Record Query Server,
which enables you to execute SQL queries against your archived data files. Refer
to Querying archived data (page 49).
For more information about searching records within HP TRIM, refer to your HP
TRIM documentation.
Querying archived data
While the search facilities within HP TRIM are quite powerful, the data stored in
the XML files from HP Database Archiving is relational. As such, you may, at
times, want to query the data as you did when it was stored in a database but
without incurring the overhead of reloading it into your production database. The
HP Structured Records Management Solution Tutorial 49
Page 50

Creating user collections
Record Query Server (RQS) in HP TRIM provides you with direct query access to
your data without reloading it into a relational database. Using RQS, you can
access your data using standard SQL reporting and development tools on
Windows and UNIX. You can even join your archived data with existing data in a
database.
• Creating user collections (page 50)
• Querying your collection in Microsoft Office Excel (page 51)
An archive data collection is file system or backend locations of archived XML
and XSD files. Creating the collection enables the Record Query Server to view
the files. You create a collection from HP TRIM.
To create a user collection:
1 In HP TRIM, locate the folder that contains the XML documents generated by
your cartridge.
2 Right click the folder and choose Send To > Prepare for RQS. The RQS login
dialog box displays.
3 The default username and password is install and OA, respectively.
TIP HP TRIM will attempt to connect to the Record Query Server on the host
and port specified in srmsTRIMAddIn.xml (RQSHost and RQSPort).
4 The first time you perform this process, select NONE for Extent.
TIP For subsequent collections, you can choose SCHEMA or ALL. SCHEMA
drops your previously created collection before creating the new one. ALL
drops all previously created schemas before creating the new one.
50 Chapter 7: Querying the archive
Page 51

5 Click OK. The collection is saved to the server. This process may take a few
moments.
6 You can now import the data into Microsoft Office Excel or another ODBC/
JDBC client of your choice. Refer to Querying your collection in Microsoft
Office Excel (page 51).
See also HP Database Archiving software Runtime guide
Querying your collection in Microsoft Office Excel
To quickly test your collection:
1 Open Microsoft Office Excel.
NOTE The steps in this section are based upon Microsoft Office 2003.
2 From the main menu, select Data > Import External Data > New Database Query.
TIP In Microsoft Office Excel 2007, select Data > Get External Data > From
Other Sources > From Microsoft Query.
HP Structured Records Management Solution Tutorial 51
Page 52

3 Select xmlArchive_SRMS*.
4 Click OK.
5 In the OpenAccess Login dialog, type your User Name and Password. The
default user name is
6 Click OK. The Query Wizard - Choose Columns page appears.
7 In the Available tables and columns list, expand the ORDER_HEADER node.
8 Select ORDERID.
9 Click the shuttle (>) to move ORDERID to the Columns in your query list.
10 Repeat step 8 and step 9 for CUSTOMERID, ORDERDATE, TOTAL, and
install and the default password is OA.
STATUSID.
11 Click Next.
52 Chapter 7: Querying the archive
Page 53

12 Click Next. No changes are necessary on the Query Wizard - Filter Data page.
13 Click Next. No changes are necessary on the Query Wizard - Sort Order page.
14 Select Return Data to Microsoft Office Excel in the Query Wizard - Finish page.
15 Click Finish. The Import Data dialog box appears.
16 Select New Worksheet.
17 Click OK. Your data is loaded into the spreadsheet and you can manipulate it
as you would any other data in an Excel spreadsheet.
TIP If you found that some of your data types could not be displayed properly
in MS Excel, you could override those data types in the Record Query Server.
Refer to HP Database Archiving software Runtime guide for more
information.
Summary and next steps
In this chapter you learned to:
— create collections
HP Structured Records Management Solution Tutorial 53
Page 54

— import your data into MS Excel
You have now completed the basic HP Database Archiving structured records
management tutorial. The HP Database Archiving software documentation set
contains a number of other tutorials that you may wish to try out now:
• HP Database Archiving software Archive developer’s guide
— Chapter 2, Application retirement
— Chapter 3, Data subsetting
— Chapter 4, Eligibility analytics
— Chapter 5, Database to database archive and reload
• HP Database Archiving software Runtime guide
— Chapter 2, Configuring the Web Console
— Chapter 3, Deploying and running business flows
— Chapter 4, Viewing eligibility analytics
54 Chapter 7: Querying the archive
Page 55

ATroubleshooting
This appendix describes some of the common issues and solutions that you may
encounter when configuring and running HP Database Archiving and HP TRIM
together for structured records management.
• Summary of issues (page 55)
• Design time issues (page 56)
• Runtime issues (page 57)
• Archive access issues (page 60)
WARN ING! This appendix only covers those issues specific to HP Database
Archiving when integrated with HP TRIM for structured records management.
For other, general issues regarding HP Database Archiving, refer to HP Database
Archiving software Troubleshooting guide. For general HP TRIM issues, refer to
the HP TRIM online help and documentation.
Summary of issues
Following is a list of common issues that you may encounter:
• Unable to convert cartridge to SRMS (page 56)
• Unable to classify cartridge (page 56)
• Warning when adding Groovy script (page 57)
• Job fails with Groovy error (page 57)
• Job fails with Groovy exception (page 57)
• Failure when launching an SRMS cartridge (page 58)
• Archive files not loaded into HP TRIM (page 59)
• Insufficient capacity error in HP TRIM (page 59)
• Loaded files do not match originals (page 59)
• Too many files and folders created in HP TRIM (page 60)
• Cannot search the archive from HP TRIM (page 60)
• Sending to RQS fails (page 61)
HP Structured Records Management Solution Tutorial 55
Page 56

Design time issues
Design time issues
This section describes issues that might arise when you are designing an SRMS
cartridge.
Unable to convert cartridge to SRMS
Symptom When you select SRMS > Convert to SRMS Cartridge, you receive an error
similar to the following:
HP Structured Records Management Solution is not
configured. Please contact your HP Account Representative.
Cause You either do not have SRMS configured at all for this instance of HP Database
Archiving or SRMS is misconfigured.
Solution • If SRMS is not configured at all, contact HP to have HP Enterprise Services
configure it for you.
• If SRMS was already configured, ensure that
Unable to classify cartridge
Symptom When you attempt to classify an SRMS cartridge, you receive an error similar to
the following:
Cause The problem could be either of the following:
• You do not have a connection to the HP TRIM repository defined in Designer.
• The connection to the HP TRIM repository does not have the correct name.
srmsLoader_config.xml
srmsTRIMAddIn.xml, which are located in
and
<install_dir>\obt\config, either:
— Point to a valid instance of HP TRIM that has the HP TRIM Enabler Pack
properly installed and configured. If this is the problem, you may be able
to modify the path and correct the problem yourself.
Or:
— Contain a set of valid configuration settings. If this is the problem, consult
your DBA or HP TRIM administrator.
Error: SRMS repository connection '<connection_name>' does
not exist!
Solution Create a connection to the HP TRIM repository.
• Ensure that the connection to the HP TRIM repository has the correct name.
The connection name must match the value specified by
<connectionName> in the srmsLoader_config.xml, which resides in
the location where the HP TRIM Enabler Pack was installed and configured.
For example:
<dbarch>
<connectionName>trim_repos</connectionName>
56 Appendix A: Troubleshooting
Page 57

...
</dbarch>
If you are uncertain of the connection name or details, consult your DBA or
HP TRIM administrator.
Warning when adding Groovy script
Symptom When you choose SRMS > Add SRMS activity to Business Flow, you get a
warning indicating that you have two instances of the Groovy script and you only
need one:
Business Flow already contains an SRMS Loader activity.
Only one call per business flow is needed. Continuing
adding another call?
Cause You must have previously added a Groovy script that calls the SRMS Loader.
Runtime issues
Solution Click
click
Runtime issues
This section describes issues that might arise when you are running an SRMS
cartridge.
Job fails with Groovy error
Symptom When you run an SRMS business flow, the job fails with the following error:
org.codehaus.groovy.control.MultipleCompilationErrorsExcepti
on: startup failed, General error during parsing: Did not
find four digit hex character code. line: 10 col:43
Cause The path specification in the Groovy script was incorrect. It used a single
backslash (\). It must use a double backslash (\\) or a single forward slash (/)
instead.
Solution Ensure that your path specification in the Groovy script uses either a double
backslash (\\) or a single forward slash (/), both of which will resolve to a single
backslash (\). For example:
Cancel to avoid creating a duplicate Groovy script. Alternatively, you could
OK, create the new Groovy script, and delete the previous one.
… "SYNCHRONOUS","c:\\temp\\mydir\\")
or
… "SYNCHRONOUS","c:/temp/mydir/")
Job fails with Groovy exception
When you run an SRMS business flow, the job fails with the following Groovy
exception:
HP Structured Records Management Solution Tutorial 57
Page 58

Runtime issues
Exception while executing a Groovy script
Cause The archive data files were not found at the location specified in the Groovy script
that calls the SRMS Loader. Hence, the SRMS Loader failed.
Solution Ensure that your path specification in the Groovy script matches the location of
the archive data files. You can ensure that the archive files reside in the specified
location in one of two ways:
• In the Web Console, when you run the business flow, choose a destination
location that matches your path specification. If necessary, you can create a
new location in the Web Console for this purpose.
• Manually move the archive files from wherever HP Database Archiving
generated them to the path you specified in your SRMS Loader call.
Failure when launching an SRMS cartridge
Symptom When you attempt to launch an SRMS business flow from the Web Console, you
find the following message in the log file:
16.07.2009 13:51:38 Connected to TRIM.. Exit Code: 7
16.07.2009 13:51:38 Got folder record type 'STRUCTURED
RECORDS FOLDER. Exit Code: 0
16.07.2009 13:51:40 Got document record type 'STRUCTURED
RECORD. Exit Code: 0
16.07.2009 13:51:42 Failed to save document. An error
occurred accessing external record addIn
(srmsTRIMAddIn.srmsRecordAddInDeferredDelete) for PostSave.
Invalid Additional Field object passed in to TRIM SDK.. Exit
Code: 14
16.07.2009 13:51:42 SF09/34. Exit Code: 0
Cause The most likely reason for this error message is that srmsLoader_config.xml
srmsTRIMAddIn.xml were not configured for the HP Database Archiving
and
instance.
Solution Ensure that
located in
srmsLoader_config.xml and srmsTRIMAddIn.xml, which are
<install_dir>\obt\config, point to a valid instance of HP TRIM
that has the HP TRIM Enabler Pack properly installed and configured. If you are
uncertain of the configuration details, consult your DBA or HP TRIM
administrator.
Reload fails against source database for non-intrusive environments
Symptom When you attempt to reload data to the source database of a non-intrusive
environment, you receive the following error:
Status: Initialization Failed
· 1 Validation Failed: Reload not allowed for D2F
non-intrusive environment
No actions executed
Cause In a non-intrusive environment, you cannot reload data back to the source
database.
58 Appendix A: Troubleshooting
Page 59

Solution Upload the data to a different database.
Archive files not loaded into HP TRIM
Symptom Your cartridge successfully ran, and the XML files were generated, but the files
were not loaded into HP TRIM.
Cause In order for your archive files to be loaded into HP TRIM, the business flow must
successfully call the HP TRIM Loader to ingest the files into HP TRIM. If the
loader is not called or fails for some reason, the files are not ingested into HP
TRIM.
Solution • Ensure that your business flow includes a Groovy script that calls the HP
TRIM Loader.
• Ensure that your HP TRIM Enabler Pack configuration is correct. You may
need to consult with your DBA or HP Support.
TIP If necessary, use the Launch SRMS Loader tool to launch the loader
manually.
Runtime issues
Insufficient capacity error in HP TRIM
Symptom HP TRIM displays the following error message when attempting to load your
archive data file:
Document store operation failed – the Document Store has
insufficient capacity
Cause When you archive a large amount of data from database to file, the archive data
files generated by HP Database Archiving can become quite large. HP TRIM
stores documents in the file system and therefore you must have enough free
space in that file system to accommodate the archive data files.
Solution Be conscious of the potential size of your archive date files and ensure that you
have sufficient free space in your HP TRIM file system. If necessary, do the
following before trying to load the data files:
• Clear some space on the HP TRIM file system.
• Create a new HP TRIM document store on a file system that has sufficient
space.
Loaded files do not match originals
Symptom When HP TRIM performs a validation of the archived files, you receive a
message stating that some hashes did not match originals.
Cause The problem could be either of the following:
• MD5 files were not generated by HP Database Archiving.
• The files changed between the time you generated them and the time they
were loaded into HP TRIM.
HP Structured Records Management Solution Tutorial 59
Page 60

Archive access issues
Solution • In the Web Console, under database to file parameters, ensure that the
Checksum algorithm parameter is set to MD5 checksum.
• If there truly is a difference between the loaded files and the generated files,
you may need to discard the loaded files and regenerate new archive files in
order to be certain that the files were not corrupted in some way.
Too many files and folders created in HP TRIM
Symptom In HP TRIM, you find that you have many archive data files stored in multiple
folders from just a single run of HP Database Archiving.
Cause When you set the batch size in HP Database Archiving to a smaller number, it
caps the number of rows stored in a file at that level, which can lead to a
proliferation in the number of archive data files. For example, suppose you set the
batch size to 955 for a data set that contains 12,000 rows and HP Database
Archiving generates 14 files.
If, in addition to setting a small batch size, you also set
in
srmsLoader_config.xml to a small number, then you get multiple folders in
HP TRIM. For example, if the
only 2 files per folder and creates as many folders as it needs to accommodate all
of the files.
Solution • To make fewer but larger archive data files, you can set a larger batch size.
The default batch size is 10,000. A large batch size will reduce the number of
files generated by HP Database Archiving.
• To reduce the number of HP TRIM folders, you can set a higher value for
FolderContentNumber in srmsLoader_config.xml. Zero indicates that
all of the files from a single run will go into one folder, regardless of the
number files.
WARN ING! HP TRIM performs better if there are not too many documents inside
a single folder. Approximately 300 documents per folder is the ideal maximum.
When trying to reduce the number of files per folder, you need to consider the
potential impact on performance. If fewer folders might lead to a very large
number of files within a folder, you may want to reconsider your approach.
FolderContentNumber is 2, then HP TRIM puts
FolderContentNumber
Archive access issues
This section describes issues that might arise when you are attempting to query
archive files that are stored in HP TRIM.
Cannot search the archive from HP TRIM
Symptom When you try to search the records in HP TRIM, the search fails.
Cause When you extracted the data, if you stored it in .gz format, HP TRIM cannot
search it.
60 Appendix A: Troubleshooting
Page 61

Solution You can either not use the .gz format for your extractions or use the RQS to query
Sending to RQS fails
Symptom When you right click the folder containing your XML documents in HP TRIM
Cause HP TRIM was unable to connect to the Record Query Server for some reason. It
Solution • Ensure that the Record Query Server you are trying to use is up and running.
Archive access issues
the records instead.
and select
Registration not complete for RunID x.
Register with RQS process reported failure for RunID: x
Detail: java.sql.SQLException: [DataDirect][OpenAccess SDK
JDBC Driver]TCP/IP error, connection refused.
Send To > Prepare for RQS, you receive an error:
could be an incorrect user name or password, host name, or port. It could also be
that the Record Query Server is not up and running properly.
Refer to HP Database Archiving software Runtime guide for details on how to
start the Record Query Server.
• Confirm that you are using the correct user name and password.
install/OA
is the default user name and password combination for the Record Query
Server.
• Confirm that the configuration file,
referencing the host (
RQSHost) and port (RQSPort).
srmsTRIMAddIn.xml, is correctly
HP Structured Records Management Solution Tutorial 61
Page 62

Archive access issues
62 Appendix A: Troubleshooting
Page 63

Glossary
active database The database from which you plan to archive data. Typically, this database is your
online transaction processing (OLTP) or production database. In a two or three
tiered configuration, the active database resides on tier one and is the source for
data movement operations.
active environment The Web Console views and acts upon only one environment at a time, the active
environment. To switch the active environment, you use the Change Active option
in the Web Console.
activity In Designer, a component of a business flow, which is added by using the toolbar.
For example, you can add archive and reload activities to your business flow.
Note, activities in a business flow are different from what you see at runtime and
therefore do not necessarily map directly to what you see in Console.
advanced selection A method of data selection that discovers all of the interrelated rows from
multiple tables and conceptually places them in the same application partition for
archiving.
annotation In Designer, a comment associated with the project, or one of its objects or
components. These comments are collected and published in a PDF file when you
right click a project or business flow and select Generate Documentation.
application partitioning The concept of partitioning related rows together during data selection, regardless
of whether they are in one or more tables. Application partitioning is unique to HP
Database Archiving and contrasts with the more common table partitioning
offered by the database management software, which only groups related rows
from one table.
archive data store The location where the data is to be archived. Can be a separate database, separate
space on the same database, or an XML file. In a two-tiered configuration, the
archive data store resides on tier two and can be a database or XML. In a
three-tiered configuration, the archive data store is a database on tier two and
XML on tier three, and is the target for data movement operations.
archive query server The component that provides SQL access to XML database archives.
bulk data movement A method of data movement that is optimized for moving large amounts of data
into an archive data store. With bulk, all of the eligible data is removed from the
active database during a production outage (the application is offline and not
accessible to users).
business flow A series of activities, such as archive operations and scripts, that run in sequence.
You build business flows in Designer.
HP Database Archiving software 63
Page 64

business flow status The Web Console shows the last run of each business flow. The states are
Complete/Error/Running.
cartridge An instance of model- or schema-based eligibility criteria used to move or copy
data from one location to another. Cartridges capture the application and business
rules to ensure referential integrity of the data. For any one model in your project,
you may have many cartridges that use it.
chaining table The lower level table in a many-to-one or a many-to-many relationship between
higher level and lower level tables in the model hierarchy.
classification The HP TRIM classification to be applied to the data moved by HP Database
Archiving. This classification specifies where to place the data when it is ingested
by HP TRIM. For more information, refer to the HP TRIM documentation.
collection The configuration of a directory location and file pattern to match a set of
archived XML files, thus allowing SQL access to the archived data.
comma separated values
(CSV)
A database to file output format that stores the data as values separated by
commas and a metadata file. Each line in the CSV file corresponds to a row in a
table. Within a line, fields are separated by commas, each field belonging to one
table column. CSV files provide a simple format that many applications can
import.
command Command files or JavaScript files launched by the Web Console on your behalf
with status displays.
condition In Designer, the way you branch your business flow to run or skip an activity
based on some criteria.
configuration parameter A type of parameter that has its values set by an administrator (someone who has
repository privileges from Console) through the administrator interface. Typically,
this type of parameter represents values that should be changed very infrequently,
perhaps only at deployment time.
console user The Web Console identifies individual users, who are distinct from database
users. The properties for a Console user are User Name, Full Name, Password,
Enabled, Description, Email, Phone, and Privileges.
console user name The login name associated with a Console user.
constraint A column or a list of columns that enables you to identify rows in the database and
relate them to one another.
custom properties User-created name/value pairs in cartridges and business flows. These values are
exposed in the runtime as parameters.
customization A change that an administrator or DBA makes to a project provided by a third
party, typically for a packaged application like Oracle PeopleSoft or Oracle
E-Business Suite. As long as the customization is allowable by the project, the
user can merge the customization into newer revisions of the third party project.
64 Glossary
Page 65

customization mode A Designer mode that provides visual cues to indicate customizations in the
model. In a project with locked files, customization mode is on by default, but you
can toggle it on and off from the toolbar in the model editor.
data masking The process of replacing private or confidential data during movement with a
specified mask. You can choose from pre-defined masks that are part of HP
Database Archiving or create your own mask. A mask may or may not be
reversible upon reload from the archive data store.
data movement The method used by HP Database Archiving to actually move data. When
creating a cartridge or adding it to a business flow, you specify which form of data
movement to use (transactional, bulk or partitioned for database to database, and
copy or archive for database to file).
data transparency The ability to access archived data through your standard application interfaces
for data access. Data transparency enables users to access archived data as though
it were still in the active database.
database constraint A constraint that exists in the database and can be discovered and referenced from
Designer.
database to database A movement in which data goes from an active database to an archive database, or
separate tablespaces inside the active database. Typically, the archive database is
located on cheaper storage devices.
database to file A movement in which data goes from an active database to a file (XML or CSV
format), which is offline but still accessible through SQL using the archive query
server and a client tool of your choice.
deployment assistant The user interface component within Designer used to deploy or generate business
flows.
description A technical description created by the developer for her own reference. These
descriptions do not appear in the generated PDF file for the cartridge or business
flow.
Designer The user interface component used to develop, test, and deploy your archiving
solution. Designer is a powerful graphical development environment for archive
solutions.
distributed instance A configuration option for database to database archiving where the data you
archive is stored on a separate database from the source or active database.
driving table A driving object is a root of a model hierarchy. Its relationship to the child tables
drives the selection of transactions.
dynamic list of values A list of values for a parameter that obtains its members from a SELECT
statement that returns identifiers and labels.
dynamic parameter A type of parameter that has its value set by a Groovy script that runs at
deployment time to obtain a value. For example, this type of parameter can supply
HP Database Archiving software
65
Page 66

the type or version of a database or application, which can be obtained
programmatically at deployment time.
embedded repository A Java database, installed with HP Database Archiving, that can act as your
repository database, where you store your HP Database Archiving metadata.
Alternatively, your source database or another database can act as the repository
database.
environment The source and (optional) target credentials against which you plan to run
commands. You can define multiple environments within your installation to
identify various source and target databases.
error One of the ways in which you can interrupt a business flow. Error indicates that
the business flow failed for some reason.
exclusive rules One of the ways in which HP Database Archiving determines whether to include
or exclude rows from the archive operation. Exclusive rules require all rows in the
constraint table to match for inclusion. Exclusive rules exclude the instance if the
condition on any child is false, like STATUS=’CLOSED’.
exit One of the ways in which you can interrupt a business flow. You can exit
successfully or with a warning.
export The way that you save an HP Database Archiving project to an exchange format
(.hdp) from the File menu. See also import.
export data The way that a user can send data to CSV format from Preview using the toolbar
item.
generate documentation The process of collecting and grouping all annotations into a PDF file that also
describes the business flow or cartridge structure.
import The way that you transfer projects from exchange format (.hdp) into the Project
Navigator. You can also use import to migrate cartridges created in 5.1 to 6.1. See
also export.
inclusive rules One of the ways in which HP Database Archiving determines whether to include
or exclude rows from the archive operation. Inclusive rules require only one row
in the constraint table to match the rule and be included. Inclusive rules include
the instance if the condition on any child is true, like
PRODUCT_RECALLED=’Y’.
interrupt The way to stop or pause a business flow (pause, error, exit with warning, exit
successfully).
local cache A capture of the metadata for your databases, schemas, and tables used when
working offline in Designer.
local deployment The generation and deployment of your cartridge or business flow to an
environment on your local, Designer client. Deployment files are generated
locally and then deployed to the designated, local environment.
66 Glossary
Page 67

lookup table A table that contains helpful non-transactional information. For example,
non-transactional information could be status definitions, or the name of the sales
representative.
managed table A table in the model that is copied and then purged from the active database by a
cartridge. Transactional, chaining, and driving tables in a model are all typically
managed tables.
model A model identifies the tables and table relationships representing a business entity
or related business entities. A project can have multiple models. Each model
contains a driving table and all of its child and descendent tables.
model compatibility Each model in your project can have one or more dynamic parameters associated
with it to verify the compatibility with the target environment. If the compatibility
parameter returns false, then the cartridge referencing the model will not deploy
or run and throw an error. For example, the script could return false for Oracle
10.2 and true for Oracle 11.1 to indicate that a cartridge referencing the model can
only deploy and run against Oracle 11.1.
model-based cartridge A cartridge that moves data based upon a defined data model with relationships.
This type of cartridge is typically used for ongoing archive operations.
non-intrusive environment In a non-intrusive environment, data is archived without an interface schema and
a generic JDBC driver is used. A non-intrusive environment enables you to copy
or archive data from read-only sources, which is especially helpful in cases where
the data is associated with older technologies that might not support basic SQL
statements or when the database administrator or company policy prohibits write
access to the production environment.
OLTP database The online transaction processing database that typically is your active or source
database.
partitioned data movement A method of data movement that, whenever possible, will leverage Oracle
database partitioning to move data more efficiently than transactional data
movement.
pause One of the ways in which you can interrupt a business flow. Pausing suspends the
business flow while awaiting operator intervention.
reload The act of taking data from an archive data store and loading it into the active
database.
remote deployment The generation and deployment of your cartridge or business flow to an
environment on a system that is remote from your Designer client. Deployment
files are generated locally and then deployed to the designated, remote
environment.
repository The location that holds business flow metadata, product configuration data, and
data collected during runtime. The repository can be located on your active
database, another logical database, or can be embedded database.
HP Database Archiving software
67
Page 68

rule Qualifications added to the model in order to include or exclude data based on
certain criteria. For example, you might add a rule to exclude from archiving any
orders that are not yet closed.
runtime parameter A type of parameter that has its values set by the operator executing the job in
Console or on the command line. Typically, this type of parameter represents
operational values that tend to change frequently and therefore need to be set each
time the job is run.
schema-based cartridge A cartridge that moves data based upon the database schema rather than a defined
data model with relationships. This type of cartridge is typically used for database
retirement or the cleanup of orphan tables.
selection The form of data selection to use (standard or advanced) for choosing data. When
creating a cartridge or adding it to a business flow, you must specify the selection
method.
single instance A configuration option for database to database archiving where the data you
archive is stored on the same database (Oracle) or the same server (SQL Server)
as the source or active database.
source The location (database) from which you are copying or moving data.
SQL access server See archive query server.
standard selection A method of data selection that restricts itself to the rows identified by the model.
Unlike advanced selection, it does not attempt to traverse related rows across
multiple tables.
structured records
management
A type of solution that extracts structured data from a source application and
moves it into XML format. The XML is then ingested into the corporate records
management system for long term management and eventual disposal according
to corporate policy.
table use A database table, view, or synonym that is referenced in Designer, for example, in
the model. The same table can be used multiple times in a model. For example, a
table could be appear as a transactional table and a lookup table in the same
model.
target The location (database or XML) to which you are copying or moving data.
tier A level in your database archiving configuration. You can have two or three tiered
configurations. In a two-tiered configuration, tier one contains your active
database and tier two your archive data store, which can be a database or XML. In
a three-tiered configuration, tier one contains your active database, tier two an
archive database, and tier three XML.
transactional data
movement
68 Glossary
Transactional movement uses set-based data movement and is the default method
of movement.
Page 69

transactional table A table that contains information about the business transaction. For example, a
transactional table might contain detailed tax or payment information related to
each business transaction.
unique identifiers (UIDs) A 16 hexadecimal identifier calculated based on the content of a Designer file.
This value is used to determine if the user has customized key pieces of a project.
unmanaged table A table in a model that is copied but not purged from the active database by a
cartridge. Lookup tables in a model are typically unmanaged tables.
virtual constraint A constraint that you define in Designer that only exists within HP Database
Archiving.
Web Console A browser-based interface where you can create and manage your deployment
environments, and deploy, run, administer, and monitor your business flows.
HP Database Archiving software
69
Page 70

70 Glossary
Page 71

Index
A
adding
Groovy scripts 31
archiving
data collections 50
data movement 30
query server 50
querying data from 51
audience
intended 5
B
business flows
creating 29
deploying 37
running 41
start activity 29
C
cartridges
converting to SRMS 25
creating 21
editing 23
editior 23
failing to launch 58
model-based 21
previewing 23
schema-based 21
classifying
cartridges, troubleshooting 56
concepts 12
HP TRIM 26
in Designer 25
menu item 26
collections
archive data 50
connections
to HP TRIM database 18
conventions
document 6
converting
cartridges to SRMS 25
cartridges, troubleshooting 56
copying
data movement 30
creating
business flows 29
cartridges 21
D
data
sample 15
data movement
archive 30
copy 30
defining
concepts 12
Demarc
sample data 15
demo
data 15
deploying
business flows 37
encryption keys 38
logs 40
disposing
concepts 13
documentation
conventions 6
including at deployment 38
related 6
updates 7
E
editing
cartridges 23
encryption keys
deployment 38
errors
common 55
extracting
concepts 12
G
generating
HP Structured Records Management Solution Tutorial 71
Page 72

documentation 38
Groovy scripts
adding 31
adding SRMS activity 31
example loader calls 35
troubleshooting 57
H
HP
Subscriber’s choice web site 7
HP TRIM
calling SRMS Loader 31
classifications 26
searching records 49
troubleshooting 59, 60, 61
viewing extracted data from 47
I
ingesting
concepts 13
L
licensing, HP
end user license agreement 2
logs
showing deployment 40
M
managing
concepts 13
Microsoft Excel
querying 51
models
cartridges 21
P
prerequisites
product 5
software 9
previewing
cartridges 23
projects
importing in Designer 17
properties
custom 25
set types 25
Q
queries
server for archive 50
R
record query server
HP TRIM 50
records
management 11
structured 11
retention
risks 11
risks
infinite retention 11
running
business flows 41
S
sample data
loading 15
scalability
concepts 14
schema
cartridges 21
selection
advanced 30
standard 30
software
prerequisites 9
version 1
SRMS
asynchronous calls 34
calling loader 31
concepts 11
configurations 33
default paths 35
example loader calls 35
loader calling options 34
loader options 33
substitution paths 35
synchronous calls 34
structured records management
concepts 11
solution 11
Subscriber’s choice, HP 7
subscription service
Subscriber’s choice 7
support
web site 8
T
troubleshooting
cartridges, classifying 56
common issues 55
converting cartridges to SRMS 56
failure launching cartridge 58
72 Index
Page 73

Groovy scripts 57
Groovy scripts, SRMS 57
HP TRIM 59, 60, 61
W
web sites
HP Subscriber’s choice 7
support 8
HP Structured Records Management Solution Tutorial 73
Page 74

74 Index
Page 75

Page 76

 Loading...