

Page 1

HP StorageWorks
All-in-One Storage Manager
user guide
452695002
Part number: 452695-002
irst edition: October 2007
F
Page 2

Legal and notice information
© Copyright 1999, 2007 Hewlett-Packard Development Company, L.P.
Confidential computer software. Valid license from HP required for possession, use or copying. Consistent with FAR 12.211 and
12.212, Commercial Computer Software, Computer Software Documentation, and Technical Data for Commercial Items are licensed
to the U.S. Government under vendor’s standard commercial license.
The information contained herein is subject to change without notice. The only warranties for HP products and services are set forth
in the express warranty statements accompanying such products and services. Nothing herein should be construed as constituting
an additional warranty. HP shall not be liable for technical or editorial errors or omissions contained herein.
Microsoft, Windows, Windows XP, and Windows NT are U.S. registered trademarks of Microsoft Corporation.
UNIX is a registered trademark of The Open Group.
Printed in the US
Page 3

Contents
Aboutthisguide .......................... 7
Intendedaudience...................................... 7
Prerequisites ........................................ 7
Relateddocumentation.................................... 7
Documentconventionsandsymbols .............................. 8
Usingonlinehelp ...................................... 8
1All-in-OneStorageManager .................... 11
All-in-OneStorageManager.................................. 11
Softwarerequirements .................................. 11
Softwaresupport .................................. 11
Storagemanagementinfrastructure............................ 12
Managingstorageforapplicationservers....................... 12
Managingstorageforsharedfolders......................... 13
Abouttheuserinterface ................................ 14
Menubar .................................... 14
Toolbar ..................................... 15
Navigationpane ................................. 15
Contentpane................................... 15
Actionspane ................................... 15
Defininguserinterfaceoptions............................ 17
AddanAll-in-OneStorageSystem .............................. 17
RemoveanAll-in-OneStorageSystem............................. 17
2Hostingstorageforapplicationsandsharedfolders ......... 19
UsingtheHostanExchangeStorageGroupWizard ...................... 20
EnteringanameofaserverthathostsExchange...................... 20
SelectingExchangestoragegroupcomponents....................... 20
LocalContinuousReplication(LCR)............................ 21
UsingtheCreateaSharedFolderWizard........................... 21
Namingasharedfolder ................................ 22
Settingpermissionsforasharedfolder .......................... 22
UsingtheHostaSQLServerDatabaseWizard......................... 22
SelectingaserverthathostsSQLServer.......................... 23
SelectingSQLServerdatabasecomponents........................ 23
Selectingadatabaseworkloadtype ........................... 24
Using the Host a User-DefinedApplicationWizard ....................... 24
Choosetypeofapplication ............................... 25
Enteringanapplicationname.............................. 25
UsingtheCreateaVirtualLibraryWizard........................... 25
AccessingtheVirtualLibraryWizard........................... 25
Configureyourvirtuallibrary ............................ 25
Allocatingspaceforcomponents............................... 26
Selecting advanced configurationsettings......................... 27
Selectingdataprotection .................................. 31
Reviewingtasksummaryandschedulingtasks ......................... 33
Monitoringtaskcompletionstatus .............................. 33
Cancellingtasks.................................... 34
Migrating user-defined application data to your HP All-in-One Storage System when using a remote
windows application . . . . . . . . . . . . . . . . . . . . . . . . . . . . . . . . . . . . 34
All-in-One Storage Manager
3
Page 4

3Dataprotection . . ....................... 37
DataProtectiontab .................................... 37
Selectinglocaloralternatebackup............................ 37
Managingsnapshotsandbackups............................ 38
Snapshots ........................................ 38
Schedulingsnapshots ................................. 38
Takingsnapshots ................................... 38
Exposingasnapshot.................................. 38
Unexposingasnapshot................................. 39
Revertingdatatosnapshots............................. 39
Schedulingandrunningbackups............................... 39
Managingbackups .................................. 39
Restoringdatafrombackups............................... 40
Selectingthesourcedevice ............................. 40
Selectingtherestoredestination ........................... 40
LaunchingDPX .................................. 40
UsingDPXtorestoredata.............................. 40
ResettingthepasswordfortheASMbackupuseraccount................. 41
SpecifyingapasswordforASMBackup........................ 41
UsingtheAdministrators’accounttochangeanASMbackuppassword .......... 41
4 Managing storage . . . .................... 43
Increasingorreducingtheallocatedstorage.......................... 43
Changingthepercentfullwarningthreshold.......................... 44
Removingapplicationareasfromview ............................ 44
Changing permissions, names, descriptions, or paths of shared folders . . . . . . . . . . . . . . 45
Deletingsharedfolders................................... 45
5 Monitoring storage ....................... 47
ApplicationView ..................................... 47
Accessingapplicationandsharedfolderproperties..................... 47
DataProtection .................................... 56
StorageView....................................... 58
Accessingstorageareaproperties ............................ 58
ApplicationServerView .................................. 61
Accessingapplicationserverproperties.......................... 61
StorageUtilizationView .................................. 62
6Troubleshooting,servicing,andmaintenance ............ 65
Troubleshootingthestoragesystem.............................. 65
Operatingsystemproblemsandresolutions ........................ 65
Applicationsoftwareproblems.............................. 65
SQLServererrors ................................. 66
ASMalerts.................................... 66
Recoveringfromlogicaldiskfailure............................ 71
Glossary............................. 73
Index .............................. 77
4
Page 5

Figures
1
2
3
Applicationstorageinfrastructure ......................... 13
Sharedfolderstorageinfrastructure ........................ 14
Exampleofalert ................................ 67
All-in-One Storage Manager
5
Page 6

Tables
1
2
3
4
5
Documentconventions............................... 8
Softwaresupport................................ 12
Actionspanequickreference........................... 15
Selectingstoragegroupcomponentstohost .................... 21
Selectingdatabasecomponentstohost ...................... 23
6
Advanced win
7
DescriptionsofRAIDlevels............................ 29
8
Operating s
9
Detailstab—Exchangestoragegroupproperties................... 49
10
Storagetab—Exchangestoragegroupcomponentproperties ............. 49
11
Mail Store tab—Exchange storage group component properties . . . . . . . . . . . . 50
12
Public Store tab—Exchange storage group c omponent properties . . . . . . . . . . . 51
13
Logtab—Exchangestoragegroupcomponentproperties............... 51
14
Operatingstatus—Sharedfolderproperties..................... 52
15
Storagetab—Sharedfolderproperties....................... 57
16 O p e r a t i
17
Storagetab—SQLServerdatabasecomponentproperties .............. 53
18
DataFiletab—SQLServerdatabasecomponentproperties.............. 54
19
Logtab—SQLServerdatabasecomponentproperties ................ 54
20
Operating status—User-definedapplicationproperties................ 55
21
Storage tab—User-defined application properties . . . . . . . . . . . . . . . . . . 55
22 Operatingstatus—DataProtectionproperties.................... 56
dowitems............................. 27
tatus—Exchangeproperties ...................... 48
ngstatus—SQLServerproperties ..................... 53
23
Storagetab—Sharedfolderproperties....................... 57
24
Storagetab—Sharedfolderproperties....................... 57
25
VirtualLibraryProperties............................. 58
26
Operatingstatus—Generaltab.......................... 59
27
Storagetab—HPAll-in-OneStorageSystemlogicaldiskproperties........... 60
28
Storagetab—HPAll-in-OneStorageSystemvolumeproperties............. 60
29
Operatingstatus—Applicationservervolumeproperties ............... 62
30
oragetab—Applicationservervolumeproperties ................. 62
St
31
Operatingsystemproblems ........................... 65
32
Alertdescriptions................................ 68
6
Page 7

About this guide
This guide provides information about the HP StorageWorks All-in-One Storage Manager (ASM) software,
including how to use the ASM storage-allocation wizards and user interface to:
• Host SQL Server, Exchange, and user-defined application data on your HP All-in-One Storage
System.
• Create shared folders on your HP All-in-One Storage System.
• M anag e and monitor storage on your HP All-in-One Storage System.
• Backup and take snapshots of data stored on your HP All-in-One Storage System.
• Restore data to your HP All-in-One Storage System from backups.
• Revert data stored on your HP All-in-One Storage System to a past snapshot.
• Troubleshoot ASM storage alerts.
For easy access, this document is produced as a printable document (PDF) and shipped on the HP
StorageWorks All-in-One Storage System documentation CD; however, all user information is also part
of the ASM online help system, accessible from the ASM main menu. To learn more about this guide,
related product documentation, and HP technical support refer to the following sections:
• Intended audience, page 7
• Prerequisites, page 7
• Related documentation,page7
•
Document conventions and symbols,page8
•
Using online help,page8
Intended audience
This doc
Exchange Server 2003 (Exchange), Microsoft SQL Server 2000 (SQL Server), or other t ypes of
application servers hosted by ASM.
ument is intended for network and IT administrators who are experienced with Microsoft
Prerequisites
Prerequisites for using ASM include:
• Install your HP All-in-One Storage System.
• Complete the Rapid Startup Wizard.
• If the application server(s) whose storage you plan to host on your HP All-in-One Storage System
is on a domain, add your HP All-in-One Storage System to the same domain.
• If the application server(s) whose storage you plan to host on your HP All-in-One Storage System
is configuredtouseaDNSserver,configure your HP All-in-One Storage System to use the same
or equivalent DNS server.
• Install the All-in-One Storage Manager agent on application server(s) with data you plan to host
on your HP All-in-One Storage System using the All-in-One Storage Manager Agent Installer on
the H P StorageWorks All-in-One Storage Blade System Recovery DVD. See the HP StorageWorks
All-in-OneStorageSystemquickstartinstructionsfor more information.
Related documentation
The following d ocuments provide related information:
All-in-One Storage Manager
7
Page 8
• HP StorageWorks All-in-One Storage System quick start instructions
• H P StorageWorks Data Protector Express users guide and technical reference
You can find these documents on the HP StorageWorks All-in-One Storage System documentation CD and
the HP documents web site: h
ttp://www.hp.com/support/manuals.
You can also find online help for Microsoft iSCSI Target and other applications used with ASM in the HP
All-in-One Storage System Management help window.
Document conv
Table 1 Document conventions
Convention
Blue text: Table 1
Blue, underlined text: h ttp://www.hp.com
Bold text
Italic text Text emphasis
Monospace text
Monosp
Monospace, bold text
CAUTION:
Indicates that failure to follow directions could result in damage to equipment or data.
ace, italic text
entions and symbols
Element
Cross-reference links and e-mail addresses
Web site addresses
• Keys that ar
• Text typed i
• GUI elemen
menu and li
• File and directory names
• System output
• Code
• Commands, their arguments, and argument values
• Code variables
• Command variables
Emphasized monospace text
epressed
nto a GUI element, such as a box
ts that are clicked or selected, such as
st items, buttons, tabs, and check boxes
NOTE:
Provides additional information.
Using online help
The ASM help system incorporates the following navigational features:
• Contents tab—Displays a table of contents (TOC) for the help system. Topics are organized in
books for efficient retrieval. Click the icon located next to each folder to expand the outline and
lay topics. T o view a topic, click a topic.
disp
• Index tab—D isplays an index of help topics. To locate a topic, either scroll through the list, or
enter a keyword or phrase for which to search and then press Enter. To view a topic, click a
topic. The topic displays in the right pane.
• Sea
8
rch tab—Allows you to search for words contained in topics. After the word is loc ated, the
topics containing that word are displayed in a list. To view a specific topic, select the topic, and
then click Go. The topic displays in the right pane.
About this guide
Page 9

• Toolbar controls—The toolbar contains Hide, Back, and Print buttons, similar to those found in
Web browsers. These buttons let you hide the content pane, browse back through topics you
have previously viewed, and print active panes.
All-in-One Storage Manager
9
Page 10

10
About this guide
Page 11

1 All-in-O ne Storage Manager
All-in-One Storage Manager
HP StorageWorks All-in-One Storage M anager (ASM) is a storage hosting and management tool that
radically simplifies:
•
Hosting storage for applications and shared folders, page 19
•
Configuring data protection, page 37
•
Managing storage,page43
•
Monitoring storage,page47
ASM provides storage-allocation wizards that walk you through the process of allocating and configuring
storage on your HP All-in-One Storage System to host application data and shared folders. The
storage-allocation wizards also allow you to schedule backups and snapshots of hosted application
data and shared folders.
Other wizards are provided to help you set up SQL Server database storage, storage for user-defined
applications, and storage for shared folders.
ASM is designed to work seamlessly with Windows administrator tools, the HP All-in-One Storage
System Management application, Microsoft iSCSI Target, and Data Protector Express. For example, you
can change your HP All-in-One Storage System’s:
• Storage allocations ( quotas), shared folder permissions and names, and snapshot schedules
using ASM, Windows administrator tools, and the HP All-in-One Storage System Management
applications.
• Med ia rotation type using ASM and Data Protector Express.
However, you should not use Windows administrator tools to change the paths to storage configured on
your HP All-in-One Storage System or file directories created by ASM on application servers with storage
hosted on your HP All-in-One Storage System. Doing so will break the iSCSI communication paths
between your application servers and HP All-in-One Storage System, and make it so ASM can no longer
locate allocated storage areas on your HP All-in-O ne Storage System.
Software requirements
ASM co
Software support
Only storage for application servers running on Windows Server 2003 and on the same domain as
your HP All-in-One Storage System can be hosted.
ASM provides storage-management services for the following applications:
mes preinstalled on your HP All-in-One Storage System. A license key is not required for ASM.
All-in-One Storage Manager
11
Page 12

Table 2 Software support
Microsoft Exchange Server 2003 and 2007
See “Using the Host an Exchange Storage Group
Wizard”onpage20.
File sharing services on local storage
Microsoft SQL Server 2000 and 2005
User-defined applications
Microsoft iSCSI Target and Data Protector Express are required to host application storage and create
backups using ASM. Microsoft iSCSI Target and Data Protector Express come preinstalled on your HP
All-in-One Storage System. A license key is not required for Microsoft iSCSI Target. Your license key for
Data Protec
tor Express comes preinstalled on your HP All-in-One Storage System.
Storage management infrastructure
The purpose of ASM is to simplify storage management, so that you do not need to understand the
complexities of allocating and configuring storage, and hosting application storage on your HP All-in-One
Storage System. ASM handles two types of use models:
• M anaging storage for application servers,page12
•
Managing storage for shared folders, page 13
Managing storage for application servers
With ASM, you can allocate, configure, and host storage for applications residing on servers that
hostExchange,SQLServer,anduser-defined applications using the Host an Exchange Storage Group
Wizard, Host a SQL Server Database Wizard, and Host a User-Defined Application Wizard.
The wizards suggest a default storage size, plus default advanced configuration settings, such as RAID
level, for each application component. You can customize all the defaults to fityourstorageneeds.
However, the default advanced settings provided for Exchange and SQL Server are based on HP storage,
Exchan
ge, and SQL Server best practices and should generally not be changed.
See “Using the Create a Shared Folder
Wizard”onpage21.
See “Using the
Wizard”onpa
See “Using the Host a User-Defined Application
Wizard”onpage24.
Host a SQL Server Database
ge 22.
For app
stora
lication storage, ASM creates an iSCSI LUN on your HP All-in-One Storage System for each
ge group component, database component, or the user-defined application you select to host in the
storage-allocation wizard, and exports it to the application server whose storage will be hosted. ASM
also creates a LUN on your HP All-in-One Storage System to host the storage group component, database
component, or the user-defined application you selected in the storage-allocation wizard. All storage
unication passes through the iSCSI LUN on the application server to the LUN on your HP All-in-One
comm
Storage System. This allows data saved by the application to the iSCSI LUN on the application server to
be automatically saved to your HP All-in-One Storage System instead (see Figure 1).
12
All-in-One Storage Manager
Page 13
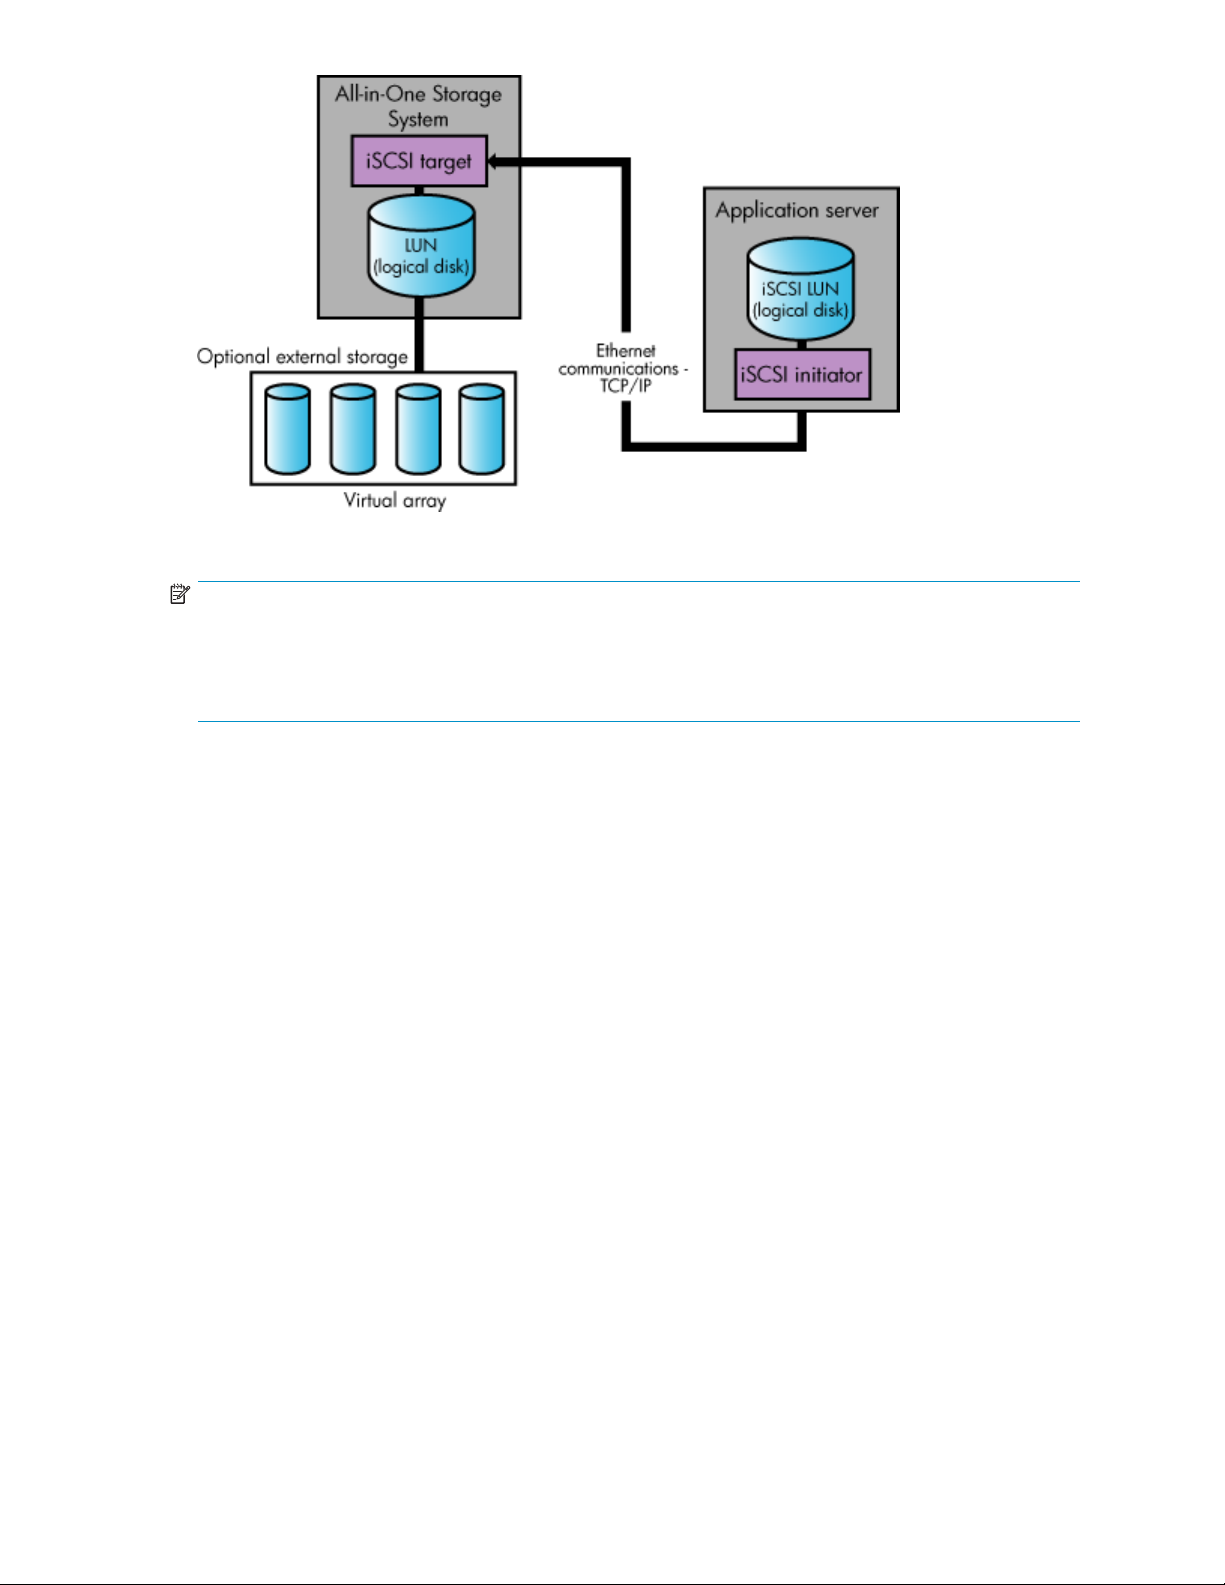
Figure 1 App
NOTE:
The iSCSI communication path is transparent to the application, application server, and Windows
Explorer. The application, application server, and Windows Explorer believe the data is stored on the
applicati
application server, not the LUN(s) on your HP All-in-One Storage System, using Windows Explorer.
ASM provides automated data migration for Exchange and SQL Server. ASM discovers Exchange
storage group an d SQL Server database components and hosts the storage components you select
through the storage-allocation wizards. ASM automatically migrates the data for the selected storage
components to your HP All-in-One Storage System. ASM a lso configures the application to read and
write data for the hosted storage component to the iSCSI LUNs created on the application server by ASM.
ASM does not provide automated data migration for user-defined application servers. You
must manually migrate the application data to your HP All-in-One Storage System after using
the H ost a User-Defined Application Wizard to allocate and configure storage space. See
“Migrating user-defined application data to your HP All-in -One Storage System” on page 34 for more
information. You must also configure the application to read and write data to the iSCSI LUN created on
the application ser ver by ASM. See the application’s documentation for more i nformation.
on server. So, to view the application data, you must navigate to the iSCSI LUN(s) on the
lication storage infrastructure
Managing storage for shared folders
With ASM, you can set up and monitor top-level shared folders (file shares) using the Create a Shared
Folder Wizard. The wizard suggests a default storage size for each shared folder, plus default advanced
configuration settings, such as RAID level. You can customize all the defaults to fityourstorageneeds.
For shared folder storage, ASM creates a LUN on your H P All-in-One Storage System to hold the shared
folder and then creates the shared folder (see Figure 2). Shared folders whose storage is configured with
the same RAI D level are created on the same LUN.
All-in-One Storage Manager
13
Page 14
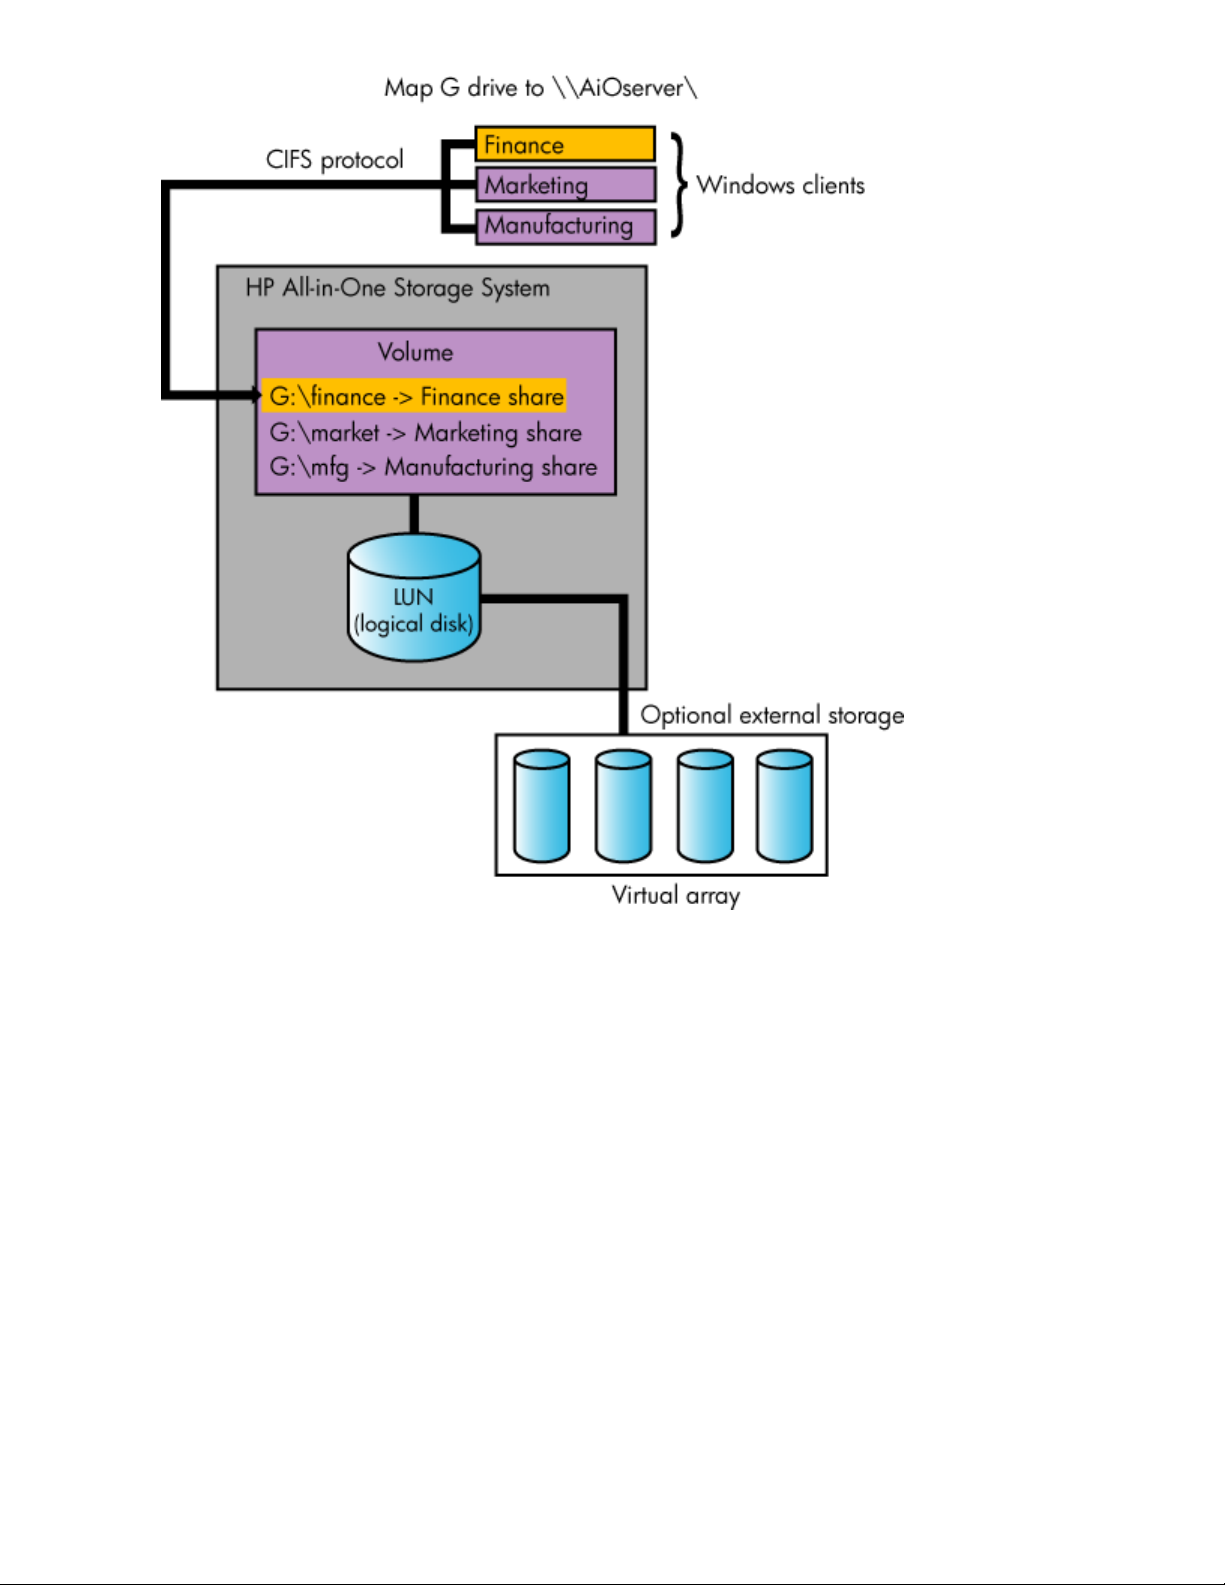
Figure 2 Shared folder storage infrastructure
ASM discovers any top-level and nested shared folders on your HP All-in-One Storage System during
setup and afterwards on an ongoing basis. ASM allows you to m onitor and manage any top-level
shared folders created on your HP All-in-One Storage System using ASM or other applications, such as
Windows Explorer or the Shared Folder MMC snap-in.
After s hared folders are created, communication between client and host takes place over the Common
Internet File System (CIFS) protocol.
Nested shared folders, which are shared folders that reside inside top-level shared folders, cannot be
created using ASM, but can be viewed in ASM by selecting the top-level shared folder in the content
pane and then clicking Properties in the Action pane. Use other applications, such as Windows Explorer
or the Shared Folder MMC snap-in, to create nested shared folders on your HP All-in-One Storage System.
About the user interface
Menu bar
The menu bar, located at the top of the ASM main window, is the Microsoft Management Console
(MMC) menu bar. See the MMC online help for more information. To open MMC online help, click
Help in the Actions pane.
14
All-in-One Storage Manager
Page 15

Toolbar
The toolbar, loc
information. To open MMC online help, click Help in the Actions pane.
Navigation pane
The Navigation pane, located on the left side, allows you to quickly navigate between HP All-in-One
Storage M anagement applications.
Content pane
The content pane, located in the center, displays application storage and storage component (logical
disk and volum
view based on hierarchy.
The information displayed in the content pane depends on the item selected in the Filters drop-down menu,
located at the
“Monitoring storage” on page 47 for more information on views and information displayed in the
content pane.
Filters drop-down menu
Select an application from the Filters drop-down menu, located at the top of the content pane, to view
information for only that application in the content pane. Select All from the Filters drop-down menu to
view information for all applications and shared folders in the content pane.
ated just below the menu bar , is the MMC toolbar. See the MMC online help for more
e) properties, such as allocated and used space, using an expandable and collapsible
top of the content pane, and the view selected in the Actions pane. See
Actions pane
The Actions pane, located on the right side of the main window, provides a list of actions available to
the item cur
provides ac
storage an
Table 3 Act
Application View
Storage View
Application Server View
Storage Utilization View
rently selected in the content pane. Along with other selectable items, the Actions pane
cess to storage-allocation wizards that walk you through the process of hosting application
d creating shared folders.
ions pane quick reference
Menu
Displays the used and allocated storage space, a n d storage status
of Exchange storage groups, SQL Server databases, user-defined
storage, and shared folders hosted on your HP All-in-One Storage
System in the content pane. See “Application View”onpage47for
more information.
Displays the used and allo cated storage space of the storage areas
(logical disks and volumes) on your HP All-in-One Storage System that
eated by ASM to store application data and shared folders in the
were cr
tpane. See“Storage View” on page 58 for more information.
conten
Displays your HP All-in-One Storage System and the application servers
with storage hosted on your HP All-in-One Storage System in the content
pane. See “Application Server View”onpage61formoreinformation.
Displays the alloca ted storage values for specific applications and the
shared folders pool, the unallocated storage value, and the storage
value for data not managed by ASM in a pie chart. See “Storage
Utilization View”onpage62formoreinformation.
Description
All-in-One Storage Manager
15
Page 16

Menu
Tools > Task Viewer
Description
Opens the Task Viewer, where you can view the:
• Status of tasks completed or scheduled to run in the future.
• All tasks tha t failed and the errors reported.
The Task Viewer also allows you to cancel running and scheduled
tasks. See “Monitoring task completion status” on page 33 for further
information.
Displays the C
• Change the co
onfigure Options window, where you can:
lors used in the content pane to display the different
typesofstorage,volumes,andservers.
Tools > Display Options
• Changethescalingusedinthecontentpanesothesizeatwhich
each applic
to the size
at equal si
See “Defini
ation area or shared folder is displayed is proportional
of its allocated storage space, or to display them all
ze.
ng user interface options” on page 17 for further information.
Refresh Refreshes the content pane.
Any one of the following items:
• Host an Exchange Storage
Group
• CreateaSharedFolder
• Host a SQL Server Database
Opens a storage-allocation wizard that helps you allocate and
configure storage space on your HP All-in-One Storage System.
• Host a User-Defined
Application
View > Customize
Help
This is a
online h
Opens online help for ASM.
n MMC command. See the Microsoft Management Console
elp. To open MMC online help, click Help in the Actions pane.
Opens the Allocate Space Wizard where you can change the following
storage configurations for the item selected in the content pane:
Allocate Space
• Size of allocated storage
• Percentage full warning threshold
• Enforced allocated limit (shared folders only)
See Table 6 on page 27 for more information.*
Removes the application component or user-defined application
selected in the content pane from view. Application areas removed
from view can no longer be managed or monitored using ASM, but
Remove from View
the application storage remains hosted on your HP All-in-O ne Storage
System.
nl
See “Removing application areas from view”onpage44formore
information.*
nl
Opens the Properties window where you can view the properties for
the item selected in the content pane. See “Accessing application
Properties
and shared folder properties”onpage47,“Accessing storage
area properties” on page 58, and “Accessing application server
properties” on page 61 for more information.*
Opens the Data Protection tab of the Properties window where
you can schedule backups, run a backup, or restore data from a
Data Protection
backup. You can also schedule snapshots, take a snapshot, expose a
snapshot, or revert data to a past snapshot. See “Configuring data
rotection” on page 37 for more information.*
p
* These actions can also be selected by right-clicking an item in the content pane.
16
All-in-One Storage Manager
Page 17

Defining user int
erface options
ASM allows you t
Changing color settings
Changing color settings customizes the color used in the content pane to display the different types of
storage, volumes, and ser vers. Colors help distinguish the different t ypes of storage, storage areas,
and servers from ea ch other.
1. In the Actions pane, select Tools > Options.
The Configure Op tions window o pens.
2. Click the Colors tab.
3. Select an item in the Items list and a color in the Color drop-down menu.
4. When your color selections are complete, click Apply to apply the color settings to the content pane.
5. Click OK.
Scaling display settings
Changing the scaling settings customizes the size a t which each application area or shared folder is
displayed in the content p ane. You can choose to scale each application area and shared folder so that
it is displayed in proportion to its capacity (allocated storage size), or so that all the application areas
and shared folders are displayed at the same size.
1. In the Acti
The Configure Op tions window o pens.
2. Click the Scaling tab.
3. Select th
• According to capacity, using automatic scaling—Displays logical disks and volumes, and
application areas according to relative size, but leaves the display readable.
•Allasthe
same size.
4. Click Apply to apply your change.
5. Click OK
o customize the user interface color and scale settings.
ons pane, select Tools > Options.
e storage-display proportion setting:
same size—Displays logical disks and volumes, and application areas as the
.
Add an All-in-One Storage System
You may add another All-in-One Storage System for the ease of managing more than one All-in-One
from the same console. To add another All-in-One Storage System:
1. Click on Add All-in-One Storage System in the Actions pane.
2. A dialog box will open. Enter the hostname or IP address of the All-in-One Storage System to
add.
3. The added All-in-One Storage System will appear in the Navigation pane.
Remove an All-in-One Storage System
ove an added All-in-One Storage System:
To rem
1. Click on Remove All-in-One Storage System.
2. A window will appear, asking if you would like to remove the All-in-One Storage System
3. Click Yes.
All-in-One Storage Manager
17
Page 18

18
All-in-One Storage Mana ger
Page 19

2 Hosting storage for applications
andsharedfolders
The All-in-One Storage Manager (ASM) radically simplifies hosting application storage and shared
folders on your HP All-in-One Storage System, using storage-allocation wizards. Use storage-allocation
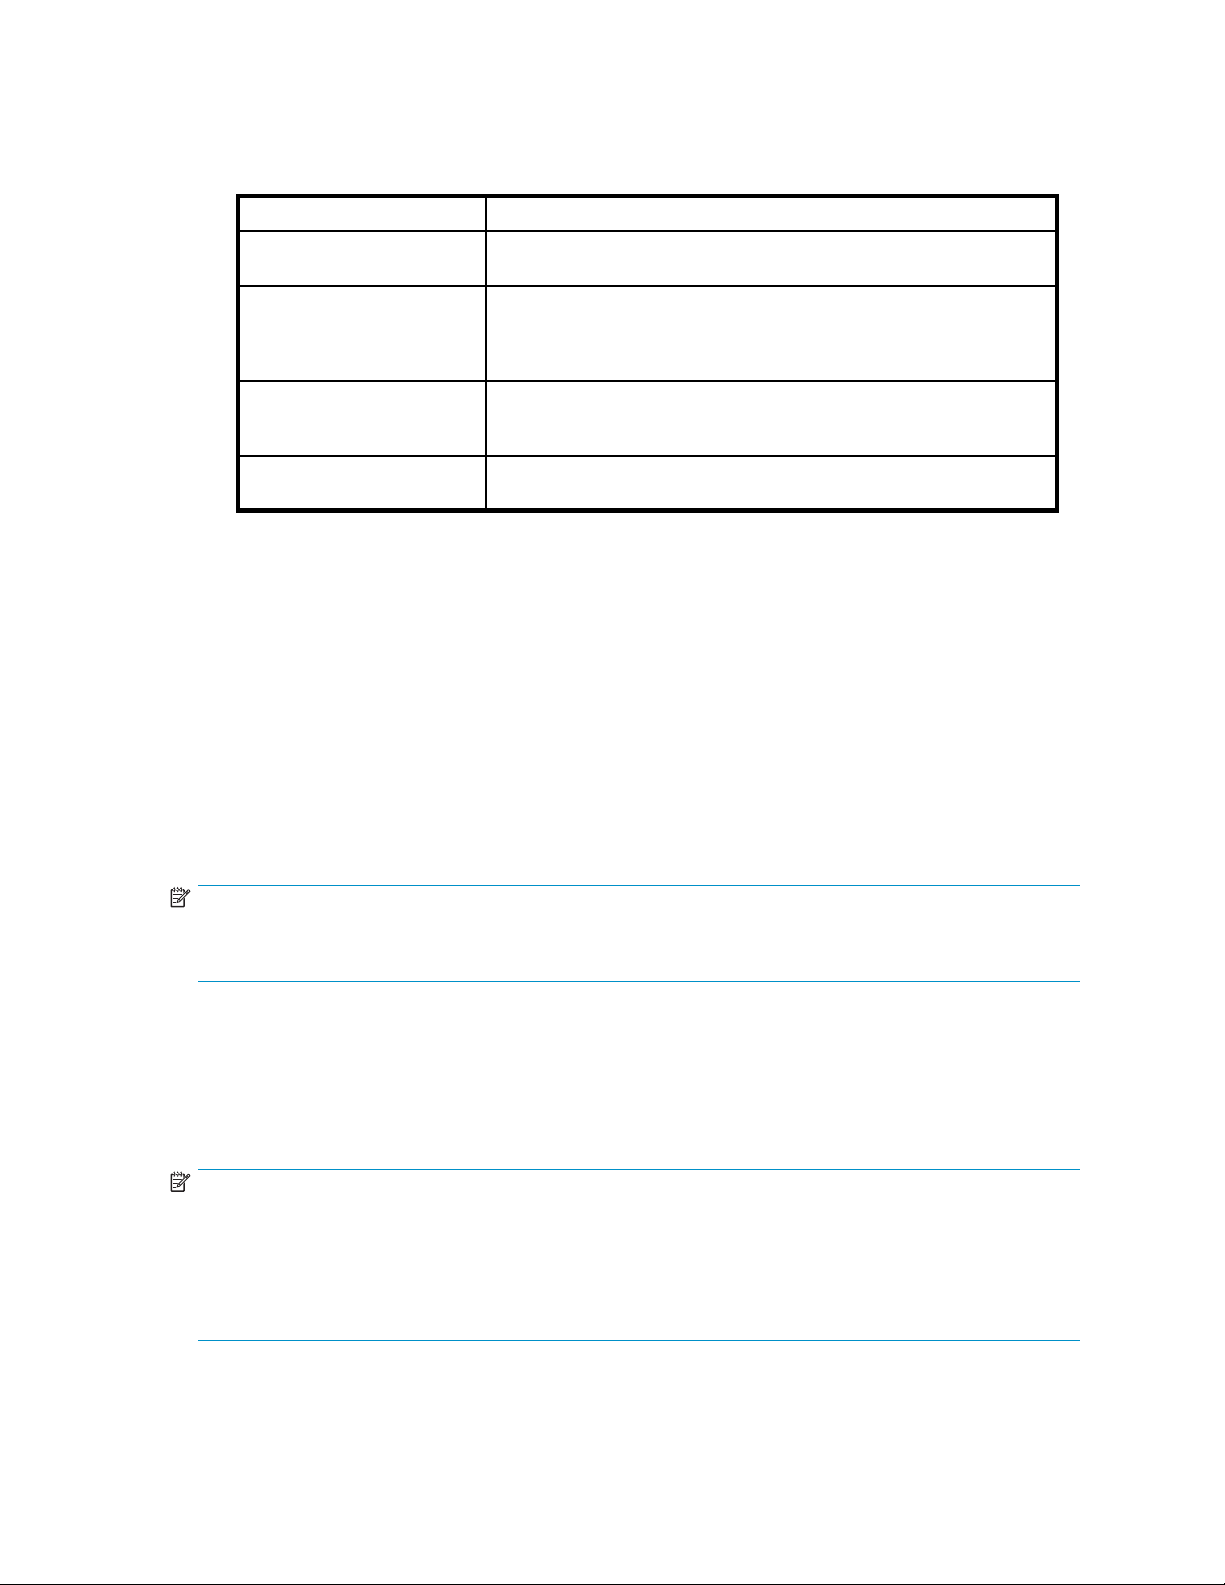
wizards to allocate and con figure storage for these applications:
Application
Exchange
Shared Folders
SQL Server
Description
Allocate and configure storage for
individual Exchange storage group
components. A wizard assists you by
discovering Exchange storage group
components (such as mail stores, public
stores, and logs) , suggesting default
storage configurations based on best
practices for Exchange, migrating the
Exchange storage group components
you selected to your HP All-in-One
Storage System, deleting the Exchange
storage group components you selected
from the Exchange, and configuring
Exchange to store data on your HP
All-in-One Storage System.
shared folders on your HP
Create
-One Storage System. A wizard
All-in
assists you in allocating and configuring
ge space for shared folders, and
stora
creating shared folders.
Allocate and configure storage for
SQL Server databases. A wizard
assists you by discovering servers
that host SQL Server and SQL Server
database components (such as data
files and logs), suggesting default
storage configurations based on best
practices for SQL Server, migrating
the SQL Server database components
you selected to your HP All-in-One
Storage System, deleting the SQL Server
database components you selected from
the server t hat hosts SQL Server, and
configuring SQL Server to store data on
your HP All-in-One Storage System.
See “Using the Host an Exchange
Storage Group Wizard”onpage20
dFolders. See“Using the Create
Share
ed Folder Wizard”onpage21.
aShar
SQL database and components. See
“Using the Host a SQL Server Database
Wizard”onpage22.
User-Defined
Applications
Allocate and configure storage for
any remote application running under
Windows Server 2003 that uses NTFS
volumes for storage. A wizard assists
you in allo cating and configuring
storage space.
nl
User-Defined Applications. See Using
the Host a User-Defined Application
Wizard.
The wizard does not migrate
user-defined application data to
your HP All-in-One Storage System or
reconfigure the application to store data
on your HP All-in-One Storage System.
Youmustdothismanuallyasdescribed
in “Migrating user-defined application
All-in-One Storage Manager
19
Page 20

Application
Data Protection
Description
Create a virtual library where data from
aremotesystemisbackeduponyour
All-in-One Storage System. A wizard
assists you in choosing size and storage
allocation.
data to your HP A
System” on page
in the applica
tion’s documentation.
ll-in-One Storage
34, and as described
Using the Host an Exchange Storage Group Wizard
The H ost an Exchange Storage Group Wizard automatically discovers the Exchange storage groups in
your network domain and helps you allocate and confi gure storage space for these components:
• Mail store
• Public stores—Contain the data in public folders.
• Logs—Providearecordofeverymessagestoredinastoragegroup.
Before you begin configuring storage for Exchange
• Make sure the ASM agent is installed on each server with Exchange data you plan to host. See
the HP StorageWorks All-in-One Storage System quick start instructions for more information.
• Make sure you have an up-to-date backup of your Exchange data and logs.
s—Contain the data in user mailboxes.
Accessing the Host an Exchange Storage Group Wizard
1. In the Actions pane, select Host an Exchange Storage Group.
TheHostanExchangeStorageGroupWizardwelcomepageopens.
2. Click Next to open the Specify Exchange Server page (see
“Entering a name of a server that hosts Exchange” on page 20).
Entering a name of a server that hosts Exchange
Use the Specify Exchange Server page to provide ASM with the name or the Internet Protocol (IP) address
of a remote server in your current domain that hosts E xchange.
1. Do one of the following:
• Enter the host name of a server that hosts Exchange (exactly as it is registered in the domain).
• Enter the IP address of a server that hosts Exchange.
2. Click Next to open the Select Storage Group Components page (see
“Selecting Exchange Server storage group components” on page 20).
lecting E xchange storage group components
Se
Use the Select Storage Group Components page to select the Exchange storage group and storage
group components (mail stores, public stores, and logs) you want to host on your HP All-in-One Storage
stem and manage using ASM.
Sy
o one of the following:
1.D
• Select the entire storage group (including all of its components) by checking the box next to
the storage g roup.
elect individual storage group components by expanding the list and checking the boxes
•S
next to the components.
20
Hosting storage for applications and shared folders
Page 21
You must select a ll the storage group components in a storage group i f you want to run backups
or take snapshots of the Exchange storage group using ASM.
The table below lists the action ASM will perform for each storage group component selected.
Table 4 Selecting storage group components to host
Action Description
None
Allocate Spa
Allocate Space, Move Data
None, Already Managed
ce
Component’s check box is not selected, so ASM will not perform any
action. Select check box to change action.
Component’s d
System. The component was removed from view. The component
will be returned to view. See “Removing application areas from
view” on page
Storage space will be allocated and configured on your HP All-in-One
Storage System. Component’s data will be migrated to your HP
All-in-One Storage System.
Component’s data is already hosted on your HP All-in-One Storage
System and already managed by ASM. No action is possible.
2. To view the properties for a storage group component, select the storage group component name
and then click Properties.
See “MailStore database properties”onpage50,“PublicStore database properties”onpage51,
and “Log properties for storage group” on page 51 for descriptions of the properties displayed.
3. When you are done, click Next to open the Storage Allocation page (see
“Allocating space for components” on page 26).
Local Continuous Replication (LCR)
If the Lo
option o
the Sel
the same manner as other Exchange components.
cal Continuous Replication (LCR) feature is enabled in Microsoft Exchange 2007, you have the
f migrating LCR components to your All-in-One Storage System. LCR components are shown in
ect Storage Group Components page in the wizard if this feature is enabled. They are selected in
ata is already hosted on your HP All-in-One Storage
44 for more information.
NOTE:
It is not recommended to host both the LCR and the original Exchange components on a single
-One Storage System.
All-in
Using the Create a Shared Folder Wizard
The Create a Shared Folder Wizard walks you through the process of creating a top-level shared folder
(file share) on your HP All-in-One Storage System, including allocating and configuring the required
storage.
NOTE:
You cannot create nested shared folders on your HP All-in-One Storage System using ASM. You may
use other applications, such as Windows Explorer or the Shared Folder MMC snap-in, to create nested
shared folders on your HP All-in-One Storage System.
You can view the nested shares in a top-level shared folder by selecting the top-level shared folder in the
content pane, clicking Properties in the Action pane, and then clicking the Nested Shares tab.
All-in-One Storage Manager
21
Page 22

Accessing the Create a Shared Folder Wizard
1. In the Actions pane, select CreateaSharedFolder.
TheCreateaSharedFolderWizardwelcomepageopens.
2. Click Next to open the Enter a Shared Folder Name and Description page (see Naming a shared
folder).
Naming a shar
Use the Enter a Shared Folder Name and Description page to provide ASM with a name and description
for the shared folder.
1. Enter the name for the shared folder.
2. Enter a description of the shared folder (optional).
3. Click Next to open the Set Shared Folder Permissions page (see Setting permissions for a shared
ed folder
NOTE:
The path to the shared folder is created by ASM and is based on the shared folder name.
The Share Pa
folder).
th field is
Read Only
.
Setting permissions for a shared folder
Use the Set Shared Folder Permissions page to set network user read and write permissions for the
shared folder.
NOTE:
Permissions can be further customized using Windows administration tools, such as Windows Explorer
and the Shared Folder MMC snap-in.
1. Select a permission level.
2.
Click Next to open the Storage Allocation page (see “Allocating space for components”onpage26).
Using the Host a SQL Server Database Wizard
The H ost a SQL Server Database Wizard automatically discovers the servers that host SQL Server and
SQL Server databases on your domain, and helps you allocate and configure storage space for each
database component you select:
• Data file—Contains pointers to database files, storage for system tables and objects, and storage
for database data and objects.
• Log file—Holds all the transaction log information for the database. Every database has exactly
one log file, which cannot be used to hold any other data.
Before you b egin con fi guring storage for SQL Server
• Make
• Make sure you have an up-to-date backup of your SQL Server data and logs.
Accessing the Host a SQL Server Database Wizard
1. In the Actions pane, select Host a SQL Server Databa se.
sure the ASM agent is installed on each server with SQL Server data you plan to host. See
HP StorageWorks All-in-One Storage System quick start instructions for more information.
the
22
Hosting storage for applications and shared folders
Page 23

TheHostaSQLServerDatabaseWizardwelcomepageopens.
2. Click Next to open the Select a SQL Server page (see Selecting a server that hosts SQL Ser ver).
Selecting a ser
Use the Select a
ver that hosts SQL Server
SQL Server page to select one of the servers that hosts SQL Server discovered on
your domain by the wizard.
1. Do one of the following:
• E nter the host
name of a server that hosts SQL (exactly as it is registered in the domain).
• Enter the IP address of a server that hosts SQL.
2. Click Next to open the Select Database Components page (see Selecting SQL Server database
components)
.
Selecting SQL Server database components
Use the Select Database Components page to select the SQL Server database and database components
youwanttohostonyourHPAll-in-OneStorageSystem.
1. Do one of the following:
• Select the entire database components (including all of its components) by checking the
box next to the component.
• Select individual database components by expanding the list and checking the boxes next
to the components.
You must select all the database components, including the log file, in a database if you want to
run backups and/or take snapshots of the database using ASM.
NOTE:
ASM cannot migrate system databases; for example, ASM cannot migrate master,
model, msdb and tempdb.
The following table lists the action ASM can perform for each database component listed.
Table 5 Selecting database components to host
Action Description
None
Allocate Spac e
ateSpace,MoveData
Alloc
None, Already Managed
Component’s check box is not selected, so ASM will not perform any
action. Select check box to change action.
Component’s data is already hosted on your HP All-in-One Storage
System. The component was removed from view. The component
will be returned to view. See “Removing application areas from
view” on page 44 for more information.
Storage space will be allocated and configured on your HP All-in-One
Storage System. Component’s data will be migrated to your HP
All-in-One Storage System.
Component’s data is already hosted on your HP All-in-One Storage
System and already managed by ASM. No action is possible.
2. To view the properties for a database component, select the database component name a nd then
click Properties.
See “Data file properties” on page 54 and “Log file properties for database” on page 54 for
descriptions of the p roperties displayed.
All-in-One Storage Manager
23
Page 24

3. IfyoudonotwantASMtodeletetheoriginalfiles for the selected database components from
the server that hosts SQL Server after it migrates the data to your HP All-in-One Storage System,
clear the Delete original files after checkbox.
4. When you are don e, click Next to open the Select the Database Workload Type page (see Selecting
a database workload type).
Selecting a database workload type
UsetheSelecttheDatabaseWorkloadTypepagetoselecttheworkloadtypefortheSQLServerdatabase.
NOTE:
You can only select the database workload type while using the Host a SQL Server Database Wizard.
The database
1. Do one of the following:
•SelectTransaction processing (TP) for frequently updated, fast growing databases with large
•SelectDecision support systems (DSS) for databases designed to handle queries on large
2. When you are done, click Next to open the Storage Allocation page (see
“Allocating space for components” on page 26).
workload type cannot be changed later.
volumes of data requiring concurrent user access.
amounts of data, typically used for data-mining applications.
Using the Host a User-Defined Application Wizard
The wizard helps you set up your All-in-One Storage System to store application data for various
applications. Storage will be allocated for the application, optionally exposed to another server using the
iSCSI protocol, and an NTFS file volume may be optionally created on the remote application server.
Upon completion, you can monitor and manage storage for the application through the the All-in-One
Storage manager.
After storage is allocated and configured on your HP All-in-One Storage System for a remote application
using the Host a User-Defined Application Wizard, do the following:
• Manually migrate the remote application’s data to your H P All-in-One Storage System. See
“Migrating user-defined application data to your HP All-in-One Storage System”onpage34
for more information.
• Configure the remote application to store its data on the iSCSI LUN exported by ASM to the
application server as described in the application’s documentation.
Before you begin configuring storage for a user-defined application
• Verify the remote application has the following characteristics:
• Runs under Windows Server 2003
•UsesNTFSvolumesforstorage
• Make sure the ASM agent is installed on each application server with data you plan to host. See
the HP StorageWorks All-in-One Storage System quick start instructions for more information.
• Make sure you have an up-to-date backup of your remote application data and logs.
• For an iSCSI LUN application, you will need the iSCSI qualified name.
NOTE:
For a remote windows application, you need to know the path to the iSCSI LUN on the application
server to configure the remote application to store data on the iSCSI LUN. The path to the iSCSI LUN is
displayed on the application’s Properties window on the Storage tab.
24
Hosting storage for applications and shared folders
Page 25

To access the Host a User-Defined Application Wizard
1. In the Actions pane, select Host a User-Define d Application.
The Host a User-Defined Application Wizard welcome page opens.
2. Click Next toopentheChoosetypeofApplicationpage(seeEntering an application server name).
Choose type of application
1. Select the type of application for hosting a user-defined application:
• Remote Windows Application- ASM will provision storage for the application and expose
the storage t
recommende
installed on the application server to use this option.
• iSCS I LUN- Allows you to connect to remote servers. You will need to install an initiator
on your host
• Local storage only- Creates a volume on your All-in-One Storage System
2. Click Next to open the Enter an Application Name page (see Entering an application name).
o the g iven server as an N TFS volume over the iSCSI protocol. This is the
d option for most scenarios. The All-in-One Storage Manage agent must be
server.
Entering an application name
Use the Enter an Application Name page to enter a name for the application. This name will be used
anywhere the application is referenced in ASM, so it must be a unique name.
1. Enteranamefortheapplication.
2. When you are done, click Next to open the Storage Allocation page (see Allocating space for
components).
Using th
e Create a Virtual Library Wizard
The wiza
You wil
rd helps you create a virtual library for disk-to-disk backup on your All-in-One Storage System.
l then be able to manage the storage for the virtual library through ASM.
Accessing the Virtual Library Wizard
To access the Create a
1. In the
2. Click Next to open the Configure virtual library page (see Configure your virtual library).
Configure your virtual library
To configure your virtual library, do the following:
1. In the name dialog box, type a name for your virtual library.
2. In the number of slots field, type or use the arrows to indicate how many slots are need ed for
3. Click Next. This will open the Storage Allocation page. See Allocating space for components for
Actions pane, select Create a Virtual Library.
The Create a Virtual Library welcome page opens.
your virtual library.
more information on how to allocate space for components.
All-in-One Storage Manager
25
Page 26

NOTE:
The number of slots needed for your virtual library will depend on your tape storage
size.Thenumberofslotsbackeduponyourtapestoragesystemandthenumberneeded
for your virtual library will be the same.
Allocating space for components
Use the Storage Allocation page in the wizards to specify the allocated space size and advanced
configuration settings for each application component or shared folder listed. Default values are provided.
NOTE:
15MBistheminimumvaluethatcanbeallocated. Youcannotsetthesizebelowtheminimumvalue.
NOTE:
SQL Server and Exchange default advanced c onfigu ration settings are based on SQL Server or
Exchange, and HP storage best practices, and should generally not be changed.
1. Do one of the following:
•ClickNext to accept the default values that ASM h as provided for the components,
user-defined application, or shared folder selected.
• Change the default size values:
•Selectarowtoedit.
• Highlight the storage size unit value a nd then enter a new value as ne cessar y: m egabytes
(MB), gigabytes (GB), or terabytes (TB).
• Highlight the storage size number value and enter a new value, or click the arrow buttons
to change the value.
NOTE:
The Size Range column shows the minimum and maximum storage space that can be
allocated to each application component, user-defined application, or shared folder listed.
Whenever you change the allocated space size or an advanced configuration setting
for an application component, the maximum value for Size Range is recalculated for all
the application components listed.
NOTE:
To change the advanced configuration settings for an application component, user-defined
application, or shared folder listed, select the item to edit and then click Advanced.See
“Selecting advanced configuration settings” on page 27 for more information.
2. When you are done selecting the storage allocation and configuration settings, click Next to open
the summary page.
26
Hosting storage for applications and shared folders
Page 27

NOTE:
After storage space is allocated and configured using a wizard, only the following storage configuration
settings can be changed:
• Allocated space size
• Percent full warning threshold
• Enforce Allocated Limit (shared folders only)
Once a logical disk is created, its configuration cannot be changed.
Selecting advanced configuration settings
Use the Advanced window in the wizard to change the allocated space size and default advanced
configuration settings for each application component, user-defined application, and shared folder listed.
After storage is configured using a wizard, you can access the Advanced window from the Allocate
Space Wizard and change the allocated space size, percent full threshold warning, and/or enforce
allocated limit (shared folders only) values as needed.
NOTE:
When allocating storage on an AiO400 Storage System that does not have additional external storage,
most of the default advanced configuration settings cannot be changed. This is because the AiO400
Storage System is pre-configured with one volume a nd one logical disk, and ASM is unable to create
any new logical disks on the system. All storage allocated is allocated from the existing logical disk.
Table 6 provides a brief description of the items you can modify:
Table 6 Advanced window items
Item
Size
RAID Level
Description
The amount of storage that ASM allocates
to the application component, user-defined
application, or shared folder you are
configuring.
Hard drive formatting that provides different
levels of performance, capacity, and d ata
protection.
Notes
You are prevented from setting the
size below 15 MB.
nl
NOTE:
Once the allocated storage
space is full (100 percent used),
no further data can be stored to
the space until you increase the
size using the Allocate Space
Wizard. The only exception is
for shared folders without an
enforced allocated limit. If there
is unused storage space on the
logical disk where a shared
folder without an enforced
allocated limit resides, data can
be written to the shared folder
until the logical disk is full.
For more information about RAID
levels, see Customizing RAID
levels on page 28.*
RAID Stripe Size
Thenumberofbytesorkilobytesofdatain
each RAID stripe (block of data). The RAID
stripe size selected affects performance.
nl
For the best performance, select the stripe size
closest to the size of the files being saved.
ASM provides the following
general values: small (8 kB),
medium (16 kB), and large (64
kB).*
All-in-One Storage Manager
27
Page 28

Item
Percent Full Warning
Threshold
Exclusive Storage
Description
The percent full value that when reached
changes the storage status to Warning and
issues a warning alert. The warning indicates
that storage use has surpassed the percentage
full value. F
see a warning
pane when storage is at 75 percent full.
Data is stored on hard drives dedicated
to storing only the data for the application
component, user-defined application, or
shared folder you are configuring. The number
of hard drives dedicated depends on the
allocated space size and other advanced
storage configuration settings selected for the
item you are configuring.
nl
Exclusive storage is required by some
applications for the storage of specifictypes
of data.
or example, if you enter 75%, you
(yellow asterisk) in the content
Notes
The percent full warning threshold
is set by default to 80%.
nl
Percent full warning threshold
values are ASM-specific;
percent full warning threshold
values selected in the Quota
Management MMC snap-in are
not adopted by ASM. However, all
other Quota Management MMC
snap-in settings are adopted by
ASM. See Setting a percent full
warning threshold on page 30.
For Exchange and SQL Server,
ASM default values specify
exclusive storage for log files,
which according to storage best
practices, should be isolated from
other application storage areas.*
Enforce Allocated
Limit (Quota)
Hot Spare Required
Physical D isk Type
*After you have allocated and configured storage for an application component, user-defined application,
or shared folder using a wizard, you can change the allocated space size, change the percent full warning
threshold,andchangetheenforcedallocatedlimit(sharedfoldersonly). However,youcannotchange
the RAID level, RAID stripe size, Hot Spares, or Exclusive Storage settings. This is due to the nature of
how hard drives work.
Customizing RAID levels
Before you customize the default RAID level setting, review Table 7 toseehowthedifferentRAIDlevels
affect per formance, capacity, and data protection level.
Sets an enforced quota for the amount of
storageavailabletoasharedfolder. When
the storage space allocated to a shared folder
is full, no further data can be saved to the
shared folder.
spare is a hard drive reserved as a spare
Ahot
torage space configured as RAID 1, 1+0,
for s
r 6. A hot spare automatically replaces a
5, o
d drive when it fails. When the failed hard
har
ve is replaced, its replacement becomes the
dri
whotspare.
ne
Type of physical disk to add for the hot spare
This item is available for shared
folders only. See Enforcing an
allocated storage limit for shared
folders on page 30.
spare is assigned at the
Ahot
ylevel. ALUNthatdoes
arra
require a hot spare may be
not
igned one anyway if another
ass
onthesamearrayrequiresa
LUN
t spare.
ho
YouareabletochooseSAS,
(Serial Attached SCSI) SATA,
(Serial Advanced Technology
Attachment) or SCSI (Small
Computer System Interface) for a
physical disk type.
Unless you customize the advanced configuration settings, the wizard configures the storage space with
the default values shown on the Advanced window:
• For Exchange and SQL Server, the wizard suggests default settings based on HP storage best
practices and specific recommendations for Exchange storage group and SQL Server database
components. You should generally accept these defaults.
28
Hosting storage for applications and shared folders
Page 29

• For user-defined applications and shared folders (where industry-standard recommendations
cannot be determined), the wizard provides default settings you can customize.
Table 7 shows how the different RAID levels affect:
• Performance–The speed at which data is read from and written to the hard drives. The RAID level
with the best performance rating provides the fastest reads and writes.
• Capacity–The available storage space on the hard drives. The RAID levels with the best capacity
rating require the least amount of storage space to store data.
• Da ta protection–The number of hard drives that can fail without data being lost. The RAID level
with the best data protection rating allows more hard drives to fail before data is lost.
For more information on the different RAID levels, see Table 7.
Table 7 D escriptions of RAID levels
RAID level
No RAID
RAID 0 – Striping (No Fault Tolerance)
RAID 1 – Mirroring
RAID 1+ 0 – Mirroring and Striping
Description
Offers no protection against disk failure. If a disk drive fails, data
will be lost.
Offers the greatest capacity and performance without data protection.
If you select this option, you will experience data loss if a hard drive
that holds the data fails. However, because no logical drive capacity
is used for redundant data, this method offers the best capacity. This
method offers the best processing speed by reading two stripes on
different hard drives at the same time and by not having a parity
drive.
Offers a good combination of data protection and performance.
RAID 1 or d rive mirroring creates fault tolerance by storing duplicate
sets of data on a minimum of two hard drives. There must be an even
number of drives for RAID 1. RAID 1 and RAID 1+0(10) are the most
costly fault tolerance methods b ecause they require 50 percent of
the drive capacity to store the redundant data. R AID 1 mirrors the
contents of one hard drive in the array onto another. If either hard
drive fails, the other hard drive provides a backup copy of the files
and normal system operations are not interrupted.
Offers the best combination of data protection and performance.
RAID 1+0 or drive mirroring creates fault tolerance by storing
duplicate sets of data on a minimum of four hard drives. There must
be an even number of drives for RAID 1+0. RAID 1+0(10) and RAID
1arethemostcostlyfaulttolerancemethodsbecausetheyrequire
50 percent of the drive capacity to store the redundant data. RAID
1+0(10) first mirrors each drive in the array to another, and then
stripes the data across the mirrored pair. If a physical drive fails,
themirrordriveprovidesabackupcopyofthefiles and normal
system operations are not interrupted. RAID 1+0(10) can withstand
multiple simultaneous drive failures, as long as the failed drives are
not mirrored to each other.
RAID 5 – Distributed Data Guarding
RAID 6– Advanced Data Guarding
(ADG)
Offers the best combination of data protection and usable capacity
while also improving performance over R AID 6. R AI D 5 stores parity
data across all the physical drives in the array and allows more
simultaneous read operations and higher performance than data
guarding. If a drive fails, the controller uses the parity data and the
data on the remaining drives to reconstruct data from the failed drive.
The system continues operating with a slightly reduced performance
until you replace the failed drive. RAID 5 can only withstand the loss
of one drive without total array failure. It requires a n array with a
minimum of three physical drives. Usable capacity is N-1 where N is
the number of physical drives in the logical array.
Offers the best data protection and is an extension of RAID 5. RAID
6 uses multiple parity sets to store data and can therefore tolerate up
to 2 drive failures simultaneously. RAID 6 requires a minimum of 4
drives and is available only if the controller h as an enabler. Writer
All-in-One Storage Manager
29
Page 30

RAID level
Setting a percent full warning threshold
To receive a warning alert when storage capacity reaches a specified limit, set the percent full warning
threshold. You can set a warning threshold for any application component, user-defined application,
and shared folder that ASM manages.
By default, the warning threshold is set to 80%. To change it, enter a new percent value on the Advanced
window.
After you set a warning threshold, ASM changes the status indicator for the application component,
user-defined application, or shared folder when this threshold has been surpassed. This is a warning
only; no hard limits are enforced on storage capacity as a result of setting this value. The warning is
visible in these places:
• A yellow warning icon appears on the application component, user-defined application, or
shared folder icon in the c ontent pane.
• As an alert in the Properties window.
NOTE:
For shared folders, you can set an enforceable limit (or quota) for allocated storage, as well as a warning
threshold. For more information, see Enforcing an allocated storage limit for shared folders.
Description
performance is lower than RAID 5 due to parity data updating on
multiple drive
two disks to fa
the number of p
s. It uses two disk for parity; its fault tolerance allows
il simultaneously. Usable capacity is N-2 where N is
hysical drives in the logical array.
Enforcing an allocated storage limit for shared folders
ASMprovidesawaytoenforceanallocatedstoragelimitforasharedfolder. Ifenforced,thesystem
does not allow the amount of allocated space for the shared folder to be exceeded.
If the capacity of the shared folder surpasses the percent full warning threshold and reaches the allocated
space limit, the file folder status changes from Warning to Critical in the content pane, and users are
blockedfromaddingdatatothissharedfolder.
NOTE:
If you do not choose to enforce an allocated storage limit for a sha red folder, the ASM status indicator
still goes from
to the shared folder as long as there is still unallocated storage space on the lo gical disk where the
sharedfolderresides. Datacanbewrittentothesharedfolderuntilthelogicaldiskisfull.
By default, the Enforce Allocated Limit (Quota) is set to No for all shared folders. To change this setting,
do one of the following:
• Using the Create a Shared Folder Wizard, change the Enforce Alloc a ted Limit (Quota) setting
on the Advanced window to Yes.
• Select the shared folder in the content pane, click Properties in the Actions pane, click the
Warning Threshold tab, and then select the Enforce Allocated Limit (Quota).
• Select the shared folder in the content pane, click Allocate Space in the Actions pane, click
Advanced, and then change the Enforce Allocated Limit (Quota) setting to Yes.
WarningtoCritical
in the content pane; however, users are not blocked from adding data
30
Hosting storage for applications and shared folders
Page 31

NOTE:
ASM will only allow you to change the default Enforce Allocated Limit (Quota) setting after storage space
isallocatedforthesharedfolderusingASM,whichisdoneforyouwhenyouusetheCreateaShared
Folder Wizard. However, this is not done if you create a shared folder using an application other than
ASM,suchasWindowsExplorerortheSharedFolderMMCsnap-in.
To allocated space for a shared folder, specify a size using the Allocate Space Wizard as described in
“Increasing or reducing the allocated storage” on page 43.
Selecting data protection
Use Data Protection window in the wizard to select the following:
• Local disk backup- Previous version of data are retained on disk using virtual library backups
and/or volume snapshots for fast recovery.
• Alternate location backup— Data copied off of this All-in-One Storage system to tape, other disks,
or other types of storage med ia. This enables long term storage and disaster recovery.
• Modify Advanced Properties:
•
Scheduling backups, page 31, of an Exchange storage group, SQL Server database,
user-defined application, or shared folder for local disk backup or an Alternative location
backup.
•
Scheduling snapshots, page 33, of an Exchange storage group, SQL Ser ver database,
user-defined application, or all the shared folders on the same volume for a local disk backup
or an Alternative location backup.
NOTE:
BackupsandsnapshotsaredisabledforanExchangestoragegrouporanSQLServerdatabaseifnot
allthecomponentsoftheExchangestoragegrouporSQLServerdatabaseareselectedonthe
components to host
NOTE:
Snapshots are taken at the volume level. See “Storage View” on page 58, for information on viewing
volumes.
After you have selected data protection settings, click Okay.
page of the wizard.
Before you schedule backups
Before you schedule backups:
• Before you schedule alternate location backups, install a tape library or other physical device and
add it to the same domain as your HP All-in-One Storage System.
• Installing a tape library that can accommodate the media rotation type required
by your environment requires advanced tape storage management experience. See
ttp://www.hp.com/sbso/serverstorage/ultimate.html to learn more about tape storage.
h
Scheduling backups
Select
1. On the Data Protection page in any wizard, select Modify Advanced Properties.Thiswillopen
the Data Protection Advanced Properties tab.
All-in-One Storage Manager
31
Page 32

NOTE:
You are also able to get to the Data Protection Advanced Properties tab by selecting Data
Protection after you have scheduled backups. See Selecting local or alternate backup for
more information on how to navigate to the Data Protection page outside of a wizard.
2. IntheDataProtectionAdvancedPropertiestab,SelectSche dule backups to a virtual library to
enable the backup schedule or leave unselected to suspend backups for now.
3. Select a Data Protector Express media rotation type from the list.
4. Type or use the arrows to indicate a t ype for the backup to take place.
5. Select the size for the virtual library. A default value will be recommended, based on the selected
rotation type and component size. Click on Modify Advanced Properties to modify these settings.
See Selecting advanced configuration settings for more information on advanced properties.
Changing the default backup schedule
IfyouplantobackupmorethanoneapplicationwithstoragehostedonyourHPAll-in-OneStorage
System or have other backups already running at 11:00 p.m., you can change the scheduled time of
your backups so they do not all run at 11:00 p.m. (default time).
NOTE:
If you do not change the default backup schedule, backups will run consecutively when backed up to the
samedeviceorruninparallelwhenbackeduptodifferentdevicesat11:00p.m.
After you finish creating a backup job using a wizard, you can change the backup job schedule by
opening the application or shared folder’s backup job:
1. Launch Data Protector Express.
2. On the login window:
a. Enter localhost in the Host name field.
b. Enter ASMbackup in the User name field.
c. Leave the password field empty.
CAUTION:
The default password for ASMbackup is not defined. It can be changed in the
Command Line Interface.
d. Click OK.
3. Click Jobs and Media in the Favorites pane, located on the left side of the main window.
4. Double-click ASMbackup on the right side of the main window.
5. Select the backup job for the application or shared folder whose backup schedule you want to edit.
6. Right-click the file and select Properties.
7. Click Schedule to view the backup schedule.
See Modifying Rotation Types of the HP StorageWorks Data Protector E xpress Users Guide and Technical
Reference for more information.
32
Hosting storage for applications and shared folders
Page 33

Scheduling snapshots
1. On the Data Protection page in any wizard, select Modify Advanced Properties.Thiswillopen
the Data Protection Advanced Properties tab.
NOTE:
You are also able to get to the Data Protection Advanced Properties tab by selecting Data
Protection after you have scheduled backups. See Selecting local or alternate backup for
more information on how to navigate to the Data Protection page outside of a wizard.
2. Click the box on the right side of the Snapshot Schedules box to open the Snapshot Schedule page.
3. Click Add to add a snapshot to the snapshot schedule.
4. Select a snapshot frequency (hourly, daily, weekly, monthly) for snapshots.
5. Enter a start date for snapshots.
6. Enter a start time for snapshots.
7. To add another snapshot to the snapshot schedule, repeat steps 2 through 5.
8. To delete a snapshot from the snapshot schedule, select the snapshot and click Remove.
9. Click OK to save your changes and return to the Data Protection page.
The Schedules box now displays the snapshots added, or displays Aggregate Schedule if more than one
snapshot was a dded to the snapshot schedule.
Reviewing task summary and scheduling tasks
1. Review the list of tasks the wizard will perform to allocate and con fi gure storage, and to host the
application storage or shared folder on your HP All-in-One Storage System.
For application storage, ensure the following is true before you run the tasks:
• You have an up-to-date backup of the application data and logs.
• The application data and logs are not being accessed or modified.
2. Do one of the following:
• Togobackandchangeyourselections,clickBack.
• To run the listed tasks immediately, click Finish.
• The Task Viewer op ens, running the tasks required to configure storage and migrate data.
See Monitoring task completion status for more information.
• If the Task Viewer does not open, select Tools > Task Viewer in the Actions pane to open
the Task Viewer. ASM will not open the Task Viewer automatically if a task completes
quickly.
• Toscheduletaskstorunatalatertime,selectSc h e dule tasks to run later, enter a start date
and time, and then click Finish.
To select AM or PM for the start time, click the up and down arrow buttons.
To use a calendar to select a start date, click the down arrow button (located to the right of
the up and down arrow buttons) to open a calendar. To change the month displayed on the
calendar, click the p revious and next buttons on the calendar, or click on the m onth or year
displayed at the top of the calendar to display drop-down lists.
Monitoring task completion status
The Task Viewer shows the status of ASM wizard tasks. ASM wizard tasks allocate and configure storage,
host application storage and shared folders, and configure data protection.
All-in-One Storage Manager
33
Page 34

NOTE:
Click the Expand tree icon next to a task to view its subtasks.
Select a task to view its description in the Details box on the Task Viewer.
The Task Viewer has a filter drop-down menu. Each selection displays information about task-completion
status for different time periods:
• Show All—Displays all tasks that have been completed or failed to complete. Displays the tasks
and subtasks currently being processed and all scheduled tasks.
• Today—Displays the tasks and subtasks currently being processed, all scheduled tasks, and
tasks that completed or failed today.
• Last 3 Days—Displays the tasks and subtasks currently being processed, all scheduled tasks, a n d
tasks that completed or failed during the past three days, including today.
• Last 7 Days—Displays the tasks and subtasks currently being processed, all scheduled tasks, a n d
tasks that completed or failed during the past seven days, including today.
• Last 30 D ays—Displays the tasks and subtasks currently being processed, all scheduled tasks, and
tasks that completed or failed during the past thirt y days, including today.
• Errors Only—Displays all tasks that h ave failed and provides information about problems that
occurred during task processing.
The status of each task is provided and can be any one of the following:
• Scheduled—The task has been scheduled to run at a specified time.
• Verifying—ASM is confirming the configuration you specified is valid.
• Ready—The task is ready to run and is waiting for other tasks or background processes to run.
• Running—The task is being processed.
• Completed (date)—The task completed without problems.
• Cancelling—The task is being cancelled.
• Cancelled—The task has been cancelled (see Cancelling tasks).
• Failed—An error occurred during processing; select Errors Only from the drop-down menu for
detailed information about the failure.
Cancelling tasks
1. To cancel an uncompleted task, select the task and click Cancel Selected Task.
2. Click Yes to confirm.
Tasks canceled af ter they have started may not cancel imme diately. A task will stop running when the last
subtask started is completed. All subtasks listed below the last completed subtask are not completed
andcannotberestarted.
Migrating user-defined application data to your HP All-in-One
Storage System when using a remote windows application
For a remote windows application, the Host an Exchange Storage Group Wizard and Host a SQL
Server D atabase Wizard automatically migrate application data from the application server to your HP
All-in-OneStorageSystem. TheHostaUser-Defined Application Wizard, however, does not migrate data
for a user-defined application from the application server to your H P All-in-One Storage System for a
remote windows applications.You must do this manually.
1. Using ASM, determine the path to the iSCSI LUN (logical disk) created on the application server
by ASM, as follows:
a. Select the user-defined application in the content pane.
34
Hosting storage for applications and shared folders
Page 35

b. In the Actions pane, select Properties.
The Properties window opens.
c. Click the Storage tab.
d. Record the Application Path information displayed.
2. Copy the application data to the path on the application server recorded in step 1 as follows:
a. Using Windows Explorer, navigate to the application data you want to host on your HP
All-in-One Storage System.
b. Copy the application data and paste it to the application path on the application server
recorded in step 1.
For example, if the ap plication data is stored on C:\application\data and the
application path you recorded is G:\application\data, copy and paste the data in
C:\application\data to G:\application\data on the application server.
3. Delete the application data from the old path (optional).
Any data saved to the iSCSI LUN on the application server is now saved to a LUN on your H P All-in-One
Storage System and not on the server.
All-in-One Storage Manager
35
Page 36

36
Hosting storage for applications and shared folders
Page 37

3Dataprotection
The Data protection tab allows for the following:
• Select how data protection is configured, using local disk-to-disk (Local D2D) and/or Alternate
Location B ackup (D2Any) of an E xchange storage group, SQL Server database, user-defined
application, or shared folder.
• Select a media rotation type for backups or run a backup of an Exchange storage
group, SQL Server database, user-defined application, or shared folder. See
“Scheduling and running backups” on page 39.
• Create a snapshot schedule, take a snapshot, or delete a snapshot of an Exchange
storage group, SQL Server database, user-defined application, or shared folder using See
“Scheduling, taking, and d eleting snapshots” on page 38.
• View the contents of a snapshot by exposing it. See
“Exposing and unexposing a snapshot”onpage38.
• Restore an Exchange storage group, SQL Server database, user-defined application, or shared
folder from a backup. See “Restoring data from backups” on page 40.
• Revert an Exchange storage group, SQL Server database, or user-defined application to a past
snapshot. See “Reverting data to past snapshots” on page 39.
NOTE:
Backups and snapshots are disabled in ASM for an Exchange storage group or an SQL Server database
if not all the components of the Exchange storage group or SQL Server database are hosted. To host
components not yet hosted for a storage group or database, start the Host an Exchange Storage Group
Wizard or Host a SQL Server Database Wizard as appropriate, select the storage group or database,
and then select the components on the
Select components to host
page that are not yet hosted.
Data Protection tab
In the Data Properties tab, you are able to select data protection features, modify advanced properties,
and manage backups and snapshots.
Selecting local or alternate backup
A local storage device (D2D) can be used to save snapshots for fast recovery or an alternative location
backup (D2Any) for long term storage. They can also be chosen concurrently.
1. Do one of the following:
• Select an Exchange storage group (or a component of a storage group) in the content pane
to schedule backups of the Exchange storage group.
• Select an SQL Server database (or a component of a database) in the content pane to
schedule backups of the SQL Server database.
• Select a user-defined application in the content pane to schedule backups of the user-defined
application.
• Select a shared folder in the content pane to schedule backups of the shared folder.
2. Do one of the following:
• In the Actions pane, click Data Protection.
•IntheActionspane,clickProperties and then select the Data Protection tab.
All-in-One Storage Manager
37
Page 38

3. You may select Local Disk Backup (D2D) and/or Alternative Location Backup (D2Any) for any
component.
4. Click on Modify Advanced Properties to schedule backups and snapshots. See Scheduling backups
for m ore information on scheduling backups and snapshots.
Managing snapshots and backups
To manage snapshots and backups, first navigate to the Data Protection tab:
1. Do one of the following:
• Select an Exchange storage group (or a component of a storage group) in the content pane
to schedule backups of the Exchange storage group.
•SelectanSQ
schedule backups of the SQL Server database.
• Sele ct a user-defined application in the content pane to schedule backups of the user-defined
applicatio
• Select a shared folder in the content pane to schedule backups of the shared folder.
2. Do one of the following:
•IntheActi
• In the Actions pane, click Properties and then select the Data Protection tab.
3. Click on Manage backups and snapshots
L Server database (or a component of a database) in the content pane to
n.
ons pane, click Data Protection.
Snapshots
From the Manage backups and snapshots tab, you are able to take snapshots, expose or unexpose
them, and schedule them. See Managing snapshots and backups to navigate to the Manage bac kups
and snapshots tab.
Schedul
ing snapshots
•
To sche
dule snapshots, see Scheduling snapshots on page 33 for more information.
Taking snapshots
1. To take a snapshot immediately, click Take Snapshot in the Manage backups and snapshots tab
and then click Yes to confirm.
2. To delete a snapshot, select the snapshot from the snapshot l ist and click Delete.
3. When you are done making changes, click OK.
Exposing a snapshot
You can view a read-only copy of a snapshot of an Exchange storage group, SQL Server database, or
user-defined application by exposing the snapshot on your HP All-in-One Storage System. Exposing a
snapshot allows you to view the contents of a snapshot and selectively revert files.
NOTE:
A snapshot of a shared folder cannot be exposed using ASM. Use the Shadow Copy Client to view
snapshots of shared folders from a client computer. Snapshots of a shared folder are stored on the same
gical disk as the shared folder, in a protected system folder.
lo
• To expose a snapshot:
a. Navigate to the Manage Backups and Snapshots tab.
38
Data protection
Page 39

b. Select an unexposed snapshot from the snapshot list.
c. Click Expose.
d. Enter the expose path on the application server where you will view the snapshot. Your expose
path will vary, depending on where your are storing your snapshots.
Unexposing a snapshot
Unexposing a s
• To unexpose a snapshot:
a. Navigate to the M ana ge Backups and Snapshots tab.
b. Select an exposed snapshot from the snapshot list.
c. Click Unexp
d. Click Yes to confirm.
napshot
Reverting data to snapshots
ASM allows you to revert data stored on your HP All-in-One Storage System and local storage to a
snapshot. This overwrites the existing data and reverts it to a past state.
NOTE:
Snapshots of shared folders cannot be reverted to snapshots using ASM. To revert a shared folder to a
past snapshot, select and then right-click the shared folder in Windows Explorer and select Revert.
1. In the Manage Backups and Snapshots page, select a snapshot from the list.
NOTE:
To view the contents of a snapshot, expose it. See
“Exposing and unexposing a snapshot”onpage38formoreinformation.
ose.
2. Click Re
3. Click Yes to confirm.
vert.
Scheduling and running backups
•
To schedule backups, see Scheduling backups on page 31 for more information.
Managing backups
After scheduling backups, you are able to manage backups for Exchange storage group, SQL Server
database, user-defined application, or shared folders. Based on the components selected, you have
llowing options:
the fo
• Run virtual library backup-After you have created a virtual library for a component, you are able
to run a virtual library backup from this location.
• Run al
• Launch the restore wizard- Clicking on this wizard will taking you through the restore process, for
To ru
1. Navigate to the Data Protection page. See for more information.
ternative location backup- If an alternative backup device has been assigned, you may run
ternative location backup from this page.
an al
either a virtual library backup or an alternative location backup.
n a virtual library, alternative location backup or launch the restore wizard:
All-in-One Storage Manager
39
Page 40

2. Select Manage backups and snapshots.
3. Select the appropriate backup by clicking on the tabs.
Restoring data
ASM allows you t
using Data Protector Express. You can choose to overwrite the existing data with the backup, or restore
the backup to an unused space on your H P All-in-One Storage System so you can selectively overwrite
existing data
1. Click on Manage backups and snapshots in the Data Protection tab.
2. Click Launch restore wizard to launch the wizard and open Selecting the Source Device page. See
If you want to
the HP Stora
from backups
.
Selecting th
restore data using a backup other than the latest backup, see Selecting files for restoring of
geWorks Data Protector Express Users Guide and Technical Reference for more information.
o restore data to your HP All-in-One Storage System from the latest backups created
esourcedevice).
Selecting the source device
1. Select the DVD-RW drive on your HP All-in-One Storage System, tape library, or virtual library
where the backup is saved.
2. Click Next to open the Restore Destination page (see Selecting the restore destination).
Selecting
the restore destination
1. Do one of the following:
•SelectOverwrite Restore to overwrite the existing data with the backup.
•SelectDi
location (path) where you want the backup saved on your HP All-in-One Storage System.
To browse for the location, click Browse.
2. Click Next to open the Launch DPX page (see Launching DPX).
fferent Location Restore to save the backup to a different location, and then enter the
Launching DPX
1. Click Launch DPX to launch Data Protector Express (see Using DPX to restore data).
2. After the restore is complete, click Finish to exit the wizard.
Using
DPX to restore data
1. When the login window appears, do the following:
a. Enter localhost in the Host name field.
b. Ente
c. Leave the password field empty.
d. Click OK.
2. Click Jobs and Media in the Favorites pane, located on the left side of the main window.
3. Double-click ASMbackup on the right side of the main window.
r ASMbackup in the User name field.
CAUTION:
Do not set a password for the ASMbackup user account in Data Protector
Express. Setting a password for the ASMbackup user account prevents ASM from
unicating with Data Protector Express, which will cause problems. S ee??? to
comm
reset passwords
40
Data protection
Page 41

4. Select the restore job for the application or shared folder whose data you want to restore.
NOTE:
To select the files to restore , it will defautll to restoring files from the last backup.such as
when it was performed, right-click the restore job and select Properties.Itwilldefaultto
restoring files from the last backup.
5. Right-click the restore job and click Run to perform the restore.
6. Click Yes to confirm the restore.
To view the status of the restore job, click Job Status in the Favorites pane.
7. Exit Data Protector Express.
Resetting the password for the ASMbackup user account
To reset or change the ASMBackup user password:
1. Use the Command Line interface (CLI) found at C:\Program Files\HP\HP All-in-One Storage
Manager\hpkacli.exe
The password may b e set interactively, allowing the password characters to be masked, or it
may be set with a single command.
2. The following code can be used to change the ASMbackup password:
> hpkacli /?
set password [/password:/newpassword:
•Use/password: to specify the current password of an ASMbackup account.
•Use/newpassword: to specify the new password for the ASM backup account.
3. Type in the new password.
SpecifyingapasswordforASMBackup
To specify a password ASMBackup where previously there was none:
1. Use the Command Line interface (CLI) found at C:\Program Files\HP\HP All-in-One Storage
Manager\hpkacli.exe
2. Type the following:
> hpkacli set password
3. This will bring up the following:
Current password for ASMbackup:
New password for ASMbackup:
Confirm new password for ASMbackup:
4. Type in the new password.
5. Confirm the new password by t yping in password again under Confirm new password.
6. The password has been set.
Using the Administrators’ account to change an ASMbackup password
1. Use the Command Line interface (CLI) found at C:\Program Files\HP\HP All-in-One Storage
Manager\hpkacli.exe
2. Type in the following:
> hpkacli set password
3. This will bring up the following:
Password of Admin user:
New password for ASMbackup:
Confirm new password for ASMbackup:
4. Type in your old password.
5. Type in your new password.
All-in-One Storage Manager
41
Page 42

6. Confirm your new password by typing it in again.
7. The password has been set.
42
Data protection
Page 43

4Managingstorage
After an application is hosted or shared folder is created on your HP All-in-One Storage System using a
storage-allocation wizard, you can manage its storage and data by:
•
Increasing or reducing the allocated storage,page43
• Changing the percent full warning threshold,page44
• Removing application areas from view, page 44
•
Changing permissions, names, descriptions, or paths of shared folders, page 45
•
Deleting shared folders,page45
Increasing
You can incr
or sh ared f
Increasin
space allocated to the logical disk) holding the data. Reducing the allocated storage does not reduce the
size of the logical disk holding the data, because once hard drive space is allocated to a logical disk,
it cannot be una llocated due to the configuration of hard drives.
NOTE:
Unallocated storage on a logical disk is re-allocated by ASM when new or additional storage is
allocated to an application component or shared folder and the advanced configuration values selected
forthestoragematchesthoseofthelogicaldisk.
For example, if an application component or shared folder’s allocated storage is increased, any
unallocated space on the logical disk where it resides is used before the logical disk grows.
1. Select the application component, user-defined application, or shared folder in the content pane.
2. In the Actions pane, click Allocate Space to open the Allocate Space wizard.
3. Changethesizevalue:
• Highlight the storage size unit value and then enter a new value as necessary: megabytes
• Highlight the storage size number value and enter a new value, or click the arrow buttons
The Size Range column shows the minimum and maximum storage space that can be allocated to
an application component, user-defined application, or shared folder. Whenever you change
the storage space allocated to an application component or change a n advanced configuration
setting for an application component, the maximum value for Size Range is recalculated for each
application component shown.
or reducing the allocated storage
ease or reduce the storage allocated to an application component, user-defined application,
older after storage is initially allocated and configuredusingastorage-allocationwizard.
g the storage allocated requires ASM to grow the logical disk (increase the amount of hard drive
(MB), gigabytes (GB), or terabytes (TB).
to change the value.
NOTE:
To change the percent full warning threshold and/or enforce allocated limit (shared folders
only) setting, click Advanced.See“Selecting advanced configuration settings”onpage27
for more information.
4. Click Next to open the Review Tasks Summary page (see
“Reviewing task summary and scheduling tasks” on page 33).
All-in-One Storage Manager
43
Page 44

Changing the per
cent full warning threshold
You can change t
application, o
wizard. See Set
NOTE:
For shared folders, you can set an enforced limit (quota) for allocated storage, as well as a warning
threshold. For more information, see Enforcing an allocated storage limit for shared folders on page 30.
To change the percent full warning threshold from the Properties window:
1. Select the application component, user-defined application, or shared folder in the content pane.
2. In the Actions pane, click Properties.
3. Click the Warning Threshold tab.
4. Change the percent full warning threshold value.
5. Click OK.
To change the percent full warning threshold using the Allocate Space Wizard:
1. Select the application component, user-defined application, or shared folder in the content pane.
2. In the Actions pane, click Allocate Space.
3. Click Advanced.
4. Change the percent full warning threshold value.
he percent full warning threshold value for an application component, user-defined
r shared folder after storage is initially allocated and c onfiguredusingastorage-allocation
ting a percent full warning threshold on page 30 for more information.
5. Click Next to open the Review Tasks Summary page (see
“Reviewing task summary and scheduling tasks” on page 33).
Removing application areas from view
You can remove application components and user-defined applications from view on the ASM user
interface. This allows you to remove storage information from the content pane pertaining to storage
allocations lost due to hard drive failure or storage for an application component or user-defined
application whose storage you plan to unhost.
Removing an application component or user-defined application from view does not unhost its storage.
Its storage is still hosted on your HP All-in-One Storage System. To permanently remove storage from
your All-in-One storage system, you must first remove the storage that is hosted by AiO. Depending
on the type of storage ,see h
information on how to remove different types of storage.
NOTE:
If you remove an application component or user-defined application from view without unhosting the
storage, your All-in-One Storage System will re-discover the applications immediately.
NOTE:
This action is not available for shared folders. Because ASM automatically discovers top-level shared
rs on your HP All-in-One Storage System, the folder would just reappear after the next discovery
folde
ess. A shared folder is automatically removed from view when it is removed from your HP All-in-One
proc
Storage System.
ttp://h71028.www7.hp.com/ERC/downloads/4AA 1-1026ENW.pdf for
To remove an application component or user-defined application from view:
44 Managing storage
Page 45

1. Permanently remove storage from your AiO, depending on the type of application. The application
component will still remain in the content pane.
2. Select the application component or user-defined application to remove in the content pane.
3. In the Actions pane, click Remove from View.
Aconfirmation dialog box opens.
4. Do one of the following:
•ClickOK to remove the item from view.
•ClickCancel to cancel the action.
Changing per
shared folde
ASM cannot be used to change permissions, names, descriptions, or paths of top-level or nested shared
folders that reside on your HP All-in-One Storage System. Use Windows Explorer or the Shared Folder
MMC s nap-in to change permissions, names, descriptions, or paths of shared folders that reside on your
HP All-in-One Storage System.
ASM automat
or paths of
implement
the ASM us
You wil l n
To find the
pane. The share path listed on the General tab is the path for the shared folder.
missions, names, descriptions, or paths of
rs
ically discovers and adopts any changes you make to the permissions, na mes, descriptions,
shared folders using other applications. You do not have to make any changes in ASM to
the changes. Click Refresh in the Actions pane (or perform any action in ASM) to update
er interface to display your changes.
eed to know the path of a shared folder to change its permissions, name, description, or path.
path, select the shared folder in the content pane and then click Properties in the Actions
Deleting shared folders
ASM cannot be used to delete top-level or nested shared folders that reside on your HP All-in-One
Storage System. Use Windows Explorer or the Shared Folder MMC snap-in to delete shared folders
that reside on your HP All-in-One Storage System.
A shared folder is automatically removed from view on the ASM user interface when it is deleted from
your HP All-in-One Storage System.
All-in-One Storage Manager
45
Page 46

46 Managing storage
Page 47

5 Monitoring s torage
ASM provides storage-management functions so you can quickly view used and allocated storage, and
percent full warning thresholds settings for application and shared folder storage on your HP All-in-One
StorageSystem. Youhaveachoiceoftheseviewsforthecontentpane:
•
Application View, page 47—Monitoring the overall used and allocated storage values for specific
applications and shared folders (such as Exchange or SQL Server storage)
•
Storage View, page 58—Monitoring the used and allocated storage values for the logical disks
and volumes on your HP All-in-One Storage System that ASM created to host application storage
andsharedfolders.
•
Application Server View, page 61—Monitoring the application servers with storage hosted on
your HP All-in-One Storage System.
•
Storage Utilization View, page 62—Monitoring the allocated storage values for specific
applications and the shared folders pool, the unallocated storage value, and the storage value for
data not ma naged by ASM.
Views are selected from the Actions pane.
You can a lso quickly view storage status on the content pane. Status icons for warnings and critical
conditions are displayed on top of icons in the content pane when storage status changes from OK to
Warning or Critical. See “ASM alerts”onpage66formoreinformationonstatusicons.
NOTE:
Select an item in the content pane and then click Properties in the Actions pane to view any alerts for the
item. See “ASM alerts” on page 66 for alert descriptions and troubleshooting information.
Application View
Application View displays the used and allocated storage space, and storage status of applications and
shared folders hosted on your HP All-in-One Storage System in the content pane.
• In the Actions pane, select Application View.
• To view all the application storage and shared folders hosted on your HP All-in-One Storage
System in the content pane, select All from the Filters drop-down menu, located at the top of the
content pane. See Filters drop-down menu on page 15 for more information.
Application storage properties are displayed in order of hierarchy in an expandable and collapsible view.
Click the Expand tree icon next to each application to view the used and allocated storage properties for
the hosted application components. Click the Collapse tree icon next to expanded applications to hide
the application component storage properties.
To view all the storage p roperties for an item listed in the content pane, see Accessing application
and shared folder properties.
Accessing application and shared folder properties
When Application View is selected in the Actions pane, you can view the storage status, alerts, and
properties for the following:
• Applications
• Application component
• User-defined applications
All-in-One Storage Manager
47
Page 48

• Shared folders pool
• Shared folders
Do one of the following:
• Select the item in the content pane and then click Properties in the Actions pane.
• Right-click the item in the content pane and select Properti es.
NOTE:
ASM rolls up all status alerts to the highest level. For instance, if a top-level shared folder has surpassed
its percent full warning threshold and exceeded its enforced allocated storage space, a warning message
isshowninthesharedfolderspool. Likewise,ifacriticalstatusalertexistsinanExchangemailstore,
that alert is also shown in the status for the Exchange storage group.
Accessing properties for Exchange, Exchange storage group, and Exchange storage group
components
ASM provides properties information for Exchange, Exchange storage group, and Exchange storage
group components when Exchange storage is hosted on your HP All-in-One Storage System.
1. In the Actions pane, select Application View.
2. From the Filters drop-down menu, select Exchange or All.
3. To access Exchange:
•SelectExchange in the content pane and then click Properties in the Actions pane.
•Right-clickExchange in the content pane and select Properties.
To access Exchange Storage groups and components:
• Select any Exchange storage group or Exchange storage group component in the content pane
and then click Properties in the Action pane.
• Right-click any Exchange storage group or component in the content pane and select Properties.
Properties window
ASM provides properties information for Exchange, Exchange storage groups, and components for
storage hosted on your HP All-in-One Storage System. The following lists the tabs available in the
properties window, and in parenthesis, if it applies to Exchange, Exchange storage groups, or Exchange
storage group components.
• General tab—(Exchange, Exchange storage groups, and components) Displays the name of the
application, the total capacity reserved for the application, and its operating status:
Table 8 Operating status—Exchange proper ties
Status indicator Value
OK
Warning
Critical
Exchange is running and storage is online. No aler ts.
SeetheAlertslistformoreinformation. SeeTable 32 on page 68 for
alert descriptions.
SeetheAlertslistformoreinformation. SeeTable 32 on page 68 for
alert descriptions.
48 Monitoring storage
Page 49

Table 9 Details tab—Exchange storage group properties
Property
Value
Exchange Server
Exchange Version Version of Exchange.
Days before log file removal The number of days before log files are deleted from the server.
Directory Server
Server Ty pe
Clustered
Replication Type
LCR status
LCR Copy
LCR Log Folder Copy
LCR System Folder Copy Path to LCR system file copies
Name of server where Exchange storage is being hosted.
The domain controller used by the server.
The type of Exchange installation: Front-end or Back-end. ASM can
only host storage from Back-end Exchange servers, because Front-end
Exchange installations do not actually store mailboxes and other
Exchange data.
Indicates whether the server that hosts SQL Server is part of a cluster.
Type of Exchange replication enabled.
Indicates Exchange status for LCR.
Indicates if Exchange component is the original or a copy.
Path to the LCR log file copies
• Data Protection tab—(Exchange storage groups, exchange storage group components )
Allows you to schedule backups or run a backup of the storage group, or restore the storage
group from a backup. It also al lows you to schedule snapshots or ta ke a snapshot of the
storage group, expose a snapshot, or revert the storage group to a past snapshot. See
“Configuring data protection” on page 37 for more information.
• Storage tab—(Exchange storage group properties) Displays the storage group component’s
storage space, including allocated space, used space, free space, and the following storage
allocation details:
Table 10 Storage tab—Exchange storage group component properties
Property
Application Path
Protocol
Application Server Host Name
Application Server Volume Name
Application Server Volume Status
cation Server Volume -
Appli
sive Storage
Exclu
Application Server Volume RAID Level
Value
Path to the file directory on the server that hosts Exchange where the
storage group component’s data is saved by Exchange. The file
directory is located on the volume created on the iSCSI LUN exported
by ASM to the server that hosts Exchange.
Communication protocol used to transfer data between the server
that hosts Exchange (and the storage group component) and your HP
All-in-One Storage System.
Name of s
compone
Name of the volume on the server that hosts Exchange to which
Exchange saves the storage group component’s data. The volume
resides on the iSCSI LUN exported by ASM to the server that hosts
Exchange.
Status of the volume on the server that hosts Exchange where the
storage group component is stored.
Indic
exclusive storage. See Table 6 on page 27 for more information.
TheRAIDleveltowhichthestoragegroupcomponentstorageis
configured. See Customizing RAID levels on page 28 for more
information.
erver that hosts Exchange and the storage group
nt.
ates if storage group component’s storage is configured with
All-in-One Storage Manager
49
Page 50

Property
Value
Application Server Volume RAID Stripe Size
Application S
Read Cache
Application Server Volume Write Cache
Application Server Volume Number of Hot Spares
Applicatio
Mount Paths
erver Volume -
nServerVolume-
TheRAIDstripesizetowhichthestoragegroupcomponent’sstorage
is configured. See Table 6 on page 27 for more information.
Speeds up read
storage array
Speedsupwriteswhenenabled. Thissettingisdeterminedbythe
storage array, not ASM.
The number of hot spares with which the storage group component
storage is configured. See Table 6 on page 27 for more information.
Path the volume is mounted on, on the server that hosts Exchange.
The volume is built on the iSCSI LUN exported by ASM to the server
that hosts Exchange.
s when enabled. This setting is determined by the
,notASM.
• Warning Threshold tab—(Exchange storage group components) Allows you to change
the Percent Full Warning Threshold value for the storage group component. See
Setting a percent full warning threshold on page 30 for more information.
• Mail Store, Public Store, or Log tab—(Exchange storage group components) One of these
three tabs is available depending on whether the storage group component is a mail store,
public store, or log.
• Mail Store tab—Displays the status and properties of the mail store reported byt the Exchange
server.
Table 11 Mail Store tab—Exchange storage group component properties
Value
Description
MailStoreName Nameofstoragegroupmailstore.
Online
Database File
Streaming Database File
(Exchange 2003 only)
Replication type
LCR Status
LCR Copy
LCR Dat
• Public
abase Copy File
Store tab—Displays the public store’s free space and the following storage allocation
The storage group mail store is available for use.
Path to the file that stores all messages submitted through MAPI,
as well as the database tables that define mai l boxes, messages,
folders, and attachments.
Path to the file that stores Internet-formatted messages, such as
native Multipurpose Internet Extensions (MIME) content.
IndicatesifLCRisbeingused.
Indicate Exchange warnings for LCR.
Copy of the active/original exchange component.
LCR mailstore copy
Path to
details about the public store:
50
Monitoring storage
Page 51

Table 12 Public Store tab—Exchange storage group component properties
Value
Public Store Name
Online
Database File
Streaming Database File
(Exchange 2003 only)
Replication Type
LCR Status
LCR Copy
LCR Database Copy File
Description
Name of storage group public store.
The storage group public store is available for use.
Path to the file that stores all messages submitted through MAPI,
as well as the database tables that define mailboxes, messages,
folders, and attachments.
Path to the file stores Internet-formatted messages, such as native
Multipurpose Internet extensions (MIME) content.
IndicatesifLCRisbeingused.
Indicate Exchange warnings for LCR.
Copy of the active/original exchange component.
Path to the LCR public folder copy
• Log tab—Displays the log’s free space and the following storage allocation details about
the log:
Table 13 Log tab—Exchange storage group component properties
Value
Path
Circular Logging
Description
Path to the log file.
Indicates whether or not circular logging is en abled. If enabled,
a n ew log entry will replace the oldest log entry when the size
limit is reached.
Replication Type
LCR Status
LCR Copy
LCR Log Folder Copy
LCR System Folder Copy
IndicatesifLCRisbeingused.
Indicate Exchange warnings for LCR.
Copy of the active/original exchange component.
Path to the LCR log file copies
Path to LCR system file copies
Accessing properties for the shared folders
ASM provides properties information for shared folders pool and for any shared folder on your HP
All-in-One
status, in
offline, an
1. In the Actions pane, select Application View.
2. From the Filters drop-down menu, select Shared Folders or All.
3. Do one of t
• General
shared folder, share path on your HP All-in-One Storage System, share description, and the
shared folder operating status:
Storage System. Using properties information, you can determine details about shared-folder
cluding allocated space, and nested shares (if any), whether shared-folder storage is online or
d any warning or critical status indicators.
he following:
• Select Shared Folders in the content pane and then click Properties in the Actions pane.
•Right-clickShared Folders inthecontentpaneandselectProperties.
tab— (Shared folders pool, shared folders) Displays the shared folder name, type of
All-in-One Storage Manager
51
Page 52

Table 14 Operating status—Shared folder properties
Status indicator Value
OK
Warning
Critical
The storage is online.
The storage has surpassed the percent full warning threshold. See the
Alerts list for more information. See Table 32 on page 68 for alert
descriptions.
Shared folder storage has past the allocated storage limit and alerts
areshown. SeetheAlertslistformoreinformation. SeeTable
32 on page 68 for alert descriptions.
• Storage tab—(Shared folders) Displays the shared folder storage space, including allocated
space, used space, free space, and the following storage allocation details:
Table 15 Storage tab—Shared folder properties
Property
Storage Server Host Name
Storage Server Volume - Name
Storage Server Volume - Status
Storage Server Volume Exclusive Storage
Storage Server Volume - RAID
Level
Value
Name of your HP All-in-One Storage System.
Name of the volume on your HP All-in-One Storage System where
the shared folder is stored.
Status of the volume that holds the shared folder on your HP All-in-One
Storage System.
Indicatesifsharedfolder’sstorageisconfigured with exclusive
storage. See Table 6 on page 27 for more information.
The RAID level to which the shared folder’s storage is configured. See
Customizing RAID levels on page 28 for more information.
Storage Server Volume - RAID
Stripe Size
Storage Server Volume - Read
Cache
Storage Server Volume - Write
Cache
Storage Server Volume Number of Hot Spares
Storage Server Volume - Mount
Paths
• Warning Threshold tab—(Shared folders) Allows you to enable or disable
theenforcementoftheallocatedspacelimitforthesharedfolder. See
Enforcing an allocated storage limit for shared folders on page 30 for more information.
Also, allows you to change the shared folder’s percent full warning threshold value. See
Setting a percent full warning threshold on page 30 for more information.
• Nested Shares tab—(Shared folders) Displays the list of nested file shares (if any) contained
within the shared folder.
• Data Protection tab—(Shared folders) Allows you to schedule backups or run a backup of the
shared folder, or restore the sha red folder from a backup. It also allows you to schedule snapshots
or take a snapshot of the shared folder. See “Selecting data protection” on page 31 for more
information.
Accessing properties for SQL Server
TheRAIDstripesizetowhichthesharedfolder’sstorageisconfigured.
See Table 6 on page 27 for more information.
Speeds up reads when enabled. This setting is determined by the
storage array, not ASM.
Speedsupwriteswhenenabled. Thissettingisdeterminedbythe
storage array, not ASM.
The number of hot sp ares with which the shared folder’s storage is
configured. See Table 6 on page 27 for more information.
Path to where the volume that holds the shared folder on your HP
All-in-One Storage System is mounted.
ASM provides p roperties i nformation for SQL Server when SQL Server storage is hosted on your HP
All-in-One Storage System.
52
Monitoring storage
Page 53

1. In the Actions pane, select Application View.
2. From the Filters drop-down menu, select SQL Server or All.
3. Do one of the following:
• Select one of the following:SQL Server, SQL Server database or a SQL Server database
component in the content pane and then click Properties in the Actions pane.
•Right-clickSQL Server, SQL Server database or a SQL Server database component in the
content pane and select Properties.
Properties w
ASM provides
SQL Server storage is hosted on your HP All-in-One Storage System. The following lists the tabs in the
properties window, and in parenthesis, which applications are applicable: SQL Server, SQL Server
databases or
• General tab—(SQL Server, SQL Server database, SQL Server database component) Displays the
Table 16 Ope
Status indicator Value
OK
Warning
Critical
• Storage tab—(SQL Server database component) Displays the database component’s storage
Table 17 Storage tab—SQL Ser ver database component properties
Property
indow
properties information for the SQL server, databases and database components when
SQL Server database components.
name of the application, the total capacity reserved for the application, and its operating status:
rating status— SQL Server properties
SQL Server is running and storage is online. No alerts.
SeetheAlertslistformoreinformation. SeeTable 32 on page 68 for
alert descriptions.
SeetheAlertslistformoreinformation. SeeTable 32 on page 68 for
alert descriptions.
space, including allocated space, used space, free space, and the following storage allocation
details:
Value
Application Path
Protocol
Application Server Host Name
Application Server Volume Name
Application Server Volume Status
Application Server Volume Exclusive Storage
Application Server Volume - RAID
Level
Application Server Volume - RAID
Stripe Size
Path to the file directory on the server that hosts SQL Server where the
database component’s data is saved by SQL Server. The file directory is
located on the volume created on the iSCSI LUN exported by ASM to
the server that hosts SQL Server.
Communication protocol used to transfer data between the server that
hosts SQL Server (and the database component) and your HP All-in-One
Storage System.
Name of server that hosts SQL Server and the database component.
Name of the volume on the server that hosts SQL Server to which SQL
Server saves the database component’s data. The volume resides on
the iSCSI LUN (logical disk) exported by ASM to the server that hosts
SQL Server.
Status of the volume on the server that hosts SQL Server where the
database component is stored.
Indicates if database component storage is configured with exclusive
storage. See Table 6 on page 27 for more information.
The RAID level to which the database component storage is configured.
See Customizing RAID levels on page 28 for more information.
The RAID stripe size to which the database component’s storage is
configured. See Table 6 on page 27 for more information.
All-in-One Storage Manager
53
Page 54

Property
Value
Application Server Volume - Read
Cache
Application Server Volume Write Cache
Application Server Volume Number of Hot Spares
Application Server Volume Mount Paths
Speeds up reads when enabled. This setting is determined by the
storage array, not ASM.
Speeds up writes when enabled. This setting is determined by the
storage array, not ASM.
The number of hot spares with which the database component storage is
configured. See Table 6 on page 27 for more information.
Path the volume is mounted on, on the server that hosts SQL Server.
ThevolumeisbuiltontheiSCSILUNexportedbyASMtotheserver
that hosts SQL Server.
• Warning Threshold tab—(SQL Server database component) Allows you to change
the percent full warning threshold value for the database component. See
Setting a percent full warning threshold on page 30 for more information.
• Data File or Log tab— (SQL Server database component) One of these two tabs is available
depending on whether the database component is a data file or log.
• Data File tab—Displays the data file’s free space and the following storage allocation details
about the SQL Server data file:
Table 18 Data File tab—SQL Server d atabase component properties
Value
Data File Name
Filename
Description
Name of database data file.
Relative path to where the database data file is stored on the server
that hosts SQL Ser ver.
File Group File group of data file. This value is assigned by SQL Server.
Data File Space Available
Free storage space available for data file.
• Log tab—Displays the log file’s free space and the following storage allocation details about the
SQL Server log file.
Table 19 Log tab—SQL Server database component properties
Value
Log Name
File Name
Description
Name of database log file.
Relative path to where the d atabase log file is stored on the server
that hosts SQL Ser ver.
• Data Protection tab—(SQL server database, SQL server database component) Allows you to
schedule backups or run a backup of the database that owns the database component, or restore
the database that owns the database component from a backup. It also allows you to schedule
snapshots or take a snapshot of the database that owns the database component, expose a
snapshot, or revert the database that owns the database component to a past snapshot. See
“Configuring data protection” on page 37 for more information.
Accessing properties for the user-defined applications
ASM provides properties information for the user-defined applications on your HP All-in-One Storage
System. Using properties information, you can determine the status of all user-defined application areas
monitored by ASM, and any warning or critical status indicators.
1. In the Actions pane, select Application View.
2. From the Filters drop-down menu, select User-Defined or All.
3. To select properties for the user-defined application pool:
54 Monitoring storage
Page 55

• Select User-Defined in the content pane and then click Properties in the Actions pane.
or
•Right-clickUser-Defined inthecontentpaneandselectProperties.
For a user-defined application:
• Select any user-defined application in the content pane and then click Properties in the
Actions pane.
or
• Right-click any user-defined application in the content pane and select Properties.
Properties wi
• General tab—Displays the user-defined application name, name of the application server that
• Storage tab—Displays the user-defined application’s storage space, including allocated space,
ndow
runs the user-
Table 20 Operating status—User-defined application properties
Status indicator Value
OK
Warning
Critical
used space, free space, and the following storage allocation details:
Table 21 Storage tab—User-defined application properties
Property
Application Path
Protocol
defined application, and the application area status:
Application storage is online. No alerts.
SeetheAlertslistformoreinformation. SeeTable 32 on page 68
for alert descriptions.
SeetheAlertslistformoreinformation. SeeTable 32 on page 68
for alert descriptions.
Value
Path to the file directory on the application server where the
user-defined application data is saved by the user-defined application.
The file directory is located on the volume created on the iSCSI LUN
that was exported by ASM to the application server.
Communication protocol used to transfer data between the server that
hosts the user-defined application and your HP All-in-One Storage
System.
Application Server Host Name Name of server that hosts the user-defined application.
Application Server Volume Name
Application Server Volume Status
Application Server Volume Exclusive Storage
Application Server Volume RAID Level
Application Server Volume RAID Stripe Size
Application Server Volume Read Cache
Application Server Volume Write Cache
Nameofthevolumeontheapplicationservertowhichthe
user-defined application saves its data. The volume resides on the
iSCSI LUN (logical disk) exported by ASM to the application server.
Status of th e volume on the application server where the user-defined
application data is stored.
Indicates if user-defined application storage is configured with
exclusive storage. See Table 6 on page 27 for more information.
The RAID level to which the user-defined application storage is
configured. See Customizing RAID levels on page 28 for more
information.
TheRAIDstripesizetowhichtheuser-defined application storage is
configured. See Table 6 on page 27 for more information.
Speeds up reads when enabled. This setting is determined by the
storage array, not ASM.
Speeds up writes when enabled. This setting is determined by the
storage array, not ASM.
All-in-One Storage Manager
55
Page 56

Property
Value
Application Server Volume Number of Hot Spares
Application Server Volume Mount Paths
• Warning Threshold tab—Allows you to change the percent full warning threshold value for the
user-defined application. See Setting a percent full warning threshold on page 30 for more
information.
• Data Protection tab—Allows you to schedule backups or run a backup of the user-defined
application data, or restore the user-defined application data from a backup. It also
allows you to schedule snapshots or take a snaps hot of the user-defined application data,
expose a snapshot, or revert the user-defined application data to a past snapshot. See
“Configuring data protection” on page 37 for more information.
Data Protection
Data Prote
Properties window
ASM provides properties information on your HP All-in-One Storage System. The following lists the tabs
available in the properties window for Data Protection.
Table 22 Operating status— Data Protection properties
Status indicator Value
The number of hot spares with which the database component storage
is configured. See Table 6 on page 27 for more information.
Path the application server volume is mounted on. The volume is built
on the iSCSI LUN exported by ASM to the application server.
ction allows you to configure for virtual libraries and snapshots.
OK
Warning
Critical
Data Prot
SeetheAlertslistformoreinformation. SeeTable 32 on page 68 for
alert descriptions.
SeetheAlertslistformoreinformation. SeeTable 32 on page 68 for
alert descriptions.
ection is running and storage is online. No alerts.
56
Monitoring storage
Page 57

Table 23 Storage tab—Shared folder proper ties
Property
Storage Server Host Name
Storage Server Volume - Name
StorageServerVolume-Status
Storage Server Volume - Exclusive
Storage
StorageServerVolume-RAID
Level
StorageServerVolume-RAID
Stripe Size
StorageServerVolume-Read
Cache
StorageServerVolume-Write
Cache
StorageServerVolume-Number
of Hot Spares
StorageServerVolume-Mount
Paths
Value
Name of your HP All-in-One Storage System.
Name of the volume on your HP All-in-One Storage System where the
shared folder is stored.
Status of the volume that holds the shared folder on your HP All-in-One
Storage System.
Indicatesifsharedfolder’sstorageisconfigured with exclusive storage.
See Table 6 on page 27 for more information.
The RAID level to which the shared folder’s storage is configured. See
Customizing RAID levels on page 28 for more information.
TheRAIDstripesizetowhichthesharedfolder’sstorageisconfigured.
See Table 6 on page 27 for more information.
Speeds up reads when enabled. This setting is determined by the
storage array, not ASM.
Speeds up writes when enabled. This setting is determined by the
storage array, not ASM.
The number of hot spares with which the shared folder’s storage is
configured. See Table 6 on page 27 for more information.
Path to where the volume that holds the shared folder on your HP
All-in-OneStorageSystemismounted.
• Warning Threshold- Allows you to change the percent full warning threshold value for the virtual
library.
Table 24 Storage tab—Shared folder properties
Property
Storage Server Host Name
Storage Server Volume - Name
StorageServerVolume-Status
Storage Server Volume - Exclusive
Storage
StorageServerVolume-RAID
Level
StorageServerVolume-RAID
Stripe Size
StorageServerVolume-Read
Cache
StorageServerVolume-Write
Cache
Value
Name of the host server for your virtual library.
Name of the volume on your HP All-in-One Storage System where the
virtual library is stored.
StatusofthevolumethatholdsthevirtuallibraryonyourHPAll-in-One
Storage System.
Indicatesifthevirtuallibrarystorageisconfi gured with exclusive storage.
The RAID level to which the virtual library’s storage is configured. See
Customizing RAID levels on page 28 for more information.
TheRAIDstripesizetowhichthevirtuallibrary’sstorageisconfigured.
See Table 6 on page 27 for more information.
Speeds up reads when enabled. This setting is determined by the
storage array, not ASM.
Speeds up writes when enabled. This setting is determined by the
storage array, not ASM.
StorageServerVolume-Number
of Hot Spares
StorageServerVolume-Mount
Paths
The number of hot spares with which the virtual library storage is
configured.
Path to where the volume that holds the virtual library on your HP
All-in-OneStorageSystemismounted.
All-in-One Storage Manager
57
Page 58

Table 25 Virtual Library Properties
Property
Device name
Machine name
Device path
Slot count
Storage View
Storage View displays the used and allocated storage space of the storage areas (logical disks and
volumes) on your HP All-in-One Storage System that were created by ASM to store application data
and shared folders.
• In the Actions pane, select Storage View.
• To view the storage area properties for all applications and shared folders hosted on your HP
All-in-One Storage System, select All from the Filters drop-down menu, located at the top of the
content pane. See Filters drop-down menu on page 15 for more information.
Storage area properties are displayed in order of hierarchy in an expandable and collapsible view. For
example, all the volumes on your HP All-in-One Storage System are displayed under the logical disks they
reside on, and all the applications and shared folders hosted on your HP All-in-One Storage System are
displayed under the volumes on which they are stored. Application components and individual shared
folders are displayed under the app lication or shared folders pool to which they belong.
Click the Expand tree icon next to each logical disk name to view the volume’s storage properties. Click
the Collapse tree icon next to expanded logical disks to hide the volume’s storage properties.
ASM assigns a drive letter to each volume on a logical disk. The drive letter can be viewed on the
volume’s Properties window. See Accessing properties for HP All-in-One Storage System volumes on this
page for more information.
Value
Name of device
Name of machine hosting the virtual library
Location of device
Number of slots used for a virtual library
NOTE:
A logical disk can only have one RAID configuration, so an application’s components will reside on
more than one logical disk if different RAID levels are selected for the application components using
the storage-allocation wizard.
To view all the storage properties for an item listed in the content pane, see Accessing storage area
properties.
Accessing storage area properties
When Storage View is selected in the Actions pane, you can view the storage status, alerts, and
properties for the following storage areas on your HP All-in-One Storage System:
• Volumes
• Logical disks
Do one of the following:
• Select the item in the content pane and then click Properties in the Actions pane.
• Right-click the item in the content pane and select Properti es.
Accessing properties for HP All-in-One Storage System volumes
ASM provides properties information for a ny volume on a logical disk on your HP All-in-One Storage
System.
58
Monitoring storage
Page 59

1. In the Actions pa ne, select Storage View.
2. Do one of the following:
• Select a ny Volume (Vol) area in the content pane and then click Properties in the Actions
pane.
• Right-click any Volume (Vol) area in the content pane and select Properties.
Accessing pro
perties for HP All-in-One Storage System logical disks
ASM provides p
by ASM.
1. In the Actions pa ne, select Storage View.
2. Do one of the following:
• Select any l
• Right-click any logical disk in the content pane and select Properties.
Properties window
ASM provides properties information for any logical disks and for any logical disk created on your
HP All-in-One Storage System.
General tab—Based on the application opened, logical disks or volumes, it will list the operating status
for that application only.
Table 26 O perating status—G eneral tab
Status indicator Value
OK
Warning
Critical
roperties information for the logical disks created on your H P All-in-One Storage System
ogical disk in the content pane and then click Properties in the Actions pane.
The stora
SeetheAlertslistformoreinformation. SeeTable 32 on page 68 for
alert descriptions.
SeetheAlertslistformoreinformation. SeeTable 32 on page 68 for
alert descriptions.
ge is online. No alerts.
Storage tab—Displays the unallocated space, used space, free space on the volume, and also details on
your volume or logical disk properties, depending on the application open:
All-in-One Storage Manager
59
Page 60

Table 27 Storage tab—HP All-in-One Storag e System logical disk proper ties
Property
System Name
Physical Disks
Exclusive Storage
RAID Level
RAID Stripe Size
Read Cache
Write Cache
Number of Hot Spares
Unmanaged D ata Space on the logical disk used to store data that is not managed by ASM.
Free Space
Table 28 St
orage tab—HP All-in-One Storage System volume properties
Value
Name the system uses to identify the logical disk.
Globally unique identifier(s) of the hard drive(s) used by the logical disk
for storage.
Indicatesifthelogicaldiskisconfigured with exclusive storage. See
Table 6 on page 27 for more information.
The RAID level to which the logical disk is configured. See Customizing
RAID levels on
TheRAIDstripesizetowhichthelogicaldiskisconfigured. See Table
6 on page 27 for more information.
Speeds up reads when enabled. This setting is determined by the
storage array, not ASM.
Speeds up writes when enabled. This setting is determined by the
storage array, not ASM.
The number of hot spares with which the logical disk is configured. See
Table 6 on page 27 for more information.
Unused sto
page 28 for more information.
rage space on the logical disk that is not allocated.
Property
Storage Server Host Name
StorageServerVolume-Name
Storage Server Volume - Status
Storage Server Volume - Exclusive
Storage
Storage Server Volume - RAID
Level
Storage Server Volume - RAID
Stripe Size
Storage Server Volume - Read
Cache
Storage Server Volume - Write
Cache
Storage Server Volume - Number
of Hot Spares
StorageServerVolume-Mount
Paths
Value
Name of your HP All-in-One Storage System.
Name of th
StatusofthevolumeonyourHPAll-in-OneStorageSystem.
Indicatesifvolumeisconfigured with exclusive storage. See Table
6 on page 27 for more information.
The RAID level to which the volume is configured. See Customizing RAID
levels on
TheRAIDstripesizetowhichthevolumeisconfigured. See Table
6 on page 27 for more information.
Speeds up reads when enabled. This setting is determined by the
storage array, not ASM.
Speeds up writes when enabled. This setting is determined by the
storage array, not ASM.
The number of hot spares with which the shared folder’s storage is
configured. See Table 6 on page 27 for more information.
Path on which the volume on your HP All-in-One Storage System is
mounted.
e volume on your HP All-in-One Storage System.
page 28 for more information.
• Warning Threshold tab—Allows you to change the percent full warning threshold value for the
user-defined application.
• Data Protection tab—Allows you to schedule backups or run a backup of the user-defined
application data, or restore the user-defined application data from a ba ckup. It also allows you to
schedule snapshots or take a snapshot of the user-defined application data, expose a snapshot,
or revert the user-defined application data to a p ast snapshot.
60
Monitoring storage
Page 61

Application Server View
Application Se
hosted on your HP All-in-One Storage System. Expand HP All-in-One Storage System to display the
top-level shared folders on your HP All-in-One Storage System. Expand the application ser vers listed to
display the application server volumes and the applications hosted on the volumes.
• In the Actions
• To view the properties for all application servers with storage hosted on your HP All-in-One
Storage System, select All from the Filters drop-down menu, located at the top of the content pane.
See Filters drop-down menu on page 15 for more information.
Application server properties are displayed in order of hierarchy in an expandable and collapsible view.
For example, all the volumes created on the iSCSI LUNs (logical disk) exported by ASM to the application
server are displayed under the application server, and all the application components hosted from the
applicatio
Click the Expand tree icon next to each application server to view the used and alloca ted storage
properties for the volume and application components. Click the Collapse tree icon next to an expanded
application server to hide the volume and application component storage properties.
To view all the storage p roperties for an item listed in the content pane, see Accessing application
server pro
rver View lists your HP All-in-One Storage System and the application servers with storage
pane, select A pplication Se rver View.
n server are displayed under the application server.
perties.
Accessing application server properties
When Application Server View is selected in the Actions pa n e, you can view the storage status, alerts,
and properties for the following:
• Volumes created on the iSCSI LUNs (logical disks) exported by ASM to the application servers
• Shared folders and application components (same information displayed on Application View)
Do one of the following:
• Select the item in the content pane and then click Properties in the Actions pane.
• Right-click the item in the content pane and select Properties.
See “Accessing application and shared folder properties” on page 47 for descriptions of shared folder
and application component p roperties.
Accessing properties for application server volumes
ASM provides properties information for application server volumes created on the iSCSI LUNs exported
by ASM t
1. In the Actions pane, select Application Server View.
2. Do one of the following:
3. Click one of the following tabs:
o the application server.
• Selec
• Right-click an application server volume in the content pane and select Properties.
• Gene
t an application server volume in the content pane and then click Properties in the
Actions pane.
ral tab—Displays the name of the volume on the application server, the volume type,
and status:
All-in-One Storage Manager
61
Page 62

Table 29 Operating status—Application server volume properties
Status indicator Value
OK
Warning
Critical
The storage is online.
SeetheAlertslistformoreinformation. SeeTable 32 on page 68
for alert descriptions.
SeetheAlertslistformoreinformation. SeeTable 32 on page 68
for alert descriptions.
• Storage tab—Displays the unallocated space, used space, free space on the volume, and the
following storage allocation details:
Table 30 Storage tab—Application server volume properties
Property
Application Server Host Name
Application Server Volume Name
Application Server Volume Status
Application Server Volume Exclusive Storage
Application Server Volume RAID Level
Application Server Volume RAID Stripe Size
Value
Name of the application server where the volume resides.
Name of the volume on the application server. Volume is located
on the iSCSI LUN exported by ASM.
Status of the volume on the application server.
Indicates if the volume on the application server is configured with
exclusive storage. See Table 6 on page 27 for more information.
The RAID level to which the volume on the application server is
configured. See Customizing RAID levels on page 28 for more
information.
TheRAIDstripesizetowhichthevolumeont
is configured. See Table 6 on page 27 for more i
he application server
nformation.
Application Server Volume Read Cache
Application Server Volume Write Cache
Application Server Volume Number of Hot Spares
Application Server Volume Mount Paths
Storage Utilization View
Storage Utilization View displays the allocated storage values for specific applications and the shared
folders pool, the unallocated storage value, and the storage value for data not managed by ASM in a
pie chart.
• In the Actions pane, select Storage Utilization View.
The storage value for each application hosted, the shared folders pool, unallocated storage, and data not
managed by ASM is displayed according to its percentage of total capacity, using colors selected in the
Color Options window (see Changing color settings on page 17).
The total capacity of your HP All-in-One Storage System is divided into the following areas:
• Exchange—Storage allocated to ho
• Shared Folders—Storage allocated to host shared folders.
• SQL Server—Storage allocated to host SQL Server database components.
• User-defined—Storage allocated
Speeds up reads when enabled. This setting is determined by the
storage array, not ASM.
Speeds up writes when enabled. This setting is determined by the
storage array, not ASM.
The number of hot spares with which the vo
server is configured. See Table 6 on page
Path the volume is mounted on.
lume on the application
27 for more information.
st Exchange storage group components.
to host user-defined applications.
62
Monitoring storage
Page 63

• Unmanag ed— Storage used by data that is not managed by ASM.
The unmanaged value is the total storage being used to store data not managed
by ASM, such as application or shared folder data no longer managed by ASM
because the application components or shared folder was removed from view (see
“Removing application areas from view” on page 44) and any other data saved on your HP
All-in-One Storage System that is not managed by ASM.
• Unallocated—Unused storage that is not allocated.
The unallocated space value is the total unused space on your HP All-in-One Storage System that
has not been allocated to host application or shared folder storage. Unallocated storage includes
raw (unconfigured) storage and unused configured storage (logical disks).
NOTE:
Logicaldisks(LUNs)beingusedtostoreapplicationdataorsharedfolderscannotbegrown(increased
in size) by ASM using space on unused logical disks (configured storage); they can only be grown
using raw storage.
Unused logical disks are reallocated by ASM when an unhosted application component,
shared folder, or user-defined application’s storage is hosted using a storage-allocation
wizard and the advanced configuration settings selected in the wizard match those of
the unused logical disk. You can find the advanced configuration settings a nd capacities
of unused (and used) logical disks on the Properties window for each logical disk (see
Accessing properties for HP All-in-One Storage System logical disks on page 59).
All-in-One Storage Manager
63
Page 64

64 Monitoring storage
Page 65

6 Troubleshooting, servicing, and
maintenance
Troubleshooting the storage system
Use the references and general guidelines in this section to troubleshoot your HP StorageWorks All-in-One
Storage System.
Operating system problems and resolutions
Use the sugge
Table 31 Operating system problems
Problem
Operating system locks up Scan for viruses with an updated virus scan utility.
General protection fault (GPF) occurs. This can occur
when the Microsoft operating system terminates
suddenly with an error, including, but not limited to:
• Miscalculating the amount of RAM needed for
an allocation
• Transferring execution to a segment that is not
executable
• Writing to a read-only or a code segment
• Loading a bad value into a segment register
• Using a null pointer
A GPF is immediately identifiable by a blue screen
with white text, and the text may contain information
that identifies the problem.
Errors are displayed in the error log
stions below to help resolve operating system issues.
Operating system updates
Action
• Remove any newly installed software or hardware
to verify that they are not the cause.
• BoottheserverinSafeModeorthelastknown
good configuration.
If neither of these actions resolves the problem, contact
an authorized service provider. For more information
about debugging tools or specific GPF messages, see
the Microsoft web site: h
whdc/devtools/debugging/default.mspx.
Follow the information provided in the error log, and
then see the operating system documentation.
ttp://www.microsoft.com/
Use care when applying operating system updates (service packs, hotfixes, a n d patches). Before
updating the operating system, read the release notes for each update. If you do not require specific fixes
from the update, HP recommends that you do not apply the updates.
If you decide to apply an operating system update:
1. Perform a full system backup.
2. Apply the operating system update, using the instructions provided.
3. Install the current drivers.
Application software problems
If your application software locks up, perform the following actions:
• Check the application log and o perating system log for entries indicating why the software failed.
• Check for incompatibility with other software on the server.
All-in-One Storage Manager
65
Page 66

• Check the support web site of the software vendor for known problems.
• Review the log files for changes mad e to the server that may have caused the problem.
• Scan the server for viruses with an updated virus scan utility.
SQL Server errors
Host a SQL Server Database Wizard authentication error
Problem: While using the Host a SQL Server Database Wizard, you receive an error message informing
you that ASM cannot authenticate with the server that hosts SQL Server.
Solution: Each SQL Server license (instance) must have a login for the local user called ASMUser with the
server role defined as System Administrators. This login is created during the installation of the ASM
agent on the server that hosts SQL Server; however, if another SQL Server license is installed after the
ASM agent is installed, this login will not be configured.
To fix this problem, you can remove the ASM agent from the server that hosts SQL Server, and then
reinstall it following the instructions in the HP StorageWorks All-in-One Storage System quick start
instructions (no information will be lost). Or, manually enter the login as follows:
1. Open SQL Server Enterprise Manager.
2. Connect to the server with SQL Server data you want to store on your HP All-in-One Storage System.
3. Select the Security Folder.
4. Select Logins.
5. Select New Login.
6. In the Name field, enter ASMUser.
7. In the Domain field, enter the domain name for the server that hosts SQL Server.
8. Select the Server Roles tab.
9. Select the System Administrators server role and click OK.
ASM alerts
ASM generates an alert whenever the status of an application a rea or storage area changes from OK to
Warnin
Alerts
g or C ritical. The alerts describe the condition that caused the storage status to change.
are displayed on the General tab of the Properties window.
66
Troubleshooting, servicing, and maintenance
Page 67

Figure 3 Example of alert
To view al
erts:
• Select an item in the Content pane and click Properties in the Actions pane to view the alerts
for the item selected.
Storage s
tatus i s displayed as an icon when the storage status is Warning or Critical:
• In the Content pane on application, application component, or logical disk icons.
• In the Properties window on the General tab.
NOTE:
ASM roll
percent
the sha
s up any status alert to the highest level. For instance, if a shared folder has surpassed its
fullwarningthresholdandexceededitsallocatedstoragespace,awarningiconisshownon
red folders icon. Likewise, if a critical status exists in an Exchange mail store, the critical icon is
also shown on the Exchange storage group icon.
Table 32 on page 68 lists all possible ASM alerts and provides descriptions, possible causes, and
solutions for each alert.
All-in-One Storage Manager
67
Page 68

Table 32 Alert descriptions
Object Alert text
Any
application
component,
user-defined
application,
or shared
folder
Directory size
cannot be
determined.
Used space
has exceeded
its X%
warning
threshold.
Directory path
cannot be
found.
Description
Used space cannot
be determined.
Used space is
about to surpass the
percent full warning
threshold (X%).
Allocated storage
space cannot be
located. Volume is
intact.
Possible cause Solution
Directory perm
is preventing A
from determining
the used space or
the logical disk has
failed. An al
be issued for
logical disk
failed.
The percent of used
space exceeds the
percent full warning
threshold or the
logical disk has
failed. An alert will
be issued for the
logical disk if it has
failed.
Path assigned to
allocated storage
has been changed
or the logical disk
has failed. An alert
will be issued for the
logical disk if it has
failed.
ission
SM
ert will
the
if it has
Change directory
permissions back to
default permissions set by
ASM.
nl
If the logical disk has
failed, see “Recovering
from logical disk
failure”onpage71.
Increase the percent
full warning threshold
(see Setting a
percent full warning
threshold on page 30)
or increase the allocated
storage (see “Increasing
or reducing the allocated
storage”onpage43).
nl
If the logical disk has
,see“Recovering
failed
from logical disk
re”onpage71.
failu
Change path to allocated
storage back to path
assigned by ASM.
nl
If the logical disk has
failed, see “Recovering
from logical disk
failure”onpage71.
Application
data could not
be found at
path ’<path>’.
Storage has
reached its
allocated
space.
Storage not
found for
application
area
referencing
host
’<server>’
path ’<path>’.
A file cannot be
found.
No more data can
be saved to the
allocated storage
space. 100 percent
of allocated storage
is used.
The HP All-in-One
Storage System
volume that holds
the application
component’s data
can no longer b e
found at the mount
path specified in
the volume’s storage
properties.
File has been moved
or deleted.
sed storage has
U
reached the total
allocated space.
The volume’s mount
path was changed
using an application
other than ASM.
Restore file or revert file
using snapshot.
Increase the allocated
spaceordeletedata
to reduce used storage.
See “Increasing or
reducing the allocated
storage”onpage43for
more information.
Change the volume’s
mount path back to the
path assigned by ASM.
68
Troubleshooting, servicing, and maintenance
Page 69

Object Alert text
Description
Possible cause Solution
Exchange
storage group
Any Exchange
storage group
component
Exchange
MailStore
Exchange
PublicStore
SQL Server
Database
This storage
group could
not be found
on host
’<server>’.
This storag
group
component
could not b
found on h
’<server
This MailStore
is offline.
This
PublicStore is
offline.
This d
is not
funct
stat
e
e
ost
>’.
atabase
in a
ional
e.
The storage group
cannot be found on
the server that hosts
Exchange.
The storage group
component cannot
be found on the
server that hosts
Exchange.
Status of mail store is
offline.
Status of public store
is offline.
Database is offline.
The storage group
was deleted
or renamed in
Exchange, and
storage is still
hosted on your HP
All-in-One Storage
System.
The storage
component w
deleted or
in Exchang
storage is
hosted on
All-in-O
System.
Administrator has
placed mail store
offline.
Administrator has
placed public store
offline.
group
as
renamed
e, and
still
your HP
ne Storage
Restore the storage
group using Exchange or
remove the storage for
the storage group from
view on the ASM user
interface to stop receiving
alerts.
Restore the storage
group component using
Exchange or remove the
storage fo
group component from
view on the ASM user
interface to stop receiving
alerts.
Return mail store to
online.
Return public store to
online.
rthestorage
SQL Server
Data File
SQL Server
Log
This database
could not be
found on host
’<server>’.
This database
is not
attached.
The location
of this data file
has changed.
This data file
could not
be found in
the database
’<database>’
on host
’<server>’.
The location
of this log has
changed.
This log
could not
be found in
the database
’<database>’
on host
’<server>’.
The database exists
but the data file
cannot be found.
The database exists
but the data file
cannot be found.
The database exists
but the log file cannot
be found.
The database exists
but the log file cannot
be found.
Database has been
deleted or renamed.
This is an expected
condition during a
restore.
le has been moved
Fi
deleted.
or
File has been moved
or deleted.
File has been moved
or deleted.
File has been moved
or deleted.
Restore database or
change its name back.
No action required.
Restore file or revert file
using snapshot.
Restore file or revert file
using snapshot.
Restore file or revert file
using snapshot.
Restore file or revert file
using snapshot.
All-in-One Storage Manager
69
Page 70

Object Alert text
Logical Disk
Health:
Rebuilding
Description
Hard drive was
replaced. Resyncing
mirror on new hard
drive if logical disk
is RAID 1 or RAID
1+0(10). Rebuilding
parity on new hard
drive if logical disk is
RAID 5 or RAID 6.
Possible cause Solution
Hard drive was
replaced.
No action required.
Health:
Failing but still
working
Health:
Failing
redundancy
but one mirror
still working
Health: Failed
redundancy
but one mirror
still working
Health: Failed
redundancy,
the last mirror
is failing
A hard drive is failing
but still working.
Logical disk is
configured as RAID
1orRAID1+0(10).
One of the pair of
mirrored hard drives
is failing but the
other hard drive is
still working.
Logical disk is
configured as RAID
1orRAID1+0(10).
One of the pair of
mirrored hard drives
has failed but the
other hard drive is
still working.
Logical disk is
configured as RAID
1orRAID1+0(10).
One of the pair of
mirrored hard drives
has failed and the
other hard drive is
failing.
Hard drive i
s failing.
Hard drive is failing.
Hard drive has
failed.
Hard drive has failed
and another hard
drive is failing.
Replace fai
now (option
hard drive a
ling hard drive
al) or replace
fter it fails.
Replace failing hard drive
now (optional) or replace
hard drive after it fails.
Replace failed hard drive
immediately to restore
redundancy.
ace failed hard drive
Repl
diately to restore
imme
undancy.
red
nl
If second hard drive fails
before first is replaced,
the logical disk and data
on the logical disk will be
lost.
70
Health: Failed
Logical disk has
failed.
The logical disk
is growing.
Transition
state:
Extending
Per formance is
degraded. Reads
and writes can still
be performed to
logical disk.
Troubleshooting, servicing, and maintenance
rd drive(s) with
Ha
orage allocated
st
othelogicaldisk
t
have failed. The
logical disk cannot
be rebuilt. The
logical disk and
data on the logical
disk are lost.
ASM is growing a
logical disk (LUN)
to allocate new
or more storage
to an application
component,
user-defined
application, or
shared folder.
Replace the failed hard
drives. Allocate new
storage to replace lost
storage. Restore data to
allocated space using
backups if available.
No action is required.
Page 71

Object Alert text
Transition
state:
Reconfiguring
Description
The logical disk is
being reconfigured.
Possible cause Solution
Configuration
changes are
being made to the
logical disk by an
application other
than ASM.
No action is required.
Recover
Status: Not
ready
Status: Offline
Status: Failed
Logical disk not
usable while an
operation is being
performed.
Logical disk is not
usable.
Logical disk is not
usable.
Operation is
performed that
prevents logical disk
from being u
Administrator has
taken logical disk
offline.
Hardware failure has
occurred.
being
sed.
No action is r
Return the logical disk to
online.
See array controller
documentation for more
information.
equired.
ing from logical disk failure
Applica
the data
drives, allocate new storage on your HP All-in-One Storage System using a storage-allocation wizard
to replace the lost storage, and then restore the data to the new allocated storage using a backup
(see “Restoring data from backups” on page 40).
NOTE:
Snapsh
storag
same l
tion component or shared folder da ta stored on a logical dis k that failed is lost. To recover
and reallocate storage on your HP All-in-One Storage System, replace any failed hard
ots cannot be used to recover data lost as a result of logical disk failure. Snapshots of Exchange
e groups, SQL Server databases, user-defined applications, and shared folders are stored on the
ogical disks as the original data, and therefore are also lost.
All-in-One Storage Manager
71
Page 72

72
Troubleshooting, servicing, and maintenance
Page 73

Glossary
This section defines the terms used to describe the ASM user interface and program features.
Actions pane The right pane in the main window of the ASM user interface that provides a
Advanced window A window accessed by clicking the Advanced button in any of the
allocated space Storage space that is being used by, or reserved for, application or shared
application server A server computer in a computer network dedicated to running certain software
list of actions, based on your current selection in the Content pane. Along with
other selectable items, the Actions p ane provides access to storage-allocation
wizards, which help you allocate and configure storage.
storage-allocation wizards or the Allocate Space Wizard. When accessed
from any of the storage-allocation wizards, the Advanced window allows you
tochangethesizeoftheallocatedspaceandthedefault(recommended)
advanced configuration settings. When accessed from the Allocate Space
Wizard, the Advanced window allows you to change the size of the allocated
space, percent full warning threshold, and enforced allocated limit (shared
folders only).
folder storage.
applications whose job is to provide network access to software client/server
applications and, sometimes, the data that belongs to appli
cationsaswell.
array Also known as a JBOD (just a bunch of disks). A group of hard drives in an
enclosure (chassis) that are controlled by an array controller.
array controller Controls reads and writes to the hard drives in an array.
backups A read-only copy of data copied to media, such as hard drives or magnetic
tape, for data p rotection.
A full backup copies all the data selected to be backed up. An incremental
backup copies only data selected to be backed up that has changed since the
last full backup.
Backups provide data protection in the event of system or hard drive failure,
because the data is stored on media separate from the system hard drives.
backup application
CIFS Common Internet file system. The protocol used in Windows environments for
Content pan e ThecenterpaneinthemainwindowoftheASMuserinterfacethatdisplays
data migration Theprocessofmovingdatafromonestoragedevicetoanother,suchasmoving
An application used to create, manage, and monitor backups.
shared folders.
storage utilization, and the storage status of application components and shared
folders.
application data from an application server to your HP All-in-One Storage
System. ASM supports automatic data migration for Exchange and SQL Server
data.
data protection Protects data from being corrupted or lost as a result of hard drive failure.
Methods used to provide data protection include RAID and b ackups.
All-in-One Storage Manager
73
Page 74

enforce allocated
limit (quota)
An enforced quota for the amount of storage available to a shared folder. An
enforce allocated limit prevents data from being saved to a shared folder once
all the storage space allocated to the shared folder is used.
Exchange storage
group
The fundamental unit of storage mana gement in Microsoft Exchange. Storage
groups consist of Mail stores, Public stores, and log files.
exclusive storage An Advanced window option that allows you to dedicate a hard drive(s) for
storing data for a specific application component or shared folder.
file system A method for storing and organizing computer files and the data they contain to
make it easy to find and access them.
hot spares An Advanced window option that allows you to reserve one or two hard drives
as spares. A hot spare is a hard drive reserved as a spare for storage space
configured as RA ID 1, RAID 1+0(10) , or 5. A hot spare automatically replaces
aharddrivewhenitfails.
iSCSI Internet small computer system interface. Like an ordinary SCSI interface, iSCSI
is standards-based and efficiently transmits block-level data bet ween a host
computer (such as a server that hosts Exchange or SQL Server) and a target
device (such as an HP All-in-One Storage System). By carrying SCSI commands
over IP networks, iSCSI is used to facilitate data transfers over intranets and to
manage storage over long distances.
ASM works with the Microsoft iSCSI Target, which builds the iSCSI infrastructure
on application servers with data hosted on your HP All-in-One Storage System
and on your HP All-in-One Storage System so that application data is stored on
your HP All-in-One Storage System.
iSCSI LUN A type of LUN (logical disk) created on an application server by ASM when a
storage-allocation wizard is ran to host application storage. When application
storage is hosted using ASM, all storage communication passes through the
iSCSI LUN on the application server to the LUN on your HP All-in-One Storage
System. This allows data saved by the application to the iSCSI LUN on the
application server to be transparently stored on your HP All-in-One Storage
System instead.
log file The component of a Microsoft Exchange storage group or a Microsoft SQL
Server database that contains log data.
logical disk Also known as a LUN. A logical disk contains one or more volumes and spans
multiple hard drives in an array. RAID configuration of storage is performed at
the logical disk level.
LUN Also known as a logical disk. ASM will grow a LUN (make it larger) when the
LUN requires more of the storage space on an array.
Mail store The component of a Microsoft Exchange storage group that contains mailbox
data.
Menu bar The horizontal menu located at the top of the ASM user interface. The menu bar
is the Microsoft Management Console menu bar; ASM is a snap-in hosted by
the Microsoft Management Console.
MMC snap-in Microsoft Management Console snap-in. An application added to the Microsoft
Management Console. All-in-One Storage Manager is a MMC snap-in.
NAS Network-attached storage. This term is used to refer to a specialized type of
file server. The HP All-in-One Storage System provides NAS storage as well
as iSCSI storage.
74
Glossary
Page 75

Navigation pane TheleftpaneinthemainwindowoftheASMuserinterfacethatallowsyou
to quickly navigate between HP All-in-One Storage System Management
applications.
NFS Network file system. The protocol used in most Unix environments to share
folders or mounts. The Create a Shared Folder Wizard does not create NFS
shares, but NFS shares can be created using the Shared Folder MMC snap-in.
percent full warning t hreshold
Percentage of capacity for a storage area (storage a llocated to an application
component or shared folder) at which an alert is generated. This alert is
displayed in the Content pane and sent to the Windows Event Log. See
Setting a percent full warning threshold on page 30 for more information.
Public store The component of a Microsoft Exchange storage group that contains public
folder data.
RAID Redundant array of intelligent disks. Two or more hard drives configured to
provide a storage with resilience to hard drive failure through the use of R A I D
striping and parity d isks.
RAID level See Table 7 for RAID level descriptions.
RAID striping Writing data to hard drives in an array by interleaving bytes or groups of bytes
acrossthemultipleharddrives. Thisallowsmorethanonedisktobereadfrom
or written to simultaneously, which increases the performance.
RAID stripe size The number of bytes or kilobytes of data in a RAID stripe (block of data).
restore To recover lost data using a backup.
revert To return s
scaling Changes th
storage i
the appli
tored data to a previous state using a snapshot.
e display proportions of application component and shared folder
n the Content pane. You can choose to scale by the size (capacity) of
cation comp onent and shared folder’s storage space, or scale them all
the same. To change the scale setting, select Tools > Options.
size The amount of storage that ASM allocates and configures for an application
component or shared folder. To change the size of the allocated storage for
an application component or shared folder, select the application component
or shared folder in the Content pane and then select Allocate Space in the
Actions pane.
snapshot A read-only copy of a volume at a specific point in time. Unlike a backup, data
is not copied to any media during a snapshot. Instead, when a file is modified
after a snapshot is created, the new updates are written to a new location. The
file-system maintains records and pointers to keep track of the snapshot data
and file changes. A snapshot takes less than a second to create.
Status bar The area located at the bottom of the ASM user interface that displays server
information and system alerts.
tape librar y An enclosure filled with magnetic tape cartridges, tape drives, and a robot(s).
The tapes are electronically labeled for identificationandstoredinlibraryslots
when not in use. When data needs to be written or read from a tape, the robot
loadsthetapecartridgeintoanavailabletapedriveinthelibrary.
Task Viewer A window that displays completed tasks, scheduled tasks, and errors. To open
the Task Viewer, select Tools > Task Viewer.
toolbar The area below the menu bar that contains icons for commonly-used commands.
The toolbar is the Microsoft Management Console toolbar; ASM is a snap-in
hosted by the Microsoft Ma nagement Console.
All-in-One Storage Manager
75
Page 76

top-level share Top-level shared folder in a directory hierarchy.
unallocated space Unused storage that is not allocated. Unallocated space includes raw
(unconfigured) storage and unused configured storage (logical disks).
user-defined application
Any remote application that runs under Windows Server 2003 and uses NTFS
volumes for storage.
virtual array Hard drives in an array can be divided into groups to create two or more virtual
arrays. ASM grows a virtual array (makes it bigger) when a hard drive(s) must
be added to the virtual array to obtain the required storage space. A virtual
array contains one or more LUNs.
virtual library Also known as a virtual tape library. A virtual library acts like a physical tape
library except that hard drive arrays are used for storage instead of magnetic
tapes.
volume Residesonalogicaldisk.Volumesareassignedadriveletteronthefile system
and contain file directories.
warning threshold See percent full warning threshold.
76
Glossary
Page 77

Index
A
accessing application and shared folder
properties,47
accessing application server properties,61
accessing properties
for SQL Server,52
for application server volumes,61
for Exchange,48
for HP All-in-One Storage System logical
disks,59
for HP All-in-One Storage System volumes,
58
for shared folders pools,51
for the user-define d application pool,54
accessing storage area properties,58
Application Server View,47,61
application server volumes
accessing properties,61
operating status values,62
Storage properties,62
application servers
managing storage,12
application storage
infrastructure,13
Application Storage Manager
alerts,66
user interface options,17
Application View,47,47
audience,7
HP All-in-One Storage System alerts
operating status values,59
HP All-in-One Storage System logical disks
accessing properties,59
Storage properties,60
HP All-in-One Storage System volumes
accessing properties,58
Storage properties,60
L
log file properties for database,54
log properties for storage groups,51
M
Mailstore database,50
managing storage
for application servers,12
for shared folders,13
Microsoft Exchange Server
accessing properties,48
operating status values,48
Microsoft Exchange storage group components
Storage properties,49
Microsoft Exchange storage groups
Details properties,49
monitoring storage,47
C
conventions
document,8
D
Data file properties,54
data protection,49
Details properties
Exchange storage groups,49
document
conventions,8
prerequisites,7
related documentation,7
documentation
HP web site,8
H
help
using,8
N
Nested Shares,52
O
operating status values
application server volumes,62
Exchange,48
HP All-in-One Storage System alerts,59
shared folders,52
user-defined applications,55
operating system problems,65
P
prerequisites,7
PublicStore database,50
R
recovering from logical disk failure,71
related documentation,7
All-in-One Storage Manager
77
Page 78

S
shared folder storage infrastructure,14
shared folders
operating status values,52
Storage properties,57,57
shared folders pool
accessing properties,51
SQL Server
accessing properties,52
SQL Server database components
Storage properties,53
SQL server errors,66
SQL Server properties
operating status values,53
status icons,47
storage management infrastructure,12
Storage properties
Exchange storage group components,49
shared folders,57,57
SQL Ser ver database components,53
Storage View,47,58
T
troubleshooting,65
U
user-defined application pool
accessing properties,54
user-defined applications
operating status values,55
storage properties,55
W
Warning Threshold,50
web sites
HP documentation,8
78
 Loading...