

HP StorageWorks Modular Smart Array 1510i, StorageWorks MSA 1510i Installation Instructions Manual

HP StorageWorks
Modular Smart Array 1510i
controller
installation instructions
English
About this document
This document details procedures for installing a redundant controller in an HP
StorageWorks Modular Smart Array 1510i (MSA1510i.)
Before you begin
Read the following cautions and notes.
CAUTION: Parts can be damaged by electrostatic discharge. Use proper
anti-static protection. See documentation shipped with your system for
additional information.
NOTE: You can hot-add this redundant component to the MSA1510i.
Removing power from the device is not required.
Installing the redundant controller
© Copyright 2005-2006 Hewlett-Packard Development Company, L.P.
Second edition February 2006
Product names mentioned herein may be trademarks of their respective
companies as reflected by an associated footnote.
Information in this document is subject to change without notice.
Printed in the US.
www.hp.com
*383076-022*
383076-022
1
1
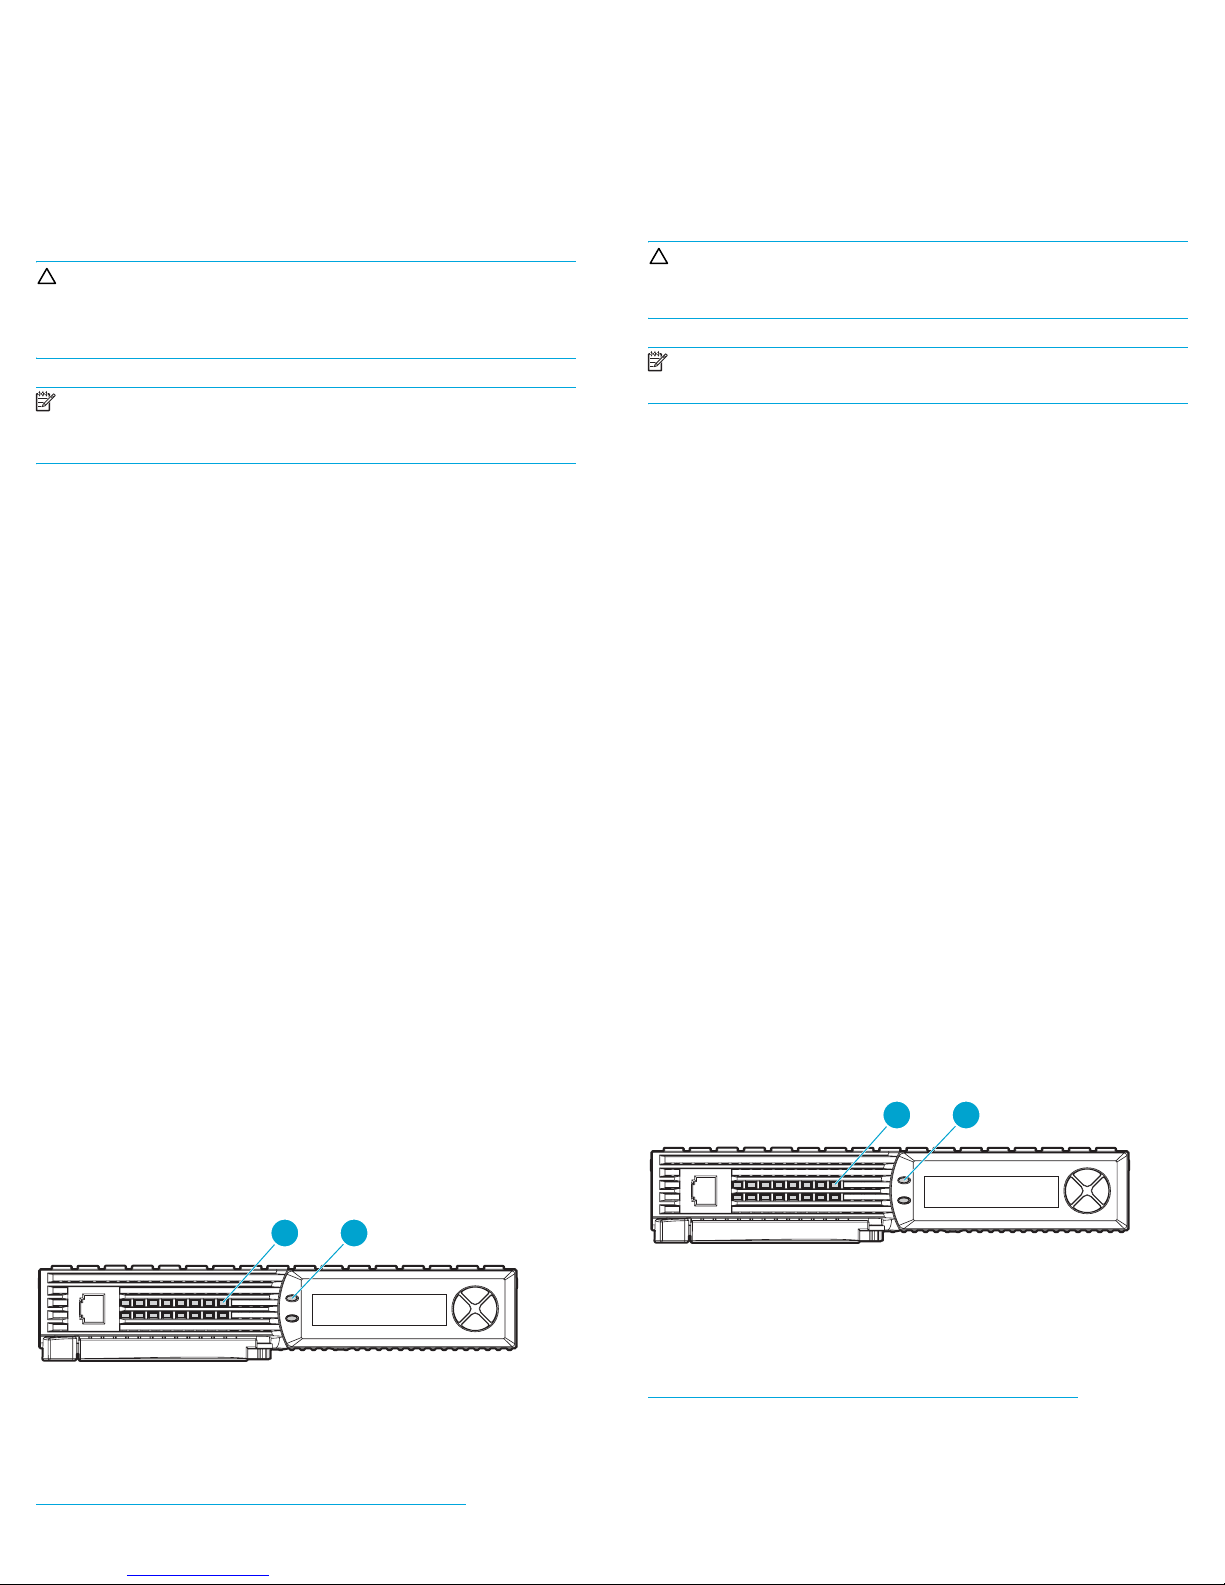
Step 1: Remove the controller blank
1 Press the controller blank thumb latch and pull the latch handle out
[Figure 1 (1)].
1. Pull the blank straight out of the chassis [Figure 1 (2)].
Step 2: Install the redundant controller
1. Insert the redundant controller into the chassis [Figure 2 (1)].
2. Push the controller in as far as it will go, and then press the latch handle
inward, until it is flush against the front panel
[Figure 2 (2)].
Confirming the firmware version
If the firmware versions on the two controllers are mismatched, the following
LCD message may be displayed:
07. CLONE FIRMWARE? ‘<‘ = NO, ‘>’ = YES
To select YES, press the left navigation button on the controller.
To select NO, press the right navigation button.
HP recommends selecting YES to copy the firmware from the active controller
to this new redundant controller. If NO is selected, the redundant controller is
disabled and the storage system runs in a non-redundant mode.
Verifying controller status
• Verify that the controller heartbeat LED (1) is on or blinking.
• Verify that the controller fault LED (2) is off.
1 2
2
2
1
15173
15192
Additional information
See the HP StorageWorks MSA1510i maintenance and service guide
or other MSA1510i-related documents on the MSA1510i web site:
http://h18006.www1.hp.com/products/storageworks/msa1510i.
2
15174
Deutsch
Español
Zu diesem Dokument
In diesem Dokument wird die Vorgehensweise zur Installation eines
redundanten Controllers in ein HP StorageWorks Modular Smart Array 1510i
(MSA1510i) erläutert.
Bevor Sie beginnen
Lesen Sie die folgenden Warnhinweise und Informationen.
ACHTUNG: Komponenten können durch elektrostatische Entladung
beschädigt werden. Verwenden Sie einen angemessenen Antistatik-Schutz.
Weitere Informationen finden Sie in der mit Ihrem System gelieferten
Dokumentation.
Hinweis: Diese redundante Komponente kann bei laufendem Betrieb in
das MSA1510i eingesetzt werden. Sie müssen die Stromversorgung des
Geräts nicht unterbrechen.
Einsetzen des redundanten Controllers
Schritt 1: Entfernen des Dummy-Moduls
1 Drücken Sie mit dem Daumen auf die Verriegelung des
Controller-Dummy-Moduls, und ziehen Sie den Verriegelungshebel
heraus [Abbildung 1 (1)].
2. Ziehen Sie das Dummy-Modul gerade aus dem Gehäuse heraus
[Abbildung 1 (2)].
Schritt 2: Einsetzen des redundanten Controllers
1. Setzen Sie den redundanten Controller in das Gehäuse ein
[Abbildung 2 (1)]
2. Drücken Sie den Controller so weit wie möglich in das Gehäuse hinein und
den Verriegelungshebel nach innen, bis er an der Gerätefront anliegt
[Abbildung 2 (2)].
.
Prüfen der Firmware-Version
Wenn die Firmware-Versionen der beiden Controller nicht übereinstimmen,
wird auf dem LCD möglicherweise die folgende Meldung angezeigt:
07. CLONE FIRMWARE? ‘<‘ = NO, ‘>’ = YES
Um YES auszuwählen, drücken Sie die linke Navigationstaste auf dem
Controller.
Um NO auszuwählen, drücken Sie die rechte Navigationstaste.
HP empfiehlt die Auswahl von YES zum Kopieren der Firmware vom aktiven
Controller auf den neuen redundanten Controller. Bei Auswahl von NO wird der
redundante Controller deaktiviert, und das Storage-System wird weiterhin in
einem nicht-redundanten Modus betrieben.
Acerca de este documento
En este documento se detallan los procedimientos para instalar un controlador
redundante en un HP StorageWorks Modular Smart Array 1510i (MSA1510i).
Antes de empezar
Lea las siguientes precauciones y advertencias.
PRECAUCIÓN: La carga electrostática puede dañar las piezas. Utilice
protección antiestática. Consulte la documentación que se incluye con su
sistema para obtener más información.
NOTA: Puede añadir en funcionamiento este componente al MSA1510i.
No es necesario desconectar la alimentación del dispositivo.
Instalación de un controlador redundante
Paso 1: Extraer el panel de protección del
controlador
1 Presione el pestillo del panel de protección del controlador y tire
del asa del pestillo hacia fuera [Figura 1 (1)].
2. Extraiga el panel de protección del chasis [Figura 1 (2)].
Paso 2: Instalar el controlador redundante
1. Inserte el controlador redundante en el chasis [Figura 2 (1)].
2. Empuje el controlador hasta el fondo y presione el asa del pestillo hacia
dentro hasta que cierre en el panel frontal
[Figura 2 (2)].
Confirmación de la versión de firmware
Si las versiones de firmware de los dos controladores no coinciden, aparecerá
el siguiente mensaje en la pantalla:
07. CLONE FIRMWARE? ‘<‘ =NO, ‘>’=YES
Para seleccionar YES (SÍ), pulse el botón de navegación izquierdo del
controlador.
Para seleccionar NO, pulse el botón de navegación derecho.
HP recomienda seleccionar YES (SÍ) para copiar el firmware del controlador
activo a este nuevo controlador redundante. Si selecciona NO, el controlador
redundante se desactiva y el sistema de almacenamiento se ejecuta en modo
no redundante.
Comprobación del estado del controlador
• Compruebe que el LED de latencia del controlador (1) está encendido o
parpadea.
• Compruebe que el LED de fallo del controlador (2) está apagado.
Prüfen des Controller-Status
• Stellen Sie sicher, dass die Heartbeat-LED des Controllers (1) leuchtet oder
blinkt.
• Stellen Sie sicher, dass die Fehler-LED des Controllers (2) nicht leuchtet.
1 2
15192
Weitere Informationen
Weitere Informationen finden Sie im HP StorageWorks MSA1510i
Maintenance and Service Guide
MSA1510i-Dokumenten auf der MSA1510i-Website unter:
http://h18006.www1.hp.com/products/storageworks/msa1510i.
oder anderen
1 2
15192
Información adicional
Consulte la Guía de mantenimiento y servicio de HP StorageWorks
MSA1510i u otros documentos relacionados con MSA1510i en el
sitio Web de MSA1510i:
http://h18006.www1.hp.com/products/storageworks/msa1510i.
 Loading...