

HP StorageWorks Modular Smart Array 500 G2, StorageWorks Modular Smart Array 30 Installation Instructions Manual
Page 1
4-Port Shared Storage
Module
Installation Instructions
for HP StorageWorks Modular Smart
Array 500 Generation 2 and Modular
Smart Array 30 Storage Systems
Overview
The storage system ships standard with a 2-Port Shared Storage
Module. To upgrade the storage system and enable data transfer
through four SCSI ports, install the optional 4-Port Shared
Storage Module.
Kit Contents
•
4-Port Shared Storage Module
•
This document
•
HP Smart Array Multipath Software CD (for MSA500 G2
storage systems only)
Module Installation Requirements
To ensure that the HBAs can negotiate I/O paths with the
MSA500 G2 controllers, always install the most recent
firmware for the 4-Port Shared Storage Module, the controller,
and the HBAs:
Read Instructions Completely Before Beginning
Installation Procedures
© Copyright 2004 Hewlett-Packard Development Company, L.P.
The information contained herein is subject to change without notice. The
only warranties for HP products and services are set forth in the express
warranty statements accompanying such products and services. Nothing
herein should be construed as constituting an additional warranty. HP shall
not be liable for technical or editorial errors or omissions contained herein.
HP 4-Port Shared Storage Module Installation Instructions
April 2004 (First Edition)
Part Number 354905-001
Printed in the U.S.A.
Printed in the U.S.A.
•
For HBA firmware upgrade procedures, refer to the
controller documentation that ships with the hardware.
•
For controller and Shared Storage Module firmware
upgrade procedures, refer to the HP website
(http://www.hp.com/support/proliantstorage).
Installing the 4-Port Shared
Storage Module
CAUTION: In systems that use external data
storage, be sure that the server is the first unit to be
powered down and the last to be powered back up. Taking
this precaution ensures that the system does not
erroneously mark the drives as failed when the server is
powered up.
IMPORTANT: The upgrade for the StorageWorks MSA30
is only available for systems running HP-UX or Linux IA-64
operating systems. For more information, refer to the HP
StorageWorks Modular Smart Array 30 Multi Initiator
Upgrade for HP-UX or Linux IA-64 Systems Installation
Guide.
1. Power down the storage system.
2. Disconnect the SCSI cabling connected to the 2-Port
Shared Storage Module.
HP CONFIDENTIAL File Name: 354905-001_Intrepid_4port_OC.doc Last Saved On: 1/22/04 10:57 AM
Page 2
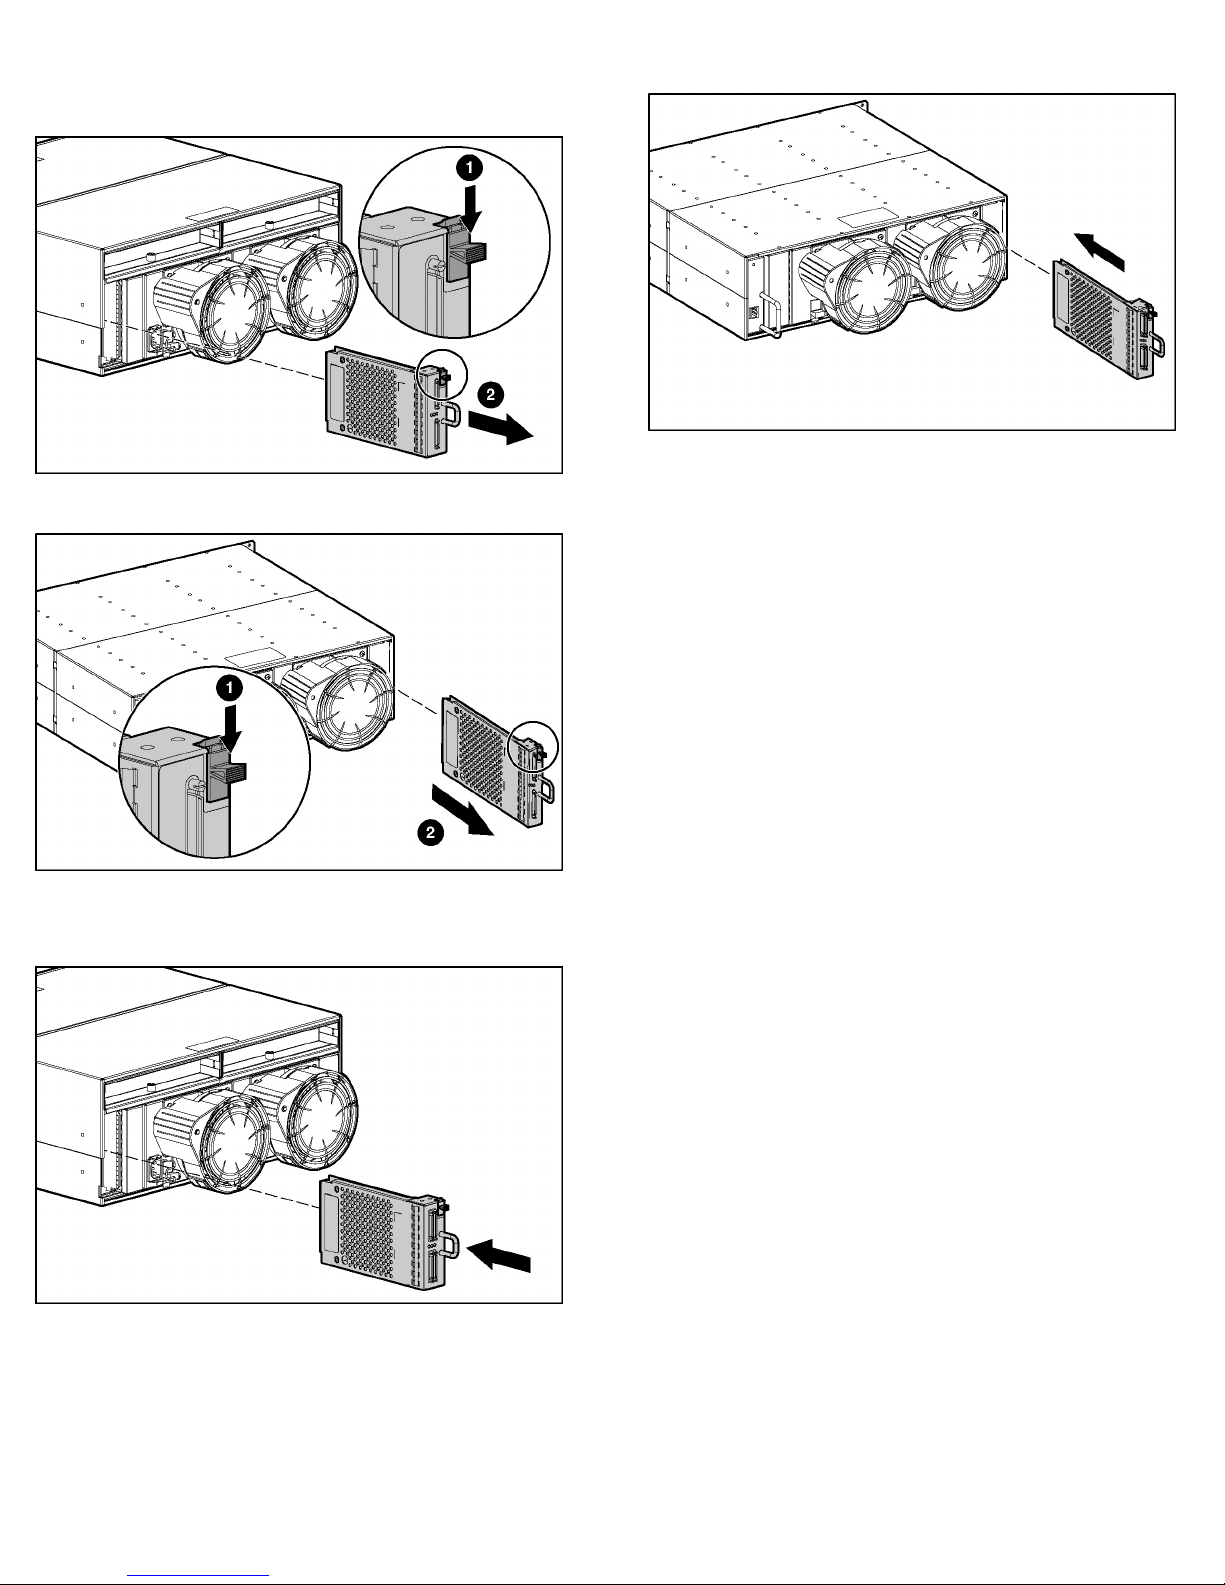
3. Remove the 2-Port Shared Storage Module.
MSA500 G2
MSA30
MSA30
4. Install the 4-Port Shared Storage Module.
MSA500 G2
5. Connect cabling. Refer to storage system documentation.
The installation is complete.
Selective Storage Presentation
SSP is a controller firmware feature that enables the
administrator to control access from hosts to logical drives on
the MSA500 G2 storage system. The administrator selects
which server host or hosts can access the stored data, restricting
access as needed to assure data integrity and security.
Each logical drive on the HP StorageWorks Modular Smart
Array 500 Generation 2 controller has an access control list that
contains the IDs of the server host adapters that have access to
the drive. If a server attempts to send commands to a logical
drive without access authority, the controller rejects the
command.
The configuration utility maps the IDs of server host adapters to
connection names and sets up access control lists for logical
drives based on the adapter IDs.
SSP Hardware Configurations
HP CONFIDENTIAL File Name: 354905-001_Intrepid_4port_OC.doc Last Saved On: 1/22/04 10:57 AM
To configure the hardware for SSP, use SCSI cables to connect
each server to the 2-Port or 4-Port Shared Storage Module
installed in the storage system. Boot volumes for individual
servers can reside on server drives or storage system drives.
Enabling SSP
After choosing the configuration that best suits your needs,
enable SSP with ACU Version 7.10 or later. Locate ACU on
the SmartStart CD. For instructions, refer to the HP Array
Configuration Utility User Guide on the Documentation CD.
 Loading...