

Page 1

User
Guide
HP StorageWorks
File System Extender 3.2
First Edition (December 2005)
Part Number: T3648-96004
Page 2

Legal and notice information
© Copyright 2005 Hewlett-Packard Development Company, L.P.
Hewlett-Packard Company makes no warranty of any kind with regard to this material, including, but not limited to, the implied warranties of
merchantability and fitness for a particular purpose. Hewlett-Packard shall not be liable for errors contained herein or for incidental or consequential
damages in connection with the furnishing, performance, or use of this material.
This document contains proprietary information, which is protected by copyright. No part of this document may be photocopied, reproduced, or
translated into another language without the prior written consent of Hewlett-Packard. The information is provided “as is” without warranty of any
kind and is subject to change without notice. The only warranties for HP products and services are set forth in the express warranty statements
accompanying such products and services. Nothing herein should be construed as constituting an additional warranty. HP shall not be liable for
technical or editorial errors or omissions contained herein.
Adobe® and Acrobat® are trademarks of Adobe Systems Incorporated.
Intel and Itanium are trademarks or registered trademarks of Intel Corporation or its subsidiaries in the United States and other countries.
Microsoft, Windows, Windows NT, and Windows XP are U.S. registered trademarks of Microsoft Corporation.
Oracle® is a registered U.S. trademark of Oracle Corporation, Redwood City, California.
UNIX® is a registered trademark of The Open Group.
File System Extender 3.2 User Guide
Page 3

Contents
Intended audience . . . . . . . . . . . . . . . . . . . . . . . . . . . . . . . . . . . . . . . . . . . . . . . . . . . . . . . . . . . . . . . 7
Related documentation . . . . . . . . . . . . . . . . . . . . . . . . . . . . . . . . . . . . . . . . . . . . . . . . . . . . . . . . . . . . 7
Prerequisites. . . . . . . . . . . . . . . . . . . . . . . . . . . . . . . . . . . . . . . . . . . . . . . . . . . . . . . . . . . . . . . . . . . . 8
Software requirements . . . . . . . . . . . . . . . . . . . . . . . . . . . . . . . . . . . . . . . . . . . . . . . . . . . . . . . . . . 8
Hardware requirements . . . . . . . . . . . . . . . . . . . . . . . . . . . . . . . . . . . . . . . . . . . . . . . . . . . . . . . . . 8
Document conventions and symbols . . . . . . . . . . . . . . . . . . . . . . . . . . . . . . . . . . . . . . . . . . . . . . . . . . . 8
HP technical support . . . . . . . . . . . . . . . . . . . . . . . . . . . . . . . . . . . . . . . . . . . . . . . . . . . . . . . . . . . . . . 9
HP-authorized reseller. . . . . . . . . . . . . . . . . . . . . . . . . . . . . . . . . . . . . . . . . . . . . . . . . . . . . . . . . . . 9
Helpful web sites . . . . . . . . . . . . . . . . . . . . . . . . . . . . . . . . . . . . . . . . . . . . . . . . . . . . . . . . . . . . . . 9
1 Introducing HP StorageWorks File System Extender . . . . . . . . . . . . . . . . . . . . . . . . . . . 11
What is FSE? . . . . . . . . . . . . . . . . . . . . . . . . . . . . . . . . . . . . . . . . . . . . . . . . . . . . . . . . . . . . . . . . . . 11
FSE basics . . . . . . . . . . . . . . . . . . . . . . . . . . . . . . . . . . . . . . . . . . . . . . . . . . . . . . . . . . . . . . . . . . . . 11
Infinite file system. . . . . . . . . . . . . . . . . . . . . . . . . . . . . . . . . . . . . . . . . . . . . . . . . . . . . . . . . . . . . 11
Library - tape compatibility . . . . . . . . . . . . . . . . . . . . . . . . . . . . . . . . . . . . . . . . . . . . . . . . . . . . . . 12
Automatic error detection . . . . . . . . . . . . . . . . . . . . . . . . . . . . . . . . . . . . . . . . . . . . . . . . . . . . . . . 12
NFS and CIFS support . . . . . . . . . . . . . . . . . . . . . . . . . . . . . . . . . . . . . . . . . . . . . . . . . . . . . . . . . 12
FSE architecture . . . . . . . . . . . . . . . . . . . . . . . . . . . . . . . . . . . . . . . . . . . . . . . . . . . . . . . . . . . . . . . . 12
FSE operations . . . . . . . . . . . . . . . . . . . . . . . . . . . . . . . . . . . . . . . . . . . . . . . . . . . . . . . . . . . . . . 13
FSE components . . . . . . . . . . . . . . . . . . . . . . . . . . . . . . . . . . . . . . . . . . . . . . . . . . . . . . . . . . . . . 14
FSE implementation options. . . . . . . . . . . . . . . . . . . . . . . . . . . . . . . . . . . . . . . . . . . . . . . . . . . . . . 16
FSE daemons/services and FSE agents. . . . . . . . . . . . . . . . . . . . . . . . . . . . . . . . . . . . . . . . . . . . . . 20
FSE user interfaces . . . . . . . . . . . . . . . . . . . . . . . . . . . . . . . . . . . . . . . . . . . . . . . . . . . . . . . . . . . . 22
2 Configuring, starting, and stopping the FSE Management Console . . . . . . . . . . . . . . . . . 27
Configuring the FSE Management Console . . . . . . . . . . . . . . . . . . . . . . . . . . . . . . . . . . . . . . . . . . . . . 27
Configuring the logging level . . . . . . . . . . . . . . . . . . . . . . . . . . . . . . . . . . . . . . . . . . . . . . . . . . . . 30
Starting and stopping the FSE Management Console . . . . . . . . . . . . . . . . . . . . . . . . . . . . . . . . . . . . . . 31
Starting and stopping the FSE Management Console server . . . . . . . . . . . . . . . . . . . . . . . . . . . . . . . 31
Starting and stopping the FSE Management Console client . . . . . . . . . . . . . . . . . . . . . . . . . . . . . . . . 33
3 Configuring FSE . . . . . . . . . . . . . . . . . . . . . . . . . . . . . . . . . . . . . . . . . . . . . . . . . . . . 37
Before you start . . . . . . . . . . . . . . . . . . . . . . . . . . . . . . . . . . . . . . . . . . . . . . . . . . . . . . . . . . . . . . . . 37
Configuration basics . . . . . . . . . . . . . . . . . . . . . . . . . . . . . . . . . . . . . . . . . . . . . . . . . . . . . . . . . . . . . 38
Configuration files . . . . . . . . . . . . . . . . . . . . . . . . . . . . . . . . . . . . . . . . . . . . . . . . . . . . . . . . . . . . 38
Templates . . . . . . . . . . . . . . . . . . . . . . . . . . . . . . . . . . . . . . . . . . . . . . . . . . . . . . . . . . . . . . . . . . 39
Configuration Database . . . . . . . . . . . . . . . . . . . . . . . . . . . . . . . . . . . . . . . . . . . . . . . . . . . . . . . . 39
Resource Management Database. . . . . . . . . . . . . . . . . . . . . . . . . . . . . . . . . . . . . . . . . . . . . . . . . . 40
Using FSE command-line interface for configuring resources and policies . . . . . . . . . . . . . . . . . . . . . . 40
Using the FSE Management Console for configuring resources and policies . . . . . . . . . . . . . . . . . . . . 41
Configuration procedure . . . . . . . . . . . . . . . . . . . . . . . . . . . . . . . . . . . . . . . . . . . . . . . . . . . . . . . . . . 59
Step 1: configuring FSE libraries and FSE drives . . . . . . . . . . . . . . . . . . . . . . . . . . . . . . . . . . . . . . . 60
Step 2: configuring FSE media pools . . . . . . . . . . . . . . . . . . . . . . . . . . . . . . . . . . . . . . . . . . . . . . . 67
Step 3: preparing HSM file systems . . . . . . . . . . . . . . . . . . . . . . . . . . . . . . . . . . . . . . . . . . . . . . . . 67
Step 4: configuring FSE partitions . . . . . . . . . . . . . . . . . . . . . . . . . . . . . . . . . . . . . . . . . . . . . . . . . 69
Step 5: preparing FSE media . . . . . . . . . . . . . . . . . . . . . . . . . . . . . . . . . . . . . . . . . . . . . . . . . . . . 72
Step 6: mounting HSM file systems . . . . . . . . . . . . . . . . . . . . . . . . . . . . . . . . . . . . . . . . . . . . . . . . 73
Reconfiguring FSE interprocess communication. . . . . . . . . . . . . . . . . . . . . . . . . . . . . . . . . . . . . . . . . . . 75
Reconfiguring communication on a consolidated FSE implementation or on an FSE server . . . . . . . . . . 76
Reconfiguring communication on external Linux FSE clients . . . . . . . . . . . . . . . . . . . . . . . . . . . . . . . . 77
Reconfiguring communication on external Windows FSE clients. . . . . . . . . . . . . . . . . . . . . . . . . . . . . 78
Changing the IP address of an FSE host. . . . . . . . . . . . . . . . . . . . . . . . . . . . . . . . . . . . . . . . . . . . . . . . 80
4 Managing media . . . . . . . . . . . . . . . . . . . . . . . . . . . . . . . . . . . . . . . . . . . . . . . . . . . 81
FSE media pools. . . . . . . . . . . . . . . . . . . . . . . . . . . . . . . . . . . . . . . . . . . . . . . . . . . . . . . . . . . . . . . . 81
hp StorageWorks File System Extender User Guide 3
Page 4

Media pool types and their characteristics . . . . . . . . . . . . . . . . . . . . . . . . . . . . . . . . . . . . . . . . . . . 81
Configuring a media pool . . . . . . . . . . . . . . . . . . . . . . . . . . . . . . . . . . . . . . . . . . . . . . . . . . . . . . 82
Determining the configured media pools. . . . . . . . . . . . . . . . . . . . . . . . . . . . . . . . . . . . . . . . . . . . . 84
Checking the status of a particular media pool . . . . . . . . . . . . . . . . . . . . . . . . . . . . . . . . . . . . . . . . 85
FSE media . . . . . . . . . . . . . . . . . . . . . . . . . . . . . . . . . . . . . . . . . . . . . . . . . . . . . . . . . . . . . . . . . . . . 86
FSE medium volumes . . . . . . . . . . . . . . . . . . . . . . . . . . . . . . . . . . . . . . . . . . . . . . . . . . . . . . . . . . 86
FSE media types . . . . . . . . . . . . . . . . . . . . . . . . . . . . . . . . . . . . . . . . . . . . . . . . . . . . . . . . . . . . . 87
Disk media . . . . . . . . . . . . . . . . . . . . . . . . . . . . . . . . . . . . . . . . . . . . . . . . . . . . . . . . . . . . . . . . . 87
Adding media to an FSE media pool . . . . . . . . . . . . . . . . . . . . . . . . . . . . . . . . . . . . . . . . . . . . . . . 90
Formatting media . . . . . . . . . . . . . . . . . . . . . . . . . . . . . . . . . . . . . . . . . . . . . . . . . . . . . . . . . . . . 90
Initializing media. . . . . . . . . . . . . . . . . . . . . . . . . . . . . . . . . . . . . . . . . . . . . . . . . . . . . . . . . . . . . 91
Duplicating media . . . . . . . . . . . . . . . . . . . . . . . . . . . . . . . . . . . . . . . . . . . . . . . . . . . . . . . . . . . . 92
Reorganizing media . . . . . . . . . . . . . . . . . . . . . . . . . . . . . . . . . . . . . . . . . . . . . . . . . . . . . . . . . . 94
Recreating redundant copies of migrated data . . . . . . . . . . . . . . . . . . . . . . . . . . . . . . . . . . . . . . . 100
Checking the status of media . . . . . . . . . . . . . . . . . . . . . . . . . . . . . . . . . . . . . . . . . . . . . . . . . . . 104
Changing the condition status of media . . . . . . . . . . . . . . . . . . . . . . . . . . . . . . . . . . . . . . . . . . . . 106
Closing medium volumes . . . . . . . . . . . . . . . . . . . . . . . . . . . . . . . . . . . . . . . . . . . . . . . . . . . . . . 106
Recreating Fast Recovery Information from media . . . . . . . . . . . . . . . . . . . . . . . . . . . . . . . . . . . . . 107
Removing FSE media . . . . . . . . . . . . . . . . . . . . . . . . . . . . . . . . . . . . . . . . . . . . . . . . . . . . . . . . . 107
5 Migration, release, recall, and deletion . . . . . . . . . . . . . . . . . . . . . . . . . . . . . . . . . . 109
FSE operation basics. . . . . . . . . . . . . . . . . . . . . . . . . . . . . . . . . . . . . . . . . . . . . . . . . . . . . . . . . . . . 109
Hierarchical Storage Manager lists . . . . . . . . . . . . . . . . . . . . . . . . . . . . . . . . . . . . . . . . . . . . . . . 110
About policies . . . . . . . . . . . . . . . . . . . . . . . . . . . . . . . . . . . . . . . . . . . . . . . . . . . . . . . . . . . . . . 111
Migration . . . . . . . . . . . . . . . . . . . . . . . . . . . . . . . . . . . . . . . . . . . . . . . . . . . . . . . . . . . . . . . . . . . 112
Migration policy parameters . . . . . . . . . . . . . . . . . . . . . . . . . . . . . . . . . . . . . . . . . . . . . . . . . . . . 112
Example situations that trigger migration . . . . . . . . . . . . . . . . . . . . . . . . . . . . . . . . . . . . . . . . . . . 113
Default migration policy . . . . . . . . . . . . . . . . . . . . . . . . . . . . . . . . . . . . . . . . . . . . . . . . . . . . . . . 114
Release . . . . . . . . . . . . . . . . . . . . . . . . . . . . . . . . . . . . . . . . . . . . . . . . . . . . . . . . . . . . . . . . . . . . . 114
Watermarks . . . . . . . . . . . . . . . . . . . . . . . . . . . . . . . . . . . . . . . . . . . . . . . . . . . . . . . . . . . . . . . 114
Exclusion from release . . . . . . . . . . . . . . . . . . . . . . . . . . . . . . . . . . . . . . . . . . . . . . . . . . . . . . . . 116
Release policy parameters . . . . . . . . . . . . . . . . . . . . . . . . . . . . . . . . . . . . . . . . . . . . . . . . . . . . . 119
Example situations that trigger release . . . . . . . . . . . . . . . . . . . . . . . . . . . . . . . . . . . . . . . . . . . . . 120
Default release policy. . . . . . . . . . . . . . . . . . . . . . . . . . . . . . . . . . . . . . . . . . . . . . . . . . . . . . . . . 121
Recall . . . . . . . . . . . . . . . . . . . . . . . . . . . . . . . . . . . . . . . . . . . . . . . . . . . . . . . . . . . . . . . . . . . . . . 121
Recall parameters . . . . . . . . . . . . . . . . . . . . . . . . . . . . . . . . . . . . . . . . . . . . . . . . . . . . . . . . . . . 121
Default recall policy . . . . . . . . . . . . . . . . . . . . . . . . . . . . . . . . . . . . . . . . . . . . . . . . . . . . . . . . . . 122
Deletion . . . . . . . . . . . . . . . . . . . . . . . . . . . . . . . . . . . . . . . . . . . . . . . . . . . . . . . . . . . . . . . . . . . . 122
Automatic deletion process . . . . . . . . . . . . . . . . . . . . . . . . . . . . . . . . . . . . . . . . . . . . . . . . . . . . . 122
Deletion policy parameters . . . . . . . . . . . . . . . . . . . . . . . . . . . . . . . . . . . . . . . . . . . . . . . . . . . . . 122
Examples of a configured deletion policy . . . . . . . . . . . . . . . . . . . . . . . . . . . . . . . . . . . . . . . . . . . 123
Default deletion policy . . . . . . . . . . . . . . . . . . . . . . . . . . . . . . . . . . . . . . . . . . . . . . . . . . . . . . . . 124
Starting the deletion job . . . . . . . . . . . . . . . . . . . . . . . . . . . . . . . . . . . . . . . . . . . . . . . . . . . . . . . 124
Recalling deleted files . . . . . . . . . . . . . . . . . . . . . . . . . . . . . . . . . . . . . . . . . . . . . . . . . . . . . . . . 124
Resource allocation. . . . . . . . . . . . . . . . . . . . . . . . . . . . . . . . . . . . . . . . . . . . . . . . . . . . . . . . . . . . . 125
Resource allocation concepts . . . . . . . . . . . . . . . . . . . . . . . . . . . . . . . . . . . . . . . . . . . . . . . . . . . 125
System allocation and job priority policy . . . . . . . . . . . . . . . . . . . . . . . . . . . . . . . . . . . . . . . . . . . . . . 127
System allocation and job priority policy parameters . . . . . . . . . . . . . . . . . . . . . . . . . . . . . . . . . . . 127
Partition allocation and job priority policy . . . . . . . . . . . . . . . . . . . . . . . . . . . . . . . . . . . . . . . . . . . . . 128
Partition allocation and job priority policy parameters . . . . . . . . . . . . . . . . . . . . . . . . . . . . . . . . . . 128
Priority calculation . . . . . . . . . . . . . . . . . . . . . . . . . . . . . . . . . . . . . . . . . . . . . . . . . . . . . . . . . . . . . 130
Multiple copying . . . . . . . . . . . . . . . . . . . . . . . . . . . . . . . . . . . . . . . . . . . . . . . . . . . . . . . . . . . . . . 131
Parallel copying . . . . . . . . . . . . . . . . . . . . . . . . . . . . . . . . . . . . . . . . . . . . . . . . . . . . . . . . . . . . 132
Sequential copying . . . . . . . . . . . . . . . . . . . . . . . . . . . . . . . . . . . . . . . . . . . . . . . . . . . . . . . . . . 132
HSM file system access modes . . . . . . . . . . . . . . . . . . . . . . . . . . . . . . . . . . . . . . . . . . . . . . . . . . . . . 132
Limited Access Mode (LAM) and Full Access Mode (FAM) . . . . . . . . . . . . . . . . . . . . . . . . . . . . . . . 132
6 Monitoring and maintaining FSE . . . . . . . . . . . . . . . . . . . . . . . . . . . . . . . . . . . . . . . 135
About monitoring and maintaining in FSE . . . . . . . . . . . . . . . . . . . . . . . . . . . . . . . . . . . . . . . . . . . . . 135
4
Page 5

Monitoring the FSE implementation . . . . . . . . . . . . . . . . . . . . . . . . . . . . . . . . . . . . . . . . . . . . . . . . . . 135
Managing FSE partitions . . . . . . . . . . . . . . . . . . . . . . . . . . . . . . . . . . . . . . . . . . . . . . . . . . . . . . . . . 136
Monitoring FSE partition status . . . . . . . . . . . . . . . . . . . . . . . . . . . . . . . . . . . . . . . . . . . . . . . . . . 136
Disabling an FSE partition. . . . . . . . . . . . . . . . . . . . . . . . . . . . . . . . . . . . . . . . . . . . . . . . . . . . . . 137
Enabling an FSE partition . . . . . . . . . . . . . . . . . . . . . . . . . . . . . . . . . . . . . . . . . . . . . . . . . . . . . . 137
Removing an FSE partition . . . . . . . . . . . . . . . . . . . . . . . . . . . . . . . . . . . . . . . . . . . . . . . . . . . . . 138
Retrieving detailed information about configured FSE partitions . . . . . . . . . . . . . . . . . . . . . . . . . . . . 138
Switching the access mode for an HSM file system. . . . . . . . . . . . . . . . . . . . . . . . . . . . . . . . . . . . . 138
Monitoring FSE jobs . . . . . . . . . . . . . . . . . . . . . . . . . . . . . . . . . . . . . . . . . . . . . . . . . . . . . . . . . . . . 139
Checking the consistency of the File System Catalog . . . . . . . . . . . . . . . . . . . . . . . . . . . . . . . . . . . . . . 141
Consistency check of FSC vs. HSM file system . . . . . . . . . . . . . . . . . . . . . . . . . . . . . . . . . . . . . . . . 141
Consistency check of FSC vs. FSE media . . . . . . . . . . . . . . . . . . . . . . . . . . . . . . . . . . . . . . . . . . . 143
Recalling older generations of a file . . . . . . . . . . . . . . . . . . . . . . . . . . . . . . . . . . . . . . . . . . . . . . . . . 146
Viewing logs . . . . . . . . . . . . . . . . . . . . . . . . . . . . . . . . . . . . . . . . . . . . . . . . . . . . . . . . . . . . . . . . . 148
The FSE event log . . . . . . . . . . . . . . . . . . . . . . . . . . . . . . . . . . . . . . . . . . . . . . . . . . . . . . . . . . . 149
The FSE error log . . . . . . . . . . . . . . . . . . . . . . . . . . . . . . . . . . . . . . . . . . . . . . . . . . . . . . . . . . . . 153
Retrieving detailed information . . . . . . . . . . . . . . . . . . . . . . . . . . . . . . . . . . . . . . . . . . . . . . . . . . . . . 158
Examples of command outputs generated using the --list --detail options . . . . . . . . . . . . . . . . . . . . . . 159
Determining total offline storage capacity . . . . . . . . . . . . . . . . . . . . . . . . . . . . . . . . . . . . . . . . . . . . . 168
7 Backup, restore, and recovery . . . . . . . . . . . . . . . . . . . . . . . . . . . . . . . . . . . . . . . . . 171
Defining your backup strategy . . . . . . . . . . . . . . . . . . . . . . . . . . . . . . . . . . . . . . . . . . . . . . . . . . . . . 171
FSE implementation components . . . . . . . . . . . . . . . . . . . . . . . . . . . . . . . . . . . . . . . . . . . . . . . . . 171
FSE backup types. . . . . . . . . . . . . . . . . . . . . . . . . . . . . . . . . . . . . . . . . . . . . . . . . . . . . . . . . . . . 172
Methods of retrieving data . . . . . . . . . . . . . . . . . . . . . . . . . . . . . . . . . . . . . . . . . . . . . . . . . . . . . 173
Backup . . . . . . . . . . . . . . . . . . . . . . . . . . . . . . . . . . . . . . . . . . . . . . . . . . . . . . . . . . . . . . . . . . . . . 174
What is FSE backup? . . . . . . . . . . . . . . . . . . . . . . . . . . . . . . . . . . . . . . . . . . . . . . . . . . . . . . . . . 174
How it works? . . . . . . . . . . . . . . . . . . . . . . . . . . . . . . . . . . . . . . . . . . . . . . . . . . . . . . . . . . . . . . 174
Backup media management . . . . . . . . . . . . . . . . . . . . . . . . . . . . . . . . . . . . . . . . . . . . . . . . . . . . 175
The fsebackup command . . . . . . . . . . . . . . . . . . . . . . . . . . . . . . . . . . . . . . . . . . . . . . . . . . . . . . 176
Restore . . . . . . . . . . . . . . . . . . . . . . . . . . . . . . . . . . . . . . . . . . . . . . . . . . . . . . . . . . . . . . . . . . . . . 182
What is FSE restore? . . . . . . . . . . . . . . . . . . . . . . . . . . . . . . . . . . . . . . . . . . . . . . . . . . . . . . . . . 182
Restore procedure . . . . . . . . . . . . . . . . . . . . . . . . . . . . . . . . . . . . . . . . . . . . . . . . . . . . . . . . . . . 182
Post-restore steps . . . . . . . . . . . . . . . . . . . . . . . . . . . . . . . . . . . . . . . . . . . . . . . . . . . . . . . . . . . . 185
Recovery . . . . . . . . . . . . . . . . . . . . . . . . . . . . . . . . . . . . . . . . . . . . . . . . . . . . . . . . . . . . . . . . . . . . 186
File System Catalog recovery . . . . . . . . . . . . . . . . . . . . . . . . . . . . . . . . . . . . . . . . . . . . . . . . . . . 186
HSM file system recovery . . . . . . . . . . . . . . . . . . . . . . . . . . . . . . . . . . . . . . . . . . . . . . . . . . . . . . 186
8 Troubleshooting . . . . . . . . . . . . . . . . . . . . . . . . . . . . . . . . . . . . . . . . . . . . . . . . . . . 189
FSE startup and shut-down problems . . . . . . . . . . . . . . . . . . . . . . . . . . . . . . . . . . . . . . . . . . . . . . . . . 190
Firebird server problems . . . . . . . . . . . . . . . . . . . . . . . . . . . . . . . . . . . . . . . . . . . . . . . . . . . . . . . . . 194
Communication problems . . . . . . . . . . . . . . . . . . . . . . . . . . . . . . . . . . . . . . . . . . . . . . . . . . . . . . . . 195
SCSI problems . . . . . . . . . . . . . . . . . . . . . . . . . . . . . . . . . . . . . . . . . . . . . . . . . . . . . . . . . . . . . . . . 197
Tape library problems . . . . . . . . . . . . . . . . . . . . . . . . . . . . . . . . . . . . . . . . . . . . . . . . . . . . . . . . . . . 199
Media management problems . . . . . . . . . . . . . . . . . . . . . . . . . . . . . . . . . . . . . . . . . . . . . . . . . . . . . 201
HSM file system mounting problems . . . . . . . . . . . . . . . . . . . . . . . . . . . . . . . . . . . . . . . . . . . . . . . . . 204
HSM file system filter problems. . . . . . . . . . . . . . . . . . . . . . . . . . . . . . . . . . . . . . . . . . . . . . . . . . . . . 208
Migration problems . . . . . . . . . . . . . . . . . . . . . . . . . . . . . . . . . . . . . . . . . . . . . . . . . . . . . . . . . . . . 210
Recall problems . . . . . . . . . . . . . . . . . . . . . . . . . . . . . . . . . . . . . . . . . . . . . . . . . . . . . . . . . . . . . . . 213
Backup, restore, and recovery problems . . . . . . . . . . . . . . . . . . . . . . . . . . . . . . . . . . . . . . . . . . . . . . 216
Other problems . . . . . . . . . . . . . . . . . . . . . . . . . . . . . . . . . . . . . . . . . . . . . . . . . . . . . . . . . . . . . . . 219
FSE troubleshooting tools . . . . . . . . . . . . . . . . . . . . . . . . . . . . . . . . . . . . . . . . . . . . . . . . . . . . . . . . . 223
Debugging FSE processes . . . . . . . . . . . . . . . . . . . . . . . . . . . . . . . . . . . . . . . . . . . . . . . . . . . . . . . . 224
Debugging options . . . . . . . . . . . . . . . . . . . . . . . . . . . . . . . . . . . . . . . . . . . . . . . . . . . . . . . . . . 224
Debugging HSM file system filter . . . . . . . . . . . . . . . . . . . . . . . . . . . . . . . . . . . . . . . . . . . . . . . . . 229
Debugging FSE backup and restore jobs . . . . . . . . . . . . . . . . . . . . . . . . . . . . . . . . . . . . . . . . . . . 230
Potential problems with debugging . . . . . . . . . . . . . . . . . . . . . . . . . . . . . . . . . . . . . . . . . . . . . . . 230
Contacting support . . . . . . . . . . . . . . . . . . . . . . . . . . . . . . . . . . . . . . . . . . . . . . . . . . . . . . . . . . . . . 231
Gathering information about your problem . . . . . . . . . . . . . . . . . . . . . . . . . . . . . . . . . . . . . . . . . . 231
hp StorageWorks File System Extender User Guide 5
Page 6

FSE error codes . . . . . . . . . . . . . . . . . . . . . . . . . . . . . . . . . . . . . . . . . . . . . . . . . . . . . . . . . . . . . . . 232
A Directory layout. . . . . . . . . . . . . . . . . . . . . . . . . . . . . . . . . . . . . . . . . . . . . . . . . . . 239
B FSE configuration templates . . . . . . . . . . . . . . . . . . . . . . . . . . . . . . . . . . . . . . . . . . 241
Template for FSE libraries . . . . . . . . . . . . . . . . . . . . . . . . . . . . . . . . . . . . . . . . . . . . . . . . . . . . . . . . 242
Template for FSE drives . . . . . . . . . . . . . . . . . . . . . . . . . . . . . . . . . . . . . . . . . . . . . . . . . . . . . . . . . . 243
Template for an LTO media pool . . . . . . . . . . . . . . . . . . . . . . . . . . . . . . . . . . . . . . . . . . . . . . . . . . . 245
Template for a disk media pool . . . . . . . . . . . . . . . . . . . . . . . . . . . . . . . . . . . . . . . . . . . . . . . . . . . . 246
Template for FSE partitions - General part . . . . . . . . . . . . . . . . . . . . . . . . . . . . . . . . . . . . . . . . . . . . . 247
Template for FSE partitions - Migration part . . . . . . . . . . . . . . . . . . . . . . . . . . . . . . . . . . . . . . . . . . . . 248
Template for FSE partitions - Release part . . . . . . . . . . . . . . . . . . . . . . . . . . . . . . . . . . . . . . . . . . . . . 249
Template for FSE partitions - Recall and Allocation part . . . . . . . . . . . . . . . . . . . . . . . . . . . . . . . . . . . . 251
Template for FSE partitions - Deletion part . . . . . . . . . . . . . . . . . . . . . . . . . . . . . . . . . . . . . . . . . . . . . 252
Template for FSE system configuration. . . . . . . . . . . . . . . . . . . . . . . . . . . . . . . . . . . . . . . . . . . . . . . . 253
6
Page 7

About this guide
This guide provides information about:
• Preparing your environment prior to installing software
• Installing the software
• Verifying successful installation and troubleshooting problems
Intended audience
This guide is intended for use by system administrators who are experienced with the following (depending
on the type of installation):
• SUSE LINUX Enterprise Server 8 (SLES) or Red Hat Enterprise Linux 3 (RHEL) operating systems
(abbreviated to Linux throughout this guide)
NOTE: You must have a thorough knowledge of Linux and be logged on to the system as root in
order to execute shell commands.
• Windows Server 2003 or Windows 2000 Server operating systems (abbreviated to Windows
throughout this guide)
NOTE: You need administrative privileges to perform the administrative tasks. These privileges are
granted only if you are either locally logged to the system as Administrator (recommended) or using
a remote access software that supports logging in with the real Administrator account. The
Windows native Remote Desktop tool, for example, may be unsuitable for these tasks, since it uses
a different Administrator account when logging in remotely.
Once the software is successfully installed, you then need to configure File System Extender (FSE) resources,
such as disk media and tape libraries, HSM file systems, and configure migration policies. This
configuration is described in the FSE User’s Guide.
Related documentation
FSE documentation consists of the following manuals:
• FSE Read Me First
• FSE Release Notes
• FSE Installation Guide
• FSE User’s Guide
• FSE Command-Line Reference
hp StorageWorks File System Extender User Guide 7
Page 8

Prerequisites
Prerequisites for setting up product include:
Software requirements
For information on software requirements, see the FSE Release Notes and the FSE Installation Guide.
Hardware requirements
For information on hardware requirements, see the FSE Release Notes.
Document conventions and symbols
Table 1 Document conventions
Convention Element
Medium blue text: Figure 1 Cross-reference links and e-mail addresses
Medium blue, underlined text
(http://www.hp.com)
Bold font
Italics font Text emphasis
Monospace font
Monospace, italic font
Monospace, bold font Emphasis of file and directory names, system output, code, and text
WARNING! Indicates that failure to follow directions could result in bodily harm or death.
Web site addresses
• Key names
• Text typed into a GUI element, such as into a box
• GUI elements that are clicked or selected, such as menu and list
items, buttons, and check boxes
• File and directory names
• System output
• Code
• Text typed at the command-line
• Code variables
• Command-line variables
typed at the command line
CAUTION: Indicates that failure to follow directions could result in damage to equipment or data.
IMPORTANT: Provides clarifying information or specific instructions.
NOTE: Provides additional information.
TIP: Provides helpful hints and shortcuts.
8
Page 9

HP technical support
Telephone numbers for worldwide technical support are listed on the HP support web site:
http://www.hp.com/support/
Collect the following information before calling:
• Technical support registration number (if applicable)
• Product serial numbers
• Product model names and numbers
• Description of the steps being performed
• Applicable error messages
• Operating system type and revision level
• Detailed, specific questions
For continuous quality improvement, calls may be recorded or monitored.
HP strongly recommends that customers sign up online using the Subscriber's choice web site:
http://www.hp.com/go/e-updates
• Subscribing to this service provides you with e-mail updates on the latest product enhancements, newest
versions of drivers, and firmware documentation updates as well as instant access to numerous other
product resources.
• After signing up, you can quickly locate your products by selecting Business support and then Storage
under Product Category.
.
.
HP-authorized reseller
For the name of your nearest HP-authorized reseller:
• In the United States, call 1-800-345-1518.
• Elsewhere, visit the HP web site: http://www.hp.com
telephone numbers.
Helpful web sites
For third-party product information, see the following HP web sites:
• http://www.hp.com
• http://www.hp.com/go/storage
• http://www.hp.com/support
. Then click Contact HP to find locations and
/
hp StorageWorks File System Extender User Guide 9
Page 10

10
Page 11
1 Introducing HP StorageWorks File System Extender
This chapter includes the following topics:
• What is FSE?, page 11
• FSE basics, page 11
• FSE architecture, page 12
What is FSE?
HP StorageWorks File System Extender (FSE) is a mass storage oriented software product, based on
client-server technology. It has been designed and developed to support the archiving, backup, and online
access of data-intensive applications like SAP R/3, DMS, CAD/CAM, digital imaging, BackOffice, as well
as for applications in the audio, video and pre-print fields.
FSE provides large, virtually infinite storage space by combining disk storage and tape library storage with
high-capacity tape media and by implementing Hierarchical Storage Management (HSM). It enables
transparent and automated data archiving and retrieval, and efficiently stores and manages extremely
large quantities of data. FSE implementation can be used as an online storage site or as a backup server.
Its main benefits are easy data management with fast data access, economical data storage, and data
protection. Data archiving and retrieval can be automated and customized for each end user of the FSE
implementation by logically partitioning the system.
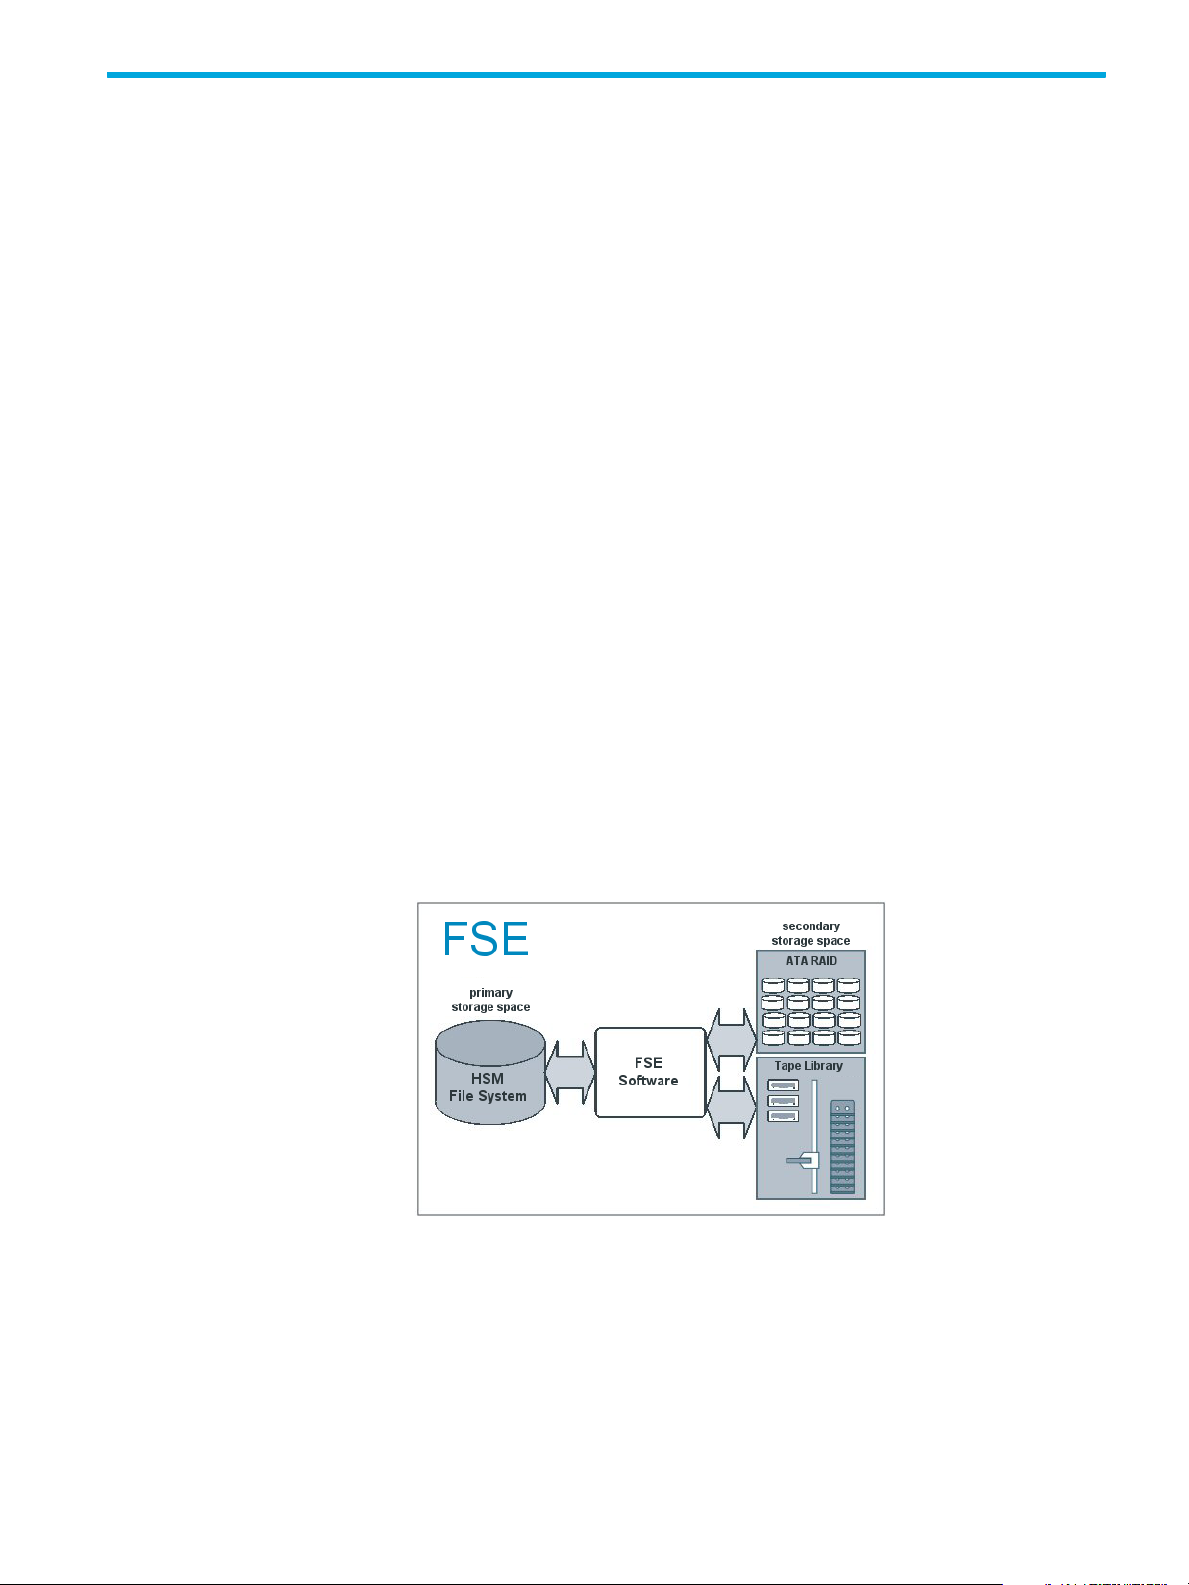
The efficiency of the FSE implementation is achieved with a storage capacity that consists of primary and
secondary storage space. These two types of storage space present a successful combination of the speed
of disk storage and the capacity and flexibility of tape media. In an FSE implementation, secondary
storage space only stores least accessed files and primary storage space is used as a cache for recently
used files. Policy-driven archiving and retrieval processes make it possible for FSE administrators to tune the
system for best performance based on the type of data and the way applications handle that data
FSE software manages both primary and secondary storage space. It is highly-modularized and
implemented with a series of intercommunicating components that are responsible for data management.
For detailed information on these components, see ”FSE components” on page 14.
Figure 1 Example of FSE storage spaces
For details on supported and required hardware and software, see the FSE Release Notes.
FSE basics
Infinite file system
The most significant characteristic of FSE is a virtually infinite file system and a very transparent access to
the data through the file system. You have access to essentially unlimited storage capacity. FSE constantly
controls the files in use.You define the way FSE controls these files with migration, release, and deletion
policies. It also enables multiple copying of migrated files; therefore satisfying the need for additional
backup copies and protecting from failure of any single medium.
hp StorageWorks File System Extender User Guide 11
Page 12

Library - tape compatibility
FSE software is a part of HP StorageWorks File System Extender, and can be used with supported SCSI
tape libraries with supported drive types.
FSE software supports LTO drive technologies for LTO Ultrium 1, LTO Ultrium 2 and LTO Ultrium 3 media.
For a list of supported tape libraries, tape drives, and tape media, see the FSE Release Notes.
Automatic error detection
FSE automatically detects drive and media hardware errors. When FSE detects such errors, the following
happens:
• The drive is marked as offline.
• If the error occurs during a migration job, the medium is marked as unreliable, which disables
further writing to it.
• If the error occurs during a recall job, the medium is marked as unusable, which disables reading
from and writing to it. Neither the marked drive nor medium are used for the operation until the
administrator appropriately marks the drive and medium. For more information, see ”Changing the
condition status of media” on page 106.
NFS and CIFS support
Remote Linux and Windows clients access HSM file systems using standard protocols. Network File System
(NFS) is the standard protocol for UNIX and Linux platforms. Common Internet File System (CIFS) is the
standard protocol for Windows platform.
Linux FSE client specific
FSE supports access to FSE partitions from remote locations via NFS and CIFS protocols.
HSM file systems can be exported to be accessed via NFS protocol.
Access using CIFS protocol is enabled by a special add-on custom-built Samba package. Files that are
written to or read from an HSM file system through a Samba connection are handled like all other files
created or accessed locally on the HSM file system. The add-on package enables Samba to notify remote
CIFS clients (especially Windows Explorer on Windows platform) when a file is offline, thus preventing
unnecessary recalls of offline files. For further information on Samba integration, see the FSE Release
Notes.
Windows FSE client specific
FSE supports remote access to FSE partitions through regular CIFS protocol (Windows shares) without any
further requirements.
FSE architecture
Efficiency is achieved by granting FSE continuous control over the files in use. You define how FSE controls
these files with different policies.
Basically, FSE copies new or modified file information from a file on an HSM file system to FSE media,
releases rarely used files and makes them offline, and recalls offline files when necessary. These are the
principal FSE operations, called migration, release, and recall.
Figure 2 Main operations in FSE
12 Introducing HP StorageWorks File System Extender
Page 13

FSE operations
FSE main operations are migration, release, recall, and deletion. They are configured with user-defined
policies. For more information on configuring policies, see ”Migration, release, recall, and deletion” on
page 109. After they are configured, the policies enable automatic, unattended execution of the
corresponding operations. However, these operations can also be triggered manually using the fsefile
command. For details on manual triggering, see the FSE Command-Line Reference.
Regardless of how they are invoked, the migration, recall, and deletion operations are represented and
controlled in the FSE implementation by so-called FSE jobs. Using the fsejob command, an FSE
administrator can display information about existing jobs or manipulate them. Example situations when
such manipulation is needed are the following:
• the priority of a particular recall job has to be increased, because urgently needed documents have to
be recalled from FSE media, and there are currently other jobs with higher priorities running in the FSE
implementation.
• a library in the FSE implementation has run out of FSE media and therefore additional media need to
be added to it and initialized, in order to get the media available and migration jobs running again.
For details on monitoring FSE jobs, see ”Monitoring FSE jobs” on page 139. For more information about
the fsejob command, see the FSE Command-Line Reference.
Migration
Migration is a process of copying files from the HSM file system to FSE media. If a file is not modified for a
configured period of time, it passes the so-called file age check and becomes a candidate for migration
(migration candidate).
Release
Migration is done in two steps:
1. Files from the migration candidate list are copied from the HSM file system to a temporary location on
the FSE server, called a disk buffer. The disk buffer location is platform-dependent.
Linux specific
The disk buffer is located in the /var/opt/fse/diskbuf directory.
Windows specific
The disk buffer is located in the %InstallPath%\var\diskbuf directory.
The value of %InstallPath% depends on the path selection during FSE installation. It defaults to
C:\Program Files\Hewlett-Packard\FSE.
2. Data from this temporary location is copied to FSE media. To have redundant copies of the file data
made during the migration job, the respective FSE partition must have multiple media pools assigned to
it. For more information, see ”Multiple copying” on page 131.
Once the migration job is completed, the temporary location is cleared. The file entry in the Hierarchical
Storage Manager (HSM) is moved from the migration candidate list to the release candidate list.
For further information on migration process and its configuration, see chapter ”Migration, release, recall,
and deletion” on page 109.
Release is a process following migration or recall, during which a file data is removed from the HSM file
system, leaving only the file header. FSE starts a release according to watermark parameters. For more
information, see ”Watermarks” on page 114.
Once the file is copied to FSE media, it becomes a release candidate. FSE checks the release candidates
for changes. If a file on the release candidate list was not modified, and a high watermark is reached on
the HSM file system, the content (file data) of the file is removed from the HSM file system to free disk
space. The same thing happens if a critical watermark is reached, but in this case all migrated files are
released, regardless of how much time has passed since their last migration.
Once the release operation is completed, the file is offline and its file entry is removed from the release
candidate list.
hp StorageWorks File System Extender User Guide 13
Page 14

Recall
Deletion
For further information on release process and its configuration, see ”Migration, release, recall, and
deletion” on page 109.
Recall is a process of copying file data from FSE media back to an HSM file system. It is the reverse process
to migration.
Recall is done in two steps:
1. Data is copied from the FSE media to a temporary location (disk buffer).
2. Data from this temporary location is copied back to the HSM file system, thus recreating file contents.
Once the recall job is completed, the temporary location is cleared, and the offline file is online again. Its
file entry in the Hierarchical Storage Manager is added to the current release candidate list.
FSE stores older versions of files on its media, referred to as older generations, which can be recalled
manually. For details, see ”Recalling older generations of a file” on page 146.
For further information on recall process and its configuration, see chapter ”Migration, release, recall, and
deletion” on page 109.
Deletion is a process of obsoleting and removing obsolete files from HSM file systems. You can use this
process for various purposes, including Information Lifecycle Management (ILM) and freeing disk space of
redundant files.
The criteria that induce file obsolescence on HSM file systems are defined in the deletion policy. Each HSM
file system has its own deletion policy. Deletion is enabled on regular and WORM HSM file systems.
For further information on deletion process and its configuration, see chapter ”Migration, release, recall,
and deletion” on page 109.
FSE components
HSM file system
An HSM file system (HSM FS) is a hard disk area reserved for storage of user files and directories (user
data), and managed by the FSE implementation. The HSM file system is used to store the metadata
(names, attributes, and permissions of user data) and user data that is currently online.
Linux specific
On Linux platform, HSM file system is based on the Ext3 file system; the HSM attributes are stored in Ext3
extended attributes.
Windows specific
On Windows platform, HSM file system is based on the NTFS.
In an FSE installation, an HSM file system represents the primary storage space, and the FSE media
represent the secondary storage space.
An HSM file system can be configured either as a regular file system or as a WORM file system:
• Regular file system
All files and directory operations are supported as known for the native file system of the respective
platform.
• WORM (Write-Once Read-Many) file system
File and directory operations are restricted to read-only after a configured period of time. The limitation
does not include adding files to directories, which can be done as on a regular file system.
For details on configuring a WORM HSM file system, see ”Step 4: configuring FSE partitions” on
page 69.
Hierarchical Storage Manager (HSM) is a component of the HSM file system. As a part of an FSE client, it
handles HSM file system events and manages the migration and release candidate lists. Each mounted
HSM file system has one FSE HSM.
14 Introducing HP StorageWorks File System Extender
Page 15

In a distributed FSE implementation, HSM file system, its HSM, and the File System Event Manager are
located on a separate FSE client.
FSE partition
FSE uses FSE partitions to split the storage into multiple entities, meaning that one FSE implementation can
have more than one FSE partition. This way FSE provides the possibility for complex organization of data
management.
Each FSE partition is related to a single HSM file system and has its own policies and its own File System
Catalog (FSC). This enables you to configure individual policies (migration, release, deletion, and resource
allocation) for a particular FSE partition, according to the characteristics of files and their intended use.
Each configured FSE partition is controlled by one Partition Manager (PM), which creates and manages
FSE jobs for migration, recall, and deletion operations. The Partition Manager is located on the FSE server.
It is included in the FSE server installation package.
File System Catalog
The File System Catalog (FSC) is a database related to a single FSE partition. It consists of a Data Location
Catalog (DLC) and a Name Space Catalog (NSC).
The Data Location Catalog contains information about location of files on the FSE media. It stores a full
history of file locations.
The Name Space Catalog (NSC) contains metadata of files on an HSM file system. It only stores the latest
generation metadata, which includes directory structure, standard attributes and additional
platform-dependent metadata. This data enables recovery of an HSM file system. For details, see
”Recovery” on page 186.
Linux specific
For HSM file systems located on Linux FSE clients, NSC also stores ownership information of directories and
files.
Windows specific
For HSM file systems located on Windows FSE clients, NSC also stores ACLs (Access Control Lists) and
Alternate Data Streams for user data.
The File System Catalog location is platform-dependent.
Linux specific
File System Catalog is located in the /var/opt/fse/part/PartitionName/fsc directory.
Windows specific
File System Catalog is located in the %InstallPath%\var\part\PartitionName\fsc directory.
The value of %InstallPath% depends on the choice made in the FSE installation process. It defaults to
C:\Program Files\Hewlett-Packard\FSE.
FSE media pool
An FSE partition must have at least one media pool assigned to it. An FSE media pool is configured to
group media of the same type, which have the same characteristics.
Media pools are configured regarding their purpose and correspond to the specifics of FSE partition data
and FSE media types, for example, a WORM or regular disk media pool. Therefore, one media pool
cannot be assigned to multiple partitions in order to keep the files from different FSE partitions separated.
An FSE partition can have assigned multiple media pools which have to be of the same type: "Regular" or
"WORM".
By assigning multiple media pools to one FSE partition, multiple copies of FSE data are made. This kind of
FSE partition configuration is described in ”Multiple copying” on page 131. For more information on
media pool types and their configuration, see ”FSE media pools” on page 81.
hp StorageWorks File System Extender User Guide 15
Page 16

FSE medium
FSE supports different types of tape media and also disk media for data storage. Each FSE medium, either
a medium cartridge or disk medium has an entry and properties written in the Resource Management
Database (RMDB). Each FSE medium is assigned to one FSE media pool. For more information on media
types, see ”FSE media types” on page 87.
An FSE medium is usually formatted and further divided into partitions that hold medium volumes. The
Resource Manager identifies the medium with a barcode. For media specifics regarding their type, see
”FSE media types” on page 87and ”Disk media” on page 87.
FSE library
An FSE library is any supported tape library attached to a host with FSE software, and configured as an
FSE implementation. An FSE implementation can consist of one or more FSE libraries. Each FSE library is a
repository of library slots, where medium cartridges are physically located, with a built-in changer device
to move the media around. It has one or more connected drives.
Each configured FSE library has one Library Agent running. The Library Agent handles actions in the FSE
library, such as loading and unloading media, and library inventory rescan.
FSE drive
An FSE drive is a tape drive inside an FSE library, configured in the FSE implementation. It is used to read
to and write from FSE media.
Supported drive types are:
• LTO Ultrium 1, LTO Ultri um 2, and LTO Ultrium 3
For further information on the supported drive models, see the FSE Release Notes.
FSE implementation options
Due to its modular structure FSE allows several implementation options. It can be set up as a consolidated
implementation or as a distributed implementation of servers and clients, each of those being run on any of
the supported platforms. For limitations regarding platform support in distributed FSE environments, see the
FSE Release Notes.
Additionally, FSE provides support for multiple tape libraries. The number of libraries that can be
connected to one FSE server depends on the number of slots for Fibre Channel and SCSI cards on the
machine hosting the FSE server.
16 Introducing HP StorageWorks File System Extender
Page 17
Consolidated implementation
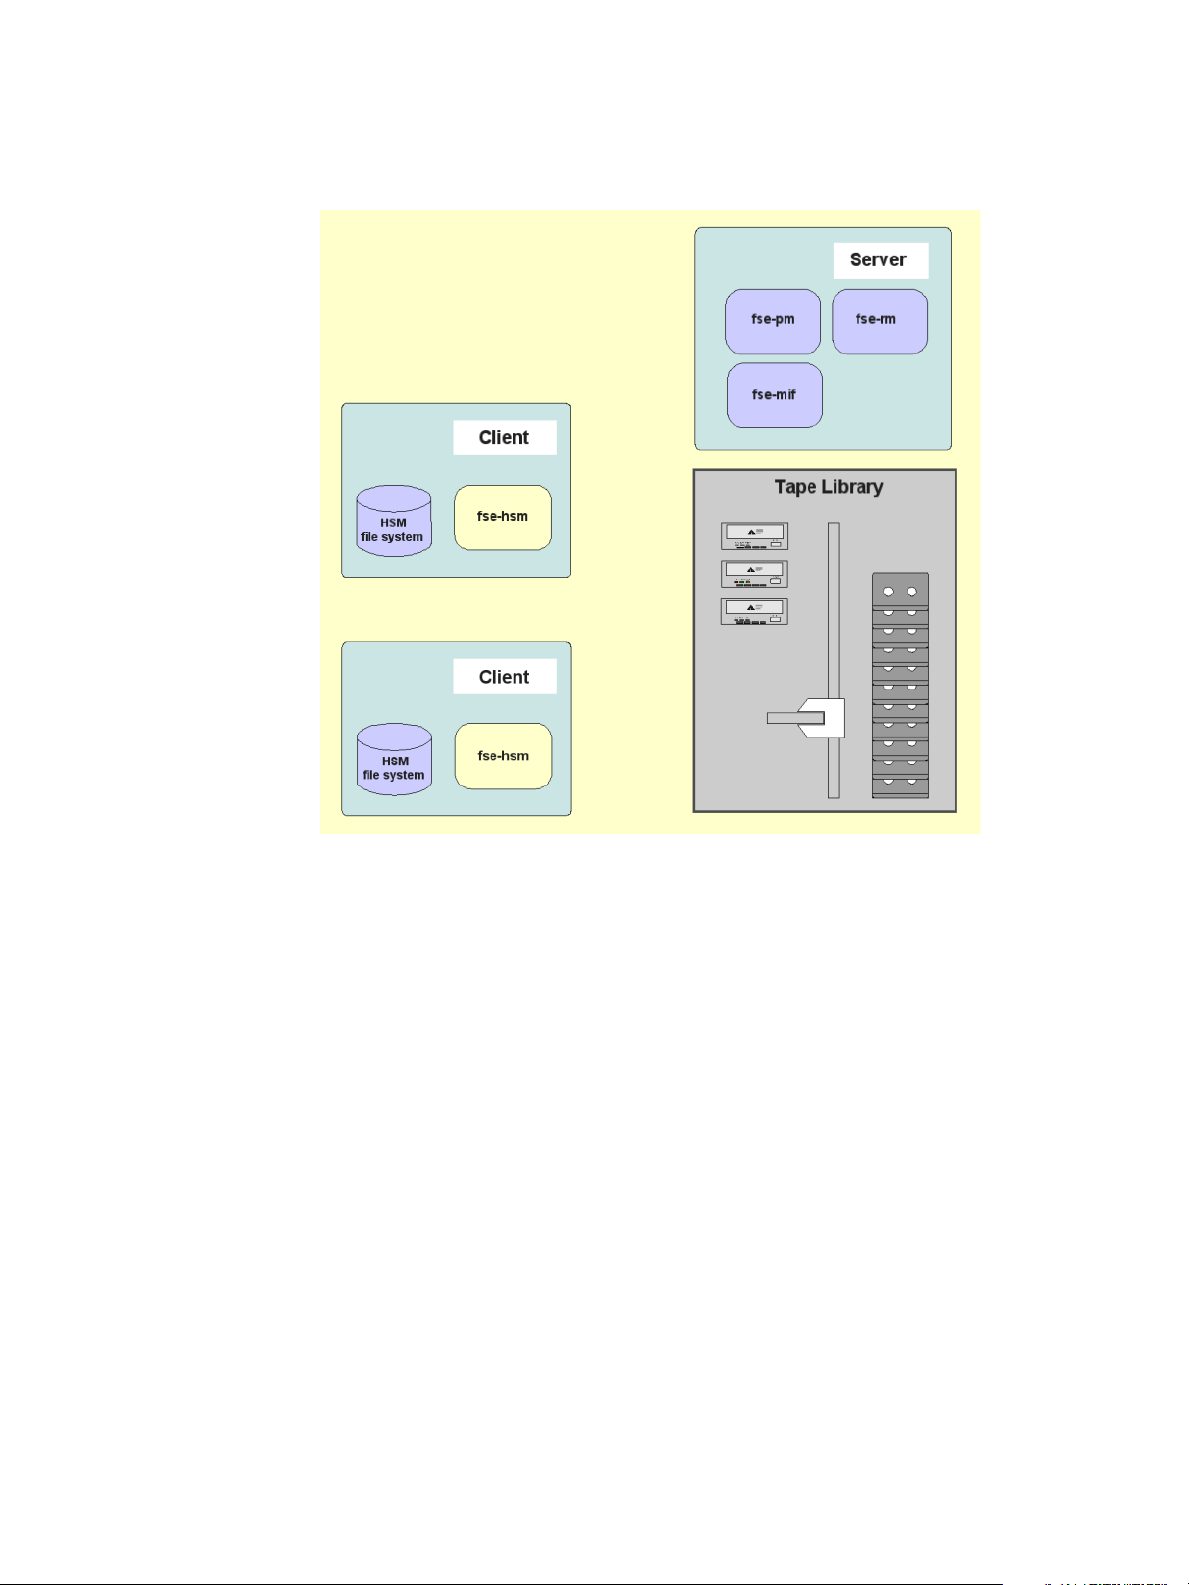
The simplest application is the “all in a box” configuration, where all FSE components reside on the same
machine.
Figure 3 Consolidated FSE implementation
This consolidated FSE implementation integrates the functionality of both FSE server and FSE client in a
single machine. It has a direct connection to secondary media and hosts an arbitrary number of HSM file
systems. User data from local HSM file systems are stored on the media in the attached tape library or on
disk media.
hp StorageWorks File System Extender User Guide 17
Page 18
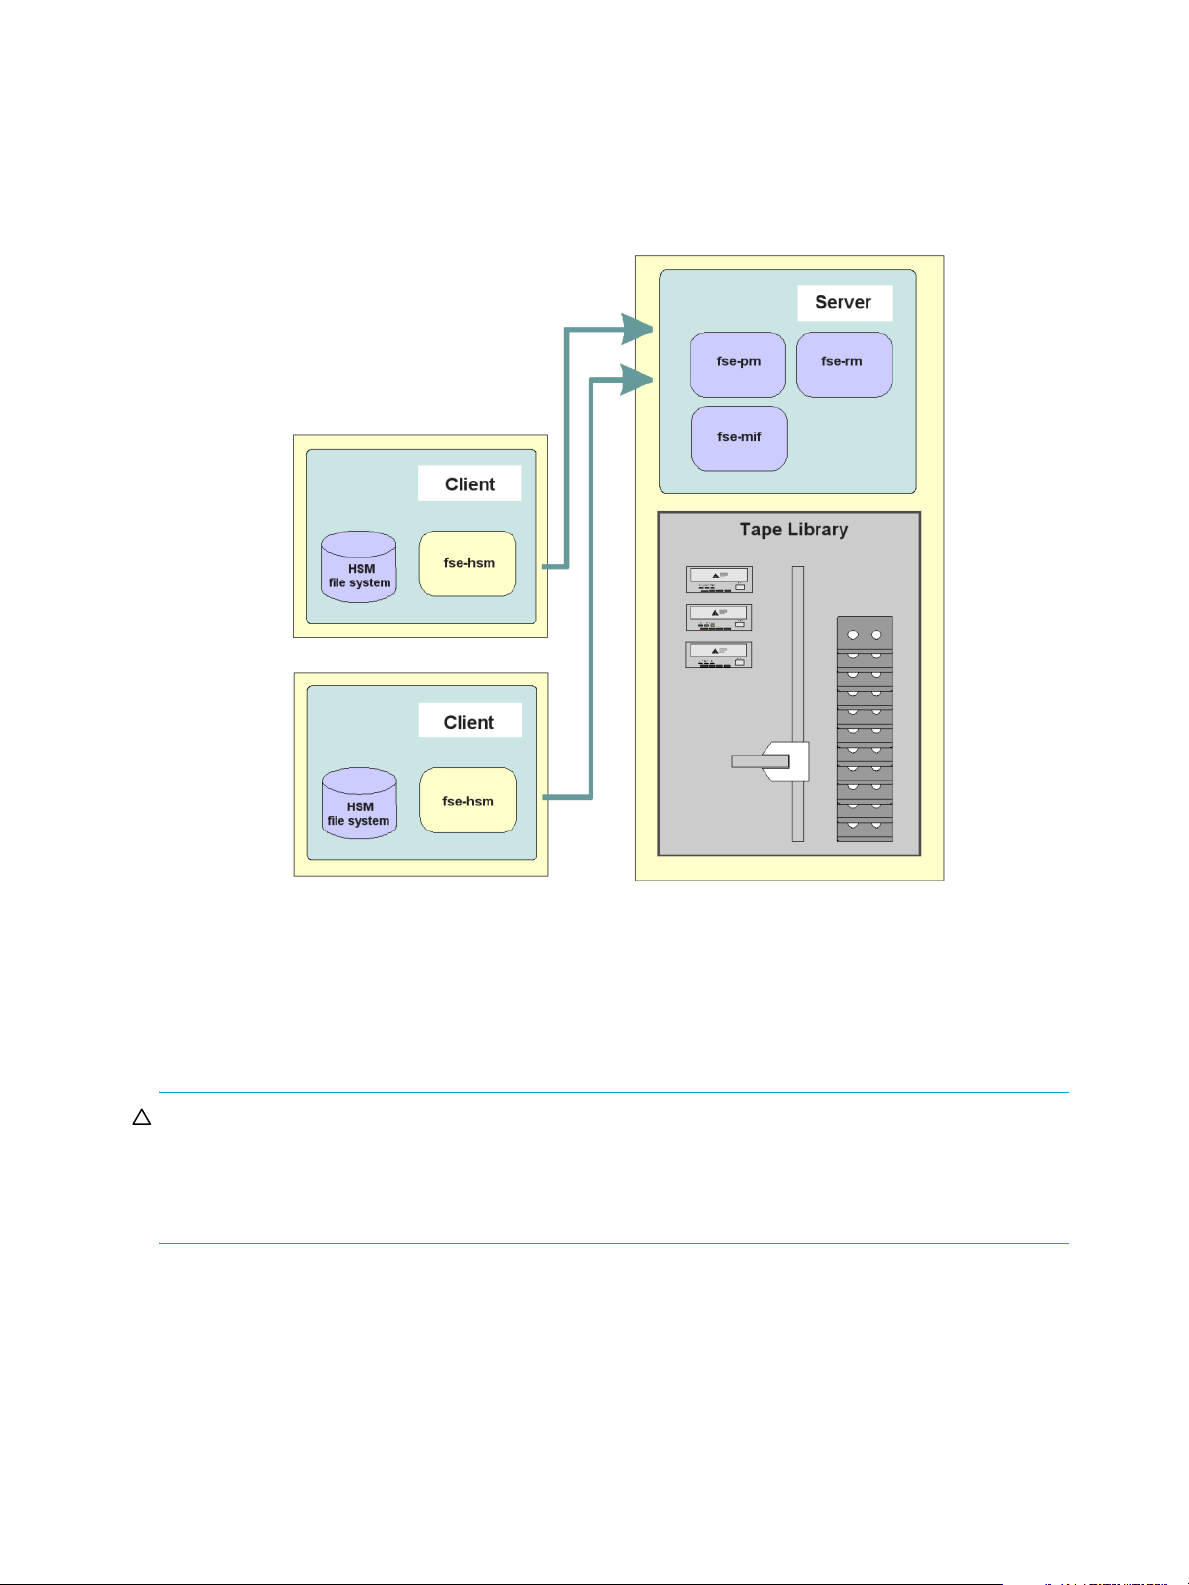
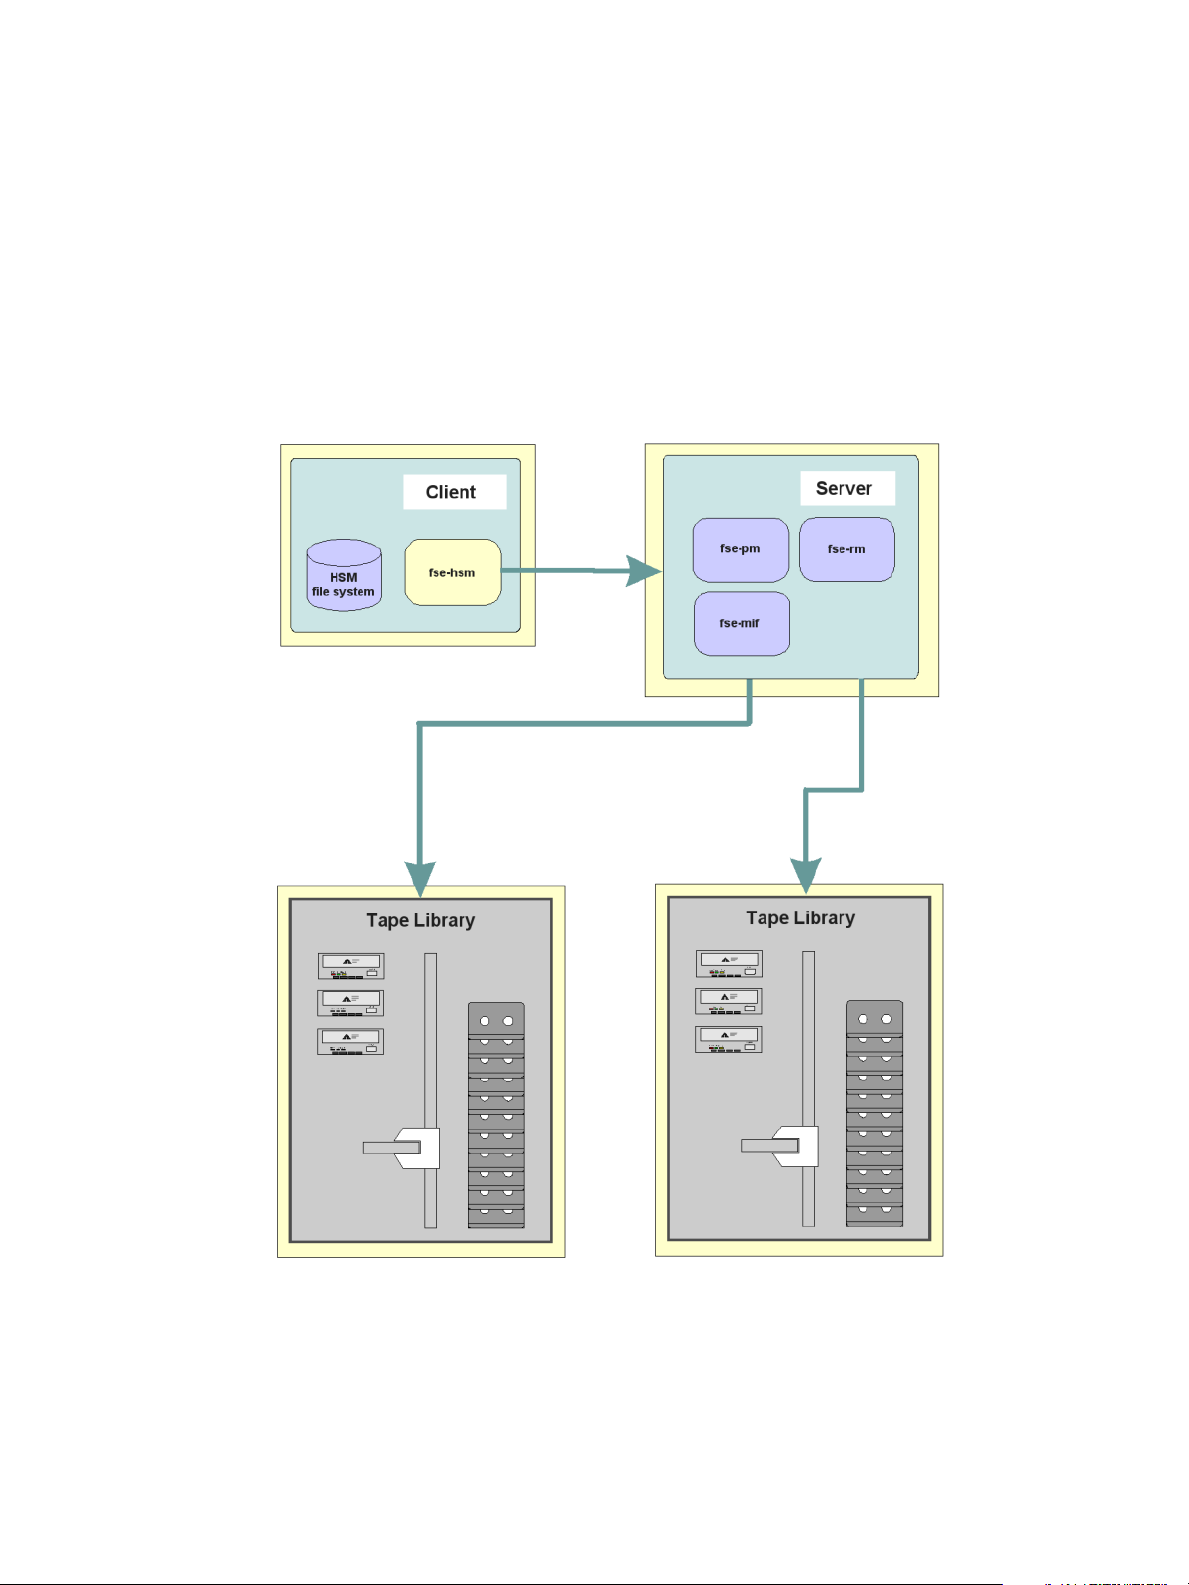
Distributed implementation
In this implementation, FSE clients connect to one FSE server and are physically separated. External clients
connect to the server through either a LAN or a private network, and host HSM file systems, while the FSE
server does not need to host any HSM file systems.
Figure 4 Distributed FSE implementation
The clients manage the HSM file systems and communicate with major services running on the server. User
data from HSM file systems on clients is transferred to the FSE server and recorded on the corresponding
tape media in the attached tape library, or on the secondary disk. This makes it possible to manage file
systems on multiple file server machines without the need for a library and drives for each machine. It is
also possible to configure a mixed implementation, which combines the consolidated implementation with
external clients.
CAUTION: An FSE implementation does not support any proxy server or firewall between FSE clients and
the FSE server. FSE will only work if there is a direct network connection with a full-duplex transmission
between FSE clients and the FSE server.
For the latest information on supported TCP/IP connections, see the FSE Release Notes.
18 Introducing HP StorageWorks File System Extender
Page 19
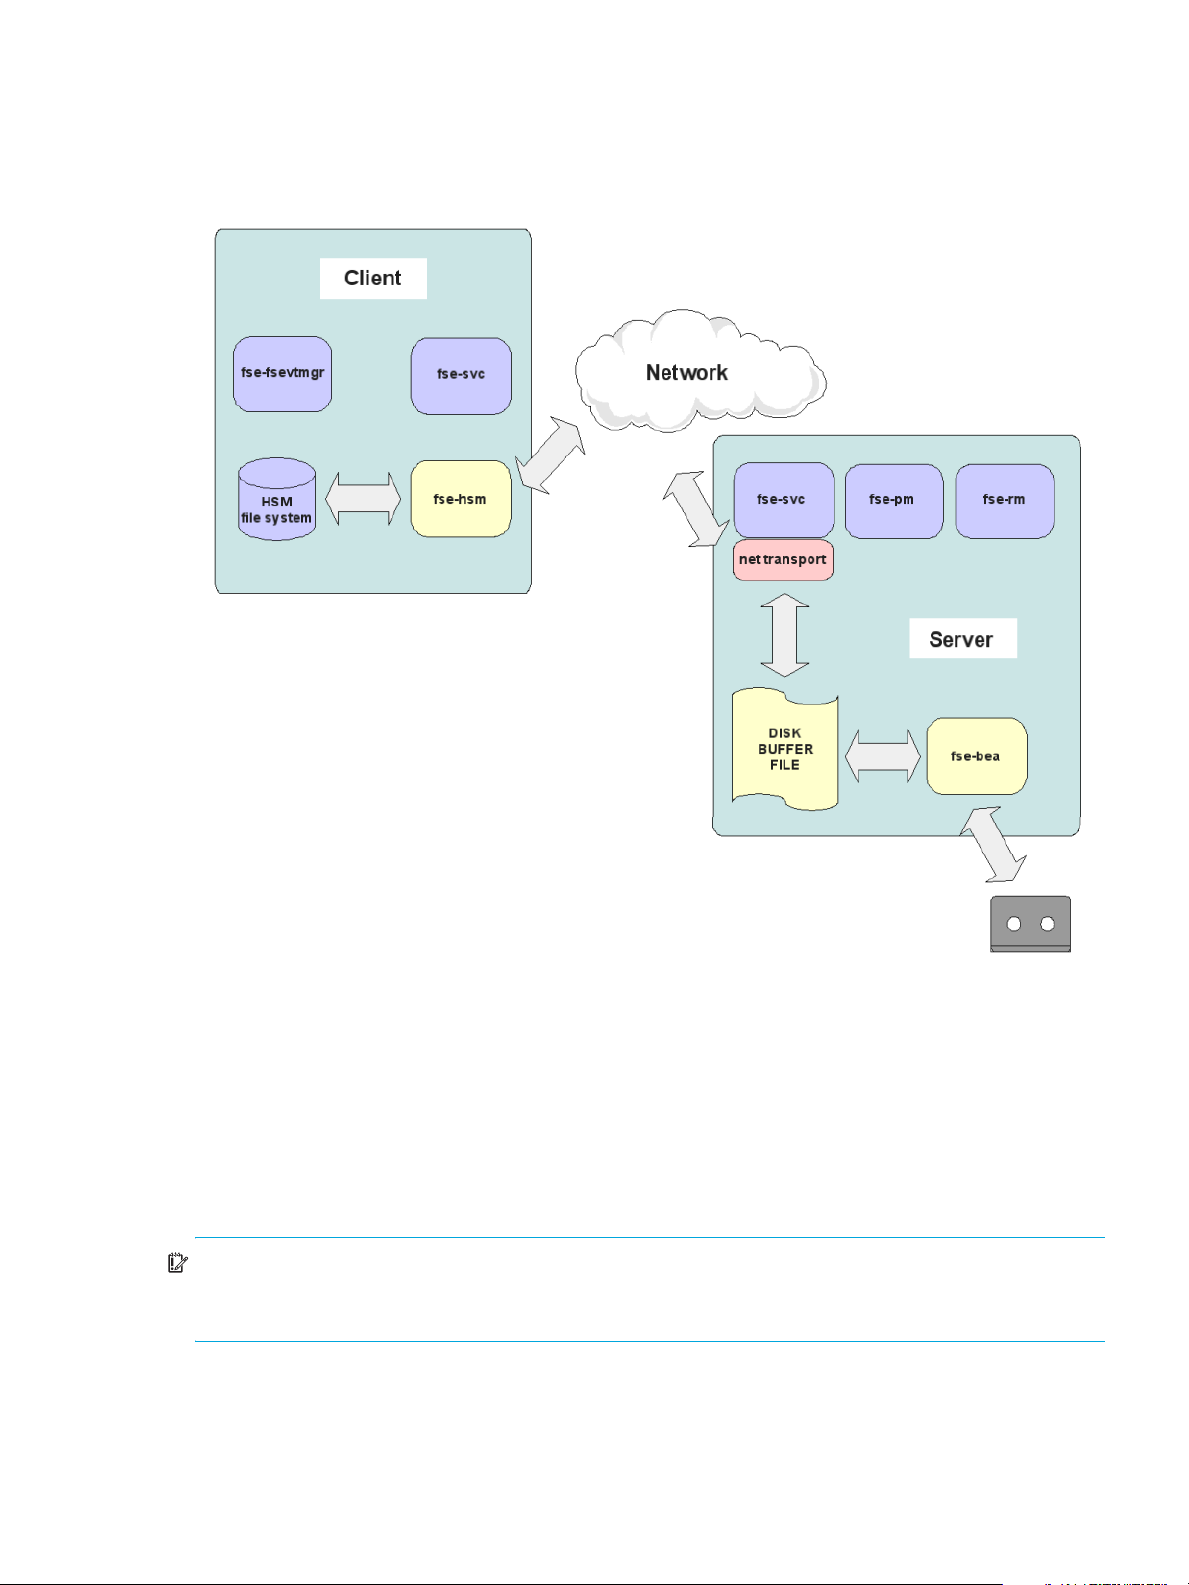
Client-server communication in a distributed FSE implementation
An external FSE client communicates with an FSE server through the network using CORBA services. An
external client can connect to only one FSE server.
Figure 5 Client-server communication
The network must provide a full-duplex connection between the FSE server and each of the external FSE
clients. You can verify the network connection using the FSE tool fse_net. For more information about
fse_net, see ”FSE troubleshooting tools” on page 223.
You can check whether a network connection is full-duplex by pinging the server from the client and vice
versa. If there is no response to one of the ping commands, the connection is half duplex only. In this
case, FSE cannot perform its basic operations.
Half-duplex connections are provided, for example, if NAT (Network Address Translation) is used between
FSE clients and the FSE server.
IMPORTANT: In a distributed or mixed FSE implementation, if FSE processes on the FSE server or
integrated FSE system are restarted, you must restart FSE processes on all external FSE clients to resume
normal FSE operation.
Configuring the communications settings in a distributed FSE implementation
In a distributed FSE implementation, an FSE client needs to know to which FSE server it belongs. To provide
this information, you need to modify the FSE interprocess (client-server) communications settings according
to your particular FSE implementation. These settings are affected by your choice of ordinary LAN
hp StorageWorks File System Extender User Guide 19
Page 20
connections or private network connections for FSE client-server communication. You can retrieve the
parameters that you will use for network configuration using the FSE fse_net tool.
If you are about to configure the interprocess communication in a newly installed FSE implementation, the
configuration must be performed before the first startup of FSE. Similarly, reconfiguring the communications
in an already employed FSE implementation is allowed only while all FSE-related processes (including the
omniNames service) on all FSE hosts are stopped. For instructions on how to perform the configuration, see
”Reconfiguring FSE interprocess communication” on page 75.
FSE implementation with multiple libraries
Attaching multiple libraries provides an option for a scalable FSE implementation. If storage space is
running out, another library can be added to the installation. Media inside the new library can then be
added to existing FSE media pools.
Figure 6 FSE implementation with multiple libraries
If multiple copies on different libraries are needed, the solution is using multiple libraries. Media can then
be assigned to separate FSE media pools dedicated in a one-to-one relationship to each library.
FSE daemons/services and FSE agents
There are several intercommunicating processes running on the FSE implementation. These processes are
either FSE daemons/services or FSE agents.
20 Introducing HP StorageWorks File System Extender
Page 21

Generally, FSE daemons/services are the processes that are running most of the time FSE is operating. An
FSE daemon/service is usually a server process with several sophisticated services. FSE agents are
software agents, and are designed to perform defined tasks required by each specific job.
Location of the binaries for FSE daemons/services and FSE agents is platform-dependent.
Linux specific
FSE daemon/service and agent binaries are located in the directory /opt/fse/lbin.
Windows specific
FSE daemon/service and agent binaries are located in the directory %InstallPath%\bin.
The value of %InstallPath% depends on the choice made in the FSE installation process. It defaults to
C:\Program Files\Hewlett-Packard\FSE.
CAUTION: You should not run any of the binaries manually. Such improper use may cause data loss.
Windows specific: fse.exe is the binary of the fse command. It can be used for purposes described in
”FSE command list” on page 24.
FSE daemons/services and FSE agents are listed in the following table.
FSE daemon/service
Binary Running on... Description
or FSE agent
File System Event Manager fse-fsevtmgr FSE client Intercepts mount events for
the HSM file system and
starts Hierarchical Storage
Manager (HSM)
Hierarchical Storage
Manager
FSE Service fse-svc FSE client, FSE server Launches other FSE
FSE Windows Service fse.exe Windows FSE client,
Resource Manager fse-rm FSE server Manages Resource
Management Interface fse-mif FSE server Handles user requests
fse-hsm FSE client Receives file system events,
manages HSM lists, starts
migration, release, recall,
and deletion jobs
daemons/services and FSE
agents
Launches other FSE
Windows FSE server
services at system startup
Management Database,
allocates FSE resources
(FSE drives, FSE media,
and so on)
issued with FSE
commands, manages FSE
administrative jobs
Partition Manager fse-pm FSE server Manages FSE jobs for
migration, recall, deletion,
recovery, reorganization,
and maintenance
hp StorageWorks File System Extender User Guide 21
Page 22

FSE daemon/service
Binary Running on... Description
or FSE agent
Library Agent fse-la-s FSE server Handles actions on FSE
libraries, such as loading
and unloading media,
library inventory rescan,
and so on
Back End Agent fse-bea FSE server Handles data transfer
between FSE drives and
FSE media, executes FSE
media formatting and
initialization
The following figure demonstrates the interaction of the main FSE components.
Figure 7 Main FSE components - interaction
FSE user interfaces
FSE command-line interface
Introduction to FSE command-line interface
The FSE command-line interface provides commands that can be used to perform standard tasks:
configure, monitor, and manage the FSE implementation. The commands are passed to FSE through the
Management Interface, responsible for accepting, handling, and executing requests for user actions.
22 Introducing HP StorageWorks File System Extender
Page 23

Linux specific
To use FSE commands, you must be logged on to the system as “root”.
Windows specific
To use FSE commands, you need administrative privileges. These privileges are granted only if you are
either locally logged to the system as Administrator (recommended) or using a remote access software that
supports logging in with the real Administrator account. The Windows native Remote Desktop tool, for
example, may be unsuitable for these tasks, since it uses a different Administrator account when logging in
remotely.
FSE command option syntax is based on standard Linux and UNIX command syntax. Typically, on
Windows platform, options start with a ‘/’ character, while FSE command syntax demands a ‘--’ string as
the option prefix.
All FSE commands include brief online help that lists a synopsis of available options. For example, if you
want to see help for the fsepartition command, you would use:
fsepartition --help
FSE commands have the following characteristics:
• One command per FSE resource
FSE commands are based on a principle of one command per FSE resource, for example
fsepartition, fsepool, fsemedium, fselibrary, fsedrive, and so on.
• Common options
The majority of FSE commands share similar options, for example --help, --add, --modify,
--remove, --list, --show, --status, and so on.
• Short and long option variants
FSE commands accept short (-o) and long (--option) formats of options. For example, the -a and
--add options have the same effect.
NOTE: Some command options do not have short variants.
• Location
Linux specific
On Linux platform, FSE commands are located in the /opt/fse/sbin directory.
Windows specific
On Windows platform, FSE commands are located in the %InstallPath%\bin directory.
The value of %InstallPath% depends on the choice made in the FSE installation process. It defaults
to C:\Program Files\Hewlett-Packard\FSE.
• Documentation
FSE commands are documented in two formats. Both formats have the same contents: a detailed
description of FSE commands, their options, arguments, invocation syntax, operation, and usage
examples. The FSE command documentation formats are the following:
• Printed format: a separate manual called FSE Command-Line Reference
• Online format: an online version of the FSE Command-Line Reference
For details on how to read the online FSE command-line reference, see ”Accessing the online FSE
command-line reference” on page 24
hp StorageWorks File System Extender User Guide 23
Page 24

FSE command list
The following table lists all FSE commands with a brief description. For a detailed description of command
functionality and invocation syntax, see the FSE Command-Line Reference, or use the online FSE
command-line reference as described in ”Accessing the online FSE command-line reference” on page 24.
FSE command Description
fse Initiates or terminates the FSE server or FSE client operation. Shows current status of the
FSE daemons. Prepares FSE system for the restore process. Configures mount points for
HSM file systems (on Windows platform only). Enables or disables Limited Access Mode
for a particular HSM file system (on Windows platform only).
fsebackup Backs up a complete FSE system state, including HSM file systems and FSE databases
and system files, to the FSE backup media.
fsebak Achieves a consistent state of all HSMDBs and FSCs to allow an eventual back-up
creation.
fsecheck Performs a File System Catalog consistency check against an HSM file system and FSE
media.
fsedrive Manages configuration of the FSE drives.
fsefile Manages files on an HSM file system. Recalls older file generations from FSE media.
Adds files to migration candidate list. Releases files from an HSM file system. Triggers
migration on an FSE partition. Triggers deletion of files from an HSM file system.
fsejob Monitors execution of running FSE jobs. Shows status of running FSE jobs. Manages
running FSE jobs.
fselibrary Manages configuration of the FSE libraries. Monitors inventory of the FSE libraries.
fsemedium Manages configuration of the FSE media. Formats and initializes FSE media. Performs
maintenance tasks on the FSE media. Duplicates or reorganizes FSE media. Recreates a
copy of the unreadable data located on damaged FSE media. Modifies current status of
the FSE media.
fsepartition Manages configuration of the FSE partitions. Scans the FSE partitions for obsolete data
and reports the corresponding statistics.
fsepool Manages configuration of the FSE media pools. Reports the FSE media pool-related
statistics gathered during the scan for obsolete data.
fserecover Recovers a File System Catalog from its redundant duplicate data sources (FSE media
and Fast Recovery Information). Recovers an HSM file system from existing Name Space
Catalog.
fserestore Restores a complete FSE system state from the backup image on FSE backup media.
fsesystem Manages FSE system configuration. Reports states of FSE partitions.
Accessing the online FSE command-line reference
Linux specific
On Linux platform, FSE command-line reference is available online as UNIX man pages.
Provided that the MANPATH environment variable contains the appropriate path to the FSE man pages, you
can view the man page for a particular FSE command by invoking the man command and specifying the
name of the FSE command as its argument:
# man FSECommandName
For a list of all FSE commands and files used by FSE (such as a list of configuration and log files) see the
fseintro man page:
# man fseintro
24 Introducing HP StorageWorks File System Extender
Page 25

Windows specific
On Windows platform, FSE command-line reference is available online as Windows/HTML help.
To view HTML help for FSE commands, perform the following steps:
1. Click on the Start menu.
2. Expand Programs, Hewlett-Packard, and FSE.
3. To view the HTML help compiled in a single CHM file, click Docs (CHM file).
To view the HTML help as a series of linked HTML files in your system default web browser, click Docs
(index.html).
For a list of all FSE commands and files used by FSE (such as a list of configuration and log files), see the
fseintro entry in the HTML help.
FSE Management Console
The FSE Management Console is an add-on to the basic FSE software and provides FSE users with a
graphical user interface for configuring and operating the FSE implementation. The set of tasks that can be
executed using the FSE Management Console includes:
• configuration
• maintenance
• monitoring
The FSE Management Console runs as a distributed software application. The server part, the FSE
Management Console server, runs as a background or foreground standalone application and provides
access to the data stored in FSE databases and system files. The client part, the FSE Management Console
client, runs as an interactive standalone application and provides the configuration, administration and
monitoring features for FSE. The FSE Management Console client can be used from anywhere in the
intranet, not necessarily from a system that is part of the FSE implementation.
For information on installing, upgrading, and uninstalling the FSE Management Console, see the FSE
Installation Guide. For information on configuring, starting, and stopping the FSE Management Console,
see chapter ”Configuring, starting, and stopping the FSE Management Console” on page 27.
FSE Management Console server
The FSE Management Console server acts as CORBA servant, giving access to different functions such as
logon, administration, and so on. The server configuration is automatically saved in external configuration
file.
The FSE Management Console server maintains its own information pool about FSE resources and their
state. The information pool is periodically updated by contacting the Management Interface (MIF) process,
which performs all the configuration and administration actions on the system requested by the FSE
Management Console client. By default, the pool update occurs every 300 seconds, but this period can be
customized. During startup, the FSE Management Console server queries the CORBA Name Service for a
registered MIF process for the specified system. If connection to MIF is established successfully, the server
stores the pointer and continues the initialization procedure - otherwise it stops with an appropriate
diagnostic message.
FSE Management Console client
The FSE Management Console client software application allows you to configure, maintain, and monitor
FSE resources.
If the connection between FSE Management Console client and FSE Management Console server is lost, a
manual reconnection is required. You can also enable automatic reconnection by setting the appropriate
configuration option. Nevertheless, the cached information remains available and can be accessed via the
FSE Management Console client without retrying to connect to the FSE Management Console server.
hp StorageWorks File System Extender User Guide 25
Page 26

26 Introducing HP StorageWorks File System Extender
Page 27

2 Configuring, starting, and stopping the FSE
Management Console
This chapter includes the following topics:
• Configuring the FSE Management Console, page 27
• Starting and stopping the FSE Management Console server, page 31
• Starting and stopping the FSE Management Console client, page 33
Configuring the FSE Management Console
This chapter provides instructions for initial configuration of the FSE Management Console server. The FSE
Management Console client has no specific configuration files.
The FSE Management Console server has its own configuration file where you can specify parameters that
control its operation. The location of the configuration file is platform dependent.
Linux specific
On Linux platform, the full pathname of the configuration file for FSE Management Console server is
/var/opt/fse/cfg/gui/guisrv.conf.
Windows specific
On Windows platform, the full pathname of the configuration file for FSE Management Console server is
%InstallPath%\var\cfg\gui\guisrv.conf.
The value of %InstallPath% depends on the choice made in the FSE installation process. It defaults to
C:\Program Files\Hewlett-Packard\FSE.
The configuration file is a text file. The lines beginning with the character # are comments.
# File : guisrv.conf
# Purpose: GUI Server configuration file
# log file name
GUI_LOGFILE = /var/opt/fse/log/guisrv.log
# MIF pooling interval (in seconds)
#GUI_POLLINTERVAL = 30
GUI_POLLINTERVAL = 300
# user database location
GUI_USERDB = /var/opt/fse/cfg/gui/guisrv.users.db
# MIF map file if needs
MIF_MAP = /var/opt/fse/cfg/gui/guisrv.mif.conf
# FSE system log file
LOG_FILE = /var/opt/fse/log/fse.log
# configuration file
CFG_FILE = /etc/opt/fse/services.cfg
hp StorageWorks File System Extender User Guide 27
Page 28

# GUI Server debug level
# DEBUG_LEVEL = -d4 -DAll
# path to OMNIORB configuration file
OMNIORB_CONFIG = /etc/opt/fse/omniORB.cfg
# ORB parameters: for instance -ORBtraceLevel 10
# default:
# ORB_ARGS = -ORBendPoint giop:tcp::4055
# you can add new parameter or replace port number
# MIF URL to bind to MIF object (<context>/<name>)
# MIF_URL = FSE/mgr/$(SERVER)/mif
The following table lists the configurable parameters:
Parameter Description
GUI_LOGFILE Specifies the location for the FSE Management Console server log file, the
destination for all diagnostic information, warnings, errors, and debug
output that the MC server produces.
Linux specific
On Linux platform, the default full pathname of the file is
/var/opt/fse/log/guisrv.log.
Windows specific
On Windows platform, the default full pathname of the file is
%InstallPath%\var\log\guisrv.log.
The value of %InstallPath% depends on the choice made in the FSE
installation process. It defaults to
C:\Program Files\Hewlett-Packard\FSE.
GUI_POLLINTERVAL Specifies how often the FSE Management Console server polls the FSE
implementation for data (number, in seconds).
The default value is: 300 (300 seconds = 5 minutes).
GUI_USERDB Specifies the location for the FSE Management Console server user
database.
Linux specific
On Linux platform, the default full pathname of the file is
/etc/opt/fse/gui/guisrv.users.db.
Windows specific
On Windows platform, the default full pathname of the file is
%InstallPath%\var\cfg\gui\guisrv.users.db.
28 Configuring, starting, and stopping the FSE Management Console
Page 29

Parameter Description
MIF_MAP Specifies the location of the MIF-to-MC translation file which contains
mappings for values returned by the Management Interface process
Linux specific
On Linux platform, the default full pathname of the file is
/etc/opt/fse/gui/guisrv.mif.conf.
Windows specific
On Windows platform, the default full pathname of the file is
%InstallPath%\var\cfg\gui\guisrv.mif.conf.
In normal circumstances, you should not change this parameter.
LOG_FILE Specifies the location of the FSE implementation event log file which needs to
be accessed by the FSE Management Console server.
Linux specific
On Linux platform, the default full pathname of the file is
/var/opt/fse/log/fse.log.
Windows specific
On Windows platform, the default full pathname of the file is
%InstallPath%\var\log\fse.log.
CFG_FILE Specifies the location for the FSE implementation services configuration file.
Linux specific
On Linux platform, the default full pathname of the file is
/etc/opt/fse/services.cfg.
Windows specific
On Windows platform, the default full pathname of the file is
%InstallPath%\etc\services.cfg.
DEBUG_LEVEL Specifies the logging level information for the FSE Management Console
server (for details, see ”Configuring the logging level” on page 30). The
setting can be overridden by specifying the corresponding command line
option when starting the FSE Management Console server.
The default value is d1 -DAll
OMNIORB_CONFIG Specifies the location of the omniORB.cfg file.
The usage of the omniorb.cfg file is required on each host with:
• more then one network adapter.
• private network communication as the means for data transfer in the FSE
implementation.
For details on how to configure the omniORB.cfg file, see chapter
”Configuring FSE”.
This option does not have default value.
Location of the omniORB.cfg file can also be specified with the
OMNIORB_CONFIG environment variable. You must set the variable before
starting the FSE Management Console server or FSE Management Console
client.
hp StorageWorks File System Extender User Guide 29
Page 30

Parameter Description
ORB_ARGS Specifies the command line parameters that are passed to the omniORB
MIF_URL Specifies the CORBA Naming Service URL of the Management Interface
Configuring the logging level
Both the FSE Management Console server and the FSE Management Console client can be configured to
log their activities to log files. A specific path and filename can be defined using the appropriate
command line options or the corresponding configuration file parameters.
Logging is done according to the specified debug level, which is encoded by two parameters: -dLevel
and -DObject
# Argument for debug level after the option -d can be either integer or literal:
0 | No - no trace information (default value)
1 | Err - only errors
2 | Wrn - errors and warnings
3 | Inf - errors, warnings, and trace
4 | Trc - errors, warnings, and detailed trace
# Argument for tracing level after the option -D is literal
# For FSE Management Console server
Mif[D] – the communication activity between MC server and Management Interface;
Cs[D] – the communication activity between MC server and MC client;
Pool[D] – activity on Pool object;
Flt[D] – activity on Filter objects;
All[D] – whole activity for all logical parts of MC server
# For FSE Management Console client
Comm[D] – communication activity between MC client and MC server modules;
Thrd[D] – thread activity (receiving events from other threads),
locking/unlocking thread synchronization objects, etc.;
Gui[D] – main MC thread activity, processing the received information and user
input events;
All[D] – whole activity for all logical parts of MC client.
# The suffix "D" in object names means "detailed"
binary.
The default value is: -ORBendPoint giop:tcp::4055
process, which is used by the FSE Management Console server to interact
with FSE.
The default value is: FSE/mgr/%(SERVER)%/mif
In normal circumstances, you should not change this parameter.
Example of a configured FSE Management Console logging
DEBUG_LEVEL = -d4 -DAll
DEBUG_LEVEL = -dTrc -DAllD
Name of the FSE Management Console server log file is predefined and the location is
platform-dependent.
30 Configuring, starting, and stopping the FSE Management Console
Page 31

Linux specific
On Linux platform, the full pathname of the FSE Management Console server log file is
/var/opt/fse/log/guisrv.log.
Windows specific
On Windows platform, the full pathname of the FSE Management Console server log file is
%InstallPath%\var\log\guisrv.log.
The value of %InstallPath% depends on the choice made in the FSE installation process. It defaults to
C:\Program Files\Hewlett-Packard\FSE.
Name of the FSE Management Console client log file is predefined and the location is the same on all
supported platforms.
Common
The FSE Management Console client log file is named guiclt.log and located in the current working
directory of the FSE Management Console client.
Starting and stopping the FSE Management Console
This chapter provides instructions for starting and stopping the FSE Management Console server and the
FSE Management Console server on the supported platforms, and for configuring the preferred startup
method of the FSE Management Console server.
Linux specific
On Linux platform, both FSE Management Console components can be started and stopped using
command-line interface.
Windows specific
On Windows platform, both FSE Management Console components can be started and stopped using
command-line interface or graphical user interface.
Starting and stopping the FSE Management Console server
The FSE Management Console server can be run in foreground or background mode. You can choose the
execution mode by supplying the appropriate options at the command line. Using the command-line
options of the, you can also customize the path of the FSE Management Console server configuration file
and set the preferred debugging level.
Windows specific
On Windows platform, you can also start, stop or configure the startup of the FSE Management Console
server in the background mode using graphical user interface.
Starting and stopping the FSE Management Console server on Linux systems
On Linux platform, the FSE Management Console client can be started using command-line interface.
The FSE Management Console server execution modes are:
• background mode
In this mode, FSE Management Console server is running as a daemon (detached process).
• foreground mode
In this mode, FSE Management Console server is running in foreground like an application.
Starting the FSE Management Console server using CLI
The FSE Management Console server executable file accepts the following command options.
guisrv - FSE GUI Server ver. 3.2.5
Copyright (C) 2002-2005 Hewlett-Packard
Usage: guisrv {<options>}
<options> are:
hp StorageWorks File System Extender User Guide 31
Page 32

-F - startup in foreground mode
-d<level> -D<object> - debug level (default -d2 -DAll):
1 - only errors
2 - errors and warnings
3 - errors, warnings and trace
4 - errors, warnings and detailed trace
-f<file name> - configuration file
(default /var/opt/fse/cfg/gui/guisrv.conf)
-[h?] - usage information
To start the FSE Management Console server, proceed as follows:
1. Change the current directory as shown:
# cd /etc/init.d
2. Run the following command, specifying the appropriate options.
# guisrv Options
Starting and stopping the FSE Management Console server on Windows systems
On Windows platform, the FSE Management Console client can be started using command-line interface
or graphical user interface.
The FSE Management Console server execution modes are:
• background mode
This is the recommended mode. In this mode, FSE Management Console server is running as an
ordinary Windows service. Use either command-line interface or graphical user interface to run the FSE
Management Console server in this mode:
• If you choose to use CLI: At the command line, specify options -I, -U, -S, or -T to install, uninstall,
start, or stop the service of the FSE Management Console server, respectively.
• If you choose to use GUI: use the Windows administrative tool Services to start or stop the FSE
Management Console server as a Windows service, as shown in the figure below. For further
information about the Services tool, see the Microsoft Windows documentation.
Figure 8 Starting and stopping Windows services
• foreground mode
32 Configuring, starting, and stopping the FSE Management Console
Page 33

In this mode, FSE Management Console server is running as foreground console application. Use either
command-line interface or graphical user interface to run the FSE Management Console server in this
mode:
• If you choose to use CLI: At the command line, specify the command-line option -F to run the FSE
Management Console server in the foreground mode.
• If you choose to use GUI: follow the procedure described in ”Starting the FSE Management Console
server using GUI” on page 33.
NOTE: During installation of the FSE Management Console server, the server is automatically installed as
a Windows service and configured with automatic startup type, but the service itself is not started.
Starting the FSE Management Console server using CLI
The FSE Management Console server executable file accepts the following command options.
File System Extender GUI Server - ver 3.2.5
Copyright (C) 2002-2005 Hewlett-Packard
Usage: guisrv {<options>}
<options> are:
-I - install as Windows NT service
-U - uninstall Windows NT service
-S - start Windows NT service and install it if necessary
-T - stop Windows NT service
-F - startup in foreground mode
-d<level> -D<object> - debug level (default -d2 -DAll):
1 - only errors
2 - errors and warnings
3 - errors, warnings and trace
4 - errors, warnings and detailed trace
-f<file name> - configuration file
(default ...\var\cfg\gui\guisrv.conf)
To start the FSE Management Console server, proceed as follows:
1. Change the current directory as shown:
C:\>cd %InstallPath%\bin
The value of %InstallPath% depends on the choice made in the FSE installation process. It defaults
to C:\Program Files\Hewlett-Packard\FSE.
2. Run the following command, specifying the appropriate options:
%InstallPath%\bin>guisrv Options
Starting the FSE Management Console server using GUI
To start the FSE Management Console server, proceed as follows:
1. Click Start > Programs > Hewlett-Packard > FSE > FSE GUI–Server (Process).
Starting and stopping the FSE Management Console client
You can start or stop the FSE Management Console client using command-line interface. Command-line
options enable you to customize the path of the FSE Management Console client log file and set the
preferred debugging level.
hp StorageWorks File System Extender User Guide 33
Page 34

Windows specific
On Windows platform, you can also start or stop the FSE Management Console client using graphical user
interface.
When starting up, the FSE Management Console client reads the initialization file for the current user. This
file contains all the current settings made by this user during the last session, for example, defined systems
with connection details and settings from the Settings dialog. The environment of the client is restored to its
original state - the stored settings are applied and the corresponding system objects are added to the tree.
If a password has been previously saved for a system, the FSE Management Console client tries to
reconnect silently, otherwise the Connection dialog appears.
The location of the FSE Management Console client initialization file is platform-dependent.
Linux specific
On Linux platform, the initialization file is located in the directory $HOME. The value of the environment
variable $HOME is /root for root user and /home/UserLoginName for other users.
Windows specific
On Windows platform, the initialization file is located in the directory
C:\Documents and Settings\Username\Application Data\guicltrc.
The command-line options of the FSE Management Console client are the same of all supported platforms.
FSE GUI Client ver. 3.2.5
Copyright (c) 2002-2005 Hewlett-Packard
Usage:
-----------------------------------
guiclt [-l <logfile>] [-P <objectpath>] [-d<level> -D<object>]
-l<logfile> - does logging into the specified <logfile>;
-P <objectpath> - opens only the specified tree branch in the window;
-d <level> -D <object> - specifies the debug level.
-----------------------------------
Starting and stopping the FSE Management Console client on Linux systems
On Linux platform, the FSE Management Console client can be started using command-line interface.
Starting the FSE Management Console client using CLI
Prerequisite
As the FSE Management Console client is an X11 application, general prerequisites for X11 applications
apply. Before starting the FSE Management Console client, check that your DISPLAY environment variable
is set properly. The variable has to conform to the following format:
DISPLAY=Hostame:Display[.Screen]
If the variable is not set, use the export command to specify it.
Example of setting the DISPLAY environment variable
# export DISPLAY=fse_mc_client:0
To start the FSE Management Console client, proceed as follows:
1. Change the current directory as shown:
# cd /etc/init.d
2. Run the following command, specifying the appropriate options.
# guiclt Options
34 Configuring, starting, and stopping the FSE Management Console
Page 35

Starting and stopping the FSE Management Console client on Windows systems
On Windows platform, the FSE Management Console client can be started using command-line interface
or graphical user interface.
Starting the FSE Management Console client using CLI
To start the FSE Management Console client, proceed as follows:
1. Change the current directory as shown:
C:\>cd %InstallPath%\bin
The value of %InstallPath% depends on the choice made in the FSE installation process. It defaults
to C:\Program Files\Hewlett-Packard\FSE.
2. Run the following command, specifying the appropriate options:
%InstallPath%\bin>guiclt Options
Starting the FSE Management Console client using GUI
To start the FSE Management Console client, proceed as follows:
1. Click Start > Programs > Hewlett-Packard > FSE > FSE GUI–Client.
hp StorageWorks File System Extender User Guide 35
Page 36

36 Configuring, starting, and stopping the FSE Management Console
Page 37

3Configuring FSE
This chapter includes the following topics:
• Before you start, page 37
• Configuration basics, page 38
• Configuration procedure, page 59
• Reconfiguring FSE interprocess communication, page 75
• Changing the IP address of an FSE host, page 80
Before you start
FSE provides effective management of your data with its extended virtual disk storage, which is controlled
by user-defined policies. Although operating FSE is transparent, you need to think ahead and analyze your
needs in order to configure your environment most efficiently.
The following list introduces the most common choices that you need to make in advance.
• Analyze your environment: determine which file systems need to be under FSE control.
• Analyze the types of data stored in your environment and sort the data logically according to the
following characteristics:
• Which files need to be migrated (archived)?
• Will such files be used again for write operations or will they be treated as read-only?
• Which of these files need additional (redundant) migrated copies?
• What will be the approximate or average size of files stored on an FSE partition?
• What will be the estimated maximum number of files that will be stored on an FSE partition?
• Will certain files become redundant after a period of time and can therefore eventually be deleted
to free space on the file system?
• Will certain files have to be deleted after some period of time due to legal requirements?
Note that these characteristics and how you apply them in your policies can significantly influence the
performance of the FSE implementation. For example, data that needs frequent archiving will put a
significant load on your system because of the constant migrations. On the other hand, data that you
will only use for read-only purposes demands only one migration and many recalls and releases,
resulting in a reduced amount of media, and reduced impact on FSE implementation performance.
• Regarding file expiration, consider the following points:
• Will certain files need to be deleted from FSE partitions after a period of time, due to legal
requirements?
• How many migrated file generations will be treated as valid, or how long will they need to be
stored on FSE media?
• Determine the number of available drives. In a setup with tape as the only secondary media, the
number of available drives will limit the number of migrations and recalls that can be performed in
parallel on the FSE implementation. It will also limit the number of copies that can be made in parallel.
• Decide on the number and individual characteristics of your FSE partitions; consider the previously
determined data characteristics for each partition. Note that each FSE partition has its own media
pools assigned and is located on a separate HSM file system.
• Create a special media pool for the backup of the FSE implementation. The backup media pool
requires enough media to hold snapshots of the HSM file systems and FSE databases; you will have to
decide how many backup copies you want to keep for data protection.
• Consider supported media types (tape, disk) according to your data characteristics. Note that
duplicating (tape) media can significantly ease your vaulting policy.
• Consider your resource policies. Your system and partition policies need to be synchronized and well
balanced if you want to achieve good performance.
hp StorageWorks File System Extender User Guide 37
Page 38

• Define your migration and release policies regarding the characteristics of files on each individual file
system, such as how much are the files in use, are these “working” files or files that simply need to be
retained safely, how often do you want these files to be migrated, and so on.
• Consider the effect of your policies on your FSE implementation and tune it accordingly.
Configuration basics
All FSE resources, namely FSE library, FSE drive, FSE media pool, FSE medium, and FSE medium volume,
must be configured before you can start using FSE. You configure FSE resources using configuration plain
text files. See also section ”Using the FSE Management Console for configuring resources and policies” on
page 41 for a graphical interface to most of the tasks.
Configuration files
The plain text file format, used for configuration files, has the following advantages:
• Simple editing and modification
To edit and modify your configuration files, you can use any tool that can save files as plain text.
• Similar syntax for each component
You configure your resources using corresponding syntax, considering the requirements of a particular
resource.
• Parsing
You can collect data from existing, already applied configuration files using parsing utilities and scripts.
• Use of comments
You can add your own comments to configuration files. Comments are introduced with a hash
character (#) in order to be marked and preserved.
FSE configuration file elements
Each configuration file consists of particular elements, which can be grouped as follows:
Element Description
type Identification of configurable object type
header Contains version number, date of application, user name
sections Related parameters are logically grouped to sections
variables Used to set parameters
comments User comments; they are marked with a # sign
qualifiers Amount of data: KB, MB…; time units: m, h…:, percentage: %
The following example shows the elements as they are represented in the configuration file:
[FSE Pool] <-------------------------------------------- type
[Version = 1] <---------------------------------------- header
[Date = "2005/08/05 15:00:12"]
[User = "fse-administrator@company.com"]
# This is where actual parameters start <------------- comment
Name = "My_Media_Pool" <------------ main section
MediaFamily = LTO # AIT | LTO
PoolType = Regular # Regular | WORM | Backup
[DefaultFormat] <---------------------------------- subsection
38 Configuring FSE
Page 39

Templates
For each resource type, a default configuration template is available so that you do not need to create
configuration files from scratch. The templates already contain most of the required parameters with
remarks on the appropriate use of configuration variables, and details of maximum and minimum values.
When configuring a new FSE resource, make a copy of the appropriate template, modify the copy
according to the characteristics of the resource, and then configure the resource using the copy.
NOTE: While modifying templates for configuration of new resources, preserve the double quote
characters (") that surround the values of some variables. Removing these characters may lead to problems
with adding new resources in certain cases.
Templates are located in the following directories on consolidated FSE implementation or the FSE server:
Linux specific
Windows specific
BlockSize = 32KB <---------------------------- qualifier
NumOfVolumes = 1
SysVolLocation = NONE # NONE | FIRST | MIDDLE | LAST
SizeOfSysVol <- = 0MB ----------------------------- variable
/opt/fse/newconfig
%InstallPath%\newconfig
To configure your resources and your policies, use FSE commands or the FSE Management Console.
Resource configuration is described in section ”Using FSE command-line interface for configuring resources
and policies” on page 40. For more information on FSE commands, see ”FSE command-line interface” on
page 22. For more information on the FSE management console, see ”FSE Management Console” on
page 25.
See appendix ”FSE configuration templates” on page 241 for details on default settings in FSE
configuration files and for maximum and minimum parameter values.
Configuration Database
The FSE configuration is stored in the Configuration Database. This database maintains a configuration
history for each configured FSE resource thus providing multiple revisions of configuration files. When you
reconfigure your resources, the new configuration is marked with a new revision number.
Additionally, you are able to revert from the current to any other configuration revision at any time. You
only need to retrieve the desired revision from the configuration database, and then reapply it. The applied
configuration is again saved as a new configuration revision.
CAUTION: Do not directly alter the contents of the Configuration Database, as it may cause failures or
even loss of data. Use the FSE command-line interface to change the configuration as described in section
”Using FSE command-line interface for configuring resources and policies” on page 40 and section ”Using
the FSE Management Console for configuring resources and policies” on page 41.
The Configuration Database is located in the following directory:
Linux specific
/var/opt/fse/cfg
hp StorageWorks File System Extender User Guide 39
Page 40

Windows specific
%InstallPath%\var\cfg
Resource Management Database
Once FSE resources are configured, the data from the configuration files are written to the Resource
Management Database (RMDB). This database keeps all relevant information on FSE resources, such as
the current status, usage information, and characteristics.
When an FSE resource is removed from the configuration, all data referring to it is removed from Resource
Management Database accordingly.
The Resource Management Database is located in the following directory:
Linux specific
/var/opt/fse/rmdb
Windows specific
%InstallPath%\var\rmdb
Using FSE command-line interface for configuring resources and policies
You configure FSE resources and your policies using the command-line commands. You can use each
command with similar options, such as --list, --add, --remove, --show, --modify, depending on
your needs. You can repeat the commands if needed, for example to add multiple media to a media pool.
The following subsections provide examples of how to configure a new FSE resource, how to re-configure
your current FSE resource configuration, and how to revert to the previous revision of the FSE resource
configuration.
Configuring a new FSE resource
You want to configure a new partition on Linux platform. You will use an existing template, modify it and
then apply it to configure a new FSE partition. You can use the described commands in a similar way
when configuring any of the FSE resources. Note that the procedure for the new partition configuration is
generally the same for both operating systems, except for the location of the templates, which is
platform-dependent.
Linux specific
Configuration templates are located in the directory /opt/fse/newconfig.
Windows specific
Configuration templates are located in the directory %InstallPath%\newconfig.
The value of %InstallPath% depends on the choice made in the FSE installation process. It defaults to
C:\Program Files\Hewlett-Packard\FSE.
1. Locate the desired template in the newconfig directory and copy it to the selected directory, in this
example named MyConfiguration, using the following commands:
Linux specific
# cd MyConfiguration
# cp /opt/fse/newconfig/fse-partition.cfg PartitionCfgFileName
Windows specific
D:\>cd MyConfiguration
D:\MyConfiguration>copy
2. Edit the template and modify the parameter values relevant for the new FSE partition.
40 Configuring FSE
C:\Program Files\Hewlett-Packard\FSE\newconfig\fse-partition.cfg
PartitionCfgFileName
Page 41

NOTE: While modifying the template, preserve the double quote characters (") that surround the
values of some variables. Removing these characters might lead to problems in certain cases.
3. To configure a new partition, apply the modified template using the following:
fsepartition --add PartitionCfgFileName
You have configured a new FSE partition. This FSE partition configuration is stored in the configuration
database as the first respective configuration revision.
Modifying the configuration of an FSE resource
You want to change the parameter values of your migration policy. Since these parameters are written in
the FSE partition configuration file, you will use the fsepartition command followed by the relevant
command options, which you can use in a similar way when re-configuring any of the FSE resources.
1. Check the names of the configured partitions in order to get the exact name of the partition for which
you want to modify a migration policy, using the following command:
fsepartition --list [--detail]
2. Copy the parameters of the selected partition (in this example named PartitionName) to a file,
named for example MyFile in the current directory:
fsepartition --show PartitionName > MyFile
3. Edit the created configuration file and modify the parameter values relevant for your policies using any
text editor.
4. Apply the new configuration using the following command:
fsepartition --modify PartitionName MyFile
This FSE partition configuration is stored in the configuration database with a new revision number.
Reverting to a previous revision of an FSE resource configuration
You want to revert from the current to the previous configuration revision 4. You will retrieve the chosen
fourth revision from the configuration database, and then reapply it.
1. Check the names of the configured partitions in order to get the exact name of the partition for which
you want revert to the previous revision, using the following command:
fsepartition --list [--detail]
2. Check the configuration history for the target partition. Use the following command to get the list of all
configuration revisions for the target partition in the configuration database.
fsepartition --show PartitionName --history
3. Copy the contents of the chosen configuration revision (in our case 4) for FSE partition to a file, named
for example MyFile in the current directory:
fsepartition --show PartitionName 4 > MyFile
4. Apply the chosen configuration revision using the following command:
fsepartition --modify PartitionName MyFile
This FSE partition configuration is stored in the configuration database with a new revision number.
Using the FSE Management Console for configuring resources and policies
You can use the FSE Management Console to perform tasks related to the FSE implementation.
hp StorageWorks File System Extender User Guide 41
Page 42

NOTE: The FSE Management Console client can connect to several FSE Management Console servers
simultaneously. Thus, if your environment includes more than one FSE implementation, you can configure
and monitor all FSE implementations from the same FSE Management Console client session running on a
single computer.
Operational modes of the FSE Management Console client
The FSE Management Console client supports two operational modes. For each FSE Management Console
server you want to operate to, you can choose between the following:
• online operational mode
In this mode, the FSE Management Console client is connected to the FSE Management Console server
and has access to the Management Interface of the belonging FSE implementation. All changes you
make using GUI of the FSE Management Console client are immediately reflected in the applied FSE
configuration.
• offline operational mode
In this mode, the FSE Management Console client is not connected to the FSE Management Console
server. It has no access to the FSE configuration that is currently applied in the FSE implementation. You
can locally configure FSE resources and policies, and apply them to the FSE configuration at a later
time, using online operational mode. The configured FSE resources and policies are locally stored in
the ordinary FSE configuration files.
Typically, a configuration session in the offline operational mode consists of the following phases:
• “Logging in” to an FSE Management Console server in the offline operational mode.
For details, see ”Choosing offline operational mode” on page 43.
• Configuring all required FSE resources in the proposed order.
For details, see ”Configuration procedure” on page 59.
• Saving the configuration of all or individual FSE resources to configuration files on the local host by
selecting Write all config files or Configuration File menu item from the Tools menu, respectively.
You can choose the operational mode when connecting to the FSE Management Console server,
specifying the appropriate options in the Connection dialog box. Unless you configured an automatic
reconnection to a particular FSE Management Console server, the Connection dialog box displays each
time the FSE Management Console client is started.
Figure 9 New connection dialog box
NOTE: You can establish a connection to another FSE Management Console server using the FSE
Management Console client GUI. For details, see ”Graphical user interface overview” on page 43.
42 Configuring FSE
Page 43

Choosing online operational mode
Prerequisites
The prerequisites for using online operational mode for a particular FSE implementation are the running
FSE implementation and a running FSE Management Console server for this FSE implementation.
To choose the online operational mode, perform the following steps:
1. Click Start > Programs > Hewlett-Packard > FSE > FSE GUI-Client to start the FSE Management Console
client.
2. In the Connection dialog box, in the Hostname box, enter the name of the host where the FSE
Management Console server is running.
3. In the User box, enter admin, and leave the Password box empty. These are the predefined values.
IMPORTANT: To prevent potential unauthorized accesses to the FSE Management Console server,
you should change the default user name and password as soon as possible. For details, see ”FSE
Management Console users” on page 58.
4. In the Name box, enter a unique descriptive name that will identify this connection during the FSE
Management Console client session.
5. If you want the FSE Management Console client to automatically connect to this FSE Management
Console server on subsequent startups, select the Reconnect automatically check box.
6. Click Connect to connect to the specified FSE Management Console server and close the Connection
dialog box.
Choosing offline operational mode
Limitations
• In the offline operational mode, you can only perform FSE configuration-related tasks for a particular
FSE implementation. All changes are local and can be applied to the FSE implementation in a
subsequent online session.
• In the FSE Management Console client GUI, the All Media, Unassigned Media, Jobs, Log, and Users
containers are not visible. For details, see ”Graphical user interface overview” on page 43.
To choose the offline operational mode, perform the following steps:
1. Click Start > Programs > Hewlett-Packard > FSE > FSE GUI-Client to start the FSE Management Console
client.
2. In the Connection dialog box, in the Name box, enter a unique descriptive name that will identify the
remote FSE implementation during the FSE Management Console client session.
3. Select the Offline configuration radio button.
4. Click Connect to start an offline configuration procedure and close the Connection dialog box.
Graphical user interface overview
This section provides an overview of GUI of the FSE Management Console client and a description of all its
functional areas. This section includes the following topics:
• Graphical user interface layout, page 44
• The object tree, page 45
• The menu bar, page 52
• The toolbar, page 55
• The status bar, page 56
• Keyboard shortcuts, page 58
hp StorageWorks File System Extender User Guide 43
Page 44

Graphical user interface layout
Figure 10 GUI layout
The object tree contains hierarchically organized objects. You can browse the hierarchy by clicking the
expand/collapse buttons besides objects. Expanding a subtree does not select the object at the subtree
origin. To select an object, click it.
NOTE: If there are problems with particular object, the belonging icon displayed in the object tree
changes into a question mark (“?”), similarly as in the Windows-native Device Manager.
The right pane shows the property page with details and status information for the selected object. For a
container object (object containing other objects), the right pane displays a list of its childobjects. You can
choose the preferred sort order by clicking on the column titles. The properties page displays properties of
the currently selected object in the object tree. If the property page shows an object list, double-clicking an
object in the list opens the Properties pop-up window with properties of this object. For details on
properties of particular objects, see section ”Configuration procedure” on page 59, chapters ”Migration,
release, recall, and deletion” and ”Monitoring and maintaining FSE”, or appendix ”FSE configuration
templates”.
The menu bar contains menus that provide access to the FSE Management Console actions. Some of the
actions also have corresponding shortcuts on the toolbar.
The toolbar is located under the menu bar and contains icons that can be used as shortcuts to the most
often used actions.
The status bar is located at the bottom of the FSE Management Console client window and shows the
information related to the currently selected item in the object tree.
There are two different modes in which the object properties displayed in the GUI are updated:
• Online update mode: In this update mode, when the displayed properties are changed outside the FSE
Management Console, the FSE Management Console server notifies the FSE Management Console
client about the changes and the client refreshes the display. The refresh interval depends on the FSE
Management Console server’s polling interval, defined by the GUI_POLLINTERVAL configuration
parameter.
44 Configuring FSE
Page 45

This is the default update mode.
• On-request update mode: In this update mode, when the properties of a particular object are
displayed in the FSE Management Console client GUI, the FSE Management Console server
immediately queries the Management Interface and retrieves the requested data.
The object tree
The object tree lists all manageable objects in the FSE implementation. You can navigate through the tree
and use drop-down and pop-up menus for listing, configuring, monitoring, and managing the objects. You
can also define object and field filters. There are two conceptually different types of FSE Management
Console objects:
•Containers are completely virtual objects and hold at least one level of child objects which are either
virtual (for example: FSE libraries, FSE media pools) or physical (for example: FSE drives, FSE media).
Container objects have associated the New action (menu item), which means “create a new object of
the container type”, for example: create a new FSE library.
The exceptions are the containers for FSE jobs (actions are associated to each job, but not to the jobs
container) and for all FSE media and unassigned FSE media (with these containers, the action New
means “assign media to an FSE media pool”).
Containers do not have associated the Configuration action.
• Physical and virtual objects correspond either to FSE resources (for example: FSE drives) or to FSE
actions (for example: FSE logs). Library, drive, and partition objects provide the Enable/Disable action
(menu item), which is used to change their status. Media objects provide the
Unreliable/Unusable/Good action, which is used to change their condition status. Most of the physical
objects have associated Configuration and Configuration File actions that will open the configuration
window or save the object’s local configuration file to disk, respectively.
Object types
Possible container and physical object types are the following:
• <SystemName> (physical object)
This object is the root of the object tree. All other objects and containers are part of the host
SystemName.
When this object is selected, two tabs are displayed on the right pane. The General tab shows the
name of the host where the FSE Management Console is running, the FSE implementation status, the
host name or IP address, the current user name, and version information for the FSE software
components. In the Configurable parameters tab, you can review and modify the FSE system
configuration variables.
When this object is right-clicked, the following actions are available in the pop-up menu:
• Connect or Disconnect: establishes or terminates the connection to the FSE Management Console
server.
• Change Password: open the Changing Password window, where you can change the password for
current user name.
• Write all config files: saves all configuration parameters related to the objects in the object tree to
configuration files on the local disk.
For description of other available actions, see ”Actions associated to objects” on page 52.
• Libraries (container)
This container holds a list of the configured FSE libraries in the FSE implementation.
When this object is selected, the FSE library list is shown in the right pane. For each library the library
name, the library family, the library type, the FQDN of the host to which the library is connected, the
library control device, current status of the library, and the library firmware revision are displayed.
When this object is right-clicked, the actions New, New Window from this place, and Properties are
available in the pop-up menu. For action descriptions, see ”Actions associated to objects” on page 52.
• <LibraryName> (physical object)
An FSE library configured in the FSE implementation. This object holds the containers for FSE slots and
FSE drives configured in the library.
hp StorageWorks File System Extender User Guide 45
Page 46

When this object is selected, the General tab is displayed on the right pane. The tab shows the current
status and the configuration variables of the FSE library.
When this object is right-clicked, the following actions are available in the pop-up menu:
• Enable or Disable: makes the library available to the FSE implementation or puts the library offline.
• Rescan: triggers inventory update on the library.
• Update: triggers inventory update with a physical slot rescan on the library.
For description of other available actions, see ”Actions associated to objects” on page 52.
• <LibraryName> > Slots (container)
This container holds a list of FSE slots configured for the FSE library LibraryName.
When this object is selected, the FSE slot list for the library is shown in the right pane. For each slot the
slot address, the slot type, current status of the slot, and the barcode of the medium located in the slot
(it the slot is in use) are displayed.
• <LibraryName> > Drives (container)
This container holds a list of FSE drives belonging to the FSE library LibraryName.
When this object is selected, the FSE drive list for the library is shown in the right pane. For each drive
the drive name, the medium barcode (if the drive is loaded), the drive family, the belonging library
name, host to which the drive is connected, the drive control device, current status of the drive, and the
drive firmware revision are displayed.
When this object is right-clicked, the actions New, New Window from this place, and Properties are
available in the pop-up menu. For action descriptions, see ”Actions associated to objects” on page 52.
• <LibraryName> > Drives > <DriveName> (physical object)
An FSE drive assigned to the FSE library LibraryName. The drive executes read and write operations
on the available FSE media.
When this object is selected, the General tab is displayed on the right pane. In the tab, you can review
and modify the FSE drive configuration variables.
When this object is right-clicked, the following action is available in the pop-up menu:
• Enable or Disable: makes the drive available to the FSE implementation or puts the drive offline.
For description of other available actions, see ”Actions associated to objects” on page 52.
• Drives (container)
This container holds a list of the configured FSE drives in the FSE implementation. FSE drives may
belong to different FSE libraries.
When this object is selected, the FSE drive list for the whole FSE implementation is shown in the right
pane. For each drive the drive name, the medium barcode (if the drive is loaded), the drive family, the
name of the library to which the drive belongs, the FQDN of the host to which the drive is connected,
the drive control device, current status of the drive, and the drive firmware revision are displayed.
When this object is right-clicked, the actions New, New Window from this place, and Properties are
available in the pop-up menu. For action descriptions, see ”Actions associated to objects” on page 52.
• Drives > <DriveName> (physical object)
An FSE drive assigned to any of the configured FSE libraries in the FSE implementation.
When this object is selected, the General tab is displayed on the right pane. The tab shows the current
status and the configuration variables of the FSE drive.
When this object is right-clicked, the following action is available in the pop-up menu:
• Enable or Disable: makes the drive available to the FSE implementation or puts the drive offline.
For description of other available actions, see ”
Actions associated to objects” on page 52.
• Media Pools (container)
This container holds a list of the FSE media pools configured in the FSE implementation.
When this object is selected, the FSE media pool list is shown in the right pane. For each media pool
the media pool name, the media pool family, the media pool type, the default block size, number of
medium volumes on the media, size of the data volumes, location of the system volume, and size of the
system volume are displayed.
46 Configuring FSE
Page 47

When this object is right-clicked, the actions New, New Window from this place, and Properties are
available in the pop-up menu. For action descriptions, see ”Actions associated to objects” on page 52.
• Media Pools > <MediaPoolName> (virtual object)
An FSE media pool configured in the FSE implementation. Holds a list of media assigned to this FSE
media pool.
When this object is selected, the same parameters are displayed for each medium as with the All
Media Pools container.
When this object is right-clicked, the actions New, Configuration, Delete object, Configuration File,
New Window from this place, and Properties are available in the pop-up menu. For action
descriptions, see ”Actions associated to objects” on page 52.
• Partitions (container)
This container holds a list of the configured FSE partitions. Each FSE partition can have one or more
FSE media pools assigned. All data stored on an FSE medium belonging to the media pool assigned to
a particular FSE partition is considered as data belonging to this FSE partition.
When this object is selected, the FSE partition list for the whole FSE implementation is shown in the right
pane. For each partition the partition name, current status of the partition, the FQDN of the host on
which the belonging HSM file system is located, the mount point of the HSM file system, and current
activity of the FSE partition are displayed.
When this object is right-clicked, the actions New, New Window from this place, and Properties are
available in the pop-up menu. For action descriptions, see ”Actions associated to objects” on page 52.
• Partitions > <PartitionName> (physical object)
An FSE partition configured in the FSE implementation. This object holds a list of the media belonging
to it and a list of the media pools assigned to it.
When this object is selected, three tabs are displayed on the right pane. The General tab shows the
general FSE partition parameters. The Advanced tab shows parameters related to resource allocation,
migration and release parameters, and the parameters related to job priorities for the partition. The
Deletion tab shows currently configured deletion policy.
When this object is right-clicked, the following actions are available in the pop-up menu:
• Enable or Disable: makes the partition available to the FSE implementation or disables the partition.
• Trigger Deletion: triggers deletion of the expired files on the belonging HSM file system, according
to the configured deletion policy.
• Check Medium: triggers a consistency check on the partition, comparing the belonging media
against the corresponding File System Catalog.
• Check FS: triggers a consistency check on the partition, comparing the belonging HSM file system
against the corresponding File System Catalog.
• Recover FSC: triggers recovery of the corresponding File System Catalog.
• Recover FS: triggers recovery of the belonging HSM file system.
• Reorg-Scan: scan medium volumes on all media that belong to the partition for obsolete data.
For description of other available actions, see ”Actions associated to objects
” on page 52.
• Partitions > <PartitionName> > Media Pools (container)
This container holds a list of the FSE media pools assigned to the FSE partition PartitionName.
When this object is selected, the same parameters are displayed for each media pool as with the
Media Pools container.
When this object is right-clicked, the actions New Window from this place and Properties are available
in the pop-up menu. For action descriptions, see ”Actions associated to objects” on page 52.
• Partitions > <PartitionName> > Media Pools > <MediaPoolName> (virtual object)
An FSE media pool configured in the FSE implementation and assigned to the FSE partition
PartitionName. This object holds a list of all FSE media assigned to this media pool.
When this object is selected, the same parameters are displayed for each medium as with the All
Media Pools container.
hp StorageWorks File System Extender User Guide 47
Page 48

When this object is right-clicked, the actions New, Configuration, Delete object, Configuration File,
New Window from this place, and Properties are available in the pop-up menu. For action
descriptions, see ”Actions associated to objects” on page 52.
• Partitions > <PartitionName> > All Media (container)
This container holds a list of all media belonging to the FSE partition PartitionName.
When this object is selected, the same parameters are displayed for each medium as with the All
Media Pools container.
When this object is right-clicked, the actions New, New Window from this place, and Properties are
available in the pop-up menu. For action descriptions, see ”Actions associated to objects” on page 52.
• All Media (container)
This container holds a list of the FSE media currently available in the FSE implementation.
NOTE: The All Media container is not accessible while the FSE Management Console client is in
the offline operational mode.
When this object is selected, the list of all FSE media configured in the FSE implementation is shown in
the right pane. For each medium the medium barcode, the medium type, the belonging media pool,
current status of the medium, current location of the medium, number of medium volumes on the
medium and location of the system volume are displayed. If the option Media slackspace calculation is
enabled in the FSE Management Console client settings, and a medium has been scanned for
reorganization, the additional slack space percentage is displayed for each such medium.
NOTE: The percentage represents the average slack space for all medium volumes on the medium.
If the medium is empty, the corresponding slack space percentage is zero.
When this object is right-clicked, the actions New, New Window from this place, and Properties are
available in the pop-up menu. For action descriptions, see ”Actions associated to objects” on page 52.
• Unassigned Media (container)
This container holds a list of the FSE media available in the FSE implementation but not assigned to any
of the FSE media pools.
NOTE: The Unassigned Media container is not accessible while the FSE Management Console
client is in the offline operational mode.
When this object is selected, the same parameters are displayed for each medium as with the All
Media Pools container.
When this object is right-clicked, the actions New, New Window from this place, and Properties are
available in the pop-up menu. For action descriptions, see ”Actions associated to objects” on page 52.
• Jobs (container)
This container holds a list of the jobs started on the FSE implementation, showing the status and other
properties of each job (job type, current priority, and so on).
NOTE: The Jobs container is not accessible while the FSE Management Console client is in the
offline operational mode.
When this object is selected, the list of current FSE jobs is shown in the right pane. For each job the job
ID, number of copies that the job can read (recall job) or must write (migration job), the partition name,
the job type, current job priority, the starting date and time, and current job status are displayed.
48 Configuring FSE
Page 49

IMPORTANT: Only the jobs that are currently running and up to 25 most recently finished jobs are
displayed.
When this object is right-clicked, the action New Window from this place is available in the pop-up
menu. For action description, see ”Actions associated to objects” on page 52.
• Log (physical object)
This object holds a list of the error and warning messages stored in the FSE error log.
NOTE: The Log container is not accessible while the FSE Management Console client is in the
offline operational mode.
When this object is selected, the list of error entries logged in the FSE error log is shown in the right
pane. For each error, the date and time of the error occurrence, the FQDN of the host where the FSE
server is running, the ID of the FSE process the entry belongs to, the FSE process name, and the full
error message are displayed. Depending on the cause of a particular error, the related object (FSE
partition, SCSI device), ID of the FSE job, and the barcode of the FSE medium are displayed.
When this object is right-clicked, the actions New Window from this place and Properties are available
in the pop-up menu. For action descriptions, see ”Actions associated to objects” on page 52.
• Users (container)
This container holds a list of users that are authorized to log in to the FSE Management Console server.
NOTE: The Users container is not accessible while the FSE Management Console client is in the
offline operational mode or if your current FSE Management Console user does not belong to the
Superuser profile type.
When this object is selected, the list of configured FSE Management Console users is shown in the right
pane. For each user, the user name, the user description, and the profile type of the user is displayed.
When this object is right-clicked, the action New Window from this place is available in the pop-up
menu. For action description, see ”Actions associated to objects” on page 52.
• <MediumBarcode> (physical object)
An FSE medium configured in the FSE implementation.
Objects of this type are displayed in the right pane when the All Media or Unassigned Media
containers are selected in the object tree.
When this object is right-clicked, the following actions are available in the pop-up menu, depending on
the current state of the medium:
• Good: makes the medium fully operational and available for normal use.
• Unreliable: disallows writing to the medium.
• Unusable: disallows reading from and writing to the medium.
• Remove: removes the medium from the FSE implementation.
• Recreate FRI: recreates missing Fast Recovery Information on disk from the migrated metadata on
the medium.
• Reorganize: starts the media reorganization job for the medium.
• Duplicate Media: duplicates the medium to another medium that is still unassigned.
For description of other available actions, see ”Actions associated to objects” on page 52.
• <MediumVolumeNumber> (physical object)
An FSE medium volume on the selected FSE medium.
Objects of this type are displayed in the Media - Properties window after the action Properties is
selected for a particular FSE medium.
hp StorageWorks File System Extender User Guide 49
Page 50

When this object is right-clicked, the following actions are available in the pop-up menu, depending on
the current state of the medium volume:
• Reorganize: starts the media reorganization job for the medium volume.
• Close: marks the medium volume as full.
• <JobID> (physical object)
An FSE job that was recently running or is still running in the FSE implementation.
Objects of this type are displayed in the right pane when the Jobs container is selected in the object
tree.
When this object is right-clicked, the following actions are available in the pop-up menu, depending on
the current state of the job:
• Change Priority: changes the priority of the running job.
• Abort: aborts the running job.
For description of other available actions, see ”Actions associated to objects” on page 52.
• <UserName> (physical object)
An FSE Management Console user configured in the FSE Management Console.
Objects of this type are displayed in the right pane when the Users container is selected in the object
tree.
When this object is right-clicked, the following actions are available in the pop-up menu:
• New: creates a new user.
• Delete object: deletes the user.
• Configuration: displays properties of the user.
50 Configuring FSE
Page 51

Creation, Configuration, and Properties dialog boxes
The Creation, Configuration, and Properties dialog boxes have identical contents for a particular object.
The only difference is in the protection of the object properties (read-only, editable).
Figure 11 Creation dialog box
Figure 12 Configuration dialog box
hp StorageWorks File System Extender User Guide 51
Page 52

Figure 13 Properties dialog box
Actions associated to objects
When you right-click a particular object in the object tree, a pop-up menu is displayed. The set of the
available menu items depends on the object type and the current object status. The actions (pop-up menu
items) that are available for the majority of object and container types are the following:
• New: creates a new object of the selected type, for example: new FSE library, new FSE media pool,
and so on.
• Configuration: opens the Configuration window for the selected object.
• Delete object: removes the selected object.
• Configuration File: opens the Configuration File window with the current configuration for the selected
object. The file can be saved to disk by clicking Save.
• New Window from this place: opens a new FSE Management Console client instance in which the
properties of the currently selected object are displayed in the right pane.
• Properties: opens the Properties window for the selected object.
There are two different types of actions:
• Plain action is executed immediately after it is triggered.
Example of a plain action is configuring, enabling or disabling an FSE drive.
• Advanced action creates an appropriate job that executes the required task.
Example of an advanced action is formatting or initializing an FSE medium.
The menu bar
The menu bar contains several menus.
52 Configuring FSE
Page 53

The Server menu
The menu items of the Server menu are listed and described in the following table.
Menu item (action) Action description
New Connection Opens the Connection window where you can specify connection settings and
create a new connection to an FSE implementation:
• Name: specifies a descriptive name for the connection. This name
identifies the remote FSE Management Console server system in the object
tree.
• Online system: specifies that the connection is established to an online
FSE implementation, and the FSE Management Console client is in the
online operational mode.
• Offline configuration: specifies that the FSE Management Console client is
in the offline operational mode, without connecting.
When this option is enabled, other connection settings are made
unavailable.
• Hostname: specifies the host name or IP address of the system running the
FSE Management Console server.
• User: specifies the name of the user logging in to the FSE Management
Console server. The user name must be available in the user database of
the FSE Management Console server in order to be able to establish the
connection.
The default user name is admin.
• Password: specifies the user password.
The password for the default user is an empty string.
• Reconnect automatically: specifies if the FSE Management Console client
should try to reconnect automatically in case the connection is
unexpectedly terminated.
• Remember password: specifies if the FSE Management Console client
should cache the password and not ask for it on subsequent
reconnections.
Connect Establishes the connection with the selected FSE Management Console server.
Disconnect Closes the connection with the selected FSE Management Console server.
Remove Server Removes the selected system from the object tree.
Exit Closes the FSE Management Console client.
The Tools menu
The menu items of the Tools menu are listed and described in the following table.
Menu item (action) Applicable objects Action description
Set State Library, drive, and
partition objects.
Media Medium objects. Displays a submenu with the menu items:
Displays a submenu with the menu items:
•Enable
• Disable
• Mark media... Good/Unreliable/Unusable
• Assign to Media Pool
•Remove
•Copy Content
•Duplicate Media
• Recreate FRI
•Reorganize
•Format And Initialize
hp StorageWorks File System Extender User Guide 53
Page 54

Menu item (action) Applicable objects Action description
Library Library objects. Displays a submenu with the menu items:
•Rescan
• Update
Partition Partition objects. Displays a submenu with the menu items:
•Trigger Deletion
•Check Medium
•Check FS
•Recover FSC
•Recover FS
•Reorg-Scan
Job Jobs objects. Displays a submenu with the menu items:
• Change Priority
•Abort
Volumes Medium volume
objects.
Configuration Library, drive, partition,
and media pool
objects.
Delete object System, library, drive,
media pool, partition,
and user objects.
Configuration File Library, drive, partition,
and media pool
objects.
Write all config files System objects. Saves all configuration files for all objects in object tree to
Change Password System objects. Open the Changing Password window where you can
Settings This menu item is
enabled globally.
Displays a submenu with the menu items:
•Reorganize
•Close
Opens the Configuration window for the selected object,
in which you can modify its configuration.
Removes the selected object from the object tree.
Opens the configuration file for the selected object and
displays it in the Configuration window.
The configuration file can be saved to disk. The comments
describe values that you can enter into the corresponding
fields.
local disk.
change password for the current user.
Opens the Settings window where you can modify the
following FSE Management Console client settings.
• Confirmation on configuration changes: controls
whether a confirmation dialog box appears after
each configuration change.
• Job property window on job start-up: specifies if
the Properties window is displayed for the job at
job startup.
• Media slackspace calculation: enables or disables
calculation and display of the average slack space
on the selected FSE medium.
• Reconnect timeout: defines the automatic
reconnect time period in seconds (the default value
is 300 s).
54 Configuring FSE
Page 55

The Windows menu
The menu items of the Windows menu are listed and described in the following table.
Menu item (action) Action description
New Instance Opens a new FSE Management Console client instance in which the initial GUI
view is displayed.
New Window from this place Opens a new FSE Management Console client instance in which the properties of
the currently selected object are displayed in the right pane.
The Help menu
The menu items of the Help menu are listed and described in the following table.
Menu item (action) Action description
About Displays the FSE Management Console software version.
The toolbar
The toolbar provides icons for easy one-click access to the most common actions. The following icons are
available:
Icon Action Action description
New Connection See ”The Server menu” on page 53.
Connect See ”The Server menu” on page 53.
Disconnect See ”The Server menu” on page 53.
New Opens the Creation window for a new object of the selected type.
Configuration See ”The Tools menu” on page 53.
Properties Opens the Properties window for the selected object, in which you can view
its current configuration.
Delete object See ”The Tools menu” on page 53.
Configuration File See ”The Tools menu” on page 53.
Write all config files See ”The Tools menu” on page 53.
Refresh Updates the data FSE Management Console client GUI display with the
latest data retrieved from the FSE implementation.
Toggle Filter Select objects from the list on the properties pane and click this button to
filter the required items.
hp StorageWorks File System Extender User Guide 55
Page 56

The status bar
The status bar provides current status of the FSE Management Console client, and the object count and the
status information for the item that is currently selected in the object tree. The status information is only
available for the following containers and objects:
•containers: Libraries, Slots, Drives, Media Pools, Partitions, All Media, Unassigned Media, Jobs.
• objects (virtual and physical): <MediaPoolName>, Log.
The meaning of the status icons and other status information depends on the selected object’s type:
• Libraries (container)
The status bar displays the number of configured FSE libraries in the selected FSE implementation.
Additional numbers represent FSE library counts according to their states. The status icons have the
following meaning:
Status icon Current status
online
disabled
erroneous
• Slots (container)
The status bar displays the number of configured FSE slots in the selected FSE library. Additional
numbers represent FSE slot counts according to their states. The status icons have the following
meaning:
Status icon Current status
free
reserved
• Drives (container)
The status bar displays the number of configured FSE drives in the selected FSE implementation.
Additional numbers represent FSE drive counts according to their states. The status icons have the
following meaning:
Status icon Current status
online
in use
disabled
erroneous
• Media Pools (container)
The status bar displays the number of configured FSE media pools in the selected FSE implementation.
• <MediaPoolName> (virtual object)
56 Configuring FSE
Page 57

The status bar displays the number of configured FSE media in the selected FSE media pool. Additional
numbers represent FSE media pool counts according to their states. The status icons have the following
meaning:
Status icon Current status
good
unusable
unreliable
uninitialized
• Partitions (container)
The status bar displays the number of configured FSE partitions in the selected FSE implementation.
Additional numbers represent FSE partition counts according to their states. The status icons have the
following meaning:
Status icon Current status
ready
other
disabled
• All Media (container)
The status bar displays the number of all configured FSE media in the selected FSE media pool.
Additional numbers represent configured FSE media counts according to their states. The status icons
have the same meaning as with the virtual object <MediaPoolName>.
• Unassigned Media (container)
The status bar displays the number of the configured and unassigned FSE media in the selected FSE
media pool. Additional numbers represent unassigned FSE media counts according to their states. The
status icons have the same meaning as with the virtual object <MediaPoolName>.
• Jobs (container)
The status bar displays the following numbers related to the selected FSE implementation:
• the number of all running FSE jobs
• the number of running FSE administrative jobs
• the number of running FSE migration jobs
• the number of running FSE recall jobs
• Log (physical object)
The status bar displays the number of entries in the FSE error log of the selected FSE implementation.
Additional numbers represent FSE error log entry counts according to their types. The entry icons have
the following meaning:
Entry icon Entry type
warning
error
hp StorageWorks File System Extender User Guide 57
Page 58

Keyboard shortcuts
The following keyboard shortcuts are available for the most common actions.
Menu item (action) Keyboard shortcut
New Connection Alt + N
Connect Alt + C
Disconnect Alt + D
Remove Server Alt + R
Exit Alt + X
Settings Alt + O
Properties Alt + Enter
FSE Management Console users
Access to an FSE implementation from the FSE Management Console client is allowed only to configured
users that are stored in the FSE Management Console user database. For the first login to an FSE
implementation (establishing a connection with the appropriate FSE Management Console server), the FSE
Management Console client provides the default user named admin. This user has the Superuser profile
type and an empty string as its password.
IMPORTANT: You should change the password of the admin user as soon as possible to prevent
potential unauthorized accesses. For details, see ”Displaying and modifying properties of FSE
Management Console users” on page 58.
If you are logged to the FSE Management Console server with a user name of the Superuser profile type,
you can display all configured FSE Management Console users by selecting Users in the object tree. The
configured users list appears in the right pane.
Managing FSE Management Console users
NOTE: Management of the FSE Management Console users is enabled only for the superusers.
Adding new FSE Management Console users
To add a new FSE Management Console user, follow the steps:
1. In the FSE Management Console client GUI, in the object tree, select Users.
2. In the property page, right-click on an existing user name, and click New.
3. In the User Details windows, specify appropriate options for the new user.
For details, see ”FSE Management Console user properties” on page 59.
4. Click Apply.
Displaying and modifying properties of FSE Management Console users
To display or change configuration of an FSE Management Console user, follow the steps:
1. In the FSE Management Console client GUI, in the object tree, select Users.
2. In the property page, right-click on an existing user name, and click Configuration.
3. In the User Details windows, read or specify appropriate options of the selected user.
For details, see ”FSE Management Console user properties” on page 59.
4. If you have modified a user configuration, click Apply.
Otherwise, click Cancel.
58 Configuring FSE
Page 59

Removing FSE Management Console users
To remove an FSE Management Console user, follow the steps:
1. In the FSE Management Console client GUI, in the object tree, select Users.
2. In the property page, right-click on an existing user name and click Delete object.
FSE Management Console user properties
Each configured FSE Management Console user has the following properties, which are shown in the User
Details window:
• User name: unique alphanumeric string for identifying the user.
• Description: an arbitrary string that additionally describes the user.
• Password: the user’s password.
• Permissions: one of the four available user profile types.
The predefined user profile types are the following:
•Monitoring
Users with Monitoring permissions are enabled to view the current configuration of the FSE
resources and to monitor system activity of the FSE implementation. They cannot list the configured
FSE Management Console users.
•Configuration
Users with Configuration permissions are enabled to add, remove, and modify the configuration of
the FSE resources, and to perform monitoring tasks. They cannot list the configured FSE
Management Console users.
• Administration
Users with Administration permissions are enabled to modify the configuration of the FSE resources,
but cannot add or remove them. They can perform monitoring tasks. They cannot list the configured
FSE Management Console users.
• Superuser
Users with Superuser permissions are enabled to manage all aspects of the FSE resources, perform
monitoring tasks, and list and manage the FSE Management Console users.
Configuration procedure
The general procedure for FSE configuration consists of the following:
• Editing the configuration file in plain text format - entering parameter values.
NOTE: To avoid difficulties like missing or inappropriate parameters, it is recommended that you
refer to FSE configuration templates. They already contain all required parameters and provide
remarks on appropriate use of configuration variables.
• Applying the configuration file with the appropriate command.
Different FSE resources are related to each other and therefore have to be configured in the appropriate
order, as follows:
1. ”Step 1: configuring FSE libraries and FSE drives” on page 60.
2. ”Step 2: configuring FSE media pools” on page 67.
3. ”Step 3: preparing HSM file systems” on page 67.
4. ”Step 4: configuring FSE partitions” on page 69.
5. ”Step 5: preparing FSE media” on page 72.
6. ”Step 6: mounting HSM file systems” on page 73.
Once FSE media are initialized, FSE medium volumes are configured automatically. They are related
accordingly to the FSE medium, FSE media pool and FSE partition.
hp StorageWorks File System Extender User Guide 59
Page 60

Linux specific
NOTE: You must be logged on to the system as root in order to execute FSE commands.
Windows specific
NOTE: You need administrative privileges to perform the configuration tasks. These privileges are granted
only if you are either locally logged to the system as Administrator (recommended) or using a remote
access software that supports logging in with the real Administrator account. The Windows native Remote
Desktop tool, for example, may be unsuitable for these tasks, since it uses a different Administrator account
when logging in remotely.
Step 1: configuring FSE libraries and FSE drives
About SCSI identification
For the FSE library and drive configuration, you need to identify the SCSI addresses of libraries and drives
that will be used by the FSE implementation. Use the fse_scsi --scan command to find addresses. The
format of the identification strings that are displayed depend on the operating system where the
fse_scsi command is run.
NOTE: A particular FSE drive is related to a single FSE library.
Linux specific
On Linux platform, FSE uses a SCSI generic (sg) driver for accessing SCSI libraries and drives. The sg
driver is an upper level SCSI subsystem device driver that enables user applications to send SCSI
commands to relevant devices. It is capable of addressing up to 256 SCSI devices.
When configuring libraries and drives, you need to specify their control device file names: each device file
name corresponds to one attached SCSI device. Control device file names are located in the /dev
directory. Therefore, the specified control device for library and drive takes the form /dev/sgX, where X is
a number between 0 and 255.
Windows specific
Before configuring FSE drives, ensure that the drivers of all tape drives to be used as FSE drives are
disabled on a consolidated FSE implementation or FSE server host. For more information on disabling the
tape drive drivers, see the FSE Installation Guide.
On Windows platform, FSE identifies attached SCSI devices (libraries and drives) by specifying port, bus,
target, and LUN in the form of id:P:B:T:L, where:
P ..... SCSI port number (HBA number) to which the device is connected.
B ..... SCSI bus/channel number on the HBA to which the device is connected.
T ..... target ID to which the device is connected.
L ..... logical unit number (LUN) of the device.
Library and drive configuration procedure
NOTE: To use disk media, no library and drive configuration is needed.
1. Before you start configuring FSE libraries and drives, you must determine their control device files. Use
the fse_scsi tool to get the desired output:
60 Configuring FSE
Page 61

Linux specific
C:\Program Files\Hewlett-Packard\FSE\bin>fse_scsi --scan
** /dev/sg0 id:0:0:6:0
SCSI device ID: port 0, ch 0, id 6, lun 0, type Disk 0
Device: HP OPEN-V 5003 ser #:10804 std :3
** /dev/sg1 id:0:0:7:0
SCSI device ID: port 0, ch 0, id 7, lun 0, type Disk 0
Device: HP OPEN-V 5003 ser #:10804 std :3
** /dev/sg2 id:0:0:8:0
SCSI device ID: port 0, ch 0, id 8, lun 0, type Disk 0
Device: HP OPEN-V 5003 ser #:10804 std :3
** /dev/sg3 id:0:0:8:0
SCSI device ID: port 0, ch 0, id 8, lun 0, type Disk 0
Device: HP OPEN-V 5003 ser #:10804 std :3
** /dev/sg4 id:0:0:10:0
SCSI device ID: port 0, ch 0, id 10, lun 0, type Medium Changer 8
Device: HP MSL6000 Series 0507 ser #:3G48LRP4SXDE std :2
** /dev/sg5 id:0:0:10:1
SCSI device ID: port 0, ch 0, id 10, lun 1, type Tape 1
Device: HP Ultrium 3-SCSI G25W ser #:HU10520PUW std :3
** /dev/sg6 id:0:0:10:2
SCSI device ID: port 0, ch 0, id 10, lun 2, type Tape 1
Device: HP Ultrium 3-SCSI G24W ser #:HU10520PW7 std :3
hp StorageWorks File System Extender User Guide 61
Page 62

** /dev/sg7 id:0:0:10:3
SCSI device ID: port 0, ch 0, id 10, lun 3, type Storage Array 12
Device: HP NS E1200-160 5678 ser #:P088LB std :4
Done!
NOTE: If the Library Agent is running, the device for the library used by the agent is not seen in
the list.
TIP: You can also check the /proc/scsi/scsi file for a list of available SCSI devices.
Windows specific
C:\Program Files\Hewlett-Packard\FSE\bin>fse_scsi --scan
** \\.\Scsi2: id:2:0:1:0
SCSI device ID: port 2, ch 0, id 1, lun 0, type Medium Changer 8
Device: COMPAQ MSL5000 Series 0507 ser #: N/A std : N/A
** \\.\Scsi2: id:2:0:1:1
SCSI device ID: port 2, ch 0, id 1, lun 1, type Tape 1
Device: HP Ultrium 3-SCSI G24W ser #: N/A std : N/A
** \\.\Scsi2: id:2:0:1:2
SCSI device ID: port 2, ch 0, id 1, lun 2, type Tape 1
Device: HP Ultrium 3-SCSI G24W ser #: N/A std : N/A
** \\.\Scsi2: id:2:0:1:3
SCSI device ID: port 2, ch 0, id 1, lun 3, type Storage Array 12
Device: HP NS E1200-160 5669 ser #: N/A std : N/A
Done!
62 Configuring FSE
Page 63

2. Enter the values you get from the output of the above command to the configuration files for library and
drives, and check that all other parameters match the characteristics of your library and drives.
See ”Library and tape drive configuration examples” on page 63 for reference. You will configure your
media pool according to your drive configuration.
3. Configure the FSE library using the command:
fselibrary --add LibraryCfgFile
4. Once the library is configured, a new Library Agent is started. Media that are physically located in the
library are added to the FSE configuration automatically, but they are not yet assigned to the media
pool.
5. Configure the new FSE drive using the command:
fsedrive --add DriveCfgFile
The following are examples of configuration files for FSE libraries and various supported FSE tape drives.
The examples present configurations for all supported platforms, despite the fact that the differences in
configuration are minor (in these particular examples, the difference is in the ControlDevice variable).
Library and tape drive configuration examples
Example of a library configuration file
Linux specific
[FSE Library]
[Version = 1]
[Date = "2005/04/11 15:24:32"]
[User = "fse-administrator@company.com"]
#
# Specify a name for the tape library and a host name, where it
# resides. Use full host name.
#
Name = "HP MSL5000 #2 LTO"
Host = "fse_server.company.com"
#
# Control device is identification of library's
# (media changer's) on the specified system.
#
# Tip: use fse_scsi --scan to list available SCSI devices
#
# Linux: /dev/sgN
# Windows: id:P:B:T:L
#
ControlDevice = "/dev/sg0"
LibType = SCSI
# AIT - Sony AIT Family
# LTO - LTO Ultrium
MediaFamily = LTO
#
# Specify the slots that will be used with this library.
hp StorageWorks File System Extender User Guide 63
Page 64

# You can specify ranges of slot numbers and individual
# slot numbers.
#
# Example:
# Slots = (1-15, 20, 22, 24, 26-30)
#
[Slots]
Slots = (1-35)
64 Configuring FSE
Page 65

Windows specific
[FSE Library]
[Version = 1]
[Date = "2005/04/11 15:24:32"]
[User = "fse-administrator@company.com"]
#
# Specify a name for the tape library and a hostname, where it
# resides. Use full host name.
#
Name = "HP MSL5000 #2 LTO"
Host = "fse_server.company.com"
#
# Control device is identification of library's
# (media changer's) on the specified system.
#
# Tip: use fse_scsi --scan to list available SCSI devices
#
# Linux: /dev/sgN
# Windows: id:P:B:T:L
#
ControlDevice = "id:0:0:0:0"
LibType = SCSI
# AIT - Sony AIT Family
# LTO - LTO Ultrium
MediaFamily = LTO
#
# Specify the slots that will be used with this library.
# You can specify ranges of slot numbers and individual
# slot numbers.
#
# Example:
# Slots = (1-15, 20, 22, 24, 26-30)
#
[Slots]
Slots = (1-35)
Example of an AIT-WORM tape drive configuration file
Linux specific
[FSE Drive]
[Date = "2005/04/11 15:30:12"]
hp StorageWorks File System Extender User Guide 65
Page 66

[User = "fse-administrator@company.com"]
Name = "WORM 01"
Library = "GTL340i-AIT"
MediaFamily = AIT
DriveIndex = "1"
Capabilities = (WORM)
Host "fse_server.company.com"
{
ControlDevice = "/dev/sg3"
}
Windows specific
[FSE Drive]
[Date = "2005/04/11 15:30:12"]
[User = "fse-administrator@company.com"]
Name = "WORM 01"
Library = "GTL340i-AIT"
MediaFamily = AIT
DriveIndex = "1"
Capabilities = (WORM)
Host "fse_server.company.com"
{
ControlDevice = "id:1:0:4:0"
}
Example of an LTO Ultrium tape drive configuration file
Linux specific
[FSE Drive]
[Date = "2005/04/11 15:30:12"]
[User = "fse-administrator@company.com"]
Name = "LTO 01"
Library = "GTL340i-LTO"
MediaFamily = LTO
DriveIndex = "1"
Capabilities = ()
Host "fse_server.company.com"
66 Configuring FSE
Page 67

{
ControlDevice = "/dev/sg4"
}
Windows specific
[FSE Drive]
[Date = "2005/04/11 15:30:12"]
[User = "fse-administrator@company.com"]
Name = "LTO 01"
Library = "MSL6000-LTO"
MediaFamily = LTO
DriveIndex = "1"
Capabilities = ()
Host "fse_server.company.com"
{
ControlDevice = "id:0:2:0:0"
}
Step 2: configuring FSE media pools
For detailed information on creating a specific media pool type, see ”Configuring a media pool” on
page 82. Generally, you configure an FSE media pool as follows:
1. Set the proper values of FSE media partitioning parameters in the media pool configuration file. Check
that all other parameters match the characteristics of your media.
2. Add the FSE media pool to the FSE implementation using the command:
fsepool --add MediaPoolCfgFile
Step 3: preparing HSM file systems
You need to prepare an HSM file system for each FSE partition that you plan to configure. For details, see
”Creating and preparing new HSM file systems” on page 67.
You can also include the existing non-HSM file systems in the FSE implementation. All data on such file
systems is preserved and put under the FSE control. For more information, see ”Integrating existing file
systems in the FSE implementation” on page 68.
Creating and preparing new HSM file systems
On Linux systems, HSM file systems must be located on LVM volumes. On Windows systems, HSM file
systems must be located on separate disk volumes.
Preparing HSM file systems on Linux platform
For detailed LVM configuration steps on Linux platform, see the FSE Installation Guide, section ”Preparing
Logical Volume Manager (LVM) volumes” on page 29.
For steps for creating HSM file systems on top of LVM volumes, see the FSE Installation Guide, section
”Creating file systems on top of LVM logical volumes” on page 31.
The next step, configuring an FSE partition, is described in the FSE User’s Guide, section ”Configuring a
regular FSE partition on Linux platform” on page 69. For a WORM FSE partition configuration, see
”Configuring a WORM FSE partition” on page 71.
hp StorageWorks File System Extender User Guide 67
Page 68

Preparing HSM file systems on Windows platform
To create a separate volume (disk partition) for an HSM file system, proceed as follows:
1. In Control Panel, double-click Administrative Tools, and then double-click Computer Management.
2. Click Disk Management, right-click an unallocated region of a basic disk, and then click Create
Partition, or right-click free space in an extended partition, and then click Create Logical Drive. Note
that dynamic disks are also supported.
3. Follow the Create Partition Wizard. For the first three steps, set the appropriate options and click Next.
4. In the Assign Drive Letter or Path window, select either the Assign a drive letter or Mount this volume at
an empty folder that supports drive paths option and click Next. Possible choices are shown in the
following graphics.
Figure 14 Assigning a drive letter
Figure 15 Mounting a volume to an empty folder
5. In the next step of the Create Partition Wizard, accept the default options by clicking Next.
6. Click Finish to close the Create Partition Wizard and format the newly created partition.
For information on the access modes that are available for HSM file systems on Windows platform, see
”HSM file system access modes” on page 132.
The next step, configuring an FSE partition, is described in ”Configuring a regular FSE partition on
Windows platform” on page 70. For a WORM FSE partition configuration, see ”Configuring a WORM
FSE partition” on page 71.
Integrating existing file systems in the FSE implementation
Integrating existing file systems on Linux platform
On Linux platform, existing Ext3 file systems residing on LVM volumes can be used, provided they are
remounted as HSM file systems after the belonging FSE partitions are configured.
For details on how to integrate existing file systems on a particular platform, see the FSE Installation Guide,
appendix ”Integrating existing file systems in the FSE implementation”, section ”Integrating existing file
systems on Linux platform”.
The next step, configuring an FSE partition, is described in the FSE User’s Guide, section ”Configuring a
regular FSE partition on Linux platform” on page 69. For a WORM FSE partition configuration, see
”Configuring a WORM FSE partition” on page 71.
Integrating existing file systems on Windows platform
On Windows platform, you can use existing disk volumes (partitions); you only need to dismount the
Windows native NTFS file system, and configure the corresponding FSE partitions afterwards.
68 Configuring FSE
Page 69

For details on how to integrate existing file systems on a particular platform, see the FSE Installation Guide,
appendix ”Integrating existing file systems in the FSE implementation”, section ”Integrating existing file
systems on Windows platform”.
The next step, configuring an FSE partition, is described in the FSE User’s Guide, section ”Configuring a
regular FSE partition on Windows platform” on page 70. For a WORM FSE partition configuration, see
”Configuring a WORM FSE partition” on page 71.
Step 4: configuring FSE partitions
NOTE: A particular FSE partition is related to a single HSM file system and one or more FSE media pools.
Configuring a regular FSE partition on Linux platform
After you have configured FSE media pools and prepared an HSM file system, you can configure FSE
partitions as follows:
1. The FSE partition configuration contains a major:minor number pair for the HSM file system. To get
these two parameters, enter the command below.
# ls -l /dev/vg_fse/fs02
brw-rw---- 1 root disk 58, 12 2005-12-04 00:48 \
/dev/vg_fse/fs02
NOTE: If the file system is located on an FSE client, the command has to be run on the client
machine. It is mandatory to provide the information where the file system is located.
2. You can find the major number in the fifth column and the minor number in the sixth column; edit the
FSE partition configuration file accordingly.
#
# Where is the HSM file system?
#
Client "linux_fse_host.company.com"
{
FileSystemID = 58:12 # e.g. 58:1, Linux client
# FileSystemID = "Volume{xxxxxxxx-xxxx-xxxx-xxxx-xxxxxxxxxxxx}"
# Windows client
Type = Regular
# Regular - regular read/write file system
# WORM - Write-Once-Read-Many file system
# uncomment and configure if Type = WORM :
# WORMTimeout = 450s
}
3. Decide which FSE media pools should be assigned to the FSE partition, and specify an appropriate
value for the Pools variable in the configuration file.
CAUTION: Once migrations have already been running on the FSE partition, you cannot change
the set of FSE media pools that are assigned to the FSE partition any more.
hp StorageWorks File System Extender User Guide 69
Page 70

4. Add the new FSE partition:
# fsepartition --add PartitionCfgFile
Once the partition is configured, a new Partition Manager is started for the newly configured partition.
5. Optionally, check the status of the partition and the belonging Partition Manager using the following
command:
# fsepartition --status PartitionName
Configuring a regular FSE partition on Windows platform
When configuring a volume for the HSM file system, verify that the prerequisites are met, and consider the
following points about volume configuration.
About Windows disk volumes
A Windows physical disk can be subdivided into volumes. Each volume has its unique volume ID, for
example Volume{729f2319-ba82-11d7-a2d5-00e01884ee37}. These volume IDs only change
when the partitioning scheme of the physical disk changes. You get this unique volume ID using the
mountvol command.
CAUTION: Windows FSE clients use volume IDs for identifying the disk volumes of the configured FSE
partitions. Volume IDs are volume name strings without the \\?\ prefix and the trailing backslash. When
configuring an FSE partition, ensure that you use volume ID and not volume name for the FileSystemID
variable in the FSE partition configuration file.
FSE partition configuration procedure
To configure an FSE partition, proceed as follows:
1. At the command prompt, enter the mountvol command. Select the volume ID of the FSE partition.
This is an example of the mountvol command output:
C:\Program Files\Hewlett-Packard\FSE\bin>mountvol
...
Possible values for VolumeName along with current mount points are:
\\?\Volume{97d09c72-b208-11d7-8f8b-806d6172696f}\
C:\
\\?\Volume{97d09c73-b208-11d7-8f8b-806d6172696f}\
D:\
\\?\Volume{f6f3e1b6-b2ac-11d7-9c99-00b0d02fadef}\
D:\hsm_fs_folder
\\?\Volume{97d09c71-b208-11d7-8f8b-806d6172696f}\
F:\
\\?\Volume{97d09c70-b208-11d7-8f8b-806d6172696f}\
A:\
2. In the command output, mark and copy the \\?\Volume{number}\ value above the line
D:\hsm_fs_folder.
In the above example, you would copy the value:
\\?\Volume{f6f3e1b6-b2ac-11d7-9c99-00b0d02fadef}\
3. Paste the volume name without the \\?\ prefix and the trailing backslash in the FileSystemID field
in the FSE partition configuration file.
70 Configuring FSE
Page 71

Example of the required format of the volume ID is shown in this excerpt of the partition configuration
file:
# Where is the HSM file system?
#
Client "windows_fse_host.company.com"
{
# FileSystemID = _HSM_FS_MAJOR_:_HSM_FS_MINOR_
# e.g. 58:1, Linux client
FileSystemID="Volume{f6f3e1b6-b2ac-11d7-9c99-00b0d02fadef}"
# Windows client
Type = Regular
# Regular - regular read/write file system
# WORM - Write-Once-Read-Many file system
# uncomment and configure if Type = WORM :
# WORMTimeout = 450s
}
4. Decide which FSE media pools should be assigned to the FSE partition, and specify an appropriate
value for the Pools variable in the configuration file.
CAUTION: Once migrations have already been running on the FSE partition, you cannot change
the set of FSE media pools that are assigned to the FSE partition any more.
5. Add the new FSE partition:
C:\>fsepartition --add PartitionCfgFile
Once the partition is configured, a new Partition Manager is started for the newly configured partition.
6. Determine the name of the disk volume that belongs to the FSE partition using mountvol first, and
then invoke the following command:
C:\>fse --dismount-ntfs VolumeName
The command will detach the automatically attached NTFS from the volume and allow it to be mounted
later as an HSM file system.
7. Optionally, check the status of the FSE partition and the belonging Partition Manager:
C:\>fsepartition --status PartitionName
Configuring a WORM FSE partition
FSE provides an option to configure an HSM file system as a WORM (Write-Once Read-Many) file system.
The Type parameter in the FSE partition configuration file defines whether the type of a file system is
“regular” or “WORM”.
IMPORTANT: A WORM FSE partition cannot be changed to a regular FSE partition.
On an FSE WORM file system a file can be written only once but can be read many times. A WORM file
system prevents both files and their metadata, including access control rights and file attributes, from being
modified, regardless of access permissions. Consequently, it is not possible to remove files from directories
or rename them, but only to add new files.
hp StorageWorks File System Extender User Guide 71
Page 72

There is also a timeout parameter (WORMTimeout) that defines the interval during which it is possible to
modify or delete a file after the file is closed. During this interval, the file contents and its metadata can be
modified; the file can be renamed, moved, or removed. Once the interval has expired, the file, its
metadata, and location can never be modified again. This parameter is commented out in the template
file. It must be uncommented if the file system type is “WORM”. The timeout value must be set according to
the specific archiving environment.
NOTE: If a WORM FSE partition is used for accounting or legislation applications, it must be related only
to WORM FSE media pools.
Examples of configuration files for WORM FSE partitions
The following is an example of a WORM FSE partition configuration file on Linux platform.
Linux specific
#
# Where is the HSM file system?
#
Client "fse_host.company.com"
{
FileSystemID = 58:2 # e.g. 58:1, Linux client
# FileSystemID = "Volume{xxxxxxxx-xxxx-xxxx-xxxx-xxxxxxxxxxxx}"
# Windows client
Type = WORM
# Regular - regular read/write file system
# WORM - Write-Once-Read-Many file system
# uncomment and configure if Type = WORM :
WORMTimeout = 60s
}
#
# Specify which media pool(s) will be used for storing data to.
#
# NOTE: The number of pools specified defines the number of copies to
# be done.
#
Pools = ("MyWORMPool1", "MyWORMPool2")
The differences between configuration files for WORM FSE partitions located on Linux and Windows hosts
are the same as with regular FSE partitions.
Step 5: preparing FSE media
Once all FSE resources except media are configured, follow the procedure below to prepare FSE media.
For specifics on preparing disk media, see ”Disk media specifics” on page 89.
72 Configuring FSE
Page 73

NOTE: A particular FSE medium is related to a single FSE media pool, single FSE partition, and single
FSE library.
1. Create an entry for the FSE medium and add it to the already configured media pool:
fsemedium --add Barcode --pool PoolName
2. Physically place the FSE medium into a free library slot, and then trigger a physical inventory update
(barcode rescan):
fselibrary --update-inventory LibraryName --rescan
3. Format the medium using the command below. If the medium is already properly formatted
(partitioned), skip this step and proceed with initialization.
fsemedium --format Barcode
CAUTION: Formatting erases all data on the medium.
In case the medium has already been formatted and used by the FSE implementation, you need to use
an additional --force option:
fsemedium --format Barcode --force
NOTE: The option --force will allow formatting of the FSE medium only if there is no valid FSE
user data stored on it (% used of all medium volumes is zero).
During formatting, the FSE medium is partitioned into FSE media volumes.
4. Once the medium is formatted, you must initialize the FSE media volumes created on it. For more
information on media volumes, see ”FSE medium volumes” on page 86.
For regular initialization use the following command:
fsemedium --init Barcode
For forced initialization use the following command:
fsemedium --init Barcode --force
NOTE: You can execute both formatting and initializing at once by using the command
fsemedium --format Barcode --init.
Once FSE media are formatted and initialized, the HSM file system can be mounted.
Step 6: mounting HSM file systems
After you have configured FSE resources, you have to mount the HSM file systems on machines that host
HSM file systems, that is on a consolidated FSE implementation or on an external FSE client. Once the file
systems are mounted, the FSE implementation is ready to be used.
NOTE: A particular HSM file system is related to a single FSE partition.
Mounting HSM file systems on Linux platform
To mount the local HSM file systems and automate subsequent mounting of them, proceed as follows. Use
the mount points and device file paths from your actual file system configuration on the local host:
hp StorageWorks File System Extender User Guide 73
Page 74

1. Check the status of the FSE partitions using the following command:
# fsesystem --status
The status for all configured partitions must be “ready”.
2. Create a directory that will serve as a mount point for the HSM file system:
# mkdir /fse/fsefs_01
3. Add the corresponding file system entry to the local file /etc/fstab.This step is platform dependent.
Linux specific
Add the following line to the /etc/fstab file:
/dev/vg_fsefs/fsefs_01 /fse/fsefs_01 hsmfs noauto 0 2
CAUTION: You must use the values in the third1, fourth2, fifth, and sixth column as specified
above. You may use different values in the first and second column according to your actual LVM
volume configuration.
The following notes apply:
•The keyword hsmfs in the third column refers to the file system type, which is the HSM file system.
•The keyword noauto refers to the file system mounting options. An HSM file system cannot be
automatically mounted at system startup when the local FSE processes are not running yet.
4. If necessary, repeat the steps 2 and 3 for all other local HSM file systems that you plan to use. Note
that their associated FSE partitions must already be configured.
5. Mount the local HSM file systems. This step depends on where you are about to mounting the HSM file
systems.
CAUTION: To avoid obstructing other FSE users and the operation of already existing HSM file
systems, it is necessary that you choose the mounting mode as appropriate.
If you are mounting the file systems on an integrated FSE system with connected external FSE clients or
on any FSE host where other local HSM file systems are already put into use, enter the following
command for each newly configured HSM file system:
# mount /fse/fsefs_01
If you are mounting HSM file systems on a newly installed FSE host, enter the following command to
mount all locally configured HSM file systems:
# fse --restart
Mounting HSM file systems on Windows platform
Mounting disk volumes on Windows is in fact performed by the operating system automatically on its first
use. When an object on the disk volume (HSM file system) is accessed, the HSM file system is
automatically mounted in Full Access Mode (FAM) (if the FSE processes are already running) or in Limited
Access Mode (LAM) (if the FSE processes are not running yet). For more information on HSM file system
access modes, see ”HSM file system access modes” on page 132.
Additionally, if the FSE processes are running, use the following command to mount an HSM file system in
Full Access Mode before it is actually accessed:
C:\>fse --mount MountPoint VolumeName
In either case you can later check if the HSM file system is available as follows:
1. The keyword hsmfs in the third column refers to the type of file system. This is an HSM file system.
2. The keyword noauto refers to the file system mounting option. An HSM file system cannot be automatically mounted at system
boot time before FSE startup.
74 Configuring FSE
Page 75

1. At the command prompt, use the cd command to change the current directory to the mount point of the
HSM file system, and run the dir command.
2. Invoke the following command:
C:\>fsepartition --list
In the command output, the corresponding FSE partition should have its status set to mounted.
NOTE: For information on how to determine the access mode for a particular HSM file system or
troubleshoot potential problems with disk volume access, see the description of the fse command in the
FSE command-line reference.
Reconfiguring FSE interprocess communication
FSE interprocess communication is configured according to the FSE implementation (consolidated,
distributed, or mixed FSE implementation) and the network type used for FSE interprocess communication
(ordinary LAN, private network). The initial configuration must be performed after the FSE software
package installation, before the FSE implementation is put into operation for the first time. Afterwards, if
the implementation or the network type is changed, the communication settings must be reconfigured.
CAUTION: An appropriate configuration of the FSE interprocess communication is of crucial importance
for normal FSE operation. An improperly modified communication configuration may lead to a
non-operating FSE implementation.
FSE interprocess communication settings consist of two plain text files installed on each FSE host. The files
and their locations are the following:
Configuration file Location on Linux platform Location on Windows platform
services.cfg /etc/opt/fse %InstallPath%\etc
omniORB.cfg /etc/opt/fse %InstallPath%\etc
NOTE: .Depending on the network type used for interprocess communication in your FSE implementation
(LAN, private network), omniORB.cfg may not be present in the specified directory. You can always find
its template in the directory /opt/fse/newconfig and copy the file to its target location, if needed.
You can also change the default path where FSE searches for the omniORB.cfg file using the
OMNIORB_CONFIG environment variable.
The reconfiguration procedure
The general procedure for reconfiguring interprocess communication is as follows:
1. Stop all FSE processes with the fse --stop command.
Note that you must first stop the processes on external FSE clients, and then stop the processes on a
consolidated FSE implementation or on the FSE server.
2. Stop the omniNames service with the omniNames --stop command.
3. Purge the omniNames (CORBA) service data files. Their location is platform-dependent.
Linux specific
On Linux platform, omniNames service data files are located in the directory
/var/opt/fse/omniorb.
Windows specific
On Windows platform, omniNames service data files are located in the directory
%InstallPath%\var\omniorb.
hp StorageWorks File System Extender User Guide 75
Page 76

4. Modify the services.cfg or omniORB.cfg file on all FSE hosts according to the changes in your
FSE implementation or changes of the network type employed. The required modifications are
described in the following sections.
You can use FSE proprietary fse_net tool to retrieve the parameters required for the configuration. For
more information on fse_net, see ”FSE troubleshooting tools” on page 223.
NOTE: SUSE LINUX specific
On a SUSE LINUX system, do not run YaST2 after you have configured this FSE host to use a private
network for the FSE interprocess communication. Running YaST2 modifies /etc/hosts in such a
way that the subsequent FSE implementation startups fail.
Alternatively, you can modify /etc/sysconfig/suseconfig by changing the line
CHECK_ETC_HOSTS="yes" to CHECK_ETC_HOSTS="no". You can then run YaST2 without
affecting FSE operation, but you cannot modify host names with it.
5. Start the omniNames service and all FSE processes using the fse --start command.
Note that you must first start the processes on a consolidated FSE implementation or on the FSE server,
and then start the processes on external FSE clients.
CAUTION: In the following procedures for configuring a LAN connection, if you reconfigure a system with
several network adapters enabled, you must configure the omniORB.cfg file as described in the
procedures for configuring private network communications, instead of renaming the file.
In this case, the parameters you specify in omniORB.cfg must be verified against the actual LAN
configuration for that system.
Reconfiguring communication on a consolidated FSE implementation or on an FSE server
Ordinary LAN connection
This section describes the configuration procedure for the following situations:
• if your FSE implementation consists of a consolidated FSE implementation and you do not plan to
connect external FSE clients to it.
• if you want your external FSE clients to communicate with the consolidated FSE implementation or with
the FSE server through an ordinary LAN.
Perform the following steps:
1. Ensure that the value of the server variable in services.cfg equals the fully-qualified domain
name (FQDN) that identifies the consolidated FSE implementation or the FSE server inside the LAN.
The following is an example of a properly configured services.cfg file in FSE implementation using
an ordinary LAN. The file can also include the hostname variable, but this variable is redundant in
such FSE implementation.
server = lan-server.company.com
2. Rename the omniORB.cfg file (for example, to omniORB.bak) on the consolidated FSE
implementation or the FSE server so that you will be able to retrieve it later, if required.
Private network connection
If your external (distributed) FSE clients will use a private network for communicating with the FSE server,
make the following modifications on the FSE server:
1. Add the hostname variable (if not present) to services.cfg and set its value to the fully-qualified
domain name (FQDN) that identifies the system inside the private network.
76 Configuring FSE
Page 77

The following is an example of a properly configured services.cfg file in FSE implementations
using a private network. The server variable is redundant in such FSE implementation.
hostname = fse-server.fsenet
server = private-server.company.com
2. Rename the omniORB.cfg backup file (for example, omniORB.bak) back to omniORB.cfg. Modify
the following parameters in the file:
• the FQDN that identifies the system inside the private network
• the IP address of the system
• the subnet mask
All these parameters must be verified against the actual private network configuration. Ensure that the
FQDN you specify in omniORB.cfg matches the FQDN specified for the hostname variable in the
services.cfg file.
The following is an example of a properly configured omniORB.cfg file:
# Which interface omniORB uses for IORs
endPoint = giop:tcp:private-server.company.com:
# The order of network interfaces to use for accepting connections:
# Only localhost and private network. Others are denied.
clientTransportRule = localhost tcp
clientTransportRule = 192.168.240.0/255.255.255.0 tcp
clientTransportRule = * none
# The order of network interfaces to use for opening new connections:
# Only localhost and private network. Others are denied.
serverTransportRule = localhost tcp
serverTransportRule = 192.168.240.0/255.255.255.0 tcp
serverTransportRule = * none
Reconfiguring communication on external Linux FSE clients
Ordinary LAN connection
If the external Linux FSE clients and the consolidated FSE implementation or the FSE server will
communicate through an ordinary LAN, you have to modify the services.cfg file on each external
Linux FSE client, as follows:
1. Ensure that the value of the server variable in services.cfg equals the fully-qualified domain
name (FQDN) that identifies the consolidated FSE implementation or the FSE server inside the LAN.
The following is an example of a properly configured services.cfg file in FSE implementations
using an ordinary LAN. The file can also include the hostname variable, but this variable is redundant
in such FSE implementation.
server = lan-server.company.com
2. Rename the omniORB.cfg file (for example, to omniORB.bak) on the consolidated FSE
implementation or the FSE server so that you will be able to retrieve it later if required.
3. Repeat step 2 of this procedure on the external Linux FSE client.
hp StorageWorks File System Extender User Guide 77
Page 78

Private network connection
If the external (distributed) Linux FSE clients will communicate through a private network to the FSE server,
you must modify both configuration files, services.cfg and omniORB.cfg, on each external Linux
client, as follows:
1. Modify the value of the server variable in services.cfg to contain the fully-qualified domain
name (FQDN) that identifies the consolidated FSE implementation or the FSE server inside the private
network.
2. Add the hostname variable (if not present) to services.cfg and set its value to the FQDN that
identifies the Linux FSE client inside the private network.
The following is an example of a properly configured services.cfg file in FSE implementations
using a private network:
hostname = fse-client.fsenet
server = private-server.company.com
3. Rename the omniORB.cfg backup file (for example, omniORB.bak) back to omniORB.cfg. Modify
the following parameters in the file:
• the FQDN that identifies the consolidated FSE implementation or the FSE server inside the private
network
• the IP address of the system
• the subnet mask
All these parameters must be verified against the actual private network configuration. Ensure that the
FQDN you specify in omniORB.cfg matches the FQDN specified for the server variable in the
services.cfg file.
The following is an example of a properly configured omniORB.cfg file:
# Which interface omniORB uses for IORs
endPoint = giop:tcp:private-server.company.com:
# The order of network interfaces to use for accepting connections:
# Only localhost and private network. Others are denied.
clientTransportRule = localhost tcp
clientTransportRule = 192.168.240.0/255.255.255.0 tcp
clientTransportRule = * none
# The order of network interfaces to use for opening new connections:
# Only localhost and private network. Others are denied.
serverTransportRule = localhost tcp
serverTransportRule = 192.168.240.0/255.255.255.0 tcp
serverTransportRule = * none
Reconfiguring communication on external Windows FSE clients
Ordinary LAN connection
If the external Windows FSE clients and the consolidated FSE implementation or the FSE server will
communicate through an ordinary LAN, you have to modify the services.cfg file on each external
Windows client, as follows:
78 Configuring FSE
Page 79

1. Ensure that the value of the server variable in services.cfg equals the fully-qualified domain
name (FQDN) that identifies the consolidated FSE implementation or the FSE server inside the LAN.
The following is an example of a properly configured services.cfg file in FSE implementations
using an ordinary LAN. The file can also include the hostname variable, but this variable is redundant
in such FSE implementation.
server = lan-server.company.com
2. Rename the omniORB.cfg file (for example, to omniORB.bak) on the consolidated FSE
implementation or the FSE server so that you will be able to retrieve it later if required.
Private network connection
If the external Windows FSE clients and the consolidated FSE implementation or the FSE server will
communicate through a private network, you must modify both configuration files, services.cfg and
omniORB.cfg, on each external Windows client, as follows:
1. Modify the value of the server variable in services.cfg to contain the fully-qualified domain
name (FQDN) that identifies the consolidated FSE implementation or the FSE server inside the private
network.
2. Add the hostname variable (if not present) to services.cfg and set its value to the FQDN that
identifies the Windows FSE client inside the private network.
The following is an example of a properly configured services.cfg file in FSE implementations
using a private network:
hostname = fse-windows-client.fsenet
server = private-server.company.com
3. Rename the omniORB.cfg backup file (for example, omniORB.bak) back to omniORB.cfg. Modify
the following parameters in the file:
• the FQDN that identifies the consolidated FSE implementation or the FSE server inside the private
network
• the IP address of the system
• the subnet mask
All these parameters must be verified against the actual private network configuration. Ensure that the
FQDN you specify in omniORB.cfg matches the FQDN specified for the server variable in the
services.cfg file.
The following is an example of a properly configured omniORB.cfg file:
# Which interface omniORB uses for IORs
endPoint = giop:tcp:private-server.company.com:
# The order of network interfaces to use for accepting connections:
# Only localhost and private network. Others are denied.
clientTransportRule = localhost tcp
clientTransportRule = 192.168.240.0/255.255.255.0 tcp
clientTransportRule = * none
# The order of network interfaces to use for opening new connections:
# Only localhost and private network. Others are denied.
serverTransportRule = localhost tcp
hp StorageWorks File System Extender User Guide 79
Page 80

serverTransportRule = 192.168.240.0/255.255.255.0 tcp
serverTransportRule = * none
Changing the IP address of an FSE host
When changing the IP address of a host of the FSE implementation, proceed as follows:
1. Stop the FSE processes with fse --stop.
2. Stop the omniORB naming service with omniNames --stop.
3. Remove all files in the directory for temporary omniORB files. This directory is platform-dependent.
Linux specific
The temporary omniORB directory is /var/opt/fse/omniorb.
Windows specific
The temporary omniORB directory is %InstallPath%\var\omniorb.
The value of %InstallPath% depends on the choice made in the FSE installation process. It defaults
to C:\Program Files\Hewlett-Packard\FSE.
4. Change the IP address of the host using the operating system tools.
5. If the omniORB.cfg file is configured, change its contents appropriately.
For more information, see ”Reconfiguring FSE interprocess communication” on page 75.
6. Start the omniORB naming service and FSE processes with fse --start.
80 Configuring FSE
Page 81

4 Managing media
The way you manage FSE media can significantly increase the stability and performance of your FSE
implementation. Managing media consists of tasks that are related to the media life cycle, from formatting,
initialization and optional duplication for data vaulting, to replacing worn-out media and media
reorganization.
FSE supports several media types, which are grouped into appropriate media pools. These media pools
are created by the FSE administrator according to their purpose, for example, a backup pool for media is
used only for backup and holds only one type of media.
All media must be formatted and initialized before they can be used for data storage by FSE. Then you are
able to track media pools and media, review their characteristics and statuses, make exact copies of your
media, or decide on multiple copies made at once. For specifics regarding disk media, see ”Disk media”
on page 87.
This chapter includes the following topics:
• FSE media pools, page 81
• FSE media, page 86
FSE media pools
An FSE media pool is common storage for the migrated HSM file system data. It groups media of the same
type into a logical unit, which is tracked as a group. All media in the same FSE media pool share such
characteristics as number of medium volumes, availability of system volumes, capacity of medium volumes,
and so on (see ”FSE media” on page 86 for more information on media types and characteristics). Media
in the same media pool can be located in multiple FSE tape libraries or disk systems.
A media pool is related to one FSE partition only and cannot be assigned to more than one partition.
However, an FSE partition can have more than one media pool assigned to it, but the assigned media
pools must be either regular or WORM. Note, however, that FSE 3.2 does not support any WORM media.
The number of media pools assigned to the FSE partition determines the number of copies to be made. For
more information on multiple copying, see ”Multiple copying” on page 131.
The procedures in this section provide instructions for:
• Media pool types and their characteristics, page 81
• Configuring a media pool, page 82
• Determining the configured media pools, page 84
• Checking the status of a particular media pool, page 85
Media pool types and their characteristics
The media pool type is defined in the media pool configuration file. Location of configuration templates is
platform-dependent.
Linux specific
Configuration templates for FSE media pools are located in the directory /opt/fse/newconfig.
Windows specific
Configuration templates for FSE media pools are located in the directory %InstallPath%\newconfig.
The value of %InstallPath% depends on the choice made in the FSE installation process. It defaults to
C:\Program Files\Hewlett-Packard\FSE.
For more information on editing templates, see ”Configuration basics” on page 38. Examples of FSE
media pool configuration are listed in the next section, ”Configuring a media pool” on page 82.
• Regular media pool
hp StorageWorks File System Extender User Guide 81
Page 82

This media pool type is the most common one since it is used for regular archiving of the migrated FSE
implementation data. It contains FSE media that can be overwritten, reorganized, reinitialized, and
reformatted.
• WORM media pool
Used for WORM media only. On these media, data can be recorded only once, therefore WORM
media pool type is particularly suitable for storing permanent archives. It is used to migrate files stored
on an WORM HSM file system accordingly. Note that FSE 3.2 does not support any WORM media.
• Backup media pool
Used for backup media only. A backup media pool is used differently to other media pools; since
backup media do not store user data migrated from an HSM file system, but are only meant for storing
backup copies of the FSE implementation, there is only one backup FSE media pool configured in FSE.
A backup media pool must be configured with only one volume, and backup media in such a pool
should not be initialized. For details about FSE backup, see chapter ”Backup, restore, and recovery” on
page 171.
Configuring a media pool
A configured media pool is a prerequisite for the partition configuration. Each FSE partition is located on a
separate HSM file system and must have at least one configured media pool.
Depending on the data characteristics of each partition, media type which you want to use for archiving
such data as well as the archiving purpose (regular archiving, backup, or WORM for permanent data
archiving) you need to create the appropriate media pool type.
NOTE: The maximum number of medium volumes per disk medium is 255. When configuring a disk
media pool, you need to specify the VolumeSize parameter large enough that 255 * VolumeSize is
larger than the complete disk medium. Otherwise a warning is issued and the number of volumes is set to
255, leaving some unused space.
To configure a media pool, select the appropriate template, modify it and then apply it to configure a new
FSE media pool.
1. Locate the wanted configuration template in the newconfig directory, for example
fse-pool-LTO.cfg, and copy it to the selected directory. For configuration template location, see
”Media pool types and their characteristics” on page 81.
The example below shows how you copy the template fse-pool-LTO.cfg to the directory
MyConfiguration.
Linux specific
# cd MyConfiguration
# cp /opt/fse/newconfig/fse-pool-LTO.cfg MediaPoolCfgFile
Windows specific
D:\FSE>cd MyConfiguration
D:\FSE\MyConfiguration>copy
"C:\Program Files\Hewlett-Packard\FSE\newconfig\fse-pool-LTO.cfg"
MediaPoolCfgFile
2. Set the proper values of the FSE media partitioning parameters in the media pool configuration file.
Check that all other parameters match the characteristics of your media.
Windows specific
Note that some Windows host bus adapter (HBA) drivers (particularly Adaptec and QLogic) do not
support large block sizes by default. You can increase the transfer size by adding the MaximumSGList
value to DWORD registry setting. See section ”Media management problems” on page 201 for
details.
Check the following examples for the specifics according to different pool types, and then continue
applying the modified templates.
82 Managing media
Page 83

Example of an LTO media pool configuration file
[FSE Pool]
[Version = 1]
[Date = "2005/04/10 16:11:26"]
[User = "fse-administrator@company.com"]
#
# Specify the name of the media pool. Media pools are
# used by FSE partitions.
#
# NOTE: You have to assign media to pools with fsemedium command.
#
Name = "My_LTO_Pool"
MediaFamily = LTO
# Regular - regular media pool for FSE partition
# Backup - media pool for backup media
PoolType = Regular
#
# Change the values of the on-tape format if the defaults don't suit
you.
#
# NOTE: Some of the parameters will be used only if the tapes are
# (re)formatted.
#
[DefaultFormat]
BlockSize = 32KB #min=4KB max=1536KB
# Single volume only supported on LTO. Therefore, no system volume is
# created on the LTO tape.
NumOfVolumes = 1
SysVolLocation = None
SizeOfSysVol = 0MB
Example of a disk media pool configuration file
[FSE Pool]
[Version = 1]
[Date = "2005/04/10 17:30:00"]
[User = "fse-administrator@company.com"]
hp StorageWorks File System Extender User Guide 83
Page 84

#
# Specify the name of the media pool. Media pools are
# used by FSE partitions.
#
# NOTE: You have to assign media to pools with fsemedium command.
#
Name = "My_DM_pool"
MediaFamily = DISK
PoolType = Regular
#
# Change the values of the on-tape format if the defaults don't suit
you.
#
# NOTE: Some of the parameters will be used only if the tapes are
# (re)formatted.
#
# Mountpoint should be 254G to store the capacity of 5 x AIT2
#
[DefaultFormat]
BlockSize = 32KB #min=4KB max=1536KB
VolumeSize = 100GB #min=100MB max=2000GB
3. To configure a new media pool, apply the modified template:
fsepool --add MediaPoolCfgFile
You have configured a new FSE media pool. Its configuration is stored in the Configuration Database as
the first respective configuration revision. For more information, see ”Configuration Database” on page 39.
Once the media pool is configured, you need to add media that you want to use for FSE operation to this
pool, as described in ”Adding media to an FSE media pool” on page 90.
Determining the configured media pools
You can determine the attributes of all configured media pools in the FSE implementation by running the
following command:
fsepool --list [--detail]
The command output lists the names and attributes of all currently configured FSE media pools in the FSE
implementation, as follows:
• the media pool family and type,
• the owning partition name,
• the medium block size,
• the number of volumes on the medium,
• the data volume size,
• the location of an optional system volume on the medium,
84 Managing media
Page 85

• the system volume size.
You can specify most of these attributes in the media pool configuration file.
If you use the --detail option, fsepool formats the output in a different way, and displays additional
FSE media pool attributes, as follows:
• the UUID of the pool,
• the UUID of the owning partition,
• the media pool’s RMDB entry key.
These attributes are assigned automatically by FSE during the FSE media pool (or FSE partition)
configuration.
Excerpt from the fsepool --list output
Pool Family Type Partition BlkSize[KB] #Vol VSize[MB] SysVol SysVol[MB]
my_LTO LTO Regular partLTO 128 1 n/a None n/a
my_Disk DISK Regular partLTO 64 1 100 None n/a
Excerpt from the fsepool --list --detail output
Pool: my_LTO
UUID: c8898640-8f8a-44aa-a6fd-47687ac1f791
Family: LTO
Type: Regular
Partition: partLTO
PartUUID:
BlkSize[KB]: 128
#Vol: 1
VSize[MB]: n/a
SysVol: None
SysVol[MB]: n/a
Key: 1
Pool: my_Disk
UUID: f264a661-1076-41dc-baab-bae7aed9e15b
Family: DISK
Type: Regular
Partition: partLTO
PartUUID:
BlkSize[KB]: 128
#Vol: 1
VSize[MB]: 100
SysVol: None
SysVol[MB]: n/a
Key: 2
Checking the status of a particular media pool
To check the current status of a particular media pool, you must determine the FSE partition to which the
media pool belongs. Run the following command:
fsepool --list [--detail]
hp StorageWorks File System Extender User Guide 85
Page 86

In the fsepool command output, locate the name of the owning partition and supply it as an argument to
the fsepartition command as follows:
fsepartition --status PartitionName
The output of this command lists the names of all media pools that are currently assigned to the selected
partition, and their current status, as follows:
• the total and available capacity of all data volumes on media belonging to the media pool,
• the percentage of data volume usage,
• the total and available capacity of all system volumes on media in the media pool,
• the percentage of system volume usage,
• the numbers of good, unreliable, unusable, and uninitialized media of the media pool.
Excerpt from the fsepartition --status output
Pool Size[MB] Avail[MB] Used[%] SysSize[MB] SysAvail[MB]
poolLTO 92173 70397 24 0 0
SysUsed[%] #Good #Unreliable #Unusable #Uninit
0 2 0 0 0
FSE media
An FSE implementation supports tape media as well as disk media. Each FSE medium has an entry and
properties written in the Resource Management Database (RMDB) and is assigned to one FSE media pool
according to its type. The Resource Manager identifies the medium with a barcode, which is either
acquired automatically from the media library or specified manually when adding media to the media
pool. A medium barcode must be unique - no other tape or disk medium in any of the libraries managed
by a particular FSE implementation can have the same barcode.
Once the medium is added to the FSE media pool, it can be prepared for use by the FSE implementation.
Preparation includes formatting and initializing of the FSE media. Formatting depends on media
technology support for multiple volumes. Next step is initialization, which overwrites the volume header
and adds the medium volume entry to the Resource Management Database. Both media formatting and
initialization are processed by an administrative job and are executed by the Back End Agent.
Disk media emulates tape media to a great extent and can be used for regular archiving of the migrated
FSE implementation. The advantage of using disk media is accelerated recall of offline files.
The fsemedium command is used to monitor and manage FSE media. It is also used to invoke
administrative jobs, which perform FSE media formatting and initialization of new or already used media.
The procedures in this section provide instructions on:
• Adding media to an FSE media pool, page 90
• Formatting media, page 90
• Initializing media, page 91
• Duplicating media, page 92
• Reorganizing media, page 94
• Recreating redundant copies of migrated data, page 100
• Checking the status of media, page 104
• Changing the condition status of media, page 106
• Closing medium volumes, page 106
• Recreating Fast Recovery Information from media, page 107
• Removing FSE media, page 107
FSE medium volumes
There are two types of medium volumes:
86 Managing media
Page 87

• Data volume
Used to store regular migration data. Each FSE medium must have at least one data volume; usually, an
FSE medium is partitioned into several data volumes. LTO Ultrium media do not support multiple
medium volumes, and they do not need to be formatted. FSE supports up to 255 data volumes on disk
media.
FSE media types
The following is a list of the supported media types and their characteristics:
• LTO Ultrium 1, LTO Ultri um 2, LTO Ultrium 3
Used in regular and backup media pools.
LTO Ultrium 1, LTO Ultrium 2, and LTO Ultrium 3 media do not support multiple volumes and do not
need to be formatted. A single data volume is created on such media during initialization.
If a medium is used as a backup medium, it must be configured with only one volume, and backup
media in such a pool should be formatted but not initialized. For details about backup media, see
”Backup media management” on page 175.
• Disk media
Used in regular media pools.
Disk media are implemented as a file system mounted to a subdirectory on the consolidated FSE
implementation or an FSE server. For example, two disk media are represented as
/var/opt/fse/dm/dm000001 and /var/opt/fse/dm/dm000002. The last part of a pathname
(dm000001, dm000002) is used as a ‘barcode’ for identification of disk media. This naming
convention prevents disk media interfering with real barcodes.
Linux specific
On Linux platform, disk media are located in the directory /var/opt/fse/dm.
Windows specific
On Windows platform, disk media are located in the directory %InstallPath%\var\dm.
The value of %InstallPath% depends on the choice made in the FSE installation process. It defaults
to C:\Program Files\Hewlett-Packard\FSE.
A file system for disk media can be either local or remote. For more information, see ”Disk media” on
page 87.
Disk media
An FSE disk medium is a mounted file system that emulates an FSE tape medium; therefore, managing disk
media is similar to managing tape media. Using FSE disk media is advantageous in terms of recall, since
it significantly decreases the time required to bring files back online (offline file access times).
When an FSE user requests an offline file, a recall job first attempts to allocate a medium from the FSE disk
media pool and only if no such medium exists it allocates a tape medium. When offline files are located
on a disk medium, recalls can run simultaneously and are not affected by the number of currently
unallocated drives, but by the corresponding FSE partition configuration parameters. No more than
MaxNumDrivesRecall x 2 jobs are started at once. The MaxNumDrivesRecall and other
configurable FSE partition parameters are described in ”Partition allocation and job priority policy” on
page 128.
Before starting to use disk media, you should consider the following points about the two types of disk in
an FSE implementation:
Performance disk
Dedicate a disk with high performance for FSE software installation and HSM file systems. Such a disk
serves as a primary storage space of files with high frequency of user access, which may affect the
performance of the whole FSE implementation. A performance disk is not meant to be a secondary storage
space (file archive storage), thus its capacity is not as important as its high performance, which enables
optimal operation of FSE.
Capacity disk
hp StorageWorks File System Extender User Guide 87
Page 88

The main purpose of a capacity disk in FSE is its availability as a secondary storage space. A capacity
disk should be dedicated to the FSE disk media and the FSE disk buffer. Generally, it is used as a large
archive storage, meaning that the frequency of user access to archived files is relatively low compared to
that of the HSM file system on the performance disk. The capacity disk is used during migrations and
recalls and should have enough space for holding the migrated generations of the HSM file system files.
The available space on the disk media in an FSE disk media pool should correlate to the available space
on the tape media in the FSE tape media pool assigned to the same FSE partition. The FSE tape media
pool is typically used for storing the first copies. Suppose that the tape media pool contains 20 LTO Ultrium
1 media (approximately 20 * 200 GB of available space); the corresponding disk media pool should
have 4 TB of available space.
NOTE: It is recommended that a separate disk partition is allocated for the FSE disk buffer to improve
robustness and to avoid potential data loss.
Local and remote file systems as disk media
FSE supports local file systems to be configured as disk media.
Linux specific
On Linux platform, it is possible to use remote file systems as disk media and to access them via the NFS or
CIFS protocol.
NOTE: If you are configuring a remote file system as a disk medium, you can mount only a complete file
system created for this purpose; mounting shared directories (subtree of a file system) is not supported.
Linux specific
On Linux platform, a file system that will be configured as a disk medium must be mounted to a
subdirectory of /var/opt/fse/dm, for example:
/var/opt/fse/dm/dm000001
/var/opt/fse/dm/dm000002
Mounting a file system includes adding appropriate file system entries to the /etc/fstab file. For
automating the mounting, see the man pages for the fstab and mount commands.
Remote file systems are mounted via the NFS protocol. Note that when using an NFS volume as a disk
medium, you must export a file system with the no_squash_root parameter to enable “root” to access
the file system.
You define this parameter in the /etc/exports file on the NFS server for this particular export. It is
recommended that you make such exports available only for the FSE server. The following is the example
of the appropriate entry in the /etc/exports file:
/mnt/disk_medium linux_host.company.com(rw,no_squash_root)
Windows specific
On Windows platform, a file system for a disk medium must be mounted to a subdirectory of
%InstallPath%\var\dm; for example:
C:\Program Files\Hewlett-Packard\FSE\var\dm\dm000001
C:\Program Files\Hewlett-Packard\FSE\var\dm\dm000002
The value of %InstallPath% depends on the choice made in the FSE installation process. It defaults to
C:\Program Files\Hewlett-Packard\FSE.
To configure a mount point for a file system that will be used as a disk medium, use the Disk Management
interface (click Start > Settings > Control Panel, double-click Administrative Tools and then Computer
Management, and select Disk Management).
88 Managing media
Page 89

Disk media specifics
The main difference between tape and disk media is in preparing media for use by FSE. A disk medium
must be mounted to a dmNumber mount point in the disk media location before it can be used. The
location is platform-dependent.
Linux specific
On Linux platform, disk media are located in the directory /var/opt/fse/dm.
Windows specific
On Windows platform, disk media are located in the directory %InstallPath%\var\dm.
The value of %InstallPath% depends on the choice made in the FSE installation process. It defaults to
C:\Program Files\Hewlett-Packard\FSE.
Afterwards disk media also needs to be formatted and initialized, but you must be aware of the distinctions
between the different media types:
• Disk media can only be added to an FSE disk media pool.
• Maximum number of medium volumes on an FSE disk medium is 255. You define the size of medium
volumes in the media pool configuration file.
NOTE: When configuring an FSE disk media pool, you need to specify a VolumeSize parameter
large enough that 255 * VolumeSize is larger than the total disk medium size. Otherwise, a
warning is issued and the number of volumes is set to 255, leaving some unused space.
• Disk media are formatted and initialized in the same way as tape media. Formatting of disk media
creates subdirectories for medium volumes. At initialization, the size of medium volumes is written to the
Resource Management Database and to each initialized volume.
• A particular disk medium volume is closed when the total size of all files on the volume reaches the
volume size defined in the disk media pool configuration.
• Once a disk medium is formatted, it is not possible to add additional medium volumes to the medium.
When running out of space, another disk medium must be added to the disk media pool.
• The barcode of a disk medium is the relative part of the mount point, for example dm000001,
dm000002. Its length is limited to 64 characters.
Example layout of disk media
|-- dm
| `-- dm000001 medium barcode
| |-- 00000001 volume number
| | |-- 00000001.hdr volume header
| | `-- 00000003.vdf volume data file
| |-- 00000002
| | |-- 00000001.hdr
| | |-- 00000003.vdf
| | `-- 00028545.fri fast recovery information file
| `-- 00000003
| `-- 00000001.hdr volume contains no data
Each medium volume has its own directory named after the corresponding volume number, for
example: /var/opt/fse/dm/dm000001/00000001. The volume directory includes the following
files:
• medium volume header (00000000.hdr)
• medium volume data (00000003.vdf)
• medium volume FRI data (FileBlockOffset.fri)
hp StorageWorks File System Extender User Guide 89
Page 90

• medium volume size identifier (vol.info)
• Data compression is not supported for disk media.
• Location information, which you get by running the fsemedium --list command, is not valid for
disk media. For details, see ”Checking the status of media” on page 104.
Adding media to an FSE media pool
By adding media to an FSE media pool, you prepare them so they can be used by FSE. Note that the
parameters specified in an FSE media pool configuration determine the characteristics for all media added
to this media pool, such as the number of medium volumes and the system volume size and location. See
”FSE medium volumes” on page 86for a description of data and system volumes and ”Disk media” on
page 87 for disk media specifics.
1. Create an entry for an FSE medium and add it to a configured FSE media pool using the fsemedium
command, specifying the medium barcode:
fsemedium --add Barcode --pool PoolName
Repeat this step for all media that you plan to add to the FSE implementation at this time.
2. If you want to add non-disk FSE media, physically place all newly-added FSE media into free slots in
the corresponding library. Trigger a physical library inventory update (medium barcode rescan) using
the following command:
fselibrary --update-inventory LibraryName --rescan
Once the media are added to the FSE media pool, you must format and initialize them, which prepares
them for use as the secondary storage space in FSE.
Formatting media
Formatting is the first step of preparing a medium for use in the FSE implementation. Formatting creates
partitions on the medium. These partitions are called FSE medium volumes. The number of the medium
volumes that can be created by formatting depends on the media family of the medium and the limitations
imposed by FSE. A medium is partitioned according to the parameters specified in the corresponding FSE
media pool configuration.
CAUTION: Formatting erases all data on the medium.
A medium is formatted using the following command:
fsemedium --format Barcode
If particular medium has already been used in the FSE implementation or contains certain types of data,
you must use forced formatting to format it. The following command initiates forced formatting for a
medium:
fsemedium --format Barcode --force
For more information on the fsemedium command, see the FSE Command-Line Reference.
The following table helps you determine what kind of formatting is allowed for different kind of media that
are identified by FSE.
Medium contents Type of formatting
Blank (new) YES YES
Unknown (contains data of unknown format) YES YES
Tar volumes NO YES
ECMA/ANSI volumes NO YES
90 Managing media
Regular (--format) Forced (--format --force)
Page 91

Medium contents Type of formatting
FSE volumes with no valid FSE user data NO YES
FSE volumes with valid FSE user data NO NO
Skipping media formatting
In certain cases, a medium only needs to be initialized in order to be used in the FSE implementation, and
the formatting step can be skipped. This can be done for the following media:
• new or already used LTO media
These media support only one medium volume and do not need partitioning.
• other media that have been used in the FSE implementation, if the layout of medium volumes on the
medium will not change.
The layout includes the number of data volumes and the presence and position of the system volume on
the medium. For details, see ”FSE medium volumes” on page 86.
Once the medium is formatted, it becomes an FSE medium, and you need to initialize the medium volumes
on it.
Initializing media
After formatting, an FSE medium needs to be initialized. Initialization is the second step of the media
preparation for use in the FSE implementation. For each medium volume on the FSE medium, initialization
labels its header and adds a corresponding medium volume entry to the Resource Management Database.
Regular (--format) Forced (--format --force)
NOTE: The media that will be used for storing FSE backups (backup media) should not be initialized. The
FSE backup process rejects initialized media to prevent unintentional overwriting of the FSE user data.
For more information on backup media specifics, see ”Backup media management” on page 175.
A medium is initialized using the following command:
fsemedium --init Barcode
If particular medium has already been used in the FSE implementation or contains certain types of data,
you must use forced initialization to initialize it. The following command initiates forced initialization for a
medium:
fsemedium --init Barcode --force
For more information on the fsemedium command, see the FSE Command-Line Reference.
The following table helps you determine what kind of initialization is allowed for different medium volume
types identified by FSE.
Medium volume type Types of initialization
Regular (--init) Forced (--init --force)
Blank (new) YES YES
Unknown (contains data of unknown format) YES YES
Tar volume NO YES
ECMA/ANSI volume NO YES
FSE volume with no valid FSE user data NO YES
FSE volume with valid FSE user data NO NO
hp StorageWorks File System Extender User Guide 91
Page 92

Notes
FSE medium volumes that store valid FSE user data are the volumes which:
• store some data that is referenced by the belonging File System Catalog (FSC).
• belong to an FSE media pool which is currently assigned to an FSE partition.
• have the parameter Used[%] greater than zero in the output of the command
fsemedium --list --volume.
FSE medium volumes that do not store valid FSE user data are the volumes for which any of the above
criteria is not met.
TIP: You can initiate formatting and initialization of a medium at once with the command
fsemedium --format Barcode --init. This command formats the medium and initializes all
medium volume created on it.
You can initialize a particular medium volume on the medium with the command
fsemedium --init Barcode --volume VolumeNumber.
Duplicating media
The FSE implementation provides an option to have multiple copies of the migrated data made
automatically during a migration job. You do this by configuring several FSE media pools for one FSE
partition. The number of media pools assigned to the same partition corresponds to the number of copies
the files will have on FSE media. For more information, see ”Multiple copying” on page 131.
Multiple copying is favorable with regards to recall, since you are able to recall your data from any
available copy. All media pools that are assigned to the same partition contain the same set of data,
however, it is not guaranteed that an individual medium from a certain media pool has a corresponding
medium with exactly the same data in another media pool. If you want to create an exact copy of an FSE
medium for eventual replacement of the original, you must duplicate the medium.
Media duplication is usually used for data vaulting, where media duplicates are put off-site to increase
data safety. It can also be useful in situations where a particular medium becomes worn out and the data
on it is still valuable.
NOTE: Media duplication is not available for disk media.
A duplicated medium is an exact copy of the original medium. An original medium and its copy have the
following characteristics:
• same medium volume headers, including medium volume UUIDs
• same Fast Recovery Information data, on system volume and all data volumes
• same data
• same media types and capacities
• different medium barcodes
How it works
An admin job is started to duplicate a medium. A medium duplication process first requests disk buffer
resources, allocates the original medium and then the target medium. If the prerequisites are met, the
medium duplication is started volume by volume. Once finished, the medium copy has the same attributes
and data as the original except for the medium barcode.
92 Managing media
Page 93

NOTE: To replace an original medium with its duplicate, you should label the duplicate medium with the
original barcode, remove the original medium, and use the duplicate instead.
When a medium copy is first used in place of the original, a warning is written to the fse.log file as the
FSE implementation recognizes that the medium for the particular barcode has been switched.
Typically, when you decide to duplicate a medium, for example for storing backup copies off-site, the
original medium is full and all its medium volumes are closed. If the medium is not yet full and still has
open volumes that are almost full, it is recommended that you first close all such volumes (as described in
”Closing medium volumes” on page 106), and then start duplicating. This way you will not have to repeat
the duplicating procedure each time new data is migrated to the original medium.
If you are duplicating a medium that still has open volumes, the medium volumes are copied as is and are
left open on the target medium. Therefore, you have to repeat the duplication procedure every time new
data is migrated to the original medium in order to have an up-to-date medium copy. In such cases, you
can reuse the same target medium as described in ”Procedure for duplicating media” on page 93.
Note that while a medium duplication is in progress, no other job (migration or recall) can use the disk
buffer space that was allocated. The migration jobs are resumed when disk buffer space is freed, while
recall jobs fail after the specified timeout.
Procedure for duplicating media
Before you start duplicating an FSE medium, you must ensure that the media duplication prerequisites are
met. Note that the most common reasons for media duplication failures are shortage of the FSE disk buffer
space and mismatches in the medium characteristics.
Prerequisites
• A target medium, which will hold a copy of the original data, must be of the same type as the original
medium.
• The target medium must have sufficient capacity.
• There must be enough free disk space for the FSE disk buffer. The minimal required space is the native
FSE medium capacity multiplied by 2, as shown in the following examples:
LTO 1 : 100 GB * 2 = 200 GB
LTO 2 : 200 GB * 2 = 400 GB
LTO 3 : 400 GB * 2 = 800 GB
• The target medium should not contain any valid data or header such as a tar archive label or an
ECMA / ANSI label.
• The target medium should not be initialized.
• The target medium should not belong to any FSE media pool that is already assigned to an FSE
partition.
Normal duplication
When all duplication prerequisites are met, and the original and target media are prepared, you can
make a duplicate of the original medium using the following command:
fsemedium --duplicate SourceBarcode TargetBarcode [--no-monitor]
If you do not want to monitor the medium duplication progress, specify the --no-monitor option as
shown in the command syntax above. Otherwise, the duplication progress will be reported to the standard
output.
hp StorageWorks File System Extender User Guide 93
Page 94

Forced duplication
When any of the last three duplication prerequisites is not met and normal duplication fails, you can still
duplicate to the target medium if you use forced duplication functionality. You can perform a forced
medium duplication using the following command:
fsemedium --duplicate SourceBarcode TargetBarcode [--no-monitor] --force
CAUTION: Since forced duplication overwrites any data that is stored on the target medium, data loss
may occur on the target medium.
Example output for a medium duplication with enabled monitoring, using single tape drive
fsemedium --duplicate 123123 456456
[11:42:09] Started.
[11:42:09] Requesting resources...
[11:42:09] Resources allocated.
[11:42:09] Medium 123123 is already present in drive drv1.
[11:42:09] Starting Back End Agent.
[11:42:10] Medium 123123: 2 volumes found.
[11:42:10] Medium 123123, volume 1: Reading volume identification...
[11:43:48] Medium 123123, volume 1: Reading data.
[11:43:58] Medium 123123, volume 1: Volume read and written to disk
buffer.
[11:44:10] Medium 123123, volume 2: Reading volume identification...
[11:44:48] Medium 123123, volume 2: Reading data.
[11:45:58] Medium 123123, volume 2: Volume read and written to disk
buffer.
[11:43:58] Reading finished, releasing resources.
[11:42:09] Requesting resources...
[11:42:09] Resources allocated.
[11:48:42] Loading medium 456456 to drive drv1.
[11:43:58] Checking medium format.
[11:43:58] Blank medium detected.
[11:43:48] Medium 456456: Blank volume detected.
[11:43:58] Medium 456456, volume 1: Writing data...
[11:43:58] Medium 456456, volume 1: Volume written.
[11:43:58] Medium 456456, volume 2: Writing data...
[11:43:58] Medium 456456, volume 2: Volume written.
[11:43:58] Writing finished, releasing resources.
[11:43:58] Finished.
Reorganizing media
In FSE, data stored on an HSM file system is automatically and periodically migrated to FSE media. This
applies not only to every new file created on the HSM file system, but also to every existing file whose
attributes or contents is modified. Each modification of the file subsequently causes it to be migrated to
media as a new file generation.
94 Managing media
Page 95

Over time, the situation can arise where a large proportion of space on FSE media is occupied by old,
obsolete generations of files. FSE enables you to reclaim media space by reorganizing the data on the
media. The media reorganization process frees space on media by preserving only selected file
generations and removing the others. FSE media space can then be reused for newly migrated data.
Media reorganization is a medium-volume-based process. This means that the smallest unit of the
secondary storage space that can be reorganized is a single FSE medium volume. Similarly, the smallest
unit that can be reused is an FSE medium volume. As system volumes do not contain file data, only data
volumes can be reorganized.
Prerequisites
• Before scanning media as part of the media reorganization process run the FSC vs. media check with
the --autocorrect and --match-media options. For more information, see ”Consistency check of
FSC vs. FSE media” on page 143.
Limitation
• After the reorganization of one or more FSE medium volumes on an FSE medium, any duplicates of the
medium created before the reorganization are rendered useless, as (part of) the source medium has
been reinitialized at the end of the reorganization job.
To restore data safety level, you need to duplicate each medium that contains reorganized medium
volumes and whose sources for the reorganization process were duplicated before the reorganization.
The media reorganization process
The media reorganization process consists of two steps: scanning and copying. Each step is controlled and
performed by its own FSE job.
The scanning step is run for all FSE media in all FSE media pools that are assigned to a specified FSE
partition. This step determines the locations of valid and obsolete data on the already closed (full) and still
open FSE medium volumes, according to parameters that you define. It then records the scan results to the
Resource Management Database (RMDB). The scanning process is performed as a search through the
corresponding File System Catalog (FSC), therefore the FSE media themselves are not physically scanned.
The results of the scanning step are used in the copying step. This step copies all selected file generations
from the medium volumes being reorganized to open and empty medium volumes in the same FSE media
pool. The original volumes are then recycled and finally reinitialized. To reduce the number of drive load
and unload operations during the copying step, the data is copied to (open or empty) medium volumes on
the same medium, if any exist.
Note that the copying step of the reorganization process is not started until the scanning step has
completed, and vice versa.
Before running the copying step, you can preview the results of the scan to decide which FSE medium
volumes or FSE media you actually want to reorganize. It is only useful to reorganize volumes with a high
enough proportion of obsolete data (that is, a high enough percentage of FSE slack space).
During execution of the reorganization process, FSE progressively shows status indicators (such as
“scanned”, “in reorg”, and “recycled”) to the medium volumes being reorganized. These indicators help
you detect and track the reorganization progress for a particular medium volume. You can display these
status indicators at any time with the following command:
fsemedium --list [Barcode] --volume
hp StorageWorks File System Extender User Guide 95
Page 96

The following table depicts the reorganization steps, a description of their tasks, the volume status
indicators that are set, and the corresponding FSE jobs.
Reorganization
Step tasks Status of medium volumes Job type
step
Step 1: Scanning [open/full] FSE reorganizational
1. Change the status of the FSE
partition to in scan.
2. Scan medium volumes for
obsolete data.
3. Write the scan results to the
RMDB.
[open/full], scanned
4. Change the status of the
scanned FSE partition back to
[enabled/mounted].
Step 2: Copying [open/full], scanned, in reorg FSE reorganization job
1. Copy selected data from the
medium volumes being
reorganized to open or empty
medium volumes.
2. Recycle the reorganized
medium volumes.
[open/full], scanned, in reorg,
3. Reinitialize the recycled
medium volumes.
recycled
scan job
Note that if migrations to a particular FSE medium volume occur after the volume has been scanned but
before the copying step has been triggered, the “scanned” status indicator of this volume is removed. The
copying step of the reorganization cannot be started for this volume until the volume is scanned again.
You can limit the number of tape drives used during the reorganization of a specified FSE partition
(MaxNumDrivesRecall variable in the FSE partition configuration file) or system-wide
(SystemMaxNumDrivesMaint variable in the FSE system configuration file). The priority of the FSE
reorganization jobs is defined by the MaintPriority variable in the FSE partition configuration file.
The progress of the media reorganization process is logged to the FSE event log, while potential errors that
are encountered during the process are logged to the FSE error log. If any of the reorganization jobs is
interrupted, you must re-run it from the beginning. In some cases, the FSE disk buffer files generated during
the process have to be manually deleted.
You can start each media reorganization step and view the scan results using the FSE command-line
interface. The fsepool, fsepartition and fsemedium commands provide special options for this
purpose.
Media reorganization parameters
When triggering the FSE reorganizational scan job, you can specify two parameters that define which
migrated file generations are treated as valid during scanning and thus preserved during copying. The
parameters are in the form of arguments to the fsepartition command, and are the following:
Reorganization parameter Argument to fsepartition
empty
boundary migration date and time (mandatory) "YYYY/MM/DD HH:mm:ss"
number of latest generations (optional) NumberOfGenerations
96 Managing media
Page 97

CAUTION: With either parameter, only the migrated generations containing file contents count as file
generations. The migrated generations that contain only file headers (name, standard and extended
attributes, ACLs, ...) or changes to a file alternate data stream do not count as migrated file generations.
Generally, these generations are not preserved during media reorganization.
The boundary migration date and time parameter
If only this parameter is specified, all migrated file data generations created after the boundary migration
date and time parameter are considered as valid.
The number of latest generations parameter
This optional parameter limits the number of generations that would otherwise be considered as valid by
the boundary migration date and time parameter alone.
If the parameter value is smaller than the number of valid generations determined by the boundary
migration date and time parameter, then the set of valid generations is reduced to the number of latest
generations value. Otherwise, the parameter has no effect.
Exceptions to the reorganizational rule
There are two exceptions to the rule defined by the reorganization parameters:
• The newest migrated generation is always preserved, even if it contains only file header changes or
changes to a file alternate data stream.
• If no migrated generation (with file contents) is covered by the specified parameters, the latest
generation with file contents is preserved.
Handling deleted files
Files that were deleted from the HSM file system before the reorganizational scan job (either during
automatic deletion or manually) are handled in a special way. In certain situations, the exceptions above
are not valid for these files.
CAUTION: Files that had been deleted from the HSM file system and whose last “empty” generations are
not covered by the boundary migration date and time or the number of latest generations parameter are
not preserved during media reorganization. All migrated generations of such files are permanently lost.
Scanning media for obsolete data
You can run the scanning step of the reorganization process on all media belonging to a particular FSE
partition, using the following command:
fsepartition --reorg-scan PartitionName "YYYY/MM/DD HH:mm:ss"
[NumberOfGenerations]
NOTE: You can omit the time part (HH:mm:ss) of the ExpirationDate argument ("YYYY/MM/DD
HH:mm:ss"). In this case, the time 00:00:00 is assumed.
During the execution of the job, fsepartition reports the job execution progress to the standard output,
allowing you to monitor the scanning process in the command shell.
hp StorageWorks File System Extender User Guide 97
Page 98

Example output of the fsepartition --reorg-scan command
fsepartition --reorg-scan my_part "2005/11/26 15:25:13" 3
[11:42:09] Started (JobID: 20050121000001).
[11:42:10] Scanning FSC for reorganization info.
[11:42:10] Scan Parameters: "2005/11/26 15:25:13", generations: 3.
[11:55:22] Scanning complete. Scanned 33.005.664 file generation copies.
[11:55:23] Use 'fsepartition --reorg-stat' to see the details.
[11:55:25] Finished.
Checking the resulting statistics of a reorganizational scan job
After the scan job is completed, you can check the statistics gathered during the scanning process. You
can display both statistics related to individual FSE media pools and statistics related to individual FSE
media assigned to the specified FSE partition.
Displaying the FSE media pool-based statistics
To check the statistics for all configured FSE media pools:
1. Ensure that all scan jobs have completed.
2. Run the command:
fsepool --reorg-stat
Example command output:
Name NumOfMedia ValidData[MB] Total[MB] SlackSpace[%]
Pool001 5 9540 25412 62%
Pool002 3 3000 10000 70%
Pool002 1 1000 1000 0%
PoolLTO 10 0 3610 0%
The meaning of the columns is the following:
NumOfMedia
ValidData
Total
SlackSpace
Number of FSE media assigned to the media pool.
Amount of space on the FSE media, assigned to the media pool, occupied by valid
file generations.
If the FSE media pool has not yet been scanned for reorganization, it has 0 (the
zero value) displayed in place of the ValidData amount.
Total amount of space on the FSE media assigned to the media pool.
Percentage of FSE slack space.
FSE slack space is the space on FSE media occupied by migrated file generations
considered obsolete by the reorganizational scan job.
Displaying the FSE media-based statistics
To check the statistics for all FSE media that belong to a particular FSE partition:
1. Ensure that the scan job running on the chosen partition has completed.
2. Run the command:
fsepartition --reorg-stat PartitionName [SlackThreshold%]
You can also specify a value for the optional SlackThreshold% argument to filter out media for
which the percentage of obsolete data is not high enough, and thus less likely to need reorganizing.
Example command output:
Barcode VolNum ValidData[MB] Total[MB] SlackSpace[%]
Med001 6 980 1200 19%
Med002 5 190 1000 81%
98 Managing media
Page 99

Med003 5 0 1000 100%
Med004 5 100 1000 90%
The meaning of the columns is the following:
VolNum
ValidData
Total
SlackSpace
Number of the FSE medium volumes on the medium.
Amount of space on the FSE medium occupied by valid file generations.
If the FSE medium has not yet been scanned for reorganization, it has 0 (zero)
displayed in place of the ValidData amount.
Total amount of space on the FSE medium.
Percentage of FSE slack space.
FSE slack space is the space on the medium occupied by migrated file generations
that were considered obsolete by the reorganizational scan job.
Running the media reorganization job
Using the fsemedium command, you can run the copying step of the reorganization process on all
medium volumes of a specific medium, on a single FSE medium volume, or on a series of specified FSE
medium volumes.
By default, the command reports the progress of the reorganization job to the command shell for
monitoring purposes. You can disable monitoring by specifying the --no-monitor option.
NOTE: To prevent the copying step of the FSE reorganization job from copying the data to the same
medium (that is, to the medium whose medium volumes are being reorganized), set the condition status of
the medium being reorganized to “unreliable” before running the reorganization job. Use the fsemedium
--mark-unreliable command for this purpose.
Note that FSE media with the condition status “unreliable” are not available for migrations. After the
reorganization job has finished, and the reorganized medium volumes have been reinitialized, you must
remove the “unreliable” status of the reorganized medium using the fsemedium --mark-good
command.
The following is the syntax of the fsemedium command when used for media reorganization:
fsemedium --reorg Barcode [{-V | --volume} VolumeNumber...]
[--no-monitor]
With monitoring enabled, the command generates an output similar to the following:
[11:42:09] Started (JobID: 20050121000002).
[11:42:09] Requesting resources...
[11:42:09] Resources allocated.
[11:42:09] Medium 050003 is already present in drive drv1.
[11:42:09] Starting Back End Agent.
[11:42:09] Medium 050003, volume 1: Reading valid files…
[12:20:58] Medium 050003, volume 1: Valid files written to disk buffer.
[12:20:58] Requesting resources...
[12:20:59] Medium 050003, volume 2: Reading valid files…
[12:47:12] Resources allocated.
[12:47:12] Loading medium 050010 to drive drv2.
[12:47:49] Starting Back End Agent.
[12:47:49] Medium 050010, volume 5: Writing…
[12:49:58] Medium 050003, volume 2: Valid files written to disk buffer.
hp StorageWorks File System Extender User Guide 99
Page 100

[12:49:58] Reading finished, releasing resources.
[13:00:58] Medium 050010, volume 5: Data written to medium volume.
[13:01:58] Medium 050010, volume 6: Writing…
[13:10:50] Medium 050010, volume 6: Data written to medium volume.
[13:11:50] Writing finished, releasing resources.
[13:12:38] Finished.
If you disabled monitoring, you can still check the status of the FSE reorganization job using the
fsejob --list command. Alternatively, you can track the reorganizational progress in detail by
inspecting the FSE event log, named fse.log.
Linux specific
On Linux platform, FSE event log is located in the directory /var/opt/fse/log/.
Windows specific
On Windows platform, FSE event log is located in the directory %InstallPath%\var\log.
The value of %InstallPath% depends on the choice made in the FSE installation process. It defaults to
C:\Program Files\Hewlett-Packard\FSE.
Reusing the recycled medium volumes
Space on FSE medium volumes that participated in the reorganization job can be reused for storage of
new data. The status of these medium volumes is set to “recycled” by the corresponding Partition Manager.
You can retrieve a list of the recycled medium volumes using the following command:
fsemedium --list Barcode --volume
An example output is the following:
Barcode VolNum Type Size[MB] Avail[MB] Used[%] Status
052002 1 Data 5949 5592 80 full, scanned, in reorg,
recycled
052002 2 Data 5949 5949 60 open, scanned
052002 3 Data 5949 5949 0 empty
052002 4 Data 5949 5949 0 empty
052002 5 System 1019 1019 0 open
In the example, the first medium volume on the FSE medium with barcode 052002 was recycled during the
reorganization job and can be reused.
Before recycled medium volumes can be reused, they must be reinitialized. The reinitialization is performed
automatically at the end of the FSE reorganization job. All recycled medium volumes are reinitialized in
sequence. If the reorganization job has been terminated for some reason before medium volume
reinitialization, you have to reinitialize the recycled volumes manually. For more information on initializing
FSE medium volumes, see section ”Initializing media” on page 91 and the FSE Command-Line Reference.
Recreating redundant copies of migrated data
FSE enables you to assign several FSE media pools to the same FSE partition, in order to store multiple
copies of the migrated data on FSE media (via the Pools variable in the FSE partition configuration file).
In such a configuration, each media pool contains one copy of the migrated data from the HSM file
system.
Having multiple copies of the migrated data is useful for various reasons, including the possibility of storing
a particular copy in a vault and increasing the overall safety of the migrated data. For information on
configuring multiple copies, see ”Multiple copying” on page 131.
Since tape media wear out over time, some can eventually become unusable. Migrated file generations on
such media can no longer be recalled. In effect, this means that one copy of the migrated data is lost. FSE
enables you to recover the damaged copy, provided that such data was migrated from an FSE partition for
100 Managing media
 Loading...