

Page 1
Full-Server Failover
User’s Guide
Twelfth Edition (March 2009)
Part Number: T2558-96328
Page 2

© Copyright 2009 Hewlett-Packard Development Company, L.P.
Hewlett-Packard Company makes no warranty of any kind with regard to this material, including, but not limited to, the
implied warranties of merchantability and fitness for a particular purpose. Hewlett-Packard shall not be liable for errors
contained herein or for incidental or consequential damages in connection with the furnishing, performance, or use of this
material.
This document contains proprietary information, which is protected by copyright. No part of this document may be
photocopied, reproduced, or translated into another language without the prior written consent of Hewlett-Packard. The
information contained in this document is subject to change without notice.
Microsoft®, Windows®, and Windows NT® are U.S. registered trademarks of Microsoft Corporation.
Hewlett-Packard Company shall not be liable for technical or editorial errors or omissions contained herein. The information
is provided "as is" without warranty of any kind and is subject to change without notice. The warranties for Hewlett-Packard
Company products are set forth in the express limited warranty statements for such products. Nothing herein should be
construed as constituting an additional warranty.
HP StorageWorks Storage Mirroring Full-Server Failover User’s Guide
Twelfth Edition (March 2009)
Part Number: T2558-96328
Double-Take, GeoCluster, Double-Take for Virtual Systems, TimeData, netBoot/i, winBoot/i, Double-Take Cargo, sanFly, Livewire, NSI, Balance, DoubleTake ShadowCaster, and associated logos are registered trademarks or trademarks of Double-Take Software, Inc. and/or its subsidiaries in the United States
and/or other countries. Microsoft, Windows, and the Windows logo are trademarks or registered trademarks of Microsoft Corporation in the United States
and/or other countries. All other trademarks are the property of their respective companies.
9 Double-Take Software, Inc. All rights reserved.
© 200
Page 3

Table of Contents
Chapter 1 Introduction .........................................................1-1
Full-Server Failover .......................................................................... 1-1
Resources ......................................................................................... 1-2
Conventions used in this guide ......................................................... 1-2
Chapter 2 Installation ...........................................................2-1
System requirements ........................................................................ 2-1
Installing or upgrading Full-Server Failover ..................................... 2-3
Uninstalling Full-Server Failover ....................................................... 2-5
Chapter 3 Clients ..................................................................3-1
Configuring Full-Server Failover Manager options ............................ 3-2
Saving and reusing configuration options ......................................... 3-2
Chapter 4 Finding a Compatible Target .................................4-1
Chapter 5 Establishing Server Protection ..............................5-1
Configuring optional settings ............................................................ 5-3
Chapter 6 Monitoring Failover ..............................................6-1
Monitoring failover ........................................................................... 6-1
Viewing the log ................................................................................. 6-1
Chapter 7 Initiating Failover .................................................7-1
Starting failover using Full-Server Failover Manager ........................ 7-1
Starting failover from a command line .............................................. 7-3
Chapter 8 Performing Failback ..............................................8-1
Chapter 9 Managing Snapshots .............................................9-1
Chapter 10 Using Firewalls .................................................10-1
Full-Server Failover ports ............................................................... 10-1
Microsoft Windows ports ................................................................ 10-1
Hardware ports ............................................................................... 10-1
i
Page 4
Introduction
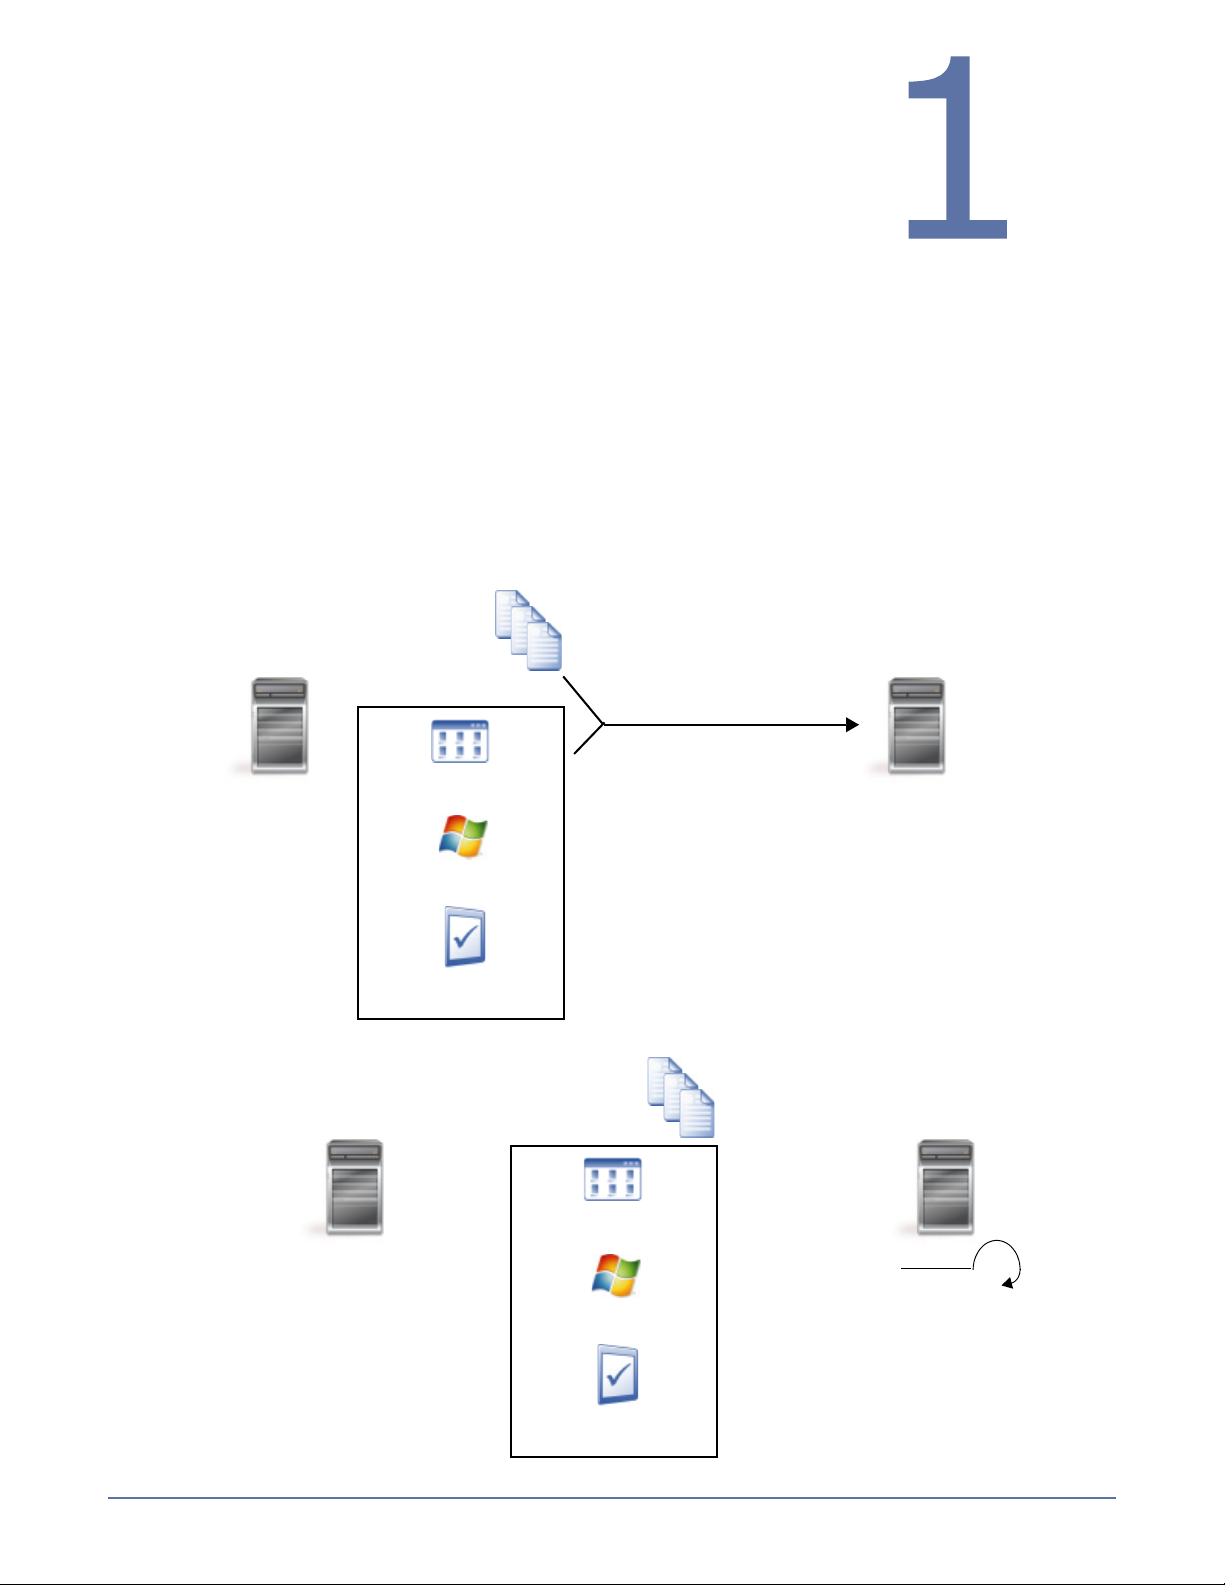
Source Data
Source
Target
Storage Mirroring
Mirroring and Replication
Source
Source System
Source
Source Server
Applications
Operating System
Configuration
Storage Mirroring mirroring and
replication technology keeps the target
up-to-date with any changes
that occur on the source.
State
After failover and a target
Target
Source
Source Data
Source
Source System
Source
Source Server
Applications
Operating System
Configuration
Source
X
State
reboot, the target is replaced
with the source, including
its system state.
Welcome to Storage Mirroring Full-Server Failover! This manual is
for users who want to provide high availability for their entire server.
This chapter includes a Full-Server Failover overview, a list of
resources available to you while using Full-Server Failover, and a list
of conventions used throughout this manual.
Full-Server Failover
The Storage Mirroring Full-Server Failover feature provides high availability for an entire server,
including the system state, which is the server’s configured operating system and applications. Using
Full-Server Failover Manager, you identify your source, which is the server you want to protect, and
your target, which is the server that will stand-in for the source in the event the source fails. Once
the two servers are selected and their configurations validated, Full-Server Failover monitors the
source for a failure. When it fails, Full-Server Failover allows the target to stand-in for the source by
rebooting and applying the source, including its system state, on the target. After the reboot, the
target becomes the source, and the target no longer exists.
Full-Server Failover is installed with Storage Mirroring and is activated with your Storage Mirroring
activation code.
1 - 1
Page 5

Resources
You have many resources available to you when using Full-Server Failover.
Operating System and application documentation—Make sure that you have complete
documentation for your operating system and your applications.
Storage Mirroring documentation—All Storage Mirroring products include documentation.
Manuals are available on the product CD (in the \docs subdirectories of each set of program
installation files) and in the installation directory you selected during the installation. The manuals
are in Adobe
®
Acrobat® PDF format. If needed, you can install the free Adobe Acrobat Reader®
by downloading the latest version from the Adobe web site at www.adobe.com.
Storage Mirroring Online Help—Some of the consoles contain online help which can be
accessed by pressing the F1 key, clicking the Help button on screens where it is available, or
selecting Help, Help Topics.
Readme—All Storage Mirroring products include a readme file containing last-minute
information. Readme files are available on the product CD (in the \docs subdirectories of each set
of program installation files) and in the installation directory you selected during the installation.
The readme files are in HTML format and can be viewed using any HTML browser.
Conventions used in this guide
The following conventions are used throughout this guide:
Bold is used for items you click or select with the mouse, such as menu names and items, dialog
box options, or button names. For example, when you see
File menu and then choose Options from the pull-down menu.
Blue italics is used for cross-references to other sections or chapters in this guide.
Code text is used to indicate text that is displayed on-screen exactly as shown (such as screen
messages or error messages) and text that should be entered exactly as shown.
File, Options, you should select the
1 - 2
Page 6

Installation
Before installing Full-Server Failover, verify that your source and
target meet the system requirements. Then proceed with Installing
or upgrading Full-Server Failover on page 2-3.
System requirements
Each server that will be used as a Full-Server Failover source or target should meet the following
system requirements.
NOTE: These requirements are high-level requirements that each server must meet to run the
Full-Server Failover program. A target server may meet these requirements but may not
be suitable to stand-in for a source in the event of a source failure. See Finding a
Compatible Target on page 4-1 for additional information regarding an appropriate
target server for your source.
Operating System and Licensing—There are different Storage Mirroring licenses depending on
the operating system you are using. Be sure you have the correct license for your operating
system. Each of the Windows 2003 operating systems listed in the chart require Service Pack 1
or later.
License Operating Systems
a
NAS
Windows Small Business Server 2008
Windows Small Business Server 2003 or 2003 R2
Server Edition
Windows Server 2008 Standard or Web Edition
Windows Server 2003 or 2003 R2 Standard, Web, or Standard
x64 Edition
Advanced Edition
Windows Server 2008 Enterpriseor HPC Edition
Windows Server 2003 or 2003 R2 Enterprise or Enterprise x64
Edition
Any valid operating system which can be used with a Storage
Mirroring Server Edition license
Virtual Machines Edition These operating systems are for the guest operating system. The
host can be any operating system.
Windows 2008 Enterprise, Standard, or Web Edition
Windows 2003 or 2003 R2 Enterprise, Standard, or Web Edition
a. You will need to check with your NAS vendor to verify if there are technical or license
restrictions on failing over an image of a server to different hardware.
NOTE: Microsoft Server Core is also supported for a Server Core to Server Core
configuration, however you will be unable to launch the installation automatically. You
can run the setup.exe for your architecture (i386 or x64), or you can push the
installation by performing an automatic installation (see the Storage Mirroring User’s
Guide) or by using the Enterprise Install Console (see the Enterprise Install Console
User’s Guide).
File System—Storage Mirroring supports the same file system formats that Microsoft supports:
FAT, FAT32, and NTFS.
2 - 1
Page 7

System Memory—There are different memory requirements depending on the operating system
you are using. Be sure you have at least the minimum amount of memory for your environment.
You may want to consider having at least the recommended amount of system memory.
Operating System
Any Windows 32-bit Operating
Minimum System
Memory
128 MB At least 512 MB
Recommended System
Memory
System
Any Windows 64-bit Operating
512 MB At least 1024 MB
System
Disk Usage—The amount of disk space required for the Full-Server Failover program files is
approximately 70 MB. More importantly, you need to verify that you have enough disk space on
the target. See Finding a Compatible Target on page 4-1 for more details on selecting an
appropriate target server.
NOTE: The program file can be installed to any volume while the Microsoft Windows Installer
files are automatically installed to the operating system boot volume.
Server Name—Storage Mirroring includes Unicode file system support, but your server name
must still be in ASCII format. If you have the need to use a server’s fully-qualified domain name,
your server cannot start with a numeric character because that will be interpreted as an IP
address.
Protocols and Networking—TCP/IP with static IP addressing is required. By default, Storage
Mirroring is configured for IPv6 and IPv4 environments, but the Storage Mirroring service will
automatically check the server at service startup and modify the appropriate setting if the server
is only configured for IPv4.
Windows Management Instrumentation (WMI)—Storage Mirroring is dependent on the WMI
service. If you do not use this service in your environment, contact technical support.
Cluster support—Microsoft clusters identify disks by their disk signature, which is stored on the
physical disk in the master boot record. When Full-Server Failover is used to failover a cluster
node, the disk signature of the target will be different than the source and the cluster will fail to
start. Therefore, Full-Server Failover does not natively support the full-server protection of
Microsoft cluster nodes. However, you can alter the disk signature on the target manually. See
the Microsoft Knowledge Base article 280425 at http://support.microsoft.com/kb/280425 for
details on how to change the disk signature.
2 - 2
Page 8

Installing or upgrading Full-Server Failover
Use these instructions to install Full-Server Failover or upgrade an existing Full-Server Failover
installation. If you are using the same installation files as your existing installation, you can modify
or repair the existing installation.
1. Close any open applications.
2. Start the installation program using the appropriate instructions, depending on your media
source.
CD—Load the CD into the local CD-ROM drive. If auto-run is enabled, the installation program
will start automatically. To manually start the program, select Start, Run and specify
<cd_drive>:\autorun.exe.
Web download—Launch the .exe file that you downloaded from the web.
3. When the installation program begins, the Storage Mirroring Setup Launcher appears. This
interface allows you to install and view documentation for various applications from HP. The
listed applications will depend on which products are included on the CD or in the web download.
To install Full-Server Failover, select Storage Mirroring for Windows from the list of products
and then select Install Storage Mirroring for Windows.
4. Depending on your version of Windows and the components you have installed, you may see an
initial screen indicating that you should install Microsoft .NET Framework. If you do not see this
screen, your server already has the appropriate version of Microsoft .NET. The best practice is to
install Microsoft .NET before installing Storage Mirroring. Clicking Install will continue the
installation program and give you the opportunity to install or skip the Microsoft .NET
installation. Clicking Cancel will exit the installation program.
NOTE: The Microsoft .NET installation is via a web download. If your server does not have an
Internet connection, you must manually install Microsoft .NET from the Storage
Mirroring CD or from a copy from the Microsoft web site.
5. Review and accept the HP license agreement to continue with the installation program. Click
Next to continue.
6. If you already have Full-Server Failover installed and you are using the same installation files,
you will be prompted to modify, repair, or remove the the existing installation. Select Modify or
Repair and complete the remaining steps in the installation.
7. Select the type of installation you want to perform.
Client and Server Components—Installs the Full-Server Failover server and client
components
Client Components Only—Installs the Full-Server Failover client components only
Server Components Only—Installs the Full-Server Failover server components only
Select the option appropriate for your machine. You can also specify where the files will be
installed.
Click Next to continue.
NOTE: If you selected the Client Components Only installation type, the remaining setup
screens are skipped.
8. You will be prompted to enter your activation code information. Your Activation Code is a
24-character, alpha-numeric activation code which applies the appropriate Storage Mirroring
license to your installation. You must have a valid activation code to use Storage Mirroring.
Add-on codes are optional. If you purchased any add-on components, enter each Add-on Code
individually and click Add. The code type and the expiration date, if any, will be displayed. After
you have entered all of your codes, click Next to continue.
9. The next screen will depend on the activation code you entered.
If you have entered a valid activation code, you will be prompted to confirm the code. Click
Next to continue the installation.
If you have entered an invalid activation code, you will be prompted that the code is incorrect
and that the source and target modules will not load. Click Back and reenter your activation
code.
2 - 3
Page 9

If you have entered an evaluation activation code, the expiration date will be displayed and
you will be prompted that the source and target modules will not load after that date. Click
Next to continue the installation. You must update the activation code to a valid one through
the Management Console before the expiration date, otherwise, on the expiration date,
functionality will be disabled.
10. Storage Mirroring uses system memory to store data in queues. Specify the maximum amount
of system memory to be used for the queues and click Next to continue. The default setting is
dependent on your operating system. If you set it lower, Storage Mirroring will use less system
memory, but you will queue to disk sooner which may impact system performance. If you set it
higher, Storage Mirroring will maximize system performance by not queuing to disk as soon, but
the system may have to swap the memory to disk if the system memory is not available. In
general, the amount of memory Storage Mirroring and other applications on the server are
configured to use should be less than the amount of physical memory on the system to prevent
low memory conditions.
11. When the Storage Mirroring system memory queue is exhausted, Storage Mirroring will queue to
disk. Specify the size of the disk queue. By default, the disk space is set to Unlimited which will
allow the queue usage to automatically expand whenever the available disk space expands. You
also need to specify a location for the disk queue. See the Storage Mirroring User’s Guide for
more details about appropriate queue locations. Click Next to continue.
12. The security information screen appears next. Review this information and click Next to
continue with the installation.
NOTE: The user performing any Full-Server Failover tasks must be a member of both the
Double-Take Admin and local Administrators groups.
13. If you are satisfied with the selections you have made and are ready to begin copying the files,
click Install.
14. During the installation, you may be prompted to add an exception to the Windows Firewall for
Storage Mirroring. Click OK to add the port exception. If you Cancel the port modification, you
will have to manually modify your firewall settings for Storage Mirroring processing on port
6320.
15. After the files have completed copying, click Finish to exit the installation program.
The Full-Server Failover installation is complete.
NOTE: If you are upgrading an existing Full-Server Failover installation, in some instances you
may be prompted to reboot to complete the installation. For example, a reboot might be
necessary to update files that are currently in use.
2 - 4
Page 10

Uninstalling Full-Server Failover
Use these instructions if you want to uninstall an existing Full-Server Failover installation. If you want
to use the product installation files to uninstall, you have to use the same installation files as the
currently installed version. If you do not have the same installation files as the currently installed
ve rs io n, yo u w il l n ee d t o u se th e W in do ws Ad d/ Re mo ve Pr og ra ms fe at ur e t o u ni ns ta ll th e s of tw ar e.
1. Close any open applications.
2. If you are using the Windows Add/Remove Programs feature, confirm that you want to remove
the program and then continue with step 7.
3. If you are using the same installation files as the currently installed version, start the installation
program using the appropriate instructions, depending on your media source.
CD—Load the CD into the local CD-ROM drive. If auto-run is enabled, the installation program
will start automatically. To manually start the program, select Start, Run and specify
<cd_drive>:\autorun.exe.
Web download—Launch the .exe file that you downloaded from the web.
4. When the installation begins, you will be given the opportunity to check for a more recent
version of the software. Select No and click Next.
5. Review and accept the HP license agreement to continue with the installation program. Click
Next to continue.
6. When prompted to modify, repair, or remove the the existing installation, select Remove and
click Next to continue.
7. The installation program is immediately ready to begin removing the files. Click Remove to
continue.
8. You will be prompted to indicate whether or not you want to remove the security groups. Click
Yes to continue.
9. A message prompt informs you that the uninstall program has completed successfully. Click OK.
NOTE: If you changed the location where the disk queue files are stored, these directories will
not be removed during the uninstallation. You will need to manually remove them.
Any files created by the Microsoft Windows Installer during the Full-Server Failover
installation can be safely deleted after an uninstall.
In some instances, you may be prompted to reboot to complete the uninstallation.
2 - 5
Page 11

Clients
Full-Server Failover has its own client called the Full-Server Failover
Manager. It allows you to create your source and target connection,
monitor your high availability protection, manage your Full-Server
Failover snapshots, and initiate failover.
3 - 1
Page 12

Configuring Full-Server Failover Manager options
You can configure options for the Full-Server Failover Manager client by selecting File, Options.
Refresh Interval—By default, the main window of Full-Server Failover Manager will
automatically update every five (5) seconds. If desired, you can modify the refresh rate. You can
also refresh the main window manually by selecting File, Refresh.
Enable Verbose Logging—By default, Full-Server Failover Manager creates a log that maintains
all processing information. If desired, you can disable the option so that only basic processing
information is logged.
Clear cached credentials on exit—By default, Full-Server Failover Manager will save the user
credentials supplied for each servers. If desired, you can clear the credentials that are cached so
they are not saved. You can also clear the user credentials manually by selecting File, Clear
Cached Credentials.
Saving and reusing configuration options
After you have created a protection pair and configured any of the optional settings you can save
those settings so that you can reuse them for future pairs of servers. Configure your options as
defined in Establishing Server Protection on page 5-1 and Configuring optional settings on
page 5-3. Once you have the settings the way you want them, save them by selecting File, Defaults
Save Current Settings as Defaults. This creates a file called FFMDefaults.xml, which will
automatically be the default settings the next time you use the Full-Server Failover Manager. If
desired, you can rename the
FFMDefaults.xml to be used by the Full-Server Failover Manager. This would allow you to have
multiple failover configurations, which you can be more easily interchanged. You can also use these
different files to initiate failovers without using the Full-Server Failover Manager GUI. For more
information, see Starting failover from a command line on page 7-3.
NOTE: Because network adapters are uniquely identified on each server, the Network Mapping
is not stored in the default settings.
If you want to reset the configuration settings back to the default settings, select File, Defaults,
Reset Defaults.
FFMDefaults.xml file and then save a new set of defaults to
,
3 - 2
Page 13

Finding a Compatible Target
In a high availability protection solution, the target you select must be suitable for becoming the
source, in the event the source fails. Full-Server Failover will validate the target you select and
identify any incompatibilities. Errors will disqualify the target as a suitable server. To find a
compatible target, check the table below for each of the requirements.
Target Compatibility
Requirement Configuration
Operating system
version
Domain The domain of the source should be the same as the domain of the target.
Server role The target cannot be a domain controller. Ideally, the target should not host
Architecture The source and the target must have the same architecture. For example, you
Processors There are no limits on the number or speed of the processors, but the source
Memory The target memory should be within 25% (plus or minus) of the source. If the
Network adapters You must map at least one NIC from the source to one NIC on the target. If
The source and the target must have the same operating system. For
example, you cannot have Windows 2003 on the source and Windows 2008
on the target. The two servers do not have to have the same level of service
pack or hotfix.
any functionality (file server, application server, and so on) because the
functionality will be removed when failover occurs.
If your source is a domain controller, it will start in a non-authoritative restore
mode after failover. This means that if the source was communicating with
other domain controllers before failover, it will require one of those domain
controllers to be reachable after failover so it can request updates. If this
communication is not available, the domain controller will not function after
failover. If the source is the only domain controller, this is not an issue.
cannot failover a 32-bit server to a 64-bit server.
and the target should have at least the same number of processors. If the
target has fewer processors or slower speeds than the source, there will be
performance impacts for the users after failover.
target has much less memory than the source, there will be performance
impacts for the users after failover.
the source has more NICs than the target, some of the source NICs will not
be mapped to the target. Therefore, the IP addresses associated with those
NICs will not be available after failover, unless you configure the advanced
options. If there are more NICs on the target than the source, the additional
NICs will still be available after failover.
File system format The source and the target must have the same file system format. For
example, an NTFS volume cannot be sent to a FAT volume.
HAL type and
version
Administrative
shares
The Windows hardware abstraction layer (HAL) refers to a layer of software
that deals directly with your computer hardware. The HAL type and version do
not have to be identical, but they must be compatible between the source and
the target. If the two are incompatible, Full-Server Failover will warn you. In
that case, you must upgrade or downgrade the target.
The Full-Server Failover Manager must be able to access administrative
shares on the source and the target.
4 - 1
Page 14

Requirement Configuration
Boot volume
configuration
System volume The target must have the same system volume as the source. The system
Logical volumes There are no limits to the number of logical volumes, although you are bound
System path The source and the target must have the same system path. The system path
Storage Mirroring
path
Storage Mirroring
data state
Capacity and free
Space
The target boot volume cannot be a dynamic disk configuration. The boot
volume is the disk volume that contains the Windows operating system and
supporting files. By default, the operating system files are in the \Windows
folder, and the supporting files are in the \Windows\System32 folder. The
boot volume might be the same volume as the system volume, but that
configuration is not required.
volume is the disk volume that contains the hardware-specific files that are
needed to start Windows. The system volume might be the same volume as
the boot volume, but that configuration is not required.
by operating system limits. The source and the target must have the same
number of logical volumes, and the source and the target must have the same
drive letters. For example, if the source has drives C: and D:, the target
cannot have drives D: and E:. In this case, the target target must also have
drives C: and D:.
includes the location of the Windows files, Program Files, and Documents and
Settings.
Full-Server Failover must be installed on the system path on the source and
the target.
The source should be from a time when the Storage Mirroring data state is
good. If you are using snapshots, you may want to use a snapshot from the
last good data state.
The target must have enough space to store the data from the source. This
amount of disk space will depend on the applications and data files you are
protecting. The more data you are protecting, the more disk space you will
need. You must also have enough space on the target to process and apply
the system state data.
Full-Server Failover performs several validation checks to determine if
adequate disk space is available. First, the target must have enough free
space on its system volume to hold the entire volume(s) (free and used) from
the source. If this first validation check passes, then no additional checks are
necessary. Otherwise, there must be at least enough free space on the target
system volume to store the system path (including the location of the
Windows files, Program Files, and Documents and Settings) from the source.
If this second validation check passes, then no additional checks are
necessary. If this second validation fails, Full-Server Failover will check to see
if a previous failover may have been attempted. Since Full-Server Failover can
reuse the disk space from a previous failover attempt, it will add the size of
that data to the amount of free space available. If that is enough space for the
failover, the failover will continue. If not, you will either have to select a
different target or delete files on the target to free disk space.
4 - 2
Page 15

Establishing Server Protection
Use the following instructions to establish protection for your source.
1. From the Windows desktop, select Start, Programs, Storage Mirroring, Full-Server
Failover Manager.
NOTE: The user performing any Full-Server Failover tasks must be a member of both the
Double-Take Admin and local Administrators groups.
2. Enter your source and target servers. You can click Browse when selecting either server to
locate it by drilling down through your network. After you have specified a server name, enter
login credentials when prompted. Once the server is selected and logged in, the Properties tab
at the bottom of Full-Server Failover Manager updates to display the server’s properties.
NOTE: If you select a source that already has Full-Server Failover enabled, the target and
status of the protection will populate automatically.
When logging in, the user name, password, and domain are limited to 100 characters.
3. You can configure optional protection settings, if desired. For details on each of the optional
settings, see Configuring optional settings on page 5-3.
5 - 1
Page 16

4. You must validate that your target is compatible with your source and can stand-in if the source
fails. Click Validate configuration. You can also select Actions, Validate. The Validation tab
at the bottom of Full-Server Failover Manager updates to display the validation check. Errors are
designated by a white X inside a red circle. Warnings are designated by a black exclamation
point (!) inside a yellow triangle. A successful validation is designated by a white checkmark
inside a green circle.
Double-click on any of the validation items to see details. You must correct any errors before you
can enable protection. Depending on the error, you may be able to click Fix or Fix All and let
Full-Server Failover correct the problem for you. You can also select Actions, Fix Validation
Issues or Actions, Fix All Validation Issues. For those errors that Full-Server Failover cannot
correct automatically, you will need to modify the target to correct the error, or you can select a
different target. You must revalidate the selected servers until the validation check passes
without errors.
5. Once the validation check passes without errors, click Enable Protection to begin monitoring.
You can also select Actions, Enable Protection.
NOTE: If you have a Full-Server Failover connection established, do not create any Storage
Mirroring connections from the Full-Server Failover source or target.
If you are using a cluster, you must manually alter the disk signature before or after
failover. See the Microsoft Knowledge Base article 280425 at
http://support.microsoft.com/kb/280425 for details on how to change the disk signature.
You can automate the disk signature alteration as part of failover using the pre- or
post-failover scripts. See Configuring optional settings on page 5-4 for instructions on
the failover scripts.
5 - 2
Page 17

Configuring optional settings
If you want to configure optional protection settings, click Configure protection from the main
Full-Server Failover Manager window, after you have selected your source and target. You can also
select Actions, Configure Protection. There are multiple tabs for different types of protection
settings. The Protection tab determines what on the source will be protected and how the target will
handle the protection. The Failover tab controls how the failover process will be handled. The
Advanced tab specifies how the connection between the source and target is configured. Review the
details below for each of the optional protection settings.
Volumes to include—Select the volumes that you want to protect. You must have the same
volumes on the source and target. You cannot deselect the boot volume. If you deselect other
volumes, you will not be protecting the entire source server.
Directories to exclude—Select the directories that you want to exclude. If you exclude any
directories, you will not be protecting the entire source server.
Add—Click Add to specify a directory to exclude. Enter the name of the directory or click
Browse to search for the directory path. Specify Recursive if sub-directories of the listed
directory should be excluded also. Specify Non-recursive if sub-directories of the listed
directory should be included. Click OK to add the directory to the list of Directories to
exclude. Repeat this step to add multiple directories.
Edit—Highlight a directory in the list and click Edit to modify the directory definition. After
modifying the directory, click OK to save the changes.
Remove—Highlight a directory in the list and click Remove to delete the directory definition.
The directory will no longer be excluded.
Target services—Full-Server Failover Manager determines what services are currently running
on the target. You can specify which services you want to keep running and those services you
want to stop when you enable your protection. Move the services between the Services to stop
and Services to leave running lists by using the double arrows. Select Show critical services
to see the list of critical services that will remain running on the target. The critical services are
displayed in a lighter colored, italics font. The critical services cannot be moved from the running
list.
Snapshots—A snapshot is an image of data taken at a single point in time. Snapshots allow you
to view files and folders as they existed at points of time in the past, so you can, for example,
recover from cases where corrupted source data was replicated to the target. By default,
Full-Server Failover takes periodic snapshots of the data on the target. When failover is triggered,
you can use the target data at the time of failover or you can revert to a snapshot of the target
data.
Enable periodic snapshots—By default, periodic snapshots are enabled. If you disable
snapshots, the data on the target at the time of a failure will be used. Because Full-Server
Failover uses the Microsoft Volume Shadow Copy service to create snapshots, your target
must be running Windows 2003 Service Pack 1 or later. If you are using an earlier version of
Windows, this option will not be available. Additionally, your source and target must be using
the NTFS file system. If you are using a FAT file system, the FAT volumes will not be included
in the snapshot set, and when the snapshots are reverted, the FAT volume will not be
time-consistent with the NTFS volumes.
Snapshot Interval—By default, Full-Server Failover will take a snapshot of the target data
every 60 minutes. If desired, increase or decrease the interval between snapshots.
Start now—If you want to start taking snapshots immediately after the Full-Server Failover
connection is established, select Start now.
Start at—If you want to start taking snapshots at a specific data and time, select Start at
and specify the date and time parameters.
Failover—The Failover section configures how failover monitoring occurs.
Manual intervention required—By default, you will be notified when a failover is necessary,
but the failover process will not start until you manually initiate it. If you disable intervention,
failover will automatically start when a failure is detected.
Monitor Interval—By default, the target checks to see if the source is online every five (5)
seconds. The source responds back to the target when it receives one of these checks. If
desired, increase or decrease the interval between checks.
5 - 3
Page 18

Missed intervals—By default, the target can miss five (5) responses from the source before
assuming the source has failed. If desired, increase or decrease the number of responses that
can be missed before the source is identified as failed.
NOTE: Together, the Monitor interval and Missed intervals settings determine the
total time before failover would be triggered. For example, five missed checks
every five seconds would be 25 seconds to trigger failover. To achieve shorter
delays before failover, use lower values. To achieve longer delays before failover,
choose higher values.
Pre-Failover Script and Post-Failover Script—If you want to execute a script on the target
before failover (Pre-Failover Script) begins or after failover has occurred (Post-Failover
Script), specify the path to the script on the target. You can also search for the script by
clicking Browse. The script will be processed using the same user account that is configured
to run the Storage Mirroring service. Scripts may contain any valid Windows command,
executable, batch, or script file. The Pre-Failover Script will be executed as soon as the
failover process is initiated. The Post-Failover Script will be executed after the failover
process ends and the target has been rebooted.
Network Mapping—Specify how you want to handle network configurations on the target after
failover.
Apply source network configuration to the target—If you select this option, the source
IP addresses will be failed over to the target. The IP addresses associated with each NIC on
the source will be mapped to the NIC you specify on the target. If the source has more NICs
than the target, some of the source NICs will not be mapped to the target, or the target NICs
may need to be used for more than one source NIC. If there are more NICs on the target than
the source, the additional NICs will still be available after failover. If you are using a LAN
environment, you should select this option.
Retain target network configuration—If you select this option, the source IP addresses
will not be failed over to the target. The target will retain all of its original IP addresses. If your
target is on a different subnet (typical of a WAN environment), you should select this option.
The following options are available if you want to update DNS.
DNS Server—The source’s primary DNS server is selected by default. If desired, you can
select a different DNS server.
Source Server IP—Select the IP address from the source that you want to remap to an
IP address on the target.
Target Server IP—Select an IP adddress on the target that will be replace the source IP
address in DNS.
Username—Specify a user that has privileges to access and modify DNS records. The
account must be a DNS Admin for the domain in which the DNS server resides. You can
enter a user name for a different domain by entering a fully qualified user name. The fully
qualified user name must be in the format domain\username or username@domain. If
you enter a non-qualified name, the DNS domain will be used by default. The domain
name is obtained from the DNS server name, provided that reverse lookup in DNS is
enabled.
Password—Enter the password that is associated with the specified user name.
After you have entered the DNS information, click Test to validate that DNS is configured
correctly and that the specified credentials are sufficient to update DNS. When the DNS
configuration is complete, click OK to save your entries and return to the Configure
Protection window.
NOTE: If you are protecting a cluster node and select Retain target network
configuration, the virtual IP addresses associated with the cluster will still be
failed over. The only IP address that will not be failed over is the physical IP
address of the cluster node.
Route—By default, Full-Server Failover will select the default route for transmissions. If desired,
select a different IP address on the target that will be used for Full-Server Failover transmissions.
5 - 4
Page 19

Mirroring—Select the type of Storage Mirroring mirroring process you want to perform. A Full
mirror will transmit all files from the source to the target. A Checksum mirror will transmit only
the blocks of data that are different between the source and target.
NOTE: The mirror will remain in an initializing state until the mirror calculation is complete.
Estimate Replication Set size based on volume—If enabled, the replication set size is based
on the volume size, which is a faster calculation. If disabled, the replication set size is based on
the selected data, which can be a slower calculation.
Compression—Select the level of compression that you want to use. This reduces the amount of
bandwidth needed to transmit data from the source to the target. The data is compressed before
being transmitted and then is uncompressed before it is written on the target. If desired, you can
also disable Compression. Typically, compression is used in WAN environments, but not in LAN
environments.
After you have configured the settings on the various tabs, click OK to return to the main Full-Server
Failover Manager window.
5 - 5
Page 20

Monitoring Failover
After you have enabled protection, you can monitor the protection
from Full-Server Failover Manager, and you can review the log file
generated by Full-Server Failover Manager.
Monitoring failover
The Protection Status is displayed in the right center of Full-Server Failover Manager. You can tell
the status of your protection from this field.
Disabled—Protection for the source has not been started. The target must be validated as
compatible before you can enable protection.
Initializing—Full-Server Failover is initializing protection. Once initialization is complete,
mirroring will automatically begin.
Mirroring (% complete)—Full-Server Failover is mirroring the source’s data and system state
to the target. The percentage indicates how much of the mirror has been completed. Protection
is not complete until the mirror has completed.
Mirroring (Retrying)—You may see this status message if the target is out of disk space or if
Full-Server Failover cannot write to a file on the target. Check the log file on the target for more
information.
Mirroring (Mirror stopped)—You may see this status message if your mirroring process has
stopped. Depending on the reason for the stopped mirror, it may restart automatically. Check
your Full-Server Failover log file.
Mirroring (Source Unavailable)—You may see this status message if the source has become
unavailable during your mirroring process. You cannot failover until the mirroring process is
complete. Correct the issues causing the unavailability, and mirroring will restart automatically.
Mirroring (Op Dropped)—You may see this status message if the target server cannot apply
data to disk. For example, a file may be in use on the target. Check the log file on the target for
more details. See the Storage Mirroring User’s Guide for details on the log file.
Enabled—The mirroring is complete and protection of the source is enabled. In the event the
source should fail, the target will be able to stand-in for it.
Enabled (Source Unavailable)—You may see this message when the target has lost
communication with the source. If communication is reestablished before the failover monitoring
time expires, the status will update to Enabled. If communication is not reestablished before the
failover monitoring time expires, the status will update to Failover condition met.
Failover condition met—The target has missed too many responses from the source, indicating
that the source has failed. At this time, you need to manually determine the status of the source.
If the source is still up and users are accessing it, you need to resolve the communications errors
between the source and target. Once the communication issue is resolved, the status will update
to the appropriate state. If the source is indeed down and users are unable to access it, start
failover.
Failing over (% complete)—The target is in the process of failing over for the source. The
percentage indicates how much of the failover has been completed.
Failed over—Failover is complete. The target will automatically reboot.
In addition to the status displayed in Full-Server Failover Manager, a log file is generated detailing
processing information.
Viewing the log
By default, Full-Server Failover Manager logs basic processing information. To view the log file, select
File, Logs, View Full-Server Failover Manager Log. The log file will be opened automatically in
Notepad. The log file,
directory where you installed it. You can clear the log file by selecting File, Logs, Clear Full-Server
Failover Manager Log.
FFMLog.log, is located on the Full-Server Failover Manager machine in the
6 - 1
Page 21

Initiating Failover
In the event your source has failed, you can failover to your target
allowing for immediately availability. Failover can be initiated
through the Full-Server Failover Manager client. You also have the
option of initiating failover by using a command line interface.
Starting failover using Full-Server Failover Manager
When a failover condition is met, you will want to start failover. Additionally, you can start it without
a failover condition, as long as protection is enabled. For example, you may want to force failover
when upgrading to a better source server.
NOTE: If you are testing failover and your source is a domain controller, do not let the domain
To start failover, click Failover
If Full-Server Failover determines there is a possibility that the data on the target is incomplete, you
will be warned before failover begins. If you proceed with failover, the state of the source will be
unknown until failover is complete. The best case scenario would be a missing data file, while the
worst case scenario would be missing system state data that causes the server to be unusable or
unbootable.
controller communicate with any other production domain controllers after failover.
Otherwise, when the original source domain controller is brought online after the test, it
may create a USN rollback scenario if the test domain controller was allowed to
communicate with other production domain controllers.
. You can also select Actions, Failover.
Shutdown source server if running—If the source is still running, Full-Server Failover Manager
can stop it. Although, if Full-Server Failover Manager cannot communicate with the source, the
shutdown command will fail. This option prevents network conflicts in those cases where the
source and target are still both running and communicating, such as a forced failover.
Use live data—Select this option to use the data on the target at the time of failover.
7 - 1
Page 22

Revert to specified snapshot—Select this option, and then select a snapshot. The data on the
target will be reverted to the selected snapshot. This option will not be available if there are no
snapshots on the target or if the target does not support snapshots. To help you understand what
snapshots are available, use the Type and Status columns. The Status indicates the state of the
connection between the source and target at the time the snapshot was taken. The Type
information is displayed in the following table.
Type Description
Scheduled This snapshot was taken as part of a periodic snapshot.
Deferred This snapshot was taken as part of a periodic snapshot, although it did not
occur at the specified interval because the connection between the source
and target was not in a good state.
User Request This snapshot was taken manually by a user.
Click OK to initiate failover. Monitor the failover percentage as shown in the Protection Status. At
the end of failover, the target will be rebooted automatically. After the reboot, the target will no
longer exist, since it will become the source.
NOTE: Because the Windows product activation is dependent on hardware, you may need to
reactivate your Windows registration after failover. Follow the on-screen prompts to
complete the reactivation.
If you are failing over a cluster node, it is possible that volumes may lose their drive letter
assignments. If a clustered application fails to start after failover and the disk signature
has changed, check the drive letter assignments under the Disk Management utility and
re-create drive letter assignments as needed.
7 - 2
Page 23

Starting failover from a command line
You can configure connections and initiate failover without using the Full-Server Failover Manager
user interface. The same executable that launches the user interface can be used from a command
prompt with options. The command line execution opens the user interface, passes through specified
parameters, and initiates specified processes. You may want to use this alternate execution if you
have different configuration files that you want to execute or if you have multiple connections. The
Full-Server Failover Manager command can be initiated one at a time from a command prompt, or it
can be scripted.
The Full-Server Failover Manager executable is located in the installation directory.
Command FFManager
Description Initiates the Full-Server Failover Manager user interface, passes through
specified parameters, and initiates specified processes
Syntax
Options
FFMANAGER /SOURCE source_name /TARGET target_name
/USERNAME
/PROTECT /FAILOVER /LOGLEVEL
SOURCE source_name—Name of the source
TARGET target_name—Name of the target
USERNAME username—Name of a user who is a member of the
username /PASSWORD password /VALIDATE /FIXALL
number /CONFIG filename
Double-Take Admin security group
PASSWORD password—Password associated with the specified user
VALIDATE—Validates the configuration of the two servers to make sure they
are compatible
FIXALL—Corrects those errors that Full-Server Failover can automatically
correct
PROTECT—Initiates the connection between the source and target
FAILOVER—Initiates failover from the source to the target
LOGLEVEL number—Specifies the level of detailed logged based on the
following numbers.
2—Informational messages are logged
3—Informational and error messages are logged
4—Informational, error, and exception messages are logged
5—Informational, error, exception, and debug messages are logged. This
is the default setting.
6—Informational, error, exception, debug, and internal coding messages
are logged
CONFIG filename—Name of the file that contains the failover options. If no
file is specified, the FFMDefaults.xml file will be used.
Examples
ffmanager /source alpha /target beta /username
administrator /password passsword /validate /fixall
/protect
ffmanager /source alpha /target beta /username
administrator /password passsword /validate /failover
Notes If you do not specify any options with this command, the Full-Server Failover
Manager user interface will open. The fields will be blank and no processing will
occur.
7 - 3
Page 24

Performing Failback
After your target has failed over and becomes your source, you can
stay with that configuration long term. However, in some instances,
it may be necessary or desired to go back to using the original
hardware after you have failed over. Use the following process to
failback to your original (or other) hardware.
1. Because your new source is on the network, you must make sure your original source is unique
on the network to avoid name and IP address conflicts. You have several options available for
achieving this.
Reinstall Windows using unique server information. This may be the best option if your original
source was a domain controller or running a name-specific application like Exchange.
Run a utility like Microsoft SysPrep to modify SIDs (security identifiers), IP addresses, and the
server name.
Manually make the original source unique by modifying IP addresses and the server name. If
your original source was a domain controller, you must also modify the SIDs.
2. Establish protection from your new source to your original source using the same process as
when you protected your original source. See Establishing Server Protection on page 5-1 for
details.
3. When the protection has been established from your new source to your original source, initiate
failover. See Initiating Failover on page 7-1 for details.
Once failover has completed, you will be back to your original hardware.
8 - 1
Page 25

Managing Snapshots
By default, snapshots are enabled in Full-Server Failover. Also by
default, a snapshot is taken every 60 minutes. This may lead to
numerous snapshots on the target that you may want to manage.
You can do that by selecting Actions, Snapshot Manager. (This
option is only available when a source and target are selected and protection is enabled.)
Enable periodic snapshots—By default, periodic snapshots are enabled. Because Full-Server
Failover uses the Microsoft Volume Shadow Copy service to create snapshots, your target must
be running Windows 2003 Service Pack 1 or later. Your source and target must also be using the
NTFS file system. If you are using an earlier version of Windows or a FAT file system, this option
will not be available. If you disable snapshots, the data on the target at the time of a failure will
be used.
Snapshot Interval—By default, Full-Server Failover will take a snapshot of the target data every
60 minutes. If desired, increase or decrease the interval between snapshots.
Start now—If you want to start taking snapshots immediately after the Full-Server Failover
connection is established, select Start now.
Start at—If you want to start taking snapshots at a specific data and time, select Start at and
specify the date and time parameters.
Take Snapshot—If you want to take a snapshot manually (outside of the specified interval), click
Take Snapshot.
9 - 1
Page 26

Delete Snapshot—If you no longer want to keep a snapshot, you can delete it by highlighting
the snapshot in the Existing Snapshots list and clicking Delete Snapshot. To help you
understand the snapshots, use the Type and Status columns. The Status indicates the state of
the connection between the source and target at the time the snapshot was taken. the Type
information is displayed in the following table.
Type Description
Scheduled This snapshot was taken as part of a periodic snapshot.
Deferred This snapshot was taken as part of a periodic snapshot, although it did not
occur at the specified interval because the connection between the source
and target was not in a good state.
User Request This snapshot was taken manually by a user.
NOTE: The Schedule options at the top of the Snapshot Manager are the same options from the
Configure Protection Protection tab. If you change the options in one location, they will
be changed in the other location too.
The Existing Snapshots list only contains snapshots from Full-Server Failover.
Snapshots from other utilities and tools will not be listed.
9 - 2
Page 27

Using Firewalls
If your source and target are on opposite sides of a NAT or firewall,
you will need to configure your hardware to accommodate
Full-Server Failover communications. You must have the hardware
already in place and know how to configure the hardware ports. If
you do not, see the reference manual for your hardware.
In a NAT or firewall environment, you must have a static mapping where a single, internal IP address
is always mapped in a one-to-one correlation to a single, external IP address. Full-Server Failover
cannot handle dynamic mappings where a single, internal IP address can be mapped to any one of a
group of external IP addresses managed by the router.
Full-Server Failover ports
Full-Server Failover relies on Storage Mirroring for port configuration. By default, Storage Mirroring
uses port 6320 for all communications. To verify or modify the ports, you must use the Storage
Mirroring Management Console.
1. Select Start, Programs, Storage Mirroring, Management Console.
2. Locate your servers in the server tree in the left pane of the Management Console.
NOTE: If your server is not listed, select Insert, Server. Type the machine name or IP
address and click OK.
3. Right-click the server in the left pane of the Management Console and select Properties.
4. On the Network tab, verify or modify the Communications Port as needed. All Full-Server
Failover servers and clients must be using the same port.
Full-Server Failover uses ICMP pings to monitor the source for failover. A failover monitor will not be
created if ICMP is blocked (although the data and system state will still be protected). You should
configure your hardware to allow ICMP pings between the source and target. If you cannot, you will
have to monitor for a failure manually and create a dummy monitor at failover time that can be
manually failed over. Contact technical support for assistance with this manual process.
Microsoft Windows ports
Full-Server Failover uses WMI (Windows Management Instrumentation) which uses RPC (Remote
Procedure Call). By default, RPC will use ports at random above 1024, and these ports must be open
on your firewall. RPC ports can be configured to a specific range by specific registry changes and a
reboot. See the Microsoft Knowledge Base article 154596 for instructions.
Full-Server Failover relies on other Microsoft Windows ports.
Microsoft File Share uses ports 135 through 139 for TCP and UDP communications.
Microsoft Directory uses port 445 for TCP and UDP communications.
These ports must be open on your firewall. Check your Microsoft documentation if you need to modify
these ports.
Hardware ports
You need to configure your hardware so that the Full-Server Failover and Microsoft Windows ports
are open. Since communication occurs bidirectionally, make sure you configure both incoming and
outgoing traffic.
There are many types of hardware on the market, and each can be configured differently. See your
hardware reference manual for instructions on setting up your particular router.
10 - 1
 Loading...