

Page 1
Application Manager
user’s guide
Part number: T2558-96322
Ninth edition: March 2009
Page 2

© Copyright 2009 Hewlett-Packard Development Company, L.P.
Hewlett-Packard Company makes no warranty of any kind with regard to this material, including, but
not limited to, the implied warranties of merchantability and fitness for a particular purpose.
Hewlett-Packard shall not be liable for errors contained herein or for incidental or consequential
damages in connection with the furnishing, performance, or use of this material.
This document contains proprietary information, which is protected by copyright. No part of this
document may be photocopied, reproduced, or translated into another language without the prior
written consent of Hewlett-Packard. The information contained in this document is subject to change
without notice.
Microsoft®, Windows®, and Windows NT® are U.S. registered trademarks of Microsoft Corporation.
Hewlett-Packard Company shall not be liable for technical or editorial errors or omissions contained
herein. The information is provided "as is" without warranty of any kind and is subject to change
without notice. The warranties for Hewlett-Packard Company products are set forth in the express
limited warranty statements for such products. Nothing herein should be construed as constituting
an additional warranty.
HP StorageWorks Storage Mirroring Application Manager User’s Guide
Ninth Edition (March 2009)
Part Number: T2558-96322
Page 3

Table of Contents
Chapter 1 Introduction ..........................................................1-1
About the Storage Mirroring Application Manager ............................. 1-1
Supported configurations .................................................................. 1-1
Exchange ............................................................................................................. 1-1
SQL ..................................................................................................................... 1-2
SharePoint............................................................................................................ 1-3
File server ............................................................................................................ 1-4
BlackBerry ............................................................................................................ 1-5
Requirements .................................................................................... 1-5
Exchange requirements .......................................................................................... 1-6
SQL requirements.................................................................................................. 1-7
File server requirements ......................................................................................... 1-8
SharePoint requirements ........................................................................................ 1-8
BlackBerry requirements......................................................................................... 1-9
Related documentation...................................................................... 1-9
User’s guide.......................................................................................................... 1-9
Application notes ................................................................................................. 1-10
Readme files ....................................................................................................... 1-10
Chapter 2 Navigating the user interface ................................2-1
Install the Application Manager ......................................................... 2-1
Start the Application Manager ........................................................... 2-2
Menu options ..................................................................................... 2-3
Change Application Manager preferences .......................................... 2-4
Using the online help ......................................................................... 2-5
Chapter 3 Protecting an Exchange Server..............................3-1
Verify the Exchange environment (recommended) ............................ 3-1
Select a task ...................................................................................... 3-2
Select a domain ................................................................................. 3-2
Select source and target servers ....................................................... 3-3
Enter server login information ................................................................................. 3-4
Using clustered Exchange servers ............................................................................ 3-4
Configure protection settings ............................................................ 3-4
Failover settings ................................................................................ 3-5
Failover type ......................................................................................................... 3-5
Services ............................................................................................................... 3-8
Resources (cluster only) ......................................................................................... 3-9
Monitor settings .............................................................................. 3-10
Application Monitoring (BETA) ............................................................................... 3-11
Snapshot settings ............................................................................ 3-12
Page 4

Connection settings ......................................................................... 3-13
Route................................................................................................................. 3-13
Protected Storage Groups ..................................................................................... 3-13
Mirror type ......................................................................................................... 3-14
Enable compression ............................................................................................. 3-14
Advanced settings ........................................................................... 3-14
Replication set rules............................................................................................. 3-15
Failover/failback scripts ........................................................................................ 3-16
Force AD replication ............................................................................................. 3-17
Target(ed) domain controller................................................................................. 3-17
Advanced settings................................................................................................ 3-18
Saving configuration changes.......................................................... 3-19
Chapter 4 Protecting an Exchange Cluster with a
Like-Named Cluster ...............................................................4-1
Prerequisites ..................................................................................... 4-1
Permissions ....................................................................................... 4-1
Multiple EVS ...................................................................................... 4-1
Configuring a standby cluster ............................................................ 4-2
Enabling protection ........................................................................... 4-5
Dealing with a failure ........................................................................ 4-6
Graceful failover .................................................................................................... 4-6
Site failure failover................................................................................................. 4-6
Differences in failback ............................................................................................ 4-6
Chapter 5 Protecting a SQL Server.........................................5-1
Select a task ...................................................................................... 5-1
Select a domain ................................................................................. 5-2
Select source and target servers ....................................................... 5-3
Add or manage servers........................................................................................... 5-4
Enter server login information ................................................................................. 5-5
Using clustered SQL servers .................................................................................... 5-5
Configure protection settings ............................................................ 5-5
Select SQL instances.......................................................................... 5-6
Failover settings ................................................................................ 5-6
Failover type ......................................................................................................... 5-7
Services ............................................................................................................... 5-9
Resources (cluster only) ....................................................................................... 5-10
Monitor settings .............................................................................. 5-11
Application Monitoring (BETA) ............................................................................... 5-12
Snapshot settings ............................................................................ 5-13
Connection settings ......................................................................... 5-14
Route................................................................................................................. 5-14
Protected Databases ............................................................................................ 5-14
Mirror type ......................................................................................................... 5-18
Enable compression ............................................................................................. 5-18
ii
Page 5

Advanced settings ........................................................................... 5-19
Replication set rules............................................................................................. 5-19
Failover/failback scripts ........................................................................................ 5-20
Items to failover .................................................................................................. 5-21
Advanced settings................................................................................................ 5-22
Saving configuration changes.......................................................... 5-22
Chapter 6 Protecting a File Server .........................................6-1
Select a task ...................................................................................... 6-1
Select a domain ................................................................................. 6-2
Select source and target servers ....................................................... 6-3
Add or manage servers........................................................................................... 6-4
Enter server login information ................................................................................. 6-4
Configure protection settings ............................................................ 6-5
Failover settings ................................................................................ 6-5
Failover type ......................................................................................................... 6-5
Services ............................................................................................................... 6-8
Monitor settings ................................................................................ 6-9
Snapshot settings ............................................................................ 6-10
Connection settings ......................................................................... 6-11
Route................................................................................................................. 6-11
File Shares.......................................................................................................... 6-11
Mirror type ......................................................................................................... 6-11
Enable compression ............................................................................................. 6-12
Advanced settings ........................................................................... 6-12
Replication set rules............................................................................................. 6-12
Failover/failback scripts ........................................................................................ 6-13
Items to failover .................................................................................................. 6-14
Advanced settings................................................................................................ 6-15
Saving configuration changes.......................................................... 6-15
Chapter 7 Protecting a SharePoint Server..............................7-1
Select a task ...................................................................................... 7-2
Select a domain ................................................................................. 7-2
Select SharePoint front end ............................................................... 7-3
Select source and target servers ....................................................... 7-3
Add or manage servers........................................................................................... 7-4
Enter server login information ................................................................................. 7-5
Configure protection settings ............................................................ 7-5
Failover settings ................................................................................ 7-6
Failover type ......................................................................................................... 7-6
Services ............................................................................................................... 7-9
Add/remove SharePoint services............................................................................ 7-10
Monitor settings .............................................................................. 7-10
Application Monitoring (BETA) ............................................................................... 7-11
Snapshot settings ............................................................................ 7-13
iii
Page 6

Connection settings ......................................................................... 7-13
Route................................................................................................................. 7-14
Protected Databases ............................................................................................ 7-14
Mirror type ......................................................................................................... 7-14
Enable compression ............................................................................................. 7-14
Advanced settings ........................................................................... 7-15
Replication set rules............................................................................................. 7-15
Failover/failback scripts ........................................................................................ 7-16
Items to failover .................................................................................................. 7-17
Advanced settings................................................................................................ 7-18
SharePoint settings ......................................................................... 7-19
Saving configuration changes.......................................................... 7-20
Chapter 8 Protecting a BlackBerry Server..............................8-1
Select a task ...................................................................................... 8-2
Select a domain ................................................................................. 8-2
Select source and target servers ....................................................... 8-3
Add or manage servers........................................................................................... 8-4
Enter server login information ................................................................................. 8-4
Configure protection settings ............................................................ 8-5
Failover settings ................................................................................ 8-5
Failover type ......................................................................................................... 8-5
Services ............................................................................................................... 8-8
Monitor settings ................................................................................ 8-9
Snapshot settings ............................................................................ 8-10
Connection settings ......................................................................... 8-11
Route................................................................................................................. 8-11
Protected Databases ............................................................................................ 8-11
Mirror type ......................................................................................................... 8-11
Enable compression ............................................................................................. 8-12
BlackBerry settings.......................................................................... 8-12
Advanced settings ........................................................................... 8-13
Replication set rules............................................................................................. 8-14
Failover/failback scripts ........................................................................................ 8-14
Advanced settings................................................................................................ 8-16
Saving configuration changes.......................................................... 8-17
Complete BlackBerry protection ...................................................... 8-17
Chapter 9 Validate the Configuration.....................................9-1
Chapter 10 Enabling Protection for a Server ........................ 10-1
Enable protection ............................................................................ 10-1
Disable protection ........................................................................... 10-2
Monitor protection status ................................................................ 10-2
Protection status states ........................................................................................ 10-2
Protection detail states ......................................................................................... 10-3
iv
Page 7

Verify target data viability ............................................................... 10-5
Relocating the MTA and SMTP pickup path and queues.............................................. 10-7
Managing snapshots ........................................................................ 10-8
Chapter 11 Failover, Failback, and Restoration....................11-1
DNS failover, failback, and restoration ............................................ 11-1
Initiating automatic failover .................................................................................. 11-1
Initiating manual failover ...................................................................................... 11-2
Failback and restoration........................................................................................ 11-3
Identity failover, failback, and restoration ...................................... 11-4
Initiating a failover............................................................................................... 11-4
Failback and restoration........................................................................................ 11-4
Recovering to the original source ........................................................................... 11-5
Rehoming the Exchange objects to the source ......................................................... 11-7
Re-enabling protection .................................................................... 11-7
Appendix A Recommended Credentials..................................A-1
Application Manager credentials........................................................ A-1
Assigning the user to the Power Users group ............................................................. A-1
Assigning the user to the Storage Mirroring Admin group ............................................ A-1
Assigning the user to the local servers’ Administrators group ....................................... A-2
Assigning the user to the DnsAdmins group............................................................... A-2
Manually set SPN update permissions ....................................................................... A-6
Exchange credentials......................................................................... A-6
Assigning Exchange 2003 Full Administrator permission.............................................. A-7
Assigning Exchange 2007 Full Administrator permission.............................................. A-7
Delegating Exchange administrative rights ................................................................ A-8
SQL credentials.................................................................................. A-8
Assigning SQL Server System Administrators permission............................................. A-9
SharePoint credentials....................................................................... A-9
BlackBerry credentials....................................................................... A-9
Appendix B Rebuilding the Source .........................................B-1
Rebuilding the original Exchange source ........................................... B-1
Rebuilding the original SQL source .................................................... B-3
Appendix C Exchange and SQL Failover with BlackBerry........C-1
Appendix D Using a non-Microsoft DNS Server ..................... D-1
Using /altdns.....................................................................................D-1
Appendix E Using the Target Data Verification
(TDV) Utility ..........................................................................(-1
Appendix F Using the DNS Failover (DFO) Utility ...................)-1
Appendix G Using the Exchange Failover (EFO) Utility.......... G-1
v
Page 8

Introduction
This document describes how to use the Storage Mirroring
Application Manager to create and validate your application
configuration. The Application Manager lets you quickly configure
protection for an application without requiring you to have advanced
knowledge of either Storage Mirroring or your application. The Application Manager works by
gathering information about your source and target environments, then configuring Storage Mirroring
to protect the source.
About the Storage Mirroring Application Manager
The Application Manager is used to simplify the setup of standard Storage Mirroring connections. The
Application Manager discovers all servers running a designated application in your environment so
that you can determine which servers are not protected. It gathers information about the
environment from various sources (including Storage Mirroring, Active Directory
automatically configures Storage Mirroring to protect that environment. It also performs a “health
check” to make sure that your configuration is correct. This check not only helps to reduce
configuration errors, but it also simplifies the setup process.
Supported configurations
NOTE: Blackberry Server and Exchange cannot be protected on the same machine.
®
, and DNS) and
Exchange
Exchange 2003 Exchange 2007
Source to target topology
One to one Yes Yes
Many to one No No
One to many No No
Cascaded (chained) No No
Cluster support
Cluster to cluster Yes Mailbox role only
Cluster to standalone Yes Mailbox role only
Standalone to cluster No No
Application configurations
2000/2003 front-end
server
2000/2003 back-end server Yes N/A
2007 consolidated roles N/A Mailbox role only
No N/A
2007 distributed roles N/A Mailbox role only
Domain topology
Single forest Yes Yes
Multiple forest No No
1 - 1
Page 9

Exchange 2003 Exchange 2007
Parent/child Yes Yes
Child/child Yes Yes
NOTE: For Exchange 2007, in a consolidated role environment only the mailbox role is protected.
The Hub Transport and Client Access roles are not protected or failed over because they
are already installed on the target.
For Exchange 2007, replication and failover between a distributed role source
configuration to a consolidated role target configuration is permitted, provided that the
systems are configured as follows:
The source Mailbox Server role is installed on a standalone server or MSCS cluster
with the other roles residing on different servers.
The target configuration is a stand-alone server with the Mailbox, Hub Transport, and
Client Access roles installed.
In these configurations, Storage Mirroring will not replicate any data associated with the
Hub Transport/Client Access data; however, the target Hub Transport/Client Access roles
function properly when failing over the source Mailbox role, allowing necessary
operations to resume.
Using the Application Manager with Exchange in clustered environments
The Application Manager can be used in the following cluster configurations with Exchange 2003:
Clustered source to standalone target
Multi-node cluster to another multi-node cluster
Multi-node cluster to a single-node cluster (requires GeoCluster
Single-node cluster to a multi-node cluster (requires GeoCluster PLUS)
®
PLUS)
NOTE: The Application Manager does not support configurations where Exchange and the
domain controller are on the same node of a cluster.
When using Exchange on a cluster, Exchange must be installed in its own uniquely named
group and not in the cluster group.
Like-named cluster support is only available for clusters running Exchange 2003. It is not
available for Exchange 2007.
SQL
SQL Server
2000
Source to target topology
One to one Yes Yes Yes Yes
Many to one Database mode
only
One to many No No No No
Cascaded (chained) No No No No
Cluster support
Cluster to cluster No Yes Yes No
SQL Server
2005
Database mode
only
SQL Server
2008
Database mode
only
SQL Express
Database mode
only
1 - 2
Page 10

SQL Server
2000
SQL Server
2005
SQL Server
2008
SQL Express
Cluster to
standalone
Standalone to
cluster
Application configurations
Named instance Yes Yes Yes Yes
Database only Yes Yes (standalone
Domain topology
Single forest Yes Yes Yes Yes
Multiple forest No No No No
Parent/child Yes Yes Yes Yes
Child/child Yes Yes Yes Yes
No No No No
No No No No
only)
Yes (standalone
only)
Yes
Using the Application Manager with SQL in clustered environments
The Application Manager can be used with SQL Server 2005 or SQL Server 2008 in a cluster-to-cluster
environment.
If you want to use SQL 2000 in a clustered environment, or if you have a cluster-to-standalone
configuration, refer to one of the following application notes, available from
http://www.hp.com/support
Guidelines for using Microsoft SQL Server 2000 with Storage Mirroring
Guidelines for using Microsoft SQL Server 2005 with Storage Mirroring
.
SharePoint
SQL 2000 SQL 2005 SQL 2008
Source to target topology
One to one Yes Yes Yes
Many to one No No No
One to many No No No
Cascaded (chained) No No No
Cluster support
Cluster to cluster No No No
Cluster to standalone No No No
Standalone to cluster No No No
Application configurations
WSS Yes Yes Yes
MOSS 2007 Yes Yes Yes
Domain topology
1 - 3
Page 11

SQL 2000 SQL 2005 SQL 2008
Single forest Yes Yes Yes
Multiple forest No No No
Parent/child Yes Yes Yes
Child/child Yes Yes Yes
Application Manager for SharePoint supports only SQL instance mode protection. Database-only
protection mode is not available.
By default, Application Manager for SharePoint displays the Advanced options and automatically
selects to failover Server Name and Hostname (SPNs). These two options are required to make
SharePoint failover work correctly.
Application Manager for SharePoint does not support graceful/soft failover.
Only target web servers running a version of SharePoint that is identical to what is installed on
the source web front-end can be extended into the source SharePoint configuration.
The SharePoint Admin account used to install WSS 3 or MOSS 2007 on the source web front-end
is required to extend a target web server into the SharePoint configuration.
File server
Windows 2003 Windows 2008
Source to target topology
One to one Yes Yes
Many to one No No
One to many No No
Cascaded (chained) No No
Cluster support
Cluster to cluster No No
Cluster to standalone No No
Standalone to cluster No No
Domain topology
Single forest Yes Yes
Multiple forest No No
Parent/child No No
Child/child Yes, as long as the
child domain has a
DNS server. If the
DNS server resides
in the parent
domain, then
validation will fail.
Yes, as long as the
child domain has a
DNS server. If the
DNS server resides
in the parent
domain, then
validation will fail.
Application Manager for file severs does not support graceful/soft failover.
1 - 4
Page 12

BlackBerry
The Application Manager can be used to configure Storage Mirroring to provide high availability for
BlackBerry Enterprise Server using a Microsoft SQL Server database back end. This allows a
secondary server to assume the identity and role of a failed server while maintaining the availability
of BlackBerry Enterprise Server and/or SQL Server services with minimal disruption or data loss.
All versions
Consolidated to consolidated Supported
Distributed to distributed Not supported
Distributed to consolidated Not supported
Requirements
The Application Manager will run from any client (or server) on any Microsoft® Windows® operating
system that has access to the domain in which the servers are located.
NOTE: Storage Mirroring Application Manager should be run on a machine that is not a domain
controller. Hewlett-Packard recommends that you run Application Manager from either a
third “administrative” client that is running a supported operating system or from the
Storage Mirroring target.
If you attempt to run Application Manager on a domain controller, the following errors
may occur:
Application Manager could not verify credentials when connecting to the server
x.x.x.x. Due to technical restrictions, credentials cannot be verified when used to
connect to a local machine.
GetWbemScope: Attempting connection to WBEM server (using specified
credentials): x.x.x.x: <domain>\<user>: root\microsoftdns
The Application Manager requires the following minimum system configuration:
Two servers that meet one of the following operating system requirements:
Microsoft Windows 2003 with Service Pack 1 or later
Microsoft Windows XP with Service Pack 2 or later
Microsoft Windows Vista
Microsoft Windows 2008
NOTE: Windows 2008 Server Core installation option is not supported.
Microsoft Windows 2008 can only be used with the following application versions:
Exchange 2007
SQL 2005 and SQL 2008
File Server
SharePoint
Two licensed copies of Storage Mirroring with the most recent Windows Server 2008 feature pack
NOTE: Storage Mirroring must be installed and running on the source and target servers. If
the Storage Mirroring service is not installed or not running on source or target server,
an error will appear.
1 - 5
Page 13

A copy of the most recent version of the Storage Mirroring Application Manager
NOTE: The version of Storage Mirroring and Storage Mirroring Application Manager must be
the same.
See the Hewlett-Packard support website to obtain the most recent version of the
Application Manager.
.NET Framework version 3.5 with service pack 1 or later. If you do not have .NET Framework
version 3.5 SP 1 installed, Application Manager will prompt you to install it
Microsoft Installer version 3.0 or later (as required by the .NET Framework version 3.5 SP 1)
An active internet connection (required only during the Application Manager installation to
download the Microsoft Admin Pack, .NET Framework, and/or SQL Server 2005 Backward
Compatibility components containing the SQLDMO libraries)
NOTE: Alternatively, these packages are available on the Hewlett-Packard support website
and can be downloaded to a different server, from which you can use an internal file
share or removable media to copy the files to the Application Manager client.
If you are using the Target Data Verification feature, you will need to install the Volume Shadow
Copy Service SDK (Vshadow.exe) in the windows\system32 directory on the target server.
This tool is available for download from the Windows Download Center on the Microsoft website
(www.microsoft.com).
The target must have drive letters that match the drive letters where the protected application
stores data
Application Manager does not support single-label DNS domain names (that is, domain names
that do not include a suffix such as
The program files for your application must be installed in the same location on the target and
.com, .corp, .net, and so on)
the source
In addition, your environment must adhere to requirements specific to the application you are
protecting. For additional requirements, see:
Exchange requirements on page 1-6
SQL requirements on page 1-7
File server requirements on page 1-8
SharePoint requirements on page 1-8
BlackBerry requirements on page 1-9
Exchange requirements
If you are using the Application Manager for Exchange, your system must meet the following
requirements.
Two licensed copies of Microsoft Exchange Server that meet one of the following requirements:
Exchange Server 2003
1 - 6
Page 14

Exchange 2007
NOTE:
Hewlett-Packard recommends that the Exchange version be the same as the
operating system version (for example, Windows Server 2003 running Exchange
2003).
Only Exchange 2007 is supported with Windows Server 2008.
The source and target servers must both be running a Microsoft-supported
operating system/Exchange combination.
Both source and target Exchange versions must be identical.
To perform target data verification, you must be using Exchange 2003 with service
pack 1 or later.
For Exchange 2007, Application Manager may be run on a workstation, provided
that the Exchange 2007 Management Tools are installed prior to installing the
Application Manager.
To use the Application Manager for Exchange, Storage Mirroring must be running under the
localsystem account.
The client or server that is running the Application Manager must have access to the domain in
which the Exchange servers are located.
The source and target Exchange servers must be in the same root forest domain.
The source and target servers must be part of the same Exchange Administrative Group.
The target Exchange server cannot be a domain controller.
The Exchange configurations on the source and target servers must be identical for the following
components:
Storage groups
Location of storage groups (log and data files)
Log file prefixes
Database locations (log and data files)
Message Transfer Agent (MTA) location
Queue paths
NOTE: This requirement does not apply to like-named clusters.
In a parent\child domain, at least one domain controller in the child domain must designated as
a global catalog server.
The Application Manager does not support configurations where Exchange and the domain
controller are on the same node of a cluster.
While installing Exchange Server 2003 on a domain controller is a supported operation, it is not
generally recommended. Hewlett-Packard also does not recommend this configuration. If you
must use Exchange Server2003 on a domain controller, review the following Microsoft Knowledge
Base articles:
http://support.microsoft.com/kb/822179
http://support.microsoft.com/kb/332097
http://support.microsoft.com/kb/305065
http://support.microsoft.com/kb/304403
http://support.microsoft.com/kb/875427
SQL requirements
If you are using the Application Manager for SQL, your system must meet the following requirements.
Two licensed copies of Microsoft SQL Server that meet one of the following requirements:
SQL Server 2000 with Service Pack 4 or later
1 - 7
Page 15

SQL Server 2005
SQL Server 2008
SQL Sever Express
NOTE:
If you are using SQL Server, you will be prompted to download and install the
Microsoft SQL Server 2005 backward compatibility components. This package
includes the SQLDMO library, which is required to run the Application Manager.
You should use the same version and service pack of SQL Server on both the
source and target servers. Exceptions would be that in Database Only protection
mode you may use a newer version of SQL Server on the target server or have a
32-bit source and a 64-bit target to perform a failover (for instance, when using
Application Manager to facilitate a migration from SQL Server 2000 on the source
to SQL Server 2005 on the target, or to migrate data from a 32-bit source to a
64-bit target). You cannot failback when using different versions of SQL Server
on the source and target.
To enable the Application Manager to work with MSDE (SQL Express 2000) and SQL Server 2005
Express, Named Pipes and TCP/IP need to be added to the Enabled Protocols. By default, these
are disabled. They must be enabled to accept remote connections.
For MSDE, you must run the svrnetcn.exe command, which is located in the C:\Program
Files\Microsoft SQL Server\80\Tools\Binn directory.
For SQL Server 2005 Express, you must launch the SQL Server Configuration Manager,
expand SQL Server 2005 Network Configuration, and for Protocols for MSSQLSERVER
enable Named Pipes and TCP/IP.
To use the Application Manager for SQL, the user logged on to Windows must be a member of
the SQL Server sysadmin role on the source and target servers.
The source and target SQL servers must be in the same domain; otherwise, the SQL Server
service on both the source and target servers must be configured to start with the same domain
user account.
In order to protect SQL named instances, both the source and target SQL Servers must have
named instances with the exact same name installed prior to configuring protection.
File server requirements
If you are using the Application Manager for file servers, your system must meet the following
requirement.
Two licensed copies of Storage Mirroring 5.0 with the latest service pack
NOTE:
Hewlett-Packard strongly recommends that the target server be a dedicated
standby server which does not host any critical applications. During failback for file
servers, the Server service is re-started, which could also re-start any dependent
services.
File server protection is currently only supported in a flat domain.
SharePoint requirements
If you are using the Application Manager for SharePoint, your system must meet the following
requirements.
Windows SharePoint Services (WSS) version 3
NOTE: WSS 3.0 service pack 1 is required for Windows 2008.
Microsoft Office SharePoint Server (MOSS) 2007
NOTE: MOSS 2007 service pack 1 is required for Windows 2008.
1 - 8
Page 16

SQL Server 2000, SQL Server 2005, or SQL Server 2008 back-end
NOTE: SharePoint protection is currently only supported in a flat domain.
Windows Firewall—You will need to open port 6350 for Sharepoint communication.
BlackBerry requirements
If you are using the Application Manager for BlackBerry, your system must meet the following
requirements.
Licensed copies of Microsoft SQL Server that meet one of the following requirements:
SQL Server 2000 with Service Pack 4 or later
SQL Server 2005
SQL Express
NOTE:
If you are using SQL Server, you will be prompted to download and install the
Microsoft SQL Server 2005 backward compatibility components. This package
includes the SQLDMO library, which is required to run the Application Manager.
You should use the same version and service pack of SQL Server on both the
source and target servers. The only exception would be that you may use a newer
version of SQL Server on the target server to perform a failover while in Database
Only protection mode (for instance, when using Application Manager to facilitate
a migration from SQL Server 2000 on the source to SQL Server 2005 on the
target). You can NOT failback when using different versions of SQL Server on the
source and target.
Licensed copies of BlackBerry Enterprise Server for Microsoft Exchange versions 4.1.4
through 4.1.6
Licensed copies of Microsoft Exchange Server that meet one of the following requirements:
NOTE:
Hewlett-Packard recommends that the Exchange version be the same as the
operating system version (for example, Windows Server 2003 running Exchange
2003).
The source and target servers must both be running a Microsoft-supported
operating system/Exchange combination.
Both source and target Exchange versions must be identical.
To perform target data verification, you must be using Exchange 2003 with service
pack 1 or later.
Related documentation
Before you begin to configure your solution, make sure that you have complete documentation for
your operating system, application, and Storage Mirroring.
User’s guide
The following document(s) contain additional information that you may need while setting up this
solution:
Storage Mirroring User’s Guide or online documentation
NOTE: The Storage Mirroring User’s Guide contains a list of Storage Mirroring error codes. This
reference is useful for troubleshooting.
1 - 9
Page 17

Application notes
While the Application Manager greatly simplifies the process of configuring your application for use
with Storage Mirroring, Hewlett-Packard recognizes that in some environments a manual process for
application configuration is more desirable. However, the manual process is much more time
consuming and labor intensive. Hewlett-Packard has application notes which provide guidelines on
using manual processes to configure your application with Storage Mirroring.
To obtain application notes for the manual process for Exchange configurations, you must contact
Hewlett-Packard technical support. Current contact information for technical support is available at
http://www.hp.com/support
Application notes for other applications are available for download from the Application Notes page
of the Hewlett-Packard support web site (http://www.hp.com/support
.
).
Readme files
The following readme files contain additional reference information related to the Application
Manager:
Readme_Application_Manager.htm—The readme file contains information about known issues
and workarounds in the current release of the Application Manager.
Readme_DFO.htm—The DNS failover utility (DFO.exe), which is called in the failover scripts,
automatically updates DNS resource records in order to seamlessly redirect network clients. The
DFO readme file documents DFO syntax, known issues, and workarounds.
The readme files can be found in the folder where the Application Manager is installed (the default
installation location is either \Program Files\Storage Mirroring\ or \Program files\Application
Manager).
1 - 10
Page 18

Navigating the user interface
The Application Manager interface is designed to guide you through the process of configuring
protection for your servers. The default configuration parameters have been selected to be
appropriate for most configurations; however, you may need to modify them for your specific
environment. Any changes you make to non-machine specific configuration settings (such as Missed
Packets) will become the default the next time you run the Application Manager.
When you launch the Application Manager and select an application to protect, you will see the main
Application Manager window. The Setup tab of the Application Manager window leads you through
the steps to configure protection for a server using standard Windows-style controls. Enter
information in fields, select options from drop-down menus, click buttons, and use menu options to
configure protection.
After protection has been set up, use the Monitor tab to view information about the current
source/target pair. Based on the current protection status and/or failover state, the Failover,
Monitoring, and Protection button text on the Monitor tab will be updated to display the available
command. If the Application Manager is not in a state that will allow any of these options to be
executed, the corresponding button(s) will be grayed out (disabled).
The interface provides tooltip-style online help. When you place the pointer over a field in the
Application Manager, a tooltip will appear to provide additional information about the field.
Install the Application Manager
If you have not done so already, install the Application Manager by running the Application Manager
installation file downloaded from the Hewlett-Packard support website or from your installation
media. If you install .NET during the Application Manager installation, you may be required to reboot
your system prior to the installation of Application Manager. After the reboot, the installation should
continue.
When the installation autorun file is launched, the Application Manager will detect the platform that
the server is running on (that is, whether it is on 32-bit or 64-bit). When you select Install
Application Manager, the correct version of Application Manager will be installed automatically.
NOTE: On 32-bit systems, if Storage Mirroring is installed before the Application Manager is
For the initial setup, the Application Manager only needs to be installed on one system. For managing
failover and failback, the Application Manager should be run from either the target server or an
administrative workstation.
installed, then the Application Manager will be installed to the same location as Storage
Mirroring. If the Application Manager is installed before Storage Mirroring, then the
Application Manager will be installed to the \Application Manager directory that is created.
On 64-bit systems, Storage Mirroring is installed to the Program Files directory (not
\Program Files <x86>). When the Application Manager is installed, the Application
Manager will be installed to the \Program Files folder where Storage Mirroring resides. If
the Application Manager is installed before Storage Mirroring, then the Application
Manager will be installed to \Program Files\Application Manager. If Storage Mirroring is
subsequently installed, it will be in a separate directory (that is, the Application Manager
will be installed to \Program Files\Application Manager and Storage Mirroring will be
installed to \Program Files\Storage Mirroring).
2 - 1
Page 19

The Application Manager installation uses an active internet connection to download the Microsoft
Admin Pack and SQL server backward compatibility (SQLDMO) files. In addition, if you do not have
.NET Framework version 3.5 SP1 installed, you will be prompted to install it. Microsoft Installer
version 3.0 or later is required to install the .NET Framework.
NOTE: Alternatively, these packages are available on the Hewlett-Packard support website and
can be downloaded to a different server, from which you can use an internal file share or
removable media to copy the files to the Application Manager client.
Start the Application Manager
Launch the Application Manager by selecting Start, Programs, Storage Mirroring, Application
Manager. The Application Manager will open. If you have not yet set up protection, the window will
show the Welcome screen.
You can protect servers for a different application by selecting one of the following options in the
Tasks area on the left pane:
Protect Exchange Server—To protect an Exchange server, click this option. The right pane will
display the Manage Exchange page, which will lead you through the steps to protect an Exchange
server. Continue with Protecting an Exchange Server on page 3-1.
Protect SQL Server—To protect a SQL server, click this option. The right pane will display the
Manage SQL page, which will lead you through the steps to protect a SQL server. Continue with
Protecting a SQL Server on page 5-1.
Protect File Server—To protect a file server, click this option. The right pane will display the
Manage File Server page, which will lead you through the steps to protect a File server. Continue
with Protecting a File Server on page 6-1.
Protect SharePoint Server—To protect a SharePoint server, click this option. The right pane
will display the Manage SharePoint Server page, which will lead you through the steps to protect
a SharePoint server. Continue with Protecting a SharePoint Server on page 7-1.
Protect BlackBerry Server—To protect a BlackBerry server, click this option. The right pane will
display the Manage BlackBerry Server page, which will lead you through the steps to protect a
BlackBerry server. Continue with Protecting a BlackBerry Server on page 8-1.
2 - 2
Page 20

Menu options
Based on the current protection status and/or failover state, the Protection, Monitoring, and
Failover/Failback menu options will be updated to display the available commands. If the Application
Manager is not in a state that will allow any of these options to be executed, the corresponding menu
option(s) will be grayed out (disabled).
The following menu options are available on the main Application Manager window:
File menu
New—Start a new application server protection
Exit—Exit the Application Manager
Tools menu
Options—Modify Application Manager preferences and clear cached credentials
Delegate Rights (Exchange Only)— Assign Exchange administrative rights to an account
Actions menu
Configure Protection—Launch the Configure Protection dialog box
Validate—Validate the source/target configuration
Enable/Disable Protection—Enable or disable protection for the source server
Enable/Disable Monitoring—Enable or disable failover monitoring for the source server
Failover/Failback—Initiate manual failover or failback
View source DFO log—Launch a viewer to examine the log file generated by the dfo.exe utility
on the source server
View source ExchFailover log (Exchange only)—Launch a viewer to examine the log file
generated by the exchfailover.exe utility on the source server
View target DFO log—Launch a viewer to examine the log file generated by the dfo.exe utility
on the target server
View target ExchFailover log (Exchange only)—Launch a viewer to examine the log file
generated by the exchfailover.exe utility on the target server
Manage SQL Servers (SQL and SharePoint only)—Extended options for selecting SQL servers
and testing SQL services on those servers. This is the same window that is displayed when you
click the Advanced Find button on the SQL Manager or Sharepoint Manager main page.
Verify Target Data (Exchange and SQL only)—Verify that the target stores (for Exchange) or
databases (for SQL) will mount with the replicated data without forcing a re-mirror
Restore PF Tree (Exchange only)—Add the target back to the PF list to which the source belongs
NOTE: This option is only available when Application Manager is running in the Advanced
context.
Manage Snapshots—Launch the Snapshot Manager.
Help menu
View Welcome Page—Return to the initial Application Manager screen, from which you can
check for product updates or access the Hewlett-Packard website
View Online Help—Launch the Application Manager online help
View User’s Guide—Launch the Application Manager User’s Guide PDF
About—View the Application Manager revision number and copyright information
2 - 3
Page 21
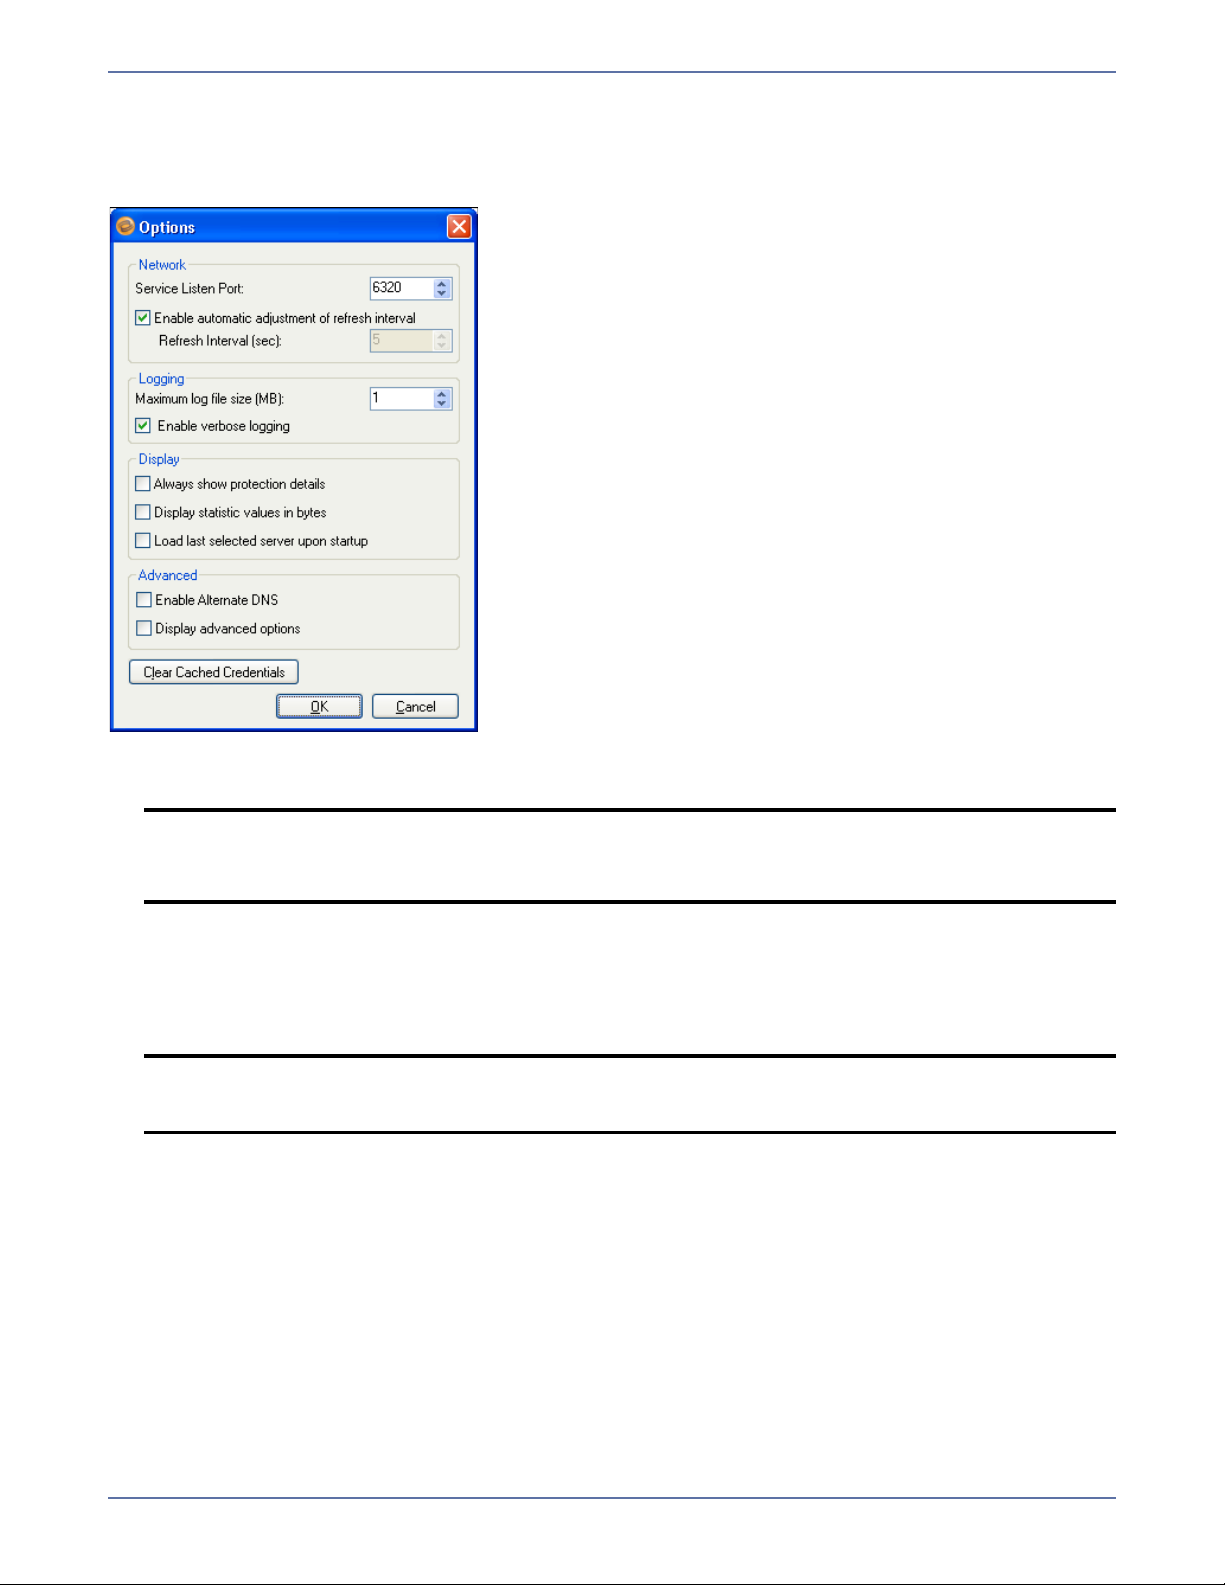
Change Application Manager preferences
To change display preferences for the Application Manager, select Tools, Options. The Options
dialog box will appear.
1. In the Service Listen Port field, enter the value for the Storage Mirroring port to be used for
Application Manager communication. The default port is 6320.
NOTE: The Storage Mirroring Application Manager Service Listen Port must be the same as
the Storage Mirroring Service Listen Port on both the source and target servers.
You can also change the port through the Storage Mirroring Management Console.
2. To specify the rate at which the Application Manager updates the protection status, clear the
Enable automatic adjustment of refresh interval checkbox, then enter the desired Refresh
Interval. You can enter a value between 1 and 30,000 seconds.
3. If you want the refresh interval to be updated automatically, select the Enable automatic
adjustment of refresh interval checkbox.
NOTE: If the Application Manager appears to be running slowly, it may be because the
refresh interval is set to a long interval. Set a shorter refresh interval and make sure
that the automatic adjustment option is not selected.
4. In the Maximum log file size field, enter the maximum size for the dtam.verbose.log file.
When the maximum size is reached, the dtam.verbose.log file is renamed to
dtam.verbose.prev.log and subsequent actions are logged to a new dtam.verbose.log file
(Default = 1 MB).
5. Select the Enable verbose logging checkbox to have all user interactions with Application
Manager logged to the dtam.verbose.log file (Default = selected).
6. Select the Always show protection details checkbox to have the Protection Details section on
the Monitor tab expanded by default.
7. Select the Display statistics values in bytes checkbox if you always want to show the values
on the Protection Details section on the Monitor tab values in bytes, rather than in MB, GB, or
TB.
8. Select the Load last selected server upon startup checkbox to automatically reconnect to the
last protected source/target pair when Application Manager is re-started.
2 - 4
Page 22

9. Select the Enable Alternative DNS checkbox to launch Application Manager in \Altdns mode
the next time it is opened. For more information, see Using a non-Microsoft DNS Server on
page D-1.
10. Select the Display Advanced Options checkbox to launch Application Manager in \Advanced
mode the next time it is opened.
11. Click the Clear Cached Credentials button to clear the cached user name and password.
12. Click OK to save your changes, or Cancel to discard your changes and exit the Options dialog
box.
Using the online help
To view additional information about a task in the Application Manager interface, from the Help
menu, click View Online Help. This will launch the online help file in your internet browser.
To search for information about a topic, use tabs on the left pane:
The Contents tab provides a table of contents for the help file. Click a topic to view the topic in
the right pane.
The Index tab provides a list of terms. Click on a term to view the help topic(s) that include that
term.
The Search tab allows you to enter a word or words. When you click the Search button, a list of
all topics that include that term appears. Click on the topic title to view the topic.
While viewing the online help and readme (.htm) files in Internet Explorer, a message may appear
stating that Internet Explorer has restricted the file from showing active content. You can disable this
setting by modifying your Internet Explorer security settings.
1. In Internet Explorer, select Tools, Internet Options.
2. On the Advanced tab, scroll down to the Security section.
3. Enable Allow active content to run in files on My Computer.
2 - 5
Page 23

Protecting an Exchange Server
To configure protection for your Exchange servers, you will complete the following steps:
1. Install Exchange on the source server and apply any Exchange service packs or patches. Use the
default installation options for Exchange.
2. Install Exchange on the target, placing it in the same Exchange organization as the source and
verifying that the installation location for the target is the same as the source. Apply any
Exchange service packs or patches. Use the default installation options for Exchange with the
following considerations:
The target must be a unique installation (that is, two Exchange servers must be available for
a protection pair)
Logical drive mapping must be the same on the source and target, and must assigned prior
to running the Application Manager
3. Install Storage Mirroring on the source and target Exchange servers. See the Storage Mirroring
Getting Started guide for more information.
4. Install the Application Manager on page 2-1
5. Verify the Exchange environment (recommended) on page 3-1
6. Select a task on page 3-2
7. Select a domain on page 3-2
8. Select source and target servers on page 3-3
9. (Optional) Configure protection settings on page 3-4
10. Validate the Configuration on page 9-1
To protect your Exchange server, you will complete the following steps:
1. Enable protection on page 10-1
2. Monitor protection status on page 10-2
In the event of a failure, you will need to perform some additional tasks. These tasks are described
in Failover, Failback, and Restoration on page 11-1.
NOTE: If you need to protect any data that is stored on a non-mailbox server role (for example,
SMTP queue data), you will need to configure protection for that data separately. In
addition, you may need to manually update the DNS setting for the client access server
to point to the target site.
Verify the Exchange environment (recommended)
Before you use Application Manager, complete the following tasks to verify that the environment is
properly set up.
1. With both Exchange servers online, use Active Directory Users and Computers to move an
existing user from the source to the target and then back to the original source.
2. Verify that you can create a new user on the target.
3. To verify connectivity, create an Outlook
connect to the target.
®
profile for the new user on a client machine and
3 - 1
Page 24
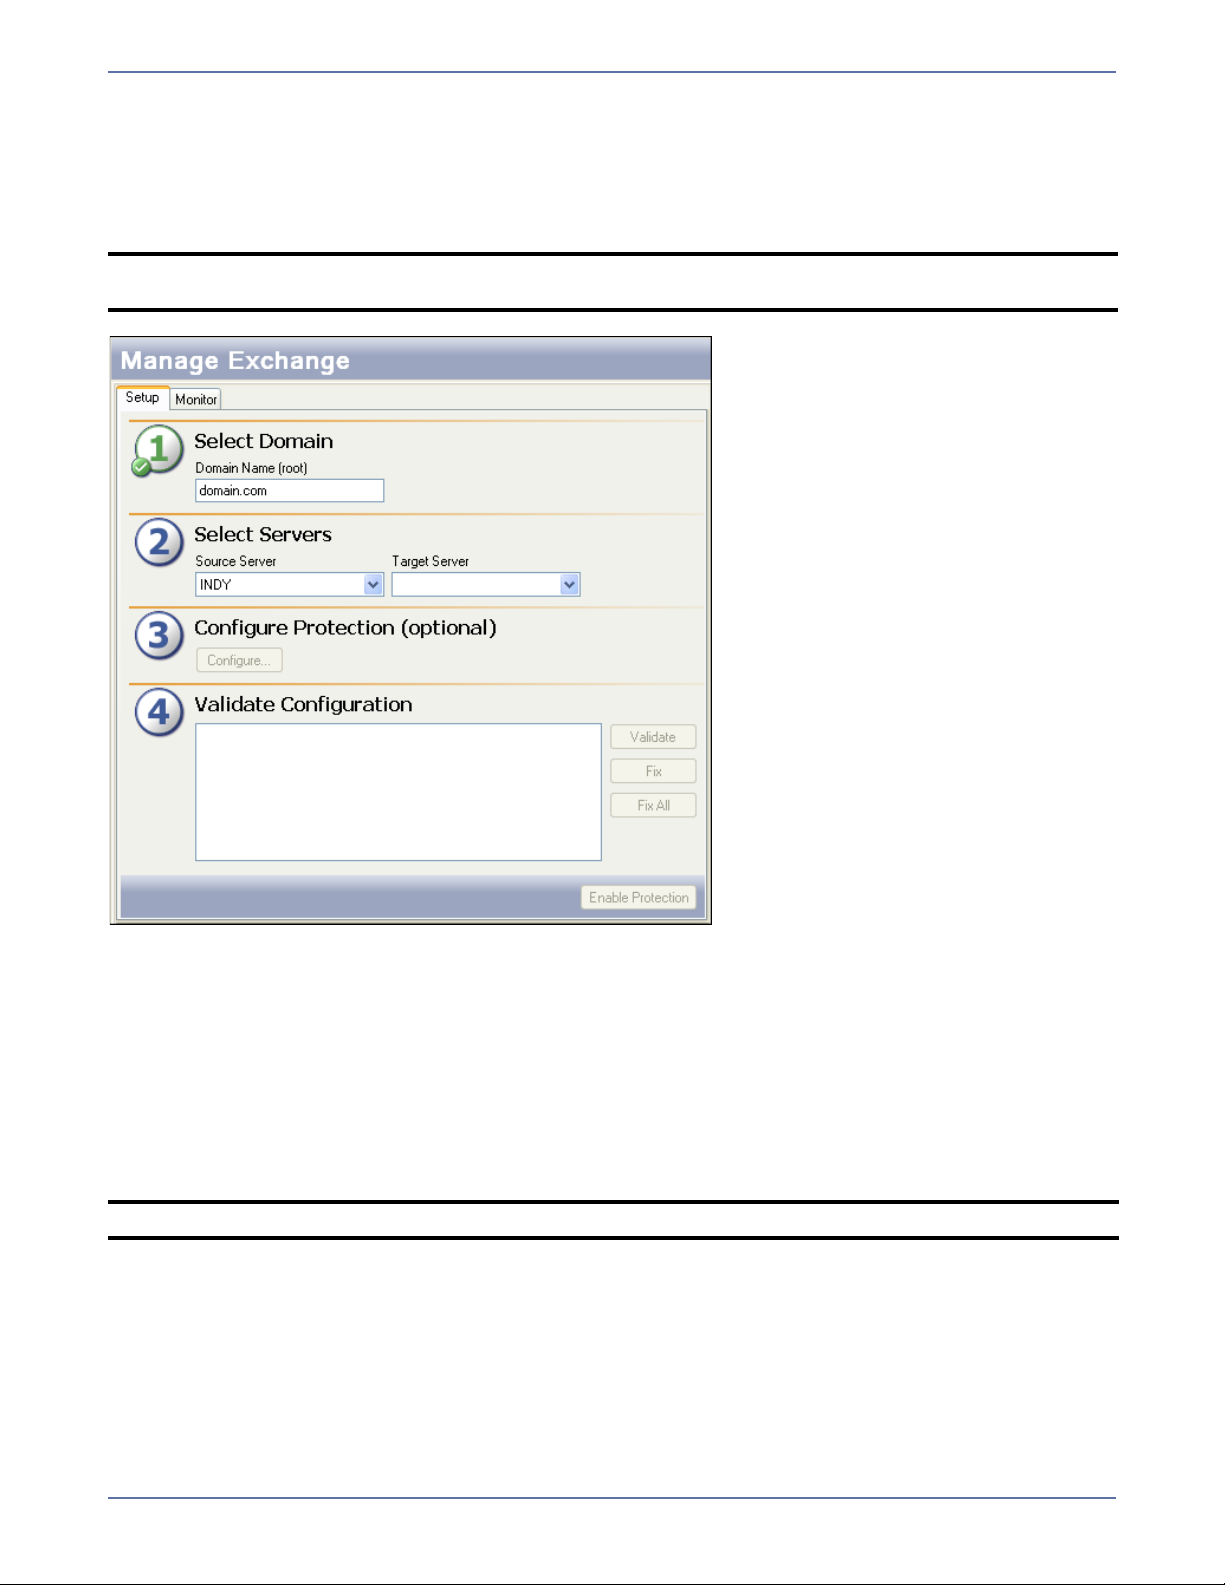
Select a task
To protect an Exchange server, open the Application Manager (Start, Programs, Storage
Mirroring, Application Manager), then on the Tasks area on the left pane, select Protect
Exchange Server. The Manage Exchange page will appear in the right pane. Make sure that the
Setup tab is in view.
NOTE: You can also launch Application Manager for Exchange by using the command line
/exchange option (dtam /exchange).
Select a domain
The Domain Name on the main window will be populated automatically with the root domain where
the Application Manager client resides. This is necessary for Application Manager to gather Exchange
information from the Configuration container.
If you want to change the domain, type in a domain name for a trusted root domain that the
Application Manager client can connect to, then press Tab or click on another field. If the domain you
entered doesn’t exist or you do not have the credentials to modify Active Directory for the new
domain, the Domain Login window will appear. You will be prompted to enter the domain name, user
name, and password to use for logging in to the domain.
NOTE: Domain names must include a suffix, such as
The user account should have administrator permissions. For more information about configuring
permissions, see Recommended Credentials on page A-1.
3 - 2
.com, .corp, or .net.
Page 25
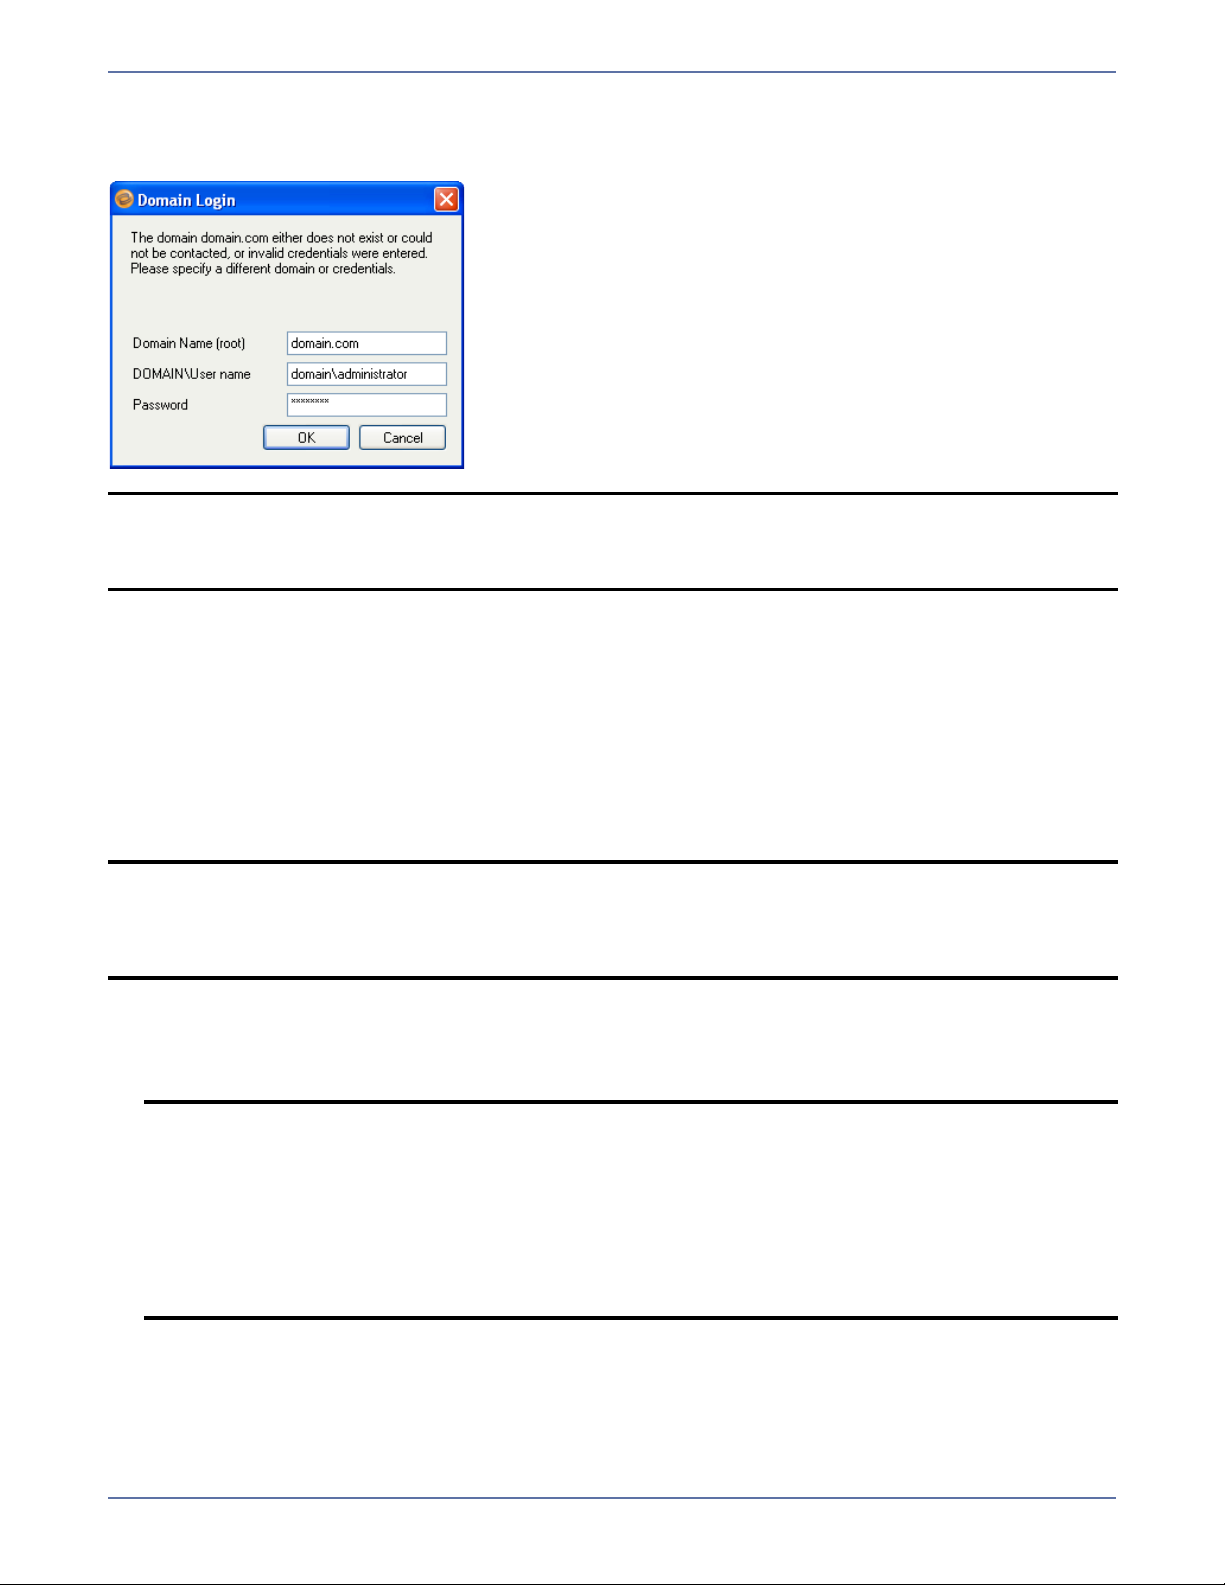
You may enter a user name for a different domain by entering a fully-qualified user name. The
fully-qualified user name must be in the format NetBIOS domain name\username or username.
If you enter a non-qualified name, the default domain will be used.
NOTE: When the Application Manager launches, it selects the forest root automatically. The
domain that is entered MUST be the root of the forest domain, since this is where all
Exchange server objects reside (even if the Exchange server is a member of a child
domain).
Select source and target servers
The Application Manager will automatically attempt to populate the Source Server and Target
Server lists with any servers in the specified domain that are running Exchange.
If you select a source/target pair for which you have previously enabled and disabled protection, you
may use the existing configuration settings (provided that the source/target connection is not
currently active, in which case the existing setting s will always be used). When you select Configure
or Validate, a prompt will appear asking if you want to re-use the previous configuration information.
Click Yes to re-use the previous information, or click No to revert to the Application Manager default
settings.
NOTE: If the IP address(es) for the source or target server have changed since you originally
configured protection (for example, if you configure the source or target in a staging area
and then send it to a production location), you must re-configure the protection settings.
When you are prompted to re-use the previous protection configuration, click No, then
click the Configure Protection button.
1. In the Source Server field, select the Exchange server that you want to protect. If this is your
first time to log in to the selected server, you will be prompted to enter server login information.
For more information about logging in to servers, see Enter server login information on
page 3-4.
NOTE: You cannot protect a server if it is already functioning as a target server.
If you attempt to select a source that is currently unavailable, a prompt will appear
stating that the source is not available and that if the source is failed over, you should
first select the target.
If you select the target, then select the source (as recommended in the prompt), the
same prompt appears (though you would expect to get a prompt to failover). The
ability to failover using the Application Manager will not be available until a failover
condition has been met in accordance with the failover monitor settings set on the
Monitoring tab.
2. In the Target Server field, select the backup Exchange server that will protect the source
server in the event of a failure. The target must be in the same Exchange admin group as the
source.
3 - 3
Page 26
Notice that after the source and target servers are selected, the Protection Status on the Monitor tab
changes to Unprotected.
NOTE: If you select a target that is monitoring a connection that has met a failover condition and
requires manual intervention, a prompt will appear asking if you want to initiate failover.
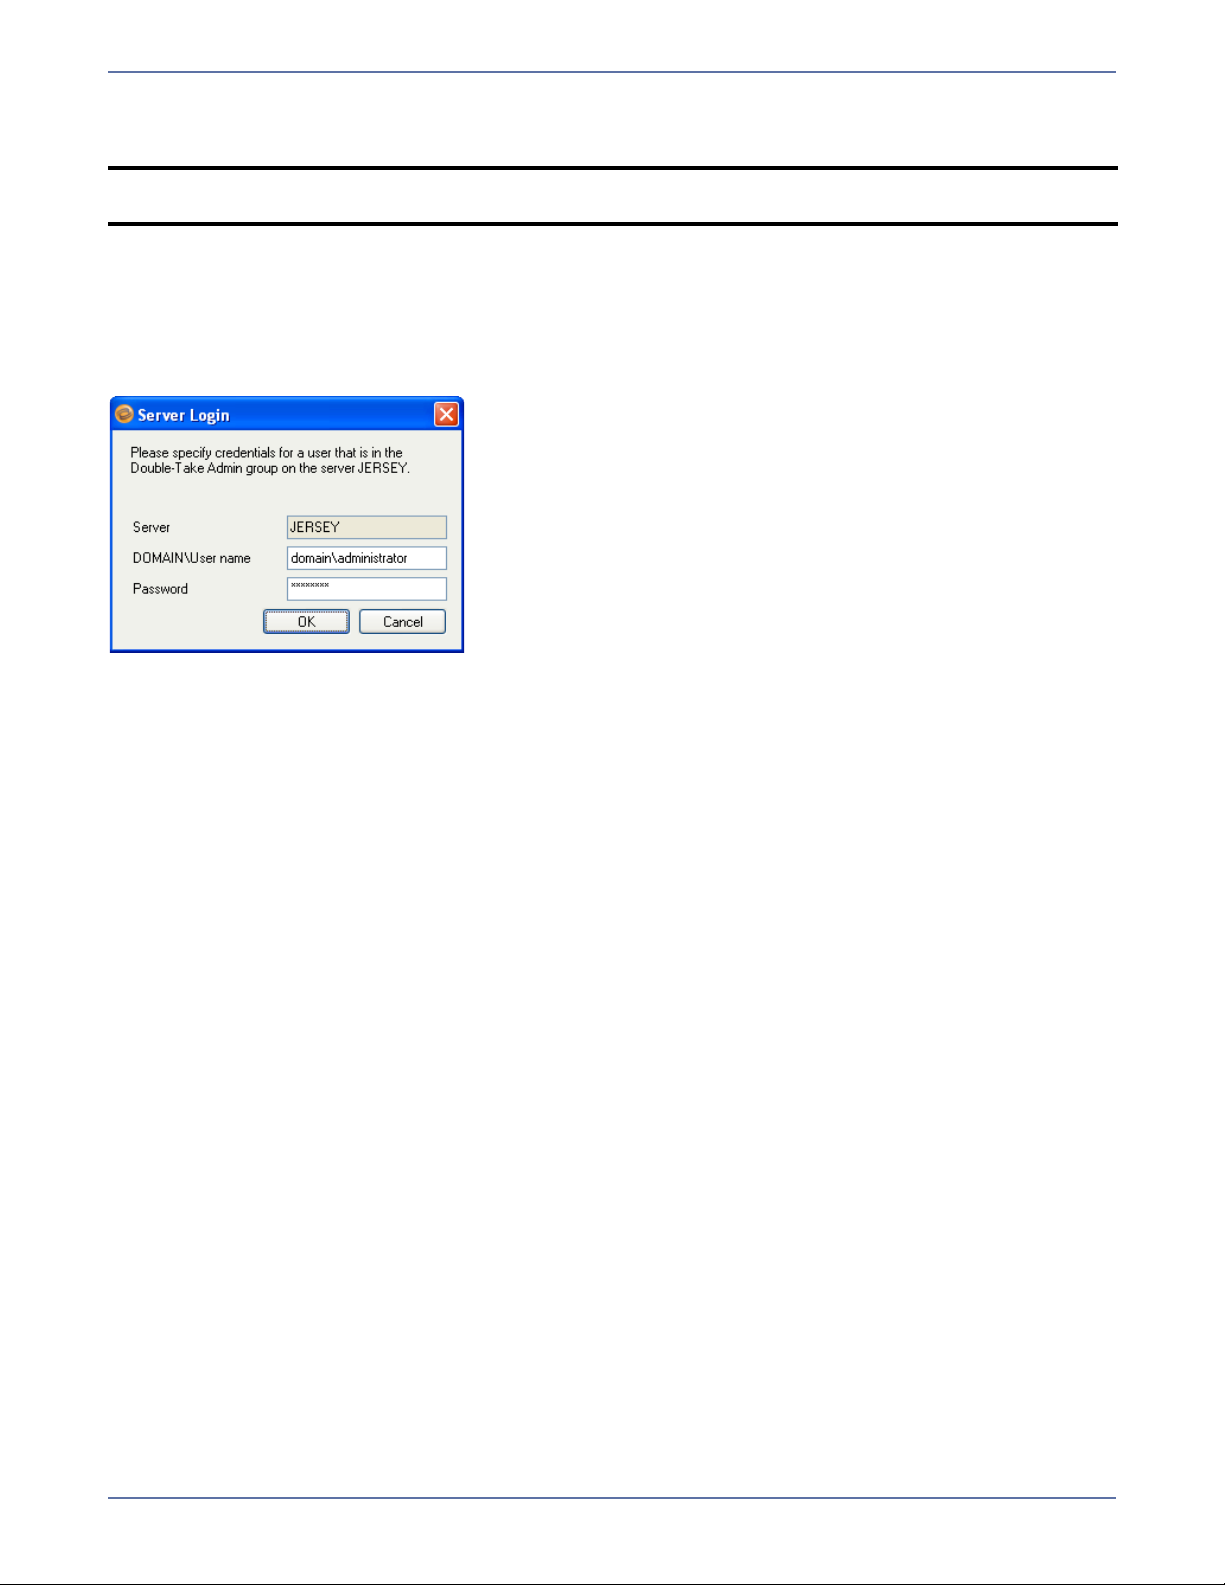
Enter server login information
After you select a server for the first time, you will be prompted to enter a user name and password
to use for logging in to the selected server. The login account MUST be a member of the Storage
Mirroring Admin local security group for the selected server. For more information about permissions,
see Recommended Credentials on page A-1.
You may enter a user name for a different domain by entering a fully-qualified user name. The
fully-qualified user name must be in the format domain\username or username@domain. If you
enter a non-qualified name, the DNS domain will be used. Entering the credentials for the logged-on
user may be valid.
The Application Manager will attempt to use the same user name and password the next time you
select a server.
Using clustered Exchange servers
Exchange virtual servers (EVS) are selectable in the same way as physical servers; however, physical
servers that are members of a cluster (called a “node”) are not shown in the server drop-down list.
For more information about setting up protection for a cluster with a like-named cluster, see
Protecting an Exchange Cluster with a Like-Named Cluster on page 4-1.
Configure protection settings
If you do not need to change the configuration settings, continue with Validate the Configuration
on page 9-1.
If you have already enabled protection for a connection and need to change the configuration
parameters, you will first need to disable protection as described in Disable protection on
page 10-2.
To change the default configuration parameters, click Configure from the main Application Manager
window, or select Actions, Configure Protection from the menu. The Configure Protection window
will appear.
The Configure Protection window has tabs for configuring failover, connection, and advanced settings.
The following sections describe the options on each of these tabs.
3 - 4
Page 27
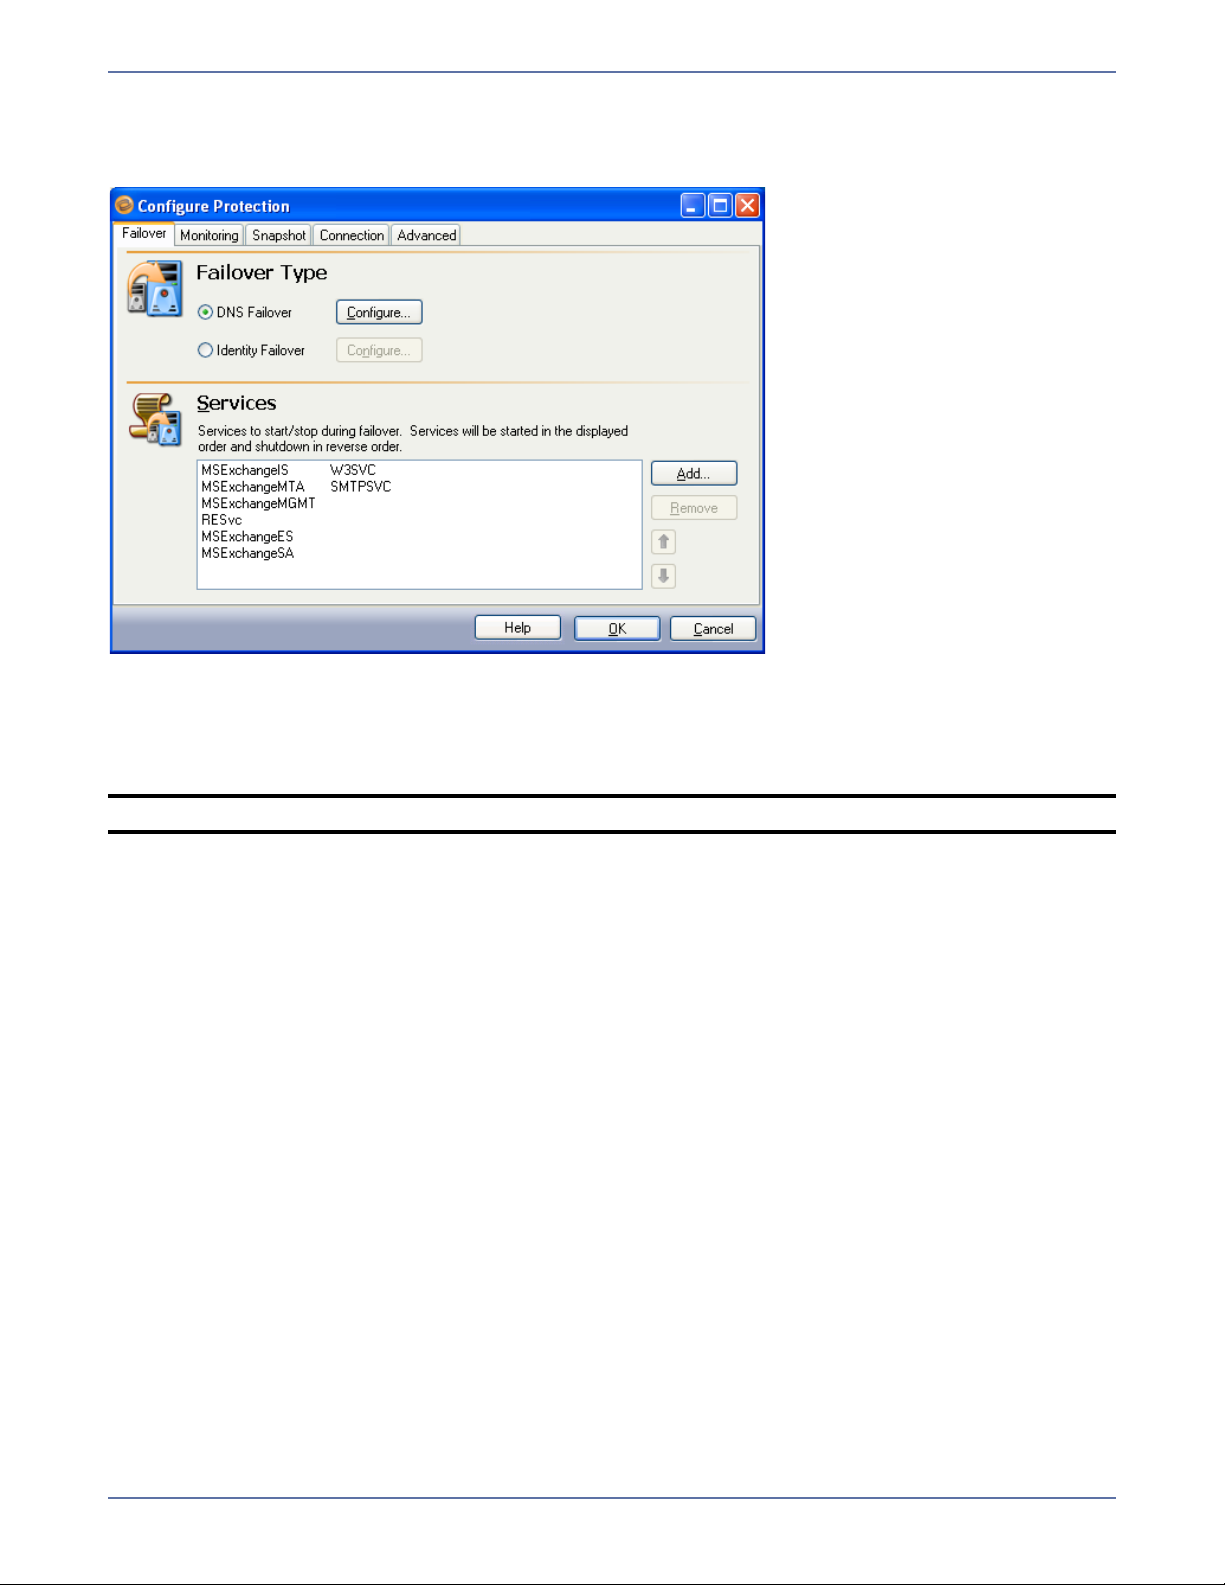
Failover settings
The Failover tab includes options that will be applied during Exchange failover.
Failover type
Failover Type indicates what name resolution method will be used to redirect users to the target
Exchange server in the event of a source failure. By default, DNS Failover is selected.
NOTE: For clustered environments, only DNS failover is supported.
DNS failover
DNS Failover is the recommended method for failover. Use this option if you want to failover by
updating the DNS records associated with the source. This will modify all source server A, MX, and
PTR-type DNS resource records to point to the target.
In DNS Failover, the DNS records for the source server are modified to point to the target server’s IP
address. This allows clients to resolve the source Exchange server name to the target server’s
network name and IP address at failover time. DNS Failover eliminates duplicate server name and IP
addresses on your network.
3 - 5
Page 28
After you select the DNS Failover option, click Configure. The Configure DNS Failover window will
appear.
Configure the following information for DNS failover:
1. To add additional DNS server IP addresses, type the IP address into the DNS Server field, then
click Add.
2. The list box under the DNS Server field contains all DNS IP addresses for the source and target
servers. The label after the DNS IP address indicates whether the DNS IP address belongs to the
source, target, or both.
NOTE: To remove an IP address from the DNS server list, select the IP address, then click
the Delete button.
3. In the Source IP column, select the checkbox next to the source IP address(es) to be monitored
for failover.
4. In the Target IP column, select the target IP address to be used when failover occurs.
NOTE: If one or more IP addresses are configured for the SMTP virtual server on the target,
the first IP address will be the default target IP address for all source IP addresses.
If the target is monitoring multiple source IP addresses for failover, each monitored
source IP address must be mapped to a unique target IP address.
5. To specify the value the Application Manager will establish for Time to Live (TTL) on the source’s
affected DNS records, select the Update TTL checkbox, then enter the desired update interval
(in seconds). The default is the current TTL of the source’s A records. The recommended value is
300 seconds (5 minutes) or less.
6. In the Username field, enter the user name that will be used to access/modify DNS records.
The login account MUST be a member of the DNSAdmins group for the domain in which the DNS
server resides. For more information about permissions, see Recommended Credentials on
page A-1.
You may enter a user name for a different domain by entering a fully-qualified user name. The
fully-qualified user name must be in the format domain\username or username@domain. If
you enter a non-qualified name, the DNS domain will be used by default. The domain name is
obtained from the DNS server name, provided that reverse lookup in DNS is enabled. For more
information about enabling reverse lookup, refer to your Microsoft documentation.
3 - 6
Page 29

7. In the Password field, enter the password that will be used to access/modify DNS records.
8. Click the Test button to validate that DNS failover is configured correctly for the selected DNS
server(s) and that the specified credentials are sufficient to update DNS.
9. When the DNS configuration is complete, click OK to save your entries and return to the
Configure Protection window.
NOTE:
If you are running Windows Server 2000 on the primary DNS server hosting zones or
domains that contain source and/or target resource records, you must have the DNS
WMI Provider installed on that DNS server.
The Dynamic updates setting for the DNS zone should be set to Secure only.
Otherwise, you must disable dynamic registration on the source server in order to
prevent the source from reclaiming its DNS record.
If a hosts file entry for the source server exists on the client machine, errors may occur
during a failover and failback.
Reverse lookup in DNS should be enabled. For more information about enabling reverse
lookup, refer to your Microsoft documentation.
DNS registration for the private (devoted to Storage Mirroring) NIC IP should be
disabled.
If your Exchange server is using a public IP address to receive email, you will have to
change the public advertised DNS MX record to reflect the target IP. Consult your
service provider for instructions.
To allow external email to be delivered to the target server when the source is
unavailable, you should create an additional external MX record for the target server.
The target MX record should have a lower priority than the source. Refer to your router
or firewall documentation for more information.
For more information about using the DNS Failover utility, access the dfo.exe help by
typing
dfo.exe /? from a command prompt.
In order to set the primary DNS server with which the Application Manager will communicate during
failover, you must launch Application Manager using the command line
option (
dtam /exchange /advanced). When launched in the Advanced context, the Client DNS
/exchange /advanced
Server field will appear on the Configure DNS Failover window. Use the Client DNS Server field to
select the primary DNS server.
Identity failover
Select this option if you want to failover by transferring the source IP address and name to the target.
When using identity failover, it is possible that a name and/or IP address conflict can occur either
during failover or when the original source server comes back online. To avoid this conflict, use DNS
Failover.
NOTE: Identity failover is not supported in clustered environments.
Application Manager cannot be used for failover or failback when the Identity failover
method is selected. However, the Failover Control Center can still be used to initiate
failover. DNS failover reduces downtime and provides other benefits. It is recommended
for most environments.
In Identity Failover, the target’s physical identity is modified to match the source during a failover.
This includes the target adopting the source server’s name, primary IP address, and drive shares
during a failover. Identity failover may be required in the following situations:
Access to the domain controller or DNS server is not available (for example, due to permissions)
from the account that Storage Mirroring runs under on the source/target servers.
If you determine that the time it takes to propagate the necessary DNS or Active Directory
changes to the rest of your environment is not acceptable. The time needed to propagate these
changes depends on your Active Directory Replication and DNS server settings.
If you have client applications that are configured to connect to an IP address rather than a server
name.
3 - 7
Page 30
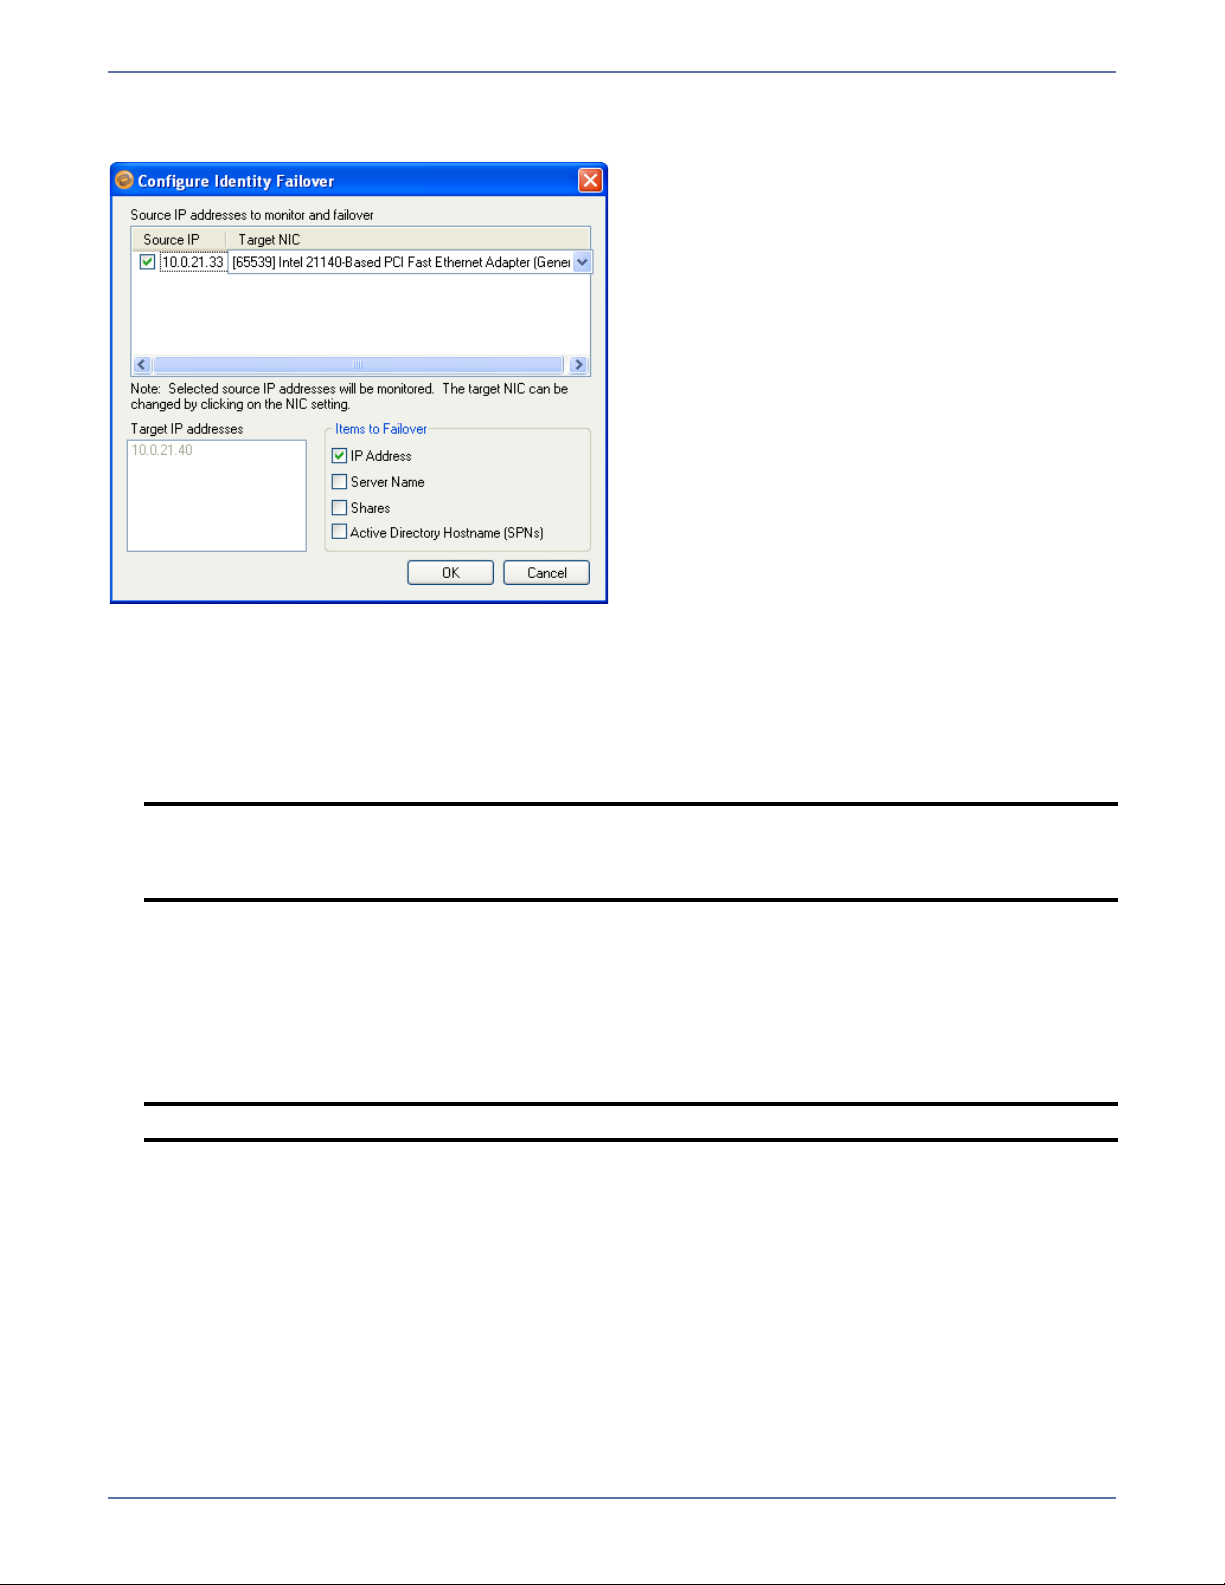
After you select the Identity Failover option, click Configure. The Configure Identity Failover window
will appear.
Enter the following information for Identity failover:
1. In the Source IP column, select the source IP address(es) to be monitored for failover.
2. In the Target NIC column, select the target NIC to be used when failover occurs.
3. The Target IP Addresses area displays the IP address(es) of the selected target NIC.
4. Select the IP Address checkbox if you want the specified source IP address to be monitored
(Default = selected).
NOTE: If your source and target servers are on different subnets, you should NOT failover
the IP address. Instead, if the server name is required you should choose DNS failover
with the Advanced switch and select the Server Name. For more information, see
Advanced settings on page 3-18.
5. Select the Server Name checkbox if you want the source name to be added to the target when
failover occurs (Default = NOT selected).
6. Select the Shares checkbox if you want the source file shares to be added to the target when
failover occurs (Default = NOT selected).
7. Select the Active Directory Hostname (SPNs) checkbox to remove the host SPN (Service
Principle Name) from Active Directory for the source automatically and add it to Active Directory
for the target during failover (Default = NOT selected).
NOTE: You should NOT select this option when using Exchange.
8. Click OK to save your entries and return to the Configure Protection window.
Services
Application Manager will determine the appropriate Exchange services to start/stop based on your
operating system/Exchange configuration. You should only modify this selection if there are
additional services that need to be started along with Exchange during the failover/failback process.
3 - 8
Page 31

Modifying the default configuration for services may affect whether data can be successfully
replicated. Do not modify the services to start/stop unless you are very familiar with Storage
Mirroring and Exchange.
1. To add a service, click Add. The Add Service window will appear.
2. Select the Service name from the drop-down box, then click Add; or, type the name of a
service, then press Enter.
3. If available, select the Service must be stopped on target checkbox. Most services must be
stopped on the target for replication to occur properly.
4. When you are finished entering services, click Close to return to the Failover configuration
window.
5. To remove a service, select one or more services, then click Remove.
You can only remove services that you added manually using the Application Manager.
6. Services will be started in the displayed order (top-to-bottom starting with the left column) and
shutdown in reverse order (bottom-to-top starting with the right column). To re-arrange the
order in which services are started/stopped:
a. Add any additional services.
b. Select a service in the list, then use the up and down arrow buttons to move the service to
the appropriate position in startup/shutdown order.
Resources (cluster only)
If you are using clustered Exchange servers, you will select resources instead of services to bring
online and offline during failover. The Resource selection works exactly like the service selection
functionality.
NOTE: If you are using Exchange in a cluster-to-standalone configuration and have selected a
source cluster server, a button will appear in the Services/Resources area, allowing you
to toggle between services to start/stop on the target, and Resources to start/stop on the
source.
3 - 9
Page 32

Monitor settings
The Monitoring tab includes options for configuring how you want to monitor the source server for
failure.
Configure how you want to monitor the source server for failure.
1. Select the Active Monitoring Enabled option to enable or disable failover for the selected
source/target pair.
2. By default, Manual Intervention Required is selected. Manual intervention allows you to
control when failover occurs. When a failure occurs, a prompt appears and waits for you to
initiate the failover process manually.
Disable Manual Intervention Required only if you want failover to occur immediately when a
failure condition is met.
3. In the Method to monitor for Failover field, select the ping method to use when monitoring
source IP addresses.
Network Access (ICMP)—Storage Mirroring failover uses ICMP pings to determine if the
source server is online. If a network device, such as a firewall or router, between the source
and target is blocking ICMP traffic, failover monitors cannot be created or used.
Replication Service (UDP)—The Storage Mirroring service on the target server sends a
ping-like UDP request to the source Storage Mirroring service, which replies immediately to
confirm it is running. This method is useful when ICMP is blocked on routers between the
source and target.
4. Configure how long to wait after a source failure to initiate failover. The amount of time before
failover begins is calculated by multiplying the Monitor Interval by the Missed Packets. For
example, if the Monitor Interval is set to 5 seconds and the Missed Packets setting is 5, a failover
condition will be identified after 25 seconds of missed source activity.
NOTE: In a cluster environment, make sure to include a cushion to account for the time it
takes for the EVS to failover between nodes. Setting values too low will cause the
Application Manager to assume the source cluster has failed and will indicate that a
failover condition has been met.
a. In the Monitor Interval field, select how often the monitor should check the source
machine availability (Default = 5 seconds).
b. In the Missed Packets field, select how many monitor replies can be missed before
assuming the source machine has failed (Default = 5 missed replies).
5. If you are monitoring multiple IP addresses, select one of the Failover Trigger options.
All Monitored IP Addresses Fail—Failover begins when all monitored IP addresses fail.
One Monitored IP Address Fails—Failover begins when any of the monitored IP addresses
fail.
3 - 10
Page 33

Application Monitoring (BETA)
By default, application monitor settings are not available in this release of the Storage Mirroring
Application Manager. Application monitoring is only available when you launch Application Manager
using the command line
WARNING: This feature is currently BETA and should not be used in production environments.
1. If you select the Enable Application Monitoring checkbox, the remaining fields in Application
Monitor Settings area will be enabled.
NOTE: A message box will appear, asking you to confirm that you want to use this BETA
feature. To continue, click OK.
Application monitoring is not available when dealing with a cluster.
/exchange /advanced option (dtam /exchange /advanced)
2. In the Monitor Interval field, enter the interval (in seconds) at which you want to check
application health.
3. In the Error Threshold field, enter the number of consecutive errors that can be received
before an error alert appears.
4. In the Type of Monitoring area, select one of the following options.
Built-in Monitoring Points—Use the default monitoring options.
Custom Script—Launch a batch file to check application health. Either type the name of the
script, or click Browse to locate a script.
NOTE: If you select Custom Script, you will also need to designate whether to use .PS1
(PowerShell) or .VB (VisualBasic) as the Script Engine. Make sure you select the
appropriate engine for your script type.
An example script that you can use as a basis for creating your custom script is
included in the \Samples subfolder where the Application Manager is installed.
5. In the Username field, enter the fully-qualified user name that will be used to run WMI scripts.
The fully-qualified user name must be in the format domain\username or
username@domain.
NOTE: The required credentials for running WMI scripts is full WMI access to the CIMV2
namespace. Under Windows 2008, the supplied credentials must also be allowed
through DCOM and User Access Control. It is recommended that a group be created
for running scripts, and that the required permissions be given to the group.
By default, the administrative group of a Windows 2008 machine has full WMI access.
However, DCOM and User Access Control settings may need to be adjusted.
6. In the Password field, enter the password for the specified user account.
7. Click the Test button to validate that the specified credentials are sufficient to run WMI scripts.
3 - 11
Page 34

8. (Optional) Click the Clear Cached Credentials button to clear the cached user name and
password.
Snapshot settings
The following allow you to set up snapshots of your target data that can be used when failing over.
By default, snapshots are not enabled in the Application Manager.
1. To enable snapshots, select the Enable periodic snapshots checkbox. This will enable the
remaining controls.
2. In the Snapshot interval field, select the interval at which you want to perform snapshots (in
minutes). The minimum interval is 15 minutes.
3. Select one of the following options for when to begin collecting snapshots:
Start now—Select this option to take the first snapshot as soon as protection is enabled.
Start at—Select this option to start taking snapshots at a future time. If you select this option,
you will also need to enter a date and time.
4. When you are finished, click OK.
3 - 12
Page 35

Connection settings
The Connection tab includes options that will be applied to the specified source/target connection.
Route
This setting identifies the Target IP Address that the Storage Mirroring data will be transmitted
through. You should only change this setting if you want to select a different route for Storage
Mirroring traffic. On a machine with more than one NIC, this increases the flexibility of configuring
Storage Mirroring activity. For example, you can separate regular network traffic and Storage
Mirroring traffic on a machine. The default ports will be used.
In a cluster, the route should be set to the name of the Exchange virtual server (EVS) dependent
IP address.
Protected Storage Groups
The Protected Storage Groups area displays the storage groups, mailbox, and public folder stores.
Select the Exchange storage groups that you want to protect. By selecting individual storage groups
to protect, you can reduce the amount of data being replicated and filter out storage groups that do
not need to be protected or failed over. Only the users associated with the selected storage groups
will be failed over. By default, all storage groups are selected for an Exchange source.
The replication set that the Application Manager generates will include the directories and files needed
to protect the selected storage groups. It is recommended that you protect all storage groups.
NOTE:
If you do not select all storage groups, you should make sure that other backups are
available from which to recover the storage groups that are not failed over.
Hewlett-Packard recommends that you place all query-based distribution groups in a
single organization container and give the target server full control rights to the
container and all child objects.
You can also select non-application specific data under the Volumes folder.
NOTE: If Override Generated Rules is selected on the Advanced tab, this control will be
disabled.
3 - 13
Page 36

To refresh the tree view to show new source directories or files that may have been added or
removed, select the logical node, then click the Refresh button. If a node in the volumes branch is
selected, then the items under that node will be refreshed.
Mirror type
The following options specify what files you want sent from the source to the target during a mirror.
Full—Copies all of the directories and files in the replication set to the target machine. If a mirror
has already been completed, another full mirror will overwrite the data on the target.
Checksum—(Default) This option performs a checksum comparison calculation. A checksum
calculation is a formula applied to blocks of data to determine if the binary make-up of the block
is identical. If the checksums on the source and target machine are the same, the block is skipped.
If the checksums on the source and target machine are not the same, the block on the source is
sent to the target. With this option, the entire file is not overwritten; only the block that is received
from the source is overwritten.
NOTE: The Mirror type setting also applies to the restoration connection.
Enable compression
This setting enables compression of data that is transmitted from the source to the target. Significant
improvements in bandwidth utilization have been seen in Wide Area Network (WAN) configurations
or in any case where network bandwidth is a constraint.
Compression may be used in Local Area Network (LAN) configurations, though it may not provide any
significant network improvements.
You can specify compression for different source/target connections, but all connections to the same
target will have the same compression settings.
By default, compression is disabled. To enable it, select Enable Compression, then set the level
from minimum to maximum compression.
Advanced settings
The Advanced tab includes advanced configuration options.
3 - 14
Page 37

Replication set rules
A replication set defines what directories/files are to be protected by Storage Mirroring. By default,
Application Manager selects all of the necessary directories/files to protect Exchange based on your
source server configuration. These include all storage groups (system and log files), each database
store (mailbox and public folder system and log files), Message Transfer Agent (MTA) files, and SMTP
queues (pickup path and queuepath). By default, the Application Manager-generated replication set
will be named
You should only modify the replication set rules if there are additional directories/files specific to your
configuration that must also be protected with Exchange. Modifying the default configuration for
replication set rules may affect whether data can be successfully replicated. Do not modify the
replication set unless you are very familiar with Storage Mirroring and Exchange.
NOTE: If you want to protect the Badmail folder, you will need to manually add it to the
To change the replication set rules:
1. Select the Override Generated Rules checkbox.
NOTE: When this box is selected, the Protected Storage Groups control on the Connection
2. To add a replication set rule, click Add. The Add Repset Rule dialog box will appear.
xdag01_<source server name>_<target server name>.
replication set as described in this section.
tab will be disabled. For more information, see Protected Storage Groups on
page 3-13.
3. In the Rule Path field, type the directory that you want to protect or exclude.
4. In the Include/Exclude area, select whether to include or exclude the path from the replication
set.
5. In the Recursive area, select whether the directory should be recursive (protecting all
sub-folders under the directory) or non-recursive (protecting only the files in the directory).
6. Click Add.
7. When you have entered all of your replication set rules, click Close to return to the Advanced
configuration tab.
NOTE: You will need to manually verify that the rule path is correct since the Application
Manager does not validate rule paths.
8. To remove a rule, select one or more rules, then click Remove.
NOTE: Removing rules that were automatically added by Application Manager could impact
the success of failover. Any changes to rules should be thoroughly tested.
9. To reset the rules to the auto-generated rules and to re-enable the Protected Storage Groups
control, remove the selection from the Override Generated Rules checkbox.
3 - 15
Page 38

Failover/failback scripts
Scripts are executed at different points during the failover/failback process to perform the actions
necessary to make Exchange available on the appropriate server. Scripts perform steps such as
starting/stopping services, modifying mailbox values in Active Directory to point users to the
appropriate server, and modifying DNS entries on the DNS server to point users to the appropriate
server.
Editing scripts is an advanced feature. Do not edit scripts unless you fully understand what each
command is doing.
NOTE: Any manual edits to the failover/failback scripts should be made carefully and tested prior
to deployment in order to make sure that the changes are correct. If you remove the
/username entry from the DFO command line in the PostFailover script, DNS failover
will fail.
Scripts are automatically generated by Application Manager during configuration. The scripts are
copied to the Storage Mirroring installation directory on the specified server using the administrative
share for that server’s drive.
Script File name Description
Failover Post_failover_<source>_<target>
.txt
Failback Pre_failback_<source>_<target>.
txt
Restore Post_restore_<source>_<target>.
txt
NOTE: The post-restore script must be run from the source server.
By default, Application Manager generates all the required scripts for you automatically based on your
system configuration. You can also edit the scripts to add, modify, or delete specific commands. To
edit a script:
1. Click on the button for the script you want to update. The script file will be displayed using your
machine’s default editor.
2. Enter your changes.
3. Save the script file.
Any change you make to the script in the editor will be copied to the appropriate server when
configuration changes are accepted, thus overwriting any changes that have been made outside the
Application Manager.
The scripts can be overwritten by certain operations during setup. For example, any changes to
configuration options done in the Application Manager will overwrite previous script changes. If you
want to make permanent changes to a script, you must modify the appropriate .txt file within
the Application Manager installation directory. If there is more than one client machine that will be
configuring failover, the change must be made to all the appropriate .txt files.
A post-failover script is executed after the
core failover processes have completed on
the target server. The primary functions of
the post-failover script are to start the
services on the target and to modify DNS
and Active Directory entries as necessary.
A pre-failback script is executed before
failback processing occurs on the target
server. The primary functions of this script
are to stop services on the target and to
move DNS and Active Directory entries as
necessary.
A post-restore script is not executed
automatically, though it is provided on the
source to perform actions that are generally
required after data has been restored from
the target to source after a failover/failback.
The primary function of this script is to
restart services on the source server and
rehome
source server.
the public folders hosted on the
3 - 16
Page 39

Before running Application Manager multiple times (for example, when re-enabling protection after a
failover/failback), save a copy of your post-restore and pre-failback batch files. After Application
Manager executes, replace the default script file(s) with the customized file(s) that you saved.
Force AD replication
(Default = selected) When selected, replication is initiated from the domain controller with which the
source or target server communicates. This will be done each time the Exchange Failover utility
(exchfailover.exe) is executed from within the failover/failback scripts. For more information about
using the Exchange Failover utility, see Using the Exchange Failover (EFO) Utility on page G-1.
Disable Force AD Replication if you do not want Active Directory changes to be replicated.
In the Max wait time for AD replication field, enter the maximum time you want to wait for Active
Directory replication to complete before continuing on with the failover/back process. The default is
30 minutes.
NOTE: The wait time is a factor determining when failover is complete.
If replication exceeds the amount of time specified, a log entry is created and replication
continues. If it is exceeded, failover is not reported as incomplete or failed.
Target(ed) domain controller
This field allows you to specify the name of the domain controller where updates will be made during
failover and failback. If this field is left blank, the default or Active Directory-determined domain
controller will be used.
NOTE: The Target(ed) domain controller field is only available for Exchange 2003. It is not
By default, the domain controller is resolved through Windows.
available for Exchange 2007.
You must enter the name of the domain controller. IP addresses are not valid for this field.
3 - 17
Page 40

Advanced settings
The following options allow you to control what functions Application Manager will perform during
configuration. By default, Application Manager performs all of these functions. Individual functions
should only be disabled for testing or debugging purposes.
NOTE: These options are only available when you launch Application Manager using the
command line
/exchange /advanced option (dtam /exchange /advanced).
1. Select the Server Name checkbox if you want the source name to be added to the target when
failover occurs (Default = NOT selected).
2. Select the Shares checkbox if you want the source file shares to be added to the target when
failover occurs (Default = NOT selected).
3. Select the Active Directory Hostname (SPNs) checkbox if you want to remove the host SPN
(Service Principle Name) automatically from Active Directory for the source and add it to Active
Directory for the target during failover (Default = NOT selected).
NOTE: If you are using Active Directory, you should enable this option. Otherwise, you may
4. Select the Create Replication Set checkbox to automatically create a replication set that
includes all of the necessary directories/files that must be protected for your specific
configuration. This should only be disabled if you have customized your replication set and do
not want to overwrite it (Default = selected).
5. Select the Create Failover Scripts checkbox to automatically generate the failover/failback
scripts and copy them to the appropriate server. This should be disabled only if you have
customized your script files and do not want them to be overwritten (Default = selected).
6. Select the Create Connection checkbox to create the connection between the source and
target using the automatically-generated replication set. This should only be disabled if you
would like to verify the replication set that is created by Application Manager prior to connection
(Default = selected).
experience problems with failover.
3 - 18
Page 41

7. Select the Create Failover Monitor checkbox to create a failover monitor on the target to
monitor the source for failure. This monitor will use the failover parameters specified during
configuration as well as the script files that have been created (Default = selected).
8. When you are finished, click OK.
9. If you want to add the target back to the PF list to which the source belongs, you will need to
enable the Restore PF Tree option.
a. Select Tools, Actions.
b. Choose Display Advanced Options.
c. Select Protect Exchange Server again. The Restore PF Tree option will be added to the
Actions menu.
d. Select Actions, Restore PF Trees. This will copy the owning PF tree setting from the source
public folders to the target public folders.
This setting is cleared when protection is enabled, which prevents SMTP queuing issues when
trying to deliver messages to the target, but is never restored. If you want to have an active
target server, you can use this command to restore it to a pre-Application Manager state.
Saving configuration changes
After you have changed the configuration parameters, click OK to apply the settings. If you click
Cancel, any changes you have made will be discarded and the previous configuration parameters will
be used.
When you have finished configuring the optional protection options, continue with Validate the
Configuration on page 9-1.
NOTE: If you close the Application Manager prior to enabling protection, your changes will not
be saved. You must enable protection in order to save your configuration settings for a
source/target pair.
If you modify your configuration on the source server (such as adding a new storage
group or database), you must disable protection, run validation and fix any issues, then
re-enable protection to apply the changes to the Application Manager replication set.
3 - 19
Page 42

Protecting an Exchange Cluster with a Like-Named Cluster
This section describes the process used to configure protection for an Exchange cluster with a
like-named (also known as a standby) cluster.
When you protect a cluster with a like-named cluster, the Application Manager moves the EVS
(Exchange virtual server) location from the source cluster to the target cluster. By moving the EVS,
the process of moving users and public folders from one server to another is not needed because they
will continue to use the same mail store on the target as they were on the source. This, coupled with
the ability to reduce the TTL (Time to Live) value of the EVS DNS record (optional), allows a more
seamless failover.
Prerequisites
Before you can use the Application Manager to protect a cluster with a like-named cluster, you must
complete the following:
Each target server node must have the same version and service pack level of Exchange as is
installed on the source nodes.
The target must have a resource group that has the same name as the resource group on the
source.
The target resource group only needs to contain physical disk resources, which MUST use the
same drive letters that are used by the physical disk resources on the source.
NOTE: Like-named cluster support is only available for clusters running Exchange 2003. It is not
available for Exchange 2007.
Permissions
When protecting a cluster with a like-named cluster, you can perform the setup, failover, and failback
with the following permissions:
The user must be a member of the local Storage Mirroring Admin group.
The user must be a member of the local Administrators group on all cluster nodes.
The user must be delegated Full Exchange Administrator access through Exchange System
Manager.
(Optional) In order to change the TTL within DNS during failover, the user must be a member of
the DnsAdmins group.
Multiple EVS
The instructions in this chapter also apply to setting up multiple EVS. There are two ways to perform
multiple EVS failover:
Set up multiple like-name jobs for each EVS on your source cluster, as described in this chapter.
4 - 1
Page 43

Failover multiple EVS servers to pre-existing EVS servers on the target. If you choose this option,
instead of selecting the like-named equivalent, you will select the target EVS with which to setup
protection. The Like-named cluster setup window will not appear since you are not using a
like-named target.
NOTE: If you are running Exchange 2003 in mixed mode, the first installed EVS contains the MTA
(Message Transfer Agent) resource that is needed to communicate with versions prior to
Exchange 2003. If you do not failover all Exchange virtual servers, then any user who is
in a different mail store than the first one may not be able to route mail.
Configuring a standby cluster
The process for protecting a cluster with a like-named cluster is similar to protecting a standard
cluster. The following instructions point out the differences in configuration. For more information
about basic protection functions, see Protecting an Exchange Server on page 3-1.
1. In the Source Server field, select the source cluster that you want to protect.
2. In the Target Server field, select the same server.
NOTE: The server name will be appended with the suffix “(like-named)”
4 - 2
Page 44

3. After you select a like-named cluster for the target, you will need to configure the like-named
cluster. After you select the target server, the Like-named cluster setup dialog box will appear.
4. Enter the following information:
Target Cluster—Enter the name of one of the target nodes, then click Connect.
Network—Select the NIC to which you will assign the IP address.
IP Address (to create)—Enter a new IP address for the target to use when it stands in for
the source.
Subnet Mask—Enter the subnet mask to use for the new IP address.
Storage Resources—The Application Manager will automatically select the required storage
resources on the target, provided that they exist (for example, if the source and target both
have
E:\ and S:\). Verify that the drive letters where Exchange data is located are selected.
NOTE:
You can not de-select a storage resource that exists on both the source and
target.
If the drive letters on the source and target do not match, then not all required
data will be selected automatically. You will need to select it manually. The
selected storage resources must be in the same group.
5. When you are finished, click OK to return to the Manage Exchange window.
4 - 3
Page 45

6. On the Manage Exchange window, click Configure to open the Configure Protection window,
then select the Failover tab.
7. DNS Failover is the only option available for configuring protection with like-named clusters.
For more information about DNS failover, see DNS failover on page 3-5.
8. If you want to modify DNS configuration options, click Configure. The Configure DNS Failover
window will appear.
4 - 4
Page 46

9. On the Configure DNS window, you can modify the TTL value for the DNS record. You can also
specify the user credentials needed to modify DNS. When you are finished, you can click Test to
test the DNS configuration for the selected DNS server(s), or click OK to return to the
Configure Protection window.
NOTE: Decreasing the TTL value will increase the speed at which clients get the updated
information.
10. After you have changed the configuration parameters, click OK to apply the settings and return
to the Manage Exchange window. If you click Cancel, any changes you have made will be
discarded and the previous configuration parameters will be used.
11. Click Validate to validate the selected cluster pair. The validation proceeds exactly like
validation for other methods of failover.
12. Click Enable Protection to enable protection for the source cluster.
Enabling protection
After protection is enabled, the Application Manager creates four resources on the target cluster: two
generic script resources, an IP address resource, and a temporary name resource. The temporary
name resource is the source EVS name with “_LN” appended to the end. The Application Manager
uses the temporary name resource for the connection between the source and target clusters. The
Application Manager gets the order of the source cluster resources from the Microsoft Cluster DLL,
then builds the scripts with the resources in order and based off the source’s resources configuration.
Scripts are automatically generated by the Application Manager during configuration. The scripts are
copied to the Storage Mirroring installation directory on the specified server using the administrative
share for that server’s drive.
Script File name Description
Failover post_failover_LN.txt A post-failover script is executed after the core failover
processes have completed on the target server. The
primary function of the post-failover script is to start
the resources on the target.
Failback pre_failback_LN.txt A pre-failback script is executed before failback
processing occurs on the target server. The primary
function of this script is to stop resources on the target.
Restore post_restore_LN.txt A post-restore script is not executed automatically,
though it is provided on the source to perform actions
that are generally required after data has been restored
from the target to source after a failover/failback. The
primary function of this script is to restart resources on
the source server.
After the resources are online and the mirroring has completed, the source cluster is considered
protected and the Application Manager starts monitoring the source for complete source failure.
NOTE: If you modify your configuration on the source cluster, you must disable protection, run
validation and fix any issues, then re-enable protection to apply the changes to the
Application Manager replication set.
4 - 5
Page 47

Dealing with a failure
Graceful failover
At the user's discretion, the Application Manager can perform a graceful, or “soft”, failover. A soft
failover means the source cluster remains up and running while the EVS is transferred to the target
cluster. This can be accomplished by using the failover button in Application Manager. The steps the
Application Manager takes to transfer the EVS from the source cluster to the target are the same as
during a site failure failover, which is described in Site failure failover on page 4-6. The only
difference is that in a soft failover, the source cluster resources are taken offline gracefully.
Site failure failover
If the Application Manager detects that the source cluster has failed completely, it will display a
prompt asking if a failover is desired. The time it takes for the Application Manager to realize a
complete source cluster failure varies greatly. At times, the prompt can be seconds after the failure,
or it might take several minutes. If you want the prompt to appear more quickly and you know that
the source cluster has failed, you can decrease the amount of wait time by closing the Application
Manager, re-opening it, and selecting the protected pair (if it is not automatically selected).
When a failover is initiated, the following steps occur:
1. The Application Manager waits on the target replication queue to empty.
2. The exchfailover.exe utility fails over the virtual protocols of the EVS.
3. The resources are created on the target cluster.
The resources are created in the same order as they appeared on the source cluster.
The resources are configured exactly as they were on the source cluster.
4. The resources are brought online.
5. The DNS failover utility is used to lock the source DNS record.
Differences in failback
The process used to failback to the source cluster is the same as any other cluster failover method.
The only difference is the EVS is now on both the source and target clusters.
To failback to the source cluster, make sure the Physical Disk resource(s) and the IP Address resource
are online on the source cluster, then use the Storage Mirroring Application Manager to failback.
NOTE: When you bring the source cluster online, an identical network name will still be active
on the target. Because of this, when the source cluster tries to bring up the EVS on the
source, the network name resource will fail and consequently the group will not come
online on the source. You should allow the source cluster to finish trying to bring the
resources online before using the Application Manager to failback.
4 - 6
Page 48

Protecting a SQL Server
To configure protection for your SQL servers using Application Manager, you will complete the
following steps:
1. Install SQL on the source server and apply any SQL service packs or patches. Use the default
installation options for SQL.
2. Install SQL on the target, verifying that the installation location for the target is the same as the
source. Apply the same SQL service packs or patches that were installed on the source. Use the
default installation options for SQL with the following considerations:
The target must be a unique installation (that is, two SQL servers must be available for a
protection pair).
Logical drive mapping must be the same on the source and target and must be assigned prior
to running the Application Manager.
You should use the same version and service pack of SQL Server on both the source and target
servers.
If you are using clusters, you will need to pre-configure the SQL instances on the target using
any combination of default and/or named instances to match what is on the source.
3. Install Storage Mirroring on the source and target SQL servers. See the Storage Mirroring
Getting Started guide for more information.
4. Install the Application Manager on page 2-1
5. Select a task on page 5-1
6. Select a domain on page 5-2
7. Select source and target servers on page 5-3
8. (Optional) Configure protection settings on page 5-5
9. Validate the Configuration on page 9-1
To protect your SQL server, you will complete the following steps:
1. Enable protection on page 10-1
2. Monitor protection status on page 10-2
In the event of a failure, you will need to perform some additional tasks. These tasks are described
in Failover, Failback, and Restoration on page 11-1.
Select a task
To protect a SQL server, open the Application Manager (Start, Programs, Storage Mirroring,
Application Manager), then on the Tasks area on the left pane, select Protect SQL Server. The
Manage SQL page will appear in the right pane. Make sure that the Setup tab is in view.
NOTE: You can also launch Application Manager for SQL by using the command line
dtam /sql).
(
5 - 1
/sql option
Page 49

Select a domain
The Domain Name on the main window will be populated automatically with the domain where the
Application Manager client resides.
If you want to change the domain, type in a domain name for a trusted domain that the Application
Manager client can connect to, then press Tab or click on another field. If the domain you entered
doesn’t exist or you do not have the credentials to modify Active Directory for the new domain, the
Domain Login window will appear. You will be prompted to enter the domain name, user name, and
password to use for logging in to the domain.
NOTE: Domain names must include a suffix, such as
The user account should have administrator permissions. For more information about configuring
permissions, see Recommended Credentials on page A-1.
You may enter a user name for a different domain by entering a fully-qualified user name. The
fully-qualified user name must be in the format NetBIOS domain name\username or username.
If you enter a non-qualified name, the default domain will be used.
5 - 2
.com, .corp, or .net.
Page 50

Select source and target servers
If this is your first time to select a SQL server to protect, you may need to click the Advanced Find
button to add servers to the Source Server and Target Server fields. For more information, see Add
or manage servers on page 5-4.
If you select a source/target pair for which you have previously enabled and disabled protection, you
may use the existing configuration settings (provided that the source/target connection is not
currently active, in which case the existing settings will always be use d) . W hen you select Configure
or Validate, a prompt will appear asking if you want to re-use the previous configuration information.
Click Yes to re-use the previous information, or click No to revert to the Application Manager default
settings.
NOTE: If the IP address(es) for the source or target server have changed since you originally
configured protection (for example, if you configure the source or target in a staging area
and then send it to a production location), you must re-configure the protection settings.
When you are prompted to re-use the previous protection configuration, click No, then
click the Configure Protection button.
1. In the Source Server field, select the SQL server that you want to protect. If this is your first
time to log in to the selected server, you will be prompted to enter server login information. For
more information about logging in to servers, see Enter server login information on
page 5-5.
NOTE: You cannot protect a server if it is already functioning as a target server.
If you attempt to select a source that is currently unavailable, a prompt will appear
stating that the source is not available and that if the source is failed over, you should
first select the target.
If you select the target, then select the source (as recommended in the prompt), the
same prompt appears (though you would expect to get a prompt to failover). The
ability to failover using the Application Manager will not be available until a failover
condition has been met in accordance with the failover monitor settings set on the
Monitoring tab.
2. In the Target Server field, select the backup SQL server that will protect the source server in
the event of a failure.
Notice that after the source and target servers are selected, the Protection Status on the Monitor tab
changes to Unprotected.
NOTE: If you first select a target that is monitoring a connection that has met a failover condition
and requires manual intervention, then select the protected source server, a prompt will
appear asking if you want to initiate failover.
5 - 3
Page 51

Add or manage servers
If the servers you need do not appear, click the Advanced Find button, or select Actions, Manage
SQL Servers. The Manage SQL Servers window will appear.
To discover all servers in the domain:
1. Click the Search button. The Discovered Servers list will be populated with all servers that the
Application Manager can discover that reside in the domain.
2. To directly add a server to the drop-down list on the Manage SQL main page, select the server in
the Discovered Servers list, then use the >> button to move it into the Current Servers list.
3. To add a non-discovered server to the Current Servers list, enter the server name in the field
next to the Add button, then click Add.
NOTE: In environments with a very large number of servers in Active Directory, you may
experience significant delays while the Application Manager searches for SQL servers.
To override the automatic scan for SQL servers, you can launch Application Manager
through the command line using the
/nosqlsearch option
(dtam /sql /nosqlsearch). This will cause the Application Manager not to populate
the Source and Target fields automatically. You will then need to click the Advanced Find
button and add the source and target SQL servers manually.
4. After a server has been added to the Current Servers list, you can manage that server. Select
the server, then select one of the following options:
Remove—Click the Remove button to remove the selected server from the drop-down list
on the Manage SQL main page.
Test SQL—Click the Test SQL button to determine if SQL is installed and accessible for the
selected server.
5. When you have finished adding, managing, or testing servers, click OK to save your changes, or
Cancel to return to the Manage SQL main page without saving.
5 - 4
Page 52

Enter server login information
After you select a server for the first time, you will be prompted to enter a user name and password
to use for logging in to the selected server. The login account MUST be a member of the Storage
Mirroring Admin local security group for the selected server. For more information about permissions,
see Recommended Credentials on page A-1.
You may enter a user name for a different domain by entering a fully-qualified user name. The
fully-qualified user name must be in the format domain\username or username@domain. If you
enter a non-qualified name, the DNS domain will be used. Entering the credentials for the logged-on
user may be valid.
The Application Manager will attempt to use the same user name and password the next time you
select a server.
Using clustered SQL servers
SQL servers are selectable in the same way as physical servers; however, physical servers that are
members of a cluster (called a “node”) are not shown in the server drop-down list.
Configure protection settings
If you do not need to change the configuration settings, continue with Validate the Configuration
on page 9-1.
If you have already enabled protection for a connection and need to change the configuration
parameters, you will first need to disable protection as described in Disable protection on
page 10-2.
To change the default configuration parameters, click Configure from the main Application Manager
window, or select Actions, Configure Protection from the menu. The Configure Protection window
will appear.
The Configure Protection window has tabs for configuring failover, connection, and advanced settings.
The following sections describe the options on each of these tabs.
5 - 5
Page 53

Select SQL instances
If you launch the Application Manager using the /sql /advanced switch (dtam /sql
/advanced
does not exist on the target. This window will appear only when Application Manager is launched in
advanced mode and when there are two or more SQL instances (default plus one or more named
instance, or two or more named instances and no default instance).
The Source SQL Server Instances list will be populated with all instances that the Application Manager
can discover on the source SQL server.
1. To directly add an instance, select the server in the Source SQL Server Instances list, then
use the >> button to move it into the SQL Server Instances to Protect list.
2. To add a non-discovered instance to the SQL Server Instances to Protect list, enter the instance
name in the field next to the Add button, then click Add.
3. When you have finished adding instances, click OK to save your changes, or Cancel to return to
the Configure Protection page without saving.
), you can select which instances to protect, for example, when an instance is offline or
Failover settings
The Failover tab includes options that will be applied during SQL failover.
5 - 6
Page 54

Failover type
Failover Type indicates what name resolution method will be used to redirect users to the target SQL
server in the event of a source failure. By default, DNS Failover is selected.
NOTE: For clustered environments, only DNS failover is supported.
DNS failover
DNS Failover is the recommended method for failover. Use this option if you want to failover by
updating the DNS records associated with the source. This will modify all source server A, MX, and
PTR-type DNS resource records to point to the target.
In DNS Failover, the DNS records for the source server are modified to point to the target server’s IP
address. This allows clients to resolve the source SQL server name to the target server’s network
name and IP address at failover time. DNS Failover eliminates duplicate server name and IP
addresses on your network.
After you select the DNS Failover option, click Configure. The Configure DNS Failover window will
appear.
Configure the following information for DNS failover:
1. To add additional DNS server IP addresses, type the IP address into the DNS Server field, then
click Add.
2. The list box under the DNS Server field contains all DNS IP addresses for the source and target
servers. The label after the DNS IP address indicates whether the DNS IP address belongs to the
source, target, or both.
NOTE: To remove an IP address from the DNS server list, select the IP address, then click
the Delete button.
3. In the Source IP column, select the checkbox next to the source IP address(es) to be monitored
for failover.
4. In the Target IP column, select the target IP address to be used when failover occurs.
NOTE: If the target is monitoring multiple source IP addresses for failover, each monitored
source IP address must be mapped to a unique target IP address.
5 - 7
Page 55

5. To specify the value the Application Manager will establish for Time to Live (TTL) on the source’s
affected DNS records, select the Update TTL checkbox, then enter the desired update interval
(in seconds). The default is the current maximum TTL of all the source’s A records. The
recommended value is 300 seconds (5 minutes).
6. In the Username field, enter the user name that will be used to access/modify DNS records.
The login account MUST be a member of the DNSAdmins group for the domain in which the DNS
server resides. For more information about permissions, see Recommended Credentials on
page A-1.
You may enter a user name for a different domain by entering a fully-qualified user name. The
fully-qualified user name must be in the format domain\username or username@domain. If
you enter a non-qualified name, the DNS domain will be used by default. The domain name is
obtained from the DNS server name, provided that reverse lookup in DNS is enabled. For more
information about enabling reverse lookup, refer to your Microsoft documentation.
7. In the Password field, enter the password that will be used to access/modify DNS records.
8. Click the Test button to validate that DNS failover is configured correctly for the selected DNS
server(s) and that the specified credentials are sufficient to update DNS.
9. When the DNS configuration is complete, click OK to save your entries and return to the
Configure Protection window.
NOTE:
If you are running Windows Server 2000 on the primary DNS server hosting zones or
domains that contain source and/or target resource records, you must have the DNS
WMI Provider installed on that DNS server.
The Dynamic updates setting for the DNS zone should be set to Secure only.
Otherwise, you must disable dynamic registration on the source server in order to
prevent the source from reclaiming its DNS record.
If a hosts file entry for the source server exists on the client machine, errors may occur
during a failover and failback.
Reverse lookup in DNS should be enabled. For more information about enabling reverse
lookup, refer to your Microsoft documentation.
DNS registration for the private (devoted to Storage Mirroring) NIC IP should be
disabled.
If dynamic updates are enabled on a standard primary zone, the source server will be
able to update its DNS records after failover. To prevent this, configure DNS to use an
Active Directory-integrated zone.
For more information about using the DNS Failover utility, access the dfo.exe help by
typing
dfo.exe /? from a command prompt.
Identity failover
Select this option if you want to failover by transferring the source IP address and name to the target.
When using identity failover, it is possible that a name and/or IP address conflict can occur either
during failover or when the original source server comes back online. To avoid this conflict, use DNS
Failover.
NOTE: Identity failover is not supported in clustered environments.
Application Manager cannot be used for failover or failback when the Identity failover
method is selected. However, the Failover Control Center can still be used to initiate
failover. DNS failover reduces downtime and provides other benefits. It is recommended
for most environments.
In Identity Failover, the target’s physical identity is modified to match the source during a failover.
This includes the target adopting the source server’s name, primary IP address, and drive shares
during a failover. Identity failover may be required in the following situations:
Access to the domain controller or DNS server is not available (for example, due to permissions)
from the account that Storage Mirroring runs under on the source/target servers.
If you determine that the time it takes to propagate the necessary DNS or Active Directory
changes to the rest of your environment is not acceptable. The time needed to propagate these
changes depends on your Active Directory Replication and DNS server settings.
5 - 8
Page 56

If you have client applications that are configured to connect to an IP address rather than a server
name.
After you select the Identity Failover option, click Configure. The Configure Identity Failover window
will appear.
Enter the following information for Identity failover:
1. In the Source IP column, select the source IP address(es) to be monitored for failover.
2. In the Target NIC column, select the target NIC to be used when failover occurs.
3. The Target IP Addresses area displays the IP address(es) of the selected target NIC.
4. Select the IP Address checkbox if you want the specified source IP address to be monitored
(Default = selected).
NOTE: If your source and target servers are on different subnets, you should NOT failover
the IP address. Instead, if the server name is required you should choose DNS failover
with the Advanced switch and select the Server Name. For more information, see
Advanced settings on page 5-22.
5. Select the Server Name checkbox if you want the source name to be added to the target when
failover occurs (Default = NOT selected).
6. Select the Shares checkbox if you want the source file shares to be added to the target when
failover occurs (Default = NOT selected).
7. Select the Active Directory Hostname (SPNs) checkbox to remove the host SPN (Service
Principle Name) from Active Directory for the source automatically and add it to Active Directory
for the target during failover (Default = NOT selected).
8. Click OK to save your entries and return to the Configure Protection window.
Services
Application Manager will determine the appropriate SQL services to start/stop based on your
operating system/SQL configuration. You should only modify this selection if there are additional
services that need to be started along with SQL during the failover/failback process.
5 - 9
Page 57

Modifying the default configuration for services may affect whether data can be successfully
replicated. Do not modify the services to start/stop unless you are very familiar with Storage
Mirroring and SQL.
1. To add a service, click Add. The Add Service window will appear.
2. Select the Service name from the drop-down box, then click Add; or, type the name of a
service, then press Enter.
3. If available, select the Service must be stopped on target checkbox. Most services must be
stopped on the target for replication to occur properly.
4. When you are finished entering services, click Close to return to the Failover configuration
window.
5. To remove a service, select one or more services, then click Remove.
You can remove all of the services besides the required SQL server service (
default instance, or
6. Services will be started in the displayed order (top-to-bottom starting with the left column) and
shutdown in reverse order (bottom-to-top starting with the right column). To re-arrange the
order in which services are started/stopped:
a. Add any additional services.
b. Select a service in the list, then use the up and down arrow buttons to move the service to
the appropriate position in startup/shutdown order.
MSSQL$<instance_name> for a named instance).
MSSQLSERVER for a
Resources (cluster only)
If you are using clustered SQL servers, you will select resources instead of services to bring online
and offline during failover. The Resource selection works exactly like the service selection
functionality.
5 - 10
Page 58

Monitor settings
The Monitoring tab includes options for configuring how you want to monitor the source server for
failure.
Configure how you want to monitor the source server for failure.
1. Select the Active Monitoring Enabled option to enable or disable failover for the selected
source/target pair.
2. By default, Manual Intervention Required is selected. Manual intervention allows you to
control when failover occurs. When a failure occurs, a prompt appears and waits for you to
initiate the failover process manually.
Disable Manual Intervention Required only if you want failover to occur immediately when a
failure condition is met.
3. In the Method to monitor for Failover field, select the ping method to use when monitoring
source IP addresses.
Network Access (ICMP)—Storage Mirroring failover uses ICMP pings to determine if the
source server is online. If a network device, such as a firewall or router, between the source
and target is blocking ICMP traffic, failover monitors cannot be created or used.
Replication Service (UDP)—The Storage Mirroring service on the target server sends a
ping-like UDP request to the source Storage Mirroring service, which replies immediately to
confirm it is running. This method is useful when ICMP is blocked on routers between the
source and target.
4. Configure how long to wait after a source failure to initiate failover. The amount of time before
failover begins is calculated by multiplying the Monitor Interval by the Missed Packets. For
example, if the Monitor Interval is set to 5 seconds and the Missed Packets setting is 5, a failover
condition will be identified after 25 seconds of missed source activity.
NOTE: In a cluster environment, make sure to include a cushion to account for the time it
takes for SQL to failover between nodes. Setting values too low will cause the
Application Manager to assume the source cluster has failed and will indicate that a
failover condition has been met.
a. In the Monitor Interval field, select how often the monitor should check the source
machine availability (Default = 5 seconds).
b. In the Missed Packets field, select how many monitor replies can be missed before
assuming the source machine has failed (Default = 5 missed replies).
5. If you are monitoring multiple IP addresses, select one of the Failover Trigger options.
All Monitored IP Addresses Fail—Failover begins when all monitored IP addresses fail.
One Monitored IP Address Fails—Failover begins when any of the monitored IP addresses
fail.
5 - 11
Page 59

Application Monitoring (BETA)
By default, application monitor settings are not available in this release of the Storage Mirroring
Application Manager. Application monitoring is only available when you launch Application Manager
using the command line
WARNING: This feature is currently BETA and should not be used in production environments.
1. If you select the Enable Application Monitoring checkbox, the remaining fields in Application
Monitor Settings area will be enabled.
NOTE: A message box will appear, asking you to confirm that you want to use this BETA
feature. To continue, click OK.
Application monitoring is not available when dealing with a cluster.
/sql /advanced option (dtam /sql /advanced)
2. In the Monitor Interval field, enter the interval (in seconds) at which you want to check
application health.
3. In the Error Threshold field, enter the number of consecutive errors that can be received
before an error alert appears.
4. In the Type of Monitoring area, select one of the following options.
Built-in Monitoring Points—Use the default monitoring options.
Custom Script—Launch a batch file to check application health. Either type the name of the
script, or click Browse to locate a script.
NOTE: If you select Custom Script, you will also need to designate whether to use .PS1
(PowerShell) or .VB (VisualBasic) as the Script Engine. Make sure you select the
appropriate engine for your script type.
An example script that you can use as a basis for creating your custom script is
included in the \Samples subfolder where the Application Manager is installed.
5. In the Username field, enter the fully-qualified user name that will be used to run WMI scripts.
The fully-qualified user name must be in the format domain\username or
username@domain.
NOTE: The required credentials for running WMI scripts is full WMI access to the CIMV2
namespace. Under Windows 2008, the supplied credentials must also be allowed
through DCOM and User Access Control. It is recommended that a group be created
for running scripts, and that the required permissions be given to the group.
By default, the administrative group of a Windows 2008 machine has full WMI access.
However, DCOM and User Access Control settings may need to be adjusted.
6. In the Password field, enter the password for the specified user account.
7. Click the Test button to validate that the specified credentials are sufficient to run WMI scripts.
5 - 12
Page 60

8. (Optional) Click the Clear Cached Credentials button to clear the cached user name and
password.
Snapshot settings
The following allow you to set up snapshots of your target data that can be used when failing over.
By default, snapshots are not enabled in the Application Manager.
1. To enable snapshots, select the Enable periodic snapshots checkbox. This will enable the
remaining controls.
2. In the Snapshot interval field, select the interval at which you want to perform snapshots (in
minutes). The minimum interval is 15 minutes.
3. Select one of the following options for when to begin collecting snapshots:
Start now—Select this option to take the first snapshot as soon as protection is enabled.
Start at—Select this option to start taking snapshots at a future time. If you select this option,
you will also need to enter a date and time.
4. When you are finished, click OK.
5 - 13
Page 61

Connection settings
The Connection tab includes options that will be applied to the specified source/target connection.
Route
This setting identifies the Target IP Address that the Storage Mirroring data will be transmitted
through. You should only change this setting if you want to select a different route for Storage
Mirroring traffic. On a machine with more than one NIC, this increases the flexibility of configuring
Storage Mirroring activity. For example, you can separate regular network traffic and Storage
Mirroring traffic on a machine. The default ports will be used.
In a cluster, the route should be set to the name of the SQL dependent IP address.
Protected Databases
For SQL, you can select one of the following protection modes:
SQL instance (default)
Database only
Database only mode, many-to-one configurations
SQL instance (default)
Select SQL Instance protection mode to replicate all of the SQL program and data files (except the
\binn directory) to the target SQL server. This will allow the clients to access your production SQL
Server data and functionality on the target in the event of a failure.
5 - 14
Page 62

SQL Instance protection mode requires that the source and target servers both have the exact same
version of SQL (major and minor versions) as well as similar logical drive structures (the target must
have at least the same logical drives as the source where SQL program and data files are stored).
Certain user databases can be de-selected, but the System databases (except for
tempdb) are
required.
NOTE:
If you are protecting SQL named instances, both the source and target SQL Servers
must have named instances with the exact same name installed prior to configuring
protection.
When using named instances, all named instances will appear in the Protected
Databases area. You can either de-select an entire instance, or select specific
databases within each instance.
By default, the TcpPort on the source named instance will be different than the
TcpPort on the target named instance. However, the Application Manager will still be
able to work and there is no need for any additional configuration.
If you need to reduce the amount of mirroring and replication traffic, you may choose
to deselect the tempdb database if it is not necessary.
You can also select non-application specific data under the Volumes folder.
NOTE: If Override Generated Rules is selected on the Advanced tab, this control will be
disabled.
To refresh the tree view to show new source directories or files that may have been added or
removed, select the logical node, then click the Refresh button. If a node in the volumes branch is
selected, then the items under that node will be refreshed.
Database only
The Database Only mode is intended for advanced users only.
Select Database Only protection mode to replicate only the
target server. The selected database(s) will be attached to the target SQL Server upon failover,
allowing clients to access the underlying data.
You can also select non-application specific data under the Volumes folder.
.mdf, .ldf, and .ndf files to the
NOTE: If Override Generated Rules is selected on the Advanced tab, this control will be
disabled.
To refresh the tree view to show new source directories or files that may have been added or
removed, select the logical node, then click the Refresh button. If a node in the volumes branch is
selected, then the items under that node will be refreshed.
During the configuration and validation process, you will have the opportunity to transfer user logins
and permissions (both server and database-level) and certain SQL Server registry and configuration
settings to the target server. This will allow users to access the data associated with the selected
database(s), but no other server-level functionality will be transferred to the target server (including
but not limited to Job Server configuration, Full-Text service configuration, SQL Replication
configuration, linked servers, remote servers, backup devices).
NOTE: When using Database Only mode, any SQL Server replication configured on the protected
databases must be configured by the administrator on the target after failover.
5 - 15
Page 63

If you select Database Only protection mode, you can select a non-system database and map it to a
unique path on the target.
NOTE: You must first select the database in order for the Target Path commands to be visible.
1. Select the database you want to re-map, then click the ellipse button. The Choose a Target
Folder window will appear.
2. Enter the desired path in the Target Path field, then click OK.
NOTE: The target database must be either offline or detached from the target before you can
enable protection in the Application Manager. The validation test will detect if the
target database is still online. Clicking Fix will detach that database on the target.
5 - 16
Page 64

3. To confirm the new path, click Apply.
NOTE: If Database-Only protection mode is used to protect SQL Server, attempting to attach
a replicated SQL database on the target server after failover can fail when done
outside of the Application Manager.
The Storage Mirroring service account (typically the target's LocalSystem account) is
the account used to attach/detach databases on failover/failback. When the database
is detached by the failback script, the Storage Mirroring service account becomes the
owner of those files that make up the database (*.mdf, *.ldf, etc.), and any attempts
to manually attach the database may fail if the user account does not yet have NTFS
permissions to access the physical files.
To change the permissions on an individual file, perform these steps on each file that
is part of the database's file list.
1. In Windows Explorer, select the folder that contains the physical files for the
database that needs to be manually attached.
2. Right-click, then select Properties.
3. Select the Security tab.
4. Determine if the user account has NTFS permissions for that folder.
5. If the user account does not have specific or inherited permissions, click the Add
button.
6. Enter the user account name (such as domain\administrator).
7. After the user account has been added, give the account the necessary
permissions to the folder (Full Control).
8. Make sure that the subfolders and files are set to inherit these rights, then click
OK.
Database only mode, many-to-one configurations
The following examples describe the SQL many-to-one configurations that can be protected using
Application Manager.
Example 1: If you have two SQL servers (
default instance installed, you can protect databases from both servers' default instance, provided
that the database names are unique.
Case 1: Both source servers’ default instances have a database named “Accounting”. You can
only protect/failover one server's copy of the database (because SQL on the target will not allow
you to attach more than one copy of the same-named database).
NOTE: If you select and setup both servers’ default instances for protection and both source
servers fail, the “Accounting” database on the first source server to be failed over will
be attached. The second server to failover will not be able to attach its “Accounting”
database.
Case 2: If
“Accounting2”, then you can protect and failover the database on both servers without any
issues.
NOTE: All database filenames (
Source1 has a database named “Accounting1”, and Source2 has a database named
Uniquely named (for example, accounting1.mdf and accounting2.mdf), or
Uniquely located on the target (for example,
c:\Source1\accounting1\accounting.mdf and
c:\Source2\accounting2\accounting.mdf).
Source1 and Source2) where each server has only the
*.mdf, *.ldf, and *.ndf) must either be:
Example 2: If you have two SQL servers (
instance installed (for example,
protect databases from both servers if the target has at least those two instances installed
(
Target1\instance1 and Target1\instance2).
Source3\instance1 and Source4\instance2), you can
Source3 and Source4) where each has a named
5 - 17
Page 65

Case: Both source SQL servers have a database named “Accounting”
(
Source3\instance1|Accounting and Source4\instance2|Accounting). You can
protect and failover each SQL server’s copy of the database without any issue.
NOTE: All the database filenames (
Uniquely named (for example, accounting1.mdf and accounting2.mdf), or
Uniquely located on the target (for example,
*.mdf, *.ldf, and *.ndf) must either be:
c:\Source3\accounting1\accounting1.mdf and
c:\Source4\accounting2\accounting2.mdf)
Mirror type
The following options specify what files you want sent from the source to the target during a mirror.
Full—Copies all of the directories and files in the replication set to the target machine. If a mirror
has already been completed, another full mirror will overwrite the data on the target.
Checksum—(Default) This option performs a checksum comparison calculation. A checksum
calculation is a formula applied to blocks of data to determine if the binary make-up of the block
is identical. If the checksums on the source and target machine are the same, the block is skipped.
If the checksums on the source and target machine are not the same, the block on the source is
sent to the target. With this option, the entire file is not overwritten; only the block that is received
from the source is overwritten.
NOTE: The Mirror type setting also applies to the restoration connection.
Enable compression
This setting enables compression of data that is transmitted from the source to the target. Significant
improvements in bandwidth utilization have been seen in Wide Area Network (WAN) configurations
or in any case where network bandwidth is a constraint.
Compression may be used in Local Area Network (LAN) configurations, though it may not provide any
significant network improvements.
You can specify compression for different source/target connections, but all connections to the same
target will have the same compression settings.
By default, compression is disabled. To enable it, select Enable Compression, then set the level
from minimum to maximum compression.
5 - 18
Page 66

Advanced settings
The Advanced tab includes advanced configuration options.
Replication set rules
A replication set defines what directories/files are to be protected by Storage Mirroring. By default,
Application Manager selects all of the necessary directories/files to protect SQL based on your source
server configuration. These include the SQL application data and transaction logs, tempdb files, and
SQL error logs. By default, the Application Manager-generated replication set will be named
sqldag01_<source server name>_<target server name>
You should only modify the replication set rules if there are additional directories/files specific to your
configuration that must also be protected with SQL. Modifying the default configuration for replication
set rules may affect whether data can be successfully replicated. Do not modify the replication set
unless you are very familiar with Storage Mirroring and SQL.
To change the replication set rules:
1. Select the Override Generated Rules checkbox.
NOTE: When this box is selected, the Protected Databases control on the Connection tab will
be disabled. For more information, see Protected Databases on page 5-14.
2. To add a replication set rule, click Add. The Add Repset Rule dialog box will appear.
.
3. In the Rule Path field, type the directory that you want to protect or exclude.
4. In the Include/Exclude area, select whether to include or exclude the path from the replication
set.
5 - 19
Page 67

5. In the Recursive area, select whether the directory should be recursive (protecting all
sub-folders under the directory) or non-recursive (protecting only the files in the directory).
6. Click Add.
7. When you have entered all of your replication set rules, click Close to return to the Advanced
configuration tab.
NOTE: You will need to manually verify that the rule path is correct since the Application
Manager does not validate rule paths.
8. To remove a rule, select one or more rules, then click Remove.
NOTE: Removing rules that were automatically added by Application Manager could impact
the success of failover. Any changes to rules should be thoroughly tested.
9. To reset the rules to the auto-generated rules and to re-enable the Protected Databases control,
remove the selection from the Override Generated Rules checkbox.
Failover/failback scripts
Scripts are executed at different points during the failover/failback process to perform the actions
necessary to make SQL available on the appropriate server. Scripts perform steps such as
starting/stopping services, attaching/detaching databases in database-only protection mode, and
modifying DNS entries on the DNS server to point users to the appropriate server.
Editing scripts is an advanced feature. Do not edit scripts unless you fully understand what each
command is doing.
Scripts are automatically generated by Application Manager during configuration. The scripts are
copied to the Storage Mirroring installation directory on the specified server using the administrative
share for that server’s drive.
Script File name Description
Failover post_failover_sql.txt A post-failover script is executed after the
core failover processes have completed on
the target server. The primary functions of
the post-failover script are to start the
services on the target and to modify DNS
and Active Directory entries as necessary.
Failback pre_failback_sql.txt A pre-failback script is executed before
failback processing occurs on the target
server. The primary functions of this script
are to stop services on the target and to
move DNS and Active Directory entries as
necessary.
Restore post_restore_sql.txt A post-restore script is not executed
automatically, though it is provided on the
source to perform actions that are generally
required after data has been restored from
the target to source after a failover/failback.
The primary function of this script is to
restart services on the source server.
By default, Application Manager generates all the required scripts for you automatically based on your
system configuration. You can also edit the scripts to add, modify, or delete specific commands. To
edit a script:
1. Click on the button for the script you want to update. The script file will be displayed using your
machine’s default editor.
2. Enter your changes.
3. Save the script file.
5 - 20
Page 68

Any change you make to the script in the editor will be copied to the appropriate server when
configuration changes are accepted, thus overwriting any changes that have been made outside the
Application Manager.
The scripts can be overwritten by certain operations during setup. For example, any changes to
configuration options done in the Application Manager will overwrite previous script changes. If you
want to make permanent changes to a script, you must modify the appropriate .txt file within
the Application Manager installation directory. If there is more than one client machine that will be
configuring failover, the change must be made to all the appropriate .txt files.
Before running Application Manager multiple times (for example, when re-enabling protection after a
failover/failback), save a copy of your post-restore and pre-failback batch files. After Application
Manager executes, replace the default script file(s) with the customized file(s) that you saved.
Items to failover
Select the items to failover.
1. Select the Server Name checkbox if you want the source name to be added to the target when
failover occurs (Default = NOT selected).
2. Select the Shares checkbox if you want the source file shares to be added to the target when
failover occurs (Default = NOT selected).
3. Select the Active Directory Hostname (SPNs) checkbox if you want to remove the host SPN
(Service Principle Name) automatically from Active Directory for the source and add it to Active
Directory for the target during failover (Default = NOT selected).
NOTE: If you are using Active Directory, you should enable this option. Otherwise, you may
experience problems with failover.
5 - 21
Page 69

Advanced settings
The following options allow you to control what functions Application Manager will perform during
configuration. By default, Application Manager performs all of these functions. Individual functions
should only be disabled for testing or debugging purposes.
NOTE: These options are only available when you launch Application Manager using the
command line
/sql /advanced option (dtam /sql /advanced).
1. Select the Create Replication Set checkbox to automatically create a replication set that
includes all of the necessary directories/files that must be protected for your specific
configuration. This should only be disabled if you have customized your replication set and do
not want to overwrite it (Default = selected).
2. Select the Create Failover Scripts checkbox to automatically generate the failover/failback
scripts and copy them to the appropriate server. This should be disabled only if you have
customized your script files and do not want them to be overwritten (Default = selected).
3. Select the Create Connection checkbox to create the connection between the source and
target using the automatically-generated replication set. This should only be disabled if you
would like to verify the replication set that is created by Application Manager prior to connection
(Default = selected).
4. Select the Create Failover Monitor checkbox to create a failover monitor on the target to
monitor the source for failure. This monitor will use the failover parameters specified during
configuration as well as the script files that have been created (Default = selected).
Saving configuration changes
After you have changed the configuration parameters, click OK to apply the settings. If you click
Cancel, any changes you have made will be discarded and the previous configuration parameters will
be used.
5 - 22
Page 70

When you have finished configuring the optional protection options, continue with Validate the
Configuration on page 9-1.
NOTE: If you close the Application Manager prior to enabling protection, your changes will not
be saved. You must enable protection in order to save your configuration settings for a
source/target pair.
If you modify your configuration on the source server (such as adding a new storage
group or database to a directory that was not included in the replication set), you must
disable protection, run validation and fix any issues, then re-enable protection to apply
the changes to the Application Manager replication set.
5 - 23
Page 71

Protecting a File Server
To configure protection for your file servers using Application Manager, you will complete the
following steps:
1. Install Storage Mirroring on the source and target file servers. See the Storage Mirroring Getting
Started guide for more information.
2. Install the Application Manager on page 2-1
3. Select a task on page 6-1
4. Select a domain on page 6-2
5. Select source and target servers on page 6-3
6. (Optional) Configure protection settings on page 6-5
7. Validate the Configuration on page 9-1
To protect your file server, you will complete the following steps:
1. Enable protection on page 10-1
2. Monitor protection status on page 10-2
In the event of a failure, you will need to perform some additional tasks. These tasks are described
in Failover, Failback, and Restoration on page 11-1.
Select a task
To protect a File server, open the Application Manager (Start, Programs, Storage Mirroring,
Application Manager), then on the Tasks area on the left pane, select Protect File Server. The
Manage File Server page will appear in the right pane. Make sure that the Setup tab is in view.
NOTE: You can also launch Application Manager for File Servers by using the command line
/fileprint option (dtam /fileprint).
6 - 1
Page 72

Select a domain
The Domain Name on the main window will be populated automatically with the domain where the
Application Manager client resides.
If you want to change the domain, type in a domain name for a trusted domain that the Application
Manager client can connect to, then press Tab or click on another field. If the domain you entered
doesn’t exist or you do not have the credentials to modify Active Directory for the new domain, the
Domain Login window will appear. You will be prompted to enter the domain name, user name, and
password to use for logging in to the domain.
NOTE: Domain names must include a suffix, such as
The user account should have administrator permissions. For more information about configuring
permissions, see Recommended Credentials on page A-1.
You may enter a user name for a different domain by entering a fully-qualified user name. The
fully-qualified user name must be in the format NetBIOS domain name\username or username.
If you enter a non-qualified name, the default domain will be used.
6 - 2
.com, .corp, or .net.
Page 73

Select source and target servers
Click the Advanced Find button to add servers to the Source Server and Target Server fields. For
more information, see Add or manage servers on page 6-4.
If you select a source/target pair for which you have previously enabled and disabled protection, you
may use the existing configuration settings (provided that the source/target connection is not
currently active, in which case the existing settings will always be use d) . W hen you select Configure
or Validate, a prompt will appear asking if you want to re-use the previous configuration information.
Click Yes to re-use the previous information, or click No to revert to the Application Manager default
settings.
NOTE: If the IP address(es) for the source or target server have changed since you originally
configured protection (for example, if you configure the source or target in a staging area
and then send it to a production location), you must re-configure the protection settings.
When you are prompted to re-use the previous protection configuration, click No, then
click the Configure Protection button.
1. In the Source Server field, select the File server that you want to protect. If this is your first
time to log in to the selected server, you will be prompted to enter server login information. For
more information about logging in to servers, see Enter server login information on
page 6-4.
NOTE: You cannot protect a server if it is already functioning as a target server.
If you attempt to select a source that is currently unavailable, a prompt will appear
stating that the source is not available and that if the source is failed over, you should
first select the target.
If you select the target, then select the source (as recommended in the prompt), the
same prompt appears (though you would expect to get a prompt to failover). The
ability to failover using the Application Manager will not be available until a failover
condition has been met in accordance with the failover monitor settings set on the
Monitoring tab.
2. In the Target Server field, select the backup File server that will protect the source server in
the event of a failure.
NOTE: In a parent/child configuration, you will need to click Advanced Find and manually add
the target server. The Application Manager only searches the root domain (or domain
entered in Domain Name) and since the target server is in a child domain, it will not
be auto discovered.
Notice that after the source and target servers are selected, the Protection Status on the Monitor tab
changes to Unprotected.
NOTE: If you first select a target that is monitoring a connection that has met a failover condition
and requires manual intervention, then select the protected source server, a prompt will
appear asking if you want to initiate failover.
6 - 3
Page 74

Add or manage servers
If the servers you need do not appear, click the Advanced Find button. The Manage Servers window
will appear.
To discover all servers in the domain:
1. Click the Search button. The Discovered Servers list will be populated with all servers that the
Application Manager can discover that reside in the domain.
2. To directly add a server to the drop-down list on the Manage File Server main page, select the
server in the Discovered Servers list, then use the >> button to move it into the Current
Servers list.
3. To add a non-discovered server to the Current Servers list, enter the server name in the field
next to the Add button, then click Add.
4. After a server has been added to the Current Servers list, you can click the Remove button to
remove the selected server from the drop-down list on the Manage File Server main page.
5. When you have finished adding servers, click OK to save your changes, or Cancel to return to
the Manage File Server main page without saving.
Enter server login information
After you select a server for the first time, you will be prompted to enter a user name and password
to use for logging in to the selected server. The login account MUST be a member of the Storage
Mirroring Admin local security group for the selected server. For more information about required
account permissions, see Recommended Credentials on page A-1.
You may enter a user name for a different domain by entering a fully-qualified user name. The
fully-qualified user name must be in the format domain\username or username@domain. If you
enter a non-qualified name, the DNS domain will be used by default. Entering the credentials for the
logged-on user may be valid.
The Application Manager will attempt to use the same user name and password the next time you
select a server.
6 - 4
Page 75

Configure protection settings
If you do not need to change the configuration settings, continue with Validate the Configuration
on page 9-1.
If you have already enabled protection for a connection and need to change the configuration
parameters, you will first need to disable protection as described in Disable protection on
page 10-2.
To change the default configuration parameters, click Configure from the main Application Manager
window, or select Actions, Configure Protection from the menu. The Configure Protection window
will appear.
The Configure Protection window has tabs for configuring failover, connection, and advanced settings.
The following sections describe the options on each of these tabs.
Failover settings
The Failover tab includes options that will be applied during File server failover.
Failover type
Failover Type indicates what name resolution method will be used to redirect users to the target File
server in the event of a source failure. By default, DNS Failover is selected.
DNS failover
DNS Failover is the recommended method for failover. Use this option if you want to failover by
updating the DNS records associated with the source. This will modify all source server A, MX, and
PTR-type DNS resource records to point to the target.
In DNS Failover, the DNS records for the source server are modified to point to the target server’s IP
address. This allows clients to resolve the source File server name to the target server’s network
name and IP address at failover time. DNS Failover eliminates duplicate server name and IP
addresses on your network.
6 - 5
Page 76

After you select the DNS Failover option, click Configure. The Configure DNS Failover window will
appear.
Configure the following information for DNS failover:
1. To add additional DNS server IP addresses, type the IP address into the DNS Server field, then
click Add.
2. The list box under the DNS Server field contains all DNS IP addresses for the source and target
servers. The label after the DNS IP address indicates whether the DNS IP address belongs to the
source, target, or both.
NOTE: To remove an IP address from the DNS server list, select the IP address, then click
the Delete button.
3. In the Source IP column, select the checkbox next to the source IP address(es) to be monitored
for failover.
4. In the Target IP column, select the target IP address to be used when failover occurs.
NOTE: If the target is monitoring multiple source IP addresses for failover, each monitored
source IP address must be mapped to a unique target IP address.
5. To specify the value the Application Manager will establish for Time to Live (TTL) on the source’s
affected DNS records, select the Update TTL checkbox, then enter the desired update interval
(in seconds). The default is the current maximum TTL of all the source’s A records. The
recommended value is 300 seconds (5 minutes).
6. In the Username field, enter the user name that will be used to access/modify DNS records.
The login account MUST be a member of the DNSAdmins group for the domain in which the DNS
server resides. For more information about required account permissions, see Recommended
Credentials on page A-1.
You may enter a user name for a different domain by entering a fully-qualified user name. The
fully-qualified user name must be in the format domain\username or username@domain. If
you enter a non-qualified name, the DNS domain will be used by default. The domain name is
obtained from the DNS server name, provided that reverse lookup in DNS is enabled. For more
information about enabling reverse lookup, refer to your Microsoft documentation.
7. In the Password field, enter the password that will be used to access/modify DNS records.
6 - 6
Page 77

8. Click the Test button to validate that DNS failover is configured correctly for the selected DNS
server(s) and that the specified credentials are sufficient to update DNS.
9. When the DNS configuration is complete, click OK to save your entries and return to the
Configure Protection window.
NOTE:
If you are running Windows Server 2000 on the primary DNS server hosting zones or
domains that contain source and/or target resource records, you must have the DNS
WMI Provider installed on that DNS server.
The Dynamic updates setting for the DNS zone should be set to Secure only.
Otherwise, you must disable dynamic registration on the source server in order to
prevent the source from reclaiming its DNS record.
If a hosts file entry for the source server exists on the client machine, errors may occur
during a failover and failback.
Reverse lookup in DNS should be enabled. For more information about enabling reverse
lookup, refer to your Microsoft documentation.
DNS registration for the private (devoted to Storage Mirroring) NIC IP should be
disabled.
If dynamic updates are enabled on a standard primary zone, the source server will be
able to update its DNS records after failover. To prevent this, configure DNS to use an
Active Directory-integrated zone.
For more information about using the DNS Failover utility, access the dfo.exe help by
typing
dfo.exe /? from a command prompt.
Identity failover
Select this option if you want to failover by transferring the source IP address and name to the target.
When using identity failover, it is possible that a name and/or IP address conflict can occur either
during failover or when the original source server comes back online. To avoid this conflict, use DNS
Failover.
NOTE: Application Manager cannot be used for failover or failback when the Identity failover
method is selected. However, the Failover Control Center can still be used to initiate
failover. DNS failover reduces downtime and provides other benefits. It is recommended
for most environments.
In Identity Failover, the target’s physical identity is modified to match the source during a failover.
This includes the target adopting the source server’s name, primary IP address, and drive shares
during a failover. Identity failover may be required in the following situations:
Access to the domain controller or DNS server is not available (for example, due to permissions)
from the account that Storage Mirroring runs under on the source/target servers.
If you determine that the time it takes to propagate the necessary DNS or Active Directory
changes to the rest of your environment is not acceptable. The time needed to propagate these
changes depends on your Active Directory Replication and DNS server settings.
If you have client applications that are configured to connect to an IP address rather than a server
name.
6 - 7
Page 78

After you select the Identity Failover option, click Configure. The Configure Identity Failover window
will appear.
Enter the following information for Identity failover:
1. In the Source IP column, select the source IP address(es) to be monitored for failover.
2. In the Target NIC column, select the target NIC to be used when failover occurs.
3. The Target IP Addresses area displays the IP address(es) of the selected target NIC.
4. Select the IP Address checkbox if you want the specified source IP address to be monitored
(Default = selected).
NOTE: If your source and target servers are on different subnets, you should NOT failover
the IP address. Instead, if the server name is required you should choose DNS failover
with the Advanced switch and select the Server Name. For more information, see
Advanced settings on page 6-15.
5. Select the Server Name checkbox if you want the source name to be added to the target when
failover occurs (Default = selected).
6. Select the Shares checkbox if you want the source file shares to be added to the target when
failover occurs (Default = selected).
7. Select the Active Directory Hostname (SPNs) checkbox to remove the host SPN (Service
Principle Name) from Active Directory for the source automatically and add it to Active Directory
for the target during failover (Default = selected).
8. Click OK to save your entries and return to the Configure Protection window.
Services
Application Manager will determine the appropriate services to start/stop based on your system
configuration. You should only modify this selection if there are additional services that need to be
started during the failover/failback process.
6 - 8
Page 79

Modifying the default configuration for services may affect whether data can be successfully
replicated. Do not modify the services to start/stop unless you are very familiar with Storage
Mirroring and the applications running on your server.
1. To add a service, click Add. The Add Service window will appear.
2. Select the Service name from the drop-down box, then click Add; or, type the name of a
service, then press Enter.
3. If available, select the Service must be stopped on target checkbox. Most services must be
stopped on the target for replication to occur properly.
4. When you are finished entering services, click Close to return to the Failover configuration
window.
5. To remove a service, select one or more services, then click Remove.
You can only remove services that you added manually using the Application Manager.
6. Services will be started in the displayed order (top-to-bottom starting with the left column) and
shutdown in reverse order (bottom-to-top starting with the right column). To re-arrange the
order in which services are started/stopped:
a. Add any additional services.
b. Select a service in the list, then use the up and down arrow buttons to move the service to
the appropriate position in startup/shutdown order.
Monitor settings
The Monitoring tab includes options for configuring how you want to monitor the source server for
failure.
Configure how you want to monitor the source server for failure.
1. Select the Active Monitoring Enabled option to enable or disable failover for the selected
source/target pair.
2. By default, Manual Intervention Required is selected. Manual intervention allows you to
control when failover occurs. When a failure occurs, a prompt appears and waits for you to
initiate the failover process manually.
Disable Manual Intervention Required only if you want failover to occur immediately when a
failure condition is met.
3. In the Method to monitor for Failover field, select the ping method to use when monitoring
source IP addresses.
6 - 9
Page 80

Network Access (ICMP)—Storage Mirroring failover uses ICMP pings to determine if the
source server is online. If a network device, such as a firewall or router, between the source
and target is blocking ICMP traffic, failover monitors cannot be created or used.
Replication Service (UDP)—The Storage Mirroring service on the target server sends a
ping-like UDP request to the source Storage Mirroring service, which replies immediately to
confirm it is running. This method is useful when ICMP is blocked on routers between the
source and target.
4. Configure how long to wait after a source failure to initiate failover. The amount of time before
failover begins is calculated by multiplying the Monitor Interval by the Missed Packets. For
example, if the Monitor Interval is set to 5 seconds and the Missed Packets setting is 5, a failover
condition will be identified after 25 seconds of missed source activity.
a. In the Monitor Interval field, select how often the monitor should check the source
machine availability (Default = 5 seconds).
b. In the Missed Packets field, select how many monitor replies can be missed before
assuming the source machine has failed (Default = 5 missed replies).
5. If you are monitoring multiple IP addresses, select one of the Failover Trigger options.
All Monitored IP Addresses Fail—Failover begins when all monitored IP addresses fail.
One Monitored IP Address Fails—Failover begins when any of the monitored IP addresses
fail.
Snapshot settings
The following allow you to set up snapshots of your target data that can be used when failing over.
By default, snapshots are not enabled in the Application Manager.
1. To enable snapshots, select the Enable periodic snapshots checkbox. This will enable the
remaining controls.
2. In the Snapshot interval field, select the interval at which you want to perform snapshots (in
minutes). The minimum interval is 15 minutes.
3. Select one of the following options for when to begin collecting snapshots:
Start now—Select this option to take the first snapshot as soon as protection is enabled.
Start at—Select this option to start taking snapshots at a future time. If you select this option,
you will also need to enter a date and time.
4. When you are finished, click OK.
6 - 10
Page 81

Connection settings
The Connection tab includes options that will be applied to the specified source/target connection.
Route
This setting identifies the Target IP Address that the Storage Mirroring data will be transmitted
through. You should only change this setting if you want to select a different route for Storage
Mirroring traffic. On a machine with more than one NIC, this increases the flexibility of configuring
Storage Mirroring activity. For example, you can separate regular network traffic and Storage
Mirroring traffic on a machine. The default ports will be used.
File Shares
By default, all non-administrative file shares are selected. You can add other data that you want to
protect by selecting the checkbox next to it in the tree view.
NOTE: On a domain controller, you cannot protect the NETLOGON and SYSVOL shares and they
will not be visible in the File Shares tree.
You can also select non-application specific data under the Volumes folder.
NOTE: If Override Generated Rules is selected on the Advanced tab, this control will be
disabled.
To refresh the tree view to show new source directories or files that may have been added or
removed, select the logical node, then click the Refresh button. If a node in the volumes branch is
selected, then the items under that node will be refreshed.
Mirror type
The following options specify what files you want sent from the source to the target during a mirror.
Full—Copies all of the directories and files in the replication set to the target machine. If a mirror
has already been completed, another full mirror will overwrite the data on the target.
6 - 11
Page 82

Checksum—(Default) This option performs a checksum comparison calculation. A checksum
calculation is a formula applied to blocks of data to determine if the binary make-up of the block
is identical. If the checksums on the source and target machine are the same, the block is skipped.
If the checksums on the source and target machine are not the same, the block on the source is
sent to the target. With this option, the entire file is not overwritten; only the block that is received
from the source is overwritten.
NOTE: The Mirror type setting also applies to the restoration connection.
Enable compression
This setting enables compression of data that is transmitted from the source to the target. Significant
improvements in bandwidth utilization have been seen in Wide Area Network (WAN) configurations
or in any case where network bandwidth is a constraint.
Compression may be used in Local Area Network (LAN) configurations, though it may not provide any
significant network improvements.
You can specify compression for different source/target connections, but all connections to the same
target will have the same compression settings.
By default, compression is disabled. To enable it, select Enable Compression, then set the level
from minimum to maximum compression.
Advanced settings
The Advanced tab includes advanced configuration options.
Replication set rules
A replication set defines what directories/files are to be protected by Storage Mirroring. By default,
Application Manager selects all of the necessary directories/files to protect the file server based on
your source server configuration. These include all non-administrative file shares. By default, the
Application Manager-generated replication set will be named
name>_<target server name>
You should only modify the replication set rules if there are additional directories/files specific to your
configuration that must also be protected. Modifying the default configuration for replication set rules
may affect whether data can be successfully replicated. Do not modify the replication set unless you
are very familiar with Storage Mirroring.
.
6 - 12
fileprint_<source server
Page 83

To change the replication set rules:
1. Select the Override Generated Rules checkbox.
NOTE: When this box is selected, the File Shares control on the Connection tab will be
disabled. For more information, see File Shares on page 6-11.
2. To add a replication set rule, click Add. The Add Repset Rule dialog box will appear.
3. In the Rule Path field, type the directory that you want to protect or exclude.
4. In the Include/Exclude area, select whether to include or exclude the path from the replication
set.
5. In the Recursive area, select whether the directory should be recursive (protecting all
sub-folders under the directory) or non-recursive (protecting only the files in the directory).
6. Click Add.
7. When you have entered all of your replication set rules, click Close to return to the Advanced
configuration tab.
NOTE: You will need to manually verify that the rule path is correct since the Application
Manager does not validate rule paths.
8. To remove a rule, select one or more rules, then click Remove.
NOTE: Removing rules that were automatically added by Application Manager could impact
the success of failover. Any changes to rules should be thoroughly tested.
9. To reset the rules to the auto-generated rules and to re-enable the File Shares control, remove
the selection from the Override Generated Rules checkbox.
Failover/failback scripts
Scripts are executed at different points during the failover/failback process to perform the actions
necessary to make the file shares available on the appropriate server.
Editing scripts is an advanced feature. Do not edit scripts unless you fully understand what each
command is doing.
6 - 13
Page 84

Scripts are automatically generated by Application Manager during configuration. The scripts are
copied to the Storage Mirroring installation directory on the specified server using the administrative
share for that server’s drive.
Script File name Description
Failover post_failover_FilePrint.txt A post-failover script is executed after the
Failback pre_failback_FilePrint.txt A pre-failback script is executed before
Restore post_restore_FilePrint.txt A post-restore script is not executed
Post-failback post_failback_FilePrint.txt A post-failback script is executed on the
core failover processes have completed on
the target server. The primary functions of
the post-failover script are to start the
services on the target and to modify DNS
and Active Directory entries as necessary.
failback processing occurs on the target
server. The primary functions of this script
are to stop services on the target and to
move DNS and Active Directory entries as
necessary.
automatically, though it is provided on the
source to perform actions that are generally
required after data has been restored from
the target to source after a failover/failback.
The primary function of this script is to
restart services on the source server.
target before the post-restore script runs.
The primary function of this script is to
re-start the Server service and all dependent
services on the source in order to refresh
client connections.
By default, Application Manager generates all the required scripts for you automatically based on your
system configuration. You can also edit the scripts to add, modify, or delete specific commands. To
edit a script:
1. Click on the button for the script you want to update. The script file will be displayed using your
machine’s default editor.
2. Enter your changes.
3. Save the script file.
Any change you make to the script in the editor will be copied to the appropriate server when
configuration changes are accepted, thus overwriting any changes that have been made outside the
Application Manager.
The scripts can be overwritten by certain operations during setup. For example, any changes to
configuration options done in the Application Manager will overwrite previous script changes. If you
want to make permanent changes to a script, you must modify the appropriate .txt file within
the Application Manager installation directory. If there is more than one client machine that will be
configuring failover, the change must be made to all the appropriate .txt files.
Before running Application Manager multiple times (for example, when re-enabling protection after a
failover/failback), save a copy of your post-restore and pre-failback batch files. After Application
Manager executes, replace the default script file(s) with the customized file(s) that you saved.
Items to failover
Select the items to failover.
1. Select the Server Name checkbox if you want the source name to be added to the target when
failover occurs (Default = selected).
2. Select the Shares checkbox if you want the source file shares to be added to the target when
failover occurs (Default = selected).
6 - 14
Page 85

3. Select the Active Directory Hostname (SPNs) checkbox if you want to remove the host SPN
(Service Principle Name) automatically from Active Directory for the source and add it to Active
Directory for the target during failover (Default = selected).
NOTE: If you are using Active Directory, you should enable this option. Otherwise, you may
experience problems with failover.
Advanced settings
The following options allow you to control what functions Application Manager will perform during
configuration. By default, Application Manager performs all of these functions. Individual functions
should only be disabled for testing or debugging purposes.
NOTE: These options are only available when you launch Application Manager using the
command line
1. Select the Create Replication Set checkbox to automatically create a replication set that
includes all of the necessary directories/files that must be protected for your specific
configuration. This should only be disabled if you have customized your replication set and do
not want to overwrite it (Default = selected).
2. Select the Create Failover Scripts checkbox to automatically generate the failover/failback
scripts and copy them to the appropriate server. This should be disabled only if you have
customized your script files and do not want them to be overwritten (Default = selected).
3. Select the Create Connection checkbox to create the connection between the source and
target using the automatically-generated replication set. This should only be disabled if you
would like to verify the replication set that is created by Application Manager prior to connection
(Default = selected).
4. Select the Create Failover Monitor checkbox to create a failover monitor on the target to
monitor the source for failure. This monitor will use the failover parameters specified during
configuration as well as the script files that have been created (Default = selected).
/fileprint /advanced option (dtam /fileprint /advanced).
Saving configuration changes
After you have changed the configuration parameters, click OK to apply the settings. If you click
Cancel, any changes you have made will be discarded and the previous configuration parameters will
be used.
6 - 15
Page 86

When you have finished configuring the optional protection options, continue with Validate the
Configuration on page 9-1.
NOTE: If you close the Application Manager prior to enabling protection, your changes will not
be saved. You must enable protection in order to save your configuration settings for a
source/target pair.
If you modify your configuration on the source server (such as adding a new storage
group or database), you must disable protection, run validation and fix any issues, then
re-enable protection to apply the changes to the Application Manager replication set.
6 - 16
Page 87

Protecting a
Source
Microsoft SQL Server (default or named instance)
Storage Mirroring
Internet Information Services
Microsoft SQL Server (default or named instance)
Storage Mirroring
Targe t
Source
Internet Information Services
database server
front-end
database server
and
front-end
WSS 3.0 or MOSS 2007
WSS 3.0 or MOSS 2007
web server
web server
SharePoint Server
The SharePoint databases will be protected by default and the Application Manager can be used to
extend the target web front-end into the source SharePoint configuration.
To configure protection for your SharePoint servers using Application Manager, you will complete the
following steps:
1. Configure each source as a Windows member server.
2. Install Microsoft SQL Server on each source that will be used as a back-end server.
NOTE: For SQL Server 2000, Microsoft recommends that all service packs be installed
independently for each source and target instance. This ensures that operating
system files and registry entries are applied appropriately.
3. Install and configure Windows SharePoint Services (WSS 3.0) or Microsoft Office SharePoint
Server (MOSS 2007) on each source that will be used as a front-end server, according to
Microsoft guidelines.
4. Configure each Windows 2003 target as a member server in the same Active Directory
or trusted domain environment as the source.
5. Install SQL on the target, verifying that the locations for the SQL installation and the location of
the data and log files for the target are the same as the source. Apply the same SQL service
packs or patches as were installed on the source. Use the default installation options for SQL
with the following considerations:
The target must be a unique installation (that is, two separate SQL servers must be available
for a protection pair)
Logical drive mapping must be the same on the source and target and must assigned prior to
running the Application Manager.
NOTE: For SQL Server 2000, Microsoft recommends that all service packs be installed
independently for each source and target instance. This ensures that operating
system files and registry entries are applied appropriately.
®
domain
6. Install WSS 3.0 or MOSS 2007 on the target server, but DO NOT configure it if you want to use
Storage Mirroring Application Manager to extend the target into the Web Farm.
7 - 1
Page 88

7. Install Storage Mirroring the source and target SQL servers using the installation defaults. See
the Storage Mirroring Getting Started guide for details.
8. Install the Application Manager on page 2-1
9. Select a task on page 7-2
10. Select a domain on page 7-2
11. Select SharePoint front end on page 7-3
12. Select source and target servers on page 7-3
13. (Optional) Configure protection settings on page 7-5
14. Validate the Configuration on page 9-1
To protect your SharePoint server, you will complete the following steps:
1. Enable protection on page 10-1
2. Monitor protection status on page 10-2
In the event of a failure, you will need to perform some additional tasks. These tasks are described
in Failover, Failback, and Restoration on page 11-1.
Select a task
To protect a SharePoint server, open the Application Manager (Start, Programs, Storage
Mirroring, Application Manager), then on the Tasks area on the left pane, select Protect
SharePoint Server. The Manage SharePoint page will appear in the right pane. Make sure that the
Setup tab is in view.
NOTE: You can also launch Application Manager for SharePoint by using the command line
/sharepoint option (dtam /sharepoint).
Select a domain
The Domain Name on the main window will be populated automatically with the domain where the
Application Manager client resides.
7 - 2
Page 89

If you want to change the domain, type in a domain name for a trusted domain that the Application
Manager client can connect to, then press Tab or click on another field. If the domain you entered
doesn’t exist or you do not have the credentials to modify Active Directory for the new domain, the
Domain Login window will appear. You will be prompted to enter the domain name, user name, and
password to use for logging in to the domain.
NOTE: Domain names must include a suffix, such as
The user account should have administrator permissions. For more information about configuring
permissions, see Recommended Credentials on page A-1.
You may enter a user name for a different domain by entering a fully-qualified user name. The
fully-qualified user name must be in the format NetBIOS domain name\username or username.
If you enter a non-qualified name, the default domain will be used.
.com, .corp, or .net.
Select SharePoint front end
Enter the name of the server that functions as the SharePoint front end, then click Get Config to load
that server’s configuration information into the Application Manager. The source server will be
detected and added to the Source Server field.
Select source and target servers
If this is your first time to select a SharePoint server to protect, you may need to click the Advanced
Find button to add servers to the Source Server and Target Server fields. For more information, see
Add or manage servers on page 7-4.
If you select a source/target pair for which you have previously enabled and disabled protection, you
may use the existing configuration settings (provided that the source/target connection is not
currently active, in which case the existing settings will always be use d) . W hen you select Configure
7 - 3
Page 90

or Validate, a prompt will appear asking if you want to re-use the previous configuration information.
Click Yes to re-use the previous information, or click No to revert to the Application Manager default
settings.
NOTE: If the IP address(es) for the source or target server have changed since you originally
configured protection (for example, if you configure the source or target in a staging area
and then send it to a production location), you must re-configure the protection settings.
When you are prompted to re-use the previous protection configuration, click No, then
click the Configure Protection button.
1. In the Source Server field, select the SharePoint server that you want to protect. If this is your
first time to log in to the selected server, you will be prompted to enter server login information.
For more information about logging in to servers, see Enter server login information on
page 7-5.
NOTE: You cannot protect a server if it is already functioning as a target server.
If you attempt to select a source that is currently unavailable, a prompt will appear
stating that the source is not available and that if the source is failed over, you should
first select the target.
If you select the target, then select the source (as recommended in the prompt), the
same prompt appears (though you would expect to get a prompt to failover). The
ability to failover using the Application Manager will not be available until a failover
condition has been met in accordance with the failover monitor settings set on the
Monitoring tab.
2. In the Target Server field, select the backup SharePoint server that will protect the source
server in the event of a failure.
Notice that after the source and target servers are selected, the Protection Status on the Monitor tab
changes to Unprotected.
NOTE: If you first select a target that is monitoring a connection that has met a failover condition
and requires manual intervention, then select the protected source server, a prompt will
appear asking if you want to initiate failover.
Add or manage servers
If the servers you need do not appear, click the Advanced Find button, or select Actions, Manage
SQL Servers. The Manage SQL Servers window will appear.
To discover all servers in the domain:
1. Click the Search button. The Discovered Servers list will be populated with all servers that the
Application Manager can discover that reside in the domain.
2. To directly add a server to the drop-down list on the Manage SharePoint main page, select the
server in the Discovered Servers list, then use the >> button to move it into the Current
Servers list.
7 - 4
Page 91

3. To add a non-discovered server to the Current Servers list, enter the server name in the field
next to the Add button, then click Add.
NOTE: In environments with a very large number of servers in Active Directory, you may
4. After a server has been added to the Current Servers list, you can manage that server. Select
the server, then select one of the following options:
Remove—Click the Remove button to remove the selected server from the drop-down list
Test SQL—Click the Test SQL button to determine if SQL is installed and accessible for the
5. When you have finished adding, managing, or testing servers, click OK to save your changes, or
Cancel to return to the Manage SharePoint main page without saving.
experience significant delays while the Application Manager searches for SQL servers.
To override the automatic scan for SQL servers, you can launch Application Manager
through the command line using the
(
dtam /sharepoint /nosqlsearch). This will cause the Application Manager not to
populate the Source and Target fields automatically. You will then need to click the
Advanced Find button and add the source and target SQL servers manually.
on the Manage SharePoint main page.
selected server.
/nosqlsearch option
Enter server login information
After you select a server for the first time, you will be prompted to enter a user name and password
to use for logging in to the selected server. The login account MUST be a member of the Storage
Mirroring Admin local security group for the selected server. For more information about permissions,
see Recommended Credentials on page A-1.
You may enter a user name for a different domain by entering a fully-qualified user name. The
fully-qualified user name must be in the format domain\username or username@domain. If you
enter a non-qualified name, the DNS domain will be used. Entering the credentials for the logged-on
user may be valid.
The Application Manager will attempt to use the same user name and password the next time you
select a server.
Configure protection settings
If you do not need to change the configuration settings, continue with Validate the Configuration
on page 9-1.
If you have already enabled protection for a connection and need to change the configuration
parameters, you will first need to disable protection as described in Disable protection on
page 10-2.
To change the default configuration parameters, click Configure from the main Application Manager
window, or select Actions, Configure Protection from the menu. The Configure Protection window
will appear.
The Configure Protection window has tabs for configuring failover, connection, SharePoint, and
advanced settings. The following sections describe the options on each of these tabs.
7 - 5
Page 92

Failover settings
The Failover tab includes options that will be applied during SharePoint failover.
Failover type
Failover Type indicates what name resolution method will be used to redirect users to the target
SharePoint server in the event of a source failure. By default, DNS Failover is selected.
DNS failover
DNS Failover is the recommended method for failover. Use this option if you want to failover by
updating the DNS records associated with the source. This will modify all source server A, MX, and
PTR-type DNS resource records to point to the target.
In DNS Failover, the DNS records for the source server are modified to point to the target server’s IP
address. This allows clients to resolve the source SharePoint server name to the target server’s
network name and IP address at failover time. DNS Failover eliminates duplicate server name and IP
addresses on your network.
7 - 6
Page 93

After you select the DNS Failover option, click Configure. The Configure DNS Failover window will
appear.
Configure the following information for DNS failover:
1. To add additional DNS server IP addresses, type the IP address into the DNS Server field, then
click Add.
2. The list box under the DNS Server field contains all DNS IP addresses for the source and target
servers. The label after the DNS IP address indicates whether the DNS IP address belongs to the
source, target, or both.
NOTE: To remove an IP address from the DNS server list, select the IP address, then click
the Delete button.
3. In the Source IP column, select the checkbox next to the source IP address(es) to be monitored
for failover.
4. In the Target IP column, select the target IP address to be used when failover occurs.
NOTE: If the target is monitoring multiple source IP addresses for failover, each monitored
source IP address must be mapped to a unique target IP address.
5. To specify the value the Application Manager will establish for Time to Live (TTL) on the source’s
affected DNS records, select the Update TTL checkbox, then enter the desired update interval
(in seconds). The default is the current maximum TTL of all the source’s A records. The
recommended value is 300 seconds (5 minutes).
6. In the Username field, enter the user name that will be used to access/modify DNS records.
The login account MUST be a member of the DNSAdmins group for the domain in which the DNS
server resides. For more information about permissions, see Recommended Credentials on
page A-1.
You may enter a user name for a different domain by entering a fully-qualified user name. The
fully-qualified user name must be in the format domain\username or username@domain. If
you enter a non-qualified name, the DNS domain will be used by default. The domain name is
obtained from the DNS server name, provided that reverse lookup in DNS is enabled. For more
information about enabling reverse lookup, refer to your Microsoft documentation.
7. In the Password field, enter the password that will be used to access/modify DNS records.
7 - 7
Page 94

8. Click the Test button to validate that DNS failover is configured correctly for the selected DNS
server(s) and that the specified credentials are sufficient to update DNS.
9. When the DNS configuration is complete, click OK to save your entries and return to the
Configure Protection window.
NOTE:
If you are running Windows Server 2000 on the primary DNS server hosting zones or
domains that contain source and/or target resource records, you must have the DNS
WMI Provider installed on that DNS server.
The Dynamic updates setting for the DNS zone should be set to Secure only.
Otherwise, you must disable dynamic registration on the source server in order to
prevent the source from reclaiming its DNS record.
If a hosts file entry for the source server exists on the client machine, errors may occur
during a failover and failback.
Reverse lookup in DNS should be enabled. For more information about enabling reverse
lookup, refer to your Microsoft documentation.
DNS registration for the private (devoted to Storage Mirroring) NIC IP should be
disabled.
If dynamic updates are enabled on a standard primary zone, the source server will be
able to update its DNS records after failover. To prevent this, configure DNS to use an
Active Directory-integrated zone.
For more information about using the DNS Failover utility, access the dfo.exe help by
typing
dfo.exe /? from a command prompt.
Identity failover
Select this option if you want to failover by transferring the source IP address and name to the target.
When using identity failover, it is possible that a name and/or IP address conflict can occur either
during failover or when the original source server comes back online. To avoid this conflict, use DNS
Failover.
NOTE: Application Manager cannot be used for failover or failback when the Identity failover
method is selected. However, the Failover Control Center can still be used to initiate
failover. DNS failover reduces downtime and provides other benefits. It is recommended
for most environments.
In Identity Failover, the target’s physical identity is modified to match the source during a failover.
This includes the target adopting the source server’s name, primary IP address, and drive shares
during a failover. Identity failover may be required in the following situations:
Access to the domain controller or DNS server is not available (for example, due to permissions)
from the account that Storage Mirroring runs under on the source/target servers.
If you determine that the time it takes to propagate the necessary DNS or Active Directory
changes to the rest of your environment is not acceptable. The time needed to propagate these
changes depends on your Active Directory Replication and DNS server settings.
If you have client applications that are configured to connect to an IP address rather than a server
name.
7 - 8
Page 95

After you select the Identity Failover option, click Configure. The Configure Identity Failover window
will appear.
Enter the following information for Identity failover:
1. In the Source IP column, select the source IP address(es) to be monitored for failover.
2. In the Target NIC column, select the target NIC to be used when failover occurs.
3. The Target IP Addresses area displays the IP address(es) of the selected target NIC.
4. Select the IP Address checkbox if you want the specified source IP address to be monitored
(Default = selected).
NOTE: If your source and target servers are on different subnets, you should NOT failover
the IP address. Instead, if the server name is required you should choose DNS failover
with the Advanced switch and select the Server Name. For more information, see
Advanced settings on page 7-18.
5. Select the Server Name checkbox if you want the source name to be added to the target when
failover occurs (Default = NOT selected).
6. Select the Shares checkbox if you want the source file shares to be added to the target when
failover occurs (Default = NOT selected).
7. Select the Active Directory Hostname (SPNs) checkbox to remove the host SPN (Service
Principle Name) from Active Directory for the source automatically and add it to Active Directory
for the target during failover (Default = NOT selected).
8. Click OK to save your entries and return to the Configure Protection window.
Services
Application Manager will determine the appropriate SharePoint services to start/stop based on your
operating system/SharePoint configuration. You should only modify this selection if there are
additional services that need to be started along with SharePoint during the failover/failback process.
7 - 9
Page 96

Modifying the default configuration for services may affect whether data can be successfully
replicated. Do not modify the services to start/stop unless you are very familiar with Storage
Mirroring and SharePoint.
1. To add a service, click Add. The Add Service window will appear.
2. Select the Service name from the drop-down box, then click Add; or, type the name of a
service, then press Enter.
3. If available, select the Service must be stopped on target checkbox. Most services must be
stopped on the target for replication to occur properly.
4. When you are finished entering services, click Close to return to the Failover configuration
window.
5. To remove a service, select one or more services, then click Remove.
You can remove all of the services besides the required SQL server service (
default instance, or
6. Services will be started in the displayed order (top-to-bottom starting with the left column) and
shutdown in reverse order (bottom-to-top starting with the right column). To re-arrange the
order in which services are started/stopped:
a. Add any additional services.
b. Select a service in the list, then use the up and down arrow buttons to move the service to
the appropriate position in startup/shutdown order.
MSSQL$<instance_name> for a named instance).
MSSQLSERVER for a
Add/remove SharePoint services
To stop the target SharePoint services when protection is enabled, click the Add SharePoint
Services button. SharePoint services will be added to the list of services.
NOTE: If you add SharePoint services, they will be started upon failover and stopped upon
failback. This will result in SharePoint on the target being active only when the target is
failed over.
Monitor settings
The Monitoring tab includes options for configuring how you want to monitor the source server for
failure.
7 - 10
Page 97

Configure how you want to monitor the source server for failure.
1. Select the Active Monitoring Enabled option to enable or disable failover for the selected
source/target pair.
2. By default, Manual Intervention Required is selected. Manual intervention allows you to
control when failover occurs. When a failure occurs, a prompt appears and waits for you to
initiate the failover process manually.
Disable Manual Intervention Required only if you want failover to occur immediately when a
failure condition is met.
3. In the Method to monitor for Failover field, select the ping method to use when monitoring
source IP addresses.
Network Access (ICMP)—Storage Mirroring failover uses ICMP pings to determine if the
source server is online. If a network device, such as a firewall or router, between the source
and target is blocking ICMP traffic, failover monitors cannot be created or used.
Replication Service (UDP)—The Storage Mirroring service on the target server sends a
ping-like UDP request to the source Storage Mirroring service, which replies immediately to
confirm it is running. This method is useful when ICMP is blocked on routers between the
source and target.
4. Configure how long to wait after a source failure to initiate failover. The amount of time before
failover begins is calculated by multiplying the Monitor Interval by the Missed Packets. For
example, if the Monitor Interval is set to 5 seconds and the Missed Packets setting is 5, a failover
condition will be identified after 25 seconds of missed source activity.
a. In the Monitor Interval field, select how often the monitor should check the source
machine availability (Default = 5 seconds).
b. In the Missed Packets field, select how many monitor replies can be missed before
assuming the source machine has failed (Default = 5 missed replies).
5. If you are monitoring multiple IP addresses, select one of the Failover Trigger options.
All Monitored IP Addresses Fail—Failover begins when all monitored IP addresses fail.
One Monitored IP Address Fails—Failover begins when any of the monitored IP addresses
fail.
Application Monitoring (BETA)
By default, application monitor settings are not available in this release of the Storage Mirroring
Application Manager. Application monitoring is only available when you launch Application Manager
using the command line
WARNING: This feature is currently BETA and should not be used in production environments.
1. If you select the Enable Application Monitoring checkbox, the remaining fields in Application
Monitor Settings area will be enabled.
NOTE: A message box will appear, asking you to confirm that you want to use this BETA
feature. To continue, click OK.
Application monitoring is not available when dealing with a cluster.
/sharepoint /advanced option (dtam /sharepoint /advanced)
7 - 11
Page 98

2. In the Monitor Interval field, enter the interval (in seconds) at which you want to check
application health.
3. In the Error Threshold field, enter the number of consecutive errors that can be received
before an error alert appears.
4. In the Type of Monitoring area, select one of the following options.
Built-in Monitoring Points—Use the default monitoring options.
Custom Script—Launch a batch file to check application health. Either type the name of the
script, or click Browse to locate a script.
NOTE: If you select Custom Script, you will also need to designate whether to use .PS1
(PowerShell) or .VB (VisualBasic) as the Script Engine. Make sure you select the
appropriate engine for your script type.
An example script that you can use as a basis for creating your custom script is
included in the \Samples subfolder where the Application Manager is installed.
5. In the Username field, enter the fully-qualified user name that will be used to run WMI scripts.
The fully-qualified user name must be in the format domain\username or
username@domain.
NOTE: The required credentials for running WMI scripts is full WMI access to the CIMV2
namespace. Under Windows 2008, the supplied credentials must also be allowed
through DCOM and User Access Control. It is recommended that a group be created
for running scripts, and that the required permissions be given to the group.
By default, the administrative group of a Windows 2008 machine has full WMI access.
However, DCOM and User Access Control settings may need to be adjusted.
6. In the Password field, enter the password for the specified user account.
7. Click the Test button to validate that the specified credentials are sufficient to run WMI scripts.
8. (Optional) Click the Clear Cached Credentials button to clear the cached user name and
password.
7 - 12
Page 99

Snapshot settings
The following allow you to set up snapshots of your target data that can be used when failing over.
By default, snapshots are not enabled in the Application Manager.
1. To enable snapshots, select the Enable periodic snapshots checkbox. This will enable the
remaining controls.
2. In the Snapshot interval field, select the interval at which you want to perform snapshots (in
minutes). The minimum interval is 15 minutes.
3. Select one of the following options for when to begin collecting snapshots:
Start now—Select this option to take the first snapshot as soon as protection is enabled.
Start at—Select this option to start taking snapshots at a future time. If you select this option,
you will also need to enter a date and time.
4. When you are finished, click OK.
Connection settings
The Connection tab includes options that will be applied to the specified source/target connection.
7 - 13
Page 100

Route
This setting identifies the Target IP Address that the Storage Mirroring data will be transmitted
through. You should only change this setting if you want to select a different route for Storage
Mirroring traffic. On a machine with more than one NIC, this increases the flexibility of configuring
Storage Mirroring activity. For example, you can separate regular network traffic and Storage
Mirroring traffic on a machine. The default ports will be used.
Protected Databases
By default, all of the SharePoint program and data files (except the \binn directory) are selected for
replication to the target SharePoint server. This will allow the clients to access your production
SharePoint server data and functionality on the target in the event of a failure.
The source and target servers must both have the exact same version of SharePoint (major and
minor versions) as well as similar logical drive structures (the target must have at least the same
logical drives as the source where SharePoint program and data files are stored).
NOTE:
You can also select non-application specific data under the Volumes folder.
NOTE: If Override Generated Rules is selected on the Advanced tab, this control will be
To refresh the tree view to show new source directories or files that may have been added or
removed, select the logical node, then click the Refresh button. If a node in the volumes branch is
selected, then the items under that node will be refreshed.
If you are using a SQL server named instance for a back-end database server in your
SharePoint setup, both the source and target SQL servers must have named instances
with the exact same name and logical drive structure as the source SQL server
installed prior to configuring protection.
To enable the ability to add or remove SharePoint instances, you can launch
Application Manager through the command line using the
/advanced
a dialog box will appear when you select Configure Protection.
If you need to reduce the amount of mirroring and replication traffic, you may choose
to deselect the tempdb database if it is not necessary.
disabled.
option (dtam /sharepoint /advanced). With this option enabled,
/sharepoint
Mirror type
The following options specify what files you want sent from the source to the target during a mirror.
Full—Copies all of the directories and files in the replication set to the target machine. If a mirror
has already been completed, another full mirror will overwrite the data on the target.
Checksum—(Default) This option performs a checksum comparison calculation. A checksum
calculation is a formula applied to blocks of data to determine if the binary make-up of the block
is identical. If the checksums on the source and target machine are the same, the block is skipped.
If the checksums on the source and target machine are not the same, the block on the source is
sent to the target. With this option, the entire file is not overwritten; only the block that is received
from the source is overwritten.
NOTE: The Mirror type setting also applies to the restoration connection.
Enable compression
This setting enables compression of data that is transmitted from the source to the target. Significant
improvements in bandwidth utilization have been seen in Wide Area Network (WAN) configurations
or in any case where network bandwidth is a constraint.
Compression may be used in Local Area Network (LAN) configurations, though it may not provide any
significant network improvements.
7 - 14
 Loading...