

Page 1
Storage Mirroring for Linux
User’s Guide
Third Edition (April 2009)
Part Number: T2558-96317
Page 2

© Copyright 2009 Hewlett-Packard Development Company, L.P.
Hewlett-Packard Company makes no warranty of any kind with regard to this material, including, but not limited to, the implied
warranties of merchantability and fitness for a particular purpose. Hewlett-Packard shall not be liable for errors contained
herein or for incidental or consequential damages in connection with the furnishing, performance, or use of this material.
This document contains proprietary information, which is protected by copyright. No part of this document may be
photocopied, reproduced, or translated into another language without the prior written consent of Hewlett-Packard. The
information contained in this document is subject to change without notice.
Microsoft®, Windows®, and Windows NT® are U.S. registered trademarks of Microsoft Corporation.
Hewlett-Packard Company shall not be liable for technical or editorial errors or omissions contained herein. The information is
provided "as is" without warranty of any kind and is subject to change without notice. The warranties for Hewlett-Packard
Company products are set forth in the express limited warranty statements for such products. Nothing herein should be
construed as constituting an additional warranty.
HP StorageWorks Storage Mirroring for Linux User’s Guide
Third Edition (April 2009)
Part Number: T2558-96317
Double-Take, Balance, Double-Take Cargo, Double-Take Flex, Double-Take for Hyper-V, Double-Take for Linux, Double-Take
Move, Double-Take ShadowCaster, Double-Take for Virtual Systems, GeoCluster, Livewire, netBoot/i, NSI, sanFly, TimeData,
TimeSpring, winBoot/i, and associated logos are registered trademarks or trademarks of Double-Take Software, Inc. and/or
its affiliates and subsidiaries in the United States and/or other countries. Microsoft, Hyper-V, Windows, and the Windows logo
are trademarks or registered trademarks of Microsoft Corporation in the United States and/or other countries. Linux is a
registered trademark of Linus Torvalds. Red Hat is a registered trademark of Red Hat, Inc. in the United States and other
countries. Novell, the Novell logo, the N logo, SUSE are registered trademarks of Novell, Inc. in the United States and other
countries. All other trademarks are the property of their respective companies.
© 1996-2009 Double-Take Software, Inc. All rights reserved.
Page 3

Table of Contents
Chapter 1 Introduction .........................................................1-1
Storage Mirroring operations ............................................................ 1-3
Mirroring ............................................................................................................. 1-3
Replication ........................................................................................................... 1-4
Failure monitoring and failover ............................................................................... 1-5
Restoration .......................................................................................................... 1-6
Sample configurations ...................................................................... 1-7
One-to-one, active/standby .................................................................................... 1-7
One-to-one, active/active ...................................................................................... 1-8
Many-to-one ........................................................................................................ 1-9
One-to-many ..................................................................................................... 1-10
Chained ............................................................................................................. 1-11
Single server ...................................................................................................... 1-12
Virtual systems .................................................................................................. 1-13
Resources ....................................................................................... 1-14
Chapter 2 Installation ...........................................................2-1
System requirements ........................................................................ 2-1
Installing or upgrading Storage Mirroring for Linux .......................... 2-3
Configuring your servers using DTSetup ........................................... 2-4
Installing or Upgrading the Storage Mirroring Client for Windows .... 2-9
Removing (Erasing) Storage Mirroring ........................................... 2-10
Removing the Storage Mirroring Client for Windows ...................... 2-10
Chapter 3 Clients ..................................................................3-1
Management Console ........................................................................ 3-1
Logging on and off of Storage Mirroring ................................................................... 3-2
Storage Mirroring workspaces ................................................................................. 3-3
Saving a workspace ......................................................................................... 3-3
Opening a workspace ....................................................................................... 3-3
Failover Control Center ..................................................................... 3-4
Configuring communication ports ............................................................................ 3-4
Configuring refresh rate ......................................................................................... 3-4
Clearing maintained security credentials .................................................................. 3-4
Chapter 4 Replication Sets ....................................................4-1
Replication capabilities ..................................................................... 4-3
Creating a replication set .................................................................. 4-5
Creating or modifying replication rules manually .............................. 4-6
Selecting a block device for replication.............................................. 4-7
Modifying a replication set ................................................................ 4-7
Renaming and copying a replication set ........................................... 4-7
Deleting a replication set .................................................................. 4-7
Calculating replication set size ......................................................... 4-8
i
Page 4

Chapter 5 Establishing a Connection Using the Connection
Wizard ..................................................................................5-1
Chapter 6 Establishing a Connection Using the Connection
Manager ...............................................................................6-1
Chapter 7 Establishing a Connection Across a NAT or
Firewall ................................................................................7-1
Verifying the Storage Mirroring port settings ................................... 7-1
Configuring the hardware ................................................................. 7-2
Inserting the servers in the Management Console ............................ 7-2
Establishing the connection .............................................................. 7-2
Chapter 8 Simulating a Connection .......................................8-1
Gathering system information .......................................................... 8-1
Establishing the simulated connection .............................................. 8-2
Chapter 9 Managing Connections ..........................................9-1
Monitoring connections .................................................................... 9-2
Monitoring the message window ...................................................... 9-6
Queuing Storage Mirroring data ........................................................ 9-8
Understanding queuing .......................................................................................... 9-8
Configuring queuing ............................................................................................ 9-10
Configuring automatic reconnections ............................................. 9-12
Configuring compression ...................................................................................... 9-13
Disconnecting a connection ............................................................ 9-13
Chapter 10 Mirroring and Replication .................................10-1
Controlling mirroring ................................ ...................................... 10-1
Controlling an automatic mirror ...................................................... 10-3
Configuring and removing orphan files ........................................... 10-5
Starting replication ......................................................................... 10-6
Chapter 11 Verification .......................................................11-1
Manual verification ......................................................................... 11-1
Scheduled verification .................................................................... 11-2
Verification log ............................................................................... 11-3
Chapter 12 Data Transmission ............................................12-1
Controlling transmission manually ................................................ . 12-1
Controlling a target manually ........................................................ . 12-1
Scheduling transmission criteria and bandwidth limiting ................ 12-2
ii
Page 5

Chapter 13 Failover and Failback ........................................13-1
Configuring failover ........................................................................ 13-1
Editing failover configuration ......................................................... 13-3
Removing failover configuration ..................................................... 13-4
Monitoring failover ......................................................................... 13-4
Testing failover ............................................................................... 13-5
Failover manual intervention .......................................................... 13-5
Initiating failback ........................................................................... 13-6
Chapter 14 Restoration .......................................................14-1
Chapter 15 Monitoring Tools ...............................................15-1
Log files .......................................................................................... 15-2
Viewing the log files ............................................................................................ 15-3
Log messages .................................................................................................... 15-4
Linux System Log ........................................................................... 15-9
DTStat .......................................................................................... 15-19
Configuring the statistics file ...............................................................................15-20
Running DTStat from the command prompt ...........................................................15-21
DTStat statistics ................................................................................................15-22
SNMP ............................................................................................ 15-26
Configuring SNMP ..............................................................................................15-26
SNMP statistics ..................................................................................................15-27
SNMP traps .......................................................................................................15-29
Chapter 16 Server Settings .................................................16-1
General ........................................................................................... 16-2
Setup .............................................................................................. 16-4
Network .......................................................................................... 16-5
Queue ............................................................................................. 16-6
Source ............................................................................................ 16-8
Target ........................................................................................... 16-10
Database ...................................................................................... 16-11
Logging ......................................................................................... 16-12
E-mail notification ........................................................................ 16-13
Chapter 17 Security ............................................................17-1
Security access levels ..................................................................... 17-1
Security advantages and considerations ......................................... 17-1
Clearing maintained security credentials ........................................ 17-2
Index........................................................................................ I
iii
Page 6

Introduction
Welcome to Storage Mirroring® for Linux®! Storage Mirroring is a
real-time data replication and failover software product. Storage
Mirroring augments your existing data protection strategy by
reducing downtime and data loss, and it provides these services with
minimal impact on existing network and communication resources.
Storage Mirroring allows you to specify mission-critical data that must be protected and replicates,
in real-time, that data from a production server, known as the source, to a backup server, known as
the target. The target server, on a local network or at a remote site, stores the copy of the critical
data from the source. Storage Mirroring monitors any changes to the critical data and sends the
changes to the target server. By replicating only the file changes rather than copying an entire file,
Storage Mirroring allows you to more efficiently use resources.
Offsite disaster recovery services—No business is immune from the many disasters - disk
crashes, power failures, human error, natural disasters - that will inevitably stop the flow of data
at one or more of your facilities. Tape-based disaster recovery can only restore data to the point
of the last backup, which was most likely the prior night. Any data created since the last backup
will be lost. An effective disaster recovery plan requires a comprehensive data protection plan,
including Storage Mirroring continuous data replication.
Storage Mirroring can be combined with your existing tape backup solution for a more
comprehensive disaster recovery plan. Storage Mirroring is a disaster recovery software based
on asynchronous real-time replication and automatic failover to provide cost-effective business
continuity for Microsoft
servers, and many other applications. Storage Mirroring provides continuous data protection by
sending an up-to-the-minute copy of the data as it is being changed to the target server.
Features such as built-in bandwidth control allows data to be replicated to a remote source, far
from harms way of a disaster such as hurricanes, tornadoes, and brown-outs. That same
bandwidth control allows data to be restored within minutes.
Local high availability services—As businesses come to increasingly depend on continuous
access to their data, ensuring that their data is available on-demand is of paramount importance.
Traditional solutions, such as tape backup and hardware mirroring, are not without flaws. Tape
backup poses a potential risk in that data backups must be performed when the system is idle,
meaning that as much as a day's worth of data could be lost. Tape recovery time can also be below
many business's recovery time objectives (and does not provide high availability).
A more cost-effective answer to a high availability solution is asynchronous host-based
replication for high availability. Support for non-proprietary hardware and storage systems
means you can leverage your existing resources. You will also get real-time data protection
without distance limitations, ensuring high availability for all your business-critical applications,
including e-mail. Real-time data replication at the byte level, regardless of application, is a much
more efficient use of computing and bandwidth resources for high availability. With Storage
Mirroring all of your applications can have cost-effective, real-time data protection and high
availability.
Enhanced centralized backup—The rapid growth in storage brought on by the Internet and
distributed computing has placed nearly impossible demands on administrators responsible for
protecting corporate data assets. The backup window has shrunk to nearly zero and tape backup
systems can introduce significant overhead to a production server, seriously impacting its
performance. While the importance of backups increases, the impact of periodic full system
backups is obvious. Even nightly incremental backups dominate processing while they examine
every file system object and then read all files that have changed in their entirety for backup.
Performing this process across a network adds additional overhead as the entire process happens
across the wire.
These days permanent point in time storage and recovery, like that provided by periodic tape
backup, is required. And despite the fact that Storage Mirroring cannot provide a way to retrieve
historical file versions or files that may have been previously deleted by users, Storage Mirroring
can enhance the backup process by continuously replicating critical data to centralized servers
and using tape backup systems to backup the replica rather than the production servers. Using
Storage Mirroring offloads the burden of periodic tape backups from multiple production servers
to a dedicated backup server and makes centralized tape backup a reality, significantly reducing
management cost and improving reliability. Regardless of a file’s state on the source, on the
target every file is closed and available for consistent backup at any point in time.
®
Exchange, Microsoft SQL Server®, Oracle®, virtual systems, file
1
1 - 1
Page 7
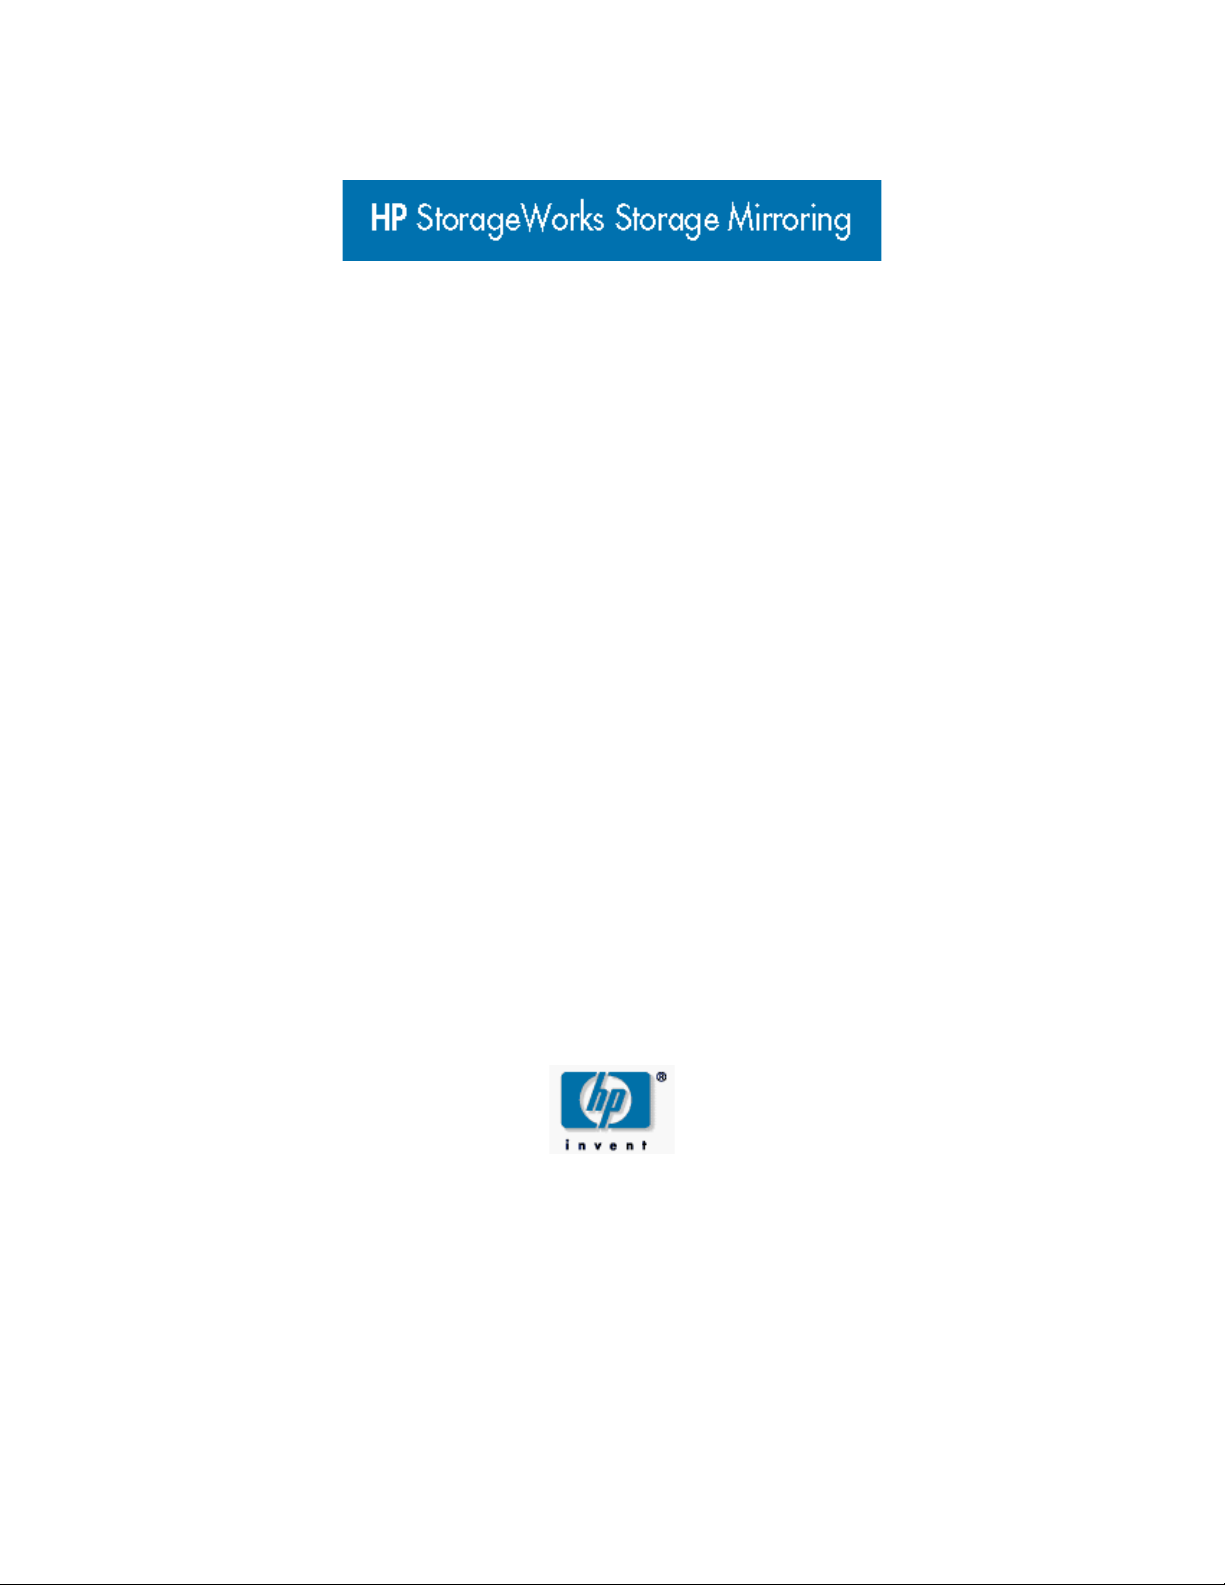
The following diagram is one common Storage Mirroring configuration.
Testing or Migration
Offsite Disaster
High Availability
Centralized
Production (Source) Servers
(Target) Server
Tape Backup
Server
Recovery Server
1 - 2
Page 8

Storage Mirroring operations
Source Target
2/4
1/29
All files can be
Checksums can
calculate blocks to
Different files can
be mirrored
New files are mirrored
Identical files are
not mirrored
Flexible mirroring options allow you to choose
which files are mirrored from the source to the target.
mirrored
be mirrored
Storage Mirroring performs four basic types of operations.
Mirroring—The initial copy or subsequent resynchronization of selected data
Replication—The on-going capture of byte-level file changes
Failure monitoring and failover—The ability to monitor and stand-in for a server, in the event
of a failure
Restoration—A mirror of selected data from the target back to the source
Mirroring
Mirroring is the process of transmitting user-specified data from the source to the target so that an
identical copy of data exists on the target. When Storage Mirroring initially performs mirroring, it
copies all of the selected data, including file attributes and permissions. Mirroring creates a
foundation upon which Storage Mirroring can efficiently update the target server by replicating only
file changes.
If subsequent mirroring operations are necessary, Storage Mirroring can mirror specific files or blocks
of changed data within files. By mirroring only files that have changed, network administrators can
expedite the mirroring of data on the source and target servers.
Mirroring has a defined end point - when all of the selected files from the source have been
transmitted to the target. When a mirror is complete, the target contains a copy of the source files
at that point in time.
1 - 3
Page 9
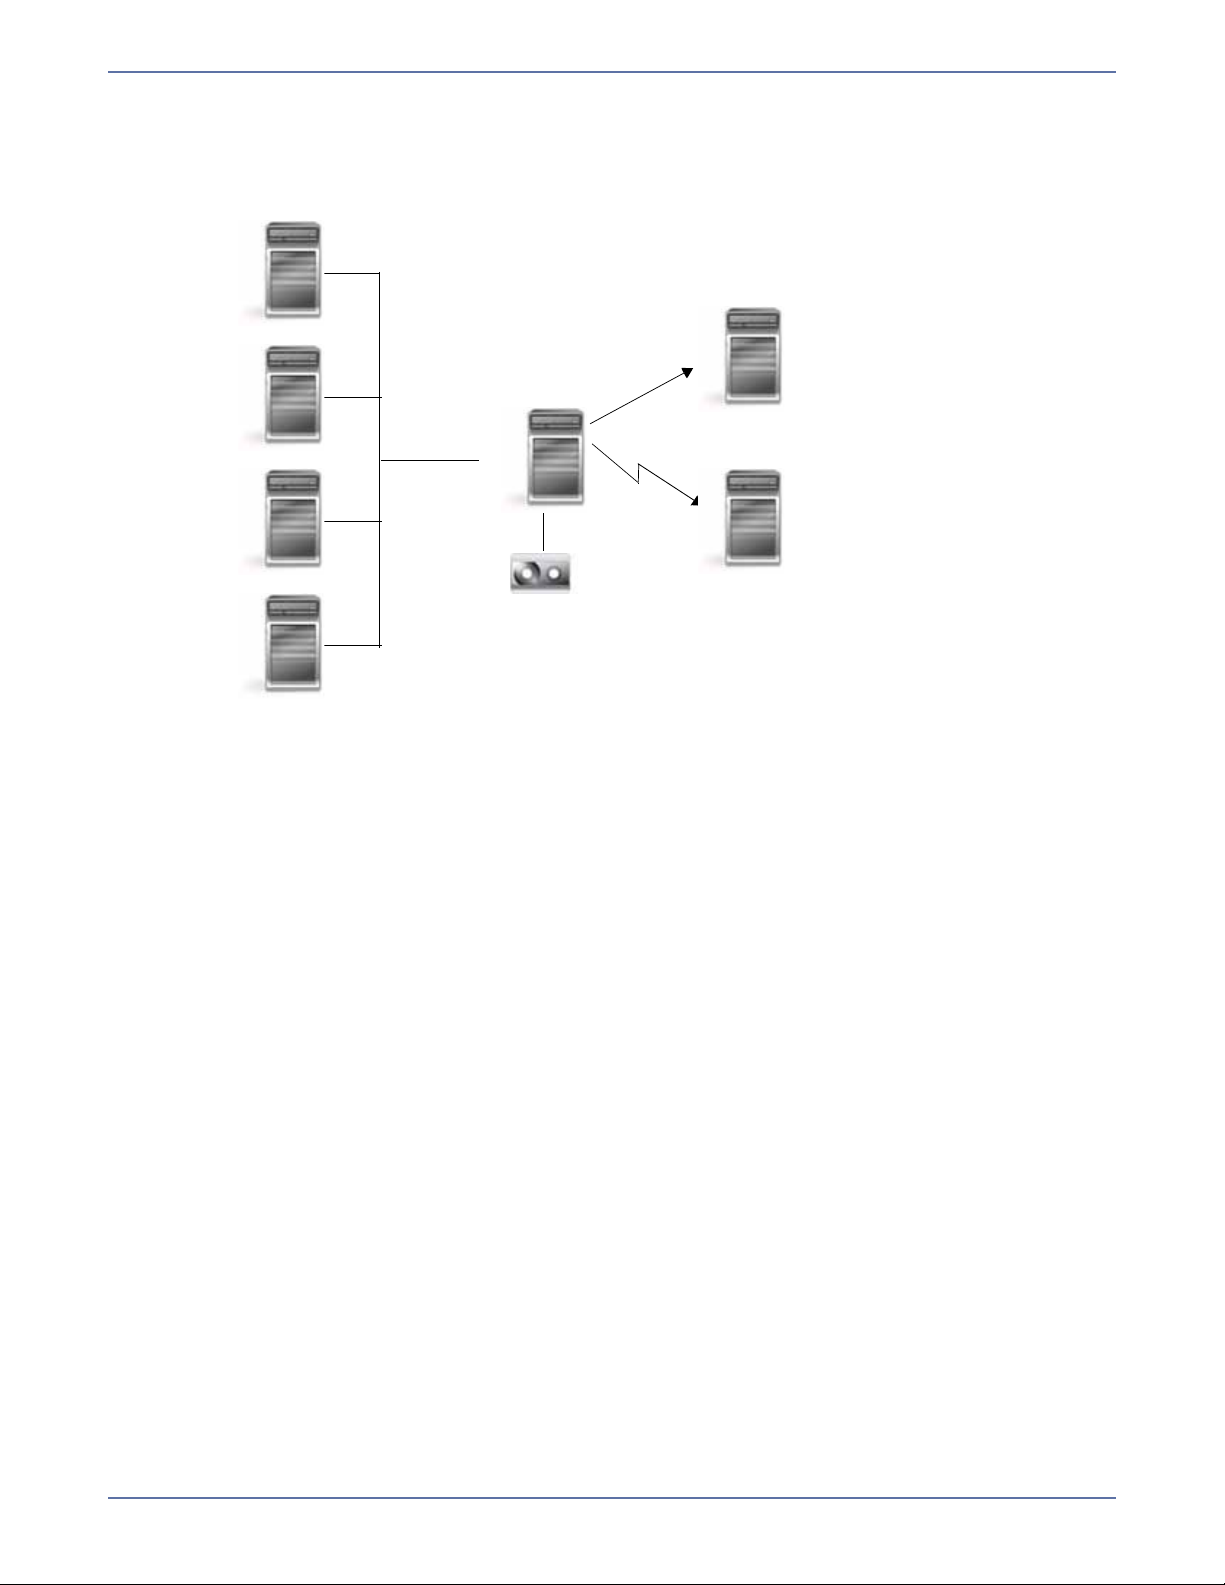
Replication
Source Target
User or application updates
part of a file
Only the changed
portion of the file is
Up-to-date copy maintained
on the target
replicated
Replication is the real-time transmission of file changes. Unlike other related technologies, which are
based on a disk driver or a specific application, the Storage Mirroring replication process operates at
the file system level and is able to track file changes independently from the file’s related application.
In terms of network resources and time, replicating changes is a more efficient method of maintaining
a real-time copy of data than copying an entire file that has changed.
After a source and target have been connected through Storage Mirroring, file system changes from
the user-defined data set are tracked. Storage Mirroring immediately transmits these file changes to
the target server. This real-time replication keeps the data on the target up-to-date with the source
and provides high availability and disaster recovery with minimal data loss.
Unlike mirroring which is complete when all of the files have been transmitted to the target,
replication continuously captures the changes as they are written to the source. Replication keeps the
target up-to-date and synchronized with the source.
1 - 4
Page 10

Failure monitoring and failover
Source Target
User and application requests
sent to the source name or IP address
Mirroring and replicating data
Failure monitoring
Before failover occurs
Source Target
User and application requests
sent to the source name or IP address
After failover occurs
which is now running o the target
X
Failover is the process in which a target stands in for a failed source. As a result, user and application
requests that are directed to the failed source are routed to the target.
Storage Mirroring monitors the source status by tracking network requests and responses exchanged
between the source and target. When a monitored source misses a user-defined number of requests,
Storage Mirroring assumes that the server has failed. Storage Mirroring then prompts the network
administrator to initiate failover, or, if configured, it occurs automatically.
The failover target assumes the network identity of the failed source. When the target assumes the
identity of the source, user and application requests destined for the source server or its IP
address(es) are routed to the target.
When partnered with the Storage Mirroring data replication capabilities, failover routes user and
application requests with minimal disruption and little or no data loss. In some cases, failover may
be used without data replication to ensure high availability on a server that only provides processing
services, such as a web server.
1 - 5
Page 11
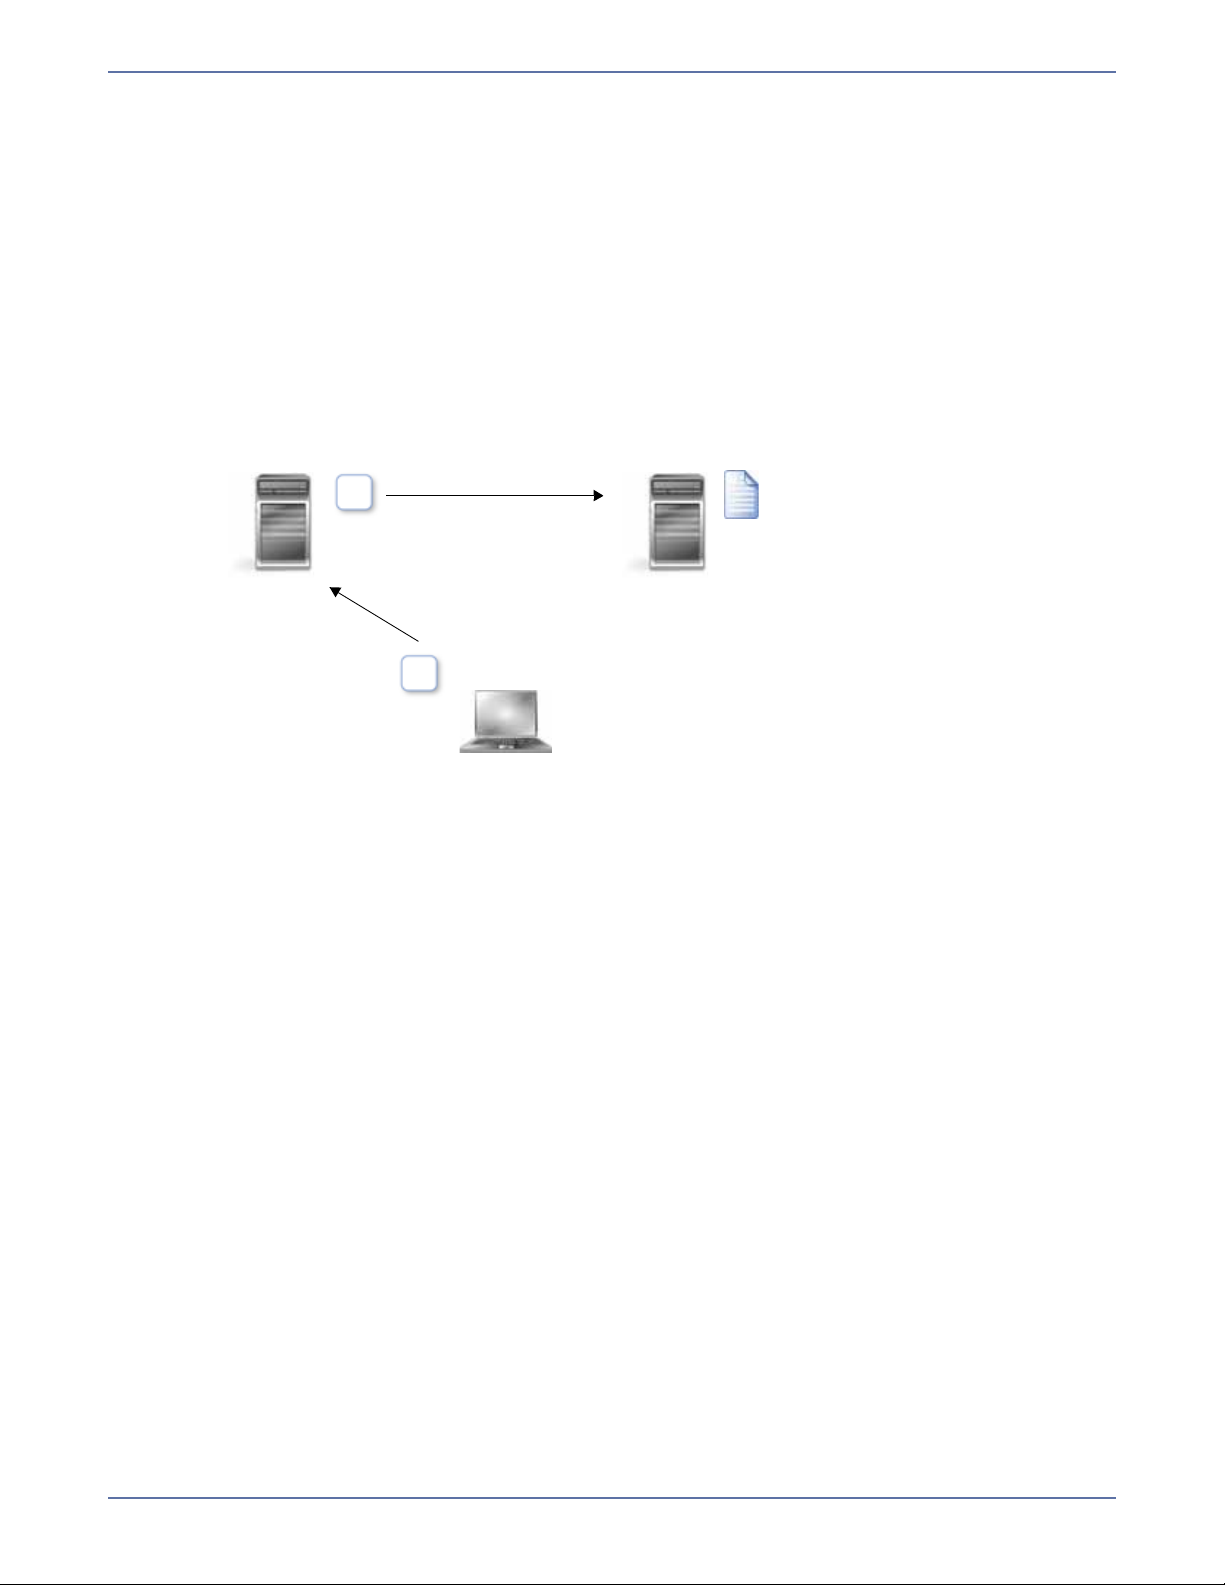
Restoration
Source Target
2/4
2/5
All files can be
Checksums can
calculate blocks to
Different files can
be restored
New files are restored
Identical files are
not restored
Flexible restoration options allow you to choose
which files are restored from the target to the source.
restored
be restored
Restoration provides an easy method for copying replicated data from the target back to its original
location on the source. The process only requires you to select the source, target, and the
appropriate replication set. There is no need to select files or to remember where the data came from
on the source since that information is maintained by Storage Mirroring.
Restoration can be used if the source data is lost due to a disk crash or when the most up-to-date
data exists on the target due to failover. At the time of a source server failure, your Storage Mirroring
target will contain the same data as your Storage Mirroring source. If you are using the Storage
Mirroring failover capabilities, users can continue updating data on the target server while the
problems on the source are resolved. Because of the continued updates on the target, when the
source server is ready to come back online, the two servers will no longer contain the same data.
Restoration is the process of copying the up-to-date data from the target back to the original source
or a new source.
When a restoration is complete, the source and target are again synchronized.
1 - 6
Page 12
Sample configurations
Source
(Active)
Target
(Standby)
Storage Mirroring is an exceptionally flexible product that can be used in a wide variety of network
configurations. To implement Storage Mirroring effectively, it is important to understand the possible
configuration options and their relative benefits. Storage Mirroring configuration options can be used
independently or in varying combinations.
NOTE: The Storage Mirroring replication and failover features have different server
requirements. If you use Storage Mirroring to monitor and stand in for failed servers, the
source and target must have identical versions of operating system and applications. By
contrast, Storage Mirroring replication operations do not require that the source and
target servers have identical versions of operating system and applications.
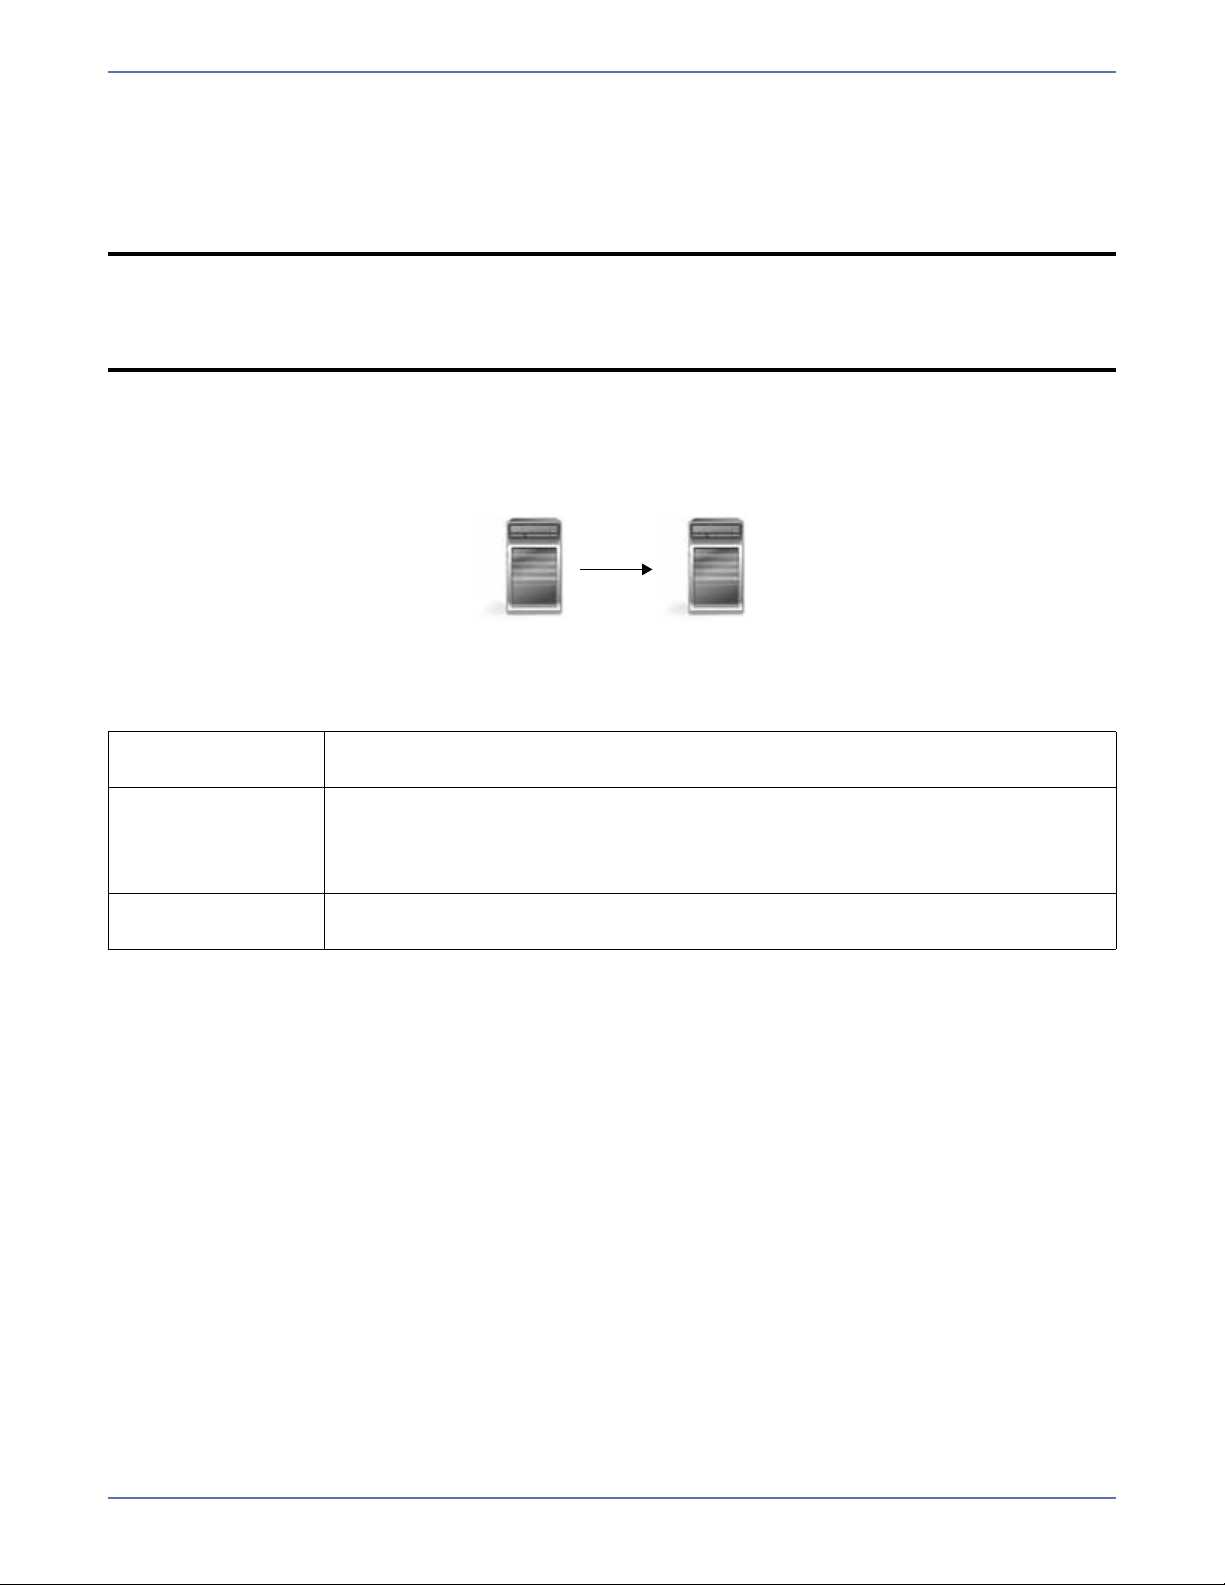
One-to-one, active/standby
Description One target server, having no production activity, is dedicated to support one
source server. The source is the only server actively replicating data.
Applications This configuration is appropriate for offsite disaster recovery, failover, and
critical data backup. This is especially appropriate for critical application
servers such as Exchange, SQL Server, and web servers.
This is the easiest configuration to implement, support, and maintain.
Considerations This configuration requires the highest hardware cost because a target server
is required for every source server.
1 - 7
Page 13

One-to-one, active/active
Data from first source
Data from second source
Source and Target
(Active)
Target and Source
(Active)
Description Each server acts as both a source and target actively replicating data to each
other.
Applications This configuration is appropriate for failover and critical data backup. This
Considerations Coordination of the configuration of Storage Mirroring and other applications
configuration is more cost-effective than the Active/Standby configuration
because there is no need to buy a dedicated target server for each source.
In this case, both servers can do full-time production work.
can be more complex than the one-to-one active/standby configuration.
During replication, each server must continue to process its normal workload.
Administrators must avoid selecting a target destination path that is included
in the source’s replication set. Any overlap will cause an infinite loop.
To support the production activities of both servers during failover without
reducing performance, each server should have sufficient disk space and
processing resources.
Failover and failback scripts must be implemented to avoid conflict with the
existing production applications.
1 - 8
Page 14
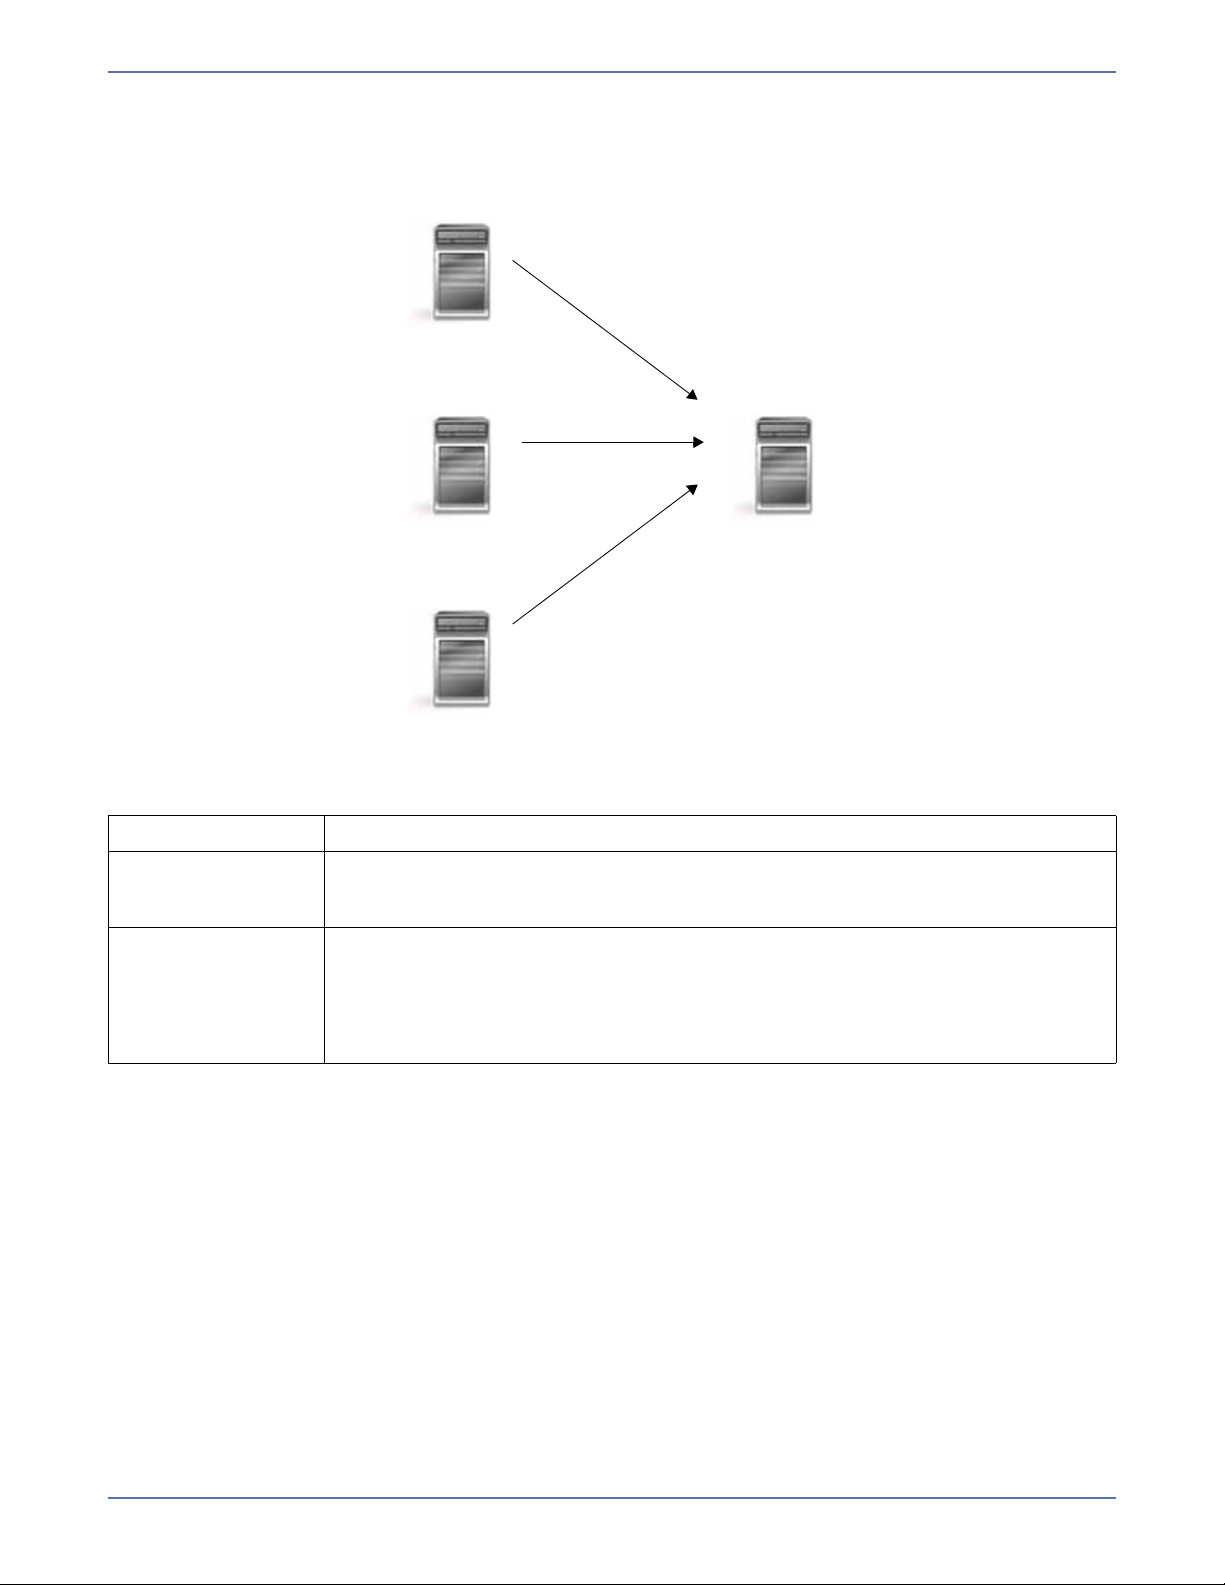
Many-to-one
Source
TargetSource
Source
Description Many source servers are protected by one target server.
Application This configuration is appropriate for offsite disaster recovery. This is also an
Considerations The target server must be carefully managed. It must have enough disk
excellent choice for providing centralized tape backup because it spreads the
cost of one target server among many source servers.
space and RAM to support replication from all of the source systems. The
target must be able to accommodate traffic from all of the servers
simultaneously. If using failover, scripts must be coordinated to ensure that,
in the event that the target server stands in for a failed server, applications
will not conflict.
1 - 9
Page 15

One-to-many
Target
Source Target
Target
Description One source server sends data to multiple target servers. The target servers
Applications This configuration provides offsite disaster recovery, redundant backups, and
Considerations Updates are transmitted multiple times across the network. If one of the
may or may not be accessible by one another.
data distribution. For example, this configuration can replicate all data to a
local target server and separately replicate a subset of the mission-critical
data to an offsite disaster recovery server.
target servers is on a WAN, the source server is burdened with WAN
communications.
1 - 10
Page 16

Chained
Source Target and Source Target
Description The source servers sends replicated data to a target server, which acts as a
Applications This is a convenient approach for integrating local high availability with offsite
Considerations The target/source server could become a single point of failure for offsite data
source server and sends data to a final target server, which is often offsite.
disaster recovery. This configuration moves the processing burden of WAN
communications from the source server to the target/source server.
After failover in a one-to-one, many-to-one, or one-to-many configuration,
the data on the target is no longer protected. This configuration allows
failover from the first source to the middle machine, with the third machine
still protecting the data.
protection.
1 - 11
Page 17

Single server
Source and Target
Replication set data
Copy of replication set data
C:\Data
D:\Data
on specified target path
Description Source and target Storage Mirroring components are loaded on the same
Applications This configuration is useful for relocating data within existing servers so that
Considerations This configuration does not provide high availability for the entire server. This
server allowing data to be replicated from one location to another on the
same volume or to a separate volume on the same server. These could be
locally attached SCSI drives or Fibre Channel based SAN devices.
open files can be backed up. If the source and target copies of the data are
located on different drives, this configuration does support high availability
of the replication set in the event that the source hard drive fails.
configuration must be configured carefully so that an infinite loop is not
created.
1 - 12
Page 18
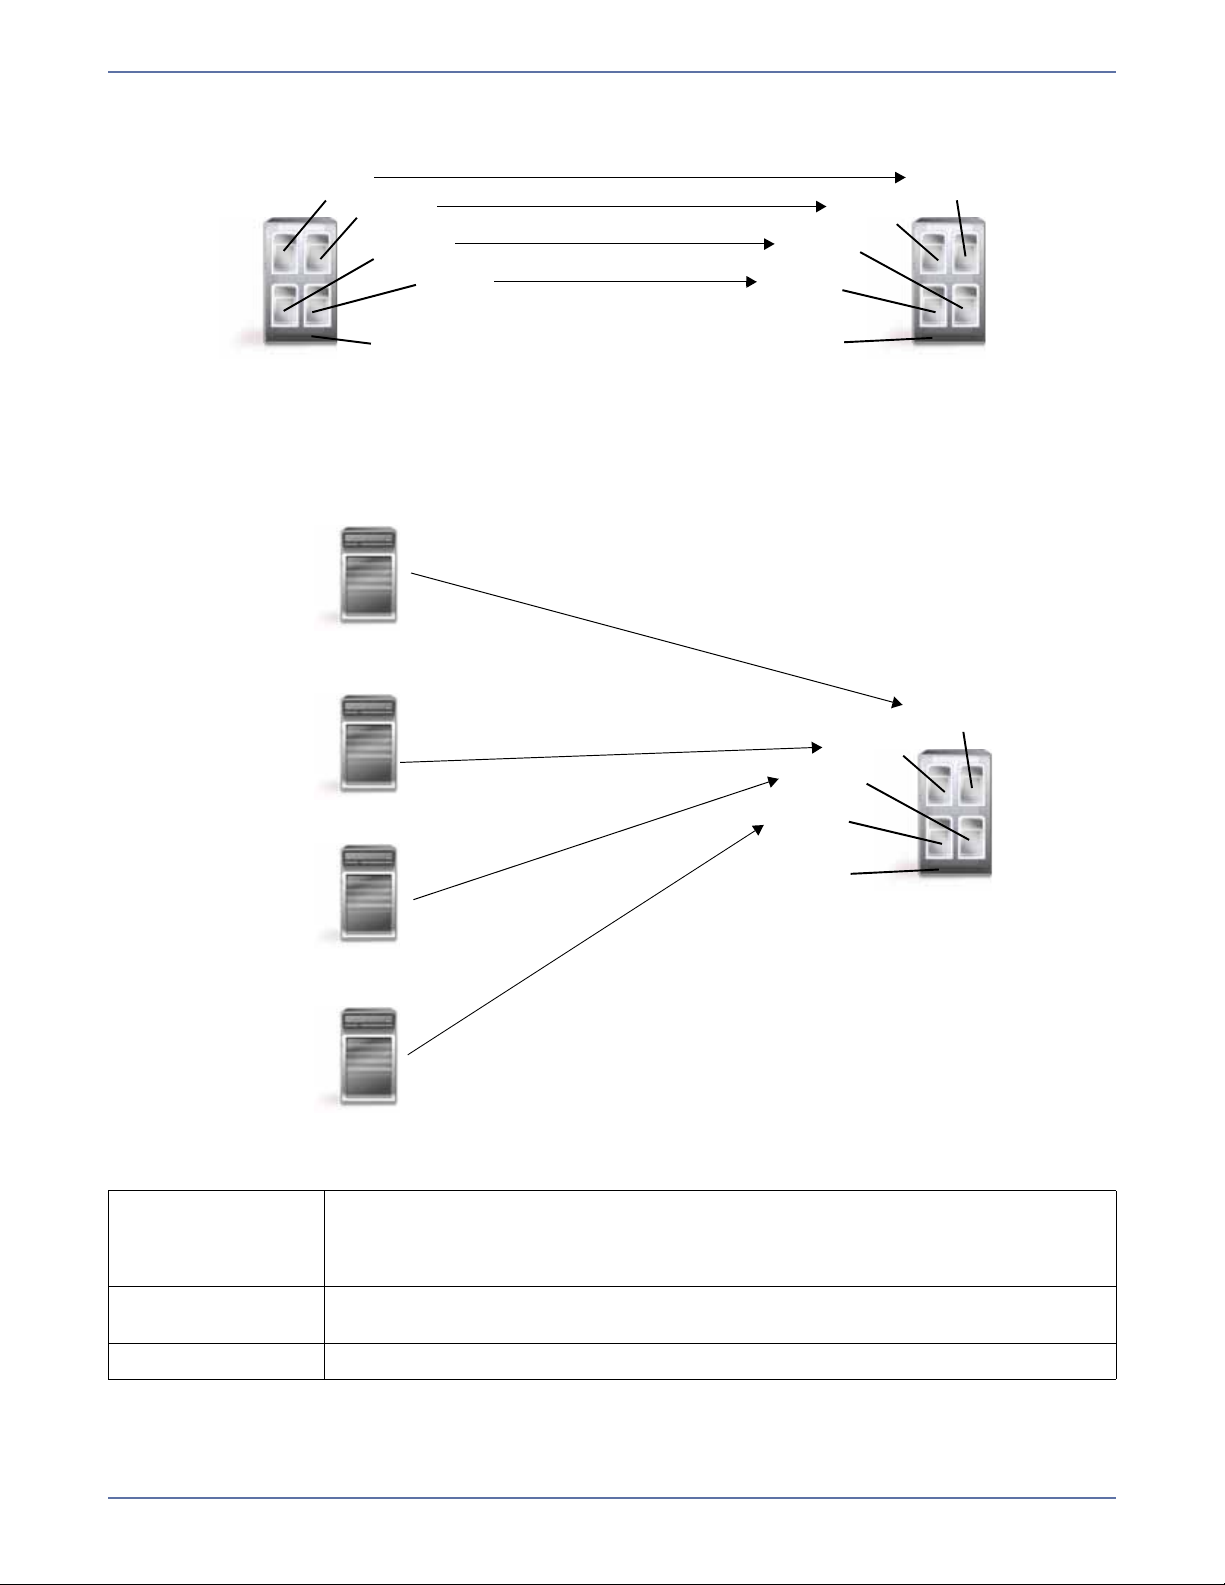
Virtual systems
Source Target
Virtual to virtual configuration
Source
Physical to vir tual configuration
Guest
Guest
Guest
Guest
Host
Guest
Guest
Guest
Guest
Host
Target
Guest
Guest
Guest
Guest
Host
Source
Source
Source
Description Source and/or target Storage Mirroring components are loaded on the guest
Applications This configuration easily protects virtual environments. When combined with
Considerations This configuration does not protect data outside of the virtual system.
operating system allowing data to be replicated between virtual systems.
One Storage Mirroring for Virtual Machines license can be used on up to five
virtual servers.
physical servers, this configuration offers additional flexbility.
1 - 13
Page 19

Resources
You have many resources available to you when using Storage Mirroring.
Operating System and application documenta ti on—Make sure that you have complete
documentation for your operating system and your applications.
Storage Mirroring documentation—The complete set of Storage Mirroring documentation
inc ludes the man u a ls listed b elow. Each manu al is available in the \DblTake\docs directory on the
product CD and in the root of the installation directory you selected during the installation. The
manuals are in Adobe
Reader
Storage Mirroring fo r Linux User’s Guide—This guide is a complete how-to guide with detailed
®
by downloading the latest version from the Adobe web site at www.adobe.com.
steps for installing and using Storage Mirroring. This guide also contains a complete list of
Storage Mirroring messages, alerts, and statistics. The file name of this manual is User’s
Guide.pdf.
Storage Mirroring fo r Linux Scripting Guide—This guide is a scripting manual for those users
who want to use DTCL (Double-Take Command Language). The file name of this manual is
Scripting Guide.pdf.
Storage Mirroring for Lin ux Evaluation Guide—This guide is for those users who are evaluating
Storage Mirroring. It walks through specific steps allowing you to become familiar with the
Storage Mirroring core technology first hand. The file name of this manual is Evaluation
Guide.pdf.
Storage Mirroring Online Help—The Storage Mirroring Management Console and Failover
Control Center contain context-sensitive online help. The online help can be accessed by pressing
the F1 key, clicking the Help button on screens where it is available, or selecting Help, Help
Topics.
Readme—Storage Mirroring includes a readme file which contains any last-minute information.
This file is called readme.html and is located in the \DblTake\docs directory of the product CD and
in the root of the installation directory you selected during the installation.
®
Acrobat® PDF format. If needed, you can install the free Adobe Acrobat
1 - 14
Page 20

Installation
Review System requirements on page 2-1 and then use the
appropriate instructions from the following list to meet your goal.
Installing or upgrading Storage Mirroring for Linux on
page 2-3—Use these instructions if you are installing or upgrading on a Linux server.
Configuring your servers using DTSetup on page 2-4—Use these instructions to configure
your Storage Mirroring servers.
Installing or Upgrading the Storage Mirroring Client for Windows on page 2-9—Use these
instructions if you want to install or upgrade Storage Mirroring on a Windows® client.
Removing (Erasing) Storage Mirroring on page 2-10—Use these instructions if you want to
remove Storage Mirroring from a Linux server.
Removing the Storage Mirroring Client for Windows on page 2-10—Use these instructions
if you want to uninstall Storage Mirroring from a Windows client.
System requirements
Verify that each machine that will be used as a Storage Mirroring source or target meets the following
system requirements.
Operating System—Make sure your servers meets the operating system requirements outlined
in the following table.
Physical Servers and
Virtual Machines Guest
Operating Systems
Red Hat
®
Enterprise
Linux 4.5 through 4.7
for 32-bit architecture
CentOS 4 Updates 5-7
for 32-bit architecture
Red Hat Enterprise
Linux 4.5 through 4.7
for 64-bit architecture
CentOS 4 Updates 5-7
for 64-bit architecture
Red Hat Enterprise
Linux 5.0 through 5.3
for 32-bit architecture
CentOS 5 GA-Update 2
for 32-bit architecture
Red Hat Enterprise
Linux 5.0 through 5.3
for 64-bit architecture
CentOS 5 GA-Update 2
for 64-bit architecture
Kernel
Version
2.6.9.x.x
2.6.18.x.x
Kernel Type
Default
SMP
HugeMem
Default
SMP
LargeSMP
Default (SMP)
Xen
PAE
Default (SMP)
Xen
File
System
Ext2
Ext3
Virtual Machines
Platforms
VMware
Microsoft
®
Virtual Server
Xen
Virtual Iron
®
®
2 - 1
Page 21

Physical Servers and
Virtual Machines Guest
Operating Systems
SUSE Linux Enterprise
Server 10.2 for 32-bit
architecture
Kernel
Version
2.6.16.x.x
Kernel Type
Default
SMP
BigSMP
Xen
XenPAE
File
System
Ext2
Ext3
ReiserFS
Virtual Machines
Platforms
VMware
Microsoft
®
Virtual Server
Xen
Virtual Iron
®
®
SUSE Linux Enterprise
Server 10.2 for 64-bit
architecture
Default
SMP
Xen
NOTE: Because Storage Mirroring has operating system dependent files, if you are upgrading
your operating system (to a new major version, not a service pack) and have Storage
Mirroring installed, you must remove Storage Mirroring prior to the operating system
upgrade. Uninstall Storage Mirroring, perform the operating system upgrade, and
then reinstall Storage Mirroring.
System Memory—At a minimum, you should have 512 MB of memory on each server. Ideally,
you should have 1 GB.
Disk Usage—The amount of disk space required for the Storage Mirroring program files is
approximately 45 MB. About 5 MB will be located on your
/(root) partition, and the remainder
will be on your /usr partition. You will need to verify that you have additional disk space for
Storage Mirroring queuing, logging, and so on. Additionally, on a target server, you need sufficient
disk space to store the replicated data from all connected sources, allowing additional space for
growth.
Protocols—TCP/IP
Name resolution—Your servers must have name resolution using hosts files entries, DNS,
and/or DHCP. For details on configuring name resolution by any of these methods, see your Linux
documentation or online Linux resources.
2 - 2
Page 22

Installing or upgrading Storage Mirroring for Linux
Use these instructions if you are installing or upgrading Storage Mirroring.
1. Determine the installation package that is appropriate for your operating system.
Operating System Installation File
32-Bit Operating System StorageMirroring-versionnumbers.i386.rpm
64-Bit Operating System StorageMirroring-versionnumbers.x86_64.rpm
The versionnumbers in the installation file name will vary and will correspond to the version of
Storage Mirroring you are installing. For example, if you are installing version 4.5.11.0.2200, the
installation files would be StorageMirroring-4.5.11.0-2200.i386.rpm or
StorageMirroring-4.5.11.0-2200.x86_64.rpm. If you are uncertain about the architecture of
your machine, you can use the uname -m command to determine it.
2. Once you have determined the appropriate installation package to use, you can install the
software from the UI or from the command line.
UI installation—Double-click the .rpm file from the UI and confirm the installation or
upgrade.
Command line installation—Use the following steps to install from a command line.
a. Go to a shell prompt by launching a terminal application from your UI or logging in via the
Linux virtual console.
b. If you are not already, become the superuser ("root") by typing su -.
c. If you are installing from a CD, mount the file ISO 9660 or UDF file system.
d. To run the installation use rpm -i with the installation file name to install the software or
rpm -U with the installation file name to upgrade the software. For example, if you were
installing on a 32-bit operating system, you would use the command rpm -i
StorageMirroring-4.5.11.0-2200.i386.rpm.
A successful installation returns you to the shell prompt. If you receive an error message
during the installation, you will need to reinstall the software. If you are unable to resolve the
error, contact technical support.
3. After you have installed the software, you need to configure your installation prior to using
Storage Mirroring. Run the following command from the shell prompt.
DTSetup
NOTE: Do not run DTSetup using the sudo command. Use a real root shell to launch DTSetup
instead, either by logging in as root on the console or by using the login session of a
non-privileged user to run su - to start a root shell.
4. The first time you run DTSetup after an installation or upgrade, you will be prompted to review
the HP license agreement. Review the agreement and accept the terms of agreement by typing
yes. You cannot use Storage Mirroring without agreeing to the licensing terms.
5. When the DTSetup menu appears, at a minimum you must specify an activation code, configure
replication, and start the daemon. You may also desire to modify the security group
configuration. During the install, root is automatically added to the main Storage Mirroring
security group. If you want to add other users or remove root, you should modify the security
group configuration as well. For details on all of the DTSetup menu options, see Configuring
your servers using DTSetup on page 2-4.
2 - 3
Page 23

Configuring your servers using DTSetup
DTSetup is a menu-driven application to provide easy access to Storage Mirroring server
configuration.
1. Run the following command from the shell prompt to start DTSetup.
DTSetup
NOTE: Do not run DTSetup using the sudo command. Use a real root shell to launch DTSetup
instead, either by logging in as root on the console or by using the login session of a
non-privileged user to run su - to start a root shell.
2. The first time you run DTSetup after an installation or upgrade, you will be prompted to review
the HP license agreement. Review the agreement and accept the terms of agreement by typing
yes. You cannot use Storage Mirroring without agreeing to the licensing terms.
3. When the DTSetup menu appears, enter the number of the menu option you want to access. Use
the following list (with corresponding menu numbers) to understand each menu option.
=== DTSetup Main Menu ===
Menu Options:
1. Setup tasks
2. Start/Stop Storage Mirroring daemon
3. Start User Interface (DTCL -i)
4. Documentation/Troubleshooting tasks
Q. Quit DTSetup
Please choose a menu option :
1. Setup tasks—Several setup tasks are required for Storage Mirroring functionality, including
an activation code for each server, at least one user in the Storage Mirroring administrator
group, and replication configuration for your source. The remaining items in the setup menu
are also Storage Mirroring configuration related, but are optional.
1.1. Set activation code—For each server, you must specify a unique activation code,
which is an alpha-numeric code that applies the appropriate Storage Mirroring license
to your installation.
1.2. Add/Remove users to Storage Mirroring groups—Storage Mirroring uses the
native operating system to provide security. Privileges are granted through
membership in user groups defined on each machine running Storage Mirroring. To
gain access to a particular Storage Mirroring source or target, the user must provide a
valid operating system user name and password and the specified user name must be a
member of one of the Storage Mirroring security groups. The administrator group
(dtadmin) provides full privileges and the monitor group (dtmon) provides a subset of
privileges. During the install, root is automatically added to the Storage Mirroring
administrator group. See Security on page 17-1 for details on security and the specific
privileges granted to each group.
1.2.1. Add Storage Mirroring Administrator—This option adds users to the Storage
Mirroring administrator group.
1.2.2. Remove Storage Mirroring Administrator—This option removes users from
the Storage Mirroring administrator group
1.2.3. Add Storage Mirroring Monitor—This option adds users to the Storage
Mirroring monitor group.
1.2.4. Remove Storage Mirroring Monitor—This option removes users from the
Storage Mirroring monitor group.
2 - 4
Page 24

1.3. Configure File System or Block Device Replication—Storage Mirroring hooks
operations for replication by interjecting itself between the kernel VFS layer and the
underlying file system. This must be done on a case by case basis for each block
device, mount point, or parent directory that needs to be replicated.
NOTE: When making changes replication configuration changes, stop any
applications that may be running and restart them after the replication
changes have been made. Storage Mirroring needs to be loaded on the file
system before any applications, otherwise some data may not be replicated.
1.3.1. Configure File System Replication setup file—In order to use Storage
Mirroring replication, data that will be replicated must reside on a partition,
which is specially mounted with the Storage Mirroring file system (DTFS) driver.
DTFS is a transparent file system that monitors the storage file system so that
data changes can be captured. The data on those mount points can only be
replicated if they are under DTFS mount points. The DTSetup utility allows you
to configure entries in /etc/DT/dtfs_mounts to mount specific partitions as DTFS
when Storage Mirroring is started.
NOTE: Storage Mirroring is compatible with NFS and Samba services as long
as they are mounted on top of Storage Mirroring. Storage Mirroring
should be mounted just above the storage file system. Additionally,
NFS and/or Samba must be started after the Storage Mirroring
daemon.
Do not select the root as a replication mount point.
If you have a single drive system, mount DTFS to any of the
subdirectories directly under root that you want to replicate.
1.3.1.1. Add an entry to /etc/DT/dtfs_mounts—Type the path of the
highest subdirectory for which replication should be captured. This can
be the path to a mount point or a subdirectory of a volume. You can
either stop and restart the Storage Mirroring daemon so that new
entries in /etc/DT/dtfs_mounts will take effect or you can mount the
entries immediately using menu option 1.3.1.3.
NOTE: You will be prompted whether you want to replicate access
times. The access-time file property changes during a mirror
and causes replication operations to be generated during a
mirror and every time a file is read from or written to. This
may have a negative effect on performance. If you do not
replicate access times on both the source and target when
the volume is initially mounted, you may increase the
performance, especially during mirroring. (Access times
from files closes are always replicated regardless of this
configuration.)
1.3.1.2. Remove an entry from /etc/DT/dtfs_mounts—Type the path of
the entry that needs to be removed.
1.3.1.3. Mount all entries in /etc/DT/dtfs_mounts as DTFS—This option
will cause the entries of the list to be mounted with DTFS immediately,
rather than when the daemon is started. This allows you to review the
effects of the changes and troubleshoot any issues.
1.3.1.4. Unmount DTFS from all entries in /etc/DT/dtfs_mounts—This
will unmount DTFS from the mount points on the system, if any. This
allows you to make changes to the DTFS mounts without unloading the
daemon.
NOTE: If you are using Konquerer, you can only unmount a
replication mount point by rebooting the server.
2 - 5
Page 25

1.3.2. Configure Block Device Replication setup file—In order to use Storage
Mirroring replication, data that will be replicated on a block device must be
accessed through a loop device which is specially attached using the Storage
Mirroring loop driver (DTLOOP). DTLOOP allows the loop device to serve as a
monitoring point for operations performed on the block device so that data
changes can be captured. Existing block devices may be available for
replication, but the data on those block devices can only be replicated if they are
accessed through the DTLOOP loop device. It is important that operations on the
block device be made through the loop device only, or the operations will not be
replicated. Failure to do so will result in corrupted data on the target system.
1.3.2.1. Add an entry to /etc/DT/dtloop_devices—Enter the path to the
block device that is to be replicated and press Enter. Then, enter the
path to the loop device to use (/dev/loop#), if the same one should
always be attached. DTLOOP can also use the first one available, but
that may mean it attaches to a different one on subsequent
reboots/restarts, which may not be desirable. After pressing Enter, you
will be asked if you want to attach at an offset into the block device and
if you want to use an encrypted loop device. In general, these options
can be left blank. See the documentation for losetup for more
information on using encryption. You can either stop and restart the
Storage Mirroring daemon so that new entries in
/etc/DT/dtloop_devices will take effect or you can mount the entries
immediat
1.3.2.2. Remove an entry from /etc/DT/dtloop_devices—Enter the path of
ely usin
g menu option 1.3.2.3.
the block device that needs to be removed.
1.3.2.3. Attach all entries in /etc/DT/dtloop_devices to a loop device—
This option will cause the entries of the list to be attached to loop
devices with DTFS immediately, rather than when the daemon is
started. This allows you to review the effects of the changes and
troubleshoot any issues.
1.3.2.4. Detach loop devices from all entries in
/etc/DT/dtloop_devices—This option
device from the b
lock devices on the system, if any. This allows you to
will detach the DTLOOP loop
make changes to the DTLOOP loop devices without unloading the
daemon.
1.3.2.5. List block devices on this system—This option will provide a list of
block devices to which DTLOOP can be attached. Use this list as a guide
for menu option 1.3.2.1.
1.3.3. Manual Replication Configuration menu—This option will take you to the
menu where the file system and block device replication configuration can be
changed but not persisted between reboots/restarts.
1.3.3.1. Manually mount DTFS on a file system—Type the path of the
highest subdirectory for which replication should be captured. This can
be the path to a mount point or a subdirectory of a volume.
NOTE: You will be prompted whether you want to replicate access
times. The access-time file property changes during a mirror
and causes replication operations to be generated during a
mirror and every time a file is read from or written to. This
may have a negative effect on performance. If you do not
replicate access times on both the source and target when
the volume is initially mounted, you may increase the
performance, especially during mirroring. (Access times
from files closes are always replicated regardless of this
configuration.)
1.3.3.2. Manually unmount a DTFS file system—Type the path of the entry
that needs to be removed from replication.
2 - 6
Page 26

1.3.3.3. Manually attach DTLOOP to a block device—Enter the path to the
block device that is to be replicated and press Enter. Then, enter the
path to the loop device to use (/dev/loop#). DTLOOP can also use the
first one available. After pressing Enter, you will be asked if you want
to attach at an offset into the block device and if you want to use an
encrypted loop device. In general, these options can be left blank. See
the documentation for losetup for more information on using
encryption.
1.3.3.4. Manually detach DTLOOP from a block device—Enter the path of
the block device that needs to be removed from replication.
1.4. Configure iptables for Storage Mirroring—If you are using Storage Mirroring across
a router, you will need to configure the router ports to accommodate Storage Mirroring
traffic. Use this option to assist in IP address configuration.
1.4.1. Open Storage Mirroring ports in iptables—This option attempts to open the
IP ports needed by Storage Mirroring: 1500 (TCP/UDP), 1505 (UDP), and 1506
(TCP). This option only works on RedHat firewalls with a default configuration
and is provided for administrators who are not familiar with configuring
firewalls. If possible, you should open the port yourself.
1.4.2. Close Storage Mirroring ports in iptables—This option attempts to close the
ports that were opened in menu option 1.4.1.
1.5. Edit Storage Mirroring config file—Storage Mirroring program settings are the
user-definable options that control Storage Mirroring application settings and Storage
Mirroring processing settings. This includes options like the name of the verification log
file and the size of the Storage Mirroring memory pool. You can set these options using
DTSetup or the Storage Mirroring clients.
1.6. Configure Storage Mirroring driver performance—You can configure various
throttling and memory settings from DTSetup, although changes to these settings
should be made with caution. Contact technical support for advice on the proper
settings for your specific environment.
2. Start/Stop Storage Mirroring daemon—The Storage Mirroring daemon will start
automatically after Storage Mirroring is installed and the server is rebooted. You can start
and stop the Storage Mirroring daemon using this built-in DTSetup script.
2.1. Start Storage Mirroring and process driver config—This option starts the Storage
Mirroring daemon and the auto replication configuration is processed.
2.2. Stop Storage Mirroring but preserve driver config—This option stops the Storage
Mirroring daemon but does not unload the drivers from the kernel or detach and
unmount replicated devices.
2.3. Restart service but preserve driver config—This option does a full stop and start of
the Storage Mirroring daemon but does not unload the drivers from the kernel or
detach and unmount replicated devices.
2.4. Restart service and reset driver config—This option does a full stop and start,
completely unloading the daemon and drivers and then reloading them. Do not unload
the driver if there are still processes using the DTFS mount point.
2.5. Stop the running service and teardown driver config—This option stops the
Storage Mirroring daemon and the drivers are unloaded from the kernel after detaching
and unmounting replicated devices. Do not unload the driver if there are still processes
using the DTFS mount point.
2.6. Go to Replication Configuration menu—This option takes you to menu option 1.3.3
and then returns you to this point when exit that menu.
3. Start User Interface (DTCL -i)—You can launch the Storage Mirroring interactive command
prompt which allows you to enter DTCL commands one at a time.
4. Documentation/Troubleshooting tasks—This menu provides access to Storage Mirroring
log files, a diagnostic collection tool, user documentation, and several legal documents.
4.1. View log files—Storage Mirroring logs alerts, which are proccessing notifications,
warnings, and error messages. The logs are written to disk.
4.1.1. View /var/log/DT/dtlog*.dtl in less—This option uses the less file viewer
program to view all of the Storage Mirroring logs, starting from the most recent.
4.1.2. Follow the output of latest dtlog—This option uses tail -f to watch the output
of the Storage Mirroring logs in real-time.
2 - 7
Page 27

4.1.3. View /var/log/messages in less—This option uses the less file viewer
program to view the system log messages.
4.1.4. Follow the output of /var/log/messages—This option uses tail -f to watch
the output of the system log messages in real-time.
4.2. Collect and package diagnostic info—You may need to collect configuration data
when reporting problems to technical support. DTSetup can gather Storage Mirroring
log files, Storage Mirroring settings, network configuration information such as IP
addresses, and other data which may be necessary for technical support to
troubleshoot issues.
4.3. View user documentation—You can view Storage Mirroring documentation such as
the Evaluation Guide, User’s Guide, readme, and several legal documents. DTSetup
attempts to determine your viewers.
4.3.1. View ReadMe HTML—This option views the readme file which contains last
minute release notes.
4.3.2. View Scripting Guide PDF—This option views the Scripting Guide which
contains DTCL commands and scripting information.
4.3.3. View Users Guide PDF—This option views the User’s Guide which contains
instructions for using Storage Mirroring.
4.3.4. View Evaluation Guide PDF—This option views the Evaluation Guide which
contains step-by-step instructions for evaluating Storage Mirroring.
4.3.5. View End User License Agreement TXT—This option views the End User
License Agreement legal document.
4.3.6. View dtfs/dtrep module license TXT—This option views the open source
legal document.
4.3.7. Change a document viewer—This option allows you to specify a document
viewer.
2 - 8
Page 28

Installing or Upgrading the Storage Mirroring Client for Windows
Use the instructions to install the Storage Mirroring clients on a Microsoft Windows machine. Your
Windows version can be Windows 2003, Windows XP Service Pack 2 or later, or Windows Vista on
32-bit or 64-bit platforms.
1. Close any open applications.
2. Start the installation program using the appropriate instructions, depending on your media
source.
CD—Load the Storage Mirroring CD into the local CD-ROM drive. If auto-run is enabled, the
installation program will start automatically. To manually start the program, select Start, Run
and specify <cd_drive>:\autorun.exe. Select to install Storage Mirroring for Windows.
Web download—Launch the .exe file that you downloaded from the web. When prompted,
unzip the files and launch the installation.
3. When the Storage Mirroring installation program begins, the Welcome screen is displayed. Click
Next to continue.
4. Review and accept the Storage Mirroring license agreement to continue with the installation
program. Click Next to continue.
5. Select the folder where you would like to install the Storage Mirroring clients and click Next to
continue.
6. When you are ready to begin copying the files, click Install.
7. After the files have completed copying, click Finish to exit the installation program.
2 - 9
Page 29

Removing (Erasing) Storage Mirroring
Use these instructions if you want to remove (erase) an existing Storage Mirroring installation.
1. Go to a shell prompt by launching a terminal application from your graphical user interface (GUI)
or logging in via the Linux virtual console.
2. If you are not already, become the superuser ("root") by typing su -.
3. Erase Storage Mirroring by using the command rpm - e StorageMirroring.
A successful removal returns you to the shell prompt. If you receive an error message during the
removal, you will need to erase the software again. If you are unable to resolve the error, contact
technical support.
NOTE: After removing Storage Mirroring, some files may not be removed until after the server
has been rebooted
Removing the Storage Mirroring Client for Windows
Use these instructions if you want to remove the Storage Mirroring clients on a Microsoft Windows
machine.
NOTE: If desired, you can use the Add/Remove Programs function of the Windows Control Panel
to remove the Storage Mirroring clients.
1. Close any open applications.
2. Start the installation program using the appropriate instructions, depending on your media
source.
CD—Load the Storage Mirroring CD into the local CD-ROM drive. If auto-run is enabled, the
installation program will start automatically. To manually start the program, select Start, Run
and specify <cd_drive>:\autorun.exe. Select to install Storage Mirroring for Windows.
Web download—Launch the .exe file that you downloaded from the web. When prompted,
unzip the files and launch the installation.
3. When the Storage Mirroring installation program begins, the Welcome screen is displayed. Click
Next to continue.
4. On the Maintenance dialog box, select Remove and click Next to continue.
5. The installation program is immediately ready to begin removing the Storage Mirroring files.
Click Remove to continue.
When the message prompt informs you that the uninstall program has completed successfully, click
OK.
2 - 10
Page 30
Clients
Storage Mirroring has two clients, the Management Console and the
Failover Control Center that control and manage your connections
and failover. Both clients can be started from the Windows
menu. You can also launch the Failover Control Center from the
menu in the Management Console.
NOTE: Storage Mirroring also has a scripting language which can be used in an interactive client
or in scripts. For more information, see the Scripting Guide.
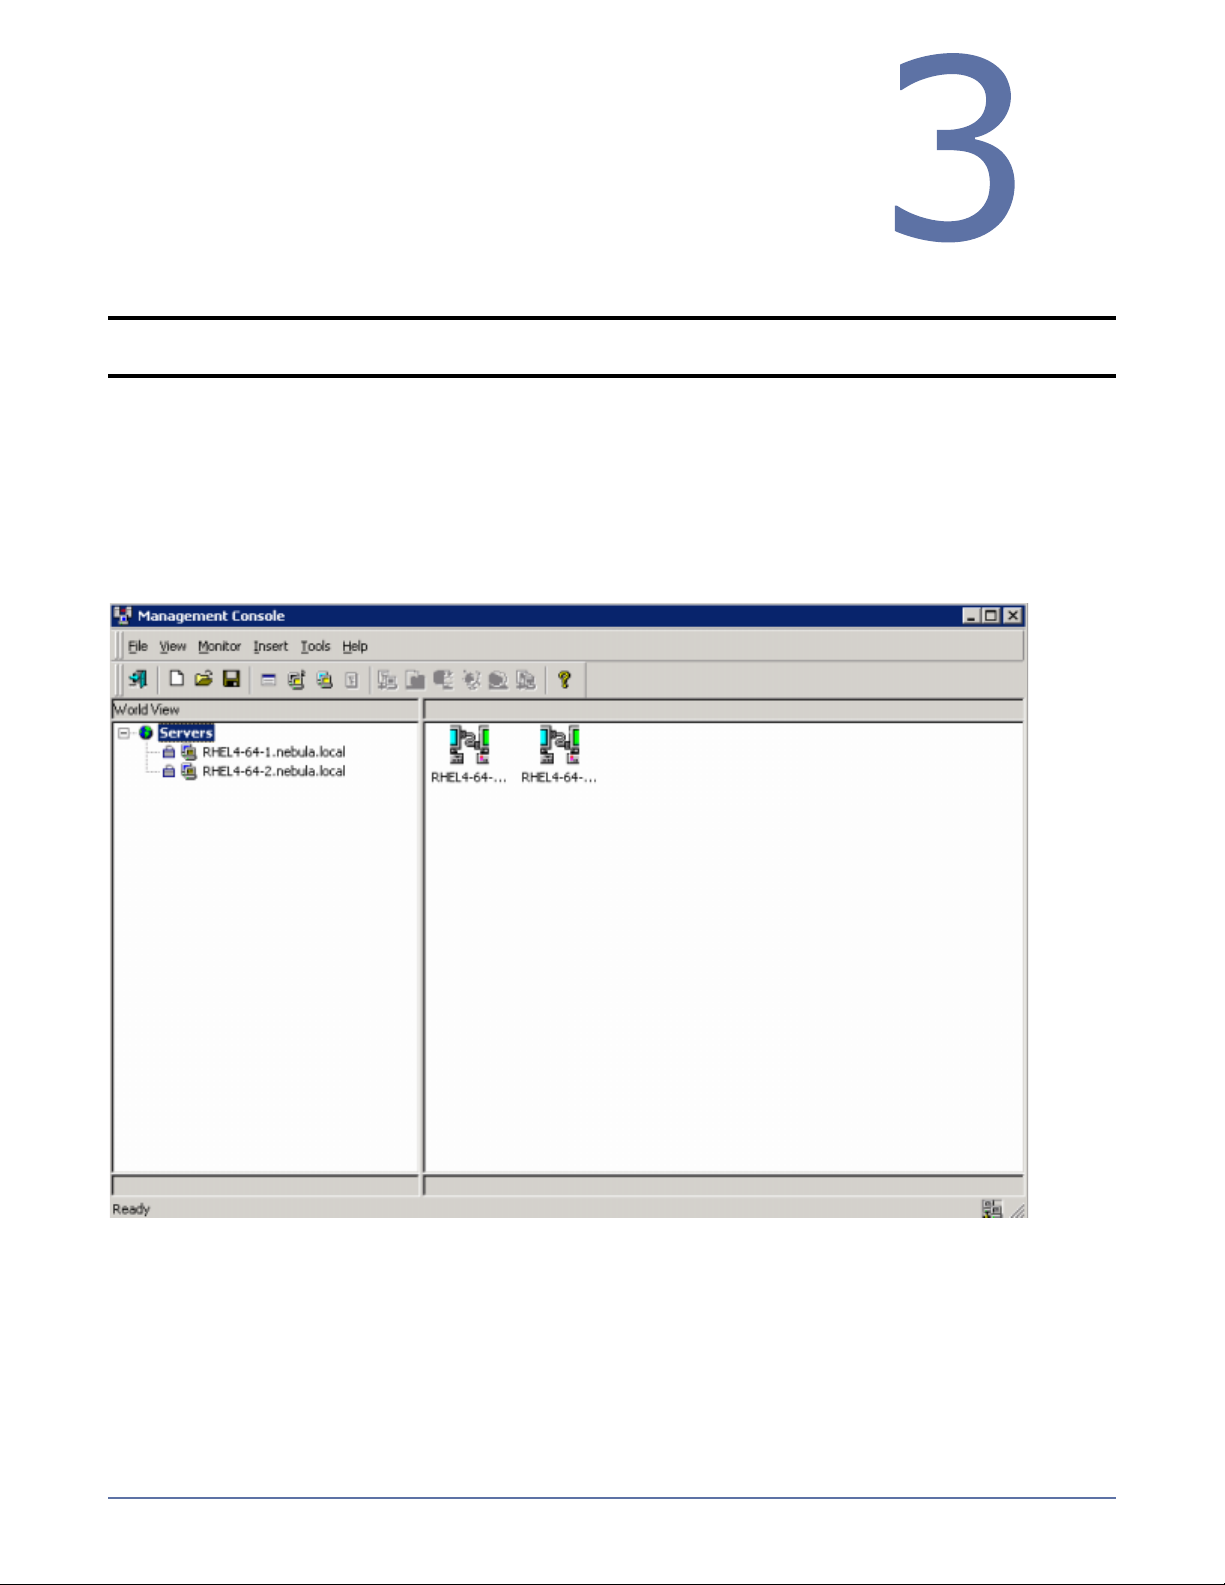
Management Console
From the Management Console, you can manage, monitor, and control your Storage Mirroring
connections. The Management Console is a two pane view. The views in the panes change depending
on what is highlighted. For example, when the root of the tree in the left pane is selected, all of the
machines in your environment running Storage Mirroring are displayed in the right pane. If you
expand the tree in the left pane and select a server, any connections for that server are displayed in
the right pane.
Start
Tools
3 - 1
Page 31

Logging on and off of Storage Mirroring
To ensure protection of your data, Storage Mirroring offers multi-level security using native operating
system security features. Privileges are granted through membership in user groups defined on each
machine running Storage Mirroring. To gain access to a particular Storage Mirroring source or target,
the user must provide a valid operating system user name and password and the specified user name
must be a member of one of the Storage Mirroring security groups. Once a valid user name and
password has been provided and the Storage Mirroring source or target has verified membership in
one of the Storage Mirroring security groups, the user is granted appropriate access to the source or
target and the corresponding features are enabled in the client. Access to Storage Mirroring is granted
on one of the following three levels:
Administrator Access—All Storage Mirroring features are available for that machine. For
example, this access level includes creating replication sets and establishing Storage Mirroring
connections.
Monitor Access—Statistics can be viewed on that machine, but Storage Mirroring features are
not available. For example, this access level does not allow the user to create or modify
replication sets or create or modify Storage Mirroring connections, but does allow you to view the
connection statistics for any established Storage Mirroring connections on that machine.
No Access—The machine appears in the Storage Mirroring Management Console and can be
pinged using a scripting command, but no other access is available.
1. Highlight a machine on the left pane of the Management Console. By double-clicking the
machine name, Storage Mirroring automatically attempts to log you on to the selected machine
using the ID that you are currently logged on with. Verify your access by the resulting icon.
2. If you have no access, the Logon dialog box will automatically appear. If you have monitor
access or want to log on with a different username, right-click the machine name and select
Logon.
3. Specify your Username, Password, Domain, and whether you want your password saved.
Click
OK. Verify your access by the resulting icon and log on again if necessary.
NOTE: When logging in, the user name, password, and domain are limited to 100 characters.
If your activation code is missing or invalid, you will be prompted to open the Server
Properties general tab to add or correct the code. Select Yes to open the Server
Properties dialog box or select No to continue without adding an activation code.
If the login does not complete within 30 seconds, it is automatically canceled. If this
timeout is not long enough for your environment, you can increase it by adjusting the
Communication Timeout on the Configuration tab of the Management Console
properties. Select File, Options, from the Management Console to access this
screen.
Storage Mirroring uses ICMP pings to verify server availability during the login
process. If your Storage Mirroring server is across a router or firewall that has ICMP
pings disabled, you will need to disable the Storage Mirroring ICMP ping verification.
To do this, select File, Options, from the Management Console and disable Use
ICMP to verify server availability.
Icon Description Access Granted
This icon is a computer with a gear and it indicates the Storage
Mirroring security is set to administrator access.
This icon is a computer with a magnifying glass and it indicates
Administrator
rights
Monitor rights
the Storage Mirroring security is set to monitor only access.
This icon is a lock and it indicates the Storage Mirroring
No rights
security is set to no access.
4. To log off of a Storage Mirroring machine, right-click the machine name on the left pane of the
Management Console and select Logout.
3 - 2
Page 32

Storage Mirroring workspaces
The Management Console workspace contains the display of the panes of the Management Console
and any servers that may have been inserted. Multiple workspaces can be used to help organize your
environment or to view settings from another machine.
Saving a workspace
As you size, add, or remove windows in the Management Console, you can save the workspace to
use later or use on another Storage Mirroring client machine. Select File and one of the following
options.
Save Workspace—Save the current workspace. If you have not previously saved this
workspace, you must specify a name for this workspace.
Save Workspace As—Prompt for a new name when saving the current workspace.
Opening a workspace
From the Management Console, you can open a new workspace or open a previously saved
workspace. Select File and one of the following options.
New Workspace —Open an untitled workspace with the default Storage Mirroring window
settings.
Open Workspace—Open a previously saved workspace.
3 - 3
Page 33

Failover Control Center
From the Failover Control Center, you can manage, monitor, and control failover for your Storage
Mirroring servers. The Failover Control Center displays a main window for monitoring failover activity.
Control buttons to the right allow you to configure and manage your servers.
Configuring communication ports
The Failover Control Center use two ports for various Storage Mirroring communications.
Service Transmit Port—The Failover Control Center uses this port to send commands to Storage
Mirroring servers.
Heartbeat Listen Port—The Failover Control Center uses this port to listen for heartbeats
transmitted from Storage Mirroring servers.
To view or modify the port settings in the Failover Control Center, select Settings,
Communications.
Configuring refresh rate
The failover client periodically requests information from the source and target. Depending on the
type of information, the request may be a machine-specific request, like obtaining the Time to Fail
status from a target, or may be a general request, like determining which machines are running
Storage Mirroring.
The rate at which these requests are made can be modified through the Failover Control Center
refresh rate dialog box. Select
lower refresh rate value updates the information in the Failover Control Center window's Monitored
Machines tree more often, but also generates more network traffic and higher utilization on the
client and target machines. A higher refresh rate value updates the information less frequently, but
minimizes the network traffic.
Settings, Refresh Rate. The default update interval is one second. A
Clearing maintained security credent ial s
To remove cached credentials, access the credentials security option, by selecting Settings,
Security. To remove the security credentials, enable Clear Cached Security Credentials and then
click OK.
3 - 4
Page 34

Replication Sets
A replication set defines the data on a source machine that Storage
Mirroring protects. Replication sets are defined by volumes,
directories, files, or wild card combinations. Creating multiple
replication sets allows you to customize sets of data that need to be
protected.
When a replication set is created, a series of rules are defined that identify the volumes, directories,
files, and/or wild card combinations that will be replicated to the target. Each rule includes:
Path—The path including volume, drive, directory, file, and/or wild card
Include—If the specified path is to be included in the files sent to the target
Exclude—If the specified path is not to be included in the files sent to the target
Recursive—If the rule should automatically be applied to the subdirectories of the specified path
For example, a replication set rule might be
volume\directory\* inc, rec
This specifies that all files contained in the volume\directory path are included in the replication set.
Because recursion is set, all files and subdirectories under volume\directory are also included. A
complete replication set becomes a list of replication set rules.
Replication sets offer flexibility tailoring Storage Mirroring to your environment. For example, multiple
replication sets can be created and saved for a source to define a unique network configuration. There
may be three replication sets - Critical Data, User Data, and Offsite Data. Critical Data could be
configured to replicate, in real-time, to an onsite high-availability server. Offsite Data is replicated
across a WAN and, therefore, is configured to queue changes until a sufficient amount of data is
changed to justify transmission. At that point, the connection is made and stays active until all the
data is transmitted. User Data is not replicated throughout the day, but a nightly changed file mirror
copies only blocks of data that are different between the source and target server prior to a nightly
tape backup operation being run on the target server. Each of these replication sets can be automated
to transmit as needed, thus protecting your entire environment.
Keep in mind the following notes when creating and working with replication sets and connections.
Limitations
Replication set rules are limited in length meaning that the entire volume\directory\filename
including slashes, spaces, periods, extensions, cannot exceed 259 characters.
Storage Mirroring can mirror, replicate, verify, and restore paths up to 4,095 characters. Paths
longer than 4,095 characters will be skipped and logged to the Storage Mirroring log file and
the Linux system log.
Do not name replication sets or select a target location using illegal characters. Illegal
characters include the following.
4
period . question mark ? forward or backward angle bracket < >
colon : quotation mark " forward or backward slash \ /
asterisk * pipe or vertical bar |
Error checking and avoidance
Do not connect more than one replication set to the same location on a target. You could
overwrite or corrupt your data.
Replication sets contain error checking to avoid inadvertent overwrites of the replication set
rules. When replication sets are modified, a generation number is associated with the
modifications. The generation number is incremented anytime the modifications are saved,
but the save is not allowed if there is a mismatch between the generation number on the
source and the Management Console. You will be notified that the replication set could not be
saved. This error checking safeguards the replication set data in the event that more than one
client machine is accessing the source’s replication sets.
4 - 1
Page 35

Storage Mirroring will not replicate the same data from two different replication sets on your
source. The data will only be replicated from one of the replication sets. If you need to
replicate the same data more than once, connect the same replication set to multiple targets.
If you rename the root folder of a connected replication set, Storage Mirroring interprets this
operation as a move from inside the replication set to outside the replication set. Therefore,
since all of the files under that directory have been moved outside the replication set and are
no longer a part of the replication set, those files will be deleted from the target copy of the
replication set. This, in essence, will delete all of your replicated data from the target. If you
have to rename the root directory of your replication set, make sure that the replication set
is not connected.
When creating replication sets, keep in mind that when recursive rules have the same type
(include or exclude) and have the same root path, the top level recursive rule will take
precedence over lower level non-recursive rules. For example, if you have /var/data included
recursively and /var/data/old included nonrecursively, the top level rule, /var/data/, will take
precedence and the rule /var/data/old will be discarded. If the rules are different types (for
example, /var/data is included and /var/data/old is excluded), both rules will be applied as
specified.
Virus protection
Virus protection software on the target should not scan replicated data. If the data is protected
on the source, operations that clean, delete, or quarantine infected files will be replicated to
the target by Storage Mirroring. If the replicated data on the target must be scanned for
viruses, configure the virus protection software on both the source and target to delete or
quarantine infected files to a different directory that is not in the replication set. If the virus
software denies access to the file because it is infected, Storage Mirroring will continually
attempt to commit operations to that file until it is successful, and will not commit any other
data until it can write to that file.
4 - 2
Page 36

Replication capabilities
Storage Mirroring replicates all file and directory data in the supported Linux file systems. (See
System requirements on page 2-1 for the file systems supported). It does not replicate items that
are not stored on the file system, such as pseudo-file systems like /proc and /sys. In addition, note
the following.
Data that will be replicated must reside on a Storage Mirroring partition, which is specially
mounted with the Storage Mirroring file system (DTFS) driver. DTFS is a virtual file system that
monitors the storage file system so that data changes can be captured. DTFS is a transparent file
system. Existing mount points may be available for replication, but the data on those mount point
can only be replicated if they are DTFS mount points. The DTSetup utility allows you to specify
which mount points should be DTFS mount points. See Configuring your servers using
DTSetup on page 2-4 for more information on the DTSetup utility.
DTFS mount points are identified in the Management Console by dtfs in the mount point name.
Storage Mirroring is compatible with NFS and Samba services as long as they are mounted on top
of Storage Mirroring. Storage Mirroring should be mounted just above the storage file system.
Additionally, NFS and Samba should be started after the Storage Mirroring daemon.
Do not select the root as a replication mount point.
If you have a single drive system, mount DTFS to any of the subdirectories directly under root
that you want to replicate.
If you select data stored on a recursive mount point for replication, a mirror will never finish.
Storage Mirroring does not check for data stored on recursive mount points.
If any directory or file contained in your replication set specifically denies permission to the
account running the Storage Mirroring daemon, the attributes of the file on the target will not be
updated because of the lack of access.
If you are using soft links, keep in mind the following.
If a soft link to a directory is part of a replication set rule’s path above the entry point to the
replication set data, that link will be created on the target as a regular directory if it must be
created as part of the target path.
If a soft link exists in a replication set (or is moved into a replication set) and points to a file
or directory inside the replication set, Storage Mirroring will remap the path contained in that
link based on the Storage Mirroring target path when the option RemapLink is set to the
default value (1). If RemapLink is set to zero (0), the path contained in the link will retain its
original mapping.
If a soft link exists in a replication set (or is moved into a replication set) and points to a file
or directory outside the replication set, the path contained in that link will retain its original
mapping and is not affected by the RemapLink option.
If a soft link is moved out of or deleted from a replication set on the source, that link will be
deleted from the target.
If a soft link to a file is copied into a replication set on the source and the operating system
copies the file that the link pointed to rather than the link itself, then Storage Mirroring
replicates the file copied by the operating system to the target. If the operating system does
not follow the link, only the link is copied.
If a soft link to a directory is copied into a replication set on the source and the operating
system copies the directory and all of its contents that the link pointed to rather than the link
itself, then Storage Mirroring replicates the directory and its contents copied by the operating
system to the target. If the operating system does not follow the link, only the link is copied.
If any operating system commands, such as chmod or chown, is directed at a soft link on the
source and the operating system redirects the action to the file or directory which the link
references, then if the file or directory referenced by the link is in a replication set, the
operation will be replicated for that file to the target.
The operating system redirects all writes to soft links to the file referenced by the link.
Therefore, if the file referenced by the symbolic link is in a replication set, the write operation
will be replicated to the target.
4 - 3
Page 37

If you are using hard links, keep in mind the following.
If a hard link exists (or is created) only inside the replication set on the source, having no
locations outside the replication set, the linked file will be mirrored to the target for all
locations and those locations will be linked if all link locations on the target exist on the same
partition.
If a hard link crosses the boundaries of a replication set on the source, having locations both
inside and outside the replication set, the linked file will be mirrored to the target for only
those locations inside the replication set on the source, and those locations will be linked on
the target if all link locations exist on the same partition.
If a hard link is created on the source linking a file outside the replication set to a location
inside the replication set, the linked file will be created on the target in the location defined by
the link inside the replication set and will be linked to any other locations for that file which
exist inside the replication set.
If any hard link location is moved from outside the replication set into the replication set on
the source, the link will not be replicated to the target even if other link locations already exist
inside the replication set, but the linked file will be created on the target in the location defined
by the link.
If any hard link location existing inside the replication set is moved within the replication set
on the source, the move will be replicated to the target and the link will be maintained if the
new link location does not cross partitions in the target path.
If any hard link location existing inside the replication set is moved out of the replication set,
that file or linked location will be deleted on the target.
If a hard linked file is copied from any location inside or outside the replication set to a location
inside the replication set on the source, the copy will be replicated to the target.
If a hard linked file has a location in the replication set and any of the operating system
commands, such as chmod or chown, are directed at that file from a location inside the
replication set, the modification to the file will be replicated to the target. Operations on hard
links outside of the replication set are not replicated.
If a hard linked file has a location in the replication set and a write operation is directed at that
file from inside the replication set, the write operation will be replicated to the target.
Opertions on hardl inks outside of the replication set are not replicated.
If any hard link location existing inside the replication set is deleted on the source, that file or
linked location will be deleted from the target.
If a hard link location is created on the same volume but outside of the path where DTFS is
mounted, the hard link operation will fail because the operating system regards the DTFS
mount as a separate volume.
4 - 4
Page 38

Creating a replication set
Before you can establish a connection, you must create a replication set.
1. Highlight a source in the left pane of the Management Console and select Insert, Replication
Set from the menu bar. You can also right-click on the source name and select New,
Replication Set.
2. A replication set icon appears in the left pane under the source. By default, it is named New
Replication Set. Rename the newly inserted replication set with a unique name by typing over
the default name and pressing Enter. This process is similar to naming a new folder in Windows
Explorer.
3. Expand the tree under the replication set name to view the volume and directory tree for the
source.
NOTE: The default number of files that are listed in the right pane of the Management
Console is 2500, but this is user configurable. A larger number of file listings allows
you to see more files in the Management Console, but results in a slower display rate.
A smaller number of file listings displays faster, but may not show all files contained
in the directory. To change the number of files displayed, select File, Options and
adjust the File Listings slider bar to the desired number.
To hide offline files, such as those generated by snapshot applications, select File,
Options and disable Display Offline Files. Offline files and folders are denoted by
the arrow over the lower left corner of the folder or file icon.
4. Identify the data on the source that you want to protect by selecting volumes, drives,
directories, and/or specific files.
NOTE: Be sure and verify what files can be included by reviewing Replication capabilities
on page 4-3.
5. After selecting the data for this replication set, right-click the new replication set icon and select
Save. A saved replication set icon will change from red to black.
4 - 5
Page 39

Creating or modifying replication rules manually
There may be times when you cannot browse for data when creating a replication set. For example,
you can create a replication set rule for a directory or file that does not exist. Since you cannot browse
for the location, you have to create replication set rule manually. At other times, the data you want
to replicate cannot be easily selected from the Management Console. For example, you may want to
select all .db files from a specific volume or directory. This task may be easier to complete by creating
the replication set rule manually. Use the following instructions to create or modify a replication set
rule manually.
1. If you do not have a replication set created, you need to create one. Highlight a source in the left
pane of the Management Console and select Insert, Replication Set from the menu bar. You
can also right-click on the source name and select New, Replication Set. A replication set icon
appears in the left pane under the source. By default, it is named
Rename the newly inserted replication set with a unique name by typing over the default name
and pressing Enter. This process is similar to naming a new folder in Windows Explorer.
2. Right-click on the replication set icon and select Properties. The Replication Set Properties
dialog box appears and lists any existing rules. The existing rules may have been entered
manually or selected by browsing the source. Each rule will display the attributes associated it.
New Replication Set.
Inc—Include indicates that the specified path is to be included in the files sent to the target
Exc—Exclude indicates that the specified path is not to be included in the files sent to the
target
Rec—Recursion indicates the rule should automatically be applied to the subdirectories of the
specified path. If you do not select this option, the rule will not be applied to subdirectories.
3. From the Replication Set Properties dialog box, click Add.
4. Specify a path, wild card or specific file name. Select the Include, Exclude, and/or Recurse
sub-directories attributes to be applied to this rule and click OK.
5. If you need to select block devices for replication, click Add Device. The block devices
configured for Storage Mirroring replication are shown by default. Highlight the device to include
in the replication set and click OK. If the device you want to include is not displayed, you can
click Show Other Devices to view all devices which are eligible for Storage Mirroring
replication. You can select any of these devices, but you cannot use them for Storage Mirroring
replication until they are configured for Storage Mirroring replication. The status no dtloop
indicates the device is not configured for Storage Mirroring replication. See Configuring your
servers using DTSetup on page 2-4 for details on replication configuration.
6. If you need to edit an existing rule, highlight it and click Edit.
7. If you need to remove a rule, highlight it and click Remove.
8. After the replication set rules have been defined, exit the Replication Set Properties dialog box
by clicking OK. Notice the replication set icon has changed from black to red, indicating changes
to the replication set rules. If you click Cancel, your changes will not be reflected in the current
replication set.
9. Right-click the replication set icon and select Save. A saved replication set icon will change from
red to black.
4 - 6
Page 40

Selecting a block device for replication
Storage Mirroring allows you to select block devices for replication.
1. In the left pane, right-click the replication set that should include the block device and select
Add Device.
2. The block devices configured for Storage Mirroring replication are shown by default. Highlight
the device to include in the replication set and click OK.
NOTE: If the device you want to include is not displayed, you can click Show Other
Devices to view all devices which are eligible for Storage Mirroring replication. You
can select any of these devices, but you cannot use them for Storage Mirroring
replication until they are configured for Storage Mirroring replication. The status no
dtloop indicates the device is not configured for Storage Mirroring replication. See
Configuring your servers using DTSetup on page 2-4 for details on replication
configuration.
3. Repeat steps 1 and 2 for any additional devices.
Modifying a replication set
Storage Mirroring allows you to make modifications to a replication set when you want to change the
data you wish to protect. This allows you to add, remove, or modify any replication set rules without
having to create a new replication set.
1. In the left pane, highlight the replication set you want to modify and expand the volume and
directory levels as needed.
2. Modify the items by marking or clearing the volume, drive, directory, or file check boxes. Notice
the replication set icon has changed from black to red, indicating changes to the replication set
rules.
3. After updating the rules for this replication set, right-click the replication set icon and select
Save. A saved replication set icon will change from red to black.
NOTE: If you save changes to a connected replication set, it is recommended that you perform
a mirror to guarantee data integrity between the source and target machines. A dialog
box will appear instructing you to disconnect and reconnect the replication set and
perform a difference mirror.
Renaming and copying a replication set
To rename or copy a replication set, click once on a highlighted replication set name to edit the field.
Specify a unique name and press Enter. The process is similar to renaming a folder in Windows
Explorer. If the original replication set has not been saved (red icon), the new name replaces the
original name. If the original replication set is saved (black icon), the new name creates a copy of the
original replication set.
NOTE: If you save changes to a connected replication set, it is recommended that you perform
a mirror to guarantee data integrity between the source and target machines. A dialog
box will appear instructing you to disconnect and reconnect the replication set and
perform a difference mirror.
Deleting a replication set
You can only delete a replication set if it is not currently connected. If the replication set is connected,
you must disconnect the connection and then delete the replication set.
To delete a replication set, right-click the replication set icon and select Delete. Additionally, you can
highlight the replication set and press the Delete key on the keyboard.
4 - 7
Page 41

Calculating replication set size
While Storage Mirroring is mirroring, the right pane of the Management Console displays statistics to
keep you informed of its progress. If the size of the replication set is determined before the mirror is
started, Storage Mirroring can display the percentage of the replication set that has been mirrored in
the Mirror Status column. If the size was not calculated prior to starting the mirror, the column
displays Mirroring.
1. Right-click on the replication set icon and select Properties. The Replication Set Properties
dialog box appears.
2. Select the Size tab.
3. If the replication set size has never been determined, click Calculate. If the replication set has
previously been determined, the button will be labeled Recalculate. Depending on user activity,
the size shown may not accurately reflect the current size of the replication set. If changes are
occurring to files in the replication set while the calculation is being made, the actual size may
differ slightly. The amount of data is determined at the exact time the calculation is made.
4. Click OK to return to the Management Console.
NOTE: You can also configure the replication set calculation when establishing a connection
through the Connection Manager by selecting Calculate Replication Set size on
connection on the Mirroring tab.
If your replication set contains a large number of files, for example, ten thousand or
more, you may want to disable the calculation of the replication set size so that data will
start being mirrored sooner. If calculation is enabled, the source calculates the file size
before it starts mirroring. This can take a significant amount of time depending on the
number of files and system performance. Disabling calculation will result in the mirror
status not showing the percentage complete or the number of bytes remaining to be
mirrored.
4 - 8
Page 42

Establishing a
Connection Using the
5
Connection Wizard
The Connection Wizard guides you through the process of protecting your data. It helps you select a
source, identify the data from your source that will be included in the replication set, and select a
target. The connection itself provides disaster recovery protection. If you want to extend the
protection and provide high availability, you can add failover monitoring.
1. Start the Connection Wizard to establish your connection by selecting Tools, Connection
Wizard.
NOTE: If the Storage Mirroring Servers root is highlighted in the left pane of the Management
2. The Connection Wizard opens to the Welcome screen. Review this screen and click Next to
continue.
NOTE: At any time while using the Connection Wizard, click Back to return to previous
3. If you highlighted a source in the Management Console, the source will already be selected. If it
is not, select the Storage Mirroring source. This is the server where the files reside that you want
to protect. Click Next to continue.
Console, the Connection Wizard menu option will not be available. To access the
menu, expand the server tree in the left pane, and highlight a server in the tree.
screens and review your selections.
NOTE: Storage Mirroring will automatically attempt to log on to the selected source using the
4. If you highlighted a target in the Management Console, the target will already be selected. If it is
not, select the Storage Mirroring target. This is your backup server that will receive the data
from the source. Click Next to continue.
NOTE: Storage Mirroring will automatically attempt to log on to the selected target using the
5. Choose to create a new replication set or use a replication set that already exists.
Create a new replication set with this name—If you choose to create a new replication,
specify a replication set name.
Use this rep lic ati on se t—If you choose to use an existing replication set, specify the name
of that replication set by selecting it from the pull-down menu.
Click Next to continue.
6. If you are creating a new replication set, a tree display appears identifying the volumes and
directories available on your selected source server. Mark the check box of the volumes and/or
directories you want to protect. Click Next to continue.
identification of the user logged on to the local machine. If the logon is not successful,
the Logon dialog box will appear prompting for your security identification. When
logging in, the user name, password, and domain are limited to 100 characters.
identification of the user logged on to the local machine. If the logon is not successful,
the Logon dialog box will appear prompting for your security identification. When
logging in, the user name, password, and domain are limited to 100 characters.
5 - 1
Page 43

7. Select the location on the target where the data will be stored.
Send all data to a single path on the target—This option sends all selected volumes and
directories to the same location on the target. The default location is
/source_name/replication_set_name/volume_name.
Send all data to the same path on the target—This option sends all selected volumes and
directories to the same directories on the target.
Custom—To select a custom path, click once in the Target Path field and modify the drive
and directory to the desired location.
Click Next to continue.
8. Review your selections on the summary screen. If your Connection Wizard settings are correct,
establish your connection by completing one of the two options below:
If you do not want to set advanced options, click Finish. The Connection Wizard will close, the
connection will be established, and mirroring and replication will begin.
If you want to set advanced options, click Advanced Options. The Connection Wizard will
close and the Storage Mirroring Connection Manager will open. The Servers tab will be
completed.
5 - 2
Page 44

Establishing a
Connection Using the
6
Connection Manager
After you have created a replication set, you can establish a connection through the Connection
Manager by connecting the replication set to a target.
1. Open the Connection Manager to establish the connection.
Highlight the replication set and select Tools, Connection Manager.
Right-click on the replication set and select Connection Manager.
Drag and drop the replication set onto a target. The target icon could be in the left or right
pane of the Management Console.
2. The Connection Manager opens to the Servers tab. Depending on how you opened the
Connection Manager, some entries on the Servers tab will be completed already. For example, if
you accessed the Connection Manager by right-clicking on a replication set, the name of the
replication set will be displayed in the Connection Manager. Verify or complete the fields on the
Servers tab.
Source Server—Specify the source server that contains the replication set that is going to be
transmitted to the Storage Mirroring target.
Replication Set—At least one replication set must exist on the source before establishing a
connection. Specify the replication set that will be connected to the target.
Target Serve r—Specify which Storage Mirroring target will maintain the copy of the source’s
replication set data. You can specify a machine name, IP address, or virtual IP address.
Route—This is an optional setting allowing you to specify the IP address and port on the
target the data will be transmitted through. This allows you to select a different route for
Storage Mirroring traffic. For example, you can separate regular network traffic and Storage
Mirroring traffic on a machine with multiple IP addresses.
Mappings—You must specify the location on the target where the source’s replication set data
will reside. Storage Mirroring offers two predefined locations as well as a custom option that
allows you to create your own path.
6 - 1
Page 45

All To One—This option replicates data from the source to a single volume on the target.
The pre-defined path is /source_name/replication_set_name/volume_name. If you are
replicating from multiple volumes on the source, each volume would be replicated to the
same volume on the target.
One To One—This option replicates data from the source to the same directory structure
on the target. For example, /var/data and /usr/files on the source will be replicated to
/var/data/ and /usr/files, respectively, on the target.
Custom Location—If the predefined options do not store the data in a location that is
appropriate for your network operations, you can specify your own custom location where
the replicated files will be sent. Click the target path and edit it, selecting the appropriate
location.
Start Mirror on Connection—Mirroring can be initiated immediately when the connection is
established. If mirroring is not configured to start automatically, you must start it manually
after the connection is established.
WARNING: Data integrity cannot be guaranteed without a mirror being performed. This option
is recommended for the initial connection.
Start Replication on Connection—Replication can be initiated immediately when the
connection is established. If replication is not configured to start automatically, you must start
it manually after the connection is established. If you disable this option, you will need to
perform a mirror prior to beginning replication to guarantee integrity.
3. If desired, you can configure mirror settings before establishing your connection. Select the
Mirroring tab on the Connection Manager.
Full Mirror—All files in the replication set will be sent from the source to the target.
Difference Mirror—Only those files that are different based size or date and time (depending
on files or block devices) will be sent from the source to the target.
Only send data if the source’s date is newer than the target’s date—Only those
files that are newer on the source are sent to the target.
NOTE: If you are using a database application, do not use the newer option unless
you know for certain you need it. With database applications, it is critical that
all files, not just some of them that might be newer, get mirrored.
6 - 2
Page 46

Use checksum comparison to send minimal blocks of data—For those files flagged
as different, the mirror performs a checksum comparison and only sends those blocks
that are different.
NOTE: See the table File Differences Mirror Options Compared on page 10-2 for a
comparison of how the file difference mirror settings work together, as well as how
they work with the global checksum setting on the Source tab of the Server
Properties.
Remirror on Auto-Reconnect—In certain circumstances, for example if the disk-based
queues on the source are exhausted, Storage Mirroring will automatically disconnect
connections (called auto-disconnect) and then automatically reconnect them (called
auto-reconnect). In order to ensure data integrity on the target, Storage Mirroring will perform
an automatic mirror (called an auto-remirror) after an auto-reconnect. If you enable this
option, specify the type of auto-remirror that will be performed.
Differences with Checksum—Any file that is different on the source and target based
on date, time, and/or size is flagged as different. The mirror then performs a checksum
comparison on the flagged files and only sends those blocks that are different.
Differences with no Checksum—Any file that is different on the source and target
based on date, time, and/or size is sent to the target.
Full—All files are sent to the target.
NOTE: Database applications may update files without changing the date, time, or file
size. Therefore, if you are using database applications, you should use the File
Differences with checksum or Full option.
Calculate Replication Set size on connection—Determines the size of the replication set
prior to starting the mirror. The mirroring status will update the percentage complete if the
replication set size is calculated.
4. Click Connect to establish the connection.
6 - 3
Page 47

Establishing a
Connection Across a
7
NAT or Firewall
If your source and target are on opposite sides of a NAT or firewall, you will need special
configurations to accommodate the complex network environment. Additionally, you must have the
hardware already in place and know how to configure the hardware ports. If you do not, see the
reference manual for your hardware.
In this environment, you must have static mapping where a single, internal IP address is always
mapped in a one-to-one coorelation to a single, external IP address. Storage Mirroring cannot handle
dynamic mappings where a single, internal IP address can be mapped to any one of a group of
external IP addresses managed by the router.
Verifying the Storag e Mirroring port settin g s
Storage Mirroring uses specific ports for communication between the Storage Mirroring servers and
Storage Mirroring clients. In order to use Storage Mirroring through a NAT or firewall, you must first
verify the current Storage Mirroring port settings so that you can open the correct ports on your
hardware to allow Storage Mirroring machines to communicate with each other.
Using the following table, locate and record your port settings for each of the Storage Mirroring ports.
The port setting can be found in the following locations.
Management Console—From the Management Console, select File, Options, and go to the
Configuration tab.
Failover Control Center—From the Failover Control Center, select Settings,
Communications.
Storage Mirroring server—From the Management Console, right-click on a server in the tree in
the left pane of the Management Console, select Properties, and go to the Network ta b.
Port Description
Management Console
Status Transmit Port
Management Console
Heartbeat
Advertisement
Failover Control
Center Service
Transmit Port
Failover Control
Center Heartbeat
Listen Port
The Status Transmit Port sends and receives
directed UDP comunications to display status
and statistics in the Management Console.
The Heartbeat Advertisment port sends and
receives broadcast UDP communications to
populate the Management Console tree with
Storage Mirroring servers.
The Service Transmit Port sends and receives
TCP communication between Storage
Mirroring servers and between Storage
Mirroring servers and Storage Mirroring
clients.
The Heartbeat Listen Port send and receives
broadcast UDP communications to populate
the Failover Control Center with Storage
Mirroring servers.
Default
Setting
1505
1500
1500
1500
Record
Your Port
Setting
7 - 1
Page 48

Port Description
Default
Setting
Record
Your Port
Setting
Storage Mirroring
Server Service Listen
Port
Storage Mirroring
Server Heartbeat
Transmit Port
Storage Mirroring
Server Status Listen
Port
NOTE: If you change any of the port settings, you must stop and restart the Storage Mirroring
daemon for the new port setting to take effect.
The Service Listen Port sends and receives
TCP communication between Storage
Mirroring servers and between Storage
Mirroring servers and Storage Mirroring
clients.
The Heartbeat Advertisement port sends and
receives broadcast UDP communications to
populate the Management Console tree with
Storage Mirroring servers.
The Status Listen Port sends directed UDP
comunications to display status and statistics
in the Management Console.
1500
1500
1505
Configuring the hardware
You need to configure your hardware so that Storage Mirroring traffic is permitted access through the
router and directed appropriately. Using the port information from the previous section, configure
your router identifying each Storage Mirroring server, its IP address, and the Storage Mirroring and
router ports. Also, note the following caveats.
Since Storage Mirroring communication occurs bidirectionally, make sure you configure your
router for both incoming and outgoing traffic for all of your Storage Mirroring servers and Storage
Mirroring clients.
In addition to UDP heartbeats, Storage Mirroring failover can use ICMP pings to determine if the
source server is online. If you are going to use ICMP pings and a router between the source and
target is blocking ICMP traffic, failover monitors cannot be created or used. In this situation, you
must configure your router to allow ICMP pings between the source and target.
Since there are many types of hardware on the market, each can be configured differently. See your
hardware reference manual for instructions on setting up your particular router.
Inserting the servers in the Management Console
If your network is configured to propagate UDP broadcasts, your servers will be populated in the
Management Console from across the router. If not, you have to manually insert the servers, by
selecting Insert, Server. Type the IP address of the router the server is connected to and the port
number the server is using for heartbeats.
Establishing the connection
Once your server is inserted in the Management Console, you can use the Connection Wizard or the
Connection Manager to establish your connection. See Establishing a Connection Using the
Connection Wizard on page 5-1 or Establishing a Connection Using the Connection Manager
on page 6-1 for details on establishing a connection through either of these methods.
7 - 2
Page 49

Simulating a Connection
8
Storage Mirroring offers a simple way for you to simulate a connection in order to generate statistics
that can be used to approximate the time and amount of bandwidth that the connection will use when
actively established. This connection uses the TDU (T
null (non-existent) target to simulate a real connection. No data is actually transmitted across the
network. Since there is no true connection, this connection type helps you plan for a disaster recovery
solution.
Gathering system information
Before and after simulating your connection, you may want to gather network and system
information specific to Storage Mirroring operations. Use the DTSetup Diagnostics utility to
automatically collect this data. It gathers Storage Mirroring log files, Storage Mirroring and system
settings, network configuration information, and other data which may be necessary in evaluating
Storage Mirroring performance.
1. Run the DTSetup command from the shell prompt.
NOTE: Do not run DTSetup using the sudo command. Use a real root shell to launch DTSetup
instead, either by logging in as root on the console or by using the login session of a
non-privileged user to run su - to start a root shell.
2. Select option 4 for troubleshooting.
3. Select option 2 for diagnostics.
4. When you run DTSetup, it may take several mintues for it to finish processing. When it is
complete, a .tar.gz file will be created in /var/run/DT. The file name will have DTInfo with the
date and time.
Be sure and run the diagnostics before and after your simulation.
hroughput Diagnostics Utility), which is a built-in
8 - 1
Page 50

Establishing the simulated connection
After you have created a replication set, you can establish the simulated connection through the
Connection Manager by connecting the replication set to the TDU.
1. Opening the Connection Manager to establish the connection.
Highlight the replication set and select Tools, Connection Manager.
Right-click on the replication set and select Connection Manager.
2. The Connection Manager opens to the Servers tab. Depending on how you opened the
Connection Manager, some entries on the Servers tab will be completed already. For example, if
you accessed the Connection Manager by right-clicking on a replication set, the name of the
replication set will be displayed in the Connection Manager. Verify or complete the fields on the
Servers tab.
Source Server—Specify the source server that contains the replication set that is going to be
simulated to the TDU.
Replication Set—At least one replication set must exist on the source before establishing a
connection. Specify the replication set that will be connected to the TDU.
Target Server—Select the Diagnostics target.
Route—After selecting the Diagnostics target, the Route will automatically be populated with
Throughput Diagnostics Utility (TDU).
Mappings—Mappings are not required when simulating a connection because no data is
actually transmitted to the target.
Start Mirror on Connection—Make sure this option is selected so that your simulation will
be realistic.
Start Replication on Connection—Make sure this option is selected so that your simulation
will be realistic.
3. Click Connect to establish the connection. The simulation data will be logged to the Storage
Mirroring statistics file. See DTStat on page 15-19 for more information.
8 - 2
Page 51

Managing Connections
A unique connection ID is associated with each Storage Mirroring
connection. The connection ID provides a reference point for each
connection. The connection ID is determined by sequential numbers
starting at one (1). Each time a connection is established, the ID counter is incremented. It is reset
back to one each time the Storage Mirroring daemon is restarted. For example, if the Storage
Mirroring daemon was started and the same replication set was connected to five target machines,
each connection would have a unique connection ID from 1 to 5.
The connection can be in various states as described in the following table.
9
Connection
Status
Started The network connection exists and is available for data transmission. Replication
and mirror data are transmitted to the target as soon as possible. This is the
standard state that you will see most often.
Stopped Storage Mirroring has linked the source and target, but the network connection
does not exist. Replication and mirror data are not transmitted to the target but
are held in queue on the source.
Paused The network connection exists and is available for data transmission, but the
replication and mirror data is being held in a queue and is not being transmitted
to the target.
Scheduled Storage Mirroring has linked the source and target, but the network connection is
not established until event driven or scheduling criteria have been met.
Error A transmission error has occurred. Possible errors include a broken physical line
or a failed target daemon.
This chapter covers several connection related activities.
Monitoring connections on page 9-2
Monitoring the message window on page 9-6
Queuing Storage Mirroring data on page 9-8
Configuring automatic reconnections on page 9-12
Disconnecting a connection on page 9-13
Description
9 - 1
Page 52

Monitoring connections
When a source is highlighted in the left pane of the Management Console, the connections and their
statistics are displayed in the right pane. Additionally, colors and icons are used for the connections,
and the Storage Mirroring servers, to help you monitor your connections. Review the Connection
Statistics and Connection and Ser ver Dis play tables for statistics and status descriptions. (Statistics
marked with an asterisk (*) are not displayed, by default.)
Connection Statistics
Statistic Description
Replication Set Replication set indicates the name of the connected replication set.
Connection ID The connection ID is the incremental counter used to number each
connection established. This number is reset to one each time the Storage
Mirroring daemon is restarted.
Target Name The name of the target as it appears in the server tree in the left pane of the
Management Console. If the server’s name is not in the server tree, the IP
address will be displayed.
Target IP The target IP is the IP address on the target machine where the mirroring
and replication data is being transmitted.
Target Data State
OK—The data on the target is in a good state.
Mirroring—The target is in the middle of a mirror process. The data will
not be in a good state until the mirror is complete.
Mirror Required—The data on the target is not in a good state because
a remirror is required. This may be caused by an incomplete or stopped
mirror or an operation may have been dropped on the target.
Restore required—The data on the source and target do not match
because of a failover condition. Restore the data from the target back to
the source. If you want to discard the changes on the target, you can
remirror to resynchronize the source and target.
Target Status
OK—The target machine is active and online.
Not Loaded—The target module is not loaded on the target. (For
example, the activation code is invalid.)
Paused—The target machine is paused by user intervention.
Retrying—The target machine is retrying operations for the connection.
This field may not be updated until there is source/target activity.
Commit Mode * The commit mode status indicates the connection status.
Real-time—Data is being transmitted to the target machine in real-time.
Scheduled—Data is waiting to be transmitted to the target machine until
one or more transmit options have been met.
Transmit Mode
Started—Data is being transferred to the target machine.
Paused—If the transmission is real-time and the transmission has been
paused, the Transmit Mode indicates Paused.
Scheduled—If the transmission is scheduled, the Transmit Mode
indicates Scheduled.
Stopped—Data is not being transferred to the target machine.
Error—There is a transmission error.
9 - 2
Page 53

Statistic Description
Mirror Status Mirroring—If the file size of the replication set has not been calculated
and the data is being mirrored to the target machine, the Mirror Status
will indicate Mirroring.
Idle—Data is not being mirrored to the target machine.
Paused—Mirroring has been paused.
Percentage Complete—If the file size of the replication set has been
calculated and the data is being mirrored to the target machine, the
Mirror Status will display the percentage of the replication set that has
been sent.
Waiting—Mirroring is complete, but data is still being written to the
target.
Restoring—Data is being restored from the target to the source.
Verifying—Data is being verified.
Removing Orphans—Storage Mirroring is checking for orphan files
within the target path location (files that exist on the target but not on
the source). These files will be removed.
Replication Status
Replicating—Data is being replicated to the target machine.
Ready—There is no data to replicate to the target machine.
Stopped—Replication has stopped.
Pending—If auto-remirror is enabled and you have experienced a source
or target failure and recovery, the status will change to pending while the
connections are reestablished and will update when the remirror begins.
If auto-remirror is disabled and you have experienced a source or target
failure and recovery, replication will be Pending until a remirror is
performed. Without a remirror, data integrity cannot be guaranteed.
Out of Memory—Kernel memory has been exhausted.
Queued (Ops) * The queued (ops) statistic indicates the total number of mirror and replication
operations that are in the source queue.
Sent (Bytes) The sent (bytes) statistic indicates the total number of mirror and replication
bytes that have been transmitted to the target.
Sent Compressed
(Bytes)
The sent compressed (bytes) statistic indicates the total number of
compressed mirror and replication bytes that have been transmitted to the
target. If compression is disabled, this statistic will be the same as sent
(bytes).
Intermediate
Queue (Bytes) *
Disk Queue
(Bytes)
Queued
Replication (Bytes)
Sent Replication
(Bytes)
Sent Compressed
Replication
(Bytes) *
The intermediate queue (bytes) indicates the total amount of memory being
used by the operations buffer queue.
The disk queue (bytes) indicates the amount of disk being used to queue data
on the source.
The queued replication (bytes) statistic is the total number of replication
bytes that are remaining to be transmitted from the source.
The sent replication (bytes) statistic is the total number of replication bytes
that have been transmitted to the target.
The sent compressed replication (bytes) statistic is the total number of
compressed replication bytes that have been transmitted to the target. If
compression is disabled, this statistic will be the same as sent replication
(bytes).
Queued Mirror
(Ops) *
The queue mirror (ops) statistic is the total number of mirror operations in
the queue.
Sent Mirror (Bytes) The sent mirror (bytes) statistic is the total number of mirror bytes that have
been transmitted to the target.
9 - 3
Page 54

Statistic Description
Sent Compressed
Mirror (Bytes) *
Skipped Mirror
(Bytes)
Remaining Mirror
(Bytes)
Queued
Replication (Ops) *
Last File Touched The last file touched identifies the last file that Storage Mirroring transmitted
Connected Since Connected since is the date and time indicating when the current connection
You can change the statistics that are displayed by selecting File, Options and selecting the
Statistics tab.
The statistics displayed in the Management Console will be listed with check boxes to the left of each
item. Mark the check box to the left of each statistic that you want to appear, and clear the check
box to the left of each statistic that you do not want to appear.
The statistics appear on the Management Console in the order they appear on the Statistics tab. If
you want to reorder the statistics, highlight the statistic to be moved and select the up or down arrow
button, to the right of the vertical scroll bar, to move the selection up or down in the list. Repeat this
process for each statistic that needs to be moved until you reach the desired order.
Click OK to apply and save any changes that have been made to the order or display of the
Management Console statistics.
If you have made changes to the statistics list and have not yet saved them, you can go back to the
previously used settings by clicking Reset to Last. This will revert the list back to the last saved
settings.
To return the statistics list to the Storage Mirroring default selection and order, click Reset to
Default.
The sent compressed mirror (bytes) statistic is the total number of
compressed mirror bytes that have been transmitted to the target. If
compression is disabled, this statistic will be the same as sent mirror (bytes).
The skipped mirror (bytes) statistic is the total number of bytes that have
been skipped when performing a difference or checksum mirror. These bytes
are skipped because the data is not different on the source and target
machines.
The remaining mirror (bytes) statistic is the total number of mirror bytes that
are remaining to be sent to the target.
The queued replication (ops) statistic is the total number of replication
operations in the queue.
to the target. If you are using long file names (more than several thousand
characters long) you may want to disable the display of this statistic to
improve Management Console response times.
was made. This field is blank, indicating that a TCP/IP socket is not present,
when the connection is waiting on transmit options or if the transmission has
been stopped. This field will maintain the date and time, indicating that a
TCP/IP socket is present, when transmission has been paused.
9 - 4
Page 55

Connection and Server Display
Location
Icons and
colors displayed
in the right
pane when a
server is
highlighted in
the left pane
Left pane icon An icon with yellow and blue servers indicates a server that is working
Icon or
Color
A green checkmark on a connection indicates the connection is
working properly.
A red X on a connection indicates a connection error. For example, an
error may be caused by broken transmission or pending replication.
To determine the exact problem, locate the connection data item that
appears in red.
White If the connection background is white, the Management Console and
the source are communicating.
Gray If the connection background is gray, the Management Console and
the source are no longer communicating. The connection data stops
updating once communications have stopped. Once communications
have been reestablished, the connection background will change
back to white.
properly.
A red X on a server icon indicates the Management Console cannot
communicate with that server or that is a problem with one of the
server’s connections. If the connection background is gray, it is a
communication issue. If the connection also has a red X, it is a
connection issue.
A red tree view (folder structure) on a server icon indicates a restore
is required because of a failover.
Description
A black X on a server icon indicates the server is not running Storage
Mirroring.
You can configure when the icons and colors change to accommodate your network environment. For
example, a slow or busy network may need longer delays before updating the icons or colors.
1. Select File, Options. On the Configuration tab, you will see Site Monitor and Connection
Monitor. The Site Monitor fields control the icons on the left pane of the Management Console
and the icons on the right pane when a group is highlighted in the left pane. The Connection
Monitor
separate monitoring capabilities allow for flexible monitoring.
2. Under Site Monitor, specify Check Status In terval to identify the number of seconds between
requests sent from the Management Console to the servers in order to update the display. Valid
values are between
3. Under Site Monitor, specify Missed Status Responses to identify the number of responses
from a server that can be missed before the Management Console considers communications
lost and updates the icons. Valid values are between
4. Under Connection Monitor, specify Missed Status Responses to identify the number of
responses from a server that can be missed before the Management Console considers
communications lost and updates the icons and colors. Valid values are between
The default setting is
5. Click OK to save the settings.
NOTE: If the Site Monitor and Connection Monitor settings are different, at times, the
field controls the display when a server is highlighted in the left pane. These two
0 and 3600. The default setting is 30 seconds.
1 and 100. The default setting is 2.
0 and 1000.
5.
icons and color may not be synchronized between the left and right panes.
9 - 5
Page 56

Monitoring the message window
In addition to the statistics and status shown in the Management Console, you can also open a
message window to view Storage Mirroring processing alerts. These alerts include notifications,
warnings, and errors.
NOTE: The standard appearance of the message window is a white background. If your message
window has a gray background, the window is inactive. The Management Console may
have lost communications with that server, for example, or you may no longer be logged
into that server.
The message window is limited to the most recent 1000 lines. If any data is missing an
entry in red will indicate the missing data. Regardless of the state of the message
window, all data is maintained in the Storage Mirroring log on the server.
1. Open a new message window by using any of the following methods:
Right-click on the server that you want to monitor in the left pane and select New, Message
Window.
Select the Message Window icon from the toolbar.
Select Monitor, New Message Window and identify the Server that you want to monitor.
NOTE: Repeat this step to open multiple message windows.
2. To control the window after it is created, use either of the following methods to access the
control methods listed in the following table.
Right-click on the message window and select the appropriate control.
Select the appropriate toolbar control.
Select Monitor, the name of the message window, and the appropriate control.
Message
Window
Control
Description
Toolbar
Icon
Close Closes the message window
Clear Clears the message window
9 - 6
Page 57

Message
Window
Control
Description
Toolbar
Icon
Pause/
Resume
Pauses and resumes the message window.
Pausing prevents new messages from being displayed in the
message window so that you are not returned to the bottom of the
message window every time a new message arrives. The
messages that occur while the window is logged are still logged to
the Storage Mirroring log file.
Resuming displays the messages that were held while the window
was paused and continues to display any new messages.
Pausing is automatically initiated if you scroll up in the message
window. The display of new log messages will automatically
resume when you scroll back to the bottom.
Copy Allows you to copy selected text
Options This control is only available from the Monitor menu. Currently,
there are no filter options available so this option only allows you
to select a different server. In the future, this control will allow you
to filter which messages to display.
3. To change which server you are viewing messages for, select a different machine from the
dropdown list on the toolbar. If necessary, the login process will be initiated.
4. To move the message window to other locations on your desktop, click and drag it to another
area or double-click it to automatically undock it from the Management Console.
9 - 7
Page 58

Queuing Storage Mirroring data
2
System Memory
100.10.10.9_1100_1_1.xlog
100.10.10.9_1100_1_4.xlog
100.10.10.9_1100_1_2.xlog
100.10.10.9_1100_1_3.xlog
System Memory
Target Server
3
5
216.234.244.47_1100_1_1.xlog
216.234.244.47_1100_1_4.xlog
216.234.244.47_1100_1_2.xlog
216.234.244.47_1100_1_3.xlog
File Change
1
File Change
6
4
Applied
Source Server
During the Storage Mirroring installation, you identified the amount of disk space that can be used
for Storage Mirroring queuing. Queuing to disk allows Storage Mirroring to accommodate high volume
processing that might otherwise fill up system memory. For example, on the source, this may occur
if the data is changing faster than it can be transmitted to the target, or on the target, a locked file
might cause processing to backup.
Understanding queuing
The following diagram will help you understand how queuing works. Each numbered step is described
after the diagram.
1. If data cannot immediately be transmitted to the target, it is stored, or queued, in system
memory. You can configure how much system memory you want to use for queuing. By default,
128 or 512 MB of memory is used, depending on your operating system.
2. When the allocated amount of system memory is full, new changed data bypasses the full
system memory and is queued directly to disk. Data queued to disk is written to a transaction
log. Each transaction log can store 5 MB worth of data. Once the log file limit has been reached,
a new transaction log is created. The logs can be distinguished by the file name which includes
the target IP address, the Storage Mirroring port, the connection ID, and an incrementing
sequence number.
NOTE: You may notice transaction log files that are not the defined size limit. This is because
3. When system memory is full, the most recent changed data is added to the disk queue, as
described in step 2. This means that system memory contains the oldest data. Therefore, when
data is transmitted to the target, Storage Mirroring pulls the data from system memory and
sends it. This ensures that the data is transmitted to the target in the same order it was changed
on the source. Storage Mirroring automatically reads operations from the oldest transaction log
file into system memory. As a transaction log is depleted, it is deleted. When all of the
transaction log files are deleted, data is again written directly to system memory (step 1).
4. To ensure the integrity of the data on the target, the information must be applied in the same
order as it was on the source. If there are any delays in processing, for example because of a
locked file, a similar queuing process occurs on the target. Data that cannot immediately be
applied is queued to system memory. By default, 128 or 512 MB of memory is used, depending
on your operating system.
5. When the allocated amount of system memory on the target is full, new incoming data bypasses
the full system memory and is queued directly to disk. Data queued to disk is written to a
transaction log. On the target, the transaction logs are identified with the source IP address, the
Storage Mirroring port, the connection ID, and an incrementing sequence number.
data operations are not split. For example, if a transaction log has 10 KB left until the
limit and the next operation to be applied to that file is greater than 10 KB, a new
transaction log file will be created to store that next operation. Also, if one operation
is larger than the defined size limit, the entire operation will be written to one
transaction log.
9 - 8
Page 59

6. Like the source, system memory on the target contains the oldest data so when data is applied
to the target, Storage Mirroring pulls the data from system memory. Storage Mirroring
automatically moves operations from the oldest transaction log file to system memory. As a
transaction log is depleted, it is deleted. When all of the transaction log files are deleted, data is
again written directly to system memory (step 4).
9 - 9
Page 60

Configuring queuing
You should configure queuing on both the source and target.
1. Right-click the server on the left pane of the Management Console and select Properties.
2. Select the Queue tab.
3. Specify the Folder where the disk queue will be stored. Storage Mirroring displays the amount
of free space on the volume selected. Any changes made to the queue location will not take
effect until the Storage Mirroring daemon has been restarted on the server.
Select a location on a volume that will have minimal impact on the operating system and
applications being protected. For best results and reliability, this should be a dedicated, non-boot
volume. The disk queue should not be on the same physical or logical volume as the data being
replicated.
NOTE: Scanning the Storage Mirroring queue files for viruses can cause unexpected results.
4. Specify the Maximum system memory for queue. This is the amount of system memory, in
MB, that will be used to store data in queues. When exceeded, queuing to disk will be triggered.
This value is dependent on the amount of physical memory available but has a minimum of 32
MB. By default, 128 MB of memory is used. If you set it lower, Storage Mirroring will use less
system memory, but you will queue to disk sooner which may impact system performance. If
you set it higher, Storage Mirroring will maximize system performance by not queuing to disk as
soon, but the system may have to swap the memory to disk if the system memory is not
available.
If anti-virus software detects a virus in a queue file and deletes or moves it, data
integrity on the target cannot be guaranteed. As long as you have your anti-virus
software configured to protect the actual production data, the anti-virus software can
clean, delete, or move an infected file and the clean, delete, or move will be replicated
to the target. This will keep the target from becoming infected and will not impact the
Storage Mirroring queues.
9 - 10
Page 61

Since the source is typically running a production application, it is important that the amount of
memory Storage Mirroring and the other applications use does not exceed the amount of RAM in
the system. If the applications are configured to use more memory than there is RAM, the
system will begin to swap pages of memory to disk and the system performance will degrade.
For example, by default an application may be configured to use all of the available system
memory when needed, and this may happen during high-load operations. These high-load
operations cause Storage Mirroring to need memory to queue the data being changed by the
application. In this case, you would need to configure the applications so that they collectively do
not exceed the amount of RAM on the server. Perhaps on a server with 1 GB of RAM running the
application and Storage Mirroring, you might configure the application to use 512 MB and
Storage Mirroring to use 256 MB, leaving 256 MB for the operating system and other applications
on the system. Many server applications default to using all available system memory, so it is
important to check and configure applications appropriately, particularly on high-capacity
servers.
Any changes to the memory usage will not take effect until the Storage Mirroring daemon has
been restarted on the server.
5. Specify the Maximum disk space for queue. This is the maximum amount of disk space, in
MB, in the specified Folder that can be used for Storage Mirroring disk queuing, or you can select
Unlimited which will allow the queue usage to automatically expand whenever the available
disk space expands. When the disk space limit is reached, Storage Mirroring will automatically
begin the auto-disconnect process. By default, Storage Mirroring will use an unlimited amount of
disk space. Setting this value to zero (
6. Specify the Minimum Free Space. This is the minimum amount of disk space in the specified
0) disables disk queuing.
Folder that must be available at all times. By default, 50 MB of disk space will always remain
free. The Minimum Free Space should be less than the amount of physical disk space minus
Maximum disk space for queue.
NOTE: The Maximum disk space for queue and Minimum Free Space settings work in
conj un c t io n wit h e a ch o the r . F o r ex amp le, a ss u me y our que u es a re s to r e d o n a 1 0 GB
disk with the Maximum disk space for queue set to 10 GB and the Minimum Free
Space set to 500 MB. If another program uses 5 GB, Storage Mirroring will only be
able to use 4.5 GB so that 500 MB remains free.
7. Specify the Alert at following queue usage percenta ge. This is the percentage of the disk
queue that must be in use to trigger an alert message in the Linux system log. By default, the
alert will be generated when the queue reaches 50%.
8. Click OK to save the settings.
9 - 11
Page 62

Configuring automatic reconnections
While disk queues are user configurable and can be extensive, they are limited. If the amount of disk
space specified for disk queuing is met, additional data could not be added to the queue and data
would be lost. To avoid any data loss, the auto-disconnect and auto-reconnect processes occur.
Exhausted queues on the source—If disk queuing is exhausted on the source, Storage
Mirroring will automatically start disconnecting connections. This is called auto-disconnect. The
transaction logs and system memory are flushed allowing Storage Mirroring to begin processing
anew. The auto-reconnect process ensures that any connections that were auto-disconnected are
automatically reconnected. Then, if configured, Storage Mirroring will automatically remirror the
data. This process is called auto-remirror. The remirror re-establishes the target baseline to
ensure data integrity, so disabling auto-remirror is not advised.
Exhausted queues on the target—If disk queuing is exhausted on the target, the target instructs
the source to pause. The source will automatically stop transmitting data to the target and will
queue the data changes. When the target recovers, it will automatically tell the source to resume
sending data. If the target does not recover by the time the source queues are exhausted, the
source will auto-disconnect as described above. The transaction logs and system memory from
the source will be flushed then Storage Mirroring will auto-reconnect. If configured, Storage
Mirroring will auto-remirror. The remirror re-establishes the target baseline to ensure data
integrity, so disabling auto-remirror is not advised.
Queuing errors—If there are errors during disk queuing on either the source or target, for
example, Storage Mirroring cannot read from or write to the transaction log file, the data integrity
cannot be guaranteed. To prevent any loss of data, the source will auto-disconnect and
auto-reconnect. If configured, Storage Mirroring will auto-remirror. The remirror re-establishes
the target baseline to ensure data integrity, so disabling auto-remirror is not advised.
Target server interruption—If a target machine experiences an interruption (such as a cable
or NIC failure), the source/target network connection is physically broken but both the source and
target maintain the connection information. The Storage Mirroring source, not being able to
communicate with the Storage Mirroring target, stops transmitting data to the target and queues
the data changes, similar to the exhausted target queues described above. When the interruption
is resolved and the physical source/target connection is reestablished, the source begins sending
the queued data to the target. If the source/target connection is not reestablished by the time
the source queues are exhausted, the source will auto-disconnect as described above.
Target daemon shutdown—If the target daemon is stopped and restarted, there could have
been data in the target queue when the daemon was stopped. To prevent any loss of data, the
Storage Mirroring daemon will attempt to persist to disk important target connection information
(such as the source and target IP addresses for the connection, various target queue information,
the last acknowledged operation, data in memory moved to disk, and so on) before the daemon
is stopped. If Storage Mirroring is able to successfully persist this information, when the Storage
Mirroring daemon on the target is restarted, Storage Mirroring will pick up where it left off, without
requiring an auto-disconnect, auto-reconnect, or auto-remirror. If Storage Mirroring cannot
successfully persist this information prior to the restart (for example, a server crash or power
failure where the target daemon cannot shutdown gracefully), the source will auto-reconnect
when the target is available, and if configured, Storage Mirroring will auto-remirror. The remirror
re-establishes the target baseline to ensure data integrity, so disabling auto-remirror is not
advised.
NOTE: If you are experiencing frequent auto-disconnects, you may want to increase the amount
of disk space on the volume where the Storage Mirroring queue is located or move the
disk queue to a larger volume. See Queuing Storage Mirroring data on page 9-8 for
more information.
If you have changed data on the target while not failed over, for example if you were
testing data on the target, Storage Mirroring is unaware of the target data changes. You
must manually remirror your data from the source to the target, overwritting the target
data changes that you caused, to ensure data integrity between your source and target.
Use the following steps to configure automatic reconnections.
1. Right-click the source server on the left pane of the Management Console and select
Properties.
2. Select the Setup tab.
3. Verify that the check box Automatically Reconnect During Source Initialization is marked
to enable the auto-reconnect feature.
4. Click OK to save the settings.
9 - 12
Page 63

Configuring compression
To help reduce the amount of bandwidth needed to transmit Storage Mirroring data, compression
allows you to compress data prior to transmitting it across the network. In a WAN environment this
provides optimal use of your network resources. If compression is enabled, the data is compressed
before it is transmitted from the source. When the target receives the compressed data, it
uncompresses it and then writes it to disk. On a default Storage Mirroring installation, compression
is disabled.
NOTE: Any replication sets from a source connected to the same IP address on a target will share
the same compression configuration.
Keep in mind that the process of compressing data impacts processor usage on the source. If you
notice an impact on performance while compression is enabled in your environment, either adjust to
a lower level of compression, or leave compression disabled. Use the following guidelines to
determine whether you should enable compression:
If data is being queued on the source at any time, consider enabling compression.
If the server CPU utilization is averaging over 85%, be cautious about enabling compression.
The higher the level of compression, the higher the CPU utilization will be.
Do not enable compression if most of the data is inherently compressed. Many image (.jpg,
.gif) and media (.wmv, .mp3, .mpg) files, for example, are already compressed. Some images
files, such as
for those types.
Compression may improve performance even in high-bandwidth environments.
Do not enable compression in conjunction with a WAN Accelerator. Use one or the other to
compress Storage Mirroring data.
1. Right-click the connection on the right pane of the Management Console and select Connection
Manager.
2. Select the Compression tab.
3. By default, compression is disabled. To enable it, select Enable Compression.
4. Depending on the compression algorithms available for your operating system, you may see a
slider bar indicating different compression levels. Set the level from minimum to maximum
compression to suit your needs.
5. Click OK to save the settings.
.bmp and .tif, are uncompressed, so enabling compression would be beneficial
Disconnecting a connection
To disconnect a Storage Mirroring connection, right-click the connection on the right pane of the
Management Console and select Disconnect. The source and target will be disconnected.
NOTE: If a connection is disconnected and the target is monitoring the source for failover, you
will be prompted if you would like to continue monitoring for a failure. If you select Yes,
the Storage Mirroring connection will be disconnected, but the target will continue
monitoring the source. To make modifications to the failure monitoring, you will need to
use the Failover Control Center. If you select No, the Storage Mirroring connection will
be disconnected, and the source will no longer be monitored for failure by the target.
If a connection is disconnected while large amounts of data still remain in queue, the
Management Console may become unresponsive while the data is being flushed. The
Management Console will respond when all of the data has been flushed from the queue.
9 - 13
Page 64

Mirroring and Replication
Mirroring and replication are the key components of Storage Mirroring. This chapter contains
information on the following mirroring and replication capabilities.
Controlling mirroring on page 10-1
Controlling an automatic mirror on page 10-3
Configuring and removing orphan files on page 10-5
Starting replication on page 10-6
Controlling mirroring
After a connection is established, you need to be able to control the mirroring. You can start, stop,
pause and resume mirroring. Right-click the connection on the right pane of the Management Console
and select Mirroring and the appropriate mirror control.
Pause or Resume—When pausing a mirror, Storage Mirroring stops queuing mirror data on the
source but maintains a pointer to determine what information still needs to be mirrored to the
target. Therefore, when resuming a paused mirror, the process continues where it left off.
Stop—When stopping a mirror, Storage Mirroring stops queuing mirror data on the source and
does not maintain a pointer to determine what information still needs to be mirrored to the target.
Therefore, when starting a mirror that has been stopped, the process will mirror all of the data
contained in the replication set.
Start—If you select to start a mirror, you will need to make the following two selections on the
Start Mirror dialog box.
Full Mirror—All files in the replication set will be sent from the source to the target.
Difference Mirror—Only those files that are different based size or date and time (depending
on files or block devices) will be sent from the source to the target. See the table File
Differences Mirror Options Compared on page 10-2 for a comparison of how the file
difference mirror settings work together, as well as how they work with the global checksum
setting on the Source tab of the Server Properties.
Only send data only if source’s date is newer than the target’s date—Only those
files that are newer on the source are sent to the target.
NOTE: If you are using a database application, do not use the newer option unless
you know for certain you need it. With database applications, it is critical that
all files, not just some of them that might be newer, get mirrored.
Use Checksum to send minimal blocks of data—For those files flagged as different,
the mirror performs a checksum comparison and only sends those blocks that are
different.
Calculate Replication Set size prior to mirror—Determines the size of the replication set
prior to starting the mirror. The mirroring status will update the percentage complete if the
replication set size is calculated.
10 - 1
Page 65

File Differences Mirror Options Compared
Server
Properties
Source
a
Tab
Checksum
All
(
)
(
)
Connection Manager Mirroring Tab
or
Start Mirror Dialog
File
Differences
Only if
Source is
Newer
Checksum
Any file that is different on the source
and target based on the date, time,
and/or size is transmitted to the
target. The mirror sends the entire
file.
Any file that is newer on the source
than on the target based on date
and/or time is transmitted to the
target. The mirror sends the entire
file.
Any file that is different on the source
and target based on date, time,
and/or size is flagged as different.
The mirror then performs a
checksum comparison on the flagged
files and only sends those blocks that
are different.
Action Performed
comparison on all files and only sends
those blocks that are different.
Any file that is newer on the source
than on the target based on date
and/or time is flagged as different.
The mirror performs a checksum
(
)
The mirror then performs a
checksum comparison on the flagged
files and only sends those blocks that
are different.
a.A checkmark enclosed in parentheses () indicates that the global option on the Server
Properties Source tab can be on or off. The use of this option does not change the
action performed during the mirror.
10 - 2
Page 66

Controlling an automatic mirror
In certain circumstances, for example if the disk-based queues on the source are exhausted, Storage
Mirroring will automatically disconnect connections (called auto-disconnect) and then automatically
reconnect them (called auto-reconnect). In order to ensure data integrity on the target, Storage
Mirroring will perform an automatic mirror (called an auto-remirror) after an auto-reconnect.
NOTE: Auto-remirror is a per source option. When enabled, all connections from the source will
perform an auto-remirror after an auto-reconnect. When disabled, none of the
connections from the source will perform an auto-remirror after an auto-reconnect.
1. Right-click a server in the left pane of the Management Console and select Properties.
2. Select the Setup tab.
3. Verify that the Perform Remirror After Auto-Reconnect check box is selected to initiate an
auto-remirror after an auto-reconnect.
NOTE: If auto-remirror is disabled and an auto-reconnect occurs, the transmission state of
the connection will remain pending after the reconnect until a mirror is started
manually.
4. Specify the type of mirror that you wish to perform.
File Differences with Checksum—Any file that is different on the source and target based
on date, time, and/or size is flagged as different. The mirror then performs a checksum
comparison on the flagged files and only sends those blocks that are different.
File Differences with no Checksum—Any file that is different on the source and target
based on date, time, and/or size is sent to the target.
10 - 3
Page 67

Full—All files are sent to the target.
NOTE: Database applications may update files without changing the date, time, or file size.
Therefore, if you are using database applications, you should use the File
Differences with checksum or Full option.
See the table File Differences Mirror Options Compared on page 10-2 for a
comparison of how the file difference remirror settings work together, as well as how
they work with the global checksum setting on the Source tab of the Server
Properties.
5. Click OK to save the settings.
10 - 4
Page 68

Configuring and removing orphan files
An orphan file is a file that exists in the target’s copy of the replication set data, but it does not exist
in the source replication set data. An orphan file can be created when you delete a file contained in
the source replication set while there is no Storage Mirroring connection. For example, if a connection
was made and a mirror was completed and then the connection was stopped and a file was deleted
on the source, an orphan file will exist on the target. Because the connection has been disconnected,
the delete operation is not replicated to the target and the file is not deleted on the target.
Additionally, orphan files may also exist if files were manually copied into or deleted from the location
of the target’s copy of the replication set data.
You can configure orphan files to be moved or deleted automatically during a mirror, verify, or
restore, or you can move or delete orphan files manually at any time. You can move or delete all
orphan files on the target or only those orphan files that are older than a specified period of time.
The results of orphan processing are maintained in the Storage Mirroring log on the target, including
the number of moved/deleted orphan files, the directories, and the number of bytes.
NOTE: Orphan file configuration is a per target option. All connections to the same target will
If you want to remove orphan files manually, right-click an established connection and select
Remove Orphans, Start. If you want to stop the process after it has been started, right-click the
connection and select Remo ve Orphans, Stop.
To configure orphan files for processing during a mirror, verify, or restore, use the following
instructions.
1. Right-click the connection on the right pane of the Management Console and select Connection
Manager.
2. Select the Orphans tab.
have the same orphan file configuration.
The orphans feature does not move or delete alternate data streams. To do this, use a
full mirror which will delete the additional stream(s) when the file is re-created.
If Storage Mirroring is configured to move orphan files, the Storage Mirroring log file will
indicate that orphan files have been deleted even though they have actually been moved.
This is a reporting issue only.
If delete orphans is enabled, directories and files that do not exist on the source and are
excluded in the replication set using a wildcard rule will be removed from the target path.
If you have data in your target path that does not exist on the source, do not use wildcard
rules in your replication set. Manually select and deselect those files which should be
included or excluded from your replication set.
10 - 5
Page 69

3. Specify if you want to log the name of the orphan files to the Storage Mirroring log file on the
target by marking Log Orphaned Files to Target Log.
4. By default, the orphan files feature is disabled. To enable it, mark Move/Delete Orphan Files.
5. Specify if you want to Delete Orp haned F iles or Move Orphaned Files to a different location.
If you select the move option, identify the locatio n where these o rphan files will be located.
NOTE: If you are moving files, make sure the directory you specify to move the files to is not
6. Specify if you want to Remove All Orphans or Remove Orphans not modified within the
following time period. If you select the time-based option, only orphans older than the time
you specify will be removed.
7. Click OK to save the settings.
included in the destination of the replication set data so that the orphan files are only
moved once.
Starting replication
Starting replication when establishing a connection is the default and recommended configuration. If
replication is not started, data is not added to the queue on the source, and source/target data
integrity is not guaranteed.
To start replication, right-click the connection on the right pane of the Management Console and
select Replication, Start. After starting replication, you should perform a remirror to guarantee the
source and target data are identical.
10 - 6
Page 70

Verification
Verification is the process of confirming that the data on the target
is identical to the data on the source. Verification creates a log file
detailing what was verified as well as which files are not
synchronized. If the data is not the same, Storage Mirroring can
automatically initiate a remirror. The remirror ensures data integrity between the source and target.
Manual verification
A manual verification can be run anytime a mirror is not in progress.
1. Right-click the connection on the right pane of the Management Console and select Verify.
2. Select the verification options that you would like to perform.
Verify only—This option verifies the data and generates a verification log, but it does not
remirror any files that are different on the source and target.
Remirror data to the target automatically—This option verifies the data, generates a
verification log, and remirrors to the target any files that are different on the source.
Only if the source’s date is newer than the target’s—If you are remirroring your files,
you can specify that only files that are newer on the source than the target be remirrored.
NOTE: If you are using a database application, do not use the newer option unless you
know for certain you need it. With database applications, it is critical that all files,
not just some of them that might be newer, get mirrored.
Use Checksum comparison to send minimal blocks of data—Specify if you want the
verification process to use a block checksum comparison to determine which blocks are
different. If this option is enabled, only those blocks (not the entire files) that are different will
be identified in the log and/or remirrored to the target.
NOTE: Database applications may update files without changing the date, time, or file
size. Therefore, if you are using database applications, you should use the block
checksum comparison to ensure proper verification and remirroring.
3. Click OK to start the verification.
11 - 1
Page 71

Scheduled verification
Verification can be scheduled to occur automatically at periodic intervals.
1. Right-click the connection on the right pane of the Management Console and select Connection
Manager.
2. Select the Verify tab.
3. Specify when you want to start the initial verification. Select the immediate date and time by
clicking Now, or enter a specific Date and Time. The down arrow next to Date displays a
calendar allowing easy selection of any date. Time is formatted for any AM or PM time.
4. Mark the Reverification Interval check box to repeat the verification process at the specified
interval. Specify an amount of time and choose minutes, hours, or days.
5. Select if you want to Remirror data to the target automatically. When enabled, Storage
Mirroring will verify the data, generate a verification log, and remirror to the target any files that
are different on the source. If disabled, Storage Mirroring will verify the data and generate a
verification log, but no files will be remirrored to the target.
6. If you are remirroring your files, you can specify Only send data if source’s date is newer
than the target’s date so that only files that are newer on the source than on the target are
remirrored.
NOTE: If you are using a database application, do not use the newer option unless you know
for certain you need it. With database applications, it is critical that all files, not just
some of them that might be newer, get mirrored.
7. Specify if you want the verification process to Use Checksum to send minimal blocks of data
to determine which blocks are different. If this option is enabled, only those blocks (not the
entire files) that are different will be identified in the log and/or remirrored to the target.
NOTE: Database applications may update files without changing the date, time, or file size.
Therefore, if you are using database applications, you should use the block checksum
comparison to ensure proper verification and remirroring.
8. Click OK to save the settings.
11 - 2
Page 72

Verification log
A verification log is created on the source during the verification process. The log identifies what is
verified as well as which files are not synchronized.
1. Right-click the source server on the left pane of the Management Console and select
Properties.
2. Select the Logging tab.
3. At the top of the window, Folder identifies the location where the log files identified on this tab
are stored. By default, the log files are stored in the same directory as the Storage Mirroring
program files.
4. Under the Verification section, Filename contains the base log file name for the verification
process. The replication set name will be prepended to the base log file name. For example,
since the default is
DTVerify.log, the verification log for the replication set called UserData
would be UserData DTVerify.log.
5. Specify the Maximum Length of the log file. The default is 1048576 bytes (1MB). When the log
file reaches this limit, no additional data will be logged.
6. By default, the log is appended to itself each time a verification process is completed. Clear the
Append check box if you do not want to append to the previous log file.
NOTE: Changes made to the verification log in the Server Properties
, Logging tab will
apply to all connections from the current source machine.
7. Specify the Language of the log file. Currently, English is the only available language.
8. Click OK to save the settings.
In the log file, each verification process is delineated by beginning and end markers. A list of files that
are different on the source and target is provided as well cumulative totals for the verification process.
The information provided for each file is the state of its synchronization between the source and the
target at the time the file is verified. If the remirror option is selected so that files that are different
are remirrored, the data in the verify log reflects the state of the file before it is remirrored, and does
not report the state of the file after it is remirrored. If a file is reported as different, review the output
for the file to determine what is different.
11 - 3
Page 73

Data Transmission
Storage Mirroring data is continuously transmitted to the target
machine. Although the data may be queued if the network or target
machine is slow, the default transmission setting is to transmit the
data as soon as possible. You can modify the tranmission to suit your environment.
Manual transmis sion contr ol—You can maintain the source/target connection, but still control
the transmission of data across the network by using the manual transmission controls. If
tranmission is paused, the data is queued on the source until you manually restart the
transmission.
Manual target control—You can break the source/target connection without disconnecting the
connection, so that you can control the transmission of data across the network. You can do this
by pausing the target. If the target is paused, data is queued on the source until you manually
resume the target.
Scheduled transmission—You can set event driven or scheduling criteria to determine when
data is transmitted. Data is queued on the source until the event or schedule is met. Also,
transmission can be stopped by using these criteria. Scheduled transmission options can be
toggled on and off, allowing you to enable them only when you need to use them.
Bandwidth limitations—You can specify bandwidth limitations to restrict the amount of network
bandwidth used for Storage Mirroring data transmissions. Data is queued on the source until
bandwidth is available. Bandwidth limitations can be full-time or scheduled.
Controlling transmission manually
12
To start, pause, or resume the transmission of data from the source to the target, right-click an
established connection and select Transmit and the appropriate transmission control.
Controlling a target manually
You can break the source/target connection without disconnecting the connection, so that you can
control the transmission of data across the network. You can do this by pausing the target. If the
target is paused, data is queued on the source until you manually resume the target. For example,
you may want to pause the target while you perform a backup of the target data, and then resume
the target when the backup is complete.
While the target is paused, the Storage Mirroring source cannot queue data indefinitely. If the source
queue is filled, Storage Mirroring will automatically disconnect the connections and attempt to
reconnect them. See Configuring automatic reconnections on page 9-12 for more information.
To pause a target, right-click a target server on the left pane of the Management Console and select
Pause Target. All active connections to that target will complete the operatings already in progress.
You will see Pause Pending in the Management Console while these operations are completed. The
status will update to Paused after the operations are completed. Any new operations will be queued
on the source until the target is resumed. When you are ready to resume the target, right-click the
target and select Resume Target.
NOTE: If you have multiple connections to the same target, all connections will be paused and
resumed.
12 - 1
Page 74

Scheduling transmission criteria and bandwidth limiting
Using the Connection Manager Transmit tab, you can set start and stop criteria along with a schedule
window.
NOTE: Storage Mirroring checks the schedule once every second, and if a user-defined criteria
is met, transmission will start or stop, depending on the option specified.
Any replication sets from a source connected to the same IP address on a target will share
the same scheduled transmission configuration.
1. Right-click the connection on the right pane of the Management Console and select Connection
Manager.
2. Select the Transmit tab. The Transmit tab contains four limit types: Bandwidth, Start, Stop,
and Window. The transmission options for each limit type are displayed by highlighting a
selection in the Limit Type box.
At the top of the Transmit tab dialog box, the Enable Transmission Limiting check box
allows you to turn the transmission options on or off. You can enable the transmission options
by marking the Enable Transmission Limiting check box when you want the options to be
applied, but you can disable the transmission options, without losing the settings, by clearing
that check box.
Also at the top of the Transmit tab dialog box, the Clear All button, when selected, will remove
all transmission limitations that have been set under any of the limit types. The Clear button will
clear the settings only for the Limit Type selected.
3. Select the Bandwidth option in the Limit Type box. Mark the Limit Bandwidth check box to
enable the bandwidth limiting features. Define the bandwidth available for Storage Mirroring
transmission by using either of the following options.
Percentage—Specify the percentage of bandwidth to be used for Storage Mirroring
transmissions and the total bandwidth capacity that is available.
Transfer Rate (bytes/second)—Specify the number of bytes to send every second.
NOTE: The only value that is persistently stored is the number of bytes per second. When
the page is refreshed, the percentage and available bandwidth may not be the
same value that you entered. Storage Mirroring changes these values to the
maximum values for the smallest possible link. For example, if you enter 10% of
T1, this is equivalent to 19300 bytes/second. If you select another transmit option
or another tab of the Connection Manager and then return to the bandwidth
option, Storage Mirroring will change the value to 60% of 256 Kbps which is also
equivalent to 19300 bytes/second.
12 - 2
Page 75

4. When you schedule transmission start criteria, transmission will start when the criteria is met
and will continue until the queue is empty or a transmission stop criteria is met. Select the Start
option in the Limit Type box.
Define the start options for Storage Mirroring transmission by using any combination of the
following options.
Transmissio n session start—This option establishes a date and time of the day to begin
transmitting data. For example, you may want to specify a transmission time that corresponds
to a low bandwidth usage time. Once started, Storage Mirroring will continue to transmit data
until the queue is empty or until another limitation stops the transmission. Specify a Date and
Time to start transmitting data. The down arrow next to the date field displays a calendar
allowing easy selection of any date. The time field is formatted for any AM or PM time.
Session Interval—This option begins transmitting Storage Mirroring data at specified
intervals of time. This option is used in conjunction with Transmission session start. For
example, if the Session Interval is set to repeat transmission every 30 minutes and the
Transmissio n sess ion sta rt is set to begin transmitting at 10 p.m., if the queue is emptied
at 10:20 the transmission will stop. The start criteria is again met at 10:30 and Storage
Mirroring will begin transmitting any new data in the queue. Specify an interval for additional
transmissions by indicating a length of time and choosing minutes, hours, or days.
Queue Threshold (percentage) and Queue threshold (bytes)—If the allocated amount
of queue disk space is in use, Storage Mirroring cannot continue to queue data causing an
auto-disconnect and the potential for loss of data. To avoid using the entire queue, you can
configure Storage Mirroring to begin transmitting data to the target when the queue reaches
a certain point. This point can be defined as a percentage of the disk queue that must be in
use or the number of bytes in the disk queue. For example, if you specify 40%, when 40% of
the queue is in use, Storage Mirroring initiates the transmission process and sends the data
in the queue to the target machine. The transmission stops when the queue is empty or a
Storage Mirroring stop transmission criteria is met. Or you might set a queue threshold of 500
MB. Storage Mirroring will wait until there is 500 MB of data in the queue and then begin
transmitting the data. Like other start criteria, Storage Mirroring continues transmitting until
the queue is empty or a Storage Mirroring stop criteria is met. Specify a percentage of the disk
queue and system memory that must be in use to initiate the transmission process, and/or
specify the number of bytes that must be in the source queue and system memory to initiate
the transmission process.
NOTE: A Transmission Session Start setting will override any other start criteria. For
example, if you set the Transmission Session Start and the Queue
Threshold, transmission will not start until you reach the indicated start time.
12 - 3
Page 76

5. Schedule any desired stop criteria to stop transmission after a transmission start criteria has
initiated the transmission. If you do not establish a stop criteria, transmission will end when the
queue is empty. Select the Stop option in the Limit Type box.
Define the stop options to stop Storage Mirroring transmissions by using either or both of the
following options.
Time Limit—The time limit specifies the maximum length of time for each transmission
period. Any data that is not sent during the specified time limit remains on the source queue.
When used in conjunction with the session interval start option, you can explicitly define how
often data is transmitted and how long each transmission lasts. Specify the maximum length
of time that Storage Mirroring can continue transmitting by indicating a length of time and
choosing minutes, hours, or days.
Byte Limit—The byte limit specifies the maximum number of bytes that can be sent before
ending the transmission session. When the byte limit is met, Storage Mirroring will
automatically stop transmitting data to the target. Any data that still remains waits in the
source queue until the transmission is restarted. When used in conjunction with a session start
option, you can explicitly define how much data is being sent at a given time. Specify the
m a x i m u m n u m b e r o f b y t e s t h a t c a n b e s e n t b e f o r e e n d i n g t h e S t o r a g e M i r r o r i n g t r a n s m i s s i o n .
NOTE: The transmission start and stop criteria should be used in conjunction with each
other. For example, if you set the Queue Threshold equal to 10 MB and the Byte
Limit equal to 10 MB, a network connection will be established when there is 10
MB of data in the queue. The data will be transmitted and when the 10 MB Byte
Limit is reached, the network connection closes. This is useful in configurations
where metered charges are based on connection time.
12 - 4
Page 77

6. Schedule a transmission window to establish a period of availability for all Storage Mirroring
transmissions. You can specify a begin and end time for all Storage Mirroring transmissions.
When a transmission window is in effect, all other start and stop criteria are bound by this
window. This means that Storage Mirroring will never transmit data outside of an established
window, regardless of other transmission settings. For example, if you set a window of
availability from 9 p.m. to 4 a.m. and a start option to initiate transmission at 5 a.m., the
window option will override the start option and no data will be sent at 5 a.m. Select the
Window option in the Limit Type box.
NOTE: Setting a transmission window by itself is not sufficient to start a transmission. You
still need to set a start criteria within the window.
Define a window to control Storage Mirroring transmissions by enabling the feature and then
specifying both window options.
Enable Transmission Window—This option specifies whether a transmission window is in
use.
Open window time—Specifies the time, formatted for AM or PM, when the transmission
window will open, allowing transmission to begin.
Close window time—Specifies the time, formatted for AM or PM, when the transmission
window will close, stopping all transmission.
7. Click OK to save the settings.
12 - 5
Page 78

Failover and Failback
Failover is the process in which a target stands in for a failed source.
As a result, user and application requests that are directed to the
failed source are routed to the target.
Storage Mirroring monitors the source status by tracking network requests and responses exchanged
between the source and target. When a monitored source misses a user-defined number of requests,
Storage Mirroring assumes that the machine has failed. Storage Mirroring then prompts the network
administrator to initiate failover, or, if configured, it occurs automatically.
The failover target assumes the network identity of the failed source. When the target assumes the
identity of the source, user and application requests destined for the source machine or its IP
address(es) are routed to the target.
When partnered with the Storage Mirroring data replication capabilities, failover routes user and
application requests with minimal disruption and little or no data loss. In some cases, failover may
be used without data replication to ensure high availability on a machine that only provides
processing services, such as a web server.
Failover can be configured to stand in for one or more IP addresses associated with different NICs on
the source. Each IP address can be added to a specific target NIC making NIC configuration very
flexible. For example, a single NIC on the source may have one or more IP addresses assigned to it.
If that source or the NIC fails, all traffic from the source is directed to the target. If there are multiple
NICs on the source, the target can assume the traffic from all of the addresses. Additional NICs on
the target increase flexibility and control. Secondary target NICs can assume the traffic from a failed
source NIC while normal target traffic can continue to use the primary target NIC.
Configuring failover
1. The Failover Control Center can be started from within the Management Console or from the
Windows desktop.
From the Management Console, select Tools, Failover Control Center.
From the Windows desktop, select Start, Programs, Storage Mirroring, Failover Control
Center.
2. Select a failover target from the Target Machine list box.
NOTE: If the target you need is not listed, click Add Target and manually enter a name or
3. Click Login to login to the selected target.
4. Select a source machine to monitor by clicking Add Monitor. The Insert Source Machine dialog
box appears in front of the Monitor Settings dialog box.
5. On the Insert Source Machine dialog, specify your source machine by any of the following
methods.
IP address (with or without a port number). You can also select the Browse button
to search for a target machine name. Click OK to select the target machine and return
to the Failover Control Center main window.
Type the name of the machine that you want to monitor in Machine Name(s) and click OK.
13 - 1
Page 79

Click Browse to search for a machine. Select a domain from the list box at the top of the
Select Machine dialog box to list the available machines for that domain. Highlight a source
to be monitored and click OK.
Click Custom. Enter the name of the server and click Add. Specify the IP address and subnet
mask of the specified server and click OK. Click OK again.
The Insert Source Machine dialog closes and the Monitor Settings dialog remains open with your
source listed in the Names to Monitor tree.
6. In the Names to Monitor tree, locate and select the IP addresses on the source that you want
to monitor.
7. Highlight an IP address that you have selected for monitoring and select a Target Adapter that
will assume that IP address during failover. Repeat this process for each IP address that is being
monitored.
NOTE: Current IP Addresses displays the IP address(es) currently assigned to the selected
target adapter.
8. Highlight an IP address that you have selected for monitoring and select a Monitor Interval.
This setting identifies the number of seconds between the monitor requests sent from the target
to the source to determine if the source is online. Repeat this step for each IP address that is
being monitored.
9. Highlight an IP address that you have selected for monitoring and select the Missed Packets.
This setting is the number of monitor replies sent from the source to the target that can be
missed before assuming the source machine has failed. Repeat this step for each IP address that
is being monitored.
NOTE: To achieve shorter delays before failover, use lower Monitor Interval and Missed
Packets values. This may be necessary for IP addresses on machines, such as a web
server or order processing database, which must remain available and responsive at
all times. Lower values should be used where redundant interfaces and high-speed,
reliable network links are available to prevent the false detection of failure. If the
hardware does not support reliable communications, lower values can lead to
premature failover. To achieve longer delays before failover, choose higher values.
This may be necessary for IP addresses on slower networks or on a server that is not
transaction critical. For example, failover would not be necessary in the case of a
server restart.
10. Highlight the source name and specify the Items to Failover, which identifies which source
components you want to failover to the target.
IP Addresses—If you want to failover the IP addresses on the source, enable this option and
then specify the addresses that you want to failover.
Monitored only—Only the IP address(es) that are selected for monitoring will be failed
over.
13 - 2
Page 80

Include Unmonitored—All of the IP address(es) will be failed over.
NOTE: If you are monitoring multiple IP addresses, IP address conflicts may occur during
failover when the number of IP addresses that trigger failover is less than the
number of IP addresses that are assumed by the target during failover. For
example, if a source has four IP addresses (three public and one private), and two
of the three public addresses are monitored, but all three public addresses are
configured to failover, a conflict could occur. If the source fails, there is no conflict
because all of the IP addresses have failed and no longer exist. But if the failure
only occurs on one of the monitored addresses, the other two IP addresses are
still affected. If all of the addresses are failed over, these addresses then exist on
both the source and the target. Therefore, when a source machine has fewer IP
addresses that trigger failover than IP addresses that will be failed over, there is
a risk of an IP address conflict.
If your network environment is a WAN configuration, do not failover your IP
addresses unless you have a VPN infrastrucutre so that the source and target can
be on the same subnet, in which case IP address failover will work the same as a
LAN configuration. If you do not have a VPN, you can automatically reconfigure
the routers via a failover script (by moving the source's subnet from the source's
physical network to the target's physical network). There are a number of issues
to consider when designing a solution that requires router configuration to achieve
IP address failover. Since the route to the source's subnet will be changed at
failover, the source server must be the only system on that subnet, which in turn
requires all server communications to pass through a router. Additionally, it may
take several minutes or even hours for routing tables on other routers throughout
the network to converge.
11. By default, Manual Intervention is enabled, allowing you to control when failover occurs.
When a failure occurs, a prompt appears in the Failover Control Center and waits for you to
manually initiate the failover process. Disable this option only if you want failover to occur
immediately when a failure occurs.
12. If you are using any failover or failback scripts, click Scripts and enter the path and filename for
each script type. Scripts may contain any valid Linux command, executable, or script file.
Examples of functions specified in scripts include stopping daemons on the target before failover
because they may not be necessary while the target is standing in for the source, stopping
daemons on the target that need to be restarted with the source’s machine name and IP
address, starting daemons or loading applications that are in an idle, standby mode waiting for
failover to occur, notifying the administrator before and after failover or failback occurs, stopping
daemons on the target after failback because they are no longer needed, stopping daemons on
the target that need to be restarted with the target machine’s original name and IP address, and
so on.
Specify each script that you want to run and the following options, if necessary.
If you want to delay the failover or failback processes until the associated script has
completed, mark the appropriate check box.
If you want the same scripts to be used as the default for future monitor sessions, mark the
appropriate check box.
Click OK to return to the Monitor Settings dialog box.
13. Click OK on the Monitor Settings dialog box to save your monitor settings and begin monitoring
for a failure.
Editing failover configuration
If you want to edit the monitor settings for a source that is currently being monitored, highlight that
source on the Monitored Machines tree on the main Failover Control Center screen and click Edit.
The Monitor Settings dialog box will open. Follow the instructions under Configuring failover on
page 13-1.
13 - 3
Page 81

Removing failover configuration
Colored Bullets
Time to Fail
Status Bar
Windows Desktop Icon Tray
Counter
If you want to discontinue monitoring a source, highlight that machine on the Monitored Machines
tree on the main Failover Control Center screen and click Remove Monitor. No additional dialog
boxes will open.
Monitoring failover
Since it can be essential to quickly know the status of failover, Storage Mirroring offers various
methods for monitoring the state of failover. When the Failover Control Center is running, you will
see four visual indicators:
The Failover Control Center Time to Fail counter
The Failover Control Center status bar located at the bottom of the window
The Failover Control Center colored bullets to the left of each IP address and source machine
The Windows desktop icon tray containing a failover icon
NOTE: You can minimize the Failover Control Center and, although it will not appear in your
Windows taskbar, it will still be active and the failover icon will still appear in the desktop
icon tray.
The Failover Control Center does not have to be running for failover to occur.
13 - 4
Page 82

The following table identifies how the visual indicators change as the status of failover changes.
Time to Fail
Countdown
The Time to Fail
counter is counting
down and resetting
Source is Online
Source Fails and
Failover is
Initiated
Failover is
Complete
a. When the Time to Fail value has decreased by 25% of the entire timeout period, the bullet
changes from green to yellow, indicating that the target has not received a response from the
source. The yellow bullet is a caution signal. If a response from the source is received, the
countdown resets and the bullets change back to green. If the countdown reaches zero without
the target receiving a response from the source, failover begins.
each time a
response is received
from the source
machine.
The Time to Fail
countdown value is
0.
The Time to Fail
counter is replaced
with failed message.
Status Bar
The status bar
indicates that
the target
machine is
monitoring the
source
machine.
The status bar
displays the
source machine
and IP address
currently being
assumed by the
target.
The status bar
indicates that
monitoring has
continued.
Colored
Bullets
The bullets are
green.
The bullets are
red.
The bullets are
red.
a
Desktop Icon
Tray
The Windows
desktop icon
tray contains a
failover icon
with red and
green
computers.
The Windows
desktop icon
tray contains a
failover icon
with red and
green
computers.
The Windows
desktop icon
tray contains a
failover icon
with a red
computer.
Testing failover
The failover process, including script processing, can be tested at any time. To force unavailability,
disconnect the network cable from a monitored machine, wait for the Time to Fail counter to
decrease to zero and failover begins. To avoid the countdown delay, highlight the monitored machine
name in the Failover Control Center window and select Failover.
Failover manual intervention
If Manual Intervention is enabled, the Failover Control Center will prompt you when a failure occurs.
NOTE: If the Failover Control Center is not running at the time the failure occurs, the manual
Click
Cancel to abort the failover process. If necessary, you can initiate failover later from the Failover
Control Center. Click OK to proceed with failover.
intervention dialog box will appear the next time the Failover Control Center is started.
When a failure occurs, an alert is forwarded to the Linux system log. You can then start
the Failover Control Center and respond to the manual intervention prompt.
If SNMP is installed and configured, an SNMP trap is also generated. When using a
third-party SNMP manager, an e-mail or page can be generated to notify you of the
failure.
13 - 5
Page 83

Initiating failback
When failover occurs, a source machine has failed. The steps below must be completed in order to
complete failback without IP address or name conflicts.
1. Verify that your source machine is not connected to the network. If it is, disconnect it.
2. Resolve the source machine problem that caused the failure.
WARNING: Do not connect the source machine to the network at this time.
3. In the Failover Control Center, select the source machine that is currently standing in for the
failed source.
NOTE: If your target machine has been replaced during failover because of the configuration
you selected (perform failover by replacing target identity with source), do not select
your target from the Target Machine list. Since the target has been replaced by the
source, it no longer exists and the Failover Control Center will retry for several
minutes (possibly up to five minutes), until it finally fails in locating the target. After
a replace failover, select your source machine in the Target Machine list, which will be
monitoring itself in a failed over state, and perform failback. After failback, the target
will be available again.
4. Select the failed source and click Failback. If you specified a pre-failback script in your failover
configuration, that script will be executed at this time.
13 - 6
Page 84

5. You will be prompted to determine if you want to continue monitoring the source. Bring the
source online and select Continue or Stop to indicate if you want to continue monitoring the
source.
After you have selected whether or not to continue monitoring the source machine, the source
post-failback script, if configured, will be started.
NOTE: At this time, the source machine must be online and Storage Mirroring must be
running to ensure that the source post-failback script can be started. If the source
has not completed its boot process, the command to start the script may be lost and
the script will not be initiated.
Failback is now complete.
13 - 7
Page 85

Restoration
The Management Console provides an easy method for restoring
replicated data from the target back to the original source or to a
new source server. You are only required to input the original
source, the target, and the name of the replication set you want to
restore. Storage Mirroring handles the rest, including selecting the files in the replication set and
restoring them to the correct location.
1. From the Management Console, select Tools, Restoration Manager.
2. Identify the Original Source machine. This is your source machine where the data originally
resided.
3. Select the Restore From machine. This is the target machine where the copy of the data is
stored.
4. Replication Set contains the replication set information stored on the target machine (the
machine in Restore From). If no replication sets are available, the list will be blank. Select the
replication set that corresponds to the data that you need to restore.
NOTE: Restoration applies to the entire replication set and should not be used for individual
file restoration. Individual files can be restored manually by copying the files from the
target to the source machine using native operating system tools.
5. Select the Restore To machine. This is the machine where the copy of the data will be sent.
6. The Restore To and Restore From paths will automatically be populated when the replication
set is selected. The restore to path is the directory that is the common parent directory for all of
the directories in the replication set. If the replication set crosses volumes, then there will be a
separate path for each volume. The restore from path is the path on the target server where the
replicated files are located.
NOTE: Restoring across a NAT router requires the ports to be the same as the original
connection. If the ports have been modified (manually or reinstalled), you must set
the port numbers to the same values as the last valid source/target connection.
14 - 1
Page 86

7. Select the Use Backup Replication Set check box to use the target’s copy of the replication set
database for the restoration. If this check box is not marked, you will be accessing the
replication set information from the source.
8. Select the Restore Replication Set check box to restore the target’s copy of the replication set
database to the source during the restoration process.
9. Select the restoration conditionals that you want to use.
Overwrite existing data during restore—This option restores all existing files by
overwriting them. Any files that do not exist on the source are written also. If this option is
disabled, only files that do not exist on the source will be restored.
Only if backup copy’s date is more—This option restores only those files that are newer on
the target than on the source. The entire file is overwritten with this option.
NOTE: If you are using a database application, do not use the newer option unless you
know for certain you need it. With database applications, it is critical that all files,
not just some of them that might be newer, get mirrored.
Use Checksum comparison to send minimal blocks of data—Specify if you want the
restoration process to use a block checksum comparison to determine which blocks are
different. If this option is enabled, only those blocks (not the entire files) that are different will
be restored to the source.
10. If you want to configure orphan files, click the Orphans tab. The same orphan options are
available for a restoration connection as a standard connection. See Configuring and
removing orphan files on page 10-5 for more details.
11. Click Restore to begin the restoration.
14 - 2
Page 87

Monitoring Tools
In addition to the monitoring capabilities within the Storage
Mirroring clients, you can monitor Storage Mirroring processing
using other tools.
Log files are generated for various Storage Mirroring components recording alerts (notifications,
warnings, and errors). These log files can be viewed using a standard text viewer. See Log files
on page 15-2.
The Windows Event Viewer also receives alerts (notifications, warnings, and errors), but only from
the Storage Mirroring service. These alerts are logged to the Event Viewer Application log. See
Linux System Log on page 15-9.
DTStat is a utility that reports statistical information. See DTStat on page 15-19.
SNMP reports alerts and statistics. See SNMP on page 15-26.
15 - 1
Page 88

Log files
Various Storage Mirroring components (Storage Mirroring daemon, Management Console, Failover
Control Center, and the Command Line Client) generate a log file to gather alerts, which are
notification, warning, and error messages. The log files are written to disk. They can be viewed, from
the location where Storage Mirroring is installed, with a standard text viewer.
Each log file consists of a base name, a series number, and an extension.
Base Name—The base name is determined by the application or process that is running.
Component Log File Base Name
Storage Mirroring dtlog
Management Console mc
Failover Control Center fcc
Command Line Client dtcl
Series Number—The series number ranges from 1 to 999. For example, Storage Mirroring
begins logging messages to
will be written to dtlog2. As long as log messages continue to be written, files dtlog3, dtlog4,
dtlog5 will be opened and filled. When the maximum number of files is reached, which by default
is
5, the oldest file is deleted when the sixth file is created. For example, when dtlog6 is created,
dtlog1 is deleted and when dtlog7 is created, dtlog2 is deleted. When file dtlog999 is
created and filled,
messages to that file. In the event that a file cannot be removed, its number will be kept in the
list, and on each successive file remove, the log writer will attempt to remove the oldest file in
the list.
Extension—The extension for each log file is .dtl.
dtlog1 will be re-created and Storage Mirroring will continue writing log
dtlog1. When this file reaches its maximum size, the next log file
Component Sample Log File Names
Storage Mirroring dtlog1.dtl, dtlog2.dtl
Management Console mc1.dtl, mc2.dtl
Failover Control Center fcc1.dtl, fcc2.dtl
Command Line Client dtcl1.dtl, dtcl2.dtl
1. To modify the maximum file size and the number of Storage Mirroring log files that are
maintained, access the Server Properties dialog box by right-clicking a machine name in the left
pane of the Management Console and selecting Properties.
2. Select the Logging tab.
3. At the top of the window, Folder indicates the directory where the log files are located. The
default is the directory where the Storage Mirroring program files are installed.
4. Modify any of the options under Messages and Alerts, if necessary.
Maximum Length—Specify the maximum length of the log file. The default size is 1048576
bytes
Maximum Files—Specify the maximum number of log files that are maintained. The default
and is limited by the available hard drive space.
is 5 and the maximum is 999.
NOTE:
If you change the Maximum Length or Maximum Files, you must restart the
Storage Mirroring daemon for the change to take effect.
5. Click OK to save the changes.
15 - 2
Page 89

Viewing the log files
The log files can be viewed, from the location where Storage Mirroring is installed, with a standard
text viewer.
Sample Storage Mirroring Daemon Log File
01/15/2007 14:14:18.3900 95 98 2 2 69 Kernel Started
01/15/2007 14:14:18.4200 95 98 3 2 10004 Valid Activation Key Detected :
01/15/2007 14:14:18.5350 98 170 4 2 52501 Target module loaded successfully
01/15/2007 14:14:18.6760 98 172 5 2 10004 Valid Activation Key Detected :
01/15/2007 14:14:18.9870 130 131 6 2 51501 Source module loaded successfully
01/15/2007 14:24:15.2070 130 132 7 2 72 Connection Request from
ip://206.31.4.305
01/15/2007 14:24:16.3090 131 133 8 2 600002 Unified login provides ADMIN access
01/15/2007 14:24:40.9680 132 134 9 2 99 RepSet Modified: UserData
01/15/2007 14:25:22.4070 134 131 10 2 71 Originator Attempting ip://206.31.4.305
01/15/2007 14:25:22.5030 134 131 11 2 0 Transmission Create to
ip://206.31.4.305.
01/15/2007 14:25:22.6060 135 133 12 2 500000 UserData is connected to
ip://206.31.4.305
01/15/2007 14:25:23.5030 136 98 13 2 87 Start Replication on connection 1
Sample Management Console Log File
00/00/0000 00:00:00.0000 Application starting
09/11/2007 12:45:53.8980 704 1032 1 2 0 Could not find XML file: C:\Program
Files\StorageWorks\Storage Mirroring\ Administrator.xml, default groups will be
added.
09/11/2007 12:45:53.9580 704 1032 2 2 0 Adding default group: Storage Mirroring
Servers
09/11/2007 12:45:53.9580 704 1032 3 2 0 Adding default group: Storage Mirroring
Servers\ Auto-Discovered Servers
09/11/2007 12:46:08.3390 704 1032 4 210004 Evaluation license expires in 95 day(s).
The following table describes the information found in each column of the log file.
Column # Description
Column 1 The date the message was generated.
Column 2 The time the message was generated.
Column 3 The process ID.
Column 4 The thread ID.
Column 5 The sequence number is an incremental counter that assigns a unique number
to each message.
Column 6 The type or level of message displayed:
1—Warning or error message
2—Informational message
Column 7 The message ID.
Column 8 The message text.
15 - 3
Page 90

Log messages
The following table describes some of the standard Storage Mirroring alerts that may be displayed in
the log files. The ID appears in column 7 of the log file, and the message appears in column 8.
NOTE: In the following table, con_id refers to the unique connection ID assigned to each
connection between a source replication set and a target.
ID Message Description
0 N/A There are several log messages with this ID
number. See the description in the Message
column.
7
Synchronous ioctl returned
STATUS_
PENDING
Communication with the Storage Mirroring
driver is not being performed correctly. A
reboot is required to guarantee replication and
data integrity.
Failed to reset Replication
Flags. Replication may not be
performed correctly.
69 Storage Mirroring kernel started
on server_name
An error occurred between the Storage
Mirroring driver and recent changes to the
replication set. The possible resolutions are:
Undo the changes to the replication set
Stop and restart Storage Mirroring
Reboot the server
The Storage Mirroring daemon was started on the
Storage Mirroring server specified.
70 Storage Mirroring kernel stopped The Storage Mirroring daemon was stopped on a
Storage Mirroring server.
71 Originator attempting
ip://xxx.xxx.xxx.xxx
A source is requesting to connect a replication set
to a target machine.
72 Connection request from
ip://xxx.xxx.xxx.xxx
73 Connected to
ip://xxx.xxx.xxx.xxx
74 Connection paused with
ip://xxx.xxx.xxx.xxx
75 Connection resumed with
ip://xxx.xxx.xxx.xxx
76 Connection failed to
ip://xxx.xxx.xxx.xxx
77 Connection lost with IP address
address
A target machine has received a source machine’s
request to connect a replication set to the target.
A source machine has successfully connected a
replication set to a target machine.
A network connection between the source and the
target exists and is available for data transmission,
but data is being held in queue and is not being
transmitted to the target. This happens because the
target machine cannot write data to disk fast
enough. Storage Mirroring will resolve this issue on
its own by transmitting the data in queue when the
target catches up.
The transmission of data from the source machine
to the target machine has resumed.
An attempt to establish a network connection
between a source machine and target machine has
failed. Check your network connections and verify
that the target machine is still online.
The network connection previously established
between a source machine and target machine has
been lost. Check your network connections and
troubleshoot to see why the connection was lost.
15 - 4
Page 91

ID Message Description
78 Auto-disconnect threshold has
been reached.
The Storage Mirroring queue has exceeded its limit,
and the auto-disconnect process will disconnect the
source and target connection. The auto-reconnect
process will automatically reestablish the
connection if the auto-reconnect feature is enabled.
If the auto-reconnect feature is not enabled, you
must first verify that the connection between the
source and target has been broken, and then
manually reestablish the connection in the
Management Console.
79 Memory freed to bring Storage
Mirroring memory usage below
Data in the source queue has been sent to the
target machine, bringing the pagefile below its limit.
the limit
80 Trying to auto-retransmit to
ip://xxx.xxx.xxx.xxx
Storage Mirroring is attempting to automatically
reconnect previously established source and target
connections after a server reboot or
auto-disconnect. This is also referred to as the
auto-reconnect process.
81 Schedule transmit start to target A scheduled transmission of data from a source
machine to a target machine has started. See the
description in the Message column.
82 Schedule transmit end to target A scheduled transmission of data from a source
machine to a target machine has ended. See the
description in the Message column.
85 repset has been
auto-disconnected
Storage Mirroring automatically disconnects the
source and target connection because the queue
size has reached a specified size for this action.
87 Start replication on connection
con_id
88 Stop replication on connection
con_id
89
Mirror started con_id
Data has started replicating from a source machine
to a target machine.
Data has stopped replicating from a source machine
to a target machine.
Data is being mirrored from a source machine to a
target machine.
90 Mirror stopped con_id The process of mirroring data from a source
machine to a target machine has stopped due to
user intervention or an auto-disconnect. (This
means the mirroring process was not completed.)
91 Mirror paused con_id The process of mirroring data from a source
machine to a target machine has paused because
the target machine cannot write the data to disk
fast enough. Storage Mirroring will resolve this
issue on its own by transmitting the data in queue
when the target catches up.
92 Mirror resumed con_id The process of mirroring data from a source
machine to a target machine has resumed.
93 Mirror ended con_id The process of mirroring data from a source
machine to a target machine has ended.
94 Verification started con_id The verification process of confirming that the
Storage Mirroring data on the target is identical to
the data on the source has started.
95 Verification ended con_id The verification process of confirming that the
Storage Mirroring data on the target is identical to
the data on the source has ended.
15 - 5
Page 92

ID Message Description
97 Restore started con_id The restoration process of copying the up-to-date
data from the target back to the original source
machine has started.
98 Restore completed con_id The restoration process of copying the up-to-date
data from the target back to the original source
machine has been completed.
99 RepSet Modified: repset_ name This message means that the specified replication
set has been modified.
100 Failover condition has been met
and user intervention is required
Storage Mirroring has determined that the source
has failed, and requires manual intervention to start
the failover process.
101 Failover in progress!!! The conditions for failover to occur have been met,
and the failover process has started.
102 Target full! The disk to which data is being written on the target
is full. This issue may be resolved by deleting files
on the target machine or by adding another disk.
801 Auto-disconnect has occurred on
IP address address with
connection con_id Disconnected
replication set name:
Auto-disconnect has occurred for the specified
connection. This is due to the source queue filling
up because of a network or target failure or
bottleneck.
repset_name.
10001 Activation key is not valid. An invalid activation code was identified when the
Storage Mirroring daemon was started.
10002 Evaluation period has expired. The evaluation license has expired.
10003 Activation code violation with
machine machine_name
Duplicate single-server activation codes are being
used on the servers, and Storage Mirroring is
disabled.
10004 Valid activation key detected A valid activation code was identified when the
Storage Mirroring daemon was started.
51001 Source module failed to load The Storage Mirroring source module failed to load.
Look at previous log messages to determine the
reason. (Look for messages that indicate that either
the activation code was invalid or the
user-configurable source module was not set to
load automatically at startup.) The source module
may have been configured this way intentionally.
51501 Source module loaded
successfully
The Storage Mirroring source module was loaded
successfully.
51502 Source module already loaded The Storage Mirroring source module was already
loaded.
51503 Source module stopped The Storage Mirroring source module stopped.
52000
The target has been paused
due to manual intervention.
The target has been resumed
The target has been paused or resumed through
user intervention.
due to manual intervention.
15 - 6
Page 93

ID Message Description
52000 Unfinished Op error This error message contains various Microsoft API
codes. The text Code -<x> Internal <y> appears at
the end of this message. The code value indicates
why the operation failed, and the internal value
indicates the type of operation that failed. The most
common code values that appear in this error
message are:
(5) Permission denied: The account running
the Storage Mirroring daemon does not have
permission to update the file specified.
(32) Sharing violation: Another application is
using a particular file that Storage Mirroring is
trying to update. Storage Mirroring will wait and
try to update the file later.
(112) Disk full: The disk to which data is being
written on the target is full. This issue may be
resolved by deleting files on the target machine
or by adding another disk.
52501 Target module loaded
successfully
The Storage Mirroring target module was loaded
successfully.
52502 Target module already loaded The Storage Mirroring target module was already
loaded.
52503 Target module stopped The Storage Mirroring target module stopped.
53001 File was missing from target The verification process confirms that the files on
the target are identical to the files on the source.
This message would only appear if the verification
process showed that a file on the source was
missing from the target.
53003 Could not read filename Storage Mirroring could not read a file on the source
machine because the file may have been renamed
or deleted. For example, temporary files show up in
queue but do not show up during transmission. (No
user action required.)
54000 Kernel started The Storage Mirroring daemon was started.
54001 Failover module failed to load The Storage Mirroring failover module failed to load.
Look at previous log messages to determine the
reason.
54503 Failover module stopped The Storage Mirroring failover module stopped.
99001 Starting source module low
memory processing
The source’s queue is full, and the auto-disconnect
process will disconnect the source and target
connection. The auto-reconnect process will
automatically reestablish the connection if the
auto-reconnect feature is enabled. If the
auto-reconnect feature is not enabled, you must
first verify that the connection between the source
and target has been broken, and then manually
reestablish the connection in the Management
Console.
99999 Application is terminating
normally
503010 Asyncloctl for status thread 178
terminated, terminating the
status thread
The Storage Mirroring daemon is shutting down
normally.
A Storage Mirroring process monitors the state of
the Storage Mirroring driver. When the daemon is
shut down, the driver is shut down, and this process
is terminated. (No user action required.)
15 - 7
Page 94

ID Message Description
600002 Unified login provides ADMIN
access
User user has level access (x)
700000 The source machine
source_machine is not
responding to a ping.
800000
Active Directory GetHostSpns
function call failed
Active Directory RemoveSpns
function call failed
Active Directory AddSpns
function call failed
Using the current login grants ADMIN access.
The listed user has listed access level and access
level ID.
This occurs when all monitored IP addresses on the
source machine stop responding to pings.
Countdown to failover will begin at the first
occurence and will continue until the source
machine responds or until failover occurs.
Storage Mirroring failed to get the host SPN
(Service Principal Name) from Active Directory.
Storage Mirroring failed to remove an SPN from
Active Directory.
Storage Mirroring failed to add a host SPN to
Active Directory.
15 - 8
Page 95

Linux System Log
An event is a significant occurrence in the system or in an application that requires administrators to
be notified. The operating system writes notifications for these events to the Linux system log. The
location of the log file depends on the configuration of /etc/syslog.conf, however, by default, it is
/var/log/messages. The following table identifies the events generated by Storage Mirroring.
ID Category Severity Event Message Required Response
1 Activation
Key
2 Activation
Key
3 Activation
Key
4 Activation
Key
5 Activation
Key
3000 Service Info. Logger service was
Error This evaluation period has
expired. Mirroring and
replication have been
stopped. To obtain a license,
please contact your vendor.
Info. The evaluation period
expires in %1 day(s).
Info. The evaluation period has
been activated and expires in
%1 day(s).
Warning Duplicate activation codes
detected on machine %1
from machine %2.
Error This product edition can only
be run on Windows 2000
Server or Advanced Server
running the Server Appliance
Kit.
successfully started.
Contact your vendor to
purchase either a single or
site license.
Contact your vendor before
the evaluation period expires
to purchase either a single or
site license.
Contact your vendor before
the evaluation period expires
to purchase either a single or
site license.
If you have an evaluation
license or a site license, no
action is necessary. If you
have a single license, you
must purchase either
another single license or a
site license.
Verify your activation code
has been entered correctly
and contact technical
support.
No action required.
3001 Service Info. Logger service was
successfully stopped.
4000 Service Info. Kernel was successfully
started.
4001 Service Info. Target service was
successfully started.
4002 Service Info. Source service was
successfully started.
4003 Service Info. Source service was
successfully stopped.
4004 Service Info. Target service was
successfully stopped.
4005 Service Info. Kernel was successfully
stopped.
4006 Service Error Service has aborted due to
the following unrecoverable
error: %1
15 - 9
No action required.
No action required.
No action required.
No action required.
No action required.
No action required.
No action required.
Restart the Storage Mirroring
daemon.
Page 96

ID Category Severity Event Message Required Response
4007 Service Warning Auto-disconnecting from %1
(%2) for Replication Set %3,
ID: %4 due to %5
4008 Service Info. Auto-disconnect has
succeeded for %1 (%2) for
Replication Set %3, ID: %4
4009 Service Info. Auto-reconnecting
Replication Set %1 to %2
(%3)
4010 Service Info. Auto-reconnect has
succeeded connecting
Replication Set %1 to %2
(%3)
4011 Service Error Auto-reconnect has failed
connecting Replication Set
%1 to %2 (%3)
The connection is
auto-disconnecting because
the disk-based queue on the
source has been filled, the
daemon has encountered an
unknown file ID, the target
server has restarted, or an
error has occurred during
disk queuing on the source or
target (for example, Storage
Mirroring cannot read from
or write to the transaction log
file).
No action required.
No action required.
No action required.
Manually reestablish the
replication set to target
connection.
4014 Service Info. Service has started network
transmission.
4015 Service Info. Service has stopped network
transmission.
4016 Service Info. Service has established a
connection to %1 (%2) for
Replication Set %3, ID: %4
4017 Service Info. Service has disconnected
from %1 (%2) for
Replication Set %3, ID: %4
4018 Service Warning %1, however, mirroring and
replication have been
disabled as a restore is
required due to a previous
failover.
4019 Service Info. Service has started a mirror
to %1 (%2) for Replication
Set %3, ID: %4
4020 Service Info. Service has paused a mirror
to %1 (%2) for Replication
Set %3, ID: %4
4021 Service Info. Service has resumed a
mirror to %1 (%2) for
Replication Set %3, ID: %4
No action required.
No action required.
No action required.
No action required.
Perform a restoration.
No action required.
No action required.
No action required.
4022 Service Info. Service has stopped a mirror
to %1 for Replication Set
%2, ID: %3, %4
15 - 10
No action required.
Page 97

ID Category Severity Event Message Required Response
4023 Service Info. Service has completed a
mirror to %1 %2 for
Replication Set %3, ID: %4,
%5
4024 Service Info. Service has started
Replication to %1 (%2) for
Replication Set %3, ID: %4
4025 Service Info. Service has stopped
Replication to %1 (%2) for
Replication Set %3, ID: %4
4026 Service Info. The target has been paused
due to user intervention.
4027 Service Info. The target has been resumed
due to user intervention.
4028 Service Warning Registration of service class
with Active Directory failed.
Verify that the Active
Directory server is up and
the service has the proper
permissions to update its
entries.
4029 Service Warning Registration of service
instance with Active
Directory failed. Verify that
the Active Directory server is
up and the service has the
proper permissions to update
its entries.
No action required.
No action required.
No action required.
No action required.
No action required.
Verify that the Active
Directory server is running
and that the Storage
Mirroring daemon has
permission to update Active
Directory.
Verify that the Active
Directory server is running
and that the Storage
Mirroring daemon has
permission to update Active
Directory.
4030 Service Error RSResource.dll has an
unknown error. The product
functionality has been
disabled.
4031 Service Error RSResource.dll could not be
opened. The product
functionality has been
disabled.
4032 Service Error The RSResource.dll
component version does not
match the component
version expected by the
product. The product
functionality has been
disabled.
4033 Service Error RSResource.dll build version
is invalid. The product
functionality has been
disabled.
Reinstall the software, using
the installation Repair
option, to install a new copy
of the RSResource.dll.
Contact technical support if
this error persists.
Reinstall the software, using
the installation Repair
option, to install a new copy
of the RSResource.dll.
Contact technical support if
this error persists.
Reinstall the software, using
the installation Repair
option, to install a new copy
of the RSResource.dll.
Contact technical support if
this error persists.
Reinstall the software, using
the installation Repair
option, to install a new copy
of the RSResource.dll.
Contact technical support if
this error persists.
15 - 11
Page 98

ID Category Severity Event Message Required Response
4034 Service Error Error verifying the service
name. The product
functionality has been
disabled.
4035 Service Error Error verifying the product
name. The product
functionality has been
disabled.
4036 Service Error Error verifying the vendor
name. The product
functionality has been
disabled.
4037 Service Error Error verifying the vendor
URL name. The product
functionality has been
disabled.
4038 Service Error Error verifying the product
code. The product
functionality has been
disabled.
Reinstall the software, using
the installation Repair
option, to install a new copy
of the RSResource.dll.
Contact technical support if
this error persists.
Reinstall the software, using
the installation Repair
option, to install a new copy
of the RSResource.dll.
Contact technical support if
this error persists.
Reinstall the software, using
the installation Repair
option, to install a new copy
of the RSResource.dll.
Contact technical support if
this error persists.
Reinstall the software, using
the installation Repair
option, to install a new copy
of the RSResource.dll.
Contact technical support if
this error persists.
Reinstall the software, using
the installation Repair
option, to install a new copy
of the RSResource.dll.
Contact technical support if
this error persists.
4039 Service Error Error while reading
RSResource.dll. The product
functionality has been
disabled.
4040 Service Error The product code is illegal for
this computer hardware. The
product functionality has
been disabled.
4041 Service Error The product code is illegal for
this operating system
version. The product
functionality has been
disabled.
4042 Service Error The product code requires
installing the Windows
Server Appliance Kit. The
product functionality has
been disabled.
Reinstall the software, using
the installation Repair
option, to install a new copy
of the RSResource.dll.
Contact technical support if
this error persists.
Reinstall the software, using
the installation Repair
option, to install a new copy
of the RSResource.dll.
Contact technical support if
this error persists.
Reinstall the software, using
the installation Repair
option, to install a new copy
of the RSResource.dll.
Contact technical support if
this error persists.
Reinstall the software, using
the installation Repair
option, to install a new copy
of the RSResource.dll.
Contact technical support if
this error persists.
15 - 12
Page 99

ID Category Severity Event Message Required Response
4043 Service Error This product can only be run
on a limited number of
processors and this server
exceeds the limit. The
product functionality has
been disabled.
4044 Service Error An error was encountered
and replication has been
stopped. It is necessary to
stop and restart the service
to correct this error.
4045 Service Error %1 value must be between
1025 and 65535. Using
default of %2.
4046 Service Error This service failed to start
because of a possible port
conflict. Win32 error: %1
4047 Service Error Could not load ZLIB DLL %1.
Some levels of compression
will not be available.
Reinstall the software, using
the installation Repair
option, to install a new copy
of the RSResource.dll.
Contact technical support if
this error persists.
Contact technical support if
this error persists.
Verify that the Storage
Mirroring port value you are
trying to use is within the
valid range. If it is not, it will
automatically be reset to the
default value.
Verify that the Storage
Mirroring ports are not
conflicting with ports used by
other applications.
The compression levels
available depend on your
operating system. You can
reinstall the software, using
the installation Repair
option, to install a new copy
of the DynaZip.dll, or contact
technical support if this error
persists.
4048 Service Info. Service has started a delete
orphans task to %1 (%2) for
Replication Set %3, ID: %4
4049 Service Info. Service has paused a delete
orphans task to %1 (%2) for
Replication Set %3, ID: %4
4050 Service Info. Service has resumed a delete
orphans task to %1 (%2) for
Replication Set %3, ID: %4
4051 Service Info. Service has stopped a delete
orphans task to %1 (%2) for
Replication Set %3, ID: %4
4052 Service Info. Service has completed a
delete orphans task to %1
(%2) for Replication Set %3,
ID: %4
4053 Service Info. Service has started a restore
task to %1 (%2) for
Replication Set %3, ID: %4
4054 Service Info. Service has paused a restore
task to %1 (%2) for
Replication Set %3, ID: %4
4055 Service Info. Service has resumed a
restore task to %1 (%2) for
Replication Set %3, ID: %4
No action required.
No action required.
No action required.
No action required.
No action required.
No action required.
No action required.
No action required.
15 - 13
Page 100

ID Category Severity Event Message Required Response
4056 Service Info. Service has stopped a
restore task to %1 (%2) for
Replication Set %3, ID: %4
4057 Service Info. Service has completed a
restore task to %1 (%2) for
Replication Set %3, ID: %4
4058 Service Info. Service has started a
verification task to %1 (%2)
for Replication Set %3, ID:
%4
4059 Service Info. Service has paused a
verification task to %1 (%2)
for Replication Set %3, ID:
%4
4060 Service Info. Service has resumed a
verification task to %1 (%2)
for Replication Set %3, ID:
%4
4061 Service Info. Service has stopped a
verification task to %1 (%2)
for Replication Set %3, ID:
%4
4062 Service Info. Service has completed a
verification task to %1 (%2)
for Replication Set %3, ID:
%4
No action required.
No action required.
No action required.
No action required.
No action required.
No action required.
No action required.
4110 Service Warning Target cannot write %1 due
to target disk being full.
Operation will be retried (%2
times or forever)
4111 Service Warning Target can not write %1 due
to a sharing violation.
Operation will be retried (%2
times or forever)
4112 Service Warning Target can not write %1 due
to access denied. Operation
will be retried (%2 times or
forever)
4113 Service Warning Target can not write %1 due
to an unknown reason.
Operation will be retried (%2
times or forever). Please
check the log files for further
information on the error.
The disk on the target is full.
The operation will be retried
according to the
TGExecutionRetryLimit
setting.
A sharing violation error is
prohibiting Storage Mirroring
from writing on the target.
The operation will be retried
according to the
TGExecutionRetryLimit
setting.
An access denied error is
prohibiting Storage Mirroring
from writing on the target.
The operation will be retried
according to the
TGExecutionRetryLimit
setting.
An unknown error is
prohibiting Storage Mirroring
from writing on the target.
The operation will be retried
according to the
TGExecutionRetryLimit
setting.
4120 Service Info. Target write to %1 was
completed successfully after
%2 retries.
15 - 14
No action required.
 Loading...