

Page 1

HP Storage Essentials SRM Enterprise Edition 6.0 Microsoft Windows
Application Integration Software
for SAP ACC version A.02.00
User Guide
T4283-96335
Part number: T4283-96336
Third edition: May 2008
Page 2

Legal and notice information
© Copyright 2002-2007 Hewlett-Packard Development Company, L.P.
Hewlett-Packard Company makes no warranty of any kind with regard to this material, including, but not limited to, the implied
warranties of merchantability and fitness for a particular purpose. Hewlett-Packard shall not be liable for errors contained herein or
for incidental or consequential damages in connection with the furnishing, performance, or use of this material.
This document contains proprietary information, which is protected by copyright. No part of this document may be photocopied,
reproduced, or translated into another language without the prior written consent of Hewlett-Packard. The information is provided
“as is” without warranty of any kind and is subject to change without notice. The only warranties for HP products and services are
set forth in the express warranty statements accompanying such products and services. Nothing herein should be construed as
constituting an additional warranty. HP shall not be liable for technical or editorial errors or omissions contained herein.
Microsoft and Windows are registered trademarks of Microsoft Corporation. Oracle is a registered trademark of Oracle
Corporation. Sun, Solaris, Sun StorEdge, and Java are trademarks or registered trademarks of Sun Microsystems, Inc. in the United
States and other countries. AIX and IBM are registered trademarks of International Business Machines Corporation in the United
States, other countries or both. SGI and IRIX are registered trademarks of Silicon Graphics, Inc. Netscape is a registered trademark
of Netscape Communications Corporation in the United States and other countries. HDS and HiCommand are registered
trademarks of Hitachi Data Systems. HP, HP-UX, and OpenVMS, Tru64 UNIX are registered trademark of Hewlett-Packard
Development Company. QLogic is a trademark of QLogic Corporation. Emulex is a registered trademark of Emulex Corporation.
HBAnyware is a trademark of Emulex Corporation. SAP and SAP NetWeaver are registered trademarks of SAP AG in Germany and
in several other countries. ABAP is a trademark of SAP AG in Germany and in several other countries.
Other product and company names mentioned herein may be the trademarks of their respective owners.
HP Storage Essentials SRM Enterprise Edition Microsoft Windows Application Integration Software for SAP ACC version A.02.00
User Guide
Page 3

Contents
About this guide . . . . . . . . . . . . . . . . . . . . . . . . . . . . . . . . . . . . . . . . . . . . . . . . . xi
Intended audience . . . . . . . . . . . . . . . . . . . . . . . . . . . . . . . . . . . . . . . . . . . . . . . . . . . . . . . . . xi
Prerequisites . . . . . . . . . . . . . . . . . . . . . . . . . . . . . . . . . . . . . . . . . . . . . . . . . . . . . . . . . . . . . xi
Related documentation . . . . . . . . . . . . . . . . . . . . . . . . . . . . . . . . . . . . . . . . . . . . . . . . . . . . . . xi
Document conventions and symbols . . . . . . . . . . . . . . . . . . . . . . . . . . . . . . . . . . . . . . . . . . . . . xii
HP technical support . . . . . . . . . . . . . . . . . . . . . . . . . . . . . . . . . . . . . . . . . . . . . . . . . . . . . . . xiii
HP-authorized reseller . . . . . . . . . . . . . . . . . . . . . . . . . . . . . . . . . . . . . . . . . . . . . . . . . . . xiii
Helpful web sites . . . . . . . . . . . . . . . . . . . . . . . . . . . . . . . . . . . . . . . . . . . . . . . . . . . . . . . xiii
Contents
1SAP Adaptive Computing Overview . . . . . . . . . . . . . . . . . . . . . . . . . . . . . . . . . 1
SAP ACC overview. . . . . . . . . . . . . . . . . . . . . . . . . . . . . . . . . . . . . . . . . . . . . . . . . . . . . . . . . 2
The virtual SAP landscape . . . . . . . . . . . . . . . . . . . . . . . . . . . . . . . . . . . . . . . . . . . . . . . . . 2
SAP ACC components . . . . . . . . . . . . . . . . . . . . . . . . . . . . . . . . . . . . . . . . . . . . . . . . . . . . 4
Virtual IP address. . . . . . . . . . . . . . . . . . . . . . . . . . . . . . . . . . . . . . . . . . . . . . . . . . . . . . . . 7
Virtualized data. . . . . . . . . . . . . . . . . . . . . . . . . . . . . . . . . . . . . . . . . . . . . . . . . . . . . . . . . 8
Control. . . . . . . . . . . . . . . . . . . . . . . . . . . . . . . . . . . . . . . . . . . . . . . . . . . . . . . . . . . . . . 10
Application Integration Software for SAP ACC . . . . . . . . . . . . . . . . . . . . . . . . . . . . . . . . . . . . . 10
HP Storage Essentials SRM Enterprise Edition . . . . . . . . . . . . . . . . . . . . . . . . . . . . . . . . . . . 10
Active host management interface . . . . . . . . . . . . . . . . . . . . . . . . . . . . . . . . . . . . . . . . . . . 10
Application Integration Software . . . . . . . . . . . . . . . . . . . . . . . . . . . . . . . . . . . . . . . . . . . . 10
2 Creating an Adaptive Landscape . . . . . . . . . . . . . . . . . . . . . . . . . . . . . . . . . . 13
SAP virtual landscape . . . . . . . . . . . . . . . . . . . . . . . . . . . . . . . . . . . . . . . . . . . . . . . . . . . . . . 13
Configure the SAP ACC landscape. . . . . . . . . . . . . . . . . . . . . . . . . . . . . . . . . . . . . . . . . . . . . 14
Configure the SAP instance . . . . . . . . . . . . . . . . . . . . . . . . . . . . . . . . . . . . . . . . . . . . . . . . . . 15
3 Install HP Storage Essentials SRM and HP SIM . . . . . . . . . . . . . . . . . . . . . . . . . 17
User account . . . . . . . . . . . . . . . . . . . . . . . . . . . . . . . . . . . . . . . . . . . . . . . . . . . . . . . . . . . . 17
Storage system considerations . . . . . . . . . . . . . . . . . . . . . . . . . . . . . . . . . . . . . . . . . . . . . . . . 17
SAN zoning . . . . . . . . . . . . . . . . . . . . . . . . . . . . . . . . . . . . . . . . . . . . . . . . . . . . . . . . . . 18
Host groups . . . . . . . . . . . . . . . . . . . . . . . . . . . . . . . . . . . . . . . . . . . . . . . . . . . . . . . . . . 18
Reserved-Group. . . . . . . . . . . . . . . . . . . . . . . . . . . . . . . . . . . . . . . . . . . . . . . . . . . . . . . . 18
4 Install the Application Integration Software for SAP ACC . . . . . . . . . . . . . . . . . . 19
Requirements . . . . . . . . . . . . . . . . . . . . . . . . . . . . . . . . . . . . . . . . . . . . . . . . . . . . . . . . . . . . 19
Installation Steps. . . . . . . . . . . . . . . . . . . . . . . . . . . . . . . . . . . . . . . . . . . . . . . . . . . . . . . . . . 19
Installation Checks . . . . . . . . . . . . . . . . . . . . . . . . . . . . . . . . . . . . . . . . . . . . . . . . . . . . . . . . 23
Removing the Application Integration Software for SAP ACC . . . . . . . . . . . . . . . . . . . . . . . . . . . 24
5 Interprocess Communications . . . . . . . . . . . . . . . . . . . . . . . . . . . . . . . . . . . . . 25
Installing OpenSSH. . . . . . . . . . . . . . . . . . . . . . . . . . . . . . . . . . . . . . . . . . . . . . . . . . . . . . . . 25
Setup and Configuration on the Storage Essentials Server. . . . . . . . . . . . . . . . . . . . . . . . . . . 26
User Guide iii
Page 4

Setup and Configuration on the ACC Server . . . . . . . . . . . . . . . . . . . . . . . . . . . . . . . . . . . . 26
Setup and Configuration on the Managed Node . . . . . . . . . . . . . . . . . . . . . . . . . . . . . . . . . 27
6 Install the Integration Library on Managed Nodes . . . . . . . . . . . . . . . . . . . . . . . 29
Installing the storage specific integration library on SAP hosts . . . . . . . . . . . . . . . . . . . . . . . . . . 29
Updating the storage specific integration library on SAP hosts . . . . . . . . . . . . . . . . . . . . . . . . . . 31
7 Record Storage Resources information . . . . . . . . . . . . . . . . . . . . . . . . . . . . . . . 33
Adding a Storage Resource Identifier . . . . . . . . . . . . . . . . . . . . . . . . . . . . . . . . . . . . . . . . . . . 33
Viewing resource information. . . . . . . . . . . . . . . . . . . . . . . . . . . . . . . . . . . . . . . . . . . . . . . . . 40
Removing a Storage Resource Identifier. . . . . . . . . . . . . . . . . . . . . . . . . . . . . . . . . . . . . . . . . . 41
8 Application Logs . . . . . . . . . . . . . . . . . . . . . . . . . . . . . . . . . . . . . . . . . . . . . . 45
9 Program Properties . . . . . . . . . . . . . . . . . . . . . . . . . . . . . . . . . . . . . . . . . . . . 49
Changing the user name and password used for communicating with HP Storage Essentials SRM . 49
Changing the reserve group assignment . . . . . . . . . . . . . . . . . . . . . . . . . . . . . . . . . . . . . . . . . 50
10Operational Details . . . . . . . . . . . . . . . . . . . . . . . . . . . . . . . . . . . . . . . . . . . . 53
Operational information . . . . . . . . . . . . . . . . . . . . . . . . . . . . . . . . . . . . . . . . . . . . . . . . . . . . 53
Location of important log files . . . . . . . . . . . . . . . . . . . . . . . . . . . . . . . . . . . . . . . . . . . . . . . . 57
Common issues . . . . . . . . . . . . . . . . . . . . . . . . . . . . . . . . . . . . . . . . . . . . . . . . . . . . . . . . . . 58
Provisioning errors . . . . . . . . . . . . . . . . . . . . . . . . . . . . . . . . . . . . . . . . . . . . . . . . . . . . . . 58
An element in HP Storage Essentials SRM is reported as “(missing)”. . . . . . . . . . . . . . . . . . . . 58
HP Storage Essentials SRM is out of sync with managed host or storage array . . . . . . . . . . . . 58
Mount error in Microsoft Windows environment . . . . . . . . . . . . . . . . . . . . . . . . . . . . . . . . . 59
Some part of the SAP ACC Process fails, but SAP report instance “running” . . . . . . . . . . . . . . 59
11Application Scripts Description and Usage . . . . . . . . . . . . . . . . . . . . . . . . . . . . 61
Overview . . . . . . . . . . . . . . . . . . . . . . . . . . . . . . . . . . . . . . . . . . . . . . . . . . . . . . . . . . . . . . 61
SAP Central Instance . . . . . . . . . . . . . . . . . . . . . . . . . . . . . . . . . . . . . . . . . . . . . . . . . . . . 62
SAP Database Instance. . . . . . . . . . . . . . . . . . . . . . . . . . . . . . . . . . . . . . . . . . . . . . . . . . . 62
Starting and Stopping SAP instances . . . . . . . . . . . . . . . . . . . . . . . . . . . . . . . . . . . . . . . . . 62
Sample Scripts . . . . . . . . . . . . . . . . . . . . . . . . . . . . . . . . . . . . . . . . . . . . . . . . . . . . . . 63
Script Design . . . . . . . . . . . . . . . . . . . . . . . . . . . . . . . . . . . . . . . . . . . . . . . . . . . . . . . . . . . . 64
Preparing the SAP Central Instance . . . . . . . . . . . . . . . . . . . . . . . . . . . . . . . . . . . . . . . . . . 64
Sample Input Parameters . . . . . . . . . . . . . . . . . . . . . . . . . . . . . . . . . . . . . . . . . . . . . . . 65
Implementation . . . . . . . . . . . . . . . . . . . . . . . . . . . . . . . . . . . . . . . . . . . . . . . . . . . . . . 65
Attaching the SAP Database Instance . . . . . . . . . . . . . . . . . . . . . . . . . . . . . . . . . . . . . . . . . 66
Sample Input Parameters . . . . . . . . . . . . . . . . . . . . . . . . . . . . . . . . . . . . . . . . . . . . . . . 67
Implementation . . . . . . . . . . . . . . . . . . . . . . . . . . . . . . . . . . . . . . . . . . . . . . . . . . . . . . 67
Detaching the SAP Database Instance . . . . . . . . . . . . . . . . . . . . . . . . . . . . . . . . . . . . . . . . 68
Sample Input Parameters . . . . . . . . . . . . . . . . . . . . . . . . . . . . . . . . . . . . . . . . . . . . . . . 68
Implementation . . . . . . . . . . . . . . . . . . . . . . . . . . . . . . . . . . . . . . . . . . . . . . . . . . . . . . 68
Deleting the SAP Central Instance . . . . . . . . . . . . . . . . . . . . . . . . . . . . . . . . . . . . . . . . . . . 69
Sample Input Parameters . . . . . . . . . . . . . . . . . . . . . . . . . . . . . . . . . . . . . . . . . . . . . . . 69
Implementation . . . . . . . . . . . . . . . . . . . . . . . . . . . . . . . . . . . . . . . . . . . . . . . . . . . . . . 69
Configuring SAP to Run Customized Scripts . . . . . . . . . . . . . . . . . . . . . . . . . . . . . . . . . . . . . . . 71
iv
Page 5

Troubleshooting . . . . . . . . . . . . . . . . . . . . . . . . . . . . . . . . . . . . . . . . . . . . . . . . . . . . . . . . . . 72
Central Instance Scripts . . . . . . . . . . . . . . . . . . . . . . . . . . . . . . . . . . . . . . . . . . . . . . . . . . 72
Database Instance Scripts . . . . . . . . . . . . . . . . . . . . . . . . . . . . . . . . . . . . . . . . . . . . . . . . . 72
Index . . . . . . . . . . . . . . . . . . . . . . . . . . . . . . . . . . . . . . . . . . . . . . . . . . . . . . . . 75
User Guide v
Page 6

vi
Page 7

Figures
1 The components to create a virtualized application . . . . . . . . . . . . . . . . . . . . . . . . . . . . . . . . 2
2 Virtual SAP instance on physical server HostA . . . . . . . . . . . . . . . . . . . . . . . . . . . . . . . . . . . . 3
3 SAP instance is moved from HostA to HostB . . . . . . . . . . . . . . . . . . . . . . . . . . . . . . . . . . . . . 4
4 Architecture for SAP Adaptive Computing Controller . . . . . . . . . . . . . . . . . . . . . . . . . . . . . . . 5
5 Overview of the SAP ACC library . . . . . . . . . . . . . . . . . . . . . . . . . . . . . . . . . . . . . . . . . . . . 7
6 Relationship between physical storage devices on different operating systems . . . . . . . . . . . . . . 9
7 Configuring the Storage Integration in the SAP ACC Interface . . . . . . . . . . . . . . . . . . . . . . . . 15
8 Accepting the license agreement . . . . . . . . . . . . . . . . . . . . . . . . . . . . . . . . . . . . . . . . . . . . 20
9 Choose a destination folder . . . . . . . . . . . . . . . . . . . . . . . . . . . . . . . . . . . . . . . . . . . . . . . 21
10 Providing integration information . . . . . . . . . . . . . . . . . . . . . . . . . . . . . . . . . . . . . . . . . . . . 22
11 Installation is complete . . . . . . . . . . . . . . . . . . . . . . . . . . . . . . . . . . . . . . . . . . . . . . . . . . .23
12 Communication between systems. . . . . . . . . . . . . . . . . . . . . . . . . . . . . . . . . . . . . . . . . . . . 25
13 Login page . . . . . . . . . . . . . . . . . . . . . . . . . . . . . . . . . . . . . . . . . . . . . . . . . . . . . . . . . . . 29
14 Integration Library tab . . . . . . . . . . . . . . . . . . . . . . . . . . . . . . . . . . . . . . . . . . . . . . . . . . .30
15 Install/Upgrade Integration Library window . . . . . . . . . . . . . . . . . . . . . . . . . . . . . . . . . . . . 31
16 Login page . . . . . . . . . . . . . . . . . . . . . . . . . . . . . . . . . . . . . . . . . . . . . . . . . . . . . . . . . . . 34
17 The Add Storage Resource page . . . . . . . . . . . . . . . . . . . . . . . . . . . . . . . . . . . . . . . . . . . . 35
18 Associate physical storage to storage resources. . . . . . . . . . . . . . . . . . . . . . . . . . . . . . . . . . 36
19 A reserved group entry. . . . . . . . . . . . . . . . . . . . . . . . . . . . . . . . . . . . . . . . . . . . . . . . . . . 37
20 Confirm details for new storage resource . . . . . . . . . . . . . . . . . . . . . . . . . . . . . . . . . . . . . . 38
21 Newly added storage resource is displayed . . . . . . . . . . . . . . . . . . . . . . . . . . . . . . . . . . . . 39
22 Storage Resource Properties . . . . . . . . . . . . . . . . . . . . . . . . . . . . . . . . . . . . . . . . . . . . . . . 41
23 Removing a storage resource . . . . . . . . . . . . . . . . . . . . . . . . . . . . . . . . . . . . . . . . . . . . . . 42
24 Application Log page. . . . . . . . . . . . . . . . . . . . . . . . . . . . . . . . . . . . . . . . . . . . . . . . . . . . 45
25 Application log detail. . . . . . . . . . . . . . . . . . . . . . . . . . . . . . . . . . . . . . . . . . . . . . . . . . . .46
26 Program Properties page . . . . . . . . . . . . . . . . . . . . . . . . . . . . . . . . . . . . . . . . . . . . . . . . . 50
27 Modify reserve group assignment . . . . . . . . . . . . . . . . . . . . . . . . . . . . . . . . . . . . . . . . . . . 51
29 Sample scripts for starting and stopping SAP instances. . . . . . . . . . . . . . . . . . . . . . . . . . . . . 63
User Guide vii
Page 8

viii
Page 9

Tables
1 Document conventions . . . . . . . . . . . . . . . . . . . . . . . . . . . . . . . . . . . . . . . . . . . . . . . . xii
User Guide ix
Page 10

x
Page 11

About this guide
This guide provides information about the implementation of the HP Storage Essentials Storage
Resource Management (SRM) Enterprise Edition Windows Application Integration Software for SAP
Adaptive Computing Controller. The Application Integration Software is available with HP Storage
Essentials Storage Resource Management (SRM) to enable and integrate with the Adaptive
Computing Controller for SAP when using SAN attached storage on HP StorageWorks arrays.
Intended audience
This guide is intended for:
• Storage Administrator
• System Administrator
• SAP Basis Administrator
• Network Administrator
Prerequisites
Prerequisites for using this product include:
• Networking
• Storage Area Networks (SANs)
• The Common Information Model (CIM)
• HP Storage Essentials Storage Resource Management
• HP Systems Insight Manager
Related documentation
In addition to this guide, please refer to the following document sets:
• HP Storage Essentials Storage Resource Management (SRM) Software
• HP Systems Insight Manager
• Adaptive Computing concepts
• Application Virtualizing
• SAP® Adaptive Computing Controller
• SAP note number 1119595
HP documents can be found on the HP website: http://www.hp.com/support/
SAP documents can be found on the SAP website: http://service.sap.com/adaptive
User Guide xi
Page 12

Document conventions and symbols
Table 1 Document conventions
Convention Element
Medium blue text: Figure 1 Cross-reference links and e-mail addresses
Medium blue, underlined text
(http://www.hp.com
Bold font • Key names
Italics font Text emphasis
Monospace font • File and directory names
Monospace, italic font • Code variables
Monospace, bold font Emphasis of file and directory names, system output, code, and
)
Web site addresses
• Text typed into a GUI element, such as into a box
• GUI elements that are clicked or selected, such as menu and
list items, buttons, and check boxes
• System output
• Code
• Text typed at the command-line
• Command-line variables
text typed at the command line
WARNING! Indicates that failure to follow directions could result in bodily harm or death.
xii
CAUTION: Indicates that failure to follow directions could result in damage to equipment or data.
IMPORTANT: Provides clarifying information or specific instructions.
NOTE: Provides additional information.
Page 13

TIP: Provides helpful hints and shortcuts.
HP technical support
Telephone numbers for worldwide technical support are listed on the HP support web site:
http://www.hp.com/support/
Collect the following information before calling:
• Technical support registration number (if applicable)
• Product serial numbers
• Product model names and numbers
• Applicable error messages
• Operating system type and revision level
• Detailed, specific questions
For continuous quality improvement, calls may be recorded or monitored.
HP strongly recommends that customers sign up online using the Subscriber's choice web site at
http://www.hp.com/go/e-updates
• Subscribing to this service provides you with e-mail updates on the latest product enhancements,
newest versions of drivers, and firmware documentation updates as well as instant access to
numerous other product resources.
• After signing up, you can quickly locate your products by selecting Business support and then
Storage under Product Category.
.
.
HP-authorized reseller
For the name of your nearest HP-authorized reseller:
• In the United States, call 1-800-345-1518.
• Elsewhere, visit the HP web site: http://www.hp.com
and telephone numbers.
Helpful web sites
For third-party product information, see the following HP web sites:
• http://www.hp.com
• http://www.hp.com/go/storage
• http://www.hp.com/support/
. Then click Contact HP to find locations
User Guide xiii
Page 14

xiv
Page 15

1 SAP Adaptive Computing Overview
This chapter describes the following:
• SAP ACC overview, page 2
• Application Integration Software for SAP ACC, page 10
With the increasing complexity and inflexibility of the traditional SAP® environment, it has become
necessary to rethink the way that a SAP environment is managed. With the SAP Adaptive
Computing Controller (ACC), SAP has taken the first steps in improving the management of the SAP
Landscape, and has provided a number of integration points for vendors to extend the Adaptive
Computing Controller functionality.
This document describes the solution from Hewlett-Packard (HP) to extend an SAP Adaptive
Computing environment to support Storage Area Network (SAN) attached storage from HP. The
document provides background information about the adaptive computing concept and the specific
integration points used by HP. This User Guide also describes the usage of the integrated solution
with the SAP ACC in detail.
The basis of the SAP ACC is to virtualize the SAP application from the underlying computing
environment, and arrange the software services together in a group of resources that can start, stop
or be moved from any system, at any time, when needed, where needed. The process of abstracting
the SAP software from the underlying hardware is known as Service Virtualization, and it requires
that the SAP instance and all resources necessary for the virtual resource be independent of any
physical system or system resource. This includes the IP address or host name for the software
service as well as any storage used by the service.
The benefits of implementing an adaptive computing environment includes:
• Lower total cost of ownership (TCO)
• Better server utilization
• Better control of IT landscape
• Higher service levels at lower cost
• A standard approach to the four basic building blocks of you IT landscape: computing,
network, storage, and management
• Productivity
• Faster response time to business-driven needs
• Reduced operation complexity
• Flexibility
• Ability to assign and use hardware resources when needed
• Easy to add or modify hardware components in landscape
User Guide 1
Page 16

SAP ACC overview
The following section provides some basic background on the structure and functionality of the SAP
Adaptive Computing Controller (SAP ACC). For more detailed information, please refer to the
documentation provided by SAP on this subject.
The following topics are covered in this section:
• The virtual SAP landscape, page 2
• SAP ACC components, page 4
• Virtual IP address, page 7
• Control, page 10
The virtual SAP landscape
To create an adaptive SAP landscape, it is necessary to have a virtual application setup. The
application and all the resources belonging to the applications (network and storage) must be
grouped together into one unit that can be moved from one system to another independent from
anything else on the system.
The following figure describes the components to create a virtualized application.
Figure 1 The components to create a virtualized application
A SAP instance consists of network resources that includes a virtual host name and a virtual IP
address. This virtual IP address is different from the dedicated server IP address assigned to the
hardware. The virtual IP address of the application makes it possible to connect to the application,
independent of the hardware, anywhere in the landscape.
The SAP instance also consists of physical storage, either Network Attached Storage (NAS) or
Storage Area Network (SAN)-attached storage. The storage is made up of file systems located on
logical devices (Ldev) from a storage system. The SAP ACC groups all the storage components of an
instance under the Storage Resource Identifier (SRID) and lets you create a custom name for the
storage component of the instance.
The HP Storage Essentials Storage Resource Management (SRM) Enterprise Edition Microsoft
Windows Application Integration Software for SAP ACC provides a link between the SRID created
in SAP and the physical storage resources that is associated with that instance. This allows HP
Storage Essentials SRM to Present or Un-present this storage from any host in the SAN.
SAP Adaptive Computing Overview2
Page 17

In the following figure, the virtual SAP instance is running on physical server HostA. The SAP
Instance has two SAN-attached storage devices mapped from the storage array to the server.
Figure 2 Virtual SAP instance on physical server HostA
Let’s assume the SAP administrator decides that it is necessary to move this SAP instance from server
HostA to server HostB due to business reasons or for maintenance. The SAP ACC initiates the
service relocation action, and the Application Integration Software for SAP ACC ensures that the
User Guide 3
Page 18
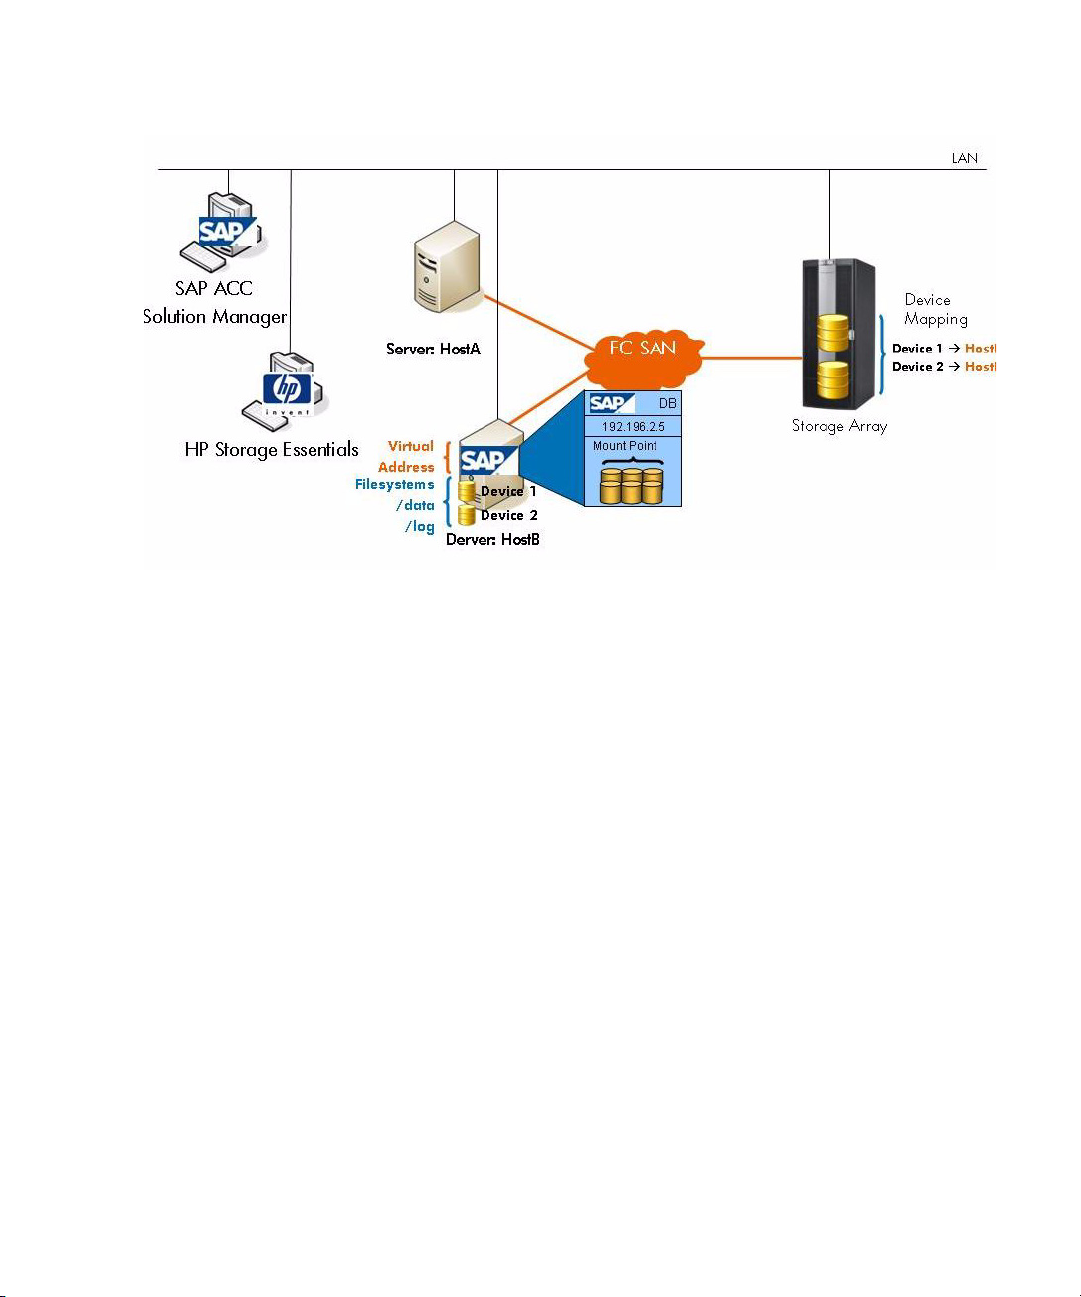
storage devices are removed from server HostA and are presented to server HostB. The following
figure shows the status of the landscape after the service relocation is completed.
Figure 3 SAP instance is moved from HostA to HostB
The SAP ACC gives the SAP administrator the power and flexibility to stop, start or relocate any SAP
instance to any system in the landscape when needed and on what is available.
SAP ACC components
SAP developed the ACC as a system management-like application based on the J2EE engine of the
Web application server. The ACC software runs on a control node and interacts with other SAP
components to create a full image of the entire SAP landscape. The SAP ACC also implements a
component that runs on the managed node, enabling SAP to perform specific function on each
node.
SAP Adaptive Computing Overview4
Page 19

The following is a high level diagram of the SAP ACC Architecture.
Figure 4 Architecture for SAP Adaptive Computing Controller
The ACC station or Control node consists of the WebAS 6.40 J2EE Engine and the Adaptive
Computing Controller software. The ACC software communicates with the System Landscape
Directory (SLD) to derive a list of managed nodes installed in the SAP Landscape. Each managed
node needs to register itself in the SLD Using remote function calls, and the SLD collect status
information from the managed node using the saposcol agent installed on each managed node.
The ACC also requires the SAP instance-specific information from SAP® Solution Manager and
obtains this information using remote function calls via the gateway process. The gateway process
can be implemented either as a standalone or an integrated gateway system.
All Adaptive Computing operations are initiated and controlled from the SAP ACC control node
using the GUI provided by SAP.
An SAP ACC agent is installed on each managed node in the system landscape that is under ACC
control. This “sapacosprep” agent receives command operations from the central SAP ACC
controller and executes the necessary integration modules to enable adaptive computing functions
on the managed node.
Internally the “sapacosprep” agent comprises of a platform/partner independent module and an
API that enables partners to integrate their platform and storage solutions by providing the
User Guide 5
Page 20

necessary integration modules. The functions that the partner modules need to provide can be
divided into two categories:
• Functions that are platform specific
• Activate an IP address
• Deactivate a virtual IP address
• Attach a network file system
• Detach a network file system
• Functions that are storage specific
• Attach a distributed file system
• Detach a distributed file system
• Attach a Storage Resource
• Detach a Storage Resource
Besides the two partner modules, SAP maintains and provides a common function module that
provides:
• Setup and callback functions
• Return module version and information
SAP Adaptive Computing Overview6
Page 21
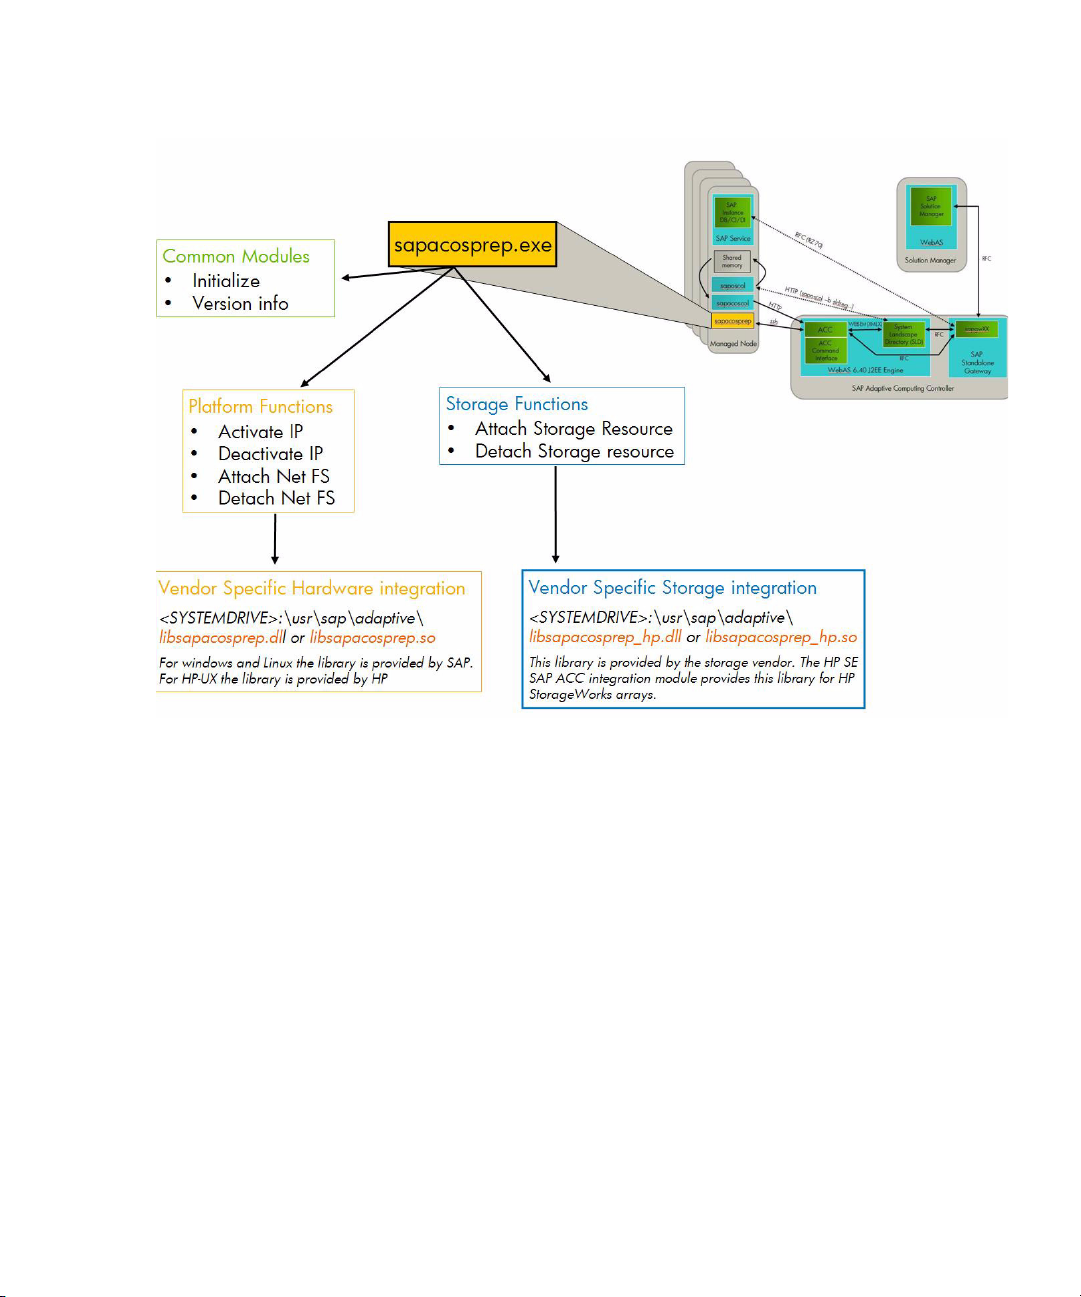
The following figure provides an overview of the SAP ACC integration library, the functions
implemented and the vendor integration point available.
Figure 5 Overview of the SAP ACC library
Keep in mind the following about Figure 5, “Overview of the SAP ACC library,” on page 7:
• The platform-specific modules are provided by each platform hardware/operating system
support team. For HP-UX these modules are provided by the HP SAP consulting and integration
team for HP-UX. For Microsoft Windows and Linux platforms the modules are provided by the
SAP support team.
• The storage-specific modules are provided by each storage vendor, but storage-specific modules
can also be platform-specific. The Application Integration Software for SAP ACC distributes this
storage-specific module for HP StorageWorks arrays.
Virtual IP address
Adaptive Computing uses the concept of assigning a unique IP address and network name to the
application, and by doing this, it separates the application from the physical host IP address. The
process of using virtual IP addresses for applications is commonly used in all cluster systems, and all
major operating system releases support the overloading of a network interface card with multiple IP
addresses. The advantage here is you can always access the application through one unique name,
no matter where the application is running.
User Guide 7
Page 22

NOTE: To install or convert a SAP installation to a virtual landscape, the platform specific libraries
will be required to enable virtual IP addresses on the managed nodes.
Virtualized data
Adaptive Computing also implements the concept of virtualizing the application data into a single
group of data devices (Storage Resources) that can be moved between physical managed nodes.
The first requirement to accomplish data virtualization is to ensure that all the data required for the
application is located on a dedicated set of storage devices. For the Application Integration
Software for SAP ACC, it is required that all the storage devices for a specific SAP application are
located on a central storage system with SAN access from all of the managed nodes. In the SAP
ACC, the set of physical Storage Resources that are required for a specific SAP instance are
identified by a Storage Resource Identifier (SRID). This identifier provides the link between the SAP
ACC application and the Application Integration Software for SAP ACC.
The Application Integration Software for SAP ACC is specifically designed to support SAN-attached
storage in an adaptive landscape.
SAP Adaptive Computing Overview8
Page 23
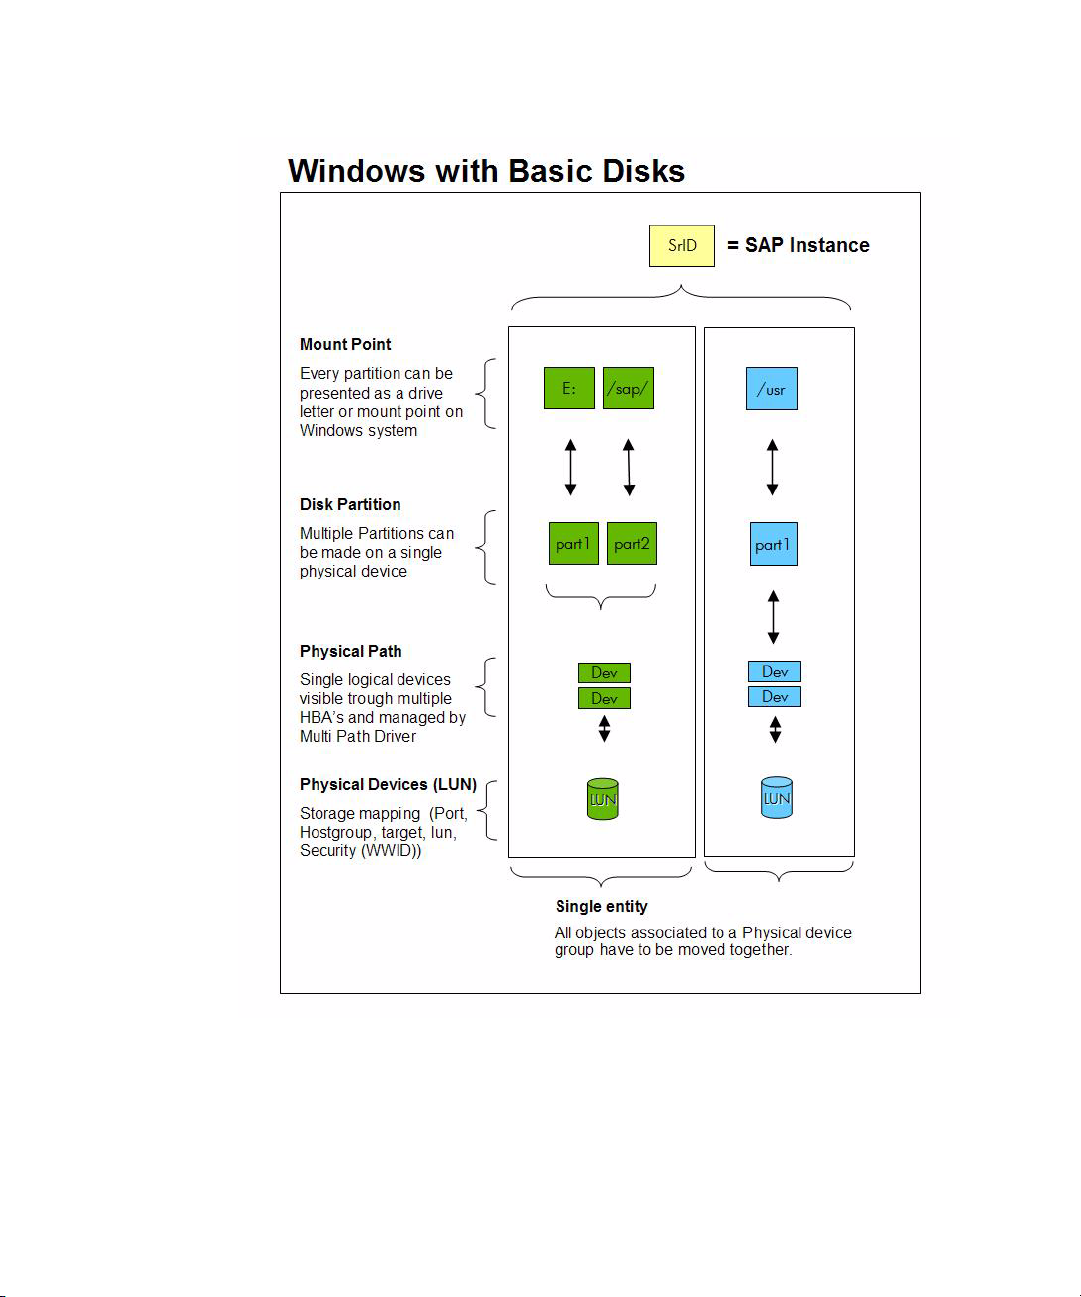
The following diagram shows the relationships between physical storage devices and their usage on
Windows systems.
Figure 6 Relationship between physical storage devices on different operating systems
Operating system disk management utilities lets you combine or subdivide the physical devices into
custom-sized file systems, each with a specific mount point on the host.To successfully move physical
resources between systems, without impacting other application, it is important to make sure that the
physical drives and all associated objects belong only to the SAP instance identified by the SRID.
User Guide 9
Page 24

Control
Controlling the adaptive landscape is performed from within the SAP application using the ACC
software that is build on top of the SAP NetWeaver® application.
Application Integration Software for SAP ACC
To support a fully automated SAN storage movement between managed nodes, HP has developed
the Application Integration Software for SAP ACC. The Application Integration Software for SAP
ACC consists of the following parts:
• HP Storage Essentials SRM Enterprise Edition
• Active host management interface
• Application Integration Software for SAP ACC
HP Storage Essentials SRM Enterprise Edition
The HP Storage Essentials SRM Enterprise Edition product suite provides an integrated array
management functionality for storage provisioning and managed node management. The
Application Integration Software for SAP ACC is built on the HP Storage Essentials SRM API
functions, and it utilizes the HP Storage Essentials SRM database for host objects and the storage
management functions to present and un-present storage to/from any managed node in the
landscape.
Active host management interface
The Application Integration Software for SAP ACC provides an active host management interface
for HP SIM to perform active management on the managed nodes for storage management. For this
to work, it is necessary to have all managed nodes discovered in HP SIM and HP Storage Essentials
SRM and to configure a Secure Shell (OpenSSH) communication to each managed node.
Application Integration Software
The Application Integration Software has three main functions:
• Maintain relationship between Storage Resource Identifier (SRID) and the physical storage
devices - Since the SAP ACC does not maintain a list of physical devices associated to a SAP
instance, but rather only an identifier for the Storage Resources used by an SAP instance, it is
necessary to maintain a link between the SRID used in the SAP ACC configuration and the list of
physical devices used by the instance. The Application Integration Software for SAP ACC
provides an interface that lets you easily associate the Storage Resource Identifier with a specific
mount point and associated physical devices.
• Provide the interaction between SAP ACC and storage management - The Application
Integration Software for SAP ACC provides the vendor specific storage API
(libsapacosprep_hp.dll) to integrate with the SAP “sapacosprep” agent on the managed node.
The storage API forwards storage related requests to the Application Integration Software for
SAP ACC.
• Implement the flow of operation necessary to “start”, “stop” or “relocate” Storage Resource
to/from a managed node - This includes the necessary actions on the managed node to
discover, configure and mount/unmount file systems on the individual computing systems and
SAP Adaptive Computing Overview10
Page 25

storage array manipulation (to present and un-present storage to/from the managed node). The
Application Integration Software for SAP ACC is also responsible to protect storage devices that
are not currently accessed by any managed node.
User Guide 11
Page 26

SAP Adaptive Computing Overview12
Page 27

2 Creating an Adaptive Landscape
This chapter describes the following:
• SAP virtual landscape, page 13
• Configure the SAP ACC landscape, page 14
• Configure the SAP instance, page 15
How you create your adaptive landscape will depend on your environment:
• For new SAP installations, the landscape should be designed and implemented with
virtualization in mind, even if it is not planned to utilize virtualization at this stage. This step will
eliminate the painful process of changing a landscape to support virtualization at a later stage,
and it can also be used to support clustering solutions and operating system virtualization
solutions.
• For the existing SAP landscapes that are not virtualized, it will be necessary to change the
hostname and IP addresses of most instances. This step can be a complex and time consuming
task. Please consult with you SAP provider to plan the best way to modify the landscape.
NOTE: When creating a virtual landscape, use a DNS server and create roaming profiles for the
SAP admin users, and other users. This way all user and system data are centrally controlled and
consistent on all nodes. It is also recommended to use a dedicate SAP Solution Manager server.
SAP virtual landscape
Installing a virtualized SAP system requires a dedicated network name (IP address and host name)
for each SAP instance. This host name needs to be used when SAP is installed, instead of the fixed
server name or IP address. For more details on installing a virtual SAP landscape, consult the SAP
installation manuals and your SAP provider/integrator.
Keep the following in mind:
• The vendor-specific platform library is necessary to add the virtual IP address to the existing IP
address of the system. Access the following Web site to obtain the library for your operating
system: http://service.sap.com/adaptive
This URL requires you to provide an SAP S-user ID.
Once you login to the Web site, access the library as follows:
• Microsoft Windows and Linux - SAP provides the library for Microsoft Windows and Linux.
Follow the links for the library provided by SAP.
• HP-UX - The HP-UX SAP platform team provides the library, which is posted in the vendor
area of the Web site. Follow the vendor specific links for the library provided by the HP-UX
SAP platform team.
User Guide 13
Page 28

NOTE: SAP ACC 1.0 is supported with NetWeaver 2004 only and not with 2004s.
Always use the latest support pack recommended by SAP.
Configure the SAP ACC landscape
The following steps describe the high-level actions necessary to configure the SAP ACC landscape.
For more detailed instructions, consult the SAP documentation for installing and configuring SAP
adaptive computing.
1. Set up the SAP Solution Manager server. Apply the latest support packages and license.
2. Set up the SAP ACC server to the minimum SP8. Verify you can access the ACC interface before
proceeding to the latest SP14.
3. Set up the standalone gateway server on the ACC server.
4. Set up the managed nodes either as ABAP™ only or ABAP+Java WebAS.
5. Register managed nodes into the System Landscape Directory (SLD).
6. Use Solution Manager to activate the nodes as Adaptive-Enabled servers.
7. Configure the adaptive servers on the ACC GUI. ACC Enable the servers and set up the Logical
Landscape.
8. Set up OpenSSH on the ACC server as SAPService<SID>, where SID is the SAP instance number
of the WebAS on the ACC server.
Creating an Adaptive Landscape14
Page 29

Configure the SAP instance
In the SAP ACC software, it is necessary to define the appropriate Storage Vendor integration
module to be used for each Adaptive enabled SAP instance. The following diagram is an example
of how to configure the Storage integration in the SAP ACC interface:
Figure 7 Configuring the Storage Integration in the SAP ACC Interface
1. Select the appropriate Sap Instance, and select Configuration.
2. Define Storage type as “SR”, this is to define that it is an integrate Storage Resource.
3. Under MountPoint/SRID, define a Storage Resource ID for this instance. This is a free text field
and should be descriptive of the instance. This value will be sent to the Application Integration
Software for SAP ACC with the appropriate “start” or “stop” operation request. This value must
match the Storage Resource defined in the Application Integration Software for SAP ACC.
4. Define Partner ID as HP.
User Guide 15
Page 30

Creating an Adaptive Landscape16
Page 31

3 Install HP Storage Essentials SRM and HP SIM
This chapter describes the following:
• User account, page 17
• Storage system considerations, page 17
IMPORTANT: Refer to the release notes to determine which versions of HP Storage Essentials
Storage Resource Management (SRM) and HP Systems Insight Manager (SIM) are supported.
Prior to installing the Application Integration Software for SAP ACC, HP Storage Essentials SRM and
HP SIM must be installed and configured. Services must complete the following steps in order before
installing the HP Storage Essentials SRM SAP ACC Application Integration Software:
IMPORTANT: The following steps are just an overview. Consult the documentation for HP SIM and
HP Storage Essentials SRM for more detailed information.
1. Install HP Storage Essentials SRM with the latest service pack according to the HP Storage
Essentials SRM documentation.
2. Install HP SIM with the latest service pack according to the HP SIM documentation.
3. Install the HP Storage Essentials SRM/HP SIM connector.
4. From HP SIM, discover all components (hosts, switches, and arrays).
5. Install OpenSSH onto the host machines.
6. Install the CIM Extensions that ship with HP Storage Essentials SRM onto the host machines.
7. From HP SIM, discover of all systems.
8. Run Discovery Data Collection.
9. Schedule HP Storage Essentials SRM so that Run Discovery Data Collection runs frequently.
User account
The administrator account that is created during the installation of HP Storage Essentials SRM, is the
account that is used for communication between the Application Integration Software for SAP ACC
and HP Storage Essentials SRM.
NOTE: When you create custom users, they must belong to the Storage Administrator role or
Domain Administrator role. Only users assigned to the Storage Administrator role or Domain
Administrator role can access the Application Integration Software for SAP ACC.
Storage system considerations
This section describes the following:
User Guide 17
Page 32

• SAN zoning, page 18
• Host groups, page 18
• Reserved-Group, page 18
SAN zoning
For a Managed Node to be able to access the physical storage device, it has to be physically
connected to the storage array using a Storage Area Network (SAN). If any zone security is
implemented in the SAN, the Managed Node must be added to the appropriate SAN zone for the
Managed Node to have logical access to the storage array.
The Application Integration Software for SAP ACC does not change any SAN configuration in order
for a Managed Node to have access to the Storage Array.
Host groups
Each Managed Host in the SAP Landscape must have some physical connection to the storage
array, and a host group must be created on the front-end host port, of the storage array, for each
Managed Node. The Managed Node's host bus adapter (HBA) world wide name (WWN) must be
added to the Host group in order for the host to be able to access any devices in that host group.
This procedure must be performed even is the Managed Node will not initially have access to any
physical storage. During the device presentation phase of the operation the Application Integration
Software will determine the HBA WWN for the requesting Managed Node, and must be able to
match this to some Host groups defined on the array.
Reserved-Group
In the HP StorageWorks XP array, a logical device (LDEV) is considered unused (or available) if the
device is not presented to any front end port or host group. One of the advantages of using
Adaptive Computing Controller is the ability to stop some SAP resources, and then, when these
resources are needed again, be able to start them on any available Managed Node. When a
resource is stopped using the SAP ACC, the Application Integration Software will un-present the
physical storage (LDEV's) from the host group, and for some time the physical storage will not be
presented to any port. In order to protect the physical storage from mistakenly being identified as
available, the Application Integration Software will create a Reserved Group host group on a
specific port in the array, and present all adaptive enabled physical storage to that host group, to
ensure that a physical storage device will always have at least one presentation to a host group.
The Reserve-Group will be created when the first storage resource for a storage array is defined in
the Application Integration Software.
NOTE: The HP StorageWorks XP array has a limit of the number of physical devices that can be
assigned per host group and per port. This limit is dependant on the array version and can be
between 1024 and 2048 devices. For this reason, the current version of Application Integration
Software is limited to the number of devices it can managed per storage array.
Install HP Storage Essentials SRM and HP SIM18
Page 33

4 Install the Application Integration Software for SAP
ACC
This chapter describes the following:
• Requirements, page 19
• Installation Steps, page 19
• Installation Checks, page 23
• Removing the Application Integration Software for SAP ACC, page 24
Requirements
The Application Integration Software for SAP ACC is dependant on the prior successful installation
of the following software components on the same server:
• HP Storage Essentials SRM Enterprise Edition software
• HP System Insight Manager
• The HP Storage Essentials SRM/SIM Connector
The Application Integration Software for SAP ACC is intended to be installed on the same physical
server that HP Storage Essentials SRM Enterprise Edition and HP System Insight Manager are
installed on. Installation on any other remote system is not supported.
IMPORTANT: Refer to the release notes for more requirements.
Installation Steps
Login to the HP Storage Essentials SRM server using the same user name used for the HP Storage
Essentials SRM installation.
NOTE: It is important to be able to distinguish between local or domain administrator users and to
make sure that the correct user is used for installing the Application Integration Software for SAP
ACC. The installation process has to register the Application Integration Software into HP SIM and
HP Storage Essentials SRM. Using the incorrect user results in authentication errors.
1. Insert CD-ROM for Application Integration Software into the CD drive, install shield will
automatically start. If the installation does not start automatically, click setup.exe from installation
media.
User Guide 19
Page 34

NOTE: If setup.exe is run from a shared drive, a warning message might appear asking for
confirmation if the application is save to run. Click OK to start the install shield.
The end user license agreement appears.
Figure 8 Accepting the license agreement
2. Click Next to continue.
3. Enter the install location.
Install the Application Integration Software for SAP ACC20
Page 35

The installation program prompts for an installation location.
Figure 9 Choose a destination folder
Default location to install the Application Integration Software for SAP ACC
is%SystemDrive%\Program File\HP\SE_SAP_ACC_Integration
To change the default installation location, click the Browse button and select the alternative
location.
NOTE: It is recommended to use the default installation location.
4. Click the Next button to continue.
5. Enter the port number, domain, user names, and passwords.
The dialog box displays the default port setting used for the Application Integration Software for
SAP ACC. You may use the default ports if they are not already being used on the system. If any
of these ports numbers are being used, choose different, unused port numbers for those ports.
The ports are used to perform the following functions:
a. External Operations Port: mount and dismount operations will be requested through this port.
User Guide 21
Page 36

b. Service Monitor Port: listens for the service to connect and monitor the status of HP Storage
Essentials SRM SAP ACC Integration Core.
c. Configuration port 1: listens for communications with the HP Storage Essentials SRM SAP
ACC Integration Configuration Web interface.
d. Configuration Port 2: a second port to listen for communications with the HP Storage
Essentials SRM SAP ACC Integration Configuration Web interface.
Figure 10 Providing integration information
This dialog also prompts for the user name and password settings for HP Storage Essentials SRM
and HP Systems Insight Management. This information lets the Application Integration Software
for SAP ACC communicate with HP Storage Essentials SRM and HP System Insight Management
so that storage movement operations can be performed. If you do not know the user name and
password settings for HP Storage Essentials SRM and HP Systems Insight Manager, ask your
system administrator to enter it.
The user name needs to be provided in the format <domain>\username, where <domain> is
either the local system domain or the global domain user, depending on what account was used
during installation of HP Storage Essentials SRM.
The Next button completes the installation of the necessary files on the HP Storage Essentials
SRM server.
Install the Application Integration Software for SAP ACC22
Page 37

6. Finish the installation by clicking Finish.
Figure 11 Installation is complete
Installation Checks
The following directories are created during installation:
• C:\Program Files\HP\SE SAP ACC Integration
• C:\Program Files\HP\SE SAP ACC Integration\bin
• C:\Program Files\HP\SE SAP ACC Integration\ACC_deploy
• C:\Program Files\HP\SE SAP ACC Integration\config
• C:\Program Files\HP\SE SAP ACC Integration\deploy
• C:\Program Files\HP\SE SAP ACC Integration\docs
• C:\Program Files\HP\SE SAP ACC Integration\lib
• C:\Program Files\HP\SE SAP ACC Integration\logs
• C:\hp\StorageEssentials\JBossandJetty\server\appiq\deploy\SE_SAP_ACC_I
ntegration.war and it’s subdirectories
• C:\Program Files\HP\SE\SAP ACC Integration\sample
The installation also adds a local Windows service to automatically start the HP Storage Essentials
SRM SAP ACC integration core when Windows starts. The name of this service is HP SE SAP ACC
Integration Core Service.
User Guide 23
Page 38

IMPORTANT: Verify that the AppStorManager service has started. The AppStorManager service
runs HP Storage Essentials SRM. Although the Application Integration Software for SAP ACC
depends on the AppStorManager service running, the AppStorManager service is not part of the
Application Integration Software for SAP ACC.
Removing the Application Integration Software for SAP ACC
IMPORTANT: The removal program for the Application Integration Software for SAP ACC stops
AppStorManager, which is the service for HP Storage Essentials SRM, before removing the
Application Integration Software. Plan the removal of the Application Integration Software for SAP
ACC when HP Storage Essentials SRM is not being heavily used and/or during off peak hours.
To remove a previous version of the Application Integration Software for SAP ACC:
1. Access the Add or Remove Programs window by selecting Start > Settings > Control Panel >
Add or Remove Programs.
2. From the list of currently installed programs, select HP_SE_SAP_ACC_Integration.
3. Click the Change/Remove.
4. Click Remove.
The removal program for the Application Integration Software for SAP ACC stops and starts
AppStorManager.
NOTE: After removal of the Application Integration Software for SAP ACC, the HP Storage
Essentials SRM server takes some time before it is ready for operations. Wait approximately
5 minutes before using HP Storage Essentials SRM after removing the Application Integration
Software for SAP ACC. This is an estimate, it may take longer and can vary depending on
the network environment. For example, a greater number of elements in the network
increases the time required for path calculations done at the start of HP Storage Essentials
SRM.
Install the Application Integration Software for SAP ACC24
Page 39

5 Interprocess Communications
This chapter describes ”Installing OpenSSH” on page 25.
The Adaptive Computing Integration Software uses different communication methods to enable all
the different components to communicate with each other. For successful implementation, it is
necessary to understand the communication methods and the dependencies between products.
The following diagram displays a summary of the inter-process communications in the adaptive
landscape.
Figure 12 Communication between systems
Installing OpenSSH
Secure Shell (OpenSSH) is used for the communication between the SAP ACC server to the
managed nodes, as well as between the HP SIM and the managed nodes. SAP and HP SIM have
different methods to install and configure SSH to the host, depending on what is already configured.
This can result in some issues when configuring the integrated solution.
The following is a high level sequence for installing OpenSSH in the adaptive landscape. For more
details on installation and commands, please refer to the user documentation on OpenSSH or the
Installation Guides for SAP and HP SIM.
User Guide 25
Page 40

Setup and Configuration on the Storage Essentials Server
1. Install OpenSSH through the HP SIM GUI to the managed nodes using a common local
administrator account.
IMPORTANT: The local administrator account must be valid on all managed nodes for HP SIM to
successfully install tools. You can check which administrator account SIM is currently using by
opening a command prompt on the Storage Essentials server and entering the following command:
mxglobalsettings –ld WindowsAdminUserName
If the listed local administrator account is incorrect, you must change the administrator account used
by SIM by issuing the following command:
mxglobalsettings –s WindowsAdminUserName=<Administrator account>
HP Insight Manager Service must be restarted for the change to take
effect.
2. Once OpenSSH is successfully installed onto a managed node, you must configure the SIM
agent to be able to communicate with the managed node. This can be done by entering the
following command from a command prompt on the Storage Essentials server:
mxagentconfig –a –n <hostname> -u <Administrator username> -p <password>
3. Verify that SIM is able to communicate with the managed host through OpenSSH by performing
the following steps:
a. Select Tools > Command Line Tools > Windows > dir… from the SIM menu.
b. Select the host and enter the dir command on a local drive.
NOTE: If the dir task fails the first time in HP SIM, you must repeat the operation again. It
has been observed that OpenSSH will fail on the first communication attempt, but any
subsequent communication will succeed if it has been successfully set up.
4. Set up the ACC server and managed nodes if OpenSSH is functioning properly.
Setup and Configuration on the ACC Server
1. Login as <DOMAIN>\<Administrator>
2. Install OpenSSH and enter c:\OpenSSH (no spaces in path) as the installation directory.
3. Set up the OpenSSH service to start as the SAP ACC Administrator username. For example:
SAP-ACC\SAPServiceJ2E
4. Create the directory c:\OpenSSH\home.
5. Create the system variable HOME = c:\OpenSSH\home
6. Open regedit and set:
HKLM\Software\Cygnus solutions\Cygwin\mounts v2\/home
String value native = c:\OpenSSH\home
Interprocess Communications26
Page 41

7. Configure c:\OpenSSH\etc\sshd_config. Set the parameters:
RSAAuthentication yes
PasswordAuthentication no
8. Create a file to map the domain users to ssh users. Open a command prompt and enter:
Cd c:\OpenSSH\etc
..\bin\mkpasswd –d > passwd
9. Create a home directory for the SAP ACC Administrator or the SAPService<SID> username. For
example:
mkdir c:\OpenSSH\home\SAPServiceJ2E
10.Delete the file c:\OpenSSH\var\log\OpenSSH.log to avoid permission problems when
restarting the service as the administrator.
11.Reboot the server
12.Create the RSA key pair on the ACC server. Open a command prompt and enter the following
commands:
sh
cd $HOME
ssh-keygen –t rsa
Accept the default filename /home/Administrator/.ssh/id_rsa and press return for no
passphrase and press return again to confirm your choices.
The files id_rsa and id_rsa.pub are generated under /home/Administrator/.ssh.
Setup and Configuration on the Managed Node
1. Login as <DOMAIN>\<Administrator>
OpenSSH is installed under c:\Program Files (x86)\OpenSSH. Edit sshd_config under
the etc directory:
a. Enable RSAAuthentication by setting no to yes.
b. Enable the AuthorizedKeysFile by deleting the # sign in front
c. Leave PasswordAuthentication as the yes default.
2. Open a command prompt and enter the following in the OpenSSH\etc directory:
..\bin\mkpasswd –d >> passwd
\bin\mkgroup -d >> group
3. Add the SAP ACC Administrator user (SAPServiceJ2E for example) to the Administrators
group on the managed node. This can be done by opening a command prompt and entering:
net localgroup administrators <DOMAIN>\<ACC Administrator> /add
Reboot the managed node
Once the managed node is working, login as the SAP ACC Administrator and create the
authorized_keys file. Consider the following:
• The quickest way to create this file is to copy the id_rsa.pub file from the ACC server and
rename it as the authorized_keys file.
• The file must be stored under c:\Documents and Settings\SAPServiceJ2E\.ssh
directory
User Guide 27
Page 42

Interprocess Communications28
Page 43
6 Install the Integration Library on Managed Nodes
This chapter describes the following:
• Installing the storage specific integration library on SAP hosts, page 29
• Updating the storage specific integration library on SAP hosts, page 31
The HP Storage Essentials SRM SAP ACC Integration Software contains a feature that
installs/updates components onto the managed nodes. The install/update feature will only work
properly after the managed node is configured and discovered in HP Storage Essentials SRM, and
the OpenSSH module has been deployed to the managed node from HP SIM.
Installing the storage specific integration library on SAP hosts
1. Login to the HP Storage Essentials SRM SAP ACC Integration Software.
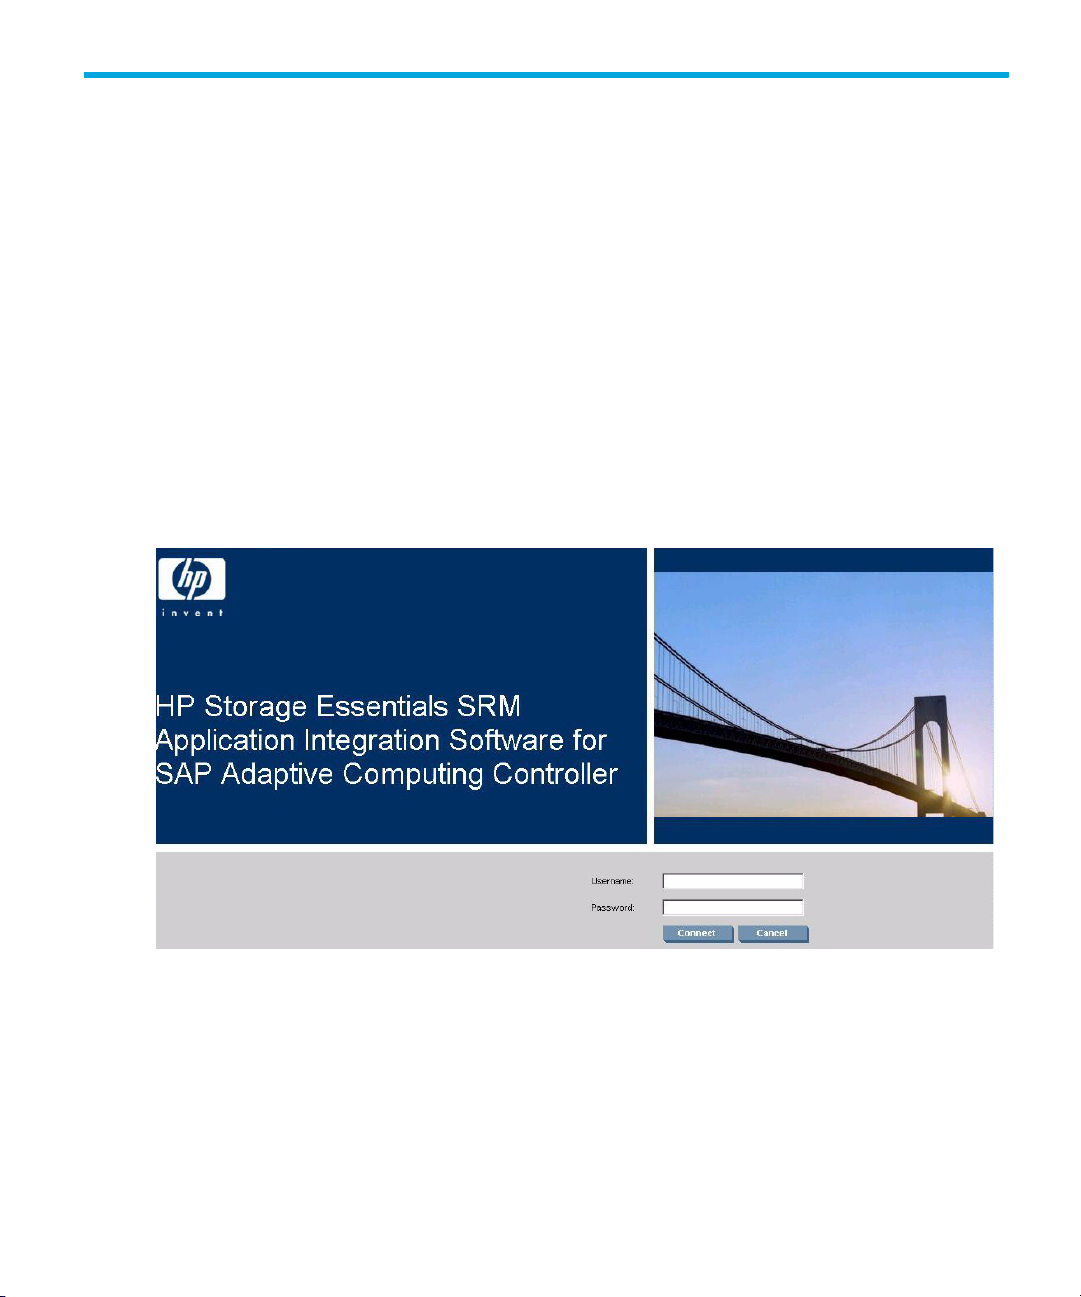
2. Open an Internet Explorer browser window and enter the following URL:
http://<SE Server name or IP>/SE_SAP_ACC_Integration/pages/Login.jsp
The following login page appears.
Figure 13 Login page
3. Enter your user name and password to connect to the HP Storage Essentials SRM SAP ACC
Integration Software (format is <domain>\username).
User Guide 29
Page 44
NOTE: The <domain> can either be the local host domain or the global domain,
depending on what you used to install HP SIM and HP Storage Essentials SRM.
For a successful authentication, the username and password must match a username and
password recognized by Storage Essentials. The match must be letter-by-letter and case
sensitive.
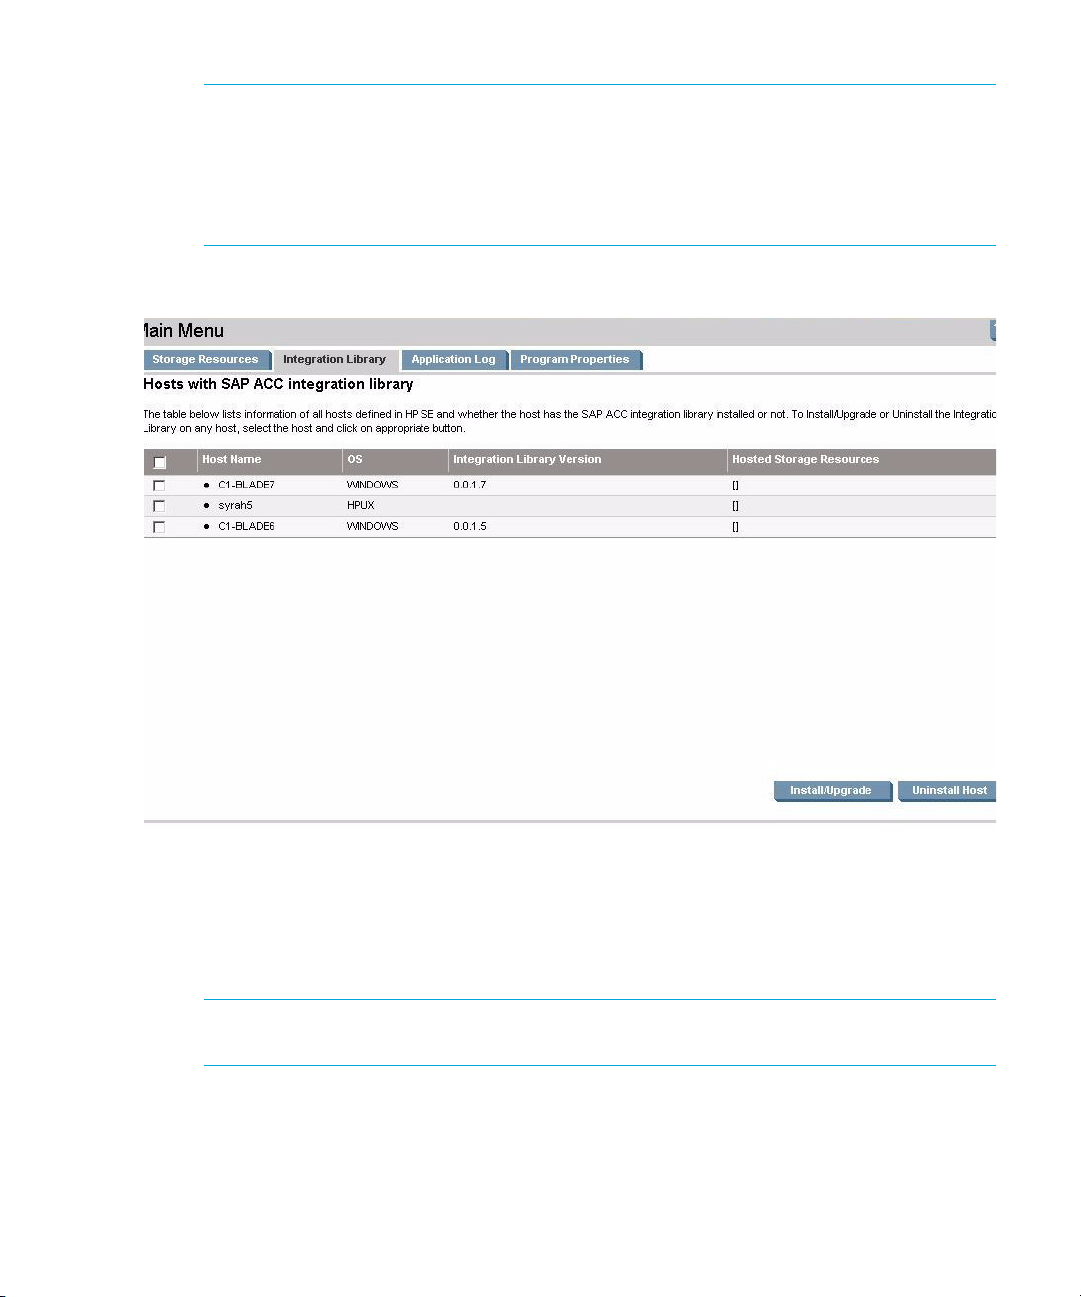
4. Click the Integration Library tab.
Figure 14 Integration Library tab
The page lists the hosts discovered in HP Storage Essentials SRM, along with the operating
system that each host is running. The Integration Library version is unknown for all hosts, until a
specific library version is distributed to that host. The Hosted Storage Resources column displays
the active Storage Resources that have been added to a host.
NOTE: It is possible to configure a Storage Resource from a host without the library
installed, but that resource cannot be moved unless a library is also installed on the host.
5. Select the host from the list that requires the library to be installed. This is the vendor-specific
library that links the SAP ACC to the HP Storage Essentials SRM SAP ACC integration software.
Click the Install/Upgrade button to install the library on that host.
Install the Integration Library on Managed Nodes30
Page 45
NOTE: This version only supports one host installation at a time.
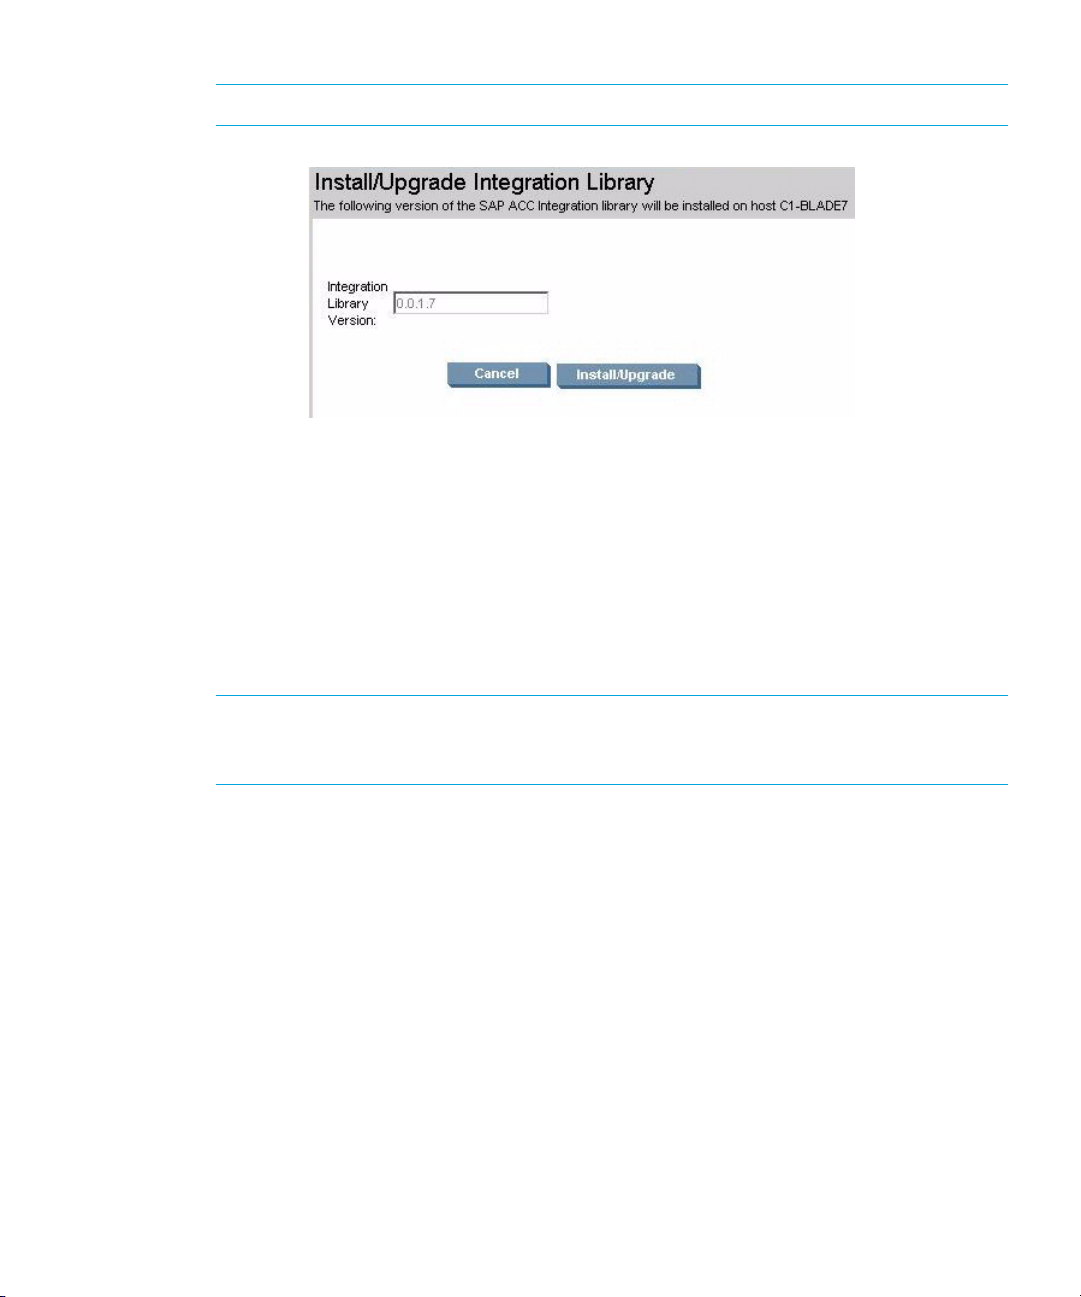
Figure 15 Install/Upgrade Integration Library window
The dialog confirms the version number of the Integration Library that is about to be installed on
the selected host. This will always list the latest version of the library that is installed on the local
server.
6. To start the installation of the library on the SAP host, click the Install/Upgrade button.
The library is installed in the <SYSTEMDRIVE>:\usr\sap\adaptive directory on the host.
The installation process also adds entries in the system registry, which the Integration Software
requires to connect to the HP Storage Essentials SRM server, including the HP Storage Essentials
SRM server name and the port number for communication.
NOTE: If the HP Storage Essentials SRM server name or communication port numbers for
HP Storage Essentials SRM SAP ACC Integration Software is changed, it would be necessary
to re-install/update the Integration Software on all the managed nodes.
After the operation is completed, the process displays the version of the library that was just
installed on the host.
Updating the storage specific integration library on SAP hosts
When new versions of the Storage specific integration library are available, it is only necessary to
install the version onto the HP Storage Essentials SRM SAP ACC Integration Software server, and
then use the above procedure to update all existing hosts to the new version of the library.
User Guide 31
Page 46

Install the Integration Library on Managed Nodes32
Page 47

7 Record Storage Resources information
This chapter provides information about the following
• Adding a Storage Resource Identifier, page 33
• Viewing resource information, page 40
• Removing a Storage Resource Identifier, page 41
Adding a Storage Resource Identifier
The HP Storage Essentials SRM SAP ACC Integration Software saves the Storage Resource Identifiers
(SRIDs) in the Integration Software’s database. Actual file system and physical devices are obtained
from the host that has the Storage Resource active.
Prerequisites:
• The SAP instance is installed on the managed node.
• All the storage associated with the SAP instance is presented and mounted on the managed
node.
• The managed node is configured and discovered in HP Storage Essentials SRM.
• The SSH agent is deployed to the managed node from HP SIM, and communication to the
managed node is enabled.
• The HP Storage Essentials SRM SAP ACC Integration Software host agents are installed on the
managed node.
To add a Storage Resource ID to the Integration Software database:
1. Log into the HP Storage Essentials SRM SAP ACC Integration Software:
2. Open an Internet Explorer browser window and enter the following URL:
http://<HP Storage Essentials SRM Server name or
IP>/SE_SAP_ACC_Integration/pages/Login.jsp
where <HP Storage Essentials SRM Server name or IP> is the DNS name or IP address of the
server running HP Storage Essentials SRM.
User Guide 33
Page 48

The following login page is displayed.
Figure 16 Login page
3. Enter the user name and password to connect to the HP Storage Essentials SRM server. The
format of the user name is <domain>\username.
After successful authentication, the HP Storage Essentials SRM SAP ACC integration Main
window is displayed.
The list of Storage Resources is empty the first time you add a resource.
4. Click the Add button to add a Storage Resource.
The Add Storage Resource page is displayed.
Record Storage Resources information34
Page 49

5. Enter the Storage Resource ID in the Storage Resource Name field. The Storage Resource ID you
enter in this field must match the Storage Resource ID used in the SAP ACC interface when
defining the storage for the specific SAP instance.
Figure 17 The Add Storage Resource page
6. Add a Storage Resource group name, or select a name from the list of existing Storage Resource
groups.
This field is only used to sort the defined Storage Resources on the Main menu, and it has no
other functional value. The field can be left blank if desired.
NOTE: If this is the first Storage Resource, the Storage Resource group menu is empty.
7. Add a description for the Storage Resource. This field is only to provide more detail of actual
resources and has no functional value. The field can be left blank if desired.
8. Select the host that has this resource currently active and mounted from the menu. By default the
menu lists the host names configured in the HP Storage Essentials SRM server, including hosts
that are not part of the SAP ACC landscape. If this list is too long, select the check box next to
the menu to limit the list to only hosts that have the HP Storage Essentials SRM SAP ACC
Integration host agent installed.
9. Click Next.
User Guide 35
Page 50

A list of active file systems on the selected host are displayed. Detailed information for each file
system is displayed in the table.
Figure 18 Associate physical storage to storage resources
10.Select a file system that is part of the SAP instance. Multiple file systems can be selected. A file
system can only belong to one Storage Resource at any time. If the file system is already defined
in a Storage Resources (resource name is listed in the SRID column of display), it is not possible
to select this resource again.
NOTE: Collecting the information about the file systems and storage related to the file
systems can take some time.
11.Define the reserved group for the safekeeping of offline devices.
If this is the first resource for this HP StorageWorks XP array, the Reserved-Group page is
displayed to identify the reserved group used for safekeeping of the Storage Resources when
resource is not presented to any system.
Record Storage Resources information36
Page 51

In the HP StorageWorks XP array, a storage device not presented to any host or host port is
considered a free or available device, and will be available to be used whenever new storage is
required. To protect the data on a storage device that is not currently active in the Adaptive
Computing environment, the HP Storage Essentials SRM SAP ACC Integration software presents
all Adaptive Computing storage devices to a reserved host group, to ensure that these devices
will always have at least one presentation to a port in the array. The port does not have to be
connected to any hosts, and the host group should not provide access to any host either.
NOTE: If a reserve port already exists for this HP StorageWorks XP array, the following
dialog box is not displayed. Go to Step 13.
Figure 19 A reserved group entry
The port number selected for the reserved group should be a Target or RCU Target port with
security enabled. The Application Integration Software creates a host group with default name
SAP ACC Reserved on this port and assign all the physical devices used in the Adaptive
Computing environment to this group.
You can re-name the host group name used for the reserve port, either when defining the port in
this dialog box, or in the Program Properties tab on the main screen.
NOTE: The HP StorageWorks XP array has a limit of the number of physical devices that
can be assigned per host group and per port. This limit is dependant on the array version
and can be between 1024 and 2048 devices. For this reason, the current version of
Application Integration Software is limited to the number of devices it can managed per
storage array.
12.Click Next.
The Confirmation screen is displayed. This page does not let you modify the reserved group port
number or name. To modify information, click Cancel to restart the process.
User Guide 37
Page 52

Figure 20 Confirm details for new storage resource
13.Click the Finish button.
The Storage Resource is added to the HP Storage Essentials SRM SAP ACC Integration Software
configuration files. The physical devices are also added to the reserved group on the specific
array. The reserved group is also created if this is the first Storage Resource for that array.
Record Storage Resources information38
Page 53

NOTE: This process can take some time, due to storage provisioning to the reserve pool.
After successful completion of adding a Storage Resource the HP Storage Essentials SRM SAP
ACC Integration Software returns to the main screen and the newly added Storage Resource is
displayed in the table of configured Storage Resources.
Figure 21 Newly added storage resource is displayed
The Status column displays the current status of this storage. A Mounted status means that a resource
is currently active on a specific server indicated by the Hosted By column. If a resource is stopped
then the resource status changes to Dismounted and the Hosted by column is empty.
Other possible values for the status field are:
• Mounted - A resource is currently active on the server listed in the Hosted by column
• Mounting - A resource is starting on the server listed in the Hosted by column
• Dismounted - A resource is not currently active on the server listed in the Hosted by column
• Dismounting - The resource is in the process of stopping on the server listed in the Hosted by
column
• Failed - A process of the mount or unmount operations has failed and resource is in some failed
status.
• Unknown - This is displayed when an unexplained error occurs in the application.
User Guide 39
Page 54

NOTE: The HP SAP ACC Integration Software displays the last known status for the resource. Any
status change done without the knowledge of the Integration Software, for example a manual
change, can result in the status information being incorrect.
NOTE: If mounting or dismounting a resource is interrupted prior to completion, the status may be
displayed as Dismounting or Mounting.
Viewing resource information
To see detailed information of a configured Storage Resource, select the resource from the main
screen and click the Properties button. Properties for only one resource can be viewed in this
release.
Record Storage Resources information40
Page 55

The Storage Resource Properties window appears.
Figure 22 Storage Resource Properties
Removing a Storage Resource Identifier
A storage resource can be removed by selecting the resource on the main screen and clicking
Remove.
User Guide 41
Page 56

Figure 23 Removing a storage resource
Record Storage Resources information42
Page 57

A confirmation screen is displayed with two check boxes.
A Storage Resource can be in one of two states at the time of deletion form the HP Storage
Essentials SRM SAP ACC Application Integration Software.
• Mounted: If the resource is mounted and therefore presented to a host, the delete operation only
removes the configuration information from the local configuration files and removes the physical
devices from the reserved group. The physical devices remains presented to the current managed
node and the file system remains mounted on this host. In this case it is very easy to add the
resource back into the HP Storage Essentials SRM SAP ACC Integration software.
• Dismounted: If the Storage Resource is currently dismounted, and therefore not presented to any
managed node, but only available in the reserved group on the array, the removal process
removes the local definition of the resources as well as the presentation to the reserved group. In
this case, the physical devices are no longer presented to any port on the array, and it is
considered to be available to other applications. If the data on the devices is important to you,
first mount the resource on a managed node using the SAP ACC interface, before deleting the
resource.
IMPORTANT: Before selecting the check boxes on this page, you should understand the
implications and take responsibility for the physical devices and any data on these devices before
performing the delete operation.
User Guide 43
Page 58

Record Storage Resources information44
Page 59
8 Application Logs
The log files for all storage operations are located on the HP Storage Essentials SRM server
under%SystemDrive%\Program File\HP\SE SAP ACC Integration\logs folder, and it
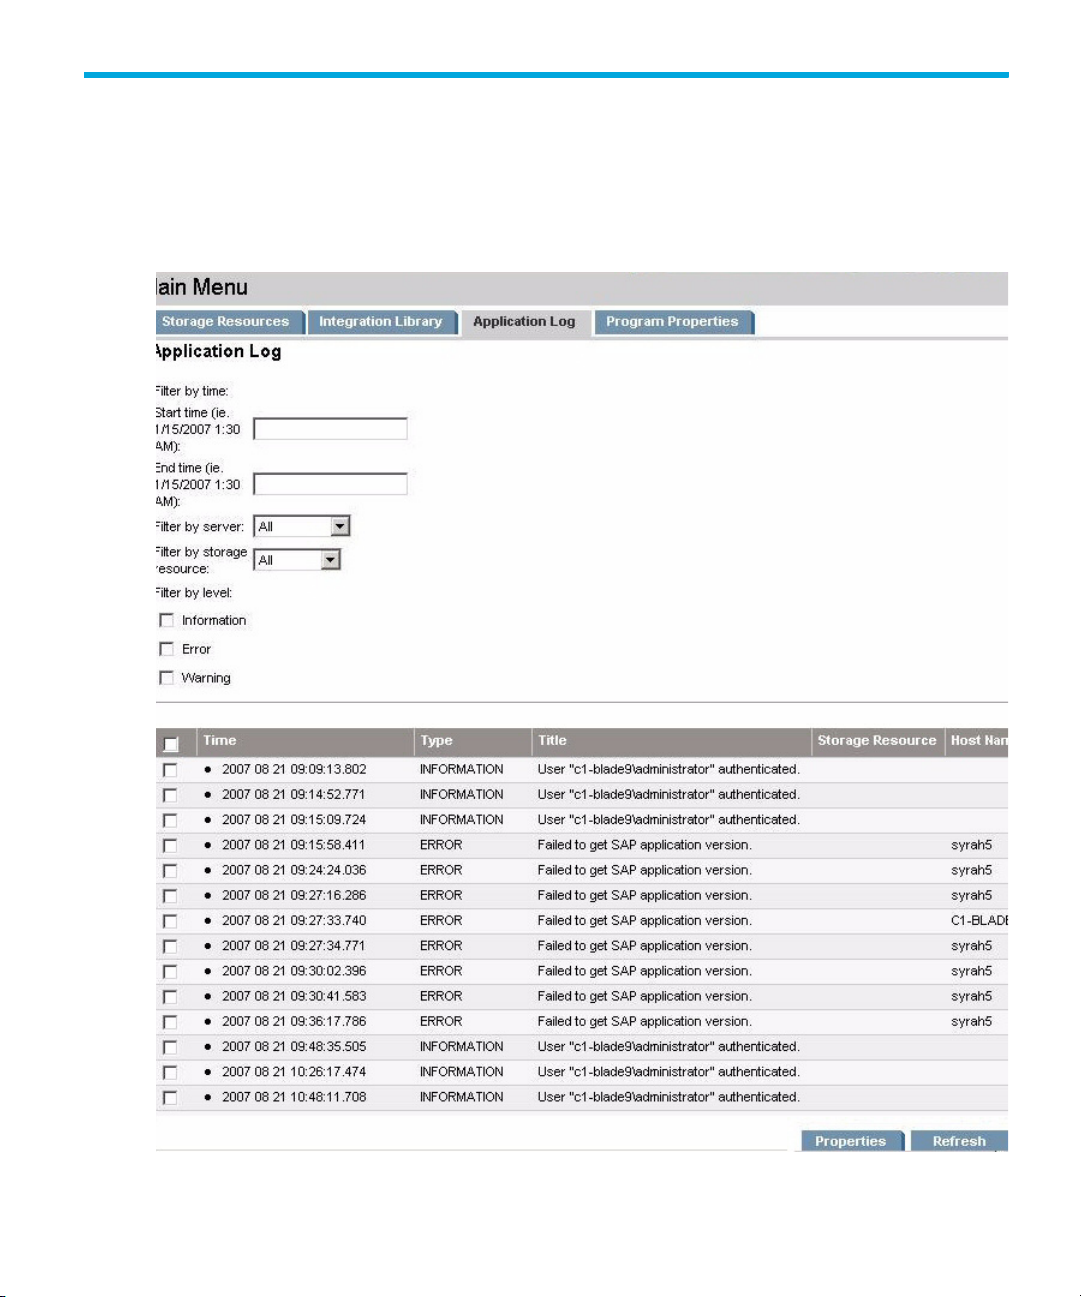
can also be accessed by selecting the Application Log tab on the main screen.
Figure 24 Application Log page
User Guide 45
Page 60
The Application Log page lets you filter the log file for the following:
• a time period
• a host
• SRID
• type of event
To view the application log entries, enter a start date and time in the mm/dd/yyyy hh:mm AM|PM
format, for example 1/15/2007 1:30 AM. You can add any other filter options as necessary, then
click the Refresh button.
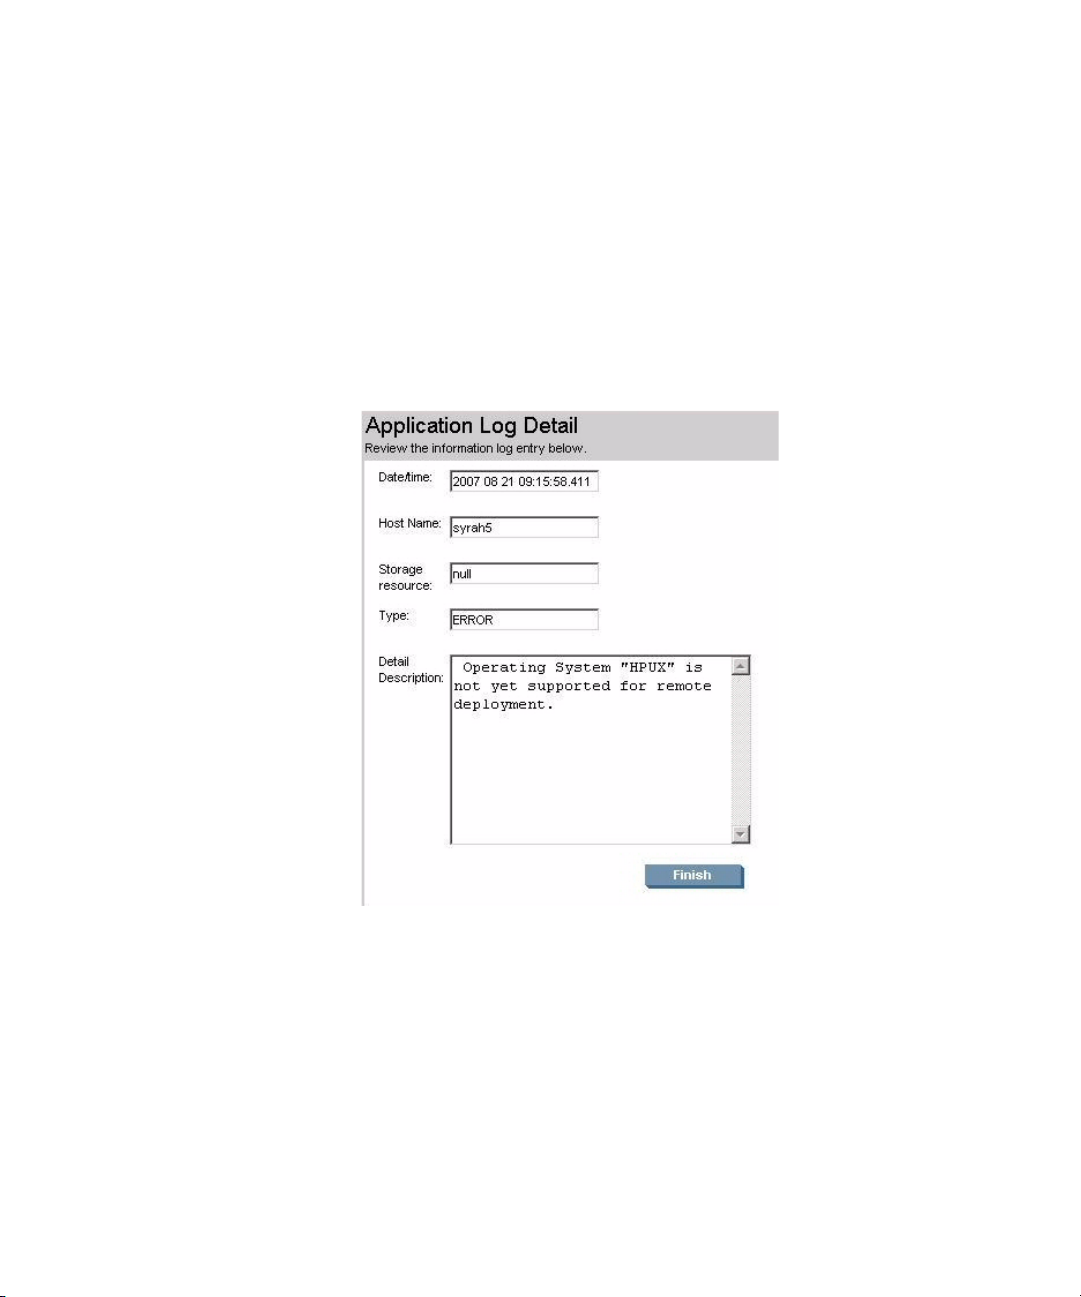
To see more details about an event, select the check box next to the event description and then click
Properties.
Figure 25 Application log detail
The log messages are classified as follows:
• Error: This level is the most important because it indicates that a problem occurred during a
process. Further investigation and corrective actions might be required.
• Warning: The next most important level to indicate that there may be a problem in the
configuration or environment. Further investigation and correction of warning condition is
recommended.
• Information: The lowest level for log messages, recording normal operations and events. No
action is required.
Application Logs46
Page 61

The HP Storage Essentials SRM SAP ACC Integration Software creates a new log file monthly. Old
log files remain in the log directory. You can remove the old log files manually from
the%SystemDrive%\Program Files\HP\SE SAP ACC Integration\logs directory.
User Guide 47
Page 62

Application Logs48
Page 63

9Program Properties
This chapter describes the following:
• Changing the user name and password used for communicating with HP Storage Essentials
SRM, page 49
• Changing the reserve group assignment, page 50
Use the Program Properties tab to do one or more of the following:
• Modify the user name and/or password used for communicating with HP Storage Essentials
SRM.
• Change the reserve group assignment.
To learn more, click one of the following:
• Changing the user name and password used for communicating with HP Storage Essentials
SRM, page 49
• Changing the reserve group assignment, page 50
Changing the user name and password used for communicating with HP Storage Essentials SRM
The administrator account which is created during the installation of HP Storage Essentials SRM, is
the account used for communication between the Application Integration Software for SAP ACC
and HP Storage Essentials SRM.
If the user name or password for administrator account changes, you must make the Application
Integration Software aware of this change so that the it can continue to communicate with HP
Storage Essentials SRM. This includes changes in the username or password letter case.
To change the user name and/or password:
1. Click the Program Properties tab from the main menu.
2. If applicable, enter the new user name in the User name field, as shown in the following figure.
3. If applicable, enter the new password in the Password field.
User Guide 49
Page 64

4. Click Save Changes.
Figure 26 Program Properties page
Changing the reserve group assignment
To change the reserve group assignment for a specific array:
1. Click the Program Properties tab from the Main Menu.
2. Select the array to be modified.
3. Click Properties.
Program Properties50
Page 65
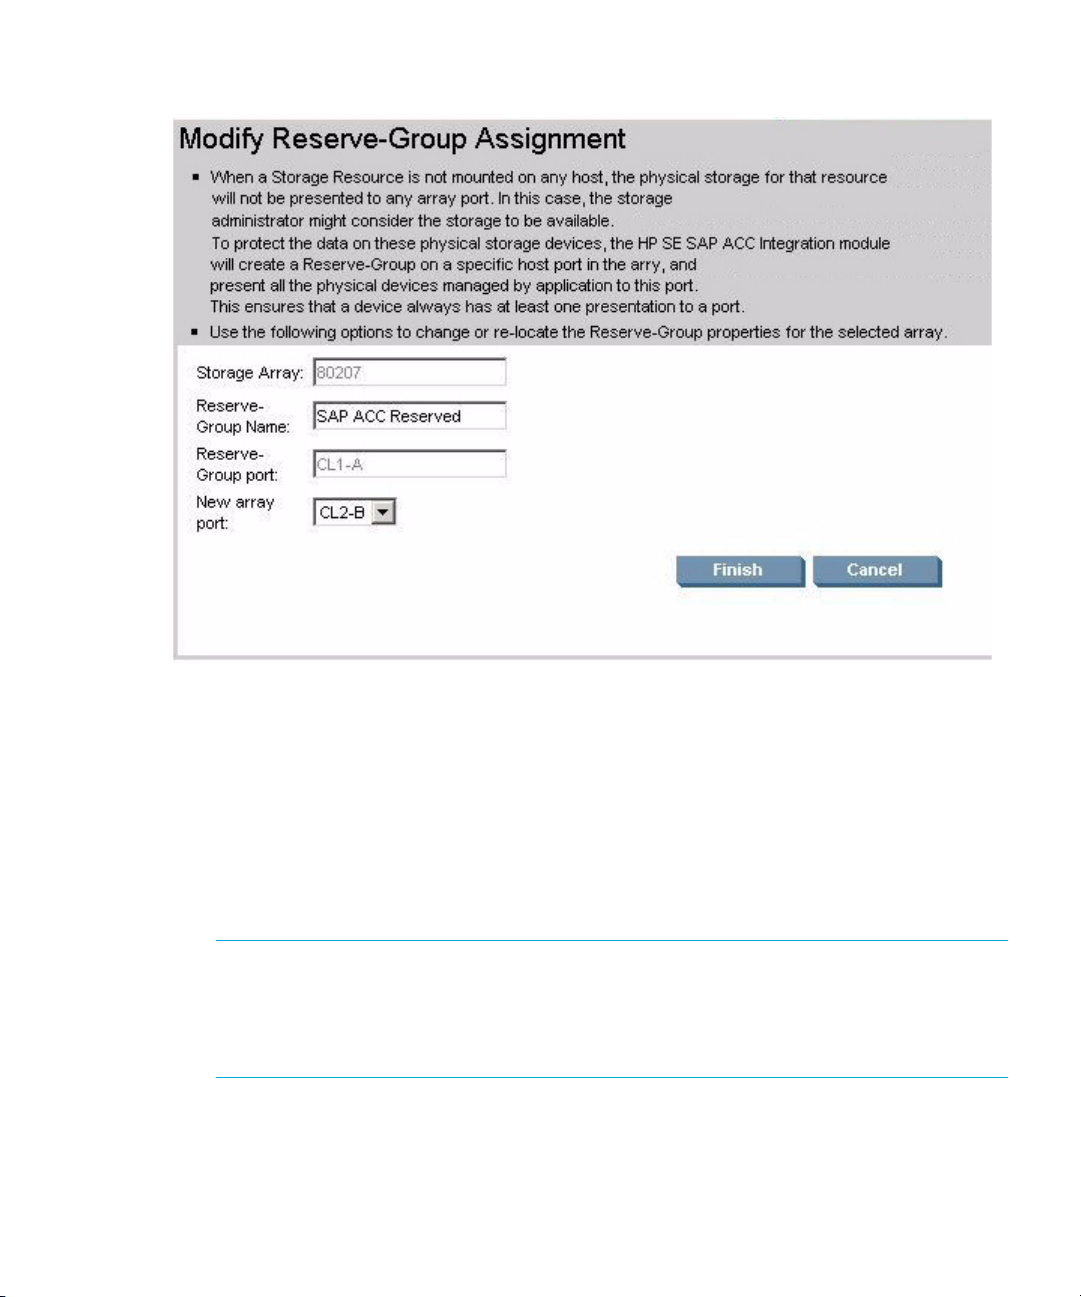
The following page is displayed.
Figure 27 Modify reserve group assignment
4. Change the port number or the name of the Reserve-Group on the array for the reserved group.
The port number selected for the reserved group should be a Target or RCU Target port with
security enabled. The HP Storage Essentials SRM SAP ACC integration software will create a
host group with default name SAP ACC Reserved on this port and assign all the physical devices
used in the Adaptive Computing environment to this group.
You can rename the host group name used for the reserve port, either when defining the port in
this dialog box, or in the HP Storage Essentials SRM SAP ACC integration tab on the main
screen.
NOTE: The HP StorageWorks XP array has a limit of the number of physical devices that
can be assigned per host group and per port. This limit is dependant on the array version
and can be between 1024 and 2048 devices. For this reason, the current version of the
Application Integration Software is limited to the number of devices it can managed per
storage array.
5. Click Finish.
The Application Integration Software for SAP ACC creates a host group on the new port and
moves the devices used by the configured resources to the new host group. The old host group is
deleted.
User Guide 51
Page 66

Program Properties52
Page 67

10 Operational Details
This chapter describes the following:
• Operational information, page 53
• Location of important log files, page 57
• Common issues, page 58
Operational information
The movement of the application is initiated and controlled from the SAP ACC interface. The
administrator has a choice from three operations: start, stop, or relocate a resource, where relocate
is a combination of stopping on one Managed Node and starting on the next. The start and stop
operations are also referred to as attach and detach. The following diagram provides the general
flow of the stop operation.
The diagram indicates the different steps involved in the operation and which application is
responsible for managing the specific step. The process is initiated by the SAP ACC Server, the
control is passed on to the Application Integration Software which in turn interacts with HP SIM or
HP Storage Essentials SRM to perform the necessary operations.
User Guide 53
Page 68

Figure 28: Flow diagram of operational details
This flow diagram can also be used to trace any issues and to determine which log file to look at for
failure events.
1. Lock Managed Node.
This is an SAP ACC operation to lock any other ACC operations for the specific Managed
Node, to ensure that only one operation will be performed on any node at any time. If some
other node is already performing an operation, the new request will be on hold until the
previous operation complete.
For any errors during this step, see the SAP ACC log files for the specific instance and operation.
2. Check OpenSSH to Managed Node.
This is an SAP ACC operation to ensure communication with the managed Node exists and is
working. If the Managed node cannot be reached, the node will be considered down and the
operation will fail.
Operational Details54
Page 69

Check the OpenSSH installation, and manually test communications between SAP ACC server
and the Managed Node.
3. SAP ACC verifies the “sapacosprep.exe” installation and version by running the “sapacosprep
-diag” command.
The following is the typical output for this command:
SAPACOSPrep information: program version: 1.0.4 (compiled at: Mar 6 2007,
systemid: 560 (PC with Windows NT), relno: 6400, patchno: 173, intno:
20020600); partner API version:1
Library information: Windows platform module; library version: 1.0.3;
partner API version: 1; partner ID: sap
Found SAPACOSPrep storage library c:\usr\sap\adaptive\libsapacosprep_hp.dll
Library information: HP StorageWorks enabled for Application Integration
Software for SAP ACC Copyright 2007 Hewlett Packard Company; library
version: 1.3.2; partn
A failure during this check means that the sapacosprep host agent is either not installed
correctly or not working properly.
NOTE: SAP ACC does not necessarily check to ensure the storage specific library was
detected, but rather if sapacosprep can be executed.
4. Call Application stop scripts.
Stopping the application and any sub-components of the application is the user's responsibility.
The HP Storage Essentials SRM SAP ACC integration software provides a number of sample
scripts that can be adopted to function in the specific environment. The scripts produce some log
output that will be visible in the SAP ACC application log for the specific instance and
operation.
5. Call Storage specific library with “detach”.
SAP ACC now calls the sapacosprep agent with a “detach” option for the Storage Resource ID.
The sapacosprep invokes the storage specific Library and performs the “AcDetachSr” operation.
The Storage specific library calls the Application Integration Software for SAP ACC using the
information stored in the registry keys on the local system, and requests a “detach” operation for
the SRID.
The SAP ACC application log file does not display specific information for actions performed
during the detach operation. For more specific information, it is necessary to connect to the
Application Integration Software for SAP ACC and look at the log files for the specific instance
or monitor the text version of the log file.
6. Receive detach request.
The Application Integration Software for SAP ACC now has control of the storage operations
and will perform the necessary tasks to “detach” or “attach” the storage.
In the Application Integration Software log file, a message should be logged indicating that the
integration core has received the request. If this message is missing, it would indicate that the
integration core is not running on that the listener port or the integration library port is not
correct. Check to ensure the HP Storage Essentials SRM SAP ACC integration service is running
on the HP Storage Essentials SRM server.
7. Verify Host accessibility.
User Guide 55
Page 70

This is an internal check from the Integration core service to ensure that the Managed node is
accessible and configured in the Application Integration Software. If the Managed Node is not
accessible, a potential problem can be that communication between OpenSSH from HP-SIM
server to Managed Node is broken. Check the OpenSSH installation and run the specified
communication checks (see “Installing OpenSSH” on page 32) to ensure communication from
HP Storage Essentials SRM and HP SIM to Managed Node.
Another potential issue can be that the Managed node is indicated as missing in HP Storage
Essentials SRM. This would happen if a Managed node was discovered, but for some reason HP
Storage Essentials SRM could not make contact to this node during the last hardware check
process. In this case, check that the credentials for the Managed node is correct in HP Storage
Essentials SRM and ensure that the CIM extensions service is running on the Managed Node.
8. Un-mount/Export File system.
The Application Integration Software will now call the active host management module added to
HP SIM to perform the necessary operations on the Managed node to un-mount and export the
file systems associated with this SRID.
For this operation to succeed, the OpenSSH communication with the host must be functional.
For more details on execution errors, check the tasks log in HP SIM.
If some user or process is still accessing a file system, it is possible that the operation will fail. In
this case, ensure that application shutdown was performed correctly, and that all processes
using this file system is stopped.
9. Un-present physical storage from the Host.
The Integration core uses the HP Storage Essentials SRM API to request a provisioning-action for
the specific storage array in order to remove the presentations for the specific physical storage
from the Managed Node.
Provisioning-errors can occur if the service processor (SVP) of the storage array is in a locked
status. It is important to minimize the use of the SVP for any storage changes, instead, it is
recommended to perform all storage changes using HP Storage Essentials SRM.
For more details on the failure, check the HP Storage Essentials SRM log files and the storage
array audit trails.
10.Return success/failure.
If all operations are successful, the integration core will return success status to the integration
library and to the sapacosprep module. If any operation fails during the un-mount or un-present
operations, the Integration core will attempt to roll back any changes, leaving the managed
node in the same state that the operation started with, and return “failure” to the integration
library and to the sapacosprep module.
11.Call platform specific library with “deactivate IP”.
SAP ACC resumes control of operations and calls the platform specific library, using
sapacosprep module, to deactivate the instance virtual IP address.
Any errors during this operation can be due to OpenSSH communication or errors in the
Platform specific library. Monitor the SAP ACC application log for any errors.
Operational Details56
Page 71

NOTE: If deactivating the IP address fails, SAP might incorrectly indicate that the instance is
“running” on this managed node. In SAP ACC 1.0, SAP assumes that the instance is running
if the virtual IP address of the instance is available, and it is not necessarily if the application
is up and running.
12.Unlock Managed Node.
The last step in the operation is for SAP ACC to unlock the managed node and allow for any
other operations to be executed on this managed node.
In the same way as with the “stop” process, the operations start from the SAP ACC server, but
the order in executing some of the process is different.
The Application Integration Software for SAP ACC has one very import change in operation
when handling a attach operation.
When receiving an attach request, the Application Integration Software must first determine if
the physical storage associated with this request is already presented to any Managed node or
not. If the storage is already presented to a managed node and the Managed node is not
accessible, the physical storage must first be un-presented from that Managed Node before it
can be presented to the requesting node.
This condition is true if the system that was running the application crashed for some reason and
is now not available. The administrator may want to re-start the application on another node, the
Application Integration Software must ensure that when the crashed server is operational again,
and this server will not have access to the physical storage.
In the event that the original owner of the physical storage is available, the Application
Integration Software cannot forcefully un-present the storage from this system, since it has no
guarantee that the application is down. In this case, the Application Integration Software must
return a failure status for the “attach” operation. The SAP Administrator would need to start the
instance on the original node, and then perform a “relocate” operation to move the application
to the new node.
Location of important log files
SAP ACC application log: Available from the SAP ACC interface by selecting the appropriate
instance and application log.
• Application Integration Software for SAP ACC: Available from the Application Integration
Software for SAP ACC by selecting the Application Log tab, or viewing the text version located
in the <installDir>\logs directory.
• HP Storage Essentials SRM: Available from the HP Storage Essentials SRM console or text
versions available in <InstallDir>\logs. Specifically the “appiq.log” and “cimom.log”
files.
• HP Systems Insight Manager: Available from the console or text versions located at
<InstallDir>\output\runnow, <installDir>\logs\mx.log, and
<InstallDir>\plugin\sedeploy\logs
• OpenSSH: Available in <installDir>\logs
User Guide 57
Page 72

Common issues
HP Storage Essentials SRM SAP ACC Integration Library call fails.
1. If the SAP ACC process does not perform the “sapacosprep storage Library function
AcDetachSr/AcAttachSr” operation, make sure that storage resource for this instance is
configured as type “SR” and that Partner ID field is set to HP.
2. Ensure that the “sapacosprep -diag” call does recognize the HP Library “libsapacosprep_hp.dll”.
If the library is not listed during the sapacosprep -diag operation, the installation of this library
might be incorrect. Best action is to re-install the integration library using the Application
Integration Software for SAP ACC.
3. If the libsapacosprep.dll cannot communicate with HP Storage Essentials SRM SAP ACC
Integration core, ensure that the Integration Core service is running on the HP Storage Essentials
SRM server. Another potential issue can be that the registry keys on the managed node for the
integration library is incorrect. The best way to check this is to reinstall the integration Library
using the Application Integration Software for SAP ACC.
4. If the HP Storage Essentials SRM server IP address or listener port for the Application Integration
Software for SAP ACC changes, it would be necessary to reinstall all host agents to update the
registry key information.
Provisioning errors
The Service processor (SVP) for the storage array is locked. This is the most common error. Ensure
that users are not using the service processor for array modifications. Recommend them to use HP
Storage Essentials SRM for any changes. This will also ensure that HP Storage Essentials SRM is
always in sync with the array configuration. If the hardware maintenance is in progress, it will not
be possible to perform SAP ACC operations, due to exclusive access requirements for hardware
changes.
The Web Console user has a Lock on the array. Please use HP Storage Essentials SRM to perform
any necessary array configuration changes where possible, and limit the time required to exclusively
lock the array using the Web console. Any provisioning operations during this time will fail, due to
the exclusive lock.
An element in HP Storage Essentials SRM is reported as “(missing)”
On a regular intervals, HP Storage Essentials SRM will check hardware accessibility of all
discovered elements. If a communication error exists on this Element, HP Storage Essentials SRM will
mark the element as “(missing)”. Any subsequent operations on this element will fail, until the issue is
solved and the element is rediscovered.
HP Storage Essentials SRM is out of sync with managed host or storage array
Any manual operation on a managed node or a Storage array, without a rediscovery from HP
Storage Essentials SRM, will result in an out-of-sync condition. Application Integration Software for
SAP ACC relies on HP Storage Essentials SRM to have up-to-date information on the managed node
and storage array, and if the information is out-of-sync, the Application Integration Software for SAP
ACC will report incorrect information. To avoid this situation perform Step 2 below. Step 1 is
optional.
Operational Details58
Page 73

1. (Optional) Schedule a Run Discovery Data Collection operation to refresh all HP Storage
Essentials SRM element data. This operation should be scheduled to run at an off-peak hours
when SAP ACC Integration is not being used.
2. Perform a manual Run Discovery Data Collection operation after any manual changes on the
storage array or managed nodes.
Mount error in Microsoft Windows environment
If Windows use the “automount” function, then it is possible that as soon as a new device is
presented to a Managed node, the device will be mounted by Windows Auto Mount feature, but
not necessarily on the correct mount point. This operation also results in active host management
operation failure.
NOTE: Disable the Windows Auto Mount feature for all Managed Nodes.
Some part of the SAP ACC Process fails, but SAP report instance “running”
In SAP ACC 1.0, the ACC process assumes an instance is running if the Virtual IP address of the
instance is available on a node, and not necessarily if the storage devices or application processes
is active on the node. SAP and HP is working on resolving this issue and version 2.0 of ACC will
have better methods to determine if an application is running on not.
User Guide 59
Page 74

Operational Details60
Page 75

11 Application Scripts Description and Usage
This chapter describes how to customize sample scripts that let you start and stop the SAP Central
Instance (CI) and the SAP Database (DB) Instance. To use SAP application services in the Adaptive
Computing Controller (ACC), it is required to have a CI and a DB Instance installed. To be able to
start an SAP application service instance on a virtual hostname, it is necessary to use start and stop
scripts. These scripts are run from the SAP GUI, and SAP provides some of them. For starting and
stopping of application services with Windows, SAP documentation refers the user to
implementation partner information
HP SE SAP ACC Integration users.
This chapter is organized in the following main sections:
• Overview, page 61
• Script Design, page 64
• Configuring SAP to Run Customized Scripts, page 71
• Troubleshooting, page 72
The ”Overview” section includes introductory material such as Central Instance and Database
Instance definitions, sample cases where a SAP administrator needs to stop and start those
instances, recommended order to stop/start Central Instance and Database Instances, and a
general description of the sample scripts provided with HP SE SAP ACC Integration.
The ”Script Design” section provides a detailed description of the HP SE SAP ACC Integration
sample scripts, which the reader can follow to create customized start and stop scripts.
1
. The purpose of this chapter is to provide such information for
The ”Configuring SAP to Run Customized Scripts”section explains the procedure to configure SAP's
Transaction SMSY to run those scripts.
The last section, ”Troubleshooting”, provides solutions for typical issues the user may face while
designing and testing these customized scripts.
Overview
The Adaptive Computing environment supported by HP Storage Essentials for SAP ACC consists of
Managed Node servers, control stations, and storage disk array(s). Managed Nodes are Windows
2003 servers that can host SAP Central Instances and Database Instances. Microsoft SQL Server
2005 SP1 is used for Database Instances.
An SAP system consists of SAP instances. An SAP instance is a group of processes that are started
and stopped at the same time
• Central Instance
• Central Services Instance
1. Section 3.2.6 Start and Stop Scripts, SAP's Adaptive Computing Controller, Component Implementation and Operation
Guide, Release V1.0, Document version V5-February 15, 2006.
2. Section 2, SAP System Architecture, SAP's Technical Infrastructure Guide - SAP NetWeaverTM 2004s, Document Version
2.3, June 2006.
2
. The following instances exist in a NetWeaver SAP system:
User Guide 61
Page 76

• Database Instance
• Dialog Instance
Further information regarding instances is available in SAP's documentation
beyond the scope of this chapter.
The following sections provide a high-level overview of SAP instance terminology. For further
information, refer to related SAP documentation, such as the SAP DB documentation
(http://www.sapdb.org/sap_db_documentation.htm
documentation (http://service.sap.com/adaptive
are required to access the second website. Both of these reference websites were used as references
for this chapter.
SAP Central Instance
The SAP Central Instance (CI) is the basic mandatory SAP process that has to exist for a user to be
able to log on to the SAP Database (DB) Instance. The SAP CI is composed of physical servers and
numerous software components including a database gateway. It provides services used by clients
connected to the SAP system. SAP is structured in such a way that you can run the DB on one server
and the user processes on another server.
SAP Database Instance
The SAP Database (DB) Instance is the Database used for the SAP application. Each Database
Instance consists of threads, main memory structures (caches), and disk-based storage of the data.
Starting and Stopping SAP instances
1
. Dialog instances are
) and SAP Adaptive Computing
). A SAP user ID and password, or a SAP passport
There are multiple cases where a SAP Administrator needs to start or stop the SAP Central Instance
(CI) and Database Instance (DB) in order to perform other administration activities. Summarized
below are different cases where the SAP administrator may be required to start/stop the CI and DB
instances:
• Starting an SAP application service instance on a virtual hostname
3
• Resetting Service Status in case of failures
• Adding a New Computing Node to the ACC
• Adding a New Application Service to the ACC
.
4
.
5
.
• Stopping and starting the SAP system during Post-Installation and Post-Patch activities
1
.
6
.
HP SE SAP ACC users running the application together with SAP must start and stop SAP Central
Instance services and attach and detach the SAP Database Instance. This can be achieved by
3. Section 4.7.4 Reset of Service Status in case of Failures, SAP's Adaptive Computing Controller, Component
Implementation and Operation Guide, Release V1.0, Document version V5, February 15, 2006.
4. Section 5.1 Adding a New Computing Node to the ACC, SAP's Adaptive Computing Controller, Component
Implementation and Operation Guide, Release V1.0, Document version V5, February 15, 2006.
5. Section 5.2 Adding A new Application Service to the ACC, SAP's Adaptive Computing Controller, Component
Implementation and Operation Guide, Release V1.0, Document version V5, February 15, 2006.
6. Section 8, SAP's Adaptive Computing Controller 1.0 For SAP Web Application Server 6.40, Installation Guide,
Document Version 1.9, January 4, 2006.
Application Scripts Description and Usage62
Page 77

running command scripts that implement these operations. The operations, and the scripts that
implement them, must be executed in the following order:
1. Start the SAP Central Instance
2. Attach the SAP Database Instance
3. Detach the SAP Database Instance
4. Delete the SAP Central Instance
NOTE: Each step must run successfully before the following step can be started.
Sample Scripts
When you install the HP Storage Essentials SRM SAP ACC Integration Software on the HP Storage
Essentials SRM server, sample scripts are copied into the <INSTALL_DIR>\SE SAP ACC
Integration\sample directory on the SRM server.
Figure 29 Sample scripts for starting and stopping SAP instances
User Guide 63
Page 78

You can use these sample scripts as a reference for developing scripts customized to perform those
operations on your system. The sample scripts were designed for Microsoft Windows.
The scripts provided are the following:
• prepareCI.cmd.rename: sample script that includes commands to install and start the SAP
Central Instance.
• attachDB.cmd.rename: sample script that includes commands to attach the Database
Instance.
• detachDB.cmd.rename: sample script that includes commands to detach the Database
Instance.
• deleteCI.cmd.rename: sample script that includes commands to stop the SAP Central
Instance.
• hpqcc_attach_db.sql.rename, sap_change_usr.sql.rename, and
sap_clear_db.sql.rename: SQL stored procedures called by the
attachDB.cmd.rename and detachDB.cmd.rename scripts.
For systems running SAP ACC version 1.0, copy the scripts from the sample directory on the SRM
server to the C:\usr\sap\adaptive directory on each Managed Node, and customize them for
each machine environment. You can then run each script at the MS-DOS command prompt by
entering the appropriate command line with the relevant input parameters.
Further details about each script are provided in the following sections.
Script Design
It is recommended that you modify and test the scripts working with two scripts at one time with
prepare CI and delete CI as the first pair, and attach and detach DB as the second pair. The reason
for this methodology is that since they are complementary pairs, the second script of the pair
undoes most of the modifications performed by the first script of the pair returning the system back to
its original state. This simplifies the debugging process, where a script may need to be run
repeatedly and its changes reversed before a new trial. The following sections provide further
information about each of the reference sample scripts.
This section describes the following:
• Preparing the SAP Central Instance, page 64
• Attaching the SAP Database Instance, page 66
• Detaching the SAP Database Instance, page 68
• Deleting the SAP Central Instance, page 69
Preparing the SAP Central Instance
The first script to customize is prepareCI.cmd.rename. The purpose of this script is to install and
start the SAP Central Instance (CI). Prior to running this script, the SAP SID system containing the
profile’s executables must already be mounted.
This section describes the following:
• Sample Input Parameters, page 65
Application Scripts Description and Usage64
Page 79

• Implementation, page 65
Sample Input Parameters
A script designed to start the SAP Central Instance services for a particular system must be provided
with the following input parameters:
• SID: System ID of the SAP system installed on the Managed Node
• VHOST: Virtual hostname of the SAP CI
• DBHOST: Virtual hostname of the server running the DB instance
• SAPGLOB: Hostname of the SAP global host. This value is usually the hostname of the CI.
• CINR: Instance number of CI
• INR: SAP instance number
• PASSWD: Password of SAPServicesID
• JNR: Optional: Java Instance Number
The command line interface for this script is the following:
prepareCI.cmd SID VHOST DBHOST SAPGLOB CINR INR PASSWD [JNR]
The header in the prepareCI.cmd.rename sample script contains this command line interface
and variables used by the sample script. Read the legal disclaimer before running any sample
script.
Implementation
This section provides a brief description of the steps that must be included in a script designed to
install and start the SAP Central Instance. The sample script includes all of the necessary steps. Have
the prepareCI.cmd.rename script open in an editor for reference to best follow these
instructions.
1. Set variables to be used in the script to match directories used by SAP on the Managed Node
where the script will be executed. It is not required to run the script on every Managed Node.
The sample script sets up the following variables:
• INAM
• JNAM
• SAPMNTG
• INSTANCE_PROFILE
• START_PROFILE
• JAVA_START_PROFILE
2. Add SAP local administrator groups to the Managed Node’s localgroup. In the sample script,
they are represented by the SAP_LOCALAdmin and SAP_%SID%_LocalAdmin variables. This
procedure is also described in available SAP documentation
7
.
3. Register the start service, as shown in the sample script.
7. Section 3.2.3 Additional Steps after the initial Installation of Adaptive Computing Controller, Component Implementation
and Operation Guide, Release V1.0, Document version V5, February 15, 2006.
User Guide 65
Page 80

4. If the SAP Java instance is supported, it must be started before the Central Instance is started. In
this case, use SAPSTARTSRV.EXE to register the Java start profile, the SAP service user ID, and
the user environment. In the sample script, this is represented by the variables
JAVA_START_PROFILE, %USERDOMAIN%\%SAPService%SID%, and
%USERDOMAIN%\%SID%adm.
Include a waiting time (around 10 seconds) for the Java instance to start.
5. Start the Central Instance using SAPSTARTSRV.EXE. In the sample script, this is implemented
by the following command:
%SYSTEMDRIVE%\usr\sap%SID%\%SID%\sys\exe\run\SAPSTARTSRV.EXE
-r -q -p %START_PROFILE% -s %SID% -n %INR% -U
%USERDOMAIN%\SAPService%SID% -P %SAPSERVICEPASSWD% -e
%USERDOMAIN%\%SID%adm
6. Copy SAPSTARTSRV.EXE and the librfc32.dll to the system32 directory in your
Windows directory (for example: C:\WINDOWS\system32). The sample script copies these
files to the system32 directory and then changes to this directory location.
7. Verify that the following SAP services are present:
• SAP System Message Port
• SAP System Dispatcher port (for the SAP instance number)
• SAP System Dispatcher Security Port (for the SAP instance number)
• SAP System Gateway Port (for the CI)
• SAP System Gateway Security Port (for the CI)
• SAP System Gateway Port (for the SAP instance number)
• SAP System Gateway Security Port (for the SAP instance number)
The sample script executes a series of find commands to verify that the SAP services are
present. For example, to check if the SAP System Message Port service is present, you can run
the following command:
NOTE: You must customize this command for your system before running it.
find /i "sapms%SID%" %windir%\system32\drivers\etc\services
if %errorlevel%==0 goto sapms_defined
echo sapms%SID% 36%CINR%/tcp # SAP System Message Port >>
%windir%\system32\drivers\etc\services
After you have customized this script to your satisfaction, place the customized script in the
C:\usr\sap\adaptive\ directory on the Managed Node and execute it.
Verify the script has successfully started the SAP Central Instance. This process may vary depending
on the particular system. Consult the corresponding vendor documentation. Notice that the Central
Instance can not be verified unless the Database Instance is also running.
Attaching the SAP Database Instance
The purpose of this script is to attach the SAP Database (DB) Instance to the target SQL server.
Application Scripts Description and Usage66
Page 81

This section describes the following:
• Sample Input Parameters, page 67
• Implementation, page 67
Sample Input Parameters
A script designed to attach the SAP Database Instance for a particular system must be provided with
the following input parameter:
• SID: System ID of the SAP system installed on the Managed Node
The command line interface for this script is the following:
attachDB.cmd SID
The header in the attachDB.cmd.rename sample script contains this command line interface
and variables used by the sample script. Read the legal disclaimer before running any sample
script.
Implementation
This section provides a brief description of the steps that must be included in a script designed to
attach the SAP Database Instance. The sample script includes all of the necessary steps. Have the
attachDB.cmd.rename script open in an editor for reference to best follow these instructions:
1. Run the SQL stored procedure that prepares the running SQL server to attach the Database
Instance. A sample stored procedure to perform this task is hpqcc_attach_db, which is
included in the hpqcc_attach_db.sql.rename file in the sample directory. This stored
procedure creates a specific file (attachDB_%SID%.sql) for the SAP instance ID. This file
contains a single SQL command, as shown below, that is later executed by the sample script as
described in step 3 below.
exit(
hpqcc_attach_db 'X22', @filename1 =
N'C:\database\X22\X22_DATA_DISK\X22DATA1.mdf'
)
The hpqcc_attach_db.sql.rename sample file also includes a separate SQL procedure
called sp_detach_db. The purpose of this stored procedure is to detach the Database
Instance before the hpqcc_attach_db procedure is executed.
The sample SQL stored procedures can be run separately using the SQL Server before running
the sample attachDB.cmd script.
2. Start the SQL server service. In the sample script, this is done only if the service is stopped. If the
SQL server is already running and a script tries to start it again, the Windows operating system
will display an error message.
3. Run the attachDB_%SID%.sql stored procedure created in step 1, and confirm that the
Database Instance has been successfully attached. This is done in the sample script by printing a
message in a specific file (C:\database\X22\X22_DATA_DISK\X22DATA1.mdf). This file
is used to store either a successful message (indicating that the Database Instance has been
attached), or an error message stating otherwise.
User Guide 67
Page 82

4. This script can be further improved by adding code that displays additional error messages if
any of the preceding steps is not completed. This is also illustrated in the sample script provided.
After customizing the script, verify that the script has successfully attached the Database Instance.
This process may vary depending on the particular system. Consult the corresponding vendor
documentation.
Prior to running the resulting script, the SQL service must be installed, and the user running the script
must have administrative permission to make changes on that server.
Detaching the SAP Database Instance
The purpose of this script is to detach the SAP Database (DB) Instance from the target SQL server.
This section describes the following:
• Sample Input Parameters, page 68
• Implementation, page 68
Sample Input Parameters
A script designed to detach the SAP Database Instance from a particular system must be provided
with the following input parameters:
• SID: System ID of the SAP system installed on the Managed Node
• VHOST: Virtual hostname of the SAP DB
The command line interface for this script is the following:
detachDB.cmd SID VHOST
The header in the detachDB.cmd.rename sample script contains this command line interface
and variables used by the sample script. Read the legal disclaimer before running any sample
script.
Implementation
This section provides a brief description of the steps that must be included in a script designed to
detach the SAP Database (DB) Instance from the target SQL server. The sample script includes all of
the necessary steps. Have the detachDB.cmd.rename script open in an editor for reference to
best follow these instructions:
1. Verify that the SQL server is not already running, and then start the SQL server. The script
performs this task by creating a file that contains a list of stopped services and checking if the
SQL server service is in this list. This verification is done to avoid Windows error messages.
2. Run a SQL stored procedure that removes the stored procedures corresponding to the SAP
Database Instance that you want to remove. A sample stored procedure that performs this task is
included in the sap_clear_db.sql.rename file located in the sample directory.
3. Run a SQL stored procedure to detach the SAP Database Instance. The sample stored procedure
to perform this task is hpqcc_detach_db, which is included in the
hpqcc_attach_db.sql.rename file in the sample directory. Similar to the approach used
for attaching the Database Instance, a success message or error message is generated and read
to confirm if the stored procedure has run successfully.
Application Scripts Description and Usage68
Page 83

4. This script can be further improved by adding code that displays additional error messages if
any of the preceding steps is not completed. This is also illustrated in the sample script provided.
After customizing the script, verify that the script has successfully detached the Database Instance.
This process may vary depending on the particular system. Consult the corresponding vendor
documentation.
Deleting the SAP Central Instance
The purpose of this script is to remove the SAP Central Instance (CI) services.
This section describes the following:
• Sample Input Parameters, page 69
• Implementation, page 69
Sample Input Parameters
A script designed to start the SAP Central Instance for the particular system must be provided with
the following input parameters:
• SID: System ID of the SAP system installed in the Managed Node
• VHOST: Virtual hostname of the SAP CI
• CINR: Instance number of CI
• JNR: Optional: Java instance Number
The command line interface for this script is the following:
deleteCI.cmd SID VHOST CINR [JNR]
The header in the deleteCI.cmd.rename sample script contains this command line interface
and variables used by the sample script. Read the legal disclaimer before running any sample
script.
Implementation
This section provides a brief description of the steps that must be included in a script designed to
remove the SAP Central Instance services. The sample script includes all of the necessary steps.
Have the deleteCI.cmd.rename script open in an editor for reference to best follow these
instructions:
1. Set those variables to be used in the script to match the directory structure of the SAP installation
present on the Managed Node where the script will be run. This is implemented in the sample
script by setting the following variables:
• INAM
• JNAM
• SAPMNTG
User Guide 69
Page 84

2. Stop the SAP Central Instance. This can be implemented by running the stopsap command, as
shown in the sample script:
%SYSTEMDRIVE%\usr\sap%SID%\%SID%\sys\exe\run\stopsap name=%SID% nr=%INR%
SAPDIAHOST=%CI%
3. Stop the SAP SID service. This step is implemented in the sample script as follows:
sc stop SAP%SID%_%INR%
4. Delete the SAP SID service. The sample script uses the following command:
%SYSTEMDRIVE%\usr\sap%SID%\%SID%\sys\exe\run\SAPSTARTSRV.EXE -u -q -s %SID%
-n %INR%
NOTE: The sample script shows that the SAP SID service can also be deleted by running the
following command:
sc delete SAP%SID%_%INR%
5. If present, stop the Java instance. This is implemented in the sample script by using the stopsap
command as follows:
%SYSTEMDRIVE%\usr\sap%SID%\%SID%\%JNAM%\exe\stopsap name=%SID% nr=%JNR%
SAPDIAHOST=%CI%
6. Allow time (around 10 seconds) for the Central Instance to stop.
7. If the Java instance is supported, stop the Java instance service. This is implemented in the
sample script by using the following command:
sc stop SAP%SID%_%JNR%
8. If the Java instance is supported, also delete the Java service. This is implemented in the sample
script using the following command:
%SYSTEMDRIVE%\usr\sap%SID%\%SID%\sys\exe\run\SAPSTARTSRV.EXE -u -q -s %SID%
-n %JNR%
NOTE: The sample script shows that the Java instance service can also be deleted by
running the following command:
sc delete SAP%SID%_%JNR%
9. Delete those groups that were added to the local group in the script used to start the Central
Instance. This is implemented in the sample script using the following command:
net localgroup SAP_%SID%_LocalAdmin /delete
An error message is displayed if the group to be deleted is not found in the localgroup.
10.This script can be further improved by adding code that displays additional error messages if
any of the preceding steps is not completed. This is also illustrated in the sample script provided.
After customizing the script, verify that the script has successfully stopped and removed the Central
Instance services. This process may vary depending on the particular system. Consult the
corresponding vendor documentation
Application Scripts Description and Usage70
Page 85

Configuring SAP to Run Customized Scripts
This section describes the procedure to run a customized script using the SAP GUI. It is assumed that
the SAP administrator has developed a customized script compatible with the SAP landscape. It is
also assumed that the SAP Administrator is familiar using SAP's Transaction SMSY. Otherwise, it is
recommended to read the corresponding SAP documentation
most part, the process steps described below match that SAP reference documentation.
Place the customized sample scripts in a specific SAP directory. For Windows systems supporting
SAP ACC version 1.0, place all sample scripts in the C:\usr\sap\adaptive directory of the
Managed Node controlled by ACC. This is defined as the SAP's agent directory. Include this
directory in the system path
Perform the following procedure to run a customized script:
1. Login to the SAP Solution Manager.
2. Navigate to the Transaction SMSY.
3. Select Landscape Components.
4. Select the desired system type, click the desired SID.
5. Navigate to General Information. Switch to Edit Mode, and check the Adaptive Enabled check
box.
6. Select the Adaptive Computing tab.
7. Enter the Adaptive Computing pool and click Save.
8. Click Activate. This switches the application service to the adaptive mode.
9. In the left menu, navigate to the application package below the SID. Select the Instances tab.
10.Click the icon with glasses to switch to Change Mode.
11.Click the icon with the pencil to open the configuration menu. The Business Area, Group Name,
and Service Description allow you to describe the application services shown in the ACC.
12.Enter a command line in the Start Command and Stop Command fields to match the command
usage required to launch the corresponding script.
In the case of the Central Instance in the Start Command field, enter the command required to
run the customized version of the prepareCI.cmd script. Similarly, in the Stop Command field,
enter the command required to run the customized version of the deleteC1.cmd script. A
sample for both of these fields is shown below:
Start Command
: prepareCI.cmd SID VHOST DBHOST SAPGLOB CINR INR PASSWD [JNR]
Stop Command: deleteCI.cmd SID VHOST CINR [JNR]
In the case of the Database Instance in the Start Command field, enter the command required to
run the customized version of the attachDB.cmd script. In the Stop Command field, enter the
command required to run the customized version of the detachDB.cmd script.
13.Save the data.
9
.
8
before reading this section. For the
8. Section 4.6.5 Adaptive Enable Application Services using Transaction SMSY, Adaptive Computing Controller,
Component Implementation and Operation Guide, Release V1.0, Document Version V5, February 15, 2006.
9. Section 4.5.1 Setting up ACC Agents, Adaptive Computing Controller, Component Implementation and Operation
Guide, Release V1.0, Document Version V5, February 15, 2006.
User Guide 71
Page 86

This configuration allows the customized scripts to be launched by SAP when required.
Troubleshooting
This section provides troubleshooting procedures to use if there are problems executing the scripts as
explained in the following sections:
• Central Instance Scripts, page 72
• Database Instance Scripts, page 72
Central Instance Scripts
If the scripts developed for a particular system fail to start or stop the SAP Central Instance, the
following troubleshooting procedure can be followed:
1. Verify that all the correct input parameters are provided for the specific script.
2. Verify the directory paths used in the script match the actual directory paths on the Managed
Node where the scripts are executed. Make necessary corrections to match the directory paths
on the Managed Node.
3. Verify that both the Central Instance and Database Instance are running on the ACC node.
4. Make sure that the required IP addresses are enabled. Otherwise, take the appropriate steps
using the corresponding SAP ACOS prep commands. For example, you can enter the following
command:
C:\usr\sap\adaptive\sapacosprep -a ifup -i ACCLAN -h <virtual
hostname of central instance>
5. Run the script again and verify if the start or stop process is successful after the corrections.
Database Instance Scripts
If the scripts developed for a particular system fail to attach and detach the SAP Database Instance,
the following troubleshooting procedure can be followed:
1. Verify that all the correct input parameters are provided for the specific script.
2. Verify the directory paths used in the script match the actual directory paths on the Managed
Node where the scripts are executed. Make necessary corrections to match the directory paths
on the Managed Node.
3. Verify that both the Central Instance and Database Instance are running on the ACC node.
4. Make sure the required IP addresses are enabled. Otherwise, take the appropriate steps using
the corresponding SAP ACOS prep commands. For example, you can enter the following
commands:
C:\usr\sap\adaptive>sapacosprep -a ifup -i ACCLAN -h <virtual
hostname of DB server>
5. Try running the scripts on the Managed Node where the SQL Server is installed. Verify that the
Managed Node running the SQL Server has no networking connectivity issues to the other
Managed Nodes.
6. Check the SQL Server logs to identify the problem area.
Application Scripts Description and Usage72
Page 87

7. Manually stop and restart the SQL database service processes. Check that no other user is
currently accessing the SQL database before performing this step.
8. Use the SQL server to verify that the SQL stored procedures developed for the installation system
are running properly. Run those stored procedures again if necessary. Check the SQL server logs
to further troubleshoot the issue. Verify that the stored procedures are producing the required
output.
9. Run the script again and verify if the attach or detach process is successful after the corrections.
User Guide 73
Page 88

Application Scripts Description and Usage74
Page 89

Index
A
adaptive landscape
creating 13
adding
Storage Resource Identifier 33
administrator account 17
Application Integration Software
checking installation 23
installing 19
overview 1
removing 24
requirements 19
application logs 45
application scripts 61
troubleshooting 72
attachDB.cmd.rename 64
audience xi
authorized reseller, HP xiii
C
changing
connection information for HP Storage Essentials
SRM 49
reserved group assignments 50
checking
installation 23
CIM xi
common issues 58
components 4
configuring
SAP instance 15
SAP landscape 14
conventions
document xii
text symbols xii
creating
adaptive landscape 13
D
data virtualized 8
deleteCI.cmd.rename 64
detachDB.cmd.rename 64
document
conventions xii
prerequisites xi
related documentation xi
E
event management 45
H
help, obtaining xiii
host groups 18
HP
authorized reseller xiii
storage web site xiii
Subscriber’s choice web site xiii
technical support xiii
HP SIM 17
HP Storage Essentials SRM 17
I
incorrect information 58
installation checking 23
installing 25
Application Integration Software 19
HP SIM 17
HP Storage Essentials SRM 17
Integration Library 29
Integration Library
installing 29
updating 31
interprocess communications 25
L
landscape 13
configuring 14
SAP 2
location of
application scripts 63
log files 57
log files 57
User Guide 75
Page 90

logging 45
M
missing elements 58
modifying
connection information for HP Storage Essentials
SRM 49
reserved group assignments 50
mount error 59
mx.log 57
N
Networking xi
O
OpenSSH 25
installing 25
operational infromation 53
out of sync information 58
overview 1
P
password
HP Storage Essentials SRM 49
password changes 49
prepareCI.cmd.rename 64
prerequisites xi
program properties 49
provisioning errors 58
R
related documentation xi
removing
Storage Resource Identifier 41
reserved group assignments
changing 50
reserved-group 18
runnow 57
S
SAN xi
SAN zoning 18
SAP
landscape 2
SAP components 4
SAP instance
configuring 15
SAP landscape
configuring 14
Storage Resource Identifier
adding 33
removing 40, 41
storage system considerations 17
Subscriber’s choice, HP xiii
symbols in text xii
T
technical support, HP xiii
text symbols xii
troubleshooting
application scripts 72
U
updating
Integration Library 31
upgrading
Integration Library 31
user account 17
user name
HP Storage Essentials SRM 49
user name changes 49
V
viewing
application logs 45
events 45
program properties 49
resource information 40
virtual IP address
IP address 7
virtual SAP landscape 2
virtualized data 8
W
web sites
HP storage xiii
HP Subscriber’s choice xiii
76
 Loading...