

HP Storage Essentials DB Viewer, Storage Essentials Standard Edition SRM Installation Manual
Page 1

HP Storage Essentials SRM 6.0 Installation Guide
for Enterprise Edition and Standard Edition SRM
Software
Second edition: April 2008
Page 2

Legal and notice information
© Copyright 2002-2008 Hewlett-Packard Development Company, L.P.
Hewlett-Packard Company makes no warranty of any kind with regard to this material, including, but not limited to, the implied
warranties of merchantability and fitness for a particular purpose. Hewlett-Packard shall not be liable for errors contained herein or
for incidental or consequential damages in connection with the furnishing, performance, or use of this material.
This document contains proprietary information, which is protected by copyright. No part of this document may be photocopied,
reproduced, or translated into another language without the prior written consent of Hewlett-Packard. The information is provided
“as is” without warranty of any kind and is subject to change without notice. The only warranties for HP products and services are
set forth in the express warranty statements accompanying such products and services. Nothing herein should be construed as
constituting an additional warranty. HP shall not be liable for technical or editorial errors or omissions contained herein.
Microsoft and Windows are registered trademarks of Microsoft Corporation. Oracle is a registered trademark of Oracle
Corporation. Sun, Solaris, Sun StorEdge, and Java are trademarks or registered trademarks of Sun Microsystems, Inc. in the United
States and other countries. AIX and IBM are registered trademarks of International Business Machines Corporation in the United
States, other countries or both. SGI and IRIX are registered trademarks of Silicon Graphics, Inc. Netscape is a registered trademark
of Netscape Communications Corporation in the United States and other countries. HDS and HiCommand are registered
trademarks of Hitachi Data Systems. HP, HP-UX, and OpenVMS, Tru64 UNIX are registered trademark of Hewlett-Packard
Development Company. QLogic is a trademark of QLogic Corporation. Emulex is a registered trademark of Emulex Corporation.
HBAnyware is a trademark of Emulex Corporation.
UNIX is a registered trademark in the U.S. and in other countries, exclusively licensed through X/Open Company, Ltd.
Other product and company names mentioned herein may be the trademarks of their respective owners.
HP Storage Essentials SRM 6.0 Installation Guide
Page 3

Contents
About this guide . . . . . . . . . . . . . . . . . . . . . . . . . . . . . . . . . . . . . . . . . . . . . . . .xxiii
Intended audience . . . . . . . . . . . . . . . . . . . . . . . . . . . . . . . . . . . . . . . . . . . . . . . . . . . . . . . xxiii
Prerequisites . . . . . . . . . . . . . . . . . . . . . . . . . . . . . . . . . . . . . . . . . . . . . . . . . . . . . . . . . . . xxiii
Related documentation . . . . . . . . . . . . . . . . . . . . . . . . . . . . . . . . . . . . . . . . . . . . . . . . . . . . xxiii
Document conventions and symbols . . . . . . . . . . . . . . . . . . . . . . . . . . . . . . . . . . . . . . . . . . . . xxiv
HP technical support . . . . . . . . . . . . . . . . . . . . . . . . . . . . . . . . . . . . . . . . . . . . . . . . . . . . . . . xxv
HP-authorized reseller . . . . . . . . . . . . . . . . . . . . . . . . . . . . . . . . . . . . . . . . . . . . . . . . . . . xxv
Helpful web sites . . . . . . . . . . . . . . . . . . . . . . . . . . . . . . . . . . . . . . . . . . . . . . . . . . . . . . . xxv
Contents
1 Overview . . . . . . . . . . . . . . . . . . . . . . . . . . . . . . . . . . . . . . . . . . . . . . . . . . . . 1
Supported Platforms for Installing HP Storage Essentials. . . . . . . . . . . . . . . . . . . . . . . . . . . . . . . . 1
Roadmap for Installation and Initial Configurations . . . . . . . . . . . . . . . . . . . . . . . . . . . . . . . . . . . 1
About this Product . . . . . . . . . . . . . . . . . . . . . . . . . . . . . . . . . . . . . . . . . . . . . . . . . . . . . . . . . 4
Storage Management Terms . . . . . . . . . . . . . . . . . . . . . . . . . . . . . . . . . . . . . . . . . . . . . . . . 4
Key Benefits . . . . . . . . . . . . . . . . . . . . . . . . . . . . . . . . . . . . . . . . . . . . . . . . . . . . . . . . . . . 4
Key Features . . . . . . . . . . . . . . . . . . . . . . . . . . . . . . . . . . . . . . . . . . . . . . . . . . . . . . . . . . . 4
Software Requirements . . . . . . . . . . . . . . . . . . . . . . . . . . . . . . . . . . . . . . . . . . . . . . . . . . . . 5
Web Browser Configuration Requirements . . . . . . . . . . . . . . . . . . . . . . . . . . . . . . . . . . . . . . 5
2 Installing the Management Server on Microsoft Windows. . . . . . . . . . . . . . . . . . . 7
Important Information About Upgrading . . . . . . . . . . . . . . . . . . . . . . . . . . . . . . . . . . . . . . . . . . 7
Keep in Mind the Following . . . . . . . . . . . . . . . . . . . . . . . . . . . . . . . . . . . . . . . . . . . . . . 8
Installation/Upgrade Process is Now Automated . . . . . . . . . . . . . . . . . . . . . . . . . . . . . . . . . . . . 8
Pre-installation Checklist
(Installations and Upgrades). . . . . . . . . . . . . . . . . . . . . . . . . . . . . . . . . . . . . . . . . . . . . . . . . . . 8
Installation and Upgrade Requirements
(Cannot Proceed with Install/Upgrade if
Not Met) . . . . . . . . . . . . . . . . . . . . . . . . . . . . . . . . . . . . . . . . . . . . . . . . . . . . . . . . . . . 9
Overview of the Verify System Requirements Screen . . . . . . . . . . . . . . . . . . . . . . . . . . . . 11
How to Install Microsoft SNMP and SNMP Trap Services. . . . . . . . . . . . . . . . . . . . . . . . . 12
How to turn off Internet Information Services (IIS) and
Third–Party Web servers . . . . . . . . . . . . . . . . . . . . . . . . . . . . . . . . . . . . . . . . . . . . . . . 13
How to Verify that Microsoft Access Data Components
(MDAC) 2.7 Service Pack 1 or Later is Installed . . . . . . . . . . . . . . . . . . . . . . . . . . . . . . . 13
How to Verify Networking . . . . . . . . . . . . . . . . . . . . . . . . . . . . . . . . . . . . . . . . . . . . . . 14
Be Sure to Install a Supported Browser . . . . . . . . . . . . . . . . . . . . . . . . . . . . . . . . . . . . . 14
About the New Storage Essentials for Windows Installation Options . . . . . . . . . . . . . . . . . . . 14
Storage Essentials Installation Wizard Options. . . . . . . . . . . . . . . . . . . . . . . . . . . . . . . . . . . . . 16
Installing Storage Essentials and HP Systems Insight Manager for Windows on Separate Servers . . 17
Step 1 – Read the Support Matrix and Release Notes . . . . . . . . . . . . . . . . . . . . . . . . . . . 17
Step 2 – (Required for Separate Server Installations Only)
HP Storage Essentials SRM 6.0 Installation Guide iii
Page 4

Manually Install HP Systems Insight Manager . . . . . . . . . . . . . . . . . . . . . . . . . . . . . . . . . 17
Step 3 – Install Storage Essentials on the Storage Essentials Server . . . . . . . . . . . . . . . . . . 19
Step 4 – Verify that HP SIM is Running on the Remote Server . . . . . . . . . . . . . . . . . . . . . . 24
Step 5 – Complete the Storage Essentials Installation. . . . . . . . . . . . . . . . . . . . . . . . . . . . 24
Step 6 – Configure Browser Settings . . . . . . . . . . . . . . . . . . . . . . . . . . . . . . . . . . . . . . . 25
Step 7 – Browse to the HP SIM Home Page . . . . . . . . . . . . . . . . . . . . . . . . . . . . . . . . . . 25
Step 8 – Obtain and Apply a Storage Essentials License Key Before Setting Up Discovery on HP
SIM. . . . . . . . . . . . . . . . . . . . . . . . . . . . . . . . . . . . . . . . . . . . . . . . . . . . . . . . . . . . . . 26
Step 9 – Copy Your CIM Extensions to the HP SIM Server . . . . . . . . . . . . . . . . . . . . . . . . 26
Step 10 – Check for and Install any Required Service Packs
and Hot Fix Files. . . . . . . . . . . . . . . . . . . . . . . . . . . . . . . . . . . . . . . . . . . . . . . . . . . . . 26
Step 11 – Install Your CIM Extensions and Set Up Discovery . . . . . . . . . . . . . . . . . . . . . . 27
Installing Storage Essentials and HP SIM for Windows on the Same Server . . . . . . . . . . . . . . . . . 27
Step 1 – Read the Support Matrix and Release Notes . . . . . . . . . . . . . . . . . . . . . . . . . . . 27
Step 2 – Log On to the Windows Server . . . . . . . . . . . . . . . . . . . . . . . . . . . . . . . . . . . . 27
Step 3 – Start the Storage Essentials for Windows Installation Wizard . . . . . . . . . . . . . . . 27
Step 4 – Obtain a License Key (Required to Start the Management Server for the First Time) 32
Step 5 – Configure Browser Settings . . . . . . . . . . . . . . . . . . . . . . . . . . . . . . . . . . . . . . . 33
Step 6 – Browse to the HP SIM Home Page . . . . . . . . . . . . . . . . . . . . . . . . . . . . . . . . . . 33
Step 7 – Check for Required Service Packs
and Hot Fix Files. . . . . . . . . . . . . . . . . . . . . . . . . . . . . . . . . . . . . . . . . . . . . . . . . . . . . 34
Step 8 – Install Your CIM Extensions and Set Up Discovery . . . . . . . . . . . . . . . . . . . . . . . 34
If Storage Essentials Fails to Start . . . . . . . . . . . . . . . . . . . . . . . . . . . . . . . . . . . . . . . . . . . . 34
Installing the Standalone Version of Storage Essentials for Windows. . . . . . . . . . . . . . . . . . . . . . 34
Step 1 – Read the Support Matrix and Release Notes . . . . . . . . . . . . . . . . . . . . . . . . . . . 35
Step 2 – Log On to the Windows Server . . . . . . . . . . . . . . . . . . . . . . . . . . . . . . . . . . . . 35
Step 3 – Start the Storage Essentials for Windows Installation Wizard . . . . . . . . . . . . . . . 35
Step 4 – Obtain a License Key (Required to Start the Management Server for the First Time) 39
Step 5 – Check for Required Service Packs
and Hot Fix Files. . . . . . . . . . . . . . . . . . . . . . . . . . . . . . . . . . . . . . . . . . . . . . . . . . . . . 40
Step 6 – Install Your CIM Extensions and Set Up Discovery . . . . . . . . . . . . . . . . . . . . . . . 40
Upgrading the Storage Essentials for Windows Management
Server (Contact Your Account
Representative Before Upgrading) . . . . . . . . . . . . . . . . . . . . . . . . . . . . . . . . . . . . . . . . . . . . . 40
Keep in Mind the Following . . . . . . . . . . . . . . . . . . . . . . . . . . . . . . . . . . . . . . . . . . . . . 40
Considerations Before Upgrading . . . . . . . . . . . . . . . . . . . . . . . . . . . . . . . . . . . . . . . . . 40
About Migrating Brocade Fabric Access API–Managed Switches to SMI-S After Upgrading . . . 42
About Changes to McDATA and Connectrix Switches After Upgrading . . . . . . . . . . . . . . . . . 42
About Resetting Archive Mode After Upgrading
If You Use Automatic RMAN Backups . . . . . . . . . . . . . . . . . . . . . . . . . . . . . . . . . . . . . . . . 42
About CIM Extensions and Backup Manager Hosts After Upgrading . . . . . . . . . . . . . . . . . . . 43
Upgrading the Management Server and HP SIM for Windows . . . . . . . . . . . . . . . . . . . . . . . 43
Step 1 – Read the Support Matrix and Release Notes . . . . . . . . . . . . . . . . . . . . . . . . . . . 43
Step 2 – Verify that You are Running Storage Essentials Build 5.1 Service Pack 4 or a Later Build
5.1 Service Pack . . . . . . . . . . . . . . . . . . . . . . . . . . . . . . . . . . . . . . . . . . . . . . . . . . . . 43
Step 3 – Save Configuration Files for the Global Change Management Business Tool . . . . . 43
Step 4 – Manually Upgrade HP SIM
iv
Page 5

(Required Only When HP SIM is Running
on a Separate Server) . . . . . . . . . . . . . . . . . . . . . . . . . . . . . . . . . . . . . . . . . . . . . . . . . 44
Step 5 – Manually Export the Database. . . . . . . . . . . . . . . . . . . . . . . . . . . . . . . . . . . . . 45
Step 6 – Start the Storage Essentials Upgrade Wizard
and Resolve Any Minimum Requirement Issues . . . . . . . . . . . . . . . . . . . . . . . . . . . . . . . . 45
Step 7 – Customize Database Passwords. . . . . . . . . . . . . . . . . . . . . . . . . . . . . . . . . . . . 47
Step 8 – Enable RMAN Backup if Desired . . . . . . . . . . . . . . . . . . . . . . . . . . . . . . . . . . . 48
Step 9 – Upgrade is Required on the Following
CIM Extensions . . . . . . . . . . . . . . . . . . . . . . . . . . . . . . . . . . . . . . . . . . . . . . . . . . . . . 48
Step 10 – Rediscover all Elements . . . . . . . . . . . . . . . . . . . . . . . . . . . . . . . . . . . . . . . . . 48
Steps That Can be Run Anytime After the Upgrade . . . . . . . . . . . . . . . . . . . . . . . . . . . . . . . 48
Re-add Remote Sites in Global Reporter. . . . . . . . . . . . . . . . . . . . . . . . . . . . . . . . . . . . . 49
Upgrade Your Storage Essentials CLI Clients . . . . . . . . . . . . . . . . . . . . . . . . . . . . . . . . . 50
Upgrade Your CIM Extensions . . . . . . . . . . . . . . . . . . . . . . . . . . . . . . . . . . . . . . . . . . . 50
Migrate Your Brocade Switches to SMI-A. . . . . . . . . . . . . . . . . . . . . . . . . . . . . . . . . . . . 50
Check any McDATA and Connectrix Switches . . . . . . . . . . . . . . . . . . . . . . . . . . . . . . . . 52
Configurations Required for Discovering EMC CLARiiON Storage Systems . . . . . . . . . . . . . . . . 53
About Service Account Credentials . . . . . . . . . . . . . . . . . . . . . . . . . . . . . . . . . . . . . . . . . . 53
Changing the Service Account Credentials for the
HP Systems Insight Manager Service . . . . . . . . . . . . . . . . . . . . . . . . . . . . . . . . . . . . . . . 53
Important Information About Changing the SIM_MANAGER Password . . . . . . . . . . . . . . . . . . . . 54
Removing Storage Essentials . . . . . . . . . . . . . . . . . . . . . . . . . . . . . . . . . . . . . . . . . . . . . . . 55
Considerations when Uninstalling the SIM Connector . . . . . . . . . . . . . . . . . . . . . . . . . . . 55
3 Installing the Management Server on Linux . . . . . . . . . . . . . . . . . . . . . . . . . . . . 59
Important Information About Upgrading . . . . . . . . . . . . . . . . . . . . . . . . . . . . . . . . . . . . . . . . . 59
Deployment Types . . . . . . . . . . . . . . . . . . . . . . . . . . . . . . . . . . . . . . . . . . . . . . . . . . . . . . . . 60
Pre-installation Checklist . . . . . . . . . . . . . . . . . . . . . . . . . . . . . . . . . . . . . . . . . . . . . . . . . . . . 60
HP SIM. . . . . . . . . . . . . . . . . . . . . . . . . . . . . . . . . . . . . . . . . . . . . . . . . . . . . . . . . . . . . . 60
Pre-requisite RPMs for Oracle on Linux . . . . . . . . . . . . . . . . . . . . . . . . . . . . . . . . . . . . . . . . 61
Software Dependencies for Storage Essentials . . . . . . . . . . . . . . . . . . . . . . . . . . . . . . . . . . . 62
Verify Network Settings . . . . . . . . . . . . . . . . . . . . . . . . . . . . . . . . . . . . . . . . . . . . . . . . . . 63
Installing from a Network Drive . . . . . . . . . . . . . . . . . . . . . . . . . . . . . . . . . . . . . . . . . . . . . . . 64
Step 1 - Install the Oracle Database . . . . . . . . . . . . . . . . . . . . . . . . . . . . . . . . . . . . . . . . . . . . 64
Before Installing the Oracle Database . . . . . . . . . . . . . . . . . . . . . . . . . . . . . . . . . . . . . . . . 65
Prerequisites . . . . . . . . . . . . . . . . . . . . . . . . . . . . . . . . . . . . . . . . . . . . . . . . . . . . . . . . . . 65
Installing the Database . . . . . . . . . . . . . . . . . . . . . . . . . . . . . . . . . . . . . . . . . . . . . . . . . . . 66
Oracle Critical Patch Update . . . . . . . . . . . . . . . . . . . . . . . . . . . . . . . . . . . . . . . . . . . . 73
Accessing the Linux Host. . . . . . . . . . . . . . . . . . . . . . . . . . . . . . . . . . . . . . . . . . . . . . . . . . 75
Step 2 - Install the Management Server . . . . . . . . . . . . . . . . . . . . . . . . . . . . . . . . . . . . . . . . . . 76
Step 3 - Verify that Processes Can Start . . . . . . . . . . . . . . . . . . . . . . . . . . . . . . . . . . . . . . . . . . 79
Step 4 - Install and Configure HP SIM . . . . . . . . . . . . . . . . . . . . . . . . . . . . . . . . . . . . . . . . . . . 82
Change the SIM_MANAGER Password (Optional). . . . . . . . . . . . . . . . . . . . . . . . . . . . . . . . 83
Step 5 - Install the HP SIM Connector . . . . . . . . . . . . . . . . . . . . . . . . . . . . . . . . . . . . . . . . . . . 85
Considerations when Uninstalling SIM Connector . . . . . . . . . . . . . . . . . . . . . . . . . . . . . . . . 86
Step 6 - Configure SUSE Linux for Use with Business Tools. . . . . . . . . . . . . . . . . . . . . . . . . . . . . 86
Step 7 - Browse to HP SIM Home Page . . . . . . . . . . . . . . . . . . . . . . . . . . . . . . . . . . . . . . . . . . 87
HP Storage Essentials SRM 6.0 Installation Guide v
Page 6

Step 8 - Configure Firefox . . . . . . . . . . . . . . . . . . . . . . . . . . . . . . . . . . . . . . . . . . . . . . . . . . . 87
Step 9 - Import a Storage Essentials License . . . . . . . . . . . . . . . . . . . . . . . . . . . . . . . . . . . . . . . 88
Installing the Java Plug-in on Linux . . . . . . . . . . . . . . . . . . . . . . . . . . . . . . . . . . . . . . . . . . . . . 88
Configurations Required for Discovering EMC CLARiiON Storage Systems . . . . . . . . . . . . . . . . 89
Removing the Management Server . . . . . . . . . . . . . . . . . . . . . . . . . . . . . . . . . . . . . . . . . . . . . 89
Upgrading the Linux Management Server from Build 5.1 to Build 6.0 (Contact Your Account
Representative Before
Upgrading) . . . . . . . . . . . . . . . . . . . . . . . . . . . . . . . . . . . . . . . . . . . . . . . . . . . . . . . . . . . . . 92
Considerations Before You Upgrade . . . . . . . . . . . . . . . . . . . . . . . . . . . . . . . . . . . . . . . . . 92
Upgrade Overview . . . . . . . . . . . . . . . . . . . . . . . . . . . . . . . . . . . . . . . . . . . . . . . . . . . . . 94
Steps to Upgrade the Management Server. . . . . . . . . . . . . . . . . . . . . . . . . . . . . . . . . . . . . . . . 95
Step 1 - Read the Support Matrix and Release Notes . . . . . . . . . . . . . . . . . . . . . . . . . . . . . . 95
Step 2 - Verify that You Are Running Build 5.1
Service Pack 4 or a Later 5.1 Service Pack . . . . . . . . . . . . . . . . . . . . . . . . . . . . . 95
Step 3 - Save Configuration Files for the Global
Change Management Business Tool . . . . . . . . . . . . . . . . . . . . . . . . . . . . . . . . . . 95
Step 4 - Upgrade HP SIM . . . . . . . . . . . . . . . . . . . . . . . . . . . . . . . . . . . . . . . . . . . . . . . . . 95
Step 5 - Run the upgradeAppStorManager Script . . . . . . . . . . . . . . . . . . . . . . . . . . . . . . . . 96
Step 6 - Run the uninstallOracle9i Script . . . . . . . . . . . . . . . . . . . . . . . . . . . . . . . . . . . . . . . 97
Step 7 - Install the Oracle 10g Database . . . . . . . . . . . . . . . . . . . . . . . . . . . . . . . . . . . . . . 97
Step 8 - Upgrade the Management Server . . . . . . . . . . . . . . . . . . . . . . . . . . . . . . . . . . . . . 98
Step 9 - Import the Database. . . . . . . . . . . . . . . . . . . . . . . . . . . . . . . . . . . . . . . . . . . . . . . 98
Step 10 – Upgrade the HP SIM Connector . . . . . . . . . . . . . . . . . . . . . . . . . . . . . . . . . . . . . 98
Step 11 - Start Management Server . . . . . . . . . . . . . . . . . . . . . . . . . . . . . . . . . . . . . . . . . . 99
Step 12 - Customize Database Passwords. . . . . . . . . . . . . . . . . . . . . . . . . . . . . . . . . . . . . . 99
Step 13 - Enable RMAN Backup if Desired . . . . . . . . . . . . . . . . . . . . . . . . . . . . . . . . . . . . . 99
Step 14 - Upgrade Selected CIM Extensions . . . . . . . . . . . . . . . . . . . . . . . . . . . . . . . . . . . . 99
Step 15 - Rediscover All Elements . . . . . . . . . . . . . . . . . . . . . . . . . . . . . . . . . . . . . . . . . . 100
Steps that Can Be Run Anytime after the Upgrade . . . . . . . . . . . . . . . . . . . . . . . . . . . . . . . . . 100
Re - Add Remote Sites in Global Reporters . . . . . . . . . . . . . . . . . . . . . . . . . . . . . . . . . . . . 100
Migrate Your Brocade Switches to SMI-A . . . . . . . . . . . . . . . . . . . . . . . . . . . . . . . . . . . . . 100
About Migrating Your Brocade Switches to SMI-A . . . . . . . . . . . . . . . . . . . . . . . . . . . . . . . 101
Upgrade Your CLI Clients . . . . . . . . . . . . . . . . . . . . . . . . . . . . . . . . . . . . . . . . . . . . . . . . 103
Upgrading Your CIM Extensions . . . . . . . . . . . . . . . . . . . . . . . . . . . . . . . . . . . . . . . . . . . 103
4 Discovering Switches, Storage
Systems, NAS Devices, and
Tape Libraries. . . . . . . . . . . . . . . . . . . . . . . . . . . . . . . . . . . . . . . . . . . . . . . 105
About Discovery . . . . . . . . . . . . . . . . . . . . . . . . . . . . . . . . . . . . . . . . . . . . . . . . . . . . . . . . . 106
Scheduling Discovery Tasks . . . . . . . . . . . . . . . . . . . . . . . . . . . . . . . . . . . . . . . . . . . . . . 106
Discovery of SMI-S Devices . . . . . . . . . . . . . . . . . . . . . . . . . . . . . . . . . . . . . . . . . . . . . . . 106
Discovery of Elements in a Storage Area Network (SAN) . . . . . . . . . . . . . . . . . . . . . . . . . . 107
Using Credentials . . . . . . . . . . . . . . . . . . . . . . . . . . . . . . . . . . . . . . . . . . . . . . . . . . . . . 108
Using WBEM Settings . . . . . . . . . . . . . . . . . . . . . . . . . . . . . . . . . . . . . . . . . . . . . . . . 108
Choosing Between System and Global Credentials . . . . . . . . . . . . . . . . . . . . . . . . . . . . 108
Discovery Steps . . . . . . . . . . . . . . . . . . . . . . . . . . . . . . . . . . . . . . . . . . . . . . . . . . . . . . . . . 109
Overview . . . . . . . . . . . . . . . . . . . . . . . . . . . . . . . . . . . . . . . . . . . . . . . . . . . . . . . . . . . 109
vi
Page 7

Testing your SMI-S Providers (Optional) . . . . . . . . . . . . . . . . . . . . . . . . . . . . . . . . . . . . . . 109
Configuring the Selective Discovery Filter (Optional) . . . . . . . . . . . . . . . . . . . . . . . . . . . . . 109
Configuring the HP SIM Connector to Pass Devices with the DNS Name (Optional) . . . . . . . . 110
Signing in to HP SIM . . . . . . . . . . . . . . . . . . . . . . . . . . . . . . . . . . . . . . . . . . . . . . . . . . . 110
Enabling Product Health Monitoring. . . . . . . . . . . . . . . . . . . . . . . . . . . . . . . . . . . . . . . . . 111
Discovering the HP Storage Essentials Management Server . . . . . . . . . . . . . . . . . . . . . . . . . 112
Discovering Elements . . . . . . . . . . . . . . . . . . . . . . . . . . . . . . . . . . . . . . . . . . . . . . . . . . . 113
Discovering Switches . . . . . . . . . . . . . . . . . . . . . . . . . . . . . . . . . . . . . . . . . . . . . . . . . . . . . 115
Discovering Brocade Switches. . . . . . . . . . . . . . . . . . . . . . . . . . . . . . . . . . . . . . . . . . . . . 116
Migrating Brocade API Switches to SMI-S
After Upgrading . . . . . . . . . . . . . . . . . . . . . . . . . . . . . . . . . . . . . . . . . . . . . . . . . . . . . . 117
Discovery Information for Brocade Switches . . . . . . . . . . . . . . . . . . . . . . . . . . . . . . . . . 119
Discovering CNT Switches . . . . . . . . . . . . . . . . . . . . . . . . . . . . . . . . . . . . . . . . . . . . . . . 120
Discovery Process for CNT Switches . . . . . . . . . . . . . . . . . . . . . . . . . . . . . . . . . . . . . . 120
Discovering Cisco Switches. . . . . . . . . . . . . . . . . . . . . . . . . . . . . . . . . . . . . . . . . . . . . . . 121
Discovery Information for Cisco Switches . . . . . . . . . . . . . . . . . . . . . . . . . . . . . . . . . . . 122
Discovering Sun StorEdge, QLogic and HP StorageWorks M-Series for p-Class BladeSystems . 123
Discovery Information for Sun StorEdge, QLogic and HP StorageWorks M-Series for p-Class
BladeSystem Switches . . . . . . . . . . . . . . . . . . . . . . . . . . . . . . . . . . . . . . . . . . . . . . . . 123
Discovering McDATA and EMC Connectrix Switches . . . . . . . . . . . . . . . . . . . . . . . . . . . . . 124
Discovering McDATA and Connectrix switches with SMI-S . . . . . . . . . . . . . . . . . . . . . . . 126
SMI-S Discovery Information for McDATA and Connectrix Switches . . . . . . . . . . . . . . 127
Discovering McDATA and Connectrix Switches through a Proxy with SWAPI . . . . . . . . . . 127
Discovering McDATA and Connectrix Switches through a Proxy with SNMP . . . . . . . . . . 128
Discovering McDATA and Connectrix Switches through a Direct Connection and SNMP . . 129
Changing the Discovery Settings. . . . . . . . . . . . . . . . . . . . . . . . . . . . . . . . . . . . . . . . . 130
Excluding McDATA and EMC Connectrix Switches from Discovery . . . . . . . . . . . . . . . . . 131
Managing McDATA and EMC Connectrix Switches . . . . . . . . . . . . . . . . . . . . . . . . . . . 132
Adding McDATA and EMC Connectrix Switches . . . . . . . . . . . . . . . . . . . . . . . . . . . 132
Removing McDATA and EMC Connectrix Switches . . . . . . . . . . . . . . . . . . . . . . . . . 133
Replacing McDATA and EMC Connectrix Switches . . . . . . . . . . . . . . . . . . . . . . . . . 133
Changing the SNMP Trap Listener Port and Community String for Switches Discovered
with SNMP . . . . . . . . . . . . . . . . . . . . . . . . . . . . . . . . . . . . . . . . . . . . . . . . . . . . . . . . . . 133
Discovering Storage Systems . . . . . . . . . . . . . . . . . . . . . . . . . . . . . . . . . . . . . . . . . . . . . . . . 134
Discovering 3PAR Storage Systems . . . . . . . . . . . . . . . . . . . . . . . . . . . . . . . . . . . . . . . . . 135
Discovering EMC Solutions Enabler . . . . . . . . . . . . . . . . . . . . . . . . . . . . . . . . . . . . . . . . . 136
Excluding EMC Symmetrix Storage Systems from Discovery . . . . . . . . . . . . . . . . . . . . . . 136
Excluding EMC Symmetrix Storage Systems from a Forced Device Manager Refresh. . . . . 137
Discovering EMC CLARiiON Storage Systems . . . . . . . . . . . . . . . . . . . . . . . . . . . . . . . . . . 138
Discovering LSI Storage Systems . . . . . . . . . . . . . . . . . . . . . . . . . . . . . . . . . . . . . . . . . . . 139
Discovery Information for LSI Storage Systems . . . . . . . . . . . . . . . . . . . . . . . . . . . . . . . 139
Discovering HDS Storage Systems . . . . . . . . . . . . . . . . . . . . . . . . . . . . . . . . . . . . . . . . . . 140
Discovery Information for HDS Storage Systems . . . . . . . . . . . . . . . . . . . . . . . . . . . . . . 140
Excluding HDS Storage Systems from Discovery . . . . . . . . . . . . . . . . . . . . . . . . . . . . . . 140
Excluding HDS Storage Systems from Force Device Manager Refresh . . . . . . . . . . . . . . . 141
Discovering HP Storage Systems . . . . . . . . . . . . . . . . . . . . . . . . . . . . . . . . . . . . . . . . . . . 142
Discovering HP StorageWorks MSA Arrays . . . . . . . . . . . . . . . . . . . . . . . . . . . . . . . . . 142
HP Storage Essentials SRM 6.0 Installation Guide vii
Page 8

Discovery Information for an MSA . . . . . . . . . . . . . . . . . . . . . . . . . . . . . . . . . . . . . 143
Discovering HP StorageWorks EVA Arrays . . . . . . . . . . . . . . . . . . . . . . . . . . . . . . . . . 143
Discovery Information for an EVA . . . . . . . . . . . . . . . . . . . . . . . . . . . . . . . . . . . . . 143
Obtaining SNMP Traps using Command View EVA . . . . . . . . . . . . . . . . . . . . . . . . . . . 144
Community String Requirements. . . . . . . . . . . . . . . . . . . . . . . . . . . . . . . . . . . . . . . 144
Obtaining SNMP traps from Command View . . . . . . . . . . . . . . . . . . . . . . . . . . . . . 144
Viewing or Changing the Community String in HP Storage Essentials . . . . . . . . . . . . . 144
Viewing or Changing the Community String in Command View EVA 6.x . . . . . . . . . . 145
Viewing or Changing the Community String in Command View EVA 7.x . . . . . . . . . . 145
Configuring event and host notification in Command View EVA . . . . . . . . . . . . . . . . 145
Discovering HP StorageWorks XP Arrays . . . . . . . . . . . . . . . . . . . . . . . . . . . . . . . . . . . 145
Discovering HP XP Arrays by Using Command View XP and SMI-S . . . . . . . . . . . . . . 146
Discovering HP XP Arrays by Using Command View XP Advanced Edition . . . . . . . . . 146
Discovering HP XP Arrays by using the built-in XP Provider . . . . . . . . . . . . . . . . . . . . 146
Discovering IBM Storage Systems or IBM SVCs . . . . . . . . . . . . . . . . . . . . . . . . . . . . . . . . . 147
Discovery Information for IBM Storage Systems/SVCs . . . . . . . . . . . . . . . . . . . . . . . . . . 148
Discovering Sun StorEdge Storage Systems . . . . . . . . . . . . . . . . . . . . . . . . . . . . . . . . . . . . 148
Discovering Sun StorEdge 3510 Storage Systems . . . . . . . . . . . . . . . . . . . . . . . . . . . . . 148
Discovery Information for Sun StorEdge 3510 Storage Systems . . . . . . . . . . . . . . . . . 149
Discovering Sun StorEdge 6920 and 6940 Storage Systems . . . . . . . . . . . . . . . . . . . . . 149
Discovering Sun StorEdge 6130 Storage Systems . . . . . . . . . . . . . . . . . . . . . . . . . . . . . 149
Discovering Xiotech Storage Systems . . . . . . . . . . . . . . . . . . . . . . . . . . . . . . . . . . . . . . . . 149
Discovering NAS Devices and Tape Libraries. . . . . . . . . . . . . . . . . . . . . . . . . . . . . . . . . . . . . 150
Discovering NAS Devices . . . . . . . . . . . . . . . . . . . . . . . . . . . . . . . . . . . . . . . . . . . . . . . . 150
Discovering HP NAS Devices on Windows . . . . . . . . . . . . . . . . . . . . . . . . . . . . . . . . . 150
Discovery Information for HP NAS Devices on Windows . . . . . . . . . . . . . . . . . . . . . 151
Discovering HP NAS Devices on Linux. . . . . . . . . . . . . . . . . . . . . . . . . . . . . . . . . . . . . 151
Discovery Information for HP NAS Devices on Linux . . . . . . . . . . . . . . . . . . . . . . . . . 151
Discovering NetApp NAS Devices . . . . . . . . . . . . . . . . . . . . . . . . . . . . . . . . . . . . . . . 151
Discovery Information for NetApp NAS Devices . . . . . . . . . . . . . . . . . . . . . . . . . . . 152
Enabling SSL Communication with a NetApp NAS Device . . . . . . . . . . . . . . . . . . . . 152
Discovering Sun NAS Devices . . . . . . . . . . . . . . . . . . . . . . . . . . . . . . . . . . . . . . . . . . 153
Discovering HP and IBM Tape Libraries . . . . . . . . . . . . . . . . . . . . . . . . . . . . . . . . . . . . . . 153
Discovery Data Collection . . . . . . . . . . . . . . . . . . . . . . . . . . . . . . . . . . . . . . . . . . . . . . . . . . 153
About Discovery Data Collection . . . . . . . . . . . . . . . . . . . . . . . . . . . . . . . . . . . . . . . . . . . 154
Running Discovery Data Collection . . . . . . . . . . . . . . . . . . . . . . . . . . . . . . . . . . . . . . . . . 154
Stopping Discovery Data Collection . . . . . . . . . . . . . . . . . . . . . . . . . . . . . . . . . . . . . . . . . 155
Other Discovery Features. . . . . . . . . . . . . . . . . . . . . . . . . . . . . . . . . . . . . . . . . . . . . . . . . . . 156
Selective Discovery Filter . . . . . . . . . . . . . . . . . . . . . . . . . . . . . . . . . . . . . . . . . . . . . . . . 156
Editing Rules for the Selective Discovery Filter. . . . . . . . . . . . . . . . . . . . . . . . . . . . . . . . 156
Rules for the Inclusive and Exclusive Flags . . . . . . . . . . . . . . . . . . . . . . . . . . . . . . . . 157
IP Address Formats Allowed . . . . . . . . . . . . . . . . . . . . . . . . . . . . . . . . . . . . . . . . . 158
Characters Allowed . . . . . . . . . . . . . . . . . . . . . . . . . . . . . . . . . . . . . . . . . . . . . . . 158
Configuring the Selective Discovery Filter. . . . . . . . . . . . . . . . . . . . . . . . . . . . . . . . . . . 158
Discovering a Single Element using the Manual Tab. . . . . . . . . . . . . . . . . . . . . . . . . . . . . . 159
Changing Credentials for Discovery . . . . . . . . . . . . . . . . . . . . . . . . . . . . . . . . . . . . . . . . . 159
Saving Discovery Settings to a Hosts File . . . . . . . . . . . . . . . . . . . . . . . . . . . . . . . . . . . . . 160
viii
Page 9

Importing a Hosts File. . . . . . . . . . . . . . . . . . . . . . . . . . . . . . . . . . . . . . . . . . . . . . . . . . . 161
Viewing Log Messages. . . . . . . . . . . . . . . . . . . . . . . . . . . . . . . . . . . . . . . . . . . . . . . . . . 161
Viewing the Status of System Tasks . . . . . . . . . . . . . . . . . . . . . . . . . . . . . . . . . . . . . . . . . 162
Using Discovery Groups . . . . . . . . . . . . . . . . . . . . . . . . . . . . . . . . . . . . . . . . . . . . . . . . . 162
Creating Custom Discovery Lists . . . . . . . . . . . . . . . . . . . . . . . . . . . . . . . . . . . . . . . . . 163
Managing Discovery Groups . . . . . . . . . . . . . . . . . . . . . . . . . . . . . . . . . . . . . . . . . . . 164
Moving Elements Between Discovery Groups . . . . . . . . . . . . . . . . . . . . . . . . . . . . . . . . 164
Method 1: Select Discovery Group. . . . . . . . . . . . . . . . . . . . . . . . . . . . . . . . . . . . . 165
Method 2: Edit a Discovered Element . . . . . . . . . . . . . . . . . . . . . . . . . . . . . . . . . . . 165
Deleting Discovered Elements . . . . . . . . . . . . . . . . . . . . . . . . . . . . . . . . . . . . . . . . . . . . . 165
Removing an Element . . . . . . . . . . . . . . . . . . . . . . . . . . . . . . . . . . . . . . . . . . . . . . . . 166
Deleting a single element from an access point. . . . . . . . . . . . . . . . . . . . . . . . . . . . . . . 166
Working with Quarantined Elements . . . . . . . . . . . . . . . . . . . . . . . . . . . . . . . . . . . . . . . . 167
Placing an Element in Quarantine . . . . . . . . . . . . . . . . . . . . . . . . . . . . . . . . . . . . . . . . 167
Removing an Element from Quarantine . . . . . . . . . . . . . . . . . . . . . . . . . . . . . . . . . . . . 167
Updating the Database with Element Changes . . . . . . . . . . . . . . . . . . . . . . . . . . . . . . . . . 168
5 Managing Licenses . . . . . . . . . . . . . . . . . . . . . . . . . . . . . . . . . . . . . . . . . . . 171
About the License . . . . . . . . . . . . . . . . . . . . . . . . . . . . . . . . . . . . . . . . . . . . . . . . . . . . . . . . 171
Importing a License File . . . . . . . . . . . . . . . . . . . . . . . . . . . . . . . . . . . . . . . . . . . . . . . . . . . . 175
Viewing Cumulative Licenses . . . . . . . . . . . . . . . . . . . . . . . . . . . . . . . . . . . . . . . . . . . . . . . . 176
Viewing a Specific License. . . . . . . . . . . . . . . . . . . . . . . . . . . . . . . . . . . . . . . . . . . . . . . . . . 176
Deleting a License. . . . . . . . . . . . . . . . . . . . . . . . . . . . . . . . . . . . . . . . . . . . . . . . . . . . . . . . 177
License Setup for Array Performance Pack . . . . . . . . . . . . . . . . . . . . . . . . . . . . . . . . . . . . . . . 177
Upgrading License from Standard Edition to Enterprise Edition. . . . . . . . . . . . . . . . . . . . . . . . . 179
6 Deploying and Managing CIM Extensions . . . . . . . . . . . . . . . . . . . . . . . . . . . 181
Remote CIM Extensions Management . . . . . . . . . . . . . . . . . . . . . . . . . . . . . . . . . . . . . . . . . . 181
About SSH. . . . . . . . . . . . . . . . . . . . . . . . . . . . . . . . . . . . . . . . . . . . . . . . . . . . . . . . . . . . . 182
Copying the CIM Extensions to the Management Server . . . . . . . . . . . . . . . . . . . . . . . . . . . 182
Creating Default Logins for Hosts . . . . . . . . . . . . . . . . . . . . . . . . . . . . . . . . . . . . . . . . . . . 183
The CIM Extensions Management Tool . . . . . . . . . . . . . . . . . . . . . . . . . . . . . . . . . . . . . . . . . 184
Launching the CIM Extensions Management Tool. . . . . . . . . . . . . . . . . . . . . . . . . . . . . . . . 184
Adding Remote Hosts. . . . . . . . . . . . . . . . . . . . . . . . . . . . . . . . . . . . . . . . . . . . . . . . . . . 184
Host Lists . . . . . . . . . . . . . . . . . . . . . . . . . . . . . . . . . . . . . . . . . . . . . . . . . . . . . . . . . . . 185
Importing a Host List . . . . . . . . . . . . . . . . . . . . . . . . . . . . . . . . . . . . . . . . . . . . . . . . . 185
Exporting a Host List . . . . . . . . . . . . . . . . . . . . . . . . . . . . . . . . . . . . . . . . . . . . . . . . . 185
Managing CIM Extensions on Remote Hosts . . . . . . . . . . . . . . . . . . . . . . . . . . . . . . . . . . . 185
Configuring CIM Extensions . . . . . . . . . . . . . . . . . . . . . . . . . . . . . . . . . . . . . . . . . . . . . . 186
Log Files . . . . . . . . . . . . . . . . . . . . . . . . . . . . . . . . . . . . . . . . . . . . . . . . . . . . . . . . . . . . 187
Status Icons. . . . . . . . . . . . . . . . . . . . . . . . . . . . . . . . . . . . . . . . . . . . . . . . . . . . . . . . . . 187
The HP SIM Plug-in . . . . . . . . . . . . . . . . . . . . . . . . . . . . . . . . . . . . . . . . . . . . . . . . . . . . . . . 188
Installing the HP SIM Plug-in . . . . . . . . . . . . . . . . . . . . . . . . . . . . . . . . . . . . . . . . . . . . . . 188
Using the HP SIM Plug-in . . . . . . . . . . . . . . . . . . . . . . . . . . . . . . . . . . . . . . . . . . . . . . . . 189
Installing the CIM Extension for HP Tru64 UNIX. . . . . . . . . . . . . . . . . . . . . . . . . . . . . . . . . 189
Log Files . . . . . . . . . . . . . . . . . . . . . . . . . . . . . . . . . . . . . . . . . . . . . . . . . . . . . . . . . . . . 189
About Upgrading Your CIM Extensions . . . . . . . . . . . . . . . . . . . . . . . . . . . . . . . . . . . . . . . . . 189
HP Storage Essentials SRM 6.0 Installation Guide ix
Page 10

7 Installing the CIM Extension for IBM AIX. . . . . . . . . . . . . . . . . . . . . . . . . . . . . 191
About the CIM Extension for IBM AIX . . . . . . . . . . . . . . . . . . . . . . . . . . . . . . . . . . . . . . . . . . 191
Prerequisites . . . . . . . . . . . . . . . . . . . . . . . . . . . . . . . . . . . . . . . . . . . . . . . . . . . . . . . . . . . 192
Verifying SNIA HBA API Support . . . . . . . . . . . . . . . . . . . . . . . . . . . . . . . . . . . . . . . . . . . . . 193
Installing the CIM Extension . . . . . . . . . . . . . . . . . . . . . . . . . . . . . . . . . . . . . . . . . . . . . . . . . 193
Setting Up Monitoring. . . . . . . . . . . . . . . . . . . . . . . . . . . . . . . . . . . . . . . . . . . . . . . . . . . . . 194
Starting the CIM Extension Manually. . . . . . . . . . . . . . . . . . . . . . . . . . . . . . . . . . . . . . . . . . . 195
How to Determine if the CIM Extension Is Running . . . . . . . . . . . . . . . . . . . . . . . . . . . . . . . . . 195
Configuring CIM Extensions. . . . . . . . . . . . . . . . . . . . . . . . . . . . . . . . . . . . . . . . . . . . . . . . . 195
Changing the Port Number . . . . . . . . . . . . . . . . . . . . . . . . . . . . . . . . . . . . . . . . . . . . . . . 195
Adding a New Port Number to Discovery . . . . . . . . . . . . . . . . . . . . . . . . . . . . . . . . . . 196
Configuring the CIM Extension to Listen on a Specific Network Card . . . . . . . . . . . . . . . . . . 196
Additional Parameters . . . . . . . . . . . . . . . . . . . . . . . . . . . . . . . . . . . . . . . . . . . . . . . . . . 197
Finding the Version of a CIM Extension . . . . . . . . . . . . . . . . . . . . . . . . . . . . . . . . . . . . . . . . . 197
Stopping the CIM Extension . . . . . . . . . . . . . . . . . . . . . . . . . . . . . . . . . . . . . . . . . . . . . . . . . 198
Rolling Over the Log Files . . . . . . . . . . . . . . . . . . . . . . . . . . . . . . . . . . . . . . . . . . . . . . . . . . 198
Fulfilling the Prerequisites. . . . . . . . . . . . . . . . . . . . . . . . . . . . . . . . . . . . . . . . . . . . . . . . . . . 198
Removing the CIM Extension from AIX. . . . . . . . . . . . . . . . . . . . . . . . . . . . . . . . . . . . . . . . . . 199
8 Installing the CIM Extension for SGI ProPack for Linux . . . . . . . . . . . . . . . . . . . 201
About the CIM Extension for SGI ProPack for Linux . . . . . . . . . . . . . . . . . . . . . . . . . . . . . . . . . 201
Prerequisites . . . . . . . . . . . . . . . . . . . . . . . . . . . . . . . . . . . . . . . . . . . . . . . . . . . . . . . . . . . 202
Verifying SNIA HBA API Support . . . . . . . . . . . . . . . . . . . . . . . . . . . . . . . . . . . . . . . . . . . . . 202
Installing the CIM Extension . . . . . . . . . . . . . . . . . . . . . . . . . . . . . . . . . . . . . . . . . . . . . . . . . 203
Starting the CIM Extension Manually. . . . . . . . . . . . . . . . . . . . . . . . . . . . . . . . . . . . . . . . . . . 204
How to Determine if the CIM Extension Is Running . . . . . . . . . . . . . . . . . . . . . . . . . . . . . . . . . 205
Configuring CIM Extensions. . . . . . . . . . . . . . . . . . . . . . . . . . . . . . . . . . . . . . . . . . . . . . . . . 205
Changing the Port Number . . . . . . . . . . . . . . . . . . . . . . . . . . . . . . . . . . . . . . . . . . . . . . . 206
Adding a New Port Number to Discovery . . . . . . . . . . . . . . . . . . . . . . . . . . . . . . . . . . 206
Configuring the CIM Extension to Listen on a Specific Network Card . . . . . . . . . . . . . . . . . . 206
Additional Parameters . . . . . . . . . . . . . . . . . . . . . . . . . . . . . . . . . . . . . . . . . . . . . . . . . . 207
Stopping the CIM Extension . . . . . . . . . . . . . . . . . . . . . . . . . . . . . . . . . . . . . . . . . . . . . . . . . 208
Rolling Over the Log Files . . . . . . . . . . . . . . . . . . . . . . . . . . . . . . . . . . . . . . . . . . . . . . . . . . 208
Removing the CIM Extension from SGI ProPack for Linux . . . . . . . . . . . . . . . . . . . . . . . . . . . . . 208
9 Installing the CIM Extension for HP-UX . . . . . . . . . . . . . . . . . . . . . . . . . . . . . . 209
About the CIM Extension for HP-UX . . . . . . . . . . . . . . . . . . . . . . . . . . . . . . . . . . . . . . . . . . . 209
Prerequisites . . . . . . . . . . . . . . . . . . . . . . . . . . . . . . . . . . . . . . . . . . . . . . . . . . . . . . . . . . . 210
Verifying SNIA HBA API Support . . . . . . . . . . . . . . . . . . . . . . . . . . . . . . . . . . . . . . . . . . . . . 210
Installing the CIM Extension . . . . . . . . . . . . . . . . . . . . . . . . . . . . . . . . . . . . . . . . . . . . . . . . . 210
Starting the CIM Extension Manually. . . . . . . . . . . . . . . . . . . . . . . . . . . . . . . . . . . . . . . . . . . 211
How to Determine if the CIM Extension Is Running . . . . . . . . . . . . . . . . . . . . . . . . . . . . . . . . . 212
Configuring CIM Extensions. . . . . . . . . . . . . . . . . . . . . . . . . . . . . . . . . . . . . . . . . . . . . . . . . 212
Restricting the Users Who Can Discover the Host. . . . . . . . . . . . . . . . . . . . . . . . . . . . . . . . 212
Changing the Port Number . . . . . . . . . . . . . . . . . . . . . . . . . . . . . . . . . . . . . . . . . . . . . . . 213
Adding a New Port Number to Discovery . . . . . . . . . . . . . . . . . . . . . . . . . . . . . . . . . . 213
Configuring the CIM Extension to Listen on a Specific Network Card . . . . . . . . . . . . . . . . . . 213
x
Page 11

Additional Parameters . . . . . . . . . . . . . . . . . . . . . . . . . . . . . . . . . . . . . . . . . . . . . . . . . . 214
Finding the Version of a CIM Extension . . . . . . . . . . . . . . . . . . . . . . . . . . . . . . . . . . . . . . 215
Combining Start Commands . . . . . . . . . . . . . . . . . . . . . . . . . . . . . . . . . . . . . . . . . . . . . . 215
Stopping the CIM Extension . . . . . . . . . . . . . . . . . . . . . . . . . . . . . . . . . . . . . . . . . . . . . . . . . 216
Rolling Over the Log Files . . . . . . . . . . . . . . . . . . . . . . . . . . . . . . . . . . . . . . . . . . . . . . . . . . 216
Fulfilling the Prerequisites. . . . . . . . . . . . . . . . . . . . . . . . . . . . . . . . . . . . . . . . . . . . . . . . . . . 216
Removing the CIM Extension from HP-UX . . . . . . . . . . . . . . . . . . . . . . . . . . . . . . . . . . . . . . . . 217
10Installing the CIM Extension for SGI IRIX. . . . . . . . . . . . . . . . . . . . . . . . . . . . . 219
About the CIM Extension for SGI IRIX . . . . . . . . . . . . . . . . . . . . . . . . . . . . . . . . . . . . . . . . . . 219
Prerequisites . . . . . . . . . . . . . . . . . . . . . . . . . . . . . . . . . . . . . . . . . . . . . . . . . . . . . . . . . . . 219
Verifying SNIA HBA API Support . . . . . . . . . . . . . . . . . . . . . . . . . . . . . . . . . . . . . . . . . . . . . 220
Installing the CIM Extension . . . . . . . . . . . . . . . . . . . . . . . . . . . . . . . . . . . . . . . . . . . . . . . . . 220
Starting the CIM Extension Manually. . . . . . . . . . . . . . . . . . . . . . . . . . . . . . . . . . . . . . . . . . . 221
How to Determine if the CIM Extension Is Running . . . . . . . . . . . . . . . . . . . . . . . . . . . . . . . . . 222
Configuring CIM Extensions. . . . . . . . . . . . . . . . . . . . . . . . . . . . . . . . . . . . . . . . . . . . . . . . . 222
Changing the Port Number . . . . . . . . . . . . . . . . . . . . . . . . . . . . . . . . . . . . . . . . . . . . . . . 222
Adding a New Port Number to Discovery . . . . . . . . . . . . . . . . . . . . . . . . . . . . . . . . . . 222
Configuring the CIM Extension to Listen on a Specific Network Card . . . . . . . . . . . . . . . . . . 222
Additional Parameters . . . . . . . . . . . . . . . . . . . . . . . . . . . . . . . . . . . . . . . . . . . . . . . . . . 223
Starting the CIM Extension by chkconfig . . . . . . . . . . . . . . . . . . . . . . . . . . . . . . . . . . . 224
Finding the Version of a CIM Extension . . . . . . . . . . . . . . . . . . . . . . . . . . . . . . . . . . . . . . 224
Stopping the CIM Extension . . . . . . . . . . . . . . . . . . . . . . . . . . . . . . . . . . . . . . . . . . . . . . . . . 225
Rolling Over the Logs . . . . . . . . . . . . . . . . . . . . . . . . . . . . . . . . . . . . . . . . . . . . . . . . . . . . . 225
Removing the CIM Extension from SGI IRIX . . . . . . . . . . . . . . . . . . . . . . . . . . . . . . . . . . . . . . 225
11Installing the CIM Extension for SUSE and Red Hat Linux. . . . . . . . . . . . . . . . . 227
About the CIM Extension for Red Hat
Linux Advanced Server and SUSE Linux. . . . . . . . . . . . . . . . . . . . . . . . . . . . . . . . . . . . . . . . . 227
Prerequisites . . . . . . . . . . . . . . . . . . . . . . . . . . . . . . . . . . . . . . . . . . . . . . . . . . . . . . . . . . . 228
Verifying SNIA HBA API Support . . . . . . . . . . . . . . . . . . . . . . . . . . . . . . . . . . . . . . . . . . . . . 228
Driver Information for Verifying Emulex SNIA Adapters . . . . . . . . . . . . . . . . . . . . . . . . . . . 228
Driver Information for Verifying QLogic SNIA Adapters . . . . . . . . . . . . . . . . . . . . . . . . . . . 229
Installing the CIM Extension . . . . . . . . . . . . . . . . . . . . . . . . . . . . . . . . . . . . . . . . . . . . . . . . . 229
Starting the CIM Extension Manually. . . . . . . . . . . . . . . . . . . . . . . . . . . . . . . . . . . . . . . . . . . 232
How to Determine if the CIM Extension Is Running . . . . . . . . . . . . . . . . . . . . . . . . . . . . . . . . . 232
Configuring CIM Extensions. . . . . . . . . . . . . . . . . . . . . . . . . . . . . . . . . . . . . . . . . . . . . . . . . 232
Changing the Port Number . . . . . . . . . . . . . . . . . . . . . . . . . . . . . . . . . . . . . . . . . . . . . . . 232
Adding a New Port Number to Discovery . . . . . . . . . . . . . . . . . . . . . . . . . . . . . . . . . . 233
Configuring the CIM Extension to Listen on a Specific Network Card . . . . . . . . . . . . . . . . . . 233
Additional Parameters . . . . . . . . . . . . . . . . . . . . . . . . . . . . . . . . . . . . . . . . . . . . . . . . . . 234
Finding the Version of a CIM Extension . . . . . . . . . . . . . . . . . . . . . . . . . . . . . . . . . . . . . . 234
Stopping the CIM Extension . . . . . . . . . . . . . . . . . . . . . . . . . . . . . . . . . . . . . . . . . . . . . . . . . 235
Rolling Over the Log Files . . . . . . . . . . . . . . . . . . . . . . . . . . . . . . . . . . . . . . . . . . . . . . . . . . 235
Removing the CIM Extension from Red Hat or SUSE Linux . . . . . . . . . . . . . . . . . . . . . . . . . . . . 235
12Installing the CIM Extension for NonStop . . . . . . . . . . . . . . . . . . . . . . . . . . . . 237
About the CIM Extension for NonStop . . . . . . . . . . . . . . . . . . . . . . . . . . . . . . . . . . . . . . . . . . 237
HP Storage Essentials SRM 6.0 Installation Guide xi
Page 12

Prerequisites . . . . . . . . . . . . . . . . . . . . . . . . . . . . . . . . . . . . . . . . . . . . . . . . . . . . . . . . . . . 237
NonStop G06.27 or later Software Requirements . . . . . . . . . . . . . . . . . . . . . . . . . . . . . . . 237
Network Port . . . . . . . . . . . . . . . . . . . . . . . . . . . . . . . . . . . . . . . . . . . . . . . . . . . . . . . . 238
Installing the CIM Extension . . . . . . . . . . . . . . . . . . . . . . . . . . . . . . . . . . . . . . . . . . . . . . . . . 238
Verifying SNIA HBA API Support . . . . . . . . . . . . . . . . . . . . . . . . . . . . . . . . . . . . . . . . . . . . . 239
Starting the CIM Extension Manually. . . . . . . . . . . . . . . . . . . . . . . . . . . . . . . . . . . . . . . . . . . 240
Restricting the Users Who Can Discover the Host . . . . . . . . . . . . . . . . . . . . . . . . . . . . . . . . . . 241
Changing the Port Number . . . . . . . . . . . . . . . . . . . . . . . . . . . . . . . . . . . . . . . . . . . . . . . . . 241
Specifying the CIM Extension to Listen on a Specific Network Card . . . . . . . . . . . . . . . . . . . . . 242
Finding the Version of a CIM Extension . . . . . . . . . . . . . . . . . . . . . . . . . . . . . . . . . . . . . . 243
Combining Start Commands . . . . . . . . . . . . . . . . . . . . . . . . . . . . . . . . . . . . . . . . . . . . . . 244
Finding the Status of the CIM Extension. . . . . . . . . . . . . . . . . . . . . . . . . . . . . . . . . . . . . . . . . 244
Stopping the CIM Extension . . . . . . . . . . . . . . . . . . . . . . . . . . . . . . . . . . . . . . . . . . . . . . . . . 244
Rolling Over the Logs . . . . . . . . . . . . . . . . . . . . . . . . . . . . . . . . . . . . . . . . . . . . . . . . . . . . . 244
Increasing the native logging level . . . . . . . . . . . . . . . . . . . . . . . . . . . . . . . . . . . . . . . . . . . . 245
Fulfilling the Prerequisites. . . . . . . . . . . . . . . . . . . . . . . . . . . . . . . . . . . . . . . . . . . . . . . . . . . 245
Removing the CIM Extension from NonStop . . . . . . . . . . . . . . . . . . . . . . . . . . . . . . . . . . . . . . 245
Handling Daylight Savings Time Changes for the NonStop CIM Extension. . . . . . . . . . . . . . . . . 246
13Installing the CIM Extension for OpenVMS . . . . . . . . . . . . . . . . . . . . . . . . . . . 249
About the CIM Extension for OpenVMS . . . . . . . . . . . . . . . . . . . . . . . . . . . . . . . . . . . . . . . . 249
Prerequisites . . . . . . . . . . . . . . . . . . . . . . . . . . . . . . . . . . . . . . . . . . . . . . . . . . . . . . . . . . . 250
Installing the CIM Extension . . . . . . . . . . . . . . . . . . . . . . . . . . . . . . . . . . . . . . . . . . . . . . . . . 251
Installing the CIM Extension on a Standalone Host. . . . . . . . . . . . . . . . . . . . . . . . . . . . . . . 251
Installing the CIM Extension on a Cluster . . . . . . . . . . . . . . . . . . . . . . . . . . . . . . . . . . . . . 252
Starting the CIM Extension Manually. . . . . . . . . . . . . . . . . . . . . . . . . . . . . . . . . . . . . . . . . . . 252
How to Determine if the CIM Extension is Running . . . . . . . . . . . . . . . . . . . . . . . . . . . . . . . . . 253
Configuring CIM Extensions. . . . . . . . . . . . . . . . . . . . . . . . . . . . . . . . . . . . . . . . . . . . . . . . . 253
Restricting the Users Who Can Discover the Host. . . . . . . . . . . . . . . . . . . . . . . . . . . . . . . . 253
Changing the Port Number . . . . . . . . . . . . . . . . . . . . . . . . . . . . . . . . . . . . . . . . . . . . . . . 254
Adding a Port Number to Discovery . . . . . . . . . . . . . . . . . . . . . . . . . . . . . . . . . . . . . . 254
Configuring the CIM Extension to Listen on a Specific Network Card . . . . . . . . . . . . . . . . . . 255
Additional Parameters . . . . . . . . . . . . . . . . . . . . . . . . . . . . . . . . . . . . . . . . . . . . . . . . . . 255
Finding the Version of a CIM Extension . . . . . . . . . . . . . . . . . . . . . . . . . . . . . . . . . . . . . . . . . 256
Combining Start Commands . . . . . . . . . . . . . . . . . . . . . . . . . . . . . . . . . . . . . . . . . . . . . . . . 256
Modifying the Boot Time Start Script (Optional) . . . . . . . . . . . . . . . . . . . . . . . . . . . . . . . . . . . 257
Stopping the CIM Extension . . . . . . . . . . . . . . . . . . . . . . . . . . . . . . . . . . . . . . . . . . . . . . . . . 257
Rolling Over the Log Files . . . . . . . . . . . . . . . . . . . . . . . . . . . . . . . . . . . . . . . . . . . . . . . . . . 257
Increasing the Native Logging Level . . . . . . . . . . . . . . . . . . . . . . . . . . . . . . . . . . . . . . . . . . . 258
Removing the CIM Extension from OpenVMS. . . . . . . . . . . . . . . . . . . . . . . . . . . . . . . . . . . . . 258
Uninstalling the OpenVMS CIM Extension on a Standalone Host . . . . . . . . . . . . . . . . . . . . . 258
Uninstalling the OpenVMS CIM Extension on a Cluster Host . . . . . . . . . . . . . . . . . . . . . . . . 259
14Installing the CIM Extension for HP Tru64 UNIX . . . . . . . . . . . . . . . . . . . . . . . 261
About the CIM Extension for Tru64 UNIX. . . . . . . . . . . . . . . . . . . . . . . . . . . . . . . . . . . . . . . . 261
Prerequisites . . . . . . . . . . . . . . . . . . . . . . . . . . . . . . . . . . . . . . . . . . . . . . . . . . . . . . . . . . . 262
Installing the CIM Extension . . . . . . . . . . . . . . . . . . . . . . . . . . . . . . . . . . . . . . . . . . . . . . . . . 262
xii
Page 13

Installing the CIM Extension on a Standalone Host. . . . . . . . . . . . . . . . . . . . . . . . . . . . . . . 263
Installing the CIM Extension on a Cluster . . . . . . . . . . . . . . . . . . . . . . . . . . . . . . . . . . . . . 263
Verifying SNIA HBA API Support . . . . . . . . . . . . . . . . . . . . . . . . . . . . . . . . . . . . . . . . . . . . . 264
Starting the CIM Extension Manually. . . . . . . . . . . . . . . . . . . . . . . . . . . . . . . . . . . . . . . . . . . 264
How to Determine if the CIM Extension Is Running . . . . . . . . . . . . . . . . . . . . . . . . . . . . . . . . . 265
Configuring CIM Extensions. . . . . . . . . . . . . . . . . . . . . . . . . . . . . . . . . . . . . . . . . . . . . . . . . 265
Restricting the Users Who Can Discover the Host. . . . . . . . . . . . . . . . . . . . . . . . . . . . . . . . 265
Changing the Port Number . . . . . . . . . . . . . . . . . . . . . . . . . . . . . . . . . . . . . . . . . . . . . . . 266
Adding a New Port Number to Discovery . . . . . . . . . . . . . . . . . . . . . . . . . . . . . . . . . . 266
Configuring the CIM Extension to Listen on a Specific Network Card . . . . . . . . . . . . . . . . . . 266
Additional Parameters . . . . . . . . . . . . . . . . . . . . . . . . . . . . . . . . . . . . . . . . . . . . . . . . . . 267
Finding the Version of a CIM Extension . . . . . . . . . . . . . . . . . . . . . . . . . . . . . . . . . . . . . . . . . 268
Stopping the CIM Extension . . . . . . . . . . . . . . . . . . . . . . . . . . . . . . . . . . . . . . . . . . . . . . . . . 268
Rolling Over the Logs . . . . . . . . . . . . . . . . . . . . . . . . . . . . . . . . . . . . . . . . . . . . . . . . . . . . . 268
Increasing the Native Logging Level . . . . . . . . . . . . . . . . . . . . . . . . . . . . . . . . . . . . . . . . . 269
Fulfilling the Prerequisites. . . . . . . . . . . . . . . . . . . . . . . . . . . . . . . . . . . . . . . . . . . . . . . . . . . 269
Removing the CIM Extension from Tru64 . . . . . . . . . . . . . . . . . . . . . . . . . . . . . . . . . . . . . . . . 269
Removing the CIM Extension from a Standalone Host. . . . . . . . . . . . . . . . . . . . . . . . . . . . . 269
Removing the CIM Extension from a Cluster . . . . . . . . . . . . . . . . . . . . . . . . . . . . . . . . . . . 269
15Installing the CIM Extension for Sun Solaris . . . . . . . . . . . . . . . . . . . . . . . . . . 271
About the CIM Extension for Solaris . . . . . . . . . . . . . . . . . . . . . . . . . . . . . . . . . . . . . . . . . . . 271
Prerequisites . . . . . . . . . . . . . . . . . . . . . . . . . . . . . . . . . . . . . . . . . . . . . . . . . . . . . . . . . . . 272
Verifying SNIA HBA API Support . . . . . . . . . . . . . . . . . . . . . . . . . . . . . . . . . . . . . . . . . . . . . 272
Installing the CIM Extension . . . . . . . . . . . . . . . . . . . . . . . . . . . . . . . . . . . . . . . . . . . . . . . . . 273
Starting the CIM Extension Manually. . . . . . . . . . . . . . . . . . . . . . . . . . . . . . . . . . . . . . . . . . . 274
How to Determine if the CIM Extension Is Running . . . . . . . . . . . . . . . . . . . . . . . . . . . . . . . . . 275
Configuring CIM Extensions. . . . . . . . . . . . . . . . . . . . . . . . . . . . . . . . . . . . . . . . . . . . . . . . . 275
Restricting the Users Who Can Discover the Host. . . . . . . . . . . . . . . . . . . . . . . . . . . . . . . . 275
Changing the Port Number . . . . . . . . . . . . . . . . . . . . . . . . . . . . . . . . . . . . . . . . . . . . . . . 276
Adding a New Port Number to Discovery . . . . . . . . . . . . . . . . . . . . . . . . . . . . . . . . . . 276
Configuring the CIM Extension to Listen on a Specific Network Card . . . . . . . . . . . . . . . . . . 277
Additional Parameters . . . . . . . . . . . . . . . . . . . . . . . . . . . . . . . . . . . . . . . . . . . . . . . . . . 277
Finding the Version of a CIM Extension . . . . . . . . . . . . . . . . . . . . . . . . . . . . . . . . . . . . . . 278
Combining Start Commands . . . . . . . . . . . . . . . . . . . . . . . . . . . . . . . . . . . . . . . . . . . . . . 278
Stopping the CIM Extension . . . . . . . . . . . . . . . . . . . . . . . . . . . . . . . . . . . . . . . . . . . . . . . . . 279
Rolling Over the Log Files . . . . . . . . . . . . . . . . . . . . . . . . . . . . . . . . . . . . . . . . . . . . . . . . . . 279
Removing the CIM Extension from Solaris . . . . . . . . . . . . . . . . . . . . . . . . . . . . . . . . . . . . . . . 279
16Installing the CIM Extension for Microsoft Windows. . . . . . . . . . . . . . . . . . . . . 281
About the CIM Extension for Windows . . . . . . . . . . . . . . . . . . . . . . . . . . . . . . . . . . . . . . . . . 281
Verifying SNIA HBA API Support . . . . . . . . . . . . . . . . . . . . . . . . . . . . . . . . . . . . . . . . . . . . . 282
Installing the CIM Extension . . . . . . . . . . . . . . . . . . . . . . . . . . . . . . . . . . . . . . . . . . . . . . . . . 283
Installing the CIM Extension Using the Silent Installation . . . . . . . . . . . . . . . . . . . . . . . . . . . . . 284
Upgrading a Host with the Latest CIM Extension. . . . . . . . . . . . . . . . . . . . . . . . . . . . . . . . . . . 284
Configuring CIM Extensions. . . . . . . . . . . . . . . . . . . . . . . . . . . . . . . . . . . . . . . . . . . . . . . . . 285
Changing the Port Number . . . . . . . . . . . . . . . . . . . . . . . . . . . . . . . . . . . . . . . . . . . . . . . 285
HP Storage Essentials SRM 6.0 Installation Guide xiii
Page 14

Adding a New Port Number to Discovery . . . . . . . . . . . . . . . . . . . . . . . . . . . . . . . . . . 286
Configuring the CIM Extension to Listen on a Specific Network Card . . . . . . . . . . . . . . . . . . 286
Defining UNC Volumes . . . . . . . . . . . . . . . . . . . . . . . . . . . . . . . . . . . . . . . . . . . . . . . . . 286
Additional Parameters . . . . . . . . . . . . . . . . . . . . . . . . . . . . . . . . . . . . . . . . . . . . . . . . . . 287
Rolling Over the Log Files . . . . . . . . . . . . . . . . . . . . . . . . . . . . . . . . . . . . . . . . . . . . . . . . . . 288
Removing the CIM Extension from Windows . . . . . . . . . . . . . . . . . . . . . . . . . . . . . . . . . . . . . 288
17Installing and Discovering the Windows Proxy . . . . . . . . . . . . . . . . . . . . . . . . 291
Installing the Windows Proxy . . . . . . . . . . . . . . . . . . . . . . . . . . . . . . . . . . . . . . . . . . . . . . . . 291
Discovering the Windows Proxy . . . . . . . . . . . . . . . . . . . . . . . . . . . . . . . . . . . . . . . . . . . . . . 292
Configuring Windows Proxy Authentication . . . . . . . . . . . . . . . . . . . . . . . . . . . . . . . . . . . . . . 293
Decreasing the Maximum Java Heap Size . . . . . . . . . . . . . . . . . . . . . . . . . . . . . . . . . . . . . . . 294
Removing the Windows Proxy . . . . . . . . . . . . . . . . . . . . . . . . . . . . . . . . . . . . . . . . . . . . . . . 294
18Discovering Applications, Backup Hosts and Hosts . . . . . . . . . . . . . . . . . . . . . 297
Step 1 — Discovering Your Hosts and Backup Manager Hosts . . . . . . . . . . . . . . . . . . . . . . . . . 297
Step A — Set Up Discovery for Hosts . . . . . . . . . . . . . . . . . . . . . . . . . . . . . . . . . . . . . . . . 299
Step B — Discovery Data Collection . . . . . . . . . . . . . . . . . . . . . . . . . . . . . . . . . . . . . . . . 301
Step 2 — Setting Up Discovery for Applications . . . . . . . . . . . . . . . . . . . . . . . . . . . . . . . . . . . 302
Creating Custom Passwords on Managed Database Instances . . . . . . . . . . . . . . . . . . . . . . 303
Monitoring Oracle . . . . . . . . . . . . . . . . . . . . . . . . . . . . . . . . . . . . . . . . . . . . . . . . . . . . . 304
Step A — Create the APPIQ_USER Account for Oracle . . . . . . . . . . . . . . . . . . . . . . . . . 304
Removing the APPIQ_USER Account for Oracle . . . . . . . . . . . . . . . . . . . . . . . . . . . . . . 306
Step B — Provide the TNS Listener Port . . . . . . . . . . . . . . . . . . . . . . . . . . . . . . . . . . . . 307
Step C — Set up Discovery for Oracle 10g . . . . . . . . . . . . . . . . . . . . . . . . . . . . . . . . . 308
Discovering Oracle Real Application Clusters (RAC) . . . . . . . . . . . . . . . . . . . . . . . . . . . 309
Deleting Oracle Application Information . . . . . . . . . . . . . . . . . . . . . . . . . . . . . . . . . . . 311
Monitoring Microsoft SQL Server . . . . . . . . . . . . . . . . . . . . . . . . . . . . . . . . . . . . . . . . . . . 312
Switching to Mixed Mode Authentication. . . . . . . . . . . . . . . . . . . . . . . . . . . . . . . . . . . 312
Step A — Create the appiq_user Account for the Microsoft SQL Server . . . . . . . . . . . . . . 313
Step B — Provide the Microsoft SQL Server Name and Port Number. . . . . . . . . . . . . . . . 316
Removing the appiq_user Account for Microsoft SQL Server . . . . . . . . . . . . . . . . . . . . . . 317
Deleting Microsoft SQL Server Information . . . . . . . . . . . . . . . . . . . . . . . . . . . . . . . . . . 318
Monitoring Microsoft SQL Server Clusters . . . . . . . . . . . . . . . . . . . . . . . . . . . . . . . . . . 318
Provide the Microsoft SQL Server Name and Port Number for a Cluster . . . . . . . . . . . 319
Monitoring Sybase Adaptive Server Enterprise . . . . . . . . . . . . . . . . . . . . . . . . . . . . . . . . . 320
Step A — Create the APPIQ_USER account for Sybase . . . . . . . . . . . . . . . . . . . . . . . . . 321
Removing the APPIQ_USER Account for Sybase . . . . . . . . . . . . . . . . . . . . . . . . . . . . . . 322
Step B — Provide the Sybase Server Name and Port Number . . . . . . . . . . . . . . . . . . . . 322
Deleting Sybase Information. . . . . . . . . . . . . . . . . . . . . . . . . . . . . . . . . . . . . . . . . . . . 323
Monitoring Microsoft Exchange. . . . . . . . . . . . . . . . . . . . . . . . . . . . . . . . . . . . . . . . . . . . 323
Adding Microsoft Exchange Domain Controller Access . . . . . . . . . . . . . . . . . . . . . . . . . 324
Editing a Microsoft Exchange Domain Controller . . . . . . . . . . . . . . . . . . . . . . . . . . . . . 325
Deleting a Microsoft Exchange Domain Controller . . . . . . . . . . . . . . . . . . . . . . . . . . . . 325
Monitoring Microsoft Exchange Failover Clusters . . . . . . . . . . . . . . . . . . . . . . . . . . . . . 325
Monitoring Caché . . . . . . . . . . . . . . . . . . . . . . . . . . . . . . . . . . . . . . . . . . . . . . . . . . . . . 325
Step A — Import the Wrapper Class Definitions into the Caché Instance . . . . . . . . . . . . . 326
xiv
Page 15

Step B — Create APPIQ_USER Account on the Caché Instance. . . . . . . . . . . . . . . . . . . . 330
Locked Down Security Mode . . . . . . . . . . . . . . . . . . . . . . . . . . . . . . . . . . . . . . . . . 332
Removing the APPIQ_USER Account from the Caché Instance. . . . . . . . . . . . . . . . . . . . . 332
Step C — Provide the Caché Instance Name and Port Number . . . . . . . . . . . . . . . . . . . 334
Deleting Caché Information . . . . . . . . . . . . . . . . . . . . . . . . . . . . . . . . . . . . . . . . . . . . 335
Step 3 — Discovering Applications. . . . . . . . . . . . . . . . . . . . . . . . . . . . . . . . . . . . . . . . . . . . 335
Step A — Detect Your Applications . . . . . . . . . . . . . . . . . . . . . . . . . . . . . . . . . . . . . . . . . 335
Step B — Obtain the Topology . . . . . . . . . . . . . . . . . . . . . . . . . . . . . . . . . . . . . . . . . . . . 336
Step C — Run Discovery Data Collection . . . . . . . . . . . . . . . . . . . . . . . . . . . . . . . . . . . . . 337
Changing the Oracle TNS Listener Port . . . . . . . . . . . . . . . . . . . . . . . . . . . . . . . . . . . . . . . . 338
Changing the Password for the Managed Database Account. . . . . . . . . . . . . . . . . . . . . . . . . . 338
19Host and Application Clustering . . . . . . . . . . . . . . . . . . . . . . . . . . . . . . . . . . 341
About Clustering. . . . . . . . . . . . . . . . . . . . . . . . . . . . . . . . . . . . . . . . . . . . . . . . . . . . . . . . . 341
Discovering Clusters . . . . . . . . . . . . . . . . . . . . . . . . . . . . . . . . . . . . . . . . . . . . . . . . . . . . . . 341
Automatic Discovery of Host Clusters . . . . . . . . . . . . . . . . . . . . . . . . . . . . . . . . . . . . . . . . 342
Manual Discovery of Host Clusters . . . . . . . . . . . . . . . . . . . . . . . . . . . . . . . . . . . . . . . . . . 342
Filtering Hosts. . . . . . . . . . . . . . . . . . . . . . . . . . . . . . . . . . . . . . . . . . . . . . . . . . . . . . 343
File Servers and Clusters. . . . . . . . . . . . . . . . . . . . . . . . . . . . . . . . . . . . . . . . . . . . . . . . . 344
Clustering in System Manager . . . . . . . . . . . . . . . . . . . . . . . . . . . . . . . . . . . . . . . . . . . . . . . 344
Clustering in Topology . . . . . . . . . . . . . . . . . . . . . . . . . . . . . . . . . . . . . . . . . . . . . . . . . . . . 345
Clustering in Capacity Manager. . . . . . . . . . . . . . . . . . . . . . . . . . . . . . . . . . . . . . . . . . . . . . 346
20Managing Security . . . . . . . . . . . . . . . . . . . . . . . . . . . . . . . . . . . . . . . . . . . 349
About Security for the Management Server . . . . . . . . . . . . . . . . . . . . . . . . . . . . . . . . . . . . . . 349
About Roles . . . . . . . . . . . . . . . . . . . . . . . . . . . . . . . . . . . . . . . . . . . . . . . . . . . . . . . . . 349
SIMViewOnly . . . . . . . . . . . . . . . . . . . . . . . . . . . . . . . . . . . . . . . . . . . . . . . . . . . 351
Granting Global Reporter Access. . . . . . . . . . . . . . . . . . . . . . . . . . . . . . . . . . . . . . 351
Domain Administrator Role Privileges . . . . . . . . . . . . . . . . . . . . . . . . . . . . . . . . . . . 351
System Configuration Option. . . . . . . . . . . . . . . . . . . . . . . . . . . . . . . . . . . . . . . . . 351
Roles Used to Restrict Access . . . . . . . . . . . . . . . . . . . . . . . . . . . . . . . . . . . . . . . . . 352
Options for Restricting a Role . . . . . . . . . . . . . . . . . . . . . . . . . . . . . . . . . . . . . . . . 352
About Organizations . . . . . . . . . . . . . . . . . . . . . . . . . . . . . . . . . . . . . . . . . . . . . . . . . . . 353
Planning Your Hierarchy. . . . . . . . . . . . . . . . . . . . . . . . . . . . . . . . . . . . . . . . . . . . . . . . . 355
Naming Organizations . . . . . . . . . . . . . . . . . . . . . . . . . . . . . . . . . . . . . . . . . . . . . . . . . 355
Managing User Accounts . . . . . . . . . . . . . . . . . . . . . . . . . . . . . . . . . . . . . . . . . . . . . . . . . . 356
Adding Users . . . . . . . . . . . . . . . . . . . . . . . . . . . . . . . . . . . . . . . . . . . . . . . . . . . . . . . . 356
Editing a User Account . . . . . . . . . . . . . . . . . . . . . . . . . . . . . . . . . . . . . . . . . . . . . . . . . . 357
Deleting Users . . . . . . . . . . . . . . . . . . . . . . . . . . . . . . . . . . . . . . . . . . . . . . . . . . . . . . . . 358
Modifying Your User Profile . . . . . . . . . . . . . . . . . . . . . . . . . . . . . . . . . . . . . . . . . . . . . . 358
Modifying Your User Preferences . . . . . . . . . . . . . . . . . . . . . . . . . . . . . . . . . . . . . . . . . . . 359
System, Capacity and Performance Manager Preferences . . . . . . . . . . . . . . . . . . . . . . . 359
System Manager and Element Topology Preferences . . . . . . . . . . . . . . . . . . . . . . . . . . . 359
Warnings for Slow Systems Operations . . . . . . . . . . . . . . . . . . . . . . . . . . . . . . . . . . . . 359
Viewing the Properties of a Role . . . . . . . . . . . . . . . . . . . . . . . . . . . . . . . . . . . . . . . . . . . 360
Viewing the Properties of an Organization . . . . . . . . . . . . . . . . . . . . . . . . . . . . . . . . . . . . 360
Managing Roles . . . . . . . . . . . . . . . . . . . . . . . . . . . . . . . . . . . . . . . . . . . . . . . . . . . . . . . . . 361
HP Storage Essentials SRM 6.0 Installation Guide xv
Page 16

Adding Roles . . . . . . . . . . . . . . . . . . . . . . . . . . . . . . . . . . . . . . . . . . . . . . . . . . . . . . . . 361
Editing Roles . . . . . . . . . . . . . . . . . . . . . . . . . . . . . . . . . . . . . . . . . . . . . . . . . . . . . . . . . 362
Deleting Roles . . . . . . . . . . . . . . . . . . . . . . . . . . . . . . . . . . . . . . . . . . . . . . . . . . . . . . . . 362
Managing Organizations . . . . . . . . . . . . . . . . . . . . . . . . . . . . . . . . . . . . . . . . . . . . . . . . . . 363
Adding an Organization . . . . . . . . . . . . . . . . . . . . . . . . . . . . . . . . . . . . . . . . . . . . . . . . 363
Adding Storage Volumes to an Organization . . . . . . . . . . . . . . . . . . . . . . . . . . . . . . . . 364
Viewing Organizations . . . . . . . . . . . . . . . . . . . . . . . . . . . . . . . . . . . . . . . . . . . . . . . . . 365
Editing an Organization . . . . . . . . . . . . . . . . . . . . . . . . . . . . . . . . . . . . . . . . . . . . . . . . . 365
Removing an Organization. . . . . . . . . . . . . . . . . . . . . . . . . . . . . . . . . . . . . . . . . . . . . . . 366
Removing Members from an Organization . . . . . . . . . . . . . . . . . . . . . . . . . . . . . . . . . . . . 366
Filtering Organizations. . . . . . . . . . . . . . . . . . . . . . . . . . . . . . . . . . . . . . . . . . . . . . . . . . 367
Changing the Password of System Accounts . . . . . . . . . . . . . . . . . . . . . . . . . . . . . . . . . . . . . 368
Using Active Directory/LDAP for Authentication . . . . . . . . . . . . . . . . . . . . . . . . . . . . . . . . . . . 369
Step 1 — Configure the Management Server to Use AD or LDAP. . . . . . . . . . . . . . . . . . . . . 370
Configuring the Management Server to Use Active Directory . . . . . . . . . . . . . . . . . . . . . 370
Configuring the Management Server to Use LDAP. . . . . . . . . . . . . . . . . . . . . . . . . . . . . 373
Step 2 — Restart the AppStorManager Service and Login as the Designated Admin Account . 376
Step 3 — Add Users to the Management Server . . . . . . . . . . . . . . . . . . . . . . . . . . . . . . . . 377
Step 4 — Provide Login Information to Your Users . . . . . . . . . . . . . . . . . . . . . . . . . . . . . . . 377
21Troubleshooting . . . . . . . . . . . . . . . . . . . . . . . . . . . . . . . . . . . . . . . . . . . . . 379
Troubleshooting Installation/Upgrade . . . . . . . . . . . . . . . . . . . . . . . . . . . . . . . . . . . . . . . . . . 379
If Your Installation or Upgrade Failed, Capture the Logs . . . . . . . . . . . . . . . . . . . . . . . . . . . 380
Checking Installation Log Files . . . . . . . . . . . . . . . . . . . . . . . . . . . . . . . . . . . . . . . . . . . . 380
“The environment variable ‘perl5lib’ is set.” Message . . . . . . . . . . . . . . . . . . . . . . . . . . . . 381
“SEVERE: OUI-10029...” Message . . . . . . . . . . . . . . . . . . . . . . . . . . . . . . . . . . . . . . . . . 382
Brocade API Switches Displaying Stale Data . . . . . . . . . . . . . . . . . . . . . . . . . . . . . . . . . . . 382
SIM Connector Fails to Install for Single–Server Configurations . . . . . . . . . . . . . . . . . . . . . . 382
“Reverse Lookup Failed” Message (Windows only) . . . . . . . . . . . . . . . . . . . . . . . . . . . . . . 382
Re-installing the HP SIM Connector
(If Your HP SIM User Name or Password is Incorrect or was Changed) . . . . . . . . . . . . . . . . 383
Increasing the time-out for the HP SIM Connector. . . . . . . . . . . . . . . . . . . . . . . . . . . . . . . . 383
Storage Essentials Menus Are Not Shown in HP SIM . . . . . . . . . . . . . . . . . . . . . . . . . . . . . 384
NoSuchElement Error . . . . . . . . . . . . . . . . . . . . . . . . . . . . . . . . . . . . . . . . . . . . . . . . . . . 384
Difficulty Displaying Storage Essentials Pages After Generating a Custom Certificate . . . . . . 384
Troubleshooting the Oracle Database (Windows) . . . . . . . . . . . . . . . . . . . . . . . . . . . . . . . 384
Use Only the Installation Wizard
(or Unix Scripts) to Install/Upgrade Oracle . . . . . . . . . . . . . . . . . . . . . . . . . . . . . . . . . 384
Existing Oracle Database Is Detected . . . . . . . . . . . . . . . . . . . . . . . . . . . . . . . . . . . . . 385
Configuring the Java Console . . . . . . . . . . . . . . . . . . . . . . . . . . . . . . . . . . . . . . . . . . . . . . . 385
java.lang.SecurityException: Failed to validate one time key . . . . . . . . . . . . . . . . . . . . . . . . . . 385
“Data is late or an error occurred” Message . . . . . . . . . . . . . . . . . . . . . . . . . . . . . . . . . . . . . 385
appstorm.<timestamp>.log Filled with Connection Exceptions . . . . . . . . . . . . . . . . . . . . . . . . . 385
Receiving HTTP ERROR: 503 When Accessing the Management Server . . . . . . . . . . . . . . . . . . 386
Windows . . . . . . . . . . . . . . . . . . . . . . . . . . . . . . . . . . . . . . . . . . . . . . . . . . . . . . . . . . . 386
Unix systems . . . . . . . . . . . . . . . . . . . . . . . . . . . . . . . . . . . . . . . . . . . . . . . . . . . . . . . . . 387
Errors in the Logs . . . . . . . . . . . . . . . . . . . . . . . . . . . . . . . . . . . . . . . . . . . . . . . . . . . . . . 388
xvi
Page 17

Permanently Changing the Port a CIM Extension Uses (UNIX Only). . . . . . . . . . . . . . . . . . . . . . 388
Configuring UNIX CIM Extensions to Run Behind Firewalls . . . . . . . . . . . . . . . . . . . . . . . . . . . 389
Volume Names from Ambiguous Automounts Are Not Displayed . . . . . . . . . . . . . . . . . . . . . . . 393
Installing the Software Security Certificate . . . . . . . . . . . . . . . . . . . . . . . . . . . . . . . . . . . . . . . 393
Installing the Certificate by Using Microsoft Internet Explorer 6.0. . . . . . . . . . . . . . . . . . . . . 394
Changing the Security Certificate to Match the Name of the Server . . . . . . . . . . . . . . . . . . . 394
Windows. . . . . . . . . . . . . . . . . . . . . . . . . . . . . . . . . . . . . . . . . . . . . . . . . . . . . . . . . 394
and Linux . . . . . . . . . . . . . . . . . . . . . . . . . . . . . . . . . . . . . . . . . . . . . . . . . . . . . . . . 395
Troubleshooting Discovery and Discovery Data Collection . . . . . . . . . . . . . . . . . . . . . . . . . . . . 395
Troubleshooting Mode . . . . . . . . . . . . . . . . . . . . . . . . . . . . . . . . . . . . . . . . . . . . . . . . . . 396
Unable to discover Emulex host bus adapters . . . . . . . . . . . . . . . . . . . . . . . . . . . . . . . . . . 397
CIMOM Service Not Starting After Trying to Discover Sybase or SQL Server Applications . . . 397
Configuring E-mail Notification for Discovery Data Collection . . . . . . . . . . . . . . . . . . . . . . . 398
Increasing the Time-out Period and Number of Retries for Switches in Progress . . . . . . . . . . . 398
“Connection to the Database Server Failed” Error . . . . . . . . . . . . . . . . . . . . . . . . . . . . . . . 400
An Element is Not Listed on the Discovery Data Collection Page . . . . . . . . . . . . . . . . . . . . . 400
DCOM Unable to Communicate with Computer . . . . . . . . . . . . . . . . . . . . . . . . . . . . . . . . 401
Duplicate Listings/Logs for Brocade Switches in Same Fabric . . . . . . . . . . . . . . . . . . . . . . . 401
Duplicate listings: Targets tab . . . . . . . . . . . . . . . . . . . . . . . . . . . . . . . . . . . . . . . . . . . 401
Duplicate Logs . . . . . . . . . . . . . . . . . . . . . . . . . . . . . . . . . . . . . . . . . . . . . . . . . . . . . 401
Duplicate entries for the same element on the Discovery Data Collection page . . . . . . . . . . . 402
Element Logs Authentication Errors During Discovery . . . . . . . . . . . . . . . . . . . . . . . . . . . . . 402
EMC Device Masking Database Does Not Appear in Topology (AIX Only) . . . . . . . . . . . . . . 402
Management Server Does Not Discover Another Management Server's Database . . . . . . . . . 402
Microsoft Exchange Drive Shown as a Local Drive . . . . . . . . . . . . . . . . . . . . . . . . . . . . . . . 402
Unable to Discover Microsoft Exchange Servers . . . . . . . . . . . . . . . . . . . . . . . . . . . . . . . . 402
Nonexistent Oracle Instance Is Displayed . . . . . . . . . . . . . . . . . . . . . . . . . . . . . . . . . . . . . 402
Requirements for Discovering Oracle . . . . . . . . . . . . . . . . . . . . . . . . . . . . . . . . . . . . . . . . 403
Do Not Run Overlapping Discovery Schedules . . . . . . . . . . . . . . . . . . . . . . . . . . . . . . . . . 403
"This storage system uses unsupported firmware.
ManagementClassName: class_name" Message . . . . . . . . . . . . . . . . . . . . . . . . . . . . . . . . 403
Troubleshooting Topology Issues. . . . . . . . . . . . . . . . . . . . . . . . . . . . . . . . . . . . . . . . . . . . . . 403
About the Topology . . . . . . . . . . . . . . . . . . . . . . . . . . . . . . . . . . . . . . . . . . . . . . . . . . . . 404
Undiscovered Hosts Display as Storage Systems . . . . . . . . . . . . . . . . . . . . . . . . . . . . . . . . 407
Solaris Machines Appear to Have Extra QLogic HBAs . . . . . . . . . . . . . . . . . . . . . . . . . . . . 407
No Stitching for Brocade Switches with Firmware 3.2.0 . . . . . . . . . . . . . . . . . . . . . . . . . . . 407
Link Between a Brocade Switch and a Host Disappears from the Topology . . . . . . . . . . . . . . 407
Incorrect Topology Sometimes Displayed for CNT Switches . . . . . . . . . . . . . . . . . . . . . . . . 408
Device Locking Mechanism for Brocade Element Manager Query/Reconfiguration . . . . . . . . 408
A Discovered Sun StorEdge A5000 JBOD Does Not Display Its WWN Properly . . . . . . . . . . 408
Sun 6920 Storage Systems: “ReplicatorSQLException: Database create error”
During Discovery Data Collection . . . . . . . . . . . . . . . . . . . . . . . . . . . . . . . . . . . . . . . . . . 408
Mirrored Volumes Cannot Be Provisioned on Sun 6920 Storage Systems . . . . . . . . . . . . . . . 408
Unable to Monitor McDATA Switches . . . . . . . . . . . . . . . . . . . . . . . . . . . . . . . . . . . . . . . 408
Unable to Detect a Host Bus Adapter . . . . . . . . . . . . . . . . . . . . . . . . . . . . . . . . . . . . . . . . 409
Navigation Tab Displays Removed Drives as Disk Drives . . . . . . . . . . . . . . . . . . . . . . . . . . 409
Unable to Obtain Information from a CLARiiON Storage System . . . . . . . . . . . . . . . . . . . . . 409
HP Storage Essentials SRM 6.0 Installation Guide xvii
Page 18

Discovery Fails Too Slowly for a Nonexistent IP Address. . . . . . . . . . . . . . . . . . . . . . . . . . . 409
“CIM_ERR_FAILED” Message . . . . . . . . . . . . . . . . . . . . . . . . . . . . . . . . . . . . . . . . . . . . . 410
Re-establishing Communication with EFCM . . . . . . . . . . . . . . . . . . . . . . . . . . . . . . . . . 411
CIM_ERR_FAILED When Trying to Activate a Zone Set Using McDATA SWAPI . . . . . . . . . . . 412
Communicating with HiCommand Device Manager Over SSL . . . . . . . . . . . . . . . . . . . . . . . 412
Unable to Discover a UNIX Host Because of DNS or Routing Issues . . . . . . . . . . . . . . . . . . . 413
ERROR replicating APPIQ_EVAStorageVolume during Discovery Data Collection for an EVA array.
414
Recalculating the Topology . . . . . . . . . . . . . . . . . . . . . . . . . . . . . . . . . . . . . . . . . . . . . . . 414
Troubleshooting Provisioning . . . . . . . . . . . . . . . . . . . . . . . . . . . . . . . . . . . . . . . . . . . . . . . . 414
Cannot Access a Resource Owned by Another Controller. . . . . . . . . . . . . . . . . . . . . . . . . . 414
Error -56. . . . . . . . . . . . . . . . . . . . . . . . . . . . . . . . . . . . . . . . . . . . . . . . . . . . . . . . . . . . 415
“Can't delete this zone” Message . . . . . . . . . . . . . . . . . . . . . . . . . . . . . . . . . . . . . . . . . . 415
Changes in EFC Manager Requiring Discovery Data Collection. . . . . . . . . . . . . . . . . . . . . . 415
Troubleshooting CLI Errors . . . . . . . . . . . . . . . . . . . . . . . . . . . . . . . . . . . . . . . . . . . . . . . . . . 415
Using the CLI Command While Upgrading . . . . . . . . . . . . . . . . . . . . . . . . . . . . . . . . . . . . 415
NoSuchElement Error . . . . . . . . . . . . . . . . . . . . . . . . . . . . . . . . . . . . . . . . . . . . . . . . . . . 415
Troubleshooting Hardware . . . . . . . . . . . . . . . . . . . . . . . . . . . . . . . . . . . . . . . . . . . . . . . . . 415
About Swapping Host Bus Adapters. . . . . . . . . . . . . . . . . . . . . . . . . . . . . . . . . . . . . . . . . 416
“Fork Function Failed” Message on AIX Hosts . . . . . . . . . . . . . . . . . . . . . . . . . . . . . . . . . . 416
Known Driver Issues . . . . . . . . . . . . . . . . . . . . . . . . . . . . . . . . . . . . . . . . . . . . . . . . . . . . 416
Known Device Issues . . . . . . . . . . . . . . . . . . . . . . . . . . . . . . . . . . . . . . . . . . . . . . . . . . . 416
“mailbox command 17 failure status FFF7” Message . . . . . . . . . . . . . . . . . . . . . . . . . . . . . 420
”Process Has an Exclusive Lock” Message . . . . . . . . . . . . . . . . . . . . . . . . . . . . . . . . . . . . 420
Index . . . . . . . . . . . . . . . . . . . . . . . . . . . . . . . . . . . . . . . . . . . . . . . . . . . . . . . 423
xviii
Page 19

Figures
1 Missing Xvfb Package Message. . . . . . . . . . . . . . . . . . . . . . . . . . . . . . . . . . . . . . . . . . . . . 63
2 Setting Kernel Parameters . . . . . . . . . . . . . . . . . . . . . . . . . . . . . . . . . . . . . . . . . . . . . . . . . 68
3 Oracle User Account Not Enabled Error . . . . . . . . . . . . . . . . . . . . . . . . . . . . . . . . . . . . . . . 68
4 Discovery Setup page . . . . . . . . . . . . . . . . . . . . . . . . . . . . . . . . . . . . . . . . . . . . . . . . . . 111
5 Monitoring Product Health window . . . . . . . . . . . . . . . . . . . . . . . . . . . . . . . . . . . . . . . . . 111
6 HP Storage Essentials Management Server “localhost” . . . . . . . . . . . . . . . . . . . . . . . . . . . . 112
7 HP Storage Essentials Discovery progress table . . . . . . . . . . . . . . . . . . . . . . . . . . . . . . . . . 115
8 Run SE Discovery Data Collection Now link . . . . . . . . . . . . . . . . . . . . . . . . . . . . . . . . . . . 115
9 Deleting Discovered Elements from the Management Server . . . . . . . . . . . . . . . . . . . . . . . . 166
10 An Example of Direct Attached Storage . . . . . . . . . . . . . . . . . . . . . . . . . . . . . . . . . . . . . . 175
11 Current Usage Summary Display . . . . . . . . . . . . . . . . . . . . . . . . . . . . . . . . . . . . . . . . . . . 178
12 EVA Selection Screen . . . . . . . . . . . . . . . . . . . . . . . . . . . . . . . . . . . . . . . . . . . . . . . . . . . 179
13 Discovery progress. . . . . . . . . . . . . . . . . . . . . . . . . . . . . . . . . . . . . . . . . . . . . . . . . . . . . 300
14 Run SE Discovery Data Collection Now link . . . . . . . . . . . . . . . . . . . . . . . . . . . . . . . . . . . 301
15 Selecting Import from Disk . . . . . . . . . . . . . . . . . . . . . . . . . . . . . . . . . . . . . . . . . . . . . . . 327
16 Enabling Compile Class . . . . . . . . . . . . . . . . . . . . . . . . . . . . . . . . . . . . . . . . . . . . . . . . . 328
17 Selecting appiq.cls. . . . . . . . . . . . . . . . . . . . . . . . . . . . . . . . . . . . . . . . . . . . . . . . . . . . . 329
18 Importing Wrapper Class Definitions . . . . . . . . . . . . . . . . . . . . . . . . . . . . . . . . . . . . . . . . 330
19 System Manager Cluster Representation . . . . . . . . . . . . . . . . . . . . . . . . . . . . . . . . . . . . . . 345
20 Cluster Element Topology Representation . . . . . . . . . . . . . . . . . . . . . . . . . . . . . . . . . . . . . 346
21 Capacity Manager Cluster Representation . . . . . . . . . . . . . . . . . . . . . . . . . . . . . . . . . . . . 347
22 Parent-Child Hierarchy for Organizations . . . . . . . . . . . . . . . . . . . . . . . . . . . . . . . . . . . . . 353
23 Children in Multiple Organizations . . . . . . . . . . . . . . . . . . . . . . . . . . . . . . . . . . . . . . . . . 354
24 Run SE user security configuration . . . . . . . . . . . . . . . . . . . . . . . . . . . . . . . . . . . . . . . . . . 357
25 Clicking the Name of Your User Account . . . . . . . . . . . . . . . . . . . . . . . . . . . . . . . . . . . . . 359
26 Active Organization. . . . . . . . . . . . . . . . . . . . . . . . . . . . . . . . . . . . . . . . . . . . . . . . . . . . 368
27 Perl5lib environment variable message. . . . . . . . . . . . . . . . . . . . . . . . . . . . . . . . . . . . . . . 381
28 Reverse Lookup Failed . . . . . . . . . . . . . . . . . . . . . . . . . . . . . . . . . . . . . . . . . . . . . . . . . . 382
HP Storage Essentials SRM 6.0 Installation Guide xix
Page 20

xx
Page 21

Tables
1 Document conventions . . . . . . . . . . . . . . . . . . . . . . . . . . . . . . . . . . . . . . . . . . . . . . . xxiv
2 Roadmap for Installation and Initial Configurations . . . . . . . . . . . . . . . . . . . . . . . . . . . . . 2
3 Pre-installation Requirements to Install or Upgrade . . . . . . . . . . . . . . . . . . . . . . . . . . . . . 10
4 Overview of Switch Discovery Requirements . . . . . . . . . . . . . . . . . . . . . . . . . . . . . . . . 116
5 Discovery Settings for McDATA and Connectrix Switches . . . . . . . . . . . . . . . . . . . . . . . 124
6 Discovery Requirements for Storage Systems . . . . . . . . . . . . . . . . . . . . . . . . . . . . . . . . 134
7 Discovery Requirements NAS Devices and Tape Libraries . . . . . . . . . . . . . . . . . . . . . . . 150
8 Task Status descriptions . . . . . . . . . . . . . . . . . . . . . . . . . . . . . . . . . . . . . . . . . . . . . . 162
9 Discovery Group Ports . . . . . . . . . . . . . . . . . . . . . . . . . . . . . . . . . . . . . . . . . . . . . . . 163
10 License Restrictions. . . . . . . . . . . . . . . . . . . . . . . . . . . . . . . . . . . . . . . . . . . . . . . . . . 171
11 Determining Managed Access Points . . . . . . . . . . . . . . . . . . . . . . . . . . . . . . . . . . . . . 173
12 Status Icons. . . . . . . . . . . . . . . . . . . . . . . . . . . . . . . . . . . . . . . . . . . . . . . . . . . . . . . 187
13 Parameters for CIM Extensions . . . . . . . . . . . . . . . . . . . . . . . . . . . . . . . . . . . . . . . . . 197
14 Parameters for CIM Extensions . . . . . . . . . . . . . . . . . . . . . . . . . . . . . . . . . . . . . . . . . 207
15 Parameters for CIM Extensions . . . . . . . . . . . . . . . . . . . . . . . . . . . . . . . . . . . . . . . . . 214
16 Parameters for CIM Extensions . . . . . . . . . . . . . . . . . . . . . . . . . . . . . . . . . . . . . . . . . 223
17 Parameters for CIM Extensions . . . . . . . . . . . . . . . . . . . . . . . . . . . . . . . . . . . . . . . . . 234
18 TCP/IP Process Display Commands . . . . . . . . . . . . . . . . . . . . . . . . . . . . . . . . . . . . . . 243
19 Port Arguments . . . . . . . . . . . . . . . . . . . . . . . . . . . . . . . . . . . . . . . . . . . . . . . . . . . . 243
20 Parameters for CIM Extensions . . . . . . . . . . . . . . . . . . . . . . . . . . . . . . . . . . . . . . . . . 255
21 Parameters for CIM Extensions . . . . . . . . . . . . . . . . . . . . . . . . . . . . . . . . . . . . . . . . . 267
22 Parameters for CIM Extensions . . . . . . . . . . . . . . . . . . . . . . . . . . . . . . . . . . . . . . . . . 277
23 Parameters for CIM Extensions . . . . . . . . . . . . . . . . . . . . . . . . . . . . . . . . . . . . . . . . . 288
24 Script Names for Managed Databases. . . . . . . . . . . . . . . . . . . . . . . . . . . . . . . . . . . . 303
25 Default Role Privileges . . . . . . . . . . . . . . . . . . . . . . . . . . . . . . . . . . . . . . . . . . . . . . . 350
26 Default Role Privileges by Elements. . . . . . . . . . . . . . . . . . . . . . . . . . . . . . . . . . . . . . . 352
27 Troubleshooting Firewalls . . . . . . . . . . . . . . . . . . . . . . . . . . . . . . . . . . . . . . . . . . . . . 389
28 Time-out Properties. . . . . . . . . . . . . . . . . . . . . . . . . . . . . . . . . . . . . . . . . . . . . . . . . . 399
29 Retry Properties . . . . . . . . . . . . . . . . . . . . . . . . . . . . . . . . . . . . . . . . . . . . . . . . . . . . 400
30 Troubleshooting Discovery and Discovery Data Collection . . . . . . . . . . . . . . . . . . . . . . 405
31 Known Device Issues . . . . . . . . . . . . . . . . . . . . . . . . . . . . . . . . . . . . . . . . . . . . . . . . 417
HP Storage Essentials SRM 6.0 Installation Guide xxi
Page 22

xxii
Page 23

About this guide
This guide provides information about:
• Installing the product
• Discovering elements
• Creating users
• Changing the admin password
• Installing JReport Designer
Intended audience
This guide is intended for:
• Network Engineers
• Administrators
• Any one that needs to monitor and/or manage their file servers
Prerequisites
Prerequisites for using this product include:
• Networking
• Storage Area Networks (SANs)
• The Common Information Model (CIM)
Related documentation
In addition to this guide, please refer to other documents for this product:
• Online help for HP Storage Essentials SRM
• HP Storage Essentials SRM User Guide
• HP Storage Essentials SRM Application Guide
• HP Storage Essentials SRM CLI Guide
• HP Storage Essentials SRM for File Servers Guide
These and other HP documents can be found on the HP web site: http://www.hp.com/support/
HP Storage Essentials SRM 6.0 Installation Guide xxiii
Page 24

Document conventions and symbols
Table 1 Document conventions
Convention Element
Medium blue text: Figure 1 Cross-reference links and e-mail addresses
Medium blue, underlined text
(http://www.hp.com
Bold font • Key names
Italics font Text emphasis
Monospace font • File and directory names
Monospace, italic font • Code variables
Monospace, bold font Emphasis of file and directory names, system output, code, and
)
Web site addresses
• Text typed into a GUI element, such as into a box
• GUI elements that are clicked or selected, such as menu and
list items, buttons, and check boxes
• System output
• Code
• Text typed at the command-line
• Command-line variables
text typed at the command line
WARNING! Indicates that failure to follow directions could result in bodily harm or death.
xxiv
CAUTION: Indicates that failure to follow directions could result in damage to equipment or data.
IMPORTANT: Provides clarifying information or specific instructions.
NOTE: Provides additional information.
Page 25

TIP: Provides helpful hints and shortcuts.
HP technical support
Telephone numbers for worldwide technical support are listed on the HP support web site:
http://www.hp.com/support/
Collect the following information before calling:
• Technical support registration number (if applicable)
• Product serial numbers
• Product model names and numbers
• Applicable error messages
• Operating system type and revision level
• Detailed, specific questions
For continuous quality improvement, calls may be recorded or monitored.
HP strongly recommends that customers sign up online using the Subscriber's choice web site at
http://www.hp.com/go/e-updates
• Subscribing to this service provides you with e-mail updates on the latest product
enhancements, newest versions of drivers, and firmware documentation updates as well as
instant access to numerous other product resources.
• After signing up, you can quickly locate your products by selecting Business support and then
Storage under Product Category.
.
.
HP-authorized reseller
For the name of your nearest HP-authorized reseller:
• In the United States, call 1-800-345-1518.
• Elsewhere, visit the HP web site: http://www.hp.com
and telephone numbers.
Helpful web sites
For third-party product information, see the following HP web sites:
• http://www.hp.com
• http://www.hp.com/go/storage
• http://www.hp.com/support/
. Then click Contact HP to find locations
HP Storage Essentials SRM 6.0 Installation Guide xxv
Page 26

xxvi
Page 27

1Overview
This chapter contains the following topics:
• Supported Platforms for Installing HP Storage Essentials, page 1
• Roadmap for Installation and Initial Configurations, page 1
• About this Product, page 4
Supported Platforms for Installing HP Storage Essentials
This chapter provides a general overview of the installation steps for the various operating systems
on which HP Storage Essentials is supported:
• Linux
• Microsoft Windows
NOTE: The Linux management server is not available with Storage Essentials Standard Edition.
Roadmap for Installation and Initial Configurations
Storage Essentials integrates tightly with HP Systems Insight Manager. The installation steps for
Storage Essentials require you to install Storage Essentials, HP System Insight Manager, and the HP
SIM Connector. HP highly recommends that you follow the steps outlined in Table 2 on page 2.
Be sure to see the support matrix for your edition. The support matrix can be found on the top level
of the management server CD-ROM.
HP Storage Essentials SRM 6.0 Installation Guide 1
Page 28

IMPORTANT: If you access HP Systems Insight Manager through HTTP over SSL (HTTPS), you must
provide the full DNS name for the host to be able to access HP Storage Essentials. For example,
you could access HP Systems Insight Manager by using
https://mycomputer.domainname.com:50000, but you could not use
https://mycomputer:50000. For non-secure connections (HTTP), the full DNS name does not need
to be provided.
Table 2 Roadmap for Installation and Initial Configurations
Step Description Where to Find
1 Install the management server. • Microsoft Windows - See ”Installing the
Management Server on Microsoft
Windows” on page 7.
• Linux - See ”Installing the Management
Server on Linux” on page 59.
2 Perform discovery for switches, NAS
devices, and storage systems. This
step requires the management server
to be connected to the network
containing the switches, NAS devices,
and storage systems you want to
manage.
See ”Discovering Switches, Storage Systems,
NAS Devices, and Tape Libraries” on
page 105.
Overview2
Page 29

Table 2 Roadmap for Installation and Initial Configurations (continued)
Step Description Where to Find
3 Install a CIM Extension on each host
(other than the management server)
from which you want the management
server to be able to obtain
information. The CIM Extension
gathers information from the operating
system and host bus adapters on the
host. It then makes the information
available to the management server.
It is possible to install, upgrade, and
manage CIM Extensions remotely
across any number of hosts. See
”Deploying and Managing CIM
Extensions” on page 181.
HP Storage Essentials Standard
Edition supports a subset of the
devices supported by Enterprise
Edition. See the HP Storage Essentials
Standard Edition Support Matrix for a
list of supported devices. The support
matrix is accessible from the
Documentation Center (Help >
Documentation Center in Storage
Essentials).
IMPORTANT: Do not install CIM
extensions on the management
1
server.
• IBM AIX - See ”Installing the CIM Extension
for IBM AIX” on page 191.
• SGI ProPack for Linux - See ”Installing the
CIM Extension for SGI ProPack for Linux”
on page 201.
• HP-UX - See ”Installing the CIM Extension
for HP-UX” on page 209.
• SGI IRIX - See ”Installing the CIM Extension
for SGI IRIX” on page 219.
• SUSE and Red Hat Linux - See ”Installing
the CIM Extension for SUSE and Red Hat
Linux” on page 227.
• HP OpenVMS (Alpha) - See ”Installing the
CIM Extension for OpenVMS” on
page 249.
• HP Tru64 UNIX - See ”Installing the CIM
Extension for HP Tru64 UNIX” on
page 261.
• Sun Solaris - See ”Installing the CIM
Extension for Sun Solaris” on page 271.
• Microsoft Windows - See ”Installing the
CIM Extension for Microsoft Windows” on
page 281.
• NonStop - See ”Installing the CIM
Extension for NonStop” on page 237
4 The Windows Proxy is required when
the management server is on Linux
and you want to obtain information
from Microsoft Windows hosts that do
not have a CIM extension installed.
4 Configure the applications and hosts
for monitoring. This step includes
discovering applications, master
backup servers, and hosts.
5 Change the password of the system
accounts.
See ”Installing and Discovering the Windows
Proxy” on page 291.
See ”Discovering Applications, Backup Hosts
and Hosts” on page 297.
See ”Changing the Password of System
Accounts” on page 368.
HP Storage Essentials SRM 6.0 Installation Guide 3
Page 30

1
If you install CIM extensions on the management server, the Database Admin Utility returns the
following error and does not run correctly: [isAppIQCIMOMAlive] - false
About this Product
This product can simplify your complex environment and lower your cost of management with
CIM-based integrated storage management. The management software integrates the management
of applications, servers, storage networks and storage subsystems in a single, easy to implement
and intuitive solution.
The management software integrates the various components in the storage infrastructure into a
CIM/WBEM/SMI-S standards-based database so you can eliminate vendor dependencies and
view and manage your infrastructure as a whole.
By giving your administrators a single, integrated console to manage tactical activities such as
provisioning storage, managing real time events, installing new applications, and migrating
servers and storage, as well as strategic activities such as forecasting, planning and cost analysis,
the management software's integrated storage management lowers your cost of acquiring and
managing a heterogeneous storage environment.
Storage Management Terms
• CIM - A common data model of an implementation-neutral schema for describing overall
management information in a network/enterprise environment.
• Web-Based Enterprise Management (WBEM) - An initiative based on a set of management and
Internet standard technologies developed to unify the management of enterprise computing
environments.
See the glossary in the management server User Guide or in the management server help system
for additional definitions.
Key Benefits
• More efficient use of existing assets
• Increased application availability and performance
• Quicker deployment of storage infrastructure and business applications
• Protection of customer flexibility and investments with a standards-based interface
Key Features
• End-to-end visibility of business applications - Provides an interface for you to monitor your
business applications, including their associated infrastructure and interdependencies.
• Integrated storage management - Lowers cost of acquiring and managing a heterogeneous
storage environment using multiple disparate, point solutions.
• Standards-based architecture - Protects customer flexibility and investments with a
standards-based interface for managing heterogeneous storage environments.
• Storage server, network and subsystem provisioning - Reduces manual processes and risk of
downtime due to free-space outages with multi-level storage provisioning.
Overview4
Page 31

• Reporting - Offers flexible, in-depth report generation in both predefined and user defined
formats, or export data to other management applications.
• Integrated asset management and chargeback - Centralizes all aspects of storage inventory for
maximum asset utilization. Improves accountability and budgeting with cost accounting based
chargeback on user defined utilization characteristics.
• Web-based global management console - Provides management of heterogeneous storage
environments through a web-based user interface.
Software Requirements
To find the software requirements for the management server and for the elements you plan to
discover, refer to the support matrix for your edition.
Web Browser Configuration Requirements
Before you can use the management server, verify the following are enabled on your Web
browser:
• cookies
• JavaScript
• Java
For more information about enabling the items listed above, refer to the online help for your Web
browser.
HP Storage Essentials SRM 6.0 Installation Guide 5
Page 32

Overview6
Page 33

2 Installing the Management Server on Microsoft
Windows
Follow the steps in this chapter to install the management server on the Windows operating system.
See the following topic if you are installing the management server on another supported operating
system:
• ”Installing the Management Server on Linux” on page 59
Important Information About Upgrading
Please contact your Account Representative for upgrades. Upgrading requires assistance from HP
Services.
Be sure to read ”Installation/Upgrade Process is Now Automated” on page 8 and the
requirements in the ”Pre-installation Checklist (Installations and Upgrades)” on page 8 for important
installation and upgrade information.
NOTE: The Linux management server is not available with Storage Essentials Standard Edition.
This chapter contains the following topics:
• Installation/Upgrade Process is Now Automated, page 8
• Pre-installation Checklist (Installations and Upgrades), page 8
• Installation and Upgrade Requirements (Cannot Proceed with Install/Upgrade if Not Met),
page 9
• About the New Storage Essentials for Windows Installation Options, page 14
• Installing Storage Essentials and HP Systems Insight Manager for Windows on Separate
Servers, page 17
• Installing Storage Essentials and HP SIM for Windows on the Same Server, page 27
• Installing the Standalone Version of Storage Essentials for Windows, page 34
• About the Windows Upgrade Wizard, page 51
• Upgrading the Storage Essentials for Windows Management Server (Contact Your Account
Representative Before Upgrading), page 40
• About Migrating Brocade Fabric Access API–Managed Switches to SMI-S After Upgrading,
page 42
• About Changes to McDATA and Connectrix Switches After Upgrading, page 42
• Configurations Required for Discovering EMC CLARiiON Storage Systems, page 53
• ”Important Information About Changing the SIM_MANAGER Password” on page 54
HP Storage Essentials SRM 6.0 Installation Guide 7
Page 34

Keep in Mind the Following
• All steps must be completed for the management server to work properly.
• Before beginning any installation or upgrade steps, refer to the support matrix for your edition
to determine the minimum software and hardware requirements. The support matrix can be
found on the top level of the management server CD-ROM.
• During the management server for Windows installation, double-byte characters are not
allowed in the installation path. The installation wizard displays the following error message if
the path does not meet the requirements:
The installation path for $PRODUCT_NAME$ may NOT contain embedded
spaces, non-English characters, or punctuation. The path is limited
to basic ASCII alphanumeric characters.
• Install the management server on a dedicated computer.
• Installation using Virtual Network Computing (VNC) software is not supported.
• If the installation software is accessed over a network, the software must be accessed using a
mapped network drive (drive letter). Installation using an UNC path (\\host\sharename) will
not work.
• All communication with regard to managed elements is out-of-band via IP, and no SAN
connectivity is required or recommended for the management server.
Installation/Upgrade Process is Now Automated
The installation and upgrade process is now automated by the installation/upgrade wizard.
Manual installations are no longer recommended. Be sure to read and follow the new installation
and/or upgrade instructions in this document.
IMPORTANT: Please contact your Account Representative for upgrades. Upgrading requires
assistance from HP Services.
Do not manually install the Oracle database. You must begin the installation starting with the
Storage Essentials installation wizard CD or setup.exe file.
Pre-installation Checklist (Installations and Upgrades)
The following basic requirements must be met before beginning an installation or upgrade. If the
management server installation wizard detects missing requirements during system verification you
will need to make changes to your system. The basic system requirements are explained in this
section along with additional information on how to meet these requirements:
• Installation and Upgrade Requirements (Cannot Proceed with Install/Upgrade if Not Met),
page 9
• How to Install Microsoft SNMP and SNMP Trap Services, page 12
• How to Verify that Microsoft Access Data Components (MDAC) 2.7 Service Pack 1 or Later is
Installed, page 13
Installing the Management Server on Microsoft Windows8
Page 35

• How to Verify Networking, page 14
• Be Sure to Install a Supported Browser, page 14
Installation and Upgrade Requirements (Cannot Proceed with Install/Upgrade if Not Met)
The requirements listed in Table 3 on page 10 must be met or the installation or upgrade will stop.
See ”Overview of the Verify System Requirements Screen” on page 11 for additional information
about the requirements listed on the Verify System Requirements screen (one of the screens
displayed during an installation or an upgrade by the installation/upgrade wizard).
HP Storage Essentials SRM 6.0 Installation Guide 9
Page 36

IMPORTANT: Contact Customer Support if you are upgrading. Upgrades require assistance from
Customer Support.
Table 3 Pre-installation Requirements to Install or Upgrade
Requirement: Must Meet or Exceed or the Installation or
Upgrade Will Stop:
NTFS File System: Installations: The NTFS file system is required to
install the product.
Upgrades: If Oracle 9i is installed on a volume
using the FAT32 file system, you must convert the
volume to NTFS before you can upgrade.
Contact customer support for information about
converting the volume to NTFS.
Screen Resolution: Minimum resolution is 800x600.
Windows Account: You must be logged in as an Administrator.
Operating System: Microsoft Windows Server 2003 SP1 or higher.
Windows 2000 is no longer supported. See the
support matrix for more information.
MS Internet Explorer: Internet Explorer 6 SP 1 or higher.
TCP/IP: TCP/IP must be enabled.
Minimum disk space for temp and
installation files:
The drive that the TEMP environment variable
points to must have at least 2 GB of free space. If
your TEMP directory is not on your system drive,
make sure your system drive has at least 65 MB
free as well.
%perl5lib% environment variable: The %perl5lib% environment variable cannot
be set to any value. See ”Troubleshooting
Installation/Upgrade” on page 379 for more
information.
Installation Locations specified in the
Installation Options screen for the
following share these requirements:
• HP Systems Insight Manager
• Storage Essentials
• Oracle Database
• Oracle Database Backup
• Valid locations must be entered on the
Installation Options screen.
• Path information can only contain the
following characters: A-z, 0-9, hyphen,
underscore, period, back slash.
• Storage Essentials, Oracle database, and
Oracle database backup paths cannot
contain spaces.
• Drive letter must be a fixed drive.
Installing the Management Server on Microsoft Windows10
Page 37

Table 3 Pre-installation Requirements to Install or Upgrade
Requirement: Must Meet or Exceed or the Installation or
Upgrade Will Stop:
HP Systems Insight Manager
Credentials:
SNMP and SNMP Trap Services: SNMP and SNMP Trap Services must be installed
Valid HP Systems Insight Manager credentials
must be entered on the Storage Essentials HP
Systems Insight Manager Service Account
Credentials screen or the Storage Essentials
installation wizard will stop during a single-server
installation (HP SIM and Storage Essentials
installed on the same server).
and running or the Storage Essentials installation
wizard will stop during a single-server installation
(HP SIM and Storage Essentials installed on the
same server).
See ”How to Install Microsoft SNMP and SNMP
Trap Services” on page 12 for details on
installing and starting these services.
Overview of the Verify System Requirements Screen
The Verify System Requirements screen displays the current status for the following based on the
results of the system scan performed by the installation wizard after starting the installation or
upgrade. Requirements that must be met to proceed with the installation/upgrade and
requirements that do not stop the installation/upgrade are described here:
• Current User Account — The account you use to install/upgrade must have Windows
Administrator privileges or the installation or upgrade will stop.
• Memory — The minimum RAM requirement varies depending on your installation option:
• When HP SIM and Storage Essentials are installed on separate servers the minimum
RAM requirement for the Storage Essentials server is 4 GB with 6 GB recommended.
• When HP SIM and Storage Essentials are installed on the same server together the
minimum RAM requirement for the Storage Essentials server is 6 GB with 8 GB
recommended.
NOTE: If the minimum amount of RAM is close to the requirement, the installation wizard
continues.
• Physical Address Extension (PAE) — PAE is a Windows setting to utilize amounts of RAM
greater than 4 GB on certain versions of Windows. See your Windows documentation for more
information about PAE settings. The installation or upgrade continues regardless of PAE.
• Disk Storage (typical installation) — Depends on the following:
HP Storage Essentials SRM 6.0 Installation Guide 11
Page 38

• With ARCHIVING and RMAN backup off: minimum disk space: 100 GB, recommended
disk space: 200 GB.
• With ARCHIVING and RMAN backup on: minimum disk space: 200 GB, recommended
disk space: 350 GB.
The installation or upgrade will not continue if the disk space requirements are not met.
Operating System — Windows 2003 Server SP1, SP2, R2, R2 SP2. The installation or upgrade
will not continue if the operating system requirement is not met.
• Processor — A dual Intel XEON (or AMD equivalent) 3.4 GHz or higher CPU is required. If the
CPU is close to the requirement, the installation wizard continues.
• DNS Resolution — The installation wizard verifies the IP address and DNS name of the server
using nslookup. If nslookup is not successful, the installation will continue.
IMPORTANT: DNS Resolution failure will prevent the product from running successfully.
See the following topic in the troubleshooting chapter if the DNS Resolution requirement
fails: “Reverse Lookup Failed” Message (Windows only), page 382.
• Port Availability — The management server requires the following ports to be available:
•80
•162
•443
• 1098–1120
• 4444
• 4445
• 4763
• 5962–5988
• 8009
• 8083
• 8093
If you see a warning in the Ports Availability requirement you need to check to be sure that the
ports listed are not currently in use and make any changes that are necessary. Be aware that
the installation will continue even if a required port is not available.
NOTE: During upgrades, the Port Availability check may falsely indicate that the port for
the management server is currently in use. When you check the port, you see that it is
reserved by the management server and you can therefore safely ignore the warning.
How to Install Microsoft SNMP and SNMP Trap Services
To install Microsoft SNMP and SNMP Trap Services:
1. Check Windows Services (Start > Administrative Tools > Services) to see if the SNMP Service is
installed and running. If it is not installed, continue with step 2.
Installing the Management Server on Microsoft Windows12
Page 39

NOTE: These instructions may vary depending on the version of Windows you are
running.
2. Go to Control Panel > Add or Remove Programs > Add/Remove Windows Components.
3. Select the Management and Monitoring Tools line and click Details.
4. Unselect everything except Simple Network Management Protocol. Click OK.
5. Select Next, then select Next again. Keep Remote administration mode selected.
6. Ensure that you deselect Internet Information Services (IIS) – it is enabled by default when
installing SNMP. Click OK if you get a warning box to remove Connection Manager
Components.
7. Insert the Windows CD when prompted.
8. Follow the wizard to complete the installation of the SNMP Services.
9. Verify in Services that the SNMP Service is now running as a service.
IMPORTANT: If SNMP is not running, the HP SIM login page will not be displayed.
How to turn off Internet Information Services (IIS) and
Third–Party Web servers
To turn off Internet Information Services (IIS) and third–party Web servers, verify that Internet
Information Services (IIS) is either not installed or the service is set to manual and stopped.
Other third–party Web servers also conflict with Storage Essentials, which uses port: 80 and/or
port: 443 for its services. If IIS is running, port: 80 and/or port: 443 is already used and Storage
Essentials pages will not be displayed. HP SIM pages will continue to render properly. If IIS is
running, you will not be able to access a Storage Essentials page from HP SIM and you will see the
following error in the log located at <Storage Essentials Installation
Directory>\logs\appstorm.<timestamp>.log:
java.net.BindException: Address already in use: JVM_Bind:
How to Verify that Microsoft Access Data Components (MDAC) 2.7 Service Pack 1 or Later is Installed
To verify that Microsoft Access Data Components (MDAC) 2.7 Service Pack 1 or later is installed:
1. Navigate to <installDrive>\Program Files\Common Files\System\Ado
2. Right-click the icon for the msado15.dll file.
3. In the pop-up menu, select Properties, and click the Version tab to display the version number.
The version must be 2.7 or later.
4. If the file is not found in this path, use the Windows search engine to find the file.
5. If you must download MDAC, refer to http://www.microsoft.com/downloads/
MDAC Service Pack. Download and install 2.7 SP1 or later.
6. Reboot when prompted.
HP Storage Essentials SRM 6.0 Installation Guide 13
and search for
Page 40

How to Verify Networking
The management server must have static or dynamic host name resolution. To verify that the
server’s name can be resolved through DNS:
1. Right click My Computer in the Start menu.
2. Select Properties.
3. Click on the Computer Name tab to see the fully qualified name of the computer under the label
Full Computer Name. The server must be in the domain in which it is going to be used.
4. From a command prompt, type nslookup <FQDN>.
FQDN (fully qualified domain name) is the fully qualified computer name obtained in the
previous step.
5. In the command prompt, type nslookup <IP address>.
IP address is the IP address of the server.
Both results from nslookup should have the same fully qualified computer name and IP address.
6. In the command prompt, type nslookup <Short name of computer>. Results should
resolve to the computer’s fully qualified computer name and IP address.
HP SIM uses nslookup to resolve the names and IP addresses of managed systems. If the DNS suffix
com is listed in the TCP/IP properties as one to append, problems such as inaccurate system status
and incorrect IP addresses for systems HP SIM manages may occur. To correct this, remove com
from the TCP/IP DNS suffix list:
1. Open Control Panel > Network Connections > Local Area Connection > Properties. Choose the
Internet Protocol > Properties > Advanced > DNS tab.
2. If com is in the Append these suffixes (in order) box, remove it.
NOTE: If you will be browsing to HP SIM from a server in a different domain, assure that
the DNS suffix of the management server is added to the suffix list of the web client. Failure
to set this will prevent Storage Essentials pages from rendering. HP SIM pages will work
correctly.
Be Sure to Install a Supported Browser
Install a supported browser on any machine from which you intend to view HP SIM and HP Storage
Essentials pages. See the support matrix for a list of supported browsers.
About the New Storage Essentials for Windows Installation Options
If you are familiar with installing earlier builds of Storage Essentials, earlier than Build 6.0, be
aware that the installation steps have changed. See ”Installation/Upgrade Process is Now
Automated” on page 8 for important information.
Storage Essentials can be installed as a plug-in to HP Systems Insight Manager (HP SIM) in an
integrated configuration or you can choose to install the standalone version of Storage Essentials.
The integrated version of Storage Essentials and HP SIM can be installed on separate servers or on
a single server depending on your requirements. An additional software component—included in
Installing the Management Server on Microsoft Windows14
Page 41

the Storage Essentials installation files—(the HP SIM Connector) provides the integration between
Storage Essentials and HP SIM.
The Storage Essentials installation wizard automatically installs the HP SIM Connector on the
Storage Essentials server (along with the other software components described later). When
Storage Essentials is installed in the separate server configuration, the Storage Essentials
installation wizard additionally installs the HP SIM Connector on the separate HP SIM server via a
network connection to provide communication between HP SIM and Storage Essentials on separate
servers.
As a best practice, HP recommends installing HP Storage Essentials as a plug-in for HP Systems
Insight Manager (the integrated version of Storage Essentials). The integrated version of HP SIM
and Storage Essentials provides the following feature sets:
• Hardware and software health status polling, monitoring, and event management for:
•Storage
•Servers
•Switches
• Infrastructure
• And other elements on your network such as enclosures, racks, clients and printers
• HP SIM provides standards-based support for HP and third-party devices and management
frameworks.
• When Storage Essentials is integrated with HP SIM, you access the Storage Essentials features
and menu options via Storage Essentials menu items on the HP SIM menus and within various
HP SIM screens.
The integrated version of HP Storage Essentials and HP Systems Insight Manager includes the
following software components:
• HP Systems Insight Manager 5.1 SP1
(HP SIM 5.2 is also supported. Contact your Sales Engineer to determine which version of HP
SIM is best for your environment. This installation guide provides instructions for installing HP
SIM 5.1, the version included with your Storage Essentials 6.0 product kit.)
• Storage Essentials 6.0
• HP SIM Connector 6.0
(included in the Storage Essentials installation files and automatically installed by the Storage
Essentials installation wizard)
• Oracle 10g Standard Edition for Storage Essentials 6.0
(automatically installed by the Storage Essentials installation wizard)
• CIM Extension files (6.0)—Common Information Module files that you install on the hosts and
other network elements you want to manage and for which you want to automate discovery.
• CIM Extension Management tool for installing some of the supported CIM extensions in batch
mode, remotely, onto multiple hosts.
HP Storage Essentials SRM 6.0 Installation Guide 15
Page 42

Storage Essentials Installation Wizard Options
This release of the HP Storage Essentials management server for Windows provides the following
options for installing the Storage Essentials management server:
IMPORTANT: The server must meet or exceed the minimum requirements listed in the support
matrix for your edition.
• Integrated with Storage Essentials and HP Systems Insight Manager (HP SIM) on separate
servers (recommended)
As a best practice HP recommends installing the integrated product on separate servers. This
installation option provides hardware and software health status polling, monitoring, and event
management for storage, servers, switches, infrastructure, and other elements on your network
such as enclosures, racks, clients and printers. In addition, HP SIM provides standards-based
support for HP and other third-party management frameworks.
See Installing Storage Essentials and HP Systems Insight Manager for Windows on Separate
Servers, page 17 for steps on installing with this option.
• Integrated with HP Storage Essentials and HP Systems Insight Manager on the same server
Installing Storage Essentials and HP SIM on the same server provides the same benefits
provided with the recommended installation option, except that all of the components are
installed on one server. This option has greater minimum system requirements. See the support
matrix for details.
See Installing Storage Essentials and HP SIM for Windows on the Same Server, page 27 for
steps on installing with this option.
• Standalone Option: HP Storage Essentials only installation
HP Storage Essentials is installed on a single server without the HP SIM and other integrated
components. (This option is supported, but not recommended because it does not provide the
full feature set provided by the integrated installation options.)
See ”Installing the Standalone Version of Storage Essentials for Windows” on page 34 for
steps on installing with this option.
The Storage Essentials installation wizard checks your system to verify that it meets the basic system
requirements and it automatically installs the required Oracle database instance and the following
software: HP Storage Essentials, the HP SIM Connector, and HP Systems Insight Manager (note that
the separate server installation option requires the manual installation of HP SIM on the designated
HP SIM server).
Installing the Management Server on Microsoft Windows16
Page 43

IMPORTANT: Do not install the Oracle database separately. With this release of the product, you
must first install the management server for Windows CD. The installation wizard automatically
installs the Oracle database and prompts you for the Oracle CD during the installation at the
appropriate time. Installing the Oracle database used by the management server manually is no
longer recommended. Be sure to see ”Installation/Upgrade Process is Now Automated” on
page 8.
Installing Storage Essentials and HP Systems Insight Manager for Windows on Separate Servers
This is the recommended installation option. Complete the following steps to install HP SIM and the
Storage Essentials management server for Windows on separate servers.
IMPORTANT: HP SIM and Storage Essentials must be installed on the same domain.
Step 1 – Read the Support Matrix and Release Notes
Read the support matrix and make sure the server (or servers) on which you are installing the
Storage Essentials management server meets or exceeds the requirements. The installation wizard
provides a link to the support matrix and release notes on each screen (Documentation > Support
Matrix or Release Notes).
See ”Troubleshooting Installation/Upgrade” on page 379 for additional help if needed.
Step 2 – (Required for Separate Server Installations Only)
Manually Install HP Systems Insight Manager
IMPORTANT: As of the publication of this Second edition of the HP Storage Essentials SRM 6.0
Installation Guide, HP SIM 5.2 is also supported. Contact your Sales Engineer for help with
determining which version of HP SIM best meets your network management requirements.
Storage Essentials 6.0 is only compatible with HP SIM 5.1 SP1 or 5.2. Earlier versions of HP SIM
are not supported with this release of Storage Essentials. Note that the instructions in this section
describe how to install HP SIM 5.1 — the version of HP SIM included in your Storage Essentials
6.0 product software kit. HP SIM 5.1 Service Pack 1 is additionally required.
Install HP SIM 5.1 on the designated HP SIM server following the steps in this section.
By default, the Custom installation option is enabled during the HP SIM installation. You can set
system security options based on your site requirements when prompted during the HP SIM
installation.
1. Log on to the designated HP SIM Windows server and create a Windows user account with
administrative privileges with which to install and manage HP SIM. As a best practice, consider
naming the account HP SIM to make it easier to delineate from other user accounts.
HP Storage Essentials SRM 6.0 Installation Guide 17
Page 44

2. Put the HP SIM 5.1 CD in the CD drive of the designated HP SIM server. The HP SIM installation
wizard program starts automatically. If the HP SIM installation does not start, double-click
setup.exe found in the hpsim directory.
3. Follow the instructions on the HP SIM 5.1 installation screens. As a best practice, install only the
HP SIM components that are required to install and set up Storage Essentials:
• System Management Homepage
• HP Systems Insight Manager
4. Accept the default options on each HP SIM screen except for the options noted below.
• Do not enable IP Restricted Logins.
Installing the Management Server on Microsoft Windows18
Page 45

• Do not enable IP Binding.
You can optionally install other HP SIM components at a later time by running the HP SIM CD
again on the HP SIM server and following the instructions in the HP SIM documentation once
the Storage Essentials installation is complete.
5. Reboot the HP SIM server when prompted at the end of the HP SIM installation.
6. Do not set up discovery when prompted by the HP SIM First Time User wizard. For the
integrated version of Storage Essentials and HP SIM you will set up discovery after the Storage
Essentials components are installed and you have imported your Storage Essentials license.
Step 3 – Install Storage Essentials on the Storage Essentials Server
Install Storage Essentials from the Storage Essentials CD (or a network or local drive) following the
steps in this section.
HP Storage Essentials SRM 6.0 Installation Guide 19
Page 46

NOTE: The drive on which you install Storage Essentials must be NTFS format or the
installation will fail.
The directory in which you install the Storage Essentials management server must have write
access for the local Administrators group. Be aware that installing the management server in
a directory created by another program (for example: the Proliant Support Pack) is not
recommended.
Follow these steps to install Storage Essentials (for the HP SIM-integrated separate server
installation option):
1. Verify the following:
• The designated Storage Essentials server meets or exceeds the requirements listed in the
Pre-installation Checklist (Installations and Upgrades), page 8 and in the support matrix for
your edition.
• The file system format on the Storage Essentials server is NTFS. The Storage Essentials
installation wizard will display an error message if the file system is not NTFS.
• The Storage Essentials server must reside on the same domain with the HP SIM server.
2. Start the Storage Essentials installation wizard using one of the following options:
To install from the CDs do the following:
a. Put the Storage Essentials CD in the CD drive of the designated Storage Essentials server.
The Storage Essentials installation wizard program should start automatically.
b. If it does not start, double-click setup.exe found in the root directory on the Storage
Essentials CD.
To install from a network or local hard drive, do the following:
a. Create the following directory structure on the designated drive from which you will install
Storage Essentials:
IMPORTANT: The directory names, as shown below, cannot contain any spaces.
\<ManagementServerCDs>\oracle
(Copy the Oracle 10g installation files found on the Oracle DVD to this directory.)
\<ManagementServerCDs>\srm
(Copy the Storage Essentials for Windows installation files found on the Storage Essentials
CD to this directory.)
\<ManagementServerCDs>\cimext1
(Copy the CIM Extensions CD 1 installation files to this directory.)
Installing the Management Server on Microsoft Windows20
Page 47

\<ManagementServerCDs>\cimext2
(Copy the CIM Extensions CD 2 installation files to this directory. Note that the CIM
Extensions CD 2 is not required as part of this Storage Essentials management server
installation.)
b. Double-click setup.exe in the srm directory to which you copied the Storage Essentials
installation files.
The Storage Essentials for Windows installation wizard starts and the Welcome screen is
displayed.
3. Click Next to continue. The Getting Started screen is displayed. Click the hyperlinks to review
the requirements for getting started with the installation.
4. Click Next to continue.
The Storage Essentials for Windows installation wizard scans the server to determine if this is a
new installation or an upgrade and the Installation Options screen is displayed.
5. By default the HP Storage Essentials and HP Systems Insight Manager (HP SIM) on Separate
Servers option is selected. If the option is not selected, then click this option.
IMPORTANT: Valid locations must be entered on the Installation Options screen. Path
information can only contain the following characters: A-z, 0-9, hyphen, underscore,
period, back slash. Storage Essentials, HP SIM, and the Oracle database paths cannot
contain spaces. Drive letters must be fixed drives.
6. Enter the fully qualified domain name or the IP Address for the HP SIM server (the server on
which you previously installed HP SIM in Step 2) in the HP SIM server name <FQDN> or IP
Address box.
7. Enter the path or browse to the directory in which you want to install Storage Essentials in the
HP Storage Essentials installation location box. The installation path must be basic ASCII
alphanumeric characters, no spaces, no international characters, and no double-byte
characters.
8. Enter or browse to the directory in which you want to install the Oracle database and click
Next. A dialog box is displayed and the Storage Essentials installation wizard prompts you to
verify that HP SIM is installed and running on the remote server that you specified on this
Installation Options screen before you can proceed to the next Storage Essentials installation
wizard screen.
9. You must manually verify that you can access the remote HP Systems Insight Manager on the
remote server you specified and click OK to continue. The Verify System Requirements screen is
displayed.
10.Scroll through the list of requirements on the Verify System Requirements screen and make any
system changes necessary. If you see a warning in the Ports Availability requirement you need
to check the port assignments to be sure that the ports listed are not currently in use and make
any changes that are necessary. See the support matrix to verify the requirements listed below:
• Current User Account — The account you use to install must have Windows Administrator
privileges or the installation will stop.
HP Storage Essentials SRM 6.0 Installation Guide 21
Page 48

• Memory — The minimum RAM requirement varies depending on your installation option:
• When HP SIM and Storage Essentials are installed on separate servers the minimum
RAM requirement for the Storage Essentials server is 4 GB with 6 GB recommended.
• When HP SIM and Storage Essentials are installed on the same server together the
minimum RAM requirement for the Storage Essentials server is 6 GB with 8 GB
recommended.
NOTE: If the minimum amount of RAM is close to the requirement, the installation wizard
continues.
• Physical Address Extension (PAE) — PAE is a Windows setting to utilize amounts of RAM
greater than 4 GB on certain versions of Windows. See your Windows documentation for
more information about PAE settings. The installation or upgrade continues regardless of
PAE.
• Disk Storage (typical installation) — Depends on the following:
• With ARCHIVING and RMAN backup off: minimum disk space: 100 GB, recommended
disk space: 200 GB.
• With ARCHIVING and RMAN backup on: minimum disk space: 200 GB, recommended
disk space: 350 GB.
The installation or upgrade will not continue if the disk space requirements are not met.
• Operating System — Windows 2003 Server SP1, SP2, R2, R2 SP2. The Storage Essentials
installation or upgrade will not continue if the operating system requirement is not met.
• Processor — A dual Intel XEON (or AMD equivalent) 3.4 GHz or higher CPU is required. If
the CPU is close to the requirement, the installation wizard continues.
• DNS Resolution — The installation wizard verifies the IP address and DNS name of the
server using nslookup. If nslookup is not successful, the installation will still continue.
IMPORTANT: DNS Resolution failure will prevent the product from running successfully.
See the following topic in the troubleshooting chapter if the DNS Resolution requirement
fails: “Reverse Lookup Failed” Message (Windows only), page 382.
• Port Availability — The management server requires the following ports to be available:
•80
•162
•443
• 1098–1120
• 4444
• 4445
• 4763
• 5962–5988
Installing the Management Server on Microsoft Windows22
Page 49

• 8009
• 8083
• 8093
If you see a warning in the Ports Availability requirement you need to check to be sure that the
ports listed are not currently in use and make any changes that are necessary. Be aware that
the installation will continue even if a required port is not available.
NOTE: During upgrades, the Port Availability check may falsely indicate that the port for
the management server is currently in use. When you check the port, you see that it is
reserved by the management server and you can therefore safely ignore the warning.
11.Click Next and the Storage Essentials installation wizard proceeds to its HP Systems Insight
Manager Service Account Credentials screen. The fully qualified domain name or the IP
Address that you entered in the Installation Options screen for the designated server on which
HP SIM is installed is automatically displayed in the HP SIM Server box.
12.Enter the following on the HP Systems Insight Manager Service Account Credentials screen and
click Next:
• The user account name of the HP SIM server that you installed in ”Step 2 – (Required for
Separate Server Installations Only) Manually Install HP Systems Insight Manager” on
page 17.
• The password for the HP SIM server and also verify the password.
• The Domain name of the domain on which the HP SIM server resides.
The Installation Summary screen is displayed.
13.Verify the components that will be installed, use the Previous button to make any changes and
click Install when you are ready to install Storage Essentials and the other required software
components listed on the screen. The Storage Essentials installation wizard automatically
installs the components on the Storage Essentials server starting with the Oracle 10g Standard
Edition database.
IMPORTANT: If you decide to cancel the Storage Essentials installation before it has
finished, the installation wizard must first complete the installation of the current component
and will prompt you to click Yes to cancel the installation or No to continue the installation
after the current component installation is finished. If you cancel and then resume the
installation at a later time, the installation wizard will continue the installation from where it
stopped when you cancelled.
14.The Storage Essentials installation wizard prompts you to verify that the remote HP SIM server
you installed previously in Step – 2 is running when the Storage Essentials installation wizard
finishes installing the Oracle component. Do not click OK until you have verified that the remote
HP SIM server is running.
HP Storage Essentials SRM 6.0 Installation Guide 23
Page 50

Step 4 – Verify that HP SIM is Running on the Remote Server
Before the Storage Essentials installation wizard installs the HP SIM Connector component, you
must verify that HP SIM is currently running on the remote HP SIM server you specified in the
Installation Options screen. The Storage Essentials installation wizard automatically installs the HP
SIM Connector on the Storage Essentials server and the HP SIM Connector must be able to connect
to the remote HP SIM server in order for the integrated Storage Essentials and HP SIM installation
to be successful. Follow these steps:
1. Manually access the remote HP SIM server over the network.
2. Verify that you can log in to HP SIM on that server.
Step 5 – Complete the Storage Essentials Installation
Continue the Storage Essentials installation after verifying that the HP SIM server is running and is
accessible on the network.
1. Go back to the Storage Essentials server and click OK to dismiss the dialog box that prompts
you to verify your HP SIM server is running.
The Storage Essentials installation wizard will then install the HP SIM Connector component on
the Storage Essentials server.
There is a two minute delay after you click OK on the Storage Essentials server while the HP
SIM Connector is installed on the Storage Essentials server and the Storage Essentials
installation wizard then connects to the specified HP SIM server and automatically installs the
HP SIM Connector component on the HP SIM server.
The Storage Essentials menu items are added to the HP SIM menus and screens when the
Storage Essentials installation wizard automatically installs the HP SIM Connector component
on the HP SIM server.
2. Click Next on the Status screen. The Storage Essentials Installation Complete screen is
displayed.
NOTE: If the HP SIM Connector fails, re-start the Storage Essentials installation wizard. The
Storage Essentials installation wizard will detect the Storage Essentials and Oracle components
and will automatically display the HP SIM Connector screen allowing you to re-install the HP SIM
Connector. If the issue continues, contact Customer Support.
3. Copy the Unique Client ID (UID) number displayed on the Installation Complete screen and
paste it into a text document or make a note of it. You need the UID number to obtain a License
Key.
Installing the Management Server on Microsoft Windows24
Page 51

IMPORTANT: You must have your license ready to import before you can set up discovery
using the HP Systems Insight Manager’s First Time wizard. If you do not import your Storage
Essentials license before setting up discovery using the HP SIM First Time User wizard,
Storage Essentials cannot run its discovery and the Storage Essentials discovery will fail.
4. Click Finish accepting the default setting: Yes, reboot the system now. The Storage Essentials
server must be rebooted.
Step 6 – Configure Browser Settings
Configure your browser settings for HP SIM and Storage Essentials to function properly. See the
support matrix for your edition for a list of supported browsers. Refer to your browser’s
documentation for details.
1. Verify that Java and JavaScript are installed and enabled.
2. Configure the browser to accept all cookies.
3. Turn off popup blocking.
4. Verify that SSL 3.0 or TLS 1.0 is enabled.
• For Internet Explorer: Tools > Internet Options > Advanced > Security
•For Firefox: Tools > Options > Advanced
Step 7 – Browse to the HP SIM Home Page
1. Browse to HP Systems Insight Manager Home Page and wait until HP SIM is fully started. HP
SIM has fully started when you can bring up the Systems Insight Manager Home page. See the
HP SIM documentation for help with starting SP SIM.
2. Start the HP Storage Essentials (AppStorManager) service and change to Automatic.
3. You should now be able to access HP SIM and Storage Essentials from a web browser using
the URL https://<FQDN of localhost>:50000
(for example https://example.domain.com:50000). The host name must be fully qualified. HP
SIM is displayed in the browser window and you are prompted to enter the user name and
password for HP SIM.
NOTE: Do not use the Systems Insight Manager Homepage icon placed on the desktop
after installation. This icon will use localhost to browse to HP SIM. A best practice is to save
a bookmark for https://<FQDN>:50000 to the desktop, edit the properties, change icon,
and browse to <install dir>:\HP\Systems Insight Manager\HPSIM.ico.
4. Supply the login credentials for the user that was used to install HP SIM. HP SIM launches and
the Storage Essentials menus are included on the HP SIM menus.
5. Disregard the HP SIM First Time User wizard until you have imported your Storage Essentials
license following the instructions in the next step.
HP Storage Essentials SRM 6.0 Installation Guide 25
Page 52

IMPORTANT: Be sure to apply your Storage Essentials license before setting up discovery with the
HP SIM First Time User wizard. See Step 8 – Obtain and Apply a Storage Essentials License Key
Before Setting Up Discovery on HP SIM, page 26.
Step 8 – Obtain and Apply a Storage Essentials License Key Before Setting Up Discovery
on HP SIM
If you see the HP Systems Insight Manager First Time User wizard, do not click the Do not
automatically display this dialog again check box. You must first import your Storage Essentials
license. Without the license, Storage Essentials cannot start and the HP SIM discovery will fail.
After you import the Storage Essentials license, restart the HP SIM First Time wizard (Options > First
Time Wizard from HP SIM) to set up discovery. Follow these steps to obtain and import your
Storage Essentials license:
1. Go to http://webware.hp.com
from the Installation Complete screen) and the HP Order ID (found on the entitlement certificate)
to create a permanent license key.
2. Import the license key:
a. Log in to HP SIM on the remote HP SIM server.
b. Click the Security menu. Click Deploy > License Manager > Storage Essentials > Manage
Storage Essentials Keys in HP Systems Insight Manager.
c. Click Licenses from the menu.
d. Click the Import License File button.
e. Click the Browse button.
You are shown the file system of the computer being used to access the management server.
f. Select the license file.
g. Click OK.
and use the generate password option with the UID (copied
Step 9 – Copy Your CIM Extensions to the HP SIM Server
As a best practice HP recommends copying the CIM extensions included on the CIM extensions CD
to the HP SIM server. The HP SIM software component includes a tool called the CIM Extension
Management tool which can be used to install your CIM extensions on multiple hosts in batch
mode.
See ”Deploying and Managing CIM Extensions” on page 181.
Step 10 – Check for and Install any Required Service Packs
and Hot Fix Files
1. Contact your Sales Engineer to obtain the latest service packs and hot fix files for Storage
Essentials and HP SIM.
2. Install the latest required service packs and hot fix files for Storage Essentials and HP Systems
Insight Manager. See the Service Pack release notes for installation instructions.
Installing the Management Server on Microsoft Windows26
Page 53

Step 11 – Install Your CIM Extensions and Set Up Discovery
Before you can discover all of the elements (systems) on your network, you must install the CIM
extensions that were copied to the management server during the installation as mentioned in the
previous step. For more information about CIM extensions and setting up discovery, see the
following chapters:
See ”Deploying and Managing CIM Extensions” on page 181.
See ”Discovery Steps” on page 109.
Installing Storage Essentials and HP SIM for Windows on the Same Server
Complete the following steps to install the Storage Essentials management server and HP SIM for
Windows on the same server.
Step 1 – Read the Support Matrix and Release Notes
Read the support matrix and the release notes to make sure the server on which you are installing
the Storage Essentials management server meets or exceeds the requirements. The installation
wizard provides a link to these documents accessible on each screen (Documentation > Support
Matrix or Release Notes). Additionally, be sure to read the important information in ”Installation
and Upgrade Requirements (Cannot Proceed with Install/Upgrade if Not Met)” on page 9.
Step 2 – Log On to the Windows Server
Create a new account or log in to an existing account on the Windows system on which you are
installing HP Storage Essentials and HP Systems Insight Manager that has Administrator privileges
providing the following permissions:
• Ability to log on as a service
• Ability to create a token object
• Ability to replace a process level token
Step 3 – Start the Storage Essentials for Windows Installation Wizard
Do not install the Oracle database separately. See ”Installation/Upgrade Process is Now
Automated” on page 8 for important information about installing the Oracle database.
IMPORTANT: The drive on which you install the management server must be NTFS format or the
installation wizard will fail.
1. Verify the following:
• The designated Storage Essentials server meets or exceeds the requirements listed in the
Pre-installation Checklist (Installations and Upgrades), page 8 and in the support matrix for
your edition.
• The file system format on the Storage Essentials server is NTFS. The Storage Essentials
installation wizard will display an error message if the file system is not NTFS.
2. Start the Storage Essentials installation wizard using one of the following options:
HP Storage Essentials SRM 6.0 Installation Guide 27
Page 54

To install from the CDs do the following:
a. Put the Storage Essentials CD in the CD drive of the designated Storage Essentials server.
The Storage Essentials installation wizard program should start automatically.
b. If it does not start, double-click setup.exe found in the root directory on the Storage
Essentials CD.
To install from a network or local hard drive, do the following:
a. Create the following directory structure on the designated drive from which you will install
Storage Essentials:
IMPORTANT: The directory names, as shown below, cannot contain any spaces.
\<ManagementServerCDs>\oracle
(Copy the Oracle 10g installation files found on the Oracle DVD to the Oracle directory you
created.)
\<ManagementServerCDs>\srm
(Copy the Storage Essentials for Windows installation files found on the Storage Essentials
CD to the srm directory you created.)
\<ManagementServerCDs>\hpsim
(Copy the HP Systems Insight Manager installation files found on the HP SIM CD to the
hpsim directory you created.)
\<ManagementServerCDs>\cimext1
(Copy the CIM Extensions CD 1 installation files to the cimext1 directory you created.)
\<ManagementServerCDs>\cimext2
(Copy the CIM Extensions CD 2 installation files to the cimext2 directory you created. Note
that the CIM Extensions CD 2 is not required as part of the Storage Essentials installation.)
b. Double-click setup.exe in the srm directory to which you copied the Storage Essentials
installation files.
Installing the Management Server on Microsoft Windows28
Page 55

IMPORTANT: The directory in which you install the management server must have write access
for the local Administrators group. Be aware that installing the management server in a directory
created by another program (for example: the Proliant Support Pack) is not recommended.
3. Read the information on the Welcome screen. Click the hypertext links on the screen to learn
about service packs and other important requirements and click Next when you are ready to
continue.
The System Inspection screen is displayed briefly while the installation wizard checks the system
and the Getting Started screen is displayed giving you an overview of the installation process.
4. Click Next to continue. The Installation Options screen is displayed.
5. Click the Storage Essentials and HP SIM on the same server option.
Choose the installation locations. Installing HP Storage Essentials and HP Systems Insight
Manager on the same server allows you to install all of the software components on one
designated system. The software components include:
– HP Storage Essentials
– HP Systems Insight Manager
– Oracle 10g Standard Edition database
– HP SIM Connector
– CIM Extension Management tool
IMPORTANT: Valid locations must be entered on the Installation Options screen. Path
information can only contain the following characters: A-z, 0-9, hyphen, underscore,
period, back slash. Storage Essentials, HP SIM, and the Oracle database paths cannot
contain spaces. Drive letters must be fixed drives.
Choose the installation directory where you want to install the Oracle database for the Storage
Essentials management server. Choose a drive with enough dedicated disk space for the
Oracle database and its backup files. The disk space requirements are dependent on the size
of the SAN you are managing.
If the system does not meet the disk space requirements for the Oracle database used to store
the management server data, the installation stops and prompts you to allocate the required
disk space.
6. Click Next. The Service Account Credentials screen is displayed. Enter the user name and
password for the HP SIM service account and the Domain name of the domain on which you
are installing Storage Essentials and click Next. Click the Help button for more information
about the service account credentials if needed.
HP Storage Essentials SRM 6.0 Installation Guide 29
Page 56

NOTE: In Storage Essentials, the HP SIM Administrator will be assigned the HP Storage
Essentials Administrator role (Domain Admin). See ”About Security for the Management
Server” on page 349 for more information.
The installation wizard scans the system to verify that it meets the requirements specified in the
support matrix and the Verify System Requirements screen is displayed showing the current
status of the system.
7. Scroll through the list of system requirements to see if you need to make any changes to your
system and click Next. Once you click Next, the Summary screen is displayed.
NOTE: See ”Pre-installation Checklist (Installations and Upgrades)” on page 8 if you need
help making changes to meet basic system requirements. See ”Troubleshooting
Installation/Upgrade” on page 379 for additional information.
8. Scroll through the list of requirements on the Verify System Requirements screen and make any
system changes necessary. If you see a warning in the Ports Availability requirement you need
to check the port assignments to be sure that the ports listed are not currently in use and make
any changes that are necessary. See the support matrix to verify the requirements listed below:
• Current User Account — The account you use to install must have Windows Administrator
privileges or the installation will stop.
• Memory — The minimum RAM requirement varies depending on your installation option:
• When HP SIM and Storage Essentials are installed on separate servers the minimum
RAM requirement for the Storage Essentials server is 4 GB with 6 GB recommended.
• When HP SIM and Storage Essentials are installed on the same server together the
minimum RAM requirement for the Storage Essentials server is 6 GB with 8 GB
recommended.
NOTE: If the minimum amount of RAM is close to the requirement, the installation wizard
continues.
• Physical Address Extension (PAE) — PAE is a Windows setting to utilize amounts of RAM
greater than 4 GB on certain versions of Windows. See your Windows documentation for
more information about PAE settings. The installation or upgrade continues regardless of
PAE.
• Disk Storage (typical installation) — Depends on the following:
• With ARCHIVING and RMAN backup off: minimum disk space: 100 GB, recommended
disk space: 200 GB.
• With ARCHIVING and RMAN backup on: minimum disk space: 200 GB, recommended
disk space: 350 GB.
The installation or upgrade will not continue if the disk space requirements are not met.
Installing the Management Server on Microsoft Windows30
Page 57

• Operating System — Windows 2003 Server SP1, SP2, R2, R2 SP2. The Storage Essentials
installation or upgrade will not continue if the operating system requirement is not met.
• Processor — A dual Intel XEON (or AMD equivalent) 3.4 GHz or higher CPU is required. If
the CPU is close to the requirement, the installation wizard continues.
• DNS Resolution — The installation wizard verifies the IP Address and DNS name of the
server using nslookup. If nslookup is not successful, the installation will still continue.
IMPORTANT: DNS Resolution failure will prevent the product from running successfully.
See the following topic in the troubleshooting chapter if the DNS Resolution requirement
fails: “Reverse Lookup Failed” Message (Windows only), page 382.
• Port Availability — The management server requires the following ports to be available:
•80
•162
•443
• 1098–1120
• 4444
• 4445
• 4763
• 5962–5988
• 8009
• 8083
• 8093
If you see a warning in the Ports Availability requirement you need to check to be sure that the
ports listed are not currently in use and make any changes that are necessary. Be aware that
the installation will continue even if a required port is not available.
NOTE: During upgrades, the Port Availability check may falsely indicate that the port for
the management server is currently in use. When you check the port, you see that it is
reserved by the management server and you can therefore safely ignore the warning.
9. Click Install after reviewing the components that will be installed. Click Previous if you need to
make any changes before installing the management server files. Once you click the Install
button, the Oracle installation for the management server begins and the Command Prompt
window is displayed showing the status of the Oracle installation. The management server
installation wizard Status screen is displayed in the background.
HP Storage Essentials SRM 6.0 Installation Guide 31
Page 58

NOTE: Because you are installing Storage Essentials and HP Systems Insight Manager on
the same server, the CIM extension files are copied to the management server so that you
can install the extensions on the hosts in your network at a later time. The CIM extensions
are not installed, only copied to the management server during this installation.
If you click Cancel during the installation, the installation wizard completes the installation of the
current component before stopping. Once the component installation is complete, the
installation wizard prompts you to confirm that you want to cancel. Click Yes to cancel or No to
continue with the installation.
If you are installing the management server from the CD set, you are prompted to insert the CDs
in the required order of installation indicated by the installation wizard screens.
10.Click Next when all components are installed. The Installation Complete screen is displayed.
11.If you see a Unique Client ID number on the Installation Complete screen, copy the number and
complete ”Step 4 – Obtain a License Key (Required to Start the Management Server for the First
Time)” on page 32.
If your product allows honorary licensing, you will not see the Unique Client ID in which case,
you must select the restart the management server option and click Done.
Step 4 – Obtain a License Key (Required to Start the Management Server for the First
Time)
See your product invoice for important information about licensing. If you are required to import a
license, copy your Unique Client ID number and follow the instructions in your product invoice
documentation to obtain and apply your license key.
IMPORTANT: You must have your license ready to import before you can set up discovery using
the HP Systems Insight Manager’s First Time wizard. If you do not import your Storage Essentials
license before setting up discovery using the HP SIM First Time wizard, Storage Essentials cannot
run its discovery and the Storage Essentials discovery fails.
If you are installing Storage Essentials the management server for the first time and your product
requires a license, you must obtain a license key to start and run the product. If you see the HP
Systems Insight Manager First Time wizard, do not click the Do not automatically display this
dialog again check box. After you import the Storage Essentials license, restart the HP SIM First
Time wizard (Options > First Time Wizard from HP SIM). Follow these steps to obtain and import
your Storage Essentials license:
1. Copy (Ctrl + C) the Unique Client ID (UID) displayed on the Installation Complete screen.
2. Follow the instructions for obtaining your license key in your product invoice documentation.
Go to http://webware.hp.com
Order ID (found on the entitlement certificate) to create a permanent license key.
3. Import the license key:
a. Click Deploy > License Manager > Storage Essentials > Manage Storage Essentials Keys in
HP Systems Insight Manager.
Installing the Management Server on Microsoft Windows32
and use the generate password option with the UID and HP
Page 59

b. Click the Import License File button.
c. Click the Browse button.
You are shown the file system of the computer being used to access the management server.
d. Select the license file.
e. Click OK.
IMPORTANT: See ”Checking Installation Log Files” on page 380 for more information about
installations and upgrades.
Step 5 – Configure Browser Settings
Configure your browser settings for HP SIM and Storage Essentials to function properly. See the
support matrix for your edition for a list of supported browsers. Refer to your browser’s
documentation for details.
1. Verify that Java and JavaScript are installed and enabled.
2. Configure the browser to accept all cookies.
3. Turn off popup blocking.
4. Verify that SSL 3.0 or TLS 1.0 is enabled.
• For Internet Explorer: Tools > Internet Options > Advanced > Security
•For Firefox: Tools > Options > Advanced
Step 6 – Browse to the HP SIM Home Page
1. Browse to HP Systems Insight Manager Home Page and wait until HP SIM is fully started. HP
SIM has fully started when you can bring up the Systems Insight Manager Home page.
2. Start the HP Storage Essentials (AppStorManager) service and change to Automatic.
3. You should now be able to access HP SIM and Storage Essentials from a web browser using
the URL https://<FQDN of localhost>:50000
(for example https://example.domain.com:50000). The host name must be fully qualified.
NOTE: Do not use the Systems Insight Manager Homepage icon placed on the desktop
after installation. This icon will use localhost to browse to HP SIM. A best practice is to save
a bookmark for https://<FQDN>:50000 to the desktop, edit the properties, Change icon,
and browse to <install dir>:\HP\Systems Insight Manager\HPSIM.ico.
4. Supply the login for the user that was used to install HP SIM.
HP Storage Essentials SRM 6.0 Installation Guide 33
Page 60

IMPORTANT: Be sure to apply your Storage Essentials license key before setting up discovery with
the HP SIM First Time User wizard. See ”Step 4 – Obtain a License Key (Required to Start the
Management Server for the First Time)” on page 32.
Step 7 – Check for Required Service Packs
and Hot Fix Files
Check with your Sales Engineer to obtain and install the latest required service packs and hot fix
files for Storage Essentials and HP Systems Insight Manager.
Step 8 – Install Your CIM Extensions and Set Up Discovery
Before you can discover all of the elements (systems) on your network, you must install the CIM
extensions that were copied to the management server during the installation. See the following
chapters:
See ”Deploying and Managing CIM Extensions” on page 181.
See ”Discovery Steps” on page 109.
If Storage Essentials Fails to Start
If the credentials for the HP SIM server are entered incorrectly, you might not see the Storage
Essentials options on the HP SIM menus and/or Storage Essentials might fail to start when you
access Storage Essentials options from the HP SIM menus. Re-install the SIM Connector if you see
either of these issues following these steps:
1. Put the Storage Essentials CD in the CD drive of the Storage Essentials server. The installation
wizard starts automatically, determines that all components are installed, and automatically
displays the HP Systems Insight Manager Service Account Credentials screen.
2. Verify that HP SIM is running and accessible if Storage Essentials and HP SIM are installed on
separate servers (log in to HP SIM on the separate HP SIM server).
3. Return to Storage Essentials and enter the correct credentials for the HP SIM server and click
OK. The SIM Connector is installed and the connection between HP SIM and Storage Essentials
is successful as long as the HP SIM credentials you enter in the Re-install Connector screen are
correct.
Installing the Standalone Version of Storage Essentials for Windows
Follow the steps in this section to install Storage Essentials for Windows using the standalone
installation option. The standalone version of Storage Essentials consists of the following software
components:
• Storage Essentials (Build 6.0)
• Oracle 10g for Storage Essentials (Build 6.0)
Installing the Management Server on Microsoft Windows34
Page 61

• CIM Extension files (Build 6.0—Common Information Module files that you install on the
hosts and other network elements you want to manage and for which you want to automate
discovery)
• CIM Extension Management tool for installing some of the supported CIM extensions in
batch mode, remotely, onto multiple hosts.
Step 1 – Read the Support Matrix and Release Notes
Read the support matrix and the release notes to make sure the server on which you are installing
the Storage Essentials management server meets or exceeds the requirements. The installation
wizard provides a link to these documents accessible on each screen (Documentation > Support
Matrix or Release Notes). Additionally, be sure to read the important information in ”Installation
and Upgrade Requirements (Cannot Proceed with Install/Upgrade if Not Met)” on page 9.
Step 2 – Log On to the Windows Server
Create a new account or log in to an existing account on the Windows system on which you are
installing HP Storage Essentials that has Administrator privileges providing the following
permissions:
• Ability to log on as a service
• Ability to create a token object
• Ability to replace a process level token
Step 3 – Start the Storage Essentials for Windows Installation Wizard
Do not install the Oracle database separately. See ”About the New Storage Essentials for
Windows Installation Options” on page 14 for important information about installing the Oracle
database.
IMPORTANT: The drive on which you install the management server must be NTFS format or the
installation wizard will fail.
1. Verify the following:
• The designated Storage Essentials server meets or exceeds the requirements listed in the
Pre-installation Checklist (Installations and Upgrades), page 8 and in the support matrix for
your edition.
• The file system format on the Storage Essentials server is NTFS. The Storage Essentials
installation wizard will display an error message if the file system is not NTFS.
IMPORTANT: The directory in which you install the management server must have write access for
the local Administrators group. Be aware that installing the management server in a directory
created by another program (for example: the Proliant Support Pack) is not recommended.
2. Start the Storage Essentials installation wizard using one of the following options:
To install from the CDs do the following:
HP Storage Essentials SRM 6.0 Installation Guide 35
Page 62

a. Put the Storage Essentials CD in the CD drive of the designated Storage Essentials server.
The Storage Essentials installation wizard program should start automatically.
b. If it does not start, double-click setup.exe found in the root directory on the Storage
Essentials CD.
To install from a network or local hard drive, do the following:
a. Create the following directory structure on the designated drive from which you will install
Storage Essentials:
IMPORTANT: The directory names, as shown below, cannot contain any spaces.
\<ManagementServerCDs>\oracle
(Copy the Oracle 10g installation files found on the Oracle DVD to the Oracle directory you
created.)
\<ManagementServerCDs>\srm
(Copy the Storage Essentials for Windows installation files found on the Storage Essentials
CD to the srm directory you created.)
\<ManagementServerCDs>\cimext1
(Copy the CIM Extensions CD 1 installation files to the cimext1 directory you created.)
\<ManagementServerCDs>\cimext2
(Copy the CIM Extensions CD 2 installation files to the cimext2 directory you created. Note
that the CIM Extensions CD 2 is not required as part of the Storage Essentials installation.)
b. Double-click setup.exe in the srm directory to which you copied the Storage Essentials
installation files.
IMPORTANT: The directory in which you install the management server must have write access
for the local Administrators group. Be aware that installing the management server in a directory
created by another program (for example: the Proliant Support Pack) is not recommended.
3. Read the information on the Welcome screen. Click the hypertext links on the screen to learn
about service packs and other important requirements and click Next when you are ready to
continue.
The System Inspection screen is displayed briefly while the installation wizard checks the system
and the Getting Started screen is displayed giving you an overview of the installation process.
4. Click Next to continue. The Installation Options screen is displayed.
5. Click Standalone Option: HP Storage Essentials only installation.
Installing the Management Server on Microsoft Windows36
Page 63

6. Choose the installation location. You can change the installation location of the management
server and the Oracle database if you prefer.
IMPORTANT: Valid locations must be entered on the Installation Options screen. Path
information can only contain the following characters: A-z, 0-9, hyphen, underscore,
period, back slash. Storage Essentials and the Oracle database paths cannot contain
spaces. Drive letters must be fixed drives.
Choose the installation directory where you want to install the Oracle database for the Storage
Essentials management server. Choose a drive with enough dedicated disk space for the
Oracle database and its backup files. The disk space requirements are dependent on the size
of the SAN you are managing.
7. Click Next. The installation wizard scans the system to verify that it meets the requirements
specified in the support matrix and the Verify System Requirements screen is displayed showing
the current status of the system.
If the system does not meet the disk space requirements for the Oracle database used to store
the Storage Essentials management server data, the installation stops and prompts you to
allocate the required disk space.
8. Scroll through the list of system requirements to see if you need to make any changes to your
system and click Next. Once you click Next, the Summary screen is displayed.
NOTE: See ”Pre-installation Checklist (Installations and Upgrades)” on page 8 if you need
help making changes to meet basic system requirements. See ”Troubleshooting
Installation/Upgrade” on page 379 for additional information.
If you see a warning in the Ports Availability requirement you need to check the port
assignments to be sure that the ports listed are not currently in use and make any changes that
are necessary. See the support matrix to verify the requirements listed below:
• Current User Account — The account you use to install must have Windows Administrator
privileges or the installation will stop.
• Memory — The minimum RAM requirement is 4 GB with 6 GB recommended.
NOTE: If the minimum amount of RAM is close to the requirement, the installation wizard
continues.
• Physical Address Extension (PAE) — PAE is a Windows setting to utilize amounts of RAM
greater than 4 GB on certain versions of Windows. See your Windows documentation for
more information about PAE settings. The installation or upgrade continues regardless of
PAE.
• Disk Storage (typical installation) — Depends on the following:
• With ARCHIVING and RMAN backup off: minimum disk space: 100 GB, recommended
disk space: 200 GB.
HP Storage Essentials SRM 6.0 Installation Guide 37
Page 64

• With ARCHIVING and RMAN backup on: minimum disk space: 200 GB, recommended
disk space: 350 GB.
The installation or upgrade will not continue if the disk space requirements are not met.
See the HP Storage Essentials 6.0 SRM User Guide for information about the archiving
and RMAN backup features.
• Operating System — Windows 2003 Server SP1, SP2, R2, R2 SP2. The Storage Essentials
installation or upgrade will not continue if the operating system requirement is not met.
• Processor — A dual Intel XEON (or AMD equivalent) 3.4 GHz or higher CPU is required. If
the CPU is close to the requirement, the installation wizard continues.
• DNS Resolution — The installation wizard verifies the IP address and DNS name of the
server using nslookup. If nslookup is not successful, the installation will still continue.
IMPORTANT: DNS Resolution failure will prevent the product from running successfully.
See the following topic in the troubleshooting chapter if the DNS Resolution requirement
fails: “Reverse Lookup Failed” Message (Windows only), page 382.
• Port Availability — The management server requires the following ports to be available:
•80
•162
•443
• 1098–1120
• 4444
• 4445
• 4763
• 5962–5988
• 8009
• 8083
• 8093
If you see a warning in the Ports Availability requirement you need to check to be sure that the
ports listed are not currently in use and make any changes that are necessary if there are any
port conflicts. Be aware that the installation will continue even if a required port is not
available.
NOTE: During upgrades, the Port Availability check may falsely indicate that the port for
the management server is currently in use. When you check the port, you see that it is
reserved by the management server and you can therefore safely ignore the warning.
9. Click Install. Click Previous if you need to make any changes before installing the management
server files. Once you click the Install button, the Oracle installation for the management server
begins and the Command Prompt window is displayed showing the status of the Oracle
Installing the Management Server on Microsoft Windows38
Page 65

installation. The Storage Essentials installation wizard Status screen is displayed in the
background.
If you click Cancel during the installation, the installation wizard completes the installation of the
current component before stopping. Once the component installation is complete, the
installation wizard prompts you to confirm that you want to cancel. Click Yes to cancel or No to
continue with the installation. If you cancel, you can resume the installation by starting the
Storage Essentials installation wizard setup.exe file at a later time. The installation wizard
will resume its installation from where you cancelled.
IMPORTANT: The CIM extension files are copied to the management server so that you can install
the extensions on the hosts in your network at a later time. The CIM extensions are not installed,
only copied to the management server during this installation.
If you are installing the management server from the CD set, you are prompted to insert the CDs
in the required order of installation indicated by the installation wizard screens.
10.Click Next when all components are installed. The Installation Complete screen is displayed.
11.Copy the Unique Client ID number on the Installation Complete screen and complete ”Step 4 –
Obtain a License Key (Required to Start the Management Server for the First Time)” on
page 32.
IMPORTANT: See ”Checking Installation Log Files” on page 380 for details about accessing the
Storage Essentials installation log files.
Step 4 – Obtain a License Key (Required to Start the Management Server for the First
Time)
See your product invoice for important information about licensing. If you are required to import a
license, copy your Unique Client ID number and follow the instructions in your product invoice
documentation to obtain and apply your license key.
If you are installing Storage Essentials for the first time you must obtain a license key to start and
run the product. Follow these steps to obtain and import your Storage Essentials license:
1. Copy (Ctrl + C) the Unique Client ID (UID) displayed on the Installation Complete screen.
2. Follow the instructions for obtaining your license key in your product invoice documentation.
Go to http://webware.hp.com
Order ID (found on the entitlement certificate) to create a permanent license key.
3. Import the license key:
a. Click the Security menu.
b. Click Licenses from the menu.
c. Click the Import License File button.
d. Click the Browse button.
You are shown the file system of the computer being used to access the management server.
and use the generate password option with the UID and HP
HP Storage Essentials SRM 6.0 Installation Guide 39
Page 66

e. Select the license file.
f. Click OK.
Step 5 – Check for Required Service Packs
and Hot Fix Files
Check with your Sales Engineer to obtain and install the latest required service packs and hot fix
files for Storage Essentials.
Step 6 – Install Your CIM Extensions and Set Up Discovery
Before you can discover elements (systems) on your network, you must install the CIM extensions
that were copied to the management server during the installation. See the following chapters:
See ”Deploying and Managing CIM Extensions” on page 181.
See the Discovery Steps section in the Discovering Switches, Storage Systems, NAS Devices, and
Tape Libraries chapter for details on setting up disocvery.
Upgrading the Storage Essentials for Windows Management Server (Contact Your Account Representative Before Upgrading)
This section provides details about upgrading the Storage Essentials for Windows management
server.
IMPORTANT: Please contact your Account Representative for upgrades. Upgrading requires
assistance from HP Services.
Keep in Mind the Following
• Before upgrading, verify that the server meets the requirements listed in the ”Pre-installation
Checklist (Installations and Upgrades)” on page 8.
• Refer to the release notes for upgrade path and late breaking information about upgrading the
management server. See the Upgrade section in the release notes.
• Complete the upgrade and its subsequent steps in one session, which may take several hours
depending on your network configuration. Completing the steps over several sessions will result
in incomplete data until all steps have been completed.
Considerations Before Upgrading
Before you upgrade, consider the following:
• Brocade SMI-S Switches
The Brocade switch manufacturer no longer supports the Brocade Fabric Access API provider
and with this release of the management server, the Brocade Fabric Access API provider is no
longer supported. After upgrading, any Brocade switches that are managed by the Brocade
API provider will be quarantined. Historical data will be retained by the API-managed Brocade
switches, but you will not be able to run Discovery Data Collection on these switches until they
Installing the Management Server on Microsoft Windows40
Page 67

are migrated to the Brocade SMI-S provider (note that the Brocade SMI-S provider is called the
SMI-Agent in the Brocade documentation). Data such as topology and zoning from the Brocade
switch will be stale and you will be unable to use the Brocade switch to perform provisioning or
to gather port performance statistics through the Brocade switch.
Before the Brocade API-managed switches can be migrated to SMI-S, you must first download,
install, and configure the Brocade SMI-S provider on the management server. For details on
downloading, installing, and configuring the Brocade SMI-A agent provider, see ”Migrate Your
Brocade Switches to SMI-A” on page 50.
• CIM Extensions
The latest build of the management server requires you to upgrade some of your CIM
extensions. See ”About Upgrading Your CIM Extensions” on page 189 for details.
• After you upgrade the management server, you are required to run Discovery Data Collection
on all new and existing managed elements. This allows the software to gather any new data
that is associated with the new features available in the latest release.
• Windows hosts using SecurePath
SecurePath information is not retrieved from legacy CIM extensions.
• Backup Manager Hosts
After you upgrade, you need to rediscover backup details. Make note of your Backup Manager
hosts. Refer to Managing Backups in the user guide for help with viewing a list of Backup hosts.
• The following elements are not supported even though they were supported in Service Pack 4,
Build 5.1 of the management server:
• Cisco switches with firmware versions earlier than 3.1.x for switches discovered through
SMI-S. You need to upgrade to version 3.2.(2c) if you want to discover the Cisco switches
through SMI-S.
• Brocade SMI-A versions prior to 120.6.0a. You need to upgrade to at least version
120.6.0a.
• Oracle Upgrade
This release of the management server is only compatible with Oracle 10g Standard Edition.
During the upgrade process, Oracle 9i is automatically removed from the management server
and Oracle 10g is automatically installed. Because Oracle 9i is removed during the upgrade to
Oracle 10g, any customized Oracle passwords must be reset to the defaults. After the upgrade
is successful it is strongly recommended that you change the Oracle passwords from the
defaults using the Database Admin utility. See Database Passwords in the user guide for more
information.
IMPORTANT: Oracle passwords will be reset to their default values.
• Determine What Kind of Data HP SIM Passes Storage Essentials
When devices are discovered in HP SIM, the information for the device that is passed from HP
SIM to Storage Essentials is the IP address and any user credential information that has been
entered within HP SIM. It is possible to have the DNS name instead of the IP Address passed
from HP SIM to Storage Essentials by changing the StorageEssentialsSendIPAddress flag in the
HP Storage Essentials SRM 6.0 Installation Guide 41
Page 68

HP SIM globalsettings.props file from True to false. This file can be found in the following
directory on the HP SIM server:
[SIM_Installation_Directory]\config\globalsettings.props
• Windows 2000 is no longer supported. See the support matrix for your edition for complete
information on supported Windows versions.
• After upgrading, hosts are managed directly from the application server, and will no longer be
managed by our internal CIMOMs. Each host will be treated as its own discovery group; hosts
will no longer be members of the built-in discovery groups (default, discovery group 1, etc). See
”Managing Discovery Groups” on page 108 for more information.
• CLI clients earlier than the current revision are not supported.
• Any customizations to your CIMOMConfig.xml will not be preserved, because the file format
has changed. The old file will be saved to <installation directory>\SavedData for reference.
The customizations in the old CIMOMConfig.xml file must be manually merged into the file
shipped with 6.0 and you must restart the management server before the customizations are
applied to the updated management server.
• Files backed up to %MGR_DIST%\SavedData
The upgrade will save data to %MGR_DIST%\SavedData. Do not delete this directory.
About Migrating Brocade Fabric Access API–Managed Switches to SMI-S
After Upgrading
As noted earlier, The Brocade switch manufacturer no longer supports the Brocade Fabric Access
API provider and the Fabric Access API provider is no longer supported with this release of the
management server. Any Brocade switches that are managed with the Brocade Fabric Access API
provider will be quarantined after upgrading the management server. The management server
retains the data for the API switches after upgrading, but you cannot complete Discovery Data
Collection until you migrate these Brocade switches to the Brocade SMI Agent provider. See
”Migrate Your Brocade Switches to SMI-A” on page 50 for instructions on downloading and
installing the Brocade SMI-A provider.
About Changes to McDATA and Connectrix Switches After Upgrading
By default after upgrading, the management server is configured to use the SMI-S provider to
manage and discover McDATA and Connectrix switches. The migration to SMI-S is not required for
McDATA and Connectrix switches as it is with the Brocade Fabric Access API provider. The steps
for changing the discovery settings for McDATA and Connectrix switches are explained in the
discovery chapter.
About Resetting Archive Mode After Upgrading If You Use Automatic RMAN Backups
After upgrading to Oracle 10g, your Archive mode setting in the Database Admin Utility is reset to
the default setting (No Archive Mode). If ARCHIVE MODE was enabled before upgrading, you
must access the Database Admin Utility and re-enable Archive Mode in order to continue automatic
RMAN backups. See the User Guide in the Documentation Center (Help > Documentation Center)
for the steps.
Installing the Management Server on Microsoft Windows42
Page 69

About CIM Extensions and Backup Manager Hosts After Upgrading
Upgrade CIM extensions on servers with the following functionality:
• Backup Manager Hosts – Backup information is not gathered from legacy CIM extensions. In
order for backup information to be gathered by the management server, the CIM extensions on
the Backup Manager Host must be at the same build number as the management server.
When you upgrade your management server, upgrade the CIM extensions on your Backup
Manager Host in order to continue to see backup data.
• Windows hosts using SecurePath – SecurePath information is not retrieved from legacy CIM
extensions.
Upgrading the Management Server and HP SIM for Windows
Important Upgrade Requirements
• Do not upgrade Oracle separately. The upgrade steps have changed with this release of the
product. The Storage Essentials management server upgrade wizard migrates and upgrades
the Oracle database automatically along with the HP SIM Connector component and the
Storage Essentials software. Be sure to start the Storage Essentials upgrade with the Storage
Essentials CD–ROM (not the Oracle DVD).
• Exit all external utilities that use Oracle before starting the upgrade wizard.
Step 1 – Read the Support Matrix and Release Notes
Read the support matrix to make sure the servers on which you are upgrading the Storage
Essentials management server meet or exceed the requirements. Management server requirements
are listed on the Mgr platform tab of the support matrix. Also read the release notes for late
breaking issues not covered in the installation guide. The release notes and support matrix can be
found on the top-level of the management server CD and the CIM extension CDs. Additionally, see
”Installation and Upgrade Requirements (Cannot Proceed with Install/Upgrade if Not Met)” on
page 9.
Step 2 – Verify that You are Running Storage Essentials Build 5.1 Service Pack 4 or a
Later Build 5.1 Service Pack
Verify that you have a working version of the Build 5.1 SP4 Storage Essentials management server
and HP SIM Connector before upgrading to Build 6.0. Existing installations that are at Build 5.1
SP1, Build 5.1 SP2, or Build 5.1 SP3 must upgrade to Build 5.1 SP4 or later before upgrading to
Build 6.0.
Step 3 – Save Configuration Files for the Global Change Management Business Tool
Make a copy of the configuration files saved through the Global Change Management Business
Tool. The configuration files are not retained after you upgrade the product. These files are located
in the advisors/saved-configuration area on the management server. Place these files back after
the upgrade or re–install. If you do not use Global Change Management or do not wish to keep the
old configurations, you can ignore this step.
HP Storage Essentials SRM 6.0 Installation Guide 43
Page 70

Step 4 – Manually Upgrade HP SIM
(Required Only When HP SIM is Running
on a Separate Server)
Skip this step to manually upgrade HP SIM if Storage Essentials and HP SIM are installed on the
same server. When the two are installed on the same server, the Storage Essentials installation
wizard automatically checks for HP SIM and walks you through the upgrade. Upgrade HP SIM in
this step if HP SIM is running on a separate server.
IMPORTANT: Stop the AppStorManager service prior to starting this step.
• If you are running an earlier version of HP SIM 5.1 on Windows in a dual server Storage
Essentials and HP SIM configuration, you must manually upgrade HP SIM. Your integrated
environment will be non-operational until after the completion of the Storage Essentials
installation wizard and HP SIM Connector upgrade. The manual installation of HP SIM is only
required if HP SIM and Storage Essentials are installed on separate servers.
• Install HP SIM 5.1 or later using the HP SIM CD–ROM included with your Storage Essentials
software on the designated HP SIM server following the steps in this section.
• If HP Systems Insight Manager is installed on a separate server, you must first upgrade the HP
SIM server separately to HP SIM 5.1. If you are running HP SIM 5.1 on the HP SIM server, you
are not required to upgrade the HP SIM server. Continue to ”Step 5 – Manually Export the
Database” on page 45 if the HP SIM server is running version 5.1. Follow the steps below if HP
SIM needs to be upgraded.
NOTE: Earlier versions of HP SIM (earlier than 5.1) run on the Oracle 9i database and are not
compatible with this release of Storage Essentials.
1. Stop the AppStorManager service on the Storage Essentials server.
2. Log on to the HP SIM Windows server and put the HP SIM CD in the CD drive of the HP SIM
server or double-click the HP SIM setup.exe file if you have copied the HP SIM installation files
to a network or local drive.
3. Follow the instructions on the HP SIM upgrade screens. As a best practice, upgrade only the
following components that are required to install and set up Storage Essentials:
• System Management Homepage
• HP Systems Insight Manager
4. Accept the default options on each HP SIM screen. You can optionally install/upgrade other HP
SIM components at a later time by running the HP SIM CD again on the HP SIM server and
following the instructions in the HP SIM documentation once the Storage Essentials installation is
complete.
5. Reboot the HP SIM server when prompted at the end of the HP SIM installation.
6. Verify you can start the HP SIM service and log into HP SIM without any errors.
7. Log out of HP SIM.
8. Stop the HP SIM service.
Installing the Management Server on Microsoft Windows44
Page 71

Step 5 – Manually Export the Database
Manually export the database and create an image of the server.
Export the database and create an image as described in the following steps. Make sure you select
Export HPSIM Schema so that HP System Insight Manager data is exported.
IMPORTANT: Make sure you save the backup in a directory structure that is not part of the
management server installation directory.
1. Stop the services for HP SIM and HP Storage Essentials (AppStorManager) before you run the
Database Admin Utility.
2. Use the Database Admin Utility to export your Oracle database. Be sure to select Export HPSIM
Schema in the Database Admin Export window so that HP System Insight Manager data is
exported. See ”Database Maintenance and Management” on page 263.
As a best practice it is highly recommended that you backup the management server to create
a restorable image of the server using the backup tool of your choice.
Step 6 – Start the Storage Essentials Upgrade Wizard
and Resolve Any Minimum Requirement Issues
1. Exit all external utilities that use Oracle before starting the upgrade wizard.
2. Put the Storage Essentials for Windows Management Server installation CD in the CD-ROM
drive of the management server running Storage Essentials and HP SIM or on the separate
server on which Storage Essentials is installed if you are running a separate server
configuration. The Storage Essentials upgrade wizard starts automatically and the Welcome to
Storage Essentials screen is displayed.
3. Click Next. The System Inspection screen is displayed briefly while the Storage Essentials
installation wizard scans your system and determines that you are upgrading. As long as the
system requirements are met, the Getting Started with an Upgrade screen is displayed.
IMPORTANT: The Storage Essentials upgrade wizard stops AppStorManager, the service
for HP Storage Essentials host, even if you cancel the upgrade program without making any
changes. Restart the service after cancelling setup.exe to bring your system back to an
operational state.
The following checks are performed before the Storage Essentials installation wizard starts. If
any of these checks fail, the installation wizard will not start until the requirement is met. See
”Pre-installation Checklist (Installations and Upgrades)” on page 8 and the support matrix and
release notes (Documentation > Support Matrix or Release Notes, accessible from any Storage
Essentials installation wizard screen) for more details on the requirements:
• Only one instance of the installation wizard can be running.
• Screen resolutions less than 800x600 pixels will cause the upgrade to fail.
• You must be logged into the machine with administrator privileges or the upgrade will fail.
HP Storage Essentials SRM 6.0 Installation Guide 45
Page 72

• The server must be running a supported operating system or the upgrade will fail. Refer to
the support matrix for a valid operating system.
• Microsoft Internet Explorer 6.0 SP1 or later must be installed or the upgrade will fail.
• TCP/IP must be installed or the upgrade will fail.
• *The upgrade will fail if SNMP and the SNMP trap service is not installed and enabled. The
upgrade program tells you SNMP must be enabled and SNMP trap services must be
installed. The upgrade will not go beyond a certain point until you enable SNMP and
SNMP trap services.
• If insufficient disk space in %Temp% is detected the upgrade will fail. You must have at least
2 GB of free disk space on the drive where %temp% is located.
4. Read the overview information on the Getting Started with an Upgrade screen and click Next.
The Upgrade Locations screen is displayed showing the directories in which the management
server components are currently installed.
5. Optional. Select the check box to copy your CIM extensions to the management server only if
you want to overwrite the existing CIM extension files. You can copy the CIM extensions from
the CIM Extension CD manually to the management server at a later time. Note that this option
only copies the CIM extension files to the management server. It does not install the CIM
extensions on your hosts.
IMPORTANT: The 6.0 CIM extensions are required on any backup manager hosts to
continue collecting backup manager discovery data. Build 5.1 CIM extensions on backup
manager hosts are not supported after upgrading. See ”Deploying and Managing CIM
Extensions” on page 181 for information on installing CIM extensions.
6. Optional. You can change the location of the Oracle database.
7. Click Next to continue. The Verify System Requirements screen is displayed. See the support
matrix for complete system requirement details.
NOTE: The Port Availability requirement line may show a warning during an upgrade that
can be ignored, as it indicates that the existing management server service has reserved the
ports.
8. Click Next. The HP Systems Insight Manager Service Account Credentials screen is displayed.
Enter the password for the HP Systems Insight Manager. The user name and domain boxes are
pre-filled based on the information entered in the Upgrade Locations screen earlier.
9. Click Next. The Upgrade Summary screen is displayed showing the selected components to be
upgraded.
10.Click Upgrade to continue or Previous to make changes to the previous screen or Cancel if you
need to make changes to the server. Once you click Upgrade, the upgrade wizard begins
migrating the Oracle database and will not allow you to cancel until the migration is complete.
The automated Oracle database migration creates a backup of your Oracle 9i database,
exports the database, installs Oracle 10g Standard Edition, and imports the database during
the upgrade. You can cancel the upgrade once the database migration is complete if desired.
Installing the Management Server on Microsoft Windows46
Page 73

If you click Cancel during the upgrade, the Storage Essentials upgrade wizard completes the
upgrade of the current component before stopping. Once that component upgrade is complete,
the Storage Essentials upgrade wizard prompts you to confirm that you want to cancel. Click
Yes to cancel or No to continue with the installation.You can resume the upgrade by running the
Storage Essentials upgrade wizard again.
NOTE: As mentioned earlier, the upgrade wizard stops AppStorManager, the service for
the management server HP Storage Essentials, even if you cancel the upgrade program
without making any changes. Restart the service after cancelling setup.exe to bring your
system back to an operational state.
11.During the upgrade, the Storage Essentials for Windows installation wizard resets all
customized Oracle passwords to their default values in order to automatically upgrade the
Oracle database that resides on the Storage Essentials server to Oracle 10g. You must change
the SIM_MANAGER password HP SIM uses to access the Oracle database back to quake by
using the mxpassword command and the CLI interface on the HP SIM server during the upgrade
process.
a. Log onto the server running HP Systems Insight Manager.
b. Enter the following at the command prompt:
C:\> mxpassword -m -x MxDBUserPassword=mynewPass
where mynewPass is your new password for the database.
The SIM_MANAGER password is changed.
c. Continue with the Storage Essentials upgrade wizard. You can change the SIM_MANAGER
password from the default when the Storage Essentials upgrade is done.
The Installation Complete screen is displayed when the upgrade wizard completes upgrading
each component.
NOTE: If you specified any customized changes using the Product Health > Advanced
option in a prior release, a record of those changes is saved in the
%mgr_dist%\logs\custom.txt file after upgrading.
12.Click Finish to reboot the management server.
Step 7 – Customize Database Passwords
The database passwords are reset during the upgrade. Use the Database Admin Utility to
customize your database passwords.
During the upgrade, all Oracle passwords are reset to their defaults, including the TNS listener
password, and the passwords for the SYS, SYSTEM, DB_SYSTEM_USER, SIM_MANAGER,
RMAN_USER accounts. Please use the Database Admin Utility to change these passwords after
upgrading.
HP Storage Essentials SRM 6.0 Installation Guide 47
Page 74

Step 8 – Enable RMAN Backup if Desired
RMAN Backup is disabled by default as part of the upgrade process. When you log into the
management server after upgrading, you see a message informing you that RMAN Backup is
disabled. You should re-enable RMAN backup as soon as possible to continue backing up your
data.
Step 9 – Upgrade is Required on the Following
CIM Extensions
Upgrade CIM extensions on servers with the following functionality:
• Backup Manager Hosts — Backup information is not gathered from legacy CIM extensions. In
order for backup information to be gathered by the management server, the CIM extensions on
the Backup Manager Hosts must be at the same build number as the management server.
When you upgrade your management server, upgrade the CIM extensions on your Backup
Manager Host in order to continue to see backup data.
• Windows hosts using SecurePath — SecurePath information is not retrieved from legacy CIM
extensions.
• *Host that you want to retrieve cluster information for example: Veritas Cluster Server on Solaris
cluster and Microsoft Cluster Server
• *Linux hosts that support QLogic failover
*This is new functionality that requires Build 6.0 of the CIM extension.
Step 10 – Rediscover all Elements
You should rediscover all elements after you do an upgrade by running /Discovery Data
Collection.
Discovery is important because:
• Better scalability is provided after discovery.
• Cluster functionality. To use the new functionality, upgrade the CIM extensions to Build 6.0 and
rediscovery is required.
• You will see the following issues until you do Discovery:
• Reports and Capacity Manager/Capacity Explorer show incorrect raw capacity data for
storage systems.
• There is no trunked status indication on Brocade fabrics.
• No NPIV status indication.
• No provisioning for HP StorageWorks EVA arrays using Command View EVA.
• New host modes on storage systems are not available.
• Backup data collection would be suspended until CIM extensions on Backup Manager Hosts
are upgraded to Build 6.0 and they are rediscovered.
Steps That Can be Run Anytime After the Upgrade
The following steps can be completed any time after the upgrade; however, you will have reduced
functionality with the product until you complete these steps.
Installing the Management Server on Microsoft Windows48
Page 75

Re-add Remote Sites in Global Reporter
IMPORTANT: After the upgrade, all remote sites in the Global Reporters are removed. This is
done so you can upgrade the remote sites to the same version before Global Reporter attempts to
gather data. Before you re-add the remote sites, be sure to upgrade them to the same build number
as the management server (Build 6.0 CIM extensions).
All sites that provide global reports must be upgraded to the latest build of the management server.
Install this build of the management server on all remote sites, then complete the following steps for
each management server that is using Global Reporter.
1. You must modify the listener.ora file at each remote site, as described in the following steps. For
example, assume you have three remote sites. You must log onto each of these remote sites and
modify the listener.ora file at each remote site, as described in the following steps:
a. Log onto the remote site.
b. Stop the service for the management server running.
c. Stop the listener service for Oracle (OracleOraHome92TNSListener).
d. Open the following file in a text editor on the computer:
%ORA_HOME%\network\admin\listener.ora
e. After
(ADDRESS = (PROTOCOL = TCP)(HOST = 192.168.10.1)(PORT = 1521))
LISTENER =
(DESCRIPTION_LIST =
(DESCRIPTION =
(ADDRESS_LIST =
(ADDRESS = (PROTOCOL = TCP)(HOST = localhost)(PORT = 1521))
(ADDRESS = (PROTOCOL = TCP)(HOST =
)
)
)
f. Save the file and exit.
g. Start the listener service for Oracle (OracleOraHome92TNSListener).
h. Start AppStorManager.
2. Open the page for Global Reporter (Reports > Storage Essentials > Report Configuration >
Global Reporter in HP Systems Insight Manager on the Global Reporter server and remove all
(ADDRESS = (PROTOCOL = TCP)(HOST = localhost)(PORT = 1521)), add the
following line:
where 192.168.10.1 is the IP address of the local host server. Replace 192.168.10.1 with
the IP address of your local host.
The text should now appear as follows:
192.168.10.1)(PORT = 1521))
remote sites listed by clicking the button.
3. Click the Refresh Now button at the bottom of the page. This action clears the management
server database.
HP Storage Essentials SRM 6.0 Installation Guide 49
Page 76

4. Add desired remote sites, by clicking the New Site button and providing the appropriate
information. Refer to the User Guide and online help for more information.
5. To upgrade the database with data from the added sites, click the Refresh Now button at the
bottom of the page.
Upgrade Your Storage Essentials CLI Clients
CLI clients earlier than Build 6.0 do not work with Build 6.0 of the management server. Refer to the
CLI Guide for more information about upgrading your CLI clients.
Upgrade Your CIM Extensions
See ”About Upgrading Your CIM Extensions” on page 189 " for details.
Migrate Your Brocade Switches to SMI-A
After successfully upgrading the management server, any Brocade switches that use the
Brocade Fabric Access API provider must be migrated to the Brocade SMI-A provider. The
management server will prompt you to migrate your Brocade switches the first time you log on to
the management server after the upgrade and will display the Brocade API switches that need to
be migrated.
Until you migrate your Brocade switches to SMI-A, data such as topology and zoning from the
Brocade switch will be stale and you will be unable to use the Brocade switch to perform
provisioning or gather port performance statistics through the Brocade switch. The Brocade
Fabric Access API switches are quarantined and you will have the option to migrate to the
Brocade SMI-A provider at your discretion in case your SAN policy requires that you validate the
new Brocade SMI Agent provider before migrating your Brocade switches.
The quarantined API-managed Brocade switches retain their historical data and that data
remains intact during the migration to the SMI-A provider.
However, new data will not be collected for the quarantined Brocade switches until you migrate
the switches to the SMI-A provider.
After migrating the Brocade switches to SMI-A, the Brocade SMI-A proxy server is placed in its
own discovery group. This new discovery group is not part of any Discovery Data Collection
schedule. If the Brocade switches were part of a Discovery Data Collection schedule prior to
migration, you must manually adjust those schedules to run Discovery Data Collection for the
migrated Brocade switches. If the schedules are not adjusted manually, Discovery Data
Collection will not run for the migrated switches as per pre-migration schedules.
Follow these steps to migrate your Brocade switches to the Brocade SMI-A provider:
1. Download the Brocade SMI Agent v120.6.0a provider software and its Installation Guide
from the Brocade website:
http://www.brocade.com/support/SMIAGENT.jsp
See the support matrix for your edition for details on the latest supported version for the
management server.
Installing the Management Server on Microsoft Windows50
Page 77
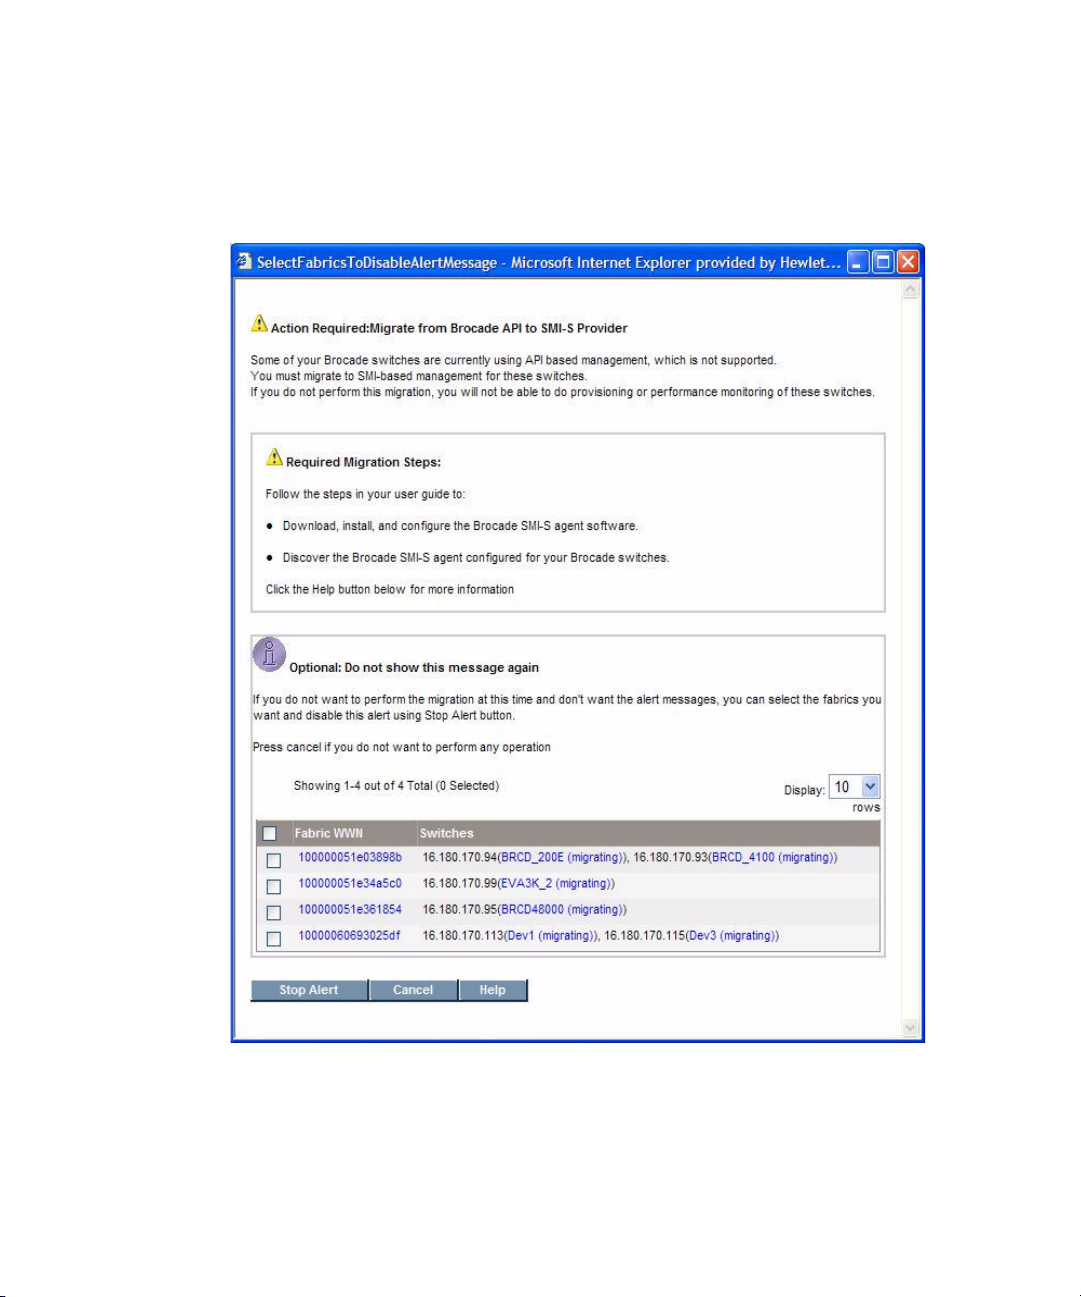
2. Install the Brocade SMI Agent with a minimum version of 120.6.0a and configure the
proxy servers on the server with which you will manage your Brocade access points
following the installation and configuration instructions included in the Brocade
v120.6.0a Installation Guide. Refer to the Brocade document for SMI-A requirements.
3. Log on to the management server. HP Storage Essentials alerts you to migrate your
Brocade Fabric Access API switches when you first log on.
Your Brocade switches are quarantined until you migrate to the SMI-A provider. The
migration message is displayed each time you log on to the management server until
each Brocade switch is migrated to the new Brocade SMI-A provider or you choose to
disable the message.
HP Storage Essentials SRM 6.0 Installation Guide 51
Page 78

4. Run HP SIM discovery for the Brocade proxy server. See the chapter, “Discovering
Switches, Storage Systems, NAS Devices, and Tape Libraries.”
5. Run Discovery Data Collection. See the chapter, “Discovering Switches, Storage
Systems, NAS Devices, and Tape Libraries.”
The Brocade switches are migrated to the SMI-A provider.
Important: Before performing any provisioning operations that involve a Brocade
switch you must perform Discovery Data Collection for any subset of
elements that includes the Brocade switch.
6. If you were using discovery schedules to collect details for Brocade switches prior to
migrating them to SMI-A, add the new discovery group for the Brocade proxy server to
your pre-existing Discovery Data Collection schedules as described in the following
steps:
a. Select Options > Storage Essentials > Discovery > Schedule Discovery Data Collection
in HP Systems Insight Manager.
b. Click the Edit ( ) button corresponding to the discovery schedule you want to
modify.
c. Click the Discovery Groups tab.
d. Select the Brocade proxy under the list of discovery groups.
e. Click Add Selected Groups To Schedule.
f. Click Finish.
Check any McDATA and Connectrix Switches
As mentioned earlier, by default after upgrading, the management server is configured to use the
SMI-S provider to manage and discover McDATA and Connectrix switches. The migration to SMI-S
is not required for McDATA and Connectrix switches as it is with the Brocade Fabric Access API
provider.
You must do one of the following after upgrading:
• Before you can discover McDATA and Connectrix switches with SMI-S, you must download and
install the McDATA SMI-S provider software. See the document HP StorageWorks M-Series at:
http://www.hp.com/go/hpsim/providers
verify that you are running a current version of the SMI-S provider..
• See the following section to change the default from SMI-S if you prefer not to migrate to the
SMI-S provider:
”Changing the Discovery Settings” on page 130.
Installing the Management Server on Microsoft Windows52
for instructions. Check this web site periodically to
Page 79

Configurations Required for Discovering EMC CLARiiON Storage Systems
The EMC Navisphere CLI is required for the management server to communicate with the
CLARiiON storage system. At the time this documentation was created, EMC distributed the
Navisphere CLI as part of the EMC Navisphere Software Suite. Contact your EMC representative
for more information about obtaining the Navisphere CLI. Distribution rights for the Navisphere CLI
belong to EMC.
In Navisphere add the following to the privilege user section:
root@name_of_my_management_server
root@IP_of_my_management_server
where
• name_of_my_management_server is the DNS name of the computer running the
management server software
• IP_of_my_management_server is the IP address of the computer running the
management server software
The management server service needs to be restarted after installing EMC Navisphere CLI.
About Service Account Credentials
You are asked for service account credentials during a typical installation of HP SIM or during the
installation of OpenSSH Services for HP SIM. The user name and password you provide is for the
user that is installing HP SIM. This must be an existing user account with administrative privileges.
This user account is also used for starting the HP SIM service.
IMPORTANT: If you change the credentials of the service account you provided, for example the
password, you must change the credential information for the HP SIM service. You can change the
credential information for the service as described in ”Changing the Service Account Credentials
for the HP Systems Insight Manager Service” on page 53.
During a typical installation of HP SIM, the Service Account Credentials window is displayed. The
Domain and Username fields default to the installing account credentials, but these can be edited.
Enter the Password for the account. Click Next.
IMPORTANT: A user name and password cannot contain a space followed by a double-quote. If
you use this character in your user name or password, you will receive an Invalid character error
and not be allowed to sign in.
Changing the Service Account Credentials for the HP Systems Insight Manager Service
The HP Systems Insight Manager service uses the service account credentials supplied during the
installation. If the service account credentials change, you must make the HP Systems Insight
HP Storage Essentials SRM 6.0 Installation Guide 53
Page 80

Manager service aware of these changes. If you do not, the HP Systems Insight Manager service
will not start and you will not be able to use HP SIM.
To change the service account credentials for the HP Systems Insight Manager service:
1. Right-click the HP Systems Insight Manager service from the services panel.
2. Select Properties from the drop-down menu.
3. Click the Log On tab.
4. Change the user name (This account) and password on the Log On tab to match the information
for the new credentials. If the host is in a domain, specify the account using the
domain\username format.
Important Information About Changing the SIM_MANAGER Password
The information Storage Essentials and HP SIM share is stored in a database with the user name
SIM_MANAGER and the default password quake. For security reasons, it is strongly recommended
you change the password for this database.
NOTE: This step only applies if Storage Essentials and HP SIM are sharing the same Oracle
database and HP SIM is using the Oracle appiq instance.
Make sure you keep the new password for SIM_MANAGER in a safe location, as it is your
responsibility to remember the Oracle passwords.
The management server requires the password to have the following characteristics:
• a minimum of three characters
• starts with a letter
• contains only letters, numbers and underscores (_)
• does not start or end with an underscore (_)
To change the password for SIM_MANAGER:
1. Log onto the server running Storage Essentials.
2. Stop the AppStorManager service if it is started.
3. Log onto the server running HP SIM.
4. Stop the HP SIM service so that it can not access the database.
IMPORTANT: Be sure the HP SIM service does not access the Oracle database before you
finish changing the password for the Oracle database.
5. Enter the following at the command prompt:
C:\> mxpassword -m -x MxDBUserPassword=mynewPass
where mynewPass is your new password for the Oracle database.
Installing the Management Server on Microsoft Windows54
Page 81

6. Use the Database Admin Utility to change the SIM_MANAGER password in the Oracle
database.
IMPORTANT: You must provide the same SIM_MANAGER password for the mxpassword
command and the Database Admin Utility.
a. To access the Database Admin Utility, go to the %MGR_DIST%\Tools\dbAdmin directory
on the Storage Essentials management server and double-click dbAdmin.bat.
If you are shown an error message when you start the Database Admin Utility, stop the
AppStorManager service and click the Refresh button.
b. Click Change Passwords in the left pane.
c. Select SIM_MANAGER from the User Name box.
d. Type the current password in the Old Password box.
e. Type the new password in the New Password box.
f. Retype the password in the Confirm Password box.
g. Click Change.
The Database Admin Utility changes the password for the specified account.
h. Restart the HP Systems Insight Manager service.
i. Restart the AppStorManager service.
Removing Storage Essentials
Follow these steps to remove the HP SIM Connector, HP SIM, Storage Essentials, and Oracle.
Considerations when Uninstalling the SIM Connector
If you need to uninstall the SIM connector at a later time, be aware of the following considerations:
The SIM Connector is the Storage Essentials component that enables communication between HP
Systems Insight Manager and Storage Essentials. The SIM Connector consists of two parts, the HP
SIM side of the connector and the Storage Essentials side of the connector. In a typical uninstall,
both parts of the connector are removed. However, if HP SIM is not functioning, it is possible to
remove only the Storage Essentials side of the connector. If the HP SIM side of the connector is not
removed, HP SIM will be left in an unknown state. HP SIM will still contain Storage Essentials
objects such as menu items and links. However, the Storage Essentials items will not function.
If the SIM Connector Uninstall wizard detects that HP SIM is not available you see a message
similar to the following:
HP Systems Insight Manager is not available. Click Cancel to exit the
uninstall or Continue to remove only the Storage Essentials SIM
Connector.
At this point, you have two options;
1. Cancel the uninstall. After you start HP SIM you can restart the uninstall. (recommended),
2. Continue the uninstall and remove only the Storage Essentials side of the connector.
HP Storage Essentials SRM 6.0 Installation Guide 55
Page 82

IMPORTANT: Use the Continue option only if you do not intend to use this installation of SIM
either on its own or integrated with Storage Essentials.
To remove Storage Essentials:
1. Stop the service for the management server (make sure HP SIM is/remains running) by doing
the following:
a. Go to the Services window (Start > Control Panel > Administrative Tools > Services).
b. Right-click the AppStorManager service in the Services window.
c. Select Stop from the drop-down menu.
2. Open the Add or Remove Programs window (Control Panel > Add or Remove Programs).
3. Do the following to uninstall the HP SIM Connector.
a. Select HP Connector and click the Change/Remove button. The Uninstall SIM Connector
wizard starts.
IMPORTANT: HP Systems Insight Manager must be running in order to completely remove
each portion of the Connector software from HP SIM and Storage Essentials. See
”Considerations when Uninstalling the SIM Connector” on page 55 for more details.
b. Select the Remove option, then click Next.
c. Enter these credentials:
• HP SIM Hostname (fully qualified name)
• HP SIM Administrator name (the name with which you installed HP SIM), using the
format: domain\administrator
• HP SIM Administrator password
d. Click Uninstall. The Uninstall Complete screen is displayed.
e. Select No, I will restart my system myself.
f. Click Done.
4. Uninstall HP SIM (Start > Programs > HP Systems Insight Manager > Uninstall HP Systems
Insight Manager). HP SIM is removed from the management server.
5. Do the following to uninstall Storage Essentials:
a. In the Add or Remove Programs window, select Storage Essentials.
b. Click the Change/Remove button. The Uninstall wizard starts.
c. In the Uninstall wizard screen, select the Remove option, then click Next.
d. Click Uninstall. The Uninstall Complete screen is displayed.
e. Select No, I will restart my system myself.
f. Click Done.
6. Do the following to remove Oracle and the Oracle instance for Storage Essentials:
Installing the Management Server on Microsoft Windows56
Page 83

a. Open a Command Prompt window on the Storage Essentials management server (Start >
Run > cmd.exe, click OK).
b. Put the Oracle DVD in the DVD drive of the Storage Essentials management server.
c. Change directory (CD) to the root of the Oracle DVD.
d. Enter the following at the command prompt window on the management server to remove
Oracle and the Storage Essentials management server database instance:
cscript removeOracle10g.vbs
Oracle is removed from the management server.
7. Delete the old Storage Essentials management server installation directory. If the directory is set
with Read Only permissions do the following:
a. Right-click the directory and select Properties > Security.
b. HIghlight (click) Administrator and click Full Control under the Allow column.
c. Select the General tab and clear the Read-only check box.
d. Click OK and select Apply changes to this folder, sub-folders and files radio button.
e. Click Ignore All if you see an error message.
f. Delete the directory.
8. Delete the installation log files:
• del %systemdrive%\srnInstsallLogs\*.log
• del %windir%\srmwiz.ini
HP Storage Essentials SRM 6.0 Installation Guide 57
Page 84

Installing the Management Server on Microsoft Windows58
Page 85

3 Installing the Management Server on Linux
NOTE: The Linux management server is not available with Storage Essentials Standard Edition.
See the following topic if you are installing the management server on another supported operating
system:
• ”Installing the Management Server on Microsoft Windows” on page 7
Important Information About Upgrading
Please contact your Account Representative for upgrades. Upgrading requires assistance from HP
Services.
Keep in mind the following:
• All steps must be completed for the management server to work properly.
• Linux management server is supported only on the following versions:
• Redhat 4 (U3 or higher)
• SUSE 9 (SP3)
• SUSE 10 or SUSE 10 SP1
• Refer to the product Support Matrix regarding other related software and version requirements.
• For optimal performance, install the management server on a dedicated computer. See the
support matrix for your edition for hardware requirements.
• Installation through Virtual Network Computing (VNC) software is not supported.
• During management server installation, double-byte characters are not allowed in the
installation path. InstallScript.iap_xml has been modified to display the following message if
double-byte characters are entered:
The installation path for $PRODUCT_NAME$ may NOT contain double-byte
characters.
The installation path must be basic ASCII alphanumric characters, no
spaces, no international characters, and no double-byte characters.
Please choose a different installation directory.
This chapter describes the following installation topics and steps:
• Deployment Types, page 60
• Pre-installation Checklist, page 60
• Installing from a Network Drive, page 64
• Step 1 - Install the Oracle Database, page 64
• Step 2 - Install the Management Server, page 76
• Step 3 - Verify that Processes Can Start, page 79
• Step 4 - Install and Configure HP SIM, page 82
HP Storage Essentials SRM 6.0 Installation Guide 59
Page 86

• Step 5 - Install the HP SIM Connector, page 85
• Step 6 - Configure SUSE Linux for Use with Business Tools, page 86
• Step 7 - Browse to HP SIM Home Page, page 87
• Step 8 - Configure Firefox, page 87
• Step 9 - Import a Storage Essentials License, page 88
• Installing the Java Plug-in on Linux, page 88
• Configurations Required for Discovering EMC CLARiiON Storage Systems, page 89
• Removing the Management Server, page 89
• Upgrading the Linux Management Server from Build 5.1 to Build 6.0 (Contact Your Account
Representative Before Upgrading), page 92
Deployment Types
This product provides two types of deployments:
• Single box deployment - HP Systems Insight Manager (SIM) and Storage Essentials are installed
on the same server. Follow the instructions in this chapter.
• Dual box deployment - HP SIM and Storage Essentials are installed on different servers. When
you install HP SIM on a different server, skip ”Step 4 - Install and Configure HP SIM” on
page 82. After you install HP SIM by using the directions provided in the HP SIM
documentation, continue the installation steps with ”Step 5 - Install the HP SIM Connector” on
page 85.
Pre-installation Checklist
HP SIM
Verify that the following required software is available on your system, and install any that are
missing:
• SSH - Verify that SSH is installed by entering the following command:
• SNMP - Verify that SNMP is installed by entering the following command
• C++ libraries - Verify that standard C++ libraries are installed by entering the following
• Linux glibc library - Verify that the Linux glibc library is installed by entering the following
Installing the Management Server on Linux60
# rpm -qa | grep ssh
If SSH is not installed, the previous command does not return any results.
# rpm -qa | grep snmp
If SNMP is not installed, the previous command does not return any results.
command:
# rpm -qa | grep compat
If the libraries are not installed, the previous command does not return any results.
command:
# rpm -qa | grep glibc
If the library is not installed, the previous command does not return any results.
Page 87

Install any missing components from the Linux operating system CD before continuing with the
installation.
Pre-requisite RPMs for Oracle on Linux
Verify that your system includes the required packages by using the following command:
# rpm –q <package-name>
Required RPMs for Oracle 10g on RHEL systems:
• binutils-2.15.92.0.2-10.EL4
• compat-db-4.1.25-9
• control-center-2.8.0-12
• gcc-3.4.3-9.EL4
• gcc-c++-3.4.3-9.EL4
• glibc-2.3.4-2
• glibc-common-2.3.4-2
• gnome-libs-1.4.1.2.90-44.1
• libstdc++-3.4.3-9.EL4
• libstdc++-devel-3.4.3-9.EL4
• make-3.80-5
• xscreensaver-4.18-5.rhel4.2
Required RPMs for Oracle 10g on SUSE 9 systems:
• binutils-2.15.90.0.1.1-32.5
• gcc-3.3.3-43.24
• gcc-c++-3.3.3-43.24
• glibc-2.3.3-98.28
• gnome-libs-1.4.1.7-671.1
• libstdc++-3.3.3-43.24
• libstdc++-devel-3.3.3-43.24
• make-3.80-184.1
• xscreensaver-4.16-2.6
• orarun-1.8-109.15
• sysstat-5.0.1
Required RPMs for Oracle 10g on SUSE 10
• binutils
• glibc-2.4
• gcc-4.1.0
• gcc-c++-4.1.0
• libaio
HP Storage Essentials SRM 6.0 Installation Guide 61
Page 88

• libaio-devel
• libstdc++
• make-3.80
• openmotif-libs
• sysstat-6.0.2
• orarun-1.9-21
The preceding information is taken from
http:/www.novell.com/products/server/oracle/oracle10g_install.html. RPMs for SLES 9 can be
found at http://www.novell.com/products/server/oracle/software.html and RPMs for SLES 10
can be found in the SLES 10 product CD.
NOTE: The orarun-1.9 package is available from
http://ftp.novell.com/partners/oracle/sles-10/orarun-1.9-21.15.i586.rpm.
The list of packages described above for RHEL and SUSE includes all the packages needed for
Oracle installation. Some of these packages might be selectively installed depending on the mode
of installation followed during OS installation.
Software Dependencies for Storage Essentials
NOTE: The database configuration and creation script is different for Oracle 10g than it was for
Oracle 9i. As a result, the management server software Build 6.0 is not supported by Oracle 9i.
Management server software builds earlier than 6.0 are not supported on the Oracle 10g
platform.
Verify that the following required software is available on your system, and install any that are
missing:
• Perl 5.8.3 or above. By default, the OS installs Perl 5.8.3 on SUSE 9 and Perl 5.8.5 on RHEL 4.
• ‘Xvfb’ is required for Application Viewer and Reporter. The Application Viewer and Reporter
pages show a ‘java.lang.NoClassDefFoundError’ if ‘Xvfb’ is not installed. This package comes
with the OS distribution (for both RHEL & SLES) and is installed if Full OS Install is selected.
• For RHEL, the package name is “xorg-x11-Xvfb”
• For SLES 9,the package name is “XFree86-Xvfb”
• For SLES 10, the package name is “xorg-x11-Xvfb”
For RHEL 4 or SUSE 10, if the “xorg-X11-Xvfb” package is not installed, the management
server installer displays a message that the “Xvfb” package is not installed, and stops the install
process. Install the package named “xorg-X11-Xvfb” and then re-run the management server
installation. This package is available on RHEL 4 OS CD’s and SUSE 10 CDs.
For SUSE 9, if the “XFree86-Xvfb” package is not installed, the management server installer
displays a message that the “Xvfb” package not installed, and stops the install process. Install the
Installing the Management Server on Linux62
Page 89

package named “XFree86-Xvfb” and then re-run the management server installation. This
package is available on the SUSE 9 CD’s.
The following shows a representative example of the error message that would be displayed.
Figure 1 Missing Xvfb Package Message
Verify Network Settings
Verify the network configuration for the management server:
1. Verify that the appropriate DNS server entries are present in /etc/resolv.conf. Verify that
the correct DNS suffixes are mentioned in the order of preference in which they need to be
appended to hostnames.
For example:
nameserver 172.168.10.1
nameserver 172.168.10.2
search “yourenvironment”.com
2. From a console window on the management server, enter the following command:
ping <hostname>
where <hostname> is the hostname (without domain name) of the Linux CMS.
The ‘ping’ command must ping the IP address of the management server. It must not ping the
loopback address (127.0.0.1). If it pings the loopback address, edit the /etc/hosts file to
make appropriate corrections.
The /etc/hosts file should have entries similar to:
127.0.0.1 localhost.localdomain localhost
192.168.0.100 myservername.mydomain.com myservername
HP Storage Essentials SRM 6.0 Installation Guide 63
Page 90

NOTE: If the ping command fails to ping the IP address and instead pings the loopback
address, the oracle listener process will fail to start and therefore, the CIMOM process will
also fail.
3. Enter the following command:
nslookup <hostname>
where <hostname> is the hostname (without domain name) of the management server.
4. Enter the following command:
nslookup <IP address>
where <IP address> is the IP address of the server.
5. Verify that both results from nslookup have the same fully qualified computer name and IP
address.
Installing from a Network Drive
Support for installing (or upgrading) from a network drive is limited to NFS mounted network drives
only. After the network drive is mounted to the local server, there are no separate network
drive-related steps required for the installation (or upgrade).
• Create a directory on which the NFS drive will be mounted:
#mkdir /InstallSE
• Mount the NFS shared network drive from NFS server (example: "pillbox") with shared drive
"InstallSE", with strong recommendation to set it as read only.
#mount pillbox:/InstallSE /InstallSE
• Any database ISO files must be loop-mounted and it is strongly recommended to set them to
read only mode. Management CD ISO files can be mounted in the same way as shown in the
following representative example for the Oracle database. (Names such as Disk1 or Vol1 can
be user-configurable, created by user with “mkdir”.) The steps need to be repeated for any
other ISO user trying to mount from NFS mount (Database, management server, CIM extension)
Example:
#mkdir /Disk1
#mount -o loop,ro /InstallSE/database/linux/<oracle10g.iso> /Disk1
In this example, to install the Oracle database:
#/Disk1/InstallDatabase
Step 1 - Install the Oracle Database
The management server uses a database to store the data it collects from the hardware it monitors.
The management server ships with a DVD that includes Oracle 10g Release 2, 10.2.0.1, upgrade
to Oracle 10g Release 2, 10.2.0.3, and the October 2007 Critical Patch Update for Oracle 10g
Release 2.
The install for Oracle 10g Release 2, 10.2.0.1, will also install the upgrade to Oracle 10g Release
2, 10.2.0.3, and apply the October 2007 Critical Patch Update.
Installing the Management Server on Linux64
Page 91

Install the database for the management server on a computer that does not already have Oracle
installed. In later steps, you will install the management server on the same machine that you
installed Oracle.
Before Installing the Oracle Database
Keep in mind the following:
• Refer to the support matrix for your edition for system requirements.
• Once you start the installation, do not exit. The Oracle installer creates the orauser file within
the first few minutes of the installation. This file remains on the system if the installation is
stopped before completion. Future installations of the management server database look for the
orauser file to verify that the database is installed. If you exit the Oracle installation before the
installation is finished, the management server will not run correctly.
• Install the database on the computer on which you plan to install the management server.
• Before you install Oracle, ensure the Linux server has the packages installed that are required
by Oracle.
• For both Linux SUSE and RHEL, Oracle 10.2.0.1.0 (32 bit) Standard Edition software is used.
• For the management server Build 6.0 software, the Oracle install runs in silent mode.
(Oracle installs silently showing progress indication in the console through text messages.)
This process does not require X-server and DISPLAY settings.
• When you install the database on Linux, files with group-writeable permissions are installed in
the ORA_HOME directory.
Prerequisites
Before you install the database on a Linux server, do the following:
• Verify that the server is running sh, ksh or bash shell.
• Verify the following directories have write permissions:
/
/tmp
Parent directory of ORA_HOME
• If you are running Red Hat Enterprise Linux AS 4 or Red Hat Enterprise Linux ES 4, delete the
existing Oracle user if present, before proceeding with the installation. The installation will fail if
there is an existing Oracle user.
• On SUSE Linux systems, on installing the ‘orarun’ rpm, the Oracle user account gets created
automatically. However the oracle user account needs to be enabled by changing the shell
entry from ‘/bin/false’ to ‘/bin/bash’ for oracle user in the /etc/passwd file.
• Setting of the kernel parameters for Oracle on both Red Hat and SUSE systems is handled by
the Oracle installer script and the user need not set the kernel parameters.
• At least 400 MB of free space is required in the /tmp directory.
• ORA_HOME should have a minimum of 50 GB of free space.
HP Storage Essentials SRM 6.0 Installation Guide 65
Page 92

NOTE: If the Oracle installation fails, a re-install will not run successfully because of existing files
or existing Oracle user. In such a case, uninstall Oracle using the Oracle uninstall script. Refer to
step 6 of ”Removing the Management Server” on page 89.
Installing the Database
To install the database:
1. Login to the Linux host as root user.
2. Insert the first Oracle Database DVD and mount it using the following commands:
# mkdir -p /mnt/oradisk
# mount /dev/cdrom /mnt/oradisk
where /dev/cdrom is the device.
3. Verify that you are in the top level directory:
# cd /
4. Start the installation of the database by entering the following:
# /mnt/oradisk/InstallDatabase
NOTE: All commands and filenames are case-sensitive.
5. The script will ask if you wish to continue. Enter “y.”
Installing the Management Server on Linux66
Page 93

6. The oracle installer script checks for required RPMs and terminates if any required RPM is
missing. In such case, install the missing RPMs and restart the installation.
INFO: Checking for required packages...
ERROR: sysstat is not installed.
ERROR: Please install missing pre-requisite packages
before proceeding with installation.
Terminating installation.
If the installer finds a different version of a pre-requisite RPM, it will
prompt the user to confirm continuing the installation.
INFO: Checking for required packages...
WARN: Looking for package gcc-4.1.0. Found gcc-4.1.2_20070115-0.11.
WARN: Looking for package gcc-c++-4.1.0. Found gcc-c++-4.1.2_20070115-0.11.
WARN: Version mismatch in pre-requisite packages.
Oracle may not work with these versions.
Do you want to continue? [y/n]:
y
INFO: Verified pre-requisite packages.
INFO: Proceeding with installation...
7. If there is insufficient swap space, the script displays a message saying that the swap space is
insufficient and a message similar to the following displays:
INFO: Checking swap space...
INFO: Available RAM: 4082752
INFO: Recommended Swap size: 4082752
INFO: Current Swap: 2097144
INFO: Insufficient swap size.
INFO: Creating additional swap space: 1985608
1985608+0 records in
1985608+0 records out
mke2fs 1.38 (30-Jun-2005)
/tmp/swapForOracle1.tmp is not a block special device.
Proceed anyway? (y,n)
Enter ‘y’ at the prompt.
You may be prompted to create multiple swap files. Enter ‘y’ each time you encounter the
prompt described above.
HP Storage Essentials SRM 6.0 Installation Guide 67
Page 94

8. The temporary disk space in /tmp is checked. If the disk space in /tmp is less that 400 MB, the
installation will abort with the below message.
ERROR: You need at least 400MB in the /tmp directory.
You only have 100 MB.
Terminating installation.
9. Appropriate kernel parameters are automatically set by the installation script.
Figure 2 Setting Kernel Parameters
10.On SUSE systems, the oracle user account should be enabled prior to starting the installation. If
the oracle user is not enabled, an error message is shown as below.
Figure 3 Oracle User Account Not Enabled Error
On Red Hat systems, if an oracle user is already existing, an error message
is shown indicating that this oracle user needs to be deleted. The following
shows the error message.
ERROR: This script has detected an existing Oracle user account on this
system.
This script requires that no Oracle user account be present prior
to the installation.
Please contact your System Administrator to resolve this conflict.
11.When prompted, enter the Oracle home directory. The default location for SUSE 9 and SUSE
10 is /opt/oracle, and for RHEL 4 is /home/oracle.
12.When prompted, enter the Oracle installation directory. The default location is opt/oracle.
Please enter the Oracle user's home directory. [Default: /home/oracle]
Please enter Oracle installation directory [Default: /opt/oracle]
INFO: Created Oracle users home directory.
Installing the Management Server on Linux68
Page 95

13.If you are running Red Hat Enterprise Linux AS 4 or RHEL 4.0, you will be asked to enter the
password for oracle user. Enter the password when prompted.
14.Enter “y” when asked to start the Oracle Universal Installer. For RHEL 4.0, text similar to the
following console output may display. (Representative console output for SUSE 10 and SUSE
10 SP1 is also included at the end of this example following the “Note” information.)
Starting Oracle Installer...
Starting Oracle Universal Installer...
Checking installer requirements...
Checking operating system version: must be redhat-3, SuSE-9, redhat-4,
UnitedLinux-1.0, asianux-1 or asianux-2
Passed
All installer requirements met.
Preparing to launch Oracle Universal Installer from
/tmp/OraInstall2007-10-24_05-33-55PM. Please wait ...Oracle Universal
Installer, Version 10.2.0.1.0 Production
Copyright (C) 1999, 2005, Oracle. All rights reserved.
Font specified in font.properties not found
[--symbol-medium-r-normal--*-%d-*-*-p-*-adobe-fontspecific]
Font specified in font.properties not found
[--symbol-medium-r-normal--*-%d-*-*-p-*-adobe-fontspecific]
Font specified in font.properties not found
[--symbol-medium-r-normal--*-%d-*-*-p-*-adobe-fontspecific]
Warning: Cannot convert string "<Key>Escape,_Key_Cancel" to type
VirtualBinding
Warning: Cannot convert string "<Key>Home,_Key_Begin" to type VirtualBinding
Warning: Cannot convert string "<Key>Help,_Key_F1" to type VirtualBinding
HP Storage Essentials SRM 6.0 Installation Guide 69
Page 96

NOTE: The warning messages in the above console output can safely be ignored.
NOTE: The Oracle Installer that comes with the Oracle Database Server Patch 10.2.0.1 does not
officially support SUSE 10; however, the Oracle database is supported on SUSE 10. The resulting
error messages can be safely ignored. Also, “Failed” and “Not Executed” check complete
messages in the pre-requisites result can be safely ignored.
For SUSE 10 and SUSE 10 SP1, text similar to the following displays:
INFO: The next step is to start the Oracle Universal Installer.
Start the Oracle Universal Installer ? [y/n]:
y
Starting Oracle Installer...
Starting Oracle Universal Installer...
Checking installer requirements...
Checking operating system version: must be redhat-3, SuSE-9, redhat-4,
UnitedLinux-1.0, asianux-1 or asianux-2
Failed <<<<
>>> Ignoring required pre-requisite failures. Continuing...
Preparing to launch Oracle Universal Installer from
/tmp/OraInstall2007-09-29_07-40-00PM. Please wait ...Oracle Universal
Installing the Management Server on Linux70
Page 97

Installer, Version 10.2.0.1.0 Production Copyright (C) 1999, 2005, Oracle.
All rights reserved.
You can find a log of this install session at:
/opt/oracle/oraInventory/logs/installActions2007-09-29_07-40-00PM.log
Starting execution of Prerequisites...
Total No of checks: 11
Performing check for CertifiedVersions
Checking operating system requirements ...
Expected result: One of redhat-3,redhat-4,SuSE-9,asianux-1,asianux-2
Actual Result: SuSE-SUSE Linux Enterprise Server 10 (i586)
Check complete. The overall result of this check is: Failed <<<<
Check complete: Failed <<<<
Problem: Oracle Database 10g is not certified on the current operating
system.
Recommendation: Make sure you are installing the software on the correct
platform.
=======================================================================
Performing check for Packages
Checking operating system package requirements ...
Check complete. The overall result of this check is: Not executed <<<<
Check complete: Not executed <<<<
OUI-18001: The operating system 'Linux Version SuSE-SUSE Linux Enterprise
Server 10 (i586)' is not supported.
Recommendation: Install the required packages before continuing with the
installation.
...........................................................................
......................... 100% Done.
15.Once the installer begins installing Oracle 10g, it cannot be paused or cancelled. The only way
to re-install Oracle is to uninstall it and start all over again.
16.Once Oracle 10g is installed successfully, the script automatically executes root.sh from
$ORACLE_HOME where $ORACLE_HOME is usually /opt/oracle/product/10.2.0.1.
HP Storage Essentials SRM 6.0 Installation Guide 71
Page 98

The following is the output of the script. Your output may differ slightly based on the file paths
you entered.
Oracle Database 10g Installation : OK
---------------------------------------------------------------------INFO: Running root.sh...
----------------------------------------------------------------------Runni
ng Oracle10 root.sh script...
The following environment variables are set as:
ORACLE_OWNER= oracle
ORACLE_HOME= /opt/oracle/product/10.2.0.1
Enter the full pathname of the local bin directory: [/usr/local/bin]:
Copying dbhome to /usr/local/bin ...
Copying oraenv to /usr/local/bin ...
Copying coraenv to /usr/local/bin ...
Creating /etc/oratab file...
Entries will be added to the /etc/oratab file as needed by
Database Configuration Assistant when a database is created
Finished running generic part of root.sh script.
Now product-specific root actions will be performed.
----------------------------------------------------------------------OK.
The upgrade to Oracle 10g 10.2.0.3 starts after Oracle 10g 10.2.0.1
completes installation.
------------------------------------------------------------------------ This script installs Oracle Database 10g Release Patch Set 2
------------------------------------------------------------------------INFO : Checking the OS Release...
Installing the Management Server on Linux72
Page 99

After upgrading to Oracle 10.2.0.3, the installer will execute root.sh from $ORACLE_HOME. The
user does not have to open a new terminal window and run the script as mentioned in the
following representative example.
The following configuration scripts need to be executed as the "root" user.
/opt/oracle/product/10.2.0.1/root.sh
To execute the configuration scripts:
1. Open a terminal window
2. Log in as "root"
3. Run the scripts
The installation of Oracle Database 10g Release 2 Patch Set 2 was
successful.
Please check
'/opt/oracle/oraInventory/logs/silentInstall2007-10-24_05-41-14PM.log' for
more details.
Running Oracle10 root.sh script...
The following environment variables are set as:
ORACLE_OWNER= oracle
ORACLE_HOME= /opt/oracle/product/10.2.0.1
Enter the full pathname of the local bin directory: [/usr/local/bin]: The
file "dbhome" already exists in /usr/local/bin. Overwrite it? (y/n)
NOTE: There is no need to overwrite these files as they would not have changed.
Oracle Critical Patch Update
The critical patch update is applied automatically after the installer completes upgrading to Oracle
10.2.0.3. If Oracle 10.2.0.3 upgrade fails, then the critical patch update will exit with a failure.
HP Storage Essentials SRM 6.0 Installation Guide 73
Page 100

The installation is done in silent mode and output similar to the following displays when the
installation begins:
INFO : Checking the OS Release...
Found SUSE LINUX Enterprise Server 9.
Installing Oracle 10g Release 2 Critical Patch Update, October 2007...
INFO: Installing Oracle 10g Release 2, October 2007 CPU : 6121183
Patch 6121183 installed successfully.
INFO: Installing Oracle 10g Release 2, October 2007 CPU : 6121242
Patch 6121242 installed successfully.
INFO: Installing Oracle 10g Release 2, October 2007 CPU : 6121243
Patch 6121243 installed successfully.
INFO: Installing Oracle 10g Release 2, October 2007 CPU : 6121244
Patch 6121244 installed successfully.
INFO: Installing Oracle 10g Release 2, October 2007 CPU : 6121245
Patch 6121245 installed successfully.
INFO: Installing Oracle 10g Release 2, October 2007 CPU : 6121246
Patch 6121246 installed successfully.
INFO: Installing Oracle 10g Release 2, October 2007 CPU : 6121247
Patch 6121247 installed successfully.
INFO: Installing Oracle 10g Release 2, October 2007 CPU : 6121248
Patch 6121248 installed successfully.
INFO: Installing Oracle 10g Release 2, October 2007 CPU : 6121249
Patch 6121249 installed successfully.
INFO: Installing Oracle 10g Release 2, October 2007 CPU : 6121250
Patch 6121250 installed successfully.
INFO: Installing Oracle 10g Release 2, October 2007 CPU : 6121257
Patch 6121257 installed successfully.
INFO: Installing Oracle 10g Release 2, October 2007 CPU : 6121258
Patch 6121258 installed successfully.
INFO: Installing Oracle 10g Release 2, October 2007 CPU : 6121260
Patch 6121260 installed successfully.
INFO: Installing Oracle 10g Release 2, October 2007 CPU : 6121261
Patch 6121261 installed successfully.
INFO: Installing Oracle 10g Release 2, October 2007 CPU : 6121263
Patch 6121263 installed successfully.
INFO: Installing Oracle 10g Release 2, October 2007 CPU : 6121264
Patch 6121264 installed successfully.
INFO: Installing Oracle 10g Release 2, October 2007 CPU : 6121266
Patch 6121266 installed successfully.
INFO: Installing Oracle 10g Release 2, October 2007 CPU : 6121268
Patch 6121268 installed successfully.
INFO: Installing Oracle 10g Release 2, October 2007 CPU : 6394981
Patch 6394981 installed successfully.
INFO: Installing Oracle 10g Release 2, October 2007 CPU : 6397928
Patch 6397928 installed successfully.
INFO: Installing Oracle 10g Release 2, October 2007 CPU : 6397929
Installing the Management Server on Linux74
 Loading...