

Page 1

HP StorageWorks
Secure Key Manager
users guide
AJ087-96011
Part number: AJ087–96011
nd edition: November 2008
2
Page 2

Legal and notice information
© Copyright 2007-2008 Hewlett-Packard Development Company, I.E.
© Copyright 2000, 2008 Ingrian Networks, Inc.
Confidential computer software. Valid license from HP required for possession, use or copying. Consistent with FAR 12.211 and
12.212, Commercial Computer Software, Computer Software Documentation, and Technical Data for Commercial Items are licensed
to the U.S. Government under vendor’s standard commercial license.
The information contained herein is subject to change without notice. The only warranties for HP products and services are set forth
in the express warranty statements accompanying such products and services. Nothing herein should be construed as constituting
an additional warranty. HP shall not be liable for technical or editorial errors or omissions contained herein.
Compaq Computer Corporation is a wholly-owned subsidiary of Hewlett-Packard Company.
Adobe® and Acrobat® are trademarks of Adobe Systems Incorporated.
Intel, Itanium, Pentium, Intel Inside, and the Intel Inside logo are trademarks or registered trademarks of Intel Corporation or its
subsidiaries in the United States and other countries.
Microsoft, Windows, Windows XP, and Windows NT are U.S. registered trademarks of Microsoft Corporation.
Microsoft, Windows, Windows NT, and Windows XP are U.S. registered trademarks of Microsoft Corporation.
Java is a US trademark of Sun Microsystems, Inc.
Oracle® is a registered U.S. trademark of Oracle Corporation, Redwood City, California.
UNIX® is a registered trademark of The Open Group.
Page 3

Contents
1Installingandreplacinghardware................. 21
Preparingfortheinstallation................................. 21
Toolsforinstallation .................................. 21
TakingESDprecautions................................. 21
Groundingmethodstopreventelectrostaticdischarge.................... 21
Rackplanningresources .................................. 22
Rackrequirements................................... 22
Rackwarnings .................................... 22
Optimumenvironment ................................... 23
Space and airflowrequirements ............................. 23
Temperaturerequirements................................ 23
Powerrequirements .................................. 24
Electricalgroundingrequirements ............................ 24
Unpacking ........................................ 25
Identifyingtheshippingcartoncontents............................ 25
Selectingaracklocation .................................. 26
RemovinganexistingSKM(appliance)fromthesystem ..................... 27
Installingtherailsintherack ................................ 27
Attachingrailstotheappliance ............................... 28
Installingtheapplianceintherack.............................. 28
Attachingthecables.................................... 28
2Configuring the system . . . . ................... 31
StartingtheSKMappliance................................. 31
Configuring the firstSKMappliance ............................. 33
Setting up the local CertificateAuthority(CA) ....................... 34
Creating the SKM server certificate............................ 35
EnablingSSLontheKeyManagementSystem(KMS)Server ................. 37
Establishingacluster.................................... 37
Creatingthecluster .................................. 38
Copying the Local CA certificate............................. 38
Adding SKM appliances to the cluster . . . . . . . . . . . . . . . . . . . . . . . . . . 39
Creating and installing the SKM Server Certificate ..................... 40
Propagating third-party certificates.............................. 41
Copying the certificates................................. 41
Installing the certificates ................................ 42
EnrollingclientdeviceswiththeSKM............................. 42
Verifying that installation and initial configurationissuccessful .................. 42
3Performingconfigurationandoperationtasks ............ 43
Keyandpolicyprocedures ................................. 43
Creatingakey .................................... 43
Importingakey.................................... 43
Settinggrouppermissionsforakey............................ 44
DownloadinganRSAkey................................ 44
Deletingakey..................................... 44
Authorizationpolicyprocedures ............................... 45
Creatinganauthorizationpolicy............................. 45
Deletinganauthorizationpolicy ............................. 45
Userandgroupprocedures................................. 45
Secure Key Manager
3
Page 4

Creatingauser .................................... 45
Creatingagroup ................................... 46
Addingausertoagroup................................ 46
Removingauserfromagroup.............................. 46
Deletingauser .................................... 46
Deletingagroup ................................... 47
LDAPserverprocedures................................... 47
SettinguptheLDAPuserdirectory ............................ 47
TestingtheLDAPuserdirectoryconnection......................... 47
SettinguptheLDAPschema............................... 47
SettingupanLDAPfailoverserver ............................ 48
TestingtheLDAPfailoverserverconnection ........................ 48
Certificateprocedures ................................... 48
Creating a certificaterequest .............................. 48
Creating a server certificatefortheSKM ......................... 48
Creating a client certificate ............................... 50
Creating a self-signed certificate............................. 51
Installing a certificate.................................. 51
Installing a certificatechain............................... 52
Downloading a certificate................................ 52
CertificateAuthority(CA)procedures............................. 53
Adding a CA certificatetothetrustedCAlist ....................... 53
Removing a CA certificatefromthetrustedCAlist ..................... 53
Creating a new trusted CA list profile........................... 53
Deleting a trusted CA list profile ............................. 54
Signing certificaterequestswithalocalCA ........................ 54
Viewing the certificatessignedbyalocalCA ....................... 54
DownloadingalocalCA................................ 54
DeletingalocalCA .................................. 55
CreatingalocalCA.................................. 55
Creatingaself-signedrootCA.............................. 55
CreatinganintermediateCArequest........................... 55
Installing a CA certificate................................ 56
Removing a CA certificate ............................... 56
FIPSstatusserverprocedures ................................ 57
EnablingtheFIPSstatusserver.............................. 57
ViewingtheFIPSstatusreport .............................. 57
KMSserverprocedures................................... 57
EnablingSSL ..................................... 57
Enabling key and policy configurationbyclientapplications................. 58
EnablingtheLDAPserver................................ 58
Enablingpasswordauthentication ............................ 58
Enabling client certificateauthentication.......................... 58
Configuringtheuseraccountlockoutsettings........................ 59
Clusteringprocedures ................................... 59
Creatingacluster ................................... 59
Joiningacluster.................................... 59
Synchronizingwithaclustermember........................... 60
SettingupSSLinacluster................................ 60
Removingadevicefromacluster............................. 61
Upgradingacluster .................................. 61
Deletingacluster ................................... 61
Dateandtimeprocedures.................................. 61
SettingthedateandtimeontheSKM........................... 61
ConfiguringanNTPserverconnection .......................... 62
ManuallysynchronizingwithanNTPserver ........................ 62
IPauthorizationprocedures................................. 62
SpecifyingwhichclientscanconnecttotheSKM...................... 62
SNMPprocedures..................................... 63
ConfiguringSNMPv1/v2ontheSKM .......................... 63
4
Page 5

ConfiguringSNMPv3ontheSKM ............................ 63
Administratorprocedures.................................. 64
Creatinganadministrator................................ 64
Deletinganadministrator................................ 64
LDAPAdministratorserverprocedures............................. 64
SettinguptheLDAPadministratorserver ......................... 64
TestingtheLDAPadministratorserverconnection...................... 64
SettinguptheLDAPschema............................... 65
SettinguptheLDAPfailoverserver............................ 65
TestingtheLDAPfailoverserverconnection ........................ 65
Passwordmanagementprocedures.............................. 65
Changingyourpassword................................ 65
Configuringpasswordsettingsforlocaladministrators.................... 65
Changing passwords when a security officerleaves..................... 66
Multiplecredentialsprocedures ............................... 66
Configuringthemultiplecredentialsfeature ........................ 66
Grantingcredentials.................................. 67
Revokingacredentialgrant............................... 67
Remoteadministrationprocedures .............................. 67
EnablingtheWebAdminUserAuthenticationfeature.................... 67
Signing a certificate request and downloading the certificate............... 67
Converting a certificatefromPEMtoPKCS12format .................. 68
Importing a certificatetoawebbrowser ....................... 68
EnablingWebAdminUserAuthenticationontheSKM ................. 68
Backup procedures for keys, configurations, and certificates ................... 69
Importingandexportingkeysbetweenclusters....................... 69
Backing up configurations and certificatestoexternalserver,thentoCD............ 76
Backingupkeystoexternalserver,thentoDVD ...................... 78
Log configurationprocedures ................................ 80
Configuringlogrotation ................................ 80
Enablingsyslog.................................... 80
Enablingsignedlogs.................................. 80
VerifyingasecurelogusingMicrosoftOutlook....................... 80
VerifyingasecurelogusingOpenSSL........................... 81
Recreating the log signing certificate........................... 82
Logviewprocedures.................................... 82
Viewinganarchivedlog ................................ 82
Manuallyrotatingalog................................. 82
Downloadingalog .................................. 82
Clearingalog .................................... 82
4 Maintaining the SKM ...................... 85
Backupandrestoreoverview ................................ 85
Backupandrestorepage.................................. 86
Createbackup .................................... 86
Createbackup:securityitems ............................ 86
CreateBackup:DeviceItems ............................ 87
CreateBackup:BackupSettings........................... 88
RestoreBackup .................................... 89
BackupRestoreInformation ............................... 90
InternalBackupList................................... 91
Services Configurationpage ................................ 92
ServicesList...................................... 92
Restart/Halt...................................... 93
SystemInformationpage .................................. 94
DeviceInformation................................... 94
LicenseInformation................................... 94
SoftwareUpgrade/Install................................ 95
Upgradingtoapatchrelease............................ 96
Secure Key Manager
5
Page 6

Rollingbacksoftware ............................... 96
SystemHealthpage .................................... 96
Refreshpage ..................................... 96
PowerSupplyStatus .................................. 97
CoolingFanStatus................................... 98
NetworkDiagnosticspage ................................. 98
PingInformation.................................... 98
TracerouteInformation ................................. 99
HostInformation.................................... 99
NetstatInformation................................... 99
ReadingNetstatResults............................... 100
ASKMapplianceinformationsheet ................. 101
BUsingtheManagementConsole.................. 103
Logginginandout..................................... 103
UsingtheHometab .................................... 103
Summaryscreen.................................... 103
SecuritySummary................................. 103
SystemSummary ................................. 104
RecentActions .................................. 105
Searchscreen..................................... 105
UsingfeaturescommontotheSecurityandDevicetabs ..................... 106
Filteringsections.................................... 107
Settingthenumberofitemsperpage........................... 107
AccessingtheHelpsystem ............................... 107
Using the Key and Policy Configurationscreen......................... 108
Keys......................................... 109
KeyProperties..................................... 111
Versionedkeys .................................... 112
GroupPermissions................................... 113
CustomAttributes ................................... 114
KeyVersionsandAvailableUsage............................ 114
RSAPublicKey .................................... 115
CreateQuery..................................... 116
ModifyQuery..................................... 117
CreateKey...................................... 118
CloneKey ...................................... 119
ImportKey ...................................... 120
Authorization Policy ConfigurationPage.......................... 122
AuthorizationPolicies................................ 122
AuthorizationPolicyProperties............................ 123
AuthorizedUsagePeriods.............................. 124
ActiveVersions .................................... 125
CustomKeyAttributes ................................. 125
Configuringtheusersandgroups .............................. 126
LocalUsers...................................... 127
UserAdministrationPermission............................ 127
SelectedLocalUser .................................. 128
CustomAttributes ................................... 128
LocalGroups ..................................... 129
LocalGroupProperties................................. 130
UserList ....................................... 130
LDAP Server Configuration ............................... 131
LDAPUserDirectoryProperties............................ 131
LDAPSchemaProperties .............................. 132
LDAPFailoverServerProperties ........................... 133
LDAP User & Group Configuration............................ 134
LDAPUsers.................................... 134
6
Page 7

LDAPGroups ................................... 135
UserList ..................................... 135
Certificate and CA ConfigurationPage............................ 136
CertificateList..................................... 136
CertificateInformation ................................. 137
CertificateInstallation ................................. 139
Self Signed Certificate ................................. 140
Create CertificateRequest................................ 141
Using the Import Certificatescreen............................ 142
Using the Certificate and CA Configurationscreen ....................... 143
Trusted Certificate Authority List Profiles .......................... 143
The Default Profile................................. 144
Trusted CertificateAuthorityList ............................. 144
Local CertificateAuthority(CA)List............................ 145
CA CertificateProperties ................................ 146
Sign CertificateRequest................................. 147
Signed Certificates................................... 148
Signed CertificateInformation.............................. 149
CreateLocalCA.................................... 150
CA CertificateList ................................... 151
Install CA Certificate.................................. 152
Support for CertificateRevocationLists ............................ 153
LocalCAs ...................................... 153
Auto-Update . . . . . . . . . . . . . . . . . . . . . . . . . . . . . . . . . . . 154
ForcePeriodicUpdate ............................... 154
RelatedCLICommands............................... 154
Usingadvancedsecurityfeatures............................... 155
AdvancedSecurityoverview............................... 155
AdvancedSecurityAccessControl.......................... 155
High Security Configurationpage ............................ 156
FIPSCompliance ................................. 156
HighSecuritySettings ............................... 157
Security Settings ConfiguredElsewhere ........................ 158
HighSecurityProcedures................................ 159
ConfiguringtheSKMforFIPSCompliance....................... 159
ConfiguringtheHighSecuritySettingsonanSKM ................... 160
FIPSStatusServeroverview............................... 160
FIPSStatusReport ................................. 161
FIPSStatusServerpage................................. 163
FIPSStatusServerSettings.............................. 163
SSLoverview ..................................... 164
SSLHandshake .................................. 164
SSLSections ..................................... 165
SSLOptions.................................... 165
SSLCipherOrder ................................. 166
ConfiguringtheKMSServer................................. 168
Authenticationoverview................................. 168
AuthenticationOptions............................... 168
Key Management Services Configurationsections...................... 169
KMSServerSettings ................................ 169
KMSServerAuthenticationSettings.......................... 170
UserAccountLockoutSettings............................ 173
HealthCheckoverview................................. 173
HealthChecksections ................................. 173
HealthCheck................................... 174
Configuringthecluster ................................... 174
Clusteringoverview .................................. 174
TheClusterKey .................................. 175
Cluster Configurationpage ............................... 176
ClusterMembers ................................. 176
Secure Key Manager
7
Page 8

ClusterSettings .................................. 177
CreateCluster................................... 178
JoinCluster.................................... 179
ConfiguringtheDate&Time ................................ 180
NetworkTimeProtocoloverview............................. 180
Date&TimeConfigurationPage............................. 181
DateandTimeSettings............................... 181
NTPSettings ................................... 182
Configuringthenetwork .................................. 182
NetworkInterfacessections............................... 183
NetworkInterfaceList ............................... 183
Gateways&Routingsections .............................. 183
DefaultGatewayList................................ 183
Examples of Default Gateway Configurations ..................... 184
StaticRouteList .................................. 185
Hostname&DNSsections ............................... 186
HostnameSetting ................................. 186
DNSServerList .................................. 187
PortSpeedsections .................................. 187
NetworkInterfacePortSpeed/Duplex......................... 187
IPAuthorizationsections ................................ 188
IPAuthorizationSettings .............................. 188
AllowedClientIPAddresses............................. 189
ConfiguringSNMP..................................... 190
SNMPoverview.................................... 190
Authentication................................... 191
The SNMP Configurationpage ............................. 192
SNMPAgentSettings ............................... 192
SNMPv1/SNMPv2CommunityList.......................... 193
SNMPv3UsernameList............................... 194
SNMPManagementStationList ........................... 195
SNMPManagementStationProperties ........................ 196
CreateSNMPManagementStation ......................... 197
EnterpriseMIBoverview ................................ 199
Configuringadministratoraccounts.............................. 200
Administratoroverview................................. 201
Accesscontrols .................................. 201
Usingmultipleadministratoraccounts......................... 202
HighAccessAdministrators............................. 202
DefaultAdministrator................................ 202
LocalandLDAPAdministrators............................ 202
Administratorpasswords .............................. 202
LDAPadministrators .................................. 203
LDAPadministrativeserver ............................... 203
Administratorprocedures................................ 204
Creatinganadministrator.............................. 204
Deletinganadministrator.............................. 204
CreateLDAPAdministrator ............................. 205
SelectLDAPUsername ............................... 207
PasswordManagementoverview............................. 207
Passwordconstraints................................ 207
PasswordManagementsections ............................. 209
ChangeYourPasswordsection............................ 209
PasswordSettingsforLocalAdministrators....................... 209
MultipleCredentialsoverview.............................. 211
Operationsrequiringmultipleauthentication...................... 211
MultipleCredentialssections .............................. 213
MultipleCredentialsforKeyAdministration ...................... 213
CredentialsGranted................................ 214
GrantaCredential................................. 214
8
Page 9

RemoteAdministrationSettingsoverview ......................... 215
RemoteAdministrationSettingssections.......................... 215
RemoteAdministrationSettings ........................... 216
LDAPAdministratorServer ................................. 218
LDAPAdministratorserverandFIPScompliance ...................... 218
LDAPAdministratorServerPropertiessection........................ 218
LDAPSchemaProperties ................................ 219
LDAPFailoverServerProperties ............................. 220
Viewinglogsandstatistics ................................. 221
Loggingoverview ................................... 221
Logrotation.................................... 221
Securelogs.................................... 224
Log Configurationpage ................................ 224
RotationSchedule ................................. 224
LogRotationProperties............................... 225
SyslogSettings .................................. 226
LogSigning.................................... 227
Log Signing CertificateInformation.......................... 228
ActivityLogSettings ................................ 229
LogViewerpage ................................... 229
SystemLog.................................... 229
AuditLog..................................... 230
ActivityLog.................................... 231
ClientEventLog.................................. 234
Statisticspage..................................... 235
RefreshStatistics.................................. 236
SystemStatistics.................................. 236
ConnectionStatistics................................ 237
Throughput.................................... 237
LicenseUsage................................... 238
RefreshStatistics(server) .............................. 238
KMSStatistics................................... 239
CUsingtheCommandLineInterface................. 241
Shellcommands...................................... 241
CommandLineInterfacesyntax ............................... 241
Quotingarguments .................................. 241
Escapingcharactersusingbackslash......................... 242
Tabcompletion .................................. 242
Commandshortcuts ................................ 242
Commandsearch ................................. 243
Commandmodes ..................................... 243
Enteringviewmode .................................. 243
Entering configuremode .............................. 243
Enteringscriptmode................................ 243
Scriptingmode ...................................... 244
Creatingscripts.................................... 244
Manualcreation.................................. 244
Executingscripts.................................. 244
Displayinganddeletingscripts ........................... 245
Installing certificates ................................ 245
Enteringpasswords ................................ 245
CLIcommands ...................................... 245
Activitylogcommands................................. 252
Administrator&LDAPcommands ............................ 252
Auditlogcommands.................................. 256
Autologoutcommands ................................. 256
Backupandrestorecommands ............................. 257
CA certificatecommands................................ 257
Certificatecommands ................................. 262
Secure Key Manager
9
Page 10

CRLcommands .................................... 264
Clienteventlogcommands ............................... 267
Deviceresetandrestorecommands ........................... 268
Diagnosticcommands ................................. 269
FIPScommands.................................... 269
Health check configurationcommands .......................... 272
Helpcommands.................................... 272
Historycommands................................... 272
Logcommands .................................... 273
Modecommands ................................... 277
Networkcommands .................................. 277
Servicescommands .................................. 282
SNMPcommands................................... 284
SSLcommands .................................... 288
Statisticscommands .................................. 291
Systemcommands................................... 291
Systemhealthcommands................................ 294
Systeminformationcommands.............................. 295
Systemlogcommands ................................. 296
DTroubleshooting......................... 297
ERegulatorycompliancenotices .................. 299
Regulatory compliance identificationnumbers ......................... 299
FederalCommunicationsCommissionnotice.......................... 299
FCCratinglabel.................................... 299
ClassAequipment................................. 299
ClassBequipment................................. 299
Declaration of Conformity for products marked with the FCC logo, United States only . . . . . . 300
Modification ..................................... 300
Cables........................................ 300
Canadiannotice(AvisCanadien) .............................. 300
ClassAequipment................................... 300
ClassBequipment................................... 300
EuropeanUnionnotice................................... 300
Japanesenotices ..................................... 301
Koreannotices ...................................... 301
ClassAequipment................................... 301
ClassBequipment................................... 301
Taiwanesenotices..................................... 302
BSMIClassAnotice.................................. 302
Taiwanbatteryrecyclestatement............................. 302
Lasercompliance ..................................... 302
Dutchlasernotice ................................... 303
Frenchlasernotice................................... 303
Germanlasernotice.................................. 303
Italianlasernotice................................... 304
Japaneselasernotice ................................. 304
Spanishlasernotice .................................. 304
Recyclingnotices ..................................... 305
Disposal of waste equipment by users in private household in the European Union . . . . . . . . 305
Dutchnotice ..................................... 305
Czecholslovakiannotice ................................ 305
Estoniannotice .................................... 306
Finnishnotice..................................... 306
Frenchnotice ..................................... 306
Germannotice .................................... 306
Greeknotice ..................................... 307
Hungariannotice ................................... 307
10
Page 11

Italiannotice ..................................... 307
Latviannotice..................................... 308
Lithuaniannotice ................................... 308
Polishnotice ..................................... 308
Portuguesenotice ................................... 309
Slovakiannotice.................................... 309
Sloveniannotice.................................... 309
Spanishnotice .................................... 310
Swedishnotice .................................... 310
Batteryreplacementnotices................................. 311
Dutchbatterynotice .................................. 311
Frenchbatterynotice.................................. 311
Germanbatterynotice................................. 312
Italianbatterynotice.................................. 312
Japanesebatterynotice................................. 313
Spanishbatterynotice ................................. 313
FSpecifications.......................... 315
SKM appliance specifications................................ 315
Environmental specifications................................. 316
GAboutthisguide ........................ 317
Intendedaudience..................................... 317
Relateddocumentation................................... 317
Documentconventionsandsymbols ............................. 317
Rackstability ....................................... 318
HPtechnicalsupport.................................... 318
Customerselfrepair .................................... 319
Productwarranties..................................... 319
Subscriptionservice .................................... 319
HPwebsites........................................ 319
Documentationfeedback .................................. 319
Glossary............................. 321
Index .............................. 323
Secure Key Manager
11
Page 12

Figures
1
Identifythecontentsoftheshippingcarton..................... 26
2
Connect the pow
3
Viewing the CertificateResponseField....................... 52
4
Filteringthelistofkeys.............................. 70
5
Exportingthekey................................ 70
6
VerifyingtheBackupSummarysectiontoexportandimportthekey .......... 71
7
Enteringbackupinformation ........................... 71
8
CompletingtheBackupRestoreInformationscreen.................. 73
9
Findingthekeytoforcereplication ........................ 75
10
Toggling t
11
Creating the backup of configurations and certificates ................ 77
12
Verifying
13
Verifying the Backup Summary section to backup all keys to an external server . . . . . . 79
14
ViewingtheCreateBackup:SecurityItemssection.................. 86
15
ViewingtheCreateBackup:DeviceItemssection .................. 87
16
Viewing
17
ViewingtheRestoreBackupsection ........................ 90
heDeletableproperty.......................... 75
the Backup Summary section to backup the configurations and certificates . . . 78
theCreateBackup:BackupSettingssection................. 88
ersuppliestoACpowersources .................. 29
18
ViewingtheBackupRestoreInformationsection................... 91
19
ViewingtheInternalBackupListsection ...................... 91
20
21
22
23
24
25
26
27
28
29
30
31
32
33
gtheServicesListsection.......................... 92
Viewin
ViewingtheRestart/Haltsection ......................... 93
ngtheDeviceInformationsection....................... 94
Viewi
ViewingtheLicenseInformationsection ...................... 94
ngtheSoftwareUpgrade/Installsection.................... 95
Viewi
ViewingtheRefreshPagesection ......................... 97
ViewingthePowerSupplyStatussection...................... 97
ViewingtheCoolingFanStatussection....................... 98
ViewingthePingInformationsection........................ 98
ViewingtheTracerouteInformationsection ..................... 99
ViewingtheHostInformationsection........................ 99
ViewingtheNetstatInformationsection ...................... 99
ewingtheNetstatResults............................ 100
Vi
FrontandtopofSKMappliance ......................... 101
12
Page 13

34
Back of SKM appli
35
ViewingtheAdministratorAuthenticationscreen................... 103
ance............................. 102
36
Viewing the Log
37
ViewingtheSecuritySummarysection....................... 104
38
ViewingtheSystemSummarysection ....................... 104
39
ViewingtheRecentActionssection ........................ 105
40
ViewingtheSearchCriteriasection ........................ 106
41
ViewingtheResultssection............................ 106
42
Viewing the Filter fields ............................. 107
43
Viewing the number of items per page fields .................... 107
44
Locating b
45
Viewingthecontext-sensitivehelpwindow ..................... 108
46
FindingtheHelplink .............................. 108
47
ViewingtheKeysection ............................. 110
48
ViewingtheKeyPropertiessection......................... 112
49
ViewingtheGroupPermissionssection....................... 113
50
51
gtheCustomAttributessection ....................... 114
Viewin
ViewingtheKeyVersionsandAvailableUsagesection................ 115
outwindow ........................... 103
uttontolaunchcontext-sensitivehelp ................... 108
52
ViewingthePublicKeysection .......................... 115
53 ViewingCreateQuerysection .......................... 116
54
ViewingSavedQueriessection.......................... 117
55
ViewingtheModifyQuerysection ........................ 117
56
ViewingtheCreateKeysection.......................... 118
57
ViewingtheCloneKeysection .......................... 120
58
ViewingtheImportKeysection.......................... 121
59
ViewingtheAuthorizationPoliciessection...................... 123
60
61
62
63
6
65
66
67
wingtheAuthorizationPolicyPropertiessection.................. 123
Vie
ViewingtheAuthorizedUsagePeriodssection.................... 124
ViewingtheActiveVersionssection ........................ 125
ViewingtheCustomKeyAttributessection ..................... 126
4
ViewingtheLocalUserssection.......................... 127
ViewingtheSelectedLocalUsersection ...................... 128
ViewingtheCustomAttributessection ....................... 129
ViewingtheLocalGroupssection......................... 129
68
ViewingtheLocalGroupPropertiessection..................... 130
69
ViewingtheUserListsection ........................... 130
70
ViewingtheLDAPUserDirectoryPropertiessection ................. 131
Secure Key Manager
13
Page 14

71
ViewingtheLDAPSchemaPropertiessection .................... 132
72
ViewingtheLDAPFailoverServerPropertiessection ................. 133
73
Viewing the LDA
74
ViewingtheLDAPGroupssection......................... 135
75
ViewingtheUserListsection ........................... 136
76
Viewing the CertificateListsection......................... 137
77
Viewing the CertificateInformationsection ..................... 138
78
Viewing the CertificateInstallationsection ..................... 140
79
Viewing the Self Signed Certificatesection..................... 141
80
Viewing the Create CertificateRequestsection ................... 141
81
Viewing the Import Certificatesection ....................... 142
82
Viewing the Trusted Certificate Authority List Profilessection.............. 144
83
Viewing the Trusted CertificateAuthorityListsection ................. 144
84
Viewing the Trusted CertificateAuthorityList(EditMode) ............... 145
85
Viewing the Local CertificateAuthorityListsection.................. 145
86
Viewing the CA CertificateInformationsection ................... 147
87
Viewing the Sign CertificateRequestsection .................... 148
88
Viewing the Signed Certificatessection ...................... 148
PUserssection.......................... 134
89
Viewing the Signed CertificateInformationsection.................. 149
90
Viewing the Create Local CertificateAuthoritysection ................ 150
91
Viewing the CA CertificateListsection....................... 152
92
Viewing the Install CA Certificatesection...................... 153
93
94
95
96
97
98
99
100
101
102
10
104
3
gtheFIPSCompliancesection ....................... 156
Viewin
ViewingtheHighSecuritySettingssection ..................... 157
Viewing the Security Settings ConfiguredElsewheresection.............. 159
ViewingtheFIPSStatusReport:normal....................... 162
ingtheFIPSStatusServerSettingssection ................... 164
View
ViewingtheSSLOptionssection ......................... 166
ViewingtheSSLCipherOrdersection ....................... 167
ViewingtheKMSServerSettingssection...................... 169
ViewingtheKMSServerAuthenticationSettingssection ............... 171
ViewingtheUserAccountLockoutSettingssection.................. 173
ewingtheHealthChecksection......................... 174
Vi
ViewingtheClusterMemberssection ....................... 176
14
105
ViewingtheClusterSettingssection ........................ 177
106
ViewingtheCreateClustersection ........................ 178
107
ViewingtheJoinClustersection.......................... 179
Page 15

108
ViewingtheDateandTimeSettingssection..................... 181
109
ViewingtheNTPSettingssection ......................... 182
110
ViewingtheNetworkInterfaceListsection ..................... 183
111
ViewingtheDefaultGatewayListsection...................... 184
11 2
Viewing the St
11 3
ViewingtheHostnameSettingsection ....................... 186
11 4
ViewingtheDNSServerListsection........................ 187
11 5
ViewingtheNetworkInterfacePortSpeed/Duplexsection .............. 188
11 6
Viewing the
11 7
ViewingtheAllowedClientIPAddressessection................... 189
11 8
ViewingtheSNMPAgentSettingssection ..................... 192
11 9
ViewingtheSNMPv1/SNMPv2CommunityListsection................ 193
12 0
Viewing t
121
ViewingtheSNMPManagementStationListsection................. 195
12 2
ViewingtheSNMPManagementStationPropertiessection.............. 196
123
ViewingtheCreateSNMPManagementStationsection ............... 198
124
ViewingtheCreateLDAPAdministratorsection ................... 205
12 5
ViewingtheSelectLDAPUsernamesection..................... 207
126
127
gtheChangeYourPasswordsection..................... 209
Viewin
ViewingthePasswordSettingsforLocalAdministratorssection............. 210
aticRouteListsection ........................ 186
IPAuthorizationSettingssection .................... 189
heSNMPv3UsernameListsection..................... 194
12 8
12 9
13 0
131
13 2
13 3
13 4
13 5
13 6
13 7
13 8
13 9
14 0
141
14 2
14 3
ngtheMultipleCredentialsforKeyAdministrationsection ............ 213
Viewi
ViewingtheCredentialsGrantedsection...................... 214
ViewingtheGrantaCredentialsection ...................... 215
ViewingtheRemoteAdministrationSettingssection ................. 216
ViewingLDAPAdministratorServerPropertiessection ................ 219
ViewingLDAPSchemaPropertiessection...................... 220
wingtheLDAPFailoverServerPropertiessection ................. 221
Vie
ViewingtheRotationSchedulesection....................... 224
ViewingtheLogRotationPropertiessection..................... 225
ViewingtheSyslogSettingssection ........................ 227
ViewingtheLogSigningsection ......................... 227
Viewing the Log Signing CertificateInformationsection................ 228
ViewingtheActivityLogSettingssection ...................... 229
ViewingtheSystemLogsection.......................... 230
ViewingtheCurrentSystemLogsection ...................... 230
ViewingtheAuditLogsection........................... 231
14 4
ViewingtheCurrentAuditLogsection ....................... 231
Secure Key Manager
15
Page 16

14 5
ViewingtheActivityLogsection.......................... 233
14 6
ViewingtheCurrentActivityLogsection ...................... 234
147
Viewing the Cli
14 8
ViewingtheCurrentClientEventLogsection .................... 235
14 9
ViewingtheRefreshStatisticssection........................ 236
15 0
ViewingtheSystemStatisticssection........................ 236
151
Viewing the C
152
ViewingtheThroughputsection.......................... 238
15 3
ViewingtheLicenseUsagesection......................... 238
15 4
ViewingtheRefreshStatisticssection........................ 239
15 5
Viewing th
entEventLogsection........................ 235
onnectionStatisticssection...................... 237
eKMSStatisticssection......................... 240
16
Page 17

Tables
1
2
3
4
5
CreateBackup:SecurityItemssectioncomponents.................. 87
CreateBackup:DeviceItemssectioncomponents .................. 88
CreateBackup:BackupSettingssectioncomponents................. 89
RestoreBackupsectioncomponents ........................ 90
InternalBackupListsectioncomponents ...................... 91
6
Internal Ba
7
ServicesListsectioncomponents ......................... 93
8
Restart/H
9
DeviceInformationsectioncomponents....................... 94
10
LicenseInformationsectioncomponents ...................... 95
11
SoftwareUpgrade/Installsectioncomponents.................... 95
12
Refresh
13
PowerSupplyStatussectioncomponents...................... 97
14
Coolin
15
PingInformationsectioncomponents........................ 98
16
Tracer
17
HostInformationsectioncomponents ....................... 99
18
NetstatInformationsectioncomponents ...................... 100
19
NetstatHeadings................................ 100
20
AdministratorAuthenticationscreencomponents................... 103
21SystemSummarysectioncomponents ....................... 105
ckupListsectioncomponents ...................... 92
altsectioncomponents ......................... 93
Pagesectioncomponents ......................... 97
gFanStatussectioncomponents ...................... 98
outeInformationsectioncomponents..................... 99
22
RecentActionssectioncomponents ........................ 105
23
SearchCriteriasectioncomponents ........................ 106
24
25
2
27
28 KeyPropertiessectioncomponents ........................ 112
29 GroupPermissionssectioncomponents....................... 113
30
32
33 CreateQuerysectioncomponents......................... 116
sultssectioncomponents............................ 106
Re
Filter fieldscomponents ............................. 107
6
Items Per Page fieldscomponents ......................... 107
Keyssectioncomponents............................. 111
CustomAttributessectioncomponents ....................... 114
31
KeyVersionsandAvailableUsagesectioncomponents................ 115
PublicKeysectioncomponents .......................... 115
Secure Key Manager
17
Page 18

34
SavedQueriessectioncomponents ........................ 117
35
ModifyQuerysectioncomponents ........................ 118
36 CreateKeysectioncomponents.......................... 119
37
CloneKeysectioncomponents .......................... 120
38 ImportKeysectioncomponents.......................... 121
39
AuthorizationPoliciessectioncomponents ..................... 123
40
Authorizat
41
AuthorizationUsagePeriodssectioncomponents .................. 124
ionPolicyPropertiessectioncomponents.................. 123
42ActiveVersionssectioncomponents ........................ 125
43
CustomKeyAttributionssectioncomponents .................... 126
44
Local Use
45
SelectedLocalUsersectioncomponents ...................... 128
46
CustomAttributessectioncomponents ....................... 129
47
LocalGroupssectioncomponents......................... 130
48
LocalGroupPropertiessectioncomponents..................... 130
UserListsectioncomponents ........................... 130
49
50
LDAPUserDirectoryPropertiessectioncomponents ................. 132
51
LDAPSchemaPropertiessectioncomponents .................... 133
52
LDA
53
LDAPUserssectioncomponents.......................... 135
rssectioncomponents.......................... 127
PFailoverServerPropertiessectioncomponents ................. 134
54 LDAPGroupssectioncomponents......................... 135
55
LDAPGroupssectioncomponents......................... 136
56
CertificateListsectioncomponents......................... 137
57
CertificateInformationsectioncomponents..................... 139
58
CertificateInstallationsectioncomponents ..................... 140
59
Self Signed Certificatesectioncomponents..................... 141
60
Create CertificateRequestsectioncomponents ................... 142
61
Import Certificatesectioncomponents ....................... 143
62
Trusted Certificate Authority List Profilessectioncomponents.............. 144
63
Trusted CertificateAuthorityListsectioncomponents ................. 144
64
Trusted CertificateAuthorityListComponents .................... 145
65
Local CertificateAuthorityListsectioncomponents.................. 146
66
CA CertificateInformationsectioncomponents ................... 147
67
Sign CertificateRequestsectioncomponents .................... 148
68
Signed Certificatessectioncomponents ...................... 149
69
Create Local CertificateAuthoritysectioncomponents ................ 151
70
CA CertificateListsectioncomponents....................... 152
71
Install CA Certificatesectioncomponents...................... 153
18
Page 19

72
FIPSCompliancesectioncomponents ....................... 157
73
HighSecuritySettingssectioncomponents ..................... 158
74
Security Setti
75
FIPSStatusServertests.............................. 161
76 FIPS Sta tus Re
77
FIPSStatusServerSettingssectioncomponents ................... 164
ngs ConfiguredElsewheresectioncomponents.............. 159
portcomponents .......................... 163
78 SSLOptionssectioncomponents ......................... 166
79
SSLCipherOrdersectioncomponents....................... 167
80
KMSServerSettingssectioncomponents...................... 170
81
KMSServerAuthenticationSettingssectioncomponents ............... 172
82
UserAccountLockoutSettingssectioncomponents.................. 173
83
HealthChecksectioncomponents......................... 174
84
ClusterMemberssectioncomponents ....................... 177
85
ClusterSettingssectioncomponents........................ 178
86
CreateClustersectioncomponents ........................ 179
87
JoinClustersectioncomponents.......................... 180
88
DateandTimeSettingssectioncomponents..................... 181
89
NTPSettingssectioncomponents ......................... 182
90
NetworkInterfaceListsectioncomponents ..................... 183
91
DefaultGatewayListsectioncomponents...................... 184
92 StaticRouteListsectioncomponents........................ 186
93 HostnameSettingsectioncomponents....................... 187
94 DNSServerListsectioncomponents........................ 187
95
NetworkInterfacePortSpeed/Duplexsectioncomponents .............. 188
96
IPAuthorizationSettingssectioncomponents .................... 189
97
AllowedClientIPAddressessectioncomponents .................. 190
98
NMPAgentSettingssectioncomponents ..................... 193
S
99
SNMPv1/SNMPv2CommunityListsectioncomponents................ 194
100
SNMPv3UsernameListsectioncomponents .................... 195
101
SNMPManagementStationListsectioncomponents................. 196
102
SNMPManagementStationPropertiessectioncomponents.............. 197
103
CreateSNMPManagementStationsectioncomponents ............... 199
104
CreateLDAPAdministratorsectioncomponents ................... 206
105
SelectLDAPUsernamesectioncomponents..................... 207
106
ChangeYourPasswordsectioncomponents..................... 209
107
PasswordSettingsforLocalAdministratorssectioncomponents............. 210
108
Multiple Credentials for Key Administration section components . . . . . . . . . . . . 214
109
CredentialsGrantedsectioncomponents...................... 214
Secure Key Manager
19
Page 20

11 0
GrantaCredentialsectioncomponents ...................... 215
111
RemoteAdministrationSettingssectioncomponents ................. 217
11 2
LDAPAdministratorServerPropertiessectioncomponents............... 219
11 3
LDAPSchemaPropertiessectioncomponents .................... 220
11 4
LDAPFailoverServerPropertiessectioncomponents ................. 221
11 5
Log filenamingconventions ........................... 222
11 6
RotationSchedulesectioncomponents....................... 225
11 7
LogRotationPropertiessectioncomponents..................... 226
11 8
SyslogSettingssectioncomponents ........................ 227
119 LogSigningsectioncomponents ......................... 228
12 0
Log Signing CertificateInformationsectioncomponents................ 229
121
ActivityLogSettingssectioncomponents...................... 229
12 2 S y st e m L o
gsectioncomponents.......................... 230
123CurrentSystemLogsectioncomponents ...................... 230
12 4
AuditLogsectioncomponents .......................... 231
12 5
CurrentAuditLogsectioncomponents....................... 231
126
FieldsintheActivityLog............................. 232
127
ValuesfortheDetailFieldintheActivityLog .................... 233
12 8
ActivityLogsectioncomponents.......................... 233
12 9
CurrentActivityLogsectioncomponents ...................... 234
13 0
FieldsintheClientEventLog........................... 234
131
ClientEventLogsectioncomponents........................ 235
13 2
CurrentClientEventLogsectioncomponents .................... 235
13 3
RefreshStatisticssectioncomponents........................ 236
temStatisticssectioncomponents........................ 237
Sys
13 4
135ConnectionStatisticssectioncomponents...................... 237
13 6
Throughputsectioncomponents.......................... 238
137 LicenseUsagesectioncomponents ........................ 238
8
13
RefreshStatisticssectioncomponents........................ 239
20
13 9
KMSStatisticssectioncomponents......................... 240
14 0
ListofCLIcommands .............................. 245
141
clocksetsyntaxdetails ............................. 294
14 2
Commonproblems ............................... 297
Documentconventions.............................. 317
14 3
Page 21

1 Installing and replacing
hardware
This section details the steps to install or replace the SKM hardware:
• Preparing for the installation
• Rack planning resources
•Optimumenvironment
• Unpacking
• Identifying the shipping carton contents
• Removing the existing appliance
• Install rails in the rack
Preparing for the installation
Tools for installation
• Two people
• #2 Phillips screwdriver
• Box cutting knife
• Laptop or PC that can be attached to the appliance using the null modem cable for the initial
configuration.
Taking ESD precautions
To prevent damaging the system, be aware of the precautions you need to follow when setting up the
system or handling parts. A discharge of static electricity from a finger or other conductor may damage
system boards or other static-sensitive devices. This type of damage may reduce the life expectancy of
the device.
To preve
• Avoid hand contact by transporting and storing products in static-safe containers.
• Keep electrostatic-sensitive parts in their containers until they arrive at static-free workstations.
• Place p
• Avoid touching pins, leads, or circuitry.
• Always be properly grounded when touching a static-sensitive component or assembly.
nt electrostatic damage:
arts on a grounded surface before removing them from their containers.
Grounding methods to prevent electrostatic discharge
Several methods are used for grounding. Use one or more of the following methods when handling or
installing electrostatic-sensitive parts:
• Use a wrist strap connected by a ground cord to a grounded workstation or computer chassis.
Wrist straps are flexible straps with a minimum of 1 megaohm ±10 percent resistance in the
ground cords. To provide proper ground, wear the strap snug against the skin.
• Use heel straps, toe straps, or boot straps at standing workstations.
Wear the straps on both feet when standing on conductive floors or dissipating floor mats.
• Use conductive field service tools.
Secure Key Manager
21
Page 22

• Use a portable field service kit with a folding static-dissipating work mat.
If you do not have any of the suggested equipment for proper grounding, have an authorized reseller
install the part.
For more information on static electricity or assistance with product installation, contact your authorized
reseller.
Rack planning r
The rack resource kit ships with all HP or Compaq branded 9000, 10000, and H9 series racks. A
summary of the content of each resource follows:
• Custom Builde
can be created using:
•Asimple,guidedinterface
•Build-it-yo
• The Installing Rack Products video provides a visual overview of operations required for
configuring a rack with rack-mountable components. It also provides the following important
configuration steps:
• Planning the site
•Installin
•Cablingserversinarack
• Coupling multiple racks
• The Rack P
HP and Compaq branded racks and rack options. It also helps you set up and optimize a rack
in a manner that best fits your environment.
Rack requirements
HP supports the HP System E racks and the HP 10000 Series racks for use with the SKM. Other racks
mightalsobesuitable,buthavenotbeentestedwiththeSKM.
g rack servers and rack options
roducts Documentation CD enables you to view, search, and print documentation for
esources
r is a web-based service for configuring one or many racks. Rack configurations
urself model
NOTE:
If desired, when installing an SKM expansion unit, place it in a different rack from the other SKM
appliances as far away from each other as possible to minimize the chance that they will both be
disabled by the same physical or electrical event.
Rack warnings
WARNING!
To reduce the risk of personal injury or damage to the equipment, be sure that:
• The leveling jacks are extended to the floor.
• The full weight of the rack rests on the leveling jacks.
• The stabilizing feet are attached to the rack if it is a single-rack installation.
• The racks are coupled together in multiple-rack installations.
• Only one component is extended at a time. A rack may become unstable if more than one
component is extended for any reason.
22
Installing and replacing hardware
Page 23

WARNING!
To reduce the risk of personal injury or equipment damage when unloading a rack:
• At least two people are needed to safely unload a rack from a pallet. An empty 42U rack can weigh
as much as 115 kg (253 lb), can stand more than 2.1 m (7 ft) tall, and may become unstable when
being moved on its casters.
• Never stand in front of a rack when it is rolling down the ramp from the pallet. Always handle a
rack from both sides.
Optimum environment
When installing an SKM in a rack, select a location that meets the environmental standards described
in this section and Environmental specifications.
Space and airflow requirements
To allow for servicing and adequate airflow, observe the following space and airflow requirements
when deciding where to install a rack:
• Leave a minimum clearance of 122 cm (48 in) in front of the rack.
• Leave a minimum clearance of 76.2 cm (30 in) behind the rack.
• Leave a minimum clearance of 122 cm (48 in) from the back of the rack to the back of another
rack when racks are back-to-back.
An SKM draws in cool air through the front door and expels warm air through the rear door. Therefore,
the front and rear rack doors must be adequately ventilated to allow ambient room air to enter the cabinet,
and the rear door must be adequately ventilated to allow the warm air to escape from the cabinet.
CAUTION:
To prevent improper cooling and damage to the equipment, do not block the ventilation openings.
When vertical space in the rack is not filled by an SKM or rack component, the gaps between the
components cause changes in airflow through the rack and across the servers. Cover all gaps with
blanking panels to maintain proper airflow. Using a rack without blanking panels results in improper
cooling
The Comp
and rea
CAUTION:
If a third-party rack is used, observe the following additional requirements to ensure adequate airflow
and to prevent damage to the equipment:
• Front and rear doors—If the 42U rack includes closing front and rear doors, you must allow
• Side—The clearance between the installed rack component and the side panels of the rack must
that can lead to thermal damage.
aq 10000 Series racks provide proper SKM cooling from flow-through perforations in the front
r doors that provide 64 percent open area for ventilation.
5,350 sq cm (830 sq in) of holes evenly distributed from top to bottom to permit adequate airflow
(equivalent to the required 64 percent open area for ventilation).
be a minimum of 7 cm (2.75 in).
Temperature requirements
To ensure continued safe and reliable equipment operation, install or position the system in a
well-ventilated, climate-controlled environment.
Secure Key Manager
23
Page 24

The maximum recommended ambient operating temperature (TMRA) for the SKM system is 35° C (95° F).
The temperature in the room where the rack is located must not exceed 35° C (95° F).
CAUTION:
To reduce the risk of damage to the equipment when installing third-party options:
• Do not permit optional equipment to impede airflow around the SKM or to increase the internal rack
temperature beyond the maximum allowable limits.
• Do not exceed the TMRA.
Power requirements
Installation of an SKM must comply with local and regional electrical regulations governing the installation
of information technology equipment by licensed electricians. This equipment is designed to operate in
installations covered by NFPA 70, 1999 Edition (National Electric Code) and NFPA-75, 1992 (code for
Protection of Electronic Computer/Data Processing Equipment). For electrical power ratings on options,
see the product rating label or the user documentation supplied with that option.
WARNING!
To reduce the risk of personal injury, fire, or damage to the equipment, do not overload the AC supply
branch circuit that provides power to the rack. Consult the electrical authority having jurisdiction over
wiring and installation requirements of your facility.
CAUTION:
Protect the SKM from power fluctuations and temporary interruptions with a regulating uninterruptible
power supply (UPS). This device protects the hardware from damage caused by power surges and
voltage spikes and keeps the system in operation during a power failure.
When installing an SKM connected to more than one disk array, you may need to use additional power
distribution devices to safely provide power to all devices. Observe the following guidelines:
• Balance the device power load between available AC supply branch circuits.
• Do not allow the overall system AC current load to exceed 80 percent of the branch circuit
AC current rating.
• Do not use common power outlet strips for this equipment.
• Provide a separate electrical circuit for each device.
Electrical grounding requirements
The SKM must be grounded properly for proper operation and safety. In the United States, you must
install the equipment in accordance with NFPA 70, 1999 Edition (National Electric Code), Article 250, as
well as any local and regional building codes. In Canada, you must install the equipment in accordance
with Canadian Standards Association, CSA C22.1, Canadian Electrical Code. In all other countries,
you must install the equipment in accordance with any regional or national electrical wiring codes, such
as the International Electrotechnical Commission (IEC) Code 364, parts 1 through 7. Furthermore, you
must be sure that all power distribution devices used in the installation, such as branch wiring and
receptacles, are listed or certified grounding-type devices.
Because of the high ground-leakage currents associated with multiple SKM and servers connected to the
same power source, HP recommends the use of a power distribution unit (PDU) that is either permanently
wired to the building’s branch circuit or includes a non-detachable cord that is wired to an industrial-style
plug. NEMA locking-style plugs or those complying with IEC 60309 are considered suitable for this
purpose. Using common power outlet strips for an SKM is not recommended.
24
Installing and replacing hardware
Page 25

Unpacking
Place the shipp
the shipping ca
notify the carr
To unpack the SKM:
1. Open the top of the shipping cartons.
2. Carefully lift the units out of the boxes and remove the packing materials.
3. Place the units on a stable work surface.
NOTE:
Inspect the units for any damage that may have occurred during shipment. If damage is
detected, co
4. Remove the accessory kits and documentation from the shipping cartons. Set them aside for later use.
5. Place shipping materials back into the shipping cartons.
6. Set the shipping cartons aside for later use.
ing carton as close to the installation site as possible. Before unpacking the SKM, inspect
rton for damage that may have occurred during shipment. If you detect any damage,
ier and HP before unpacking the unit.
ntact your authorized service representative.
Identifying the shipping carton contents
A new SKM cluster contains at least two appliances, individually boxed.
NOTE:
Important System ROM updates for new processors
If the
are included in the carton, please disregard them.
,orthe
HP ProLiant Essentials Foundation Pack
Each appliance box contains the items shown in Figure 1.
Secure Key Manager
25
Page 26

Figure 1 Identify the contents of the shipping carton
Item
1
2
3
4
5
6DocumentationCD
71Uspacer
8
9
Description
Appliance
Power cords (2 — 1 black, 1 gray)
Null modem cable
1U rack mounting hardware kit and documentation
Keys to the bezel (2 sets of 2 keys)
USB key
Completed appliance information sheet,
Pre-installation survey and checklist, and Installation
poster
NOTE:
Ifthisisareplacementappliance,notehowtheunitispackedintheshippingcarton. Handlethe
packing materials carefully so that you can repackage the old appliance using the replacement carton
and packing materials.
CAUTION:
There will be several tamper-evident labels. Do not cut or damage these labels because they are required
for FIPS compliance audits.
Selecting a rack location
Select a rack location that meets the space, airflow, temperature, power, and electrical grounding
requirements described in Rack planning resources.
For adequate airflow within the rack, use appropriate high airflow inserts in rack cabinet doors and
observe industry standard practices for adequate spacing between racks or rows of racks.
NOTE:
Do not in
from op
26
stall an appliance in the bottom unit of the rack; doing so will prevent the locking bezel cover
ening.
Installing and replacing hardware
Page 27

Removing an exi
sting SKM (appliance) from the system
Skip this step i
1. Zeroize the or
following com
hostname# configure
hostname# reset factory settings zeroize
Confirm that yo
Allow the system to zeroize the contents of the appliance. During this process the appliance reboots
automatically several times. The process may take several minutes.
2. Halt the syste
Are you ready to begin setup? (y/halt):
Type halt.Afteryouconfirm that you want to halt the system, the appliance begins a shutdown
process. This may take a few minutes and powers off the appliance.
Once the appl
3. Release the p
the appliance.
4. Unlock and open the locking bezel cover.
5. Loosen the thumbscrews on the front bezel to release the appliance from the rack.
6. Close and r
7. Extendtheapplianceoutoftherackuntilthesliderailslockintoplace.
8. With another person, press the inner rail release latches. Pull the appliance out of the rack and set
it on a sta
9. Remove the rails from the original appliance for reuse on the replacement appliance. To do so,
pull out on the tab of the rail that locks the center tab of the appliance, slide the rail forward,
and pull the rail off the appliance.
10. Return t
11 . Skip to Attaching rails to the appliance.
f you are installing a new appliance.
iginal appliance. To do so, sign into the command line interface and enter the
mands:
u wish to perform the zeroize operation.
m. At the end of the zeroize process the system displays the following:
iance has powered itself off it is ready to be removed and packaged for shipment.
ower cables from the strain relief clip. Disconnect the Ethernet and power cables from
e-lock the front bezel and remove the keys.
ble work surface.
he original appliance to HP according to the repackaging instructions sent separately.
Installing the rails in the rack
1. Locate the rail kit.
2. Adjust the outer slide rail to the approximate rack depth.
3. At one side of the rack, align the rail with the holes in the rack. The word Front is engraved on
the front of the rails; the word Rear is engraved on the rear of the rails.
4. Insert the rail into the holes in the rack and press firmly until the rail is secure.
Secure Key Manager
27
Page 28
5. Repeat these steps with the other side rail.
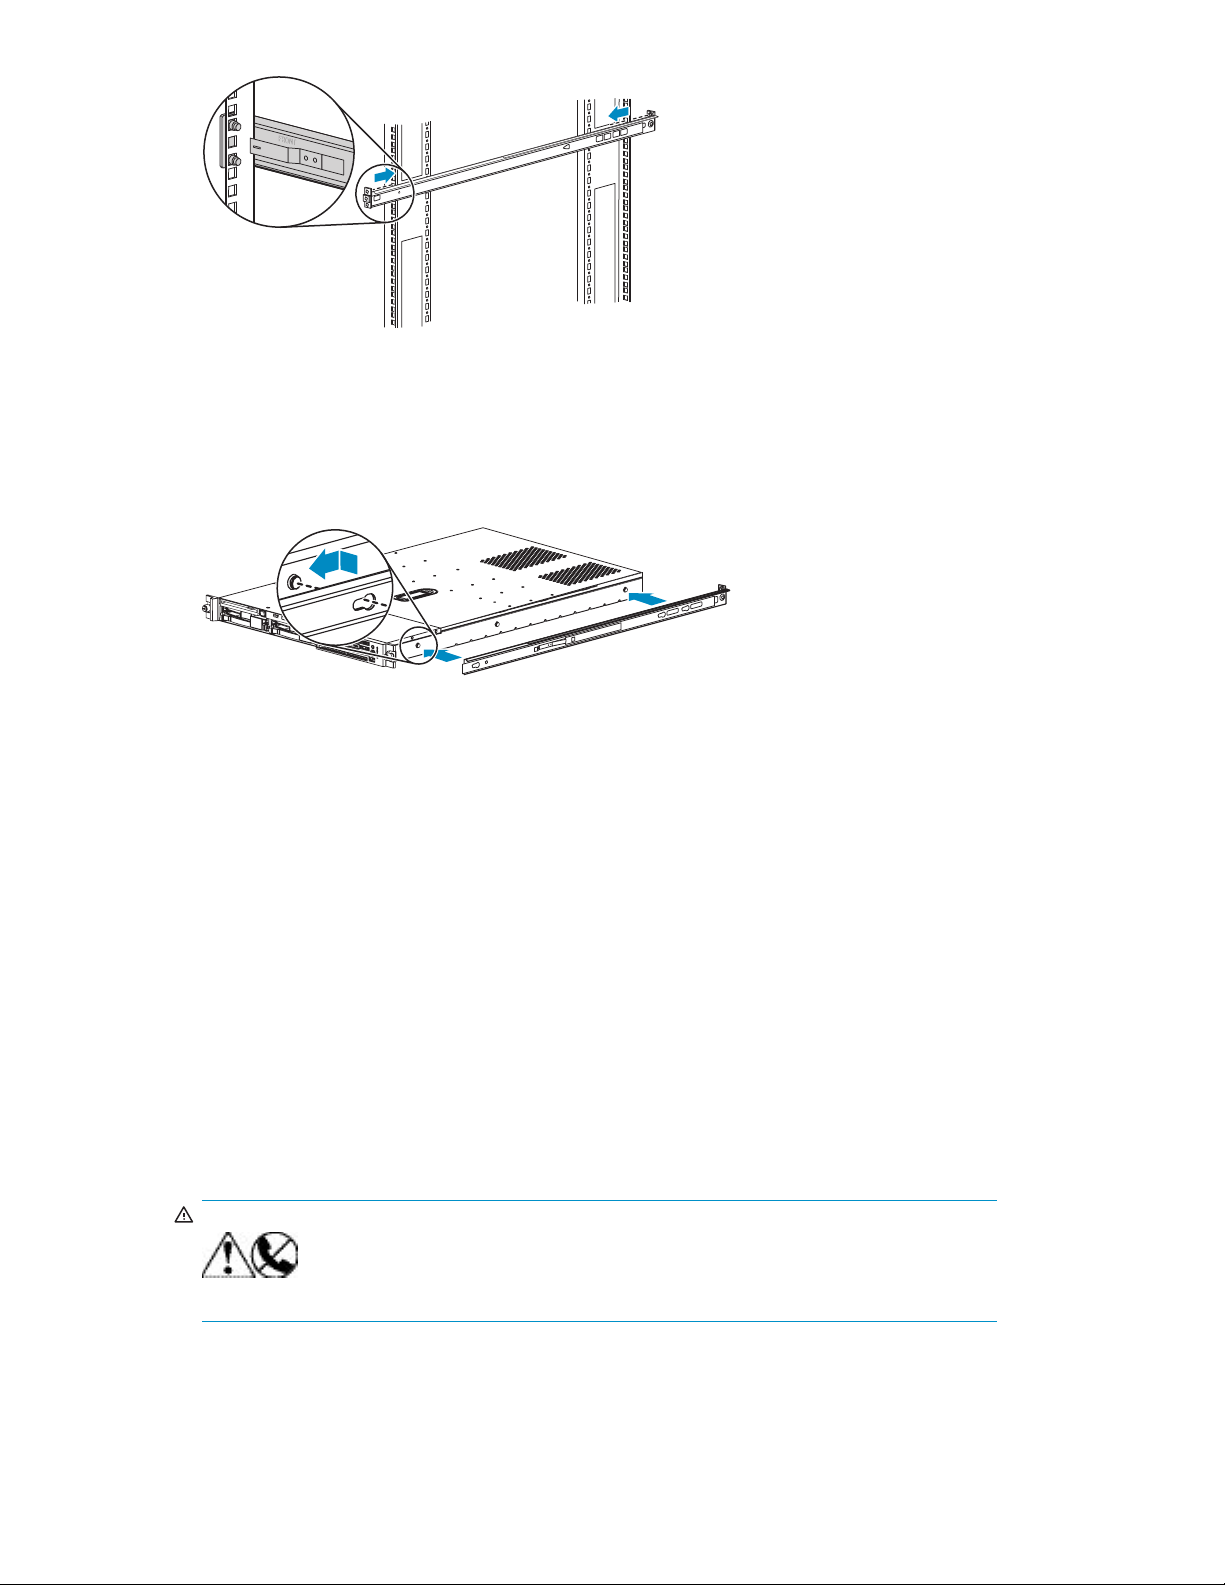
Attaching rails to the appliance
11776
Instal
1. Align one of
so that the
2. Align the holes in the rail with the round tabs on the side of the appliance.
3. Put the rail onto the appliance with the tabs extending into the holes on the side of the rail, then
slidetherailtowardthefrontoftheapplianceuntilthetabsarelockedintotherail.
4. Perform these steps again to install the other rail on the other side of the appliance.
the rails with the left side of the appliance (as you face the front of the appliance)
word “FRONT” on the rail is seen right-side-up and at the front of the node.
11184
lingtheapplianceintherack
1. Align the rails on the appliance with the rails in the rack.
2. Slide the appliance fully into the rack.
ils on the appliance will lock into the rails on the rack. When fully seated against the
The ra
rack, the appliance will also lock into place.
3. With the appliance fully seated in the rack, tighten the thumbscrews just until the bezel is
ed to the rack.
secur
Attaching the cables
1. Connect a standard Ethernet (CAT-5) cable from your local IP network (LAN) to the 10/100/1000
NIC 1 (RJ-45) connector.
WARNING!
To reduce the risk of electric shock, fire, or damage to the equipment, do not
plug telephone or telecommunications connectors into RJ-45 (NIC) connectors.
28
Installing and replacing hardware
Page 29

2. Connect the appliance power supplies’ AC power connectors to two separate AC power sources
using the power cables provided (see Figure 2).
Figure 2 Connec
3. Use the strain
t the power supplies to AC power sources
relief clip from the hardware kit to secure the power cord to the rack.
4. If this is a replacement appliance, pack the old appliance in the shipping materials for the
replacement appliance. You may need to remove the slide rails and null modem cable from the old
appliance to fititinthebox.
5. Plug one end o
that you will
f the null modem cable into the serial port. Plug the other end into the laptop or PC
use to configure the appliance.
Secure Key Manager
29
Page 30

30
Installing and replacing hardware
Page 31

2Configuring the system
Starting the SKM appliance
NOTE:
To prepare to configure the system, have ready all information listed on the pre-install survey. This
information was gathered by your site Security Officer and the HP installation team before the system
wasshipped;ifithasbeenlost,obtaintheformfromw
Support for your Product, Manuals) and complete it now. If portions of this information are inaccurate or
unknown, the installation will be incomplete and data encryption can not occur.
The SKM appliance is configured from the laptop or PC connected to the appliance with the null modem
cable.
To configure the SKM appliance, perform the following steps for each appliance being installed:
1. Power on the SKM by pressing the Power On/Standby button located under the front bezel of
the appliance.
Green LEDs on the front of the appliances should light up (except the UID and NIC2 LEDs). If they do
not, ensure that all cables are firmly connected.
2. Sign into the appliance using a terminal emulation program, such as Hyperterminal™.
ww.hp.com (on the SKM product page, under
3. While the SKM is performing the initial boot sequence, use the terminal emulator to specify the
following serial port settings.
• VT100/ANSI
•9600bps
• 8 data bits
•Parity-none
•1stopbit
•Hardwareflow control
4. When the appliance is booted, it displays the following prompt:
Are you ready to begin setup? (y/halt):
Enter y.
5. Follow the prompts to enter the necessary information:
TIP:
Press Enter to accept the default.
a. Admin a
appliances and clustering.
b. Time zone
ccount password. The Security Officerwillusetheadminaccounttoconfigure the SKM
Secure Key Manager
31
Page 32

c. Date
d. Time. The time is based on a 24–hour clock. There is no a.m. or p.m. designation. For
example, 1:20 p.m. is 13:20:00.
e. IP address of the SKM appliance. The appliance must have a static network address, it cannot
obtain an IP address through DHCP.
f. Subnet mask
g. Default gateway
h. Hostname, including the domain. For example, skm.example.com.
The screen displays the information you entered and the message "Is this correct? (y/n):
i. If the information displayed is correct, enter y; if not enter n and make the necessary corrections.
j. Web interface port number. HP recommends using the default port number 9443.
After the configuration settings are saved, a log-in prompt displays.
32
Configuring the system
Page 33

6. Configure the default settings for the key replication interval and retry attempts.
NOTE:
These commands require firmware version 1.1 or greater.
a. Log in to the appliance as admin using the password specified during configuration.
b. Type configure to enter configuration mode.
<hostname>#config
<hostname>(config)#
c. Type the following commands to set both the key replication and key replication retry intervals.
<hostname>(config)# setsv serverpriv nae_repl_retry_attempts 1440
This command returns: Config update successful.
<hostname>(config)# setsv serverpriv nae_repl_retry_interval 60
This command returns: Config update successful.
<hostname>(config)# restart stagd
d. Verify that the settings have taken effect.
<hostname>(config)#display serverpriv nae_repl_retry_attempts
This command returns: 1440
<hostname>(config)# display serverpriv nae_repl_retry_interval
This command returns: 60
e. Log out of the appliance.
<hostname> (config)# exit
<hostname># exit
These commands display:
Exiting command line interface
Release 4.8.1-10
NOTE:
These settings can also be entered using a remote ssh connection while logged in as admin.
7. Unplug the null modem cable from the laptop or PC and from the SKM. All further configuration will
be done from the web management console.
Configuring the first SKM appliance
If you have more than one SKM appliance, HP recommends that they be clustered for high availability. In
this section, one SKM appliance will be configured first. In Establishing a cluster,thatconfiguration will
be transferred to the remaining SKM appliances.
If you are replacing an SKM appliance or adding a member to an existing cluster, skip to Establishing a
cluster.
The configurations in this step are performed from the SKM management web console, which can be
accessed from any web browser with Internet access to the SKM appliance. The URL for the appliance is:
https://<appliance hostname>:<appliance port number>
Secure Key Manager
33
Page 34

Where
• <appliance hostname> is the hostname or IP address you provided in Starting the SKM
appliance,step4.
• <appliance port number> is 9443 by default. If you changed the port number in Starting the
SKM appliance, step 4, use that number instead.
Setting up the
To create and i
1. Logon to the SKM management web console using the admin password you supplied in Starting
the SKM appliance.
2. Select the Se
3. In Certificates & CAs,clickLocal CAs.
4. Enter information required by the Create Local Certificate Authority section of the window to create
your local C
local Certificate Authority (CA)
nstall local CAs, perform the following steps:
curity tab.
A, which will be the root for authentication of the clusters.
a. Enter a Certificate Authority Name and Common Name. These may be the same value, for
example SKM Local CA.
b. Enter your organizational information.
c. Enter the Email Address where you want messages to the Security Officer to go.
d. Enter the Key Size. HP recommends using 2048 for maximum security.
e. Click Self-signed Root CA and enter the CA Certification Duration and Maximum User Certificate
Duration. These values determine when the certificate must be renewed and should be set in
accordance with your company’s security policies. The default value for both is 3650 days or
10 years.
5. Click Create.
34
Configuring the system
Page 35

6. Add the Local CA to the Trusted CAs list.
a. In Certificates & CAs,clickTrusted CA Lists to display the Trusted Certificate Authority List Profiles.
b. Click on the Default Profile Name (not the radio button).
c. In the Trusted Certificate Authority List,clickEdit.
d. From the list of Available CAs in the right panel, select the CA you created in step 4. For
example, SKM Local CA.
e. Click Add.
f. Click Save.
7. If appropriate, add known, third-party CAs to the Trusted CAs list.
a. In Certificates & CAs,clickTrusted CA Lists to display the Trusted Certificate Authority List Profiles.
b. Click on the Default Profile Name.
c. In the Trusted Certificate Authority List,clickEdit.
d. From the list of Available CAs in the right panel, select the third-party CA you require.
e. Click Add.
f. Click Save.
NOTE:
Repeat these steps any time another local CA is needed.
Creating the SKM server certificate
To create the SKM server certificate, perform the following steps:
1. Click the Security tab.
2. In Certificates and CAs, select Certificates.
3. Enter information required by the Create Certificate Request section of the window to create the
SKM server certificate.
a. Enter a Certificate Name and Common Name, for example SKM Server.
b. Enter your organizational information.
c. Enter the E-mail Address where you want messages to the Security Officer to go.
d. Enter the Key Size. HP recommends using the default value: 1024.
Secure Key Manager
35
Page 36

4. Click Create Certificate Request.
5. Click on the newly created certificate from Certificate List, for example SKM Server.
6. Copy the certificate data, from -----BEGIN CERTIFICATE REQUEST----- to -----END
CERTIFICATE REQUEST--––– lines. Be careful to exclude extra carriage returns or spaces after
the data. This information will be used in step 10 of this section.
7. In the Certificates & CAs menu, click Local CAs.
8. Click on t
he CA name you created in Setting up the local Certificate Authority (CA), for example
SKM Local CA.
9. Click Sign Request.
10. Enter data required by the Sign Certificate Request section of the window.
a. Sel
ect the CA name from the Sign with Certificate Authority drop down box. For example,
SKM Local CA.
b. Select Server as the Certificate Purpose.
c. En
ter the number of days before the certificate must be renewed based on your site’s security
policies. The default value is 3649 or 10 years.
d. Paste the copied certificate data from step 6 into the Certificate Request box.
36
Configuring the system
Page 37

11 . Click Sign Request.
12. Copy the signed certificate data, from -----BEGIN to END…----- lines. Be careful to exclude
extra carriage returns or spaces after the data. This information will be used in step 16 of this section.
13 . In the Certificates & CAs menu, click on Certificates.
14. Click on the certificate name created in steps 3 – 4 of this section. For example, SKM Server.
15 . Click Install Certificate.
16 . Paste the signed certificate data from step 12 and click Save. Note that the Certificate status is
now Active.
Enabling SS
The KMS Serv
KMS Server before this interface will operate. After SSL is enabled on the first appliance it will be
automatically enabled on the other cluster members.
To configure
1. Select the Device tab.
2. In the Device Configuration menu, click KMS Server to display the Key Management Services
3. In the KMS Server Settings section of the window, click Edit. The following warning may display.
4. Configure the KMS Server Settings as shown. (Ensure that the port and connection timeout settings
L on the Key Management System (KMS) Server
er provides the interface to the client. Secure Sockets Layer (SSL) must be enabled on the
and enable SSL, perform the following steps:
Configuration window.
are 9000 and 3600, respectively). For Server Certificate, select the name of the certificate you
created in Creating the SKM server certificate, step 4. For example, SKM Server.
5. Click Save.
RTANT:
IMPO
se apply the most recent security patch(es) to ensure maximum security.
Plea
ve support alerts, driver updates, software, firmware, and customer replaceable components, in
Recei
your E-mail through HP Subscriber’s Choice. Sign up for Subscriber’s Choice Driver, Patch, Security, and
Support alerts at the following URL: h
Establishing a cluster
The procedures in this section will establish a cluster configuration on one SKM appliance and then
transfer that configuration to the remaining appliances.
ttp://www.hp.com/go/myadvisory
Secure Key Manager
37
Page 38

• In Creating the cluster, the cluster is created on one SKM appliance.
Skip this section if you already have an SKM cluster.
• In Copying the Local CA certificate,theLocalCAcertificate from an existing cluster member is
copied into the copy buffer in preparation for pasting it into the management console of each of
the SKM appliances that will be added to the cluster in Adding SKM appliances to the cluster.
Start here if you are replacing an SKM or expanding an existing cluster. When replacing an
appliance or expanding the cluster, any of the existing cluster members may be used to transfer
the cluster configuration.
• In Adding SKM appliances to the cluster, each of the additional SKM appliances will be added
to the cluster.
Start here if you already have a cluster and the Local CA certificate from Copying the Local CA
certificate is still available in your copy buffer.
If you only have one SKM appliance, skip Establishing a cluster and continue with Propagating
third-party certificates.
Creating the cluster
To create the cluster, perform the following steps on one of the SKM appliances to be clustered:
1. From the SK
M management console, click the Device tab.
2. In the Devi
3. Type the c
4. If requ
5. Click the Create button.
6. In the Cluster Settings section of the window, click Download Cluster Key and save the key to a
conven
The cluster key is a text file and is only required temporarily. It may be deleted from your computer’s
desktop after all SKM appliances have been added to the cluster.
ce Configuration menu, click Cluster.
luster password in the Create Cluster section of the main window to create the new cluster.
ired, change the Local Port. HP recommends using the default value of 9001.
ient location, such as your computer’s desktop.
Copying the Local CA certificate
Before an SKM appliance can be added to a cluster, the Local CA certificate from an SKM already in the
cluster must be installed onto the new SKM appliance.
To copy the Local CA certificate:
1. If you do not have a browser window open from Creating the cluster, log into the SKM management
console of one of the existing cluster members.
2. Click the Security tab.
3. In the Certificates & CAs menu, click Local CAs.
4. Click on the name of the local CA from the Local Certificate Authority List section of the screen. This
is the name of the CA created in Setting up the local Certificate Authority (CA),steps3—4.For
example, SKM Local CA.
38
Configuring the system
Page 39

5. Copy the certificate data from the CA Certificate Information,from-----BEGIN CERTIFICATE
REQUEST----- to -----END CERTIFICATE REQUEST--–––. Be careful to exclude extra
carriage returns or spaces after the data. This certificate data will be transferred to the other SKM
appliances in Copying the Local CA certificate.
6. Keep this browser window open while adding appliances to the cluster in the next section.
Adding SKM appliances to the cluster
To add SKM appliances to the cluster, perform the following steps on each additional appliance.
1. Open a new browser window, keeping the browser window from Copying the Local CA certificate
open.
2. If you skipped Creating the cluster, retrieve the cluster key text file now. To do so, select the Cluster
Settings section of the window, click Download Cluster Key and save the key to a convenient
location, such as your computer’s desktop.
The cluster
desktop after all SKM appliances have been added to the cluster.
3. In the new browser window, log into the management console of the SKM appliance that is being
added to th
4. Add the first member’s CA to the list of known CAs.
a. In the Certificates & CAs menu, click Known CAs.
b. Enter inf
key is a text file and is only required temporarily. It may be deleted from your computer’s
e cluster and click the Security tab.
ormation required in the Install CA Certificate section near the bottom of the page.
c. Type the Certificate Name of the certificate being transferred from the first cluster member. This
is the name in Creating the cluster, step 8. For example, SKM Local CA.
d. Paste the copied certificate data into the Certificate box. This is the data copied from Copying
the Local CA certificate,step2.
e. Click Install.
Secure Key Manager
39
Page 40

5. Add the first member’s CA to the Trusted CAs list.
a. In the Certificates & CA menu, click Trusted CA Lists.
b. Click on the Default Profile Name.
c. Click Edit.
d. SelectthenameoftheCAfromthelistofAvailableCAsintherightpanel. Forexample,
SKM Local CA.
e. Click Add.
f. Click Save.
6. Jointheappliancetothecluster.
a. Select the Device tab.
b. In the Device Configuration menu, click on Cluster.
c. In the Cluster,clickonJoin Cluster.
d. In the Join Cluster section of the window, leave Local IP and Local Port set to their defaults.
e. Type the original cluster member’s IP into ClusterMemberIP.
f. Type the original cluster member’s port into Cluster Member Port. The default value of this port
is 9001. If this value was changed in Creating the cluster,step4,usethatvalue.
g. Click Browse and select the Cluster Key File you saved in Creating the cluster, step 6.
h. Type the cluster password into Cluster Password.
i. Click Join.
7. After adding all members to the cluster, delete the cluster key file from the desktop.
Creating and installing the SKM Server Certificate
To create and install the SKM Server Certificate, perform the following steps on each new appliance on
the cluster:
1. Click t
2. In the Certificates & CAs menu, click Certificates.
3. Enter information required in the Create Certificate Request section of the window as shown:
he Security tab.
a. Fill in the Certificate Name and Common Name. The Certificate Name must match the name
used for the certificate created in Creating the SKM server certificate.
b. Type your organizational information.
c. Type the E-mail Address where you want messages to the Security Officer to go.
d. Select the Key Size. HP recommends using the default value: 1024.
40
Configuring the system
Page 41

4. Click Create Certificate Request.
5. Click on the newly created certificate SKM Server from Certificate List.
6. Copy the certificate data, from lines -----BEGIN CERTIFICATE REQUEST----- to -----END
CERTIFICATE REQUEST-----. Be careful to exclude extra carriage returns or spaces after the
data.
7. In the Certificates & CAs menu, click Local CAs.
8. Click on the SKM Local CA.
9. Click Sign Request.
10. Enter information required in the Sign Certificate Request section of the window as shown:
a. In the Sign with Certificate Authority drop down box, select SKM Local CA.
b. Select Server as the Certificate Purpose.
c. UsethedefaultCertificate Duration 3649.
d. Paste the copied certificate data into the Certificate Request box.
11 . Click Sign Request.
12. Copy the certificate data, from lines -----BEGIN CERTIFICATE REQUEST----- to -----END
CERTIFICATE REQUEST-----. Be careful to exclude extra carriage returns or spaces after the
data.
13 . In the Certificates & CAs menu, click Certificates.
14. Click on the SKM Server in the Certificate List.
15 . Click Install Certificate.
16 . Paste the copied certificate data and click Save.
Propagating third-party certificates
Skip this section if the original cluster member does not have third-party certificates.
Copying the certificates
To copy the certificates, perform the following steps on the original cluster member:
1. Log into the cluster member’s SKM management console and click the Device tab.
2. In the Maintenance menu, click on Backup & Restore and then Create Backup.
Secure Key Manager 41
Page 42

3. Click Select None.
4. Select Certificates then Choose from list and select SKM Server.
5. Click Continue.
6. Click Select None.
7. Click Continue.
8. In the Create Backup screen,typeaname,description,andpasswordforthecertificate backup.
9. Select Download to Browser.
10. Click Backup and save the backup to your desktop.
Installing t
he certificates
To install th
1. In the Maintenance menu, click Backup & Restore and then Restore Backup.
2. Click Upload from browser.
3. Click Brows
4. Type the Backup Password.
5. Click Restore.
6. Click Sele
7. Type the Backup Password.
8. Navigate to Device > Maintenance > Services > Restart/Halt.
9. In the Mai
10. Click Restart.
11 . Click Commit. Wait for the system to reboot.
ecertificates, perform the following steps on each of the additional cluster members:
e and locate the previously saved backup on your desktop.
ct All.
ntenance menu, click Services.
Enrolling client devices with the SKM
The SKM is compatible with many client devices (for example, ETLA libraries). To establish correct
communication between the SKM and the client, you must create a client account, then configure the
client to obtain keys from the SKM. Please see the appropriate SKM installation poster for your client
device in order to complete these steps.
Verify
ing that installation and initial configuration is successful
t be necessary to verify the installation and initial configuration. The method of verification
It migh
depends on the client to which the SKM is attached. Please see the appropriate SKM installation
document for your client device in order to complete these steps.
42
Configuring the system
Page 43

3Performingconfiguration and
operation tasks
Key and policy procedures
Creating a ke
To create a key:
1. Log in to the Management Console as an administrator with Keys and Authorization Policies access
control.
2. Navigate to the Create Key section on the Key and Policy Configuration page (Security > Keys).
3. Enter a unique key name in the Key Name field.
4. Enter a value in the Owner Username field to assign a specific owner or leave this value blank to
create a global key. If an owner is listed for the key, then that is the only user who can access the
key, unle
5. Select an algorithm.
6. To make the key deletable by the owner, select Deletable. Deletable global keys are deletable
by all use
7. To make the key exportable from SKM, select Exportable.Anexportablekeycanbeexportedbyits
owner and by members of a group with “Export” permission for the key. An exportable global key
is expor
8. To copy permission settings from an existing key, use the Copy Group Permissions From field.
9. Click Create.
IMPORTANT:
Createabackupimmediatelyaftercreatingakey. Thereisnowaytorecoverakeythat
has not
y
ss you set group permissions. Global keys can be accessed by all users.
rs.
table by all users.
been backed up.
Importing a key
To import a key:
1. Log in to the Management Console as an administrator with Keys and Authorization Policies access
control.
2. Navigate to the Import Key section on the Key and Policy Configuration page (Security > Keys).
3. Enter a unique key name in the Key Name field.
4. Enter a value in the Owner Username field to assign a specific owner or leave this value blank to
create a global key. If an owner is listed for the key, then that is the only user who can access the
key, unless you set group permissions. Global keys can be accessed by all users.
5. Select the algorithm.
6. To make the key deletable by the owner, select Deletable. Deletable global keys are deletable
by all users.
Secure Key Manager 43
Page 44

7. To make the key exportable on from non-FIPS SKM, select Exportable.Anexportablekeycan
be exported by its owner and by members of a group with “Export” permission for the key. An
exportable global key is exportable by all users.
8. Paste the key bytes in the Key field. Asymmetric keys must be imported in PEM-encoded ASN.1
DER-encoded PKCS #1 format, and both the public and private keys must be imported. Symmetric
keys must be in Base 16 format, and in the case of DES keys, parity bits must be properly set.
NOTE:
The server will not import keys that are known to be weak, such as 64 bit DES. In addition,
the parity bits must be set properly; otherwise, the server returns an error.
9. Click Import.
Setting group permissions for a key
Prior to setting group permissions, you must create a group. If your group permissions will use an
authorization policy, you must also create that authorization policy before continuing.
To set the group permissions for a key:
1. Log in to the Management Console as an administrator with Keys and Authorization Policies access
control.
2. Navigate to the Keys section of the Key and Policy Configuration page (Security > Keys). Select the
key for which you want to create permissions.
3. Navigate to the Group Permissions section on the Permissions tab.
4. Click Add.
5. Enter a group name in the Group field.
6. Select Always or choose an Authorization Policy for the export operation.
7. Click Save.
8. Click Add to create permissions for additional groups.
Downloading an RSA key
To download an RSA key:
1. Log in to the Management Console as an administrator with Keys and Authorization Policies access
control.
2. Navigate to the Keys section of the Key and Policy Configuration page (Security > Keys). Select
the RSA key.
3. Navigate to the Public Key section.
4. Click Download Public Key to download the public portion of the RSA key.
Deleting a key
To delete a key:
1. Log in to the Management Console as an administrator with Keys and Authorization Policies access
control.
2. Navigate to the Keys section of the Key and Policy Configuration page (Security > Keys).
3. Select the key and click Delete.
44
Performing configuration and operation tasks
Page 45

Authorization policy procedures
Creating an authorization policy
To create an authorization policy:
1. Log in to the Management Console as an administrator with Keys and Authorization Policies access
control.
2. Navigate to the Authorization Policies section of the Authorization Policy Configuration page
(Security > Authorization Policies).
3. Click Add.
4. Enter a Policy Name.
5. Click Save.
6. Select the Policy to access the Authorization Policy Configuration page.
7. Click Edit to establish a rate limit using the Maximum Operations per Hour field. Click Save.
8. Click Add to establish a time limit using the Start Day, Start Time, End Day,andEnd Time fields.
Click Save. Repeat this step to set multiple usage periods.
Deleting a
nauthorizationpolicy
To delete an authorization policy:
1. Log in to the Management Console as an administrator with Keys and Authorization Policies access
control.
2. Navigate to the Authorization Policies section of the Authorization Policy Configuration page
(Security > Authorization Policies).
3. Select a
Policy Name and click Delete.
User and group procedures
NOTE:
UseraccountsandgroupscanbemanagedlocallyontheSKMandsharedamongclusterednodes.
This is the preferred method, as this maintains the Federal Information Processing Standards (FIPS)
compliance for the nodes. User accounts and groups can also be managed centrally. If managing all
user and group accounts centrally is a priority, refer to
Protection Best Practices
Creating a user
To create a user:
white paper.
HP StorageWorks Secure Key Manager Key
1. Log in to the Management Console as an administrator with Users, Groups, and LDAP access control.
2. Navigate to the Local Users section of the User & Group Configuration page (Security > Local
Users & Groups).
3. Click Add.
4. Enter a username and password.
5. To give this user the ability to create, modify, and delete users and groups via the XML interface,
select User Administration Permission.
Secure Key Manager 45
Page 46

6. To give this user the ability to change his or her own password via the XML interface, select Change
Password Permission. Users with User Administration Permission selected automatically have this
ability.
7. Click Save.
Creating a group
To create a group:
1. Log in to the Ma
nagement Console as an administrator with Users, Groups, and LDAP access control.
2. Navigate to t
Users & Groups).
3. Click Add.
4. Enter a name i
5. Click Save.
You can now add users to the group.
he Local Groups section of the User & Group Configuration page (Security > Local
ntheGroup field.
Adding a user to a group
To add a user to a group:
1. Log in to the Management Console as an administrator with Users, Groups, and LDAP access control.
2. Navigate to the Local Groups section of the User & Group Configuration page (Security > Local
Users & Groups).
3. SelectaGroupandclickProperties or click the group name to access the User List section.
4. Click Add and enter the user in the Username field.
5. Click Save.
Removing a user from a group
To remove a user from a group:
1. Log in to the Management Console as an administrator with Users, Groups, and LDAP access control.
2. Navigate to the Local Groups section of the User & Group Configuration page (Security > Local
Users &
3. SelectaGroupandclickProperties or click the group name to access the User List section.
4. Select the Username and click Delete.
Deleting a user
If you discover that you erroneously deleted a user, you can recreate that user. After recreating the user,
you must manually add that user to any groups to which it belonged before it was deleted.
NOTE:
You cannot delete a user if it is a key owner.
To delete a user:
1. Log in to the Management Console as an administrator with Users, Groups, and LDAP access control.
2. Navigate to the Local Users section of the User & Group Configuration page (Security > Local
Users & Groups).
46
Performing configuration and operation tasks
Groups).
Page 47

3. Select the Username and click Delete.
Deleting a group
To delete a grou
1. Log in to the Management Console as an administrator with Users, Groups, and LDAP access control.
2. Navigate to the Local Groups section of the User & Group Configuration page (Security > Local
Users & Groups).
3. Select the Gr
p:
oup and click Delete.
LDAP server procedures
Setting up the LDAP user directory
To set up the LDAP user directory:
1. Log in to the
2. Navigate t
(Security > LDAP > LDAP Server).
3. Click Edit.
4. Enter the
5. If using SSL, select Use SSL and enter the Trusted CA List Profile.
6. Enter the number of seconds to wait for the LDAP server during connections in the Timeout field.
7. Enter the Bind DN (distinguished name) and Bind Password.
8. Click Sa
Management Console as an administrator with Users, Groups, and LDAP access control.
o the LDAP User Directory Properties section of the LDAP Server Configuration page
Server IP and Hostname, Server Port.
ve.
Testing the LDAP user directory connection
To test the LDAP user directory connection:
1. Log in to the Management Console as an administrator with Users, Groups, and LDAP access control.
2. Navigate to the LDAP User Directory Properties section of the LDAP Server Configuration page
(Security > LDAP > LDAP Server).
3. Click LDAP Test.
Setting up the LDAP schema
To set up the LDAP schema:
1. Log i
2. Navi
3. Click Edit.
4. Ent
5. Click Save.
n to the Management Console as an administrator with Users, Groups, and LDAP access control.
gate to the LDAP Schema Properties section of the LDAP Server Configuration page (Security >
LDAP > LDAP Server).
er the values for your LDAP schema.
Secure Key Manager 47
Page 48

Setting up an LDAP failover server
To set up an LDAP failover server:
1. Log in to the Management Console as an administrator with Users, Groups, and LDAP access control.
2. Navigate to the LDAP Failover Server Properties section of the LDAP Server Configuration page
(Security >
3. Click Edit.
4. Enter the Failover Server IP or Hostname and Failover Server Port.
5. Click Save
LDAP > LDAP Server).
.
Testing the LDAP failover server connection
To test the LDAP failover server connection:
1. Log in to the Management Console as an administrator with Users, Groups, and LDAP access control.
2. Navigate to the LDAP Failover Server Properties section of the LDAP Server Configuration page
(Security > LDAP > LDAP Server).
3. Click LDAP Test.
Certificate procedures
•Creati
• Creating a Server Certificate for the Key Manager
• Creating a Client Certificate
•Creati
•InstallingaCertificate
•InstallingaCertificate Chain
•Downl
ng a Certificate Request
ng a Self-Signed Certificate
oading a Certificate
Creating a certificate request
To create a certificate request:
1. Log in to the Management Console as an administrator with Certificates access control.
2. Navigate to the Create Certificate Request section of the Certificate and CA Configuration page
(Security > Certificates).
3. Enter the Certificate Name, Common Name, Organization Name, Organizational Unit Name,
Locality Name, StateorProvinceName, Country Name, Email Address,andKey Size for the
certificate.
4. Click Create Certificate Request.
Youmustnowsignthisrequestwithacertificate authority.
Creating a server certificate for the SKM
Before the SKM can respond to SSL requests from a client application, the SKM must be configured with
at least one server certificate.
48
Performing configuration and operation tasks
Page 49

NOTE:
To generate a valid certificate, you must have a certificate authority sign a certificate request. You can
create local CAs on the SKM, and use those CAs to sign certificate requests. Otherwise, you must use an
external CA to sign certificate requests. The following steps assume that you have already created a
local CA.
To create a server certificate for the SKM:
1. Log in to the Management Console as an administrator with Certificates access control.
2. Navigate to the Create Certificate Request section of the Certificate and CA Configuration page
(Security > Certificates).
3. Enter the Certificate Name, Common Name, Organization Name, Organizational Unit Name,
Locality Name, StateorProvinceName, Country Name, Email Address,andKey Size for the
certificate.
4. Click Create Certificate Request. The new request appears in the Certificate List with a status
of Request Pending.
NOTE:
If you are creating a certificate for a client application, you must generate the certificate
request on the client application. If you are using a Java application, you can use the
keytool application to create and manage the certificate.
5. Select th
ecertificate request and click Properties to access the Certificate Request Information section.
6. Copy the certificate request text. The certificate text looks similar, but not identical, to the following
text.
-----BEG
IN CERTIFICATE REQUEST-----
MIIBmzCCAQQCAQAwWzEPMA0GA1UEAxMGZmxldGNoMQkwBwYDVQQKEwA
VBAsTADEJMAcGA1UEBxMAMQkwBwYDVQQIEwAxCzAJBgNVBAYTAlVTMQ
ZIhvcNAQ
kBFgAwgZ8wDQYJKoZIhvcAYBABTUxxgY0AMIGJAoGBAMUqA
sCcUqnt5Yug+qTSbgEFnvnYWUApHKDlx5keC1lguQDU1ol2Xcc3YGrU
JIMK2giQ5b+ABQDemRiD11vInQqkhV6ngWBRD0lpKCjU6QXDEE9KGCK
0rr2LErq
xUuYwOu50Tfn4T3tKb1HGgfdzAgMBAAGgADANBgkqhkiG9w
OBgQCuYnv8vBzXEZpgLD71FfeDK2Zqh0FnfTHXAkHrj4JP3MCMF5nKH
NHHy0cYKTDP+hor68R76XhLVapKMqNuUHUYf7CTB5JNHHy0cYKTNHHy
Ce8nvvUG
+yp2Eh8aJ7thaua41xDFXPmIEXTqzXi1++DCWAdWayXmg==
-----END CERTIFICATE REQUEST-----
CAUTION:
Be sure to include the first and last lines (-----BEGIN CERT... and -----END
CERT...),andcopyonlythetextinthecertificate. Do not copy any extra white space.
7. Navigate to the Local Certificate Authority List section.
8. Select a CA and click Sign Request.
9. Paste the certificate request into the Certificate Request field. Select Server as the Certificate Purpose,
specify a Certificate Duration and click Sign Request. The newly-activated certificate displays on a
new page.
Secure Key Manager 49
Page 50

10. Copy the certificate text.
11 . Navigate back to the Certificate List section.
12. Select the certificate request and click Properties to access the Certificate Request Information section.
13. Click Install Certificate.
14. Paste the text of the signed certificate into the Certificate Response field.
15. Click Save. When you return to the main Certificate Configuration page, the certificate request is
now an active certificate. It can be used in to establish SSL connections with client applications.
Creating a client certificate
To create a client certificate for the SKM:
1. Log in to the
Management Console as an administrator with Certificates access control.
2. Navigate t
(Security
3. Enter the Certificate Name, Common Name, Organization Name, Organizational Unit Name,
Locality Name, StateorProvinceName, Country Name, Email Address,andKey Size for the
certificate.
4. Click Cre
of Request Pending.
NOTE:
If you are creating a certificate for a client application, you must generate the certificate
request on the client application. If you are using a Java application, you can use the
keytool application to create and manage the certificate.
5. Select the certificate request and click Properties to access the Certificate Request Information section.
6. Copy the certificate request text. The certificate text looks similar, but not identical, to the following
text.
-----BEGIN CERTIFICATE REQUEST-----
MIIBmzCCAQQCAQAwWzEPMA0GA1UEAxMGZmxldGNoMQkwBwYDVQQKEwA
VBAsTADEJMAcGA1UEBxMAMQkwBwYDVQQIEwAxCzAJBgNVBAYTAlVTMQ
ZIhvcNAQkBFgAwgZ8wDQYJKoZIhvcAYBABTUxxgY0AMIGJAoGBAMUqA
sCcUqnt5Yug+qTSbgEFnvnYWUApHKDlx5keC1lguQDU1ol2Xcc3YGrU
otheCreateCertificate Request section of the Certificate and CA Configuration page
>Certificates).
ate Certificate Request. The new request appears in the Certificate List with a status
JIMK2giQ5b+ABQDemRiD11vInQqkhV6ngWBRD0lpKCjU6QXDEE9KGCK
0rr2LErqxUuYwOu50Tfn4T3tKb1HGgfdzAgMBAAGgADANBgkqhkiG9w
OBgQCuYnv8vBzXEZpgLD71FfeDK2Zqh0FnfTHXAkHrj4JP3MCMF5nKH
NHHy0cYKTDP+hor68R76XhLVapKMqNuUHUYf7CTB5JNHHy0cYKTNHHy
Ce8nvvUG+yp2Eh8aJ7thaua41xDFXPmIEXTqzXi1++DCWAdWayXmg==
-----END CERTIFICATE REQUEST-----
CAUTION:
Be sure to include the first and last lines (-----BEGIN CERT... and -----END
CERT...), and copy only the text in the certificate. Do not copy any extra white space.
7. Navigate to the Local Certificate Authority List section.
8. Select a CA and click Sign Request.
50
Performing configuration and operation tasks
Page 51

9. Paste the certificate request into the Certificate Request field. Select Client as the Certificate Purpose,
specify a Certificate Duration and click Sign Request. The newly-activated certificate displays on a
new page.
10. Copy the certificate text.
11 . Navigate back to the Certificate List section.
12. Select the certificate request and click Properties to access the Certificate Request Information section.
13 . Click Install Certificate.
14. Paste the text of the signed certificate into the Certificate Response field.
15 . Click Save. When you return to the main Certificate Configuration page, the certificate request is
now an active certificate. If the certificate is for a client application, please see the appropriate
developer guide for instructions on installing the client certificate.
Creating a self-signed certificate
The SKM allows you to test self-signed certificates. This allows you to avoid getting a certificate request
signed by a local CA, or a CA on another SKM. Self-signed certificates can be presented to client
applications just like any other certificate.
IMPORTAN
Aself-si
using a t
To create a self-signed certificate:
1. Log in to the Management Console as an administrator with Certificates access control.
2. Navigate to the Create Certificate Request section of the Certificate and CA Configuration page
3. Enter the Certificate Name, Common Name, Organization Name, Organizational Unit Name,
4. Click Create Certificate Request.Thecertificate request will appear in the Certificate List section on
5. Select the certificate request and click Properties to access the Certificate Request Information section.
6. Click Create Self Sign Certificate.
7. Enter the duration for which the certificate will be valid in the Certificate Duration field.
8. Click Create. The SKM performs the following steps:
T:
gned certificate should be used for testing purposes only. Any attempt to connect with an SKM
est self-signed certificate sends a warning to the client browser.
(Security > Certificates).
Locality Name, StateorProvinceName, Country Name, Email Address,andKey Size for the
certificate.
the top of the page.
a. The certificate request is copied into a new certificate request called <certificate_name>–selfsign.
b. The SKM transforms <certificate_name> –selfsign into an active certificate by generating a
self-signed certificate.
The self–signed certificate is presented as an Active Certificate in the Certificate List.
c.
NOTE:
The SKM keeps time based on the universal standard of GMT/UTC and provides for clock error up to
one full day difference from the date of the certificate start.
Installing a certificate
Prior to installing a certificate, you must have a copy of the certificate response from the CA.
Secure Key Manager
51
Page 52

To install a certificate:
1. Log in to the Management Console as an administrator with Certificates access control.
2. Navigate to the Certifi cate List section of the Certificate and CA Configuration page (Security
>Certificates).
3. Select the certificate request and click Properties to access the Certificate Request Information section.
4. Click Install Certificate.
5. Paste the certificate response from the CA into the Certificate Response field on the Certificate
Installation page.
6. Click Save.
The SKM verifies the validity of the newly installed certificate. If determined to be valid, the certificate
appears as “Certificate Active” in the Certificate List.
Installing a certificate chain
When CAs sign server certificates with an intermediate CA, it might be necessary for an SKM to send
multiple certificates to a client to enable the client to verify the server certificate. Multiple certificates
contained in one certificate are called a certificate chain. A client connecting to a forwarding rule that
uses such a chain receives all certificates on the chain.
Certificat
e chains can be installed on the SKM through the Certificate Installation page.
To instal
1. Log in to the Management Console as an administrator with Certificates access control.
2. Navigate to the Certifi cate List section of the Certificate and CA Configuration page (Security
3. Select the certificate and click Properties to access the Certificate Information section.
4. Click In
5. Append
lacertificate chain:
>Certificates).
stall Certificate to access the Certificate Installation page.
the intermediate CA certificate to the server certificatereceivedfromtheCA.Thecombined
certificates should be displayed in the Certificate Response field, as shown here:
Figure 3 Viewing the Certificate Response Field
6. Click Save.
Downloading a certificate
To download a certificate:
1. Log in to the Management Console as an administrator with Certificates access control.
52
Performing configuration and operation tasks
Page 53

2. Navigate to the Certificate List section of the Certificate and CA Configuration page (Security
>Certificates).
3. Select the Certificate Name and click Properties to access the Certificate Information section.
4. Click Download.
Certificate Authority (CA) procedures
Adding a CA certificate to the trusted CA list
To add a CA certificate to the trusted CA list:
1. Log in to the Management Console as an administrator with Certificate Authorities access control.
2. Navigate to the Trusted Certificate Authority List Profiles section of the Certificate and CA
Configuration page (Security > Trusted CA Lists).
3. Select a profile and click Properties to access the Trusted Certificate Authority List section.
4. Click Edit.
5. Use the Add button to move available CAs to the Trusted CA list.
6. Click Save.
Removing a CA certificate from the trusted CA list
To remove a CA certificate to the trusted CA list:
1. Log in to the Management Console as an administrator with Certificate Authorities access control.
2. Navigate to the Trusted Certificate Authority List Profiles section of the Certificate and CA
Configuration page (Security > Trusted CA Lists).
3. Select a profile and click Properties to access the Trusted Certificate Authority List section.
4. Click E
5. Use the Remove button to move CAs from the Trusted CA list.
6. Click Save.
dit.
Creating a new trusted CA list profile
To create a new trusted CA list profile:
1. Log in to the Management Console as an administrator with Certificate Authorities access control.
2. Navigate to the Trusted Certificate Authority List Profiles section of the Certificate and CA
Configuration page (Security > Trusted CA Lists).
3. Click Add.
4. Enter a new Profile Name.
5. Click Save. This creates a new entry on the list of profile.
6. Select the profile and click Properties to access the Trusted Certificate Authority List section.
7. Click Edit.
8. Use the Add button to move available CAs to the Trusted CA list.
9. Click Save.
Secure Key Manager
53
Page 54

Deleting a trusted CA list profile
To delete a trusted certificate authority list profile:
1. Log in to the Man
agement Console as an administrator with Certificate Authorities access control.
2. Navigate to the
Configuration
3. Select a profil
NOTE:
You cannot de
Trusted Certificate Authority List Profiles section of the Certificate and CA
page (Security > Trusted CA Lists).
eandclickDelete.
lete the default profile.
Signing certificate requests with a local CA
To sign certificate requests with a local CA:
1. Generate a certificate request on the machine where the client application resides. If you are
signing a certificate for another SKM, then generate the certificate request on that machine. If you
are signing a certifi cate for a client application, the documentation that accompanies the client
application should explain how to create a new certificate request.
2. Paste the certificate request generated by the client application into the certificate request field on
the Sign Certifi cate Request page.
3. Set Certificate Purpose to Server if this certificateisusedbyanSKM;setthepurposetoClientifthis
certificate is used by a client application. The maximum duration for a certificate signed by a local
CA is determined by the value of the Maximum User Certificate Duration field for that CA.
4. Click Sign Request. The SKM displays the newly signed certificate.
5. Install the certificate on the client application or SKM. The certificate can now used to establish
SSL sessions.
Viewing the certificatessignedbyalocalCA
To view all of the certificates signed by a local CA:
1. Log in to the Management Console as an administrator with Certificate Authorities access control.
2. Navigate to the Local Certificate Authority List section of the Certificate and CA Configuration
page (Security > Local CAs).
3. Select a certificate authority and click Show Signed Certs to access the Signed Certificates section.
Alternatively, you can access the Signed Certificates section by using the Show Signed Certs button
on the CA Certificate Information section.
Downloading a local CA
To download a local CA:
1. Log in to the Management Console as an administrator with Certificate Authorities access control.
2. Navigate to the Local Certificate Authority List section of the Certificate and CA Configuration
page (Security > Local CAs).
3. Select a certificate authority and click Download to download the CA to your local workstation.
Alternatively, you can download the certificateauthoritybyusingtheDownload button on the
CA Certificate Information section.
54
Performing configuration and operation tasks
Page 55

Deleting a local CA
To delete a local CA:
1. Log in to the Man
agement Console as an administrator with Certificate Authorities access control.
2. Navigate to the
page (Security > Local CAs).
3. Select a certificate authority and click Delete.
Creating a local CA
To create a local certificate authority:
1. Log in to the Management Console as an administrator with Certificate Authorities access control.
2. Navigate to the Create Local Certificate Authority section of the Certificate and CA Configuration
page (Security > Local CAs).
3. Enter the Certificate Authority Name, Common Name, Organization Name, Organizational Unit
Name, Locality Name, StateorProvinceName, Country Name, Email Address,andKey Size.
4. Select either Self-signed Root CA or Intermediate CA Request as the Certificate Authority Type.
5. Click Create.
Creating
a self-signed root CA
To create
1. Log in to
2. Navigat
a self-signed root CA:
the Management Console as an administrator with Certificate Authorities access control.
e to the Create Local Certificate Authority section of the Certificate and CA Configuration
page (Security > Local CAs).
Local Certificate Authority List section of the Certificate and CA Configuration
3. Enter the Certificate Authority Name, Common Name, Organization Name, Organizational Unit
Name, Locality Name, StateorProvinceName, Country Name, Email Address,andKey Size.
4. Select
5. Click Create.
Self-signed Root CA as the Certificate Authority Type.
Creating an intermediate CA request
To create an intermediate CA request:
1. Log in to the Management Console as an administrator with Certificate Authorities access control.
2. Navigate to the Create Local Certificate Authority section of the Certificate and CA Configuration
page (Security > Local CAs).
3. Enter the Certificate Authority Name, Common Name, Organization Name, Organizational Unit
Name, Locality Name, StateorProvinceName, Country Name, Email Address,andKey Size.
4. Select Intermediate CA Request as the Certificate Authority Type.
5. Click Create. The new request appears in the Local Certificate Authority List section with a status
of CA Certificate Request Pending.
6. Navigate to the Local Certificate Authority List section of the Certificate and CA Configuration
page (Security > Local CAs).
7. Select the CA Certificate Request and click Properties to access the CA Certificate Information section.
Secure Key Manager
55
Page 56

8. Copy the CA certificate request text.
The certificate text looks similar, but not identical, to the following text.
-----BEGIN CERTIFICATE REQUEST-----
MIIBmzCCAQQCAQAwWzEPMA0GA1UEAxMGZmxldGNoMQkwBwYDVQQKEwA
VBAsTADEJMAcGA1UEBxMAMQkwBwYDVQQIEwAxCzAJBgNVBAYTAlVTMQ
ZIhvcNAQkBFgAwgZ8wDQYJKoZIhvcAYBABTUxxgY0AMIGJAoGBAMUqA
sCcUqnt5Yug+qTSbgEFnvnYWUApHKDlx5keC1lguQDU1ol2Xcc3YGrU
JIMK2giQ5b+ABQDemRiD11vInQqkhV6ngWBRD0lpKCjU6QXDEE9KGCK
0rr2LErqxUuYwOu50Tfn4T3tKb1HGgfdzAgMBAAGgADANBgkqhkiG9w
OBgQCuYnv8vBzXEZpgLD71FfeDK2Zqh0FnfTHXAkHrj4JP3MCMF5nKH
NHHy0cYKTDP+hor68R76XhLVapKMqNuUHUYf7CTB5JNHHy0cYKTNHHy
Ce8nvvUG+yp2Eh8aJ7thaua41xDFXPmIEXTqzXi1++DCWAdWayXmg==
-----END CERTIFICATE REQUEST-----
CAUTION:
Be sure to include the first and last lines (-----BEGIN CERT... and -----END
CERT...), and copy only the text in the certificate. Do not copy any extra white space.
9. Sign this request with another CA. Copy the signed certificate text.
10. Navigate back to the Local Certificate Authority List section.
11 . Select the CA Certificate Request and click Properties to access the CA Certificate Information section.
12. Click Install Certificate.
13. Paste the text of the signed CA certificate into the Certificate Response field.
14. Click Save.
When you return to the Local Certificate Authority List section, the CA certificate is now active.
Installing a CA certificate
Prior to installing a CA certificate, you must have a copy of the CA certificate on your local drive.
To install a CA certificate:
1. Log in to the Management Console as an administrator with Certificate Authorities access control.
2. Navigate to the Install CA Certificate section of the Certificate and CA Configuration page (Security
>KnownCAs).
3. Enter a value for the Certificate Name and paste the CA certificate text in the Certificate field.
4. Click Install. The CA will be added to the CA Certifi cate list.
Removing a CA certificate
To remove a CA certificate:
1. Log in to the Management Console as an administrator with Certificate Authorities access control.
2. Navigate to the CA Certificate List section of the Certificate and CA Configuration page (Security
>KnownCAs).
3. Select a CA certificate and click Delete.
56
Performing configuration and operation tasks
Page 57

FIPS status server procedures
Enabling the FIPS status server
To enable the FIPS Status Server:
1. Log in to the Management Console as an administrator with SSL, Advanced Security, and KMS
Server access controls.
2. Navigate to the FIPS Status Server page (Security > FIPS Status Server).
3. Click Edit.
4. Select Enable FIPS Status Server.
5. Select the Local IP address from the list or select [All].
6. Enter the Local Port the FIPS Status Server listens on or, accept the default port value of 9081.
7. Click Save.
Viewing the FIPS status report
To view the
1. Use either the Management Console or the CLI to locate the IP and port of the status report. By
default, the location is <Management Console IP>:9081/status.html.
a. To locate the IP and port using the Management Console: log in to the Management Console
b. To locate the IP and port using the CLI: log in to the CLI and use the show FIPS server command.
2. Open a web browser and navigate to the IP and port using http. For example,
http:192.168.12.20:9081/status.html.
FIPS Status Report:
and navig
ate to the FIPS Status Server page (Security > Advanced Security > FIPS Status Server).
KMS server procedures
The KMS server is the firmware component of the SKM server that manages communications between the
SKM and the clients. This section describes the procedures you will follow when managing the KMS server.
Enabli
ng SSL
o enabling SSL, you must have a server certificate available on the KMS Server.
Prior t
To enable SSL:
1. Log in to the Management Console as an administrator with KMS Server access control.
2. Navigate to the KMS Server Settings section of the Key Management Services Configuration page
ce>KMSServer>KMSServer).
(Devi
3. Click Edit.
4. Select Use SSL.Selectacertificate in the Server Certificate field.
5. Clic
k Save.
Secure Key Manager
57
Page 58

Enabling key and policy configuration by client applications
Enabling key and policy configuration by client applications permits the following actions:
• create and delete key.
• export and i
• create, delete and modify operations of users and groups.
To enable key and policy configuration by client applications:
1. Log in to the Management Console as an administrator with KMS Server access control.
2. Navigate to the KMS Server Settings section of the Key Management Services Configuration page
(Device > K
3. Click Edit.
4. Select Allow Key and Policy Configuration Operations.
5. Click Sav
mport key.
MS Server > KMS Server).
e.
Enabling the LDAP server
To enable the LDAP server:
1. Log in to the Management Console as an administrator with KMS Server access control.
2. Navigate to the KMS Server Authentication Settings section of the KMS Server Configuration page
(Device>KMSServer>KMSServer).
3. Click Edit.
4. Select LDAP in the User Directory field.
5. Click Save.
Enabl
ing password authentication
To enable password authentication:
1. Log in to the Management Console as an administrator with KMS Server access control.
2. Navigate to the KMS Server Authentication Settings section of the KMS Server Configuration page
ice > KMS Server > KMS Server).
(Dev
3. Click Edit.
4. Select Required in the Password Authentication field.
5. Cli
ck Save.
Enabling client certificate authentication
To enable client certificate authentication:
1. Log in to the Management Console as an administrator with KMS Server access control.
2. Navigate to the KMS Server Authentication Settings section of the KMS Server Configuration page
(Device>KMSServer>KMSServer).
3. Click Edit.
4. Select either Used for SSL Session only or Used for SSL session and username in the Client Certificate
Authentication field.
5. Select a profile list in the Trusted CA List Profile field. The server will use this profile when verifying
that the client certificate is signed by a CA trusted by the SKM.
58
Performing configuration and operation tasks
Page 59

6. Use the Username Field in Client Certificate field to specify which field in the client certificate must
contain a valid username. This setting is optional.
7. Select Require Client Certificate to Contain Source IP to specify that the client certificate must contain
the client’s IP address in the subjectAltName field. This setting is optional.
8. Click Save.
Configuring the user account lockout settings
To configuretheuseraccountlockoutsettings:
1. Log in to the M
anagement Console as an administrator with KMS Server access control.
2. Navigate to t
>KMSServer>KMSServer).
3. Click Edit.
4. Select Enab
after a spe
5. Enter a val
6. Enter a value in the Account Lockout Duration field. This is the period of time during which the
account is not available during lockout.
7. Click Sav
he User Account Lockout Settings section of the KMS Server Configuration page (Device
le Account Lockout to prevent a user from logging in to the server for a given duration
cified number of failed login attempts.
ue in the Number of Failed Authentication Attempts Before Account Lockout field.
e.
Clustering procedures
Creating a cluster
You create a cluster on one SKM and then join other members to that cluster. To create a cluster:
1. Select a
2. Log in to the Management Console as an administrator with Cluster access control.
3. Navigate to the Create Cluster section on the Cluster Configuration page (Device > Cluster).
4. Enter the Local IP, Local Port,andCluster Password.
5. Click
nSKMtobethefirst cluster member. This device cannot currently be a member of a cluster.
Create Cluster.
Joining a cluster
Before joining a cluster, make sure that the KMS Server does not already belong to another cluster. SKMs
can belong to only one cluster at a time. To join a cluster:
1. Log in to the Management Console of a current cluster member as an administrator with Cluster
access control.
2. Navigate to the Cluster Settings section of the Cluster Configuration page (Device > Cluster).
3. Click Download Cluster Key to save the key on your local file system. The cluster key contains
authentication information used when passing information between cluster members.
4. LogintotheSKMthatyouwanttoaddtotheclusterandnavigatetoJoinClustersectiononthe
Cluster Configuration page. Enter the Local IP, Local Port, Cluster Member IP, Cluster Member Port,
and Cluster Password. Enter the location of the cluster key in the Cluster Key field.
Secure Key Manager
59
Page 60

5. Click Join Cluster.
NOTE:
After joining the cluster, you will be prompted to synchronize with an existing cluster
member. We recommend that you synchronize your device. For more information about
this process, please see Synchronizing With a Cluster Member.
6. Delete the cluster key from the local file system on your workstation.
Synchronizing with a cluster member
To synchronize with a cluster member:
1. Log in to the Management Console that will be updated as an administrator with Cluster access
control.
2. Navigate to the Cluster Members section of the Cluster Configuration page (Device > Cluster).
3. Select the server from which you will copy configuration settings.
4. Click Synchronize With and confirm this action. As part of the synchronization, the KMS Server will
create an automatic synchronization backup before installing the new configuration.
CAUTION:
Synchronizing the local device with the cluster overwrites the existing configuration, which
may include keys. You can access overwritten information using the synchronization
backup. If you have any keys that only exist on the local device, you can use the backup
and restore features to copy them to another SKM before synchronizing the local device.
Setting up SSL in a cluster
When using SSL in a cluster, the replication settings must include KMS Server settings and all cluster
members must use a server certificate with the same name, as indicated on the KMS Server Settings
section. The contents of those server certificates, however should be unique.
To config
1. Log in t
2. Navig
3. Create a certificate request.
4. Repea
5. Sign all of the certificate requests with the same CA. You can use a local CA on one of your devices,
6. Inst
7. Sel
8. Log in to that device’s Management Console as an administrator with KMS Server access control.
9. Navigate to the KMS Server Settings section on the Key Management Services Configuration page.
10. Select Use SSL and set Server Certificate to the newly created certificate.
11 . Navigate to the Cluster Settings section on the Cluster Configuration page.
ure SSL for a cluster:
o the Management Console as an administrator with Certificate access control.
ate to the Create Certificate Request section on the Certifi cate and CA Configuration page
(Device > Cluster).
t steps 1, 2, and 3 for each device in the cluster. Use the same name for each certificate
request.
other CA within your organization’s PKI.
or an
all each signed certificate on the appropriate device.
ect an SKM with configuration settings that you can push out to other cluster members.
12. Click Save and confirm your changes. Once you confirm the settings, they will be replicated to the
ther cluster members. No automatic synchronization backup will occur.
o
60
Performing configuration and operation tasks
Page 61

Removing a device from a cluster
To remove a device from a cluster:
1. Log in the Manag
administrator with Cluster access control.
2. Navigate to the Cluster Settings section of the Cluster Configuration page (Device > Cluster).
3. Click Remove Fr
ementConsoleofthedevicethatwillberemovedfromtheclusterasan
om Cluster.
Upgrading a cluster
Aclustercanbeupgradedbyupgradingonedeviceatatime.Onceallofthedevicesarerunningthe
new software, you can configure the replication settings as needed.
TIP:
We recommend that you do not make configuration changes while upgrading a cluster.
To upgrade a cluster:
Log in to the Management Console as an administrator with Software Upgrade and System Health
1.
access control.
Upgrade the software on the device.
2.
Repeat steps 1 and 2 for each member of the cluster.
3.
Deleting a cluster
A cluster is deleted when the last member is removed from the cluster.
To delete a cluster:
1. Log in the Management Console of the device that will be removed from the cluster as an
administrator with Cluster access control.
2. Navigate to the Cluster Settings section of the Cluster Configuration page (Device > Cluster).
3. Click Remove From Cluster.
4. Repeat these steps for each member of the cluster.
Date and time procedures
Setting the date and time on the SKM
To set the date and time on the SKM:
1. Log in to the Management Console as an administrator with Network and Date/Time access control.
2. NavigatetotheDateandTimeSettingssectionoftheDate&TimeConfiguration page (Device
>Date&Time).
3. Click Edit.
4. Modify the Date, Time,andTime Zone fields as needed.
5. Click Save.
Secure Key Manager
61
Page 62

Configuring an NTP server connection
To configure an NTP server connection:
1. Log in to the Management Console as an administrator with Network and Date/Time access control.
2. NavigatetotheNTPSettingssectionoftheDate&TimeConfiguration page (Device > Date & Time).
3. Click Edit.
4. Select Ena
5. Enter the IP addresses of the NTP in the NTP Server fields.
6. Specify the frequency with which the SKM will poll the NTP server(s). If you enter a value that is not
amultipl
7. Click Save.
ble NTP.
eof5,theSKMwillrounddown to the nearest multiple of 5.
Manually synchronizing with an NTP server
The SKM will automatically synchronize with the NTP server according to the Poll Interval value indicated
in the NTP section.
To manually synchronize with an NTP server:
1. Log in to the Management Console as an administrator with Network and Date/Time access control.
2. NavigatetotheNTPSettingssectionoftheDate&TimeConfiguration page (Device > Date & Time).
3. Click Synchronize Now.
IP authorization procedures
Specifying which clients can connect to the SKM
The IP authorization feature enables you to control which clients can connect to the SKM and what
services they can access.
To specify which clients can connect to the SKM:
1. Log in to the Management Console as an administrator with Network and Date/Time access control.
2. Navigate to the Allowed Client IP Addresses section of the Network Configuration page (Device >
Network > IP Authorization).
3. Click Add.
4. Enter a single IP address, a range of addresses, or a subnet in the IP Address, Range, or Subnet field.
5. SelecttheservicesthatwillbeavailabletothisclientusingtheKMS Server, Web Administration,
and SSH Administration fields.
NOTE:
You can grant access to various features but you cannot explicitly deny access to a specific
client.IntheeventthataspecificIPislistedindividually
address acquires the sum of listed permissions.
6. Click Save.
7. Repeat steps 3 through 6 as needed.
and
as part of a group, that IP
8. Click Edit on the IP Authorization Settings section.
62
Performing configuration and operation tasks
Page 63

9. For each service select either Allow All Connections to grant access to all clients or Only Allow IPs
Specified Below to grant access to only the clients listed in the Allowed Client IP Addresses section
with that service selected.
10. Click Save.
NOTE:
When updating this feature from the Management Console, the system ensures that the
current administrator IP address maintains its web administration permissions.
SNMP procedures
Configuring SNMPv1/v2 on the SKM
The SKM supports all three versions of SNMP. From a configuration standpoint, SNMPv1/v2 are treated
as a unit, and SNMPv3 is treated separately. Please note that HP SNMP agent is capable of providing
the following SNMP functionality:
• itenablestheNMStoaccesstheMIBsontheSKM.
• it initiates trap messages to the NMS.
You can configure the HP SNMP agent to provide either piece of functionality or both pieces. Both pieces
of functionality are optional.
To configure an HP agent to communicate with an NMS running SNMPv1/v2 software, there are three
basic steps:
1. Configure the agent at the SNMP Agent Settings section.
2. Create a community at the SNMPv1/SNMPv2 Community List section to enable the NMS to access
the Enterprise MIBs.
3. Define an NMS at the Create SNMP Management Station section if you want the SKM to initiate trap
messages to the NMS. You only have to provide values for the fi rst fi ve fields in the Create SNMP
Management Station section. The fields that are used for SNMPv3 are clearly marked with as v3 only.
Configuring SNMPv3 on the SKM
The SKM supports all three versions of SNMP. From a configuration standpoint, SNMPv1/v2 are treated
as a unit, and SNMPv3 is treated separately. Please note that HP SNMP agent is capable of providing
the following SNMP functionality:
• itenablestheNMStoaccesstheMIBsontheSKM.
• it initiates trap messages to the NMS.
You can configure the HP SNMP agent to provide either piece of functionality or both pieces. Both pieces
of functionality are optional.
To configure an HP agent to communicate with an NMS running SNMPv3 software, there are three
basic steps:
1. Configure the agent at the SNMP Agent Settings section.
2. Create an SNMPv3 username at the SNMPv3 Username List section to enable the NMS to access
the Enterprise MIBs.
3. Define an NMS at the Create SNMP Management Station section if you want the SKM to initiate
trap messages to the NMS. The fields required for defining an SNMPv3 NMS depend on the
combination of authorization and privacy you choose.
Secure Key Manager
63
Page 64

Administrator procedures
Creating an administrator
To create an administrator account:
1. Log in the Management Console as an administrator with Administrators access control.
2. Navigate to the Create Administrator section on the Administrator Configuration page (Device
> Administrators > Administrators).
3. Enter values in the Username, Full Name, Description,andPassword fields.
4. Confi rm the password in the Confirm Password field.
5. Select the access controls for the administrator account.
6. Click Create.
Deleting an
To delete an administrator account:
1. Log in the Management Console as an administrator with Administrators access control.
2. Navigate to the Administrator List section on the Administrator Configuration page (Device >
3. Select the administrator and click Delete.
4. Confi rm the action on the Secondary Approval section.
administrator
Administ
rators > Administrators).
LDAP Administrator server procedures
This section describes the procedures you will follow when managing LDAP administrator servers.
Setting
up the LDAP administrator server
To set up the LDAP Administrator Server:
1. Log in to the SKM appliance as a Local administrator with High Access Administrator access control.
2. Navigate to the LDAP Administrator Server Properties section of the Administrator Configuration
page (D
3. Click Edit.
4. Enter the Hostname or IP Address and Port.
5. If usi
evice > Administrators > LDAP Administrator Server).
ng SSL, select Use SSL and enter the Trusted Certificate Authority.
6. Ente
7. Enter the Bind DN (distinguished name) and Bind Password.
8. Click Save.
r the number of seconds to wait for the LDAP server during connections in the Timeout field.
Testing the LDAP administrator server connection
To test the LDAP administrator server connection:
1. Log in to the SKM appliance as a Local administrator with High Access Administrator access control.
2. Navigate to the LDAP Administrator Server Properties section of the Administrator Configuration
page (Device > Administrators > LDAP Administrator Server).
64
Performing configuration and operation tasks
Page 65

3. Click LDAP Test.
Setting up the LDAP schema
To set up the LDA
1. Log in to the SKM appliance as a Local administrator with High Access Administrator access control.
2. Navigate to the LDAP Schema Properties section of the Administrator Configuration page (Device >
Administrators > LDAP Administrator Server).
3. Click Edit.
4. EnterthevaluesforyourLDAPschema.AllfieldsarerequiredexceptUserListFilter.
5. Click Save.
PSchema:
Setting up the LDAP failover server
To set up the LDAP Failover Server:
1. Log in to the SKM appliance as a Local administrator with High Access Administrator access control.
2. Navigate to the LDAP Failover Server section of the LDAP Administrator Configuration page (Device >
Administrators > LDAP Administrator Server).
3. Click Edit.
4. Enter the Failover Hostname or IP Address and Failover Port.
5. Click Save.
Testing the LDAP failover server connection
To test t
1. Log in to the SKM appliance as a Local administrator with High Access Administrator access control.
he LDAP Failover Server Connection:
2. Navigate to the LDAP Failover Server section of the LDAP Administrator Configuration page (Device >
Administrators > LDAP Administrator Server).
3. Click L
DAP Test.
Password management procedures
Changing your password
To change your administrator account password:
1. Log in
2. Navi
3. Ent
4. Enter a new password in the New Password and Confirm New Password fields.
5. Click Change Password.
Configuring password settings for local administrators
To configure password settings for local administrators:
1. Log in to the Management Console as an administrator with High Access Administrators access
to the Management Console using your administrator account.
gate to the Change Your Password section of the Administrator Configuration page (Device
guration > Administrators > Password Management).
Confi
er your current password in the Current Password field.
control.
Secure Key Manager
65
Page 66

2. Navigate to the Password Settings for Local Administrators section of the Administrator Configuration
page (Device Configuration > Administrators > Password Management).
3. Click Edit.
4. To enable password expiration, enter the Maximum Password Age in the Password Expiration field.
When an administrator’s password reaches this age, the administrator will be forced to create a
new password.
5. To enable password history, enter the Num Passwords to Remember in the Password History field.
When creating a new password, an administrator cannot use a value that exists in their password
history.
NOTE:
The password history is only consulted when administrators attempt to change their own
passwords. It is not checked when one administrator changes another’s password.
6. Enter the Minimum Password Length.
7. Specify if the password must contain at least one lower case letter, upper case letter, number, or
special character, or some combination of these values.
8. Click Save.
Changing passwords when a security officer leaves
In the event of a security officer personnel change, immediately change the passwords for administrator
accounts, user accounts, and backups in order to protect integrity of the SKM system and the data
protected by the encryption keys. This procedure should be handled quickly but deliberately, so that
access to the SKM configuration is secured but not in a haphazard manner. It is best to have a
documented procedure in place to handle such a situation. One possible procedure is the following:
1. Delete the former security officer’s administrator account immediately, then create a new
administrator account with the same permissions but a different account name. Have the replacement
security officer use the new account.
NOTE:
The account must be deleted because It is not possible for administrators to change another
administrator’s password on the SKM.
2. Have each remaining security officer change their administrator account password, preferably with
at least one other security officer present to witness the password change.
3. Change the user account passwords on both the SKM and the enrolled clients, again with at least
one other security officer present. Because this may interrupt the ability of the library to retrieve
keys during the change and verification, this should be done outside the backup window at the
earliest convenience.
4. Change the backup job passwords for each SKM in the configuration. Remember that if an
automated script is being used to run the backup jobs, the password information will have to be
changed in the script, as well.
tiple credentials procedures
Mul
Configuring the multiple credentials feature
To configure the multiple credentials feature:
1. Log in to the Management Console as an administrator with High Access Administrators access
control.
66
Performing configuration and operation tasks
Page 67

2. Navigate to the Multiple Credentials for Key Administration section on the Administrator
Configuration page (Device > Administrators > Multiple Credentials).
3. Click Edit.
4. Select Require Multiple Credentials.
5. Specify the number of administrators required to perform configuration operations. There must be
at least as many administrators with High Access Administrator access control as are required
by this field.
6. To allow administrators to grant their credentials to other administrators for a limited time period
select Allow Time-Limited Credentials. Enter the time period in the Maximum Duration for
Time-Limited Credentials field.
7. Click Save.
Granting cr
edentials
Prior to granting credentials, you must select RequireMultipleCredentialsand Allow Time-Limited
Credentials on the Multiple Credentials for Key Administration section.
To grant credentials:
1. Log in to th
control. This is the administrator that will grant credentials to another.
2. Navigate to the Grant a Credential section on the Administrator Configuration page (Device >
Administrators > Multiple Credentials).
3. Select t
4. Enter the duration that the credentials will be granted. This value must be less that the Maximum
Duration for Time-Limited Credentials value in the Multiple Credentials for Key Administration section.
5. Select the operations for which you are granting credentials.
6. Click G
e Management Console as an administrator with High Access Administrator access
he administrator that will receive the credentials in the Grant to field.
rant. You can now view the granted credentials in the Credentials Granted section.
Revoking a credential grant
Prior to revoking a credential grant, you must have granted credentials.
To revoke a credential grant:
1. Log in to the Management Console as an administrator that has previously granted credentials.
2. Navigate to the Credentials Granted section on the Administrator Configuration page (Device >
Device Configuration > Administrators > Multiple Credentials).
3. Click Delete/Revoke. The credential grant will be removed from the system.
Remote administration procedures
Enabling the Web Admin User Authentication feature
The Web Admin User Authentication feature requires a client certificate signed by the local CA on the
SKM.
Signing a certificate request and downloading the certificate
This section describes how to sign a certificate request with a local CA and then download the certificate.
You must download the certificate immediately after it is signed by the CA.
To sign a certificate request with a local CA:
Secure Key Manager
67
Page 68

1. Open the certificate request in a text editor.
2. Copy the text of the certificaterequest. Thecopiedtextmustincludetheheader(-----BEGIN
CERTIFICATE REQUEST-----) and the footer (-----END CERTIFICATE REQUEST-----).
3. Log in to the Management Console as an administrator with Certificates access control.
4. Navigate to the Local Certificate Authority List (Security > Certificates&CAs>LocalCAs). Select the
local CA and click Sign Request to access the Sign Certificate Request section.
5. Modify the fields as shown:
• Sign with Certificate Authority - Select the CA that signs the request.
• Certificate Purpose -SelectClient.
• Certificate Duration (days) - Enter the life span of the certificate.
• Certificate Request -Pastealltextfromthecertificate request, including the header and footer.
6. Click Sign Request. This will take you to the CA Certificate Information section where the certificate
is displayed in PEM format.
7. Click the Download button to save the certificate to your client.
Converting a certifi cate from PEM to PKCS12 format
The SKM can provide you with a certificate in PEM format. You must convert that certificate to PKCS12
before im
porting it to your web browser.
To conver
• Execute the following command if you are using openssl:
tacertificate from PEM to PKCS12 format:
openssl pkcs12 -export -inkey <key filename> -in <cert filename> -out
<pkcs12
filename>
Importing a certificate to a web browser
To import a certificate into Mozilla Firefox:
1. From the menu, go to Tools > Options.
2. Click Advanced.
3. Click the Security tab.
4. Click View Certificates.
5. Click the Import a Certificate button.
6. Click Import on the Your Certificates tab.
7. Enter the passwords when prompted.
To import a certificate into Microsoft Internet Explorer:
1. From the menu, go to Tools > Internet Options.
2. Click the Content tab.
3. Click Certificates.
4. Click Import.
The Import Certificate Wizard guides you through the rest of the certificate import process.
ling Web Admin User Authentication on the SKM
Enab
To enable Web Admin User Authentication on the SKM:
1. Log in to the Management Console.
68
Performing configuration and operation tasks
Page 69

2. Navigate to the Remote Administration Settings section (Device > Administrators > Remove
Administration).
3. Click Edit.
4. Select Web Admin User Authentication.
5. Click Save.
NOTE:
This feature is
YouwillbeloggedoutoftheManagementConsoleandwillneedavalidclientcertificate
to return. If needed, you can use the edit ras settings command from the CLI to disable
this feature without presenting a certificate.
immediately
enabled when you select Web Admin User Authentication.
Backup procedures for keys, configurations, and certificates
Importing and exporting keys between clusters
Use the SKM backup/restore feature to export one key at a time from Cluster #1, and import it to Cluster
#2. When a key is exported, the corresponding usage permissions are also exported. To use the
imported key, it is necessary to set permissions on Cluster #2’s library clients. Also, when a key is
imported (restored) to a cluster, it must be manually replicated to other nodes in that cluster.
NOTE:
TheexportedkeyremainsaccessibletoCluster#1;thekeyhasbeencopied,notmoved.
1. Determinethekeynametobeexported.
Each piece of media has a unique key name, containing the media’s barcode, and the UTC
timestamp when block 0 of that media was written.
NOTE:
The following is one example of how to filter for a specifickey.Otherfilters are available,
and may work better in different situations.
a. From the Security window, in the Keys menu on the left, select Keys.
b. In the list of keys displayed, select FilteredByKeyNamewherevaluecontains<enterthe
barcode>.
Secure Key Manager
69
Page 70

2. Determine the Key Sharing Group.
a. From the filtered list of keys, choose the one with the most recent timestamp (the number
sequence at the end of the key name) and click Properties.(SeeFigure 4).
Figure 4 Filtering the list of keys
b. Select the Permissions tab to display the name of the Group, listed in the Group Permissions
panel.
c. NotethenameoftheGroup.
3. Export (backup) the key.
a. FromtheDevicetab,intheMaintenance menu on the left, select Backup & Restore, then select
Create Backup to display the Create Backup panel (see Figure 5).
Figure 5 Exporting the key
b. In the Security Items field, click Select None.
c. In the Keys field, select One key, then enter or copy/paste the key name.
d. Click
Continue.
e. From Device Items, click Select None.
f. Click Continue.
70
Performing configuration and operation tasks
Page 71

NOTE:
Steps c. through f. above ensure the backup filecontainsonlythesinglekey.
g. In the Backup Summary section of the panel, verify that no settings, certificates, or local CAs are
included. In the Keys field, verify that the desired key is listed. (See Figure 6).
Figure 6 Verifying the Backup Summary section to export and import the key
h. Enter the Backup Name, Backup Description, and Backup Password, then select the Destination
(as shown in Figure 7).
Figure 7 Entering backup information
i. Click Backup.
A message displays when the backup is complete. The backup operation should take a few
seconds.
Secure Key Manager
71
Page 72

4. Send the tape and the Destination (backup) file to the Cluster #2 admin. Also transmit the Group
name and the backup password.
NOTE:
For security reasons, HP recommends these communications occur separately, via different
communication paths.
72
Performing configuration and operation tasks
Page 73

5. Import (restore) the backup file to Cluster #2
a. On the SKM, from the Device Tab, in the Maintenance menu on the left, select Backup & Restore,
then Restore Backup. The Backup Restore Information screen displays.
b. Specify the source of the file, and the backup password.
c. On the next screen, Backup Restore Information (see Figure 8), in the All Items field, select
Select None.
Figure 8 Completing the Backup Restore Information screen
d. In the Security Items panel, in the Keys field, select All keys. Alternatively, you may enter the key
name, and restore 1 key.
CAUTION:
Although the backup file should only contain 1 key, it is a best practice to deselect
everything except keys. If anything else is selected, restoring configurations would
overwrite existing configurations for that node, and would very likely break the node’s
ability to function.
NOTE:
Restoring keys is additive. New keys are added to the existing list, and no existing
keys are replaced.
e. In the
Backup Password field, enter the backup password.
f. Click Restore.
A message displays when the restore is complete.
Secure Key Manager
73
Page 74

6. Restart the SKM software.
NOTE:
Following a restore, the SKM must be restarted.
a. From the SKM Device tab, in the Maintenance menu, select Services.
b. In the Restart/Halt pane, in the Restart/Halt fi eld, select Restart.
c. Click Commit.
d. Select Confirm to initiate the restart request.
Restart will take approximately 5 minutes.
e. When the restart is complete, login to the SKM again.
74
Performing configuration and operation tasks
Page 75

7. Force replication of the key across Cluster #2.
a. From the SKM Security tab, in the Keys menu on the left, select Keys.
b. Use filtering from the Keys section of the panel (for example: Filtered by Key Name where value
contains <key name>,asshowninFigure 9)tofind the key.
Figure 9 Finding the key to force replication
c. Select the K
ey Name, then click Properties.
d. From the Key and Policy Configuration screen, select the Properties tab.
e. Click Edit.
f. Toggle the D
eletable property, then click Save.(SeeFigure 10.)
Figure 10 Toggling the Deletable property
g. Again, click Edit.
h. Again, toggle the Deletable property, then click Save.
NOTE:
This step changed the imported key’s “Deletable” property, then changed it back. A
property change forces replication of the key to other cluster nodes. This method is simpler
than restoring the file to and rebooting each node.
Secure Key Manager
75
Page 76

8. Ensure that the key sharing group has been added.
a. From the SKM interface, Security tab, Users and LDAP Menu, select Local Users and Groups.
b. Verify that the Group name from Cluster #1 is listed in the Local Groups section under Group.
c. If the Group name from Cluster #1 is not listed, add it now.
i. Under Local Groups pane, select Add.
ii. Enter the Group name, provided from Cluster #1. The name must match exactly.
iii. Click the name of the new group.
iv. In the User List section, select Add.
v. Add the name of each library client that must access the key, then click Save.
NOTE:
Permission configuration should only be necessary once. After the key sharing group
exists, other keys imported from that group will automatically be shared.
Backing up configurations and certificates to external server, then to CD
SKM Configurations and Certificates may be backed up to a file on an external server or workstation.
Using standard tools on that server or workstation, the backup file may be written to CD. Since each SKM
node’s network configuration is unique, you should repeat the process for each node in the SKM.
NOTE:
Keys are not backed up by this process. Key backup is described in Backing up keys to external server,
then to DVD.
To backup all configurations and certificates (everything but keys):
76
Performing configuration and operation tasks
Page 77

1. FromtheSKMinterfaceontheDevicetabintheMaintenance menu on the left, select Backup &
Restore, then select Create Backup.
Figure 11 Creating the backup of configurations and certificates
2. In the Create Backup pane, Security Items field, click Select All.
3. In the Key
s field, select No keys.
4. Click Continue.
5. In the Device Items field, click Select All.
6. Click Co
ntinue.
Secure Key Manager
77
Page 78

7. In the Backup Summary section of the panel, verify that all of the settings, certificates, and local
certificate authorities are included in the backup. Also verify that [None] is selected in the Keys
field. (See Figure 12.)
Figure 12 Verifying the Backup Summary section to backup the configurations
and certificates
8. Enter the Backup Name, Backup Description, and Backup Password, and select the Destination.
The destination can be the browser or a location on an SCP (secure copy) server.
9. Click Backup.
A message displays when the backup is complete.
CAUTION:
Be sure to save the backup password in a secure place so it is available when the backup is
restored.
10. Optionally, use tools on the server or workstation to create a CD containing the Destination file.
Backing up keys to external server, then to DVD
SKM keys can be backed up to a file on an external server. HP recommends backing up each node
individually.
NOTE:
This process backs up keys only, not configurations and certificates. Certificate and configuration backup
is described in Backing up configurations and certificates to external server, then to CD.
To backup keys only to an external server:
78
Performing configuration and operation tasks
Page 79

1. FromtheSKMinterfaceontheDevicetab,intheMaintenance menu, select Backup Restore,then
Create Backup.
2. In the Create Backup pane, in the Security Items field, click Select None.
3. In the Keys field, select All keys.
4. Click Continue.
5. IntheDeviceItemsfield, click Select None.
6. Click Continue.
7. In the Backup Summary section of the panel, review the backup summary to ensure only keys are
being backed up. Repeat steps 2 - 5 if needed. (See Figure 13.)
Figure 13 Verifying the Backup Summary section to backup all keys to an external
server
8. Enter the Backup Name, Backup Description, and Backup Password, and select the Destination.
For key backup, HP recommends using an SCP server with at least 10GB of free disk space.
9. Click Backup
NOTE:
Although the backup file is compressed, the key database could be up to 4GB.
The GUI displays a message when the backup is complete.
The backup will consist of multiple files if the size exceeds about 1.5GB For 100,000 keys; a single
backup file, typically about 1.4GB, is normal. Be sure to save the backup password in a secure
place, so it’s available when the backup is restored.
10. Optionally, use tools on the server or workstation to create a DVD containing the keys.
NOTE:
The backup must be set to under 4.7GB in order to create the DVD.
Secure Key Manager
79
Page 80

Log configurati
on procedures
Configuring log rotation
To configure log rotation:
1. Log in to the Management Console as an administrator with Logging access control.
2. Navigate to the Log Configuration page (Device > Log Configuration) and click the Rotation &
Syslog tab.
3. Select a log in the Rotation Schedule section and click Properties to access the Log Rotation
Properties section.
4. Click Edit.
5. Use the Rotation Schedule and Rotation Time fields to specify when the log will be rotated.
6. Specify the number of logs that will be maintained in the log archive using the Num Logs Archived
field.
7. Enter a value in the Max Log File Size field. When a log filereachesthissizeitisautomatically
rotated, regardless of the Rotation Schedule and Rotation Time settings.
8. Enter a transfer destination if you would like the rotated log moved off of the SKM.
9. Click Save.
Enablin
gsyslog
To enable syslog:
1. Log in to the Management Console as an administrator with Logging access control.
2. Navigate to the Log Configuration page (Device > Log Configuration) and click the Rotation &
Syslog
3. Select a log in the Syslog Settings section and click Edit.
4. Select Enable Syslog and enter the server IPs, ports, and syslog facility.
5. Click Save.
6. Repe
tab.
at steps 3, 4 and 5 to enable syslog for multiple logs.
Enabling signed logs
To enable signed logs:
1. Log in to the Management Console as an administrator with Logging access control.
2. Navigate to the Log Configuration page (Device > Log Configuration) and click the Log Signing tab.
3. Click Edit in the Log Settings section.
4. Select Sign Log for the log(s) you would like to be signed.
5. Click Save. From now on, the system will sign the selected logs with the log signing certificate
created when the SKM was initialized.
VerifyingasecurelogusingMicrosoftOutlook
To verify a secure log using Microsoft Outlook:
1. Move the log file off of the SKM or download it to a Windows machine.
80
Performing configuration and operation tasks
Page 81

2. Change the file extension on the log file to .eml. The file will now be recognized by Windows
as an E-mail file.
3. Double-click on the file. Outlook Express will open and display a help screen with a security header
that reads: “Digitally signed - signing digital ID is not trusted.”
4. Click Continue. A security warning will appear.
5. Click View Digital ID. The Signing Digital ID Properties dialog will appear.
6. Click the Details tab and scroll down to the Thumbprint field.
7. Download the Log Signing Certificate used to sign the log file from the SKM.
8. Double-click on the Log Signing Certificate. The Certificate dialog will appear.
9. Select the Details tab.
10. Scroll down to the Thumbprint field.
11 . Compare the thumbprints of the Signing Digital ID Properties dialog and the Log Signing Certificate
dialog. If the text strings are identical, the integrity of the log file is secure.
Verifying a secure log using OpenSSL
Prior to verifying a secure log, you must have installed OpenSSL on the machine that will verify the log
file. You can use the procedure in both Windows and UNIX/Linux environments. If OpenSSL has not
been installed on your Windows machine, you can find a Windows distribution here:
http://w
To verify a secure log:
1. Log in to the Management Console as an administrator.
ww.slproweb.com/products/Win32OpenSSL.html
2. Navigate to the Log Configuration page (Device > Log Configuration) and click the Log Levels
&Signin
3. Click View Log Signing Cert.
4. Click Download Log Signing Cert and save the Log Signer certificate to your local machine.
5. Navigate to the Audit Log page (Device>Logs&Statistics>LogViewer><select the log page> )
and click Download Entire Log.Savethelogfileinthesamedirectoryasthelogsignercert. (You
cansaveboththelogfile and the certificate anywhere you like; for the sake of simplicity, these
procedures assume that the two filesareinthesamedirectory.)
6. From
openssl smime -verify -in <signed log file> -nointern -certfile <log
cert file> -text -noverify.
Afte
been
2006
200
2006-07-06 11:24:26 [admin]: Downloaded Cert logsigner
2006-07-06 12:30:17 [admin]: User admin login has expired.
Verification successful
You c
you
“Ve
gtab.
the command prompt, enter the following command:
r issuing the command, the text from the log file is displayed. If the text of the log file has not
modified, the system displays “Verification successful” below the log text, as shown here:
-07-06 09:15:02 [admin]: Logged in from 192.168.1.170 via web
6-07-06 11:17:30 [admin]: Logged in from 192.168.1.170 via web
an test this process by modifying the text in the log file and running the command again. When
issue the command, the system again displays the text of the log file, but this time, it displays
rification failure” after the text of the log file.
Secure Key Manager
81
Page 82

Recreating the l
og signing certificate
Prior to creati
signed logs.
To recreate the log signing certificate:
1. Log in to the Management Console as an administrator with Logging access control.
2. Navigate to the Log Configuration page (Device > Log Configuration) and click the Rotation &
Syslog tab.
3. Click Recreate Log Signing Cert in the Audit Log Settings section.
4. Enter a Certificate Duration.
5. Click Create and confirm the action.
ng a new log signing certificate, backup the old certificate so you can verify previously
Log view procedures
Viewing an a
To view an archived log:
1. Log in to the Management Console as an administrator with Logging access control.
2. Navigate to the Log Viewer page (Device > Log Viewer) and click the tab for the log you would
3. Choose a log in the Log File field. Specify the number of lines to view and select Wrap Lines to
4. Click Display Log to view the log in the Log File section.
rchived log
like to vie
wrap the lines of text in your browser window.
w.
Manually rotating a log
To manually rotate a log:
1. Log in to the Management Console as an administrator with Logging access control.
2. Navigate to the Log Viewer page (Device > Log Viewer) and click the tab for the log you would
like to rotate.
3. Click Rotate Logs.
Downl
oading a log
Todownloadalog:
1. Log in to the Management Console as an administrator with Logging access control.
2. Navigate to the Log Viewer page (Device > Log Viewer) and click the tab for the log you would
to download.
like
3. Choose a log in the Log File field.
4. Click Display Log.
5. Cli
ck Download Entire Log.
Clearing a log
To clear a log:
1. Log in to the Management Console as an administrator with Logging access control.
82
Performing configuration and operation tasks
Page 83

2. Navigate to the Log Viewer page (Device > Log Viewer) and click the tab for the log you would
like to download.
3. Choose a log in the Log File field.
4. Click Display Log.
5. Click Clear.
Secure Key Manager
83
Page 84

84
Performing configuration and operation tasks
Page 85

4MaintainingtheSKM
Backup and restore overview
Clustering SKM nodes is an effective way of exchanging keys and configuration data to allow for failover,
but it is not the complete solution for protecting the SKM environment. Perform regular backups of the SKM
nodes to ensure that your encryption solution is protected in a disaster-recovery scenario. In addition, if
connectivity between nodes is lost, even for a brief time, the nodes can become out-of-sync—one node
might have keys from a library that were not replicated across the cluster, for example. In this event, using
the backup utility is critical to being able to distribute the unreplicated keys to the other cluster nodes.
Because of this out-of-sync possibility, it is necessary to back up each SKM node, even in a clustered
environment. Since this could affect several nodes, some of which might be in offsite locations, it is best to
develop a way to automate those backups to make administering the SKMs easier.
The SKM provides three ways of backing up the keys and configuration. There are advantages
and disadvantages to each method.
• Backing up internally to the SKM is the quickest and most secure way of running a backup, but
provides no disaster-recovery protection and must be performed manually.
• Backup by downloading the data via browser (this encrypts and saves the data to the local
computer via the browser interface) provides disaster-recovery protection since the data is stored
outside the SKM and is OS independent (because the browser handles the transfer), but again
must be run manually.
• Backup to an external server using SCP (secure file transfer) to copy the backup file provides both
disaster-recovery protection and the ability to be automated, but SCP is an older secure protocol
and, if the desire is to send the data to a Windows server, requires additional software as SCP is
not a recognized protocol on Windows. SCP still works to secure the backup data, however, and
so this method is the preferred solution for backing up the SKM.
To read more about how to copy settings between devices, please see Services Configuration Page.
The HP StorageWorks Secure Key Manager’s backup mechanism allows you to achieve two important
objectives: (1) back up information on the device to be restored in case of a failure, and (2) copy
configuration information between devices. Once a device is fully configured with networking
information, certificates, and user accounts, we recommend that the entire configuration be backed up.
Likewise, when you make changes to your configuration, update your backup files.
When restoring a backup, you can select which components of the backup file to restore. In general,
once you select which items to restore, the current settings for those items are cleared from the SKM
before the settings from the backup file are restored in their place. So if you restore a backup that
contains Users & Groups, you can expect that any settings you configured previously for Users & Groups
will be overwritten by the configuration from the backup file. No other configuration items are affected by
the restore operation.
Restoring keys, certificates, or local CAs, in contrast, is an additive process. The SKM adds the keys,
certificates, and local CAs from the backup file to the existing set of keys, certificates, and CAs. This is
because keys, certificates, and local CAs are unique cryptographic objects that cannot be recreated.
If one of these objects is being restored on a device where there is already a similar object with the same
name, the key, certificate, or local CA from the backup file overwrites the existing object.
Every backup file is protected with a key on the SKM and a password provided by the administrator.
Because a backup file may contain sensitive information, such as user accounts and certificates, we
recommend a reasonably long backup password.
Secure Key Manager
85
Page 86

Backup and resto
The Backup and restore page enables you to create and restore backups. This page contains the
following sections:
• Create Backup
•RestoreBacku
•RestoreBackupInformation
•InternalBackupList
Create backup
Use the Create Backup section of the Backup and Restore page to create a backup configuration. When
creating a backup, you can choose which components to back up.
p
re page
Create back
Use this section to select the security items to include in your backup.
up: security items
Figure
The fol
86
14 Viewing the Create Backup: Security Items section
lowing table describes the components of the Create Backup: Security Items section.
Maintaining the SKM
Page 87

Table 1 Create Backup: Security Items section components
Components Description
Security Items
Keys
Authorization
Policies
Local Users &
Groups
LDAP Server
Certificates
Local Certificate
Authorities
Known CAs, CRLs,
and Trusted CA List
Profiles
High Security Select to backup the device’s high security settings.
FIPS Status Server
Continue
Click Select All toincludeallofthekeymanagementitemsinyourbackup. Click
Select None to deselect all key management items.
Select the method for backing up keys. Select to backup all, none, or a specifickey.
Select to backup all authorization policies on the server.
Select to back
Select to backup the LDAP server configuration.
Selectthemethodforbackingupcertificates. Select to either backup all, none, or
specificcertificates.
Select the me
all, none, or specificcertificates.
Select to backup all known CAs, CRLs, and trusted CA list profiles.
Select to b
FIPS-capa
Click Continue to configure the next group of items.
up all local users and groups on the server.
thod for backing up local certificate authorities. Select to either backup
ackup the FIPS status server configuration. This field is available only on
ble devices.
Create Backup: Device Items
Usethissectiontoselectthedeviceitemstoincludeinyourbackup.
Figure 15 Viewing the Create Backup: Device Items section
The following table describes the components of the Create Backup: Device Items section.
Secure Key Manager
87
Page 88

Table 2 Create Backup: Device Items section components
Components Description
Device Items
NTP, Network,
IP Authorization,
Administrators
and Remote
Administration,
SNMP, Logging,
SSL, KMS Server,
Services, Log
Signing Certificate
Continue
Back Click Back to return to the previous section.
Cancel
Click Select All toincludeallofthedeviceconfiguration items in your backup. Click
Select None to d
Select the corresponding check box to include this configurationinformationinthe
backup.
Click Continue to configure the next group of items.
Click Cancel to abort the backup and return to the Create Backup: Security Items
section.
Create Backup: Backup Settings
Use this section to specify the name, password, and location of the backup and review its contents.
eselect all device configuration items.
Figure 16 Viewing the Create Backup: Backup Settings section
The following table describes the components of the Create Backup: Backup Settings section.
88
Maintaining the SKM
Page 89

Table 3 Create Backup: Backup Settings section components
Components Description
Enteranameforthebackupfile. For backups stored externally, the backup filename
Backup Name
is created by appending _0_bkp to the backup name. For large backups, the zero
is incremente
of two files: fo
dby1foreachadditionalfile. For example, backup foo could consist
o_0_bkp and foo_1_bkp.
Backup Description
Backup Password
Enter a short description for the backup.
Enterapasswordforyourbackupconfiguration.
CAUTION:
The backup configuration cannot be restored without this password.
Confirm Backup
Password
Destination
Backup Click Backup to create the backup.
Back Click Back to return to the previous section.
Cancel
Confirm the password for your backup configuration.
Specify the de
on the SKM, do
If you are crea
after, we recommend that you store the backup file externally. If you download
the backup configuration to a browser, the backup configuration is encrypted and
downloaded
is not neces
the backup c
• the destin
• thenameof
informat
• the usern
• the passw
Click Cancel to abort the backup and return to the Create Backup: Security Items
section.
stination information. The backup configuration can be stored internally
wnloaded to a browser, or copied to another machine via FTP or SCP.
ting this backup in anticipation of doing a software upgrade immediately
to your local machine. You must specify a name for the file; however, it
sary to specify an extension for the file. If you select FTP or SCP to copy
onfiguration to another machine, you must provide the following:
ation host.
the file on the destination host. The file name can contain path
ion.
ame of the account on the destination host.
ord for the user account on the destination host.
Backup Summary
Restore Backup
Use the
you re
Restore Backup section of the Backup and Restore page to restore data from a backup file. After
store a backup configuration you must restart your system for the changes to take effect.
Displays all of the items that could possibly be backed up and indicates the items to
be included in your backup configuration.
Secure Key Manager
89
Page 90

Figure 17 Vie
wing the Restore Backup section
The following table describes the components of the Restore Backup section.
Table 4 Restore Backup section components
Components Description
Source
Specify the source of the backup configuration. When restoring a backup that spans
multiple files, specify the zero-th file here (for example, internal _0_bkp). Specif
the zero-th file indicates to the Key Manager that the backup contains multiple files.
The Key Manager will then automatically transfer all of the backup files.
The backup configuration might be stored internally or on another machine. If the
backup configuration is stored locally, you can select it from the drop-down unde
Internal option. If the backup configuration is stored on another machine, you can
either upload the filethroughthebrowseroryoucancopythefile to the SKM via
FTP or SCP. If you are copying the backup configuration to SKM via FTP or SCP,
you must provide the following:
• the source host.
• the name of the file on the source host.
• the username of the account on the source host.
• thepasswordfortheuseraccountonthesourcehost.
ying
rthe
NOTE:
Backup files larger than 100 MB cannot be transferred through the browser. You
must use SCP or FTP to upload these files.
Backup Password
Restore
Enter the backup configuration password.
Click Restore to restore the backup configuration.
NOTE:
Key Manager DataSecure appliance Number of Active Versions Allowed for a Key setting on the Key
and Policy Configuration page. If the key has more active versions than permitted by that setting,
the key restore will fail.
To restore a key with more active versions than the system allows, you must change the Number of Active
Versions Allowed for a Key setting before restoring the backup. You can then reduce the key’s active
versions and return the Number of Active Versions Allowed for a Key to its original value.
Backup Restore Information
The Backup Restore Information section of the Backup and Restore page provides a list of contents in a
given backup file. You can select the individual items to include in the backup.
90
Maintaining the SKM
Page 91

Figure 18 Viewing the Backup Restore Information section
The following table describes the components of the Internal Backup List section.
Table 5 Intern
al Backup List section components
Components Description
Backup Name Displays the backup name.
Description
Archive Date Displays the date on which the backup was created.
All Items
Backup Password Enter the backup password.
Restore
Back Click Back to return to the Restore Backup section.
Download
Delete
Internal Backup List
The Internal Backup List section of the Backup and Restore page provides a list of internal backup files.
Displays a description of the backup file.
Click Select All to select all of the items included in the backup. Click Select None to
deselect all of the items.
Click Restore to restore all of the selected items.
Click Downl
button enab
system.
Click Delete to remove the backup from the SKM.
oad to download an internal backup file to your browser. The Download
les you to move a previously created internal backup file to a secondary
Figure 19 Viewing the Internal Backup List section
The following table describes the components of the Internal Backup List section.
Secure Key Manager
91
Page 92

Table 6 Internal Backup List section components
Components Description
Backup Name Displays the ba
Date
Size
Download
Delete
Displaysthedateonwhichthebackupwascreated.
Displaysthesizeofthebackupfile.
Click Download to download an internal backup file to your browser. The Download
button enables you to move a previously created internal backup file to a secondary
system.
Click Delete to remove the backup from the SKM.
ckup name.
Services Confi guration page
Use the Services Configuration page to manage the types of services you want to activate or deactivate
during the current session or when the SKM next boots up. This page contains the following sections:
•ServicesLis
Key Manager.
•Restart/Halt
Services List
Use the Services List section to view current configurations for the services on the SKM.
tUsetheServicesListpagetoviewcurrentconfigurations for the services on the
Figure 20 Viewing the Services List section
The following table describes the components of the Services List section.
92
Maintaining the SKM
Page 93

Table 7 Services List section components
Components Description
“brains” of the SKM, which manages all incoming and outgoing
both secure and clear text). When disabled, the SKM cannot be
requests.
ration: When enabled, the SKM can be configured through a web
ration: the remote Command Line Interface (CLI) administration tool.
d,theSKMcanbeconfiguredusingtheremoteCLIusingSSH.
When enabled, the SKM sends alerts over the network to monitor
ivity.
Name
• KMS Server: the
connections (
used to fulfill
• Web Administ
browser.
• SSH Administ
When enable
• SNMP Agent:
system act
Status
Startup
Start
Stop
Enable Startup
Disable Startup
Refresh Click Refresh to refresh the values on this section.
Restart/Halt
Use the Restart/Halt section to either shutdown or reboot the SKM.
Current activity status of the service type, either started or stopped. You control the
status by clicking Start or Stop.
The state of each of the services after the SKM boots up.
Click Star
“Started”
Click Stop to a service. The status column of the Services List section displays “Stopped”
in the status column for the affected service type.
Click Enable Startup to specify that a service should be enabled on startup.
Click Disa
t to start a service. The status column of the Services List section displays
in the status column for the affected service type.
ble Startup to specify that a service should be disabled on startup.
Figure 21 Viewing the Restart/Halt section
The following table describes the components of the Restart/Halt section.
Table 8 Re
start/Halt section components
Components Description
SelectRestarttoreboottheSKM,orHalttoshutdown.
Restart/Halt
NOTE:
Using the restart and halt functions terminates all active connections to the SKM.
Commit
Click Commit to perform the function selected in the Restart/Halt field.
IMPORTANT:
Remove any peripheral devices connected to the keyboard, mouse, and video ports on the SKM before
restarting. Use of these ports during the restart process can cause the process to hang.
Secure Key Manager
93
Page 94

System Informa
tion page
Use the System I
system and sof
• Device Information
• License Information
• Software Upgr
Device Information
The first section of the page shows the device information, which includes the model of SKM you are
using and the Unit ID.
Figure 22 Viewing the Device Information section
The following table describes the components of the Device Information section.
Table 9 Device Information section components
Components Description
nformation page to perform software upgrades and examine information about the
tware currently installed. This page contains the following sections:
ade/Install
Product
Unit ID
Software Version Displays the version of the server software.
Software Install
Date
License Information
Licenses allow a set number of client devices to connect to the SKM at any particular time; once the set
number of
has been terminated. Before any clients can connect to the SKM, you must install a valid license. Licenses
can be obtained from Customer Support. If you do not have a valid license, or if you find that you need
to purch
The License Information section displays the number of clients that the SKM is licensed to serve at any
given time.
clients has been reached, subsequent connection requests are refused until another connection
ase more licenses, you can contact Customer Support.
Displays the model of SKM.
The Unit ID is composed of letters and numbers. On the DL360 G5 platform, the Unit
ID is ten characters. You will be required to provide your Unit ID if you ever need to
contact Customer Support.
Displays the date of installation.
Figure 2
94
Maintaining the SKM
3 Viewing the License Information section
Page 95

The following table describes the components of the License Information section.
Table 10 License Information section components
Components Description
Licenses
Licenses in Use
Displays the number of client connections available.
Displays the number of client connections currently in use.
Software Upgrade/Install
The software upgrade and installation mechanism can be used to install new features, upgrade core
software, and apply security patches. You can upgrade or install software from both the Management
Console and the Command Line Interface. If you are interested in monitoring the status of the upgrade,
perform the upgrade from the Command Line Interface.
Software upgrades must be applied to all SKM individually in a cluster. Software upgrades are not
replicated across members of a cluster.
To safeguard SKMs, only software signed by HP can be installed on the SKM. Changes to multiple
components of the system are bundled together in an encrypted software file provided by the Customer
Service org
anization at HP.
Figure 24
The follo
Table 11 S
Viewing the Software Upgrade/Install section
wing table describes the components of the Software Upgrade/Install section.
oftware Upgrade/Install section components
Components Description
Specify the method for copying the software file to the SKM. If you are uploading the
file through the browser, select Upload from browser, then click Browse and locate the
file on the local drive or network. If you are using FTP or SCP to copy the file to the
SKM, select the appropriate option and enter the following information:
Source
Upgra
de/Install
• Host: the source host.
• Filename: the name of the file on the source host.
• Username: the username of the account on the source host.
• Password: the password for the user account on the source host.
Click Upgrade/Install tocopythesoftwaretotheSKM,verifythesignature,and
update the system. When these tasks are completed, the system automatically reboots.
Because the system is unavailable while it is rebooting, your browser might display
an error.
Secure Key Manager
95
Page 96

Upgradingtoapa
tch release
Patch releases
cumulative, wh
patches are cumulative, we recommend that you always install the most recent patch.
IMPORTANT:
Youmustberunningthebasereleaseuponwhichthepatchisbuiltbeforeupgradingtothepatch
release. You c
If you receive a software patch from HP, follow the installation instructions that come with it.
Rolling back software
Occasionally it is necessary to roll back software to a previous version. The SKM allows you to roll back
one version of the software. As such, we recommend that you avoid doing multiple patch upgrades on
the same base release. Instead, roll back from the patch release to the base release before doing the
upgrade to the patch release.
NOTE:
ThesoftwarerollbackprocesscanbeperformedfromtheCLIonly;itcannotbeperformedfromthe
Management Console.
IMPORTANT:
Before perfo
configurati
some featur
rolling back to, those features will not be available after the software rollback.
rming a software rollback, it is very important that you create a backup of your existing
on. In most cases, you can restore a backup after you have done the software rollback. If
esaresupportedinthemorerecentversionofthesoftwareandnotthebaseversionyouare
are lightweight; customers do not have to re-qualify an entire release. All patches are
ich means that the functionality in patch one exists in patch two, and so on. Because
annot upgrade directly from a
previous
base release to a patch.
System Health page
The System Health feature provides information about the SKM’s power supplies and cooling fans.
When the SKM detects a change in the status of a power supply unit or cooling fan, the System Health
page reflects the change and displays a warning message if appropriate. In addition, if your system
is configured for SNMP, the SKM sends an SNMP trap to the SNMP Management Station indicating
the change in status.
This page contains the following sections:
•RefreshPage
• Power Supply Status
•CoolingFanStatus
Refresh page
The Refresh Page section controls how frequently the System Health page is refreshed. When the page is
refreshed, the values displayed on the page are updated. The refresh interval you specify on the System
Health page does not affect the refresh interval on the CLI.
96
Maintaining the SKM
Page 97

Figure 25 Viewing the Refresh Page section
The following table describes the components of the Refresh Page section.
Table 12 Refresh Page section components
Component Description
Specify the refresh rate of the System Statistics page. Available refresh intervals are:
• Never (default value)
• 5seconds
• 15 s e c on ds
• 30 seconds
Refresh Ever
y
• 60 seconds
• 2 minutes
• 5 minutes
NOTE:
ThisvalueisonlyvalidwhileyouareviewingtheSystemStatisticspage. Ifyou
access another page on the Management Console and return to the System
Statistics page, the value returns to Never.
Set Refresh Time Click Set Refresh Time to apply the new value.
Refresh Now Click Refresh Now to refresh the System Statistics page on demand.
Power Supp
The Power Supply Status section provides information on the status of the power supply to the SKM.
Figure 26
The follo
Table 13 Power Supply Status section components
Componen
Power Supply
ly Status
Viewing the Power Supply Status section
wing table describes the components of the Power Supply Status section.
t
Descript
The status of each power supply is represented on a different line for each power
supply. The following states apply:
• Operational: The power supply unit is operational.
• Not receiving power: No power is supplied to the power supply unit. The system
• Removed or damaged: The power supply unit has been removed from the SKM.
ion
issues a warning stating that “A power supply is not plugged in or is malfunctioning.”
The system issues a warning stating that “A power supply has been removed or
damaged.”
Secure Key Manager
97
Page 98

Cooling Fan Stat
us
The Cooling Fan
following tabl
Figure27ViewingtheCoolingFanStatussection
The following table describes the components of the Cooling Fan Status section.
Table 14 Cooling Fan Status section components
Component Description
Fan Status
Status section provides information on the status all of the SKM’s cooling fans. The
e describes the different states that are represented in the Cooling Fan Status section.
Displays the status of the cooling fan. The following states apply:
• Operational: All fans are operational.
• Failure: Oneormorefanshavestopped,lostpower,orarebroken. Thesystem
displays a warning message until the problem is resolved and power to the SKM is
removed. The warning reads “Fan failure; please contact support immediately.”
Network Diagnostics page
The Network Diagnostics page allows you to test network connectivity by running any of the following:
ping, traceroute, host, or netstat. This page contains the following sections:
• Ping Information
• Traceroute Information
• Host Information
• Netstat Information
Ping Information
Use the Ping Information section to test connectivity.
Figure 28 Viewing the Ping Information section
The following table describes the components of the Ping Information section.
Table 15 Ping Information section components
Component Description
Ping
Run
98
Maintaining the SKM
Specify the host name or IP Address of the system to ping. This tool helps test
connectivity.
Click Run to run the process.
Page 99

Traceroute Info
Use the Traceroute Information section to examine the path between the SKM and a destination.
Figure 29 Viewing the Traceroute Information section
The following table describes the components of the Traceroute Information section.
Table 16 Traceroute Information section components
Component Description
rmation
Traceroute
Run
Host Information
Use the Host Information section to test DNS.
Figure 30 Viewing the Host Information section
The following table describes the components of the Host Information section.
Table 17 Host Information section components
Component Description
Host
Specify the host name or IP Address of the destination system for performing a
traceroute. This tool h
destination.
Click Run to run the process.
Specify the host name or IP Address to look up with DNS. This tool helps test whether
DNS is operational on the device.
elps you examine the path packets take from the SKM to the
Run
Netstat Information
Use the Netstat Information section to list all active network connections to the SKM.
Figure 31 Viewing the Netstat Information section
The following table describes the components of the Netstat Information section.
Click Run to run the process.
Secure Key Manager
99
Page 100

Table 18 Netstat Information section components
Component Description
Run
Reading Netsta
TheNetstatdia
the form of a col
Figure 32 Viewing the Netstat Results
ThefollowingtabledescribestheheadingsthatappearintheNetstatreport.
Table 19 Netstat Headings
Heading
Proto
Recv-Q
Send-Q The number of bytes awaiting acknowledgement by the remote host.
Local Address
Click Run to see a list of all active network connections on the SKM.
tResults
gnostic feature provides information about the active network connections on the SKM in
umnar report, which looks like the following:
Description
The protocol used by the connection. Either TCP, UDP, or RAW.
Thenumberofbytesreceivedfromtheremotehostwaitingtoberead.
The local address or hostname and port number of the connection.
Foreign Address
State
The remote address or hostname and port number of the connection.
The state of the connection.
100
Maintaining the SKM
 Loading...