

HP S240n, ENVY 34 W3T65AA User Manual

User Guide

© Copyright 2016 HP Development Company,
L.P.
FreeSync and Radeon are trademarks of
Advanced Micro Devices, Inc. HDMI, the HDMI
Logo and High-Denition Multimedia Interface
are trademarks or registered trademarks of
HDMI Licensing LLC. Windows is either a
registered trademark or trademark of
Microsoft Corporation in the United States
and/or other countries.
The information contained herein is subject to
change without notice. The only warranties for
HP products and services are set forth in the
express warranty statements accompanying
such products and services. Nothing herein
should be construed as constituting an
additional warranty. HP shall not be liable for
technical or editorial errors or omissions
contained herein.
First Edition: December 2016
Document part number: 906986-001

About This Guide
This guide provides information on monitor features, setting up the monitor, using the software and technical
specications.
WARNING! Text set o in this manner indicates that failure to follow directions could result in bodily harm or
loss of life.
CAUTION: Text set o in this manner indicates that failure to follow directions could result in damage to
equipment or loss of information.
NOTE: Text set o in this manner provides important supplemental information.
TIP: Text set o in this manner provides helpful hints.
This product incorporates HDMI technology.
iii

iv About This Guide

Table of contents
1 Getting Started ............................................................................................................................................. 1
Important safety information ............................................................................................................................... 1
Product features and components ........................................................................................................................ 2
Features ............................................................................................................................................... 2
Rear components ................................................................................................................................ 3
Setting up the monitor .......................................................................................................................................... 4
Use caution when setting up the monitor ........................................................................................... 5
Attaching the monitor stand ............................................................................................................... 6
Connecting the cables ......................................................................................................................... 7
Adjusting the monitor ......................................................................................................................... 9
Turning on the monitor ..................................................................................................................... 10
HP watermark and image retention policy ....................................................................................... 10
Mounting the monitor ....................................................................................................................... 11
Removing the monitor stand .......................................................................................... 11
Attaching the VESA mounting bracket ........................................................................... 12
2 Using the monitor ........................................................................................................................................ 13
Software and utilities .......................................................................................................................................... 13
The Information le ........................................................................................................................... 13
The Image Color Matching le ........................................................................................................... 13
Installing the INF and ICM les ............................................................................................................................ 13
Installing from the optical disc (available in select regions) ............................................................ 13
Downloading from the web ............................................................................................................... 14
Using the on-screen display (OSD) menu ............................................................................................................ 14
Assigning the Function buttons ........................................................................................................................... 15
Adjusting to Low Blue Light Mode ....................................................................................................................... 16
Using Auto-Sleep Mode ....................................................................................................................................... 16
3 Support and troubleshooting ........................................................................................................................ 17
Solving common problems .................................................................................................................................. 17
Button lockouts ................................................................................................................................................... 17
Product support ................................................................................................................................................... 18
Preparing to call technical support ..................................................................................................................... 18
Locating the rating label ...................................................................................................................................... 19
v

4 Maintaining the monitor .............................................................................................................................. 20
Maintenance guidelines ....................................................................................................................................... 20
Cleaning the monitor ......................................................................................................................... 21
Shipping the monitor ......................................................................................................................... 21
Appendix A Technical specications ................................................................................................................. 22
Preset display resolutions ................................................................................................................................... 23
Entering user modes ......................................................................................................................... 24
Power adapter ..................................................................................................................................................... 24
Energy saver feature ........................................................................................................................................... 24
Appendix B Accessibility ................................................................................................................................. 25
Supported assistive technologies ....................................................................................................................... 25
Contacting support .............................................................................................................................................. 25
vi

1 Getting Started
Important safety information
A power cord is included with the monitor. If another cord is used, use only a power source and connection
appropriate for this monitor. For information on the correct power cord set to use with the monitor, refer to
the
Product Notices provided on your optical disc, if one is included, or in your documentation kit.
WARNING! To reduce the risk of electric shock or damage to the equipment:
• Plug the power cord into an AC outlet that is easily accessible at all times.
• Disconnect power from the computer by unplugging the power cord from the AC outlet.
• If provided with a 3-pin attachment plug on the power cord, plug the cord into a grounded (earthed) 3-pin
outlet. Do not disable the power cord grounding pin, for example, by attaching a 2-pin adapter. The grounding
pin is an important safety feature.
For your safety, do not place anything on power cords or cables. Arrange them so that no one may
accidentally step on or trip over them. Do not pull on a cord or cable. When unplugging from the AC outlet,
grasp the cord by the plug.
To reduce the risk of serious injury, read the Safety and Comfort Guide. It describes proper workstation, setup,
posture, and health and work habits for computer users, and provides important electrical and mechanical
safety information. This guide is located on the web at http://www.hp.com/ergo.
CAUTION: For the protection of the monitor, as well as the computer, connect all power cords for the
computer and its peripheral devices (such as a monitor, printer, scanner) to some form of surge protection
device such as a power strip or Uninterruptible Power Supply (UPS). Not all power strips provide surge
protection; the power strips must be specically labeled as having this ability. Use a power strip whose
manufacturer oers a Damage Replacement Policy so you can replace the equipment, if surge protection
fails.
Use the appropriate and correctly sized furniture designed to properly support your HP LCD monitor.
WARNING! LCD monitors that are inappropriately situated on dressers, bookcases, shelves, desks, speakers,
chests, or carts may fall over and cause personal injury.
Care should be taken to route all cords and cables connected to the LCD monitor so that they cannot be pulled,
grabbed, or tripped over.
NOTE: This product is suitable for entertainment purposes. Consider placing the monitor in a controlled
luminous environment to avoid interference from surrounding light and bright surfaces that may cause
disturbing reections from the screen.
Important safety information 1

Product features and components
Features
This product is an AMD FreeSync™–qualied monitor, which allows you to enjoy PC gaming with smooth,
responsive, tear-free performance whenever a picture changes on the screen. The external source connected
to your monitor must have the FreeSync driver installed.
AMD FreeSync technology is designed to eliminate stuttering and tearing in games and videos by locking a
monitor’s refresh rate to the frame rate of the graphics card. Check with the manufacturer of your component
or system for
specic capabilities.
IMPORTANT: AMD Radeon™ Graphics and/or AMD A-Series APU-compliant monitors with DisplayPort/HDMI
Adaptive-Sync required. AMD 15.11 Crimson driver (or newer) is required to support FreeSync over HDMI.
NOTE: Adaptive refresh rates vary by monitor. More information is available at www.amd.com/freesync.
To enable FreeSync on the monitor, press the Menu button on the monitor to open the on-screen display
(OSD) menu. Select Color Control, select Viewing Modes, and then select Gaming.
The light-emitting diode (LED) backlit monitor has an active matrix, IPS panel. The monitor features include
the following:
●
60.47 cm (23.8-inch) diagonal viewable area with 1920 x 1080 FHD resolution, plus full-screen support
for lower resolutions
●
Tilt capability and easy viewing from sitting or standing position, or while moving from one side of the
monitor to the other
●
HDMI (High-Denition Multimedia Interface) video input
●
DisplayPort video input
●
USB Type-C port with power delivery up to 60 W
●
Plug and Play capability if supported by your operating system
●
On-screen display (OSD) adjustments in 10 languages for easy setup and screen optimization
●
HP Display Assistant software for adjusting monitor settings and enabling theft deterrence features
●
HDCP (High-bandwidth Digital Content Protection) used on digital inputs
●
Software and documentation optical disc provided with the monitor in select regions that includes
monitor drivers and product documentation
●
VESA mounting bracket for attaching the monitor to a wall-mount device or swing arm
●
Low Blue Light Mode settings to create a more relaxing and less stimulating image
NOTE: For safety and regulatory information, refer to the Product Notices provided on your optical disc, if
one is included, or in your documentation kit. To locate updates to the user guide for your product, go to
http://www.hp.com/support. Select Find your product, and then follow the on-screen instructions.
2 Chapter 1 Getting Started
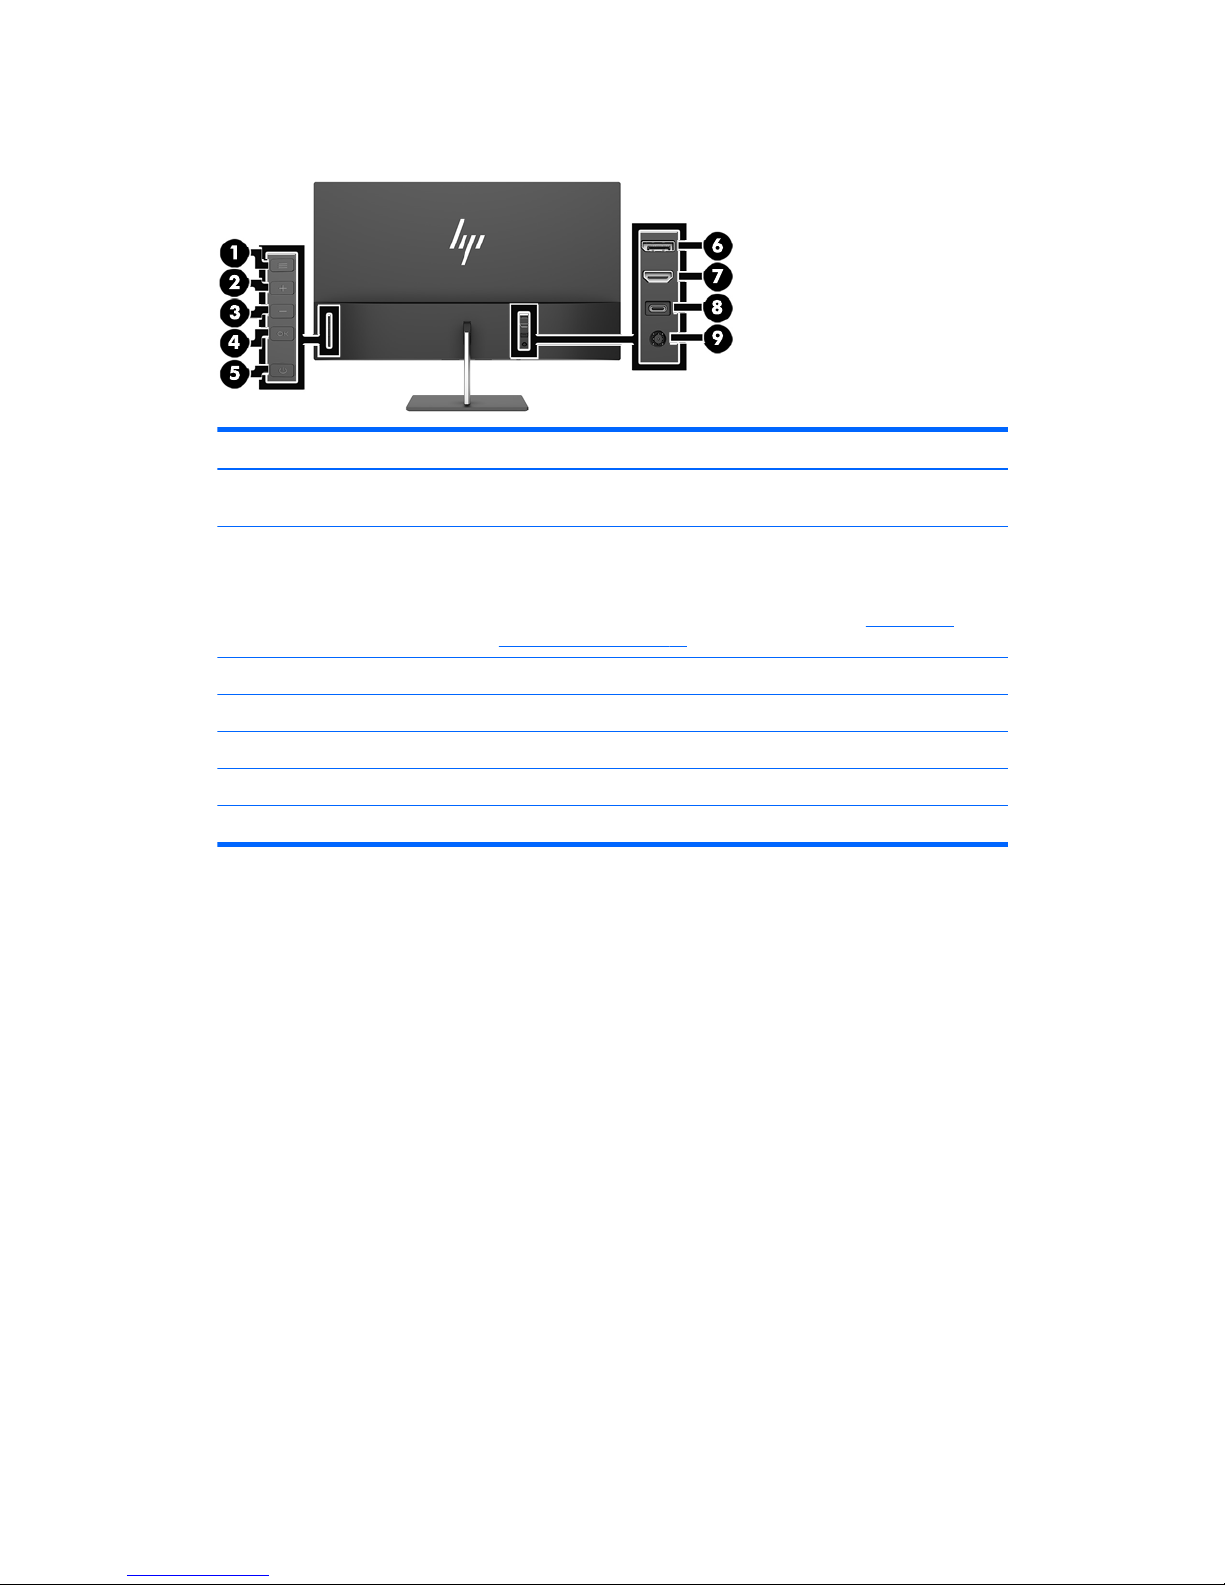
Rear components
Component Function
1 Menu button Press to open the OSD menu, select a menu item from the OSD, or close the
OSD menu.
2–4 Function buttons Use these buttons to navigate through the OSD menu based on the
indicators above the buttons that are activated while the OSD menu is open.
NOTE: You can recongure the Function buttons in the OSD menu to
quickly select the most commonly used operations. See Assigning the
Function buttons on page 15 for more information.
5 Power button Press the button to turn the monitor on or o.
6 DisplayPort Connects the DisplayPort cable from the source device to the monitor.
7 HDMI port Connects the HDMI cable from the source device to the monitor.
8 USB Type-C port Connects the USB Type-C cable from the source device to the monitor.
9 Power connector Connects an AC adapter.
Product features and components 3

Setting up the monitor
4 Chapter 1 Getting Started
 Loading...