

Page 1

HP Remote Insight Lights-Out Edition II User Guide
February 2006 (Sixth Edition)
Part Number 232664-006
Page 2

© Copyright 2002, 2006 Hewlett-Packard Development Company, L.P.
The information contained herein is subject to change without notice. The only warranties for HP products and services are set forth in the express
warranty statements accompanying such products and services. Nothing herein should be construed as constituting an additional warranty. HP
shall not be liable for technical or editorial errors or omissions contained herein.
Confidential computer software. Valid license from HP required for possession, use or copying. Consistent with FAR 12.211 and 12.212,
Commercial Computer Software, Computer Software Documentation, and Technical Data for Commercial Items are licensed to the U.S.
Government under vendor’s standard commercial license.
Microsoft and Windows are U.S. registered trademarks of Microsoft Corporation. Windows Server is a trademark of Microsoft Corporation.
Linux is a U.S. registered trademark of Linus Torvalds. Java is a U.S. trademark of Sun Microsystems, Inc.
February 2006 (Sixth Edition)
Part Number 232664-006
Audience assumptions
This document is for the person who installs, administers, and troubleshoots servers and storage systems.
HP assumes you are qualified in the servicing of computer equipment and trained in recognizing hazards
in products with hazardous energy levels.
Page 3

Contents
Operational overview ................................................................................................................... 8
New in this release.................................................................................................................................... 8
RILOE II kit contents ...................................................................................................................................8
Installing the RILOE II................................................................................................................... 10
Preparing to install RILOE II....................................................................................................................... 10
Remote Insight cable configuration ............................................................................................................11
Keyboard/mouse adapter cable configuration ............................................................................................ 11
Installing RILOE II in the server................................................................................................................... 12
Installing Internal Cables .......................................................................................................................... 13
Installing a Virtual Power Button cable (4-pin).................................................................................... 14
Installing a Remote Insight cable (16-pin).......................................................................................... 14
Installing a Remote Insight cable (30-pin).......................................................................................... 14
Connecting external cables to RILOE II ....................................................................................................... 14
Keyboard/mouse adapter cable connection ..................................................................................... 15
Headless server deployment............................................................................................................ 16
Monitor cable connection ............................................................................................................... 16
LAN cable connection.................................................................................................................... 17
AC power adapter connection ........................................................................................................ 17
Powering up the server............................................................................................................................. 18
Configuring the RILOE II .............................................................................................................. 19
Configuration options ..............................................................................................................................19
Remote setup ................................................................................................................................19
ROM-Based Setup Utility F8 ............................................................................................................ 19
SmartStart setup of RILOE II.............................................................................................................20
Installing RILOE II device drivers ................................................................................................................ 20
Microsoft device driver support .......................................................................................................20
Novell NetWare device driver support............................................................................................. 20
Linux device driver support ............................................................................................................. 21
Disabling DNS/DHCP ............................................................................................................................. 21
Using the RILOE II ....................................................................................................................... 23
Accessing RILOE II for the first time ............................................................................................................ 23
Features of the RILOE II ............................................................................................................................25
Managing the user and configuration settings of the RILOE II ........................................................................ 25
User configurations and settings ...................................................................................................... 25
Network settings............................................................................................................................ 27
Global settings.............................................................................................................................. 29
SNMP alerts and settings................................................................................................................31
Two-Factor Authentication Settings................................................................................................... 33
Security Settings ............................................................................................................................ 34
RILOE II firmware updates............................................................................................................... 34
Using the Remote Console........................................................................................................................ 35
Remote Console Information Option................................................................................................. 36
Using Enhanced Features of the Remote Console ............................................................................... 36
Optimizing performance for graphical Remote Console......................................................................37
Remote Console hot keys................................................................................................................ 38
Supported hot keys........................................................................................................................ 39
Video replays of previous server Reset Sequences.............................................................................. 40
Windows® EMS console................................................................................................................ 40
Contents 3
Page 4

Terminal Services pass-through option........................................................................................................ 41
Terminal Services Client requirements............................................................................................... 41
Enabling the Terminal Services Pass-Through option ...........................................................................43
Remote Console and Terminal Services clients................................................................................... 44
Troubleshooting Terminal Services ...................................................................................................44
Using virtual devices................................................................................................................................45
Virtual power................................................................................................................................ 46
Virtual media ................................................................................................................................46
Resetting the RILOE II to the factory default settings ......................................................................................57
Getting help ...........................................................................................................................................58
Pocket PC access with RILOE II.................................................................................................................. 58
RILOE II security.......................................................................................................................... 62
General security guidelines....................................................................................................................... 62
Password guidelines ......................................................................................................................62
Encryption ....................................................................................................................................62
Two-factor authentication.......................................................................................................................... 63
Setting up two-factor authentication for the first time........................................................................... 63
Two-factor authentication user certificates .........................................................................................64
Two-factor authentication login........................................................................................................ 65
Using two-factor authentication with directory authentication............................................................... 65
Introduction to certificate services ..............................................................................................................66
Certificates ................................................................................................................................... 67
Installing certificate services ............................................................................................................68
Verifying directory services ............................................................................................................. 68
Configuring Automatic Certificate Request ........................................................................................ 68
Securing RBSU........................................................................................................................................ 69
Systems Insight Manager integration.............................................................................................70
Integrating RILOE II with Systems Insight Manager ....................................................................................... 70
Systems Insight Manager functional overview.............................................................................................. 70
Systems Insight Manager identification and association................................................................................ 71
Systems Insight Manager status .......................................................................................................71
Systems Insight Manager links......................................................................................................... 71
Systems Insight Manager systems lists............................................................................................... 72
Configuring Systems Insight Manager identification of RILOE II...................................................................... 72
Receiving SNMP alerts in Systems Insight Manager .....................................................................................73
Systems Insight Manager port matching ..................................................................................................... 73
Directory services........................................................................................................................ 75
Overview of directory integration ..............................................................................................................75
Benefits of directory integration................................................................................................................. 75
How directory integration works................................................................................................................ 76
Advantages and disadvantages of schema-free and HP Extended schema ...................................................... 76
Setup for Schema-free directory integration.................................................................................................77
Active Directory preparation ........................................................................................................... 77
Schema-free browser-based setup.................................................................................................... 77
Schema-free scripted setup.............................................................................................................. 77
Schema-free HPLOMIG-based setup.................................................................................................78
Schema-free setup options ..............................................................................................................78
Setting up HP schema directory integration................................................................................................. 79
Features supported by HP schema directory integration ......................................................................79
Setting up directory services............................................................................................................ 79
Directory services support............................................................................................................... 80
Schema required software .............................................................................................................. 80
Contents 4
Page 5

Schema installer ............................................................................................................................ 81
Management snap-in installer.......................................................................................................... 83
Directory services for Active Directory ..............................................................................................83
Active Directory Lights-Out management........................................................................................... 91
Directory services for eDirectory ...................................................................................................... 92
User login using directory services ................................................................................................... 99
Directory settings.....................................................................................................................................99
Group administration................................................................................................................... 101
Directory tests .............................................................................................................................102
Directory-enabled remote management ....................................................................................... 103
Introduction to directory-enabled remote management................................................................................ 103
Creating roles to follow organizational structure........................................................................................ 103
Using existing groups................................................................................................................... 103
Using multiple roles...................................................................................................................... 104
How directory login restrictions are enforced ............................................................................................ 105
Restricting roles........................................................................................................................... 105
User restrictions........................................................................................................................... 106
Creating multiple restrictions and roles ........................................................................................... 107
Using bulk import tools........................................................................................................................... 108
Scripting, command line, and utility options................................................................................. 110
Overview of the Lights-Out DOS utility...................................................................................................... 110
CPQLODOS general guidelines.....................................................................................................110
Command line arguments............................................................................................................. 110
RIBCL XML Commands for CPQLODOS.......................................................................................... 111
Lights-Out directories migration utilities..................................................................................................... 113
Compatibility .............................................................................................................................. 113
Pre-migration checklist.................................................................................................................. 113
HP Lights-Out directory package....................................................................................................114
HPQLOMIG operation .................................................................................................................114
HPQLOMGC operation................................................................................................................122
Lights-Out Configuration Utility ................................................................................................................ 125
Group administration using the Lights-Out Configuration Utility.......................................................... 125
Query definition in Systems Insight Manager................................................................................... 127
Application Launch using Systems Insight Manager.......................................................................... 127
Batch processing using the Lights-Out Configuration Utility ................................................................ 128
Lights-Out Configuration Utility parameters...................................................................................... 128
Using Perl with the XML scripting interface................................................................................................ 129
XML enhancements ...................................................................................................................... 129
Opening an SSL connection.......................................................................................................... 130
Sending the XML header and script body .......................................................................................131
HPONCFG........................................................................................................................................... 133
HPONCFG supported operating systems ........................................................................................ 133
HPONCFG requirements .............................................................................................................. 133
Installing HPONCFG.................................................................................................................... 134
Using HPONCFG........................................................................................................................ 134
Remote Insight command language ......................................................................................................... 138
RIBCL sample scripts ....................................................................................................................138
RIBCL general guidelines .............................................................................................................. 138
XML header................................................................................................................................ 139
Data types.................................................................................................................................. 139
Response definitions .................................................................................................................... 139
RIBCL......................................................................................................................................... 140
Contents 5
Page 6

LOGIN....................................................................................................................................... 140
USER_INFO................................................................................................................................ 141
ADD_USER ................................................................................................................................. 141
DELETE_USER.............................................................................................................................. 143
GET_USER.................................................................................................................................. 144
MOD_USER................................................................................................................................ 145
GET_ALL_USERS.......................................................................................................................... 146
GET_ALL_USER_INFO .................................................................................................................. 147
RIB_INFO................................................................................................................................... 148
RESET_RIB ..................................................................................................................................149
GET_NETWORK_SETTINGS ......................................................................................................... 149
MOD_NETWORK_SETTINGS ....................................................................................................... 151
GET_GLOBAL_SETTINGS .............................................................................................................153
MOD_GLOBAL_SETTINGS ...........................................................................................................154
CLEAR_EVENTLOG...................................................................................................................... 156
UPDATE_RIB_FIRMWARE .............................................................................................................156
GET_FW_VERSION .....................................................................................................................157
HOTKEY_CONFIG ...................................................................................................................... 158
DIR_INFO................................................................................................................................... 159
GET_DIR_CONFIG ...................................................................................................................... 159
MOD_DIR_CONFIG .................................................................................................................... 161
SERVER_INFO............................................................................................................................. 163
RESET_SERVER............................................................................................................................ 163
INSERT_VIRTUAL_FLOPPY............................................................................................................. 164
EJECT_VIRTUAL_FLOPPY...............................................................................................................164
COPY_VIRTUAL_FLOPPY .............................................................................................................. 165
GET_VF_STATUS......................................................................................................................... 165
SET_VF_STATUS.......................................................................................................................... 166
GET_HOST_POWER_STATUS .......................................................................................................167
SET_HOST_POWER..................................................................................................................... 167
GET_VPB_CABLE_STATUS ............................................................................................................168
GET_ALL_CABLES_STATUS ...........................................................................................................169
GET_TWOFACTOR_SETTINGS ..................................................................................................... 169
MOD_TWOFACTOR_SETTINGS ................................................................................................... 170
Troubleshooting the RILOE II....................................................................................................... 173
Supported client operating systems and browsers ...................................................................................... 173
Supported hardware and software ..........................................................................................................173
Server PCI Slot and Cable Matrix............................................................................................................ 174
Network connection problems................................................................................................................. 176
Inability to connect to the board through the NIC............................................................................. 176
Inability to obtain SNMP information from Insight Manager 7 when connected to the Remote Insight
Network interface........................................................................................................................176
Web browser not connecting to the RILOE II IP address .................................................................... 177
Alert and trap problems ......................................................................................................................... 177
Inability to Receive Insight Manager 7 Alerts (SNMP Traps) from the RILOE II ...................................... 177
Server power status reported incorrectly and send test trap not responding ......................................... 177
NetWare initialization errors ..................................................................................................................177
NetWare error message table.......................................................................................................178
Miscellaneous problems ......................................................................................................................... 178
Accessing System Partition Utilities................................................................................................. 178
Inability to reboot the server.......................................................................................................... 178
Inability to upgrade the RILOE II firmware....................................................................................... 179
Incorrect time or date of entries in the event log............................................................................... 179
Contents 6
Page 7

Interpreting LED indicators ............................................................................................................ 179
Invalid Source IP address.............................................................................................................. 179
Login name and password problems.............................................................................................. 180
Remote Console mouse control issue ..............................................................................................180
Resetting the RILOE II to Factory Default Settings ..............................................................................180
Virtual Floppy media applet is unresponsive.................................................................................... 180
Video Problems........................................................................................................................... 181
Troubleshooting the host server ...............................................................................................................181
Additional information on the state of the host server........................................................................ 181
Information logs ..........................................................................................................................181
Restarting the host server .............................................................................................................. 185
Directory Services errors......................................................................................................................... 185
Directory Server connect failed......................................................................................................186
Invalid credentials ....................................................................................................................... 186
Invalid Directory Server address or port..........................................................................................186
Directory Server timeout ...............................................................................................................186
Unauthorized, couldn't find RILOE II object .....................................................................................186
Unauthorized, no readable roles ...................................................................................................187
Unable to read restrictions on object.............................................................................................. 187
Time restriction not satisfied .......................................................................................................... 187
IP restriction not satisfied ..............................................................................................................187
Unauthorized.............................................................................................................................. 187
Directory Services schema ......................................................................................................... 187
HP Management Core LDAP OID classes and attributes..............................................................................187
Core classes ............................................................................................................................... 187
Core attributes ............................................................................................................................188
Core class definitions................................................................................................................... 188
Core attribute definitions ..............................................................................................................189
Lights-Out Management specific LDAP OID classes and attributes ................................................................ 191
Lights-Out Management classes ..................................................................................................... 191
Lights-Out Management attributes ..................................................................................................191
Lights-Out Management class definitions.........................................................................................191
Lights-Out Management attribute definitions ....................................................................................192
Technical support...................................................................................................................... 194
Before you contact HP............................................................................................................................ 194
HP contact information........................................................................................................................... 194
Regulatory compliance notices ................................................................................................... 195
Federal Communications Commission notice............................................................................................. 195
Class A equipment....................................................................................................................... 195
Class B equipment....................................................................................................................... 195
Modifications..............................................................................................................................196
Declaration of conformity for products marked with the FCC logo, United States only........................... 196
Canadian notice (Avis Canadien)............................................................................................................ 196
European Union regulatory notice ...........................................................................................................196
BSMI notice.......................................................................................................................................... 198
Japanese notice .................................................................................................................................... 198
Acronyms and abbreviations...................................................................................................... 199
Index....................................................................................................................................... 202
Contents 7
Page 8
Operational overview
In this section
New in this release................................................................................................................................... 8
RILOE II kit contents .................................................................................................................................. 8
New in this release
Added support for:
• Schema-free active directory ("Setup for Schema-free directory integration" on page 77)
• Two-factor authentication (on page 63)
• Terminal Services pass-through option (on page 41)
Updated the following:
• RIBCL ("Remote Insight command language" on page 138)
• Systems Insight Manager integration (on page 70)
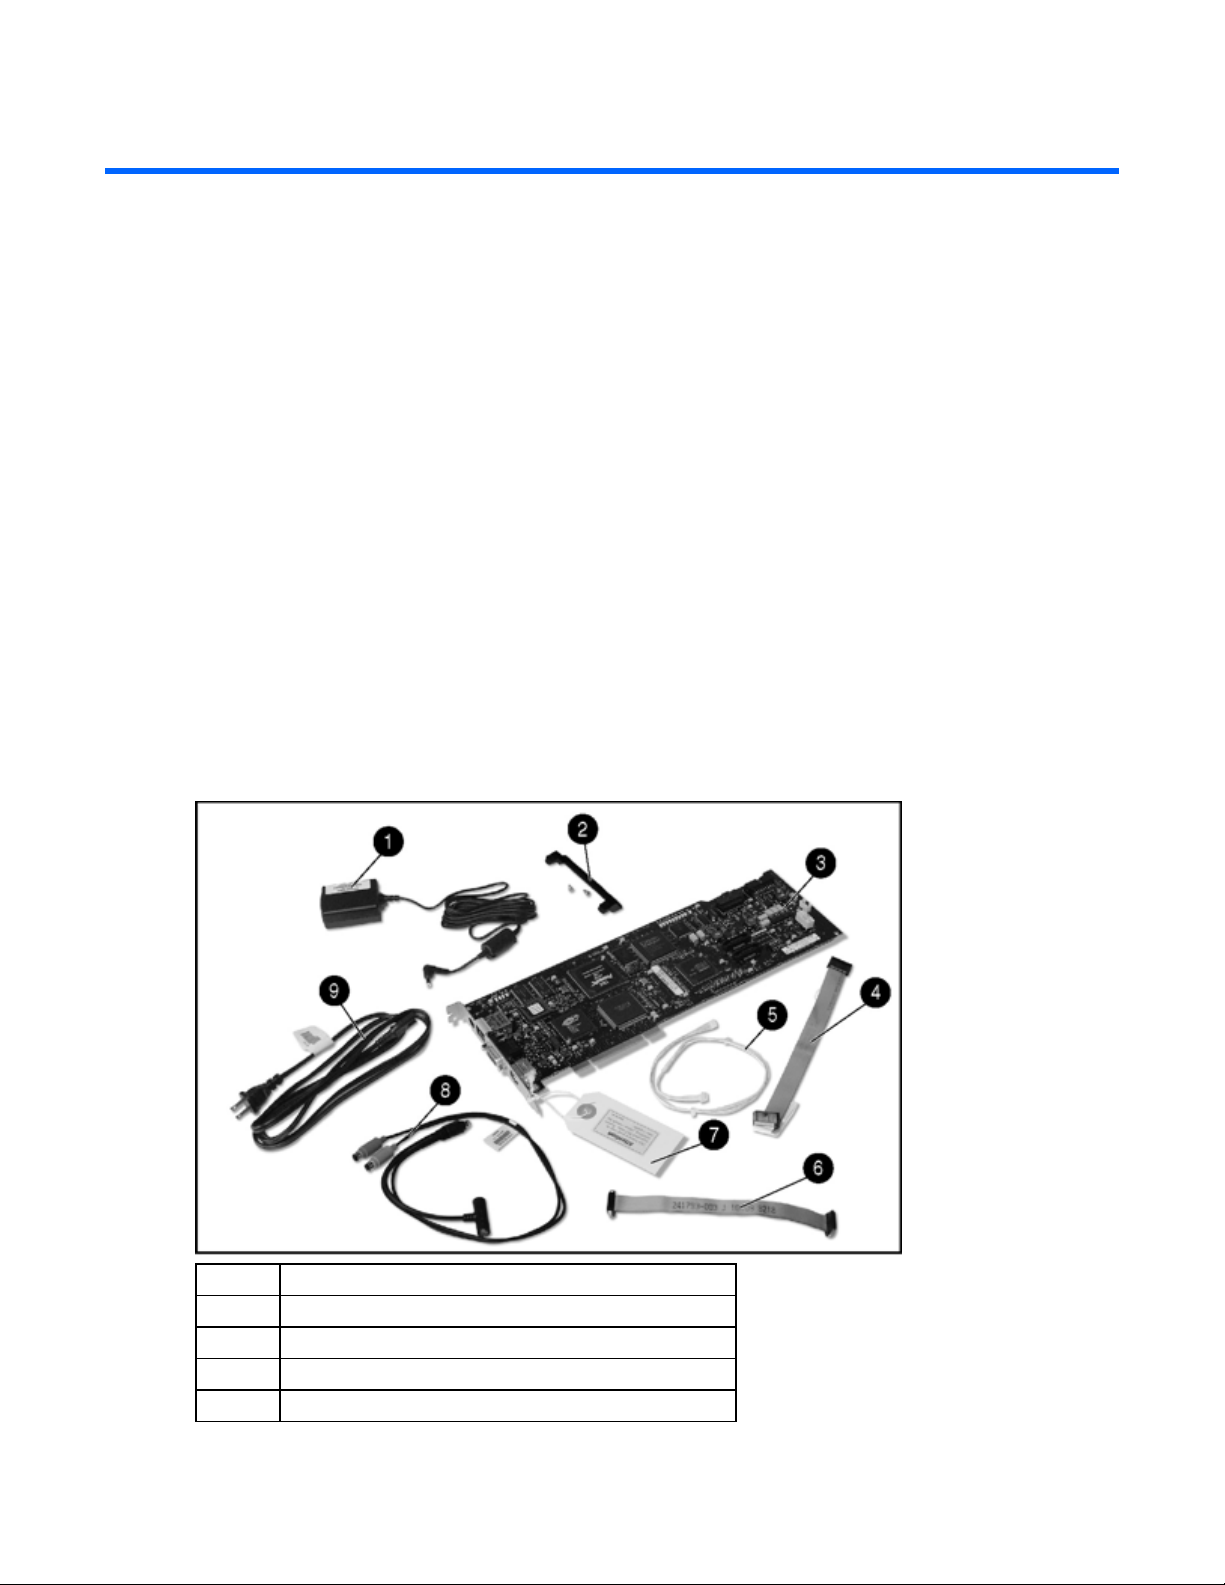
RILOE II kit contents
Item Description
1 AC power adapter
2 PCI extender bracket
3 RILOE II board
4 Remote Insight cable (16-pin)
Operational overview 8
Page 9

Item Description
5 Virtual Power Button cable (4-pin)
6 Remote Insight cable (30-pin)
7 Network settings tag
8 Keyboard/mouse adapter cable
9 Power cord
System documentation and support software CDs (not
shown)
Operational overview 9
Page 10

Installing the RILOE II
In this section
Preparing to install RILOE II ..................................................................................................................... 10
Remote Insight cable configuration ........................................................................................................... 11
Keyboard/mouse adapter cable configuration........................................................................................... 11
Installing RILOE II in the server ................................................................................................................. 12
Installing Internal Cables ......................................................................................................................... 13
Connecting external cables to RILOE II...................................................................................................... 14
Powering up the server ........................................................................................................................... 18
Preparing to install RILOE II
WARNING: Some ProLiant servers are capable of producing energy levels that are
considered hazardous. Do not remove enclosures or bypass the interlocks provided to
protect against these hazardous conditions. Installation of accessories and options in
areas other than front hot-plug bays should be performed by individuals who are both
qualified in the servicing of computer equipment and trained in the hazards associated
with products capable of producing hazardous energy levels. Refer to the documentation
provided with the server for additional information on installing options in the server.
1. Locate the documentation provided with the server for server-specific slot information.
2. Use the PCI slot matrix ("Server PCI Slot and Cable Matrix" on page 174) to select an unused PCI
slot, appropriate cables, and video switch settings and to determine supported features for the
server.
3. Be sure the server has the latest system ROM revision. For instructions on updating the system ROM
of your server, refer to the server documentation. To download the latest server ROM upgrade for
your server, go to the HP website (http://www.hp.com/servers/lights-out).
Installing the RILOE II 10
Page 11
Remote Insight cable configuration
For servers that use the Remote Insight cable, RILOE II connects to the host server, peripheral devices,
power source, and LAN.
Item Description
1 Remote Insight cable
2 RILOE II installed in a server
3 AC power adapter connected to RILOE II
4 Monitor connected to RILOE II
5 Keyboard connected to the server
6 Mouse connected to the server
7 LAN connected to RILOE II
Keyboard/mouse adapter cable configuration
CAUTION: Using the external mouse/keyboard cables with the internal cables causes conflicts with mouse
and keyboard functions.
Installing the RILOE II 11
Page 12

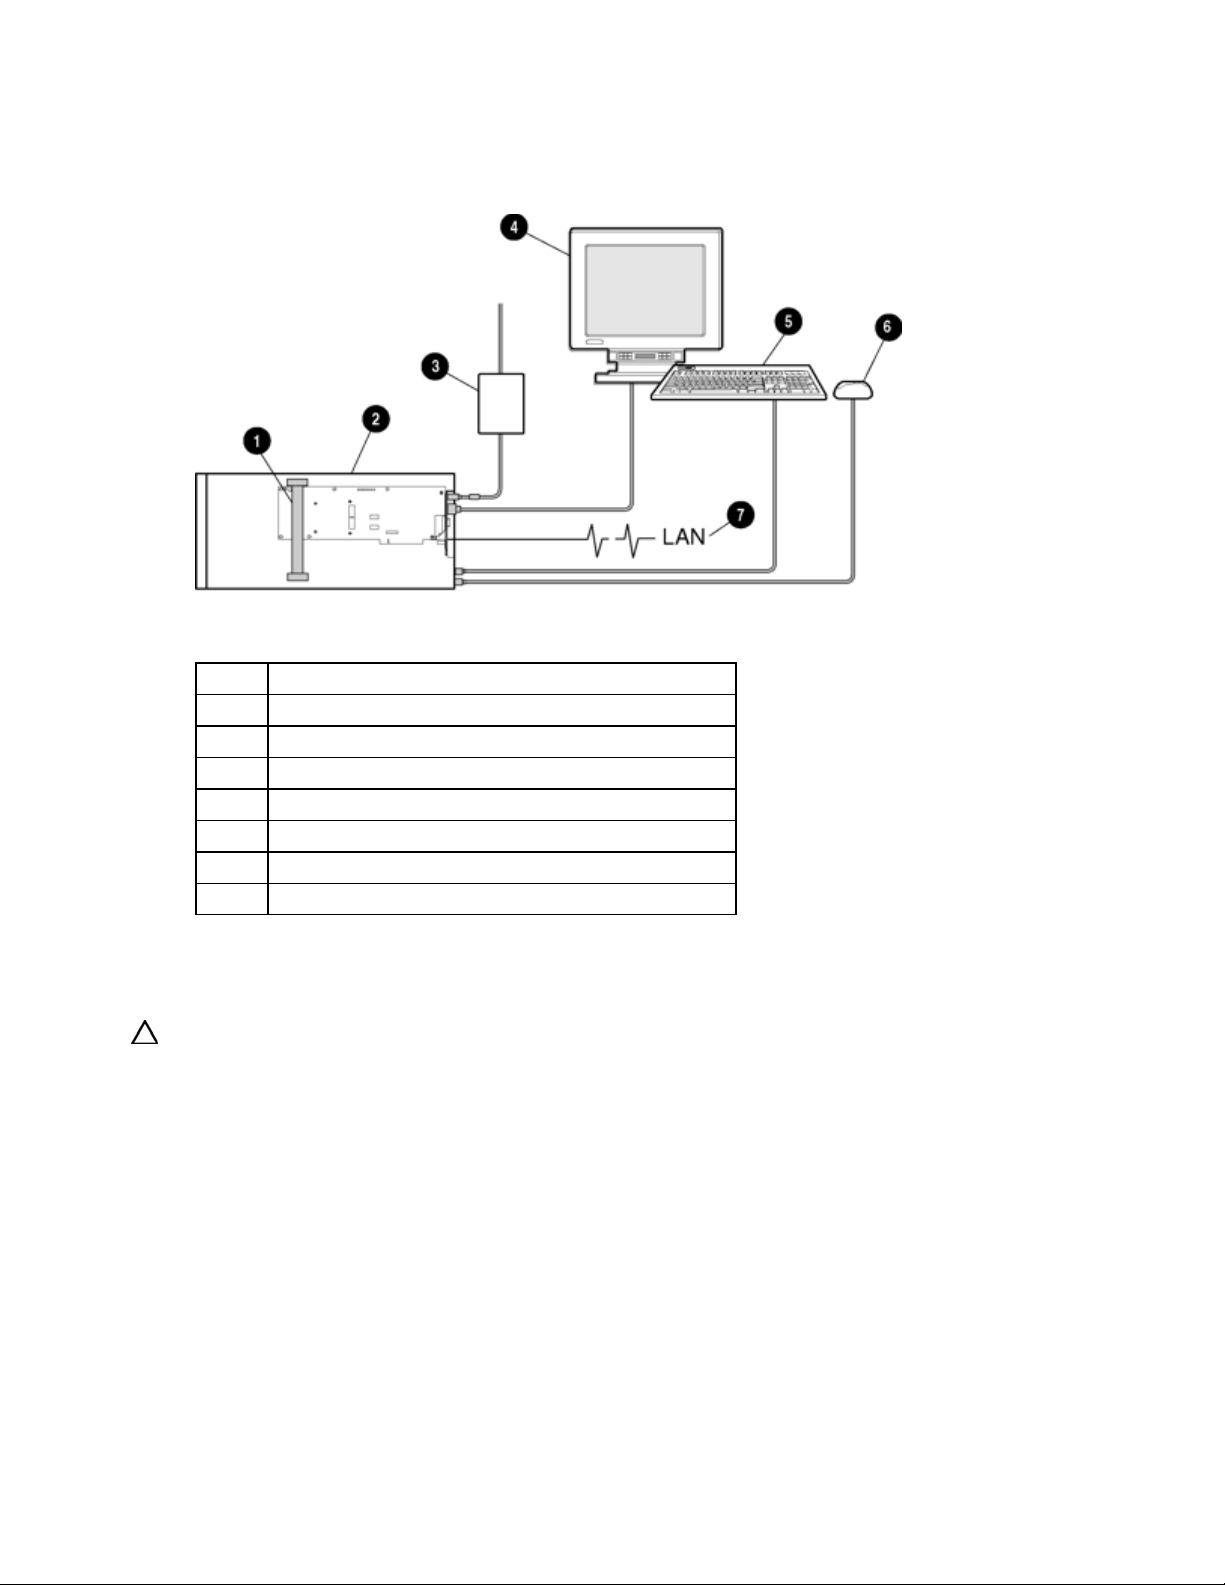
For servers that use the keyboard/mouse adapter cable, RILOE II connects to the host server, peripheral
devices, power source, and LAN.
Item Description
1 RILOE II installed in a server
2 AC power adapter connected to RILOE II
3 Monitor connected to RILOE II
4
5
6 Keyboard/mouse adapter cable
7 LAN connected to RILOE II
Keyboard connected to RILOE II keyboard/mouse
adapter cable
Mouse connected to the RILOE II keyboard/mouse
adapter cable
Installing RILOE II in the server
CAUTION: To prevent damage to electrical components, properly ground the server before beginning any
installation procedure. Improper grounding can cause electrostatic discharge.
1. If you are installing RILOE II in a shared EISA/PCI slot, attach the PCI extender bracket to the board
before installing the board in the server. The PCI extender bracket is not needed when installing the
board in PCI-only slots.
Installing the RILOE II 12
Page 13
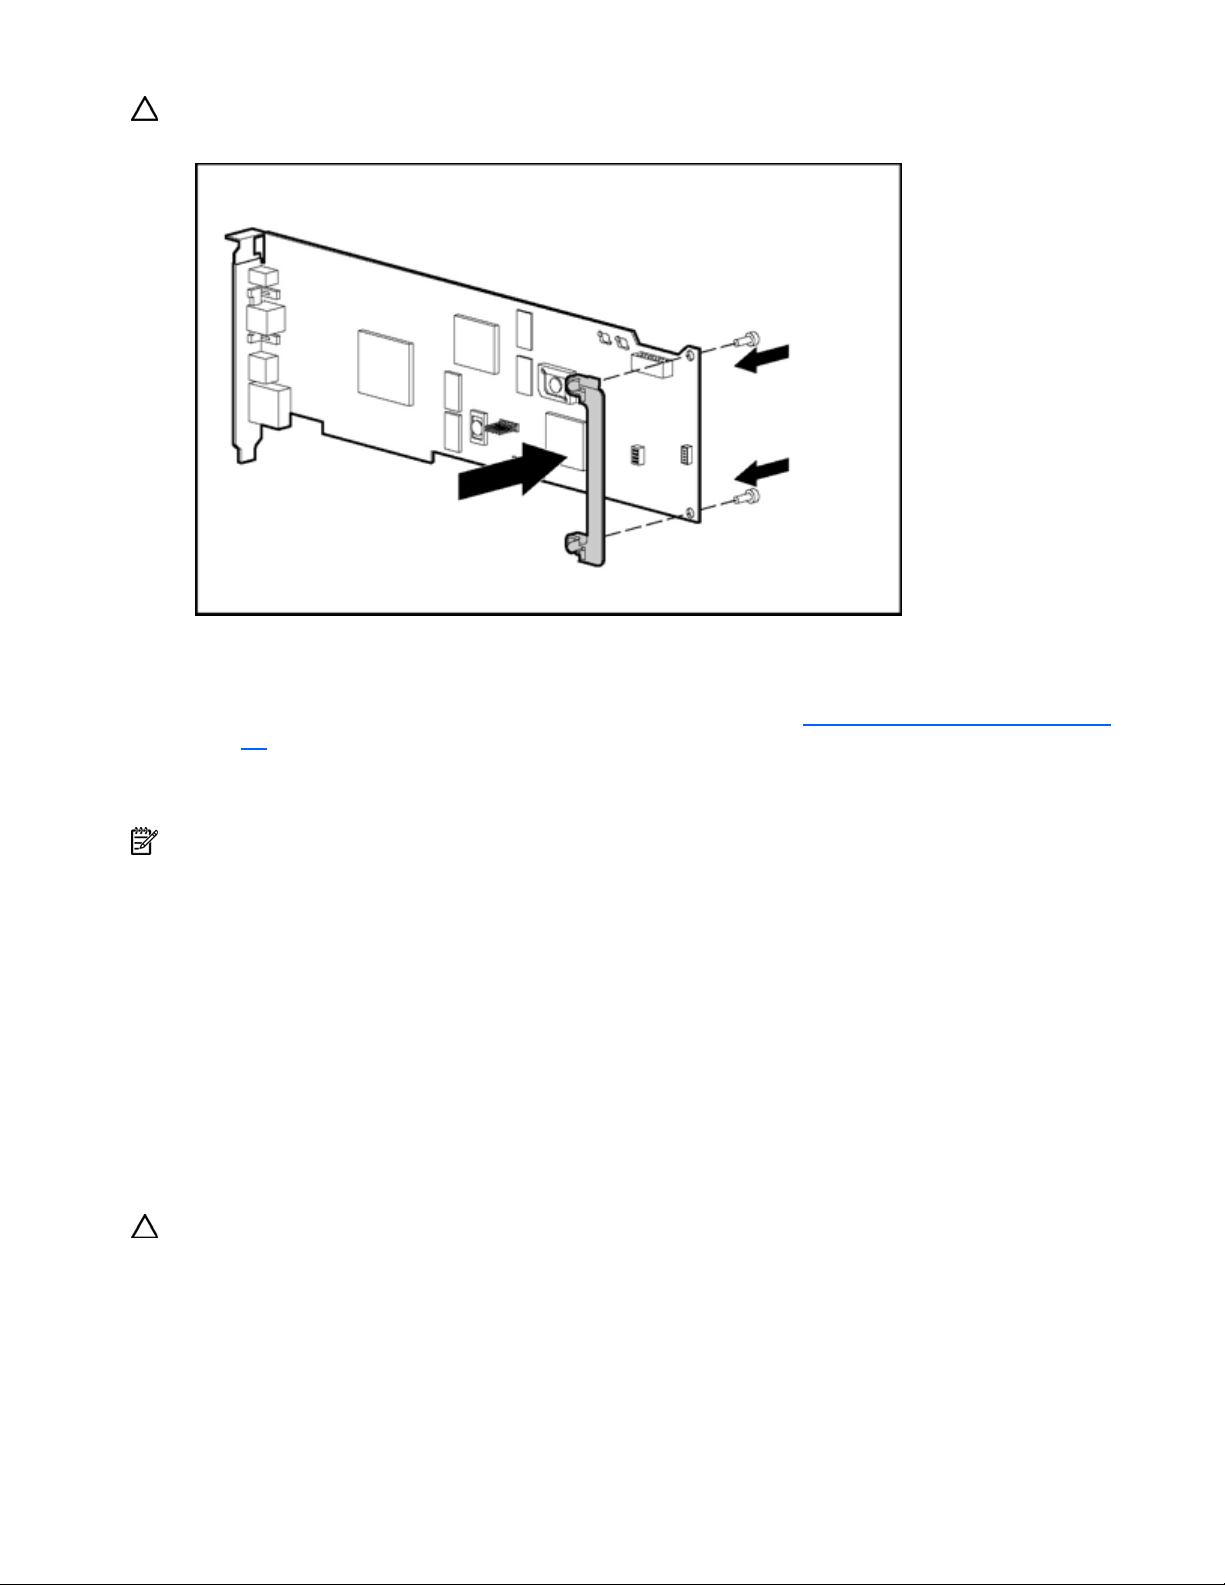
CAUTION: The screws shown are self-tapping, and some amount of force is required for installation. Use
caution when installing the screws to prevent damage to the RILOE II.
The extender should extend past the right edge of the board.
2. If you are installing RILOE II in a server that was previously configured with a RILOE and the server is
running a Windows®-based operating system, upgrade the systems management driver with the
Advanced System Management Driver found on the HP website (http://www.hp.com/servers/lights-
out). The systems management driver must be upgraded before installing RILOE II in the server.
3. Power down the server and disconnect all power cords to remove power from the server.
4. Disassemble the server.
NOTE: Refer to the server documentation for instructions on disassembling the server to install an option
board.
5. Select an appropriate PCI slot. See the "Server PCI Slot and Cable Matrix (on page 174)" for more
information. RILOE II can be server-slot specific.
6. Loosen the retaining screw and remove the slot cover. If RILOE II is being installed in a hot-plug slot,
release the slot lever and remove the slot cover.
7. Press the RILOE II board firmly into the slot.
8. Secure the board in place with the retaining screw, or close the hot-plug slot lever, as appropriate.
9. Disable the onboard video, if required for the server. See the "Server PCI Slot and Cable Matrix (on
page 174)" for more information.
Installing Internal Cables
CAUTION: Using the external mouse/keyboard cables with the internal cables causes conflicts with mouse
and keyboard functions.
The following describes:
• installing a Virtual Power button cable (4-pin) (on page 14)
• installing a Remote Insight cable (16-pin) (on page 14)
• installing a Remote Insight cable (30-pin) (on page 14)
Installing the RILOE II 13
Page 14

Installing a Virtual Power Button cable (4-pin)
To enable the Virtual Power Button feature of the RILOE II on servers that use a four-pin connector on the
server system board, install the Virtual Power Button cable (4-pin) (PN 160011-001):
1. Power down the server and disconnect all power cords to remove power from the server.
2. Connect the four-pin connector on the cable to the Virtual Power Button cable connector, located on
the rear of the RILOE II.
3. Connect the four-pin connector on the other end of the cable into the four-pin connector on the server
system board.
IMPORTANT: Be sure that you do not connect the Virtual Power Button cable to the speaker connection on
the server system board.
NOTE: For detailed instructions on the location of the connector on the server system board, refer to the
documentation provided with the server.
4. Refer to the server documentation to reassemble the server.
Installing a Remote Insight cable (16-pin)
To install the Remote Insight cable (16-pin) (P/N 177634-001):
1. Power down the server and disconnect all power cords to remove power from the server.
2. Connect the 16-pin connector on the Remote Insight internal cable to the Remote Insight connector
(16-pin), located on the edge of the board.
3. Connect the 16-pin connector on the other end of the Remote Insight internal cable to the 16-pin
Remote Insight connector on the server system board.
NOTE: For detailed instructions on the location of the connector on the server system board, refer to the
documentation provided with the server.
4. Refer to the server documentation to reassemble the server.
Installing a Remote Insight cable (30-pin)
To install the Remote Insight cable (30-pin) (P/N 241793-010):
1. Power down the server and disconnect all power cords to remove power from the server.
2. Connect the 30-pin connector on the Remote Insight cable to the Remote Insight connector (30-pin),
located on the edge of the board.
3. Connect the 30-pin connector on the other end of the Remote Insight cable to the 30-pin Remote
Insight connector on the server system board.
NOTE: For detailed instructions on the location of the connector on the server system board, refer to the
documentation provided with the server.
4. Refer to the server documentation to reassemble the server.
Connecting external cables to RILOE II
After installing RILOE II in your server, connect the external cables. During normal operation, the RILOE II
passes the keyboard and mouse signals to the server and functions as the primary video controller. This
configuration allows the following operations to occur:
• Transparent substitution of a remote keyboard and mouse for the server keyboard and mouse
Installing the RILOE II 14
Page 15
•
Saving of video captures of reset sequences and failure sequences in the RILOE II memory for later
replay
• Simultaneous transmission of video to the server monitor and to a Remote Console monitor
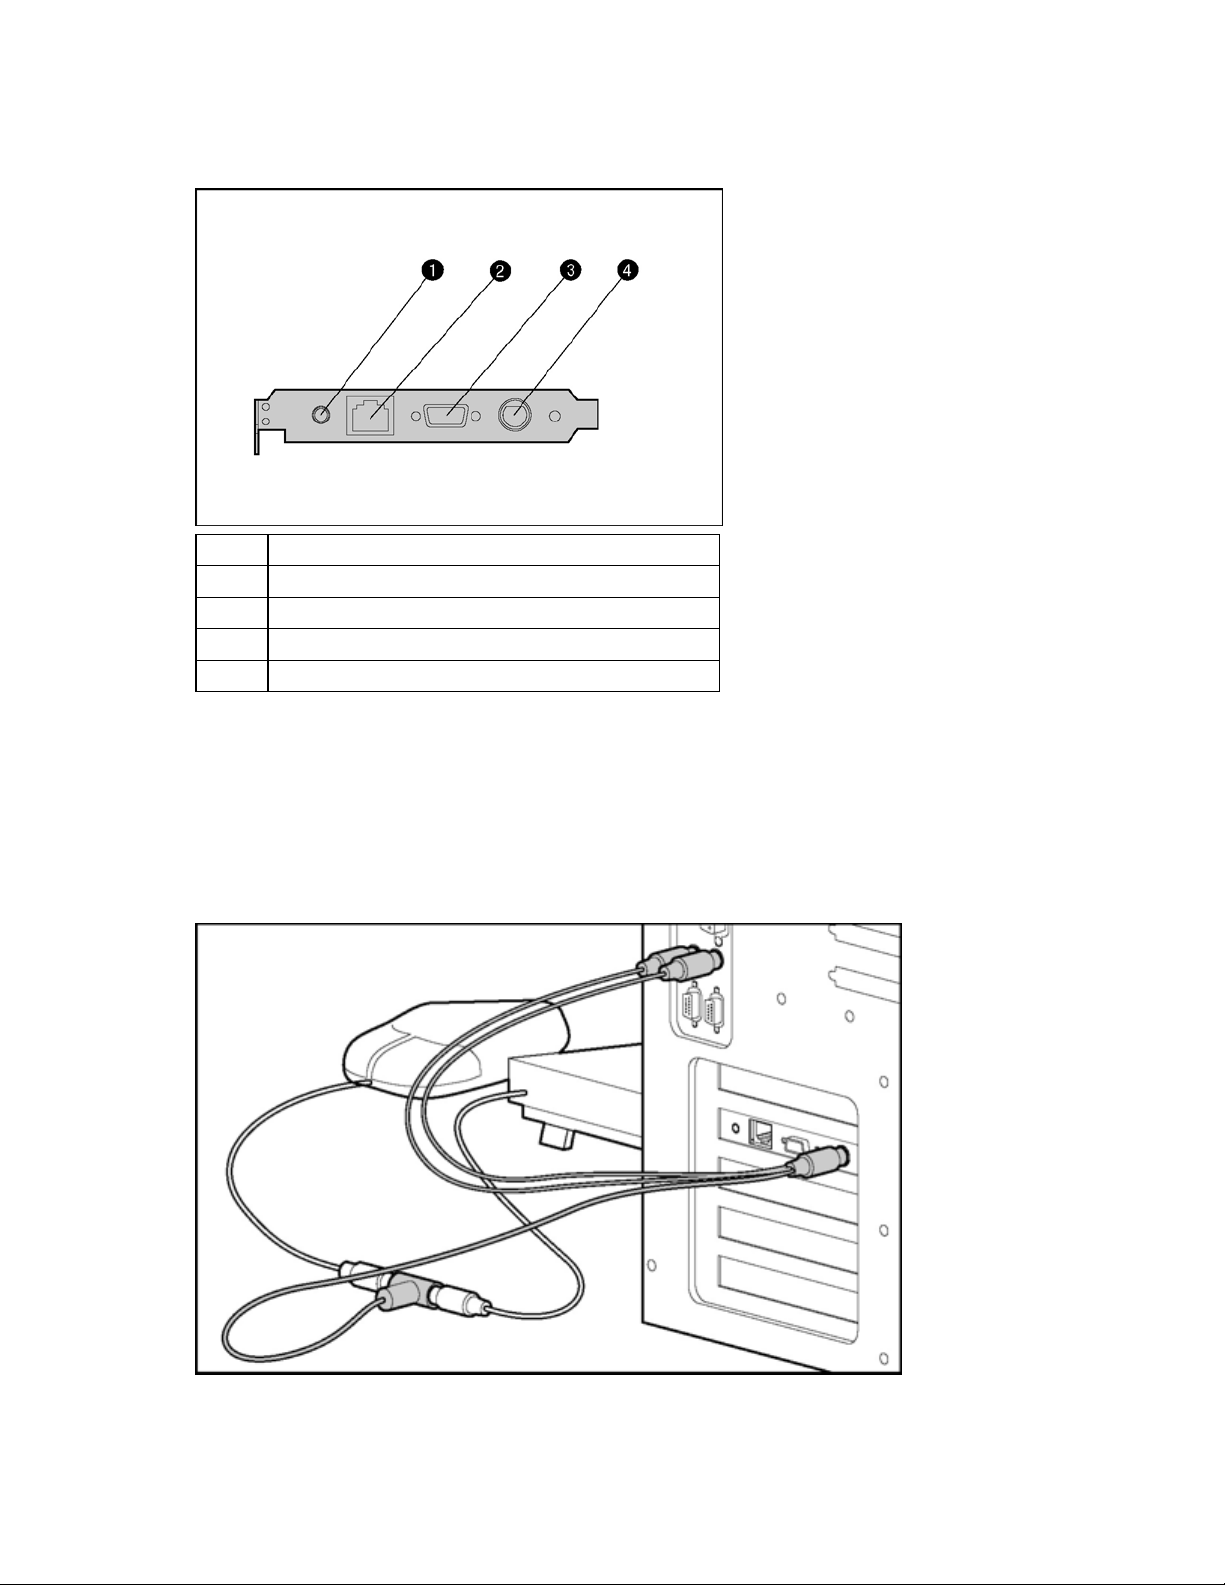
Item Description
1 AC power adapter connector
2 LAN connector
3 Video connector
4 Keyboard/mouse connector
Keyboard/mouse adapter cable connection
The keyboard and mouse signals must pass through RILOE II. For more information, See the
"Keyboard/Mouse Adapter cable configuration (on page 11)" section.
Some servers use a Remote Insight cable for the keyboard and mouse and do not require you to use the
keyboard/mouse adapter cable. See the "Server PCI Slot and Cable Matrix (on page 174)" section to
see if your server requires the keyboard/mouse cable.
To connect the keyboard/mouse cable:
Installing the RILOE II 15
Page 16
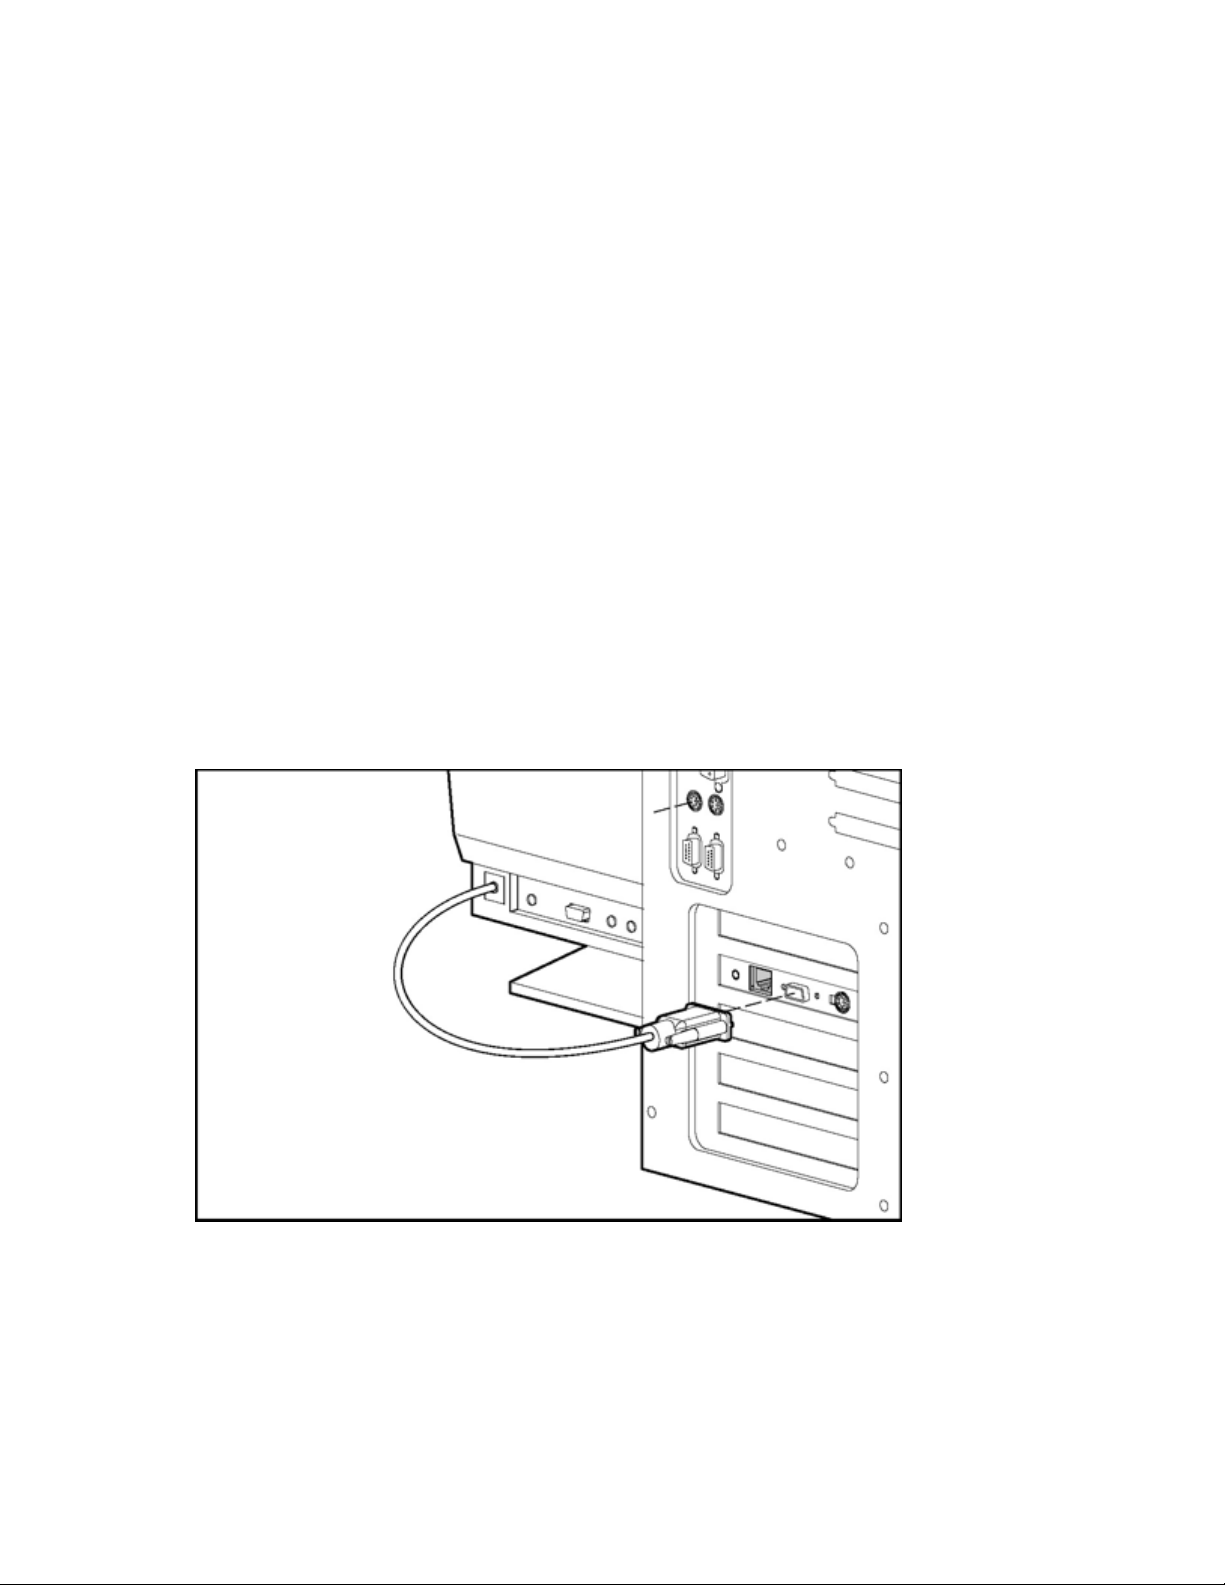
1.
Disconnect the keyboard and mouse cables from the server.
2. Connect the keyboard and mouse cables to the color-coded T-shaped keyboard/mouse connector of
the RILOE II keyboard/mouse adapter cable, as shown.
3. Connect the color-coded plugs of the keyboard mouse adapter cable to the keyboard and mouse
connectors of the server.
4. Connect the black plug of the keyboard/mouse adapter cable to the RILOE II keyboard/mouse
connector.
Headless server deployment
For headless server deployment, you do not have to connect the physical keyboard or mouse device to
the server. However, to have remote keyboard and mouse capabilities, you must use the keyboard/mouse
adapter cable provided with the RILOE II, the Remote Insight cable (16-pin), or Remote Insight cable (30pin).
Monitor cable connection
To use a monitor with a server that has RILOE II installed, connect the monitor to the RILOE II video
connector.
RILOE II incorporates the ATI RAGE XL video controller to ensure that a compatible controller is available
for Remote Console operation. Adding RILOE II to a Windows® server replaces the embedded video
controller of the server with the ATI RAGE XL video controller. Windows® loads a generic video driver to
support the RILOE II video controller. The generic video driver works but lacks support for the ATI RAGE XL
features.
For headless server deployment, do not connect a monitor to the server or to the RILOE II video connector.
To connect the monitor signal cable:
1. Disconnect the monitor signal cable from the server monitor connector.
2. Connect the monitor signal cable to the RILOE II video connector.
3. If you are installing RILOE II in a server running Microsoft® Windows NT® 4.0, install the latest ATI
RAGE XL driver from the PSP for Microsoft® Windows NT® 4.0 located on the SmartStart CD.
For RILOE II to perform correctly, some servers require disabling the server onboard video. See the slot
matrix ("Server PCI Slot and Cable Matrix" on page 174) for a list of servers that require disabling the
Installing the RILOE II 16
Page 17
server onboard video. For instructions on disabling the server onboard video, See the documentation
provided with the server.
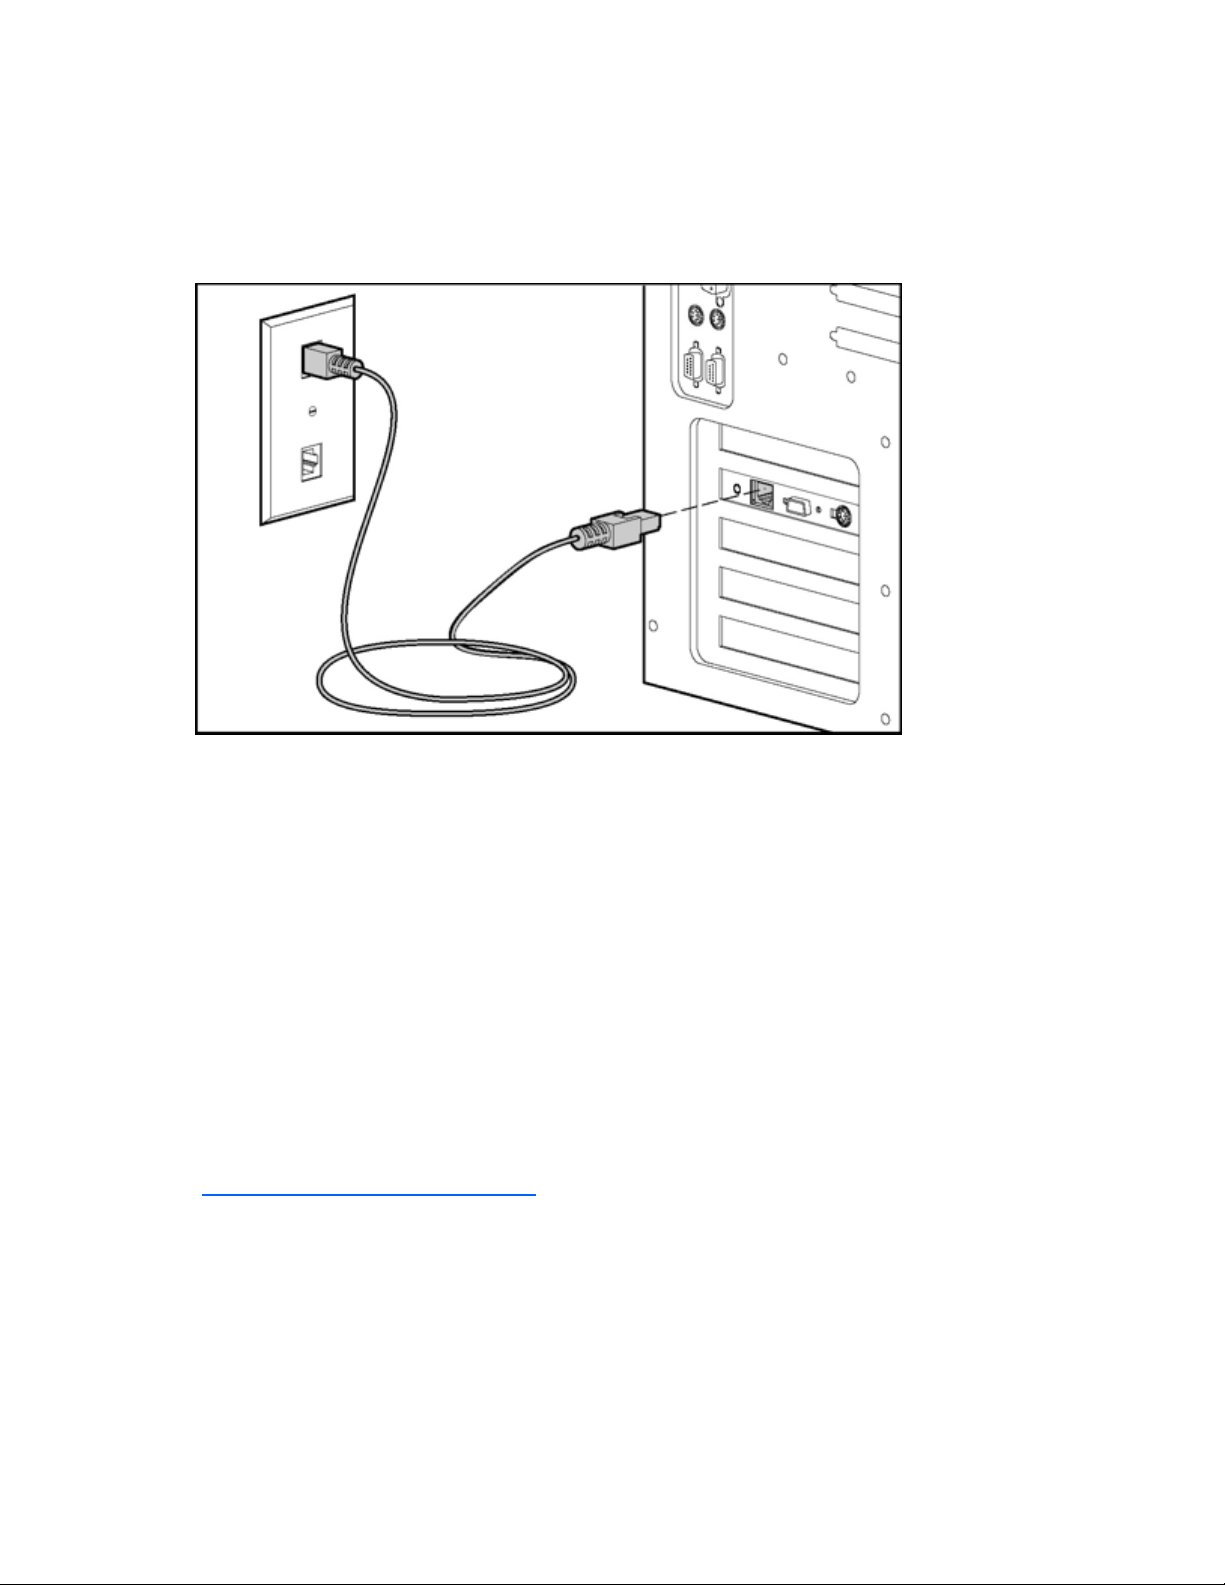
LAN cable connection
To access RILOE II using TCP/IP across a 10-MB or 100-MB Ethernet network, connect one end of the
LAN cable to the LAN connector on RILOE II to an active network jack.
The green LED indicator that is located close to the AC power adapter connector indicates the speed of
the connection. If the LED indicator is on, then the connection is 100-MB. If the LED is off, then the
connection is 10-MB.
The green LED indicator that is located close to the video connector indicates a link. If the LED is on, then
a connection is established.
AC power adapter connection
When the AC power adapter is connected, RILOE II has access to power that is independent of the main
server power. To increase server manageability, HP recommends connecting the AC power adapter to a
power circuit that is separate from that of the server.
HP ProLiant CL, DL, and ML servers that use the Remote Insight cable (16- or 30-pin) do not require the use
of the AC power adapter.
The HP ProLiant ML330, ProLiant ML330e, and ProLiant DL760 servers require the installation of the
power adapter included in RILOE II kit. For detailed information, See the documentation provided with the
server. For a complete list of servers that require the AC power adapter, See the HP website
(http://www.hp.com/servers/lights-out
).
Installing the RILOE II 17
Page 18
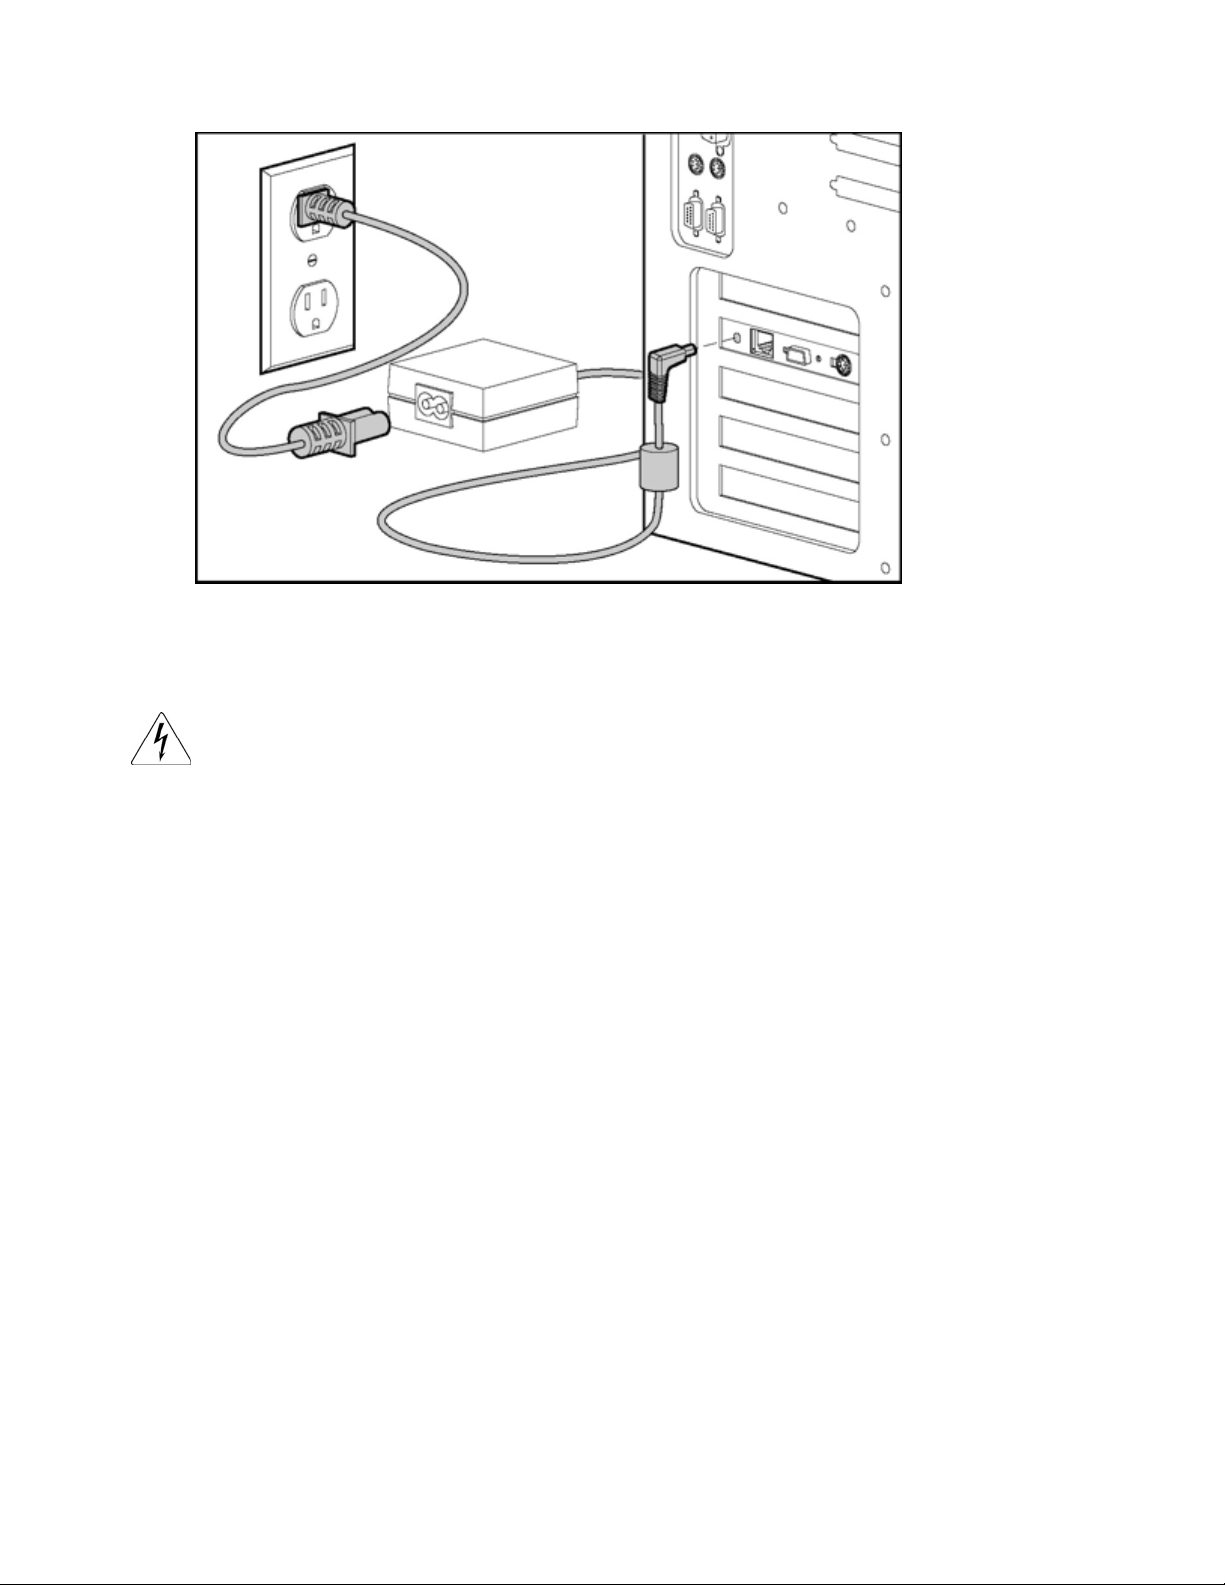
Connect the AC power adapter cable as shown.
Powering up the server
1. Plug the AC main power cord into the server and then into a grounded AC outlet.
WARNING: To reduce the risk of electric shock or damage to the equipment:
• Disconnect power from the system by unplugging all power cords from the power
supplies.
• Do not disable the power cord grounding plug. The grounding plug is an important
safety feature.
• Plug the power cord into a grounded (earthed) electrical outlet that is easily
accessible at all times.
2. Turn on any peripheral devices attached to the server.
3. Turn on the server.
Installing the RILOE II 18
Page 19

Configuring the RILOE II
In this section
Configuration options ............................................................................................................................. 19
Installing RILOE II device drivers............................................................................................................... 20
Disabling DNS/DHCP ............................................................................................................................ 21
Configuration options
After you have installed RILOE II in the server and completed all necessary peripheral connections,
configure RILOE II.
RILOE II offers two configuration options:
• Remote setup allows you to configure RILOE II from the Remote Console through a browser interface.
• The ROM-based setup utility F8 (RBSU F8) allows you to configure RILOE II during server boot-up.
RBSU F8 is useful for configuring servers that do not use DNS/DHCP. RBSU F8 is available every
time the server is booted. RBSU F8 cannot run remotely.
Regardless of the configuration method you use, familiarize yourself with all the configuration parameters.
Use the user guide to determine what parameters are required to set up RILOE II. Leave parameters set to
default values unless you know the parameter should be changed for your environment. Before starting
RBSU F8, record any required values for your installation.
Some servers contain DIP switches on the system board to control certain security settings. Before
beginning configuration, if the server is equipped with a Configuration Lock Switch, set this switch to off
(unlocked). See the documentation or hood labels that shipped with the server for more information about
the Configuration Lock Switch. When configuration is complete, return the switch to the on (locked)
position.
Remote setup
Remote setup allows you to configure the RILOE II from the Remote Console.
1. Using a standard Web browser, access the RILOE II from a remote network client and provide the
default DNS name, user name, and password on the network settings tag supplied with the board.
2. When you successfully log on to the RILOE II, you will be able to change the default values of the
network and user settings through the Web browser interface of the RILOE II. You will also be able to
install operating system drivers and Insight Manager agents on the remote host server using the
graphical Remote Console.
ROM-Based Setup Utility F8
RBSU F8 allows you to set up the RILOE II during server boot up. However, RBSU is not accessible
through the RILOE II Remote Console. It can only be accessed locally at the server.
1. Restart or power up the server.
2. Press the F8 key to enter RBSU when the cursor flashes and the RILOE II prompt displays on the
screen.
Configuring the RILOE II 19
Page 20

3.
Make and save any necessary changes to the RILOE II.
4. Exit the RBSU.
SmartStart setup of RILOE II
Use RBSU F8 during SmartStart to configure the RILOE II. Configuring the RILOE II using SmartStart is not
an option.
Installing RILOE II device drivers
The RILOE II Management Interface Driver enables system software, such as SNMP Insight Agents and the
Terminal Services pass-through service, to communicate with RILOE II.
The device drivers required to support RILOE II are part of the PSP located on the SmartStart CD or the,
Management CD, or on the HP website (http://www.hp.com/servers/lights-out
All the support drivers for your server and RILOE II can be downloaded from the HP website
(http://www.hp.com/servers/lights-out
To download the device drivers:
1. Click the RILOE II graphic.
2. Select Software and Drivers.
).
).
Microsoft device driver support
The device drivers that support the RILOE II are part of the PSP that is located on the HP website
(http://www.hp.com/support
) or on the SmartStart CD. Before you install the Windows® drivers, obtain
the Windows® documentation and the latest Windows® Service Pack.
RILOE II prerequisite files:
• CPQCIDRV.SYS provides the RILOE II Management Interface Driver support.
• CPQASM2.SYS, SYSMGMT.SYS, and SYSDOWN.SYS provide the RILOE II Advanced Server
Management Controller Driver support.
PSP for Microsoft® Windows® products includes an installer that analyzes system requirements and
installs all drivers. The PSP is available on the HP website (http://www.hp.com/support
SmartStart CD.
To install the drivers in the PSP:
1. Download the PSP from the HP website (http://www.hp.com/support).
2. Run the SETUP.EXE file included in the download, and follow the installation instructions.
For additional information about the PSP installation, read the text file included in the PSP download.
Novell NetWare device driver support
The device drivers required to support RILOE II are part of the PSP that is located on the SmartStart CD
and the HP website (http://www.hp.com/support
analyzes system requirements and installs all drivers.
) or on the
).The PSP for Novell NetWare includes an installer that
RILOE II prerequisite files:
• The CPQHLTH.NLM file provides the Health Driver for Novell NetWare.
• The CPQCI.NLM file provides RILOE II Management Interface Driver support.
Configuring the RILOE II 20
Page 21

When updating RILOE II drivers, be sure RILOE II is running the latest version of RILOE II firmware. You
can obtain the latest version as a Smart Component from the HP website
(http://www.hp.com/servers/lights-out
).
To install the drivers download the PSP from the HP website (http://www.hp.com/support
server. After downloading the PSP follow the Novell NetWare component installation instructions to
complete the installation. For additional information about the PSP installation, read the text file included
in the PSP download.
When using Novell NetWare 6.X, use the RAGE-XL video driver that is provided by the operating system
for best results.
Linux device driver support
You can download the PSP files containing the RILOE II driver, the foundation agents, and health agents
from the HP website (http://www.hp.com/support
II driver are available on the website. The HP Management Agents for Linux are:
• ASM package (hpasm) which combines the health driver, IML viewer, foundation agents, health
agent, and standard equipment agent into one package.
• RSM package (hprsm) which combines the RIB driver, rack daemon, RIB agent, and rack agent into
one package.
To load the health and RILOE II driver packages, use the following commands:
rpm –ivh hpasm-d.vv.v-pp.Linux_version.i386.rpm
rpm –ivh hprsm-d.vv.v-pp.Linux_version.i386.rpm
where d is the Linux distribution and version and
vv.v-pp are version numbers.
) to a NetWare
). The instructions on how to install or update the RILOE
For additional information, refer to the Software and Drivers website (http://www.hp.com/support
To remove the health and RILOE II drivers, use the following commands:
rpm –e hprsm
rpm –e hpasm
For additional information, refer to the Software and Drivers website (http://www.hp.com/support
Disabling DNS/DHCP
HP recommends using DNS/DHCP with the RILOE II to simplify installation. In the event that DNS/DHCP
cannot be used, use the following procedure to disable DNS/DHCP and configure the network settings:
1. Restart or power up the server.
2. Press the F8 key to enter the RBSU when the cursor flashes and the RILOE II prompt displays on the
screen.
NOTE: Use the arrow keys to highlight selections.
3. Select Network, DNS/DHCP, and press the Enter key. The Network Autoconfiguration
screen displays.
4. Select DHCP Enable and press the space bar to turn off DHCP. Be sure that DHCP Enable is set
to off and press the F10 key to save the changes.
NOTE: It will take a few minutes for the board to save the network changes and to reset.
).
).
Configuring the RILOE II 21
Page 22

5.
Select Network, NIC, and TCP/IP, and press the Enter key. The Network Configuration
screen displays.
6. Configure your network settings.
7. Press the F10 key to save the changes.
NOTE: It will take a few minutes for the board to save the network changes and to reset.
8. Exit the RBSU.
Configuring the RILOE II 22
Page 23

Using the RILOE II
In this section
Accessing RILOE II for the first time........................................................................................................... 23
Features of the RILOE II ........................................................................................................................... 25
Managing the user and configuration settings of the RILOE II....................................................................... 25
Using the Remote Console....................................................................................................................... 35
Terminal Services pass-through option....................................................................................................... 41
Using virtual devices............................................................................................................................... 45
Resetting the RILOE II to the factory default settings..................................................................................... 57
Getting help .......................................................................................................................................... 58
Pocket PC access with RILOE II................................................................................................................. 58
Accessing RILOE II for the first time
RILOE II is preconfigured with a default user name, password, and DNS name. A network-settings tag that
shows the default values is attached to the board. Use these values to access the board remotely from a
network client using a standard browser. For security reasons, HP recommends that you change these
default settings after accessing RILOE II for the first time.
Default values:
• User name: Administrator
• Password: The last eight digits of the serial number
• DNS name: RIBXXXXXXXXXXXX, where the 12 Xs are the MAC address of RILOE II
NOTE: User names and passwords are case sensitive.
Using the RILOE II 23
Page 24
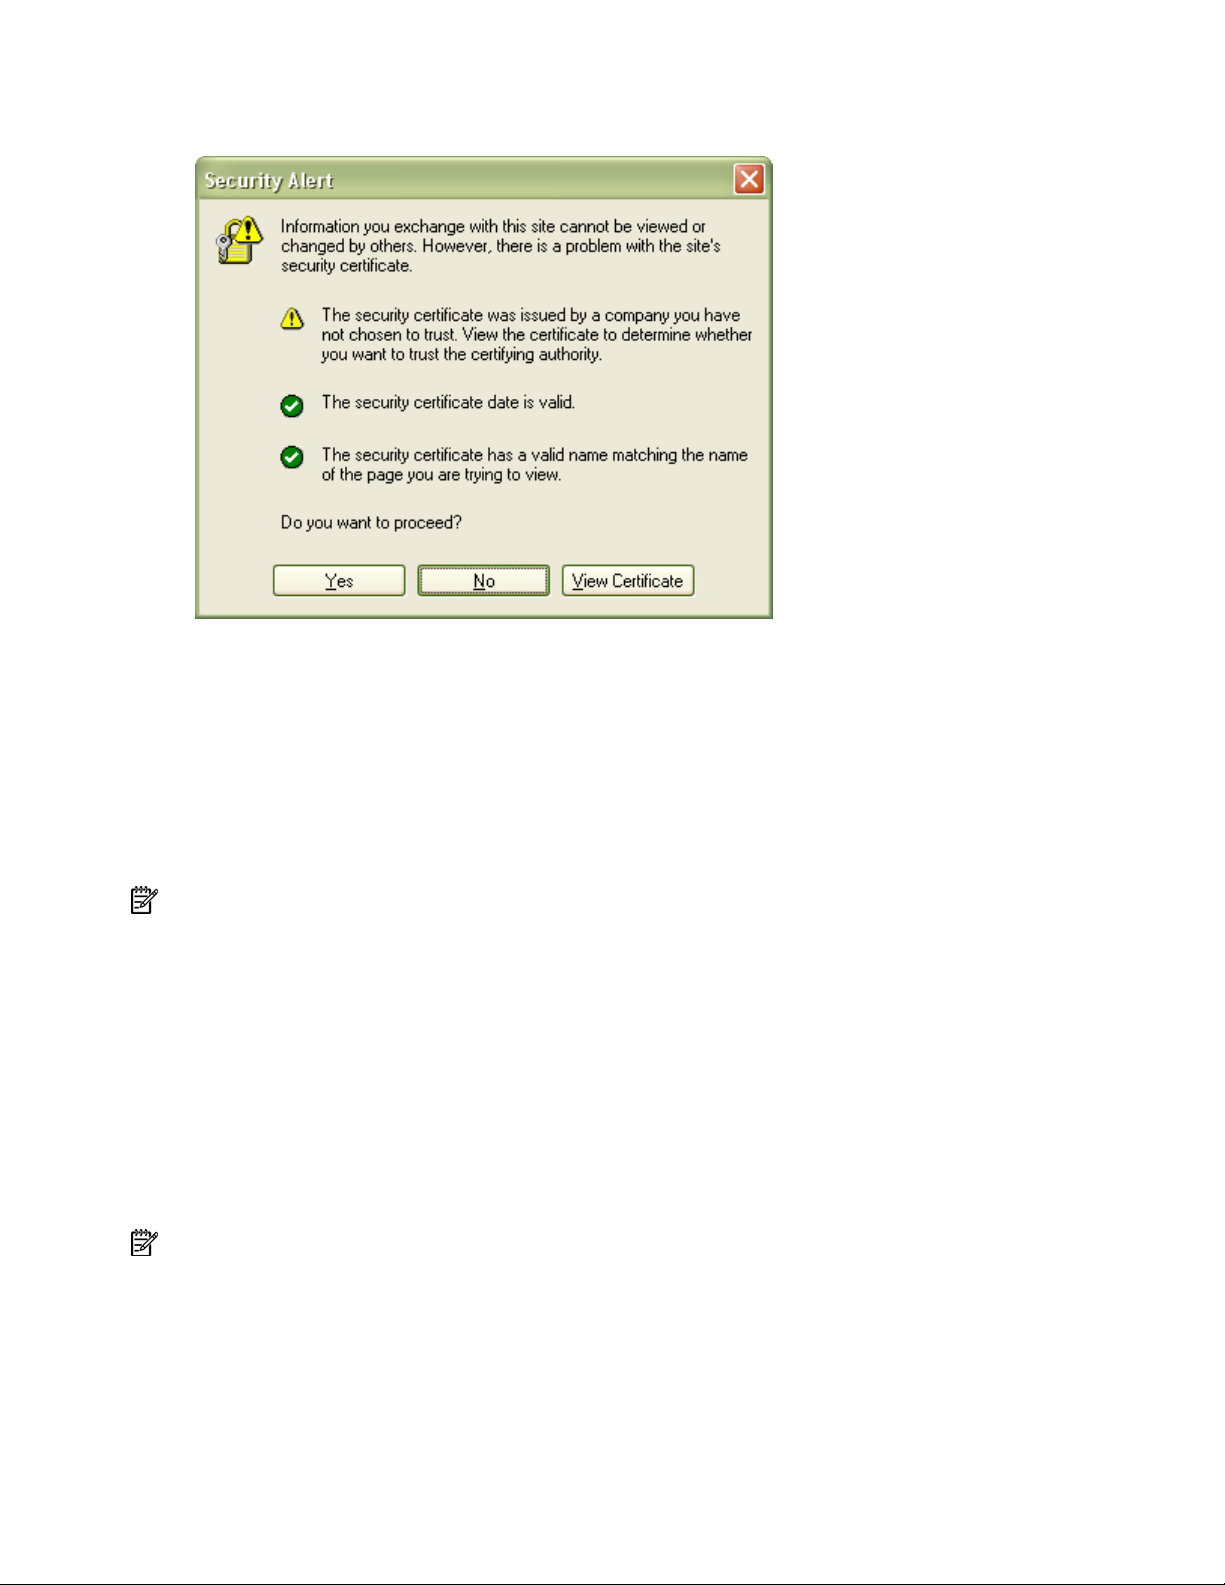
1.
Enter RILOE II IP address or DNS name in the address bar of the browser. A Security Alert page
appears.
2. Perform one of the following actions:
• Click Yes to continue to the login page of RILOE II.
• Click No to return to the Welcome page of RILOE II.
• Click View Certificate to view the certificate information. Installing the certificate to your
browser prevents the security alert message from displaying in the future. However, security alert
messages reappear when the certificate is removed from your browser, the firmware is
upgraded, the board is rebooted, or the name of RILOE II board is changed.
3. To install the certificate, proceed to step 4. If you do not want to install the certificate, proceed to
step 5.
NOTE: The Group Administration function, access to the RILOE II Web interface, and keystroke access to
the Remote Console are encrypted with SSL security using a 128-bit RC4 cipher.
4. To install the certificate to your browser:
a. Click Install Certificate. The Certificate Manager Import Wizard starts.
b. Click Next.
c. Click Next to allow the browser to automatically select the certificate store when the Certificate
Store page appears.
d. Click Finish when the Completing the Certificate Manager Import Manager Wizard appears.
e. Click Yes to confirm the installation of the certificate when the confirmation page appears.
5. At the login page, use the default user name and password from the network settings tag and click
OK.
NOTE: On the RILOE II login page, the maximum length of the Login Name is 40 characters for local
users. For Directory Services users, the maximum length of the Login Name is 256 characters.
After the default user name and password are verified, the Remote Insight Status Summary page appears.
The Remote Insight Status Summary page provides general information about the RILOE II, such as the
user currently logged on, server name and status, Remote Insight IP address and name, and latest log
entry data. The summary home page also shows whether RILOE II has been configured to use HP webbased Management and Insight Management Web agents.
Using the RILOE II 24
Page 25

Features of the RILOE II
The RILOE II screen displays the following tabs:
• System Status
This section provides information about the server and the RILOE II. The information includes server
status, RILOE II status, survey information, the Remote Insight Event Log, and the Integrated
Management Log.
• Remote Console
This section gives you access to the Remote Console and enables you to define keystroke sequences
that are transmitted to the remote host server at the press of a hot key. It also provides reset sequence
playback and Windows® 2003 EMS access.
• Virtual Devices
This section provides remote Virtual Power Button, power cycle capabilities, remote
reset capabilities, Virtual Floppy Drive, Virtual Floppy Drive USB, and Virtual CD Drive USB.
• Administration
This section allows you to manage individualized settings for users, SNMP alerts, the network
environment, global security, certificates, and directory services settings. This section also includes
an option that enables you to upgrade the RILOE II firmware.
Managing the user and configuration settings of the RILOE II
The options available in the Administration section allow you to manage user settings, SNMP alerting
through integration with Insight Manager, security settings, and network environment settings. This section
User configurations and settings
also provides a firmware upgrade option that allows you to keep the RILOE II current.
In User Settings of the Administration section, you can add new users or modify a user's profile. A user
with administrator status can remotely add, delete, and modify the configurations of other Remote Insight
users.
Parameter Default value Definition
User Name Administrator
Login Name Administrator
Password
Enforced client IP
Address
A random, eightcharacter
alphanumeric string
that is factory
assigned
None
This parameter is the user's real name as it
appears in the user list and event log. It is not
the name used to log in. The maximum length
of the user name is 40 characters.
This is a case-sensitive name that the user must
provide to log in to RILOE II.
This is a case-sensitive password that the user
must provide to log in to RILOE II. In Security
Options, the minimum password length can
be assigned. The minimum password can be
from 0 to 40 characters. The default minimum
password length is eight characters.
This parameter specifies a specific IP address,
an IP address range, or a DNS name. Client
login attempts that do not meet the specified
requirements are rejected.
Using the RILOE II 25
Page 26

Parameter Default value Definition
Administer User Access Yes
This privilege allows a user to add, modify,
and delete user accounts. It also allows the
user to alter privileges for all users, including
granting all permissions to a user.
Configure RILOE Access No
This privilege enables a user to make changes
to RILOE II settings, such as network settings
and global settings, and to clear the event
log.
Login Access Yes
This setting grants or denies the user login
access. Login access can be used to create a
user who is a service provider and who
receives alerts from the board but does not
have login access to RILOE II.
Remote Console Access Yes
This privilege allows a user to remotely
manage the Remote Console of a managed
system, including video, keyboard, and
mouse controls.
Remote Server Reset
and Power Button
Yes
This privilege allows a user to power-cycle or
reset the host platform.
Sccess
Virtual media Yes
This privilege allows a user to use virtual
media on the host platform.
Adding authorized users
You can assign a different access level to each user. A user can have the administer access privilege,
which grants the ability to create, modify, or delete other users. Conversely, a user can be denied the
administer access privilege, as well as access to other features of the RILOE II.
The RILOE II supports up to 25 users. Login attempts are tracked and login failures are logged. You have
the option of generating alerts on a remote management system running Systems Insight Manager when
login attempts fail. The RILOE II supports all LAN-oriented security features and dynamic password
encryption.
To add a new user to the RILOE II:
1. Log in to the RILOE II using an account with administrator privileges.
2. Click User Settings on the Administration tab.
3. Click Add and complete the fields with the necessary information for the user being added.
4. When the user profile is complete, click Save User Information to return to the User Settings
screen.
NOTE: To clear the user profile form while entering a new user or to recover the user's original information,
click Restore User Information.
Modifying an existing user's profile
To modify an existing user's information:
1. Log in to the RILOE II using an account with administrator privileges.
2. Click User Settings on the Administration tab.
3. Select the user that you want to modify and click Modify.
4. Change the user information in the fields that require modification. Click Save User Information
to return to the User Settings screen.
Using the RILOE II 26
Page 27
NOTE: To clear the user profile form while entering a new user or to recover the user's original information,
click Restore User Information.
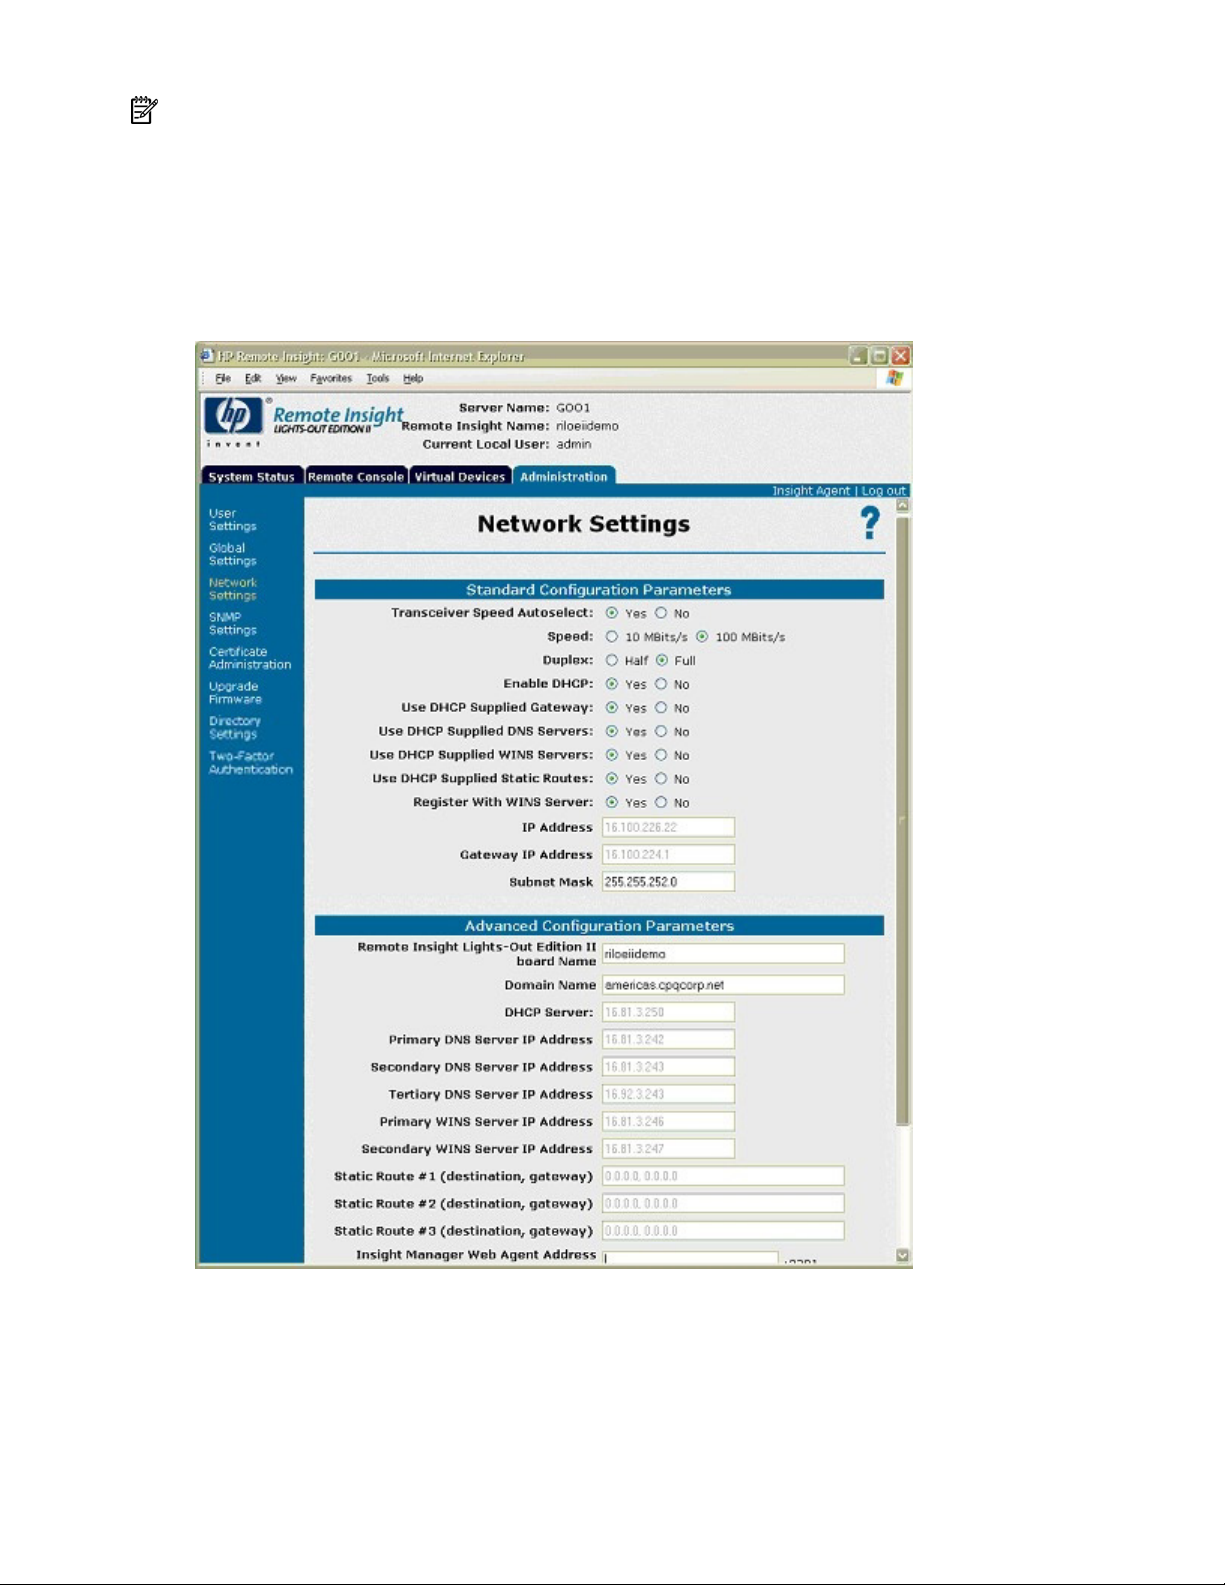
Network settings
The Network Settings option on the Administration tab enables you to view and modify the NIC IP
address, subnet mask, TCP/IP-related settings, and specify IP address or DNS name for web-based
management agents. You can enable or disable DHCP and, for servers not using DHCP, you can
configure a static IP address.
To change network settings for RILOE II:
1. Log in to the RILOE II using an account with administrator privileges.
2. Click Network Settings in the Administration tab.
3. Change the network settings as needed by typing in the fields. After completing parameter changes,
click Apply to save the changes.
Using the RILOE II 27
Page 28

When you click Apply, RILOE II restarts. During the restart process, the connection from the browser
to the board is terminated. To reestablish a connection, wait 60 seconds before launching another
browser session and logging in to RILOE II.
Parameter Default value Definition
Transceiver Speed
Yes
Autoselect
Speed Autoselect
Duplex Autoselect
Enable DHCP Yes
Use DHCP
Yes
Supplied gateway
Use DHCP
Yes
Supplied DNS
servers
Use DHCP
Yes
Supplied WINS
servers
Use DHCP
Yes
Supplied Static
Routes
Register with
Yes
WINS Server
IP Address N/A
Subnet Mask N/A
Gateway IP
N/A
Address
Autoselect detects the interface speed and sets the interface to
operate at 10 Mb/s or 100 Mb/s and at half or full duplex. If
necessary, you can set this parameter to No so you can manually
adjust the speed and duplex settings.
Use this parameter to assign 10-Mb/s or 100-Mb/s connection
speeds if Transceiver Speed Autoselect is not enabled.
Use this parameter to assign half or full duplex to the NIC if
Transceiver Speed Autoselect is not enabled.
This parameter enables you to select a static IP disables (No) or
enables the use of a DHCP server (Yes) to obtain an IP address for
the RILOE II subsystem.
You cannot set the RILOE II IP address and subnet mask if DHCP is
enabled.
Enabling DHCP allows you to configure the following DHCP options:
• Use DHCP Supplied Gateway
• Use DHCP Supplied DNS Servers
• Use DHCP Supplied WINS Servers
• Use DHCP Supplied Static Routes
• Use DHCP Supplied Domain Name
This parameter controls whether RILOE II uses the DHCP serversupplied gateway. If not, enter one in the Gateway IP Address box.
This parameter controls whether RILOE II uses the DHCP serversupplied DNS server list. If not, enter one in the
Primary/Secondary/Tertiary DNS Server boxes.
This parameter controls whether RILOE II will use the DHCP serversupplied WINS server list. If not, enter one in the
Primary/Secondary WINS Server boxes.
Toggles whether RILOE II will use the DHCP server-supplied static
route. If not, enter one in the Static Route #1, #2, #3 boxes.
RILOE II automatically registers with a WINS server. By default,
WINS server addresses are assigned by DHCP.
Use this parameter to assign a static IP address to RILOE II on your
network. By default, the IP address is assigned by DHCP.
Use this parameter to assign the subnet mask for the default
gateway. By default, the subnet mask is assigned by DHCP.
Use this parameter to assign the IP address of the network router that
connects RILOE II subnet to another subnet where the management
console resides. By default, the gateway is assigned by DHCP.
RILOE II Board
N/A
Name
Domain Name N/A
DHCP server N/A
Use this parameter to assign a unique name to RILOE II. This name
can be used, if DHCP and DNS are configured as the address to
connect to RILOE II instead of the IP address.
Enter the name of the domain in which RILOE II will participate. By
default, the domain name is assigned by DHCP.
This parameter is automatically detected if Enable DHCP is set to
Yes. You cannot change this parameter.
Using the RILOE II 28
Page 29
Parameter Default value Definition
Primary,
secondary, and
tertiary DNS server
Primary and
secondary WINS
server
Static routes #1,
#2, #3
Insight Manager
Web Agent
Address http://
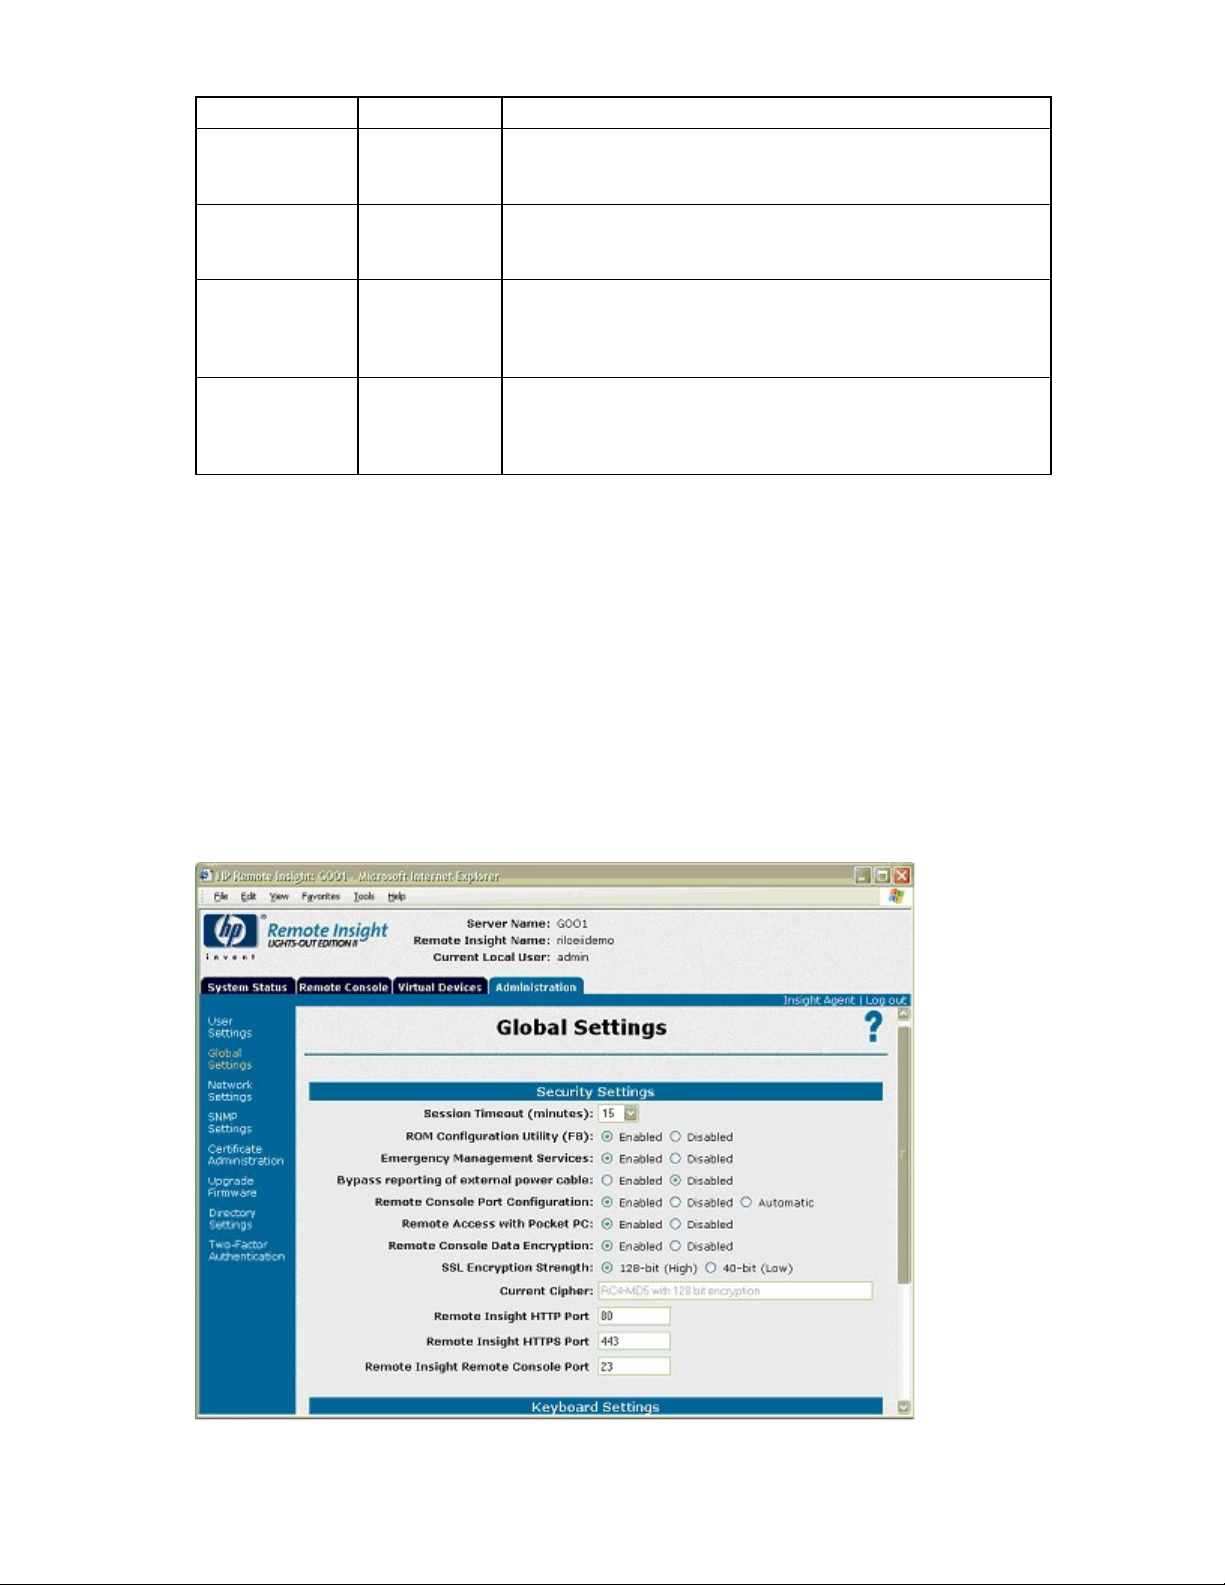
Global settings
The Global Settings option enables you to view and modify security settings for RILOE II. The Global
Settings page enables you to configure the Remote Console time-out and RILOE II ports to be used for the
RILOE II web server, Remote Console, and Virtual Media. These settings are applied globally, regardless
of the individual user settings.
N/A
N/A
N/A for both
the destination
and gateway
address
N/A
Use this parameter to assign a unique DNS server IP address on the
network. By default, the primary, secondary, and tertiary DNS
servers are assigned by DHCP.
Use this parameter to assign a unique WINS server IP address on
the network. By default, the primary and secondary WINS servers
are assigned by DHCP.
Use this parameter to assign a unique static route destination and
gateway IP address pair on the network. You can assign up to three
static route pairs. By default, the static routes are assigned by DHCP.
Use this parameter to assign the IP address of the host server. Port
number 2301 is automatically appended to the IP address to allow
access to the HP web-enabled Systems Management Agents from
within RILOE II user interface.
To change global settings for RILOE II:
1. Log in to RILOE II using an account that has the Configure RILOE II Settings privilege. Click
Administration.
2. Click Global Settings.
3. Change the global settings as needed by entering your selections in the fields.
After completing any parameter changes, click Apply to save the changes.
Using the RILOE II 29
Page 30

Parameter Default value Definition
Session Timeout
(minutes)
30 minutes
This parameter specifies how many minutes a session can
remain inactive before RILOE II the user is required to log in
again.
ROM configuration
utility (F8)
Enabled
This parameter enables or disables the use of the F8 key,
during POST, to access the Remote Insight ROM
Configuration Utility.
Emergency
Management Services
Bypass Reporting Of
External Power Cable
Enabled
Disabled
This parameter enables or disables the use of the Windows
.NET EMS through RILOE II.
This parameter determines if RILOE II reports whether or not
the external power cable is connected to the operating
system agent. If this settings is Enabled and there are no
other status problems, Insight Manager reports a green
status.
If this parameter is Disabled, RILOE II reports the true status of
the external power connector to the operating system agent.
Insight Manager reports RILOE II status as degraded if the
external connector is disconnected.
Remote Console Port
Configuration
Enabled
This parameter determines how the Remote Console port is
configured. There are three options:
• Enabled allows administrators to specify the Remote
Console port.
• Disabled prevents administrators from designating a
Remote Console port.
• Automatic uses the default port.
Remote Access with
Pocket PC
Remote Console Data
Encryption
Enabled
Enabled
This parameter enables or disables access to RILOE II through
a Pocket PC client.
This parameter determines if data communication with the
Remote Console is encrypted. Encryption (enabled) helps
keep your remote console session private on the network. If
you intend to use a standard telnet client to access a RILOE II,
this parameter must be disabled.
SSL Encryption
128-bit
Strength
Current Cipher N/A
This parameter displays the current cipher strength setting.
The most secure is 128-bit (High).
This parameter displays the encryption algorithm currently
being used to protect data during transmission between the
browser and RILOE II. The algorithm is negotiated by RILOE II
and the browser.
Remote Insight HTTP
80
Port
Remote Insight HTTPS
443
Port
Remote Insight
23
console Port
Host Keyboard Model US
The embedded web server in RILOE II is configured by
default to use port 80 for unencrypted communications.
The embedded web server in RILOE II is configured by
default to use port 443 for encrypted communications.
RILOE II Remote Console is configured by default to use port
23 for Remote Console communications.
This parameter enables you to specify the language model of
the keyboard during a Remote Console session.
Using the RILOE II 30
Page 31

Parameter Default value Definition
Level of Data
Returned
View XML Reply N/A
SNMP alerts and settings
In the Administration>SNMP Settings section, you can enable, disable, and test SNMP alerts. SNMP
alerts are forwarded from the host server and RILOE II to an Insight Manager console. The two types of
alerts are:
• Host OS Generated SNMP Traps—The Insight Management agents provided for each
supported network operating system generate these alerts. These agents must be installed on the host
server to receive these alerts. Alerts are sent to Insight Manager clients on the network and
forwarded asynchronously by RILOE II to users that have been configured to receive them.
• Remote Insight Board Alerts—These alerts are generated when RILOE II detects conditions that
are independent of the host server operating system. These alerts can be Insight Manager SNMP
traps or pager alerts. Alerts include major events, such as a host server power outage or host server
reset, and RILOE II events, such as a disconnected keyboard cable or an unauthorized login attempt.
Medium
This parameter configures how much data is returned to
Insight Manager.
• None returns no data.
• Low returns the current board status and the board type
(RILOE II).
• Medium returns the board status, the board type, and the
serial number.
• High returns the board status, the board type, the serial
number and several other pieces of information.
This parameter displays the XML reply sent to Insight
Manager. This parameter only displays when you use
Internet Explorer.
To enable alerts:
Using the RILOE II 31
Page 32

1.
Log in to the RILOE II using an account with administrator privileges.
2. Click SNMP Settings on the Administration tab.
3. Click Yes for the alert types that you want to receive.
4. Enter the IP addresses to send the alerts to in the SNMP Trap Destinations field.
5. Click Apply SNMP Settings.
Parameter Default Value Definition
SNMP Trap Alert
Destination(s)
N/A
Enter the IP address of the remote management PC that
will receive SNMP trap alerts from RILOE II. Up to three
IP addresses can be designated to receive SNMP
alerts. The maximum value for each address is 50
characters.
Forward Host OS
Generated SNMP
No
This parameter enables or disables forwarding of host
operating system generated SNMP traps.
Alerts
Send HP Remote
Insight Board
No
This parameter enables or disables sending of RIB
SNMP trap information.
SNMP traps
Enable SNMP
Pass-through
Status
Enabled
This parameter enables the system to pass SNMP
packets from the Insight Management Agent. When set
to No, all SNMP traffic is stopped and will not passthrough RILOE II.
SNMP Pass-through Status
When the SNMP Pass-through Status feature is enabled, RILOE II will accept SNMP packets from a
management station and pass them to the Insight Management Agents running on the server. The agents
on the server processes these SNMP packets and send the response back to RILOE II, which in turn
transmits these packets back to the management station. This helps the management station gather
information about the server even when the server network connection is not working.
When the SNMP Pass-through Status feature is disabled, RILOE II will not accept any SNMP packet from a
management station and thus will not forward these packets to the agents. So, the management software
can not get information or send commands to the agents running on the server if the server network
connection is not working.
Generating Test Alerts
Test alerts are generated through the Manage Alerts option in the Administration section. These
alerts include Systems Insight Manager SNMP traps and are used to verify the network connectivity of the
RILOE II in Systems Insight Manager.
To send out a test alert:
1. Click SNMP Settings on the Administration tab.
2. Click Send Test Trap. If a trap destination is not provided, an error message displays.
3. After generating the alert, a confirmation screen appears.
4. If the alert system is working correctly, an alarm screen displays advising you that an alert has been
received.
Disabling Alerts
1. Log in to the RILOE II using an account with administrator privileges.
2. Click SNMP Settings on the Administration tab.
Using the RILOE II 32
Page 33

3.
Click No for the alert types that you want to disable.
4. Click Apply SNMP Settings.
Two-Factor Authentication Settings
The Two-Factor Authentication Settings page displays the configuration of two-factor authentication
settings, the trusted CA certificate information, and provides a method of changing the configuration and
importing or deleting a trusted CA certificate.
The Enforce Two-Factor Authentication setting controls whether two-factor authentication is used for user
authentication during login. Selecting Yes for the Enforce Two-Factor Authentication setting will require
two-factor authentication. The No value disables the feature and allows login with user name and
password only. You cannot change the setting to Yes if a trusted CA certificate is not configured.
Changing the setting resets RILOE II saving the changes. To provide the necessary security, the following
configuration changes are made when two-factor authentication is enabled:
• Remote Console Data Encryption: Yes (Disables telnet access)
• Enable Secure Shell (SSH) Access: No
• Serial Command Line Interface Status: Disabled
If telnet, SSH, or Serial CLI access is required, re-enable these settings after two-factor authentication is
enabled. However, because these access methods do not provide a means of two-factor authentication,
only a single factor is required to access RILOE II with telnet, SSH or Serial CLI.
When two-factor authentication is enabled, access with the CPQLOCFG utility is disabled, because
CPQLOCFG does not supply all authentication requirements. However, the HPONCFG utility is functional,
because administrator privileges on the host system are required to execute the utility.
The Check for Certificate Revocation setting controls whether RILOE II uses the certificate CRL distribution
points attribute to download the latest CRL and check for revocation of the client certificate. If the client
certificate is contained in the CRL or if the CRL cannot be downloaded for any reason, access is denied.
The CRL distribution point must be available and accessible to RILOE II when Check Certificate Revocation
is set to Yes.
The Certificate Owner Field setting specifies which attribute of the client certificate to use when
authenticating with the directory. If SAN is specified, RILOE II extracts the User Principle Name from the
Subject Alternative Name attribute and then uses the User Principle Name when authenticating with the
Using the RILOE II 33
Page 34

directory, for example, username@domain.extension. If Subject is specified, RILOE II will derive the user's
distinguished name from the subject name attribute. For example, if the subject name is
/DC=com/DC=domain/OU=organization/CN=user, RILOE II will derive:
CN=user,OU=organization,DC=domain,DC=com.
The Certificate Owner Field setting is only used if directory authentication is enabled. Configuration of the
Configuration Owner Field depends on the version of directory support used, the directory configuration,
and the certificate issuing policy of your organization.
A trusted CA certificate is required for two-factor authentication to function. You cannot change the
Enforce Two-Factor Authentication setting to Yes if a trusted CA certificate has not been configured. Also,
a client certificate must be mapped to a local user account if local user accounts are used. If RILOE II is
using directory authentication, client certificate mapping to local user accounts is optional.
To change two-factor authentication settings for RILOE II:
1. Log in to RILOE II using an account that has the Configure RILOE II Settings privilege. Click
Administration.
2. Click Two-Factor Authentication Settings.
3. Change the settings as needed by entering your selections in the fields.
4. After completing any parameter changes, click Apply to save the changes.
Security Settings
The Security Settings provided for the RILOE II include:
• Session Timeout—This option allows the Remote Console session on the network client to end
automatically after the set amount of time selected.
• ROM-Based Configuration Utility (F8)—This option allows you to enable or disable the RBSU
F8 setup.
• Remote Access with Pocket PC—This option allows you to enable or disable the remote access
for pocket PCs.
To change the security settings:
1. Log in to the RILOE II using an account with administrator privileges.
2. Click Global Settings on the Administration tab.
3. Change the settings in the Security Settings section.
4. Click Apply Settings.
Another security feature is the progressive delays for failed browser login attempts. After a series of five
failed login attempts by a user, the RILOE II imposes delays to subsequent logins. This scenario continues
until a valid login is completed. This feature assists in defending against possible dictionary attacks
against the browser login port.
RILOE II firmware updates
Firmware upgrades enhance the functionality of RILOE II. Firmware upgrades can be accomplished from
any network client using a standard web browser. However, only users with the "configure RILOE
settings" privilege can upgrade the firmware on RILOE II.
The most recent firmware is available on the HP website (http://www.hp.com/servers/lights-out
Smart Component.
To upgrade RILOE II firmware:
1. Log in to RILOE II using an account with "configure RILOE settings" privileges.
2. Click Upgrade Firmware on the Administration tab.
Using the RILOE II 34
) as a
Page 35

3.
Follow the instructions on the firmware upgrade page. If you need additional assistance, click ?.
Using the Remote Console
The Remote Console tab provides access to different views of the Remote Console and enables you to
define keystroke sequences that are transmitted to the remote host server by pressing a hot key. Standard
RILOE II provides embedded hardware Remote Console capabilities on a text mode page. The operating
system-independent console supports text modes that display remote host server activities, such as
shutdown and startup operations.
The Remote Console option redirects the host server console to the network client browser, providing full
text (standard) and graphical mode video, keyboard, and mouse access to the remote host server.
With the Remote Console, you have complete control over a remote host server as if you were in front of
it. You can access the remote file system and the network drives. The Remote Console enables you to
change hardware and software settings for the remote host server, install applications and drivers,
change remote server screen resolution, and gracefully shut down the remote system.
With the Remote Console, you can observe POST boot messages as the remote host server restarts and
initiate ROM-based setup routines to configure the hardware of the remote host server. When installing
operating systems remotely, the graphical Remote Console enables you to view and control the host server
page throughout the installation process.
Using the RILOE II 35
Page 36

For best performance, be sure to configure the host operating system display as described in "Optimizing
performance for graphical Remote Console (on page 37)."
Remote Console Information Option
The Remote Console Information option displays information concerning the Remote Console options
available, as well as a link to download an updated Java™ Runtime Environment, which is necessary for
using Remote Console with the single cursor option.
Although up to 10 users are allowed to simultaneously log in to RILOE II, only one user at a time can
access the Remote Console. A warning message displays indicating the Remote Console is already in
use.
Remote Console will not be available if the remote console port configuration on the Global Settings tab is
set to disabled.
Using Enhanced Features of the Remote Console
Local Cursor
Local (single) cursor mode presents a single mouse cursor during a Remote Console session.
Synchronization of two cursors is eliminated, making navigation easier in the Remote Console
window. Local cursor mode is the default setting.
The dual cursor mode uses two mouse cursors in the Remote Console window to represent the host
server mouse cursor and the local client mouse cursor. The local client cursor is seen as a crosshair in
the Remote Console window.
To switch to dual cursor mode, click OFF next to Local Cursor. To return to single cursor mode, click
ON next to Local Cursor.
Refresh
Instances might occur when the Remote Console screen is not displaying the latest data. Click
Refresh to force the RILOE II to repaint the screen.
Ctl+Alt+Del
Click Ctl+Alt+Del to log on to Windows NT®, Windows® 2000, and Windows® Server 2003.
Using the RILOE II 36
Page 37

Alt Lock
The ALT key on the local keyboard is not passed from the client to the host server. To simulate
pressing the ALT key on the host server, select ALT Lock.
Character Set
Use this option to change the default character set used by the Remote Console and the type of
operating system to which the Remote Console is connected. Modifying the Remote Console settings
ensures proper operation of the Remote Console and correct display of colors and characters.
Optimizing performance for graphical Remote Console
HP recommends the following client and server settings based on the operating system used.
Recommended client settings
Ideally, the remote server operating system display resolution should be the same resolution, or smaller,
than that of the browser computer. Higher server resolutions transmit more information, slowing the overall
performance.
Use the following client and browser settings to optimize performance:
• Display Properties
• Select an option greater than 256 colors.
• Select a greater screen resolution than the screen resolution of the remote server.
• Linux X Display Properties—On the X Preferences screen, set the font size to 12.
• Remote Console
• For Remote Console speed, HP recommends using a 700-MHz or faster client with 128 MB or
more of memory.
• For the Remote Console Java™ applet execution, HP recommends using a single processor client.
• Mouse Properties
• Set the Mouse Pointer speed to the middle setting.
• Set the Mouse Pointer Acceleration to low or disable the pointer acceleration.
Remote Console Linux settings
When using the RILOE II Remote Console to display text screens in Linux, border characters or other line
drawing characters might not display correctly.
To properly configure the Remote Console text mode character set:
1. Click the Character Set dropdown menu from the Remote Console applet.
2. Select the Lat1–16 character set.
Recommended server settings
The following is a list of recommended server settings based on the operating system used.
NOTE: To display the entire host server screen on the client Remote Console applet, set the server display
resolution less than or equal to that of the client.
Microsoft® Windows® 2000 settings
To optimize performance, set server Display Properties to a plain background (no wallpaper pattern).
Using the RILOE II 37
Page 38

Microsoft® Windows® Server 2003 settings
To optimize performance, set the server Display Properties to plain background (no wallpaper
pattern) and set the Server Mouse Properties to Disable Pointer Trails.
Microsoft® Windows NT® 4.0 and Windows® 2000 settings
Use the following settings to optimize performance:
• Server Display Properties
• Plain Background (no wallpaper pattern)
• Display resolution of 800 x 600 or 1024 x 768 pixels
• 256-color or 24-bit color mode
• Server Mouse Properties
• Select None for mouse pointer Scheme.
• Deselect Enable Pointer Shadow.
• Select Motion or Pointer Options and set the pointer Speed slider to the middle position.
• Set pointer Acceleration to None.
Red Hat Linux and SUSE Linux server settings
To optimize performance, set the server Mouse Properties>Pointer Acceleration to 1x. For KDE, access
the Control Center, select Peripherals/Mouse, then select the Advanced tab.
Novell NetWare settings
Use the following settings to optimize performance:
Server Display Properties
• 800 x 600 pixels or lower screen resolution
• 256 colors
Remote Console hot keys
The Remote Console hot keys feature enables you to define up to five multiple-key combinations for each
hot key. When a hot key is pressed in the Remote Console, the defined key combination (all keys pressed
at the same time) is transmitted in place of the hot key to the remote host server.
The Remote Console hot keys are active during a remote console session through the Remote Console
applet and during a text remote console session through a telnet client.
To define a Remote Console hot key:
1. Click Remote Console Hot Keys in the Remote Console tab.
2. Select the hot key you want to define and use the list boxes to select the key sequence to be
transmitted to the host server when you press the hot key.
3. Click Save Hot Keys when you have finished defining the key sequences.
Using the RILOE II 38
Page 39

The Remote Console Hot Keys page also contains a Reset Hot Keys option. The Reset Hot Keys option
clears all entries in the hot key fields. Click Save Hot Keys to save the cleared fields.
Supported hot keys
The Program Remote Console Hot Keys page allows you to define up to 6 different sets of hot keys for use
during a Remote Console session. Each hot key represents a combination of up to 5 different keys which
are sent to the host machine whenever the hot key is pressed during a Remote Console session. The
selected key combination (all keys pressed at the same time) are transmitted in its place. For more
information, refer to "Remote Console hot keys (on page 38)." The following table lists keys available to
combine in a Remote Console hot key sequence.
ESC F12 : o
L_ALT
R_ALT ! > q
L_SHIFT # = r
R_SHIFT $ ? s
INS % @ t
DEL & [ u
HOME ~ ] v
END ( \ w
PG UP ) ^ x
PG DN * _ y
ENTER + a z
TAB - b {
" "
(Space)
< p
BREAK . c }
Using the RILOE II 39
Page 40

F1 / d |
F2 0 e ;
F3 1 f ’
F4 2 g L_CTRL
F5 3 h R_CTRL
F6 4 i NUM PLUS
F7 5 j NUM MINUS
F8 6 k SCRL LCK
F9 7 l BACKSPACE
F10 8 m SYS RQ
F11 9 n
Video replays of previous server Reset Sequences
The Reset Sequences option on the Remote Console tab provides video replay of server reset
sequences. This option allows you to observe ROM-based POST messages and operating system load
messages of previous host server resets, including any error messages displayed by the operating system
before a server stops.
IMPORTANT: The reset sequences option requires the use of the Remote Console. You cannot access the
Remote Console while replaying the reset sequences. A user cannot use Remote Console if another user is
on one of the selected replay sequence pages. Only one user is permitted access to Remote Console at a
time. If another user is viewing one of the previous, current, or failed sequence pages, you will receive the
following message: "Another user is accessing the Remote Console feature of the
RILOE II. Only one user is permitted access at a time. Remote Console will
automatically start when Remote Console becomes available."
To access video replays of the host server reset sequences:
1. Click Reset Sequences on the Remote Console tab.
2. Select the desired sequence replay from the following options:
• Previous Reset Sequence Replay—This option allows you to replay the video sequence
prior to the most recent host server reset. The video replay displays ROM-based messages and
operating system load messages that occurred while starting the remote host server.
• Current Reset Sequence Replay—This option allows you to replay the video sequence of
the most recent host server reset. The video replay displays ROM-based messages and operating
system load messages that occurred while starting the remote host server.
• Failure Sequence Replay—This option lets you replay the video sequence leading up to the
most recent host server reset resulting from a system problem. This video replay includes any
error information generated by the operating system prior to the host server problem and
subsequent reset.
Windows® EMS console
A feature of Windows® Server 2003 is the EMS. The typical usage model for the EMS console is to
physically connect a serial cable to the server. RILOE II, however, enables you to use EMS over the
network through a Web browser. Microsoft® EMS gives you the ability to display running processes,
change the priority of processes, and halt processes. The EMS console and the RILOE II Remote Console
can be used at the same time.
Using the RILOE II 40
Page 41

The Windows® EMS Console, if enabled, provides the ability to perform EMS in cases where video,
device drivers, or other operating system features have prevented normal operation and normal corrective
actions from being performed.
The Windows® EMS serial port must be enabled through the host system RBSU. The configuration allows
for the enabling or disabling of the EMS port, and the selection of the COM port. The RILOE II system will
automatically detect whether the EMS port is enabled or disabled, and the selection of the COM port.
To obtain the SAC> prompt, typing Enter might be required after connecting through the Virtual Serial
Port console.
For more information on using the EMS features, refer to the Windows® Server 2003 Server
documentation.
Terminal Services pass-through option
Terminal Services is provided by the Microsoft® Windows® operating systems. The RILOE II Terminal
Services pass-through option provides a connection between the Terminal Services server on the host
system and the Terminal Services client on the client system. When the Terminal Services pass-through
option is enabled, RILOE II firmware sets up a socket, listening by default on port 3389. All data received
from the Terminal Services on this port is forwarded to the server and all data it receives from the server is
forwarded back to the socket. The firmware assumes anything received on this port is in an RDP packet.
RDP packets are exchanged between the RILOE II firmware and the server's Terminal Services (RDP) server
through the localhost address on the server. A service is provided to facilitate communications between
the RILOE II firmware and the RDP server, such that the RDP server believes that an external RDP
connection has been established. For more information on RDP service, refer to the "Windows® RDP PassThrough service (on page 42)" section.
A Terminal Services session provides a performance-enhanced view of the host system console. When the
operating system is unavailable (or the Terminal Services server or client is unavailable), the traditional
RILOE II remote console provides the view of the host system console. For more information on Remote
Console and Terminal Services, refer to the "Remote Console and Terminal Services clients (on page 44)"
section.
To configure the Terminal Services pass-through option, refer to "Terminal Services Client requirements (on
page 41)" and "Terminal Services Pass Through installation ("Terminal Services pass-through installation"
on page 42)."
Terminal Services Client requirements
The Terminal Services client is available on Microsoft® Windows® client machines running:
• Windows® 2000
Microsoft® Windows® 2000 servers require the installation of Microsoft® .NET Framework to
support the use of Terminal Services. After .NET Framework is installed, the Terminal Services client
must be installed from diskettes created by the Terminal Services server. Consult your Windows®
operating guides or help files for instructions. When installing the Terminal Services client on
Windows® 2000, use the default installation location. The Terminal Services client in Windows®
2000 generates a dialog box asking for which target Terminal Services server to use.
• Windows® Server 2003
On Windows® Server 2003 servers, the Terminal Services client and RDP connection is built in. The
client is an integral part of the operating system and is activated using Remote Desktop sharing. To
activate desktop sharing allow, select My Computer>Properties>Remote>Remote Desktop.
The Terminal Services client in Windows® Server 2003 provides command line options and
seamless launches from the Remote Console applet.
• Windows® XP
Using the RILOE II 41
Page 42

On Windows® XP servers, the Terminal Services client and RDP connection is built in. The client is
an integral part of the operating system and is executed by selecting
Start>Programs>Accessories>Communications>Remote Desktop. The Terminal Services
client in Windows® XP provides command line options and seamless launches from the Remote
Console applet.
Windows® RDP Pass-Through service
To use the RILOE II Terminal Services Pass-Through feature, a service must be installed on the host system.
This service will show the name of RILOE II Proxy in the host's list of available services. The service utilizes
the Microsoft® .NET framework's security and reliability. After the service has started, the service polls the
RILOE II to find out if a an RDP connection with the client has been established. If an RDP connection with
the client has been established, it then establishes a TCP connection with localhost and begins
exchanging packets. The port used to communicate with localhost is read from the Windows® registry at
HKLM\SYSTEM\CurrentControlSet\Control\TerminalServer\Wds\rdpwd\Tds\tcp\P
ortNumber
This is typically port 3389.
Terminal Services pass-through installation
• Microsoft® Windows® 2000 and Windows® 2003 require Microsoft® .NET Framework to support
the use of Terminal Services. The Terminal Services pass-through service and the RILOE II
Management Interface Driver for Microsoft® Windows® 2000 and Microsoft® Windows Server™
2003 must be installed on the server that has the RILOE II. The service and RILOE II driver are
available as Smart Components on the HP website and on the HP SmartStart CD. They are also part
of the ProLiant Support Pack for Microsoft® Windows® Server 2003 and Microsoft® Windows®.
a. Install the RILOE II Management Interface driver.
b. Install the service. To install the service, launch the component installer and follow the directions
in the installation wizard.
If the service is already installed, then it must be manually restarted or the server rebooted when
the driver is installed.
c. Install or activate the Terminal Services client.
Microsoft® Windows® 2000 servers require the installation of Microsoft® .NET Framework to
support the use of Terminal Services. After .NET Framework is installed, the Terminal Services
client must be installed from diskettes created by the Terminal Services server or by downloading
the client from the Microsoft® website and installed through the Control Panel using Add or
Remove Programs. Consult your Windows® operating guides or help files for instructions. When
installing the Terminal Services client on Windows® 2000, use the default installation location.
On Microsoft® Windows Server™ 2003, you can activate Remote Desktop sharing by selecting
the Remote tab under My Computer and Properties.
If the RILOE II installation is complete and if Terminal Services Pass-through is set to automatic, then
Terminal Services launches when the installation is complete.
• Microsoft® Windows® XP clients have the Remote Desktop Connection built in and no other
installation is required.
Errors during installation and during execution of the pass-through service are logged in the server's
Application Event Log. The pass-through service can be removed using Add or Remove Programs in the
Control Panel.
Windows® 2000 Terminal Services port change
If the Terminal Services port is changed, Windows® 2000 client must manually configure the Terminal
Services Client Connection Manager.
Using the RILOE II 42
Page 43

1.
Start the Terminal Services Client Connection Manager, and create a new connection to the terminal
server.
2. Highlight the icon created, and select File>Export. Rename the file with a .cns extension. For
example: myilo.cns.
3. Edit the myilo.cns file by looking for the line Server Port=3389. Replace 3389 with your new port
number and save the file.
4. From the Client Connection Manager, highlight the New Connection icon, and click
File>Import.
5. Double-click the newly created icon to launch terminal server and connect to the new port.
Enabling the Terminal Services Pass-Through option
By default, the Terminal Services pass-through feature is disabled and must be enabled in Global Settings.
Until the Terminal Services pass-through feature is enabled, the Remote Console has the Terminal Services
button deactivated, and the console session error message Remote Session already in use by
another user is misleading.
Use of the Terminal Services pass-through feature requires installation of the latest Lights-Out Management
Interface Driver and Terminal Services pass-through Service for Microsoft® Windows® on the server. The
interface driver must be installed before installing the service.
When the Terminal Services pass-through option is set to Enabled or Automatic on the Global Settings
page and the Terminal Services Client is installed on the Windows® client (installs by default on
Windows® XP), the Terminal Services button is enabled. When the Terminal Services button is clicked, the
applet tries to launch the Terminal Services, even if the server is not running a Windows® operating
system.
You must comply with Microsoft® license requirements which are the same as connecting through the
server's NIC. For instance, when set for administrative access, Terminal Services does not allow more
than two connections, regardless of whether the connections are through the server's NIC or RILOE II or
both.
Terminal Services Pass-Through status
The RILOE II Status page displays the status of the Terminal Services pass-through feature, as follows:
• Server software not detected
• Available for use
• In use
The UID light flashes whenever a Terminal Services connection is active through the RILOE II. It flashes at
the same frequency and duty cycle as when the Remote Console is active.
Terminal Services warning message
Terminals Services users operating on Windows® 2003 Server might notice the following when using the
Terminal Services pass-through feature of RILOE II. If a Terminal Services session is established through
RILOE II and a second Terminal Services session is established by a Windows® administrator (Console
mode), the first Terminal Services session is disconnected. However, the first Terminal Services session
does not receive the warning message indicating the disconnection until approximately one minute later.
During this one-minute period, the first Terminal Services session is available or active. This is normal
behavior, but it is different than the behavior observed when both Terminal Services sessions are
established by Windows® administrators. In that case, the warning message is received by the first
Terminal Services session immediately.
Using the RILOE II 43
Page 44

Terminal Services button display
RILOE II firmware does not accurately display through the Terminal Services button. Even if the operating
system is not enabled (for example, the host operating system is Linux, which does not support Terminal
Services operation), the Terminal Services button might not appear inactive and might inaccurately imply
that Terminal Services operation is available.
Remote Console and Terminal Services clients
Using the management network connection to the RILOE II, an RILOE II Remote Console session can be
used to display a Terminal Services session to the host. When the RILOE II Remote Console applet runs, it
launches the Terminal Services client based on user preference. The Sun JVM must be installed to obtain
full functionality of this feature. If the Sun JVM is not installed, then the dual-cursor Remote Console cannot
automatically launch the Terminal Services client.
If Terminal Services pass-through is enabled, and the Terminal Services server is available, switching
between RILOE II Remote Console and the Terminal Services client will be seamless as the server
progresses from pre-OS environment to OS-running environment, to OS-not available environment. The
seamless operation is available as long as the Terminal Services client is not started before Remote
Console is available. If Remote Console is available, and the Terminal Services client is available, Remote
Console will start the Terminal Services client when appropriate.
When using the Terminal Services pass-through option with Windows® 2000, there is approximately a
one-minute delay after the CTRL-ALT-DEL dialog box appears before the Terminal Services client launches.
On Windows® Server 2003, the delay is about 30 seconds. The 30 second delay represents how long it
takes for the service to connect to the RDP client running on the server. If the server is rebooted from the
Terminal Services client, the Remote Console screen turns grey or black for up to one minute while RILOE
II determines that the Terminal Services server is no longer available.
If Terminal Services mode is set to Enabled, but you want to use the Remote Console, then the Terminal
Services client should be launched directly from the Terminal Services client menu. Launching directly from
the client menu allows simultaneous use of the Terminal Services client and the Remote Console.
Terminal Services can be disabled or enabled at any time. Changing the Terminal Services configuration
causes the RILOE II firmware to reset. Resetting the RILOE II firmware interrupts any open connections to
RILOE II.
When the Terminal Services client is launched by the Remote Console, Remote Console goes into a sleep
mode to avoid consuming CPU bandwidth. Remote Console still listens to the Remote Console default port
23 for any commands from the RILOE II.
RILOE II passes-through only one Terminal Services connection at a time. Terminal Services has a limit of
two concurrent sessions.
The Remote Console activates and becomes available if the Remote Console is in sleep mode and the
Terminal Services client is interrupted by any of the following:
• The Terminal Services client is closed by the user.
• The Windows® operating system is shut down.
• The Windows® operating system locks-up.
Troubleshooting Terminal Services
If you are experiencing problems with RILOE II Terminal Services pass-through, check the following:
1. Verify that Terminal Services is enabled on the host by selecting My
Computer>Properties>Remote>Remote Desktop.
2. Verify that the RILOE II pass-through configuration is enabled or set to automatic by checking the
RILOE II Global Settings configuration.
Using the RILOE II 44
Page 45

3.
Verify if the RILOE II Management Interface Driver is installed on the host by selecting My
Computer>Properties>Hardware>Device Manager>Multifunction Adapters.
4. Verify if Terminal Services pass-through service and the RILOE II proxy is installed and running on the
host by selecting Control Panel>Administrative Tools>Services and attempting to restart the
Terminal Service.
5. Determine if the Application Event Log is full.
The Terminal Services pass-through service might experience start-up problems when the operating
system Application Event Log is full. To view the event log, select Computer
Management>System Tools>Event Viewer>Application.
6. Verify that the Terminal Services port assignment is correct. Verify that the Terminal Services client,
mstsc.exe, is located in \WINDOWS\SYSTEM32.
If not, reconfigure the pass-through configuration to Enabled and manually activate the Terminal
Services client.
Using virtual devices
With virtual devices, an administrator directs a host server to boot and use a diskette or CD-ROM on the
client machine or use an image file from anywhere on the network. Virtual devices eliminate the need to
visit a host server to insert and use a diskette or CD-ROM, enabling remote operating system installation
and host server ROM updates from a CD or network drive.
Virtual devices allow you to carry out any of the following functions:
• Running User Diagnostics by booting the host server from a diagnostic diskette
NOTE: HP recommends that you first delete the SYSMON2.TM file before using User Diagnostics with the
Virtual Floppy Drive.
• Applying ROM updates to remote host servers
• Deploying an operating system or other software from a CD in a client machine to a host server
• Performing disaster recovery of failed operating systems
NOTE: If the server operating system does not support ACPI, using the virtual power button feature of the
RILOE II will shut down the server immediately and not permit a graceful shutdown.
Using the RILOE II 45
Page 46

Virtual power
The Virtual Power button enables control of the power state of the remote server and simulates pressing
the physical power button on the server. If the remote host server is not responding, the Virtual Power
button feature allows you to initiate a cold or warm reboot to bring the server back online.
Some of the following power options do not gracefully shut down the operating system. To initiate a
graceful shutdown, use the Remote Console before using the Virtual Power button.
Use the refresh feature of the browser to keep the status of the power indicator up to date.
To use the Virtual Power button, select the power option you want and click to initiate the power option.
The available power options are:
• Shutdown Server and Power OFF performs a graceful shutdown before initiating a power off to the
host server. Shutdown Server and Power OFF is enabled on if RILOE II is attached to the server's
power button using the correct cable.
• Turn Server Power ON turns the server on.
• Force Server Power Off forces the server power off and does not initiate a graceful shutdown. Force
Server Power Off is available only if RILOE II is attached to the server's power button using the
correct cable.
• Reboot Server initiates a reboot of the server and does not initiate a graceful shutdown before
rebooting the server.
Virtual media
RILOE II Virtual Media option provides you with a Virtual Floppy disk drive and CD-ROM drive, which can
direct a remote host server to boot and use standard media from anywhere on the network. Virtual Media
devices are available when the host system is booting. RILOE II Virtual media devices connect to the host
server using USB technology. Using USB also enables new capabilities for RILOE II Virtual Media devices
when connected to USB-supported operating systems. Different operating systems provide varying levels
of USB support.
Using the RILOE II 46
Page 47

•
If the Virtual Floppy capability is enabled, the floppy drive normally cannot be accessed from the
client operating system.
• If the Virtual CD-ROM capability is enabled, the CD-ROM drive cannot be accessed from the client
operating system.
Under certain conditions, you can access the Virtual Floppy drive from the client operating system while it
is connected. However, it is important that access to the Virtual Floppy drive from the client operating
system not be attempted while it is connected as a virtual media device. Doing so could cause data loss
on the floppy drive. Always disconnect virtual media before trying to access it from the client operating
system.
You can access virtual media on a host server from a client through a graphical interface using a Java™
applet and through a script interface using an XML engine.
To access RILOE II Virtual Media devices using the graphical interface, select Virtual Media on the Virtual
Devices tab. An applet loads in support of the Virtual Floppy or Virtual CD-ROM device.
RILOE II Virtual Floppy
RILOE II Virtual Floppy disk is available at server boot time for all operating systems. Booting from RILOE II
Virtual Floppy enables you to upgrade the host system ROM, deploy an operating system from network
drives, and perform disaster recovery of failed operating systems, among other tasks.
If the host server operating system supports USB mass storage devices, then RILOE II Virtual Floppy is also
available after the host server operating system loads. You can use RILOE II Virtual Floppy when the host
server operating system is running to upgrade device drivers, create an emergency repair diskette, and
perform other tasks. Having the Virtual Floppy available when the server is running can be especially
useful if you must diagnose and repair a problem with the NIC driver.
The Virtual Floppy can be the physical floppy drive on which you are running the web browser, or an
image file stored on your local hard drive or network drive.
NOTE: For best performance use image files. HP recommends using local image files stored either on the
hard drive of your client PC or on a network drive accessible through a high-speed network link.
To use a physical floppy in your client PC:
1. Select Local Media Drive.
2. Select the drive letter of the desired local floppy or USB key drive on your client PC from the
dropdown menu. To ensure the source diskette or image file is not modified during use, select the
Force read-only access option.
3. Click Connect.
Using the RILOE II 47
Page 48

The connected drive icon and LED changes state to reflect the current status of the Virtual Floppy Drive.
To use an image file:
1. Select Local Image File within the Virtual Floppy section of the Virtual Media applet.
2. Enter the path or file name of the image in the text box, or click Browse to locate the image file
using the Choose Disk Image File dialog. To ensure the source diskette or image file is not modified
during use, select the Force read-only access option.
3. Click Connect.
The connected drive icon and LED changes state to reflect the current status of the Virtual Floppy drive.
When connected, the virtual devices are available to the host server until you close the Virtual Media
applet. When you are finished using the Virtual Floppy, you can either select to disconnect the device
from the host server or close the applet.
NOTE: The Virtual Media applet must remain open in your browser as long as you continue to use a Virtual
Media Device.
RILOE II Virtual Floppy is available to the host server at run time if the operating system on the host server
supports USB floppy drives. See "Operating System USB Support (on page 57)" for information on which
operating systems support USB mass storage at the time of the publication of this manual.
RILOE II Virtual Floppy appears to your operating system just like any other drive. When using RILOE II for
the first time, the host operating system might prompt you to complete a New Hardware Found wizard.
When you are finished using RILOE II Virtual Media and disconnect it, you might receive a warning
message from the host operating system regarding unsafe removal of a device. This warning can be
avoided by using the operating system-provided feature to stop the device before disconnecting it from the
Virtual Media.
Virtual Floppy operating systems notes
• MS-DOS
During boot and during an MS-DOS session, the Virtual Floppy device displays as a standard BIOS
floppy drive. This device will display as drive A. An existing physically attached floppy drive is
obscured and unavailable during this time. You cannot use a physical local floppy drive and the
Virtual Floppy simultaneously.
• Windows® 2000 SP3 or later and Windows® Server 2003
Virtual Floppy drives display automatically after Microsoft® Windows® has recognized the
mounting of the USB device. Use it as you would a locally attached device.
To use Virtual Floppy during a Windows® installation to provide a driver diskette, disable the
integrated diskette drive in the host RBSU which forces the Virtual Floppy to appear as drive A.
Using the RILOE II 48
Page 49

•
Red Hat and SLES Linux
Linux supports the use of USB diskette drives. Refer to the "Mounting USB Virtual Floppy in Linux
("Mounting USB Virtual Media Floppy in Linux" on page 49)" section for step-by-step instructions.
Mounting USB Virtual Media Floppy in Linux
1. Access RILOE II through a browser.
2. Select Virtual Media in the Virtual Devices tab.
3. Select a diskette drive or diskette image and click Connect.
4. Load the USB drivers, using the following commands:
modprobe usbcore
modprobe usb-storage
modprobe usb-ohci
5. Load the SCSI disk driver, using the following command:
modprobe sd_mod
6. Mount the floppy drive, using the following command:
mount /dev/sda /mnt/floppy –t vfat
NOTE: Use the man mount command for additional file system types.
The floppy device can be used as a Linux file system, if formatted as such, with the mount command.
However, 1.44-Mb diskettes are usually accessed utilizing the mtools utilities distributed with both Red Hat
and SLES. The default mtools configuration does not recognize a USB-connected floppy. To enable the
various m commands to access the Virtual Floppy device, modify the existing /etc/mtools.conf file and
add the following line:
drive v: file="/dev/sda" exclusive
This modification enables the mtools suite to access the Virtual Floppy as v. For example:
mcopy /tmp/XXX.dat v:
mdir v:
mcopy v:foo.dat /tmp/XXX
Virtual Floppy screen
The Virtual Floppy screen provides the status of the Virtual Floppy, the ability to load a Virtual Floppy
image, and the ability to change Virtual Floppy settings.
Uploading a diskette image to the remote server
The Insert Floppy Image option allows you to send a diskette image file to RILOE II on the remote host
server. RILOE II treats the diskette image file as a standard diskette.
The external power of the 16- and 30-pin Remote Insight cables must be installed when booting to a
Virtual Floppy, otherwise the image will be lost when the server is reset.
Using the RILOE II 49
Page 50

NOTE: Image files of diskettes are created and stored locally on the hard drive or on a network drive with
the Diskette Image Utility (on page 51). This utility is available for download from the HP website
(http://www.hp.com/servers/lights-out
).
To upload a diskette image to RILOE II on the host server:
1. Click Virtual Floppy in the Virtual Devices tab.
2. Enter the location and name of the diskette image file, or click Browse and select the diskette
image file you want to transfer to RILOE II.
3. When the full path and diskette image file name are in the text entry field, click Insert Floppy
Image to upload the image file to RILOE II in the host server.
The Virtual Floppy Drive can hold only one diskette image file at a time. The uploaded diskette image file
remains in the Virtual Floppy Drive until it is either replaced with another diskette image file or erased
from the Virtual Floppy Drive by clicking Eject Virtual Floppy on the Virtual Floppy Status page. The
diskette image file is erased if power to RILOE II is lost. Logging out of RILOE II does not erase the diskette
image file from the Virtual Floppy Drive.
Changing Virtual Floppy drive settings
The Virtual Floppy screen allows you to view and change current settings for the Virtual Floppy Drive.
Changes you make to the virtual diskette drive boot and write-protect options take effect when you click
Submit Changes.
A host server can use files uploaded to a Virtual Floppy Drive only if the Virtual Floppy Drive is active. The
Virtual Floppy Drive becomes active when the RILOE II restarts the host server using a diskette image file
uploaded to the Virtual Floppy Drive. The Virtual Floppy Drive remains active until the remote host server
is restarted with its own operating system.
NOTE: Although the Virtual Floppy Drive is active, the physical diskette drive of the host server is
temporarily disabled. The diskette drive of the host server becomes re-enabled when the host server is
restarted with its own operating system and the Virtual Floppy Drive is not active.
Using the RILOE II 50
Page 51

The Virtual Floppy Boot option has three settings:
• Boot Always—This setting instructs the RILOE II to always boot the host server from the diskette
image file in the Virtual Floppy Drive. If this setting is checked, the Virtual Floppy Status screen
shows the virtual drive as active after the server has restarted.
• Boot Once—This setting instructs the RILOE II to boot the host server one time from the diskette
image file in the Virtual Floppy Drive. If this setting is checked, the Virtual Floppy Status screen
shows the virtual drive as active after the server has restarted.
• No Boot—This is the default setting for the Virtual Floppy Drive. It instructs the RILOE II not to boot
the host server from the diskette image file in the Virtual Floppy Drive. This setting has no effect on
the Virtual Floppy Drive status.
Copying files on the host server to the Virtual Floppy drive
The Write Protect Virtual Floppy option on the Virtual Floppy screen specifies whether data on
the host server can be copied to the Virtual Floppy Drive. If this option is selected, the Virtual Floppy Drive
is write protected and no data from the host server can be copied to it.
To copy remote files to the Virtual Floppy Drive using standard operating system commands typed at the
Remote Console, be sure that the Write Protect Virtual Floppy option is deselected. The Virtual
Floppy option cannot be used to upgrade the RILOE II firmware.
Diskette Image Utility
The Diskette Image Utility has three functions:
• Creating an image file from a standard 1.44-MB diskette suitable for use with the Virtual Floppy
Drive
• Creating a standard 1.44-MB diskette from an image file copied from the Virtual Floppy Drive
• Comparing a diskette image file with a standard 1.44-MB diskette
To create an image file from a diskette
1. Launch the Diskette Image Utility and click the Create Image File tab.
2. Insert the diskette you want to make an image of into the diskette drive.
3. Provide the path, the file name of the image, and an image file description. A page similar to the
following appears.
NOTE: The path can be a local or a network path. If you do not provide a path, the image file is saved on
the Desktop.
Using the RILOE II 51
Page 52

4.
Click Create to generate the image file in the specified location.
To create a diskette from an image file
1. Launch the Diskette Image Utility and click the Create Diskette tab.
2. Insert a blank diskette into the diskette drive.
CAUTION: If the diskette is not blank, all data on the diskette will be erased.
3. Enter the path and name of the image file and the target diskette drive.
4. To navigate to the location of the image file, click Browse. A page similar to the following
appears.
Using the RILOE II 52
Page 53

5.
Click Create to generate the diskette from the image file.
To compare an image file with a diskette
1. Launch the Diskette Image Utility and click the Verify Image File tab.
2. Insert the diskette you want to compare against an image file into the diskette drive.
3. Enter the path and name of the image file and the target diskette drive or navigate to the location of
the image file by clicking Browse. A page similar to the following appears.
Using the RILOE II 53
Page 54

4.
Click Verify to start comparing the image file with the diskette. When the verification is complete,
the results appears.
RILOE II Virtual CD-ROM
RILOE II Virtual CD-ROM is available at server boot time for operating systems specified in the "Operating
system USB support (on page 57)" section. Booting from RILOE II Virtual CD-ROM enables you to deploy
an operating system from network drives, and perform disaster recovery of failed operating systems,
among other tasks.
If the host server operating system supports USB mass storage devices, then RILOE II Virtual CD-ROM is
also available after the host server operating system loads. You can use RILOE II Virtual CD-ROM when
the host server operating system is running to upgrade device drivers, install software, and perform other
tasks. Having the Virtual CD-ROM available when the server is running can be especially useful if you
must diagnose and repair a problem with the NIC driver.
The Virtual CD-ROM can be the physical CD-ROM drive on which you are running the web browser, or
an image file stored on your local hard drive or network drive.
NOTE: For best performance use image files. HP recommends using local image files stored either on the
hard drive of your client PC or on a network drive accessible through a high-speed network link.
To use a physical CD-ROM drive in your client PC:
1. Select Local CD-ROM Drive.
2. Select the drive letter of the desired physical CD-ROM drive on your client PC from the dropdown
menu.
Using the RILOE II 54
Page 55

3.
Click Connect.
To use an image file:
1. Select Local Image File within the Virtual CD-ROM section of the Virtual Media applet.
2. Enter the path or file name of the image in the text box or click Browse to locate the image file
using the Choose Disk Image File dialog.
3. Click Connect.
The connected drive icon and LED changes state to reflect the current status of the Virtual CD-ROM. When
connected, virtual devices are available to the host server until you close the Virtual Media applet. When
you are finished using the Virtual CD-ROM, you can choose to disconnect the device from the host server
or close the applet. The Virtual Media applet must remain open when using a Virtual Media Device.
RILOE II Virtual Media CD-ROM will be available to the host server at run time if the operating system on
the host server supports USB floppy drives. See "Operating system USB support (on page 57)" for
information on which operating systems support USB mass storage at the time of the publication of this
manual.
RILOE II Virtual Media CD-ROM appears to your operating system just like any other CD-ROM. When
using RILOE II for the first time, the host operating system may prompt you to complete a New Hardware
Found wizard.
When you are finished using RILOE II virtual media and disconnect it, you might receive a warning
message from the host operating system regarding unsafe removal of a device. This warning can be
avoided by using the operating system-provided feature to stop the device before disconnecting it from the
Virtual Media.
Virtual Media CD-ROM operating system notes
• MS-DOS
The virtual CD-ROM is not supported in MS-DOS.
• Windows® 2000 SP3 or later and Windows® Server 2003
The virtual CD-ROM displays automatically after Windows® has recognized the mounting of the
USB device. Use it as you would a locally attached CD-ROM device.
On Windows® 2000 SP3 or later, My Computer on the host server displays an additional CD-ROM
drive when the Virtual Media applet is connected. If the server operating system is up and running
and you attempt to disconnect and reconnect within the Virtual Media applet, it can fail. The icon
turns green, but the additional CD-ROM drive does not display in My Computer.
Using the RILOE II 55
Page 56

To resolve this problem, reboot the host server, and, after the operating system is available, the
Virtual Media CD-ROM is ready for use. This problem only occurs on servers with no physical CDROM drive.
• Linux
• Red Hat Linux
On servers with a locally attached IDE CD-ROM, the virtual CD-ROM device is accessible at
/dev/cdrom1. However, on servers without a locally attached CD-ROM, such as the BL-class
blade systems, the virtual CD-ROM is the first CD-ROM accessible at /dev/cdrom.
The virtual CD-ROM can be mounted as a normal CD-ROM device using:
mount /mnt/cdrom1
• SLES 9
The SLES 9 operating system places USB-connected CD-ROMs in a different location and the
virtual CD-ROM can be found at /dev/scd0, unless there is already a USB-connected local CDROM, in which case, it would be /dev/scd1.
The virtual CD-ROM can be mounted as a normal CD-ROM device using:
mount /dev/scd0 /media/cdrom11
Refer to "Mounting USB Virtual Media CD-ROM in Linux (on page 56)" for step-by-step instructions.
Mounting USB Virtual Media CD-ROM in Linux
1. Access RILOE II through a browser.
2. Select Virtual Media in the Virtual Devices tab.
3. Select a CD-ROM to be used and click Connect.
4. Mount the drive using the following command:
mount /dev/cdrom1 /mnt/cdrom1
For SLES 9:
mount /dev/scd0 /media/cdrom11
Creating RILOE II disk image files
The RILOE II virtual media feature enables you to create diskette and CD-ROM image files within the same
applet. Creation of DVD image files using the Virtual Media applet is not supported. The image files
created from the applet are ISO-9660 file system images. The performance of RILOE II virtual media is
faster when image files are used. The utility to create RILOE II Virtual Floppy and CD-ROM disk image files
is integrated into the Virtual Media applet; however, images can also be created using industry-standard
tools, such as DD.
To create an image file:
1. Click Create Disk Image.
2. Select the local media drive from the dropdown menu.
3. Enter the path or file name in the text box or click Browse to select an existing image file or to
change the directory in which the image file will be created.
Using the RILOE II 56
Page 57

4.
Click Create. The virtual media applet begins the process of creating the image file. The process is
complete when the progress bar reaches 100%. To cancel the creation of an image file, click
Cancel.
The Disk>>Image option is used to create image files from physical diskettes or CD-ROMs. The
Image>>Disk option is not valid for a Virtual CD-ROM image. The Disk>>Image button changes to
Image>>Disk when clicked. Use this button to switch from creating image files from physical diskettes to
creating physical floppy diskettes from image files.
RILOE II Virtual Media privilege
The ability to use the RILOE II Virtual Media is restricted by an RILOE II User Privilege. Authorized users
must have the Virtual Media privilege to select a Virtual Media Device and connect it to the host server.
Virtual Media applet timeout
The Virtual Media applet does not timeout when Virtual Media is connected to the host server. The Virtual
Media applet closes if the user logs out.
Operating system USB support
To use virtual media devices your operating system must have support for USB devices. Your operating
system must also support USB mass storage devices. Currently, Windows® 2000 SP4 and later,
Windows® 2003, RedHat Enterprise Linux 3 and 4 and SUSE SLES 9 have the required support. Other
operating systems may also support USB mass storage devices.
During system boot, the ROM BIOS will provide the USB support until the operating system loads. Since
MS-DOS uses the BIOS to communicate with storage devices, utility diskettes that boot DOS will also
function with virtual media.
NOTE: RedHat Enterprise Linux 3 will not allow you to provide a driver diskette using virtual media.
Resetting the RILOE II to the factory default settings
The RILOE II can be reset to the factory default settings by using the RBSU F8. To reset the board to the
factory settings:
1. Restart or power up the server.
2. Press the F8 key to enter RBSU F8 when the cursor flashes and the RILOE II prompt displays on the
screen.
3. Select File, then select Set Defaults.
4. Select Enter when the screen displays Set to Factory Defaults.
5. Select File, then select Exit.
Using the RILOE II 57
Page 58

Getting help
Assistance for all RILOE II options is available by means of the Remote Insight Help hyperlink. This link
provides summary information about the features of the board and helpful information for optimizing the
operation of the RILOE II.
Pocket PC access with RILOE II
RILOE II provides support for network access from HP handheld devices supporting Pocket Internet
Explorer. RILOE II provides a special user interface for connecting to RILOE II from the HP iPAQ Pocket
PC.
Features on the handheld interface include:
• Remote Insight Summary
• Status
• Virtual Power Button
• Reboot Server
• Virtual Floppy Status
• Integrated Management Log
• Remote Insight Event Log
• SSL Encryption—40-bit and 128-bit options
You can enable or disable the HP iPAQ browser interface only from a desktop browser on the Global
Settings page. If access is disabled, you are notified. Handheld access is disabled by default.
To enable the Pocket PC access feature:
1. Log in to RILOE II using an account with administrator privileges.
2. Click Global Settings on the Administration tab.
3. Click Remote Access with Pocket PC.
4. Click Apply Settings to save the changes.
When using a web browser to access RILOE II, the client is detected. If the client is an HP iPAQ running
Pocket Internet Explorer, specific small form factor optimized content appears. The initial web page is not
encrypted.
The following procedure is an example of accessing the RILOE II with the HP iPAQ H3600 Pocket PC:
Using the RILOE II 58
Page 59

1.
Tap Tap here to login to RILOE name. An SSL session is negotiated and a certificate warning
appears.
2. Tap Yes to proceed to the login page.
Using the RILOE II 59
Page 60

3.
Enter a valid user ID and password in the login page, and tap Go. Do not enable the Save
Password option.
If the user ID and password are valid, you are logged in to RILOE II and a web page similar to the
following appears.
At a minimum, the HP iPAQ browser interface supports the Virtual Power button, rebooting the server,
changing the Virtual Floppy status, viewing the logs, and display status information. If you attempt to
browse to any unsupported web page, you are redirected to the initial HP iPAQ web page.
Browsing to an unsupported web page is considered an attempt to use the HP iPAQ browser interface for
functions beyond the scope of the ones listed. For example, attempting to access Global Settings from the
HP iPAQ redirects you to the initial display page.
In this case, because you are already logged in, tapping the Tap here to login to RILOE name at the
initial display page bypasses the login page and takes you to the home page.
Using the RILOE II 60
Page 61

If Pocket PC access is disabled, a page similar to the following appears.
User authentication is required for access to RILOE II. After authentication, the Pocket PC user remains
logged in until the session is ended by closing the Pocket PC browser. To close the browser, tap the Q
key, tap Close active task, and close the browser.
Using the RILOE II 61
Page 62

RILOE II security
In this section
General security guidelines ..................................................................................................................... 62
Two-factor authentication ........................................................................................................................ 63
Introduction to certificate services ............................................................................................................. 66
Securing RBSU....................................................................................................................................... 69
General security guidelines
The following are general guidelines concerning security for RILOE II:
• For maximum security, RILOE II should be set up on a separate management network.
• RILOE II should not be connected directly to the Internet.
• A 128-bit cipher strength browser must be used.
Password guidelines
The following is a list of recommended password guidelines:
• Never write down or recorded passwords.
• Never share passwords with others.
• Passwords generally should not be words that are in a dictionary or are easy to guess, such as
company names, product names, user names, or a user's user ID.
• Passwords should include at least three of the following characteristics:
• At least one numeric character
• At least one special character
• At least one lowercase character
• At least one uppercase character
Passwords issued for a temporary user ID, a password reset, or a locked-out user ID should also conform
to these standards. Each password must be a minimum length of zero characters and a maximum length
of 40 characters. The default minimum length is set to eight characters. HP recommends that you do not
set the minimum password length to fewer than eight characters is not recommended unless you have a
physically secure management network that does not extend outside the secure data center.
Encryption
RILOE II provides strong security for remote management in distributed IT environments by using 128-bit
SSL encryption of HTTP data transmitted across the network. SSL encryption ensures that the HTTP
information is secure as it travels across the network.
Remote Console data is protected using 128-bit RC4 bidirectional encryption.
RILOE II security 62
Page 63

Two-factor authentication
RILOE II is a powerful tool for managing HP ProLiant servers. To prevent misuse of this tool, access to
RILOE II requires reliable user authentication. This firmware release provides a stronger authentication
scheme for RILOE II using two factors of authentication: a password or PIN and a private key for a digital
certificate. Users are asked to verify their identities by providing both factors. Users can store their digital
Setting up two-factor authentication for the first time
certificates and private keys wherever they choose, for example, smart card, USB token, or hard disk.
When setting up two-factor authentication for the first time you can use either local user accounts or
directory user accounts. For more information on two-factor authentication settings, See the "Two-Factor
Authentication Settings (on page 33)" section.
Setting up local user accounts:
1. Obtain the public certificate from the CA that issues user certificates or smart cards in your
organization.
2. Export the certificate in Base64 encoded format to a file on your desktop, for example, CAcert.txt.
3. Obtain the public certificate of the user who needs access to RILOE II.
4. Export the certificate in Base64 encoded format to a file on your desktop, for example, Usercert.txt.
5. Open the file CAcert.txt in Notepad, select all of the text, and copy by pressing the Ctrl+C keys.
6. Log in to RILOE II and browse to the Two-Factor Authentication Settings page.
7. Click Import Trusted CA Certificate. Another page appears.
8. Click the white text area so that your cursor is in the text area, and paste the contents of the
clipboard by pressing the Ctrl+V keys.
9. Click Import Root CA Certificate. The Two-Factor Authentication Settings page appears again
with information displayed under Trusted CA Certificate Information.
10. From your desktop, open the file for the user certificate in Notepad, select all the text, and copy the
text to the clipboard by pressing the Ctrl+C keys.
11. Browse to the User Administration page on RILOE II, and select the user for which you have obtained
a public certificate or create a new user.
12. Click View/Modify.
13. Click Add a certificate.
14. Click the white text area so that your cursor is in the text area, and paste the contents of the
clipboard by pressing the CTRL+V keys.
15. Click Add user Certificate. The Modify User page appears again with a 40 digit number in the
Thumbprint field. You can compare the number to the thumbprint displayed for the certificate by
using Microsoft® Certificate Viewer.
16. Browse to the Two-Factor Authentication Settings page.
17. Change Enforce Two-Factor Authentication to Yes.
18. Change Check for Certificate Revocation to No (default).
19. Click Apply. RILOE II is reset. When RILOE II attempts to go to the login page again, the browser
displays the Client Authentication page with a list of certificates that are available to the system.
If the user certificate is not registered on the client machine, you will not see it in the list. The user
certificate must be registered on the client system before you can use it. If there are no client
certificates on the client system you may not see the Client Authentication page and instead see a
Page cannot be displayed error. To resolve the error, the client certificate must be registered on the
client machine. For more information on exporting and registering client certificates, See the
documentation for your smart card, or certificate authority.
RILOE II security 63
Page 64

20.
Choose the certificate that was added to the user in RILOE II. Click OK.
21. If prompted to do so, insert your smart card, or enter your PIN or password.
After completing the authentication process, you have access to RILOE II.
Setting up directory user accounts:
1. Obtain the public certificate from the CA that issues user certificates or smart cards in your
organization.
2. Export the certificate in bas64 encoded format to a file on your desktop, for example, CAcert.txt.
3. Open the file in Notepad, select all the text, and copy the contents to the clipboard by pressing the
Ctrl+C keys.
4. Log in to RILOE II and browse to the Two-Factor Authentication Settings page.
5. Click Import Trusted CA Certificate. Another page appears.
6. Click the white text area so that your cursor is in the text area, and paste the contents of the
clipboard by pressing the Ctrl+V keys.
7. Click Import Root CA Certificate. The Two-Factor Authentication Settings page appears again
with information displayed under Trusted CA Certificate Information.
8. Change Enforce Two-Factor authentication to Yes.
9. Change Check for Certificate Revocation to No (default).
10. Change Certificate Owner Field to SAN. For more information, See the "Two-Factor Authentication
Settings (on page 33)" section.
11. Click Apply. RILOE II is reset. When RILOE II attempts to go to the login page again, the browser
displays the Client Authentication page with a list of certificates that are available to the system.
12. Select the certificate added to the user in RILOE II. Click Ok.
13. If prompted to do so, insert your smart card, or enter your PIN or password. The login page should
be displayed with the e-mail address for the user in the Directory User field. You cannot change the
Directory User field.
14. Enter the password for the directory user. Click Login.
After completing the authentication process, you have access to RILOE II. See the "Directory settings (on
page 99)" section for more information on configuring directory users and privileges.
Two-factor authentication user certificates
To authenticated a user through locally on RILOE II, a certificate must be associated with the user's local
user name. On the Administration>Modify User page, if a certificate has been mapped to the user a
thumbprint (an SHA1 hash of the certificate) appears with a button that removes the certificate. If a
certificate has not been mapped to the user, Thumbprint: A certificate has NOT been
mapped to this user appears with a button that starts the certificate import process.
To set up a user for two-factor authentication and add a user certificate:
1. Log in to RILOE II using an account that has the Configure RILOE II Settings privilege. Click
Administration.
2. Select a user.
3. Click View/Modify.
4. Under the User Certificate Information section, click Add a certificate.
5. On the Map User Certificate page, paste the user certificate into the text-box and click Import
Certificate. For more information on creating, copying, and pasting certificate information, See the
"Setting up two-factor authentication for the first time (on page 63)" section.
RILOE II security 64
Page 65

Two-factor authentication login
When you connect to RILOE II and two-factor authentication is required, the Client Authentication page
prompts you to select the certificate you want to use. The Client Authentication page displays all of the
certificates available to authenticate a client. Select your certificate. The certificate can be a certificate
mapped to a local user in RILOE II, or a user specific certificate issued for authenticating to the domain.
After you have selected a certificate, if the certificate is protected with a password or if the certificate is
stored on a smart card, a second page appears prompting you to enter the PIN or password associated
with the chosen certificate.
The certificate is examined by RILOE II to ensure it was issued by a trusted CA by checking the signature
against the CA certificate configured in RILOE II. RILOE II determines if the certificate has been revoked
and if it maps to a user in the RILOE II local user database. If all of these tests pass, then the normal RILOE
II user interface appears.
If your credential authentication fails, the Login Failed page appears. If login fails, you are instructed to
close the browser, open a new browser page, and try connecting again. If directory authentication is
enabled, and local user authentication fails, RILOE II displays a login page with the directory user name
field populated with either the User Principal Name from the certificate or the Distinguished Name
(derived from the subject of the certificate). RILOE II requests the password for the account. After providing
the password, you are authenticated.
Using two-factor authentication with directory authentication
In some cases, configuring two-factor authentication with directory authentication is complicated. RILOE II
can use HP Extended schema or Default Directory schema to integrate with directory services. To ensure
security when two-factor authentication is enforced, RILOE II uses an attribute from the client certificate as
the directory user's login name. Which client certificate attribute RILOE II uses is determined by the
Certificate Owner configuration setting on the Two-Factor Authentication Settings page. If Certificate
RILOE II security 65
Page 66

Owner is set to SAN, RILOE II obtains the directory user's login name from the UPN attribute of the SAN.
If the Certificate Owner setting is set to Subject, RILOE II obtains the directory user's distinguished name
from the subject of the certificate.
Which one of these settings to choose depends on which directory integration method is used, how the
directory architecture is designed, and what information is contained in user certificates that are issued.
The following examples assume you have the appropriate permissions.
Authentication using Default Directory Schema, part 1: The distinguished name for a user in
the directory is CN=John Doe,OU=IT,DC=MyCompany,DC=com, and the following are the attributes of
John Doe's certificate:
• Subject: DC=com/DC=MyCompany/OU=IT/CN=John Doe
• SAN/UPN: john.doe@MyCompany.com
Authenticating to RILOE II with username:john.doe@MyCompany.com and password, will work if twofactor authentication is not enforced. After two-factor authentication is enforced, if SAN is selected on the
Two-Factor Authentication Settings page, the login page automatically populates the Directory User field
with john.doe@MyCompany.com. The password can be entered, but the user will not be authenticated.
The user is not authenticated because john.doe@MyCompany.com, which was obtained from the
certificate, is not the distinguished name for the user in the directory. In this case, you must select Subject
on the Two-Factor Authentication Settings page. Then the Directory User field on the login page will be
populated with CN=John Doe,OU=IT,DC=MyCompany,DC=com, which is the user's actual distinguished
name. If the correct password is entered, the user is authenticated.
Authentication using Default Directory Schema, part 2: The distinguished name for a user in
the directory is CN=john.doe@MyCompany.com,OU=IT,DC=MyCompany,DC=com, and the following
are the attributes of John Doe's certificate:
• Subject: DC=com/DC=MyCompany/OU=Employees/CN=John
Doe/E=john.doe@MyCompany.com
• SAN/UPN: john.doe@MyCompany.com
• Search context on the Directory Settings page is set to: OU=IT,DC=MyCompany,DC=com
In this example, if SAN is selected on the Two-Factor Authentication Settings page, the Directory User field
on the login page is populated with john.doe@MyCompany.com. After the correct password is entered,
the user is authenticated. The user is authenticated even though john.doe@MyCompany.com is not the
distinguished name for the user. The user is authenticated because RILOE II attempts to authenticate using
the search context fields (CN=john.doe@MyCompany.com, OU=IT, DC=MyCompany, DC=com)
configured on the Directory Settings page. Becasue this is the correct distinguished name for the user,
RILOE II successfully finds the user in the directory.
NOTE: Selecting Subject on the Two-Factor Authentication Settings page causes authentication to fail,
because the subject of the certificate is not the distinguished name for the user in the directory.
When using the HP Extended schema method, HP recommends selecting the SAN option on the Twofactor Authentication Settings page.
Introduction to certificate services
Certificate Services are used to issue signed digital certificates to network hosts. The certificates are used
to establish SSL connections with the host and verify the authenticity of the host.
Installing Certificate Services allows Active Directory to receive a certificate that allows Lights-Out
processors to connect to the directory service. Without a certificate, RILOE II cannot connect to the
directory server.
RILOE II security 66
Page 67

Each directory server that you want RILOE II to connect to must be issued a certificate. If you install an
Enterprise Certificate Service, Active Directory can automatically request and install certificates for all of
the Active Directory controllers on the network.
Certificates
By default, RILOE II creates a self-signed certificate for use in SSL connections. The self-signed certificate
enables RILOE II to work without any additional configuration steps. The security features of RILOE II can
be enhanced by importing a trusted certificate.
• Generate Certificate Request—RILOE II can create a CR (in PKCS #10 format), which can be
sent to a CA. The certificate request is Base64 encoded. A CA processes the request and returns a
response (X.509 certificate) that can be imported into RILOE II.
The CR contains a public/private key pair that is used for validation of communications between the
client browser and RILOE II. The generated CR is held in memory until either a new CR is generated,
a certificate is imported by this process, or RILOE II is reset, which means you can generate the CR
and copy it to the client clipboard, leave RILOE II website to retrieve the certificate, then return to
import the certificate.
When submitting the request to the CA, be sure to:
• Use the RILOE II name as listed on the System Status page as the URL for the server.
• Request the certificate be generated in the RAW format.
• Include the Begin and End certificate lines.
RILOE II security 67
Page 68

Every time you click Generate Certificate Request, a new certificate request is generated, even
though the RILOE II name is the same.
• Import Certificate—If you are returning to the Create Certificate Request page with a certificate to
import, click Import Certificate to go directly to the Certificate Import page without generating a
new CR. A given certificate only works with the keys contained in the CR from which the certificate
was generated. If RILOE II is reset or another CR is generated since the CR that was used to request
the certificate generated, then another CR must be generated and a new certificate procured from
the CA.
You can create a certificate request or import an existing certificate using RIBCL XML commands. These
commands enable you to script and automate certificate deployment on RILOE II servers instead of
manually deploying certificates through the web interface. For more information, See
"CERTIFICATE_SIGNING_REQUEST" and "IMPORT_CERTIFICATE" in the "Remote Insight Command
Language (on page 138)" section.
CERTIFICATE_SIGNING_REQUEST and IMPORT_CERTIFICATE cannot be used with the standard
CPQLOCFG utility. However, you can use the PERL version of CPQLOCFG in combination with these
commands.
Installing certificate services
1. Select Start>Settings>Control Panel.
2. Double-click Add/Remove Programs.
3. Click Add/Remove Windows Components to start the Windows Components wizard.
4. Select the Certificate Services check box. Click Next.
5. Click OK at the warning that the server cannot be renamed. The Enterprise root CA option is
selected because there is no CA registered in the active directory.
6. Enter the information appropriate for your site and organization. Accept the default time period of
two years for the Valid for field. Click Next.
7. Accept the default locations of the certificate database and the database log. Click Next.
8. Browse to the c:\I386 folder when prompted for the Windows® 2000 Advanced Server CD.
9. Click Finish to close the wizard.
Verifying directory services
Because management processors communicate with Active Directory using SSL, it is necessary to create a
certificate or install Certificate Services. You must install an enterprise CA because you will be issuing
certificates to objects within your organizational domain.
To verify that certificate services is installed:
1. Select Start>Programs>Administrative Tools>Certification Authority.
2. If Certificate Services is not installed an error message appears.
Configuring Automatic Certificate Request
To specify that a certificate be issued to the server:
1. Select Start>Run, and enter mmc.
2. Click Add.
3. Select Group Policy, and click Add to add the snap-in to the MMC.
4. Click Browse, and select the Default Domain Policy object. Click OK.
5. Select Finish>Close>OK.
RILOE II security 68
Page 69

6.
Expand Computer Configuration>Windows Settings>Security Settings>Public Key
Policies.
7. Right-click Automatic Certificate Requests Settings, and select New>Automatic
Certificate Request.
8. Click Next when the Automatic Certificate Request Setup wizard starts.
9. Select the Domain Controller template, and click Next.
10. Select the certificate authority listed. (It is the same CA defined during the Certificate Services
installation.) Click Next.
11. Click Finish to close the wizard.
Securing RBSU
The RILOE II RBSU allows user access for viewing and modifying the RILOE II configuration. RBSU access
settings can be configured using RBSU, browser, RIBCL scripts, and the RILOE II Security Override Switch.
RBSU has three levels of security:
• RBSU Disabled (most secure)
If RILOE II RBSU is disabled, user access is prohibited. This prevents modification using the RBSU
interface.
• RBSU Login Required (more secure)
If RBSU login is required, then the active configuration menus are controlled by the authenticated
user's access rights.
• RBSU Login Not Required (default)
Anyone with access to the host during POST may enter the RILOE II RBSU to view and modify
configuration settings. This is an acceptable setting if host access is controlled.
RILOE II security 69
Page 70

Systems Insight Manager integration
In this section
Integrating RILOE II with Systems Insight Manager...................................................................................... 70
Systems Insight Manager functional overview ............................................................................................ 70
Systems Insight Manager identification and association .............................................................................. 71
Configuring Systems Insight Manager identification of RILOE II.................................................................... 72
Receiving SNMP alerts in Systems Insight Manager.................................................................................... 73
Systems Insight Manager port matching.................................................................................................... 73
Integrating RILOE II with Systems Insight Manager
RILOE II fully integrates with Systems Insight Manager in key operating environments. Full integration with
Systems Insight Manager also provides a single management console for launching a standard Web
browser to access. While the operating system is running, you can establish a connection to RILOE II
using Systems Insight Manager.
Integration with Systems Insight Manager provides:
• Support for SNMP trap delivery to a Systems Insight Manager console
Delivery to a Systems Insight Manager console can be configured to forward SNMP traps to a pager
or e-mail.
• Support for SNMP management
Systems Insight Manager is allowed to access the Insight Management Agents information through
RILOE II.
• Support for a management processor
Systems Insight Manager adds support for a new device type, the management processor. All RILOE
II devices installed in servers on the network are discovered in Systems Insight Manager as
management processors. The management processors are associated with the servers in which they
are installed.
• Grouping of RILOE II management processors
All RILOE II devices can be grouped together logically and displayed on one page. This capability
provides access to RILOE II from one point in Systems Insight Manager.
• RILOE II hyperlinks
Systems Insight Manager provides a hyperlink on the server device page to launch and connect to
RILOE II.
• HP Management Agents
RILOE II, combined with HP Management Agents, provides remote access to system management
information through the RILOE II browser-based interface.
Systems Insight Manager functional overview
Systems Insight Manager enables you to:
Systems Insight Manager integration 70
Page 71

•
Identify RILOE II processors.
• Create an association between RILOE II and its server.
• Create links between RILOE II and its server.
• View RILOE II and server information and status.
• Control the amount of detailed information displayed for RILOE II.
• Draw a visualization of the ProLiant BL p-Class rack infrastructure.
The following sections give a summary of each function. For detailed information on these benefits and
how to use Systems Insight Manager, refer to the HP Systems Insight Manager Installation and User
Guide, provided with Systems Insight Manager.
Systems Insight Manager identification and association
Systems Insight Manager can identify RILOE II and create an association between RILOE II and the server.
The administrator of the RILOE II device may configure RILOE II to respond to Systems Insight Manager
Systems Insight Manager status
identification requests.
In Systems Insight Manager, RILOE II is identified as a management processor. Systems Insight Manager
displays the management processor status within the Systems List.
The RILOE II management processor is displayed as an icon in the device list on the same row as its host
server. The color of the icon represents the status of the management processor.
For a complete list of device statuses, refer to the HP Systems Insight Manager Installation and User
Guide.
Systems Insight Manager links
For ease of management, Systems Insight Manager creates links to the following locations:
• RILOE II and the host server from any System List
• The server from the System Page of RILOE II
Systems Insight Manager integration 71
Page 72

•
RILOE II from the System Page of the server
The Systems List pages display RILOE II, the server, and the relationship between RILOE II and server. For
example, the page can display the server, the RILOE II name next to the server, and RILOE II name IN
server in the System Name field for RILOE II.
Clicking on a status icon for RILOE II takes you to the RILOE II Web interface. Clicking on the hardware
status icon takes you to the Insight Management Agents for the device. Clicking on the RILOE II or server
name takes you to the System Page of the device. Within the System Page are the Identity, Links, and
Event tabs. These tabs provide identity and status information, event information, and links for the
associated device.
Systems Insight Manager systems lists
RILOE II management processors can be viewed within Systems Insight Manager. The administrator can
create and use customized system lists to group management processors. Refer to the HP Systems Insight
Manager Installation and User Guide for further details.
Configuring Systems Insight Manager identification of
RILOE II
RILOE II enables you to set how much data is returned on an Systems Insight Manager request for more
information.
The level of data returned is controlled on the SNMP/Insight Manager Settings page. The identification
data level options are:
• High—Associations are present, and all data is present on the summary page.
• Medium—Associations are present, but the summary page contains less detail than at high
security.
• Low—Associations are present, if SNMP pass-through is supported. If not, the server and
management processor are separate entities in the device list.
• None—No data is returned to Systems Insight Manager.
Display information Low Medium High None
Product Name Y Y Y —
Server Serial Number — Y Y —
Server State —
Management Processor Status Y Y Y —
Management Processor Serial Number — Y Y —
RILOE II Advanced License Status and Data — Y Y —
Hardware Revision Information — — Y —
Firmware Revision Information — — Y —
Rack Topology — Y Y —
Single Sign On* — — Y —
Secure Task Execution* — — Y —
Y —
CIMOM* — — Y —
Device Home Page URL — — Y —
* Reserved for future integration.
Systems Insight Manager integration 72
Page 73

Receiving SNMP alerts in Systems Insight Manager
You can configure RILOE II to forward alerts from the host operating system management agents, and to
send RILOE II-generated alerts to Systems Insight Manager.
Systems Insight Manager provides support for full SNMP management, and RILOE II supports SNMP trap
delivery to Systems Insight Manager. You can view the event log, select the event, and view the additional
information about the alert.
Configuring receipt of SNMP alerts in Systems Insight Manager is a two-step process. The process
requires Systems Insight Manager to discover RILOE II and configuring RILOE II to enable SNMP alerts.
1. To enable RILOE II to send SNMP traps click SNMP/Insight Manager Settings on the
Administration tab of RILOE II navigation frame to enable SNMP alerting and to provide an
SNMP trap IP address to RILOE II. SNMP trap IP address should be the address of the computer
running Systems Insight Manager. See the “SNMP alerts and settings (on page 31)” section for
details.
2. To discover RILOE II in Systems Insight Manager configure RILOE II as a managed device for Systems
Insight Manager. Adding RILOE II to Systems Insight Manager allows the NIC interface on RILOE II to
function as a dedicated management port, isolating management traffic from the remote host server
NIC interface.
a. Start Systems Insight Manager. Click Options>Discovery>Automatic Discovery to
discover any RILOE II devices to be managed by Systems Insight Manager.
b. Select IP range pinging and, if the IP address does not already appear in the Ping Inclusion
Ranges section, enter the IP address.
c. Click Save and Run to add RILOE II to Systems Insight Manager. After the discovery is
complete, subsequent queries displays the device as a management processor.
d. You may need to edit the SNMP monitor community string (for example, by changing it to
"public") so that RILOE II appears in the list of monitored devices. You can change the SNMP
monitor community string by accessing the Systems Protocol Settings page. Click
Options>Protocol Settings>System Protocol Settings.
Another option is to click Options>Protocol Settings>Global Protocol Settings and set
community strings to use during discovery under Default SNMP Settings. When set, you can use
steps a through c to run discovery again.
For major, uncleared events, RILOE II traps are displayed in All Events. You can use the orange
button at the top of the page to obtain information about the major uncleared events. Click the
Event Type to obtain further information about the event.
HP Insight Agents for RILOE II must be installed on the remote host server to enable management of
RILOE II. See "Installing RILOE II device drivers" for additional details about installing and
configuring agents.
Systems Insight Manager port matching
Systems Insight Manager is configured to start an HTTP session to check for RILOE II at port 80. The port
can be changed. If you want to change the port number, you must also change it in Network Settings and
Systems Insight Manager.
To change the port number in Systems Insight Manager, add the port to the
config\identification\additionalWsDisc.props file in the directory where Systems Insight Manager is
installed. The entry must start with the HTTP port for RILOE II. No entry needs to be in this file for RILOE II if
it remains at the standard Port 80. It is very important that the entry is on a single line and the port
number is first, with all other items identical to the following example (including capitalization).
Systems Insight Manager integration 73
Page 74

The following example shows what the entry is if RILOE II is to be discovered at port 55000 (this should
all be on one line in the file):
55000=RILOE
II, ,true,false,com.hp.mx.core.tools.identification.mgmtproc.MgmtProcess
orParser
Systems Insight Manager integration 74
Page 75

Directory services
In this section
Overview of directory integration............................................................................................................. 75
Benefits of directory integration................................................................................................................ 75
How directory integration works .............................................................................................................. 76
Advantages and disadvantages of schema-free and HP Extended schema .................................................... 76
Setup for Schema-free directory integration ............................................................................................... 77
Setting up HP schema directory integration ............................................................................................... 79
Directory settings.................................................................................................................................... 99
Overview of directory integration
RILOE II can be configured to use a directory to authenticate and authorize its users. There are two
configuration options available: using a directory that has been extended with HP Schema or using the
directory’s default schema (schema-free.)
There are white papers available for more information on directory integration on the HP website
(http://www.hp.com/servers/lights-out
).
Benefits of directory integration
Directory integration benefits include:
• Scalability—The directory can be leveraged to support thousands of users on thousands of RILOE IIs.
• Security—Robust user password policies are inherited from the directory. User password complexity,
rotation frequency, and expiration are policy examples.
• Anonymity (lack thereof)—In some environments, users share Lights-Out accounts, which results in not
knowing who performed an operation, instead of knowing what account (or role) was used.
• Role-based administration (when using HP Extended schema)—You can create roles (for instance,
clerical, remote control of the host, complete control) and associate users or user groups with those
roles. A change to a role applies to all users and Lights-Out devices associated with that role.
• Single point of administration—You can use native administrative tools, such as MMC and
ConsoleOne to administrate Lights-Out users.
• Immediacy—A single change in the directory rolls-out immediately to associated Lights-Out
processors, which eliminates the need to script the change process.
• Elimination of another username and password—You can use existing user accounts and passwords
in the directory without having to record or remember a new set of credentials for Lights-Out.
• Flexibility—When configured for HP Extended schema, you can create a single role for a single user
on a single RILOE II, you can create a single role for multiple users on multiple RILOEs, or you can
use a combinations of roles as is suitable for your enterprise.
• Compatibility—Lights-Out directory integration applies to iLO, RILOE, and RILOE II products. The
integration supports the popular Active Directory and eDirectory.
Directory services 75
Page 76

•
Standards—Lights-Out directory support builds on top of the LDAP 2.0 standard for secure directory
access.
How directory integration works
Schema-free
At the login page, enter a login name and a password. If ActiveX is enabled in the browser, the login
name is converted to the directories DN format and stored in a security cookie in the browser. The
browser then loads the home page for RILOE II.
RILOE II reads the security cookie and extracts the DN for each page displayed. RILOE II reads the
directory object pointed to by the DN. RILOE II then determines what groups the object is a member of
and compares this information with a list kept in RILOE II. If there is a match, then the privileges
associated with this group in RILOE II determine whether you have access to the page requested.
When using a schema-free directory configuration, after you attempt to log in to RILOE II, RILOE II
attempts to read your object in the directory to determine what groups you are a member of. RILOE II
compares the list of groups to group names RILOE II is configured to recognize. If RILOE II finds a match,
RILOE II determines what privileges you have based on the privileges configured for that group in RILOE
II.
If you are a member of any group that RILOE II recognizes, you have login rights to RILOE II, regardless of
what rights are associated with the group. User rights are a combination of all rights for the groups you
are a member of that RILOE II recognizes.
If at login the ActiveX control does not run, then the complete login name or the login name prepended
with a user context is used for the directory lookup process. For this to work, the login name must either
be in full DN format or in a format that the combination of the login name with a user context is made into
a full DN.
HP Extended schema
Refer to the "Directory-enabled remote management (on page 103)" section.
Advantages and disadvantages of schema-free and HP
Extended schema
Before configuring RILOE II for directories, you must decide whether to use the directory's schema-free
option (the default schema) or the HP Extended schema option.
The advantages of using the schema-free option are:
• There is no need to extend the directory's schema.
• When ActiveX controls are enabled on the browser, logging in using NetBIOS and e-mail formats is
supported.
The advantages of using the HP Extended schema option are:
• There is much more flexibility in controlling access. For example, access can be limited to a time of
day or from a certain range of IP addresses.
• Groups are maintained in the directory, not on each RILOE II.
• eDirectory works only with RILOE II using the HP Extended schema.
Directory services 76
Page 77

Setup for Schema-free directory integration
Before setting up the Schema-free option, your system must meet all the prerequisites outlined in the
"Active Directory preparation (on page 77)" section.
You can set up RILOE II for directories in three ways:
• Manually using a browser ("Schema-free browser-based setup" on page 77).
• Using a script ("Schema-free scripted setup" on page 77).
Active Directory preparation
• Using HPLOMIG ("Schema-free HPLOMIG-based setup" on page 78).
The schema-free option is supported on the following operating systems:
• Microsoft® Active Directory
• Microsoft® Windows® Server 2003 Active Directory
SSL must be enabled at the directory. To enable SSL, install a certificate for the domain in Active
Directory. RILOE II only communicates with the directory over a secure SSL connection. For more
information, refer to the Microsoft® Knowledge Base, article number 247078: Enabling SSL
Communication over LDAP for Windows® 2000 Domain Controllers on the Microsoft® website
(http://support.microsoft.com/
).
To validate the setup, you should have the directory distinguished name for at least one user and the
distinguished name of a security group the user is a member of.
Schema-free browser-based setup
Schema-free can be setup using the RILOE II browser-based interface.
1. Log on to RILOE II using an account that has the Configure RILOE II Settings privilege. Click
Administration.
IMPORTANT: Only users with the Configure RILOE II Settings privilege can change these settings. Users
that do not have the Configure RILOE II Settings privilege can only view the assigned settings.
2. Click Directory Settings.
3. Select Use Directory Default Schema in the Authentication Settings section. For more
information, refer to the "Schema-free setup options (on page 78)" section.
4. Click Apply Settings.
5. Click Test Settings.
Schema-free scripted setup
To setup the schema-free directories option using RIBCL XML scripting:
1. Download and review the scripting and command line resource guide.
2. Write a script that configures RILOE II for schema-free directories support and run it. The following
script can be used as a template.
<RIBCL VERSION="2.0">
<LOGIN USER_LOGIN="admin" PASSWORD="password">
<DIR_INFO MODE = "write">
<MOD_DIR_CONFIG>
<DIR_ENABLE_GRP_ACCT value = "yes"/>
Directory services 77
Page 78

<DIR_GRPACCT1_NAME value
="CN=Administrators,CN=Builtin,DC=HP,DC=com "/>
<DIR_GRPACCT1_PRIV value = "1"/>
</MOD_DIR_CONFIG>
</DIR_INFO>
</LOGIN>
</RIBCL>
Schema-free HPLOMIG-based setup
HPLOMIG is the easiest way to set up a large number of LOM processors for directories. To use
HPLOMIG, download the HPQLOMIG utility and additional documentation from the HP website
(http://www.hp.com/servers/lights-out
processors for directories. For more information on using HPLOMIG, refer to the "HPLOMIG Operation"
section.
Schema-free setup options
Setup options are the same regardless of which method (browser, HPQLOMIG, or script) you use to
configure the directory.
). HP recommends using HPLOMIG when configuring many LOM
After enabling directories and selecting the Schema-free option, you have the following options.
Minimum Login Flexibility
• Enter the directory server’s DNS name or IP address and LDAP port. Typically, the LDAP port for an
SSL connection is 636.
• Enter the distinguished name for at least one group. The chosen group can be a security group (for
example CN=Administrators,CN=Builtin,DC=HP,DC=com) or any other group as long as the
intended RILOE II users are members of the group.
With a minimum configuration, you can log into RILOE II using your full distinguished name and
password. You must be a member of a group that RILOE II recognizes.
Better Login Flexibility
• In addition to the minimum settings, enter at least one directory user context.
At login time, the login name and user context are combined to make the user's distinguished name.
For instance, if the user logs in as JOHN.SMITH and a user context is set up as
CN=USERS,DC=HP,DC=COM, then the distinguished name that RILOE II tries will be
CN=JOHN.SMITH,CN=USERS,DC=HP,DC=COM.
Maximum Login Flexibility
• Configure RILOE II as described in the minimum and better login flexibility options.
• Configure RILOE II with a DNS name, not an IP address for the directory server's network address.
The DNS name must be resolvable to an IP address from both RILOE II and the client system.
• Enable ActiveX controls in your browser. The RILOE II login script will attempt to call a Windows®
control to convert the login name to a distinguished name.
Configuring RILOE II with maximum login flexibility enables you to log in using your full distinguished
name and password, your name as it appears in the directory, NetBIOS format
(domain\login_name), or the e-mail format (login_name@domain).
NOTE: Your system security settings or installed software might prevent the login script from calling the
Windows® ActiveX control. If this happens, your browser displays a warning message in the status bar,
message box, or might stop responding. To help identify what software or setting is causing the problem,
create another profile and log in to the system.
Directory services 78
Page 79

In some cases, you might not be able to get the maximum login flexibility option to work. For instance, if
the client and RILOE II are in different DNS domains, one of the two might not be able to resolve the
directory server name to an IP address.
Setting up HP schema directory integration
When using the HP schema directory integration, RILOE II supports both Active Directory and eDirectory.
Features supported by HP schema directory integration
However, these directory services require the schema being extended.
RILOE II Directory Services functionality enables you to:
• Authenticate users from a shared, consolidated, scalable user database.
• Control user privileges (authorization) using the directory service.
• Use roles in the directory service for group-level administration of RILOE II management processors
and RILOE II users.
Extending the schema must be completed by a Schema Administrator. The local user database is retained.
You can decide not to use directories, to use a combination of directories and local accounts, or to use
directories exclusively for authentication.
NOTE: When connected through the Diagnostics Port, the directory server is not available. You can log in
using a local account only.
Setting up directory services
To successfully enable directory-enabled management on any Lights-Out management processor:
1. Review the following sections:
• "Directory services (on page 75)"
• "Directory services schema (on page 187)"
• "Directory-enabled remote management (on page 103)"
2. Install:
a. Download the HP Lights-Out Directory Package containing the schema installer, the management
snap-in installer, and the migrations utilities from the HP website
(http://www.hp.com/servers/lights-out
b. Run the schema installer (on page 81) once to extend the schema.
c. Run the management snap-in installer (on page 83), and install the appropriate snap-in for your
directory service on one or more management workstations.
3. Update:
a. Flash the ROM on the Lights-Out management processor with the directory-enabled firmware.
b. Set directory server settings and the distinguished name of the management processor objects on
the Directory Settings (on page 99) page in the RILOE II GUI.
4. Manage:
a. Create a management device object and a role object ("Directory services objects" on page 88)
using the snap-in.
b. Assign rights to the role object, as necessary, and associate the role with the management device
object.
c. Add users to the role object.
).
Directory services 79
Page 80

For more information on managing the directory service, See "Directory-enabled remote
management (on page 103)." Examples are available in the "Directory services for Active Directory
(on page 83)" and "Directory services for eDirectory (on page 92)" sections.
5. Handle exceptions:
• Lights-Out migration utilities are easier to use with a single Lights-Out role. If you plan to create
multiple roles in the directory, you might need to use directory scripting utilities, such as LDIFDE
or VB script, to create complex role associations. See the "Using bulk import tools (on page
108)" for more information.
• If you have RILOE II or RILOE processors with old firmware, you might need to manually update
the firmware using a browser. Minimum firmware requirements for remote firmware update using
LOM product Minimum supported firmware
RILOE 2.41
RILOE II All versions
iLO 1.10
iLO 2 1.00
RIBCL and directory migration utility as follows:
After the schema has been extended, you can complete the directory services setup by using HP Lights-Out
Directories Migration Utilities (on page 113). The migration utilities are included in the HP Lights-Out
Directory Package. Version 1.13 of the Directories Migration Utility allows Lights-Out import and export
and supports different user credentials for each Lights-Out processor.
Directory services support
Using HP schema directory integration, RILOE II supports the following directory services:
• Microsoft® Active Directory
• Microsoft® Windows® Server 2003 Active Directory
• Novell eDirectory 8.7.3
• Novell eDirectory 8.7.1
RILOE II software is designed to run within the Microsoft® Active Directory Users and Computers and
Novell ConsoleOne management tools, enabling you to manage user accounts on Microsoft® Active
Directory or Novell eDirectory. This solution makes no distinction between eDirectory running on
NetWare, Linux, or Windows®. Spawning an eDirectory schema extension requires Java™ 1.4.0 or later
for SSL authentication.
RILOE II supports Microsoft® Active Directory running on one of the following operating systems:
• Windows® 2000 family
• Windows® Server 2003 family
RILOE II supports eDirectory running on one of the following operating systems:
• NetWare 5.X
• NetWare 6.X
• Red Hat Enterprise Linux AS 2.1
Schema required software
RILOE II requires specific software, which will extend the schema and provide snap-ins to manage the
RILOE II network. An HP Smart Component is available for download that contains the schema installer
and the management snap-in installer. The HP Smart Component can be downloaded from the HP website
(http://www.hp.com/servers/lights-out
).
Directory services 80
Page 81

Schema installer
Bundled with the schema installer are one or more .xml files. These files contain the schema that will be
added to the directory. Typically, one of these files will contain core schema that is common to all the
supported directory services. Additional files contain only product-specific schemas. The schema installer
requires the use of the .NET framework.
The installer includes three important screens:
• Schema Preview
• Setup
Schema Preview
• Results
The Schema Preview screen enables the user to view the proposed extensions to the schema. This screen
reads the selected schema files, parses the XML, and displays it as a tree view. It lists all of the details of
the attributes and classes that will be installed.
Setup
The Setup screen is used to enter the appropriate information before extending the schema.
The Directory Server section of the Setup screen enables you to select whether you will be using Active
Directory or eDirectory, and to set the computer name and the port to be used for LDAP communications.
IMPORTANT: Extending the schema on Active Directory requires that the user be an authenticated Schema
Administrator, that the schema is not write protected, and the directory is the FSMO role owner in the tree.
The installer will attempt to make the target directory server the FSMO Schema Master of the forest.
To get write access to the schema on Windows® 2000 requires a change to the registry safety interlock. If the
user selects the Active Directory option, the schema extender will attempt to make the registry change. It
Directory services 81
Page 82

will only succeed if the user has rights to do this. Write access to the schema is automatically enabled on
Windows® Server 2003.
The Directory Login section of the Setup screen enables you to enter your login name and password.
These might be required to complete the schema extension. The Use SSL during authentication option sets
the form of secure authentication to be used. If selected, directory authentication using SSL is used. If not
selected and Active Directory is selected, Windows NT® authentication is used. If not selected and
eDirectory is selected, the administrator authentication and the schema extension will proceed using an
unencrypted (clear text) connection.
Directory services 82
Page 83

Results
The Results screen displays the results of the installation, including whether the schema could be extended
and what attributes were changed.
Management snap-in installer
The management snap-in installer installs the snap-ins required to manage RILOE II objects in a Microsoft®
Active Directory Users and Computers directory or Novell ConsoleOne directory.
RILOE II snap-ins are used to perform the following tasks in creating an RILOE II directory:
• Creating and managing the RILOE II and role objects (policy objects will be supported at a later
date)
• Making the associations between RILOE II objects and the role (or policy) objects
Directory services for Active Directory
The following sections provide installation prerequisites, preparation, and a working example of Directory
Services for Active Directory. HP provides a utility to automate much of the directory setup process. You
can download the HP Directories Support for Management Processors on the HP website
Active Directory installation prerequisites
(http://h18004.www1.hp.com/support/files/lights-out/us/index.html
Directory Services for RILOE II uses LDAP over SSL to communicate with the directory servers. Before
installing snap-ins and schema for Active Directory, you should read and have available the following
documentation:
).
IMPORTANT: Installing Directory Services for RILOE II requires extending the Active Directory schema.
Extending the schema must be completed by an Active Directory Schema Administrator.
Directory services 83
Page 84

•
Extending the Schema in the Microsoft® Windows® 2000 Server Resource Kit, available at
http://msdn.microsoft.com
• Installing Active Directory in the Microsoft® Windows® 2000 Server Resource Kit
• Microsoft® Knowledge Base Articles
• 216999 Installing the remote server administration tools in Windows® 2000
• 314978 Using the Adminpak.msi to install a server administration tool in Windows® 2000
• 247078 Enabling SSL communication over LDAP for Windows® 2000 domain controllers
• 321051 Enabling LDAP over SSL with a third-party certificate authority
Directory services preparation for Active Directory
To set up directory services for use with RILOE II management processors:
1. Install Active Directory. For more information, refer to Installing Active Directory in the Microsoft®
Windows® 2000 Server Resource Kit.
2. Install the Microsoft® Admin Pack (the ADMINPAK.MSI file, which is located in the i386
subdirectory of the Windows® 2000 Server or Advance Server CD). For more information, refer to
the Microsoft® Knowledge Base Article 216999.
3. In Windows® 2000, the safety interlock that prevents accidental writes to the schema must be
temporarily disabled. The schema extender utility can do this if the remote registry service is running
and the user has sufficient rights. This can also be done by setting
HKEY_LOCAL_MACHINE\SYSTEM\CurrentControlSet\ServicesParameters\Schema
Update Allowed in the registry to a non-zero value (refer to the "Order of Processing When
Extending the Schema" section of Installation of Schema Extensions in the Windows® 2000 Server
Resource Kit) or by the following steps. This step is not necessary if you are using Windows® Server
2003.
IMPORTANT: Incorrectly editing the registry can severely damage your system. HP recommends creating a
back up of any valued data on the computer before making changes to the registry.
a. Start MMC.
b. Install the Active Directory Schema snap-in in MMC.
c. Right-click Active Directory Schema and select Operations Master.
d. Select The Schema may be modified on this Domain Controller.
e. Click OK.
The Active Directory Schema folder might need to be expanded for the checkbox to be available.
4. Create a certificate or install Certificate Services. This step is necessary to create a certificate or
install Certificate Services because RILOE II communicates with Active Directory using SSL. Active
Directory must be installed before installing Certificate Services.
5. To specify that a certificate be issued to the server running active directory:
a. Launch Microsoft® Management Console on the server and add the default domain policy snap-
in (Group Policy, then browse to Default domain policy object).
b. Click Computer Configuration>Windows Settings>Security Settings>Public Key
Policies.
c. Right-click Automatic Certificate Requests Settings, and select new>automatic
certificate request.
d. Using the wizard, select the domain controller template, and the certificate authority you want to
use.
Directory services 84
Page 85

6.
Download the Smart Component, which contains the installers for the schema extender and the snapins. The Smart Component can be downloaded from the HP website
(http://www.hp.com/servers/lights-out
7. Run the schema installer application to extend the schema, which extends the directory schema with
).
the proper HP objects.
The schema installer associates the Active Directory snap-ins with the new schema. The snap-in
installation setup utility is a Windows® MSI setup script and will run anywhere MSI is supported
(Windows® XP, Windows® 2000, Windows® 98). However, some parts of the schema extension
application require the .NET Framework, which can be downloaded from the Microsoft® website
(http://www.microsoft.com
).
Snap-in installation and initialization for Active Directory
1. Run the snap-in installation application to install the snap-ins.
2. Configure the directory service to have the appropriate objects and relationships for RILOE II
management.
a. Use the management snap-ins from HP to create RILOE II, Policy, Admin, and User Role objects.
b. Use the management snap-ins from HP to build associations between the RILOE II object, the
policy object, and the role object.
c. Point the RILOE II object to the Admin and User role objects (Admin and User roles will
automatically point back to the RILOE II object).
For more information on RILOE II objects, refer to "Directory services objects (on page 88)."
At a minimum, you must create:
• One Role object that will contain one or more users and one or more RILOE II objects.
• One RILOE II object corresponding to each RILOE II management processor that will be using the
directory.
Example: Creating and configuring directory objects for use with RILOE II in Active Directory
The following example shows how to set up roles and HP devices in an enterprise directory with the
domain testdomain.local, which consists of two organizational units, Roles and RILOES.
Assume that a company has an enterprise directory including the domain testdomain.local, arranged as
shown in the following screen.
Create an organizational unit, which will contain the Lights-Out Devices managed by the domain. In this
example, two organizational units are created called Roles and RILOES.
Directory services 85
Page 86

1.
Use the HP provided Active Directory Users and Computers snap-ins to create Lights-Out
Management objects in the RILOES organizational unit for several RILOE II devices.
a. Right-click the RILOES organizational unit found in the testdomain.local domain, and select
NewHPObject.
b. Select Device in the Create New HP Management Object dialog box.
c. Enter an appropriate name in the Name field of the dialog box. In this example, the DNS host
name of the RILOE II device, rib-email-server, will be used as the name of the Lights-Out
Management object, and the surname will be RILOEII.
Enter and confirm a password in the Device LDAP Password and Confirm fields. The device will use this
password to authenticate to the directory, and should be unique to the device. This password is the
password that is used in the Directory Settings screen of the RILOE II.
d. Click OK.
2. Use the HP provided Active Directory Users and Computers snap-ins to create HP Role objects in the
Roles organizational unit.
a. Right-click the Roles organizational unit, select New then Object.
b. Select Role for the field type in the Create New HP Management Object dialog box.
c. Enter an appropriate name in the Name field of the New HP Management Object dialog box. In
this example, the role will contain users trusted for remote server administration and will be
called remoteAdmins. Click OK.
d. Repeat the process, creating a role for remote server monitors called remoteMonitors.
3. Use the HP provided Active Directory Users and Computers snap-ins to assign the roles rights, and
associate the roles with users and devices.
a. Right-click the remoteAdmins role in the Roles organizational unit in the testdomain.local
domain, and select Properties.
b. Select the HP Devices tab, then click Add.
Directory services 86
Page 87

c.
Using the Select Users dialog box, select the Lights-Out Management object created in step 2,
rib-email-server in folder testdomain.local/RILOES. Click OK to close the dialog, then click
Apply to save the list.
d. Add users to the role. Click the Members tab, and add users using the Add button and the
Select Users dialog box. The devices and users are now associated.
4. Use the Lights Out Management tab to set the rights for the role. All users and groups within a role
will have the rights assigned to the role on all of the RILOE II devices managed by the role. In this
example, the users in the remoteAdmins role will be given full access to the RILOE II functionality.
Select the boxes next to each right, and then click Apply. Click OK to close the property sheet.
5. Using the same procedure as in step 4, edit the properties of the remoteMonitors role, add the rib-
email-server device to the Managed Devices list on the HP Devices tab, and add users to the
remoteMonitors role using the Members tab. Then, on the Lights Out Management tab, select the box
next to the Login. Click Apply and OK. Members of the remoteMonitors role will be able to
authenticate and view the server status.
User rights to any RILOE II are calculated as the sum of all the rights assigned by all the roles in which the
user is a member, and in which the RILOE II is a Managed Device. Following the preceding examples, if
a user is in both the remoteAdmins and remoteMonitors roles, they will have all the rights, because the
remoteAdmins role has those rights.
To configure RILOE II and associate it with a Lights-Out Management object used in this example, use
settings similar to the following on the Directory Settings screen.
RIB Object DN = cn=rib-email-server,ou=RILOES,dc=testdomain,dc=local
Directory services 87
Page 88

Directory User Context 1 = cn=Users,dc=testdomain,dc=local
For example, to gain access, user Mel Moore, with the unique ID MooreM, located in the users
organizational unit within the testdomain.local domain, who is also a member of one of the
remoteAdmins or remoteMonitors roles, would be allowed to log in to the RILOE II. Mel would enter
testdomain\moorem, or moorem@testdomain.local, or Mel Moore, in the Login Name field of
the RILOE II login screen, and use their Active Directory password in the Password field of that screen.
Directory services objects
One of the keys to directory-based management is proper virtualization of the managed devices in the
directory service. This virtualization allows the administrator to build relationships between the managed
device and user or groups already contained within the directory service. User management of RILOE II
requires three basic objects in the directory service:
• Lights-Out Management object
• Role object
• User objects
Each object represents a device, user, or relationship that is required for directory-based management.
NOTE: After the snap-ins are installed, ConsoleOne and MMC must be restarted to show the new entries.
After the snap-in is installed, RILOE II objects and RILOE II roles can be created in the directory. Using the
Users and Computers tool, the user will:
• Create RILOE II and role objects.
• Add users to the role objects.
• Set the rights and restrictions of the role objects.
Active Directory snap-ins
The following sections discuss the additional management options available within Active Directory Users
and Computers after the HP snap-ins have been installed.
Directory services 88
Page 89

HP Devices
The HP Devices tab is used to add the HP devices to be managed within a role. Clicking Add enables
you to browse to a specific HP device and add it to the list of member devices. Clicking Remove
enables you to browse to a specific HP device and remove it from the list of member devices.
Members
After user objects are created, the Members tab enables you to manage the users within the role. Clicking
Add enables you to browse to the specific user you want to add. Highlighting an existing user and
clicking Remove removes the user from the list of valid members.
Active Directory role restrictions
The Role Restrictions subtab allows you to set login restrictions for the role. These restrictions include:
• Time restrictions
• IP network address restrictions
• IP/mask
• IP range
Directory services 89
Page 90

•
DNS name
Time restrictions
You can manage the hours available for logon by members of the role by clicking Effective Hours in
the Role Restrictions tab. In the Logon Hours pop-up window, you can select the times available for logon
for each day of the week in half-hour increments. You can change a single square by clicking it, or you
can change a section of squares by clicking and holding the mouse button, dragging the cursor across
the squares to be changed, and releasing the mouse button. The default setting is to allow access at all
times.
Enforced client IP address or DNS name access
Access can be granted or denied to an IP address, IP address range, or DNS names.
1. In the By Default dropdown menu, select whether to Grant or Deny access from all addresses
except the specified IP addresses, IP address ranges, and DNS names.
2. Select the addresses to be added, select the type of restriction, and click Add.
3. In the new restriction pop-up window, enter the information and click OK. The new restriction pop-
up window displays.
The DNS Name option allows you to restrict access based on a single DNS name or a subdomain,
entered in the form of host.company.com or *.domain.company.com.
Directory services 90
Page 91

4.
Click OK to save the changes.
To remove any of the entries, highlight the entry in the display list and click Remove.
Active Directory Lights-Out management
After a role is created, rights for the role can be selected. Users and group objects can now be made
members of the role, giving the users or group of users the rights granted by the role. Rights are managed
on the Lights Out Management tab.
The available rights are:
• Login—This option controls whether users can log in to the associated devices.
• Remote Console—This option enables the user access to the Remote Console.
• Virtual Media—This option enables the user access to the RILOE II virtual media functionality.
• Server Reset and Power—This option enables the user access to the RILOE II Virtual Power
button to remotely reset the server or power it down.
• Administer Local User Accounts—This option enables the user to administer accounts. The user
can modify their account settings, modify other user account settings, add users, and delete users.
Directory services 91
Page 92

•
Administer Local Device Settings—This option enables the user to configure the RILOE II
management processor settings. These settings include the options available on the Global Settings,
Network Settings, SNMP Settings, and Directory Settings screens of the RILOE II Web browser.
Directory services for eDirectory
The following sections provide installation prerequisites, preparation, and a working example of Directory
eDirectory installation prerequisites
Services for eDirectory.
Directory Services for RILOE II uses LDAP over SSL to communicate with the directory servers. RILOE II
software is designed to install in an eDirectory version 8.6.1 (and above) tree. HP does not recommend
installing this product if you have eDirectory servers with a version less than eDirectory 8.6.1. Before
installing snap-ins and schema extensions for eDirectory, you should read and have available the
following technical information documents, available at Novell Support (http://support.novell.com
Installing Directory Services for RILOE II requires extending the eDirectory schema. Extending the schema
must be completed by an Administrator.
• TID10066591 Novell eDirectory 8.6 NDS compatibility
• TID10057565 Unknown objects in a mixed environment
• TID10059954 How to test whether LDAP is working correctly
• TID10023209 How to configure LDAP for SSL (secure) connections
• TID10075010 How to test LDAP authentication
).
Snap-in installation and initialization for eDirectory
Refer to "Snap-in installation and initialization ("Snap-in installation and initialization for Active Directory"
on page 85)" for step-by-step instructions on using the snap-in installation application.
NOTE: After the snap-ins are installed, ConsoleOne and MMC must be restarted to show the new entries.
Example: Creating and configuring directory objects for use with LOM devices in eDirectory
The following example shows how to set up roles and HP devices in a company called samplecorp, which
consist of two regions, region1 and region2.
Directory services 92
Page 93

Assume samplecorp has an enterprise directory arranged according to the following screen.
1. Begin by creating organizational units in each region, which will contain the Lights-Out Management
devices and roles specific to that region. In this example, two organizational units are created,
called roles and hp devices, in each organizational unit, region1 and region2.
2. Use the HP provided ConsoleOne snap-ins to create Lights-Out Management objects in the hp
devices organizational unit for several RILOE II devices.
a. Right-click the hp devices organizational unit found in the region1 organizational unit, and select
New then Object.
b. Select hpqTarget from the list of classes and click OK.
c. Enter an appropriate name and surname in the New hpqTarget dialog box. In this example,
the DNS host name of the RILOE II device, rib-email-server will be used as the name of the LightsOut Management object, and the surname will be RILOEII. Click OK.
d. The Select Object Subtype dialog box is displayed. Select Lights Out Management
Device from the list, and click OK.
Directory services 93
Page 94

Repeat the process for several more RILOE II devices with DNS names rib-nntp-server and rib-file-server-
users1 in hp devices under region1, and rib-file-server-users2 and rib-app-server in hp devices under
region2.
1. Use the HP provided ConsoleOne snap-ins to create HP Role objects in the roles organizational
units.
a. Right-click the roles organizational unit found in the region2 organizational unit, and select New
then Object.
b. Select hpqRole from the list of classes and click OK.
c. Enter an appropriate name in the New hpqRole dialog box. In this example, the role will
contain users trusted for remote server administration and will be named remoteAdmins. Click
OK.
d. The Select Object Subtype dialog box is displayed. Because this role will be managing the
rights to Lights-Out Management devices, select Lights Out Management Devices from the
list, and click OK.
e. Repeat the process, creating a role for remote server monitors, named remoteMonitors, in roles in
region1, and a remoteAdmins and a remoteMonitors role in roles in region2.
2. Use the HP provided ConsoleOne snap-ins to assign rights to the role and associate the roles with
users and devices.
a. Right-click on the remoteAdmins role in the roles organizational unit in the region1
organizational unit, and select Properties.
b. Select the Role Managed Devices subtab of the HP Management tab, and click Add.
c. Using the Select Objects dialog box, browse to the hp devices organizational unit in the
region1 organizational unit. Select the three Lights-Out Management objects created in step 2.
Click OK, then click Apply.
d. Next, add users to the role. Click the Members tab, and add users using the Add button and
the Select Object dialog box.
Directory services 94
Page 95

e.
The devices and users are now associated. Use the Lights Out Management Device Rights
subtab of the HP Management tab to set the rights for the role. All users within a role will
have the rights assigned to the role on all of the RILOE II devices managed by the role. In this
example, the users in the remoteAdmins role will be given full access to the RILOE II functionality.
Select the boxes next to each right, and click Apply. Click Close to close the property sheet.
3. Using the same procedure as in step 1, edit the properties of the remoteMonitors role:
a. Add the three RILOE II devices within hp devices under region1 to the Managed Devices list
on the Role Managed Devices subtab of the HP Management tab.
b. Add users to the remoteMonitors role using the Members tab.
c. Then, using the Lights Out Management Device Rights subtab of the HP Management
tab, select the check box next to Login, and click Apply and Close. Members of the
remoteMonitors role will be able to authenticate and view the server status.
User rights to any LOM device are calculated as the sum of all the rights assigned by all the roles in which
the user is a member, and in which the LOM device is a Managed Device. Following the preceding
examples, if a user is in both the remoteAdmins and remoteMonitors roles, they will have all the rights,
because the remoteAdmins role has those rights.
To configure a LOM device and associate it with a Lights-Out Management object used in this example,
use settings similar to the following on the Directory Settings screen.
NOTE: Commas, not periods, are used in LDAP distinguished names to separate each component.
RIB Object DN = cn=rib-email-server,ou=hp
devices,ou=region1,o=samplecorp
Directory User Context 1 = ou=users,o=samplecorp
For example, user CSmith, located in the users organizational unit within the samplecorp organization,
who is also a member of one of the remoteAdmins or remoteMonitors roles, would be allowed to log in to
the RILOE II. They would type csmith (case insensitive) in the Login Name field of the RILOE II login
screen and use their eDirectory password in the Password field of that screen to gain access.
Directory Services objects for eDirectory
Directory Services objects enable virtualization of the managed devices and the relationships between the
managed device and user or groups already contained within the directory service.
Directory services 95
Page 96

Role managed devices
The Role Managed Devices subtab under the HP Management tab is used to add the HP devices to be
managed within a role. Clicking Add allows you to browse to the specific HP device and add it as a
managed device.
Members
After user objects are created, the Members tab allows you to manage the users within the role. Clicking
Add allows you to browse to the specific user you want to add. Highlighting an existing user and clicking
Delete removes the user from the list of valid members.
Directory services 96
Page 97

eDirectory Role Restrictions
The Role Restrictions subtab allows you to set login restrictions for the role. These restrictions include:
• Time restrictions
• IP network address restrictions
• IP/mask
• IP range
• DNS name
Time restrictions
You can manage the hours available for logon by members of the role by using the time grid displayed in
the Role Restrictions subtab. You can select the times available for logon for each day of the week in halfhour increments. You can change a single square by clicking it, or a section of squares by clicking and
holding the mouse button, dragging the cursor across the squares to be changed, and releasing the
mouse button. The default setting is to allow access at all times.
Enforced client IP address or DNS name access
Access can be granted or denied to an IP address, IP address range, or DNS names.
1. In the By Default dropdown menu, select whether to Allow or Deny access from all addresses,
except the specified IP addresses, IP address ranges, and DNS names.
2. Select the addresses to be added, select the type of restriction, and click Add.
3. In the Add New Restriction pop-up window, enter the information and click OK. The Add New
Restriction pop-up for the IP/Mask option is shown.
The DNS Name option allows you to restrict access based on a single DNS name or a subdomain,
entered in the form of host.company.com or *.domain.company.com.
4. Click Apply to save the changes.
Directory services 97
Page 98

To remove any of the entries, highlight the entry in the display field and click Delete.
Lights-Out Management
After a role is created, rights for the role can be selected. Users and group objects can now be made
members of the role, giving the users or group of users the rights granted by the role. Rights are managed
on the Lights Out Management Device Rights subtab of the HP Management tab.
The available rights are:
• Login—This option controls whether users can to log in to the associated devices.
Login access can be used to create a user who is a service provider and who receives alerts from the
board but does not have login access to the RILOE II.
Directory services 98
Page 99

•
Remote Console—This option allows the user access to the Remote Console.
• Virtual Media—This option allows the user access to the RILOE II Virtual Floppy and Virtual Media
functionality.
• Server Reset and Power—This option allows the user to remotely reset the server or power it
down.
• Administer Local User Accounts—This option allows the user to administer accounts. The user
can modify their account settings, modify other user account settings, add users, and delete users.
• Administer Local Device Settings—This option allows the user to configure the RILOE II board
settings. These settings include the options available on the Global Settings, Network
Settings, SNMP Settings, and Directory Settings screens of the RILOE II Web browser.
User login using directory services
The RILOE II login page Login Name field accepts all of the following:
• Directory users
• LDAP Fully Distinguished Names
Example: CN=John Smith,CN=Users,DC=HP,DC=COM, or @HP.com
NOTE: The short form of the login name by itself does not tell the directory which domain you are trying to
access. You must provide the domain name or use the LDAP distinguished name of your account.
• DOMAIN\user name form (Active Directory Only)
Example: HP\jsmith
• username@domain form (Active Directory Only)
Example: jsmith@hp.com
NOTE: Directory users specified using the @ searchable form may be located in one of three searchable
contexts, which are configured within Directory Settings.
• User name form
Example: John Smith
NOTE: Directory users specified using the user name form may be located in one of three searchable
contexts, which are configured within Directory Settings.
• Local users—Login-ID
NOTE: On the RILOE II login page, the maximum length of the login name is 39 characters for local users.
For Directory Services users, the maximum length of the login name is 256 characters.
Directory settings
The Directory Settings page enables you to configure and test your directory services. Click Apply
Settings to save any changes.
Administer Groups allows you to associate one of the six groups available in Group Administration page,
with the groups in Active Directory server.
Directory services 99
Page 100

Test Settings allows you to test the communication between the directory server and RILOE II.
Parameter Default value Definition
Disable Directory
Authentication
No
This parameter enables or disables directory
authentication. If this parameter is set to Yes and
directory support is properly configured, this
parameter enables user login to RILOE II using
directory credentials.
Use Directory
Default Schema
Use HP Extended
Schema
Directory Server
Address
Yes
No
0.0.0.0
This parameter enables or disables the use of
schema-free directories.
This parameter enables or disables the use of
extended schema directories.
This parameter specifies the Directory Server DNS
name or IP address. HP recommends using a DNS
name or multi-host DNS name. If an IP address is
used, the directory will not be available if that
server is down.
Directory Server
LDAP Port
636
This option sets the port number used to connect to
the directory server. The SSL-secured LDAP port
number is 636.
LOM Object
Distinguished
Name
LOM Object
Password
N/A
N/A
This option specifies the unique name for RILOE II
in the directory. LOM Object Distinguished Names
are limited to 256 characters.
This parameter specifies the password for the
RILOE II object to access the directory. LOM
Object Passwords are limited to 40 characters.
Directory services 100
 Loading...