

Page 1

HP 3PAR Recovery Manager 4.2.0 Software for Microsoft Exchange 2007
User’s Guide
Abstract
This guide is designed for System Administrators and Microsoft Exchange Administrators who are responsible for backing up
Microsoft Exchange mailbox or public store databases and who understand Microsoft Exchange 2007.
HP Part Number: QL226-96078
Published: August 2011
Page 2

© Copyright 2011 Hewlett-Packard Development Company, L.P.
Confidential computer software. Valid license from HP required for possession, use or copying. Consistent with FAR 12.211 and 12.212, Commercial
Computer Software, Computer Software Documentation, and Technical Data for Commercial Items are licensed to the U.S. Government under
vendor's standard commercial license.
The information contained herein is subject to change without notice. The only warranties for HP products and services are set forth in the express
warranty statements accompanying such products and services. Nothing herein should be construed as constituting an additional warranty. HP shall
not be liable for technical or editorial errors or omissions contained herein.
Acknowledgments
Intel®, Itanium®, Pentium®, Intel Inside®, and the Intel Inside logo are trademarks or registered trademarks of Intel Corporation or its subsidiaries
in the United States and other countries.
Microsoft®, Windows®, Windows® XP, and Windows NT® are U.S. registered trademarks of Microsoft Corporation.
Adobe® and Acrobat® are trademarks of Adobe Systems Incorporated.
Java and Oracle are registered trademarks of Oracle and/or its affiliates.
UNIX® is a registered trademark of The Open Group.
Microsoft Exchange 2007 is a trademark of Microsoft Corporation.
All other trademarks and registered trademarks are owned by their respective owners.
Page 3

Contents
1 Introduction...............................................................................................7
Related Documents...................................................................................................................7
Typographical Conventions........................................................................................................7
Advisories................................................................................................................................8
2 Overview of Recovery Manager...................................................................9
System Requirements.................................................................................................................9
General Requirements for Recovery Manager..........................................................................9
Components Required on the Exchange Server (Production Server).............................................9
Components Required on the Backup Server............................................................................9
Licenses Required on the HP 3PAR Storage Server....................................................................9
Recovery Manager Requirements................................................................................................9
Running Recovery Manager on a Japanese OS..........................................................................10
Features Supported.................................................................................................................10
Features Not Supported...........................................................................................................11
Microsoft Volume Shadow Copy Service....................................................................................11
Supported VSS Components....................................................................................................12
How VSS Works with Exchange...............................................................................................13
Recovery Manager Layout........................................................................................................13
Centralized Backup Configuration........................................................................................14
Single Host Backup Configuration........................................................................................14
CCR Backup Configuration..................................................................................................15
Multiple Domain Backup Configurations...............................................................................16
Server Relationships...........................................................................................................17
Backup Server..............................................................................................................17
Remote Copy Backup Server...........................................................................................17
Exchange Servers..........................................................................................................17
Connectivity.................................................................................................................17
3 Installation and Deinstallation.....................................................................18
Upgrading to Recovery Manager for Exchange..........................................................................18
Production Server...............................................................................................................18
Backup Server...................................................................................................................18
Installing Recovery Manager....................................................................................................18
Verifying the Installation...........................................................................................................19
Understanding the Registry......................................................................................................19
Editing the Registry.................................................................................................................20
Environment Variables.............................................................................................................20
Deinstalling Recovery Manager................................................................................................20
4 Configuring Recovery Manager..................................................................22
Configuring the Database........................................................................................................22
Configuring Recovery Manager................................................................................................22
Installation Location............................................................................................................22
Search Path.......................................................................................................................22
Changing the Recovery Manager TCP/IP Port........................................................................22
Configuring Exchange Server Policies...................................................................................22
Configuring Mount Functionality..........................................................................................23
Configuring Recovery Manager for CCR...............................................................................23
Configuring the Provider.................................................................................................23
Grouping Volumes into Autonomic Groups............................................................................23
Domain Sets.................................................................................................................23
Volume Sets..................................................................................................................24
Contents 3
Page 4

Host Sets......................................................................................................................24
Configuring Multiple Domains..................................................................................................24
Multiple Domain Requirements.............................................................................................24
Registering Domains...........................................................................................................24
Modifying Domain Credentials............................................................................................25
Unregistering a Domain......................................................................................................25
Managing Domain Components..........................................................................................25
Configuring the Host Computer and the HP 3PAR Storage System.................................................25
5 Configuring Backup Software.....................................................................26
Overview..............................................................................................................................26
Before You Begin....................................................................................................................26
Configuring Symantec NetBackup.............................................................................................26
Configuring HP Data Protector..................................................................................................27
Requirements.....................................................................................................................27
Setting Up the HP Data Protector Backup Specification............................................................27
Setting Up HP Data Protector Cell Manager Access................................................................28
Using Your Backup Software....................................................................................................28
Using Symantec NetBackup.................................................................................................28
Using HP Data Protector.....................................................................................................28
6 Using the Recovery Manager GUI..............................................................29
Overview of the Recovery Manager GUI...................................................................................29
Menu Bar.........................................................................................................................29
Node Tree Pane.................................................................................................................29
Informational Pane.............................................................................................................29
Displaying Domain Information............................................................................................29
Displaying Server Information..............................................................................................29
Displaying Storage Group Information..................................................................................30
Updating the Information Displayed.....................................................................................30
Starting the GUI.....................................................................................................................30
Stopping the GUI...................................................................................................................30
Managing Domains................................................................................................................30
Working with the Local Domain...........................................................................................30
Registering Nonlocal Domains.............................................................................................30
Modifying Domain Credentials............................................................................................31
Unregistering a Domain......................................................................................................31
Working in Multiple Domains..............................................................................................31
Registering the Server..............................................................................................................31
Updating Server Registration...............................................................................................31
Setting the Recovery Manager Policy Configuration.....................................................................31
How Recovery Manager Policies Work.................................................................................31
Numeric-Based Policies..................................................................................................32
Expiration-Based Policies................................................................................................32
Retention Time Restrictions..............................................................................................33
Setting Recovery Manager Policies.......................................................................................33
Modifying the Time Constraints for a Virtual Copy..................................................................34
Configuring Email Notifications................................................................................................34
Deleting Email Configurations..................................................................................................35
Creating Virtual Copies of Storage Groups................................................................................35
How Virtual Copy Creation Works.......................................................................................35
Processes during Virtual Copy Creation............................................................................36
Processes after Virtual Copy Creation..............................................................................36
Manually Creating a Virtual Copy of a Storage Group...........................................................36
Creating Remote Virtual Copies of Storage Groups................................................................37
How Remote Virtual Copy Works....................................................................................37
4 Contents
Page 5

Manually Creating a Remote Virtual Copy of a Storage Group...........................................37
Creating a Virtual Copy of an LCR-Enabled Storage Group.....................................................37
Creating a Virtual Copy of a CCR-Enabled Storage Group......................................................38
Scheduling Automatic Virtual Copies....................................................................................39
Automating Tasks...................................................................................................................39
Scheduling Automated Tasks with Task Scheduler...................................................................39
Managing Automated Tasks with Task Manager....................................................................40
Mounting a Virtual Copy.........................................................................................................41
Unmounting a Virtual Copy......................................................................................................41
Refreshing Virtual Copy Information..........................................................................................41
Refreshing All Virtual Copies...............................................................................................41
Refreshing All Virtual Copies for a Specific Storage Group......................................................42
Refreshing a Specific Virtual Copy........................................................................................42
Backing Up a Virtual Copy......................................................................................................42
Manually Creating Backups at the Storage Group Level..........................................................42
Creating Backups at the Storage Group Level for CCR............................................................43
Scheduling Automatic Backups at the Storage Group Level......................................................45
Creating a Backup of a Virtual Copy....................................................................................45
Scheduling an Automatic Backup of a Virtual Copy................................................................46
Restoring from a Virtual Copy...................................................................................................47
Restoring a Storage Group with File Copy Restore..................................................................47
Restoring a Storage Group with Volume Restore.....................................................................47
Restoring a Volume or Directory from a Media Backup............................................................48
Analyzing the Repository.........................................................................................................48
Manually Analyzing and Synchronizing the Repository...........................................................48
Scheduling Automatic Repository Analysis and Synchronization...............................................48
Validating a Virtual Copy........................................................................................................49
Removing Virtual Copies..........................................................................................................49
Removing “Available” Virtual Copies....................................................................................49
Removing “Removed” Virtual Copies....................................................................................49
Viewing Event Message Descriptions.........................................................................................50
7 Using the Recovery Manager CLI................................................................51
Recovery Manager for Exchange Command Line Interface (CLI)....................................................51
Recovery Manager Commands................................................................................................51
RMExch analyze................................................................................................................52
RMExch backup.................................................................................................................53
RMExch config..................................................................................................................55
RMExch create..................................................................................................................56
RMExch deletebackup........................................................................................................59
RMExch display.................................................................................................................60
RMExch displayDomain......................................................................................................61
RMExch listbackup.............................................................................................................62
RMExch ModifyDomain......................................................................................................63
RMExch mount..................................................................................................................64
RMExch peer.....................................................................................................................65
RMExch policy...................................................................................................................66
RMExch portconfig.............................................................................................................68
RMExch rcstatus.................................................................................................................69
RMExch RegisterDomain.....................................................................................................70
RMExch remove.................................................................................................................71
RMExch report...................................................................................................................72
RMExch repository ............................................................................................................73
RMExch reset.....................................................................................................................74
RMExch restore..................................................................................................................75
Contents 5
Page 6

RMExch setvc....................................................................................................................77
RMExch unmount...............................................................................................................78
RMExch UnRegisterDomain.................................................................................................79
RMExch validate................................................................................................................80
Running Recovery Manager as a Scheduled Job.........................................................................80
Scheduling Virtual Copies using the Recovery Manager GUI...................................................80
Scheduling Virtual Copies with Windows Task Scheduler........................................................80
8 Rapid Backup and Recovery for Exchange...................................................82
Key Microsoft Exchange File Types............................................................................................82
Backup..................................................................................................................................82
Virtual Copies........................................................................................................................82
Advantages of Using Recovery Manager..............................................................................83
Recovery Procedures...............................................................................................................83
Point-In-Time Recovery.........................................................................................................83
Volume Promote Point-In-Time Recovery.................................................................................84
Single Copy Clusters.....................................................................................................85
Continuous Copy Replication Clusters..............................................................................85
Point-Of-Failure Recovery.....................................................................................................85
Point-of-Failure Recovery for File Copy Restore...................................................................85
Point-of-Failure Recovery for Volume Restore......................................................................86
Single Mailbox Recovery....................................................................................................86
Restoring a Mailbox from a Backup to a Recovery Server...................................................87
Using the Recovery Storage Group Feature............................................................................89
How Recovery Storage Groups Operate...........................................................................89
Creating a Recovery Storage Group................................................................................89
Restoring a Mailbox Store to the Recovery Storage Group..................................................90
Additional Documentation.......................................................................................................91
9 Remote Copy for Recovery Manager...........................................................92
Overview..............................................................................................................................92
How Remote Copy Works........................................................................................................92
Synchronous Mode Remote Copy.........................................................................................92
Asynchronous Periodic Mode Remote Copy ..........................................................................92
Setting Up Remote Copy..........................................................................................................93
Support for Remote Copy Modes and Policies........................................................................93
Support for GeoCluster for Microsoft Windows......................................................................93
Setting Up Remote Copy Volume Groups for Storage Groups.......................................................94
Recovering a Storage Group from a Remote Copy Backup Server.................................................94
A Server Virtualization Environments..............................................................95
VMWare and Egenera............................................................................................................95
B Troubleshooting........................................................................................96
Known Issues.........................................................................................................................96
Known Microsoft Issues............................................................................................................96
Troubleshooting......................................................................................................................96
C Event Messages.....................................................................................102
6 Contents
Page 7

1 Introduction
Related Documents
(CLI) to configure and manage the HP 3PAR Storage System
configure and administer HP 3PAR Storage Systems
(CLI) for remote clients to install and configure Recovery
Manager
problems
Read the…For Information About…
HP 3PAR InForm OS CLI Administrator’s ManualUsing the HP 3PAR InForm OS Command Line Interface
HP 3PAR InForm Management Console HelpUsing the HP 3PAR InForm Management Console to
HP 3PAR InForm OS Concepts GuideAssigning the appropriate user roles and rights
HP 3PAR InForm OS CLI Administrator’s Manual
HP 3PAR InForm OS Command Line Interface ReferenceUsing the HP 3PAR InForm OS Command Line Interface
HP 3PAR InForm OS Messages and Operator’s GuideIdentifying HP 3PAR Storage System components and fixing
HP 3PAR InForm OS Concepts GuideUnderstanding the HP 3PAR Storage System and its features
Shadow copies using HP 3PAR VSS Provider Software for
Microsoft Windows
Typographical Conventions
The following typographical conventions are used in this guide:
Table 1 Typographical Conventions
ABCDabcd
ABCDabcd
ABCDabcd
ABCDabcd
ABCDabcd
HP 3PAR VSS Provider Software for Microsoft Windows
User's Guide
HP 3PAR InForm OS Configuration MatrixPlatform-specific release levels
To obtain a copy of this documentation, go to http://
www.hp.com/go/3par/, navigate to your product page,
click Support for your product, and then click Manuals.
Used for dialog box elements such as
titles and button labels.
output, and for text you are to enter.
output.
Used for variables in file names,
paths, and screen output, and
variables in user input.
ExampleMeaningTypeface
Enter your system name in the Value
box and click OK.
Found < 12 > 73G disks.Used for file names, paths, and screen
Enter cli at the Windows command
prompt.
cli% removevv VV1Used to contrast your input with system
Removing vv VV1.
[root@(systemID-nodeID)root]
To continue Enter your system
name ==> systemname
Related Documents 7
Page 8

NOTE: The InServ Storage Server has been rebranded as HP 3PAR Storage System. There are
instances in this document where screenshots and/or menu items and command output refer to the
HP 3PAR Storage System as InServ or InServ Storage Server.
Advisories
To avoid injury to people or damage to data and equipment, be sure to observe the cautions and
warnings in this guide. Always be careful when handling any electrical equipment.
WARNING! Warnings alert you to actions that can cause injury to people or irreversible damage
to data or the operating system.
CAUTION: Cautions alert you to actions that can cause damage to equipment, software, or data.
NOTE: Notes are reminders, tips, or suggestions that supplement the procedures included in this
guide.
8 Introduction
Page 9

2 Overview of Recovery Manager
System Requirements
General Requirements for Recovery Manager
• Microsoft Windows Server 2008 or 2008 R2
• Single processor with either 1.4 GHz (x64) or 1.3GHz (Dual Core)
• 512 MB RAM
• 32 GB hard drive space
• Virtual copy (snapshot) space must be available on HP 3PAR Virtual Volumes.
To create virtual copies on the base volume, you must allocate virtual copy space to the volume
itself when you create the base volume. For information on creating a base volume with virtual
copy capability, or assigning virtual copy space after the base volume is created, see the HP
3PAR InForm OS Command Line Reference.
NOTE: For complete details on system configurations, see “Recovery Manager Layout” (page 13).
Components Required on the Exchange Server (Production Server)
• Microsoft Exchange Server
• HP 3PAR InForm OS Command Line Interface (CLI)
• HP 3PAR VSS Provider Software for Microsoft Windows
• Recovery Manager Agent component
Components Required on the Backup Server
• Microsoft Exchange Management Tools component
• HP 3PAR InForm OS Command Line Interface (CLI)
• HP 3PAR VSS Provider Software for Microsoft Windows
• Recovery Manager Backup Server component
Licenses Required on the HP 3PAR Storage Server
• HP 3PAR Virtual Copy Software
• HP 3PAR VSS Provider Software for Microsoft Windows
• HP 3PAR Recovery Manager Software for Microsoft Exchange
• HP 3PAR Remote Copy Software (Optional)
• HP 3PAR Virtual Lock Software (Optional)
NOTE: For platform-specific release levels, refer to the latest HP 3PAR InForm OS Configuration
Matrix. To obtain a copy of this documentation, go to http://www.hp.com/go/3par/, navigate
to your product page, click Support for your product, and then click Manuals.
Recovery Manager Requirements
• The Exchange datastores for which you are creating virtual copies must be online.
• The same level of software updates is required on all Exchange servers.
System Requirements 9
Page 10

• Microsoft Exchange System Management Tools must be installed on the backup server.
NOTE: If you are running a Single Copy Cluster (SCC) or a CCR (Cluster Continuous
Replication) on Windows 2008, the backup server needs to have the "Failover Clustering"
feature enabled to function properly.
• HP 3PAR VSS Provider 2.1.0 or higher Software for Microsoft Windows is required.
• Microsoft .Net Framework V3.5 or higher is required by VSS Provider.
• Visual C++ (2005 Redistributable) Runtime libraries (x64 or x86). You can install this
automatically by running the Setup.exe program provided with Recovery Manager for
Exchange.
There is a known issue for Recovery Manager for Exchange when running Setup.exe on
Windows 2008. If you have already installed the Visual C++ Runtime library, the install script
still asks you to install it. You can install it again or directly install it from the .msi file.
• For CCR configurations on two HP 3PAR Storage Systems, where both nodes are separated
by a long distance, two Recovery Manager for Exchange backup servers are required.
NOTE: For platform-specific release levels, refer to the latest HP 3PAR InForm OS Configuration
Matrix. To obtain a copy of this documentation, go to http://www.hp.com/go/3par/, navigate
to your product page, click Support for your product, and then click Manuals.
Running Recovery Manager on a Japanese OS
CAUTION: To be fully compatible with Recovery Manager, you must use English-language naming
conventions in your Exchange setup (for example, for domain names, instance and database
names, path names, and so on).
Recovery Manager does not function correctly when any language other than English is used, even
for areas in which Exchange itself supports Japanese characters.
• Exchange OS: Windows Server 2008 R2, Japanese OS
• HP 3PAR VSS Provider 2.1.0 Software
• HP 3PAR Recovery Manager Software for Microsoft Exchange 4.2
• HP 3PAR Storage System 2.3.1 or higher
NOTE: The Japanese OS does not support scheduling virtual copies using Task Scheduler. (In
other words, the functionality described in “Automating Tasks” (page 39) is not available in the
Japanese OS.)
Features Supported
• Exchange online virtual copy creation using Volume Shadow Copy Service
• Volume Shadow Copy Service “Full” backup type
• Virtual copy creation using HP 3PAR VSS Provider Software for Microsoft Windows
• Access to the HP 3PAR Storage System via the HP 3PAR Command Line Interface (CLI) for
Microsoft Windows
• Mount virtual copies on Windows hosts on which Recovery Manager is installed
• Mount virtual copies with read/write permissions
• Unmount virtual copies
• Delete virtual copies
10 Overview of Recovery Manager
Page 11

• Backup using HP Data Protector or Symantec NetBackup
• Restore from backup using HP Data Protector or Symantec NetBackup
• File Copy restore
• Volume restore
• Co-existence with autonomic groups (domain sets, volume sets, and host sets)
• Virtual copy creation of LCR databases where the active and passive copies both reside on
a single HP 3PAR Storage System.
• Virtual copy creation of CCR databases, where active and passive copies reside on a single
or dual HP 3PAR Storage System with single or dual Recovery Manager backup servers, where
the second backup server connects to a secondary HP 3PAR Storage System at the remote
site
• Virtual Lock of CCR storage groups and CCR virtual copies
• Recovery Manager GUI
• Recovery Manager CLI
• Virtual copy creation for local and remote Exchange servers
• Single Copy Cluster for Exchange 2007
• Host sets for Single Copy Cluster
• Centralized virtual copy management with multiple Exchange servers
• Cross–Windows-domain support
• HP 3PAR Remote Copy Software (in both synchronous and asynchronous periodic mode)
• Queueing of virtual copy creation and backup for different storage groups from the same
backup server
Features Not Supported
• VSS backup types “Incremental”, “Differential”, “Copy” and “Log”
• A single Exchange server spanning different HP 3PAR Storage Systems
• All backup tools excluding HP Data Protector and Symantec NetBackup
• Access to the HP 3PAR Storage System via SSH
• Creation of virtual copy on System Boot Volume
• Exchange CCR volumes in a Remote Copy volume group
• Cross HP 3PAR Storage System mounts (includes CCR dual HP 3PAR Storage System
configurations)
• VSS snapshot backup for SCR node
• Windows automount feature
• Date customization: Recovery Manager always displays dates in month/day/year format
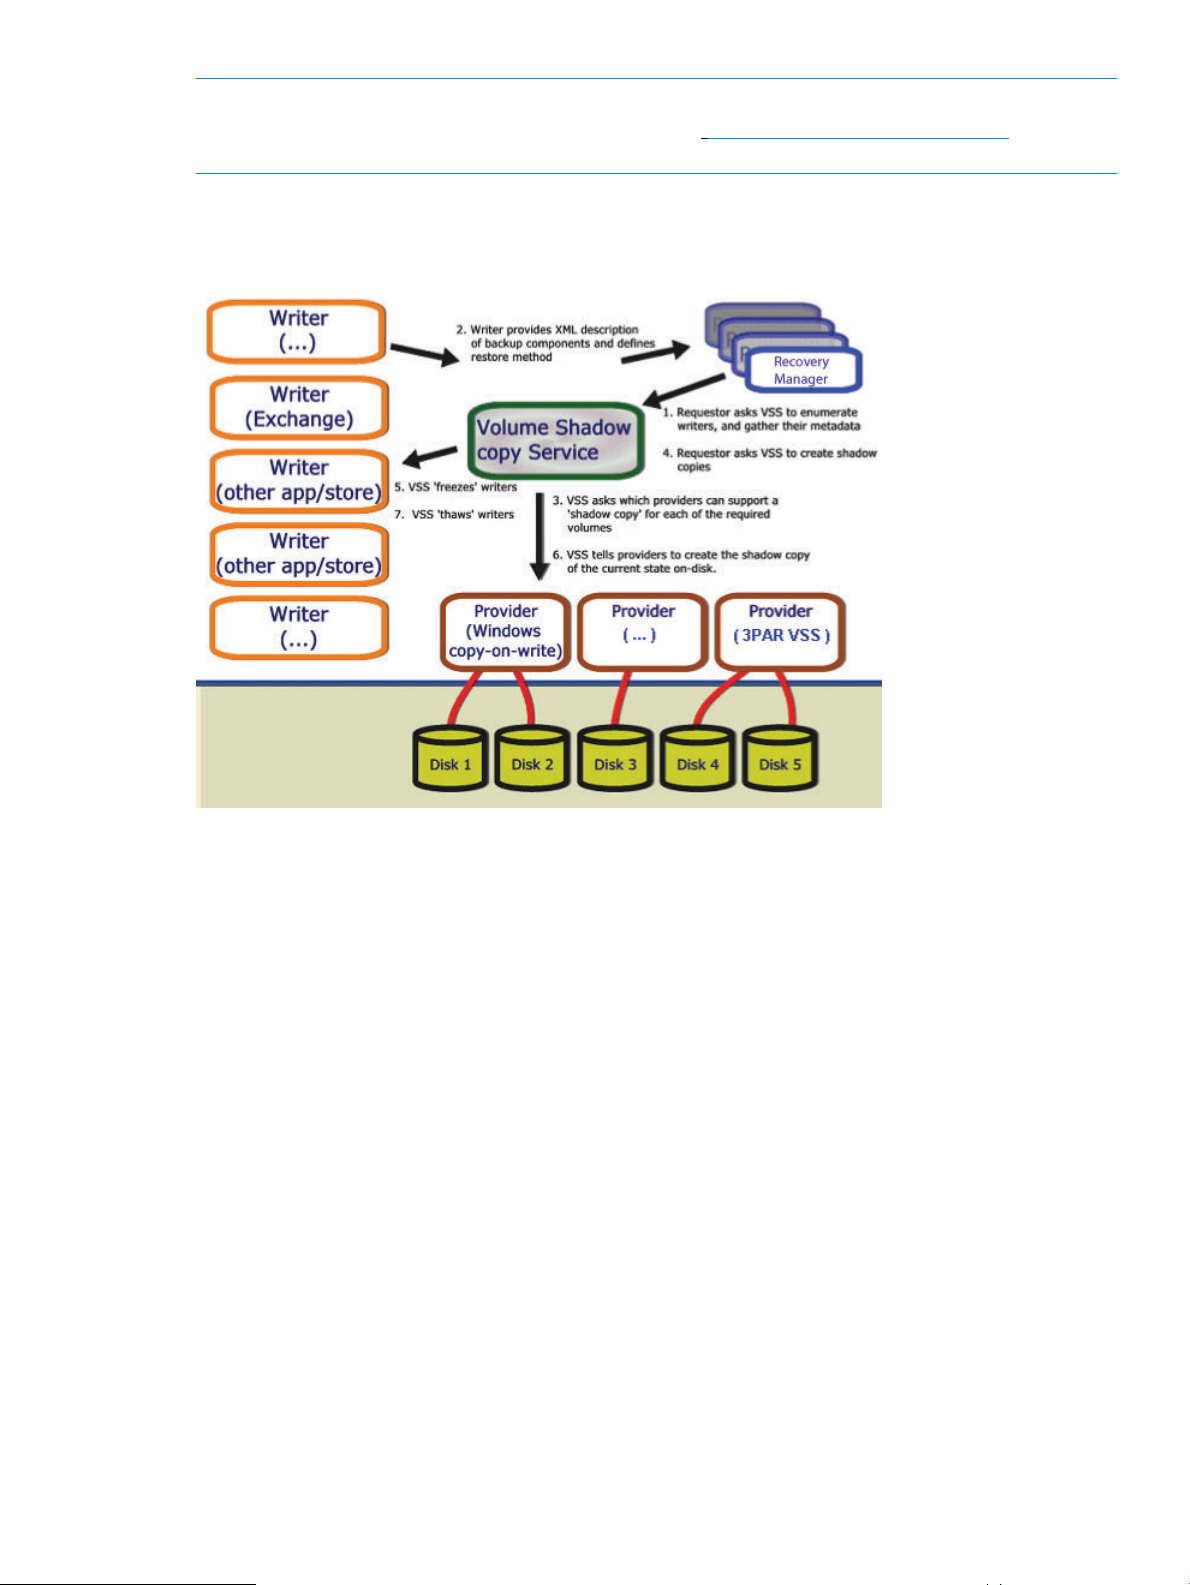
Microsoft Volume Shadow Copy Service
Microsoft includes VSS (Volume Shadow Copy Service) in Windows to simplify the enterprise’s
storage environment. It provides a framework for creating a point-in-time copy of a single or multiple
volumes.
Microsoft Windows Server VSS works with the VSS-aware applications that are in use to determine
when a volume shadow copy (snapshot) can be made. (A snapshot is a virtual copy: a copy of
some data set, for example, a disk volume, at a point in time.) VSS then communicates with the
Features Not Supported 11
Page 12

operating system and applications and freezes I/O to the storage system to allow snapshot creation
(without the freeze function, data could become corrupted when the snapshot is taken because the
system might be in the middle of a task). Meanwhile, applications continue to run uninterrupted.
The original volume continues to change as the process continues, but the shadow copy of the
volume remains constant. VSS also gives permission to the backup application to access the volume
and back it up in its frozen state. The shadow copy volume is then used for the actual backup.
After VSS saves the shadow copy volume on the backup device, it deletes the shadow copy.
VSS coordinates between Requestors (backup applications such as Recovery Manager), Writers
(applications such as windows services like Exchange 2007) and Providers (components that create
the shadow copies).
Table 2 VSS Components
VSS Component DescriptionVSS Component
Requestor
Writer
Provider
Supported VSS Components
VSS components currently supported by HP 3PAR VSS Provider Software for Microsoft Windows
include:
• Requestor
Recovery Manager◦
◦ Symantec NetBackup for Microsoft Windows
◦ HP Data Protector for Microsoft Windows
• Writer - Microsoft Exchange 2007
The requestor is backup software that initiates the creation
of the shadow copy.
The writer is any application software that participates in
the shadow copy process and whose files and data are
included in the process.
The provider is the storage technology that does the actual
shadow copy.
12 Overview of Recovery Manager
Page 13
NOTE: For platform-specific release levels, refer to the latest HP 3PAR InForm OS Configuration
Matrix. To obtain a copy of this documentation, go to http://www.hp.com/go/3par/, navigate
to your product page, click Support for your product, and then click Manuals.
How VSS Works with Exchange
Figure 1 HP 3PAR VSS Provider Software for Microsoft Windows Operation Overview
1. The requestor (Recovery Manager) sends a command to the Volume Shadow Copy service to
take a shadow copy of the selected Exchange storage group.
If a previous request is still in process, Recovery Manager adds the new request to the request
queue.
2. The Volume Shadow Copy service communicates with the Exchange writer to flush the current
log file generation to disk and suspend any writes to the log files and to the .edb file. The
.stm file is not allowed to grow; however, read-only access is still allowed. Therefore, anything
that is already there can still be accessed from the client.
3. Volume Shadow Copy service communicates with the provider to initiate the shadow copy
process for the disk volumes that contain Exchange data. VSS talks to the writers and providers
to fix a point in time for the shadow copy to take place; it is the provider that actually does
the shadow copy.
4. The shadow copy typically takes less than a minute. Clients that use Microsoft Outlook in
cached mode do not notice any disruption. Clients of earlier versions of Outlook might see
the hourglass icon for several moments during the shadow copy process.
5. After the shadow copy is created, Volume Shadow Copy service communicates with the
Exchange writer to indicate that it can resume writing to disk.
6. The queues of the email transactions are written to the logs.
The shadow copy is now available to the requestor for backing up.
Recovery Manager Layout
Recovery Manager allows for many types of configuration, depending on your setup.
How VSS Works with Exchange 13
Page 14
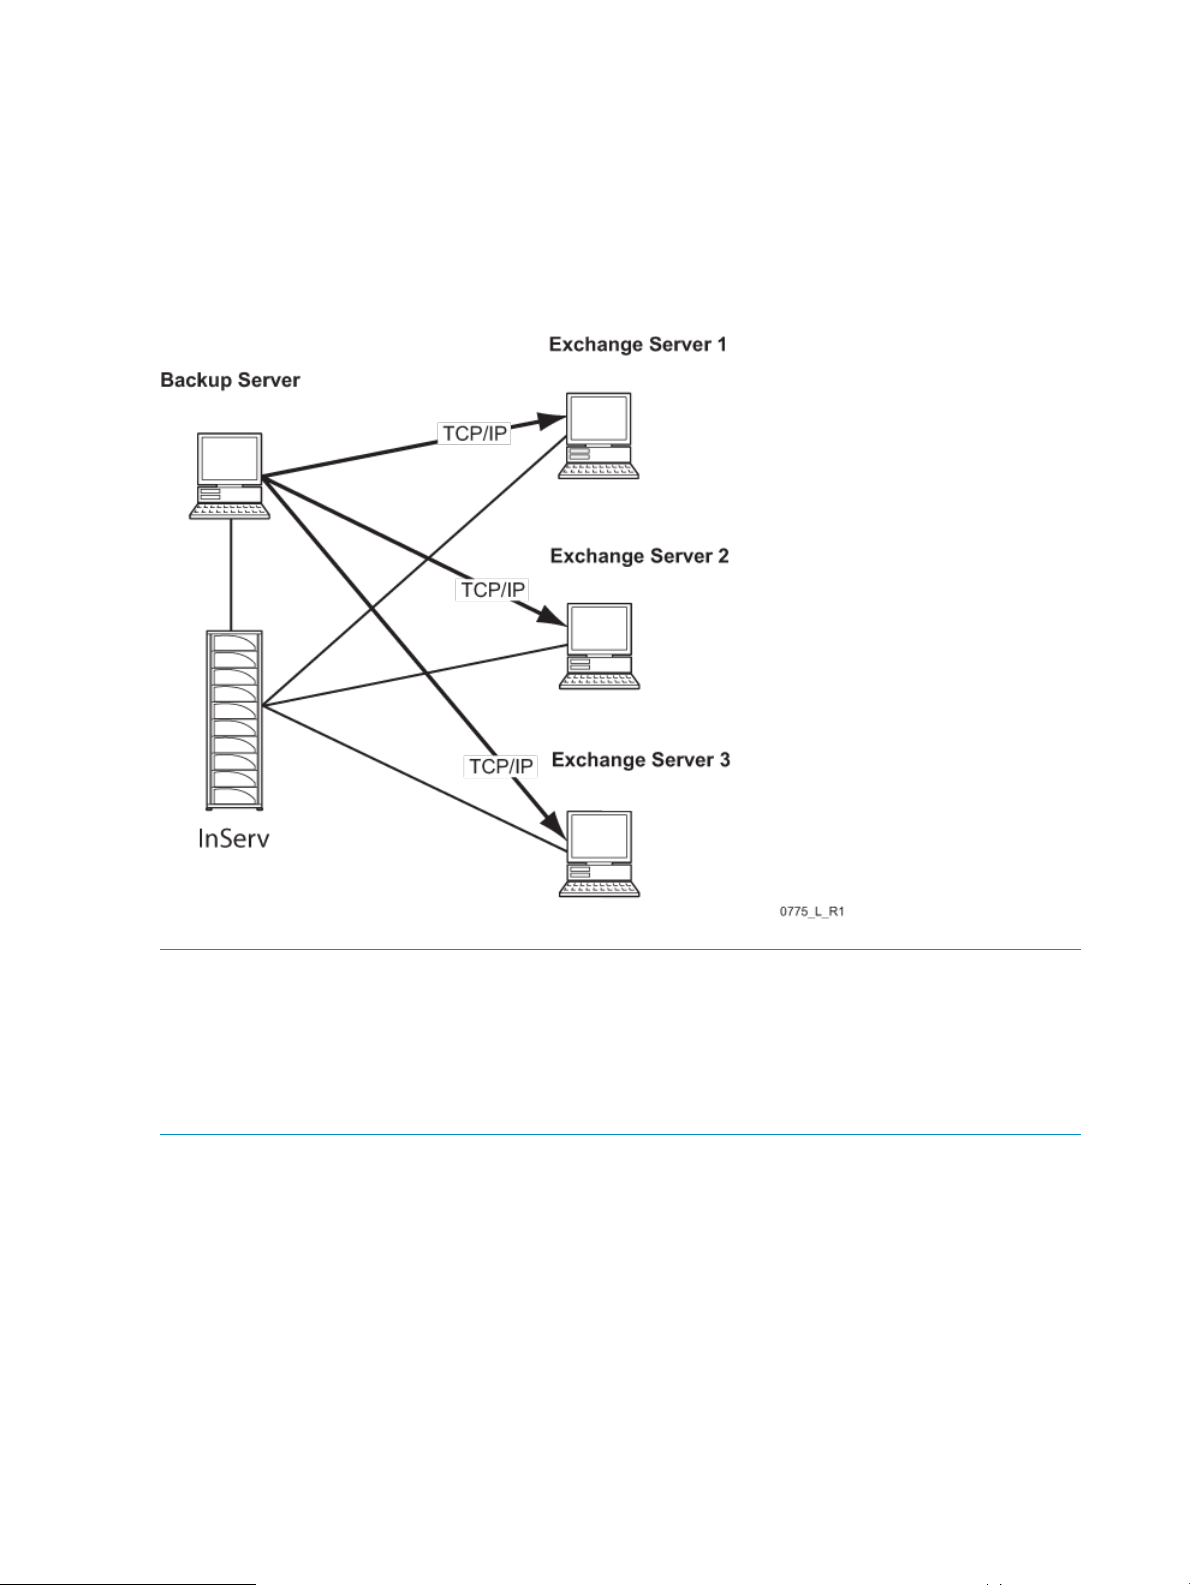
Centralized Backup Configuration
A centralized backup configuration, as shown in Figure 2 (page 14), allows you to maximize the
resources and performance of the Exchange servers through off-host central control management
capabilities. A single backup server can remotely create virtual copies on multiple Exchange servers
and manage all virtual copies on the backup server.
This type of configuration is recommended if you need to manage multiple Exchange servers or
are in a clustered environment.
Figure 2 Centralized Backup Configuration
NOTE: The Exchange System Management Tools is required on the Recovery Manager Backup
Server for Exchange database for validation purposes. In addition, the Exchange Servers and the
Management Tools must use matched release and service pack versions.
NOTE: All the Exchange servers, including the Recovery Manager Backup Server component,
must be in the same Windows domain (unless you have configured Recovery Manager to use
multiple Active Directory domains).
Single Host Backup Configuration
A single host backup configuration, as shown in Figure 3 (page 15), allows you to manage virtual
copies locally on the Exchange server.
14 Overview of Recovery Manager
Page 15
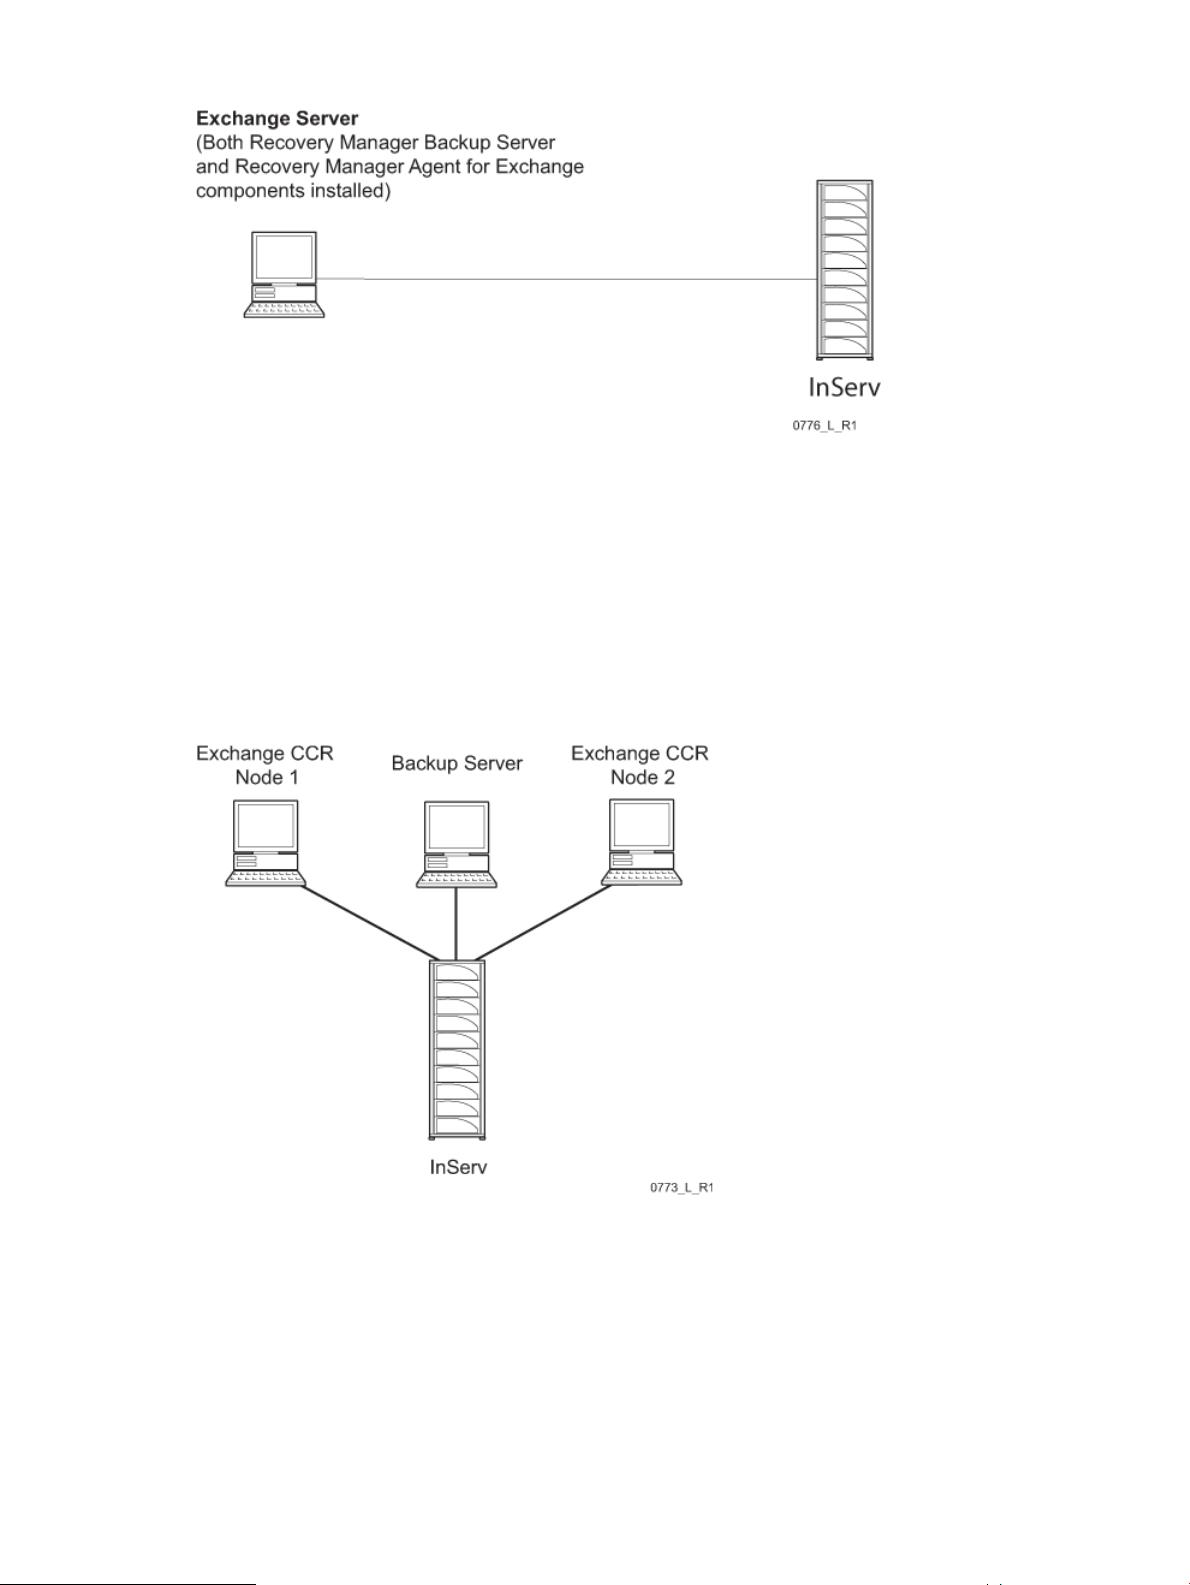
Figure 3 Single Host Backup Configuration
CCR Backup Configuration
CCR configurations can be implemented at a single site or span multiple sites. When implemented
at a single site, a single backup server is utilized as shown in Figure 4 (page 15) and Figure 5
(page 16). For implementations that span multiple sites, two backup servers are required as shown
in Figure 6 (page 16). The command RMExch peer is used to specify the name of the peer backup
server for multiple sites. This command must be run in CCR configurations using two backup servers
and is not required for CCR configurations using only one backup server. See “Configuring Recovery
Manager” (page 22).
Figure 4 Single HP 3PAR Storage System, Single Site
Recovery Manager Layout 15
Page 16
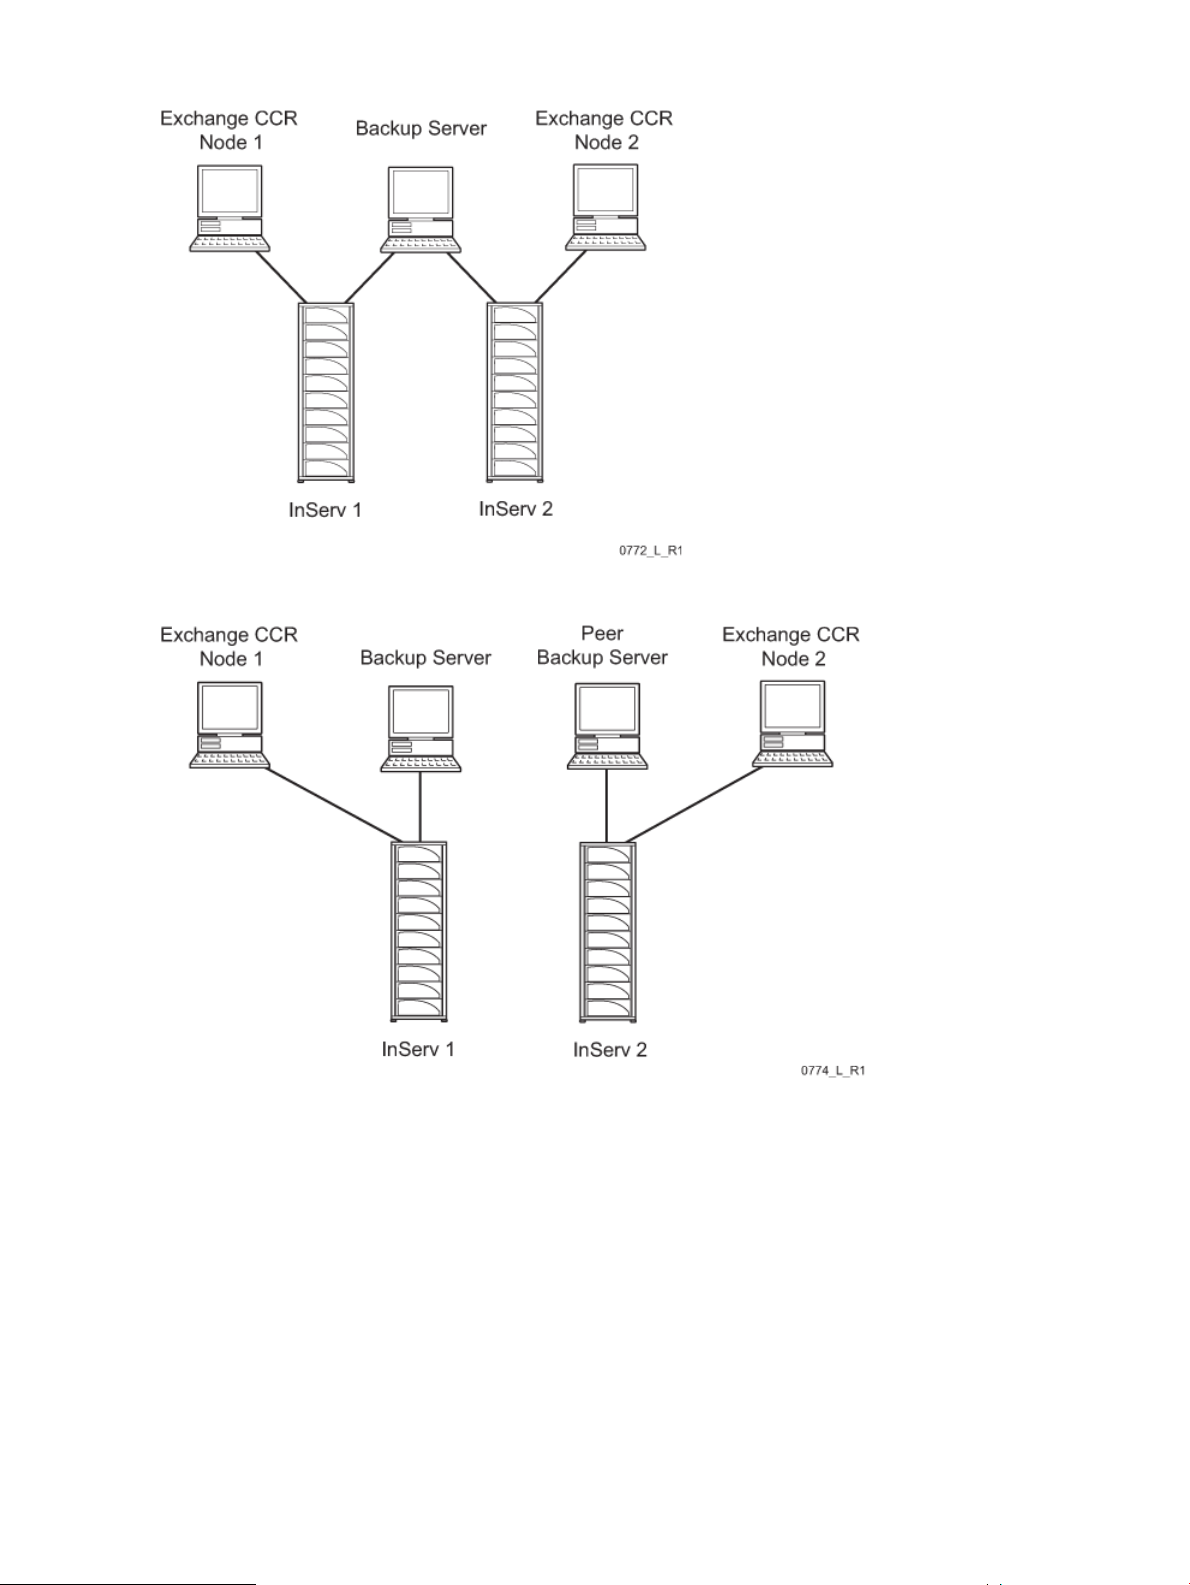
Figure 5 Two HP 3PAR Storage Systems, One Site
Figure 6 Two HP 3PAR Storage Systems, Two Sites
Multiple Domain Backup Configurations
Multiple domain backup configurations, shown in Figure 7 (page 17), allow you to use one backup
server for multiple Active Directory domains. Keep in mind:
• All backup components (for example, the backup server, backup software client, and Remote
Copy target server) must be in the local domain.
• The production servers and the Windows hosts enabled for mounting virtual copies can be in
domains other than the local domain.
For more information about configuring multiple domain setups, see “Configuring Multiple Domains”
(page 24).
16 Overview of Recovery Manager
Page 17
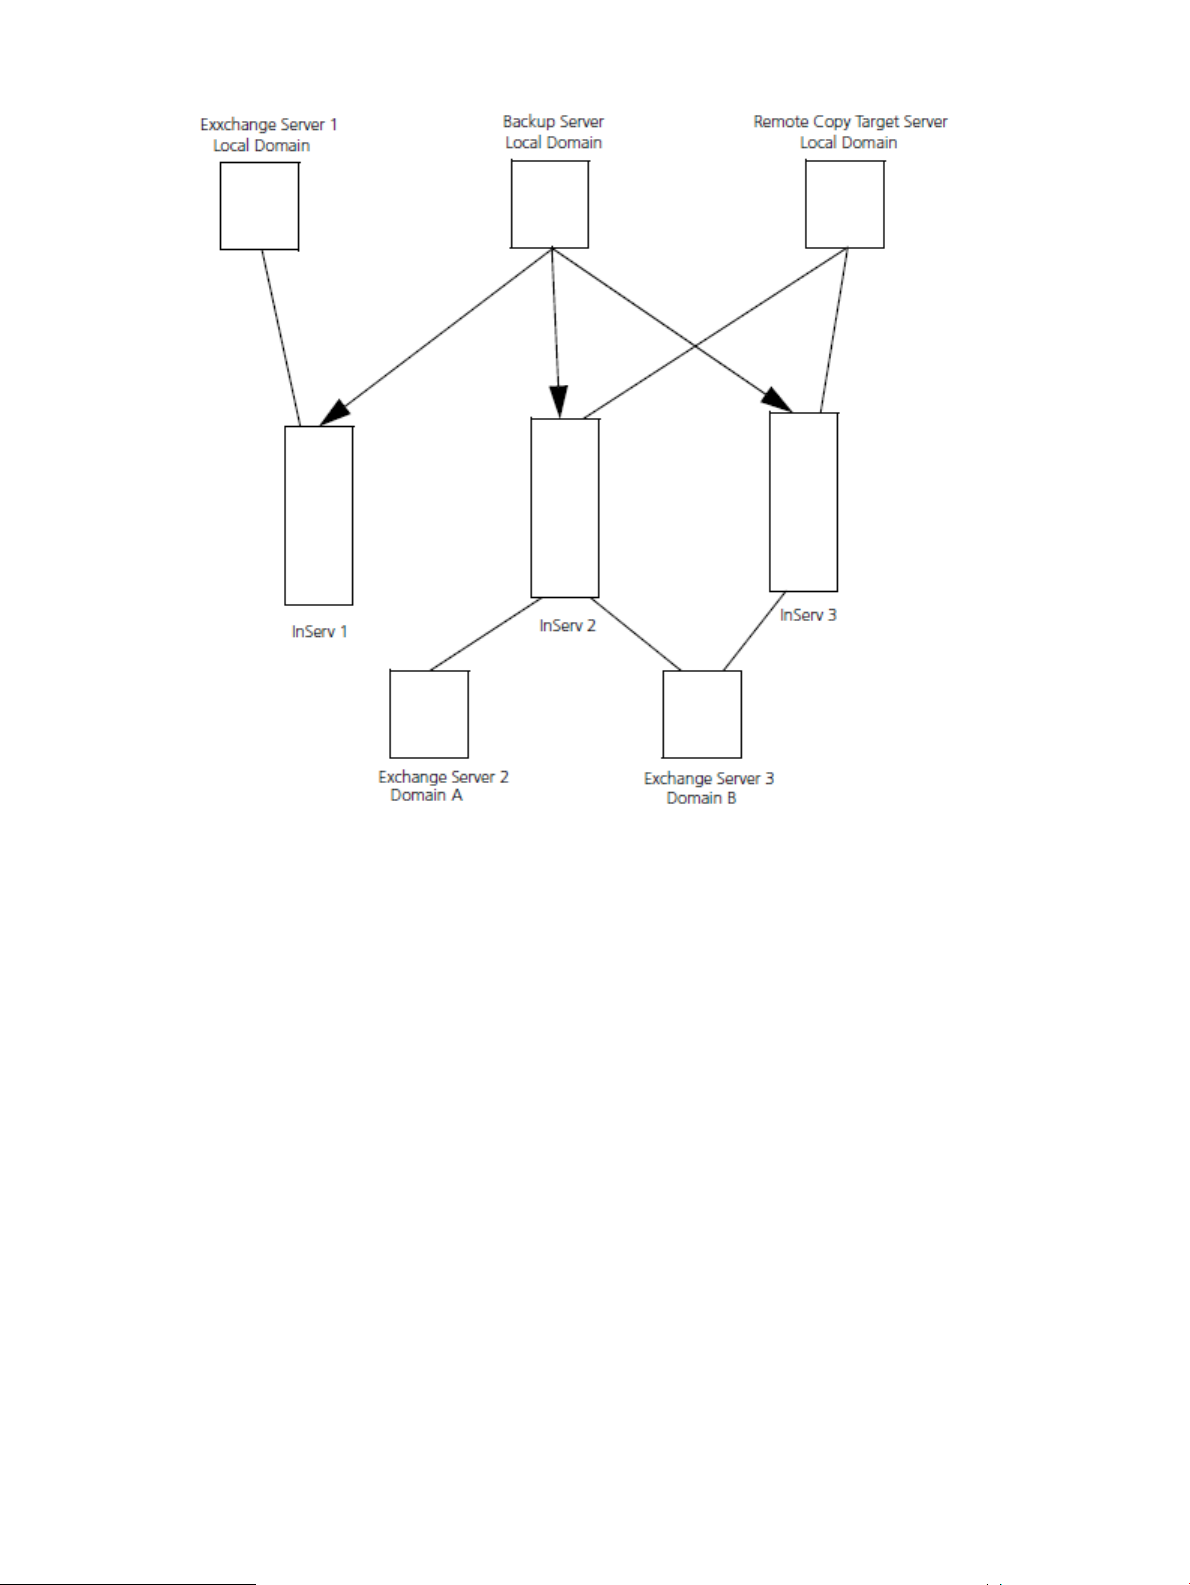
Figure 7 Multiple Domains
Server Relationships
The following defines the roles and relationship between the server types:
Backup Server
The Backup Server plays a central control point for the Recovery Manager that controls and manages
the backup and restore on different Exchange servers.
Remote Copy Backup Server
Depending on the configuration, the Remote Copy backup server(s) manage synchronous and
asynchronous periodic Remote Copy virtual copies.
Exchange Servers
The Exchange Servers can be standalone servers or cluster virtual servers.
Connectivity
Both the Backup Server and Exchange Servers need to be connected to the same HP 3PAR Storage
System. To manage a CCR-enabled configuration from a single backup server for CCR nodes that
connect to two HP 3PAR Storage Systems within the same site; the backup server needs to connect
to two HP 3PAR Storage Systems with separate FC or iSCSI connections. The HP 3PAR Storage
Systems also need to be in the same active directory domain unless you have registered multiple
Active Directory domains.
Recovery Manager Layout 17
Page 18

3 Installation and Deinstallation
Upgrading to Recovery Manager for Exchange
Following are instructions for upgrading to HP 3PAR Recovery Manager Software for Microsoft
Exchange from version 2.2.4 through 3.0.2 to version 4.2.0.
NOTE: In Recovery Manager for Exchange, version 3.0.2, the installation directory has changed
from \Program Files\3PAR\vcdba\Exchange to \Program Files\3PAR\RM\Exchange.
To migrate from version 2.2.4 to 3.0.2, 4.1.0, or 4.2.0, deinstall Recovery Manager for Exchange,
install Recovery Manager for Exchange 3.0.2, 4.1.0, or 4.2.0, and move the Repository folder
from the old \vcdba\Exchange\Repository to the new \RM\Exchange\Repository
location.
Production Server
1. Deinstall Recovery Manager for Exchange. See “Deinstalling Recovery Manager” (page 20).
2. Install Recovery Manager for Exchange 4.2.0. See “Installing Recovery Manager” (page 18).
Backup Server
1. Backup the repository to a safe location, i.e. the folder Exchange\Repository and all
directories and files under it.
2. Deinstall Recovery Manager for Exchange. See “Deinstalling Recovery Manager” (page 20).
3. Install Recovery Manager for Exchange 4.2.0. See “Installing Recovery Manager” (page 18).
4. Move the Repository folder from the old \vcdba\Exchange\Repository to the new \RM\
Exchange\Repository location.
5. Check to see that the old virtual copies can be seen from the GUI and re-register the Exchange
Server(s) if necessary.
Installing Recovery Manager
Before installing Recovery Manager, install the HP 3PAR Command Line Interface (CLI) for remote
clients. For details on installing the CLI, see the HP 3PAR InForm OS Command Line Interface
Reference. You must also install HP 3PAR VSS Provider Software for Microsoft Windows before
installing Recovery Manager for Microsoft Exchange. Install Recovery Manager for Exchange on
a host computer where Microsoft Exchange is running.
WARNING! Before installing Recovery Manager, create a backup of your repository data.
CAUTION: Back up your data before upgrading the Recovery Manager or all data will be lost.
See “Upgrading to Recovery Manager for Exchange” (page 18) for instructions on performing a
backup.
NOTE: HP recommends that you install the application directly from the system console.
To install Recovery Manager:
1. Log on as the System Administrator.
NOTE: In order to log in as the System Administrator, you must have Exchange server and
system administrator rights.
2. Insert the Recovery Manager CD into a CD-ROM drive.
18 Installation and Deinstallation
Page 19

3. Open a Windows Explorer window by clicking Start→All Programs→Accessories→Windows
Explorer.
4. Click the CD-ROM drive to expand the files.
5. Double-clickSetup.exe to launch the installation wizard
6. Click Next.
7. Agree to the license, then click Next.
8. Specify the installation directory for Recovery Manager.
NOTE: The Disk Cost button analyzes the amount of available storage space and compares
it to the amount required for the Recovery Manager installation.
9. Click Next to confirm the installation destination.
10. Specify the installation type for the local system.
• Recovery Manager Backup Server — Installs components required for local system to
perform centralized backup management.
• Recovery Manager Agent for Exchange Server — Installs components for local system to
be managed by the Recovery Manager Backup Server component installed server.
• All of above — Choose this option if you have a single host setup where the local system
manages its own virtual copies.
11. Click Next to confirm the local server selection.
12. Click Next to start the installation.
13. When the installation is completed, click Close.
After closing, the system configuration information is gathered and displayed in a text file
named RMECfgChk.txt. This information is useful for verifying whether all the required
components are present on the system.
14. If you are using a remote desktop session to install Recovery Manager, log off all connected
remote sessions after the installation is complete. The newly added environment variables then
go into effect.
Verifying the Installation
1. Log on as the System Administrator.
2. Click Start→Control Panel→Programs and Features.
3. Verify Recovery Manager appears under the Currently installed programs column.
Understanding the Registry
After Recovery Manager is installed successfully, some information is written into the registry
database under HKEY_LOCAL_MACHINE\SOFTWARE\3PAR\RM_Exchange.
CAUTION: DO NOT try to edit the registry key value unless asked by your local service provider
for support purposes.
NOTE: For tracking purposes, you will be asked to modify the value of the TraceLevel to a higher
number to record more detailed information to the log file.
The TraceLevel has the following values:
1 — Error messages logged
2 — Error and warning messages logged
3 — Error, warning, and informational messages logged
4 — Error, warning, informational and debug messages logged
5 — Error, warning, informational, debug and verbose messages logged
Verifying the Installation 19
Page 20

Editing the Registry
To edit registry data for Recovery Manager:
1. Click Start→Run.
2. Enter regedit in the Run window and click OK.
3. On the left-hand side of the registry window, click
HKEY_LOCAL_MACHINE→SOFTWARE→3par→RM_Exchange.
4. On the right-side of the window, double-click TraceLevel.
5. Modify the Value Data field and click OK to save the change.
Table 3 System Registry Values for Recovery Manager
ValueName
BackupTimeout
RCQueryTimer
The timeout value for the Symantec NetBackup
initialization process detection in minutes. This setting
is optional if the default is not appropriate.
Location of the GUI Log File (Java errors only).GUILog
Recovery Manager Installation path.InstallPath
Path to the GUI jar file.JarPath
The monitoring interval for remote copy progress on the
target server in minutes. This setting is optional if the
default is not appropriate.
Root path to the Recovery Manager repository.RepPath
Number of Trace files to keep before deleting.TraceHistory
The trace level for the log file:Tracelevel
1 — Error messages logged
2 — Error and warning messages logged
3 — Error, warning, and informational messages logged
4 — Error, warning, informational and debug messages
logged
5 — Error, warning, informational, debug and verbose
messages logged
The default value is 5.
The location where the log file resides.TraceLog
NOTE: See “Event Messages” (page 102) for descriptions of events and possible actions to
fix possible problems.
Environment Variables
Installation of Recovery Manager adds the full path to its executables and libraries to the system’s
PATH environment variable. If for some reason this has not been done, neither the GUI nor the CLI
will work. If this is the case, manually add the full paths for the bin and ext directories under
RM_Exchange to the PATH environment variable.
Deinstalling Recovery Manager
CAUTION: Back up your data before upgrading Recovery Manager or all data will be lost. See
“Upgrading to Recovery Manager for Exchange” (page 18) for instructions on performing a backup.
To deinstall Recovery Manager from Windows 2008:
1. Log on as the System Administrator.
20 Installation and Deinstallation
Page 21

2. Click Start→Control Panel→Programs and Features.
3. Select 3PAR Recovery Manager for Microsoft Exchange.
4. Click Uninstall.
NOTE: Removing the Recovery Manager installation will not remove the Recovery Manager
repository for virtual copy management.
Deinstalling Recovery Manager 21
Page 22

4 Configuring Recovery Manager
Configuring the Database
• Be sure to use Exchange files created on basic disks using the NTFS file system. Recovery
Manger does not support other types of file systems.
• Maintain a 1:1 relationship between storage groups and volumes:
Do not add more than one storage group plus its data files to a volume.◦
◦ Do not add files from one storage group (including its data files) to multiple volumes.
◦ Do not store non-Exchange data on volumes that store Exchange data files.
CAUTION: Be sure to maintain a one storage group:one volume relationship.
Configuring Recovery Manager
Installation Location
By default Recovery Manager installs in %SystemDrive%\Program Files\3PAR\RM\Exchange
Search Path
The Recovery Manager executables are stored in the directory you specify during installation.
Recovery Manager automatically adds the specified directory to the Windows environment variable
PATH; you can therefore issue Recovery Manager CLI commands from any directory.
Changing the Recovery Manager TCP/IP Port
The Recovery Manager listening service on each Recovery Manager Agent component installed
on the mailbox server and Recovery Manager backup server communicates through a TCP/IP port.
By default, Recovery Manager communications use port 9933. If port 9933 is available, no extra
port configuration is necessary.
If port 9933 is not available, you must change the Recovery Manager TCP/IP port.
NOTE: The TCP/IP port used by Recovery Manager for Exchange must be the same on all
associated hosts in the centralized backup configuration.
1. Select an available port. The valid TCP/IP port range is 1024 to 65535.
2. To set a new port number, issue the RMExch portconfig command.
For example, to change the port number to 9950:
RMExch portconfig -h spotted -p 9950
3. Restart the Recovery Manager for Exchange Agent service.
4. Repeat these steps for all associated hosts in the centralized backup configuration.
Configuring Exchange Server Policies
• To use the Recovery Manager GUI to set storage group policies, see “Using the Recovery
Manager GUI” (page 29).
• To use the Recovery Manager CLI to set storage group policies, see “Using the Recovery
Manager CLI” (page 51) for information about using the RMExch policy command.
22 Configuring Recovery Manager
Page 23

Configuring Mount Functionality
The Windows automount feature is not compatible with Recovery Manager. To ensure that the
Windows automount feature is disabled:
1. Open a command prompt (cmd) window.
2. Enter: diskpart
3. At the DISKPART prompt, enter: automount disable
4. Exit the command prompt window.
Configuring Recovery Manager for CCR
Recovery Manager for Exchange supports CCR.
• If your CCR configuration uses a single HP 3PAR Storage System, you can rely on a single
backup server. You do not need to perform any additional configuration steps.
• If your CCR configuration spans two HP 3PAR Storage Systems:
You require two backup servers: one connected to each HP 3PAR Storage System. One
◦
backup server acts as the backup server managed CCR active node, and the other acts
as the peer backup server managed CCR passive node. Both backup servers can execute
Recovery Manager CLI commands.
◦ You must use the RMExch peer CLI command to configure the peer backup server as
described in “RMExch peer” (page 65).
◦ To display the current configuration, use the RMExch peer display CLI command.
Configuring the Provider
You must use the provider's ProvCfg.exe utility to configure the provider to use the HP 3PAR
Storage System to which each backup server and Exchange production server connects. For more
information, see the provider's user guide.
• If your CCR configuration has one HP 3PAR Storage System, add only that one HP 3PAR
Storage System.
• If your CCR configuration has two HP 3PAR Storage Systems at one site, add both HP 3PAR
Storage Systems to your backup server.
• If your configuration has two HP 3PAR Storage Systems at two sites, add one HP 3PAR Storage
System to each backup server.
For the appropriate configuration diagrams, see “CCR Backup Configuration” (page 15).
Grouping Volumes into Autonomic Groups
You can group virtual volumes into autonomic groups (domain sets, volume sets, or host sets).
Domain Sets
If your Exchange configuration involves multiple storage groups that belong to different HP 3PAR
Virtual Domains, you can use domain sets to group these virtual domains into one HP 3PAR Storage
System domain set. This configuration enables you to use just one Recovery Manager backup
server to manage all your storage groups.
When working with domain sets, keep in mind the following:
• All hosts, users, and virtual volumes must belong to the same virtual domain.
• To mount a virtual copy or media backup to a server that is in a different virtual domain than
the domain in which it was created, you must use the CLI command RMExch mount -h.
• To create a Remote Copy group for a virtual volume that is in a user-defined domain, the
target virtual volume must be in the same user-defined domain.
Configuring Recovery Manager 23
Page 24

To configure domain sets, use CLI commands:
1. Ensure you are running HP 3PAR InForm Operating System Software 2.3.1 or higher.
2. Ensure you have access to all domains.
3. Create a domain set that contains all the virtual domains for all the storage groups.
4. Move the backup server to a domain within the domain set.
5. Create a Command Provisioning Group (CPG) belonging to the new virtual domain.
6. Create a virtual volume belonging to the CPG you just created.
7. Create a host belonging to the virtual domain.
8. Export the VLUN to the host.
9. On the Recovery Manager backup and production servers, set the user for the VSS provider.
10. Ensure the HP 3PAR Storage System connection is good.
Volume Sets
To configure volume sets:
• In a volume set, place one storage group and its log files.
NOTE: For more information on HP 3PAR Command Line Interface (CLI) commands, see the
HP 3PAR InForm OS Command Line Interface Reference. For more information on HP 3PAR
VSS Provider Software, see the HP 3PAR VSS Provider Software for Microsoft Windows User’s
Guide.
• Do not place one volume in more than one volume set.
• Do not place unrelated volumes in a volume set.
Host Sets
You can configure your system with host sets and volume sets, or with host sets only.
Configuring Multiple Domains
Multiple domain configurations allow you to use one backup server for multiple Active Directory
domains. You can use a multiple-domain setup with any Recovery Manager for Exchange 2007
configuration.
All multiple domain configurations must follow these rules:
• All backup components (for example, the backup server, the backup software client, and the
Remote Copy target server) must be in the local domain.
• The production servers and the Windows hosts enabled for mounting virtual copies can be in
any domain; local or nonlocal.
For more information about Recovery Manager for Exchange configurations, see “Recovery Manager
Layout” (page 13). For an example multiple-domain configuration, see “Multiple Domain Backup
Configurations” (page 16).
Multiple Domain Requirements
Ensure your domain names follow Microsoft naming conventions for Active Directory and for fully
qualified domain names (FQDN). For more information, see Microsoft documentation on Active
Directory and FQDN naming conventions.
Registering Domains
You do not need to register the local domain. To register an additional domain:
24 Configuring Recovery Manager
Page 25

1. Use the Recovery Manager GUI or the RMExch RegisterDomain CLI command.
For more information, see “Registering Nonlocal Domains” (page 30) or “RMExch
RegisterDomain” (page 70).
2. If you used the CLI command to register the domain, refresh the GUI.
After you register a domain, the Recovery Manager GUI displays the FQDN of the registered
domain in the node tree pane. You can now add storage groups and Windows hosts to the
domain. For more information, see “Managing Domain Components” (page 25).
Modifying Domain Credentials
To modify the credentials stored for a domain, use the Recovery Manager GUI or the RMExch
ModifyDomain CLI command.
For more information, see “Modifying Domain Credentials” (page 31) or “RMExch
ModifyDomain” (page 63).
Unregistering a Domain
1. Remove all storage groups and Windows hosts from the domain.
Recovery Manager does not allow you to unregister domains that contain Recovery Manager
for Exchange components.
2. Unregister the domain using the Recovery Manager GUI or the RMExch UnRegisterDomain
CLI command.
For more information, see “Unregistering a Domain” (page 31) or “RMExch
UnRegisterDomain” (page 79).
Managing Domain Components
• To use the GUI to manage Recovery Manager operations on storage groups and Windows
hosts in nonlocal domains, use the same GUI procedures as you do for storage groups and
Windows hosts in the local domain.
For more information, see “Using the Recovery Manager GUI” (page 29).
• To use CLI commands to manage storage groups in nonlocal domains, use the same commands
as for storage groups in the local domain and use the -domain option to specify the domain
name.
For more information, see “Using the Recovery Manager CLI” (page 51).
If you do not specify a domain name when you issue a CLI command, Recovery Manager
attempts to execute the command in the local domain.
Configuring the Host Computer and the HP 3PAR Storage System
See the HP 3PAR InForm OS Concepts Guide and the HP 3PAR InForm OS CLI Administrator’s
Manual for information about configuring the controller nodes on the HP 3PAR Storage System to
communicate with the host computer.
Configuring the Host Computer and the HP 3PAR Storage System 25
Page 26

5 Configuring Backup Software
Overview
HP 3PAR Recovery Manager can be used with either Symantec NetBackup or HP Data Protector
to back up and restore the virtual copies created by Recovery Manager. Keep in mind:
• If you are using backup software in the backup environment, you will need to install a backup
master or client on the backup server.
• There should be two master servers containing your backup software for CCR configurations
that span two sites (and two HP 3PAR Storage Systems).
• If you are using a multiple-domain configuration, you must use Symantec NetBackup software.
NOTE: For information about the supported versions of Symantec NetBackup and HP Data
Protector, see the latest HP 3PAR InForm OS Configuration Matrix. To obtain a copy of this
documentation, go to http://www.hp.com/go/3par/, navigate to your product page, click Support
for your product, and then click Manuals.
Before You Begin
Ensure that you have set up a storage unit for storing virtual copy backups. For more information,
see the documentation for the backup software you are using.
Configuring Symantec NetBackup
To set up your Symantec NetBackup software, see the Symantec NetBackup documentation.
To configure Symantec NetBackup to function with Recovery Manager for Exchange, set the
following parameters during the configuration process:
Clients
SettingBackup Policy Parameter
MS-Windows-NTPolicy type
Select the machine on which the Recovery Manager Backup
Server component is installed.
User backupType of backup
Activate all the time slots:Starting times for backups
• Modify Day: Mon
• Start Time: 12:00:00AM
• End Day: Sun
• End Time: 12:00:00AM
• Duration (days): 7
26 Configuring Backup Software
Page 27

NOTE: If the Windows Open File Backup option in NetBackup is enabled, the NetBackup client
takes additional temporary read-only (RO) and read/write (RW) snapshots on your base volumes.
After the backup process is complete, Windows displays this event message: Target LUN is
not a 3PAR Virtual Volume.
To deactivate this function, disable the Windows Open File Backup in NetBackup.
NOTE: If you plan on backing up multiple storage groups using NetBackup and Recovery
Manager for Exchange, you need a different policy for each storage group that will be backed
up at the same time. For example, if the first backup of Storage Group One has not finished yet,
in order for the backup of Storage Group Two to be performed correctly by Recovery Manager
for Exchange and NetBackup, it must use a different policy.
For more information on installing Symantec NetBackup, see Symantec NetBackup documentation.
Configuring HP Data Protector
Requirements
• HP Data Protector Software 6.2
• Data Protector patch for omnidl (Patch # DPWIN_00514)
• Each data list name (also known as the backup specification) must be unique across the entire
system
Setting Up the HP Data Protector Backup Specification
To use HP Data Protector with Recovery Manager, you must set up a default backup specification.
The backup specification specifies the default mount point and the necessary devices for tape
backup.
1. Open the Data Protector GUI.
2. Select Backup→Add Backup.
3. In the Create New Backup dialog box, select Blank_Filesystem_Backup and click OK.
4. Click Next (do not select any items).
5. Select the device that Data Protector is to use for backups.
6. Click Next until the Manual add... appears.
7. Click Manual add...
8. Select Windows filesystem and click Next.
9. Enter the appropriate client system, mount point, and description. HP recommends:
<server_used_as_backup_client>Client system
C:Mount point
defaultDescription
NOTE: Recovery Manager uses this information only to create a backup template. Recovery
Manager does not use the actual data entered.
10. Click Next until the Finish button is enabled.
11. Save the backup specification.
When you issue the RMExch backup command with the -dl option, use the name with
which you saved the backup specification (e.g., DPbackup) as the value of the -dl option.
Configuring HP Data Protector 27
Page 28

Setting Up HP Data Protector Cell Manager Access
To use HP Data Protector with Recovery Manager, you must enable the system accounts on the
registered client system to access the Data Protector Cell Manager.
1. Open the Data Protector GUI.
2. In the toolbar drop-down list, select Users.
3. Under the Users folder in the left pane, choose admin, and then choose SYSTEM.
4. In the Client system drop-down list on the General/Properties of the Data Protector User tab
in the right pane, select <Any>.
For more information on installing HP Data Protector, see HP Data Protector documentation.
Using Your Backup Software
• The default mount point for virtual copy backups is:
<system drive>:\3parSnapshot
• You must manually synchronize backups. If a backup expires in your backup software, you
must manually remove the backup from Recovery Manager. If you remove a valid backup
from Recovery Manager, you must manually remove it from your backup software.
• Recovery Manager does not track restore progress. You must use your backup software to
monitor restore progress.
• For more information about using CLI commands with your backup software, see RMExch
backup, RMExch deletebackup, RMExch listbackup, and RMExch restore in
“Using the Recovery Manager CLI” (page 51).
• For more information about using your backup software to back virtual copies up to media
or to restore virtual copies from media, see “Using the Recovery Manager GUI” (page 29).
Using Symantec NetBackup
• Symantec NetBackup software is case-sensitive. If you are using NetBackup, make sure all
information entered pertaining to the policy is supplied with the proper case.
• Any time you are using NetBackup to back up to media or restore from media, you can monitor
the progress using the progress log:
<RM_installation_location>\log\nbulog\Mailbox_Database_timestamp.log
• To modify the timeout value for NetBackup software initialization, see “Understanding the
Registry” (page 19).
Using HP Data Protector
For each HP Data Protector backup you create, a postscript (.bat) file is created in the $DP_HOME\
bin folder (where $DP_HOME is the Data Protector install location; for example, C:\ program
files\Omniback.) This script cleans up after the associated backup is complete.
Note that Recovery Manager does not clean these postscripts. After a backup is complete (either
successfully or with failures), you can manually remove the associated postscript batch file if desired.
28 Configuring Backup Software
Page 29

6 Using the Recovery Manager GUI
This chapter provides instructions for using the HP 3PAR Recovery Manager Software Graphical
User Interface (GUI) to back up and restore storage groups.
Overview of the Recovery Manager GUI
Recovery Manager provides a Graphical User Interface (GUI) for backing up and restoring storage
groups at a point-in-time. The Recovery Manager GUI is a windows application, containing a menu
bar, a node tree pane, informational right pane, and a command log window. It provides the
capability to create, remove, mount, unmount, back up, and restore a virtual copy for a storage
group.
NOTE: The GUI is not available for the Recovery Manager Agent for Exchange Server installations.
Menu Bar
The menu bar consists of the following:
• Console menu - allows you to exit the GUI; register the server; and register, modify, and
unregister domains.
• Actions menu - allows you to access virtual copy functionality.
• Scheduled Tasks menu - provides access to the Task Manager.
• About menu - provides an About 3PAR Recovery Manager screen and access to other helpful
links, such as descriptions for event messages that may be generated during operation.
Node Tree Pane
The node tree pane presents the system’s Exchange server. When the Recovery Manager GUI
starts, it analyzes the servers’ domains, storage groups, mailbox information, and virtual copies,
then displays them graphically as a nested tree in the left pane.
Informational Pane
The informational pane displays detailed information about each item selected in the node tree
pane. If the pane’s contents exceed the pane’s width, a scroll bar appears at the bottom of the
pane.
Displaying Domain Information
The node tree pane displays the local domain and its components under the Local Domain node,
directly beneath the MS Exchange node.
If you have configured multiple Recovery Manager domains, the pane displays nonlocal domains
(named as their fully qualified domain names) and their components after the Local Domain node.
Displaying Server Information
Recovery Manager supports Local Continuous Replication (LCR) and Cluster Continuous Replication
(CCR). LCR- and CCR-enabled storage groups are marked with the and icons, respectively,
in the node tree pane. The LCR/CCR column in the informational pane show which storage group
is LCR- or CCR-enabled.
Overview of the Recovery Manager GUI 29
Page 30

Displaying Storage Group Information
To display information about a storage group, click the storage group name in the node tree pane.
In the informational pane, Recovery Manager displays detailed information about the selected
storage group, as described in Table 4 (page 30).
Table 4 Storage Group Information Columns
Updating the Information Displayed
You must manually update the information displayed in the Recovery Manager GUI when:
• You enable or disable LCR or CCR for a storage group.
• In a CCR setup, the active node and passive node pair are switched (for example, a failover
takes place).
To rescan the server:
1. Ensure that the storage group is in a healthy state.
For example, if you are rescanning the server after a failover, the storage group might remain
in the Initializing state for a few seconds.
Displays...Column...
The name of the information store.Store
The type of information store: Mailbox Store or Public StoreStore Type
The status of the data store: Mounted or UnmountedStatus
The location of the EDB (property store) file storeEDB File
2. Right-click the MS Exchange node and select Rescan Server Configuration.
Starting the GUI
To start the Recovery Manager GUI, double-click the 3PAR Recovery Manager for Exchange icon
on your desktop.
Stopping the GUI
To stop the Recovery Manager GUI, select Console→Exit from the menu bar. For more information,
see “Menu Bar” (page 29).
Managing Domains
Working with the Local Domain
• If you are using only the local Active Directory domain, the Recovery Manager GUI displays
all your Recovery Manager components under the Local Domain node.
• If you are using multiple domains, the GUI displays the Recovery Manager components related
to backups—as well as any storage groups and Windows hosts added to the local
domain—under the Local Domain node.
Recovery Manager automatically registers the local domain.
Registering Nonlocal Domains
To register a nonlocal Active Directory domain:
1. Make sure Recovery Manager for Exchange is configured for multiple domains.
For more information, see “Configuring Multiple Domains” (page 24).
2. Right-click the MS Exchange node and select Register Domain.
30 Using the Recovery Manager GUI
Page 31

3. In the Register Domain dialog box, enter the server name, Windows domain and username,
and password.
4. Click Ok.
Modifying Domain Credentials
1. Right-click the MS Exchange node and select Modify Domain.
2. In the Modify Domain dialog box, enter the new server name, Windows domain and username,
or password.
3. Click Ok.
Unregistering a Domain
1. Remove all storage groups and Windows hosts from the domain you are unregistering.
Recovery Manager does not allow you to unregister domains that contain Recovery Manager
for Exchange components.
2. Right-click the MS Exchange node and select Unregister Domain.
3. In the Unregister Domain dialog box, enter the server name you are removing from the Recovery
Manager configuration.
4. Click Ok.
Working in Multiple Domains
To use the GUI to manage Recovery Manager operations on storage groups and Windows hosts
in nonlocal domains, use the same GUI procedures as you do for storage groups and Windows
hosts in the local domain.
Registering the Server
Before the GUI can manage Exchange servers, you must register all the servers.
To register a server:
1. Right-click the server node and select Server Registration .
2. Select a server that is managed by the Recovery Manager for Exchange GUI.
3. Click OK.
Recovery Manager takes a few minutes to scan all Exchange servers, and then it updates the
node tree. This process might take longer the first time you register servers.
Updating Server Registration
When you create a new instance or storage group after server registration is complete, you must
rescan the server configuration before Recovery Manager can manage the server.
To rescan the servers, right-click the MS Exchange node and select Rescan Server Configuration.
Setting the Recovery Manager Policy Configuration
Recovery Manager applies policy settings at the storage group level; therefore, each storage group
can have its own policy. In addition, you can configure individual virtual copies with their own
policy settings.
How Recovery Manager Policies Work
The Recovery Manager policy-setting feature allows you to:
• Specify and configure either a numeric-based or expiration-based policy
• Specify a retention time during which the storage group and its virtual copies cannot be
removed (if you have an HP 3PAR Virtual Lock license)
Registering the Server 31
Page 32

NOTE: Modifications you make to an existing policy are not retroactive. Virtual copies created
under a previous policy (whether numeric or expiration-based) retain the policy setting under which
they were created.
In addition, when you switch policy type, the system retains the virtual copies that exist at the time
of the policy change as follows:
• If you switch from an expiration-based policy to a numeric-based policy, the system does not
remove the expiration dates from the existing virtual copies, and these existing virtual copies
expire according to their set expiration date.
• If you switch from a numeric-based policy to an expiration-based policy, the system does not
apply expiration values to the existing virtual copies. These existing virtual copies continue to
reside on the system until you manually delete them or manually set an expiration time for
each individual virtual copy.
Numeric-Based Policies
If you specify a numeric-based policy, you can modify the maximum number of virtual copies
allowed per storage group.
• By default, Recovery Manager allows you to create a maximum of 10 virtual copies per storage
group.
• If a single backup server is managing active and passive nodes, the maximum virtual copy
count specified in the policy is enforced on a per-node basis. Therefore, the backup server
can contain twice the maximum number of virtual copies.
• The numeric-based policy also enables you to set Recovery Manager to automatically remove
the oldest virtual copy for each storage group, after the maximum limit of virtual copies is
reached, before creating a new virtual copy. If you do not choose to automatically remove
virtual copies when required in order to create a new virtual copy, you must manually delete
old virtual copies before you can create new copies.
NOTE: A virtual copy must be unmounted to be removed. If the oldest virtual copy for which
retention time has elapsed is mounted (and the maximum limit has been reached), Recovery
Manager displays an error message and cancels creation of the new virtual copy.
To create a new virtual copy after the maximum limit of virtual copies is reached, you must unmount
the oldest virtual copy.
Expiration-Based Policies
If you choose an expiration-based policy, you can set Recovery Manager to automatically remove
virtual copies after a specified period of time has elapsed.
If you specify an expiration time for a remote virtual copy:
• If HP 3PAR Remote Copy Software is set up in asynchronous periodic mode, Recovery Manager
sets the expiration time for the remote virtual copy on the backup server only, not for the virtual
copy created on the primary server.
• If Remote Copy is set up in synchronous mode, Recovery Manager sets the expiration time for
both the virtual copy on the primary server and the remote virtual copy on the backup server.
For more information, see the HP 3PAR Remote Copy Software User’s Guide.
The expiration-based policy option is only available if your HP 3PAR Storage System is running
HP 3PAR InForm Operating System Software 2.3.1 or above.
32 Using the Recovery Manager GUI
Page 33

Retention Time Restrictions
When you set a retention time for virtual copies (from either the active or passive node), Recovery
Manager creates a virtual lock on the storage group and its virtual copies. The storage group and
virtual copies created within the retention period cannot be removed during the retention period.
When setting a retention time, keep in mind the following restrictions:
• You must have an HP 3PAR Virtual Lock license to set retention times.
• The minimum retention time is 1 hour; the maximum is 43,800 hours/1,825 days (5 years).
The default retention time on a system is 336 hours (14 days).
• You can set a retention time for both numeric-based and expiration-based policies.
• The retention time cannot exceed the maximum retention time set for the HP 3PAR Storage
System.
• The retention time cannot be longer than the expiration time (if the policy is expiration-based).
• If you create a remote virtual copy and Remote Copy is set up in asynchronous periodic mode,
the retention time is applied to the remote copy on the backup server only. If Remote Copy is
set up in synchronous mode, the retention time is applied to both the remote copy on the
backup server and the virtual copy on the primary server.
• After the retention time is set, it can be increased, but it cannot be removed or reduced.
Setting Recovery Manager Policies
1. In the node tree pane, right-click the storage group you want to configure and select Policy.
2. Depending on whether you want to set a maximum number of copies or you want to set an
expiration time frame, do the following in the Policy Setup dialog box:
Follow these steps:To set:
Maximum number of virtual
copies
Expiration time frame for
virtual copies
1. Select the Numeric radio button.
2. In the Maximum Virtual Copies kept in InServ text box, enter the desired maximum
as a number between 1 and 500.
3. To remove the oldest virtual copy each time a copy above the maximum is created,
check the Remove the oldest Virtual Copies checkbox.
To keep the oldest virtual copy (and therefore prevent new virtual copies from
being made after the maximum number is reached), uncheck the Remove the
oldest Virtual Copies checkbox.
1. Select the Expiration radio button.
2. In the Default Expiration Time text box, enter the number of hours or days after
which you want Recovery Manager to remove each virtual copy.
The minimum expiration period is 1 hour; the maximum is 43,800 hours/1,825
days (5 years).
3. In the drop-down list, select either Hours or Days.
3. To modify the default retention time for the storage group and its virtual copies, enter the
number of hours or days you want to keep the storage group and its contents.
The minimum retention period is 1 hour; the maximum is 43,800 hours/1,825 days (5 years).
For more information about retention time restrictions, see “How Recovery Manager Policies
Work” (page 31).
4. Click Finish.
The virtual copy policy is effective immediately for all future virtual copies.
Setting the Recovery Manager Policy Configuration 33
Page 34

NOTE: You can also use the CLI command RMExch policy to set Recovery Manager policies.
For more information, see “Using the Recovery Manager CLI” (page 51).
Modifying the Time Constraints for a Virtual Copy
To modify the retention time or the expiration time or both for a virtual copy:
1. In the node tree pane, right-click the virtual copy you want to modify, and select Edit Time
Constraints.
2. To set a new retention time, check the Retention Time checkbox and enter a new value.
3. To set a new expiration time, check the Expiration Time checkbox and enter a new value.
For more information on setting the retention and expiration time, see “How Recovery Manager
Policies Work” (page 31).
4. Click Ok.
NOTE: You can also use the CLI command RMExch setvc to modify time constraints for a
virtual copy. For more information, see “Using the Recovery Manager CLI” (page 51).
Configuring Email Notifications
You can configure Recovery Manager to automatically send an email when:
• You create a virtual copy or remote virtual copy, or Recovery Manager automatically creates
a virtual copy or remote virtual copy according to the task schedule.
• You create a backup or Recovery Manager automatically creates a backup according to the
task schedule.
• You restore a storage group.
In addition, you can configure the email to notify you only when an operation completes, only
when an error message displays, or when either occurs.
NOTE: For more information about scheduling automatic virtual copies, remote virtual copies,
and backups, see “Scheduling Automated Tasks with Task Scheduler” (page 39).
To configure email notifications:
1. In the node tree pane, right-click the storage group for which you want to configure email
notifications, and select Email Config.
2. In the Email Configuration pane, enter the appropriate information in the following text boxes:
• Email Type - Type of email server (e.g., SMTP)
• SMTP Host Name - Name of the email server
• Port - Port of the email server
• Sender Email Address - Email address of the sender
• Password - Password for the sender’s email address
• Receiver Email Address - Email address of the person to be notified of task activity and/or
errors
3. To send email notifications via the Secure Sockets Layer protocol, ensure the SSL checkbox is
checked.
4. To make sure the email configuration works, click the Test Connection button.
34 Using the Recovery Manager GUI
Page 35

5. In the Operations pane, check the desired checkboxes in the tab for each type of task (Create
Virtual Copy, Backup, and/or Restore) for which you want emails:
• Info - Recovery Manager sends informational emails for successful operations.
• Error - Recovery Manager sends informational emails for operations that were not
completed successfully.
Both informational and error emails contain the result of the operation and the related CLI
output.
6. Click Finish.
Recovery Manager encrypts the password and saves the configuration as an XML file with
the filename EmailConfig.xml. Each time a virtual copy or backup is created or a restoration
is performed on this storage group, Recovery Manager checks the XML file and, if email is
configured for the task, sends an email with the task information and/or error messages.
Deleting Email Configurations
To permanently stop all email notifications for a storage group:
1. Select the storage group for which you do not want to receive any email notifications.
2. Select Actions→Delete Email Config.
Creating Virtual Copies of Storage Groups
You can use Recovery Manager to manually create virtual copies at the storage group level. You
can also schedule Recovery Manager to automatically make virtual copies of storage groups.
NOTE: You can configure Recovery Manager to automatically send email notifications when
virtual copies are manually or automatically created. For more information, see “Configuring Email
Notifications” (page 34).
How Virtual Copy Creation Works
Recovery Manager creates virtual copies for Microsoft Exchange Server at the storage group level
because this is the recoverable unit defined by Microsoft.
The log files for all the mailbox data stores are managed at the storage group level. Therefore,
when Recovery Manager creates a virtual copy for a storage group, it creates a virtual copy of
all virtual volumes where the information store, log, and system files reside in order to preserve
data consistency.
You can create virtual copies of standard storage groups, LCR-enabled storage groups, and
CCR-enabled storage groups. If you have Remote Copy set up, you can also create a virtual copy
to be saved on a remote server; this type of copy is called a remote virtual copy.
Deleting Email Configurations 35
Page 36

NOTE: You can only create a virtual copy of a storage group that is online.
NOTE: A virtual copy of a storage group is a virtual copy of all the volumes where the storage
group data (log, chk, and edb files) resides. Therefore, HP recommends that you do not store
any non-Exchange data on volumes that store Exchange data files.
Processes during Virtual Copy Creation
While Recovery Manager attempts to create the virtual copy (or copies), the following processes
take place:
• The production server VSS waits up to 10 seconds for the writers to freeze I/O; this interval
is not configurable. In most cases, 10 seconds is a sufficient window in which to successfully
create a virtual copy.
However, in some circumstances (e.g., a very heavy load), 10 seconds might not be enough,
and the virtual copy fails by design. VSS does not automatically retry shadow copy creation;
instead, you must use the Recovery Manager GUI or the command line interface to attempt
to create a virtual copy again.
• On the production server, Recovery Manager dismounts and unmasks the virtual copy device
from the Windows server, and breaks the virtual copy away from VSS control. During this
process a delayed write error might appear, or the message the system failed to flush data
to the transaction log might appear in the System Event Log. This is standard.
Processes after Virtual Copy Creation
After creating a virtual copy, Recovery Manager checks the integrity of the Exchange files. If
desired, you can perform a manual check as well.
Manually Creating a Virtual Copy of a Storage Group
To create a virtual copy:
1. In the node tree pane, right-click the storage group for which you want to create a virtual
copy, and select Create→Virtual Copy.
2. In the Validate Virtual Copy area, select whether you want Recovery Manager to validate the
server name or skip validation of the virtual copy, and whether you want Recovery Manager
to truncate the log.
3. Optional: If you want to adjust the expiration or retention time policy values (or both) for this
virtual copy (or, if you are scheduling automatic copies, this group of virtual copies):
• To adjust the expiration time, check the Expiration Time checkbox and enter the new
expiration time.
• To adjust the retention time, check the Retention Time checkbox and enter the new retention
time.
Even if the policy has a retention time value, you can override the policy for an individual
virtual copy in this Retention Time checkbox. Valid values are 0 (for no retention time) to
43,800 hours/1,825 days.
For more information, see “Setting the Recovery Manager Policy Configuration” (page 31).
4. To immediately create one virtual copy, click Finish in the Create Virtual Copy dialog box. To
schedule virtual copies, see “Scheduling Automatic Virtual Copies” (page 39).
36 Using the Recovery Manager GUI
Page 37

Creating Remote Virtual Copies of Storage Groups
How Remote Virtual Copy Works
When you create remote virtual copies, Recovery Manager uses Remote Copy to send the virtual
copies to the Remote Copy backup server. The Remote Copy backup server is a remote server that
is the Recovery Manager backup server.
To use remote virtual copy functionality:
• The HP 3PAR Remote Copy Software license must be installed.
• Remote Copy volume groups must be configured.
• Both the Remote Copy primary server and backup server must be running the same version
of Recovery Manager.
For more information, see “Remote Copy for Recovery Manager” (page 92).
Manually Creating a Remote Virtual Copy of a Storage Group
To create a remote virtual copy of a storage group:
1. In the node tree pane, right-click the storage group for which you want to create a virtual
copy, and select Create→Remote Virtual Copy.
2. In the Validate Virtual Copy area, select whether you want Recovery Manager to validate the
server name or skip validation of the virtual copy, and whether you want Recovery Manager
to defer log truncation (if validating) or truncate the log (if skipping validation).
3. Optional: If you want to adjust the expiration or retention time values (or both) for this virtual
copy (or, if you are scheduling automatic copies, this group of virtual copies):
• To adjust the expiration time, check the Expiration Time checkbox and enter the new
expiration time.
• To adjust the retention time, check the Retention Time checkbox and enter the new retention
time.
Even if the policy has a retention time value, you can override the policy for an individual
virtual copy in this Retention Time checkbox. Valid values are 0 (for no retention time) to
43,800 hours/1,825 days.
For more information, see “Setting the Recovery Manager Policy Configuration” (page 31).
4. Click Next.
5. In the Target Server Name field, enter the name of the Remote Copy target server.
6. Optional: To view the policy values for the remote server, click Fetch Policy.
7. Optional. To edit the modifiable remote server policy values for the remote virtual copy (or
copies) you are creating, make your changes in the Policy Info area.
8. To immediately create one remote virtual copy, click Finish in the Create Remote Virtual Copy
dialog box.
Creating a Virtual Copy of an LCR-Enabled Storage Group
You can use Recovery Manager to create a virtual copy of a storage group for which Local
Continuous Replication (LCR) is enabled.
When you create an LCR virtual copy, Recovery Manager uses Exchange’s LCR copy as the source
of the virtual copy. (An LCR copy is a replica of a storage group, created using Exchange’s LCR
feature, that is continually updated with Exchange data.) Recovery Manager also creates a virtual
copy of all virtual volumes where the information store, log, and system files reside in order to
preserve the data for consistency.
To create an LCR virtual copy of a storage group:
Creating Virtual Copies of Storage Groups 37
Page 38

1. In the node tree pane, right-click the LCR-enabled storage group for which you want to create
a virtual copy, and select Create→LCR Virtual Copy.
2. In the Validate Virtual Copy area, select whether you want Recovery Manager to validate the
server name or skip validation of the LCR virtual copy, and whether you want Recovery
Manager to truncate the log.
3. Optional: If you want to adjust the expiration or retention time policy values (or both) for this
virtual copy (or, if you are scheduling automatic copies, this group of virtual copies):
• To adjust the expiration time, check the Expiration Time checkbox and enter the new
expiration time.
• To adjust the retention time, check the Retention Time checkbox and enter the new retention
time.
Even if the policy has a retention time value, you can override the policy for an individual
virtual copy in this Retention Time checkbox. Valid values are 0 (for no retention time) to
43,800 hours/1,825 days.
For more information, see “Setting the Recovery Manager Policy Configuration” (page 31).
4. To immediately create one LCR virtual copy, click Finish in the Create Virtual Copy dialog box.
To schedule virtual copies, see “Scheduling Automatic Virtual Copies” (page 39).
Creating a Virtual Copy of a CCR-Enabled Storage Group
You can use Recovery Manager to create a virtual copy of a storage group for which Cluster
Continuous Replication (CCR) is enabled. You can create a virtual copy for an active node, a
passive node, or both the passive and active node.
To create a CCR virtual copy of a storage group:
1. In the node tree pane, right-click the CCR-enabled storage group for which you want to create
a virtual copy, and select Create.
2. Select one of the following options:
DescriptionOption
CCR Virtual Copy on Active Node
CCR Virtual Copy on Passive Node
CCR Virtual Copy on Passive and Active
Node
Recovery Manager creates a virtual copy of the resources that are on
the active node of the Exchange cluster. Recovery Manager saves the
virtual copy to the active node of the corresponding backup server
(primary).
Recovery Manager creates a virtual copy of the resources that are on
the passive node of the Exchange cluster. Recovery Manager saves
the virtual copy to the passive node of the corresponding backup server.
Recovery Manager first creates a virtual copy on the passive node and
then saves the virtual copy to the passive node of the corresponding
backup server. Next, Recovery Manager creates a virtual copy on the
active node and then saves the virtual copy to the active node of the
corresponding backup server.
3. In the Validate Virtual Copy area, select whether you want Recovery Manager to validate the
server name or skip validation of the CCR virtual copy, and whether you want Recovery
Manager to truncate the log.
38 Using the Recovery Manager GUI
Page 39

4. Optional: If you want to adjust the expiration or retention time policy values (or both) for this
virtual copy (or, if you are scheduling automatic copies, this group of virtual copies):
• To adjust the expiration time, check the Expiration Time checkbox and enter the new
expiration time.
• To adjust the retention time, check the Retention Time checkbox and enter the new retention
time.
Even if the policy has a retention time value, you can override the policy for an individual
virtual copy in this Retention Time checkbox. Valid values are 0 (for no retention time) to
43,800 hours/1,825 days.
For more information, see “Setting the Recovery Manager Policy Configuration” (page 31).
5. To immediately create one CCR virtual copy, click Finish in the Create Virtual Copy dialog
box. To schedule virtual copies, see “Scheduling Automatic Virtual Copies” (page 39).
Scheduling Automatic Virtual Copies
To schedule automatic virtual copies:
1. In the node tree pane, right-click the storage group for which you want to create a virtual
copy, and select one of the following:
• Create→Virtual Copy
• Create→Remote Virtual Copy
• Create→LCR Virtual Copy
• Create→CCR Virtual Copy
2. Click Next in the Create Virtual Copy dialog box.
The Task Scheduler appears. For more information, see “Scheduling Automated Tasks with
Task Scheduler” (page 39).
Automating Tasks
You can use the Task Scheduler to schedule Recovery Manager to automatically create virtual
copies (standard, LCR, and CCR), remote virtual copies, and backups, and to automatically analyze
and synchronize (if desired) a repository.
You can use Task Manager to manage all your scheduled virtual copies and backups for all
Recovery Manager products running on your servers.
Scheduling Automated Tasks with Task Scheduler
To schedule automatic virtual copies, backups, and analysis and synchronization of the repository:
1. Set up a virtual copy creation, backup creation, or repository analysis task as desired. For
more information, see:
• “Scheduling Automatic Virtual Copies” (page 39)
• “Scheduling Automatic Backups at the Storage Group Level” (page 45)
• “Scheduling Automatic Repository Analysis and Synchronization” (page 48)
2. In the Task Scheduler dialog box, check the Schedule this task checkbox.
3. In the Password text box, enter a local user password for the backup server.
4. In the Password (confirm) text box, re-enter the password.
5. From the Start Time drop-down list, select the hour at which you want Recovery Manager to
start creating automatic virtual copies.
Automating Tasks 39
Page 40

6. To specify the frequency with which the automatic virtual copies are to be created, select the
appropriate radio button in the left pane of the Schedule Pattern area.
The type of calendar displayed depends on the frequency of the automatic virtual copies
selected in the left pane of the Schedule Pattern area.
• Once - Schedules one automated virtual copy.
In the right pane, select the month and year in which to create the virtual copy from the
drop-down list above the calendar view, then select the day on the calendar.
• Hourly - Schedules automated virtual copies multiple times a day at the interval you
specify.
From the drop-down list in the right pane, select the number of hours you want to pass
between automated copies.
• Daily - Schedules automated virtual copies on a daily basis at the interval you specify.
To schedule copies at regular intervals during the week, select the radio button for
◦
Every day in the right pane and enter the number of days between copies.
◦ To schedule copies on a daily basis, select the radio button for Every weekday in
the right pane and, in the Start Date text box, enter the start date or use the Calendar
icon to select a start date.
• Weekly - Schedules automated virtual copies by the day of the week.
In the right pane, enter the number of weeks you want to pass between automated copies
and check the checkbox for each day of the week on which a virtual copy is to be created.
• Monthly - Schedules automated virtual copies by day or date of the specified months.
◦ Day - To schedule copies on a specific date at a specific monthly interval, enter the
date (as a number) and the number of months between copies. For example, if you
enter Day 24 of every 2 months, Recovery Manager automatically creates a virtual
copy every 24th day of every other month.
◦ The (first Sunday) - To schedule copies on a specific day and in specific months, use
the drop-down lists to specify the day and the checkboxes to specify the exact months
to create copies. For example, if you enter The first Sunday of every month
and check the Jan, Apr, and Aug checkboxes, Recovery Manager automatically
creates a virtual copy the first Sunday in January, the first Sunday in April, and the
first Sunday in August.
7. Click Finish.
NOTE: You can use the Task Manager to edit, run, delete, and view details of scheduled
tasks. For more information, see “Managing Automated Tasks with Task Manager” (page 40).
NOTE: All tasks created in Task Scheduler and their associated script files are not
automatically removed when you deinstall Recovery Manager. Retention of tasks allows you
to upgrade your version of Recovery Manager without losing scheduling information.
Managing Automated Tasks with Task Manager
To use Task Manager to manage all your scheduled virtual copies and backups for all Recovery
Manager products running on your servers:
1. In the node tree pane, ensure a node is selected.
2. Select Scheduled Tasks→Task Manager.
Recovery Manager lists all scheduled tasks in the Task Manager dialog box in the Task Name
column, prefixing Recovery Manager for Exchange tasks with RME.
40 Using the Recovery Manager GUI
Page 41

3. To manage a scheduled task, select it and click one of the following buttons:
• Edit - Opens the Task Scheduler, with which you can modify the task. To save your
changes, you must enter your password. For more information, see “Scheduling Automated
Tasks with Task Scheduler” (page 39).
• Detail - Displays task information in the Task Detail dialog box.
• Delete - Deletes the task and its associated script file.
• Edit Script - Displays the task script and enables you to modify it.
• Run Now - Performs the selected task immediately (in addition to its scheduled run time).
• Refresh - Updates the list and status of scheduled tasks.
4. To exit the Task Manager dialog box, click OK.
Mounting a Virtual Copy
When you mount a virtual copy, Recovery Manager mounts all stores (mailbox, public store, logs)
under the virtual copy.
NOTE: You can mount a virtual copy to only one host at a time.
To mount a virtual copy:
1. In the node tree pane, right-click the virtual copy you want to mount, and select Mount.
2. From the Host Name drop-down list, select the host to which to mount the virtual copy.
3. Click OK.
Recovery Manager:
• Makes the virtual copy available to the selected host server
• Displays data for the mounted virtual copy (store) in the informational pane
• Displays Mounted in the Virtual Copy Status column
• Displays the host server to which the virtual copy was mounted in the Mounted Host
column
Unmounting a Virtual Copy
When you unmount a virtual copy, Recovery Manager unmounts all stores (mailbox, public store,
logs) under the virtual copy.
To unmount a virtual copy, right-click the mounted virtual copy and select Unmount.
Recovery Manager:
• Updates the informational pane for the unmounted virtual copy
• Displays Unmounted in the Virtual Copy Status column
• Removes the host name from the Mounted Host column
Refreshing Virtual Copy Information
If you are using both the Recovery Manager GUI and the CLI, and you use the CLI to make changes
without stopping and restarting the GUI, you must manually update the virtual copy information.
You can perform this update at several levels.
Refreshing All Virtual Copies
To refresh all virtual copies, right-click the Virtual Copy Management node in the node tree pane
and select Refresh.
Mounting a Virtual Copy 41
Page 42

Refreshing All Virtual Copies for a Specific Storage Group
To refresh all virtual copies for a specific storage group, right-click the storage group under the
Virtual Copy Management node and select Refresh.
Refreshing a Specific Virtual Copy
To refresh a specific virtual copy, right-click the virtual copy and select Refresh.
Backing Up a Virtual Copy
You can use Recovery Manager to back up virtual copies to media using HP Data Protector or
Symantec NetBackup.
To back up a virtual copy to media, you must first configure your backup software (Data Protector
or NetBackup) as described in “Configuring Backup Software” (page 26).
You can back up virtual copies at the storage group level or by individual virtual copy. You can
also schedule Recovery Manager to automatically create backups of storage groups.
NOTE: You can configure Recovery Manager to automatically send email notifications when
backups are manually or automatically created. For more information, see “Configuring Email
Notifications” (page 34).
Manually Creating Backups at the Storage Group Level
When you create a backup of a storage group level virtual copy, Recovery Manager automatically
creates a virtual copy for the storage group and mounts it, your backup software backs the virtual
copy up to media, and Recovery Manager unmounts the virtual copy. You can also choose to have
Recovery Manager automatically remove the newly created virtual copy.
To create a backup of a virtual copy at the storage group level:
1. In the node tree pane, right-click the storage group node you want to back up and select
Backup to Media.
2. From the Vendor drop-down list, select the backup software you are using:
• Symantec NetBackup
• HP Data Protector
3. In the Parameters area, enter the required information, depending on your backup software:
Enter these parameters:If you are using:
Symantec NetBackup
HP Data Protector
• Master Server Name: The NBU master server
• NBU Policy Name: The name of the policy you are
using
• NBU Full Schedule Name: The name of the schedule
within the policy you are using
For more information, see Symantec NetBackup
documentation and “Configuring Backup Software”
(page 26).
• Data List: The name of the data list
For more information about data lists, see the description
of backup specifications in HP Data Protector
documentation.
42 Using the Recovery Manager GUI
Page 43

NOTE: After the first successful backup, Recovery Manager saves the information entered
in the Parameters area and displays it as the default the next time you create a backup.
4. To automatically remove the newly created virtual copy after backup, ensure the Remove
Virtual Copy from InServ after backup checkbox is checked.
5. To immediately create one backup, click Finish.
• Recovery Manager creates the backup, names it as its timestamp, and adds it to the
Backup Management node under the relevant storage group in the node tree pane if:
◦ You are using an expiration-based policy, or
◦ You are using a numeric-based policy but either have not reached the maximum
number of virtual copies allowed or the policy is configured to remove old copies
as necessary (i.e., the Remove the oldest Virtual Copies checkbox is checked).
• Recovery Manager does not create the backup if you are using a numeric-based policy
and:
◦ The policy is not configured to remove the oldest virtual copies (i.e., the Remove the
oldest Virtual Copies checkbox is not checked), and
◦ You have reached the maximum number of virtual copies allowed and therefore
Recovery Manager cannot create a new virtual copy.
For more information, see “Setting the Recovery Manager Policy Configuration” (page 31).
NOTE: To monitor NetBackup progress, use the progress log at the following location:
<RM_install_location>\log\nbulog\
exchserver_storagegroup_timestamp.log
Creating Backups at the Storage Group Level for CCR
You can use Symantec NetBackup or HP Data Protector to create backups of CCR virtual copies
on either the active or the passive node.
To back up a CCR virtual copy at the storage group level:
1. In the node tree pane, right-click the storage group node you want to back up, and select one
of the following:
• Backup→on Active Node
• Backup→on Passive Node
2. From the Vendor drop-down list, select the backup software you are using:
• Symantec NetBackup
• HP Data Protector
Backing Up a Virtual Copy 43
Page 44

3. In the Parameters area, enter the required information, depending on your backup software:
Enter these parameters:If you are using:
Symantec NetBackup
HP Data Protector
• Master Server Name: The NBU master server
• NBU Policy Name: The name of the policy you are
using
• NBU Full Schedule Name: The name of the schedule
within the policy you are using
For more information, see Symantec NetBackup
documentation and“Configuring Backup Software”
(page 26).
• Data List: The name of the data list
For more information about data lists, see the description
of backup specifications in HP Data Protector
documentation.
4. To automatically remove the newly created virtual copy after backup, ensure the Remove
Virtual Copy from InServ after backup checkbox is checked.
• Symantec NetBackup
• HP Data Protector
5. To immediately create one backup, click Finish.
• Recovery Manager creates the backup, names it as its timestamp, and adds it to the
Backup Management node under the relevant storage group in the node tree pane if:
◦ You are using an expiration-based policy, or
◦ You are using a numeric-based policy but either have not reached the maximum
number of virtual copies allowed or the policy is configured to remove old copies
as necessary (i.e., the Remove the oldest Virtual Copies checkbox is checked).
If Recovery Manager creates the new backup:
• If you are creating a backup of a CCR virtual copy on the active node, Recovery Manager
creates a virtual copy on the cluster’s active node and backs it up to the corresponding
NetBackup server.
• If you are creating a backup of a CCR virtual copy on the passive node and the policy
is set to remove the virtual copy created for backup purposes (in other words, the Remove
virtual copy from InServ after backup checkbox is checked in the selected server’s policy),
Recovery Manager creates a virtual copy on the cluster’s passive node, backs it up to
the corresponding NetBackup server, and removes the virtual copy.
• If you are creating a backup of a CCR virtual copy on the passive node and the policy
is set to retain the virtual copy created for backup purposes (in other words, the Remove
virtual copy from InServ after backup checkbox is unchecked in the selected server’s
44 Using the Recovery Manager GUI
Page 45

policy), Recovery Manager creates both the CCR virtual copy and its backup on the
backup server of the selected server.
• Recovery Manager does not create the backup if you are using a numeric-based policy
and:
◦ The policy is not configured to remove the oldest virtual copies (i.e., the Remove the
oldest Virtual Copies checkbox is not checked), and
◦ You have reached the maximum number of virtual copies allowed and therefore
Recovery Manager cannot create a new virtual copy.
For more information, see “Setting the Recovery Manager Policy Configuration” (page 31).
6. Verify that the virtual copy has been backed up. To do so, ensure that the GUI displays the
information described in Table 5 (page 45).
Table 5 Verifying the Virtual Copy Backup Status
ValueColumn
Virtual Copy Status
Backup Keyword
• If the associated policy is set to remove the virtual
copy from the HP 3PAR Storage System after backup,
the status is Removed.
• If the virtual copy is not removed, the status is
Mounted.
For more information on virtual copy statuses, seeTable 6
(page 49).
NBUBackup Mechanism
FULLBackup Type
The Recovery Manager-generated keyword for the NBU
backup, in the format:
exchange server_storagegroup_timestamp
7. If the backup fails, refresh the GUI to reset the columns in the informational pane (as described
in Table 5 (page 45)) back to their previous values.
Scheduling Automatic Backups at the Storage Group Level
To schedule automatic backups of a storage group:
1. In the node tree pane, right-click the storage group you want to back up, and select Backup
to Media.
2. In the Backup to Media dialog box, enter the appropriate information. For more information,
see “Manually Creating Backups at the Storage Group Level” (page 42).
3. Click Next.
4. In the Task Scheduler, schedule backups as desired. For more information, see “Scheduling
Automated Tasks with Task Scheduler” (page 39).
Creating a Backup of a Virtual Copy
When you create a backup of one virtual copy, Recovery Manager copies the existing virtual copy,
and the backup software backs the copy up to the media using the same timestamp as the original
copy. Recovery Manager does not create a new virtual copy for backups of an individual virtual
copy.
To create a backup of one virtual copy:
1. In the node tree pane, right-click the virtual copy you want to back up and select Backup to
Media.
Backing Up a Virtual Copy 45
Page 46

2. From the Vendor drop-down list, select the backup software you are using:
• Symantec NetBackup
• HP Data Protector
3. In the Parameters area, enter the required information, depending on your backup software:
Enter these parameters:If you are using:
Symantec NetBackup
HP Data Protector
• Master Server Name: The NBU master server
• NBU Policy Name: The name of the policy you are
using
• NBU Full Schedule Name: The name of the schedule
within the policy you are using
For more information, see Symantec NetBackup
documentation and“Configuring Backup Software”
(page 26).
• Data List: The name of the data list
For more information about data lists, see the description
of backup specifications in HP Data Protector
documentation.
4. To immediately create one backup, click Finish.
• Recovery Manager creates the backup, names it as its timestamp, and adds it to the
Backup Management node under the relevant storage group in the node tree pane if:
◦ You are using an expiration-based policy, or
◦ You are using a numeric-based policy but either have not reached the maximum
number of virtual copies allowed or the policy is configured to remove old copies
as necessary (i.e., the Remove the oldest Virtual Copies checkbox is checked).
• Recovery Manager does not create the backup if you are using a numeric-based policy
and:
◦ The policy is not configured to remove the oldest virtual copies (i.e., the Remove the
oldest Virtual Copies checkbox is not checked), and
◦ You have reached the maximum number of virtual copies allowed and therefore
Recovery Manager cannot create a new virtual copy.
For more information, see “Setting the Recovery Manager Policy Configuration” (page 31).
Scheduling an Automatic Backup of a Virtual Copy
To schedule an automatic backup of one virtual copy:
1. In the node tree pane, right-click the virtual copy you want to back up, and select Backup to
Media.
2. In the Backup to Media dialog box, enter the appropriate information. For more information,
see “Manually Creating Backups at the Storage Group Level” (page 42).
3. Click Next.
4. In the Task Scheduler dialog box, check the Schedule this task checkbox.
Recovery Manager enables you to schedule an automatic backup of a virtual copy once.
Therefore, in the left pane of the Schedule Pattern area, the Once radio button is automatically
selected and the other frequency options are disabled.
5. In the Password text box, enter a local user password for the backup server.
46 Using the Recovery Manager GUI
Page 47

6. From the Start Time drop-down list, select the hour at which you want Recovery Manager to
create the backup.
7. From the drop-down list above the calendar view in the right pane of the Schedule Pattern
area, select the month and year in which to create the backup.
8. On the calendar, select the day on which to create the backup.
9. Click Finish.
Restoring from a Virtual Copy
You can use either the file copy restore feature or the volume restore feature of Recovery Manager
to restore a virtual copy to its source storage group.
Recovery Manager can perform the restore from a mounted or an unmounted virtual copy, with
the following restrictions:
Non-promotable virtual copy
Restore OptionsVirtual Copy Type
File copy restoreMounted virtual copy
File copy restorePromotable virtual copy
Volume restore
Restoring a Storage Group with File Copy Restore
1. In the node tree pane, right-click the virtual copy you want to use for the restore, and select
Restore Using→File Copy.
2. To confirm you understand the warning, check the Click to continue checkbox.
3. Click Ok.
Recovery Manager overwrites the storage group with the virtual copy. The storage group is
now restored.
Restoring a Storage Group with Volume Restore
WARNING! DO NOT perform a volume restore if multiple storage groups (or any data files)
share any volumes. Data file suffixes are: .LOG, .EDB, and .CHK.
To determine how or whether your storage groups share volumes, execute the
chk_multi_storage.cmd script. By default, this script is installed at:
Program Files/3PAR/RM/Exchange/bin
If you perform a volume restore on a volume that hosts multiple storage groups and/or data files,
the operation deletes all storage group data not contained in the promoted virtual copy.
1. In the node tree pane, locate the virtual copy you want to use to restore the storage group
and select Restore Using→Volume.
2. To confirm you understand the ramifications of proceeding with the restore, check the Click
to continue checkbox.
3. Click Ok.
The virtual copy completely overwrites the storage group volume. The storage group is now
restored.
Restoring from a Virtual Copy 47
Page 48

Restoring a Volume or Directory from a Media Backup
You can restore backups to their original location (i.e., the volume(s) or directory location of the
virtual copy that was used to create the backup, not to the original Exchange data location), or
you can specify an alternate location.
To perform a media restore of a volume or directory from a backup of a virtual copy:
1. Under the Backup Management node in the node tree pane, right-click the timestamp for the
backup you want to use for the restore, and select Restore.
By default, Recovery Manager restores the backed-up virtual copy to its original location,
which is displayed in the Alternate Location text box. The original location is either the directory
C:\3parSnapshot or F:\3parSnapshot, depending on your system drive.
2. If you want to restore the virtual copy to a different location, enter the alternate location in the
Alternate Location text box or select a location from the file chooser.
3. Click OK.
The backup software mounts the backup to the specified location as a virtual copy. If you
specified an alternate restore location, the restored data appears in the alternate location.
You can monitor the progress of the NetBackup restore in the progress log located at:
<RM_Exchange_Install_Location>\log\nbulog\
exchserver_storagegroup_timestamp.log
Analyzing the Repository
You can use Recovery Manager to compare and synchronize virtual copies in the Recovery Manager
repository with the HP 3PAR Storage System. You can also schedule Recovery Manager to
automatically analyze and synchronize (if desired) the repository with the HP 3PAR Storage System.
Manually Analyzing and Synchronizing the Repository
To manually analyze and synchronize (if desired) a repository with the HP 3PAR Storage System:
1. In the node tree pane, right-click the storage group you want to analyze, and select Analyze.
2. To automatically synchronize the HP 3PAR Storage System and the repository (if necessary),
check the Synchronize result with Repository checkbox.
To analyze the repository without synchronizing it, leave the Synchronize result with Repository
checkbox unchecked.
3. To analyze immediately, click Finish.
• If you opt to automatically synchronize the results, Recovery Manager analyzes the
repository, synchronizes the repository and the HP 3PAR Storage System (if necessary),
and updates the list of virtual copies under the Virtual Copy Management node in the
node tree pane.
• If you opt to only analyze the repository, Recovery Manager displays the Analyze
Repository dialog box and performs the analysis. To view the list of virtual copies not in
the repository, if any, click the Detail button in the Analyze Repository dialog box.
To synchronize the results (if necessary), repeat the above steps to launch the Analyze
Repository dialog box. Be sure to check the Synchronize result with Repository checkbox
before continuing.
Scheduling Automatic Repository Analysis and Synchronization
To schedule automatic analysis and synchronization (if desired) of a repository with the HP 3PAR
Storage System:
1. In the node tree pane, right-click the storage group you want to analyze, and select Analyze.
48 Using the Recovery Manager GUI
Page 49

2. To automatically synchronize the HP 3PAR Storage System and the repository (if necessary),
check the Synchronize result with Repository checkbox in the Analyze Repository dialog box.
To analyze the repository without synchronizing it, leave the Synchronize result with Repository
checkbox unchecked.
3. Click Next.
4. In the Task Scheduler, schedule backups as desired. For more information, see “Scheduling
Automated Tasks with Task Scheduler” (page 39).
Validating a Virtual Copy
You can validate a mounted virtual copy with Exchange APIs through Recovery Manager.
To validate an existing mounted virtual copy for a particular storage group, right-click the virtual
copy you want to mount, and then select Validate.
Removing Virtual Copies
You can remove two types of virtual copy: virtual copies with a status of Available, and virtual
copies with a status of Removed.
WARNING! If you remove a virtual copy from the HP 3PAR Storage System while Recovery
Manager is creating a backup, and you then delete this virtual copy from the Recovery Manager
repository before a restore operation has taken place, all data is lost and you cannot recover the
storage group.
Table 6 Virtual Copy Status Descriptions
DescriptionVirtual Copy Status
Available
Mounted
A virtual copy has a status of Available when it exists in the HP 3PAR Storage
System and in the Recovery Manager repository, and it is currently not mounted
to a host.
A virtual copy has a status of Mounted when it is mounted to a host. The virtual
copy exists in both the HP 3PAR Storage System and the Recovery Manager
repository.
Removing “Available” Virtual Copies
NOTE: You cannot remove a virtual copy if it is mounted to a host server. To remove a virtual
copy from the HP 3PAR Storage System and the Recovery Manager repository, the virtual copy
must have a status of Available.
1. Ensure the virtual copy has a status of Available. If it is mounted to a host server, unmount it.
For more information, see “Unmounting a Virtual Copy” (page 41).
2. In the node tree pane, right-click the virtual copy and select Remove.
Removing “Removed” Virtual Copies
If you opted to automatically remove the newly created virtual copy from the HP 3PAR Storage
System after successful backup, Recovery Manager retains the virtual copy, with a status of Removed,
in the Recovery Manager repository for restore purposes. For more information on the removal
option, see “Manually Creating Backups at the Storage Group Level” (page 42).
To remove a virtual copy that has a status of Removed from the Recovery Manager repository,
right-click the virtual copy and select Delete Backup.
Validating a Virtual Copy 49
Page 50

Viewing Event Message Descriptions
You can view a description of all Recovery Manager error messages (aka event messages), including
tips for troubleshooting each event.
1. Ensure you have an item in the node tree pane selected.
2. Select About→Event Messages.
Recovery Manager uses your default browser to display the Event Messages file. The file contains
all the events for Recovery Manager for Exchange in order of event ID.
50 Using the Recovery Manager GUI
Page 51

7 Using the Recovery Manager CLI
Recovery Manager for Exchange Command Line Interface (CLI)
Recovery Manager for Exchange provides a Command Line Interface (CLI) that allows you to:
• Create virtual copies
• Remove virtual copies
• Validate virtual mounted copies with the eseutil.exe tool
• Reset mounting status in a repository or release operation lock status
• Compare current repository list for the specified storage group with the virtual copies on an
HP 3PAR Storage System to detect any out-of-sync snapshots
• Mount virtual copies
• Unmount virtual copies
• Back up virtual copies to media using Symantec NetBackup and HP Data Protector
• Restore backed up virtual copies using Symantec NetBackup and HP Data Protector
• Configure the peer backup server for CCR configurations
• List available backups to restore from
• Delete a backup entry from the repository
(Note: This does not remove the backup entry from NetBackup)
• Restore a storage group through file copy restore from a mounted virtual copy
• Restore a storage group through volume restore from an unmounted virtual copy
• Display virtual copies currently in the repository and their status
• Set and display the maximum number of virtual copies to maintain or virtual copy expiration
time
• Set and display virtual copy retention time
• Set and display the Recovery Manager for Exchange communication port
• Set and display advanced configuration for backup timeout and remote copy monitoring
interval
• Set and display Remote Copy history
• Gather system configuration for troubleshooting purposes
NOTE: For more information on user roles and rights, see the HP 3PAR InForm OS CLI
Administrator’s Manual.
Recovery Manager Commands
This section describes how to administer Recovery Manager for Exchange from the Command Line
Interface.
Recovery Manager for Exchange Command Line Interface (CLI) 51
Page 52

RMExch analyze
SYNTAX
RMExch analyze -s <ExchangeServer> -g <StorageGroup> [-sync] [-f]
[-InServ <InServID>] [-domain <DomainName>]
DESCRIPTION
The RMExch analyze command analyzes the existing repository and lists any out-of-sync virtual
copies information between the repository and the HP 3PAR Storage System.
PARAMETERS
The following options are supported:
• -s <ExchangeServer> - The name of the exchange server for which the storage group
belongs.
• -g <StorageGroup> - The name of the storage group for which the virtual copy timestamp
belongs.
• -sync - Automatically updates the repository to match system information. If a virtual copy
is missing virtual volumes, it is removed from the repository.
If virtual copies are using an expiration-based policy, any out-of-sync expiration times are
updated to match the system expiration time. If virtual copies have a retention time set, any
out-of-sync retention times are updated to match the system retention time.
• -f - Forces the command. This option can only be used if the -sync option is used.
• -InServ <InServID> - Specifies the system to analyze if the backup server is configured
for more than one system. If not specified, the default system detected is used.
• -domain <DomainName> - Optional. Specifies the domain to which the Exchange server
or storage group belongs.
If this option is not specified, Recovery Manager uses the local domain.
NOTE: Use quotes ("") for names that include spaces.
Examples
The following commands will analyze the existing repository and output any out-of-sync information.
RMExch analyze -s bottlenosed -g sg2
RMExch analyze -s bottlenosed -g "First storage group"
52 Using the Recovery Manager CLI
Page 53

RMExch backup
SYNTAX
RMExch backup -s <ExchangeServer> -g <storagegroup> [-t <Timestamp>]
[-p <policyName>] [-remove] [-d <fullScheduleName>] [-m <masterServer>]
[-defer|-nc] [-mp <“mountpoint”>] [-noemail] [-dl DataListName] [-domain
<DomainName>]
DESCRIPTION
The RMExch backup command backs up a virtual copy to media, or creates a virtual copy and
backs up to media (also known as a quick backup). For the latter case, no timestamp is needed.
PARAMETERS
The following options are supported:
• -s <ExchangeServer> - The name of the Exchange server to which the storage group
belongs.
• -g <Storage_group> - The name of the storage group to which the timestamp belongs.
• –t <Timestamp> - Optional. The timestamp of the virtual copy to back up. Use if the virtual
copy has already been created. Do not use to create a virtual copy and then perform a backup.
• –p <policyName> - Symantec NetBackup policy name. Only valid if Symantec NetBackup
software is in use.
• -remove - Optional. Used with quick backups. Specify this option to remove the virtual copy
after a quick backup.
◦ If the policy is a numeric-based policy, the -remove option removes both the newly
created virtual copy and the oldest virtual copy.
NOTE: HP does not recommend using the -remove option with the RMExch backup
command on virtual copies that use a numeric-based policy. If you want to automatically
delete the oldest virtual copy, configure the policy to remove the oldest virtual copy. For
more information, see the RMExch policy command.
◦ If the policy specifies an expiration time or a retention time or both, the -remove option
overrides the policy and removes the virtual copy immediately.
If the -remove option is not specified, by default the virtual copy is retained.
• –d <fullScheduleName> - Name of Symantec NetBackup backup schedule. Only valid
if Symantec NetBackup software is in use.
• –m <masterServer> - Name of the Symantec NetBackup master server. Only valid if
Symantec NetBackup software is in use.
• -defer - Optional. Specify this option to defer the Exchange log truncation after the successful
backup is confirmed in automatic creation. This option defers log truncation until backup
completion, keeping the Exchange writer in the "waiting for completion" state during that
period. This option cannot be used with the -t option.
• -nc - Optional. Skips the integrity check (not recommended). This option cannot be used
with the -t or -defer options.
Recovery Manager Commands 53
Page 54

NOTE: The -defer option is not supported when the Recovery Manager for Exchange
backup server is the same as the production server.
• -mp "mountpoint" - Optional. Specifies the mount point (delimited by quotation marks),
for a backup location other than in the default directory.
◦ Full path is required.
◦ Default is <System Drive>:\3parsnapshot.
◦ If the specified virtual copy is already mounted, this parameter will be ignored.
• -lcr - Optional. Take the snapshot from the local continuous replication copy.
• -active - Optional. One-step backup from the active CCR node (applies for CCR
configurations only, and can only perform backup for the node at the local site). The active
node is the default if -active is not specified.
• -passive - Optional. One-step backup on the passive CCR node (applies for CCR
configurations only, and can only perform backup for the node at the local site). The active
node is the default if -passive or -active are not specified.
• -noemail - Optional. Do not send an email notification even if configured for this operation.
• -dl DataListName - Specifies the data list name and indicates the backup software in
use is HP Data Protector. For more information about data lists, see the description of backup
specifications in the HP Data Protector Administrator’s Guide.
Optional: If not specified, Recovery Manager for Exchange proceeds as if the backup software
used is Symantec NetBackup.
• -domain <DomainName> - Optional. Specifies the domain to which the Exchange server
or storage group belongs.
If this option is not specified, Recovery Manager for Exchange uses the local domain.
NOTE: Use quotes ("") where spaces are included.
NOTE: Symantec NetBackup software is case sensitive. Make sure all information entered
pertaining to the policy is supplied with the proper case.
Example
The following command will perform a backup of virtual copy 020405162103 whose data has
currently been mounted.
RMExch backup -s bottlenosed -g sg2 -t 020405162103 -p test -d full -m
bottlenosed
The following command will use HP Data Protector to perform a backup of virtual copy
072211021532 using the backup specification (aka data list) rme_dl.
RMExch backup -s bottlenosed -g sg2 -t 072211021532 -dl rme_dl
54 Using the Recovery Manager CLI
Page 55

RMExch config
SYNTAX
To change/query the timeout value for NetBackup initialization process detection:
RMExch config -h <WindowsHost> -bktmout [-sec <seconds>]
To change/query the monitoring interval for Remote Copy progress on target server:
RMExch config -h <WindowsHost> -rcintvl [-min <Minutes>]
DESCRIPTION
The RMExch config command will display or change the timeout value for NetBackup initialization
process detection for backup operation and the monitoring interval for remote copy progress on
target server.
PARAMETERS
The following options are supported:
• -h <WindowsHost> - Specify the Recovery Manager installed Windows host to change or
query settings. If the host is in a different domain, specify the FQDN.
• -bktmout - Setup or inquiry for Backup process timeout value to confirm that NetBackup has
received the backup request. Valid values are 0 to 86400 seconds. Default is 30 seconds.
• -min <Minutes> - This is optional. Specifies the number of minutes.
• -sec <Seconds> - This is optional. Specifies the number of seconds. This option can only
be used if the -bktmout option is also specified.
• -rcintvl - Setup or inquiry for Remote Copy process monitoring interval. Valid values are
3 to 15 minutes. Default is 3 minutes.
Example
The following command will change Remote Copy monitoring interval to 10 minutes.
RMExch config -h Grampus -rcintvl -min 10
Recovery Manager Commands 55
Page 56

RMExch create
SYNTAX
RMExch create -s <ExchangeServer> -g <StorageGroup> [-nc [-truncate]]
[-rc <TargetServer> [-defer] [-active] [-passive] [-both] [-lcr]
[-noemail] [-exp <time>{h|H|d|D}] [-retain <time>{h|H|d|D}] [-f]
[-domain <DomainName>]
DESCRIPTION
The RMExch create command creates a virtual copy of a storage group on the primary host
where Exchange is running.
By default, Recovery Manager for Exchange exposes the virtual copy to the backup host during
virtual copy creation for data-integrity checking. Also by default, the Exchange transaction log is
truncated after the virtual copy validates successfully.
This command only supports online backup of an entire storage group. Therefore, you must make
sure the storage group is online before creating a virtual copy.
PARAMETERS
The following options are supported:
• -s <ExchangeServer> - Exchange server for which storage group belongs. This parameter
is case sensitive.
• -g <StorageGroup> - The storage group to shadow copy. This parameter is case sensitive.
• -nc - Optional - Skip the integrity check. Not recommended.
• -truncate - Optional - Force truncation of log upon successful VC creation when -nc is used.
• -rc <TargetServer> - Optional - Indicates the virtual copy creation is for Remote Copy.
Specify target server to create virtual copy once remote copy completes.
• -defer - Optional - Defer the log truncation decision after the Remote Copy completes. This
option is to defer log truncation until backup completion, keeping the Exchange writer in
"waiting for completion" state that period. This option cannot be used with the -nc or -truncate
options.
• -lcr - Optional - Take the snapshot from the local continuous replication copy.
• -active - Optional - Take the snapshot from the active CCR node (applies for CCR
configurations only). The active node is the default if -active is not specified
• -passive - Optional - Take the snapshot on the passive CCR node (applies for CCR
configurations only). The active node is the default if -passive or -active are not specified.
• -both - Optional - Take the snapshot on both active and passive nodes.
• -noemail - Optional - Do not send an email notification even if configured for this operation.
• -exp <time>{h|H|d|D} - Optional - If the policy is expiration-based, set the expiration
time for this virtual copy to the specified time. Valid values are:
◦ To set the expiration time in hours: 1-43800h (or H)
◦ To set the expiration time in days: 1-1825d (or D)
◦ To remove the expiration period: 0h
56 Using the Recovery Manager CLI
Page 57

NOTE: If you specify an expiration time for a remote virtual copy:
– If Remote Copy is set up in asynchronous periodic mode, Recovery Manager for
Exchange sets the expiration time for the remote virtual copy on the backup server
only, not for the virtual copy created on the primary server.
– If Remote Copy is set up in synchronous mode, Recovery Manager for Exchange sets
the expiration time for both the virtual copy on the primary server and the remote
virtual copy on the backup server.
For more information, see the HP 3PAR Remote Copy Software User’s Guide.
If not specified, Recovery Manager for Exchange creates the virtual copy using the expiration
time specified in the current policy.
• -retain <time>{h|H|d|D} - Optional - Set the retention time for the specified virtual
copy to the specified time. The virtual copy cannot be removed during this time period.
NOTE: Retention time restrictions are:
◦ You must have an HP 3PAR Virtual Lock license to use the -retain option.
◦ The minimum retention period is 1 hour; the maximum is 43,800 hours/1,825 days (5
years).
◦ The default retention time is 336 hours (14 days).
◦ The retention time cannot exceed the value of the system's virtual volume maximum
retention time.
◦ You can set a retention time regardless of whether the policy is numeric- or
expiration-based.
◦ The retention time cannot be longer than the expiration time (if the policy is
expiration-based).
◦ If you create a remote virtual copy and Remote Copy is set up in asynchronous periodic
mode, the retention time is applied to the remote copy on the backup server only. If
Remote Copy is set up in synchronous mode, the retention time is applied to both the
remote copy on the backup server and the virtual copy on the primary server.
◦ The retention time cannot be removed or reduced after it is set.
◦ To override the mailbox database policy and set no retention time for this virtual copy,
use a value of 0h.
• -f - Optional - When used with the -retain option, does not request confirmation for the
retention time modification.
• -domain <DomainName> - Optional. Specifies the domain to which the Exchange server
or storage group belongs.
If this option is not specified, Recovery Manager for Exchange uses the local domain.
Recovery Manager Commands 57
Page 58

NOTE: Use quotes ("") for names that include spaces.
NOTE: If you specify the -both option during the CCR configuration, Recovery Manager
for Exchange first attempts to take a snapshot on the passive node, then it attempts to take a
snapshot on the active node. A success status indicates that at least one of the snapshots was
successfully created.
Examples
The following command will create a snapshot for the storage group sg2 on exchange server
bottlenosed.
RMExch create -s bottlenosed -g sg2
NOTE: The target server to create snapshots upon the completion of remote copy process has to
have the same version of Recovery Manager Backup Server component installed. Refer to Remote
Copy Integration for more information on the Remote Copy setup.
NOTE: It is the user's responsibility to perform data integrity checking and transaction log
truncation to the virtual copy created with the -nc option. Skipping data integrity checking is not
recommend.
NOTE: VSS will wait for up to 10 seconds for the writers to freeze I/O, and this interval is not
configurable. In most cases 10 seconds is a sufficient window to successfully create a virtual copy.
However, in some circumstances under very heavy load, 10 seconds may not be enough and the
virtual copy will fail on this attempt, which is by design. VSS does not automatically retry the
shadow copy creation, you must retry the virtual copy creation using the Recovery Manager for
Exchange GUI or the command line.
NOTE: During virtual copy creation, Recovery Manager for Exchange dismounts and unmasks
the virtual copy device from the Windows server, and breaks the virtual copy away from VSS
control. During this process a “delayed write error” message may appear, or the message "the
system failed to flush data to the transaction log" may appear in the System Event Log. This is
normal.
58 Using the Recovery Manager CLI
Page 59

RMExch deletebackup
SYNTAX
RMExch deletebackup -s <ExchangeServer> -g <storagegroup>
-t <backuptimestamp> [-domain <DomainName>]
DESCRIPTION
The RMExch deletebackup command removes a backup entry in the backup repository. It will
not communicate to the backup software to delete the actual backup.
PARAMETERS
The following options are supported:
• -s <ExchangeServer> - The name of the exchange server for which the storage group
belongs.
• -g <StorageGroup> - The name of the storage group of the virtual copy that was backed
up to belongs.
• -t <BackupTimestamp> - The timestamp of the virtual copy that was backed up.
• -domain <DomainName> - Optional. Specifies the domain to which the Exchange server
or storage group belongs.
If this option is not specified, Recovery Manager uses the local domain.
NOTE: Use quotes ("") where spaces are included.
Example
The following command will delete a backup with the timestamp 020405162103
RMExch deletebackup -s bottlenosed -g sg2 -t 020405162103
Recovery Manager Commands 59
Page 60

RMExch display
SYNTAX
RMExch display <-s Exchangeserver> <-g storagegroup> [-h WindowsHost]
[-t timestamp] [-inserv <InservId>] [-exp] [-retain]
[-domain <DomainName>]
DESCRIPTION
The RMExch display command displays all virtual copies in the repository.
PARAMETERS
The following options are supported:
• -s <ExchangeServer> - The name of the exchange server for which the storage group
belongs. If this is not given then the machine name will be used.
• -g <StorageGroup> - The name of the storage group for which the virtual copy information
is to be retrieved.
• -h <WindowsHost> - This is optional. Specifies a Recovery Manager installed Windows
host to query repository information.
• -t <timestamp> - This is optional. Specify a timestamp to display more detail for that virtual
copy.
• -inserv <InservId> - This is optional. HP 3PAR Storage System Identifier.
• -exp - Optional - Display the expiration time for the listed virtual copies.
• -retain - Optional - Display the retention time for the listed virtual copies.
• -domain <DomainName> - Optional. Specifies the domain to which the Exchange server
or storage group belongs.
If this option is not specified, Recovery Manager for Exchange uses the local domain.
NOTE: Use quotes ("") where spaces are included.
NOTE: If a storage group name is given, the Exchange Server name must also be provided.
If both the Exchange Server and storage group names are not given, then the Exchange Server
defaults to the machine name.
Examples
The following commands will display the virtual copies for Exchange server Alpha and storage
group Zeta.
RMExch display -s Alpha -g Zeta
RMExch display -s xexchange -g ssg2 -inserv 418
60 Using the Recovery Manager CLI
Page 61

RMExch displayDomain
SYNTAX
RMExch displayDomain
DESCRIPTION
The RMExch displayDomain displays a list of the registered domain controllers.
PARAMETERS
None.
Example
The following command lists the registered domain controllers.
RMExch displayDomain
Recovery Manager Commands 61
Page 62

RMExch listbackup
SYNTAX
RMExch listbackup -s <ExchangeServer> [-bs Backup Server]
[-domain <DomainName>]
DESCRIPTION
The RMExch listbackup command prints a list of the virtual copies backups that have been
backed up using the RMExch backup command. For CCR configurations, different backups are
listed on each backup server. Use the -bs parameter to list the backups for the backup server in
which you are interested.
PARAMETERS
The following options are supported:
• -s <ExchangeServer> - The name of the exchange server to which the storage group
belongs.
• -bs <Backup Server> - List the backups maintained on the target backup server.
• -domain <DomainName> - Optional. Specifies the domain to which the Exchange server
or storage group belongs.
If this option is not specified, Recovery Manager uses the local domain.
Example
The following command will list the backups performed through Recovery Manager for Exchange
for the host bottlenosed.
RMExch listbackup -s bottlenosed
62 Using the Recovery Manager CLI
Page 63

RMExch ModifyDomain
SYNTAX
RMExch ModifyDomain -domainhost <DomainHost> -u <domain\username> -p
<password>
DESCRIPTION
The RMExch ModifyDomaincommand modifies an Active Directory domain.
PARAMETERS
The following options are supported:
• -domainhost <DomainHost> - The fully qualified domain name (FQDN) of the domain
host you are modifying.
• -u <domain\username> - The username that has access to the Active Directory controller.
• -p <password> - The password for the username.
NOTE: Use quotes ("") for names that include spaces.
Example
The following command changes the credentials stored for the domain controller kings.
RMExch ModifyDomain -domainhost kings.kingsmain.main.com -u
kingsmain\admin -p adminpwd
Recovery Manager Commands 63
Page 64

RMExch mount
SYNTAX
RMExch mount -s <ExchangeServer> -g <StorageGroup> -t <Timestamp>
-h <Hostname> [-mp “mountpoint”] | [-domain <DomainName>]
DESCRIPTION
The RMExch mount command mounts a virtual copy created by the RMExch create command.
When using RMExch mount command to mount a virtual copy, the program will check to see if
the virtual copy is already mounted to a host machine. The virtual copy must have an “Available”
status, before it can be mounted
PARAMETERS
The following options are supported:
• -s <ExchangeServer>- The name of the Exchange server for which the storage group
belongs.
• -g <StorageGroup> - The name of the storage group for which the virtual copy timestamp
belongs.
• -t <Timestamp> - The timestamp of the virtual copy to mount.
• -h <host> - Windows host name to mount the virtual copy. The target host must have
recovery manager installed.
If you are using a multiple domain configuration and the Windows host is not in the local
domain, use the -h option to specify the fully qualified domain name (FQDN) of the host’s
domain.
• -mp "mountpoint" - Optional - Quotation enclosed mount point, if you prefer to mount the
volume(s) elsewhere besides default directory. Full path is required. Default is to mount to
<System Drive>:\3parsnapshot.
• -domain <DomainName> - Optional. Specifies the domain to which the Exchange server
or storage group belongs.
If this option is not specified, Recovery Manager uses the local domain.
NOTE: Use quotes ("") where spaces are included.
NOTE: The <InServHost> is the host name defined in the HP 3PAR Storage System. Available
host names defined in the system can be listed by executing the HP 3PAR InForm CLI showhost
command.
NOTE: The -expose option was deprecated in release 3.1.1.
Examples
The following command will mount the virtual copy 020405162103 to the directory d:\Rmmount.
RMExch mount -s bottlenosed -g sg2 -t 020405162103 -h bottlenosed -mp
"d:\RMmount"
64 Using the Recovery Manager CLI
Page 65

RMExch peer
SYNTAX
RMExch peer [[<display>]|[-clear]|[-bs <peer_server>]]
DESCRIPTION
The RMExch peer command configures the peer backup servers for two HP 3PAR Storage System
CCR configurations. The backup server executes all commands and sends certain commands to
the peer backup server to run (such as create and backup) for the passive node option. Once the
configuration is set, you will not need to run this command again unless you want to change the
peer relationship between the backup servers.
PARAMETERS
The following options are supported:
• -bs <peer_server> - The server's name you would like to designate as your peer backup
server.
• -display - Used if the -bs parameter is not used. Displays the current configuration of your
peer backup servers.
• -clear - To remove the peer relationship between backup servers. Once the peer relationship
is removed, both backup servers are no long able to manage CCR nodes.
NOTE: The RMExch peer command is intended only for CCR configuration. The -bs option
only needs to be run once to set up the peer relationship and to manage the CCR configuration.
Examples
The following command will configure the peer backup server .
RMExch peer -bs server1
Recovery Manager Commands 65
Page 66

RMExch policy
SYNTAX
RMExch policy -s <ExchangeServer> -g <StorageGroup>
[-i <MaxVCAllowed> [-r]] [-exp <time>{h|H|d|D}] [-retain <time>{h|H|d|D}]
[-f] [-domain <DomainName>]
DESCRIPTION
The RMExch policy command displays or updates the policy for the specified Exchange server.
Policies can be numeric-based or expiration-based.
If the policy is numeric-based and you specify -i, Recovery Manager updates the policy to the
argument following -i. If you specify -r, Recovery Manager for Exchange automatically removes
the oldest virtual copy if the maximum number is exceeded. If you do not specify -r, Recovery
Manager for Exchange does not automatically remove the oldest virtual copy when the maximum
number is exceeded. The maximum value allowed is 500.
If the policy is expiration-based and you specify -exp, Recovery Manager for Exchange updates
the policy to the argument following -exp.
If you do not specify a policy, Recovery Manager for Exchange by default uses a numeric-based
policy with a maximum of 10 virtual copies.
PARAMETERS
The following options are supported:
• -s <ExchangeServer> - The name of the Exchange server to display/update the policy
configuration.
• -g <StorageGroup> - The name of the storage group.
• -i <MaxVCAllowed> - Optional. Set the maximum number of virtual copies allowed for
every storage group under the specified server.
• -r - Optional. If specified, Recovery Manager for Exchange will remove the oldest virtual
copy once the maximum number of virtual copies has been created. If not specified, the oldest
virtual copy is retained.
• -exp <time>{h|H|d|D} - Optional - If the policy is expiration-based, set the expiration
time to the specified time. Valid values are:
◦ To set the expiration time in hours: 1-43800h (or H)
◦ To set the expiration time in days: 1-1825d (or D)
◦ To remove the expiration time: 0h
• -retain <time>{h|H|d|D} - Optional - Set the retention time for virtual copies to the
specified time. A virtual copy cannot be removed during this time period.
66 Using the Recovery Manager CLI
Page 67

NOTE: Retention time restrictions are:
◦ You must have an HP 3PAR Virtual Lock license to use the -retain option.
◦ The minimum retention period is 1 hour; the maximum is 43,800 hours / 1,825 days (5
years).
◦ The default retention time is 336 hours (14 days).
◦ The retention time cannot exceed the value of the system's virtual volume maximum
retention time.
◦ You can set a retention time regardless of whether the policy is numeric- or
expiration-based.
◦ The retention time cannot be longer than the expiration time (if the policy is
expiration-based).
◦ The retention time cannot be removed or reduced after it is set.
For more information on setting retention times for individual virtual copies, see the RMExch
create and RMExch setvc commands.
• -f - Optional - When used with the -retain option, does not request confirmation for the
retention time modification.
• -domain <DomainName> - Optional. Specifies the domain to which the Exchange server
or storage group belongs.
If this option is not specified, Recovery Manager for Exchange uses the local domain.
NOTE: Use quotes ("") where spaces are included.
Examples
The following command will display current number of virtual copies allowed for any storage group
under the specified server.
RMExch policy -s bottlenosed -g storageGroup
The following command will change the maximum virtual copies allowed for any storage group
under bottlenosed to 10 and remove the oldest virtual copy when the maximum number is
reached.
RMExch policy -s bottlenosed -g "first storage group" -i 10 -r
The following command sets the expiration time to 25 hours for virtual copies in storage group
sg2:
RMExch policy -mdb sg2 -exp 25h
Recovery Manager Commands 67
Page 68

RMExch portconfig
SYNTAX
RMExch portconfig -h <WindowsServer> [-p <portnumber>]
DESCRIPTION
The RMExch portconfig command will display or update the current port configuration for the
Recovery Manager for Exchange service and RMExch CLI for the specified Windows server. When
only the -h argument is supplied, this command will list the current port number used by Recovery
Manager for Exchange for the Windows server. When -p is supplied, the port will be updated to
the argument followed by -p. The default port used by Recovery Manager for Exchange is 9933.
This should be run against all of the production servers and backup servers. If you update the port
setting on a Windows server, you will need to restart the Recovery Manager for Exchange Agent
Service before connecting through that port.
PARAMETERS
The following options are supported:
• -h <WindowsServer> - The name of the windows server to display/update the port
configuration. If the host is in a different domain, specify the FQDN.
• -p <portnumber> - Optional. If specified, the command will update the port used. If
unspecified, the command will show the current configuration. Valid values are 1024 to
65535.
Examples
The following command will display the current port configuration for server Alpha.
RMExch portconfig -h Alpha
The following command will update the port configuration for server Alpha to 9950.
RMExch portconfig -h Alpha -p 9950
68 Using the Recovery Manager CLI
Page 69

RMExch rcstatus
SYNTAX
RMExch rcstatus -s <ExchangeServer> -g <StorageGroup>
<[-query]|<-update> [-t <timestamp> -ts <RecordKeeper> -status
<RCStatus>]]> [-domain <DomainName>]
DESCRIPTION
The RMExch rcstatus command will display or update the status of the Remote Copy operation
history for periodic mode volume groups.
PARAMETERS
The following options are supported:
• -s <ExchangeServer> - Exchange server for which storage group belongs.
• -g <StorageGroup> - The storage group of the virtual copy.
• -update - Update the status of Remote Copy history for a specific timestamp.
• -query - Query Remote Copy history for specified storage group.
• -t <Timestamp> - The timestamp of the virtual copy.
• -ts <Record Keeper> - The target host to update the Remote Copy status record.
• -status - The status to save in record.
• -domain <DomainName> - Optional. Specifies the domain to which the Exchange server
or storage group belongs.
If this option is not specified, Recovery Manager uses the local domain.
NOTE: The -update option without timestamp and host will update all periodic mode Remote
Copy records from the original target server.
NOTE: Use quotes ("") where spaces are included.
Examples
The following command updates the status of an existing Remote Copy history for the specified
host.
RMExch rcstatus -s bottlenosed -g sg2 -t 050106113456 -ts Grampus -status
Success
The following command will update the existing Remote Copy history in specified host by re-querying
information from target server.
RMExch rcstatus -s bottlenosed -g "First storage group" -update -t
050106113456 -ts Grampus -status Success
Recovery Manager Commands 69
Page 70

RMExch RegisterDomain
SYNTAX
RMExch RegisterDomain -domainhost <DomainHost> -u <domain\username> -p
<password>
DESCRIPTION
The RMExch RegisterDomaincommand registers a new Active Directory domain.
PARAMETERS
The following options are supported:
• -domainhost <DomainHost> - The fully qualified domain name (FQDN) of the new domain
host. The host name can be any host in the domain you are registering.
• -u <domain\username> - The username that has access to the Active Directory controller.
• -p <password> - The password for the username.
NOTE: Use quotes ("") for names that include spaces.
Example
The following command registers the domain controller kings.
RMExch RegisterDomain -domainhost kings.kingsmain.main.com -u
kingsmain\administrator -p administratorpassword
70 Using the Recovery Manager CLI
Page 71

RMExch remove
SYNTAX
RMExch remove -s <ExchangeServer> -g <StorageGroup> -t <Timestamp>
[-domain <DomainName>]
DESCRIPTION
The RMExch remove command removes the virtual copy from the HP 3PAR Storage System and
the repository.
To be successfully removed, the virtual copy must have an “Available” status; if the virtual copy is
mounted it will not be removed. In addition, the retention time set in the virtual copy policy must
have expired, or the virtual copy must have no retention time.
PARAMETERS
The following options are supported:
• -s <ExchangeServer> - The name of the Exchange server to which the storage group
belongs.
• -g <StorageGroup> - The name of the storage group to which the virtual copy timestamp
belongs.
• –t <Timestamp>- The timestamp of the virtual copy to remove.
• -domain <DomainName> - Optional. Specifies the domain to which the Exchange server
or storage group belongs.
If this option is not specified, Recovery Manager uses the local domain.
NOTE: Use quotes ("") for names that include spaces.
Example
The following command will remove the virtual copy with timestamp 020405162103.
RMExch remove -s bottlenosed -g sg2 -t 020405162103
Recovery Manager Commands 71
Page 72

RMExch report
SYNTAX
RMExch report -h <WindowsHost> -output <OutputDirectory>
DESCRIPTION
The RMExch report command will execute the RMReport batch script under the
<InstallationPath>\Exchange\goodies folder and gather needed information on the
specified Windows host for troubleshooting purposes.
PARAMETERS
The following options are supported:
• -h <WindowHost> - Specify a Recovery Manager installed Windows host to run the
RMREPORT utility.
• -output <OutputDirectory> - The full path folder to receive the generated report.
NOTE: Use quotes ("") where spaces are included.
Example
The following command will collect remote information related to Recovery Manager for Exchange
activities.
RMExch report -h Grampus -output c:\MyReport
72 Using the Recovery Manager CLI
Page 73

RMExch repository
SYNTAX
RMExch repository [-a <newRepositoryLocation>]
DESCRIPTION
The RMExch repository command will display or move the current repository locations for
Recovery Manager for Exchange. If no arguments are specified, then the current location is
displayed. If -a is specified along with a directory, then the repository will be moved to the new
location.
PARAMETERS
The following options are supported:
• -a <newRepositorylocation> - The target directory to which the repository is moved.
Example
The following command will change the repository location to e:\3PAR Storage:
RMExch repository -a "e:\3PAR Storage"
Recovery Manager Commands 73
Page 74

RMExch reset
SYNTAX
To reset the Recovery Manager for Exchange locking on remote Windows host:
RMExch reset <-s exchange server> <-opt lock>
To reset the mount status of a particular timestamp record:
RMExch reset <-s exchange server> <-g storage group> <-t timestamp>
<-opt status>
DESCRIPTION
The RMExch reset command resets a virtual copy mounting status in the repository record and
internal process locking status on any designated Recovery Manager for Exchange installed system
with only the status option being supported. Executing this command with status option will
force the removal of currently exposed VLUNs and set the mounting status to "Available".
PARAMETERS
The following options are supported:
• -s <ExchangeServer> - The name of the exchange server to which the storage group
belongs. If the host is in another domain, specify the FQDN.
• -g <StorageGroup> - The name of the storage group to which the virtual copy timestamp
belongs.
• –t <Timestamp>- Optional - The timestamp of the virtual copy. Requires the <-opt status>
option.
• -opt <Option> - Specifies whether to reset the locking or mounting status. Currently
supported options are lock and status. The lock option is only used to unlock Recovery
Manager from previous virtual copy creation failure caused by unexpected termination.
NOTE: Reset status of a specific timestamp will force the removal of currently exposed VLUNs.
NOTE: Use quotes ("") for names that include spaces.
NOTE: When Recovery Manager is processing user requests, it will activate an internal locking
mechanism. Any incoming request will get “Server <system name> has a Recovery Manager
command running already” message. Wait until it finishes before continuing. However, in the case
of unexpected termination, the locking status may not get deactivated properly. Use this command
to release the lock for the operation to go back to normal status.
Examples
The following commands will reset the existing mount status to available.
RMExch reset -s bottlenosed -g sg2 -t 050106113456 -opt status
RMExch reset -s bottlenosed -g "First storage group" -t 050106113456
-opt status
74 Using the Recovery Manager CLI
Page 75

RMExch restore
SYNTAX
For MEDIA RESTORES
RMExch restore -s <ExchangeServer> -g <storagegroup> -t <Timestamp> [-p
<policyName>] [-m <masterServer>] [-a <altLocation>] [-src
<OrignalClientWithBackups>] [-noemail] [-dp]
For FILECOPY and VOLUME RESTORES
[-noemail] [-domain <DomainName>]
DESCRIPTION
The RMExch restore command can perform one of three functions. It can restore a previously
backed-up virtual copy from media, perform a file copy restore from a mounted virtual copy, or
perform a volume restore from an unmounted virtual copy.
Media backups can be restored to their original location, that being the volume(s) or directory
locations of the virtual copies that were backed up, not the original exchange data location.
Alternatively, an alternate location can be specified.
File copy restores copy the virtual copy's files to the original database location and overwrite the
current database files. The virtual copy to use for the restore must be mounted to the production
server hosting the storage group.
Volume promote restores overwrite all data on the original database volume. This overwrites ALL
data on the original volume and should only be performed with caution.
WARNING! DO NOT perform a volume promote restore if multiple storage groups share any
volumes. This includes all data files .LOG, .EDB, .CHK (and .STM for Exchange 2003). If you are
not sure how or if your storage groups share volumes, execute the script
chk_multi_storage.cmd, by default installed at Program Files/3PAR/RM/Exchange/
bin/, to determine how any storage groups may be sharing volumes.
PARAMETERS
For MEDIA RESTORES
The following options are supported:
• -s <ExchangeServer> - The name of the Exchange server for which the storage group
belongs.
• -g <storagegroup> - The name of the storage group for which the timestamp belongs.
• -t <Timestamp> - The timestamp of the virtual copy to restore.
• -p <policyName> - Name of the Symantec NetBackup policy set up for Recovery Manager
for Exchange. Valid only if the backup software in use is Symantec NetBackup.
• -m <masterServer> - Symantec NetBackup master server name. Valid only if the backup
software in use is Symantec NetBackup.
• -a <altLocation> - Optional. Alternate restore location.
• -src <OrignalClientWithBackups> - Optional. Specifies the client name to use for
finding backups or archives from which to restore files. The default is the current client name.
• -noemail - Optional - Do not send an email notification even if configured for this operation.
• -dp - Optional. Indicates that HP Data Protector is to be used for backup.
If not specified, Recovery Manager for Exchange proceeds as if the backup software used is
Symantec NetBackup.
Recovery Manager Commands 75
Page 76

NOTE: Use quotes ("") where spaces are included.
NOTE: If the restore is directed to the original location, ensure the original location is still valid.
NOTE: Symantec NetBackup software is case sensitive. Make sure all information entered
pertaining to the policy is with the exact case.
NOTE: Make sure the Symantec NetBackup software's bin directory is in the system search path
for this command to run.
NOTE: When a volume promote is executed on a passive node in a CCR setup, the RMExch
restore command usage will be displayed if the CCR nodes are managed by single backup
server. Otherwise, a proper error message is displayed.
Example
The following command will perform a restore of a virtual copy 020405162103 from Netbackup
media to drive J:\.
RMExch restore -s bottlenosed -g sg2 -t 020405162103 -p test -m
bottlenosed -a J:\
Parameters
For FILECOPY and VOLUME RESTORES
The following options are supported:
-s <ExchangeServer> - The name of the Exchange server for which the storage group belongs.
-g <storagegroup> - The name of the storage group for which the timestamp belongs.
-t <Timestamp> - The timestamp of the virtual copy to restore.
<-filecopy | -promote> - Specify whether to perform a file copy restore or a volume promote
restore.
-noemail - Optional - Do not send an email notification even if configured for this operation.
-domain <DomainName> - Optional. Specifies the domain to which the Exchange server or
storage group belongs. If this option is not specified, Recovery Manager uses the local domain.
NOTE: Use quotes ("") where spaces are included.
EXAMPLES
The following command will perform a restore of a virtual copy with the timestamp 020405162103
to original database location:
RMExch restore -s bottlenosed -g sg2 -t 020405162103 -filecopy
The following command will perform a volume restore of an unmounted virtual copy with the
timestamp 020405162103 to the original database volumes:
RMExch restore -s bottlenosed -g sg2 -t 020405162103 -promote
76 Using the Recovery Manager CLI
Page 77

RMExch setvc
SYNTAX
RMExch setvc -s <ExchangeServer> -g <storagegroup> -t <timestamp>
[-retain <time>{h|H|d|D} [-f]] [-exp <time>{h|H|d|D}] [-domain
<DomainName>]
DESCRIPTION
The RMExch setvc command sets time constraints for a virtual copy if the virtual copy was created
using an expiration-based policy.
PARAMETERS
The following options are supported:
• -s <ExchangeServer> - The name of the Exchange server to which the storage group
belongs.
• -g <storagegroup> - The name of the storage group to which the timestamp belongs.
• -t <Timestamp> - The timestamp of the virtual copy for which you are modifying the policy.
• -retain <time>{h|H|d|D} - Optional - Set the retention time for the specified virtual
copy to the specified time. For more information about setting the retention time, see the
RMExch create command.
• -f - Optional - When used with the -retain option, does not request confirmation for the
retention time modification.
• –exp <time> {h|H|d|D} - Optional - If the current policy is expiration-based, set or modify
the expiration time of the specified virtual copy to the specified time.
The minimum expiration period is 1 hour; the maximum is 43,800 hours/1,825 days (5
years). To remove the expiration period, specify 0h.
• -domain <DomainName> - Optional. Specifies the domain to which the Exchange server
or storage group belongs.
If this option is not specified, Recovery Manager uses the local domain.
Example
The following command extends the retention period for virtual copy 020412162103 in storage
group sg2 on Exchange server Server1 to 8 days from creation. Recovery Manager for Exchange
automatically performs the command and does not request confirmation:
RMExch setvc -s Server1 -g sg2 -t 020412162103 -retain 8d -f
The following command sets the expiration date for virtual copy 110412162103 in storage group
sg2 on Exchange server Server1 to 25 hours from creation:
RMExch setvc -s Server1 -g sg2 -t 110412162103 -exp 25h
The following command removes the expiration date for virtual copy 110412162103 in storage
group sg2 on Exchange server Server1:
RMExch setvc -s Server1 -g sg2 -t 110412162103 -exp 0h
Recovery Manager Commands 77
Page 78

RMExch unmount
SYNTAX
RMExch unmount -s <ExchangeServer> -g <StorageGroup> -t <Timestamp>
[-domain <DomainName>]
DESCRIPTION
The RMExch unmount command unmounts a currently mounted virtual copy. When using the
RMExch mount command to mount a virtual copy, the program will check to see if the virtual
copy is mounted to a host machine. The virtual copy must have a status of “Mounted” or “Exposed”
before it can be unmounted.
PARAMETERS
The following options are supported:
• -s <ExchangeServer> - The name of the Exchange server for which the storage group
belongs.
• -g <StorageGroup> - The name of the storage group for which the virtual copy timestamp
belongs.
• -t <Timestamp> - The timestamp of the virtual copy to unmount.
• -domain <DomainName> - Optional. Specifies the domain to which the Exchange server
or storage group belongs.
If this option is not specified, Recovery Manager uses the local domain.
NOTE: Use quotes ("") where spaces are included.
NOTE: The -h option was deprecated in release 3.1.1.
Examples
The following command will unmount the virtual copy 020405162103.
RMExch unmount -s bottlenosed -g sg2 -t 020405162103
78 Using the Recovery Manager CLI
Page 79

RMExch UnRegisterDomain
SYNTAX
RMExch UnRegisterDomain -domainhost <DomainHost>
DESCRIPTION
The RMExch UnRegisterDomaincommand modifies an Active Directory domain.
PARAMETERS
The following option is supported:
• -domainhost <DomainHost> - The fully qualified domain name (FQDN) of the domain
host you are removing from set of Recovery Manager for Exchange domains.
NOTE: Use quotes ("") for names that include spaces.
Example
The following command removes the registration for the domain host kings.
RMExch UnRegisterDomain -domainhost kings.kingsmain.main.com
Recovery Manager Commands 79
Page 80

RMExch validate
SYNTAX
RMExch validate -s <ExchangeServer> -g <StorageGroup> -t <Timestamp>
[-domain <DomainName>]
DESCRIPTION
The RMExch validate command verifies the data integrity of the exchange database files in
the specified virtual copy that is already mounted on the system.
PARAMETERS
The following options are supported:
• -s <ExchangeServer> - The name of the Exchange server for which the storage group
belongs.
• -g <StorageGroup> - The name of the storage group for which the virtual copy timestamp
belongs.
• –t <Timestamp>- The already mounted timestamp for validation.
• -domain <DomainName> - Optional. Specifies the domain to which the Exchange server
or storage group belongs.
If this option is not specified, Recovery Manager uses the local domain.
WARNING! If the validation operation failed on the virtual copy, the failed virtual copy cannot
be used for backup and restoration purposes. It is the user’s responsibility to manually remove the
failed virtual copy.
NOTE: Use quotes ("") for names that include spaces.
Example
The following command validates the specified Exchange database.
RMExch validate -s bottlenosed -g sg2 -t 020405162103
Running Recovery Manager as a Scheduled Job
In addition to creating virtual copies using the Command Line Interface, you can also schedule
automatic creation of virtual copies for a specific storage group using the Recovery Manager for
Exchange GUI or using Windows:
Scheduling Virtual Copies using the Recovery Manager GUI
You can schedule virtual copies at the same time you create a virtual copy of a storage group. For
more information, see “Using the Recovery Manager GUI” (page 29).
Scheduling Virtual Copies with Windows Task Scheduler
NOTE: Because the command RMExch create communicates with Exchange via the file
CDOEXM.dll, you must have Exchange administrator privileges to schedule this task.
To create virtual copies using Windows Task Scheduler:
1. Click Start > Programs > Accessories > System Tools > Task Scheduler.
Result: The Task Scheduler appears.
2. Double-click Create Task.
80 Using the Recovery Manager CLI
Page 81

3. In the Name text box on the General tab, enter a name for the task.
4. In the Security options area on the General tab, select the desired options.
5. Select the Triggers tab.
6. Click New.
7. Enter scheduling information for the automatic creation of virtual records and select OK.
8. Select the Actions tab.
9. Click New.
10. Click Browse next to the Program/script text box.
11. Navigate to the Recovery Manager for Exchange installation location. The default location
is:
C:/Program Files/3PAR/RM/Exchange/bin
12. Click RMExch.exe and click Open.
13. In the Add arguments text box, enter:
RMExch create -s <ExchangeServer> -g <storage group name>
If the name has spaces, use double-quotes (“ “) to surround the name.
For example:
RMExch create -s “Exchange Server 1” -g storagegroup3
14. Click OK.
15. In the Conditions and Settings tabs, refine the settings as desired.
16. Click OK.
Result: Virtual copies are created as you have scheduled. Depending on the policy set with
the Recovery Manager for Exchange GUI, older virtual copies on the system might automatically
be removed if the number of virtual copies exceeds your specified maximum threshold.
Running Recovery Manager as a Scheduled Job 81
Page 82

8 Rapid Backup and Recovery for Exchange
Key Microsoft Exchange File Types
Before describing backup and recovery for HP 3PAR Recovery Manager Software for Microsoft
Exchange, you must understand the elements of Exchange.
Microsoft Exchange uses these key file types for all operations:
• Log file (*.LOG). A file in which transaction log records are stored.
• Patch file (*.PAT). Used during backup, restore, and recovery operations, it contains database
pages that were split during online backup.
• Checkpoint file (*.CHK). Maintains information about the location in the transaction logs that
was last committed to the database.
• Database file (*.EDB). Properties data file to store all user data.
There are three key files within Microsoft Exchange storage groups: EDB, CHK, and LOG files. LOG
files are accessed in a sequential order; EDB files are accessed with random I/O patterns. For
optimal performance and to facilitate database management, transaction logs should be placed
on a volume that performs sequential I/O in an optimal manner such as a RAID 1 volume. The
EDB files should be placed on a separate volume that is optimized for random I/O such as a RAID
5 volume. For additional information on creating volumes, see the HP 3PAR InForm OS CLI
Administrator’s Manual.
From the performance and management point of view, a dedicated volume should be created for
every log file group on each mailbox database, and another data volume should be created for
EDB files for each data store on every mailbox database. For example, if you have two storage
groups, each with a log and five mailbox stores, create two RAID 1 volumes for the logs, and ten
RAID 5 volumes for the EDB files.
When a change is made to the mailbox database, Exchange updates the data in the memory (32K
pages) and synchronously writes a record of the transaction to the log in sequential order. This
record allows Exchange to re-create the transaction in the event of a failure. The database engine
then writes the data to the disk in large I/O operations. Exchange supports circular logging to
save disk space on the volume containing log files. However, circular logging makes hard recovery
(restoring from backup) impossible. Therefore, HP recommends that you disable the circular logging
feature (circular logging is disabled by default in Microsoft Exchange).
Backup
An online backup of Exchange runs while the data store is mounted. A full backup backs up the
entire information store and transaction log. It also truncates the log after the log has been backed
up to reduce disk space usage.
Virtual Copies
A virtual copy is a copy of another virtual volume (EDB or LOG) created using copy-on-write
techniques. Unlike a physical copy, which is a duplicate of the entire virtual volume, a virtual copy,
or snapshot, only records the changes to the original virtual volume. Therefore, minimal storage
space is used. This allows an earlier state of the original virtual volume to be re-created by starting
with its current state and rolling back all the changes that have been made since the virtual copy
was created. The system allows you to make up to 500 virtual copies of each virtual volume,
assuming that sufficient storage space was allocated when the base virtual volume was created.
82 Rapid Backup and Recovery for Exchange
Page 83

Advantages of Using Recovery Manager
Traditionally, databases are backed up to tape. Backing up to tape is a time-consuming task,
especially if the database is growing rapidly. Recovery Manager offers the following advantages
over traditional tape backup:
• Creating virtual copies of databases using Recovery Manager requires only seconds and can
be accomplished via the click of the mouse through the Recovery Manager GUI, or by
scheduling virtual copies either through Recovery Manager or via Windows’ automatic
scheduled task application. For more information, see “Creating Virtual Copies of Storage
Groups” (page 35) and “RMExch create” (page 56).
• With Recovery Manager’s optional policy settings, you can maintain a specified number of
the latest virtual copies to stay online. These online virtual copies can then be mounted to the
staging Exchange server for point-in-time recovery, thus eliminating the need to restore from
tape, which can take hours.
• After the virtual copy has been mounted to the backup server, you can perform a backup to
tape of the virtual copy using Recovery Manager.
• You can easily recover data using Recovery Manager's file copy and volume promote restore
features.
NOTE: Backup to tape can be performed in one easy command with a quick backup. See
“RMExch backup” (page 53).
Recovery Procedures
In many cases, the Exchange server is able to quietly recover when a server crashes and the
contents of the database buffer in the memory are lost. Exchange automatically recovers when you
start the information store after the failure using the checkpoint file to identify the oldest transaction
not flushed to disk and then replaying log files forward. If the checkpoint file is missing, all the log
files are scanned to determine whether any committed transactions have not been written to the
database. At the end, the database is consistent and can start normally. Most of the time, recovering
an email or a user's email is all that is needed. This can be done using the Recovery Storage
Group.
Recovery Manager provides several options for a full storage group recovery if the Recovery
Storage Group is not sufficient:
• Point-in-time recovery
• Volume promote point-in-time recovery
• Point-of-failure recovery
• Single mailbox recovery
Point-In-Time Recovery
Recovery procedures for LCR or CCR Exchange 2007 configurations should be run on the active
copy of the database (the active node for CCR). Microsoft does not support restoring to the passive
copy. Note that you must reseed the passive copy after a restore is performed on the active copy.
To perform a point-in-time recovery:
1. In the Exchange Management Console, right-click the desired database you want to recover
and select Properties.
2. Under the General tab, select This database can be overwritten by a restore.
3. Click OK.
4. On the Database Management tab in the Exchange Management Console, right-click the
storage group you want to recover and select Dismount Database.
Recovery Procedures 83
Page 84

NOTE: If in a cluster, go to the Cluster Administrator and take the Exchange Information
Store Instance resource offline. If not in a cluster, go to the services menu and stop the Exchange
Information Store Service.
5. Mount the desired virtual copy to the staging Exchange server either from the Recovery Manager
GUI or from the command line using the RMExch mount command. For more information,
see “Using the Recovery Manager GUI” (page 29) or “Using the Recovery Manager CLI”
(page 51).
If you are performing the restore in a CCR environment, suspend the replication using the
suspend-storagegroupcopy command from the Exchange Management Shell.
6. Delete the original .EDB, .LOG, and .CHK files for a clean restore.
CAUTION: ONLY remove the files, NOT the parent/intermediate folders for these files. The
original database path and its structures must be kept the same.
7. Delete all catalog subdirectories under your database directories, and delete all catalog
subdirectories under your database directories. You can move these files to new locations
instead of deleting them.
8. From the backup server, execute the Recovery Manager file copy restore command: RMExch
restore -s <exchangeServer> -g <storageGroup> -t <timestamp>
-filecopy. You can alternately use the GUI to perform a file copy restore. For more
information, see “Using the Recovery Manager GUI” (page 29).
9. After the filecopy restore completes and the database files are successfully recovered, you
can remount the database to continue its operation.
10. If you are performing the restore in a CCR environment, reseed the remote database using
the Update-StorageGroupCopy command from the Exchange Management Shell. In some
cases, you may need to use Resume-StorageGroupCopy to resume the replication.
Volume Promote Point-In-Time Recovery
Make sure the virtual copy you would like to promote has a status of Available. If it is Mounted,
unmount it.
For CCR environment volume promote restores, the following additional steps need to be performed:
1. Remove .edb, .log, and .chk files from both nodes. (Or move to a backup location).
2. Remove the catalog subdirectories in the .edb directories if they exist. Suspend the CCR.
For single copy cluster volume promote restores (not CCR), the following extra steps need to be
performed:
1. All of the resources the storage group uses, including the disk(s) for the storage group’s Log
path, System path, and its mailbox(es)’ database(s), need to be put in extended maintenance
mode.
2. From the command line, issue the following command for all disks the storage group uses:
cluster res "resourcename" /maint:on
cluster res "resourcename" /waitmaint
3. From the Cluster Administrator, take the Disk(s) offline.
4. From the backup server, execute the Recovery Manager command for the volume promote
restore. For information about the restore-promote command, see “Using the Recovery Manager
84 Rapid Backup and Recovery for Exchange
Page 85

CLI” (page 51). For information on using the GUI to execute a volume restore, see “Using the
Recovery Manager GUI” (page 29).
WARNING! DO NOT perform a volume promote restore if multiple storage groups share
any volumes. This includes all data files .LOG, .EDB, and .CHK. If you are not sure how or
if your storage groups share volumes, execute the script chk_multi_storage.cmd by
default installed at Program Files/3PAR/RM/Exchange/bin.
5. In the Computer Management window, for volume promote restores, right-click the Disk
Management node and select Rescan Disks.
6. From the Cluster Administrator, bring the Disk(s) back online.
7. Follow the appropriate steps depending on whether you are performing the operation for
“Single Copy Clusters” (page 85) or “Continuous Copy Replication Clusters” (page 85)
Single Copy Clusters
1. For the disk(s) previously put in maintenance mode, take ALL of them out of maintenance mode.
2. From the command line, issue the following command for all disks the storage group uses:
Cluster res "resourcename" /maint:off
3. Verify the EDB, LOG, CHK files are correctly appearing in the original database locations.
4. Mount the databases within the storage group.
The database is recovered to the point-in-time when the virtual copy was taken.
Continuous Copy Replication Clusters
1. Reseed the remote database using the command Update-StorageGroupCopy from the
Exchange Management Shell.
2. Use Resume-StorageGroupCopy to resume the replication.
NOTE: For Exchange 2007 virtual copies created off the LCR copy, a volume promote restore
is not supported.
Point-Of-Failure Recovery
This section provides instructions on performing a “Point-of-Failure Recovery for File Copy Restore”
(page 85) and performing a “Point-of-Failure Recovery for Volume Restore” (page 86).
Point-of-Failure Recovery for File Copy Restore
To perform a point-of-failure recovery for file copy restore:
1. Move the currently existing log files on your storage group volumes that you want to roll
forward.
NOTE: If Windows does not allow you to move, or even copy, Exchange .LOG files because
they are “being used by another program,” part of Exchange is still “live.” If this is the case,
move on to the next step.
2. Repeat the point-in-time recovery for file copy restore: step 1 to step 4.
3. With the Exchange database(s) dismounted, preserve the current log files on your storage
group volumes if you were not able to do so for step 1.
4. Mount the desired virtual copy for the staging Exchange server either from the Recovery
Manager GUI or from the command line using the RMExch mount command. For more
Recovery Procedures 85
Page 86

information, see “Using the Recovery Manager GUI” (page 29) or “Using the Recovery
Manager CLI” (page 51).
5. Delete the original .EDB, .LOG, and .CHK files for a clean restore.
CAUTION: ONLY remove the files, NOT the parent/intermediate folders of the files. The
original database path and its structures must be kept the same. You can moved the files to
new locations instead of deleting them.
6. Go to the backup server and execute the Recovery Manager file copy restore command:
RMExch restore -s <exchangeServer> -g <storageGroup> -t <timestamp>
-filecopy. Alternatively, you can execute a file copy restore using the GUI. For more
information, see “Restoring a Storage Group with File Copy Restore” (page 47)).
7. Copy the .LOG files that you preserved and overwrite the logs recovered, including the extra
logs not covered by the virtual copy. This process makes the recovery more forward-in-time.
8. Delete the checkpoint file (.CHK).
9. Remount the database(s) to continue.
The Exchange server performs a soft recovery and automatically replays the log. After the
store is mounted, Recovery Manager confirms the restore.
NOTE: In some situations Exchange might display a warning message indicating one or
more log(s) are out of sync and might not display a confirmation.
Point-of-Failure Recovery for Volume Restore
To perform a point-of-failure recovery for volume restore:
1. Move the currently existing log files on your storage group volumes that you want to roll
forward.
NOTE: If Windows does not allow you to move, or even copy, Exchange .LOG files because
the files are being used by another program, part of Exchange is still live. If this is the case,
move on to the next step.
2. Repeat the point-in-time recovery for volume restore from step 1.
3. With the Exchange database(s) dismounted, preserve the current log files on your storage
group volumes if you were not able to do so for step 1.
4. After you have taken all the disk(s) out of maintenance mode, perform the following:
a. Copy the .LOG files that you preserved and overwrite the logs recovered, including the
extra logs not covered by the virtual copy. This process makes the recovery more
forward-in-time.
b. Delete the checkpoint file (.CHK).
c. Remount the database(s) to continue.
The Exchange server performs a soft recovery and automatically replays the log. After
the store is mounted, Recovery Manager confirms the restore.
Single Mailbox Recovery
Following are two methods for single mailbox recovery using Exchange.
• “Restoring a Mailbox from a Backup to a Recovery Server” (page 87)
• “Using the Recovery Storage Group Feature” (page 89)
86 Rapid Backup and Recovery for Exchange
Page 87

Restoring a Mailbox from a Backup to a Recovery Server
To restore a mailbox from backup, you must have a recovery server that has sufficient storage
capacity to install Exchange Server and to restore the private information store database. This
server can be on the same physical network as your production Exchange Server computer.
To restore a mailbox from a backup to a recovery server:
1. Take note of the following information that is on the production Exchange Server computer:
• Organization Name
• Administrative Group Name
• Storage Group Name
2. On the recovery server, install the Windows Server operating system, and then create a new
Active Directory forest.
3. Run Exchange Server Setup and create a new organization that uses the same name as your
existing Exchange organization.
4. Do one of the following:
• If the name of your administrative group is First Administrative Group, go to the next step,
or
• Install Exchange Server to an administrative group other than the First Administrative
Group:
a. Run Exchange Server Setup and then install Microsoft Exchange System Management
Tools.
NOTE: At this point, do not install Microsoft Exchange Messaging and Collaboration
Services. Type the name of your administrative group (the same name as the
administrative group on your production server).
b. Start the Exchange System Manager.
c. Right-click your organization, and then click Properties.
d. Click the General tab, select the Display administrative groups check box, and then
click OK.
e. Quit and then restart the Exchange System Manager.
f. Right-click Administrative Groups, point to New, and then click Administrative Group.
g. In the Name box, type the name of the administrative group, and then click OK.
NOTE: You must use the same name that you used to name the administrative
group on your production Exchange Server computer.
h. Quit the Exchange System Manager.
5. Run the Exchange Server Setup and install Microsoft Exchange Messaging and Collaboration
Service and Microsoft Exchange System Management Tools (if the Exchange System
Management Tools are not already installed on the server).
Recovery Procedures 87
Page 88

6. Configure the storage group name to use the same name as the production Exchange Server
computer.
a. Start the Exchange System Manager.
b. Expand Administrative Groups, and then expand AdministrativeGroupName.
c. Expand Servers and then expand YourServerName.
NOTE: If the name of the storage group on the production server uses a name other
than First Storage Group, configure the storage group name to use the same name as
the storage group on the production Exchange Server computer.
7. Dismount the database:
a. Right-click the Mailbox Store and click Dismount Store.
b. Click Yes when you are prompted to continue.
c. Right-click the Mailbox Store and select Properties.
d. Select the Database tab and check the This database can be overwritten by a restore
checkbox.
e. Click OK.
f. Quit the Exchange System Manager.
8. Delete the existing database and log files that are on the recovery server.
9. Restore the database files from backup.
10. To repair the database, run the following repair utility:
eseutil /r E0n /d<database file directory location> /l<log file directory>
/s<system file directory>
Replace n (in EOn) with the storage group number, e.g. E01, E02, E03.
11. Mount the database.
a. Start the Exchange System Manager.
b. Expand Administrative Groups, and then expand AdministrativeGroupName.
c. Expand Servers, expand YourServerName, and then expand YourStorageGroupName.
d. Right-click the Mailbox Store, and click Mount Store.
e. Click OK when you receive the message that indicates that the store successfully mounted.
12. Create a new user in Active Directory Users and Computers. Make sure that you do not make
the new user account mailbox-enabled. To create the new user:
a. Start Active Directory Users and Computers.
b. Right-click Users, point to New, and then click User.
c. Specify the user name and the user logon name in the appropriate boxes, and click Next.
d. Specify the password information for the user, and click Next.
e. Click to clear the Create an Exchange mailbox checkbox, and click Next.
f. Click Finish.
13. In the Exchange System Manager, expand the Mailbox Store, right-click Mailboxes, and click
Run Cleanup Agent.
14. Recover the mailbox.
a. Right-click the mailbox that you want to recover and click Reconnect.
b. In the list of Active Directory accounts, click the user account that you created earlier and
click OK.
88 Rapid Backup and Recovery for Exchange
Page 89

15. Use Microsoft Outlook to export the mailbox data to a .pst file or use the Exmerge.exe
tool to extract data from multiple mailboxes.
To download Exmerge.exe, visit the following Microsoft Web site:
http://www.microsoft.com/downloads/details.aspx?displaylang=en&
familyid=429163ECDCDF- 47DC-96DA-1C12D67327D5
Using the Recovery Storage Group Feature
The recovery storage group is a specialized storage group in Exchange. After you restore a mailbox
store to the recovery storage group, use the Exmerge.exe tool to move the recovered mailbox
data from the recovery storage group to the regular storage group.
How Recovery Storage Groups Operate
In previous versions of Exchange Server, a separate Microsoft Active Directory forest needs to be
configured on a recovery server if you want to mount another copy of a production Exchange
database, or to mount a different version of a production Exchange database. With the Recovery
Storage Group feature in Exchange Server, a separate recovery computer is not always needed
when you want to recover data from a mailbox store. After you create a Recovery Storage Group,
and one or more databases have been added to it, you can either restore online backup sets, or
you can copy offline database files to the Recovery Storage Group. To extract or to merge data
from recovered databases in the Recovery Storage Group to a mailbox in a regular storage group,
use the Exchange Server version of Microsoft Exchange Mailbox Merge Wizard (Exmerge.exe).
To use a Recovery Storage Group, the Active Directory topology of the Exchange Server computer
must be intact and must be in the same state as when the copy of the database was made. This
means that the mailbox or the mailboxes that you want to recover must not be deleted or purged
from the system, or moved to a different database or to a different server.
The Recovery Storage Group feature is not intended for use in disaster recovery operations that
involve multiple servers or multiple storage groups. It is intended as a substitute in situations where
previously an alternative forest recovery server was required. Use the Recovery Storage Group
feature in recovery situations where both the following conditions are true:
• The logical information in Active Directory about the storage group and its mailboxes is intact
and unchanged.
• You want to recover data from a single mailbox, a single database, or a group of databases
that are in a single storage group. For example, you can use a Recovery Storage Group to
recover items that were deleted and purged from a user's mailbox, or you can use a Recovery
Storage Group to restore or to repair a copy of an alternative database while another copy
of the database remains in production.
Creating a Recovery Storage Group
To create a Recovery Storage Group:
1. Start the Exchange Management Console.
2. Select Toolbox on the bottom of the left panel.
3. Double-click Database Recovery Management in the middle panel.
4. Select Create a recovery storage group.
5. For the storage group or mailbox database names, select the same name as the storage group
and mailbox database names you’d like to recover.
6. Select locations where you’d like the recovery storage group files and mailbox database file(s)
to reside.
7. Create your recovery storage group.
8. Mount the virtual copy you would like to restore from to the production server.
9. Copy the EDB, CHK, and LOG files to the locations you selected for the recovery storage group.
Recovery Procedures 89
Page 90

10. Rename all the CHK and LOG files to have the same header as the Recovery Storage Group.
For example, if your Recovery Storage Group has a header of R00, then rename all your E00
headers to R00.
11. Mount the Mailbox Database from the Troubleshooting Assistant.
12. Select Merge or copy mailbox contents and select the specific actions you would like to perform.
Restoring a Mailbox Store to the Recovery Storage Group
You can restore a mailbox store to a Recovery Storage Group by manually copying the database
files to the appropriate folder on the server.
NOTE: Keep the original backup file in case you need to start over.
1. Verify that the database that you want to restore is consistent and that it is in a clean shutdown
state.
a. Open a command prompt window.
b. Change to the ExchSrvr\Bin folder.
c. Enter the following:
Eseutil /mh YourDatabaseName.edb
d. Press Enter.
e. Note whether the State line shows as State: Clean Shutdown or State: Dirty
Shutdown.
2. A soft recovery should have been performed immediately after the virtual copy for the database
was created. If it was not performed or if the database is not consistent and the database log
files exist, use the Eseutil.exe tool to perform a soft recovery on the database and commit
any uncommitted logs to the database:
a. Open a command prompt window.
b. Change to the ExchSrvr\Bin folder.
c. Enter:
eseutil /r rnn /ddatabase_folder_path
rnn — The log file prefix
database_folder_path — The name of the folder where the database files (.edb,
.stm) are located
/d — Do not add a space after this switch
For example:
eseutil /r r00 /dc:\Program Files\Exchsrvr\Recovery Storage Group"
d. Press Enter.
3. Immediately after the successful completion of a repair, perform an offline defragmentation
of the repaired database.
a. Open a command prompt window.
b. Change to the ExchSrvr\Bin folder.
c. Enter:
eseutil /d <YourDatabaseName.edb>
90 Rapid Backup and Recovery for Exchange
Page 91

d. Press Enter.
4. Copy the .edb database files from the virtual copy to the appropriate folders that you specified
earlier when you created the Recovery Storage Group.
5. If databases are currently mounted in the Recovery Storage Group, do the following:
a. Dismount the databases.
b. Use the Eseutil.exe tool to verify that the databases are in a clean shutdown state.
i. Open a command prompt window.
ii. Change to the ExchSrvr\Bin folder.
iii. Enter:
Eseutil /mh <YourDatabaseName.edb>
iv. Press Enter.
v. Note whether the State line shows as State: Clean Shutdown or State:
Dirty Shutdown.
vi. If the databases are consistent, delete all transaction log files (.log) and checkpoint
files (.chk) for the Recovery Storage Group.
6. Start the Exchange System Manager and view the properties of the database that you restored.
On the Database tab of the Mailbox Store Properties dialog box, verify that the This database
can be overwritten by a restore checkbox is selected.
7. Mount the database.
To merge data from the recovered databases in the Recovery Storage Group to a mailbox in
a regular storage group, use the Exchange Server version of Microsoft Exchange Mailbox
Merge Wizard (Exmerge.exe).
To download Exmerge.exe, visit the following Microsoft Web site:
http://www.microsoft.com/downloads/details.aspx?displaylang=en#&
familyid=429163ECDCDF- 47DC-96DA-1C12D67327D5
Additional Documentation
See Recovery Storage Groups for detailed information that applies to Exchange 2007:
http://technet.microsoft.com/en-us/library/aa997260.aspx
Additional Documentation 91
Page 92

9 Remote Copy for Recovery Manager
Overview
HP 3PAR Remote Copy Software helps you safeguard against disasters that might occur at one
location by allowing you to keep copies of data on a separate server, which can be placed at a
remote location. For example, if there were a fire or earthquake at one location, all of the data
stored there could be lost unless a backup copy can be recovered from a separate location not
affected by the disaster.
To maintain updated copies of data at a remote location, Remote Copy uses two HP 3PAR Storage
Systems: a primary server (used for production) and a backup server, which can be located
anywhere. Therefore, when disaster strikes in one location, there is always a backup of your data
at the backup site.
Recovery Manager automatically detects the Remote Copy mode in use (synchronous or
asynchronous periodic) and creates virtual copies as appropriate for the configured mode.
For more information, see the HP 3PAR Remote Copy Software User’s Guide.
How Remote Copy Works
When you synchronize data between a production system (the Remote Copy primary system) on
one site and the backup server at another site, the systems involved perform the following steps in
sequence:
NOTE: For the Recovery Manager GUI to manage virtual copies on the Remote Copy backup
server, you must register the storage group using the precise server and instance names.
Synchronous Mode Remote Copy
• Recovery Manager leverages the VSS framework to freeze the I/O at the application level.
• For synchronous mode Remote Copy, the VSS provider creates a virtual copy of the storage
groups and log volumes.
• At the same time on the remote backup site, the Remote Copy backup server takes a snapshot
of the secondary volumes.
• The Remote Copy backup server saves the virtual copy in its repository at the remote site, and
the local backup server saves a local copy of the virtual copy.
NOTE: Running Recovery Manager with synchronous mode Remote Copy requires HP 3PAR VSS
Provider Software 2.1.0 or higher.
Asynchronous Periodic Mode Remote Copy
• Recovery Manager leverages the VSS framework to freeze the I/O at the application level.
• For asynchronous periodic mode Remote Copy, the VSS provider creates a virtual copy of
the storage groups and log volumes.
• Remote Copy synchronizes the data on the primary server with the data on the backup server
(thus updating the backup server).
• After synchronization is complete, Remote Copy creates a virtual copy (aka a snapshot) on
the backup server.
• The backup server saves the virtual copy in its repository at the remote site.
• For asynchronous periodic mode Remote Copy, Recovery Manager removes the virtual copy
created on the production system (the Remote Copy primary system).
92 Remote Copy for Recovery Manager
Page 93

Setting Up Remote Copy
1. Install and configure Remote Copy. For more information, see the HP 3PAR Remote Copy
Software User’s Guide.
NOTE: Be sure to configure the backup server with the same names, structure, and Windows
authentication mode settings as the primary server.
2. Use the provcfg.exe tool (HP’s hardware provider tool) to configure the HP 3PAR Storage
Systems in the Remote Copy setup to be the default HP 3PAR Storage Systems.
CAUTION: For Remote Copy to function correctly, the Remote Copy Storage Systems must
be the default HP 3PAR Storage Systems.
If the Remote Copy HP 3PAR Storage Systems are not the default HP 3PAR Storage Systems,
Recovery Manager will not be able to locate the relevant Remote Copy volume groups, and
the Remote Copy operations will fail.
3. After you have set up Remote Copy on two HP 3PAR Storage Systems, create a Remote Copy
volume group for testing purposes.
4. Configure the Remote Copy volume group for synchronization either in synchronous mode or
in asynchronous periodic mode with a period value of zero.
Support for Remote Copy Modes and Policies
Recovery Manager supports Remote Copy in synchronous and asynchronous periodic mode.
• If you are using synchronous Remote Copy, the policies on the production system (the Remote
Copy primary system) and the backup system must match. If the policies do not match, Recovery
Manager cannot create virtual copies on a synchronous Remote Copy system.
However, if you manually specify an expiration value, a retention value, or both when you
create a virtual copy, Recovery Manager creates the virtual copy on a synchronous Remote
Copy system even if the policies on the primary and backup servers do not match.
NOTE: For more information on specifying values at the time you create virtual copies, see:
◦ The sections on manually creating virtual copies in “Using the Recovery Manager GUI”
(page 29)
◦ The description of the RMExch create command in “Using the Recovery Manager CLI”
(page 51)
• If you are using asynchronous periodic Remote Copy, you can create Recovery Manager
virtual copies even if policies on the servers do not match. If policies do not match, the virtual
copies use the policies on the backup server.
• If you are running Remote Copy in a Synchronous Long Distance configuration, the virtual
copies on the synchronous and asynchronous periodic Remote Copy backup servers do not
have the exact same timestamp.
Support for GeoCluster for Microsoft Windows
Recovery Manager for Exchange supports the use of both Remote Copy and HP 3PAR GeoCluster
Software for Microsoft Windows:
• When synchronous mode Remote Copy is used with Recovery Manager for Exchange and
GeoCluster, you can use Recovery Manager to create virtual copies on both the production
system (the Remote Copy primary system) and the backup system.
• When Synchronous Long Distance Remote Copy is used with Recovery Manager for Exchange
and GeoCluster, you can use Recovery Manager to create virtual copies on all three systems:
Setting Up Remote Copy 93
Page 94

the production system (the Remote Copy primary system), the synchronous mode backup
system, and the asynchronous periodic mode backup system.
Setting Up Remote Copy Volume Groups for Storage Groups
1. Identify the virtual volumes that contain the storage group and log files to be copied.
2. Create one (and only one) primary Remote Copy volume group per mailbox database.
3. Add the virtual volumes belonging to the storage group files and log files to the primary Remote
Copy volume group, and add the associated secondary virtual volumes to the secondary
volume group on the backup server.
CAUTION: The relationship between storage groups and Remote Copy volume groups is
1:1.
• You must add storage group files to a primary Remote Copy volume group for Remote
Copy to function.
• You must add files from only one storage group to one primary volume group.
◦ Do not disperse files from one storage group over multiple primary Remote Copy
volume groups.
◦ Do not add files from multiple storage groups to the same Remote Copy volume
group.
If you do not ensure your system meets these requirements, you run the risk of data corruption
and loss.
4. Synchronize the Remote Copy primary and secondary volume groups.
Recovering a Storage Group from a Remote Copy Backup Server
If a storage group crashes at the site that holds the production system (the Remote Copy primary
system), you can recover the data from the backup server at the remote site as long as it is set up
in an identical manner to the original production server.
NOTE: If you are performing a promote restore for volumes in a Synchronous Long Distance
Remote Copy relationship, you must manually stop Remote Copy before initiating the volume
promote restore.
1. On the backup server, use Recovery Manager to mount the virtual copy to the production
server.
2. Log onto the production server and stop the Exchange instance and its dependent services.
3. From the mounted virtual copy, manually copy all necessary storage group and log files to
the corresponding storage group location.
4. Restart the Exchange instance and its dependent services.
5. Log back onto the backup server and unmount the virtual copy.
94 Remote Copy for Recovery Manager
Page 95

A Server Virtualization Environments
VMWare and Egenera
Support for VMWare and Egenera environments is provided under certain specific conditions.
New volumes presented to VMWare and Egenera servers are not surfaced automatically, so the
RMExch mount command is limited to being executed on the backup host. Figure 8 (page 95)
shows the relationships between the HP 3PAR Storage System and VMWare and Egenera in a
virtualization environment:
Figure 8 Server Virtualization Environment
The following requirements need to be met for VMWare and Egenera to be supported:
1. The disks presented to the Exchange Servers need to be raw devices.
2. The backup server needs to be connected directly to the HP 3PAR Storage System and not
through VMWare or Egenera.
• The RMExch mount command cannot be run against a virtual machine from the VMWare
or Egenera server with the -h option.
• You must manually perform the actions to expose the volumes to the server.
Due to these restrictions, restores performed in these virtualized environments require a different
set of steps than shown in “Rapid Backup and Recovery for Exchange” (page 82). File copy and
volume promote restores are not supported for virtualized environments.
To perform a restore:
1. Follow steps 1 through 4 in “Point-In-Time Recovery” (page 83).
2. Mount the virtual copy to the backup server or restore it from backup media to the production
server.
3. On the production server, move the .edb, .log, and .chk files from the original locations
to another location. The original locations can be determined from the Exchange Management
Console.
4. Copy the .edb, .log, and .chk file(s) from the mounted or restored virtual copy location to
the actual database location.
VMWare and Egenera 95
Page 96

B Troubleshooting
Known Issues
• If a virtual volume name on the HP 3PAR Storage System is changed, the virtual copy taken
before the name change will not be able to perform a volume promote restore.
• For media backup virtual copy, it is recommended that a policy be maintained per storage
group to avoid the possibility of having the batch file overwritten under some conditions.
• When upgrading an update rollup patch on Exchange 2007 and executing a snapshot creation
with the validate (-vs) option without re-logging the console, an application error message
is displayed. To avoid this error, log off and log in after the update.
Known Microsoft Issues
• On a computer that is running a clean installation of Windows Vista Service Pack 1 (SP1) or
Windows Server 2008, an event ID 10 may be logged in the System log by VDS Dynamic
Provider. Please refer to the following website for more details:
http://support.microsoft.com/kb/948275
• Under some conditions, there may be a problem when deleting folders on directory-mounted
virtual volumes. This is a Windows known issue. Please refer to the following web site:
http://support.microsoft.com/?kbid=319368
Troubleshooting
This appendix is designed to be used like a Frequently Asked Questions section. It will help find
solutions to some of the common issues that may arise when running Recovery Manager for
Exchange.
NOTE: Recovery Manager for Exchange depends on the VSS Framework and the Microsoft
Exchange writer to be in a good state to function properly. If a problem occurs, check the status
of the Exchange Writer with the command vssadmin list writers. The state of the Microsoft
Exchange writer should be 'stable' (for the Replication Writer in CCR configurations). If it is not
stable, restart the Information Store service. You may also need to restart the VSS Service.
Problem:
You may get the following message when operating in the Windows 2008 environment while
executing Create VC or Mount VC with the Disk Management window open.
Suggestion:
This popup can be ignored by clicking Cancel as advised by Microsoft on their support site:
http://support.microsoft.com/kb/969601.
Problem:
The virtual copy creation always fails on storage group integrity checking.
Suggestion:
Make sure that the Exchange management tool on all Recovery Manager for Exchange installed
hosts have the same service pack installed.
96 Troubleshooting
Page 97

Problem:
Recovery Manager is running on both backup and server production server but Recovery Manager
consistently fails to issue a command to the remote system.
Suggestion:
Make sure the communication port for Recovery Manager is set to be the same on all Recovery
Manager installed systems. You need to restart the Recovery Manager for Exchange Agent service
on every system followed by the port change command. If the firewall or security monitoring
software is installed, verify that the communication port and remote registry service ports (139 and
445) are allowed for access.
Problem:
Recovery Manager cannot locate the Exchange Server.
Suggestion:
Recovery Manager uses the Active Directory structure to locate Exchange server information within
the same domain or, if you have registered multiple Active Directory domains, within the registered
domains. Recovery Manager cannot access the Exchange information if you have only configured
local domains and the information is not in the same domain, or if you have set up multiple Active
Directory domains but the information is in an unregistered domain.
Problem:
Recovery Manager cannot detect the storage group.
Suggestion:
The Recovery Manager user has to have Exchange Administrator privilege to access Exchange
Active Directory objects.
Problem:
Virtual copy creation always fails on the storage group.
Suggestion:
There are a few things to check on your system.
1. Make sure both the data and log files of your storage group are installed on an HP 3PAR
volume.
2. Make sure your HP 3PAR volume is formatted as Basic Disk type.
3. Make sure you have allocated snapshot space for your HP 3PAR volumes.
4. Make sure your system configuration conforms to the HP 3PAR support matrix.
Problem:
The Recovery Manager interface takes a long time to start or to bring up the server registration
dialog.
Suggestion:
When Recovery Manager is started for the first time, or when you click on the server registration,
Recovery Manager will try to scan the entire network for available Exchange servers. Exchange
object query might cause this latency.
Problem:
Recovery Manager always fails to issue a command from the user interface and command line
right after the installation.
Suggestion:
If the software is installed through a remote desktop session, the newly added environment variables
will not become effective until you log off the session. If the software is installed directly from the
system console, these variables should be available immediately.
Problem:
Symantec NetBackup takes a substantial amount of time to start a backup process. However,
Recovery Manager claims that the backup has failed.
Suggestion:
Troubleshooting 97
Page 98

Timeout for backup initialization detection can be modified to accommodate the timing issue.
Please refer to the RMExch config command for more information.
Problem:
NetBackup takes a substantial amount of time to complete a backup process.
Suggestion:
Make sure you have the latest maintenance package installed for your NetBackup application.
For more information, see the latest HP 3PAR InForm OS Configuration Matrix. To obtain a copy
of this documentation, go to http://www.hp.com/go/3par/, navigate to your product page, click
Support for your product, and then click Manuals.
Problem:
RMExch cannot connect to the specified server.
Suggestion:
Make sure the Recovery Manager for Exchange Agent service is started and that the port settings
on all Recovery Manager installed systems are the same. If you changed the port setting, you need
to restart the Recovery Manager for Exchange Agent service before running any commands.
Problem:
RMExch create is not creating a virtual copy.
Suggestion:
Check to see if you have reached the maximum number of virtual copies allowed by your policy
for this Exchange server. Also check whether the oldest virtual copy is mounted, as this will not
allow a create if the maximum number of virtual copies has been reached.
Problem:
The mounted virtual copies always show up as read-only.
Suggestion:
Make sure the Virtual Disk Service is not disabled on your system. If this service is disabled, Recovery
Manager will not be able to make the virtual copy writable.
Problem:
Recovery Manager fails to create a virtual copy for a storage group on the HP 3PAR volume, which
is also a system drive.
Suggestion:
Performing a snapshot of a storage group on the system volume is currently not supported by
Recovery Manager for Exchange.
Problem:
Recovery Manger shows the Error - VSS Asynchronous operation failed. It is recommended that
you wait 10 minutes and then try the operation again message when the create command is
executed.
Suggestion:
When you encounter this error message, run the vssadmin list writers command to list all
of the available writers on the system that are taking the snapshot of the Exchange storage group.
Make sure the Microsoft Exchange Writer status is stable. If the status is other than stable, you
need to restart the Exchange server service to reset the writer status.
Problem:
Recovery Manager shows the ERROR: Failed - Virtual Copy creation failed for storage group
<StorageGroup> message after an unexpected termination of the virtual copy create process.
Suggestion:
When Recovery Manager unexpectedly terminates, an internal locking file might still exist on your
Exchange server system. You need to remove the locking file manually for the create process to
run through. The locking file can be located under: <InstallationPath>\Exchange\vclock.
Use the RMExch reset command to reset the lock.
98 Troubleshooting
Page 99

Problem:
The event viewer shows the Volume Shadow Copy Service error: Unexpected error
IOCTL_STORAGE_QUERY_PROPERTY(\\.\PHYSICALDRIVE2, StorageDeviceProperty) BuildLunInfoForDrive. hr = 0x80070002 error when a virtual copy creation is in progress.
Suggestion:
When this message is logged by the Volume Shadow Copy service, it notifies the user that the
initial search on the imported volume is not complete. It will try again to make sure the snapshot
can be imported successfully. If the snapshot process still fails and this error is logged, please
contact HP.
Problem:
Recovery Manager creates the virtual copy successfully but does not show it in GUI or CLI.
Suggestion:
If the virtual copy is requested on a passive from active node or vice versa, it will be created on
the desired node. The virtual copy is visible only on the node where it is created. Check the
appropriate node.
Problem:
Recovery Manager shows a virtual copy as available but it is mounted or vice versa.
OR
Recovery Manager shows a virtual copy as available but it still cannot be mounted because the
status indicates that the virtual copy is already mounted.
Suggestion:
This mismatched entry might be due to a previously failed Recovery Manager operation. Check
for mismatched entries using the analyze command.
To resolve mismatched entries, follow the steps detailed below:
1. Remove VLUNs and virtual volumes for the mismatched volume. To do so, run:
RMExch analyze -s <exchange server> -g <storage group>
This command shows which virtual volumes and VLUNs might be left over from a previously
failed operation. Remove these VLUNs and virtual volumes manually from the HP 3PAR Storage
System.
2. Remove timestamp entries from the repository. To do so, run:
RMExch analyze -s <exchange server> -g <storage group>
This shows all Missing VVs from a storage group. These are the virtual volumes entries that
are deleted from HP 3PAR Storage System but are still in the repository. Remove the respective
timestamps from repository by deleting the directory:
<installpath>\3PAR\RM\Exchange\Repository\<exchange server>\<storage
group>\<time stamp>
Problem:
Recovery Manager takes too long to create a virtual copy.
Suggestion:
Once the snapshot is created, it is verified and .log files are truncated. For this, the checkpoint
is fetched and log file names are traversed one by one. This may take a longer due to a large
number of .log files for a storage group. If a virtual copy creation is taking too long, check the
virtual copy creation with the -nc switch. This will skip log verification and log truncation. Then,
verify this snapshot using the validate command. After it is validated, to truncate logs, create
a snapshot using the -truncate and -nc switches. Finally, try a regular virtual copy creation.
If the virtual copy creation with -nc is also taking a longer time, send an RMReport to HP Customer
Support.
Problem:
Troubleshooting 99
Page 100

After installing Recovery Manager, it is unable to manage the Exchange cluster from Exchange
management. It returns a COM class factory error.
OR
After installing Recovery Manager, an MSCluster-related COM class factory error is returned.
Suggestion:
If the previous version of Recovery Manager is uninstalled, the msclus.dll is unregistered and
results in the COM class factory error. To resolve this, run:
- regsvr32 C:\Windows\system32\msclus.dll
Problem:
How to recover the Exchange writer status from last error Non-retryable to No error.
Suggestion:
If the Exchange writer status shows the last error as Non-retryable on a CCR active or passive
node or an LCR passive copy, try one of the following methods to get the writer into a stable state
with no last error.
Restart the Microsoft Exchange Replication service from the passive node.
OR
Net stop MSExchangeRepl
Net start MSExchangeRepl
If restarting the Microsoft Exchange Replication service does not solve the problem, try one of the
following methods:
Restart the Microsoft Exchange Information Store service.
OR
Net stop MSExchangeIS
Net start MSExchangeIS
Problem:
How to recover the System Writer status from last error Non-retryable to No error.
Suggestion:
Restart the Cryptographic Services service.
OR
Net stop CryptSvc
Net start CryptSvc
Problem:
Remote Copy status for the volume group <remote copy group> does not permit synchronization.
Suggestion:
The involved Remote Copy group has virtual volumes that are not in synced state. Wait until all
volumes in the group display in synced state and then retry the operation.
Problem:
An LDP COM error message appears similar to the following:
RME5220: ERROR: COM: Failed to bind to LDAP path <CN=Recovery Storage
Group,CN=InformationStore,CN=WWDC1-EX-CPBE01,CN=Servers,CN=Denver,CN=Administrative
Groups,CN=Westwood,CN=Microsoft
Exchange,CN=Services,CN=Configuration,DC=westwood2000>: 0xc1032221.
Suggestion:
You may not have permissions for the specified storage group, or the storage group is absent.
Problem:
When using Symantec NetBackup, you see this message: 0x1: ERROR: Cannot connect to [NBU
server name]; socket error.
100 Troubleshooting
 Loading...