

Page 1
HP RDX USB 3.0
Removable Disk Backup System
External drive
Start Here
Commencez ici
Starten Sie hier
IMPORTANT INFORMATION ABOUT
YOUR NEW DRIVE
2 Completing the installation
Install the HP RDX Utility from www.hp.com/support/rdx. If the
software is not installed, the eject button and right-click eject method
may not work properly.
Install or update backup software:
It is important to check www.hp.com/storage/spock for software
compatibility and install any recommended updates.
Diagnostic tools
The HP RDX Utility contains basic diagnostic tools, enables proper
cartridge ejection, and allows you to download and install firmware
upgrades. The utility and firmware upgrades are available from
www.hp.com/support/rdx.
HP Library & Tape Tools, which can be downloaded free of charge
from www.hp.com/support/tapetools, can also be used to determine
whether your product can operate properly.
• The drive can be oriented horizontally or vertically.
• Select a flat, sturdy, level location for the HP RDX Removable Disk
Backup System that is close to the host server.
• Connect to a USB 3.0 port (on a computer running Windows®).
USB 2.0 is supported, but performance will be degraded.
• For optimum performance use HP-branded RDX Removable Disk
cartridges.
• Although RDX Removable Disk cartridges are ruggedly built, they
must be handled with care to ensure data integrity and long life.
• To ensure correct operation of the eject function, install the HP RDX
Utility. This utility also allows you to download and install firmware
upgrades. The utility and firmware upgrades are available from
www.hp.com/support/rdx.
1 Installation overview
IMPORTANT: For detailed, step-by-step installation
instructions, refer to the user guide found at
www.hp.com/support/rdx.
For important safety, environmental, and regulatory
information, see Safety and Compliance Information for
Server, Storage, Power, Networking, and Rack Products,
available at www.hp.com/support/Safety-Compliance-
EnterpriseProducts.
3 Product Information
Product documentation
Product documentation is available in the Storage section of the HP
Enterprise Information Library:
www.hp.com/go/storage/docs
To find information for this product:
1. In the Products and Solutions pane, select HP StoreEver Tape.
2. Selct the types of documents and your languages.
3. In the HP StoreEver Tape pane, select your product.
Other sources of information
• www.hp.com/storage/spock (for computer, OS and software
compatibility).
• www.hp.com/support/ (for latest product details).
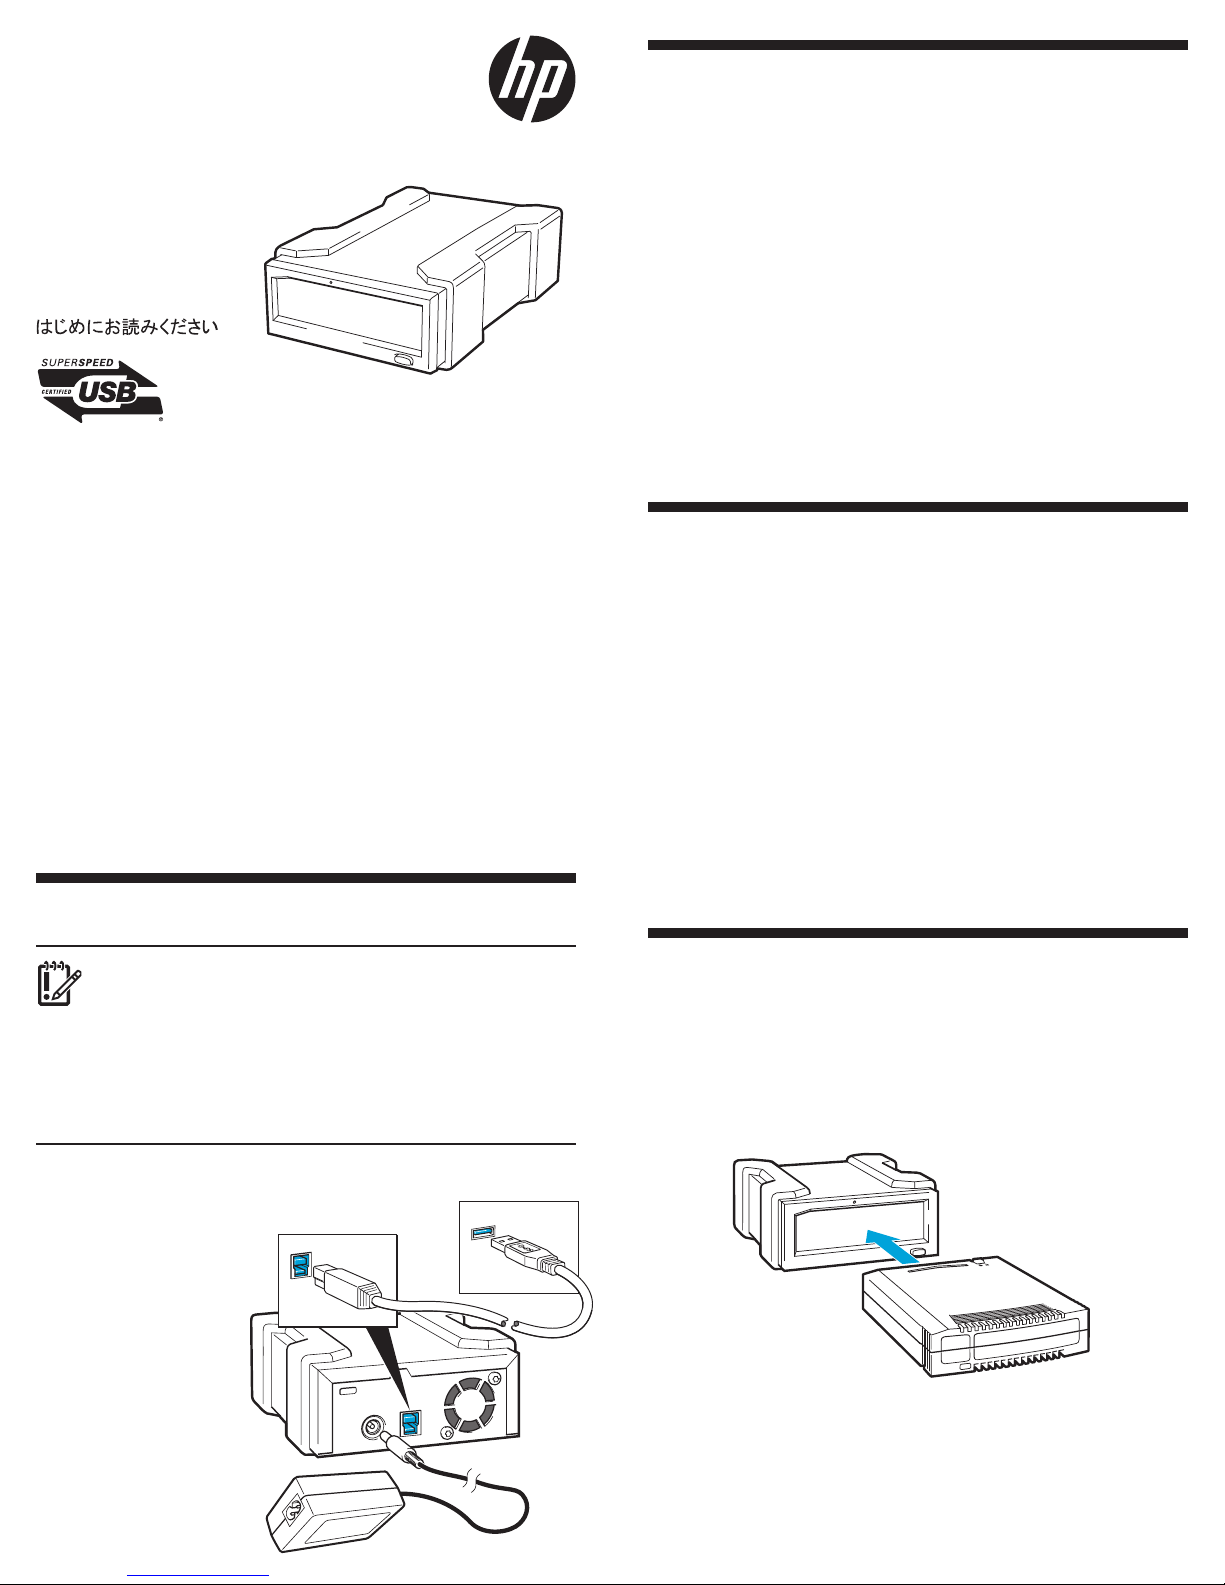
4 Using the RDX Removable Disk
Backup System
To load a cartridge:
Push the cartridge gently into the unit until it is locked into place with a
clicking sound.
For optimum performance the drive should be
connected to a USB 3.0 port. The drive is
backward compatible with
USB 2.0, but performance
will be degraded. Do not
connect the drive to a
USB 1.1 port.
The supplied power cord
is appropriate for your
geographical region. Use it to
connect to the mains power
supply. (The drive is not
powered from the USB bus.)
Page 2
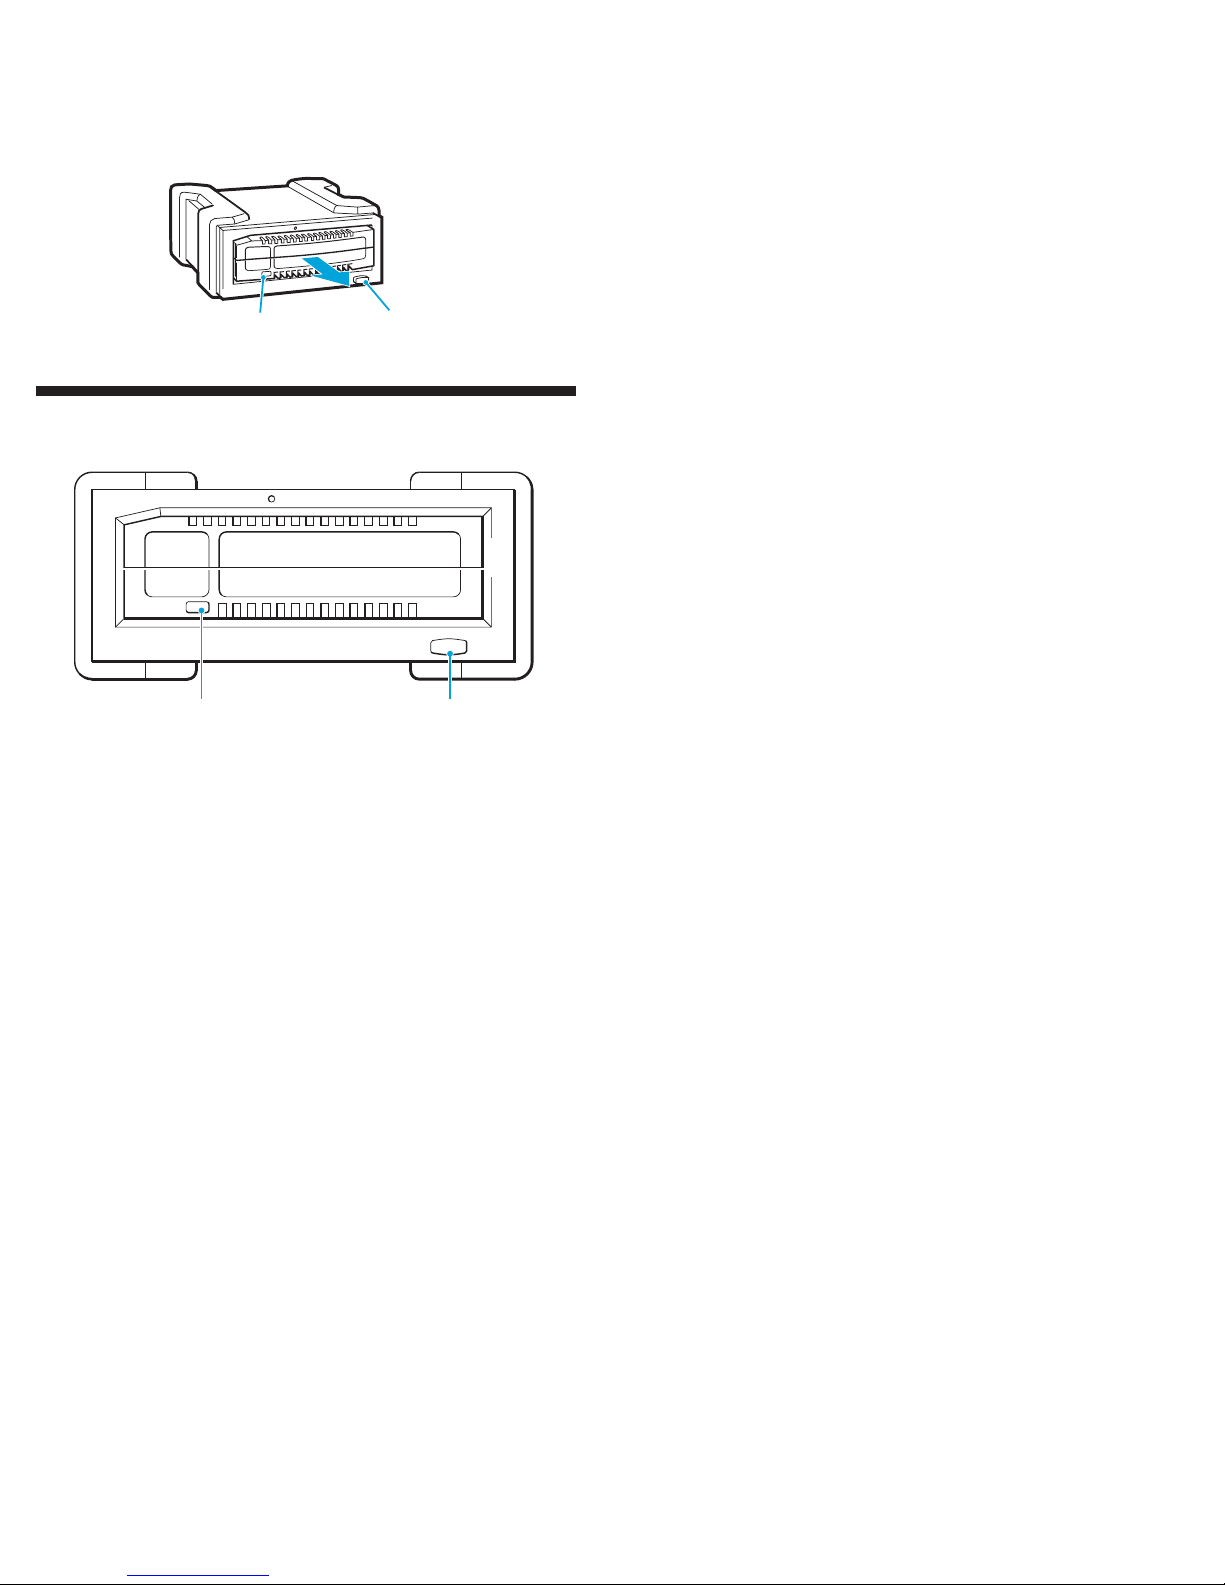
To unload a cartridge:
Eject button/Power LEDActivity LED
Wait until the cartridge Activity LED is solid green and push the Eject
button. (Eject only works correctly if HP RDX Removable disk utility is
installed.)
Activity LED
Eject button/
Power LED
5 Understanding the LEDs
Activity LED
• Blinking Green: Cartridge is connected to an RDX service
(reading, writing, seeking activity).
• On Amber: The drive has detected a cartridge fault condition.
Eject Button/Power LED
• Off: No power.
• On Green: The drive is ready for use.
• Blinking Green: The drive is ejecting the cartridge.
• On Amber: There is a fault with the drive.
• Blinking Amber: The drive is waiting for cartridge activity to
complete before ejecting.
© 2014 Hewlett-Packard Development Company, L.P.
www.hp.com
*484932-003*
484932-003
Page 3
HP RDX USB 3.0
Système de sauvegarde sur
lecteur amovible
Lecteur externe
Start Here
Commencez ici
Starten Sie hier
INFORMATIONS IMPORTANTES SUR
LE NOUVEAU LECTEUR
Pour optimiser les performances, le lecteur devrait être
connecté à un port USB
2.0. Le lecteur est
rétro-compatible avec
USB 2.0, mais les
performances
seront dégradées. Ne
branchez pas
du lecteur à un
port USB 1.1.
Le cordon fourni
est approprié à votre
région géographique.
Utilisez-le pour vous
connecter au
secteur. (Le lecteur n'est pas
alimenté à partir du bus USB.)
• Le lecteur peut être orienté horizontalement ou verticalement.
• Choisissez un emplacement plat et robuste à proximité du système
hôte pour installer HP RDX USB 3.0 Removable Disk Backup
System.
• Connectez-vous à un port USB 3.0 (sur un ordinateur exécutant
Windows®). USB 2.0 est également pris en charge, mais les
performances risquent d'être dégradées.
• Pour des performances optimales, utilisez des cartouches de
disque amovibles RDX de marque HP.
• Bien que les cartouches de disques amovibles RDX soient de
fabrication robuste, elles doivent être manipulées avec soin pour
assurer l’intégrité des données et prolonger leur durée de vie.
• Pour assurer le bon fonctionnement de la fonction d'injection,
installez l’utilitaire HP RDX Utility depuis le CD-ROM. Cet utilitaire
permet également de télécharger et d'installer les mises à niveau
du microprogramme. Les mises à niveau de l'utilitaire et du
microprogramme sont disponibles sur www.hp.com/ support/rdx.
1 Présentation de l'installation
IMPORTANT : Pour obtenir des instructions d'installation
détaillées, reportez-vous au manuel de l'utilisateur
disponible sur
www.hp.com/support/rdx.
Pour obtenir les informations importantes de sécurité,
d'environnement et de réglementations, consultez les Safety
and Compliance Information for Server, Storage, Power,
Networking, and Rack Products, disponibles sur www.
hp.com/support/Safety-Compliance-EnterpriseProducts.
2 Dernières étapes de
l'installation
Installez l'utilitaire HP RDX depuis www.hp.com/support/rdx. Si le
logiciel n’est pas installé, le bouton Éjecter et la méthode d’éjection
via le bouton droit de la souris ne fonctionneront peut-être pas
correctement.
Installation ou mise à jour du logiciel de
sauvegarde:
Il est important de consulter www.hp.com/storage/spock pour
connaître la compatibilité logicielle et installer les éventuelles mises à
jour recommandées.
Outils de diagnostic
L'utilitaire HP RDX contient des outils de diagnostics de base, permet
l'éjection de la cartouche appropriée, et permet de télécharger et
d'installer les mises à niveau du microprogramme. Les mises à niveau
de l'utilitaire et du microprogramme sont disponibles sur www.
hp.com/support/rdx.
HP Library & Tape Tools, peut être téléchargé gratuitement sur www.
hp.com/support/tapetools, peut également permettre de déterminer
si votre produit peut fonctionner correctement.
3 Informations produit
Documentation du produit
La documentation du produit est disponible dans la section Storage
de la bibliothèque d'informations de HP Enterprise:
www.hp.com/go/storage/docs
Pour rechercher des informations sur ce produit:
1. Dans le volet Products and Solutions, sélectionnez HP StoreEver
Tape.
2. Sélectionnez les types de document et vos langues.
3. Dans le volet HP StoreEver Tape, sélectionnez votre produit.
Autres sources d’information
• www.hp.com/storage/spock (pour la compatibilité des
ordinateurs, des systèmes d'exploitation et des logiciels).
• www.hp.com/support/ (pour obtenir les dernières informations sur
les produits).
Page 4

4 Utilisation du système de
Eject button/Power LEDActivity LED
sauvegarde sur disque
amovible RDX
Pour charger une cartouche:
Insérez doucement la cartouche dans l’unité jusqu’à ce qu’elle
s’enclenche en position et que vous entendiez un clic.
Pour décharger une cartouche:
Attendez que le voyant d'activité de la cartouche soit vert continu et
appuyez sur le bouton Éjection. (L'éjection ne fonctionne correctement
que si l'utilitaire HP RDX Removable Disk est installé.)
5 Signification des voyants
Voyant d'activité
• Vert clignotant : la cartouche est connectée à un service RDX
(lecture, écriture, recherche d’activité).
• Orange continu : le lecteur a détecté une condition de panne de
cartouche.
Voyant d’alimentation/du bouton Éjecter
• Éteint: pas d’alimentation.
• Vert continu : le lecteur est prêt à l'emploi.
• Vert clignotant : le lecteur est en train d'éjecter la cartouche.
• Orange continu : une erreur s’est produite au niveau de l’unité.
• Orange clignotant : le lecteur attend la fin de l’activité de la
cartouche avant de procéder à l’éjection.
Activity LED
Eject button/
Power LED
© 2014 Hewlett-Packard Development Company, L.P.
www.hp.com
*484932-003*
484932-003
Page 5

HP RDX USB 3.0
Removable Disk Backup System
Externes Laufwerk
Start Here
Commencez ici
Starten Sie hier
WICHTIGE INFORMATIONEN ZU
IHREM NEUEN LAUFWERK
• Das Laufwerk kann horizontal oder vertikal ausgerichtet werden.
• Wählen Sie für das HP RDX Removable Disk Backup System einen
Aufstellungsort aus, der eben, stabil und waagerecht ist und sich in
der Nähe des Hostsystems befindet.
• Stellen Sie eine Verbindung mit einem USB 3.0-Anschluss her
(auf einem Computer unter Windows®). USB 2.0 wird ebenfalls
unterstützt, die Leistung ist jedoch geringer.
• Verwenden Sie für eine optimale Leistung RDX Removable DiskKassetten von HP.
• Obwohl die RDX Removable Disk-Kassetten robust sind, müssen
sie umsichtig behandelt werden, um Datenintegrität und langes
Produktleben zu gewährleisten.
• Installieren Sie das HP RDX Utility, um sicherzustellen, dass die
Auswurffunktion ordnungsgemäß arbeitet. Dieses Dienstprogramm
ermöglicht es auch, Firmwareaktualisierungen herunterzuladen und
zu installieren. Die Utility und Firmware-Aktualisierungen sind über
www.hp.com/ support/rdx verfügbar.
1 Installationsübersicht
WICHTIG: Detaillierte schrittweise Anleitungen zur
Installation finden Sie im Benutzerhandbuch unter
www.hp.com/support/rdx.
Wichtige Informationen zur Sicherheit, zum Umweltschutz
und zur Zulassung finden Sie in Safety and Compliance
Information for Server, Storage, Power, Networking, and
Rack Products (Sicherheits- und Konformitätsinformationen
für Server-, Speicher-, Strom-, Netzwerk-, und Rack-Produkte),
verfügbar unter www.hp.com/support/Safety-Compliance-
EnterpriseProducts.
Für eine optimale Leistung sollte das Laufwerk mit
einem USB 3.0-Anschluss verbunden werden. Das Laufwerk ist
abwärtskompatibel mit
USB-Anschluss 2.0, aber die Leistung
wird beeinträchtigt
werden. Verbinden Sie
das Laufwerk nicht mit
einem
USB 1.1-Anschluss.
Das mitgelieferte
Netzkabel
eignet sich für Ihre
geografische Region.
Verwenden Sie es
für den Anschluss an
das Stromnetz. (Das
Laufwerk wird nicht
über den USB-Bus mit Strom versorgt.)
2 Abschließen der Installation
Laden Sie unter www.hp.com/support/rdx das HP RDX Utility
herunter. Wenn Sie die Software nicht installieren, arbeiten
die Auswurftaste und die Auswurfmethode mittels Rechtsklick
möglicherweise nicht ordnungsgemäß.
Installieren oder aktualisieren Sie die
Sicherungssoftware:
Es ist wichtig, dass Sie sich auf der Website www.hp.com/storage/
spock zur Softwarekompatibilität informieren und empfohlene
Aktualisierungen installieren.
Diagnosewerkzeuge
Das HP RDX-Dienstprogramm enthält grundlegende DiagnoseTools, ermöglicht den ordnungsgemäßen Kassettenauswurf und
das Herunterladen und Installieren von Firmwareaktualisierungen.
Die Utility und Firmware-Aktualisierungen sind über www.hp.com/
support/rdx verfügbar.
HP Library & Tape Tools können kostenlos von www.hp.com/
support/tapetools heruntergeladen und ebenfalls verwendet werden,
um den ordnungsgemäßen Betrieb Ihres Produkts zu überprüfen.
3 Produktinformation
Produktdokumentation
Produktdokumentation ist im Bereich Storage von der HP Enterprise
Information Library verfügbar:
www.hp.com/go/storage/docs
Informationsquellen für dieses Produkt:
1. Wählen Sie im Fenster Products and Solutions(Produkte und
Services) die Option HP StoreEver Tape.
2. Wählen Sie die Dokumenttypen und Ihre Sprachen.
3. Wählen Sie im Fenster HP StoreEver Tape Ihr Produkt.
Weitere Informationsquellen
• www.hp.com/storage/spock (für Computer-, Betriebssystem- und
Softwarekompatibilität)
• www.hp.com/support/ (für neueste Produktinformationen)
Page 6

Eject button/Power LEDActivity LED
4 Verwenden des HP
StorageWorks RDX Removable
Disk Backup Systems
Einlegen einer Kassette:
Schieben Sie die Kassette vorsichtig in die Einheit, bis die Kassette
hörbar einrastet.
Entnehmen einer Kassette:
Warten Sie, bis die Aktivitäts-LED der Kassette dauerhaft grün
leuchtet, und drücken Sie die Auswurftaste. (Der Auswurfvorgang
kann nur ordnungsgemäß ausgeführt werden, wenn das HP RDX
Removable Disk Utility installiert ist.)
5 Bedeutung der LEDs
Aktivitäts-LED
• Grün blinkend: Kassette ist mit einem RDX-Dienst verbunden
(lesend, schreibend, Aktivität suchend).
• Gelb leuchtend: Das Laufwerk hat einen Fehlerzustand der Kassette
erkannt.
Auswurftaste/Netz-LED
• Aus: Keine Energie.
• Grün leuchtend: Das Laufwerk kann verwendet werden.
• Grün blinkend: Das Laufwerk wirft soeben die Kassette aus.
• Gelb leuchtend: Es liegt ein Fehler des Laufwerks vor.
• Gelb blinkend: Das Laufwerk wartet, bis die Kassettenaktivität
beendet wird, bevor die Kassette ausgeworfen wird.
Activity LED
Eject button/
Power LED
© 2014 Hewlett-Packard Development Company, L.P.
www.hp.com
*484932-003*
484932-003
Page 7

Page 8

 Loading...