

Page 1

HP StorageWorks
RDX Removable Disk Backup System
User Guide
Part number: 484933–001
irst edition: June 2008
F
Page 2

Legal and notice information
© Copyright 2008 Hewlett-Packard Development Company, L.P.
The information contained herein is subject to change without notice. The only warranties for HP products and services are set forth
in the express warranty statements accompanying such products and services. Nothing herein should be construed as constituting
an additional warranty. HP shall not be liable for technical or editorial errors or omissions contained herein.
Microsoft, Windows, Windows XP, and Windows NT are U.S. registered trademarks of Microsoft Corporation.
Page 3

Contents
Aboutthisguide .......................... 7
Intendedaudience...................................... 7
Relateddocumentation.................................... 7
Documentconventionsandsymbols .............................. 7
HPtechnicalsupport..................................... 8
Productwarranties...................................... 8
Registeringyourdrive .................................... 8
Subscriptionservice ..................................... 8
HPwebsites......................................... 9
Documentationfeedback ................................... 9
1Beforeyoustart......................... 11
Overview......................................... 11
Whichoperatingsystemsaresupported? ........................... 11
HowdoIconnectthedrivetomyserver? ........................... 11
Whatarethemountingrequirementsforaninternaldevice? ................... 12
Mountingbay..................................... 12
Mountinghardware .................................. 12
HPStorageWorksRDXRemovableDiskutility ......................... 12
UsingtheHPStorageWorksCD-ROM............................. 12
2InstallinganinternalRDXRemovableDiskBackupSystem....... 13
Preparemountingbay ................................... 13
Attachmountinghardware ................................. 14
HPProLiantservers................................... 14
Otherservers..................................... 15
Installdrive........................................ 15
Connectcablestotheserver................................. 16
DecidewhichUSBcabletouse ............................. 16
ConnecttheUSBcabletotheserver ........................... 16
AttachUSBandpowercabletotheRDXRemovableDiskBackupSystem............ 17
SecuretheRDXRemovableDiskBackupSystem ........................ 18
Mountinghardwareused(HPProLiant) .......................... 19
Nomountinghardwareused .............................. 19
3InstallinganexternalRDXRemovableDiskBackupSystem....... 21
ConnectingthepowerandUSBcables ............................ 21
4OperatingyourRDXRemovableDiskBackupSystem......... 23
InstalltheRDXRemovableDiskutility(Windowsonly)...................... 23
Frontpanel........................................ 23
Media.......................................... 24
Write-protectingcartridges ............................... 24
Handlingcartridges .................................. 24
Loadingandunloading................................... 25
Insertingcartridges .................................. 25
Removingcartridges.................................. 25
Unloadusingthemouseright-clickmethod(Windows™only)............... 25
RDX Removable Disk Backup System
3
Page 4

Unloadusingtheejectbutton ............................ 26
Removingpowerfromtheunit................................ 26
5Troubleshooting . . ....................... 27
GeneralProcedure..................................... 27
UnderstandingtheLEDs................................... 28
PowerLED ...................................... 29
CartridgeActivityLED ................................. 30
UsingtheRDXutilityfordiagnostics ............................. 30
ToruntheRDXUtilityforWindows............................ 30
Emergencyeject...................................... 30
TheRDXRemovableDiskBackupSystemdoesnotappearintheDeviceManager.......... 31
Unitperformanceseemsslow ................................ 31
WriteError ........................................ 31
FirmwaredownloadfailswithWindowsServer2003...................... 31
Systemwillnotcompletebootprocess ............................ 31
6 Replacing an internal RDX Removable Disk Backup System . . . . . . . 33
Todisconnectyourdrive .................................. 33
ToreconnectyourRDXRemovableDiskBackupSystem ..................... 33
7USBConfigurationGuide..................... 35
USBinHPStorageWorksdevices .............................. 35
USBterminology...................................... 35
SettingupaUSBnetwork.................................. 36
USBcables........................................ 36
Index .............................. 37
4
Page 5

Figures
1
FrontviewoftheRDXRemovableDiskBackupSystem ................ 11
2
Removing cover
3
InstallingRDXRemovableDiskBackupSystem.................... 15
4
OrientationofspecialProLiantinternalconnector .................. 16
5
ConnectingtoastandardUSBport ........................ 17
6
ConnectingtoaspecialUSBport......................... 17
7
AttachingUSBandpowercable ......................... 18
8
Securing dr
9
ConnectingtheUSBcable............................ 22
10
Connectingthepowercable ........................... 22
11
Frontpanel .................................. 24
12
Insertingacartridge .............................. 25
13
Ejectingacartridge............................... 26
14
FrontpanelwithLEDs.............................. 28
fromtypicalserver ........................ 14
ive,nomountinghardwareused .................... 19
RDX Removable Disk Backup System
5
Page 6

Tables
1 Documentconventions............................... 7
2 Powerrequirements............................... 12
3 PowerLED................................... 29
4
CartridgeLED ................................. 30
6
Page 7
About t his guide
This guide provides information abo ut:
• Installing the H P StorageWorks RDX Removable Disk Backup System
• Using the HP StorageWorks RDX Removable Disk Backup System
• Troubleshooting the HP StorageWorks RDX Removable Dis k Backup System
Intended audi
This guide is intended for users who install, operate and maintain HP StorageWorks RDX Removable
Disk Backup Systems.
ence
Related documentation
In addition to this guide, the following document provides related information:
• ‘Starthere’posterforanoverviewoftheinstallationinformationinthisguide(availablein
English, French, German and Japanese)
You can find these documents from the Ma nuals page of the HP Business Support Center website:
h
ttp://www.hp.com/support/manuals
Document conventions and symbols
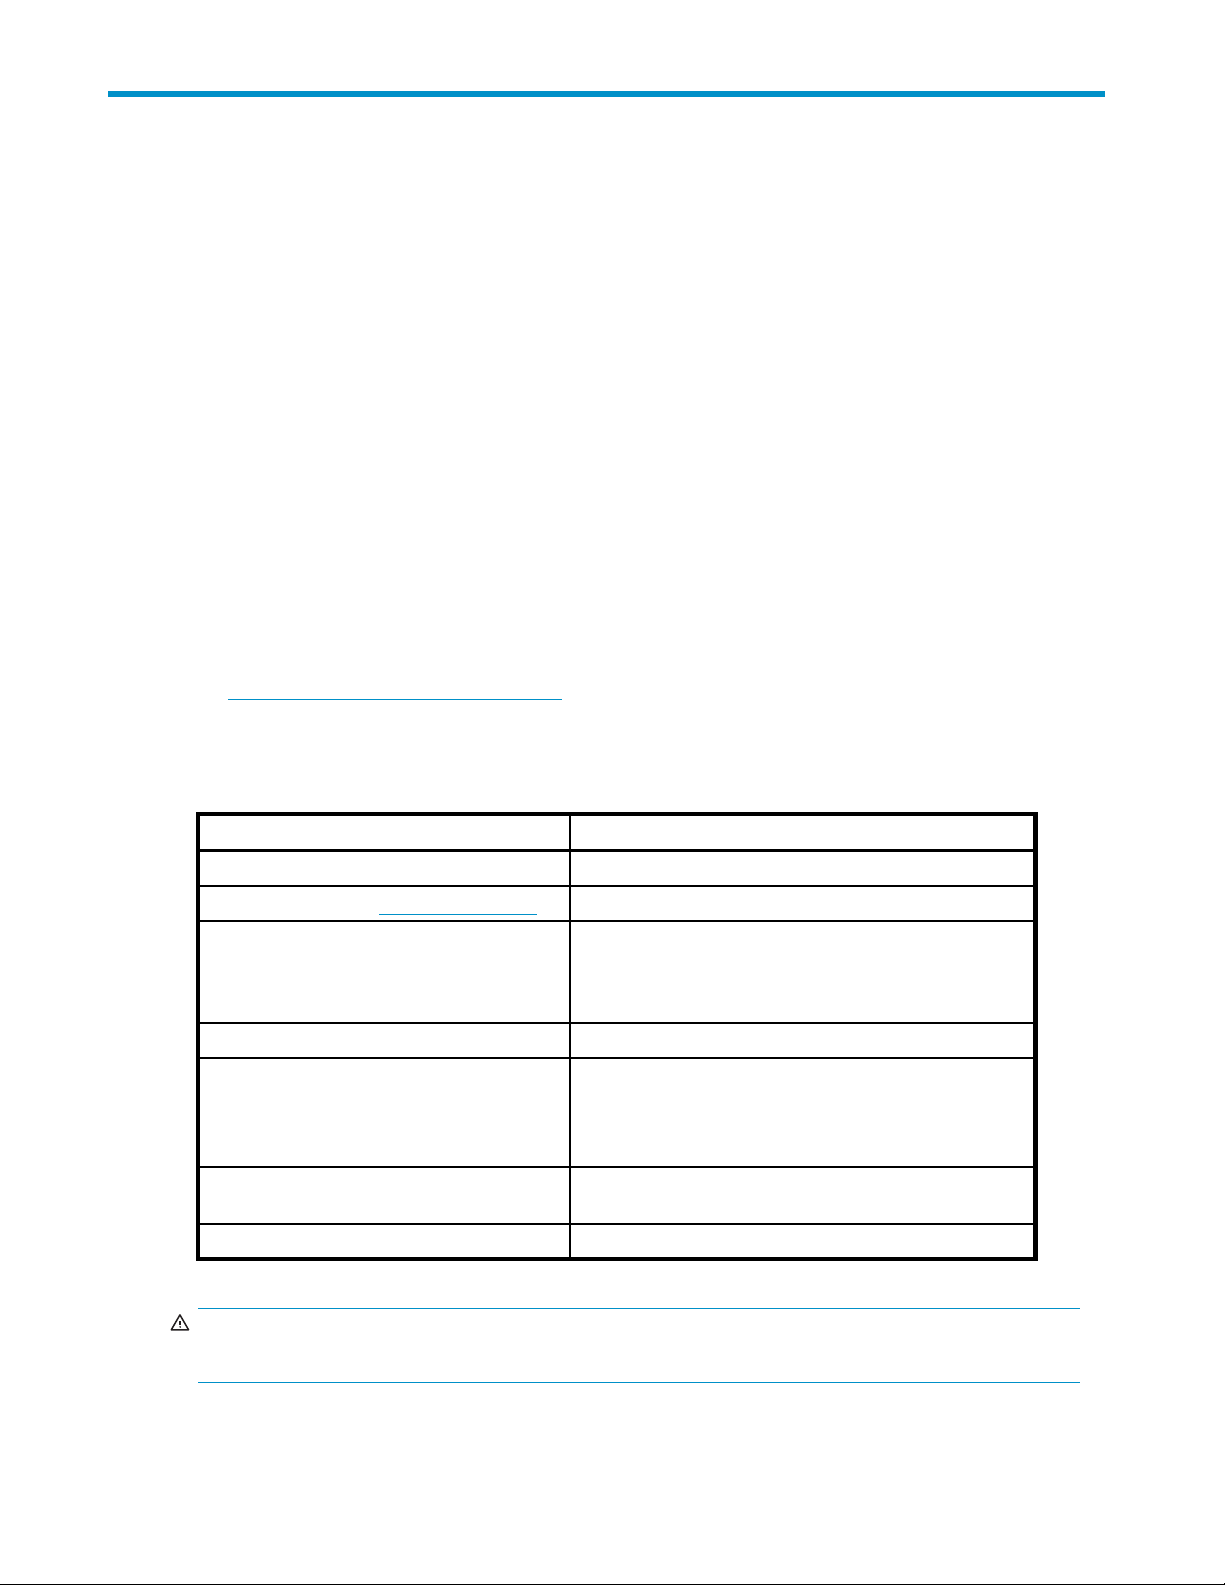
Table 1 Document conventions
Convention
Blue text: Table 1
Blue, underlined text: h ttp://www.hp.com
Bold text
Element
Cross-ref
website addresses
• Keys that are p ressed
• Text typed into a GUI element, such as a box
• GUI elements that are clicked or selected, such as
menu and list items, buttons, tabs, and check boxes
erence links and e-mail addresses
Italic text Text emphasis
• File and directory names
Monospace text
Monospace, italic text
Monospace, bold text
NING!
WAR
icates that failure to follow directions could result in bodily harm or death.
Ind
• System output
• Code
• Commands, their arguments, and argument values
• Code variables
• Command variables
hasized monospace text
Emp
RDX Removable Disk Backup System
7
Page 8

CAUTION:
Indicates that failure to follow directions could result in damage to equipment or data.
IMPORTANT:
Provides clarifying information or specific instructions.
NOTE:
Provides additi
onal information.
HP technical support
For worldwide technical support information, see the HP support website:
h
ttp://www.hp.com/support
Before contacting HP, collect the following information:
• Product model names and numbers
• Technical support registration number (if applicable)
• Product serial numbers
• Error messages
• Operating system type and revision level
• Detailed questions
Product warranties
For information about HP StorageWorks product warranties, see the warranty information website:
h
ttp://www.hp.com/go/storagewarranty
Registering your drive
Once you have installed and tested your HP StorageWorks drive, please take a few minutes to register
your product on the following website:
h
ttp://www.register.hp.com
To ensure your registration is complete, there are a number of questions on the electronic form that are
mandatory. Other questions are optional. However, the more you feel able to complete, the better HP
can meet your needs.
Subscription service
HP recommends that you register your product at the Subscriber’s Choice for Business website:
h
ttp://www.hp.com/go/e-updates
After registering, you will receive e-mail notification of product enhancements, new driver versions,
firmware updates, and other product resources.
After signing up, you can quickly locate your products by selecting Business support and then Storage
under Product Categ ory.
8
About this guide
Page 9

HP websites
For additional information, see the following HP websites:
•h
ttp://www.hp.com
•http://www.hp
•http://www.hp.com/service_locator
•http://www.hp.com/support/manuals
•http://www.h
.com/go/storage
p.com/support/downloads
Documentation feedback
HP welcomes your feedback.
To make comments and suggestions about product documentation, please send a message to
storagedocs.feedback@hp.com. All submissions become the property of HP.
RDX Removable Disk Backup System
9
Page 10

10
About this guide
Page 11
1 Before you star t
In this chapter:
• “Overview” on page 11
• “Which operating systems are supported?”onpage11
• “HowdoIconnectthedrivetomyserver?” on page 11
• “What are the mounting requirements for an internal device?” on page 12
• “RDX Removable Disk utility”onpage12
• “Using the HP StorageWorks CD-ROM”onpage12
Overview
The HP StorageWorks RDX Removable Disk Backup Systems is a removable, ruggedized, hard disk
drive system. This guide describes how to install and operate the HP StorageWorks RDX Removable
Disk Backup System. For a detailed product specification, please refer to our World Wide Web site
(h
ttp://ww
w.hp.com).
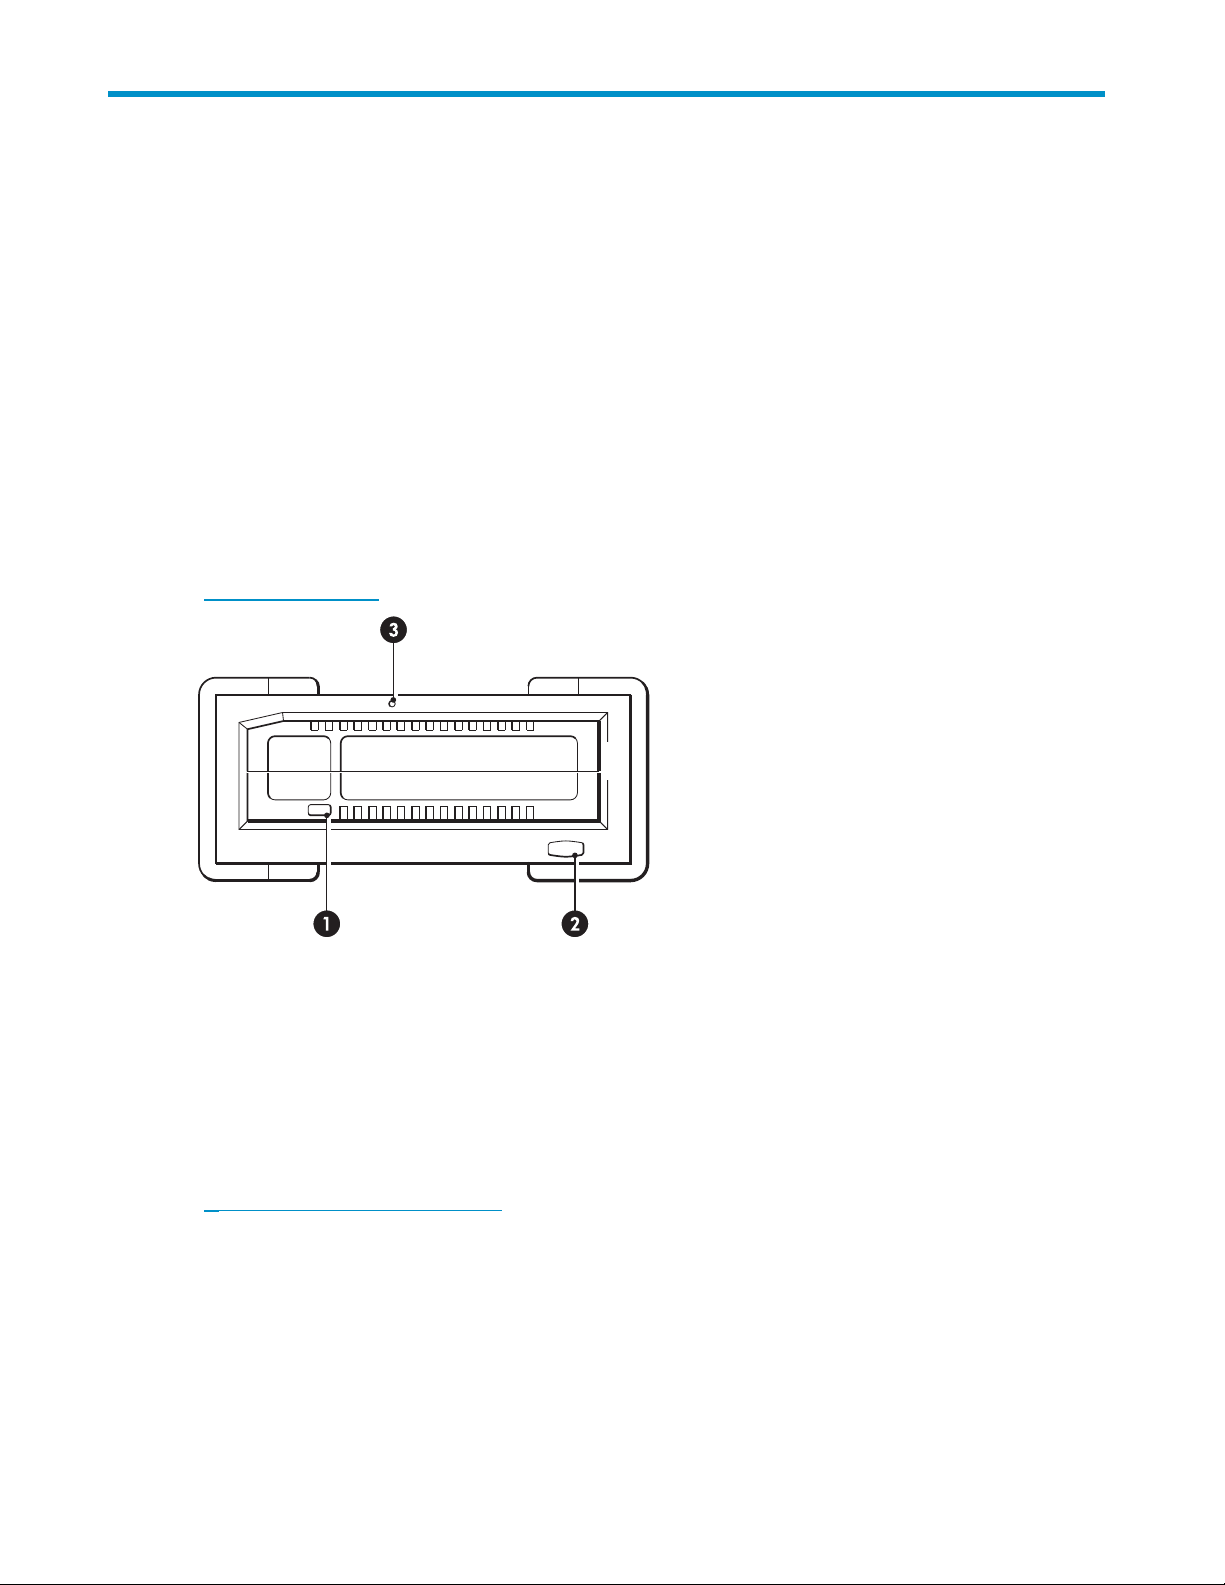
1. Cartridge activity LED (located on cartridge)
3. Emergency eject hole
Figure 1 Front view of the RDX Removable Disk Backup System
Which o
HP RDX R
Windo
(h
ttp://www.hp.com/go/connect/) for the most recent information about the operating system versions
that are suppor ted.
perating systems are supported?
emovable Disk Backup Systems can be connected to servers running under Microsoft
ws Server 2003, Server 2008 and XP Professional. Refer to ou r World Wide Web site
2. Eject button/power LED
How do I connect the drive to my server?
For optimum performance the drive should be connected to a USB 2.0 por t and it should be the only
device on the USB bus. Although the drive will function on USB 1.1, performance will be severely
degraded. See also “USB Configuration Guide” on page 35. Appropriate USB cables are supplied
with your RDX Removable Disk Backup System.
RDX Removable Disk Backup System
11
Page 12

For internal drives, the USB 2.0 connection is via an internal port on the server’s system board, which
may be a standard Type A connector or a 4–pin header cable.
What are the mounting requirements for an internal device?
Mounting bay
You need one industry-standard, 5¼-inch, half-height bay in which to install the HP R DX Removable Disk
Backup System. Power requirements are:
Table 2 Power requirements
Internal drive External d rive
+5VDC ±5%
Voltage
Power consumption (Typical/Peak) 7.5W / 13W 6.6W / 13W
+12VDC ±10%
nl
+12VDC ±10%
AC Adapter N/A
Mounting hardware
For many serv
and are fixed
Rail kits for a number of industry-standard servers may be available. For m o re details refer to:
h
ttp://www.hp.com/go/connect.
Some servers use non-standard mounting rails and do not include spares. If this is the case with your
system, you will have to order these accessories from the server manufacturer before you can install the
RDX Remova
ers, no mounting tray or rails are required. Devices simply slide into the server’s chassis
with screws. Other servers have built-in trays or rails.
ble Disk Backup System.
HP StorageWorks RDX Removable Disk utility
The CD-ROM supplied with your HP RDX Removable Disk Backup System contains a utility that enables
the Eject button and right-click eject method to operate correctly under the Windows operating system.
It should be installed immediately after you have connected the drive. This utility also contains basic
diagnostic tests.
Using the HP StorageWorks CD-ROM
The HP StorageWorks CD-ROM is a central source of information about your RDX Removable Backup
System with utilities for getting the best performance from your drive.
Universal adapter, 100-240
VAC, 50-60Hz input
Use the HP StorageWorks CD-ROM to complete installation, as described in this guide, and to verify and
troubleshoot performance after installation. It helps you to:
• Install
• Learn about your product
• Register your product
• Buy med
• Troubleshoot with the RDX Removable Disk utility
12
the RDX Removable D isk utilit y which enables the eject function to operate correctly
ia online
Before you start
Page 13

2InstallinganinternalRDX Removable Disk Backup System
If you are installing an external RDX Removable Disk Backup System, please refer to
“Installing an external RDX Removable Disk Backup System”onpage21.
NOTE:
It is important to ensure that you connect your drive to a USB 2.0 port. The drive will work on a USB 1.1
port but performance will be severely degraded.
In this chapter:
•
“Prepare mounting bay” on page 13
• “Attach mounting hardware” on page 14
• “Install drive”onpage15
•
“Connect cables to the server” on page 16
• “Attach USB and power cable to the RDX drive” on page 17
•
“Secure the RDX Removable Disk Backup System” on page 18
Prepare mounting bay
CAUTION:
To avoid personal injury or damage to the server or RDX Removable Disk Backup System, ensure that the
server is disconnected from the mains power supply while you install the d rive.
1. Assemble the necessary tools and materials:
• P hillips screwdriver
• Flat-bladed screwdriver (if your server uses slotted screws)
• Torx screwdriver (if your server uses torx screws)
• Your server manuals (for reference during installation)
2. Perform a normal system shutdown and turn off the server and any connected peripherals.
RDX Removable Disk Backup System
13
Page 14

3. Remove the cover and front panel from the server, as detailed in your server’s documentation.
As you work inside the server, you may have to disconnect other signal cables or power cables from
other devices to maneuver the new drive into plac e. If you have to do this, make a note of their
position and connections so you can put them back correctly later.
Figure 2 Removing cover from typical server
4. Remove the filler panel from a spare 5¼-inch bay of your server, as described in your server’s docu-
mentation. Keep any screws for use in “Secure the RDX Removable Disk Backup System” on page 18.
5. You are now ready to install your RDX Removable Disk Backup System.
Attach mo
If your se
mount them on the drive now. If your server does not require special mounting hardware, proceed to
“Install drive” on page 15 now.
CAUTION
Static e
availab
metal part of the chassis. Similarly, touch a bare metal part of the drive before installing it.
unting hardware
rver requires special rails or other hardware to install the RDX Removable Disk Backup System,
:
lectricity can damage electronic components. Always wear an antistatic wriststrap if one is
le. If not, after you have disconnected power from the server and removed the cover, touch a bare
HP ProLiant servers
Different models of server require different mounting methods. The server may also incorporate
a locking mechanism to hold the RDX Removable Disk Backup System in place. See
“Secure the RDX Removable Disk Backup System”onpage18.
Please check your HP ProLiant server d ocumentation to ascertain the correct method of mounting, and
to check whether mounting hardware is provided with the server.
• Mounting rails: Some HP ProLiant servers, such as ML530 and ML570, require mounting rails.
These may be metal or plastic rails attached to the filler panel of the server’s drive bay. Use a
regular Phillips screwdriver to attach the appropriate rails. Use the M3 screws provided with the
server. If in doubt, refer to your HP ProLiant server documentation.
14
Installing an internal RDX Removable Disk Backup System
Page 15

• Mounting screws: Other HP ProLiant server models, such as ML350 and ML370, require the use
of special locating screws with no mounting rail. Use a Torx screwdriver to attach the appropriate
screws. You may need to purchase the M3 screws separately.
Other servers
Attach the appropriate mounting hardware. Refer to the manufacturer’s d ocumentation for instructions.
• If you are installing on a server that requires a tray, place the RDX Removable Disk Backup
System in the t
• If you are installing in a server that requires mounting rails, fasten the rails to the RDX Removable
Disk Backup System.
• Some servers
attached to the RDX Removable Disk B ackup System with screws.
Install drive
Slide the RDX Removable Disk Backup System into the open bay, aligning the tray or rails with the slots
in the bay, as shown in Figure 3 on page 15.
ray.
have snap-on mounting rails attached to the filler panel. These can be removed and
Figure 3 Installing RDX Removable Disk B ackup System
If your server does not use mounting hardware, check that the holes in the chassis are aligned with the
holes in the side of the RDX Removable Disk Backup System.
Do not secure the RDX Removable Disk Backup System at this point because you may have to move it
to get the cables into place.
RDX Removable Disk Backup System
15
Page 16
Connect cables t
o the server
Decide which USB cable to use
Look at the diagram on the inside of the side panel of the server to establish whether the server has an
internal USB port and its location. This may be a Type A USB connector or a special 5–pin connector
with one pin missing for keying.
Three USB cables are supplied with your RDX Removable Disk Backup System.
• Many HP ProLiant servers have the special USB connector on the system board, which may be
orientated vertically or horizontally. Two cables are supplied for connecting to a special USB
connector because there are two types of pin layout.
Figure 4 Orientation of special ProLiant internal connector
• Other servers have a Type A internal USB port, possibly o n the server’s system board or on an
internal USB card; this option uses the standard USB cable.
Connect the USB cable to the server
Use the cable supplied with the RDX Removable Disk Backup System to connect to the server.
• If your se
USB cable. You can use cable ties to tidy excess cable length.
rver has a standard USB port with a Type A (flat) connector, use the supplied, standard
16
Installing an internal RDX Removable Disk Backup System
Page 17

Figure 5 Connecting to a standard USB port
• If your server has a special USB port, use the supplied, special USB cable, as illustrated in
Figure 6 on pa ge 17. Select the special cable that is appropriate for the pin layout on the
USB port.
Figure 6 Connecting to a special USB port
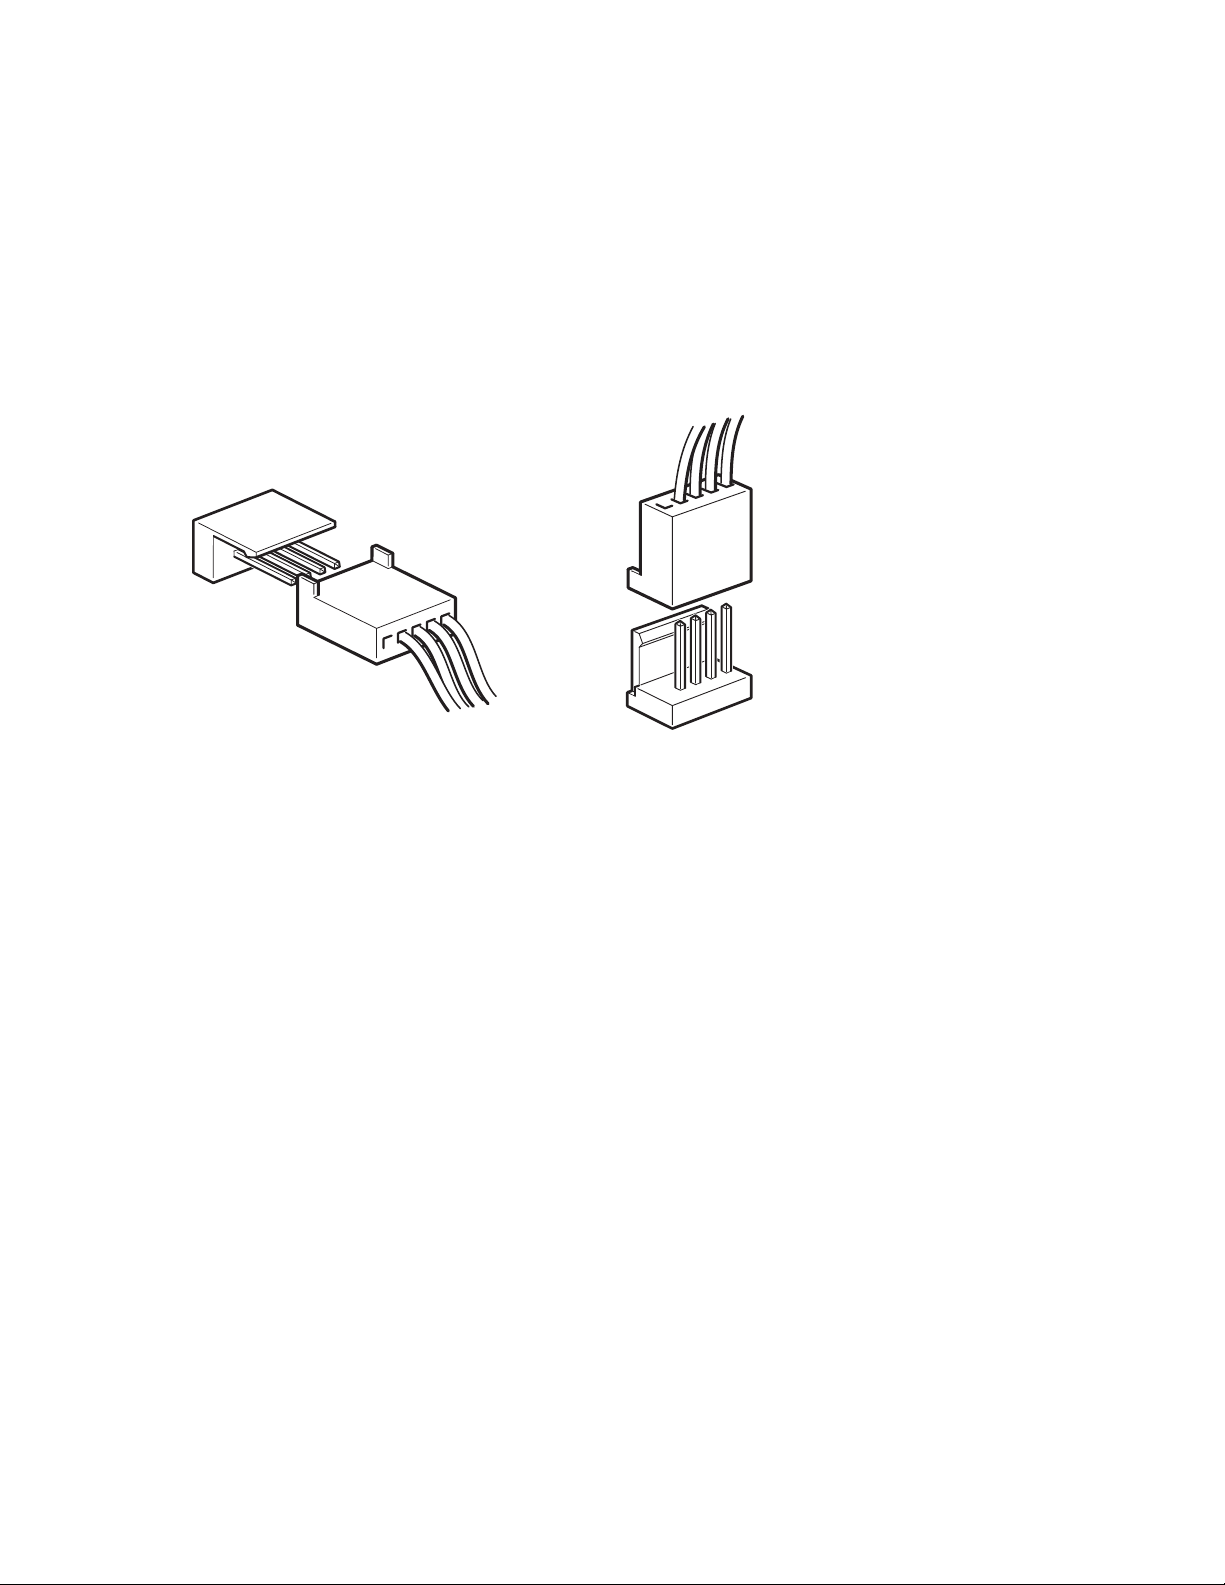
Attach
USB and power cable to the RDX Removable Disk Backup System
NOTE:
The drive is not powered from the USB bus. It must be connected to the server’s power supply.
1. Connect the Type B (square) connector on the USB cable to the internal RDX Removable Disk
Backup System.
RDX Removable Disk Backup System
17
Page 18

2. Attach a spare power cable from the server’s internal power supply to the power connector.
Secur
1 and 4. power cable 3. RDX Removable Disk Backup System
2 and 5. USB cable 6. server’s power supply
Figure 7 Attaching USB and power cable
e the RDX Removable Disk Backup System
NOTE:
Theserverlatchesandsideviewsofyourservermodelmaynotbeexactlythesameasshowninthe
illustrations. Please refer also to you server documentation.
18
Installing an internal RDX Removable Disk Backup System
Page 19

Mounting hardw
Ensure that you use the correct mounting rails or locating screws, as described in
“Attach mounting hardware” on page 14. The server also incorporates a locking mechanism to hold
the RDX Remova
1. Push the server latch down to lock the drive into position.
2. Ensure blanking plates are in place over empty bays and replace the cover on the server.
are used (H P ProLiant)
ble Disk Backup System in place.
No mounting hardware used
1. Use the M3 screws provided with the server. Check that the holes in the chassis are aligned with
the holes in the sides of the drive and use a regular Phillips screwdriver to secure the M3 screws,
as shown in Figure 8 on page 19.
1. M3 screws, supplied
Figure 8 Securing drive, no mounting hardware used
2. Ensure blanking plates are in place over empty bays and replace the cover on the server.
RDX Removable Disk Backup System
19
Page 20

20
Installing an internal RDX Removable Disk Backup System
Page 21

3 Installing an external RDX Removable Disk Backup System
If you are installing an internal RDX Removable Disk Backup System, please refer to
“Installing an internal RDX Removable Disk Backup System”onpage13.
In this chapter:
• “Connecting the power and USB c ables” on page 21
Connecting the power and USB cables
An external HP RDX Removable Disk Backup System will operate using any voltage in the range 100–240
volts (0.7 A,
A USB cable, a power cable and universal adapter are provided with your RDX Removable Disk
Backup System.
50-60 Hz). No adjustment is needed.
RDX Removable Disk Backup System
21
Page 22

1. Plug the Type B (square) connector on the USB cable into the socket on the back of the RDX
Removable Disk Backup System and connect the Type A (flat) connector to the server.
Figure9ConnectingtheUSBcable
2. Plug the rounded end of the AC adapter into the RDX Removable Disk Backup System and use
the supplied power cord to plug the AC adapter into a power outlet. (The supplied power cord
is appropriate for your geographical region.)
NOTE:
The R DX Removable Disk Backup System is not powered from the USB bus. It must be
connected to the mains power supply.
Figure 10 Connecting the power cable
22
Installing an external RDX Removable Disk Backup System
Page 23

4 Operating your RDX Removable Disk Backup System
In this chapter:
•
“Install the RDX utility” on page 23
•
“Front panel” on page 23
• “Media” on page 24
•
“Loading and unloading”onpage25
•
“Removing power from the unit” on page 26
Install the RDX Removable Disk utilit y (Windows only)
The RDX Removable Disk utility ensures that the eject function operates correctly und er Windows. It is
found on th
should be i
NOTE:
If the RDX utility is not installed, the eject button and the right-click eject method may not work properly.
e HP StorageWorks CD-ROM supplied with your RDX Removable Disk Backup System and
nstalled before you start to work with the unit.
NOTE:
You must be logged in as the Administrator or have administrator privileges to install the software.
1. Insert the supplied CD into the CD-ROM drive on the server.
2. The CD should automatically start the installation process.
3. Follow the instructions on the screen and restart the server when asked to do so.
4. Your RDX Removable Disk Backup System is now ready to use.
Front pa
The fron
door cov
If it does not start automa tically, locate the RDXInstallationWizard.exe program on the CD-ROM
and double-click to run it manually.
nel
t of the RDX Removable Disk Backup System has an opening for inserting cartridges. A protective
ers the opening. For more information about LEDs see“Understanding the LEDs” on page 28.
RDX Removable Disk Backup System
23
Page 24

1. cartridge activity LED
3. emergency reset hole
Figure 11 Front panel
NOTE:
On the internal model, the Eject button is to the right of the cartridge slot.
Media
For best performance we recommend HP branded media. The RDX Removable Backup System supports
any HP RDX cartridge. Cartridges are available in different capacities to support your storage
requirements. Order online at: h
Write-protecting cartridges
If you want to protect the data on a cartridge from being altered or overwritten, you can write-protect the
cartridge.
1. Eject the cartridge from the RDX Removable Disk Backup System.
2.
The write-protect tab is on the rear of the cartridge, see “Inserting a cartridge” on page 25.
• When the cartridge is write-protected, the padlock icon is closed.
• When the cartridge is write-enabled, the padlock icon is open.
2. eject button / power LED
ttp://www.hp.com/go/storagemedia.
Handling cartridges
Although cartridges are ruggedly built, they must be handled with care to ensure data integrity and long
life. Observe the following precautions:
• Store cartridges in their protective cases when you are not using them.
• Do not stack cartridges.
• Keep cartridges away from dust, dirt and moisture.
• Avoid direct sunlight, heat sources and temperature extremes or rapid changes in temperature.
• Do not drop cartridges or handle them roughly.
• Nevertrytoforcethecartridgeintotheunit. Ifitisdifficult to insert, check the
orientation and try again. Use the keyed corner as a guide to correct alignment, see
“Inserting a cartridge”onpage25.
24
Operating your RDX Removable Disk Backup System
Page 25

Loading and unlo
Inserting cartridges
1. Insert a cartridge into the unit with the keyed corner facing the upper left corner of the RDX
Removable Disk Backup System. The cartridge fits in only one orientation. (The write-protect tab is
on the back right of the cartridge.)
2. Push the cartridge gently into the unit until it locks into p lace with a clicking sound.
ading
1. write protect tab 2. keyed corner
Figure 12 Insertin g a cartridg e
Removing cartridges
There are two ways to eject a cartridge under normal operation.
If the eject function does not operate correctly, see “Emergency eject” on page 30.
Unload
using the mouse right-click method (Windows™ only)
1. Locate the drive letter for the device in Windows Explorer.
2. RightclickonthedeviceandselectEject.
3. The R DX Removable Disk Backup System completes any task it is currently performing and ejects
the cartridge. When the cartridge has been ejected by the unit, grasp the exposed sides of the
ridge and pull it straight out.
cart
RDX Removable Disk Backup System
25
Page 26

Unload using the
1. Press the Eject but ton on the front panel.
1. cartridge activity LED 2. eject button
Figure 13 Ejec ting a cartridge
NOTE:
On the internal model, the Eject button is to the right of the cartridge slot.
eject button
2. The drive completes any task it is currently performing and ejects the cartridge. When the cartridge
has been ejected by the unit, grasp the exposed sides of the cartridge and pull it straight out.
Removing power from the unit
To ensure reliable operation, do not remove power from the unit during read, write, search, load and
unload activities.
26
Operating your RDX Removable Disk Backup System
Page 27

5 Troubleshooting
In this chapter:
•
“General Procedure”onpage27
•
“Using the RDX utility for diagnostics ”onpage30
•
“Understanding the LEDs”onpage28
•
“Emergency eject” on page 30
•
“RDX Removable Disk Backup System does not appear in Device Manager”onpage31
•
“Unit performance seems slow” on page 31
•
“Write error”onpage31
•
“Firmware download fails with Windows Server 2003” on page 31
•
“System will not complete boot process” on page 31
General Procedure
If a problem occurs, the first step is to try to establish whether the problem lies with the cartridge, the
drive, the
Has the system just been installed?
There could be an installation problem:
1. Check thro
2. Check the power c onnectors and USB cabling.
3. Are you connected to a USB 2.0 port? Are there any other devices attached to the
host server and connections, or the way the system is being operated.
ugh the information in the relevant installation chapter of this guide.
same USB h
“USB Configuration Guide” on page 35.
ub/controller? Remove extra devices if they are not necessary. See also
4. Check the environmental conditions against the specified limits, see h
5. Are appropriate drivers and application software installed on the host?
Are you using new cartridges or a different brand of cartridge? Have you been using th e particular
cartridge for a very long time?
The pro
1. Check that you are using an RDX cartridge.
2. Check that the cartridge is not damaged.
3. Has th
4. Try the operation again.
5. If the problem still occurs, try using a different cartridge.
6. If the problem is still there, the problem probably lies with the drive or the host server.
Has the drive been moved recently? Have any cables been disconnected and reconnected? Has the
envi
Have reasonable precautions against static been taken?
The problem could lie with the drive:
1. Chec
blem could lie with the car tridge:
e cartridge been write-protected, see “Write-protecting cartridges” on page 24?
ronment c hanged—unusually hot, cold, damp or dry? Has there been dust or dirt near the d rive.
k the cables and connectors.
ttp://www.hp.com.
RDX Removable Disk Backup System
27
Page 28
2. If the problem persists, check the environmental conditions against the specified limits (refer to
h
ttp://www.hp.com). Perhaps move the drive to a more suitable site.
Has a new operating system been installed in the host server? Has new backup software been installed?
The problem could lie with the host or the software. Consult the server’s operating manuals, the software
manual, or seek help from a service engineer.
Understanding the LEDs
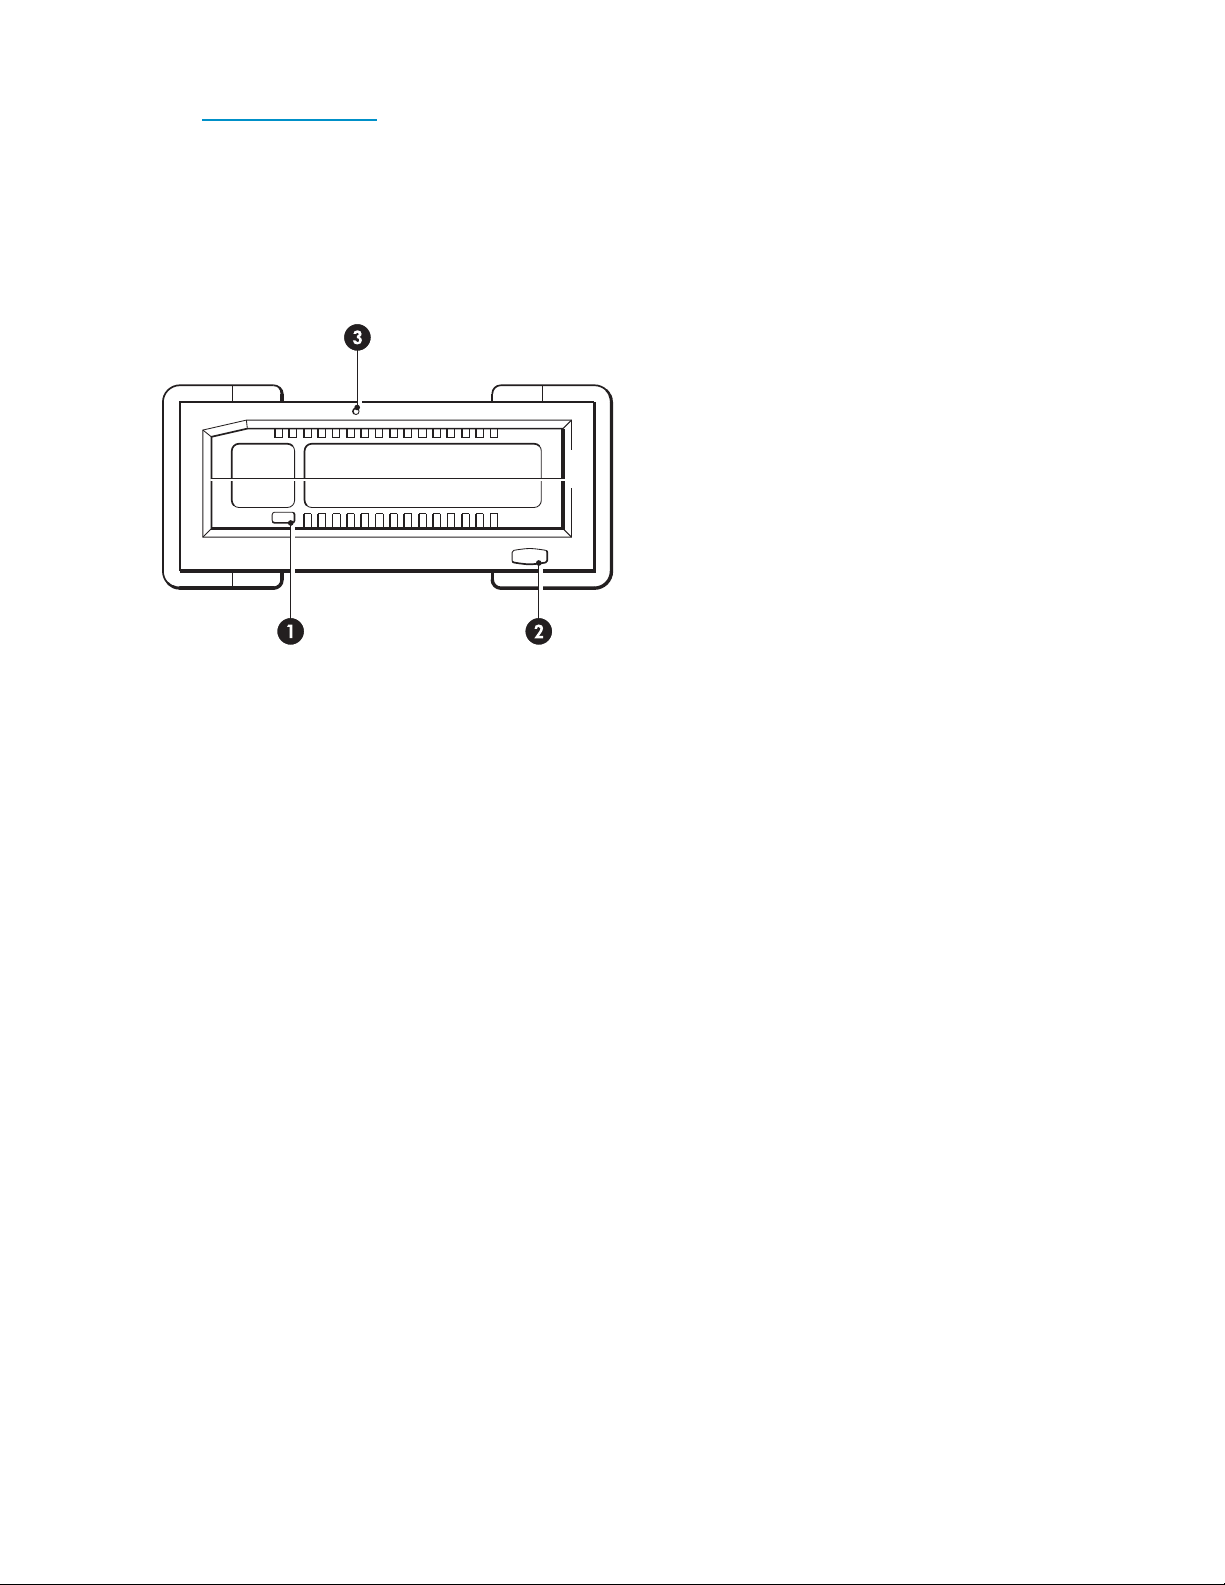
Figure 14 Front panel with LEDs
1. cartridge activity LED
3. emergency reset hole
2. eject bu
tton / power LED
28
Troubleshooting
Page 29

Power LED
Table 3 Power LED
LED Status Meaning
OFF
Steady GREEN
Blinking GR
Steady AMBER Fault
Blinking AMBER
EEN
No power
The drive is ready
for operation
Ejecting
Prevent
Action require
Check the power cable connection and replace the cable
if necessary. You can use the power cable from your
monitor or another device to check that the connection is
working.
If the power supply is present and the LED remains off,
power cycle or reset the drive. If it still fails, call for
service.
None. This is normal.
None. The un
The unit has detected a fault condition. This may be
because:
• the unit cannot eject the cartridge due to an
obstruction
• the internal electronics are damaged or
malfunctioning
Use a straightened paper clip in the Emergency Eject
Hole to remove a stuck cartridge, as described in
“Emergency eject” on page 30. If this does not resolve
the problem, run the RDX diagnostic application.
None. The host server is accessing the media and the
user has pressed the eject button. The unit will blink
amber for a few seconds then return to steady green.
Wait for host access to complete, after which the unit
will eject the cartridge. If it does not, you may not be
running the correct RDX utility, see “RDX Removable Disk
utility” on page 12. Install the RDX utility and try again.
If necessary, use Windows Explorer to eject the cartridge
(right-click on the drive letter for the RDX Removable Disk
Backup System and select Eject).
d
it is ejecting the cartridge.
RDX Removable Disk Backup System
29
Page 30
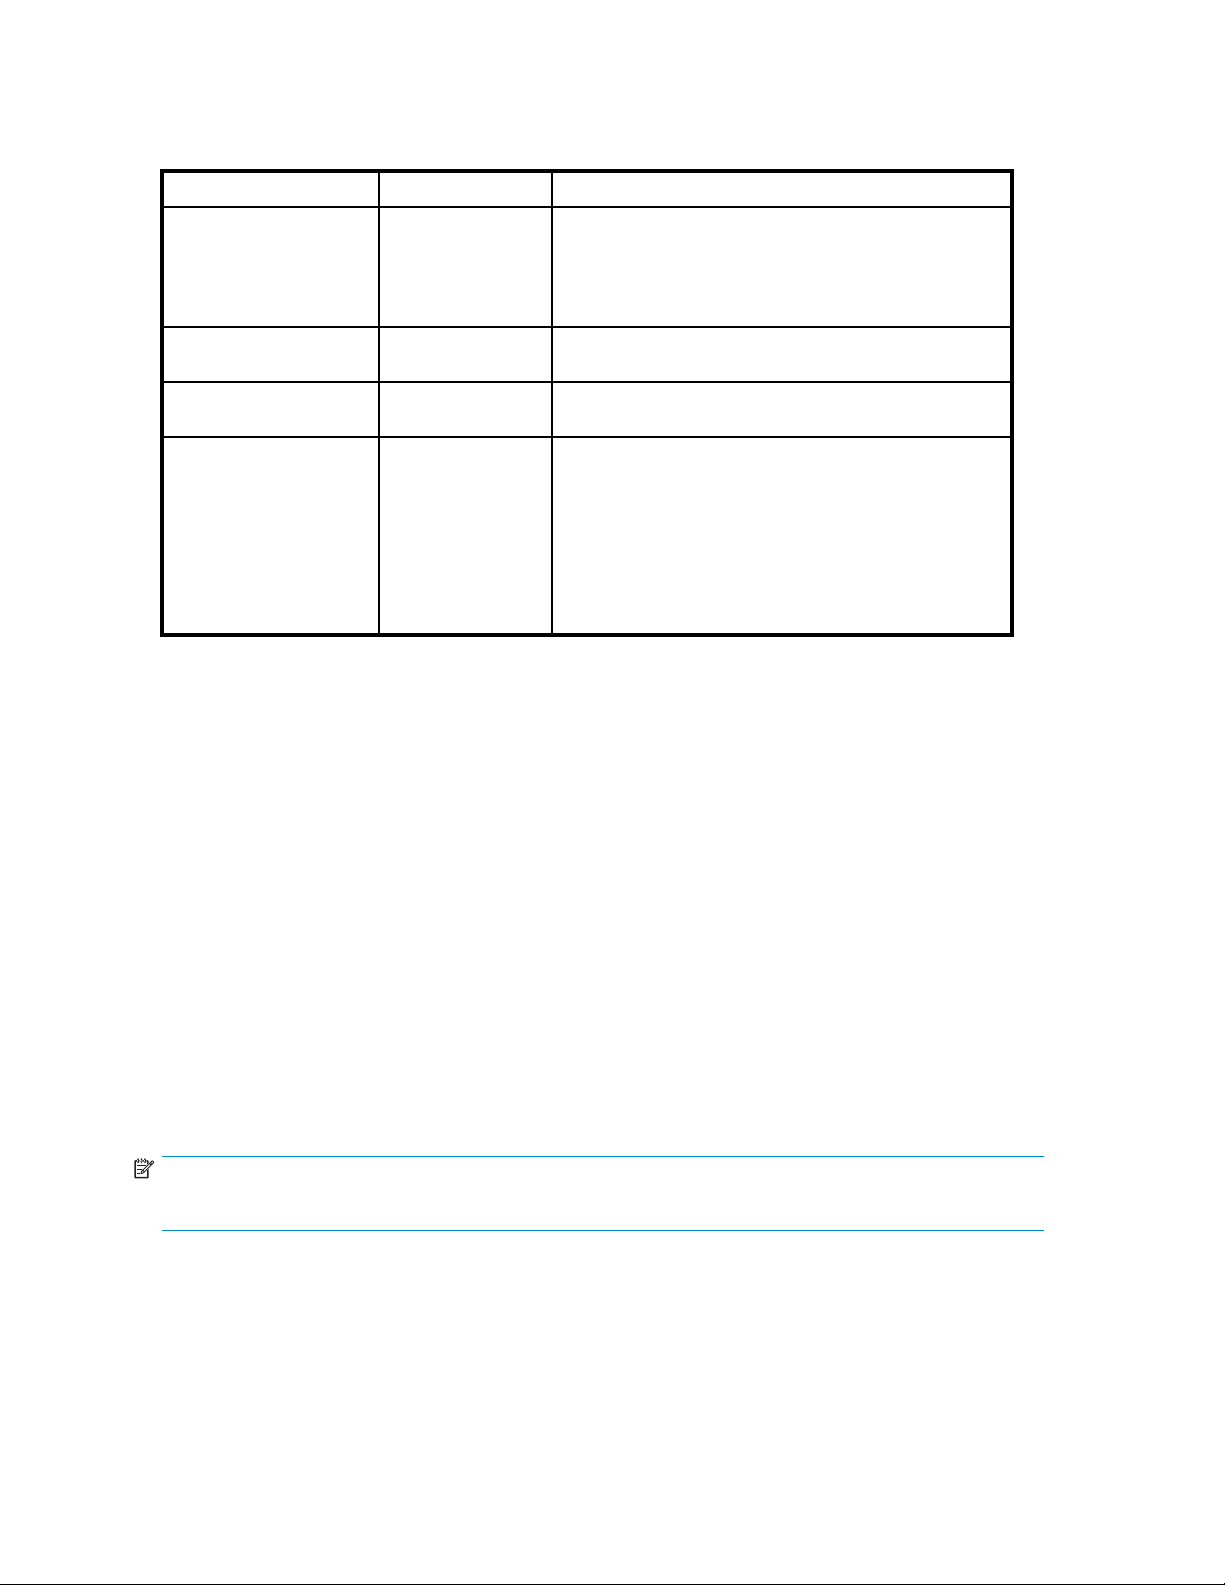
Cartridge Activ
Table 4 Cartridge LED
ity LED
LED Status Meaning
OFF
Steady GREEN
Blinking GR EEN
Steady AMBER Fault
Not ready
The cartridge is
ready for operation
Activity
Action require
The cartridge is not inserted correctly or the unit has no
power.
Make sure the c artridge is inserted correctly; it should
lock into place with a clicking sound. Check the power
cables.
None. This is normal.
None. The un
operation.
The unit has detected a cartridge fault condition. Check
for the following fault conditions:
• The cartridge is not compatible with the RDX
Removable Disk Backup System
• The cartridge has been severely damaged
• The cartridge has not been fully inserted
If this does not resolve the problem, run the RDX
diagnostic application.
Using the RDX utility for diagnostics
The RDX Utility is a Windows™ application that allows you to diagnose problems with your RDX
Removable Disk Backup System. It is normally installed immediately after connecting the RDX unit to
ensure that the eject function operates correctly, see “Install the RDX utility”onpage23.
With the RDX utility, you can:
• Identify RDX Removable Disk Backup Systems a ttached to your server.
• Retrieve device and cartridge status information.
• Upgrade the firmwareintheRDXRemovableDiskBackupSystem.
• Test the unit and the cartridge.
d
it is carrying out a read, write or seek
To run the RDX Utility for Windows
Click Start > All Programs > RDX Utility > RDX Utility. For instructions on using the RDX utility, click Help.
Emergency eject
NOTE:
DonotemergencyejectacartridgewhilethecartridgeactivityLEDisflashing.
If the car tridge does not eject, using either the eject button or the right-click eject methods, use the
following emergency eject hole method to recover the cartridge.
1. If using the internal RDX Removable Disk Backup System, turn off your server. If using the external
RDX Removable Disk Backup System, unplug the power cable.
30
Troubleshooting
Page 31

2. Insert a large straightened paper clip (or similar object) into the Emergency Eject Hole (see
“Front panel with LEDs” on page 28). Do not insert the o bject in the hole at an angle. Keep the
object straight and apply some force to eject the cartridge.
3. When the cartridge has been ejected by the unit, grasp the exposed sides of the car tridge and
pull the cartridge straight out.
4. Restart your server to reset the RDX Removable Disk Backup System. If using the external device,
remember to reconnect the power cable before restarting your server.
The RDX Removable Disk Backup System does not appear in the Device Manager
If the unit does not appear in the Windows Device Manager and the power LED is green, follow these
steps to res
1. Bring up the Device Manager:
2. Right-click on the top folder (this should be your server’s na m e). Select Scan for Hardware Changes.
3. You should see your RDX Removable Disk Backup System listed under Disk drives.Ifthedevice
can the hardware:
•Right-clickonMy Computer.
• Select Man
• Select Device Manager.
does not appear, restart the server.
age .
Unit performance seems slow
Make sure your unit is connected to a USB 2.0 port instead of a USB 1.1 port. For best performance
connect directly to a USB 2.0 root hub on the PC and not an external hub. If using an external hub, make
sure it is USB 2.0 compliant.
Be aware that the USB bus shares bandwidth between all USB devices connected to the systems,
including the RDX Removable Disk Backup System. The use of cameras, flash memory devices, and so on,
on the USB bus will decrease performance of the device. Remove extra devices if they are not necessary.
See also “USB Configuration Guide” on page 35.
Write E
rror
If the backup application reports a write error, follow these steps:
1. Verify that the write protect switch on the cartridge is set to the padlock open position.
2. Check the cartridge LED on the front of the cartridge. If this LED is am ber, the cartridge is not
ng properly. This may be due to severe damage to the cartridge. Run the RDX utility to obtain
worki
information about the failure.
more
3. Replace the cartridge if the error persists.
Firmware download fails with Windows Server 2003
If the firmware download fails with error invalid parameter and you are using Windows Server 2003,
check to ensure you have at least Service Pack 1 installed.
System will not complete boot process
Some versions of BIOS do not handle large USB removable media correctly. If your system will not
complete the boot process, follow the steps below:
RDX Removable Disk Backup System
31
Page 32

1. Make sure you are using the latest BIOS for your system by checking http://www.hp.com/support
2. Disable USB boot in the B IOS and retry.
3. Attempt to eject the cartridge and retry boot, or boot with the RDX Removable Disk Backup System
disconnected.
4. If using a FAT32 formatted cartridge, reformatting to another file system may fixtheproblem.
32
Troubleshooting
Page 33

6 Replacing an internal RDX Removable Disk Backup System
In this chapter:
•
“To disconnect your RDX Removable Disk Backup System” on page 33
•
“To reconnect your RDX Removable Disk Backup System”onpage33
If your RDX Removable Disk Backup System proves to be faulty and cannot be repaired and it is still
covered by the original warranty, it will be replaced. HP will provide a replacement unit free of charge.
Based on availability and where g eo graphy permits, the replacement unit will be shipped for next
business day delivery. Same day or four-hour delivery may be offered at an additional charge where
geography permits. If you request HP to install the replacement unit, you will be charged for the travel
and labor costs of this service.
To disconnect your drive
1. Unpack yo
2. Power of
3. Remove the cover from the server.
4. Observing normal anti-static precautions (see caution in “Attach mounting hardware”onpage14)
remove
5. Discon
the mounting bay.
6. Put the failed unit into the packaging that contained the replacement unit.
7. Return the faulty unit to your local HP Service Center. Instructions on where to return faulty units will
be shipped with the replacement unit.
You m
days. The defective pa r t must be returned with the associated documentation in the provided
shipping material. Failure to return the defective part may result in HP billing you for the replacement.
HP will pay all shipping and part return costs and determine the courier/carrier to be used.
NOTE:
If you are not replacing the RDX Removable Disk Backup System immediately, you should
rt a b lanking plate into the empty b ay. Replace the cover on the server and secure
inse
with screws, as appropriate.
ur replacement RDX Removable Disk Backup System, and retain the packaging.
f the server and disconnect from the mains power supply.
any screws that are holding the drive in place.
nect the failed unit from the server’s power and USB cables a nd slide it carefully out of
ust ship the defective unit back to HP within a defined period of time, normally five (5) business
To reconnect your RDX Removable Disk Backup System
Follow the step-by-step instructions in this User Guide.
RDX Removable Disk Backup System
33
Page 34

34
Replacing an internal RDX Removable Disk B ackup System
Page 35

7USBConfiguration Guide
In this chapter:
•
“USB in HP StorageWorks devices”onpage35
•
“USB terminology”onpage35
•
“Setting up a USB network” on page 36
•
“USB cables” on page 36
USB in HP Stor
The RDX Remov
USB transfe
less. This is defined by the transfer rate of the drive and the compressibility of the data.)
To benefit from the high-speed performance of the USB 2.0 interface, the RDX Removable Disk Baakup
System shou
thesystemportshouldalsobeUSB2.0compliant.
To maximize device performance, minimize the use of other USB devices when using the RDX Removable
Disk Backu
ageWorks devices
able Disk Backup system is a USB 2.0 logo certified device. It supports the high-speed
r rate with a theoretical maximum transfer of over 50 MB/s. (The actual backup rate will be
ld be connected to its host system via a USB 2.0 port. Any USB hubs bet ween the device and
pSystem.
USB terminology
The Universal Serial Bus, USB, is a communication interface where an intelligent host controls all the
network a ctivity. A command from the host to a particular device is broadcast to all devices on the
network. A device waits for a command addressed to itself and then responds as requested. The host
determines how much of the overall USB network bandwidth a given device can use at any time. Any
given USB network has on ly one host.
Hubs act as command repeaters and multipliers. This allows many devices to b e supported by one host.
A host command can arrive at the upstream port of the hub and be transmitted via the downstream ports
to many other device and hubs. (Likewise, device commands arriving at a downstream port are also
repeated upstream.) There is a special hub called a root hub. The root hub’s upstream port is connected
directly to the host. All USB systems have a root hub. This is why a system typically has more than one
USB p ort. All the USB ports on the system are connected to the host system via the root hub.
USB devices are not treated equally by the h ost.
• Periodic devices, which consist of interrupt and isochronous devices, are given a higher priority
than bulk transfer devices.
• Interrupt devices, such as keyboards and mice, typically send brief but important input information
to the system.
• Isochronous devices, such as web cameras, typically require timely transmission of data, such as
avideostream.
• Bulk transfer, such as printers and CD-ROM, must receive or transmit 100% accurate data. But
how fast or often the data is transmitted is not as important as the accuracy of the data.
The host will give network bandwidth priority to periodic devices and will share any remaining bandwidth
equally among any active bulk transfer devices.
USB supports many types of devices and three data transfer rates, low speed, full speed, and high speed.
(A keyboard does not need to transfer data to the system at the same speed as a cable modem.)
RDX Removable Disk Backup System
35
Page 36

The transfer speed capabilities of a device are often referred to by the USB specification revision in which
the transfer rate was defined. Therefore a USB 2.0 Hub will s upport high, full and low speed, but a
USB 1.1 hub will only support full and low speed.
The USB specification was developed and is maintained by the USB organization. The USB organization
also conducts a certification program. The USB organization will issue the USB log o to a device,
which has passed a series of tests that verify the device has correctly implemented the USB interface,
as defined by the USB specification. There are many types of USB logos depending on which features
of the USB specification a device suppor ts. A USB 2.0 logo-ed device correctly supports high, full,
andlowspeeddatatransfer.
Setting up a
USB is very u
connect a US
or need to p
between the device and host system and connect them with additional cables.
Ifyouareusingahigh-speed(USB2.0)device,makesurethattheUSBhostatthesystemandallthe
hubs between the device and host support high-speed (USB 2.0) transfer.
When using a bulk transfer device, such as an RDX Removable Disk Backup System, do not use other USB
devices that will place restrictions on the USB bandwidth available to the bulk transfer device.
If severa
simultaneously, an additional host must be added to the system. Each d evice must then be placed into
the separate networks star ting at the different hosts. An additional host is typically a new USB HBA,
which plu
if sever
constrain the USB devices’ performance.)
Always use USB logo-ed components in your USB network. This is the best and easiest method to
ensure r
l USB devices requiring large amounts of the USB network bandwidth are to operate
gs into the host system’s PCI slot, creating a new USB host that resides on the network. (Note:
al USB adapters are placed into a system, demands on the bandwidth of the system bus will
eliable operation.
USB cables
USB cables are available in a variety of lengths. The maximum cable length is 5 meters. If you need to
place a USB device further than 5 meters from the system, you must use a hub.
Do not use USB cable extenders or couples. These are not recognized or approved by the USB
organization. The USB specification does not allow their use and they are likely to reduce the reliability of
the USB network or cause it not to work completely.
USB network
ser friendly. The interface automatically assigns add resses to devices; you simply need to
BdevicetoaUSBportonasystemusingaUSBcable. IfyouhavemanyUSBdevices
lace a device away from your system, you may place up to a maximum of five USB hubs
Internal and external USB devices use the same USB cables.
36
USB Configuration Guide
Page 37

Index
A
attach mounting hardware
internal drive,14
audience,7
B
backup software problems,27
boot fails,31
buttons
Eject,25
Unload,26
C
cartridge,24
handling,24
loading,25
unloading,25,26
write protect,24
Cartridge activity LED,24,28,30
cartridges
inserting,25
problems,27
removing,25,26
CD-ROM
contents,12
connect power cable
external drive,21
internal drive,17
connect USB cable
external drive,21
internal drive,17
conventions
document,7
text symbols,7
D
device manager
disk not appearing in,31
document
conventions,7
related documentation,7
documentation
HP website,7
providing feedback,9
E
Eject button,25
eject button,26
emergency eject,30
external drive
connect power cable,21
connect USB cable,21
installation,21
F
firmware download fails,31
front panel,23
LEDs,24
LEDs,28
front view,11
H
handling cartridges,24
help
obtaining,8
host
problems,27
HP
technical support,8
I
inserting cartridges,25
install drive
external drive,21
internal drive,15
installation
external drive,21
internal drive,13
problems,27
RDX utility,23
internal drive
attach mounting hardware,14
connect power cable,17
connect USB cable,17
install drive,15
installation,13
prepare mounting bay,13
secure drive,18
USB cables,16
which USB cable to use,16
L
LED
cartridge activity,24,28
power,29
troubleshooting,28
loading cartridges,25
RDX Removable Disk Backup System
37
Page 38

M
media,24
mounting requirements,12
O
operating systems,11
operating your drive,23
P
performance,31
power LED,29
power requirements,12
prepare mounting bay
internal drive,13
R
RDX utility,12
installation,23
troubleshooting,30
related documentation,7
T
technical support
HP,8
service locator website,9
text symbols,7
U
unload
emergency eject,30
Unload button,26
unloading cartridges,25
eject button,26
mouse right-click,25
USB cable
external drive,21
internal drive,16
USB cables
internal drive,16
usb cables,36
usb configuration guide,35
usb network,36
usb terminology,35
using the drive,23
S
secure drive
internal drive,18
slow performance,31
Subscriber’s Choice, HP,8
supported operating systems,11
symbols in text,7
W
websites
HP ,9
HP Subscriber’s Choice for Business,8
product manuals,7
write error,31
write protect
cartridge,24
38
 Loading...