

Page 1

HP ROM-Based Setup Utility
User Guide
for use with HP ProLiant Generation 5 Servers
May 2006 (Fifth Edition)
Part Number 347563-005
Page 2

© Copyright 2003-2006 Hewlett-Packard Development Company, L.P.
The information contained herein is subject to change without notice. The only warranties for HP products and services are set forth in the express
warranty statements accompanying such products and services. Nothing herein should be construed as constituting and additional warranty. HP
shall not be liable for technical or editorial errors or omissions contained herein.
Confidential computer software. Valid license from HP required for possession, use or copying. Consistent with FAR 12.211 and 12.212,
Commercial Computer Software, Computer Software Documentation, and Technical Data for Commercial Items are licensed to the U.S.
Government under vendor's standard commercial license.
Microsoft and Windows are U.S. registered trademarks of Microsoft Corporation. Windows Server 2003 is a trademark of Microsoft
Corporation.
Linux is a U.S. registered trademark of Linus Torvalds.
May 2006 (Fifth Edition)
Part Number 347563-005
Audience assumptions
This document is for the person who installs, administers, and troubleshoots servers and storage systems.
HP assumes you are qualified in the servicing of computer equipment and trained in recognizing hazards
in products with hazardous energy levels.
Page 3

Contents
Introduction.................................................................................................................................. 5
Overview ................................................................................................................................................. 5
Running RBSU........................................................................................................................................... 5
RBSU menu .................................................................................................................................. 7
RBSU menu overview................................................................................................................................. 7
System Options......................................................................................................................................... 8
OS Selection................................................................................................................................... 9
Embedded Serial Port A ................................................................................................................... 9
Embedded Serial Port B.................................................................................................................. 10
Embedded LPT Port ........................................................................................................................ 11
Virtual Serial Port........................................................................................................................... 11
Embedded LPT Mode Support .........................................................................................................12
Integrated Diskette Controller .......................................................................................................... 12
NUMLOCK Power-On State............................................................................................................12
Embedded NICs............................................................................................................................ 13
Diskette Write Control.................................................................................................................... 13
Diskette Boot Control...................................................................................................................... 13
Advanced Memory Protection .........................................................................................................13
USB Control.................................................................................................................................. 14
USB 2.0 EHCI Controller ................................................................................................................ 15
Power Regulator for ProLiant ........................................................................................................... 15
PCI Devices ............................................................................................................................................ 16
Standard Boot Order (IPL)......................................................................................................................... 17
Boot Controller Order .............................................................................................................................. 17
Date and Time ........................................................................................................................................ 18
Server Availability................................................................................................................................... 19
ASR Status.................................................................................................................................... 19
ASR Timeout ................................................................................................................................. 19
Thermal Shutdown......................................................................................................................... 20
Wake-On LAN.............................................................................................................................. 20
POST Speed Up ............................................................................................................................ 20
POST F1 Prompt............................................................................................................................ 20
Power Button................................................................................................................................. 21
Automatic Power-On......................................................................................................................21
Power-On Delay............................................................................................................................ 22
Server Passwords .................................................................................................................................... 22
Set Power-On Password .................................................................................................................22
Set Admin Password ...................................................................................................................... 22
Network Server Mode.................................................................................................................... 23
QuickLock .................................................................................................................................... 23
BIOS Serial Console/EMS Support............................................................................................................ 23
BIOS Serial Console Port................................................................................................................ 24
BIOS Serial Console Baud Rate.......................................................................................................25
EMS Console ................................................................................................................................ 26
BIOS Interface Mode .....................................................................................................................26
Server Asset Text..................................................................................................................................... 27
Set Server Info Text........................................................................................................................27
Set Administrator Info Text .............................................................................................................. 28
Set Service Contact Text ................................................................................................................. 28
Contents 3
Page 4

Custom POST Message .................................................................................................................. 29
Advanced Options Menu .........................................................................................................................30
Multi-Processor Specification (MPS) Table Mode................................................................................ 30
ROM Selection.............................................................................................................................. 31
Erase Non-Volatile Memory ............................................................................................................31
Erase NVRAM/Boot Disk................................................................................................................ 32
NMI Debug Button......................................................................................................................... 32
Virtual Install Disk .......................................................................................................................... 33
Secondary IDE Channel Support...................................................................................................... 33
BIOS Enhanced RAID..................................................................................................................... 33
Node Interleaving.......................................................................................................................... 33
Serial Number ..............................................................................................................................34
Product ID .................................................................................................................................... 34
Drive Write Cache......................................................................................................................... 35
SATA Software RAID...................................................................................................................... 35
Processor Options ......................................................................................................................... 36
Utility Language ...................................................................................................................................... 38
ROM-based enhancements ..........................................................................................................39
ROM-based enhancements overview.......................................................................................................... 39
Embedded server setup............................................................................................................................39
Setup Utility .................................................................................................................................. 40
Inspect Utility ................................................................................................................................41
Diagnostics Utility.......................................................................................................................... 42
Auto-Configuration Process....................................................................................................................... 44
Boot Options .......................................................................................................................................... 46
Operating System Installation.................................................................................................................... 46
Command Line Interface .............................................................................................................. 47
Command Line Interface Overview ............................................................................................................ 47
Dual-Mode ROM-Based Utilities................................................................................................................. 47
CLI Mode Selection ................................................................................................................................. 47
Inspect CLI Commands............................................................................................................................. 48
RBSU CLI Commands............................................................................................................................... 48
System Maintenance CLI Commands.......................................................................................................... 51
Command Buffering Support..................................................................................................................... 51
Additional CLI support .............................................................................................................................51
RBSU configuration flow .............................................................................................................. 52
RBSU configuration flow overview ............................................................................................................. 52
Manual path flow.................................................................................................................................... 52
Scripted installation flow ..........................................................................................................................53
Configuration Replication Utility ...................................................................................................... 53
Array Configuration Replication Utility ............................................................................................. 54
Acronyms and abbreviations........................................................................................................ 55
Index......................................................................................................................................... 57
Contents 4
Page 5

Introduction
In this section
Overview ................................................................................................................................................ 5
Running RBSU.......................................................................................................................................... 5
Overview
HP ProLiant Generation 2 and later servers have a configuration utility embedded in the system ROM. The
configuration utility, RBSU, starts when you press the F9 key from the startup sequence.
RBSU performs a wide range of configuration activities that may include:
• Configuring system devices and installed options
• Displaying system information
• Selecting the primary boot controller
• Configuring online spare memory
Configuring system parameters should be done through RBSU instead of through the System Configuration
Utility, which was run by pressing the F10 key for previous ProLiant servers. RBSU is machine-specific and
customized for each type of server.
IMPORTANT: The menus in this document apply to Generation 5 servers, and may look different from the
menus in previous generation servers.
Running RBSU
1. To run RBSU and modify configuration settings, press the F9 key when prompted during the startup
sequence.
2. Modify configuration settings as needed.
3. Exit RBSU by pressing Esc at the main menu. The system must be restarted when exiting RBSU to
confirm configuration setting changes.
Introduction 5
Page 6
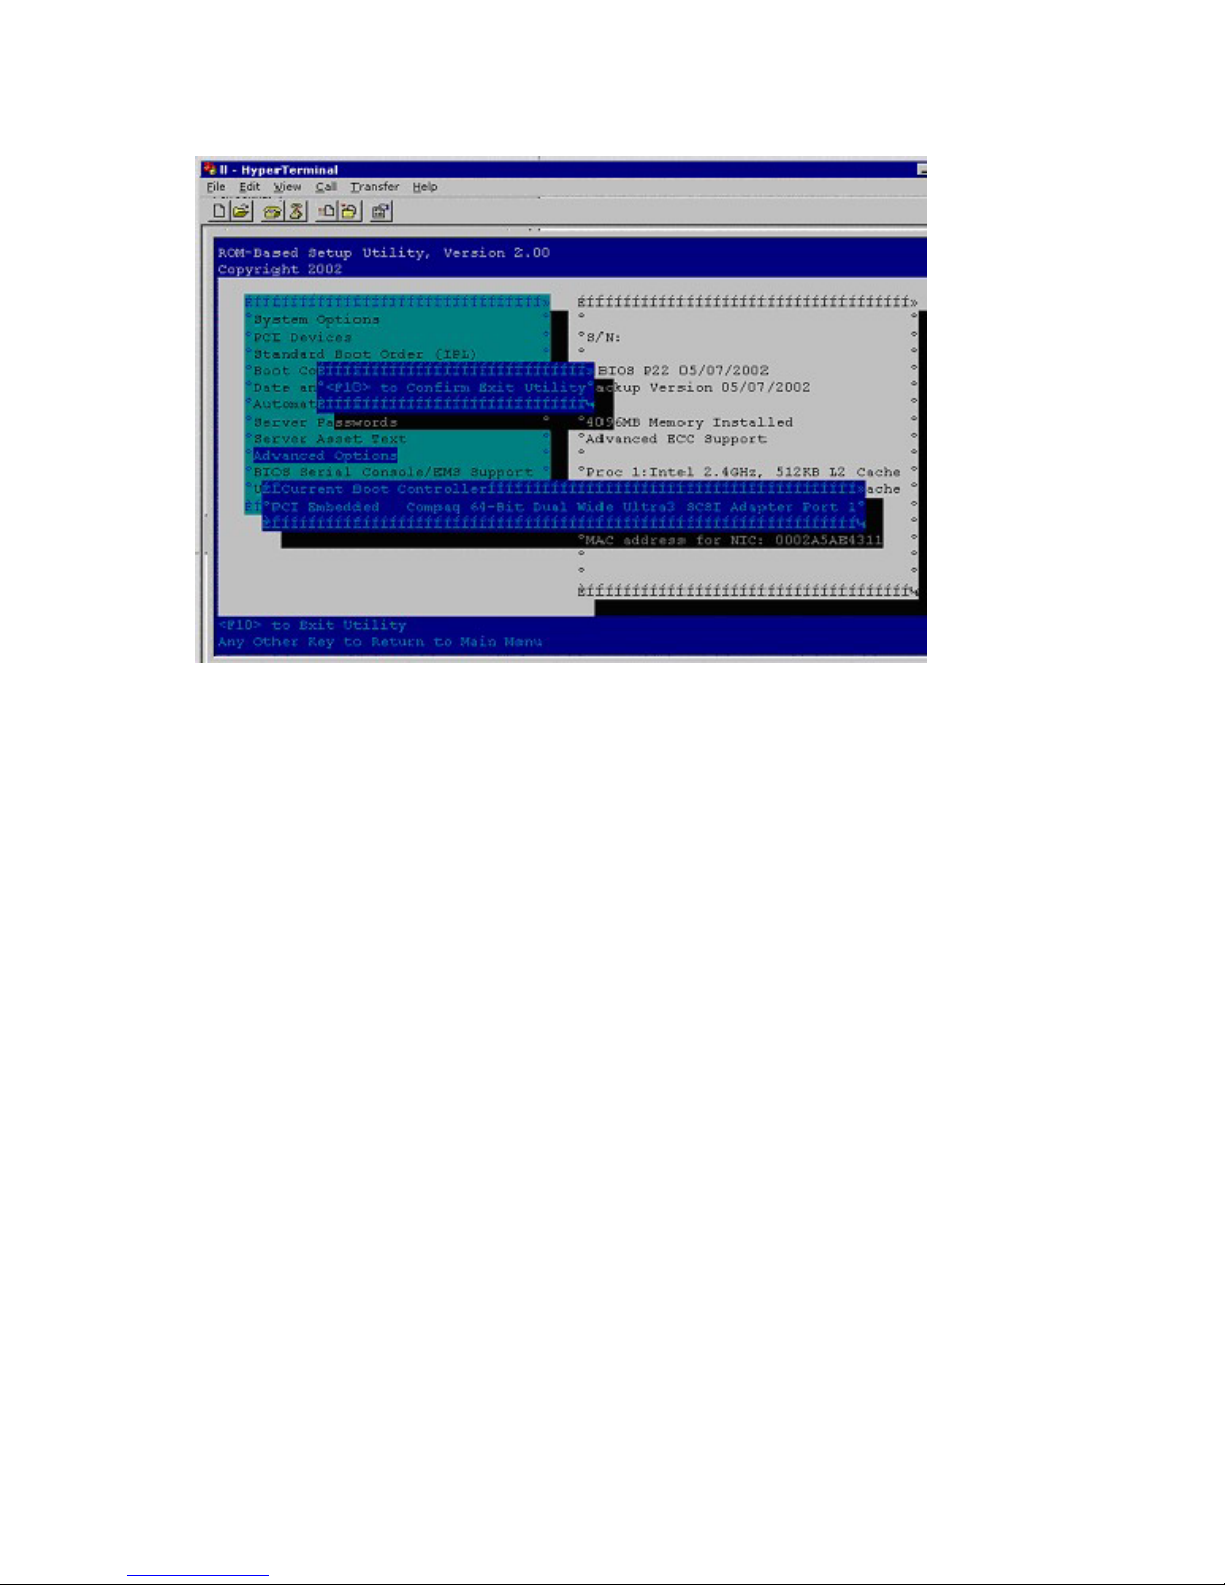
A confirmation to exit is displayed on the screen, and the current boot controller is also displayed for
reference purposes.
4. To confirm exiting RBSU, press the F10 key.
5. The server restarts using the new configuration settings.
Introduction 6
Page 7

RBSU menu
In this section
RBSU menu overview................................................................................................................................ 7
System Options........................................................................................................................................ 8
PCI Devices ........................................................................................................................................... 16
Standard Boot Order (IPL) ....................................................................................................................... 17
Boot Controller Order............................................................................................................................. 17
Date and Time ....................................................................................................................................... 18
Server Availability.................................................................................................................................. 19
Server Passwords ................................................................................................................................... 22
BIOS Serial Console/EMS Support........................................................................................................... 23
Server Asset Text.................................................................................................................................... 27
Advanced Options Menu ........................................................................................................................ 30
Utility Language ..................................................................................................................................... 38
RBSU menu overview
The RBSU menu allows you to select which configuration setting to view or modify.
IMPORTANT: Menu options may differ from those in this document, depending on specific server options.
On the right-hand side of the screen, a window displays basic information about the server. This
information includes the server model, serial number, BIOS version, backup BIOS version, memory
installed, and processors installed.
NOTE: A service number is reported below the serial number on the HP ProLiant DL760 Server only.
NOTE: Pressing the F1 key when any sub-menu option is highlighted allows you to view a description of
that feature. Please note that all menus are in English only.
RBSU menu 7
Page 8
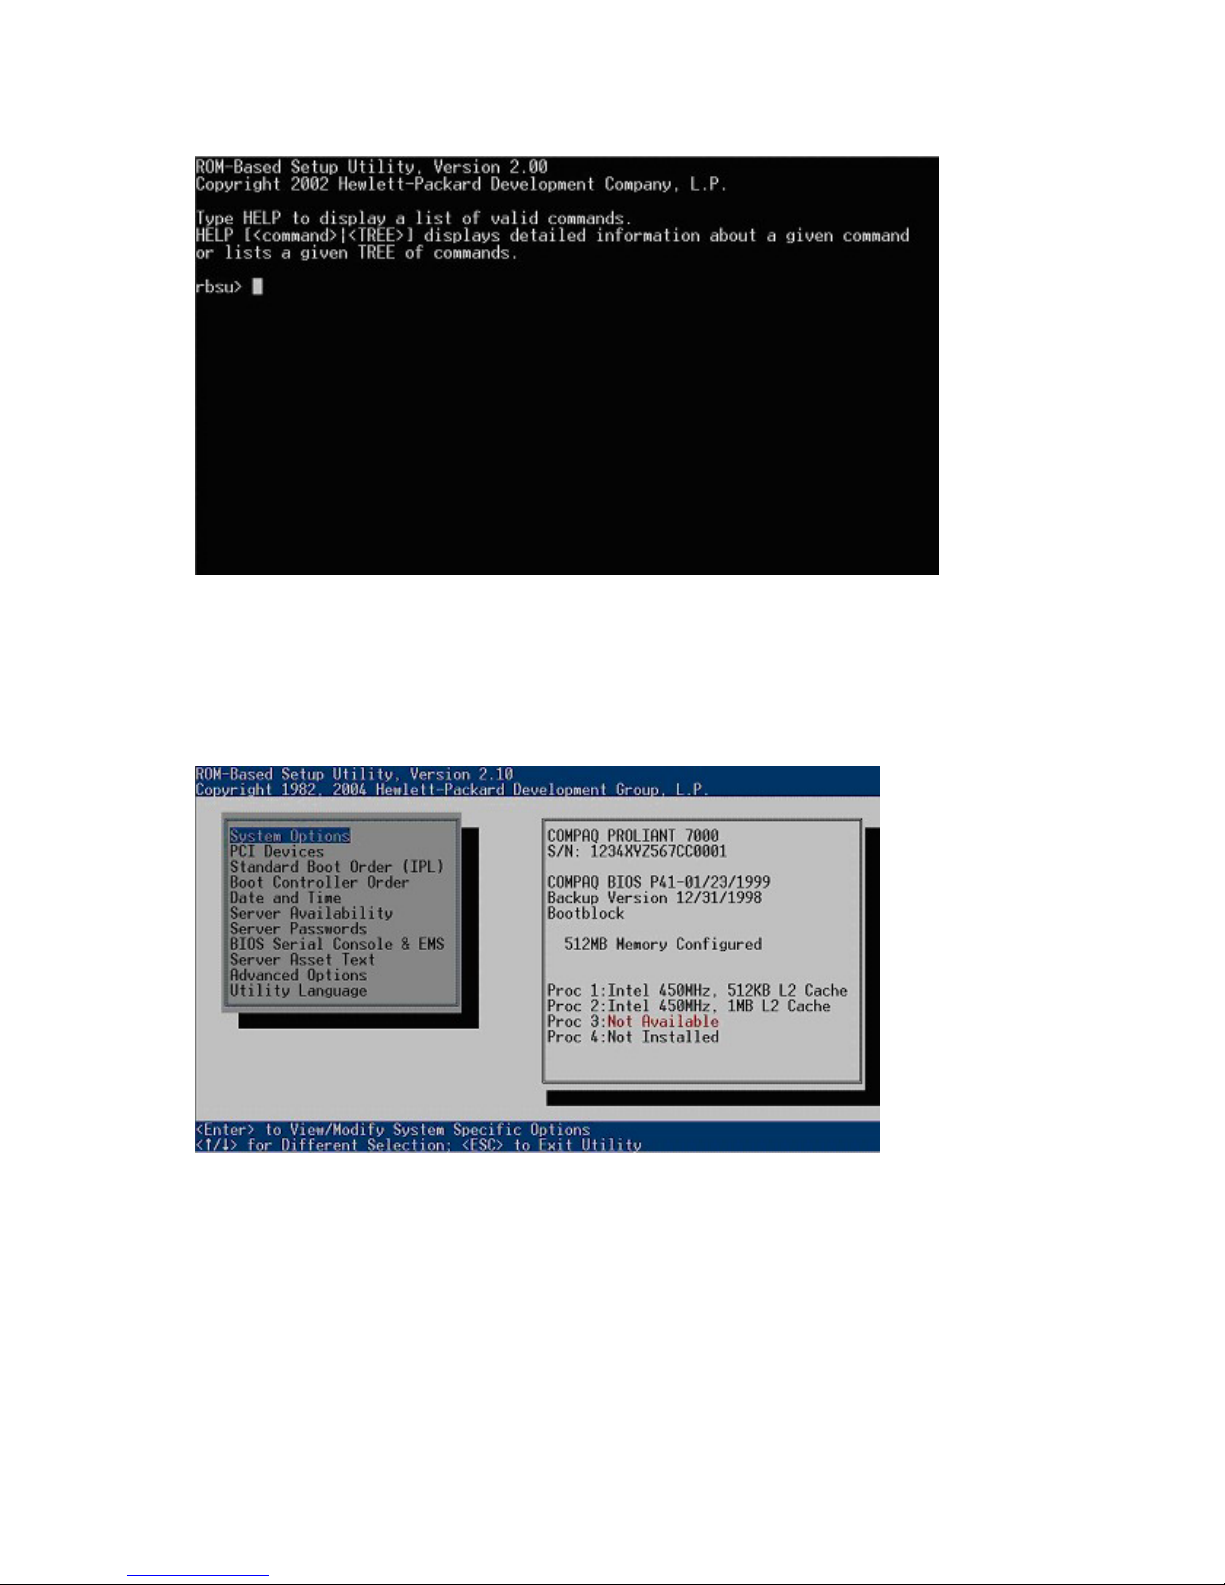
Some new servers, which use CLI and are configured using BIOS Serial Console, display a command
prompt screen.
The CLI mode of RBSU is a command-prompted interface that provides equivalent functionality to the
menu-based mode.
System Options
The System Options menu enables you to configure the basic I/O of the server and specify the OS.
System options are:
• OS Selection (on page 9)
• Embedded Serial Port A (on page 9)
• Embedded Serial Port B (on page 10)
• Embedded LPT Port (on page 11)
• Virtual Serial Port (on page 11)
• Embedded LPT Mode Support (on page 12)
• Integrated Diskette Controller (on page 12)
RBSU menu 8
Page 9
•
NUMLOCK Power-On State (on page 12)
• Embedded NICs (on page 13)
• Diskette Write Control (on page 13)
• Diskette Boot Control (on page 13)
• Advanced Memory Protection (on page 13)
• USB Control (on page 14)
• USB 2.0 EHCI Controller (on page 15)
• Power Regulator for ProLiant (on page 15)
IMPORTANT: Menu options may differ from those in this document, depending on specific server options.
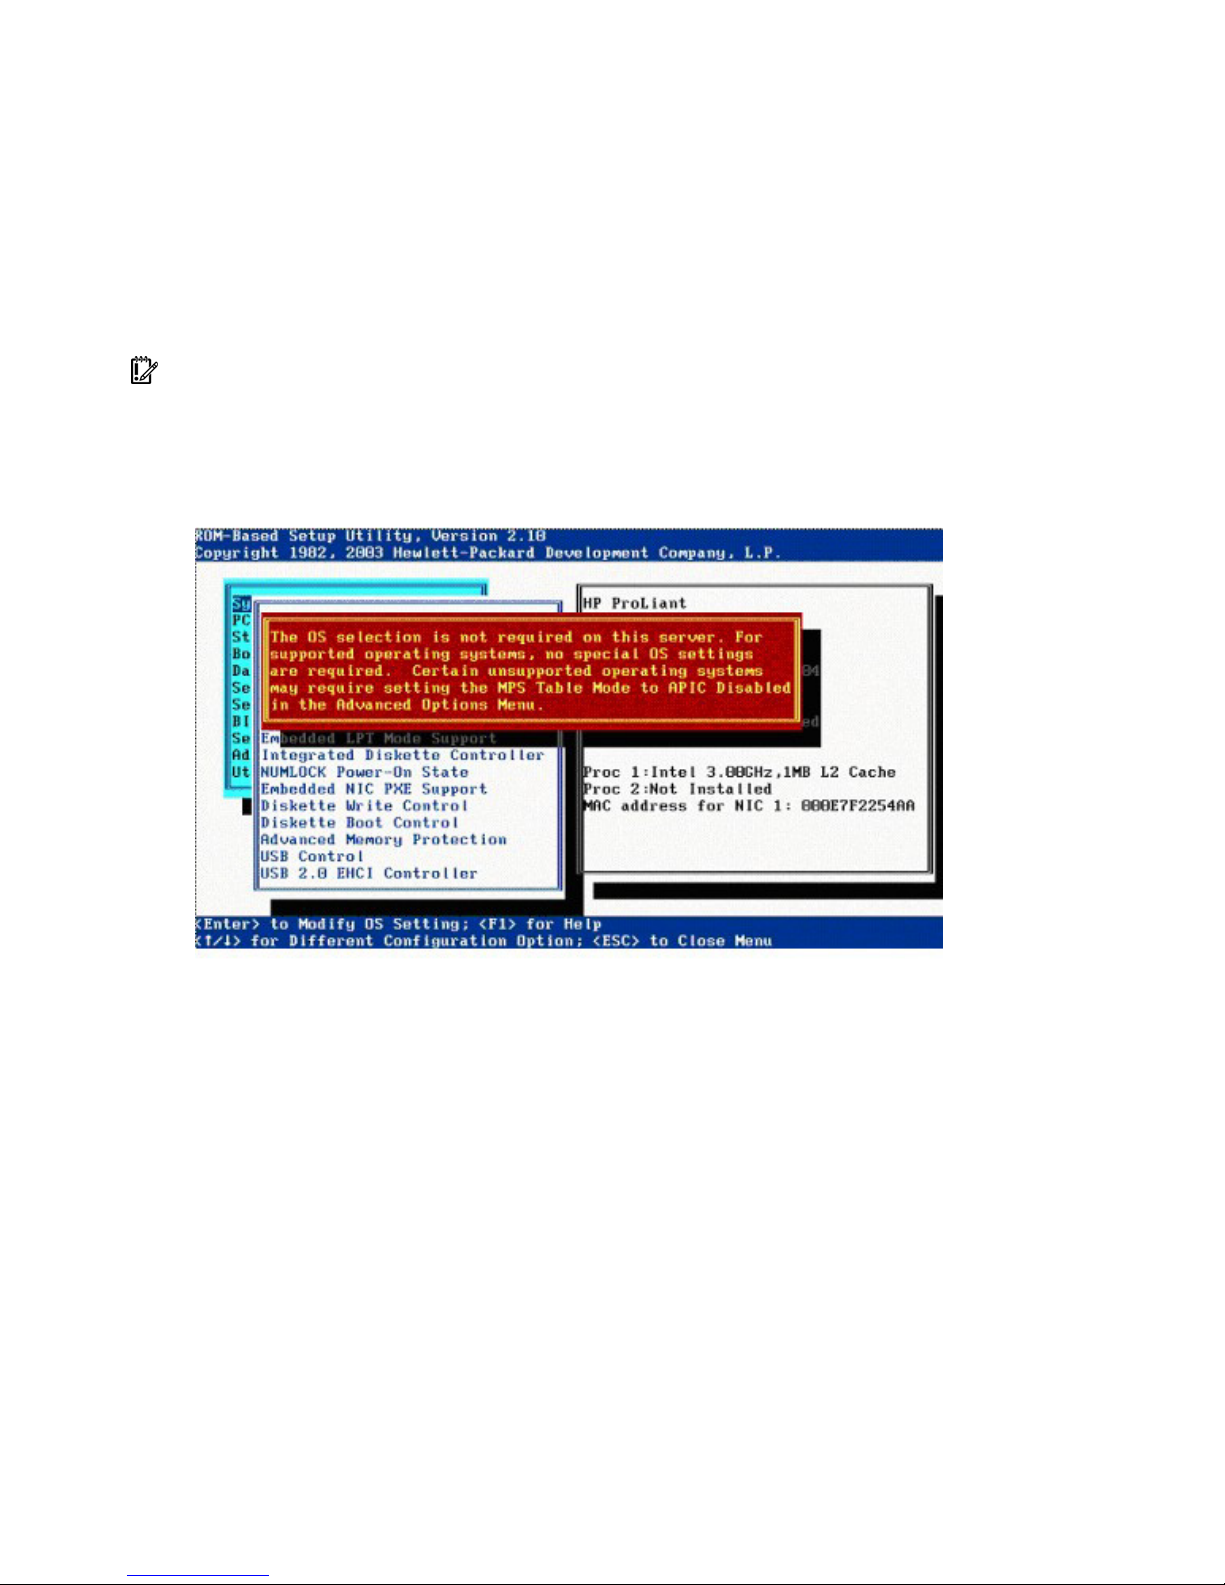
OS Selection
Changing the OS can no longer be done through RBSU. Selecting the OS Selection menu item will
result in error.
Embedded Serial Port A
The Embedded Serial Port A option sets the configuration for the internal serial port A. The settings include
the address and IRQ. This option can also disable the port.
RBSU menu 9
Page 10

NOTE: Embedded Serial Port options may be named Embedded COM Port options, depending on the
server.
Embedded Serial Port B
The Embedded Serial Port B option sets the configuration for the internal serial port B. The settings include
the address and IRQ. This option can also disable the port.
NOTE: Embedded Serial Port options may be named Embedded COM Port options, depending on the
server.
RBSU menu 10
Page 11
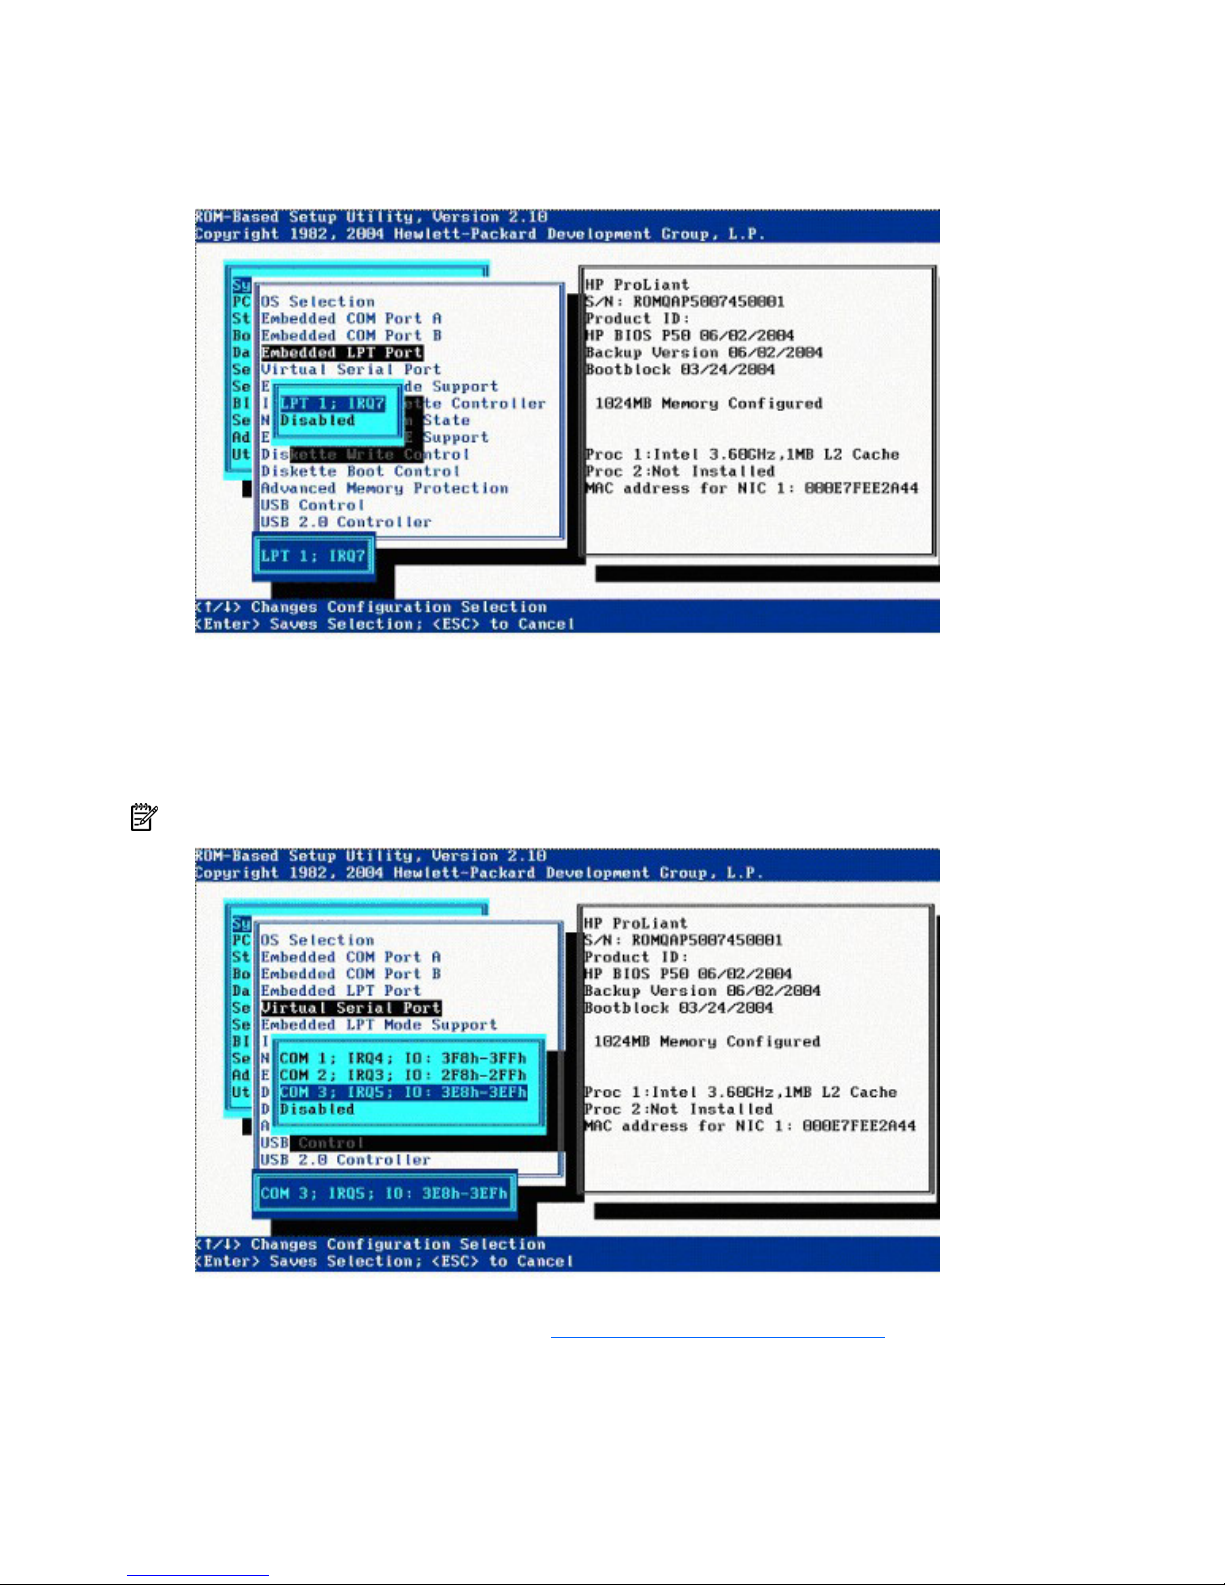
Embedded LPT Port
The Embedded LPT Port option sets the configuration for the internal LPT port. The settings include the
address and IRQ. This option can also disable the port.
Virtual Serial Port
The Virtual Serial Port option assigns the logical COM Port number and associated default resources used
by the Virtual Serial Port. When enabled, it provides remote access through the iLO management
controller to BIOS Serial Console.
NOTE: The Virtual Serial Port option requires iLO Firmware version 1.55 or later.
For detailed information about iLO configurations, refer to the HP Integrated Lights-Out User Guide on the
Documentation CD or to the HP website (http://www.hp.com/servers/lights-out
).
RBSU menu 11
Page 12
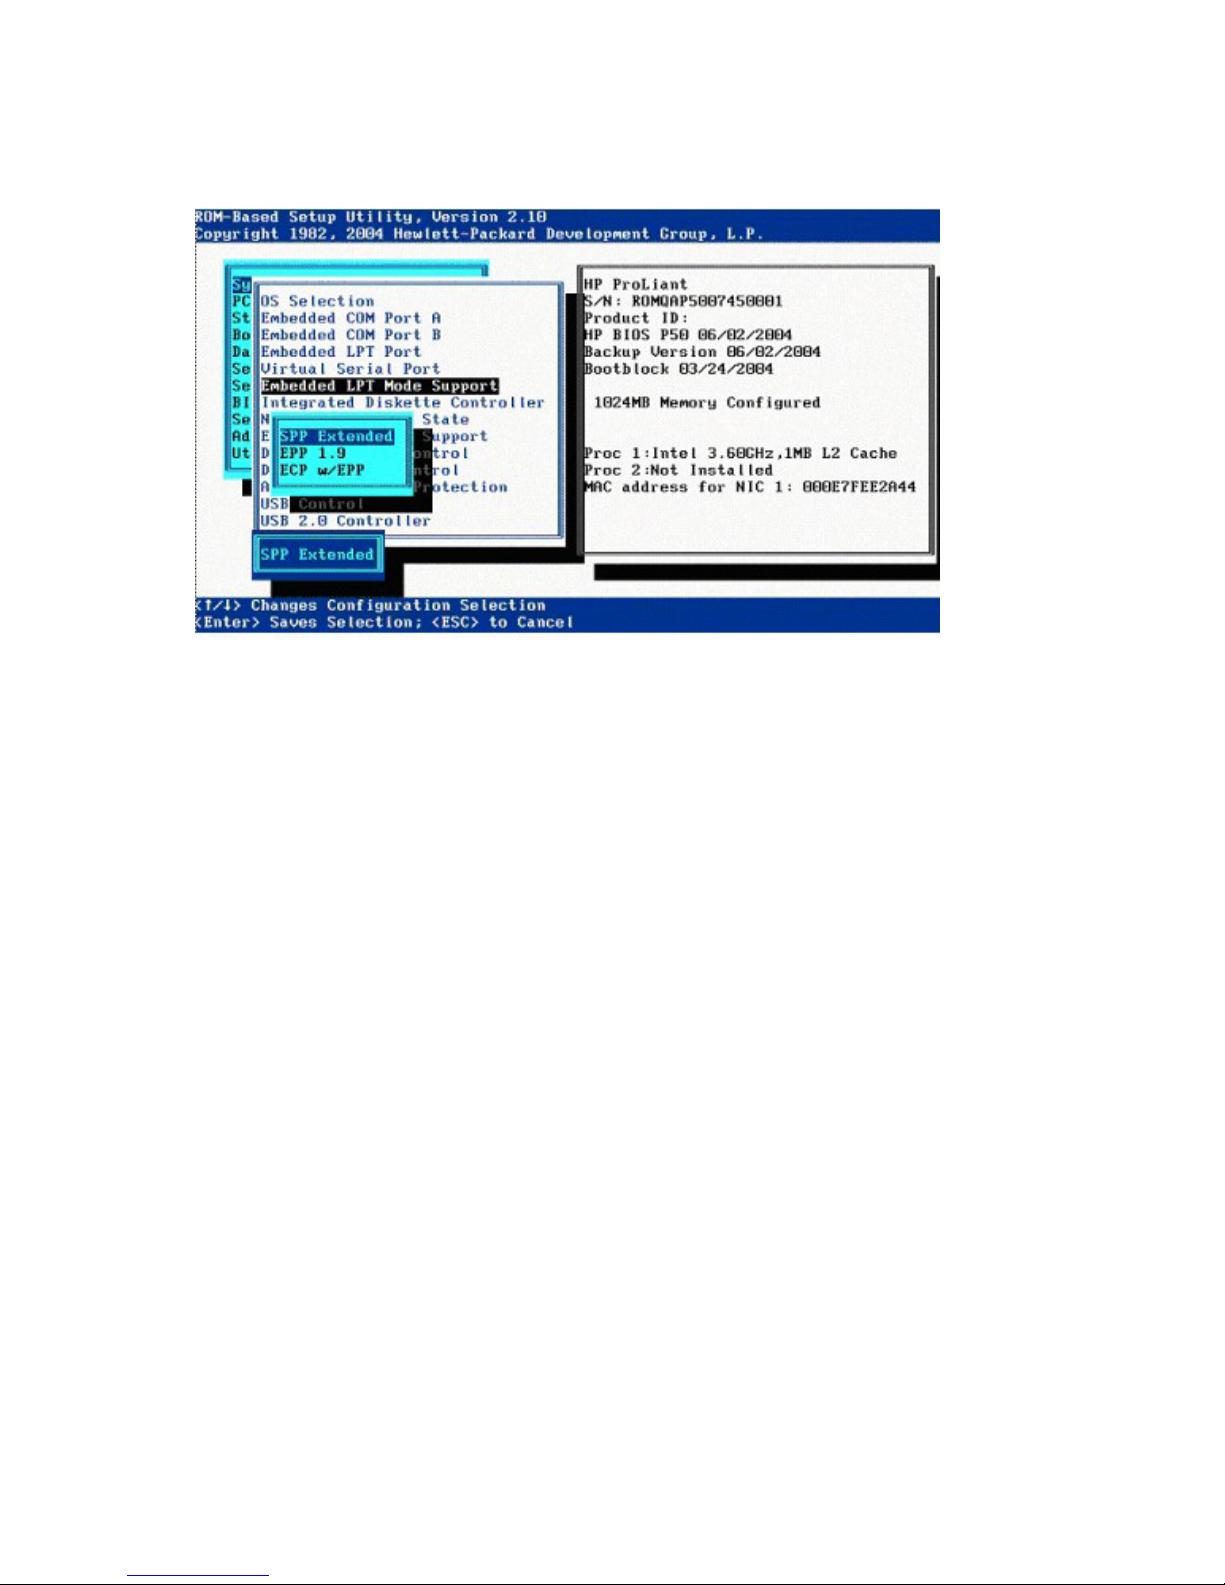
Embedded LPT Mode Support
The Embedded LPT Mode Support option assigns the local LPT Port number and associated default
resources to the selected physical LPT port. The setting may be overwritten by the OS.
Integrated Diskette Controller
The Integrated Diskette Controller option is a simple toggle setting that enables or disables the diskette
drive. When this option is disabled, the server cannot read from or write to the drive. Therefore, Diskette
Write Control and Diskette Boot Control are irrelevant when Integrated Diskette Controller is disabled.
NUMLOCK Power-On State
The NUMLOCK Power-On State option is a simple toggle setting that enables or disables the power-up
state of the NUMLOCK key. When the NUMLOCK key is enabled, the machine powers up with the
NUMLOCK key active.
RBSU menu 12
Page 13
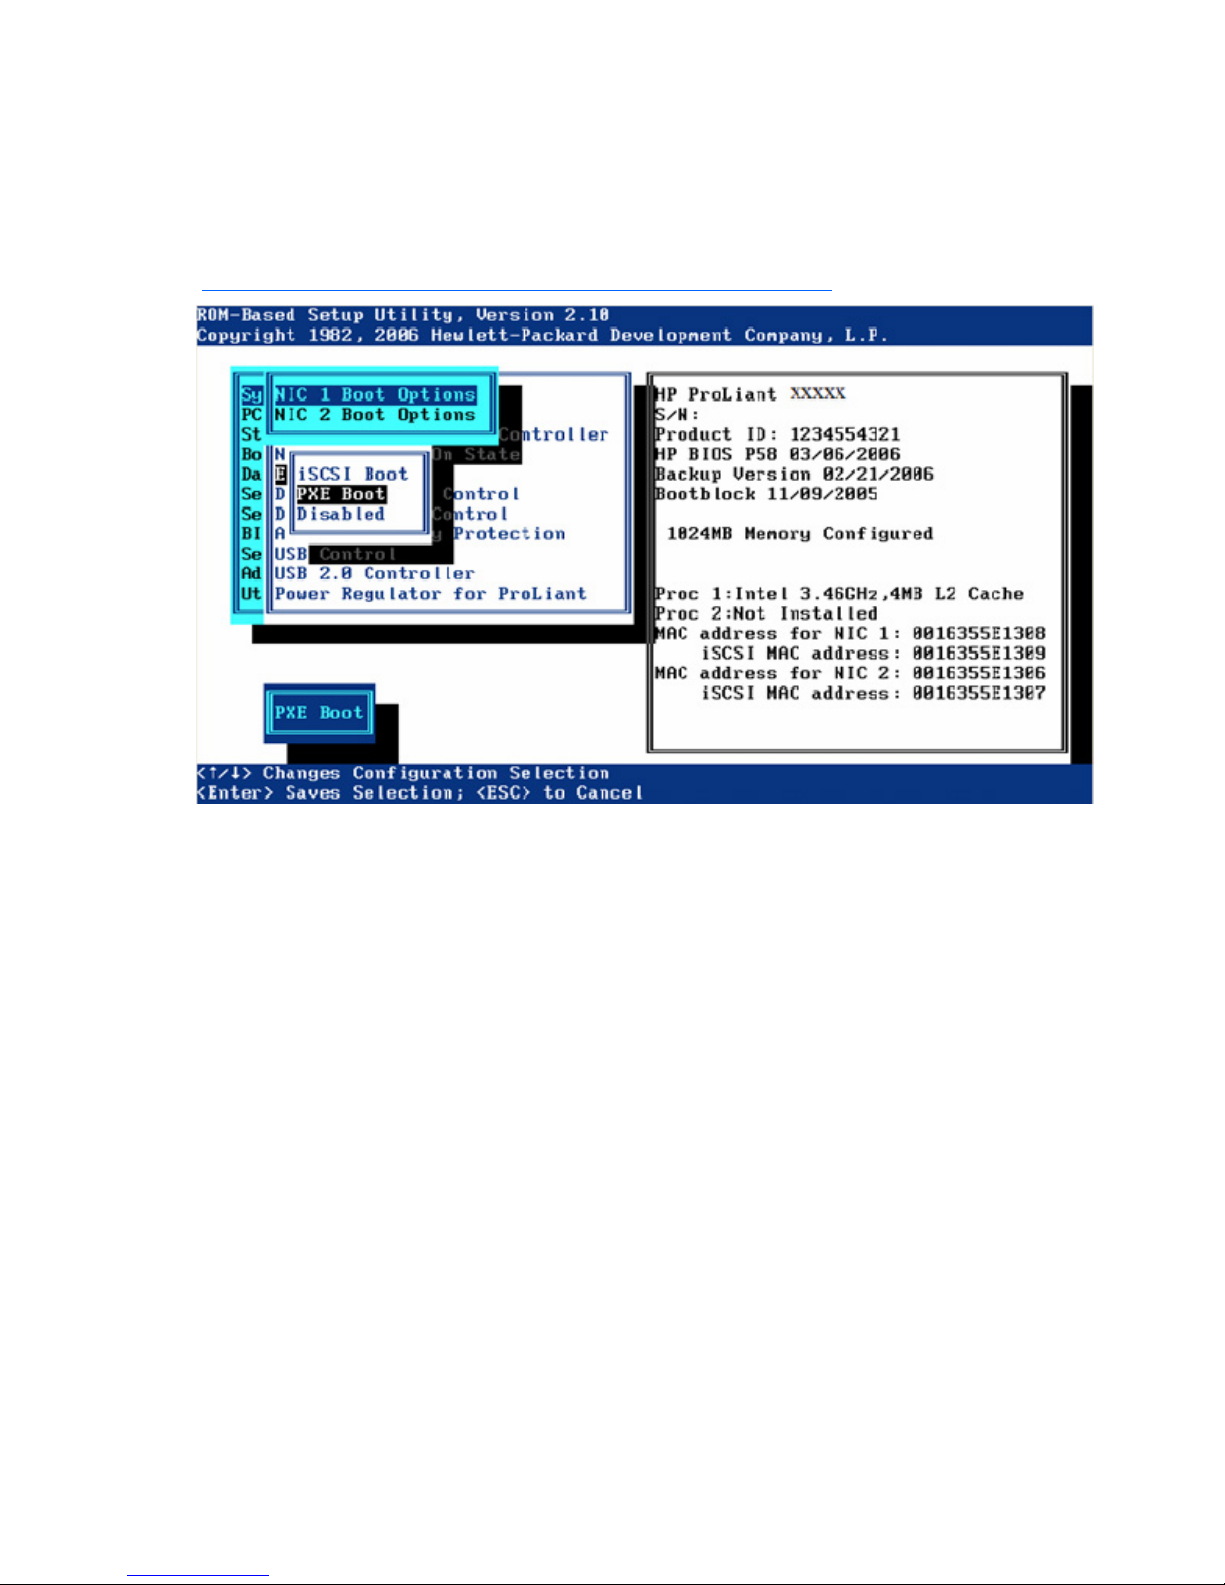
Embedded NICs
The Embedded NICs option enables iSCSI or PXE Boot support. This option enables the server to boot to
the network (embedded NIC only) and attach to a PXE server with boot images. It enables the NIC port to
display in the Standard Boot Order (IPL) list. For NIC 1, the default setting is PXE Boot, but for subsequent
NICs, the default setting is Disabled. For more information on PXE technology, see the Using PXE
Technology on Compaq ProLiant Servers white paper on the HP website
(ftp://ftp.compaq.com/pub/products/servers/management/pxe_wp.pdf
).
When enabling PXE or iSCSI Boot support, the NIC does not display in the Standard Boot Order (IPL) until
the next reboot.
Diskette Write Control
The Diskette Write Control option is a simple toggle setting that sets the write controls for the diskette
drive. The available configuration settings are either Read and Write or Read Only. When Read and
Write is selected, the server can both read data from and write data to the diskette drive.
Diskette Boot Control
The Diskette Boot Control option is a simple toggle setting that enables the diskette drive to be used as a
boot device. When this option is disabled, the server cannot boot from the diskette drive. This
configuration setting is used as a security feature.
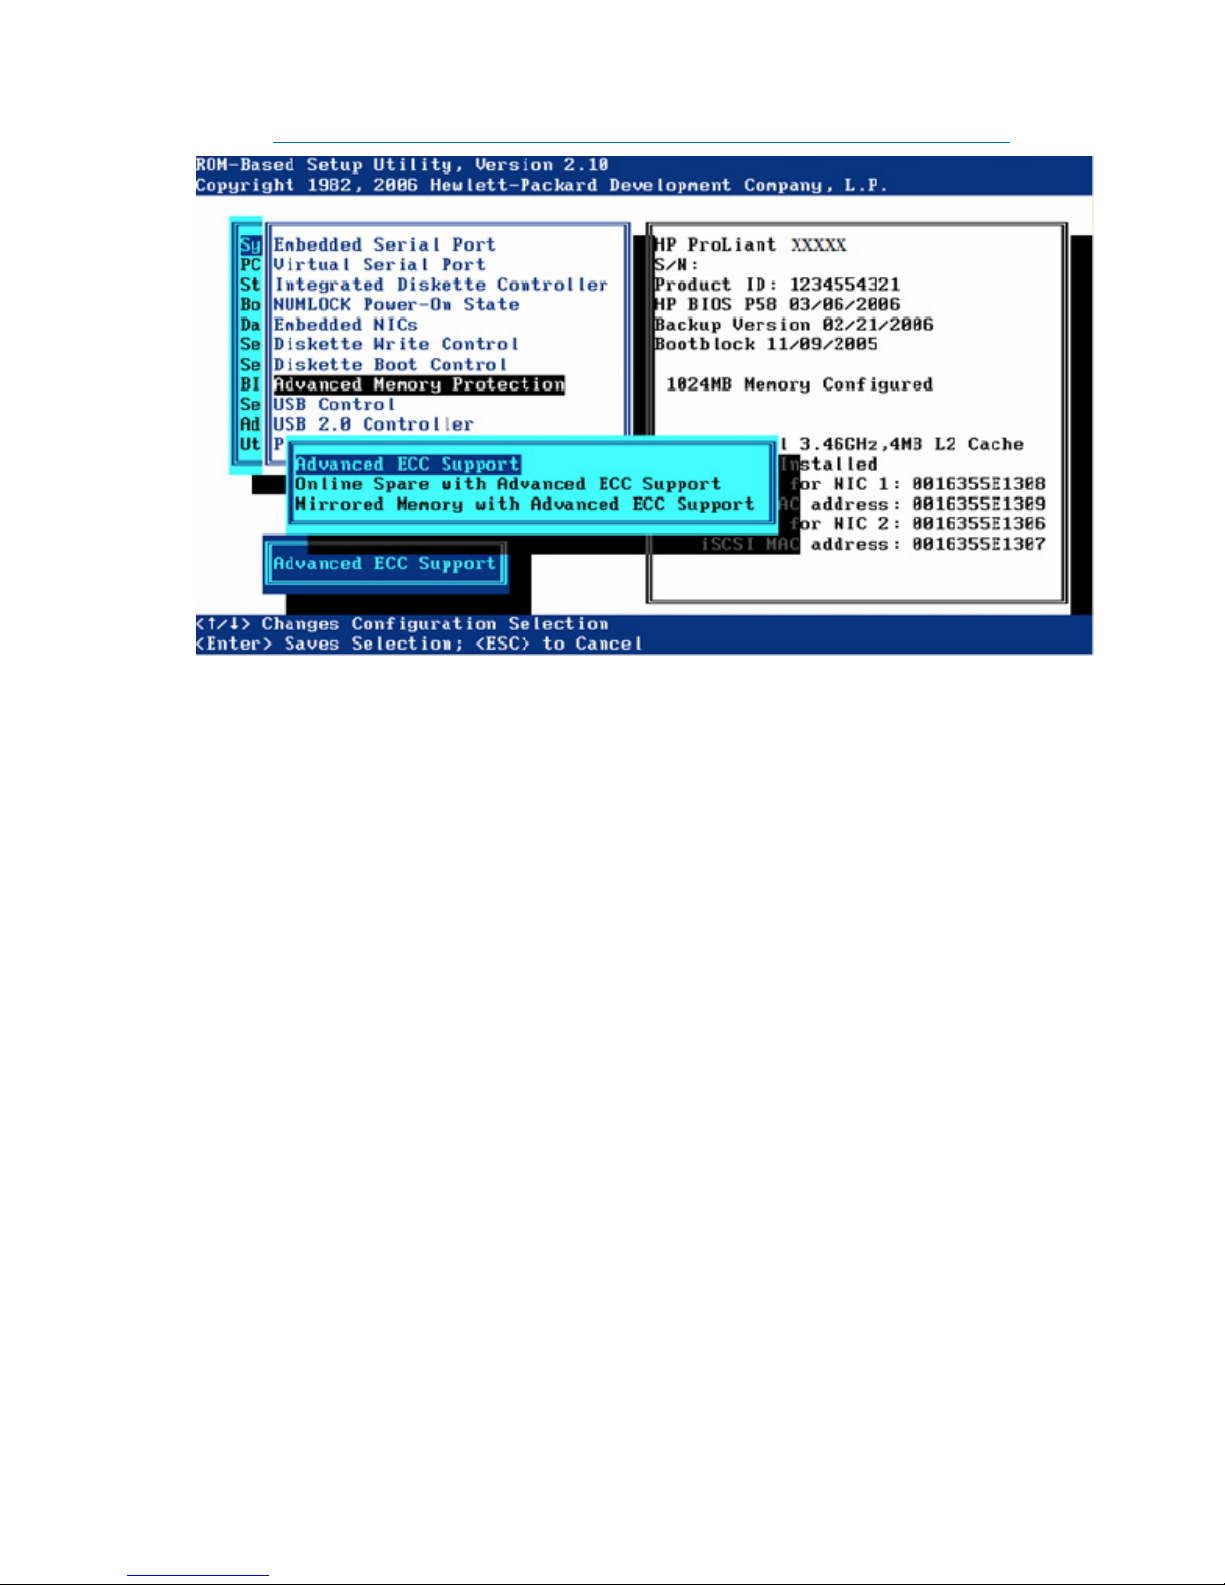
Advanced Memory Protection
The Advanced Memory Protection option provides additional memory protection beyond ECC.
RBSU menu 13
Page 14
For more information on Advanced Memory Protection, see HP ProLiant Advanced Technology on the HP
website (http://h18004.www1.hp.com/products/servers/technology/memoryprotection.html
).
The Advanced ECC Support (maximum memory) setting disables additional resiliency and provides the
largest memory capacity to the OS.
The Online Spare with Advanced ECC Support setting requires a single group of spare modules and
provides automatic failover of degraded modules in the system while it is running.
The Mirrored Memory with Advanced ECC Support option provides protection against uncorrectable
memory errors that would otherwise result in system failure. DIMM banks A and B are mirrored by DIMM
banks C and D on the same memory board. The failed memory can be replaced while the system is
running.
Mirrored DIMM pairs must be the same size to allow selection of single-board mirrored memory or dualboard mirrored memory. Pairing different size DIMMs results in the following caution:
Current memory configuration does not support Online Spare.
USB Control
The USB Control menu determines how USB ports and embedded devices operate on startup:
• When USB Enabled is selected, all USB ports and embedded devices are enabled.
• When USB Disabled is selected, all USB ports and embedded devices are disabled.
• When Legacy USB Disabled is selected, all USB ports are enabled under a USB-aware OS, but USB
is not supported during POST or RBSU. Legacy USB Disabled also disables iLO 2 virtual devices.
RBSU menu 14
Page 15

•
When External USB Port Disabled is selected, external USB ports are disabled. Under this option,
embedded USB devices still have full support under the ROM and OS.
USB 2.0 EHCI Controller
The USB 2.0 EHCI Controller option is a toggle setting that enables or disables the high-speed USB 2.0
controller.
Power Regulator for ProLiant
The Power Regulator for ProLiant option provides multiple options for managing power usage of servers.
In the HP Static High Performance Mode, the system runs at its maximum performance state.
In the HP Static Low Power Mode, the system runs in a lower state of performance.
RBSU menu 15
Page 16

In the HP Dynamic Power Savings Mode, the system adjusts the power and performance of the processor
to the workload of the processor.
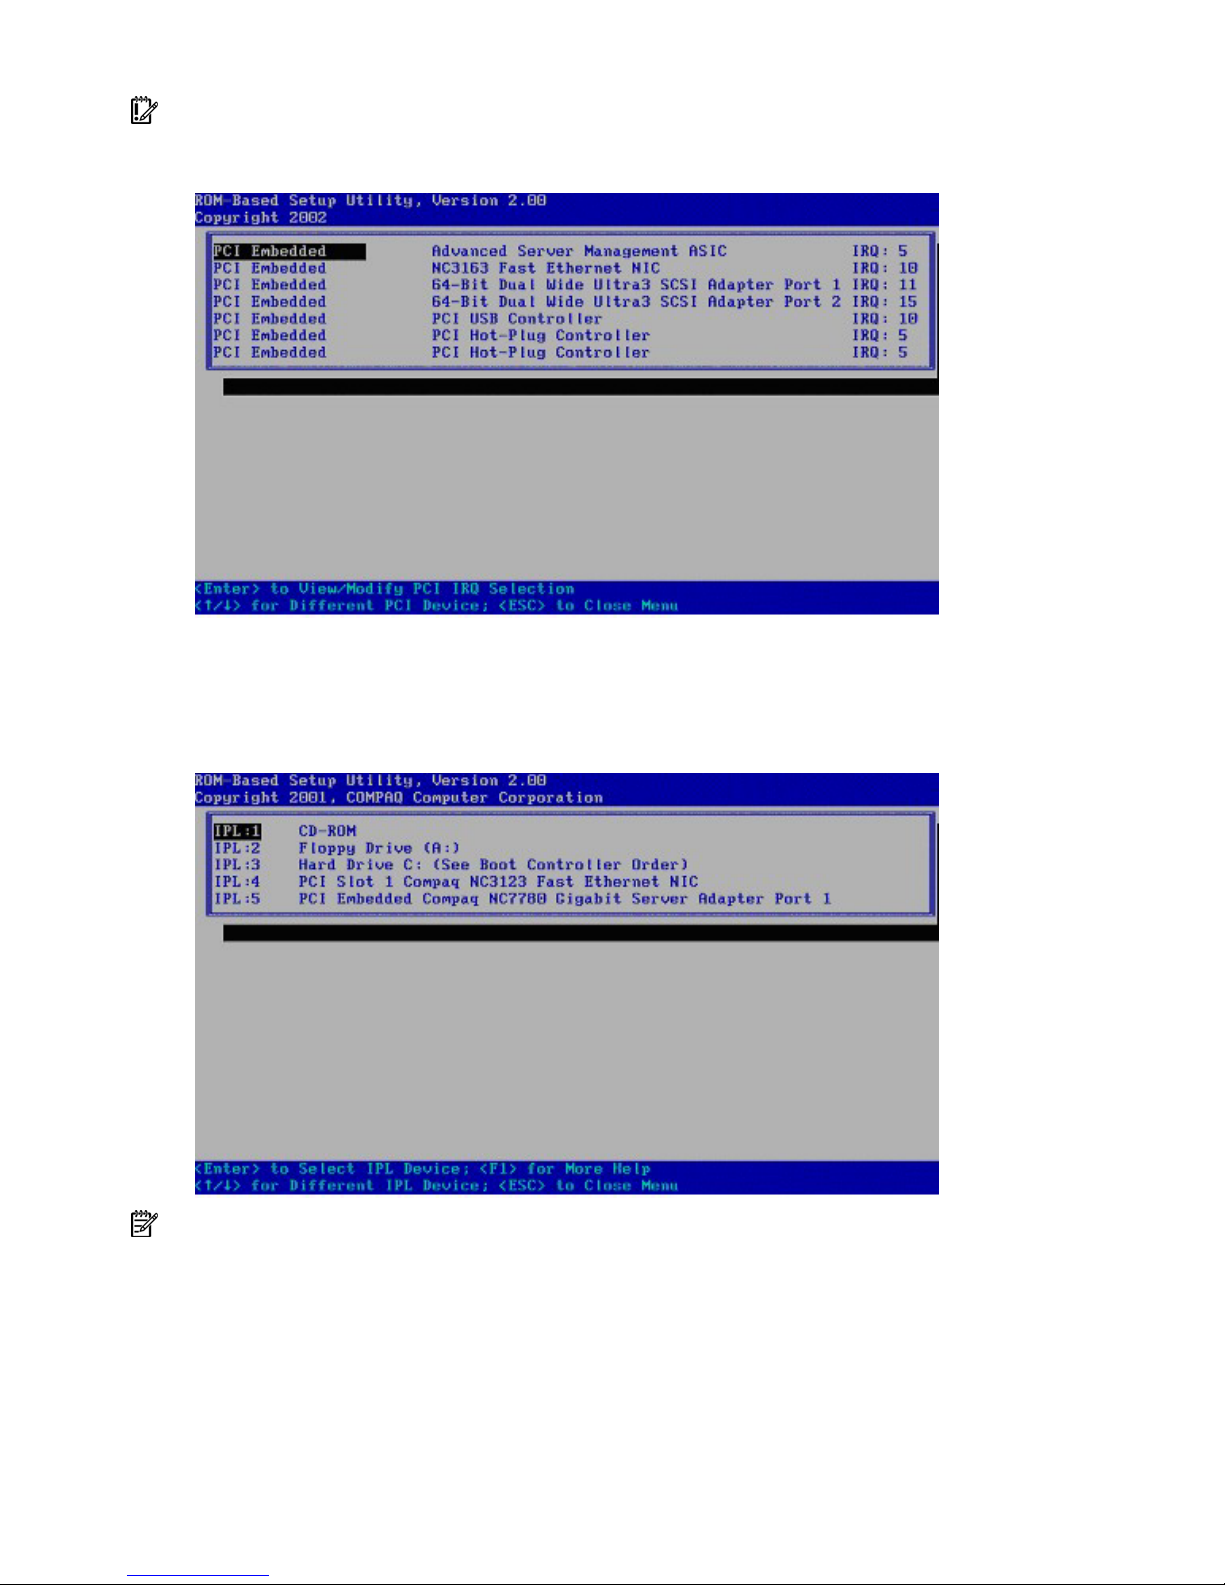
PCI Devices
The PCI Devices menu displays the configuration settings of the PCI devices installed in the server and
allows you to modify the IRQ. Multiple PCI devices can share an interrupt.
To disable a device, select the device and press the Enter key. A menu is displayed with options to
change the IRQ, as well as to disable the device.
NOTE: Only IRQs that are modified in RBSU retain the change during the next reboot. IRQs on PCI devices
that have not been modified are subject to change during reboot.
RBSU menu 16
Page 17
IMPORTANT: Disabling a PCI controller on a server with the PCI hot-plug driver installed disables all
controllers on that PCI bus if the server is running Microsoft® Windows® 2000 or Windows Server™ 2003.
To avoid this issue, remove the controller instead of disabling it.
Standard Boot Order (IPL)
The Standard Boot Order (IPL) option configures the Initial IPL device and controls the search order the
server uses to look for a bootable device.
NOTE: If you enable or disable a device, restart the server. Changes do not take effect until after reboot.
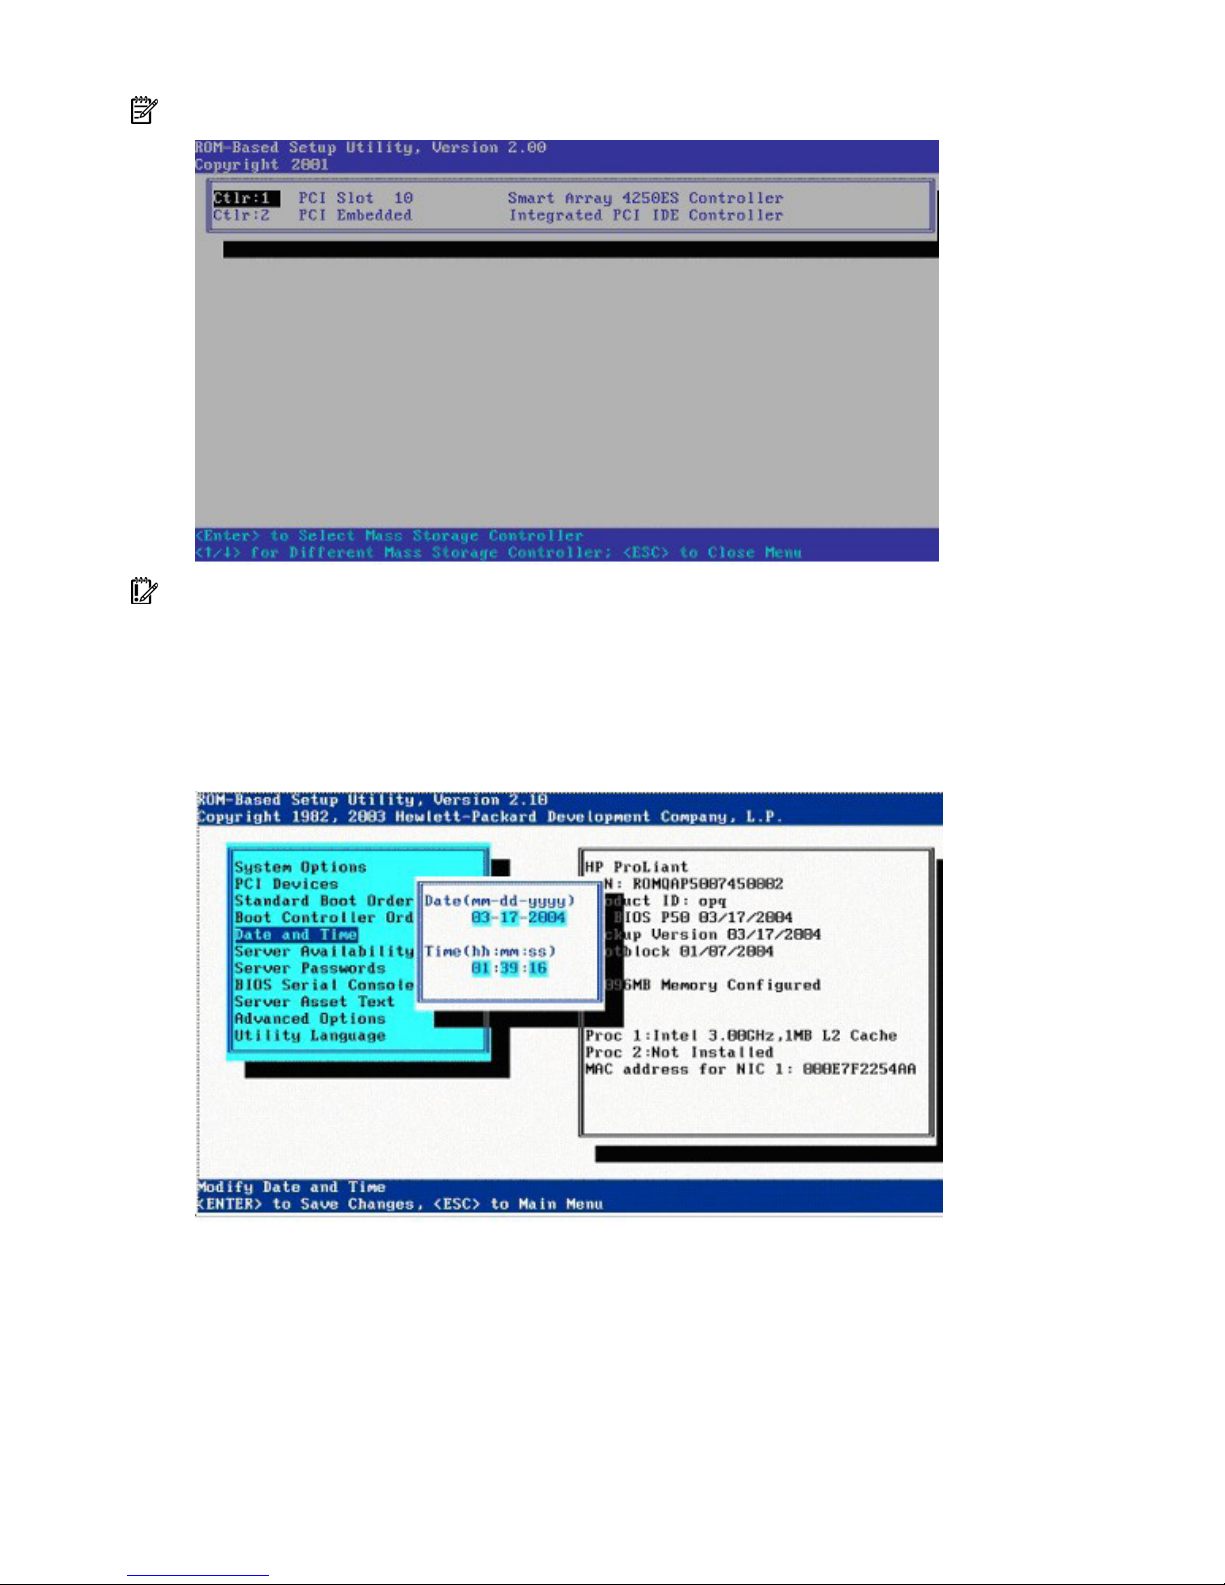
Boot Controller Order
The Boot Controller Order option selects which of the installed mass storage devices is used as the
primary boot controller. The server attempts to power up with the OS on this device.
The primary boot controller is set to controller 1.
RBSU menu 17
Page 18
NOTE: Changes made to the Boot Controller Order in the ORCA Utility are reflected in this menu.
IMPORTANT: PCI devices that have been disabled in the PCI Devices menu are still visible on the Boot
Controller Order screen.
Date and Time
The Date and Time option sets the system time and date. Enter the date in an mm-dd-yyyy (month-dayyear) format. Enter the time in an hh:mm:ss (hour-minute-second) format.
RBSU menu 18
Page 19

Server Availability
The Server Availability menu includes options that configure the ASR features.
ASR Status
The ASR Status option is a toggle setting that either enables or disables ASR. When set to Disabled, no
ASR features function.
ASR Timeout
The ASR Timeout option sets a timeout limit for resetting a server that is not responding. When the server
has not responded in the selected amount of time, the server automatically resets.
RBSU menu 19
Page 20

Thermal Shutdown
The Thermal Shutdown option is a toggle setting that determines when the server automatically powers
down due to dangerous temperatures. When the setting is enabled (default), the Advanced System
Management Driver initiates a system shutdown when the temperature reaches within 5 degrees of critical
level. When the setting is disabled, the Advanced System Management Driver shuts down the system at
critical level.
Wake-On LAN
The Wake-On LAN option is a toggle setting that enables or disables the Wake-On LAN feature. When
set to Enabled, the server can be powered up remotely using a network controller.
POST Speed Up
The POST Speed Up option is a toggle setting that enables or disables the extended power-up memory
test. When POST Speed Up is set to Enabled, the extended power-up memory test is not executed, and
the server powers up more quickly.
POST F1 Prompt
The POST F1 Prompt option is a toggle setting that configures the server so the F1 key must be pressed to
proceed when an error is encountered during the power-up sequence. A series of system tests executes
during POST before continuing with the following:
• If failures occur that allow the system to continue operating, the system continues to boot but posts a
message.
• If critical components fail or are missing, the server attempts to boot. If it can boot, it posts a
message and an F1 prompt.
• If Enabled is selected and an error occurs, the system stops at the F1 prompt until the F1 key is
pressed, before continuing to boot.
• If Delayed is selected and an error occurs, the system pauses for 20 seconds at the F1 prompt,
and then continues to boot the OS.
• If the system cannot run with the missing or failed components, it halts until those components are
replaced.
RBSU menu 20
Page 21

NOTE: The POST F1 Prompt setting is enabled by default in ProLiant ML and DL servers and is disabled by
default in BL servers.
Power Button
Disabling the Power Button feature causes the momentary power button to no longer function under any
OS. The Power Button feature does not override the 4-second hold-down of the server power button.
Automatic Power-On
The Automatic Power-On feature enables the server to automatically power on when auxiliary power is
applied to the server.
RBSU menu 21
Page 22

Power-On Delay
The Power-On Delay feature delays the server from powering on for a specified time to prevent power
usage spikes when multiple servers power up after a power loss. Wake-on LAN, RTC wake-up, and iLO 2
Virtual Power Button events override the delay and immediately power on the server.
The Power-On Delay options are:
• Disabled
• 15-second delay
• 30-second delay
• 45-second delay
• 60-second delay
• Random delay
Server Passwords
The Server Passwords menu includes options that configure the password environment of the server.
Set Power-On Password
The Set Power-On Password option sets a password that controls access to the server during power-up.
The server cannot be powered up until the correct password is entered. The Set Power-On Password
option uses a simple character string with a maximum of seven characters. To disable or clear the
password, enter the password followed by a / (slash) when prompted to enter the password.
Set Admin Password
The Set Admin Password option sets a password to control access to the administrative features of the
server. The Set Admin Password option is a simple character string with a maximum of seven characters.
To disable or clear the password, enter the password followed by a / (slash) when prompted to enter the
password.
RBSU menu 22
Page 23

Network Server Mode
The Network Server Mode option is a toggle setting that sets the server to operate in network server
mode. This feature works in conjunction with the power-on password. When set to Disabled, the server
operates normally. When it is set to Enabled, the following actions occur:
• The local keyboard remains locked until the power-on password is entered.
• The power-on password prompt is bypassed.
• When a diskette is in the diskette drive, the server does not start unless the power-on password is
entered locally.
IMPORTANT: Network server mode cannot be enabled until the power-on password has been established.
QuickLock
The QuickLock option is a toggle setting that either enables or disables the QuickLock feature. When set
to Enabled, the keyboard is locked by pressing the Ctrl+Alt+L keys. The keyboard remains locked until
the power-on password is typed.
NOTE: If the power-on password is disabled at the power-on key prompt, the QuickLock feature remains
inactive until the password is changed in RBSU.
BIOS Serial Console/EMS Support
IMPORTANT: Some languages or characters may require a specific emulation mode.
The BIOS Serial Console/EMS Support option allows you to configure the serial port to view POST error
messages and run RBSU remotely through a serial connection to the server COM port. The server that you
are remotely configuring does not require a keyboard or mouse.
For details about using BIOS Serial Console, refer to the HP BIOS Serial Console User Guide
(http://www.hp.com/servers/smartstart
BIOS Serial Console design supports VT100+ protocol, and ANSI and V100 terminal emulation. VT100
is supported by all terminal emulation programs. However, ANSI supports enhanced graphics and is
more aesthetically appealing. ANSI is the recommended choice if it meets the system requirements. CLI
support is available on some new servers for faster, more compatible display when configuring a server
using VT100 emulation. Refer to "Command Line Interface ("Command Line Interface Overview" on page
47)" for more information.
).
RBSU menu 23
Page 24

When running RBSU through BIOS Serial Console, the main menu looks slightly different than it looks
when running from the local server.
BIOS Serial Console Port
The BIOS Serial Console Port option provides additional selections for enabling BIOS Serial Console.
RBSU menu 24
Page 25

Selecting the Enable Remote option without the supported RILOE II or iLO firmware will result in an error.
BIOS Serial Console Baud Rate
The BIOS Serial Console Baud Rate option allows you to choose the correct baud rate.
RBSU menu 25
Page 26

EMS Console
The EMS Console option is a Microsoft® Windows® 2003 feature that allows for emergency
management console to be redirected through the serial port. When set to Enabled Local, the local serial
port is used for console redirection, but cannot be used by other devices. When set to Enabled Remote,
the iLO/RILOE II will be used for console redirection over the network and the serial port will be available
for other uses. The EMS Console feature is disabled by default.
BIOS Interface Mode
When Auto mode is selected, CLI mode will be automatically selected for this POST if the keyboard buffer
is getting characters from the serial port instead of the keyboard. When Command-Line mode is selected,
CLI mode will automatically be enabled.
RBSU menu 26
Page 27

Server Asset Text
The Server Asset Text menu includes options that customize the system-specific text for the server. This
information is reported on the IMD, an option for ProLiant servers.
Set Server Info Text
The Set Server Info Text option defines reference information for the server. The setting is blank by default.
• Server Name defines a two-line name identifying the server. A maximum of 14 characters can be
entered on each line.
• Server Asset Tag defines a two-line asset tag to identify the server. A maximum of 16 characters can
be entered on each line.
• Server Primary OS defines a three-line description of the primary OS of the server. A maximum of 14
characters can be entered on each line.
• Other Text defines two lines of additional text describing the server. A maximum of 14 characters
can be entered on each line.
RBSU menu 27
Page 28

Set Administrator Info Text
The Set Administrator Info Text option defines reference information for the server administrator.
• Admin Name Text defines a two-line description for the server administrator name. A maximum of
14 characters can be entered on each line.
• Admin Phone Number Text defines two lines of text for the server administrator phone number. A
maximum of 14 characters can be entered on each line.
• Admin Pager Number Text defines two lines of text for the server administrator pager number. A
maximum of 14 characters can be entered on each line.
• Other Text defines two lines of additional text relating to the server administrator. A maximum of 14
characters can be entered on each line.
Set Service Contact Text
The Set Service Contact Text option defines reference information for the service contact of the server.
• Service Name Text defines a two-line description for the service contact name. A maximum of 14
characters can be entered on each line.
RBSU menu 28
Page 29

•
Service Phone Number Text defines two lines of text for the service contact phone number. A
maximum of 14 characters can be entered on each line.
• Service Pager Number Text defines two lines of text for the service contact pager number. A
maximum of 14 characters can be entered on each line.
• Other Text defines two lines of additional text relating to the service contact. A maximum of 14
characters can be entered on each line.
Custom POST Message
The Custom POST Message option allows you to input a message that can be viewed during POST.
RBSU menu 29
Page 30

Advanced Options Menu
The Advanced Options menu includes options that allow you to configure the advanced features of the
server.
IMPORTANT: Menu options may differ from those in this document, depending on specific server options.
Multi-Processor Specification (MPS) Table Mode
The MPS Table Mode option is automatically set, based on the OS selected, and is used for interrupt
routing.
IMPORTANT: This setting is pre-selected. You can override the default setting at this menu, but successful
OS operation is dependent upon the correct (default) setting.
RBSU menu 30
Page 31

ROM Selection
The ROM Selection option toggles the server ROM between the current ROM and the backup ROM. All
servers with redundant ROMs allow you to switch to the backup ROM.
Erase Non-Volatile Memory
The Erase Non-volatile Memory option resets the non-volatile memory of the server to an initial, factory
state when Yes, Select to Erase is selected. Selecting the Erase Non-volatile Memory option results in the
following pop-up message:
Caution: Clearing NVRAM will reset all configuration settings to their
default values. Changes that have been made will be lost.
RBSU menu 31
Page 32

Erase NVRAM/Boot Disk
The Erase NVRAM/Boot Disk option resets the date, time, and all configuration settings to default values.
Data on the boot disk drive is erased, and changes that have been made will be lost.
NMI Debug Button
The NMI Debug Button option is a simple toggle setting that allows you to enable debug functionality
when the system has experienced a software lock-up. The NMI Debug Button generates an NMI to allow
the use of the OS debugger.
WARNING: When enabled, pressing the NMI Debug Button on the system board during
normal OS operation generates a Blue-Screen Trap, ABEND, or Panic, and halts the
system.
RBSU menu 32
Page 33

Virtual Install Disk
The virtual install disk is a holding place within the system ROM that contains embedded boot drivers
(such as SCSI or RAID controller drivers) that may be necessary to complete the operating system
installation. Typically, boot drivers that are placed in the virtual install disk are either not included as part
of the operating system media or are updated for new controllers. Supported operating systems
automatically find these drivers, eliminating the need for user intervention. HP recommends updating these
boot drivers to the latest version after the OS install to further optimize the system.
Secondary IDE Channel Support
The Secondary IDE Channel Support option is a toggle setting that enables or disables the secondary IDE
channel. When enabled, an additional IDE device can be connected to the secondary IDE channel.
BIOS Enhanced RAID
The BIOS Enhanced RAID feature is a toggle setting that, when enabled, analyzes the Linux data on
installed hard drives for failure information. Based on the analysis, the system ROM automatically chooses
which hard drive to boot.
Node Interleaving
The Node Interleaving feature requires all nodes to have equal memory sizes when enabled. Enabling
Node Interleaving may affect OS performance.
RBSU menu 33
Page 34

Serial Number
The Serial Number option allows you to change the serial number. HP does not recommend that you
change this number, unless you are replacing a system board.
Product ID
The Product ID option sets the system product ID, which is found on the product ID sticker on the chassis.
RBSU menu 34
Page 35

Drive Write Cache
The Drive Write Cache option controls the state of the write cache of the drives attached to the supported
controller.
SATA Software RAID
The SATA Software RAID feature enables RAID functionality (RAID 0 or RAID 1) for the embedded SATA
controller in the system.
RBSU menu 35
Page 36

Processor Options
The Processor Options menu includes submenu options for processor settings.
Processor Hyper-Threading
The Processor Hyper-Threading option is a toggle setting that allows Intel® Hyper-Threading Technology
to be enabled or disabled, though it is enabled by default. Processor Hyper-Threading delivers two logical
processors that can execute multiple tasks simultaneously using shared hardware resources of a single
processor. It is supported through the system BIOS. For more information on Processor Hyper-Threading,
refer to the HP website (http://h18004.www1.hp.com/products/servers/technology/hyper-
threading.html).
RBSU menu 36
Page 37

HW Prefetcher
The HW Prefetcher option allows processor prefetch features to be disabled. In most cases, the option
should remain enabled. The option should be disabled only after performing application benchmarking to
verify improved performance in a particular environment.
Adjacent Sector Prefetch
The Adjacent Sector Prefetch option allows processor prefetch features to be disabled. In most cases, the
option should remain enabled. The option should be disabled only after performing application
benchmarking to verify improved performance in a particular environment.
No-Execute Memory Protection
The No-Execute Memory Protection option, which is a toggle setting that is disabled by default, provides
protection against malicious codes and viruses. Unless the location specifically contains executable code,
memory is marked as non-executable.
RBSU menu 37
Page 38

Intel® Virtualization Technology
The Intel® Virtualization Technology option, when enabled, causes a Virtual Machine Manager to utilize
hardware capabilities provided by Intel Virtualization technology. The option is disabled by default.
Expansion Card Caching Optimization
The Expansion Card Caching Optimization option allows some expansion cards to cache their I/O
resources for improved performance. If the expansion card and its driver do not support this optimization,
this option should remain disabled.
Utility Language
The Utility Language menu enables you to set the display language for RBSU.
RBSU menu 38
Page 39

ROM-based enhancements
In this section
ROM-based enhancements overview ........................................................................................................ 39
Embedded server setup........................................................................................................................... 39
Auto-Configuration Process...................................................................................................................... 44
Boot Options ......................................................................................................................................... 46
Operating System Installation .................................................................................................................. 46
ROM-based enhancements overview
Some HP ProLiant servers have new ROM-based enhancements available, including:
• An auto-configuration process that, in most cases, automatically configures the entire system without
intervention
• The System Maintenance menu, which provides embedded server diagnostics and Inspect Utility
information through Embedded Server Setup
• A new erase option for RBSU, which erases the system configuration and boot drive
For details about which features the server supports, refer to the server-specific documentation.
Embedded server setup
IMPORTANT: Menu options may differ from those in this document, depending on specific server options.
The System Maintenance menu is a new utility that replaces the legacy system-partition functionality
supported on some ProLiant servers. This utility is embedded in the system ROM and provides access to
server diagnostics, RBSU, and the Inspect Utility.
ROM-based enhancements 39
Page 40

To access the System Maintenance menu, press the F10 key when prompted from the boot option ("Boot
Options" on page 46) screen.
From the System Maintenance menu, you can select from the following utilities that are embedded in the
system ROM:
• Setup Utility runs the RBSU
• Inspect Utility runs the embedded Inspect Utility
• Diagnostics Utility runs the embedded Diagnostics Utility (on page 42)
Setup Utility
Select Setup Utility from the System Maintenance menu to run the Setup Utility. Running Setup Utility
RBSU Erase Option
exits the System Maintenance menu and runs RBSU.
The RBSU Erase option allows you to erase the system configuration and boot drive. On versions of RBSU
without this new feature, the Erase Non-Volatile Memory option is available in the Advanced Options
menu of RBSU, allowing you to erase the system configuration by resetting the NVRAM to an initial,
factory state.
The new option, Erase NVRAM/Boot Disk, also erases the system configuration by resetting the NVRAM,
but erases the boot disk as well. The RBSU Erase option should only be used when you are redeploying a
server and are required to erase the NVRAM and boot drive to reinstall the operating system. If available
for the server, the Erase NVRAM/Boot Disk option is listed under the Advanced Options menu in RBSU.
ROM-based enhancements 40
Page 41

Virtual Install Disk
The virtual install disk is a holding place within the system ROM that contains embedded boot drivers
(such as SCSI or RAID controller drivers) that may be necessary to complete the operating system
installation. Typically, boot drivers that are placed in the virtual install disk are either not included as part
of the operating system media or are updated for new controllers. Supported operating systems
automatically find these drivers, eliminating the need for user intervention. HP recommends updating these
boot drivers to the latest version after the OS install to further optimize the system. The Virtual Install Disk
option is found under the Advanced Options ("Virtual Install Disk" on page 33) menu and can be enabled
or disabled in RBSU.
Inspect Utility
The Inspect Utility is embedded in the system ROM and allows you to view system configuration
information and save the information to a file on a diskette. Press the F2 key to place all Inspect
information onto a diskette.
This utility replaces the version of the Inspect Utility that is a part of the legacy system-partition functionality
supported on some HP servers.
If the server has the Inspect Utility feature, select Inspect Utility from the System Maintenance menu.
ROM-based enhancements 41
Page 42

Diagnostics Utility
The Diagnostics Utility is embedded in the system ROM, and provides a pre-boot method for quickly
checking the validity of the three major subsystems of the server needed to boot an operating system. A
complete server diagnostics is available on the SmartStart CD.
All three of these tests should pass if a bootable operating system is installed on the server.
If any test fails, there may be a problem booting the server. To run the Diagnostics Utility, select
Diagnostics Utility from the System Maintenance menu.
Memory Diagnostic Test
The memory diagnostic test uses all the processors installed in the server to test all installed memory. The
DIMMs that are installed are displayed by the cartridge and socket (or the bank and socket) in which they
are located, and errors are reported with a reference to the failed DIMM.
To run the memory diagnostic test, select Memory Test from the Diagnostics Utility menu.
For a Generation 5 server with an Intel® processor, the following options are available within the
Memory Test submenu:
ROM-based enhancements 42
Page 43

•
Software Memory Test — Choosing this option automatically runs the test until completion or until
you press the Esc key to exit.
• Quick MEMBIST Test — Choosing this option causes the system to reboot and run the preconfigured
hardware-based memory test. Upon reboot, Memory Diagnostics displays the test results. A normal
system reboot is required after performing a MEMBIST test.
• User-defined MEMBIST Test — Choosing this option enables a user-defined configuration of the
Quick MEMBIST test. Increasing the MEMBIST test time results in a blank screen for the duration of
the test. Upon test completion and reboot, Memory Diagnostics displays the test results. A normal
system reboot is required after performing a MEMBIST test.
NOTE: To cancel either MEMBIST test, press and hold the Power On/Standby button to initiate a forced
shut-down. Upon reboot, no record of an incomplete test exists.
For all servers other than a Generation 5 server with an Intel® processor, the Software Memory Test
automatically runs when Memory Test is selected from the Diagnostic Utility Menu.
CPU Diagnostic Test
The CPU diagnostic test checks the registers and MP capability of each processor. The test first checks all
the 16-bit and 32-bit registers, and then checks all the flags for all processors. If no errors are found, OK
is displayed under the Status column for each processor. If errors are found, X is displayed under the
Status column for each processor with errors.
ROM-based enhancements 43
Page 44

To run the CPU diagnostic test, select CPU Test from the Diagnostics Utility menu.
Boot Disk Diagnostic Test
The boot disk diagnostic test verifies the presence and readiness of a primary boot controller. If a
controller is present and ready, the test checks for a valid operating system boot sector.
To run the Boot Disk diagnostic test, select Boot Disk Test from the Diagnostics Utility menu.
Auto-Configuration Process
The auto-configuration process automatically runs when you boot the server for the first time. During the
power-up sequence, in many cases the system ROM automatically configures the entire system without
needing any intervention. During this process, the ORCA Utility, in most cases, automatically configures
the array with a default setting based on the number of drives connected to the server.
Drives Installed Drives Used RAID Level
1 1 RAID 0
ROM-based enhancements 44
Page 45

Drives Installed Drives Used RAID Level
2 2 RAID 1
3, 4, 5, or 6 3, 4, 5, or 6 RAID 5
More than 6 0 None
NOTE: If the boot drive contains logical volumes, or if more than six drives are installed on the system,
ORCA does not automatically configure the array. If this occurs, you must run ORCA to configure the array
settings.
By default, the auto-configuration process configures the system for a default operating system. To change
any default settings in the auto-configuration process, such as the settings for language, operating system,
and primary boot controller, execute RBSU by pressing the F9 key after system POST. After the settings
are selected according to your preference, exit RBSU and reboot the server.
ROM-based enhancements 45
Page 46

Boot Options
After the auto-configuration process completes, or after the server reboots upon exit from RBSU, the POST
sequence runs, and then the boot option screen is displayed. This screen is visible for several seconds
before the system attempts to boot from a diskette, CD, or hard drive. During this time, the menu on the
screen allows you to install an operating system or make changes to the server configuration in RBSU.
If no action is taken, the server attempts to boot first from a bootable CD before booting from the hard
drive.
Operating System Installation
For an assisted operating system installation, insert the SmartStart CD into the CD-ROM drive to begin the
installation process. The operating system and server support software are installed upon completion of
this process.
For a manual OS installation, insert the operating system CD into the CD-ROM to begin the installation
process.
ROM-based enhancements 46
Page 47

Command Line Interface
In this section
Command Line Interface Overview........................................................................................................... 47
Dual-Mode ROM-Based Utilities ............................................................................................................... 47
CLI Mode Selection ................................................................................................................................ 47
Inspect CLI Commands............................................................................................................................ 48
RBSU CLI Commands.............................................................................................................................. 48
System Maintenance CLI Commands ........................................................................................................ 51
Command Buffering Support.................................................................................................................... 51
Additional CLI support ............................................................................................................................ 51
Command Line Interface Overview
Both a full-screen, menu-driven user interface and a CLI are required to support both a Windows®/PC
background and a terminal/VT100 background. Full-screen, menu-driven utilities do not display correctly
on a VT100 interface because menus that get paged in and out require the entire screen to be redrawn.
CLI is being added to select newer servers because it provides a faster, more compatible solution for
VT100-compatible serial connections to servers using the BIOS Serial Console support.
Two basic commands, SET and SHOW, provide the foundation of the command tree wherever possible.
In addition, HELP can be accessed for commands, and EXIT or QUIT is used to exit the utility.
Dual-Mode ROM-Based Utilities
ROM-based utilities generically switch to run in either Windows® or VT100 mode to provide maximum
user benefit. RBSU also provides a user-configurable method for viewing and setting the console mode,
which is set before launching an Embedded ROM Utility remotely, through either a serial port connection
or iLO. The mode can also be set automatically.
CLI Mode Selection
On select newer servers, the BIOS automatically determines whether to run in CLI mode or full-screen,
menu-based mode for ROM embedded utilities. If a VT100-compatible terminal is being used with BIOS
Serial Console, CLI mode is selected for that boot. If BIOS Serial Console is disabled or not in use, the fullscreen, menu-based interface is used. You can force the utilities to always run in CLI mode by selecting
Command-Line Enable in the BIOS Interface Mode selection.
CQHCLI EV Value Description
0 = Command-Line Disable Disable CLI mode
1 = Command-Line Enable Always enable CLI mode
2 = Auto CLI Enable Auto determine CLI mode
Command Line Interface 47
Page 48

Inspect CLI Commands
Command Usage Description
HELP HELP or HELP <command>
EXIT EXIT Exits Inspect Utility and reboots.
QUIT QUIT Exits Inspect Utility and reboots.
EXPORT EXPORT
SHOW CONFIG SHOW CONFIG Displays all RBSU options and current settings.
SHOW CMOS SHOW CMOS Displays all ISA CMOS.
SHOW IML SHOW IML Displays all system event log records.
SHOW SMBIOS SHOW SMBIOS Displays all SMBIOS record information.
SHOW PCI SHOW PCI
SHOW EVS SHOW EVS Displays all System EVs.
SHOW MEM SHOW MEM Displays system memory map.
SHOW SYS SHOW SYS
SHOW BOOT SHOW BOOT Displays Primary Boot controller.
SHOW ACC SHOW ACC
Displays all supported commands or usage and
descriptions of a specific command.
Exports ALL information to a text file on floppy
drive A.
Displays all PCI devices and PCI header
information.
Displays overview of System from SMBIOS
information.
Displays Primary Array Controller Configuration
information.
RBSU CLI Commands
The CLI mode of RBSU is a different interface that provides equivalent functionality to the menu-based
mode.
Command Line Interface 48
Page 49

Command Usage Description
HELP HELP or HELP <command>
Displays all supported commands or usage and
descriptions of a specific command.
EXIT, QUIT EXIT, QUIT Exits RBSU and resets or power-cycles system.
SHOW CONFIG SHOW CONFIG
SHOW CONFIG <option>
SHOW CONFIG displays all available
<options>
SHOW CONFIG <option> displays current
setting and all other setting choices for <option>
specified.
SHOW CONFIG SCRIPT displays the script
required to recreate the settings of the server.
SHOW CONFIG OPTIONS SHOW CONFIG OPTIONS
Displays list of CONFIG options that are
viewable or settable using SHOW or SET
CONFIG on this server.
SHOW CONFIG SCRIPT SHOW CONFIG SCRIPT
Displays the script of SET commands required to
recreate all the server system-related
configuration settings. Does not display script for
Passwords, Date/Time, or Serial Number.
SET CONFIG
SET CONFIG <choice>
<option>
Sets CONFIG option setting to choice specified
by <choice> that corresponds to the number of
the choice listed by SHOW CONFIG for that
particular option.
SHOW SN SHOW SN Displays current serial number value.
SET SN SET SN <serial #> Set serial number to the value specified.
SHOW BOOT SHOW BOOT
Displays currently configured boot controller
order list.
SET BOOT SET BOOT <controller #>
Sets new primary boot controller to controller
number in list displayed by SHOW BOOT
command and then displays the new list.
SET BOOT (alternate usage
for scripting)
SET BOOT <order #> <PCI
Vendor/DevID> <PCI Slot #>
<PCI Bus #> <PCI Device #>
<PCI Fcn #>
Sets controller order # entry to device specified
by PCI ID and location. This format is only used
by SCRIPT driven commands. Order # is 1-based
where 1 means the primary boot controller, and
so on.
SHOW IPL SHOW IPL
Displays current standard boot order device list
of IPL devices in priority order.
SET IPL
SET IPL [A:|C:|CD|PXE]
<new IPL Priority>
Sets standard boot order priority for the IPL
device specified to new priority number
specified. The device specified must be
represented in the current IPL list displayed by
SHOW IPL.
SHOW PCI SHOW PCI
Displays a list of all PCI devices and their current
IRQ settings or disabled status. Also, displays a
list of IRQs available for PCI devices to use.
SET PCI SET PCI <device #> <IRQ>
Sets an override IRQ value (1-15) for the PCI
device selected where <#> corresponds to the
number of the PCI device in the list displayed by
the SHOW PCI command. Use 0 for the <IRQ>
value to disable a PCI device.
Command Line Interface 49
Page 50

Command Usage Description
SET PCI (alternate usage for
scripting)
SET PCI <device #> <IRQ>
Sets an override IRQ value (1-15) for the PCI
device selected where <#> corresponds to the
number of the PCI device in the list displayed by
the SHOW PCI command. Use 0 for the <IRQ>
value to disable a PCI device.
SHOW SYS SHOW SYS Displays overview of System from SMBIOS info.
SET PASSWORD
POWERON
SET PASSWORD
POWERON
Sets the Power-on password. Password must be
entered twice for verification and must be seven
characters or less.
SET PASSWORD ADMIN SET PASSWORD ADMIN
Sets the Admin password. Password must be
entered twice for verification and must be seven
characters or less.
SHOW DATE SHOW DATE Displays date <mm/dd/yy>
SHOW TIME SHOW TIME Displays time <hh:mm>
SET DATE SET DATE <mm/dd/yy>
Sets date to new value specified. Century value
assumed to be 20.
SET TIME SET TIME <hh:mm>
Sets time to new value specified. Seconds value
is set to 0.
SHOW TEXT SERVER SHOW TEXT SERVER Displays current server info text strings.
SET TEXT SERVER
SET TEXT SERVER
[N|A|P|O] [1|2|3|4]
<string>
Sets server info text string specified to <string>
where:
'N': Server Name (28)
"A': Server Asset Tag (32)
'P': Server Primary OS (42)
'O': Server Other (28)
# is the line number.
SHOW TEXT ADMIN SHOW TEXT ADMIN
Displays current administrator contact text
strings.
SET TEXT ADMIN
SET TEXT ADMIN
[N|P|G|O] [1|2|3|4]
<string>
Sets administrator contact text string specified by
<string> where:
'N': Admin name (28)
'P': Admin Phone number (28)
'G': Admin Pager number (28)
'O': Admin Other (28)
# is the line number.
SHOW TEXT SERVICE SHOW TEXT SERVICE Displays current service contact text strings.
SET TEXT SERVICE
SET TEXT SERVICE
[N|P|G|O] [1|2|3|4]
<string>
Sets service contact text string specified by <X>
<#> to <string> where X can be:
'N': Service Name (28)
'P': Service Phone number (28)
'G': Service Pager number (28)
'O': Service Other (28)
# is the line number.
SHOW TEXT IMD SHOW TEXT IMD Displays current IMD custom text strings.
Command Line Interface 50
Page 51

Command Usage Description
SET TEXT IMD
SET TEXT IMD [I|M|S]
[1|2|3|4] <string>
Sets IMD Custom text string specified by <X>
<#> to <string> where:
'I': Idle Screen (48)
'M': Custom Menu Item (14)
'S': Custom Menu Screen (56)
# is the line number.
SHOW TEXT POST SHOW TEXT POST Displays current POST custom text strings.
SET TEXT POST SET TEXT POST <string>
Sets POST Custom text to string specified by
<string>.
System Maintenance CLI Commands
Command Usage Description
HELP HELP or HELP <command>
EXIT EXIT Exits menu and continues booting.
RBSU RBSU Executes RBSU (has CLI).
INSPECT INSPECT Executes Inspect Utility (has CLI).
PXE PXE Attempts PXE Boot.
MEMDIAG MEMDIAG
CPUDIAG CPUDIAG
DISKDIAG DISKDIAG
Displays all supported commands or usage
and descriptions of a specific command.
Executes Diagnostics Utility specified.
(Diagnostics Utility has CLI output as well.)
Executes Diagnostics Utility specified.
(Diagnostics Utility has CLI output as well.)
Executes Diagnostics Utility specified.
(Diagnostics Utility has CLI output as well.)
Command Buffering Support
The CLI mode support buffers the previous five commands entered from the command line, accessible
using the up arrow key and the down arrow key.
Additional CLI support
The CLI mode support automatically handles output to the screen that scrolls off the screen by
implementing a -More- prompt at the bottom of the screen and waiting for user input to scroll to the next
page of data using key commands.
Key Function
Space Scroll to next page
Enter Scroll to next line
Q Quit display
Command Line Interface 51
Page 52

RBSU configuration flow
In this section
RBSU configuration flow overview............................................................................................................ 52
Manual path flow................................................................................................................................... 52
Scripted installation flow ......................................................................................................................... 53
RBSU configuration flow overview
RBSU can be used in two ways to configure a server: a manual flow and a scripted installation flow for
working with SmartStart software. Each method has its own flow of procedures. This information is of a
technical nature and intended for reference purposes only.
Manual path flow
NOTE: Manual Path Flow does not apply for servers with an integrated ATA RAID IDE Controller.
NOTE: Manual Path Flow is not necessary for servers with Embedded Server Setup.
RBSU can be used to configure an HP server without the use of SmartStart. When the server is powered
up in an unconfigured state, RBSU executes when the F9 key is pressed, allowing the server to be
configured. After the server has been configured using RBSU:
1. Restart or power up the server.
2. Press the F8 key to execute ORCA.
3. After the primary array controller has been configured with ORCA, restart the server.
4. Install the operating system ("Operating System Installation" on page 46). Install any necessary
applications as well.
RBSU configuration flow 52
Page 53

Use the ACU to configure any remaining array controllers.
Scripted installation flow
RBSU can be used with the SmartStart Scripting Toolkit to configure the server. The SmartStart Scripting
Configuration Replication Utility
Toolkit can be found on the HP website (http://www.hp.com/servers/sstoolkit
ConRep is shipped in the SmartStart Scripting Toolkit and is a program that works with RBSU to replicate
hardware configuration on ProLiant servers. This utility is run during State 0, Run Hardware Configuration
Utility, when doing a scripted server deployment. ConRep reads the state of the system environment
variables to determine the configuration and then writes the results to an editable script file. This file can
then be deployed across multiple servers with similar hardware and software components. For more
).
RBSU configuration flow 53
Page 54

information, refer to the SmartStart Scripting Toolkit User Guide on the HP website
(http://h18004.www1.hp.com/products/servers/management/toolkit/documentation.html
Array Configuration Replication Utility
ACR is shipped in the SmartStart Scripting Toolkit and is a replication utility used for RAID arrays. ACR is
used during State 0, Run Array Configuration Utility, when doing a scripted server deployment. It
duplicates the host array controller configuration utilities and writes them onto an editable script file. This
file is then loaded onto a startup diskette for deployment to other servers.
).
RBSU configuration flow 54
Page 55

Acronyms and abbreviations
ACR
Array Configuration Replication Utility
ASR
Automatic Server Recovery
CLI
Command Line Interface
ConRep
Configuration Replication utility
ECC
error checking and correcting
IDE
integrated device electronics
IMD
Integrated Management Display
IPL
initial program load
IRQ
interrupt request
MEMBIST
Memory Built-in Self Test
MPS
multi-processor specification
NIC
network interface controller
Acronyms and abbreviations 55
Page 56

NMI
non-maskable interrupt
NVRAM
non-volatile memory
ORCA
Option ROM Configuration for Arrays
PCI
peripheral component interface
POST
Power-On Self Test
PXE
Preboot Execution Environment
RBSU
ROM-Based Setup Utility
RTC
real-time clock
Acronyms and abbreviations 56
Page 57

Index
A
ACR (Array Configuration Replicator) 54
additional CLI support 51
Adjacent Sector Prefetch 37
Advanced Memory Protection option 13
Advanced Options menu 30
Array Configuration Replication Utility (ACR) 54
ASR (Automatic Server Recovery) 55
ASR Status option 19
ASR Timeout option 19
auto-configuration process 44
Automatic Power-On 22
Automatic Server Recovery (ASR) 55
B
BIOS Enhanced RAID 33
BIOS Interface Mode 26
BIOS Serial Console Baud Rate 25
BIOS Serial Console Port 24
BIOS Serial Console/EMS Support 7, 47
Boot Controller Order option 17
Boot Disk Diagnostic Test 44
boot options 46
E
Embedded LPT Mode Support 12
Embedded LPT Port option 8
Embedded NIC PXE Support option 13
Embedded Serial Port A option 9
Embedded Serial Port B option 10
Embedded Server Setup 39
Erase Non-Volatile Memory option 31
Erase NVRAM/Boot Disk 32
expansion card caching optimization 38
H
HW Prefetcher 37
I
Inspect CLI Commands 48
Inspect Utility 41
Integrated Diskette Controller option 12
Intel® Virtualization Technology 38
introduction 5
IPL Boot Order option 17
M
C
CLI (Command Line Interface) 47, 48, 51
CLI Mode Selection 47
Command Buffering Support 51
Command Line Interface (CLI) 47, 48, 51
configuration flow 52
Configuration Replication Utility 53
CPU Diagnostic Test 43
Custom POST Message option 29
D
Date/Time Configuration submenu 18
diagnostics utility 42
Diskette Boot Control option 13
Diskette Write Control option 13
drive write cache 35
Dual-Mode ROM-Based Utilities 47
manual path flow 52
Memory Diagnostic Test 42
MPS table mode option 30
N
network interface controller (NIC) 55
Network Server Mode option 23
NIC (network interface controller) 55
NMI Debug Button option 32
Node Interleaving 33
No-Execute Memory Protection 37
NUMLOCK Power-On State option 12
O
operating system installation 46
OS Installation 46
OS Selection option 9
Index 57
Page 58

P
PCI (peripheral component interface) 56
PCI Devices option 16
peripheral component interface (PCI) 56
POST F1 prompt 20
POST speed up 20
power button 21
power regulator 15
Power-On Delay 22
Processor Hyper-Threading 36
Processor Options 36
Product ID 34
Q
QuickLock option 23
R
RBSU CLI Commands 48
RBSU Configuration Flow 52
RBSU Erase Option 40
RBSU menu 7
ROM Selection option 31
ROM-based enhancements 39
U
USB 2.0 EHCI Controller 15
USB Control 14
Utility Language 38
V
Virtual Install Disk 33, 41
Virtual Serial port 11
W
Wake-On LAN (WOL) 20
Wake-on LAN option 20
S
SATA software RAID 35
Scripted Installation Flow 53
Secondary IDE channel support 33
Secondary IDE Channel Support option 33
Serial Number option 34
Server Asset Text 27
Server Asset Text menu 29
Server Availability 19
Server Passwords menu 22
Set Admin Password option 22
Set Administrator Info Text option 28
Set Power-On Password option 22
Set Server Info Text option 27
Set Service Contact Text option 28
Setup Utility 40
Standard Boot Order (IPL) option 17
System Maintenance CLI Commands 51
System Options menu 8
T
Thermal Shutdown option 20
Index 58
 Loading...