

Page 1

HP Rapid Deployment Pack User Guide
HP Part Number: 352869-404
Published: September 2008, Thirteenth Edition
Page 2

© Copyright 2003, 2008 Hewlett-Packard Development Company, L.P.
Legal Notices
Confidential computer software. Valid license from HP required for possession, use or copying. Consistent with FAR 12.211 and 12.212, Commercial
Computer Software, Computer Software Documentation, and Technical Data for Commercial Items are licensed to the U.S. Government under
vendor's standard commercial license.
The information contained herein is subject to change without notice. The only warranties for HP products and services are set forth in the express
warranty statements accompanying such products and services. Nothing herein should be construed as constituting an additional warranty. HP shall
not be liable for technical or editorial errors or omissions contained herein.
Acknowledgments
Microsoft and Windows are U.S. registered trademarks of Microsoft Corporation. Windows Server is a U.S. trademark of the Microsoft group of
companies. AMD is a trademark of Advanced Micro Devices, Inc. Intel is a trademark or registered trademark of Intel Corporation or its subsidiaries
in the United States and other Countries.
Page 3

Table of Contents
1 Licensing...................................................................................................7
License types..........................................................................................................................................7
Applying a license file.............................................................................................................................7
Applying a license file during an first-time installation or upgrade............................................................7
Adding a license file to an existing installation.......................................................................................7
Replacing licenses in an existing installation..........................................................................................7
2 Prerequisites..............................................................................................9
Network infrastructure requirements...........................................................................................................9
Deployment Server requirements...............................................................................................................9
3 Installing.................................................................................................11
Getting started.....................................................................................................................................11
Before you upgrade...............................................................................................................................11
Installing .............................................................................................................................................11
4 Using the Rapid Deployment Pack...............................................................23
Deployment Console basics....................................................................................................................23
Connecting server blades.......................................................................................................................23
Deploying the first server blade...............................................................................................................24
Reconfiguring the server blade................................................................................................................24
Next steps............................................................................................................................................24
5 Understanding the Deployment Server.........................................................25
Design philosophy................................................................................................................................25
Jobs....................................................................................................................................................25
Server Deployment jobs.........................................................................................................................25
Server Imaging jobs..............................................................................................................................26
Server Deployment Toolbox Jobs.............................................................................................................27
Directory structure.................................................................................................................................27
Job—Directory relationship.....................................................................................................................28
Automation environments.......................................................................................................................30
6 HP support and contact information............................................................31
Online resources...................................................................................................................................31
HP contact information...........................................................................................................................31
HP Software Technical Support and Update Service..................................................................................31
A Manually installing distribution files............................................................33
B Manually modifying configuration settings...................................................35
Synchronize display names with computer names option............................................................................35
Primary lookup key option......................................................................................................................35
PXE initial deploy boot timeout option.....................................................................................................35
Client/server file transfer port option.......................................................................................................35
Creating an IIS FTP virtual directory option...............................................................................................35
Windows product keys...........................................................................................................................36
Table of Contents 3
Page 4

Index.........................................................................................................37
4 Table of Contents
Page 5

List of Tables
5-1 Job folders.....................................................................................................................................25
5-2 Hardware configuration default settings.............................................................................................25
5-3 Windows default settings.................................................................................................................26
5-4 VMware default settings...................................................................................................................26
5-5 Linux default settings........................................................................................................................26
5-6 Deployment Server directory structure................................................................................................27
5-7 State transitions..............................................................................................................................30
A-1 Operating system directory names.....................................................................................................33
B-1 Virtual directory information.............................................................................................................36
B-2 User Tokens table entries..................................................................................................................36
5
Page 6

6
Page 7

1 Licensing
A license enables a server, either a physical server or a virtual machine, to be deployed and managed by
the Altiris Deployment Server. One license is required for each server being managed. After you apply a
license to a server, you cannot remove or transfer the license to another server.
A license file contains licenses for a predetermined number of servers. Purchased license files are not specific
to Rapid Deployment Pack versions.
To view the number of licensed nodes from the console, click Help>About.
License types
• Purchased license. To obtain this license file, follow the instructions on your license entitlement certificate.
• 10-node, 30-day evaluation license. To obtain this license file, access
http://www.hp.com/servers/rdp/eval.
• 10-node, 7-day evaluation license. This license is built into the Deployment Server.
Applying a license file
Applying a license file during an first-time installation or upgrade
To select the appropriate licensing option, see Chapter 3 Installing.
Adding a license file to an existing installation
1. Shut down all Deployment Server Consoles and Deployment Server Web Consoles.
2. Click Start>Programs>Altiris>Deployment Solution>Product Licensing Utility.
3. Enter the path to the new license file in the Activation Key File Information field, and click Next.
4. Follow the instructions to apply your additional licenses.
Replacing licenses in an existing installation
If you have combined or transferred licenses and have obtained a new license file, to replace your existing
license file follow the steps above for adding a license file. On the third wizard step, select Replace all
existing license Activation Keys with this new Activation Key.
License types 7
Page 8

8
Page 9

2 Prerequisites
Network infrastructure requirements
If you use Preboot eXecution Environment (PXE) to remotely deploy servers, then Dynamic Host Configuration
Protocol (DHCP) must be installed and accessible on the network.
Deployment Server requirements
• Hardware:
For a new installation, a HP ProLiant server with at least a 2.0 GHz processor and 1 GB RAM or
•
an equivalent virtual machine
• The correct date and time
• Microsoft® Windows® operating system:
• Microsoft Windows Server™ ®2003 x86 (SP1, R2, SP2) Standard or Enterprise Editions
NOTE: The server must not be a domain controller.
• Available disk space:
2 GB for the base installation•
• 1 GB for each Windows distribution
• 1 GB for each VMware ESX distribution
• 4 GB for each Linux distribution
• Additional space for captured disk images
• A network connection configured with a static IP address
NOTE: Changing the IP address configuration after installation is difficult. Therefore, set the IP address
before beginning the installation.
• To use the Deployment Server Web Console, you must install IIS with ASP.NET.
• To deploy VMware ESX or Linux, you must install an FTP server. For more information, see the Microsoft
documentation on how to install IIS with FTP.
For more information about requirements for the Deployment Server, see the
Deployment and Migration Guide
at http://www.hp.com/servers/rdp.
Altiris Deployment Solution
Network infrastructure requirements 9
Page 10

10
Page 11
3 Installing
Getting started
• Log in to the local console. You cannot install Rapid Deployment Pack through Terminal Services, remote
shell, or from a network share.
• Obtain a license file (either purchased or evaluation).
• Collect the applicable Windows, VMware ESX, or Linux distribution files.
• Get the applicable Windows product keys.
Before you upgrade
• Back up modified jobs or batch files.
• Shut down all Deployment Server Consoles and Web Consoles.
• When upgrading from Rapid Deployment Pack 3.00 – 3.70, the WinPE 1.6 PXE images will be replaced
with WinPE 2.1 PXE images and the WinPE 1.6 Boot Disk Creator HP drivers and support files will be
removed. WinPE 1.6 is no longer supported.
Installing
1. On the intended Deployment Server, access the Rapid Deployment Pack autorun utility using one of the
following methods:
• Insert the physical DVD into the DVD drive.
• Extract the ISO image.
• Mount the ISO image.
2. Read the terms of the ProLiant Essentials End User License Agreement (EULA), and click Agree to accept
the terms.
3. On the Overview screen, click Next.
4. On the Pre-Installation screen, click Next.
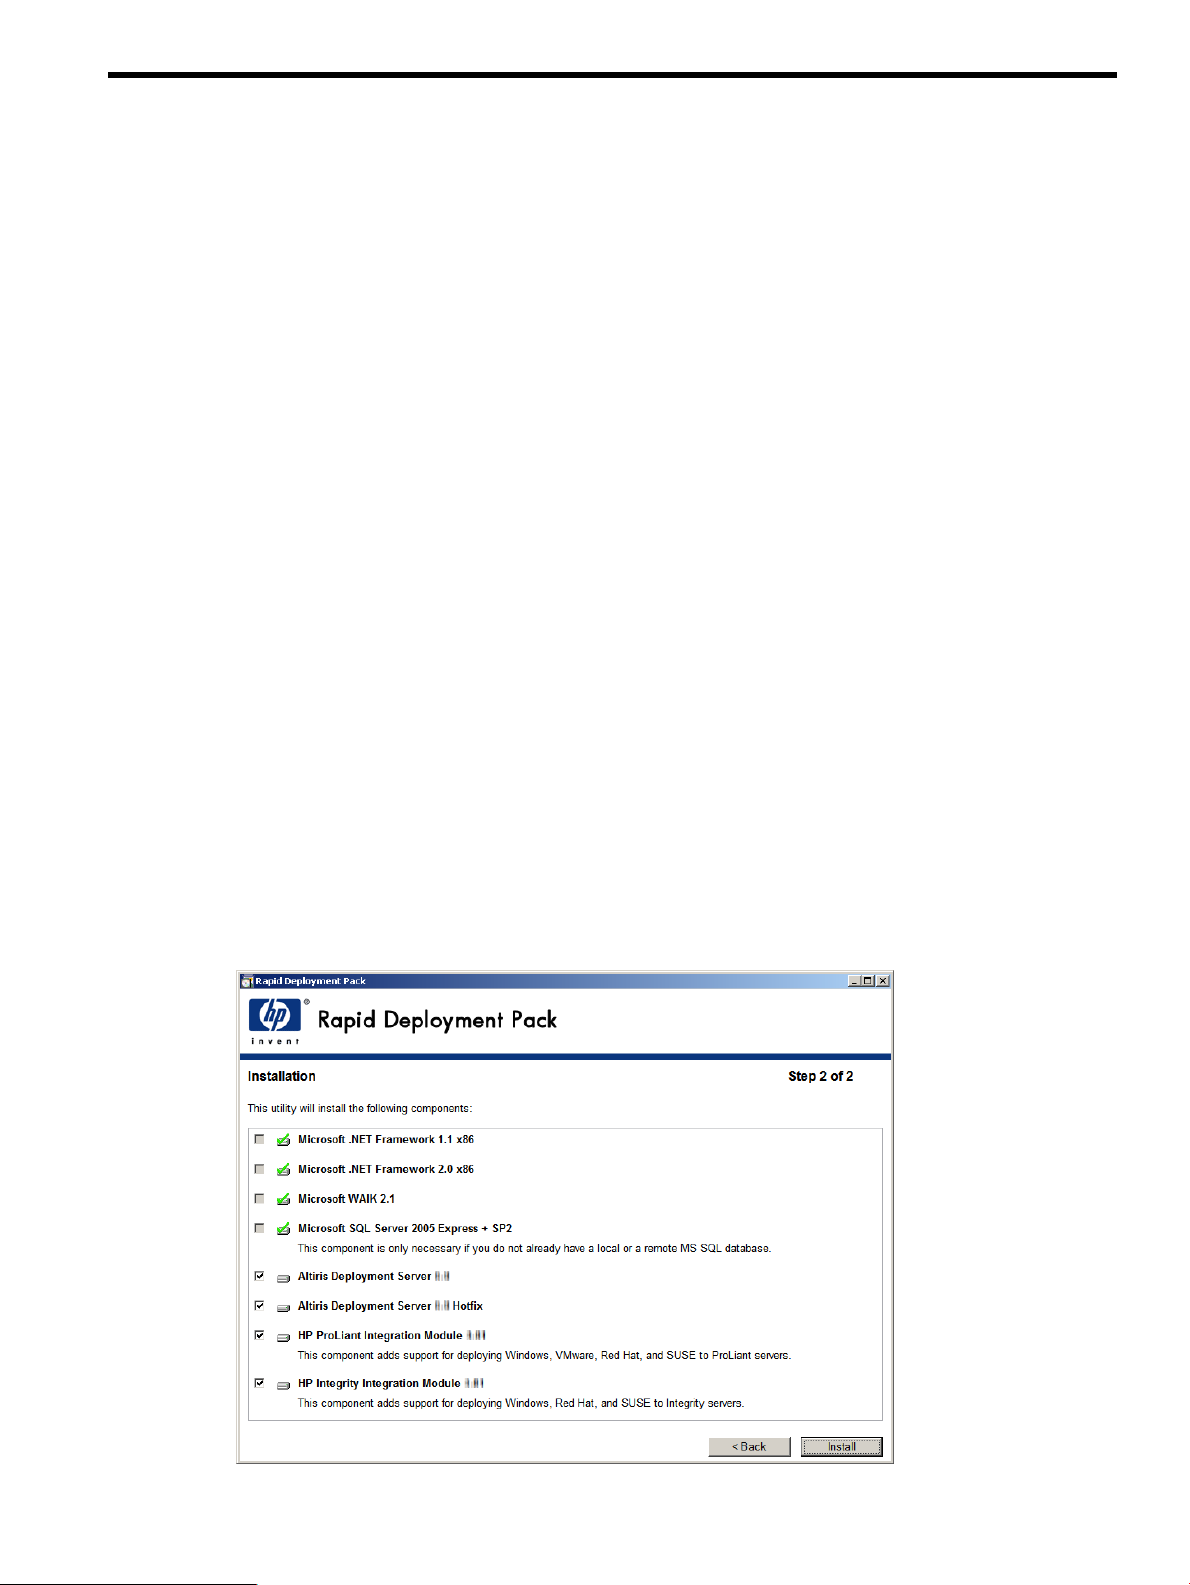
5. Verify that the appropriate components are selected for installation, and click Install. If you plan to use
an existing database, clear the Microsoft SQL Server 2005 Express option.
Getting started 11
Page 12
6. If selected, the Microsoft .NET Frameworks and Microsoft SQL Server are installed silently. You must
download and install the Microsoft WAIK 2.1, also known as the “Automated Installation Kit (AIK) for
Windows Vista SP1 and Windows Server 2008”. It is available at http://www.microsoft.com/
downloads/details.aspx?familyid=94bb6e34-d890-4932-81a5-5b50c657de08&displaylang=en&tm.
After completing the WAIK install, reinsert the Rapid Deployment Pack media and click Continue.
7. If you did not select the Altiris Deployment Server for installation, proceed to Step 23.
8. Read the Altiris EULA, and click Yes.
9. If the server has multiple network adapters, select the appropriate interface for the Deployment Server,
and click Select IP.
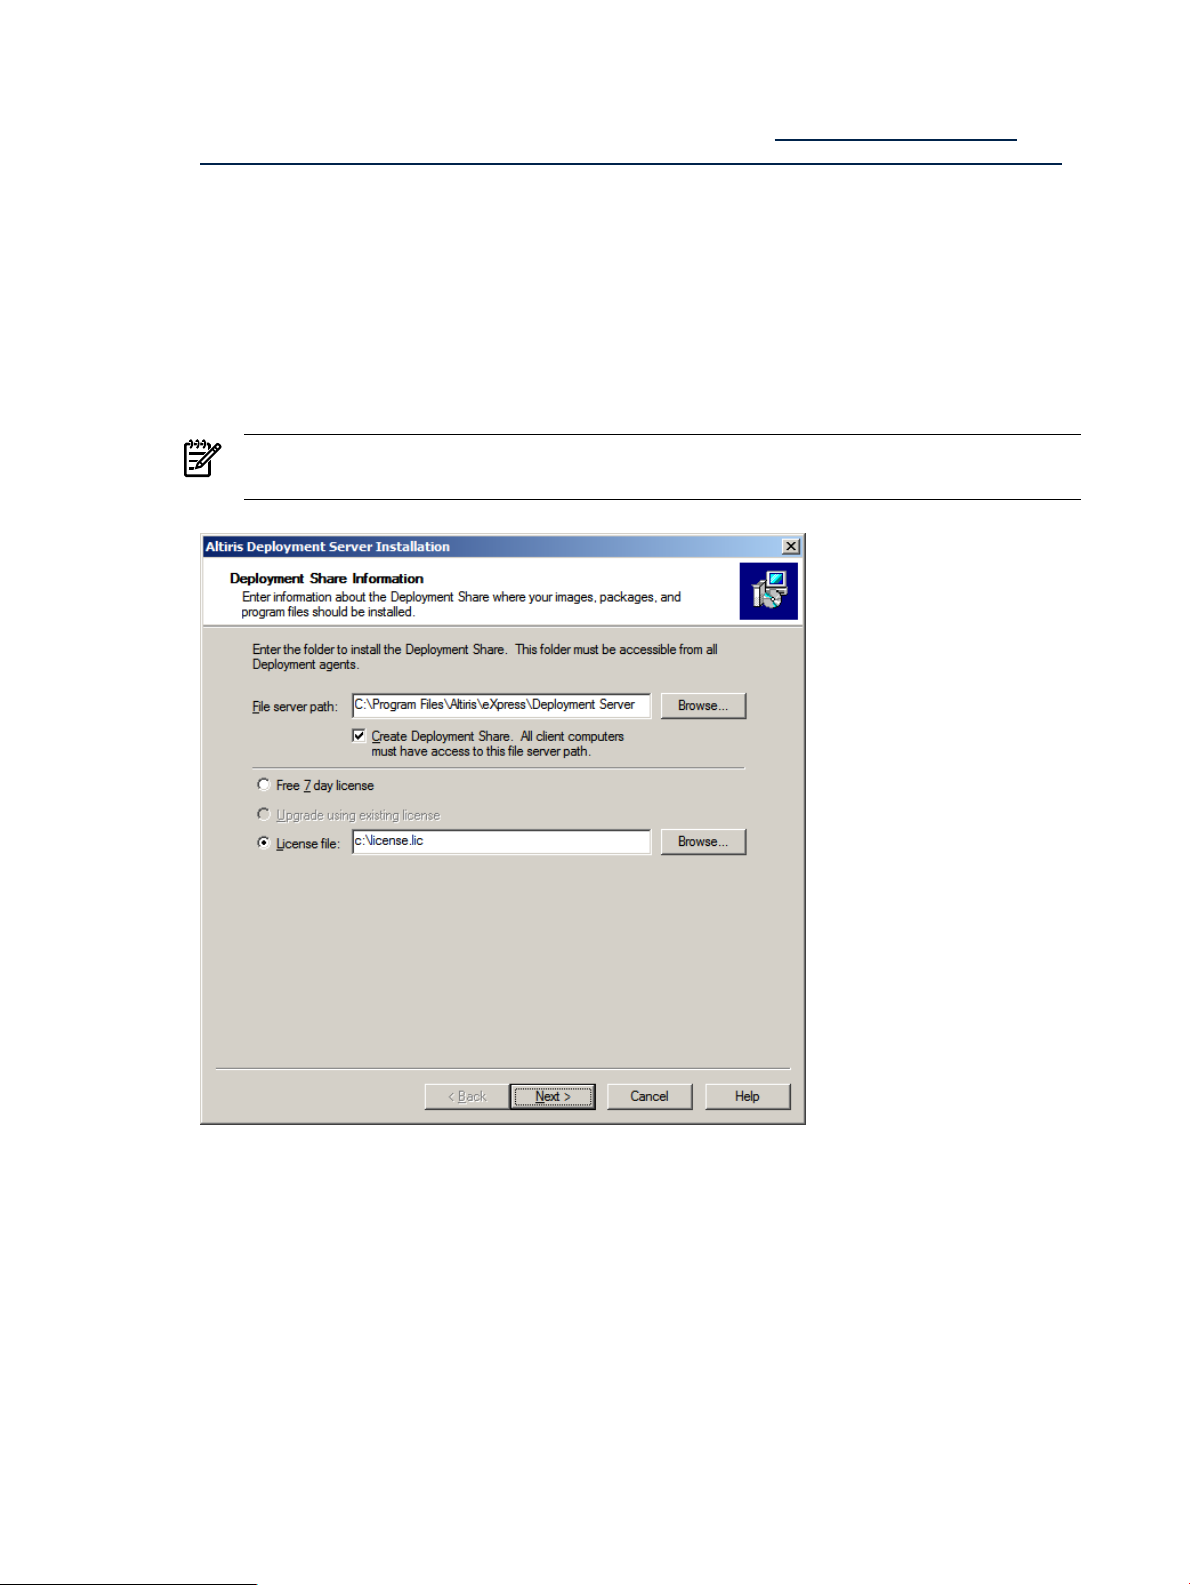
10. Select the appropriate licensing option, and click Next.
• If installing for the first-time, select Free 7 day license, or select License file, and enter the license
file path and name.
• If upgrading, verify that Upgrade using existing license is selected.
NOTE: When upgrading, you must select Upgrade using existing license to avoid losing
existing licenses.
12 Installing
Page 13

11. Enter the service credentials for the Deployment Server, and click Next.
NOTE: Do not install the Deployment Server component to a remote server because the Integration
Module installations fail.
12. Select the name of the server instance where you want to install the database, and click Next. If the
database is located on a remote server, you might be prompted for credentials. Enter a username and
password with administrative rights.
Installing 13
Page 14

13. Enter the appropriate database authentication method, and click Next.
NOTE: If you choose SQL Server Authentication, some Integration Module Configuration tasks fail.
14. If upgrading, click Yes when prompted to retain the data in the existing database.
14 Installing
Page 15

15. On the Pre-boot Operating Systems screen, click Next.
NOTE: Even though the WinPE options are not selected, WinPE is installed.
Installing 15
Page 16

16. Specify the location where you want to install PXE Server, and click Next. If DHCP is installed on a
separate server, click OK when prompted that DHCP services are required. If you choose not to use
PXE, then see the Knowledge Base article Creating and Using Automated Boot Media (Article 196).
NOTE: When upgrading, you must select No. While unintuitive, selecting this option ensures that the
PXE servers upgrade correctly.
17. Specify how clients connect to the Deployment Server, and click Next.
16 Installing
Page 17

18. Specify the location where you want to install the Deployment Server Console, and click Next.
NOTE: Do not install the initial Deployment Console component to a remote server because the
Integration Module installations fail.
19. Specify where you want to install the Deployment Server Web Console, and click Next.
Installing 17
Page 18

20. On the Installation Information screen, click Install.
21. If upgrading, click Yes when prompted to replace the eXpress share.
22. When the installation is complete, click Finish.
23. If you did not select the Altiris Deployment Server Hotfix, proceed to Step 25
24. Wait while the Altiris Deployment Server Hotfix is applied.
25. If you did not select ProLiant Integration Module software, proceed to Step 36.
26. On the Prerequisites screen, click Verify. When the process is complete, click Next.
27. Select the operating systems that you want to deploy to target servers, and click Next.
18 Installing
Page 19

28. Specify the appropriate configuration options, and click Next. For more information, see Appendix B
Manually modifying configuration settings.
NOTE: The MAC Address lookup value is required for Integrity and new ProLiant servers.
29. Specify the appropriate Windows product keys, and click Next.
30. On the Installation and Configuration screen, click Install.
31. If upgrading, click OK when prompted to back up and overwrite existing configuration files, and reimport
existing jobs.
32. For each operating system that you want to copy, specify the root directory of the distribution files, and
click Copy. If you skip copying any distribution, see Appendix A Manually installing distribution files.
33. If prompted to reinsert the Rapid Deployment Pack media, reinsert it, and click OK.
34. If you skipped any distributions, click OK when the warning message appears.
35. On the Installation and Configuration screen, click Finish.
36. If you did not select Integrity Integration Module software, proceed to Step 48.
Installing 19
Page 20

37. On the Prerequisites screen, click Verify. When the verification process is complete, click Next.
38. Select the operating systems that you want to deploy to target servers, and click Next.
39. Specify the appropriate configuration options, and click Next. For more information, see Appendix B
Manually modifying configuration settings.
NOTE: The MAC Address lookup value is required for Integrity and new ProLiant servers.
40. Specify the appropriate Windows product keys, and click Next.
41. On the Installation and Configuration screen, click Install.
42. If upgrading, click OK when prompted to back up and overwrite existing configuration files and reimport
existing jobs.
43. For each operating system that you want to copy, specify the root directory of the distribution files, and
click Copy. If you skip copying any distribution, see Appendix A Manually installing distribution files.
44. If prompted to reinsert the Rapid Deployment Pack media, reinsert it, and click OK.
45. If you skipped any distribution, click OK when the warning message appears.
20 Installing
Page 21

46. On the Installation and Configuration screen, click Finish.
47. On the Installation screen, click Next.
48. On the Post-Installation screen, click Finish.
49. Click Yes when prompted to reboot the server.
The installation is complete.
Regularly updated troubleshooting information, frequently asked questions, and specific how-to procedures are available at the HP
Rapid Deployment Pack Knowledge Base at http://www.hp.com/servers/rdp/kb.
Some important articles are:
• Rapid Deployment Pack Release Notes
• Rapid Deployment Pack Deployment Support
• Minimum Firmware Requirements for Target Servers (Article 200)
• Servers with Multiple Disks Deployment Support (Article 195)
• Virtual Machine Deployment Support (Article 193)
• Integrity Server Deployment Support (Article 186)
Installing 21
Page 22

22
Page 23

4 Using the Rapid Deployment Pack
To get started with the Rapid Deployment Pack, double-click the Deployment Console icon on the desktop.
This will bring up the console from which you can manage computers and execute jobs.
Deployment Console basics
Computers Pane—This pane shows managed computers. The New Computers group shows computers that
have connected to the Deployment Server for the first time. Click View>Show Physical Devices to add
the Physical Devices group.
Jobs Pane—This pane shows the provided jobs.
Details Pane—The right-hand side of the console displays information about the selected computer or job.
For a computer, basic properties and job history appear. For a job, tasks and computer history appear. The
Job Schedule Information dialog box displays the status of each task in the schedule. To view this dialog
box, double-click an item in the job history or computer history. The Schedule Status Detail dialog box
displays return codes and status messages. To view this dialog box, click Status Details.
To execute a job, drag and drop one or more computers onto a job, or vice-versa.
Connecting server blades
1. Connect the enclosure to the network that contains your Deployment Server, and power up the enclosure.
2. Insert the server blades into the enclosure, but do not power up the server blades.
3. Change the default rack and enclosure names.
4. Power up the server blades.
5. From the Computer pane, right-click on a server blade and select Power Control>iLO – Interface.
This action accesses the iLO homepage.
Deployment Console basics 23
Page 24

Deploying the first server blade
1. In the Jobs pane, in the Server Deployment folder, select a Windows scripted installation job. Drag the
job to the server blade in the Computers pane.
2. Select Run this job immediately, and click OK.
3. To view the progress of the job, double-click the computer in the job’s computer history.
Reconfiguring the server blade
By default the Windows scripted installation job configures the computer name as the console display name
and configures the network as DHCP.
If you need to reconfigure the server:
1. In the Computers pane, right-click the blade and click Configure.
2. Click Microsoft Networking, and enter a new computer name and a new workgroup or domain name.
3. Click TCP/IP, and enter the appropriate IP information.
4. Click OK.
5. Select Run this job immediately, and click OK.
6. If the Windows scripted installation job is still running, click OK when the warning message appears.
Next steps
Adapt and customize the Rapid Deployment Pack for your environment. The provided jobs and files are
generic and work out-of-the-box; however, they might not be sufficient for a complex server environment.
For example, you might want to change the default password in the various unattend and kickstart files. For
problem-solving information and Online resources, see Chapter 6 HP support and contact information.
24 Using the Rapid Deployment Pack
Page 25

5 Understanding the Deployment Server
Rapid Deployment Pack populates the Deployment Server Console with jobs and the Deployment Server
directory with tools, scripts, configuration files, software drivers, and documentation files. This section explains
these provided jobs and files, and the directory structure.
Design philosophy
The provided jobs, perhaps with a few tweaks, are sufficient for generic operating system deployment. More
than likely, the provided jobs will act as templates and will need to be adapted and customized. When this
is the case, HP strongly recommends that you follow a copy, rename, and modify process – copy the job or
file, rename it so that the name conveys the new behavior, and make the necessary modifications. Doing
so will provide a clean separation between the customized jobs and the provided jobs. This will allow the
provided jobs to act as working baselines.
NOTE: When editing ESX or Linux files on the Deployment Server, use a text editor that saves the file in
Linux compatible format without adding extra characters.
Jobs
Rapid Deployment Pack adds three root folders into the Jobs pane.
Table 5-1 Job folders
Server Deployment
Server Imaging
Server Deployment Toolbox
Server Deployment jobs
Unless otherwise indicated in the job name, the job uses the following default settings.
Table 5-2 Hardware configuration default settings
Smart Array
DescriptionFolder
The jobs in this folder perform a complete server deployment. They deploy a default hardware
configuration, execute a scripted operating system installation, and install the appropriate ProLiant
or Integrity Support Pack.
The jobs in this folder perform a complete server deployment. They deploy a default hardware
configuration and a captured disk image.
The jobs in this folder provide granular control over the server deployment process. By providing
jobs that perform only hardware configuration, operating system installation, and value-add software
installation, you can combine various jobs together to suit your needs.
Default settingComponent
None - .\lib\hwconfig\system\pl.xml or integrity.xmlSystem ROM
RAID level based on the number of attached drives - .\lib\hwconfig\array\pl-acu-rd.xml
or i-acu-rd.xml
Not configured in the standard jobsiLO
Not configured in the standard jobsSAN HBA
Design philosophy 25
Page 26

Table 5-3 Windows default settings
Default settingComponent
Windows administrator password
Computer name
Table 5-4 VMware default settings
VMware root password
Drive configuration
Table 5-5 Linux default settings
The administrator password is password. This password is stored as clear text in the
unattend answer file. HP recommends changing the default administrator password.
A single partition is created automatically that expands to the full drive size.Drive configuration
The Windows computer name uses the 15 right-most characters of the console display
name.
Firewall settings are disabled.Firewall
Default settingComponent
The root password is password. This password is stored as clear text in the kickstart
file. HP recommends changing the default root password.
When configuring the disk partition for a scripted operating system installation, various
VMware ESX Server specific partitions are created. These settings are default. Do not
change them.
The VMware ESX Server host name uses the console display name.Host name
VMware ESX Server specific packages are installed. Do not change this setting.Packages
Firewall settings are enabled with only some ports open.Firewall
Linux root password
Drive configuration
Server Imaging jobs
Windows Sysprep imaging notes:
• The reference and target servers must have the same BIOS EMS setting.
• Do not enable the Automatically perform reconfiguration task after completing this imaging
task option in the Distribute Disk Image task.
• Some applications do not image properly.
• The “prep” script removes or uninstalls HP hardware-specific software. This removal allows the captured
image to be deployed to any HP server. The Support Pack installation task, after the image deployment,
installs any necessary HP software.
• Just like the scripted installation, you can customize the sysprep answer file.
Default settingComponent
The root password is password. This password is stored as clear text in the
kickstart/control file. HP recommends changing the default root password.
The disk space is partitioned according to Red Hat or SUSE default specifications. Red
Hat Enterprise Linux installs Logical Volume Manager (LVM) by default.
The Linux host name uses the console display.Host name
Basic Linux server packages are installed.Packages
Firewall settings are disabled.Firewall
All NICs are enabled.Networking
• By default, the Sysprep jobs use the corresponding Enterprise product key. If you need to capture a
different edition, you must change the job to use the appropriate product key.
26 Understanding the Deployment Server
Page 27

Linux imaging notes:
• The reference and target servers must have an identical storage controllers.
• The capture image file will be .\lib\images\yyyy-linux.img where yyyy is the computer model
name, for example ProLiant DL360 G4.
• Subsequent captures on the same model will overwrite any existing image file.
• Some applications do not image properly.
Server Deployment Toolbox Jobs
This folder contains jobs that are decompositions of the other jobs, variants of the generic hardware jobs,
and non-deployment jobs.
• The Hardware Configuration and OS Imaging jobs are available in Read/Write and Capture/Deploy
pairs respectively. The job pairs use the same output/input file.
• Jobs denoted with “[server-specific]” use a output/input filename based upon the Computer ID of the
target server instead of a static filename. To determine the Computer ID look at the Properties of the
server in the console.
• If you execute a Read or Capture job, the output file will be overwritten.
• The Offline Wait job can be used to “hold” a target server in the LinuxPE environment. This job essentially
emulates a first-time LinuxPE PXE boot “Waiting for instructions” state.
• The Read Hardware Configuration jobs can generate an extensive inventory of the target server
hardware. These jobs execute various toolkit utilities, such as conrep and acu, to gather the inventory.
• The Upgrade ProLiant ML/DL/BL Firmware job uses LinuxPE, not the production operating system.
Therefore you can use it on bare-metal servers. The job upgrades the following hardware: System BIOS,
Smart Array, iLO, NIC, QLogic HBA, and local hard drives.
Directory structure
The following table provides an overview of the Deployment Server directory as populated by the Rapid
Deployment Pack. The ‘.’ in the directory paths below represents the Deployment Server installation directory.
Table 5-6 Deployment Server directory structure
.\lib\bin32
.\lib\osoem
Directory contentsDirectory
Rapid Deployment Pack documentation.\docs
The .bin files for the provided jobs.\jobs
Windows SmartStart Scripting Toolkit, Linux SmartStart Scripting Toolkit, and various tools and
scripts
Various tools and scripts.\lib\bin64
Smart Setup Scripting Toolkit for Integrity and various tools and scripts.\lib\binia64
Presupplied and captured hardware configuration files.\lib\hwconfig
Presupplied and captured image files.\lib\images
Operating system scripted installation answer files separated into subdirectories per OS.\lib\osconfig
Operating system distribution files separated into subdirectories per OS.\lib\osdist
ProLiant Drivers for Windows, Integrity Drivers for Windows, and Altiris Deployment Agents
The driver subdirectories are either a specific version number, such as 800, or zzz which is a copy
of the latest version subfolder. The provided jobs use the zzz subfolder.
.\lib\software
Operating system sysprep imaging answer files separated into subdirectories..\lib\ossysprep
ProLiant Support Packs, ProLiant Firmware Maintenance, and Integrity Support Packs
The support pack subdirectories are either a specific version number such as 800, or Z.ZZ which
is a copy of the latest version subfolder. The provided jobs use the Z.ZZ subfolder.
Server Deployment Toolbox Jobs 27
Page 28

Job—Directory relationship
The provided jobs follow a common design consisting of a sequence of Run Script, image capture or deploy,
and reboot tasks. The embedded scripts in the Run Script tasks, reference files or directories using environment
variables and pass those variables to external wrapper scripts. The wrapper scripts perform one well-defined
function, for example, calling a single utility like conrep. Using external scripts enables detailed error reporting
to the Deployment Server.
You need to edit only the embedded Run Script code. However, be aware that the wrapper scripts do not
accept arbitrary file paths. They are hard-coded to specific locations in the .\lib tree.
The following table lists the Deploy ProLiant ML/DL/BL + Windows 2003 x64 Enterprise + PSP job. The bold
lines represent each task in the job. Each task is followed by its contents, which represent code called by
the embedded Run Script code.
Run Script Deploy System Configuration {WinPE Managed (32-bit)}
set inputfile=pl.xml
call f:\lib\bin32\winpe\conrep.cmd –l %inputfile%
f:\lib\bin32\winpe\conrep.exe –l –ff:\lib\hwconfig\system\pl.xml
Power Control (Reboot)
Run Script Deploy Array Configuration {WinPE Managed (32-bit)}
set inputfile=pl-acu-rd.ini
call f:\lib\bin32\winpe\acu.cmd -i %inputfile% -internal -reset
f:\lib\bin32\winpe\acu\hpacubin.exe -i f:\lib\hwconfig\array\pl-acu-rd.ini –internal
-reset
Power Control (Reboot)
Run Script Deploy System Configuration {WinPE Managed (32-bit)}
set inputfile=pl-win.xml
call f:\lib\bin32\winpe\conrep.cmd –l %inputfile%
f:\lib\bin32\winpe\conrep.exe –l –ff:\lib\hwconfig\system\pl.xml
Distribute Disk Image {WinPE Managed (32-bit)}
f:\lib\images\ntfs.img
Run Script Copy ProLiant Files {WinPE Managed (64-bit)}
set oem=proliant.zzz\w52.64
call f:\lib\bin64\winpe\osoem1.cmd
copy f:\lib\osoem\proliant.zzz\w52.64\*.* c:\
Run Script Copy Altiris Files {WinPE Managed (64-bit)}
rem replacetokens .\lib\osoem\altiris\aclient.txt .\lib\osoem\altiris\%ID%.tmp
set configfile=%ID%.inp
call f:\lib\bin64\winpe\osoem2.cmd
copy f:\lib\osoem\altiris\%ID%.inp c:\$oem$\aclient\aclient.inp
28 Understanding the Deployment Server
Page 29

copy f:\lib\osoem\altiris\altiris-aclient*.exe c:\$oem$\aclient\aclient.exe
Run Script Copy Unattend.txt {WinPE Managed (64-bit)}
rem replacetokens .\lib\osconfig\w52e.64\default.txt .\lib\osoem\w52e.64\%ID%.txt
set unattendfile=w52e.64\%ID%.txt
call f:\lib\bin64\winpe\osconfig1.cmd
copy f:\lib\osoem\w52e.64\%ID%.txt c:\unattend.txt
Run Script Copy Distribution Files {WinPE Managed (64-bit)}
set dist=w52e.64
call f:\lib\bin64\winpe\osdist1.cmd
copy f:\lib\osdist\w52e.64\i386\*.* c:\i386
copy f:\lib\osdist\w52e.64\amd64\*.* c:\amd64
Run Script Start Install {WinPE Managed (64-bit)}
c:\amd64\winnt32.exe /s:c:\amd64 /unattend:c:\unattend.txt
Install Package
f:\lib\software\ProLiant Support Pack Z.ZZ for Windows 2003 x64\hpsum.exe –silent
Power Control (Reboot)
Job—Directory relationship 29
Page 30

Automation environments
1 2
3
4
5 6
7
LinuxPE
(Auto-
Select)
WinPE
(32-bit)
WinPE
(64-bit)
Windows
An automation environment is an operating system in which scripts can be run on the target independent
of the target’s production operating system or the Deployment Server’s operating system. The target can
boot the automation environment from a CD-ROM, USB key or through PXE. Each automation environment
consists of the necessary base files, additional HP drivers, and the appropriate Altiris Deployment Agent.
The Run Script, Create Disk Image, and Distribute Disk Image tasks enable the user to specify which automation
environment to run in. The Rapid Deployment Pack jobs specify a specific automation environment to avoid
ambiguity and to ensure that the utilities run in the correct and tested environment.
The following illustration and table provide a view of how the Deploy ProLiant ML/DL/BL + Windows
2003 x64 Enterprise + PSP scripted installation job uses the various automation environments.
Table 5-7 State transitions
DescriptionTransition
1
2
3
4
5
6
Power up a bare-metal target server. Since the target does not have a bootable hard drive, it PXE
boots. The PXE Server sends the target server the default Linux Managed (Auto-Select) image. After
the image is loaded, the agent connects to the Deployment Server. Since this is the initial connection
and no pending job exists, the Deployment Server directs the agent to wait.
Schedule the Deploy ProLiant ML/DL/BL + Windows 2003 x64 Enterprise + PSP job on the
target server. The Deployment Server determines that the target is in the incorrect automation
environment. It directs the agent to set the one-time boot EV to PXE and then reboot. When the target
PXE boots, the PXE Server sends the target server the WinPE Managed 32-bit image. After the image
is loaded, the agent connects to the Deployment Server and begins to execute task 1.
Task 2 in the job is a Reboot. The Deployment Server directs the agent to set the one-time boot EV
to PXE and then reboot. When the target PXE boots, the PXE Server sends it the WinPE Managed
32-bit image. After the image is loaded, the agent connects to the Deployment Server and executes
task 3.
Task 4 in the job is a Reboot. The Deployment Server directs the agent to set the one-time boot EV
to PXE and then reboot. When the target PXE boots, the PXE Server sends it the WinPE Managed
32-bit image. After the image is loaded, the agent connects to the Deployment Server and executes
tasks 5 and 6.
Task 7 in the job runs under a different automation environments. The Deployment Server directs
the agent to set the one-time boot EV to PXE and then reboot. When the target PXE boots, the PXE
Server sends it the WinPE Managed 64-bit image. After the image is loaded, the agent connects
to the Deployment Server and executes tasks 8 through 12.
Task 12 starts the Windows installation process. It performs the first part of setup and reboots the
target. Now that the target has a bootable hard drive, the Window setup kernel boots and completes
the installation. As part of the installation, the Deployment Agent for Windows is installed. While
the Windows installation process is in progress, the Deployment Server is waiting for the agent to
be installed and connected. After the agent connects to the Deployment Server, it executes task 13.
The last task in the job is a Reboot. The Deployment Server directs the agent to reboot.7
30 Understanding the Deployment Server
Page 31

6 HP support and contact information
Online resources
• For more information about Rapid Deployment Pack and to obtain the latest updates, see the HP Rapid
Deployment Pack website at http://www.hp.com/servers/rdp.
• For more information about specific how-to procedures, regularly updated troubleshooting information,
and frequently asked questions, see the HP Rapid Deployment Pack Knowledge Base at
http://www.hp.com/servers/rdp/kb.
• For more information about problem-solving ideas from other IT professionals, see the IT Resource Center
(ITRC) User Forum at http://forums.itrc.hp.com. Select Management Software and System Tools>
ProLiant Deployment & Provisioning.
• For more information and resources about the Altiris Deployment Solution, see the Altiris website at
http://www.altiris.com.
HP contact information
For the name of the nearest HP authorized reseller:
• In the United States, see the HP U.S. service locator webpage at http://www.hp.com/service_locator.
• In other locations, see the Contact HP worldwide webpage at
http://welcome.hp.com/country/us/en/wwcontact.html.
For HP technical support:
• In the United States, for contact options see the Contact HP United States webpage at
http://welcome.hp.com/country/us/en/contact_us.html. To contact HP by phone: Call 1-800-HP-INVENT
(1-800-474-6836). This service is available 24 hours a day, 7 days a week. For continuous quality
improvement, calls may be recorded or monitored. For U.S. customers, say "Insight Manager" when
prompted for the product name.
• In other locations, see the Contact HP worldwide webpage at
http://welcome.hp.com/country/us/en/wwcontact.html.
HP Software Technical Support and Update Service
HP offers a number of software support services, many of which are provided to our customers at no additional
charge.
Software Technical Support and Update Service - Insight Control suites and select ProLiant Essentials software
products include one year of 24 x 7 HP Software Technical Support and Update Service. This service provides
access to HP technical resources for assistance in resolving software implementation or operations problems.
The service also provides access to software updates and reference manuals either in electronic form or on
physical media as they are made available from HP. (Customers who purchase an electronic license to use
are eligible for electronic updates only.) With this service, Insight Control and ProLiant Essentials customers
will benefit from expedited problem resolution as well as proactive notification and delivery of software
updates. For more information about this service, see http://www.hp.com/services/insight.
Registration for Software Technical Support and Update Service:
There are two methods for registering:
• If you received a license entitlement certificate, automated registration for this service will take place
upon online redemption of the license certificate/key.
• If the license information you received for your product instructs you to register for Software Technical
Support and Update Service, follow the instructions so that you will be eligible for telephone support
and product updates.
How to Use Your Software Technical Support and Update Service:
Once registered, you will receive a service contract in the mail containing the Customer Service phone
number and your Service Agreement Identifier (SAID). You will need your SAID when calling for technical
Online resources 31
Page 32

support. Using your SAID, you can also go to the Software Update Manager (SUM) web page to view your
contract online and elect electronic delivery for product updates.
Warranty – HP will replace defective delivery media for a period of 90 days from the date of purchase.
This warranty applies to all Insight Control Management, HP Systems Insight Manager, and ProLiant Essentials
products.
Join the discussion – The HP Support Forum is a community-based, user-supported tool for HP customers to
participate in discussions amongst the customer community about HP products. For discussions related to
Insight Control and ProLiant Essentials software, see the "Management Software and System Tools" area.
Software and Drivers download pages – provides latest software and drivers for your ProLiant products.
Management Security (http://www.hp.com/servers/manage/security) – HP is proactive in its approach to
the quality and security of all its management software. Be sure to check this website often for the latest
down loadable security updates.
Obtain the latest SmartStart Release (http://www.hp.com/servers/smartstart) – The SmartStart, Management,
and Firmware CDs are now freely available for download following a simple registration from the SmartStart
web site. If you wish to receive physical kits with each release, you can order single release kits from the
SmartStart web site. To receive proactive notification when SmartStart releases are available, subscribe to
Subscriber's Choice at http://www.hp.com/go/subscriberschoice.
HP Worldwide Customer Service contact numbers are available at
http://www.hp.com/country/us/en/wwcontact.html. For U.S. customers, say "Insight Manager" when
prompted for the product name.
32 HP support and contact information
Page 33

A Manually installing distribution files
If you did not copy the Windows, ESX, or Linux distribution files during the installation, you must manually
copy the files for the scripted installation jobs to function properly. Manually copying the distribution files
produces the same results as copying the files during the installation.
To manually copy the distribution files, copy the entire contents of each distribution CD or DVD to the
appropriate .\lib\osdist\yyyy directory, where yyyy indicates the operating system shortcut name.
NOTE: For SLES 10, do not copy the second DVD.
Table A-1 Operating system directory names
Directory nameOperating system
w52eWindows 2003 - Enterprise Edition
w52sWindows 2003 - Standard Edition
w52wWindows 2003 - Web Edition
w52e.64Windows 2003 x64 - Enterprise Edition
w52s.64Windows 2003 x64 - Standard Edition
w52e.ia64Windows 2003 IA64 - Enterprise Edition
w61Windows 2008
w61.64Windows 2008 x64
Intel EM64T
w61.ia64Windows 2008 IA64
vmesx303VMware ESX Server 3.0.3
vmesx350u2VMware ESX Server 3.5.0 update 2
rhas47Red Hat Enterprise Linux AS 4.7 for x86
rhes47Red Hat Enterprise Linux ES 4.7 for x86
rhas47.6Red Hat Enterprise Linux AS 4.7 for AMD64 and EM64T
rhes47.64Red Hat Enterprise Linux ES 4.7 for AMD64 and Intel EM64T
rhas47.ia64Red Hat Enterprise Linux AS 4.7 for Intel Integrity
rhes47.ia64Red Hat Enterprise Linux ES 4.7 for Intel Integrity
rhel52Red Hat Enterprise Linux 5.2 for x86
rhel52.64Red Hat Enterprise Linux 5.2 for AMD64 and Intel EM64T
rhel52.ia64Red Hat Enterprise Linux 5.2 for Intel Integrity
sles10sp2\DVD1SUSE Linux Enterprise Server 10 Service Pack 2 for x86
sles10sp2.64\DVD1SUSE Linux Enterprise Server 10 Service Pack 2 for AMD64 and
sles10sp2.ia64\DVD1SUSE Linux Enterprise Server 10 Service Pack 2 for Intel Integrity
33
Page 34

34
Page 35

B Manually modifying configuration settings
Synchronize display names with computer names option
The Deployment Server can use a console display name that is different from the actual computer name.
However, the console can always reflect the same name as the computer name.
To manually enable synchronization of the display and computer names:
1. In the Deployment Server Console, click Tools>Options.
2. Click the Global tab.
3. Select the Synchronize display names with computer names.
4. Click OK.
Primary lookup key option
The Deployment Server uses the primary lookup key to determine if a server exists in the database. HP
recommends setting the primary lookup key as the server serial number and MAC address.
To manually set the primary lookup key to serial number and MAC address:
1. In the Deployment Server Console, click Tools>Options.
2. Click the Global tab.
3. Select Serial Number and MAC Address as the Primary lookup keys.
4. Click OK.
PXE initial deploy boot timeout option
By default, when a new computer (a computer not listed in the Deployment Server database) performs a PXE
boot, the PXE server sends the computer the PXE menu and waits for manual selection of the Initial Deployment
option. This process is not practical for servers, especially server blades with no local keyboard, mouse, or
monitor.
To manually change the Initial Deploy boot option:
1. In the Deployment Server Console, click Tools>PXE Configuration.
2. Click the DS tab.
3. Select Enable response to request from computers not in the DS Database.
4. Select Wait for Boot Menu default timeout before continuing with the PXE process.
5. Click Save, and then click OK.
Client/server file transfer port option
For adlagent to properly transfer files under VMware ESX 3.x, the client/server file transfer port must be set
to match the value in the supplied ESX kickstart files.
To manually set the client/server file transfer port to 4300:
1. In the Deployment Server Console, click Tools>Options.
2. Click the Global tab.
3. Select Client/server file transfer port, and enter 4300.
4. Click OK.
Creating an IIS FTP virtual directory option
For VMware ESX and Linux scripted installation deployments, a virtual directory must be configured on an
FTP server, such as IIS.
If you use an FTP server other than IIS, use the same entry settings.
To manually configure IIS FTP:
1. Launch the Internet Information Services (IIS) Manager.
2. Expand the directory in the left pane, and select Default FTP Site or another existing FTP site.
3. Right-click the FTP site, and click New>Virtual Directory.
Synchronize display names with computer names option 35
Page 36

4. Complete the Virtual Directory wizard by entering the following information when prompted.
Table B-1 Virtual directory information
EntryField
DSLIBVirtual Directory Alias
FTP Site Content Directory
5. Right-click the FTP site, and click Properties.
6. Click the Security Accounts tab.
7. Select Allow Anonymous Connections, and click OK.
8. If the FTP site name is followed by (Stopped), right-click the site name, and click Start.
Windows product keys
For Windows scripted installation deployments, you must provide a Windows product key.
To manually configure the Windows product keys:
1. In the Deployment Server Console, click Tools>Integration Module>User Tokens Editor.
2. Add or edit the appropriate entry.
3. Click the Save button.
Table B-2 User Tokens table entries
<Altiris Installation Directory>\lib
ReadVirtual Directory Access Permissions
Token nameOperating system
w52productkeyWindows 2003 x86
w52.64productkeyWindows 2003 x64
w52.ia64productkeyWindows 2003 IA64
w61dcproductkeyWindows 2008 x86 Datacenter
w61eproductkeyWindows 2008 x86 Enterprise
w61sproductkeyWindows 2008 x86 Standard
w61dc.64productkeyWindows 2008 x64 Datacenter
w61e.64productkeyWindows 2008 x64 Enterprise
w61s.64productkeyWindows 2008 x64 Standard
w61.ia64productkeyWindows 2008 IA64 Standard
36 Manually modifying configuration settings
Page 37

Index
A
Altiris Product Licensing Utility, 7
automation environment, 30
C
configuring
HP BladeSystem servers, 23
options, 35
Preboot eXecution Environment, 35
creating
FTP virtual directory, 35
image, 24
reference server, 24
D
Deployment Server
configuration, 35
directory structure, 25
requirements, 9
directory relationship job, 28
display names, synchronizing, 35
G
getting started, 11
H
HP authorized reseller, 31
HP BladeSystem servers blades
configuring, 23
HP contact information, 31
HP Software Technical Support and Update Service, 31
HP Support and Contact information, 31
I
imaging, creating, 24
installing, 11
Deployment Server, 11
operating system CDs and DVDs, 33
software, 11
J
jobs, 25
L
licenses, 7
Linux scripted installation, 25
M
Microsoft Internet Information Services
creating an FTP virtual directory, 35
O
obtaining licenses, 7
online resources, 31
options, configuring, 35
P
Preboot eXecution Environment
booting, 23
configuring, 35
PXE Configuration Utility , 35
reference, 23
prerequisites, installing, 9
primary lookup key, setting, 35
product keys, 36
R
Red Hat Linux scripted installation, 25
reference server, creating, 24
requirements
Deployment Server, 9
network, 9
S
scripted installation, customizing, 25
setting primary lookup key, 35
setting PXE initial deploy boot option, 35
software
installing, 11
support, 31
SUSE Linux, scripted installation, 25
synchronizing display names, 35
U
upgrade, 11
usage scenario, 23
V
virtual directory, creating, 35
VMware
installing operating system CDs and DVDs, 33
scripted installation, 25
W
Windows
entering product keys, 36
installing operating system CDs and DVDs, 33
synchronizing name, 35
N
network requirements, 9
37
 Loading...