

Page 1

Technical white paper
HP RAM Disk
Table of contents
Overview 2
Data written to RAM Disk 2
System requirements 2
Enable RAM Disk 3
Disable RAM Disk 6
RAM Disk Error 33.03.07 7
Supported printers 9
Page 2

2
Overview
RAM Disk provides volatile temporary storage for the print data. Upon shut down of the device or loss of power
the RAM Disk loses any data held in memory. The RAM Disk function meets the needs of customers with
requirements to have no user print data written to mass storage, such as a hard disk, eMMC or SSD.
With the installation of a supported HP DIMM, supported single-function printers can be configured to use the
DIMM as RAM Disk. Once enabled, all print data that would have been written to mass storage will instead flow
through the RAM Disk for print processing.
The supported accessory RAM DIMM modules for Ram Disk, HP 1GB 90-Pin DDR3 DIMM (2NR03A) and HP 2GB
DDR3x32 144-Pin 800MHz SODIMM (2NR09A), are Trade Agreements Act (TAA) compliant.
The RAM Disk feature is available on HP FutureSmart Enterprise single-function products introduced after
January 2015 and running HP FutureSmart firmware 4.8 or higher. See Supported Printers for a complete list
of supported products and compatible TAA compliant DIMM accessories.
Data written to RAM Disk
When the RAM Disk is enabled, the print data is sent to the RAM Drive. All other data, including system data and
configuration data will remain on the original device drive.
If the RAM Disk is enabled on a system that already has sensitive content on the mass storage device, the data is
deleted upon enabling of the RAM Disk. This is done via a cryptographic erase of the storage device.
System requirements
RAM Disk functionality requires FutureSmart 4 firmware version 4.8 or higher to be installed on the printer. The
product firmware must be installed prior to configuring the device for RAM Disk.
For more information on how to update the Enterprise printer firmware, please refer to document titled HP
Enterprise - Update the firmware.
Page 3

Enable RAM Disk
Follow these steps to enable RAM Disk:
1. Power the printer off.
2. Install the DIMM in the printer according to the DIMM installation instructions.
3. Power the printer on and wait for the printer to come to the Ready state.
4. Open a web browser.
5. In the URL field, type the IP address of the printer and then press Enter.
NOTE: If the web browser displays a message indicating that accessing the website might not be safe,
select the option to continue to the website.
Accessing this website will not harm the computer. This message is received if the printer enforces HTTPS.
6. Select the Information tab, click Configuration Page to view the printer information (Figure 1). Verify the
DIMM shows in the installed personalities and options.
Figure 1: EWS - Configuration Page
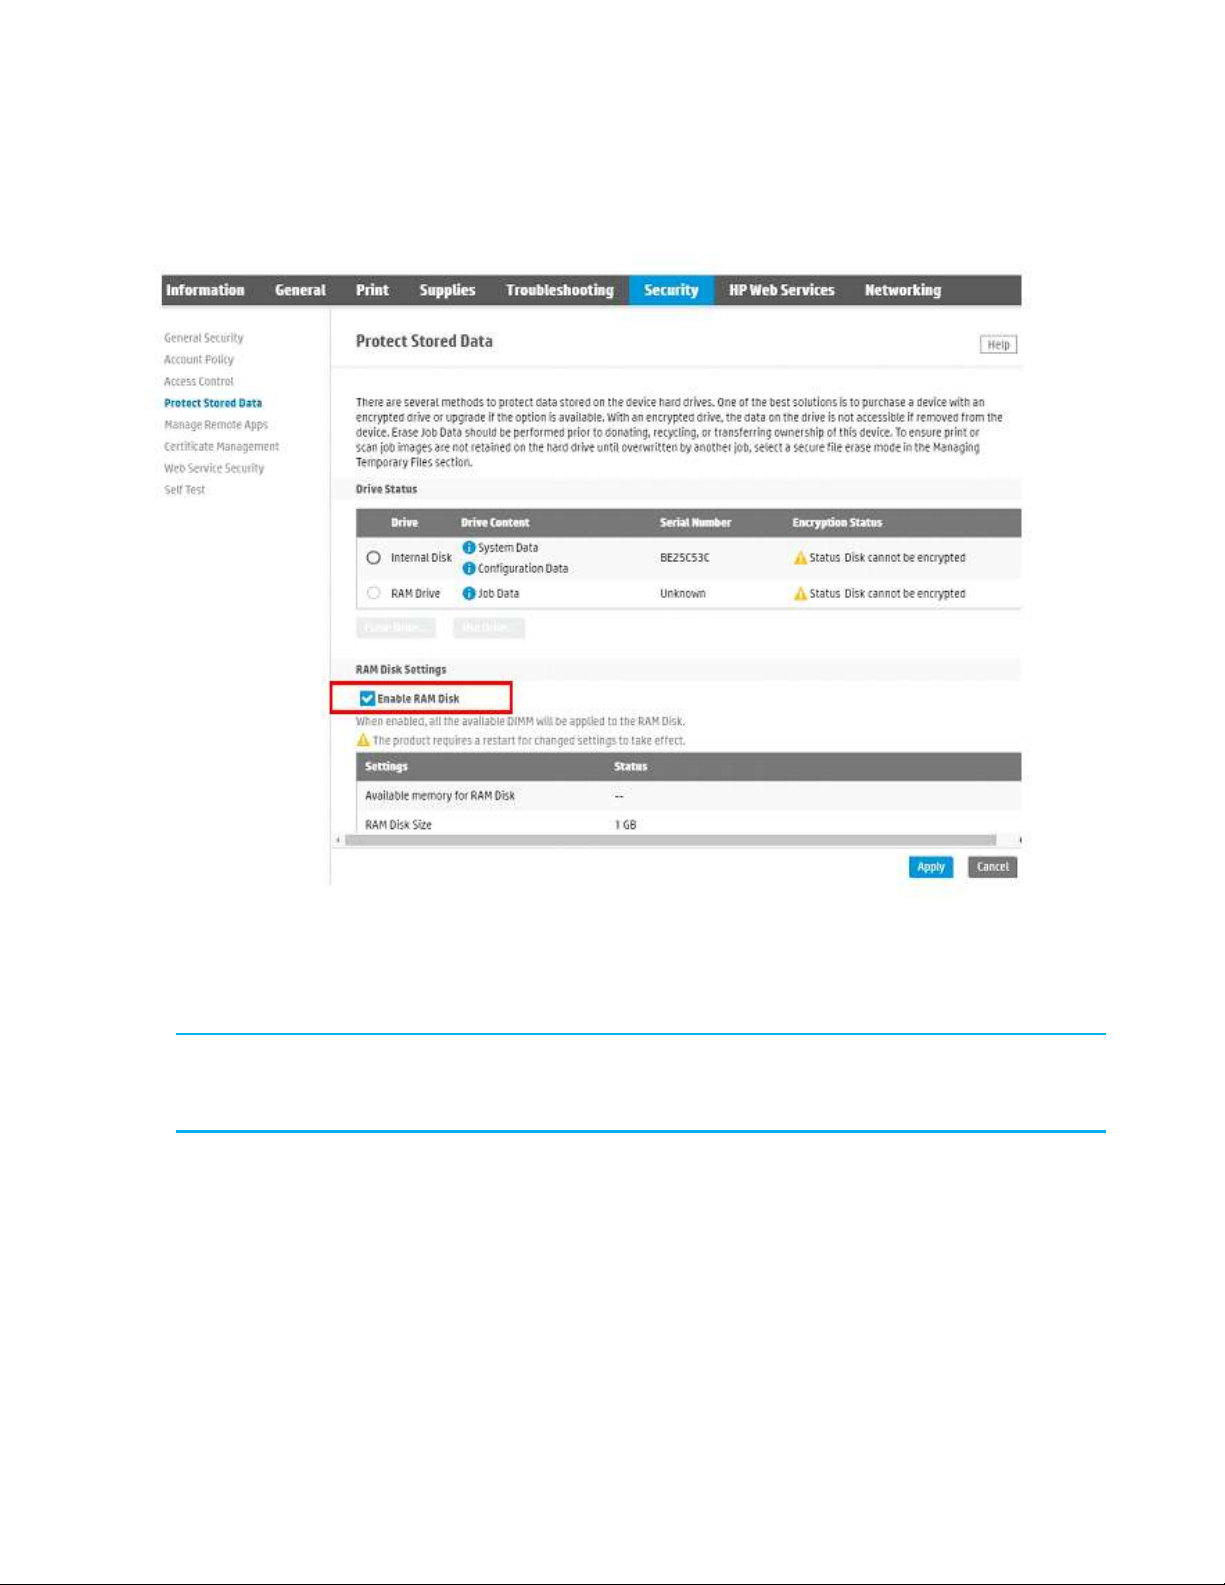
7. Select the Security tab, and then select the Protect Stored Data in the left navigation menu.
Page 4
4
8. Under RAM Disk Settings section, select the Enable RAM Disk check box. (Figure 2).
Figure 2: EWS - Enable RAM Disk in the Security tab
9. Click Apply. A restart of the printer is required to activate RAM Disk.
10. Click Restart Now. If desired, select Restart Later.
NOTE: HP recommends securing the formatter with a Kensington lock via the Kensington lock port.
See the printer manual for additional information.
To verify RAM Disk is enabled after the printer restart:
1. Open the printer Embedded Web Server.
2. Select the Security tab, and then select the Protect Stored Data in the left navigation menu.
Page 5

3. Under the Drive Status section, in the Drive Content column, verify that RAM Drive is listed, and the Job
Data is displayed. (Figure 3).
NOTE: The Encryption Status will list with a warning “Status Disk cannot be encrypted.” This is means
that the RAM Drive is not self-encrypting.
NOTE: There is no customer-facing method or interface to directly access information stored in the RAM
Drive. Upon shut down of the device or loss of power, the RAM Disk loses any data held in its memory.
Figure 3: EWS – Protect Stored Data information in the Security tab
The configuration page in the Embedded Web Server will also display the RAM Disk Size under the Memory
column (Figure 4)
Figure 4: EWS – RAM Disk Size information in the Information tab
Page 6

6
Disable RAM Disk
1. Open a web browser.
2. In the URL field, type the IP address of the printer, and then press Enter.
NOTE: If the web browser displays a message indicating that accessing the website might not be safe,
select the option to continue to the website.
Accessing this website will not harm the computer. This message is received if the printer enforces HTTPS.
3. Select the Security tab, and then select the Protect Stored Data in left navigation menu.
4. Under the RAM Disk Settings section, uncheck the Enable RAM Disk check box. (Figure 5).
Figure 5: EWS – RAM Disk Settings in the Security tab
5. Click Apply. A restart of the printer is required to deactivate RAM Disk.
6. Click Restart Now. If desired, select Restart Later.
7. The DIMM accessory can now be safely removed from the printer, if desired.
Page 7

RAM Disk Error 33.03.07
The RAM Disk error 33.03.07 can be displayed on the BIOS menu in three different scenarios:
• If the DIMM accessory is removed from the printer prior to disablement via the Embedded Web Server.
• If the DIMM accessory is left off the formatter during a printer repair.
• If the DIMM accessory fails.
In any of these scenarios, the printer boot process will stop at the pre-boot menu and post the 33.03.07 No
DIMM Installed message (Figure 6). This message is also logged in the Event Log (Figure 7).
Figure 6: Error message: 33.03.07 No DIMM Installed
Figure 7: Event Log Page
Resolve the error
To resolve the error, use one of the following solutions:
• Solution one: Reinstall the accessory DIMM onto the formatter as per the DIMM installation instructions.
Or
• Solution two: Disable the RAM Disk function from the Preboot menu, using the following instructions:
a) At the Preboot menu error code, press the Back arrow.
b) Press the down arrow to the Administrator menu. Press OK.
Page 8

8
c) Press the down arrow to the Ramdisk Disable menu (Figure 8). Press OK.
Figure 8: Ramdisk Disable
d) When prompted, press OK to accept (Figure 9).
Figure 9: Accept Ramdisk Disable
e) Press the back arrow to return to the main menu.
f) Select Continue, press OK to resume the printer start up process.
Page 9

Supported printers
You might want to include the list of supported printers. If this document will apply to future releases, be more
generic such as ‘HP LaserJet Enterprise and HP PageWide Enterprise printers running FutureSmart firmware’.
Product
Product Numbers
2NR03A
2NR09A
TAA-Compliant
HP 1GB 90-Pin
DDR3 DIMM
TAA-Compliant
HP 2GB
DDR3x32 144-
Pin 800MHz
SODIMM
HP LaserJet Enterprise M506n, dn, x, dh
F2A68A, F2A69A,
F2A70A, F2A71A
√
HP LaserJet Managed M506dnm, xm
F2A66A, F2A67A
√
HP LaserJet Enterprise M507n, dn, dng, x
1PV86A, 1PV87A,
1PV88A, 1PV89A
√
HP Color LaserJet Enterprise M553n, dn, x, dh
B5L24A, B5L25A,
B5L26A, B5L27A
√
HP Color LaserJet Managed M553dnm, xm
B5L38A, B5L39A
√
HP LaserJet Enterprise M604n, dn
E6B67A, E6B68A
√
HP LaserJet Enterprise M605dh
L4W89A
√
HP LaserJet Enterprise M605n, dn,x
E6B69A, E6B70A,
E6B71A
√
HP LaserJet Enterprise M606dn, x
E6B72A, E6B73A
√
HP LaserJet Enterprise M607n, dn
K0Q14A, K0Q15A
√
HP LaserJet Enterprise M608n, dn, x
K0Q17A, K0Q18A,
K0Q19A
√
HP LaserJet Enterprise M608nk
4QZ97A
√
HP LaserJet Enterprise M609dh, dn, x
K0Q20A, K0Q21A,
K0Q22A
√
HP LaserJet Enterprise M610dn
7PS82A
√
HP LaserJet Enterprise M611dn
7PS84A
√
HP LaserJet Enterprise M611x
7PS85A
√
HP LaserJet Enterprise M612dn
7PS86A
√
HP LaserJet Enterprise M612x
7PS87A
√
Page 10

10
Product
Product Numbers
2NR03A
2NR09A
TAA-Compliant
HP 1GB 90-Pin
DDR3 DIMM
TAA-Compliant
HP 2GB
DDR3x32 144-
Pin 800MHz
SODIMM
HP Color LaserJet Enterprise M652n, dn
J7Z98A, J7Z99A
√
HP Color LaserJet Enterprise M653dn, x, dh
J8A04A, J8A05A,
J8A06 A
√
HP Color LaserJet Enterprise M751n, dn
T3U43A, T3U44A
√
HP Color LaserJet Enterprise M856 dn, x
T3U51A, T3U52A
√
HP LaserJet Managed E50045dn
3GN19A
√
HP LaserJet Managed E50145dn Printer
1PU51A
√
HP Color LaserJet Managed E55040dw
3GX98A
√
HP LaserJet Managed E60055dn
M0P33A
√
HP LaserJet Managed E60065dn, x
M0P35A, M0P36A
√
HP LaserJet Managed E60075dn, x
M0P39A, M0P40A
√
HP LaserJet Managed E60155dn
3GY09A
√
HP LaserJet Managed E60165dn
3GY10A
√
HP LaserJet Managed E60175dn
3GY12A
√
HP Color LaserJet Managed E65050dn
L3U55A
√
HP Color LaserJet Managed E65060dn
L3U56A
√
HP Color LaserJet Managed E65150dn
3GY03A
√
HP Color LaserJet Managed E65160dn
3GY04A
√
HP Color LaserJet Managed E75245dn
T3U64A
√
HP Color LaserJet Managed E85055dn
T3U66A
√
Page 11

Product
Product Numbers
2NR03A
2NR09A
TAA-Compliant
HP 1GB 90-Pin
DDR3 DIMM
TAA-Compliant
HP 2GB
DDR3x32 144-
Pin 800MHz
SODIMM
HP PageWide Enterprise Color 556dn, xh
G1W46A,
G1W47A
√
HP PageWide Enterprise Color 765dn
J7Z04A
√
HP PageWide Managed Color E55650dn
L3U44A
√
HP PageWide Managed Color E75160dn
J7Z06A
√
HP PageWide Managed P75250dn
Y3Z49A
√
Page 12

12
Revision History
Edition/ Date (month/year)
Request submitted
Changes to the document
Edition1/ January 2020
CDD Request #3929
New .pdf uploaded in Concentra
Edition 2/ February 2020
CDD Request #3956
Added products M856/ E85055
Edition 3/ March 2021
CDD Request #5063
Added products M610, M611, M612
Updated Supported printers in
numerical order.
hp.com/go/support
Current HP driver, support, and security alerts
delivered directly to your desktop.
© Copyright 2021 HP Development Company, L.P. The information contained herein is subject to change without notice. The only warranties for
HP products and services are set forth in the express warranty statements accompanying such products and services. Nothing herein should be
construed as constituting an additional warranty. HP shall not be liable for technical or editorial errors or omissions contai ned herein.
Document ID: c06547602ENWW
 Loading...