

Page 1

HP Uninterruptible Power System
R12000 XR Models
User Guide
December 2002 (Second Edition)
Part Number 146316-002
HP CONFIDENTIAL Codename: Sierra Part Number: 146316-002 Last Saved On: 1/24/03 10:11 AM
Page 2

© 2002 Hewlett-Packard Development Company, L.P.
Hewlett-Packard Company shall not be liable for technical or editorial errors or omissions contained herein. The
information in this document is provided “as is” without warranty of any kind and is subject to change without
notice. The warranties for HP products are set forth in the express limited warranty statements accompanying such
products. Nothing herein should be construed as constituting an additional warranty.
HP Uninterrruptible Power System R12000 XR Models User Guide
December 2002 (Second Edition)
Part Number 146316-002
HP CONFIDENTIAL Codename: Sierra Part Number: 146316-002 Last Saved On: 1/24/03 10:11 AM
Page 3

Contents
About This Guide
Intended Audience...................................................................................................................................... vii
Important Safety Information..................................................................................................................... vii
Symbols on Equipment .............................................................................................................................. vii
Rack Stability ............................................................................................................................................ viii
Symbols in Text......................................................................................................................................... viii
Text Conventions ...................................................................................................................................... viii
Related Documents.......................................................................................................................................ix
Getting Help .................................................................................................................................................ix
HP Technical Support............................................................................................................................ix
HP Website ............................................................................................................................................ix
HP Authorized Reseller ..........................................................................................................................x
Reader’s Comments ......................................................................................................................................x
Chapter 1
Overview
UPS Features ............................................................................................................................................. 1-1
Communication Ports.......................................................................................................................... 1-2
UPS R12000 XR Model Part Number....................................................................................................... 1-2
Front View................................................................................................................................................. 1-3
Rear View.................................................................................................................................................. 1-4
Power Management Software.................................................................................................................... 1-5
UPS Hardware Options ............................................................................................................................. 1-5
Extended Runtime Modules................................................................................................................ 1-6
Power Distribution Units .................................................................................................................... 1-6
Remote Emergency Power Off Port .......................................................................................................... 1-6
Warranties ................................................................................................................................................. 1-7
$25,000 Computer Load Protection Guarantee................................................................................... 1-7
Pre-Failure Battery Warranty.............................................................................................................. 1-7
Chapter 2
Operation
Front Panel Controls and LCD Display..................................................................................................... 2-1
Front Panel Indicators ............................................................................................................................... 2-2
Front Panel LCD................................................................................................................................. 2-2
Front Panel LEDs................................................................................................................................ 2-3
Modes of Operation................................................................................................................................... 2-4
Turning on the Main Circuit Breaker ........................................................................................................ 2-5
Charging the Batteries ............................................................................................................................... 2-5
HP Uninterrruptible Power System R12000 XR Models User Guide iii
HP CONFIDENTIAL Codename: Sierra Part Number: 146316-002 Last Saved On: 1/24/03 10:11 AM
Page 4

Contents
Placing the UPS in Operate Mode .............................................................................................................2-6
Initiating a Self-Test ..................................................................................................................................2-6
Audible Alarms..........................................................................................................................................2-7
Silencing an Audible Alarm ................................................................................................................2-7
Placing the UPS in Bypass Mode ..............................................................................................................2-8
Shutting Down the System.........................................................................................................................2-8
Chapter 3
LCD Configuration and Status
Changing Configuration Parameters..........................................................................................................3-1
Matching the Utility Voltage .....................................................................................................................3-2
Module Locations................................................................................................................................3-3
Configuring the UPS Using the LCD Menu ..............................................................................................3-4
Initial Power-Up Display.....................................................................................................................3-4
Top Level Main Menu.........................................................................................................................3-4
Menu Map ...........................................................................................................................................3-5
Displaying the Status or Active Alarms ..............................................................................................3-7
Displaying the Frequency, Power, and Current Data ..........................................................................3-9
Displaying the Battery Charge Data..................................................................................................3-10
Setting the Time ................................................................................................................................3-10
Setting the Date .................................................................................................................................3-10
Displaying the Firmware Version .....................................................................................................3-11
Testing the LCD Display................................................................................................................... 3-11
Changing the System Setup Options .................................................................................................3-12
Chapter 4
Battery Maintenance
Precautions.................................................................................................................................................4-1
Charging Batteries .....................................................................................................................................4-2
Determining When to Replace Batteries.................................................................................................... 4-2
Obtaining New Batteries............................................................................................................................4-3
Replacing the Batteries ..............................................................................................................................4-3
Removing and Replacing the Battery Module ....................................................................................4-4
Testing the New Battery Module ........................................................................................................4-5
Disposing of Used Batteries.......................................................................................................................4-5
Care and Storage of Batteries ....................................................................................................................4-6
Pre-Failure Battery Warranty ..............................................................................................................4-6
Chapter 5
Troubleshooting
LCD Alarm Troubleshooting.....................................................................................................................5-1
Problems During Startup..........................................................................................................................5-10
Problems After Startup ............................................................................................................................5-10
CarePaq Considerations .......................................................................................................................5-12
Repairing the UPS....................................................................................................................................5-12
iv HP Uninterrruptible Power System R12000 XR Models User Guide
HP CONFIDENTIAL Codename: Sierra Part Number: 146316-002 Last Saved On: 1/24/03 10:11 AM
Page 5

Appendix A
Regulatory Compliance Notices
Regulatory Compliance Serial Numbers .................................................................................................. A-1
Federal Communications Commission Notice......................................................................................... A-1
Class A Equipment ............................................................................................................................ A-1
Class B Equipment............................................................................................................................. A-2
Declaration of Conformity for Products Marked with the FCC Logo, United States Only............... A-2
Modifications ..................................................................................................................................... A-2
Cables................................................................................................................................................. A-3
Canadian Notice (Avis Canadien) ............................................................................................................ A-3
Class A Equipment ............................................................................................................................ A-3
Class B Equipment............................................................................................................................. A-3
European Union Notice ............................................................................................................................ A-3
Japanese Notice ........................................................................................................................................ A-4
China Taiwan Notice................................................................................................................................ A-4
Battery Replacement Notice..................................................................................................................... A-5
Appendix B
Electrostatic Discharge
Preventing Electrostatic Damage ..............................................................................................................B-1
Grounding Methods To Prevent Electrostatic Damage.............................................................................B-1
Contents
Appendix C
Specifications
Physical Specifications..............................................................................................................................C-1
Input Specifications...................................................................................................................................C-1
Output Specifications ................................................................................................................................C-2
Overcurrent Protection ..............................................................................................................................C-2
Battery Specifications................................................................................................................................C-3
Battery Runtime ........................................................................................................................................C-3
Environmental Specifications....................................................................................................................C-3
Index
HP Uninterrruptible Power System R12000 XR Models User Guide v
HP CONFIDENTIAL Codename: Sierra Part Number: 146316-002 Last Saved On: 1/24/03 10:11 AM
Page 6
This guide provides information about operation, configuration, battery maintenance, and
troubleshooting for the UPS.
Intended Audience
This guide is intended for individuals requiring information about the use of UPSs. No
installation or service procedure should be carried out by someone other than a technician
with specific experience with high-voltage equipment.
Important Safety Information
Before installing this product, read the Important Safety Information document provided.
About This Guide
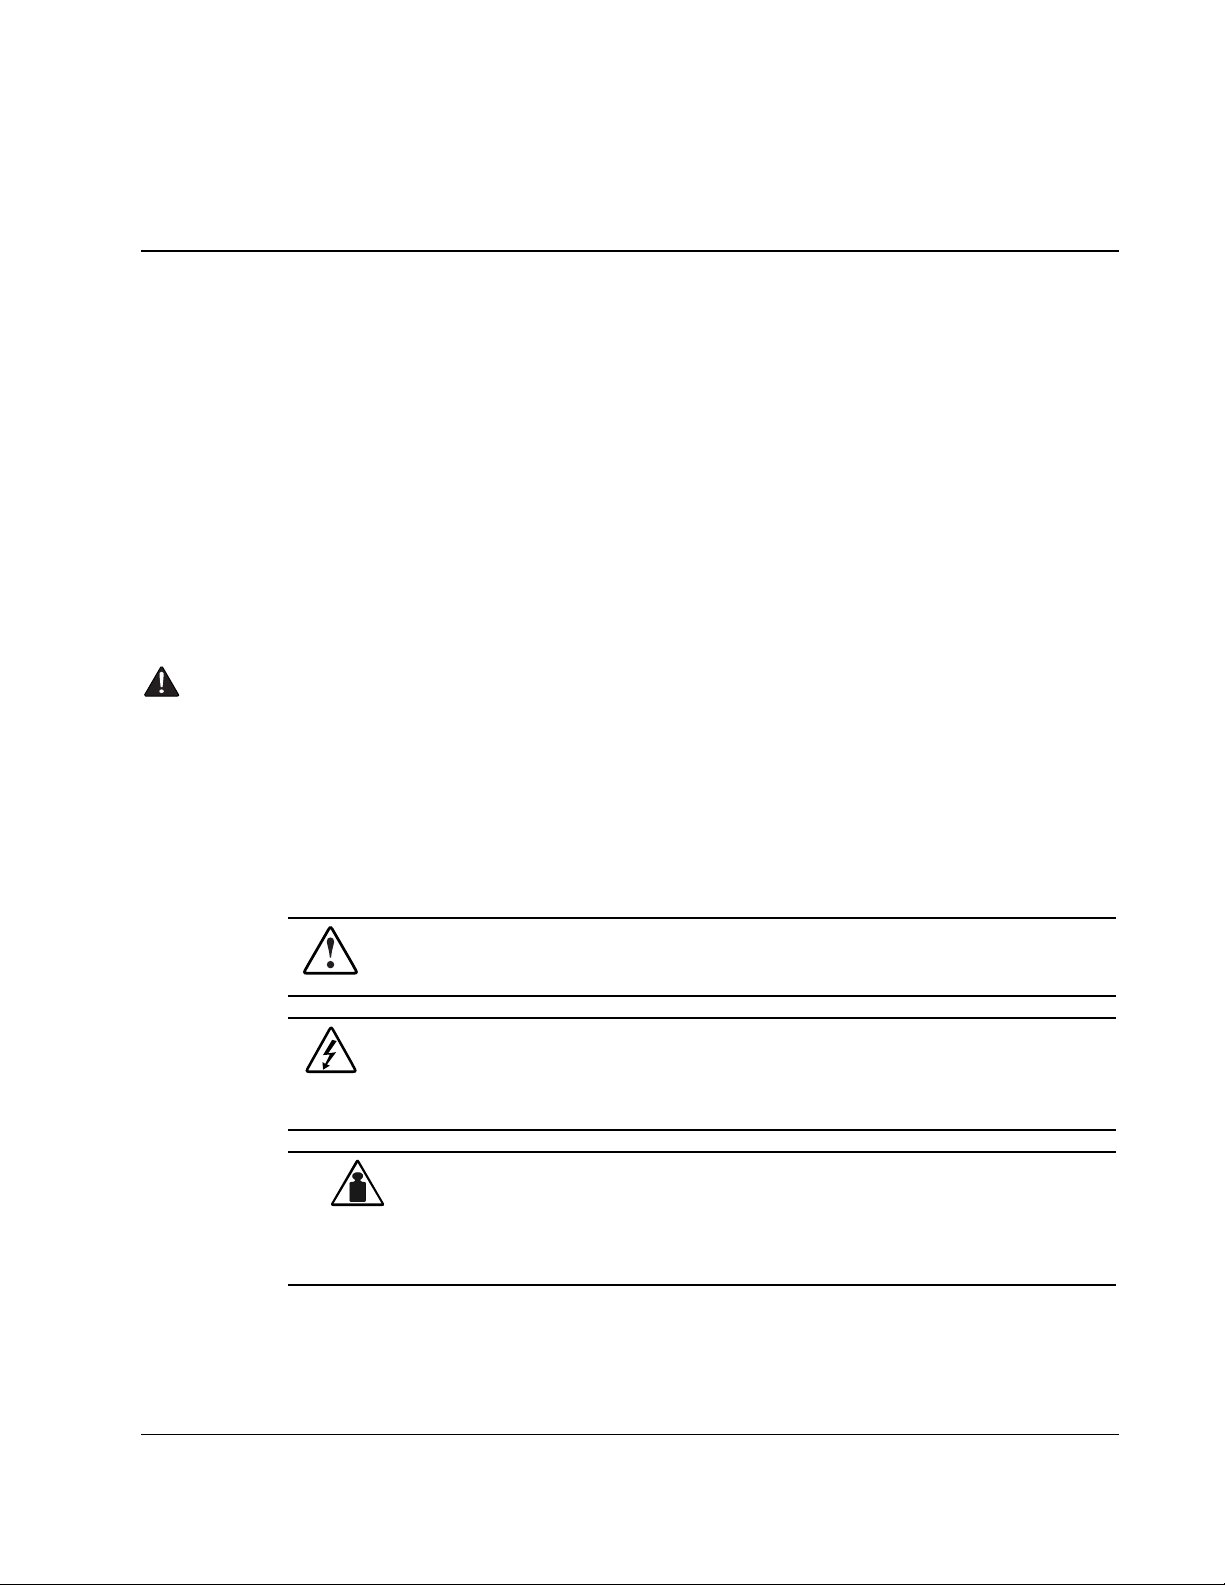
Symbols on Equipment
The following symbols may be placed on equipment to indicate the presence of potentially
hazardous conditions.
WARNING: This symbol, in conjunction with any of the following symbols, indicates
the presence of a potential hazard. The potential for injury exists if warnings are not
observed. Consult your documentation for specific details.
This symbol indicates the presence of hazardous energy circuits or electric shock
hazards. Refer all servicing to qualified personnel.
WARNING: To prevent injury from electric shock hazards, do not open this enclosure.
Refer all maintenance, upgrades, and servicing to qualified personnel.
This symbol indicates that the component exceeds the recommended weight for
one individual to handle safely.
Weight in kg
Weight in lb
WARNING: To prevent personal injury or damage to the equipment, observe
local occupational health and safety requirements and guidelines for manual
material handling.
HP Uninterrruptible Power System R12000 XR Models User Guide vii
HP CONFIDENTIAL Codename: Sierra Part Number: 146316-002 Last Saved On: 1/24/03 10:11 AM
Page 7
About This Guide
Rack Stability
WARNING: To prevent personal injury or damage to the equipment, verify that:
• The leveling feet are extended to the floor.
• The full weight of the rack rests on the leveling feet.
• The stabilizing feet are attached to the rack if it is a single-rack installation.
• The racks are coupled together if it is a multiple-rack installation.
• Extend only one component at a time. A rack may become unstable if more than
Symbols in Text
These symbols may be found in the text of this guide. They have the following meanings.
WARNING: Text set off in this manner indicates that failure to follow directions in the
warning could result in bodily harm or loss of life.
CAUTION: Text set off in this manner indicates that failure to follow directions could result in
damage to equipment or loss of information.
one component is extended for any reason.
IMPORTANT: Text set off in this manner presents clarifying information or specific instructions.
NOTE: Text set off in this manner presents commentary, sidelights, or interesting points of information.
Text Conventions
This document uses the following conventions:
• Italic type is used for complete titles of published guides or variables. Variables include
information that varies in system output, in command lines, and in command parameters
in text.
• Bold type is used for emphasis, for onscreen interface components (window titles, menu
names and selections, button and icon names, and so on), and for keyboard keys.
• Monospace typeface is used for command lines, code examples, screen displays,
error messages, and user input.
• Sans serif typeface is used for uniform resource locators (URLs).
viii HP Uninterrruptible Power System R12000 XR Models User Guide
HP CONFIDENTIAL Codename: Sierra Part Number: 146316-002 Last Saved On: 1/24/03 10:11 AM
Page 8

Related Documents
For additional information on the topics covered in this guide, refer to the following
documents:
• HP Uninterruptible Power System R12000 XR Models Installation Instructions
• HP UPS R12000 XR Models Extended Runtime Module Installation Instructions
• HP UPS XR Products Power Cord and Options Reference Guide
• HP Power Products Glossary
Getting Help
If you have a problem and have exhausted the information in this guide, further information
and other help is available in the following locations.
HP Technical Support
For telephone numbers of worldwide Technical Support Centers, go to www.hp.com.
About This Guide
HP Website
Have the following information available before you call:
• Technical support registration number (if applicable)
• Product serial number
• Product model name and number
• Applicable error messages
• Add-on boards or hardware
• Third-party hardware or software
• Operating system type and revision level
• Power management software type and version
For information on this product as well as the latest drivers, firmware, and service packs, go
to www.hp.com.
HP Uninterrruptible Power System R12000 XR Models User Guide ix
HP CONFIDENTIAL Codename: Sierra Part Number: 146316-002 Last Saved On: 1/24/03 10:11 AM
Page 9

About This Guide
HP Authorized Reseller
For the name of your nearest HP authorized reseller:
• In the United States, call 1-800-345-1518.
• In Canada, call 1-800-263-5868.
• Elsewhere, see the HP website for locations and telephone numbers.
Reader’s Comments
To comment on this guide, send an email to ServerDocumentation@hp.com.
x HP Uninterrruptible Power System R12000 XR Models User Guide
HP CONFIDENTIAL Codename: Sierra Part Number: 146316-002 Last Saved On: 1/24/03 10:11 AM
Page 10

This chapter contains a general overview of the UPS, including an introduction to the model
configuration, power management software, available hardware options, and warranties. Read
this chapter to become familiar with the features of the UPS before installing the unit.
UPS Features
The following features make this UPS versatile and easy to use:
•
Single phase, 200-240 V, Unity rated
•
Parallel redundant (N+x) capabilities in the following configurations:
— 12 KW + 0
— 9 KW + 1 (3 KW)
— 6 KW + 2 (6 KW)
1
Overview
— 3 KW + 3 (9 KW)
•
Online topology
•
10U rack-mountable form factor
•
Modular designup to four 3 KW modules
•
Serviceabilityhot-swappable batteries and electronics modules
•
Hardwired input and output
•
Front panel controls and LCD display
•
Software shipped with the unit
•
Support for HP Extended Runtime Modules (ERMs)
•
Support for Remote Emergency Power Off (REPO)
•
Two output terminal block connections to power HP Power Distribution Units (PDUs)
HP Uninterruptible Power System R12000 XR Models User Guide 1-1
HP CONFIDENTIAL Codename: Sierra Part Number: 146316-002 Last Saved On: 1/24/03 10:12 AM
Page 11

Overview
Communication Ports
The UPS includes two integrated communication ports that allow for in-band communication.
CAUTION: To avoid damage to the equipment, use only communications cables with the part
number 201092-002 (12-foot serial interface cable). One is supplied with your kit. This
UPS/Computer Interface Cable carries power and is specifically designed for UPS
communications.
UPS R12000 XR Model Part Number
The worldwide HP part number for the UPS R12000 XR with an HP 40 A HV WW PDU is
207552-B22.
1-2 HP Uninterruptible Power System R12000 XR Models User Guide
HP CONFIDENTIAL Codename: Sierra Part Number: 146316-002 Last Saved On: 1/24/03 10:12 AM
Page 12
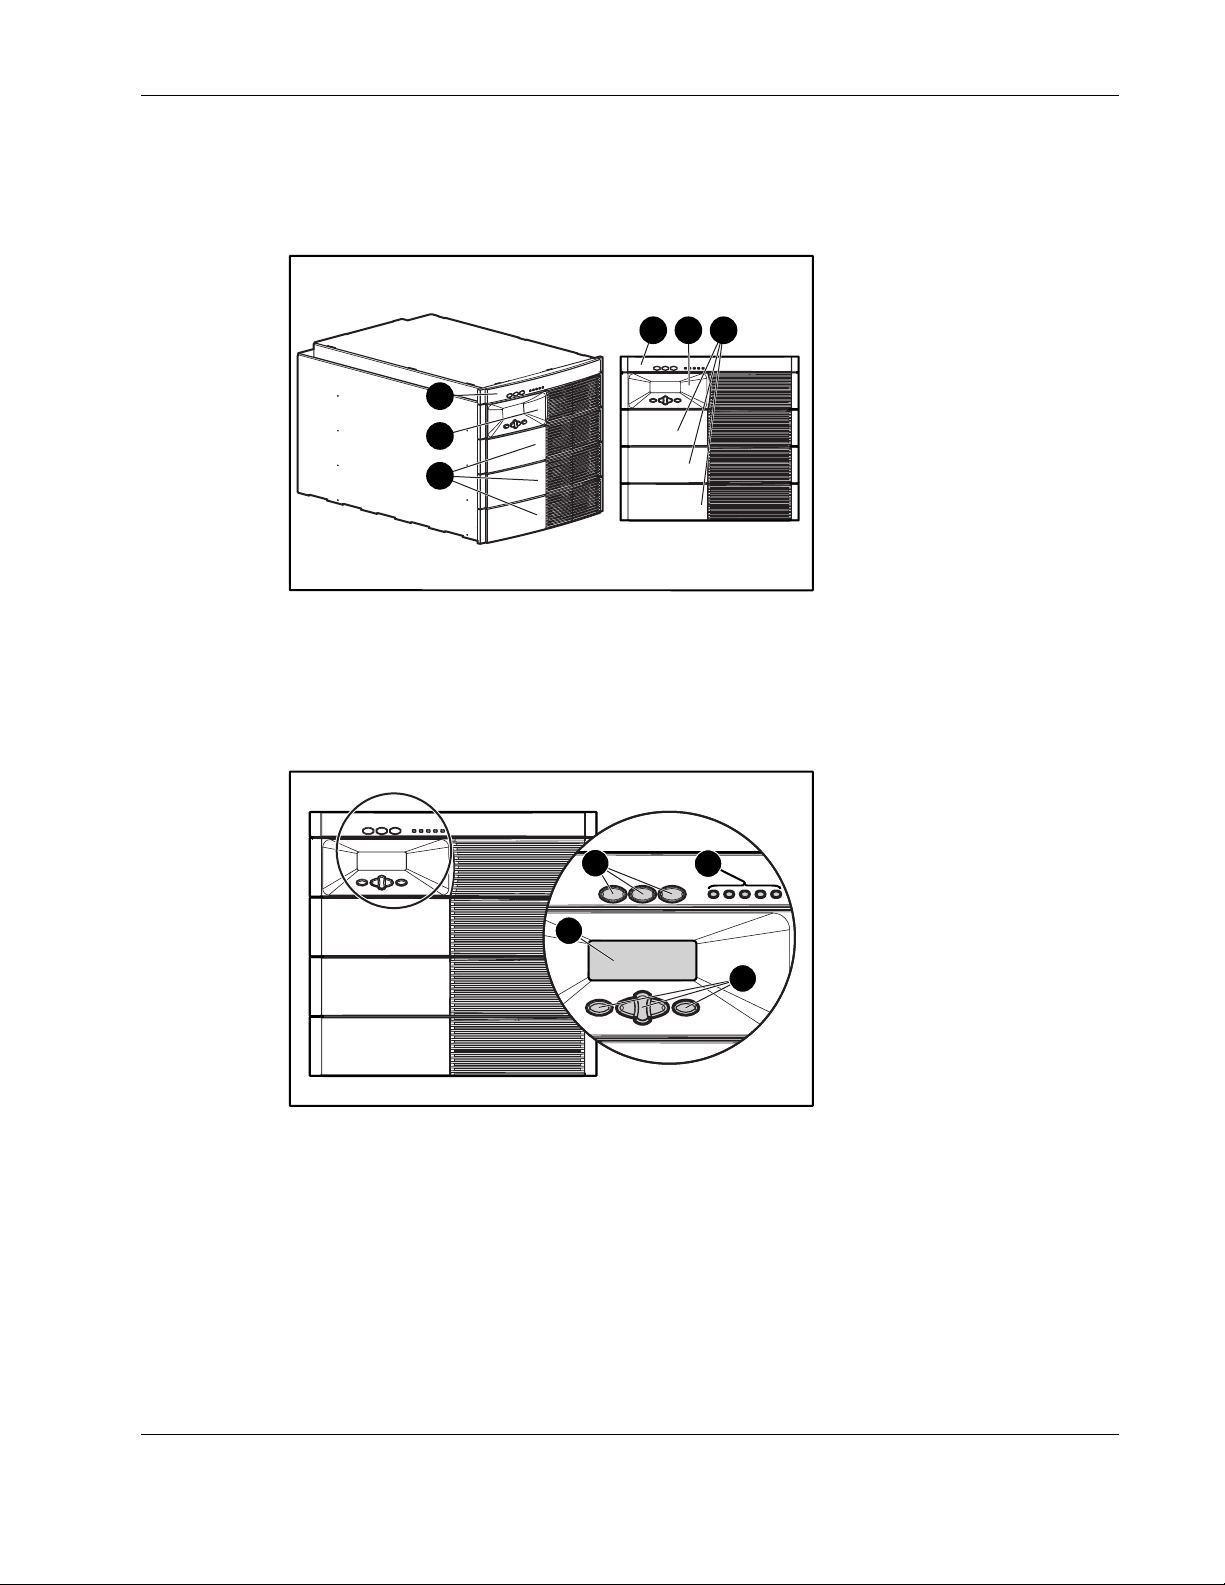
Front View
The front view of the UPS is shown in Figure 1-1 and Figure 1-2.
Figure 1-1: UPS bezels
1 Supervisory bezel
2 Control bezel
3 Blank bezels
Overview
21 3
1
2
3
1
3
2
4
Figure 1-2: UPS indicators and control buttons
1 UPS control buttons
2 LED indicators of UPS status
3 LCD status and configuration screen
4 LCD configuration control buttons
Refer to the section, “Front Panel LEDs,” in Chapter 2 for detailed information on the
meanings of the LED indicators. Refer to the section, “Front Panel Controls and LCD
Display,” in Chapter 2 for information on operating the UPS using the control buttons.
HP Uninterruptible Power System R12000 XR Models User Guide 1-3
HP CONFIDENTIAL Codename: Sierra Part Number: 146316-002 Last Saved On: 1/24/03 10:12 AM
Page 13

Overview
Rear View
The rear view of the UPS is shown in Figure 1-3 and Figure 1-4.
Figure 1-3: UPS rear view
2 2
1
1
1 Terminal block wiring punch-out points
Bypass switch
2
5
2
3
4
a
ri
e
/ S
P
M
N
S
q
a
p
m
o
C
1
Figure 1-4: Close-up of the UPS rear view
1 Option slot for future expansion
2 Ground bonding screw
3 REPO port
4 Serial communication ports (two)
Option slot for future expansion
5
rd
a
C
rt
o
l P
10
1-4 HP Uninterruptible Power System R12000 XR Models User Guide
HP CONFIDENTIAL Codename: Sierra Part Number: 146316-002 Last Saved On: 1/24/03 10:12 AM
Page 14

Power Management Software
Power management software ensures maximum power reliability of computer systems
through comprehensive control of UPSs. Specifically, power management software:
IMPORTANT: Not all UPSs are equipped to support the entire feature set listed below.
•
Manages graceful shutdown of attached equipment during utility power failures.
•
Manages independent UPS load segments to provide separate power control of connected
equipment.
•
Prioritizes the timing of equipment shutdowns, and reboots connected equipment by load
segment.
•
Shuts down and reboots any UPS and attached equipment based on a user specified
schedule.
•
Delays restart by load segment after a power outage to sequence the startup of system
components.
•
Customizes alert generation with modifiable pop-up dialog boxes, command execution,
and email and broadcast messages.
Overview
•
Monitors the status of the UPS and performs UPS diagnostics.
•
Displays power log for analysis.
For more information, refer to the power management CD provided with the UPS. For the
most current information, refer to
UPS Hardware Options
The following options are available for the UPS.
Table 1-1: Hardware Options
Option Part Number
HP ERM 217800-B21
PDU 40 A WW 207590-B23
mPDU 40 A WW 252663-B21
www.hp.com.
HP Uninterruptible Power System R12000 XR Models User Guide 1-5
HP CONFIDENTIAL Codename: Sierra Part Number: 146316-002 Last Saved On: 1/24/03 10:12 AM
Page 15

Overview
Extended Runtime Modules
The UPS supports up to two ERMs (extended runtime modules). Each ERM consists of two
battery packs in a 4U chassis. When operating at the recommended 80 percent load, one ERM
will extend the available UPS runtime by up to 15 minutes.
For more information, refer to the HP website at
Power Distribution Units
The UPS supports up to two PDUs. A PDU offers power surge protection and allows you to
distribute power among units.
Remote Emergency Power Off Port
The UPS includes an isolated REPO port. When properly wired, the REPO feature allows the
power at the UPS output receptacles to be switched off from a remote location. To use this
feature, the REPO port must be connected to a remote, normally open switch (not supplied).
When this switch is closed, the UPS immediately disconnects power to its loads. The REPO
switch is used in conjunction with a main disconnect device that removes the AC source from
the input of the UPS. To power down the entire network in the event of an emergency, the
REPO ports of multiple UPS units can be connected to a single switch.
IMPORTANT:
• The REPO port meets the requirements of NFPA Articles 645-10 and 645-11 for a Disconnecting
Means.
• If the remote switch is closed, the REPO feature immediately powers down protected devices and
does not utilize the orderly shutdown procedure initiated by power management software.
www.hp.com.
• The REPO feature shuts down UPS units operating under either utility or battery power.
• If the UPS was operating on battery power when the remote switch was closed, no power will be
available to the devices until utility power is restored and the UPS has been manually powered up.
• To restore power to the load after the REPO feature is activated, press the On button after the AC
source is reconnected to the UPS.
• Pressing and holding the On button without utility present would normally initiate a battery start and
the UPS would assume the load. However, if the On button is pressed and a REPO is detected,
battery start is inhibited and the UPS will not be able to assume the load. The electronic module
fans will spin and the Alarm LED and an audible alarm will be active as long as the On button is
held.
1-6 HP Uninterruptible Power System R12000 XR Models User Guide
HP CONFIDENTIAL Codename: Sierra Part Number: 146316-002 Last Saved On: 1/24/03 10:12 AM
Page 16

Warranties
To back up the wide range of features offered with the UPS, a three-year limited warranty is
provided.
$25,000 Computer Load Protection Guarantee
In addition to the limited warranty, a $25,000 Computer Load Protection Guarantee (provided
by the original equipment manufacturer) is offered.
IMPORTANT: The $25,000 Computer Load Protection Guarantee is offered only in North America.
The $25,000 Computer Load Protection Guarantee applies only if:
•
A qualified electrician properly wires the UPS to utility power.
The UPS installation complies with all applicable electrical and safety codes specified by
•
the National Electrical Code (NEC).
•
The UPS is used under normal operating conditions. Users must comply with all
instructions and labels.
Overview
•
The UPS is not damaged by accident (other than a utility power transient), misuse, or
abuse.
Pre-Failure Battery Warranty
Refer to the section, “Pre-Failure Battery Warranty,” in Chapter 4 for specific information on
the battery warranty.
HP Uninterruptible Power System R12000 XR Models User Guide 1-7
HP CONFIDENTIAL Codename: Sierra Part Number: 146316-002 Last Saved On: 1/24/03 10:12 AM
Page 17
This chapter contains information on operating the UPS. Topics include using the front panel
controls, LCD display, LED indicators, and modes of operation. Knowledge of these features
is helpful when configuring the system and performing more advanced functions on the unit.
NOTE: See the instructions included with the UPS kit for installation considerations and procedures.
Copies of this document can be downloaded from the website at www.hp.com.
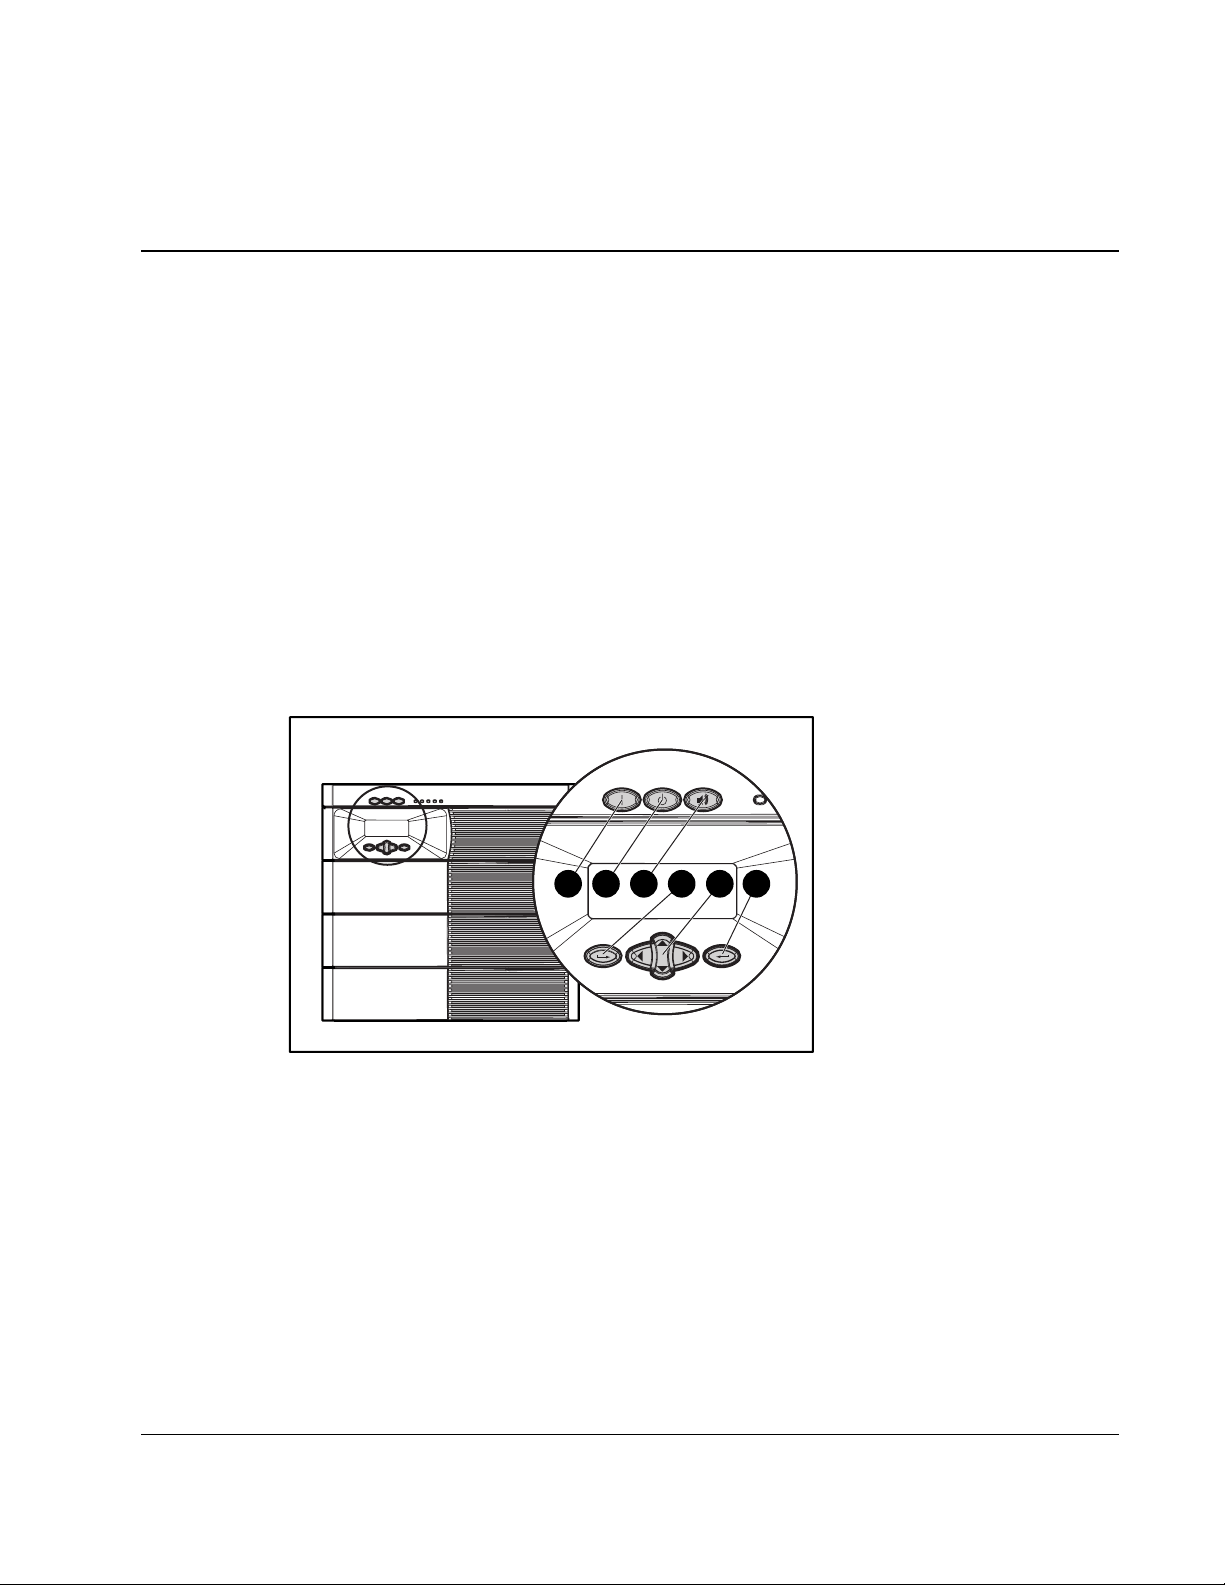
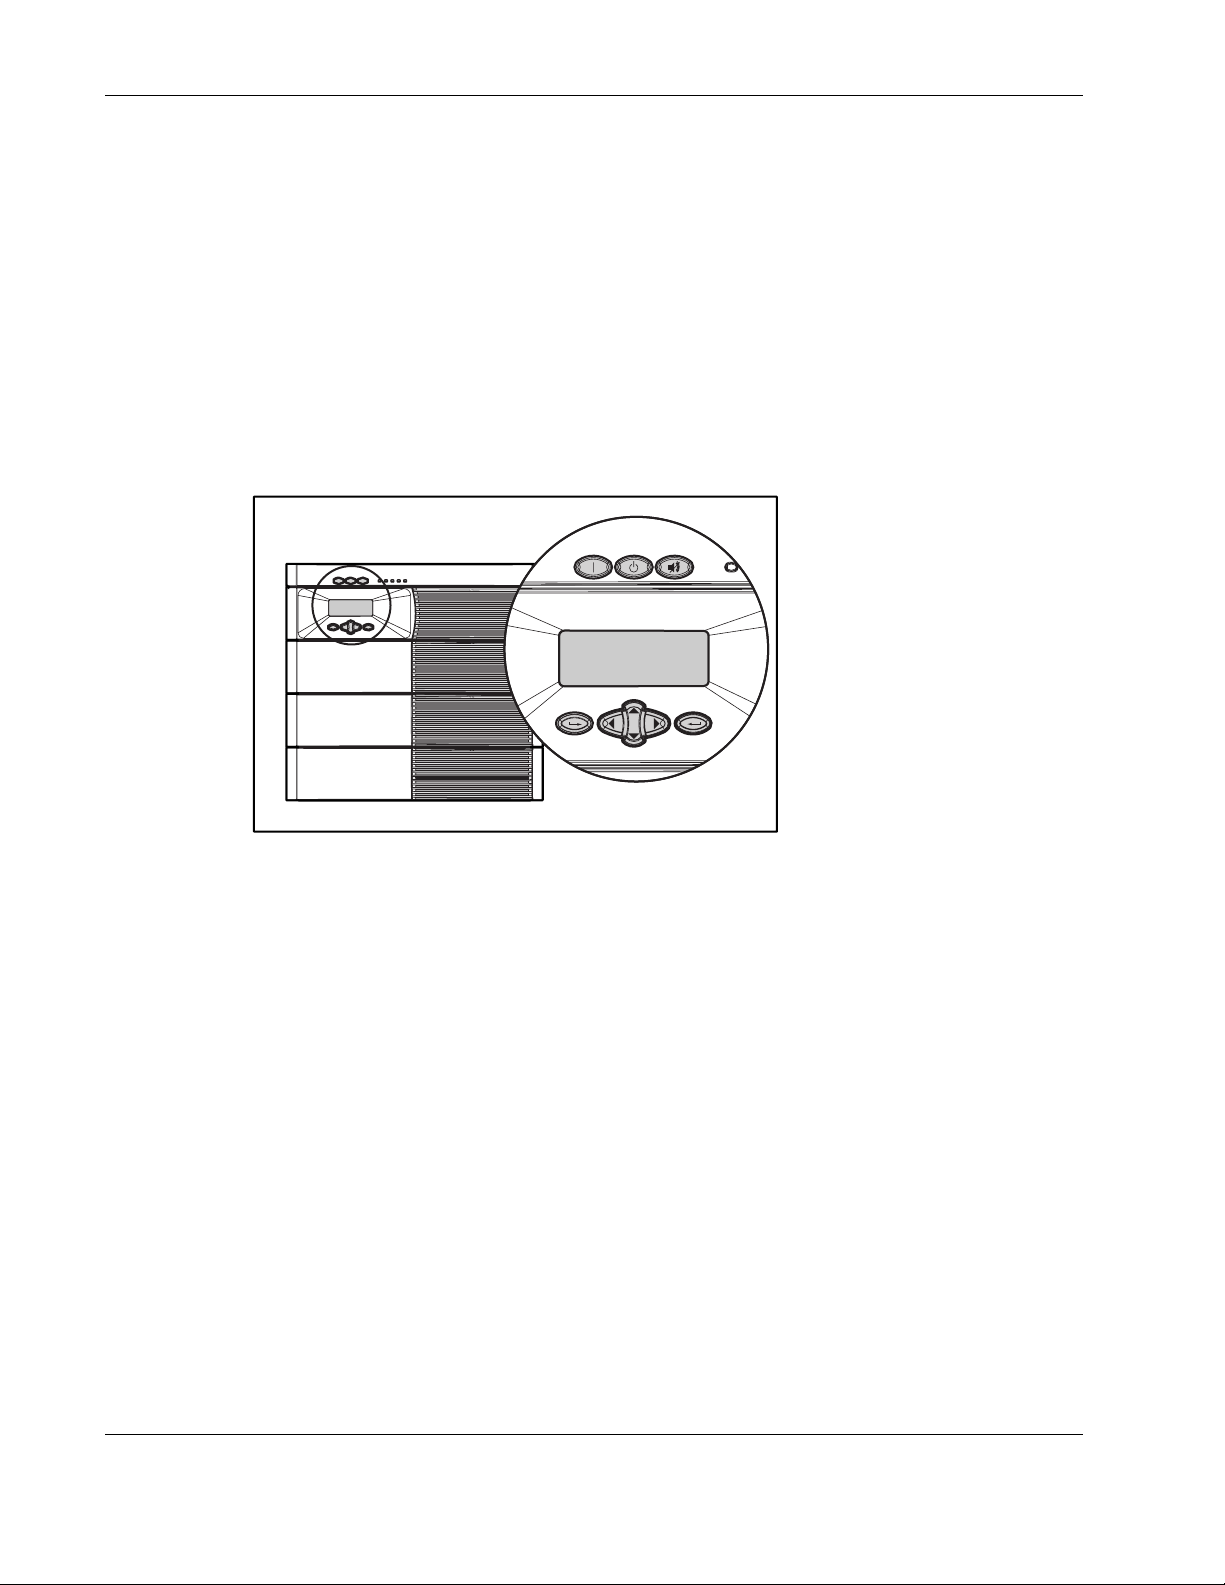
Front Panel Controls and LCD Display
The front panel controls and LCD display provide an easy-to-use UPS interface for setup,
load control, and status monitoring.
2
Operation
1 2 3 4 5 6
Figure 2-1: Front panel button controls
Item Description Function
1 On Starts UPS powering the load
2 Standby Places UPS into Standby mode/Reset
3 Test/Alarm Reset Resets alarm or initiates self-test
4 Escape Navigates and deselects options in the LCD menu
structure
5 Center Large four-way rocking button. Controls navigation
through LCD menu structure: up, down, left, and right
6
HP Uninterruptible Power System R12000 XR Models User Guide 2-1
Enter Navigates and selects options in the LCD menu structure
HP CONFIDENTIAL Codename: Sierra Part Number: 146316-002 Last Saved On: 1/24/03 10:14 AM
Page 18
Operation
Front Panel Indicators
The UPS displays information through the following indicators:
• • Front panel LCD
Front panel LEDs
Front Panel LCD
The front panel has a two-line LCD display that guides you through operation, configuration,
and monitoring of the UPS. Refer to the section, “Changing Configuration Parameters,” in
Chapter 3 for configuration instructions.
COMPAQ R12000 XR
Main Menu
COMPAQ R12000 XR
Main Menu
Figure 2-2: Front panel LCD display
2-2 HP Uninterruptible Power System R12000 XR Models User Guide
HP CONFIDENTIAL Codename: Sierra Part Number: 146316-002 Last Saved On: 1/24/03 10:14 AM
Page 19
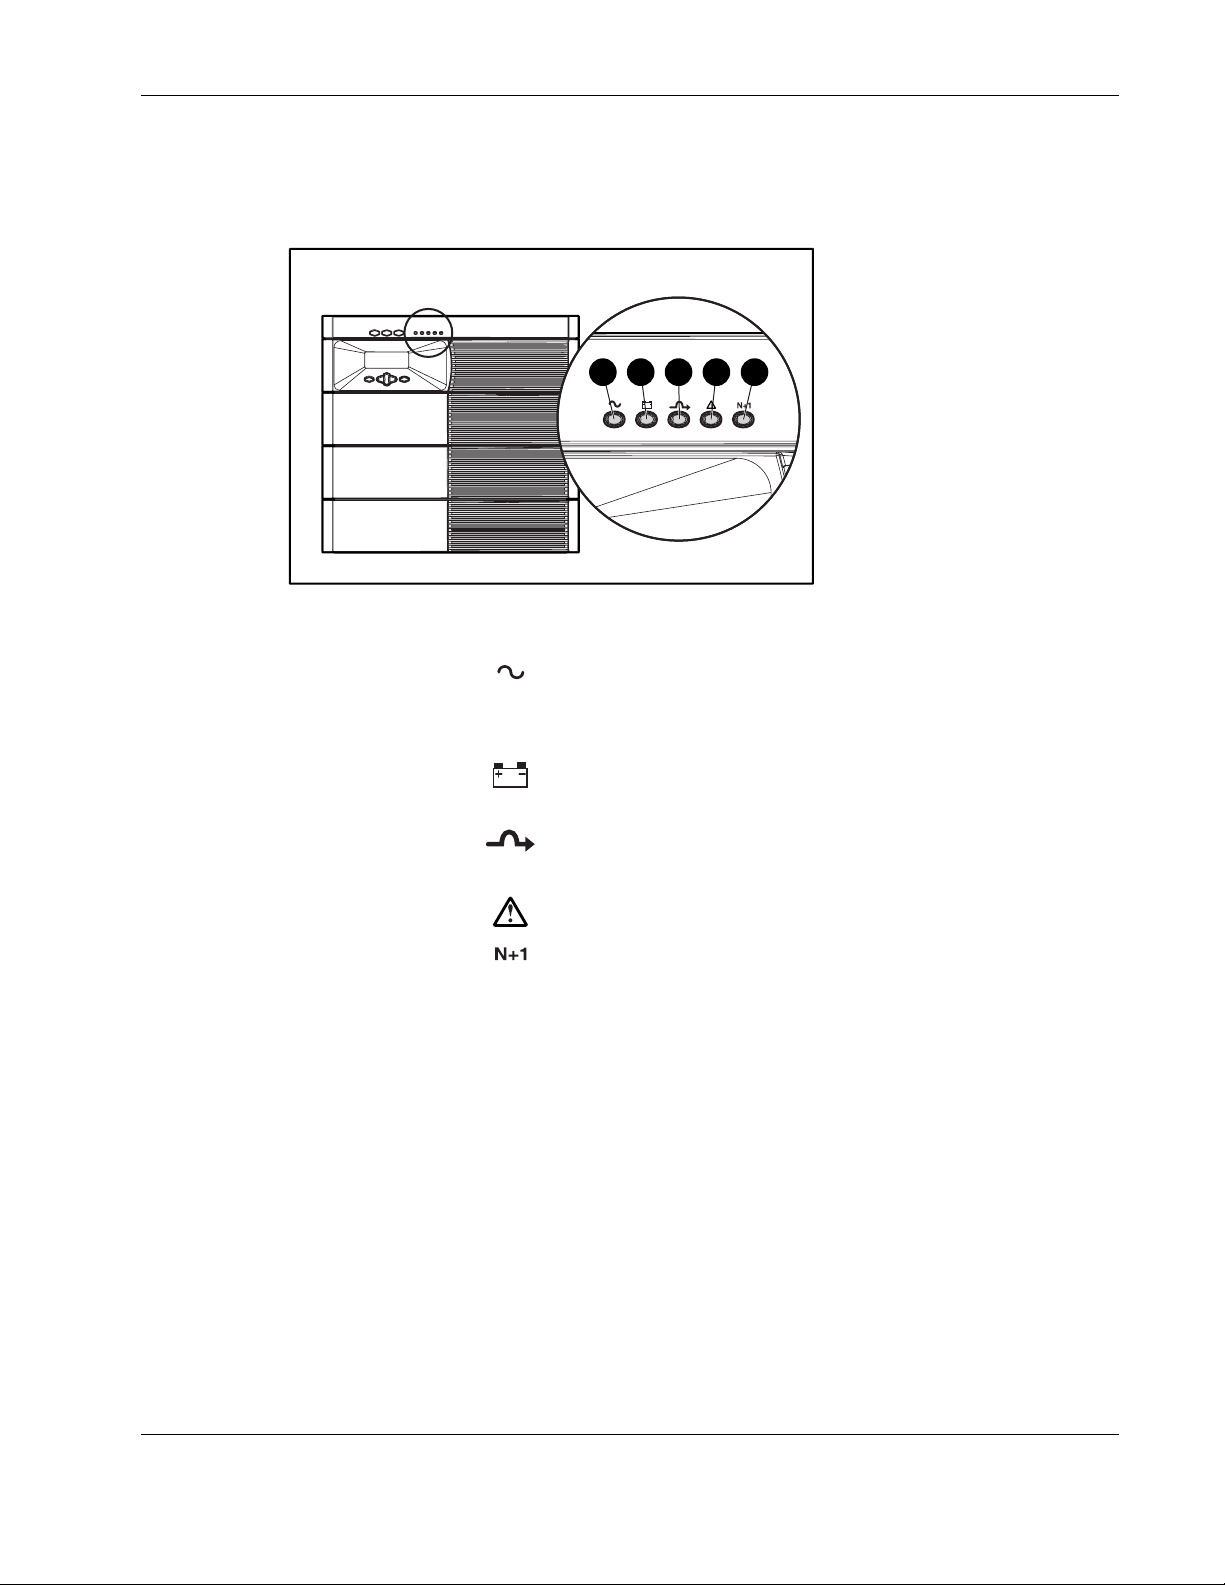
Front Panel LEDs
The front panel has five LEDs that indicate the status of the UPS.
Figure 2-3: Front panel LED display
Item Description Symbol Meaning
1 Utility
1 2 3 4 5
Solid greenNormal operation
Rapidly flashing green—Ramp Up mode
Operation
Slowly flashing greenStandby mode (batteries charging)
2 Battery
3 Bypass
4 Alarm
5 Redundant
Solid amberOn Battery
Flashing amberBattery test in progress
Solid amberOn Bypass
Flashing amber—Bypass not available
Solid redOne or more alarms may be present or active
Solid greenN+1 mode (one or more redundant electronics
modules operating in system)
Flashing green—Battery self-test initiated
OffNon-redundant, not N+1 mode
NOTE: The LED lights cycle when no electronics modules are installed and utility is present. In
Standby mode, there is no output but the batteries will be charging. The time required to reach Standby
mode can range from 45 seconds to several minutes, depending on the state of charge of the batteries.
HP Uninterruptible Power System R12000 XR Models User Guide 2-3
HP CONFIDENTIAL Codename: Sierra Part Number: 146316-002 Last Saved On: 1/24/03 10:14 AM
Page 20

Operation
Modes of Operation
The UPS has five modes of operation, indicated by the LEDs (see Figure 2-3):
•
Standby Mode
— When utility is present and output is off, the Utility LED (1) flashes slowly.
— Power is not available at the UPS output.
— The UPS monitors and charges batteries, if required.
•
Operate Mode
— The Utility LED (1) is solid green.
— The UPS is supplying power to the loads.
— The UPS monitors and charges batteries, if required.
•
Bypass Mode
— The Utility LED (1) and Battery LED (2) are off.
— The Bypass LED (3) is solid amber, and an audible alarm is active.
— The Alarm LED (4) is solid red.
— The utility is bypassing the unit and going directly to the load.
— The UPS monitors and charges batteries, if required.
•
Battery Mode
— The Battery LED (2) is solid amber.
— The Alarm LED (4) is solid red.
— Utility power is not present.
— The UPS does not charge the batteries.
— Power is available at UPS outputs.
•
Redundant Mode
— The Redundant LED (5) is solid green.
— At least one electronics module of the load can be in a redundant state (two or more
electronics modules working).
— All electronics modules share the load, but there is enough power to allow an
electronics module to go out of service.
2-4 HP Uninterruptible Power System R12000 XR Models User Guide
HP CONFIDENTIAL Codename: Sierra Part Number: 146316-002 Last Saved On: 1/24/03 10:14 AM
Page 21

Turning on the Main Circuit Breaker
After a qualified electrician has properly wired the UPS to utility power and has installed all
electronics modules, turn on the AC mains at the service panel. All LEDs come on for three
seconds as part of the system initialization. Each electronics module turns on in sequence
(with approximately 10 seconds between modules), synching up with the utility power. The
Utility LED rapidly flashes green during Startup mode.
After all electronics modules have synchronized, the UPS enters Standby mode, indicated by
the Utility LED slowly flashing green. The system will begin charging the batteries, but will
not assume the load. The system will remain in Standby mode until the UPS On command is
received.
NOTE: The time required to transition from Startup mode to Standby mode can range from 45 seconds
to several minutes, depending on the state of charge of the batteries.
Charging the Batteries
When the UPS is in Standby mode, allow the batteries to charge before putting the UPS into
service. The battery status can be monitored using the LCD display. Refer to the section,
“Displaying the Battery Charge Data,” in Chapter 3 for information on how to view current
battery charge on the LCD display.
IMPORTANT: The battery modules will charge to:
• 80 percent of their capacity within 3 hours.
Operation
• 100 percent of their capacity within 48 hours.
Charge the batteries for at least 24 hours before supplying backup power to your devices.
HP Uninterruptible Power System R12000 XR Models User Guide 2-5
HP CONFIDENTIAL Codename: Sierra Part Number: 146316-002 Last Saved On: 1/24/03 10:14 AM
Page 22

Operation
Placing the UPS in Operate Mode
Press the On button (1) to transfer the system to Operate mode.
1
Figure 2-4: UPS On button
Initiating a Self-Test
NOTE: On initial utility startup, you may receive an Inverter Uncalibrated alarm. Press the On button
to start the autocalibration process, which lasts approximately 2 to 4 minutes. Until you start this
process, the UPS will remain in Standby mode and continue to sound the alarm.
To initiate a self-test, press and hold the Test/Alarm Reset button (1) for three seconds.
Figure 2-5: Test/Alarm Reset button
1
2-6 HP Uninterruptible Power System R12000 XR Models User Guide
HP CONFIDENTIAL Codename: Sierra Part Number: 146316-002 Last Saved On: 1/24/03 10:14 AM
Page 23

Because a portion of the self-test requires battery power, the self-test will not be initiated if
the batteries are less than 90 percent charged. If the UPS detects a problem, the
Alarm LED (4) will be solid red (see Figure 2-3), and the UPS sounds an audible alarm.
NOTE: Refer to Chapter 5, “Troubleshooting,” for information on what to do if the self-test detects a
problem.
Audible Alarms
The UPS sounds an audible alarm to warn of a problem.
To identify the problem, select the Status option from the LCD Main Menu. The LCD will
display
will describe the nature of the alarm condition. Scroll through multiple alarms using the up
and down arrow keys on the Center button. Refer to the section, “Displaying the Status or
Active Alarms,” in Chapter 3 for more information on displaying the alarms using the LCD
menu.
The Main Menu displays active alarms for the entire system. Under the electronics modules
M1-M4 menus, only the individual electronics modules that have alarms are indicated. As a
result, you can pinpoint individual modules that are having problems.
X Alarms on the top line, where X is equal to the number of alarms. The bottom row
Operation
Refer to the section, “LCD Alarm Troubleshooting,” in Chapter 5 for causes and suggested
actions for all alarm conditions.
Silencing an Audible Alarm
To silence the alarm, press the Test/Alarm Reset button (1) and hold for one second.
Figure 2-6: Test/Alarm Reset button
1
HP Uninterruptible Power System R12000 XR Models User Guide 2-7
HP CONFIDENTIAL Codename: Sierra Part Number: 146316-002 Last Saved On: 1/24/03 10:14 AM
Page 24

Operation
IMPORTANT: Although the Test/Alarm Reset button silences the audible alarm, the condition that
caused the alarm still exists. Refer to Chapter 5, “Troubleshooting,” for information on what to do if the
UPS detects an alarm condition.
The silencing of the alarm is based on the current set of alarms that is present when the button is
pressed. If the alarm set changes and at least one alarm condition still exists, the audible alarm
reactivates.
If the condition that caused the alarm is a utility power failure, the alarm is silenced shortly after utility
power is restored.
Placing the UPS in Bypass Mode
This mode can be enabled by any of the following events:
•
Using the Bypass switch on the rear panel
•
Overload conditions
Manual removal of an electronics module when in Operate mode
•
NOTE: HP does not recommend enabling Manual Bypass mode when the Bypass LED is flashing
(Bypass mode not available).
Shutting Down the System
To shut down the system:
1. Place the UPS in Standby mode by pressing the Standby button for four seconds. The
load relays open and the Utility LED begins to flash slowly.
NOTE: Pressing the Standby button for seven seconds reboots the system. The system recovers
to Standby mode.
2. Disconnect the AC mains by opening the switch or circuit breaker at the utility panel.
2-8 HP Uninterruptible Power System R12000 XR Models User Guide
HP CONFIDENTIAL Codename: Sierra Part Number: 146316-002 Last Saved On: 1/24/03 10:14 AM
Page 25

LCD Configuration and Status
This chapter contains information on configuring the UPS. Topics include a description of the
LCD display menu structure, procedures for configuring the UPS, and the details of the
various UPS status options. Proper configuration of the UPS and familiarity with the menu
display is important in performing other functions on the unit, such as maintaining the battery
and troubleshooting alarms.
Changing Configuration Parameters
Use the front panel controls and LCD display to change the configuration of the UPS. The
LCD menu has a two-line LCD display with three-button control for up, down, left, right,
Enter, and Escape. The LCD is used for configuration, monitoring, and status.
3
213 4
Figure 3-1: LCD display and control buttons
Item Description Function
1 LCD Display Displays your menu position, showing UPS, electronics
module, and battery
2 Escape Navigates and deselects options in the LCD menu
structure
3 Center Controls navigation through LCD menu structure:
up, down, left, and right
4 Enter Navigates and selects options in the LCD menu structure
HP Uninterruptible Power System R12000 XR Models User Guide 3-1
HP CONFIDENTIAL Codename: Sierra Part Number: 146316-002 Last Saved On: 1/24/03 10:15 AM
Page 26

LCD Configuration and Status
Matching the Utility Voltage
Use configuration parameters to select the UPS voltage range (see Table 3-1).
•
If the utility voltage is within this range, the UPS supplies utility power to the output
receptacles.
•
If the utility voltage is outside this range, the UPS supplies battery power to the output
receptacles.
•
If the utility voltage frequently varies outside the operating range, update the UPS
configuration to match.
NOTE: When you set the voltage through the LCD panel (as described in the “Setting the Voltage”
section of this chapter), you are setting the UPS output voltage
Table 3-1: Voltage Ranges (VAC)
Nominal Utility
Voltage Level
200 166-240 200
208 166-248 208
220 176-264 220
230 (default) 184-276 230
240 192-288 240
Normal Utility
Voltage Range
UPS Output
Voltage
To update the configuration:
1. Have a licensed electrician measure your utility voltage.
2. Use Table 3-1 to identify the operating range that most closely matches your nominal
utility voltage level.
3. Update the UPS output voltage as required. Refer to the section, “Setting the Voltage,” in
this chapter for more information.
3-2 HP Uninterruptible Power System R12000 XR Models User Guide
HP CONFIDENTIAL Codename: Sierra Part Number: 146316-002 Last Saved On: 1/24/03 10:15 AM
Page 27

Module Locations
Use the LCD menus to configure either the main module or one of the electronics modules.
LCD Configuration and Status
1
2
3
4
5
Figure 3-2: UPS electronics modules, numbered
1 Main Module MM (includes all four electronics modules)
2 Module M1
3 Module M2
4 Module M3
5 Module M4
HP Uninterruptible Power System R12000 XR Models User Guide 3-3
HP CONFIDENTIAL Codename: Sierra Part Number: 146316-002 Last Saved On: 1/24/03 10:15 AM
Page 28

LCD Configuration and Status
Configuring the UPS Using the LCD Menu
Use the LCD display to access the menu. The menu contains information about the status,
meters, battery data, and firmware version of the main module or other electronics modules.
Use the menu options to set the time or date, conduct an LCD display test, and change the
system setup. The LCD display control buttons are shown in Figure 3-1.
Initial Power-Up Display
When the UPS is powered up, the LCD displays the Main Menu.
R12000 XR
Main Menu
Top Level Main Menu
After pressing the Enter button, Main Menu appears on the top line of the display. Use the
Center button to scroll through the choices displayed on the lower line of the display.
For a list of all menu options, refer to the section, “Menu Map,” in this chapter.
The variable xxxxxx is one of the choices in the left column of the menu map. Submenu
choices are shown to the right.
Main Menu
xxxxxx
3-4 HP Uninterruptible Power System R12000 XR Models User Guide
HP CONFIDENTIAL Codename: Sierra Part Number: 146316-002 Last Saved On: 1/24/03 10:15 AM
Page 29

Menu Map
Status
Main Module
Module (M) 1 through 4
Status/Alarms
Meters
Main Module
Module (M) 1 through 4
Input Voltage
Battery Data
% Battery Charge
Set Time
Set Date
Firmware Vers
MM Control Vers
MM Comm Version
M1-M4 Versions
Display Module
Display Test
System Setup
Enter Password
Comm Setup
Set Voltage
Set Language
ERM Setup
For Capacity
N+1 Redundancy
Load Power Off
Output Voltage
Input Frequency
Output Frequency
Output Power
Battery Voltage
Input Current
Set HW Config
Set Password
Serial Port 1
Opt-Slot 1
Status
System Normal
Load Power On
On Battery
On Bypass
Manual Bypass
OverLoad
Autocalibrating
Starting Up
Module Failure
Unknown Stats xx
UPS Supporting Load
Commission Battery
Parallel Mode
* For a list of all possible alarm displays, refer to the section, “Alarms,” in this chapter.
LCD Configuration and Status
*
Alarms
Serial Port 2
Opt-Slot 2
Baud Rate
HP Uninterruptible Power System R12000 XR Models User Guide 3-5
HP CONFIDENTIAL Codename: Sierra Part Number: 146316-002 Last Saved On: 1/24/03 10:15 AM
Page 30

LCD Configuration and Status
Alarms
If an alarm exists, one or more of the following alarms will display on the LCD panel. For a
descriptive list of alarm causes, refer to the section, “LCD Alarm Troubleshooting,” in
Chapter 5.
Table 3-2: Alarms
Ambient Over Temperature Inverter Startup Failure
Automatic Shutdown Pending Inverter Uncalibrated
Batteries Disconnected Level 2 Overload – Phase A
Battery DC Over Voltage Level 3 Overload – Phase A
Battery Low Level 4 Overload – Phase A
Battery n Needs Service Loss of Redundancy
Battery Not Charged Loss of Sync-Bus
Battery n Test Failed Low Battery Shutdown
Bypass Not Available Non-volatile Memory Checksum Fail
Calibration Failed On Manual Bypass
DC Link Over Voltage Output AC Over Voltage
Fan Failure Output AC Under Voltage
Fuse Failure Output Overload
Heatsink Over Temperature Program Checksum Fail
Input AC Over Voltage Rectifier Input Over Current
Input AC Under Voltage Remote Emergency Power Off
Input Under Or Over Frequency Software Incompatibility Detected
Internal Communications Failure UPS On Battery
Inverter Contactor Open UPS On Bypass
Inverter Fault Utility Fail
Inverter Output Over Current Utility Not Present
3-6 HP Uninterruptible Power System R12000 XR Models User Guide
HP CONFIDENTIAL Codename: Sierra Part Number: 146316-002 Last Saved On: 1/24/03 10:15 AM
Page 31

Displaying the Status or Active Alarms
The first option on the Main Menu is Status. Select this option and press the Enter button to
display the status or active alarms for either the main module or electronics modules M1-M4.
Main Menu
Status
Main Module (MM) Status and Alarms
Select Main Module MM to display Status and Alarms for the main module. Table 3-3 lists
the possible status options. For a descriptive list of alarm causes and solutions, refer to the
section, “LCD Alarm Troubleshooting,” in Chapter 5.
Status: Select
Main Module MM
NOTE: A display of x Alarms means that one or more alarms are present. The variable x indicates the
number of alarms.
LCD Configuration and Status
Table 3-3: Main Module Status Options
LCD Display Explanation
Load Power Off The UPS is in Standby mode and is not supporting the load.
System Normal
0 Alarms
Load Power On
x Alarms
On Battery
x Alarms
On Bypass
x Alarms
Manual Bypass
x Alarms
Overload
x Alarms
Autocalibrating
x Alarms
The UPS is operating normally from utility and is protecting the load.
No alarms are present.
The UPS is operating from utility and is protecting the load.
The UPS is operating from battery and is protecting the load.
The UPS is operating from Automatic Bypass mode and is not
protecting the load.
The UPS is operating from Manual Bypass mode and is not
protecting the load.
The UPS is protecting the load. The current load level is exceeding
the maximum operational range for the UPS.
The UPS is operating from utility and is protecting the load while it is
performing the module-sharing calibration process.
continued
HP Uninterruptible Power System R12000 XR Models User Guide 3-7
HP CONFIDENTIAL Codename: Sierra Part Number: 146316-002 Last Saved On: 1/24/03 10:15 AM
Page 32

LCD Configuration and Status
Table 3-3: Main Module Status Options continued
LCD Display Explanation
Starting Up
x Alarms
Module Failure
x Alarms
Unknown Stats x
x Alarms
UPS Supporting Load
x Alarms
The full UPS or a single electronics module (hot-swap) is ramping
up.
At least one electronics module or the Supervisory Board has
experienced a critical failure and is off-line.
The UPS issues an unrecognized status code of x. This is normal in
certain situations, such as when the UPS is busy or powering down.
The UPS is powering the load.
Electronics Modules (M1-M4) Status and Alarms
Select Module Mx to display Status and Alarms for an electronics module. The variable x
indicates one of the electronics modules (Module M1-M4). Table 3-4 lists the possible status
options. Refer to the section, “LCD Alarm Troubleshooting,” in Chapter 5 for a descriptive
list of alarm causes and solutions.
Status: Select
Module Mx
Table 3-4: Electronics Modules M1-M4 Status Options
Message LCD Display Explanation
+ Active Alarm
Count
Detected
System Normal Submodule Status
0 Alarms
Module Mx Submodule not
Not Detected
In this example, the UPS has detected no problems
with the electronics module and there are no
alarms.
Module Mx is not detected (x is 1-4).
Either an electronics module is not installed, or the
UPS is gathering system configuration information
during initialization. This condition should not
persist for more than 60 seconds after startup.
3-8 HP Uninterruptible Power System R12000 XR Models User Guide
HP CONFIDENTIAL Codename: Sierra Part Number: 146316-002 Last Saved On: 1/24/03 10:15 AM
Page 33

Displaying the Frequency, Power, and Current Data
Select Meters on the Main Menu to view the frequency, power and current of either the main
module or any of the other electronics modules.
Main Menu
Meters
This submenu provides information on virtual meters monitoring the UPS voltages. Scroll up
and down through the menu using the Center button. If the words continue off the screen,
scroll right and left to read the message. Press the Enter button to view selections. Table 3-5
lists the options under the Meters menu.
Table 3-5: Main Module and Electronics Modules M1-M4 Meter Options
LCD Display Explanation
LCD Configuration and Status
Input Volts
Output Volts
Input Frequency
Output Frequency
Output Power
│❚❚❚❚❚❚❚❚❚❚│❚❚ MM or Mx
Output Power
│❚❚❚❚❚❚----│-- MM or Mx
Battery Volts
Input Current
The utility voltage
The voltage available at the UPS output receptacles
The utility frequency in Hertz
The frequency in Hertz available at the UPS output
receptacles
The output power is shown in a bar graph. This example
shows 120% load (overload). There are ten squares in
front of the 100% line. Each represents a 10% load. The
two squares past the line each represent 10% of overload
(20% overload in all).
In contrast, this display shows a 60% load.
The battery voltage
The input current
HP Uninterruptible Power System R12000 XR Models User Guide 3-9
HP CONFIDENTIAL Codename: Sierra Part Number: 146316-002 Last Saved On: 1/24/03 10:15 AM
Page 34

LCD Configuration and Status
Displaying the Battery Charge Data
Select Battery Data on the Main Menu to display the amount of charge on the battery in
10 percent increments.
Main Menu
Battery Data
When the UPS goes into Battery mode, the following LCD displays.
Battery Discharge
|❚❚❚ | 1h=❚
The remaining battery energy is shown, where the tag “1h=❚” means that each block
represents one hour. For example, this LCD shows three hours of remaining battery time.
Other possible tags are listed in Table 3-6.
Table 3-6: Possible Tags
Tag Time
1m 1 minute per block
5m 5 minutes per block
10m 10 minutes per block
30m 30 minutes per block
1h 1 hour per block
Setting the Time
Select Set Time from the Main Menu to set the correct time.
Setting the Date
Select Set Date from the Main Menu to set the correct date.
Main Menu
Set Time
Main Menu
Set Date
3-10 HP Uninterruptible Power System R12000 XR Models User Guide
HP CONFIDENTIAL Codename: Sierra Part Number: 146316-002 Last Saved On: 1/24/03 10:15 AM
Page 35

Displaying the Firmware Version
Select Firmware Vers on the Main Menu to display firmware versions for UPS components.
Press the Enter button to view selections. Table 3-7 lists the firmware version options. The
version number is represented by xxx.
Main Menu
Firmware Vers
Table 3-7: Firmware Version Options
LCD Display Explanation
LCD Configuration and Status
MM Control Vers
xxx
MM Comm Version
xxx
M1-M4 Versions
xxx…xxx…xxx…xxx
Display Module
xxx
Testing the LCD Display
Select Display Test from the Main Menu to light all pixels to test the LCD display.
LCD TEST scrolls across the screen in both upper and lower display lines. Use the Escape
button to exit the test.
Version of firmware the control board is running
Version of firmware the communication board is running
Version of firmware in each electronics module
Version of display firmware the UPS is running
Main Menu
Display Test
❚❚❚LCD TEST❚❚❚
❚❚❚LCD TEST❚❚❚
HP Uninterruptible Power System R12000 XR Models User Guide 3-11
HP CONFIDENTIAL Codename: Sierra Part Number: 146316-002 Last Saved On: 1/24/03 10:15 AM
Page 36

LCD Configuration and Status
Changing the System Setup Options
Select System Setup from the Main Menu to enter the menu for changing system setup
options.
Main Menu
System Setup
To change the system setup, you must enter the correct password. Use the Center and Enter
buttons to select the six digits for the password [0-9 and A-Z].
NOTE: The password must be six characters long. The default password is COMPAQ. To establish or
change the password, refer to the section, “Setting the Password,” in this chapter.
Enter Password
COMPAQ
1. Select the first digit using the up and down arrow keys on the Center button.
2. Press the right arrow key on the Center button to move to the next digit.
3. To change a digit, use the left arrow key on the Center button to go back.
4. After entering the entire password, press the Enter button.
IMPORTANT: Record your password. After 30 minutes with no key presses, security is
automatically restored and the display changes to the main status display.
Setting the Baud Rate
Select Comm Setup from the System Setup menu to set up the baud rate for the
communication ports and option slots.
Table 3-8: Communications Setup Choices
LCD Display Explanation
Comm Setup
Serial Port x
Comm Setup
Opt-Slot x
System Setup
Comm Setup
Select the communication port to set up. x is either 1 or 2.
Select the option slot to set up. x is either 1 or 2.
3-12 HP Uninterruptible Power System R12000 XR Models User Guide
HP CONFIDENTIAL Codename: Sierra Part Number: 146316-002 Last Saved On: 1/24/03 10:15 AM
Page 37

Choose the baud rate for the selected serial port or option slot.
Table 3-9: Baud Rate Setup
LCD Display Explanation
LCD Configuration and Status
Baud Rate
x
Choose the baud rate for the serial port or option slot selected
above. Here, x is the baud rate and can be equal to 1200, 2400,
4800, 9600 (default) or 19200.
An asterisk (*) indicates the current baud rate.
Setting the Voltage
Select Set Voltage from the System Setup menu to set the voltage. The asterisk (*) indicates
the current configuration. The options for voltage are 200, 208, 220, 230 (default), and 240.
System Setup
Set Voltage
NOTE: This option is only available when the UPS is in Standby mode or Manual Bypass mode.
Otherwise, the LCD panel indicates Not Available.
Setting the Hardware Configuration
Select Set HW Config from the System Setup menu to set the hardware configuration for the
UPS.
System Setup
Set HW Config
Table 3-10: Hardware Configuration Choices
LCD Display Explanation
Set HW Config
ERM Setup
Set HW Config
Commission Battery
Set HW Config
Parallel Mode
Select this option to configure the number of ERMs
installed.
Select this option to enable a battery commissioning test.
Select this option to go to the Parallel Mode menu options.
HP Uninterruptible Power System R12000 XR Models User Guide 3-13
HP CONFIDENTIAL Codename: Sierra Part Number: 146316-002 Last Saved On: 1/24/03 10:15 AM
Page 38

LCD Configuration and Status
The Parallel Mode menu options allow you to configure the UPS mode of operation, as
described in Table 3-11.
Table 3-11: Parallel Mode Choices
LCD Display Explanation
Parallel Mode
For Capacity
Parallel Mode
N+1 Redundancy
Setting the Language
Select Set Language from the System Setup menu to select from seven different languages
for the menu display. The available choices are English, Francais, Deutsch, Espanol,
Japanese, Nederlands, and Italiano. The asterisk (*) indicates the current configuration.
Setting the Password
Select Set Password from the System Setup menu to set the password.
Select this option to configure the UPS for capacity operation.
Select this option to configure the UPS for redundant operation.
System Setup
Set Language
System Setup
Set Password
To access some of the more critical UPS operations, you must have a password. Use the
Center and Enter buttons to select the six digits for the password [0-9 and A-Z].
NOTE: The password must be six characters long. The default password is COMPAQ.
Enter Password
COMPAQ
1. Select the first digit using the up and down arrow keys on the Center button.
2. Press the right arrow key on the Center button to move to the next digit.
3. To change a digit, use the left arrow key on the Center button to go back.
4. After entering the entire password, press the Enter button.
IMPORTANT: Record your password. After 30 minutes with no key presses, security is
automatically restored and the display changes to the main status display.
3-14 HP Uninterruptible Power System R12000 XR Models User Guide
HP CONFIDENTIAL Codename: Sierra Part Number: 146316-002 Last Saved On: 1/24/03 10:15 AM
Page 39

This chapter contains information for properly maintaining batteries for the UPS, including
battery charging, replacement, disposal procedures, and warranties.
Precautions
Battery Maintenance
WARNING: There is a risk of personal injury from the hazardous energy levels
associated with UPS batteries. The maintenance and replacement of batteries must be
carried out by an HP authorized service representative.
WARNING: The UPS contains an internal lithium battery and a sealed lead-acid battery
module. To reduce the risk of fire or chemical burns, take the following precautions:
• Do not attempt to recharge batteries after removal from the UPS.
• Do not disassemble, crush, or puncture the batteries.
• Do not short the external contacts of the batteries.
• Do not immerse the batteries in water.
4
• Do not expose to temperatures higher than 60°C (140°F).
WARNING: To reduce the risk of personal injury from hazardous energy, take these
precautions:
• Remove watches, rings, or other metal objects.
• Use tools with insulated handles.
HP Uninterruptible Power System R12000 XR Models User Guide 4-1
HP CONFIDENTIAL Codename: Sierra Part Number: 146316-002 Last Saved On: 1/24/03 10:18 AM
Page 40

Battery Maintenance
Charging Batteries
When connected to utility power, the UPS automatically charges the batteries. No user
intervention is required while the UPS is in use. Refer to the section, “Care and Storage of
Batteries,” in this chapter for information on keeping the batteries charged while the UPS is
in extended storage.
Determining When to Replace Batteries
When the Alarm LED (1) is solid red, and the LCD displays either a Battery Needs Service or
Battery Test Failed alarm, you may need to replace the battery module. Depending on usage
and environmental conditions, the batteries should last three to six years.
1
Figure 4-1: Alarm LED
To verify the above alarms, initiate a UPS battery self-test to verify that battery replacement
is required. If the Alarm LED (1) is solid red and the alert displays on the LCD status menu,
replace the bad battery module as soon as possible.
Refer to the section, “Initiating a Self-Test,” in Chapter 2 for more information on initiating a
self-test.
4-2 HP Uninterruptible Power System R12000 XR Models User Guide
HP CONFIDENTIAL Codename: Sierra Part Number: 146316-002 Last Saved On: 1/24/03 10:18 AM
Page 41

Obtaining New Batteries
New batteries may be required within 30 to 60 days when the Alarm LED is solid red and the
LCD displays either a Battery Needs Service or Battery Test Failed alarm. Obtain spare
batteries for the UPS when this occurs.
HP supplies spare battery modules for UPS R12000 XR models. The UPS spare battery kit
part number is 228288-001
CAUTION: Because of the short shelf life of the battery, avoid storing a battery spare as a
backup. It is recommended that an inventory of spare batteries not be maintained onsite
unless a procedure to keep these batteries charged while in storage is implemented.
Replacing the Batteries
The batteries in the UPS are hot-swappable. Batteries may be replaced (hot-swapped) without
powering off the UPS if the UPS is not supplying battery power to devices. The Utility LED
will be solid green if the UPS is supplying utility power.
The UPS is provided with an internal lithium battery and a sealed lead-acid battery module.
There is a danger of explosion and risk of personal injury if the batteries are incorrectly
replaced or mistreated. Replacement is to be done by an HP authorized service provider using
the spare designated for the product. For more information about battery replacement or
proper disposal, contact your HP authorized reseller or HP authorized service provider.
Battery Maintenance
.
HP Uninterruptible Power System R12000 XR Models User Guide 4-3
HP CONFIDENTIAL Codename: Sierra Part Number: 146316-002 Last Saved On: 1/24/03 10:18 AM
Page 42

Battery Maintenance
Removing and Replacing the Battery Module
WARNING: To prevent personal injury, prepare the area and observe all
27 kg
60 lb
To remove the battery module:
1. Remove the front bezel by pulling on both ends.
materials-handling procedures for removing the battery module, which weighs
27 kg (60 lb).
Figure 4-2: Removing the front bezel
2. Remove the two screws that secure the battery module in place (1) and slide out the
battery module (2).
2
1
Figure 4-3: Removing the battery module
3. Set aside the used battery module for proper disposal. Refer to the section, “Disposing of
Used Batteries,” in this chapter.
4. To replace the battery module, reverse the preceding steps.
4-4 HP Uninterruptible Power System R12000 XR Models User Guide
HP CONFIDENTIAL Codename: Sierra Part Number: 146316-002 Last Saved On: 1/24/03 10:18 AM
Page 43

Testing the New Battery Module
After installing the new battery module, press the Test/Alarm Reset button. Refer to the
section, “Initiating a Self-Test,” in Chapter 2 for more information on initiating a self-test.
IMPORTANT: The UPS schedules the battery test, but will not execute the test until the batteries are at
least 90 percent charged.
If the installation has been successful, the Alarm LED will not be illuminated.
If the installation has not been successful, the Alarm LED turns red and the LCD menu
indicates an alarm. If this occurs, repeat the procedures in the “Replacing the Batteries”
section of this chapter, and check the battery terminal connections. If the Alarm LED is still
red, refer to Chapter 5, “Troubleshooting,” for more information on the cause of the alarm.
IMPORTANT: The batteries will charge to 80 percent of their capacity within approximately
three hours. Charge the batteries for 24 hours before using the UPS to supply backup power to devices.
The load may not be fully protected for 48 hours.
Conducting a Battery Commissioning Test
Battery Maintenance
When replacing battery modules, it is recommended running a battery commissioning test.
This test will set a base line so that the UPS accurately displays battery run-time. Refer to the
section, “Setting the Hardware Configuration,” in Chapter 3 for instructions on enabling the
battery commissioning test.
NOTE: The battery commissioning test runs in the background. Once enabled, the test can take up to
three days to run.
Disposing of Used Batteries
The spare battery kit includes the instructions and packaging required to return used batteries
to the appropriate location for disposal.
Batteries, battery modules, and accumulators should not be disposed of
together with the general household waste. In order to forward them to
recycling or proper disposal, use the public collection system or return them
to HP, your authorized HP Partners, or their agents.
HP Uninterruptible Power System R12000 XR Models User Guide 4-5
HP CONFIDENTIAL Codename: Sierra Part Number: 146316-002 Last Saved On: 1/24/03 10:18 AM
Page 44

Battery Maintenance
Care and Storage of Batteries
To maximize the life of batteries:
•
Minimize the amount of time the UPS uses battery power by matching the UPS
configuration with utility voltage. Refer to the section, “Matching the Utility Voltage,” in
Chapter 3 for more information.
•
Keep the area around the UPS clean and dust-free. If the environment is very dusty, clean
the outside of the UPS regularly with a vacuum cleaner.
•
Maintain the ambient temperature at 25
•
If storing a UPS for an extended period, recharge the batteries every six months:
— Connect the UPS to utility power.
— Allow the UPS to remain in Standby mode.
— Allow the UPS to charge the batteries for 24 hours.
— Update the Battery Recharge Date label.
CAUTION: Because of the short shelf life of the battery, avoid storing a battery spare as
a backup.
o
C (77oF).
Pre-Failure Battery Warranty
The Pre-Failure Battery Warranty, standard on all UPS units, extends the advantage of a
three-year limited warranty by applying it to the battery before it actually fails. Specifically,
the Pre-Failure Battery Warranty ensures that when customers receive notification from
power management software that the battery may fail, the battery is replaced free of charge
under the warranty.
The highest standards in the industry are maintained, as evidenced by the Pre-Failure Battery
Warranty. This warranty is beneficial in at least two significant ways:
•
Reduced total cost of ownership
•
Reduced downtime
A Pre-Failure Battery warning is given 30 days prior to a battery failure. The warning is
indicated in one or both of the following ways:
•
An LED showing that the battery is low
•
Notification from power management software
This warning provides ample time to order a spare battery. To order a spare, go to
www.hp.com.
The battery warranty coverage is three years for parts. The warranty for the first year of
ownership includes parts and labor. If battery spares are not available for a particular UPS
model, then the entire UPS, including its battery, is replaced.
4-6 HP Uninterruptible Power System R12000 XR Models User Guide
HP CONFIDENTIAL Codename: Sierra Part Number: 146316-002 Last Saved On: 1/24/03 10:18 AM
Page 45

This chapter serves as a troubleshooting guide when problems occur with the UPS. Solutions
for main and electronics module alarms are provided, as well as general solutions for UPS
problems that occur both during and after startup.
LCD Alarm Troubleshooting
Table 5-1 lists the possible alarms of the main module or electronics modules. When these
alarms occur, the LCD displays the number and type of alarms. An audible alarm may also
sound. For each alarm listed in the table, an explanation of the cause is provided, as well as a
recommended action to take to resolve the problem.
As shown in Table 5-1, x Alarms on the first line of the LCD display means that one or more
alarms are present, with the variable x indicating the number of alarms. The type of alarm is
displayed on the second line of the LCD. In Example 5-1, three alarms are present. The
Fan Failure alarm has occurred, as well as two other alarms. Use the arrow keys on the
Center button to scroll through the rest of the alarms list.
5
Troubleshooting
Example 5-1: Alarm Display
3 Alarms
Fan Failure
For more information on the LCD display and menus, refer to the section, “Configuring the
UPS Using the LCD Menu,” in Chapter 3.
HP Uninterruptible Power System R12000 XR Models User Guide 5-1
HP CONFIDENTIAL Codename: Sierra Part Number: 146316-002 Last Saved On: 1/24/03 10:20 AM
Page 46

Troubleshooting
Table 5-1: Main Module and Electronics Modules M1-M4 Active Alarms
LCD Display Possible Cause Suggested Action
x Alarms
Ambient Over
Temperature
x Alarms
Automatic
Shutdown Pending
x Alarms
Batteries
Disconnected
x Alarms
Battery DC Over
Voltage
x Alarms
Battery Low
x Alarms
Battery n Needs
Service
The UPS triggers an alarm if the
ambient temperature inside the
detecting electronics module exceeds
the preset threshold of 80°C (176°F).
Other than the alarm, no UPS action is
currently associated with this condition.
Batteries are depleted beyond their
lower limits due to the UPS being on
battery for an extended period. The
load has been disengaged and the
system has entered the 30-second
powerdown mode.
This alarm is triggered by the one of
the following events:
• The UPS detects that at least one
battery is installed incorrectly.
• Not enough battery modules are
installed to support the current
load levels.
At least one electronics module detects
that battery voltage is abnormally high
while operating in Battery mode.
The UPS detects that the current
battery voltage level has dropped
below the preset threshold configured
in the EEPROM for this alarm. This is
to be expected when operating in
Battery mode and when the batteries
discharge.
The UPS detects a battery fuse failure
or an automated battery test failure. An
automated battery test failure is
reported when battery voltage is less
than 1.8 volts per cell during the first
75 seconds of unscheduled Battery
mode operation.
The variable n indicates the slot in
which the faulted battery module is
installed. (For example, slot 1 is the
uppermost bay of the four-battery bay
slots.)
Ensure that unit grills are not blocked
and fans are operational. Correct any
environmental conditions that may be
causing the condition. Verify that the
ambient temperature is less than 40°C
(104°F).
Contact Technical Support for
assistance.
This is a normal operation. The UPS
will restart when utility power is
restored.
Remove bezels and check that each
battery module is firmly seated in its
slot. Verify that the load does not
exceed 12 kW.
Contact Technical Support for
assistance.
Switch to Maintenance Bypass mode,
and contact Technical Support for
assistance.
This is a normal operation. The UPS
will begin the shutdown process.
Contact Technical Support for
assistance.
continued
5-2 HP Uninterruptible Power System R12000 XR Models User Guide
HP CONFIDENTIAL Codename: Sierra Part Number: 146316-002 Last Saved On: 1/24/03 10:20 AM
Page 47

Troubleshooting
Table 5-1: Main Module and Electronics Modules M1-M4 Active Alarms continued
LCD Display Possible Cause Suggested Action
x Alarms
Battery Not
Charged
x Alarms
Battery n Test
Failed
x Alarms
Bypass Not
Available
x Alarms
Calibration Failed
x Alarms
DC Link Over
Voltage
x Alarms
Fan Failure
At least one battery string fails to reach
float voltage after charging for 24
hours. This could indicate a problem in
one or more battery modules.
The UPS detects a manual battery test
failure. A manual battery test failure is
reported when battery voltage is less
than 1.8 volts per cell during the
first 75 seconds of unscheduled Battery
mode operation.
The variable n indicates the slot in
which the faulted battery module is
installed. (For example, slot 1 is the
uppermost bay of the four-battery bay
slots.)
Bypass mode is currently unavailable
due to the voltage or frequency being
outside the valid operating range for
the UPS.
The UPS triggers this alarm when the
autocalibration process fails to
complete successfully. This could be
the result of an interruption from an
operating mode transition or because
of UPS load changes occurring while
autocalibration was in progress.
At least one electronics module detects
abnormally high rail voltage levels and
shuts down to protect itself and the
load from damage.
This could be caused by a hardware
failure.
At least one electronics module detects
that one or both of its cooling fans has
failed. The detecting module
immediately shuts down to protect its
heat sensitive components.
At least one battery module needs
replacing. Contact Technical Support
for assistance.
At least one battery module needs
replacing. Contact Technical Support
for assistance.
Refer to the section, “Matching the
Utility Voltage,” in Chapter 3 to verify
that voltage settings are correct.
If the condition persists, contact an
electrician.
The autocalibration process
reschedules and automatically restarts
once the UPS conditions are conducive
for the operation to complete.
Contact Technical Support for
assistance.
Contact Technical Support for
assistance.
Check the fans for blockage. If a fan is
blocked, remove the blockage, switch
to Maintenance Bypass mode, and
restart the system.
If a fan is not blocked and the problem
persists, contact Technical Support for
assistance.
continued
HP Uninterruptible Power System R12000 XR Models User Guide 5-3
HP CONFIDENTIAL Codename: Sierra Part Number: 146316-002 Last Saved On: 1/24/03 10:20 AM
Page 48

Troubleshooting
Table 5-1: Main Module and Electronics Modules M1-M4 Active Alarms continued
LCD Display Possible Cause Suggested Action
x Alarms
Fuse Failure
x Alarms
Heatsink Over
Temperature
x Alarms
Input AC Over
Voltage
x Alarms
Input AC Under
Voltage
x Alarms
Input Under Or
Over Frequency
The UPS detects that one or more of
the internal module fuses has failed.
An electronics module detects a
heatsink over temperature condition.
The detecting module immediately
shuts down to protect its heat sensitive
components.
The UPS detects that the input utility
voltage is above the maximum
operating range of about 277 v
(288 v -hysteresis).
The UPS detects that the input utility
voltage is below the minimum operating
range of about 172 v
(160 v + hysteresis).
The UPS detects that the input
frequency has a greater deviation than
± 5 Hz from the nominal window of
operation.
Contact Technical Support for
assistance.
Check the ventilation grills for
blockage. If the grills are blocked,
remove blockage, switch to
Maintenance Bypass mode, and restart
the system. Verify that the ambient
temperature is less than 40°C (104°F).
If the grills are not blocked and the
problem persists, contact Technical
Support for assistance.
If this occurs in a running system, the
system will immediately transition to
Battery mode until valid utility returns. If
this occurs before a system has
entered an online state, its startup
sequence will not complete, and the
system will shut down until valid utility
returns.
If the condition persists, contact an
electrician.
If this occurs in a running system, the
system will regulate output frequency to
its nominal 50 or 60 Hz. If this occurs
before a system has entered an online
state, its startup sequence will not
complete, and the system will shut
down until valid utility returns.
If the condition persists, contact an
electrician.
continued
5-4 HP Uninterruptible Power System R12000 XR Models User Guide
HP CONFIDENTIAL Codename: Sierra Part Number: 146316-002 Last Saved On: 1/24/03 10:20 AM
Page 49

Troubleshooting
Table 5-1: Main Module and Electronics Modules M1-M4 Active Alarms continued
LCD Display Possible Cause Suggested Action
x Alarms
Internal
Communications
Failure
x Alarms
Inverter Contactor
Open
x Alarms
Inverter Fault
x Alarms
Inverter Output
Over Current
The UPS encounters an internal
communication problem that is
hindering its ability to successfully
manage its activities and monitor the
current electronics module status. The
UPS will immediately transfer to Battery
mode and issue the Low Battery alarm
until communications are restored.
The UPS detects that an electronics
module has timed out waiting for its
load relay to close during a module
hot-swap. The electronics module has
failed to complete its startup sequence
successfully. This alarm is
accompanied by one or more alarms
from the electronics module that
indicates the root cause of the problem.
At least one electronics module detects
a hardware failure in its inverter,
generates this alarm, and subsequently
shuts down. The UPS may have
transitioned into Automatic Bypass
mode due to the failure, depending on
the load levels present at the time of
the failure.
This could be caused by a hardware
failure.
At least one electronics module
generates this alarm when it has
reached its maximum operating output
hardware current limits, as defined in
the EEPROM. The module has shut
down to protect itself and the load from
damage. The UPS may have
transitioned into Automatic Bypass
mode due to the failure, depending on
the load levels present at the time of
the failure and the number of modules
affected.
Switch to Maintenance Bypass mode,
and contact Technical Support for
assistance.
Select the Status option on the LCD
menu. Scroll through and examine the
additional alarms related to the failed
electronics module for details on
handling this condition.
Contact Technical Support for
assistance.
Reduce the load level to within UPS
operational limits. Initiate a Manual
Bypass Recovery if the UPS remains in
Bypass mode for more than
30 seconds. See the LCD panel to
determine which electronics module
generated the alarm.
If the UPS was operating within its
supported load limits when the problem
occurred, or if the problem persists,
contact Technical Support for
assistance.
continued
HP Uninterruptible Power System R12000 XR Models User Guide 5-5
HP CONFIDENTIAL Codename: Sierra Part Number: 146316-002 Last Saved On: 1/24/03 10:20 AM
Page 50

Troubleshooting
Table 5-1: Main Module and Electronics Modules M1-M4 Active Alarms continued
LCD Display Possible Cause Suggested Action
x Alarms
Inverter Startup
Failure
x Alarms
Inverter
Uncalibrated
x Alarms
Level 2 Overload –
Phase A
This alarm is triggered by one of the
following events:
• The UPS detects that at least one
electronics module failed to
complete its startup sequence as
expected and was most likely shut
down. In this situation, the alarm is
more of a general status indicator.
It should be accompanied by
another alarm, indicating the
reason for the modules failure to
start.
• An electronics module has briefly
(for approximately one-quarter of a
second) disconnected from the
system and is attempting to restart.
In this situation, no other alarms
associated with this failure will
occur, with the exception of a
possible Internal Communications
Failure alarm.
At least one electronics module has not
been calibrated together as a set,
which is required for efficient
load-sharing operations.
The UPS detects that the current load
has exceeded 102% of the maximum
capacity available, which means it is
operating in Nonredundant mode.
The UPS will transfer to Bypass mode
after two minutes of this sustained load
level.
The electronics module may not be
fully seated. Remove the bezels and
ensure that each of the electronics
modules is fully inserted into the
chassis.
Contact Technical Support for
assistance.
An autocalibration is required, and the
UPS will automatically schedule the
autocalibration process on detection of
this condition.
Contact Technical Support for
assistance.
Reduce the load level to clear the
alarm. If the alarm persists after load
reduction, see the LCD panel to
determine which electronics module is
reporting overload.
Contact Technical Support for
assistance.
x Alarms
Level 3 Overload –
Phase A
The UPS detects that the current load
has exceeded 110% of the maximum
capacity available, which means it is
operating in Nonredundant mode.
The UPS will transfer to Bypass mode
after 30 seconds of this sustained load
level.
continued
Reduce the load level to clear the
alarm. If the alarm persists after load
reduction, see the LCD panel to
determine which electronics module is
reporting overload.
Contact Technical Support for
assistance.
5-6 HP Uninterruptible Power System R12000 XR Models User Guide
HP CONFIDENTIAL Codename: Sierra Part Number: 146316-002 Last Saved On: 1/24/03 10:20 AM
Page 51

Troubleshooting
Table 5-1: Main Module and Electronics Modules M1-M4 Active Alarms continued
LCD Display Possible Cause Suggested Action
x Alarms
Level 4 Overload –
Phase A
x Alarms
Loss of
Redundancy
x Alarms
Loss of Sync-Bus
x Alarms
Low Battery
Shutdown
The UPS detects that the current load
has exceeded 120% of the maximum
capacity available, which means it is
operating in Nonredundant mode.
The UPS will transfer to Bypass mode
within one second and remain in that
mode due to the excessive overload
condition.
The UPS detects that the current load
level has exceeded the maximum safe
load level limits that would provide
redundancy protection to the
electronics modules.
The system will continue to operate,
but will no longer be in Redundant
mode. The load could be at risk if an
electronics module fails.
The UPS detects that its electronics
modules are having trouble
synchronizing with the input utility
source. The most likely cause is a poor
utility source supplying the UPS.
While on battery, the UPS detects that
the battery voltage level has dropped
below the lowest preset threshold
value. The UPS will be shut down.
This normal alarm condition occurs at
the end of a battery discharge cycle.
The threshold represents the lowest
allowable battery discharge level for the
batteries before they can no longer
safely support the load. Once valid
utility returns, the UPS will assume the
load after a minimum charge level has
been restored to the batteries, and it
will begin a complete battery recharge
cycle.
Reduce the load level to clear the
alarm. If the alarm persists after load
reduction, see the LCD panel to
determine which electronics module is
reporting overload.
Contact Technical Support for
assistance.
If redundant operation is desired,
reduce the load until the alarm clears.
Switch to Maintenance Bypass mode,
and restart the system.
Contact Technical Support for
assistance.
This is a normal operation.
x Alarms
Non-volatile
Memory
Checksum Fail
The UPS detects an EEPROM
Checksum Failure in the electronics
module or supervisory board. This
condition must be resolved before the
UPS can complete its initialization and
Check the website (www.hp.com) for
Flash upgrades.
Contact Technical Support for
assistance.
start successfully.
This alarm is most common after a
flash upgrade that requires an
EEPROM upgrade for the new
embedded software to function
correctly. The upgrade documentation
will describe this condition.
continued
HP Uninterruptible Power System R12000 XR Models User Guide 5-7
HP CONFIDENTIAL Codename: Sierra Part Number: 146316-002 Last Saved On: 1/24/03 10:20 AM
Page 52

Troubleshooting
Table 5-1: Main Module and Electronics Modules M1-M4 Active Alarms continued
LCD Display Possible Cause Suggested Action
x Alarms
On Manual Bypass
x Alarms
Output AC Over
Voltage
x Alarms
Output AC Under
Voltage
The UPS has been manually switched
into Maintenance Bypass mode. The
UPS can no longer protect the load or
condition the utility to the load.
The UPS detects that its output voltage
is higher than its configured operational
range. The UPS will immediately
initiate a transfer to Bypass mode, if
that mode is available. If Bypass mode
is not available at the time of this
failure, the UPS will shut down
immediately to protect the load.
This could be caused by a hardware
component failure.
This alarm is triggered by one of the
following events:
• The UPS detects that its output
voltage is lower than its configured
operational range. The UPS will
immediately initiate a transfer to
Bypass mode, if that mode is
available.
• A significant change in load or load
types occurs that causes a
temporary sag in output voltage. If
Bypass mode is available, the UPS
attempts to automatically recover
and return to an online mode after
a couple of seconds.
This is a normal operation.
Contact Technical Support for
assistance.
Contact Technical Support for
assistance.
If Bypass mode is not available at
the time of the failure, the UPS will
shut down immediately to protect
the load.
x Alarms
Output Overload
The current load exceeds 100% of the
maximum capacity available that this
UPS will support in Nonredundant
mode. The UPS issues an alarm, but
does not take any other action for this
level of overload.
Reduce the load level to clear the
alarm. If the alarm persists after load
reduction, see the LCD panel to
determine which electronics module is
reporting overload.
Contact Technical Support for
assistance.
x Alarms
Program
Checksum Fail
The UPS detects that the Module Flash
Program Space is corrupt. This is
usually caused by a Flash Upgrade
Failure.
This only occurs during product
upgrade.
Re-flash the failing electronics module
with the latest upgrade package.
continued
5-8 HP Uninterruptible Power System R12000 XR Models User Guide
HP CONFIDENTIAL Codename: Sierra Part Number: 146316-002 Last Saved On: 1/24/03 10:20 AM
Page 53

Troubleshooting
Table 5-1: Main Module and Electronics Modules M1-M4 Active Alarms continued
LCD Display Possible Cause Suggested Action
x Alarms
Rectifier Input
Over Current
x Alarms
Remote
Emergency Power
Off
x Alarms
Software
Incompatibility
Detected
x Alarms
UPS On Battery
x Alarms
UPS On Bypass
x Alarms
Utility Fail
x Alarms
Utility Not Present
At least one electronics module
generates this alarm when it detects an
abnormally high input current. The
detecting module shuts down to protect
itself from damage. The UPS may have
transitioned into Automatic Bypass
mode due to the failure, depending on
the load levels present at the time of
the failure and the number of modules
affected.
This could be caused by a hardware
failure.
The UPS detects a Remote Emergency
Power Off signal. The electronics
modules immediately shut down and
battery starts are inhibited.
At least one electronics module failed
the code validation check. The code
revision currently installed is
incompatible with the rest of the
system.
This is an alarm and a status to
indicate that the UPS is currently
operating in Battery mode.
This is an alarm and a status to
indicate that the UPS is currently
operating in Bypass mode.
The UPS detects that the utility source
voltage is not within an acceptable
range.
The UPS detects that the utility source
voltage is either not present, or so
abnormally low that the UPS classifies
it as not being present.
Contact Technical Support for
assistance.
Refer to the section, “Remote
Emergency Power Off Port,” in
Chapter 1 for more information.
Contact Technical Support for
assistance.
This is a normal operation. This alarm
may be accompanied by other alarms
that will indicate the root cause of the
problem.
This alarm may be accompanied by
other alarms that will indicate the root
cause of the problem.
Verify the utility power. If the problem
persists, contact an electrician.
Verify the utility power. If the problem
persists, contact an electrician.
HP Uninterruptible Power System R12000 XR Models User Guide 5-9
HP CONFIDENTIAL Codename: Sierra Part Number: 146316-002 Last Saved On: 1/24/03 10:20 AM
Page 54

Troubleshooting
Problems During Startup
If problems occur when starting the UPS, refer to Table 5-2 for possible causes and suggested
actions.
Table 5-2: Troubleshooting problems during UPS startup
Symptom Possible Cause Suggested Action
UPS will not start. There is no utility power. Unit is hardwired. Contact a qualified
Batteries are disconnected. Install the battery trays. If the
REPO: Audible alarm sounds
and Alarm LED is lit.
Problems After Startup
electrician to check power at the utility
receptacle.
batteries are installed, remove and
then reinsert the electronics modules.
Ensure that the REPO switch is in the
proper position (open) and utility is
present. Press the On button.
If problems occur after starting the UPS, refer to Table 5-3 for possible causes and suggested
actions.
Table 5-3: Troubleshooting problems after UPS startup
Symptom Possible Cause Suggested Action
Audible alarm sounds.
Alarm LED is lit.
Bypass LED is flashing. Automatic Bypass mode is not
Utility LED is flashing slowly,
and all other LEDs are off.
Utility LED is flashing rapidly. The full UPS or an electronics
An alarm condition exists. Scroll through the LCD menu for
system alarms to determine the
cause.
Scroll through the LCD menu for
available.
Utility power is within
acceptable range.
The UPS is operating normally
and is in Standby mode.
module is in the process of
starting up.
system alarms to determine the
cause.
Manual Bypass is not
recommended during this
condition.
Press the On button to assume
the load.
Wait for continuous Utility or
Battery LED light, or slowly
flashing Utility LED.
continued
5-10 HP Uninterruptible Power System R12000 XR Models User Guide
HP CONFIDENTIAL Codename: Sierra Part Number: 146316-002 Last Saved On: 1/24/03 10:20 AM
Page 55

Troubleshooting
Table 5-3: Troubleshooting problems after UPS startup continued
Symptom Possible Cause Suggested Action
All LEDs flash on and off
together.
Redundant LED and audible
alarm frequently turn on and
off.
Audible alarm sounds.
Bypass LED and Alarm LED
are lit.
Audible alarm sounds.
Battery LED and Alarm LED
are lit.
Redundant LED is off.
Audible alarm sounds.
Battery LED, Alarm LED, and
Redundant LED are lit.
Autocalibration is in process. Wait for continuous Utility
LED.
Redundancy mode is not
available.
Reduce output load to allow
system to remain in
Redundancy mode.
UPS is on bypass. Do one of the following:
• Scroll through the LCD
menu to view current
alarms.
• Use the power
management software to
view the alarm history to
determine the reason for
the transfer to Bypass
mode.
UPS is on battery. Do one of the following:
• Scroll through the LCD
menu to view current
alarms.
• Use the power
management software to
view the alarm history to
determine the reason for
the transfer to Battery
mode.
UPS is on battery. Do one of the following:
• Scroll through the LCD
menu to view current
alarms.
• Use the power
management software to
view the alarm history to
determine the reason for
the transfer to Battery
mode.
continued
HP Uninterruptible Power System R12000 XR Models User Guide 5-11
HP CONFIDENTIAL Codename: Sierra Part Number: 146316-002 Last Saved On: 1/24/03 10:20 AM
Page 56

Troubleshooting
Table 5-3: Troubleshooting problems after UPS startup continued
Symptom Possible Cause Suggested Action
UPS frequently switches
between utility and battery
power.
Utility LED and Redundant
LED are lit.
Audible alarm sounds.
Utility LED and Alarm LED are
lit.
Utility LED is lit. UPS is on utility. No action is required. The
CarePaq Considerations
The utility voltage is frequently
outside the UPS operating
range.
UPS is on utility. The UPS is operating
UPS is on utility. Redundant mode is not
Update the configuration.
normally.
The system is configured to
run in Redundant mode and is
operating within normal load
limits.
available and the Loss of
Redundancy alarm is present.
Reduce the load and verify
that no other alarms are
present.
UPS is operating normally.
The system is configured to
run in Nonredundant mode
and is supporting between a
9 KVA and 12 KVA load.
Packaged services are also available for purchase. You can choose the precise level of
support that you need, from basic to business-critical. Services available are listed in
Table 5-4.
Table 5-4: Services for UPS R12000 XR
Description Part Numbers
9x5, 4-hour response,
3-year on-site coverage
24x7, 4-hour response,
3-year on-site coverage
Hardware Installation 171256-002, FM-USINS-IN
Repairing the UPS
Repairs to the UPS must be carried out by HP or an HP authorized service representative.
Other than battery replacement, there are no user-serviceable parts.
171254-002, FM-US4HR-36
171255-002, FM-US724-36
5-12 HP Uninterruptible Power System R12000 XR Models User Guide
HP CONFIDENTIAL Codename: Sierra Part Number: 146316-002 Last Saved On: 1/24/03 10:20 AM
Page 57

Regulatory Compliance Notices
Regulatory Compliance Serial Numbers
For the purpose of regulatory compliance certifications and identification, your product has
been assigned a unique series number. The series number can be found on the product
nameplate label, along with all required approval markings and information. When requesting
compliance information for this product, always refer to this series number. The series
number is not the marketing name or model number of the product.
Federal Communications Commission Notice
Part 15 of the Federal Communications Commission (FCC) Rules and Regulations has
established Radio Frequency (RF) emission limits to provide an interference-free radio
frequency spectrum. Many electronic devices, including computers, generate RF energy
incidental to their intended function and are, therefore, covered by these rules. These rules
place computers and related peripheral devices into two classes, A and B, depending upon
their intended installation. Class A devices are those that may reasonably be expected to be
installed in a business or commercial environment. Class B devices are those that may
reasonably be expected to be installed in a residential environment (for example, personal
computers). The FCC requires devices in both classes to bear a label indicating the
interference potential of the device as well as additional operating instructions for the user.
A
The FCC rating label on the device shows the classification (A or B) of the equipment.
Class B devices have an FCC logo or FCC ID on the label. Class A devices do not have an
FCC logo or FCC ID on the label. After the Class of the device is determined, refer to the
corresponding statement in the following sections.
Class A Equipment
This equipment has been tested and found to comply with the limits for a Class A digital
device, pursuant to Part 15 of the FCC Rules. These limits are designed to provide reasonable
protection against harmful interference when the equipment is operated in a commercial
environment. This equipment generates, uses, and can radiate radio frequency energy and, if
not installed and used in accordance with the instructions, may cause harmful interference to
radio communications. Operation of this equipment in a residential area is likely to cause
harmful interference, in which case the user will be required to correct the interference at
personal expense.
HP Uninterruptible Power System R12000 XR Models User Guide A-1
HP CONFIDENTIAL Codename: Sierra Part Number: 146316-002 Last Saved On: 1/24/03 10:22 AM
Page 58

Regulatory Compliance Notices
Class B Equipment
This equipment has been tested and found to comply with the limits for a Class B digital
device, pursuant to Part 15 of the FCC Rules. These limits are designed to provide reasonable
protection against harmful interference in a residential installation. This equipment generates,
uses, and can radiate radio frequency energy and, if not installed and used in accordance with
the instructions, may cause harmful interference to radio communications. However, there is
no guarantee that interference will not occur in a particular installation. If this equipment does
cause harmful interference to radio or television reception, which can be determined by
turning the equipment off and on, the user is encouraged to try to correct the interference by
one or more of the following measures:
•
Reorient or relocate the receiving antenna.
•
Increase the separation between the equipment and receiver.
•
Connect the equipment into an outlet on a circuit that is different from that to which the
receiver is connected.
•
Consult the dealer or an experienced radio or television technician for help.
Declaration of Conformity for Products Marked with the FCC Logo, United States Only
This device complies with Part 15 of the FCC Rules. Operation is subject to the following
two conditions: (1) this device may not cause harmful interference, and (2) this device must
accept any interference received, including interference that may cause undesired operation.
For questions regarding your product, contact us by mail or telephone:
•
•
For questions regarding this FCC declaration, contact us by mail or telephone:
•
•
To identify this product, refer to the part, series, or model number found on the product.
Modifications
Hewlett-Packard Company
P. O. Box 692000, Mail Stop 530113
Houston, Texas 77269-2000
1-800-652-6672 (For continuous quality improvement, calls may be recorded or
monitored.)
Hewlett-Packard Company
P. O. Box 692000, Mail Stop 510101
Houston, Texas 77269-2000
1-281-514-3333
The FCC requires the user to be notified that any changes or modifications made to this
device that are not expressly approved by Hewlett-Packard Company may void the user’s
authority to operate the equipment.
A-2 HP Uninterruptible Power System R12000 XR Models User Guide
HP CONFIDENTIAL Codename: Sierra Part Number: 146316-002 Last Saved On: 1/24/03 10:22 AM
Page 59

Cables
Connections to this device must be made with shielded cables with metallic RFI/EMI
connector hoods in order to maintain compliance with FCC Rules and Regulations.
Canadian Notice (Avis Canadien)
Class A Equipment
This Class A digital apparatus meets all requirements of the Canadian Interference-Causing
Equipment Regulations
Cet appareil numérique de la classe A respecte toutes les exigences du Règlement sur le
matériel brouilleur du Canada.
Class B Equipment
This Class B digital apparatus meets all requirements of the Canadian Interference-Causing
Equipment Regulations
Regulatory Compliance Notices
Cet appareil numérique de la classe B respecte toutes les exigences du Règlement sur le
matériel brouilleur du Canada.
European Union Notice
Products with the CE Marking comply with both the EMC Directive (89/336/EEC) and the
Low Voltage Directive (73/23/EEC) issued by the Commission of the European Community.
Compliance with these directives implies conformity to the following European Norms (the
equivalent international standards are in parentheses):
•
EN55022 (CISPR 22) – Electromagnetic Interference
•
EN55024 (IEC61000-4-2, 3, 4, 5, 6, 8, 11) – Electromagnetic Immunity
•
EN61000-3-2 (IEC61000-3-2) – Power Line Harmonics
•
EN61000-3-3 (IEC61000-3-3) – Power Line Flicker
•
EN60950 (IEC950) – Product Safety
HP Uninterruptible Power System R12000 XR Models User Guide A-3
HP CONFIDENTIAL Codename: Sierra Part Number: 146316-002 Last Saved On: 1/24/03 10:22 AM
Page 60

Regulatory Compliance Notices
Japanese Notice
BSMI Notice
A-4 HP Uninterruptible Power System R12000 XR Models User Guide
HP CONFIDENTIAL Codename: Sierra Part Number: 146316-002 Last Saved On: 1/24/03 10:22 AM
Page 61

Battery Replacement Notice
Your computer is equipped with an internal lithium battery or battery pack. There is a danger
of explosion and risk of personal injury if the battery is incorrectly replaced or mistreated.
Unless specific replacement instructions are provided as part of this guide, replacement is to
be done by an authorized service provider using the HP spare designated for this product. For
more information about battery replacement or proper disposal, contact your authorized
reseller or your authorized service provider.
WARNING: Your computer contains an internal lithium battery or battery pack. There is
risk of fire and burns if the battery pack is not properly handled. To reduce the risk of
personal injury:
• Do not attempt to recharge the battery.
• Do not expose to temperatures higher than 60°C (140°F).
• Do not disassemble, crush, puncture, short external contacts, or dispose of in fire
or water.
Replace only with the HP spare designated for this product.
Batteries, battery packs, and accumulators should not be disposed of
together with the general household waste. To forward them to recycling or
proper disposal, please use the public collection system or return them to
HP, your authorized HP partners, or their agents.
Regulatory Compliance Notices
HP Uninterruptible Power System R12000 XR Models User Guide A-5
HP CONFIDENTIAL Codename: Sierra Part Number: 146316-002 Last Saved On: 1/24/03 10:22 AM
Page 62

Preventing Electrostatic Damage
A discharge of static electricity from a finger or other conductor may damage system boards
or other static-sensitive devices. This type of damage may reduce the life expectancy of the
device.
•
To prevent electrostatic damage when setting up the system or handling parts, avoid hand
contact by transporting and storing products in static-safe containers.
•
Keep electrostatic-sensitive parts in their containers until they arrive at static-free
workstations.
•
Place parts on a grounded surface before removing them from their containers.
•
Avoid touching pins, leads, or circuitry.
•
Always be properly grounded when touching a static-sensitive component or assembly.
B
Electrostatic Discharge
Grounding Methods To Prevent Electrostatic Damage
There are several methods for grounding. Use one or more of the following methods when
handling or installing electrostatic-sensitive parts:
•
Use a wrist strap connected by a ground cord to a grounded workstation or computer
chassis. Wrist straps are flexible straps with a minimum of 1 megohm ± 10 percent
resistance in the ground cords. To provide proper ground, wear the strap snug against the
skin.
•
Use heel straps, toe straps, or boot straps at standing workstations. Wear the straps on
both feet when standing on conductive floors or dissipating floor mats.
•
Use conductive field service tools.
•
Use a portable field service kit with a folding static-dissipating work mat.
If you do not have any of the suggested equipment for proper grounding, have a Compaq
authorized reseller install the part
For more information on static electricity, or assistance with product installation, contact your
authorized reseller.
HP Uninterruptible Power System R12000 XR Models User Guide B-1
HP CONFIDENTIAL Codename: Sierra Part Number: 146316-002 Last Saved On: 1/24/03 10:23 AM
Page 63

This appendix provides the physical, input, and output specifications for the UPS. Topics
include battery descriptions, battery runtime estimates, and environmental requirements when
operating the UPS.
Physical Specifications
Table C-1: Physical Specifications
Feature Metric U.S.
Dimensions Width 44.45 cm 17.50 in
Height 44.45 cm 17.50 in
Depth 72.64 cm 28.60 in
Weight 189 kg 420 lb
C
Specifications
Input Specifications
Table C-2: Input Specifications
UPS Model
R12000 XR WW
(worldwide)
Utility
Voltage
Frequency
(Hz)
50/60 200-240 200, 208, 220, 230 or 240
Default Settings—
Nominal Voltage (VAC)
Range
Available Settings—
Utility Voltage (VAC)
HP Uninterruptible Power System R12000 XR Models User Guide C-1
HP CONFIDENTIAL Codename: Sierra Part Number: 146316-002 Last Saved On: 1/24/03 10:24 AM
Page 64

Specifications
Output Specifications
Table C-3: Output Specifications
UPS Model Effective VA
R12000 XR WW
(worldwide)
Characteristics
Voltage The input voltage
Source of Power Regulation
Output Utility power
Battery power
Feature Specification
Other features Online efficiency > 83%
Voltage wave shape Sine wave; 3% THD with
Surge suppression High energy 6500 A peak
Noise filtering The input noise
12000 12000
Configuration
Setting (VAC)
range is 200-240 VAC
±20%.
(normal range)
Nominal Power Rating
(W)
Available Nominal
Output Voltage (VAC)
200, 208, 220, 230 or 240
±3% of nominal output
voltage rating (within the
guidelines of the Computer
Business Equipment
Manufacturers Association)
±3% of nominal output
voltage rating
typical PFC load
suppression is comprised
of Normal Mode Filtering,
Common Mode Filtering, or
a combination of both.
Overcurrent Protection
A power distribution unit (PDU) provides overcurrent protection.
C-2 HP Uninterruptible Power System R12000 XR Models User Guide
HP CONFIDENTIAL Codename: Sierra Part Number: 146316-002 Last Saved On: 1/24/03 10:24 AM
Page 65

Battery Specifications
Table C-4: Battery Specifications
Feature Specification
Type Each module contains maintenance-free, sealed, valve
Voltage The battery module has a battery string voltage of
Charging Complete charge takes no more than 48 hours.
The UPS recharges in three hours to 80% usable
Battery Runtime
Specifications
regulated lead-acid (VRLA) batteries with an eight-year
minimum float service life at 25°C (77°F).
48 Vdc.
capacity.
ERMs will recharge in less than eight hours to 80%
usable capacity.
Table C-5: Estimated Battery Runtime
Load
(Percent)
20 43 69
50 14 28
80 7 15
100 5 11
Estimated Battery
Runtime (Minutes)
Environmental Specifications
Table C-6: Environmental Specifications
Feature Specification
Operating temperature 10oC to 40oC (50oF to 104oF)
UL-tested at 25
Relative humidity 0% to 95%; non-condensing
Operating altitude Up to 2,000 m (6,562 ft) above sea level
Audible noise Typically 60 dBA
Transit temperature -25oC to +55oC (-13oF to 131oF)
Transit altitude 15,000 m (49,212 ft) above sea level
UPS with ERM
Runtime (Minutes)
o
C (77oF)
HP Uninterruptible Power System R12000 XR Models User Guide C-3
HP CONFIDENTIAL Codename: Sierra Part Number: 146316-002 Last Saved On: 1/24/03 10:24 AM
Page 66

A C
alarms cables
audible 2-7 FCC compliance statement A-3
LCD display 3-6 part number 1-2
list of 3-6 care and storage of batteries 4-6
silencing 2-7 CarePaq services 5-12
cautions, defined viii
B
batteries
caring for 4-6
charging 2-5, 4-2
conducting battery commissioning test 4-5
determining when to replace 4-2
disposing of 4-5
maximizing life of 4-6
monitoring 2-5
obtaining new 4-3
precautions 4-1
Pre-Failure Warranty 4-6
recycling or disposal A-5
removing 4-4
replacing 4-3
runtime specifications C-3
spare kit part number 4-3
specifications C-3
storing 4-6
testing new 4-5
warranty 4-6
battery charge data, displaying 3-10
Battery mode 2-4
bezels
blank 1-3
control 1-3
removing 4-4
supervisory 1-3
blank bezel 1-3
Bypass mode 2-4
charging the UPS batteries 2-5, 4-2
commissioning test, for batteries 4-5
communications setup choices, defined 3-12
conducting a battery commissioning test 4-5
conducting an LCD display test 3-11
configuration
battery charge data 3-10
date 3-10
firmware version 3-11
LCD display test 3-11
matching the utility voltage 3-2
meters 3-9
overall LCD menu map 3-5
system setup 3-12
time 3-10
using LCD menu 3-4
configuring the UPS 3-1
control bezel 1-3
control buttons
Center 2-1
Enter 2-1
Escape 2-1
On 2-1, 2-6
Standby 2-1
Test/Alarm Reset 2-1, 2-6, 2-7
D
date
displaying on the LCD menu 3-10
setting 3-10
Declaration of Conformity A-2
default password 3-12, 3-14
determining when to replace UPS batteries 4-2
Index
HP Uninterruptible Power System R12000 XR Models User Guide Index-1
HP CONFIDENTIAL Codename: Sierra Part Number: 146316-002 Last Saved On: 1/24/03 10:46 AM
Page 67

Index
displaying
electronics module firmware version 3-11
electronics modules alarms 3-8
electronics modules status 3-8
main module alarms 3-7
main module status 3-7
UPS battery charge data 3-10
disposing of used batteries 4-5
E
electric shock symbol vii
electronics modules
Redundancy mode 2-4
status and alarms 3-8
electrostatic discharge B-1
environmental specifications C-3
ERM See Extended Runtime Modules
Extended Runtime Modules, overview 1-6
F
FCC notices
Class A Equipment A-1
Class B Equipment A-2
classification label A-1
Declaration of Conformity A-2
device modifications A-2
features
communication ports 1-2
extended runtime modules (ERMs) 1-6
hardware options 1-5
power distribution units (PDUs) 1-6
power management software 1-5
remote emergency power off (REPO) 1-6
UPS 1-1
warranties 1-7
Federal Communications Commission notices See
FCC notices
firmware versions, defined 3-11
front panel
controls 2-1
LCD 2-2
LEDs 2-3
front panel LCD 2-2
front panel LEDs 2-3
front view, UPS 1-3
G
grounding methods B-1
guarantee See warranties
H
hardware configuration
options 3-13
setting 3-13
hardware options 1-5
Extended Runtime Module (ERM) 1-5
MPDU 40 A WW 1-5
PDU 40 A WW 1-5
hazardous energy circuits symbol vii
heel straps, using B-1
help
additional sources ix
HP authorized resellers, telephone numbers x
HP website ix
related documents ix
technical support telephone numbers ix
HP authorized reseller x
HP website ix
I
initiating a UPS self-test 2-6
input specifications C-1
installation of UPS 2-1
L
language
options 3-14
setting 3-14
LCD
alarm troubleshooting 5-1
configuration control buttons 1-3, 3-1
display 1-3, 3-1
status and configuration screen 1-3, 3-1
testing the display 3-11
LCD display 2-2
alarms, list of 3-6
status options, list of 3-7
LCD display menu structure 3-4
LCD menu
alarms 3-6
battery data 3-10
display test 3-11
firmware version 3-11
main 3-4
meters 3-9
navigation 3-1
overall menu map 3-5
power up 3-4
setting date 3-10
setting time 3-10
status 3-7
system setup 3-12, 3-13, 3-14
Index-2 HP Uninterruptible Power System R12000 XR Models User Guide
HP CONFIDENTIAL Codename: Sierra Part Number: 146316-002 Last Saved On: 1/24/03 10:46 AM
Page 68

Index
UPS modules 3-3
LED display 2-3
LED indicators, modes of operation 2-4
LEDs 2-3
M
main module
alarms 3-7
status 3-7
main module status options
defined 3-7, 3-8
listed 3-7, 3-8
maintaining UPS batteries 4-1
matching the utility voltage 3-2
maximizing life of batteries 4-6
meter options, defined 3-9
meters, viewing 3-9
modes of operation 2-4
O
obtaining new UPS batteries 4-3
operating the UPS 2-1
operation
front panel controls 2-1
front panel indicators 2-2
modes of 2-4
self-test 2-6
operation modes, description of 2-4
output specifications C-2
output voltage, setting 3-2
overcurrent protection C-2
P
part number
hardware options 1-5
spare battery kit 4-3
UPS R12000 XR model 1-2
password
default 3-12, 3-14
setting 3-14
physical specifications C-1
placing the UPS in Operate mode 2-6
placing UPS in Bypass mode 2-8
placing UPS in Standby mode 2-8
Pre-Failure Battery Warranty 4-6
problems after UPS startup, troubleshooting 5-10
problems during UPS startup, troubleshooting 5-10
R
rear view, UPS 1-4
Redundancy mode 2-4
regulatory compliance notices
BSMI A-4
cables A-3
Canadian A-3
Class A equipment A-1
Class B equipment A-2
device modifications A-2
European Union A-3
Japanese A-4
related documents ix
removing bezels 4-4
removing the UPS battery module 4-4
repairing the UPS 5-12
replacing UPS batteries 4-3
REPO, overview 1-6
S
safety information vii
self-test, initiating 2-6
series number A-1
setting
date 3-10
hardware configuration 3-13
language 3-14
password 3-14
time 3-10
voltage 3-13
setting up the communications baud rate 3-13
setting up the system 3-12
setting up UPS communications 3-12
shutdown 2-8
shutting down the UPS 2-8
silencing an audible alarm 2-7
specifications
battery C-3
battery runtime C-3
environmental C-3
input C-1
output C-2
overcurrent protection C-2
physical C-1
UPS C-1
Standby mode 2-4
status
LCD display 3-7
UPS 3-1
supervisory bezel 1-3
symbols
electric shock vii
in text viii
HP Uninterruptible Power System R12000 XR Models User Guide Index-3
HP CONFIDENTIAL Codename: Sierra Part Number: 146316-002 Last Saved On: 1/24/03 10:46 AM
Page 69

Index
weight vii
symbols on equipment vii
system setup
baud rate setup 3-13
communications setup 3-12
entering a password 3-12
hardware configuration 3-13
language 3-14
password 3-14
voltage 3-13
system shutdown 2-8
T
technical support ix
telephone numbers x
testing a new battery module 4-5
testing the LCD display 3-11
text conventions viii
time
displaying on the LCD menu 3-10
setting 3-10
troubleshooting
LCD alarms 5-1
problems after startup 5-10
problems during startup 5-10
UPS 5-1
troubleshooting guide 5-1
turning on the UPS main circuit breaker 2-5
U
UPS
battery maintenance 4-1
bezels 1-3
charging batteries 2-5
configuration 3-1
disposing of used batteries 4-5
front panel controls 2-1
front view 1-3
LCD display 2-2
LED display 2-3
modes of operation 2-4
modules 3-3
operation 2-1
overview 1-1
packaged service options 5-12
placing in Bypass mode 2-8
placing in Operate mode 2-6
placing in Standby mode 2-8
rear view 1-4
removing battery module 4-4
repairing 5-12
replacing the batteries 4-3
self-test 2-6
shutting down 2-8
specifications C-1
storing batteries 4-6
testing new battery module 4-5
troubleshooting 5-1
turning on the main circuit breaker 2-5
UPS features 1-1
UPS R12000 XR model part number 1-2
using the LCD display menu 3-4
utility voltage 3-2
V
viewing the UPS meter settings 3-9
views
front 1-3
rear 1-4
voltage
options 3-13
setting 3-13
voltage ranges (VAC) 3-2
W
warnings
batteries 4-1
defined viii
warranties
$25,000 Computer Load Protection
Guarantee 1-7
applicability 1-7
limited warranty 1-7
pre-failure battery 4-6
Pre-Failure Battery Warranty 1-7, 4-6
three-year limited 1-7
website, HP ix
www.hp.com ix
Index-4 HP Uninterruptible Power System R12000 XR Models User Guide
HP CONFIDENTIAL Codename: Sierra Part Number: 146316-002 Last Saved On: 1/24/03 10:46 AM
 Loading...