

Page 1

HP R100-Series Wireless VPN Routers
Configuration and Administration Guide
HP Part Number: 5998-8218
Published: October 2015
Edition: 1 (Software Version1.0.1.x)
Page 2

© Copyright 2015 Hewlett-Packard Development Company, L.P.
The information contained herein is subject to change without notice. The only warranties for HP products and services are set forth in
the express warranty statements accompanying such products and services. Nothing herein should be construed as constituting an
additional warranty. HP shall not be liable for technical or editorial errors or omissions contained herein.
Acknowledgments
Microsoft® and Windows® are U.S. trademarks of the Microsoft group of companies. Google Chrome™ browser is a trademark of
Google Inc. Mozilla® and Firefox® are registered trademarks of the Mozilla Foundation.
Warranty
WARRANTY STATEMENT: See the warranty information sheet provided in the product box and available online.
Page 3

Contents
1 Deploying the HP R110/R120 ......................................................................7
2 Using the Wizard Setup .............................................................................11
Overview................................................................................................................................................ 11
Automatically running the Wizard Setup the first time you log in ...............................................................11
Accessing the Wizard Setup after your first login ....................................................................................11
Wizard Setup.......................................................................................................................................... 11
Step 1: Specify system time settings .......................................................................................................11
Step 2: Specify WAN settings ..............................................................................................................12
Step 3: Specify wireless settings............................................................................................................15
Step 4: Summary................................................................................................................................16
3 Managing the HP R110/R120 system..........................................................17
Viewing router status ................................................................................................................................17
Setting the operating mode .......................................................................................................................18
General administration settings ..................................................................................................................19
System information (General) settings ....................................................................................................19
Administrator login credentials .............................................................................................................19
Setting the Country Code.....................................................................................................................19
Configuring web server settings ........................................................................................................... 20
Configuring trusted users.......................................................................................................................... 20
System time settings..................................................................................................................................21
Set system time...................................................................................................................................21
Daylight saving ................................................................................................................................. 22
Configuring SNMP.................................................................................................................................. 22
Managing system logs............................................................................................................................. 23
Events .............................................................................................................................................. 25
Proxy ARP settings................................................................................................................................... 25
Rebooting the router................................................................................................................................ 27
Viewing traffic statistics............................................................................................................................ 27
4 WAN configuration................................................................................... 29
Viewing the WAN interface status............................................................................................................. 29
Settings ................................................................................................................................................. 30
DHCP IP address ............................................................................................................................... 30
Static IP address ................................................................................................................................ 30
PPPoE................................................................................................................................................31
PPTP................................................................................................................................................. 33
L2TP ................................................................................................................................................ 34
DDNS ................................................................................................................................................... 35
MAC clone ............................................................................................................................................ 36
5 LAN configuration .....................................................................................37
Viewing LAN interface status.................................................................................................................... 37
LAN Settings .......................................................................................................................................... 38
Default VLAN settings......................................................................................................................... 38
DHCP relay....................................................................................................................................... 39
Spanning Tree................................................................................................................................... 40
3
Page 4

DHCP client list....................................................................................................................................... 40
VLAN settings..........................................................................................................................................41
IGMP settings......................................................................................................................................... 43
6 Wireless configuration ...............................................................................45
Viewing wireless interface status ............................................................................................................... 45
Basic wireless settings.............................................................................................................................. 46
Configuring virtual access point interfaces............................................................................................. 48
Configuring wireless security ............................................................................................................... 49
Advanced wireless settings....................................................................................................................... 57
WDS settings ......................................................................................................................................... 59
Key concepts..................................................................................................................................... 59
WDS configuration............................................................................................................................ 60
Example of a WDS Deployment .......................................................................................................... 62
WPS settings.......................................................................................................................................... 68
WMM settings ....................................................................................................................................... 69
MAC authentication settings ..................................................................................................................... 71
Viewing the client list............................................................................................................................... 72
7 VPN configuration .....................................................................................73
Viewing VPN status ................................................................................................................................. 73
VPN settings .......................................................................................................................................... 74
IPSec settings .................................................................................................................................... 74
L2TP over IPSec settings...................................................................................................................... 77
PPTP settings ..................................................................................................................................... 78
VPN passthrough settings......................................................................................................................... 79
8 Routing configuration.................................................................................81
Viewing routing status...............................................................................................................................81
Viewing the IPv4 routing table .................................................................................................................. 82
IPv4 Dynamic route settings...................................................................................................................... 83
IPv4 Static route settings .......................................................................................................................... 84
Viewing the IPv6 routing table .................................................................................................................. 85
IPv6 Dynamic route settings...................................................................................................................... 86
IPv6 Static route settings .......................................................................................................................... 86
9 Firewall configuration ................................................................................89
Viewing the firewall status........................................................................................................................ 89
Security settings...................................................................................................................................... 90
Client filtering......................................................................................................................................... 92
MAC filtering ......................................................................................................................................... 93
URL filtering............................................................................................................................................ 94
Content filtering...................................................................................................................................... 95
SPI settings............................................................................................................................................. 95
10 NAT configuration................................................................................... 99
Viewing NAT status................................................................................................................................. 99
NAT settings......................................................................................................................................... 100
Virtual server settings............................................................................................................................. 100
DMZ settings.........................................................................................................................................102
ALG settings..........................................................................................................................................103
Port trigger settings.................................................................................................................................103
11 IPv6 configuration .................................................................................105
Viewing IPv6 status ............................................................................................................................... 105
IPv6 settings......................................................................................................................................... 106
Static IPv6 ...................................................................................................................................... 106
SLAAC ........................................................................................................................................... 108
4
Page 5

DHCPv6......................................................................................................................................... 109
PPPoE.............................................................................................................................................. 110
DHCPv6 client list ...................................................................................................................................111
MLD settings ......................................................................................................................................... 112
12 QoS configuration .................................................................................113
Viewing QoS status ................................................................................................................................ 113
Traffic shaping....................................................................................................................................... 114
Traffic mapping ..................................................................................................................................... 115
13 USB configuration..................................................................................117
User Account......................................................................................................................................... 117
File Sharing settings ............................................................................................................................... 118
FTP settings ........................................................................................................................................... 119
Safe removal .........................................................................................................................................120
14 Tools....................................................................................................121
Viewing tools status ................................................................................................................................ 121
Updating software ................................................................................................................................. 121
Saving configuration settings ...................................................................................................................122
Ping .....................................................................................................................................................124
Nslookup..............................................................................................................................................125
Traceroute.............................................................................................................................................125
Email alert ............................................................................................................................................126
Scheduling............................................................................................................................................127
Support file ...........................................................................................................................................129
Viewing the EULA ..................................................................................................................................129
15 Support and other resources ................................................................... 131
Online documentation ............................................................................................................................ 131
Contacting HP....................................................................................................................................... 131
HP websites .......................................................................................................................................... 131
Conventions ..........................................................................................................................................132
A Resetting to factory defaults ...................................................................... 133
Factory reset procedures .........................................................................................................................133
Using the reset button........................................................................................................................133
Using the management interface.........................................................................................................133
B Factory default settings .............................................................................135
5
Page 6

6
Page 7

1 Deploying the HP R110/R120
Wireless community
High security wireless network for
employees using WPA/WPA2.
DSL/Cable modem
R110/R120
Wireless community 1
High security wireless network
(WPA/WPA2) for employees
Wireless community 2
Low security wireless network
for guests
VLAN 1
VLAN 2
Guests with access to a network
printer and the Internet
Employees with secure access
to all network resources
and the Internet
R110/R120
DSL/Cable modem
In a small office, the HP R110/R120 can be directly connected to a broadband modem (DSL or
cable) to provide secure wireless networking for all employees. In the following scenario,
employees can share data and resources with each other and access the Internet at the same
time:
With its wireless community feature, the R110 can be configured to provide up to four separate
wireless networks (all on the same wireless channel), and the R120 up to eight wireless
networks (split between two radios), each with its own configuration settings for security, VLAN
support, and more.
In this scenario, employees connect to wireless community 1, which is protected with WPA/
WPA2. All employee traffic exits the HP R110/R120 on VLAN 1, providing access to private
resources on the company network and on the Internet.
Guests connect to wireless community 2, which is protected with WEP. All guest traffic exits the
HP R110/R120 on VLAN 2, providing access only to the Internet.
For offices that need Ethernet ports for wired connectivity, the R110/R120 has a built-in 4-port
gigabit switch. It can also be used to extend the reach of the network to areas that are difficult
or impossible to reach with Ethernet cabling.
Page 8
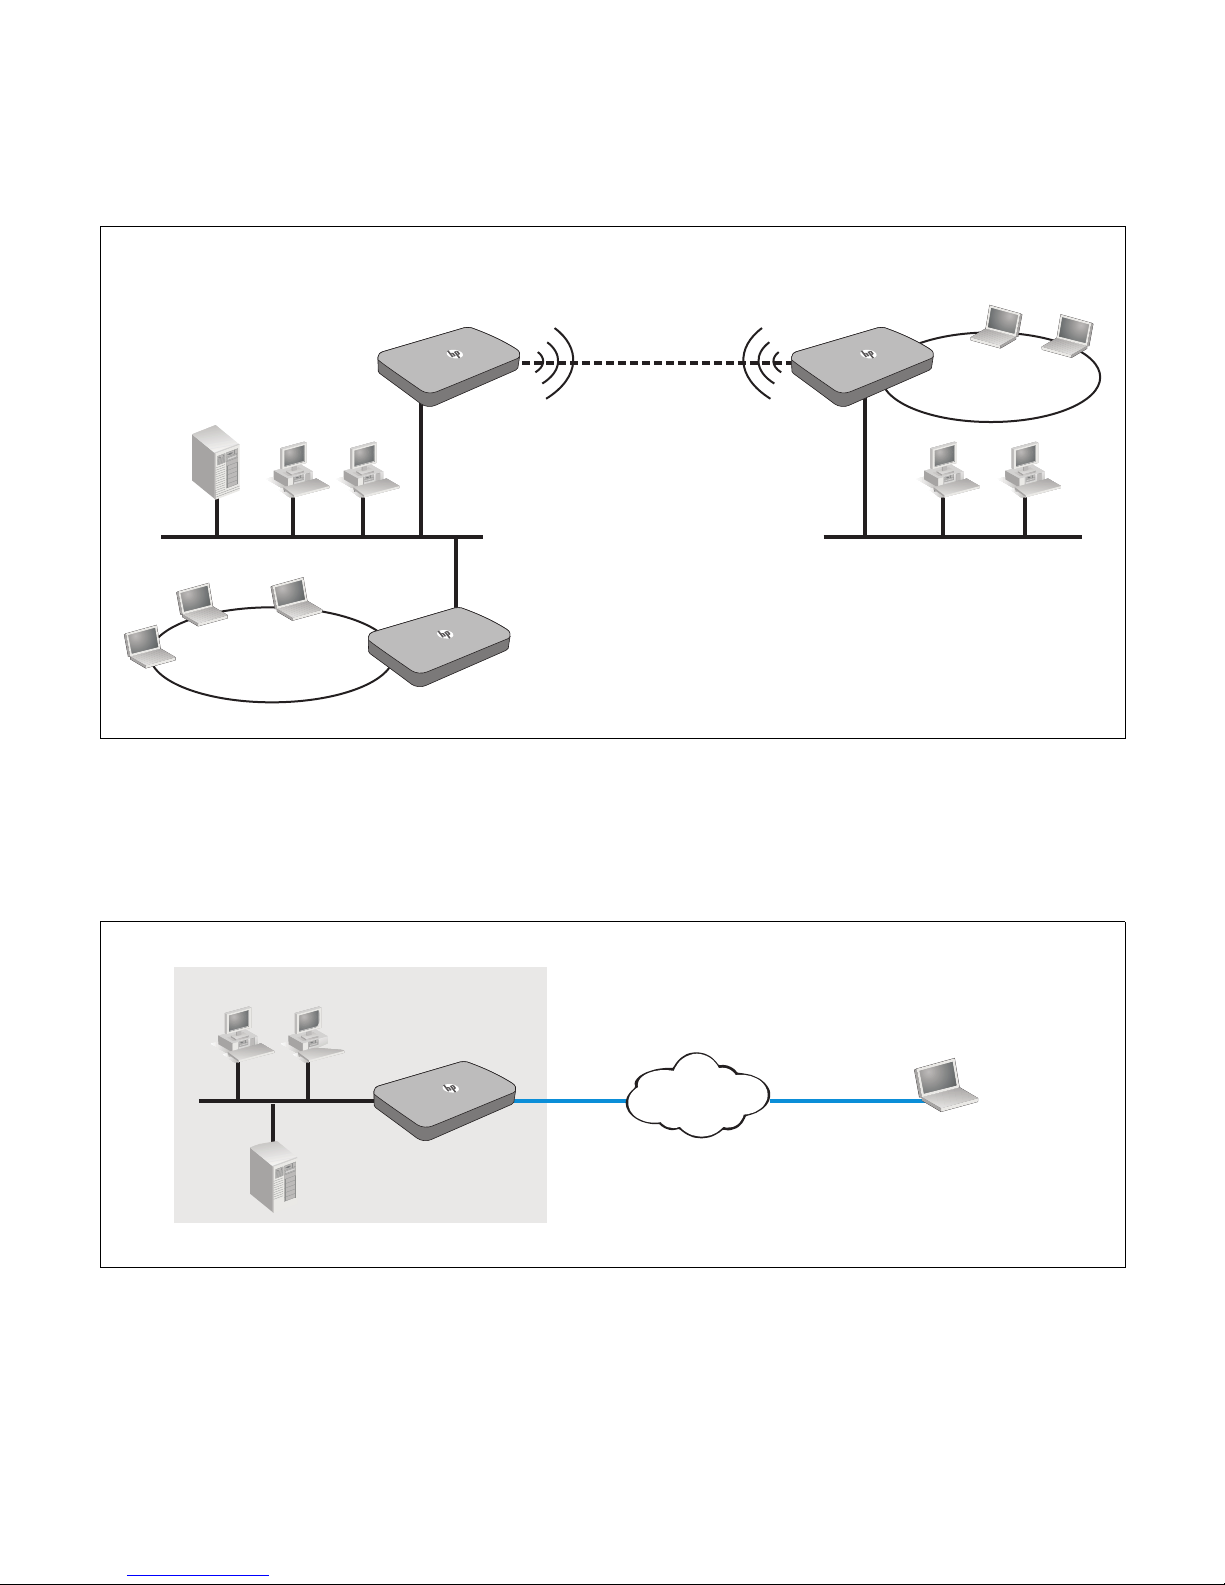
In the following scenario, HP R110/R120 #1 provides wireless network services to the
Wireless community
File server
computers
WDS
Wireless link
Employee
Main office area Warehouse
Wireless community
R110/R120
#1
R110/R120
#2
R110/R120
#3
LAN computers
Office
R110/R120
Internet
Server
LAN WAN
VPN
VPN
Remote Client
employees in the main office, while HP R110/R120 #2 and HP R110/R120 #3 use the Wireless
Distribution System (WDS) to create a wireless link between the main office network and a
small network in a warehouse. WDS eliminates the need to run cabling, allowing for fast and
easy deployment.
In the following scenario, an HP R110/R120 located in an office provides a virtual private
network (VPN) connection across the Internet to a remote client (typically a mobile worker). The
R110/R120 forms a secure VPN (IPSec, PPTP, L2TP/IPSec) connection to the remote client,
which can then access the computers and servers in the office network. The remote client can
be a Windows or Mac computer, or any Apple iOS or Android mobile device.
8 Deploying the HP R110/R120
Page 9
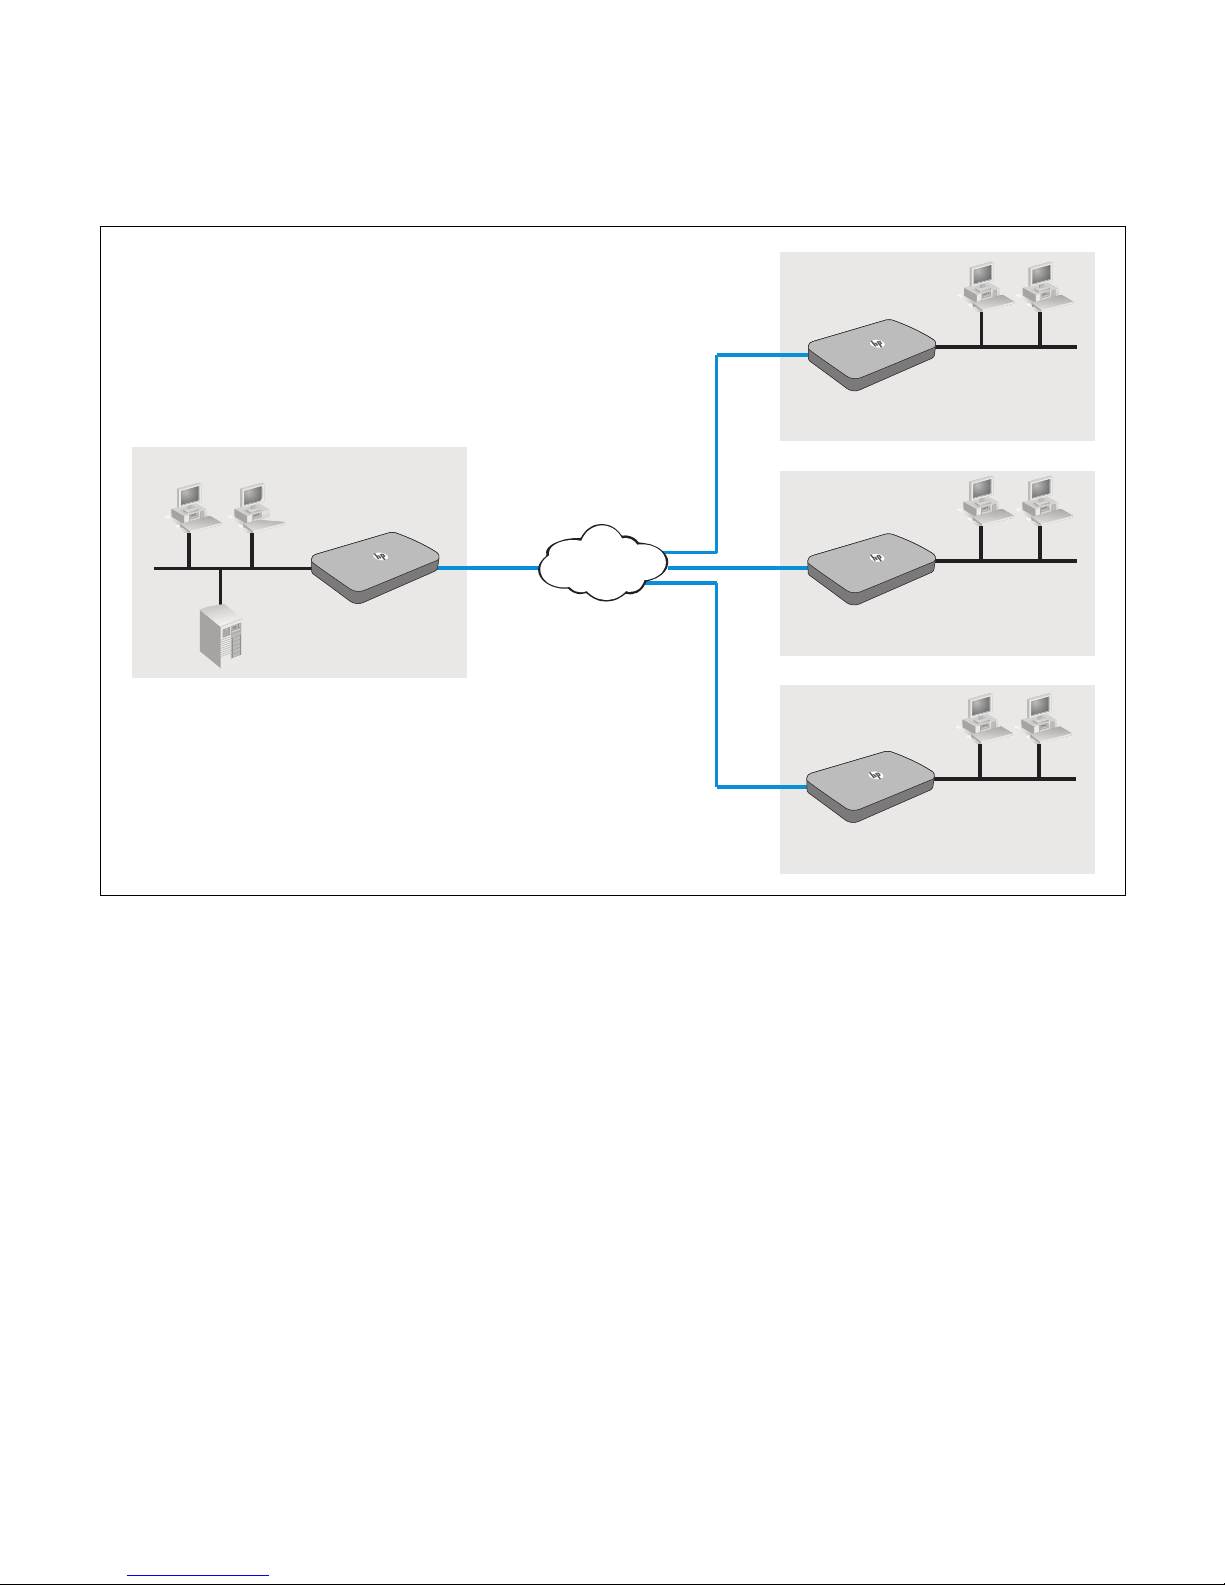
In the following scenario, four HP R110/R120s provide a virtual private network (VPN) across
LAN computers
Headquarters
Branch 1
R110/R120
#1
R110/R120
#2
Branch 2
R110/R120
#3
Branch 3
R110/R120
#4
Internet
LAN
LAN
LAN
WAN
WAN
WAN
Server
LAN WAN
VPN
VPN
VPN
VPN
the Internet between corporate headquarters and three branch offices. The R110/R120 #1
creates secure VPN connections to R110/R120 #2, R110/R120 #3, and R110/R120 #4 at three
branch locations. The computers on each branch network can access the computers and
servers on the headquarters network.
9
Page 10

10 Deploying the HP R110/R120
Page 11

2 Using the Wizard Setup
Overview
The Wizard Setup provides an easy way to quickly configure basic settings on the R110/R120
and make the router operational.
Automatically running the Wizard Setup the first time you log in
The first time you log in to the management interface (see the HP R100-Series Wireless VPN
Routers Quickstart for the first time login procedure), the HP end user license agreement
displays. When you accept the agreement, a page displays to enable you to select your
country so that wireless radio settings are configured appropriately. Select the country in which
the router is operating, and then click Save. The first page in the Wizard Setup appears.
Accessing the Wizard Setup after your first login
When you log in subsequent to completing or canceling out of the Wizard Setup, the System
Status page displays by default.
See also the HP R100-Series Wireless VPN Routers Quickstart, which describes the
configuration procedure for a basic wireless network.
Wizard Setup
To start the Wizard Setup, select Home > Wizard Setup, and then click Start.
Step 1: Specify system time settings
The router keeps time by connecting to a Network Time Protocol (NTP) server. This enables the
router to synchronize the system clock to the global Internet. The synchronized clock in the router
is used to record the system log and control client filtering. Select the proper time zone for your
location. The system clock might not update immediately. The router updates the current time
after it has made contact with time servers on the Internet and has received a response.
Alternatively, the system time can be entered manually or imported from the host computer
(copies the system time from the management computer).
Page 12
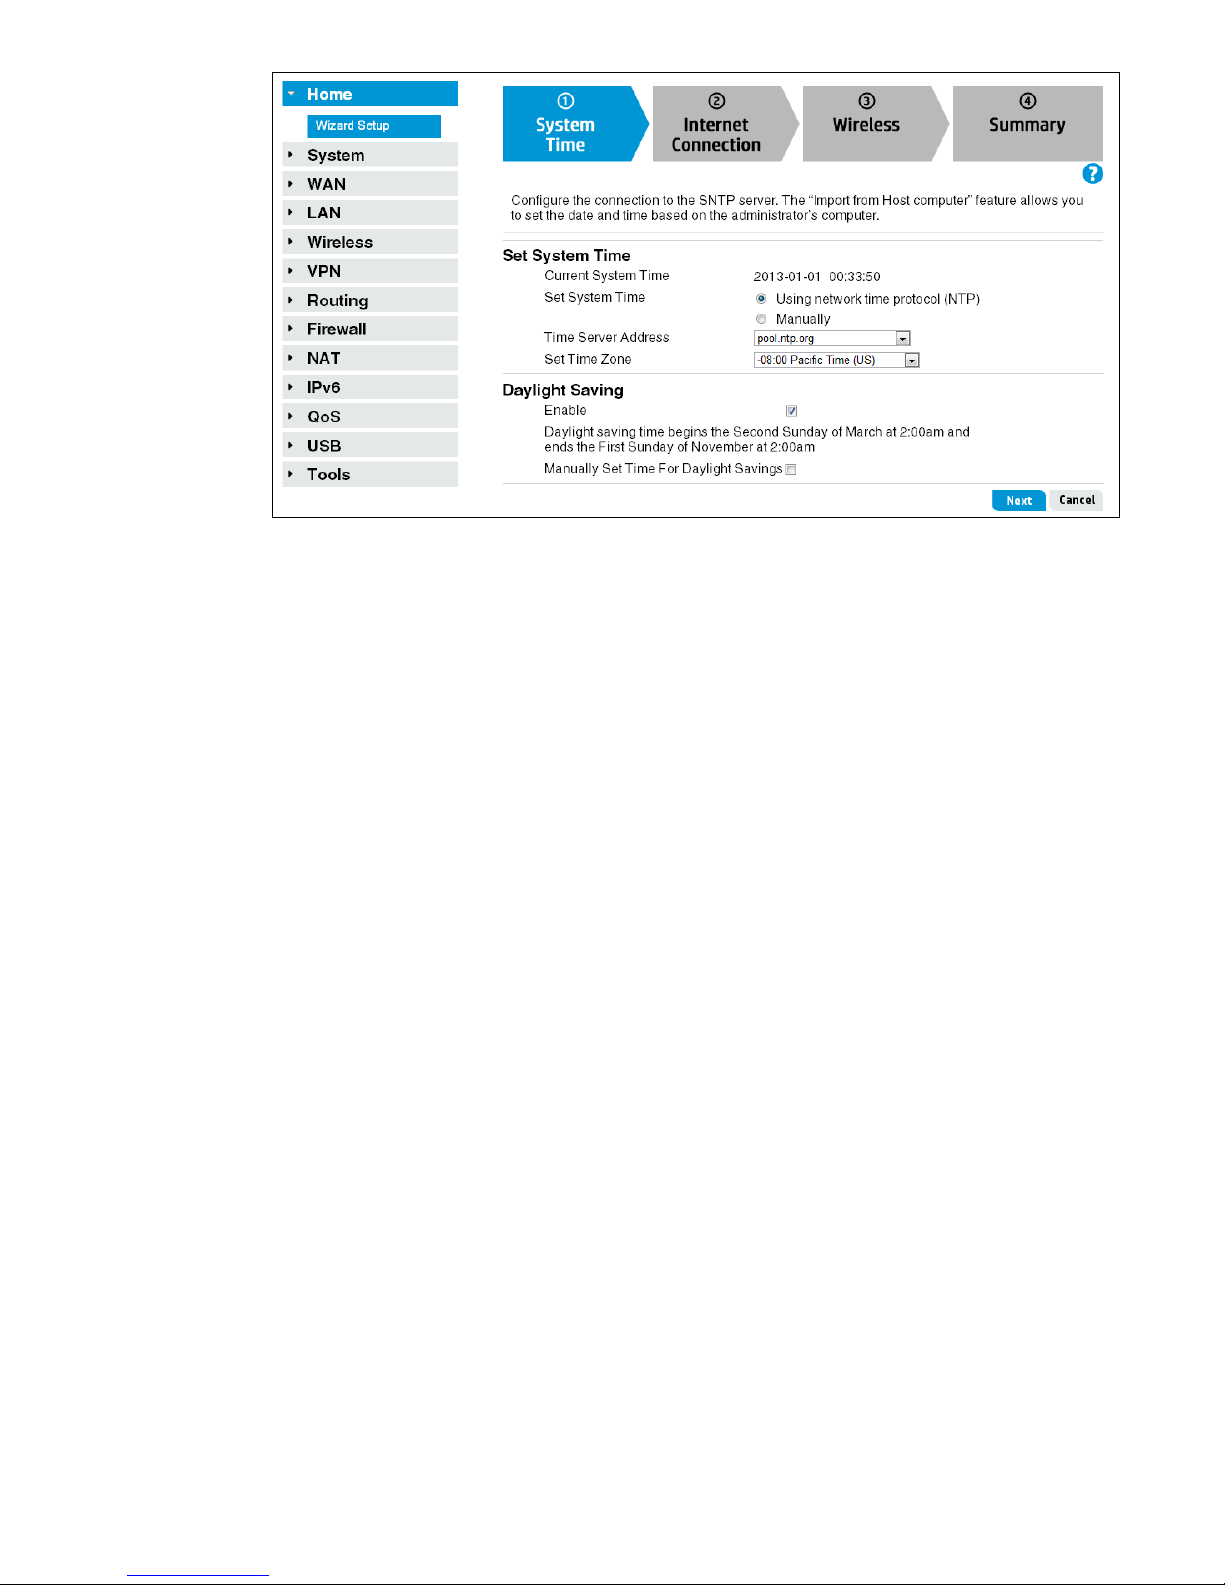
Choose either to configure the system time manually or have it automatically configured by an
NTP server. You can also enable support for daylight savings time, if required for your location.
For more information on setting the system time, see
Step 2: Specify WAN settings
The Internet Connection page allows you to set up the router for the type of Internet connection
you have. Before setting up your connection type, have your account information from your ISP
ready.
The router supports five possible connection types. Your ISP can provide you with information
on the correct type for your Internet connection and the parameters that need to be configured.
Select one of the following Connection Types, enter supplementary information as directed by
the wizard, and then click Next to apply the settings. A description of each connection type
follows.
• DHCP: See “Connection Type: DHCP” on page 12.
• Static IP Address: See “Connection Type: Static IP Address” on page 13.
• PPPoE: See “Connection Type: PPPoE” on page 13.
• PPTP: See “Connection Type: PPTP” on page 14.
• L2TP: See “Connection Type: L2TP” on page 14.
Connection Type: DHCP
A dynamic connection type is the most common method used with cable modems. In most
cases, setting the connection type to DHCP is enough to complete the connection to your ISP. If
your ISP also assigns you a Host Name, enter it in the space provide. Do not use these
characters: ` " & ' # \
“System time settings” on page 21.
For more information on the WAN DHCP Connection Type, see
page 30
12 Using the Wizard Setup
.
“DHCP IP address” on
Page 13
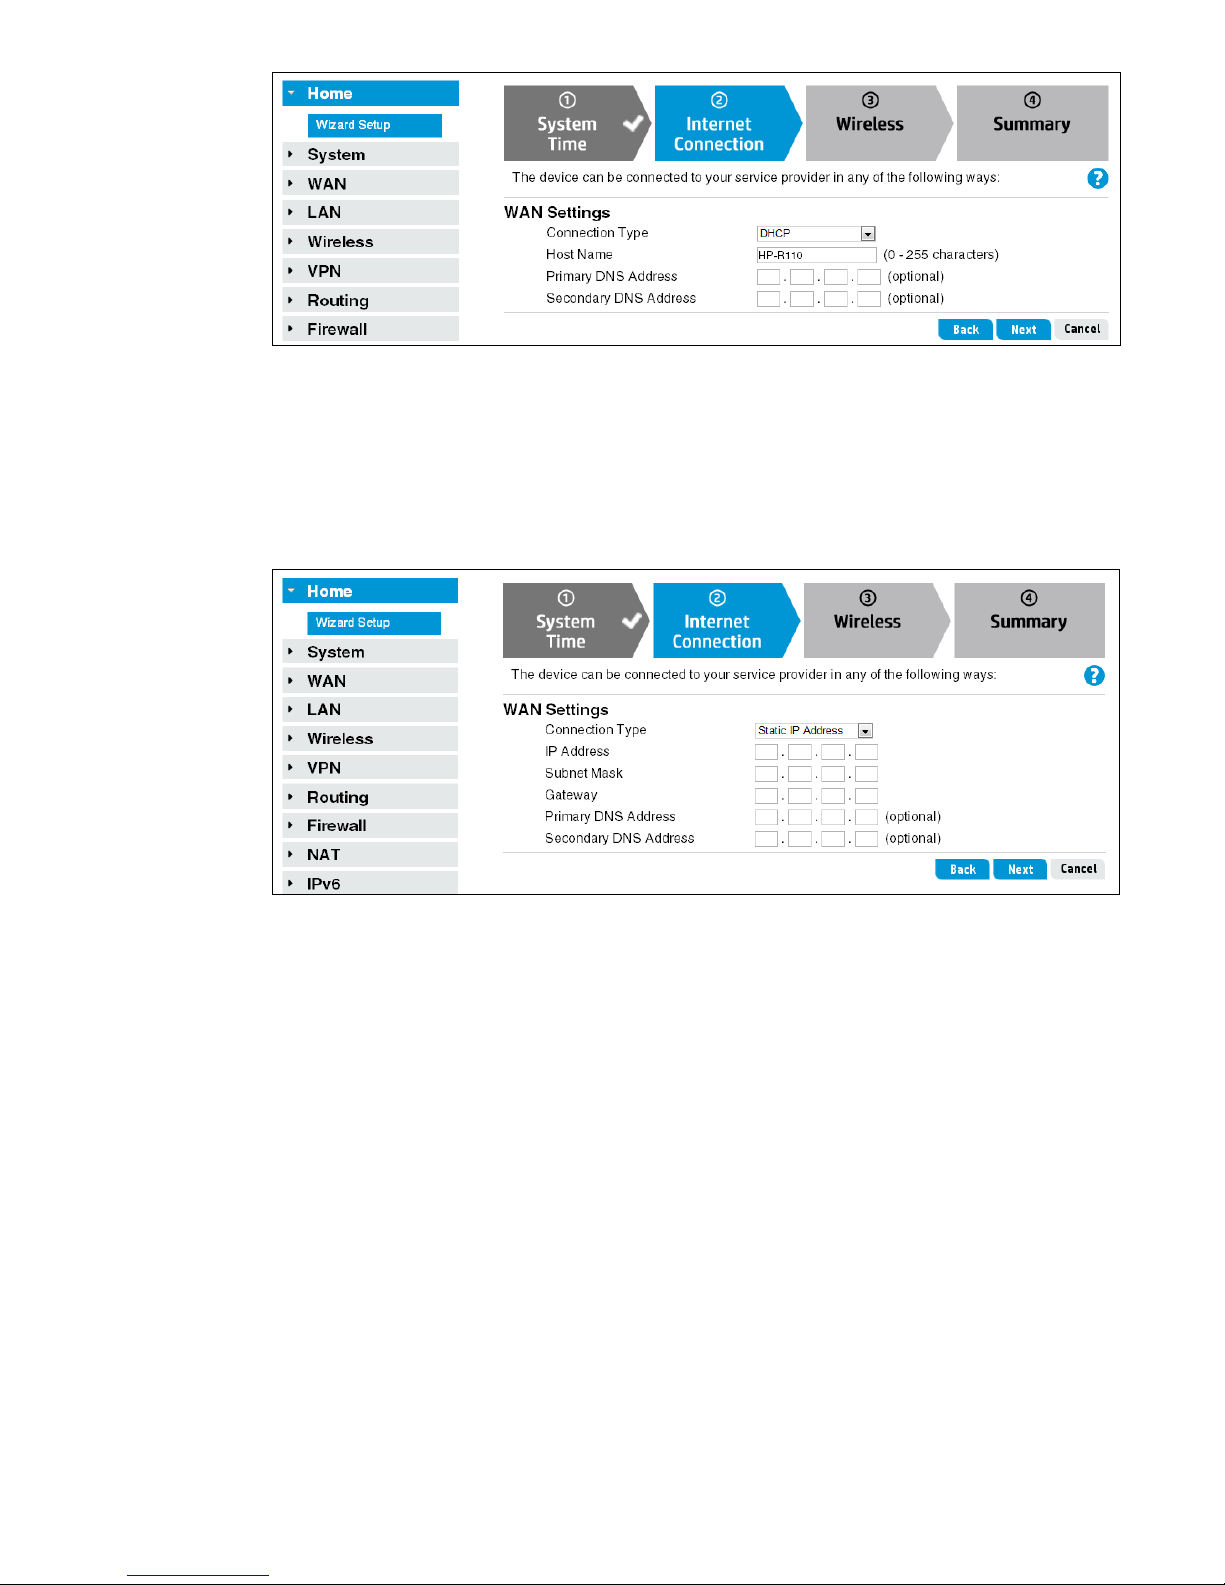
Connection Type: Static IP Address
The Static IP Address Connection Type sets the router to operate with a fixed IP address. If your
ISP provides you with a static IP address, subnet mask, and ISP gateway address, enter them in
the spaces provided.
For more information on the WAN Static IP Address Connection Type, see
on page 30
.
“Static IP address”
Connection Type: PPPoE
The Point-to-Point Protocol over Ethernet (PPPoE) is a common WAN protocol that provides a
secure connection between the service provider and the local network. Enter the specific PPPoE
information assigned by your ISP.
For more information on the WAN PPPoE Connection Type, see
“PPPoE” on page 31.
Wizard Setup 13
Page 14
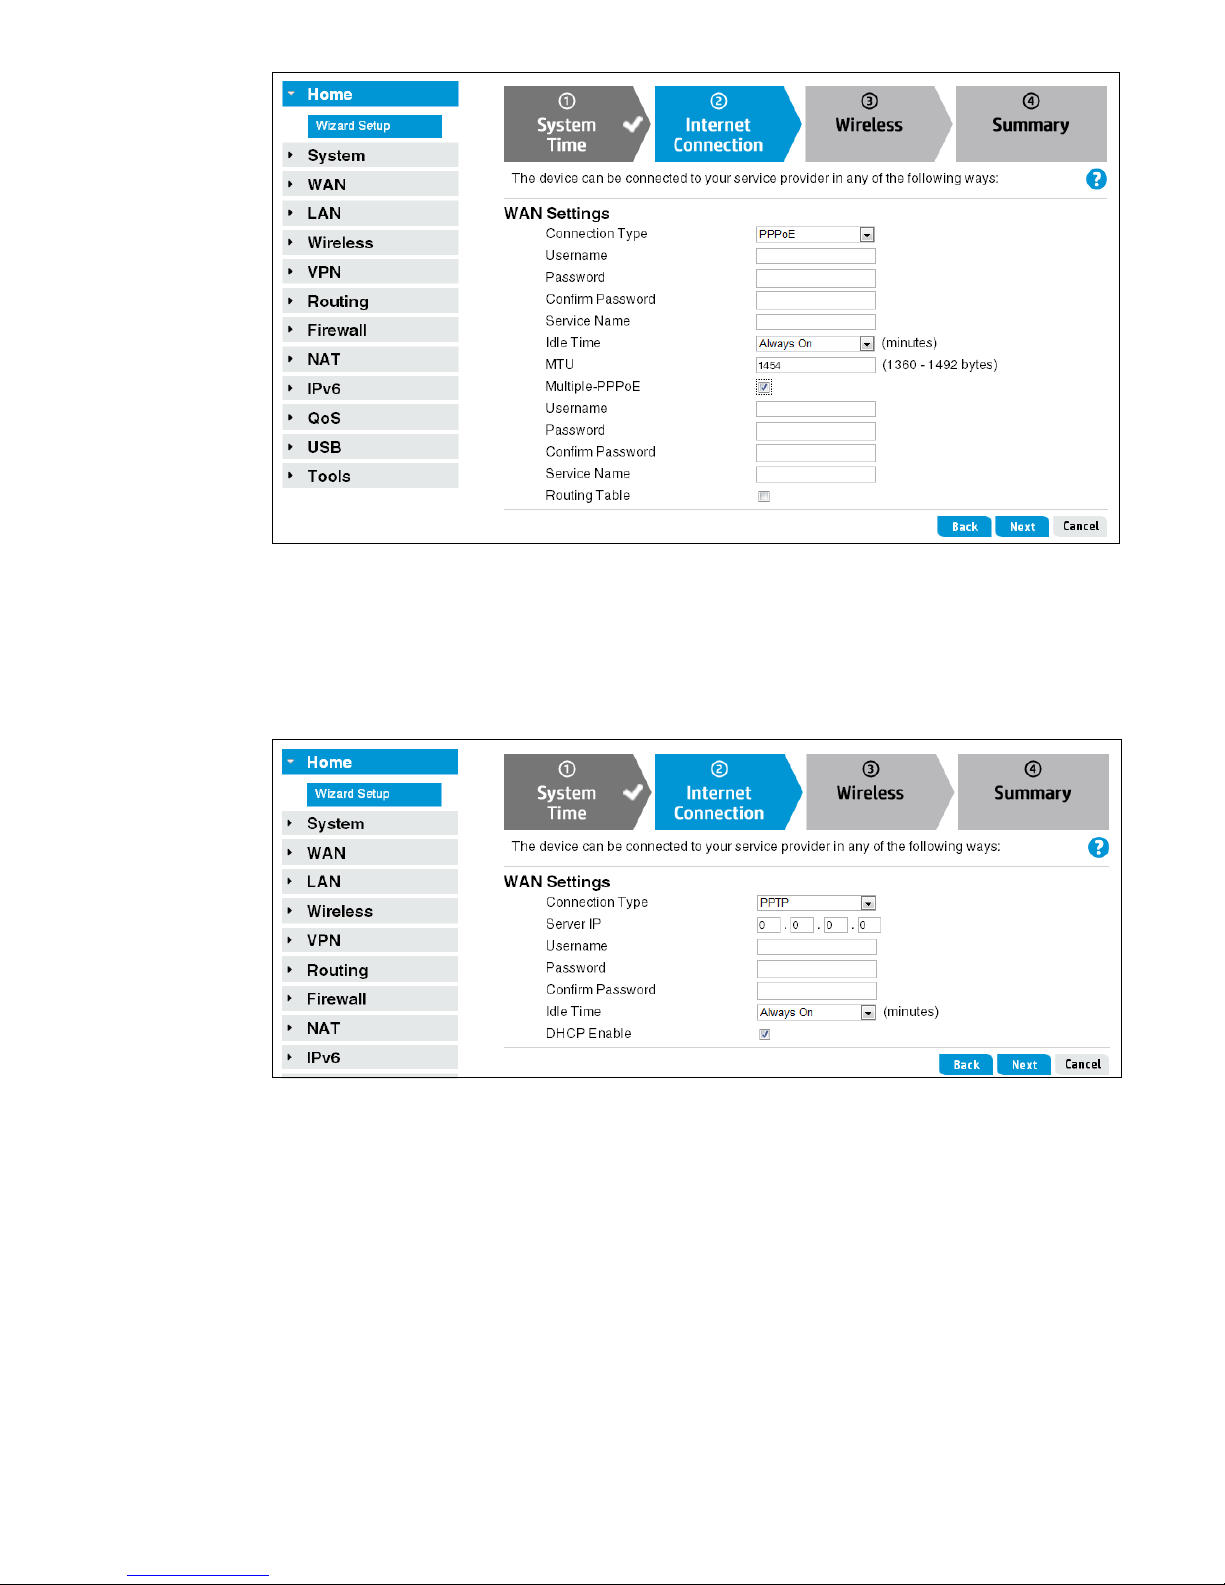
Connection Type: PPTP
The Point-to-Point Tunneling Protocol (PPTP) is a common WAN protocol used for Virtual Private
Networks (VPNs) that provides a secure connection between the service provider and the local
network. Enter the specific PPTP information assigned by your ISP.
For more information on the WAN PPTP Connection Type, see
“PPTP” on page 33.
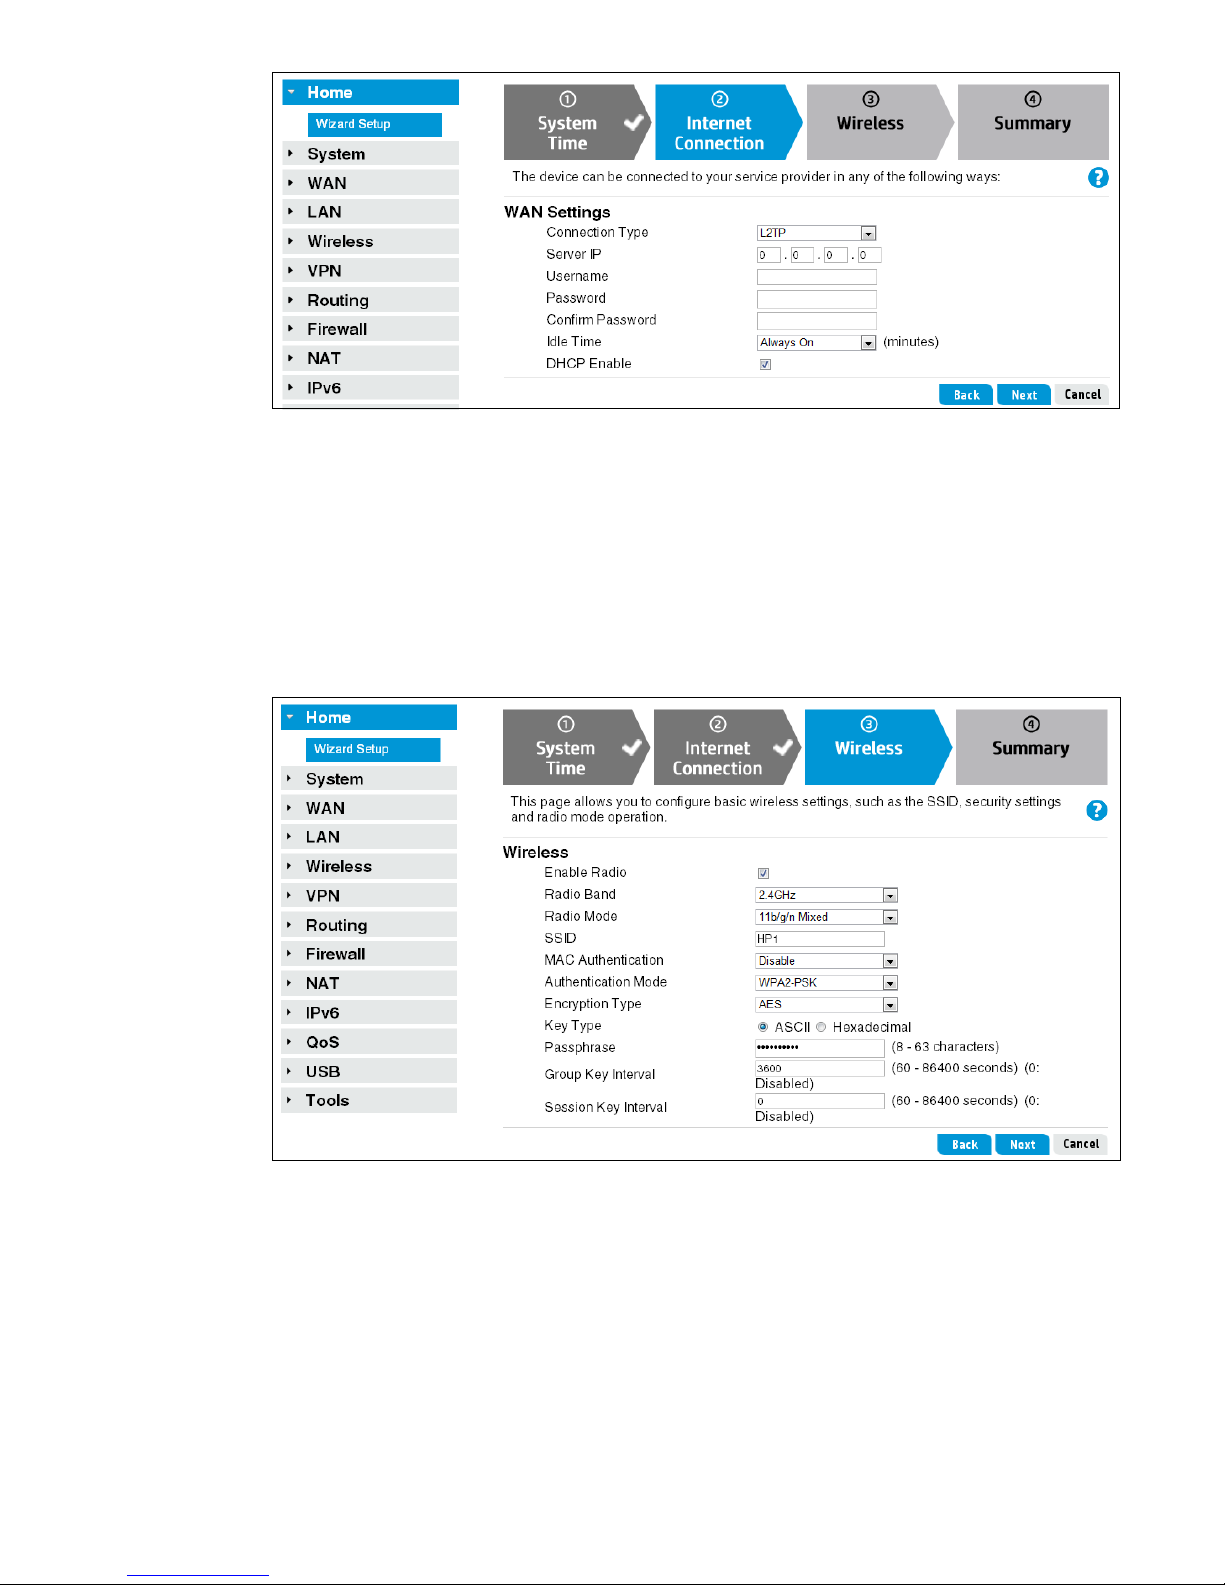
Connection Type: L2TP
The Layer 2 Tunneling Protocol (L2TP) is a common WAN protocol used for Virtual Private
Networks (VPNs) that provides a secure connection between the service provider and the local
network. Enter the specific L2TP information assigned by your ISP.
For more information on the WAN L2TP Connection Type, see
“L2TP” on page 34.
14 Using the Wizard Setup
Page 15
Step 3: Specify wireless settings
The R110 router features a single dual-band radio for 2.4 GHz or 5 GHz operation. The R120
router features two radios, one for 2.4 GHz and one for 5 GHz operation. This means that the
R110 can operate at 2.4 GHz or 5 GHz, but not both at the same time. The R120 can operate
concurrently at 2.4 GHz and 5 GHz.
The R110 router has a single configuration page for 2.4 GHz or 5 GHz operation. The R120
router has separate configuration pages for 2.4 GHz and 5 GHz operation.
Configure the following basic wireless settings before clicking Next.
Radio Band and Radio Mode
Configure the R110 router to operate in the 2.4 GHz band (for 802.11b/g/n) or the 5 GHz
band (for 802.11a/n).
For R110 and R120, select an operating mode. For 2.4 GHz, the 11 b / g / n M i x e d mode is
configured by default. For 5 GHz, 11 a / n M i x e d (R110) o r 11ac/n/a (R120) mode is
configured by default. For more information, see
“Basic wireless settings” on page 46.
Wizard Setup 15
Page 16
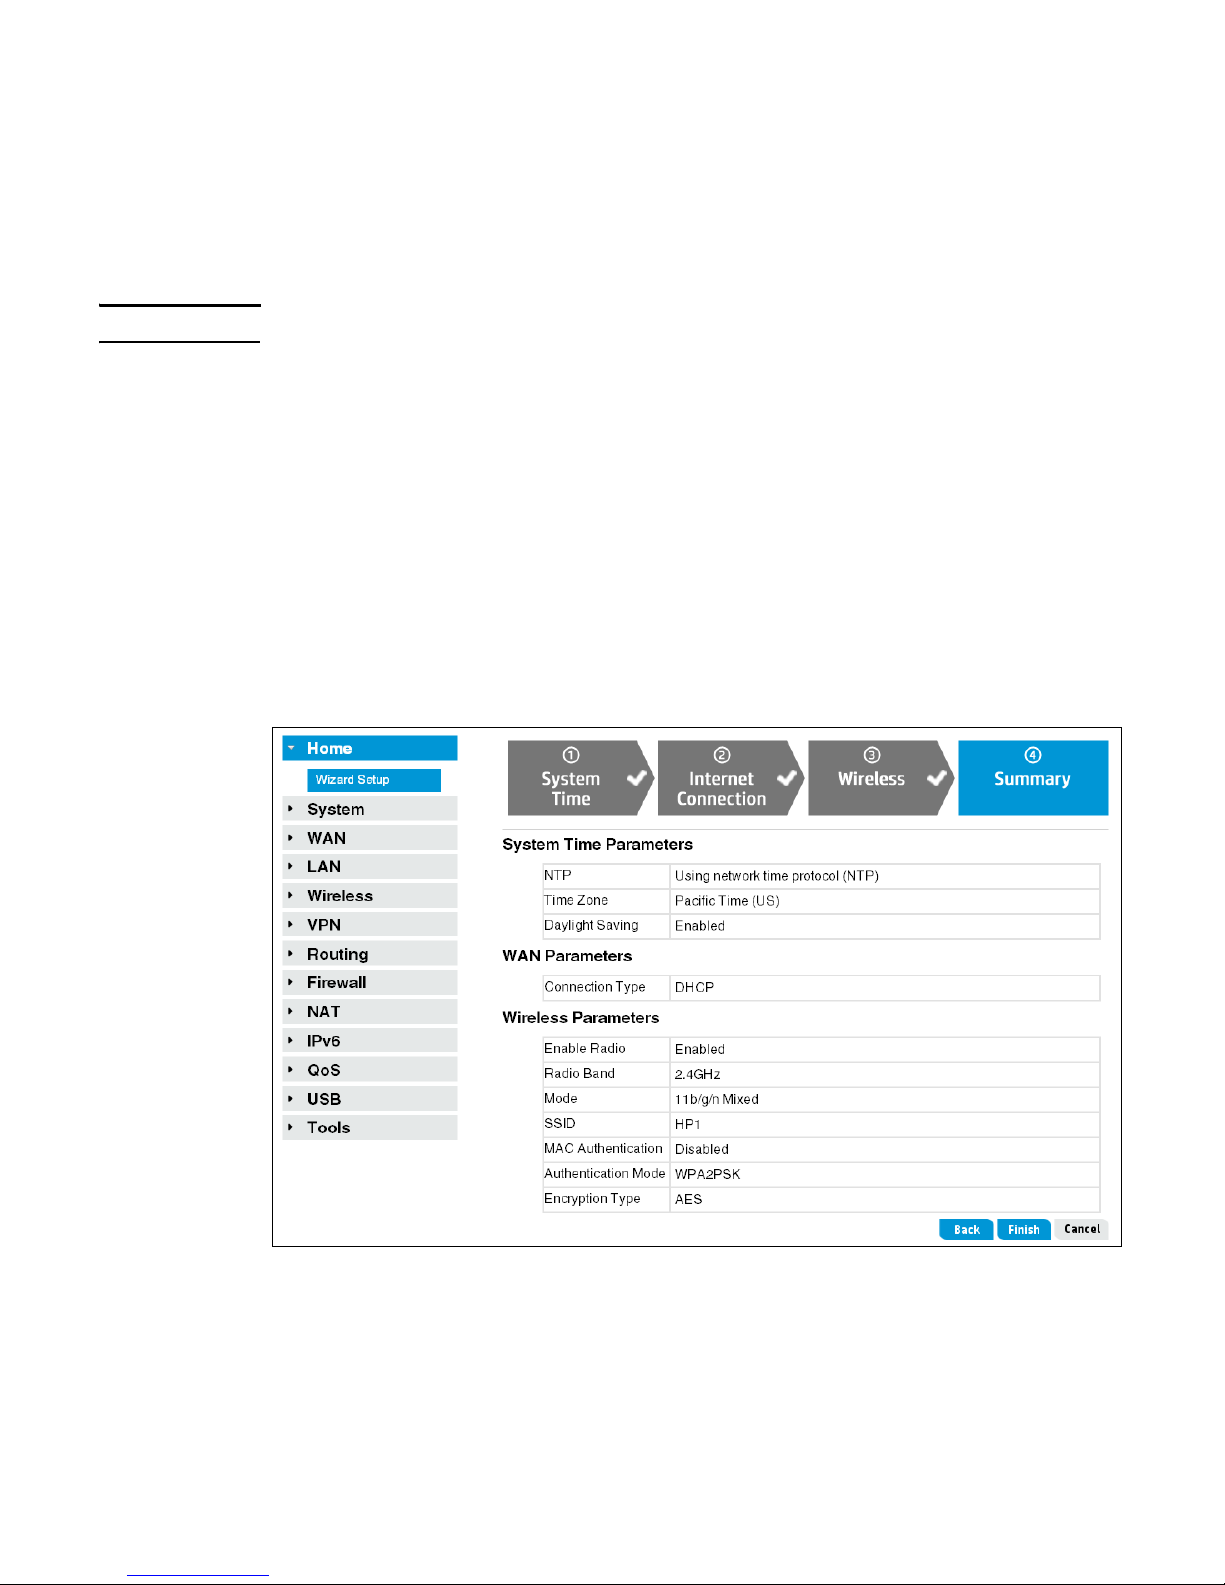
SSID
Enter a unique name to identify your wireless network.
• By default, a wireless community with an SSID of HP1 is defined on the R110.
• By default, two wireless communities with SSIDs of HPT1_2G and HP1_5G are defined
on the R120.
For more information, see
“Basic wireless settings” on page 46.
Note The R110/R120 allows you to create up to four wireless communities per radio.
MAC Authentication, Authentication Mode, and Encryption Type
Configure wireless security for the default wireless community. The R110/R120 has no wi reless
security configured by default. HP recommends that WPA2 be configured for maximum
security. Leaving the Authentication Mode setting as Open or using WEP security is not
recommended.
For more information on wireless security, see
“Configuring wireless security” on page 49.
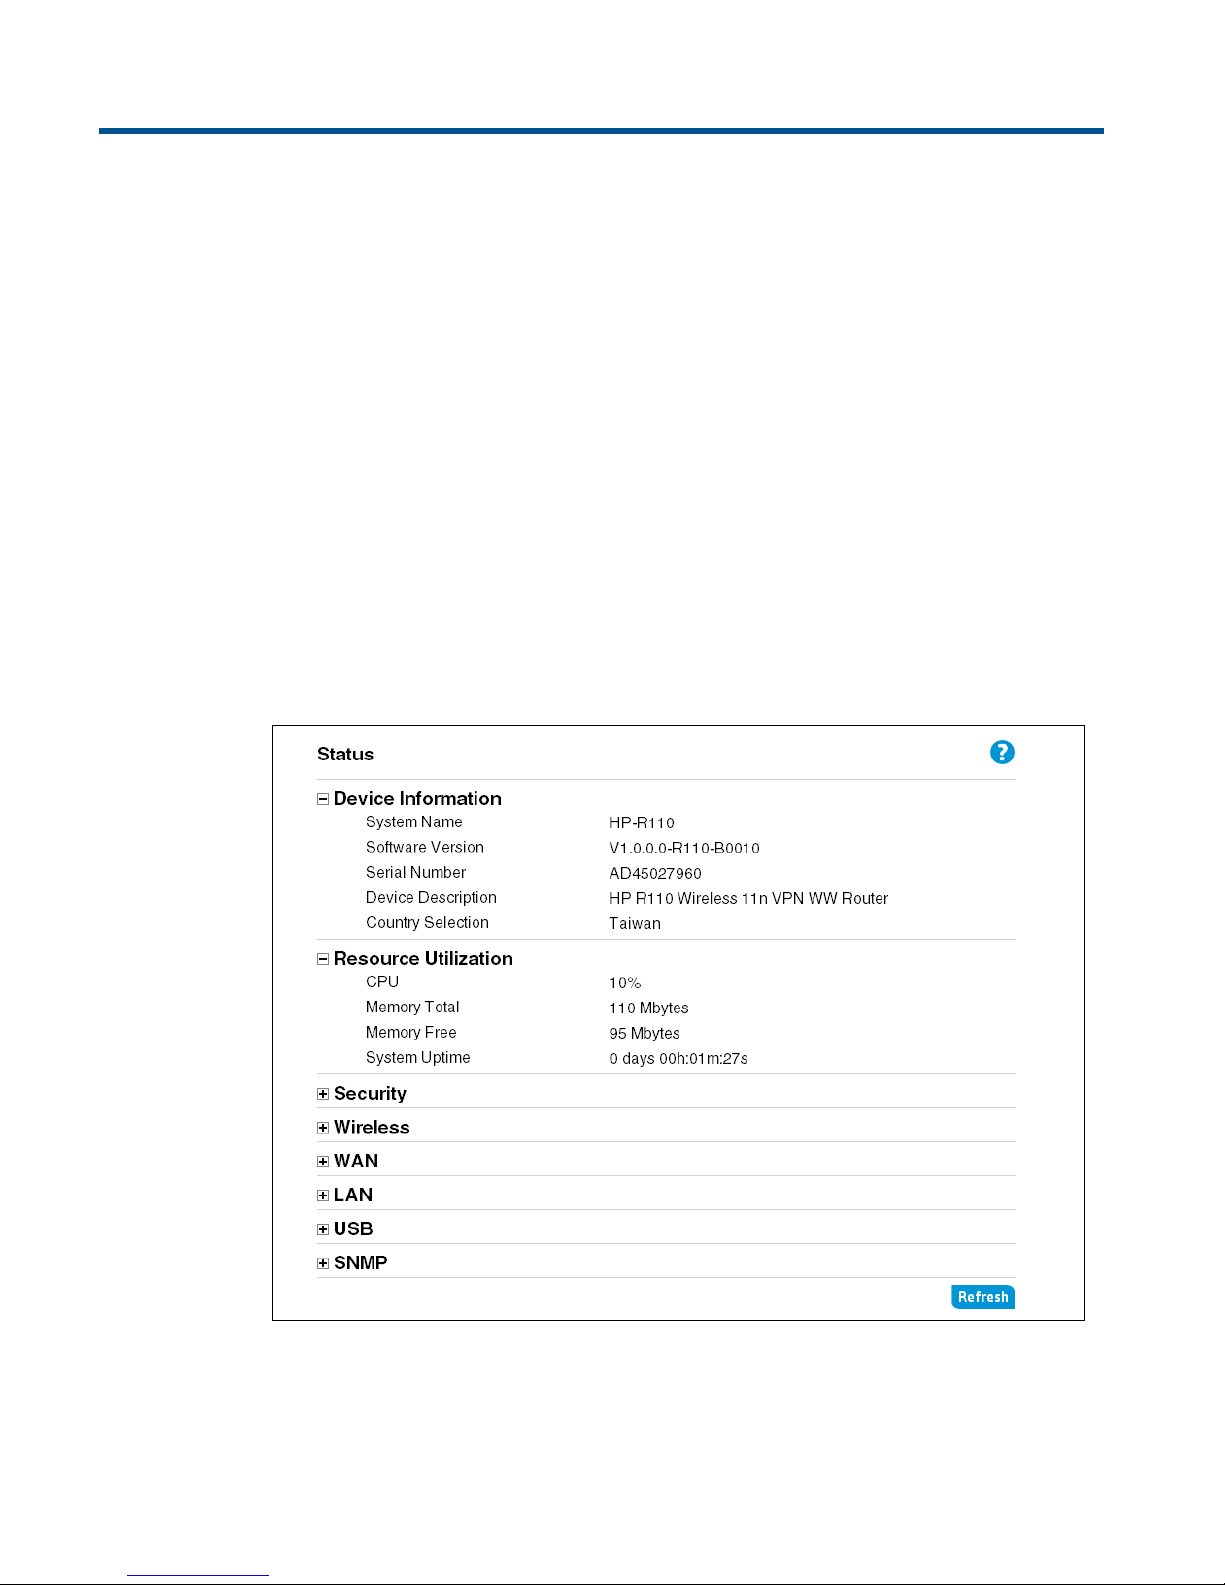
Step 4: Summary
After you complete the Wizard Setup, the Summary page displays.
Confirm the settings, and then click Finish. The router reboots and the HP R110/R120 is
operational.
16 Using the Wizard Setup
Page 17
3 Managing the HP R110/R120 system
The HP R110/R120 is managed via its web-based management interface using Microsoft
Internet Explorer 8 or later, Google Chrome v29 or later, or Mozilla Firefox v24 or later. You
can access the HP R110/R120 management tool using either http or https. Using https is
more secure, but you will see a warning because the security certificate is issued by the router
and not a known certificate authority. With https, it is acceptable to choose the option that
allows you to proceed through the security warning.
In a web browser, specify either: http://192.168.1.1 or https://192.168.1.1.
For information on launching the web-based management interface for the first time, see the HP
R100-Series Wireless VPN Routers Quickstart.
Viewing router status
The Status page displays a summary of the router’s key settings. Click Refresh to update the
status.
Page 18

The Status page includes these items:
Device Information
Shows the router's software version, hardware serial number, host name, device description,
and country selection.
Resource Utilization
Indicates the status of the router's resources, including CPU and memory usage.
Security
Displays the current settings for the Denial of Service (DoS) and Stateful Packet Inspection (SPI)
features.
When a DoS attack or SPI intrusion (a specific host blocked) is detected, an alert symbol ( )
displays on the Security line. If you open the Security section, an alert message next to
DOS or SPI indicates the security violation. Click Alert to view the log details on the
System > Log page. Click Clear to remove the alert message from the status page.
Note The security alert is not supported when the router is operating in Bridge mode.
Wireless
Displays the current settings for the wireless interface, including: radio enable, operating
frequency, mode, channel, SSID, MAC address, authentication, and encryption.
WAN
Displays the WAN connection type, status, and IP address assignment.
LAN
Displays the router's local network IP address, MAC address, and DHCP server status.
USB
Displays the current status of a device attached to the router's USB port.
SNMP
Displays the status of the Simple Network Management Protocol feature.
Setting the operating mode
The System > Mode page configures the operating mode of the router. The router supports
the following operating modes:
• Router Mode: The normal router mode that allows connections between a wired LAN and
wireless clients to the WAN Internet connection, such as a cable or DSL modem. This is the
factory set default mode.
• Bridge Mode: The router operates like an access point, extending a wired LAN to wireless
clients. In this mode there is no WAN configuration, including routing, VPN, NAT, firewall,
and QoS settings; all Internet access features are disabled. In fact, all four LAN ports and
WAN port are bridged together, so the WAN port operates like another LAN port.
18 Managing the HP R110/R120 system
Page 19
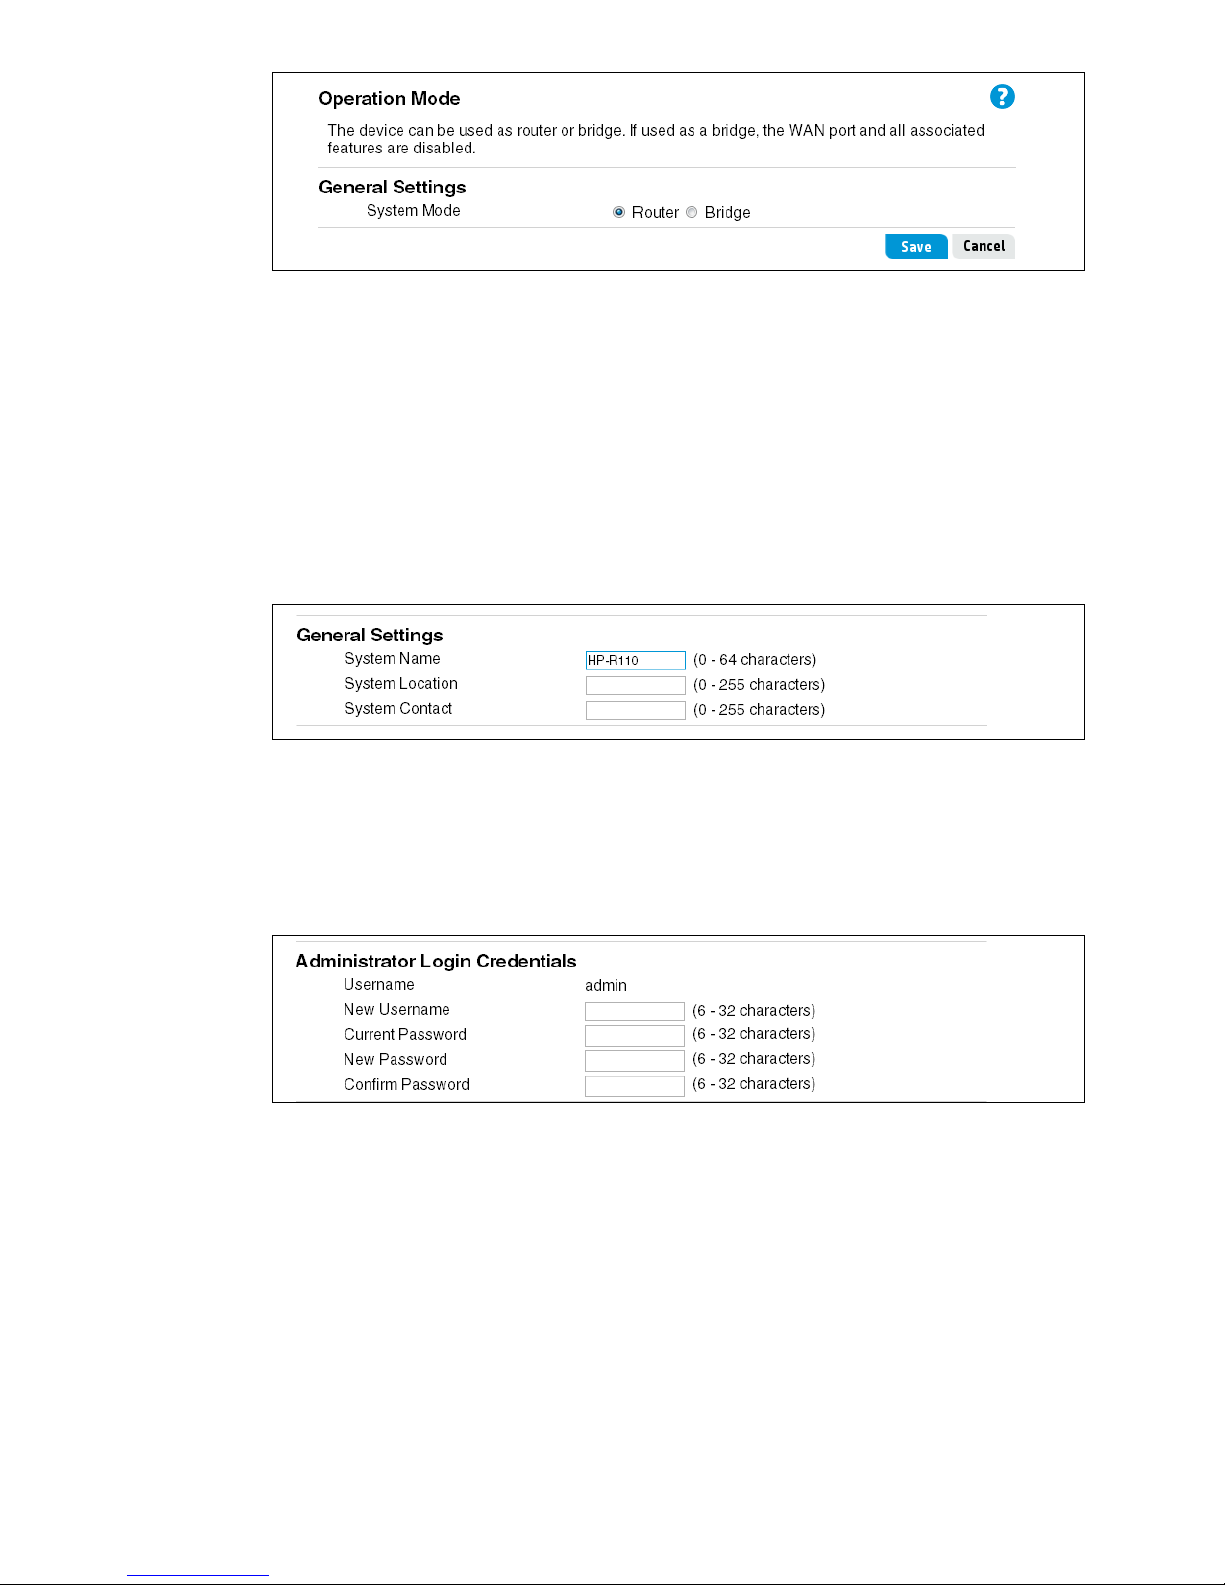
General administration settings
The System > Admin page configures the following settings for the router.
System information (General) settings
Configures settings that help identify the router, including the system name, location, and the
name of a person to contact for administrative purposes. The system name appears on the
banner and login screen. Do not use these characters: ` " & ' # \
Administrator login credentials
Configures the web management interface login username and password. The login user name
and password can be from 6 to 32 alphanumeric and special characters in length. Do not use
these characters: ` " & ' # \
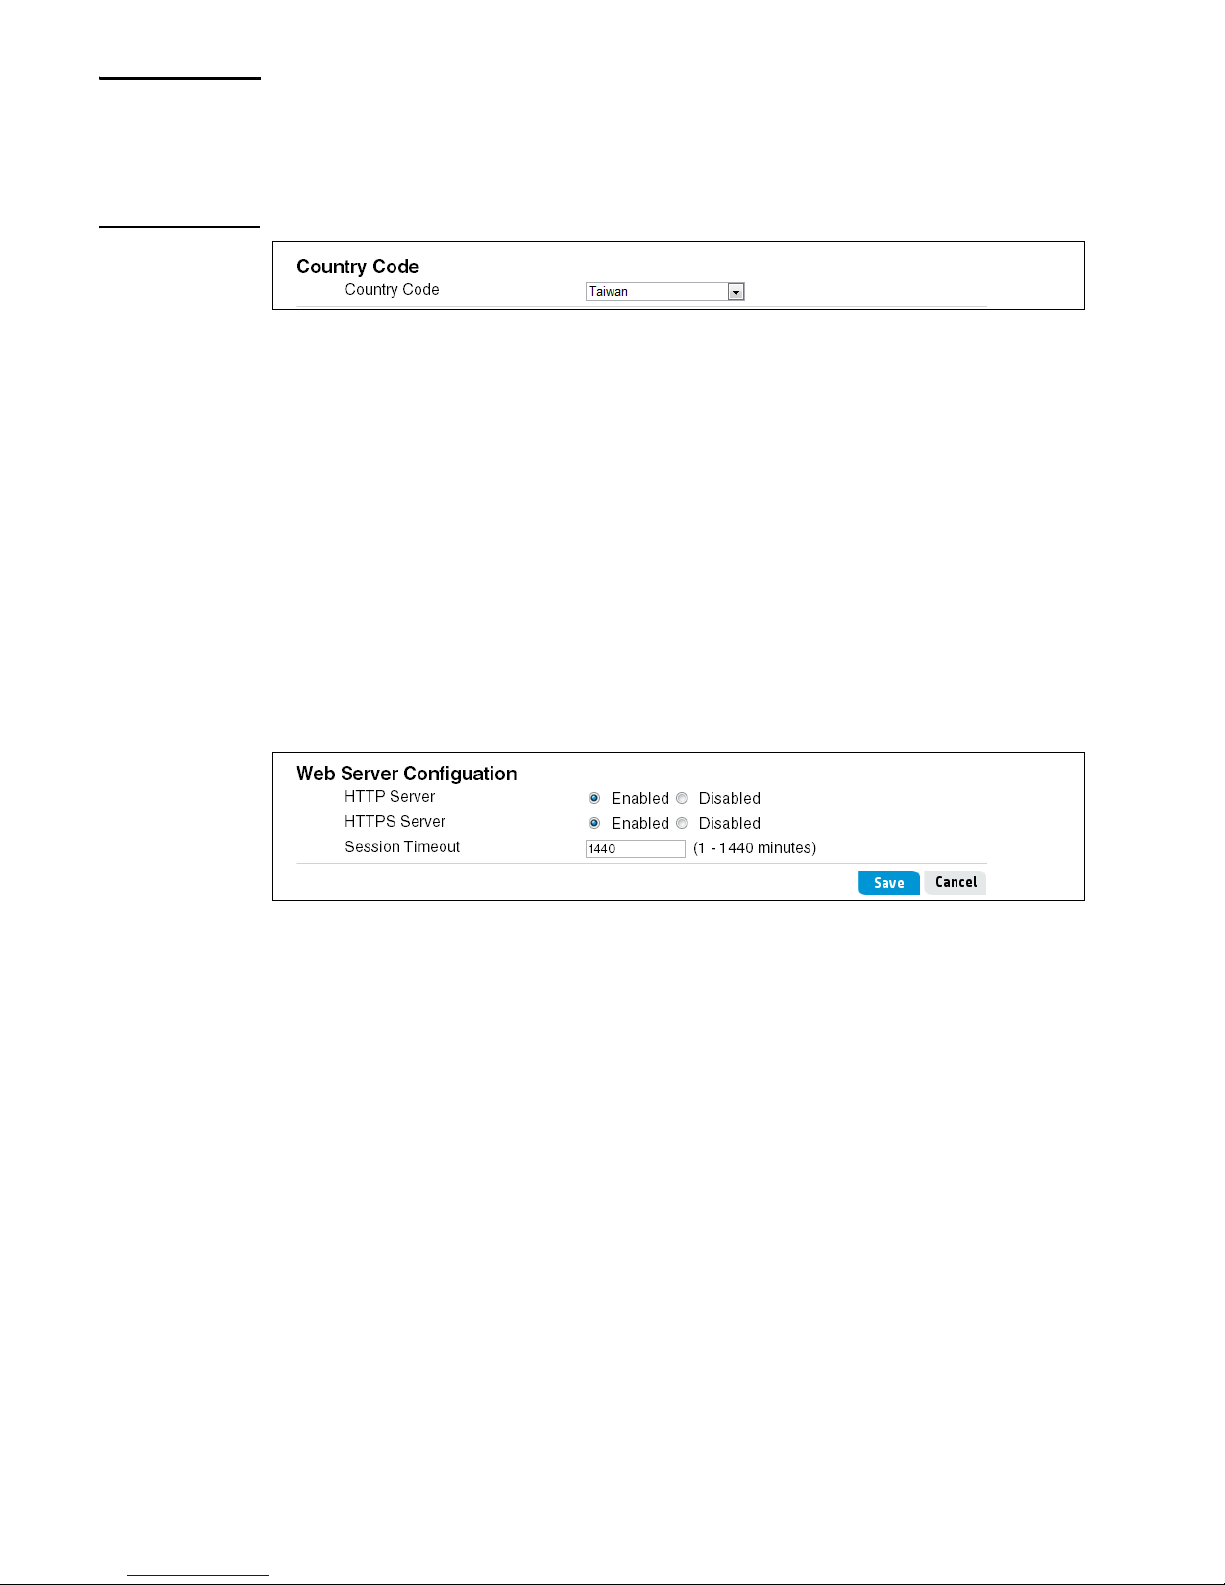
Setting the Country Code
The country of operation, also known as the regulatory domain, determines the availability of
certain wireless settings on the router. When the country is set, the router automatically limits
the available wireless channels and channel width, and adjusts the radio power level in
accordance with the regulations of the selected country.
General administration settings 19
Page 20
Caution Incorrectly selecting the country can result in illegal operation and can cause harmful
interference to other systems. You must ensure that the router is operating in accordance with
channel, power, indoor/outdoor restrictions, and license requirements for the intended country.
If you fail to heed this caution, you might be held liable for violating local regulatory
requirements.
Configuring web server settings
This section configures access to the web management interface.
HTTP Server
HTTPS Server
The router software includes HTTP and HTTPS functionality to enable communication with your
web browser. Unlike HTTP, HTTPS provides secure communications, using a digital certificate to
encrypt data exchanged between the router and your web browser. HTTP and HTTPS are both
enabled by default.
Session Timeout
Configure the Session Timeout for automatic log out from the web interface. If there is no
activity on the management session for the specified time, then the administrator is
automatically logged off.
Configuring trusted users
When using the trusted users feature, only computers with specified MAC or IP addresses can
access the router's web management interface. All other devices, either LAN or WLAN, cannot
access the web interface. A maximum of five rules can be defined.
20 Managing the HP R110/R120 system
Page 21
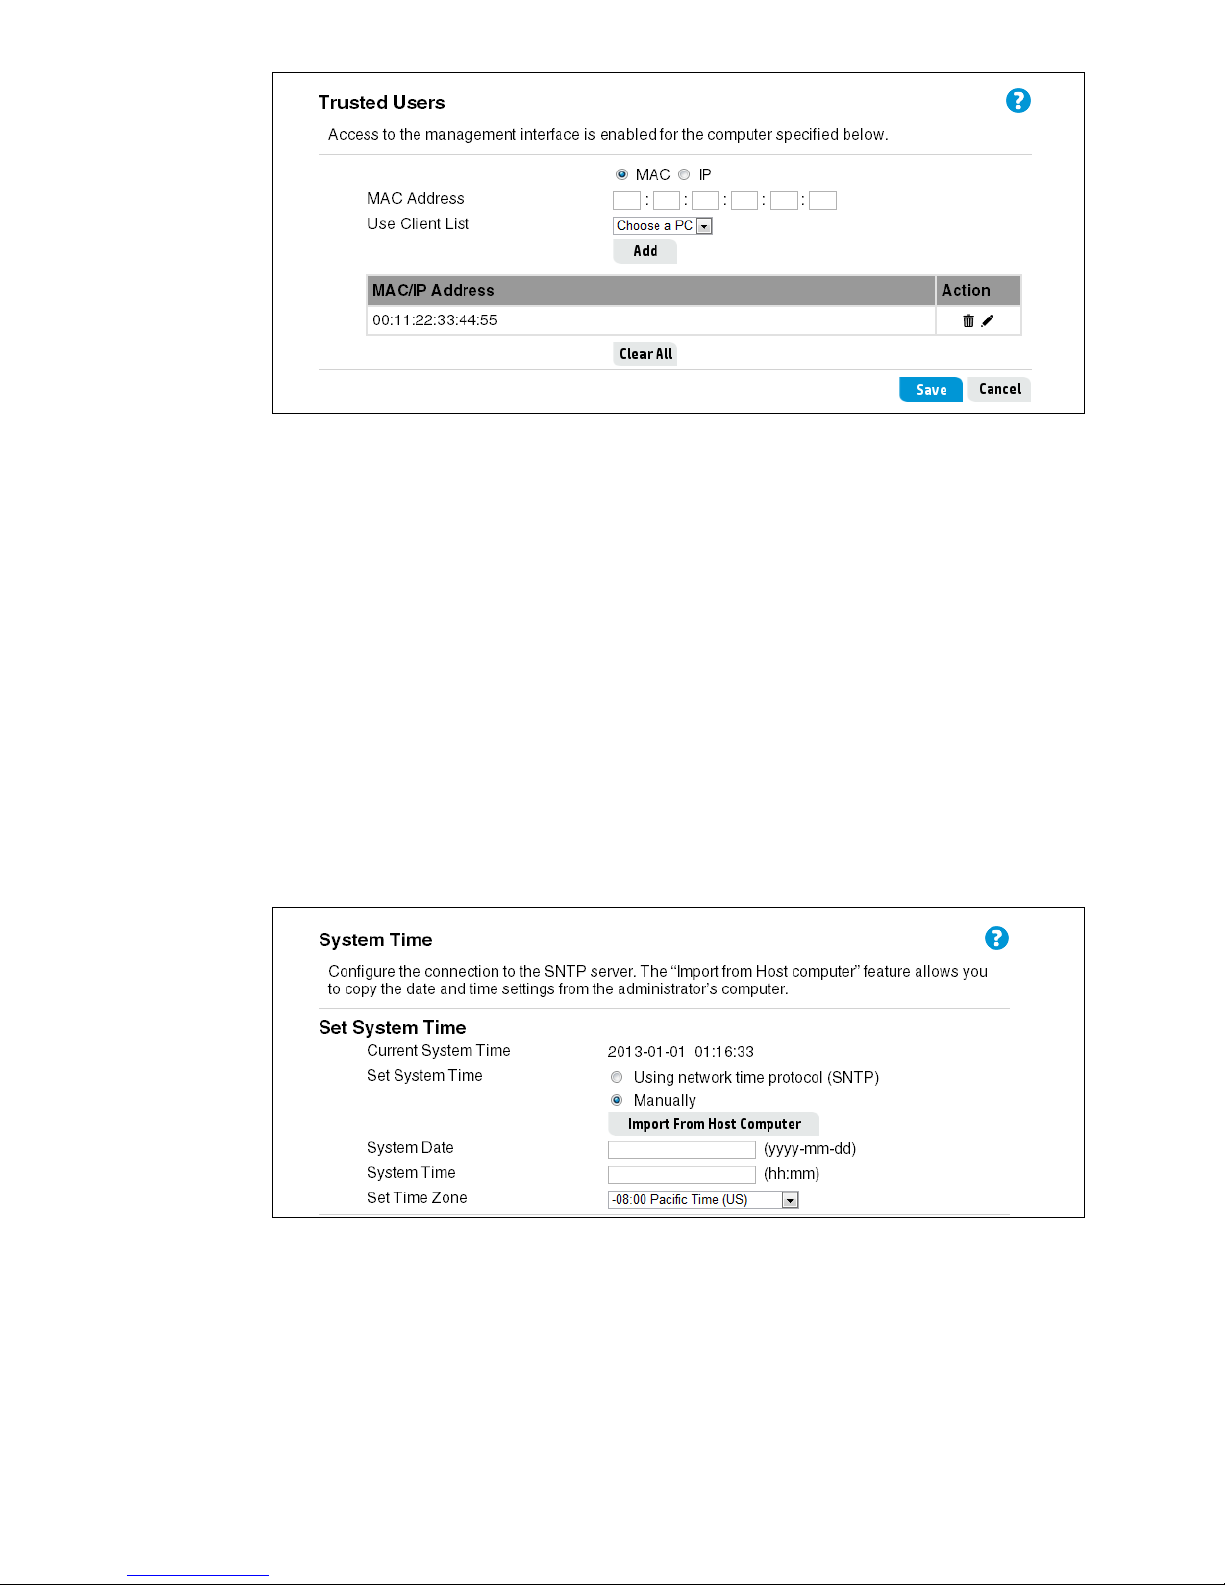
System time settings
Correct system time is important for proper operation of the router, especially when using the
logs to troubleshoot.
Select System > System time to open the System Time page. This page enables you to
configure time server and time zone information.
Set system time
This section displays the current system time. You can configure the time manually, or have it
automatically configured by a Network Time Protocol (NTP) server.
Manually
Select the date, time (in 24-hour notation), and timezone.
Using network time protocol
NTP servers transmit Coordinated Universal Time (UTC, also known as Greenwich Mean Time)
to their client systems. NTP sends periodic time requests to servers, using the returned time
stamp to adjust its clock. The timestamp is used to indicate the date and time of each event in
the system log or syslog messages.
System time settings 21
Page 22
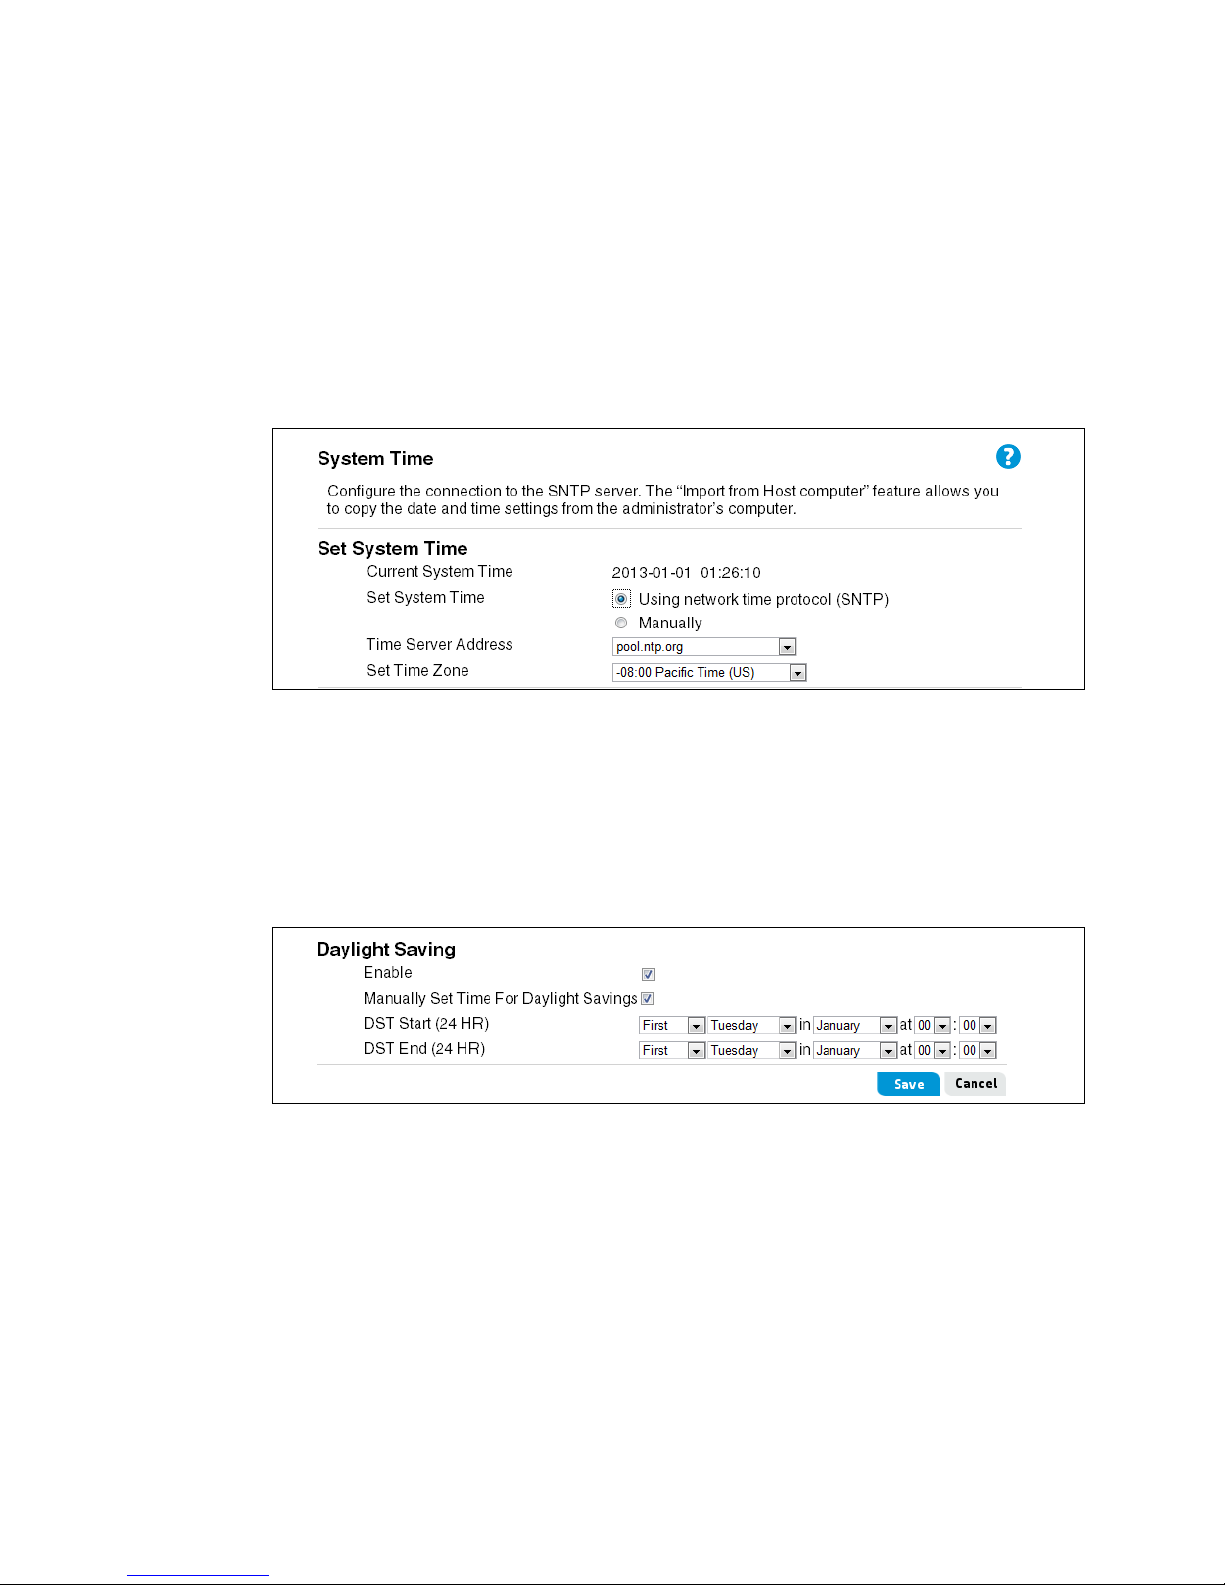
When you select this option, a field displays for you to specify the time server address. You can
specify the NTP hostname or IP address, although specifying an IP address is not
recommended because it is more likely to change. If you specify a hostname, note the following
requirements:
• It must be between 1 and 63 characters long.
• Uppercase and lowercase characters, numbers, and hyphens are allowed.
• The first character must be a letter (a to z or A to Z), and the last character cannot be a
hyphen.
An actual NTP server host name, pool.ntp.org, is configured by default and will provide the
time when the router is connected to the Internet.
Daylight saving
Use this section to enable support for daylight saving time, if required for your location. When
you select Manually Set Time For Daylight Savings, additional fields display to enable
you to configure the starting and ending dates and times, and the DST offset.
The DST offset specifies how many minutes to move the clock forward or backward.
Configuring SNMP
The Simple Network Management Protocol (SNMP) enables the remote management of the HP
R110/R120 router by a computer that has SNMP management software installed. The HP
R110/R120 provides a robust SNMP v1/v2c implementation supporting both industry-standard
MIB II objects and HP-specific MIB objects. Read-only and read-write access are supported.
Select System > SNMP to open the SNMP configuration page.
22 Managing the HP R110/R120 system
Page 23
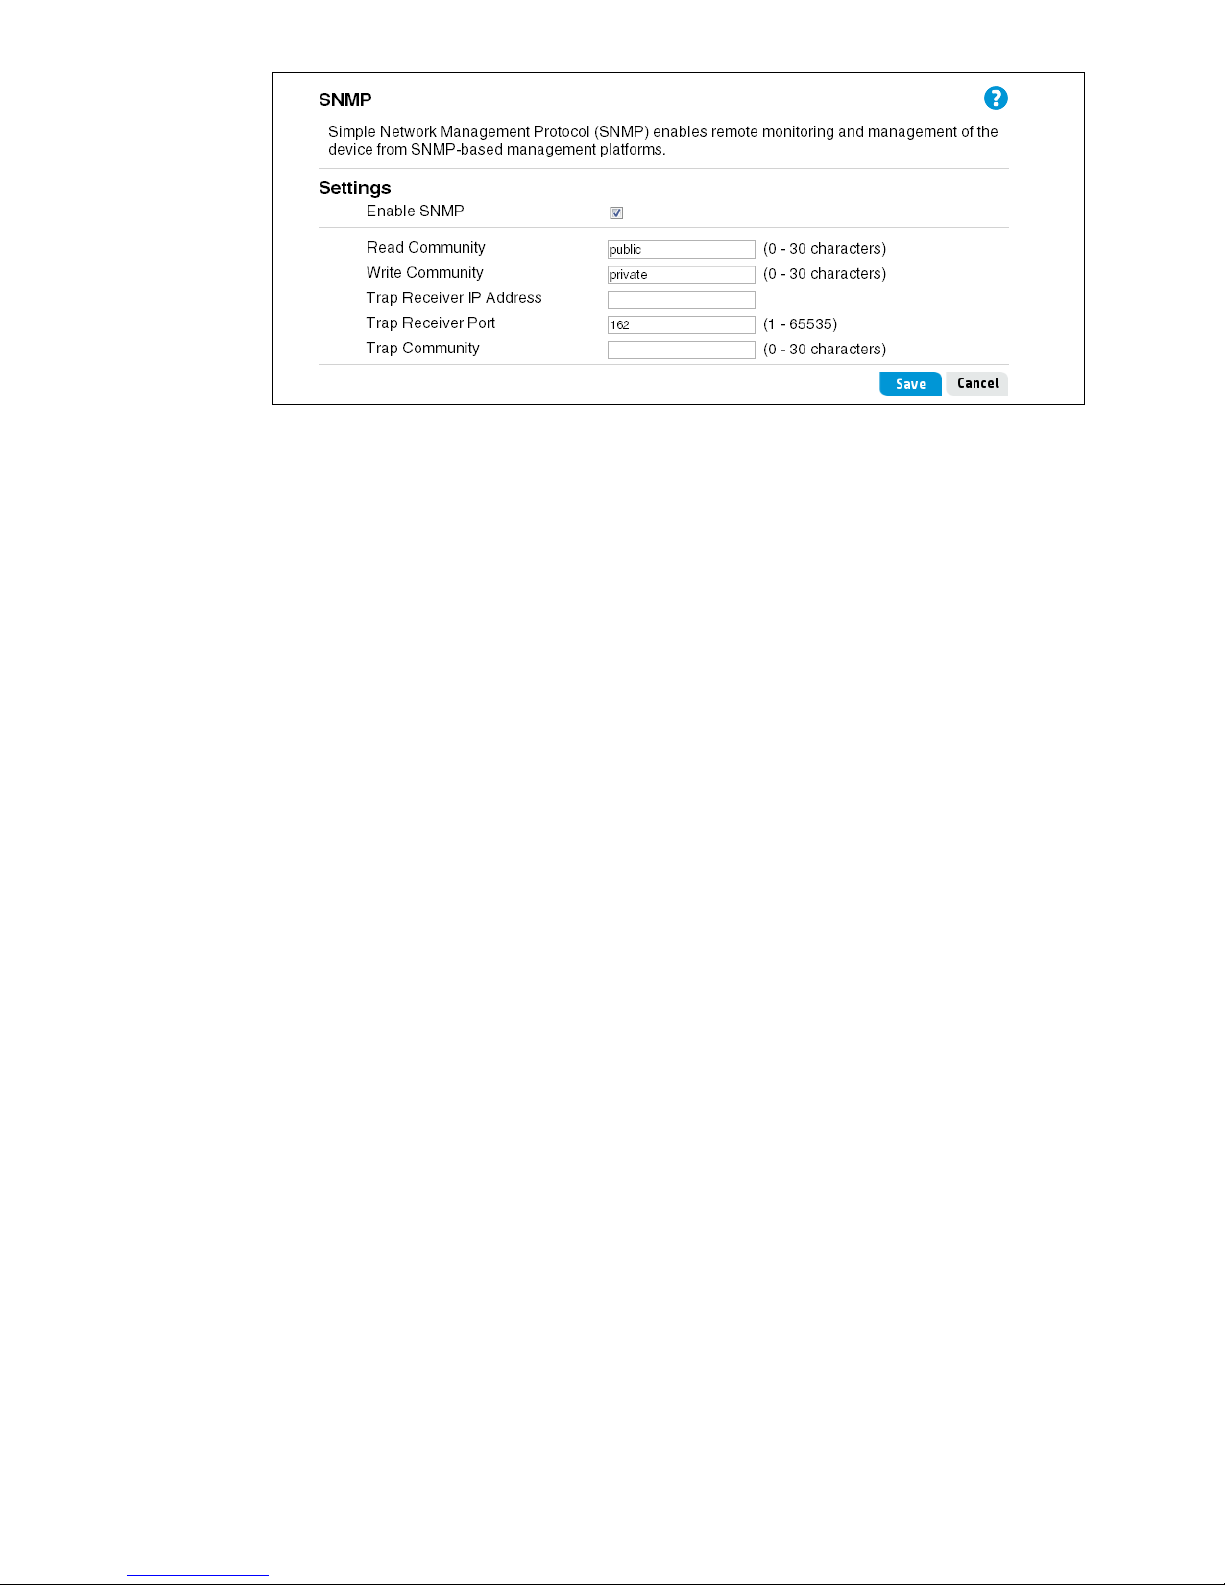
To configure SNMP, set the following options:
• Enable SNMP: Use this checkbox to enable/disable SNMP support. By default, SNMP
support is disabled, which means that the HP R110/R120 does not respond to SNMP
requests.
• Read Community: The password that controls read-only access to SNMP information on
the router. A network management program must supply this password when attempting to
get SNMP information from the router. By default, the password is set to public. Do not use
these characters: ` " & ' # \
• Write Community: The password that controls read/write access to SNMP information
on the router. A network management program must supply this password when attempting
to get or set SNMP information on the router. By default, the password is set to private.
Do not use these characters: ` " & ' # \
The router can also be configured to send status messages to an SNMP server if a problem
occurs on the network. This is done by setting the Trap Receiver option. To configure an SNMP
Trap Receiver, set the following options:
• Trap Receiver IP Address: The IP address on the computer to which the status
messages are to be sent.
• Trap Receiver Port: The port number on the computer to which the status messages are
to be sent.
• Trap Community: The computer network management program must supply this
password to receive the trap messages. Do not use these characters: ` " & ' # \
Managing system logs
The system log is a list of system messages, some of which may indicate error conditions. The
router stores up to 2048 system messages in memory. You can view these messages using the
router’s management interface, and you can configure the router to relay them as syslog
messages to a syslog server residing on the network. Note that the log messages in volatile
memory are lost when the system reboots.
Managing system logs 23
Page 24
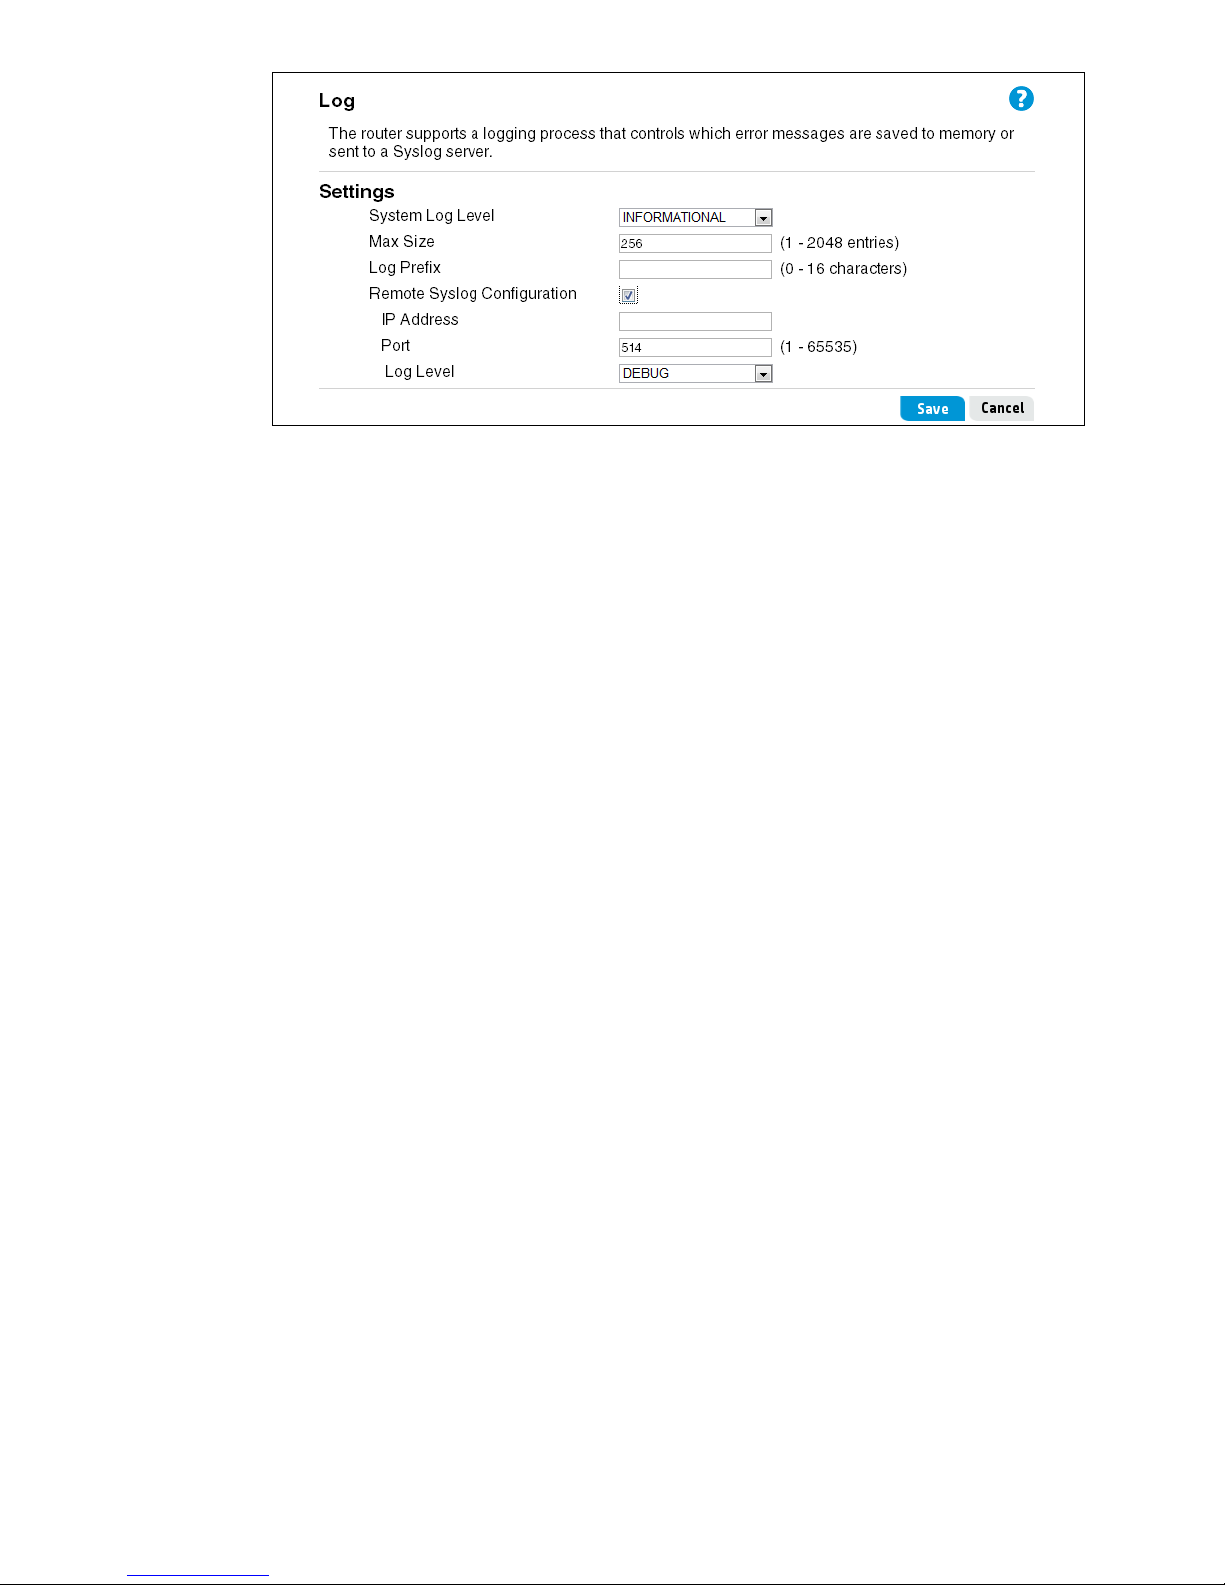
To configure system logging, set the following options:
System Log Level
You can specify the minimum severity level of the log messages to write to the system log. In the
following list, the severity levels are listed from most severe (top) to least severe (bottom):
• Emergency indicates that the system is unusable. It is the highest level of severity.
• Alert indicates action must be taken immediately.
• Critical indicates critical conditions.
• Error indicates error conditions.
• Warning indicates warning conditions.
• Notice indicates normal but significant conditions.
• Informational indicates informational messages.
• Debug indicates debug-level messages.
For example, if you select Critical, only critical, alert, and emergency messages are written to
the log.
Max Size
Specifies the maximum number of log entries to store in the router's volatile memory. When the
maximum number is reached, the old log messages are overwritten by new messages.
Log Prefix
A text identification string that is added to the log messages. This is useful for quickly
identifying messages you are interested in when using a remote syslog server.
Remote Syslog Configuration
To view a longer history of log messages, you can set up a remote syslog server that acts as a
syslog log relay host on your network. Then, you can configure the router to send syslog
messages to the remote server. The System Log Level setting determines which messages are
stored and are available for relay to a remote syslog server.
• IP Address: Specify the IP address of the remote syslog server.
24 Managing the HP R110/R120 system
Page 25

Events
• Port: The syslog process uses logical port 514 by default. It is recommended that you keep
this default. If you specify a different port number, ensure that the port number is not being
used by another protocol on your network and that your syslog server is also configured to
use that port.
• Log Level: When Remote Syslog is enabled, messages of the selected Log Level or higher
are sent to the configured syslog server.
The Events section of the System log page shows real-time system events on the router, such as
wireless clients associating with the router and being authenticated. The log shows the date the
event occurred, its severity level, the software program or process that caused the event
message, and the message text.
You can sele ct Refresh to display the most recent data from the router, or Clear to remove all
entries from the list. Click Download to save all entries to a file on the management computer.
Proxy ARP settings
Proxy ARP (Address Resolution Protocol) is a mechanism that enables a computer in a network
connected to a router to appear to be logically part of another network connected to the same
router. This means that a computer on the router’s LAN network can appear to be logically on
the WAN network, accessible using a public IP address. Note that although the computer
appears as part of the public network, it is actually protected behind the router’s firewall on the
LAN network. That is, traffic between the public network and the host computer on the LAN is
still subject to the rules and policies configured on the router. A maximum of eight rules can be
defined.
Proxy ARP settings 25
Page 26
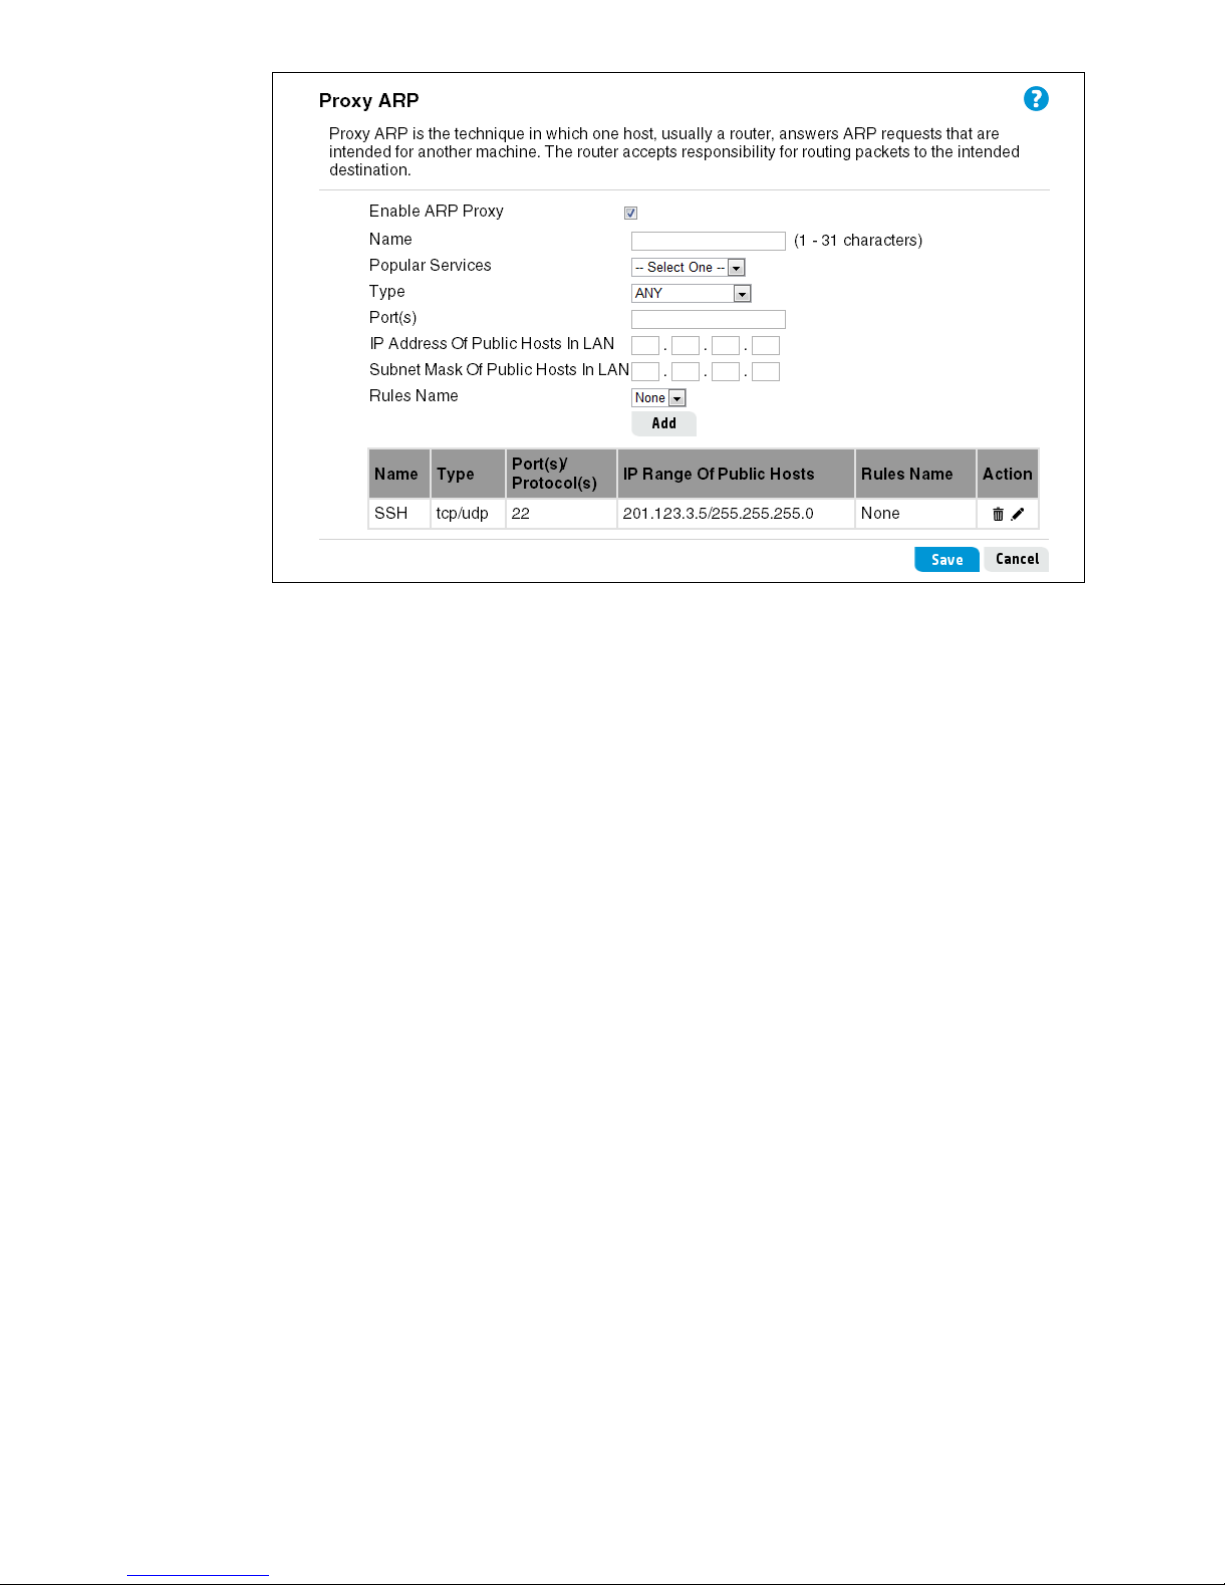
To configure Proxy ARP, set the following options:
Enable ARP Proxy
Enables the feature on the router.
Name
A name (1 to 31 alphanumeric or special characters) that describes the Proxy ARP service. Do
not use these characters: ` " & ' # \
Popular Services
Selects common protocols that identify traffic that can be forwarded through the router to a host
computer on the local LAN.
Type
Selects TCP or UDP as the protocol type, or other special protocols. When Special Protocol is
selected, the protocol numbers can be entered in the Protocol field.
Port(s)
Specifies the TCP/UDP port numbers. More than one number can be entered separated by
commas.
Protocol(s)
Specifies special protocol numbers, separated by commas.
IP Address Of Public Hosts In LAN
The IP address of a computer on the local LAN. The IP address and mask can define a range of
addresses. For example, the IP address 10.8.0.100 with a mask 255.255.255.252 specifies
addresses in the range10.8.0.100 to10.8.0.103.
Subnet Mask Of Public Hosts In LAN
The local subnet mask for the IP address.
Rules Name
Applies a schedule rule to the Proxy ARP service. The schedule rules are configured on the
Tools > Scheduling page.
26 Managing the HP R110/R120 system
Page 27
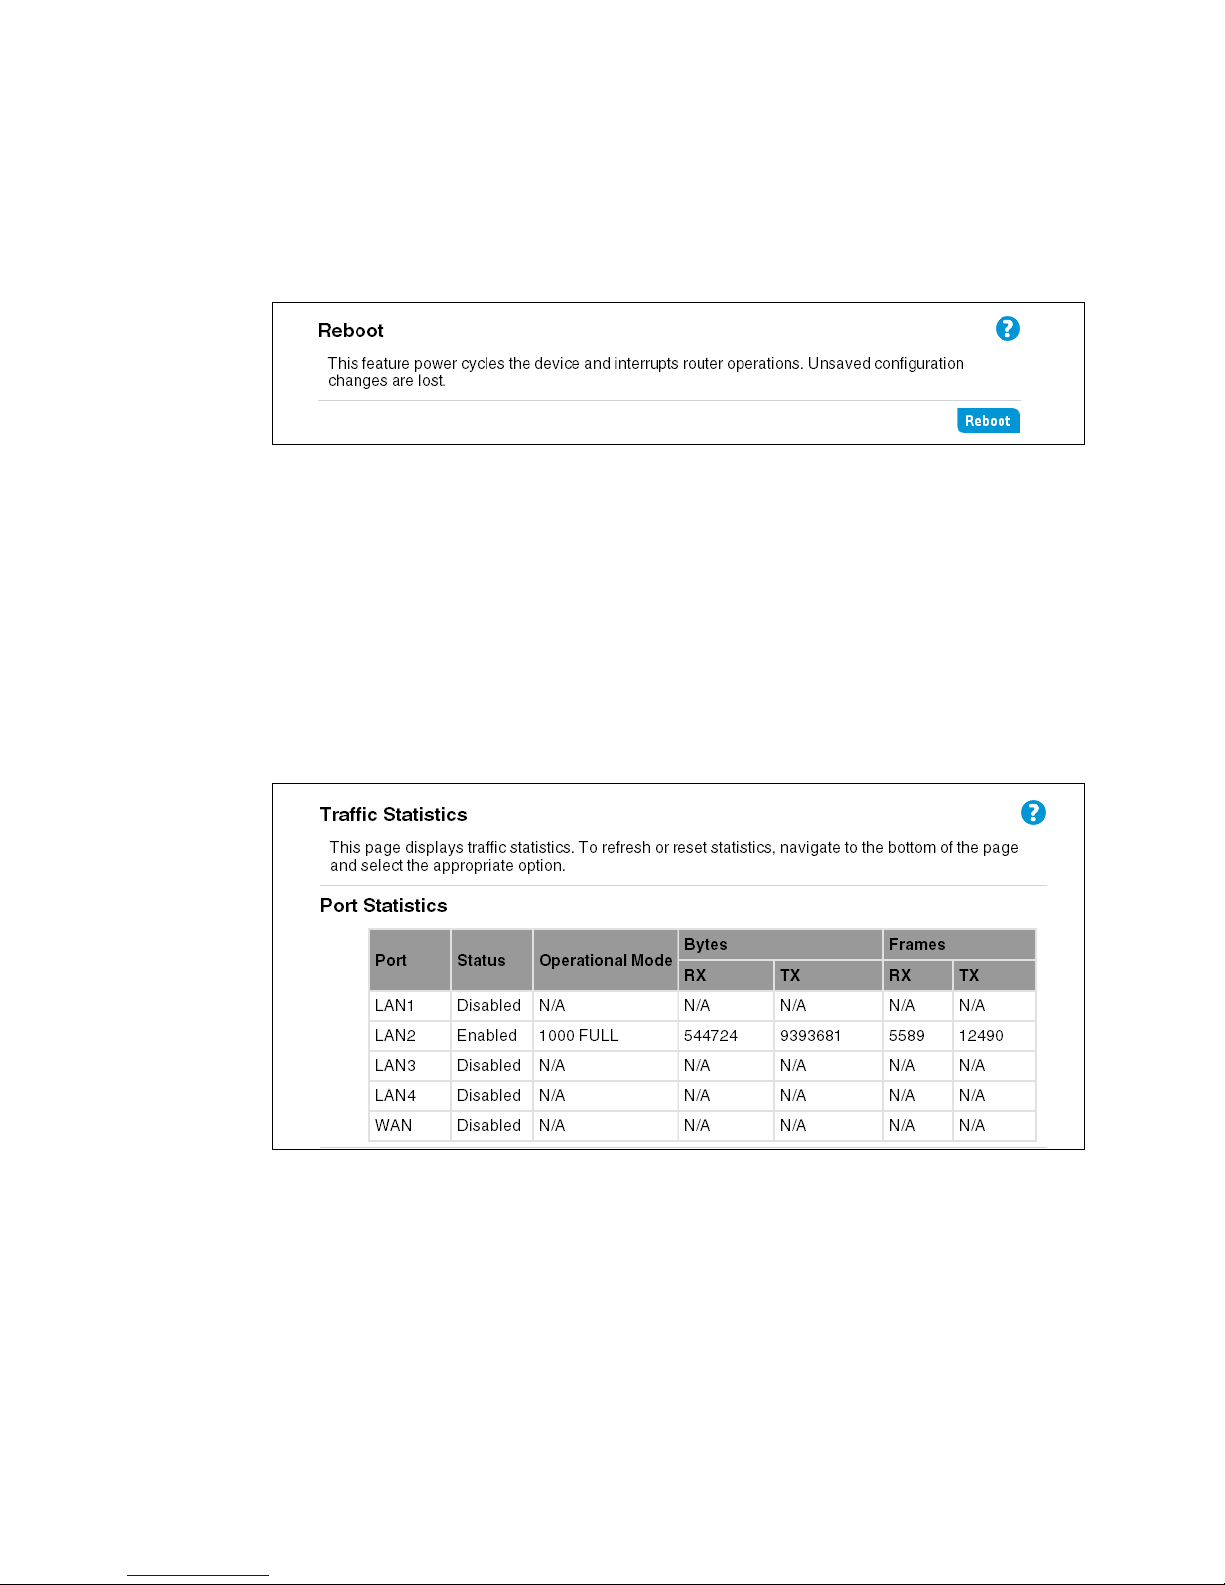
Rebooting the router
For maintenance purposes or as a troubleshooting measure, you can reboot the HP R110 /R12 0
by selecting Reboot.
The process may take several minutes during which wireless services are not available. The HP
R110/R120 resumes normal operation with the same configuration settings it had before the
reboot.
Viewing traffic statistics
To view statistics on Ethernet packets received and transmitted on the wired and wireless ports,
select System > Traffic Statistics. The Traffic Statistics page displays.
Statistics accumulate until the router is rebooted.
Port Statistics
Displays WAN and LAN port status, together with the number of frames/bytes that have been
transmitted and received.
Wireless LAN statistics
Displays traffic statistics for the wireless LAN (SSID interfaces 1 to 4). Statistics include packets/
bytes received and transmitted, and the number of packets with errors.
Rebooting the router 27
Page 28

Interface Statistics
Displays a summary of traffic statistics for the WAN and LAN ports.
Set the poll interval for updating statistics on the page and click Start. You can also click
Refresh anytime to immediately update values. Click Reset Counters to set all statistics
values back to zero.
28 Managing the HP R110/R120 system
Page 29
4 WAN configuration
The WAN pages are used to configure the parameters for your Internet connection. The
information necessary to set up a connection can be obtained from your ISP. Check with your
ISP first to find out what type of connection you should choose.
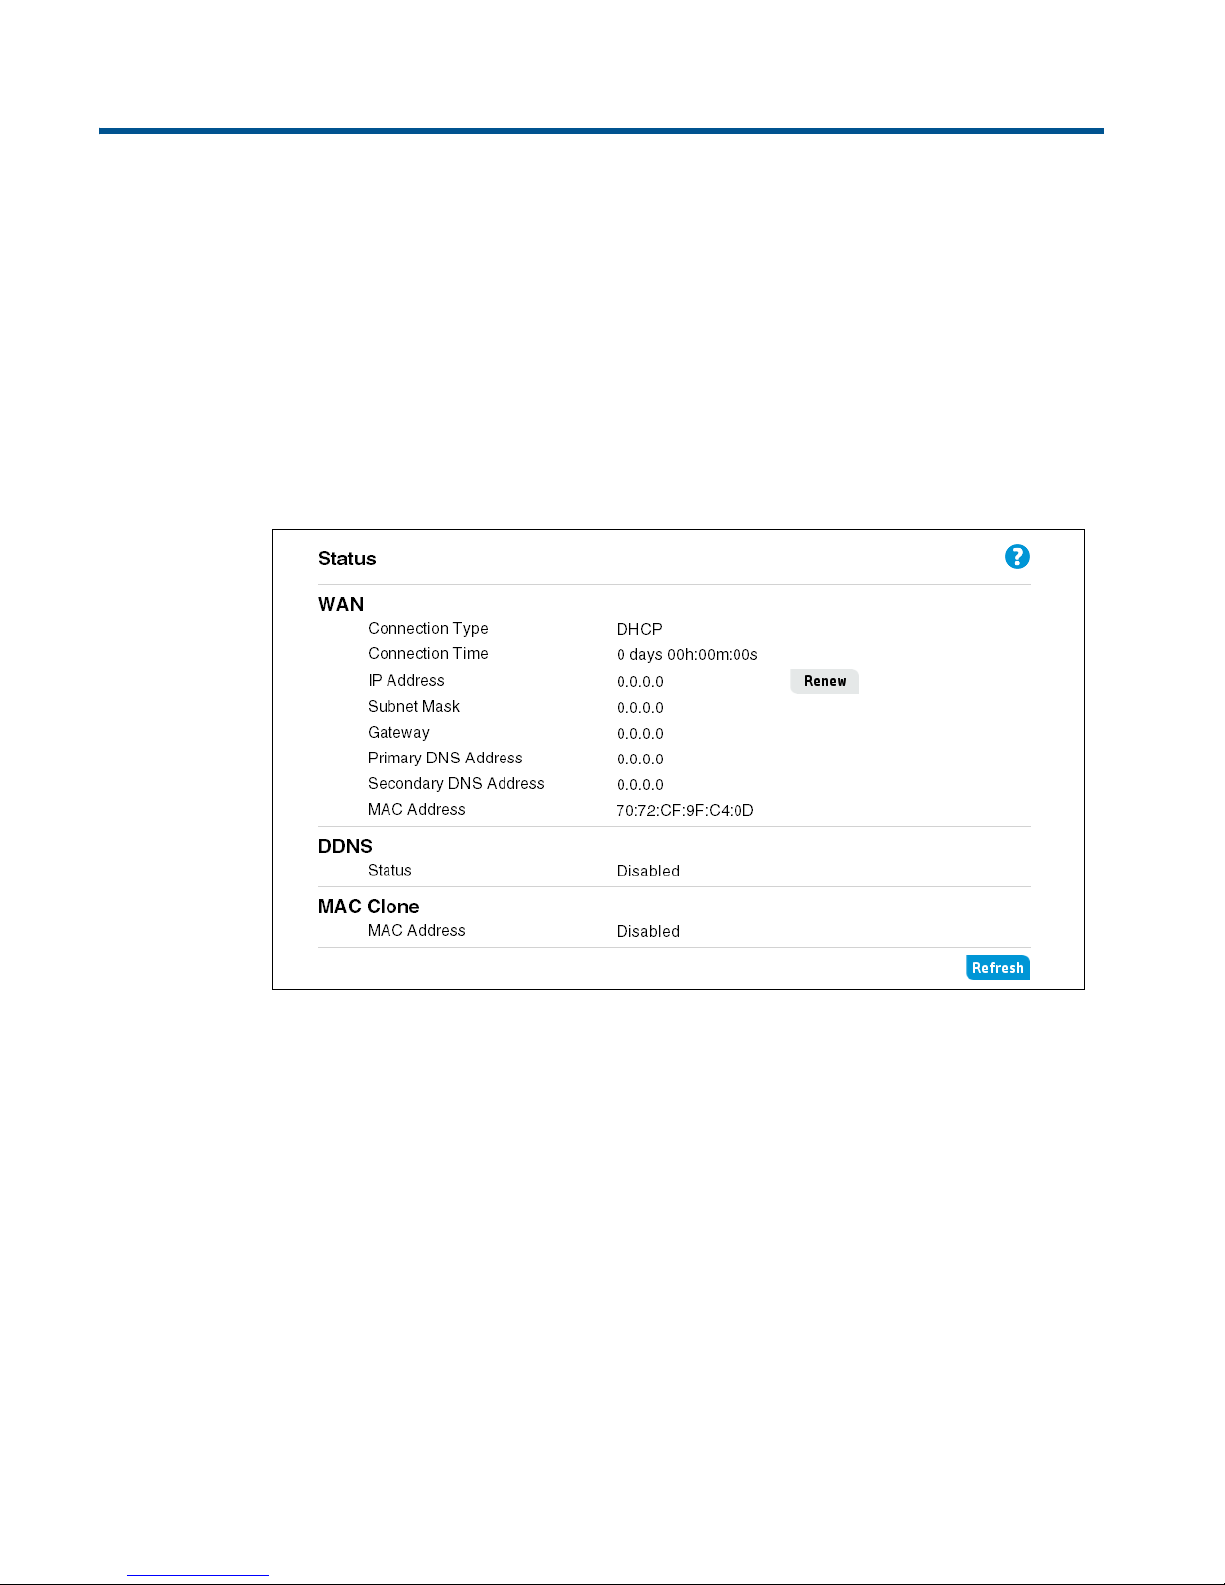
Viewing the WAN interface status
The Status page displays the setting of the WAN interface. If you are using DHCP as the
connection type, you can click Renew to request a new IP address.
This page includes the following information:
Connection Type
The router’s method of connection to the ISP.
Connection Time
The time elapsed since the Internet connection was established.
IP Address
The IP address assigned to the router’s WAN port by the ISP.
Subnet Mask
The IP subnet mask assigned to the router’s WAN port by the ISP.
Gateway
The IP address of the ISP’s gateway.
Primary/Secondary DNS Address
The IP addresses of primary and secondary domain name servers.
Page 30
DDNS
The status of a dynamic DNS service.
MAC Clone
Indicates if the WAN port MAC address has been copied from a LAN computer.
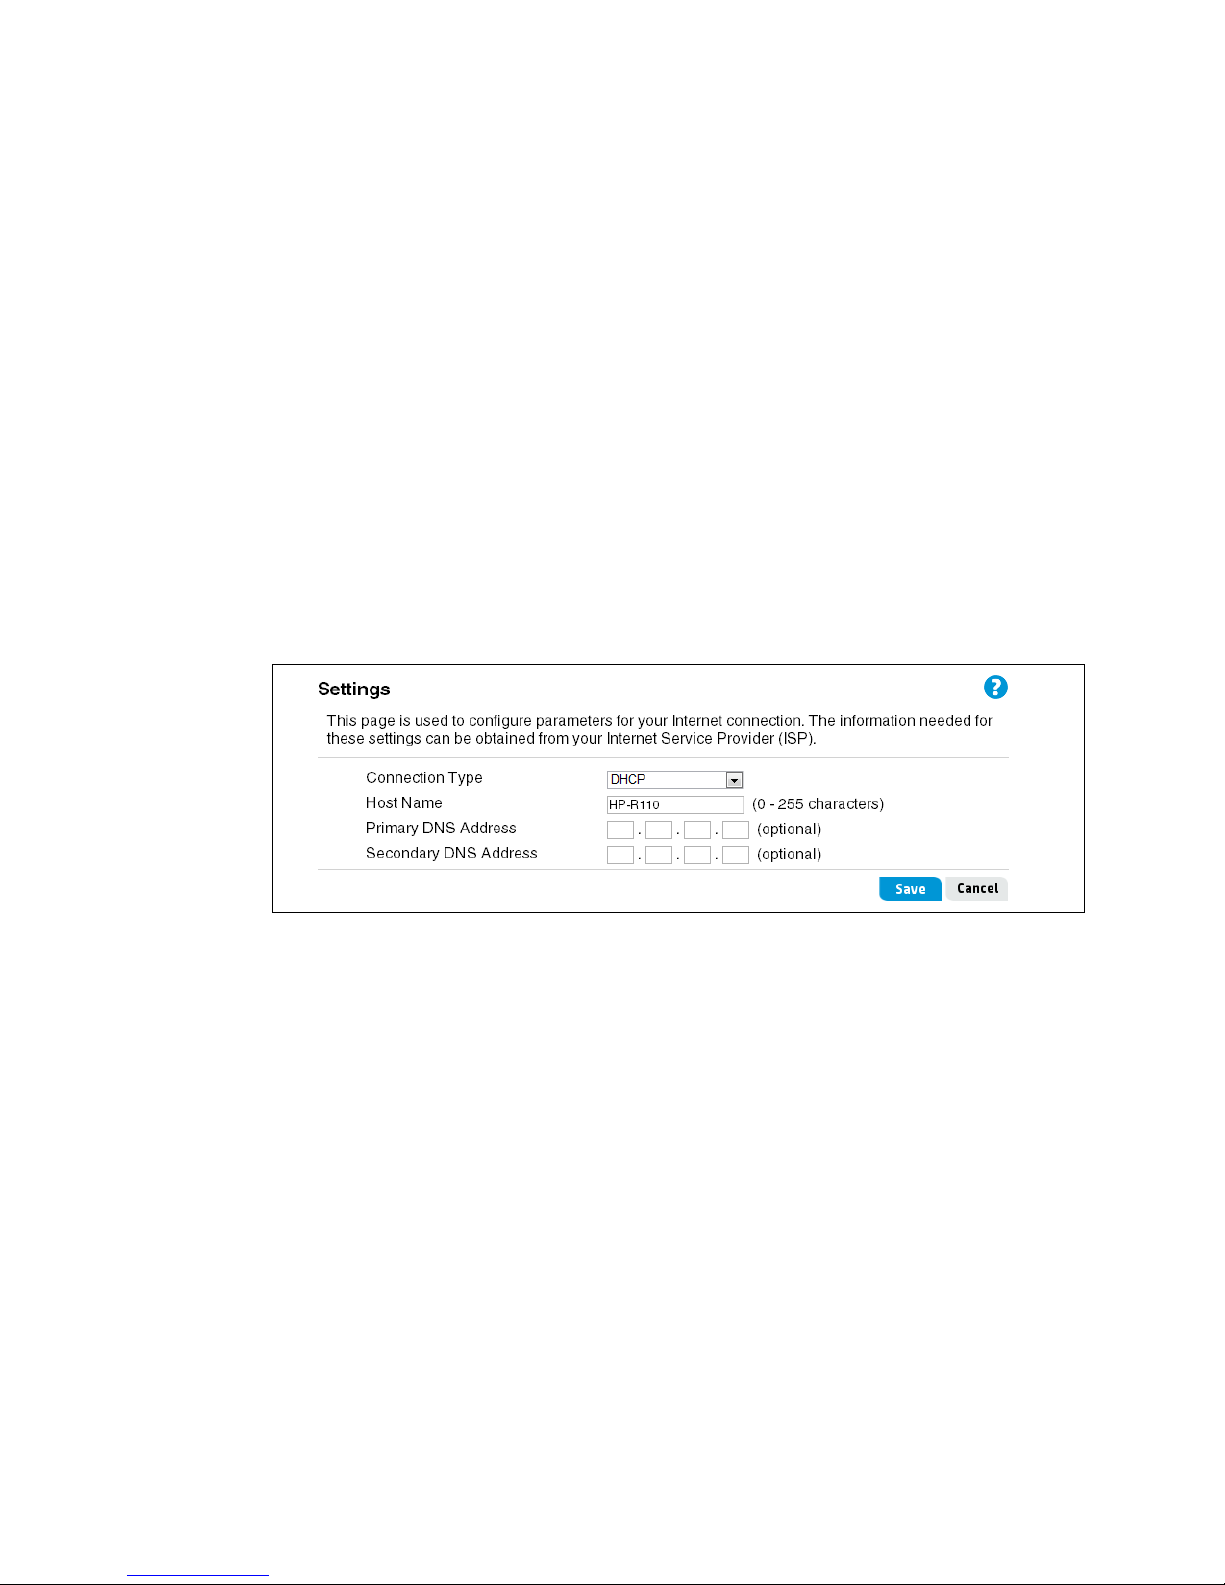
Settings
The WAN settings page configures the method that the router uses to connect to an ISP through
the WAN port. The router supports five Internet connection methods.
DHCP IP address
DHCP is the most common method used to obtain an IP address with cable modems. In many
cases, setting the connection type to DHCP is enough to complete the connection to your ISP.
Some DHCP connections may require a Host Name. Enter the Host Name in the space
provided if you were assigned one by your ISP. Do not use these characters: ` " & ' # \
Some dynamic connections require that you clone the MAC address of the computer that was
originally connected to the modem. To do so, click on WAN > MAC Clone to set the WAN
MAC address. For more information, see
“MAC clone” on page 36.
This page includes the following information:
Connection Type
Select DHCP as the router’s method of connecting to the ISP.
Host Name
The host name assigned to the router by your ISP. The host name is optional, but may be
required by some ISPs.
Primary/Secondary DNS Address
The IP addresses of primary and secondary domain name servers.
Static IP address
Static mode sets the router to use a fixed IP address to connect to the Internet. If your ISP uses
static IP addressing, you need an IP address, subnet mask, and ISP gateway address. This
information is available from your ISP or on the paperwork that your ISP left with you. Enter
your information in the provided spaces, and then click Save.
30 WAN configuration
Page 31

PPPoE
This page includes the following information:
Connection Type
Select Static IP Address as the router’s method of connecting to the ISP.
IP Address
Enter the IP address assigned to the router’s WAN port by the ISP.
Subnet Mask
Enter the IP subnet mask assigned to the router’s WAN port by the ISP.
Gateway
Enter the IP address of the ISP’s gateway.
Primary/Secondary DNS Address
Enter the IP addresses of primary and secondary domain name servers.
The Point-to-Point Protocol over Ethernet (PPPoE) is a common WAN protocol that provides a
secure connection between the service provider and the router.
Enter the PPPoE information in the provided spaces, and then click Save to activate your
settings.
Settings 31
Page 32

This page includes the following information:
Connection Type
Select PPPoE as the router’s method of connecting to the ISP.
Username
Enter your ISP-assigned user name. Do not use these characters: ` " & ' # \
Password
Enter your password (usually assigned by your ISP). Do not use these characters: ` " & ' # \
Confirm Password
Enter the password again to confirm it.
Service Name
The service name is typically optional, but may be required by some service providers. The
service name defines the attributes used to set up a dynamic PPPoE subscriber interface. HP
recommends that you do not enter a service name unless your service provider instructs you to
do so.
Idle Time
Select the number of minutes to elapse without activity before the PPPoE connection is
disconnected. Or, you can leave the default setting of Always On so that the connection is
kept open regardless of any activity. (Options: 1, 2, 5, 10, 30, 120 minutes and Always On)
32 WAN configuration
Page 33

MTU
Sets the size of the Maximum Transmission Unit (MTU) for the largest packet that the network
protocol can transmit.
Manual Connection:
You can click Connect and Disconnect to connect or disconnect the PPPoE connection
immediately.
Multiple-PPPoE
Allows you to configure a second PPPoE session to run over the same connection. The second
session connects to another PPPoE server and the configuration allows routing rules to be
defined so that different clients can be routed through either PPPoE channel.
Routing Table
The routing table contains rules that are used to route PPPoE traffic by source IP, destination IP,
TCP/UDP protocol, source port, or destination port. A maximum of eight rules can be defined.
• Source network: The source IPv4 address and mask that identifies traffic to be routed
through the specified PPP channel.
• Destination network: The destination IPv4 address and mask that identifies traffic to be
routed through the specified PPP channel.
• Protocol: Identifies TCP or UDP protocol traffic.
PPTP
• Source port: Identifies traffic from a specific TCP or UDP source port.
• Destination port: Identifies traffic from a specific TCP or UDP destination port.
• PPP: Selects the PPPoE session (1 or 2) to which the classified traffic is to be routed.
The Point-to-Point Tunneling Protocol (PPTP) is a common WAN protocol used for Virtual Private
Networks (VPNs) that provides a secure connection between the service provider and the
router.
This page includes the following information:
Connection Type
Select PPTP as the router’s method of connecting to the ISP.
Settings 33
Page 34

L2TP
Server IP
Enter the PPTP server IPv4 address as assigned by your ISP.
Username
Enter your ISP-assigned user name. Do not use these characters: ` " & ' # \
Password
Enter your password (usually assigned by your ISP). Do not use these characters: ` " & ' # \
Confirm Password
Enter the password again to confirm it.
Idle Time
Select the number of minutes to elapse without activity before the PPTP connection is
disconnected. Or, you can leave the default setting of Always On so that the connection is
kept open regardless of any activity. (Options: 1, 2, 5, 10, 30, 120 minutes and Always On)
DHCP Enable
Enables DHCP for the dynamic assignment of the WAN IP address from the ISP. You can click
Release and Renew to refresh the DHCP assignment. If you disable DHCP, enter the static
IPv4 address, subnet mask, gateway address, as well as primary and secondary DNS server
addresses, as provided by the ISP.
The Layer 2 Tunneling Protocol (L2TP) is a common WAN protocol used for Virtual Private
Networks (VPNs) that provides a secure connection between the service provider and the
router.
This page includes the following information:
Connection Type
Select L2TP as the router’s method of connecting to the ISP.
Server IP
Enter the L2TP server IPv4 address as assigned by your ISP.
Username
Enter your ISP-assigned user name. Do not use these characters: ` " & ' # \
34 WAN configuration
Page 35

DDNS
Password
Enter your password (usually assigned by your ISP). Do not use these characters: ` " & ' # \
Confirm Password
Enter the password again to confirm it.
Idle Time
Select the number of minutes to elapse without activity before the L2TP connection is
disconnected. Or, you can leave the default setting of Always On so that the connection is
kept open regardless of any activity. (Options: 1, 2, 5, 10, 30, 120 minutes and Always On)
DHCP Enable
Enables DHCP for the dynamic assignment of the WAN IP address from the ISP. You can click
Release and Renew to refresh the DHCP assignment. If you disable DHCP, enter the static
IPv4 address, subnet mask, gateway address, as well as primary and secondary DNS server
addresses, as provided by the ISP.
Dynamic DNS (DDNS) is a system for allowing an Internet domain name to be associated with
an IP address that can change. This makes it possible for other sites on the Internet to establish
connections to the server without needing to track the IP address themselves. A common use is
for running server software on a computer that has a dynamic IP address (for example, a DSL
service where the address is frequently changed by the ISP). To implement Dynamic DNS, you
must set the maximum caching time of the domain to a short period (typically a few minutes).
This prevents other sites on the Internet from retaining the old address in their cache, so that
they have to contact the name server of the domain for each new connection. Some client
programs operate in the background and check the IP address of the computer every few
minutes. If it has changed, it then sends an update request to the service.
The router provides pre-configured settings to commonly used DDNS services, such as
www.dyndns.org, zoneedit, noip, DtDNS, or 3322.org. You should first register with a DDNS
service and obtain an account. This is for users with a dynamic IP from their ISP or DHCP server
that would still like to have a domain name. The Dynamic DNS service provider provides a
password or key to be entered here.
DDNS 35
Page 36

Configure DDNS parameters as follows:
Enable DDNS
Select to enable Dynamic DNS support.
DDNS Server
Enter the name of your Dynamic DNS service provider.
Domain Name
Enter the name of your host domain.
Username
Enter the user name assigned by your DDNS service. Do not use these characters: ` " & ' # \
Password
Enter your password. Do not use these characters: ` " & ' # \
Confirm Password
Enter the password again to confirm it.
MAC clone
Some ISPs limit Internet connections to the MAC address of a specific computer. This setting
allows you to manually change the MAC address of the router’s WAN interface to match the
MAC address of the computer that was originally registered with your ISP. If you are unsure of
the MAC address originally registered by your ISP, call your ISP and request to register the
default MAC address of the router’s WAN port.
You can enter the registered MAC address by manually entering it in the boxes provided.
Otherwise, connect the computer with the registered MAC address to the router, and select the
computer’s name from the Use Client List. Click Save. The computer’s MAC address is now
copied to the router’s WAN interface.
To restore the default MAC address to the WAN port, click Reset.
36 WAN configuration
Page 37

5 LAN configuration
The HP R110/R120 router is equipped with a DHCP server that automatically assigns IP
addresses to each computer on your network. The factory default settings for the DHCP server
work with most applications. If you need to make changes to the settings, the LAN setting
pages allow you to:
• Change the default IP address of the router.
• Configure VLANs.
• Enable the DHCP server feature for each VLAN.
• Enable NAT features for each VLAN.
• Enable IGMP Snooping and IGMP Proxy for each VLAN.
• Enable the DHCP Relay feature.
• Enable Spanning Tree support.
Viewing LAN interface status
The Status page displays the current status of LAN related features, including IP settings and
VLAN configuration.
Page 38

This page includes the following information:
LAN
Displays current settings for the LAN port.
• MAC address: The Ethernet base MAC address of the router.
• IP address: The address of the router.
• Subnet mask: The subnet mask for the IP address.
• DHCP Server: The status of the DHCP server for the default VLAN.
• IGMP Proxy: The status of the IGMP Proxy feature for the default VLAN
• IGMP Snooping: The status of the IGMP Snooping feature for the default VLAN
STP
Displays Spanning Tree Protocol information. For more information, see “Spanning Tree” on
page 40
.
• Version: Indicates if the Spanning Tree Protocol (STP) or Rapid Spanning Tree Protocol
(RSTP) are enabled for the default VLAN.
• Root Port: The port on the router that is connected to the Spanning Tree root device. If
there is no root port, then this router has been accepted as the root device of the Spanning
Tree network.
• Root MAC Address: The MAC address of the root device in the Spanning Tree network.
• LAN1–LAN4: Displays the state of the router’s port interfaces in the Spanning Tree
network; Disabled, Learning, Forwarding, or Blocking.
VLAN
The table includes all VLANs currently configured on the router.
LAN Settings
The router must have a valid IP address for management using a web browser and to support
other features. The router has a default IP address of 192.168.1.1. You can use this IP address or
assign another address that is compatible with an existing local network.
Default VLAN settings
The IP Address on the Settings page is the IP address of the default VLAN. To access the web
interface, enter this IP address into the address bar of your web browser. This address can be
changed if needed. To change the IP address, enter the new IP address and click Save. The IP
address you choose should be a private IP.
Examples of a private IP are:
192.168.x.x (where x is a number between 0 and 255)
10.x.x.x (where x is a number between 0 and 255)
38 LAN configuration
Page 39

This page includes the following settings:
IP Address
The IPv4 address of the router for the default VLAN.
Subnet Mask
Only change the subnet mask if you have a specific reason to do so.
Enable DHCP Server
The Dynamic Host Configuration Protocol (DHCP) server feature automatically assigns IP
addresses to each computer on a VLAN. The DHCP server can be turned off if necessary.
Turning off the DHCP server requires you to manually set static IP addresses for each computer
on the VLAN.
IP Pool Starting/Ending Address
The IP pool is the range of IP addresses set aside for dynamic assignment to the computers on
the VLAN. The default range is 2 to 254 (253 computers). You can enter new starting and
ending IP addresses for the VLAN IP pool, or click Auto IP Range to automatically set a valid
range of addresses.
Lease Time
The length of time the DHCP server reserves an IP address for each computer on the VLAN.
VLAN ID
The ID number for the default VLAN. The default VLAN ID is 1. For more information on
configuring VLANs, see
“VLAN settings” on page 41.
DHCP relay
Dynamic Host Configuration Protocol (DHCP) can dynamically allocate IP addresses and other
configuration information to network clients that broadcast a request. To receive broadcast
requests, a DHCP server would normally have to be in the same broadcast domain (VLAN) as
the clients. However, when the router's DHCP relay feature is enabled, the received client
requests can be forwarded directly by the router to a specified DHCP server on another
broadcast domain (VLAN). Responses from the DHCP server are returned to the router, which
then broadcasts them back to clients.
LAN Settings 39
Page 40

Spanning Tree
The Spanning Tree Protocol (STP) can be used to detect and disable network loops, and to
provide backup links between switches and routers. Enabling STP allows the router to interact
with other STP-compliant switches and routers on the network to ensure that only one route
exists between any two stations on the network, and provide backup links which automatically
take over when a primary link goes down. The router supports STP (IEEE 802.1D) and Rapid
STP (IEEE 802.1w).
• Spanning Tree Protocol: STP uses a distributed algorithm to select a switch or router that
serves as the root of the spanning tree network. It selects a root port on each device (except
for the root device) that incurs the lowest path cost when forwarding a packet from that
device to the root device. Then it selects a designated device from each LAN that incurs the
lowest path cost when forwarding a packet from that LAN to the root device. All ports
connected to designated devices are assigned as designated ports. After determining the
lowest cost spanning tree, it enables all root ports and designated ports, and disables all
other ports. Network packets are therefore only forwarded between root ports and
designated ports, eliminating any possible network loops.
Once a stable network topology has been established, all devices listen for Hello BPDUs
(Bridge Protocol Data Units) transmitted from the root device (Root Bridge). If a device does
not get a Hello BPDU after a predefined interval (Maximum Age), the device assumes that
the link to the Root Bridge is down. This device will then initiate negotiations with other
devices to reconfigure the network to re-establish a valid network topology.
• Rapid Spanning Tree Protocol: RSTP is designed as a general replacement for the slower,
legacy STP. RSTP achieves much faster reconfiguration (around 1 to 3 seconds, compared
to 30 seconds or more for STP) by reducing the number of state changes before active ports
start learning, predefining an alternate route that can be used when a node or port fails,
and retaining the forwarding database for ports insensitive to changes in the tree structure
when reconfiguration occurs.
Note The router includes some fixed (not configurable) STP parameters, including the Hello Time (set
to 2 seconds) and Forward Delay (set to 4 seconds).
DHCP client list
The DHCP Clients List displays the IP address, host name, MAC address, and client type for
each client that has requested an IP address since the last reboot of the router, and for clients
with static leases.
Click Manual Assignment to reserve the dynamically assigned IP address for a specific
computer as a static lease. A maximum of 32 leases can be defined.
40 LAN configuration
Page 41

VLAN settings
VLANs on the router are organized and controlled by VLAN profiles. Up to four VLAN profiles
can be created. After a new VLAN profile is created, LAN or WLAN interfaces must be added
to the VLAN by changing the VLAN settings of the interfaces. An interface can be a member of
only one VLAN, either tagged or untagged. Add an interface as a VLAN tagged port if any
connected network devices support VLANs, otherwise add the port as untagged. To prevent the
forwarding of traffic between VLANs for security, select Block routing between VLANs.
Note that the default VLAN profile is read-only and cannot be deleted. To create a new VLAN
profile, click Add. To modify or delete a VLAN profile, click the edit or delete icons in the
Action column of each VLAN profile entry. Note that there is no delete icon for the default
VLAN profile because the default VLAN cannot be deleted.
VLAN settings 41
Page 42

On the Add VLAN page, you can set the parameters to configure the behavior of VLANs.
This page includes the following settings:
Name
A text description of the VLAN. Do not use these characters: ` " & ' # \
IP Address
The IP address of the VLAN interface.
Subnet Mask
The subnet mask of the VLAN interface.
Enable NAT
Enables the NAT feature for the VLAN interface.
Enable IGMP Snooping
Enables the feature that blocks unnecessary IP multicast traffic from flooding VLAN ports
without a specific multicast membership. This feature is works by inspecting IGMP join/leave
messages from VLAN ports to update the bridge forwarding database. IGMP Snooping is
extremely useful in saving bandwidth of low-speed interfaces to improve network utilization.
Enable DHCP Server
Enables the automatic assignment of IP addresses to clients on the VLAN.
IP Pool Starting/Ending Address
Sets the IP addresses to use for automatic assignment. You can click Auto IP Range to
automatically set a valid range of pool addresses.
Lease Time
The amount of time a client can use its assigned IP address before requesting for it to be
renewed.
VLAN ID
The ID number of the VLAN.
42 LAN configuration
Page 43

IGMP settings
The Internet Group Management Protocol (IGMP) is a communications protocol used by hosts
and adjacent routers on IP networks to establish multicast group memberships. IGMP can be
used for one-to-many networking applications, such as online streaming video and gaming,
and allows more efficient use of resources when supporting these types of applications.
This page includes the following settings:
Enable IGMP Proxy
IGMP proxy actively filters IGMP packets in order to reduce the load on the multicast router.
Join and leave messages heading upstream to the router are filtered so that only the minimal
quantity of information is sent.
Enable IGMP Snooping
IGMP snooping is the process of listening to Internet Group Management Protocol (IGMP)
network traffic. The feature allows a network switch to monitor the IGMP conversation between
hosts and routers. By monitoring these conversations, the switch maintains a map of which links
need which IP multicast streams. Multicast traffic can be filtered from the links that do not need
them, and thus control the ports that receive specific multicast traffic.
IGMP settings 43
Page 44

44 LAN configuration
Page 45

6 Wireless configuration
The wireless settings section displays configuration settings for the access point functionality of
the router. The sections include configuration options for radio signal characteristics, wireless
security features, Wireless Distribution System (WDS), Wi-Fi Protected Setup (WPS), Wi-Fi
Multimedia (WMM), and MAC authentication.
The R110 router features a single dual-band radio for 2.4 GHz or 5 GHz operation. The R120
router features two radios, one for 2.4 GHz and one for 5 GHz operation. This means that the
R110 can operate at 2.4 GHz or 5 GHz, but not both at the same time. The R120 can operate
concurrently at 2.4 GHz and 5 GHz.
The R110 router has a single configuration page for 2.4 GHz or 5 GHz operation. The R120
router has separate configuration pages for 2.4 GHz and 5 GHz operation.
Note The router supports a maximum of 64 wireless clients per radio.
Viewing wireless interface status
The Status page displays the current status of radio settings, including operating frequency,
mode, and channel, as well as specific SSID settings.
Note The web interface examples in this chapter show the R110, the web pages for the R120 are
slightly different.
Page 46

This page includes the following information:
Wireless
Displays the basic radio settings and the status of other features.
• Radio: Displays the status of the router’s radio.
• Operating Frequency: (Applies to the R110 only) Shows if the radio is operating at
2.4 GHz or 5 GHz.
• Mode: The current radio mode.
• Channel: The current operating channel.
• WMM: Displays the status of the WMM feature.
• WMM Power Save: Displays the status of the WMM power save feature.
• Radio ON/OFF Schedule: Shows if a defined time schedule is set for the radio.
VAP1
Displays the settings and feature status for the primary Virtual Access Point (VAP) interface. If
other VAP interfaces are enabled (VAP2 to VAP4), they are also listed.
• SSID: The service set identifier, or network name, of the VAP interface.
• MAC Address: The physical layer address of the VAP interface.
• Authentication Mode: The wireless security method configured for the VAP.
• Encryption Type: The data encryption configured for the VAP.
• WPS: Indicates if WPS is enabled for the VAP.
• WDS: Indicates if WDS is enabled for the VAP.
Basic wireless settings
The basic wireless settings allow you to turn the router’s wireless feature on or off, and set up
basic wireless settings for radio signal characteristics and wireless security features.
46 Wireless configuration
Page 47

This page includes the following settings:
Enable Radio
Enables the wireless section of your LAN. When disabled, no wireless clients can have access
to either the Internet or other clients on your wired or wireless LAN.
Radio Band
(Applies to the R110 only.) Allows you to select the band of your wireless network. The R110 can
operate in the 2.4 GHz band (for 802.11b/g/n) or the 5 GHz band (for 802.11a/n). The R110
does not support concurrent operation at 2.4 GHz and 5 GHz.
Radio Mode
For 2.4 GHz, the R110 and R120 support the 802.11b, 802.11g, and 802.11n wireless
standards. This option allows you to select whether the router will operate in 802.11b/g mode,
802.11b/g/n mode, or 802.11n mode only.
For 5 GHz, the R110 supports the 802.11a and 802.11n wireless standards. This option allows
you to select whether the router will operate in 802.11a only mode, 802.11n only mode, or
802.11a/n mode. The R120 also supports the 802.11ac wireless standard and allows the
selection of an 802.11ac/n/a operating mode.
Select a 2.4 GHz radio mode for the R110 and R120.
• 11b/g Mixed: Up to 11 Mbps for 802.11b and 54 Mbps for 802.11g.
• 11b/g/n Mixed: Up to 11 Mbps for 802.11b, 54 Mbps for 802.11g, and 450 Mbps for
802.11n. If support for 802.11b/g is not required, it is recommended that you choose the
802.11n-only mode.
Basic wireless settings 47
Page 48

• 11 n o n l y : Up to 450 Mbps.
Select a 5 GHz radio mode for the R110 .
• 11 a o n l y : Up to 54 Mbps.
• 11 n o n l y : Up to 450 Mbps.
• 11a/n Mixed: Up to 450 Mbps for 802.11n and 54 Mbps for 802.11a.
Select a 5 GHz radio mode for the R120.
• 11 a o n l y : Up to 54 Mbps.
• 11 n o n l y : Up to 450 Mbps.
• 11a/n Mixed: Up to 450 Mbps for 802.11n and 54 Mbps for 802.11a.
• 11ac/n/a: Up to 1.3 Gbps.
Channel
To change the wireless channel that the router uses, select the required channel from the
Channel list. When you select Auto, the router searches and selects a channel with the least
amount of interference. Click Save to save the setting.
Current Channel
When the channel setting is Auto, this displays the automatically selected channel number.
Bandwidth
The bandwidth used by a single channel is 20 MHz. When two channels are bonded, the total
bandwidth is 40 MHz. It is possible to use either 20 MHz or 40 MHz channels with 802.11n.
• 20 MHz: The bandwidth used by a single channel is 20 MHz.
• 20/40 MHz: When two channels are bonded, the total bandwidth is 40 MHz.
• 20/40/80 MHz: (Applies to 802.11ac setting for the R120) When two 40 MHz channels
are bonded, total bandwidth is 80 MHz.
Enable Schedule Rules
Implements a defined time schedule to start and stop the wireless network. Click Add to add
the schedule to the rules table. A maximum of 10 rules can be defined.
• Rules Name: Select the name of a configured schedule from the list. The schedule rules
are configured on the Tools > Scheduling page.
• Comment: Enter a text comment to describe the schedule rule.
Configuring virtual access point interfaces
The router supports up to four virtual access point (VAP) interfaces per radio; a total of four for
the R110 and eight for the R120. One VAP is the primary (with default SSID HP1 for R110), and
the others can be enabled if required. Each VAP essentially functions as a separate access
point, and can be configured with its own Service Set Identifier (SSID) and security settings.
Wireless clients associate with these VAPs the same as they would with separate physical
access points. This allows access to specific VAPs to be based on certain user groups or
application traffic.
48 Wireless configuration
Page 49

The VAP table includes the following settings:
Enable
Enables a VAP interface. By default, only the primary VAP interface is enabled, but up to four
VAP interfaces can be enabled and configured on the R110. The R120 supports four VAPs per
radio, for a total of eight VAPs.
SSID
The SSID is equivalent to the wireless network name and it can be changed if needed. The SSID
can contain any standard letters and should be a maximum of 32 characters in length. If there
are other wireless networks in your area, you need to give your wireless network a unique
name. Enter a new name in the SSID box and click Save to make the change.
Station Isolation
This feature prevents wireless clients associated to the same VAP interface (SSID) from
communicating with one another. When enabled, wireless clients associated with the same
VAP can only communicate with the Internet, LAN, and wireless clients on other VAPs.
Broadcast
By default, the router always broadcasts SSIDs in its beacon signal. When disabled, the router
does not include SSIDs in beacon messages, nor does it respond to probe requests from clients
that do not include a valid SSID. Disabling the SSID broadcast increases security of the network
because wireless clients need to know the SSID before attempting to connect to the network. If
you decide to disable the SSID broadcast, ensure that your clients know the name of the
network first.
Encryption
Click the edit icon for a VAP interface to configure security settings. The settings are displayed
below the table. See the following section for more information on wireless security settings.
Configuring wireless security
The router’s wireless interface is configured by default as an open system, which broadcasts a
beacon signal including the configured SSID. Wireless clients can read the SSID from the
beacon and automatically connect to the wireless network. To implement wireless security, you
need to employ authentication, which verifies users connecting to the network, and traffic
encryption, to protect transmitted data from interception and eavesdropping.
The router supports a number of security mechanisms that provide various levels of
authentication and encryption, depending on the requirements of the network.
Basic wireless settings 49
Page 50

MAC Authentication
You can control access to the wireless network based on the MAC address of a user’s wireless
device. You can either block access or allow access, depending on your requirements.
Select whether to disable MAC authentication, use a MAC authentication list stored locally on
the router, or use a list stored on a RADIUS server. If local MAC authentication is selected,
configure your MAC address list on the Wireless > MAC Authentication page. See “MAC
authentication settings” on page 71
.
Note MAC authentication occurs after all other authentication methods have been applied.
Authentication Mode and Encryption Type
Using authentication and encryption can help keep your network secure. Encryption works on a
system of keys, where the key on a computer must match the key on the router. The router
supports a number authentication and encryption methods. When an authentication mode is
selected from the list, only the valid encryption types can be selected and all other available
configuration options, if any, are displayed.
The router provides the following Authentication Mode options:
• Open: Allows a client to associate with the router without any authentication, but provides
the option of using WEP for encrypting data. If WEP encryption is used, clients must have
the correct WEP key to exchange traffic with the router. Selecting WEP encryption also
provides the option of using 802.1X for user authentication from a RADIUS server, which
dynamically generates WEP keys and distributes them to all clients.
For WEP settings, see
For RADIUS settings, see “Configuring RADIUS settings” on page 56.
“WEP security” on page 51.
• WPA2: The Enterprise mode of WPA2 using AES encryption. If all clients in the network
are WPA2 compatible, select this option for maximum security. This mode requires the use
of a RADIUS server. See
“WPA2” on page 52.
• WPA2-PSK: The Personal (pre-shared key) mode of WPA2 using AES encryption. The
pre-shared key mode uses a common password phrase for user authentication that is
manually entered on the router and all wireless clients. Data encryption keys are
automatically generated by the router and distributed to all clients connected to the
network. See
“WPA2-PSK” on page 53.
50 Wireless configuration
Page 51

• WPA/WPA2 Enterprise: The WPA2 Enterprise mode for mixed clients, that is, when
there are some wireless clients in the network that support only WPA (TKIP encryption). This
setting enables both WPA and WPA2 clients to associate and authenticate, but uses the
more robust AES encryption (WPA2) for clients that support it. This option allows more
interoperability at the expense of some security. This mode requires the use of a RADIUS
server. See
• WPA/WPA2-PSK Mixed: The WPA2 Personal mode for mixed clients, that is, when
there are some wireless clients in the network that support only WPA (TKIP encryption). This
setting enables both WPA and WPA2 clients to associate and authenticate, but uses the
more robust AES encryption (WPA2) for clients that support it. This option allows more
interoperability at the expense of some security. See
page 55
WEP security
Wired Equivalent Privacy (WEP) is the security protocol initially specified in the IEEE 802.11
standard for wireless communications. WEP provides a basic level of security, preventing
unauthorized access to the network, and encrypting data transmitted between wireless clients
and the router. WEP uses static shared keys (fixed-length hexadecimal or alphanumeric strings)
that are manually distributed to all clients that want to use the network. The static WEP security
on the router enables wireless data encryption, but does not provide for user authentication.
WEP is not as secure as the other security methods available.
“WPA/WPA2 enterprise” on page 54.
“WPA/WPA2-PSK mixed” on
.
To configure WEP keys on the router you must first specify the key length and type. You must
configure at least one key, although up to four keys can be entered. Only four WEP keys are
supported for each radio, that is, the four keys are shared by all SSIDs using a static WEP
security configuration. Therefore, you must have a consistent WEP key setup for all SSIDs. Note
that the number of keys, the key index (1-4), type, and length must match those configured on
the clients.
WEP security includes the following settings:
Authentication Mode
Leave as OPEN to configure WEP security. Static WEP security does not support user
authentication.
Encryption Type
Select WEP to display the security options and to configure the keys.
Basic wireless settings 51
Page 52

802.1X
Enables dynamic WEP security on the router. IEEE 802.1X enables you to authenticate wireless
clients via user accounts stored on a third-party RADIUS server. The RADIUS server is also able
to dynamically generate WEP keys and distribute them to all authenticated clients. If you
enable dynamic WEP security, be sure to also configure the RADIUS server settings. See
“Configuring RADIUS settings” on page 56.
Key Length
The number of characters you specify for the key determines the level of encryption.
Key Type
Select the format used to specify the encryption keys. The definition for the encryption keys must
be the same on the router and all wireless clients.
• Hexadecimal (characters 0-9, a-f, and A-F)
• ASCII (characters 0-9, a-z, and A-Z)
Key 1 - 4 String
Enter the encryption keys.
• Hexadecimal: Enter keys as 10 hexadecimal characters (characters 0-9, a-f, and A-F) for
64-bit keys, or 26 hexadecimal characters for 128-bit keys.
• ASCII: Enter keys as 5 alphanumeric characters for 64-bit keys, or 13 alphanumeric
characters for 128-bit keys.
Default Key
You can enter up to four keys (Key 1 to Key 4). Select the number (1 to 4) of the Key String to
use for encryption when transmitting data.
Re-Key Interval
When using 802.1X dynamic WEP keys, enter the interval at which the router refreshes the keys
for each associated client. Specify a value in the range of 60 to 86400 seconds.
Configuring WPA and WPA2 security
Wi-Fi Protected Access (WPA) was introduced as an interim solution for the vulnerability of
WEP, replacing WEP encryption with TKIP. WPA2 includes the complete wireless security
standard (802.11i) and offers backward compatibility with WPA, but uses the stronger AESCCMP encryption. Both WPA and WPA2 provide enterprise and personal modes of operation.
The personal WPA Pre-Shared Key mode uses a common password phrase for user
authentication that is manually entered on the router and all wireless clients. The enterprise
mode of WPA and WPA2 uses IEEE 802.1X for user authentication and requires a RADIUS
authentication server to be configured on the wired network. WPA2 is more secure than WPA
(TKIP) or WEP, therefore HP recommends you select WPA2 for maximum security.
WPA2
The enterprise mode of WPA2 that provides the maximum security. You must set up at least one
configured RADIUS server in your network before enabling WPA2 security.
For RADIUS server settings, see
52 Wireless configuration
“Configuring RADIUS settings” on page 56.
Page 53

WPA2 security includes the following settings:
Authentication Mode
Select WPA2 to display all settings for WPA2 security.
Encryption Type
AES is the specified encryption for WPA2. All wireless clients must be capable of supporting
AES encryption to be able to associate with the router.
Group Key Interval
Enter the interval at which the broadcast (group) key is refreshed for clients associated with this
VAP interface (the default is 3600 seconds). The valid range is 60 to 86400 seconds. Specify
a value of 0 to disable the refreshing of broadcast keys.
Session Key Interval
Enter the interval at which the router refreshes session (unicast) keys for each client associated
with the VAP interface. To enable session key refreshing, specify a value in the range of 60 to
86400 seconds. Specify a value of 0 to disable session key refresh.
WPA2-PSK
If your network does not have a RADIUS server, select the WPA2 pre-shared key (PSK) option.
The WPA2-PSK security option is typically used for home or small business networks.
WPA2-PSK security includes the following settings:
Authentication Mode
Select WPA2-PSK to display all settings for WPA2-PSK security.
Encryption Type
AES is the specified encryption for WPA2-PSK. All wireless clients must be capable of
supporting AES encryption to be able to associate with the router.
Basic wireless settings 53
Page 54

Key Type
The WPA pre-shared key can be input as an ASCII string (an easy-to-remember form of letters
and numbers that can include spaces) or hexadecimal format.
• Hexadecimal: Enter exactly 64 hexadecimal characters (characters 0-9, a-f, and A-F).
• ASCII: Enter 8 to 63 characters (alphanumeric characters 0-9, a-z, and A-Z, plus spaces
and symbols). Permitted symbols include all those that can be typed on a standard English
keyboard, such as ?, ", ‘, $, [, \, /, ], &, +, !, and #.
Passphrase
Enter the key according to the type selected; in ASCII passphrase style (8 to 63 alphanumeric
characters and keyboard symbols), or exactly 64 hexadecimal characters. For an ASCII key, HP
recommends that the key be at least 20 characters long, and be a mix of letters and numbers.
The passphrase key cannot begin or end with spaces.
Group Key Interval
Enter the interval at which the broadcast (group) key is refreshed for clients associated with this
VAP interface (the default is 3600 seconds). The valid range is 60 to 86400 seconds. Specify
a value of 0 to disable the refreshing of broadcast keys.
Session Key Interval
Enter the interval at which the router will refresh session (unicast) keys for each client associated
with the VAP interface. To enable session key refreshing, specify a value in the range of 60 to
86400 seconds. Specify a value of 0 to disable session key refresh.
WPA/WPA2 enterprise
If you have a mix of wireless clients, some of which support WPA2 (AES) and others which
support only the original WPA (TKIP), select the WPA/WPA2 Enterprise security mode. This
setting enables both WPA and WPA2 wireless clients to associate to the router, but uses the
more robust WPA2 for clients that support it. This security option allows more interoperability,
at the expense of some security.
You must set up at least one configured RADIUS server in your network before enabling WPA/
WPA2 security. For RADIUS server settings, see
“Configuring RADIUS settings” on page 56.
WPA/WPA2 security includes the following settings:
Authentication Mode
Select WPA/WPA2 Enterprise to display all settings for mixed WPA/WPA2 security.
54 Wireless configuration
Page 55

Encryption Type
The TKIP/AES type is the only encryption available for mixed WPA/WPA2 security. In mixed
mode, the unicast encryption (TKIP or AES) is negotiated for each client as they associate with
the network.
Group Key Interval
Enter the interval at which the broadcast (group) key is refreshed for clients associated with this
VAP interface (the default is 3600 seconds). The valid range is 60 to 86400 seconds. Specify
a value of 0 to disable the refreshing of broadcast keys.
Session Key Interval
Enter the interval at which the router refreshes session (unicast) keys for each client associated
with the VAP interface. To enable session key refreshing, specify a value in the range of 60 to
86400 seconds. Specify a value of 0 to disable session key refresh.
WPA/WPA2-PSK mixed
If your network does not have a RADIUS server, and you need to support a mix of wireless
clients, some of which support WPA2 (AES) and others which support only the original WPA
(TKIP), select the WPA/WPA2-PSK security option. The WPA/WPA2-PSK option is typically
used for home or small business networks.
This setting enables both WPA and WPA2 wireless clients to associate to the router, but uses
the more robust WPA2 for clients that support it. This security option allows more
interoperability, at the expense of some security.
WPA/WPA2-PSK security includes the following settings:
Authentication Mode
Select WPA/WPA2-PSK Mixed to display all settings for WPA/WPA2-PSK security.
Encryption Type
The TKIP/AES type is the only encryption available for mixed WPA/WPA2 security. In mixed
mode, the unicast encryption (TKIP or AES) is negotiated for each client as they associate with
the network.
Key Type
The WPA/WPA2 pre-shared key can be input as an ASCII string (an easy-to-remember form of
letters and numbers that can include spaces) or Hexadecimal format.
• Hexadecimal: Enter exactly 64 Hexadecimal characters (characters 0-9, a-f, and A-F).
• ASCII: Enter 8 to 63 characters (alphanumeric characters 0-9, a-z, and A-Z, plus spaces
and symbols). Permitted symbols include all those that can be typed on a standard English
keyboard, such as ?, ", ‘, $, [, \, /, ], &, +, !, and #.
Basic wireless settings 55
Page 56

Passphrase
Enter the key according to the type selected; in ASCII passphrase style (8 to 63 alphanumeric
characters and keyboard symbols), or in exactly 64 Hexadecimal characters. For an ASCII key,
HP recommends that the key be at least 20 characters long, and be a mix of letters and
numbers. The passphrase key cannot begin or end with spaces.
Group Key Interval
Enter the interval at which the broadcast (group) key is refreshed for clients associated with this
VAP interface (the default is 3600 seconds). The valid range is 60 to 86400 seconds. Specify
a value of 0 to disable the refreshing of broadcast keys.
Session Key Interval
Enter the interval at which the router refreshes session (unicast) keys for each client associated
with the VAP interface. To enable session key refreshing, specify a value in the range of 60 to
86400 seconds. Specify a value of 0 to disable session key refresh.
Configuring RADIUS settings
Remote Authentication Dial-in User Service (RADIUS) is an authentication protocol that uses
software running on a central server to control access to RADIUS-aware devices on the
network. An authentication server contains a database of user credentials for each user that
requires network access.
When using WPA2 or WPA/WPA2 enterprise security, both of which use 802.1X as the
method of user authentication, or WEP with 802.1X, a RADIUS server must be configured and
available on the connected wired network.
The RADIUS server configuration includes the following settings:
Primary RADIUS Server
Enter the IPv4 address for the primary RADIUS server that the router uses by default. For
example: 192.168.1.23.
RADIUS Key
The RADIUS key is the shared secret key for the RADIUS server. You can use up to 64
alphanumeric and special characters. Do not use these characters: ` " & ' # \
Do not use blank spaces in the key. The key is case-sensitive, and you must configure the same
key on the router and on the RADIUS server.
Secondary RADIUS Server
Enter the IPv4 address for a backup RADIUS server. If authentication fails with the primary
server, the configured backup server is tried instead. If a secondary RADIUS server is
configured, be sure to enter the RADIUS key.
56 Wireless configuration
Page 57

Accounting Enable
Select this option to track and measure the resources a particular user has consumed, such as
system time, amount of data transmitted and received, and so on. If you enable RADIUS
accounting, it is enabled for the primary and secondary RADIUS servers.
Interim Interval
The interval between transmitting accounting updates to the RADIUS server. The valid range is
30 to 3600 seconds and the default is 300 seconds.
Advanced wireless settings
The Advanced wireless settings page includes additional parameters concerning the wireless
network.
This page includes the following settings:
Beacon Interval
The Beacon Interval value indicates the frequency interval of the beacon. A beacon is a packet
broadcast by the router to synchronize the wireless network.
DTIM Interval
The DTIM Interval indicates the interval of the Delivery Traffic Indication Message (DTIM). A
DTIM field is a countdown field informing clients of the next window for listening to broadcast
and multicast messages. When the router has buffered broadcast or multicast messages for
associated clients, it sends the next DTIM with a DTIM Interval value. Its clients hear the
beacons and awaken to receive the broadcast and multicast messages. The DTIM value is
decremented every time a beacon is sent at the beacon interval.
RTS Threshold
Sets the packet size threshold at which a Request to Send (RTS) signal must be sent to a
receiving station prior to the sending station starting communications. The router sends RTS
frames to a receiving station to negotiate the sending of a data frame. After receiving an RTS
frame, the station sends a CTS (clear to send) frame to notify the sending station that it can start
sending data.
Advanced wireless settings 57
Page 58

If the RTS threshold is set to 256, the router always sends RTS signals. If set to 2347, the router
never sends RTS signals. If set to any other value, and the packet size equals or exceeds the RTS
threshold, the RTS/CTS (Request to Send / Clear to Send) mechanism will be enabled. The
stations contending for the wireless medium may not be aware of each other. The RTS/CTS
mechanism can solve this Hidden Node Problem.
Short Guard Interval
This setting is available only if the selected radio mode includes 802.11n.
The 802.11n standard specifies two guard intervals: 400ns (short) and 800ns (long). Support
of the 400ns interval is optional for transmit and receive. The guard interval is the dead time, in
nanoseconds, between symbols (or characters) transmitted by the AP. The guard interval helps
distinguish where one symbol transmission stops and another starts, thereby reducing intersymbol interference. Enabling the Short Guard Interval improves throughput and is
recommended.
802.11g Protection Mode
Enables a backward compatible protection mechanism for 802.11g and 802.11b clients. The
802.11 standard provides a way to protect transmission against other device transmission by
using the RTS/CTS protocol. There are two types of protection:
• CTS to Self: The AP that wants to send a frame sends a CTS frame to itself.
• RTS/CTS: The AP that wants to send frame first sends a Request-To-Send frame and waits
for a Clear-To-Send frame from the intended destination. By seeing the RTS or CTS frames,
802.11-compliant devices know that somebody is about to transmit and therefore do not
initiate transmission themselves.
Extension Channel Protection Mode
With 802.11n, there is the option to use a 40 (2x20) MHz bandwidth to double the data rate.
One is the primary channel, and the other is the extension channel. The primary channel is
used for communications with clients incapable of the 40 MHz mode. If the extension channel
is used, the 802.11 standard provides a way to protect transmission against other device
transmission by using the RTS/CTS protocol. There are two types of protection:
• CTS to Self: The AP that wants to send a frame sends a CTS frame to itself.
• RTS/CTS: The AP that wants to send frame first sends a Request-To-Send frame and waits
for a Clear-To-Send frame from the intended destination. By seeing the RTS or CTS frames,
802.11-compliant devices know that somebody is about to transmit and therefore do not
initiate transmission themselves.
Preamble Mode
Sets the length of the signal preamble that is used at the start of a data transmission. Using a
short preamble increases data throughput when it is supported by all connected clients. Using
a long preamble ensures that 802.11b clients can connect to the network. (Default: Auto)
Max TX Power
Adjusts the power of the radio signals transmitted from the router. The higher the transmission
power, the farther the transmission range. Power selection is not just a tradeoff between
coverage area and maximum supported clients. You also have to ensure that high-power
signals do not interfere with the operation of other radio devices in the area. (Range Percentage mode: min, 12.5%, 25%, 50%, 100%; Default: 100%)
58 Wireless configuration
Page 59

WDS settings
Wireless community
File server
computers
WDS
Wireless link
Employee
Main office area Warehouse
Wireless community
R110/R120
#1
R110/R120
#2
The R110/R120 supports WDS (Wireless Distribution System). WDS enables one or more
access points to rebroadcast received signals to extend the range and reach of the wireless
network, although this can affect the overall throughput of data.
Note that WDS implementations can vary from product to product. Hence, there is no
guarantee that different products will interoperate. In addition, the security settings for WDS
links are the same as those set up for your wireless clients.
Key concepts
WDS links provide an effective solution for extending network coverage in situations where it is
impractical or expensive to run cabling. Each R110/R120 can create one WDS link on each
VAP interface, or up to four WDS links per radio. For example, in the following figure, R110/
R120 #1 and R110/R120 #2 use the WDS on one VAP interface to create a wireless link
between the main office network and a small network in a warehouse, while also supporting
local wireless communities on another VAP interface:
Simultaneous AP and WDS support
The R110/R120 simultaneously supports wireless communities and one or more WDS links.
Although this offers flexibility, note that the total available bandwidth on the radio is shared
between all WDS links and wireless users. This can result in reduced throughput if high volumes
of traffic are being sent by both wireless users and the WDS links.
Using the 5 GHz band for WDS links
When the R110/R120 uses WDS only to extend the network by providing a dedicated link to
another R110/R120 (that is, it does not simultaneously provide a wireless network for wireless
clients), HP recommends that, whenever possible, the WDS links use 802.11a, 802.11n, or
802.11ac in the 5 GHz band. This optimizes throughput and reduces the potential for
interference, as follows:
• Most Wi-Fi clients support 802.11b/g/n in the 2.4 GHz band, this frees the 5 GHz band
for other applications such as WDS.
WDS settings 59
Page 60

• Channels in the 5 GHz band are non-overlapping.
• Assuming an optimal implementation, 802.11a supports up to 54 Mbps, 802.11n supports
up to 450 Mbps, and 802.11ac supports up to 1.3 Gbps, providing a high-bandwidth link
for traffic exchange.
Configuration considerations
The following guidelines apply when you create a WDS link between two or more R110/
R120s:
• The 5 GHz band has a shorter reach when compared to the 2.4 GHz band. This could be
a factor depending on the distance of your WDS link span.
• All radios configured for WDS must be set to the same channel. This means that on the
Wireless > Basic page under Channel, you cannot select Auto.
• The Ethernet ports for all R110/R120s must be connected to the same subnet, and each
R110/R120 must have a unique IP address.
• If WPA (PSK) security is enabled, the same link name and key must be defined on both
R110/R120s that are linked by the WDS connection.
• IEEE 802.11n uses frame aggregation, whereby multiple frames are combined into one to
reduce overhead and increase throughput. WEP-encrypted frames are not aggregated,
however, so enabling WEP security over WDS will result in reduced throughput.
• Although the R110/R120 can support up to four WDS links per radio, only one wireless link
can be defined between any two R110/R120s.
• One VAP interface in a WDS link must be configured in parent (access point) mode, and
the VAP interface at the other end of the link configured in child (station) mode.
• HP recommends setting the R110/R120 (the parent interface) that is connected to the main
network and has Internet access to Router mode, and other R110/R120s (the child
interfaces) connected through WDS links to Bridge mode.
WDS configuration
The WDS settings page includes parameters for configuring WDS links on specified VAP
interfaces.
60 Wireless configuration
Page 61

This page includes the following settings:
VAP
The VAP interface number on the router.
WDS Mode
Enables and sets the WDS operating mode for the VAP interface.
• Disable: WDS is disabled for the VAP interface. The VAP interface operates as a normal
access point service for wireless clients.
• WDS-AP: The VAP interface is the access point, or parent, in a WDS link. The VAP
interface only associates with a VAP interface on another R110/R120 that is using the same
SSID and is set to WDS-STA mode.
• WDS-STA: The VAP interface is the station in a WDS link. The VAP interface only
associates with a VAP interface on another R110/R120 that is using the same SSID and is
set to WDS-AP mode.
Parent SSID
The SSID of the WDS link. The VAP interface associates with another R110/R120 VAP interface
using this SSID.
Parent MAC
For WDS-STA mode, optionally enter the MAC address of the parent VAP interface (set to
WDS-AP mode) with which the VAP interface should associate. Typically, a VAP interface in
WDS-STA mode automatically associates with the parent SSID that is in range. If more than one
parent with the same SSID is in range, the MAC address of the intended VAP interface can be
specified. The MAC addresses for configured VAP interfaces are listed on the Wireless >
Status page (see
“Viewing wireless interface status” on page 45).
Authentication Mode and Encryption Type
Only Open, WEP, and WPA2-PSK are available for WDS link security. For information on
setting wireless security for WDS links, see
page 50
. HP recommends using WPA2-PSK for wireless security on WDS links. Make sure
“Authentication Mode and Encryption Type” on
the same encryption Key Type and Passphrase are configured at each end of a WDS link.
WDS settings 61
Page 62

Example of a WDS Deployment
File server
Wireless links
WDS
192.168.5.10
5.1
5.15
5.16
192.168.5.20
5.21 5.22
192.168.5.30
192.168.5.40
R110 #1 (Router mode)
VAP 1
WDS mode = WDS-AP
SSID = HP12
VAP 2
WDS mode = WDS-AP
SSID = HP13
R110 #2 (Bridge mode)
VAP 1
WDS mode = WDS-AP
SSID = HP22
VAP 2
WDS mode = WDS-STA
SSID = HP12
Wireless community
Wireless community
R110 #4 (Bridge mode)
VAP 2
WDS mode = WDS-STA
SSID = HP13
VAP 1
SSID HP41
VAP 1
SSID HP31
R110 #3 (Bridge mode)
VAP 2
WDS mode = WDS-STA
SSID = HP22
5.31
5.32
5.42
5.41
SSID HP13
SSID HP12
SSID HP22
This example shows you how to create WDS wireless links between physically separate
network segments.
General Information
The following is assumed for the example provided:
• For initial configuration, R110 #1, R110 #2, R110 #3, and R110 #4 are all placed at the
same location, such as on a desktop, where they are not connected to any network. After
completing configuration of all routers, R110 #1 is installed on the main network. After
configuration, R110 #2, R110 #3, and R110 #4 serve remote networks.
• For configuration, HP recommends making a wired connection from a computer directly to
each router, one at a time.
• R110 #1 is configured in Router mode and its DHCP server is enabled. R110 #2, R110 #3,
and R110 #4 are in Bridge mode with their DHCP servers disabled.
• HP recommends to preconfigure each router with a static IP address following the
instructions provided in the HP R100-Series Wireless VPN Routers Quickstart.
The IP address of each router is required to launch the web-based management interface to
configure each router.
• After WDS configuration, routers can be set for static or dynamic IP address assignment
before installation at their intended locations.
62 Wireless configuration
Page 63

Setting up WDS links
Follow these procedures to configure each router for this example. It is assumed that all routers
are set to factory defaults.
Note The details included for R110 #1 configuration are not repeated for R110 #2, R 110 #3, or
R110 #4 configuration unless there is a significant difference.
Configure R110 #1
1. Connect your computer to one of the router’s LAN ports and access the web management
interface using the default IP address 192.16 8 .1.1.
See instructions provided in the HP R100-Series Wireless VPN Routers Quickstart.
2. Set a static IP address for the router.
Select LAN > Settings. Set the IP address to 19 2.168. 5.10, the IP Pool Starting Address
to 19 2.168 .5.11, and the IP Pool Ending Address to 192 .168. 5.25 4.
Click Save, and then restart the web browser session using the IP address 19 2.168. 5.10.
3. Select a common operating channel.
For routers to communicate, they must all transmit and receive on the same channel. Select
Wireless > Basic. Select the radio band and select a channel that is unlikely to interfere
with other devices in nearby networks.
Note The HP R120 has separate wireless settings for the 2.4 GHz and 5 GHz bands.
WDS settings 63
Page 64

4. Set a common SSID for each WDS link.
To establish a WDS link, you must assign a common wireless community name (SSID) for a
VAP interface on both routers. To configure SSIDs for R110 #1, select Wireless > Basic,
enable the first two VAP interfaces, and set the SSIDs as follows:
• VAP 1 to HP12 (for WDS link with R110 #2)
• VAP 2 to HP13 (for WDS link with R110 #4)
5. Enable WDS Mode for the VAP interfaces.
Select Wireless > WDS. For R110 #1 VAP interfaces, set the WDS Mode as follows:
• Set VAP 1 to WDS-AP.
• Set VAP 2 to WDS-AP.
Note The Parent SSID settings do not need to be changed on the WDS page, the SSIDs have
already been configured in step 4.
Configure R110 #2
1. Connect your computer to one of the router’s LAN ports and access the web management
interface using the default IP address 192.16 8 .1.1.
2. Set the System Mode.
For R110 #2, HP recommends setting the operation mode to Bridge. Select System >
Mode. Select the Bridge option and click Save. Wait for the router to reboot in Bridge
mode.
Note Bridge mode disables the DHCP server for a router. For R110 #1, the operation mode is set to
the default Router. In this mode, R110 #1 can connect to the Internet and provide a DHCP
server for the network. If you need to operate other R110/R120 devices in Router mode, be sure
to disable the DHCP server on the LAN > Settings page.
64 Wireless configuration
Page 65

3. Set a static IP address for the router.
Select LAN > Settings. Set the IP address to 192.168.5.20.
Click Save, and then restart the web browser session using the IP address 192 .16 8.5. 20.
4. Select a common operating channel.
Select Wireless > Basic. Select the same radio band and channel as set for R110 #1.
5. Set a common SSID for each WDS link.
To configure SSIDs for R110 #2, se l e c t Wireless > Basic, enable the first two VAP
interfaces, and set the SSIDs as follows:
• Set VAP 1 to HP22 (for WDS link with R110 # 3 ) .
• Set VAP 2 to HP12 (for WDS link with R110 #1) .
6. Enable WDS Mode for the VAP interfaces.
Select Wireless > WDS. For R110 #2 VAP interfaces, set the WDS Mode as follows:
• Set VAP 1 to WDS-AP.
• Set VAP 2 to WDS-STA.
WDS settings 65
Page 66

Note The Parent MAC setting is not used in this example.
Configure R110 #3
1. Connect your computer to one of the router’s LAN ports and access the web management
interface using the default IP address 192.16 8 .1.1.
2. Set the System Mode.
Select System > Mode. For R110 # 3 , select the Bridge option and click Save. Wait for
the router to reboot in Bridge mode.
3. Set a static IP address for the router.
Select LAN > Settings. Set the IP address to 192.168.5.30.
Click Save, and then restart the web browser session using the IP address 192.168.5.30.
4. Select a common operating channel.
Select Wireless > Basic. Select the same radio band and channel as set for R110 #1.
5. Set a common SSID for each WDS link.
To configure SSIDs for R110 #3, select Wireless > Basic, enable the first two VAP
interfaces, and set the SSIDs as follows:
• Set VAP 1 to HP31 (provides an access point service for wireless clients).
• Set VAP 2 to HP22 (for WDS link with R110 # 2 ) .
6. Enable WDS Mode for the VAP interfaces.
Select Wireless > WDS. For R110 #3 VAP interfaces, set the WDS Mode as follows:
• Set VAP 1 to Disable.
• Set VAP 2 to WDS-STA.
Configure R110 #4
1. Connect your computer to one of the router’s LAN ports and access the web management
interface using the default IP address 192.16 8 .1.1.
2. Set the System Mode.
Select System > Mode. For R110 #4, select the Bridge option and click Save. Wait for
the router to reboot in Bridge mode.
3. Set a static IP address for the router.
Select LAN > Settings. Set the IP address to 192.168.5.40.
Click Save, and then restart the web browser session using the IP address 192 .16 8.5. 40.
4. Select a common operating channel.
Select Wireless > Basic. Select the same radio band and channel as set for R110 #1.
66 Wireless configuration
Page 67

5. Set a common SSID for each WDS link.
To configure SSIDs for R110 #4, select Wireless > Basic, enable the first two VAP
interfaces, and set the SSIDs as follows:
• Set VAP 1 to HP41 (provides an access point service for wireless clients).
• Set VAP 2 to HP13 (for WDS link with R110 #1) .
6. Enable WDS Mode for the VAP interfaces.
Select Wireless > WDS. For R110 #4 VAP interfaces, set the WDS Mode as follows:
• Set VAP 1 to Disable.
• Set VAP 2 to WDS-STA.
Test the WDS links
To test the WDS links, select Tools > Ping on R110 #1 and ping the IP addresses of each of
the other routers. If the pings succeed, the WDS links are working.
Enable encryption for the WDS links
HP recommends that you use encryption on WDS links to secure traffic and the network. Both
ends of each WDS link must be configured with the same WPA2-PSK passphrase. However,
different WDS links can use different WPA2-PSK passphrases.
Go to the Wireless > WDS page on each router. For each VAP configured as a WDS link,
click the Authentication Mode drop-down list, and select WPA2-PSK. In the
Passphrase box, enter the same shared key for both ends of each WDS link. If this key is not
the same for both VAPs, they will not be able to communicate or exchange data.
The WPA2-PSK key uses AES encryption. Enter the key according to the type selected; in ASCII
passphrase style (8 to 63 alphanumeric characters), or exactly 64 hexadecimal characters. For
an ASCII key, HP recommends that the key be at least 20 characters long, and be a mix of
letters and numbers. Acceptable characters include upper and lowercase alphabetic letters, the
numeric digits, and special symbols such as @ and #. The passphrase key cannot begin with,
or end with, spaces.
WDS settings 67
Page 68

After configuring encryption for the WDS links, use the ping tool again to test the links.
Install the routers at their locations
If required for your network, modify each router for static or dynamic IP address assignment.
Make sure to save all router configurations before disconnecting the power.
Install the routers at their intended locations.
Use the ping tool again to test the links. Alternatively, connect a laptop to each remote router,
open a browser and browse the network. The remote router provides network connectivity over
the WDS link, if properly configured.
WPS settings
Wi-Fi Protected Setup (WPS) is designed to be a convenient method to securely add new clients
to a wireless network. WPS has two basic modes of operation, Push-button Configuration (PBC)
and Personal Identification Number (PIN). The WPS PIN setup is optional to the PBC setup and
provides more security. You can use this mode by entering a PIN number on the web page.
Alternatively, the WPS button on the back of the router can be pressed to allow a single WPScompliant device to join the network.
This page includes the following settings:
WPS enable
Enables the WPS feature on the router.
Configuration state
Allows the wireless security to be set manually for the router, or selected automatically by WPS.
• Configured: Wireless security is manually set by the user.
68 Wireless configuration
Page 69

• Unconfigured: Wireless security is set automatically by WPS.
Lock
This feature enables you to lock the WPS PIN setting, which prevents it from being changed by
any external WPS registrar. Wireless clients can still be added to the network using the WPS
push-button configuration. It is still possible to manually change the router’s wireless settings.
WPS Method
Selects the WPS method for clients wanting to join the network:
• PIN: Uses the PIN setting method. Make sure the WPS feature has been enabled on the
router. On the client side, start the WPS utility that is provided by your Wi-Fi card’s vendor
and select the PIN method. You should have an 8-digit PIN number with the WPS utility.
Enter the 8-digit PIN number and click Start to activate the PIN method. If the WPS feature
is working correctly, you should see the WPS LED light up.
• PBC: Uses the push-button method. Make sure the WPS feature has been enabled on the
router. On the client side, start the WPS utility that is provided by your Wi-Fi card’s vendor
and select the PBC method. Follow the instructions for your WPS utility. Push the WPS
button on the router; the WPS LED begins blinking. While the LED is blinking, do not push
the button again. If the WPS feature is working correctly, the WPS LED lights up.
Status
Displays the following WPS status information:
• WPS Status: Displays the WPS configured state.
• Lock Status: Displays the PIN lock state.
• Self PinCode: The PIN code of the router.
• SSID: The SSID of the router’s primary VAP interface.
• Authentication Mode: The wireless security mode being used by WPS.
• Pre-shared Key: The security key being used by WPS.
WMM settings
Wi-Fi Multimedia (WMM) is a Wi-Fi Alliance interoperability certification based on the IEEE
802.11e standard. WMM provides basic Quality of service (QoS) features for IEEE 802.11
networks. WMM prioritizes traffic according to four Access Categories (AC), however it does
not provide guaranteed throughput. It is suitable for simple applications that require QoS, such
as Wi-Fi Voice over IP (VoIP) phones.
WMM settings 69
Page 70

This page includes the following settings.
Enable WMM
Select the checkbox to enable the WMM QoS features on the router.
Enable Power Saving
The WMM power save feature enables wireless client devices to extend battery life by going
into a sleep mode between sending and receiving data.
WMM Parameters
The WMM table includes these parameters:
• AC_BK: Access Category - Background. Lowest priority. Data with no delay or throughput
requirement, such as bulk data transfers.
• AC_BE: Access Category - Best Effort. Normal priority, medium delay and throughput.
Data only affected by long delays. Data from applications or devices that lack QoS
capabilities.
• AC_VI: Access Category - Video. High priority, minimum delay. Time-sensitive data such
as streaming video.
• AC_VO: Access Category - Voice. Highest priority, minimum delay. Time-sensitive data
such as VoIP (Voice over IP) calls.
• CWmin: Minimum Contention Window. The initial upper limit of the random backoff wait
time before wireless access can be attempted. The initial wait time is a random value
between zero and the CWMin value. Specify the CWMin value in the range 0-15
microseconds. Note that the CWMin value must be equal or less than CWMax value.
• CWmax: Maximum Contention Window. The maximum upper limit of the random backoff
wait time before wireless access can be attempted. The contention window is doubled after
each detected collision up to the CWMax value. Specify the CWMax value in the range 015 microseconds. Note that the CWMax must be greater or equal to the CWMin value.
• AIFSN: Arbitration Inter-Frame Space Number. The minimum amount of wait time before
the next transmission attempt. Specify the AIFSN value in the range 0-15 microseconds.
70 Wireless configuration
Page 71

• TXOP: Transmit Opportunity. The maximum time an AC transmit queue has access to the
wireless medium. When an AC queue is granted a transmit opportunity, it can transmit
data for a time up to the TXOP. This data bursting greatly improves the efficiency for high
data-rate traffic. Specify a value in the range 0-8192 microseconds.
• ACM: The admission control mode for the access category. When enabled, clients are
blocked from using the access category.
• AckPolicy: Acknowledge Policy. By default, all wireless data transmission requires the
sender to wait for an acknowledge message from the receiver. WMM allows the
acknowledgment wait time to be turned off for each Access Category (AC). Although this
increases data throughput, it can also result in a high number of errors when traffic levels
are heavy.
MAC authentication settings
For a more secure wireless network, you can specify that only certain wireless computers can
connect to the router. Up to 20 MAC addresses can be added to the MAC Filtering Table.
When enabled, all registered MAC addresses are controlled by the access rule.
MAC Authentication is a powerful security feature that allows you to specify which wireless
computers are allowed on the network. By setting the access rule to Allow only stations in
list, any wireless computer attempting to access the network that is not specified in the filter list
is denied access. When you enable this feature, you must enter the MAC address of each client
in your network to allow network access, or copy the MAC address by selecting the name of
the computer from Choose a PC. By setting the access rule to Block all stations in list,
you can block specific wireless computers from accessing the network by adding them to the
filter list. A maximum of 20 rules can be defined.
This page includes the following settings.
Filter
Select Allow only stations in list to configure only known device MAC addresses that are
permitted to access the network. Select Block all stations in list to configure known MAC
addresses that are denied access to the network.
MAC authentication settings 71
Page 72

SSID
Select the VAP interface from the SSID list for which you want to configure MAC
authentication.
MAC Address
Specify a wireless client MAC address to add to the filter table.
Use Client List
Select a wireless client MAC address to add to the filter table from those already associated
with the VAP interface.
Viewing the client list
The Client List page allows you to view all the wireless clients currently associated with the
router. Select the SSID interface from the SSID list to display associated clients.
The table of associated clients lists the MAC address, Receive Signal Strength Indicator (RSSI)
value, wireless mode, and traffic statistics.
72 Wireless configuration
Page 73

7 VPN configuration
The router includes a Virtual Private Network feature to provide a secure link between remote
users and the corporate network by establishing an authenticated and encrypted tunnel for
passing secure data over the Internet. The router supports IPSec, L2TP over IPSec client and
server, and PPTP client and server for security protection. A maximum of five VPN connections
can be enabled.
Viewing VPN status
The Status page displays the current status of VPN connections to the router.
This page includes the following information:
Tunnel type
The tunnel type configured: IPSec, L2TP over IPSec, or PPTP.
Tunnel name
The descriptive name that identifies the configured tunnel.
Tunnel status
Indicates the status of the tunnel.
Page 74

VPN settings
The VPN Settings page allows you to add and edit IPSec, L2TP over IPSec, and PPTP
connections for the router. When creating VPN connections, remember that both ends of the
connection must be configured in the same way.
When you click Add on this page, the VPN connection page opens, enabling connection
details to be configured. The VPN connection details depend on the protocol selected.
Note Adding or modifying VPN configurations causes the router to reset active VPN tunnels. The
router automatically reconnects site-to-site VPN tunnels after the configuration changes are
saved. Client VPN tunnels may require manual reconnection.
IPSec settings
The router supports the IPSec tunneling protocol. It allows users to create multiple secure IPSec
tunnels to remote end points. To establish an IPSec tunnel, the user needs to enable the feature,
and enter inbound and outbound addresses for the IPSec tunnel. This router supports MD5 and
SHA1 hash algorithm, and DES, 3DES, AES128, AES192, and AES 256 encryption algorithms.
Note Enabling IPSec VPN disables pass-through to IPSec and L2TP over IPSec Virtual Servers on the
LAN. Pass-through outbound from clients on the LAN to servers on the Internet is unaffected.
The VPN connection page displays when you click the Add button on the VPN Settings page.
From the VPN connection page you can configure detailed parameters for your IPSec VPN
connection. A maximum of five IPSec connections can be defined.
74 VPN configuration
Page 75

This page includes the following settings:
VPN Tunnel Parameters
• Tunnel Type: Select IPSec as the tunnel type.
• Tunnel Name: Enter a descriptive name for the tunnel. Do not use these characters: ` "
& ' # \
• Remote VPN Gateway: Enter the IP address or host name of the remote VPN server, or
select ANY if there is no specific server.
• IP Address / Host Name: The IP address or host name of the remote VPN server.
Remote Secure Group
• Remote Party ID: Select either ID_IPV4_ADDR, ID_FQDN, or ID_USER_FQDN.
This information must be entered identically on the IPSec software installed on the client’s
machine.
If ID_IPV4_ADDR is selected, enter the IPv4 address and subnet mask in the Remote
Network Address, and Remote Subnet Mask fields. The remote network address is
usually the network address of the LAN connected to the remote server.
VPN settings 75
Page 76

If ID_FQDN or ID_USER_FQDN (fully-qualified domain name) is selected, enter the
name for the Remote Party ID in the box next to the list. For example, an FQDN name
could be mycompany.com, and a user FQDN could be a mail address, such as
my_name@mycompany.com. This name must be unique for each connection rule that
you create.
• Remote Network Address: Enter the IPv4 address of the remote network.
• Remote Subnet Mask: Enter the subnet mask for the remote network.
Local Secure Group
• Local Party ID: Enter the identifier of the local secure group.
• Network Address: The network address of the local secure group is usually the network
address of the local network.
• Subnet Mask: Enter the subnet mask for the local network.
Phase I IKE Parameters
• Key Management: Select either IKE Main Mode or IKE Aggressive Mode as the
Internet Key Exchange (IKE) method. Note that the Main Mode is more secure but slower,
and Aggressive Mode is less secure but faster.
• Hash Algorithm: Select either MD5 or SHA1 as the algorithm to use for IPSec
authentication.
• Encrypt Algorithm: Select an encryption algorithm from the list. Both authentication and
encryption algorithms must be the same on the router and remote host.
• Key lifetime: Sets the amount of time that the keys are valid, after which they are
renewed.
• Diffie-Hellman Group: Select one of the groups to use for the Diffie-Hellman key
exchange.
• Pre-shared Key: Enter the same key on the router and the remote VPN gateway or
client. Do not use these characters: ` " & ' # \
Phase II IPSec Parameters
• Authentication Algorithm: Select either MD5 or SHA1 as the algorithm to use for
IPSec authentication.
• Encrypt Algorithm: Select an encryption algorithm from the list. Both authentication and
encryption algorithms must be the same on the router and remote host.
• Key lifetime: Sets the amount of time that the keys are valid, after which they are
renewed.
• PFS: Select for Perfect Forward Secrecy (PFS). The Diffie-Hellman Group options then
become available. The use of PFS is optional, enabling PFS adds another layer of
encryption security.
• Diffie-Hellman Group: Select one of the groups to use for the Diffie-Hellman key
exchange.
• IKE Keep Alive: Enables the router to send IKE keep-alive packets so that the VPN
connection remains open even when there is no activity.
76 VPN configuration
Page 77

L2TP over IPSec settings
The Layer 2 Tunneling Protocol is a common connection method used for VPN connections. You
can specify the detailed L2TP tunnel settings on the VPN connections page by clicking Add.
You can specify the Keep Alive time, which defines the time period without traffic after which
the PPP session is terminated. For a client tunnel, both host mode and router mode (LAN-toLAN) are supported. The tunnel can also be configured to automatically reconnect to the server
when Internet traffic is generated.
The VPN connections page displays when you click Add on the VPN Settings page. From the
VPN connection page you can configure detailed parameters for your L2TP over IPSec VPN
connection. A maximum of five L2TP connections can be defined.
This page includes the following settings:
VPN Tunnel Parameters
• Tunnel Type: Select L2TP over IPSec as the tunnel type.
• Tunnel Name: Enter a descriptive name for the tunnel. Do not use these characters: ` "
& ' # \ )
• Username: Enter the user name for L2TP tunnel. Do not use these characters: ` " & ' # \
• Password: Enter the password for the L2TP tunnel. Do not use these characters: ` " & ' #
\
• Confirm Password: Confirm the L2TP tunnel password.
• Idle Timeout: Set the time after which the tunnel is closed when there is no activity.
L2TP Type Setting
• L2TP Type: Sets the router to act as the L2TP server or client. When you set the type as
L2TP Client, you can then enter the Remote Server IP address.
VPN settings 77
Page 78

PPTP settings
• Enable Auto Reconnect: For L2TP client connections, you can automatically reconnect
when there is activity after a disconnection.
• Remote Server: Enter the remote server IP address.
IPSec Setting
• Pre-shared Key: When set to client mode, enter the key for the client connection. Do not
use these characters: ` " & ' # \
• Remote Party ID: When set to server mode, select either ID_IPV4_ADDR or
ID_USER_FQDN.
If ID_IPV4_ADDR is selected, enter the IPv4 address in the box next to the list.
If ID_USER_FQDN (fully qualified domain name) is selected, enter the name in the box
next to the list. For example, a user FQDN could be a mail address, such as
my_name@mycompany.com.
Remote Networking Setting
Enable the remote network setting, and then set the IP address and subnet mask.
The Point-to-Point Tunneling Protocol is used by some ISPs in Europe. This router allows
computers to use the Internet to remotely log into the LAN using the PPTP tunneling protocol.
You can configure the detailed PPTP tunnel settings on the VPN connection page by clicking
Add. You can specify the Idle Timeout, which defines the time period without traffic after which
the PPTP session is terminated. You can also configure the router to behave as either a client or
server. For a client tunnel, both the host mode and network mode (LAN-to-LAN) are supported.
The tunnel can also be configured to automatically reconnect to the server when Internet traffic
is generated.
The VPN connection page displays when you click Add on the VPN Settings page. From the
VPN connection page you can configure detailed parameters for your PPTP VPN connection. A
maximum of five PPTP connections can be defined.
78 VPN configuration
Page 79

This page includes the following settings:
VPN Tunnel Parameters
• Tunnel Type: Select PPTP as the tunnel type.
• Tunnel Name: Enter a descriptive name for the tunnel. Do not use these characters: ` "
& ' # \
• Username: Enter the user name for PPTP tunnel. Do not use these characters: ` " & ' # \
• Password: Enter the password for the PPTP tunnel. Do not use these characters: ` " & ' #
\
• Confirm Password: Confirm the PPTP tunnel password.
• Idle Timeout: Set the time after which the tunnel is closed when there is no activity.
PPTP Type Setting
• PPTP Type: Sets the router to act as the PPTP server or client. When you set the type as a
PPTP Client, you can then enter the Remote Server IP address.
• Enable Auto Reconnect: For PPTP client connections, you can automatically reconnect
when there is activity after a disconnection.
• Remote Server: Enter the remote server IP address.
Remote Networking Setting
Enable the remote network setting, and then set the IP address and subnet mask.
VPN passthrough settings
VPN passthrough allows VPN traffic that originates from a VPN client to pass through the
router. For example, if you are not using a VPN that is configured on the router, but are using a
laptop to access a network at another site, configuring VPN passthrough allows that
connection.
VPN passthrough settings 79
Page 80

80 VPN configuration
Page 81

8 Routing configuration
Routing configuration allows both static and dynamic methods to set up routing between
networks. You can configure static routes by entering routes directly into the routing table. Static
routing has the advantage of being predictable and easy to configure.
Alternatively, you can enable dynamic routing using RIP for IPv4 or RIPng for IPv6. The Routing
Information Protocol (RIP) is the most common used method for dynamically maintaining routing
tables in small networks. RIP uses a distance vector-based approach to routing. Routes are
chosen to minimize the distance vector, or hop count, which serves as a rough estimate of
transmission cost.
Viewing routing status
The Status page shows whether RIP or RIPng are enabled, and displays the current IPv4 and
IPv6 routing tables.
The routing tables include the information necessary to forward a packet along the best path
toward its destination. Each packet contains information about its origin and destination. When
a packet is received, the router examines the packet and matches it to the routing table entry
providing the best match for its destination. The table then provides the router with instructions
for sending the packet to the next hop on its route across the network.
Page 82

This page includes the following information:
Status
• RIP: The current status of RIP on the router.
• RIPng: The current status of RIPng on the router.
IPv4 routing table
Displays the IPv4 routes statically configured or dynamically learned by the router. For a
detailed description, see
IPv6 routing table
Displays the IPv6 routes statically configured or dynamically learned by the router. For a
detailed description, see
“Viewing the IPv4 routing table” on page 82.
“Viewing the IPv6 routing table” on page 85.
Viewing the IPv4 routing table
The routing table shows all the current IPv4 routes used by the router, including any routes
created using static routing or RIP.
This page includes the following information:
Flags
Indicates the type of route:
• C: A network directly connected to the router.
• S: A route manually entered on the router.
• R: A route dynamically learned through the RIP protocol.
Route
The destination network to which packets are routed.
Gateway
Displays the IP address of the router at the next hop to which matching packets are forwarded.
Subnet Mask
Displays the subnetwork associated with the destination.
82 Routing configuration
Page 83

Interface
The VLAN interface used to route data to the network specified by the destination network
address.
Metric
A number used to indicate the cost of a route so that the best route, among potentially multiple
routes to the same destination, can be selected.
IPv4 Dynamic route settings
The router supports the Routing Information Protocol (RIP). RIP allows an administrator to set up
routing information on one RIP-enabled device, and have that routing information replicated to
all RIP-enabled devices on the network. The router supports RIP version 1 and RIP version 2
protocols. RIP is the most widely used method for dynamically maintaining routing tables. RIP
uses a distance vector-based approach to routing. Routes are chosen to minimize the distance
vector, or hop count, which serves as a rough estimate of transmission cost. Each router
broadcasts its advertisement every 30 seconds, together with any updates to its routing table.
This allows all routers on the network to build consistent tables of next hop links which lead to
relevant subnets. The default setting is Disabled.
This page includes the following settings:
Enable RIP
Enables RIP on the router.
Enable Auto Summary
Enables Auto-Summarization on the router. Auto-Summarization sends simplified routing data to
other RIP devices rather than the full routing data. Note that this only applies to RIP version 2 as
RIP version 1 always uses automatic summarization.
Interface
The VLAN or WAN interface on the router for which RIP can be enabled.
Operation Mode
The router offers two modes of RIP operation.
• Disable: RIP is not enabled for the interface.
IPv4 Dynamic route settings 83
Page 84

• Enable: RIP is enabled for the interface. The router will transmit and receive RIP update
information to and from other RIP-enabled devices.
• Silent: RIP is enabled, however the router only receives RIP update messages, it will not
transmit any of its own.
Version
Use this field to select RIPv1 or RIPv2.
Poison Reverse
This enables RIP Poison Reverse on the router interface. Poison Reverse is a method that
propagates routes back to an interface port from which they have been acquired, but sets the
distance-vector metrics to infinity. This prevents data loops.
Authentication Required
The router offers two modes of authentication for RIPv2.
• None: Deactivates authentication on the specific interface.
• Password: An unencrypted text password that needs to be set on all RIP-enabled devices
connected to the router. Otherwise, RIP information is not shared between devices with
mismatched passwords.
Password
This field is used to enter the password required when password authentication is selected. Do
not use these characters: ` " & ' # \
IPv4 Static route settings
The router supports a static routing. You can set up static routes to ensure that all traffic for a
specific destination network is forwarded to a certain interface, for example, through a VPN
tunnel. A maximum of 15 rules can be defined.
This page includes the following settings:
Enable
Enables static routes on the router.
84 Routing configuration
Page 85

Destination
Enter the IP address of the destination host or network to which the route leads.
Subnet Mask
Enter the IPv4 subnet mask for the destination host or network. For example, for Class C IP
domains, the subnet mask is 255.255.255.0.
Gateway
Enter the IP address of the gateway through which the destination host or network can be
reached. If this router is used to connect your network to the Internet, your gateway IP is the
router's IP address. If you have another router handing your network's Internet connection,
enter the IP address of that router instead. The gateway IP address must also be routable,
otherwise the static route does not appear in the routing table.
Metric
A number used to indicate the cost of a route so that the best route, among potentially multiple
routes to the same destination, can be selected.
Interface
The interface used to route data to the network specified by the network address.
Viewing the IPv6 routing table
The routing table shows all the current IPv6 routes used by the router, including any routes
created using static routing or RIPng.
This page includes the following information:
Flags
Indicates the type of route:
• C: A network directly connected to the router.
• S: A route manually entered on the router.
• R: A route dynamically learned through the RIPng protocol.
Destination
The destination network to which packets can be routed.
Gateway
Displays the IP address of the router at the next hop to which matching frames are forwarded.
Viewing the IPv6 routing table 85
Page 86

Interface
The VLAN interface used to route data to the network specified by the destination network
address.
Metric
A number used to indicate the cost of a route so that the best route, among potentially multiple
routes to the same destination, can be selected.
IPv6 Dynamic route settings
The router supports RIP next generation (RIPng) over IPv6. Like IPv4 RIP version2, RIPng uses the
same distance-vector algorithm and hop-count metric, as well as the 30 second update timer.
However, RIPng uses a different message format, a different UDP port number, and has no limit
on the message size. Also, RIPng does not include an authentication mechanism, it relies on the
security built into IPv6 (IPsec). The default setting is Disabled.
IPv6 Static route settings
The router supports an IPv6 static routing. A maximum of 15 rules can be defined.
This page includes the following settings:
Enable
Enables IPv6 static routes on the router.
Destination
Enter the IPv6 address of the destination host or network to which the route leads.
86 Routing configuration
Page 87

Prefix Length
Enter the IPv6 prefix length for the destination host or network.
Gateway
Enter the IP address of the gateway through which the destination host or network can be
reached. If this router is used to connect your network to the Internet, your gateway IP is the
router's IP address. If you have another router handing your network's Internet connection,
enter the IP address of that router instead. The gateway IP address must also be routable,
otherwise the static route does not appear in the routing table.
Interface
The interface used to route data to the network specified by the network address.
Metric
A number used to indicate the cost of a route so that the best route, among potentially multiple
routes to the same destination, can be selected.
IPv6 Static route settings 87
Page 88

88 Routing configuration
Page 89

9 Firewall configuration
Your router is equipped with a firewall that will protect your network from a wide array of
common hacker attacks, including Denial of Service (DoS) attacks. You can turn the firewall off,
if needed. Turning off the firewall will not leave your network completely vulnerable to attacks,
but HP recommends that you leave the firewall enabled whenever possible.
In addition to the firewall, the router can block access to the Internet from clients on the local
network based on IP addresses, MAC addresses, or network service. The router can also block
access to specific websites or web page content.
Viewing the firewall status
The Status page displays the current status of the firewall settings.
Page 90

Security settings
The Security page allows you to configure global security parameters for the router.
This page includes the following settings:
Enable PING from WAN
Computer hackers use what is known as Pinging to find potential victims on the Internet. By
pinging a specific IP address and receiving a response from the IP address, a hacker can
determine that something of interest might be there. The router can be set up so it does not
respond to an ICMP Ping from the outside. This is heightens the level of security of your router.
Enable MSS Clamping
A technique, which works with TCP under specific scenarios only, is so-called MSS clamping.
With this technique or rather hack, the TCP packet’s Maximum Segment Size (MSS) is reduced
by tunnel endpoints so that the TCP connection automatically restricts itself to the maximum
available packet size. Obviously, this does not work for UDP or other protocols that have no
MSS. This approach is most applicable and used with PPPoE, but could be applied otherwise
as well; the approach also assumes that all the traffic goes through tunnel endpoints that do
MSS clamping — this is simple for single-homed access links, but could be a challenge
otherwise.
Enable UPnP (Universal Plug and Play)
Universal Plug and Play (UPnP) is a technology that offers seamless operation of voice
messaging, video messaging, games, and other applications that are UPnP compliant. Some
applications require the router’s firewall to be configured in a specific way to operate properly.
This usually requires opening TCP and UDP ports, and in some instances, setting trigger ports.
An application that is UPnP compliant has the ability to communicate with the router, basically
90 Firewall configuration
Page 91

telling the router which way it needs the firewall configured. The router ships with the UPnP
feature disabled. If you are using any applications that are UPnP compliant and want to take
advantage of UPnP, you can enable the feature. Select Enable UPnP in the UPnP section, and
then click Save to save the change.
Remote Administration
Remote administration allows you to make changes to your router’s settings from anywhere on
the Internet. To remotely manage the router, the remote user must type the following into their
browser: http://<router WAN IP address>:8000 or 8001 if using HTTPS (unless the default
port has been changed).
Note Before you enable this feature, make sure you have set the administrator password.
DoS
The router is equipped with a firewall that protects your network from a wide array of common
Denial of Service (DoS) attacks. A DoS attack is an attempt by a hacker to disrupt the normal
functioning of a target server, making it unavailable to users. A Distributed DoS (DDoS) attack
is a coordinated DoS attack from multiple source machines that flood a target server with
disruptive traffic until it fails. Turning off the DDoS Attack Filter does not leave your network
completely vulnerable to hacker attacks. HP recommends that you enable the DoS detecting
feature whenever possible.
Note When a DoS attack is detected, an alert symbol ( ) displays on the Security line of the
System > Status page (also the router’s Alert LED flashes until an attack ends). If you open
the Security section, an alert message next to DOS indicates the security violation. Click
Alert to view the log details on the System > Log page. Click Clear to remove the alert
message from the status page.
• IP Spoofing: Prevents a hacker from creating an alias (spoof) of the unit’s IP address to
which all traffic is redirected.
• Ping of Death: Prevents the reception of an oversized ping packet that the unit cannot
handle. Normal ping packets are 56 bytes, or 84 bytes with the IP header attached. The
Ping of Death will exceed the maximum IP packet size of 65,535 bytes.
• IP with zero length: Prevents received IP packets with zero data length from causing the
router to crash.
• Smurf Attack: Prevents a hacker from forging the IP address of the unit and sending
repeated ping requests to it flooding the network.
• UDP port loopback: Prevents UDP ports 7 (echo) and 19 (chargen) being used to send
data to each other causing an infinite loop that leads to a loss of performance and high
consumption of network bandwidth.
• Snork Attack: Prevents attacks on Windows computers that send UDP packets with a
source port of 7 (echo) or 19 (chargen) to destination port 135, causing unnecessary
system activity that can significantly slow performance or crash the system.
• Syn flooding: Prevents a synchronized (SYN) attack in which the process of the common
three way TCP handshake is interrupted and the acknowledge response gets sent to a
malicious IP address, or the system is flooded with false SYN requests.
Security settings 91
Page 92

Client filtering
The router can be configured to restrict access to the Internet, email, or other network services
on specific days and times. Restriction can be set for a single computer, a range of computers,
or multiple computers. Enter the filter details in the fields provided, and then click Add to add
the entry to the filter table. A maximum of 10 rules can be defined.
This page includes the following settings:
Client PC IP
The IPv4 address of a computer on the local network.
Use Client List
Selects a computer name or IP address from the list of clients already assigned an IP address by
the router.
Popular Services
Selects a common network service from the list instead of entering the protocol and ports
numbers manually.
Protocol
Selects the TCP or UDP protocol of a service to filter.
Port
The TCP or UDP port number of the service to filter.
Enable Schedule Rule
The name of a scheduling rule to apply to the filter, as configured on the Tools > Scheduling
page.
Comment
A comment that describes the filter. Do not use these characters: ` " & ' # \
92 Firewall configuration
Page 93

MAC filtering
You can deny traffic from certain known machines or devices. Use its MAC address to identify
a computer or device on the network and deny access. Traffic from a specified MAC address is
filtered depending upon the policy. Enter the filter details in the fields provided, and then click
Add to add the entry to the filter table. A maximum of 20 rules can be defined.
This page includes the following settings:
MAC Address
The MAC address of a computer on the local network.
Use Client List
Selects a computer name or MAC address from the list of clients already assigned an IP
address by the router.
Enable Schedule Rule
The name of a scheduling rule to apply to the filter, as configured on the Tools > Scheduling
page.
MAC filtering 93
Page 94

URL filtering
The URL Filter feature blocks access to websites based on matching a specified URL address or
specific keywords (HTTPS is not supported). For each filter rule, enter the URL address or a
keyword, and then select a time schedule rule to apply, if needed. Also, specified computers on
the local LAN can be excluded from the URL filtering by adding them to the Exclusion List. A
maximum of 20 URL filter rules and 10 URL exclusion rules can be defined.
This page includes the following settings:
String
The URL text or keywords that match websites to block.
Enable Schedule Rule
The name of a scheduling rule to apply to the filter, as configured on the Tools > Scheduling
page.
URL Exclusion
Configures specific computers on the local LAN that are excluded from the URL filtering.
• Exclusion Host: The IPv4 address, or range of addresses, of computers on the local
network to exclude from the URL filtering.
• Use Client List: Selects a computer name or IP address from the list of clients already
assigned an IP address by the router.
• Enable ScheduleRule: The name of a scheduling rule to apply to an excluded host, as
configured on the Tools > Scheduling page.
94 Firewall configuration
Page 95

URL Filtering Deny List
The list of URL text and keywords that match blocked websites for computers on the LAN.
Exclusion List
The list of computers on the local LAN that are excluded from the URL filtering.
Content filtering
Based on keywords contained on web pages, you can use this screen to restrict access to
certain websites that you do not want users in your network to open. Note that web page
content that is compressed is not filtered. A maximum of 10 rules can be defined.
This page includes the following settings:
Content String
The text or keywords that match web page content to block. Do not use these characters: ` " &
' # \
Enable Schedule Rule
The name of a scheduling rule to apply to the filter, as configured on the Tools > Scheduling
page.
SPI settings
Stateful Packet Inspection (SPI) is an intrusion detection feature on the router that limits access
for incoming traffic. This feature is called stateful because it examines the contents of packets to
determine the state of the communications; that is, it ensures that the stated destination
computer has previously requested the current communication. This is a way of ensuring that all
communications are initiated by the recipient computer and are taking place only with sources
that are known and trusted from previous interactions.
When an SPI violation occurs, the offending client is disconnected from the router for 30
minutes.
Content filtering 95
Page 96

Note When the number of incomplete sessions from a same host reaches the maximum value
(Maximum incomplete TCP/UDP sessions number from same host), a security
alert symbol ( ) displays on the Security line of the System > Status page. If you open
the Security section, an alert message next to SPI indicates the security violation. Click Alert
to view the log details on the System > Log page. Click Clear to remove the alert message
from the status page.
This page includes the following settings:
Enable
Enables the SPI features on the router.
Connection Policy
• Fragmentation half-open wait: Configures the number of seconds that a packet state
structure remains active. When the timeout value expires, the router drops the un-assembled
packet, freeing that structure for use by another packet.
• TCP SYN wait: Defines how long the software waits for a TCP session to synchronize
before dropping the session.
• TCP FIN wait: Specifies how long a TCP session is maintained after the firewall detects a
FIN packet.
96 Firewall configuration
Page 97

• TCP connection idle timeout: The length of time for which a TCP session is managed if
there is no activity.
• UDP session idle timeout: The length of time for which a UDP session is managed if
there is no activity.
• H.323 data channel timeout: The length of time for which an H.323 session is
managed if there is no activity.
DoS Detect Criteria
• Total incomplete TCP/UDP sessions HIGH: Defines the rate of new unestablished
sessions that cause the software to start deleting half-open sessions.
• Total incomplete TCP/UDP sessions LOW: Defines the rate of new unestablished
sessions that cause the software to stop deleting half-open sessions.
• Incomplete TCP/UDP sessions (per min) HIGH: Maximum number of allowed
incomplete TCP/UDP sessions per minute.
• Incomplete TCP/UDP sessions (per min) LOW: Minimum number of allowed
incomplete TCP/UDP sessions per minute.
• Maximum incomplete TCP/UDP sessions number from same host: Maximum
number of incomplete TCP/UDP sessions from the same host. When the maximum value is
exceeded, the host is placed on the cracker list and packets from the host are then blocked
for the duration specified by the Flooding cracker block time. During the blocking
duration, packets are just dropped and no live session exists, so there may be an
incomplete session alert.
• Incomplete TCP/UDP sessions detect sensitive time period: The length of time
before an incomplete TCP/UDP session is detected as incomplete.
• Maximum half-open fragmentation packet number from same host: The
maximum number of half-open fragmentation packets from the same host.
• Flooding cracker block time: Length of time that packets from a specific host are
blocked when a flood attack is detected.
SPI settings 97
Page 98

98 Firewall configuration
Page 99

10 NAT configuration
Network Address Translation (NAT) is a commonly used IP translation and mapping
technology. NAT enables an entire home network to share a single Internet connection using a
single IP address. Using NAT, a single device can connect all the computers in your home to
the Internet simultaneously. Additionally, NAT keeps your network fairly secure from hackers.
NAT acts as an interpreter between two networks. In this case, NAT sits between the Internet
and your network. The Internet is considered the public side, and your network is considered
the private side. When a computer on the private side requests data from the public side (the
Internet), the NAT device opens a conduit between your computer and the destination
computer. When the public computer returns results from the request, it is passed back through
the NAT device to the requesting computer.
Viewing NAT status
The Status page displays the current status of NAT, Virtual Server, DMZ, Port Trigger, and ALG
settings.
Page 100

NAT settings
The Settings page includes the global NAT enable for all VLANs on the router. If NAT is
disabled on this page, the NAT features for all VLANs are also disabled.
Turning off NAT does not affect the firewall.
Virtual server settings
This feature allows you to route external (Internet) calls for services, such as a web server (port
80), FTP server (port 21), or other applications, through your router to your internal network.
Because your internal computers are protected by a firewall, machines from the Internet cannot
reach them because they cannot be seen. If you need to configure the Virtual Server feature for
a specific application, you need to contact the application vendor to find out which port
settings you need. To manually enter settings, enter the IP address in the space provided for the
internal machine, the port type (TCP or UDP), and the private and public port(s) required to
pass traffic. Then click Add and Save. You can only pass one port per private IP address.
Opening ports in your firewall can pose a security risk. HP recommends that you disable the
settings when you are not using a specific application. A maximum of 20 rules can be defined.
This page includes the following settings:
Private IP
The IPv4 address of the computer on the local network.
100 NAT configuration
 Loading...