

Page 1

Product Models
The installation instructions provided in this document
apply to the HPE Storage File Controller which covers
the following:
HPE Storage File Controller Quick Start Guide
Abstract
This document provides system administrators step-bystep instructions for the initial installation and setup of
the HPE Storage File Controller. After deployment of the
system, HPE recommends you to read the Administrator
Guide to learn how to configure and maintain the HPE
Storage File Controller.
SKU Model Description
Q9D43A HPE Storage File
Controller
Q9D44A HPE Storage Performance
File Controller
1. Unpack the HPE Storage File Controller
Before you begin, ensure that you have the following
items in the shipping box:
• Hardware Components
◦ HPE Storage File Controller system
◦ Power cords
◦ Rail kit for installing the system in a rack
◦ Any other hardware options purchased
• Documentation and Media
◦ HPE Storage File Controller Read This First
document
◦ HPE Storage File Controller Quick Start Guide
©
Copyright 2018 Hewlett Packard Enterprise Development LP
Part Number: P08160-001
Published: September 2018
Edition: 1
*P08160-001*
◦ Windows Storage Server 2016 (WSS2016)
Certificate of Authenticity (COA) label (affixed to
the product)
◦ An envelope containing HPE Integrated Lights-
Out (iLO) Advanced Premium Security Edition
license key and document
◦ HPE Storage File Controller System Recovery
DVD (if ordered)
If any of the above-mentioned items are missing, contact
Hewlett Packard Enterprise
(https://www.hpe.com/us/en/contact-hpe.html) for
assistance.
Page 1
Page 2
IMPORTANT: For support purposes, you must
1
1
1
1
know how to locate or have a copy of the HPE
Storage File Controller system serial number, the
Product ID key from WSS2016 COA, and the iLO
Advanced Premium Security Edition license key.
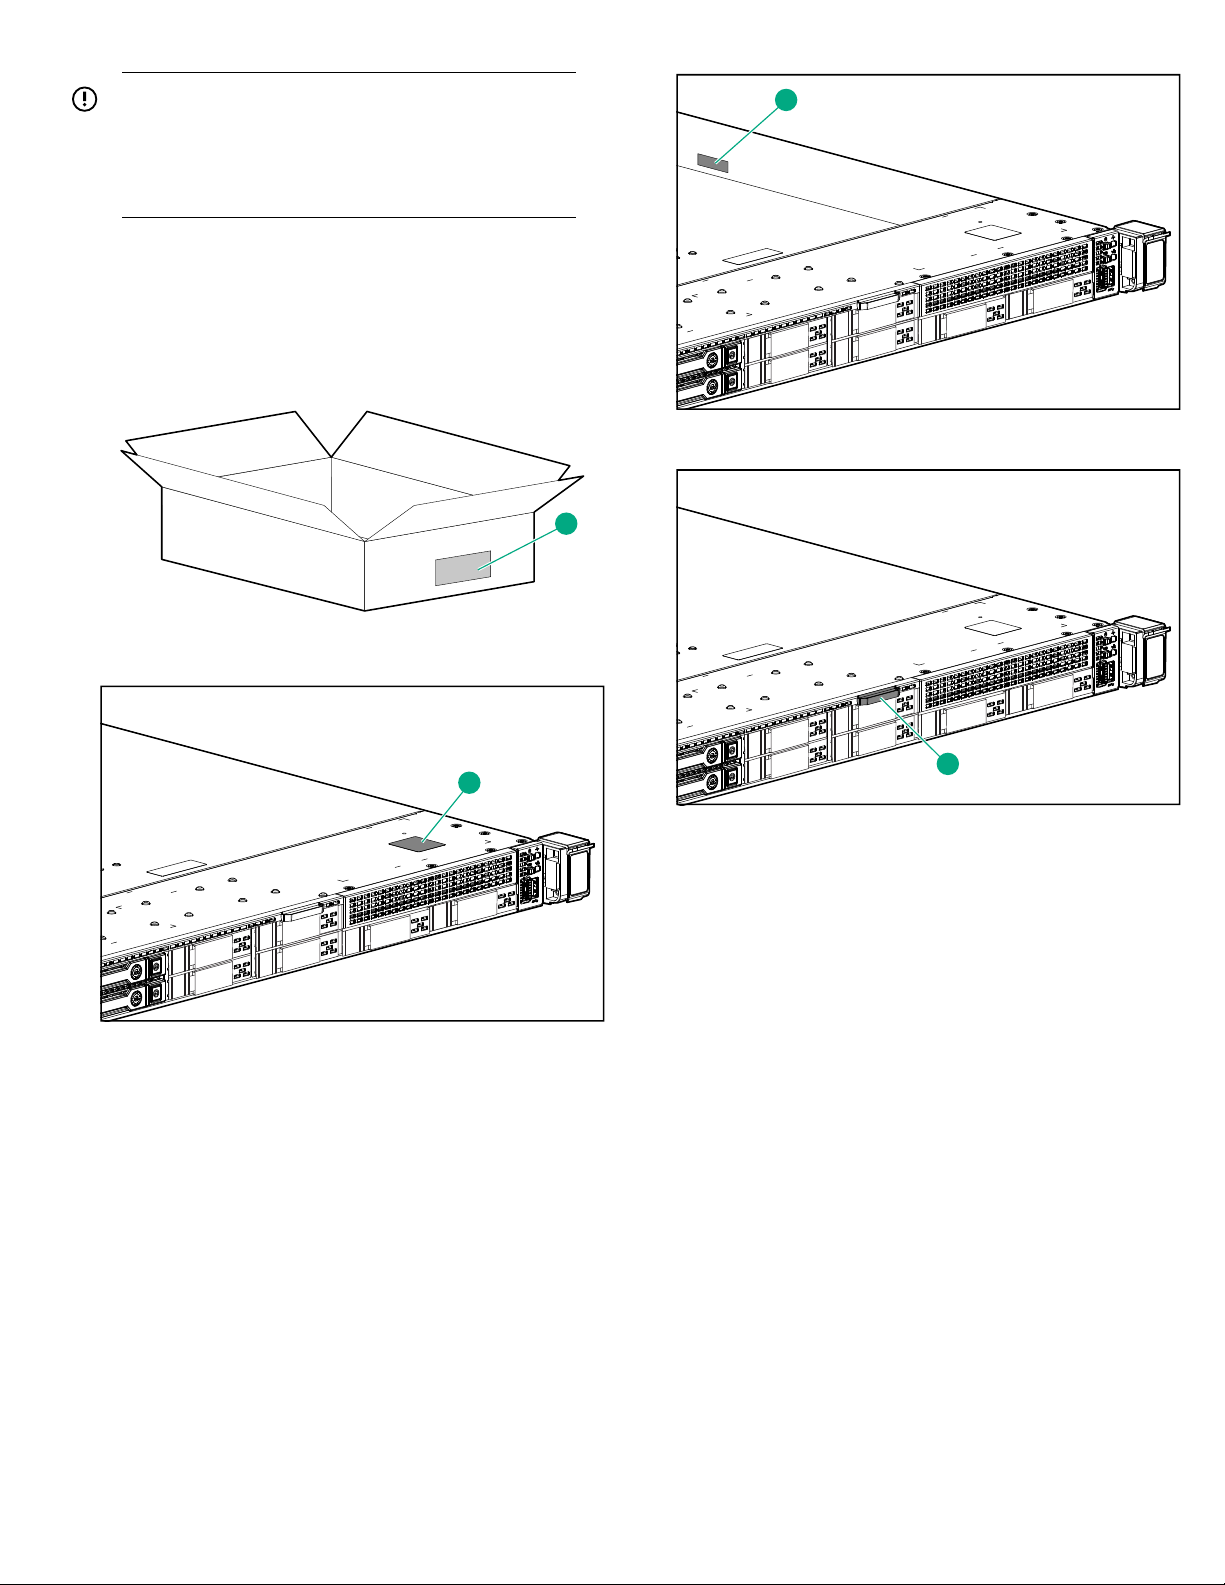
HPE personnel use the system serial number to verify
the model and warranty information. It is located in the
following places on the system:
• On a label (1) affixed outside the HPE Storage File
Controller shipping box
• Top (1) of the HPE Storage File Controller chassis
• Pull out serial number tab (1) on the product
• Inside (1) of the HPE Storage File Controller chassis
The COA label Product ID key is required when:
• The WSS2016 operating system has been
reinstalled.
• The motherboard of the HPE Storage File Controller
product is replaced.
• The original factory-installed operating system is
upgraded to a newer version of the WSS operating
system.
The iLO Advanced Premium Security Edition license key
is required when:
• The motherboard of HPE Storage File Controller
product is replaced.
• The iLO Advanced Premium Security Edition license
key must be reinstalled.
Page 2
Page 3
2. Installing the rail kits and mounting the system in a rack
must not exceed 80 percent of the branch
circuit rating.
Important safety information
CAUTION: Electrostatic Discharge (ESD) can
damage the electronic components. Ensure that
you are properly grounded (earthed) before
beginning any installation procedure.
Installation Guidelines
This installation must be performed by qualified
individuals having knowledge of the procedures,
precautions, and equipment hazards that contains
hazardous electrical circuits.
WARNING:
• The rail kits, when installed, form only a shelf
for the HPE Storage File Controller to rest on.
The HPE Storage File Controller is not attached
to the rail by any other means. Use extreme
caution when pulling the Storage File Controller
out from the rack. The storage system can slip
and fall, which may cause damage or injury to
the HPE Storage File Controller. HPE is not
responsible for any damage or injury caused by
mishandling of HPE Storage File Controller.
Installation
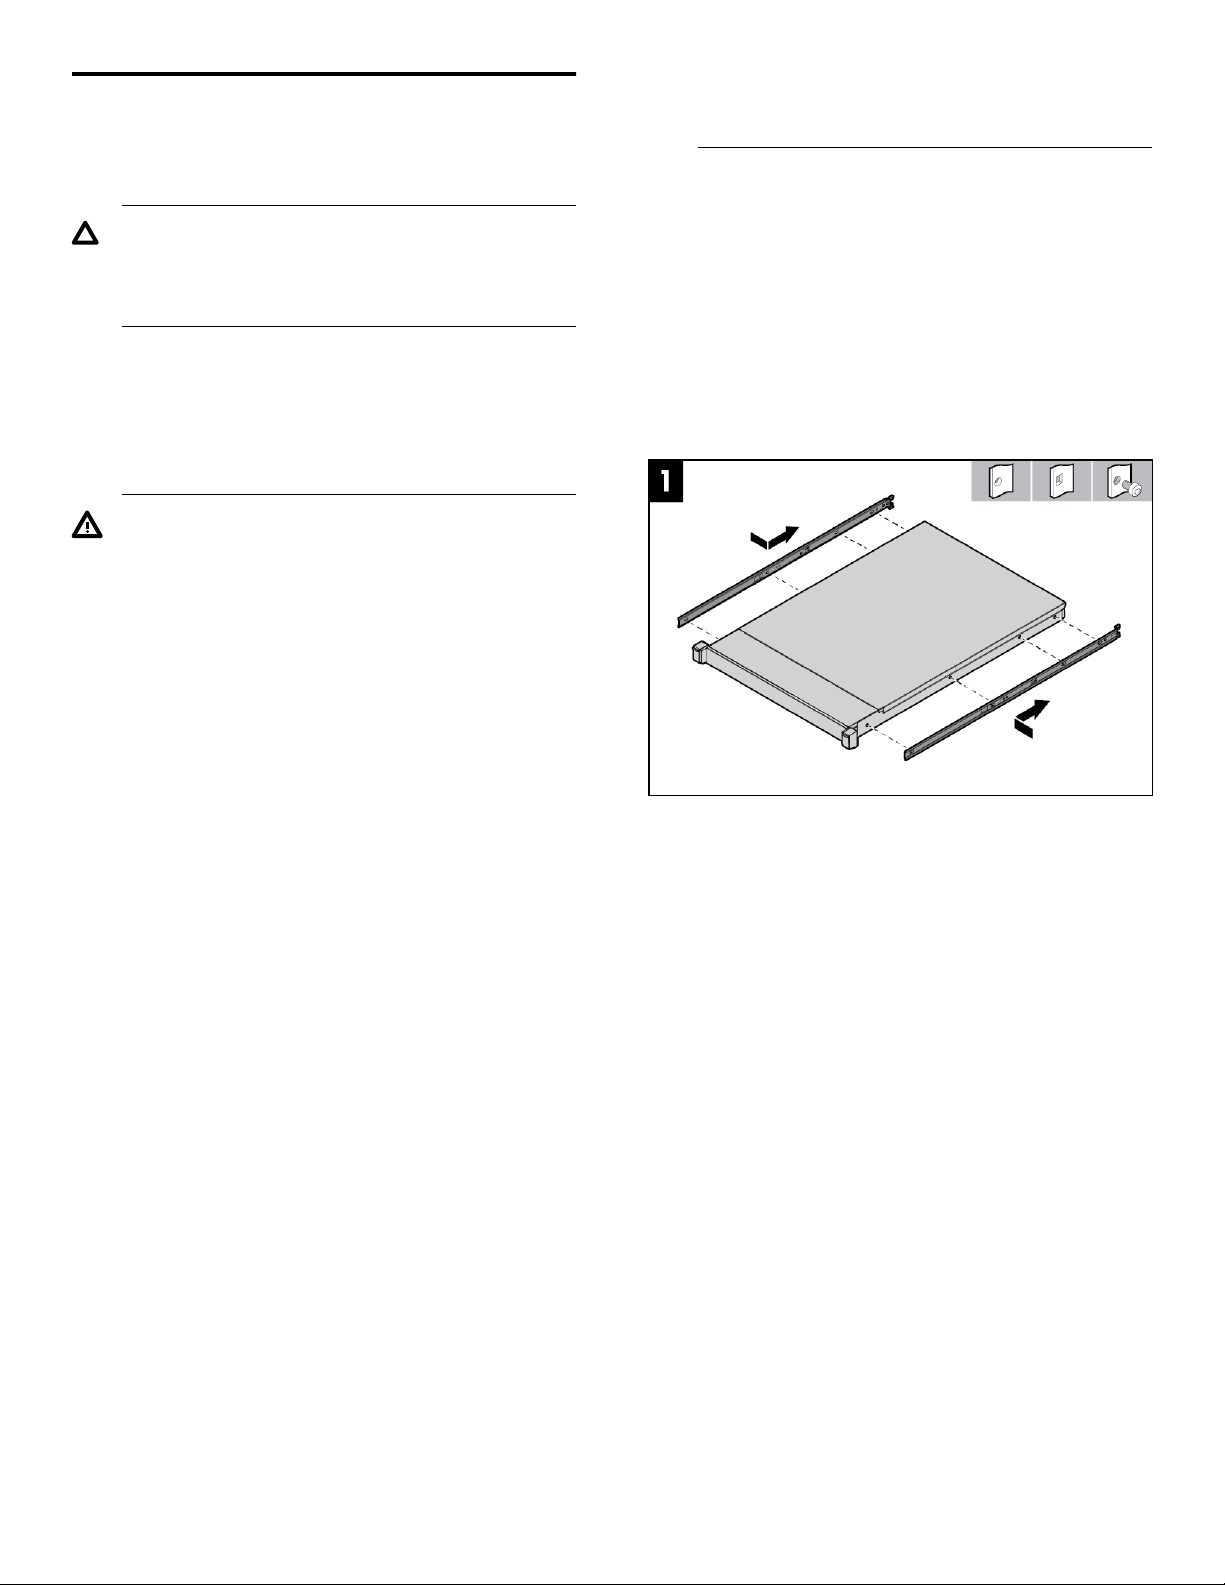
1. Install the rail kits.
For detailed instructions on installing the HPE rack
rails into square and round hole racks for an HPE 1U
Storage system, refer to the HPE Rack Rail Kit
installation instructions document, that is part of the
shipped rail kit.
2. Slide the HPE Storage File Controller into the position
on the rails as shown in Figure 1.
• Ensure that the rack is leveled and stable
before working on the rack. The leveling jacks
(feet) must extend to the floor and the full
weight of the rack must rest firmly on the floor.
• Ensure that the rack has anti-tip measures such
as, floor-bolting, anti-tip feet, ballast, or a
combination of the measures, as specified by
the rack manufacturer and applicable codes in
place.
• Ensure that sufficient personnel are available to
support one or more products during the
installation process. HPE recommends you to
use an appropriate lifting device as an
installation aid.
• Ensure that the rack is loaded from bottom to
top, with the heaviest appliances at the bottom
to make the rack steady.
• Avoid overloading the branch circuit that
provides power to the rack. The total rack load
Figure 1: Storage File Controller insertion into the
rack
3. To secure the HPE Storage File Controller to the rails,
the customized bracket at the rear ends of the rails
must overlap the chassis tab as shown in Figure 2.
Page 3
Page 4

Figure 2: Customized bracket location
4. Secure the HPE Storage File Controller to the rack
rails using thumbscrews on the front bezel as shown
in Figure 3 and Figure 4.
Figure 3: Secure HPE Storage File Controller to the
rack
Page 4
Page 5

3. Cabling the HPE Storage File Controller system to the network
The iLO network port is used to remotely manage the
Storage File Controller hardware and allows
administrators to launch a remote console session to the
system. HPE recommends that you connect the iLO port
to your management network. The iLO port is
preconfigured to obtain an IP address through DHCP. If
your environment does not support DHCP, use a KVM
and configure iLO to use a static IP address. For
instructions, see the HPE Storage File Controller System
Administrator Guide.
The 4 x 1GbE network ports are used for the storage
network and to connect the system to infrastructure
services such as, Active Directory, DNS, NTP, and so on.
The ports can be configured as segregated network
ports or a network team. Ensure that your switch is
prepared for either configuration.
5. Using the holes provided in the rear rack rails, install
the tie wraps and route external cables as required as
shown in Figure 5.
Figure 4: Cable management with tie wraps
6. Connect all power cords to the facility power source.
Item Description
1 Slot 1 PCIe3
2 Slot 2 PCIe3
3 Slot 3 PCIe3 (optional - requires second processor)
4 Power supply 2 (PS2)
5 Power supply 1 (PS1)
6 Video port
7 NIC port 4
8 NIC port 3
9 NIC port 2
10 NIC port 1
11 iLO Management Port
12 Serial port (optional)
13 USB 3.0 ports
14 FlexibleLOM (optional)
Page 5
Page 6

Connecting the HPE Storage File Controller
Connecting the HPE Storage File Controller to the
network
• Record network information
• Access the HPE Storage File Controller Console
• Cabling for the cluster heartbeat connection
Record network information
• http://blogs.msdn.com/b/clustering/archive/
2012/03/30/10289577.aspx
• https://docs.microsoft.com/en-us/windows-
server/failover-clustering/prestage-cluster-adds
Access the HPE Storage File Controller Console
To complete the setup of the Storage File Controllers,
you have to have either a connection by the direct attach
or the iLO methods, so that you can observe and interact
with the main display on each storage file controller.
It is critical to have the correct networking information
available before proceeding with the system installation
and configuration. It might be necessary to pre-stage
DNS information. Contact your system administrator to
clarify network configuration requirements.
IMPORTANT: Before joining the system to the
Active Directory domain, ensure that there is a
network connectivity between each node and
domain controller.
These addresses can be statically assigned, assigned
by a DHCP server, or both. If you are using static
addressing or a DHCP server that does not
automatically update DNS, ensure that both forward and
reverse DNS information (A and PTR records) is prestaged in the DNS server. Ensure you gather the
information for both HPE Storage File Controllers if you
are setting up a two-node cluster.
Table 1: Network information
Network device Fully qualified
DNS name
(FQDN)
System
iLO
IP address
IMPORTANT: Only the direct attach and iLO
access methods can be used to install the storage
system. When the storage system installation
process completes and the server’s IP addresses
have been assigned, you can use the remote
desktop method to access the storage system.
Procedure
1. Direct attach: This access method is mandatory if
your network does not have a Dynamic Host
Configuration Protocol (DHCP) server. Connect the
following cables to the back panel of the storage
system in this sequence: keyboard, mouse, network
cables, monitor cable, and power cable.
NOTE: The keyboard, mouse, and monitor are not
provided with the storage system.
2. iLO: Access the storage system using the iLO remote
management method:
a. Connect a network cable to the iLO port located
on the back of the storage system.
b. Connect a power cable to the storage system.
c. Locate the iLO Network Settings tag attached to
the storage system and record the default user
name, password, and DNS name.
Restrictive Active Directory environments
If the system is placed in a restrictive Active Directory
environment, it might require pre-staging Active
Directory objects or certain administrative permissions.
For more information, see the following Microsoft
articles:
d. From a remote computer, open a standard web
browser and enter the iLO management hostname
of the storage system.
Page 6
Page 7

NOTE: By default, iLO obtains the management
IP address and subnet mask from the DHCP
server in your network. The hostname found on
the iLO tag is automatically registered with DNS
server in your network. If the DHCP configuration
is not possible or the system is not found in DNS,
use the direct attach method to configure iLO with
a static IP address.
e. Using the default user information provided on the
iLO Network Settings tag, log on to iLO and
launch a remote console to the storage system.
NOTE: In the event that the initial configuration is for a
two node cluster, ensure you have either a direct
connection or iLO connection to both file controllers.
For detailed instructions about access methods, see the
HPE Storage File Controller Administrator Guide.
Cabling for the cluster heartbeat connection
Connecting HPE 3PAR Storage array to Storage File Controllers
Before you begin the HPE Storage File Controllers
installation, ensure that other storage connections (Fibre
Channel or iSCSI) for the HPE 3PAR Storage Array are
connected. Use the suggested cabling guidelines to
connect the 3PAR storage array. For more information
on cabling, see the HPE 3PAR StoreServ Cabling
Configuration Guide.
Connecting HPE 3PAR Storage array to 3PAR storage array management connection
Connect the HPE 3PAR Storage array management
network connections to the network. The 3PAR array
management IP address and login credentials is needed
during the initial configuration tasks (ICT) of the Storage
File Controllers. During the configuration in ICT, the
Storage File Controllers are able to communicate with
the 3PAR storage array management IP address. For
more information, see the HPE Storage File Controller
Administrator Guide.
A two-node Storage File Controller fail over cluster is
configured during initial setup. An ethernet cable is
connected to port 4 between the two file controllers as
depicted in the figure below. This is also known as the
cluster network interconnect. During the setup, you will
be prompted to set up a two-node cluster. This network
connection is used for establishing the initial
communication between the servers.
Figure 5: Connecting the servers
Connecting HPE 3PAR Storage array
Connect the 3PAR storage array to:
• Storage File Controllers
• 3PAR storage array management connection
Connecting HPE MSA Storage
Connect the MSA array to:
• HPE Storage File Controllers
• (Recommended) A remote management host
Connect the MSA Storage to Storage File Controllers
Direct connect and switch connect environments are
supported between the MSA storage and the file
controllers. The MSA storage host connection ports can
be either Fibre Channel or iSCSI for clustered
environments. For switch-connect configurations,
connect cables from the MSA controller host connection
ports to the switch ports and from the switch ports to the
file controllers.
For cabling examples, including connecting directly to a
server, see the HPE MSA Cabling Configuration Guide.
Page 7
Page 8

MSA array connection guidelines
• No host interface cables are shipped with MSA. For a
list of cables available from HPE, see the HPE MSA
QuickSpecs.
• In direct-connect deployments, connect each host to
the same port on both of the MSA arrays.
• In switch-connect deployments, connect an MSA
array A port and the corresponding MSA array B port
to one switch, and connect a second MSA array A
port and the corresponding MSA array B port to a
separate switch.
4. Power Up
To power up the server, use one of the following
methods:
• Press the Power On/Standby button.
• Use the virtual power button through iLO.
IMPORTANT: If the Storage File Controller is
attached to an external storage, including JBODs,
power on the external storage system before you
power on the Storage File Controller.
Connect the MSA array to a remote management host (recommended)
It is recommended that the MSA storage remote
management port be connected to the same network as
the file controllers. This will enable the remote
management (out-of-band) to be configured from the file
controllers during the initial configuration of the file
controllers.
Connect an RJ-45 Ethernet cable from the network
management port on each MSA storage management to
a switch that the file controllers can access (preferably
on the same subnet).
Connecting HPE Nimble Storage Array
Connect the Ethernet on your array to the management
network. It is recommended that the connection of the
network management ports, for the HPE Nimble Storage
Array, is on the same network segment as the Storage
File Controllers for initial setup and configuration. During
the Storage File Controllers initial configuration tasks
(ICT), there is an option to perform the Nimble Discovery
for any arrays that are not configured. For more
information, see the HPE Storage File Controller
administrator guide. If the Nimble Storage Array, has
already been configured, then, ensure that you have the
Nimble Management Group IP address and credentials
available during ICT.
Ensure that the HPE Nimble storage array is installed
and cabled before starting the configuration of the HPE
Storage File Controllers.
5. Power On Initial Startup Sequence
Before you power on either a single node Storage File
Controller or two node Storage File Controllers (setup as
a cluster), be sure to have a console and keyboard setup
by either a direct connection or through iLO remote
console connection. For more information on connecting
the Storage File controller, see the Connecting the HPE
Storage File Controller.
If the iLO port is connected to a network segment with
DHCP enabled and automatic DNS registration, use the
DNS name. The DNS name, iLO initial login, and iLO
initial password are available on the information tag
attached to the front of the system on the right side.
For more information on DHCP configuration and DNS
registration, see the HPE Storage File Controller
Administrator Guide.
NOTE: If you are setting up a two-node failover cluster,
you will control the setup of both nodes using the
primary node. The primary node is used during the initial
setup.
The second node is configured by the primary node.
During the configuration process, you will provide input
for the second node, when the accept the license
agreement is displayed on the second node. Ensure that
you are connected to the second node with a console
and keyboard (either iLO or direct connect).
After the HPE Storage File Controller is powered on, the
language selection screen is displayed.
Page 8
Page 9

NOTE: If the language selection screen does not
display, contact Hewlett Packard Enterprise support
center (https://www.hpe.com/us/en/contact-
hpe.html).
After the second node is located, you will see the
language selection on the second node is
selected based on the primary node language
selection.
The license screen is displayed for the second
node.
NOTE: The second node installation process is
stalled until you accept the license agreement.
c. Accept the license for the second node
4. Go back to the primary node and select the HPE
Storage Array that you want to connect to the
Storage File Controller
Follow the instructions provided in the wizard:
Procedure
1. Select your preferred language.
NOTE: If you are setting up a two node cluster, make
the selection on one node only. The selected node is
the primary node.
2. Read and accept the license terms.
3. Create a two node cluster
If your array is not Nimble or 3PAR array, then select
MSA/Other.
5. After selecting the storage array type, the installation
begins installing various components based upon the
array type selected. This process takes
approximately 20 minutes to complete.
a. Click No to create a single node server.
b. Click Yes to create a second node cluster.
Page 9
Page 10

After the installation is complete, the system will
reboot.
6. After reboot, the system will automatically log in using
the default local Administrator account.
The default password for the Storage File Controller
is HPEStorage!. HPE recommends that you modify
this password after you have completed your initial
setup
The Initial Configuration Tasks (ICT) application is
displayed automatically.
Online Help and HPE Storage File Controller
Administrator Guide.
Next Steps
Ensure that you follow all the steps in the ICT tasks
starting with the first task. Use the question mark on the
top right side of each task for additional online help.
If you have selected to create a two node cluster, you
will have one additional task at the very beginning before
Step 1, in the ICT, for Connection. Expand the
connection task, to verify that the connection between
the primary and second node is established and
communicable.
For further instructions on using the Initial Configuration
Tasks, for additional configuration, and setup
information, see the HPE Storage File Controller
Administrator Guide.
Warranty information
To view the warranty for your product or to view the
Safety and Compliance Information for Server, Storage,
Power, Networking, and Rack Products reference
document, go to the Enterprise Safety and Compliance
website:
Figure 6: Initial Configuration Tasks
If ICT does not launch automatically, press Windows
+ R on your keyboard, type OEMOOBE and click OK.
NOTE: If you have selected to set up a two node
cluster, the second node will not display the ICT
application, instead the ICT application will redirect
you to the primary node for configuration. For more
information, see the HPE Storage File Controller
Administrator Guide.
The Initial Configuration Tasks (ICT) application
varies based on the selected storage array. Here is
an example of a single node or standalone node
Storage File Controller. For more information about
the ICT tasks, see the HPE Storage File Controller
www.hpe.com/support/Safety-ComplianceEnterpriseProducts
Additional warranty information
HPE ProLiant and x86 Servers and Options
www.hpe.com/support/ProLiantServersWarranties
HPE Enterprise Servers
www.hpe.com/support/EnterpriseServersWarranties
HPE Storage Products
www.hpe.com/support/Storage-Warranties
HPE Networking Products
www.hpe.com/support/Networking-Warranties
Page 10
 Loading...