

Page 1
HP PS110 Wireless VPN Router Quickstart
This Quickstart shows you how to install and get started using the HP PS110 802.11n Wireless VPN Router, hereafter referred to as the PS110. (See Products list
on page 6 for part numbers.)
The latest documentation, including the HP PS110 Wireless VPN Router Configuration/Administration Guide, is available at www.hp.com/support/manuals.
The PS110 router is an all-in-one networking device designed specifically to work with the HP ProLiant MicroServer Gen 8 Server. It incorporates an IPv6 capable
router, gigabit LAN switch, 802.11n wireless access point, SPI firewall, and VPN encryption technology. The PS110 provides a single radio dual band 802.11n
access point and aggregate VPN capacity of 30 Mbps. The Device enclosure is designed to specifically stack on top of the MicroSever Gen 8 and has technology
built-in to automatically detect any HP ProLiant Server in the network via its iLO interface. In addition to auto-detection of HP ProLiant Servers, the device
interface shows real-time health status of the discovered servers via the iLO interface found on the servers.
Hardware overview
Package contents
The PS110 router, two mounting screws with wall anchors, four rubber feet, AC/
DC power adapter, power cord, and documentation.
Ports
• Four LAN Ethernet ports: Auto-sensing 10/100/1000 BaseT Ethernet ports
with RJ-45 connectors.
• One WAN Ethernet port: Auto-sensing 10/100/1000 BaseT Ethernet port
with RJ-45 connector.
• USB port: A standard USB 2.0 port that can be connected to an external
USB storage device. For details, see the USB port description in the
HP PS110 Wireless VPN Router Configuration/Administration Guide.
8
1
2
4 5
6
7
9
10
3
11
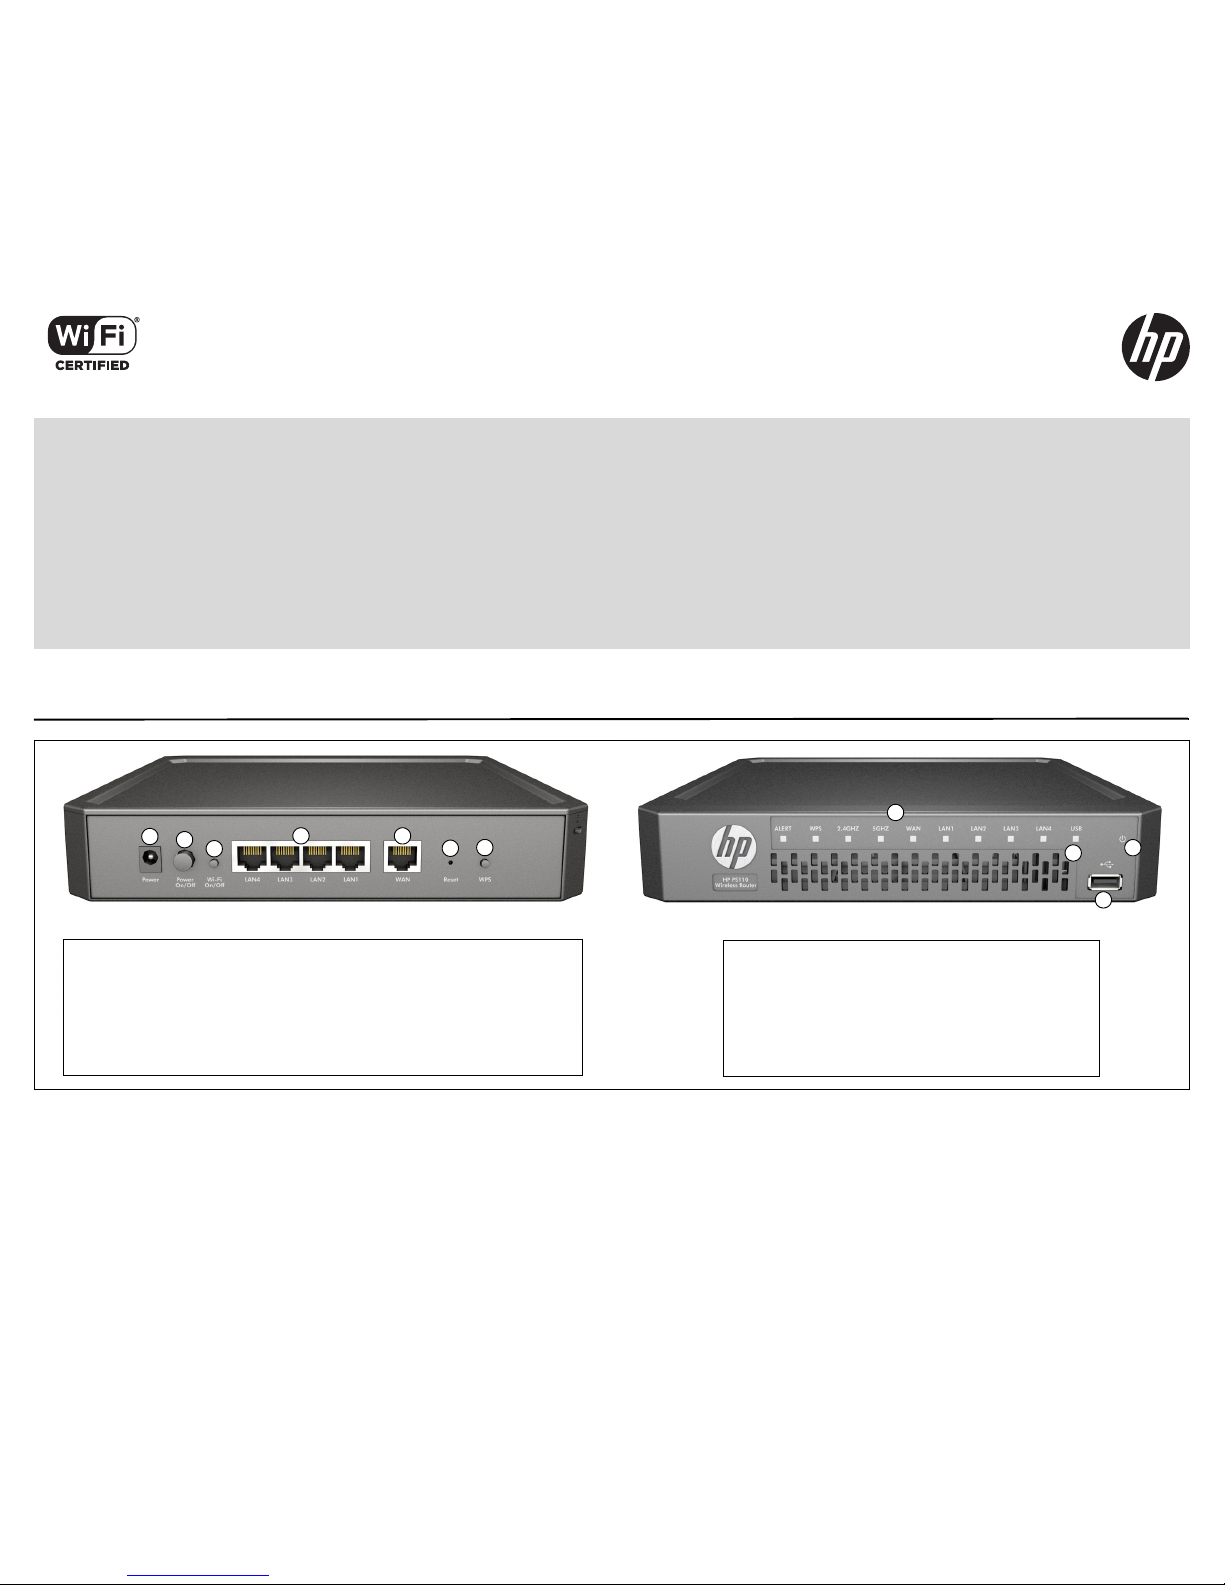
Rear view
1: Power jack 5: WAN port
2: Power On/Off button 6: Reset button
3: Wi-Fi On/Off button 7: WPS button
4: LAN ports 1–4
Front view
8: System and port status LEDs
9: USB port LED
10: USB 2.0 port
11: Power LED
The HP PS110 is a Wi-Fi Alliance authorized Wi-Fi CERTIFIED
802.11a/b/g/n product. The Wi-Fi CERTIFIED Logo is a
certification mark of the Wi-Fi Alliance.
Page 2

HP PS110 Wireless VPN Router Quickstart 2
Radio and antennas
The PS110 provides a single dual-band radio with three antennas supporting
3x3 MIMO three-spatial-stream 802.11n. The PS110 supports 802.11b/g/n
operation modes at 2.4 GHz or 802.11a/n operation modes at 5 GHz. The PS110
does not support concurrent operation at 2.4 GHz and 5 GHz.
Wi-Fi On/Off button
Press the button for more than three seconds and then release it to turn the
wireless function of the router on or off.
WPS button
Press the button for more than three seconds to enable Wi-Fi Protected Setup
(WPS) and allow a wireless client device to securely join the network. Within
two minutes, initiate the WPS procedure on the wireless client device. See the
wireless client documentation for information on how to connect to access
points using WPS.
Reset button
The Reset button is accessible through a hole on the rear panel of the PS110,
labeled as 6 on page 1. To reset the PS110 to factory defaults, insert a paper clip
into the Reset button hole and hold the button for more than three seconds,
then release.
Status LEDs
Powering the PS110
The PS110 is powered by an HP AC/DC Power Adapter.
Caution:
Only use the AC/DC power adapter and power cord that is supplied
with the PS110. Do not use any other adapter or power cord.
LED State Description
Power
Off The PS110 has no power.
Green The PS110 is fully operational.
WAN
Off The WAN port is not connected.
Green
The WAN port has a valid link. Flashing indicates
network activity.
LAN 1
–4
Off The LAN port is not connected.
Green
The LAN port has a valid link. Flashing indicates
network activity.
2.4 GHz
Off The 2.4 GHz radio is disabled.
Green
The 2.4 GHz radio is enabled. Flashing indicates
wireless network activity.
5 GHz
Off The 5 GHz radio is disabled.
Green
The 5 GHz radio is enabled. Flashing indicates
wireless network activity.
WPS
Off WPS is not active.
Green On for 20 seconds when WPS is successful.
Flashing
green
WPS is active and waiting for a wireless client
device to join the network.
USB
Off
Either an unsupported or defective USB device is
attached.
Green A USB device is attached.
Alert
Amber
The PS110 has a hardware failure or the software
has failed to load. Reset or power cycle the
PS110. If this condition persists, contact HP
customer support.
Flashing
amber
Indicates one of the following conditions:
• The PS110 is starting up following a hard or
soft reset.
• The PS110 is upgrading firmware.
• The PS110 software is being reset to factory
defaults.
• A hacker attack is detected. The Alert LED
remains flashing until the hacker attack
ends.
• The Alert LED remains flashing for 30
seconds when a USB overcurrent condition
is detected.
LED State Description
Page 3
HP PS110 Wireless VPN Router Quickstart 3 Important information to read before installing
Important information to read before installing
Warning:
This device is intended for indoor installation only. Before
installing or using the PS110, ensure that you read and understand all safety
information and regulatory requirements, particularly those relevant to your
region. Failure to follow this guidance could result in a non-compliant
situation.
Cabling: You must use supported Cat 5e (or better) cables, and where
applicable for your region, surge protection.
Country of use: During setup, you are prompted to select the country of use.
After the country has been set, the PS110 automatically limits the available
wireless channels, ensuring compliant operation in the selected country.
Entering the incorrect country can result in illegal operation and can cause
harmful interference to other systems.
Safety: Consider the following safety information during installation.
• If your network covers an area served by more than one power distribution
system, make sure all safety grounds are securely interconnected.
• Network cables can occasionally be subject to hazardous transient voltages
(caused by lightning or disturbances in the electrical power grid).
• Handle exposed metal components of the network with caution.
• The PS110 is powered on when connected to an AC power source using its
AC/DC power adapter and the power button is pushed in.
Installation
The PS110 is designed for stacking on top of an HP ProLiant MicroServer Gen 8
Server. It can also be placed on a desktop or be mounted on a wall.
Stacking on MicroServer Gen 8 servers or placing on a desktop
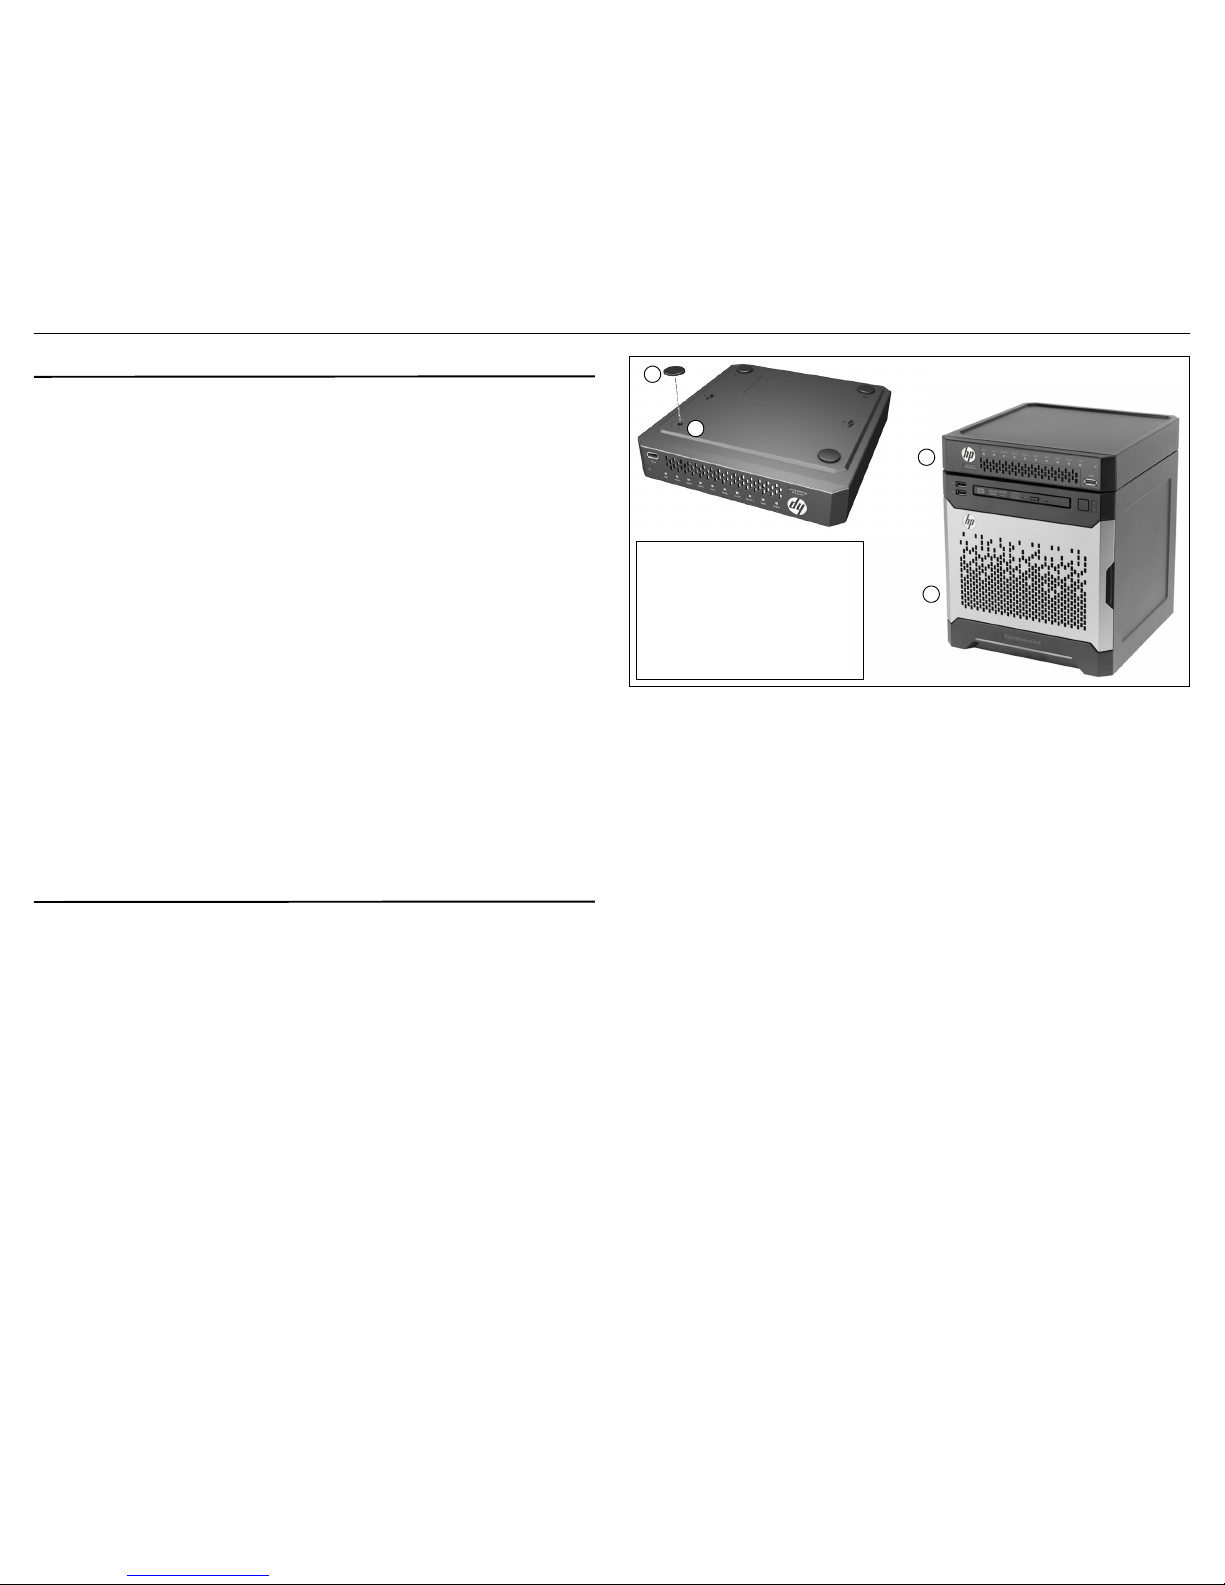
Before placing the PS110 on top of a MicroServer stack or a desktop, attach the
included four rubber feet to the recessed areas on the bottom of the PS110.
Caution:
To achieve maximum wireless coverage, the PS110 must be
placed on the very top of the stack of all MicroServer devices. For example,
if you have an HP PS1810-8G switch on top of the MicroServer, the PS110
must be placed on top of the switch.
Mounting on a wall
When mounting the PS110 on a wall, ensure that the surface to which you
attach the PS110 and the fasteners you use can support at least 0.9 kg (2 lb).
Allow extra weight for cables. When mounting on a wall, HP highly
recommends that you use the included mounting screws and wall anchors.
There are two slots on the bottom of the PS110 that can be used for wall
mounting. If you are mounting the PS110 on a wall, do not attach the rubber
feet.
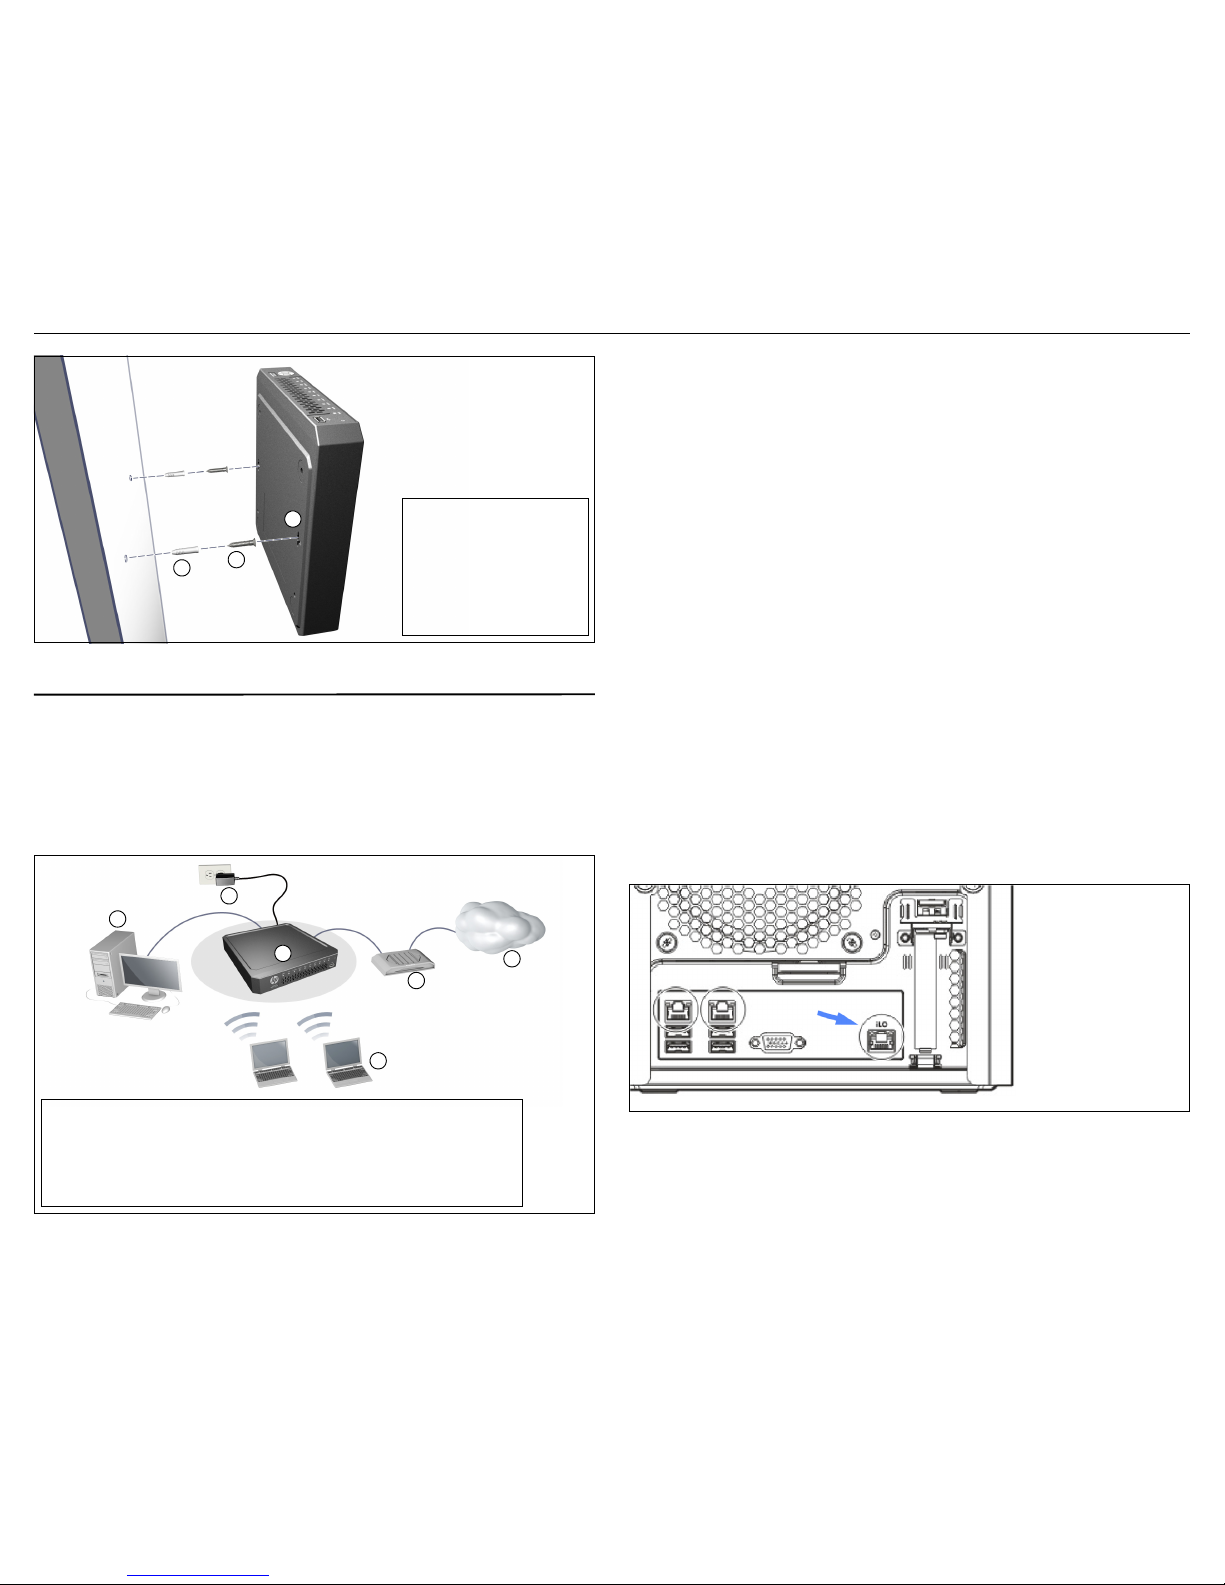
1. On the wall where the PS110 will be installed, mark two holes for the
screws (wall anchors) 176 mm (6.93 inch) apart.
Note:
The wall anchors are not needed when mounting on wooden walls.
2. Drill two holes for the wall anchors, typically 4.7 mm (3/16 inch) in
diameter, and then insert the anchors and tap them flush with the wall
surface.
3. Insert the mounting screws into the wall anchors, leaving their heads
3 mm (0.12 inch) clear of the wall surface.
4. With the network ports facing up or down, position the PS110 mounting
slots over the screw heads, and then slide the PS110 down onto the
screws. Do not let go of the PS110 until you confirm that it is securely in
place.
Server and desktop mounting
1: Rubber feet
2: PS110 feet location
3: PS110
4: HP ProLiant MicroServer
1
2
3
4
Page 4
HP PS110 Wireless VPN Router Quickstart 4 Initial configuration
Initial configuration
This procedure describes how to perform initial configuration for a factorydefault PS110. For illustration purposes, a simple scenario is used.
In this scenario, the PS110 links wired and wireless computers to the Internet
through a cable modem provided by an Internet Service Provider (ISP). For
instructions on how to configure other scenarios, see the HP PS110 Wireless
VPN Router Configuration/Administration Guide.
The PS110 is managed through its web-based management interface using
Microsoft Internet Explorer 8 or later, Google Chrome v29 or later, or Mozilla
Firefox v24 or later.
You must perform the initial configuration from a computer that is directly
connected to one of the PS110 LAN ports. If you configure the PS110 from a
wireless computer, you might lose contact with the PS110 when you change the
wireless configuration.
Note:
Do not power on the PS110 until directed.
A. Configure your computer
1. Verify that the Ethernet network interface of your computer is set to
obtain an IP address automatically from a DHCP server.
2. Disable any wireless connection on your computer.
B. Connect cables and power on the PS110
1. Connect your cable modem to the WAN port on the PS110 using a
standard Ethernet cable.
2. Connect the LAN port on your computer to one of the LAN ports on the
PS110 using a standard Ethernet cable.
3. To be able to discover and monitor the health status of HP servers from
the PS110, connect a network cable between any available LAN port on
the PS110 and the server iLO port located on the back of the server
(bottom right corner), identified here with an arrow.
Note:
It is also possible to use a single cable between the PS110 and
server for data and iLO communications, See the server
documentation on shared iLO mode for more information.
4. Connect other equipment to the LAN ports using standard Ethernet
cables.
Wall mounting
1: Wall anchors
2: Mounting screws
3: PS110 wall-mounting
slots
1
3
2
Simple scenario
1: Wired computer 4: Cable modem
2: AC/DC power adapter 5: Internet
3: PS110 6: Wireless computer
1
2
3
4
5
6
Page 5
HP PS110 Wireless VPN Router Quickstart 5 Initial configuration
5. Ensure that the power button is not pressed in.
6. Connect the AC/DC power adapter to the power socket on the PS110,
and then plug the AC/DC power adapter into a standard electrical wall
socket.
7. Power on the PS110 by pressing the power button.
Initially, the PS110 LAN port LEDs turn on and off. Wait approximately
one minute until the Alert LED turns off before proceeding to the next
step.
C. Connect to the management interface and log in
Note:
A factory-default PS110 is assumed.
1. In a web browser, enter the address: https://192.168.1.1.
2. On the Login page, specify admin for both Username and Password,
and then select Login.
Note:
HP recommends that you change the default password on the System >
Admin page and select Save. Passwords must be at least six characters
long and include four different characters.
3. On the License Agreement page, read the agreement and select Accept
HP End User License Agreement.
4. A Country prompt appears. Select the country in which the PS110 is
operating, and then click Save.
Caution:
To ensure compliance, you must select the correct country.
See Country of use on page 3.
The PS110 management interface home page opens.
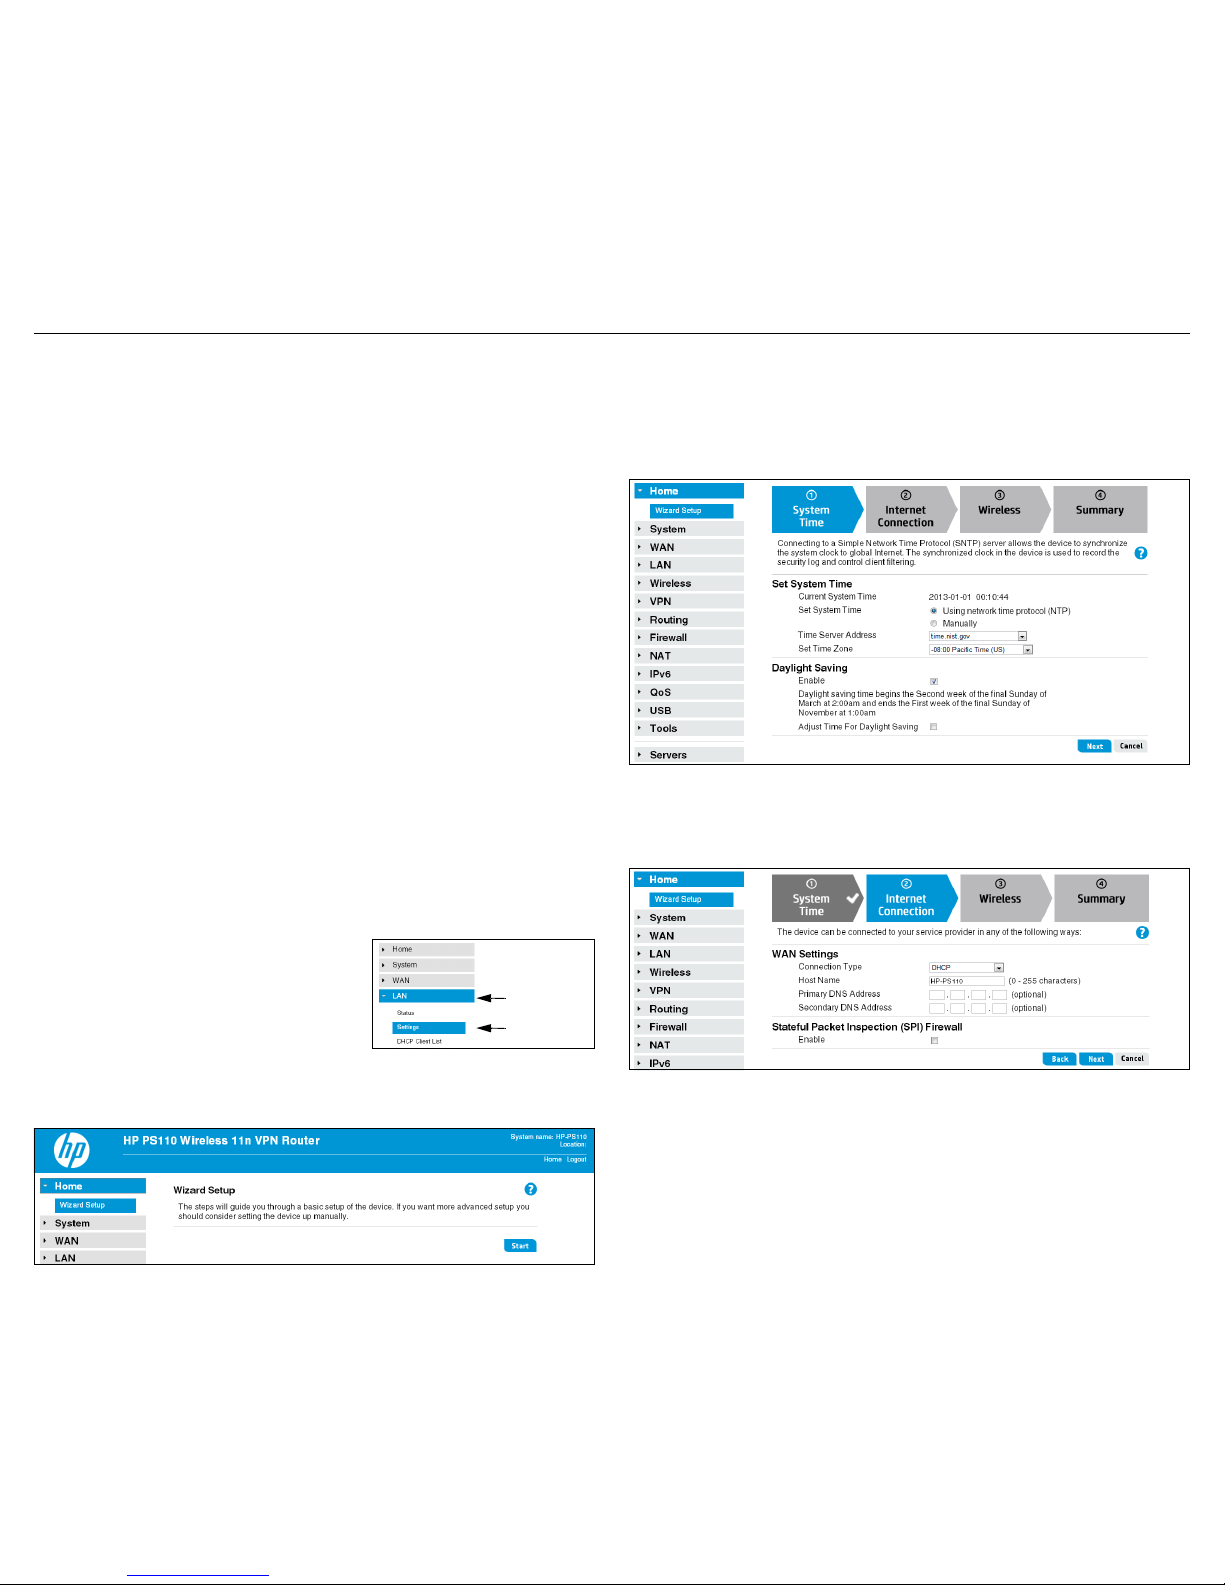
The management interface is organized with
menus and sub-menus. Instructions for
making menu selections, such as “select LAN
> Settings” indicate that you should select the
LAN menu, and then the Settings sub-menu.
D. Run the wizard to set up the PS110
1. Select Home on the management interface menu.
2. Select Start to start the wizard.
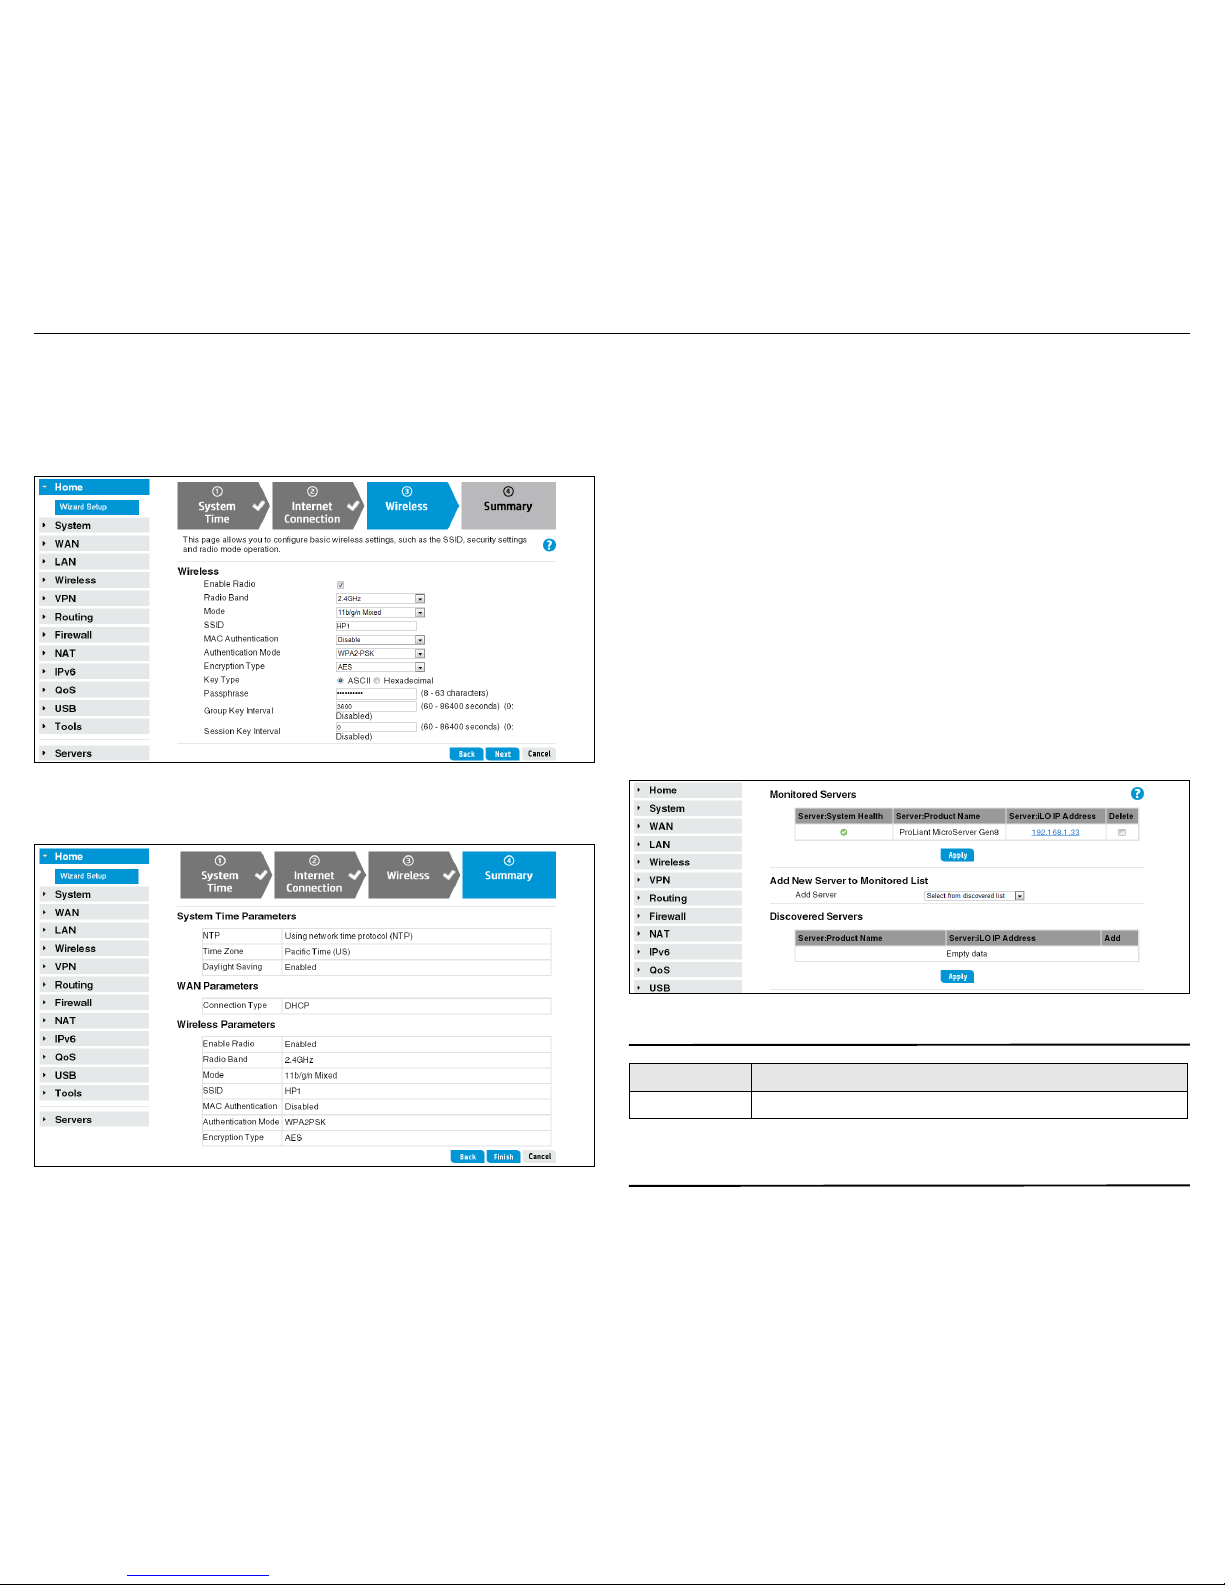
3. Either configure the system time manually by entering the date and time,
or keep the default setting of Using network time protocol (NTP). Set
the time zone for your region, and enable daylight saving, if required.
Click Next.
4. Set the Connection Type for the WAN connection to your ISP. The
default setting is to use the DHCP protocol. If desired, enable the
Stateful Packet Inspection (SPI) Firewall option. Click Next.
5. Configure the wireless settings:
• Select the 2.4 GHz or 5 GHz radio band for your wireless network.
• Set the radio operating mode. Select a compatibility mode if support
for older 802.11a/b/g devices is required, otherwise HP recommends
that you select 11n only.
• Set a unique SSID name for the wireless network.
Main menu
Sub-menu
Page 6
HP PS110 Wireless VPN Router Quickstart 6 Products list
• Select an authentication mode for security. In this example, a setting
of WPA2-PSK is selected and a Passphrase is entered for the network
security. For information on other wireless security settings, see the
HP PS110 Wireless VPN Router Configuration/Administration Guide.
Click Next.
6. Confirm the settings, and then click Finish.
The router reboots and the PS110 is operational.
E. Test the wireless connection
For the purposes of this example, the PS110 has its DHCP server enabled (the
default setting) and the cable modem is on and operating normally.
1. Disconnect the wired connection from your computer to the PS110.
2. Enable the wireless network interface of your computer.
3. Use your computer’s wireless network utility to find and connect to the
PS110’s wireless network. The SSID name is “HP1” in this example.
4. When prompted, enter the wireless security passphrase for the network,
as configured in section D, step 5.
5. Confirm that you can browse the Internet from your computer.
F. To perform additional configuration
Re-launch the PS110 management interface at https://192.168.1.1 and log in
using the configured username and password.
G. Viewing HP server status
To discover and monitor the health status of HP servers from the PS110, select
the Servers > Monitor Servers page.
Products list
WW=Worldwide, AM=The Americas (North, Central, and South America)
Technical support
For worldwide technical support information, see the HP support website at
www.hp.com/networking/support.
Model Part numbers
HP PS110 JL066A (WW), JL065A (AM)
Page 7

HP PS110 Wireless VPN Router Quickstart 7 Regulatory information
Regulatory information
FCC Notice
FCC ID: B94MRLBB1401
This FCC Class B device complies with Part 15 of the FCC rules. Operation is subject to the
following two conditions: 1) this device may not cause harmful interference, and 2) this device
must accept any interference received, including interference that may cause undesired operation.
For the full FCC Class B equipment notice and other important safety, environmental, and
regulatory information, see Safety and Compliance Information for Server, Storage, Power,
Networking, and Rack Products, available at www.hp.com/support/Safety-ComplianceEnterpriseProducts.
For products available in the USA/Canada market, 2.4 GHz operation is limited to channels 1-11.
When this device is operated in 5.15-5.25 GHz frequency range, it is restricted to indoor use only.
This device will not permit operation on channels 120-128 for 11a and 11n modes that overlap
the 5600-5650 MHz band.
A 20 cm minimum distance must be maintained between the antenna and the users of this
wireless device. Under such configuration, the FCC radiation exposure limits set forth for a
population/uncontrolled environment can be satisfied.
Any changes or modifications not expressly approved by the manufacturer could void the
user's authority to operate this equipment.
Industry Canada Notice
CAN ICES-3 (B)/NMB-3(B)
This device complies with Industry Canada license-exempt RSS standard(s). Operation is
subject to the following two conditions: (1) this device may not cause interference, and (2) this
device must accept any interference, including interference that may cause undesired
operation of the device.
Operation in the band 5150-5250 MHz is only for indoor use to reduce the potential for harmful
interference to co-channel mobile satellite systems.
Users should also be advised that high-power radars are allocated as primary users (i.e.
priority users) of the bands 5250-5350 MHz and 5650-5850 MHz and that these radars could
cause interference and/or damage to LE-LAN devices.
Important Note: IC Radiation Exposure Statement:
This equipment complies with IC RSS102 radiation exposure limits set forth for an uncontrolled environment. This equipment should
be installed and operated with minimum distance of 20 cm between the antenna and the user.
Notice for Brazil, Aviso aos usuários no Brasil
Este equipamento opera em caráter secundário, isto é, não tem direito a proteção contra
interferência prejudicial, mesmo de estações do mesmo tipo, e não pode causar interferência a
sistemas operando em caráter primário.
Notice for Mexico
La operación de este equipo está sujeta a las siguientes dos condiciones: (1) es posible que
este equipo o dispositivo no cause interferencia perjudicial y (2) este equipo o dispositivo debe
aceptar cualquier interferencia, incluyendo la que pueda causar su operación no deseada.
Notice for Korea
해당 무선설비는 전파혼신 가능성이 있으므로 인명안전과 관련된 서비스는 할 수 없음
Notice for Taiwan
低功率電波輻射性電機管理辦法
第十二條 經型式認證合格之低功率射頻電機,非經許可,公司、商號或使用者均不得
擅自變更頻率、加大功率或變更原設計之特性及功能。
第十四條 低功率射頻電機之使用不得影響飛航安全及干擾合法通信;經發現有干擾現
象時,應立即停用,並改善至無干擾時方得繼續使用。前項合法通信,指依
電信法規定作業之無線電通信。低功率射頻電機須忍受合法通信或工業、科
學及醫療用電波輻射性電機設備之干擾。
在 5.25-5.35 秭赫頻帶內操作之無線資訊傳輸設備,限於室內使用。
Notice for China
仅适用于海拔 2000 米以下地区安全使用
Specifications
B 급 기기
( 가정용 방송통신 기자재 )
이 기기는 가정용 (B 급 ) 전자파 적합기기로서주로
가정에서 사용하는 것을 목적으로 하며 , 모든 지역
에서 사용할 수 있습니다 .
Class B (broadcasting communication
device for home use)
This device obtained EMC registration mainly for
home use (Class B) and may be used in all areas.
Specification Description
Regulatory model number MRLBB-1405
Frequency range 2400–2483.5 MHz
5150–5850 MHz
Actual operating frequencies depend on regulatory approval
for the country of use.
Wireless medium Direct Sequence Spread Spectrum (DSSS), Orthogonal
Frequency Division Multiplexing (OFDM), Spatial
multiplexing (MIMO)
Network standards 802.11a, 802.11b, 802.11g, 802.11n
Channel bandwidth supported 20 and 40 MHz
Spatial streams 3 (3x3 configuration)
Data rates supported 802.11b: 1, 2, 5.5, 11 Mbps
802.11g: 6, 9, 12, 18, 24, 36, 48, and 54 Mbps
802.11a: 6, 9, 12, 18, 24, 36, 48, and 54 Mbps
802.11n: MCS0 up to MCS23 (450 Mbps)
Maximum available conducted
transmit power
Per chain 2.4 GHz: 18 dBm
All chains 2.4 GHz: 22.8 dBm
Per chain 5 GHz: 18 dBm
All chains 5 GHz: 22.8 dBm
Actual transmit power may be limited by the country of
operation.
Page 8

HP PS110 Wireless VPN Router Quickstart 8 Regulatory information
Electrical characteristics
Maximum power rating: 24 W. Power Input: 12 Vdc.
Safety
UL 60950-1; IEC/EN 60950-1; CAN/CSA-C22.2 No. 60950-1
EMC
FCC 15.107, 15.109 (US)
ICES-003 (Canada)
EN 301 489-1, EN 301 489-17 (European Union)
Radio
FCC Part 15.247, 15.407 (US)
RSS-210 (Canada)
EN 300 328, EN 301 893 (European Union)
RF exposure
FCC Bulletin OET-65C; RSS-102; EN 62311
Dimensions 245 x 230 x 43.85 mm
Weight 787 g (1.74 lb)
Operating temperature 0°C to 40°C
Non-operating/storage
temperature
-40°C to 70°C
Operating/non-operating
relative humidity
5% to 95%, noncondensing
Altitude Up to 3048 m (10,000 ft)
Specification Description
© Copyright 2014 Hewlett-Packard Development
Company, L.P. The information contained herein is
subject to change without notice.
September 2014
Printed in China
Document part # 5998-6548
*5998-5392*
 Loading...