

Page 1

HP Enterprise SQL Optimizer (HP ESO) 1.0
User Guide
HP Part Number: AM426-9013A
Published: April 2012
Edition: 2.1
Page 2

© Copyright 2011–2012 Hewlett-Packard Development Company, L.P.
Legal Notices
Confidential computer software. Valid license from HP required for possession, use or copying. Consistent with FAR 12.211 and 12.212, Commercial
Computer Software, Computer Software Documentation, and Technical Data for Commercial Items are licensed to the U.S. Government under
vendor's standard commercial license.
The information contained herein is subject to change without notice. The only warranties for HP products and services are set forth in the express
warranty statements accompanying such products and services. Nothing herein should be construed as constituting an additional warranty. HP shall
not be liable for technical or editorial errors or omissions contained herein.
Microsoft, SQL Server, and Windows are U.S. registered trademarks of Microsoft Corporation.
Intel and Xeon are trademarks of Intel Corporation in the U.S. and other countries.
Page 3

Contents
About This Document.....................................................................................5
Publishing History.....................................................................................................................5
Organization...........................................................................................................................5
1 Introduction...............................................................................................6
Features..................................................................................................................................6
2 Installing HP ESO.......................................................................................7
Software Requirements..............................................................................................................7
Microsoft SQL Server Security Settings.........................................................................................7
Installing the Software...............................................................................................................7
Uninstalling the Software...........................................................................................................9
3 Using HP ESO..........................................................................................10
Starting System Management Homepage..................................................................................10
Getting Started Pages.............................................................................................................12
Introduction Page...............................................................................................................12
Settings Pages........................................................................................................................13
Configuration....................................................................................................................13
Data Collection.............................................................................................................13
Software Discovery........................................................................................................15
Optimizations Pages...............................................................................................................15
SQL Server........................................................................................................................16
Maximum Degree of Parallelism......................................................................................16
Lightweight Pooling........................................................................................................17
Priority Boost................................................................................................................17
Min Server Memory (in MB)...........................................................................................17
Maximum Server Memory (in MB)...................................................................................17
Check Point..................................................................................................................17
Database..........................................................................................................................17
File Growth..................................................................................................................18
Database File on System Drive........................................................................................18
Multiple Database File on a Drive....................................................................................18
CPU.................................................................................................................................18
SQL Server Affinity........................................................................................................19
IO Affinity....................................................................................................................19
Storage............................................................................................................................19
Database RAID Level.....................................................................................................20
Drive Free Space...........................................................................................................20
Network...........................................................................................................................20
NUMA Node Affinity....................................................................................................21
Interrupt Affinity............................................................................................................21
Port Affinity..................................................................................................................21
System..............................................................................................................................21
Power Plan...................................................................................................................22
System Update Advisory Information................................................................................22
PCI Controller Information..............................................................................................22
Reports Pages........................................................................................................................22
Workload and Performance History......................................................................................22
Save/Rollback SQL Configuration........................................................................................23
Help Pages............................................................................................................................24
Online Help......................................................................................................................24
Contents 3
Page 4

4 Support and Other Resources.....................................................................26
Contacting HP .......................................................................................................................26
Before You Contact HP.......................................................................................................26
HP Contact Information.......................................................................................................26
Subscription Service...........................................................................................................26
Documentation Feedback....................................................................................................26
New and Changed Information in This Edition............................................................................27
Typographic Conventions.........................................................................................................27
4 Contents
Page 5

About This Document
This document describes how to install and use HP's Enterprise SQL Optimizer (HP ESO) software.
HP ESO was created for system administrators and HP support personnel responsible for installing,
configuring, and managing HP ProLiant servers running Microsoft SQL Server. This document is
not a tutorial. For the latest version, see the HP Technical Documentation website:
http://www.hp.com/go/proliant_servers-docs
Publishing History
Manufacturing Part Number
AM426-9013A
Organization
This document is organized as follows:
Publication DateSupported Products (Servers)Supported Operating
Systems
November 2011HP ProLiant DL980 G7Microsoft Windows Server
2008 R2 x64 Edition with
Service Pack 1 (SP1)
Microsoft Windows Server
2008 with Service Pack 2
(SP2)
April 2012Same as above.Same as above.AM426-9013A
Describes HP ESO features and prerequisite software.“Introduction” (page 6)
Describes how to install HP ESO.“Installing HP ESO” (page 7)
Describes how to use HP ESO.“Using HP ESO” (page 10)
Publishing History 5
Page 6

1 Introduction
HP Enterprise SQL Optimizer (HP ESO) is a software tool that greatly simplifies and consolidates
the process of tuning HP ProLiant DL980 G7 servers running Microsoft Windows Server and SQL
Server 2008, SQL Server 2008 R2, or SQL Server 2012. Use HP ESO to:
• Reduce the time and complexity of configuring and tuning systems running SQL Server
• Reduce the number of support calls due to misconfigured systems
• Help users optimize their configuration to ensure top SQL Server performance
• Improve customer satisfaction
HP ESO achieves these goals by providing optimization tools for the following system components:
• the Server – with hardware-related recommendations such as placement of PCI cards and
proper storage drive configurations, and information on the update status of HP software,
drivers, and firmware
• the Operating System – with settings for Power Management Options and storage volumes
• Microsoft SQL Server – with settings such as priority boost, light-weight pooling, CPU affinity,
and more
Features
HP ESO provides the following functionality for configuring and tuning your server and Microsoft
SQL Server:
• Scheduled or Manual Data Collection, for use as reference when optimizing the system and
SQL Server
• Built in knowledge of the hardware architecture, to properly optimize the server
• Reports page that provides a graphical display of data collection parameters, for use in
analysis and interpretation, with the ability to export to a file
• Built-in WBEM-based instrumentation for quick integration with other management tools such
as HP System Insight Manager
• Capability to roll back to previously saved configurations. Use this feature to save the current
configuration, then retrieve and apply it in the future if necessary
6 Introduction
Page 7
2 Installing HP ESO
Software Requirements
The following prerequisite software is required in order for HP ESO to function properly:
• HP System Management Homepage (HP SMH), Version 6.0 or later
• Any Internet browser supported by HP SMH (refer to your HP SMH documentation for more
information)
• Microsoft .NET Framework, Version 2.0.50727 or later
• Microsoft SQL Server 2008 Management Objects (or Microsoft SQL Server 2008 R2
Management Objects; or Microsoft SQL Server 2012 Management Objects)
• HP Insight Management WBEM Providers (highly recommended)
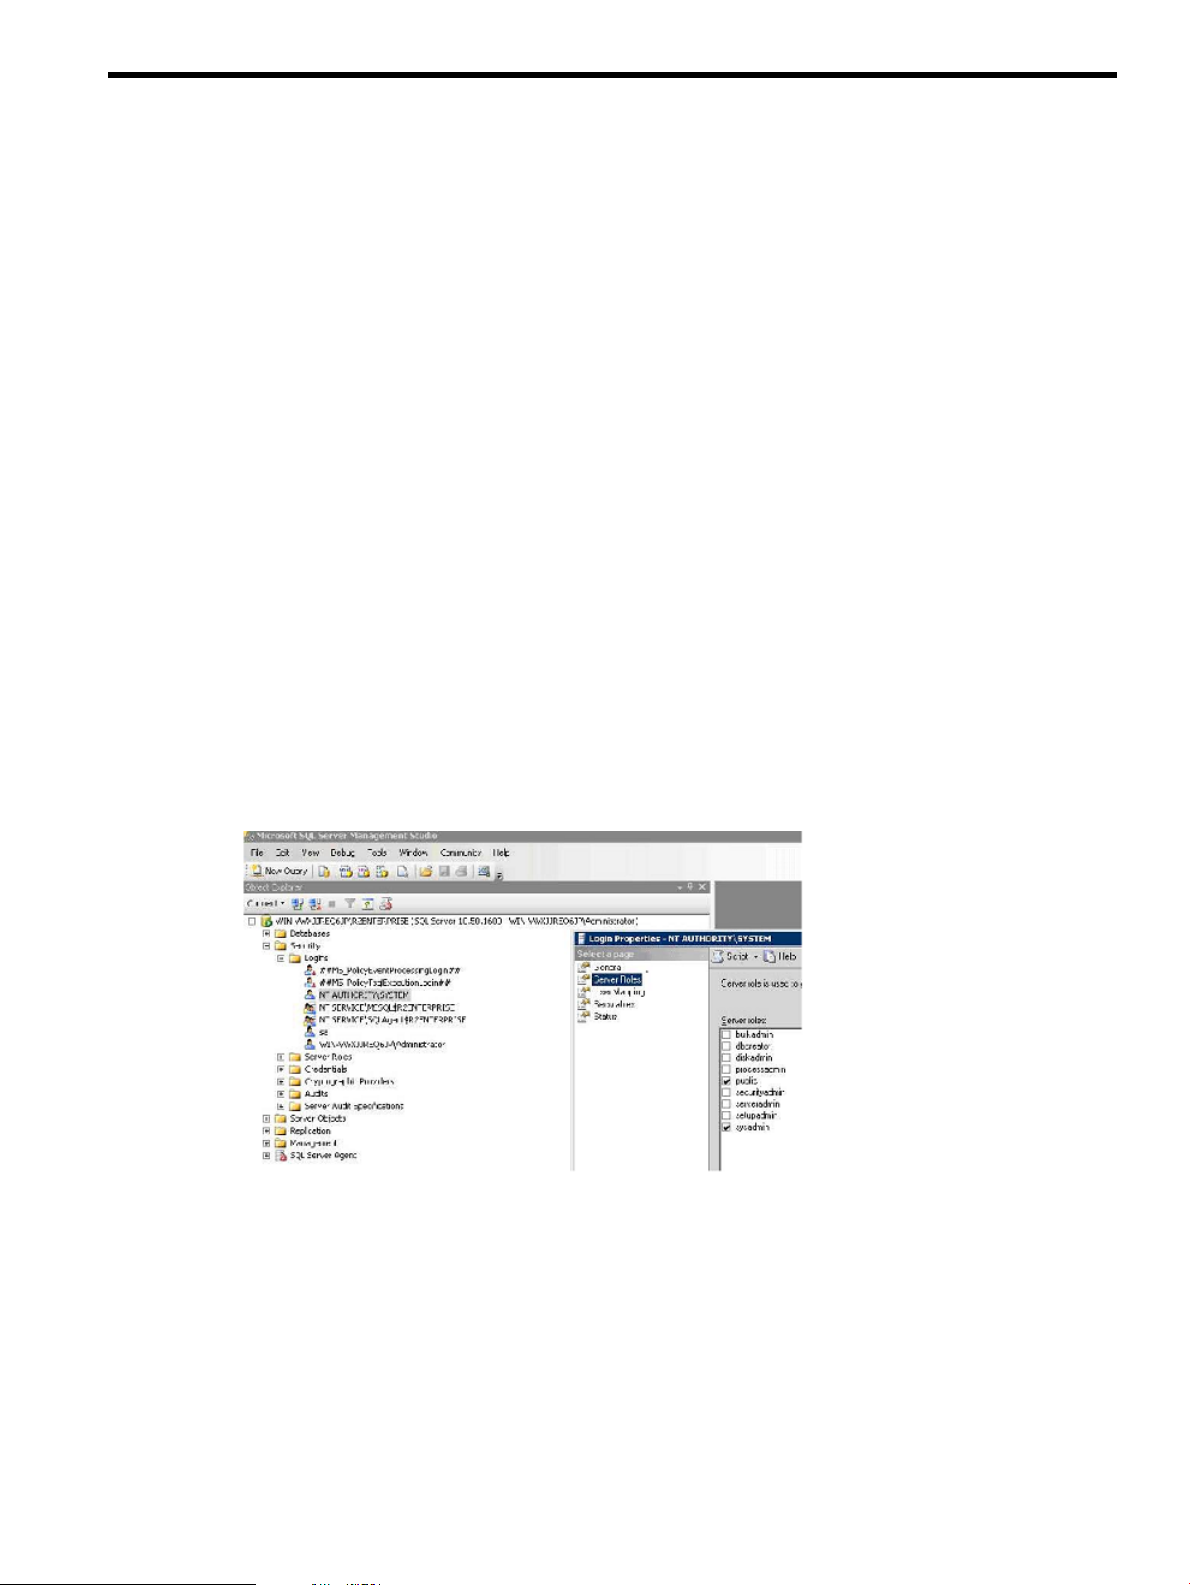
Microsoft SQL Server Security Settings
The following steps are required for HP Enterprise SQL Optimizer to be able to access all SQL
Server instances in the system:
1. Open the Microsoft SQL Server Management Studio.
2. Login to each SQL Server instance using an account that is able to set permissions of other
accounts.
3. Choose the following selections: Security → Logins → NT_AUTHORITY\SYSTEM → right click
and select Properties → Server Role → Select public, serveradmin and/or sysadmin roles.
4. Repeat the above steps for all SQL instances for ESO to optimize the resources across all SQL
instances as per their work load.
Figure 1 SQL Server Management Studio Window
Installing the Software
To install HP Enterprise SQL Optimizer, follow these steps:
1. Login as Administrator on the target system.
2. Obtain the HP ESO installation file (filename: cpnnnnnn.exe) and either double-click on it, or
right-click and select Open.
3. The first installation window displays. Click Install to continue.
Software Requirements 7
Page 8

Figure 2 Package Setup Window
4. The second installation window displays. Click Install to continue. The installation begins, with
a progress bar indicating status.
Figure 3 Setup Window #1
5. When the installation finishes successfully, click Close to exit.
Figure 4 Setup Window #2
NOTE: The HP ESO application files are installed into the %ProgramFiles%\McPerfOpt
folder, where %ProgramFiles% is typically: C:\Program Files.
8 Installing HP ESO
Page 9

If the prerequisite HP Insight Management WBEM Provider software is not installed on the system,
you will see the following warning message during HP ESO installation:
Figure 5 Install Warning Window
Uninstalling the Software
To uninstall HP Enterprise SQL Optimizer, follow these steps:
1. Login as Administrator on the target system.
2. Navigate to the Add/Remove panel (or Programs and Features in the Control Panel).
3. Locate “HP Enterprise SQL Optimizer for Windows Server x64 Edition” in the resulting list of
programs. Right-click on it and click the Uninstall button.
4. A confirmation popup displays, asking you to confirm this action. Click Yes to continue.
5. A notification popup displays, confirming that HP ESO was removed. Click OK to close this
popup and complete the process.
Uninstalling the Software 9
Page 10

3 Using HP ESO
To use HP ESO, you must first launch the HP System Management Homepage (SMH) software,
which is also the starting point for many other HP server management tools.
Starting System Management Homepage
To run the HP System Management Homepage (SMH), follow these steps:
1. From the target system Desktop, click Start → All Programs → HP Management Agents → HP
System Management Homepage.
2. When the security certificate warning displays, click Continue to this website.
NOTE: To avoid seeing this certificate error message in the future, follow the steps described
in this HP Support web page:
HP Systems Insight Manager (HP SIM) and System Management Homepage (SMH) - Microsoft
Internet Explorer Does Not Link Website Certificate to all IP or DNS Names Associated with
the Certificate
Also refer to the section “Initializing the software for the first time” in the document, HP System
Management Homepage Installation Guide, found at:
http://bizsupport1.austin.hp.com/bc/docs/support/SupportManual/c02779495/
c02779495.pdf
Figure 6 Certificate Warning Window
3. The SMH Sign In page displays. Enter a valid user name and password and click Sign In.
10 Using HP ESO
Page 11

Figure 7 SMH Sign In Page
Your user name and password must be a valid account in a group configured in the SMH
users groups. The Sign In button validates the values in the User Name and Password fields.
If both values are valid, the HP SMH Home page displays. The Clear button clears the User
Name and Password fields. The Question Mark icon (?) displays or hides a floating tooltip
box containing information about the authentication mechanism and sign in process.
4. In the SMH Home page, click on the HP ESO link in the Enterprise SQL Optimizer box.
Figure 8 SMH Home Page
Starting System Management Homepage 11
Page 12

5. The Enterprise SQL Optimizer Main page displays. Refer to the next section for instructions
on using HP ESO.
Getting Started Pages
When first run, HP ESO displays the Introduction page in the Getting Started section. The left
navigation pane displays links to all of the various HP ESO pages.
IMPORTANT: Before using the HP ESO software, it is highly recommended that you go to the
Configuration page to configure a few initial parameters that are recommended for best optimization
of SQL Server.
Introduction Page
Figure 9 Introduction Page
Remember, anytime you mouse over a setting or section with a cursor + question mark symbol
( ), clicking on that symbol brings up a floating help text bar. This feature is extremely useful in
learning about the many settings that HP ESO provides.
12 Using HP ESO
Page 13

Figure 10 Floating Help Text
Settings Pages
Use the Settings pages to configure some of your settings prior to discovery and optimization of
the HP server, the Windows Operating System (OS), and SQL Server.
Configuration
Data Collection
The Data Collection feature collects parameters from the Windows OS and SQL Server, such as
CPUs, memory and IO utilization, and SQL Server transaction rates. Collected data is saved in
the form of CSV (Comma Separated Value) files located at %ProgramFiles%\McPerfOpt\
Data.
Figure 11 CSV Data Files
These CSV files are used by HP ESO for analysis, and form the basis of its optimization
recommendations.
Click on Configuration in the HP ESO navigation pane to display the Configuration page, which
contains two sections: Data Collection Settings and Software Discovery.
Settings Pages 13
Page 14

Figure 12 Configuration Page
User input fields in the Data Collection Settings section include the following:
• START ON ⇒ Lets you select the date and time that Data Collection starts. NOW is the default
value and manually starts Data Collection right now. Click on the calendar icon ( ) to display
a floating calendar for selecting a future date and time for starting Data Collection.
• STOP ON ⇒ Lets you select the date and time when Data Collection stops. NON-STOP is the
default value and keeps Data Collection running until you stop it manually.
• Data Sampling Rate ⇒ Lets you specify how often data is sampled by Data Collection. The
default value is 10 seconds.
NOTE: The lower the sampling rate value, the finer the resolution of the data samples, and
the more accurate the internal data analysis will be. However, setting the sampling rate too
low makes the resulting data collection files larger. The higher the sampling rate value, the
coarser the resolution of data samples, and the less accurate the internal data analysis will
be. However, setting the sampling rate higher will make the resulting data collection files
smaller.
Control buttons in the Data Collection Settings section include the following:
• START ( ) ⇒ Starts Data Collection on the selected date and time in the START ON field.
• STOP ( ) ⇒ Stops Data Collection on the selected date and time in the STOP ON field.
When these buttons are disabled, they display as grayed-out.
When Data Collection starts, HP ESO automatically invokes the Windows Performance Monitor
tool to collect data from different counters.
14 Using HP ESO
Page 15

Figure 13 Performance Monitor
Software Discovery
HP ESO's Software Discovery feature checks to see if the latest HP software, drivers, and firmware
installed in the system.
Software Discovery Reference Catalog Locations specify where to find the information about the
latest available HP software, driver, and firmware updates. Possible choices are:
• Web ⇒ HP ESO connects to an HP File Transfer Protocol (FTP) site to get the latest catalog.
• Local ⇒ Lets you specify a system location for the HP catalog. When selected, software
discovery uses the local catalog file specified.
When Local is selected, specifying a shared network drive causes the software discovery to fail
by default. To work around this issue, either:
• Copy the catalog file to a non-networked drive (for example, C:).
• If using a network drive is unavoidable, use SysinternalsSuite by Mark Russianovich
(http://technet.microsoft.com/en-us/sysinternals/bb842062.aspx). PSEXEC is the only tool
needed. Perform the following steps:
1. Open up a new command window and run: psexec -s cmd.exe
2. Run the net use command or any other script to create the network drive.
The Software Discovery RUN button ( ) runs the system software discovery and updates. Results
are shown in the Optimization section’s System Software page. Status of the latest discovery also
displays below this button.
NOTE: Software Discovery executes every time the server restarts.
Optimizations Pages
This Optimizations page provides links to various types of optimizations.
IMPORTANT: It is highly recommended that you run Data Collection before visiting or modifying
the Optimization links.
In all of the optimization pages, HP ESO displays the following values or controls:
• Current Value ⇒ The current parameter value discovered in the system.
• Recommended Value ⇒ The parameter value recommended by HP ESO.
Optimizations Pages 15
Page 16

• New Value ⇒ This field contains the new parameter value to be applied to the system. By
• SET ALL button ( ) ⇒ Sets all of the parameters shown in the New Value fields on the
• SET button ( ) ⇒ Sets the specific parameter shown beside it. Click this button to make
• Enable Parameter Change check box ( ) ⇒ When checked, allows the corresponding
• Select/Unselect All check box ( ) ⇒ When checked, causes the parameter changes
• Expand and Collapse buttons ( and ) ⇒ Expand or Collapse a section in a page.
SQL Server
The SQL Server page contains recommendations for setting SQL Server parameters.
Figure 14 SQL Server Page
default, this field contains the recommended value. However, you can change this value if
desired.
page. Click this button to make the changes take effect immediately. Changes requiring a
system or SQL Server service restart are indicated after the changes are applied.
the change take effect immediately. Changes requiring a system or SQL Server service restart
are indicated after the change is applied.
parameter to be changed. When unchecked, the parameter retains its current value after
clicking the SET or SET ALL buttons.
enablement check boxes under its section to toggle between Selected and Unselected.
Maximum Degree of Parallelism
When SQL Server runs on a system with more than one microprocessor or CPU, it detects the best
degree of parallelism. Specifically, it recognizes the number of processors employed to run a single
statement, for each parallel plan execution. Use the Max Degree of Parallelism option to limit the
number of processors to use in parallel plan execution.
16 Using HP ESO
Page 17

Lightweight Pooling
Use the Lightweight Pooling option to reduce system overhead associated with the excessive context
switching sometimes seen in symmetric multiprocessing (SMP) environments. When excessive
context switching is present, lightweight pooling can provide better throughput by performing the
context switching inline, thus helping to reduce user/kernel ring transitions.
Priority Boost
Use the Priority Boost option to specify whether Microsoft SQL Server should run at a higher
Microsoft Windows 2000, Windows Server 2003, Windows Server 2008, or Windows Server
2008 R2 scheduling priority than other processes on the same system. If you set this option to 1,
SQL Server runs at a priority base of 13 in the Windows 2000, Windows Server 2003, Windows
Server 2008, or Windows Server 2008 R2 scheduler. The default is 0, which is a priority base
of 7.
Min Server Memory (in MB)
Use the Min Server Memory option to specify whether SQL Server should start with at least the
minimum amount of allocated memory and not release memory below this value. Set this value
based on the size and activity of your SQL Server instance. Always set the option to a reasonable
value to ensure the operating system does not request too much memory from SQL Server and
inhibit Windows performance.
Maximum Server Memory (in MB)
The Maximum Server Memory option specifies the maximum amount of memory SQL Server can
allocate when it starts and while it runs. Set this option to a specific value if you know there are
multiple applications running at the same time as SQL Server and you want to guarantee these
applications have sufficient memory to run. If these other applications, such as Web or e-mail
servers, request memory only as needed, then do not set the option because SQL Server will release
memory to them as needed. However, applications often use whatever memory is available when
they start and do not request more if needed. If an application that behaves in this manner runs
on the same system at the same time as SQL Server, set the option to a value that guarantees the
memory required by the application is not allocated by SQL Server.
Check Point
The Check Point option writes all dirty pages for the current database to disk. Dirty pages are data
pages that have been entered into the buffer cache and modified, but not yet written to disk. Check
points save time during a later recovery by creating a point at which all dirty pages are guaranteed
to have been written to disk.
Database
The Database page contains parameters related to database files in each SQL Server instance.
Optimizations Pages 17
Page 18

Figure 15 Database Page
File Growth
The File Growth option specifies the method of incremental allocation applied when an operating
system file is extended. Possible values are OFF, KB, or % (Percent). SQL Server files can grow
automatically from their originally specified size. When you define a file, you can specify a specific
growth increment. Every time the file is filled, it increases its size by the growth increment. If there
are multiple files in a file group, they will not automatically grow until all the files are full. Growth
then occurs in a round-robin fashion. If necessary, the tool recommends allocation of larger space
in the file and turns off automatic file growth.
Database File on System Drive
HP ESO recommends that you store the database file in a different location than the system or OS
drive. If a database file is found on the system drive, HP ESO's recommendation to relocate the
file displays on this page.
Multiple Database File on a Drive
HP ESO also recommends that the database files are located on a dedicated drive. If multiple
database files are found on a drive, HP ESO's recommendation for relocating them on separate
drives displays on this page.
CPU
The CPU page displays SQL Server and IO affinity settings and recommendations for each SQL
instance in the system. To carry out multitasking, Microsoft Windows sometimes moves process
threads among different processors. Although this is efficient from an OS point of view, this activity
can reduce SQL Server performance under heavy system loads, as each processor cache is
repeatedly reloaded with data. Assigning processors to specific threads can improve performance
under these conditions by eliminating processor reloads and reducing thread migration across
processors (thereby reducing context switching). Such an association between a thread and a
processor is called processor affinity.
18 Using HP ESO
Page 19

HP ESO generally recommends that you confine SQL instances with relatively light workloads to
under-utilized CPUs. This results in some SQL instance affinities being assigned an unusually high
order, or non-contiguous logical CPU number. Similarly, SQL Server and the operating system
automatically manage the CPU affinities of highly-utilized SQL instances. This logic results in less
conflict over CPU resources among under- and highly-utilized SQL instances.
Figure 16 CPU Page
SQL Server Affinity
On multi-processor systems, SQL Server interaction with CPU resources can be controlled by setting
the affinity mask options. Configuring these options results in SQL Server threads being scheduled
to run on the same processor each time they run. If you do not configure these options, the threads
can migrate among processors. In SQL Server 2008 R2 you can set SQL Server Affinity to a
maximum of 256 CPUs. In older versions of SQL Server this setting is limited to only 64 CPUs.
IO Affinity
The IO Affinity option binds SQL Server disk I/O to a specified subset of CPUs. In high-end SQL
Server online transactional processing (OLTP) environments, this extension can enhance the
performance of SQL Server threads issuing I/Os. This enhancement does not support hardware
affinity for individual disks or disk controllers.
NOTE: Do not set SQL Server Affinity and IO Affinity to the same CPUs because it can degrade
system performance (HP ESO displays a warning if the system is configured this way). As a general
rule, HP ESO recommends affinity on only a few specific processors for SQL instances that are
comparatively lightly utilized, so they do not use all of the available system processors. Likewise,
HP ESO does not recommend CPU Affinity for heavily utilized SQL instances, so they can use all
of the available system processors.
Storage
The Storage page displays recommendations for different storage parameters.
Optimizations Pages 19
Page 20

Figure 17 Storage Page
Database RAID Level
The recommended RAID level displays on this screen. Storage of TempDB or TempDB Log files is
recommended on RAID 1 + 0 or RAID 1 drives.
Drive Free Space
When drive free space reaches less than 20%, a Warning message displays, with a
recommendation to either move the file to a larger drive or free up more space on the current drive.
Network
The Network page includes controls for setting network interface NUMA Node, Interrupt, and Port
affinities.
20 Using HP ESO
Page 21

Figure 18 Network Page
NUMA Node Affinity
NUMA (Non Uniform Memory Access) Node is a logical grouping of processors that share common,
directly-linked physical memory. HP ESO recommends CPU NUMA Nodes closest to the network
interface I/O.
Interrupt Affinity
Network interface interrupt affinity settings include All Close CPUs, One Close CPU, or All CPUs.
HP ESO recommends All Close CPUs in most cases.
Port Affinity
SQL Server uses an application port (usually Port 1433) whose affinity can be set to one or more
CPU NUMA Nodes. As with SQL CPU Affinity, this improves performance by directing network
traffic bound to a CPU or group of CPUs used by SQL Server. Additional ports can also be added
and removed.
To delete a specific network port, follow these steps:
1. Select the IP address of the port to be deleted.
2. Clear all boxes, along with that port number box.
3. Click the Set button.
To delete all ports associated with an IP address, follow these steps:
1. Select the desired IP address.
2. Click on the Delete Port button until all entries are removed.
3. Click the Set button.
System
NOTE: Any changes you make in the Network page will not take effect until the system is rebooted.
The System page displays information about the update status of system software, drivers, and
firmware. It shows the results of the software discovery process described in the Configuration
page section earlier.
Optimizations Pages 21
Page 22

Figure 19 System Page
Power Plan
The settings in this section resemble the Windows Power Option settings. The default HP ESO
setting here is High Performance.
System Update Advisory Information
This section uses the Web catalog file to enumerate any system software components that are
out-of-date and should be upgraded to their latest versions.
PCI Controller Information
This table enumerates all of the system's add-on PCI cards. It also indicates when PCI cards are
inserted in slots that are incapable of utilizing their maximum capabilities. If better-suited slots are
available, HP ESO recommends them by slot number.
Reports Pages
Reports pages include the Workload and Performance History page and the Save/Rollback SQL
Configuration page.
Workload and Performance History
Use this page to select and view data collected by the Data Collection process (described earlier
in the Configuration page section).
22 Using HP ESO
Page 23

Figure 20 Workload and Performance History Page
To view and/or export a performance report, follow these steps:
1. Select the CSV file you want to view in the Select the report from the list field.
2. On the right side of the page, select the counters you want included in the graph (use the
Select/Unselect All check box for convenience).
3. Select the desired export file format (XML or CSV).
4. Click the GENERATE REPORT button ( ) to create the report.
Save/Rollback SQL Configuration
Use this page to save the current system configuration to an XML file and retrieve it for future use.
Reports Pages 23
Page 24

Figure 21 Save/Rollback SQL Configuration Page
The Save/Rollback SQL Configuration page displays the following values or controls:
• Save Current Settings button ( ) ⇒ Saves the current settings to an XML file.
You can enter comments and a description to make it easier to identify the saved settings in
the future.
• Restore Settings section ⇒ To retrieve, apply, or delete previously saved settings, follow these
steps:
1. Select the desired restoration point settings file by checking its box in the first column.
2. Click the View button to make HP ESO read the contents of the saved settings file (or click
3. Click Apply to apply the settings contained in the selected file.
On the initial release of HP ESO, current settings are automatically saved.
Help Pages
The Help pages display the HP ESO Online Help system. Available topics are identical in structure
and content to the HP ESO User Guide document. Use this page to find the information and help
you need to use HP ESO effectively.
Online Help
Use this page as your entry point into the HP ESO Online Help content. Click on the links in the
Table of Contents to find the desired information for optimizing SQL Server on your ProLiant server.
Delete to delete the selected file; you can also select the Select All check box to delete all
of the previously saved settings files).
24 Using HP ESO
Page 25

Figure 22 Online Help Page
Help Pages 25
Page 26

4 Support and Other Resources
Contacting HP
Before You Contact HP
Be sure to have the following information available before you call or contact HP:
• Technical support registration number (if applicable)
• Product serial number
• Product model name and number
• Product identification number
• Applicable error message
• Add-on boards or hardware
• Third-party hardware or software
• Operating system type and revision level
HP Contact Information
For the name of the nearest HP authorized reseller:
• See the Contact HP worldwide (in English) web page:
http://welcome.hp.com/country/us/ en/wwcontact.html
For HP technical support:
• In the United States, for contact options see the Contact HP United States web page:
http:// welcome.hp.com/country/us/en/contact_us.html
To contact HP by phone:
◦ Call 1-800-HP-INVENT (1-800-474-6836). This service is available 24 hours a day, 7
days a week. For continuous quality improvement, calls may be recorded or monitored.
◦ If you have purchased a Care Pack (service upgrade), call 1-800-633-3600. For more
information about Care Packs, refer to the HP website:
http://www.hp.com/hps
◦ In other locations, see the Contact HP worldwide (in English) web page:
http:// welcome.hp.com/country/us/en/wwcontact.html
Subscription Service
HP recommends that you register your product at the Subscriber's Choice for Business website:
http://www.hp.com/country/us/en/contact_us.html
After registering, you will receive email notification of product enhancements, new driver versions,
firmware updates, and other product resources.
Documentation Feedback
HP welcomes your feedback. To make comments and suggestions about product documentation,
send a message to: docsfeedback@hp.com. Include the document title and manufacturing part
number. All submissions become the property of HP.
26 Support and Other Resources
Page 27

New and Changed Information in This Edition
Edition 1 is the initial release of this document, dated November 2011.
This second edition provides additional software requirement information under “Software
Requirements” (page 7), and added new subsections,“Microsoft SQL Server Security Settings”
(page 7) and “Uninstalling the Software” (page 9).
Typographic Conventions
This document uses the following typographical conventions:
WARNING A warning calls attention to important information that, if not understood
or followed, results in personal injury or nonrecoverable system problems.
CAUTION A caution calls attention to important information that, if not understood
or followed, might result in data loss, data corruption, or damage to
hardware or software.
IMPORTANT This alert provides essential information to explain a concept or to
complete a task.
NOTE A note contains additional information to emphasize or supplement
important points of the main text.
KeyCap The name of a keyboard key or graphical interface item (such as buttons,
tabs, and menu items).
Computer output Text displayed by the computer.
User input Commands and other text that you type.
Command A command name or qualified command phrase.
Ctrl+x A key sequence. A sequence such as Ctrl+x indicates that you must press
the key labeled Ctrl while you press another key or mouse button.
New and Changed Information in This Edition 27
 Loading...