

Page 1
hp ProLiant DL760
generation 2 server
upgrade poster
Regulatory Compliance Notices
Regulatory Compliance Identification Numbers
For the purpose of regulatory compliance certifications and
identification, this product has been assigned a unique series
number. The series number can be found on the product
nameplate label, along with all required approval markings
and information. When requesting compliance information for
this product, always refer to this series number. The series
number should not be confused with the marketing name or
model number of the product.
Regulatory Notice Rating Label
The rating label on the device shows which class (A or B) the
equipment falls into. Class B devices have an FCC logo or
FCC ID on the label. Class A devices do not have an FCC ID
or logo on the label. After the class of the device is
determined, refer to the corresponding statement on the
Documentation CD.
Audience Assumptions
This poster provides a quick way for customers experienced in
server installation to upgrade the ProLiant 8500 or ProLiant
DL760 server to a ProLiant DL760 Generation 2 server. These
instructions are written assuming you are qualified to install
and service computer equipment and are trained to recognize
hazards in products with high energy levels, such as the
power supplies in this computer system. For detailed
instructions, refer to the HP ProLiant DL760 Generation 2
Server User Guide included on the Documentation CD.
Important Safety Information
Before installing the product, read the Important Safety
Information guide included with the server.
WARNING: This product contains energy levels that are
considered hazardous. There is a risk of personal injury
from electric shock and hazardous energy. The installation
and servicing of this product must be performed by
individuals who are knowledgeable of the procedures,
precautions, and hazards associated with equipment
containing hazardous energy circuits.
WARNING: To reduce the risk of personal injury or
damage to the equipment:
63 - 73 kg
140 - 161 lb
• Observe local occupational health and safety
requirements and guidelines for manual
material handling.
• Obtain adequate assistance to lift and stabilize
the chassis during installation or removal. The
product will be unstable when not fastened to
the rails.
• Remove all hot-plug power supplies, removable
modules, and drives to reduce the overall weight
of the product.
WARNING: To reduce the risk of personal injury from hot
surfaces, allow the internal components to cool before
touching them.
Page 2
WARNING: To reduce the risk of personal injury from hot
surfaces, allow the internal components to cool before
touching them.
2 Preparing the Server
CAUTION: To prevent damage to the system, you must
become static-free by touching a screw or unpainted
surface on the system's housing before beginning these
procedures. In addition, avoid touching any exposed
metal on the option boards or the system circuit boards.
IMPORTANT: A few server configurations may exceed the power
rating of a single power supply, resulting in a loss of power redundancy for the server. Use the ProLiant DL760 G2 Power Calculator
available on the ActiveAnswers website
(activeanswers.compaq.com) to ensure that power redundancy will
be maintained for your configuration.
Thank you for purchasing the
HP ProLiant DL760 Generation 2
Server Upgrade Kit.
The HP ProLiant DL760 Generation 2 Server Upgrade Kit adds
Hot Plug RAID Memory, Intel® Xeon processors MP, and PCI-X
technology to your ProLiant 8500 or ProLiant DL760 server.
After the upgrade, the server will become a ProLiant DL760
G2 server model. A new service number will be assigned to
the server to identify the new components. This service number
will be used to identify the type of system you have and will
ensure that proper help and diagnosis is given by the HP Call
Center or service technician. You will maintain the current
system serial number. When you call for service, provide both
the original system serial, number and the upgrade service
number.
NOTE: The hardware portion of the ProLiant DL760 G2 server
upgrade will take approximately 15 minutes to an hour to complete.
Duration will vary from case to case.
1 Shipping Box Contents
Before beginning the upgrade procedure, unpack the upgrade
kit and carefully review the procedure.
1. Back up all data on the server. The operating system,
applications, and data will need to be reinstalled after the
hardware portion of the upgrade.
Refer to the HP QuickSpecs for the ProLiant DL760 G2
server at www.hp.com/products/servers/platforms.
CAUTION: The ProLiant DL760 G2 server upgrade process
can destroy data on the server. To ensure that you do not
lose data, always back up the server before starting the
upgrade process.
2. Shut down the operating system as directed by the
operating system instructions.
3. Power down the server.
4. From the rear of server, label all the I/O expansion board
cables and expansion boards to match them later.
5. Disconnect all the cables from the rear of the server.
6. Disconnect the cable management arm from the rear of
the server.
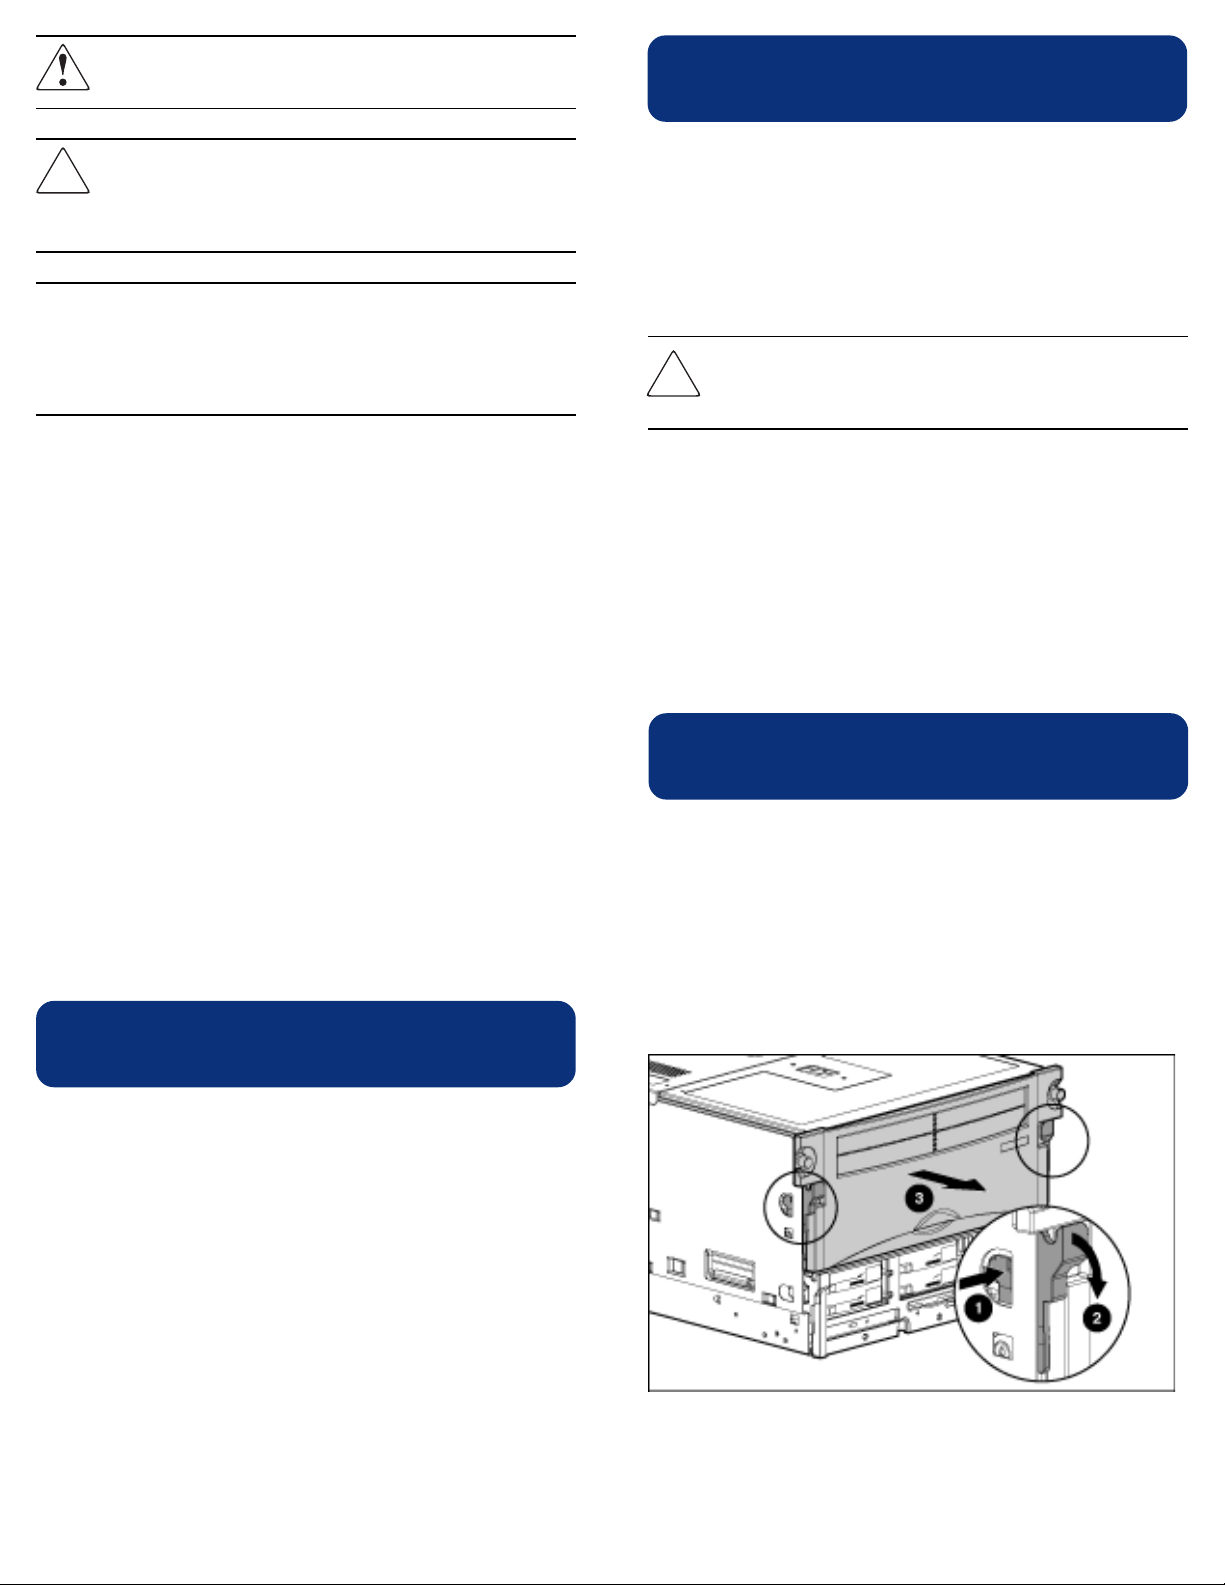
3 Removing the Modules
The upgrade involves replacing the system midplane, the I/O
module, and the processor and memory module. Extend the
server on its rails to gain access to front and rear of the server
from the front of the rack.
To remove the processor and memory module:
1. Release the processor and memory module by pressing in
the sides of the module release levers (1) and rotating the
top of the levers downward (2). Pull the module out of the
chassis until it reaches the module stop latches (3).
Unpack the shipping boxes by following the instructions and
illustrations printed on the outside of the boxes. The shipping
boxes contain the following materials:
• HP ProLiant DL760 Generation 2 Server
Documentation CD
• HP ProLiant Essentials Foundation Pack
• ProLiant DL760 G2 front hood label
• ProLiant DL760 G2 I/O module with NC7770 PCI-X 10/
100/GB network adapter and embedded Smart Array 5i
• ProLiant DL760 G2 processor and memory module with
four Intel Xeon processors MP and 10 PC133 DIMMs.
• ProLiant DL760 G2 system midplane
• ProLiant DL760 G2 I/O lid with label
• Two ProLiant DL760 G2 service number labels
• Two 220V power cables
Page 3
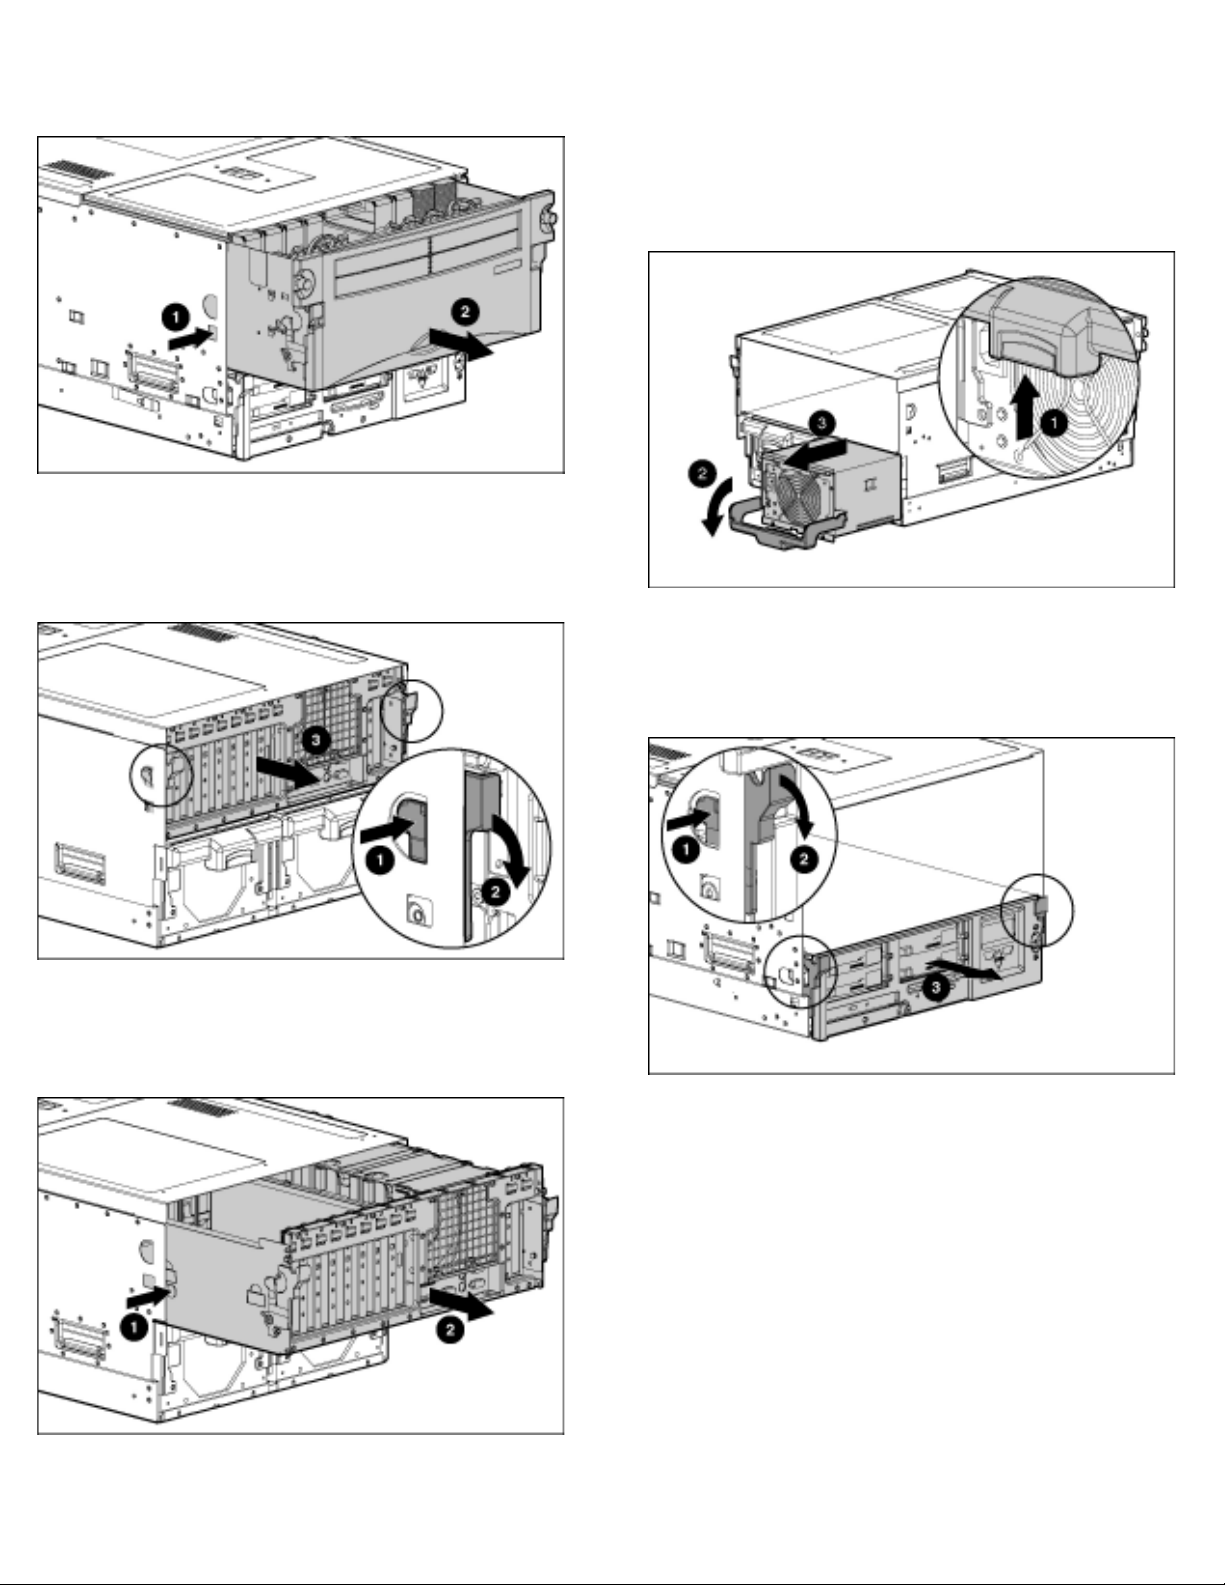
2. Remove the processor and memory module from the
chassis by pressing in the module stop latches (1) and
pulling the module out of the chassis (2). The processor
and memory module will not be reused.
To remove the I/O module:
1. Release the I/O module by pressing in the sides of the
module release levers (1) and rotating the top of the levers
downward (2). Pull the module out of the chassis until it
reaches the module stop latches (3).
To remove the server midplane, disengage the power supplies
and the media module. To remove the power supplies:
1. Squeeze upward on the release in the middle of the power
supply 1 handle (1).
2. Rotate the power supply handle downward (2) and slide
forward (3). Ensure power supply 1 is disengaged from
the midplane.
3. Repeat steps 1 and 2 for power supply 2.
To release the media module:
1. Press in the sides of the cam levers on the media module
(1) and rotate the tops of the levers downward (2).
2. Pull the media module out of the chassis until the module
makes contact with the module stop latches (3).
2. Remove the I/O module from the chassis by pressing in
the module stop latches (1) and pulling the module out of
the chassis (2). The I/O module will not be reused,
but any I/O expansion boards must be transferred
to the new I/O module.
Continued on next page
Page 4

4 Removing the I/O Lid
With the processor and memory module removed from the
chassis, remove the I/O lid. Grasp the sides of the I/O lid and
slide it forward until it is free of the server chassis and set
aside. The I/O lid will not be reused.
To install the ProLiant DL760 G2 system midplane:
1. Angle the bottom edge of the midplane assembly into the
chassis (1), making sure that the edge is seated under the
chassis midplane retainers.
2. Tilt the midplane assembly vertical (2), ensuring that the
tab on the chassis engages the slot on the assembly. This
secures the midplane assembly in place.
3. Secure the midplane assembly with the two
thumbscrews (3).
5 Replacing the System Midplane
The system midplane assembly is the board to which the server
modules and the power supplies connect.
To remove the system midplane assembly:
1. Loosen the two thumbscrews securing the system midplane
assembly to the chassis (1).
2. Remove the system midplane assembly from the chassis (2)
and set aside. The midplane assembly will not be reused.
Page 5

6 Transferring the I/O Expansion
Boards to the New I/O Module
Before you install the new I/O module, you must transfer any
existing I/O expansion boards from your existing I/O module
to your ProLiant DL760 G2 I/O module.
Remove the I/O expansion boards from the existing
I/O module:
1. Open the air baffle (1).
2. Press on the top of the appropriate expansion slot release
lever (2) and open the lever toward the rear of the
expansion slot (3).
3. Remove the expansion board out of the server (4).
To install the I/O expansion boards in the ProLiant DL760 G2
I/O module:
1. Press the top of the I/O expansion slot release lever (1)
and open the lever toward the rear of the expansion
slot (2).
2. Remove the expansion slot cover (3).
3. Insert the I/O expansion board into the appropriate
expansion slot (1), pushing firmly until the board is
securely seated.
4. Close the expansion slot release lever at the rear of the
module to secure the board (2). Be sure that the lever
latches into the closed position.
The ProLiant DL760 G2 I/O module has five PCI-X buses with
two slots each. Each slot supports PCI-X expansion boards at
100 MHz and 66 MHz, or PCI expansion boards at 66 MHz
and 33 MHz; it is keyed for 3.3V signaling. While bus
balancing is not required, you can take full advantage of all
PCI and PCI-X expansion board capabilities by putting boards
of different capabilities on different buses. Refer to the ProLiant
DL760 G2 I/O lid for PCI/PCI-X bus definitions. Slot 9 is PCI
and supports PCI expansion boards at 33 MHz; it is keyed for
5V signaling. This slot is recommended for the RILOE II
expansion board option.
NOTE: The I/O board has a Remote Management connector (30pin) to which the Remote Management cable (30-pin) connects. Refer
to the HP ProLiant DL760 Generation 2 Server User Guide for details
on installing the RILOE II option.
5. Add any additional option expansion boards, as desired.
HP has designed a self-latching slot-keeper feature to
accommodate full-length expansion boards.
Be sure that the V-shaped slot-keeper tabs on the plastic
expansion board guide are positioned over the forward end of
the expansion board.
Page 6

7 Reassembling the Server
8 Installing the Server Labels
Reassemble the server with all the new ProLiant DL760
G2 components.
1. Install the ProLiant DL760 G2 I/O module into the
server chassis.
2. Reseat the media module into the chassis.
3. Reseat the two power supplies:
a. Slide power supply 1 into the power supply cage until
the supply is seated securely (1). This action automatically pushes the spring-loaded trap door open.
b. Raise the handle to lock the power supply into place
(2). The power supply fan starts immediately if the
system is running.
Install the ProLiant DL760 G2 specific labels.
1. Install the front hood label (accessing module and memory
information). Align the corners of the label and carefully
lower it over the existing front label on your server.
2. Install the front service number label (1) next to the existing
server serial number (2) on the front top edge of the
server.
c. Repeat steps a and b for the second power supply.
4. Install the new I/O lid by sliding it into the front of the
server. The hood label is oriented to be read from the front
of the server.
5. Install a processor board option kit into the ProLiant DL760
G2 processor and memory module if an eight-processor
configuration is desired. Refer to the documentation
provided with the processor board option.
6. Install any additional memory into the five memory
cartridges located at the front of the ProLiant DL760 G2
processor and memory module. Refer to the memory
requirements and installation procedures in the HP
ProLiant DL760 Generation 2 Server User Guide located
on the Documentation CD in the upgrade kit.
7. Install the ProLiant DL760 G2 processor and memory
module into the server chassis.
WARNING: The processor and memory module weighs
more than 15.9 kg (35 lb). HP recommends either
removing ALL the memory cartridges before handling the
module, or having two people handling the module
together.
Continued on next page
Page 7

3. Install the rear service number label (1) next to the existing
server serial number (2) on the left rear edge of the server.
These service numbers will be used to identify the type of
system you have and will be sure that proper help and
diagnosis is given by the HP Call Center or service technician.
The service number labels should be referenced when
calling for service.
Memory Considerations
The upgrade kit comes standard with 10 PC133 SDRAM
DIMMs. The upgraded server can support either PC100 or
PC133 memory. In addition, both PC100 and PC133 memory
can be installed in the system at the same time, as long as the
memory is installed in different bank pairs. With any PC100
memory in the system, the memory subsystem will run at
100 MHz.
Eight or ten DIMMs are required to fill bank pairs, as
indicated by socket numbers 1&2, 3&4, 5&6, 7&8, and must
be installed in numerical bank order.
To install PC100 memory in the system, use one of the
following DIMMs.
yromeM001CPdetroppuS:1elbaT
traPPH
rebmuN
-859011
230
-959011
230/130
-959011
240/140
-549511
240/140
IMPORTANT: Do not superimpose the service number label over the
serial number labels. The service number labels are needed for
warranty purposes.
9 Completing the Upgrade
1. Slide the server back into the rack.
2. From the rear of the rack, attach the cable management
arm to the server.
3. Reinstall all I/O cables and power cables. Verify the
power supply (AC) LED is solid green.
IMPORTANT: ProLiant DL760 G2 server configurations require 220V
power. Install the 220V power cables that came with your server, if
not already in use (two 220V power cables are available in the
upgrade kit).
4. From the front of the server, verify that the interconnect
check light is not lit. This ensures all critical components
are properly seated in the server.
5. Power up the server.
6. Run system diagnostics.
7. Configure the server, using RBSU.
8. Reinstall the operating system.
9. Reinstall the applications.
10. Restore the data.
11. Register the new system configuration with HP for proper
service response.
12. Discard or redeploy remaining parts.
eludoM
ytisneD
forebmuN
nosMARD
eludom
.hceTMARDS
desU
forebmuN
repsknaB
eciveDMARDS
rebmuN
sknaBlacisyhP
eludoMno
lacisyhP
eludoM
noitazinagrO
eludoM
fonoitceleS
MARDS
gniknaB
gnisserddA
)loC/woR#(
sserddAwoR
seniL
nmuloC
seniLsserddA
eciveDesaB
desU
BM652BM215BM215BG1
81638163
BM821BM821BM652BM652
4444
1212
27xM2327xM23x227xM4627xM46x2
1AB-0AB1AB-0AB1AB-0AB1AB-0AB
11/2111/2111/31
11A-0A11A-0A21A-0A21A-0A
,9A-0A
11A
4xM234xM234xM464xM46
,9A-0A
11A
,9A-0A
11A
11/31
,9A-0A
11A
Page 8

The following PC133 memory can be installed.
yromeM331CPdetroppuS:2elbaT
traPPH
rebmuN
eludoM
ytisneD
forebmuN
nosMARDS
eludoM
.hceTMARDS
desU
sknaBrebmuN
MARDSrep
eciveD
rebmuN
sknaBlacisyhP
eludoMno
lacisyhP
eludoM
noitazinagrO
gnisserddA
)loC/woR#(
-500721
130
BM652BM215BG1BG2
81816363
BM821BM652BM652BM215
4444
1122
27xM2327xM4627xM46x2
11/2111/3111/3121/31
-600721
140
140
Legal Notices
© 2003 Hewlett-Packard Development Company, L.P.
Intel® and Pentium® are trademarks of Intel Corporation in the U.S. and other countries.
-800721
-117192
150
821x2
27xM
Hewlett-Packard Company shall not be liable for technical or editorial errors or omissions
contained herein. The information in this document is provided "as is" without warranty of
any kind and is subject to change without notice. The warranties for HP products are set
forth in the express limited warranty statements accompanying such products. Nothing
herein should be construed as constituting an additional warranty.
First Edition (March 2003)
Part Number 323574-001
sserddAwoR
seniL
nmuloC
seniLsserddA
eciveDesaB
desU
11A-0A21A-0A21A-0A21A-0A
,9A-0A
11A
4xM234xM464xM464xM821
,9A-0A
11A
,9A-0A
11A
,9A-0A
21A-11A
For memory requirements, review the memory requirements
section of the HP ProLiant DL760 Generation 2 Server User
Guide located on the Documentation CD in the upgrade kit.
To install PC100 or PC133 memory in the system, the DIMMs
must be installed in increments of 10 (or eight, if a redundant
array of memory is not desired) and be of the same size, type,
and speed. DIMM similarity can be confirmed by common
DIMM part numbers. For HP part number nomenclature, the
following example shows that the first eight numbers of the
nine digit part number must match: 123456-78x
Additional Resources
For additional information on the topics covered in this guide,
refer to the following documentation available on the
Documentation CD:
• HP ProLiant DL760 Generation 2 Server User Guide
• Smart Array 5i Controller User Guide
• ROM-Based Setup Utility User Guide
• Servers Troubleshooting Guide
• PCI Hot Plug Administration Guide
• Remote Insight Lights-Out Edition II User Guide
For the HP ProLiant DL760 G2 Power Calculator, refer to the
ActiveAnswers website at
activeanswers.compaq.com
 Loading...