


HP Photosmart R837
Digital Camera
User Guide

Legal and notice
information
© Copyright 2007 Hewlett-Packard
Development Company, L.P.
The information contained herein is
subject to change without notice. The
only warranties for HP products and
services are set forth in the express
warranty statements accompanying
such products and services. Nothing
herein should be construed as
constituting an additional warranty. HP
shall not be liable for technical or
editorial errors or omissions contained
herein.
Windows® is a U.S. registered
trademark of Microsoft Corporation.
SD Logo is a trademark of its
proprietor.

Contents
1 Getting started.......................................................................................................5
Camera top, side, and back ...................................................................................5
Camera front and bottom.........................................................................................6
Before taking pictures..............................................................................................6
Install the battery..............................................................................................7
Charge the battery............................................................................................7
Turn on the camera..........................................................................................7
Choose the language.......................................................................................8
Set the region...................................................................................................8
Set the date and time.......................................................................................8
Install and format an optional memory card.....................................................9
Install the software...........................................................................................9
Using your camera................................................................................................10
2 Taking pictures and recording video clips.......................................................11
Taking pictures......................................................................................................11
Recording video clips............................................................................................12
Instant Review.......................................................................................................12
Auto focus and exposure.......................................................................................12
Focusing on the subject.................................................................................12
Optimizing focus.............................................................................................13
Using Focus Lock...........................................................................................13
Optimizing exposure.......................................................................................13
Using zoom............................................................................................................14
Optical zoom..................................................................................................14
Digital zoom....................................................................................................14
3 Setting options for taking pictures and recording video clips.......................16
Setting the flash.....................................................................................................16
Red eye..........................................................................................................16
Using the shooting modes.....................................................................................16
Using Panorama mode...................................................................................17
Using the Picture Capture and Video Record menus............................................18
Using the Self-Timer settings.........................................................................21
Using the Burst setting...................................................................................21
Adaptive Lighting............................................................................................22
Exposure Compensation................................................................................22
White Balance................................................................................................22
ISO speed......................................................................................................22
HP Photosmart R837 Digital Camera 3

4 Reviewing images and video clips....................................................................24
Using Playback......................................................................................................24
Deleting images..............................................................................................25
Viewing thumbnails........................................................................................25
Magnifying images.........................................................................................25
Using the Playback Menu......................................................................................26
Tagging images .............................................................................................26
Viewing slideshows........................................................................................27
Stitching panoramas.......................................................................................27
5 Using the Design Gallery Menu..........................................................................28
Removing red eyes................................................................................................28
Applying artistic effects..........................................................................................28
Enhancing photos..................................................................................................29
Modifying colors.....................................................................................................30
Adding borders......................................................................................................30
Cropping images...................................................................................................31
6 Transferring and printing images......................................................................32
Transferring images with HP Photosmart Software..............................................32
Transferring images without HP Photosmart Software.........................................33
Connecting to the computer...........................................................................33
Using a memory card reader..........................................................................33
Printing directly to a printer....................................................................................33
7 Using HP Photosmart Express...........................................................................36
Using the Photosmart Express Menu....................................................................36
Marking images for printing...................................................................................36
Buying prints online...............................................................................................37
Sharing images......................................................................................................37
Setting up online destinations in the camera.................................................38
Sending images to online destinations...........................................................38
8 Using the Camera Setup Menu...........................................................................39
9 Troubleshooting..................................................................................................41
Resetting the camera............................................................................................41
Problems and solutions.........................................................................................41
Camera error messages........................................................................................45
10 Product support...................................................................................................46
Helpful websites....................................................................................................46
Getting assistance.................................................................................................46
A Managing batteries..............................................................................................48
Top points about batteries.....................................................................................48
Extending battery life.............................................................................................48
Safety precautions for using batteries...................................................................48
Power indicators....................................................................................................49
Number of shots per battery charge......................................................................49
Recharging the Lithium Ion battery.......................................................................49
Safety precautions for recharging batteries...........................................................50
B Specifications......................................................................................................52
Memory capacity...................................................................................................53
Image quality.........................................................................................................54
Video quality..........................................................................................................54
Index............................................................................................................................55
4
1
Getting started
Use this section to get familiar with the camera controls, set up your digital camera for
use, and begin taking pictures.
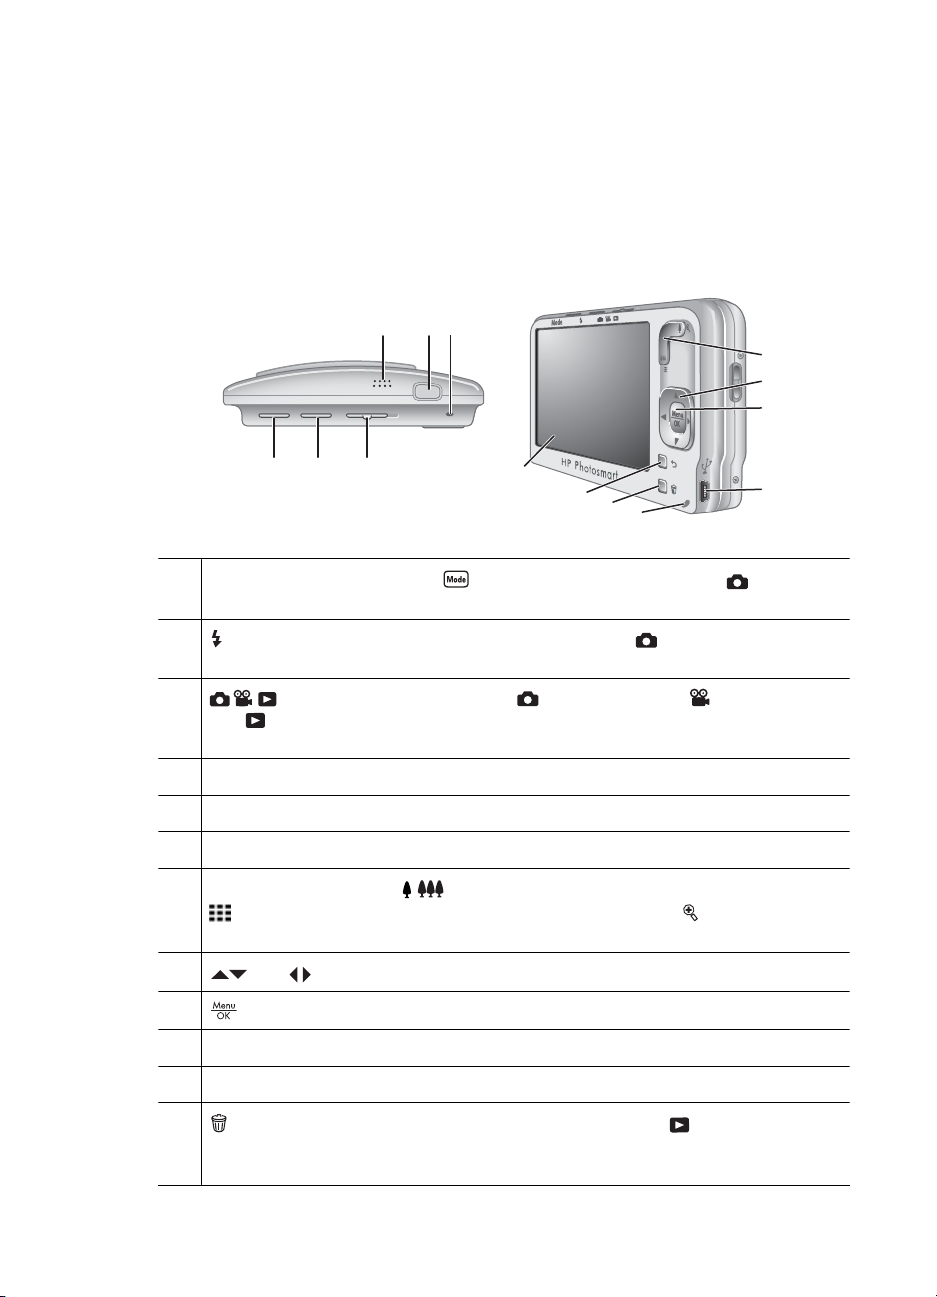
Camera top, side, and back
4 5 6
7
8
9
1 2 3
1
Mode button—Accesses the Shooting Mode menu while in Picture
Capture (see Using the shooting modes on page 16).
2 Flash button—Accesses the flash settings while in Picture Capture
(see Setting the flash on page 16).
3 Selector—Switches between Picture Capture, Video Record,
and
Playback (see Taking pictures on page 11, Recording video clips
on page 12, and Reviewing images and video clips on page 24).
4 Speaker.
5 Shutter button.
6 Power light.
7
Zoom lever—Accesses / Zoom (see Using zoom on page 14),
Thumbnails (see Viewing thumbnails on page 25), and Magnify
(see Magnifying images on page 25) functions.
8
9
10 USB connector.
and buttons—Scroll through menus and images.
button—Displays camera menus, selects options, and confirms actions.
14
13
12
10
11
11 Battery Charging light.
12
HP Photosmart R837 Digital Camera 5
Delete button— Accesses the Delete function while in Playback (see
Deleting images on page 25) or Instant Review (see Instant Review
on page 12).
Chapter 1
(continued)
13 Back button—Returns you to the previous menu or view.
14 Image Display.
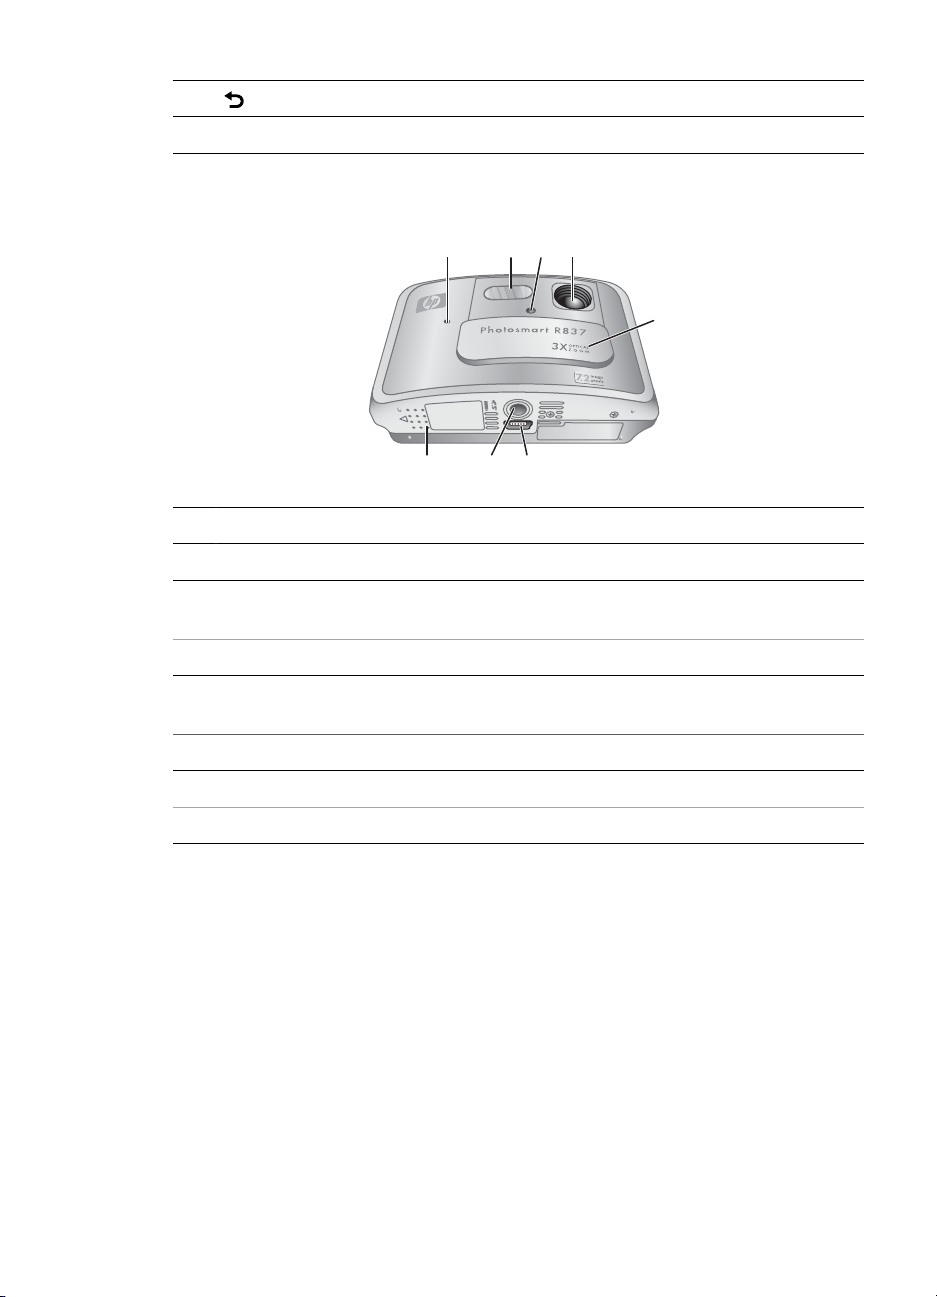
Camera front and bottom
1
1 Microphone.
2 Flash.
3 Self-Timer/Focus Assist light—See Using the Self-Timer settings
on page 21.
4 Lens.
5 Lens cover/Power switch—Turns the camera on and off and protects the lens
while the camera is off.
6 Dock connector.
7 Tripod mount.
8 Battery/Memory Card door.
2 43
5
678
Before taking pictures
Complete the following procedures before taking pictures or recording video clips.
6
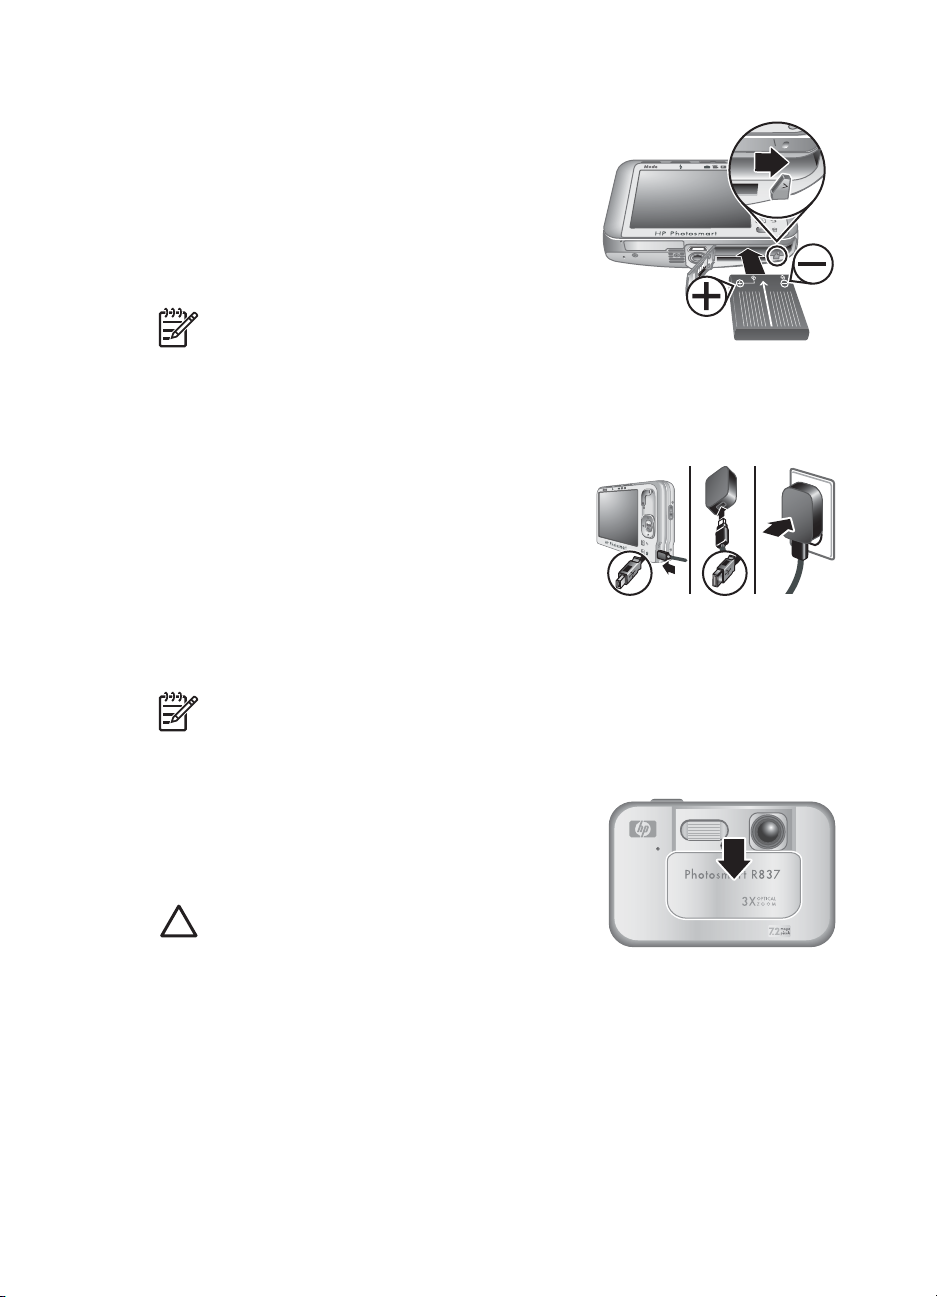
Install the battery
1. Open the Battery/Memory Card door by sliding the
door latch as indicated on the Battery/Memory
Card door.
2. Insert the battery in the larger slot, pushing the
battery in until the latch catches.
3. Close the Battery/Memory Card door.
To remove the battery, press the battery latch as shown
until the battery springs free.
Note Fully charge the battery before using it
the first time (see Charge the battery
on page 7). Turn off the camera before removing the battery.
Charge the battery
To charge the battery in the camera:
1. Plug the small end of the USB cable into the
camera and the large end into the power adapter,
then plug the power adapter into an electrical
outlet, as shown.
The camera's blinking Battery Charging light
indicates that the battery is charging. The battery
is fully charged when the Battery Charging light
turns on solid (see Recharging the Lithium Ion battery on page 49 for information
on charging times).
2. When charging is complete, disconnect the camera from the power adapter.
Note For other methods for recharging the battery, see Recharging the Lithium
Ion battery on page 49.
Turn on the camera
To turn on the camera, slide the lens cover open until it
clicks, uncovering the lens.
To turn off the camera, slide the lens cover closed until
it clicks, covering the lens.
Caution When sliding the lens cover, keep
your fingers clear of the lens. Fingerprints on the
lens can impair the quality of the picture.
HP Photosmart R837 Digital Camera 7
Chapter 1
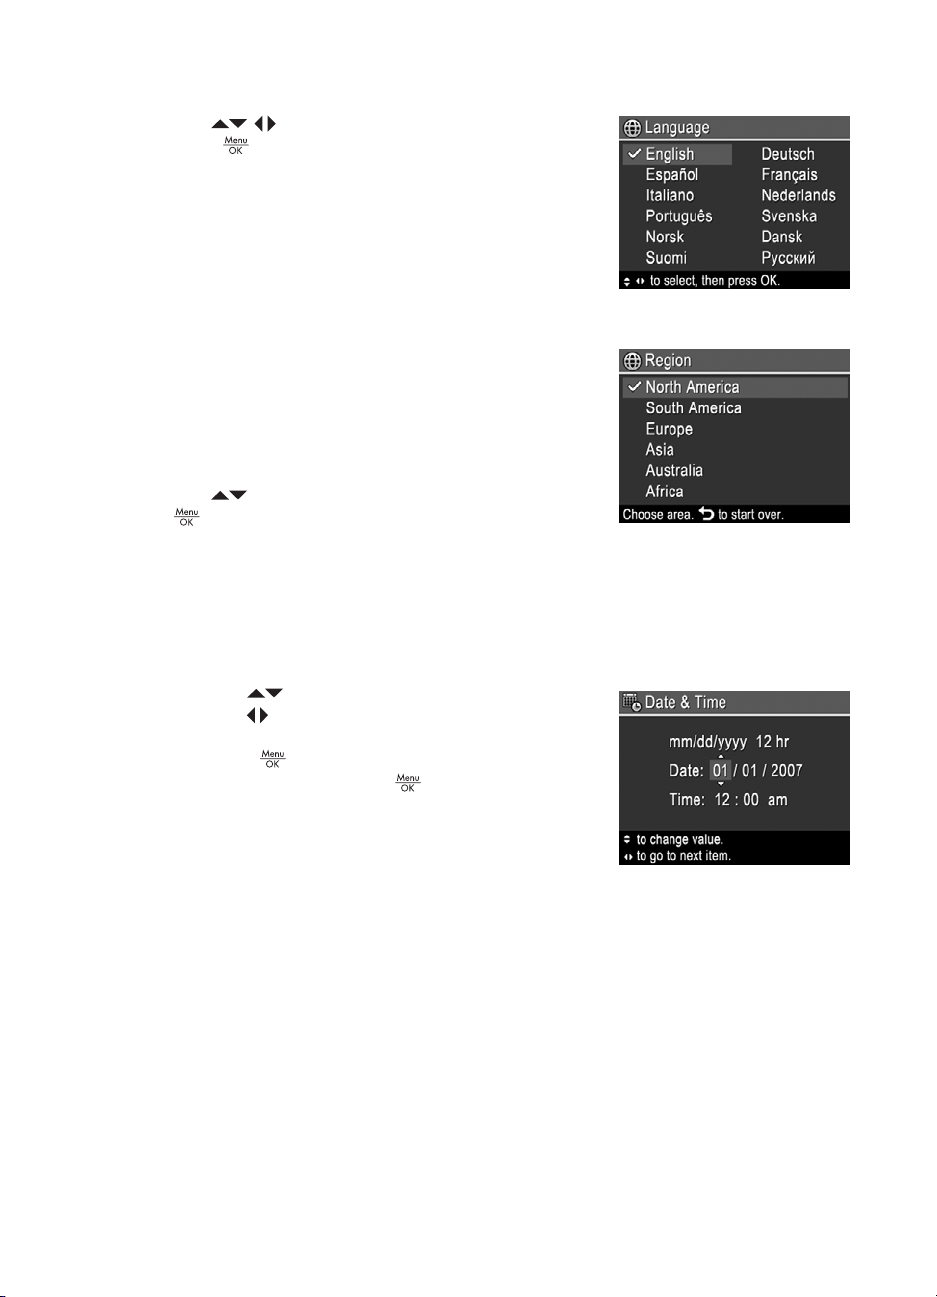
Choose the language
Use to choose the language you want, then
press
To change the language later, use the Camera Setup
Menu (see Using the Camera Setup Menu
on page 39).
.
Set the region
Along with the Language setting, the Region setting
determines the default date format and the format of the
video signal for displaying camera images on a
television when connected through an optional
HP Photosmart dock (see Using the Camera Setup
Menu on page 39).
Use
to choose the region you want, then press
.
Set the date and time
Accurately setting the date and time will help you locate images once you have
transferred them to your computer, and will ensure that images are accurately marked if
you use the date and time imprint feature. See Date & Time Imprint under Using the
Picture Capture and Video Record menus on page 18.
1.
Use
2. Use
3.
To change the date and time later, use the Camera
Setup Menu (see Using the Camera Setup Menu
on page 39).
to move to the other selections and repeat
Step 1 until the date and time are set correctly.
Press
are correct, then press
to adjust the highlighted value.
when the date, time, and format settings
again to confirm.
8
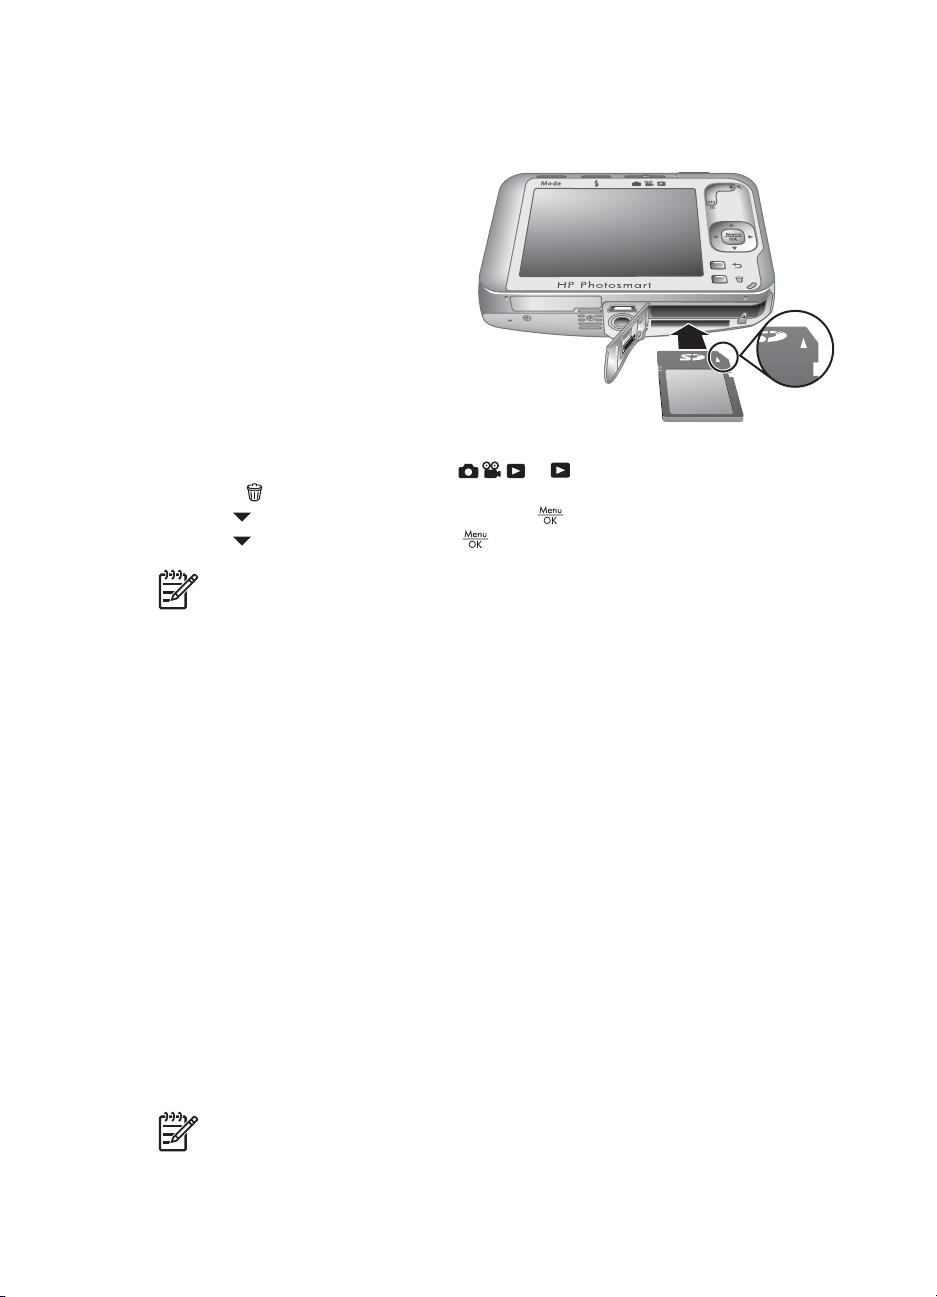
Install and format an optional memory card
This camera supports standard, high speed, and high capacity Secure Digital (SD)
memory cards, 32MB to 4GB.
1. Turn off the camera and open the
Battery/Memory Card door.
2. Insert the optional memory card in
the smaller slot as shown. Make
sure the memory card snaps into
place.
3. Close the Battery/Memory Card
door and turn on the camera.
Always format new memory cards
before first use. Formatting removes all
images from the memory card, so
make sure to transfer existing images
before formatting (see Transferring and printing images on page 32).
1. With the camera turned on, slide
2.
Press
3.
Use
4.
Use
.
to select Format Card, then press .
to select Yes, then press to format the card.
Note Once you install a memory card, all new images and video clips are stored
on the card, rather than in internal memory. To use internal memory and view
images stored there, remove the memory card. To transfer images from internal
memory to an optional memory card, see Move Images to Card under Using the
Playback Menu on page 26.
to .
For information about supported memory cards, see Storage under Specifications
on page 52.
Install the software
The HP Photosmart Software provides features for transferring images and video clips
to your computer, as well as features for modifying stored images (remove red eyes,
rotate, crop, resize, adjust image quality, and more). See the Help feature in the HP
Photosmart Software.
To install the HP Photosmart Software, your computer must meet the system
requirements as stated on the camera packaging.
To learn about Windows Vista support for your camera,
see www.hp.com/go/windowsvista (English only).
1. Close all programs and temporarily disable any virus protection software.
2. Insert the HP Photosmart Software CD into the CD drive and follow the on-screen
instructions. If the installation screen does not appear, click Start, click Run, type
D:\Setup.exe, where D is the letter of your CD drive, then click OK.
3. When the software has finished installing, re-enable virus protection software.
Note If you have trouble installing or using the HP Photosmart Software, see
the Hewlett-Packard Technical Support website for more
information: www.hp.com/support.
HP Photosmart R837 Digital Camera 9

Chapter 1
About the HP Photosmart Software
The CD that came with your camera contains HP Photosmart Software for computers
running Windows XP or x64 with at least 128MB of RAM.
To learn more about the software features and how to use them, see the Help feature in
the HP Photosmart Software.
Using your camera
Now that you’ve completed setup, you can take and review pictures and video clips.
For information on taking pictures and
capturing video clips
For information on setting picture capture
and video record options
For information on reviewing images and
video clips on the camera
For information on enhancing your images See Using the Design Gallery Menu
For information on transferring images
from your camera to a computer
For information on printing images See Printing directly to a printer
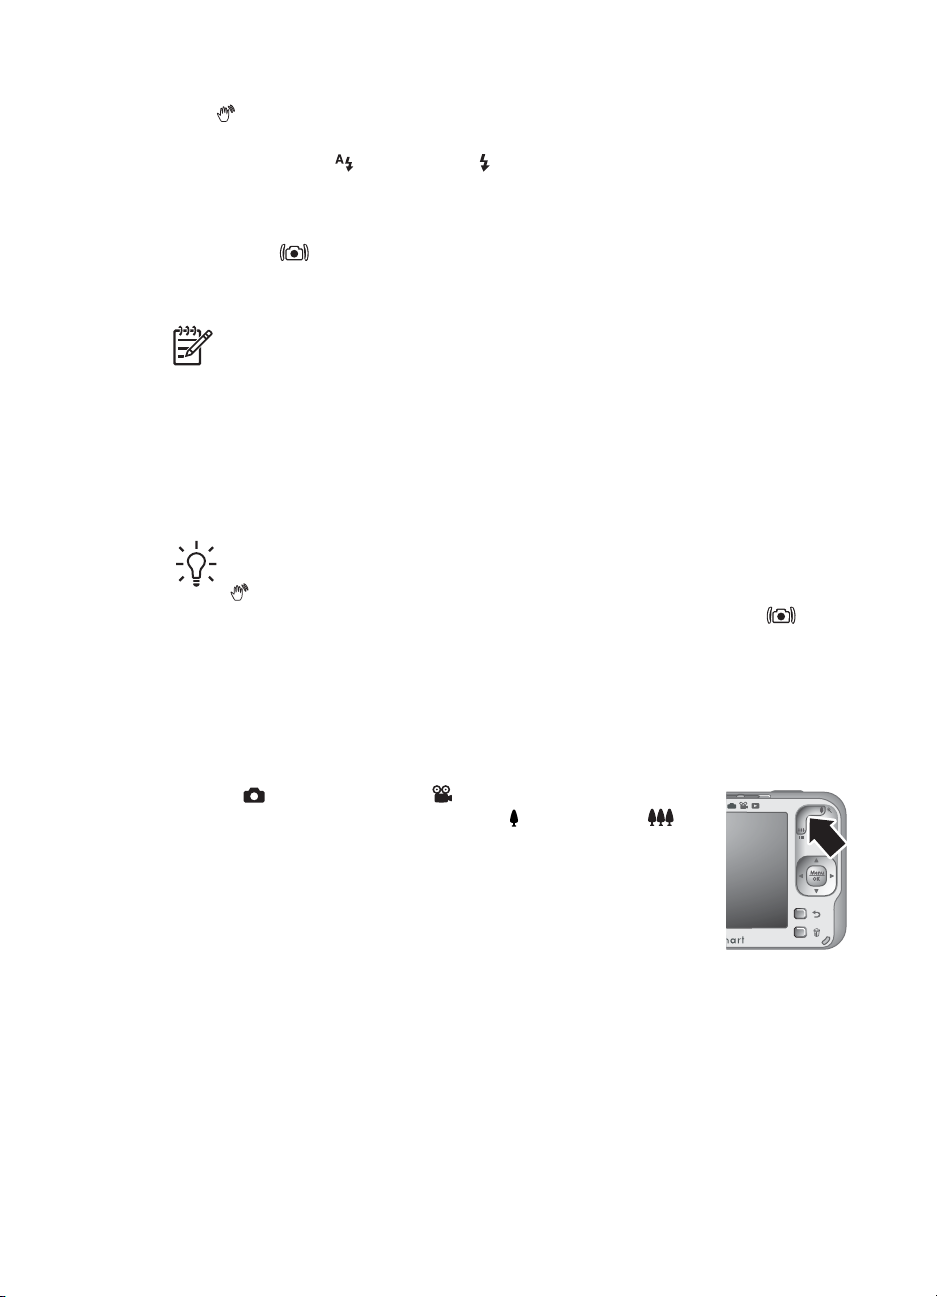
Tip To switch between Picture Capture, Video Record, and
Playback, slide to the desired option.
See Taking pictures on page 11 and
Recording video clips on page 12.
See Setting options for taking pictures and
recording video clips on page 16.
See Reviewing images and video clips
on page 24.
on page 28.
See Transferring images with
HP Photosmart Software on page 32.
on page 33.
10
2
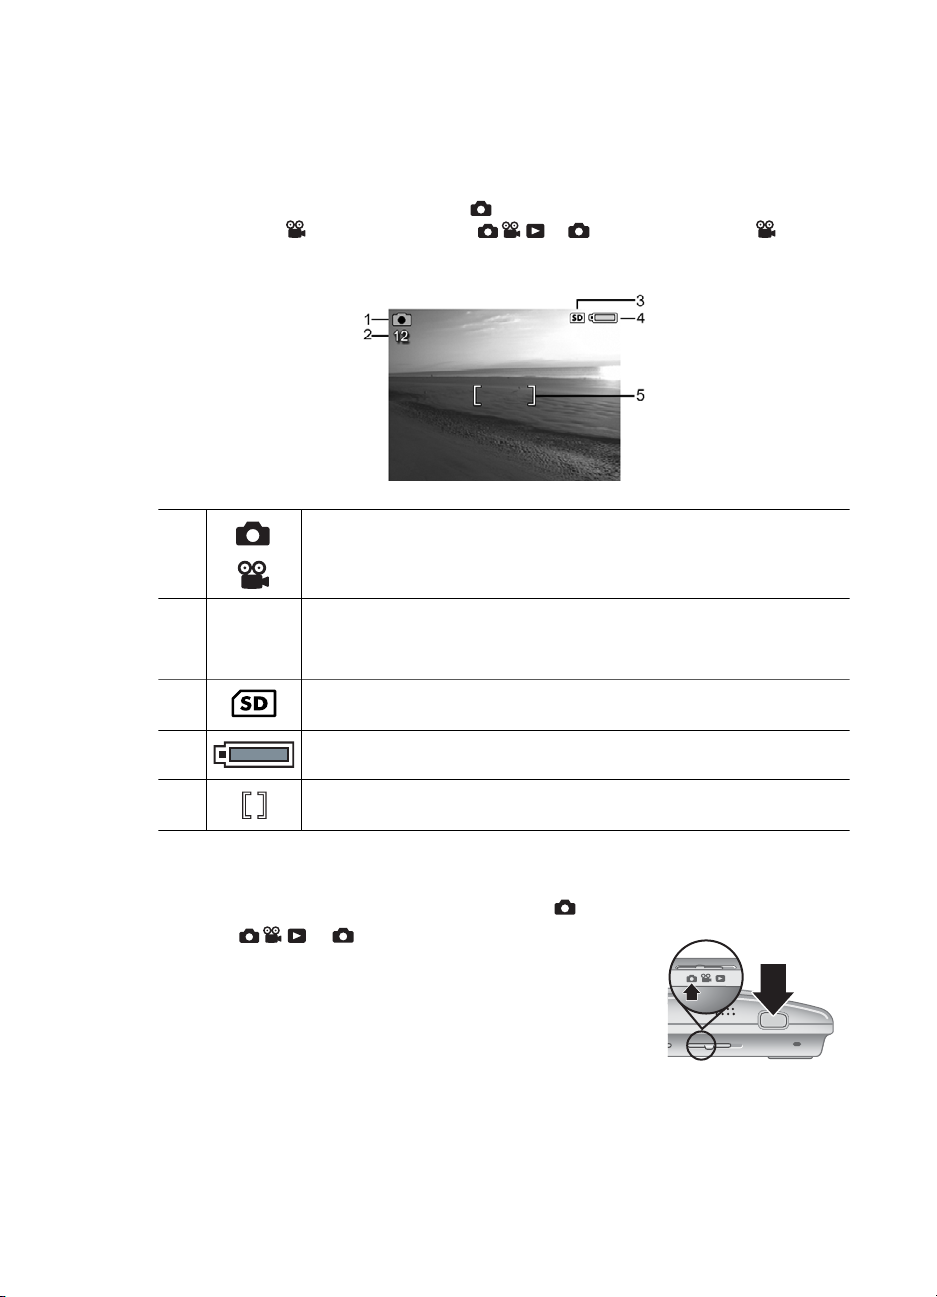
Taking pictures and recording video clips
You can take pictures when you are in Picture Capture and you can record video
when you are in
video clips. The Image Display resembles the following:
1 ● Picture Capture indicator.
Video Record. Slide to to take pictures or to to record
● Video Record indicator.
2 12
0:15
3 Memory card indicator.
4 Battery level indicator (see Power indicators on page 49).
5 Focus brackets (see Auto focus and exposure on page 12).
Taking pictures
You can take a picture when the camera is set to Picture Capture.
1. Slide
2. Frame the subject for your picture in the Image Display.
3. Press the Shutter button halfway down to measure and
lock the focus and exposure. The focus brackets in the
Image Display turn solid green when focus is locked (see
Auto focus and exposure on page 12).
4. Press the Shutter button all the way down to take the
picture.
● When taking pictures, pictures remaining count.
● When recording video clips, time remaining (in minutes and
seconds).
to .
HP Photosmart R837 Digital Camera 11
Chapter 2
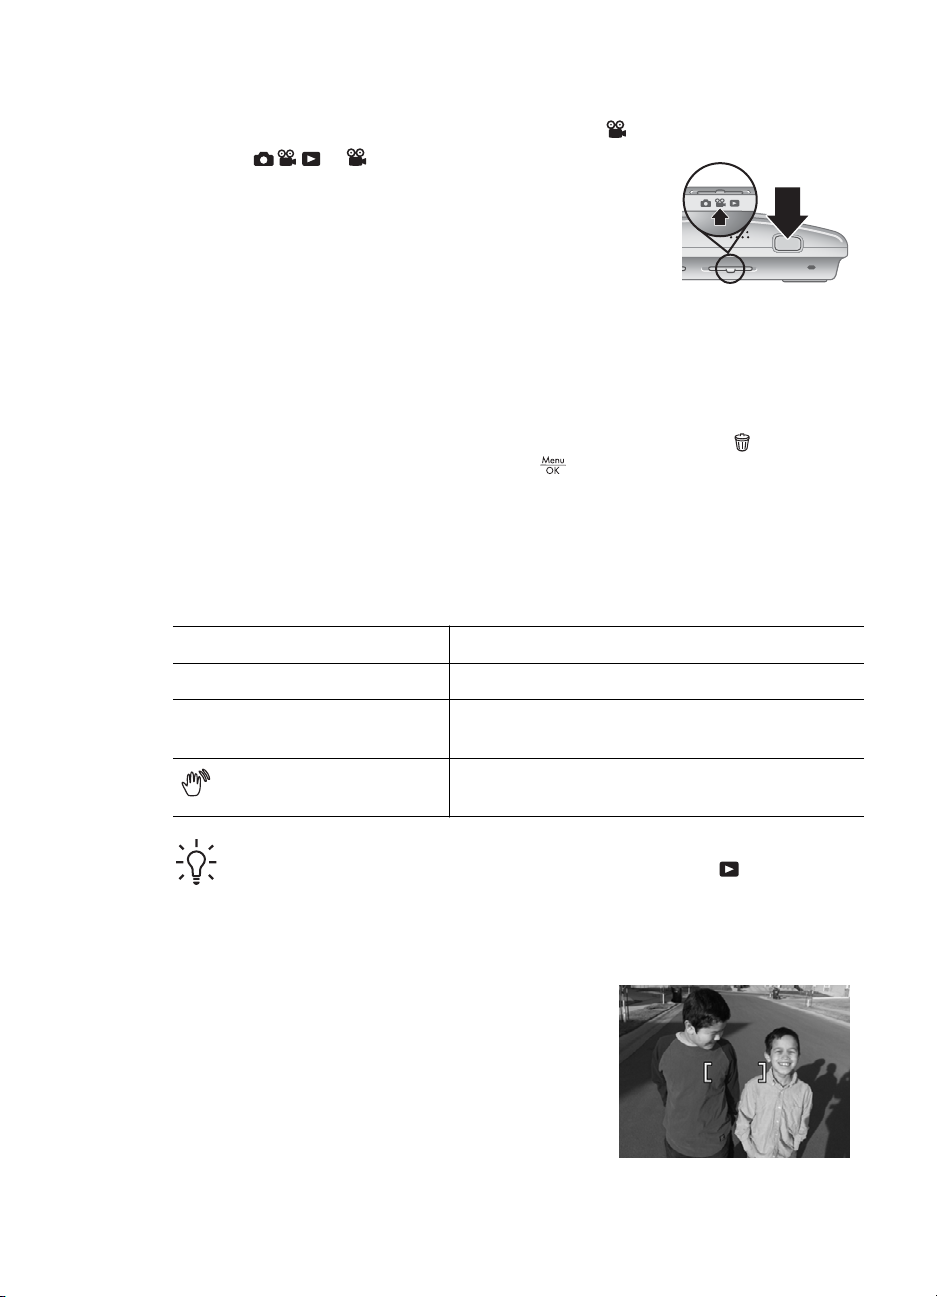
Recording video clips
You can record a video clip when the camera is set to Video Record.
1. Slide
2. Frame the subject in the Image Display.
3. Press the Shutter button halfway down to measure focus
and exposure. The focus brackets in the Image Display turn
solid green when focus is locked (see Auto focus and
exposure on page 12).
4. Press the Shutter button all the way down and release to
begin recording video.
5. To stop recording video, press and release the Shutter button again.
to .
Instant Review
After you have taken a picture or recorded a video clip, the camera displays it briefly
in Instant Review. If you want to delete the image or video clip, press
Image from the Delete sub-menu, then press
Auto focus and exposure
When you press the Shutter button halfway down, the camera automatically measures
and locks the focus (for pictures and video clips) and exposure (for pictures only). When
you auto focus:
, select This
.
Indicator
Green focus brackets Focus found.
Red focus brackets Focus not found (see Optimizing focus
(shaking hand icon)
Tip If you follow the suggestions for focus and exposure and your image does
not appear to be in proper focus or exposure when viewed in
the topics on blurry, dark, light, or grainy images in Troubleshooting
on page 41.
Focusing on the subject
When you press the Shutter button halfway down, the
camera searches for focus within the focus brackets.
When it finds focus, the focus brackets turn green.
If the focus brackets do not frame your subject, use
Focus Lock (see Using Focus Lock on page 13).
Description
on page 13).
(Pictures only) Long exposure required (see
Optimizing exposure on page 13).
Playback, see
12
Optimizing focus
When the camera cannot auto focus, the focus brackets turn red. This indicates the
picture may be out of focus because the subject is out of the focus range or the scene
has low contrast.
If you are recording a video or taking a picture with a shooting mode (see Using the
shooting modes on page 16) other than
the picture. Try releasing the Shutter button, reframing, and then pressing the Shutter
button halfway down again. If the focus brackets are still red:
For pictures and video clips: If the scene has low contrast, use Focus Lock (see Using
Focus Lock on page 13) and aim at a point on the subject that has more colors or
crisp edges.
For pictures only:
● Select a shooting mode more appropriate for the scene you are capturing (see Using
the shooting modes on page 16).
● If the subject is too close (less than 100 mm or 4.7 in), move farther away from the
subject or use
on page 16).
If the camera is set to
Try one of the following:
● Move within the
camera to
● In low contrast scenes, use Focus Lock (see Using Focus Lock on page 13).
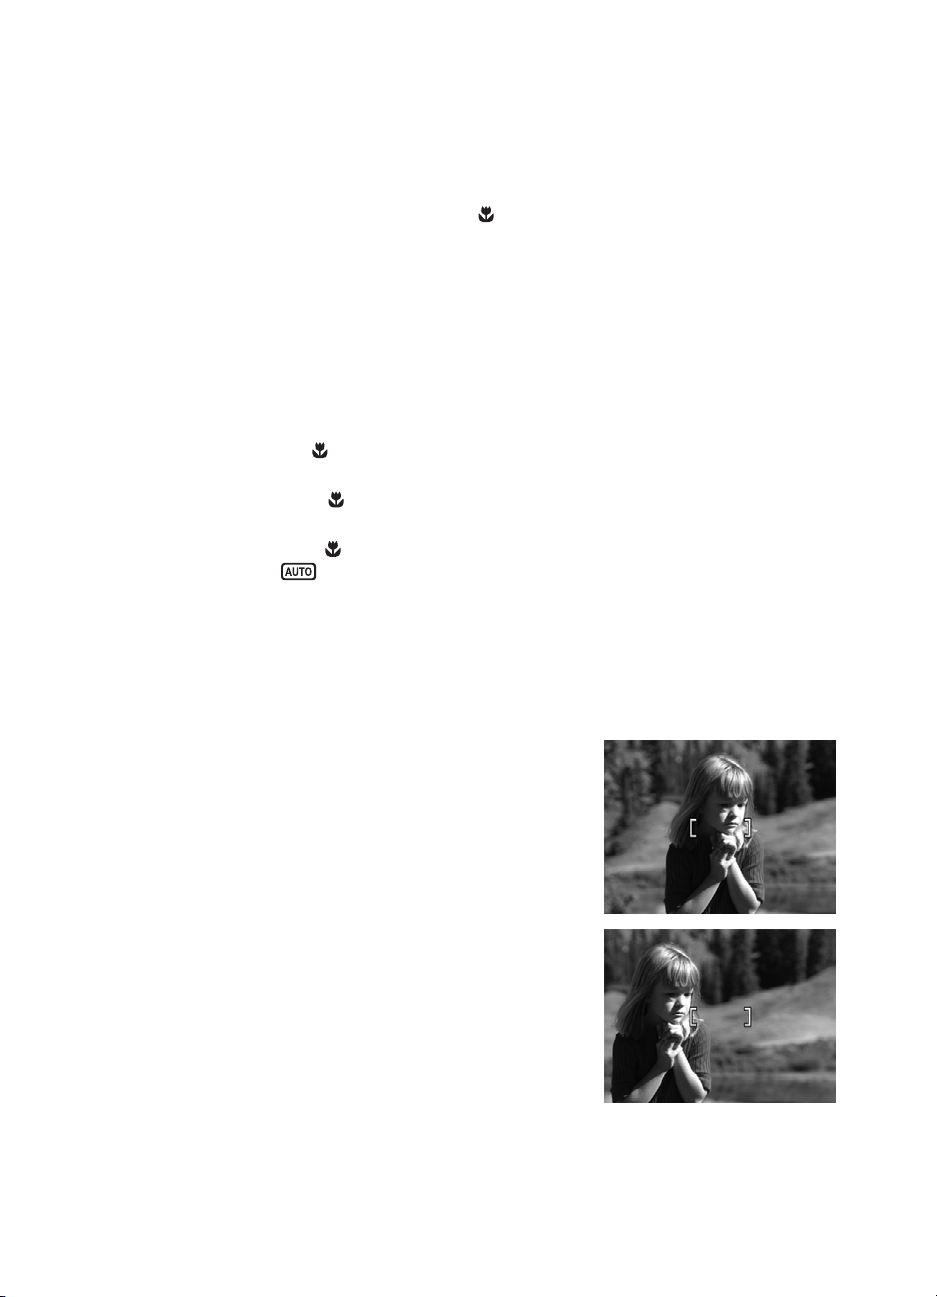
Using Focus Lock
Use Focus Lock to focus on a subject that is not in the center of the picture, to capture
action shots more quickly by pre-focusing in the area where the action will occur, or to
focus in low light or low contrast situations.
1. Frame the subject for your picture within the focus
brackets. In low light or low contrast situations,
frame a brighter or higher contrast object.
2. Press the Shutter button halfway down.
3. Hold the Shutter button halfway down and reframe.
4. Press the Shutter button all the way down to take
the picture.
Close-up and cannot focus, it will still take
Close-up (see Close-up under Using the shooting modes
Close-up and cannot focus, the camera will not take the picture.
Close-up range (100 mm to 1 m or 4.7 to 39.4 in) or set the
Auto (see Auto under Using the shooting modes on page 16).
Optimizing exposure
When you are taking a picture and press the Shutter button halfway down, the camera
also measures the light level to set the proper exposure.
HP Photosmart R837 Digital Camera 13
Chapter 2
If the camera determines the scene will require a very long exposure, a shaking hand
icon (
difficult to hold the camera still for the length of time required. Try one of the following:
● Set the flash to
on page 16).
● Set the camera on a tripod or stable surface.
● If the subject is out of the flash range or you do not have a tripod, set the shooting
mode to
on page 16).
● Turn on more light.
Using zoom
Your camera has both optical and digital zoom. Optical zoom physically adjusts the lens
to make the subject of your picture appear closer. After you have zoomed the lens fully
using optical zoom, the camera employs digital zoom. Digital zoom uses no moving lens
parts.
) appears. The camera will take the picture, but it may be blurry because it is
Auto Flash or Flash On (see Setting the flash
Steady Photo (see Steady Photo under Using the shooting modes
Note When you are recording a video, the camera continuously updates
exposure.
Tip The more you zoom in on the subject of your picture, the more small
movements of the camera are magnified (this is called camera shake). If
appears when you press the Shutter button halfway down, the picture may
be blurry. Hold the camera still, add more light to the scene, or use
Photo shooting mode (see Using the shooting modes on page 16). Try
holding the camera closer to your body or against a steady object, or set the
camera on a tripod or stable surface.
Steady
Optical zoom
Optical zoom moves the lens between wide angle (1x) and telephoto (3x).
While in
on the Zoom lever to control zoom. Press
zoom out.
Digital zoom
In digital zoom, the Image Display shows a yellow frame around the scene and the image
quality setting (MP value). As you zoom in, the scene enlarges within the yellow frame
to indicate the area of the scene the camera will capture, and the MP value decreases
to indicate the resolution at which the scene will be captured.
When capturing images using digital zoom, make sure that the MP value shown in the
Image Display is appropriate for the size at which you want to print the captured image.
14
Picture Capture or Video Record, use the buttons
to zoom in and to

For MP values and their recommended print sizes, see Image Quality under Using the
Picture Capture and Video Record menus on page 18.
1. While in
Picture Capture, press on the Zoom lever to optically zoom to the
maximum level, then release the lever.
2. Press and hold
zoom in too far, press
3. To return to optical zoom, press
until the image you want to capture fills the yellow frame. If you
.
.
Note Digital zoom is not available in Panorama mode nor when recording video
clips.
HP Photosmart R837 Digital Camera 15

3
Setting options for taking pictures and recording video clips
Your camera's settings work well for most shooting situations. For some situations,
however, the features described in this chapter can improve the pictures you take and
the video clips you record. In addition to setting features that optimize the camera for
lighting and motion, you can also set the camera to create a panorama, to take a series
of pictures rapidly or take images 10 seconds after you press the Shutter button, giving
you time to put yourself in the image.
Setting the flash
To select a flash setting, press while in Picture Capture, use to highlight the
desired flash mode, then press
.
Auto Flash (Default)—The camera uses the flash, if necessary. The flash may
cause a phenomenon called red-eye (see Red eye on page 16).
Flash On—The camera always uses flash. If the light is behind your subject,
use this setting to increase the light on the front of your subject. The flash may
cause a phenomenon called red-eye (see Red eye on page 16).
Flash Off—The camera does not use flash. Use this setting to capture poorly
lit subjects beyond the flash range or to capture scenes with the existing light.
. To exit without changing the flash setting, press
The Flash setting remains in effect until it is changed again, or you turn off the camera.
Note The flash is set to Flash Off in Landscape, / Panorama,
Sunset, and Theatre shooting modes, with the Burst setting, and
while recording video clips. The flash is set to
shooting mode.
Red eye
The red-eye phenomenon is caused when light from the flash reflects off the subjects'
eyes, which can make human eyes appear red and animal's eyes appear to glow in the
captured image. You can remove the red eyes in human subjects after you have captured
the image, using either Remove Red Eyes (see Remove Red Eyes under Using the
Design Gallery Menu on page 28) or the HP Photosmart Software that came with
your camera. You can remove the glowing eyes in animal subjects after you have
captured the image using Pet-Eye Fix (see Enhancing photos on page 29).
Using the shooting modes
Shooting modes are predefined settings for everyday situations. They are optimized for
particular types of scenes or shooting situations.
16
Flash On in Night Portrait

To select a shooting mode, press Mode while in Picture Capture, use to highlight
a shooting mode, then press
.
Auto Mode (Default)—For taking good shots quickly, when you do not have
time to select a special shooting mode.
Close-up—Use when taking close-up pictures of subjects between 100 mm
and 1 m (4.7 to 39.4 in) away.
Steady Photo—For minimizing picture blur when the subject is moving or you
cannot hold the camera still long enough in moderate to dim light conditions
(see Optimizing exposure on page 13).
Theatre—For capturing images at school programs, concerts, or indoor
sporting events without using flash.
Panorama—For grand landscapes or group pictures where you need to
capture a wide shot that one image cannot capture (see Using Panorama
or
mode on page 17).
Landscape—For scenes with deep perspective, such as mountain scenes.
Portrait—For pictures that have one or more people as their primary subject.
Action—For capturing sporting events, moving cars, or any scene where you
want to stop the action.
. To exit without changing the shooting mode, press
Night Portrait—For capturing images of people at night. This mode uses the
flash and a long exposure. As a result, you must set the camera on a tripod
or stable surface.
Beach—For capturing scenes at the beach.
Snow—For capturing scenes in snow.
Sunset—For capturing outdoor scenes at sunset.
Note The shooting modes do not apply when you are recording video clips.
The shooting mode remains in effect until it is changed again, or until you turn off the
camera.
Using Panorama mode
Panorama mode allows you to take a sequence of 2 to 5 pictures that can be stitched
together to capture a scene too wide to fit into a single picture. To stitch your panoramic
sequence together, use Stitch Panorama on the camera (see Stitching panoramas
on page 27). If you installed the HP Photosmart Software (see Install the software
HP Photosmart R837 Digital Camera 17
 Loading...