

Page 1

快速入門
Quick Start
HP Photosmart Pro B9100 series
Page 2
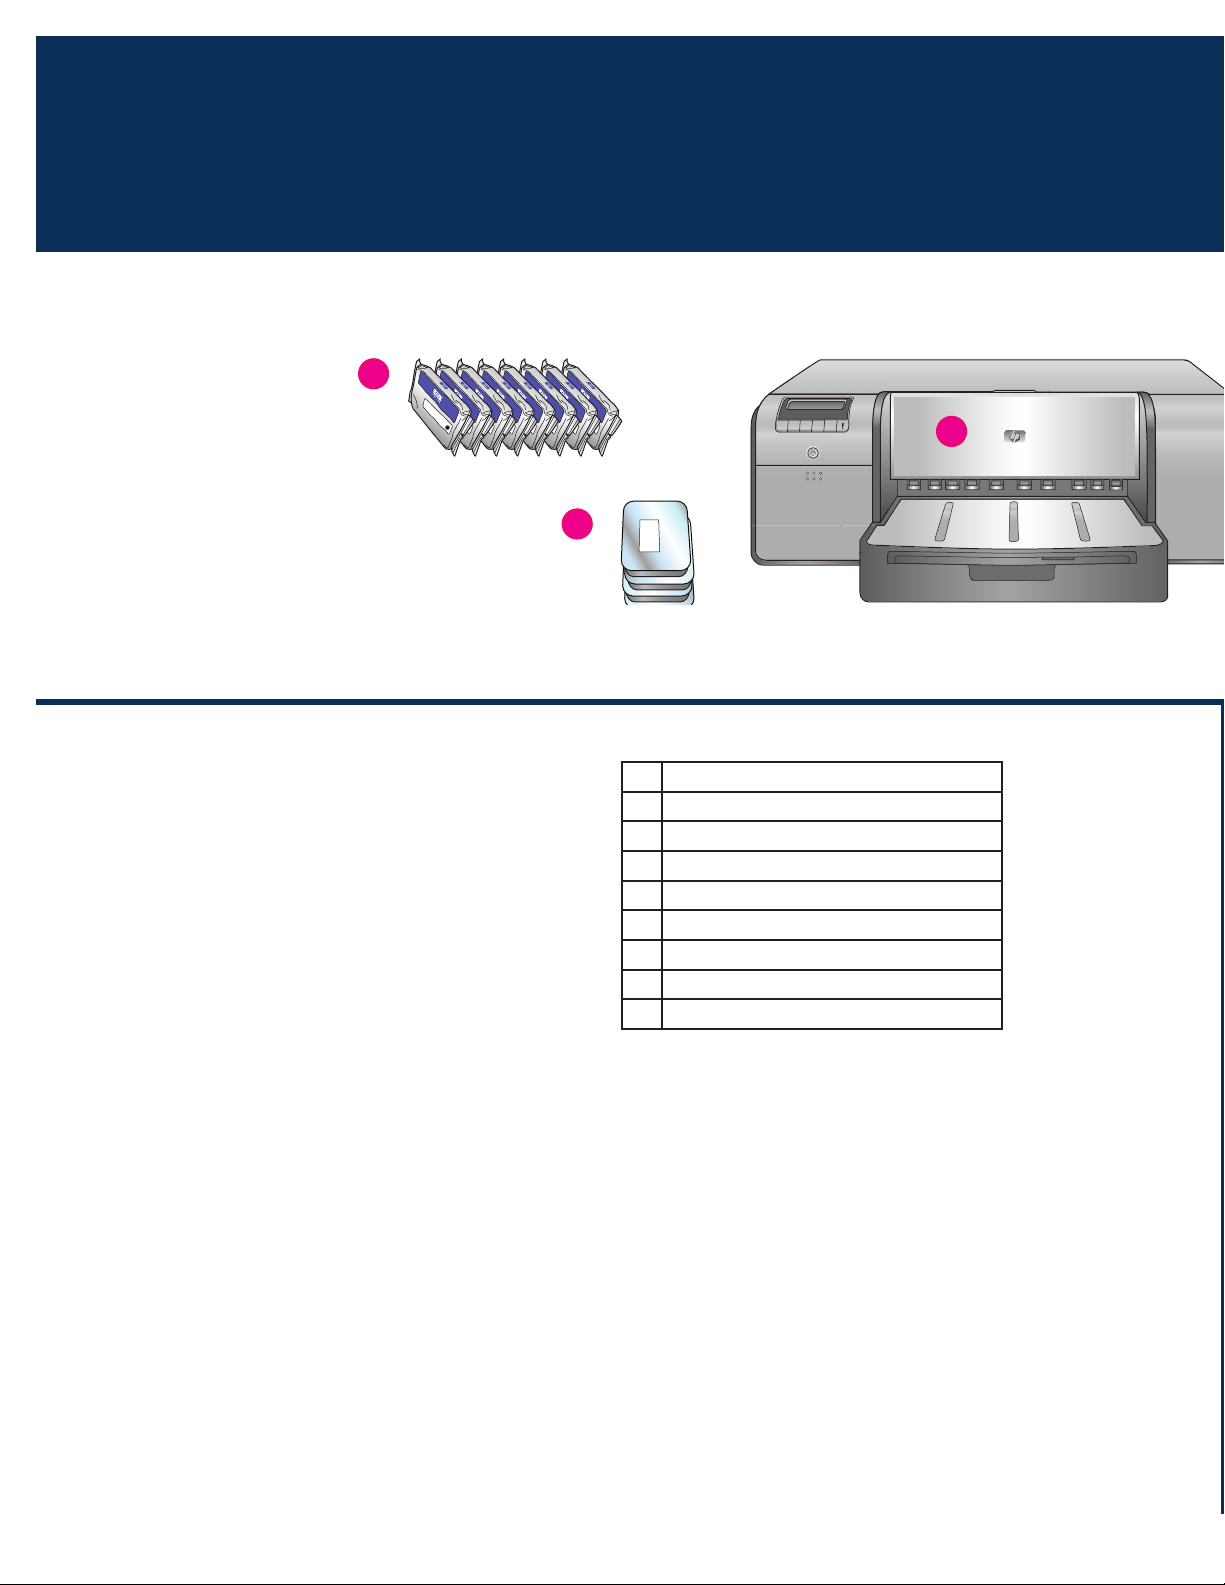
打開印表機的包裝
1
繁體中文
Unpack the printer
a
c
b
感謝您購買 HP Photosmart 印表機! 請閱讀本小手冊以瞭解如何
安裝印表機。
Windows 使用者: 如果您要使用 USB 纜線將您的印表機連接到
您的電腦,在軟體安裝期間提示您這麼做之前,請不要連接 USB
纜線(請參閱第 11 頁)。
重要! 按照所示的順序執行所有安裝步驟。 這是不需要重複進行
的一次性過程。
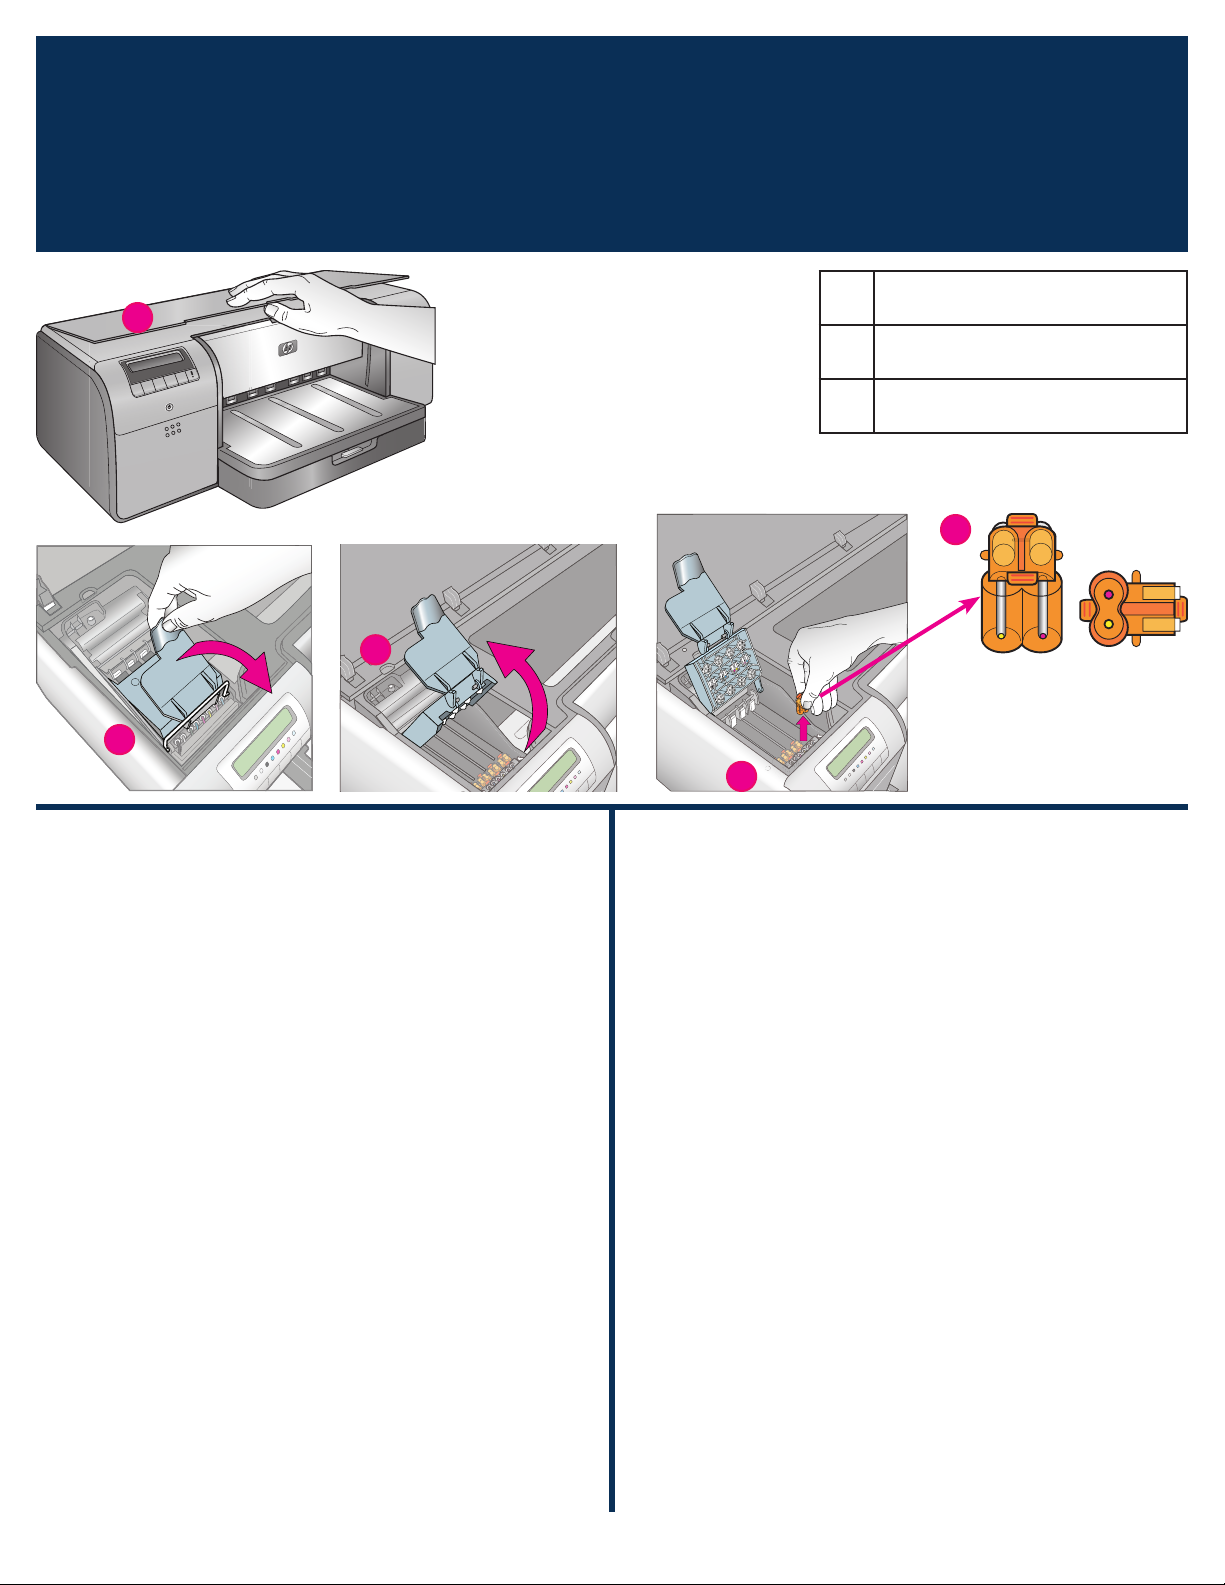
移除印表機外的膠帶和包裝。
重要! 請不要在此時打開印表機機蓋或紙匣。 如果在拆開包裝時
印表機前方的機蓋(特殊材質紙匣)被打開,請將它放回其直立
位置。
a 墨水匣(8)
b 印字頭(4)
c HP Photosmart Pro B9100 series 印表機
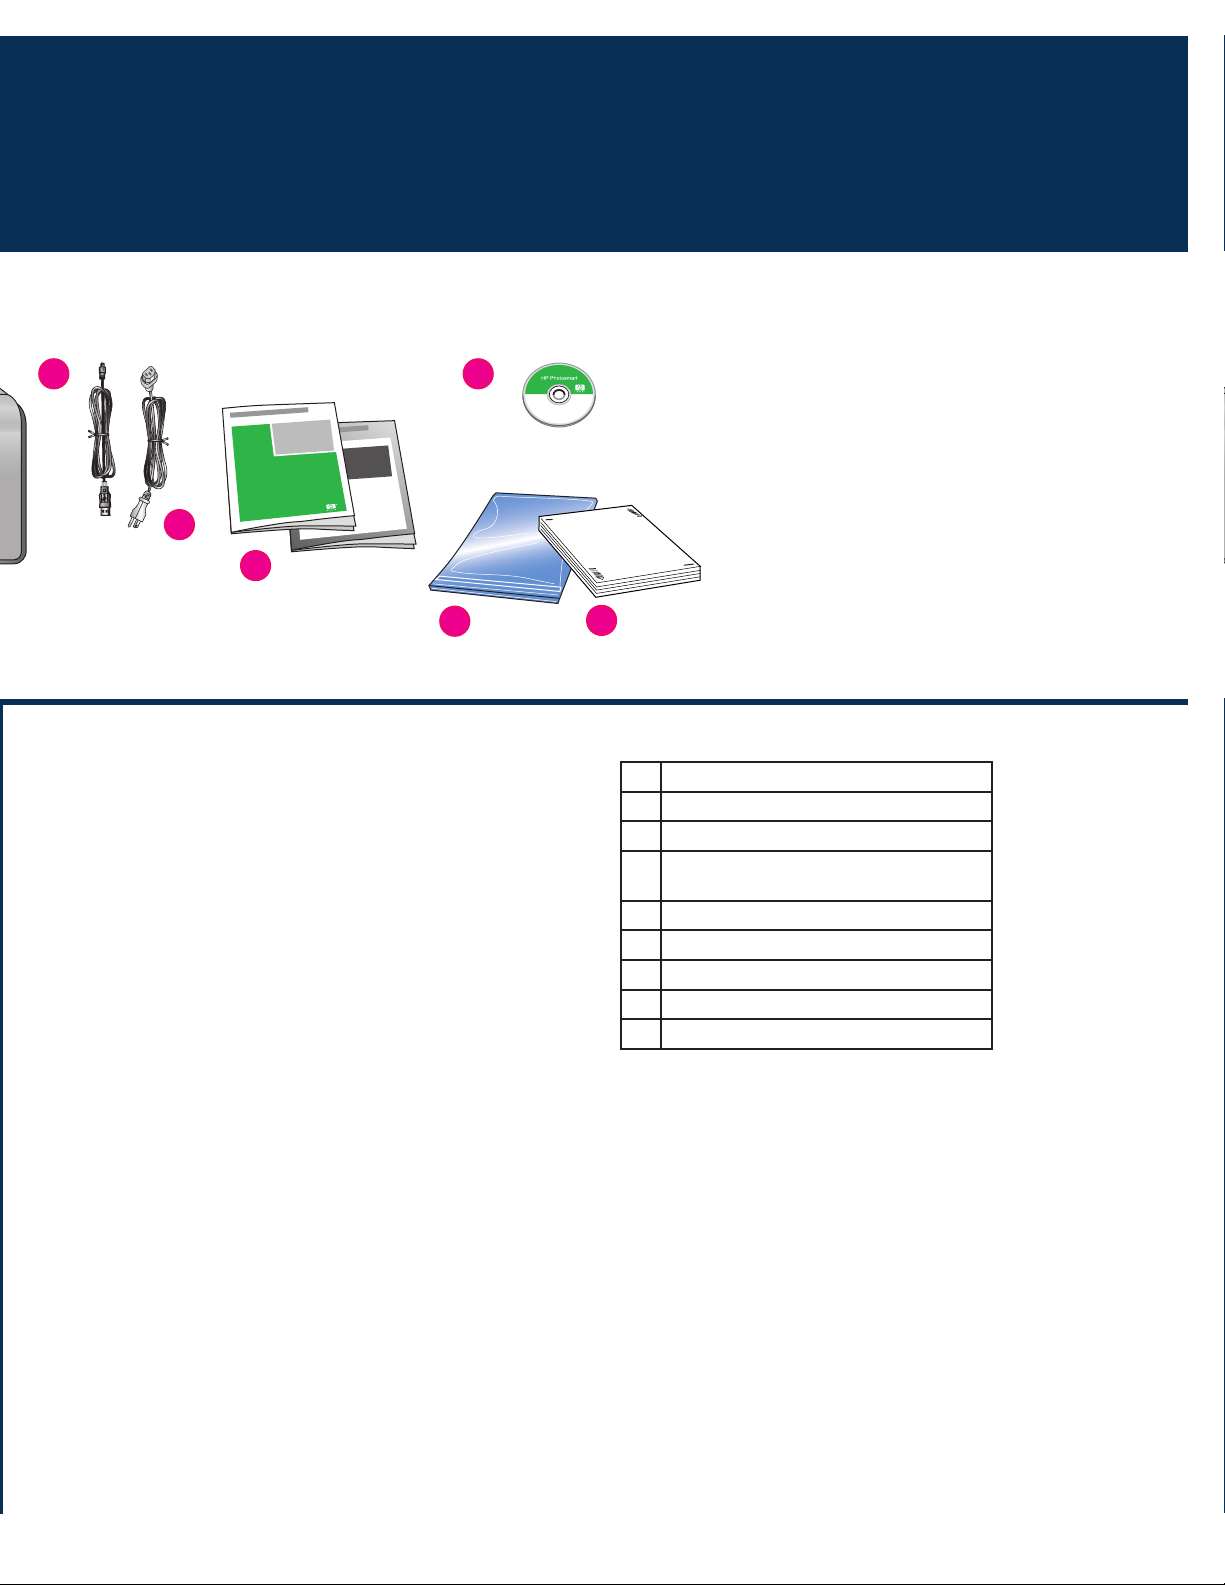
d USB 纜線(可能未在所有國家/地區提供)
電源線
e
使用者說明文件
f
相紙儲存袋
g
校準包(用於設定的紙張)
h
i HP Photosmart 軟體光碟
2
Page 3
d
i
e
f
g
English
Thank you for purchasing an HP Photosmart printer! Read this
booklet to learn how to set up the printer.
Windows users: If you are connecting your printer to your
computer with a USB cable, do not connect the USB cable until
you are prompted during software installation (page 11).
Important! Perform all of the setup steps in the order shown.
This is a one-time process that will not need to be repeated.
Remove the tape and packaging from the outside of the printer.
Important! Do not open the printer doors or trays yet. If the door
on the front of the printer (the specialty media tray) opened
during unpacking, return it to its upright position.
h
a Ink cartridges (8)
b Printheads (4)
c HP Photosmart Pro B9100 series printer
d USB cable (may not be included in all
countries/regions)
e Power cord
f User documentation
g Photo paper storage bag
h Calibration pack (paper for setup)
i HP Photosmart software on CD
3
Page 4
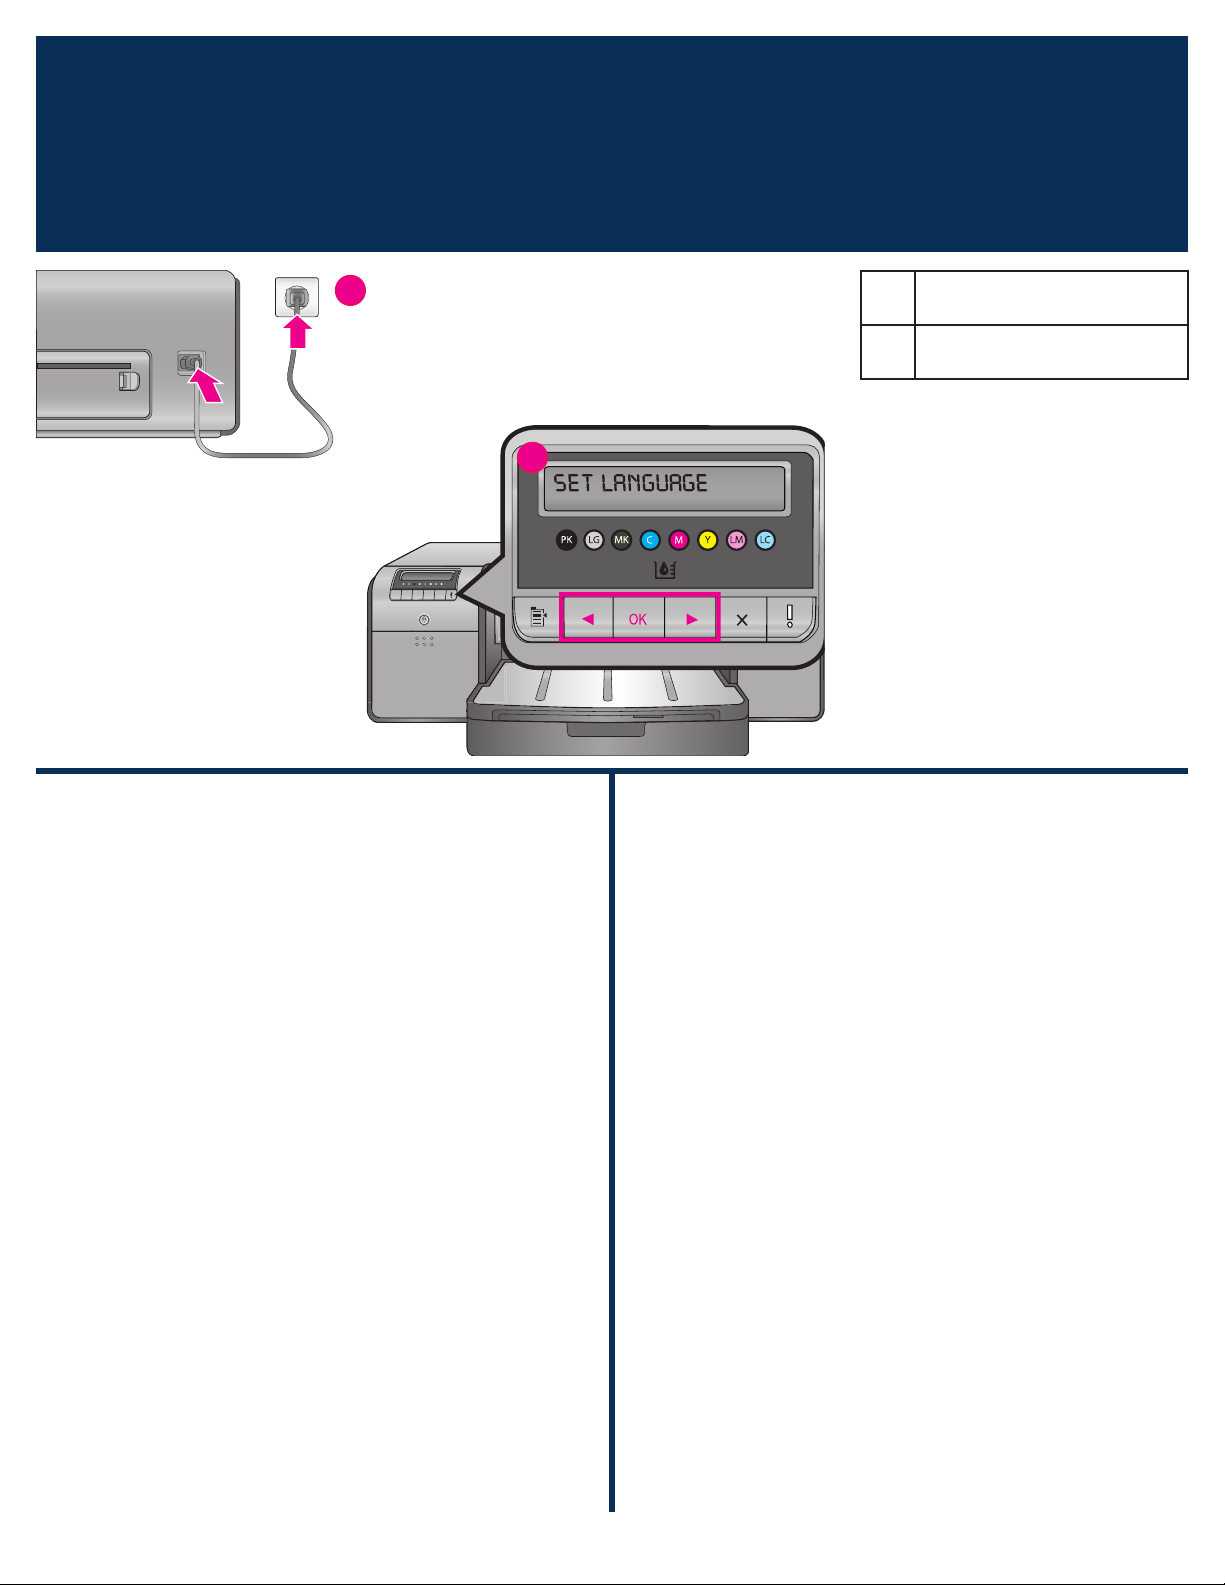
連接電源和設定語言
2
Connect the power and set the language
a
b
a 電源線連接
Power cord connection
b 印表機螢幕
Printer screen
繁體中文
Windows 使用者: 請勿連接 USB 纜線直到軟體安裝期間提示您
這麼做。
1. 確保所有印表機機蓋都已合上。
2. 將電源線分別插入印表機和牆上插座(a)。 印表機電源將會
自動開啟。 稍候片刻讓印表機啟動。
3. 印表機螢幕上出現 Set Language [English](設定語言
[英文])(b)時,執行以下操作之一:
如果英文是您要的語言,請按下 OK。
•
按 或 直到您要的語言顯示在畫面上,然後按下 OK。
•
從現在開始,印表機螢幕將使用您所選取的語言。
English
Windows users: Do not connect the USB cable until you are
prompted during software installation.
1. Ensure that all the printer doors are closed.
2. Connect the power cord to the printer and to a wall outlet
(a). The printer turns on automatically. Wait a few moments
for the printer to start up.
3. When
•
•
From now on, the printer screen will use the language you
selected.
Set Language [English] is displayed on the printer
screen (b), do one of the following:
Press OK if English is your language.
Press or until your language is displayed on the
screen, and then
press OK.
4
Page 5
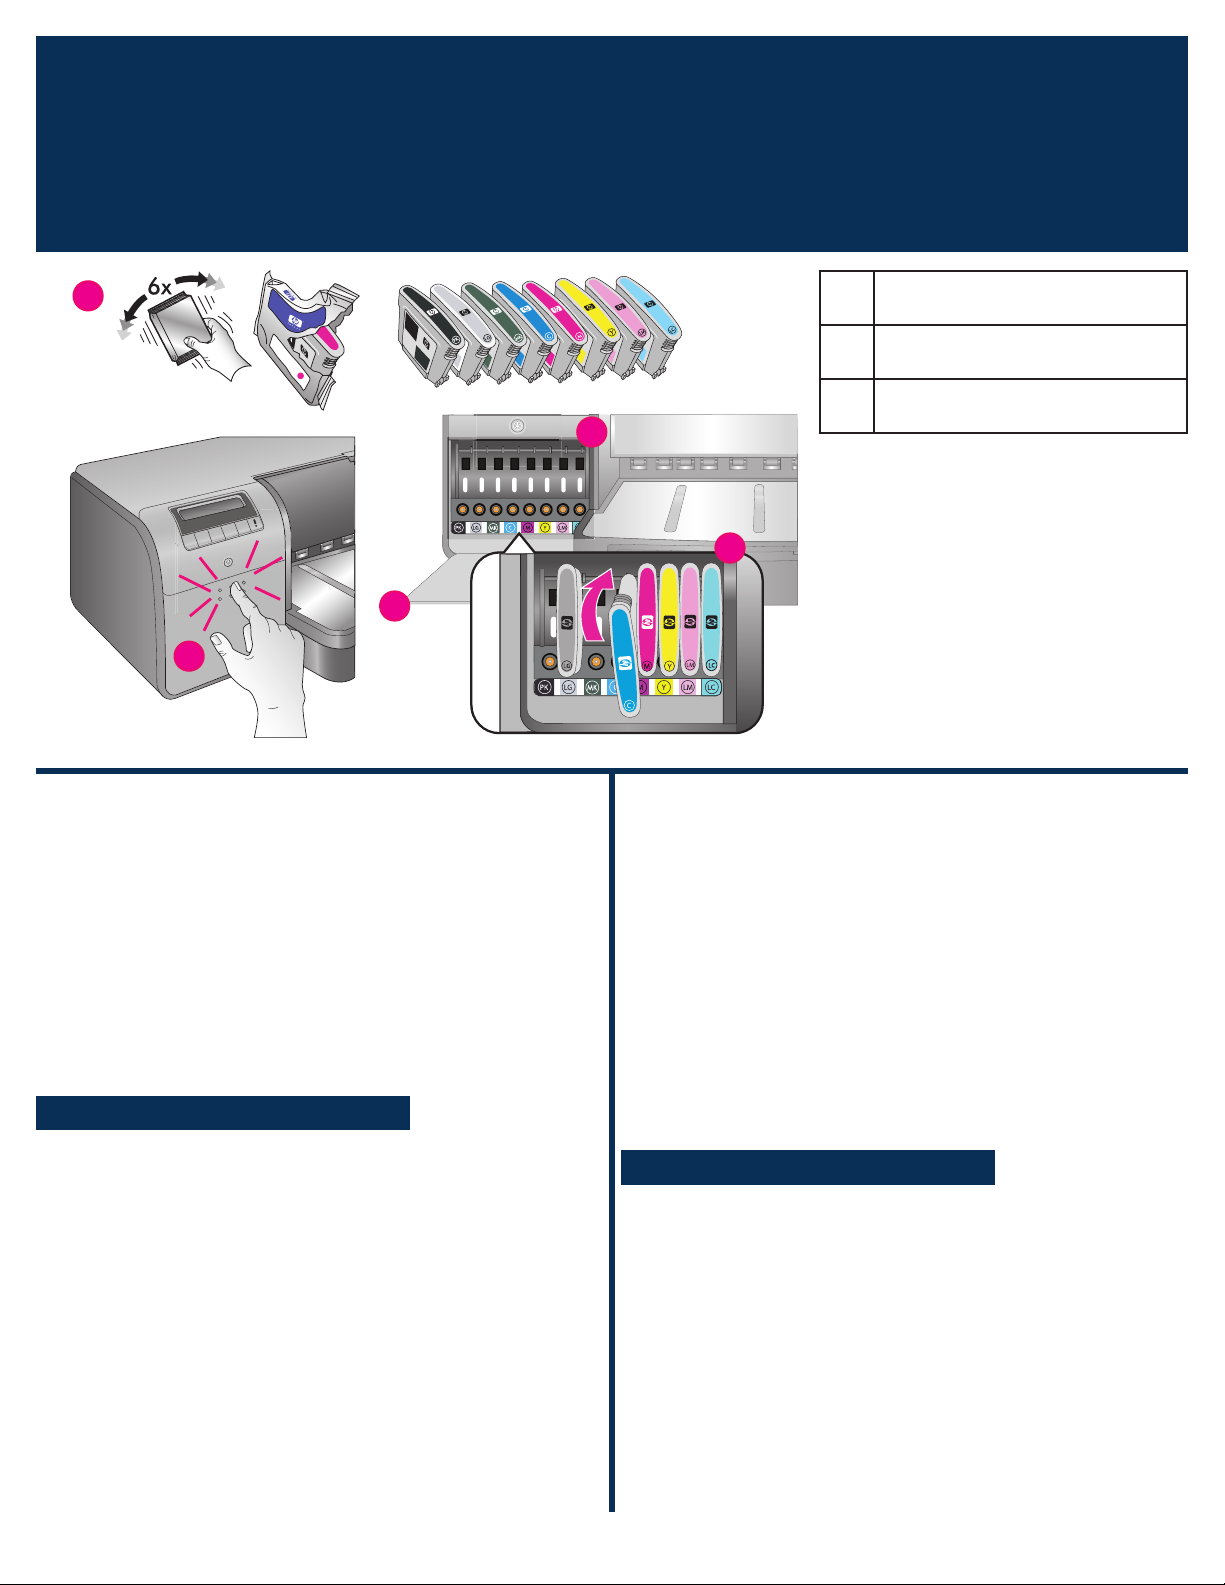
安裝墨水匣
3
d
Install the ink cartridges
c
c
c 墨水匣蓋
Ink cartridge door
d 墨水匣
Ink cartridges
e 墨水匣底座
e
e
Ink cartridge stalls
繁體中文
重要! 必須正確安裝所有八個墨水匣才能使印表機正確
操作。
1. 確保所有印表機機蓋都已合上。
2. 按下凸起的緣塊直到蓋子彈開,將墨水匣蓋(c)打開。
3. 拆開墨水匣(d)包裝前,用力搖晃每個墨水匣至少六次。
4. 拆開墨水匣包裝。 將每個墨水匣插入其色彩標記的底座
(e)。穩固壓下墨水匣以確保正確接觸。
5. 合上墨水匣蓋。
稍候片刻
印表機將灌注墨水匣使墨水開始流動,並清除墨水線路中的
空氣。
註: 印表機包裝盒所隨附墨水匣中的墨水供印表機起始化使
用。 這些墨水匣以及替換墨水匣的墨水,也用於保持列印噴嘴
清潔及墨水順暢流出。
6. 繼續執行第 6 頁的
取下安裝蓋
。
English
Important! All eight ink cartridges must be correctly
installed for the printer to work.
1. Ensure that all the printer doors are closed.
2. Open the ink cartridge door (
until the door clicks open.
3.
Before unwrapping the ink cartridges (d), shake each one
vigorously, at least six times.
4. Unwrap the ink cartridges. Insert each cartridge into its colorcoded stall (e). Press firmly on the cartridges to ensure proper
contact.
5. Close the ink cartridge door.
c) by pressing the raised bumps
Wait a few moments
The printer primes the ink cartridges to start the flow of ink
and purge air from the ink line.
Note: Ink in the cartridges included in the printer box is used
for printer initialization. Ink from these cartridges, as well
as from replacement cartridges, is also used to keep print
nozzles clear and ink flowing smoothly.
6. Continue on to
Remove the setup caps, on page 6.
5
Page 6
取下安裝蓋
4
b
Remove the setup caps
a
b
a 頂蓋
Top door
b 印字頭組件護蓋
Printhead assembly cover
c 透明橘色安裝蓋
Transparent orange setup caps
c
取下並丟棄
Remove and discard
繁體中文
1. 當被提示抬起印表機頂蓋(a)時,首先把將其封緊的資訊貼紙
撕下,然後將它打開。 取出印表機內的膠帶和包裝。
2. 抬起藍色的印字頭組件護蓋(b)。 握住把手將護蓋往上拉,
然後將它完全抬起。
3. 移除印字頭組件內的四個透明橘色安裝蓋。 握住每個蓋子
(c)的拉片,然後用力向上拉。 蓋子可能不容易取下。
有些安裝蓋可能含有墨水,而其他安裝蓋則可能是空的,這是
正常現象。
註:若您收到灌注不完整的錯誤訊息,那麼您必須拆下已安裝
的印字頭,蓋上安裝蓋,合上印字頭組件護蓋,然後合上頂
蓋。 檢視第 5 頁
方法正確。 合上墨水匣蓋。 稍候片刻讓印表機灌注墨水匣。
當印表機螢幕上出現提示時,打開頂蓋,然後再次移除橘色安
裝蓋。
4. 將蓋子丟棄。
重要! 若您未將安裝蓋移除,您將無法在下一個步驟中安裝印
字頭。
安裝墨水匣
中的指示,確保您安裝墨水匣的
c
English
1. When prompted to raise the top door (a) of the printer, first
remove the information sticker holding it closed, and then
open it. Remove the tape and packaging from the inside of
the printer.
2. Raise the blue printhead assembly cover (
forward by the handle, and then raise it up out of the way.
3. Remove the four transparent orange setup caps inside the
printhead assembly. Grasp each cap (c) by its tabs and pull
up firmly. The caps may be difficult to remove.
It is normal for some of the setup caps to contain ink, and
others to be empty.
Note: If you receive an error message that the priming is
incomplete, then you must remove the printheads if you have
already installed them, replace the setup caps, close the
printhead assembly cover, and close the top door. Review the
instructions in Install the ink cartridges, on page 5, and make
sure you installed the ink cartridges properly. Close the ink
cartridge door. Wait a few moments for the printer to prime
the ink cartridges. When prompted on the printer screen,
open the top door and remove the orange setup caps again.
4. Discard the caps.
b). Pull the cover
Important! If you do not remove the setup caps, you will not be
able to install the printheads in the next step.
6
Page 7
安裝印字頭
5
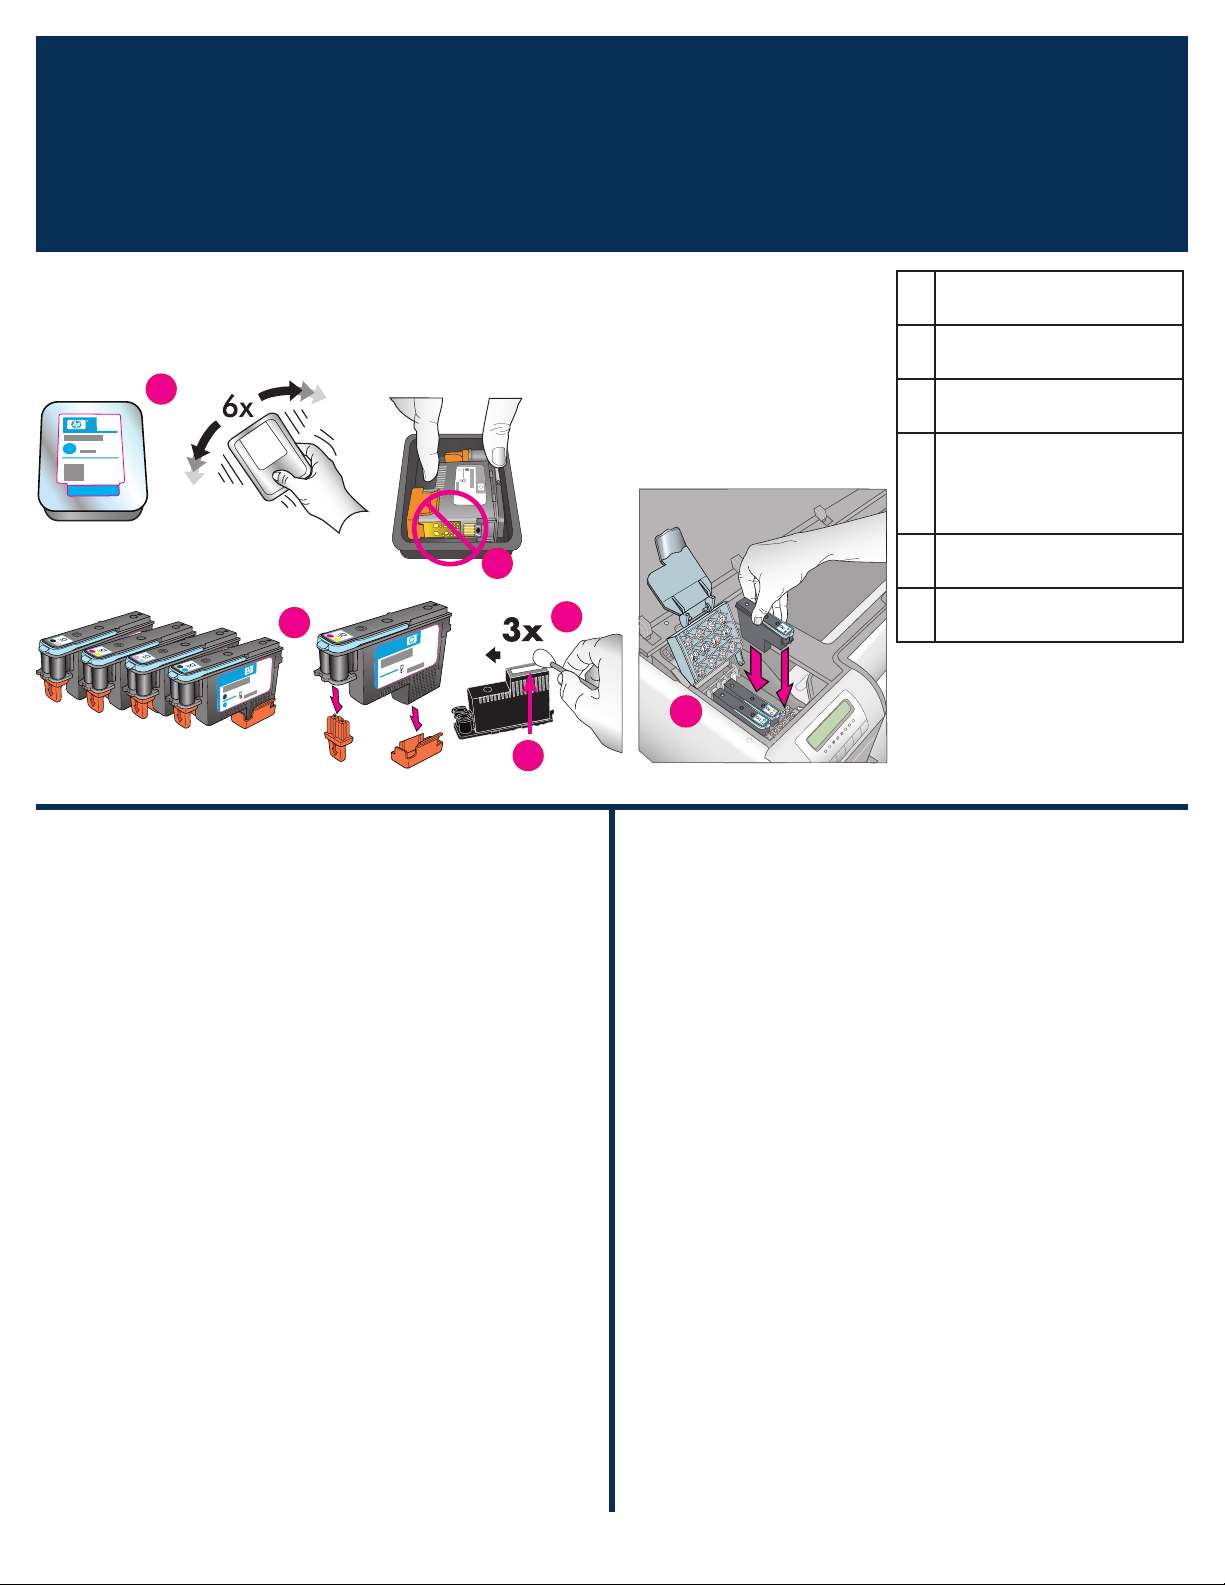
註: 印字頭的設計使其可在印表機的整個生命週期中使用。
Note: The printheads are designed to last the life of the printer.
Install the printheads
d
e
f
d 印字頭
Printheads
e 金色接點
Gold-colored contacts
f 橘色保護蓋
Orange protective covers
用於擦拭印字頭噴嘴的預濕
g
棉花棒
Pre-moistened swab for
wiping the printhead nozzles
h 噴嘴板
Nozzle plate
g
i
i 印字頭底座
Printhead stalls
h
繁體中文
重要!必須正確安裝所有四個印字頭,印表機才能操作。
1. 拆開印字頭包裝前,用力搖晃每個包裝(d)至少六次。
2. 拆開每個印字頭包裝。 請勿觸摸金色接點(e)。
3. 取下並丟棄橘色的保護蓋(f)。 取下蓋子後請勿搖晃印字
頭,因為這樣做將會使墨水產生氣泡。
重要! 每個印字頭包裝中包含有一個預濕棉花棒(g)。 打開
棉花棒,並使用棉花棒的泡沫塑料尖端沿噴嘴板(h)擦拭三
次,如上所示。 對每個印字頭使用清潔的棉花棒,然後將棉
花棒丟棄。
4. 將每個印字頭插入其色彩標記的底座(i)。 穩固壓下印字頭
直到它完全插入。
5.
放下打開的印字頭組件護蓋,使它夾在金屬桿下方,然後將護
蓋折回其原來位置。
6. 合上頂蓋。 這時,印表機起始化過程將會開始進行。
注意: 請不要在此過程中打開任何機蓋! 如果您這樣做,
印表機起始化將會停止。
English
Important! All four printheads must be correctly installed
for the printer to work.
1. Before unwrapping the printheads, shake each package (d)
vigorously, at least six times.
2. Open each printhead package.
gold‑colored contacts (e).
3. Remove and discard the orange protective covers (
shake the printheads after removing the covers, as this can
create air bubbles in the ink.
Important! A pre-moistened swab (g) is included in each
printhead package. Open the swab and use the foam tip of
the swab to wipe along the length of the nozzle plate (h) 3
times, as shown above. Use a clean swab for each printhead,
and then discard the swab.
4. Insert each printhead into its color-coded stall (
straight down on the printhead until it is all the way in.
5. Lower the open printhead assembly cover so that it clips
under the metal bar, and then fold the cover back down to its
original position.
Do not touch the
f). Do not
i). Press
6.
Close the top door. When you do, the printer initialization
process begins.
Caution: Do not open any of the doors during this process! If
you do, the printer initialization will stop.
7
Page 8
在主紙匣中裝入校準包
6
繁體中文
Load the calibration pack in the main tray
a
b
a
c
b
a
在印表機起始化過程中,印表機將會提示您在主紙匣中裝入校準
包。 校準包是印表機包裝盒中隨附的光面材質包。 它被用來列印
起始化、校正及校正頁。
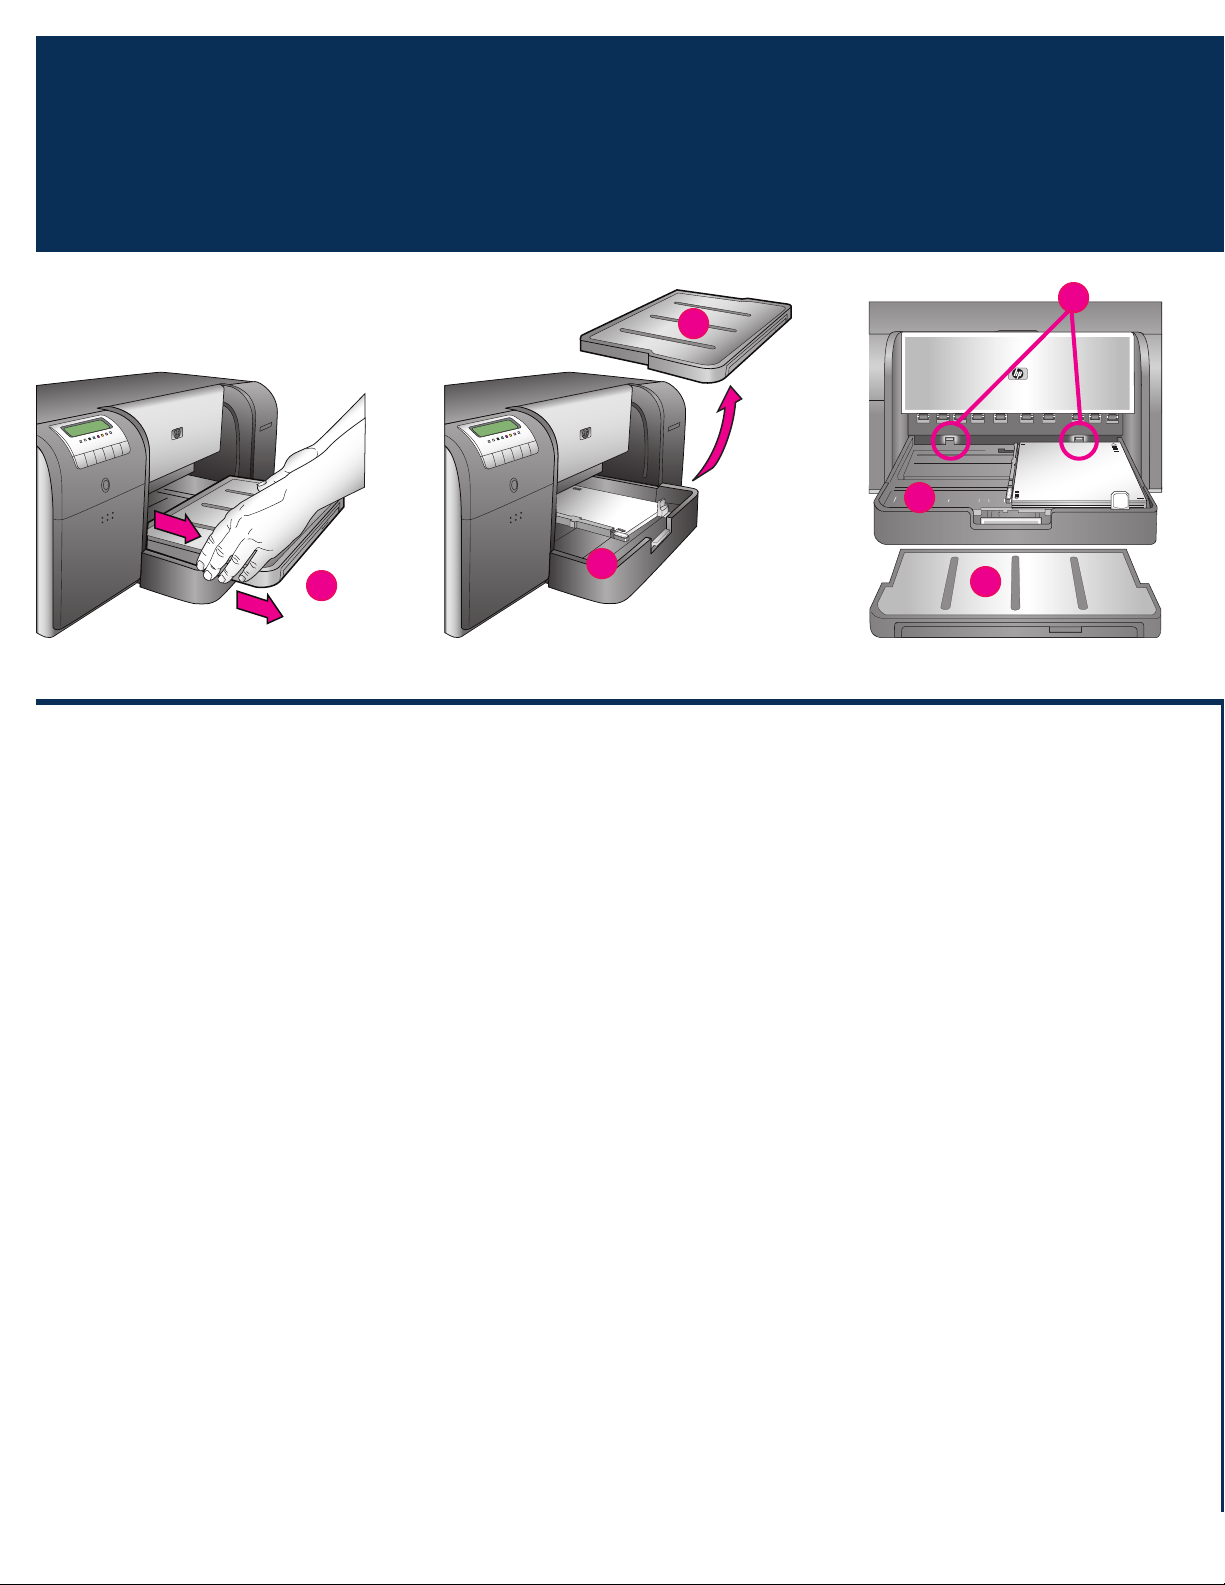
1. 抓住出紙匣的邊側然後將它拉向您,完全取下出紙匣(a)。
主紙匣現在即可接觸。
2. 將校準包從其包裝中取出,然後移除傳單。以縱向和光面朝
下,將校準包放入主紙匣(b)。將紙張與紙匣的右側和紙張擋
板(c)對齊。確保紙張未超越紙張擋板,否則將會卡塞。
3. 調整紙張寬度(d)和紙張長度(e)導板,使它們輕輕靠住紙
張邊緣。
重要! 檢查紙張是否平放在紙匣中,確保它們不會在印表機內
卡塞。
4. 將出紙匣滑回原位。
5. 用一隻手握住出紙匣,然後用另一隻手拉出延伸板,將出紙匣
延伸板(f)拉出。
6. 將出紙匣延伸板末端的紙張制動器(g)向上翻,防止紙張掉落
地面。
7. 完成裝入校準包後,按 OK。 印表機開始起始化。將會列印數
頁。 這是一項一次性、全面的起始化過程,將會持續 30 到 60
分鐘。 您可以利用這段時間來安裝印表機軟體。
若您在這個過程中收到錯誤訊息,請參閱《使用者手冊》「疑難排
解」一章下的「錯誤訊息」部分。
印表機螢幕上出現 Ready(就緒)時,即表示印表機起始化已
完成。
每個墨水匣的墨水量會在印表機螢幕上顯示。
註: 所顯示的只是估計墨水量。 實際墨水量可能有所不同。
由於校準包中所提供的是 HP 進階相紙,您可以使用印表機起始化
後剩下的任何紙張來列印相片。
註: 有關安裝印表機後裝入紙張的詳細資訊,請參閱第 18 頁的
主紙匣中裝入紙疊。
在
8
Page 9

English
a
出紙匣
Output tray
b
主紙匣
g
d
e
f
g
Main tray
c
紙張擋板
Paper stops
d
紙張寬度導板
Paper-width guide
e
紙張長度導板
Paper-length guide
f
出紙匣延伸板
Output tray extension
g
紙張制動器
Paper catch
During the printer initialization process, the printer prompts you to
load the calibration pack in the main tray. The calibration pack is
a pack of glossy media that came in the printer box. It is used to
print initialization, alignment, and calibration pages.
1. Remove the output tray (
a) completely by grasping the sides
of the tray with both hands and sliding it out toward you. The
main tray is now accessible.
2. Take the calibration pack out of its packaging and remove
the flyer. Place the calibration pack into the main tray (b), in
portrait orientation with the glossy side facing down. Align
the paper against the right side of the tray, and against the
paper stops (c). Ensure that the paper does not climb over the
paper stops, or it will jam.
3. Adjust the paper-width (
d) and paper-length (e) guides so
they rest gently against the edges of the paper.
Important! Check that the paper is lying flat in the tray, so
that it does not jam inside the printer.
4. Slide the output tray back into place.
5. Pull out the output tray extension (
f) by holding the output tray
with one hand and pulling out the extension with your other
hand.
6. Flip up the paper catch (
g) at the end of the output tray
extension to prevent paper from falling onto the floor.
between 30 and 60 minutes.
You may use this
time to install the printer software.
If you receive an error message during this process, see the Error
messages section in the Troubleshooting chapter of the User
Guide.
When Ready is displayed on the printer screen, the printer
initialization is complete.
The ink level for each cartridge is shown on the printer screen.
Note: The ink levels shown are an estimate only. Actual ink
volumes may vary.
Since the calibration pack is HP Advanced Photo Paper, you can
use any left‑over paper from the printer initialization for printing
photos.
Note: See Load a stack of paper in the main tray on page 18
for more information about loading paper after you set up the
printer.
7. When you finish loading the calibration pack, press
printer begins initializing. Several pages will print. This is a
one‑time, comprehensive initialization process that will last
OK. The
9
Page 10

USB 安裝 (Mac)
7
a
繁體中文
USB installation (Mac)
Mac
a
c
b
b
English
有關 Mac 的乙太網路安裝資訊,請參閱第 12 頁。
將 USB 纜線連接到電腦(a)和印表機背面的 USB 連接埠(b)。
註: 在印表機起始化過程中可以插入 USB 纜線。
Mac® OS X 10.2.8
1. 從 www.hp.com/support 下載 Mac® OS X 10.2.8 印表機驅
動程式。 按照畫面上的安裝指示操作。
Mac® OS X 10.3.x 及更新版本
1. 將 HP Photosmart 光碟片(c)放入電腦,然後連按兩下桌面
上的 CD(光碟片)圖示。 連按兩下 HP Photosmart
Installer(HP Photosmart 安裝程式)圖示。
2. 輸入用來管理 Mac 電腦的名稱與密碼,然後按一下 OK。
3. 選取您的語言,然後在裝置下選取 HP Photosmart Pro B9100
series。 按照畫面上的指示進行。
4. 「HP Photosmart Installer」(HP Photosmart 安裝程式)視窗出
現時,選取 Easy Install(簡易安裝)或 Custom Install(自訂
安裝),然後按一下 Install(安裝)。 按一下 Continue(繼
續)以執行「HP Setup Assistant」(HP 安裝助手)。
5. 「HP Setup Assistant」(HP 安裝助手)出現時,按一下
Next(下一步)。
6. 反白顯示「HP Photosmart Pro B9100 series 印表機」,然後
按一下 Next(下一步)。 如果印表機未在視窗中列出,確定
印表機電源已開啟且 USB 纜線連接到印表機。
7. 顯示「Congratulations」(恭禧)頁時,按一下 Finish
(完成)。
For Mac Ethernet network installation, see
page 12.
Connect the USB cable to the computer (a) and to the USB port
on the back of the printer (b). Note: It’s OK to plug in the USB
cable while the printer is initializing.
Mac® OS X 10.2.8
1. Download the Mac® OS X 10.2.8 printer driver from www.
hp.com/support. Follow the onscreen installation instructions.
Mac® OS X 10.3.x and later
1. Insert the HP Photosmart CD (c) into the computer, and then
double-click the CD icon on the desktop. Double-click the HP
Photosmart Installer icon.
2. Enter the name and password used to administer your Mac,
and then click OK.
3. Select your language, and then select
B9100 series as the device. Follow the onscreen instructions.
4. When the HP Photosmart Installer window is displayed,
choose Easy Install or Custom Install, and then click Install.
Click Continue to run the HP Setup Assistant.
5. When the HP Setup Assistant is displayed, click
6. Highlight the HP Photosmart Pro B9100 series printer, and
then click Next. If the printer is not listed in the window, make
sure that the printer is on and the USB cable is connected to
the printer.
7. When the Congratulations page is displayed, click
HP Photosmart Pro
Next.
Finish.
10
Page 11

USB 安裝 (Windows)
7
USB installation (Windows)
Windows
f
d
e
繁體中文
Windows® 2000 Professional、XP Home、XP Professional、
Professional x64
有關 Windows 的乙太網路安裝資訊,請參閱第 14 頁。
重要! 請勿連接 USB 纜線直到提示您這麼做。
1. 將 HP Photosmart 光碟片(d)放入電腦。
若未出現指示,請選取 Windows 開始功能表的執行,按一下
瀏覽,然後導覽至您放入 HP Photosmart 軟體光碟片的 CD-
ROM 光碟機。 連按兩下 setup.exe 檔案,然後按一下 OK。
註:
2. 按一下安裝,然後按照畫面上的指示(f)安裝軟體。
3. 出現提示時(g),將 USB 纜線連接到電腦(h)和印表機背面
註:
4. 出現「恭禧」頁面時,安裝已經完成。 您可以按一下列印測試
如果顯示「找到新硬體」畫面(e),按一下取消,拔下
USB 纜線,然後重新開始安裝。
的 USB 連接埠(i)。 這可能需要數分鐘(在舊系統上將需時
更長)來建立連接和複製檔案。
在印表機起始化過程中可以插入 USB 纜線。
頁來驗證連線。
g
h
h
i
English
Windows
XP Professional, Professional x64
For Windows Ethernet network installation, see page 14.
Important! Do not connect the USB cable until you are
prompted.
1. Insert the HP Photosmart CD (d) into the computer.
If instructions do not appear, select
Note: If the Found New Hardware screen is displayed
2. Click
3. When prompted (
®
2000 Professional, XP Home,
Start menu, click Browse, and navigate to the CD-ROM drive
where you inserted the HP Photosmart software CD. Doubleclick the setup.exe file and then
click OK.
(e), click Cancel, unplug the USB cable, and restart the
installation.
Install and follow the onscreen instructions (f) to install
the software.
g), connect the USB cable to the computer
(h) and to the USB port on the back of the printer (i). It may
take several minutes (or longer on older systems) to establish
a connection and copy the files.
Run from the Windows
i
Note: It’s OK to plug in the USB cable while the printer is
initializing.
4. When the Congratulations page is displayed, the installation
is complete. You may click Print a Test Page to verify the
connection.
11
Page 12

乙太網路安裝 (Mac)
7
Ethernet network installation (Mac)
Mac
a
b
繁體中文
有關 Mac 的 USB 安裝資訊,請參閱第 10 頁。
您需要以下物件將印表機連接到網路:
• 一條帶 RJ-45 插頭的 CAT-5 乙太網纜線。(此纜線與 USB 纜
線或一般電話電線不同,在這個用途上使用任何一種這些纜線
將會損壞印表機或其他網路裝置。)
• 網路存取點,例如具有開放連接埠的集線器、路由器或交
換器。
連接網路纜線
1. 從印表機背面的乙太網連接埠取下塑膠插銷(a),然後將它
丟棄。
2. 將乙太網纜線的一端連接到印表機的背面(b)。
註:
3. 將乙太網纜線的另一端連接到集線器、路由器或交換器(c)
切勿使用乙太網纜線將印表機直接連接到電腦。 不支援同層網路。
安裝印表機軟體
重要! 在每一台您要列印到 HP Photosmart 印表機的電腦上安裝該
軟體。
Mac® OS X 10.2.8
1. 從 www.hp.com/support 下載 Mac® OS X 10.2.8 印表機驅
2. 按照畫面上的安裝指示操作。
在印表機起始化過程中可以插入乙太網纜線。
上空置的連接埠。
動程式。
c
®
Mac
OS X 10.3.x
1. 將 HP Photosmart 光碟片(d)放入電腦,然後連按兩下桌面
上的 CD(光碟片)圖示。
2. 連按兩下 HP Photosmart Installer(HP Photosmart 安裝程
式)圖示。
3. 輸入用來管理 Mac 電腦的名稱與密碼,然後按一下 OK。
4. 選取您的語言,然後在裝置下選取 HP Photosmart Pro B9100
series。 按照畫面上的指示進行。
5. 「HP Photosmart Installer」(HP Photosmart 安裝程式)視窗出
現時,選取 Easy Install(簡易安裝)或 Custom Install(自訂
安裝),然後按一下 Install(安裝)。
6. 按一下 Continue(繼續)以執行「HP Setup Assistant」(HP
安裝助手)。
7. 「HP Setup Assistant」(HP 安裝助手)出現時,按一下
Next(下一步)。
8. 反白顯示「HP Photosmart Pro B9100 series 印表機」,然後
按一下 Next(下一步)。 若印表機未在視窗中列出,請確定
印表機電源已開啟並且已將網路纜線連接到印表機。
9. 按照畫面上的指示使用「Printer Setup Utility」(印表機設定公
用程式)設定印表機。
10. 按一下 Next(下一步)。
11. 顯示「Congratulations」(恭禧)頁時,按一下 Finish
(完成)。
及更新版本
12
Page 13

English
d
For Mac USB installation, see page 10.
You need the following to connect the printer to a network:
• A CAT-5 ethernet cable with an RJ-45 plug. (This is not the
same as a USB cable or a regular phone wire, either of
which can damage the printer or other network devices if
used for this purpose.)
• A network access point such as a hub, router, or switch with
an open port.
Connect the network cable
1. Remove the plastic plug (a) from the ethernet port on the back
of the printer, and discard it.
2. Connect one end of the ethernet cable to the back of the
printer (b).
Note:
3. Connect the other end of the cable to an empty port on the
Do not connect the printer directly to a computer using an
ethernet cable. Peer-to-peer networking is not supported.
Install the printer software
Important! Install the software on every computer from which you
will print to the HP Photosmart printer.
It’s OK to plug in the ethernet cable while the printer is
initializing.
hub, router, or switch (c).
®
Mac
OS X 10.3.x and later
1. Insert the HP Photosmart CD (d) into the computer, and then
double-click the CD icon on the desktop.
2. Double-click the
3. Enter the name and password used to administer your Mac,
and then click OK.
4. Select your language, and then select
HP Photosmart Pro B9100 series as the device. Follow the
onscreen instructions.
5. When the HP Photosmart Installer window is displayed,
choose Easy Install or Custom Install, and then click Install.
6. Click
7. When the HP Setup Assistant is displayed, click
8. Highlight the HP Photosmart Pro B9100 series printer, and
9. Follow the onscreen instructions to set up your printer using
10. Click
11. When the Congratulations page is displayed, click
Continue to run the HP Setup Assistant.
then click Next. If the printer is not listed in the window, make
sure that the printer is on and the network cable is connected
to the printer.
the Printer Setup Utility.
Next.
HP Photosmart Installer icon.
Next.
Finish.
Mac® OS X 10.2.8
1. Download the Mac® OS X 10.2.8 printer driver from www.
hp.com/support.
2. Follow the onscreen installation instructions.
13
Page 14

乙太網路安裝 (Windows)
7
Ethernet network installation (Windows)
Windows
a
b
繁體中文
Windows
註: XP Professional x64 系統不支援網路。
有關 Windows 的 USB 安裝資訊,請參閱第 11 頁。
您需要以下物件將印表機連接到網路:
• 一條帶 RJ-45 插頭的 CAT-5 乙太網纜線。(此纜線與 USB 纜
• 網路存取點,例如具有開放連接埠的集線器、路由器或交
連接網路纜線
1. 從印表機背面的乙太網連接埠取下塑膠插銷(a),然後將它
2. 將乙太網纜線的一端連接到印表機的背面(b)。
註:
®
2000 Professional
線或一般電話電線不同,在這個用途上使用任何一種這些纜線
將會損壞印表機或其他網路裝置。)
換器。
丟棄。
在印表機起始化過程中可以插入乙太網纜線。
、XP Home、XP Professional
c
1. 將 HP Photosmart 軟體光碟片(d)放入電腦,然後按照畫面
上的指示執行。
2. 在「連線類型」畫面上,選取透過網路,然後按一下下一步。
「搜尋」畫面將會顯示。
3. 選取要安裝的印表機:
•
如果顯示「找到印表機」畫面,選取
後按一下下一步。
•
如果顯示「找不到印表機」畫面,則按一下
照畫面上的指示查找印表機。您將需要列印「網路設定」頁
以獲取關於印表機的資訊。等待直到起始化完成,然後按印
表機控制台上的功能表。選取網路設定,列印網路設定頁。
•
如果顯示「檢查纜線連接」畫面,請參閱《使用者手冊》的
「網路」附錄,以獲得關於網路安裝指示的詳細資訊,以及
指定靜態 IP 位址的指示。
4. 出現提示時,按一下完成以結束安裝。
是,安裝此印表機,然
下一步,然後按
3. 將乙太網纜線的另一端連接到集線器、路由器或交換器上空置
的連接埠(c)。
切勿使用乙太網纜線將印表機直接連接到電腦。 不支援同層網路。
安裝印表機軟體
重要! 在每一台您要列印到 HP Photosmart 印表機的電腦上安裝該
軟體。
14
Page 15

English
d
Windows® 2000 Professional, XP Home,
XP Professional
Note: Networking with XP Professional x64 systems is not
supported.
For Windows USB installation, see page 11.
You need the following to connect the printer to a network:
• A CAT-5 ethernet cable equipped with an RJ-45 plug. (This is
not the same as a USB cable or a regular phone wire, either
of which can damage the printer or other network devices if
used for this purpose.)
• A network access point such as a hub, router, or switch with
an open port.
Connect the network cable
1. Remove the plastic plug (a) from the ethernet port on the back
of the printer, and discard it.
2. Connect one end of the ethernet cable to the back of the
printer (b).
Note:
3. Connect the other end of the ethernet cable to an empty port
It’s OK to plug in the ethernet cable while the printer is
initializing.
on the hub, router, or switch (c).
will print to the HP Photosmart printer.
1. Insert the HP Photosmart software CD (
and follow the onscreen instructions.
2. On the Connection Type screen, select
and then click Next. The Searching screen is displayed.
3. Select a printer to install:
If the Printer Found screen is displayed, select Yes, install
•
this printer, and then click Next.
If the Printer Not Found screen is displayed, click Next
•
and follow the onscreen instructions to locate the printer.
You will need to print a Network Settings page to obtain
information about the printer. Wait until the initialization
finishes, and then press Menu on the printer control panel.
Select Network settings, Print network settings page.
If the Check Cable Connection screen is displayed, refer to
•
the Networking appendix of the User Guide for detailed
network installation instructions and for instructions on
assigning a static IP address.
4. When prompted, click
Finish to exit the installation.
d) into the computer
Through the network,
Do not connect the printer directly to a computer using an
ethernet cable. Peer-to-peer networking is not supported.
Install the printer software
Important! Install the software on every computer from which you
15
Page 16

安裝疑難排解
Installation troubleshooting
繁體中文
如果印表機軟體無法成功安裝,或如果在安裝軟體後印表機與電腦無法正確連接,請參閱此頁以獲得可能的解決方法。
首先,檢查印表機與電腦之間的所有纜線連接,然後確定您使用的是最新版本的印表機軟體。 您可以透過造訪 HP 支援
網站:www.hp.com/support 獲取最新的軟體更新版本。 若您仍需協助,請閱讀印表機說明文件或聯絡 HP 支援中心。
僅限於 Mac
問題: 安裝印表機軟體後,Printer Setup Utility(Print Center)(印表機設定公用程式(列印中心))內的所有印表機都消失。
解決方法: 解除安裝然後重新安裝印表機軟體。 將印表機添加到 Printer Setup Utility(Print Center)(印表機設定公用程式(列印
中心))前,重新啟動電腦。
僅限於 Windows
問題: 插入光碟片時,並沒有自動啟動安裝軟體。
解決方法: 從 Windows 開始功能表,選取執行。 按一下瀏覽,然後導覽至您放入 HP Photosmart 軟體光碟片的 CD-ROM 光碟機。
連按兩下 setup.exe 檔案,然後按一下 OK。
問題: 「找到新硬體」畫面有開啟,但無法辨識印表機。
解決方法: 您可能在完成軟體安裝前連接了 USB 纜線。 在「找到新硬體」畫面中按一下取消,然後拔下 USB 纜線。重新開始軟體安
裝。在軟體安裝期間出現提示時連接 USB 纜線。
問題: 電腦在軟體安裝期間停止回應。
解決方法: 防毒軟體或其他軟體程式可能在背景中執行,降低了安裝處理的速度。軟體完成複製檔案期間,請等待;這可能需要數分鐘
的時間。若數分鐘後電腦仍然沒有回應,請重新啟動電腦,暫停或停用任何使用中的防毒軟體,結束所有其他軟體程式,然
後重新安裝印表機軟體。
註:您的防毒軟體會在您重新啟動電腦時重新自動開啟。
Windows 和 Mac
問題: 電腦無法讀取 HP Photosmart 光碟片。
解決方法: 請確定光碟片沒有弄髒或有刮痕。若其他光碟片可以正常運作,而 HP Photosmart 光碟片不能,該光碟片可能已損壞。您
可以從 HP 支援網站下載軟體,並向 HP 支援中心索取新的光碟片。若其他光碟片也不能正常運作,則表示您需要維修
CD-ROM 光碟機。
16
Page 17

English
If the printer software did not install successfully, or if the printer and computer are not communicating properly after software
installation, check this page for possible solutions.
First, check all cable connections between the printer and computer, and make sure you are using the most recent version of the
printer software. You can acquire the latest software updates by visiting the HP support Web site at www.hp.com/support. If you still
need help, check the printer documentation, or contact HP support.
Mac only
Problem: All of the printers in the Printer Setup Utility (Print Center) disappear after printer software installation.
Solution: Uninstall then reinstall the printer software. Restart the computer before adding the printer in the Printer Setup Utility (Print
Center).
Windows only
Problem: The installation software does not start automatically when the CD is inserted.
Solution: From the Windows Start menu, select Run. Click Browse, and navigate to the CD-ROM drive where you inserted the
HP Photosmart software CD. Double-click the
Problem: The Found New Hardware screen opens, but does not recognize the printer.
Solution: You might have connected the USB cable before completing the software installation. Click Cancel in the Found New
Hardware screen, and then disconnect the USB cable. Restart the software installation. Connect the USB cable when
prompted during software installation.
setup.exe file, and then click OK.
Problem: The computer stops responding during software installation.
Solution: Virus protection software or another software program may be running in the background and slowing down the
installation process. Wait while the software finishes copying files; this may take several minutes. If the computer is still
not responding after several minutes, restart the computer, pause or disable any active virus protection software, quit all
other software programs, and then reinstall the printer software.
Note: Your virus protection software will turn back on automatically when you restart the computer.
Windows and Mac
Problem: The computer could not read the HP Photosmart CD.
Solution: Make sure the CD is not dirty or scratched. If other CDs work but the HP Photosmart CD does not, your CD may be
damaged. You can download the software from the HP support Web site or request a new CD from HP support. If other
CDs do not work, you may need to service your CD-ROM drive.
17
Page 18

在主紙匣中裝入紙疊
Load a stack of paper in the main tray
b
a
繁體中文
重要: 為了防止紙張被卡住,在您將主紙匣重新裝入印
表機和推入主紙匣延伸板以適合紙張之後,沿著紙張設
定紙張長度導板。
Important: To prevent the paper from buckling, set the
paper‑length guide against the paper after you have
reseated the main tray in the printer and pushed in the
main tray extension to fit the paper.
主紙匣可以容納和自動裝入多張紙。 僅在此紙匣中裝入薄而富彈性
的材質,因為紙張會在通過印表機時彎曲。
註:請不要同時將超過一種尺寸和類型的紙張裝入主紙匣。
裝入主紙匣
1. 抓住出紙匣的邊側然後將它拉向您,完全取下出紙匣。 主紙匣
現在即可接觸。
2. 擠壓主紙匣釋放板(a),然後將它拉向您,延伸主紙匣並將它
取下。
3. 將紙張長度導板(f)拉出到其可能到達的最遠位置。
4. 將紙張寬度導板(e)滑向左側,騰出可容納紙張的空間。
5. 以縱向和列印面朝下,將紙疊裝入紙匣中。使用紙張尺寸標
記(b)作為指導。將紙張與紙匣的右側和紙匣末端的紙張擋
板(c)對齊。確保紙張未超越紙張擋板。
6. 在紙匣中裝入紙張後,將主紙匣放回印表機。擠壓釋放板並推
入紙匣,將延伸板(d)推入到紙張末端。
重要: 為了防止紙張被卡住,在您將主紙匣重新裝入印表機
和推入主紙匣延伸板以適合紙張之後,沿著紙張設定紙張長
度導板。
9. 將出紙匣滑回印表機。用一隻手握住出紙匣,然後用另一隻
手拉出延伸板,將出紙匣延伸板拉出。
10. 將出紙匣延伸板末端的紙張制動器向上翻,防止紙張掉落
地面。
主紙匣釋放板:擠壓此釋放板可延伸或
a
縮回主紙匣中,或從印表機取下紙匣。
紙張尺寸標記:這些標記可以用來指導
b
您以正確方向裝入紙張。
紙張擋板:將紙張與這些擋板對齊,可
c
以使紙張正確送入印表機。
主紙匣延伸板:延伸主紙匣以裝入較大
d
尺寸的紙張。完全延伸時,主紙匣可容
納大至 32 x 48 公分(13 x 19
英吋)的紙張。
紙張寬度導板:將此導板調整至緊靠紙
e
匣中紙張的左邊緣。
紙張長度導板:將此導板調整至緊靠紙
f
匣中紙張的末端。
7. 將主紙匣完全插入印表機。
8. 調整紙張寬度(e)和紙張長度(f)導板,使它們輕輕靠住紙
張邊緣。
18
Page 19

English
c
e
d
f
The main tray can hold and auto-load multiple sheets of paper.
Only load thin, flexible media into this tray, because the paper
bends as it passes through the printer.
Note: Do not load more than one size and type of paper in the
main tray at the same time.
Load the main tray
1. Remove the output tray completely by grasping the sides of
the tray with both hands and sliding it out toward you. The
main tray is now accessible.
2. Extend and remove the main tray by squeezing the main tray
release (a) and pulling the tray toward you.
3. Pull out the paper-length guide (
4. Slide the paper-width guide (
f) as far as it will go.
e) far enough to the left to make
room for the paper.
5. Place a stack of paper in the tray,
in portrait orientation
with the side to be printed facing down. Use the paper-size
markings (b) to guide you. Align the paper against the right
side of the tray and against the paper stops (c) at the end of
the tray. Ensure that the paper does not climb over the paper
stops.
6. After you have loaded paper in the tray, replace the main
tray in the printer. Push in the extension (d) to the end of the
paper by squeezing the release and pushing in the tray.
9. Slide the output tray back into the printer. Pull out the output
tray extension by holding the output tray with one hand, and
pulling out the extension with your other hand.
10. Flip up the paper catch at the end of the output tray extension
to prevent paper from falling onto the floor.
a Main tray release: Squeeze this
release to extend or retract the main
tray, or to remove the tray from the
printer.
b Paper‑size markings: Use these
markings to guide you for loading
paper in the correct orientation.
c Paper stops: Align the paper against
these stops so that the paper feeds
correctly into the printer.
d Main tray extension: Extend the main
tray to load larger sizes of paper.
Fully extended, the main tray can
hold paper up to 32 x 48 cm (13 x
19 inches).
e Paper‑width guide: Adjust this guide
to fit close to the left edge of the
paper in the tray.
f Paper‑length guide: Adjust this guide
to fit close to the end of the paper in
the tray.
Important: To prevent the paper from buckling, set the paper‑
length guide against the paper after you have reseated
the main tray in the printer and pushed in the main tray
extension to fit the paper.
7. Insert the main tray all the way into the printer.
8. Adjust the paper-width (
e) and paper-length (f) guides so they
rest gently against the edges of the paper.
19
Page 20

在特殊材質紙匣中裝入單張紙
Load a single sheet in the specialty media tray
b
a
空間(至少等於紙張長度)
Clear space (at least the length of the paper)
b
繁體中文
特殊材質紙匣主要設計用於厚的硬紙。 此紙匣的紙張會平直送入印
表機而不會彎曲。 確定印表機後方有足夠的空間,該空間須至少等
於您要列印的材質長度。 一次僅裝入一張,並確保材質厚度不超過
1.5 公釐(0.06 英吋)。 重量輕的單頁紙張也可裝入此紙匣。
HP 建議您在昂貴的特殊材質上列印前,先裝入一般紙張,然後列
印影像或文件來練習如何使用特殊材質紙匣。
裝入特殊材質紙匣
重要! 一次僅將一張紙裝入特殊材質紙匣。 裝入超過一張紙將會
導致卡紙或其他列印問題。
1. 確保印表機後方有足夠的空間,以便能讓紙張通過後方紙張插
槽來回傳送。
2. 放下特殊材質紙匣(a)。 印表機螢幕會讓您稍候,同時印表
機將抬起印字頭組件,以為特殊材質騰出空間。 在您繼續前,
請先等待直到印表機螢幕讓您送入紙張到特殊材質紙匣。
3. 以縱向和列印面朝下將紙張送入特殊材質紙匣,直到紙張曳尾
邊緣(最靠近您的邊緣)與紙匣上的白色虛線(b)對齊。 紙
張將會伸出後方紙張插槽。
將紙張對齊特殊材質紙匣的凸起邊緣(
側。未對準的紙張將會導致歪斜或其他列印問題。
如果您使用有標籤的紙張,例如帶標籤的相紙,放入紙張時,
使標籤先送入。
4. 用一隻手握住出紙匣,然後用另一隻手拉出延伸板,將出紙匣
延伸板(d)拉出。
5. 將出紙匣延伸板末端的紙張制動器向上翻,防止紙張掉落
地面。
6. 按 OK。
註:帆布材質容易捲曲。 您可通過將它儲存在塑膠袋中來防止這個
問題。 若您收到讓您檢查材質平直度的錯誤訊息,請從印表機
背面移除材質。 將它放在塑膠袋中,然後將它稍微彎折使其變
平。再次裝入材質。 若問題持續,請另外使用較平直的材質。
註:在從特殊材質紙匣列印前,您不需從主紙匣移除材質。
c),而非印表機的邊
20
Page 21

English
a 特殊材質紙匣
Specialty media tray
b 白色虛線
Dashed white line
c 凸起邊緣
c
c
Raised edge
d 出紙匣延伸板
Output tray extension
d
The specialty media tray is designed primarily for thick, rigid
media. Paper from this tray is fed straight through the printer
without being bent. Make sure that there is clear space behind
the printer that is at least equal to the length of the media you
are printing on. Load one sheet at a time, and be sure that the
media is no thicker than 1.5 mm (0.06 inches). Single sheets of
lightweight paper can also be loaded into this tray.
HP recommends that before you print on expensive specialty
media, you practice using the specialty media tray by loading a
single sheet of plain paper and printing an image or document.
Load the specialty media tray
Important! Load only one sheet into the specialty media tray at
a time. Loading more than one sheet can cause paper jams and
other printing problems.
1. Ensure that there is enough clear space behind the printer
to allow the paper to pass back and forth through the rear
paper slot.
2. Lower the specialty media tray (
a). The printer screen asks
you to wait while the printer raises the printhead assembly
to make space for the specialty media. Wait for the printer
screen to tell you to feed a sheet into the specialty media tray
before you proceed.
Align the media against the raised edge (
c) of the specialty
media tray and not against the side of the printer. Misaligned
media can result in skewing or other printing problems.
If you are using tabbed paper, such as photo paper with a
tear-off tab, insert the paper so the tab feeds in first.
4. Pull out the output tray extension (
d) by holding the output
tray with one hand and pulling out the extension with your
other hand.
5. Flip up the paper catch at the end of the output tray extension
to prevent paper from falling onto the floor.
6. Press
OK.
Note: Canvas media tends to curl. You can help prevent this by
storing it in a plastic bag. If you receive an error message
telling you to check the flatness of the media, remove the
media from the back of the printer. Place it in a plastic bag
and gently bend it until it lies flat. Load the media again. If
the problem persists, use a different, flatter sheet of media.
Note: You do not need to remove the media from the main tray
before you print from the specialty media tray.
3. Feed one sheet in portrait orientation with the side to be
printed facing up into the specialty media tray until the
trailing edge of the paper (the edge nearest you) is lined up
with the dashed white line (b) on the tray. The paper may
stick out of the rear paper slot.
21
Page 22

色彩管理選項
Color management options
繁體中文
色彩管理功能為專業攝影師和進階業餘攝影師提供在 HP Photosmart Pro B9100 series 印表機與影像編輯軟體程式、作業系統以及影像
裝置,如相機、掃瞄器和顯示器之間管理色彩的方法。您的色彩管理策略將會影響您的相片品質。有關色彩管理策略的詳細資訊,請參
閱《使用者手冊》。
註:ICC 設定檔會作為軟體安裝的一部分自動安裝。
選取以下色彩管理策略之一。
使用用於 Adobe Photoshop
用於 Adobe Photoshop 的 HP Photosmart Pro 列印外掛程式使列印過程更具效率,同時簡化了專業色彩管理。該外掛程式提供單一對話
方塊用於色彩管理和其他列印設定。它將印表機驅動程式與 Adobe Photoshop 之「預覽列印」對話方塊的設定結合起來,因此您在每次
列印時將不會再迷失於混亂的對話方塊中。
如果您在同一台電腦上安裝有 Adobe Photoshop,Photosmart Pro 列印外掛程式將會連同 HP Photosmart 印表機軟體一起自動安裝。如
果您要在稍後安裝 Adobe Photoshop,請參閱《使用者手冊》以獲得有關在稍後安裝 Photosmart Pro 列印外掛程式的指示。
1. 在 Adobe Photoshop 中開啟您要列印的檔案。
2. 按一下檔案功能表,指向 Automate(自動操作),然後按一下 Photosmart Pro 列印…
在 HP 印表機軟體中使用色彩管理設定
開啟您要列印的檔案。
Windows: 在您的軟體程式中按一下檔案功能表,然後按一下列印。 確保 HP Photosmart Pro B9100 series 印表機已被選取。 在列印
對話方塊中按一下內容,然後按一下色彩標籤。從色彩管理區域選取一個色彩空間。
Mac: 在您的軟體程式中按一下檔案功能表,然後按一下列印。 確保 HP Photosmart Pro B9100 series 印表機已被選取。 在「印
表機驅動程式」視窗中,選取 Paper Type/Quality(紙張類型/品質)。 從 Color(色彩)功能表中選擇一個色彩空間。
在您的影像編輯軟體程式中使用進階色彩管理設定
開啟您要列印的檔案。
®
7.0 及以上版本的 HP Photosmart Pro 列印外掛程式
Windows: 在您的軟體程式中按一下檔案功能表,然後按一下列印。 在列印對話方塊中按一下內容,然後按一下色彩標籤。 從色彩管
理區域內選擇應用程式管理。
Mac: 在您的軟體程式中按一下檔案功能表,然後按一下列印。在「印表機驅動程式」視窗中,選取 Paper Type/Quality(紙張類
型/品質)。 從 Color(色彩)功能表中選擇 Application Managed Colors(應用程式管理色彩)。
22
Page 23

English
Color management offers professional photographers and advanced amateur photographers a way of managing colors between
the HP Photosmart Pro B9100 series printer and image-editing software programs, the operating system, and imaging devices such
as cameras, scanners, and monitors. Your color management strategy affects the color quality of your photos. For more information
about color management strategies, see the User Guide.
Note: ICC profiles are installed automatically as part of the software installation.
Choose one of the following color management strategies.
Use the HP Photosmart Pro print plug‑in for Adobe Photoshop® 7.0 & above
The HP Photosmart Pro print plug-in for Adobe Photoshop streamlines the printing process and simplifies professional color
management. The plug-in provides a single dialog box for color management and other print settings. It combines settings from the
printer driver and the Adobe Photoshop Print with Preview dialog box so you no longer have to make your way through a confusing
maze of dialog boxes each time you print.
The Photosmart Pro print plug-in is installed automatically with the HP Photosmart printer software if you have Adobe Photoshop on
the same computer. If you install Adobe Photoshop later, see the User Guide for instructions on installing the Photosmart Pro print
plug-in at that time.
1. Open the file you want to print in Adobe Photoshop.
2. Click the
Use the color management settings in the HP printer software
Open the file you want to print.
Windows: Click the File menu in your software program, and then click Print. Make sure the HP Photosmart Pro B9100 series printer
Mac: Click the File menu in your software program, and then click Print. Make sure the HP Photosmart Pro B9100 series printer
Use the advanced color management settings in your image‑editing software program
Open the file you want to print.
Windows: Click the File menu in your software program, and then click Print. Click Properties in the Print dialog box, and then click
Mac: Click the File menu in your software program, and then click Print. Select Paper Type/Quality in the printer driver
File menu, point to Automate, and then click Photosmart Pro print....
is selected. Click Properties in the Print dialog box, and then click the Color tab. Select a color space from the Color
management area.
is selected. Select Paper Type/Quality in the printer driver window. Choose a color space from the Color menu.
the Color tab. Select Managed by Application from the Color management area.
window. Choose Application Managed Colors from the Color menu.
23
Page 24

需要更多資訊?
Need more information?
請參閱《使用者手冊》以獲得印表機功能、軟體和硬體疑難排解的說明、維護指引,以及
如何使用您的全新 HP Photosmart 印表機執行特定列印工作的說明。
Read the User Guide for a description of the printer features, software and hardware
troubleshooting information, maintenance guidelines, and explanations of how to
perform specific printing tasks using your new HP Photosmart printer.
查閱電子版 HP Photosmart 說明以取得有關使用您的印表機隨附之軟體的資訊。
Check the electronic HP Photosmart Help for information about using the software that
came with your printer.
讓 HP 的得獎支援與服務告訴您在線上或電話上獲取每天 24 小時,每週 7 天的援助之
方式。
HP 支援網站和電子支援: www.hp.com/support
材質和列印耗材: www.shopping.hp.com
Let HP's award-winning support and services show you the way with assistance online or
over the phone, 24 hours a day, 7 days a week.
HP’s support Web site and E-support: www.hp.com/support
Media and printing supplies: www.shopping.hp.com
www.hp.com
*Q5734-90223*
*Q5734-90223*
Q5734-90223
24
新加坡印製。 07/06
Printed in Singapore. 07/06
©2006 Hewlett-Packard Development Company, L.P.
 Loading...