

Hp PHOTOSMART PRO B9180, PHOTOSMART PRO B9180GP User Manual [ko]
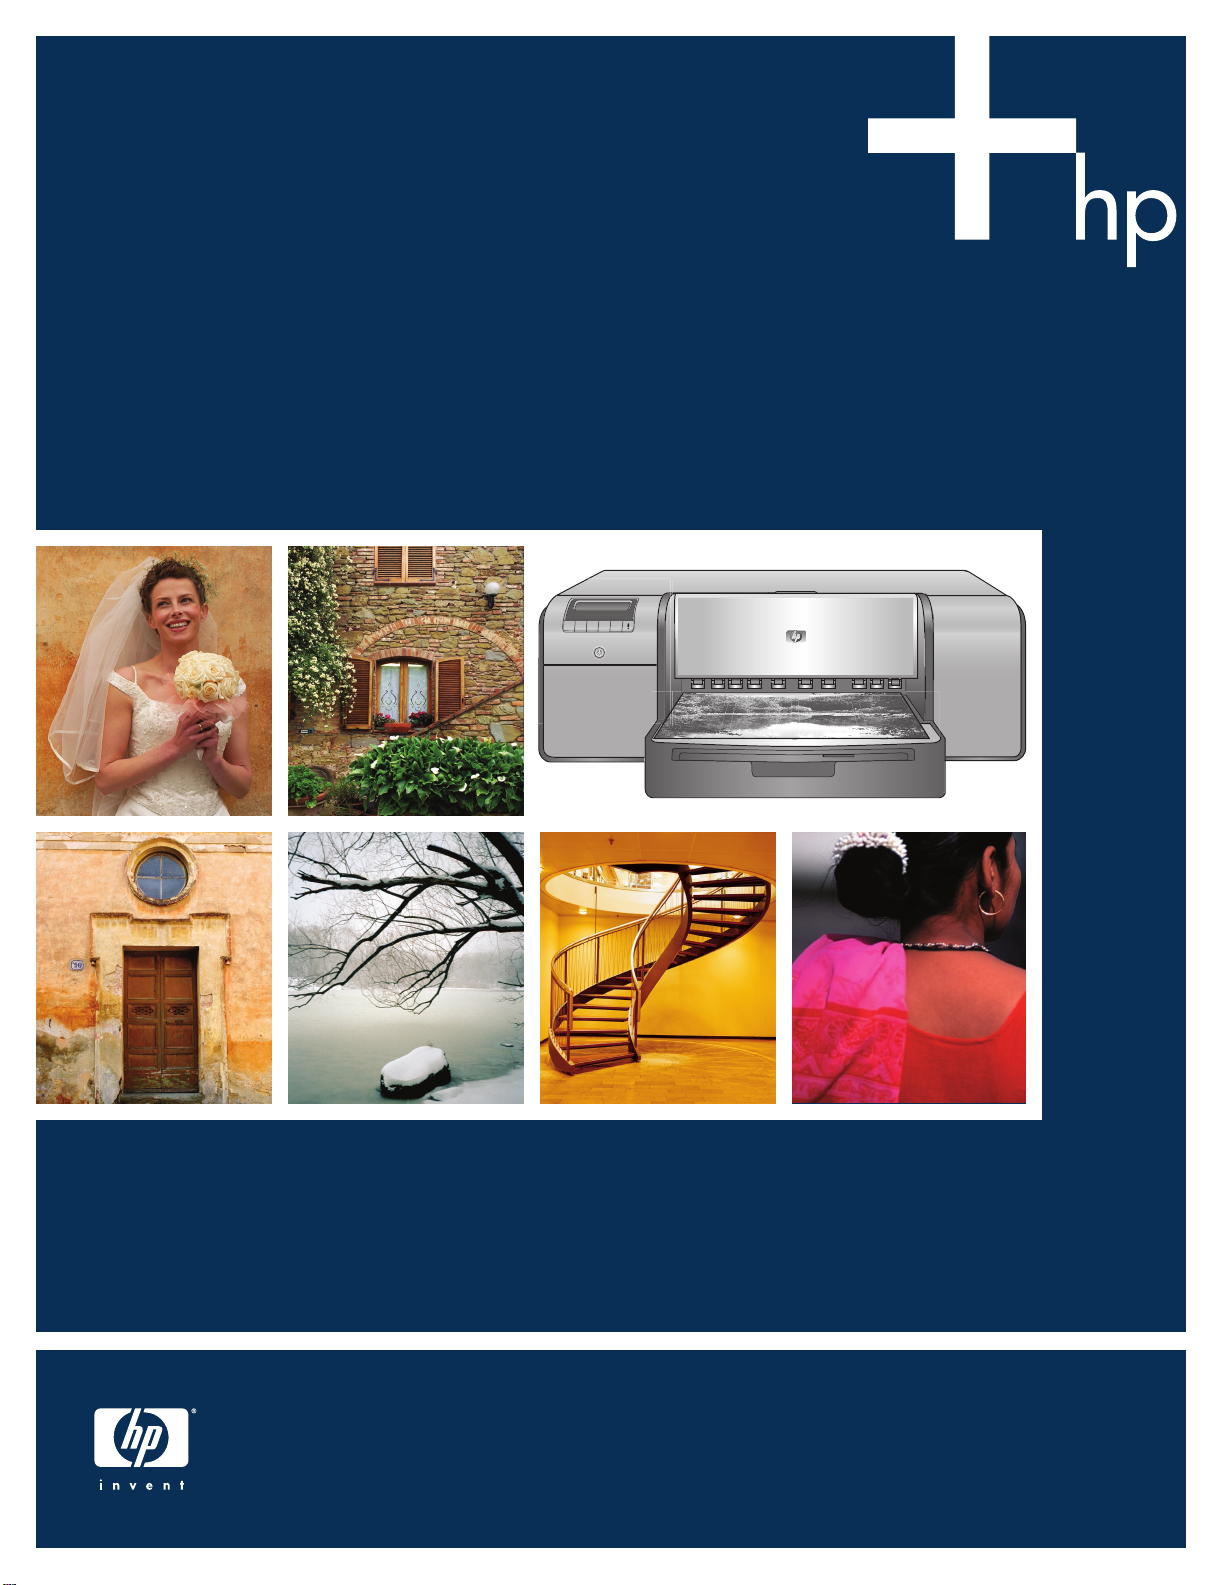
요약 설명서
Quick Start
HP Photosmart Pro B9100 series
프린터 포장 풀기
1
한국어
Unpack the printer
a
c
b
HP Photosmart 프린터를 구입해주셔서 감사합니다. 이 설명서에는
프린터 설치 방법이 나와 있습니다.
Windows 사용자: USB 케이블을 사용하여 컴퓨터에 프린터를 연결
하는 경우 소프트웨어 설치시 해당 메시지가 표시될 때까지 USB
케이블을 연결하지 마십시오(11 페이지).
중요! 다음 순서에 따라 설치 단계를 모두 수행하십시오.
이 설치는 1회의 프로세스로 반복할 필요가 없습니다.
프린터 외부의 테이프와 포장을 제거합니다.
중요! 프린터 덮개나 용지함을 아직 열지 마십시오. 포장을 풀
때 프린터 앞면 덮개(특히 용지함)가 열린 경우, 올바른 위치로
돌려 놓으십시오.
잉크 카트리지(8)
a
프린트 헤드(4)
b
HP Photosmart Pro B9100 series 프린터
c
USB 케이블(일부 지역에는 포함되지
d
않을 수 있음)
전원 코드
e
사용 설명서
f
인화지 보관 주머니
g
교정 팩(설치용 용지)
h
HP Photosmart 소프트웨어 CD
i
2
d
i
e
f
g
English
Thank you for purchasing an HP Photosmart printer! Read this
booklet to learn how to set up the printer.
Windows users: If you are connecting your printer to your
computer with a USB cable, do not connect the USB cable until
you are prompted during software installation (page 11).
Important! Perform all of the setup steps in the order shown.
This is a one-time process that will not need to be repeated.
Remove the tape and packaging from the outside of the printer.
Important! Do not open the printer doors or trays yet. If the door
on the front of the printer (the specialty media tray) opened
during unpacking, return it to its upright position.
h
Ink cartridges (8)
a
Printheads (4)
b
HP Photosmart Pro B9100 series printer
c
USB cable (may not be included in all
d
countries/regions)
Power cord
e
User documentation
f
Photo paper storage bag
g
Calibration pack (paper for setup)
h
HP Photosmart software on CD
i
3

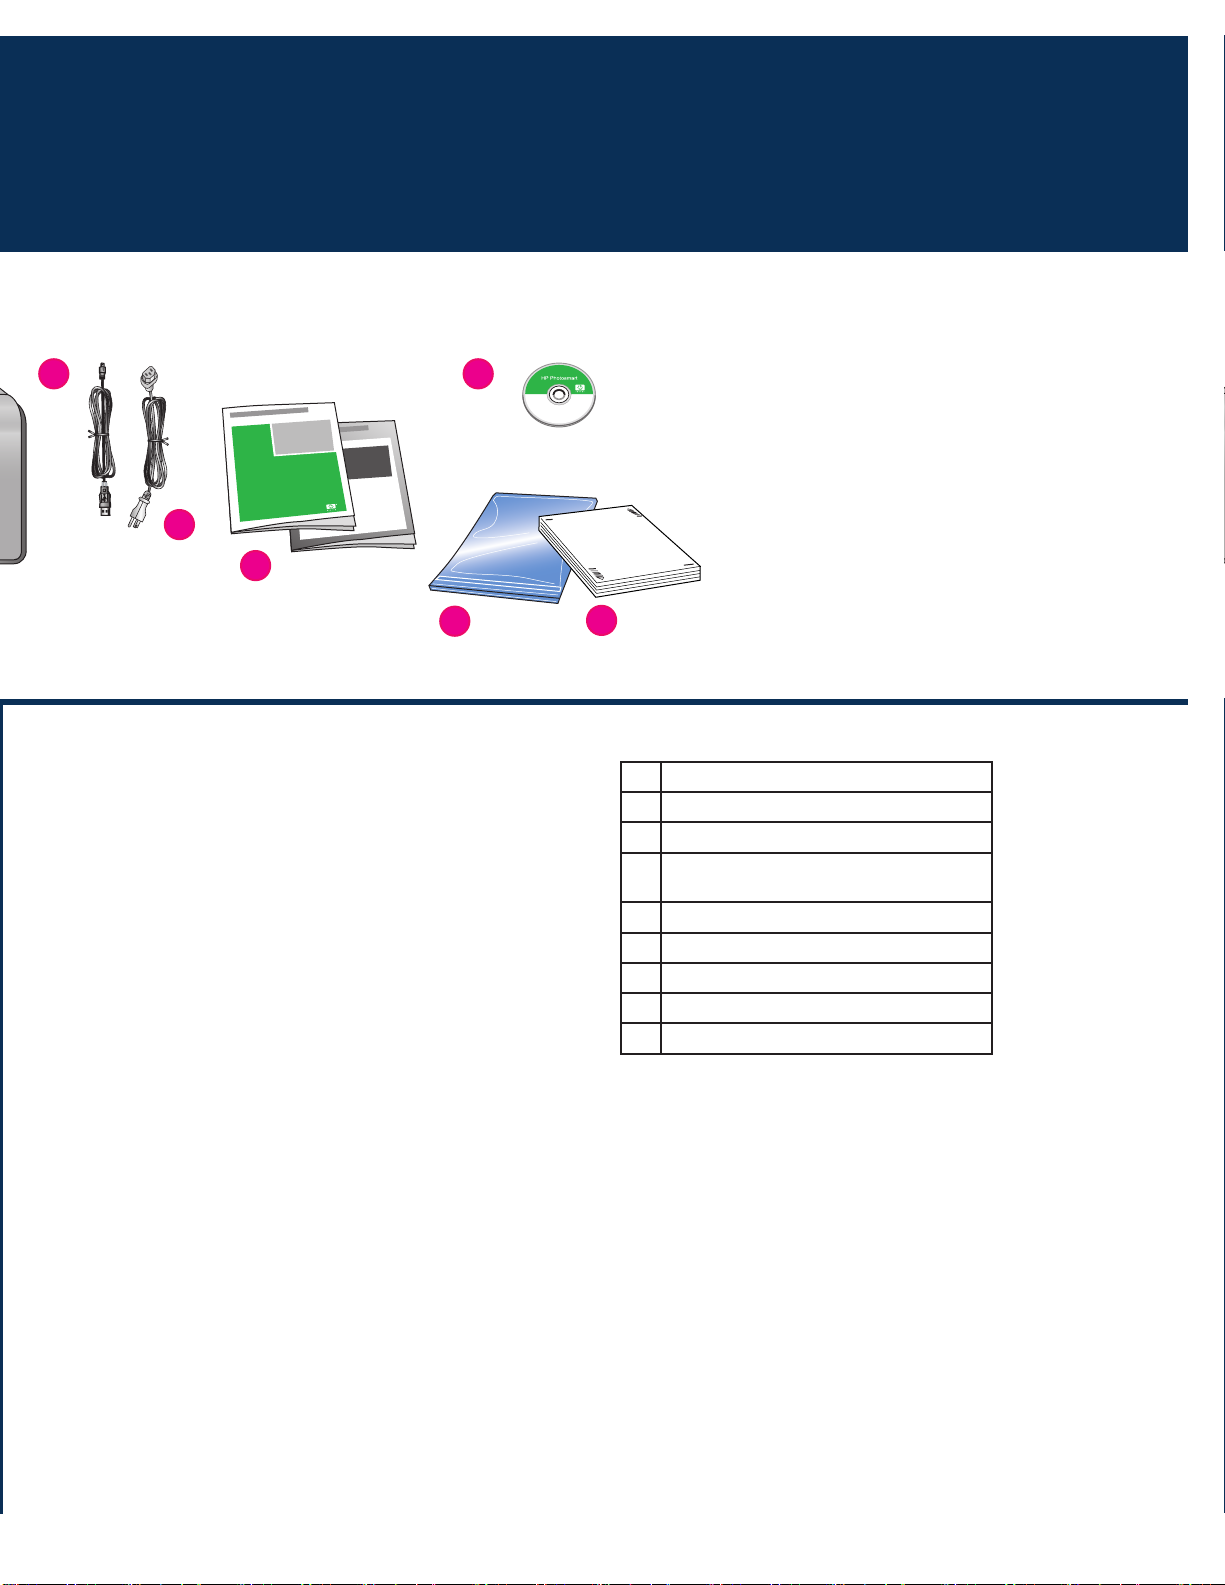
전원 연결 및 언어 설정
2
Connect the power and set the language
a
b
a 전원 코드 연결
Power cord connection
b 프린터 화면
Printer screen
한국어
Windows 사용자: 소프트웨어 설치시 메시지가 나타나기 전까지
USB 케이블을 연결하지 마십시오.
1. 프린터 덮개가 모두 닫혀 있는지 확인합니다.
2. 전원 코드를 프린터와 전원 콘센트(a)에 연결합니다. 프린
터가 자동으로 켜집니다. 프린터가 시작될 때까지 잠시 기다
리십시오.
3. Set Language [English](언어 설정[영어])가 프린터
화면(b)에 표시되면 다음 중 하나를 수행합니다.
영어로 사용하는 경우 OK(확인)를 누릅니다.
•
화면에 사용할 언어가 표시될 때까지 또는 를 누른
•
다음 OK(확인)를 누릅니다.
이제 프린터 화면이 선택한 언어로 표시됩니다.
English
Windows users: Do not connect the USB cable until you are
prompted during software installation.
1. Ensure that all the printer doors are closed.
2. Connect the power cord to the printer and to a wall outlet
(a). The printer turns on automatically. Wait a few moments
for the printer to start up.
3. When
•
•
From now on, the printer screen will use the language you
selected.
Set Language [English] is displayed on the printer
screen (b), do one of the following:
Press OK if English is your language.
Press or until your language is displayed on the
screen, and then
press OK.
4
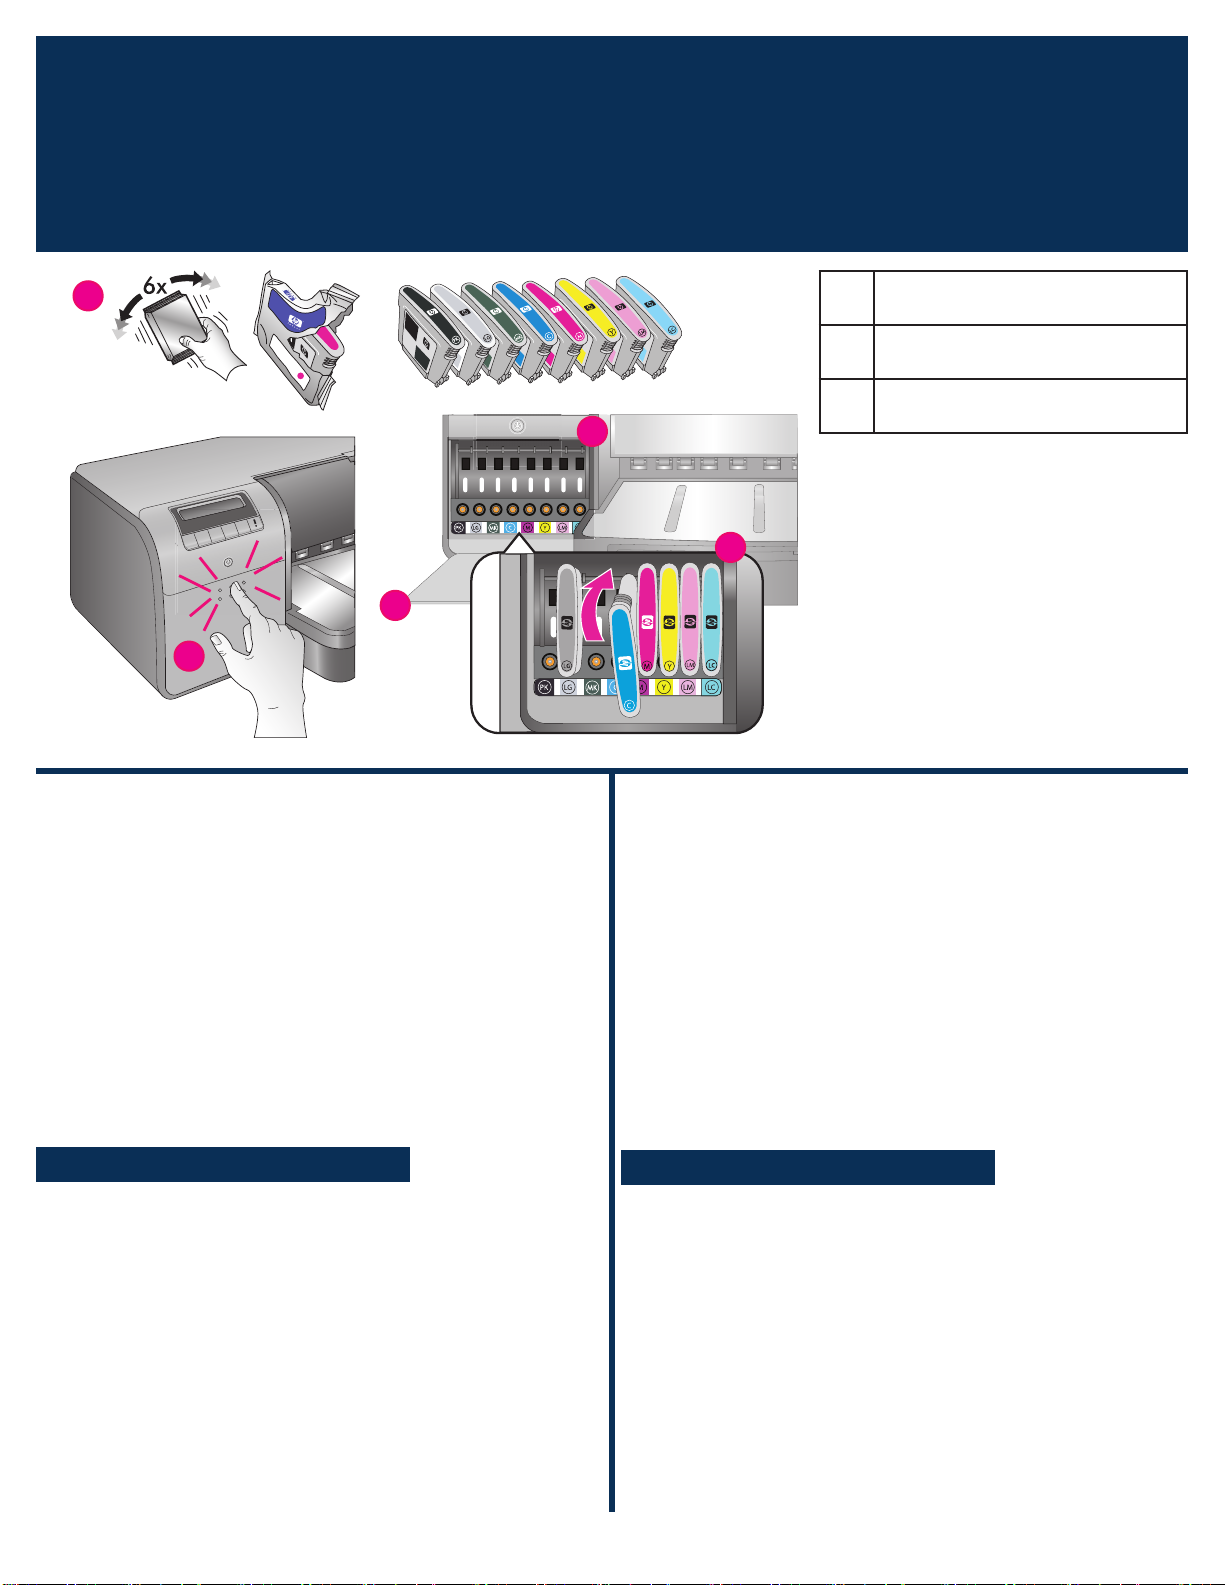
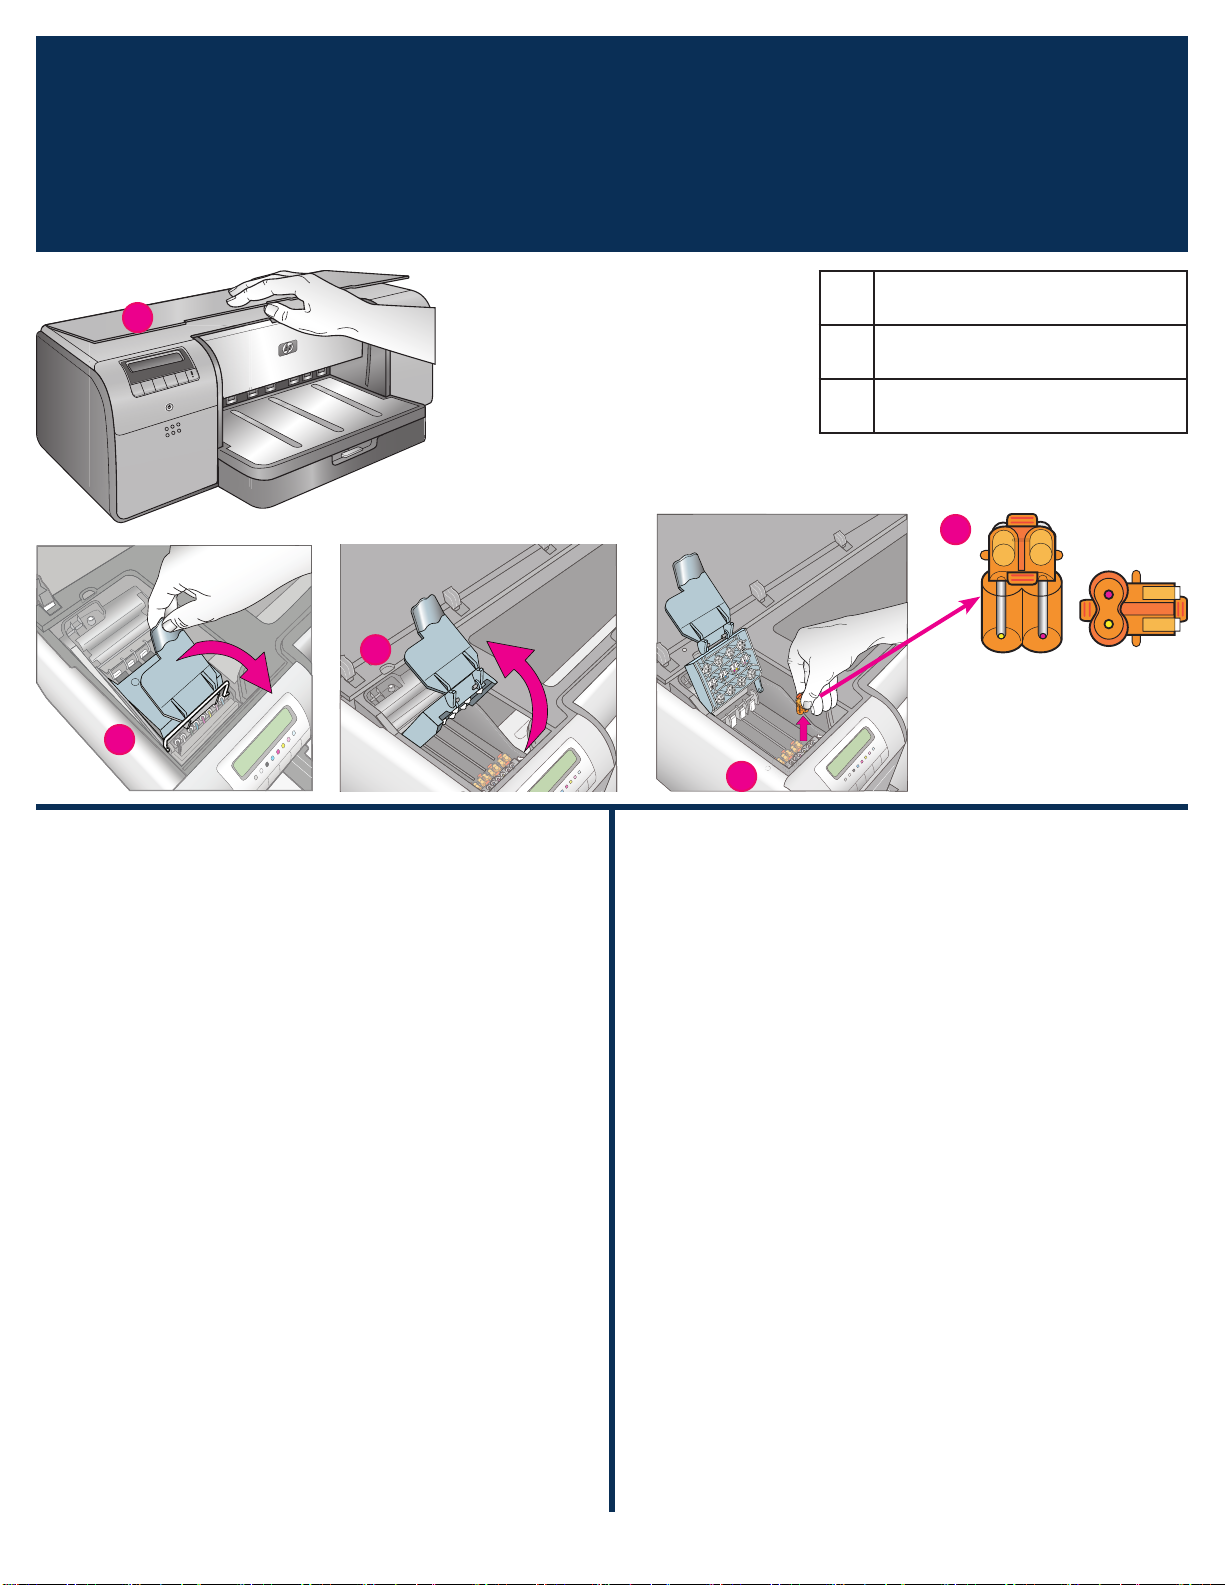
잉크 카트리지 설치
3
d
Install the ink cartridges
c
c
c 잉크 카트리지 덮개
Ink cartridge door
d 잉크 카트리지
Ink cartridges
e 잉크 카트리지 함
e
e
Ink cartridge stalls
한국어
중요! 프린터가 작동하려면 8개의 잉크 카트리지가 모두
제대로 설치되어야 합니다.
1. 프린터 덮개가 모두 닫혀 있는지 확인합니다.
2. 덮개가 열릴 때까지 돌출된 부분을 눌러 잉크 카트리지 덮개
(c)를 엽니다.
3. 잉크 카트리지(d) 포장을 풀기 전에 각각의 카트리지를 힘차게
최소 6번 잘 흔듭니다.
4. 잉크 카트리지 포장을 제거합니다. 각 카트리지를 같은 색상의
카트리지 함(e)에 삽입합니다. 제대로 접촉되도록 카트리지를
단단히 누릅니다.
5. 잉크 카트리지 덮개를 닫습니다.
잠시 기다리십시오
프린터가 잉크 카트리지에 잉크가 흐르고 잉크 라인에서 공기
가 빠지도록 합니다.
주: 프린터 상자에 포함되어 있는 카트리지의 잉크는 프린터
초기화에 사용됩니다. 이러한 카트리지는 물론 교체용 카트리
지의 잉크는 인쇄 노즐을 선명하게 유지하고 잉크의 흐름을
부드럽게 해주는 데 사용됩니다.
6. 6 페이지의
설치 캡 제거
에서 계속됩니다.
English
Important! All eight ink cartridges must be correctly
installed for the printer to work.
1. Ensure that all the printer doors are closed.
2. Open the ink cartridge door (
until the door clicks open.
3.
Before unwrapping the ink cartridges (d), shake each one
vigorously, at least six times.
4. Unwrap the ink cartridges. Insert each cartridge into its colorcoded stall (e). Press firmly on the cartridges to ensure proper
contact.
5. Close the ink cartridge door.
c) by pressing the raised bumps
Wait a few moments
The printer primes the ink cartridges to start the flow of ink
and purge air from the ink line.
Note: Ink in the cartridges included in the printer box is used
for printer initialization. Ink from these cartridges, as well
as from replacement cartridges, is also used to keep print
nozzles clear and ink flowing smoothly.
6. Continue on to
Remove the setup caps, on page 6.
5
설치 캡 제거
4
b
Remove the setup caps
a
b
a 윗면 덮개
Top door
b 프린트 헤드 어셈블리 덮개
Printhead assembly cover
c 투명 주황색 설치 캡
Transparent orange setup caps
c
꺼낸 후 폐기
Remove and discard
한국어
1. 메시지가 표시되면 프린터의 윗면 덮개(a)를 올리고, 먼저
윗면 덮개를 닫고 있던 정보 스티커를 제거하고 윗면 덮개를
엽니다, 프린터 내부의 테이프와 포장을 제거합니다.
2. 파란색 프린트 헤드 어셈블리 덮개(b)를 올립니다. 손잡이를
잡고 덮개를 앞쪽으로 잡아당긴 다음 반대 방향으로 들어
올립니다.
3. 프린트 헤드 어셈블리 내부에서 4개의 투명 주황색 설치 캡을
제거합니다. 각 캡(c)의 탭을 세게 잡아당겨 제거합니다. 캡
제거가 어려울 수 있습니다.
일부 설치 캡에는 잉크가 들어 있고 나머지는 비어있는 것이
정상입니다.
주: 준비가 완료되지 않았다는 오류 메시시가 나타나면 이미
프린트 헤드를 설치한 경우 프린트 헤드를 제거하고, 설치
캡을 교체하고, 프린트 헤드 어셈블리 덮개를 닫고 윗면 덮개
를 닫아야 합니다. 5페이지의
하고 제대로 잉크 카트리지를 설치했는지 확인하십시오. 잉크
카트리지 덮개를 닫습니다. 프린터가 잉크 카트리지를 준비할
때까지 잠시 기다리십시오. 프린터 화면에 메시지가 표시되면
윗면 덮개를 열고 주황색 설치 캡을 다시 제거합니다.
4. 캡을 페기합니다.
중요! 설치 캡을 제거하지 않으면 다음 단계의 프린트 헤드를 설치
할 수 없습니다.
잉크 카트리지 설치
지침을 확인
c
English
1. When prompted to raise the top door (a) of the printer, first
remove the information sticker holding it closed, and then
open it. Remove the tape and packaging from the inside of
the printer.
2. Raise the blue printhead assembly cover (
forward by the handle, and then raise it up out of the way.
3. Remove the four transparent orange setup caps inside the
printhead assembly. Grasp each cap (c) by its tabs and pull
up firmly. The caps may be difficult to remove.
It is normal for some of the setup caps to contain ink, and
others to be empty.
Note: If you receive an error message that the priming is
incomplete, then you must remove the printheads if you have
already installed them, replace the setup caps, close the
printhead assembly cover, and close the top door. Review the
instructions in Install the ink cartridges, on page 5, and make
sure you installed the ink cartridges properly. Close the ink
cartridge door. Wait a few moments for the printer to prime
the ink cartridges. When prompted on the printer screen,
open the top door and remove the orange setup caps again.
4. Discard the caps.
Important! If you do not remove the setup caps, you will not be
able to install the printheads in the next step.
b). Pull the cover
6
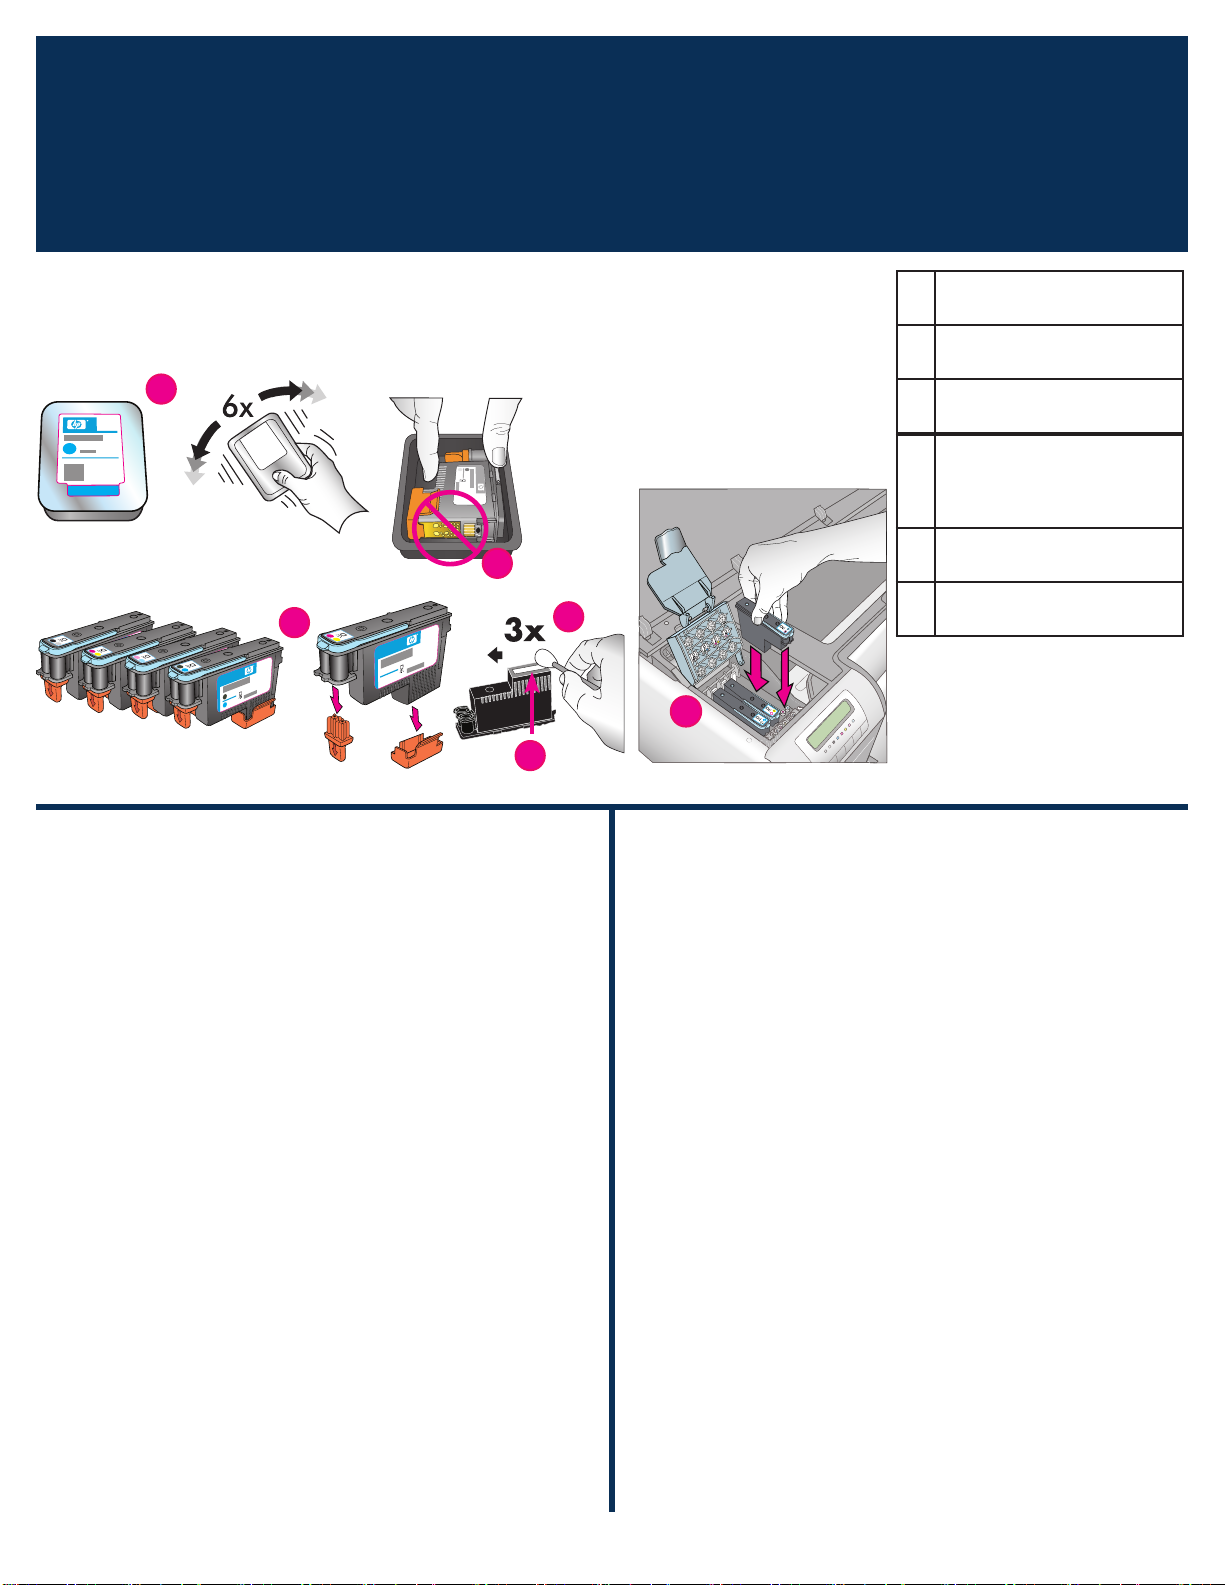
프린트 헤드 설치
5
주: 프린트 헤드는 프린터의 수명이 오래가도록 설계되었습니다.
Note: The printheads are designed to last the life of the printer.
Install the printheads
d
e
f
g
프린트 헤드
d
Printheads
금색 접촉면
e
Gold-colored contacts
주황색 보호 덮개
f
Orange protective covers
프린트 헤드 노즐을 닦는 데
g
사용하는 미리 적신 면봉
Pre-moistened swab for
wiping the printhead nozzles
노즐판
h
Nozzle plate
프린트 헤드 함
i
Printhead stalls
i
h
한국어
중요! 프린터가 작동하려면 4개의 프린트 헤드 모두 제대로
설치되어야 합니다.
1. 프린트 헤드의 포장을 풀기 전에, 각 포장(d)을 최소 6번 힘차
게 잘 흔듭니다.
각 프린트 헤드 포장을 엽니다. 금색 접촉면(e)을 만지지 마십
2.
시오.
주황색 보호 덮개(f)를 제거한 후 폐기합니다. 덮개를 제거한
3.
후에는 잉크에 거품이 생길 수 있으니 프린트 헤드를 흔들지
마십시오.
중요! 각 프린트 헤드 포장에는 미리 적신 면봉(g)이 포함되어
있습니다. 위에 표시된 대로 면봉을 열어 거품이 있는 쪽을
사용하여 노즐판(h)을 따라 3번 닦아냅니다. 각 프린트 헤드에
깨끗한 면봉을 사용하고 사용한 면봉은 폐기합니다.
각 프린트 헤드를 색상별로 구분된 함(i)에 넣습니다. 프린트
4.
헤드가 끝까지 들어가도록 세게 누르십시오.
열려 있는 프린트 헤드 어셈블리 덮개를 금속 바에 고정되도록
5.
닫은 다음 덮개를 원래대로 되돌려 놓습니다.
윗면 덮개를 닫습니다. 그러면 프린터 초기화 프로세스가 시작
6.
됩니다.
주의: 초기화를 진행하는 동안에는 어떤 덮개도 열지 마십시오!
덮개를 열면 프린터 초기화가 중단됩니다.
English
Important! All four printheads must be correctly installed
for the printer to work.
1. Before unwrapping the printheads, shake each package (d)
vigorously, at least six times.
2. Open each printhead package.
gold‑colored contacts (e).
3. Remove and discard the orange protective covers (
shake the printheads after removing the covers, as this can
create air bubbles in the ink.
Important! A pre-moistened swab (g) is included in each
printhead package. Open the swab and use the foam tip of
the swab to wipe along the length of the nozzle plate (h) 3
times, as shown above. Use a clean swab for each printhead,
and then discard the swab.
4. Insert each printhead into its color-coded stall (
straight down on the printhead until it is all the way in.
5. Lower the open printhead assembly cover so that it clips
under the metal bar, and then fold the cover back down to its
original position.
6.
Close the top door. When you do, the printer initialization
process begins.
Caution: Do not open any of the doors during this process! If
you do, the printer initialization will stop.
Do not touch the
f). Do not
i). Press
7

주 용지함에 교정 팩 넣기
6
한국어
Load the calibration pack in the main tray
a
b
a
c
b
a
프린터 초기화 과정에서 주 용지함에 교정 팩을 넣으라는 메시지가
표시됩니다. 교정 팩은 프린터 상자에 함께 들어 있는 윤이 나는
용지 팩입니다. 프린터 초기화, 정렬 및 교정 페이지에 사용합니다.
1. 양손으로 출력 용지함(a)의 양쪽을 잡고 앞쪽으로 당겨 완전히
분리합니다. 이제 주 용지함에 액세스할 수 있습니다.
2. 포장에서 교정 팩을 꺼내 플라이어를 제거합니다. 교정 팩을
윤이 나는 면을 아래로 하고 세로 방향으로 하여 주 용지함
(b)에 넣습니다. 용지를 용지함 오른쪽 그리고 용지 정지 장치
(c)에 맞춰 정렬하십시오. 용지가 걸릴 수 있으니 용지 정지
장치 위로 올라가지 않도록 하십시오.
3. 용지 너비(d) 및 용지 길이(e) 조정대를 조정하여 용지 가장
자리에 적절하게 맞춥니다.
중요! 프린터 안에서 용지가 걸리지 않도록 용지함에 용지가
평평하게 놓여 있는지 확인하십시오.
4. 출력 용지함을 다시 제자리에 넣습니다.
5. 한 손으로 출력 용지함을 잡고 다른 한 손으로 확장대를 잡아
당겨 출력 용지함 확장대(f)를 펼칩니다.
6. 출력 용지함 확장대 끝에 있는 용지 고정틀(g)을 올려 바닥으
로 용지가 떨어지지 않게 합니다.
7. 교정 팩 넣기가 완료되면 OK(확인)를 누릅니다. 프린터가
초기화됩니다. 여러 페이지가 인쇄됩니다. 30~60분이 소요
되는 1회의 통합된 초기화 과정입니다. 인쇄하는 동안 프린터
소프트웨어를 설치할 수 있습니다.
설치하는 동안 오류 메시지가 나타나면 사용 설명서의 문제 해결
장에 있는 오류 메시지 섹션을 참조하십시오.
프린터 화면에 Ready(준비)가 표시되면 프린터 초기화가 완료된
것입니다.
프린터 화면에 각 카트리지의 잉크량이 표시됩니다.
주: 보여지는 잉크량은 추정량일 뿐입니다. 실제 잉크량은 다를
수 있습니다.
교정 팩은 HP의 고급 인화지이므로 사진을 인쇄하는 동안 프린터
초기화에서 남은 용지를 사용할 수 있습니다.
주: 프린터 설치 후 용지를 넣는 방법에 대한 자세한 내용은 18
페이지의
주 용지함에 용지 넣기
를 참조하십시오.
8
 Loading...