

Page 1

User Guide
HP Photosmart Pro B8800
HP Photosmart Pro B8800 series
Guide de l’utilisateur
Page 2

Hewlett-Packard Company notices
The information contained in this document is subject to change without notice.
All rights reserved. Reproduction, adaptation, or translation of this material is prohibited without prior written permission of Hewlett-Packard, except
as allowed under copyright laws. The only warranties for HP products and services are set forth in the express warranty statements accompanying
such products and services. Nothing herein should be construed as constituting an additional warranty. HP shall not be liable for technical or editorial
errors or omissions contained herein.
© 2007 Hewlett-Packard Development Company, L.P.
Windows, Windows 2000, and Windows XP are U.S. registered trademarks of Microsoft Corporation.
Windows Vista is either a registered trademark or trademark of Microsoft Corporation in the United States and/or other countries.
Intel and Pentium are trademarks or registered trademarks of Intel Corporation or its subsidiaries in the United States and other countries.
The Bluetooth trademarks are owned by its proprietor and used by Hewlett-Packard Company under license.
Avis publiés par la société Hewlett-Packard
Les informations contenues dans ce document peuvent faire l'objet de modifications sans préavis.
Tous droits réservés. La reproduction, l'adaptation ou la traduction de ce matériel est interdite sans l'accord écrit préalable de Hewlett-Packard, sauf
dans les cas permis par la législation relative aux droits d'auteur. Les seules garanties relatives aux produits et services HP sont décrites dans les
déclarations de garantie expresse accompagnant lesdits produits et services. Aucun élément de ce document ne constitue une garantie
supplémentaire. Hewlett-Packard ne saurait être tenu pour responsable des erreurs ou omissions techniques ou rédactionnelles de ce document.
© 2007 Hewlett-Packard Development Company, L.P.
Windows, Windows 2000 et Windows XP sont des marques déposées de Microsoft Corporation aux Etats-Unis.
Windows Vista est une marque déposée ou une marque de Microsoft Corporation aux Etats-Unis et/ou dans d'autres pays.
Intel et Pentium sont des marques ou des marques déposées d'Intel Corporation ou de ses filiales aux Etats-Unis et dans d'autres pays.
Les marques Bluetooth appartiennent à leur propriétaire et sont utilisées par Hewlett-Packard Company sous licence.
Page 3

HP Photosmart Pro B8800 series
HP Photosmart Pro B8800 series User Guide
English
Page 4

Contents
1Welcome
Find more information...........................................................................................................................................................2
Printer parts..........................................................................................................................................................................3
2 Basic printing
Paper trays...........................................................................................................................................................................6
Choose the right paper or other media.................................................................................................................................7
Print from the main tray........................................................................................................................................................8
Print from the specialty media tray (single-sheet feed)......................................................................................................10
Print from a software program............................................................................................................................................12
Change print settings.........................................................................................................................................................14
Set the default print settings...............................................................................................................................................16
Make the HP Photosmart Pro B8800 series the default printer..........................................................................................17
3 Color management
What is color management?...............................................................................................................................................18
Use the HP Photosmart Pro print plug-in for Adobe Photoshop
Use application-based color management.........................................................................................................................19
Use printer-based color management................................................................................................................................20
4 Care and maintenance
Leave the printer plugged in...............................................................................................................................................21
Use the Toolbox (Windows) or HP Printer Utility (Mac)......................................................................................................21
Ink cartridge care................................................................................................................................................................21
Clean the printer.................................................................................................................................................................24
Align and calibrate the printer.............................................................................................................................................25
Print a test page.................................................................................................................................................................26
Print a sample page...........................................................................................................................................................26
Download printer software updates....................................................................................................................................26
Uninstall the printer software..............................................................................................................................................27
5 Troubleshooting and support
Printer software installation problems................................................................................................................................29
Printer hardware setup problems.......................................................................................................................................30
Printing problems...............................................................................................................................................................31
Error messages..................................................................................................................................................................33
HP support..........................................................................................................................................................................36
Regulatory model identification number SDGOA-0842......................................................................................................36
Environmental statements..................................................................................................................................................36
®
(versions 7.0, CS, and CS 2 only).................................18
English
A Error states and indicator light behavior.......................................................................................................................37
B Specifications
System requirements..........................................................................................................................................................39
Printer specifications..........................................................................................................................................................39
Media specifications...........................................................................................................................................................40
CHP Warranty......................................................................................................................................................................41
Index........................................................................................................................................................................................42
1
Page 5

1Welcome
Thank you for purchasing an HP Photosmart Pro B8800 series printer.
Designed especially for professional and serious amateur photographers, this printer yields rich, bright,
fade-resistant, and color-accurate photos, especially when used with HP Advanced Photo paper.
English
Find more information
The printer comes with the following documentation:
• Setup instructions: Read this document first. The setup instructions explain how to set up the printer and install
the HP Photosmart software. This document may be called Quick Start Guide or Setup Guide depending on
your country/region, language, or printer model.
• HP Photosmart software CD: The HP Photosmart software CD contains a detailed and animated Quick Start
Tutorial. The animated Quick Start Tutorial on the CD provides instructions for setting up the printer and installing
the software. The CD also contains the printer driver and other essential software needed to operate the printer.
• User Guide: The User Guide is the book you are reading. This book describes the basic features of the printer
and contains troubleshooting information.
• Onscreen Help: The onscreen Help provides detailed instructions on using all of the features of the
HP Photosmart. It provides complete printer specifications and troubleshooting information.
After you have installed the HP Photosmart software on a computer, open and explore the onscreen Help:
◦ Windows: From the Start menu, select Programs or All Programs, point to HP, HP Photosmart Pro
B8800 series, and then click HP Photosmart Printer Help.
◦ Mac: Select Help, Mac Help in the Finder, and then choose Library, HP Product Help.
• HP Solution Center (Windows only): The HP Solution Center provides information about all of your HP devices.
Visit the HP Solution Center to:
◦ Learn about the printer and its software, and view troubleshooting solutions, including informative How Do
I? animations
◦ Check printer status and access the printer Toolbox for maintenance utilities
◦ Update your printer software
◦ Change printer settings
◦ Order supplies
◦ Start HP Photosmart software
After you have installed the HP Photosmart software on a computer, open and explore the HP Solution Center.
◦ Right-click the HP Digital Imaging Monitor icon on the Windows taskbar, and then click Launch/Show
HP Solution Center.
NOTE: In this User Guide, printer software refers to the HP Photosmart software that comes on the CD with
the printer. The printer driver is the part of the printer software that controls the printer.
2Welcome
Page 6
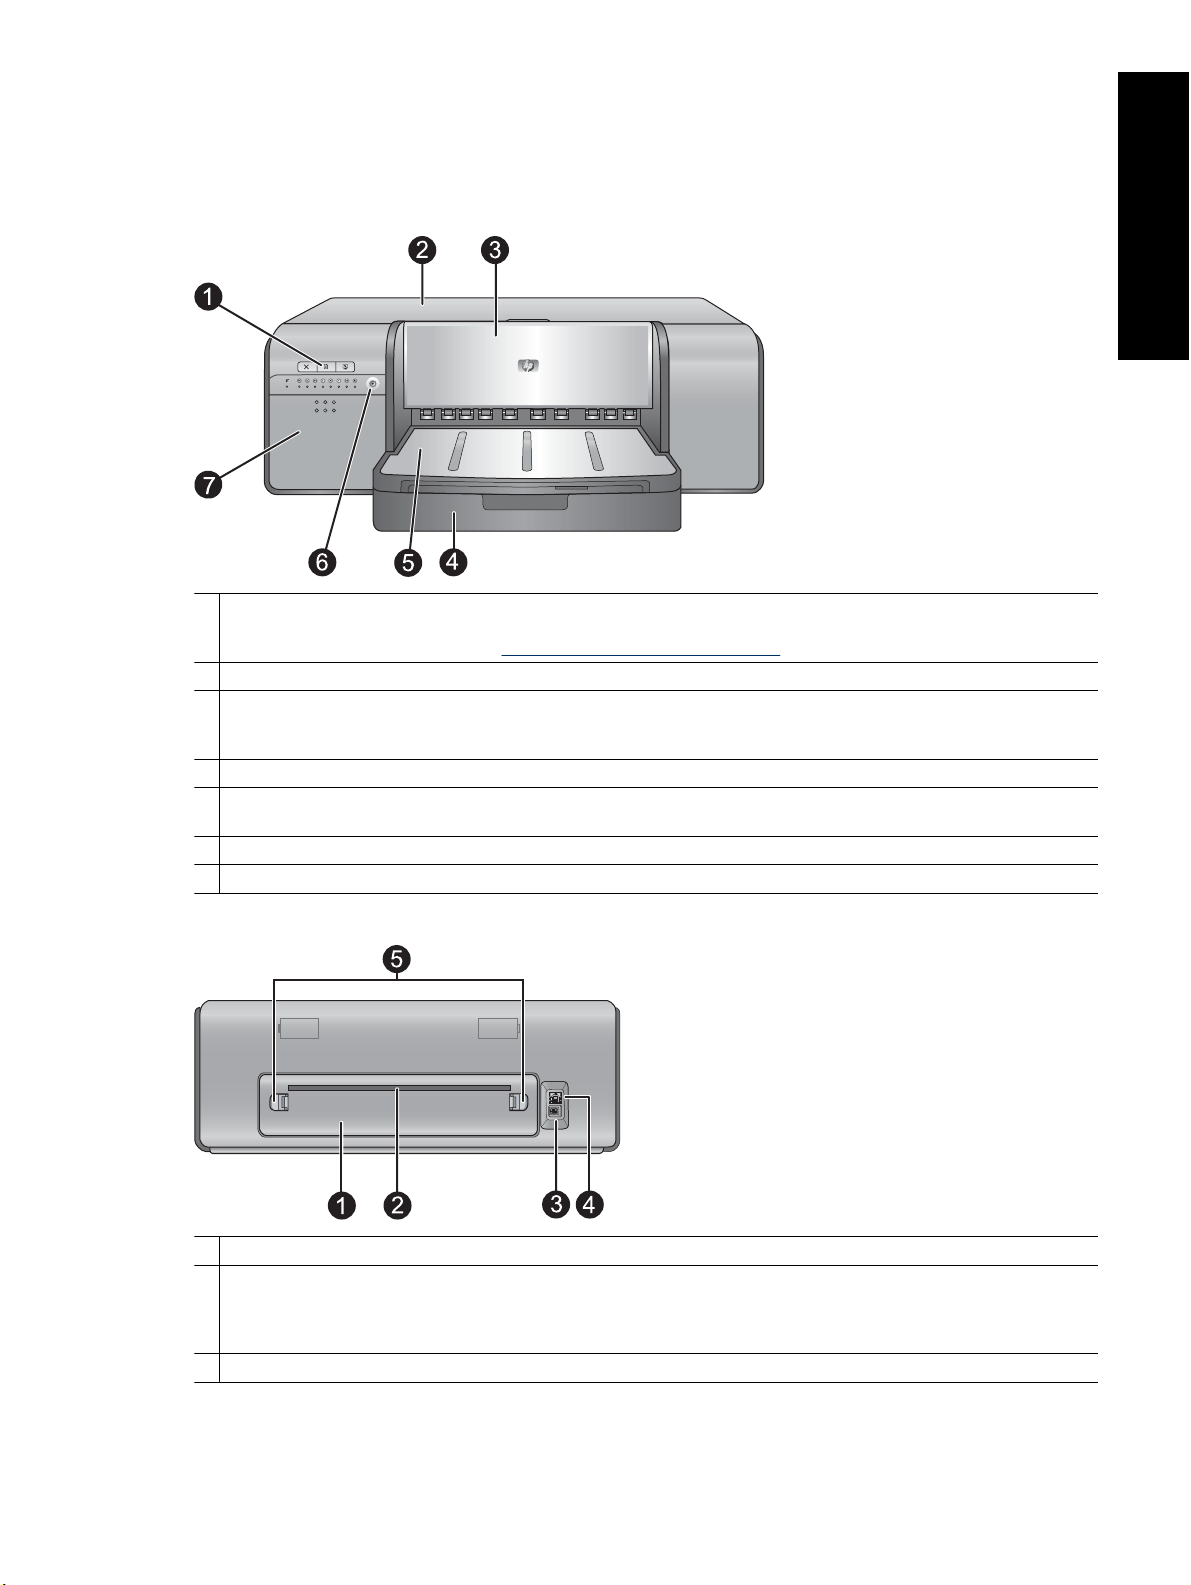
Printer parts
Front of printer
1 Control panel and indicator lights: Use the buttons on the control panel to open the Toolbox on the computer, resume or
cancel print jobs, and respond to prompts on the computer screen. View the lights to check the printer status. For more
information on the indicator lights, see
2 Top door: Lift to gain access to the printheads and to clear paper jams.
3 Specialty media tray (closed): Lower to insert a single sheet of heavy media, such as card stock or canvas. Use this tray
when you want media to be fed straight through the printer, without being bent. Do not load media thicker than 0.7 mm, or
more than one sheet at a time.
4 Main tray: Place a stack of plain paper or photo paper in this tray for printing.
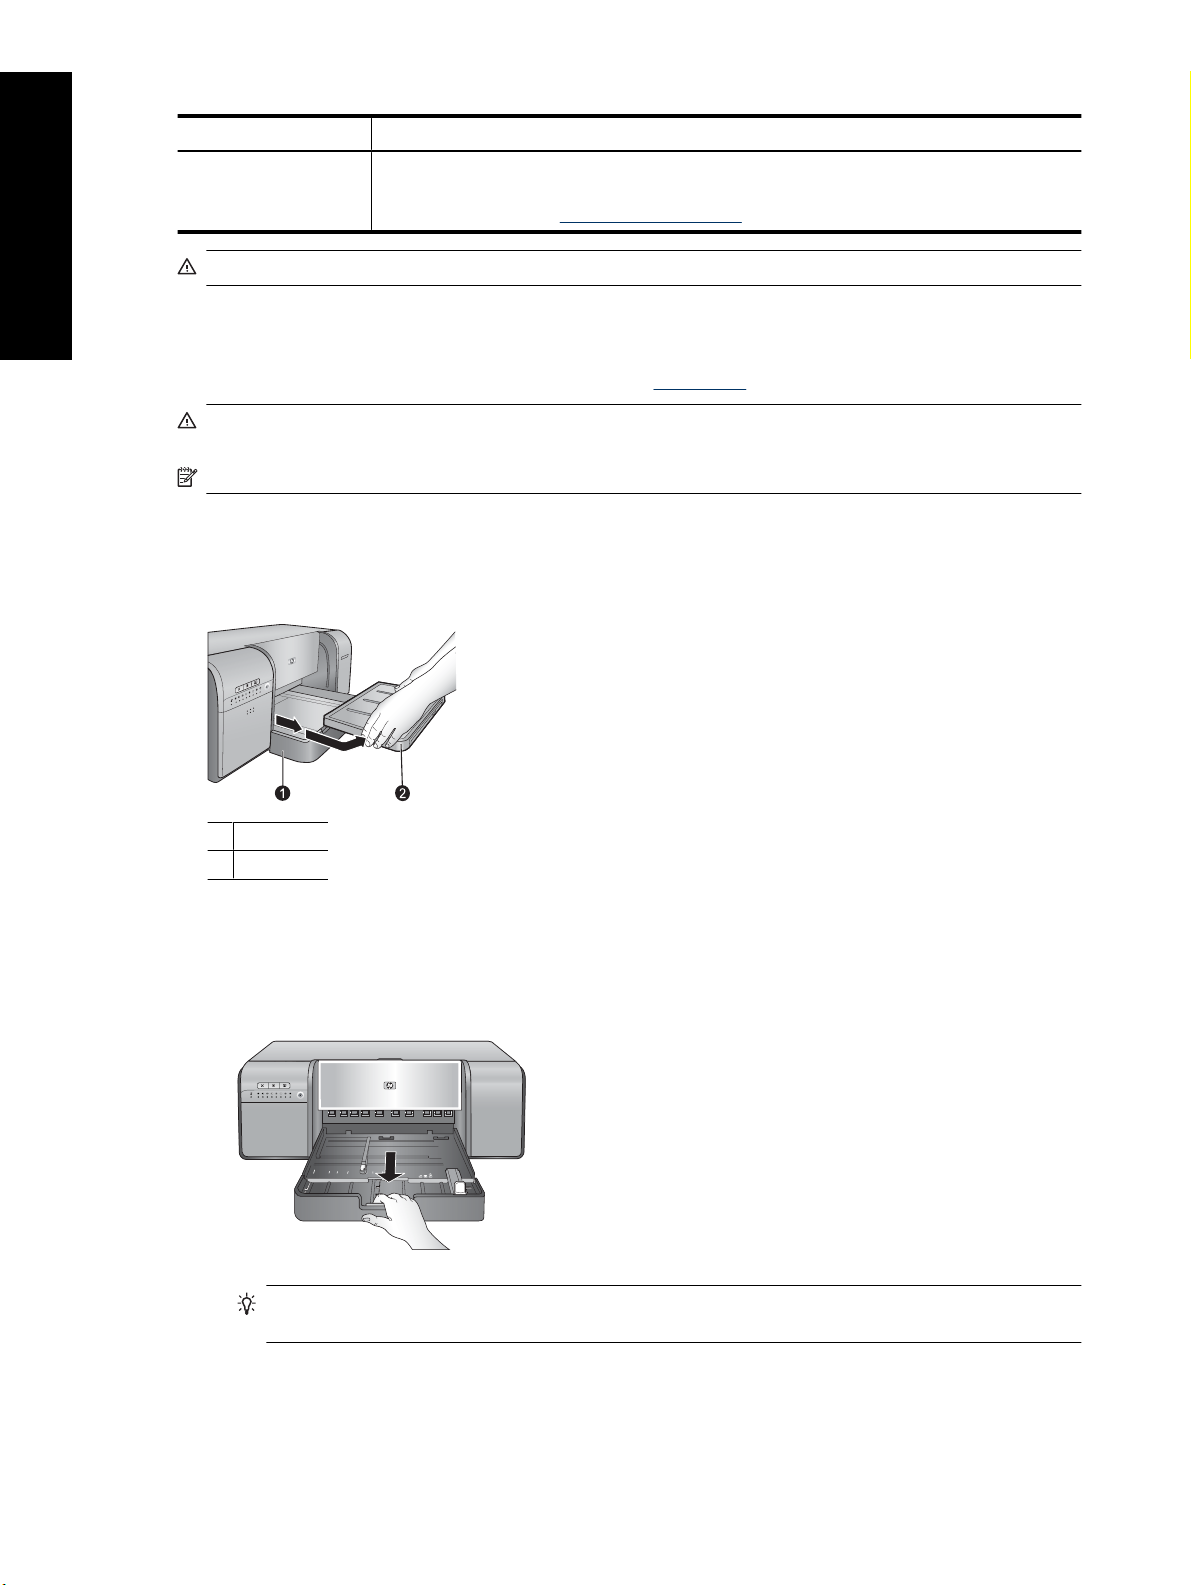
5 Output tray: Print jobs come out here. For easier access to the main tray, you can remove the output tray by sliding it towards
you.
6 On button: Press to turn on the printer.
7 Ink cartridge door: Press the raised bumps on the surface of the door to open and insert or remove ink cartridges.
English
Error states and indicator light behavior.
Back of printer
1 Rear door: Remove this door to clear paper jams.
2 Rear paper slot: Print jobs from the specialty media tray pass back and forth through this slot before being ejected on the
output tray at the front of the printer. Check that there is enough room behind the printer for the paper to pass back and forth
through the slot without any obstructions. When you are printing from the specialty media tray, the space behind the printer
should be equivalent to the length of paper you are printing on.
3 Power cord connection: Use this port to connect the power cord included with the printer.
Printer parts 3
Page 7
English
Chapter 1
4 USB port: Use this port to connect the printer to a computer.
5 Rear door releases: Press the two releases on either side of the rear paper slot to remove the rear door.
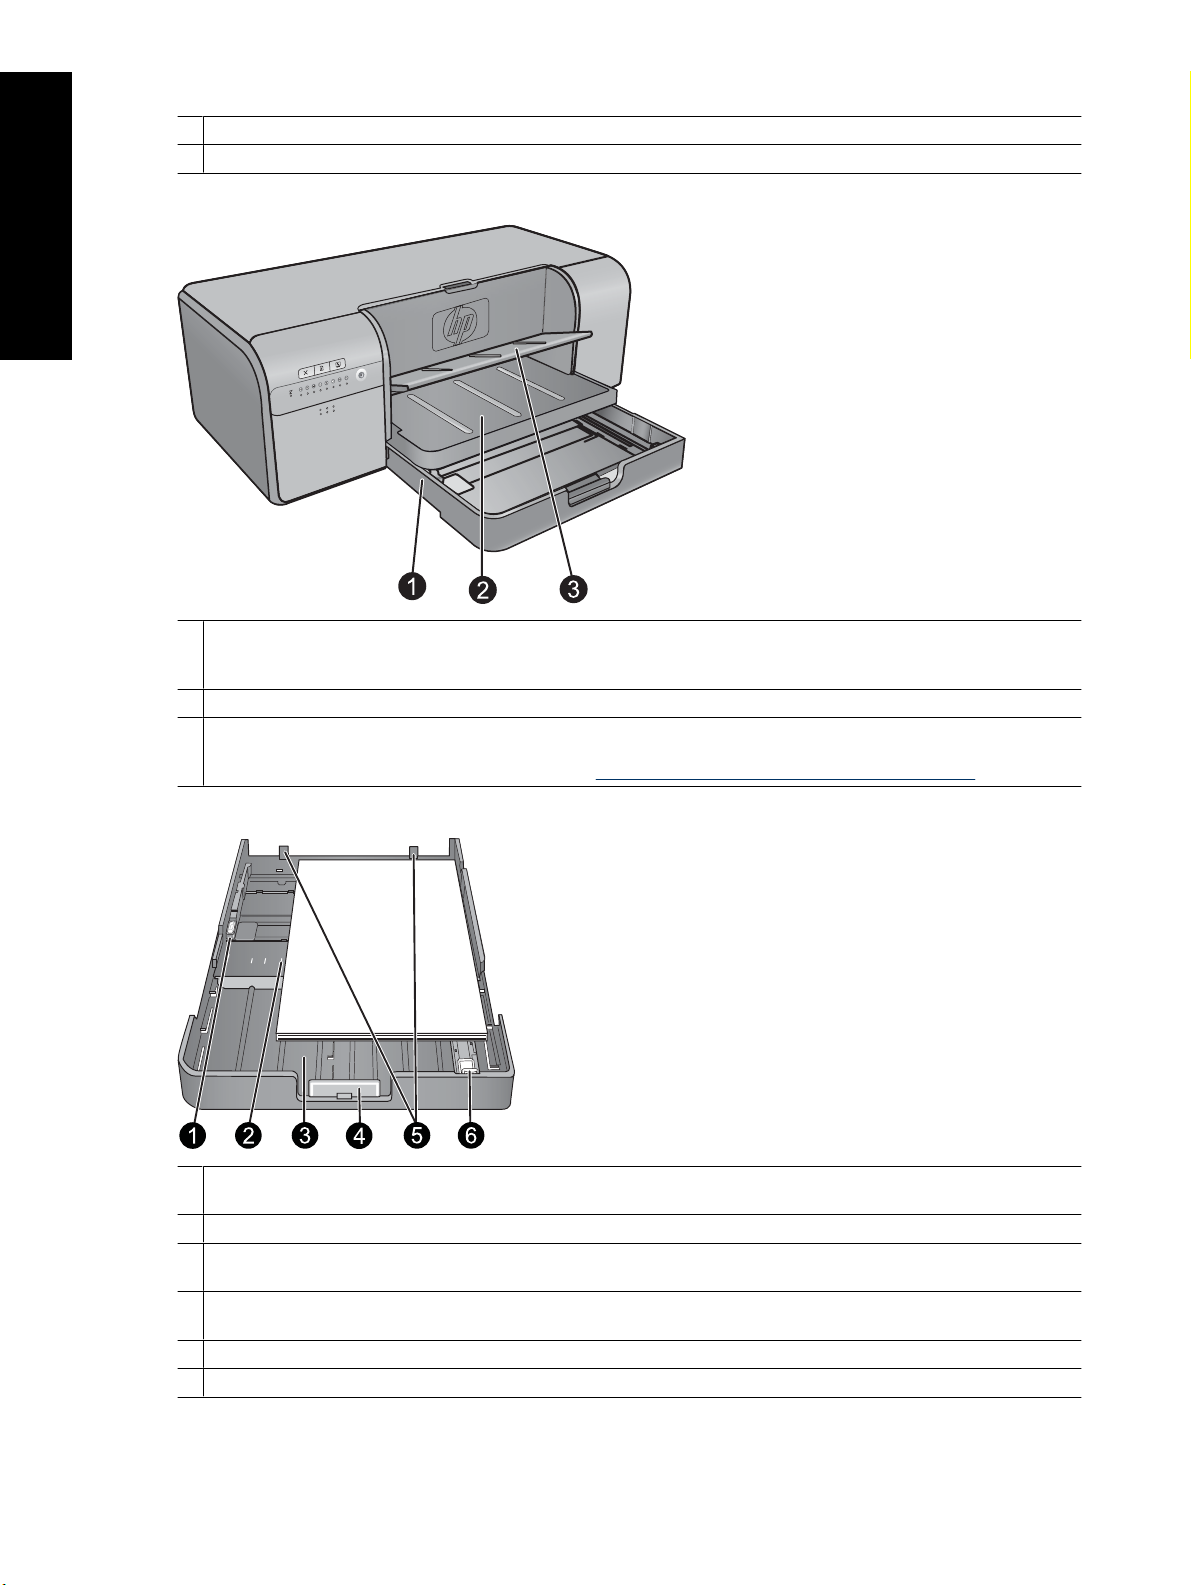
Paper trays
1 Main tray: Place a stack of photo paper, plain paper, or other non-rigid media in this tray for printing. Load the media in
portrait orientation and with the side to be printed facing down. Squeeze the main tray release to lengthen or shorten
the main tray, depending on the size of paper you are loading.
2 Output tray: Print jobs come out here. For easier access to the main tray, remove this tray by pulling it out towards you.
3 Specialty media tray (open): Insert a single sheet of heavy media, such as card stock, in this tray. Media from this tray is
fed straight through the printer without being bent. Load the media with the side to be printed facing up. Do not load media
thicker than 0.7mm. To learn how to use this tray, see
Print from the specialty media tray (single-sheet feed).
Main tray
1 Paper-width guide: Adjust this guide to fit close to the left edge of the paper in the tray by pressing the button on the front
of the guide and sliding the guide across.
2 Paper-size markings: Refer to these markings to guide you for loading paper in the correct orientation.
3 Main tray extension: Extend the main tray to load larger sizes of paper. Fully extended, the main tray can hold up to 33 x 48.3
cm (13 x 19 inch) paper.
4 Main tray release: Squeeze this release and pull it towards you to extend or retract the main tray extension, or to remove
the tray from the printer.
5 Paper stops: Align the paper against these stops so that the paper feeds correctly into the printer.
6 Paper-length guide: Adjust this guide to fit close to the end of the paper in the tray.
4Welcome
Page 8
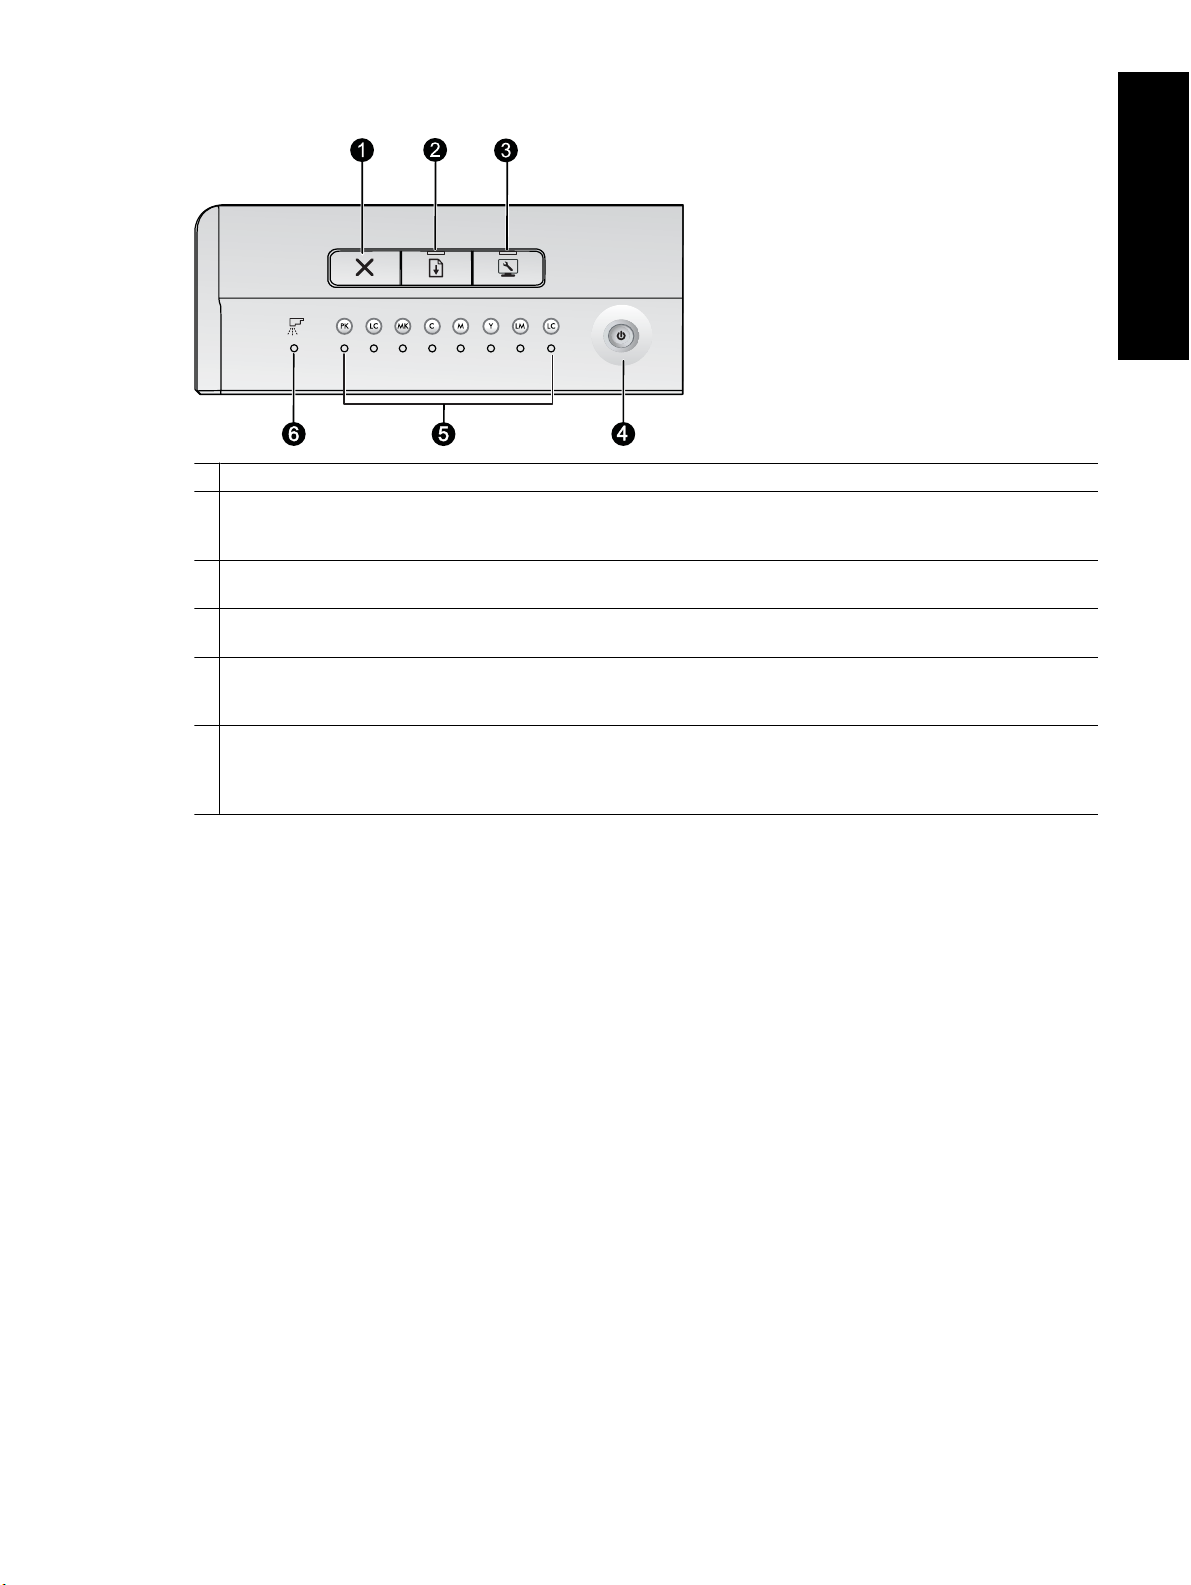
Control panel
1 Cancel: Press to stop the current print job, printhead alignment, or color calibration.
2 Resume: The Resume light flashes if the printer is out of paper or there is a paper jam. Press the Resume button to resume
printing after loading paper or clearing a paper jam. The Resume light is solid amber when the specialty media tray is lowered.
Press the Resume button to begin printing after loading media into the specialty media tray.
3 Toolbox: Press once to open the printer Toolbox (Windows) or HP Printer Utility (Mac) on the computer screen. The amber
Toolbox light flashes slowly if the printer is busy opening the Toolbox or HP Printer Utility.
4 On: The On light is solid blue when the printer is on. The On light flashes slowly when the printer is busy, and flashes rapidly
when one or more printer doors are open.
5 Ink cartridge lights: These eight lights indicate the status of each individual ink cartridge. A solid light indicates that the
corresponding cartridge might be low on ink. A flashing light indicates that the corresponding cartridge might be depleted of
ink, missing, damaged, or incompatible.
6 Printhead light: The printhead light is solid amber when the printer is busy servicing, aligning the printheads, or performing
color calibration. The printhead light flashes when a printhead is missing, damaged, or incompatible. To show which of the
four printheads has a problem, two cartridge lights corresponding to the colors that serve the affected printhead will also
flash.
English
Printer parts 5
Page 9

2 Basic printing
This section explains how to load media in the paper trays, change printer settings, and print from your computer.
English
Paper trays
The printer has two trays for paper and other media:
• Main tray: The main tray can hold multiple sheets of media and automatically feed each sheet for printing. Only
thin, flexible media can be loaded into this tray, due to the bending that media is subject to as it passes through
the printer from this tray.
• Specialty media tray: The specialty media tray is designed primarily for thicker, less flexible media. Paper from
this tray is fed straight through the printer, without being bent. When you use this tray, check that there is clear
space behind the printer at least equal to the length of the media you are printing on. Load one sheet of media
at a time into this tray, and be sure that the media is no thicker than 0.7 mm.
Any media that can be used in the main tray can also be used in the specialty media tray. However, some of the
media types supported in the specialty media tray should not be loaded in the main tray.
TIP: Use the specialty media tray for small print jobs on lightweight, flexible paper when you want to avoid
changing the paper stack in the main tray.
The table below summarizes the differences between the two media trays and provides guidelines for determining
which tray to use for a specific print job.
Feature Main tray Specialty media tray
Paper feed Multiple sheets Single sheet
Paper path Curved paper path Straight-through paper path
Media Thin, flexible Thin and thick (not more than 0.7 mm)
Media orientation Print-side DOWN Print-side UP
Supported paper sizes 7.6 x 12.7 cm to 33 x 48.3 cm
(3 x 5 inches to 13 x 19 inches)
7.6 x 12.7 cm to 33 x 111.8 cm
(3 x 5 inches to 13 x 44 inches)
Use the following guidelines for determining which tray to load a particular type of media into:
Media Main tray Specialty media tray
Photo, Inkjet, and Plain Papers
Examples: HP Advanced Photo paper,
HP Professional Satin Photo paper,
brochure, photo, inkjet, and plain papers
Digital Fine Art Papers <220 gsm
Examples: Photo rag
Digital Fine Art Papers >220 gsm
Examples: Canvas; Photo rag;
Watercolor paper
Any media thicker than 0.7 mm Not supported Not supported
Recommended Supported
Supported Recommended
Not supported Recommended
NOTE: You do not need to remove media from the main tray before you use the specialty media tray.
See Choose the right paper or other media for a description of specific paper types for use with this printer.
6 Basic printing
Page 10
Choose the right paper or other media
For a list of available HP inkjet paper, or to purchase supplies, go to:
www.hpshopping.com (U.S.)
•
www.hp.com/eur/hpoptions (Europe)
•
www.hp.com/jp/supply_inkjet (Japan)
•
www.hp.com/paper (Asia/Pacific)
•
NOTE: HP Premium and HP Premium Plus Photo papers are not supported with this printer.
To get the best and longest-lasting results from the printer, choose from these high quality papers.
To print Use this paper or media
High quality, long lasting prints and enlargements HP Professional Satin Photo paper
HP Advanced Photo paper (This paper is available in several
finishes, including glossy and satin-matte/soft gloss. Not all
finishes are available in all countries/regions or in every paper
size.)
Color calibration and printhead alignment HP Advanced Photo paper - Glossy
Casual photos from e-mail and the Web Plain paper
Text documents, draft versions, and test pages Plain paper
Important: Store paper in its original packaging or in a resealable plastic bag to prevent excessive curling, which
can prevent proper feeding. Do not leave media in the main tray when you are not printing, because the media can
curl when left exposed to air.
English
Specialty media
The printer prints on a variety of HP and non-HP specialty media. Experiment with some of the types listed here for
special effects:
• HP Hahnemühle Smooth Fine Art Paper
• HP Hahnemühle Watercolor Paper
• HP Aquarella Art Paper
• HP Artist Matte Canvas
•Photo rag
Some media types may not be available in all countries/regions. Check with your local media provider.
WARNING! Do not load media thicker than 0.7 mm, as it can damage the printer.
Supported sizes
The HP Photosmart supports a wide range of paper sizes including:
Paper type Size
Metric 10 x 15 cm (with or without tab), Panorama 10 x 30 cm, 13 x 18 cm, A3, A4, A5, A6, B4, B5, E
Imperial Index card 3 x 5 to 5 x 8 inches, 3.5 x 5 to 12 x 12 inches, 4 x 6 inches (with or without tab), Panorama
U.S. Letter, Legal, Executive, Tabloid
Japan L, 2L, Hagaki, Ofuku Hagaki
Envelopes Envelope No. 10, A2 envelope, C6 envelope, DL envelope
4 x 10 inches to 4 x 12 inches, 13 x 19 inches (B+)
Choose the right paper or other media 7
Page 11
Chapter 2
(continued)
Paper type Size
Banner paper Up to 13 x 44 inches
NOTE: To learn how to print banners, please visit the Resource Center on the HP Professional
Photography Web site at
WARNING! Do not load media thicker than 0.7 mm, as it can damage the printer.
English
Print from the main tray
To learn which media can be loaded into the main tray, see Paper trays.
WARNING! Do not load canvas or other digital fine art media heavier than 220 gsm into the main tray, as it
can damage the printer and the media. Use the specialty media tray instead.
NOTE: To print from the main tray, the specialty media tray must be closed.
To print from the main tray
1. Remove the output tray completely by grasping the sides of the tray with both hands and sliding it out towards
you. The main tray is now accessible.
www.hp.com/go/prophoto. Select your country at the top of the page.
1 Main tray
2 Output tray
2. Move the paper-width and paper-length guides to their outermost position to make room for the paper.
3. Load paper in the main tray.
a. For easier access or for loading larger sizes of media, extend the main tray by squeezing the main tray
release and pulling the tray towards you.
TIP: You can remove the tray from the printer, if necessary, by grasping the sides of the tray with both
hands and pulling it towards you.
b. Place a stack of paper in the main tray, in portrait orientation and with the side to be printed facing
down. Align the paper against the right side of the tray and against the paper stops at the back of the tray.
Check that the stack of paper is no higher than the top of the paper-width guide.
8 Basic printing
Page 12
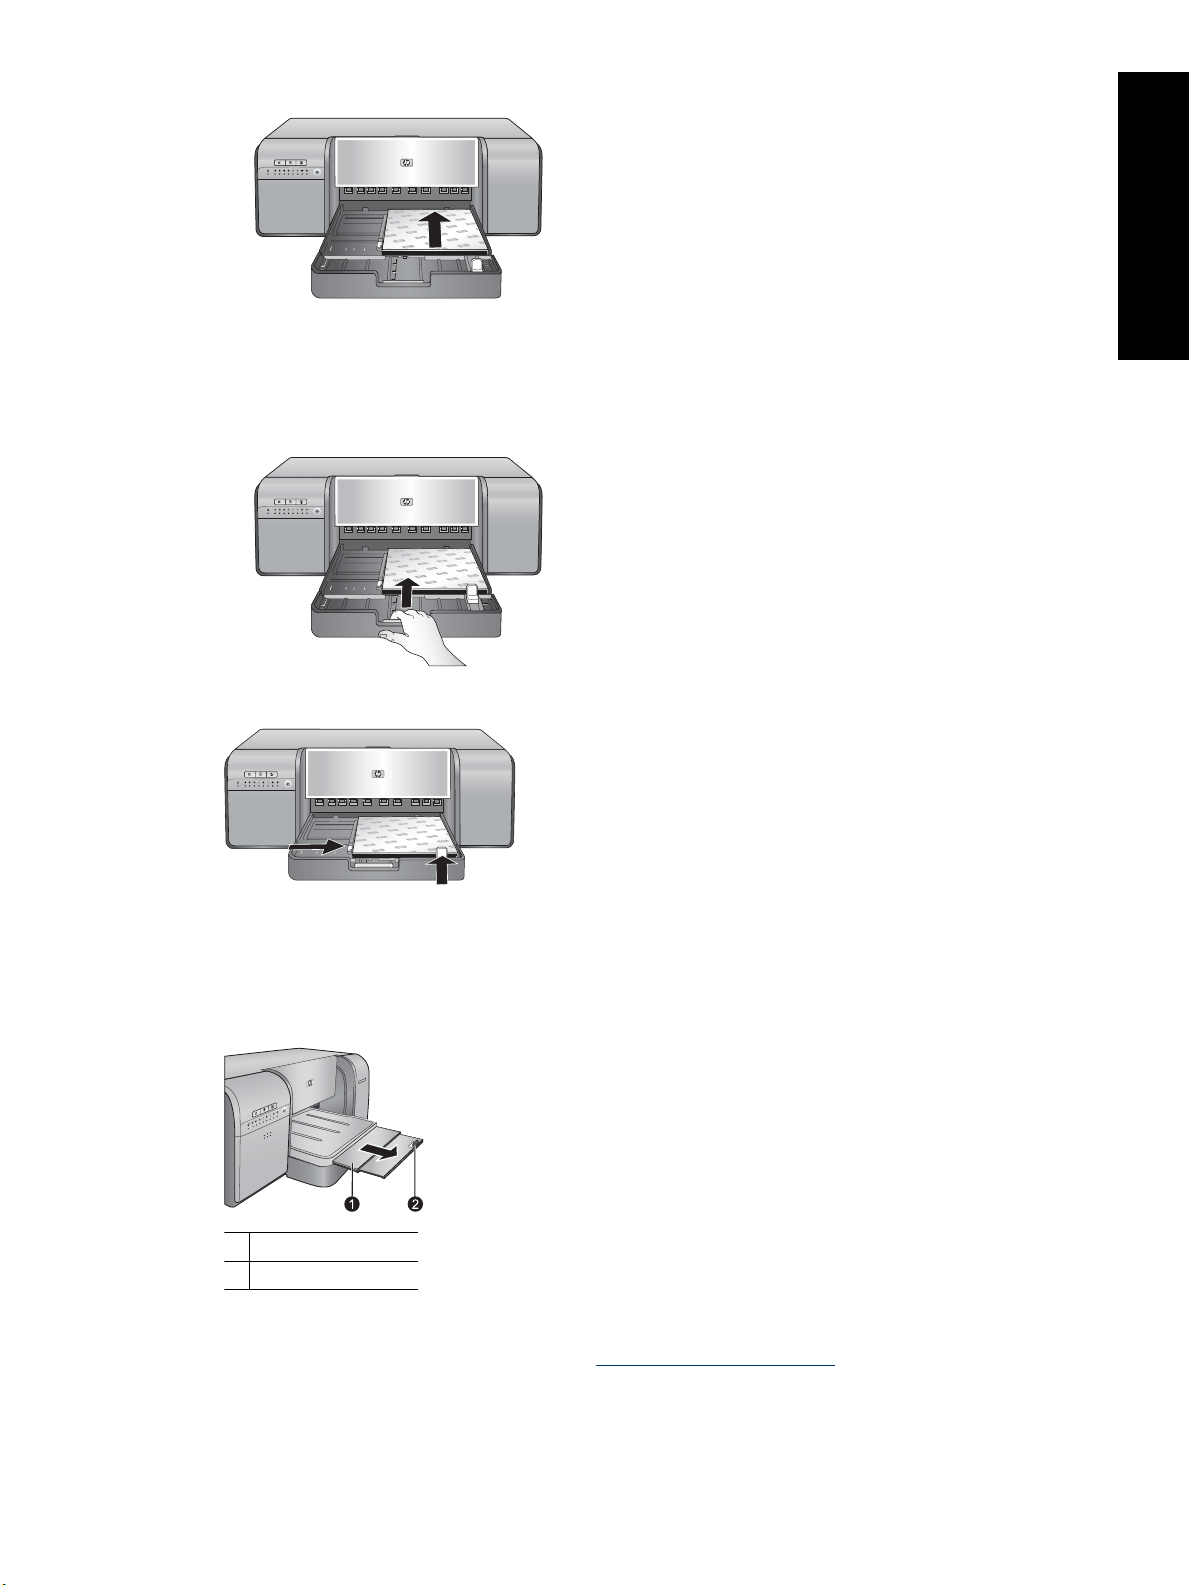
c. If you extended or removed the main tray to load paper, push in the main tray extension to the end of the
paper by squeezing the release and pushing in the extension, and push the tray back into the printer until it
is fully seated. Be sure to adjust the length of the main tray and reseat the tray in the printer before
you adjust the paper-length and paper-width guides or the paper will jam.
4. Adjust the paper-width and paper-length guides so they rest gently against the edges of the paper.
English
5. Check that the paper is lying flat in the tray.
6. Replace the output tray. If you are printing on paper larger than 21.6 x 28 cm (8.5 x 11 inches), pull out the
output tray extension by holding the output tray with one hand and pulling out the extension with your other hand.
Flip up the paper catch.
1 Output tray extension
2 Paper catch
7. In the printer driver on your computer, select the paper type that matches the type of media you have loaded.
For more information on the printer driver, see
Print from a software program.
Print from the main tray 9
Page 13

Chapter 2
8. Make sure the Paper Source (Windows) or Source (Mac) setting in the printer driver is set to Main tray or
Automatically Select, so that the printer will feed media from the main tray.
NOTE: When you select a Paper Type, the driver automatically sets the Paper Source (Windows) or
Source (Mac) to the recommended paper tray. For some media types, you may override the recommended
paper source setting. However, if a yellow warning symbol appears (Windows), or the driver does not allow
that selection (Mac), use the specialty media tray instead to avoid printer damage or poor print quality. See
English
9. Send your print job from the computer.
Print from the specialty media tray (single-sheet feed) for information on printing from the specialty media
tray.
NOTE: If you are using non-HP brands of glossy media in the main tray, and the printer does not feed the paper
or feeds multiple sheets through at once, try reducing the number of sheets in the main tray to 20 sheets, or use
the specialty media tray to print on one sheet at a time.
Print from the specialty media tray (single-sheet feed)
To learn which media can be loaded into the specialty media tray, see Paper trays.
It is recommended that before you print on expensive specialty media, you practice using the specialty media tray
by loading a single sheet of plain paper and printing an image or document.
NOTE: You do not need to remove media from the main tray before you use the specialty media tray.
To print from the specialty media tray
1. Check that there is space behind the printer for the paper to pass back and forth through the rear paper slot.
The space behind the printer should be equivalent to the length of the paper you are printing on.
NOTE: Do not feed paper into the rear paper slot.
2. Lower the specialty media tray.
The Resume light flashes while the printer raises the printhead assembly in preparation for printing from the
specialty media tray. When the Resume light stops flashing, you can load media into the tray.
1 Specialty media tray (single-sheet feed)
3. Pull out the output tray extension by holding the output tray with one hand and pulling out the extension with
your other hand. Flip up the paper catch at the end of the output tray extension to prevent paper from falling.
10 Basic printing
Page 14

1 Output tray extension
2 Paper catch
4. Load one sheet in portrait orientation and with the side to be printed facing up in the specialty media tray.
Feed the media into the printer until the back edge of the media (the edge nearest you) is lined up with the
dashed white line on the tray. Align the right edge of the media against the raised edge of the tray and not
against the side of the printer. Misaligned media can result in skewing or other printing problems, including paper
jams.
1 Specialty media tray (single-sheet feed)
For large sizes of media, the media will project through the rear paper slot at the back of the printer.
English
Important: If you are printing on canvas, or if the media is slightly curled, open the top door to check that the
media feeds under the rollers smoothly. Be sure to close the top door again.
Print from the specialty media tray (single-sheet feed) 11
Page 15

English
Chapter 2
1 Rollers
Important: If the media is not flat enough for printing, a paper jam can occur. To flatten a sheet of media before
printing, place the media in a plastic bag and gently bend it in the opposite direction of the curl.
5.
Press the
button on the printer.
6. In the printer driver on your computer, select the paper type that matches the type of media you have loaded.
For more information on the printer driver, see
7. Make sure the Paper Source (Windows) or Source (Mac) setting in the printer driver is set to Specialty media
tray, so that the printer will feed media from that tray.
NOTE: When you select a Paper Type, the driver automatically sets the Paper Source (Windows) or
Source (Mac) to the recommended paper tray. For some media types (such as photo papers, for which the
single-sheet feed may be used less often), the recommended source is the main tray although you can also
load them in the specialty media tray. When you want to print on such media from the specialty media tray,
you will need to override the recommended paper source setting.
8. Send your print job from the computer.
Print from a software program.
Print from a software program
Follow the steps below to print a photo or document using the basic printer settings. To modify the settings, see
Change print settings. To use the more advanced color management settings, see Color management.
To print from a software program (Windows)
1. Make sure you have paper loaded correctly.
2. On the File menu in your software program, click Print.
3. Select HP Photosmart Pro B8800 series as the printer. If you have already set the HP Photosmart Pro B8800
series as the default printer, you can skip this step. The HP Photosmart Pro B8800 series will already be selected.
12 Basic printing
Page 16

4. If you need to change settings, click the button that opens the Properties dialog box. Depending on your software
program, this button might be called Properties, Options, Printer Setup, or Printer.
5. Select the appropriate options for your print job by using the features available in the Advanced, Printing
Shortcuts, Features, and Color tabs.
TIP: You can easily select the appropriate options for your print job by choosing one of the predefined print
tasks on the Printing Shortcuts tab. Click a type of print task in the Printing Shortcuts box. The default
settings for that type of print task are set, and summarized on the Printing Shortcuts tab. If necessary, you
can adjust the settings here, or you can make your changes on the other tabs in the Properties dialog box.
6. Click OK to close the Properties dialog box.
7. Click Print or OK to begin printing.
To print from a software program (Mac OS X v10.4)
1. From the File menu in your software application, choose Page Setup.
The Page Setup dialog box appears, allowing you to specify the paper size, orientation, and scaling.
2. Make sure the HP Photosmart is the selected printer.
3. Specify the page attributes:
• Choose the paper size.
• Select the orientation.
• Enter the scaling percentage.
4. Click OK.
5. From the File menu in your software application, choose Print.
The Print dialog appears with the Copies & Pages pane open.
6. Change the print settings for each option in the pop-up menu, as appropriate for your project.
NOTE: When printing a photo, you must select options for the correct paper type and photo enhancement.
7. Click Print to begin printing.
To print from a software program (Mac OS X v10.5)
1. From the File menu in your software application, choose Print.
The Print dialog appears.
2. Make sure the HP Photosmart is the selected printer.
3. Specify the page attributes:
• Choose the paper size.
• Select the orientation.
• Enter the scaling percentage.
4. To change other options, such as paper type, select them from the Application pop-up menu toward the bottom
of the dialog.
English
NOTE: When printing a photo, you must select options for the correct paper type and photo enhancement.
5. Click Print to begin printing.
Print from a software program 13
Page 17

Chapter 2
Change print settings
Read this section to learn about the print settings available in the printer driver. You can also adjust print settings
in the HP Photosmart Pro print plug-in for Adobe Photoshop 7, CS, and CS2. For more information, see
HP Photosmart Pro print plug-in for Adobe Photoshop®(versions 7.0, CS, and CS 2 only).
Use the
English
For more information on the HP printer driver, see the onscreen Help:
• Windows: Right-click the HP Digital Imaging Monitor icon on the Windows taskbar and then select Launch/
Show HP Solution Center. Click Help from the options on the bottom of the HP Solution Center home page.
In the Additional Resources area, point to Documents, and then select Onscreen Guide. Also, in the print
dialog itself, right-click any option and click the What's This? box to learn more about that option.
• Mac: Choose Help, Mac Help in the Finder, and then choose Library, HP Product Help.
Select a print quality option
To select a print quality (Windows)
1. Open the Printer Properties dialog box.
2. Click the Features tab.
3. From the Print quality drop-down list, select the appropriate speed and quality setting for your project:
• Fast Draft: Prints at the fastest printing speed with most economical ink usage.
• Normal: Provides the best balance between print quality and speed. This is the appropriate setting for most
documents.
• Best: Provides high-quality printing.
• Maximum dpi: Provides high-quality, sharp images but takes longer to print than the Bestprint quality setting
and requires a large amount of disk space. To enhance color matching and detail in the photo, use
HP Advanced Photo paper when using the Maximum dpi print quality setting.
To select a print quality (Mac)
1. Open the Print dialog box.
2. Choose the Paper Type/Quality pane.
3. Click the Paper tab.
4. From the Quality pop-up menu, select the appropriate speed and quality setting for your project:
• Fast Draft: Prints at the fastest printing speed.
• Normal: Provides the best balance between print quality and speed. This setting is appropriate for most
documents.
• Best: Provides high quality printing.
• Maximum dpi: Provides high-quality, sharp images but takes longer to print than the Best print quality setting
and requires a large amount of disk space.
Set the paper type
The default paper type setting for printing is based on the printing shortcut you select. If you print on special papers,
you can change the paper type from the Printer Properties dialog box.
To select a specific paper type (Windows)
1. Open the Printer Properties dialog box.
2. Click the Features tab.
14 Basic printing
Page 18

3. Select the paper type from the Paper Type drop-down list. If the loaded paper type is not listed, add a custom
paper type. For more information on adding a custom paper type, see the onscreen Help.
NOTE: When you select a Paper Type, the driver automatically sets the Paper Source to the
recommended paper tray. Depending on the paper type you are using, overriding the recommended Paper
Source setting may result in printer or media damage. For more information, see
4. Select any other print settings that you want, and then click OK.
To select a specific paper type (Mac)
1. Open the Print dialog box.
2. Choose the Paper Type/Quality pane.
3. Click the Paper tab.
4. In the Paper Type pop-up menu, click the appropriate paper type.
NOTE: When you select a paper type, the driver automatically sets the Source to the recommended paper
tray. Depending on the paper type you are using, overriding the recommended Source setting may result
in printer or media damage. For more information, see
5. Choose any other print settings that you want, and then click Print.
Select a paper source
The printer offers two sources for paper:
• Main tray
• Specialty media tray
Paper trays.
English
Paper trays.
NOTE: When you select a paper type, the driver automatically sets the Paper Source (Windows) or Source
(Mac) to the recommended paper tray. Depending on the paper type you are using, overriding the recommended
Paper Source or Source setting may result in printer or media damage. For more information, see
trays.
To select a paper source (Windows)
1. Open the Printer Properties dialog box.
2. Click the Features tab.
3. Select one of the following options from the drop-down list:
• Automatically Select: Prints from the main tray.
• Main tray: Prints from the main tray.
• Specialty media tray: Prints from the specialty media tray.
To select a paper source (Mac)
1. Open the Print dialog.
2. Choose the Paper Type/Quality pane.
3. In the Source pop-up menu, click one of the following options:
• Main tray: Prints from the main tray.
• Specialty media tray: Prints from the specialty media tray.
Paper
Change print settings 15
Page 19
Chapter 2
Print in grayscale
You can print documents or photos in grayscale for dramatic black and white photos.
To print in grayscale (Windows)
1. Open the Printer Properties dialog box.
2. Click the Color tab, and then click Print in Grayscale in the Color Options area.
English
3. In the Print in Grayscale drop-down list, select one of the following:
• Composite gray
• Gray inks only
4. Select any other print settings you want, and then click OK.
To print in grayscale (Mac)
1. Open the Print dialog box.
2. Select the Paper Type/Quality pane.
3. Click the Paper tab.
4. In the Color pop-up menu, select Grayscale.
5. Click the Color Options tab, and select one of the following:
• Composite gray
• Gray inks only
6. Choose any other print settings that you want, and then click Print.
NOTE: The Print in Grayscale setting is not available if the Color management field on the same tab is
set to Application Managed Colors. To enable grayscale printing, choose a printer-based color
management scheme (ColorSmart/sRGB or Adobe RGB). For more information on color management
settings, see
Color management.
NOTE: For more information on color settings in the printer driver, see Color management.
Set the default print settings
If you frequently print photos or documents on the same size and type of paper, you can set print defaults or presets
with all your preferred settings.
To change the default print settings (Windows)
1. Right-click the HP Digital Imaging Monitor icon on the right side of the Windows taskbar, and then select
Launch/Show HP Solution Center to open the HP Solution Center home page.
2. Click Settings on the bottom of the HP Solution Center home page.
3. Click Printer Settings in the Print Settings area.
4. Make changes to the print settings, and then click OK.
To create presets (Mac)
1. On the File menu in your software program, click Print.
2. Choose the settings on each pane that you want to use frequently.
3. In the Presets pop-up menu, choose Save as.
4. Type the name of your new preset, and then click OK.
16 Basic printing
Page 20

Make the HP Photosmart Pro B8800 series the default printer
Windows
1. On the Windows taskbar, click Start, and then click Control Panel.
2. Open Printers (Windows Vista) or Printers and Faxes (Windows XP).
3. Right-click the HP Photosmart printer icon, and then click Set as Default Printer.
Mac
1. In the System Preferences, click Print & Fax, and then click Printing.
2. Choose an option from the Selected printer in Print Dialog pop-up menu.
English
Make the HP Photosmart Pro B8800 series the default printer 17
Page 21

3 Color management
This section provides some basic information about using color management with the HP Photosmart Pro B8800
series. For detailed information on color management, see the onscreen Help.
English
NOTE: In this User Guide, printer software refers to the HP Photosmart software that comes on the CD with
the printer. The printer driver is the part of the printer software which controls the printer.
What is color management?
Color management affects the way the colors in your photos are printed. Because the printer, image editing software
programs, the operating system, and imaging devices such as cameras, scanners, and monitors, all display colors
differently, the color management strategy you choose affects whether colors are printed more or less accurately.
Color management is based on color spaces
printers use the CMYK
look markedly different from what you see on the monitor.
Color management is a complex subject and a detailed discussion is beyond the scope of this book, which only
provides some typical examples. For more information, see the documentation that came with your third-party image
editing software program.
Choose a color management strategy
Use the HP Photosmart Pro print plug-in for Adobe Photoshop®(versions 7.0, CS, and CS 2 only).
Advanced color management
•
Uses the Adobe Photoshop
•
algorithms to produce high
resolution prints
Single streamlined dialog box with
•
the most commonly used color
management settings
3
color space. The differences between the two color spaces can cause printed photos to
1
. Most imaging devices use the RGB2 color space, while commercial
Use application-based color
management.
Advanced color management
•
Uses the Adobe Photoshop
•
algorithms to produce high
resolution prints
Several dialog boxes for all the color
•
management settings
Use printer-based color management.
Simple color management
•
Uses the printer driver color
•
management settings
TIP: 1 It is possible to have color management features turned on both in the printer driver and in a software
program such as Adobe
based or application-based color management, but not both at the same time.
TIP: 2 Periodically, calibrate the printer color to ensure that the printer provides consistent color reproduction
from print to print. See
®
Photoshop
Align and calibrate the printer.
®
. This double correction produces unsatisfactory results. Use either printer-
Use the HP Photosmart Pro print plug-in for Adobe
®
Photoshop
The HP Photosmart Pro print plug-in for Adobe Photoshop streamlines the printing process and simplifies
professional color management. The plug-in provides a central dialog box for color management and other print
settings. It combines settings from the printer driver and the Adobe Photoshop Print with Preview dialog box so
you no longer have to make your way through a confusing maze of dialog boxes each time you print.
1 Three-dimensional mathematical models for organizing color.
2 The RGB color space creates colors by mixing red, green, and blue light. Technologies that rely on light (monitors, scanners, or digital
cameras) use this color space.
3 The CMYK color space used in the printing industry is based on the light-absorbing qualities of ink printed on paper. CMYK stands for
cyan, magenta, yellow, and black, the colors used in four-color process printing.
18 Color management
(versions 7.0, CS, and CS 2 only)
Page 22

The HP Photosmart Pro print plug-in is installed automatically with the printer driver if you have Adobe Photoshop
(versions 7.0, CS, and CS 2 only) on the same computer.
Attention Adobe Photoshop CS3 users: The HP Photosmart Pro print plug-in is not supported in Photoshop CS3.
HP and Adobe have improved the print workflow built into Photoshop CS3.
NOTE: Adobe Photoshop is a standalone 3rd party software product, not included with the printer.
For more information on application-based color management, see Use application-based color management.
Install the HP Photosmart Pro print plug-in
The HP Photosmart Pro print plug-in for Adobe Photoshop is installed automatically with the HP Photosmart printer
software if you have Adobe Photoshop on the same computer. If you install Adobe Photoshop after you install the
printer software, you can then install the HP Photosmart Pro print plug-in separately.
To install the HP Photosmart Pro print plug-in (Windows)
1. Insert the HP Photosmart CD in the computer CD-ROM drive.
2. Click Install More Software.
3. Select Photosmart Pro plug-in for Photoshop® and then follow the onscreen instructions.
To install the HP Photosmart Pro print plug-in (Mac)
1. Click the HP Device Manager icon in the Dock.
2. Click Maintain Printer.
3. Select the printer from the list, and then click Select. The HP Printer Utility appears.
4. Select the Photosmart Pro print plug-in for Photoshop® pane on the left.
5. Click Install Photosmart Pro print.
Start the HP Photosmart Pro print plug-in
To start the plug-in
1. Open an image in Adobe Photoshop.
2. Select File, point to Automate, and then click Photosmart Pro print....
The print preview area in the Photosmart Pro print dialog box displays the current image in a scaled size in its true
aspect ratio. Paper borders are displayed as they will appear on the print. To resize the image, click and drag its
edges. To reposition the image on the page, click on the image and drag it to a new location. To print only a portion
of the image, drag part of the image off of a page edge.
English
Use application-based color management
Application-based color management offers more sophisticated control than the printer-based form, but also
involves greater complexity and more steps.
Application-based color management relies on files called ICC (International Color Consortium) device profiles. An
ICC profile describes a device's color space. The software program component of your color management system
uses these profiles to convert colors between each device's color space. The HP Photosmart Pro B8800 series
software installation installs HP ICC profiles automatically for the printer.
To print using application-based color management features, you have to change settings in the printer driver and
in the image editing software program. Here is one example of a typical print job using application-based color
management in Adobe Photoshop (versions CS3 or CS2). See the documentation that came with your image editing
software program for complete instructions on using the product's color management features.
To print using application-based color management (Using Photoshop CS3 or CS2)
1. Open the photo you want to print in Adobe Photoshop.
2. Select File, and click Print (CS3) or Print with Preview (CS2).
Use application-based color management 19
Page 23

English
Chapter 3
3. In Photoshop CS3: Make sure HP Photosmart Pro B8800 series is selected from the Printer drop-down list.
4. Select Color Management from the drop-down list.
5. From the Color Handling drop-down list, select Photoshop Manages Colors (CS3) or Let Photoshop
Determine Colors (CS2).
6. From the Printer Profile drop-down list, select an appropriate printer profile for the paper and ink set you are
using.
7. From the Rendering Intent drop-down list, select Perceptual or Relative. For most users, HP recommends
selecting Perceptual and the Black Point Compensation option.
8. Click Page Setup, set up the page for the current image, and then click OK.
9. Click Print.
Windows users:
a.Click Preferences in the Print dialog box.
b.Click the Color tab.
c. Select Application Managed Colors from the Color Management drop-down list.
d.Click the Features tab, select an appropriate paper type from the Paper Type drop-down list, and then click
OK.
e.Click OK.
Mac users:
a. Choose Paper Type/Quality in the Print dialog box.
b. Make sure Application Managed Colors is selected from the Color pop-up menu.
c. Select an appropriate paper type from the Paper Type pop-up menu.
10. Click Print.
Use printer-based color management
The HP Photosmart Pro B8800 series printer offers built-in automatic color management that is easy to configure.
Printer-based color management produces attractive results and should be adequate for many users.
You can choose from a range of printer driver color space settings based on the color space used by your imaging
device and your usage of ICC profiles. For more information on using printer-based color management, see the
onscreen Help. For information on how to access the onscreen Help, see
Find more information.
20 Color management
Page 24
4 Care and maintenance
Follow the guidelines in this section to extend the life span of the printer and printing supplies, and to ensure that
the photos you print are always of the highest quality.
Leave the printer plugged in
HP recommends that you always leave the printer plugged in so that it can periodically perform self-servicing
routines. If you leave the printer off for an extended period of time, you will experience a decline in print quality,
automatic maintenance routines will need to be run, and you may have to replace one or more printheads.
NOTE: You may turn the printer off to conserve power; the printer will turn itself on when necessary to run the
self-servicing routines as long as it is connected to power. If the printer is connected to a power strip, make sure
the power strip remains on so that the printer can perform automatic maintenance periodically.
The printer performs a self-servicing routine if the printer is idle for 24 hours or more. The length of time it takes for
the servicing routine to be completed depends on how long the printer has been idle. As part of the servicing routine,
a nozzle health sensor checks the printhead nozzles for blockages, clears any blockages found, if possible, and
substitutes nozzles as needed. For more information on cleaning the printheads, see
automatically.
NOTE: Ink in the cartridges included in the printer box is used for printer initialization. Ink from these cartridges,
as well as from replacement cartridges, is also used to keep print nozzles clear and ink flowing smoothly.
Clean the printheads
Use the Toolbox (Windows) or HP Printer Utility (Mac)
The Toolbox (Windows) or HP Printer Utility (Mac) contain useful tools to enhance printer performance. Use the
Toolbox or HP Printer Utility to do the following:
• Align the printheads
• Automatically clean the printheads
•Calibrate color
• Print a test page
• View estimated ink levels
English
To open the Toolbox (Windows) or HP Printer Utility (Mac) from the printer control panel
▲
Press the
(Mac).
button on the printer control panel to open the printer Toolbox (Windows) or HP Printer Utility
Ink cartridge care
Follow these tips to help maintain HP ink cartridges and ensure consistent print quality:
• For information on installing the ink cartridges and printheads the first time after you purchase the printer, see
the Quick Start Guide.
• HP recommends that you use genuine HP ink cartridges. Genuine HP ink cartridges are designed and tested
with HP printers to help you easily produce great results, time after time. Damage that results from the use of
non-HP ink cartridges is not covered by the HP warranty.
• HP does not recommend modifying or refilling HP cartridges. Damage that results from modifying or refilling
HP cartridges is not covered by the HP warranty.
• Keep all unused ink cartridges in their original sealed packages until they are needed. Store ink cartridges at
room temperature (15–35 degrees C or 59–95 degrees F).
Care and maintenance 21
Page 25
Chapter 4
Check the ink levels
NOTE: 1 Ink level warnings and indicators provide estimates for planning purposes only. When you receive a
low-ink warning message, consider having a replacement cartridge available to avoid possible printing
delays.You do not need to replace the ink cartridges until you are prompted to do so.
NOTE: 2 If the ink cartridges were used before being installed in the printer, or have been refilled, the estimated
ink levels might be inaccurate or unavailable.
English
To check the ink levels using the HP Solution Center (Windows only)
▲ Right-click the HP Digital Imaging Monitor icon on the right side of the Windows taskbar, and then select
Launch/Show HP Solution Center to open the HP Solution Center home page.
An estimate of the ink levels appears on the top right corner of the HP Solution Center home page.
To check ink levels using the printer Toolbox (Windows) or HP Printer Utility (Mac)
1.
Press
2. Windows: Click the Estimated Ink Levels tab.
Mac: Click the Supplies Status pane.
An estimate of the ink levels in the cartridges appears.
on the printer control panel to open the printer Toolbox or HP Printer Utility on the computer screen.
Replace the ink cartridges
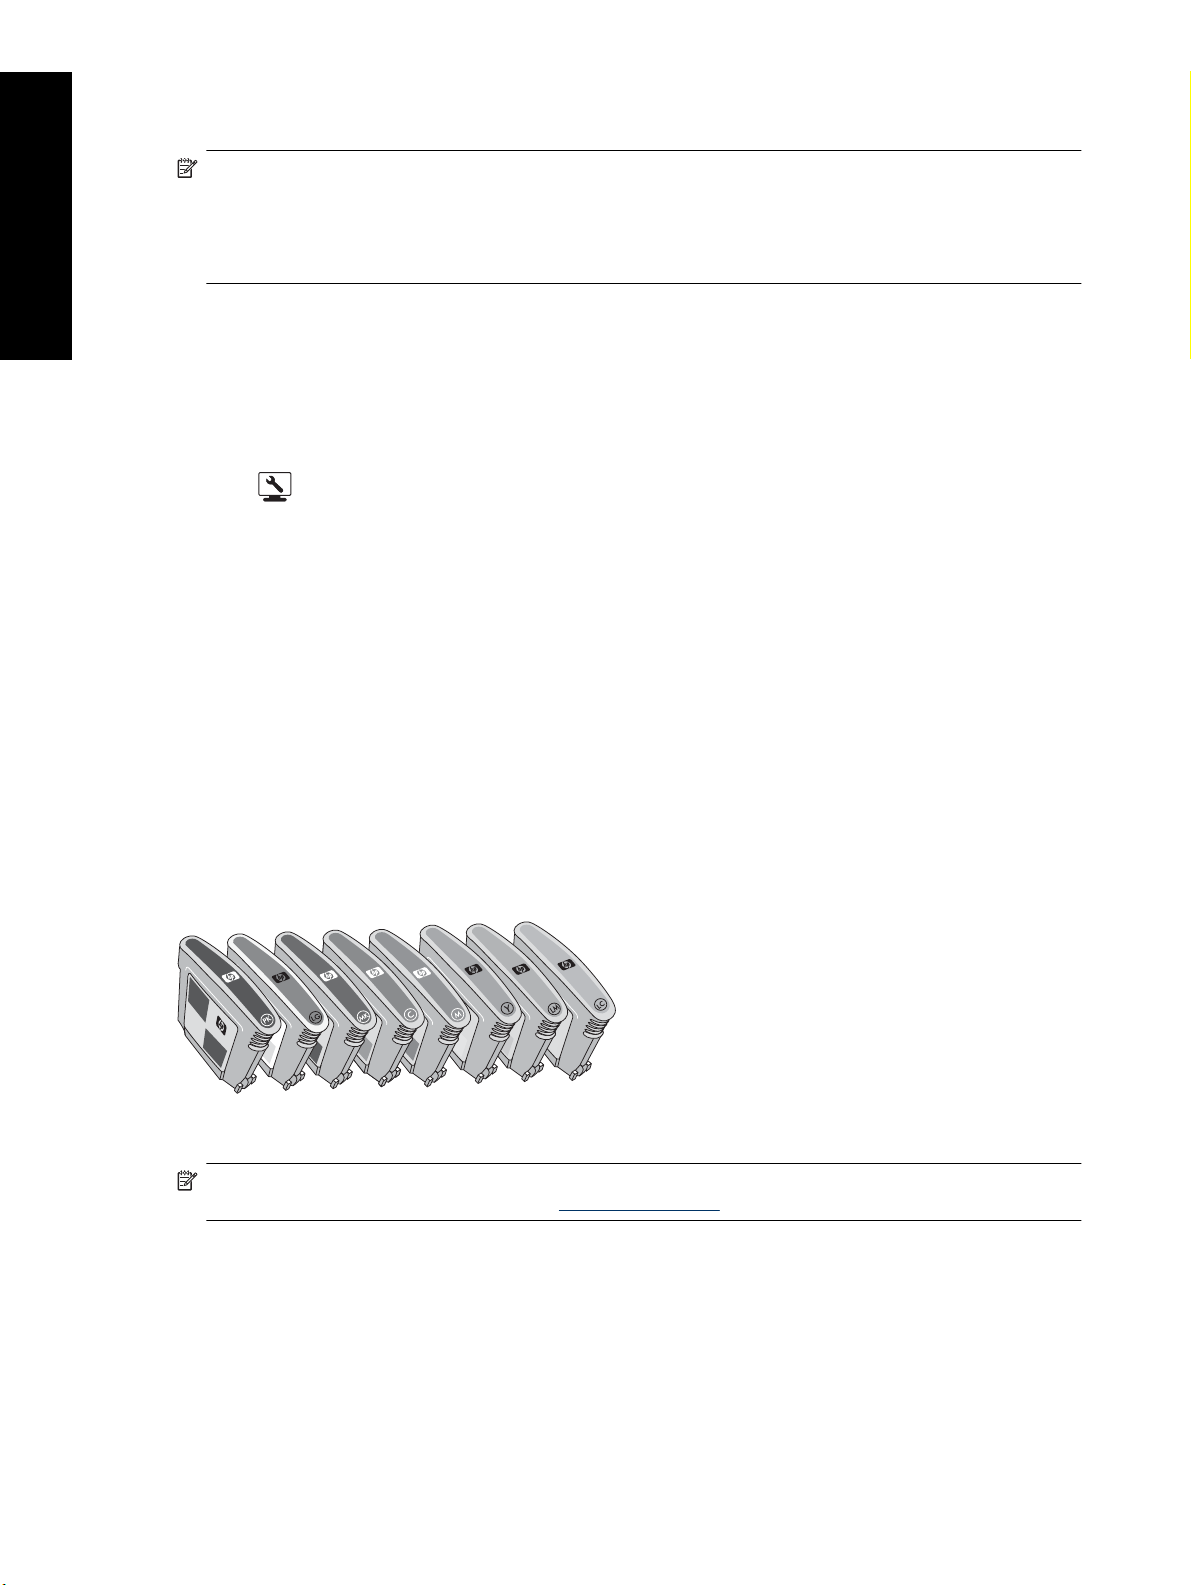
For proper operation, install all of the following eight ink cartridges:
• HP 38 Photo Black (PK) Pigment ink cartridge
• HP 38 Light Gray (LG) Pigment ink cartridge
• HP 38 Matte Black (MK) Pigment ink cartridge
• HP 38 Cyan (C) Pigment ink cartridge
• HP 38 Magenta (M) Pigment ink cartridge
• HP 38 Yellow (Y) Pigment ink cartridge
• HP 38 Light Magenta (LM) Pigment ink cartridge
• HP 38 Light Cyan (LC) Pigment ink cartridge
If you are replacing ink cartridges, check that you are using the correct cartridges.
NOTE: Before replacing the ink cartridges, you can check the cartridge ink levels using the printer Toolbox or
HP Printer Utility. For more information, see
To replace the ink cartridges
1. Open the ink cartridge door by pressing the raised bumps at the top of the door until the door clicks open.
Check the ink levels.
22 Care and maintenance
Page 26

1 Ink cartridge door
2. Remove the ink cartridges that need to be replaced. Grasp a cartridge and pull it out of the stall.
3. Shake the new ink cartridges vigorously, at least six times, before opening their packages.
4. Unwrap the ink cartridges, and then insert each cartridge into its color-coded stall in the orientation shown. Press
firmly on the cartridges to ensure proper contact.
English
5. Close the ink cartridge door.
1 Ink cartridge door
NOTE: All eight cartridges and four printheads must be correctly installed for the printer to work. If this is the
first time you are installing the ink cartridges and printheads, see the Quick Start Guide for information on the
initial set up of ink cartridges and printheads. If you need to replace the printheads, see the onscreen Help.
Ink cartridge care 23
Page 27
Chapter 4
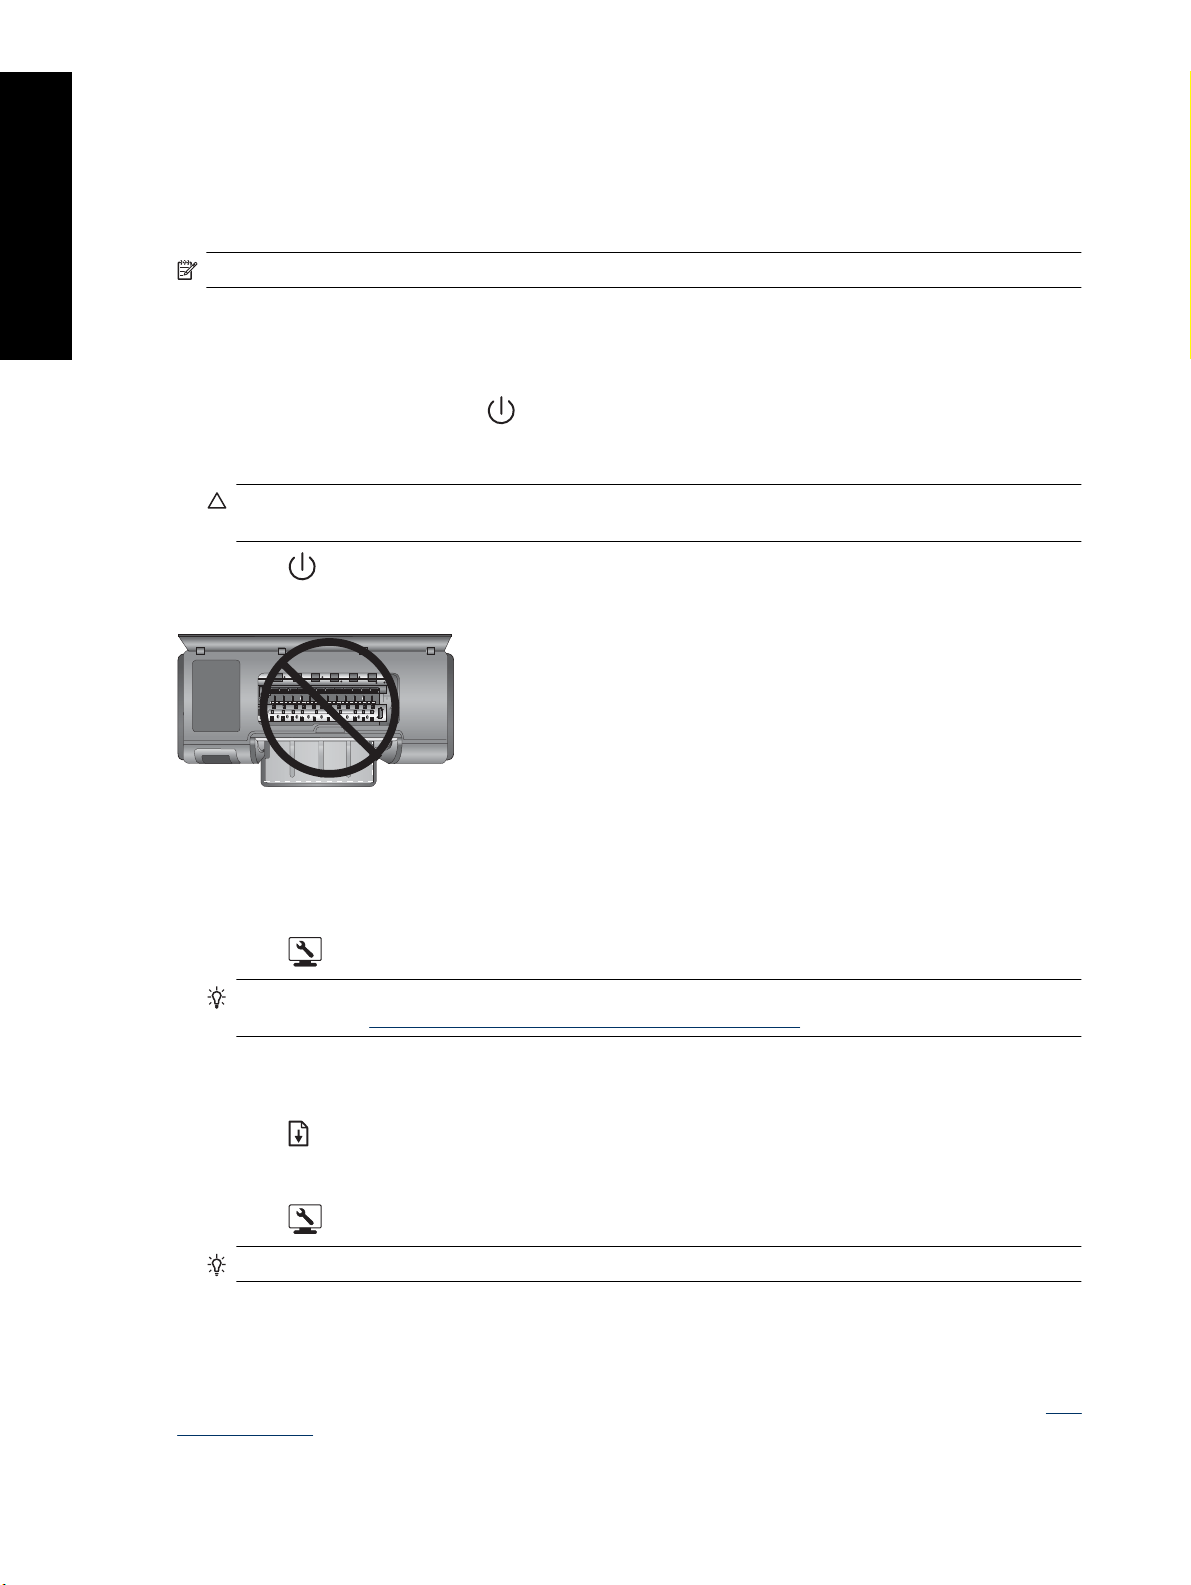
Clean the printer
For best results, keep the outside of the printer clean. If you notice any ink residue on the outside of the printer, be
sure to clean it off using the following steps.
English
NOTE: Never clean the inside of the printer.
Clean the printer exterior
To clean the outside of the printer
1.
Turn off the printer by pressing the
2. Wipe the outside of the printer with a soft cloth that has been lightly moistened with water. Be sure to wipe away
any ink residue that has accumulated on the output tray.
CAUTION: Do not use any type of cleaning solution. Household cleaners and detergents might damage
the printer finish.
3.
Press the
Do not clean inside the printer
button to turn on the printer.
Clean the printheads automatically
If you notice white lines or single-color streaks on the photos you print, the printheads might need to be cleaned.
button.
To clean the printheads automatically (Windows)
1.
Press the
TIP: You can also open the printer Toolbox from the HP Solution Center on your computer. For more
information, see
2. Click Clean the Printheads on the Device Services tab.
3. Following the directions on the computer screen, load paper so the printer can print a test page after cleaning
the printheads. Use Letter or A4-sized plain paper to conserve photo paper.
4.
Press the
To clean the printheads automatically (Mac)
1.
Press the
TIP: You can also open the HP Printer Utility from the HP Device Manager in the Dock.
2. Select the Clean pane on the left.
3. Click Clean, and follow onscreen instructions.
If you still notice white streaks or missing colors on the test page after cleaning the printheads automatically, you
might need to clean the printhead nozzles manually. For information on cleaning the printhead nozzles manually
and other maintenance tasks, refer to the onscreen Help. For information on accessing the onscreen Help, see
more information.
24 Care and maintenance
button on the printer control panel to open the printer Toolbox on the computer screen.
Use the Toolbox (Windows) or HP Printer Utility (Mac).
button to begin cleaning the printheads.
button on the printer control panel to open the HP Printer Utility on the computer screen.
Find
Page 28

NOTE: Do not clean the printheads more often than necessary, since the cleaning uses ink.
Align and calibrate the printer
The first time you install printheads in the printer or if you replace a faulty printhead, the printer performs a printer
alignment and color calibration automatically. However, if colors in the photos you print are misaligned, or if the
alignment page does not print correctly when you install a new printhead, use the following procedure to re-align
the printheads.
For consistent color reproduction from print to print, be sure to calibrate the printer color periodically. Before aligning
and calibrating the printer, check that you are using the correct paper. Use Letter or A4-sized HP Advanced Photo
paper - Glossy. If you use a different type of paper, the results may not be accurate.
To align the printheads (Windows)
1. Load Letter or A4-sized HP Advanced Photo paper - Glossy in the main tray.
2.
Press the
TIP: You can also open the printer Toolbox from the HP Solution Center on your computer. For more
information, see
3. Click the Device Services tab.
4. Click Align the Printheads.
5. Click Align and follow the onscreen instructions.
To align the printheads (Mac)
1. Load Letter or A4-sized HP Advanced Photo paper - Glossy in the main tray.
2.
Press the
button on the printer control panel to open the printer Toolbox on the computer screen.
Use the Toolbox (Windows) or HP Printer Utility (Mac).
button on the printer control panel to open the HP Printer Utility on the computer screen.
English
TIP: You can also open the HP Printer Utility from the HP Device Manager in the Dock.
3. Select the Align pane on the left.
4. Click Align and follow the onscreen instructions.
To calibrate the printer color (Windows)
1. Load Letter or A4-sized HP Advanced Photo paper - Glossy in the main tray.
2.
Press the
TIP: You can also open the printer Toolbox from the HP Solution Center on your computer. For more
information, see
3. Click the Color Calibration tab.
4. Click Initiate Color Calibration and follow the onscreen instructions.
To calibrate the printer color (Mac)
1. Load Letter or A4-sized HP Advanced Photo paper - Glossy in the main tray.
2.
Press the
TIP: You can also open the HP Printer Utility from the HP Device Manager in the Dock.
3. Select the Color Calibration pane on the left.
4. Click Start Color Calibration and follow onscreen instructions.
button on the printer control panel to open the printer Toolbox on the computer screen.
Use the Toolbox (Windows) or HP Printer Utility (Mac).
button on the printer control panel to open the HP Printer Utility on the computer screen.
Align and calibrate the printer 25
Page 29
Chapter 4
Print a test page
You can print a test page to check the condition of the printheads. The test page also contains useful information
about the printer, including the printer serial number and firmware version.
English
To print a test page (Windows)
1.
Press the
TIP: You can also open the printer Toolbox from the HP Solution Center on your computer. For more
information, see
2. Click the Device Services tab.
3. Click Print a Test Page and then click Print Page.
To print a test page (Mac)
1.
Press the
TIP: You can also open the HP Printer Utility from the HP Device Manager in the Dock.
2. Select the Test pane on the left.
3. Click Print Test Page.
button on the printer control panel to open the printer Toolbox on the computer screen.
button on the printer control panel to open the HP Printer Utility on the computer screen.
Print a sample page
You can print a sample page to verify that the printer can successfully print a photo. If you are having trouble printing
a photo from your software program, use this option as part of the troubleshooting process to determine whether
the problem is with the printer or software program.
To print a sample page (Windows)
1. Load paper in the main tray. Use plain paper to conserve photo paper.
2.
Press the
button on the printer control panel to open the printer Toolbox on the computer screen.
Use the Toolbox (Windows) or HP Printer Utility (Mac).
TIP: You can also open the printer Toolbox from the HP Solution Center on your computer. For more
information, see
3. Select Print a Sample Page and then click Print Page.
To print a sample page (Mac)
1. Load paper in the main tray. Use plain paper to conserve photo paper.
2.
Press the
TIP: You can also open the HP Printer Utility from the HP Device Manager in the Dock.
3. Select the Sample Page pane on the left.
4. Click Print Sample Page.
Use the Toolbox (Windows) or HP Printer Utility (Mac).
button on the printer control panel to open the HP Printer Utility on the computer screen.
Download printer software updates
Download the latest printer software updates periodically to ensure you have the latest features and improvements.
NOTE: The printer software update that you download from the HP Web site updates only the printer driver. It
does not update the HP Photosmart Essential software.
26 Care and maintenance
Page 30

To update your printer software (Windows)
NOTE: Make sure you are connected to the Internet before you use HP Update.
1. Open HP Update from the Windows Start menu or the HP Solution Center.
From the Start menu:
a. Windows XP: Select All Programs > HP > HP Update. The HP Update window opens.
b. Windows Vista: Locate the HP folder from the menu group, and then select HP Update.
From the HP Solution Center:
a. Right-click the HP Digital Imaging Monitor icon on the right side of the Windows taskbar, and then select
Launch/Show HP Solution Center to open the HP Solution Center home page.
b. Click Help on the bottom of the HP Solution Center home page.
c. Click Check For Updates in the Online Resources area. The HP Update window opens.
2. Click Next. HP Update searches the HP Web site for printer software updates. If the computer does not have
the most recent version of the printer software installed, a software update appears in the HP Update window.
NOTE: If the computer has the most recent version of the printer software installed, No updates are
available for your system at this time appears in the HP Update window.
3. If a software update is available, click the checkbox next to the software update to select it.
4. Click Install.
5. Follow the onscreen instructions to complete the installation.
To update your printer software (Mac)
1. Make sure the computer is connected to the Internet.
2. In the Dock, click HP Device Manager.
The HP Device Manager window appears.
3. In the Devices pop-up menu, choose the HP Photosmart.
4. From the Information and Settings pop-up menu, select Check for updates.
The HP Software Update window will open.
5. Click Check Now to check for updates.
6. If desired, click Check for updates and set the software to automatically check for updates on a schedule.
English
NOTE: You can also download printer software updates by going to www.hp.com/support, selecting your
country/region, entering the printer in the search box, and clicking on Software & Driver downloads.
Uninstall the printer software
If you need to uninstall the printer software, follow these steps.
Uninstall the printer software (Windows)
1. From the Windows Start menu, click Programs or All Programs, click HP, and then click HP Photosmart Pro
B8800 series.
2. Click Uninstall.
Uninstall the printer software (Mac)
1. Disconnect the HP Photosmart from your Mac.
2. Double-click the Applications:Hewlett-Packard folder.
3. Double-click HP Uninstaller.
Follow the onscreen instructions.
4. After the software is uninstalled, restart your computer, and then empty the Trash.
5. To reinstall the software, insert the HP Photosmart CD-ROM into your computer’s CD-ROM drive.
Uninstall the printer software 27
Page 31

English
Chapter 4
6. On the desktop, open the CD-ROM and then double-click HP Installer.
7. Follow the onscreen instructions and the instructions provided in the Setup Guide that came with the
HP Photosmart.
28 Care and maintenance
Page 32

5 Troubleshooting and support
The printer is designed to be reliable and easy to use, but if you have any problems, refer to this section for possible
solutions.
If any of the indicator lights on the printer control panel are flashing, see
more information. For additional troubleshooting information, see the onscreen Help.
Printer software installation problems
NOTE: Before contacting HP support, read this section for troubleshooting tips or go to the online support
services at
If the printer software did not install successfully or if the printer and computer are not communicating properly after
software installation, check this section for possible solutions.
Before proceeding, check all cable connections between the printer and computer, and ensure that you are using
the most recent version of the printer software.
The System Requirements dialog box is displayed during installation
Cause: A component of the computer system does not meet minimum system requirements.
Solution: Upgrade the component to the minimum system requirement and then reinstall the printer software.
www.hp.com/support. The name of HP support services may vary by country/region.
Error states and indicator light behavior for
English
The computer could not read the HP Photosmart CD
Solution: Make sure the CD is not dirty or scratched. If other CDs work but the HP Photosmart one does not,
you might have a damaged CD. You can request a new CD from HP support. If other CDs do not work, you
might need to service the CD-ROM drive.
The installation software does not start automatically when the CD is inserted (Windows only)
Solution: From the Windows Start menu, select Run. Click Browse, and then navigate to the CD drive where
you inserted the HP Photosmart CD. Double-click the setup.exe file.
The Found New Hardware wizard appears on computer (Windows only)
Cause: You might have connected the USB cable before completing the software installation.
Solution: Unplug the USB cable, click Cancel on the Found New Hardware wizard, and then restart the
software installation. Do not connect the USB cable until prompted during software installation.
The Found New Hardware wizard cannot locate the drivers on the CD (Windows only)
Solution: Unplug the USB cable, click Cancel on the Found New Hardware wizard, and then restart the
software installation. Do not connect the USB cable until prompted during software installation.
The computer stops responding during software installation
Cause: Virus protection software or another software program is running in the background and slowing down
the installation process.
Troubleshooting and support 29
Page 33

Chapter 5
Solution: Wait while the software finishes copying files; this might take several minutes. If, after several
minutes, the computer is still not responding, restart the computer, pause or disable any active virus protection
software, quit all other software programs, and then reinstall the printer software.
Printer hardware setup problems
English
If you are having problems related to printer hardware setup, check this section for possible solutions. If your issue
is related to software setup, see
control panel are flashing, see
NOTE: For complete troubleshooting assistance on printer setup, see the animated Quick Start Tutorial on the
HP Photosmart software CD. To view the Tutorial, follow these steps:
Windows: Insert the CD into your computer and click View Quick Start Tutorial.
Mac: Insert the CD into your computer, double-click the HP Software icon, and then double-click the HP
Installer icon.
The animated Quick Start Tutorial on the CD provides instructions for setting up the printer and installing software
along with troubleshooting information. To access the troubleshooting information, click Need help? on the
bottom-left corner of the Quick Start Tutorial screen.
Printer software installation problems. If any of the indicator lights on the printer
Error states and indicator light behavior for more information.
The printer is plugged in but will not turn on
Solution
• The printer might have drawn too much power. Unplug the printer power cord from the back of the printer.
Wait about 30 seconds, and then plug the cord back in. Turn on the printer.
• The printer might be plugged into a power strip that is turned off. Turn on the power strip, and then turn on
the printer.
• The power cord could be defective.
I do not know where to insert the printheads
Solution: Make sure the blue printhead assembly cover is open all the way. Pull the blue handle forward to
unlatch it, and then raise the cover all the way. The printhead slots will then be visible. For more information,
see the Insert the printheads section of the animated Quick Start Tutorial.
I cannot remove the output tray
Solution
• Pull the output tray straight towards you. Do not lift the forward edge upwards as you pull. It may take some
force to pull the tray out.
• Make sure you are not pulling the main tray (beneath the output tray) as you pull the output tray out.
Nothing happens when I press the Resume button
Solution: Make sure all four printheads and all eight ink cartridges are installed correctly. Check that both
doors and the specialty media tray are closed. Wait for the Resume light to start flashing quickly, and then try
pressing the Resume button again. If the printer calibration does not begin, there might be a paper jam. For
more information on clearing paper jams, see
Resume button on the printer.
Error message: There is a paper jam. Clear jam then press the
30 Troubleshooting and support
Page 34

The Resume light is not on or flashing
Solution: The printheads or the cartridges are missing or not installed correctly. Make sure all four printheads
and all eight ink cartridges are installed correctly. For more information, see the onscreen Help or the animated
Quick Start Tutorial.
Printing problems
NOTE: Before contacting HP support, read this section for troubleshooting tips or go to the online support
services at
TIP: View the How do I? animations available from the HP Solution Center to see how to load paper in the
main tray or the specialty media tray, how to clear a paper jam, and how to install and replace ink cartridges and
printheads.
www.hp.com/support. The name of HP support services may vary by country/region.
The printer makes noises when I turn it on, or starts making noises after sitting unused for a
while
Solution: The printer might make noises after a period of inactivity or when its power supply has been
interrupted and then restored. This is normal operation. The printer is performing an automatic maintenance
procedure to ensure it produces the best quality output. For more information, see
in.
Leave the printer plugged
Printing is very slow
Cause: You might be printing a PDF or a project containing high-resolution graphics or photos. Large, complex
projects containing graphics or photos print slower than text documents.
Solution: Consider using lower resolution graphics in the project, if possible, or allow for longer print times in
your workflow.
Paper does not feed into the printer correctly from the main tray
English
Solution
• If you are using non-HP brands of glossy media or thick media in the main tray, and the printer does not
feed the paper or feeds multiple sheets through at once, try reducing the number of sheets in the main tray
to 20, or use the specialty media tray to print on one sheet at a time.
• Remove the main tray from the printer and check that the paper stack is lying flat in the tray, and has not
been pushed up over the paper stops. When you replace the tray, be sure to push the tray into the printer
until it is seated correctly.
• There might be too much paper loaded in the tray. Check that the paper is not stacked above the height of
the paper-length guide. If it is, remove some paper and try printing again.
• The paper guides might not be adjusted correctly. Make sure the paper-width and paper-length guides fit
close to the edges of the paper without bending the paper.
• Two or more pieces of paper might be sticking together. Remove the paper from the main tray, fan the edges
of the stack to separate the sheets of paper, and then reload the paper and try printing again.
• If the paper is wrinkled or bent, try using different paper.
• The paper might be too thin or too thick. Use HP inkjet paper for best results. For more information, see
Choose the right paper or other media.
TIP: For more information on loading paper, see Choose the right paper or other media or view the How
do I? animations available from the HP Solution Center.
Printing problems 31
Page 35

Chapter 5
Printed pages are dropping off of the output tray
Solution: Always extend the output tray extension and flip up the paper catch when you print.
The printout is rippled or curled
English
Solution
• Check that the media type setting in the printer software matches the type of media loaded in the tray.
• Try a different print quality setting such as Normal or Best.
The document printed at an angle or is off-center
Solution: The paper might not be loaded correctly. Reload the paper, making sure it is correctly oriented in
the tray and that the paper-width and paper-length guides fit close to the edges of the paper. For more information
on loading paper, see
the HP Solution Center.
Choose the right paper or other media or view the How do I? animations available from
Colors are not printing satisfactorily
Solution
• The color management settings of the printer might not be set properly. For more information, see
management.
• Check that the media type setting in the printer software matches the type of media loaded in the tray.
• Check if one or more of the ink cartridges are low on ink. For more information, see
• The printer color may need to be calibrated. For more information, see
• Some of the ink nozzles on the printheads are clogged. Clean the printheads. See
automatically.
Align and calibrate the printer.
Check the ink levels.
Clean the printheads
Color
A blank page came out of the printer
Solution
NOTE: Check to make sure that the document you are printing does not have blank pages.
• You might have begun printing and then cancelled the process. If you cancelled the process before printing
started, the printer might have already loaded paper in preparation for printing. The next time you print, the
printer ejects the blank page before starting the new printing project.
• The printer picked two or more pages at once. Fan the paper stack before loading in main tray to separate
the individual pages or reduce the number of sheets loaded.
The printer ejects the paper when preparing to print
Solution: Direct sunlight could be interfering with the operation of the automatic paper sensor. Move the printer
out of direct sunlight.
Print quality is poor
Solution
• Use photo paper designed for the printer. For best results, use HP Advanced Photo paper.
• You might be printing on the wrong side of the paper. Make sure the paper is loaded in the main tray with
the side to be printed facing down or in the specialty media tray with the side to be printed facing up.
32 Troubleshooting and support
Page 36

• You might have selected a low-resolution setting on the digital camera. Reduce the print size of the image
and try printing again. For better results in the future, set the digital camera to a higher photo resolution.
• There might be a problem with a printhead. Print a test page to check the condition of the printheads. For
more information on printing a test page, see
◦ If the test page indicates the printheads need to be aligned, align the printheads. See
the printer.
◦ If the test page indicates the printheads need to be cleaned, run an automatic cleaning procedure from
the printer control panel. For more information, see
◦ If automatic cleaning does not resolve the problem, try manually cleaning the nozzles on the printheads.
For more information on cleaning the printheads manually, see the onscreen Help.
• Calibrate the printer color and check the color management settings. See
Color management for more information.
• If you are printing from a large file (for example, printing a large image at high dpi), and your system has
insufficient RAM and/or a processor of insufficient speed, your print quality may be poor. Try the following
workarounds, or increase your system processor speed and physical memory size (RAM). Please visit
www.hp.com/support (search keyword: Photosmart Pro B8800) for more information on this issue. To
optimize print quality for slow computers:
◦ Close all applications except the application you are printing from. Make sure there are no processes
running in the background.
◦ Change your color management strategy to “Managed by Application,” or disable color management.
See
Color management for more information.
◦ If you are printing a landscape image, rotate it into portrait orientation and select portrait orientation in
the driver before printing.
For detailed troubleshooting information on print quality problems, see the onscreen Help.
Print a test page.
Align and calibrate
Clean the printheads automatically.
Align and calibrate the printer and
English
Scrapes, scratches, or white lines are appearing in my prints
Solution
• Make sure the media you are using is flat. To flatten a sheet of media before printing, place the media in a
plastic bag and gently bend it in the opposite direction of the curl. If the problem still occurs, try a different
sheet of media.
• If you are using glossy HP Advanced Photo paper or HP Professional Satin Photo paper, try using the Photo
Thick paper-type setting in the printer driver.
• Try cleaning the printheads. For more information, see
• Try using the Maximum dpi print quality setting. For more information, see the onscreen Help.
Error messages
Error messages that are displayed on the printer screen can be divided into the following types:
Paper errors
•
Ink cartridge and printhead errors
•
Paper errors
Before contacting HP support, read this section for troubleshooting tips or go to the online support services at
www.hp.com/support. The name of HP support services may vary by country/region.
TIP: View the How do I? animations available from the HP Solution Center to see how to load paper in the
main tray or the specialty media tray, how to clear a paper jam, and how to install and replace ink cartridges and
printheads.
Clean the printheads automatically.
Error messages 33
Page 37

Chapter 5
Error message: Remove media
Solution: When you print on certain types of media using the specialty media tray, the printer does not fully
eject the media from the printer. If the computer prompts you to remove media from the printer, grasp the media
with both hands and gently pull it from the front of the printer.
English
Error message: There is a paper jam. Clear jam then press the Resume button on the printer
Solution: Try the following steps to clear the paper jam:
1. Open the top door and clear the printer of any paper obstructing the paper path. If needed, gently move the
printhead assembly to one side to remove the paper.
2. Press the two releases on either side of the rear door to remove it and gently remove the jammed paper
from the printer, then replace the rear access door.
3. Try pulling out the main tray and replacing it in the printer, making sure to push the tray in as far as it will go,
until it is fully seated.
4. Press Resume after clearing a paper jam.
NOTE: 1 If you were printing labels, make sure a label did not become unglued from the label sheet while
going through the printer.
NOTE: 2 Dry conditions can cause paper to curl, which can cause paper jams, so store expensive specialty
media in a plastic bag rather than in the main tray.
Error message: Out of paper
Solution: Load paper in the tray from which the print job was initiated, and then press the button to print
again. For paper-loading instructions, see
sheet feed).
Print from the main tray or Print from the specialty media tray (single-
Error message: Paper mismatch
Cause: The size of the paper in the tray does not match the photo size selected in the printer driver.
Solution: Press Cancel on the printer control panel, and re-start the print job, making sure to select the correct
paper size in the driver or load paper that matches the driver paper-size setting.
Ink cartridge and printhead errors
Before contacting HP support, read this section for troubleshooting tips or go to the online support services at
www.hp.com/support. The name of HP support services may vary by country/region.
TIP: View the How do I? animations available from the HP Solution Center to see how to load paper in the
main tray or the specialty media tray, how to clear a paper jam, and how to install and replace ink cartridges and
printheads.
Error message: Cartridge problem
Cause: The specified ink cartridges are missing or damaged.
Solution: Make sure all eight ink cartridges are installed. If there are no ink cartridges missing, try removing
the indicated cartridges and then reinstalling them. If this does not work, you might have a damaged ink cartridge.
34 Troubleshooting and support
Page 38

Check to see if your ink cartridge is still under warranty:
• If the end of warranty date has been reached, purchase a new ink cartridge.
• If the end of warranty date has not been reached, contact HP support. For more information, see
HP support.
Error message: Cartridges nearly expired --OR-- Cartridges expired
Cause: The ink in the indicated cartridges is near or at the expiration date.
Solution: Each ink cartridge has an expiration date. The purpose of expiration is to protect the printing system
and to ensure ink quality. When you receive a "Cartridges expired" message, remove and replace the expired
ink cartridge, and then close the message. You can also continue printing without replacing the ink cartridge,
by following the instructions on the product or the ink cartridge expiration message on your computer screen.
HP recommends replacing the expired ink cartridges. HP cannot guarantee the quality or reliability of expired
ink cartridges. Device service or repairs required as a result of using expired ink will not be covered under
warranty.
Error message: Replace cartridges soon
Cause: The indicated ink cartridges are estimated to be low on ink.
Solution: The indicated ink cartridges may need to be replaced soon.
NOTE: Ink level warnings and indicators provide estimates for planning purposes only. When you receive
a low-ink warning message, consider having a replacement cartridge available to avoid possible printing
delays.You do not need to replace the ink cartridges until you are prompted to do so.
English
Error message: Cannot print
Cause: The ink in the indicated cartridges has been depleted.
Solution: Replace the indicated ink cartridges. For more information, see
Replace the ink cartridges.
Error message: Printhead problem
Cause: The indicated printheads are missing, not detected, incorrectly installed, or damaged.
Solution: Try reinstalling the indicated printheads. Press firmly on each printhead until it snaps into place and
make sure the assembly cover is closed properly and the printer top door is closed. If the error message still
appears, contact HP support for special instructions on troubleshooting printhead problems.
Error message: Incompatible printheads
Solution: Replace the indicated printheads with the appropriate printheads for the device. To determine the
reorder number for all the printheads that the printer supports, see the back cover of this guide.
Error messages 35
Page 39

Chapter 5
HP support
If you still have a problem, follow these steps:
1. Check the documentation that came with the HP Photosmart.
English
2. Visit the HP online support Web site at
It is the fastest source for up-to-date device information and expert assistance and includes the following
features:
• Fast access to qualified online support specialists
• Software and driver updates for the HP Photosmart
• Valuable HP Photosmart and troubleshooting information for common problems
• Proactive device updates, support alerts, and HP newsgrams that are available when you register the
HP Photosmart
3. For Europe only: Contact your local point of purchase. If the printer has a hardware failure, you will be asked
to bring the printer to where you purchased it. Service is free during the printer limited warranty period. After the
warranty period, you will be quoted a service charge.
4. Call HP support. Support options and availability vary by device, country/region, and language.
NOTE: For a list of support phone numbers, see the phone number list on the inside of the back cover.
www.hp.com/support. HP online support is available to all HP customers.
Regulatory model identification number SDGOA-0842
For regulatory identification purposes, the product is assigned a Regulatory Model Number. The Regulatory Model
Number for the product is SDGOA-0842. This regulatory number should not be confused with the marketing name
(HP Photosmart Pro B8800 series) or product number (Q7161A, Q7161-64001).
Environmental statements
For Environmental Stewardship information, see the onscreen Help. To learn how to access the onscreen Help, see
Find more information.
36 Troubleshooting and support
Page 40

A Error states and indicator light
behavior
The lights on the printer flash to inform you about the printer status and various error conditions. Refer to this table
to determine what the flashing lights mean or to solve your error condition based on which lights are on or flashing.
For detailed information on troubleshooting, see the onscreen Help or the animated Quick Start Tutorial.
1 Resume light
2 Toolbox light
3 On light
4 Ink cartridge lights
5 Printhead light
English
NOTE: If all indicator lights are off, then the printer is off. Press the On button to turn on the printer.
Light Status Meaning
On light On The printer is on and ready to print.
Flashing quickly The specialty media tray or one or more printer doors are open.
Solution: Close the tray and the printer doors before printing.
Flashing slowly The printer is busy printing, processing information, or powering on or
Resume light Flashing quickly
Ink cartridge lights On The corresponding ink cartridges may be low on ink.
Flashing The corresponding ink cartridges may be depleted of ink, damaged,
off.
Paper is not loaded in the main tray or the specialty media tray.
•
Solution: Load paper in the tray from which the print job was
initiated.
The printer cannot feed paper from the paper tray specified for the
•
current print job.
Solution: Make sure the Paper Source setting in the printer driver
is set correctly. If you are printing from the main tray, the specialty
media tray must be raised.
The printer might have a paper jam.
•
Solution: Clear the paper jam. For information see
message: There is a paper jam. Clear jam then press the Resume
button on the printer.
There is a paper-size mismatch.
•
Solution: Make sure the paper-size setting in the driver matches
the media size loaded in the tray.
Solution: You may need to replace the indicated ink cartridges soon.
For more information, see
missing, or incompatible.
Error message: Replace cartridges soon.
Error
Error states and indicator light behavior 37
Page 41

English
Appendix A
(continued)
Solution: Make sure all eight ink cartridges are compatible with the
printer and are installed correctly. If a "Cannot print" error message is
displayed on your computer screen, replace the indicated ink
cartridges. For more information, see
a “Cannot print” error does not appear on your computer screen and
the ink cartridges are correctly installed, the indicated ink cartridges
may be damaged.
Check to see if your ink cartridge is still under warranty:
If the end of warranty date has been reached, purchase a new ink
•
cartridge.
If the end of warranty date has not been reached, contact HP
•
support. For more information, see HP support.
Printhead light On The printer is busy servicing, aligning the printheads, or performing
Ink cartridge lights
Printhead light
Toolbox light Flashing quickly The printer was unable to open the Toolbox (Windows)/HP Printer
All lights Flashing quickly The printer has an irrecoverable hardware error.
Ink cartridge lights:
•
Flashing (two cartridge
lights corresponding to the
colors that serve the
affected printhead)
Printhead light: Flashing
•
Flashing slowly The printer is busy opening the Toolbox (Windows) or HP Printer Utility
color calibration.
One or more printheads are missing, not detected, damaged, or
incompatible.
Solution: Make sure the indicated printhead is installed correctly and
the printhead assembly cover is closed and latched. If the printhead is
installed correctly but the lights continue to flash, the printhead may
be damaged. Contact HP support for special instructions on
troubleshooting printhead problems.
Utility (Mac) on the computer screen.
Solution: Make sure the computer is on and connected to the printer,
and then press the Toolbox button again. If the Toolbox (Windows)/
HP Printer Utility (Mac) does not open, try restarting the computer and
then pressing the Toolbox button again. If the Toolbox (Windows)/
HP Printer Utility (Mac) still does not open, reinstall the printer
software.
(Mac) on the computer screen.
Solution: Turn off the printer, and then unplug the power cord frorm
the back of the printer. Wait 30 seconds and then plug the printer back
in and turn it on. If all of the printer lights continue to flash, go to
www.hp.com/support or contact HP support.
Error message: Cannot print. If
38 Error states and indicator light behavior
Page 42

B Specifications
This section lists the minimum system requirements for installing the HP Photosmart printer software, and provides
selected printer specifications.
System requirements
Component Windows Mac
Operating system Microsoft® Windows XP, Windows Vista Mac OS X v10.3.9, v10.4, and v10.5
Processor Minimum: A modern 1 GHz 32-bit (x86)
RAM Windows XP and Vista Home: 512 MB
Free disk space Minimum: 400 MB (Windows XP) ;
CD-ROM drive Required Required
Browser Microsoft Internet Explorer 5.01 with SP2
USB USB port (Cable not included) USB port (Cable not included)
Printer specifications
Category Specifications
Connectivity USB 2.0 High speed
Environmental specifications Recommended during operation: 15–35° C (59–95° F), 20–80% RH
Power consumption Printing: 30 W (Average)
Power cord model number Europe: 8121-1022 (Switzerland), 8121-1017 (United Kingdom, Ireland), 8121-1011
USB support Microsoft Windows XP Home, XP Professional, and Vista
Minimum: PowerPC with G4, G5, or
or 64-bit (x64) processor or higher
Recommended: 2 GHz or higher
minimum; 1 GB recommended
All other versions of Windows Vista: 1 GB
minimum; 2 GB recommended
800 MB (Windows Vista)
or later
Maximum during operation: 5–40° C (41–104° F), 5–95% RH
Storage temperature range: -30–65° C (–22–149° F)
Sleep mode: Less than 6 W
Off: Less than 1 W (Average)
(Denmark), 8121-1015 (all other countries in Europe including Russia and Turkey)
North America: 8121-1023 (United States, Canada)
Asia: 8121-0769 (Japan), 8121-1019 (China), 8121-1020 (Taiwan), 8121-1017 (Hong
Kong, Singapore), 8121-1015 (Korea), 8121-1013 (India), 8121-1014 (Thailand),
8121-1015 (Russia, Turkey)
Africa: 8121-1028
Middle East: 8121-1032 (Israel), 8121-1015 (all other countries)
Oceania: 8121-1016 (Australia, New Zealand)
Mac OS X v 10.3.9, v10.4, and v10.5
HP recommends that the USB cable be less than 3 meters (10 feet) in length
®
Intel
Core processor
Recommended: PowerPC with G5
2 GHz or Intel
Minimum: 512 MB
Recommended: 1 GB
Minimum: 150 MB
Any browser
®
Core Duo processor
English
Specifications 39
Page 43

Appendix B
Media specifications
Category Specifications
Media specifications Maximum length (main tray): 483 mm (19 inches)
English
Media sizes Supported sizes
Paper tray capacity Main tray
Maximum length (specialty media tray): 1118 mm (44 inches)
Maximum width: 330 mm (13 inches)
Maximum weight for main tray: 220 gsm, non-rigid media
Maximum thickness for specialty media tray: 0.7 mm, one sheet at a time
7.6 x 12.7 cm to 33 x 111.8 cm (3 x 5 inches to 13 x 44 inches), including:
Metric: 10 x 15 cm (with or without tab), Panorama 10 x 30, 13 x 18 cm, A3, A4, A5, A6,
B4, B5, E
Imperial: Index card 3 x 5 inches, Index card 4 x 6 inches, Index card 5 x 8 inches,
3.5 x 5 inches, 4 x 6 inches (with or without tab), Panorama 4 x 10 inches, Panorama
4 x 11 inches, Panorama 4 x 12 inches, 5 x 7 inches, 8 x 10 inches, 11 x 14 inches,
11 x 17 inches, 12 x 12 inches, 13 x 19 inches
U.S.: Letter, Legal, Executive, Tabloid
Japan: L, 2L, Hagaki, Ofuku Hagaki
Envelopes: Envelope No. 10, A2 envelope, C6 envelope, DL envelope
Banner paper: Up to 13 x 44 inches
NOTE: To learn how to print banners, please visit the Resource Center on the HP
Professional Photography Web site at
the top of the page.
200 sheets of plain paper
60 sheets of photo paper
Specialty media tray
1 sheet of any media up to 0.7 mm thick
Output tray
50 sheets of plain paper
20 sheets of photo paper
www.hp.com/go/prophoto. Select your country at
40 Specifications
Page 44

CHP Warranty
English
HP Warranty 41
Page 45

Index
A
aligning printheads. See calibrating the
English
printer
alignment page 25
B
black and white printing 16
buttons 5
C
calibrating the printer 25
care and maintenance 21
cartridges. See ink cartridges
cleaning
printer 24
printheads automatically 24
color management
application-based 19
calibrating a monitor 19
ICC device profiles 19
installing ICC profiles 19
printer-based 20
computer
printing from 6
system requirements 39
control panel 5
D
device status. See Error states and
indicator lights behavior
Digital Fine Art media. See Specialty
media
documentation, printer 2
driver. See Print from a software program
E
error states and indicator lights table 37
F
feed slots. See Paper trays
Frequently asked questions 29
front paper slot. See Specialty Media Tray
and Paper trays
G
Getting help 29
grayscale printing 16
H
Help 29
help, electronic 2
HP Software Update 26
HP Solution Center 2
I
ink cartridge door 3
ink cartridges
checking ink levels 22
testing 26
input trays. See Paper trays
L
loading paper 8
M
main tray 3
media
buying and choosing 7
jams 34
loading 8
specialty 7
specifications 40
trays 6
media trays. See Paper trays
O
online support 36
open Toolbox 21
output tray 3
P
paper
banner paper. See Paper trays
banner printing. See Supported sizes
source, selecting 15
paper slots. See Paper trays
phone support 36
power cord connection 3
print cartridges. See ink cartridges
print driver 6
print driver, recommended settings 12
printer
calibrating 25
cleaning 24
documentation 2
error messages 33
lights 25
maintaining 21
parts 3
setup. See Quick Start Guide
specifications 39
printer driver, changing settings 14
printer software, updating 26
printheads, cleaning 24
printing
black and white 16
changing settings 14
from a computer 6
grayscale 16
test page 26
troubleshooting problems 31
Q
quality, printing test page 26
Questions and Answers 29
R
rear door 3
rear door releases 4
rear paper slot 3
S
selecting
paper source 15
print quality 14
single—sheet feed trays. See Paper trays
software
driver. See Print from a software
program
printer driver 6
troubleshooting 29
uninstall 27
updating 26
specialty media 7
specialty media tray 3
specifications
enviornmental 39
power 39
status messages. See Error messages
support, technical 36
system requirements 39
T
technical support 36
test page 26
toolbox 21
trays, paper 3
Troubleshooting 29
troubleshooting
error messages 33
flashing lights 30
HP support 36
printer hardware problems 30
printing problems 31
software installation 29
U
USB port 4
USB, specifications 39
W
warranty 41
Web support 36
42
Page 46

HP Photosmart Pro série B8800
Guide de l'utilisateur HP Photosmart Pro série B8800
Français
Page 47

Sommaire
1 Bienvenue
Sources d'information supplémentaires.............................................................................................................................45
Composants de l'imprimante..............................................................................................................................................46
2 Impression ordinaire
Bacs à papier.....................................................................................................................................................................49
Choix du papier ou du support approprié...........................................................................................................................50
Impression à partir du bac principal...................................................................................................................................51
Impression à partir du bac support spécial (alimentation feuille par feuille).......................................................................53
Impression depuis un logiciel.............................................................................................................................................56
Français
Modification des paramètres d'impression.........................................................................................................................57
Définition des paramètres d'impression par défaut............................................................................................................59
Définition de l'appareil HP Photosmart Pro série B8800 comme imprimante par défaut...................................................60
3 Gestion des couleurs
Qu'est-ce que la gestion des couleurs ?............................................................................................................................61
Utilisation du module d'extension HP Photosmart Pro pour Adobe Photoshop
uniquement).......................................................................................................................................................................62
Utilisation de la gestion des couleurs basée sur l'application.............................................................................................63
Utilisation de la gestion des couleurs basée sur l'imprimante............................................................................................64
4 Entretien et maintenance
Laissez l'imprimante branchée...........................................................................................................................................65
Utilisation de la boîte à outils (Windows) ou de l'Utilitaire d'imprimante HP (Mac).............................................................65
Entretien des cartouches d'encre.......................................................................................................................................66
Nettoyage de l'imprimante..................................................................................................................................................68
Alignement et étalonnage de l'imprimante.........................................................................................................................69
Impression d'une page de test...........................................................................................................................................71
Impression d'une page exemple.........................................................................................................................................71
Téléchargement des mises à jour du logiciel de l'imprimante............................................................................................72
Désinstallation du logiciel d'impression..............................................................................................................................72
®
(versions 7.0, CS et CS 2
5 Dépannage
Problèmes liés à l'installation du logiciel d'impression.......................................................................................................74
Problèmes liés à la configuration matérielle de l'imprimante..............................................................................................75
Problèmes d'impression.....................................................................................................................................................76
Messages d'erreur..............................................................................................................................................................79
Assistance HP....................................................................................................................................................................82
Numéro réglementaire d'identification de modèle SDGOA-0842.......................................................................................82
Protection de l'environnement............................................................................................................................................82
A Erreurs et comportement des voyants indicateurs......................................................................................................83
B Spécifications
Configuration minimale requise..........................................................................................................................................85
Caractéristiques de l'imprimante........................................................................................................................................85
Caractéristiques des supports............................................................................................................................................86
C Garantie HP.......................................................................................................................................................................87
Index........................................................................................................................................................................................88
44
Page 48

1 Bienvenue
Merci d'avoir acheté une imprimante HP Photosmart Pro série B8800.
Spécialement conçue pour les photographes professionnels et amateurs confirmés, cette imprimante produit des
photos riches, lumineuses, résistantes à la décoloration et présentant des couleurs fidèles, notamment avec le
papier photo HP Advanced.
Sources d'information supplémentaires
L'imprimante vous est livrée avec la documentation suivante :
• Instructions d'installation : Lisez ce document en premier. Les instructions de configuration expliquent
comment paramétrer l'imprimante et installer le logiciel HP Photosmart. Ce document porte le nom de Guide
de mise en route rapide ou Guide de configuration, suivant votre pays/région, la langue ou le modèle de
l'imprimante.
• CD-ROM du logiciel HP Photosmart : Le CD-ROM du logiciel HP Photosmart contient un tutoriel de démarrage
rapide détaillé et animé. Le tutoriel animé de démarrage rapide fourni sur le CD-ROM contient des instructions
de configuration de l'imprimante et d'installation du logiciel. Le CD-ROM contient également le pilote
d'imprimante et d'autres logiciels indispensables au bon fonctionnement de l'imprimante.
• Guide de l'utilisateur : le Guide de l'utilisateur est le document que vous avez entre les mains. Ce manuel
décrit l'utilisation des fonctions de base de l'imprimante et contient des informations de dépannage.
• Aide en ligne : L'aide fournit des instructions détaillées sur l'utilisation de toutes les fonctionnalités de l'appareil
HP Photosmart. Les spécifications complètes de l'imprimante sont disponibles, ainsi que des informations de
dépannage.
Après avoir installé le logiciel d'impression HP Photosmart sur un ordinateur, ouvrez et parcourez l'aide en
ligne :
◦ Windows : dans le menu Démarrer, sélectionnez Programmes ou Tous les programmes, placez le
curseur sur HP, HP Photosmart Pro série B8800 et cliquez sur Aide de l'imprimante HP Photosmart.
◦ Mac : Sélectionnez Aide, Aide Mac dans le Finder, puis Centre d'aide, Aide sur le produit HP.
• Centre de solutions HP (Windows uniquement) : Le Centre de solutions HP fournit des informations sur tous
vos périphériques HP. Visitez le Centre de solutions HP pour effectuer les tâches suivantes :
◦ Apprentissage de l'utilisation de l'imprimante et son logiciel et consultation des solutions de dépannage,
dont les animations Comment ?
◦ Contrôle de l'état et accès à la Boîte à outils de l'imprimante en vue d'exécuter les utilitaires de maintenance
◦ Mise à jour à jour du logiciel d'impression
◦ Modification des paramètres de l'imprimante
◦ Commande de fournitures
◦ Lancement du logiciel HP Photosmart
Après avoir installé le logiciel HP Photosmart sur un ordinateur, ouvrez et parcourez le Centre de solutions HP.
◦ Cliquez avec le bouton droit de la souris sur l'icône HP Digital Imaging Monitor dans la barre des tâches
de Windows, puis cliquez sur Lancer/Afficher le Centre de solutions HP.
Français
Remarque Dans ce Guide de l'utilisateur, le terme logiciel d'impression fait référence au logiciel
HP Photosmart fourni sur CD-ROM avec l'imprimante. Le pilote de l'imprimante correspond à la partie du
logiciel d'impression qui contrôle l'imprimante.
Bienvenue 45
Page 49

Chapitre 1
Composants de l'imprimante
Face avant de l'imprimante
Français
1 Panneau de commande et voyants : utilisez les boutons situés sur le panneau de commande de l'imprimante pour ouvrir
la boîte à outils sur l'ordinateur, reprendre ou annuler des travaux d'impression et répondre aux invites affichées sur l'écran
de l'ordinateur. Pour contrôler l'état de l'imprimante, observez les voyants. Pour plus d'informations sur les voyants
indicateurs, reportez-vous à la rubrique
2 Capot principal : soulevez ce capot pour avoir accès aux têtes d'impression et pour éliminer les bourrages papier.
3 Bac support spécial (fermé) : abaissez ce bac pour insérer une feuille d'un support épais, tel qu'une carte ou un canevas.
Utilisez ce bac lorsque vous souhaitez introduire le support dans l'imprimante de façon rectiligne et sans le courber. Ne
chargez pas de support d'une épaisseur supérieure à 0,7 mm, ni plusieurs feuilles en même temps.
4 Bac principal : placez une pile de papier ordinaire ou de papier photo dans ce bac pour effectuer l'impression.
5 Bac de sortie : les travaux d'impression sortent ici. Pour faciliter l'accès au bac principal, vous pouvez retirer le bac de sortie
en le tirant vers vous.
6 Bouton Marche/Arrêt : appuyez sur ce bouton pour allumer l'imprimante.
7 Porte d'accès aux cartouches d'encre : appuyez sur les bosses en relief à la surface de la porte pour ouvrir cette dernière
et insérer ou retirer les cartouches d'encre.
Erreurs et comportement des voyants indicateurs.
Arrière de l'imprimante
1 Porte arrière : retirez cette porte pour permettre le dégagement des bourrages papier.
2 Logement de papier arrière : les travaux d'impression provenant du bac support spécial passent en va-et-vient dans ce
46 Bienvenue
logement avant d'être éjectés dans le bac de sortie à l'avant de l'imprimante. Vérifiez qu'il y a assez de place à l'arrière de
l'imprimante pour que le papier puisse passer en va-et-vient dans ce logement sans rencontrer d'obstacles. Lorsque vous
imprimez à l'aide du bac support spécial, l'espace derrière l'imprimante doit être équivalent à la longueur du papier sur lequel
vous imprimez.
Page 50

3 Prise du cordon d'alimentation : utilisez ce port pour brancher le cordon d'alimentation de l'imprimante.
4 Port USB : utilisez ce port pour connecter l'imprimante à un ordinateur.
5 Dispositifs de déblocage de la porte arrière : appuyez sur les deux dispositifs de déblocage de chaque côté du logement
de papier arrière afin de retirer la porte arrière.
Bacs à papier
1 Bac principal : placez une pile de papier photo, de papier ordinaire ou d'un autre support non rigide dans ce bac pour
l'impression. Chargez le support en orientation portrait et face à imprimer vers le bas. Empoignez le dispositif de
déblocage du bac principal pour l'allonger ou le raccourcir, selon la taille du papier que vous chargez.
2 Bac de sortie : les travaux d'impression sortent ici. Pour faciliter l'accès au bac principal, vous pouvez retirer ce bac en le
tirant vers vous.
3 Bac support spécial (ouvert) : insérez dans ce bac une feuille d'un support épais, tel qu'une carte. Les supports provenant
de ce bac sont directement entraînés dans l'imprimante, sans être pliés. Chargez le papier, face à imprimer vers le
haut. Ne chargez pas de support dont l'épaisseur dépasse 0,7 mm. Pour savoir comment utiliser ce bac d'alimentation, voir
Impression à partir du bac support spécial (alimentation feuille par feuille).
Français
Bac principal
1 Guide de largeur du papier : réglez ce guide contre le bord du papier dans le bac en appuyant sur le bouton à l'avant du
guide et en le faisant glisser.
2 Marques de format de papier : reportez-vous à ces marques pour vous permettre de charger le papier dans la bonne
orientation.
3 Rallonge du bac principal : déployez le bac principal pour charger des formats de papier de grande taille. Lorsqu'il est
entièrement déployé, le bac principal peut contenir du papier d'un format maximum de 33 x 48,3 cm (13 x 19 pouces).
Composants de l'imprimante 47
Page 51

Français
Chapitre 1
4 Dispositif de déblocage du bac principal : pincez le dispositif de déblocage et tirez-le vers vous pour allonger ou réduire
la rallonge du bac principal ou pour retirer le bac de l'imprimante.
5 Guides papier : alignez le papier sur ces guides afin que le papier soit correctement alimenté dans l'imprimante.
6 Guide de longueur du papier : réglez ce guide contre le bord du papier dans le bac.
Panneau de commande
1 Annuler : Appuyez sur ce bouton pour arrêter le travail d'impression en cours, aligner la tête d'impression ou procéder à
l'étalonnage des couleurs.
2 Reprise : Le voyant Reprise clignote lorsque l'imprimante est à court de papier ou qu'un bourrage papier s'est produit.
Appuyez sur le bouton Reprise pour reprendre l'impression après avoir chargé du papier ou éliminé un bourrage papier. Le
voyant Reprise de couleur orange s'allume fixement lorsque le bac support spécial est en position abaissée. Appuyez sur
le bouton Reprise pour lancer l'impression après avoir chargé un support dans le bac support spécial.
3 Boîte à outils : Appuyez une fois sur ce bouton pour ouvrir la boîte à outils de l'imprimante (Windows) ou l'Utilitaire
d'imprimante HP (Mac) sur l'écran de l'ordinateur. Le voyant Boîte à outils de couleur orange clignote lentement lorsque
l'imprimante est occupée à ouvrir la boîte à outils ou l'Utilitaire d'imprimante HP.
4 Marche/arrêt : Le voyant Marche/arrêt de couleur bleue s'allume fixement lorsque l'imprimante est sous tension. Le voyant
Marche/arrêt clignote lentement lorsque l'imprimante est occupée. Il clignote rapidement lorsqu'une ou plusieurs portes de
l'imprimante sont ouvertes.
5 Voyants de cartouches d'encre : Ces huit voyants indiquent individuellement l'état de chaque cartouche d'encre. Un voyant
fixe indique que le niveau d'encre contenu dans la cartouche correspondante est probablement insuffisant. Un voyant
clignotant indique que la cartouche correspondante est épuisée, manquante, endommagée ou incompatible.
6 Voyant Tête d'impression : Le voyant de tête d'impression de couleur orange s'allume fixement lorsqu'une procédure de
maintenance de l'imprimante, d'alignement de la tête d'impression ou d'étalonnage des couleurs est en cours. Le voyant de
la tête d'impression clignote lorsqu'une tête d'impression est manquante, endommagée ou incompatible. Pour indiquer
laquelle des quatre têtes d'impression est défectueuse, deux voyants de cartouches correspondant aux couleurs qui
alimentent la tête d'impression affectée se mettent également à clignoter.
48 Bienvenue
Page 52

2 Impression ordinaire
Cette section explique comment charger des supports dans les bacs à papier, modifier les paramètres d'impression
et imprimer à partir de votre ordinateur.
Bacs à papier
L'imprimante est équipée de deux bacs destinés à accueillir du papier et d'autres supports :
• Bac principal : Le bac principal peut contenir plusieurs feuilles de support et charger automatiquement chaque
feuillet à imprimer. Seuls les supports fins et flexibles peuvent être chargés dans ce bac, car les supports
provenant de ce bac sont pliés lorsqu'ils passent dans l'imprimante.
• Bac support spécial : le bac support spécial est principalement conçu pour les supports épais et rigides. Le
papier provenant de ce bac est directement entraîné dans l'imprimante, sans être plié. Lorsque vous utilisez ce
bac, vérifiez qu'il y a suffisamment d'espace derrière l'imprimante, espace au moins égal à la longueur du support
sur lequel vous imprimez. Chargez le support dans ce bac à raison d'un seul feuillet à la fois, en veillant à ce
que l'épaisseur du support ne dépasse pas 0,7 mm.
Tout support utilisable dans le bac principal peut également être chargé dans le bac support spécial. Toutefois, il
convient que certains types de supports pris en charge dans le bac support spécial ne soient pas chargés dans le
bac principal.
Conseil Utilisez le bac support spécial pour effectuer de petits travaux d'impression sur du papier flexible à
faible grammage lorsque vous souhaitez éviter de changer la pile de papier dans le bac principal.
Le tableau ci-dessous récapitule les différences entre les deux bacs pour supports et indique comment déterminer
le bac adapté à un travail d'impression spécifique.
Français
Caractéristique Bac principal Bac support spécial
Margeur Feuillets multiples Feuillet simple
Circuit d'alimentation en papier Chemin d'alimentation en papier
curviligne
Support Fin, flexible Fin et épais (ne dépassant pas 0,7 mm)
Orientation du support Face à imprimer vers le bas Face à imprimer vers le haut
Formats de papier pris en charge 7,6 x 12,7 cm à 33 x 48,3 cm
(3 x 5 pouces à 13 x 19 pouces)
Curcuit d'alimentation en papier rectiligne
7,6 x 12,7 cm à 33 x 111,8 cm
(3 x 5 pouces à 13 x 44 pouces)
Suivez les instructions ci-dessous pour déterminer le bac dans lequel charger un type de support donné :
Support Bac principal Bac support spécial
Papiers photo, jet d'encre et
ordinaires
Exemples : Papier photo HP Advanced,
papier photo satin HP Professionnel,
papiers pour brochures, photo, jet
d'encre et ordinaire
Papiers beaux-arts numériques <220
g/m²
Exemples : Photo Rag (papier chiffon
pour photos)
Papiers beaux-arts numériques >220
g/m²
Exemples : Canevas, Photo Rag (papier
chiffon pour photos) Papier aquarelle
Configuration recommandée Pris en charge
Pris en charge Configuration recommandée
Pas de prise en charge Configuration recommandée
Impression ordinaire 49
Page 53

Chapitre 2
(suite)
Support Bac principal Bac support spécial
Tout support d'une épaisseur
supérieure à 0,7 mm
Pas de prise en charge Pas de prise en charge
Remarque Il n'est pas nécessaire de retirer les supports du bac principal avant d'utiliser le bac support spécial.
Pour obtenir une description des différents types de papier à utiliser avec cette imprimante, reportez-vous à la
section
Choix du papier ou du support approprié.
Choix du papier ou du support approprié
Pour obtenir la liste des papiers jet d'encre HP disponibles ou pour acheter des consommables, allez sur le site :
www.hpshopping.com (États-Unis)
•
www.hp.com/eur/hpoptions (Europe)
Français
•
www.hp.com/jp/supply_inkjet (Japon)
•
www.hp.com/paper (Asie-Pacifique)
•
Remarque Les papiers photo HP Premium et HP Premium Plus ne sont pas pris en charge sur cette
imprimante.
Pour obtenir des résultats optimaux et de longue durée avec votre imprimante, choisissez parmi des papiers HP
de grande qualité.
Documents à imprimer Utilisez ce papier ou ce support
Tirages et agrandissements haute qualité et longue durée Papier photo satin HP Professionnel
Papier photo HP Advanced (ce papier est disponible en finition
brillante ou satin-mat/semi-brillant. Toutes les finitions ne sont
pas disponibles dans tous les pays/toutes les régions, ni dans
tous les formats de papier).
Calibrage des couleurs et alignement des têtes d'impression Papier photo HP Advanced, finition brillante
Photos provenant d'un courrier électronique et du Web Papier ordinaire
Documents texte, brouillons et pages de test Papier ordinaire
Important : Stockez le papier dans son emballage d'origine ou dans un sac plastique étanche pour éviter qu'il ne
gondole, ce qui pourrait empêcher le chargement correct. Lorsque vous n'imprimez pas, ne laissez pas le support
dans le bac principal car il pourrait gondoler en restant exposé à l'air libre.
Supports spécialisés
L'imprimante permet d'imprimer sur de nombreux supports spéciaux HP et non HP. Testez certains des types de
papier répertoriés ci-dessous pour obtenir des impressions originales :
• Papier beaux-arts lisse HP Hahnemühle Smooth
• Papier pour aquarelle HP Hahnemühle Watercolor
• Papier beaux-arts HP Aquarella Art
• Papier toilé mat artistique HP
• Photo Rag (papier chiffon pour photos)
Certains types de support peuvent ne pas être disponibles dans tous les pays/toutes les régions. Renseignez-vous
auprès de votre fournisseur.
Avertissement Ne chargez pas de support d'une épaisseur supérieure à 0,7 mm au risque d'endommager
l'imprimante.
50 Impression ordinaire
Page 54

Formats pris en charge
L'appareil HP Photosmart prend en charge une grande diversité de formats de papier, dont les suivants :
Type de papier Format
Système métrique 10 x 15 cm (avec ou sans onglet), Panoramique 10 x 30 cm, 13 x 18 cm, A3, A4, A5, A6, B4, B5, E
Système impérial Fiche Bristol 3 x 5 à 5 x 8 pouces, 3,5 x 5 à 12 x 12 pouces, 4 x 6 pouces (avec ou sans onglet),
États-Unis Letter, Legal, Executive, Tabloid
Japon L, 2L, Hagaki, Ofuku Hagaki
Enveloppes Enveloppe N° 10, Enveloppe A2, Enveloppe C6, Enveloppe DL
Papier banderole Jusqu'à 13 x 44 pouces
Panoramique 4 x 10 pouces à 4 x 12 pouces, 13 x 19 pouces (B+)
Remarque Pour découvrir la méthode d'impression de banderoles, consultez le centre de
ressources (Resource Center) du site Web de photographie professionnelle HP à l'adresse
www.hp.com/go/prophoto. Sélectionnez votre pays en haut de la page.
Avertissement Ne chargez pas de support d'une épaisseur supérieure à 0,7 mm au risque d'endommager
l'imprimante.
Impression à partir du bac principal
Pour connaître les types de supports pouvant être chargés dans le bac principal, reportez-vous à la rubrique Bacs
à papier.
Avertissement Ne chargez pas de papier toilé ni de supports beaux-arts numériques de grammage supérieur
à 220 g/m² au risque d'endommager l'imprimante et les supports. Dans ce cas, utilisez plutôt le bac support
spécial.
Remarque Pour permettre l'impression à partir du bac principal, le bac support spécial doit être en position
fermée.
Pour imprimer à partir du bac principal
1. Retirez entièrement le bac de sortie en saisissant à deux mains les côtés du bac et en le tirant vers vous. Le
bac principal est maintenant accessible.
Français
1 Bac principal
2 Bac de sortie
2. Réglez les guides de largeur et de longueur en position d'ouverture maximale, afin de faciliter la mise en place
du papier.
3. Chargez du papier dans le bac principal.
a. Pour un accès plus facile ou pour le chargement de supports de grande taille, déployez le bac principal en
pinçant le dispositif de déblocage et en tirant le bac vers vous.
Impression à partir du bac principal 51
Page 55

Français
Chapitre 2
Conseil Si nécessaire, vous pouvez retirer le bac de l'imprimante en tenant les deux côtés du bac et
en le tirant vers vous.
b. Placez une pile de feuilles dans le bac principal, en orientation portrait et face à imprimer vers le bas.
Alignez le papier sur le côté droit du bac et sur les guide-papier à l'arrière du bac. La pile de feuilles ne doit
pas dépasser la hauteur du guide de largeur du papier.
c. Si vous avez déployé ou retiré le bac principal pour charger du papier, poussez l'extension du bac principal
jusqu'au bord du papier en pinçant le dispositif de déblocage et en poussant l'extension du bac, puis remettez
le bac en place dans l'imprimante en le poussant jusqu'à ce qu'il soit correctement positionné. Pour éviter
tout bourrage papier, assurez-vous de régler la longueur du bac principal et réenclenchez le bac
dans l'imprimante avant de régler les guides de longueur et de largeur du papier.
4. Réglez les guides de largeur et de longueur contre les bords du papier.
5. Vérifiez que le papier est à plat dans le bac d'entrée.
6. Remettez le bac de sortie en place. Si vous imprimez sur du papier d'un format supérieur à 21,6 x 28 cm, tirez
l'extension du bac de sortie en maintenant le bac d'une main et en tirant l'extension de l'autre. Rabattez le bac
de récupération du papier.
52 Impression ordinaire
Page 56

1 Rallonge du bac de sortie
2 Bac de réception du papier
7. Sélectionnez, sur le pilote d'imprimante de votre ordinateur, le type de papier correspondant au type de support
que vous avez chargé. Pour plus d'informations sur le pilote d'imprimante, voir
8. Assurez-vous que le paramètre Source du papier (Windows) ou Source (Mac) du pilote d'imprimante est défini
sur Bac principal ou Sélection automatique, afin que l'imprimante charge les supports à partir du bac principal.
Remarque Lorsque vous sélectionnez un Type de papier, le pilote configure automatiquement la Source
du papier (Windows) ou la Source (Mac) en fonction du type de papier recommandé. Pour certains types
de supports, il est possible de sélectionner un autre paramètre que la source de papier recommandée.
Toutefois, si un symbole d'avertissement de couleur jaune s'affiche (Windows) ou que le pilote ne permet
pas d'effectuer la sélection souhaitée (Mac), préférez l'utilisation du bac support spécial pour éviter
d'endommager l'imprimante ou d'obtenir une qualité d'impression médiocre. Pour plus d'informations sur
l'impression à partir du bac support spécial, voir
feuille par feuille).
9. Envoyez votre travail d'impression à partir de l'ordinateur.
Remarque Si vous utilisez un support brillant non HP dans le bac principal et que l'imprimante n'entraîne pas
le papier ou entraîne plusieurs feuilles au lieu d'une seule, essayez de réduire le nombre de feuilles dans le bac
principal à 20 ou utilisez le bac support spécial pour imprimer feuille par feuille.
Impression à partir du bac support spécial (alimentation
Impression depuis un logiciel.
Impression à partir du bac support spécial (alimentation
Français
feuille par feuille)
Pour connaître les types de supports pouvant être chargés dans le bac support spécial, reportez-vous à la rubrique
Bacs à papier.
Avant d'imprimer sur un support spécial onéreux, il est recommandé de s'habituer à l'utilisation du bac support
spécial en chargeant une simple feuille de papier ordinaire et en imprimant une image ou un document.
Remarque Il n'est pas nécessaire de retirer les supports du bac principal avant d'utiliser le bac support spécial.
Pour imprimer à partir du bac support spécial
1. Vérifiez qu'il y a assez de place à l'arrière de l'imprimante pour que le papier puisse passer en va-et-vient dans
le logement de papier arrière. L'espace à l'arrière de l'imprimante doit correspondre à la longueur du papier sur
lequel vous imprimez.
Remarque N'insérez pas de papier dans la fente d'alimentation arrière.
2. Abaissez le bac support spécial.
Le voyant Reprise clignote lorsque l'imprimante soulève l'ensemble tête d'impression en préparation de
l'impression à partir du bac support spécial. Lorsque le voyant Reprise cesse de clignoter, vous pouvez charger
le support dans le bac.
Impression à partir du bac support spécial (alimentation feuille par feuille) 53
Page 57

Français
Chapitre 2
1 Bac support spécial (alimentation feuille par feuille)
3. Tirez la rallonge du bac de sortie en maintenant le bac de sortie d'une main et en tirant la rallonge de l'autre
main. Rabattez le bac de récupération du papier à l'extrémité de la rallonge du bac de sortie afin d'éviter toute
chute du papier.
1 Rallonge du bac de sortie
2 Bac de réception du papier
4. Chargez une feuille en orientation portrait et face à imprimer vers le haut dans le bac support spécial.
Chargez le support dans l'imprimante jusqu'a ce que le bord arrière du support (le bord le plus proche de vous)
soit aligné sur la ligne blanche dessinée sur le bac. Alignez le bord droit du support sur le bord relevé du bac
et non sur le côté de l'imprimante. Un support mal aligné peut entraîner une impression de travers ou d'autres
problèmes, dont des bourrages papier.
1 Bac support spécial (alimentation feuille par feuille)
Pour les supports de grand format, le support sortira par le logement de papier arrière, à l'arrière de l'imprimante.
54 Impression ordinaire
Page 58

Important : En cas d'impression sur un papier toilé ou un support légèrement courbé, ouvrez le capot supérieur
afin de vérifier que le support est chargé en douceur entre les rouleaux d'entraînement. Veillez à refermer le
capot principal.
1 Rouleaux d’entraînement
Important : Si le support n'est pas suffisamment aplani avant l'impression, un bourrage risque de se produire.
Pour aplanir une feuille de support avant l'impression, placez le support dans un sac en matière plastique et
courbez-le dans le sens opposé à la déformation.
5.
Appuyez sur le bouton
de l'imprimante.
6. Sélectionnez, sur le pilote d'imprimante de votre ordinateur, le type de papier correspondant au type de support
que vous avez chargé. Pour plus d'informations sur le pilote d'imprimante, voir
Impression depuis un logiciel.
7. Assurez-vous que le paramètre Source du papier (Windows) ou Source (Mac) du pilote d'imprimante est défini
sur Bac support spécial, afin que l'imprimante charge les supports à partir de ce bac.
Remarque Lorsque vous sélectionnez un Type de papier, le pilote configure automatiquement la Source
du papier (Windows) ou la Source (Mac) en fonction du type de papier recommandé. Pour certains types
de supports (tels que les papiers photo, pour lesquels l'alimentation feuille par feuille a lieu moins souvent),
la source recommandée est le bac principal, bien que leur chargement à partir du bac support spécial soit
également possible. Lorsque vous souhaitez imprimer sur un tel support à partir du bac support spécial,
vous devez remplacer le paramètre recommandé pour la source du papier.
Français
8. Envoyez votre travail d'impression à partir de l'ordinateur.
Impression à partir du bac support spécial (alimentation feuille par feuille) 55
Page 59

Chapitre 2
Impression depuis un logiciel
Pour imprimer une photo ou un document en utilisant les paramètres de base de l'imprimante, suivez les étapes cidessous. Pour modifier les paramètres, reportez-vous à la section
utiliser les paramètres de gestion avancée des couleurs, reportez-vous à la section
Pour imprimer à partir d'un logiciel (Windows)
1. Vérifiez que le papier est correctement chargé dans l'appareil.
2. Dans le menu Fichier du logiciel, cliquez sur Imprimer.
3. Sélectionnez l'appareil HP Photosmart Pro série B8800 en tant qu'imprimante. Si l'appareil HP Photosmart Pro
série B8800 est déjà défini comme imprimante par défaut, vous pouvez ignorer cette étape. L'appareil
HP Photosmart Pro série B8800 est sélectionné automatiquement.
4. Si vous devez modifier les paramètres, cliquez sur le bouton qui ouvre la boîte de dialogue Propriétés. Selon
Français
le logiciel utilisé, ce bouton peut être libellé Propriétés, Options, Configuration d'imprimante ou
Imprimante.
5. Sélectionnez les options correspondant à votre travail d'impression dans les onglets Avancées, Raccourcis
d'impression, Fonctionnalités et Couleur.
Conseil Vous pouvez sélectionner facilement les options appropriées pour votre travail d'impression en
choisissant l'une des tâches d'impression prédéfinies dans l'onglet Raccourcis d'impression. Cliquez sur
un type de travail d'impression dans la boîte de dialogue Raccourcis d'impression. Les paramètres par
défaut pour ce type d'impression sont définis et résumés dans l'onglet des raccourcis d'impression. Le
cas échéant, vous pouvez modifier les paramètres dans cet onglet, mais vous pouvez également le faire
dans les autres onglets de la boîte de dialogue Propriétés.
Modification des paramètres d'impression. Pour
Gestion des couleurs.
6. Cliquez sur OK pour fermer la boîte de dialogue Propriétés.
7. Cliquez sur Imprimer ou sur OK pour commencer l'impression.
Pour imprimer à partir d'un logiciel (Mac OS X v10.4)
1. Dans le menu Fichier de votre application logicielle, sélectionnez Mise en page.
La boîte de dialogue Mise en page s'affiche. Vous pouvez alors définir le format du papier, son orientation et
l'échelle.
2. Vérifiez que l'appareil HP Photosmart est l'imprimante sélectionnée.
3. Définissez les attributs de page :
• Sélectionnez le format du papier.
• Sélectionnez l'orientation du papier.
• Entrez le pourcentage de mise à l'échelle.
4. Cliquez sur OK.
5. Dans le menu Fichier de votre application logicielle, sélectionnez Imprimer.
La boîte de dialogue Imprimer apparaît et le volet Copies et pages s'ouvre.
6. Modifiez les paramètres d'impression pour chaque option dans le menu déroulant, selon le projet à réaliser.
Remarque Lorsque vous imprimez une photo, vous devez sélectionner les options associées au type de
papier approprié et à l'amélioration photo.
7. Cliquez sur Imprimer pour lancer l'impression.
Pour imprimer à partir d'un logiciel (Mac OS X v10.5)
1. Dans le menu Fichier de votre application logicielle, sélectionnez Imprimer.
La boîte de dialogue Imprimer apparaît.
2. Vérifiez que l'appareil HP Photosmart est l'imprimante sélectionnée.
56 Impression ordinaire
Page 60

3. Définissez les attributs de page :
• Sélectionnez le format du papier.
• Sélectionnez l'orientation du papier.
• Entrez le pourcentage de mise à l'échelle.
4. Pour modifier d'autres options, telles que le type de papier, sélectionnez-les dans le menu déroulant de
l'application, vers le bas de la boîte de dialogue.
Remarque Lorsque vous imprimez une photo, vous devez sélectionner les options associées au type de
papier approprié et à l'amélioration photo.
5. Cliquez sur Imprimer pour lancer l'impression.
Modification des paramètres d'impression
Consultez cette section pour connaître les paramètres d'impression disponibles dans le pilote d'imprimante. Vous
pouvez également régler les paramètres d'impression dans le plug-in d'impression HP Photosmart Pro pour Adobe
Photoshop 7, CS et CS2. Pour plus de détails, reportez-vous à
Pro pour Adobe Photoshop® (versions 7.0, CS et CS 2 uniquement).
Pour plus d'informations sur le pilote d'imprimante HP, consultez l'aide en ligne :
• Windows : Cliquez avec le bouton droit de la souris sur l'icône HP Digital Imaging Monitor dans la barre des
tâches de Windows, puis sélectionnez Lancer/Afficher le Centre de solutions HP. Cliquez sur Aide dans les
options accessibles en bas de la page d'accueil du Centre de solutions HP. Dans la zone Ressources
supplémentaires, pointez sur Documents, puis sélectionnez Guide à l'écran. Vous pouvez également, dans
la boîte de dialogue d'impression, cliquer avec le bouton droit sur une option, puis cliquer sur la zone Qu'est-
ce que c'est ? pour en savoir plus sur cette option.
• Mac : Sélectionnez Aide, Aide sur le Mac dans le Finder, puis Bibliothèque, Aide sur le produit HP.
Utilisation du module d'extension HP Photosmart
Français
Sélection d'une qualité d'impression
Pour sélectionner une qualité d'impression (Windows)
1. Ouvrez la boîte de dialogue Propriétés de l'imprimante.
2. Cliquez sur l'onglet Fonctionnalités.
3. Dans la liste déroulante Qualité d'impression, sélectionnez la vitesse et la qualité d'impression appropriées
pour votre projet :
• Brouillon rapide : imprime à la vitesse la plus rapide et en faisant l'usage le plus économique de l'encre.
• Normale : offre le meilleur équilibre entre la qualité d'impression et la vitesse. Ce paramètre convient à la
plupart des documents.
• Supérieure : offre une qualité d'impression élevée.
• ppp maximal : permet d'obtenir des images d'une grande qualité et d'une grande netteté, mais avec une
vitesse d'impression plus lente qu'en mode Supérieure et une plus grande quantité d'espace disque
nécessaire. Pour améliorer le rendu des couleurs et le piqué des photos, utilisez du papier photo
HP Advanced lorsque vous choisissez d'imprimer avec le paramètre de qualité d'impression ppp maximal.
Pour sélectionner une qualité d'impression (Mac)
1. Ouvrez la boîte de dialogue Imprimer.
2. Sélectionnez le panneau Type/qualité du papier.
3. Cliquez sur l'onglet Papier.
4. Le menu contextuel Qualité vous permet de sélectionner les paramètres de vitesse et de qualité pour votre
projet :
• Brouillon rapide : imprime à la vitesse d'impression la plus rapide.
• Normale : offre le meilleur équilibre entre la qualité d'impression et la vitesse. Ce paramètre convient à la
plupart des documents.
Modification des paramètres d'impression 57
Page 61

Chapitre 2
• Optimale : offre une qualité d'impression élevée.
• ppp maximal : permet d'obtenir des images d'une grande qualité et d'une grande netteté, mais avec une
vitesse d'impression plus lente qu'en mode Supérieure et une plus grande quantité d'espace disque
nécessaire.
Définition du type de papier
Le paramètre du type de papier par défaut pour l'impression dépend du raccourci d'impression que vous
sélectionnez. Si vous imprimez sur des papiers spéciaux, vous pouvez modifier le type de papier dans la boîte de
dialogue Propriétés de l'imprimante.
Pour sélectionner un type de papier spécifique (Windows)
1. Ouvrez la boîte de dialogue Propriétés de l'imprimante.
2. Cliquez sur l'onglet Fonctionnalités.
3. Sélectionnez le type de papier dans la liste déroulante Type de papier. Si le type de papier chargé ne figure
Français
pas dans la liste, ajoutez un type de papier personnalisé. Pour plus d'informations sur l'ajout d'un type de papier
personnalisé, reportez-vous à l'aide en ligne.
Remarque Lorsque vous sélectionnez un Type de papier, le pilote configure automatiquement la Source
du papier en fonction du bac à papier recommandé. Selon le type de papier utilisé, le fait de remplacer le
paramètre recommandé pour la Source du papier risque d'endommager l'imprimante ou le support. Pour
plus de détails, reportez-vous à
4. Sélectionnez les autres paramètres d'impression appropriés, puis cliquez sur OK.
Bacs à papier.
Pour sélectionner un type de papier spécifique (Mac)
1. Ouvrez la boîte de dialogue Imprimer.
2. Sélectionnez le panneau Type/qualité du papier.
3. Cliquez sur l'onglet Papier.
4. Dans le menu déroulant Type de papier, cliquez sur le type de papier approprié.
Remarque Lorsque vous sélectionnez un type de papier, le pilote configure automatiquement la Source
en fonction du bac à papier recommandé. Selon le type de papier utilisé, le fait de remplacer le paramètre
recommandé pour la Source risque d'endommager l'imprimante ou le support. Pour plus de détails,
reportez-vous à
5. Sélectionnez les autres paramètres d'impression utiles, puis cliquez sur Imprimer.
Bacs à papier.
Sélection de la source de papier
L'imprimante propose deux sources de papier :
• Bac principal
• Bac support spécial
Remarque Lorsque vous sélectionnez un type de papier, le pilote configure automatiquement la Source du
papier (Windows) ou la Source (Mac) en fonction du bac à papier recommandé. Selon le type de papier utilisé,
le fait de remplacer le paramètre recommandé pour la Source du papier ou la Source risque d'endommager
l'imprimante ou le support. Pour plus de détails, reportez-vous à
Pour sélectionner une source de papier (Windows)
1. Ouvrez la boîte de dialogue Propriétés de l'imprimante.
2. Cliquez sur l'onglet Fonctionnalités.
3. Sélectionnez l'une des options suivantes dans la liste déroulante :
• Sélectionner auto. : l'impression s'effectue à partir du bac principal.
• Bac principal : l'impression s'effectue à partir du bac principal.
• Bac support spécial : l'impression s'effectue à partir du bac support spécial.
Bacs à papier.
58 Impression ordinaire
Page 62

Pour sélectionner une source de papier (Mac)
1. Ouvrez la boîte de dialogue Imprimer.
2. Sélectionnez la sous-fenêtre Type/qualité du papier.
3. Dans le menu déroulant Source, sélectionnez l'une des options suivantes.
• Bac principal : l'impression s'effectue à partir du bac principal.
• Bac support spécial : l'impression s'effectue à partir du bac support spécial.
Impression en niveaux de gris
Vous pouvez imprimer des documents ou des photos en niveaux de gris pour obtenir des photos en noir et blanc
d'un effet spectaculaire.
Pour imprimer en niveaux de gris (Windows)
1. Ouvrez la boîte de dialogue Propriétés de l'imprimante.
2. Cliquez sur l'onglet Couleur, puis cliquez sur Imprimer en niveaux de gris dans la zone Options de
couleur.
Remarque Le paramètre Impression en niveaux de gris n'est pas disponible si l'option Gestion des
couleurs située sous le même onglet est configurée sur Couleurs gérées par l'application. Pour activer
l'impression en niveaux de gris, sélectionnez un mode de gestion des couleurs basé sur l'imprimante
(ColorSmart/sRGB ou Adobe RGB). Pour plus d'informations sur la gestion des couleurs, voir
couleurs.
3. Dans la liste déroulante Imprimer en niveaux de gris, sélectionnez l'une des options suivantes :
• Gris composite
• Encres grises uniquement
4. Sélectionnez les autres paramètres d'impression appropriés, puis cliquez sur OK.
Français
Gestion des
Pour imprimer en niveaux de gris (Mac)
1. Ouvrez la boîte de dialogue Imprimer.
2. Sélectionnez le panneau Type/qualité du papier.
3. Cliquez sur l'onglet Papier.
4. Dans le menu déroulant Couleur, sélectionnez Niveaux de gris.
5. Cliquez sur l'onglet Options de couleur et sélectionnez l'une des options suivantes :
• Gris composite
• Encres grises uniquement
6. Sélectionnez les autres paramètres d'impression utiles, puis cliquez sur Imprimer.
Remarque Pour plus d'informations sur les paramètres de couleur dans le pilote de l'imprimante, reportez-
vous à la section
Gestion des couleurs.
Définition des paramètres d'impression par défaut
Si vous imprimez fréquemment des photos ou des documents sur du papier de même format et de même type,
vous pouvez définir des valeurs d'impression par défaut ou prérégler tous vos paramètres préférés.
Pour modifier les paramètres d'impression par défaut (Windows)
1. Cliquez avec le bouton droit de la souris sur l'icône HP Digital Imaging Monitor se trouvant sur la droite dans
la barre des tâches de Windows, puis sélectionnez Lancer/Afficher le Centre de solutions HP afin d'ouvrir la
page d'accueil du Centre de solutions HP.
2. Cliquez sur Paramètres en bas de la page d'accueil du Centre de solutions HP.
3. Cliquez sur Paramètres de l'imprimante dans la zone Paramètres d'impression.
4. Modifiez les paramètres et cliquez sur OK.
Définition des paramètres d'impression par défaut 59
Page 63

Chapitre 2
Pour créer des préréglages (Mac)
1. Dans le menu Fichier du logiciel, cliquez sur Imprimer.
2. Choisissez les paramètres que vous voulez utiliser fréquemment sur chaque panneau.
3. Dans le menu déroulant Préréglages, sélectionnez Enregistrer sous.
4. Entrez le nom de votre préréglage, puis cliquez sur OK.
Définition de l'appareil HP Photosmart Pro série B8800 comme imprimante par défaut
Windows
1. Dans la barre des tâches de Windows, cliquez sur Démarrer, puis sur Panneau de configuration.
2. Ouvrez Imprimantes (Windows Vista) ou Imprimantes et télécopieurs (Windows XP).
Français
3. Cliquez avec le bouton droit sur l'icône Imprimante HP Photosmart, puis cliquez sur Définir comme
imprimante par défaut.
Mac
1. Dans Préférences système, cliquez sur Impression & Télécopie, puis cliquez sur Impression.
2. Choisissez une option dans le menu déroulant Imprimante sélectionnée dans la boîte de dialogue
Imprimer.
60 Impression ordinaire
Page 64

3 Gestion des couleurs
La présente section contient des informations de base concernant la gestion des couleurs sur l'appareil
HP Photosmart Pro série B8800. Pour des informations détaillées sur la gestion des couleurs, reportez-vous à l'aide
en ligne.
Remarque Dans le présent guide de l'utilisateur, le terme logiciel d'impression fait référence au logiciel
HP Photosmart fourni sur CD-ROM avec l'imprimante. Le pilote de l'imprimante correspond à la partie du
logiciel d'impression qui contrôle l'imprimante.
Qu'est-ce que la gestion des couleurs ?
La gestion des couleurs a un impact sur la manière dont les couleurs de vos photos sont imprimées. L'imprimante,
les logiciels de retouche d'image, le système d'exploitation et les périphériques d'imagerie, comme les appareils
photo, les scanners et les écrans, affichent les couleurs de manière différente ; la stratégie de gestion des couleurs
que vous choisissez a donc un impact sur la précision de l'impression des couleurs.
La gestion des couleurs s'appuie sur des espaces couleur
couleur RGB
2
, les imprimantes commerciales utilisent l'espace couleur CMJN3. Les différences entre les deux
espaces couleur peuvent entraîner une réelle différence entre les photos imprimées et ce que vous voyez à l'écran.
La gestion des couleurs est un sujet complexe et l'objectif de ce manuel n'est pas de le développer, mais simplement
de proposer quelques exemples typiques. Pour plus d'informations, consultez la documentation fournie avec le
logiciel d'imagerie tiers.
1
. La plupart des périphériques d'imagerie utilisent l'espace
Français
Choix d'une stratégie de gestion des couleurs
Utilisation du module d'extension
HP Photosmart Pro pour Adobe
Photoshop® (versions 7.0, CS et CS 2
uniquement).
Gestion avancée des couleurs
•
Utilise les algorithmes d'Adobe
•
Photoshop pour produire des
impressions à résolution élevée
Une seule boîte de dialogue
•
rationalisée comportant les
paramètres de gestion des couleurs
les plus couramment utilisés
Conseil 1 Il est possible d'activer les fonctions de gestion des couleurs à la fois dans le pilote de l'imprimante
et dans un logiciel comme Adobe
Utilisation de la gestion des couleurs
basée sur l'application.
Gestion avancée des couleurs
•
Utilise les algorithmes d'Adobe
•
Photoshop pour produire des
impressions à résolution élevée
Plusieurs boîtes de dialogue pour
•
tous les paramètres de gestion des
couleurs
®
Photoshop
®
. Cette double correction peut entraîner des résultats peu
Utilisation de la gestion des couleurs
basée sur l'imprimante.
Gestion simple des couleurs
•
Utilise les paramètres de gestion des
•
couleurs du pilote de l'imprimante
satisfaisants. Utilisez la gestion des couleurs basée sur l'imprimante ou basée sur l'application, mais non les
deux en même temps.
Conseil 2 Procédez régulièrement à l'étalonnage des couleurs de l'imprimante afin d'assurer la reproduction
fidèle des couleurs d'une impression à l'autre. Reportez-vous à la section
Alignement et étalonnage de
l'imprimante.
1 Modèles mathématiques à trois dimensions pour l'organisation des couleurs.
2 L'espace couleur RGB crée les couleurs en mélangeant le rouge, le vert et le bleu ciel. Les technologies basées sur la lumière (écrans,
scanners ou appareils photo numériques) utilisent cet espace couleur.
3 L'espace couleur CMJN utilisé par le secteur industriel de l'impression est basé sur les qualités d'absorption de l'encre imprimée sur le
papier. CMJN correspond à cyan, magenta, jaune et noir, les couleurs utilisées dans l'impression par un processus à quatre couleurs.
Gestion des couleurs 61
Page 65

Chapitre 3
Utilisation du module d'extension HP Photosmart Pro pour
Adobe Photoshop® (versions 7.0, CS et CS 2 uniquement)
Le plug-in d'impression HP Photosmart Pro pour Adobe Photoshop rationalise le processus d'impression et permet
une gestion professionnelle des couleurs. Le plug-in fournit une boîte de dialogue centrale pour la gestion des
couleurs et les autres paramètres d'impression. Il combine les paramètres du pilote de l'imprimante et la boîte de
dialogue Imprimer avec aperçu d'Adobe Photoshop et vous n'avez donc pas, lorsque vous imprimez, à faire votre
choix parmi plusieurs boîtes de dialogue, ce qui peut prêter à confusion.
Le plug-in d'impression HP Photosmart Pro est automatiquement installé avec le pilote d'imprimante si vous
possédez le logiciel Adobe Photoshop (versions 7.0, CS et CS 2 uniquement) sur le même ordinateur.
Remarque à l'attention des utilisateurs de Adobe Photoshop CS3 : Le plug-in d'impression HP Photosmart Pro
n'est pas pris en charge par Adobe Photoshop CS3. HP et Adobe ont collaboré pour améliorer le flux de travaux
Français
Installation du plug-in d'impression HP Photosmart Pro
d'impression intégré à Photoshop CS3.
Remarque Adobe Photoshop est un logiciel tiers autonome, qui n'est pas fourni avec l'imprimante.
Pour plus d'informations sur la gestion des couleurs basée sur l'application, reportez-vous à la section Utilisation
de la gestion des couleurs basée sur l'application.
Si Adobe Photoshop est installé sur votre ordinateur, le plug-in HP Photosmart Pro pour Adobe Photoshop est
automatiquement installé avec le logiciel d'impression HP Photosmart. Si vous installez Adobe Photoshop après
avoir installé le logiciel d'impression, vous pouvez installer le plug-in d'impression HP Photosmart Pro séparément.
Pour installer le plug-in d'impression HP Photosmart Pro (Windows)
1. Insérez le CD-ROM HP Photosmart dans le lecteur de CD-ROM.
2. Cliquez sur Installer d'autres logiciels.
3. Sélectionnez Plug-in Photosmart Pro pour Photoshop® et suivez les instructions à l'écran.
Pour installer le plug-in d'impression HP Photosmart Pro (Mac)
1. Cliquez sur Gestionnaire de périphériques HP dans le Dock.
2. Cliquez sur Entretien de l'imprimante.
3. Sélectionnez l'imprimante dans la liste, puis cliquez sur Sélectionner. L'Utilitaire d'imprimante HP apparaît.
4. Sélectionnez le panneau Plug-in d'impression Photosmart Pro pour Photoshop® sur la partie gauche.
5. Cliquez sur Installer l'impression Photosmart Pro.
Lancement du plug-in d'impression HP Photosmart Pro
Pour lancer le plug-in
1. Ouvrez une image dans Adobe Photoshop.
2. Sélectionnez Fichier, placez le curseur sur Automatiser, puis cliquez sur Impression Photosmart Pro.
La zone d'aperçu située dans la boîte de dialogue Impression Photosmart Pro affiche l'image actuelle à une taille
ajustée dans son rapport hauteur/largeur réel. Les bordures du papier sont affichées telles qu'elles apparaîtront à
l'impression. Pour redimensionner l'image, cliquez sur ses bords et déplacez-les. Pour repositionner l'image sur la
page, cliquez sur l'image et déposez-la au nouvel emplacement. Pour imprimer uniquement une portion de l'image,
sélectionnez la partie souhaitée et déposez-la à l'extérieur d'un des bords de la page.
62 Gestion des couleurs
Page 66

Utilisation de la gestion des couleurs basée sur l'application
La gestion des couleurs basée sur l'application permet un contrôle plus étroit que la gestion des couleurs basée
sur l'imprimante, mais implique généralement une procédure plus longue et plus complexe.
La gestion des couleurs basée sur l'application utilise des fichiers appelés Profils des périphériques ICC
(International Color Consortium). Un profil ICC décrit l'espace couleur d'un périphérique. Le composant logiciel de
votre système de gestion des couleurs utilise ces profils pour convertir les couleurs entre l'espace couleur de chaque
périphérique. L'installation du logiciel HP Photosmart Pro série B8800 installe automatiquement les profils ICC HP
pour l'imprimante.
Pour imprimer en utilisant les fonctionnalités de gestion des couleurs basée sur l'application, vous devez modifier
les paramètres du pilote de l'imprimante et du logiciel de retouche d'image. Vous trouverez ci-dessous un exemple
d'un travail d'impression typique utilisant la gestion des couleurs basée sur l'application dans Adobe Photoshop
(version CS3 ou CS2). Pour plus d'instructions sur l'utilisation des fonctionnalités de gestion des couleurs du produit,
reportez-vous à la documentation fournie avec le logiciel de retouche d'image.
Pour imprimer en utilisant la gestion des couleurs basée sur l'application (Photoshop CS3 ou CS2)
1. Ouvrez la photo que vous souhaitez imprimer dans Adobe Photoshop.
2. Sélectionnez Fichier et cliquez sur Imprimer (CS3) ou Imprimer avec aperçu (CS2).
3. Dans Photoshop CS3 : Assurez-vous que l'imprimante HP Photosmart Pro série B8800 est sélectionnée dans
la liste déroulante Imprimante.
4. Sélectionnez l'option Gestion des couleurs dans la liste déroulante.
5. Dans la liste déroulante Gestion des couleurs, sélectionnez l'option Photoshop gère les couleurs (CS3) ou
Laisser Photoshop déterminer les couleurs (CS2).
6. Dans la liste déroulante Profil d'imprimante, sélectionnez un profil d'imprimante approprié pour le papier et
l'encre utilisés.
7. Dans la liste déroulante Intention de rendu, sélectionnez Perceptuel ou Relatif. HP recommande à la plupart
des utilisateurs de sélectionner l'option Perceptuel et Compensation du point noir.
8. Cliquez sur Mise en page, configurez les paramètres souhaités pour l'image en cours et cliquez sur OK.
9. Cliquez sur Imprimer.
Utilisateurs Windows :
a. Cliquez sur Préférences dans la boîte de dialogue Imprimer.
b. Cliquez sur l'onglet Couleur.
c. Sélectionnez l'option Couleurs gérées par l'application dans la liste déroulante Gestion des couleurs.
d. Cliquez sur l'onglet Fonctionnalités, sélectionnez le type de papier approprié dans la liste déroulante Type
de papier, puis cliquez sur OK.
e. Cliquez sur OK.
Français
Utilisateurs Mac :
a. Sélectionnez Type/qualité du papier dans la boîte de dialogue Imprimer.
b. Assurez-vous que l'option Couleurs gérées par l'application est sélectionnée dans le menu déroulant
Couleur.
c. Sélectionnez un type de papier approprié dans le menu contextuel Type de papier.
10. Cliquez sur Imprimer.
Utilisation de la gestion des couleurs basée sur l'application 63
Page 67

Chapitre 3
Utilisation de la gestion des couleurs basée sur l'imprimante
L'imprimante HP Photosmart Pro série B8800 propose une gestion des couleurs intégrée automatique, très facile
à configurer. La gestion des couleurs basée sur l'imprimante donne des résultats attrayants et répond aux besoins
de la plupart des utilisateurs.
Vous pouvez choisir les paramètres d'espace couleur du pilote de l'imprimante ci-dessous, selon l'espace couleur
appliqué par votre périphérique d'imagerie et votre utilisation des profils ICC. Pour plus d'informations sur l'utilisation
de la gestion des couleurs basée sur l'imprimante, reportez-vous à l'aide en ligne. Pour plus d'informations sur
l'accès à l'aide en ligne, reportez-vous à la section
Français
Sources d'information supplémentaires.
64 Gestion des couleurs
Page 68

4 Entretien et maintenance
Suivez les instructions de cette section pour prolonger la durée de vie de l'imprimante et de ses consommables et
pour bénéficier d'une qualité d'impression optimale pour vos photos.
Laissez l'imprimante branchée
HP recommande de laisser l'imprimante branchée en permanence afin qu'elle puisse exécuter périodiquement ses
routines d'auto-entretien. Si vous laissez l'imprimante débranchée pendant une longue période, vous constaterez
une altération de la qualité d'impression car les routines de maintenance automatiques n'auront pas été exécutées
et il sera peut-être nécessaire de remplacer une ou plusieurs têtes d'impression.
Remarque Vous pouvez mettre l'imprimante hors tension afin d'économiser l'énergie. L'imprimante se met
sous tension automatiquement lorsque l'exécution des routines d'auto-entretien est nécessaire, à condition
qu'elle soit reliée à une prise de courant. Si l'imprimante est branchée sur une prise multiple, assurez-vous que
celle-ci est alimentée en permanence, afin que l'imprimante puisse exécuter régulièrement les procédures
automatiques de maintenance.
Si l'imprimante reste en mode veille pendant 24 heures ou plus, elle effectue une routine d'auto-entretien. La durée
d'exécution de la routine d'entretien dépend de la durée pendant laquelle l'imprimante est restée en mode veille.
Dans le cadre de la routine d'entretien, un détecteur de vérification des buses des têtes d'impression recherche
d'éventuels blocages, puis les élimine dans la mesure du possible et intervertit les buses en fonction des besoins.
Pour plus d'informations sur le nettoyage des têtes d'impression, voir
d'impression.
Remarque L'encre contenue dans les cartouches livrées avec l'imprimante est utilisée pour l'initialisation de
celle-ci. L'encre de ces cartouches, ainsi que celle des cartouches de remplacement, sert également à maintenir
la propreté des buses et assurer l'écoulement correct de l'encre.
Nettoyage automatique des têtes
Français
Utilisation de la boîte à outils (Windows) ou de l'Utilitaire d'imprimante HP (Mac)
La boîte à outils (Windows) ou l'Utilitaire d'imprimante HP (Mac) vous offre des outils utiles pour améliorer les
performances de l'imprimante. La boîte à outils ou l'Utilitaire d'imprimante HP vous permet d'effectuer les opérations
suivantes :
• Alignement des têtes d'impression
• Nettoyage automatique des têtes d'impression
• Étalonnage des couleurs
• Impression d'une page de test
• Visualisation des niveaux d'encre estimés
Pour ouvrir la boîte à outils (Windows) ou l'Utilitaire d'imprimante HP (Mac) à partir du panneau de
commande de l'imprimante
▲
Appuyez sur le bouton
l'imprimante (Windows) ou l'Utilitaire d'imprimante HP (Mac) sur l'écran de l'ordinateur.
du panneau de commande de l'imprimante pour ouvrir la Boîte à outils de
Entretien et maintenance 65
Page 69

Chapitre 4
Entretien des cartouches d'encre
Suivez les conseils ci-dessous pour entretenir les cartouches d'encre HP et garantir une qualité d'impression stable :
• Pour plus d'informations sur la première installation des cartouches d'encre et des têtes d'impression après
l'achat de l'imprimante, reportez-vous au Guide de mise en route rapide.
• HP vous recommande d'utiliser des cartouches d'encre HP authentiques. Ces cartouches ont été conçues et
testées pour les imprimantes HP afin de vous aider à obtenir des résultats remarquables, jour après jour. Tout
dommage résultant de l'utilisation de cartouches d'encre de marque autre que HP n'est pas couvert par la
garantie HP.
• HP recommande de ne pas modifier ni recharger les cartouches HP. Tout dommage résultant de la modification
ou de la recharge des cartouches d'impression HP n'est pas couvert par la garantie HP.
• Conservez toutes les cartouches inutilisées dans leur emballage d'origine fermé jusqu'au moment de leur
utilisation. Stockez les cartouches d'encre à température ambiante (15 à 35 °C ou 59 à 95 °F)
Français
Vérification des niveaux d'encre
Remarque 1 Les avertissements et indicateurs de niveau d'encre fournissent des estimations à des fins de
planification uniquement. Lorsqu'un message d'avertissement relatif à un faible niveau d'encre s'affiche, faites
en sorte d'avoir des cartouches d'encre de rechange à portée de main afin d'éviter une perte de temps éventuelle.
Le remplacement des cartouches d'encre n'est pas nécessaire tant que vous n'y êtes pas invité.
Remarque 2 Si les cartouches d'encre ont déjà été utilisées avant d'être installées sur l'imprimante, ou qu'elles
ont été rechargées, il est possible que l'estimation des niveaux d'encre soit inexacte, voire indisponible.
Pour vérifier les niveaux d'encre à partir du Centre de solutions HP (Windows seulement)
▲ Cliquez avec le bouton droit de la souris sur l'icône HP Digital Imaging Monitor se trouvant sur la droite dans
la barre des tâches de Windows, puis sélectionnez Lancer/Afficher le Centre de solutions HP afin d'ouvrir la
page d'accueil du Centre de solutions HP.
Une estimation des niveaux d'encre s'affiche dans le coin supérieur droit de la page d'accueil du Centre
de solutions HP.
Pour vérifier les niveaux d'encre à l'aide de la boîte à outils de l'imprimante (Windows) ou l'Utilitaire
d'imprimante HP (Mac)
1.
Appuyez sur le bouton
l'imprimante ou l'Utilitaire d'imprimante HP sur l'écran de l'ordinateur.
2. Windows : Cliquez sur l'onglet Niveau d'encre estimé.
Mac : Cliquez sur le panneau État des consommables.
Une estimation des niveaux d'encre contenus dans les cartouches d'affiche.
du panneau de commande de l'imprimante pour ouvrir la Boîte à outils de
Remplacement des cartouches d'encre
Pour que l'imprimante fonctionne correctement, vous devez installer les huit cartouches d'encre suivantes :
• Cartouche d'encre Pigment noir photo HP 38 (PK)
• Cartouche d'encre Pigment gris clair HP 38 (LG)
• Cartouche d'encre Pigment noir mat HP 38 (MK)
• Cartouche d'encre Pigment cyan HP 38 (C)
• Cartouche d'encre Pigment magenta HP 38 (M)
• Cartouche d'encre Pigment jaune HP 38 (Y)
• Cartouche d'encre Pigment magenta clair HP 38 (LM)
• Cartouche d'encre Pigment cyan clair HP 38 (LC)
66 Entretien et maintenance
Page 70

Si vous devez remplacer des cartouches d'encre, assurez-vous d'utiliser les bonnes cartouches.
Remarque Avant de procéder au remplacement des cartouches d'encre, vous pouvez contrôler les niveaux à
l'aide de la boîte à outils de l'imprimante ou l'Utilitaire d'imprimante HP. Pour plus de détails, reportez-vous à
Vérification des niveaux d'encre.
Pour remplacer les cartouches d'encre
1. Ouvrez la porte d'accès aux cartouches d'encre en appuyant sur les bosses en relief sur la partie supérieure
de la porte, jusqu'à ce que celle-ci s'ouvre.
1 Porte d'accès aux cartouches d'encre
2. Retirez les cartouches d'encre devant être remplacées. Prenez une cartouche et sortez-la de son emplacement.
3. Secouez bien les nouvelles cartouches d'encre, au moins six fois, avant d'ouvrir leur emballage.
Français
4. Déballez les cartouches d'encre et insérez chaque cartouche dans le logement indiqué par une couleur et dans
le sens illustré. Appuyez fermement sur les cartouches pour vous assurer que les contacts se font bien.
5. Refermez la porte d'accès aux cartouches d'encre.
Entretien des cartouches d'encre 67
Page 71

Chapitre 4
1 Porte d'accès aux cartouches d'encre
Remarque Pour que l'imprimante fonctionne normalement, les huit cartouches et les quatre têtes d'impression
doivent être correctement installées. Si c'est la première fois que vous installez les cartouches d'encre et les
têtes d'impression, reportez-vous au Guide de mise en route rapide pour plus d'informations sur le paramétrage
Français
initial des cartouches d'encre et des têtes d'impression. Si vous devez remplacer les têtes d'impression, reportezvous à l'aide en ligne.
Nettoyage de l'imprimante
Pour obtenir les meilleurs résultats possibles, faites en sorte que la partie externe de l'imprimante soit toujours
propre. Si vous voyez des résidus d'encre sur la partie externe de l'imprimante, nettoyez-les en suivant les étapes
ci-dessous.
Remarque Ne nettoyez jamais l'intérieur de l'imprimante.
Nettoyage de l'extérieur de l'imprimante
Pour nettoyer la partie externe de l'imprimante
1.
Mettez l'imprimante hors tension en appuyant sur le bouton
2. Nettoyez la partie externe de l'imprimante avec un chiffon doux, légèrement humidifié. Assurez-vous de nettoyer
tout résidu d'encre qui aurait pu s'accumuler sur le bac de sortie.
Attention N'utilisez en aucun cas une solution de nettoyage, quelle qu'elle soit. Les produits d'entretien
ménager et les détergents risqueraient d'endommager l'aspect extérieur de l'imprimante.
3.
Appuyez sur le bouton
Ne nettoyez pas l'intérieur de l'imprimante
pour mettre l'imprimante sous tension.
.
68 Entretien et maintenance
Page 72

Nettoyage automatique des têtes d'impression
La présence de lignes blanches ou de traînées monochromes sur les photos indique que les têtes d'impression
peuvent nécessiter un nettoyage.
Pour nettoyer automatiquement les têtes d'impression (Windows)
1.
Appuyez sur le bouton
l'imprimante sur l'écran de l'ordinateur.
Conseil Vous pouvez également ouvrir la Boîte à outils de l'imprimante depuis le Centre de solutions HP
sur votre ordinateur. Pour plus de détails, reportez-vous à
l'Utilitaire d'imprimante HP (Mac).
2. Cliquez sur l'option Nettoyer les têtes d'impression sous l'onglet Services du périphérique.
3. Suivez les instructions s'affichant sur l'écran de l'ordinateur, puis chargez du papier pour que l'imprimante puisse
imprimer une page de test après le nettoyage des têtes d'impression. Utilisez du papier ordinaire au format
Lettre ou A4 pour éviter de gaspiller le papier photo.
4.
Appuyez sur le bouton
Pour nettoyer automatiquement les têtes d'impression (Mac)
1.
Appuyez sur le bouton
sur l'écran de l'ordinateur.
Conseil Vous pouvez également ouvrir l'Utilitaire d'imprimante HP à partir du Gestionnaire de
périphériques HP dans le Dock.
du panneau de commande de l'imprimante pour ouvrir la Boîte à outils de
pour commencer le nettoyage des têtes d'impression.
du panneau de commande de l'imprimante pour ouvrir l'Utilitaire d'imprimante HP
Utilisation de la boîte à outils (Windows) ou de
Français
2. Sélectionnez le panneau Nettoyer sur la partie gauche.
3. Cliquez sur Nettoyer, puis suivez les instructions à l'écran.
La présence de traînées blanches ou l'absence de couleurs sur la page de test après le nettoyage automatique des
têtes d'impression peut indiquer que vous devez nettoyer manuellement les buses de la tête d'impression. Pour
plus d'informations sur le nettoyage manuel des buses de la tête d'impression et les autres tâches de maintenance,
reportez-vous à l'aide en ligne. Pour plus d'informations sur l'accès à l'aide en ligne, reportez-vous à la section
Sources d'information supplémentaires.
Remarque Ne nettoyez pas les têtes d'impression plus souvent que nécessaire, car le nettoyage utilise de
l'encre.
Alignement et étalonnage de l'imprimante
La première fois que vous installez des têtes d'impression dans l'imprimante ou lorsque vous remplacez une tête
d'impression défectueuse, l'imprimante exécute automatiquement les procédures d'alignement et d'étalonnage des
couleurs. Toutefois, si les couleurs des photos sont mal alignées ou que la page d'alignement ne s'imprime pas
correctement à l'installation d'une nouvelle tête d'impression, suivez la procédure ci-dessous pour aligner à nouveau
les têtes d'impression.
Pour assurer une reproduction fidèle des couleurs d'une impression à l'autre, veillez à étalonner régulièrement les
couleurs de l'imprimante. Avant d'aligner et d'étalonner l'imprimante, vérifiez que vous utilisez le papier approprié.
Alignement et étalonnage de l'imprimante 69
Page 73

Français
Chapitre 4
Utilisez du papier photo HP Advanced, finition brillante au format Lettre US ou A4. Si vous utilisez un type de
papier différent, les résultats risquent de manquer de précision.
Pour aligner les têtes d'impression (Windows)
1. Chargez du papier photo HP Advanced, finition brillante au format Lettre US ou A4 dans le bac principal.
2.
Appuyez sur le bouton
du panneau de commande de l'imprimante pour ouvrir la Boîte à outils de
l'imprimante sur l'écran de l'ordinateur.
Conseil Vous pouvez également ouvrir la Boîte à outils de l'imprimante depuis le Centre de solutions HP
sur votre ordinateur. Pour plus de détails, reportez-vous à
Utilisation de la boîte à outils (Windows) ou de
l'Utilitaire d'imprimante HP (Mac).
3. Cliquez sur l'onglet Services du périphérique.
4. Cliquez sur Aligner les têtes d'impression.
5. Cliquez sur Aligner et suivez les instructions à l'écran.
Pour aligner les têtes d'impression (Mac)
1. Chargez du papier photo HP Advanced, finition brillante au format Lettre US ou A4 dans le bac principal.
2.
Appuyez sur le bouton
du panneau de commande de l'imprimante pour ouvrir l'Utilitaire d'imprimante HP
sur l'écran de l'ordinateur.
Conseil Vous pouvez également ouvrir l'Utilitaire d'imprimante HP à partir du Gestionnaire de
périphériques HP dans le Dock.
3. Sélectionnez le panneau Aligner sur la partie gauche.
4. Cliquez sur Aligner et suivez les instructions à l'écran.
Pour étalonner les couleurs de l'imprimante (Windows)
1. Chargez du papier photo HP Advanced, finition brillante au format Lettre US ou A4 dans le bac principal.
2.
Appuyez sur le bouton
du panneau de commande de l'imprimante pour ouvrir la Boîte à outils de
l'imprimante sur l'écran de l'ordinateur.
Conseil Vous pouvez également ouvrir la Boîte à outils de l'imprimante depuis le Centre de solutions HP
sur votre ordinateur. Pour plus de détails, reportez-vous à
Utilisation de la boîte à outils (Windows) ou de
l'Utilitaire d'imprimante HP (Mac).
3. Cliquez sur l'onglet Étalonnage des couleurs.
4. Cliquez sur Initialiser l'étalonnage des couleurs et suivez les instructions à l'écran.
Pour étalonner les couleurs de l'imprimante (Mac)
1. Chargez du papier photo HP Advanced, finition brillante au format Lettre US ou A4 dans le bac principal.
2.
Appuyez sur le bouton
du panneau de commande de l'imprimante pour ouvrir l'Utilitaire d'imprimante HP
sur l'écran de l'ordinateur.
Conseil Vous pouvez également ouvrir l'Utilitaire d'imprimante HP à partir du Gestionnaire de
périphériques HP dans le Dock.
3. Sélectionnez le panneau Étalonnage des couleurs sur la partie gauche.
4. Cliquez sur Démarrer l'étalonnage des couleurs et suivez les instructions à l'écran.
70 Entretien et maintenance
Page 74

Impression d'une page de test
Vous pouvez imprimer une page de test pour vérifier l'état des têtes d'impression. La page de test comporte aussi
des informations utiles sur l'imprimante, dont le numéro de série et la version du micrologiciel.
Pour imprimer une page de test (Windows)
1.
Appuyez sur le bouton
l'imprimante sur l'écran de l'ordinateur.
Conseil Vous pouvez également ouvrir la Boîte à outils de l'imprimante depuis le Centre de solutions HP
sur votre ordinateur. Pour plus de détails, reportez-vous à
l'Utilitaire d'imprimante HP (Mac).
2. Cliquez sur l'onglet Services du périphérique.
3. Cliquez sur Imprimer une page de test, puis sur Imprimer la page.
du panneau de commande de l'imprimante pour ouvrir la Boîte à outils de
Utilisation de la boîte à outils (Windows) ou de
Pour imprimer une page de test (Mac)
1.
Appuyez sur le bouton
sur l'écran de l'ordinateur.
Conseil Vous pouvez également ouvrir l'Utilitaire d'imprimante HP à partir du Gestionnaire de
périphériques HP dans le Dock.
2. Sélectionnez le panneau Test sur la partie gauche.
3. Cliquez sur Imprimer une page de test.
du panneau de commande de l'imprimante pour ouvrir l'Utilitaire d'imprimante HP
Impression d'une page exemple
Vous pouvez imprimer une page exemple pour vérifier que l'imprimante imprime une photo avec succès. Si vous
rencontrez des problèmes lors de l'impression de photos à partir de votre logiciel, utilisez cette option au cours de
la procédure de dépannage pour déterminer si le problème vient de l'imprimante ou du logiciel.
Pour imprimer une page exemple (Windows)
1. Chargez du papier dans le bac principal. Utilisez du papier ordinaire, pour économiser le papier photo.
2.
Appuyez sur le bouton
l'imprimante sur l'écran de l'ordinateur.
Conseil Vous pouvez également ouvrir la Boîte à outils de l'imprimante depuis le Centre de solutions HP
sur votre ordinateur. Pour plus de détails, reportez-vous à
l'Utilitaire d'imprimante HP (Mac).
du panneau de commande de l'imprimante pour ouvrir la Boîte à outils de
Français
Utilisation de la boîte à outils (Windows) ou de
3. Cliquez sur Imprimer une page exemple, puis sur Imprimer la page.
Pour imprimer une page exemple (Mac)
1. Chargez du papier dans le bac principal. Utilisez du papier ordinaire, pour économiser le papier photo.
2.
Appuyez sur le bouton
sur l'écran de l'ordinateur.
Conseil Vous pouvez également ouvrir l'Utilitaire d'imprimante HP à partir du Gestionnaire de
périphériques HP dans le Dock.
3. Sélectionnez le panneau Page d'exemple sur la partie gauche.
4. Cliquez sur Imprimer page exemple.
du panneau de commande de l'imprimante pour ouvrir l'Utilitaire d'imprimante HP
Impression d'une page exemple 71
Page 75

Chapitre 4
Téléchargement des mises à jour du logiciel de l'imprimante
Téléchargez les dernières mises à jour du logiciel d'impression régulièrement pour vous assurer que vous possédez
les dernières fonctionnalités et améliorations.
Remarque La mise à jour du logiciel d'impression que vous téléchargez à partir du site Web HP ne met à jour
que le pilote de l'imprimante. Elle ne met pas à jour le logiciel HP Photosmart Essential.
Pour mettre à jour votre logiciel d'imprimante (Windows)
Remarque Vérifiez que vous êtes connecté à Internet avant d'utiliser la Mise à jour de logiciels HP.
1. Ouvrez l'application Mise à jour HP à partir du menu Démarrer de Windows ou du Centre de solutions HP.
Français
À partir du menu Démarrer :
a. Windows XP : Sélectionnez Tous les programmes > HP > Mise à jour HP. La fenêtre Mise à jour HP
s'ouvre.
b. Windows Vista : Recherchez le dossier HP dans le groupe de menus et sélectionnez Mise à jour HP.
À partir du Centre de solutions HP :
a. Cliquez avec le bouton droit de la souris sur l'icône HP Digital Imaging Monitor se trouvant sur la droite
dans la barre des tâches de Windows, puis sélectionnez Lancer/Afficher le Centre de solutions HP afin
d'ouvrir la page d'accueil du Centre de solutions HP.
b. Cliquez sur Aide en bas de la page d'accueil du Centre de solutions HP.
c. Cliquez sur Vérifier les mises à jour dans la zone Ressources en ligne. La fenêtre Mise à jour HP s'ouvre.
2. Cliquez sur Suivant. L'outil de mise à jour HP recherche des mises à jour du logiciel d'impression sur le
site Web HP. Si vous ne disposez pas de la version la plus récente du logiciel de l'imprimante, une mise à jour
de logiciel apparaît dans la fenêtre Mise à jour HP.
Remarque Si votre ordinateur dispose de la toute dernière version du logiciel d'impression, le message
Aucune mise à jour disponible pour votre système s'affiche dans la fenêtre Mises à jour HP.
3. Si une mise à jour du logiciel est disponible, cochez la case située en regard de la mise à jour pour la sélectionner.
4. Cliquez sur Installer.
5. Suivez les instructions à l'écran pour terminer l'installation.
Pour mettre à jour votre logiciel d'imprimante (Mac)
1. Vérifiez que votre ordinateur est connecté à Internet.
2. Sur le Dock, cliquez sur Gestionnaire de périphériques HP.
La fenêtre Gestionnaire de périphériques HP s'affiche.
3. Dans le menu Périphériques, sélectionnez l'appareil HP Photosmart.
4. Dans le menu déroulant Informations et paramètres, sélectionnez l'option Vérifier les mises à jour.
La fenêtre Mise à jour du logiciel HP s'ouvre.
5. Cliquez sur Vérifier maintenant pour vérifier la présence de mises à jour.
6. Vous pouvez également cliquer sur Vérifier les mises à jour pour que le logiciel recherche automatiquement
les mises à jour selon un calendrier défini.
Remarque Vous pouvez aussi télécharger les mises à jour du logiciel d'impression en accédant au site
www.hp.com/support, en sélectionnant votre pays/région, en entrant le nom de l'imprimante dans la zone de
recherche et en cliquant sur les téléchargements de Logiciel & pilote.
Désinstallation du logiciel d'impression
Si vous devez désinstaller le logiciel d'impression, procédez comme suit :
72 Entretien et maintenance
Page 76

Désinstallation du logiciel d'impression (Windows)
1. Dans le menu Démarrer de Windows, cliquez sur Programmes ou Tous les programmes, cliquez sur HP,
puis cliquez sur HP Photosmart Pro série B8800.
2. Cliquez sur Désinstaller.
Désinstallation du logiciel d'impression (Mac)
1. Débranchez l'appareil HP Photosmart du Mac.
2. Cliquez deux fois sur le dossier Applications : Hewlett-Packard.
3. Double-cliquez sur Programme de désinstallation HP.
Suivez les instructions affichées à l'écran.
4. Une fois le logiciel désinstallé, redémarrez votre ordinateur.
5. Pour réinstaller le logiciel, insérez le CD-ROM HP Photosmart dans le lecteur de CD-ROM de l’ordinateur.
6. Sur le bureau, ouvrez le CD-ROM et double-cliquez sur Programme d'installation HP.
7. Suivez les instructions à l'écran et celles fournies dans le Guide de configuration fourni avec l'appareil
HP Photosmart.
Français
Désinstallation du logiciel d'impression 73
Page 77

5 Dépannage
L'imprimante est conçue pour être fiable et facile d'utilisation, mais, si vous rencontrez des problèmes, recherchez
les solutions possibles dans cette section.
Si l'un des voyants indicateurs clignote sur le panneau de commande de l'imprimante, consultez la section
et comportement des voyants indicateurs pour plus d'informations. Pour plus d'informations sur le dépannage,
reportez-vous à l'aide en ligne.
Problèmes liés à l'installation du logiciel d'impression
Remarque Avant de contacter l'assistance HP, lisez les conseils de dépannage de cette section ou consultez
les services d'assistance en ligne à l'adresse
Français
varier selon les pays/régions.
Si le logiciel d'impression ne s'installe pas correctement ou que l'imprimante et l'ordinateur ne communiquent pas
correctement après l'installation du logiciel, reportez-vous à la présente section pour y trouver les solutions à vos
problèmes.
Avant de poursuivre, vérifiez toutes les connexions entre l'imprimante et l'ordinateur et vérifiez que vous utilisez
bien la version la plus récente du logiciel d'impression.
La boîte de dialogue de configuration minimale requise s'affiche pendant l'installation
Cause: L'un des composants du système de l'ordinateur ne correspond pas à la configuration minimale
requise.
Solution: Mettez ce composant à niveau pour qu'il corresponde à la configuration requise et réinstallez le
logiciel d'impression.
www.hp.com/support. Le nom des services de support HP peut
Erreurs
L'ordinateur ne lit pas le CD HP Photosmart
Solution: Vérifiez que le CD n'est pas sale ou rayé. Si d'autres CD fonctionnent, mais pas le CD
HP Photosmart, ce dernier est sans doute endommagé. Vous pouvez commander un nouveau CD après du
service client HP. Si les autres CD ne fonctionnent pas, vous devez peut-être faire réparer votre lecteur de CDROM.
Le logiciel d'installation ne démarre pas automatiquement lorsque le CD est inséré (Windows
uniquement)
Solution: Dans le menu Démarrer de Windows, sélectionnez Exécuter. Cliquez sur Parcourir et accédez
au lecteur de CD-ROM dans lequel vous avez inséré le CD HP Photosmart. Double-cliquez sur le fichier
setup.exe.
L'assistant Nouveau matériel détecté s'affiche sur l'écran de l'ordinateur (Windows seulement)
Cause: Vous avez peut-être connecté le câble USB avant la fin de l'installation du logiciel.
Solution: Débranchez le câble USB, cliquez sur Annuler dans l'assistant Nouveau matériel détecté et
redémarrez l'installation du logiciel. Ne connectez le câble USB que lorsque vous y êtes invité pendant
l'installation du logiciel.
74 Dépannage
Page 78

L'assistant Nouveau matériel détecté ne parvient pas à localiser les pilotes sur le CD-ROM
(Windows seulement)
Solution: Débranchez le câble USB, cliquez sur Annuler dans l'assistant Nouveau matériel détecté et
redémarrez l'installation du logiciel. Ne connectez le câble USB que lorsque vous y êtes invité pendant
l'installation du logiciel.
L'ordinateur ne répond plus pendant l'installation du logiciel
Cause: Un logiciel antivirus ou un autre programme est en cours d'exécution en arrière-plan, ce qui ralentit la
procédure d'installation.
Solution: Patientez le temps que le logiciel ait terminé de copier les fichiers : ce processus peut prendre
plusieurs minutes. Si, après plusieurs minutes, l'ordinateur ne répond toujours pas, redémarrez-le, interrompez
et désactivez le logiciel antivirus, quittez tous les programmes en cours et réinstallez le logiciel d'impression.
Problèmes liés à la configuration matérielle de l'imprimante
Si vous rencontrez des problèmes liés à la configuration matérielle de l'imprimante, recherchez les solutions
disponibles dans cette section. En cas de problème lié à la configuration logicielle, voir
du logiciel d'impression. Si l'un des voyants indicateurs clignote sur le panneau de commande de l'imprimante,
consultez la section
Remarque Pour obtenir une assistance complète sur le dépannage de la configuration de l'imprimante,
consultez le tutoriel animé de démarrage rapide accessible sur le CD du logiciel HP Photosmart. Pour visualiser
le tutoriel, procédez comme suit :
Erreurs et comportement des voyants indicateurs pour plus d'informations.
Problèmes liés à l'installation
Français
Windows : Insérez le CD dans l'ordinateur et cliquez sur Afficher le tutoriel de démarrage rapide.
Mac : Insérez le CD dans votre ordinateur et double-cliquez successivement sur les icônes Logiciel HP et
Programme d'installation HP.
Le tutoriel animé de démarrage rapide fourni sur le CD-ROM contient des instructions de configuration de
l'imprimante et d'installation du logiciel, ainsi que des informations de dépannage. Pour accéder aux informations
de dépannage, cliquez sur Besoin d'aide ? dans le coin inférieur droit de l'écran du tutoriel de démarrage rapide.
L'imprimante est connectée mais ne se met pas sous tension
Solution
• Il s'agit peut-être d'une surcharge. Débranchez le cordon d'alimentation de l'arrière de l'imprimante.
Patientez environ 30 secondes, puis rebranchez le cordon d'alimentation et remettez l'imprimante sous
tension.
• L'imprimante est peut-être branchée sur un bloc multiprise hors tension. Mettez sous tension le bloc, puis
l'imprimante.
• Il est possible que le cordon soit défectueux.
Je ne sais pas comment insérer les têtes d'impression
Solution: Assurez-vous que le protecteur de l'ensemble tête d'impression, de couleur bleue, est ouvert en
protection maximale. Tirez sur la poignée de couleur bleue pour en libérer le loquet, puis soulevez le protecteur
en position maximale. Les emplacements des têtes d'impression doivent être bien visibles. Pour plus
d'informations, consultez la section Insertion des têtes d'impression sur le tutoriel animé de démarrage rapide.
Problèmes liés à la configuration matérielle de l'imprimante 75
Page 79

Français
Chapitre 5
Je ne parviens pas à extraire le bac de sortie
Solution
• Tirez l'extension du bac de sortie vers vous, dans le sens rectiligne. Veillez à ne pas soulever le bord avant
lorsque vous exercez le mouvement de traction. L'extraction du bac peut nécessiter un certain effort.
• Assurez-vous que vous n'entraînez pas le bac principal (situé en dessous du bac de sortie) lors de l'extraction
du bac de sortie.
Le bouton Reprise n'a aucun effet
Solution: Assurez-vous que les quatre têtes d'impression et les huit cartouches d'encre sont correctement
installées. Vérifiez que les deux capots, ainsi que le bac support spécial, sont en position fermée. Attendez que
le voyant de reprise se mette à clignoter rapidement, puis tentez à nouveau d'appuyer sur le bouton Reprise.
Si le lancement de l'étalonnage de l'imprimante n'a pas lieu, il est possible qu'un bourrage papier se soit produit.
Pour plus d'informations sur le dégagement des bourrages papier, reportez-vous à la section
Un bourrage papier s'est produit. Éliminez le bourrage, puis appuyez sur le bouton Reprise de l'imprimante.
Message d'erreur :
Le voyant de reprise ne s'allume pas ou ne clignote pas
Solution: Les têtes d'impression ou les cartouches sont manquantes ou ne sont pas correctement installées.
Assurez-vous que les quatre têtes d'impression et les huit cartouches d'encre sont correctement installées. Pour
plus d'informations, consultez l'aide en ligne ou le tutoriel de démarrage rapide.
Problèmes d'impression
Remarque Avant de contacter l'assistance HP, lisez les conseils de dépannage de cette section ou consultez
les services d'assistance en ligne à l'adresse
varier selon les pays/régions.
Conseil Consultez les animations Comment ? disponibles dans le Centre de solutions HP pour voir comment
charger du papier dans le bac principal ou dans le bac support spécial, comment éliminer un bourrage papier
et comment installer et remplacer les cartouches d'encre et les têtes d'impression.
L'imprimante fait du bruit lorsque je la mets sous tension ou bien commence à en faire après un
certain temps d'inutilisation
Solution: Il est possible que l'imprimante émette des bruits après une période d'inactivité ou après une
coupure de courant. Ces bruits sont normaux. L'imprimante exécute une procédure de maintenance
automatique pour garantir une qualité d'impression optimale. Pour plus d'informations, reportez-vous à la section
Laissez l'imprimante branchée.
L'impression est très lente
Cause: Vous imprimez peut-être un fichier PDF ou un projet contenant des graphiques ou des photos haute
résolution. Les projets volumineux et complexes contenant des graphiques ou des photos s'impriment plus
lentement que les documents texte.
Solution: Envisagez l'utilisation de graphiques à plus basse résolution, si possible, ou prévoyez des temps
d'impression plus longs dans votre flux de travail.
www.hp.com/support. Le nom des services de support HP peut
76 Dépannage
Page 80

Le papier ne s'introduit pas correctement dans l'imprimante à partir du bac principal.
Solution
• Si vous utilisez un support brillant ou épais de marque autre que HP dans le bac principal et que l'imprimante
n'entraîne pas le papier, ou entraîne plusieurs feuilles au lieu d'une seule, essayez de réduire à 20 le nombre
de feuillets contenus dans le bac principal ou utilisez le bac support spécial pour imprimer feuille par feuille.
• Retirez le bac principal de l'imprimante et vérifiez que la pile de papier est à plat dans le bac et n'a pas été
poussée au-dessus des guide-papier. Lorsque vous replacez le bac, assurez-vous de le pousser dans
l'imprimante jusqu'à ce qu'il soit correctement positionné.
• Le bac photo contient sans doute trop de papier. Vérifiez que le papier ne dépasse pas la hauteur du guide
de longueur. Si tel est le cas, retirez-en une partie et réessayez d'imprimer.
• Les guide-papier ne sont peut-être pas correctement placés. Vérifiez que les guides de largeur et de
longueur du papier sont placés contre les bords du papier sans le faire plier.
• Il se peut que plusieurs feuilles de papier soient collées les unes aux autres. Retirez le papier du bac
principal, feuilletez les bords de la pile pour séparer les feuilles les unes des autres, puis rechargez le papier
et relancez l'impression.
• Si le papier est plissé ou plié, essayez d'utiliser un autre papier.
• Le papier est peut-être trop mince ou trop épais. Pour obtenir des résultats optimaux, utilisez du papier jet
d'encre HP. Pour plus d’informations, reportez-vous à la section
Conseil Pour plus d'informations sur le chargement du papier, reportez-vous à la section Choix du papier
ou du support approprié ou consultez les animations Comment ? disponibles dans le Centre
de solutions HP.
Choix du papier ou du support approprié.
Français
Les pages imprimées tombent hors du bac de sortie.
Solution: Déployez toujours la rallonge du bac de sortie et rabattez le bac de récupération du papier lorsque
vous imprimez.
L'impression est ondulée ou courbée
Solution
• Vérifiez que le paramètre du type de support du logiciel d'impression correspond au type de support chargé
dans le bac.
• Essayez de sélectionner un autre paramètre de qualité d'impression, tel que Normale ou Supérieure.
Le document est imprimé de travers ou est décentré
Solution: Le papier n'a peut-être pas été correctement chargé. Rechargez le papier, assurez-vous qu'il est
correctement orienté dans le bac et que les guides de longueur et de largeur sont placés contre les bords du
papier. Pour plus d'informations sur le chargement du papier, reportez-vous à la section
support approprié ou consultez les animations Comment ? disponibles dans le Centre de solutions HP.
Choix du papier ou du
L'impression des couleurs n'est pas satisfaisante
Solution
• Les paramètres de gestion des couleurs de l'imprimante ne sont sans doute pas correctement définis. Pour
plus de détails, reportez-vous à
• Vérifiez que le paramètre du type de support du logiciel d'impression correspond au type de support chargé
dans le bac.
• Contrôlez la présence éventuelle d'un faible niveau d'encre dans une ou plusieurs cartouches. Pour plus de
détails, reportez-vous à
Vérification des niveaux d'encre.
Gestion des couleurs.
Problèmes d'impression 77
Page 81

Français
Chapitre 5
• L'étalonnage de l'imprimante couleur est peut-être nécessaire. Pour plus de détails, reportez-vous à
Alignement et étalonnage de l'imprimante.
• Certaines buses d'encre des têtes d'impression sont obstruées. Nettoyez les têtes d'impression. Reportezvous à la section
Nettoyage automatique des têtes d'impression.
La page qui sort de l'imprimante est blanche
Solution
Remarque Assurez-vous que le document que vous imprimez ne comporte pas de pages blanches.
• Vous avez lancé, puis annulé une impression. Si vous annulez le traitement avant le démarrage de
l'impression, il se peut que l'imprimante ait déjà chargé une feuille en vue de l'impression. La prochaine fois
que vous lancerez une impression, l'imprimante éjectera une feuille blanche avant de démarrer la nouvelle
impression.
• L'imprimante a prélevé deux pages ou plus en même temps. Ventilez la pile de papier avant de la charger
dans le bac principal afin de séparer les pages individuelles, ou réduisez le nombre de feuilles chargées.
L'imprimante éjecte le papier au moment de la préparation de l'impression
Solution: L'exposition de l'imprimante à la lumière solaire directe peut entraîner un dysfonctionnement du
détecteur automatique de papier. Déplacez l'imprimante à l'abri du soleil.
La qualité d'impression est médiocre
Solution
• Utilisez du papier photo conçu pour l'imprimante. Pour obtenir des résultats optimaux, utilisez du papier
photo HP Advanced.
• Vous imprimez peut-être sur la mauvaise face du papier. Assurez-vous que le papier est chargé dans le bac
principal face à imprimer vers le bas ou dans le bac pour support spécial face à imprimer vers le haut.
• Vous avez peut-être sélectionné une faible résolution sur l'appareil photo numérique. Réduisez la taille
d'impression de l'image et relancez l'impression. Pour obtenir de meilleurs résultats à l'avenir, réglez
l'appareil photo numérique sur une résolution photo plus élevée.
• L'une des têtes d'impression a peut-être un problème. Imprimez une page de test pour vérifier l'état des
têtes d'impression. Pour plus d'informations sur l’impression d’une page de test, reportez-vous à la section
Impression d'une page de test.
◦ Si la page de test indique que l'alignement des têtes d'impression est nécessaire, procédez à cet
alignement. Reportez-vous à la section
◦ Si la page de test indique que le nettoyage des têtes d'impression est nécessaire, exécutez une
procédure de nettoyage automatique à partir du panneau de commande de l'imprimante. Pour plus de
détails, reportez-vous à
◦ Si le nettoyage automatique ne permet pas de résoudre le problème, essayez de nettoyer manuellement
les buses des têtes d'impression. Pour plus d'informations sur le nettoyage manuel des têtes
d'impression, consultez l'aide en ligne :
• Procédez à l'étalonnage des couleurs de l'imprimante et vérifiez les paramètres de gestion des couleurs.
Pour plus de détails, voir
• Si vous imprimez à partir d'un fichier volumineux (par exemple, une image de grand format à résolution
élevée) alors que votre système dispose d'une capacité mémoire et/ou d'une vitesse de processeur
insuffisante, il se peut que la qualité d'impression obtenue soit médiocre. Essayez les astuces ci-dessous,
ou augmentez la vitesse de votre processeur ainsi que la taille de votre mémoire RAM. Consultez le site
Nettoyage automatique des têtes d'impression.
Alignement et étalonnage de l'imprimante et Gestion des couleurs.
Alignement et étalonnage de l'imprimante.
78 Dépannage
Page 82

www.hp.com/support (mot clé : Photosmart Pro B8800) pour obtenir plus d'informations à ce sujet. Pour
optimiser la qualité d'impression sur les ordinateurs lents :
◦ Fermez toutes les applications ouvertes, sauf celle à partir de laquelle vous imprimez. Assurez-vous
qu'aucun processus ne s'exécute en tâche de fond.
◦ Changez votre stratégie de gestion des couleurs en "Gestion par l'application" ou désactivez la gestion
des couleurs. Pour plus d’informations, reportez-vous à la section
◦ Si vous imprimez une image en orientation paysage, faites-la pivoter en orientation portrait et
sélectionnez cette orientation dans le pilote avant d'imprimer.
Pour obtenir des informations détaillées sur la résolution des problèmes liés à la qualité d'impression, consultez
l'aide en ligne.
Gestion des couleurs.
Mes impressions présentent des défauts, stries ou lignes blanches
Solution
• Assurez-vous que le support utilisé est correctement aplani. Pour aplanir une feuille de support avant
l'impression, placez le support dans un sac en matière plastique et courbez-le dans le sens opposé à la
déformation. Si le problème persiste, essayez d'utiliser une autre feuille de support.
• Si vous utilisez du papier photo HP Advanced (finition brillante) ou du papier photo HP Professional Satin,
essayez d'appliquer le paramètre d'épaisseur photo dans le pilote d'imprimante.
• Essayez de nettoyer les têtes d'impression. Pour plus de détails, reportez-vous à
des têtes d'impression.
• Essayez d'utiliser le mode d'impression ppp maximal. Pour plus d'informations, reportez-vous à l'aide en
ligne.
Nettoyage automatique
Français
Messages d'erreur
Les messages qui s'affichent sur l'écran de l'imprimante peuvent être répartis selon les catégories suivantes :
Erreurs liées au papier
•
Erreurs liées aux cartouches d'encre et aux têtes d'impression
•
Erreurs liées au papier
Avant de contacter l'assistance HP, lisez les conseils de dépannage de cette section ou consultez les services
d'assistance en ligne à l'adresse
pays/régions.
Conseil Consultez les animations Comment ? disponibles dans le Centre de solutions HP pour voir comment
charger du papier dans le bac principal ou dans le bac support spécial, éliminer un bourrage papier et installer
ou remplacer les cartouches d'encre et les têtes d'impression.
Message d'erreur : Retirez le support
Solution: Lorsque vous imprimez sur certains types de support à l'aide du bac support spécial, l'imprimante
n'éjecte pas entièrement le support. Si l'ordinateur vous invite à extraire le support de l'imprimante, saisissezle à deux mains et extrayez-le délicatement par l'avant de l'imprimante.
www.hp.com/support. Le nom des services de support HP peut varier selon les
Messages d'erreur 79
Page 83

Français
Chapitre 5
Message d'erreur : Un bourrage papier s'est produit. Éliminez le bourrage, puis appuyez sur le
bouton Reprise de l'imprimante
Solution: Pour supprimer un bourrage papier, procédez de la manière suivante:
1. Ouvrez le capot principal et ôtez tout papier obstruant le chemin du papier de l'imprimante. Si nécessaire,
déplacez doucement sur le côté les têtes d'impression pour pouvoir retirer le papier.
2. Appuyez sur les deux dispositifs de déblocage de chaque côté du capot arrière et retirez avec précaution
le papier coincé dans l'imprimante, puis remettez en place la porte arrière.
3. Essayez de sortir et de replacer le bac principal dans l'imprimante, en vous assurant de le pousser le plus
loin possible afin de le positionner correctement.
4. Après avoir éliminé un bourrage papier, appuyez sur Reprise.
Remarque 1 Si vous imprimiez des étiquettes, vérifiez qu'aucune étiquette ne s'est décollée de sa feuille
lors de son introduction dans l'imprimante.
Remarque 2 Un environnement trop sec peut faire gondoler le papier, ce qui peut entraîner des bourrages
papier ; stockez toujours les supports spéciaux onéreux dans un sac plastique plutôt que dans le bac
principal.
Message d'erreur : Bac à papier vide
Solution: Chargez du papier dans le bac à partir duquel le travail d'impression a été lancé, puis appuyez sur
le bouton
Impression à partir du bac principal ou Impression à partir du bac support spécial (alimentation feuille par
feuille).
pour relancer l'impression. Pour obtenir des instructions sur le chargement du papier, voir
Message d'erreur : Papier incompatible
Cause: Le format de papier qui se trouve dans le bac ne correspond pas au format de photo sélectionné dans
le pilote de l'imprimante.
Solution: Appuyez sur le bouton Annuler du panneau de commande de l'imprimante, puis relancez le travail
d'impression en veillant à sélectionner le format de papier approprié dans le pilote, ou à charger le papier
correspondant au paramètre de format de papier sélectionné dans le pilote.
Erreurs liées aux cartouches d'encre et aux têtes d'impression
Avant de contacter l'assistance HP, lisez les conseils de dépannage de cette section ou consultez les services
d'assistance en ligne à l'adresse
pays/régions.
Conseil Consultez les animations Comment ? disponibles dans le Centre de solutions HP pour voir comment
charger du papier dans le bac principal ou dans le bac support spécial, éliminer un bourrage papier et installer
ou remplacer les cartouches d'encre et les têtes d'impression.
Message d'erreur : Problème lié aux cartouches
Cause: Les cartouches d'encre spécifiées sont manquantes ou endommagées.
Solution: Assurez-vous que les huit cartouches d’encre sont toutes installées. Si aucune cartouche
d'impression n'est manquante, essayez de retirer, puis réinstaller les cartouches signalées. Si cette solution
reste sans effet, il est possible que l'une des cartouches d'encre soit endommagée.
www.hp.com/support. Le nom des services de support HP peut varier selon les
80 Dépannage
Page 84

Vérifiez si votre cartouche d'encre est toujours couverte par la garantie :
• Si la date de fin de garantie est atteinte, achetez une nouvelle cartouche d'encre.
• Si la date de fin de garantie n'a pas été atteinte, contactez l'assistance HP. Pour plus de détails, reportez-
vous à
Assistance HP.
Message d'erreur : Date de péremption des cartouches proche (Cartridges nearly expired), OU :
Date de péremption des cartouches dépassée (Cartridges expired)
Cause: L'encre contenue dans les cartouches indiquées a atteint sa date d'expiration, ou celle-ci est proche.
Solution: Chaque cartouche d'encre possède une date d'expiration. L'objet de cette date est de protéger le
système d'impression et de garantir la qualité de l'encre. Si vous recevez un message signalant que l'encre est
périmée, retirez et remplacez la cartouche d'encre périmée, puis refermez le message. Vous pouvez également
poursuivre votre impression sans remplacer la cartouche d'encre, en suivant les instructions affichées sur le
produit ou incluses dans le message relatif à l'expiration des cartouches d'encre qui apparaît sur l'écran de votre
ordinateur. HP recommande de remplacer les cartouches d'encre arrivées à expiration. HP ne peut pas garantir
la qualité ni la fiabilité des cartouches d'encre arrivées à expiration. Les services ou réparations du périphérique
requis suite à l'utilisation d'une encre périmée ne sont pas couverts par la garantie.
Message d'erreur : Rempl. rapide cartouches
Cause: Le niveau d'encre des cartouches d'encre indiquées est considéré comme faible.
Solution: Le remplacement des cartouches d'encre indiquées sera peut-être bientôt nécessaire.
Français
Remarque Les avertissements et indicateurs de niveau d'encre fournissent des estimations à des fins de
planification uniquement. Lorsqu'un message d'avertissement relatif à un faible niveau d'encre s'affiche,
faites en sorte d'avoir des cartouches d'encre de rechange à portée de main afin d'éviter une perte de temps
éventuelle. Le remplacement des cartouches d'encre n'est pas nécessaire tant que vous n'y êtes pas invité.
Message d'erreur : Impression impossible
Cause: L'encre contenue dans les cartouches indiquées est épuisée.
Solution: Remplacez les cartouches d'encre indiquées. Pour plus de détails, reportez-vous à
des cartouches d'encre.
Remplacement
Message d'erreur : Problème lié aux têtes d'impression
Cause: Les têtes d'impression indiquées sont manquantes, non détectées, installées de façon incorrecte ou
endommagées.
Solution: Essayez de réinstaller les têtes d'impression indiquées. Exercez une pression ferme sur chaque
tête d'impression afin qu'elle s'enclenche et assurez-vous que le couvercle de protection de l'ensemble tête
d'impression, ainsi que le capot supérieur de l'imprimante, sont correctement fermés. Si l'affichage du message
d'erreur persiste, contactez l'assistance HP pour obtenir des instructions spécialisées sur le dépannage des
problèmes liés aux têtes d'impression.
Message d'erreur : Têtes d'impression incompatibles
Solution: Remplacez les têtes d'impression indiquées par les modèles adaptés au périphérique. Pour
déterminer le numéro de renouvellement des commandes de toutes les têtes d'impression prises en charge par
l'imprimante, reportez-vous à la quatrième de couverture du présent manuel.
Messages d'erreur 81
Page 85

Chapitre 5
Assistance HP
En cas de persistance du problème, procédez comme suit :
1. Consultez la documentation fournie avec l'appareil HP Photosmart.
2. Accédez au site Web de l'assistance en ligne HP à l'adresse
est disponible pour tous les clients HP. Moyen le plus rapide d'obtenir des informations à jour sur le périphérique
ainsi qu'une assistance de spécialistes, elle offre les services suivants :
• Un accès rapide à des spécialistes de l’assistance en ligne compétents
• Des mises à jour du logiciel et du pilote pour l'appareil HP Photosmart
• Des informations pertinentes sur les produits HP Photosmart et le dépannage des problèmes les plus
courants
• Des mises à jour proactives de périphérique, des alertes d'assistance et des communiqués HP disponibles
Français
3. Pour l'Europe uniquement : contactez votre point de vente local. Si l'imprimante présente un
4. Appelez l'assistance HP. Les options d'assistance technique et leur disponibilité varient selon les périphériques,
lors de l'enregistrement de l'appareil HP Photosmart
dysfonctionnement matériel, vous serez invité à la rapporter à l'endroit où vous l'avez achetée. Les réparations
sont gratuites pendant la période de garantie limitée de l'imprimante. Au-delà de la période de garantie, les
réparations vous seront facturées.
les pays/régions et les langues.
Remarque Pour obtenir la liste des numéros de téléphone de l'assistance, reportez-vous à la liste des
numéros de téléphone sur la quatrième de couverture.
www.hp.com/support. L'assistance en ligne HP
Numéro réglementaire d'identification de modèle SDGOA-0842
Pour des motifs réglementaires d'identification, un numéro réglementaire de modèle a été affecté à votre produit.
Le numéro réglementaire d'identification de modèle de votre produit est le SDGOA-0842. Ne confondez pas le
numéro réglementaire et le nom marketing (HP Photosmart Pro série B8800) ou le numéro de produit (Q7161A,
Q7161-64001).
Protection de l'environnement
Pour plus d'informations sur la gérance en fonction de l'environnement, reportez-vous à l'aide en ligne. Pour savoir
comment accéder à l'aide en ligne, reportez-vous à la section
Sources d'information supplémentaires.
82 Dépannage
Page 86

A Erreurs et comportement des voyants
indicateurs
Les voyants de l'imprimante clignotent selon des séquences particulières pour indiquer le statut de l'imprimante et
les divers types d'erreur. Reportez-vous à ce tableau pour déterminer la signification du clignotement des voyants,
ou pour résoudre une erreur d'après les indications données par les voyants allumés ou clignotants. Pour obtenir
des informations de dépannage détaillées, consultez l'aide en ligne ou le tutoriel de démarrage rapide.
1 Voyant de reprise
2 Voyant de la boîte à outils
3 Voyant Marche/arrêt
4 Voyants de cartouches d'encre
5 Voyant Tête d'impression
Français
Remarque Si tous les voyants sont éteints, l'imprimante est hors tension. Appuyez sur le bouton Marche/
Arrêt pour mettre l'imprimante sous tension.
Voyant Statut Signification
Voyant Marche/
arrêt
Voyant Reprise Clignotement rapide
Allumé L'imprimante est sous tension et prête à imprimer.
Clignotement rapide Le bac pour support spécial est vide, ou une/plusieurs portes de
Clignotement lent L'imprimante est occupée par un travail d'impression, le traitement
l'imprimante sont ouvertes.
Solution : Refermez le bac et les portes de l'imprimante avant
d'effectuer l'impression.
d'informations ou la mise sous/hors tension.
Le bac principal ou le bac support spécial est vide.
•
Solution : Chargez du papier dans le bac à partir duquel le travail
d'impression a été lancé.
L'imprimante ne parvient pas à alimenter en papier le bac spécifié
•
pour le travail d'impression en cours.
Solution : Assurez-vous que le paramètre de Source du
papier est correctement défini dans le pilote d'imprimante. Si vous
effectuez l'impression à partir du bac principal, le bac support
spécial doit être en position relevée.
Un bourrage papier s'est peut-être produit dans l'imprimante.
•
Solution : Éliminez le bourrage papier. Pour plus d'informations,
Message d'erreur : Un bourrage papier s'est produit. Éliminez
voir
le bourrage, puis appuyez sur le bouton Reprise de l'imprimante.
Le format de papier est incorrect.
•
Solution : Assurez-vous que le paramètre de format de papier
défini dans le pilote correspond au format du support chargé dans
le bac d'alimentation.
Erreurs et comportement des voyants indicateurs 83
Page 87

Français
Annexe A
(suite)
Voyants de
cartouches
d'encre
Voyant Tête
d'impression
Voyants de
cartouches
d'encre
Voyant Tête
d'impression
Voyant Boîte à
outils
Tous les voyants Clignotement rapide Une erreur matérielle irrécupérable s'est produite sur l'imprimante.
Allumés Le niveau d'encre est peut-être insuffisant dans les cartouches
Clignotants L'encre est peut-être épuisée dans les cartouches correspondantes
Allumé L'imprimante est occupée par une opération de maintenance,
Voyants de cartouches
•
d'encre : Clignotant(s)
(deux voyants de cartouche
correspondant aux
couleurs qui alimentent la
tête d'impression
défectueuse)
Voyant Tête
•
d'impression : Clignotant
Clignotement rapide L'imprimante n'est pas parvenue à ouvrir la boîte à outils de
Clignotement lent L'imprimante est occupée à ouvrir la boîte à outils (Windows) ou
correspondantes.
Solution : Le remplacement des cartouches d'encre indiquées sera
peut-être nécessaire prochainement. Pour plus de détails, reportezvous à Message d'erreur : Rempl. rapide cartouches.
ou celles-ci sont endommagées, manquantes ou incompatibles.
Solution : Assurez-vous que les huit cartouches d'encre sont toutes
compatibles avec l'imprimante et correctement installées. Si un
message signalant l'impossibilité d'imprimer s'affiche sur l'écran de
votre ordinateur, remplacez les cartouches d'encre indiquées. Pour
plus de détails, reportez-vous à
impossible. Si aucun message ne signale l'impossibilité d'imprimer sur
l'écran de l'ordinateur et que les cartouches d'encre sont correctement
installées, il se peut que les cartouches d'encre indiquées soient
endommagées.
Vérifiez si votre cartouche d'encre est toujours couverte par la
garantie :
Si la date de fin de garantie est atteinte, achetez une nouvelle
•
cartouche d'encre.
Si la date de fin de garantie n'a pas été atteinte, contactez
•
l'assistance HP. Pour plus de détails, reportez-vous à
Assistance HP.
d'alignement des têtes d'impression ou d'étalonnage des couleurs.
Une ou plusieurs têtes d'impression sont manquantes, non détectées,
endommagées ou incompatibles.
Solution : Assurez-vous que la tête d'impression indiquée est
correctement installée et que le couvercle de l'ensemble tête
d'impression est fermé et verrouillé. Si l'ensemble tête d'impression
est correctement installé, mais que les voyants continuent de
clignoter, il se peut que la tête d'impression soit endommagée.
Contactez l'assistance HP pour obtenir des instructions spécialisées
sur le dépannage des problèmes de tête d'impression.
l'imprimante (Windows) ou l'Utilitaire d'imprimante HP (Mac) sur
l'écran de l'ordinateur.
Solution : Assurez-vous que l'ordinateur est sous tension et relié à
l'imprimante, puis appuyez de nouveau sur le bouton Boîte à outils.
Si l'ouverture de la boîte à outils (Windows) ou de l'Utilitaire
d'imprimante HP (Mac) échoue, essayez de redémarrer l'ordinateur et
d'appuyer à nouveau sur le bouton Boîte à outils. Si l'ouverture de la
boîte à outils (Windows) ou de l'Utilitaire d'imprimante HP (Mac)
continue d'échouer, réinstallez le logiciel d'imprimante.
l'Utilitaire d'imprimante HP (Mac) sur l'écran de l'ordinateur.
Solution : Mettez l'imprimante hors tension, puis débranchez le
cordon d'alimentation à l'arrière de l'imprimante. Patientez 30
secondes, puis rebranchez l'imprimante et remettez-la sous tension.
Si tous les voyants de l'imprimante continuent de clignoter, visitez le
www.hp.com/support ou contactez le service d'assistance HP.
site
Message d'erreur : Impression
84 Erreurs et comportement des voyants indicateurs
Page 88

B Spécifications
Cette section décrit la configuration système requise pour l'installation du logiciel d'impression HP Photosmart et
explique certaines caractéristiques de l'imprimante.
Configuration minimale requise
Composant Windows Mac
Système d'exploitation Microsoft® Windows XP, Windows Vista Mac OS X v10.3.9, v10.4 et v10.5
Processeur Minimum : Processeur 32 bits récent
(x86) ou 64 bits (x64) cadencé à 1 GHz
minimum
Recommandé : 2 GHz ou supérieur
RAM Windows XP et Vista Édition familiale :
512 Mo minimum, 1 Go recommandés
Toutes les autres versions de Windows
Vista : 1 Go minimum, 2 Go
recommandés
Espace disque disponible Minimum : 400 Mo (Windows XP) ;
800 Mo (Windows Vista)
Lecteur de CD-ROM Nécessaire Nécessaire
Navigateur Microsoft Internet Explorer 5.01 avec
SP2 ou version ultérieure
USB Port USB (câble non inclus) Port USB (câble non inclus)
Minimum : PowerPC doté d'un
processeur G4, G5 ou Intel
Recommandé : PowerPC doté d'un
processeur G5 2 GHz ou Intel
Minimum : 512 Mo
Recommandé : 1 Go
Minimum : 150 Mo
Tous navigateurs
®
Core
®
Core Duo
Français
Caractéristiques de l'imprimante
Catégorie Caractéristiques
Connectivité USB 2.0 haut débit
Caractéristiques
d'environnement
Consommation Impression : 30 W (moyenne)
Numéro de modèle du cordon
d'alimentation
Prise en charge USB Microsoft Windows XP Édition familiale, XP Professionnel et Vista
Recommandations en fonctionnement : 15 à 35° C (59 à 95° F), 20 à 80 % RH
Maximum en fonctionnement : 5 à 40° C (41 à 104° F), 5 à 95 % RH
Plage de températures de stockage : -30 à 65° C (-22 à 149° F)
Mode veille : Moins de 6 W
Désactivé : Moins d'1 W (moyenne)
Europe : 8121-1022 (Suisse), 8121-1017 (Royaume-Uni, Irlande), 8121-1011
(Danemark), 8121-1015 (autres pays européens, Russie et Turquie)
Amérique du Nord : 8121-1023 (États-Unis, Canada)
Asie : 8121-0769 (Japon), 8121-1019 (Chine), 8121-1020 (Taïwan), 8121-1017 (Hong
Kong, Singapour), 8121-1015 (Corée), 8121-1013 (Inde), 8121-1014 (Thaïlande),
8121-1015 (Russie, Turquie)
Afrique : 8121-1028
Moyen-Orient : 8121-1032 (Israël), 8121-1015 (tous les autres pays)
Océanie : 8121-1016 (Australie, Nouvelle-Zélande)
Mac OS X v 10.3.9, v10.4 et v10.5
HP recommande d'utiliser un câble USB d'une longueur maximale de 3 mètres (10 pieds).
Spécifications 85
Page 89

Annexe B
Caractéristiques des supports
Catégorie Caractéristiques
Caractéristiques des supports Longueur maximale (bac principal) : 483 mm
Longueur maximale (bac support spécial) : 1 118 mm
Largeur maximale : 330 mm
Grammage maximal pour le bac principal : 220 g/m², support non rigide
Épaisseur maximale pour le bac support spécial : 0,7 mm, feuille par feuille
Formats des supports
d'impression
Français
Capacité des bacs à papier Bac principal
Formats pris en charge
7,6 x 12,7 cm à 33 x 111,8 cm, y compris :
Métrique : 10 x 15 cm (avec ou sans onglet), Panoramique 10 x 30, 13 x 18 cm, A3, A4,
A5, A6, B4, B5, E
Impérial : Fiche Bristol 3 x 5 pouces, Fiche Bristol 4 x 6 pouces, Fiche Bristol 5 x 8 pouces,
3,5 x 5 pouces, 4 x 6 pouces (avec ou sans onglet), Panoramique 4 x 10 pouces,
Panoramique 4 x 11 pouces, Panoramique 4 x 12 pouces, 5 x 7 pouces, 8 x 10 pouces,
11 x 14 pouces, 11 x 17 pouces, 12 x 12 pouces, 13 x 19 pouces
États-Unis : Letter, Legal, Executive, Tabloid
Japon : L, 2L, Hagaki, Ofuku Hagaki
Enveloppes : enveloppe N° 10, enveloppe A2, enveloppe C6, enveloppe DL
Papier banderole : Jusqu'à 13 x 44 pouces
Remarque Pour découvrir la méthode d'impression de banderoles, consultez le centre
de ressources (Resource Center) du site Web de photographie professionnelle HP à
l'adresse
200 feuilles de papier ordinaire
60 feuilles de papier photo
Bac support spécial
1 feuille de support d'une épaisseur maximum de 0,7 mm
Bac de sortie
50 feuilles de papier ordinaire
20 feuilles de papier photo
www.hp.com/go/prophoto. Sélectionnez votre pays en haut de la page.
86 Spécifications
Page 90

C Garantie HP
Produit HP Durée de la garantie limitée
Supports logiciels 90 jours
Imprimante 1 an
Cartouches d'encre Jusqu'à épuisement de l'encre HP ou jusqu'à expiration de la
Têtes d'impression 1 an
A. Extension de garantie limitée
1. Hewlett-Packard (HP) garantit au client utilisateur final que les produhits HP décrits précédemment sont exempts de défauts de matériaux
et malfaçons pendant la durée indiquée ci-dessus, à compter de la date d'achat par le client.
2. Pour les logiciels, la garantie limitée HP est valable uniquement en cas d'impossibilité d'exécuter les instructions de programmation. HP ne
garantit pas que le fonctionnement du logiciel ne connaîtra pas d'interruptions ni d'erreurs.
3. La garantie limitée HP ne couvre que les défauts qui apparaissent dans le cadre de l'utilisation normale du produit et ne couvre aucun
autre problème, y compris ceux qui surviennent du fait :
a. d'une mauvaise maintenance ou d'une modification ;
b. de logiciels, de supports, de pièces ou de consommables non fournis ou non pris en charge par HP ;
c. du fonctionnement du produit hors de ses caractéristiques ; ou
d. d'une modification non autorisée ou d'une mauvaise utilisation.
4. Pour les imprimantes HP, l'utilisation d'une cartouche d'un autre fournisseur ou d'une cartouche rechargée n'entraîne pas la résiliation de la
garantie ni d'un contrat de support HP. Toutefois, si la panne ou les dégâts peuvent être attribués à l'utilisation d'une cartouche d'un autre
fournisseur, d'une cartouche rechargée ou d'une cartouche périmée, HP facturera les montants correspondant au temps et au matériel
nécessaires à la réparation de l'imprimante.
5. Si, pendant la période de garantie applicable, HP est informé d'une défaillance concernant un produit couvert par la garantie HP, HP
choisira de réparer ou de remplacer le produit défectueux.
6. Si HP est dans l'incapacité de réparer ou de remplacer, selon le cas, un produit défectueux couvert par la garantie HP, HP devra, dans un
délai raisonnable après avoir été informé du défaut, rembourser le prix d'achat du produit.
7. HP ne sera tenu à aucune obligation de réparation, de remplacement ou de remboursement tant que le client n'aura pas retourné le
produit défectueux à HP.
8. Tout produit de remplacement peut être neuf ou comme neuf, pourvu que ses fonctionnalités soient au moins équivalentes à celles du
produit remplacé.
9. Les produits HP peuvent contenir des pièces, des composants ou des matériels reconditionnés équivalents à des neufs en termes de
performances.
10. La garantie limitée HP est valable dans tout pays dans lequel le produit HP couvert est distribué par HP. Des contrats apportant des
services de garantie supplémentaires, tels que la réparation sur site, sont disponibles auprès des services de maintenance agréés par HP
dans les pays dans lequel le produit est distribué par HP ou par un importateur agréé.
B. Restrictions de garantie
DANS LA MESURE OÙ LES LOIS LOCALES L'AUTORISENT, HP OU SES FOURNISSEURS TIERS NE FONT AUCUNE AUTRE
GARANTIE OU CONDITION, EXPRESSE OU IMPLICITE, EN CE QUI CONCERNE LES PRODUITS HP ET NIENT TOUTE GARANTIE
IMPLICITE DE COMMERCIALISATION, DE QUALITÉ SATISFAISANTE OU D'ADAPTATION À UN BUT PARTICULIER.
C. Restrictions de responsabilité
1. Dans la mesure où les lois locales l'autorisent, les recours énoncés dans cette déclaration de garantie constituent les recours exclusifs du
client.
2. DANS LA MESURE OÙ LES LOIS LOCALES L'AUTORISENT, EXCEPTION FAITE DES OBLIGATIONS SPÉCIFIQUEMENT ÉNONCÉES
DANS LA PRÉSENTE DÉCLARATION DE GARANTIE, HP OU SES FOURNISSEURS TIERS NE POURRONT ÊTRE TENUS POUR
RESPONSABLES DE DOMMAGES DIRECTS, INDIRECTS, SPÉCIAUX OU ACCIDENTELS, QU'ILS SOIENT BASÉS SUR UN
CONTRAT, UN PRÉJUDICE OU TOUTE AUTRE THÉORIE LÉGALE, QUE CES DOMMAGES SOIENT RÉPUTÉS POSSIBLES OU NON.
D. Lois locales
1. Cette déclaration de garantie donne au client des droits juridiques spécifiques. Le client peut également posséder d'autres droits selon les
états des Etats-Unis, les provinces du Canada, et les autres pays ou régions du monde.
2. Si cette déclaration de garantie est incompatible avec les lois locales, elle sera considérée comme étant modifiée pour être conforme à la
loi locale. Selon ces lois locales, certaines renonciations et limitations de cette déclaration de garantie peuvent ne pas s'appliquer au client.
Par exemple, certains états des Etats-Unis, ainsi que certains gouvernements hors des Etats-Unis (y compris certaines provinces du
Canada), peuvent :
a. exclure les renonciations et limitations de cette déclaration de garantie des droits statutaires d'un client
(par exemple au Royaume-Uni);
b. restreindre d'une autre manière la possibilité pour un fabricant d'imposer ces renonciations et limitations ; ou
c. accorder au client des droits de garantie supplémentaires, spécifier la durée des garanties implicites que le fabricant ne peut nier, ou
ne pas autoriser les limitations portant sur la durée des garanties implicites.
3. EXCEPTÉ DANS LA MESURE AUTORISÉE PAR LA LÉGISLATION, LES TERMES DE LA PRÉSENTE DÉCLARATION DE GARANTIE
N'EXCLUENT, NE LIMITENT NI NE MODIFIENT LES DROITS STATUTAIRES OBLIGATOIRES APPLICABLES À LA VENTE DES
PRODUITS HP AUXDITS CLIENTS, MAIS VIENNENT S'Y AJOUTER.
Cher client,
Vous trouverez, ci-après, les coordonnées de l’entité HP responsable de l'exécution de la garantie fabricant relative à votre matériel HP dans votre pays.
En vertu de votre contrat d’achat, il se peut que vous disposiez de droits légaux supplémentaires à l’encontre de votre vendeur. Ceux-ci ne sont aucunement affectés par la présente
garantie du
fabricant HP.
En particulier, si vous êtes un consommateur domicilié en France (départements et territoires d’outre-mer (DOM-TOM) inclus dans la limite des textes qui leur sont applicables), le
vendeur reste tenu à votre égard des défauts de conformité du bien au contrat et des vices rédhibitoires hhdans les conditions prévues aux articles 1641 à 1649 du Code civil.
Code de la consommation :
"Art. L. 211-4. - Le vendeur est tenu de livrer un bien conforme au contrat et répond des défauts de conformité existant lors de la délivrance.
Il répond également des défauts de conformité résultant de l'emballage, des instructions de montage ou de l'installation lorsque celle-ci a été mise à sa charge par le contrat ou a été réalisée
sous sa responsabilité."
"Art. L. 211-5. - Pour être conforme au contrat, le bien doit :
1° Etre propre à l'usage habituellement attendu d'un bien semblable et, le cas échéant correspondre à la description donnée par le vendeur et posséder les qualités que celui-ci a présentées
à l'acheteur sous forme d'échantillon ou de modèle ;
- présenter les qualités qu'un acheteur peut légitimement attendre eu égard aux déclarations publiques faites par le vendeur, par le producteur ou par son représentant, notamment dans
la publicité ou l'étiquetage ;
2° Ou présenter les caractéristiques définies d'un commun accord par les parties ou être propre à tout usage spécial recherché par l'acheteur, porté à la connaissance du vendeur et que
ce dernier a accepté."
"Art. L.211-12. – L’action résultant du défaut de conformité se prescrit par deux ans à compter de la délivrance du bien. "
Code civil :
"Code civil Article 1641 : Le vendeur est tenu de la garantie à raison des défauts cachés de la chose vendue qui la rendent impropre à l’usage auquel on la destine, ou qui diminuent
tellement cet usage, que l’acheteur ne l’aurait pas acquise, ou n’en aurait donné qu’un moindre prix, s’il les avait connus.
"Code civil Article 1648 : L’action résultant des vices rédhibitoires doit être intentée par l’acquéreur dans un délai de deux ans à compter de la découverte du vice."
France : Hewlett-Packard France, SAS, 80, rue Camille Desmoulins, 92788 Issy les Moulineaux Cedex 9
Belgique : Hewlett-Packard Belgium BVBA/SPRL, 1, rue de l'Aéronef, B-1140 Brussels
Luxembourg : Hewlett-Packard Luxembourg SCA, 7a, rue Robert Stümper, L-2557 Luxembourg-Gasperich
date de garantie imprimée sur la cartouche (selon le cas qui se
produira en premier). Cette garantie ne couvre pas les produits
utilisant de l'encre HP qui ont été reconditionnés, mal utilisés ou
altérés.
Garantie du fabricant HP
Français
Garantie HP 87
Page 91

Index
A
Aide 74
Aide électronique 45
alignement des têtes d'impression. voir
étalonnage de l'imprimante
assistance en ligne 82
assistance téléphonique 82
assistance Web 82
B
bac de sortie 46
Français
bac principal 46
bacs à alimentation par feuillet unique.
voir Bacs à papier
bacs à papier 46
bacs d’alimentation. voir Bacs à papier
bacs pour support. voir Bacs à papier
bac support spécial 46
boîte à outils 65
C
caractéristiques
environnement 85
puissance 85
cartouches. voir cartouches d'encre
cartouches d'encre
test 71
vérification des niveaux d'encre 66
cartouches d'impression. voir cartouches
d'encre
Centre de solutions HP 45
chargement du papier 51
choix
qualité d’impression 57
source du papier 58
Configuration minimale requise 85
D
Dépannage
installation du logiciel 74
problèmes d'impression 76
dispositifs de déblocage de la porte
arrière 47
documentation, imprimante 45
Documentation , imprimante 45
E
électronique, Aide 45
Entretien et maintenance 65
étalonnage de l'imprimante 69
état du périphérique. voir Erreurs et
comportement des voyants indicateurs
F
fentes d'alimentation. voir Bacs à papier
G
garantie 87
Gestion des couleurs
basée sur l'application 63
basée sur l'imprimante 64
calibrage d'un écran 63
installation des profils ICC 63
profils de périphérique ICC 63
I
impression
à partir d'un ordinateur 49
modification des paramètres 57
niveaux de gris 59
noir et blanc 59
page de test 71
Impression
à partir d'un ordinateur 45
résolution des problèmes 76
impression en niveaux de gris 59
impression en noir et blanc 59
imprimante
caractéristiques 85
composants 46
configurer. voir Guide de mise en
route rapide
documentation 45
étalonnage 69
message d'erreur 79
nettoyage 68
voyants 69
Imprimante
documentation 45
maintenance 65
L
logement de papier arrière 46
logement de papier avant. voir Bac
support spécial et bacs à papier
logements pour papier. voir Bacs à papier
logiciel
désinstallation 72
mise à jour 72
pilote. voir Impression depuis un
logiciel
pilote de l'imprimante 49
Logiciel
dépannage 74
logiciel d'impression, mise à jour 72
M
messages d’état. voir Messages d'erreur
Mise à jour des logiciels HP 72
N
nettoyage
automatique des têtes
d'impression 69
imprimante 68
O
Obtenir de l'aide 74
ordinateur
impression depuis 49
Ordinateur
configuration minimale requise 85
impression 45
ouverture de la boîte à outils 65
P
page d'alignement 69
page de test 71
Panneau de commande 48
papier
impression de banderoles. voir
Formats pris en charge
papier banderole. voir Bacs à papier
source, sélection 58
Papiers beaux-arts numériques. voir
Supports spécialisés
pilote. voir Impression depuis un logiciel
pilote d'impression 49
pilote d'imprimante, modification des
paramètres 57
pilote d'imprimante, paramètres
recommandés 56
porte arrière 46
porte d'accès aux cartouches d'encre
46
Port USB 47
prise du cordon d'alimentation 47
Q
qualité, impression d'une page de test
71
Questions et réponses 74
Questions fréquemment posées 74
R
résolution des problèmes
Assistance HP 82
message d'erreur 79
problèmes matériels de
l'imprimante 75
voyants clignotants 75
S
supports
achat et choix 50
bacs 49
bourrages 80
caractéristiques 86
chargement 51
88
Page 92

Index
spécial 50
supports spécialisés 50
support technique 82
T
tableau des erreurs et du comportement
des voyants 83
technique, assistance 82
têtes d'impression, nettoyage 69
Touches 48
U
USB, spécifications 85
Français
89
Page 93

Français
90
Page 94

www.hp.com/support
$IULFD(QJOLVKVSHDNLQJ
$IULTXHIUDQFRSKRQH
$UJHQWLQD%XHQRV$LUHV
$UJHQWLQD
$XVWUDOLD
$XVWUDOLDRXWRIZDUUDQW\
VWHUUHLFK
%HOJL
%HOJLTXH
%UDVLO6DR3DXOR
%UDVLO
&DQDGD KS
&H QW UD O$ PH UL FD 7K H& DU LE EH DQ ZZZKSFRPVXSSRUW
&KLOH
Ё
Ё
&RORPELD%RJRW£
&RORPELD
&RVWD5LFD
ÎHVN£UHSXEOLND
'DQPDUN
(FXDGRU$QGLQDWHO ℡
(FXDGRU3DFLILWHO
(O6DOYDGRU
(VSD³D
)UDQFH
'HXWVFKODQG
˃˨˨˙ˡ˞˞˭˹˱ˬˢ˫˶˱ˢˮ˦˧˹
˃˨˨˙ˡ˞ˢ˪˱˹˯˃˨˨˙ˡ˞˯
˃˨˨˙ˡ˞˞˭˹˺˭ˮˬ
*XDWHPDOD
佭␃⡍߹㸠ᬓ
0DJ\DURUV]£J
,QGLD
,QGLD
,QGRQHVLD
,UHODQG
,WDOLD
LQYHQW
℡
ﺮﺋﺍﺰﺠﻟﺍ
ﻦﻳﺮﺤﺒﻟﺍ
ﺮﺼﻣ
ﻕﺍﺮﻌﻟﺍ
ﺖﻳﻮﻜﻟﺍ
ﻦﻤﻴﻟﺍ
לארשי
-DPDLFD
㡴㦻
뼑霢
/X[HPERXUJ)UDQ©DLV
/X[HPEXUJ'HXWVFK
0DOD\VLD
0DXULWLXV
0«[LFR&LXGDGGH0«[LFR
0«[LFR
1HGHUODQG
1HZ=HDODQG
1LJHULD
1RUJH
3DQDP£
3DUDJXD\
3HU¼
3KLOLSSLQHV
3ROVND
3RUWXJDO
3XHUWR5LFR
5HS¼EOLFD'RPLQLFDQD
5HXQLRQ
5RP¤QLD
6LQJDSRUH
6ORYHQVNR
6RXWK$IULFD56$
6XRPL
6YHULJH
6ZLW]HUODQG
㟎☷
ࡷࡎ࡙
7ULQLGDG7REDJR
7¾UNL\HòVWDQEXO$QNDUDò]PLU
%XUVD
ﻥﺎﻨﺒﻟ
8QLWHG.LQJGRP
ﺮﻄﻗ
8QLWHG6WDWHV
8UXJXD\
9HQH]XHOD&DUDFDV
9HQH]XHOD
9L¬W1DP
ﻥﺩﺭﻷﺍ
ﺏﺮﻐﻤﻟﺍ
ﻥﺎﻤ ُﻋ
ﺔﻴﺑﻮﻌﺴﻟﺍ
ﺲﻧﻮﺗ
ﺕﺍﺭﺎﻣﻹﺍ ﺔﻴﺑﺮﻌﻟﺍ ﺓﺪﺤﺘﻤﻟﺍ
 Loading...