

*Q7161-90011*
© 2007 HPDC
*Q5734-90277*
*Q5734-90277*
*XXXXX-XXXXX*
*XXXXX-XXXXX*
XXXXX--XXXXX
Quick Start
Tutorial included
Product in [country]
www.hp.com/support
HP Photosmart Pro B8800 Series
© 2007 HPDC
©
2
0
0
7
H
PD
C
*Q5734-90277
*
*Q5734-90277
*
*XXXXX-XXXXX*
*XXXXX-XXXXX*
XXXXX
-
-
XXXXX
Q
u
i
c
k
S
ta
r
t
T
u
t
o
r
i
a
l
in
c
lu
d
e
d
P
r
o
d
u
c
t
in
[
c
o
u
n
t
r
y
]
w
w
w.
h
p.
c
o
m
/
s
up
p
o
rt
HP Ph
o
tosmar
t Pr
o B8
8
00
Se
ri
es
©
2
0
0
7
H
P
D
C
*Q7161-90011*
Q7161-90011
Quick Start
HP Photosmart Pro B8800 series
HP Photosmart Pro B8800 series
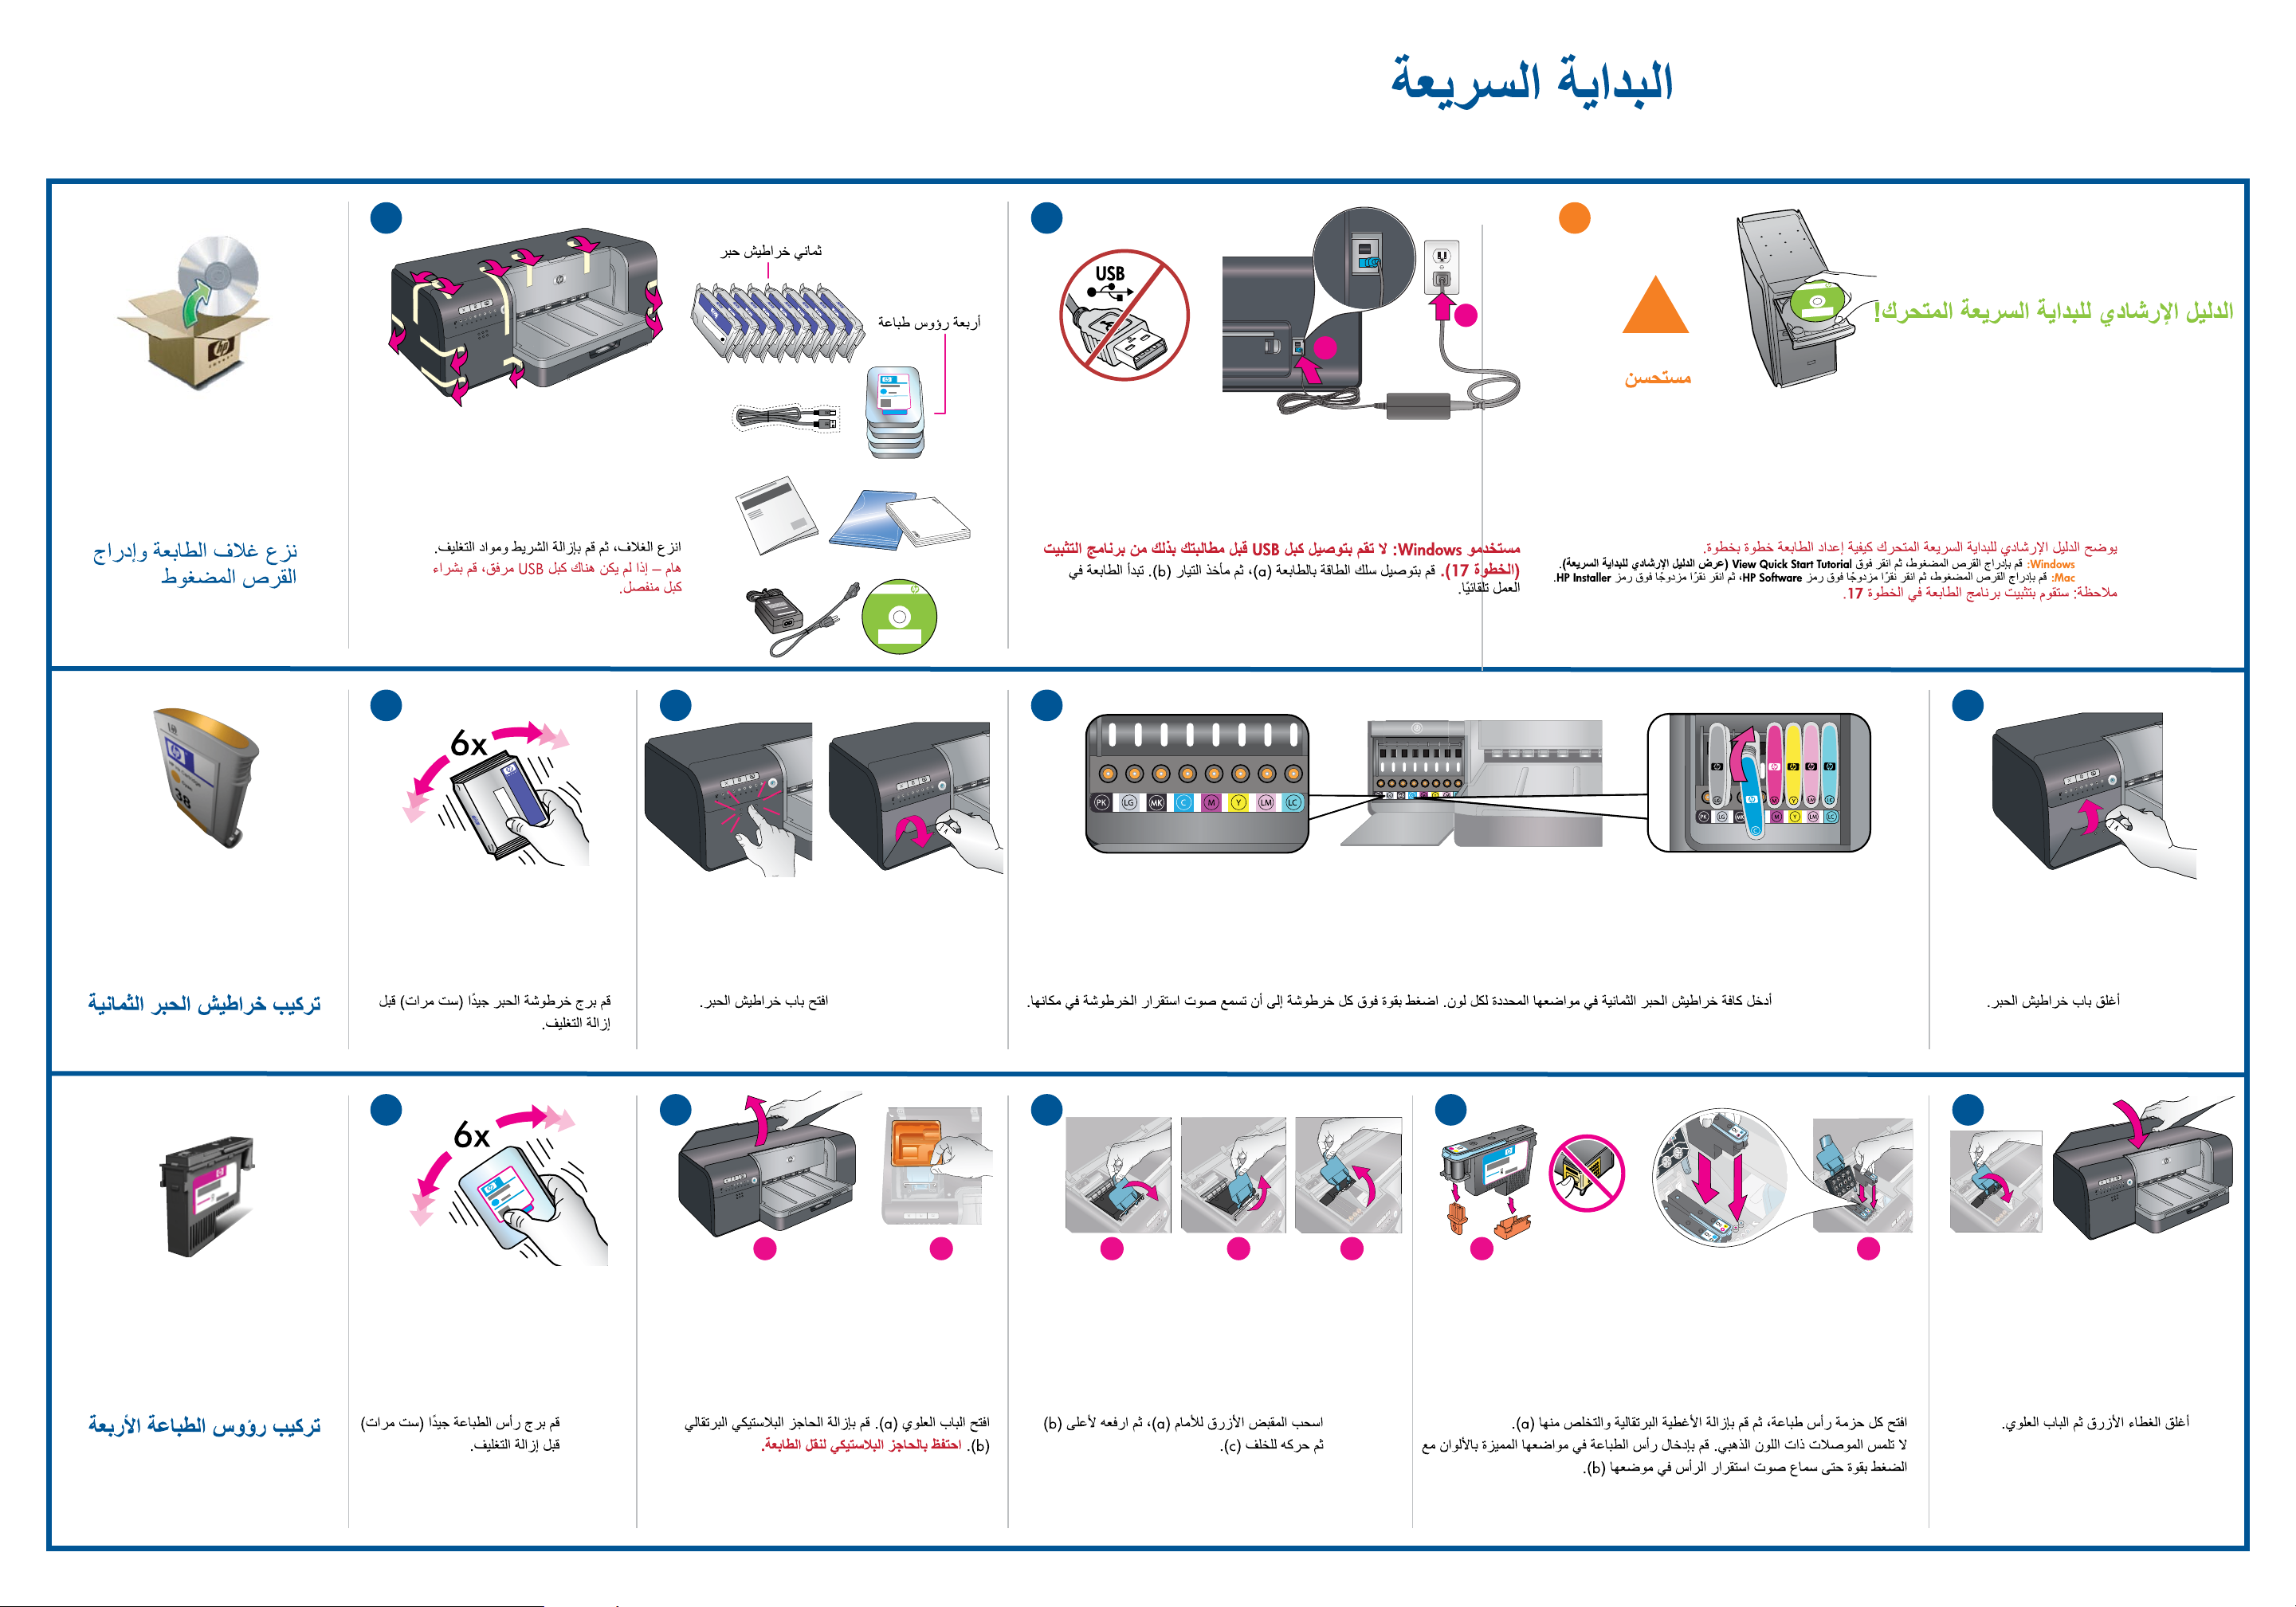
Unpack the printer and
insert the CD
1
Unpack and remove tape and packaging materials.
Important – Purchase a USB cable separately
if it is not included.
8 ink cartridges
4 printheads
2
b
a
Windows users: Do not connect the USB cable until prompted by the
software install program (step 17). Connect the power cord to the printer (a),
and then to a power outlet (b). The printer turns on automatically.
3
Animated Quick Start Tutorial!
!
Recommended
The animated Quick Start Tutorial shows you how to set up the printer step by step.
Windows: Insert included CD and click View Quick Start Tutorial.
Mac: Insert included CD, double-click the HP Software icon, and then double-click the HP Installer icon.
Note: You will install the printer software in step 17.
Insert the 8 ink cartridges
4
Shake each ink cartridge well (six times)
before unwrapping it.
8
5
6
Open the ink cartridge door. Insert all eight ink cartridges into their color-coded stalls. Press rmly on each cartridge until it snaps into place.
9
10 11
7
Close the ink cartridge door.
12
Insert the 4 printheads
Shake each printhead well
(six times) before unwrapping it.
a
b
Open the top door (a). Remove orange plastic restraint
(b). Save the restraint for transporting the printer.
a
b
Pull the blue handle forward (a), then lift it up (b)
and move it back (c).
c
Open each printhead package, and remove and discard the orange caps (a).
Do not touch the gold-colored contacts. Insert each printhead into its
a
b
Close the blue cover, and then close the
top door.
color-coded stall, pressing rmly until the printhead snaps into place (b).
HP Photosmart Pro
B8800 series
© 2007 HPDC
*Q5734-90277*
*Q5734-90277*
Quick Start
Tutorial included
Product in [country]
www.hp.com/support
*XXXXX-XXXXX*
*XXXXX-XXXXX*
XXXXX--XXXXX
Quick Start
Tutorial included
Product in [country]
www.hp.com/support
HP Photosmart Pro B8800 Series
© 2007 HPDC
13
HP Photosmart Pro
B8800 series
© 2007 HPDC
*Q5734-90277*
*Q5734-90277*
Quick Start
Tutorial included
Product in [country]
www.hp.com/support
*XXXXX-XXXXX*
*XXXXX-XXXXX*
XXXXX--XXXXX
Quick Start
Tutorial included
Product in [country]
www.hp.com/support
HP Photosmart Pro B8800 Series
© 2007 HPDC
14
15
16
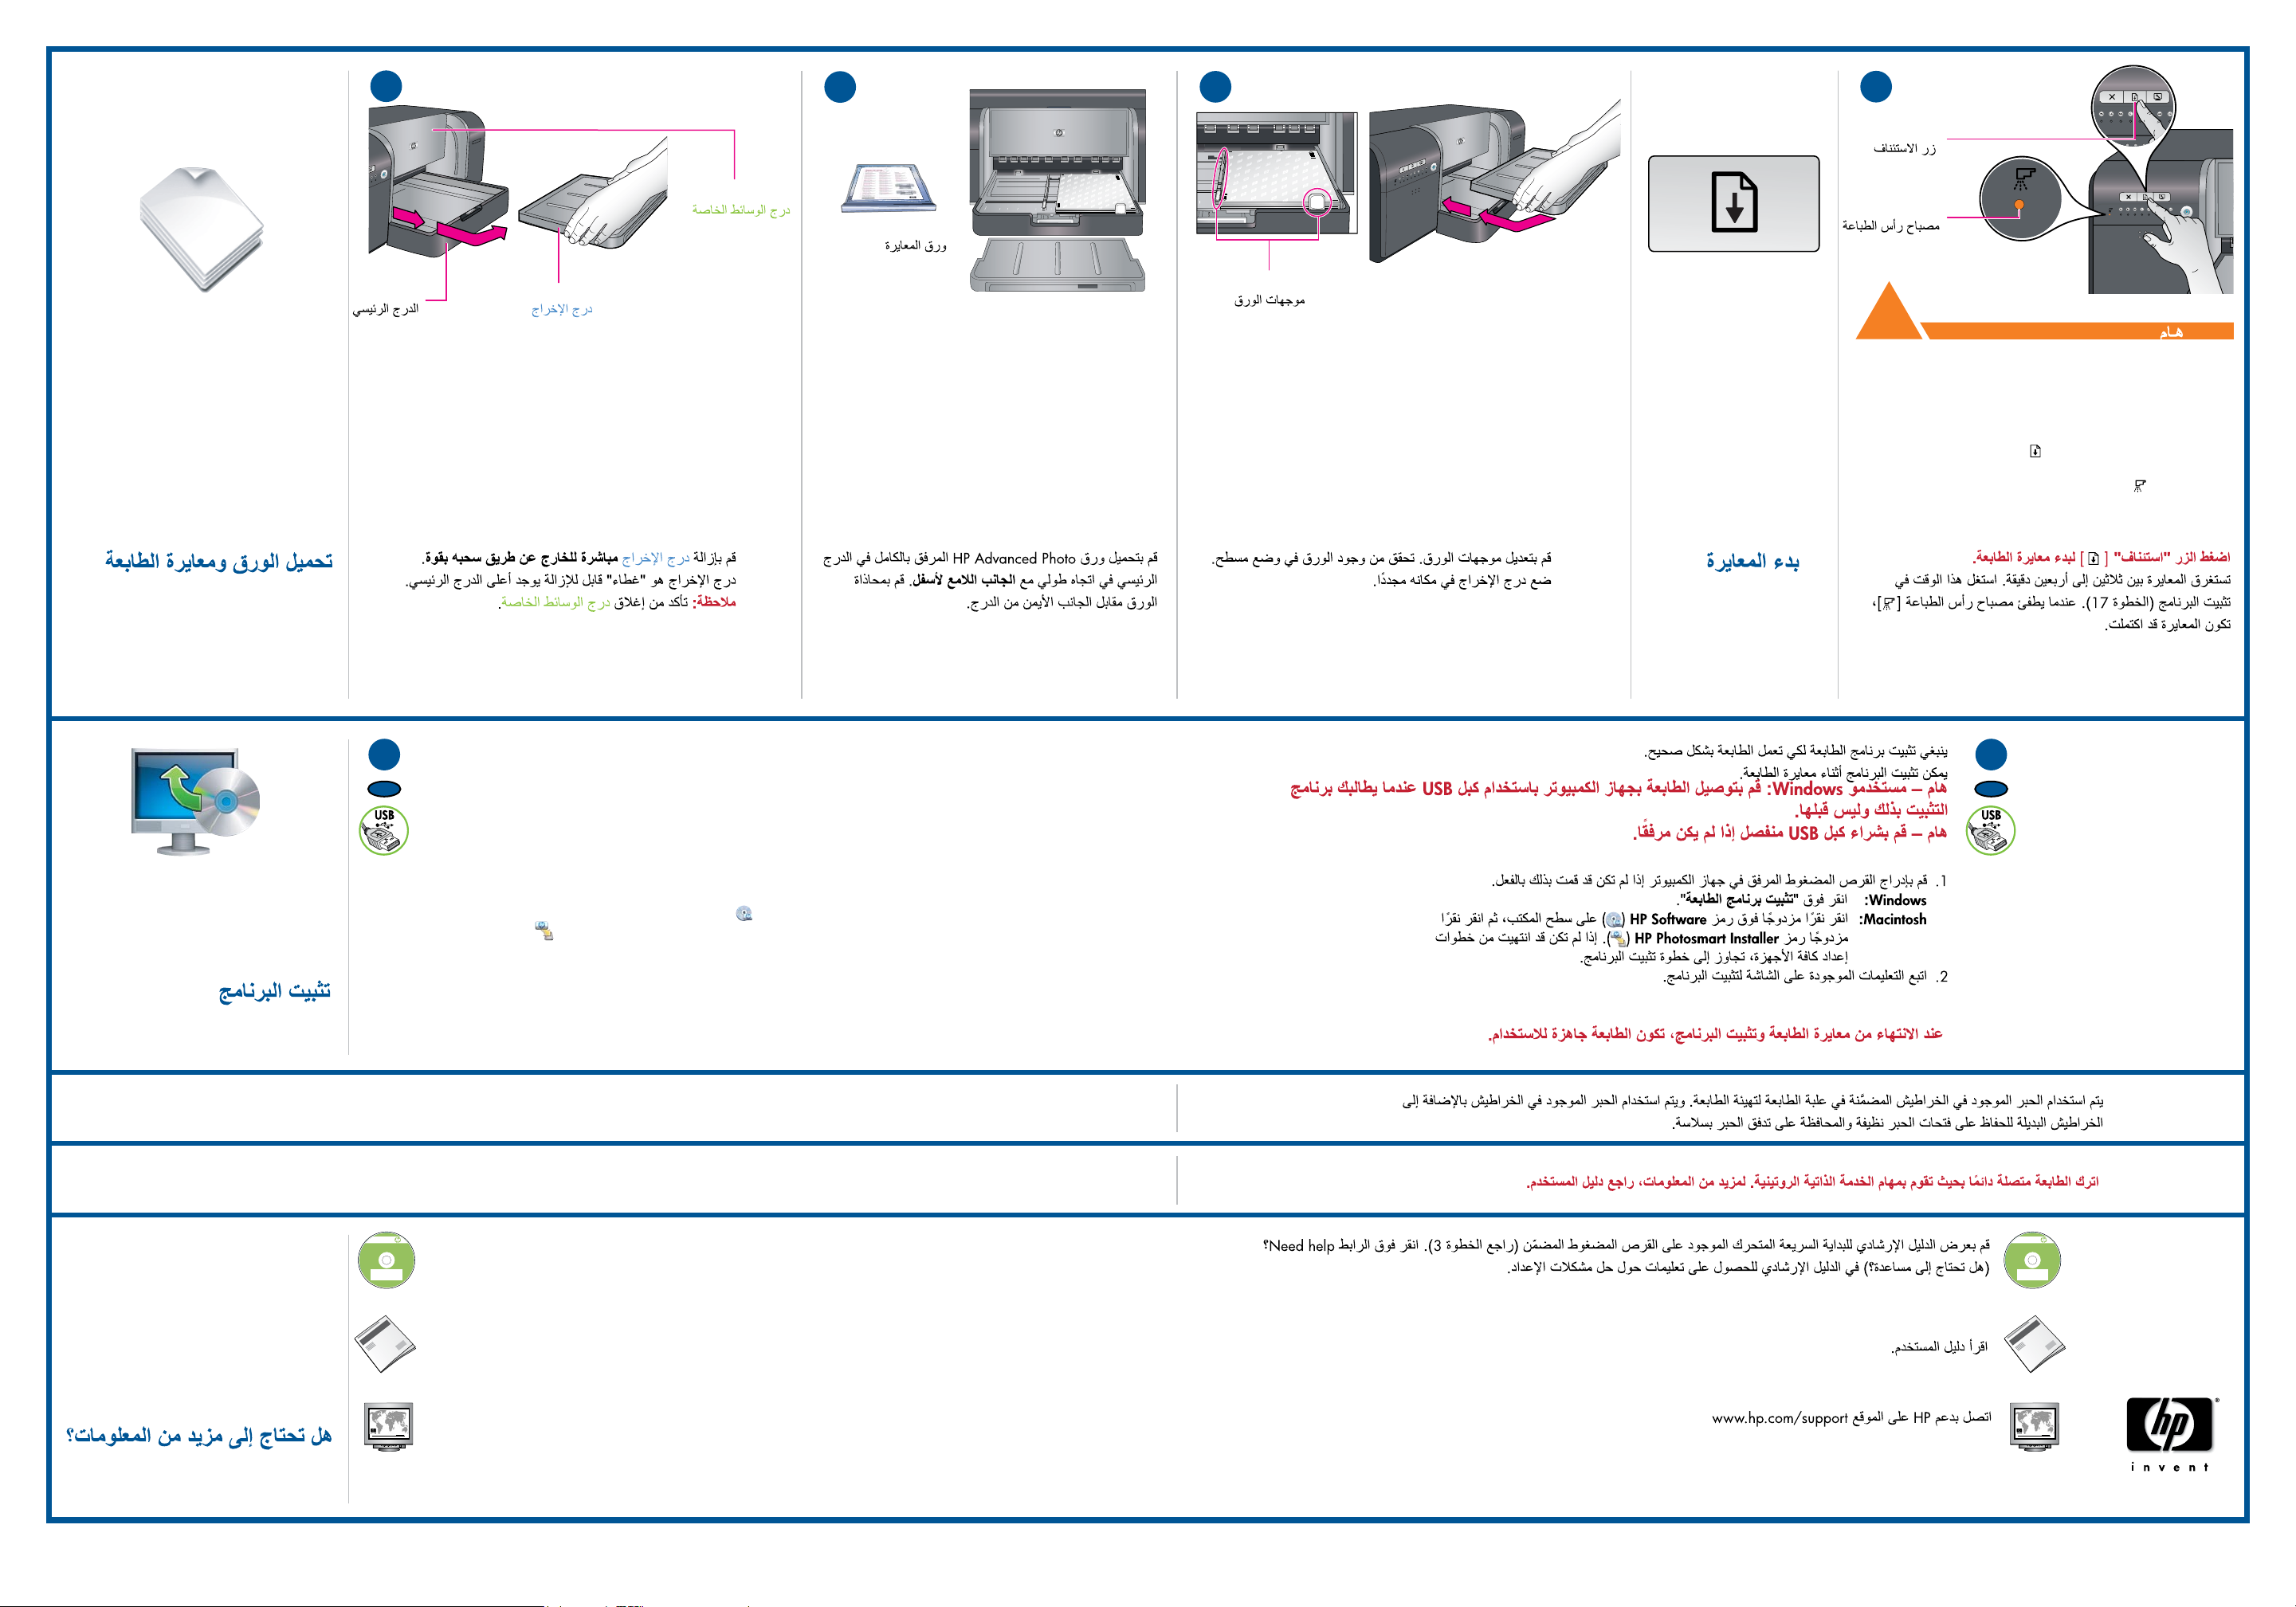
Resume button
Load paper and calibrate
the printer
Specialty media tray
Main tray
Output tray
Remove the output tray straight out, by pulling it rmly.
The output tray is the removable ‘lid’ on top of the main tray.
Note: Make sure the specialty media tray is closed.
Paper for calibration
Load all of the included HP Advanced Photo paper into
the main tray in portrait orientation, glossy side down.
Align the paper against the right side of the tray.
Paper guides
Adjust the paper guides. Check that the paper is lying at.
Slide the output tray back into place.
Start calibration
Printhead light
!
IMPORTANT
Press the Resume button [ ] to start printer calibration.
Calibration takes 30–40 minutes. Use this time to install the
software (step 17). When the Printhead light [ ] goes off,
calibration is complete.
17
EN
You need to install the printer software for the printer to work correctly. You can install the software while the
printer is calibrating.
Important – Windows users: Connect the printer to your computer with a USB cable only when prompted
by the software install program and not before.
Important – Purchase a USB cable separately if it is not included.
1.
Insert the included CD into your computer if you haven’t already.
Windows: Click Install Printer Software.
Macintosh: Double-click the HP Software icon ( ) on the desktop, and then double-click the HP Photosmart
Install the software
Installer icon ( ). If you’ve completed all the hardware setup steps, skip ahead to the software install step.
Follow the onscreen instructions to install the software.
2.
When the printer nishes calibrating and software installation is complete, your printer is
ready to use.
Ink in the cartridges included in the printer box is used for printer initialization. Ink from these cartridges, as well as from replacement
cartridges, is also used to keep print nozzles clear and ink owing smoothly.
Always leave the printer plugged in so that it can perform self-servicing routines. For more information, see the User Guide.
17
AR
View the animated Quick Start Tutorial on the included CD (see step 3). Click the Need help? link in the tutorial for
help on solving setup problems.
?
Read the User Guide.
Need more information?
Contact HP support at www.hp.com/support
www.hp.com
Printed in [country] - English
© 2007 Hewlett-Packard Development Company, L.P.
 Loading...