

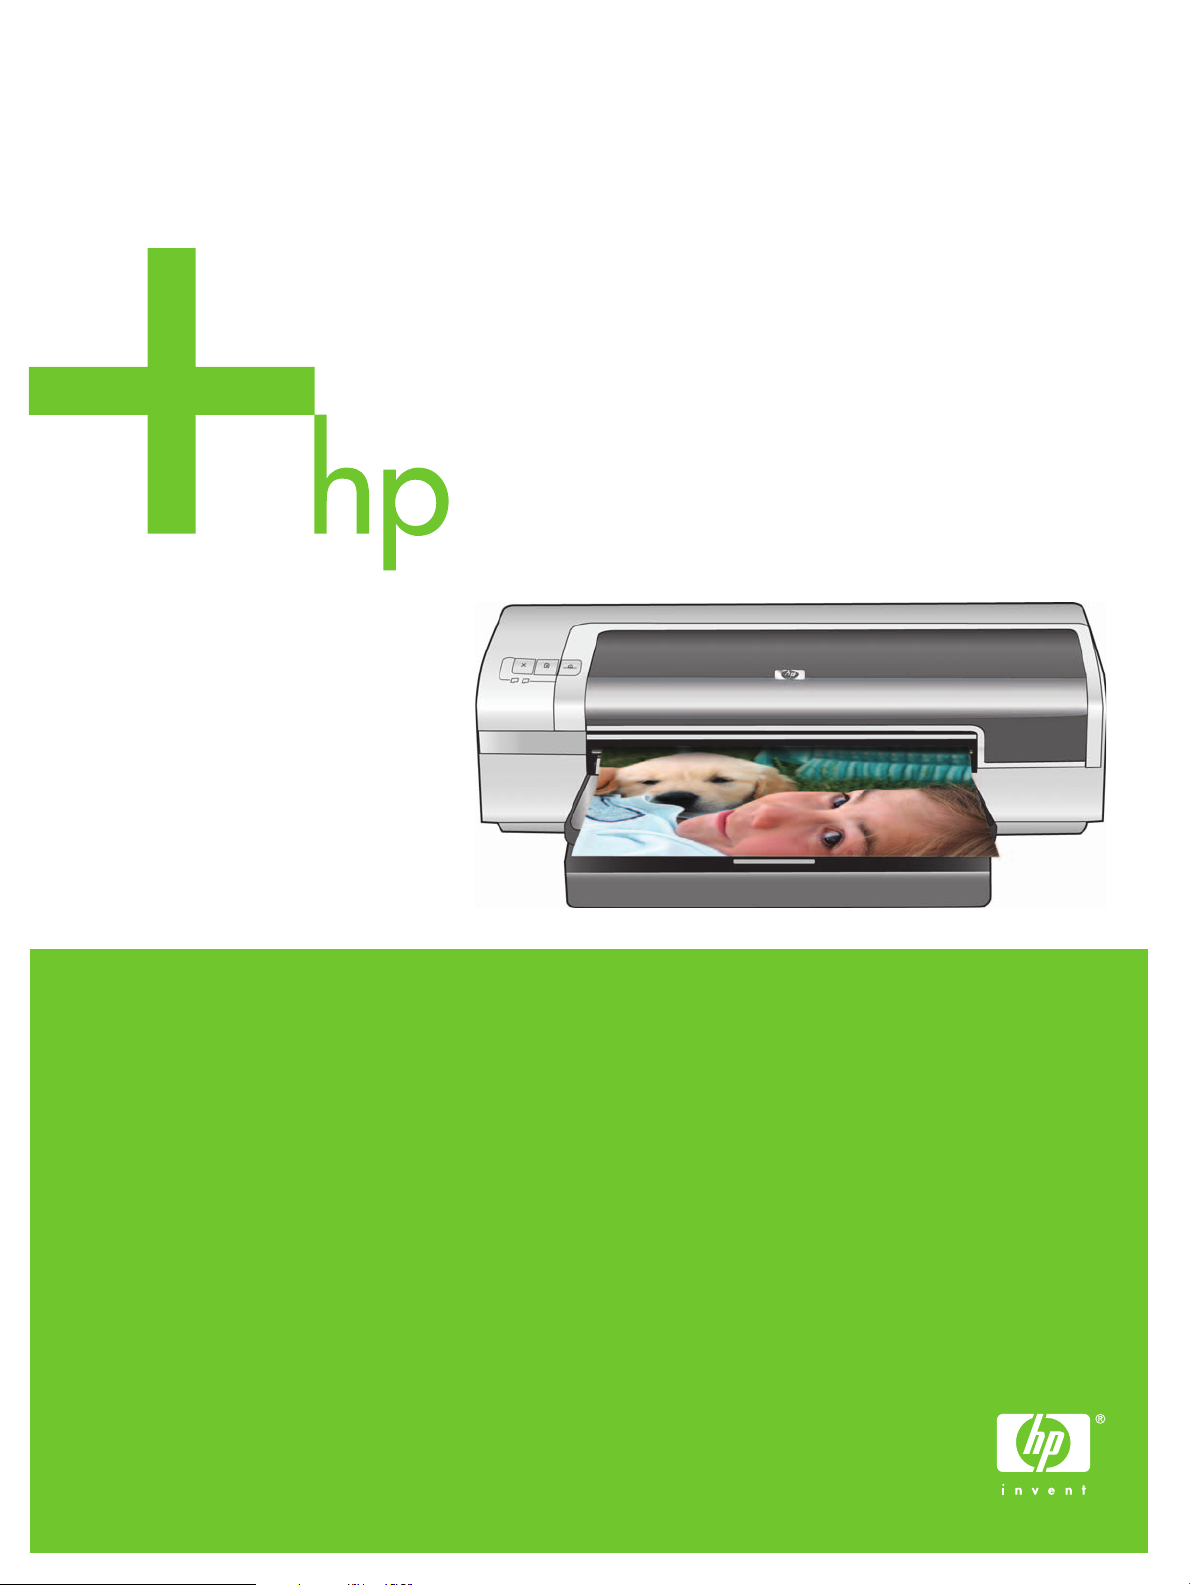
HP Photosmart Pro B8300 Series
Quick Start Guide
Guide de démarrage rapide
ﻊﻳﺮﺴﻟﺍ ﻞﻴﻐﺸﺘﻟﺍ ﺀﺪﺑ ﻞﻴﻟﺩ

Copyright Information
© 2006 Copyright Hewlett-Packard Development Company, L.P.
Reproduction, adaptation or translation without prior written
permission is prohibited, except as allowed under the copyright
laws.
The information contained herein is subject to change without
notice.
The only warranties for HP products and services are set forth in
the express warranty statements accompanying such products
and services. Nothing herein should be construed as constituting
an additional warranty. HP shall not be liable for technical or
editorial errors or omissions contained herein.
Informations de copyright
© 2006 Copyright Hewlett-Packard Development Company, L.P.
Toute reproduction, adaptation ou traduction sans autorisation
écrite préalable est interdite, sauf dans les cas autorisés par les
lois sur le droit d'auteur.
Les informations contenues dans ce document peuvent être
modifiées sans préavis.
Les garanties relatives aux produits et aux services HP sont
décrites dans les textes de garantie limitée expresse qui les
accompagnent. Aucun élément du présent document ne peut
être interprété comme constituant une garantie supplémentaire.
HP ne saurait être tenu pour responsable des erreurs ou
omissions de nature technique ou rédactionnelle qui pourraient
subsister dans le présent document.
Информация об авторских правах
© 2006 Copyright Hewlett-Packard Development Company, L.P.
Воспроизведение, адаптация или перевод без
предварительного письменного разрешения запрещены,
за исключением случаев, разрешенных законами об
авторских правах.
Содержащаяся здесь информация может быть изменена
без уведомления.
Гарантия на изделия и услуги компании HP явно
устанавливаются в прилагаемых
гарантийных положениях. Никакая приведенная в данном
документе информация не должна рассматриваться как
дополнительная гарантия. Компания HP не отвечает за
допущенные в данном документе технические или
редакторские ошибки, опечатки или неточности.
к таким изделиям и услугам
ﺮﺸﻨﻟا قﻮﻘﺣ تﺎﻣﻮﻠﻌﻣ
© 2006 Copyright Hewlett-Packard Development Company, L.P.
نذإ ﻰﻠﻋ لﻮﺼﳊا نود ﺎﻬﺘﻤﺟﺮﺗ وأ ﺎﻬﺳﺎﺒﺘﻗا وأ ةدﺎﳌا هﺬﻫ جﺎﺘﻧإ ةدﺎﻋإ ﺮﻈﺤﻳ
.ﺮﺸﻨﻟاو ﻊﺒﻄﻟا قﻮﻘﺣ ﲔﻧاﻮﻗ ﻪﺑ ﺢﻤﺴﺗ ﺎﻣ ءﺎﻨﺜﺘﺳﺎﺑ ﻖﺒﺴﻣ ﻲﺑﺎﺘﻛ
.رﺎﻌﺷإ نوﺪﺑ ﺮﻴﻴﻐﺘﻠﻟ ﺎﻨﻫ ةرﻮﻛﺬﳌا تﺎﻣﻮﻠﻌﳌا ﻊﻀﺨﺗو
نﺎﻤﻀﻟا تﺎﻧﺎﻴﺑ ﻲﻓ ﺔﺤﺿﻮﻣ HP ﺔﻛﺮﺷ تﺎﻣﺪﺧو تﺎﺠﺘﻨﳌ ةﺪﻴﺣﻮﻟا تﺎﻧﺎﻤﻀﻟا
ﺔﺑﺎﺜﲟ ﺎﻨﻫ درو ﺎﻣ رﺎﺒﺘﻋا ﻲﻐﺒﻨﻳ ﻻو .تﺎﻣﺪﳋاو تﺎﺠﺘﻨﳌا هﺬﻬﺑ ﺔﻘﻓﺮﳌا ﺔﺤﻳﺮﺼﻟا
وأ ﺔﻳﺮﻳﺮﲢ وأ ﺔﻴﻨﻓ ءﺎﻄﺧأ يأ ﻦﻋ ﺎﻬﺘﻴﻟﻮﺌﺴﻣ HP ﺔﻛﺮﺷ ﻲﻠﺨﺗو .ﻲﻓﺎﺿإ نﺎﻤﺿ
.ﺪﻨﺘﺴﳌا اﺬﻫ ﻲﻓ تدرو فﺬﺣ ءﺎﻄﺧأ يأ

Safety Information
Informations relatives à la sécurité
Always follow basic safety precautions when using this product to
reduce risk of injury from fire or electric shock.
1 Read and understand all instructions in the documentation that
comes with the printer.
2 Use only a grounded electrical outlet when connecting this
product to a power source. If you do not know whether the
outlet is grounded, check with a qualified electrician.
3 Observe all warnings and instructions marked on the product.
4 Unplug this product from wall outlets before cleaning.
5 Do not install or use this product near water, or when you are
wet.
6 Install the product securely on a stable surface.
7 Install the product in a protected location where no one can
step on or trip over the cord, and the cord cannot be damaged.
8 If the product does not operate normally, see “Troubleshooting”
in the onscreen user’s guide on the HP Photosmart Pro
software CD.
9 There are no user-serviceable parts inside. Refer servicing to
qualified service personnel.
Respectez toujours les précautions de sécurité élémentaires
quand vous utilisez ce produit afin de réduire les risques de
blessures dues au feu ou à un choc électrique.
1 Lisez et comprenez toutes les instructions contenues dans la
documentation livrée avec l'imprimante.
2 Utilisez toujours une prise de courant avec mise à la terre lors
du branchement de ce produit à une source d'alimentation.
Si vous ne savez pas si une prise de courant est mise à la
terre, consultez un électricien qualifié.
3 Suivez tous les avertissements et toutes les instructions
indiqués sur le produit.
4 Débranchez cet appareil des prises murales avant de procéder
à un nettoyage.
5 N'installez jamais cet appareil près d'une source d'eau ni si
vous êtes mouillé.
6 Installez l'appareil en toute sécurité sur une surface stable.
7 Installez l'appareil en un lieu protégé où personne ne puisse
marcher sur le cordon ou trébucher sur celui-ci, et où le cordon
ne puisse pas être endommagé.
8 Si le produit ne fonctionne pas normalement, reportez-vous à
la section « Dépannage » du guide de l'utilisateur en ligne,
disponible sur le CD du logiciel HP Photosmart Pro.
9 L'appareil ne contient aucune pièce dont l'entretien doive être
réalisé par l'utilisateur. Confiez l'entretien à un personnel
qualifié.
Информация о технике безопасности
Чтобы избежать пожара или поражения электрическим током
при эксплуатации данного изделия, следует неукоснительно
выполнять основные правила техники безопасности.
1 Внимательно прочтите все инструкции, которые
содержатся в прилагаемой к принтеру документации.
2 Подсоединяйте изделие только к заземленной розетке
сети питания. Если вы не знаете, заземлена ли розетка,
обратитесь к
3 Соблюдайте инструкции и обращайте внимание на
предупреждения, нанесенные на изделие.
4 Прежде чем приступить к чистке изделия, отсоедините
его от сетевой розетки.
5 Запрещается устанавливать и эксплуатировать данное
изделие рядом с водой, а также прикасаться к нему
мокрыми руками.
6 Изделие следует устанавливать на устойчивой
поверхности.
7 Изделие следует устанавливать в
исключена возможность повреждения кабеля, а также
возможность наступить или зацепить за него.
8 В случае неполадок в работе изделия обратитесь
кразделу “Устранение неполадок” в электронном
руководстве пользователя на компакт-диске с
программным обеспечением HP Photosmart Pro.
9 Внутри изделия нет деталей, подлежащих обслуживанию
пользователем. Обслуживание должно проводиться
квалифицированным персоналом.
квалифицированному электрику.
таком месте, где будет
ﺔﻣﻼﺴﻟا تﺎﻣﻮﻠﻌﻣ
ﺞﺘﻨﳌا اﺬﻫ ماﺪﺨﺘﺳا ﺪﻨﻋ ﺔﻴﺳﺎﺳﻷا ﺔﻴﺋﺎﻗﻮﻟا ﺔﻣﻼﺴﻟا ﺮﻴﺑاﺪﺗ ﺎ
ﻤﺋاد ﻊﺒﺗا
ً
.ﺔﻴﺋﺎﺑﺮﻬﻛ ﺔﻣﺪﺻ وأ قوﺮﺤﺑ ﺔﺑﺎﺻﻹا ﺮﻄﺧ ﻞﻴﻠﻘﺘﻟ
.ﺔﻌﺑﺎﻄﻟا ﻊﻣ ةدراﻮﻟا ﻊﺟاﺮﳌا ﻲﻓ تادﺎﺷرﻹا ﻞﻛ ﻢﻬﻓاو أﺮﻗا ١
رﺎﻴﺘﻠﻟ رﺪﺼﲟ ﺞﺘﻨﳌا اﺬﻫ ﻞﻴﺻﻮﺗ ﺪﻨﻋ ﻲﺿرأ ﻲﺋﺎﺑﺮﻬﻛ ﺬﺧﺄﻣ ﻂﻘﻓ مﺪﺨﺘﺳا ٢
،ﻻ مأ ﻲﺿرأ ءﺎﺑﺮﻬﻜﻟا ﺬﺧﺄﻣ نﺎﻛ اذإ ﺎﻤﻋ ﺔﻳارد ﻰﻠﻋ ﻦﻜﺗ ﻢﻟ اذإ .ﻲﺋﺎﺑﺮﻬﻜﻟا
.ﻞﻫﺆﻣ ءﺎﺑﺮﻬﻛ ﻲﻨﻓ ﻰﻟإ ﻚﻟذ ﻲﻓ ﻊﺟرﺎﻓ
.ﺞﺘﻨﳌا ﻰﻠﻋ ﺔﺤﺿﻮﳌا تادﺎﺷرﻹاو تاﺮﻳﺬﺤﺘﻟا ﻞﻛ ﻆﺣﻻ ٣
ﻲﻓ عوﺮﺸﻟا ﻞﺒﻗ ﻂﺋﺎﳊﺎﺑ ةدﻮﺟﻮﳌا ءﺎﺑﺮﻬﻜﻟا ﺬﺧﺂﻣ ﻦﻣ ﺞﺘﻨﳌا اﺬﻫ ﻞﺼﻓا ٤
.ﻪﻔﻴﻈﻨﺗ
نﻮﻜﺗ ﺎﻣﺪﻨﻋ وأ ءﺎﳌا ﻦﻣ بﺮﻘﻟﺎﺑ ﺞﺘﻨﳌا اﺬﻫ ماﺪﺨﺘﺳا وأ ﺐﻴﻛﺮﺘﺑ ﻢﻘﺗ ﻻ ٥
.ًﻼﺘﺒﻣ
.ﺮﻘﺘﺴﻣو ﺖﺑﺎﺛ ﺢﻄﺳ ﻰﻠﻋ نﺎﻣﺄﺑ ﺞﺘﻨﳌا ﺐﻴﻛﺮﺘﺑ ﻢﻗ ٦
وأ ﻚﻠﺴﻟا قﻮﻓ ﺪﺣأ ﺄﻄﻳ ﻻ ﺚﻴﺤﺑ ﻲﻤﺤﻣ نﺎﻜﻣ ﻲﻓ ﺞﺘﻨﳌا ﺐﻴﻛﺮﺘﺑ ﻢﻗ ٧
.ﻚﻠﺴﻟا ﻒﻠﺘﻳ ﻻ ﺎﻤﺜﻴﺣ وأ ،ﻪﺑ ﺮﺜﻌﺘﻳ
ءﺎﻄﺧﻷا فﺎﺸﻜﺘﺳا» ﻊﺟار ،ﻲﻌﻴﺒﻃ ﻞﻜﺸﺑ ﺞﺘﻨﳌا ﻞﻤﻌﻳ ﻢﻟ اذإ ٨
صﺮﻘﻟا ﻲﻓ ﺔﺷﺎﺸﻟا ﻰﻠﻋ ﺮﻬﻈﻳ يﺬﻟا مﺪﺨﺘﺴﳌا ﻞﻴﻟد ﻲﻓ «ﺎﻬﺣﻼﺻإو
.HP Photosmart Pro ﺞﻣﺎﻧﺮﺒﻟ طﻮﻐﻀﳌا
كﺮﺗا .مﺪﺨﺘﺴﳌا ﻞﺒﻗ ﻦﻣ ﺎﻬﺣﻼﺻإ ﻦﻜﳝ ءاﺰﺟأ ﺔﻳأ ﺞﺘﻨﳌا ﻞﺧاد ﺪﺟﻮﻳ ﻻ ٩
.ﻞﻫﺆﻣ حﻼﺻإ تﺎﻣﺪﺧ ﻲﻨﻓ ﻰﻟإ حﻼﺻﻹا تﺎﻣﺪﺧ
HP Deskjet 9800
Getting Started Guide
Getting Started Guide
Getting Started Guide
Getting Started Guide
H
P Des
kjet 9
80
0
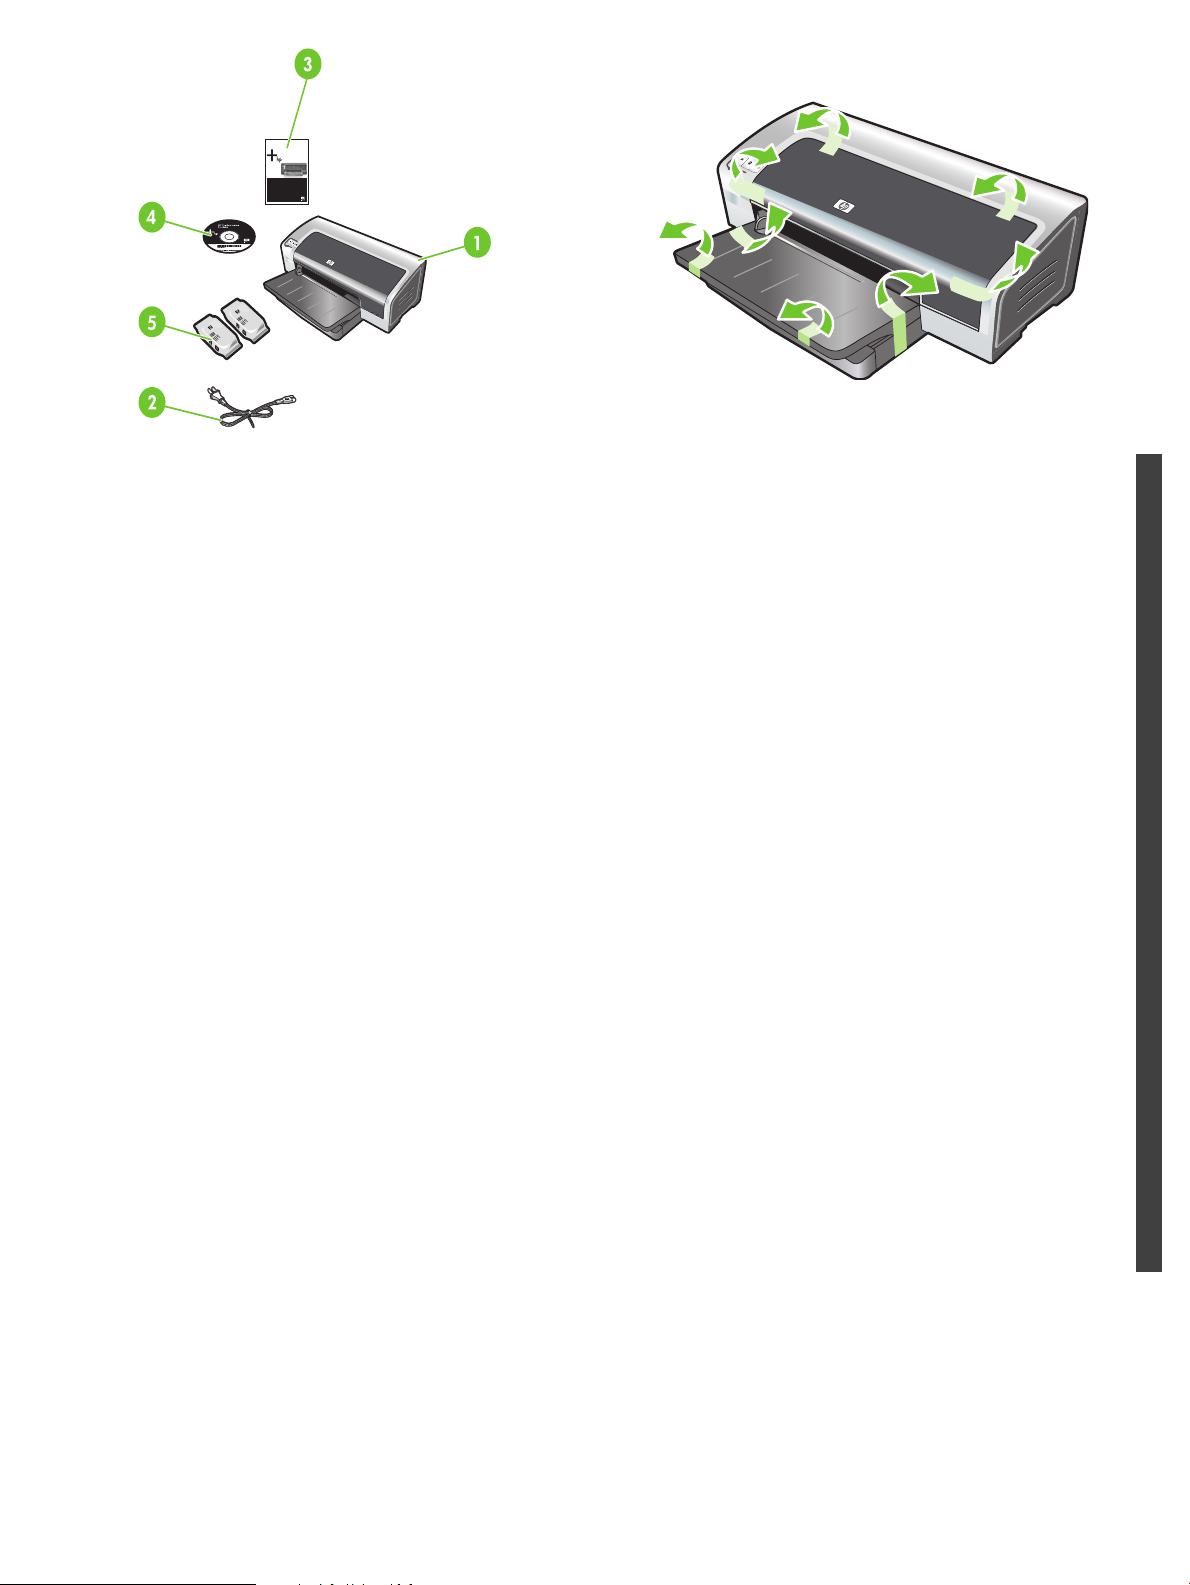
Step 1: Check the package contents.
1) HP Photosmart Pro B8300 series printer, 2) power cord,
3) printed documentation (this quick start guide),
4) HP Photosmart Pro software CD (software and electronic
documentation), 5) photo and tri-color print cartridges.
Etape 1 : Vérifiez le contenu du carton.
1) imprimante HP Photosmart Pro B8300 series, 2) cordon
d'alimentation, 3) documentation imprimée (ce guide de
démarrage rapide), 4) CD du logiciel HP Photosmart Pro
(logiciel et documentation électronique), 5) cartouches
d'impression photo et trichromique.
Шаг 1. Проверка содержимого упаковки.
1. Принтер HP Photosmart Pro B8300 series. 2. Шнур питания.
3. Печатная документация (данное краткое вводное
руководство). 4. Компакт-диск с программным обеспечением
HP Photosmart Pro (ПО и электронная документация).
5. Фото- и трехцветный картриджи.
Step 2: Remove the packing materials.
Remove all packing tape from the printer.
English
Etape 2 : Retirez les matériaux d'emballage.
Retirez les rubans d'emballage de l'imprimante.
Français
Шаг 2. Снятие упаковочного материала.
Снимите с принтера всю упаковочную ленту.
Русский
Português
1
6
7
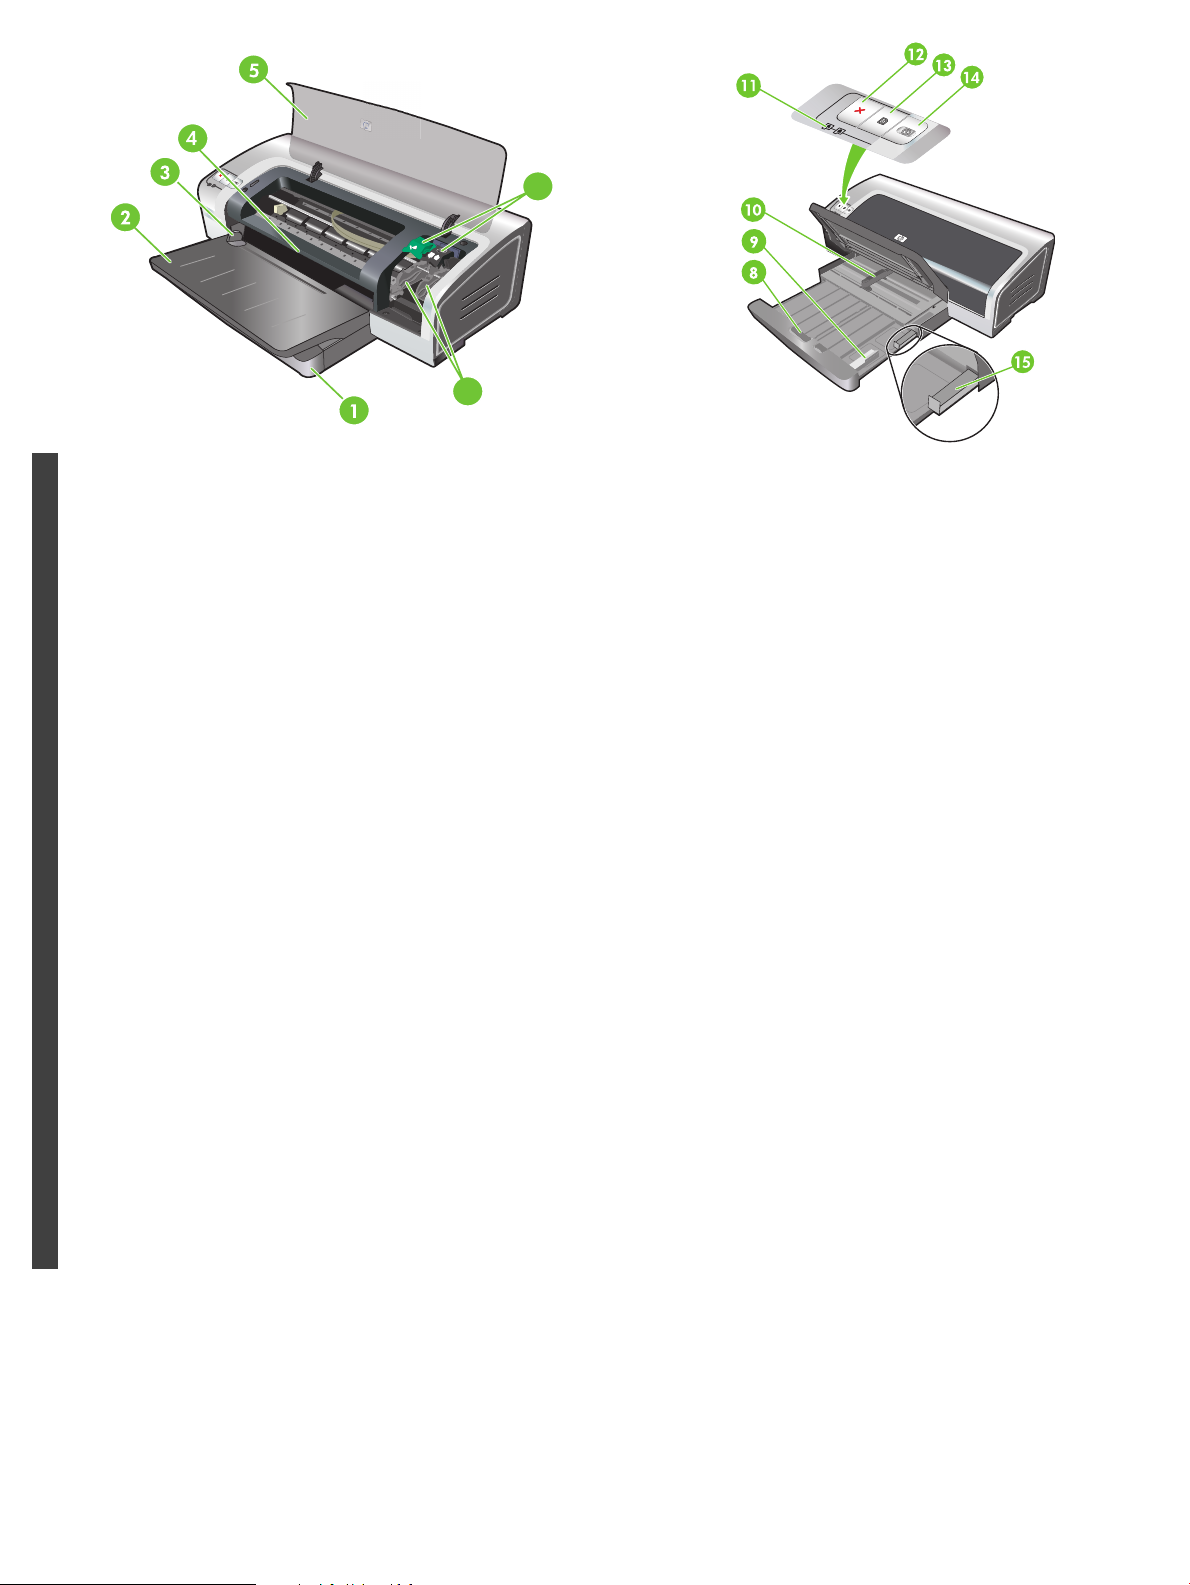
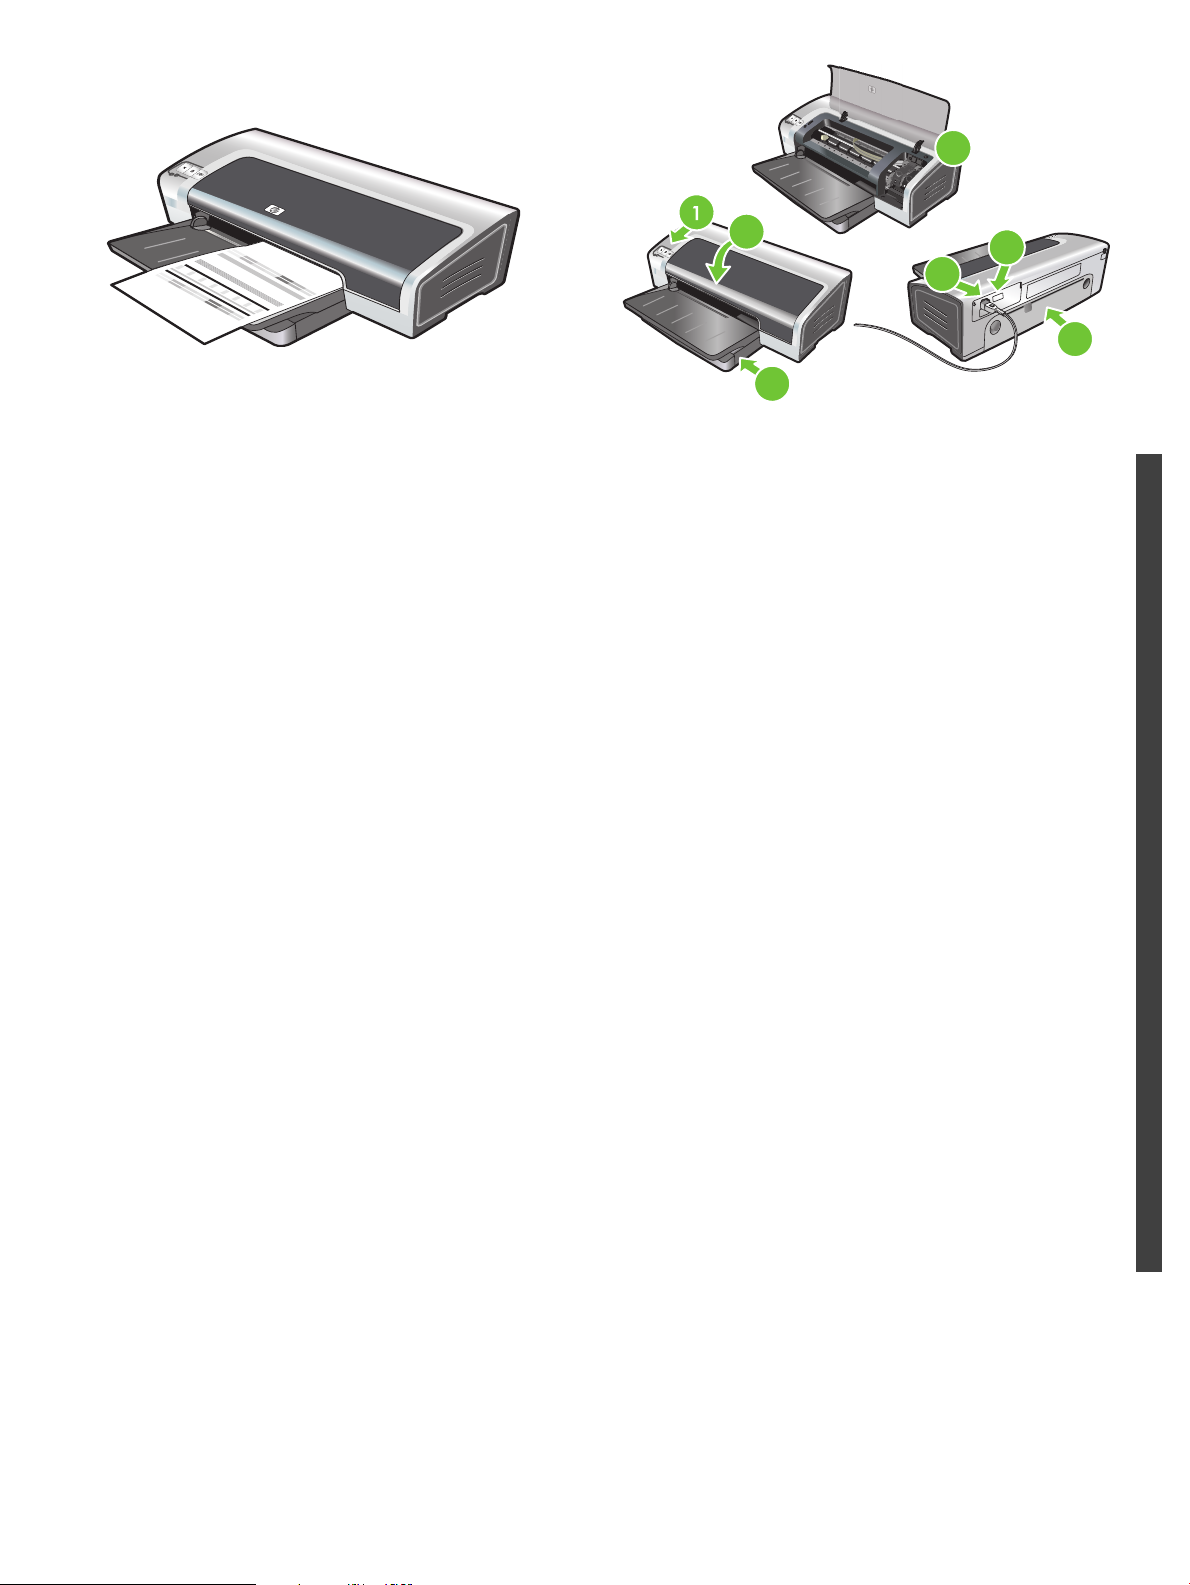
Step 3: Identify printer parts (front).
1) Extendable input tray, 2) extendable output tray, 3) front manual
feed paper guide, 4) front manual feed slot, 5) top cover, 6) print
cartridge latch, 7) print cartridge cradle,
English
Etape 3 : Identifiez les éléments de l'imprimante (face avant).
1) bac d'entrée extensible, 2) bac de sortie extensible, 3) guide de
papier de l'alimentation manuelle avant, 4) fente d'alimentation
manuelle avant, 5) capot supérieur, 6) loquet des cartouches
d'impression, 7) chariot des cartouches d'impression,
Français
Шаг 3. Детали принтера (вид спереди).
1. Выдвижной подающий лоток. 2. Выдвижной выходной
лоток. 3. Направляющая бумаги для подачи вручную спереди.
4. Гнездо для подачи вручную спереди. 5. Верхняя крышка.
6. Защелка картриджа. 7. Каретка для картриджей.
8) input tray lock, 9) small media guide, 10) paper width guide,
11) print cartridge lights, 12) Cancel button, 13) Resume button
and light, 14) Power button and light, 15) small media ejector.
8) verrou du bac d'entrée, 9) guide des petits supports,
10) guide de largeur de papier, 11) voyants des cartouches
d'impression, 12) bouton Annulation, 13) bouton et voyant
Reprise, 14) bouton et voyant Alimentation, 15) éjecteur des
petits supports.
8. Фиксатор подающего лотка. 9. Направляющая для
носителя малого формата. 10. Направляющая
бумаги. 11. Индикаторы картриджей. 12. Клавиша отмены.
13. Клавиша и индикатор возобновления печати. 14. Клавиша
и индикатор питания. 15. Эжектор носителя малого формата.
ширины
Русский
Português
2
6
5
4
3
2
5
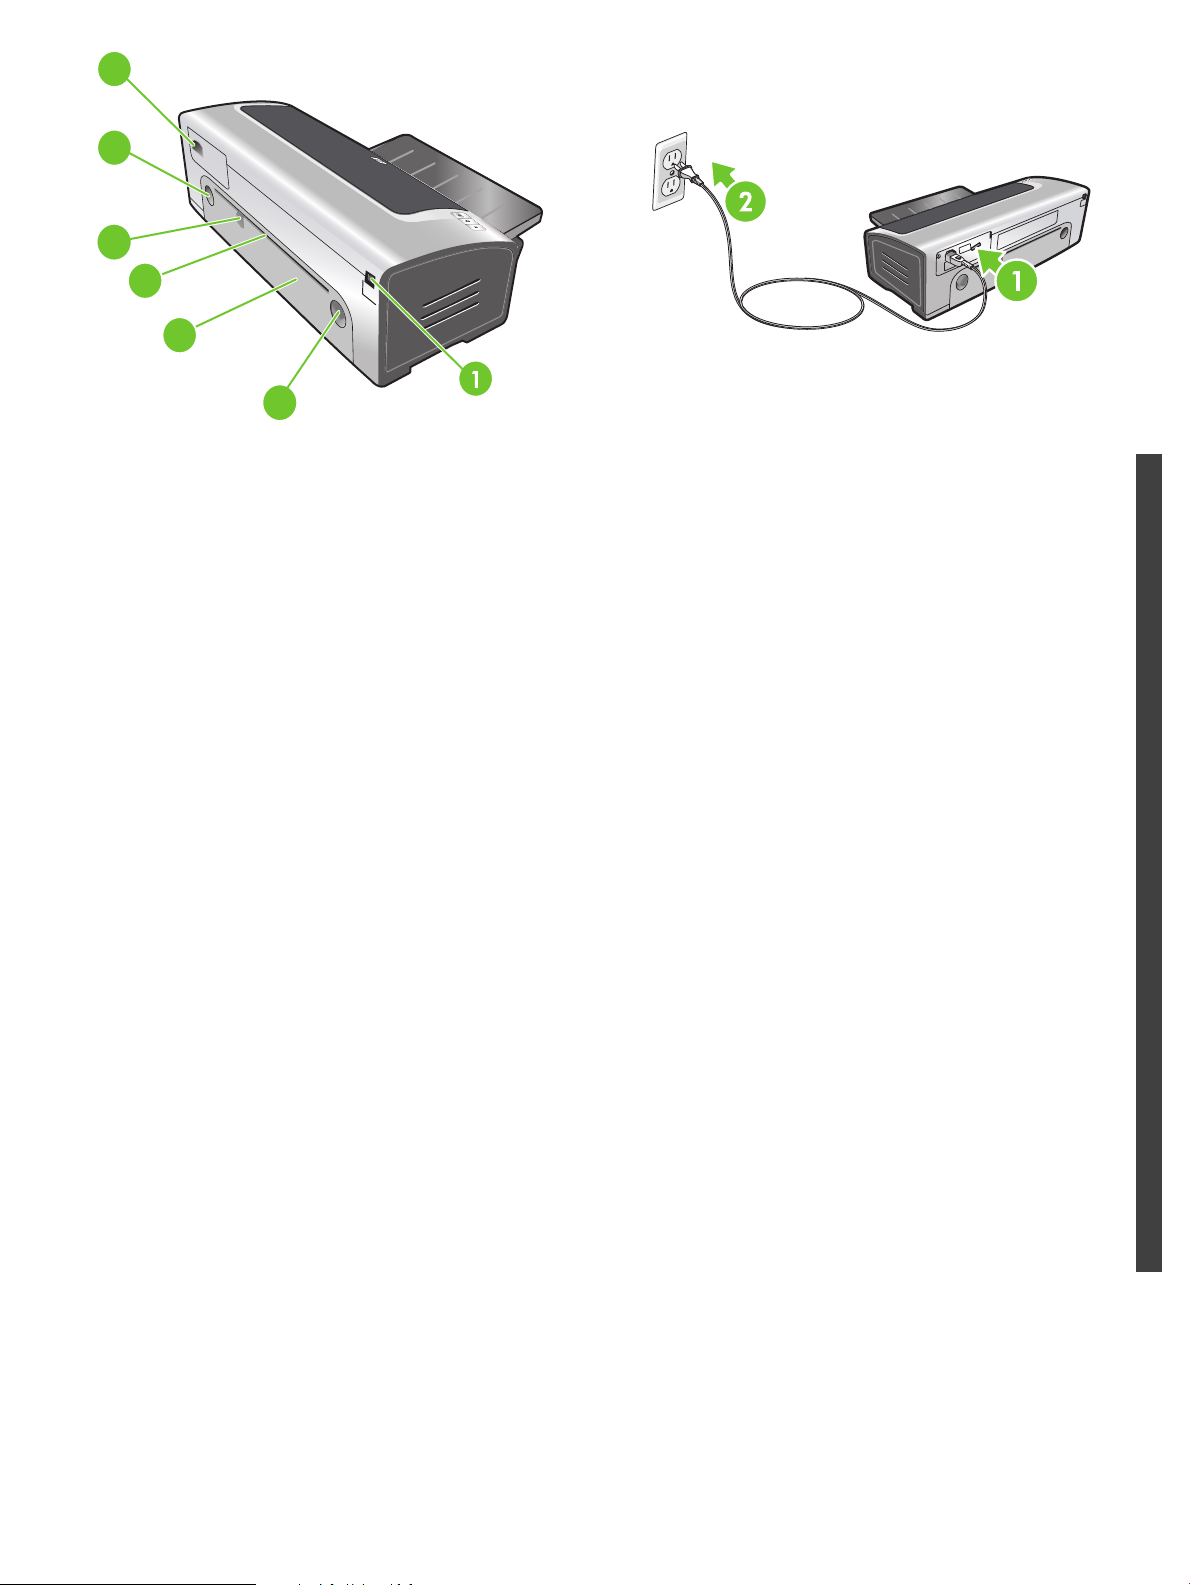
Identify printer parts (back).
1) Universal serial bus (USB) port, 2) rear access panel, 3) rear
manual feed slot, 4) rear manual feed paper guide, 5) rear access
panel release buttons, 6) power input.
Identifiez les éléments de l'imprimante (face arrière).
1) Port USB, 2) panneau d'accès arrière, 3) fente d'alimentation
manuelle arrière, 4) guide de papier de l'alimentation manuelle
arrière, 5) boutons de déblocage du panneau d'accès arrière,
6) entrée d'alimentation.
Детали принтера (вид сзади).
1. Порт универсальной последовательной шины (USB).
2. Задняя панель доступа. 3. Заднее гнездо для подачи
вручную. 4. Направляющая бумаги для подачи вручную
сзади. 5. Клавиши освобождения задней панели. 6. Разъем
питания.
Step 4: Connect the power cord.
1) Connect the power cord to the printer. 2) Plug in the power cord
to the power supply. Note: Only connect the printer to the
computer (through the USB cable) after you have completed the
software installation or when prompted to do so during
installation.
Etape 4 : Branchez le cordon d'alimentation.
1) Branchez le cordon d'alimentation sur l'imprimante.
2) Branchez le cordon d'alimentation sur une prise secteur.
Remarque : Ne connectez l'imprimante à l'ordinateur (via le câble
USB ou parallèle) qu'après avoir terminé d'installer le logiciel ou
lorsque le système invite à le faire au cours de l'installation.
Шаг 4. Подсоединение шнура питания.
1. Подсоедините шнур питания
шнура питания в розетку. Примечание. Принтер к компьютеру
следует подключать (с помощью кабеля USB) только после
полной установки программного обеспечения или после
соответствующего запроса во время его установки.
к принтеру. 2. Вставьте вилку
English
Français
Русский
Português
3
H
P
D
e
s
k
je
t
9
8
0
0
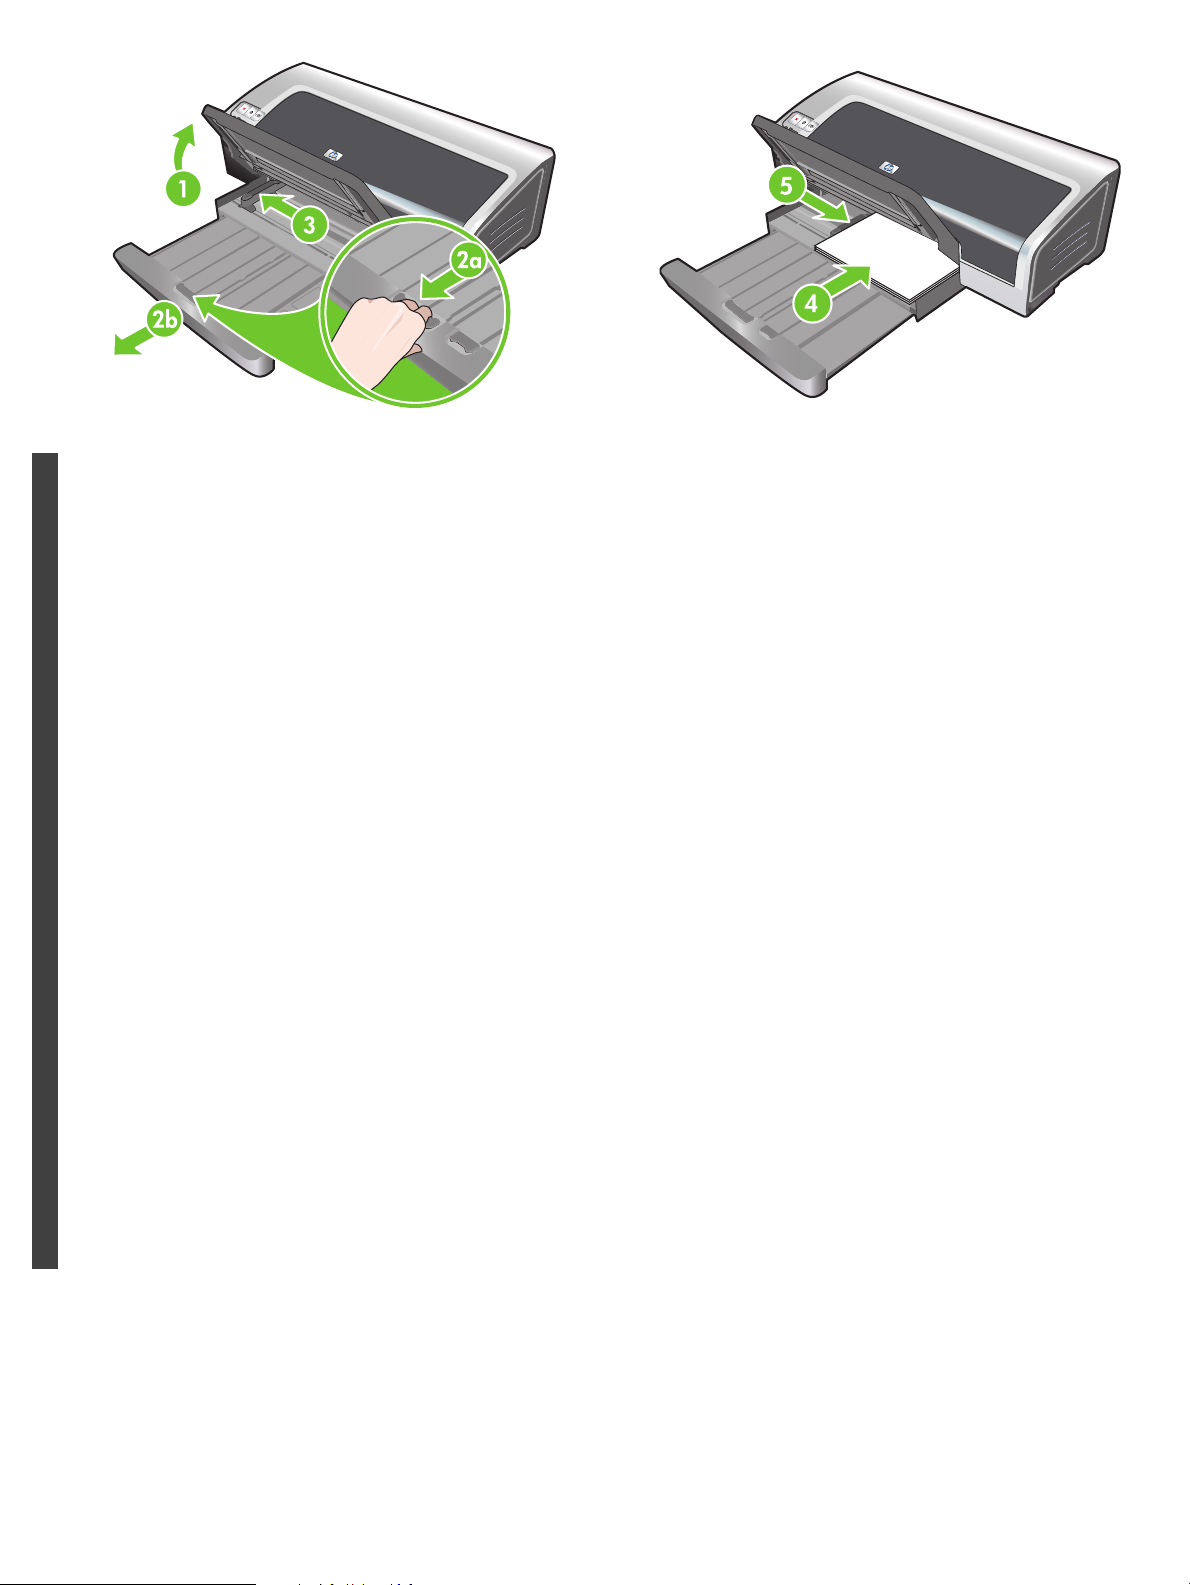
Step 5: Load the paper.
1) Raise the output tray. Wait a few seconds for the printer to
initialize. 2a) Press the input tray lock. 2b) Extend the input tray.
3) Press the button on top of the paper width guide and slide the
guide to the left to the outermost position.
English
Etape 5 : Chargez le papier.
1) Soulevez le bac de sortie. Attendez quelques secondes le
temps que l'imprimante s'initialise. 2a) Appuyez sur le verrou du
bac d'entrée. 2b) Tirez la rallonge du bac d'entrée. 3) Appuyez sur
le bouton au sommet du guide de largeur de papier et faites
glisser le guide vers la gauche vers sa position extrême.
Français
Шаг 5. Загрузка бумаги.
1. Поднимите выходной лоток. Подождите несколько секунд,
пока принтер выполнит инициализацию. 2а. Нажмите
фиксатор подающего лотка. 2б. Выдвиньте подающий лоток.
3. Нажмите клавишу сверху направляющей ширины бумаги и
сдвиньте ее влево до упора.
4) Insert up to 150 sheets of paper, print-side down along the right
side of the input tray until the paper stops. 5) Press the button on
top of the paper width guide and slide the guide to the right until
the guide stops at the edge of the media.
4) Placez jusqu'à 150 feuilles de papier dans le bac, face à
imprimer vers le bas, le long du côté droit du bac d'entrée jusqu'à
la butée. 5) Appuyez sur le bouton au sommet du guide de largeur
de papier et faites glisser le guide vers la droite jusqu'à ce qu'il
bute contre le bord des supports.
4. Положите до 150 листов бумаги стороной
для печати вниз
иприжмите стопку к правой стороне подающего лотка.
5. Нажмите клавишу сверху направляющей ширины бумаги и
сдвиньте ее вправо до полного касания со стопкой носителя.
Русский
Português
4

6b
HP Deskjet 9800
6a
6a) Press the input tray lock. 6b) Push the tray in until it stops at
the edge of the media. 7) Lower the output tray.
6a) Appuyez sur le verrou du bac d'entrée. 6b) Repoussez la
rallonge du bac d'entrée jusqu'à ce qu'elle atteigne le bord des
supports. 7) Abaissez le bac de sortie.
6а. Нажмите фиксатор подающего лотка. 6б. Задвиньте
лоток, пока он не коснется стопки носителя. 7. Опустите
выходной лоток.
Step 6: Turn on the printer and install the print cartridges.
1) Press the Power button to turn on the printer. 2) Open the top
cover and wait for the printer to initialize. Note: Wait a few
seconds for the carriage to disengage before inserting the print
cartridge. 3) Lift the print cartridge latches.
Etape 6 : Allumez l'imprimante et installez les cartouches
d'impression.
1) Appuyez sur le bouton Alimentation pour allumer l'imprimante.
2) Ouvrez le capot supérieur et attendez que l'imprimante
s'initialise. Remarque : Attendez quelques secondes que le
chariot se dégage avant d'introduire la cartouche d'impression.
3) Soulevez les loquets des cartouches d'impression.
Шаг 6. Включение принтера и установка картриджей.
1. Для включения принтера нажмите клавишу питания.
2. Откройте верхнюю крышку и подождите, пока принтер
выполнит
инициализацию. Примечание. Перед установкой
картриджа подождите несколько секунд, пока каретка
остановится на месте. 3. Поднимите фиксаторы картриджа.
English
Français
Русский
Português
5

8
6
H
P
D
e
s
kje
t 9
8
0
0
7
4) Remove the tri-color print cartridge from its package, and then
remove the clear nozzle protective tape by pulling on the pink pulltab. Caution: Do not touch the ink nozzles or copper contacts,
and do not remove the copper contacts. 5) Insert the tri-color print
cartridge into the left cradle.
English
4) Retirez la cartouche d'encre trichromique de son emballage,
puis ôtez le ruban recouvrant les gicleurs en tirant sur la languette
rose. Attention : Ne touchez pas aux gicleurs d'encre ni aux
contacts de cuivre et ne retirez pas ces derniers. 5) Insérez la
cartouche d'encre trichromique dans le logement gauche.
Français
4. Извлеките из упаковки трехцветный картридж и снимите
прозрачную защитную ленту с сопел, потянув за розовый
язычок. Предостережение. Не прикасайтесь к чернильным
соплам или медным контактам и не удаляйте медные
контакты. 5. Вставьте трехцветный картридж в левое седло
каретки.
6) Push down the latch until it snaps closed. 7) Repeat the
preceding steps to install the photo print cartridge into the right
cradle. 8) Close the top cover.
6) Enfoncez le loquet jusqu'à ce qu'il s'enclenche. 7) Répétez les
étapes précédentes pour insérer la cartouche d'encre noire dans
le logement droit. 8) Fermez le capot supérieur.
6. Нажмите
на фиксатор до его защелкивания. 7. Для
установки фотокартриджа в правое седло каретки повторите
приведенные выше действия. 8. Закройте верхнюю крышку.
Русский
Português
6
HP Des
kjet 9800
5
The printer aligns the print cartridges and automatically prints an
alignment page. The alignment process takes a few minutes.
Note: Do not open the top cover when the printer is aligning the
print cartridges.
L'imprimante aligne alors les cartouches d'impression et imprime
automatiquement une page d'alignement. Ce processus dure
quelques minutes. Remarque : N'ouvrez pas le capot supérieur
pendant l'alignement des cartouches d'impression par
l'imprimante.
7
H
P
D
es
k
je
t 9
80
0
3
2
4
6
Troubleshooting. If the printer does not print, make sure: 1) The
power light is on. 2) The light on the power supply module is lit.
3) The power cord is firmly connected. 4) The rear access panel is
locked into place. 5) The print cartridges are properly installed.
6) Paper is loaded in the input tray. 7) The top cover is closed. If it
still does not print, see “Troubleshooting” in the onscreen user’s
guide on the HP Photosmart Pro software CD.
Dépannage. Si l'imprimante n'imprime pas, effectuez les
vérifications suivantes : 1) Le voyant d'alimentation est allumé.
2) Le voyant du module d'alimentation est allumé. 3) Le cordon
d'alimentation est correctement branché. 4) Le panneau d'accès
arrière est verrouillé en position. 5) Les cartouches d'impression
sont installées correctement. 6) Le bac d'entrée contient du
papier. 7) Le capot supérieur est fermé. Si l'imprimante n'imprime
toujours pas, reportez-vous à la section « Dépannage » du guide
de l'utilisateur en ligne, disponible sur le CD du logiciel
HP Photosmart Pro.
English
Français
Принтер выполнит выравнивание картриджей и
автоматически распечатает страницу выравнивания. Процесс
выравнивания занимает несколько минут. Примечание. Во
время процедуры выравнивания картриджей не открывайте
верхнюю крышку.
Устранение неполадок. Если принтер не печатает, проверьте
следующие условия: 1.
Горит индикатор питания.
2. Горит индикатор на блоке питания. 3. Плотно подключен
шнур питания. 4. Установлена задняя панель доступа.
5. Правильно установлены картриджи. 6. В подающий
лоток загружена бумага. 7. Закрыта верхняя крышка. Если
проблему устранить не удалось, обратитесь к разделу
“Устранение неполадок” в электронном руководстве
пользователя на компакт-диске с программным обеспечением
HP Photosmart Pro.
7
Русский
Português
 Loading...