

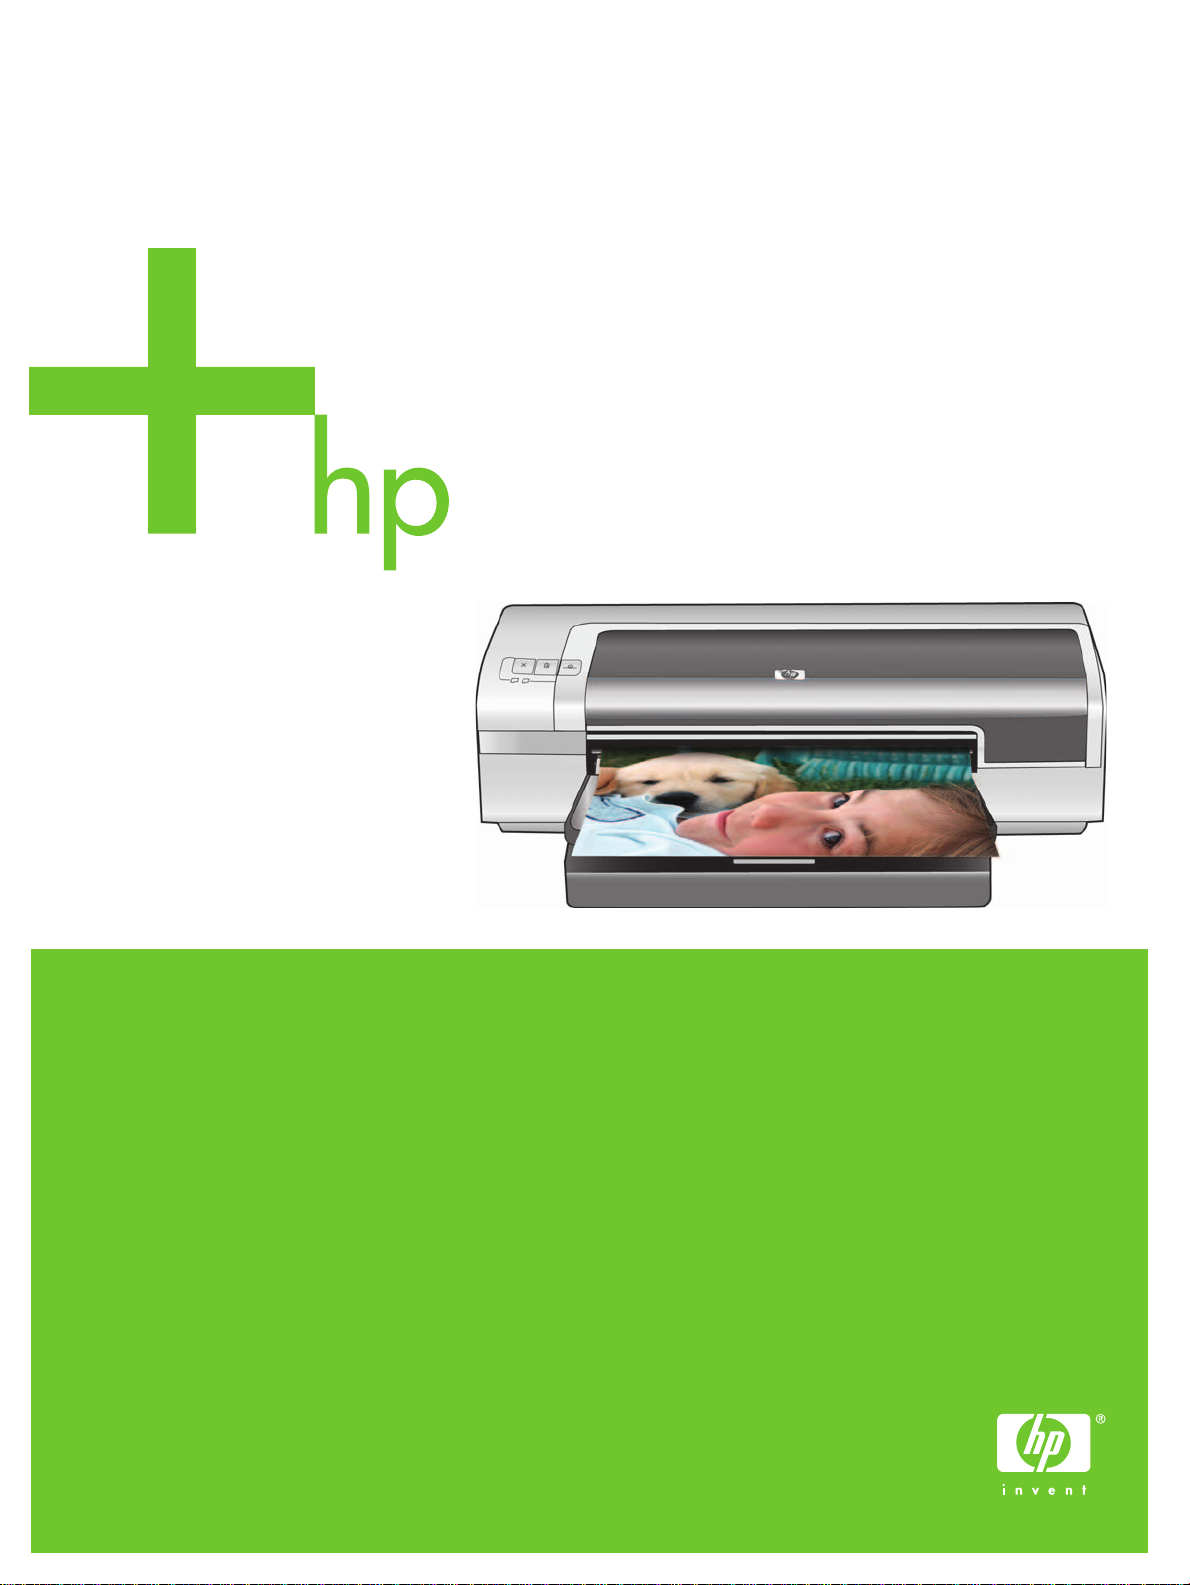
HP Photosmart Pro B8300 Series
Quick Start Guide
Guide de démarrage rapide
הריהמ הלחתהל ךירדמ

Copyright Information
© 2006 Copyright Hewlett-Packard Development Company, L.P.
Reproduction, adaptation or translation without prior written
permission is prohibited, except as allowed under the copyright
laws.
The information contained herein is subject to change without
notice.
The only warranties for HP products and services are set forth in
the express warranty statements accompanying such products
and services. Nothing herein should be construed as constituting
an additional warranty. HP shall not be liable for technical or
editorial errors or omissions contained herein.
Informations de copyright
© 2006 Copyright Hewlett-Packard Development Company, L.P.
Toute reproduction, adaptation ou traduction sans autorisation
écrite préalable est interdite, sauf dans les cas autorisés par les
lois sur le droit d'auteur.
Les informations contenues dans ce document peuvent être
modifiées sans préavis.
Les garanties relatives aux produits et aux services HP sont
décrites dans les textes de garantie limitée expresse qui les
accompagnent. Aucun élément du présent document ne peut
être interprété comme constituant une garantie supplémentaire.
HP ne saurait être tenu pour responsable des erreurs ou
omissions de nature technique ou rédactionnelle qui pourraient
subsister dans le présent document.
םירצוי תויוכז תודוא עדימ
.Copyright Hewlett-Packard Development Company, L.P 2006 ©
םיריתמש יפכ טעמל ,בתכב שארמ רתיה אלל םגרתל וא תונשל ,לפכשל ןיא
.םירצויה תויוכז יקוח
.שארמ העדוה אלל םייונישל ןותנ הז ךמסמב לולכה עדימה
שרופמב תטרופמ HP לש תורישו רצומ לכל תיוולנה תוירחאה תדועתב
וליאכ הז
ךמסמב רבד שרפל ןיא .תורישו רצומ לכל HP לש הדיחיה תוירחאה
תוינכט תואיגשל תוירחאב תאשונ הניא
HP .תפסונ תוירחא הווהמ אוה
.הז ךמסמב תוטמשהל וא הכירע תואיגשל

Safety Information
Informations relatives à la sécurité
Always follow basic safety precautions when using this product to
reduce risk of injury from fire or electric shock.
1 Read and understand all instructions in the documentation that
comes with the printer.
2 Use only a grounded electrical outlet when connecting this
product to a power source. If you do not know whether the
outlet is grounded, check with a qualified electrician.
3 Observe all warnings and instructions marked on the product.
4 Unplug this product from wall outlets before cleaning.
5 Do not install or use this product near water, or when you are
wet.
6 Install the product securely on a stable surface.
7 Install the product in a protected location where no one can
step on or trip over the cord, and the cord cannot be damaged.
8 If the product does not operate normally, see “Troubleshooting”
in the onscreen user’s guide on the HP Photosmart Pro
software CD.
9 There are no user-serviceable parts inside. Refer servicing to
qualified service personnel.
Respectez toujours les précautions de sécurité élémentaires
quand vous utilisez ce produit afin de réduire les risques de
blessures dues au feu ou à un choc électrique.
1 Lisez et comprenez toutes les instructions contenues dans la
documentation livrée avec l'imprimante.
2 Utilisez toujours une prise de courant avec mise à la terre lors
du branchement de ce produit à une source d'alimentation.
Si vous ne savez pas si une prise de courant est mise à la
terre, consultez un électricien qualifié.
3 Suivez tous les avertissements et toutes les instructions
indiqués sur le produit.
4 Débranchez cet appareil des prises murales avant de procéder
à un nettoyage.
5 N'installez jamais cet appareil près d'une source d'eau ni si
vous êtes mouillé.
6 Installez l'appareil en toute sécurité sur une surface stable.
7 Installez l'appareil en un lieu protégé où personne ne puisse
marcher sur le cordon ou trébucher sur celui-ci, et où le cordon
ne puisse pas être endommagé.
8 Si le produit ne fonctionne pas normalement, reportez-vous à
la section « Dépannage » du guide de l'utilisateur en ligne,
disponible sur le CD du logiciel HP Photosmart Pro.
9 L'appareil ne contient aucune pièce dont l'entretien doive être
réalisé par l'utilisateur. Confiez l'entretien à un personnel
qualifié.
תוחיטב תודוא עדימ
שומישה תעב םייסיסבה תוריהזה יעצמא לע דימת דפקה
וא הפירשמ העיגפה ןוכיס תא םצמצל תנמ לע הז רצומב
.תולמשחתהמ
ףרוצמה דועיתב תוארוהה לכ תא תנבהש אדוו ארק
.תספדמל
ילמשח עקשב שמתשה ,למשח רוקמל הז רצומ רוביח תעב
הנפ ,קראומ עקשהש חוטב ךניא םא .דבלב קראומ
.ךמסומ יאלמשחל
.רצומה יבג-לע
רשאכ וא םימ תברקב וב שמתשת לאו הז רצומ ןיקתת לא
.ביצי חטשמ יבג-לע החוטב הרוצב רצומה תא ןקתה
ךורדי והשימש הנכס ןיא וב ןגומ םוקמב רצומה תא ןקתה
לבכל קזנ םרגייש ששח ןיאו וילע
"תויעב ןורתפ" ףיעסב ןייע ,הכלהכ לעופ וניא רצומה םא
הנכותה רוטילקתב אצמנש ךסמה יבג-לע שמתשמל ךירדמב
דצמ הקוזחת םיבייחמה םיימינפ םיקלח ליכמ וניא רצומה
.םיכמסומ תוריש ישנאל הנפ ,תוריש תלבקל .שמתשמה
תונמוסמה תוארוההו תורהזאה לכ תא ארק
.למשחה עקשמ ותוא קתנ ,רצומה יוקינ ינפל
.בוטר ךנה
דעמי וא למשחה לבכ לע
.למשחה
.HP Photosmart Pro לש
1
2
3
4
5
6
7
8
9
HP Deskjet 9800
Getting Started Guide
Getting Started Guide
Getting Started Guide
Getting Started Guide
H
P Deskjet 980
0
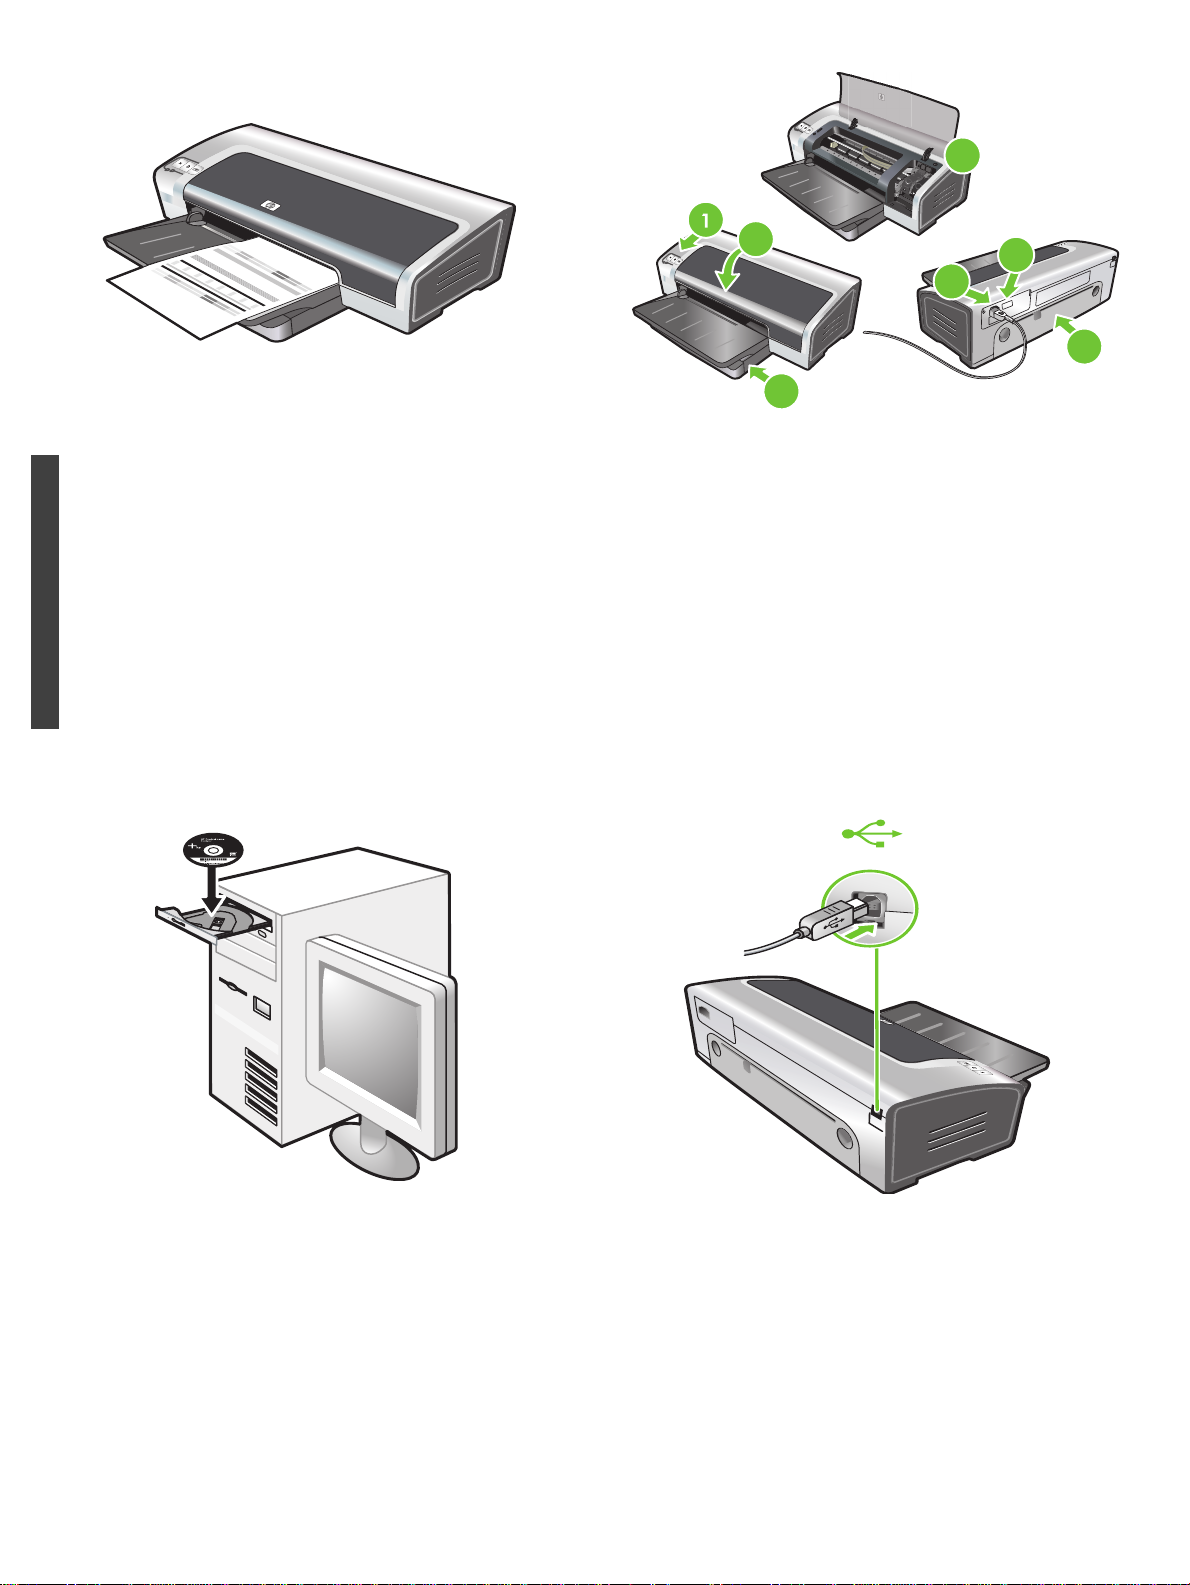
Step 1: Check the package contents.
1) HP Photosmart Pro B8300 series printer, 2) power cord,
3) printed documentation (this quick start guide),
4) HP Photosmart Pro software CD (software and electronic
documentation), 5) photo and tri-color print cartridges.
6
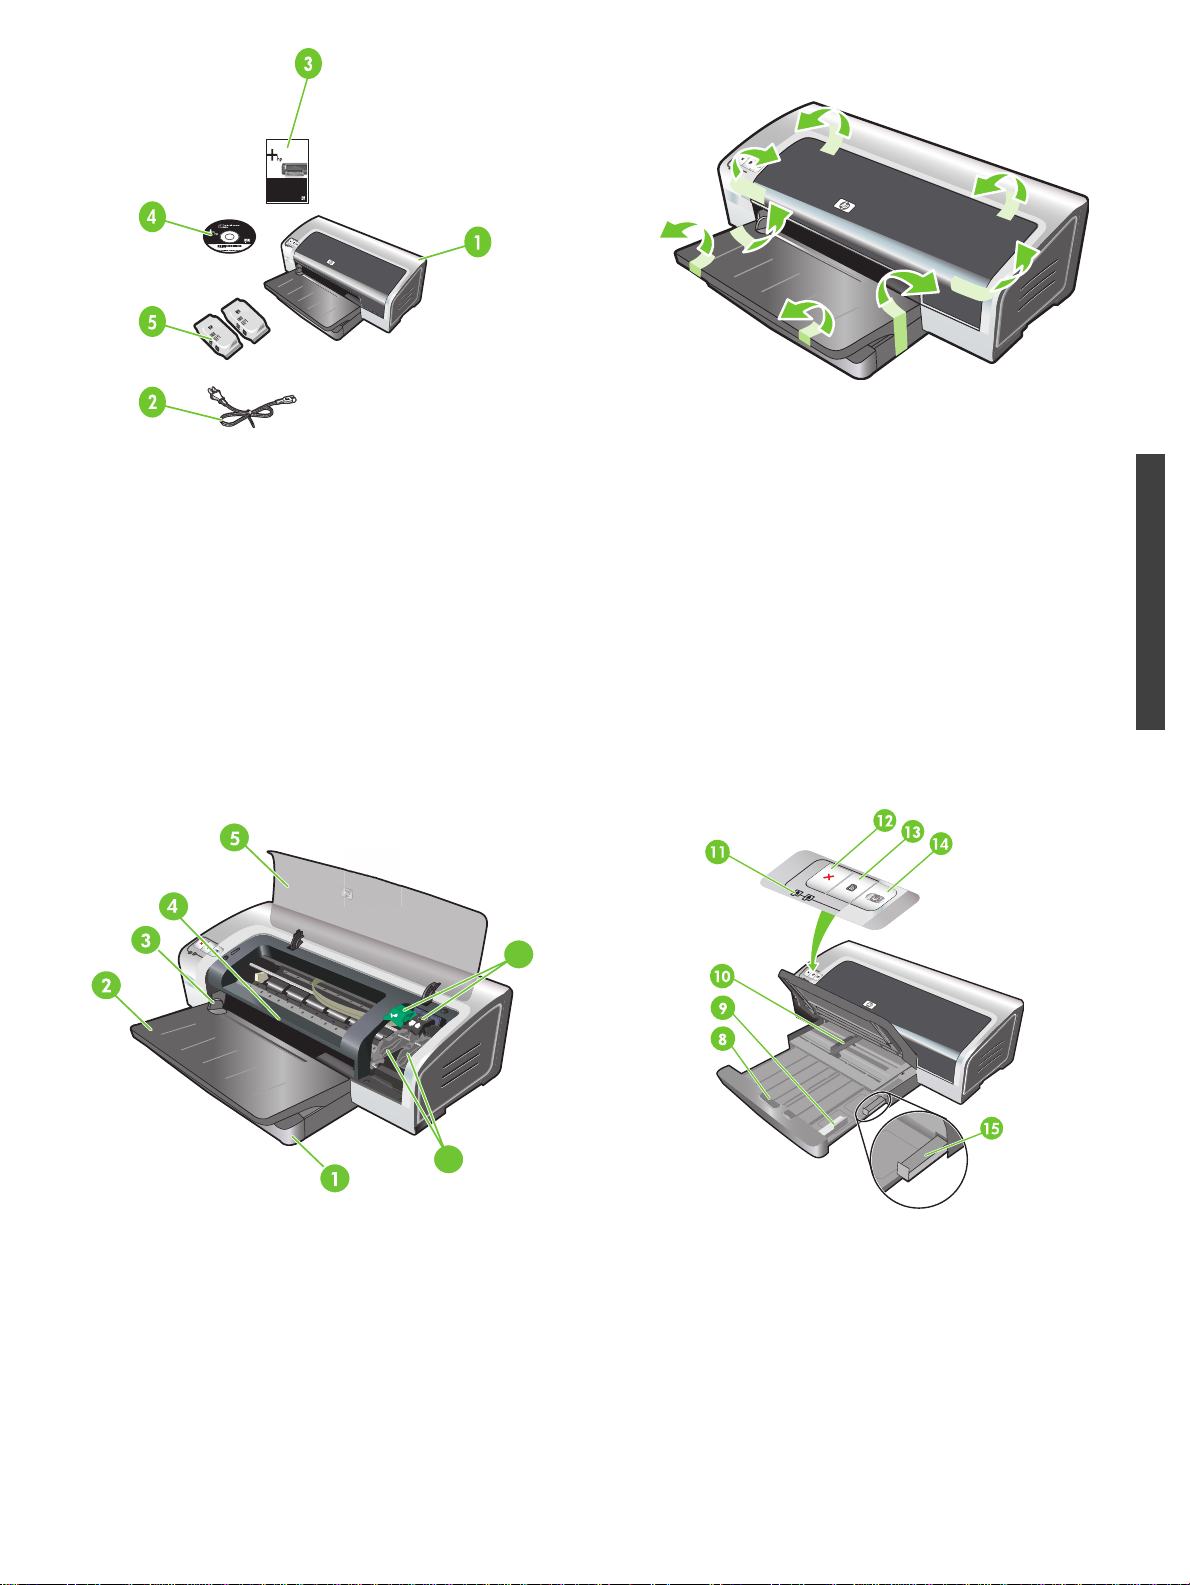
Step 2: Remove the packing materials.
Remove all packing tape from the printer.
English
7
Step 3: Identify printer parts (front).
1) Extendable input tray, 2) extendable output tray, 3) front manual
feed paper guide, 4) front manual feed slot, 5) top cover, 6) print
cartridge latch, 7) print cartridge cradle,
8) input tray lock, 9) small media
guide, 10) paper width guide, 11) print cartridge lights, 12) Cancel
button, 13) Resume button and light, 14) Power button and light,
15) small media ejector.
1
6
5
4
3
2
5
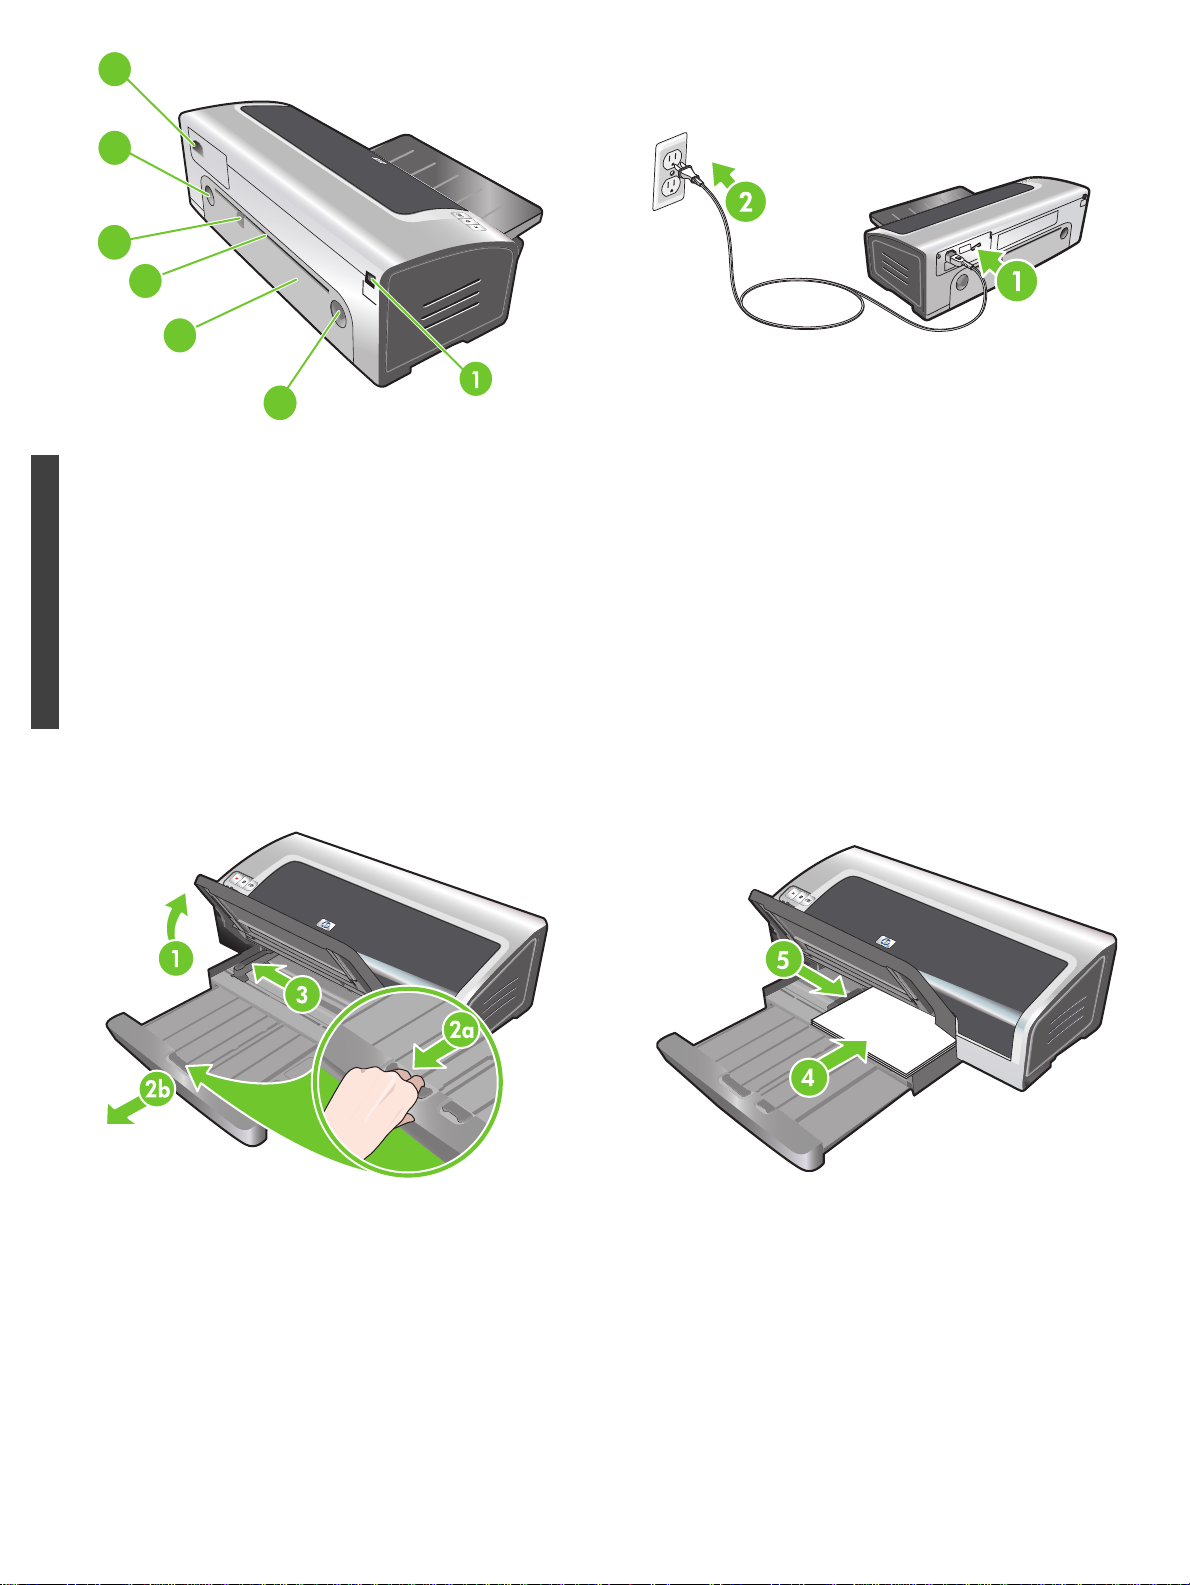
Identify printer parts (back).
1) Universal serial bus (USB) port, 2) rear access panel, 3) rear
manual feed slot, 4) rear manual feed paper guide, 5) rear access
panel release buttons, 6) power input.
English
H
P
D
e
s
k
je
t
9
8
0
0
Step 4: Connect the power cord.
1) Connect the power cord to the printer. 2) Plug in the power cord
to the power supply. Note: Only connect the printer to the
computer (through the USB cable) after you have completed the
software installation or when prompted to do so during
installation.
Step 5: Load the paper.
1) Raise the output tray. Wait a few seconds for the printer to
initialize. 2a) Press the input tray lock. 2b) Extend the input tray.
3) Press the button on top of the paper width guide and slide the
guide to the left to the outermost position.
4) Insert up to 150 sheets of paper, print-side down along the right
side of the input tray until the paper stops. 5) Press the button on
top of the paper width guide and slide the guide to the right until
the guide stops at the edge of the media.
2
6b
HP Deskjet 9800
6a
6a) Press the input tray lock. 6b) Push the tray in until it stops at
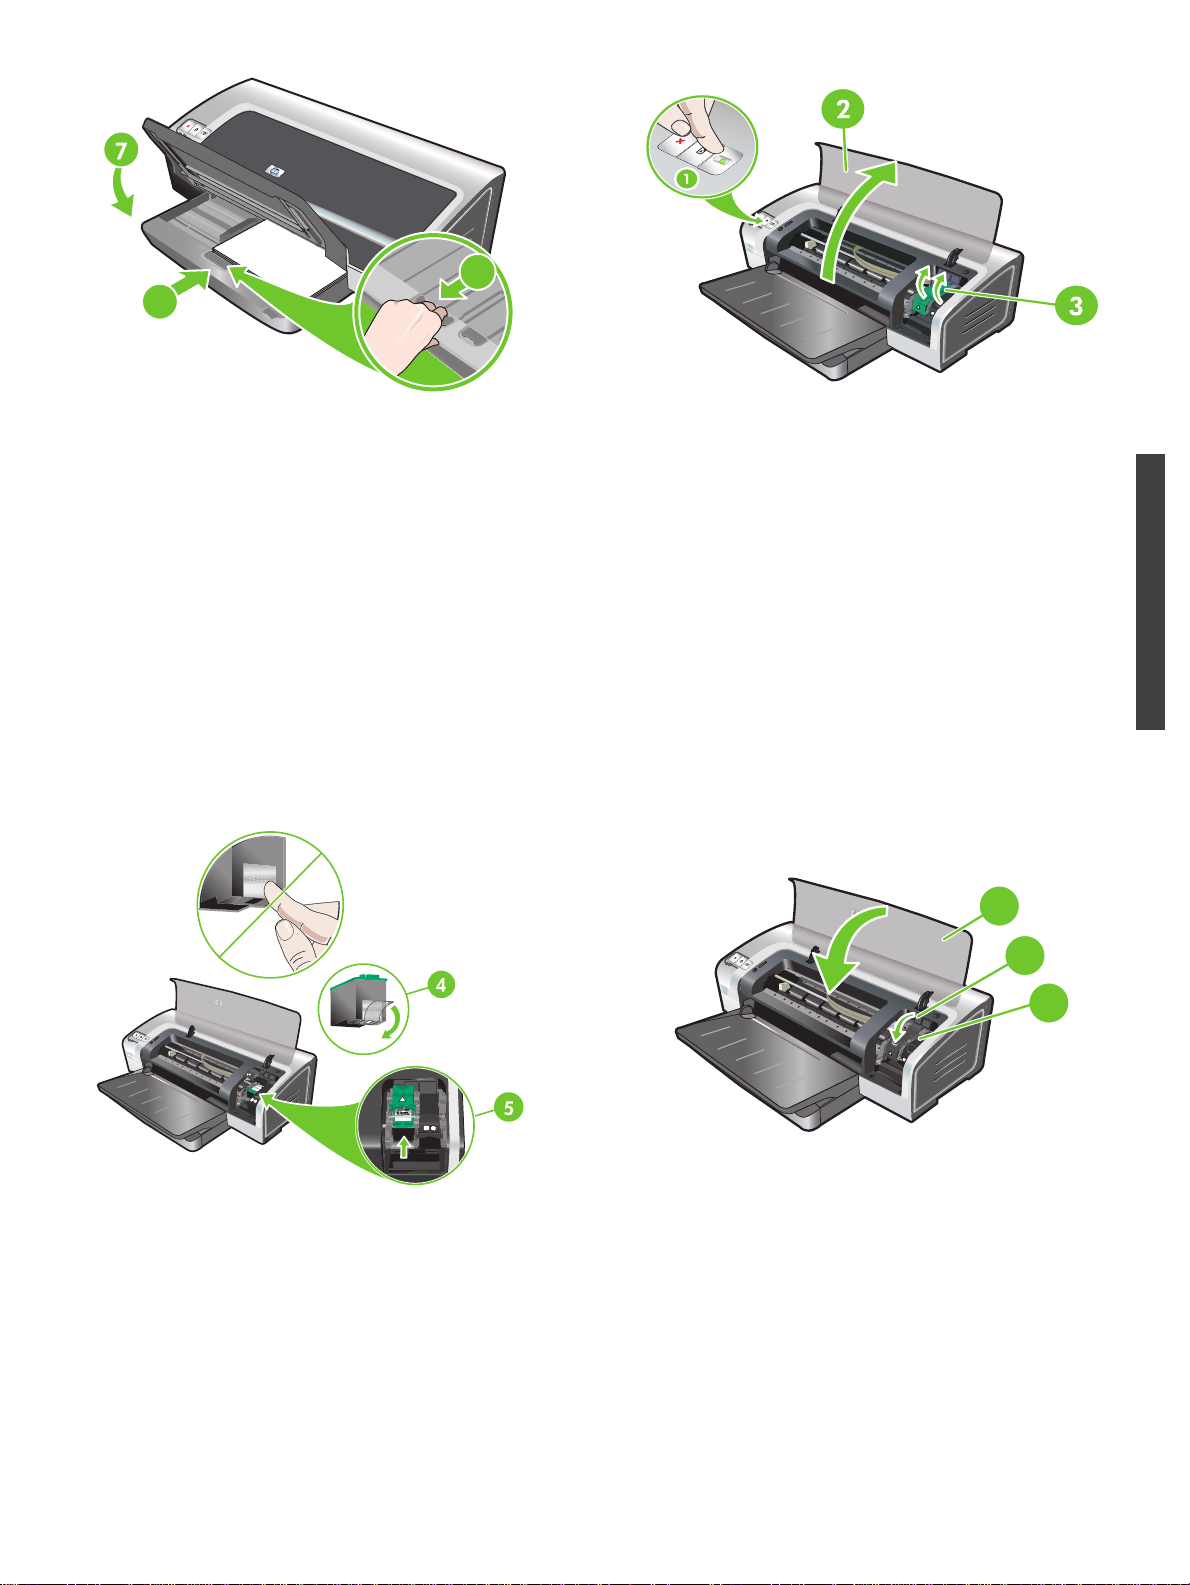
the edge of the media. 7) Lower the output tray.
Step 6: Turn on the printer and install the print cartridges.
1) Press the Power button to turn on the printer. 2) Open the top
cover and wait for the printer to initialize. Note: Wait a few
seconds for the carriage to disengage before inserting the print
cartridge. 3) Lift the print cartridge latches.
8
6
H
P
D
e
s
k
je
t
9
8
0
0
7
English
4) Remove the tri-color print cartridge from its package, and then
remove the clear nozzle protective tape by pulling on the pink pulltab. Caution: Do not touch the ink nozzles or copper contacts,
and do not remove the copper contacts. 5) Insert the tri-color print
cartridge into the left cradle.
6) Push down the latch until it snaps closed. 7) Repeat the
preceding steps to install the photo print cartridge into the right
cradle. 8) Close the top cover.
3
HP Des
kjet 9800
5
The printer aligns the print cartridges and automatically prints an
alignment page. The alignment process takes a few minutes.
Note: Do not open the top cover when the printer is aligning the
print cartridges.
English
7
H
P
D
e
s
kje
t 9
8
0
0
3
2
4
6
Troubleshooting. If the printer does not print, make sure: 1) The
power light is on. 2) The light on the power supply module is lit.
3) The power cord is firmly connected. 4) The rear access panel is
locked into place. 5) The print cartridges are properly installed.
6) Paper is loaded in the input tray. 7) The top cover is closed. If it
still does not print, see “Troubleshooting” in the onscreen user’s
guide on the HP Photosmart Pro software CD.
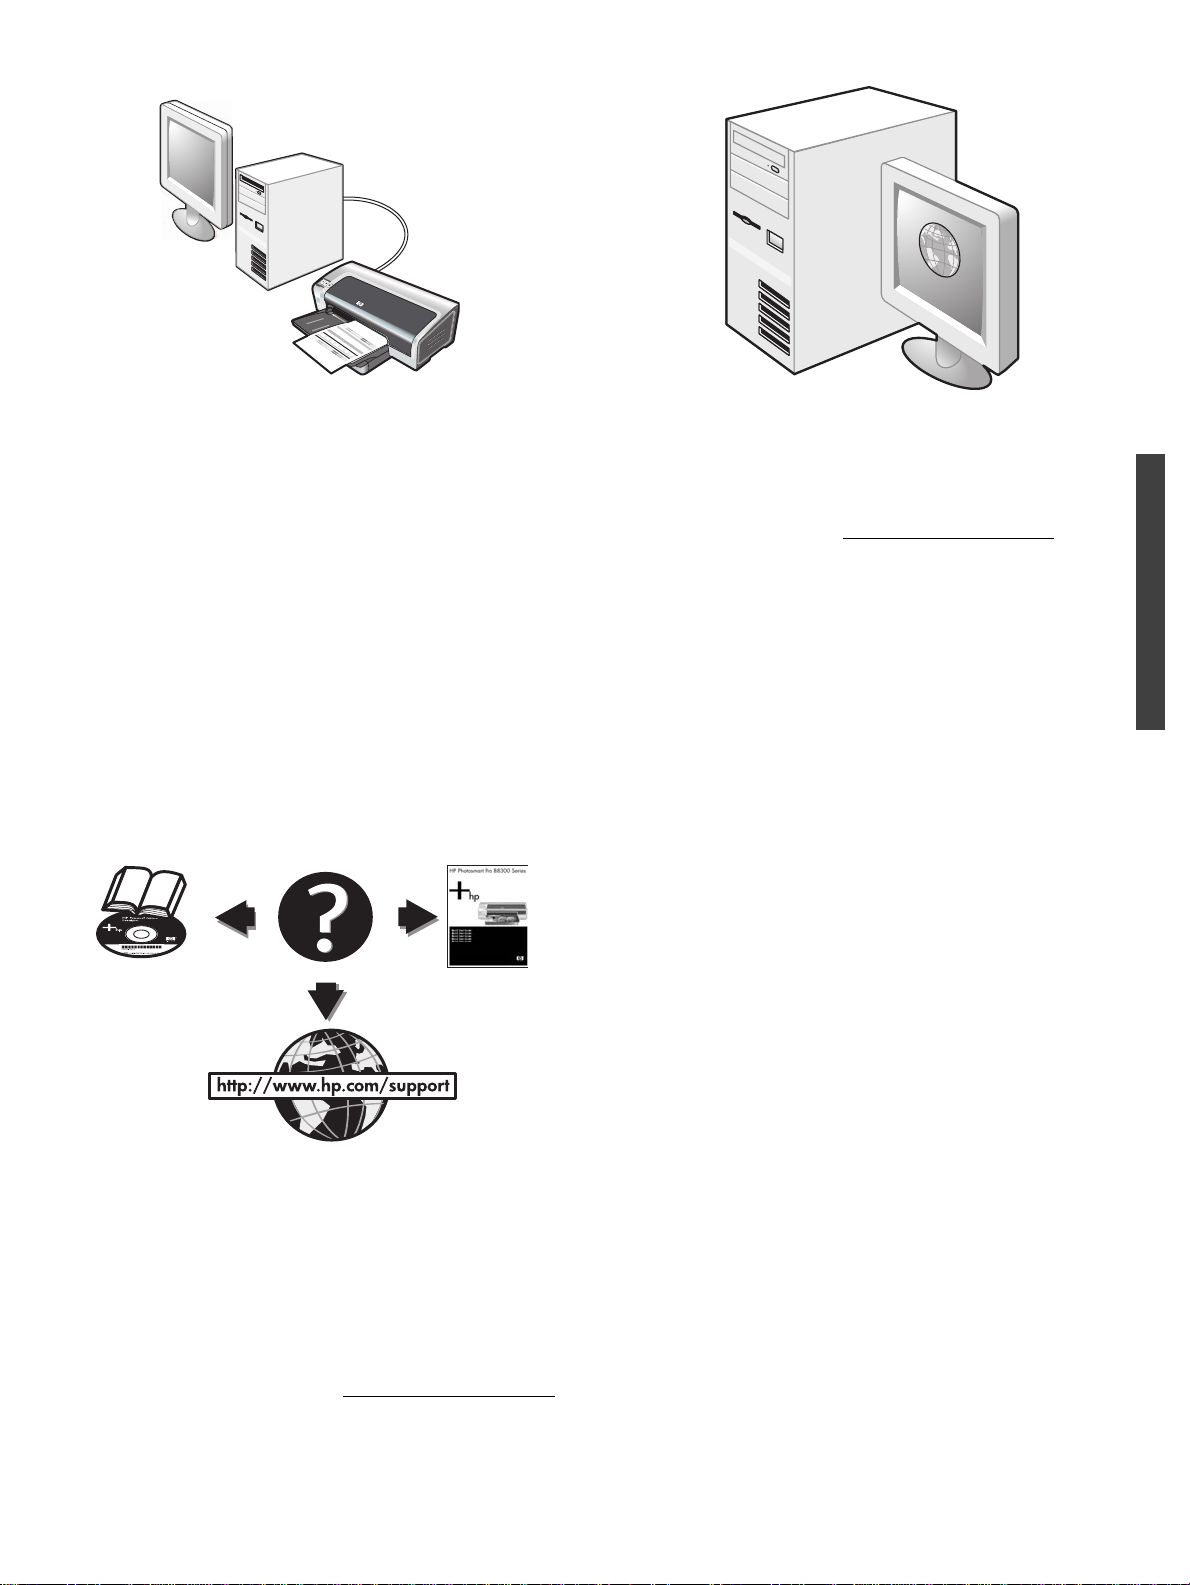
Step 7: Install the software and connect the printer.
1) Disconnect the USB cable if it is connected to the printer.
2) Insert the HP Photosmart Pro software CD into the CD-ROM
drive, and then follow the appropriate procedure for your operating
system.
3) When prompted, connect the USB cable.
4
WWW
Step 8: Test the software installation.
After you complete the software installation and connect the
printer to the computer, print a document from an application you
use frequently.
Step 9: Register the printer.
Register the printer to receive important support and technical
information. If you did not register your printer while installing the
software, you can register at http://www.register.hp.com
.
English
Congratulations!
Your printer is ready to use. For information about using the
printer and troubleshooting, see the following resources:
• The onscreen user's guide on the HP Photosmart Pro
software CD.
• HP Instant Support (for more information, see the onscreen
user's guide).
• The product support Website at http://www.hp.com/support
Getting more information.
See the onscreen user’s guide for information on how to:
• Order HP supplies and accessories.
• Print color and black-and-white photos on a variety of media
types and sizes.
• Use the small media guide to print cards and smaller-sized
media.
.
5
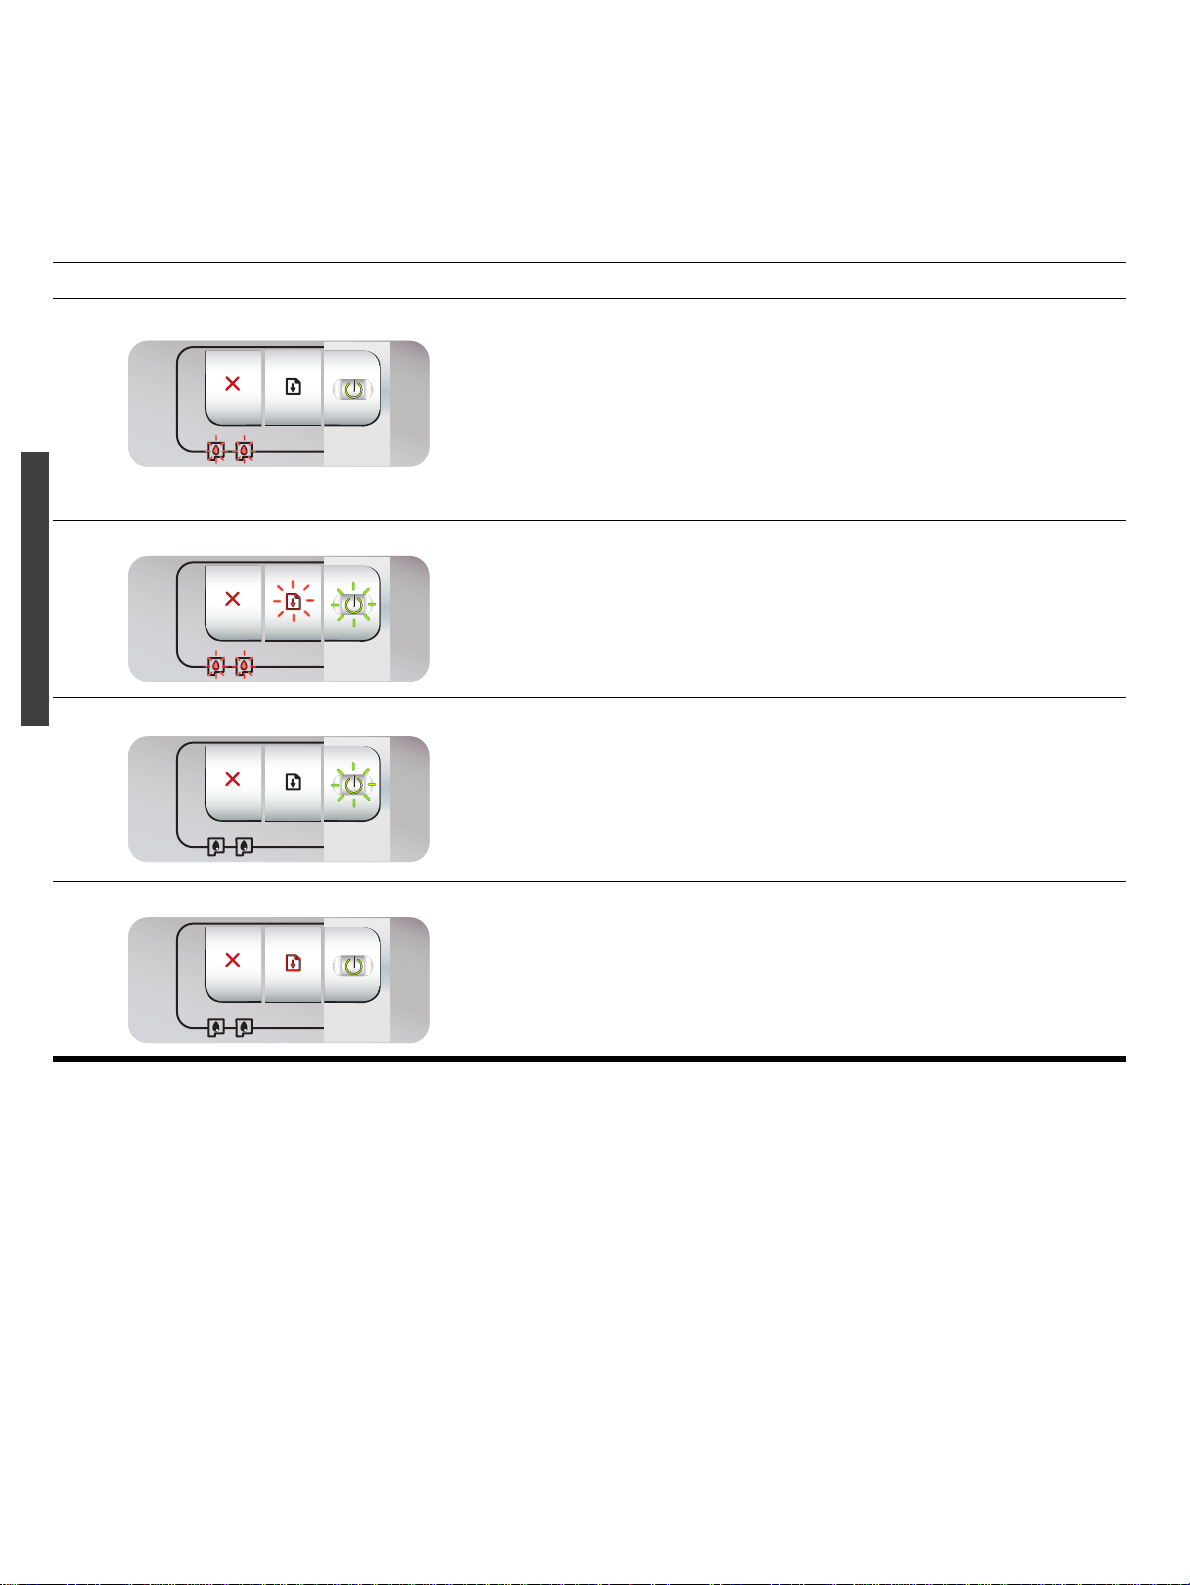
Printer lights reference
The printer lights indicate printer status and are useful for diagnosing printing problems. The following table shows printer light patterns
that might occur during the installation process.
You can find a complete list of printer light descriptions in the following locations:
• Onscreen user’s guide located on the HP Photosmart Pro software CD: See the “Printer lights reference” section.
• Diagnostics page: Press and hold the Power button, press the Resume button four times, and then release the Power button.
Printer light indication Explanation and recommended action
Left and right print cartridge lights The left print cartridge light indicates tri-color print cartridge status; the right
print cartridge light indicates photo or black print cartridge status.
The print cartridge lights can be on or blinking in combination with the Power
light and Resume light behaviors listed in this table.
• On: Print cartridge is low on ink or out of ink. Replace the print cartridge
soon. For instructions, see the onscreen user’s guide.
• Blinking: Print cartridge is damaged, missing, or incompatible. Reinstall
or replace the print cartridge. For more information, see the onscreen
user’s guide. If printing with a single print cartridge, ignore this light.
Printer lights cycle The printer lights cycle when the printer is reinitializing.
• No action required.
English
Power light blinks Printer is printing or processing a print job.
• No action required.
Power and Resume lights on Check for one of the following conditions:
• Make sure the top cover is closed.
• Make sure the rear access panel is correctly installed and locked into
place.
6
 Loading...