

Hp PHOTOSMART PREMIUM C310A User Manual [nl]
PHOTOSMART PREMIUM
USB
USB
MMC
e-ALL-IN-ONE C310 SERIES
Start setup here...
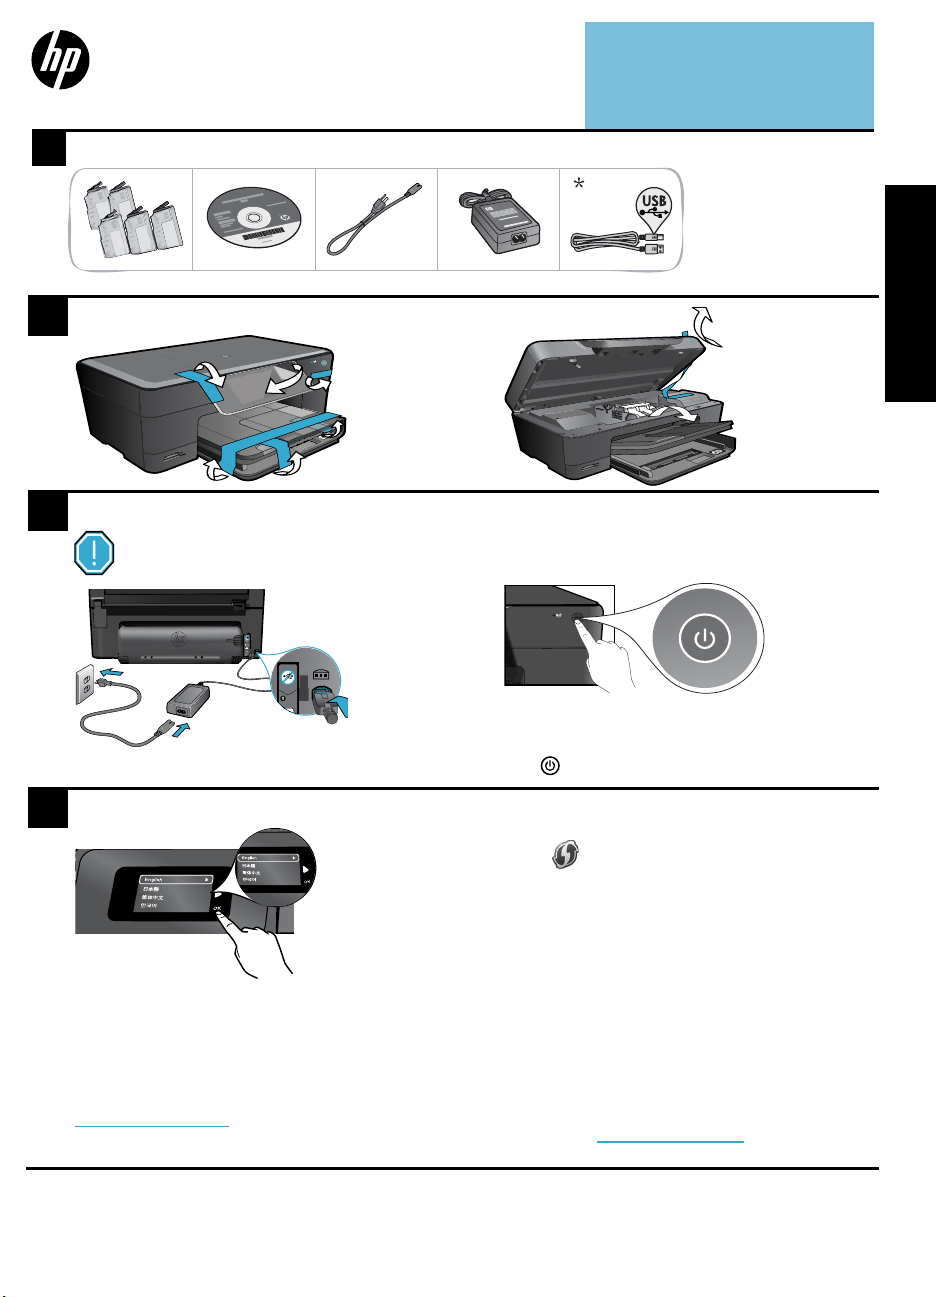
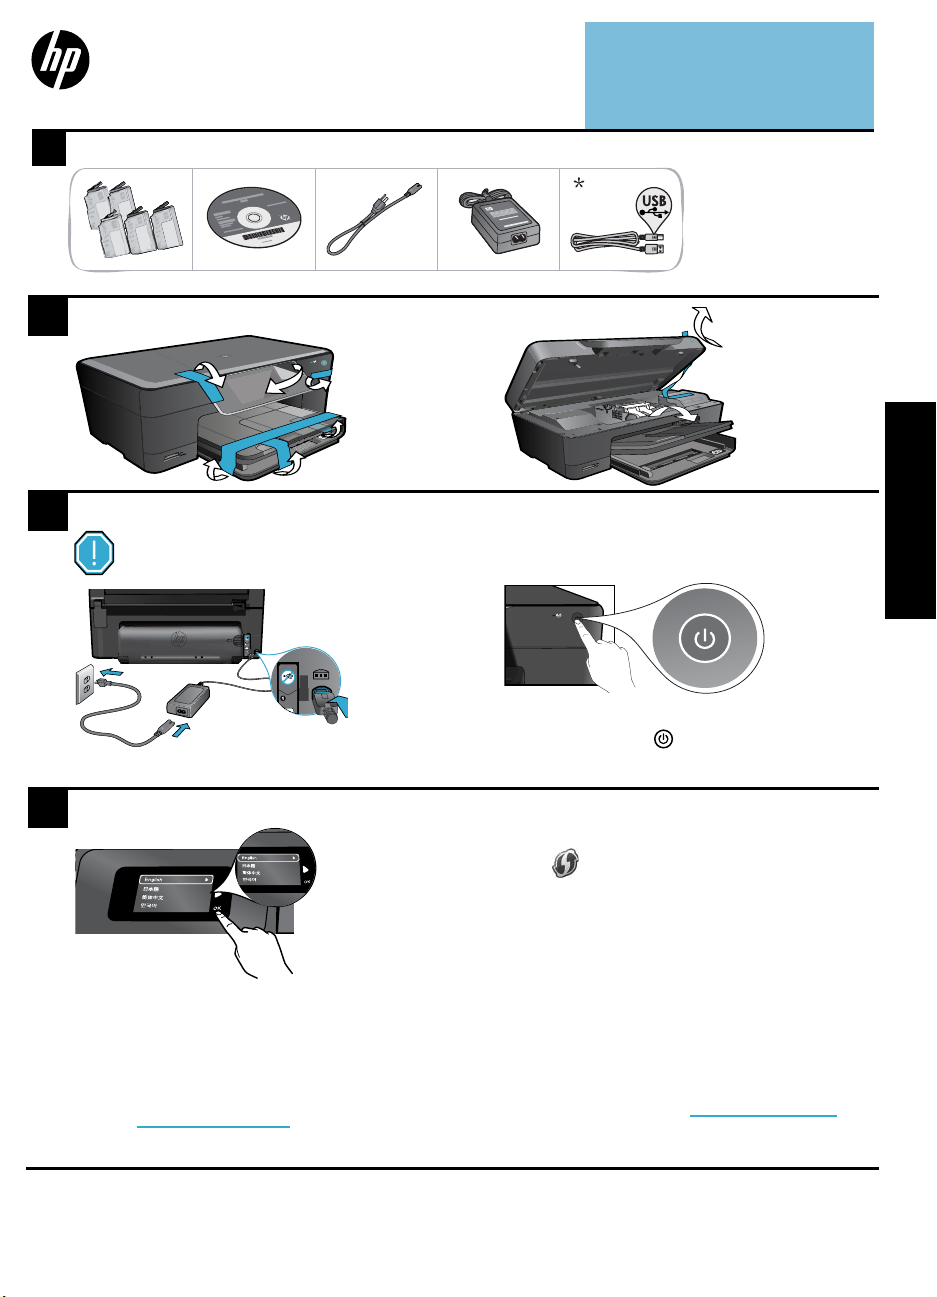
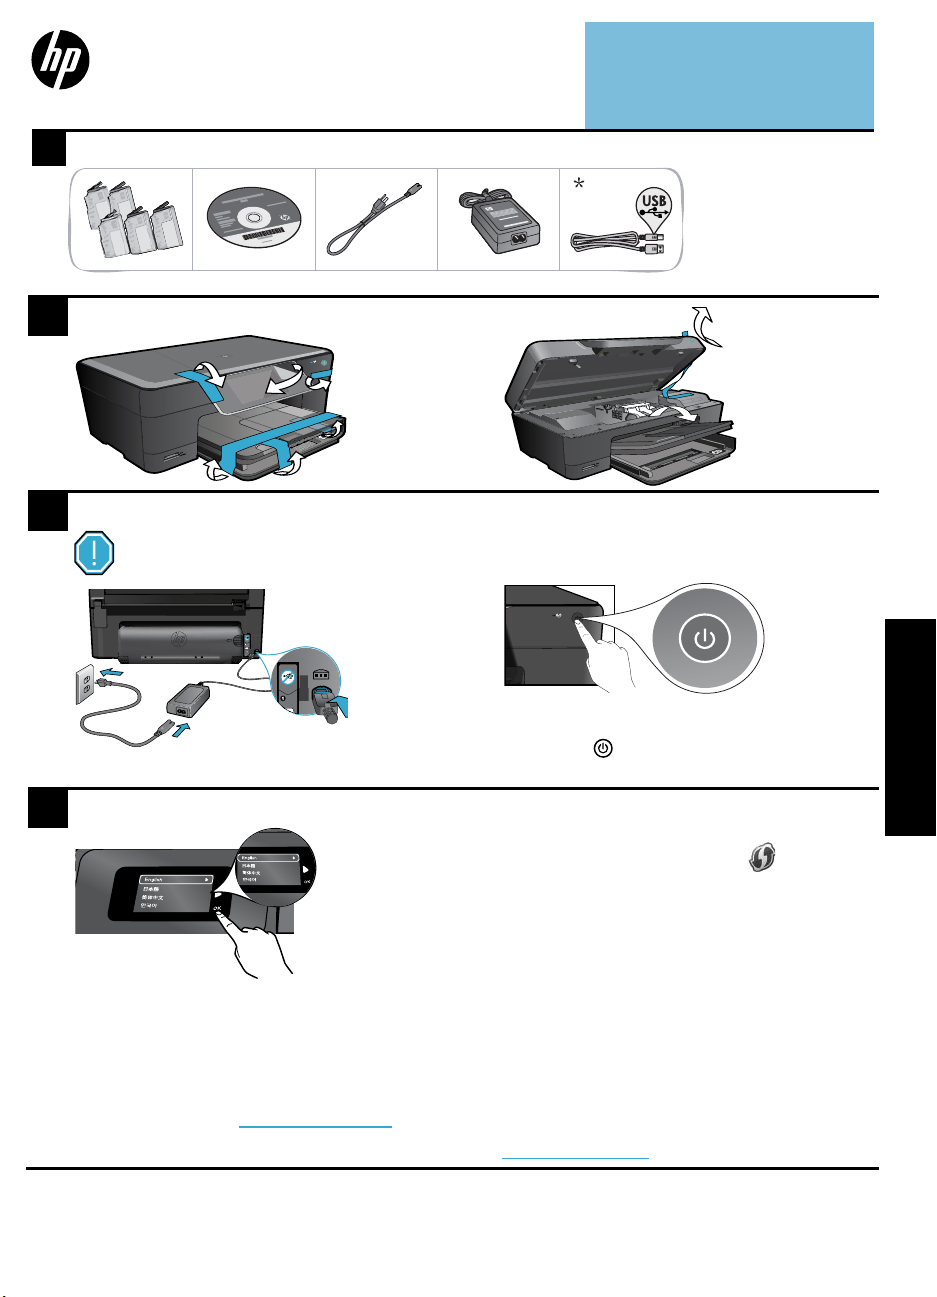
Verify box contents.
1
Unpack printer. Remove all tape, protective lm, and packing material.
2
Connect and power on.
3
Important! Do not connect a USB cable unless prompted by the software!
(Windows® only)
Inside...
Setup troubleshooting 2
Get to know your HP Photosmart 3
Features and tips 4
What’s new? Web Services 5
Network Printer Setup 6
* Not included with all models
English
Connect the power cord and adapter.
Follow the Setup Wizard.
4
Be sure to follow the instructions on the display to
guide you through setting up and connecting the
HP Photosmart, including how to set up a networked
printer connection and install ink cartridges.
For computers without a CD/DVD drive, go to
www.hp.com/support to download and install the
software.
© 2010 Hewlett-Packard Development Company, L.P.
Printed in [English]
to turn on the HP Photosmart.
Press
WiFi Protected Setup (WPS)
This HP Photosmart supports WiFi Protected Setup
(WPS) for easy one-button wireless setup.
• During setup, if you are prompted for WPS and
you have a WPS router, press the WPS button on
the router. The wireless LED on the printer will turn
on if the connection is successful.
• Otherwise, follow the setup wizard on the printer
display to be guided through wireless setup.
Register your HP Photosmart.
Get quicker service and support alerts by
registering at www.register.hp.com.
*CN503-90065*
*CN503-90065*
CN503-90065

Setup troubleshooting
If the HP
Photosmart
doesn’t turn on...
English
If you are unable
to print...
Check the power cord.
• Makesurethepowercordisrmlyconnectedtoboththeprinterandthepoweradaptor.An
LED on the power supply will be lit if the power cord is working.
• If you are using a power strip, check that the power strip is turned on. Or, plug the printer
directly into a power outlet.
• Test the power outlet to make sure that is working. Plug in another appliance that you know
works, and see if it has power. If not, there may be a problem with the power outlet.
• If you plugged the printer into a switched outlet, check that the outlet is turned on.
1. Turn off the printer, and then unplug the power cord. Plug the power cord back in, and then
press the button to turn on the printer.
2. Take care not to press the button too quickly. Press it only once. It might take a few minutes
for the printer to turn on, so if you press the button more than once, you might be turning
off the printer.
3. If you have completed all the above steps, but are still having a problem, contact HP support
for service. Go to www.hp.com/support.
Windows
Make sure that your HP Photosmart is set as the
default printer and is not ofine.
1. On the Windows taskbar, click Start.
2. Then click Control Panel.
3. Then open:
• Devices and Printers (Windows 7)
• Printers (Vista)
• Printers and Faxes (XP)
Look to see if your printer has a check mark in
a circle next to it. If not, right-click the printer
icon and choose “Set as default printer” from
the menu.
Mac
Uninstall and reinstall the software.
The uninstaller removes all the HP software
componentsthatarespecictothisHP
Photosmart. It does not remove any components
that are shared by other printers or programs.
To uninstall the software:
1. Disconnect the printer from your computer.
2. Open the Applications: Hewlett-Packard
folder.
3. Double-click HP Uninstaller. Follow the
onscreen instructions.
If you still can’t print, or if the Windows
software installation failed:
1. Remove the CD from your computer’s CD
drive, and then disconnect the printer from
the computer.
2. Restart the computer.
3. Temporarilydisableanyrewallsoftware
and close any anti-virus software.
4. Insert the printer software CD into the
computer CD drive, then follow the
onscreen instructions to install the printer
software. Do not connect the USB cable
until you are told to do so.
5. Aftertheinstallationnishes,restartthe
computer and any security software you
disabled or closed.
2
To install the software:
1. Insert the CD into your computer’s CD
drive.
2. On the desktop, open the CD, then
double-click the HP Installer.
3. Follow the onscreen instructions.
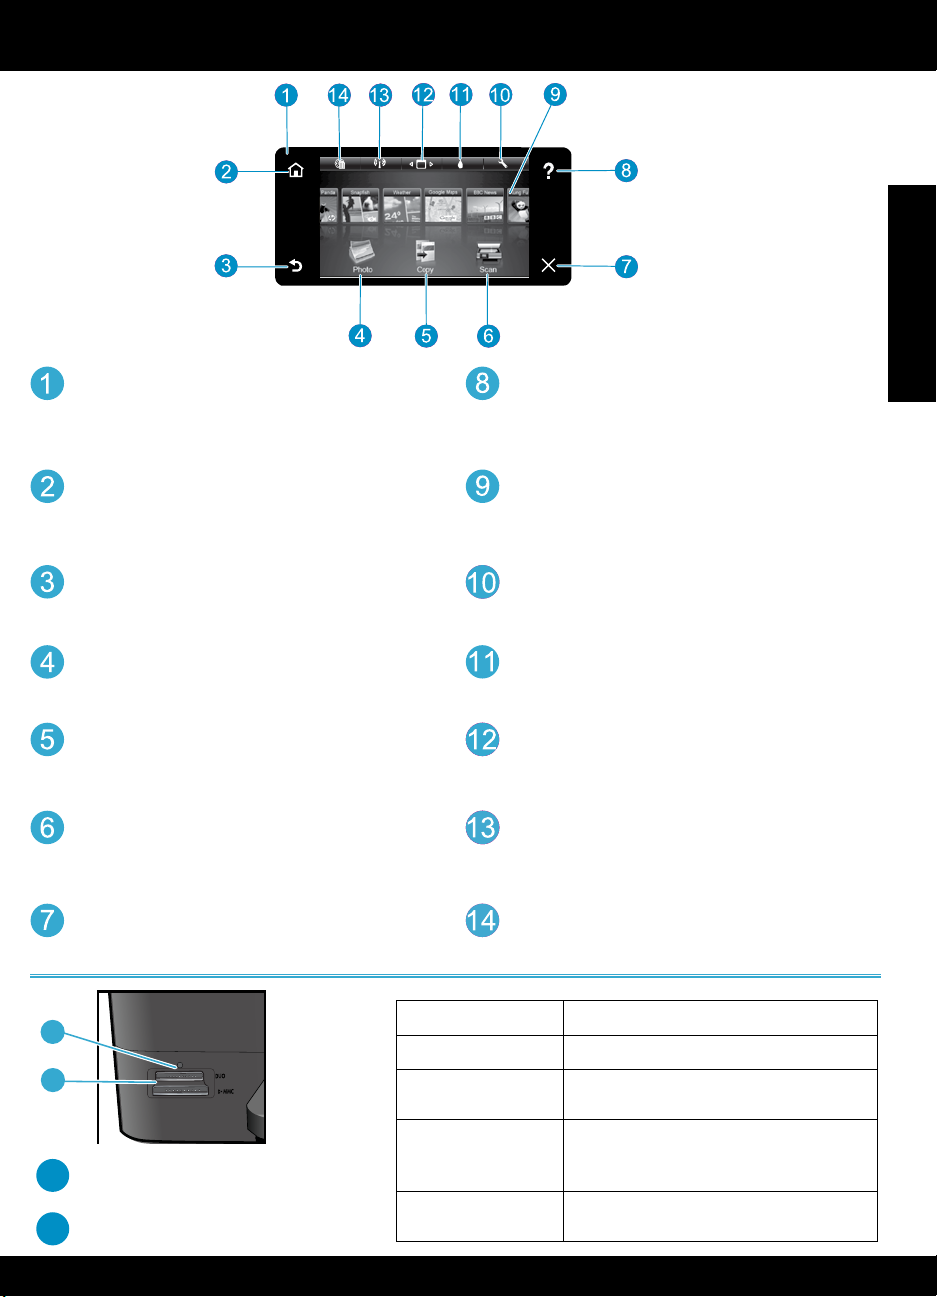
Get to know your HP Photosmart
a
b
English
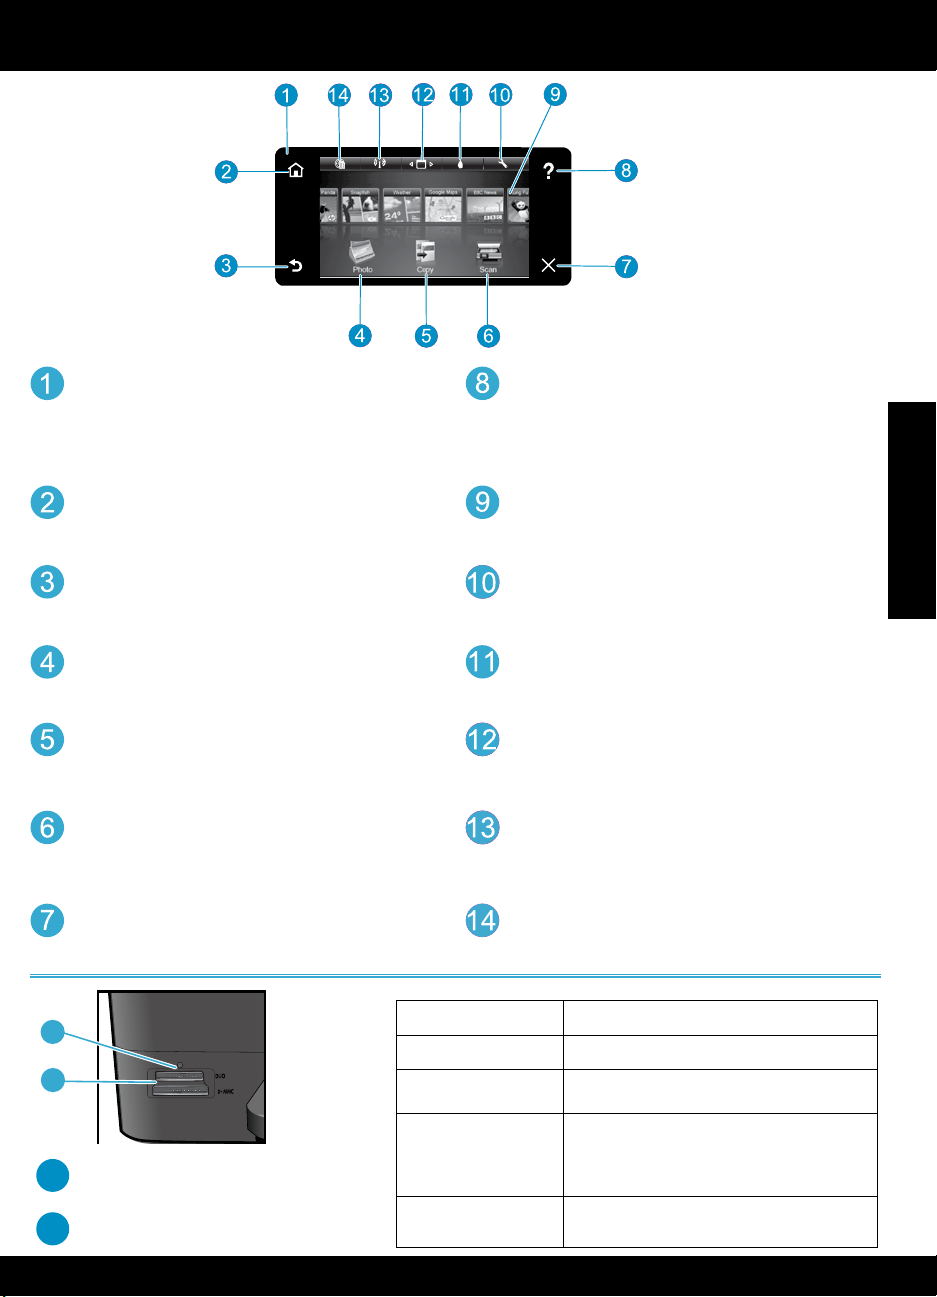
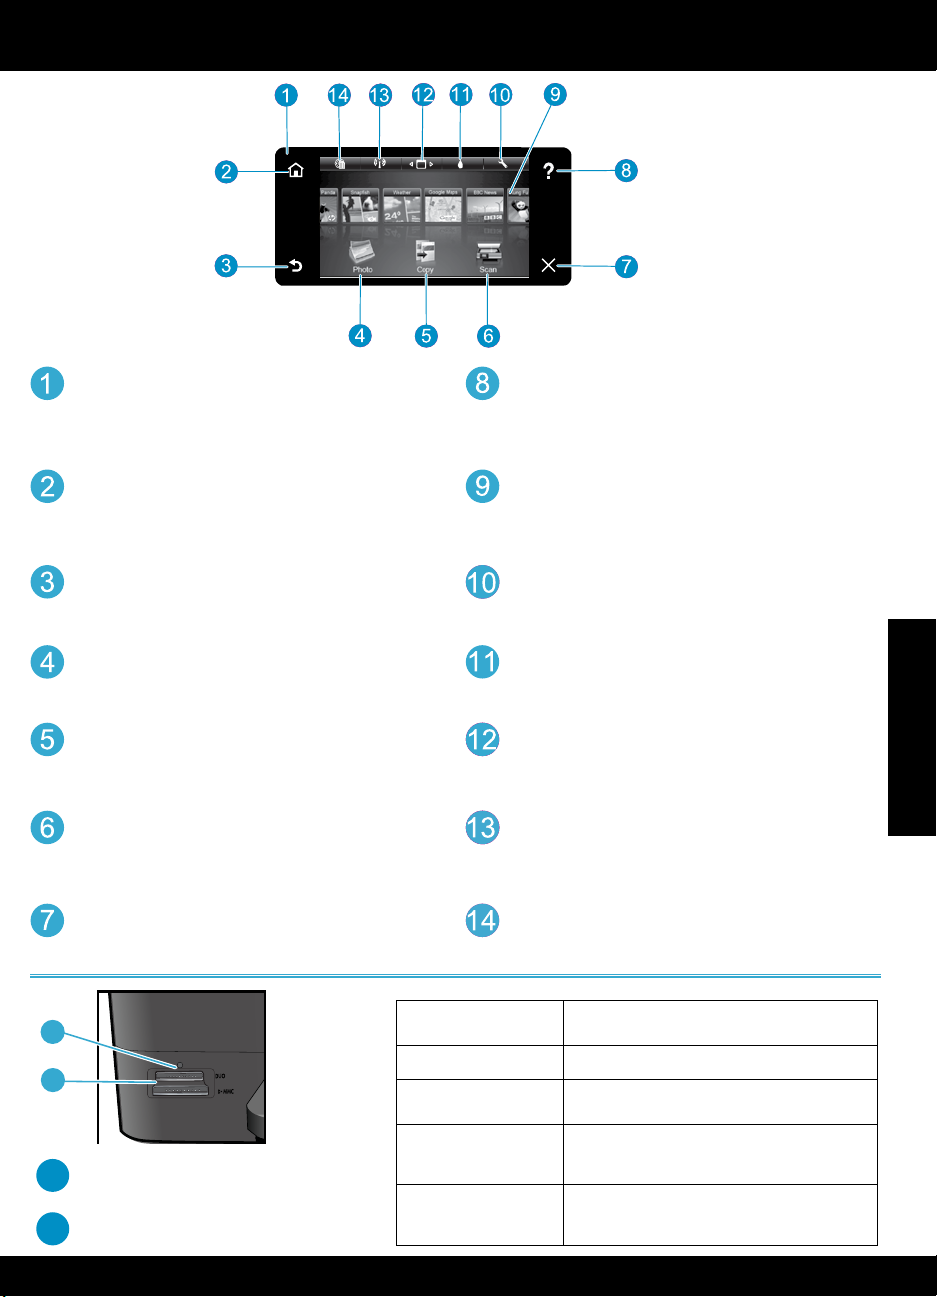
Display The color touch screen displays menus,
photos, and messages. Flick horizontally or vertically
to scroll through photos and menu items.
Home Returns to the Home screen (the default screen
when you turn on the product).
Back Returns to the previous screen.
Photo Opens the Photo menu where you can view,
edit, print, and save your photos.
Copy Opens the Copy menu where you can select a
copy type or change the copy settings.
Scan Opens the Scan menu where you can select a
destination for your scan.
Cancel Stops the current operation.
Help Touch Help on the Home screen to see all Help
topics. Touch Help on any screen to see Help for that
screen.
Apps Provides a quick and easy way to access and
print information from the Internet, such as maps,
coupons, coloring pages, and puzzles.
Setup Opens the Setup menu where you can change
product settings and perform maintenance functions.
Ink Levels Opens the Ink menu to show estimated ink
levels.
Manager Opens the Manager where you can remove
Apps from your My Favorites list.
Wireless* Opens the Network menu where you can
access the Wireless Setup Wizard and WiFi Protected
Setup.
HP ePrint Opens the Web Services menu where can
view and print your printer’s email address.
a
*Wireless Light States
Off The wireless radio is off.
b
LED for Memory Card Slots
Memory Card Slots (DUO, SD-MMC)
s
On (Steady) The wireless radio is on and the printer is
connected to the network.
Flashing (Slowly) The wireless radio is on but it is not
connected to a network. It may be trying
to connect.
Flashing (Quickly) The printer failed to connect to the network
using WiFi Protected Setup.
3
Features and tips
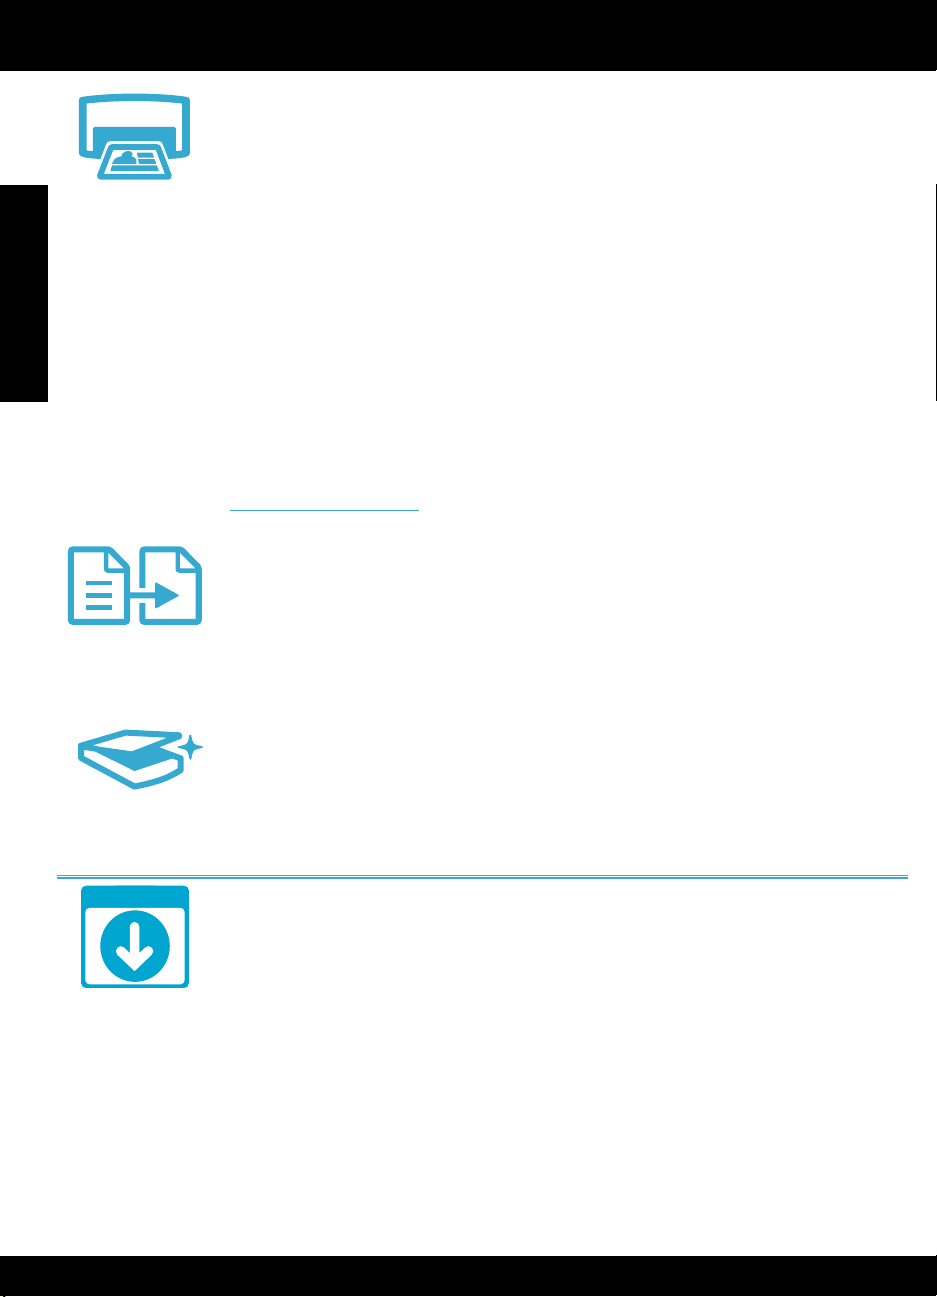
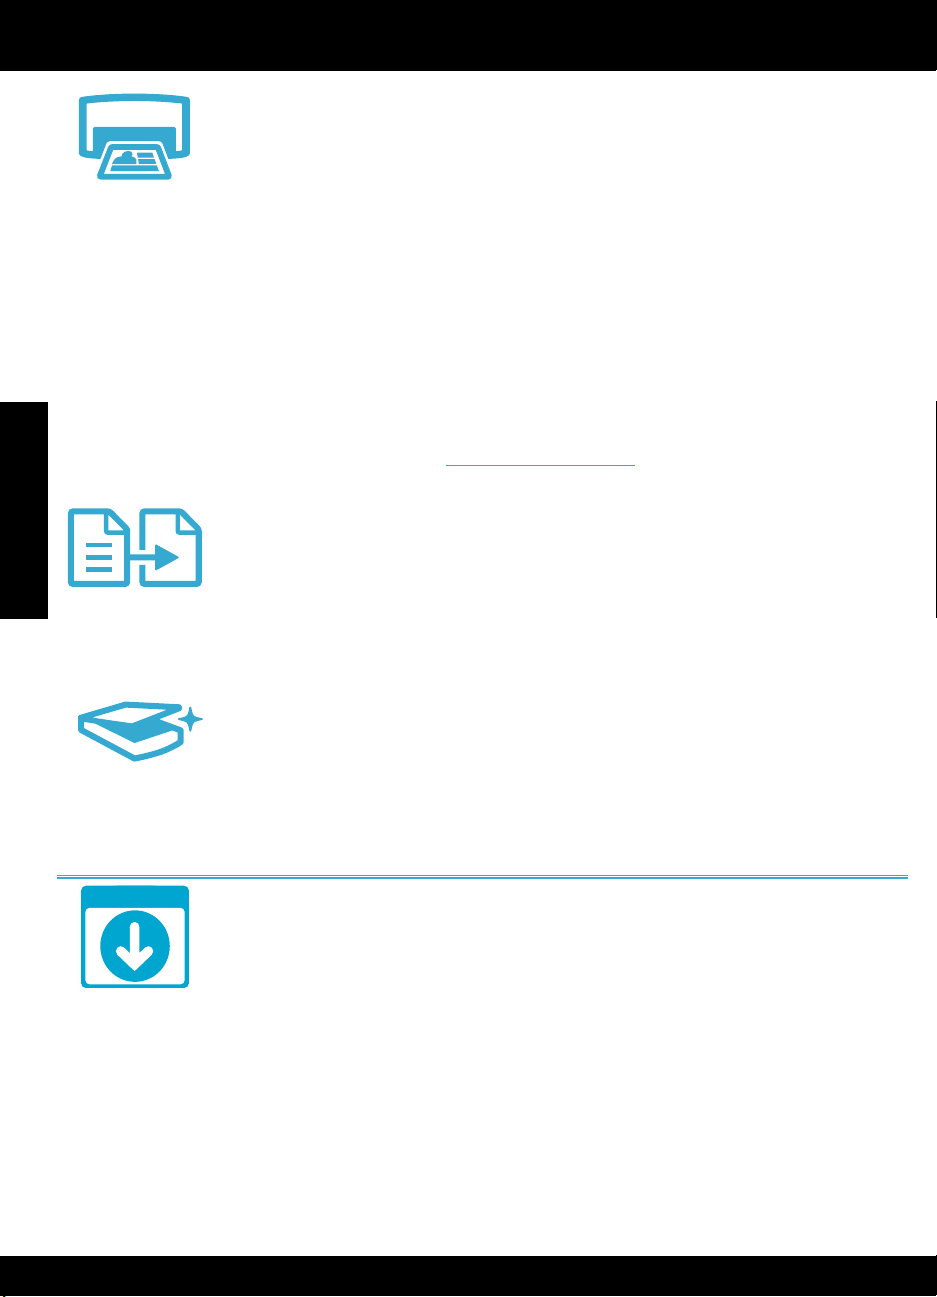
Print
English
Copy
• Print photos directly from a memory card in various sizes and papers. Use the Photo
menuontheprinterdisplayforbrowsingphotos,applyingautomaticxes,andmaking
selections.
• Print documents and photos from software applications on a connected computer.
• When installing new cartridges, see the graphic on the cartridge wrap for instructions. Make
sure to remove the plastic wrap and the orange tab before twisting off the orange plastic cap.
• ThersttimeyousetupandusetheHPPhotosmart,makesuretoinstalltheinkcartridgesthat
wereshippedwithyourdevice.Thesecartridgesarespeciallyformulatedfortherst-timeuse
of your printer.
• Makesureyouhavesufcientink.Tochecktheestimatedinklevels,selectSettings on the
printer display, select Tools, then select Display Estimated Levels.
• Photo Black cartridges are compatible with this printer.
Ink usage
Ink from the cartridges is used in the printing process in several ways, including:
• Initialization, which prepares the printer and cartridges for printing.
• Printheadservicing,whichkeepsprintnozzlesclearandinkowingsmoothly.
Also, some residual ink is left in the cartridge after it is used. For more information, go to:
www.hp.com/go/inkusage.
• Make color or black and white copies. Use the Copy menu on the printer display to choose
color,actualsizeoforiginalorresizetot,qualitysetting(draft,normal,andbest),paper
size, and the number of copies.
• Load single-sheet or thin originals, print side down, on the right front corner of the glass.
• For thick originals, like a page in a book, remove the lid. Place the original, print side down,
into the right front corner of the glass. If possible, lay the lid on top of the original to provide
a white background.
Scan
Get more info
• Scan photographs or documents. Use the Scan menu on the printer display to select Scan to
PC, Scan to Card, or Reprint. Then, load the original, print side down, on the right front corner
of the glass. Choose a scan shortcut: Photo to File, Photo to Email, or PDF Document.
• If you are scanning to a connected computer, the scanning software will open for you to make
adjustmentsandotherselections,includingthelocationofthescanle.
• For best scanning, keep the glass and the back of the lid clean. The scanner interprets any
spot or mark detected as part of the scan image.
Find more information
AdditionalproductinformationcanbefoundintheonscreenHelpandReadmelethatare
installed with the HP Photosmart software.
• Onscreen Help includes instructions on product features and troubleshooting. It also provides
productspecications,legalnotices,environmental,regulatory,andsupportinformation,plus
links to more information online on the web.
• TheReadmelecontainsHPsupportcontactinformation,operatingsystemrequirements,and
the most recent updates to your product information.
To access the onscreen Help from your computer:
• Windows XP, Vista, Win 7: Click Start > All Programs > HP > Photosmart C310 series > Help.
• Mac OS X v10.5 and v10.6: In Finder, click Help > Mac Help. In the Help Viewer, choose HP
Product Help from the Mac Help pop-up menu.
4

What’s new? Web Services
NOV
How to get started with HP ePrint
To use HP ePrint, you must have your printer connected to a network with an Internet connection.
• Press the Wireless button on the HP Photosmart front panel.
• Select the Web Services menu from the printer display. From here, you can turn the service on
or off, display the printer’s email address, and print an information page.
HP ePrint
HP Apps
Print from anywhere
HP’s free ePrint service provides an easy way to print from email, anywhere and anytime. Just
forward an email to your printer’s email address from your computer or mobile device, and both
the email message and recognized attachments will print.
• HP ePrint might not have come with your printer, but you can easily add it via product update.
See www.hp.com/go/ePrintCenter for availability and details.
• Attachments may print differently than they appear in the software program which created
them, depending on the original fonts and layout options used.
• Free product updates are provided with this service. Some updates may be required to enable
certain functionality.
Your printer is protected
To help prevent unauthorized email, HP assigns a random email address to your printer, never
publicizes this address, and by default does not respond to any sender. HP ePrint also provides
industry-standardspamlteringandtransformsemailandattachmentstoaprint-onlyformatto
reduce the threat of a virus or other harmful content.
• TheHPePrintservicedoesnotlteremailsbasedoncontent,soitcannotprevent
objectionable or copyrighted material from being printed.
Print the web, without a computer
Select an Apps icon on the printer display to print pages for the whole family.
Note: An Internet connection is required.
• Use the Quick Forms app locally. Print calendars, notebook and graph paper, even puzzles.
• Add more Apps from the web. Print coloring pages, greeting cards, and more!
• Free product updates are provided with this service. Some updates may be required to enable
certain functionality.
English
ePrintCenter
Specs
Use the HP ePrintCenter website
Use HP’s free ePrintCenter website to set up increased security for HP ePrint, specify the email
addresses that are allowed to send email to your printer, get more HP Apps, and access other free
services.
GototheePrintCenterwebsiteformoreinformationandspecictermsandconditions:
www.hp.com/go/ePrintCenter
Power specications
Note: Use this printer only with the power adapter supplied by HP.
• Power adapter: 0957-2271 (Brazil - 0957-2289)
• Input voltage: 100 to 240 Vac
• Input frequency: 50-60 Hz
• Power consumption: 85W Maximum, 50W Average
5

Network Printer Setup
Changing from USB to wireless network connection
If you initially set up your printer using a USB connection to your computer, you can switch the
connection to a wireless network connection by following these steps.
English
USB
to
Wireless
If your printer
is not found
during software
installation...
Windows
To change from USB to wireless connection:
1. Click Start, click HP, click Photosmart C310
series, then click USB to Wireless. Keep
your USB cable connected until prompted
to disconnect it.
2. Follow the instructions on the displayed
screens.
• Click Next to move from one screen to
the next.
• Click Help to get additional information
about what is required on that screen.
Mac
To change from USB to wireless connection:
1. On the HP Photosmart front panel,
press the Wireless button to display the
Wireless menu on the printer display.
2. Select Wireless Settings, then Wireless
Setup Wizard on the display.
3. Follow the steps in the Wireless Setup
Wizard to connect the printer.
4. To add the printer, go to System
Preferences, select Print & Fax, then
click the + button under the Printers list
at the left. Select your printer from the
list.
Troubleshooting for a wireless printer setup
Check that your printer is connected to your network.
Run a Wireless Network Test to check that your printer is on the network. To do this:
1. On the HP Photosmart front panel, press the Wireless button to display the Wireless menu
on the printer display.
2. Select Run Wireless Network Test on the display.
3. The Wireless Network Test Report is automatically printed.
• Check the top of the report to see if anything failed during the test.
• See the Diagnostic Summary of all tests performed, and whether or not your printer
passed.
• ViewtheCongurationSummarytoidentifytheNetworkName(SSID),Hardware
Address (Mac), and IP address.
If your printer is not connected to the network:
1. Press the Wireless button on the Printer Display to open the Wireless menu. Select
Wireless Setup Wizard.
2. Follow the instructions on the screen.
For additional help with setting up a wireless connection, go to the Wireless Printing Center
site: www.hp.com/go/wirelessprinting.
6

Fixing connectivity issues
You may have picked the wrong network or typed in your network name (SSID)
incorrectly.
Check these settings to ensure that they are correct.
You may have typed your wireless password (WEP key or WPA passphrase) incorrectly.
• If you are using encryption on your network, you’ll need to enter a key. These are case-
sensitive so be sure that it has been entered correctly.
• If the network name (SSID) or the wireless password are not found automatically during
installation, and you don’t already know them, you can download the Network Diagnostic
Utility, which can help you locate them.
• The Network Diagnostic Utility runs on computers with Windows XP SP3, Vista, or Windows
7 OS. The computer should also be wirelessly connected to your network. To download the
Network Diagnostic Utility, go to: www.hp.com/go/wirelessprinting.
You may have a router problem.
Try restarting both the printer and the router by turning off the power on each. Then, turn them
both on again.
Your computer may not be connected to your network.
Make sure that the computer is connected to the same network to which the HP Photosmart is
connected.
Your computer may be connected to a Virtual Private Network (VPN).
Temporarily disconnect from the VPN before proceeding with the installation. Being connected to
a VPN is like being on a different network. You will need to disconnect from the VPN to access the
printer over the home network.
English
Security software may be blocking communication.
Securitysoftware(rewall,anti-virus,anti-spyware)installedonyourcomputermaybeblocking
communication between the printer and the computer. An HP Diagnostic Utility runs during
installationandcanidentifyrewallsinstalledontheprinter.
Go to: www.hp.com/go/wirelessprintingformorehelpwithrewalls.Trytemporarily
disconnectingyourrewall,anti-virus,oranti-spywareapplicationstoseeifyoucannish
the installation successfully. You should re-enable the security applications after installation is
complete.
SetupyourrewallsoftwaretoallowcommunicationoverUDPport427(Windows).
After software installation
If your printer has been successfully installed, but you are having trouble printing:
• Turn off the router, printer, and computer. Then, turn on router, printer, and computer -- in that
order.
• If powering down and up doesn’t solve the problem, run the Network Diagnostic Utility
(Windows):
• Go to: www.hp.com/go/wirelessprinting to download the Network Diagnostic Utility, then
run it.
7

HP printer limited warranty statement
HP product Duration of limited warranty
Software Media 90 days
Printer 1 year
English
Print or Ink cartridges Until the HP ink is depleted or the “end of warranty” date printed
Printheads (only applies to products with customer 1 year
replaceable printheads)
Accessories 1 year unless otherwise stated
A. Extent of limited warranty
1. Hewlett-Packard (HP) warrants to the end-user customer that the HP products specified above will be free from defects
in materials and workmanship for the duration specified above, which duration begins on the date of purchase by the
customer.
2. For software products, HP’s limited warranty applies only to a failure to execute programming instructions. HP does not
warrant that the operation of any product will be interrupted or error free.
3. HP's limited warranty covers only those defects that arise as a result of normal use of the product, and does not cover
any other problems, including those that arise as a result of:
a. Improper maintenance or modification;
b. Software, media, parts, or supplies not provided or supported by HP;
c. Operation outside the product's specifications;
d. Unauthorized modification or misuse.
4. For HP printer products, the use of a non-HP cartridge or a refilled cartridge does not affect either the warranty to the
customer or any HP support contract with the customer. However, if printer failure or damage is attributable to the use of
a non-HP or refilled cartridge or an expired ink cartridge, HP will charge its standard time and materials charges to
service the printer for the particular failure or damage.
5. If HP receives, during the applicable warranty period, notice of a defect in any product which is covered by HP's
warranty, HP shall either repair or replace the product, at HP's option.
6. If HP is unable to repair or replace, as applicable, a defective product which is covered by HP's warranty, HP shall,
within a reasonable time after being notified of the defect, refund the purchase price for the product.
7. HP shall have no obligation to repair, replace, or refund until the customer returns the defective product to HP.
8. Any replacement product may be either new or like-new, provided that it has functionality at least equal to that of the
product being replaced.
9. HP products may contain remanufactured parts, components, or materials equivalent to new in performance.
10. HP's Limited Warranty Statement is valid in any country where the covered HP product is distributed by HP. Contracts
for additional warranty services, such as on-site service, may be available from any authorized HP service facility in
countries where the product is distributed by HP or by an authorized importer.
B. Limitations of warranty
TO THE EXTENT ALLOWED BY LOCAL LAW, NEITHER HP NOR ITS THIRD PARTY SUPPLIERS MAKES ANY
OTHER WARRANTY OR CONDITION OF ANY KIND, WHETHER EXPRESS OR IMPLIED WARRANTIES OR
CONDITIONS OF MERCHANTABILITY, SATISFACTORY QUALITY, AND FITNESS FOR A PARTICULAR PURPOSE.
C. Limitations of liability
1. To the extent allowed by local law, the remedies provided in this Warranty Statement are the customer's sole and
exclusive remedies.
2. TO THE EXTENT ALLOWED BY LOCAL LAW, EXCEPT FOR THE OBLIGATIONS SPECIFICALLY SET FORTH IN
THIS WARRANTY STATEMENT, IN NO EVENT SHALL HP OR ITS THIRD PARTY SUPPLIERS BE LIABLE FOR
DIRECT, INDIRECT, SPECIAL, INCIDENTAL, OR CONSEQUENTIAL DAMAGES, WHETHER BASED ON
CONTRACT, TORT, OR ANY OTHER LEGAL THEORY AND WHETHER ADVISED OF THE POSSIBILITY OF
SUCH DAMAGES.
D. Local law
1. This Warranty Statement gives the customer specific legal rights. The customer may also have other rights which vary
from state to state in the United States, from province to province in Canada, and from country to country elsewhere in
the world.
2. To the extent that this Warranty Statement is inconsistent with local law, this Warranty Statement shall be deemed
modified to be consistent with such local law. Under such local law, certain disclaimers and limitations of this Warranty
Statement may not apply to the customer. For example, some states in the United States, as well as some governments
outside the United States (including provinces in Canada), may:
a. Preclude the disclaimers and limitations in this Warranty Statement from limiting the statutory rights of a consumer
(e.g., the United Kingdom);
b. Otherwise restrict the ability of a manufacturer to enforce such disclaimers or limitations; or
c. Grant the customer additional warranty rights, specify the duration of implied warranties which the manufacturer
cannot disclaim, or allow limitations on the duration of implied warranties.
3. THE TERMS IN THIS WARRANTY STATEMENT, EXCEPT TO THE EXTENT LAWFULLY PERMITTED, DO NOT
EXCLUDE, RESTRICT, OR MODIFY, AND ARE IN ADDITION TO, THE MANDATORY STATUTORY RIGHTS
APPLICABLE TO THE SALE OF THE HP PRODUCTS TO SUCH CUSTOMERS.
Dear Customer,
You will find below the name and address of the HP entity responsible for the performance of the HP Limited Warranty in your
country.
You may have additional statutory rights against the seller based on your purchase agreement. Those rights are not
in any way affected by this HP Limited Warranty.
Ireland: Hewlett-Packard Ireland Limited, 63-74 Sir John Rogerson's Quay, Dublin 2
United Kingdom: Hewlett-Packard Ltd, Cain Road, Bracknell, GB-Berks RG12 1HN
Malta: Hewlett-Packard International Trade B.V., Malta Branch, 48, Amery Street, Sliema SLM 1701, MALTA
South Africa: Hewlett-Packard South Africa Ltd, 12 Autumn Street, Rivonia, Sandton, 2128, Republic of South Africa
on the cartridge has been reached, whichever occurs first. This
warranty does not cover HP ink products that have been refilled,
remanufactured, refurbished, misused, or tampered with.
HP Limited Warranty
8
PHOTOSMART PREMIUM
USB
USB
MMC
e-ALL-IN-ONE C310 SERIES
Erste Schritte...
Inhalt der Verpackung überprüfen.
1
Drucker auspacken. Klebeband, Schutzfolie und Verpackungsmaterial entfernen.
2
Gerät anschließen und einschalten.
3
Wichtig! USB-Kabel erst dann anschließen, wenn während der Softwareinstallation
dazu aufgefordert wird! (Nur bei Verwendung von Windows®)
Inhalt...
Fehlerbehebung bei der Einrichtung 10
Komponenten des HP Photosmart 11
Funktionen und Tipps 12
Neuheiten Webdienste 13
Netzwerkdruckereinrichtung 14
* Nicht bei allen Modellen verfügbar
Deutsch
Netzkabel und Netzteil anschließen.
Befolgen Sie die Anweisungen des Einrichtungsassistenten.
4
Beachten Sie unbedingt die Anweisungen auf dem
Druckerdisplay. Diese führen Sie durch die Schritte zum
Einrichten und Verbinden des HP Photosmart. Dazu
zählen auch das Einrichten der Verbindung für einen
Netzwerkdrucker und das Einsetzen der Druckpatronen.
Rufen Sie bei Computern ohne CD/DVD-Laufwerk die
Website www.hp.com/support auf, um die Software
herunterzuladen und zu installieren.
Drücken Sie die Taste
einzuschalten.
, um den HP Photosmart
WiFi Protected Setup (WPS)
Dieser HP Photosmart unterstützt WiFi Protected Setup
(WPS) zur einfachen Wireless-Einrichtung auf
Tastendruck.
• Wenn Sie bei der Einrichtung nach WPS
gefragt werden und Sie über einen WPS-Router
verfügen, drücken Sie die WPS-Taste am Router.
Die Wireless-LED am Drucker leuchtet, wenn die
Verbindung erfolgreich war.
•
Befolgen Sie ansonsten die auf dem
Druckerdisplay angezeigten Anweisungen des
Einrichtungsassistenten für die Wireless-Einrichtung
Registrieren Ihres HP Photosmart.
Lassen Sie das Gerät unter www.register.hp.com
registrieren, um schnelleren Service und Hinweise vom
Support zu erhalten.
.

Fehlerbehebung bei der Einrichtung
Wenn sich der
HP Photosmart
nicht einschalten
lässt...
Deutsch
Wenn kein
Drucken möglich
ist...
Überprüfen Sie das Netzkabel.
• Stellen Sie sicher, dass das Netzkabel fest mit dem Drucker und dem Netzteil verbunden ist.
Wenn das Netzkabel in Ordnung ist, leuchtet eine LED am Netzteil.
• Wenn Sie eine Steckerleiste verwenden, vergewissern Sie sich, dass diese eingeschaltet ist.
Sie können den Drucker auch direkt an eine Netzsteckdose anschließen.
• Prüfen Sie, ob die Netzsteckdose funktioniert. Schließen Sie ein funktionstüchtiges Gerät an,
um zu überprüfen, ob die Stromzufuhr gewährleistet ist. Falls nicht, kann ein Problem mit der
Steckdose vorliegen.
• Wenn das Produkt an einer geschalteten Steckdose angeschlossen ist, stellen Sie sicher, dass
die Steckdose eingeschaltet ist.
1. Schalten Sie den Drucker aus, und ziehen Sie das Netzkabel ab. Schließen Sie das Netzkabel
wieder an, und drücken Sie anschließend die Taste , um den Drucker einzuschalten.
2. Drücken Sie die Taste nicht zu schnell. Drücken Sie die Taste nur einmal. Das Einschalten
des Druckers kann einige Minuten dauern. Falls Sie die Taste mehrmals drücken, schalten
Sie den Drucker ggf. wieder aus.
3. Wenn alle oben genannten Arbeitsschritte ausgeführt wurden und das Problem weiterhin
besteht, bitten Sie den HP Support um Unterstützung. Rufen Sie die folgende Website auf:
www.hp.com/support.
Windows
Vergewissern Sie sich, dass der HP Photosmart als
Standarddrucker festgelegt und nicht offline ist
1. Klicken Sie auf der Windows-Taskleiste auf
Start.
2. Klicken Sie dann auf Systemsteuerung.
3. Öffnen Sie dann Folgendes:
• Geräte und Drucker (Windows 7)
• Drucker (Vista)
• Drucker und Faxgeräte (XP)
Überprüfen Sie, ob das runde Feld neben Ihrem
Drucker markiert ist. Ist dies nicht der Fall,
klicken Sie mit der rechten Maustaste auf das
Druckersymbol, und wählen Sie im Menü die
Option „Als Standarddrucker festlegen“ aus
.
.
Mac
Deinstallieren Sie die Software, und installieren
Sie diese erneut.
Vom Deinstallationsprogramm werden alle
speziellen HP Softwarekomponenten für den
HP Photosmart entfernt. Es entfernt keine
Komponenten, die mit anderen Druckern oder
Programmen gemeinsam genutzt werden.
So deinstallieren Sie die Software:
1. Trennen Sie die Verbindung zwischen dem
Drucker und dem Computer.
2. Öffnen Sie den Ordner Programme:
Hewlett-Packard.
3.
Doppelklicken Sie auf HP Deinstallationsprogramm.
Befolgen Sie die angezeigten Anweisungen
.
Wenn weiterhin kein Druck möglich ist oder die
Installation der Windows-Software fehlschlägt:
1. Nehmen Sie die CD aus dem CD-Laufwerk
des Computers heraus, und trennen Sie den
Drucker vom Computer.
2. Führen Sie einen Neustart des Computers
aus.
3. Deaktivieren Sie vorübergehend jede
Firewall-Software, und schließen Sie
sämtliche Antivirus-Software.
4. Legen Sie die CD mit der Druckersoftware
in das CD-Laufwerk des Computers ein,
und führen Sie die Installation entsprechend
den angezeigten Anweisungen durch.
Schließen Sie das USB-Kabel erst an, wenn
Sie dazu aufgefordert werden.
5. Nach Abschluss der Installation starten Sie
den Computer und die zuvor deaktivierte
oder geschlossene Sicherheitssoftware neu.
10
So installieren Sie die Software:
1. Legen Sie die CD in das CD-Laufwerk des
Computers ein.
2. Öffnen Sie die CD auf dem Desktop,
und doppelklicken Sie dann auf HP
Installationsprogramm.
3. Befolgen Sie die angezeigten
Anweisungen.
Komponenten des HP Photosmart
a
b
Display Auf dem farbigen Touchscreen-Display
werden Menüs, Fotos und Meldungen angezeigt.
Bewegen Sie sich in horizontaler oder vertikaler
Richtung in der Anzeige, um durch Fotos und
Menüoptionen zu blättern.
Home Ermöglicht die Rückkehr zur Startseite, die
standardmäßig beim Einschalten des Produkts
angezeigt wird.
Zurück Dient zum Zurückkehren zur vorherigen
Anzeige.
Foto Öffnet das Menü „Foto“, in dem Sie Ihre Fotos
anzeigen, bearbeiten, drucken und speichern
können.
Kopieren Öffnet das Kopiermenü, in dem Sie einen
Kopientyp auswählen oder die Kopiereinstellungen
ändern können.
Scannen Öffnet das Scan-Menü, in dem Sie ein Ziel
für die Scandaten auswählen können.
Abbrechen Stoppt den aktuellen Vorgang.
Hilfe Touchscreen-Hilfe auf der Startseite, über
die alle Hilfethemen angezeigt werden können.
Touchscreen-Hilfe auf jeder Anzeige zum Aufrufen
der Hilfe für die jeweilige Anzeige.
Bietet eine schnelle und einfache Methode, um
Apps
auf Informationen im Web wie Landkarten, Coupons,
Ausmalseiten und Puzzle zuzugreifen und diese zu drucken
Einrichtung Öffnet das Menü „Einrichtung“, über
das Sie die Produkteinstellungen ändern und
Wartungsfunktionen ausführen können.
Tintenfüllstände Öffnet das Tintenfüllstandsmenü zur
Anzeige der geschätzten Tintenfüllstände.
Manager Öffnet den Manager, über den Sie Apps
aus der Liste „Meine Favoriten“ entfernen können.
Wireless* Öffnet das Menü „Netzwerk“, über das
Sie auf den Wireless-Einrichtungsassistenten und auf
WiFi Protected Setup zugreifen können.
HP ePrint Öffnet das Menü „Webdienste“, über das
Sie die E-Mail-Adresse des Druckers anzeigen und
drucken können.
.
Deutsch
a
b
LED für Speicherkartensteckplätze
Speicherkartensteckplätze (DUO, SD-MMC)
s
*Wireless-LED
Aus
Leuchtet
(kontinuierlich)
Blinkt (langsam)
Blinkt (schnell)
11
Der Funkbetrieb ist deaktiviert.
Der Funkbetrieb ist aktiviert, und der
Drucker ist mit dem Netzwerk verbunden.
Der Funkbetrieb ist aktiviert, aber der
Drucker ist nicht mit einem Netzwerk
verbunden. Er versucht, eine Verbindung
herzustellen.
Der Drucker konnte mit WiFi Protected Setup
keine Verbindung zum Netzwerk herstellen
.
Funktionen und Tipps
• Sie können Fotos in verschiedenen Formaten auf unterschiedlichem Papier direkt von einer
• Sie können Dokumente und Fotos aus Softwareanwendungen auf einem verbundenen
• Eine Anleitung für das Einsetzen neuer Patronen können Sie der Grafik auf der
Drucken
Deutsch
Kopieren
• Wenn Sie den HP Photosmart zum ersten Mal einrichten und verwenden, müssen Sie die
• Vergewissern Sie sich, dass der Tintenfüllstand ausreichend ist. Wählen Sie zum Überprüfen
• Fotopatronen schwarz sind mit diesem Drucker kompatibel.
Tintenverbrauch
Die in den Patronen enthaltene Tinte erfüllt während des Druckprozesses verschiedene Aufgaben:
• Initialisierung, bei der der Drucker und die Patronen auf den Druck vorbereitet werden.
•
Darüber hinaus verbleiben nach der Verwendung Tintenrückstände in den Patronen. Weitere
Informationen finden Sie unter: www.hp.com/go/inkusage.
• Erstellen Sie Farb- oder Schwarzweißkopien. Verwenden Sie das Menü Kopieren auf dem
• Legen Sie aus einer Seite bestehende oder dünne Originale mit der bedruckten Seite nach
• Entfernen Sie für dicke Originale (z. B. eine Seite aus einem Buch) die Abdeckung. Legen
Speicherkarte aus drucken. Das Menü Foto auf dem Druckerdisplay dient zum Durchsuchen
von Fotos, Anwenden automatischer Korrekturen und Treffen einer Auswahl.
Computer drucken.
Patronenverpackung entnehmen. Ziehen Sie die Kunststoffverpackung am orangefarbenen
Streifen von der Patrone, und drehen Sie dann die orangefarbene Kunststoffkappe ab.
mit dem Gerät gelieferten Tintenpatronen einsetzen. Diese Patronen weisen eine spezielle
Tintenzusammensetzung für die erste Inbetriebnahme des Druckers auf.
der geschätzten Tintenfüllstände auf dem Druckerdisplay die Option Einstellungen aus.
Wählen Sie dann Extras und Geschätzte Tintenfüllstände anzeigen aus.
Druckkopfwartung, die die Druckdüsen sauber hält und für einen gleichmäßigen Tintenfluss sorgt
Druckerdisplay, um die Farbgebung, die tatsächliche Größe des Originals, eine angepasste
Größe, die Druckqualität (Entwurf, Normal, Optimal), das Papierformat und die Anzahl an
Kopien auszuwählen.
unten auf das Vorlagenglas, sodass diese rechts vorne anliegen.
Sie das Original mit der bedruckten Seite nach unten so auf das Vorlagenglas, dass es vorne
rechts anliegt. Klappen Sie die Abdeckung möglichst über das Original, um einen weißen
Hintergrund zu erhalten.
.
Scannen
Weitere Infos
• Scannen Sie Fotos oder Dokumente. Im Menü Scannen auf dem Druckerdisplay können
Sie die Optionen Scan an PC, Auf Karte scannen und Abzüge auswählen. Legen Sie
anschließend das Original mit der bedruckten Seite nach unten so auf das Vorlagenglas,
dass es vorne rechts anliegt. Wählen Sie einen Scan-Shortcut aus: Foto an Datei, Foto an
E-Mail oder PDF-Dokument.
• Wenn Sie den Scan an einen verbundenen Computer senden, wird die Scansoftware für Sie
geöffnet, damit Sie Anpassungen vornehmen und eine andere Auswahl (auch für die Position
der Scandatei) treffen können.
• Halten Sie das Vorlagenglas und die Unterseite der Abdeckung sauber, um stets ein
optimales Scanergebnis zu erzielen. Der Scanner interpretiert jeden Flecken oder jede
Verschmutzung als Teil des zu scannenden Bilds.
Weitere Informationsquellen
Weitere Informationen zum Produkt finden Sie in der Onlinehilfe und in der Readme-Datei, die
zusammen mit der HP Photosmart Software installiert werden.
• Die elektronische Hilfe umfasst Anweisungen zu den Produktfunktionen und zur
Fehlerbehebung. Außerdem finden Sie hier die Produktspezifikationen und rechtliche
Hinweise sowie Informationen zu Umweltschutz, Konformität und Support sowie Links zu
weiteren Online-Informationen im Web.
• Die Readme-Datei enthält die Informationen zur Kontaktaufnahme mit dem HP Support,
die Betriebssystemanforderungen sowie die neuesten Aktualisierungen in Bezug auf die
Produktinformationen.
So greifen Sie über den Computer auf die Onlinehilfe zu:
• Windows XP, Vista, Win 7: Klicken Sie auf Start > Alle Programme > HP > Photosmart C310
series > Hilfe.
• Mac OS X 10.5 und 10.6: Klicken Sie im Finder auf Hilfe > Mac Hilfe. Wählen Sie im
Einblend menü Mac Hilfe des Help Viewer die Option HP Produkthilfe aus.
12

Neuheiten Webdienste
NOV
Erste Schritte mit HP ePrint
Zur Verwendung von HP ePrint muss der Drucker mit einem Netzwerk oder dem Internet
verbunden sein.
• Drücken Sie die Wireless-Taste auf dem Bedienfeld des HP Photosmart.
• Wählen Sie auf dem Druckerdisplay das Menü Webdienste aus. Über dieses Menü können
Sie den Dienst ein- und ausschalten, die E-Mail-Adresse des Druckers anzeigen und eine
Informationsseite drucken.
HP ePrint
Drucken von beliebigem Standort
Der kostenlose HP ePrint Dienst ist eine einfach Methode zum Drucken von E-Mails – überall und
jederzeit. Leiten Sie einfach eine E-Mail von Ihrem Computer oder mobilen Gerät an die E-Mail-Adresse
des Druckers weiter. Daraufhin werden die E-Mail-Nachricht und die erkannten Anhänge gedruckt
• Sollte HP ePrint nicht mit Ihrem Drucker geliefert werden, können Sie den Dienst einfach über
eine Produktaktualisierung hinzufügen. Siehe www.hp.com/go/ePrintCenter in Bezug auf
Verfügbarkeit und detaillierte Informationen.
•
Anhänge werden ggf. anders gedruckt, als sie im Softwareprogramm zu deren Erstellung angezeigt
werden. Dies ist von den ursprünglich verwendeten Schriften und Layoutoptionen abhängig
• Mit diesem Dienst werden kostenlose Produktaktualisierungen bereitgestellt. Für bestimmte
Funktionen sind ggf. einige Aktualisierungen erforderlich.
Schutz des Druckers
Zum Schutz gegen E-Mails durch Unbefugte, wird Ihrem Drucker von HP eine E-Mail-Adresse nach
dem Zufallsprinzip zugewiesen. Diese Adresse wird niemals veröffentlicht, und standardmäßig wird
nicht auf Absender geantwortet. HP ePrint stellt außerdem einen Spam-Filter gemäß Industriestandard
zur Verfügung. Außerdem werden E-Mails und Anhänge in ein nur zum Drucken geeignetes Format
umgewandelt, um das Risiko durch Viren oder schädigende Inhalte zu minimieren
• Der HP ePrint-Dienst filtert die E-Mails jedoch nicht nach deren Inhalt. Es lässt sich somit
nicht verhindern, dass eventuell anstößige oder durch Urheberrecht geschützte Materialien
gedruckt werden.
.
.
Deutsch
.
HP Apps
ePrintCenter
Spezifikationen
Webinhalte ohne Computer drucken
Wählen Sie auf dem Druckerdisplay das Symbol Apps aus, um Seiten für die ganze Familie zu
drucken.
Hinweis: Eine Internetverbindung ist erforderlich.
• App„Schnellformulare“lokalverwenden.Kalender,NotizbuchsowieGrakpapierundsogar
Puzzles drucken.
• Weitere Apps aus dem Web hinzufügen. Ausmalseiten, Grußkarten und vieles mehr drucken!
• Mit diesem Dienst werden kostenlose Produktaktualisierungen bereitgestellt. Für bestimmte
Funktionen sind ggf. einige Aktualisierungen erforderlich.
Verwenden der HP ePrintCenter Website
Auf der kostenlosen HP ePrintCenter Website können Sie erweiterte Sicherheitsoptionen für HP
ePrint einrichten, die E-Mail-Adressen angeben, von denen E-Mails an den Drucker gesendet
werden dürfen, und auf weitere kostenlose Services zugreifen.
Rufen Sie die ePrintCenter Website auf, um weitere Informationen und die speziellen allgemeinen
Geschäftsbedingungen abzurufen: www.hp.com/go/ePrintCenter
Technische Daten zur Stromversorgung
Hinweis: Verwenden Sie den Drucker ausschließlich mit dem von HP gelieferten Netzteil.
• Netzteil: 0957-2271 (Brasilien - 0957-2289)
• Eingangsspannung: 100 bis 240 V Wechselspannung
• Eingangsfrequenz: 50 – 60 Hz
• Leistungsaufnahme: 85 W maximal, 50 W durchschnittlich
13

Netzwerkdruckereinrichtung
Wechseln von USB zu einer kabellosen Netzwerkverbindung
Wenn Sie den Drucker anfänglich über eine USB-Verbindung an den Computer
angeschlossen haben, können Sie mit den folgenden Schritten zu einer kabellosen
Netzwerkverbindung wechseln.
USB zu
kabellos
Deutsch
Wenn der
Drucker beim
Installieren der
Software nicht
gefunden wird...
Windows
So wechseln Sie von einer USB- zu einer
kabellosen Verbindung:
1. Klicken Sie auf Start, dann auf HP, dann
auf Photosmart C310 series und dann auf
USB zu kabellos. Lassen Sie das USB-Kabel
angeschlossen, bis Sie zum Abziehen
aufgefordert werden.
2. Befolgen Sie die angezeigten
Anweisungen.
• Klicken Sie auf Weiter, um von Anzeige
zu Anzeige zu wechseln.
• Klicken Sie auf Hilfe, um weitere Hilfe
zu den angezeigten Anweisungen zu
erhalten.
Mac
So wechseln Sie von einer USB- zu einer
kabellosen Verbindung:
1. Drücken Sie auf dem Bedienfeld des
HP Photosmart die Taste Wireless,
um das Menü Wireless auf dem
Druckerdisplay aufzurufen.
2. Wählen Sie auf dem Display
Wireless-Einstellungen und dann
Wireless-Einrichtungsassistent aus.
3. Befolgen Sie die Anweisungen
des Einrichtungsassistenten, um
den Drucker mit dem Netzwerk zu
verbinden.
4. Wechseln Sie zum Hinzufügen eines
Druckers zu Systemeinstellungen,
wählen Sie die Option Drucken &
Faxen aus, und klicken Sie dann unter
der Druckerliste auf der linken Seite auf
die Schaltfläche +. Wählen Sie Ihren
Drucker aus der Liste aus.
Fehlerbehebung für Wireless-Einrichtung von Druckern
Vergewissern Sie sich, dass der Drucker mit dem Netzwerk verbunden ist.
Führen Sie einen Test für Wireless-Netzwerk aus, um sicherzustellen, dass der Drucker mit
dem Netzwerk verbunden ist. Gehen Sie dazu wie folgt vor:
1. Drücken Sie auf dem Bedienfeld des HP Photosmart die Taste Wireless, um das Menü
Wireless auf dem Druckerdisplay aufzurufen.
2. Wählen Sie auf dem Display die Option Test für Wireless-Netzwerk durchführen aus.
3. Der Bericht zum Test für Wireless-Netzwerk wird automatisch gedruckt.
•
Der obere Teil des Berichts enthält Angaben zu den beim Test festgestellten Problemen
• In der Diagnosezusammenfassung sind alle durchgeführten Tests aufgelistet. Dabei
spielt es keine Rolle, ob diese erfolgreich waren.
• Der Konfigurationszusammenfassung können Sie den Netzwerknamen (SSID), die
Hardware-Adresse (MAC-Adresse) und die IP-Adresse entnehmen.
.
Wenn der Drucker nicht mit einem Netzwerk verbunden ist:
1. Drücken Sie die Wireless-Taste auf dem Druckerdisplay, um das Wireless-Menü zu öffnen.
Wählen Sie Wireless-Einrichtungsassistent aus.
2. Befolgen Sie die angezeigten Anweisungen.
Weitere Hilfe bei der Einrichtung einer kabellosen Verbindung erhalten Sie auf der Wireless
Printing Center-Website: www.hp.com/go/wirelessprinting.
14

Beheben von Verbindungsproblemen
Das falsche Netzwerk wurde ausgewählt, oder der Netzwerkname (SSID) wurde falsch
eingegeben.
Vergewissern Sie sich, dass diese Einstellungen korrekt sind.
Der WEP-Schlüssel oder der WPA-Kennwortschlüssel für kabellose Verbindungen
wurde falsch eingegeben.
•
Wenn Sie mit einem verschlüsselten Netzwerk arbeiten, müssen Sie einen Schlüssel eingeben. Diese
Schlüssel müssen unter Beachtung der Groß- und Kleinschreibung korrekt eingegeben werden
• Wenn der Netzwerkname (SSID) oder der WEP/WPA-Schlüssel bei der Installation nicht
automatisch gefunden wird, und Sie diese nicht bereits kennen, können Sie ein Dienstprogramm
zur Netzwerkdiagnose herunterladen. Dieses hilft Ihnen, diese Angaben zu finden
• Das Dienstprogramm zur Netzwerkdiagnose ist unter Windows XP SP3, Windows Vista oder
Windows 7 ausführbar. Der Computer muss außerdem kabellos mit dem Netzwerk verbunden
sein. Das Dienstprogramm zur Netzwerkdiagnose können Sie unter folgender Adresse
herunterladen: www.hp.com/go/wirelessprinting.
Es liegt ein Problem mit dem Router vor.
Schalten Sie den Drucker und den Router aus, um diese Geräte neu zu starten. Schalten Sie
danach beide Geräte wieder ein.
.
.
Der Computer ist nicht mit dem Netzwerk verbunden.
Vergewissern Sie sich, dass der Computer mit dem Netzwerk verbunden ist, mit dem auch der
HP Photosmart verbunden ist.
Der Computer ist mit einem VPN-Netzwerk (Virtual Private Network) verbunden.
Trennen Sie vorübergehend die VPN-Verbindung, bevor Sie mit der Installation fortfahren. Eine
Verbindung zu einem VPN hat dieselben Auswirkungen wie die Verbindung zu einem anderen
Netzwerk. Sie müssen die Verbindung zum VPN trennen, um über das eigene Netzwerk auf den
Drucker zugreifen zu können.
Sicherheitssoftware blockiert die Kommunikation.
Auf Ihrem Computer installierte Sicherheitssoftware (Firewall, Anti-Virus, Anti-Spyware) blockiert
möglicherweise die Kommunikation zwischen dem Drucker und dem Computer. Ein HP
Diagnoseprogramm wird während der Installation ausgeführt und kann die für den Drucker
installierten Firewalls erkennen.
Auf der Website www.hp.com/go/wirelessprinting erhalten Sie weitere Hilfe zu Firewalls.
Deaktivieren Sie die Firewall sowie die Anti-Virus- oder die Anti-Spyware-Anwendungen
vorübergehend, um zu prüfen, ob die Installation dann erfolgreich abgeschlossen werden kann.
Nach Abschluss der Installation sollten Sie die Sicherheitsanwendungen wieder aktivieren.
Richten Sie die Firewall-Software so ein, dass die Kommunikation über den UDP-Port 427
(Windows) erlaubt wird.
Nach der Softwareinstallation
Wenn nach einer erfolgreichen Druckerinstallation Probleme beim Drucken auftreten:
• Schalten Sie den Router, den Drucker und den Computer aus. Schalten Sie danach den
Router, den Drucker und den Computer in der angegebenen Reihenfolge wieder ein.
• Besteht das Problem danach weiterhin, führen Sie das Netzwerkdiagnoseprogramm
(Windows) aus:
• Rufen Sie die folgende Website auf: www.hp.com/go/wirelessprinting. Laden Sie das
Netzwerkdiagnoseprogramm herunter, und starten Sie dieses.
Deutsch
15

Erklärung zur beschränkten Gewährleistung für HP Drucker
HP Produkt Dauer der beschränkten Gewährleistung
Softwaremedien 90 Tage
Drucker 1 Jahr
Druckpatronen Bis die HP Tinte verbraucht oder das auf der Druckpatrone
Druckköpfe (gilt nur für Produkte, deren Druckkopf vom 1 Jahr
Kunden ausgewechselt werden kann)
Zubehör 1 Jahr (wenn nicht anders angegeben)
A. Umfang der beschränkten Gewährleistung
1. Hewlett-Packard (HP) gewährleistet dem Endkunden, dass die oben genannten HP Produkte während des oben genannten
Gewährleistungszeitraums frei von Material- und Verarbeitungsfehlern sind. Der Gewährleistungszeitraum beginnt mit dem
Kaufdatum.
2. Bei Softwareprodukten gilt die eingeschränkte Garantie von HP nur für die Nichtausführung von Programmieranweisungen.
HP übernimmt keine Garantie dafür, dass die Verwendung jeglicher Produkte unterbrechungsfrei bzw. ohne Fehler verläuft.
3. Die beschränkte Gewährleistung von HP gilt nur für Mängel, die sich bei normaler Benutzung des Produkts ergeben, und
erstreckt sich nicht auf Fehler, die durch Folgendes verursacht wurden:
a. Unsachgemäße Wartung oder Abänderung des Produkts;
b. Software, Druckmedien, Ersatzteile oder Verbrauchsmaterial, die nicht von HP geliefert oder unterstützt werden;
c. Betrieb des Produkts, der nicht den technischen Daten entspricht;
d. Unberechtigte Abänderung oder falsche Verwendung.
4. Bei HP-Druckerprodukten wirkt sich die Verwendung einer nicht von HP hergestellten bzw. einer aufgefüllten Patrone nicht
auf die Garantie für den Kunden bzw. auf jegliche Unterstützungsverträge mit dem Kunden aus. Wenn der Ausfall bzw. die
Beschädigung des Druckers jedoch auf die Verwendung einer nicht von HP hergestellten bzw. einer aufgefüllten Patrone
Deutsch
oder einer abgelaufenen Tintenpatrone zurückzuführen ist, stellt HP für die Wartung des Druckers bei diesem Ausfall bzw.
dieser Beschädigung die standardmäßigen Arbeits- und Materialkosten in Rechnung.
5. Wenn HP während des jeweils zutreffenden Gewährleistungszeitraums von einem Schaden an einem unter die
Gewährleistung von HP fallenden Produkt in Kenntnis gesetzt wird, wird das betreffende Produkt nach Wahl von HP
entweder repariert oder ersetzt.
6. Sollte HP nicht in der Lage sein, ein fehlerhaftes, unter die Gewährleistung fallendes Produkt zu reparieren oder zu ersetzen,
erstattet HP innerhalb eines angemessenen Zeitraums nach Benachrichtigung über den Schaden den vom Endkunden
bezahlten Kaufpreis für das Produkt zurück.
7. HP ist erst dann verpflichtet, das mangelhafte Produkt zu reparieren, zu ersetzen oder den Kaufpreis zurückzuerstatten,
wenn der Endkunde dieses an HP zurückgesandt hat.
8. Ersatzprodukte können entweder neu oder neuwertig sein, solange sie über mindestens denselben Funktionsumfang
verfügen wie das zu ersetzende Produkt.
9. HP Produkte können aufgearbeitete Teile, Komponenten oder Materialien enthalten, die in der Leistung neuen Teilen
entsprechen.
10. Die Erklärung zur beschränkten Gewährleistung von HP gilt in jedem Land, in dem die aufgeführten Produkte von HP
vertrieben werden. Weitergehende auf der Gewährleistung beruhende Dienstleistungen (z.B. Vor-Ort-Service) können mit
jeder autorisierten HP Serviceeinrichtung in den Ländern vereinbart werden, in denen das Produkt durch HP oder einen
autorisierten Importeur vertrieben wird.
B. Einschränkungen der Gewährleistung
WEDER HP NOCH DESSEN ZULIEFERER ÜBERNEHMEN ÜBER DAS NACH GELTENDEM RECHT ZULÄSSIGE
AUSMASS HINAUS ANDERE AUSDRÜCKLICHE ODER STILLSCHWEIGENDE GEWÄHRLEISTUNGEN ODER
ZUSICHE-RUNGEN HINSICHTLICH DER MARKTGÄNGIGKEIT, ZUFRIEDEN STELLENDEN QUALITÄT UND EIGNUNG
FÜR EINEN BESTIMMTEN ZWECK.
C. Haftungsbeschränkung
1. Sofern durch die geltende Gesetzgebung keine anderen Bestimmungen festgelegt sind, stehen dem Endkunden über die in
dieser Gewährleistungsvereinbarung genannten Leistungen hinaus keine weiteren Ansprüche zu.
2. IN DEM NACH GELTENDEM RECHT ZULÄSSIGEN MASS UND MIT AUSNAHME DER IN DIESER
GEWÄHRLEISTUNGSVEREINBARUNG AUSDRÜCKLICH ANGEGEBENEN VERPFLICHTUNGEN SIND WEDER HP
NOCH DESSEN ZULIEFERER ERSATZPFLICHTIG FÜR DIREKTE, INDIREKTE, BESONDERE, ZUFÄLLIGE ODER
FOLGESCHÄDEN, UNABHÄNGIG DAVON, OB DIESE AUF DER GRUNDLAGE VON VERTRÄGEN, UNERLAUBTEN
HANDLUNGEN ODER ANDEREN RECHTSTHEORIEN GELTEND GEMACHT WERDEN UND OB HP ODER DESSEN
ZULIEFERER VON DER MÖGLICHKEIT EINES SOLCHEN SCHADENS UNTERRICHTET WORDEN SIND.
D. Geltendes Recht
1. Diese Gewährleistungsvereinbarung stattet den Endkunden mit bestimmten Rechten aus. Der Endkunde hat unter
Umständen noch weitere Rechte, die in den Vereinigten Staaten von Bundesstaat zu Bundesstaat, in Kanada von Provinz zu
Provinz, und allgemein von Land zu Land verschieden sein können.
2. Soweit diese Gewährleistungsvereinbarung nicht dem geltenden Recht entspricht, soll sie als dahingehend abgeändert
gelten, dass die hierin enthaltenen Bestimmungen dem geltenden Recht entsprechen. Unter dem geltenden Recht treffen
bestimmte Erklärungen und Einschränkungen dieser Gewährleistungsvereinbarung möglicherweise nicht auf den Endkunden
zu. In einigen US-Bundesstaaten und in einigen anderen Ländern (sowie in einigen kanadischen Provinzen):
a. werden die Rechte des Verbrauchers nicht durch die Erklärungen und Einschränkungen dieser
Gewährleistungsvereinbarung beschränkt (z.B. in Großbritannien);
b. ist ein Hersteller nicht berechtigt, solche Erklärungen und Einschränkungen durchzusetzen;
c. verfügt ein Endkunde über weitere Gewährleistungsansprüche; insbesondere kann die Dauer stillschweigender
Gewährleistungen durch das geltende Recht geregelt sein und darf vom Hersteller nicht eingeschränkt werden, oder eine
zeitliche Einschränkung der stillschweigenden Gewährleistung ist zulässig.
3. DURCH DIESE GEWÄHRLEISTUNGSVEREINBARUNG WERDEN DIE ANSPRÜCHE DES ENDKUNDEN, DIE DURCH
DAS IN DIESEN LÄNDERN GELTENDE RECHT IM ZUSAMMENHANG MIT DEM KAUF VON HP PRODUKTEN GEWÄHRT
WERDEN, NUR IM GESETZLICH ZULÄSSIGEN RAHMEN AUSGESCHLOSSEN, EINGESCHRÄNKT ODER GEÄNDERT.
DIE BEDINGUNGEN DIESER GEWÄHRLEISTUNGSVEREINBARUNG GELTEN ZUSÄTZLICH ZU DEN GESETZLICHEN
ENDKUNDENRECHTEN.
Sehr geehrter Kunde,
Als Anlage finden Sie die Namen und Adressen der jeweiligen HP Gesellschaft, die in Ihrem Land die HP Herstellergarantie gewährt.
Über die Herstellergarantie hinaus haben Sie gegebenenfalls Mängelansprüche gegenüber Ihrem Verkäufer aus dem
Kaufvertrag, die durch diese Herstellergarantie nicht eingeschränkt werden.
Deutschland: Hewlett-Packard GmbH, Herrenberger Straße 140, D-71034 Böblingen
Luxemburg: Vegacenter, 75, Parc d'Activités Capellen, L-8308 Capellen
Österreich: Hewlett-Packard Ges.m.b.H., Wienerbergstrasse 41 A-1120 Wien
angegebene Enddatum für die Garantie erreicht ist, je nachdem,
welcher Fall zuerst eintritt. Diese Garantie gilt nicht für nachgefüllte,
nachgearbeitete, recycelte, zweckentfremdete oder in anderer
Weise manipulierte HP Tintenprodukte.
HP Herstellergarantie
16
PHOTOSMART PREMIUM
USB
USB
MMC
e-ALL-IN-ONE SÉRIE C310
Commencez la configuration ici...
Vérifiez le contenu de l’emballage.
1
Déballez l’imprimante. Retirez tous les adhésifs, films protecteurs et matériaux d’emballage.
2
Effectuez la connexion et mettez l’appareil sous tensoin.
3
Important ! Ne connectez pas le câble USB tant que vous n’y êtes pas invité par le
logiciel d’installation! (Windows® uniquement)
À l’intérieur...
Dépannage concernant l’installation 18
Apprenez à connaître votre appareil HP Photosmart
Fonctionnalités et conseils 20
Nouveautés : Services Web 21
Configuration de l’imprimante réseau 22
* Sur certains modèles uniquement
19
Connectez le cordon d’alimentation et l’adaptateur.
Suivez l’Assistant de configuration.
4
Veillez à suivre les instructions à l’écran vous guidant
dans le processus de configuration et de connexion
de l’imprimante HP Photosmart, incluant la manière
de configurer une connexion d’imprimante en réseau
et d’installer les cartouches d’encre.
Sur les ordinateurs non équipés d’un lecteur de
CD/DVD, visitez le site www.hp.com/support pour
télécharger et installer le logiciel.
Appuyez sur
HP Photosmart sous tension.
pour mettre l’imprimante
WPS (WiFi Protected Setup)
Cette imprimante HP Photosmart prend en charge la
configuration WPS (WiFi Protected Setup) pour une
configuration sans fil simplifiée par l’utilisation d’un seul bouton.
•
Au cours de la configuration, si vous êtes invité à
effectuer une configuration WPS et que vous disposez
d’un routeur WPS, appuyez sur le bouton WPS du
routeur. Le voyant de connexion sans fil s’allumera sur
l’imprimante si la connexion est correcte
• Autrement, suivez les étapes de l’Assistant de
configuration sur l’écran de l’imprimante pour
procéder à la configuration sans fil.
.
Enregistrez votre imprimante HP Photosmart.
Pour obtenir un service plus rapide et des
alertes d’assistance, enregistrez-vous sur le site
www.register.hp.com.
Français

Dépannage concernant l’installation
Si vous ne
parvenez pas à
mettre l’appareil
HP Photosmart
sous tension...
Si vous ne
parvenez pas à
imprimer...
Français
Vérifiez le cordon d’alimentation.
• Assurez-vous que le cordon d’alimentation est correctement branché à l’imprimante et à
l’adaptateur d’alimentation. La présence d’un voyant allumé sur le bloc d’alimentation indique
que le cordon d’alimentation est opérationnel.
• Si vous utilisez une prise multiple, assurez-vous que l’interrupteur dont elle est équipée est en
position de marche. Sinon, branchez l’imprimante directement à une prise de courant.
• Testez la prise de courant pour vérifier qu’elle fonctionne correctement. Branchez un autre
appareil en état de marche et vérifiez qu’il est alimenté. Si tel n’est pas le cas, un problème
est peut-être survenu au niveau de la prise d’alimentation.
• Si vous avez branché l’imprimante sur une prise à interrupteur, assurez-vous que ce dernier
est en position de marche.
1. Mettez l’imprimante hors tension et débranchez le cordon d’alimentation. Rebranchez le
cordon d’alimentation, puis appuyez sur le bouton
2. Veillez à ne pas appuyer trop rapidement sur le bouton . N’appuyez dessus qu’une seule
fois. La mise sous tension de l’imprimante peut prendre quelques minutes ; si vous appuyez à
plusieurs reprises sur le bouton , vous risquez de mettre l’imprimante hors tension.
3. Si vous avez procédé à toutes les étapes mentionnées ci-dessus et que le problème n’est
toujours pas résolu, contactez le support HP pour obtenir une assistance. Consultez le site
www.hp.com/support.
Windows
Assurez-vous que votre appareil HP Photosmart
est défini en tant qu’imprimante par défaut et
qu’il n’est pas hors ligne
1. Dans la barre des tâches de Windows,
cliquez sur Démarrer.
2. Cliquez ensuite sur Panneau de
configuration.
3. Puis, ouvrez :
• Périphériques et imprimantes
(Windows 7)
• Imprimantes (Vista)
• Imprimantes et Fax (XP)
Recherchez votre imprimante pour vérifier si
elle est désignée par une coche cerclée de noir.
Si tel n’est pas le cas, cliquez avec le bouton
droit sur l’icône de l’imprimante et sélectionnez
Définir comme imprimante par défaut dans le
menu
.
Si vous ne parvenez toujours pas à imprimer, ou que
l’installation du logiciel sous Windows échoue
1. Retirez le CD de l’unité de CD de votre
ordinateur, puis débranchez l’imprimante
de l’ordinateur.
2. Redémarrez l’ordinateur.
3.
Désactivez temporairement le logiciel de
pare-feu ainsi que l’antivirus, s’il est présent
4.
Insérez le CD du logiciel d’impression dans
le lecteur de CD, puis suivez les instructions à
l’écran pour installer le logiciel. Ne branchez
le câble USB que lorsque vous y êtes invité
5. Une fois l’installation terminée, redémarrez
l’ordinateur, ainsi que les logiciels de
sécurité que vous avez éventuellement
désactivés ou fermés.
.
:
.
.
pour mettre l’imprimante sous tension.
Mac
Désinstallez, puis réinstallez le logiciel.
Tous les composants logiciels HP propres à cet
appareil HP Photosmart sont supprimés par le
programme de désinstallation. Le programme
de désinstallation ne supprime pas les
composants partagés par d’autres produits ou
d’autres programmes.
Pour désinstaller le logiciel :
1. Déconnectez l’imprimante de votre
ordinateur.
2. Ouvrez le dossier Applications :
Hewlett-Packard.
3. Double-cliquez sur Programme de
désinstallation HP. Suivez les instructions à
l’écran.
Pour installer le logiciel :
1. Insérez le CD dans le lecteur de CD de
votre ordinateur.
2. Sur le bureau, ouvrez le CD, puis doublecliquez sur Programme d’installation HP.
3. Suivez les instructions à l’écran.
18
Apprenez à connaître votre appareil HP Photosmart
a
b
Ecran L’écran tactile affiche les menus, les photos et
les messages. Vous pouvez vous déplacer parmi les
photos et les options de menu en donnant une légère
impulsion dans le sens horizontal ou vertical.
Accueil Permet de revenir à l’écran d’accueil (écran
par défaut lorsque vous activez le produit).
Précédent Retourne à l’écran précédent.
Photo Ouvre le menu Photo à partir duquel vous
pouvez afficher, éditer, imprimer et sauvegarder vos
photos.
Copier Ouvre le menu Copier, dans lequel vous
pouvez sélectionner un type de copie ou modifier les
paramètres de copie.
Numériser Ouvre le menu Numériser, dans lequel
vous pouvez sélectionner une destination pour votre
numérisation.
Annuler Interrompt l’opération en cours.
Aide Appuyez sur le bouton Aide de l’écran d’accueil
pour voir toutes les rubriques d’aide. Appuyez sur le
bouton Aide de n’importe quel écran pour voir l’aide
correspondant à cet écran.
Apps Offre un moyen simple et rapide d’accéder à
des informations sur le Web, telles que des cartes,
des bons de remise, des pages à colorier ou des
puzzles, puis de les imprimer.
Configuration Ouvre le menu Configuration, à partir
duquel vous pouvez modifier les paramètres du
produit et exécuter des fonctions de maintenance.
Niveaux d’encre Ouvre le menu Encre pour afficher
les niveaux d’encre estimés.
Gestionnaire Ouvre le Gestionnaire dans lequel vous
pouvez supprimer des applications de votre liste Mes
favoris.
Sans fil* Ouvre le menu Réseau, à partir duquel vous
pouvez accéder à l’Assistant de configuration sans fil
et à la configuration WPS (WiFi Protected Setup).
HP ePrint Ouvre le menu Services Web, à partir
duquel vous pouvez afficher, modifier et imprimer
l’adresse électronique de votre imprimante.
Français
*Etats des voyants de
a
b
Voyant des emplacements de carte mémoire
Emplacements de carte mémoire (DUO, SD-MMC)
s
connexion sans fil
Désactivé
Allumé (sans
clignotement)
Clignotement (lent)
Clignotement (rapide)
19
La connexion sans fil est désactivée.
La connexion sans fil est activée et
l’imprimante est connectée au réseau.
La connexion sans fil est activée mais
l’imprimante n’est pas connectée au réseau.
Il se peut que la connexion soit en cours.
L’imprimante n’a pas réussi à se connecter
au réseau à l’aide de la configuration
WPS (WiFi Protected Setup).
Fonctionnalités et conseils
• Imprimez les photos directement depuis une carte mémoire dans divers formats et types
de papier. Utilisez le menu Photo sur l’écran de l’imprimante pour parcourir vos photos,
appliquer des correctifs automatiques et effectuer des sélections.
• Imprimez des documents et des photos à partir d’applications logicielles installées sur un
ordinateur connecté.
• Lors de l’installation de nouvelles cartouches, consultez l’image sur l’emballage de la
Imprimer
Copier
Français
Numériser
cartouche pour plus d’instructions. Assurez-vous de retirer l’emballage plastique et l’adhésif
orange avant de dévisser le capuchon orange.
• Lors de la configuration et de l’utilisation initiales de votre appareil HP Photosmart, veillez à
installer les cartouches d’encre qui ont été fournies avec votre périphérique. Ces cartouches
contiennent une formule spécialement adaptée à la première utilisation de votre imprimante.
• Assurez-vous que vous disposez d’encre en quantité suffisante. Pour vérifier les niveaux
d’encre estimés, sélectionnez Paramètres sur l’écran de l’imprimante, Outils, puis sélectionnez
Afficher les niveaux estimés.
• Les cartouches d’encre noir photo sont compatibles avec cette imprimante.
Utilisation de l’encre
L’encre des cartouches est utilisée dans le processus d’impression de plusieurs manières :
• Initialisation, qui prépare l’imprimante et les cartouches en vue de l’impression.
• Maintenance des têtes d’impression, qui permet de maintenir la propreté des buses et
d’assurer que l’encre s’écoule en douceur.
En outre, une certaine quantité d’encre demeure dans la cartouche après utilisation. Pour des
informations complémentaires, reportez-vous au site : www.hp.com/go/inkusage.
• Réalisez des copies en couleur ou en noir et blanc. Utilisez le menu Copier sur
l’écran de l’imprimante pour sélectionner la couleur, la taille réelle de l’original ou le
redimensionnement pour ajustement, le paramètre de qualité (brouillon, normale ou
supérieure), le format du papier, ainsi que le nombre de copies.
• Chargez les originaux se présentant sous forme de feuillets uniques ou de pages fines face
imprimée vers le bas dans l’angle avant droit de la vitre.
• Pour les originaux épais, tels qu’une page d’un ouvrage, retirez le couvercle. Placez
l’original, face imprimée vers le bas, dans l’angle avant droit de la vitre. Si possible,
recouvrez l’original à l’aide du couvercle afin de créer un arrière-plan blanc.
• Numérisez des photographies ou des documents. Utilisez le menu Numériser sur l’écran de
l’imprimante pour sélectionner Numériser vers PC, Numériser vers carte ou Réimprimer. Puis,
chargez votre original, face à imprimer vers le bas vers l’angle avant droit de la vitre. Choisissez un
raccourci de numérisation : Photo vers fichier, Photo vers courrier électronique ou Document PDF
• Si vous effectuez une numérisation vers un ordinateur connecté, le logiciel de numérisation
s’ouvrira pour vous permettre d’effectuer des réglages et d’autres sélections, incluant
l’emplacement du fichier à numériser.
•
Pour obtenir une numérisation optimale, maintenez la vitre et la partie interne du couvercle à l’état propre.
Le scanner interprète toute tache ou marque détectée sur la vitre comme faisant partie de l’image
.
.
Obtenir des
informations
complémentaires
Sources d’informations supplémentaires
Vous trouverez des informations complémentaires sur le produit dans l’aide en ligne affichée à
l’écran, ainsi que dans le fichier Lisez-moi, qui sont installés avec le logiciel HP Photosmart.
• L’aide en ligne contient des instructions relatives aux fonctionnalités et au dépannage du
produit. Elle contient également les caractéristiques du produit, des notices légales, des
informations d’ordre environnemental, normatif et relatives à l’assistance, ainsi que des liens
d’accès à des informations complémentaires en ligne sur le Web.
• Le fichier Lisez-moi contient des informations permettant de contacter l’assistance HP et décrit
la configuration requise pour le système d’exploitation, ainsi que les mises à jour les plus
récentes des informations sur votre produit.
Pour accéder à l’aide en ligne à partir de votre ordinateur :
• Windows XP, Vista, Win 7 : Cliquez sur Démarrer > Tous les programmes > HP > Photosmart
série C310 > Aide.
• Mac OS X v10.5 et v10.6 : Dans le Finder, cliquez sur Aide > Aide Mac. Dans le Visionneur
d’aide, sélectionnez Aide du produit HP à partir du menu déroulant Aide Mac.
20

Nouveautés : Services Web
NOV
Comment démarrer le service ePrint de HP ?
Pour pouvoir utiliser le service ePrint de HP, votre imprimante doit être connectée à un réseau et à Internet
• Appuyez sur le bouton Sans fil sur le panneau de commande de l’imprimante HP Photosmart.
• Sélectionnez le menu Services Web sur l’écran de l’imprimante. Depuis ce menu, vous
pouvez activer ou désactiver le service, afficher l’adresse électronique de l’imprimante et
imprimer une page d’informations.
HP ePrint
Applications HP
Imprimez depuis n’importe où
Le service gratuit ePrint de HP offre une méthode simple d’impression à partir de votre
messagerie électronique partout et à tout moment. Envoyez simplement un message électronique
à l’adresse électronique de votre imprimante à partir de votre ordinateur ou de votre
périphérique mobile. Le message électronique et les pièces jointes reconnues s’imprimeront.
•
Il se peut que le service ePrint de HP ne soit pas fourni avec votre imprimante mais vous
pouvez facilement l’ajouter en effectuant une mise à jour du produit. Consultez le site
www.hp.com/go/ePrintCenter pour obtenir des détails et des informations sur les disponibilités
• Il se peut que les pièces jointes s’impriment de manière différente par rapport au logiciel qui
les a créées, selon les polices d’origine et les options de mise en page utilisées.
• Les mises à jour gratuites du produit sont fournies avec ce service. Certaines mises à jour
peuvent être requises pour activer certaines fonctionnalités.
Votre imprimante est protégée
Afin de contribuer à lutter contre les courriers indésirables, HP attribue une adresse électronique
aléatoire à votre imprimante, ne publie jamais cette adresse et, par défaut, ne répond à aucun
expéditeur. Le service ePrint de HP inclut en outre un filtrage anti-spam normalisé et convertit les
courriers électroniques et pièces jointes en un format uniquement imprimable, afin de réduire les
risques liés aux virus ou à tout autre contenu dangereux.
• Toutefois, le service ePrint de HP ne filtrant pas les courriers électroniques d’après leur
contenu, il ne peut pas empêcher l’impression de contenus douteux ou couverts par des droits
d’auteur.
Impression à partir du Web sans passer par un ordinateur
Sélectionnez une icône Apps sur l’écran de l’imprimante pour imprimer des pages pour toute la famille
Remarque : Une connexion Internet est requise.
•
Utilisez l’application Formulaires rapides localement. Imprimez des calendriers, des bloc-notes,
des graphiques et même des puzzles
• Ajoutez plus d’applications à partir du Web. Imprimez des pages à colorier, des cartes de
vœux et davantage!
• Des mises à jour gratuites du produit sont fournies avec ce service. Certaines mises à jour
peuvent être requises pour activer certaines fonctionnalités.
.
.
.
.
Français
ePrintCenter
Caractéristiques
Utilisation du site Web ePrintCenter de HP
Utilisez le site Web ePrintCenter gratuit de HP pour configurer la sécurité renforcée du service
ePrint de HP. Spécifiez les adresses électroniques autorisées à envoyer des messages électroniques
à votre imprimante, obtenez plus d’applications HP et accédez à d’autres services gratuits.
Visitez le site Web ePrintCenter pour plus d’informations sur les termes et conditions spécifiques :
www.hp.com/go/ePrintCenter
Caractéristiques électriques
Remarque : Utilisez cette imprimante exclusivement avec l’adaptateur secteur fourni par HP.
• Adaptateur de tension : 0957-2271 (Brésil - 0957-2289)
• Tension d’entrée : 100 à 240 VCA
• Fréquence d’entrée : 50 à 60 Hz
• Consommation électrique : 85 W (maximum), 50 W (moyenne)
21

Configuration de l’imprimante réseau
Passage d’une connexion USB à une connexion réseau sans fil
Si, au départ, vous avez configuré votre imprimante à l’aide d’une connexion USB sur votre
ordinateur, vous pouvez passer à une connexion réseau sans fil en suivant ces étapes.
Français
Passage d’une
connexion
USB à une
connexion
sans fil
Si vous ne
trouvez pas
votre imprimante
au cours de
l’installation
logicielle...
Windows
Pour passer d’une connexion USB à une
connexion sans fil :
1. Cliquez sur Démarrer, sur HP, sur
Photosmart série C310, puis cliquez sur
Passage d’une connexion USB à une
connexion sans fil. Gardez votre câble
USB connecté tant que vous n’êtes pas
invité à le déconnecter.
2. Suivez les instructions sur les écrans
affichés.
• Cliquez sur Suivant pour passer d’un
écran à l’autre.
• Cliquez sur Aide pour obtenir des
informations supplémentaires sur ce
qui est requis à l’écran.
Mac
Pour passer d’une connexion USB à une
connexion sans fil :
1. Sur le panneau avant de l’imprimante,
appuyez sur le bouton Sans fil pour
afficher le menu Sans fil sur l’écran de
l’imprimante.
2. Sélectionnez Param. sans fil, puis
Assistant de configuration sans fil à
l’écran.
3. Suivez les étapes de l’Assistant de
configuration sans fil afin de connecter
l’imprimante.
4. Pour ajouter l’imprimante, consultez
Préférences système, sélectionnez
Imprimantes et fax,puis cliquez
sur le bouton + sous la liste des
imprimantes à gauche. Sélectionnez
votre imprimante dans la liste des
imprimantes.
Résolution des problèmes au cours de la configuration de
l’imprimante sans fil
Vérifiez que votre imprimante est connectée à votre réseau.
Exécutez un test réseau sans fil pour vérifier que votre imprimante se trouve sur le réseau.
Pour ce faire :
1. Sur le panneau avant de l’imprimante HP Photosmart, appuyez sur le bouton Sans fil
pour afficher le menu Sans fil sur l’écran de l’imprimante.
2. Sélectionnez Exécutez test réseau sans fil à l’écran.
3. Le rapport de test du réseau sans fil s’imprime automatiquement.
• Vérifiez le haut du rapport pour voir si rien n’a échoué au cours du test.
• Observez le résumé de diagnostiques de tous les tests effectués et vérifiez si votre
imprimante a réussi ces tests.
• Visualisez le résumé de configuration pour identifier le nom de réseau (SSID),
l’adresse matérielle (Mac) et l’adresse IP.
Si votre imprimante n’est pas connectée au réseau :
1. Appuyez sur le bouton Sans fil sur l’écran de l’imprimante pour ouvrir le menu Sans fil.
Sélectionnez l’Assistant de configuration sans fil.
2. Suivez les instructions à l’écran.
Pour obtenir de l’aide supplémentaire à propos de la configuration d’une connexion sans fil,
consultez le site Wireless Printing Center : www.hp.com/go/wirelessprinting.
22

Résolution des problèmes de connectivité
Vous ne vous êtes peut-être pas connecté au bon réseau, ou avez saisi un nom de
réseau (SSID) incorrect.
Vérifiez que ces paramètres sont corrects.
Il se peut que vous ayez tapé votre mot de passe sans fil (clé WEP ou phrase passe
WPA) de manière incorrecte.
• Si vous utilisez le chiffrement sur votre réseau, vous devrez saisir une clé. La clé et le mot de
passe sont sensibles à la casse. De fait, assurez-vous qu’ils ont été saisis correctement.
• Si le nom de réseau (SSID) ou le mot de passe sans fil ne sont pas trouvés automatiquement
au cours de l’installation et que vous ne les connaissez pas encore, vous pouvez télécharger
l’Utilitaire de diagnostique réseau qui peut vous aider à les localiser.
• L’Utilitaire de diagnostique réseau s’exécute sur les ordinateurs fonctionnant sous Windows XP
SP3, Vista ou Windows 7. Votre ordinateur doit être connecté à votre réseau. Pour télécharger
l’Utilitaire de diagnostique réseau, consultez le site : www.hp.com/go/wirelessprinting.
Un incident s’est peut-être produit au niveau du routeur.
Essayez de redémarrer l’imprimante et le routeur en désactivant l’alimentation sur chacun d’eux.
Puis, rallumez-les.
Votre ordinateur n’est peut-être pas connecté à votre réseau.
Assurez-vous que l’ordinateur est connecté au même réseau que l’appareil HP Photosmart.
Votre ordinateur est peut-être connecté à un réseau privé virtuel (VPN).
Désactivez temporairement le VPN avant de poursuivre l’installation. La connexion à un VPN
consiste à être sur un réseau différent. Vous devrez être déconnecté du VPN pour accéder à
l’imprimante sur le réseau domestique.
Les communications sont peut-être bloquées par un logiciel de sécurité.
Un logiciel de sécurité (pare-feu, anti-virus, anti-logiciel espion) installé sur votre ordinateur
bloque peut-être les communications entre l’imprimante et l’ordinateur. Un Utilitaire de
diagnostique HP s’exécute au cours de l’installation et peut identifier les pare-feu installés sur
l’imprimante.
Consultez le site : www.hp.com/go/wirelessprinting pour obtenir de l’aide sur les pare-feu.
Essayez de déconnecter temporairement vos applications de pare-feu, anti-virus, ou anti-logiciel
espion afin de déterminer si vous pouvez terminer l’installation correctement. Vous pouvez
réactiver les applications de sécurité une fois l’installation terminée.
Configurez votre pare-feu de sorte qu’il autorise les communications sur le port UDP 427
(Windows).
Après installation du logiciel
Votre imprimante a été correctement installée mais vous rencontrez des problèmes lors de
l’impression :
• Désactivez le routeur, l’imprimante et l’ordinateur. Puis, activez le routeur, l’imprimante et
l’ordinateur, dans cet ordre.
• Si l’arrêt et la remise en marche ne permettent pas de résoudre le problème, exécutez
l’Utilitaire de diagnostique réseau (Windows) :
• Consultez le site : www.hp.com/go/wirelessprinting pour télécharger l’Utilitaire de
diagnostique réseau, puis exécutez-le.
23
Français

Déclaration de garantie limitée de l’imprimante HP
Produit HP Durée de la garantie limitée
Supports logiciels 90 jours
Imprimante 1 an
Français
Cartouches d'encre Jusqu'à épuisement de l'encre HP ou jusqu'à expiration de la
Têtes d'impression (ne s'applique qu'aux produits avec 1 an
des têtes d'impression pouvant être remplacées par le client)
Accessoires 1 an, sauf indication contraire
A. Extension de garantie limitée
1. Hewlett-Packard (HP) garantit au client utilisateur final que les produhits HP décrits précédemment sont exempts de défauts de matériaux
et malfaçons pendant la durée indiquée ci-dessus, à compter de la date d'achat par le client.
2. Pour les logiciels, la garantie limitée HP est valable uniquement en cas d'impossibilité d'exécuter les instructions de programmation. HP ne
garantit pas que le fonctionnement du logiciel ne connaîtra pas d'interruptions ni d'erreurs.
3. La garantie limitée HP ne couvre que les défauts qui apparaissent dans le cadre de l'utilisation normale du produit et ne couvre aucun
autre problème, y compris ceux qui surviennent du fait :
a. d'une mauvaise maintenance ou d'une modification ;
b. de logiciels, de supports, de pièces ou de consommables non fournis ou non pris en charge par HP ;
c. du fonctionnement du produit hors de ses caractéristiques ; ou
d. d'une modification non autorisée ou d'une mauvaise utilisation.
4. Pour les imprimantes HP, l'utilisation d'une cartouche d'un autre fournisseur ou d'une cartouche rechargée n'entraîne pas la résiliation de la
garantie ni d'un contrat de support HP. Toutefois, si la panne ou les dégâts peuvent être attribués à l'utilisation d'une cartouche d'un autre
fournisseur, d'une cartouche rechargée ou d'une cartouche périmée, HP facturera les montants correspondant au temps et au matériel
nécessaires à la réparation de l'imprimante.
5. Si, pendant la période de garantie applicable, HP est informé d'une défaillance concernant un produit couvert par la garantie HP, HP
choisira de réparer ou de remplacer le produit défectueux.
6. Si HP est dans l'incapacité de réparer ou de remplacer, selon le cas, un produit défectueux couvert par la garantie HP, HP devra, dans un
délai raisonnable après avoir été informé du défaut, rembourser le prix d'achat du produit.
7. HP ne sera tenu à aucune obligation de réparation, de remplacement ou de remboursement tant que le client n'aura pas retourné le produit
défectueux à HP.
8. Tout produit de remplacement peut être neuf ou comme neuf, pourvu que ses fonctionnalités soient au moins équivalentes à celles du
produit remplacé.
9. Les produits HP peuvent contenir des pièces, des composants ou des matériels reconditionnés équivalents à des neufs en termes de
performances.
10. La garantie limitée HP est valable dans tout pays dans lequel le produit HP couvert est distribué par HP. Des contrats apportant des
services de garantie supplémentaires, tels que la réparation sur site, sont disponibles auprès des services de maintenance agréés par HP
dans les pays dans lequel le produit est distribué par HP ou par un importateur agréé.
B. Restrictions de garantie
DANS LA MESURE OÙ LES LOIS LOCALES L'AUTORISENT, HP OU SES FOURNISSEURS TIERS NE FONT AUCUNE AUTRE
GARANTIE OU CONDITION, EXPRESSE OU IMPLICITE, EN CE QUI CONCERNE LES PRODUITS HP ET NIENT TOUTE GARANTIE
IMPLICITE DE COMMERCIALISATION, DE QUALITÉ SATISFAISANTE OU D'ADAPTATION À UN BUT PARTICULIER.
C. Restrictions de responsabilité
1. Dans la mesure où les lois locales l'autorisent, les recours énoncés dans cette déclaration de garantie constituent les recours exclusifs du
client.
2. DANS LA MESURE OÙ LES LOIS LOCALES L'AUTORISENT, EXCEPTION FAITE DES OBLIGATIONS SPÉCIFIQUEMENT ÉNONCÉES
DANS LA PRÉSENTE DÉCLARATION DE GARANTIE, HP OU SES FOURNISSEURS TIERS NE POURRONT ÊTRE TENUS POUR
RESPONSABLES DE DOMMAGES DIRECTS, INDIRECTS, SPÉCIAUX OU ACCIDENTELS, QU'ILS SOIENT BASÉS SUR UN
CONTRAT, UN PRÉJUDICE OU TOUTE AUTRE THÉORIE LÉGALE, QUE CES DOMMAGES SOIENT RÉPUTÉS POSSIBLES OU NON.
D. Lois locales
1. Cette déclaration de garantie donne au client des droits juridiques spécifiques. Le client peut également posséder d'autres droits selon les
états des Etats-Unis, les provinces du Canada, et les autres pays ou régions du monde.
2. Si cette déclaration de garantie est incompatible avec les lois locales, elle sera considérée comme étant modifiée pour être conforme à la
loi locale. Selon ces lois locales, certaines renonciations et limitations de cette déclaration de garantie peuvent ne pas s'appliquer au client.
Par exemple, certains états des Etats-Unis, ainsi que certains gouvernements hors des Etats-Unis (y compris certaines provinces du
Canada), peuvent :
a. exclure les renonciations et limitations de cette déclaration de garantie des droits statutaires d'un client (par exemple au Royaume-Uni) ;
b. restreindre d'une autre manière la possibilité pour un fabricant d'imposer ces renonciations et limitations ; ou
c. accorder au client des droits de garantie supplémentaires, spécifier la durée des garanties implicites que le fabricant ne peut nier, ou ne
pas autoriser les limitations portant sur la durée des garanties implicites.
3. EXCEPTÉ DANS LA MESURE AUTORISÉE PAR LA LÉGISLATION, LES TERMES DE LA PRÉSENTE DÉCLARATION DE GARANTIE
N'EXCLUENT, NE LIMITENT NI NE MODIFIENT LES DROITS STATUTAIRES OBLIGATOIRES APPLICABLES À LA VENTE DES
PRODUITS HP AUXDITS CLIENTS, MAIS VIENNENT S'Y AJOUTER.
Cher client,
Vous trouverez, ci-après, les coordonnées de l’entité HP responsable de l'exécution de la garantie fabricant relative à votre matériel HP dans votre pays.
En vertu de votre contrat d’achat, il se peut que vous disposiez de droits légaux supplémentaires à l’encontre de votre vendeur. Ceux-ci ne sont aucunement affectés par la présente
garantie du fabricant HP.
En particulier, si vous êtes un consommateur domicilié en France (départements et territoires d’outre-mer (DOM-TOM) inclus dans la limite des textes qui leur sont applicables), le
vendeur reste tenu à votre égard des défauts de conformité du bien au contrat et des vices rédhibitoires hhdans les conditions prévues aux articles 1641 à 1649 du Code civil.
Code de la consommation :
"Art. L. 211-4. - Le vendeur est tenu de livrer un bien conforme au contrat et répond des défauts de conformité existant lors de la délivrance.
Il répond également des défauts de conformité résultant de l'emballage, des instructions de montage ou de l'installation lorsque celle-ci a été mise à sa charge par le contrat ou a été réalisée
sous sa responsabilité."
"Art. L. 211-5. - Pour être conforme au contrat, le bien doit :
1° Etre propre à l'usage habituellement attendu d'un bien semblable et, le cas échéant correspondre à la description donnée par le vendeur et posséder les qualités que celui-ci a présentées
à l'acheteur sous forme d'échantillon ou de modèle ;
- présenter les qualités qu'un acheteur peut légitimement attendre eu égard aux déclarations publiques faites par le vendeur, par le producteur ou par son représentant, notamment dans
la publicité ou l'étiquetage ;
2° Ou présenter les caractéristiques définies d'un commun accord par les parties ou être propre à tout usage spécial recherché par l'acheteur, porté à la connaissance du vendeur et que
ce dernier a accepté."
"Art. L.211-12. – L’action résultant du défaut de conformité se prescrit par deux ans à compter de la délivrance du bien."
Code civil :
"Code civil Article 1641 : Le vendeur est tenu de la garantie à raison des défauts cachés de la chose vendue qui la rendent impropre à l’usage auquel on la destine, ou qui diminuent tellement
cet usage, que l’acheteur ne l’aurait pas acquise, ou n’en aurait donné qu’un moindre prix, s’il les avait connus.
"Code civil Article 1648 : L’action résultant des vices rédhibitoires doit être intentée par l’acquéreur dans un délai de deux ans à compter de la découverte du vice."
France : Hewlett-Packard France, SAS 80, rue Camille Desmoulins 92788 Issy les Moulineaux Cedex 9
Belgique : Hewlett-Packard Belgium BVBA/SPRL, Hermeslaan 1A, B-1831 Brussels
Luxembourg : Hewlett-Packard Luxembourg SCA, Vegacenter, 75, Parc d'Activités Capellen, L-8308 Capellen
date de garantie imprimée sur la cartouche (selon le cas qui se
produira en premier). Cette garantie ne couvre pas les produits
utilisant de l'encre HP qui ont été reconditionnés, mal utilisés ou
altérés.
Garantie du fabricant HP
24
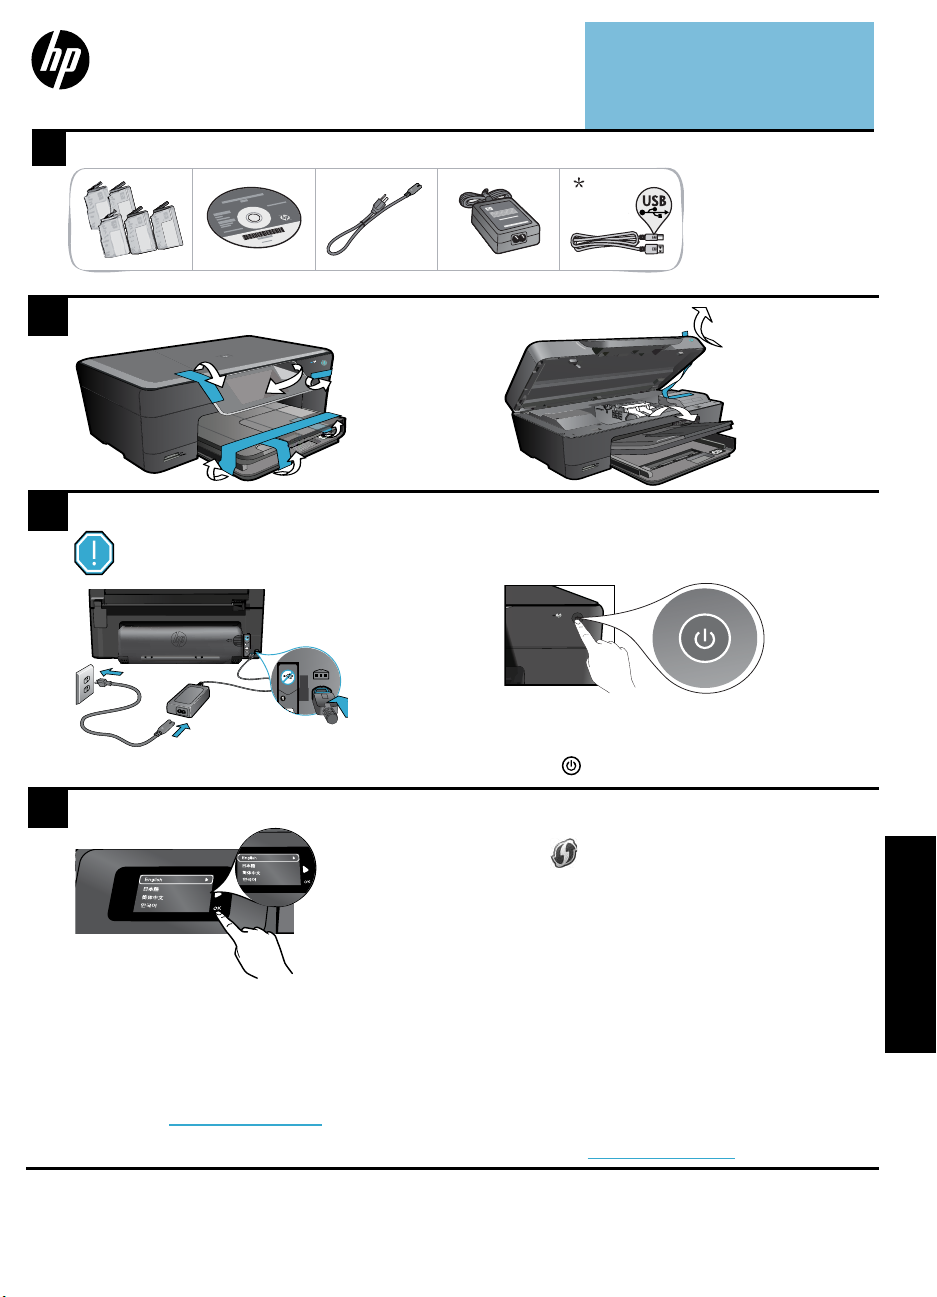
PHOTOSMART PREMIUM
USB
USB
MMC
e-ALL-IN-ONE C310 SERIES
Avviare l’installazione...
Verificare i contenuti della confezione.
1
Disimballare la stampante. Rimuovere i nastri, la pellicola protettiva e il materiale di imballaggio
2
Collegare e accendere.
3
All’interno...
Risoluzione dei problemi relativi alla configurazione
Informazioni preliminari sulla HP Photosmart
Funzionalità e suggerimenti 28
Novità? Web Services 29
Configurazione di una stampante di rete 30
Importante! Non collegare il cavo USB finché non viene richiesto dalla procedura di
installazione del software! (solo Windows®)
26
27
* Non incluso in tutti i modelli
.
Collegare l’adattatore e il cavo di alimentazione.
Seguire le indicazioni dell’installazione guidata.
4
Seguire le istruzioni riportate sul display, che
guideranno nella procedura di configurazione
e collegamento della HP Photosmart, inclusa la
configurazione e il collegamento della stampante in
rete e l’installazione delle cartucce.
Se il computer non dispone di unità CD/DVD,
visitare il sito www.hp.com/support per scaricare e
installare il software.
Premere
per accendere la HP Photosmart.
WPS (WiFi Protected Setup)
Questa HP Photosmart supporta il WiFi Protected Setup
(WPS) per una facile configurazione wireless
• Durante la configurazione verrà proposto il
WPS e, qualora si disponga di un router WPS,
premere su di esso il tasto WPS. Il LED wireless
sulla stampante si accenderà nel caso in cui sia
possibile stabilire una connessione.
• In caso contrario seguire le indicazioni
dell’installazione guidata sul display della
stampante per eseguire la configurazione
wireless.
Registrazione della HP Photosmart.
Per ottenere avvisi e risposte più rapide
dall’assistenza, effettuare la registrazione
all’indirizzo www.register.hp.com.
.
Italiano

Risoluzione dei problemi relativi alla configurazione
Se la HP
Photosmart non
si accende...
Se non è possibile
eseguire la
stampa...
Italiano
Controllare il cavo di alimentazione.
• Assicurarsi che il cavo di alimentazione sia collegato saldamente alla stampante e
all’adattatore. Se il LED di alimentazione è acceso significa che il cavo di alimentazione
funziona correttamente.
• Se viene utilizzata una presa multipla, accertarsi che sia accesa. Collegare il cavo di
alimentazione direttamente alla presa di corrente.
• Verificare il funzionamento della presa elettrica. Inserire il cavo di alimentazione di un
dispositivo funzionante e verificare che si accenda. Se non si accende, potrebbe sussistere
un problema con la presa di corrente.
• Se l’unità è collegata a una presa con interruttore, assicurarsi che questa sia accesa.
1. Spegnere la stampante e scollegare il cavo di alimentazione. Inserire di nuovo il cavo di
alimentazione, quindi premere il pulsante per accendere la stampante.
2. Non premere il pulsante troppo velocemente. Premerlo solo una volta. L’accensione
potrebbe richiedere qualche minuto, per cui se si preme il pulsante più volte, la stampante
potrebbe spegnersi.
3. Se, una volta completati i passaggi sopra descritti, il problema persiste, contattare il servizio
di assistenza HP. Visitare la pagina www.hp.com/support.
Windows
Controllare che la HP Photosmart sia impostata
come stampante predefinita e che sia in linea.
1. Nella barra delle applicazioni di
Windows, fare clic su Start.
2. Selezionare Pannello di controllo.
3. Aprire:
• Dispositivi e stampanti (Windows 7)
• Stampanti (Vista)
• Stampanti e fax (XP)
Verificare se accanto alla stampante è presente
un segno di spunta all’interno di un cerchio. In
caso contrario, fare clic con il tasto destro del
mouse sull’icona della stampante e scegliere
“Imposta come stampante predefinita” dal menu
Se non si riesce ancora a stampare o se è
impossibile installare Windows:
1. Rimuovere il CD dall’unità CD del computer
e scollegare la stampante dal computer.
2. Riavviare il computer.
3.
Disabilitare temporaneamente eventuali firewall
software e arrestare il software antivirus
4. Inserire il CD del software della stampante
nella relativa unità del computer, quindi
seguire le istruzioni visualizzate per
l’installazione. Non collegare il cavo USB
finché non verrà espressamente richiesto.
5. Al termine dell’installazione, riavviare
il computer e abilitare nuovamente il
software di protezione.
.
Mac
Disinstallare e reinstallare il software.
Il programma di disinstallazione rimuove tutti
i componenti software HP specifici dell’unità
HP Photosmart. Non rimuove i componenti
condivisi da altri prodotti o programmi.
Per disinstallare il software:
1. Scollegare la stampante dal computer.
2. Selezionare Tutti i programmi: Cartella
Hewlett-Packard.
3. Fare doppio clic su HP Uninstaller. Seguire
le istruzioni visualizzate sullo schermo.
Per installare il software:
1. Inserire il CD nell’unità CD del computer.
.
2. Sul desktop, aprire il CD e fare doppio clic
su HP Installer.
3. Seguire le istruzioni visualizzate sullo
schermo.
26
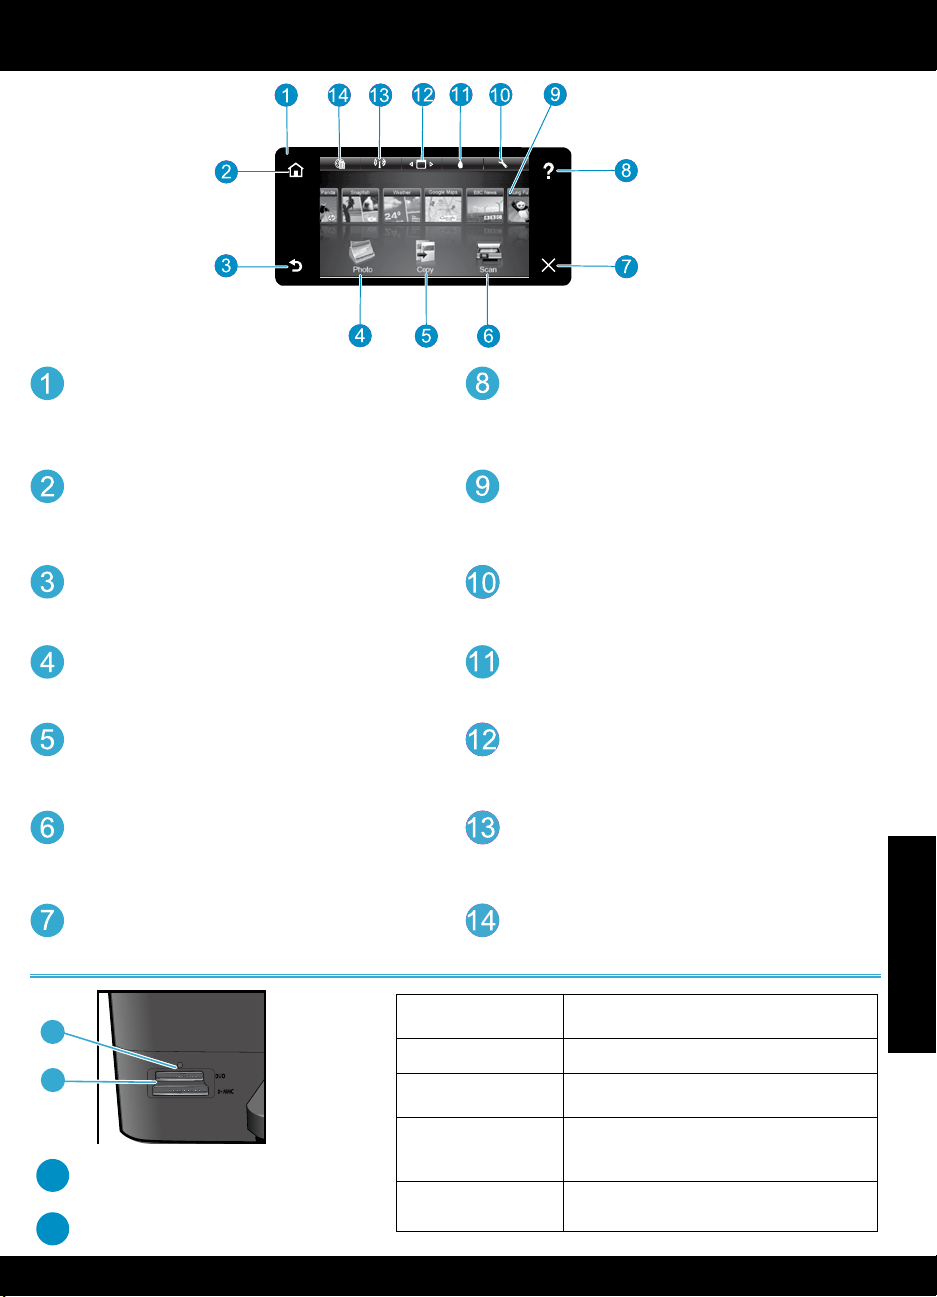
Informazioni preliminari sulla HP Photosmart
a
b
Display Il display a sfioramento mostra menu, foto e
messaggi. È possibile scorrere le foto e le opzioni del
menu sia in orizzontale che in verticale.
Home Torna alla schermata iniziale (la schermata
predefinita quando si accende l’unità).
Indietro Ritorna alla schermata precedente.
Foto Apre il menu Foto, da cui è possibile
visualizzare, modificare, stampare e salvare le foto.
Copia Apre il menu Copia, da cui è possibile
selezionare un tipo di copia o modificare le
impostazioni di copia.
Scan Apre il menu Scansione, da cui è possibile
selezionare una destinazione per la scansione.
Annulla Interrompe l’operazione corrente.
a
b
LED degli alloggiamenti delle schede di
memoria
Alloggiamenti delle schede di memoria
(DUO, SD-MMC)
s
*Stati della spia
wireless
Spenta
Accesa (fissa)
Lampeggiante
(lentamente)
Lampeggiante
(rapidamente)
27
Guida Toccare Guida sulla schermata iniziale per
vedere tutti gli argomenti della guida. Toccando
Guida su una qualunque schermata verrà
visualizzata la guida per quella schermata.
Apps Offre un modo semplice e rapido per accedere
e stampare informazioni dal Web, come mappe,
coupon, pagine da colorare e puzzle.
Configurazione Apre il menu Configurazione, da cui
è possibile modificare le impostazioni dell’unità ed
eseguire operazioni di manutenzione.
Livelli d’inchiostro Apre il menu Inchiostro, per
mostrare i livelli di inchiostro stimati.
Manager Apre il Manager, da cui è possibile
rimuovere applicazioni dall’elenco dei Preferiti.
Wireless* Apre il menu Rete, da cui è possibile
accedere all’installazione guidata wireless e al WiFi
Protected Setup.
HP ePrint Apre il menu Web Services, da cui è
possibile visualizzare e stampare l’indirizzo e-mail
della stampante.
Italiano
La radio wireless è spenta.
La radio wireless è accesa e la stampante è
collegata a una rete.
La radio wireless è accesa ma la stampante
HP non è collegata a una rete. Può essere
che stia cercando di connettersi.
La stampante non è riuscita a collegarsi alla
rete tramite il WiFi Protected Setup.

Funzionalità e suggerimenti
• Stampare foto direttamente da una scheda di memoria, in varie dimensioni e su vari tipi
di carta. Usare il menu Foto sul display della stampante per scorrere le foto, applicare
correzioni automatiche e definire selezioni.
• Consente di stampare documenti e foto dalle applicazioni su un computer collegato.
•
Per installare una nuova cartuccia, leggere le istruzioni sulla confezione della cartuccia. Rimuovere
l’involucro di plastica e la linguetta arancione prima di rimuovere il cappuccio arancione
Stampa
Copia
Scansione
• La prima volta che si imposta e utilizza l’unità HP Photosmart, verificare di aver installato
le cartucce di inchiostro in dotazione con la stampante. Le cartucce sono appositamente
formulate per il primo utilizzo della stampante.
• Controllare che l’inchiostro sia sufficiente. Per controllare i livelli stimati di inchiostro,
selezionare Impostazioni sul display della stampante, quindi selezionare Strumenti e quindi
Mostra livelli stimati.
• Le cartucce Photo Black sono compatibili con questo modello di stampante.
Utilizzo dell’inchiostro
L’inchiostro contenuto nelle cartucce è usato in vari modi durante la stampa, fra cui:
• Inizializzazione, che prepara la stampante e le cartucce per la stampa.
• Manutenzione della testina di stampa, che mantiene gli ugelli puliti e consente un miglior
scorrimento dell’inchiostro.
Inoltre rimane dell’inchiostro nella cartuccia dopo essere stata utilizzata. Per ulteriori informazioni
visitare il sito: www.hp.com/go/inkusage.
•
Effettuare copie a colori o in bianco e nero. Utilizzare il menu Copia sul display della stampante
per scegliere le opzioni relative ai colori, al formato dell’originale, all’adattamento, alla qualità
di stampa (bozza, normale e ottima), al formato della pagina e al numero di copie
• Caricare un singolo foglio dell’originale con il lato di stampa rivolto verso il basso
sull’angolo anteriore destro della superficie di scansione.
•
Se l’originale è spesso, come ad esempio la pagina di un libro, rimuovere il coperchio. Caricare
l’originale con il lato di stampa rivolto verso il basso nell’angolo anteriore destro della superficie
di scansione. Se possibile, lasciare il coperchio sull’originale per fornire uno sfondo bianco
• Scansione di fotografie o documenti. Usare il menu Scansione sul display della stampante
per selezionare Scansione a PC, Scansione a scheda o Ristampa. Quindi caricare l’originale
con il lato di stampa rivolto verso il basso nell’angolo anteriore destro della superficie di
scansione. Scegliere un sistema di scansione: Foto a file, Foto a e-mail o Documento PDF.
• Se si sta inviando la scansione a un computer collegato, il software di scansione si aprirà
automaticamente per permettere regolazioni e altre selezioni, fra cui la posizione del file
contenente la scansione.
• Per ottenere scansioni di qualità, pulire il vetro e il retro del coperchio. Lo scanner considera
qualunque cosa si trovi sulla superficie di scansione come parte dell’immagine.
.
.
.
Italiano
informazioni
Ulteriori
Informazioni aggiuntive
Per ulteriori informazioni sul prodotto, consultare la Guida e il file Leggimi compresi nel software
HP Photosmart.
• La Guida include istruzioni relative alle funzionalità del prodotto e alla risoluzione dei
problemi. Fornisce inoltre le specifiche tecniche del prodotto, le note legali, le disposizioni in
materia ambientale e le informazioni sull’assistenza oltre ai collegamenti a diversi siti Web
da cui è possibile ottenere ulteriori informazioni.
• Il file Leggimi contiene le informazioni relative all’assistenza HP, i requisiti del sistema
operativo e gli aggiornamenti più recenti alle informazioni relative al prodotto.
Per accedere alla Guida:
• Windows XP, Vista, Win 7: fare clic su Start > Tutti i programmi > HP > Photosmart C310
series > Guida.
• Mac OS X v10.5 e v10.6: In Finder, fare clic su Guida > Guida Mac. In Visualizzazione
guida selezionare Guida prodotto HP dal menu a comparsa Guida Mac.
28

Novità? Web Services
NOV
Come iniziare a usare HP ePrint
Per usare HP ePrint occorre che la stampante sia collegata a una rete dotata di connessione a Internet
• Premere il pulsante Wireless sul pannello frontale della HP Photosmart.
• Selezionare il menu Web Services dal display della stampante. Da qui è possibile attivare e disattivare
il servizio, visualizzare l’indirizzo e-mail della stampante e stampare una pagina informativa
.
.
HP ePrint
App HP
Stampa da Internet
Il servizio gratuito ePrint di HP offre un modo facile per stampare tramite e-mail, in ogni momento
e da qualunque luogo. Basta inviare una e-mail all’indirizzo e-mail della stampante da un
computer o un dispositivo mobile perché sia la e-mail che gli allegati riconosciuti vengano
stampati.
• Se HP ePrint non era incluso con la stampante, è possibile ottenerlo facilmente come
aggiornamento di prodotto. Vedere www.hp.com/go/ePrintCenter per maggiori dettagli e
informazioni sulla disponibilità.
• Gli allegati possono essere stampati diversamente da come appaiono nel programma
software che li ha creati, in funzione dei font originali e delle opzioni di layout utilizzate.
• Con questo servizio sono previsti aggiornamenti gratuiti di prodotto. Per permettere alcune
funzionalità potrebbero essere richiesti aggiornamenti specifici.
La vostra stampante è protetta
Per aiutare a impedire e-mail non autorizzate, HP assegna alla stampante un indirizzo e-mail
casuale, non reso pubblico, e per impostazione predefinita non risponde ad alcun mittente. HP
ePrint offre anche un filtraggio antispam standard di settore e trasforma e-mail e allegati in un
formato riservato per la stampa, per ridurre il rischio di virus o altri contenuti pericolosi.
• Tuttavia, HP ePrint non filtra le e-mail in base al loro contenuto, per cui non è in grado di
impedire la stampa di contenuti inopportuni o protetti da copyright.
Stampa da web senza computer
Selezionare l’icona di una Applicazione sul display della stampante per stampare contenuti per
tutta la famiglia.
Nota: è necessario disporre di una connessione a Internet.
• Uso locale dell’applicazione Quick Forms. Per stampare calendari, blocchi per appunti, carta
pergraciepernopuzzle.
•
Aggiungere altre applicazioni dal web. Per stampare pagine da colorare, cartoline d’auguri e molto altro
• Con questo servizio sono previsti aggiornamenti gratuiti di prodotto. Per permettere alcune
funzionalitàpotrebberoessererichiestiaggiornamentispecici.
!
ePrintCenter
Specifiche
tecniche
Uso del sito Web di HP ePrintCenter
Usando il sito Web gratuito ePrintCenter di HP è possibile migliorare la protezione di HP ePrint,
elencare gli indirizzi e-mail che hanno il permesso di inviare e-mail alla stampante, ottenere altre
applicazioni HP e utilizzare altri servizi gratuiti.
Visitare il sito Web ePrintCenter per avere maggiori informazioni e consultare le condizioni di
utilizzo: www.hp.com/go/ePrintCenter
Specifiche elettriche
Nota: utilizzare la stampante solo con l’adattatore fornito da HP.
• Adattatore: 0957-2271 (Brasile - 0957-2289)
• Tensione di ingresso: 100-240 V c.a.
• Frequenza d’ingresso: 50-60 Hz
• Assorbimento: 85 W Max, 50 W Media
29
Italiano
 Loading...