

HP Photosmart C309 User Manual

HP Photosmart Premium Web C309 series
Windows Help

HP Photosmart Premium Web C309
series


Contents
1 HP Photosmart Premium Web C309 series Help...................................................................3
2 Get to know the HP Photosmart
Printer parts................................................................................................................................5
Control panel features................................................................................................................7
Status Dashboard icons.............................................................................................................7
TouchSmart Web Manager.......................................................................................................8
3 How do I?.................................................................................................................................11
5Print
Print documents........................................................................................................................21
Print photos..............................................................................................................................22
Print on specialty media...........................................................................................................30
Print a Web page......................................................................................................................31
6Scan
Scan to a computer..................................................................................................................37
Scan to a memory card or USB storage device.......................................................................38
7Copy
Copy text or mixed documents.................................................................................................43
8 Reprint photos........................................................................................................................49
Contents
9Fax
Set up the HP Photosmart for faxing........................................................................................51
Send a fax................................................................................................................................70
Receive a fax............................................................................................................................72
10 Save photos
Save photos to your computer..................................................................................................73
Back up photos to a USB storage device.................................................................................74
Save photos to Snapfish...........................................................................................................76
Share photos using Snapfish....................................................................................................77
11 Network setup
Add the HP Photosmart to a network.......................................................................................81
Set up a Bluetooth connection..................................................................................................89
12 Maintain the HP Photosmart
Check the estimated ink levels.................................................................................................93
Order ink supplies.....................................................................................................................94
Replace the cartridges..............................................................................................................95
Cartridge warranty information.................................................................................................97
Print and evaluate a print quality report....................................................................................97
1

13 Solve a problem
HP support..............................................................................................................................103
Setup troubleshooting.............................................................................................................104
Print troubleshooting...............................................................................................................110
Memory card troubleshooting.................................................................................................115
Scan troubleshooting..............................................................................................................118
Copy troubleshooting..............................................................................................................119
Fax troubleshooting................................................................................................................120
Errors......................................................................................................................................137
Contents
15 Technical information
Notice......................................................................................................................................185
Cartridge chip information......................................................................................................185
Specifications.........................................................................................................................186
Environmental product stewardship program.........................................................................188
Regulatory notices..................................................................................................................194
Regulatory wireless statements..............................................................................................197
Regulatory telecommunication notices...................................................................................200
Index............................................................................................................................................205
2

1 HP Photosmart Premium Web
C309 series Help
For information about the HP Photosmart, see:
•“
Get to know the HP Photosmart” on page 5
How do I?” on page 11
•“
Print” on page 21
•“
Scan” on page 37
•“
Copy” on page 43
•“
Reprint photos” on page 49
•“
Fax” on page 51
•“
Save photos” on page 73
•“
Network setup” on page 81
•“
Maintain the HP Photosmart” on page 93
•“
Technical information” on page 185
•“
HP Photosmart Premium Web C309
series Help
HP Photosmart Premium Web C309 series Help 3

series Help
Chapter 1
HP Photosmart Premium Web C309
4 HP Photosmart Premium Web C309 series Help
2 Get to know the HP Photosmart
• Printer parts
Control panel features
•
Status Dashboard icons
•
TouchSmart Web Manager
•
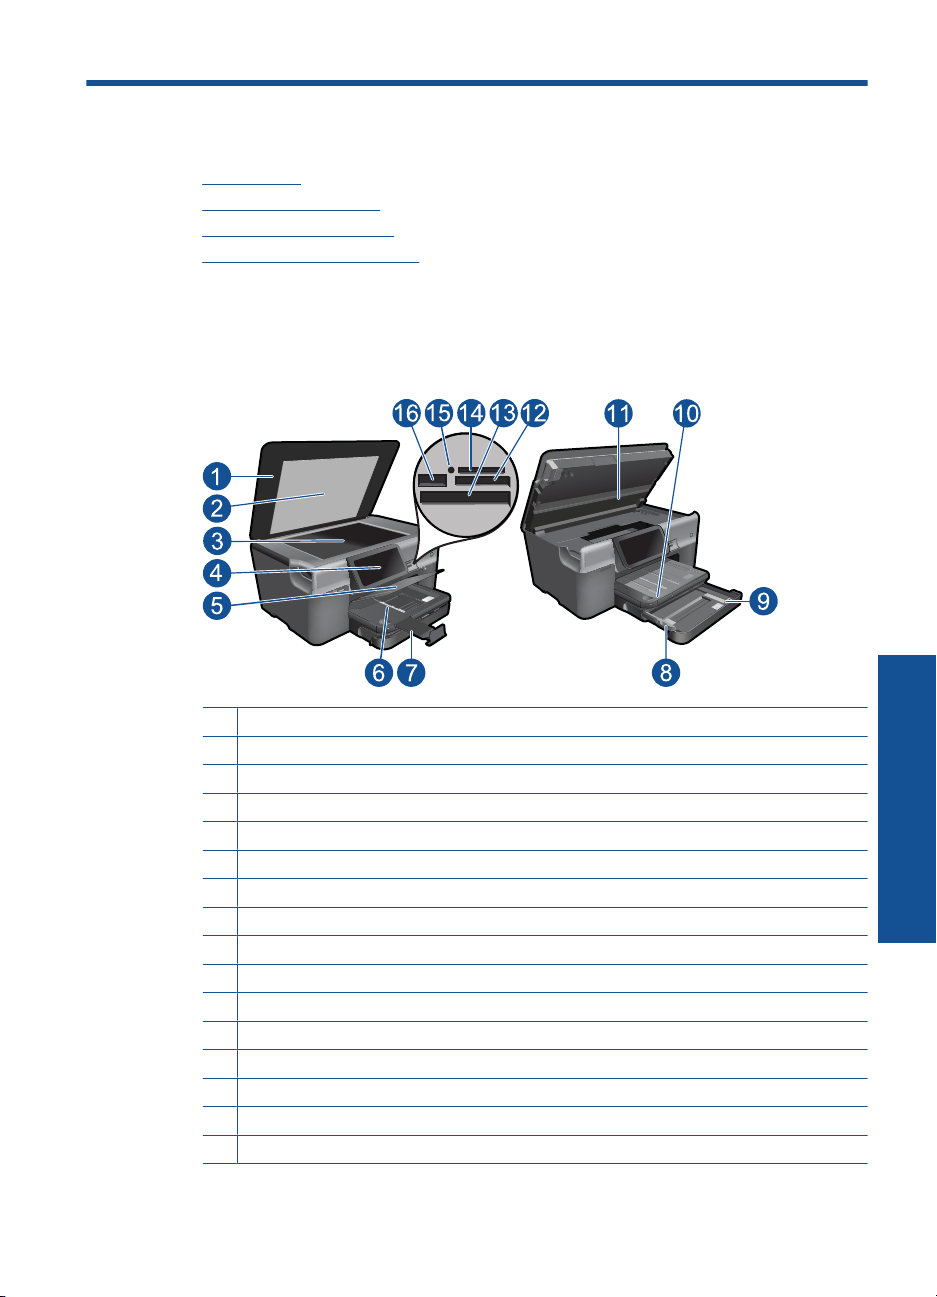
Printer parts
• Front view of the printer
1 Lid
2 Lid Backing
3 Glass
4 Color graphics display (also referred to as the display)
5 Photo tray
6 Paper-width guide for the photo tray
7 Paper tray extender (also referred to as the tray extender)
8 Paper-width guide for the main tray
9 Main tray (also referred to as the input tray)
10 Output tray
11 Cartridge door
12 Memory Card slot for Secure Digital and xD cards
13 Memory Card slot for CompactFlash cards
14 Memory Card slot for Memory Stick Cards
15 Memory Card slots LED
16 Front USB port for your PictBridge-compatible digital camera and other storage devices
Get to know the HP Photosmart 5
Get to know the HP Photosmart
Chapter 2
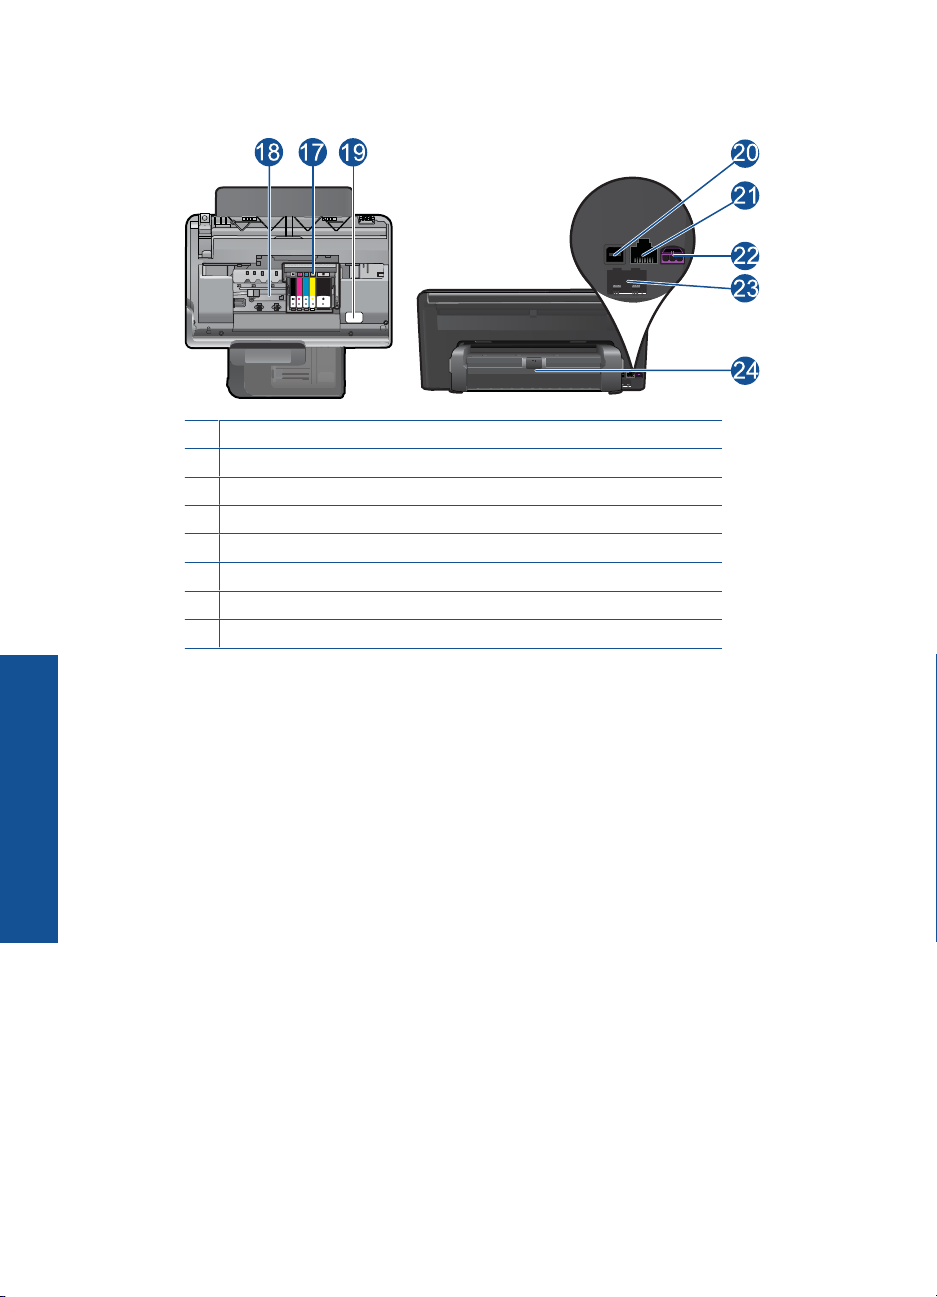
• Top and rear views of the printer
17 Printhead assembly
18 Cartridge access area
19 Model number location
20 Rear USB port
21 Ethernet port
22 Power connection (Use only with the power adapter supplied by HP.)
23 1-LINE (fax) and 2-EXT (phone) ports
24 Two-sided printing accessory
Get to know the HP Photosmart
6 Get to know the HP Photosmart
Control panel features
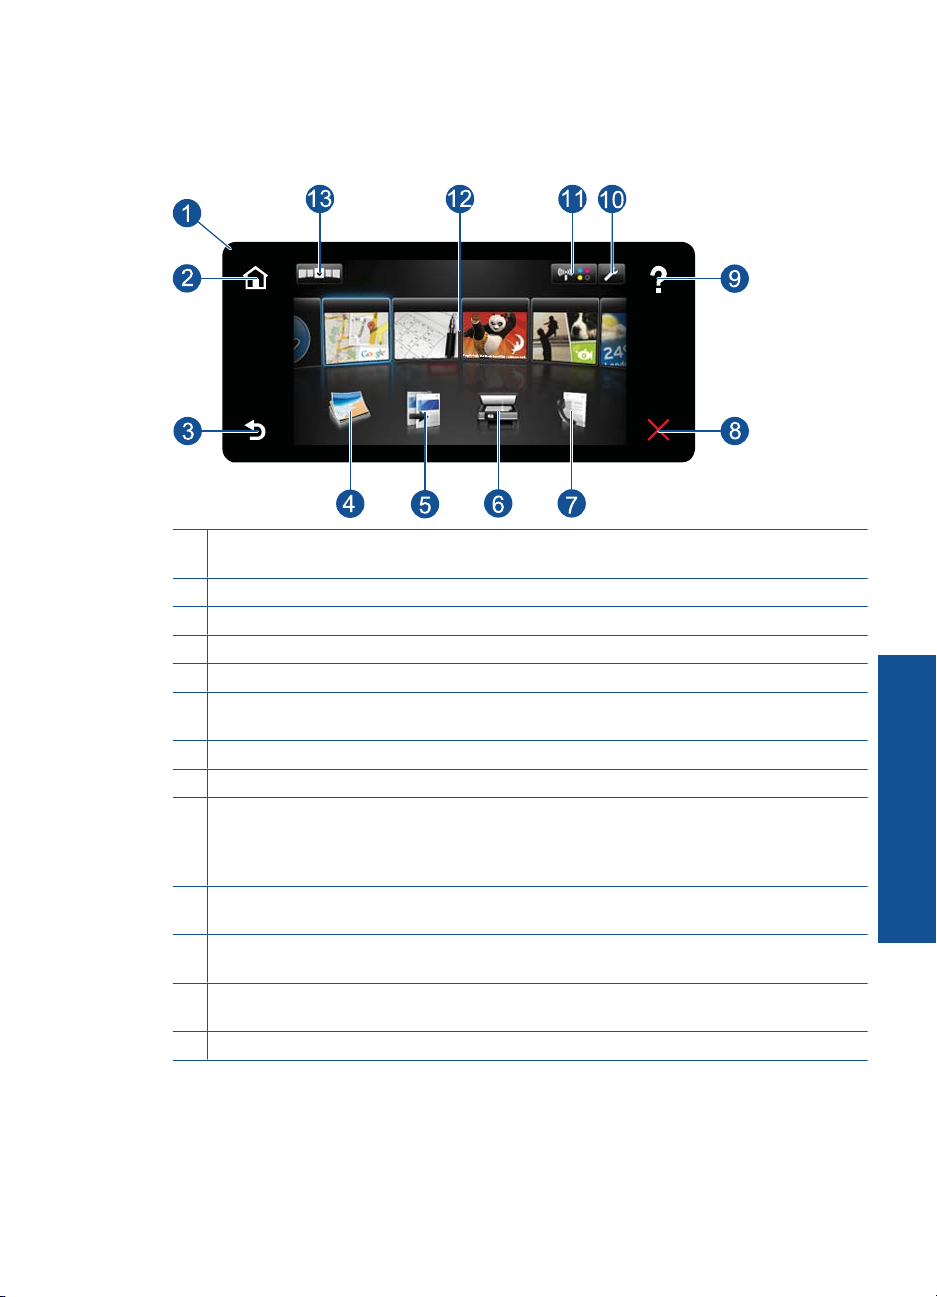
Figure 2-1 Control panel features
1 Display: The touch screen display shows menus, photos, and messages. You can flick
horizontally or vertically to scroll through the photos and menu options.
2 Home: Returns to the Homescreen (the default screen when you turn on the product).
3 Back: Returns to the previous screen on the display.
4 Photo: Opens the Photo Menu.
5 Copy: Opens the Copy menu where you can select a copy type or change the copy settings.
6 Scan: Opens the Choose Scan Destination menu where you can select a destination for
your scan.
7 Fax: Opens the Fax menu from where you can send a black-and-white or a color fax.
8 Cancel: Stops the current operation.
9 Help: From the Home screen, touching Help lists the topics for which help is available.
Depending on the topic you select, the topic will appear on the display or on your computer
screen. When viewing screens other than the Home screen, the Help button provides help
applicable to the current screen.
10 Setup: Opens the Setup menu where you can change product settings and perform
maintenance functions. This is located in the top right corner of the Touch Screen.
11 Status Dashboard icon: Opens the Status Dashboard, which displays important information
about the product status such as estimated ink levels, network connections, etc.
12 Apps: TouchSmart Web provides a quick and easy way to access and print information from
the Web, such as maps, coupons, coloring pages, and puzzles.
13 Opens the TouchSmart Web Manager where you can add, rearrange, and remove Apps.
Get to know the HP Photosmart
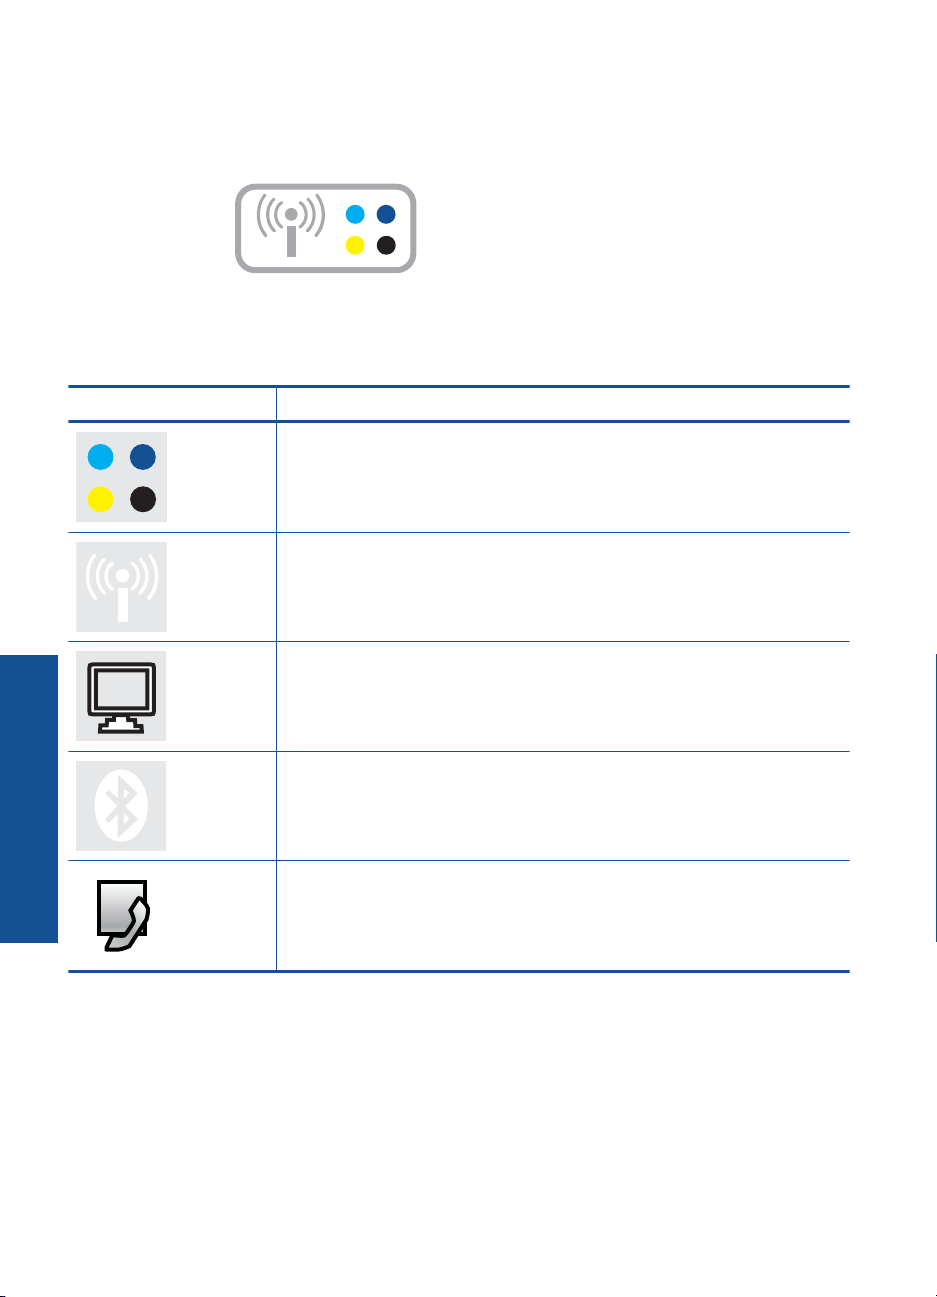
Status Dashboard icons
The Status Dashboard displays important information about the HP Photosmart. You can
touch the following icons on the Status Dashboard to view specific details.
Status Dashboard icons 7
Chapter 2
To open the Status Dashboard
▲ Touch the Status Dashboard icon in the top-right corner of the Home Screen.
Icon Purpose
Shows the estimated ink level in all the ink cartridges. Displays a warning symbol
if the ink level is less than the minimum expected ink level.
Provides the status of the wireless connection. You can also access the
Network menu and print a wireless test report.
Shows the number of computers connected to the wireless networks, as well as
Get to know the HP Photosmart
the names of each of the computers.
Provides the status of the Bluetooth connection. You can also access the
Bluetooth menu to change the connection settings.
Shows the fax settings.
TouchSmart Web Manager
The TouchSmart Web Manager can be used to add new Apps, rearrange the Apps
included in your My Favorites list, or to remove Apps. Touch the Get More icon in the
top-right corner of the Home screen to open the TouchSmart Web Manager.
8 Get to know the HP Photosmart

Manage Apps
1. Add new Apps.
a. Touch a desired App.
b. Touch Add.
2. Arrange Apps.
a. Touch the Get More icon in the top-left corner of the Home screen.
NOTE: You can also touch the Get More App on the Home screen.
b. Touch Arrange.
c. Touch Manual.
d. Touch and drag a App to move it around.
3. View the animation for this topic.
TouchSmart Web Manager 9
Get to know the HP Photosmart

Chapter 2
Get to know the HP Photosmart
10 Get to know the HP Photosmart

3 How do I?
This section contains links to commonly performed tasks, such as printing photos,
scanning, and making copies.
“Print photos from a memory card or USB
•
storage device” on page 23
“Print on specialty media” on page 30
•
“Add SIPs” on page 8
•
“Save photos” on page 73
•
“Load media” on page 15
•
“Replace the cartridges” on page 95
•
“Scan to a computer” on page 37
•
“Scan to a memory card or USB storage
•
device” on page 38
“Send a fax” on page 70
•
“Copy text or mixed documents”
•
on page 43
“Reprint photos” on page 49
•
How do I? 11
How do I?

Chapter 3
How do I?
12 How do I?

4 Paper basics
You can load many different types and sizes of paper in the HP Photosmart, including
letter or A4 paper, photo paper, transparencies, and envelopes.
By default, the HP Photosmart is set to detect the size and type of paper you load in the
input tray automatically and then adjust its settings to generate the highest quality output
for that paper. If you are using special papers, such as photo paper, transparency film,
envelopes, or labels, or if you experience poor print quality using the automatic setting,
you can manually set the paper size and type for print and copy jobs.
This section contains the following topics:
•“
Recommended papers for photo printing” on page 13
Recommended papers for printing” on page 14
•“
Load media” on page 15
•“
Information on paper” on page 19
•“
Recommended papers for photo printing
If you want the best print quality, HP recommends using HP papers that are specifically
designed for the type of project you are printing.
Depending on your country/region, some of these papers might not be available.
HP Advanced Photo Paper
This thick photo paper features an instant-dry finish for easy handling without smudging.
It resists water, smears, fingerprints, and humidity. Your prints have a look and feel
comparable to a store-processed photo. It is available in several sizes, including A4, 8.5
x 11 inch, 10 x 15 cm (4 x 6 inch) (with or without tabs), 13 x 18 cm (5 x 7 inch), and two
finishes - glossy or soft gloss (satin matte). It is acid-free for longer lasting documents.
Paper basics
HP Everyday Photo Paper
Print colorful, everyday snapshots at a low cost, using paper designed for casual photo
printing. This affordable, photo paper dries quickly for easy handling. Get sharp, crisp
images when you use this paper with any inkjet printer. It is available in semi-gloss finish
in several sizes, including A4, 8.5 x 11 inch, and 10 x 15 cm (4 x 6 inch) (with or without
tabs). For longer-lasting photos, it is acid-free.
HP Photo Value Pack
HP Photo Value Packs conveniently package original HP cartridges and HP Advanced
Photo Paper to save you time and take the guesswork out of printing affordable
professional photos with your HP Photosmart. Original HP inks and HP Advanced Photo
Paper have been designed to work together so your photos are long lasting and vivid,
print after print. Great for printing out an entire vacation’s worth of photos or multiple prints
to share.
To order HP papers and other supplies, go to
choose your country/region, follow the prompts to select your product, and then click one
of the shopping links on the page.
www.hp.com/buy/supplies. If prompted,
Paper basics 13

Chapter 4
NOTE: At this time, some portions of the HP Web site are available in English only.
Recommended papers for printing
If you want the best print quality, HP recommends using HP papers that are specifically
designed for the type of project you are printing.
Paper basics
Depending on your country/region, some of these papers might not be available.
HP Advanced Photo Paper
This thick photo paper features an instant-dry finish for easy handling without smudging.
It resists water, smears, fingerprints, and humidity. Your prints have a look and feel
comparable to a store-processed photo. It is available in several sizes, including A4, 8.5
x 11 inch, 10 x 15 cm (4 x 6 inch) (with or without tabs), 13 x 18 cm (5 x 7 inch), and two
finishes - glossy or soft gloss (satin matte). It is acid-free for longer lasting documents.
HP Everyday Photo Paper
Print colorful, everyday snapshots at a low cost, using paper designed for casual photo
printing. This affordable, photo paper dries quickly for easy handling. Get sharp, crisp
images when you use this paper with any inkjet printer. It is available in semi-gloss finish
in several sizes, including A4, 8.5 x 11 inch, and 10 x 15 cm (4 x 6 inch) (with or without
tabs). For longer-lasting photos, it is acid-free.
HP Brochure Paper or HP Superior Inkjet Paper
These papers are glossy-coated or matte-coated on both sides for two-sided use. They
are the perfect choice for near-photographic reproductions and business graphics for
report covers, special presentations, brochures, mailers, and calendars.
HP Premium Presentation Paper or HP Professional Paper
These papers are heavy two-sided matte papers perfect for presentation, proposals,
reports, and newsletters. They are heavyweight for an impressive look and feel.
HP Bright White Inkjet Paper
HP Bright White Inkjet Paper delivers high-contrast colors and sharp text. It is opaque
enough for two-sided color usage with no show-through, which makes it ideal for
newsletters, reports, and flyers. It features ColorLok Technology for less smearing, bolder
blacks, and vivid colors.
HP Printing Paper
HP Printing Paper is a high-quality multifunction paper. It produces documents that look
and feel more substantial than documents printed on standard multipurpose or copy
paper. It features ColorLok Technology for less smearing, bolder blacks, and vivid colors.
It is acid-free for longer lasting documents.
HP Office Paper
HP Office Paper is a high-quality multifunction paper. It is suitable for copies, drafts,
memos, and other everyday documents. It features ColorLok Technology for less
smearing, bolder blacks, and vivid colors. It is acid-free for longer lasting documents.
14 Paper basics

HP Iron-On Transfers
HP Iron-on Transfers (for color fabrics or for light or white fabrics) are the ideal solution
for creating custom T-shirts from your digital photos.
HP Premium Inkjet Transparency Film
HP Premium Inkjet Transparency Film makes your color presentations vivid and even
more impressive. This film is easy to use and handle, and dries quickly without smudging.
HP Photo Value Pack
HP Photo Value Packs conveniently package original HP cartridges and HP Advanced
Photo Paper to save you time and take the guesswork out of printing affordable
professional photos with your HP Photosmart. Original HP inks and HP Advanced Photo
Paper have been designed to work together so your photos are long lasting and vivid,
print after print. Great for printing out an entire vacation’s worth of photos or multiple prints
to share.
ColorLok
HP recommends plain papers with the ColorLok logo for printing and copying of everyday
documents. All papers with the ColorLok logo are independently tested to meet high
standards of reliability and print quality, and produce documents with crisp, vivid color,
bolder blacks, and dry faster than ordinary plain papers. Look for papers with the ColorLok
logo in a variety of weights and sizes from major paper manufacturers.
Paper basics
To order HP papers and other supplies, go to www.hp.com/buy/supplies. If prompted,
choose your country/region, follow the prompts to select your product, and then click one
of the shopping links on the page.
NOTE: At this time, some portions of the HP Web site are available in English only.
Load media
1. Do one of the following:
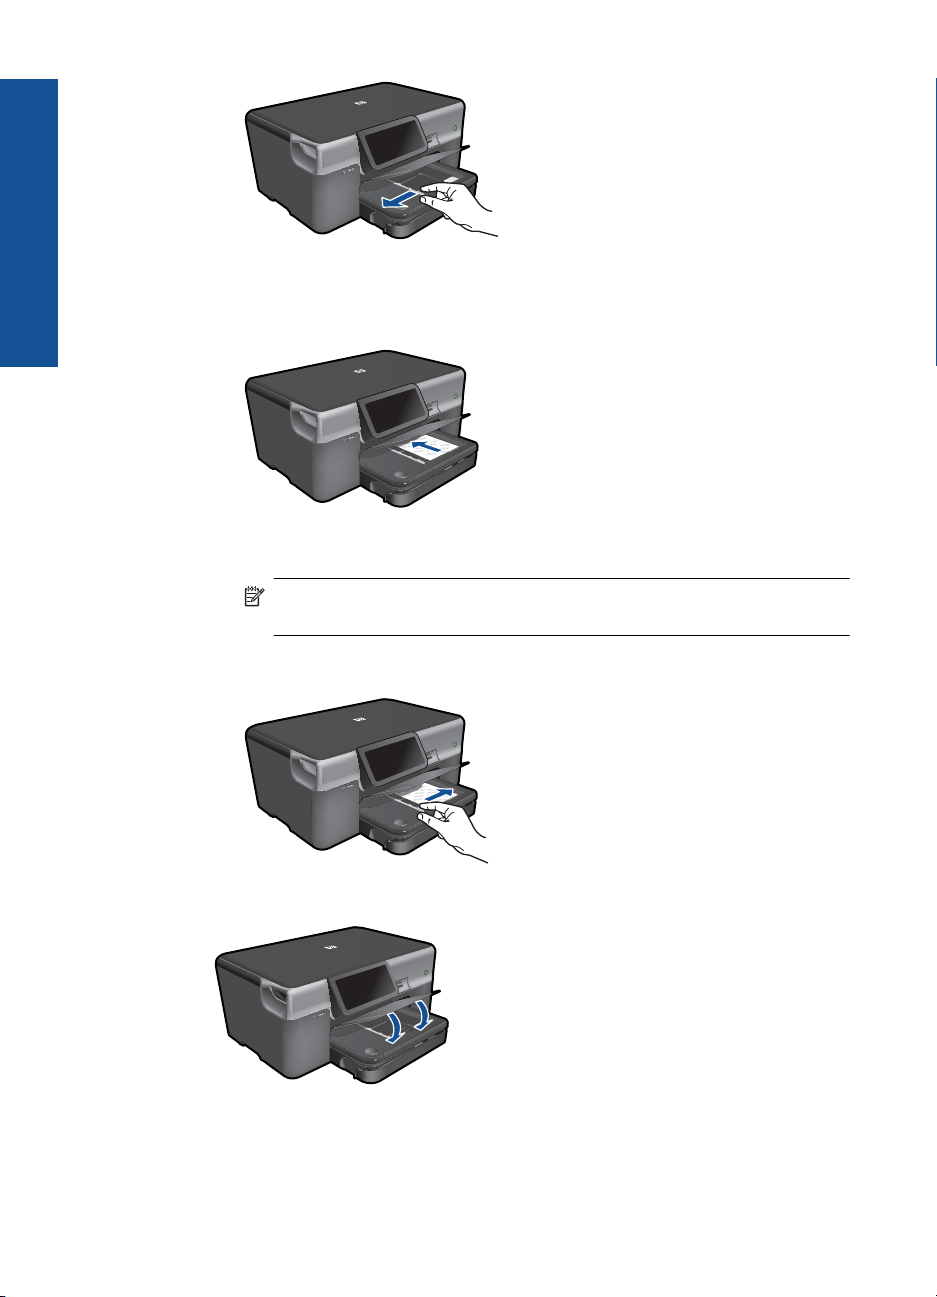
Load 10 x 15 cm (4 x 6 inch) paper
a. Raise photo tray lid.
Raise photo tray lid and slide paper-width guide outwards.
Load media 15
Chapter 4
Paper basics
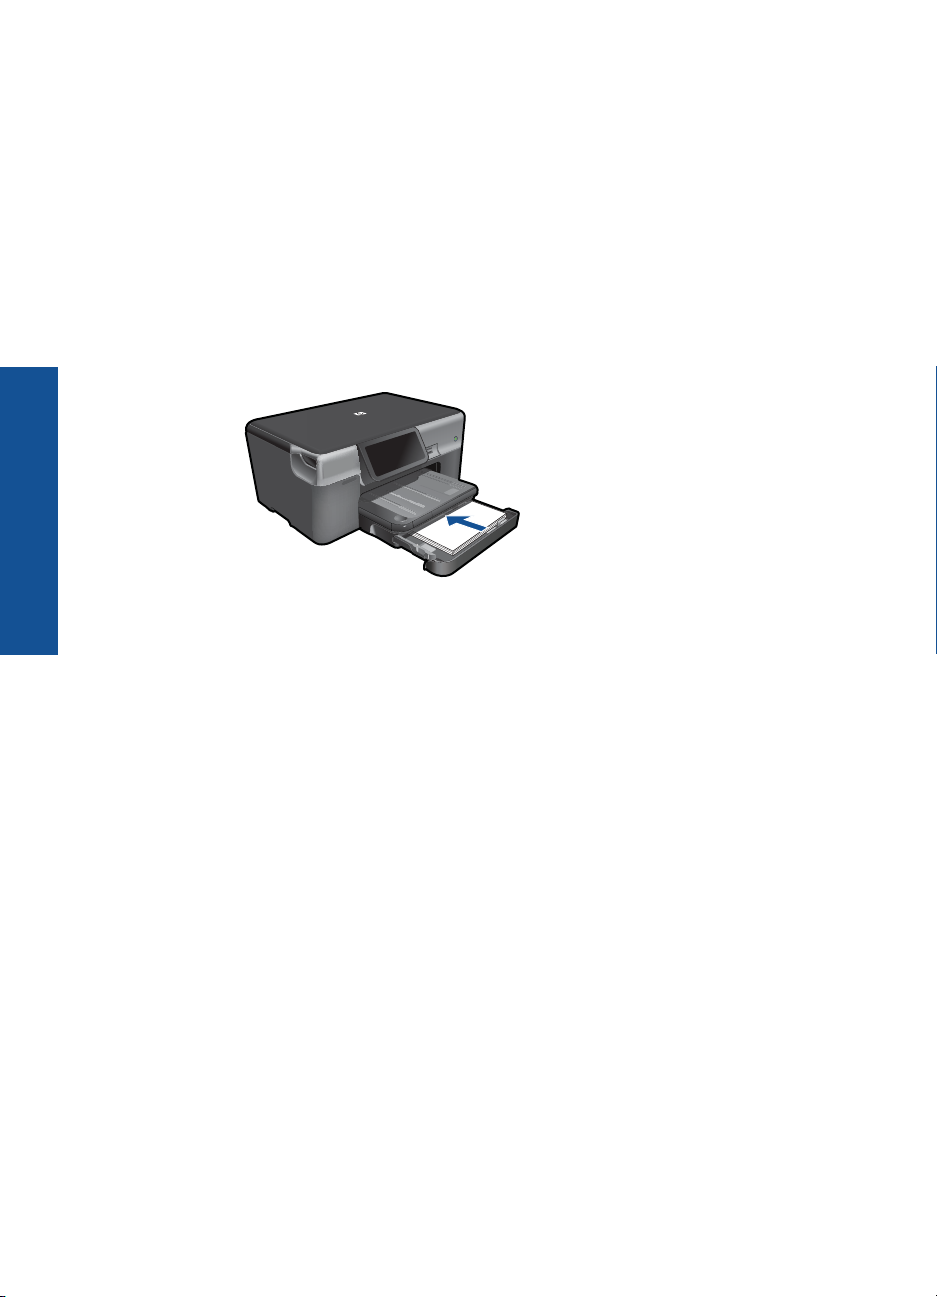
b. Load paper.
Insert stack of photo paper into photo tray with short edge forward and print
side down.
Slide stack of paper forward until it stops.
NOTE: If the photo paper you are using has perforated tabs, load photo
paper so that tabs are closest to you.
Slide paper-width guide inward until it stops at edge of paper.
c. Lower photo tray lid.
16 Paper basics

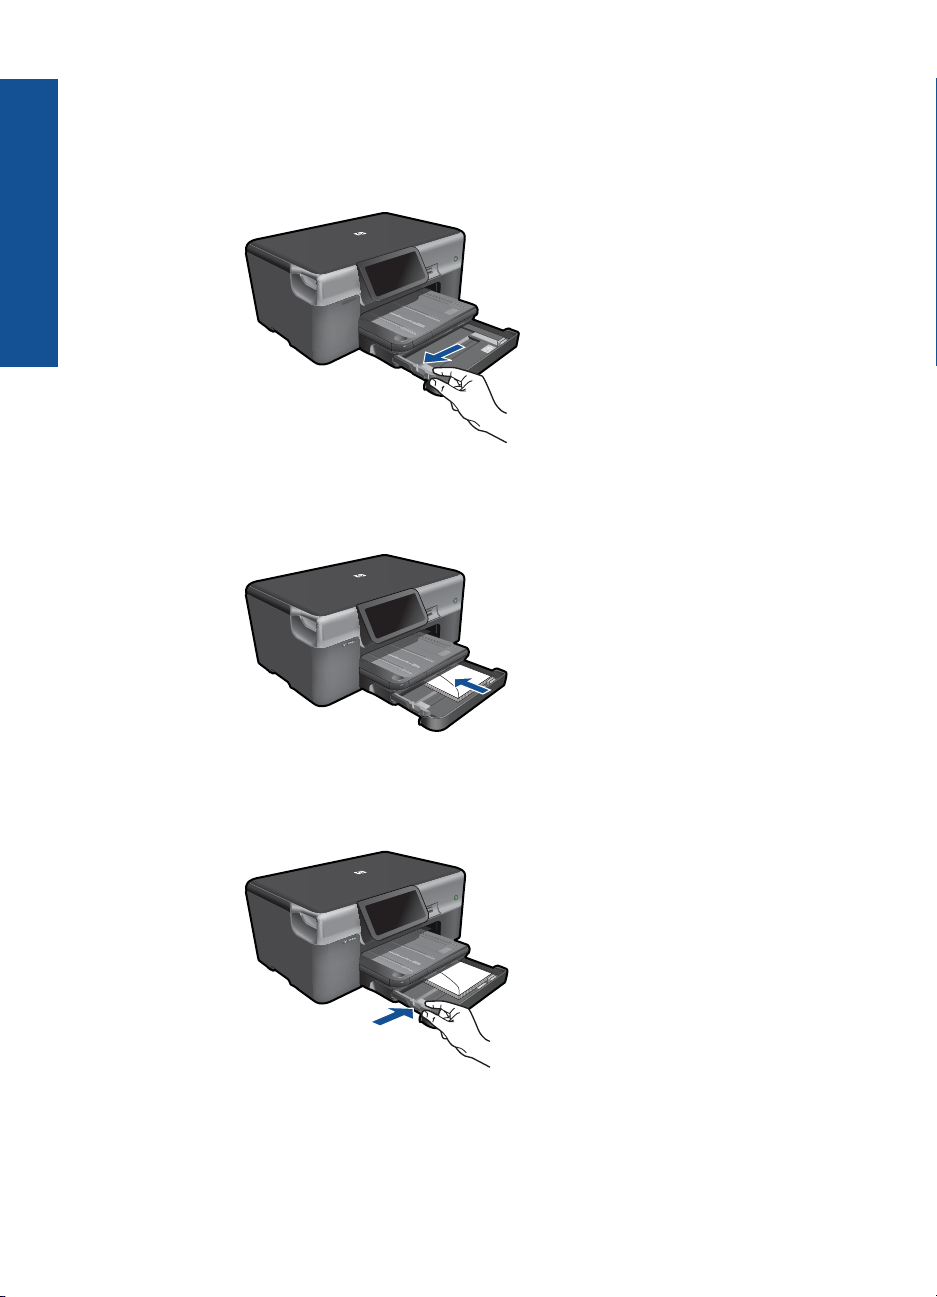
Load A4 or 8.5 x 11 inch paper
a. Pull out the main input tray.
Slide paper-width guide outwards.
Remove all paper from the main input tray.
b. Load paper.
Insert stack of paper into main input tray with short edge forward and print
side down.
Paper basics
Slide stack of paper forward until it stops.
Slide paper-width guide inward until it stops at edge of paper.
Push in main input tray.
Load media 17
Paper basics
Chapter 4
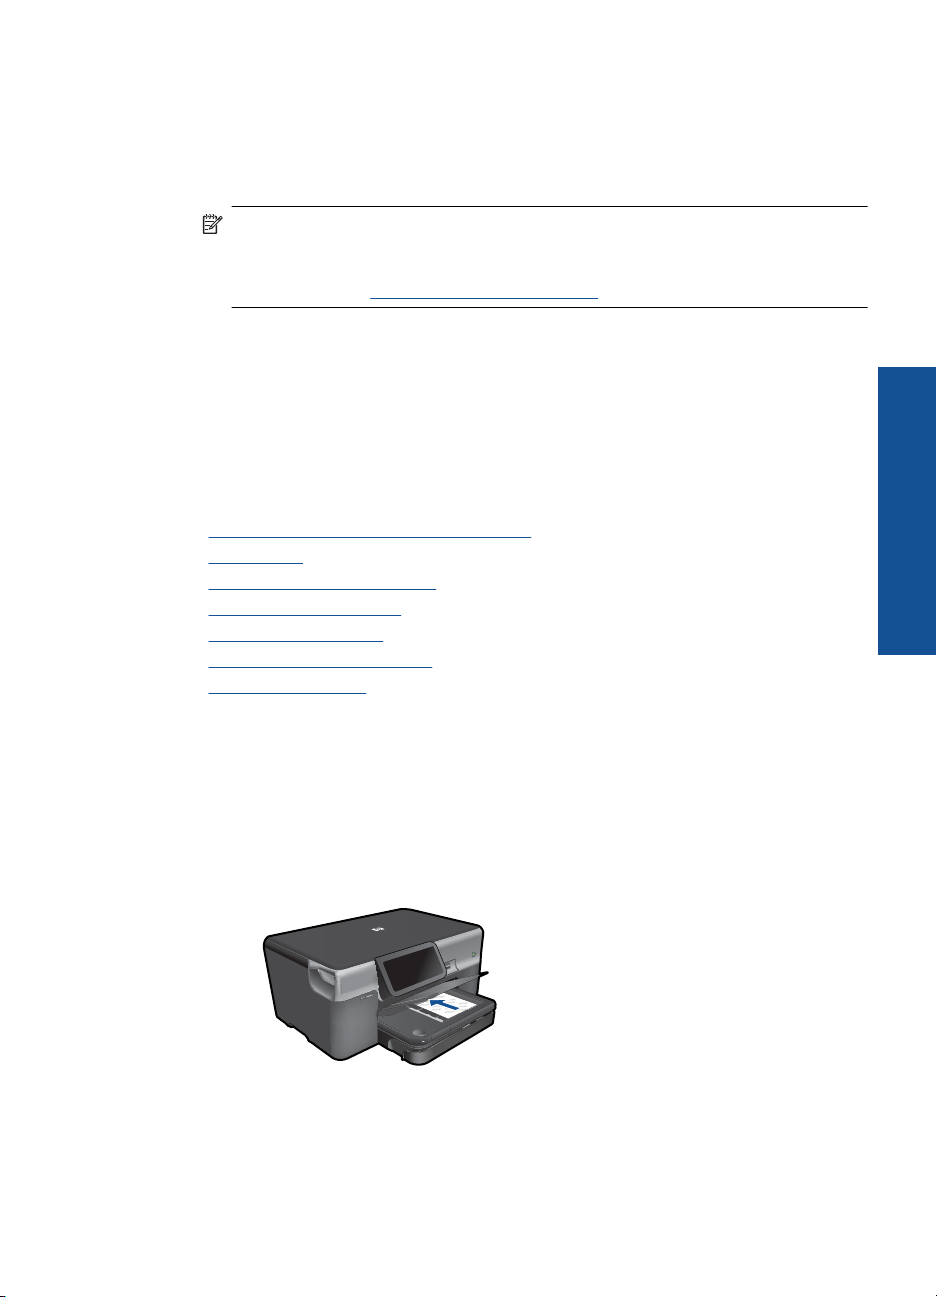
Load envelopes
a. Pull out the main input tray.
Slide paper-width guide outwards.
Remove all paper from the main input tray.
b. Load envelopes.
Insert one or more envelopes into far-right side of main input tray, with
envelope flaps on left and facing up.
2. View the animation for this topic.
18 Paper basics
Slide stack of envelopes forward until it stops.
Slide paper-width guide inward against stack of envelopes until it stops.
Push in main input tray.

Related topics
Information on paper” on page 19
“
Information on paper
The HP Photosmart is designed to work well with most paper types. Test a variety of
paper types before buying a large quantity. Find a paper type that works well and is easy
to purchase. HP papers are designed for the best quality results. In addition, follow these
tips:
• Do not use paper that is too thin, that has a slick texture, or that stretches easily. It
can feed incorrectly through the paper path, causing paper jams.
• Store photo media in its original packaging inside a resealable plastic bag on a flat
surface in a cool, dry place. When you are ready to print, remove only the paper you
plan to use immediately. When you have finished printing, return any unused photo
paper to the plastic bag.
• Do not leave unused photo paper in the input tray. The paper might start to curl, which
might reduce the quality of your printouts. Curled paper can also cause paper jams.
• Always hold photo paper by the edges. Fingerprints on photo paper can reduce print
quality.
• Do not use paper that is heavily textured. It can cause graphics or text to print
improperly.
• Do not combine different paper types and paper sizes in the input tray; the entire stack
of paper in the input tray must be the same size and type.
• For best results, do not allow printed photos to stack up in the output tray.
• Store printed photos under glass or in a storage book to prevent bleeding over time
from high humidity.
Paper basics
Information on paper 19

Paper basics
Chapter 4
20 Paper basics

5Print
“Print documents” on page 21
“Print photos” on page 22
“Print on specialty media” on page 30
“Print a Web page” on page 31
Related topics
Load media” on page 15
•“
Recommended papers for photo printing” on page 13
•“
Recommended papers for printing” on page 14
•“
Print documents
Most print settings are automatically handled by the software application. You need to
change the settings manually only when you change print quality, print on specific types
of paper or transparency film, or use special features.
To print from a software application
1. Make sure you have paper loaded in the input tray.
2. On the File menu in your software application, click Print.
3. Make sure the product is the selected printer.
4. If you need to change settings, click the button that opens the Properties dialog box.
Depending on your software application, this button might be called Properties,
Options, Printer Setup, Printer, or Preferences.
NOTE: When printing a photo, you must select options for the specific photo
paper and photo enhancement.
Print 21

Chapter 5
5. Select the appropriate options for your print job by using the features available in the
6. Click OK to close the Properties dialog box.
7. Click Print or OK to begin printing.
Related topics
•“
•“
•“
•“
•“
•“
Print
Print photos
Advanced, Printing Shortcuts, Features, and Color tabs.
TIP: You can easily select the appropriate options for your print job by choosing
one of the predefined print tasks on the Printing Shortcuts tab. Click a type of
print task in the Printing Shortcuts list. The default settings for that type of print
task are set and summarized on the Printing Shortcuts tab. If necessary, you
can adjust the settings here and save your custom settings as a new printing
shortcut. To save a custom printing shortcut, select the shortcut and click Save
As. To delete a shortcut, select the shortcut and click Delete.
Recommended papers for printing” on page 14
Load media” on page 15
View the print resolution” on page 32
Use printing shortcuts” on page 33
Set the default print settings” on page 34
Stop the current job” on page 183
•“Print photos saved on your computer” on page 22
Print photos from a memory card or USB storage device” on page 23
•“
Print photos using Snapfish” on page 28
•“
Print photos saved on your computer
To print a photo on photo paper
1. Load up to 13 x 18 cm (5 x 7 inch) paper in the photo tray or full-size photo paper in
the main input tray.
2. Slide the paper-width guide inward until it stops at the edge of the paper.
3. On the File menu in your software application, click Print.
4. Make sure the product is the selected printer.
5. Click the button that opens the Properties dialog box.
Depending on your software application, this button might be called Properties,
Options, Printer Setup, Printer, or Preferences.
6. Click the Features tab.
7. In the Basic Options area, from the Paper Type drop-down list, select More. Then,
select the appropriate photo paper type.
8. In the Resizing Options area, from the Size drop-down list, select More. Then, select
the appropriate paper size.
If the paper size and paper type are not compatible, the printer software displays an
alert and allows you to select a different type or size.
22 Print
9. (Optional) Select the Borderless printing check box if it is not already checked.
If the borderless paper size and paper type are not compatible, the product software
displays an alert and allows you to select a different type or size.
10. In the Basic Options area, select a high print quality, such as Best, from the Print
Quality drop-down list.
NOTE: To achieve the highest dpi resolution, you can use the Maximum dpi
setting with supported types of photo paper. If Maximum dpi is not listed in the
Print quality drop-down list, you can enable it from the Advanced tab. For more
information, see “
Print using the maximum dpi” on page 31.
11. In the HP Real Life Technologies area, click the Photo fix drop-down list and select
from the following options:
• Off: applies no HP Real Life Technologies to the image.
• Basic: enhances low-resolution images; moderately adjusts image sharpness.
12. Click OK to return to the Properties dialog box.
13. Click OK, and then click Print or OK in the Print dialog box.
Related topics
Recommended papers for photo printing” on page 13
•“
Load media” on page 15
•“
Print using the maximum dpi” on page 31
•“
View the print resolution” on page 32
•“
Use printing shortcuts” on page 33
•“
Set the default print settings” on page 34
•“
Stop the current job” on page 183
•“
Print
Print photos from a memory card or USB storage device
1. Do one of the following:
Print single photo on small-size paper
a. Load paper.
Load up to 13 x 18 cm (5 x 7 inch) photo paper in photo tray.
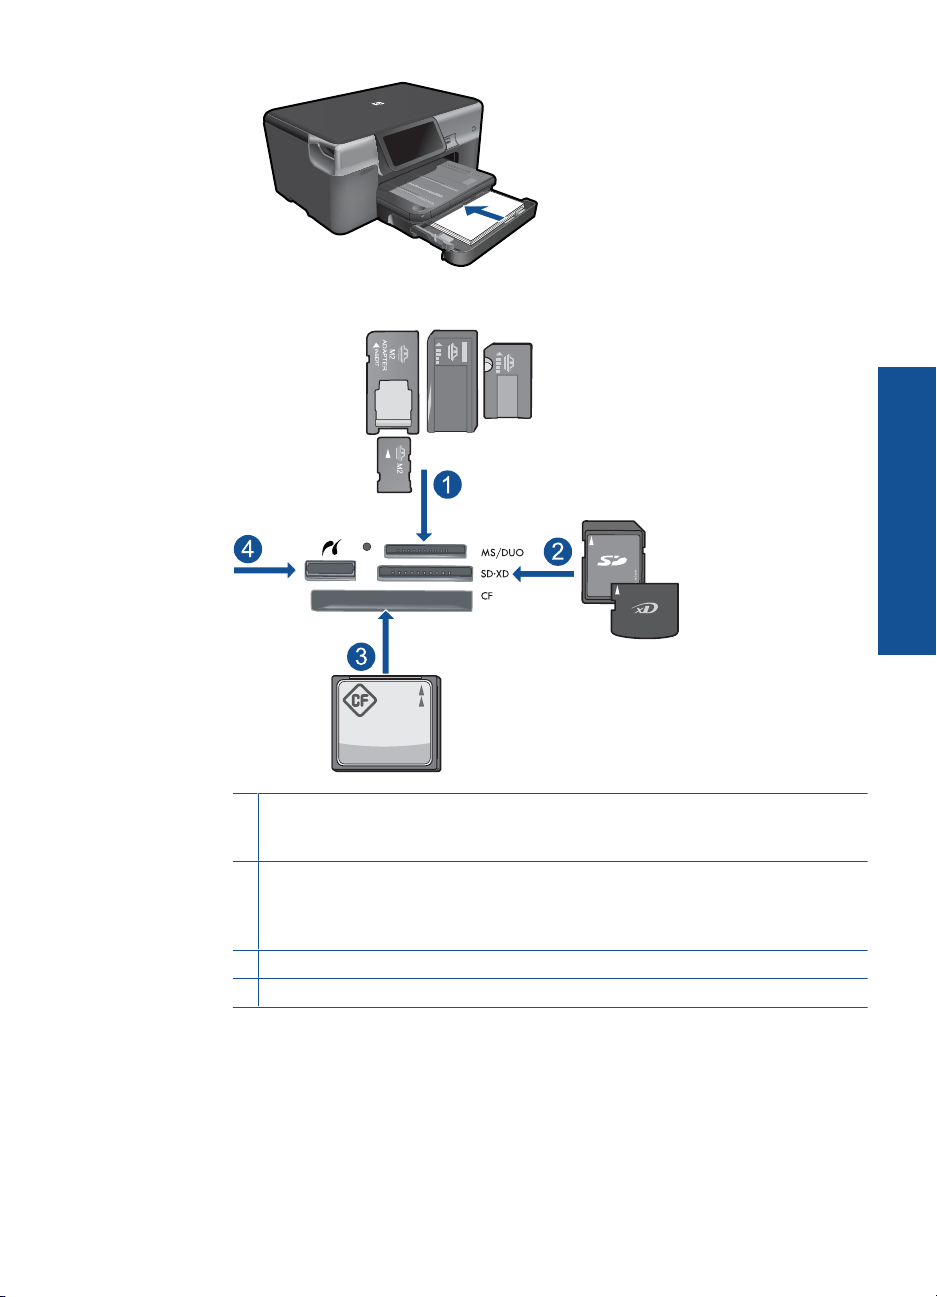
b. Insert memory device.
Print photos 23

Print
Chapter 5
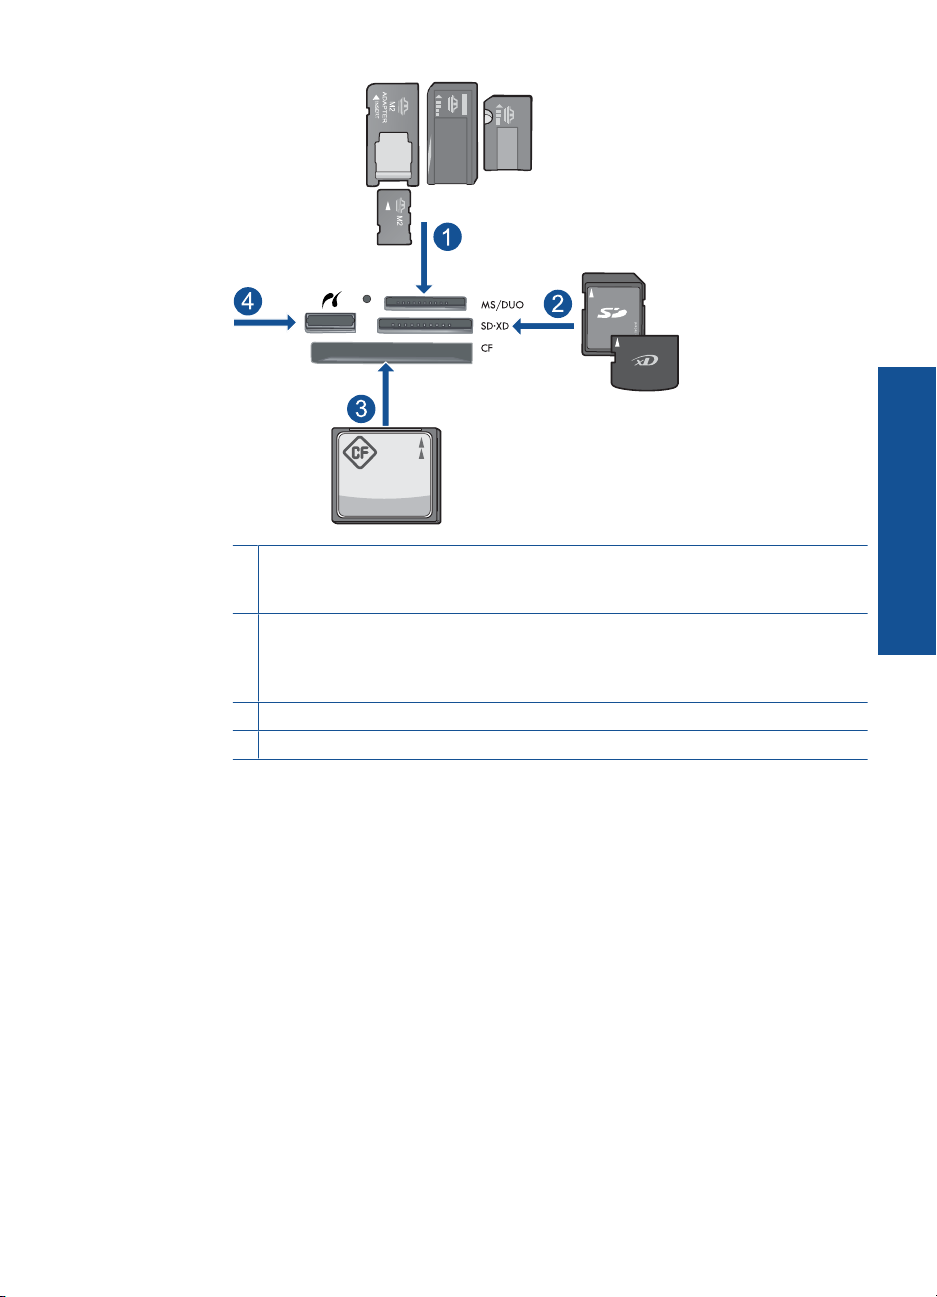
1 Memory Stick, Memory Stick Pro, Memory Stick Select, Memory Stick Magic Gate,
Memory Stick Duo or Pro Duo (adapter optional), Memory Stick Pro-HG Duo (adapter
optional), or Memory Stick Micro (adapter required)
2 MultiMediaCard (MMC), MMC Plus, Secure MultiMedia Card, MMC Mobile (RS-MMC;
adapter required), Secure Digital (SD), Secure Digital Mini (adapter required), Secure
Digital High Capacity (SDHC), TransFlash MicroSD Card (adapter required), or xDPicture card
3 CompactFlash (CF) types I and II
4 Front USB port/Pictbridge: For digital cameras and removable drives
24 Print
c. Select photo.
Touch View & Print.
Flick left or right to scroll through the photos.
Touch photo you want to print.
Touch up arrow to increase number of copies.
d. Print photo.
Touch Print to preview print job.
Touch Print.
Print single photo on full-size paper
a. Load paper.
Load full-size paper in the main input tray.
b. Insert memory device.
1 Memory Stick, Memory Stick Pro, Memory Stick Select, Memory Stick Magic Gate,
Memory Stick Duo or Pro Duo (adapter optional), Memory Stick Pro-HG Duo (adapter
optional), or Memory Stick Micro (adapter required)
2 MultiMediaCard (MMC), MMC Plus, Secure MultiMedia Card, MMC Mobile (RS-MMC;
adapter required), Secure Digital (SD), Secure Digital Mini (adapter required), Secure
Digital High Capacity (SDHC), TransFlash MicroSD Card (adapter required), or xDPicture card
3 CompactFlash (CF) types I and II
4 Front USB port/Pictbridge: For digital cameras and removable drives
Print
c. Select photo.
Touch View & Print.
Flick left or right to scroll through the photos.
Touch photo you want to print.
Touch up arrow to increase number of copies.
Print photos 25
Chapter 5
d. Change page layout.
Touch Print to preview print job.
Touch Settings to change print settings.
Touch Layout.
Touch 8.5x11.
e. Print photo.
Touch Print.
Print multiple photos on full-size paper
a. Load paper.
Load full-size paper in the main input tray.
Print
b. Insert memory device.
26 Print
1 Memory Stick, Memory Stick Pro, Memory Stick Select, Memory Stick Magic Gate,
Memory Stick Duo or Pro Duo (adapter optional), Memory Stick Pro-HG Duo (adapter
optional), or Memory Stick Micro (adapter required)
2 MultiMediaCard (MMC), MMC Plus, Secure MultiMedia Card, MMC Mobile (RS-MMC;
adapter required), Secure Digital (SD), Secure Digital Mini (adapter required), Secure
Digital High Capacity (SDHC), TransFlash MicroSD Card (adapter required), or xDPicture card
3 CompactFlash (CF) types I and II
4 Front USB port/Pictbridge: For digital cameras and removable drives
c. Select photo.
Touch View & Print.
Flick left or right to scroll through the photos.
Touch photo you want to print.
Touch up arrow to increase number of copies.
d. Change page layout.
Touch Print to preview print job.
Touch Settings to change print settings.
Touch Layout.
Touch 4x6 on 8.5x11.
e. Print photo.
Touch Print.
2. View the animation for this topic.
Print
Print photos 27
 Loading...